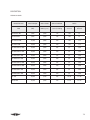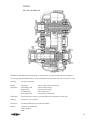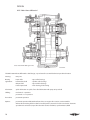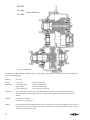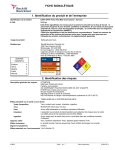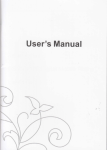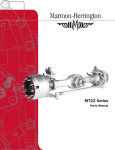
1
Marmon-Herrington
OPERATORS
MANUAL
REVISION: 2
DATED: 06/15/11
MARMON-HERRINGTON ALL-WHEEL DRIVE
13001 Magisterial Drive • Louisville, KY 40223
(502) 253-0277 • (800) 227-0727 • Fax (502) 253-0317
E-mail: [email protected]
1
TABLE OF CONTENTS
Page
OPERATION INSTRUCTIONS
Foreword.................................................................................................................................................................................. 3
Transfer Cases......................................................................................................................................................................... 5
SERVICE INFORMATION
Introduction............................................................................................................................................................................ 7
Lubrication.............................................................................................................................................................................. 7
Maintenance Schedule - Axles......................................................................................................................................... 9
Maintenance Schedule - Transfer Cases....................................................................................................................... 10
Lubrication Guide................................................................................................................................................................. 10
Service and Maintenance................................................................................................................................................... 11
TRANSFER CASES
Technical Data........................................................................................................................................................................ 13
Design....................................................................................................................................................................................... 14
Shift Mechanism.................................................................................................................................................................... 20
Schedule Maintenance Services...................................................................................................................................... 23
Front Axle................................................................................................................................................................................. 26
Adjustments............................................................................................................................................................................ 27
Troubleshooting.................................................................................................................................................................... 28
AXLES
Lubrication Guide................................................................................................................................................................. 29
Oil Levels of Wheel Hubs.................................................................................................................................................... 30
Brake Lever Adjusting......................................................................................................................................................... 31
Automatic Slack Adjuster................................................................................................................................................... 32
WARRANTY & SERVICE
Ordering — Replacement Parts....................................................................................................................................... 33
Warranty Claim Procedure................................................................................................................................................. 33
Marmon-Herrington Warranty......................................................................................................................................... 34
Warranty Repair and Claim Procedure.......................................................................................................................... 35
Notes......................................................................................................................................................................................... 36
2
FOREWORD
This manual has been prepared for owners and operators of vehicles equipped with Marmon-Herrington All-Wheel-Drive
systems and components. For additional technical assistance, contact Marmon-Herrington Customer Service.
Please observe and follow all procedural and maintenance guidelines to ensure reliable operation and optimum service life.
The Marmon-Herrington basic service schedule will integrate seamlessly into most preventative maintenance programs.
Marmon-Herrington shall not be liable for component failures or damages caused by operational abuse or neglect. Please
review the warranty statement for a detailed explanation of coverage and claim reporting procedures.
We thank you for your investment in Marmon-Herrington equipment, and look forward to serving your needs in the tradition of engineering excellence.
GENERAL OPERATING INFORMATION
TIRES AND GEAR RATIOS
Tires, wheels and axle gear ratios have been carefully selected to minimize torsional “wind-up” between front and rear axles.
Please consult tire or gear specialist before installing components differing from original equipment.
OPERATIONS
Marmon-Herrington equipped vehicles are intended for as-needed AWD (all-wheel-drive) operation in off-road conditions
only. DO NOT operate in AWD mode on hard, dry surfaces.
SHIFTING
Marmon-Herrington Axles and Transfer Cases are not fitted with any type of clutching device, and may only be shifted
when the vehicle is at a complete stop. This applies to FAE (front axle engagement), high and low range, and locking differentials. The only exceptions are those vehicles equipped with Marmon-Herrington’s Safe-T-Shift system.
SAFE-T-SHIFT
In 2003 Marmon-Herrington developed an electronic shift management system called Safe-T-Shift to help prevent shifton-the-fly events. The system uses a micro processor that limits control functions to 5mph. Speed information is sent from
a t-case mounted speed sensor.
The transfer case relies on tooth alignment for internal gears to mesh, and it may be necessary to allow the vehicle to roll
forward or backwards several inches to complete the shift. When selecting a shift function, operators must wait for the appropriate indicator to illuminate before accelerating to avoid costly internal damage.
SHIFT PROCEDURE
1. With the vehicle at a complete stop, select the desired range, axle position, or PTO function desired.
2. Place the main transmission in gear.
3. Allow the vehicle to idle forward (or backwards) several inches until shift is completed, evidenced by the
appropriate indicator light.
4. Accelerate normally.
3
In case of a manual transmission, ease the clutch out in low gear, allowing the vehicle to “walk” until shift is complete (as
per the appropriate dash indicator).
TORQUE
“Torque Shock” or “Torque Loading” is a damaging mode of failure that is easily avoidable. It generally occurs in situations
when a vehicle is operating in an area of low traction at high RPM with the wheels spinning. When the tires make abrupt
contact with a tractable surface, a violent shock-load is transmitted through the drive train. This can result in damage to
axles, drive shafts, transfer cases and transmissions.
Simply engaging the front axle and operating in low range at lower speeds will allow the vehicle to proceed without imparting undue stress on the drive train.
SUMMARY
Before retreating from the subject of shifting, it must be reemphasized that no transfer case, PTO, axle differential, or power
divider should ever be shifted while the vehicle is in motion. The engagement of these components is intended for off-road
use only, in poor traction conditions.
SAFETY SHIFT EXPLANATION AND DIAGNOSTIC
SYSTEM
The system is rated at 12v only. 24v will permanently damage the module. The module is passive, and reacts only to changes in motion allowing relay actuation based on sensor frequency and switch position. The Safety-Shift system design-intent
is to prevent the transfer-case from shifting at speeds above 5mph. Vehicle speed is monitored by a microprocessor that
controls power to electric/pneumatic solenoids that perform FAE and HI/LO shifting.
SPEED SENSOR
The system relies on speed information from the T-Case-mounted speed sensor. The speed sensor must be within one
millimeter of the tone ring to operate properly. When torqued correctly, the sensor head will be within 0.004” of the tooth
head, and perform normally. At 0.008” the sensor will no longer be able to “read” the tone ring. When sensors are removed
or replaced, the copper washer may remain on the T-Case un-noticed. If a sensor is then installed with a second washer, the
two washers will prevent the sensor from reaching the correct depth.
The speed sensor cable is color-coded White, Grey, Green and Black. The Grey wire (power to sensor) should have 9-14v
with ignition ON. The White wire is common or ground to chassis. The Black wire is a positive signal wire, and will show a 5v
pulse signal when tripped (reading a tooth). The Green wire is a negative signal wire, and will show -5v when reading the
“valley”, or area between teeth.
TROUBLESHOOTING
To diagnose faults, the rear wheels must be off the ground and turning (by hand only!) while checking voltages at wire
connections.
Verify 9-14v to dash switches and module with ignition ON.
Check Weather-Pack Connector to speed sensor for moisture or corrosion. Remember, these connectors are a “two-click”
connection, in that two clicks of the lock-ears can be felt when pushing the two ends together. The second click is vital as
it confirms full pin seating. A fully seated connection ensures proper voltage flow, and protection against contaminants.
Moisture and/or corrosion will cause short-circuiting or intermittent signal. During assembly, connectors should be installed with a Delphi Weather Pack Crimper to ensure proper fitment of the seal.
The only means of testing the speed sensor is to read voltage (+5v and -5v pulse signals) at the Black and Green wires with
the wheels turning. This can be performed with the rear axle on jacks while turning wheels (by hand only!).
4
PROCESS
No power to switches or module: Check wiring and fuses.
No signal to speed sensor: Check wiring and connectors before replacing module.
Signal TO sensor but no RETURN signal: Check wiring, connectors, and sensor.
RETURN signal from sensor but no solenoid function: Check switches and wiring before replacing module.
Power to solenoids but no shift function: Check switches and wiring before replacing solenoid.
SYSTEM WIRING
BLACK =
5v to speed sensor.
GREEN = 5v to speed sensor
ORANGE =
9-14v from AWD switch.
YELLOW =
9-14v from HI/LO switch.
BROWN =
battery to AWD solenoid.
BLUE =
battery to HI/LO solenoid.
RED =
battery positive.
GREY =
power to speed sensor
WHITE (2) =
common/ground.
5
INTRODUCTION
The efficiency and life of mechanical equipment is as dependent on proper lubrication as it is on proper engineering
design. The importance of proper lubrication is increased because of greater gear tooth and bearing pressures and
higher speeds in present day vehicles. For this reason we are vitally interested in promoting widespread usage of
the best possible lubricants for our products.
It is advisable to consider the reputation of the refiner or vendor when selecting a lubricant. He is responsible for
the quality and correct application of his product. A high quality lubricant incorrectly applied may greatly reduce the
maximum service built into our product. Past experience has proven that a large portion of service problems can
be traced to an improper lubricant or to an incorrect lubricant application.
Our purpose in compiling these specifications is to provide a guide to aid in the selection of a lubricant which will
render the most satisfactory service.
We recommend a good quality gear lube for use in our axles and transfer cases.
75w/90 thru 85w/140 and SAE90. Synthetics or mineral products are both appropriate.
Suitable grades include
LUBRICATION
A.
LUBRICATION OF THE FRONT AXLE DIFFERENTIAL CARRIER
With new axles, the original lubricant should be drained at 1,000 miles (1,600 km) but no later than 3,000
miles (4,800 km). Change every 10,000 miles (16,000 km) or annually. Drain the lubricant initially used in
the assembly while the assembly is still warm. Axles SHOULD NOT be flushed with any solvent such as
kerosene. All new axles should be checked for correct oil level before being placed into service.
Fill axle housings to bottom of level hole (in carrier and/or housing) with specified lubricant with the vehicle on
level ground.
The most satisfactory results will be obtained only when the lubricant is of the correct viscosity API GL-5 or
MILL2105B. For general use, use SAE 85-140 EP Multi-Viscosity gear lube. Higher or lower viscosity may
be required for extremely hot or cold weather.
VENTS
When filling wheel ends, take care not to over-fill the hubs. This results in lube being pumped up the vent
tube, and out the vent. When this occurs, enough lube can be purged to cause heat damage to the planetary
system.
If lube is observed leaking from the vent, the vent and it’s tube must be removed and flushed with solvent.
This cleans the inner walls of residual lube which can cause a capillary effect, resulting in continued siphoning. Ensure correct lube level after reinstalling tube and vent.
B.
FRONT DRIVE STEERING AXLE WHEEL ENDS, UNIVERSAL JOINTS, BEARINGS, BUSHINGS AND KNUCKLE PINS
The frequency of lubricant changes depends upon individual operating conditions, speed and loads. Change whenever seals are replaced or when brakes are relined or at 10,000 miles (16,000 km) or annually.
Use a high grade Lithium chassis lubricant that conforms to NLGI-2EP requirements.
1. Check for looseness
2. Apply grease
3. Observe lube purging - except in the case of cardon joints
4.If the above is not successful, remove cup or joint and check old grease. If rusty, gritty or burned, replace.
NOTE: Axle shaft cardan joints are not serviceable with pressurized grease.
IMPORTANT: At rebuild time, before installing wheel bearings onto spindle, coat bearing journals with a film
of grease to deter fretting corrosion. Apply 1/16” on spindle hub and knead into the bearings. Apply by hand,
repack every 10,000 miles (16,000 km) or annually.
C.
BRAKE LUBRICATION
A high temperature waterproof grease in a Number 1 NLGI Grade is recommended for lubricating the brake
actuating system. It should be a smooth textured corrosion resistant grease free of filters and abrasives. It
should maintain a satisfactory softness under normal parking and storage temperatures so the brakes can be
applied and released. Vehicles operating in extremely cold weather (below -40°) require a grease conforming
to MIL-G-25013C.
6
WEDGE BRAKES AND CHAMBERS (ON-HIGHWAY AND OFF-HIGHWAY)
On-Highway – Change whenever seals are replaced or when brakes are relined.
Off-Highway – Change grease every 12 months (maximum), whenever seals are replaced and when brakes
are relined. However, the change interval may be shorter than 12 months depending on the severity of service
operations. This can be determined by initially schedualing an inspection of the internal parts and lubricant
every 2 months until the first 12 month period has passed. At each inspection look for contaminated or hardened grease, or for the lack of grease.
CAM BRAKES (ON-HIGHWAY AND OFF-HIGHWAY)
On-Highway – Every 10,000 miles (16,000 km) or every 6 months for all components depending on severity
of service.
Off-Highway – For all components, change grease every 4 months (maximum), whenever seals are replaced
and brakes are relined. However, the change interval may be shorter than 4 months depending on the severity of service operation. This can be determined by initially scheduling an inspection of internal parts. At each
inspection look for contaminated or hardened grease or for the lack of grease.
D.
LUBRICATION OF TIE-ROD AND DRAG LINK
Use the same type of grease as for the wheel bearings.
E.
LUBRICATION OF DRIVELINES
Off-Highway – The change interval will differ greatly and be determined largely on the type of vehicle or
machinery being used, type of operation and severity of service. The lubricant change interval could be, for
example, one (1) day maximum or three (3) months maximum. This can be determined by initially scheduling daily or weekly inspections of universal joint, shaft , and slip yoke parts. Check seals, bearings, splines,
etc., and check condition of grease in the assemblies by purging with new grease. Look for contaminated or
hardened grease or for the lack of grease. Also, check to make sure grease purges from all four (4) bearing
and seal positions of the cross.
LUBRICATION PROCEDURES FOR UNIVERSAL JOINTS (DRIVE SHAFTS ONLY)
1.Check for looseness.
2.Apply grease.
3.Observe lube purging from all seals until new grease comes out.
4.If grease does not purge, manipulate the “U” joint until purging occurs.
5.If the above is not successful, remove cup or joint and check old grease. If rusty, gritty or burnt, replace the
complete universal joint.
LUBRICATION PROCEDURES FOR SLIP YOKES AND SPLINES
1.Check for looseness or sideplay.
2.Apply grease until purging takes place at air hle in end of slip yoke.
NOTE: Axle shaft cardan joints are not serviceable with pressurized grease.
F.
LUBRICATION OF TRANSFER CASE
Use same type and viscosity of gear lube as used in the differential carrier. Fill to the bottom of the fill hole.
DO NOT OVERFILL as this may cause the case to run hot, or cause lubricant to be pumped out of the vent.
Transfer Case may be mounted at various approved angles by the vehicle manufacturer and normally should
be filled to the bottom of the tapped hole. Capacities will vary depending upon the angle of mounting.
Lubricant should be drained at 1,000 miles (1,600 km) but no later than 3,000 miles (4,800 km). Change every
10,000 miles (16,000 km) or annually. Drain the lubricant initially used in the assembly while the assembly is
still warm. Transfer Case SHOULD NOT be flushed with any solvent such as kerosene.
G.
MAGNETIC DRAIN PLUGS
Any drive axle or transfer case while it is working, generates wear particles at a fairly steady rate. These wear
particles are very fine but hard. If these hard wear particles are allowed to circulate in the lubricant, the antifriction bearings will wear at a faster rate than they would if the hard wear particles were removed as they are
generated.
7
MAINTENANCE SCHEDULE – AXLES
1,000 Miles
1.
Change lube in differential and hubs no later than 3,000 miles.
5,000 Miles
1.
Re-torque wheel nuts after 100 and 500 miles, then every 5,000 miles thereafter.
2.
Clean vent and vent tubes.
3.
Check operation of differential lock control pressure switch.
10,000 Miles
1.
Change lube in differential and hubs.
2.
Lube brake cam bushings and brake levers.
15,000 Miles
1. Check shoe clearance and brake lining wear.
30,000 Miles
1.
Check brake shoes, drums and parts for wear.
2.
Check and re-torque mounting bolts.
3.
Lube brake shoe rollers.
60,000 Miles
Check and adjust wheel bearings.
Note: Change lube annually if vehicle operates less than prescribed mileage periods.
8
MAINTENANCE SCHEDULE – TRANSFER CASES
1,000 Miles
Change Lube.
10,000 Miles
Change lube and check vent every 10,000 miles.
Note: Change lube annually if vehicle operates less than prescribed mileage periods.
Viscosity is dependant on ambient regional temperature:
Tropic Zone: SAE 85W/140
Normal Zone: SAE 85W/90 - SAE 85W/140 – SAE 90
Frigid Zone: SAE 80W – SAE 75W/140 – SAE 75W – 90
LUBRICATION GUIDE
Acceptable Grades (-26C to 38C / -14.8F to 100F)
BP hypergear EP
Castrol EXP, Dynadrive 80W/90
ELF Tranself TYPE B
ESSO Gear Oil GX 80W/90
GX-D85W/90
MOBIL Mobilube HD
Shell Spirax HD
Total Transmission TM 85W/90
Lithium Based Lube (Grease)
Specification: NLGI-2EP
Acceptable Grades:
MOL LZS-2 EP
AGIP GR MU/EP2
SHELL Alvania EP2
Use AGIP AUTOL TOP 2000 for brake rollers.
Lubrication and Inspection Points - Axles
1.
Oil level plug (hubs)
2.
Oil fill and drain plugs (hubs)
3.
Vent and vent tube (wheel ends)
4.
Oil level and drain plugs (housing)
5.
Differential vent (housing)
6.
Lube fittings at brake arms
7.
Slack adjuster
9
SERVICE AND MAINTENANCE
HIGH PRESSURE CLEANING
When using high pressure cleaning equipment, it should be applied in such a way that:
- the water jet does not penetrate the shaft oil seals
- the cleaning water does not enter through the breather orifices
PRESERVATION FOR STORAGE
The transfer case should be stored inside a room with low air circulation with maximum relative humidity
of 60% and a temperature between 15 and 20 C.
We recommend to issue storage cards to keep record of the preservation details and dates.
Our transfer cases were filled for the test run in our factory. The remaining quantity of oil protects the unit temporarily
against corrosion.
If intending to store the unit for more than 4 months, carry out the following preservation procedure.
1.Remove breather and seal bore by means of suitable plug.
2.Fill gear oil according to instruction chapter (“oil change and maintenance”).
3.Rotate transfer cases in such a way that all interior surfaces are coated with oil.
4.Turn shafts and at the same time shift twice every position of all shifting cylinders (see chapter
“handling”).
When storage conditions are favorable (less than 60% humidity) repeat procedure points 3 - 5 every 6 moths.
When conditions are extreme (arctic or tropical, high humidity, high variation of temperature, storage location is near
to sea) repeat procedure points 3 - 5 every four months.
CAUTION: Before putting the transfer case into use the breather must be installed!
10
11
12
DESCRIPTION
TECHNICAL DATA
TRANSFER CASE
INPUT TORQUE
INPUT SPEED
WEIGHT APPROX.
RATIO
TYPE
(lbft)
MAX. (r.p.m.)
(w/o oil, PTO) kg
on-road
off-road
VG 750 w/o diff.
7,400
3,500
115
1.00
2.1
VG 750 w. diff.
7,400
3,500
125
1.00
2.1
VG 1200 w/o diff.
11,000
3,000
220
1.00
1.75
VG 1200 w. diff.
10,000
3,000
230
1.00
1.75
VG 1600/300 w/o diff.
15,000
2,800
305
.89
1.536
VG 1600/396 w/o diff.
15,000
2,800
290
.89
1.536
VG 1600/300 w. diff.
15,000
2,800
315
.89
1.536
VG 1600-396 w. diff.
15,000
2,800
300
.89
1.536
VG 2000/300 w/o diff.
18,500
2,800
335
.89
1.536
VG 2000/396 w/o diff.
18,500
2.800
330
.89
1.536
VG 2000/300 w. diff.
18,500
2,800
355
.89
1.536
VG 2000/396 w. diff.
18,500
2.800
350
.89
1.536
RTC 100
15,000
3,100
235
1:0.98
1:2.48
RTC 60-420
11,500
3,500
218
1:1.09
1:2.47
13
DESIGN
MVG 750 without differential
The MVG 750 without differential 3-shaft design, 2-speed transfer case with clockwise input drive direction.
Housing: two-pieces aluminum
Bearing
application:
Input shaft
Intermediate shaft
Output shaft
Front output shaft
- cylinder roller and 4-point-bearing
- cylinder roller bearings
- tapered roller bearings
- roller bearing, slide bearing
Lubrication: splash lubrication or splash / force feed lubrication with pump at input shaft
Shifting: pneumatic - 2 or 3 positions
Front drive: pneumatic operation
Options: pneumatic operation PTO;
synchronization;
ADM
14
DESIGN
MVG 750 with differential
The MVG 750 with differential 3-shaft design, 2-speed transfer case with clockwise input drive direction.
The spur gear planetary differential has a torque distribution ratio between front and rear axle of (1 : 2.00)
Housing: two-pieces aluminum
Bearing
application:
Input shaft
Intermediate shaft
Output shaft
and differential
Front output shaft
- cylinder roller and 4-point-bearing
- cylinder roller bearings
- tapered roller bearings
and needle bearing
- roller bearing, slide bearing
Lubrication: splash lubrication or splash / force feed lubrication with pump at input shaft
Shifting: pneumatic - 2 or 3 positions
Front drive: pneumatic, differential pneumatically lockable
Options: pneumatic operation PTO;
synchronization;
ADM
15
DESIGN
MVG 1200 without differential
Cross section VG 1200 type 7120.
The MVG 1200 without differential 3-shaft design, 2-speed transfer case with clockwise input drive direction.
Housing: two-parts
Bearing
application:
Input shaft
Intermediate shaft
Output shaft
Front output shaft
- taper roller bearings
- cylinder roller bearings
- tapered roller bearings
- roller bearing, slide bearing
Lubrication: splash lubrication or splash / force feed lubrication with pump at input shaft
Shifting: mechanical - 3 positions
pneumatic - 2 or 3 positions
Front drive: pneumatic operation
Options:pneumatic operation PTO; without front drive; rear engine drive version; version towable
without disconnecting the drive shaft in neutral position; external oil cooler connection; electronic
speedometer connection; input drive direction counter-clockwise; synchronization; ADM
16
DESIGN
MVG 1200 with differential
Cross section VG 1200 type 7124.
The MVG 1200 with differential 3-shaft design, 2-speed transfer case with clockwise input drive direction (view to
input flange).
Housing: two-parts
Bearing
application:
Input shaft
Intermediate shaft
Output shaft
and differential
Front output shaft
- taper roller bearings
- cylinder roller bearings
- tapered roller bearings
and needle bearing
- roller bearing, slide bearing
Lubrication: splash lubrication or splash / force feed lubrication with pump at input shaft
Shifting: mechanical - 3 positions
pneumatic - 2 or 3 positions
Front drive: pneumatically, differential pneumatically lockable
Options:pneumatic operation PTO; rear engine drive version; pump fitting at front and rear drive; version towable without disconnecting the drive shaft in neutral position; external oil cooler connection; electronic
peedometer connection; input drive direction counter-clockwise; synchronization; ADM
17
DESIGN
MVG 1600
without differential
MVG 2000
Cross section MVG 1600
The MVG 1600 / MVG 2000 without differential is a 3-shaft design, 2-speed transfer case with clockwise input drive direction (view to input flange).
Housing: two-parts
Bearing
application:
Input shaft
Intermediate shaft
Output shaft
Front output shaft
- taper roller bearings
- cylinder roller bearings
- tapered roller bearings
- roller bearing, slide bearing
Lubrication:splash lubrication or splash / force feed lubrication with pump at input shaft for the executions
with PTO and for external cooling system, rear engine drive version and version with mechanical
shifting
Shifting: mechanical - 3 positions
pneumatic - 2 or 3 positions
Options:pneumatic operation PTO; without front drive; rear engine drive version; pump fitting at front and rear
side; external oil cooler connection; electronic speedometer connection; input drive direction counterclockwise; synchronization; ADM
18
DESIGN
MVG 1600
with differential
MVG 2000
Cross section MVG 2000
The MVG 1600 / MVG 2000 with differential 3-shaft design, 2-speed transfer case with clockwise input drive direction (view to input flange).
Housing: two-parts
Bearing
application:
Input shaft
Intermediate shaft
Output shaft
and differential
Front output shaft
Rear drive
- taper roller bearings
- cylinder roller bearings
- tapered roller bearings
and needle bearing
- roller bearing, slide bearing
- cylinder roller bearing, 4-point bearing
Lubrication: splash lubrication or splash / force feed lubrication with pump on input shaft for the executions
with PTO and for external oil cooling system
Shifting: mechanical - 3 positions
pneumatic - 2 or 3 positions
Front drive: pneumatic, differential pneumatically lockable
Options: pneumatic operation PTO; rear engine drive version; pump fitting at front and rear side;
external oil cooler connection; electronic speedometer connection; input drive direction
counter-clockwise; synchronization; ADM
19
DESCRIPTION - Shift mechanism
Pneumatic Shifting:High and Low
3 positions without return spring
MVG 750
Pneumatic Shifting:High and Low
3 positions without return spring
20
MVG 1200
DESCRIPTION - Shift mechanism
Pneumatic Shifting:High and Low
2/3 positions without return spring
MVG 1200 / MVG 1600 / MVG 2000
Attention:
For “pneumatic shifting with
spring” we want to point out that in
case of an air pressure loss the
gear changes due to the spring
pressure on MVG 1200 from high to
low and on MVG 1600 and MVG 2000
from low to high.
Pneumatic Shifting:High and Low
3 positions with defent, without return spring
MVG 1600 / MVG 2000
21
DESCRIPTION - Shift mechanism
Engagement of the front axle drive as well as the PTO is performed pneumatically (6.5 to 8 bar air pressure).
Disengaging is done by the return spring which is installed in the shifting cylinder.
Pneumatic Shifting:
MVG 750
High and Low
2/3 positions without return spring
MVG 1200
Pneumatic Shifting: Power Take Off (PTO)
22
Magnetic drain plugs perform the vital function of trapping small metaliic particles that circulate in the lubricant,
through the gears and bearings, causing rapid wear and premature failure.
REFERENCE ONLY:
A.
Never add lubricant to axle or transfer case unless it is the same make and grade as that which is already in
the axle or transfer case. If the same lubricant is not available, drain and refill.
B.
CHECKING LEVEL
Remove filler plug. Lubricant should be level with bottom of tapped filler hole.
C.
AIR VENTS
Check every 2,000 miles (3,200 km) – Clean in solvent.
COMPONENT
Front Axle Differential Carrier
Steering Axle Wheel Ends
Brake Lubrication
Tie Rod Lubrication
Drag Link Lubrication
Drivelines Lubrication
Transfer Case Lubrication
Wheel Bearing Lubrication
(CODE)
1.Change after first 1,000 miles (1,600 km)
2.Check each 1,000 miles (1,600 km)
3.Lubricant every 2,000 miles (3,200 km)
4.Drain and refill every 10,000 miles (16,000 km)
5.Repack every 10,000 miles (16,000 km)
6.More frequent intervals may be required under adverse operating conditions.
SCHEDULED MAINTENANCE SERVICES
(CODE)
(1) (2) (4) (6)
(2) (5) (6)
(2) (6)
(3) (6)
(3) (6)
(2) (3) (6)
(1) (2) (4) (6)
(5) (6)
LUBRICATION GUIDE:
TRANSFER CASE MODELS: MVG750, MVG1200, MVG2000
SERVICE AND MAINTENANCE
OIL CHANGE AND OIL LEVEL CHECK
MVG750
OIL CHANGE (recommended in warm condition)
- drain gear oil at drain plug (1)
- clean magnet of drain plug
- mount drain plug with new seal
- fi
ll new gear oil at filling bore/level bore (2) until it
flows over
- mount level plug (2) with new seal
- unscrew breather (3), clean it and mount it again
OIL LEVEL CHECK
- open oil filling/level plug (2)
-o
il level must reach edge of level bore, if necessary top up
- mount level plug with new seal
1
2
3
oil drain plug
level plug
breather
without longitudinal differential
approx. 6
,4 l
13.5 pts.
with longitudinal differential
approx. 5
,5 l
11.6 pts.
ATTENTION: Assure correct oil level. Low level causes lack of lubrication and reduces durability.
Too high level causes excessive splashing and leads to overheating of transfer case.
23
MVG1200
OIL CHANGE (recommended in warm condition)
- drain gear oil at drain plug (1)
- clean magnet of drain plug
- mount drain plug with new seal
- fi
ll new gear oil at filling bore/level bore (2) until it
flows over
- mount level plug (2) with new seal
- unscrew breather (3), clean it and mount it again
OIL LEVEL CHECK
- open oil filling/level plug (2)
-o
il level must reach edge of level bore, if necessary top up
- mount level plug with new seal
without longitudinal differential
approx. 4
,6 l
9.7 pts.
1
2
3
with longitudinal differential
approx. 3
,5 l
7.8 pts.
oil drain plug
level plug
breather
ATTENTION: Assure correct oil level. Low level causes lack of lubrication and reduces durability.
Too high level causes excessive splashing and leads to overheating of transfer case.
MVG1600
1
2
3
4
Oil filling plug
Oil drain plug
Oil level plug
Breather
Drain oil by unscrewing both oil drain plugs (2)
Install oil drain plugs (2) with new seals
Fill oil through oil filling bore (1) until it starts to overflow at oil level bore (3)
After setting of correct oil quantity Install oil level plug (3) with new seal
Clean and install breather (4)
24
SERVICE AND MAINTENANCE
MVG2000 (Long Drop)
OIL CHANGE (recommended in warm condition)
- drain gear oil at drain plug (2)
- clean magnet of drain plug
- mount drain plug with new seal
- fi
ll new gear oil at filling bore/level bore (1) until it
flows over (3)
- mount level plug (3) with new seal
- unscrew breather (4), clean it and mount it again
OIL LEVEL CHECK
- open oil filling/level plug (3)
-o
il level must reach edge of level bore, if
necessary top up
- mount level plug with new seal
without longitudinal differential
approx. 7
,1 l
15 pts.
1
2
3
4
oil filling plug
oil drain plug
level plug
breather
with longitudinal differential
approx. 6
,5 l
13.74 pts.
ATTENTION: Assure correct oil level. Low level causes lack of lubrication and reduces durability.
Too high level causes excessive splashing and leads to overheating of transfer case.
MVG2000 (Short Drop)
OIL CHANGE (recommended in warm condition)
- drain gear oil at drain plug (1)
- clean magnet of drain plug
- mount drain plug with new seal
- fi
ll new gear oil at filling bore/level bore (2) until it
flows over
- mount level plug (2) with new seal
- unscrew breather (3), clean it and mount it again
OIL LEVEL CHECK
- open oil filling/level plug (2)
-o
il level must reach edge of level bore, if
necessary top up
- mount level plug with new seal
without longitudinal differential
approx. 9
,0 l
19 pts.
1
2
3
4
oil filling plug
oil drain plug
level plug
breather
with longitudinal differential
approx. 8
,4 l
17.75 pts.
ATTENTION: Assure correct oil level. Low level causes lack of lubrication and reduces durability.
Too high level causes excessive splashing and leads to overheating of transfer case.
25
RTC SERIES TRANSFER CASES
RTC 60-420
DRAIN OIL IN WARM CONDITIONS.
DRAIN LUBE THROUGH BOTTOM PLUG (2).
CLEAN MAGNETIC PLUG AND REPLACE.
ADD LUBE THROUGH FILL PLUG (1) UNTIL
LUBE JUST STARTS TO FLOW FROM PORT.
REPLACE PLUG.
LUBE QTY: APPROX. 5.5 PINTS
1 - FILL AND LEVEL PLUG
2 - DRAIN PLUG
3 - VENT
RTC/MTC 60: DO NOT operate with
unit in neutral, except for towing.
The lube pump drive is on idler shaft,
thus top shaft does not receive lube
in neutral position. The same applies
to 25 Series.
RTC - 100
1 - FILL PLUG
2 - LEVEL PLUG
3 - DRAIN PLUG
4 - VENT
FILL FROM PLUG (1) UNTIL LUBE
JUST STARTS TO FLOW FROM LEVEL
PLUG (2).
RTC - 100 Drive shaft must be
removed for towing.
Procedures for FAE and HI/LO
shifting the same as MVG series
units.
26
FRONT AXLE
CASTER: Backward tilt of king pin at top. To cause front
wheels to run straight normally, straighten up after turn,
and give trailling action to wheels.
CAMBER: Outward tilt of front wheels at top. To bring road
contact point of wheel more nearly under center of load.
Important tire saving adjustment.
TOE-IN: Drawing together of front wheels at front at hub
height. To prevent excessive tire wear.
KING PIN INCLINATION: Inward tilt of king pin at top to
compensate for shearing action on king pin which would
result if wheels were left vertical and had no camber and
no king pin inclination.
DRAG LINK & TIE ROD NOMENCLATURE:
The term DRAG LINK is the component that connects the Front Axle steering arm to the steering gear box.
The term TIE ROD is the component that connects the left and right front axle wheels.
27
ADJUSTMENTS
A.
CASTER
A change in axle caster could indicate front axle housing distortion, which might be caused by a minor
accident,or a permanent set in the front springs.
This is read by a protractor mounted on the pinion U-joint. Consult the respective axle specifications to determine the actual caster reading.
TO CORRECT:
If front springs are badly distorted, it is advisable to install new leaves or complete new springs.
It may only be necessary to install tapered shims between the front axle spring pads and springs. The positionof the thick part of the shim will be determined by the direction in which the axle must be tilted in order to
bringthe caster angle to the correct specification.
B.
CAMBER
Front wheel camber is controlled by the axle housings, and cannot be changed.
TO CORRECT:
Call the Factory. The application of heat will destroy the heat treatment and make the housing susceptible to
distortion.
C.
TOE-IN
Front wheel toe-in is controlled by the length of the tie rod.
For smooth operation and ease of steering at highway speeds, the axle has been adjusted such that the wheelmounting surfaces at the front are slightly closer together than on the rear side. This difference should measure 1/8”
+1/6”.
TO CORRECT:
The length of the tie rod is adjusted by rotating the threaded end (ends) through a complete turn.
Turning the tie-rod one way will slightly increase the toe-in, while rotating it the other way will slightly decreaseit
with each turn.
In the event the tie rod becomes bent, it should be replaced, as it will again bend easily even though straight-ened
to its original form.
D.
TIE ROD ENDS
Tie rod yoke pins should be adjusted to eliminate lost motion. Tie rod pins and bushings, or ball sockets,should be
replaced if worn.
E.
STEERING GEAR
The steering gear should be adjusted to eliminate excessive looseness. The standard original steering gear is used,
therefore, the original service operation applies.
F.
U-BOLT AND STUD NUTS
Front spring U-bolt nuts should be securely tightened. If the front axle continues to shift on the springs, it is
anindication that the spring center bolts are sheared and they should be replaced.
G.
WHEELS AND TIRES
Check wheels and tires for runout and balance.
See that tires are inflated to recommended pressure, in order to provide the SAME TIRE ROLLING
RADIUS,FRONT AND REAR.
28
H.
WHEEL BEARINGS
In order to ensure top performance long bearing life, the tapered-roller bearings must be properly preloaded
upon assembly anytime the outer and assembly is disassembled. Proper adjustment is obtained by tightening
the inner bearing nut, with the bearings in position, until the hub will no longer turn. Then back off the nut approximately 1/8 revolution, install retainer and outer nut, and lock in position. The hub should now turn freely
with no perceivable end-play. Consult the specific axle maintenance manual for a more detailed procedure.
I.
GENERAL INFORMATION
(1) Lubrication — Lubricate the front axle assembly in accordance with the Lubrication Chart of this manual.DO NOT
OVER LUBRICATE. If the differential, universal joints, or hub bearings are over-lubricated, the lubricant will be presurized past the oil seals and vents and may do damage by destroying the seal as well as entering the brakes.
(2) LOOSE ADJUSTMENTS — As soon as a looseness is noted in the hub bearings pivot pins, or other
adjustable points, attention should be given to these items. Normal wear is slight but develops more rapidly
as looseness occurs. If a unit is operated for a long length of time with a prevailing perceptible looseness, it
will impose a pounding action on the parts involved. This may result in severe damage or destruction of parts
and cause the necessity of replacement. This service repair can be avoided by preventive maintenance in
eliminating the looseness as it develops, by performing the necessary adjustments.
TROUBLE SHOOTING
PROBLEM
POSSIBLE CAUSE
Transfer case or axle
running “Hot”
Improper lubrication
Excessive driveline or
gear noise
Driveline imbalance
Improper lubrication
Loose or worn parts
Steering instability
(shimmy)
Wheels and/or tires out of balance
Over or under inflated tires
Worn or loose parts
Improper lubrication
Overload
Excessive or uneven
tire wear
Wheels and/or tires out of balance
Improper alignment
Over or under inflated tires.
29
30
LUBRICATION GUIDE:
FRONT DRIVING STEER AXLES: MODELS: MT10/11, MT14/17, MT22/23
MODEL
MT10/11
AXLE
WHEEL ENDS
DIFFERENTIAL
17.0 pints
MT14/17
AXLE
2.0 pints
17.0 pints
MT22/23
AXLE
2.0 pints
17.0 pints
NOTE: All capacities approximate
MT14, MT17, MT22, MT23
LUBRICATION POINTS: (Fig. 1 and 2)
1 — oil level check & filter bore screw plug
2 — oil drain bore screw plug
3 — vent valve
4 — steering swivel bearings (bottom-top)
5 — slack adjuster
6 — brake camshaft bearings
7 — tie-rod ball joints
CARDAN-JOINT SERVICE
The Cardan-Joint caps are fitted
with plugged threaded ports that
are used for disassembly/assembly.
While these ports will accept a standard zerk fitting, we recommend
that only a needle attachments be
used to flow lube into these joints.
Adding lube under pressure may
result in the failure of the cup seal.
fig. 1
MANUAL SLACK ADJUSTERS:
MT10, MT11
fig. 2
31
OIL LEVEL OF WHEEL HUBS: MT14, MT17, MT22, MT23
1 — Plug for OIL FILLING and
inspection hole
2 — Plug for DRAIN hole
A — Line of OIL LEVEL
MT14/MT17 FRONT AXLE HUB
MT22/MT23 FRONT AXLE HUB
32
SERVICE AND MAINTENANCE RECOMMENDATIONS FOR SISU
AXLES IN THE SPECIAL TRANSPORT APPLICATIONS
Axle types: Sisu Rigid Hub Reduction Drive Axles with S-Cam Drum Brakes
FIRST SERVICE AT 125 HOURS:
• Change the oil in the differential carrier and the hubs
• Check and adjust if necessary the wheel bearings
• Check the overall condition of the axle (possible oil leaks, etc.)
MAINTENANCE INTERVAL 250 HOURS:
• Check and adjust if necessary the wheel hub bearings
MAINTENANCE INTERVAL 500 HOURS IN ADDITION:
• Change the oil in the differential carrier and the hubs if no oil analysis based oil changing
system in use
• Check the adjustment and the proper operation of the slack adjusters
• Check the brake lining thickness (if less than 6 mm, the linings have to be replaced)
• Check the oil level in the differential carrier and the hubs
• Check that the breather is working properly
• Check the overall condition of the axle (possible oil leaks, etc.)
• Inspect the condition of the planetary gears
MAINTENANCE INTERVAL 1000 HOURS IN ADDITION:
• Overhaul brakes per Brakes Workshop Manual. [Disassemble. Clean (wash) and degrease
all moving parts (rollers and anchor bolts must be greased with heat resisting Molykote CU
7439 copper paste or equivalent). Check the bushings and seals for wear. Check the brake
drums for heat cracks and wear, re-machining when necessary.]
MAINTENANCE INTERVAL 5000 HOURS IN ADDITION (THROUGH DRIVE AXLES ONLY):
• Remove the inter-axle differential and inspect and replace if necessary all excessively worn
or damaged inter-axle differential parts.
GREASING:
• Grease all fittings according to the vehicle’s standard schedule.
(Grease quality for grease lubrication: NLGI 2, Mobil Grease MP or comparable.)
Please refer to appropriate service manual for correct fill and drain locations.
Sisu Axle Oil Capacities (liters)
Axle
FSDP-10
FSMP-10
FRDP-10
FRMP-10
FSDP-14
FSMP-14
FSFP-14
FSND-12
FRDP-13/16
FRMP-13/16
FRDP-20
FRMP-20
FRFP-13/16
FRDP-14
FRMP-14
FRFP-14
SRDP-30-S
Carrier
12
17
12
17
18
24
22.5
18
24
18
24
22.5
18
24
22.5
18
Hubs
Standard
1.2
1.2
1.2
1.2
2.8
2.8
2.8
3.6
3
3
3
2.8
2.8
2.8
3
Axle Total
Hubs
Standard
Hubs
Cooled
5
5
6
6
5
5
Axle Total
Hubs
Cooled
13.2
18.2
13.2
18.2
20.8
26.8
25.3
3.6
21
27
25.5
20.8
26.8
25.3
21
23
29
24
30
27.5
Note
FuPro
FuPro
FuPro
FuPro
FuPro
23 FuPro
NOTE: Capacities are based on installing angles of 3 degrees or less
33
BRAKE LEVER ADJUSTING: MT11, MT14, MT17, MT22, MT23 MODEL AXLES
1 — brake lever
2 — worm shaft
3 — cam shaft
Adjustment of the front brake is performed by turning off the worm gears of the adjustable brake lever.
Using a wrench, turn the worm shaft until the brakes stop wheel rotation. Now back off the worm shaft until only a
slight drag is felt turning the wheel by hand. The shoe clearance can be checked with a feeler guage through an
opening in the brake cover plate.
34
AUTOMATIC SLACK ADJUSTER
ITEMS:
1 — Adjusting plate
2 — Setscrew (hex. dist. 13)
3 — Setscrew (hex. dist. 10)
4 — Plastic protection cap
5 — Hex. adjusting ring (hex. dist. 32)
6 — Stop pin
7 — Plastic thread protector
The slack adjuster requires no mainenance, since it is automatically readjusted according to brake lining wear.
When replacing the brake linings, or after repairing the axle, perform adjustment of the show clearance and automatic
slack adjuster as follows:
ADJUSTMENT DATA:
A = Distance between the chamber holder plane and the brake lever bore.
B = Distance between the chamber holder plane and the brake lever bore.
C = Brake lever installation radius.
D = Brake lever installation radius.
a. Adjusting position of the brake lever and the shoe clearance:
— Remove setscrews (2,3).
— Take care of the plastic thread protector (7).
— Remove the adjusting plate (1) and the plastic protection cap (4).
By turning the hex adjusting ring (5) to proper direction, adjust for the specified distance between the seating surface and
the brake lever bore. (Start adjustment from a distance greater than specified. If required, also adjust the push rod clevis.)
— After the above operation adjust the shoe clearance to 0.3 — 0.6 mm.
35
36
REPLACEMENT PARTS
WARRANTY CLAIM PROCEDURE
When ordering replacement parts for MARMONHERRINGTON ALL-WHEEL DRIVE conversions,
the following information should be given:
When ordering parts which you feel might be covered
under warranty, advise the following information:
1. F ACTORY ORDER NUMBER (found on I.D. Plate
on driver’s door panel or small plate affixed to axle
housing). This will be a six (6) digit number. (See
illustrations this page.)
1. F ACTORY ORDER NUMBER (found on I.D. Plate
on driver’s door panel or small plate affixed to axle
housing). This will be a six (6) digit number. (See
illustrations this page.)
2. Date unit was put into operation.
2. Component for which parts are required, i.e. front
drive axle or transfer case.
3. Mileage of unit at time of failure.
3. Model of axle and/or transfer, i.e. MR-90, MR-226.
4. Nature of failure.
Upon receipt of the above, you will be advised as to
how to proceed with the claim.
The information necessary for replacement
parts and/or warranty claim procedures will
be found on either plate design.
37
MARMON-HERRINGTON WARRANTY
This is to certify that we, Marmon-Herrington Company, Louisville, Kentucky, warrant each new chassis remanufactured, or assembly or part furnished for the remanufacture of a truck chassis against defects in material and
workmanship under normal use and service. Marmon-Herrington’s obligation under this warranty is limited to replacement of, at our factory, any part or parts thereof which shall, within one (1) year after delivery of such vehicle
to the final user, but not later than eighteen (18) months after installation of the all-wheel drive conversion kit, or
prior to the time when such vehicle has been operated twelve thousand (12,000) miles, whichever first occurs, be
returned to us with transportation charges prepaid, and which our examination shall disclose to our satisfaction to
have been thus defective.
Service parts are manufactured to the same standards as production installed parts. However, since the installation thereof, as well as the age and condition of the receiving vehicle are beyond the control of Marmon-Herrington,
Service Parts are warranted for a period of ninety (90) days or five thousand (5,000) miles whichever first occurs.
All other regular warranty conditions apply.
On vehicles operating OVERSEAS, the determination of defects will be made at Marmon-Herrington Company,
Louisville, Kentucky, from complete information supplied in writing by overseas distributors or recognized acting
distributors. Complete information is defined to mean: vehicle serial number, user’s name, date of delivery, mileage
at time of breakage, date of breakage, type of service, nature of break or fault, distributor’s recommendation (for our
guidance only), and any other pertinent information. After determination of our obligation, any parts to be replaced
will be shipped to distributor or acting distributor in accordance with his instructions.
This warranty is in lieu of all other warranties expressed or implied and of all other obligations or liabilities incurred
by Marmon-Herrington. Marmon-Herrington neither assumes nor authorizes any other person to assume any other
liability in connection with this sale, including but not limited to indirect or consequential damages.
This warranty shall not apply to any vehicle which shall have been repaired or altered in any way so as in our judgment, to affect its stability or reliability, nor which has been subject to misuse, negligence, or accident, nor which
shall have been operated at a speed exceeding the factory rated speed or loaded beyond the factory rated load
capacity or operated in violation of Marmon-Herrington’s instructions.
Marmon-Herrington makes no warranty whatever on components of the original manufacturer’s chassis not related
to the modification work. Also, no warranty is made on tires, rims, ignitions, or other parts usually warranted separately by their respective manufacturers.
The manufacturers reserve the right to make changes in design, and changes or improvements upon their product,
without notice, and without incurring any obligation to install such changes or improvements upon their products
theretofore manufactured.
This warranty shall become effective only when the Warranty Certificate has been returned to Marmon- Herrington
and validated by same.
38
WARRANTY REPAIR AND CLAIM PROCEDURE
Initial Failure Reporting
1.Operator must call Marmon-Herrington Customer Service prior to performing any repairs and receive a Work Authorization
Number to be eligible for reimbursement. The work authorization number does not guarantee payment but is an acknowledgement that the vehicle is within the warranty period in terms of date and mileage, and that a claim has been activated. It will be
the responsibility of the operator to ensure that their repair facility is aware of and complies with the guidelines of this policy.
2.To expedite the authorization process, you will need the Sales Order Number or “S” number found on the front of this certificate. You will also need the Vehicle Identification Number or the last six digits of the “VIN”, the date the vehicle was placed in
service, and the current mileage. Please note the following:
•This Warranty Registration should have been submitted at the time of delivery. If our records do not include a warranty
registration, you must complete one before any authorization for repair can be issued. We will make them available by
mail or fax upon request.
3.Marmon-Herrington will pre-approve .5 hours diagnosis/inspection time prior to your call for repair authorization. If the diagnosis/inspection complaint does not reveal a warrantable failure, or result in a warrantable repair, the customer will be responsible for all charges including diagnosis/inspection time.
4.The Operators Manual contains information covering proper equipment use and maintenance schedules. Operators must
adhere to these guidelines to be eligible for reimbursement, and service records must be provided upon request.
Pre-Repair Requirements
1.Authorization for repairs will require a written estimate/repair order of costs after determination that a warrantable condition is
found to exist.
2. Estimates must contain the following information:
•
A list of all parts necessary for specific job and if applicable, all parts that will be invoiced back to Marmon-Herrington.
•The cost of disassembly, inspection and diagnosis of any portion of the vehicle to determine extent of repairs needed.
•
Current labor costs, reflecting both hourly rate and number of hours to effect repairs must be listed.
•Miscellaneous charges such as “shop supplies” must be defined. Actual dollar amounts must be listed, as percentages
will not be accepted.
•
Sublet repairs must also be defined and included in the estimate at their actual dollar amount.
•NOTE: If it becomes necessary to exceed the original estimate in terms of parts or labor, the repair facility must call
Marmon-Herrington Customer Service for additional authorization.
3.Only the use of Marmon-Herrington supplied parts will constitute reimbursement unless prior approval has been obtained.
Parts Ordering
1.While Marmon-Herrington operates a full service Parts Department, replacement parts needed to effect Warranty repairs must
be acquired through Customer Service to be eligible for reimbursement.
Post Repair requirements.
1.
The final invoice or work order must include the following:
•
Customer’s name, address, and phone number.
•
The Vehicle Identification number.
•The Sales Order Number or “S” number, which the customer can provide or can be located on the ID tag, fixed to the
transfer case or axle.
•
The Axle or Transfer Case Model and Serial Number, also located on the ID tag.
•
Mileage IN / Mileage Out.
•
The Cause and Correction of the repair including detailed description of repairs and parts replaced.
•
The date the repair order was open and the date the repairs were completed.
•
The Work Authorization Number obtained from Customer Service.
Notes to Repair Facilities
1.Miscellaneous charges such as “shop supplies” must be listed as separate line items and shown on the final invoice as stated
in “Pre-Repair Requirements”. Invoices for sublet repairs must be made available upon request.
2. All repairs must comply with any or all state and DOT requirements.
3.Downtime of vehicle and incurred costs associated due to the delay of parts shipments or any other condition beyond our
control is not reimbursable and should not be listed on the invoice.
4.All failed parts that are required to be returned to Marmon-Herrington must be received before payment will be made. The
Return Authorization will be sent with the replacement parts when shipped from Marmon-Herrington.
5.All Claims must be submitted within 60 days of completion of repairs to be eligible for reimbursement.
For Work Authorization call: 800.227.0727 ext. 699
To Submit Claims by Fax:
502.253.0317
Submit Claims by Mail to: Marmon-Herrington Company
Customer Service Department
13001 Magisterial Drive
Louisville, KY 40223
39
NOTES
40
NOTES
41
Marmon-Herrington
13001 Magisterial Drive • Louisville, KY 40223
(502) 253-0277 • (800) 227-0727 • Fax (502) 253-0317
E-mail: [email protected]
JW06/02
42
Marmon-Herrington Literature Order Form
Literature available on line at www.Marmon-Herrington.com
Sales Literature –
No Charge
Part
Quantity
Parts Manuals:
Part
Price
MVG 750 Transfer Case
TCSL001
MVG 750 Transfer Case
TCPM001
*
MVG 1200 Transfer Case
TCSL002
MVG 1200 Transfer Case
TCPM002
*
MVG 2000 Transfer Case
TCSL003
MVG 1600SD Transfer Case
TCPM004
*
MT 8 Axle
AXSL001
MVG 1600LD Transfer Case
TCPM005
*
MT 10 Axle
AXSL002
MVG 1600PLD Transfer Case
TCPM006
*
MT 11 Axle
AXSL003
MVG 2000LD Transfer Case
TCPM003
*
MT 14 Axle
AXSL004
MT 8 Axle
AXPM001
*
MT 17 Axle
AXSL005
MT 10 Axle
AXPM002
*
MT 22 Axle
AXSL006
MT 11 Axle
AXPM003
*
MT 23 Axle
AXSL007
MT 14 Axle
AXPM004
*
Driver Controlled Locking
Differential
AXSL008
MT 17 Axle
AXPM005
*
4 Page Brochure
PRBR001
MT 22 Axle
AXPM006
*
MT 23 Axle
AXPM007
*
R/RF 22 Axle
AXPM008
*
CT-8 Axle
AXPM009
*
MTL Carrier
MTLM009
*
MVG 750 Transfer Case
TCRM001
*
MVG 754 Transfer Case
TCRM005
*
MVG 1200 Transfer Case
TCRM002
*
MVG 1600 Transfer Case
TCRM004
*
MDB 1610 Drop Box
DBM003
*
MDB 500 Drop Box
DBM003
*
MVG 2000 Transfer Case
TCRM003
*
MT10/MT11 Axles
ARM001
*
MT14/MT17 Axles
ARM002
*
MT22/MT23 Axles
ARM003
*
R/RF 22 Axle
ARM004
*
CT-8 Axle
ARM005
*
OMG-2
*
Total Sales Literature
Quantity
Extended
Cost:
Repair Manuals:
Method of Payment
[ ] Check Enclosed
[ ]Purchase Order/P.O. #_____________________________
(only w/current M-H Account)
[ ] Mastercard/VISA –
Card #_________________________________________
Exp Date______________________
Authorized Card User’s Signature:
Credit Card Orders Or Current
Customers’ Purchase Orders
May Be Faxed — 502/253-0317
Operators Manuals:
General
Sub Total:
Ship Order to the following address
Total Quantity Sales Literature:
Company:_________________________________________________________________________
KY Sales Tax:
Name:____________________________________________________________________________
Standard Shipping:
Address:__________________________________________________________________________
No Charge
No Charge
TOTAL Due:
City/State:________________________________ Zip Code:_________________________________
Country:_________________________________ Postal Code:______________________________
* Call for current pricing
Telephone Number:________________________ Fax Number:______________________________
PLEASE MAKE COPIES OF THIS LITERATURE ORDER FORM AS NEEDED
7/05