1
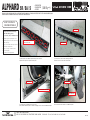
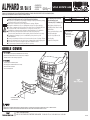
ALPHARD SR / SA / S
AGH30W/35W
GGH30W/35W
AYH30W
INSTALLATION MANUAL
(2015y~)
THANK YOU FOR PURCHASING. THIS IS THE INSTALLATION MANUAL OF WALD FRONT SPOILER FOR TOYOTA 30 ALPHARD SR/SA/S.
PLEASE READ THIS MANUAL CAREFULLY BEFORE THE INSTALLATION
ATTENTION
※ NO RETURNS CAN BE ACCEPTED BECAUSE OF IMPROPER INSTALLATION OR PAINTING.
※ CHECK THE FITMENT, AND ADJUST ALL THE DETAILS BEFORE PAINTING.
■ We assume no responsibility for any damage resulting from improper installation, painting,
modification and any cut wound in unsealing.
■ Contact the car dealer when you have any question in removing OEM parts.
■ During all the installation process, use parking brake and stop the engine completely.
■ Use rasps or sandpapers to fit the products to the body if there is an individual difference.
■ The product is made of FRP. Handle with care. Do not give the excessive force.
Gradually fix the bolts and nuts by checking the fitment and balance of the installation.
■ Check the fitment, and adjust all the details of the fitment steady and proper.
Please check the fitment and all the details regularly, fix the bolts and nuts as necessary.
■ The instruction of painting is just our recommendation, please paint it as you like.
※ PLEASE BE AWARE OF:
■ You may lose the warranty and all the services from the car maker, because of replacing OEM parts.
■ Reduced road clearance may cause inconvenience in using parking curbs and garage jack.
■ FRP, ABS and PPE products are slightly weaker than OEM parts in crashes.
■ The product may not match the body and OEM color perfectly.
Please purchase double sided tape,
primer and caulking glue at
auto accessory shop or hardware store.
PARTS
FRONT HALF SPOILER
Completely degrease and paint primer on all
the installation positions to enhance the viscidity
of double sided tape.
Use dryer to warm double sided tape to enhance
the viscidity in low temperature.
Keep the car in a dry condition more than
24 hours after gluing.
Do not wash the car during this time.
FRONT HALF SPOILER
TAPPING SCREWS (M4 X 16)
QUANTITIES
1
4
Use caulking glue
to fill the gap
between the product
and the body.
FRONT HALF SPOILER
【BEFORE PAINTING】
1) Temporarily install WALD Front Half Spoiler to the body.
※ Adjust the details of WALD Front Half Spoiler to fit the body by rasps or sandpapers.
2) Mark the location of the holes for the attached tapping screws after checking the balance.
3) Take off WALD Front Half Spoiler, then make holes according to the marked positions.
4) Paint WALD Front Half Spoiler according to the picture.
【AFTER PAINTING】
5) Completely degrease the installation position, then use calking glue to install WALD Front Half Spoiler to the body.
6) Temporarily fix the attached tapping screws.
7) Check all the details of the fitment, then tighten the attached screws.
8) Leave it till completely fixed.
※WALD SHOWCAR IS PAINTED LIKE THE PICTURE
(STEP 4)
※Installing WALD Front Half Spoiler
with widening to open slightly due to the tight fitting.
ATTACHED
TAPPING SCREWS
(M4 x 16)
MATTE BLACK
ATTENTION
※ MORE THAN 2 TECHNICIANS ARE NECESSARY IN THIS WORK. DURING ALL THE INSTALLATION PROCESS, PLEASE BE CAREFUL NOT TO DAMAGE THE BODY.
※ DEGREASE ALL THE INSTALLATION POSITIONS, AND REMOVE THE BODY PROTECTION COATING BEFORE THE INSTALLATION.
※ ADJUST ALL THE DETAILS OF OUR PRODUCTS TO FIT ON A CAR PERFECTLY.
WALD. INTERNATIONAL
ADD: 10-13 KYOGUCHI-CHO, TAKATSUKI, OSAKA, JAPAN
ZIP: 569-0072 TEL: (81)-72-673-3000 FAX: (81)-72-673-3003
2015/09
ALPHARD SR / SA / S
AGH30W/35W
GGH30W/35W
AYH30W
INSTALLATION MANUAL
(2015y~)
THANK YOU FOR PURCHASING. THIS IS THE INSTALLATION MANUAL OF WALD SIDE STEPS FOR TOYOTA 30 ALPHARD SR/SA/S.
PLEASE READ THIS MANUAL CAREFULLY BEFORE THE INSTALLATION
ATTENTION
※ NO RETURNS CAN BE ACCEPTED BECAUSE OF IMPROPER INSTALLATION OR PAINTING.
※ CHECK THE FITMENT, AND ADJUST ALL THE DETAILS BEFORE PAINTING.
■ We assume no responsibility for any damage resulting from improper installation, painting,
modification and any cut wound in unsealing.
■ Contact the car dealer when you have any question in removing OEM parts.
■ During all the installation process, use parking brake and stop the engine completely.
■ Use rasps or sandpapers to fit the products to the body if there is an individual difference.
■ The product is made of FRP. Handle with care. Do not give the excessive force.
Gradually fix the bolts and nuts by checking the fitment and balance of the installation.
■ Check the fitment, and adjust all the details of the fitment steady and proper.
Please check the fitment and all the details regularly, fix the bolts and nuts as necessary.
■ The instruction of painting is just our recommendation, please paint it as you like.
※ PLEASE BE AWARE OF:
■ You may lose the warranty and all the services from the car maker, because of replacing OEM parts.
■ Reduced road clearance may cause inconvenience in using parking curbs and garage jack.
■ FRP, ABS and PPE products are slightly weaker than OEM parts in crashes.
■ The product may not match the body and OEM color perfectly.
Please purchase double sided tape,
primer and caulking glue at
auto accessory shop or hardware store.
PARTS
SIDE STEP
Completely degrease and paint primer on all
the installation positions to enhance the viscidity
of double sided tape.
Use dryer to warm double sided tape to enhance
the viscidity in low temperature.
Keep the car in a dry condition more than
24 hours after gluing.
Do not wash the car during this time.
QUANTITIES
1SET
SIDE STEPS
Use caulking glue
to fill the gap
between the product
and the body.
SIDE STEP
【BEFORE PAINTING】
1) Remove OEM sidesteps according to the TOYOTA service manual.
2) Use OEM anchors to temporarily install WALD Side Steps to the body.
※ Adjust the details of WALD Sides Steps to fit the body by rasps or sandpapers.
3) Mark the location of WALD Side Steps with the masking tape after checking the balance.
4) Paint WALD Side Steps according to the picture.
【AFTER PAINTING】
5) Remove OEM inner panel from OEM side steps, then replace to WALD Side Steps. (As per enclosure)
6) Completely degrease the installation position.
7) Use caulking glue to install WALD Side Steps to the body.
8) Use OEM tapping screws to fix WALD Side Steps tightly.
※ After completely fixed, use OEM tapping screws on the slide door.
9) Leave them till completely fixed.
※WALD SHOWCAR IS PAINTED LIKE THE PICTURE (STEP 4)
OEM
TAPPING SCREWS
MATTE BLACK
※ The edge of WALD Side Steps has
the concave shape to make the space
to dodge OEM rear fender.
OEM TAPPING SCREW
※After completely fixed with caulking glue,
use OEM tapping screws on the slide door.
ATTENTION
※ MORE THAN 2 TECHNICIANS ARE NECESSARY IN THIS WORK. DURING ALL THE INSTALLATION PROCESS, PLEASE BE CAREFUL NOT TO DAMAGE THE BODY.
※ ADJUST ALL THE DETAILS OF OUR PRODUCTS TO FIT ON A CAR PERFECTLY.
WALD. INTERNATIONAL
ADD: 10-13 KYOGUCHI-CHO, TAKATSUKI, OSAKA, JAPAN
OEM ANCHOR
ZIP: 569-0072 TEL: (81)-72-673-3000 FAX: (81)-72-673-3003
2015/10
ALPHARD SR / SA / S
AGH30W/35W
GGH30W/35W
AYH30W
INSTALLATION MANUAL
(2015y~)
THANK YOU FOR PURCHASING. THIS IS THE INSTALLATION MANUAL OF WALD SIDE STEPS FOR TOYOTA 30 ALPHARD SR/SA/S.
PLEASE READ THIS MANUAL CAREFULLY BEFORE THE INSTALLATION.
HOW TO REPLACE
OEM INNER PANELS
DOOR PANELS
Please purchase double sided tape,
primer and caulking glue at
auto accessory shop or hardware store.
Completely degrease and paint primer on all
the installation positions to enhance the viscidity
of double sided tape.
OEM side steps are fixed to the
doors with their nails.
INNER PANELS
Use dryer to warm double sided tape to enhance
the viscidity in low temperature.
Keep the car in a dry condition more than
24 hours after gluing.
Do not wash the car during this time.
The above picture is the OEM side steps after taking off from the doors.
Split these side steps to door panels and inner panels.
The above picture is the one after unfastening all the nails.
※Do the same work on front doors and slide doors.
INNER PANEL
INNER PANEL
INSIDE OF WALD SIDE STEPS
INSIDE OF
WALD SIDE STEPS
Use caulking glue to fix OEM inner panels to the doors.
※Only the time OEM inner panels are unstable, use tapping screws to connect with WALD Side Steps.
WALD. INTERNATIONAL
ADD: 10-13 KYOGUCHI-CHO, TAKATSUKI, OSAKA, JAPAN
Do the same work on the slide doors to fix OEM inner panels.
ZIP: 569-0072 TEL: (81)-72-673-3000 FAX: (81)-72-673-3003
2015/09
ALPHARD SR / SA / S
AGH30W/35W
GGH30W/35W
AYH30W
INSTALLATION MANUAL
(2015y~)
THANK YOU FOR PURCHASING. THIS IS THE INSTALLATION MANUAL OF WALD REAR SKIRT FOR TOYOTA 30 ALPHARD SR/SA/S.
PLEASE READ THIS MANUAL CAREFULLY BEFORE THE INSTALLATION.
ATTENTION
※ NO RETURNS CAN BE ACCEPTED BECAUSE OF IMPROPER INSTALLATION OR PAINTING.
※ CHECK THE FITMENT, AND ADJUST ALL THE DETAILS BEFORE PAINTING.
■ We assume no responsibility for any damage resulting from improper installation, painting,
modification and any cut wound in unsealing.
■ Contact the car dealer when you have any question in removing OEM parts.
■ During all the installation process, use parking brake and stop the engine completely.
■ Use rasps or sandpapers to fit the products to the body if there is an individual difference.
■ The product is made of FRP. Handle with care. Do not give the excessive force.
Gradually fix the bolts and nuts by checking the fitment and balance of the installation.
■ Check the fitment, and adjust all the details of the fitment steady and proper.
Please check the fitment and all the details regularly, fix the bolts and nuts as necessary.
■ The instruction of painting is just our recommendation, please paint it as you like.
※ PLEASE BE AWARE OF:
■ You may lose the warranty and all the services from the car maker, because of replacing OEM parts.
■ Reduced road clearance may cause inconvenience in using parking curbs and garage jack.
■ FRP, ABS and PPE products are slightly weaker than OEM parts in crashes.
■ The product may not match the body and OEM color perfectly.
Please purchase double sided tape,
primer and caulking glue at
auto accessory shop or hardware store.
PARTS
REAR SKIRT
Completely degrease and paint primer on all
the installation positions to enhance the viscidity
of double sided tape.
Use dryer to warm double sided tape to enhance
the viscidity in low temperature.
Keep the car in a dry condition more than
24 hours after gluing.
Do not wash the car during this time.
REAR SKIRT
TAPPING SCREWS (M4 X 16)
QUANTITIES
1
4
Use caulking glue
to fill the gap
between the product
and the body.
REAR SKIRT
【BEFORE PAINTING】
1) Temporarily install WALD Rear Skirt to the body.
※ Adjust the details of WALD Rear Skirt to fit the body by rasps or sandpapers.
2) Check the balance of the installation position of WALD Rear Skirt on
OEM rear bumper.
3) Mark the location of the holes for the attached tapping screws
after checking the balance.
4) Take off WALD Rear Skirt, then make holes according to the marked positions.
5) Paint WALD Rear Skirt according to the picture.
【AFTER PAINTING】
6) Completely degrease the installation position, then use calking glue to
install WALD Rear Skirt to the body.
7) Check all the details of the fitment, then fix the attached tapping screws tightly.
8) Leave it till completely fixed.
■LOCATION OF WALD REAR SKIRT (STEP 2)
Ⓐ
Ⓐ:About 236 mm
Straight length from the boarder line
between OEM rear fender and bumper.
Ⓑ
※WALD SHOWCAR IS PAINTED LIKE THE PICTURE (STEP 5)
Ⓑ
Ⓑ:About 43 mm
From the bottom of
OEM parking sensors to the
top of WALD Rear Skirt.
Refer to the above instruction:Ⓑ
Refer to the above instruction:Ⓐ
MATTE BLACK
MATTE BLACK
ATTACHED
TAPPING SCREWS
(M4 x 16)
SILVER
ATTENTION
※ MORE THAN 2 TECHNICIANS ARE NECESSARY IN THIS WORK. DURING ALL THE INSTALLATION PROCESS, PLEASE BE CAREFUL NOT TO DAMAGE THE BODY.
※ DEGREASE ALL THE INSTALLATION POSITIONS, AND REMOVE THE BODY PROTECTION COATING BEFORE THE INSTALLATION.
※ ADJUST ALL THE DETAILS OF OUR PRODUCTS TO FIT ON A CAR PERFECTLY.
WALD. INTERNATIONAL
ADD: 10-13 KYOGUCHI-CHO, TAKATSUKI, OSAKA, JAPAN
ZIP: 569-0072 TEL: (81)-72-673-3000 FAX: (81)-72-673-3003
2015/09
ALPHARD SR / SA / S
AGH30W/35W
GGH30W/35W
AYH30W
INSTALLATION MANUAL
(2015y~)
THANK YOU FOR PURCHASING. THIS IS THE INSTALLATION MANUAL OF WALD GRILLE COVER FOR TOYOTA 30 ALPHARD SR/SA/S.
PLEASE READ THIS MANUAL CAREFULLY BEFORE THE INSTALLATION.
ATTENTION
※ NO RETURNS CAN BE ACCEPTED BECAUSE OF IMPROPER INSTALLATION OR PAINTING.
※ CHECK THE FITMENT, AND ADJUST ALL THE DETAILS BEFORE PAINTING.
■ We assume no responsibility for any damage resulting from improper installation, painting,
modification and any cut wound in unsealing.
■ Contact the car dealer when you have any question in removing OEM parts.
■ During all the installation process, use parking brake and stop the engine completely.
■ Use rasps or sandpapers to fit the products to the body if there is an individual difference.
■ The product is made of FRP. Handle with care. Do not give the excessive force.
Gradually fix the bolts and nuts by checking the fitment and balance of the installation.
■ Check the fitment, and adjust all the details of the fitment steady and proper.
Please check the fitment and all the details regularly, fix the bolts and nuts as necessary.
■ The instruction of painting is just our recommendation, please paint it as you like.
※ PLEASE BE AWARE OF:
■ You may lose the warranty and all the services from the car maker, because of replacing OEM parts.
■ Reduced road clearance may cause inconvenience in using parking curbs and garage jack.
■ FRP, ABS and PPE products are slightly weaker than OEM parts in crashes.
■ The product may not match the body and OEM color perfectly.
Please purchase double sided tape,
primer and caulking glue at
auto accessory shop or hardware store.
PARTS
GRILLE COVER
Completely degrease and paint primer on all
the installation positions to enhance the viscidity
of double sided tape.
Use dryer to warm double sided tape to enhance
the viscidity in low temperature.
Keep the car in a dry condition more than
24 hours after gluing.
Do not wash the car during this time.
GRILLE COVER
BOLTS (M6 x 20) (To Hold License Plate)
QUANTITIES
1
1 SET
Use caulking glue
to fill the gap
between the product
and the body.
GRILLE COVER
【BEFORE PAINTING】
1) Take off license plate, and temporarily install WALD Grille Cover to the body.
※ Adjust the details of WALD Grille Cover to fit the body by rasps or sandpapers.
2) Paint WALD Grille Cover after checking the right position.
【AFTER PAINTING】
3) Completely degrease the installation position.
4) Use caulking glue to install WALD Grille Cover to the body.
5) Check all the details of the fitment.
6) Leave it till completely fixed.
ATTACHED BOLTS (M6 x 20)
(To Hold License Plate)
ATTENTION
※ MORE THAN 2 TECHNICIANS ARE NECESSARY IN THIS WORK. DURING ALL THE INSTALLATION PROCESS, PLEASE BE CAREFUL NOT TO DAMAGE THE BODY.
※ DEGREASE ALL THE INSTALLATION POSITIONS, AND REMOVE THE BODY PROTECTION COATING BEFORE THE INSTALLATION.
WALD. INTERNATIONAL
ADD: 10-13 KYOGUCHI-CHO, TAKATSUKI, OSAKA, JAPAN
ZIP: 569-0072 TEL: (81)-72-673-3000 FAX: (81)-72-673-3003
2015/09