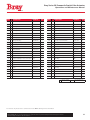
1
Series 98 Pneumatic Scotch Yoke Actuator Operation and Maintenance Manual Bray Series 98 Pneumatic Scotch Yoke Actuator Operations and Maintenance Manual TABLE OF CONTENTS 1.0 - Definition of Terms . . . . . . . . . . . . . . . . . . . . . . . . . . . . . . . . . . . . . . . . . . . 3 1.1 Hazard-free Use . . . . . . . . . . . . . . . . . . . . . . . . . . . . . . . . . . . . . . . . . . . . 3 1.2 Qualified Personnel . . . . . . . . . . . . . . . . . . . . . . . . . . . . . . . . . . . . . . . . . . 3 2.0 Introduction . . . . . . . . . . . . . . . . . . . . . . . . . . . . . . . . . . . . . . . . . . . . . . . . 4 3.0 Installation . . . . . . . . . . . . . . . . . . . . . . . . . . . . . . . . . . . . . . . . . . . . . . . . 4 4.0 Operation Guidelines . . . . . . . . . . . . . . . . . . . . . . . . . . . . . . . . . . . . . . . . . . . 5 5.0 Spring Return Pneumatic Actuator Assembly Drawing and Materials of Construction . . . . . . . . . . . 6 6.0 Maintenance . . . . . . . . . . . . . . . . . . . . . . . . . . . . . . . . . . . . . . . . . . . . . . . 8 6.1 Lubricants and Maintenance Consumables . . . . . . . . . . . . . . . . . . . . . . . . . . . . . . 8 6.2 Disassembly, Service & Reassembly of Modules . . . . . . . . . . . . . . . . . . . . . . . . . . . . 8 6.3 Spring Module . . . . . . . . . . . . . . . . . . . . . . . . . . . . . . . . . . . . . . . . . . . . 8 6.3.1 Removing the Spring Module . . . . . . . . . . . . . . . . . . . . . . . . . . . . . . . . . . 8 6.3.2 Service & Reassembly of the Spring Module . . . . . . . . . . . . . . . . . . . . . . . . . . . 9 6.4 Pressure Module . . . . . . . . . . . . . . . . . . . . . . . . . . . . . . . . . . . . . . . . . . . 9 6.4.1 Removing the Pressure Module from Actuator . . . . . . . . . . . . . . . . . . . . . . . . . . 9 6.4.2 Disassembling the Pressure Module . . . . . . . . . . . . . . . . . . . . . . . . . . . . . . . 9 6.4.3 Service & Reassembly of the Pressure Module . . . . . . . . . . . . . . . . . . . . . . . . . . 9 6.5 Torque Module . . . . . . . . . . . . . . . . . . . . . . . . . . . . . . . . . . . . . . . . . . . 11 6.5.1 Disassembling the Torque Module . . . . . . . . . . . . . . . . . . . . . . . . . . . . . . . 11 6.5.2 Service & Reassembly of the Torque Module . . . . . . . . . . . . . . . . . . . . . . . . . . 11 6.6 Reassembly of Actuator . . . . . . . . . . . . . . . . . . . . . . . . . . . . . . . . . . . . . . . 12 7.0 Field Conversions . . . . . . . . . . . . . . . . . . . . . . . . . . . . . . . . . . . . . . . . . . . . . 13 7.1 Fail Safe Condition (for Spring Return Actuators) . . . . . . . . . . . . . . . . . . . . . . . . . . . 13 7.2 Double Acting to Spring Return . . . . . . . . . . . . . . . . . . . . . . . . . . . . . . . . . . . 13 7.3 Spring Return to Double Acting . . . . . . . . . . . . . . . . . . . . . . . . . . . . . . . . . . . 13 8.0 Pneumatic Actuator - Double Acting, Single Cylinder Assembly and Materials of Construction . . . . . . 14 9.0 Pneumatic Actuator - Double Acting, Dual Cylinder Assembly and Materials of Construction . . . . . . . 16 10.0 Bolting Torques and Tools . . . . . . . . . . . . . . . . . . . . . . . . . . . . . . . . . . . . . . . . 18 10.1.a - Pressure Module . . . . . . . . . . . . . . . . . . . . . . . . . . . . . . . . . . . . . . . . . 18 10.1.b - Pressure Module . . . . . . . . . . . . . . . . . . . . . . . . . . . . . . . . . . . . . . . . . 18 10.2 - Torque Module . . . . . . . . . . . . . . . . . . . . . . . . . . . . . . . . . . . . . . . . . . 18 10.3 - Spring Module . . . . . . . . . . . . . . . . . . . . . . . . . . . . . . . . . . . . . . . . . . . 19 10.4 - Actuator Assembly . . . . . . . . . . . . . . . . . . . . . . . . . . . . . . . . . . . . . . . . . 19 All information herein is proprietary and confidential and may not be copied or reproduced without the expressed written consent of BRAY INTERNATIONAL, Inc. The technical data herein is for general information only. Product suitability should be based solely upon customer’s detailed knowledge and experience with their application. 1 Bray Series 98 Pneumatic Scotch Yoke Actuator Operations and Maintenance Manual 11.0 Technical Data . . . . . . . . . . . . . . . . . . . . . . . . . . . . . . . . . . . . . . . . . . . . . 20 11.1 - Double Acting Actuators . . . . . . . . . . . . . . . . . . . . . . . . . . . . . . . . . . . . . . 20 11.2 - Spring Return Actuators . . . . . . . . . . . . . . . . . . . . . . . . . . . . . . . . . . . . . . 21 12.0 Module Weights . . . . . . . . . . . . . . . . . . . . . . . . . . . . . . . . . . . . . . . . . . . . 25 13.0 Series 98 Dimensions . . . . . . . . . . . . . . . . . . . . . . . . . . . . . . . . . . . . . . . . . . 26 14.0 Series 98 General Specifications and Features . . . . . . . . . . . . . . . . . . . . . . . . . . . . . . 27 15.0 Hydraulic Override . . . . . . . . . . . . . . . . . . . . . . . . . . . . . . . . . . . . . . . . . . . 28 15.1 Installation . . . . . . . . . . . . . . . . . . . . . . . . . . . . . . . . . . . . . . . . . . . . . 28 15.1.1 Installing Hydraulic Override on Spring Return Actuators . . . . . . . . . . . . . . . . . . . 28 15.1.2 Operation - Spring Return Hydraulic Override . . . . . . . . . . . . . . . . . . . . . . . . . 29 15.2 Installing Hydraulic Override on DA Actuator . . . . . . . . . . . . . . . . . . . . . . . . . . . . 29 15.2.1 Operation – DA Hydraulic Override . . . . . . . . . . . . . . . . . . . . . . . . . . . . . . 30 15.3 Maintenance of Hydraulic Override . . . . . . . . . . . . . . . . . . . . . . . . . . . . . . . . . 30 15.3.1 Spring Return Hydraulic Override Cylinder . . . . . . . . . . . . . . . . . . . . . . . . . . . 30 15.3.2 Disassembly of Hydraulic Cylinder . . . . . . . . . . . . . . . . . . . . . . . . . . . . . . . 30 15.3.3 Servicing Hydraulic Cylinder . . . . . . . . . . . . . . . . . . . . . . . . . . . . . . . . . 30 15.4 DA Override Cylinder . . . . . . . . . . . . . . . . . . . . . . . . . . . . . . . . . . . . . . . . 30 15.4.1 Disassembly of Hydraulic Cylinder . . . . . . . . . . . . . . . . . . . . . . . . . . . . . . . 30 15.4.2 Servicing Hydraulic Cylinder . . . . . . . . . . . . . . . . . . . . . . . . . . . . . . . . . 31 15.5 Servicing Hand Pump Unit . . . . . . . . . . . . . . . . . . . . . . . . . . . . . . . . . . . . . . 31 16.0 Jackscrew Override . . . . . . . . . . . . . . . . . . . . . . . . . . . . . . . . . . . . . . . . . . . 32 16.1 Installation . . . . . . . . . . . . . . . . . . . . . . . . . . . . . . . . . . . . . . . . . . . . . 32 16.1.1 Installing DA Jackscrew Override . . . . . . . . . . . . . . . . . . . . . . . . . . . . . . . 32 16.1.2 Operating DA Jackscrew Override . . . . . . . . . . . . . . . . . . . . . . . . . . . . . . . 33 16.2 Installing SR Jackscrew Override . . . . . . . . . . . . . . . . . . . . . . . . . . . . . . . . . . 34 16.2.1 Operating SR Jackscrew Override . . . . . . . . . . . . . . . . . . . . . . . . . . . . . . . 34 17.0 Extended Stoppers . . . . . . . . . . . . . . . . . . . . . . . . . . . . . . . . . . . . . . . . . . . 35 17.1 Installation . . . . . . . . . . . . . . . . . . . . . . . . . . . . . . . . . . . . . . . . . . . . . 35 17.1.1 Installing Extended Stopper for Torque Module . . . . . . . . . . . . . . . . . . . . . . . . 35 17.1.2 Adjusting Extended Stopper . . . . . . . . . . . . . . . . . . . . . . . . . . . . . . . . . . . . 36 17.2 Installing Extended Stopper for Spring Module . . . . . . . . . . . . . . . . . . . . . . . . . . . 36 17.2.1 Adjusting Extended Stopper . . . . . . . . . . . . . . . . . . . . . . . . . . . . . . . . . . . . 36 Reference Drawings . . . . . . . . . . . . . . . . . . . . . . . . . . . . . . . . . . . . . . . . . . . . . 37 Trouble Shooting Potential Problems . . . . . . . . . . . . . . . . . . . . . . . . . . . . . . . . . . . . . 38 For information on this product and other Bray products please visit us at our web page - www.bray.com 2 All information herein is proprietary and confidential and may not be copied or reproduced without the expressed written consent of BRAY INTERNATIONAL, Inc. The technical data herein is for general information only. Product suitability should be based solely upon customer’s detailed knowledge and experience with their application. Bray Series 98 Pneumatic Scotch Yoke Actuator Operations and Maintenance Manual Read and Follow These Instructions Save These Instructions 1.0 - DEFINITION OF TERMS indicates a potentially hazardous situation which, if not avoided, could result in death or serious injury. indicates a potentially hazardous situation which, if not avoided, may result in minor or moderate injury. NOTICE used without the safety alert symbol indicates a potential situation which, if not avoided, may result in an undesirable result or state, including property damage. 1.1 Hazard-free Use 1.2 Qualified Personnel This device left the factory in proper condition to be safely installed and operated in a hazard-free manner. The notes and warnings in this document must be observed by the user if this safe condition is to be maintained and hazard-free operation of the device assured. A qualified person in terms of this document is one who is familiar with the installation, commissioning and operation of the product and who has appropriate qualifications, such as: • Take all necessary precautions to prevent damage due to rough handling, impact, or improper storage. Do not use abrasive compounds to clean, or scrape its surfaces with any objects. • Configuration and calibration procedures are described in this document. Proper configuration and calibration is required for the safe operation of this product. • The control system in which the unit is installed must have proper safeguards to prevent injury to personnel, or damage to equipment, should failure of system components occur. • This document does not cover every detail about every version of the product described. It cannot take into account every potential occurrence in installation, operation, maintenance and use. • Is trained in the operation and maintenance of pneumatic pressure equipment and systems in accordance with established safety practices. • Is trained or authorized to energize, de-energize, ground, tag and lock electrical circuits and equipment in accordance with established safety practices. • Is trained in the proper use and care of personal protective equipment (PPE) in accordance with established safety practices. • Is trained in first aid. • In cases where the device is installed in a potentially explosive (hazardous) location – is trained in the operation, commissioning, and maintenance of equipment in hazardous locations. • If situations transpire that are not documented in sufficient detail, please request the required information from the Bray Distributor or Representative responsible for your area. All information herein is proprietary and confidential and may not be copied or reproduced without the expressed written consent of BRAY INTERNATIONAL, Inc. The technical data herein is for general information only. Product suitability should be based solely upon customer’s detailed knowledge and experience with their application. 3 Bray Series 98 Pneumatic Scotch Yoke Actuator Operations and Maintenance Manual 2.0 INTRODUCTION The instructions and guidelines in this manual enable competent technicians to install, operate, adjust and carry out routine maintenance activities on Series 98 pneumatic actuators. Responsibility lies with the user to follow the instructions in this and in any additional documentation related to the product and accessories supplied with it. User shall ensure the equipment is installed and operated in the environment that it is intended for and effective protections are provided against exposure to pressure and temperature in excess of maximum rating. Failing to do so may affect the product warranty. Only trained personnel, aware of precautions in hazardous environments and health and safety in the workplace should service the equipment. Series 98 Actuators are designed for quarter turn rotary valves, in configurations as: DA- Double Acting with a single cylinder DD- Double Acting with dual cylinders SC- Spring Return Fail Close (CW) SO- Spring Return Fail Open (CCW) Two output torque characteristic profiles are available in the form of Symmetrical Yoke and Canted Yoke. Standard actuators have a mounting base to ISO 5211. MSS mounting base is available as an option. Mounting of the shaft driven accessories is per VDE 3845/ NAMUR standard. The maximum operating pressure of the Series 98 Pneumatic Scotch Yoke Actuators range from 40 to 150 psig, depending upon the size and configuration. Refer to the MOP (maximum operating pressure) charts or the name plate on the actuator for the maximum operating pressure. Operating media shall be clean and dry, in accordance to ISO 8573-1 Class 2.3.4 filtered to 5 microns or better, with pressure dew point of -20°C (-4°F) or at least 10°C (18°F) below ambient temperature. The user shall plan and implement a periodic maintenance program to ensure the service conditions continue as intended and the actuator is monitored and maintained per manufacturer’s recommendations. 3.0 INSTALLATION The S98 actuators are assembled, tested and delivered per the configuration ordered. The mounting of the actuator may be direct onto the valve or may require a mounting kit that would include a bracket, coupler shaft with keys and hardware. 4 WARNING Use appropriate tackles and slings to lift the actuator. Refer to Technical Data table for the approximate actuator weight. The lifting lugs provided are for lifting the actuator only and not for lifting the complete valve-actuatoraccessory assembly. NOTICE • The user shall ensure installation in intended service conditions and that the actuator is not covered with dirt/dust or other substances that may affect any heat dissipation capability, resulting in exceeding the maximum temperature rating of the actuator. • To prolong actuator seal life use only permitted media of recommended quality. • The actuator shall not be installed in hazardous areas incompatible with the defined gas groups and temperature class. • When using manual override sandwich gearbox, ensure the gearbox has over travel at least equal to that of the actuator. • The actuators can be mounted on valves in different positions, but care shall be taken to reorient suitably, some accessories like filter regulation units, hydraulic override power pack reservoirs, etc. that are gravity dependent for functioning. Before proceeding with installation, check compatibility of the valve stem to the actuator bore. The length, size and configurations (keyways / double D / square) must match. Additionally, check compatibility of valve and actuator bolting pattern. If using a mounting kit, physically check the coupler to ensure it fits the actuator bore and the valve stem. 1. Ensure the pressure module is depressurized completely by venting the ports to atmosphere and any power sources to accessories are disconnected. 2. Ensure the valve and actuator are aligned to the same position (i.e., valve closed - actuator closed or both in open). For spring return actuators, align the valve to the fail safe position of the actuator. If a sandwich gearbox manual override is used, then make sure it is also aligned with the valve and actuator position. All information herein is proprietary and confidential and may not be copied or reproduced without the expressed written consent of BRAY INTERNATIONAL, Inc. The technical data herein is for general information only. Product suitability should be based solely upon customer’s detailed knowledge and experience with their application. Bray Series 98 Pneumatic Scotch Yoke Actuator Operations and Maintenance Manual 3. Secure the valve, bolt the mounting bracket to the valve and fit the coupler shaft on the valve stem (when using mounting kit). Ensure the actuator's bore and seating face are clean and coat the valve stem/adaptor with a suitable oil/grease. Position the actuator to align the valve stem (or coupler shaft) with the yoke bore and slide the actuator on until the actuator seats on the bracket mounting surface (or on the valve top flange, in case of direct mounting). 4. When using a manual override sandwich gearbox between the actuator and valve, first couple and fix the gearbox on the valve following the gearbox installation procedure. Back off the gearbox travel stop bolts. Mount the actuator on the gearbox with the coupler shaft and bolt up the actuator on the gearbox flange. 4.0 OPERATION GUIDELINES Series 98 actuators operate well in both on-off and modulating applications. The accessories, control elements, tubing and fittings shall be chosen for adequate flow rates so as not to constrict flow or cause high pressure drop affecting the performance of the actuator. Maximum Operating Pressure (MOP) of the actuator is mentioned on the nameplate and shall not be exceeded. Suitable pressure regulator and safety valve shall be incorporated in the supply line, if the line pressure is higher than this. CAUTION 5. In order to align the bolt holes, it may be necessary to loosen the valve-bracket bolting slightly. The actuator mounting bolts should easily thread into the actuator base without side loading on the bracket (or the valve top flange). If needed, turn the actuator a bit and/or adjust the actuator travel stops. Bolt up the actuator to the bracket / gearbox flange / valve as the case may be. Do not pressurize from the cap end port of the spring return actuator. This port is normally fitted with a breather filter. If there is a possibility of the actuator being submerged temporarily in water due to flooding, then this port must be provided with an extension pipe with the breather filter on the pipe end, at a safe height above the water level. 6. Before operating the actuator, disengage the manual override, if present. The travel stops of the actuator shall limit the stroke and not those on the gearbox/valve, if present. Spring Return actuators work on air stroke or spring stroke by pressurizing or venting respectively, the adaptor side port (rod end side). A 3/2 way valve is typically used. 7. Adjust the travel stop bolts of the actuator for the proper open and closed valve positions, per valve manufacturer’s recommendations. Refer to the Series 98 specifications for the travel adjustment range for different models. 8. Tighten the travel stop bolts lock nuts after adjusting the stop bolts. Ensure the travel stops on gearbox or valve, if provided, are now adjusted and locked to fractionally lag the actuator’s stop position. DA models require alternate ports to be pressurized and vented for stroking. A 5/2 or 5/3 way direction control valve or two 3/2 way valves may be used. DD models have adaptor ports of the cylinders tubed in parallel with the end cap ports of the other side cylinder. The two cylinders work simultaneously with cap end of one and rod end of the other pressurized, at a time. 9. Ensure the manual overrides are set for the normal pneumatic operation before putting the actuator to test in power operation mode. Refer to Sec. 15 through 17. 10. Stroke the actuator a few times at not more than MOP to check for proper and smooth operation. If the actuator is equipped with a switchbox or other accessories, adjust them at this time. NOTICE It is recommended to ground the actuator assembly against any buildup of static electricity. All information herein is proprietary and confidential and may not be copied or reproduced without the expressed written consent of BRAY INTERNATIONAL, Inc. The technical data herein is for general information only. Product suitability should be based solely upon customer’s detailed knowledge and experience with their application. 5 DIVISION THIRD ANGLE BTSI DRAWING NO. ERN 164104 ES-00019 Bray Series 98 Pneumatic Scotch Yoke Actuator BTSI Deepak Divakaran RELEASED PRIMARY UNITS MM R CUSTOMER REV. SHEET 1 OF 2Manual 2 Operations04/15/2015 and Maintenance GENERAL ASSEMBLY, SERIES 98, SPRING RETURN PNEUMATIC ACTUATOR IOM/MANUALS 5.0 Spring Return Pneumatic Actuator Assembly Drawing and Materials of Construction 44 32 33 43 42 44 31 25 2 26 34 54 47 48 52 51 49 B 56 E 46 40 55 D 39 C 63 35 66 1 19 A 62 61 60 27 60 61 62 28 24 50 63 18 3 6 12 13 4 22 17 23 64 53 5 11 21 10 9 4 20 30 15 29 A 14 7 8 SECTION A-A 16 5 36 54 37 36 68 70 65 DETAIL B 45 DETAIL C 41 38 38 DETAIL D 59 57 58 67 DETAIL E 69 For reference only. Please refer to current revision of ES-00019 drawing for more information. NOTE: REFER SHEET 2 FOR BILL OF MATERIALS 6 All information herein is proprietary and confidential and may not be copied or reproduced without the expressed written consent of BRAY INTERNATIONAL, Inc. The technical data herein is for general information only. Product suitability should be based solely upon customer’s detailed knowledge and experience with their application. Bray Series 98 Pneumatic Scotch Yoke Actuator Operations and Maintenance Manual ITEM DESCRIPTION MATERIAL QTY. ITEM DESCRIPTION MATERIAL QTY. 1 Yoke Housing Ductile Iron 1 33 Piston Ductile Iron 1 2 Guide Rod Alloy Steel 1 34 End Cap, Pressure Module Ductile Iron 1 3 Housing Cover Ductile Iron 1 35 Piston Rod Alloy Steel 1 4 ** Bushing (Yoke) PTFE Bronze 2 36 ** Bushing (Adaptor) PTFE Bronze 2 5 * O-Ring (Yoke) Buna-N 2 37 * Seal, U-Cup Buna-N 1 6 * O-Ring (Cover) Buna-N 1 38 Split Collar Alloy Steel 4 Top Cover Ductile Iron 1 39 Tie Rod Steel 4 7 8 * O-Ring (Top Cover) Buna-N 1 40 Locknut, Nylok Steel 4 9 ** Flanged Bushing PTFE Bronze 1 41 * O-Ring (Piston Rod) Buna-N 1 10 * O-Ring (Accessory Drive) Buna-N 1 42 * Wear Ring PTFE 2 11 Accessory Drive Stainless Steel 1 43 * Quad Seal Buna-N 1 12 Hex Bolt Steel 8 44 * O-Ring (Barrel) Buna-N 2 13 Spring Washer Spring Steel 8 45 Retainer Ring Stainless Steel 1 14 Set Screw, Socket Head Steel 2 46 Pipe Plug Carbon Steel 1 15 Dowel Pin Hardened Steel 4 47 Adaptor, Spring Module Carbon Steel 1 16 Socket Head Caps Screw Steel 4 48 Pipe Carbon Steel 1 17 Socket Head Caps Screw, Low Head Steel 1 49 End Cap, Spring Module Carbon Steel 1 18 Seal Nut Steel 2 50 Spring Guide Carbon Steel 1 19 Stop Bolt Steel 2 51 Button Plastic 9 20 Breather Vents Carbon Steel 1 52 Spring, Compression Alloy Steel 1 21 Yoke Ductile Iron 1 53 Lifting Lug Carbon Steel 1 22 Slider Block Bronze 2 54 Spring Rod Alloy Steel 1 23 ** Yoke Pin Alloy Steel 1 55 End Cover Carbon Steel 1 24 Retainer Plate Plastic 2 56 Retainer Ring Stainless Steel 1 25 Guide Block Carbon Steel 1 57 Spring Washer Spring Steel 4 Hex Bolt Steel 4 O-Ring (End Cover) Buna-N 1 26 ** Bushing (Guide Rod) PTFE Bronze 2 58 27 ** Bushing (Yoke Pin) PTFE Bronze 2 59 28 Cap Screw, Flat Head, Hex Socket Steel 8 60 Stud Steel 12 29 Position Indicator Plastic 1 61 Nut Steel 12 30 Cap Screw, Flat Head, Hex Socket Steel 1 62 Spring Washer Spring Steel 12 31 Adaptor, Pressure Module Ductile Iron 1 63 O-Ring (Module) Buna-N 2 32 Barrel Carbon Steel 1 64 Load Ring Carbon Steel 1 * * * Parts in Seal Kits * & ** Parts in Repair Kits For reference only. Please refer to current revision of ES-00019 drawing for more information. All information herein is proprietary and confidential and may not be copied or reproduced without the expressed written consent of BRAY INTERNATIONAL, Inc. The technical data herein is for general information only. Product suitability should be based solely upon customer’s detailed knowledge and experience with their application. 7 Bray Series 98 Pneumatic Scotch Yoke Actuator Operations and Maintenance Manual 6.0 MAINTENANCE References: Series 98 actuators are designed for long service periods between maintenance, in demanding conditions. However, a preventative maintenance program is essential for ensuring good performance, safe operation, extended life of equipment and to avoid expensive down time. The service conditions, load and cycling frequency may vary largely, which would require the maintenance program to be suitably designed, with sound judgment of the working conditions. Contact manufacturer for assistance. Drawing # ES-00019 – Spring Return Actuator Assembly Drawing # ES-00020 – DA Assembly Drawing # ES-00021 – DD Assembly (Refer to the Bray website for current revisions of the drawings) 6.3 Spring Module WARNING In general, the scheduled service shall include replacement of all seals and wear parts. Follow the sequence of steps as described below. Injury or damages may occur if critical steps are bypassed or shortcuts taken. Seals shall be replaced if the actuator is in storage or inactive for long periods of time. 6.1 Lubricants and Maintenance Consumables The Standard actuators use following lubricants, contact factory for information on high/low temperature actuator lubricants, Shell Alvania EP2 (LF) grease for the Torque & Spring Modules Molykote 55 for the Pressure Module. ISO Grade 32 hydraulic fluid for hydraulic override Thread lock compound: Loctite 243 (or equivalent) Thread Sealant: Loctite 577(or equivalent) Commercial leak check fluid: Snoop (or equivalent) Anti seize compound: Loctite 77164 (or equivalent) 6.2 Disassembly, Service & Reassembly of Modules CAUTION Prior to disassembly of the actuator, disconnect all air and electrical supplies from actuator, remove the relevant accessories from actuator and dismount actuator from valve (or override gearbox, if present). NOTICE Replacement of the press fitted bushings may require workshop infrastructure to remove the worn bearings from their housing and to press fit new ones, without damaging the housings. We recommend sending the actuator (or module) to our factory for overhauls/major repairs. 8 Never attempt to cut open the Spring Module welded assembly as the spring inside is energized and can cause fatal/severe injury or extensive damages. Note: If the actuator is provided with a jackscrew or hydraulic override cylinder on the Spring Module, first ensure to back off the override fully, to unload it from any spring force. Remove the override assembly before disassembling Spring Module. 6.3.1 Removing the Spring Module (Refer to the Spring Return Pneumatic Actuator Assembly drawing) 1. Slacken the Spring Module side Travel Stop Bolt Lock Nuts (18) on the torque module (and extended stopper, if provided). Apply air pressure to pressure module adaptor port (rod end port), raising pressure slowly, enough to release spring force on the Travel Stop Bolt (19). 2. Mark the set position and back off fully both the Stop Bolts (and Extended Stopper/Jackscrew, if present) and release air pressure. This will relieve the spring preload. CAUTION Never try to loosen the Spring Rod without completely relieving the spring load on it. 3. Remove the Extended Stopper/ override assembly, if present, from the Spring Module by unfastening the bolts holding the assembly on the End Cap. All information herein is proprietary and confidential and may not be copied or reproduced without the expressed written consent of BRAY INTERNATIONAL, Inc. The technical data herein is for general information only. Product suitability should be based solely upon customer’s detailed knowledge and experience with their application. Bray Series 98 Pneumatic Scotch Yoke Actuator Operations and Maintenance Manual WARNING 6.4.1 Removing the Pressure Module from Actuator The Spring Module is welded into an integral component and the internal components cannot be disassembled. 1. For Spring return actuators the spring rod shall be first disconnected following the steps 1-4 of 6.3.1. For Double acting actuators skip this step. Spring within is under compression. Never attempt to modify or cut open this module. 2. Apply low pressure air to the adaptor port to move the piston to end cap side. 4. To take the Spring Module off the actuator, unscrew the End Cover Bolts (58), remove the End Cover (55) and the O-ring (59). Using an extended socket spanner /tube spanner, unscrew and disconnect the Spring Rod (54) from the Guide Block (25) in Torque Module. A retainer ring on the threaded side of the Spring Rod stops it from being taken out of the Spring Module. 5. Sling and support the Spring Module and remove the Module’s mounting flange Stud Nuts (61) and Lock washers (62). Spring Module can now be pulled off the Torque Module. Pull off the module carefully so as not to damage the threads on the Spring Rod and studs on the Adaptor. 6.3.2 Service & Reassembly of the Spring Module Ensure that a correct Repair Kit is on hand, prior to disassembly. 1. Take the Retainer Ring (56) off and pull the Spring Rod out from the cover end. 2. Replace the Bushing (Adaptor) (36), clean and lubricate the Spring Rod and slide it back in. 3. Install the Retainer Ring back in the Spring Rod groove. 4. Fit the Module back on Torque Module with new O-ring (63). 5. Fit End Cover back with new O-ring (59). 6.4 Pressure Module CAUTION Ensure the ports are vented to atmosphere before disassembly of Pressure Module. Failure to do so could cause severe injury. To take the Pressure Module off the Spring Return Actuator, first the Spring Module must be removed or at least the Spring Rod must be disconnected from the Guide Block (steps 1-4), as described in section 6.3.1. 3. Depressurize and remove the Plug (46) (or cover plate) on the End Cap (34). 4. Use an extended socket or tube spanner and unscrew the Piston Rod (35) from the Guide Block (25) in Torque Module. 5. Sling and support the Pressure Module. Remove the Adaptor Stud Nuts (61) and Lock washers (62). Pressure Module can now be pulled off the Torque Module. Pull off the module carefully so as not to damage the threads on the Piston Rod and studs on the Adaptor. 6. Ensure the Module sealing O-ring (63) is retained in the groove. 6.4.2 Disassembling the Pressure Module 1. Secure the Module and unscrew the Tie Rod Nuts (40). 2. Gently tap the End Cap (34) off the cylinder Barrel (32) with a plastic mallet and remove the End Cap. 3. Slide the Barrel over and off the Adaptor (31) and Piston (33), being careful not to scratch or dent the honed and chrome plated surface of the barrel. 4. Take the Piston Assembly off the Adaptor, taking care not to damage the threads. 5. Tie Rods (39) may be unscrewed from the Adaptor Plate. 6. Remove the Retainer Ring (45) and take the Split Collars (38) off the Piston Rod (35) upper groove. Pull the Piston Rod off the Piston and remove the Split Collars from the lower groove. 6.4.3 Service & Reassembly of the Pressure Module NOTICE The wear parts (all seals, piston wear bands and rod guide bushings in the Repair Kit) shall be replaced during the maintenance cycle. Ensure the replacement seals are suitable for the service temperature The assembly of the Pressure Module is done in vertical orientation. Use Dow Corning Molykote 55 lubricant in the Pressure Module. All information herein is proprietary and confidential and may not be copied or reproduced without the expressed written consent of BRAY INTERNATIONAL, Inc. The technical data herein is for general information only. Product suitability should be based solely upon customer’s detailed knowledge and experience with their application. 9 Bray Series 98 Pneumatic Scotch Yoke Actuator Operations and Maintenance Manual 1. To reassemble, secure the Adaptor Plate horizontally, after replacing the Bushing (36), with sufficient space below, to accommodate the Piston Rod. The rod seal groove side of the Adaptor faces upwards. Adaptor. Beware of the pinch points between the Piston and the Adaptor while lowering the Piston Assembly on the Adaptor inner face. 8. Lubricate and install the Wear Bands (42) and the Piston Quad Seal (43) on the Piston. 2. Lubricate the piston rod U-cup Seal (37) and insert it in the groove in Adaptor Plate with the seal lip towards piston side. 3. Lubricate and install the Adaptor O-ring (44). 9. Carefully lift and slide in the Barrel over the Piston Wear Bands, Quad Seal and Adaptor O-ring and push it down on to the Adaptor. 4. Lubricate the piston rod O-ring (41) and install in the groove on the piston rod. 10. Thread the Tie Rods into the Adaptor, use thread lock compound on the threads. 11. Lubricate the inside of the Barrel and slide in the End 5. Grease and slip in the Split Collars on the Piston Rod Cap, aligning the ports on the Adaptor and the End lower groove and slide in the Piston Rod (hex side) Cap. through the Piston till the split collars locateTHIRD inANGLE the CUSTOMER DRAWING NO. DIVISION ERN 12. Fasten the assembly with Tie Rod NutsES-00019 tightened to BTSI 164104 counter bore in the piston. the recommendedRELEASED torque. (Refer to Section 10 Bolting BTSI Deepak Divakaran REV. SHEET PRIMARY UNITS MM and 04/15/2015 1 OF 2 2 Torque Tables) 6. Install the Split Collars on the upper groove similarly secure it by the Spiral Retainer Ring. ASSEMBLY, 98,threaded into the 13. Lift the ModuleGENERAL using lifting eyeSERIES bolts R PNEUMATICPut ACTUATOR End Cap and SPRING place RETURN it horizontally. back the Plug/End Cover on the End Cap to test the module. 7. Lubricate the Piston Rod and carefully slide in the Piston IOM/MANUALS Assembly through the Rod Seal and Bushing in the 44 32 33 43 42 44 34 31 25 2 26 54 47 52 48 51 49 B 56 E 46 40 55 D 39 C 63 35 66 1 19 A 62 61 60 27 60 61 62 28 24 50 63 18 3 6 4 22 17 23 64 12 13 53 5 11 21 10 20 30 15 29 36 10 14 A 7 16 9 4 SECTION A-A 8 5 All information herein is proprietary and confidential and may not be copied or reproduced without the expressed written consent of 54 37 36 68 BRAY INTERNATIONAL, Inc. The technical data herein is for general information only. Product suitability should be based solely upon customer’s detailed knowledge and experience with their application. Bray Series 98 Pneumatic Scotch Yoke Actuator Operations and Maintenance Manual 14. Apply 10-15 psi air pressure to ports alternately to check for smooth stroking for 5-10 cycles and then raise to 80 psi and hold the pressure to check for any leaks past the Piston, through the Rod Seal and the Barrel O-rings. NOTICE Leak test the piston seal by bubble test at 80 psi pressure and for other seals check visually using commercial leak check fluids (Snoop or equivalent). For smaller models (up to 14E3) this can be done by hand. Larger models may require use of a hoist to support the weight of the Yoke sub-assembly. For this, remove the Screw (17) off the Yoke and fit an eye bolt in place. Leakage rate after hold down time shall not be much higher than 1-2 bubbles per minute with a 1⁄4" ID tube. 9. Secure the Yoke Assembly and remove the Retainer Plate Screws (28) and the Retainer Plate (24). Stroke the piston a few times to set the seals if leakage is higher, and repeat the bubble test. If still not within the limits, dismantle the module to examine the cause. 10. Pull out the Yoke Pin (23), and the upper Slider Block (22). 15. If no abnormalities are seen, the Module is ready for assembly on the Torque Module. 6.5 Torque Module 6.5.1 Disassembling the Torque Module NOTICE For SR actuators, the Spring Module or the Pressure Module must be removed from the Torque Module to allow for removal of the Guide Bar and Yoke Assembly from the Torque Module. 11. Slide the Guide Block out of the Yoke (21) and remove the bottom Slider Block. 12. Remove the Yoke sealing O-rings (5) from the Housing and Housing Cover, if replacement is required. 13. The Yoke Bushing (4) in the Housing and the Housing Cover, the Guide Bar Bushing (26) and Yoke Pin Bushing (27) in the Guide Block are press fitted and may need suitable workshop tools for removal without damaging the housing. 6.5.2 Service & Reassembly of the Torque Module For DA actuators, remove the end cover on the Torque Module. Note: Thoroughly clean/degrease all components prior to assembly. 1. Disconnect the Piston Rod (35) and the Spring Rod (54) from the Guide Block prior to disassembly. 1. Replace the bushings in the Housing, the Housing Cover and the Guide Block with suitable pressing tools. Contact factory for more information. 2. Remove the position Indicator (29), if provided. 3. Remove Top Cover Bolts (16) and the Top Cover (7). 4. Take off the Accessory Drive Shaft Assembly (11) from top of the Yoke. 5. Remove the Housing Cover Bolts (12) and Lock Washers (13). 6. Tighten the two Set Screws (14) on the Housing Cover (3), half turn at a time alternately till the Housing Cover is separated enough to pry off the Housing with a blunt tool. 7. Gently tap with plastic hammer or pull off the Guide Bar (2) from the Guide Block (25) and the Housing (1). 8. Rotate and center the Yoke Assembly, move the Guide Block towards the Yoke center and lift the Yoke Assembly out of Housing. 2. Secure the Yoke and fit the bottom Retainer Plate (24) with Screws (28), applying a drop of thread lock compound on the screw threads. 3. Flip the Yoke over, grease the bottom slot and the Slider Block (22) generously and slide the Slider Block into the slot. 4. Grease the Guide Block bushings and slide the Guide Block between the arms of the Yoke aligning the Yoke Pin bushings with the lower Slider Block pin hole. 5. Grease the Yoke Pin (23) and slide it through the upper slot in the Yoke and the Guide Block pin bearings, locating it in the lower Slider Block hole. Push the Yoke Pin down to touch the bottom Retainer Plate. 6. Grease the upper slot and the Slider Block and slide it down on the Yoke Pin through the upper slot till it rests on the Guide Block. 7. Fit the upper Retainer Plate to complete the Yoke Assembly. All information herein is proprietary and confidential and may not be copied or reproduced without the expressed written consent of BRAY INTERNATIONAL, Inc. The technical data herein is for general information only. Product suitability should be based solely upon customer’s detailed knowledge and experience with their application. 11 Bray Series 98 Pneumatic Scotch Yoke Actuator Operations and Maintenance Manual 8. Lubricate and Install the Yoke O-ring (5) in the Housing and grease the bushing and the Yoke seating raised face. 9. Carefully slide in the Yoke Assembly into the Housing bushing and push it down to seat it on the raised seating face in the Housing. 10. Grease and slide in the Guide Bar (2) through the Housing and Guide Block. 11. Screw in the accessory drive shaft assembly Screw (17) on top of the Yoke, applying a drop of thread lock compound. Grease the upper journal of the Yoke. 12. Lubricate and install the Yoke O-ring and Cover O-ring (6) in the Housing Cover and locate it on the Yoke upper journal and fit the Housing Cover on the Housing with the Cover Bolts (12). Ensure the set screws on the Housing Cover are backed off fully. 13. Locate the Accessory Drive Shaft Assembly on the top of the Yoke, locating the plate slot into the screw head. 8. For DA models (refer to Drawing #ES-00020-DA Assembly), fit the DA End Cover (52) with O-ring (47) in the groove, using Bolts (51), Nuts (50) and Spring Washers (49). Skip to step 12. 9. For DD models, mount the second Pressure Module on the other side of Torque Module, following relevant actions from steps 3 through 7. Skip to step 12. 10. For Spring Return Models, mount the Spring Module on the other side of the Torque Module in same manner as the Pressure Module and couple the Spring Rod to Guide Block just as was done with the Piston Rod. Always ensure to tighten the Piston and the Spring Rod to the recommended torque. 11. Fix the End Cover with O-ring on the Spring Module (or the Extended Travel Stop/Jackscrew Assembly/Hydraulic override cylinder, if provided). 12. Set the Travel Stops to previously marked positions. 13. Test the actuator for smooth operation at the Maximum Operating Pressure, as noted on the nameplate. 14. Replace the flanged bushing and the O-rings in the Top cover and fit it back on the Housing Cover with the Top Cover Bolts. Fit the indicator on the drive shaft. 15. Apply anti-seize compound on the stopper bolt threads and thread them with the Lock Nuts into the Torque Module Housing. 6.6 Reassembly of Actuator 1. Secure the Torque Module on its base. 2. Back off the travel Stop Bolts (19) fully and manually turn the Yoke to the side on which the Pressure Module is to be fixed. 3. Lift the Pressure Module, lubricate and place the module flange O-ring in the groove. Degrease the Piston Rod threads, apply a drop of thread lock compound on the threads and locate the module on the Torque Module’s mounting flange. 4. Carefully guide the Studs into the flange and center the module on the spigot. 5. Fasten the modules with Spring Washers and Stud Nuts, refer to the tables for torque values. 6. Take the Plug/End Cover off the End Cap of the Pressure Module and couple the Piston Rod threads to the Guide block, using an extended socket or tube spanner. Refer to the tables in Section 10 for torque values. 7. Install the Plug (or End Cover) with thread sealant and apply low pressure air (5psi) on the End Cap port till the Yoke reaches end of stroke. Restrain the Guide Bar from sliding out of the Housing while stroking. 12 All information herein is proprietary and confidential and may not be copied or reproduced without the expressed written consent of BRAY INTERNATIONAL, Inc. The technical data herein is for general information only. Product suitability should be based solely upon customer’s detailed knowledge and experience with their application. Bray Series 98 Pneumatic Scotch Yoke Actuator Operations and Maintenance Manual 7.0 FIELD CONVERSIONS 7.1 Fail Safe Condition (for Spring Return Actuators) Prior to configuration change, refer to the torque charts and ensure the actuator's torques would be suitable for the new application. The fail safe direction on Series 98 spring return actuator can be reversed from fail CW to fail CCW and vise versa. This requires interchanging the position of Pressure and Spring Modules. NOTICE It is strongly recommended to take the actuator off the valve to do the fail safe reversal. CAUTION Never try to unscrew and remove the Spring Rod without completely relieving the spring load on it. 1. Follow the steps for removing the Spring and Pressure Modules from the actuator, as described in Sections 6.3 and 6.4 respectively. 2. Switch the positions of the two modules, mount the Pressure Module first. Take care to seat the module sealing O-ring properly in the groove. Pressure Module will need to be flipped about its' axis before mounting, to get the ports to the front of the actuator. 3. Follow instructions in Section 6.6 Reassembly of the Actuator. 4. Mount the Actuator back on the valve/gearbox and adjust the travel stop bolts, as required for proper valve operation. Tighten the Lock Nuts on the travel Stop Bolts. 5. Check actuator for proper operation, at the rated working pressure. NOTICE Actuator part number and fail direction needs to be suitably changed on the name plate, after completing any configuration change. Refer to Technical Manual or contact factory for information. 7.2 Double Acting to Spring Return 1. To convert the DA actuator to Spring Return (SC or SO), a Spring Module will need to be mounted opposite the Pressure Module with a Module Mounting Kit. 2. If the Pressure Module needs to be shifted, for the required configuration of the Spring Return actuator, then first remove the Pressure Module from the actuator. Follow the procedure in Section 6.4 to remove the Pressure Module and Section 6.6 for Reassembly of Actuator. Skip this step if shifting the Pressure Module is not required. 3. Remove the DA End Cover (52), (refer to Drawing #ES00020 – DA Assembly). 4. Tighten the Studs from Module Mounting Kit into the Spring Module Adaptor, applying thread lock compound on the threads. Install the module O-ring in adaptor groove. 5. Follow steps in Section 6.6 for Reassembly of the Actuator. 6. Set the travel Stop Bolts on the Torque Module as required for proper valve seating. 7. Remove the air connection from the End Cap port of the Pressure Module and replace the connector with a breather-filter. 8. The Spring Return Actuator requires air connection only on the Adaptor port. 7.3 Spring Return to Double Acting 1. Remove Spring Module from actuator (refer to Section 6.3). 2. Fit DA End Cover with O-ring and fasteners from the DA Cover Kit. 3. Adjust travel Stop Bolts, as required. 4. Remove the breather-filter from the End Cap of the Pressure Module and connect suitable connector for connecting the air line from the direction control valve. All information herein is proprietary and confidential and may not be copied or reproduced without the expressed written consent of BRAY INTERNATIONAL, Inc. The technical data herein is for general information only. Product suitability should be based solely upon customer’s detailed knowledge and experience with their application. 13 BTSI 164104 RELEASED PRIMARY UNITS ES-00020 BTSI Deepak Divakaran REV. SHEET 04/15/2015 MM R 1 OF 2 2 Bray Series 98 Pneumatic Scotch Yoke Actuator GENERAL ASSEMBLY, SERIES 98, PNEUMATIC Operations andACTUATOR, Maintenance Manual IOM/MANUALS DOUBLE ACTING, SINGLE CYLINDER 8.0 Pneumatic Actuator - Double Acting, Single Cylinder Assembly and Materials of Construction 44 32 43 42 33 44 31 A 26 25 27 2 6 12 13 22 34 4 23 17 46 40 5 11 52 C 21 B 39 10 47 9 4 47 35 1 50 49 48 28 8 18 A 5 SECTION A-A 19 24 3 51 49 50 37 36 DETAIL B 20 30 15 29 16 14 45 41 38 38 7 55 56 53 DETAIL C 54 For reference only. Please refer to current revision of ES-00020 drawing for more information. 14 All information herein is proprietary and confidential and may not be copied or reproduced without the expressed written consent of BRAY INTERNATIONAL, Inc. The technical data herein is for general information only. Product suitability should be based solely upon customer’s detailed knowledge and experience with their application. Bray Series 98 Pneumatic Scotch Yoke Actuator Operations and Maintenance Manual ITEM DESCRIPTION MATERIAL QTY. ITEM DESCRIPTION MATERIAL QTY. 1 Yoke Housing Ductile Iron 1 27 ** Bushing (Yoke Pin) PTFE Bronze 2 2 Guide Rod Alloy Steel 1 28 Cap Screw, Flat Head, Hex Socket Steel 8 3 Housing Cover Ductile Iron 1 29 Position Indicator Plastic 1 4 ** Bushing (Yoke) PTFE Bronze 2 30 Cap Screw, Flat Head, Hex Socket Steel 1 5 * O-Ring (Yoke) Buna-N 2 31 Adaptor, Pressure Module Ductile Iron 1 6 * O-Ring (Cover) Buna-N 1 32 Barrel Carbon Steel 1 Top Cover Ductile Iron 1 33 Piston Ductile Iron 1 O-Ring (Top Cover) Buna-N 1 34 End Cap, Pressure Module Ductile Iron 1 Piston Rod Alloy Steel 1 7 8 * 9 ** Flanged Bushing PTFE Bronze 1 35 10 * O-Ring (Accessory Drive) Buna-N 1 36 ** Bushing (Adaptor) PTFE Bronze 1 * 11 Accessory Drive Stainless Steel 1 37 Seal, U-Cup Buna-N 1 12 Hex Bolt Steel 8 38 Split Collar Alloy Steel 4 13 Spring Washer Spring Steel 8 39 Tie Rod Steel 4 14 Set Screw, Socket Head Steel 2 40 Locknut, Nylok Steel 4 15 Dowel Pin Hardened Steel 4 41 * O-Ring (Piston Rod) Buna-N 1 16 Socket Head Caps Screw Steel 4 42 * Wear Ring PTFE 2 17 Socket Head Caps Screw, Low Head Steel 1 43 * Quad Seal Buna-N 1 18 Seal Nut Steel 2 44 * O-Ring (Barrel) Buna-N 2 19 Stop Bolt Steel 2 45 Retainer Ring Stainless Steel 1 20 Breather Vents Carbon Steel 1 46 Pipe Plug Carbon Steel 1 21 Yoke Ductile Iron 1 47 O-Ring (Module) Buna-N 2 22 Bronze 2 48 Stud Steel 6 23 Yoke Pin Alloy Steel 1 49 Spring Washer Spring Steel 18 24 Retainer Plate Plastic 2 50 Nut Steel 18 25 Guide Block Carbon Steel 1 51 Stud Steel 6 PTFE Bronze 2 52 End Cover, DA Ductile Iron 1 26 ** Slider Block * ** Bushing (Guide Rod) * Parts in Seal Kits * & ** Parts in Repair Kits For reference only. Please refer to current revision of ES-00020 drawing for more information. All information herein is proprietary and confidential and may not be copied or reproduced without the expressed written consent of BRAY INTERNATIONAL, Inc. The technical data herein is for general information only. Product suitability should be based solely upon customer’s detailed knowledge and experience with their application. 15 DIVISION CUSTOMER THIRD ANGLE BTSI 164104 ES-00021 Bray Series 98 Pneumatic Scotch Yoke Actuator 04/15/2015 1 OF 2 2 RELEASED PRIMARY UNITS MM R DRAWING NO. ERN BTSI Deepak Divakaran REV. SHEET Operations and Maintenance Manual GENERAL ASSEMBLY, SERIES 98, PNEUMATIC ACTUATOR, DOUBLE ACTING, DUAL CYLINDER IOM/MANUALS 9.0 Pneumatic Actuator - Double Acting, Dual Cylinder Assembly and Materials of Construction 44 43 42 44 44 2 47 42 43 44 47 A 25 26 C 46 46 B 34 33 32 31 35 A 18 19 35 1 33 32 31 48 50 49 48 50 49 28 3 24 40 40 39 39 20 30 29 14 7 16 15 36 6 45 41 38 37 38 12 52 13 27 51 22 17 23 DETAIL B 11 DETAIL C 56 5 55 53 56 21 10 9 4 8 SECTION A-A 54 5 54 For reference only. Please refer to current revision of ES-00021 drawing for more information. 16 34 All information herein is proprietary and confidential and may not be copied or reproduced without the expressed written consent of BRAY INTERNATIONAL, Inc. The technical data herein is for general information only. Product suitability should be based solely upon customer’s detailed knowledge and experience with their application. Bray Series 98 Pneumatic Scotch Yoke Actuator Operations and Maintenance Manual ITEM DESCRIPTION MATERIAL QTY. ITEM DESCRIPTION MATERIAL QTY. 1 Yoke Housing Ductile Iron 1 26 ** Bushing (Guide Rod) PTFE Bronze 2 2 Guide Rod Alloy Steel 1 27 ** Bushing (Yoke Pin) PTFE Bronze 2 3 Housing Cover Ductile Iron 1 28 Cap Screw, Flat Head, Hex Socket Steel 8 4 ** Bushing (Yoke) PTFE Bronze 2 29 Position Indicator Plastic 1 5 * O-Ring (Yoke) Buna-N 2 30 Cap Screw, Flat Head, Hex Socket Steel 1 6 * O-Ring (Cover) Buna-N 1 31 Adaptor, Pressure Module Ductile Iron 2 Top Cover Ductile Iron 1 32 Barrel Carbon Steel 2 O-Ring (Top Cover) Buna-N 1 33 Piston Ductile Iron 2 7 8 * 9 ** Flanged Bushing PTFE Bronze 1 34 End Cap, Pressure Module Ductile Iron 2 10 * O-Ring (Accessory Drive) Buna-N 1 35 Piston Rod Alloy Steel 2 11 Accessory Drive Stainless Steel 1 36 ** Bushing (Adaptor) PTFE Bronze 2 12 Hex Bolt Steel 8 37 * Seal, U-Cup Buna-N 2 13 Spring Washer Spring Steel 8 38 Split Collar Alloy Steel 8 14 Set Screw, Socket Head Steel 2 39 Tie Rod Steel 8 15 Dowel Pin Hardened Steel 4 40 Locknut, Nylok Steel 8 16 Socket Head Caps Screw Steel 4 41 * O-Ring (Piston Rod) Buna-N 2 17 Socket Head Caps Screw, Low Head Steel 1 42 * Wear Ring PTFE 4 18 Seal Nut Steel 2 43 * Quad Seal Buna-N 2 19 Stop Bolt Steel 2 44 * O-Ring (Barrel) Buna-N 4 20 Breather Vents Carbon Steel 1 45 Retainer Ring Stainless Steel 2 21 Yoke Ductile Iron 1 46 Pipe Plug Carbon Steel 2 22 Bronze 2 47 O-Ring (Module) Buna-N 2 23 ** Slider Block Yoke Pin Alloy Steel 1 48 * Stud Steel 12 24 Retainer Plate Plastic 2 49 Spring Washer Spring Steel 12 25 Guide Block Carbon Steel 1 50 Nut Steel 12 * Parts in Seal Kits * & ** Parts in Repair Kits For reference only. Please refer to current revision of ES-00021 drawing for more information. All information herein is proprietary and confidential and may not be copied or reproduced without the expressed written consent of BRAY INTERNATIONAL, Inc. The technical data herein is for general information only. Product suitability should be based solely upon customer’s detailed knowledge and experience with their application. 17 Bray Series 98 Pneumatic Scotch Yoke Actuator Operations and Maintenance Manual 10.0 BOLTING TORQUES AND TOOLS 10.1.a - Pressure Module Tie Rod Thread Spanner Size, mm Torque, Nm 8 9 10 12 14 16 18 20 22 24 28 32 36 M10 M12 M12 M16 M16 M20 M20 M24 M24 M30 M24 M30 M30 17 19 19 24 24 30 30 36 36 46 36 46 46 230 335 410 610 330 540 685 25 35 45 80 110 180 End Plug, NPT 1.25 1.5" 1.5" 2" 2" 2" Allen Key .75” 1” 1” 1” 1” 1” End Plate Bolts M10 M10 M10 M10 M10 M10 M10 Spanner Size, mm 17 17 17 17 17 17 17 Torque, Nm 25 25 25 25 25 25 25 Consumables Thread Sealant Loctite 577 / Equivalent Thread Lock Loctite 234 / Equivalent Lubricant Dow Corning Molykote 55 (for standard actuators). Refer to TS-00084 for Low/High temperature trim lubricants 10.1.b - Pressure Module MODEL 45 E2 Piston Rod Diameter, inch Rod Thread 73 E2 14 E3 24 E3 45 E3 10 E4 1 1.25 1.5 1.75 2.25 2.75 M24 x 2 M27 x 2 M30 x 2 M36 x 3 M48 x 3 M60 x 4 Piston Rod Hex A/F, mm Torque, Nm Piston Rod Minimum No. of Turns 21 26 32 36 46 55 200 200 250 250 350 450 10 13.5 15 12 16 15 10.2 - Torque Module MODEL 45 E2 73 E2 14 E3 24 E3 45 E3 10 E4 Housing Cover Bolts/Studs M8 M8 M10 M12 M12 M16 Spanner Size, mm 13 13 17 19 19 24 Torque, Nm 13 13 25 50 50 115 Retainer Plate Screws M5 M6 M6 M6 M6 M8 3 4 4 4 4 5 M10 Allen Key, mm Acc Drive Screw M6 M6 M6 M8 M8 Allen Key, mm 5 5 5 6 6 8 Top Cover Bolts M6 M8 M8 M8 M8 M10 Allen Key, mm 5 6 6 13 13 17 Spanner Size, Metric Consumables Thread Sealant Loctite 577 / Equivalent Thread Lock Loctite 243 / Equivalent Anti seize Loctite Ni Anti Seize Lubricant Shell Alvania Lead Free EP2 Grease (for Standard Actuator). Refer to TS00084 for Low/High temperature trim lubricants 18 All information herein is proprietary and confidential and may not be copied or reproduced without the expressed written consent of BRAY INTERNATIONAL, Inc. The technical data herein is for general information only. Product suitability should be based solely upon customer’s detailed knowledge and experience with their application. Bray Series 98 Pneumatic Scotch Yoke Actuator Operations and Maintenance Manual 10.3 - Spring Module MODEL Spring Rod Diameter, inch Rod Thread Spring Rod Hex A/F, mm Torque, Nm Spring Rod Minimum No. of Turns End Cover Bolt Spanner Size, mm 45 E2 73 E2 14 E3 24 E3 45 E3 1 1.25 1.5 1.75 2.25 10 E4 2.75 M24 x 2 M27 x 2 M30 x 2 M36 x 3 M48 x 3 M60 x 4 21 26 32 36 46 55 200 200 250 250 350 450 10 13.5 15 12 16 15 M12 M12 M16 M16 M16 M20 19 19 24 24 24 30 73 E2 14 E3 24 E3 45 E3 10 E4 10.4 - Actuator Assembly MODEL ISO Base Base Bolting Size Module Mounting Stud-Nut Size 45 E2 F16/F12 F16/F12 F25/F16 F30/F25 F35/F30 F40/F35 M20/M12 M20/M12 M16/M20 M20/M16 M30/M20 M36/M30 M24 M10 M12 M12 M16 M16 Spanner Size, Metric 17 19 19 24 24 36 Torque, Nm 40 70 70 165 165 545 Consumables Thread Sealant Loctite 577 / Equivalent Thread Lock Loctite 243 / Equivalent Lubricant Shell Alvania Lead free EP2 Grease (for Standard Actuator). Refer to TS-00084 for Low/High temp trim lubricants. All information herein is proprietary and confidential and may not be copied or reproduced without the expressed written consent of BRAY INTERNATIONAL, Inc. The technical data herein is for general information only. Product suitability should be based solely upon customer’s detailed knowledge and experience with their application. 19 Bray Series 98 Pneumatic Scotch Yoke Actuator Operations and Maintenance Manual 11.0 TECHNICAL DATA 11.1 - Double Acting Actuators Model Maximum Operating Pressure Symmetrical Volume Canted Cu.in Actuator Weight Lts Assembly Weight (approx) w/Jackscrew Override w/Hydraulic Override bar 10.3 9.9 8.0 5.6 4.1 6.3 5.0 4.0 2.8 psi 150 119 96 67 49 76 60 48 bar 10.3 8.2 6.6 4.6 3.4 5.2 4.1 3.3 Rod End 322 417 519 750 1020 669 858 1079 1581 Cap End 346 442 560 831 1135 669 858 1079 1581 Rod End 5.3 6.8 8.5 12.3 16.7 11.0 14.1 17.7 25.9 Cap End 5.7 7.2 9.2 13.6 18.6 11.0 14.1 17.7 25.9 Lbs 143 152 172 209 267 203 220 260 335 Kg 65 69 78 95 121 92 100 118 152 Lbs 207 216 236 273 331 Kg 94 98 107 124 150 kg 45E2-08 45E2-09 45E2-10 45E2-12 45E2-14 DD 45E2-08 45E2-09 45E2-10 45E2-12 psi 150 144 117 81 59 92 72 59 41 Lbs DA DA 73E2-10 73E2-12 73E2-14 73E2-16 73E2-10 DD 73E2-12 150 107 78 60 77 54 10.3 7.4 5.4 4.1 5.3 3.7 127 88 65 49 64 44 8.7 6.1 4.4 3.4 4.4 3.0 621 902 1227 1588 1289 1887 668 985 1347 1766 1289 1887 10.2 14.8 20.1 26.0 21.1 30.9 11.0 16.2 22.1 29.0 21.1 30.9 245 280 331 399 344 414 111 127 150 181 156 188 331 366 417 485 150 166 189 220 359 395 445 514 163 179 202 233 DA 14E3-12 14E3-14 14E3-16 14E3-18 14E3-20 14E3-12 DD 14E3-14 14E3-16 150 127 97 77 62 87 64 49 10.3 8.7 6.7 5.3 4.3 6.0 4.4 3.4 142 104 80 63 51 72 52 40 9.8 7.2 5.5 4.3 3.5 4.9 3.6 2.8 1071 1458 1890 2421 2978 2223 3032 3951 1152 1574 2061 2626 3300 2223 3032 3951 17.6 23.9 31.0 39.7 48.8 36.5 49.7 64.8 18.9 25.8 33.8 43.1 54.1 36.5 49.7 64.8 386 437 507 591 721 536 637 778 175 198 230 268 327 243 289 353 534 584 655 739 869 242 265 297 335 394 558 608 679 763 893 253 276 308 346 405 DA 24E3-14 24E3-16 24E3-18 24E3-20 24E3-22 24E3-24 24E3-14 DD 24E3-16 24E3-18 24E3-20 150 124 98 80 66 55 82 63 49 40 10.3 8.6 6.8 5.5 4.5 3.8 5.6 4.3 3.4 2.8 134 102 81 66 54 46 67 52 9.2 7.1 5.6 4.5 3.7 3.1 4.6 3.5 1831 2387 3059 3750 4561 5452 3785 4948 6314 7834 1954 2560 3255 4084 5012 5917 3785 4948 6314 7834 30.0 39.2 50.2 61.5 74.8 89.4 62.1 81.1 103.5 128.5 32.0 42.0 53.4 67.0 82.2 97.0 62.1 81.1 103.5 128.5 657 721 800 941 1041 1208 886 1014 1173 1455 298 327 363 427 472 548 402 460 532 660 873 937 1016 1157 1257 1424 396 425 461 525 570 646 910 974 1054 1195 1294 1462 413 442 478 542 587 663 DA 45E3-18 45E3-20 45E3-22 45E3-24 45E3-28 45E3-18 DD 45E3-20 45E3-22 45E3-24 150 121 100 84 62 75 61 50 42 10.3 8.4 6.9 5.8 4.3 5.2 4.2 3.5 2.9 123 100 83 69 51 62 50 41 8.5 6.9 5.7 4.8 3.5 4.3 3.5 2.9 3722 4584 5591 6676 9074 7617 9462 11564 13745 3895 4878 5973 7068 9699 7617 9462 11564 13745 61.0 75.2 91.7 109.5 148.8 124.9 155.2 189.7 225.4 63.9 80.0 98.0 115.9 159.1 124.9 155.2 189.7 225.4 1105 1241 1345 1515 1942 1543 1817 2024 2363 501 563 610 687 881 700 824 918 1072 1457 1594 1698 1867 2295 661 723 770 847 1041 DA 10E4-22 10E4-24 10E4-28 10E4-32 10E4-36 DD 10E4-22 10E4-24 10E4-28 10E4-32 150 150 113 86 68 92 77 57 43 10.3 10.3 7.8 5.9 4.7 6.3 5.3 3.9 3.0 150 126 93 71 56 76 64 47 10.3 8.7 6.4 4.9 3.9 5.2 4.4 3.2 6875 8173 11049 14589 18327 14080 16676 22763 30497 7205 8504 11713 15908 19859 14080 16676 22763 30497 112.8 134.0 181.2 239.3 300.6 230.9 273.5 373.3 500.2 118.2 139.5 192.1 260.9 325.7 230.9 273.5 373.3 500.2 2092 2269 2754 3309 4017 2873 3225 4195 5306 949 1029 1249 1501 1822 1303 1463 1903 2407 2698 2875 3360 3915 4623 1224 1304 1524 1776 2097 20 All information herein is proprietary and confidential and may not be copied or reproduced without the expressed written consent of BRAY INTERNATIONAL, Inc. The technical data herein is for general information only. Product suitability should be based solely upon customer’s detailed knowledge and experience with their application. Bray Series 98 Pneumatic Scotch Yoke Actuator Operations and Maintenance Manual 11.2 - Spring Return Actuators Model Maximum Operating Pressure Spring # Symmetrical Canted Volume Actuator Weight Rod End Assembly Weight (approx) w/Jackscrew Override psi bar psi bar Cu.In Lts Lbs Kg Lbs Kg 150 10.3 150 10.3 322 5.3 278 126 304 138 150 10.3 150 10.3 417 6.8 287 130 313 142 146 10.0 125 8.6 519 8.5 306 139 333 151 45E2-12 101 7.0 87 6.0 750 12.3 344 156 370 168 45E2-14 74 5.1 63 4.4 1020 16.7 401 182 428 194 45E2-08 150 10.3 150 10.3 322 5.3 289 131 315 143 45E2-09 150 10.3 150 10.3 417 6.8 298 135 324 147 45E2-08 45E2-09 45E2-10 45E2-10 1 Lbs Kg 150 10.3 135 9.3 519 8.5 317 144 344 156 45E2-12 108 7.4 93 6.4 750 12.3 355 161 381 173 45E2-14 79 5.4 69 4.7 1020 16.7 412 187 439 199 45E2-08 150 10.3 150 10.3 322 5.3 295 134 353 160 45E2-09 150 10.3 150 10.3 417 6.8 304 138 362 164 150 10.3 148 10.2 519 8.5 324 147 381 173 45E2-12 117 8.1 103 7.1 750 12.3 362 164 419 190 45E2-14 86 5.9 75 5.2 1020 16.7 419 190 476 216 45E2-09 150 10.3 150 10.3 417 6.8 324 147 384 174 45E2-10 150 10.3 150 10.3 519 8.5 344 156 403 183 121 8.4 107 7.4 750 12.3 381 173 441 200 89 6.1 79 5.4 1020 16.7 439 199 498 226 73E2-10 150 10.3 150 10.3 621 10.2 459 208 520 236 536 243 73E2-12 139 9.6 120 8.3 902 14.8 494 224 556 252 571 259 102 7.0 88 6.1 1227 20.1 545 247 606 275 622 282 78 5.4 67 4.6 1588 26.0 613 278 675 306 690 313 150 10.3 150 10.3 621 10.2 461 209 525 238 538 244 144 9.9 125 8.6 902 14.8 496 225 560 254 573 260 105 7.3 91 6.3 1227 20.1 547 248 611 277 624 283 80 5.5 70 4.8 1588 26.0 615 279 679 308 692 314 73E2-10 150 10.3 150 10.3 621 10.2 483 219 549 249 560 254 73E2-12 150 10.3 133 9.2 902 14.8 518 235 584 265 595 270 111 7.7 98 6.7 1227 20.1 569 258 635 288 646 293 85 5.9 75 5.1 1588 26.0 637 289 703 319 714 324 73E2-10 150 10.3 150 10.3 621 10.2 538 244 604 274 615 279 73E2-12 150 10.3 141 9.7 902 14.8 573 260 639 290 650 295 117 8.1 103 7.1 1227 20.1 624 283 690 313 701 318 90 6.2 79 5.4 1588 26.0 692 314 758 344 769 349 45E2-10 45E2-12 2 w/Hydraulic Override 3 4 45E2-14 73E2-14 1 73E2-16 73E2-10 73E2-12 73E2-14 2 73E2-16 73E2-14 3 73E2-16 73E2-14 73E2-16 4 All information herein is proprietary and confidential and may not be copied or reproduced without the expressed written consent of BRAY INTERNATIONAL, Inc. The technical data herein is for general information only. Product suitability should be based solely upon customer’s detailed knowledge and experience with their application. 21 Bray Series 98 Pneumatic Scotch Yoke Actuator Operations and Maintenance Manual 11.2 - Spring Return Actuators - Cont. Model Maximum Operating Pressure Spring # Symmetrical Canted Volume Actuator Weight Rod End Assembly Weight (approx) w/Jackscrew Override w/Hydraulic Override psi bar psi bar Cu.In Lts Lbs Kg Lbs Kg Lbs Kg 14E3-12 150 10.3 150 10.3 1071 17.6 747 339 842 382 855 388 14E3-14 150 10.3 137 9.5 1458 23.9 798 362 893 405 906 411 122 8.4 105 7.2 1890 31.0 869 394 963 437 977 443 14E3-18 96 6.6 83 5.7 2421 39.7 952 432 1047 475 1060 481 14E3-20 78 5.4 67 4.6 2978 48.8 1082 491 1177 534 1190 540 150 10.3 150 10.3 1071 17.6 769 349 869 394 877 398 150 10.3 142 9.8 1458 23.9 820 372 919 417 928 421 126 8.7 108 7.5 1890 31.0 891 404 990 449 999 453 14E3-18 99 6.8 86 5.9 2421 39.7 974 442 1074 487 1082 491 14E3-20 80 5.5 69 4.8 2978 48.8 1105 501 1204 546 1213 550 14E3-12 150 10.3 150 10.3 1071 17.6 789 358 888 403 897 407 14E3-14 150 10.3 148 10.2 1458 23.9 840 381 939 426 948 430 130 9.0 113 7.8 1890 31.0 910 413 1010 458 1019 462 14E3-18 103 7.1 89 6.1 2421 39.7 994 451 1093 496 1102 500 14E3-20 83 5.7 72 5.0 2978 48.8 1124 510 1224 555 1232 559 14E3-12 150 10.3 150 10.3 1071 17.6 816 370 930 422 924 419 14E3-14 150 10.3 150 10.3 1458 23.9 866 393 981 445 974 442 138 9.5 121 8.3 1890 31.0 937 425 1052 477 1045 474 109 7.5 95 6.6 2421 39.7 1021 463 1135 515 1129 512 14E3-16 1 14E3-12 14E3-14 14E3-16 14E3-16 14E3-16 2 3 4 14E3-18 88 6.1 77 5.3 2978 48.8 1151 522 1265 574 1259 571 14E3-12 14E3-20 150 10.3 150 10.3 1071 17.6 838 380 952 432 946 429 14E3-14 150 10.3 150 10.3 1458 23.9 888 403 1003 455 996 452 143 9.8 126 8.7 1890 31.0 959 435 1074 487 1067 484 14E3-18 113 7.8 99 6.8 2421 39.7 1043 473 1157 525 1151 522 14E3-20 91 6.3 80 5.5 2978 48.8 1173 532 1287 584 1281 581 14E3-16 22 5 All information herein is proprietary and confidential and may not be copied or reproduced without the expressed written consent of BRAY INTERNATIONAL, Inc. The technical data herein is for general information only. Product suitability should be based solely upon customer’s detailed knowledge and experience with their application. Bray Series 98 Pneumatic Scotch Yoke Actuator Operations and Maintenance Manual 11.2 - Spring Return Actuators - Cont. Model Maximum Operating Pressure Spring # Symmetrical Canted Volume Actuator Weight Rod End Assembly Weight (approx) w/Jackscrew Override w/Hydraulic Override psi bar psi bar Cu.In Lts Lbs Kg Lbs Kg Lbs Kg 24E3-14 150 10.3 150 10.3 1831 30.0 1232 559 1387 629 1389 630 24E3-16 150 10.3 138 9.5 2387 39.2 1296 588 1451 658 1453 659 24E3-18 126 8.7 109 7.5 3059 50.2 1376 624 1530 694 1532 695 102 7.0 88 6.1 3750 61.5 1517 688 1671 758 1673 759 24E3-22 84 5.8 73 5.0 4561 74.8 1616 733 1770 803 1772 804 24E3-24 71 4.9 61 4.2 5452 89.4 1784 809 1938 879 1940 880 24E3-14 150 10.3 150 10.3 1831 30.0 1250 567 1407 638 1407 638 24E3-16 150 10.3 145 10.0 2387 39.2 1314 596 1470 667 1470 667 24E3-18 132 9.1 114 7.9 3059 50.2 1393 632 1550 703 1550 703 106 7.3 92 6.4 3750 61.5 1534 696 1691 767 1691 767 24E3-22 88 6.1 76 5.2 4561 74.8 1634 741 1790 812 1790 812 24E3-24 74 5.1 64 4.4 5452 89.4 1801 817 1958 888 1958 888 24E3-14 150 10.3 150 10.3 1831 30.0 1276 579 1468 666 1433 650 24E3-16 150 10.3 150 10.3 2387 39.2 1340 608 1532 695 1497 679 24E3-18 139 9.6 122 8.4 3059 50.2 1420 644 1612 731 1576 715 113 7.8 99 6.8 3750 61.5 1561 708 1753 795 1717 779 24E3-22 93 6.4 81 5.6 4561 74.8 1660 753 1852 840 1817 824 24E3-24 78 5.4 68 4.7 5452 89.4 1828 829 2019 916 1984 900 24E3-14 150 10.3 150 10.3 1831 30.0 1334 605 1528 693 1490 676 24E3-16 150 10.3 150 10.3 2387 39.2 1398 634 1592 722 1554 705 24E3-18 145 10.0 127 8.8 3059 50.2 1477 670 1671 758 1634 741 117 8.1 103 7.1 3750 61.5 1618 734 1812 822 1775 805 24E3-22 97 6.7 85 5.8 4561 74.8 1717 779 1911 867 1874 850 24E3-24 81 5.6 71 4.9 5452 89.4 1885 855 2079 943 2041 926 150 10.3 150 10.3 2387 39.2 1400 635 1596 724 1556 706 150 10.3 133 9.2 3059 50.2 1479 671 1675 760 1636 742 122 8.4 108 7.4 3750 61.5 1620 735 1817 824 1777 806 24E3-22 101 6.9 89 6.1 4561 74.8 1720 780 1916 869 1876 851 24E3-24 84 5.8 75 5.1 5452 89.4 1887 856 2083 945 2044 927 24E3-20 24E3-20 24E3-20 24E3-20 1 2 3 4 24E3-16 24E3-18 24E3-20 5 All information herein is proprietary and confidential and may not be copied or reproduced without the expressed written consent of BRAY INTERNATIONAL, Inc. The technical data herein is for general information only. Product suitability should be based solely upon customer’s detailed knowledge and experience with their application. 23 Bray Series 98 Pneumatic Scotch Yoke Actuator Operations and Maintenance Manual 11.2 - Spring Return Actuators - Cont. Model Maximum Operating Pressure Spring # Symmetrical Canted Volume Actuator Weight Rod End Assembly Weight (approx) w/Jackscrew Override bar psi bar Cu.In Lts Lbs Kg Lbs Kg 45E3-18 150 10.3 150 10.3 3722 61.0 2169 984 2418 1097 45E3-20 150 10.3 134 9.2 4584 75.2 2306 1046 2555 1159 128 8.8 110 7.6 5591 91.7 2410 1093 2659 1206 45E3-24 107 7.4 93 6.4 6676 109.5 2579 1170 2829 1283 45E3-28 79 5.4 68 4.7 9074 148.8 3007 1364 3256 1477 45E3-18 150 10.3 150 10.3 3722 61.0 2220 1007 2469 1120 45E3-20 150 10.3 138 9.5 4584 75.2 2357 1069 2606 1182 132 9.1 114 7.9 5591 91.7 2460 1116 2709 1229 45E3-24 111 7.6 96 6.6 6676 109.5 2630 1193 2879 1306 45E3-28 81 5.6 70 4.8 9074 148.8 3058 1387 3307 1500 45E3-18 150 10.3 150 10.3 3722 61.0 2363 1072 2612 1185 45E3-20 150 10.3 147 10.2 4584 75.2 2500 1134 2749 1247 139 9.6 122 8.4 5591 91.7 2604 1181 2853 1294 45E3-24 117 8.1 102 7.0 6676 109.5 2773 1258 3023 1371 45E3-28 86 5.9 75 5.2 9074 148.8 3201 1452 3450 1565 45E3-18 150 10.3 150 10.3 3722 61.0 2474 1122 2723 1235 45E3-20 150 10.3 150 10.3 4584 75.2 2610 1184 2859 1297 144 9.9 126 8.7 5591 91.7 2714 1231 2963 1344 45E3-24 120 8.3 105 7.3 6676 109.5 2884 1308 3133 1421 45E3-28 88 6.1 77 5.3 9074 148.8 3311 1502 3560 1615 45E3-18 150 10.3 150 10.3 3722 61.0 2535 1150 2784 1263 45E3-20 150 10.3 150 10.3 4584 75.2 2672 1212 2921 1325 149 10.2 131 9.0 5591 91.7 2776 1259 3025 1372 45E3-24 125 8.6 110 7.6 6676 109.5 2945 1336 3194 1449 45E3-28 91 6.3 80 5.5 9074 148.8 3373 1530 3622 1643 10E4-22 150 10.3 150 10.3 6875 112.8 4153 1884 4429 2009 10E4-24 150 10.3 150 10.3 8173 134.0 4330 1964 4605 2089 143 9.8 123 8.4 11049 181.2 4815 2184 5090 2309 10E4-32 109 7.5 94 6.4 14589 239.3 5370 2436 5646 2561 10E4-36 86 5.9 74 5.1 18327 300.6 6078 2757 6354 2882 10E4-22 150 10.3 150 10.3 6875 112.8 4297 1949 4572 2074 10E4-24 150 10.3 150 10.3 8173 134.0 4473 2029 4749 2154 147 10.1 126 8.7 11049 181.2 4958 2249 5234 2374 10E4-32 112 7.7 97 6.7 14589 239.3 5514 2501 5789 2626 10E4-36 88 6.1 76 5.3 18327 300.6 6221 2822 6497 2947 10E4-22 150 10.3 150 10.3 6875 112.8 4594 2084 4870 2209 10E4-24 150 10.3 150 10.3 8173 134.0 4771 2164 5046 2289 150 10.3 135 9.3 11049 181.2 5256 2384 5531 2509 10E4-32 119 8.2 103 7.1 14589 239.3 5811 2636 6087 2761 10E4-36 94 6.5 82 5.6 18327 300.6 6519 2957 6795 3082 10E4-22 150 10.3 150 10.3 6875 112.8 4793 2174 5068 2299 10E4-24 150 10.3 150 10.3 8173 134.0 4969 2254 5245 2379 150 10.3 141 9.7 11049 181.2 5454 2474 5730 2599 10E4-32 123 8.5 108 7.4 14589 239.3 6010 2726 6285 2851 10E4-36 97 6.7 85 5.9 18327 300.6 6717 3047 6993 3172 45E3-22 45E3-22 45E3-22 45E3-22 45E3-22 10E4-28 10E4-28 10E4-28 10E4-28 24 1 2 3 4 5 1 2 3 4 Lbs Kg w/Hydraulic Override psi All information herein is proprietary and confidential and may not be copied or reproduced without the expressed written consent of BRAY INTERNATIONAL, Inc. The technical data herein is for general information only. Product suitability should be based solely upon customer’s detailed knowledge and experience with their application. Bray Series 98 Pneumatic Scotch Yoke Actuator Operations and Maintenance Manual 12.0 MODULE WEIGHTS MODULE WEIGHTS (APPROX), Lbs Model Rated Torq. Nm Pressure Modules Size, Inch Torque Module 45 E2 4,500 84 73 E2 7,300 146 14 E3 14,000 236 24 E3 24,000 428 45 E3 45,000 666 10 E4 100,000 1312 8 9 10 12 14 60 68 88 126 183 99 134 185 150 16 18 20 Spring Modules 22 24 28 32 36 254 201 271 355 485 229 293 373 514 439 575 613 780 679 849 1276 780 957 1442 1997 2705 1 2 3 4 134 146 152 172 214 216 238 293 362 384 403 430 452 575 593 619 677 679 1431 1065 1116 1259 1369 2061 2205 2502 2701 5 MODULE WEIGHTS (APPROX), Kg Model Rated Torq. Nm Torque Module 45 E2 4,500 38 73 E2 7,300 66 14 E3 14,000 107 24 E3 24,000 194 45 E3 45,000 302 10 E4 100,000 595 Spring Modules 8 27 9 31 10 12 14 16 18 20 22 24 28 40 57 83 45 61 84 115 91 123 161 220 104 133 169 233 278 354 199 261 308 385 579 354 434 654 68 32 906 36 1227 All information herein is proprietary and confidential and may not be copied or reproduced without the expressed written consent of BRAY INTERNATIONAL, Inc. The technical data herein is for general information only. Product suitability should be based solely upon customer’s detailed knowledge and experience with their application. 1 2 3 4 5 61 66 69 78 97 98 108 133 164 174 183 195 205 261 269 281 307 308 483 506 571 621 649 935 1000 1135 1225 25 E ØH Bray Series 98 Pneumatic Scotch Yoke Actuator B Operations and Maintenance Manual T C 13.0 SERIES 98 DIMENSIONS LEFT VIEW FRONT VIEW L ØN 12.70 4.0 S 30 20 ØQ R 6.0 J ACCESSORY DRIVE DETAILS M5 P 7.00 U 80.0 STEM BORE DETAIL K M RIGHT VIEW TOP VIEW A D F G E B ØH T FRONT VIEW C LEFT VIEW L SERIES 98 MAX DIMENSIONS, inch ØN Model ISO Base S A B 14.8 12.70 C D 14.8 14.2 6.3 12.5 26.2 9.4 9.7 9.4 13.1 16.8 15.8 7.9 6.0 15.8 28.5 12.8 11.8 11.3 16.5 4.0 E F G H J K L M N P Q R S T U -- 0.7 8.5 2.0 0.5 2.3 7.7 3.8 -- 0.7 9.8 2.5 0.625 3.1 7.8 5.1 F16/F12 52.8 73E2 F16/F12 60.1 ØQ 16.8 14E3 F25/16 72.6 21.3 21.3 18.8 9.3 18.5 35.3 13.5 12.1 15.4 19.6 5.1 0.7 10.9 3.0 0.75 3.7 11.8 5.7 24E3 F30/25 90.0R 25.1 25.1 21.9 11.5 22.9 45.2 15.6 14.3 19.3 23.8 5.1 1.0 13.1 4.5 1.0 5.2 13.8 7.3 45E3 F35/30 33.3 25.8 14.3 28.6 58.9 18.7 15.3 22.8 29.57.00 5.1 1.0 14.1 6.0 1.5 6.8 16.3 8.3 1.75 8.3 18.7 11.3 R S T U 45E2 10E4 113.3 STEM BORE DETAIL F40/F35 138.1 20 33.3 ACCESSORY DRIVE DETAILS 41.7 38.0 32.8 17.8 30 35.5 69.8 21.9 80.0 M 18.9 28.3 M5 37.6 5.1 J P 1.0 K 17.8 7.0 U RIGHT VIEW TOP VIEW SERIES 98 MAX DIMENSIONS, mm Model ISO Base A B C D E F G H J K L M N P Q 45E2 F16/F12 1342 376 376 360 159 318 664 240 246 240 333 -- 18 216 50.0 12.0 59 195 96 73E2 F16/F12 1526 427 427 400 201 402 723 326 300 288 420 -- 18 249 63.5 15.88 78 197 129 14E3 F25/16 1843 542 542 477 235 470 896 342 307 390 498 130 18 276 76.2 19.05 93 300 145 24E3 F30/25 2287 638 638 556 291 582 1148 397 364 491 605 130 25 334 114.3 25.4 131 350 186 45E3 F35/30 2877 845 845 656 363 726 1495 476 388 580 750 130 25 357 152.4 38.1 173 415 212 10E4 F40/F35 3507 1060 964 832 451 902 1773 556 481 720 955 130 25 451 177.8 44.50 210.8 475 286 Refer ES drawings for dimensions of specific models CYLINDER PORT SIZE Cylinder Size Ports, NPT 26 2.5" - 5" 6" - 9" 10" 12" - 16" 18" - 24" 28" - 36" 1/4" 3/8" 1/2" 3/4" 1" 1.5" All information herein is proprietary and confidential and may not be copied or reproduced without the expressed written consent of BRAY INTERNATIONAL, Inc. The technical data herein is for general information only. Product suitability should be based solely upon customer’s detailed knowledge and experience with their application. Bray Series 98 Pneumatic Scotch Yoke Actuator Operations and Maintenance Manual 14.0 SERIES 98 GENERAL SPECIFICATIONS AND FEATURES GENERAL SPECIFICATIONS RANGE ISO Model Mounting Base Spring End Torque Nm Rated Torque Nm Lb-in Spring End Torque Lb-in Maximum Stem Acceptance Diameter mm inch Maximum Stem Height Over Travel (on either side) Min Max Min Max mm ± degrees 45 E2 F12/F16 4,500 39,830 1,070 2,675 9,471 23,676 50.0 1.97 183 5 73 E2 F12/F16 7,300 64,612 2,130 4,280 18,853 37,882 63.5 2.50 216 5 14 E3 F16/F25 14,000 123,914 3,485 7,845 30,846 69,436 76.2 3.00 240 5 24 E3 F25/F30 24,000 212,424 6,555 15,150 58,018 134,093 114.3 4.50 295 3 45 E3 F30/F35 45,000 398,295 11,950 25,595 105,769 226,541 152.4 6.00 318 3 10 E4 F35/F40 100,000 885,100 25,226 50,306 223,275 445,261 177.8 7.00 350 3 CONFIGURATIONS DA Double Acting- Single Cylinder DD Double Acting- Dual Cylinders SC Spring Return- Fail CW SO Spring Return- Fail CCW Pressure Range 40 - 150 psi Media Dry Compressed Air / Inert / Natural Gas OPERATING CONDITIONS Contact factory for other media Standard : -20°F to 200°F (-29°C to 93°C) Temperature Range Standard Options High Temp : Up to 300°F (149°C) Contact factory for extended ranges Low Temp : Down to -50°F (-46°C) COMPLIANCES Torque Base Mounting dimensions options per ISO 5211: 2001(E) or MSS SP-101-1989 Accessories Shaft Driven Accessories Mounting as per NAMUR-VDE Testing In accordance with EN 15714-3:2009 Ingress Protection IP66/IP67M per IEC 60529 Safety ATEX, SIL 3, PED All information herein is proprietary and confidential and may not be copied or reproduced without the expressed written consent of BRAY INTERNATIONAL, Inc. The technical data herein is for general information only. Product suitability should be based solely upon customer’s detailed knowledge and experience with their application. 27 Bray Series 98 Pneumatic Scotch Yoke Actuator Operations and Maintenance Manual 15.0 HYDRAULIC OVERRIDE Hydraulic overrides on S98 actuators provide low effort, high thrust in a compact size for manually operating the actuator. The hydraulic override cylinders are single acting on the SR models and double acting on the DA models of the Actuators. These are available on Models 73E2 through 10E4. The hydraulic override consists of a power pack with a hand operated high pressure pump and oil reservoir connected by tubing to the hydraulic override cylinder. The hydraulic cylinder is mounted on the Spring Module end thrust base on SR models and on the Torque Module flange on the DA models. The hydraulic override cylinders are designed for 3,000 psi max working pressure and provide adequate thrust to output the required valve torque. The operating pressure required is set on the hand pump assembly through a builtin relief valve. 15.1 Installation Series 98 standard actuators with hydraulic overrides are shipped pre-assembled with the cylinder, hand pump, bypass valves and tubing complete. The hand pump unit is selected, factory installed and the hydraulic pressure valve set per the application. No additional customer installation/ adjustment is usually required. 4. Secure the cylinder flange on the thrust base of the Spring Module with the spring washers and nuts from the override mounting kit. 5. Thread in the hydraulic connector into the cylinder port (if not already fitted into the cylinder). Use a commercial hydraulic fitting thread sealant (Loctite 542 or equivalent). 6. Fit a 3-way valve, rated for 150 psi (10.3 bar) working pressure, to the pneumatic module’s port (Refer to Figure A).Turn the valve to venting position so that the pneumatic cylinder’s port is connected to atmosphere. 7. Fit the hydraulic hand pump assembly bracket on the rear accessories mounting pad of the Torque Module with the 4 bolts supplied in the kit. Tube the cylinder port to the pump outlet port, as in Figure A. The standard mounting, as shown, is for the actuator in horizontal orientation. Special brackets for other orientations of the actuator can be supplied upon request. 8. On the Tee fitting at the pump outlet, remove the plug and install a suitable pressure gage (0-4000psi). Actuators in service, without this override option, can be retrofitted with the override kit as described below. 15.1.1 Installing Hydraulic Override on Spring Return Actuators 1. Disconnect air pressure and electrical power from actuator. 2. In fail safe position of the actuator, remove the end cover plate retaining the O-ring on the End Cap. 3. Firmly thread the studs (10) supplied with the override mounting kit, into the thrust base. With the piston rod fully retracted, insert the Hydraulic Cylinder into the Spring Module positioning the air venting plug at the top. 9. Remove the filler-breather cap and fill the reservoir till about 1-2" from the top with hydraulic fluid (ISO 32 grade for standard temperature service). Install the breather cap on the reservoir (do not substitute the breather cap with a plug). Stroke the pump a few times with the pressure release valve on the pump open, to bleed air out of pump. 10. Lightly loosen the air vent screw on the cylinder flange to bleed off air from the hydraulic lines. Close the pressure release valve on the pump and stroke the hydraulic pump till the pressure builds up. Tighten the vent plug when no more air bubbles bleed out. The piston rod advances to press against the Spring Rod’s end face and the thrust from the hydraulic pressure effects the override function. 11. Note the maximum hydraulic pressure setting for the actuator model (refer to the SR Hydraulic MOP table). Check the hydraulic pressure on the gage at the end of the actuator’s stroke. Refer to the hand pump service manual and adjust the overload valve setting on the pump to the MOP. 28 All information herein is proprietary and confidential and may not be copied or reproduced without the expressed written consent of BRAY INTERNATIONAL, Inc. The technical data herein is for general information only. Product suitability should be based solely upon customer’s detailed knowledge and experience with their application. Bray Series 98 Pneumatic Scotch Yoke Actuator Operations and Maintenance Manual 15.2 Installing Hydraulic Override on DA Actuator MOP for SR Hydraulic Overrides Model 73 E2 14 E3 24 E3 45 E3 10 E4 MOP psi Spring Number 1 2 3 4 1585 1880 2425 2740 5 bar 109 130 167 189 psi 1325 1520 1770 2260 bar 91 105 122 156 187 psi 1290 1530 1950 2260 2595 2705 bar 89 105 134 156 179 psi 1185 1415 1615 1855 2155 149 bar 82 98 111 128 psi 2465 3005 3630 4400 bar 170 207 250 303 15.1.2 Operation - Spring Return Hydraulic Override 1. Turn the actuator so that the guide block is at the cover end side of the Torque Module and ensure it stays in this position after disconnecting air pressure and electrical power from actuator. 2. Remove the DA cover from the torque module and mount the DA hydraulic override cylinder assembly with the hardware supplied in mounting kit. Make sure to install the O-ring on the mounting flange. 3. Remove the hydraulic cylinder's tie rod nuts and the end cap without disturbing the cylinder barrel. With a suitable socket/tube spanner located on the hex head at the piston end, thread and tighten the piston rod into the threading on Guide Block (inside the Torque Module). Refer to the table below for tightening torque. Hydraulic Piston Rod Tightening Torque Model 1. To operate the override, turn the 3/2 way valve on the pressure module to vent the cylinder port to atmosphere and Close the pressure release valve (PRV) on the hand pump manifold. Operating the Hand Pump on the power pack extends the Hydraulic cylinder's piston rod and pushes the Spring Rod while compressing the spring and operates the actuator manually. 2. Opening the pressure release valve relieves the hydraulic pressure to reservoir. The spring returns the piston rod of override cylinder to retracted position and the actuator to fail safe position. 3. To restore normal pneumatic operation, turn the pressure release valve to full Open and switch the 3/2 way valve on pneumatic cylinder, to connect the cylinder port to the air supply pressure. Torque Lb-ft Nm 73 E2 148 200 14 E3 184 250 24 E3 184 250 45 E3 258 350 10 E4 332 450 4. Replace the end cap, taking care not to damage the cap seal, and tighten the tie rod nuts of the hydraulic cylinder. 5. Install the 3-way valves, rated for 150 psi (10.3 bar) working pressure, on the pneumatic cylinder ports (Refer to Figure B) and turn them to venting position. 6. Mount the hydraulic pump assembly on the Torque Module’s rear accessories pad, as described in previous section. 7. Tube the ports of the hydraulic cylinder to the direction control valve’s ports, on the hydraulic hand pump unit. (Refer to Figure B) Fill the reservoir with clean hydraulic fluid, till about 1-2" from the top. Fit back the fillerbreather cap. 8. Turn the direction control valve on the hand pump unit to direct oil flow to one of the cylinder ports. Loosen the corresponding vent plug on the cylinder and stroke the hand pump to vent out air in the lines. Tighten the vent plug when no more air bubbles are seen. Repeat the same for the other side of the cylinder. 9. Check and ensure the Hydraulic pressure setting of the pump does not exceed the MOP setting, refer to the table on DA Hydraulic MOP. Use the plugged port on the pressure line Tee to connect a suitable pressure gage. Set the pump relief valve to the MOP, at the stroke end. All information herein is proprietary and confidential and may not be copied or reproduced without the expressed written consent of BRAY INTERNATIONAL, Inc. The technical data herein is for general information only. Product suitability should be based solely upon customer’s detailed knowledge and experience with their application. 29 Bray Series 98 Pneumatic Scotch Yoke Actuator Operations and Maintenance Manual MOP for DA Hydraulic Overrides Model 73 E2 14 E3 24 E3 45 E3 10 E4 MOP psi 1935 bar 133 psi 2000 bar 138 psi 2090 bar 144 psi 2005 bar 138 psi 2130 bar 147 15.2.1 Operation – DA Hydraulic Override 1. For Manual Override operation, turn the 3-way valves on the pressure module to vent the cylinder ports to atmosphere and close the hydraulic bypass valve, (HBV). Turn the lever on the direction control valve on the hand pump unit to select the direction of the actuator rotation and stroke the hand pump to reach the required valve position. 2. To restore pneumatic operation, turn the direction control valve to center position, the HBV to Open position and switch the vent valves to connect the cylinder ports to the air supply lines. CAUTION Over thrust by the hydraulic override may cause actuator damage. Prevent unsafe conditions and damage by adjusting the overload valve on the pump to limit the hydraulic pressure as per the MOP tables. 15.3 Maintenance of Hydraulic Override The hydraulic system may require servicing only when testing the system indicates no build up of pressure or the cylinder seals leak. 15.3.1 Spring Return Hydraulic Override Cylinder Leakage of hydraulic fluid past the piston seal can be a cause for failure to hold the position when operating the override. Leakage can be confirmed if oil can be seen dripping out of the weep hole on the cylinder. 30 15.3.2 Disassembly of Hydraulic Cylinder Ensure the hydraulic cylinder seal kit is on hand before disassembling the cylinder. 1. Disconnect the air pressure and the electrical power from the actuator and ensure the actuator turns to the fail safe position. 2. Disconnect the hydraulic tubing from the override cylinder port. 3. Remove the nuts and spring washers from the studs (10) holding the cylinder flange on the Spring Module end. 4. Pull the cylinder out of the Spring Module and inspect for leakage from the weep hole at the rod end. Proceed to replace seals if leakage is confirmed. 5. Secure the cylinder, loosen and remove the rod end guide nut. 6. Pull the piston assembly out of the cylinder. 15.3.3 Servicing Hydraulic Cylinder 1. Remove the old seal and wear rings from the piston and thoroughly clean the cylinder and piston assembly.. 2. Replace the u-cup seal and wear ring on the piston with new ones. Lubricate the seal and the wear ring with clean hydraulic fluid and carefully slide the piston into the cylinder. 3. Replace the seals and guide bushing on the rod side nut and install the nut. 4. Flush clean the oil tank and tubing, fill fresh hydraulic fluid and re-mount the cylinder on the Spring module, connect the tubing and vent out the air from the line, as described in the Installation Section. 5. Operate the hydraulic override to test for correct operation. 15.4 DA Override Cylinder 15.4.1 Disassembly of Hydraulic Cylinder 1. Operate the actuator so that the hydraulic cylinder piston is at the cap end side. 2. Shift the direction control valve on the hand pump unit to mid position, disconnect the air pressure and the electrical power from actuator and ensure it stays in this position. 3. Disconnect the hydraulic tubing from the cylinder ports. 4. Remove the tie rod nuts off the hydraulic cylinder and pull the end cap off the barrel. All information herein is proprietary and confidential and may not be copied or reproduced without the expressed written consent of BRAY INTERNATIONAL, Inc. The technical data herein is for general information only. Product suitability should be based solely upon customer’s detailed knowledge and experience with their application. Bray Series 98 Pneumatic Scotch Yoke Actuator Operations and Maintenance Manual 5. With a socket spanner located on the hex head of the hydraulic cylinder’s piston, loosen and disengage the piston rod from the Guide Block in the Torque Module. 6. Remove the fasteners holding the hydraulic cylinder’s flange on the Torque Module end. 7. Take the cylinder assembly off the Torque Module. 15.4.2 Servicing Hydraulic Cylinder 1. Drain the oil from the rod side of the cylinder and pull the barrel with the piston and the piston rod out of the cylinder head. 2. Pull the barrel off the piston, remove the old seals and wear band. Thoroughly wash/clean all parts. 3. Inspect the barrel and the piston for any damage or scoring. Repair/replace any damaged parts. 4. Replace the seals, wear rings, guide bushings, o-rings on the cylinder head and end caps. Reassemble the cylinder and install it on the Torque Module as described in the Installation Section. 5. Flush clean the hydraulic fluid reservoir and tubing. Fill fresh fluid to required level before testing the operation of the override as described in installation section. 15.5 Servicing Hand Pump Unit Refer to the hand pump unit manufacturer’s service manual for maintenance instructions. All information herein is proprietary and confidential and may not be copied or reproduced without the expressed written consent of BRAY INTERNATIONAL, Inc. The technical data herein is for general information only. Product suitability should be based solely upon customer’s detailed knowledge and experience with their application. 31 Bray Series 98 Pneumatic Scotch Yoke Actuator Operations and Maintenance Manual 16.0 JACKSCREW OVERRIDE Jackscrews provide an economical manual override option on the actuator for use in case of air failure. These jackscrews come in two types, direct hand wheel operated and bevel gearbox driven. 3. Free the Extension Rod from the Jackscrew assembly, apply a drop of medium strength thread lock compound on the extension rod threads and firmly tighten it into the threading in the Guide Block inside the Torque Module. Refer to the piston rod tightening torque table under Section 15.2. The direct hand wheel jackscrew has a rotating screw threading into a bronze nut when installed on the Torque module of DA actuators and on the Spring module of Spring Return actuators. The hand wheel directly turns the screw or nut to move the jackscrew forward or back. The bevel gearbox driven jackscrews are required to reduce the manual effort on larger actuator models and stiffer springs that require higher thrust to compress. Here the screw translates with an anti-rotation arrangement. 16.1 Installation 4. Coat the extension rod with NLGI2 grease. Jackscrew overrides are usually factory installed on the actuator. Override units are shipped with the jackscrew assembly installed on the actuator so that the actuator is ready for installation in the auto operation mode. No additional customer installation is required. 5. Lubricate and place the flange O-ring into the groove on the jackscrew assembly flange If a field retrofit is required on actuators without a manual override, the installation instructions provide a guide for a qualified technician to install and operate the Jackscrew overrides. 16.1.1 Installing DA Jackscrew Override 1. Disconnect the air pressure and the electrical power from actuator. 2. Remove the DA end cover from the actuator. 6. Back off the jackscrew fully in the assembly and carefully slide the mounting flange of the jackscrew assembly on the extension rod. Take care in locating the bushing and the flange seal on the extension rod. Direc t D G ear D 32 rive Jac rive Ja kscrew c k s c re - DA w - DA All information herein is proprietary and confidential and may not be copied or reproduced without the expressed written consent of BRAY INTERNATIONAL, Inc. The technical data herein is for general information only. Product suitability should be based solely upon customer’s detailed knowledge and experience with their application. Bray Series 98 Pneumatic Scotch Yoke Actuator Operations and Maintenance Manual 7. Slide the assembly to locate and mate the flanges. Use the hardware supplied in the kit to fasten the assembly to the Torque Module flange. 2. Turn the hand wheel on the jackscrew assembly to move the screw forward, until it touches the extension rod’s end. 8. Install suitable size 3/2 manual valves on the pneumatic cylinder’s ports, which will either connect the ports to the air supply or vent them to atmosphere. The ports must be vented when operating the manual override (Refer to Figure C). 3. Push the T-handle into the jackscrew head to couple it with the extension rod. 4. Turn the hand wheel to turn the actuator in required direction (see direction markers on the hand wheel). 5. After completing the manual override stroke, disengage the coupler by pulling out the T-handle. Back off the jackscrew completely before restoring pneumatic operation. NOTICE Figure C 16.1.2 Operating DA Jackscrew Override The jackscrew is not designed as an extended travel stop. It must be taken to fully backed-off position for the actuator to work normally in automatic mode. Turn the 3 position valves to connect the air supply to restore automatic operation. 1. To test / operate the override, shut off the main air supply and turn the 3 position valves on the cylinder ports to vent the ports to atmosphere. CAUTION The extension rod moves back and forth in normal operation. Do not remove any protective covers on the DA jackscrew assembly without ensuring the air supply is cut off and that the automatic operation of actuator is disabled. All information herein is proprietary and confidential and may not be copied or reproduced without the expressed written consent of BRAY INTERNATIONAL, Inc. The technical data herein is for general information only. Product suitability should be based solely upon customer’s detailed knowledge and experience with their application. 33 Bray Series 98 Pneumatic Scotch Yoke Actuator Operations and Maintenance Manual 16.2 Installing SR Jackscrew Override 1. Disconnect the air pressure and the electrical power from actuator and ensure the actuator is at its fail safe position. 2. Remove the end cover on the Spring module. Retain/ replace the cover O-ring. 6. Install a suitable 3 position manual valve to the pneumatic cylinder’s rod end port (Refer to Figure D). 3. Apply a drop of thread lock compound on the mounting stud threads and firmly tighten them into the spring module end cap. Figure D 16.2.1 Operating SR Jackscrew Override 4. Back off the jackscrew fully in the assembly and mount the jackscrew assembly on the spring module end cap thrust base. 1. To test / operate the override, shut off the main air supply and turn the 3 position valve on the cylinder port to vent the cylinder port to atmosphere. The actuator should move to its fail safe position. 2. Turn the hand wheel on the jackscrew to advance the screw into the spring module (see direction markers on the hand wheel). 3. Resistance will be felt when the thrust head of the jackscrew touches the end of the spring rod. 4. Turning the hand wheel further will compress the spring and simultaneously turn the actuator. Direc t Dri ve Jacksc NOTICE rew -SR 5. Locate the Jackscrew assembly flange into the studs and fasten with the supplied nuts and lock washers. The spring constantly loads on the jackscrew and returns the actuator to fail safe state when the jackscrew is retracted. Bring the actuator to fail safe position and turn the 3 position valve on cylinder port to connect to air supply to restore auto operation mode. CAUTION Never disassemble the Jackscrew assembly with the spring load on the screw. Severe injuries/damage can result due to non-compliance. Retract the jackscrew completely to free the load, before attempting any maintenance on the assembly. 34 All information herein is proprietary and confidential and may not be copied or reproduced without the expressed written consent of BRAY INTERNATIONAL, Inc. The technical data herein is for general information only. Product suitability should be based solely upon customer’s detailed knowledge and experience with their application. Bray Series 98 Pneumatic Scotch Yoke Actuator Operations and Maintenance Manual 17.0 EXTENDED STOPPERS Extended Stoppers allow restriction of the actuator rotation angle higher than the travel stops provided on the Torque Module. These Extended Stoppers modules fit on the Torque Module for single cylinder double acting actuators and on the Spring Module for the spring return actuators. 4. Apply medium strength thread lock compound to the threads of the Bolt (4) and thread it into the Guide Block and tighten to lock the Bolt on the Guide Block face. The standard extended stops restrict the linear stroke of the Guide Block to provide the rotation adjustment up to 45 degrees from the end. A 90 degree extended stop is an option. 17.1 Installation Extended Stoppers are usually factory installed on the actuator and adjusted to the angle per customer’s requirement if supplied as a valve-actuator package. If supplied as fitted on stand-alone actuator then the stoppers are backed off fully, to permit installation at site on the valve and they must be adjusted after installation. If a field retrofit is required on actuators without the extended stopper, the installation instructions provide a guide for a qualified technician to install and adjust them. 4 5. Loosen the Lock Nut and back off the Extended Stopper in the assembly. 6. Lubricate and locate the flange O-ring in the groove on the assembly’s flange and mount the assembly on the torque module. 17.1.1 Installing Extended Stopper for Torque Module This Extended Stopper module is installed only on Single Cylinder DA actuators. 1. Disconnect the air pressure and the electrical power from actuator. 2. Remove the DA end cover from the actuator. 7. Secure the assembly with the mounting bolts, nuts and lock washers from the mounting kit. 3. Clean threads on the Guide Block. All information herein is proprietary and confidential and may not be copied or reproduced without the expressed written consent of BRAY INTERNATIONAL, Inc. The technical data herein is for general information only. Product suitability should be based solely upon customer’s detailed knowledge and experience with their application. 35 Bray Series 98 Pneumatic Scotch Yoke Actuator Operations and Maintenance Manual 17.1.2 Adjusting Extended Stopper Connect air supply to the rod end side port of the pneumatic cylinder, adjust the extended stopper screw to required position, and reverse the actuator direction to stop movement by the extended stopper. Confirm position and tighten the seal-nut to lock the position. 5. Tighten the nuts with spring washers; refer to Table 10.4 for tightening torque for the nut size. 17.2.1 Adjusting Extended Stopper 1. Connect air supply to the rod end side (Adaptor) port of the pneumatic cylinder; tighten the extended stopper screw to approximately required position. Release air so that the actuator will reverse direction by the spring action and stop against the extended stopper. Repeat to get to final position. NOTICE 2. Confirm position and tighten the seal-nut to lock the position. The Extended Stopper is not designed as a jackscrew. Do not use this to manually override the actuator. Always adjust the stopper with no load on it. WARNING Never remove the assembly fasteners without first backing off the Extended Stopper fully to release any load on it. 17.2 Installing Extended Stopper for Spring Module This Extended Stopper module is installed on Spring Module's thrust base. 1. Disconnect air pressure and any electrical power from actuator. NOTICE The Extended Stopper is not designed as a jackscrew. Do not use this to manually override the actuator. Always adjust the stopper with no load on it. 2. Remove the end cover on the Spring Module. 3. Thread in and tighten the studs from the mounting kit, into the Spring Module thrust base. Use thread lock (Loctite 242 or equivalent). Locate the end cover O-ring in the groove. 4. Back off the stopper bolt and mount the Extended Stopper assembly on the Spring Module end cap. 36 WARNING Never remove the assembly fasteners without first backing off the Extended Stopper fully to release any load on it. All information herein is proprietary and confidential and may not be copied or reproduced without the expressed written consent of BRAY INTERNATIONAL, Inc. The technical data herein is for general information only. Product suitability should be based solely upon customer’s detailed knowledge and experience with their application. Bray Series 98 Pneumatic Scotch Yoke Actuator Operations and Maintenance Manual REFERENCE DRAWINGS Description Drg # Hydraulic Override Assembly DA ES 00094 Hydraulic Override Assembly SR ES 00095 Jackscrew Assembly, DA Direct Drive ES 00105 Jackscrew Assembly, DA Gear Drive ES 00106 Jackscrew Assembly, SR Direct ES 00113 Jackscrew Assembly, SR Gear Drive ES 00114 Sandwich Gearbox ES 00126 Extended Stoppers, SR ES 00127 Extended Stoppers, DA ES 00201 All information herein is proprietary and confidential and may not be copied or reproduced without the expressed written consent of BRAY INTERNATIONAL, Inc. The technical data herein is for general information only. Product suitability should be based solely upon customer’s detailed knowledge and experience with their application. 37 Bray Series 98 Pneumatic Scotch Yoke Actuator Operations and Maintenance Manual TROUBLE SHOOTING POTENTIAL PROBLEMS FAULT POSSIBLE CAUSES RECOMMENDED ACTIONS Erratic Movement Inconsistent supply /dirty operating media/clogged filters Check media supply pressure and line filters, correct as necessary. Refer to Introduction section in this manual for operating media requirements. Inadequate lubrication Disassemble and lubricate. Refer to Maintenance section in this manual for lubricant specs. Worn/damaged parts Disassemble and inspect. Replace worn/damaged parts. Refer to Disassembly, Service & Reassembly of Modules section in this manual. Seal set due to long periods of inactivity Operate for 5-10 cycles and check. Replace seals if not resolved. Refer to the procedures under Pressure Module section in this manual, for replacement and testing procedures. Valve problem - bearing/seal friction, damaged parts Refer to valve manufacturer’s IOM. Stoppers set incorrectly Check and adjust. Foreign object left inside during maintenance Disassemble, inspect for damages and correct. Manual override in wrong position Check and fully retract manual override devices for proper automatic operation. Valve problem - Restriction, friction, incorrect valve stopper Refer to valve manufacturer’s IOM. Supply pressure inadequate Check and correct supply pressure to operating pressure. Inadequate flow Check flow control devices and adjust for sufficient flow. Repair any kinked tubing. Tubing or exhaust vents blocked Check and clean the vents, silencers and tubing. Pressure Module seals leaking Check leaks and replace seals. Refer to the procedures under Pressure Module section in this manual, for replacement and testing procedures. Defective Accessories/Inadequate capacity Refer to accessory manufacturer’s IOM manual and specs. Valve jammed or requires higher torque Refer to valve manufacturer’s IOM. Altered schematic Check if the control circuit is as per the supplied schematic. Correct the circuit, if altered. Solenoid valve/positioner/control elements malfunction Check /Refer to accessory manufacturer’s IOM manual for troubleshooting. Disengaged piston rod/ broken connection/ jammed mechanism Refer to Maintenance section for module/actuator disassembly procedures to disassemble appropriate module for inspection. Valve problem - jammed Refer to valve manufacturer’s IOM. Altered schematics Check if the control circuit is as per the supplied schematic. Correct the circuit, if altered. Control component malfunction/failure Check and replace Choked exhaust silencer/foreign object blocking exhaust line Remove vent to confirm normal operation. Clean/replace exhaust silencer. Spring rod disengaged/connection broken Refer to Maintenance section for module/actuator disassembly procedures to disassemble appropriate module for inspection. Valve problem - jammed Refer to valve manufacturer’s IOM. Incomplete Stroke Loss of power No response to energizing Fails to go to the failsafe position 38 All information herein is proprietary and confidential and may not be copied or reproduced without the expressed written consent of BRAY INTERNATIONAL, Inc. The technical data herein is for general information only. Product suitability should be based solely upon customer’s detailed knowledge and experience with their application. Bray Series 98 Pneumatic Scotch Yoke Actuator Operations and Maintenance Manual POTENTIAL MISUSE PREVENTION MEASURES Use in unintended conditions Refer to Introduction & Installation sections in this manual and supporting product documentation.If in doubt, contact manufacturer. Supply pressure greater than the actuator MOP to compensate for valve problems / incorrect selection. Use of appropriate pressure limiting devices in the supply pressure line to limit the pressure to actuator’s MOP is highly recommended and shall be ensured by the end user. Refer to the Maximum Operating Pressure sections in this manual. Actuator MOP is printed on the name plate for ready reference. Actuator subjected to temperatures out of permissible limits Refer to name plate and to General Specifications section for the limits of service temperature of the supplied trim. Ensuring the environmental conditions do not cause over the limit temperatures, is end user’s responsibility. Used with operating media that does not conform to specification Clean dry media of instrumentation grade only shall be supplied. Refer to Introduction section of this manual for specs. Lifting actuator-valve-accessories assembly using lifting lugs on actuator that are meant only for the actuator Read Warnings in the Installation section of this manual and on the stickers pasted on actuators. Use slings and tackles of sufficient capacity appropriately for lifting assemblies. Actuator weight is printed on the name plate for ready reference. Pressurizing cap end port on spring return actuators to overcome valve jamming or to compensate valve sealing problems Refer to Operation Guidelines section of this manual. Pressurizing pneumatic cylinder to aid spring may cause over load on valve stem and actuator parts resulting in damages to valve/ actuator. Do not substitute the vent provided on cap end port of cylinder with a pipe fitting. Maintenance by unauthorized personnel See Safety Information section.Do not permit anyone, other than qualified technicians who have read and fully understood the installation and maintenance instructions, to perform any maintenance/adjustments on the actuator. Maintenance without de-energizing Refer to Disassembly, Service & Reassembly of Modules section of this manual. Under no circumstances shall attempt be made to disassemble the pressure module or any fastener/ plug be loosened, without isolating supply pressure and venting the cylinder ports to atmosphere. Operating the actuator without end covers Never operate the actuator in partially disassembled condition or with the Spring Module / Pressure Module end plate removed. Altering the design to increase spring end load for compensating valve seating problems Strictly prohibit change of any component design or adding spacers to increase the spring end load. The Spring Rod thread engagement will be compromised and this can have disastrous consequences resulting in equipment damage and/or severe personal injury. RESIDUAL RISKS This document does not cover every detail about every version of the product described. It cannot take into account every potential occurrence in installation, operation, maintenance and use. End user shall devise and provide adequate protection against hazards such as: External Fire Impacts during installation/servicing Hazardous emissions when Natural Gas is operating media Contact with metal surfaces due to high/low ambient temperatures or conduction/ radiation Static electricity. All information herein is proprietary and confidential and may not be copied or reproduced without the expressed written consent of BRAY INTERNATIONAL, Inc. The technical data herein is for general information only. Product suitability should be based solely upon customer’s detailed knowledge and experience with their application. 39 All statements, technical information, and recommendations in this bulletin are for general use only. Consult Bray representatives or factory for the specific requirements and material selection for your intended application. The right to change or modify product design or product without prior notice is reserved. Patents issued and applied for worldwide. Bray® is a registered trademark of Bray International, Inc. © 2015 Bray International, Inc. All rights reserved. OM_S98PSYA_05_04_2015 Bray Controls A Division of Bray International, Inc. 13333 Westland East Blvd. Houston, Texas 77041 Tel: 281.894.5454 • www.bray.com