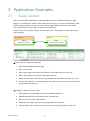
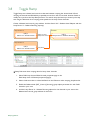
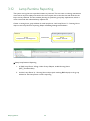
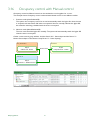
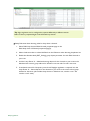
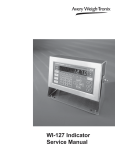
1
Philips LightMaster KNX DALI MultiMaster Dimmer Actuator Commissioning Guide Philips LightMaster KNX DALI MultiMaster Dimmer Actuator Commissioning Guide version 1.2 Document Revision: A Not to be reproduced without permission. Specifications are subject to change without notice. © 2013 Koninklijke Philips Electronics N.V. All rights reserved. LightMaster and associated logos are the registered trademarks of Koninklijke Philips Electronics N.V. All other trademarks and logos are the property of their respective owners. Philips LightMaster 2 Contents 1 System Information 1.1 Safety instructions 5 1.2 Verify hardware installation 6 1.3 Commissioning approach 6 1.4 Device LED indications 7 1.5 Plug-ins 7 1.6 References 8 1.7 Related documents 8 1.8 Technical support contacts 1.8.1 Phone 1.8.2 Email 1.8.3 Web 9 9 9 9 1.9 Conventions 9 2 LightMaster DALI MultiMaster Dimmer Actuator 2.6.5 2.6.6 5 11 2.1 Description 2.1.1 Connections 2.1.2 Version information 11 12 13 2.2 Configuration 2.2.1 Standard configuration 2.2.2 Configuration Menu 14 15 15 2.3 DALI MultiMaster device properties 2.3.1 Device identification 2.3.2 Product information 2.3.3 Startup settings 2.3.4 Count settings 2.3.5 DALI driver settings 16 16 16 17 17 18 2.4 DALI MultiMaster scenes 2.4.1 Scene count (Min=16, Max=32) 2.4.2 General 2.4.3 DALI Channels 19 19 19 20 2.5 DALI lamp drivers global channel properties 21 2.5.1 Channel control 21 2.5.2 Emergency testing 21 2.5.3 Group objects 22 2.5.4 DALI group objects 22 2.6 DALI lamp driver channel properties 2.6.1 General 2.6.2 DALI address 2.6.3 Channel control 2.6.4 Emergency testing Philips LightMaster 23 23 23 24 24 3 Group objects DALI group objects 25 25 2.7 Sensor device properties 2.7.1 Device identification 2.7.2 Product information 2.7.3 DALI address 26 26 26 26 2.8 Sensor applications 2.8.2 General 2.8.3 Motion control 2.8.4 Light control 2.8.5 Corridor hold-on 27 32 33 34 35 2.9 Sensor properties – Motion control 2.9.1 General 2.9.2 Timing 2.9.3 Scene actions 2.9.4 Action Chain Editor 2.9.5 Logic function 2.9.6 Group objects 36 36 36 37 38 39 39 2.10 Sensor properties – Light control 2.10.1 Closed loop 2.10.2 First offset row 2.10.3 Second offset row 2.10.4 Closed loop scenes 2.10.5 Open loop 2.10.6 Open loop bands 2.10.7 Action Chain Editor 2.10.8 Lux sensor 2.10.9 Calibration 2.10.10 Group objects 40 40 41 42 42 45 46 47 48 48 49 2.11 Calibrating the sensor 49 2.12 Sensor properties – Corridor hold-on 2.12.1 Corridor hold-on linking 2.12.2 General 2.12.3 Corridor hold-on objects 2.12.4 Action Chain Editor 51 53 54 54 56 2.13 Dry contact device properties 2.13.1 Device identification 2.13.2 Product information 2.13.3 DALI address 57 57 57 57 2.14 Dry contact switch properties – Switches 2.14.1 Action 2.14.2 Action Chain Editor 2.14.3 Group objects 58 58 60 61 2.15 Group object types 2.15.1 Lamp Driver X Objects 2.15.2 Sensor X Objects 2.15.3 Dry Contact Switch X Objects 62 62 65 72 2.15.4 Lamp Status Objects 2.15.5 Sector Y/Z Emergency Test Objects 2.15.6 Scene Table Start Index Object 2.16 Group Addresses 2.16.1 Group address linking 2.16.2 Group address example 74 75 76 77 77 78 2.17 DALI Configuration Wizard 80 2.17.1 DALI configuration toolbar 81 2.17.2 DALI lamp drivers and devices toolbar 82 2.17.3 Enumerate DALI network 83 2.17.4 Locate lamp driver channels and assign DALI addresses 84 2.17.5 Save configuration data 85 2.17.6 Maintenance Activities 86 3 Application Examples 87 3.1 Scene Control 87 3.2 On/Off Control 88 3.3 Absolute Level Control 90 3.4 Relative Level Control 91 3.5 Toggle Scene 93 3.6 Toggle On/Off 95 3.7 Toggle Level 96 3.8 Toggle Ramp 97 3.9 Ramp Up or Down and Stop 99 3.10 Ramp Up or Down, Stop and Program 101 3.11 Lamp Status and Lamp Level Monitoring 103 3.12 Lamp Runtime Reporting 104 3.13 Lamp Failure and Communication Failure Reporting 105 3.14 Emergency Ballast Testing and Test Failure reporting 106 3.15 Occupancy Control 109 3.16 Occupancy control with Manual control 111 3.17 Daylight Regulation 113 3.18 Daylight Regulation with Corridor rows 115 3.19 Occupancy Control with Daylight regulation 119 3.20 Daylight Override 121 3.21 Corridor Hold On 123 3.22 Cascaded Corridor Hold On 126 3.23 Background level for Open Plan 130 Philips LightMaster 4 1 System Information 1.1 Safety instructions Please read these instructions carefully before starting to work with the products. 1. Electrical devices may only be installed and assembled by specialist technicians. 2. The applicable accident prevention regulations must be observed. Failure to follow the instructions could result in electrocution, damage to the device, fire or other hazards. 3. Opening a device will render the warranty null and void. 4. Keep the device out of the range of sources of disruption. 5. Please maintain the proper ambient temperature for the device. 6. Avoid moisture, corrosive gases, strong vibration and dust. 7. Never allow liquid of any kind to come in contact with the device. 8. If the device nevertheless comes into contact with moisture or other liquids, shut the device off immediately and dry it completely before using again. 9. Cleaning the device; do not use any alcohol, petrol or petroleum-based cleaners and make sure not to touch connected contacts. 10. Check the cables regularly and replace damaged cables in good time. 11. For your own safety make sure every power connection is made via a fuse or an MCB (Main Control Block). 12. If any faults occur or for servicing you should contact Philips LightMaster. Philips LightMaster 5 1.2 Verify hardware installation Commissioning can only proceed once the integrity of the wiring has been verified. Ensure the installation observes the following: • Minimum distance between devices is observed with suitable position for proper ventilation. • The requisite safety devices (e.g. fuses, automatic safety devices, etc.) are connected in order to prevent excessive voltage. • Devices are connected to the bus. • KNX polarity is correct for each device. • Loads are connected within applicable lamp load limits. • Power supplies are connected. • You can locate the program button on each device and red program LED illuminates. 1.3 Commissioning approach After hardware installation has been verified, the next step is to commission the system by assigning individual addresses, group addresses and configuring the input and output parameters. 1. Select Device in ETS 2. Enter Individual address, Name, Description and Status in Properties Settings 3. Select Edit > Download All. ETS prompts to press the programming button. 4. Press programming button on the device (red program LED lights). 5. The Individual address is downloaded from ETS into the device (red LED goes out, when it is completed successfully). 6. Enter applicable group addresses and object properties. 7. Select Edit > Download Partial for each device. 8. Switch on mains voltage to the lighting load. 9. Test the operation of each device with the aid of the ETS software. 10. Check that all the system functions are operating correctly. Philips LightMaster 6 Device LED indications PROGRAMMING MODE OTLOADER APPLICATION/BO 1.4 BOOTLOADER MODE Non-Programming Mode Programming Mode KNX BUS FAULT PDBC120DALI-KNX MULTIMASTER FALSE GREEN ON (100%) TRUE RED FLASH ON 10% OFF 90% ORANGE ON (100%) FALSE TRUE APPLICATION MODE Non-Programming Mode 1.5 FALSE TRUE Programming Mode FALSE TRUE RED FLASH ON 90% OFF 10% reserved RED FLASH ON 10% OFF 90% RED ON (100%) RED FLASH ON 90% OFF 10% Plug-ins LightMaster uses the following ETS plug-in: Plug in Description PDBC120 Configuration Enables configuration of DALI MultiMaster controller. Includes product name, version information, device properties, application properties, preset scenes, lamp driver channels, Sensor properties, Dry Contact properties, Sensor Calibration and DALI enumeration and maintenance tasks. From the Parameters tab in ETS you can: • Enable fault logging • Select product language Philips LightMaster 7 1.6 References The Philips LightMaster range of products complies with international standards KNX (ISO/ IEC 14543-3) and EMC standard (electromagnetic compatibility/elektromagnetische Kompatibilität). For further information about KNX and ETS refer to the KNX Association website. http://knx.org/ It is assumed that readers have acquired specialist Lighting Control and KNX knowledge before commissioning LightMaster products. In depth technical knowledge is provided in the form of a faceto-face LightMaster training module available internationally from the Philips Controls Training Academy. 1.7 Related documents The following PDF documents are available for download via the web at: http://www.philips.com/knx http://www.lighting.philips.com/main/subsites/dynalite/index.wpd Application Guide Commissioning Guides Philips LightMaster Service Manual Installation Manuals 8 Data Sheets 1.8 Technical support contacts Contact Philips Global Systems, Lighting call desk for assistance with hardware or software questions: 1.8.1 Phone Call desk +800 7445 4775 Europe Call desk +61 2 8338 9899 Australia, New Zealand 1.8.2 Email [email protected] 1.8.3 Web http://www.philips.com/knx 1.9 Conventions Advanced parameters are shown in italics. Caution: highlights safety issues or where there is a risk of permanent damage to equipment. Note: highlights important factors you need to consider. Tip: highlights shortcuts, accepted conventions and best practice. Philips LightMaster 9 Intentionally Blank Philips LightMaster 10 Dimmer Actuators 2 LightMaster DALI MultiMaster Dimmer Actuator • PDBC120-DALI-KNX, LightMaster DALI MultiMaster Dimmer Actuator (up to 64 DALI channels + up to 16 MultiMaster devices), 1 x 20 A relay • PLOS-CM DALI, MultiMaster Sensor • PPMI4-DALI, MultiMaster Dry Contact Interface 2.1 Description The DALI MultiMaster Actuator is a fully featured DALI load controller supporting MultiMaster bidirectional communication to DALI lamps, sensors and dry contact Interfaces. DALI lamps can be individually controlled by the DALI short address or controlled in groups using the DALI group address in each of the light fittings. The Dimmer Actuator is able to zone and rezone logical DALI areas without changing network wiring. It can also receive network messages from the light fittings and devices. Multiple universes can be controlled together using additional Dimmer Actuators connected over KNX. The Dimmer Actuator includes a built in DALI power supply and 20A lighting power relay. A total of 64 DALI compatible lighting fittings (including emergency) may be controlled. The power relay automatically cuts power to the load when all lamps in the DALI universe have been dimmed to zero. In addition, up to 16 user interfaces (PLOS-CM-DALI and/or PPM14-DALI) may also be connected directly onto the DALI bus thereby simplifying and reducing the amount of control wiring required. Philips LightMaster 11 2.1.1 Connections DALI sensors and dry contact devices Total of 64 DALI luminaires broken up over 3 x RCDs Earth Neutral Active N SUPPLY L IN LOOP DA+ DADALI OUT RELAY RCD 20A MCB RCD RCD Key Active Neutral Earth KNX PROG SW - + DALI KNX KNX The PDBC120-DALI-KNX Dimmer Actuator allows lamps (DALI lamp driver channels) and input devices to be grouped in any configuration, thereby overcoming the 16 group and 16 scene limits of the DALI specification. For example, each of the five shaded zone in the diagram below indicates a separate area that can be controlled as a group (each DALI lamp can also be controlled individually). The diagram also shows a DALI multifunction sensor and programmable DALI Dry Contact Interface installed in each area. L-04 L-05 L-01 L-02 L-03 L-09 L-10 L-11 L-12 L-13 L-17 L-18 L-19 L-20 L-21 L-07 L-08 L-14 L-15 L-16 L-22 L-23 L-24 L-06 PDBC120-DALI-KNX Philips LightMaster L-25 L-26 L-27 L-28 L-33 L-34 L-35 L-36 L-29 L-37 L-30 L-38 L-31 L-39 L-32 L-40 L-41 L-42 L-43 L-44 L-45 L-46 L-47 L-48 L-49 L-50 L-51 L-52 L-53 L-54 L-55 L-56 L-57 L-58 L-59 L-60 L-61 L-62 L-63 L-64 12 The application table below lists the number of available group objects, group addresses and associations for the DALI MultiMaster Dimmer Actuator. Type PDBC120-DALI-KNX maximum number of group objects maximum number of group Addresses maximum number of associations 1559 2400 2400 2.1.2 Version information The product name, database version and firmware version can be found in both ETS or in the Configuration Plug-In. Check version information in ETS. 1. Right-click the device name in the devices list. 2. Select Info > Device Info. 3. Click in the right hand side panel to display the Device Information. Check version information in the configuration plug-in. 1. Right-click the device name in the devices list. 2. Select Plug-In > PDBC120 Configuration. 3. Tick the Advanced checkbox. 4. Scroll down to Product information on the DALI MultiMaster Device Properties page. Note: A device must be connected and have an individual address to read the version information. Philips LightMaster 13 2.2 Configuration All DALI MultiMaster Dimmer Actuator settings are configured using the configuration plug-in. Run the configuration plug-in: 1. Right-click the device name in the devices list. 2. Select Plug-in. 3. Select PDBC120 Configuration to open the configuration window. Tick the check box in the top right hand corner to reveal additional parameters. The button opens the DALI configuration Wizard. The button restores the plug-in configuration to the default settings. Philips LightMaster 14 2.2.1 Standard configuration When configuring the MultiMaster controller the configuration may be completed in two phases; Offline and Online. Offline configuration steps: Online configuration steps: 1. Enter MultiMaster properties a. b. c. d. 5. Download All KNX information Channel names Enable group objects Scene count and scene names Lighting scene levels and fade times 2. Select application and/or enter Sensor properties and Dry Contact Switch properties 3. Create Group addresses for each function in each area 6. Run Plug-In and enumerate DALI network 7. Locate lamp driver channels/devices and assign DALI short addresses 8. Save configuration data 9. Maintenance Activities 4. Link group addresses to input objects and output objects Note: During maintenance activities, if there are any modifications to the scene levels, or new KNX group addresses added, then Update DALI Scenes is a mandatory step when saving configuration data. 2.2.2 Configuration Menu The Configuration Menu can be expanded and collapsed using the and icons. Clicking expands the tree to reveal the configuration pages for the DALI lamp driver channels, the DALI MultiMaster Sensor and the DALI MultiMaster Dry Contact devices. The available configuration pages are: • • • • • • • • • • • Philips LightMaster DALI MultiMaster device properties DALI MultiMaster scenes DALI lamp drivers global channel properties DALI lamp driver channel properties Sensor device properties Sensor applications Sensor properties – Motion control Sensor properties – Light control Sensor properties – Corridor hold-on Dry contact device properties Dry contact switch properties – Switches 15 2.3 DALI MultiMaster device properties 2.3.1 Device identification Device identification properties are entered into the database only as a job reference. They are NOT downloaded into the device. 2.3.1.1 Device name Enter a local/site specific name for the device. 2.3.1.2 Location Enter device location information. 2.3.1.3 Description Enter relevant device function information. 2.3.1.4 KNX Individual address The physical address downloaded into the device by pressing the programming button. 2.3.1.5 Serial number (job only) Enter device serial number for future reference. 2.3.2 Product information The product information properties are read from the device and are not editable. • • • • • • • • • • • • • Philips LightMaster Product name Product category Product type Device code PCB assembly version PCB assembly revision Firmware major version Firmware minor version Firmware build number Bootloader major version Bootloader minor version Bootloader build number GTIN 16 2.3.3 Startup settings 2.3.3.1 Startup scene A startup scene for all lamp driver channels can be specified for when the device powers up. Default = last scene. 2.3.4 Count settings When using more than 10 MultiMaster devices in a universe the number of allowed DALI ballasts is reduced due to DALI power limitations (see table). Usually less than the maximum 64 addresses are installed due to circuit loading considerations and to leave spare addresses for future modifications. Maximum number of Sensors/Switches Maximum number of DALI lamp drivers 10 64 11 59 12 54 13 49 14 44 15 39 16 34 2.3.4.1 Device configuration Click the dropdown list to select the combination of DALI devices and DALI lamp drivers for this controller. 2.3.4.2 Lamp drivers count Enter the total number of DALI lamp drivers connected to this controller. 2.3.4.3 Sensor devices count Enter the total number of DALI sensors connected to this controller. 2.3.4.4 Dry contact devices count Enter the total number of DALI dry contacts connected to this controller. Philips LightMaster 17 2.3.5 DALI driver settings 2.3.5.1 Write DALI power on level to driver Tick the checkbox to specify the power on level. The power on level is written to the DALI lamp drivers during enumeration. If set to 255 (Don’t care) the ballast will return to the previous level before the power down state. The ballast will go to this level if no other power level telegram is received. 2.3.5.2 DALI Power on Level (%) This level is written to the DALI ballasts during enumeration. 2.3.5.3 Write DALI system failure level to driver Tick the checkbox to specify a DALI system failure level. The level in the DALI system failure level parameter will be used by DALI ballasts upon system failure. 2.3.5.4 DALI system failure level (%) The level in this parameter will be written to the DALI ballasts during enumeration. If set to 255 (Don’t care) the ballast remains at the level previous to the failure. This level is used when there is insufficient voltage on the DALI line. eg Short circuit/open circuit. 2.3.5.5 Automatic DALI driver status reporting Telegrams are automatically generated upon lamp status changes instead of just when requested. 2.3.5.6 DALI status polling interval (ms) The time period between polling the status of DALI lamp drivers. Philips LightMaster 18 2.4 DALI MultiMaster scenes Scene control is the preferred method for lighting control applications. Scenes can be setup to allow simultaneous recall of different levels for multiple channels by a single telegram. Default Scenes 1to 16 are already preconfigured for automatic application settings: • • • • • • • • • • Scene 1 Automatic Mode Scenes 2-8 Manual Override Scene 9 Smart Timer Active Scene 10 Switch-Off Warning Scene 11 Unoccupied Corridor Scene 12 Unoccupied Open Plan Scene 13 Unoccupied Cell Office Scene 14 Daylight Override Scene 15 Corridor Hold Time Out Scene 16 User Defined scene The levels for all scenes including the default scenes can be modified by clicking the Scenes tab and entering a percentage level for the DALI lamp driver channels for a particular area (group address). 2.4.1 Scene count (Min=16, Max=32) The number of scenes required for all areas controlled by the device. Default = 16. 2.4.2 General 2.4.2.1 Name Enter a meaningful name for the scene. The scene name can be based on the activity supported such as presentation scene, meeting scene, night time cleaning scene, welcome scene etc. 2.4.2.2 Exclude for all channels This parameter enables exclusion of specific lamp drivers from the scene. It provides a “don’t care” option to leave the level of a lamp driver unchanged from the current level. 2.4.2.3 Level for all channels This is a global parameter to specify the same value for all channel levels in the scene. 2.4.2.4 Fade time for all channels (s) This is a global parameter to specify the same value for all channel fade times in the scene. Philips LightMaster 19 2.4.3 DALI Channels The DALI channels scene editor allows you to set up all the scenes required in each area of your floor layout. Scenes can be easily added or changed as occupancy and room usage changes. Different fade times and lamp driver levels can be selected for each channel. Before configuring scenes, identify the areas where each DALI lamp driver channel belongs. It will be easy to identify each lamp driver channel if they have been given a meaningful area/channel name on the Channel properties page. A different range of scenes can then be specified for each area (group address). Note: It is not necessary to set all 64 lamp drivers levels for each scene. Only set the channel levels for lamp drivers that will have a common area (group address). 2.4.3.1 Index The DALI lamp driver channel number. 2.4.3.2 Name This parameter displays the name of the DALI lamp driver channel. The channel name can be edited on the Channel properties page. 2.4.3.3 Exclude Tick the checkbox to not alter the channel level when changing to this scene. 2.4.3.4 Level (%) Setup the individual levels for each channel in a scene. 2.4.3.5 Fade Time (s) If applicable, specify a different fade time for each channel in a scene. Philips LightMaster 20 2.5 DALI lamp drivers global channel properties 2.5.1 Channel control 2.5.1.1 DALI Minimum level (%) This parameter sets the minimum channel level as a percentage. This is a DALI parameter that is updated to the DALI lamp drivers during enumeration. 2.5.1.2 DALI Maximum level (%) This parameter sets the maximum channel level as a percentage. This is a DALI parameter that is updated to the DALI lamp drivers during enumeration. 2.5.1.3 Fade time when dimming (s) The fade time used for Absolute level dimming. 2.5.1.4 Fade time when switching (s) The fade time used for ON/OFF switching. 2.5.1.5 Fade time when ramping (s) The fade time used for Relative level dimming (ramping) for each ramping step. 2.5.2 Emergency testing 2.5.2.1 Emergency test sector Select Y or Z to include the channel in an emergency sector. Philips LightMaster 21 2.5.3 Group objects Click the checkboxes to enable the following group objects: • • • • • • • Scene (DPT_SceneControl) ON/OFF (DPT_Switch) Absolute level (DPT_Scaling) Relative level (DPT_Control_Dimming) Feedback ON/OFF (DPT_Switch) Feedback level (DPT_Scaling) Running hours (DPT_TimerPeriodHrs) 2.5.4 DALI group objects Click the checkboxes to enable the following group objects: • • • • Philips LightMaster Lamp failure (DPT_Alarm) Communication failure (DPT_Alarm) Emergency test failure (DPT_Alarm) Emergency test status (DPT_xxx) 22 2.6 DALI lamp driver channel properties Right-click the DALI lamp driver in the menu to Copy or Paste settings. 2.6.1 General 2.6.1.1 Channel name Enter a meaningful name for each DALI lamp driver channels to indicate the area and channel location. For example, Boardroom front 1, Corridor east 2, Training room 3 etc. 2.6.2 DALI address The DALI address information is displayed and can be modified using the DALI Configuration Wizard. • • • • Philips LightMaster Short address Random address Galaxy Universe 23 2.6.3 Channel control 2.6.3.1 DALI Minimum level (%) This parameter sets the minimum channel level as a percentage. This is a DALI parameter that is updated to the DALI lamp drivers during enumeration. 2.6.3.2 DALI Maximum level (%) This parameter sets the maximum channel level as a percentage. This is a DALI parameter that is updated to the DALI lamp drivers during enumeration. 2.6.3.3 Fade time when dimming (s) The fade time used for Absolute level dimming. 2.6.3.4 Fade time when switching (s) The fade time used for ON/OFF switching. 2.6.3.5 Fade time when ramping (s) The fade time used for Relative level dimming (ramping) for each ramping step. 2.6.4 Emergency testing 2.6.4.1 Emergency test sector Select Y or Z to include the channel in an emergency sector. Philips LightMaster 24 2.6.5 Group objects Click the checkboxes to enable the following group objects: • • • • • • • Scene (DPT_SceneControl) ON/OFF (DPT_Switch) Absolute level (DPT_Scaling) Relative level (DPT_Control_Dimming) Feedback ON/OFF (DPT_Switch) Feedback level (DPT_Scaling) Running hours (DPT_TimerPeriodHrs) 2.6.6 DALI group objects Click the checkboxes to enable the following group objects: • • • • Philips LightMaster Lamp failure (DPT_Alarm) Communication failure (DPT_Alarm) Emergency test failure (DPT_Alarm) Emergency test status (DPT_xxx) 25 2.7 Sensor device properties Right-click the DALI Sensor in the menu to Copy or Paste settings. 2.7.1 Device identification Device identification properties are entered as a job reference into the database. They are NOT downloaded into the device. 2.7.1.1 Device name Enter a local/site specific name for the device. 2.7.1.2 Location Enter device location information. 2.7.1.3 Description Enter relevant device function information. 2.7.1.4 Serial number (job only) Enter device serial number for future reference. 2.7.2 Product information The product information properties are read from the device and are not editable. • • • • • • • • Product name Product category Product type Device code Model ID Firmware major version Firmware minor version GTIN 2.7.3 DALI address The DALI address information is displayed and can be modified using the DALI Enumeration Wizard. • • • • Philips LightMaster Short address Random address Galaxy Universe 26 2.8 Sensor applications To enable faster commissioning the LightMaster Configuration Plug-in uses default scenes (1-16) and application scenarios (for example “Meeting Room”) to easily setup lighting applications. The Sensor applications page enables you to select an application scenario for each area to be controlled. The application will then automatically configure the associated properties for the sensor. The standard application scenarios are: 1. 2. 3. 4. 5. 6. Cell Office Work Island Meeting Room Corridor Lift Lobby Kitchen 7. 8. 9. 10. 11. Break Out Reception Stairway Toilet Other Once the application parameters are selected then the group addresses can be created and linked to the required input and output objects. If applicable, more unique applications can be configured by entering further details into the properties pages for each device. Note: All standard applications rely on Scene (DPT_SceneControl) and Absolute level (DPT_Scaling) control objects. These objects must remain enabled for applications to operate. If light > 150% of target level for 15 minutes, switch OFF. If light < 110% of target level, immediately switch ON. Recall scene Manual Override (Scene 2-8) Automatic Mode (Scene 1) Smart Timer Active (Scene 9) Functions X Application scenario + With corridor hold-on NoMotion 15 min Motion NoMotion < 30 Sec 25 min - Without corridor hold-on Light Control Closed loop active Light Control Open loop active Application X Motion Event active Switch-Off Warning (Scene 10) No-Motion Event active Corridor Notifier Active Corridor Timer Active NoMotion 30 sec Corridor Activator Active Application X Motion Recall Scene Recall Scene 4+ 5+ 8+ 9+ Motion / Recall Scene 1 Motion / Recall Scene 1 Unoccupied Corridor (Scene 11) Corridor Time out 5 min 2 6 7 Motion / Recall Scene 1 Unoccupied Open Plan (Scene 12) 4+ 5+ 8+ 9+ Peer/Child Activate 2 6 7 Peer/Child Activate Corridor Time out Application X Corridor Time Out (Scene 15) Standard applications flowchart Philips LightMaster 27 4589- 1 3 10 11 Unoccupied Cell Office (Scene 13) Corridor Time out 1 Light 3 Level 4- > 500 Lux 5Peer/Child 8Light Activate 9Level 10 <= 500 Lux 11 Daylight Override (Scene 14) The standard applications use the following default scene numbers to enable the selected behavior: • • • • • • • • • • Scene 1 Automatic Mode Scenes 2-8 Manual Override Scene 9 Smart Timer Active Scene 10 Switch-Off Warning Scene 11 Unoccupied Corridor Scene 12 Unoccupied Open Plan Scene 13 Unoccupied Cell Office Scene 14 Daylight Override Scene 15 Corridor Hold Time Out Scene 16 User Defined scene For example, to override motion sensing, send scene 2 to the Sensor – Motion Scene object. Note: Selecting an application modifies the settings on the Application page as well as on Sensor properties page. Reselecting any application resets all Sensor settings to the defaults for that application. The default levels used for LightMaster applications are: Scene Philips LightMaster Default Light Levels 1 100% 2 70% 3 40% 4 0% 5 80% 6 60% 7 50% 8 20% 9 100% 10 20% 11 100% 12 20% 13 0% 14 0% 15 0% 16 100% 28 2.8.1.1 Cell Office Application Motion control actions • On first motion, recalls Automatic Mode (Scene 1). • After 15 minutes of no-motion recalls Switch-Off Warning (fades in 2 sec. to 20%) for 30 seconds before recalling Unoccupied Cell Office and switching off). • Selection between auto/manual and on/off. • Optional Daylight Override (whole room). • Optional multi sensor area (enables Motion Timeout Sync group object). • Optional Smart Timer adds 10 minutes to timeout if motion is detected during Switch-Off Warning. Light control actions • Closed loop enabled in Automatic Mode, disabled in Manual Override scenes. • Two optional extra rows are configurable with dynamic offset compared to Row 1 (Default max offset Row 2 = 30% higher channel level, Row 3 = 50% higher channel level). • If there is enough light (> 150% of target level), the lights will switch OFF after a 15 minute delay, and ON when the light level drops (< 110% of target level). • If scene 1 is recalled the lights will fade to the level defined for scene 1 (Scene levels are configurable but default is 100%) before regulating to the required lux level. Regulation starts after 10 seconds and it will take several minutes to regulate from 100% to 1%. The switchon level is defined in the scene and does not depend on the current light sensor value. The same applies for corridor rows. • Corridor rows still regulate while window row is at min level. They reach min level when light level detected is 100%+offset * setpoint. • Daylight Switch-off for all rows is configurable (advanced application settings). Manual control actions • Scene 1 recalls automatic behaviour (motion and light). • Scene 2-8 are manual overrides. o o o o • Philips LightMaster No daylight regulation. Motion times out after 15 minutes (using Switch-Off Warning). After no-motion time out, triggering motion will recall scene 1, not the previous scene. Smart timer operates but it will go back to automatic behaviour, not to the manually selected scene. Default fade time between scenes is 2 seconds. 29 2.8.1.2 Work Island Application Actions differences compared to Cell Office • On no-motion timeout, the lights fade to background light level (scene 12). • If Corridor hold-on is selected, the lights will stay on background level until the whole open plan is vacated. • If Corridor hold-on is selected, the lights will switch on to background lighting level, when one of the other areas in the open plan becomes occupied. • If Corridor hold-on is not selected, the lights will stay on background level until they are switched off manually or by a time program. • Always auto on/off. • No daylight override. 2.8.1.3 Meeting Room Application Actions differences compared to Cell Office application • No daylight switching. • No daylight override. 2.8.1.4 Corridor Application Actions differences compared to Cell Office application • No daylight override. • No smart timer when Corridor hold-on is active. • If Corridor hold-on is selected, on no-motion timeout, lights will go to standby (scene 11) and will still stay on if any connected office areas are still occupied. • If Corridor hold-on is selected, the lights will switch on (scene 1) when one of the connected office areas becomes occupied. • If Corridor hold-on is selected, the Timeout can be configured (for a switch-off delay after the last connected office area is vacated). • If Corridor hold-on is not selected, the lights will switch off (scene 15) when motion times out. • It is possible to configure different levels for the Corridor hold-on scene (Scene 11) and for an occupied corridor scene (Scene 1). Philips LightMaster 30 2.8.1.5 Lift Lobby Application Actions are identical to Corridor application 2.8.1.6 Kitchen Application Actions are identical to Corridor application 2.8.1.7 Break Out Application Actions are identical to Corridor application 2.8.1.8 Reception Application Actions are identical to Corridor application 2.8.1.9 Stairway Application Actions are identical to Corridor application 2.8.1.10 Toilet Application Actions differences compared to Cell Office application • No light sensor options • Always auto on/off 2.8.1.11 Other Applications Actions are identical to Cell Office application Philips LightMaster 31 2.8.2 General 2.8.2.1 Application Select where the sensor will be used: 1. 2. 3. 4. 5. 6. 7. 8. 9. 10. 11. CellOffice WorkIsland MeetingRoom Corridor LiftLobby Kitchen BreakOut Reception Stairway Toilet Other The application in your specific area does not have to exactly match one of the above scenarios; it is simply an estimation of how the area is used. 2.8.2.2 Use motion sensor Click the checkbox to enable motion control functions. 2.8.2.3 Autogenerate on off actions Enables motion and no-motion actions to switch channels ON and OFF in addition to scene changes. Not compatible with Corridor hold-on. 2.8.2.4 Use light sensor Click the checkbox to enable light control functions. 2.8.2.5 Use corridor hold-on Click the checkbox to enable Corridor hold-on control functions. Philips LightMaster 32 2.8.3 Motion control The purpose of motion control is to automatically illuminate a space when it is occupied, and reduce or extinguish lighting when it is vacant to save energy. Any number of light fixtures may be controlled with motion control from a single sensor. 2.8.3.1 This motion sensor is used for Select how the motion sensor in the room will be used: • • • • Auto On and Auto Off Auto On and Manual Off Manual On and Auto Off Manual On and Manual Off 2.8.3.2 Switch off timer (s) Time period before going to the Switch-Off Warning scene. Default = 15 minutes. Min = 70 seconds. 2.8.3.3 Smart timer (s) Enable extended timeout. Extends the time before Switch-Off Warning to 25 minutes if motion is detected during the first switch-off warning. 2.8.3.4 Daylight override Used in Open loop light control. Disables motion detection when there is sufficient daylight by placing the area into a scene that does not use motion control actions. 2.8.3.5 Multiple sensor area Enables the Timeout Sync group object. These objects are linked when using multiple sensors in the one area to synchronize their timeout periods. Note: when using multiple sensors link the Timeout Sync objects for each sensor using the same group address. Philips LightMaster 33 2.8.4 Light control The objective of light control is to automatically maintain a specific lighting level appropriate for the tasks being conducted in the area under control. 2.8.4.1 Required lux level Closed loop light control setpoint. 2.8.4.2 Rows with offset Select the number of corridor offset rows (0, 1 or 2). These are lighting rows that are less affected by incoming daylight so are generally set to a higher light level than the lighting row nearest to the incoming daylight. 2.8.4.3 Allowed to switch off (lux) Enable daylight switch-off feature. 2.8.4.4 Switch off above (lux) Lighting switches OFF and stops regulating if the detected lux level is above this value. 2.8.4.5 Switch off delay (m) Delay in minutes when switching off the lighting after the Switch off above lux level is detected. 2.8.4.6 Switch off corridor rows Enables corridor row to be switched OFF when lux level is reached. Default = NOT switch off. This parameter is only visible when Rows with offset is set to greater than 0. 2.8.4.7 Allowed to switch on Lets the lighting recommence regulating upon reaching the Switch on below lux level. 2.8.4.8 Switch on below (lux) Lighting switches ON and starts regulating if the detected lux level is below this value. Philips LightMaster 34 2.8.5 Corridor hold-on 2.8.5.1 Area has a parent Enables the Notifier object for the area where the sensor is located. This parameter is only visible when the selected application is Corridor, Lift Lobby, Reception or Stairway. Philips LightMaster 35 2.9 Sensor properties – Motion control 2.9.1 General 2.9.1.1 Motion control enabled/disabled Click the checkbox to use motion control functions. 2.9.1.2 Scene wrap around Click the checkbox to use scene warp around. If a scene telegram is sent with a scene number greater than the total available scenes then the scene recalled will be based on the scene number sent minus a multiple of the total available scenes. For example, if there are 16 scenes and scene number 17 is sent then scene 1 is recalled or if scene 18 or 34 is sent then scene 2 is recalled etc. 2.9.1.3 Single sensor motion control Select when using a single sensor. Disables the timeout sync object. 2.9.2 Timing These are global parameters to set all motion control actions of the sensor. 2.9.2.1 Switch-off timer (s) Switch off timer is the no-motion timeout period. 2.9.2.2 Action delay period (s) Action delay is used to prevent the sensor immediately switching the lights back on when the user overrides the light level to OFF. It provides time for the user to leave the room. Action delay gets activated whenever a scene is recalled external to the sensor. Only when the sensor itself has recalled a scene (for example because of a no-motion event), the action delay is ignored and an event on the motion sensor will immediately be executed. 2.9.2.3 Resend inhibit delay (s) The period that must elapse between motion detection telegrams. Stops unnecessary triggering. Philips LightMaster 36 2.9.3 Scene actions 2.9.3.1 Count The number of scenes set for motion control actions. 2.9.3.2 Scene The scene number. 2.9.3.3 Enabled Enable or disable motion control actions for the scene. 2.9.3.4 Name Displays the name from the Scenes page. Defaults are: • • • • • • • • • • Scene 1 Automatic Mode Scenes 2-8 Manual Override Scene 9 Smart Timer Active Scene 10 Switch-Off Warning Scene 11 Unoccupied Corridor Scene 12 Unoccupied Open Plan Scene 13 Unoccupied Cell Office Scene 14 Daylight Override Scene 15 Corridor Hold Time Out Scene 16 User Defined scene Note: The no-motion timeout has a tolerance of up to 30 seconds from the configured value. This is only likely to be noticeable when the timeout is set to a very short duration. 2.9.3.5 Motion actions Click to open the Action Chain Editor. 2.9.3.6 No-motion actions Click Philips LightMaster to open the Action Chain Editor. 37 2.9.4 Action Chain Editor Enter actions for motion or no-motion. 1. Click to add a function from the menu. 2. Select the function in the Action Chain Editor window. 3. Enter the required parameters for the function or click to remove the function. 4. Enable the related group objects for the selected functions. • • • • Recall Scene Enter a scene number in the range 1 to 32. Recall On/Off Enter a target state. Recall Level Enter a target level as a percentage. Ramp Level Enter a direction (Increase or Decrease) and a step size as a percentage. 2.9.4.1 Use global timeout Use the value in the Timing, Switch-off timer parameter. 2.9.4.2 Switch off timer (s) Specify an individual Switch-off timer parameter value (no-motion timeout period). This parameter is only enabled when Use global timeout is unchecked. 2.9.4.3 Delay Select No Delay, Action Delay or Resend Inhibit for an individual scene. Philips LightMaster 38 2.9.5 Logic function 2.9.5.1 Logic input + motion = motion output The Sensor X - Motion Logic Input and Logic Output objects allow the sensor to perform a logical function (AND, OR, XOR) with an external 1 bit input and the internal motion sensor state (1=Occupied, 0=Unoccupied) to modify the motion output. 0 = FALSE, 1 = TRUE. 2.9.5.2 Logic input + motion = logic output The Sensor X - Motion Logic Input and Logic Output objects allow the sensor to perform a logical function (AND, OR, XOR) with an external 1 bit input and the internal motion sensor state (1=Occupied, 0=Unoccupied to modify the logic output. 0 = FALSE, 1 = TRUE. 2.9.5.3 Invert logic input Click the checkbox to invert the 1 bit logic input. 2.9.5.4 Invert motion input Click the checkbox to invert the 1 bit motion input. 2.9.6 Group objects Click the checkboxes to enable the following group objects: • • • • • • • • Philips LightMaster Scene (DPT_SceneControl) ON/OFF (DPT_Switch) Absolute level (DPT_Scaling) Relative level (DPT_Control_Dimming) Time out sync (DPT_TimePeriodSec) Logic input (DPT_Switch) Logic input (DPT_Switch) Enable/disable motion (DPT_Switch) 39 2.10 Sensor properties – Light control Note: Link the Light scene group objects and Light Absolute level group objects to the lighting channels for light control functions. 2.10.1 Closed loop Closed loop lighting control should be used where the sensor is located within the same area as the group under control. In this arrangement the control loop is effectively closed as the sensor will directly detect any changes in lighting level from the luminaires that it controls. Closed loop lighting control is generally recommended for enclosed office spaces. 2.10.1.1 Closed loop light control enabled/disabled Click the checkbox to use closed loop light control functions. 2.10.1.2 Scene wrap around Click the checkbox to use scene warp around. If a scene telegram is sent with a scene number greater than the total available scenes then the scene recalled will be based on the scene number sent minus a multiple of the total available scenes. For example, if there are 16 scenes and scene number 17 is sent then scene 1 is recalled or if scene 18 or 34 is sent then scene 2 is recalled etc. 2.10.1.3 Proceed if level unknown Regulation will commence from 50% if the level is unknown. If unchecked then closed loop regulation will not start at all if there is no reply to the READ command sent from sensor to the lamp drivers. 2.10.1.4 Dead zone (lux) Minimum change required from the setpoint before regulation will change the light level. For example, if the target level is 400 lux and the deadzone is 10 lux, there will be no regulation when the lux level is between 400 lux and 410 lux. Philips LightMaster 40 2.10.1.5 Decrement steps The 1 byte (0 to 254) decrement step size for changes in regulation. 2.10.1.6 Increment steps The 1 byte (0 to 254) increment step size for changes in regulation. 2.10.1.7 Update period (ms) Minimum time in seconds, between changes in regulation. 2.10.1.8 Switch-off delay (m) The delay used in minutes, when the lux level crosses the Switch-off above threshold. 2.10.2 First offset row Zones adjacent to windows receive more daylight than those closer to the core of the building. Corridor-Row Offset enables the brightness of luminaires near the window and those near the core areas to be regulated by a different factor so the corridor row luminaires have a greater output. The sensor uses a different offset adjustment at maximum level and minimum level to automatically scale the offset based on the amount of daylight entering the room. A variable offset ensures that the window row and corridor row lights are set to the same level when there is no natural light. The values for max offset, negative offset and zero offset level must be measured with a lux meter as they will depend on the location of the sensor, the penetration of light into the building and the distance between the window row and corridor row. 2.10.2.1 Max offset The maximum light level difference between the window row and the corridor row. 2.10.2.2 Negative offset Select this checkbox if the sensor is located near the corridor row. 2.10.2.3 Zero offset level There will be no offset if the light level at the offset row is above this value. Philips LightMaster 41 2.10.3 Second offset row 2.10.3.1 Max offset Maximum light level difference between the window row and the corridor row. 2.10.3.2 Negative offset Select this checkbox if the sensor is located near the corridor row 2.10.3.3 Zero offset level There will be no offset if the light level at the offset row is above this value. 2.10.4 Closed loop scenes Closed loop regulation may be defined for the first (primary), second and third lighting rows nearest to the incoming daylight. The two corridor rows have a configurable max-offset and zero-offsetlevel. (default = 30% and 50% offset). The Offset cannot be changed using dimming telegrams. Corridor rows still regulate while primary (window) row is at min level. They reach min level when light level detected by the sensor is (100% + max-offset) * setpoint. A negative offset is allowed (e.g. regulate middle row when the sensor is in the middle). Often the corridor rows will by default have a minimum output greater than zero, indicating to the user that the lighting is operational. It is however possible to configure corridor rows to be switched OFF completely. All rows can be configured to switch-off on a daylight threshold. Daylight override applies to all rows. Not just the window row. Min and max levels are configurable per row. Philips LightMaster 42 2.10.4.1 Count The number of scenes available for light control actions 2.10.4.2 Scene The sequence reference number for the scene used to control the closed loop regulation for a specific target level. 2.10.4.3 Primary Regulation enabled/disabled Click the checkbox to enable regulation for the first lighting row nearest to incoming daylight. 2.10.4.4 Name The scene name. 2.10.4.5 Target level (lux) The target lux level for the selected scene. 2.10.4.6 Primary – Min level (%) The regulated light level will not drop below this value. 2.10.4.7 Primary – Max level (%) The regulated light level will not go above this value. 2.10.4.8 Primary – Switch off allowed Click the checkbox to allow the regulation to switch the channel OFF when there is sufficient incoming light. 2.10.4.9 Primary – Switch off threshold (lux) Enter the lux level above which the channel will switch OFF. Philips LightMaster 43 2.10.4.10 Primary – Switch on allowed Click the checkbox to allow the regulation to switch the channel ON when there is insufficient incoming light. Once the light level drops below the Switch on threshold, the lights will switch back on immediately and daylight regulation will commence. 2.10.4.11 Primary – Switch on threshold (lux) Enter the lux level below which the channel will switch ON at the level specified in Primary – Min level. 2.10.4.12 Second – Regulation enabled/disabled Click the checkbox to enable regulation for the second lighting row nearest to incoming daylight. 2.10.4.13 Second – Min level The regulated light level will not drop below this value. 2.10.4.14 Second – Max level The regulated light level will not go above this value. 2.10.4.15 Second – Switch off allowed Click the checkbox to allow the regulation to switch the channel OFF when there is sufficient incoming light. 2.10.4.16 Second – Switch on allowed Click the checkbox to allow the regulation to switch the channel ON when there is insufficient incoming light. Once the light level drops below the Switch on threshold, the lights will switch back on immediately and daylight regulation will commence. 2.10.4.17 Third – Regulation enabled/disabled Click the checkbox to enable regulation for the third lighting row nearest to incoming daylight. 2.10.4.18 Third – Min level The regulated light level will not drop below this value. 2.10.4.19 Third – Max level The regulated light level will not go above this value. 2.10.4.20 Third – Switch off allowed Click the checkbox to allow the regulation to switch the channel OFF when there is sufficient incoming light. The Light On Off group object must be linked with the lighting channels. Philips LightMaster 44 2.10.4.21 Third – Switch on allowed Click the checkbox to allow the regulation to switch the channel ON when there is insufficient incoming light. Once the light level drops below the Switch on threshold, the lights will switch back on immediately and daylight regulation will commence. 2.10.5 Open loop Open loop lighting control should be used where the sensor is not located within the same area of the group under control. In this arrangement the control loop is open as the sensor will not directly detect any changes in lighting level from the luminaires that it controls. In this Light Control application mode, bands of lighting levels are defined with related actions. When the light level enters a band, the actions defined for that band are executed. 2.10.5.1 Open loop light control enabled/disabled Click the checkbox to use open loop light control functions. 2.10.5.2 Initial action on startup Click the checkbox to use the open loop light control action on device startup. 2.10.5.3 Update period (ms) The time period that must elapse before the action occurs. Tip: Setting a short period will increase responsiveness however generate higher network traffic. Conversely setting a longer period will decrease network traffic though reduce the responsiveness of control. 2.10.5.4 Click Philips LightMaster Active scene mask to enable/disable scenes where open loop control will be active. 45 2.10.6 Open loop bands 2.10.6.1 Count (Min=2, Max=10) Enter the number of lux bands required. 2.10.6.2 Band The Band sequence number. Band 1 = lowest lux band. 2.10.6.3 Low level band (lux) The low range of the lux band. 2.10.6.4 High level band (lux) The high range of the lux band. 2.10.6.5 Click Philips LightMaster Action to open the Action Chain Editor. 46 2.10.7 Action Chain Editor Enter actions for open loop bands. 1. Click to add a function from the menu. 2. Select the function in the Action Chain Editor window. 3. Enter the required parameters for the function or click to remove the function. 4. Enable the related group objects for the selected functions. • • • • Philips LightMaster Recall Scene Enter a scene number in the range 1 to 32. Recall On/Off Enter a target state. Recall Level Enter a target level as a percentage. Ramp Level Enter a direction (Increase or Decrease) and a step size as a percentage. 47 2.10.8 Lux sensor The multifunction sensor can also transmit the actual light level it is sensing to other network devices, for example a third party display or actuator with light level input. 2.10.8.1 Lux sensor enabled/disabled Click the checkbox to use the Lux sensor function. 2.10.8.2 Minimum update period (s) Minimum time for sensor to update the lux value onto the KNX bus. 2.10.8.3 Maximum update period (s) Maximum time for sensor to update the lux value onto the KNX bus. 2.10.8.4 Update when change is greater than (lux) Only update the Lux value to the KNX bus when the change is greater than this amount. 2.10.9 Calibration 2.10.9.1 Use default lux coefficient Select this to value to use the default lux coefficient. A lux level must still be entered in the calibration tool. 2.10.9.2 Lux calibration gradient coefficient Advanced setting that is automatically set when calibrating the sensor using the calibration plug-in. 2.10.9.3 Lux calibration offset coefficient Advanced setting that is automatically set when calibrating the sensor using the calibration plug-in. 2.10.9.4 Linearization scaler Advanced setting that is automatically set when calibrating the sensor using the calibration plug-in. Philips LightMaster 48 2.10.10 Group objects Click the checkboxes to enable the following group objects: • • • • • • • • 2.11 Scene (DPT_SceneControl) ON/OFF (DPT_Switch) Level row 1 (DPT_Scaling) Level row 2 (DPT_Scaling) Level row 3 (DPT_Scaling) Relative level (DPT_Control_Dimming) Lux (DPT_Value_Lux) Enable/disable (DPT_Switch) Calibrating the sensor For correct operation of the multifunction sensor in any lighting level control application it must be calibrated. When the sensor is installed in the typical mounting position on a ceiling facing down, the sensor actually measures the light reflected back to it from the surfaces below. However the objective of most lighting control applications is to maintain lighting levels at a specific horizontal working plane height ie on the top of a desk. Therefore if the surfaces below the sensor have a low reflectance, ie dark carpets etc, the level of light measured at the sensor will be quite different to that at the working plane height. The sensor can compensate for this difference by applying a factor to the measured light level to determine the actual light level. The relationship between the two levels is determined through calibration. Run Sensor Calibration Plug-in 1. Press to run the DALI Configuration Wizard: 2. Select the required Sensor from the sensor section in the topology tree (must be enumerated) 3. Click Calibrate in the DALI configuration wizard to calibrate the sensor. The Sensor Calibration dialogue box displays as shown below. Philips LightMaster 49 The Max Raw Value and Max Lux Value parameters define the upper limits of the graph within the page for display purposes only. Where illumination levels are high, raise the Max Raw Value and Max Lux Value scales to bring the graph traces within the visible range. The polling interval determines how often the lux level is updated. Calibrate Sensor 1. Allow the raw level (blue graph) to stabilize (become almost a straight horizontal line). 2. Using a suitable quality lux meter, measure the light level at the desired working plane height at a reference point in the area below the sensor. 3. Enter the measured value in the Reference Lux parameter 4. Click the Calibrate button 5. Before closing the calibration plug-in page, continue to view the displayed Lux trace to confirm calibration was effective. Providing there has been no change in the lighting level since the reference Lux level was measured and entered, the displayed Lux trace should promptly begin indicating a Lux level around the entered reference value. 6. Close the Sensor Calibration dialogue box Note: The title bar of the calibration plug-in page must indicate the sensor status as “Connected” and the graph trace must be stable before attempting calibration. Philips LightMaster 50 2.12 Sensor properties – Corridor hold-on Corridor hold-on enables lighting to be maintained in an area depending on the occupancy status of other areas. A typical application would involve maintaining lighting in a corridor when offices accessed by that corridor are occupied. Corridor hold-on is configured with Notifier, Activator and Timer Objects. These objects are linked together to create a dependency between child areas and parent areas. Child areas have a Notifier to signal occupancy to the parent area and the parent area has an Activator and a Timer to turn the lighting ON or OFF based on the occupancy signals. Child Area • Notifier Scene Control Object A 1 byte object used to detect the occupied and unoccupied scenes in the child area. • Notifier Occupancy Sync Object A 1 bit object used to signal occupancy to linked parent and child areas. Parent Area • Activator Scene Control Object A 1 byte object that operates during the unoccupied corridor hold-on scenes and performs an action when the Activator Occupancy Sync object detects occupancy in a child area. • Activator Occupancy Sync Object A 1 bit object used to detect occupancy in a linked child areas. • Timer Scene Control Object A 1 byte object that operates during the occupied corridor hold-on scenes and performs an action when the timeout period expires. • Timer Occupancy Sync Object A 1 bit object used to detect occupancy in a linked child areas and reset the timer countdown. A Notifier Scene Control object detects the occupied scenes in a child area which enables the Notifier Sync object to send occupancy signals to the linked Activator and Timer objects in the parent area and to the Notifier Sync objects in other child areas. If the Activator Scene Control Object is in an unoccupied scene it can perform an action to recall an occupied scene in the parent area. A Notifier Scene Control object detects unoccupied scenes in a child area and the Notifier Sync object stops sending occupancy signals to the linked Activator and Timer and other Notifier Sync objects allowing their timers to expire. If the Timer Scene Control Object is in an occupied scene and the timer expires then it can perform an action to recall an unoccupied scene in the parent area. Philips LightMaster 51 An area can be both a child and a parent. Although, each child area must have a switch/sensor, a parent area does not need to have its own switch/sensor. It is possible to create different dependencies for example, between work islands in an open plan office or to create a hierarchy of dependencies as illustrated below. Background Lighting Work Island 1 Work Island 2 Work Island 3 Child/Parent Child/Parent Child/Parent Work Island 4 Work Island 5 Work Island 6 Child/Parent Child/Parent Child/Parent Work Island 7 Work Island 8 Work Island 9 Child/Parent Child/Parent Child/Parent Parent Open plan background lighting Carpark Parent Lobby Child/Parent Corridor 1 Corridor 2 Child/Parent Child/Parent Office 1 Office 2 Office 3 Office 4 Office 5 Office 6 Child Child Child Child Child Child Cascaded corridor hold-on (four levels) Philips LightMaster 52 2.12.1 Corridor hold-on linking Once the relevant Corridor hold-on objects have been configured they must then be linked to each other and to the lamp drivers with matching group addresses to function correctly. For example: Sensor 1/1/1 Motion Scene Dimmer Sensor 1/1/1 Lamp Driver X - Scene 1/1/2 Motion Scene Notifier Dimmer 1/1/2 Lamp Driver X - Scene Notifier 1/1/1 Corridor Notifier Scene 1/1/2 Corridor Notifier Scene 1/5/1 Corridor Notifier Sync 1/5/1 Corridor Notifier Sync Cell Office 1 Sensor 1/1/3 Motion Scene Cell Office 2 Sensor Dimmer 1/1/4 Motion Scene 1/1/3 Lamp Driver X - Scene Dimmer 1/1/4 Lamp Driver X - Scene Activator Notifier 1/1/3 Corridor Notifier Scene 1/1/4 Corridor Activator Scene 1/5/2 Corridor Notifier Sync 1/5/2 Corridor Activator Sync Activator Timer 1/1/3 Corridor Activator Scene 1/1/4 Corridor Timer Scene 1/5/1 Corridor Activator Sync 1/5/2 Corridor Timer Sync Timer 1/1/3 Corridor Timer Scene 1/5/1 Corridor Timer Sync Corridor Philips LightMaster 53 Lobby 2.12.2 General Key point: The process of implementing corridor hold-on involves the following steps: 1 2 3 4 2.12.2.1 Specify occupied (Notifier) scenes for the child areas. Specify child unoccupied (Activator) scenes and child occupied (Timer) scenes for the parent area. Set parent area scene actions for when the child areas are occupied and unoccupied. Link child area objects to parent area objects. Corridor hold-on enabled/disabled Click the checkbox to use Corridor hold-on functions. 2.12.3 Corridor hold-on objects 2.12.3.1 Count (Min=3, Max=10) Total number of corridor hold-on objects required for the sensor. 2.12.3.2 Index Corridor hold-on object number. 2.12.3.3 Object type Select Notifier, Timer or Activator object. 2.12.3.4 Enabled/disabled Click the checkbox to enable the corridor hold-on object. Philips LightMaster 54 2.12.3.5 Resume at startup Click the checkbox to initiate the corridor hold-on function at startup. 2.12.3.6 Exclude scene range Click the checkbox to exclude the specified scene ranges (non-active scenes). Scene ranges can be specified to be included or excluded as active scenes. Default = included. 2.12.3.7 Scene range start Enter the lower scene number as the start of the range. 2.12.3.8 Scene range end Enter the higher scene number as the end of the range. The corridor hold-on object will be active in this scene range or NOT active in this scene range depending on the Exclude scene range parameter. 2.12.3.9 Scene range 2 start Enter the lower scene number as the start of the range. 2.12.3.10 Scene range 2 end Enter the higher scene number as the end of the range. The corridor hold-on object will be active in this scene range or NOT active in this scene range depending on the Exclude scene range parameter. 2.12.3.11 Scene range 3 start Enter the lower scene number as the start of the range. 2.12.3.12 Scene range 3 end Enter the higher scene number as the end of the range. The corridor hold-on object will be active in this scene range or NOT active in this scene range depending on the Exclude scene range parameter. 2.12.3.13 Timeout (s) Is available only for Notifier and Timer objects. • The Notifier Timeout it is the time period between Notifier sync telegrams. This resets all linked timers. Must be less than the Timer timeout value. • The Timer timeout period is reset each time it receives a Notifier sync telegram. Philips LightMaster 55 2.12.3.14 Actions Click to open the Action Chain Editor. Actions are not required for the Notifier object as it is a child object. Only the parent (Activator and Timer) objects are used to generate actions. 2.12.4 Action Chain Editor Enter actions for corridor hold-on. 1. Click to add a Recall Scene function from the menu. 2. Select Recall Scene in the Action Chain Editor window. 3. Enter the required scene number or click to remove the function. Note: The Notifier, Timer and Activator are scene centric objects that require DPT_SceneControl to function. Only Recall Scene actions should be used for Corridor hold-on. Philips LightMaster 56 2.13 Dry contact device properties Right-click the DALI Dry Contact in the menu to Copy or Paste settings. 2.13.1 Device identification Device identification properties are entered into the database only as a job reference. They are NOT downloaded into the device. 2.13.1.1 Device name Enter a local/site specific name for the device. 2.13.1.2 Location Enter device location information. 2.13.1.3 Description Enter relevant device function information. 2.13.1.4 Serial number (job only) Enter device serial number for future reference. 2.13.2 Product information The product information properties are read from the device and are not editable. • • • • • • • • 2.13.3 Product name Product category Product type Device code Model ID Firmware major version Firmware minor version GTIN DALI address The DALI address information is displayed and can be modified using the DALI Enumeration Wizard. • • • • Philips LightMaster Short address Random address Galaxy Universe 57 2.14 Dry contact switch properties – Switches The DALI Dry Contact Interface provides four programmable switch inputs that can be triggered by short or extended press and release actions. Each input can be independently configured for multiple Scene, ON/OFF, Absolute level or Relative level functions. Note: scene control is the recommended control method used in lighting control applications. Although, switches and sensors can recall up to 64 scenes, The DALI MultiMaster dimmer can only recall a maximum of 32 scenes. 2.14.1 Action 2.14.1.1 Switch actions Click the dropdown box to select the preconfigured functions for the switch: • • • • • • • • • Philips LightMaster No Function The action has no defined function. Recall Scene Recalls a scene number. Enter the Recall Scene number (range =1 to 32). Recall On/Off Switches the Channel. Enter the Target State, ON or OFF. Recall Level Recalls a channel level as a percentage. Enter the Target Channel Level (%). Ramp Up Increases the channel level by the step size. Enter the Step Size. Default = 100%. Ramp Down Decreases the channel level by the step size. Enter the Step Size. Default = 100%. Stop Ramp Stops the ramping functions. No parameters required. Toggle Scene The recalled scene alternates between two scenes. Enter the ON scene number and the OFF scene number (range =1 to 32). Toggle On/Off The switched state alternates between ON and OFF. No parameters required. 58 • • • • • • • 2.14.1.2 Toggle Level The recalled channel level alternates between a maximum level and a minimum level. Enter the Maximum level (%) and the Minimum level (%). Toggle Ramp The ramping direction alternates between Increasing and decreasing. Enter the Step Up Size and the Step Down Size. Default = 100%. Ramp Up and Stop Increases the channel level up by the step size or until stopped by the release action. Ramp Down and Stop Decreases the channel level down by the step size or until stopped by the release action. Ramp Up-Stop and program Increases the channel level up by the step size or until stopped by the release action and saves the final channel level(s) to the scene specified in the Program Scene parameter. Ramp Down-Stop and program Decreases the channel level down by the step size or until stopped by the release action and saves the final channel level(s) to the scene specified in the Program Scene parameter. Custom The actions are defined using the Action Chain Editor. Switch enabled/disabled Click the checkbox to enable the input switch. 2.14.1.3 Press action startup Trigger the press action on device startup. 2.14.1.4 Click 2.14.1.5 Click 2.14.1.6 Press action to open the Action Chain Editor. Release action to open the Action Chain Editor. Extended press action Extended Press is defined as greater than 1.5 seconds. Click 2.14.1.7 Click Philips LightMaster Release from extended press action to open the Action Chain Editor. 59 to open the Action Chain Editor. 2.14.2 Action Chain Editor Enter switch actions. 1. Click to add a function from the menu. 2. Select the function in the Action Chain Editor window. 3. Enter the required parameters for the function or click to remove the function. 4. Enable the related group objects for the selected functions. • • • • • • • • • • Philips LightMaster Recall Scene Enter a scene number in the range 1 to 32. Recall On/Off Enter a target state. Recall Level Enter a target level as a percentage. Ramp Level Enter a direction (Increase or Decrease) and a step size as a percentage. Stop Ramp No entry required. Program Scene Enter a scene number where the current levels will be saved. Toggle Scene Enter an on-scene number and an off-scene number. Toggle On/Off No entry required. Toggle Level Enter a minimum level and a maximum level as a percentage. Toggle Ramp Enter a step up size and a step down size. 60 2.14.3 Group objects Click the checkboxes to enable the following group objects: • • • • Philips LightMaster Scene (DPT_SceneControl) ON/OFF (DPT_Switch) Absolute level (DPT_Scaling) Relative level (DPT_Control_Dimming) 61 2.15 Group object types This section lists the KNX group objects. The group objects are used for the assignment of group addresses. Objects become visible when their function is enabled. 2.15.1 Lamp Driver X Objects 2.15.1.1 Lamp Driver X - Scene Function Type Size Priority Flags Input/Output DPT_SceneControl 8 bit Low C,R,W The Lamp Driver X - Scene object is used for recalling predefined scenes. It also supports saving levels of several lighting channels to a scene by the user. The most significant bit defines whether the scene is recalled or saved. 1=save, 0=recall. When receiving a scene number the channel will fade to the predefined light level using the configured fade time for this scene. If the light level for the recalled scene is set to Don’t care (0xFF) then the channel level will not change. 2.15.1.2 Lamp Driver X - On Off Function Type Size Priority Flags Input/Output DPT_Switch 1 bit Low C,R,W The Lamp Driver X – On Off object is used for switching the lighting channels.1=ON, 0=OFF. If the channel is OFF and an ON telegram is received then the lights will fade up to the previous level using the Fade time when switching value. 2.15.1.3 Lamp Driver X - Absolute Dimming Function Type Size Priority Flags Input/Output DPT_Scaling 8 bit Low C,R,W The Lamp Driver X - Absolute Dimming object provides a percentage dimming level for the lighting channels. When receiving a light level different from the current light level, the channel will fade to the new light level using the Fade time when dimming value. Philips LightMaster 62 2.15.1.4 Lamp Driver X - Relative Dimming Function Input/Output Type Size Priority Flags DPT_Control_Dimming 4 bit Low C,W The Lamp Driver X - Relative Dimming object is used for increasing or decreasing the channel level by a set percentage. It provides a way to dim the lights using a relative target level. One variable indicates an increase or decrease in brightness and the other indicates the step code which is converted to a percentage step size. Ramping up will stop after changing by the step size or at the maximum level configured for the channel. Ramping down will stop after changing by the step size or at the minimum level configured for the channel. The lights will make the relative change using the Fade time when ramping value set for the channel. It is not possible to switch lights off with this function. The most significant bit indicates the ramping direction. 1=increase, 0=decrease. The step code is a 3 bit value in the range 0 to 7. A zero code provides the stop ramp function. Step code 0 1 2 3 4 5 6 7 2.15.1.5 100% / Step size Break indication 1 2 4 8 16 32 64 Step size Stop ramp 100% 50% 25% 12.5% 6.25% 3.125% 1.5625% Lamp Driver X - Feedback On Off Function Type Size Priority Flags Output DPT_Switch 1 bit Low C,R,T The Lamp Driver X - Feedback On Off object provides a 1 bit value indicating the current switch state of the channel. 1=ON, 0=OFF. 2.15.1.6 Lamp Driver X - Feedback Level Function Type Size Priority Flags Output DPT_Scaling 8 bit Low C,R,T The Lamp Driver X - Feedback Level object provides an 8 bit value indicating the current light level of the channel. For example, when a scene number is recalled, the DPT_Scaling object will show the value (0-100%) changing during the fade. 2.15.1.7 Lamp Driver X - Running Hours Function Type Size Priority Flags Output DPT_TimePeriodHrs 16 bit Low C,R The Lamp Driver X - Running Hours object provides a 16 bit value equaled to the cumulative running hours of the channel. Philips LightMaster 63 2.15.1.8 Lamp Driver X - Lamp Failure Function Type Size Priority Flags Output DPT_Alarm 1 bit Low C,R,T This object allows the DALI network to provide feedback on the status of lamps using a standard one bit data type. The Dimmer Actuator regularly scans the DALI network for ballasts that have a lamp failure. A lamp failure should be detected within 10 minutes. Bit set to 1 means Lamp failure alarm, 0 means no alarm. 2.15.1.9 Lamp Driver X - Communication Failure Function Type Size Priority Flags Output DPT_Alarm 1 bit Low C,R,T This object allows the DALI network to provide feedback on the status of communication to ballasts using a standard one bit data type (DPT_Alarm). The Dimmer Actuator regularly scans the DALI network for ballasts that go missing, or have power cycled since their last light level update command. A non-communicating ballast should be detected within 10 minutes. Bit set to 1 = Lamp driver failure alarm, 0 = no alarm. 2.15.1.10 Lamp Driver X - Emergency Test Failure Function Type Size Priority Flags Output DPT_Alarm 1 bit Low C,R,T This output object enables Emergency test failure reporting to be performed for each lamp driver assigned to either emergency sector Y or Z. At the start of a test all Emergency Fixture Status group objects that are part of that sector are cleared. Results of the emergency test for the drivers that are part of the requested sector are updated in the 1 bit Emergency Test Failure object where 0 = Pass and 1 = Fail. 2.15.1.11 Lamp Driver X - Emergency Test Status Function Type Size Priority Flags Output DPT_LightMasterSpecific 8 bit Low C,R,T This output object allows Emergency test status to be identified for each lamp driver assigned to either emergency sector Y or Z. The Emergency Test Status object indicates the DALI emergency mode is set to running or not running. 1 = Test in progress, 0 = No test in progress. Philips LightMaster 64 2.15.2 Sensor X Objects 2.15.2.1 Sensor X – Motion Scene Function Type Size Priority Flags Input/Output DPT_SceneControl 8 bit Low C,R,W,T,U The Sensor X - Motion Scene object is used for recalling predefined scenes configured for lighting channels. When receiving a scene number the channel will fade to the predefined light level using the configured fade time for this scene. Only the lower 6 bits are used to recall scene numbers 1 to 64. 2.15.2.2 Sensor X – Motion Absolute Level Function Type Size Priority Flags Output DPT_Scaling 8 bit Low C,R,W,T,U The Sensor X - Motion Absolute Level object provides a percentage dimming level for the lighting channels. When receiving a light level different from the current light level, the channel will fade to the new light level using the Fade time when dimming value set for the channel. Philips LightMaster 65 2.15.2.3 Sensor X – Motion On Off Function Type Size Priority Flags Output DPT_Switch 1 bit Low C,R,W,T,U The Sensor X - Motion On Off object is used for switching the lighting channels.1=ON, 0=OFF. If the channel is OFF and an ON telegram is received then then the lights will fade up to the previous level using the Fade time when switching value set for the channel. 2.15.2.4 Sensor X – Motion Relative Level Function Type Size Priority Flags Output DPT_Control_Dimming 4 bit Low C,R, T The Sensor X – Motion Relative Level object is used for increasing or decreasing the channel level by a set percentage. It provides a way to dim the lights using a relative target level. One variable indicates an increase or decrease in brightness and the other indicates the step code which is converted to a percentage step size. Ramping up will stop after changing by the step size or at the maximum level configured for the channel. Ramping down will stop after changing by the step size or at the minimum level configured for the channel. The lights will make the relative change using the Fade time when ramping value set for the channel. It is not possible to switch lights off with this function. The most significant bit indicates the ramping direction. 1=increase, 0=decrease. The step code is a 3 bit value in the range 0 to 7. A zero code provides the stop ramp function. Step code 100% / Step size Step size 0 Break indication Stop ramp 1 1 100% 2 2 50% 3 4 25% 4 8 12.5% 5 16 6.25% 6 32 3.125% 7 64 1.5625% 2.15.2.5 Sensor X – Motion Timeout Sync Function Type Size Priority Flags Input/Output DPT_TimePeriodSec 16 bit Low C,R,W,T,U The Sensor X - Motion Timeout Sync object is used to synchronize the occupancy timeout period where multiple sensors are used together in one area. 2.15.2.6 Sensor X – Motion Logic Input Function Type Size Priority Flags Input DPT_Switch 1 bit Low C,R,W The Sensor X - Motion Logic Input object allows the sensor to perform a logical function with this external input and the internal motion sensor state (1=Occupied, 0=Unoccupied). This is a 1 bit input to the selected logical function (AND, OR, XOR). 0 = FALSE, 1 = TRUE. Philips LightMaster 66 2.15.2.7 Sensor X – Motion Logic Output Function Type Size Priority Flags Output DPT_Switch 1 bit Low C,R,W The Sensor X - Motion Logic Output object allows the sensor to perform a logical function with an external input and the internal motion sensor state (1=Occupied, 0=Unoccupied). This is a 1 bit output to the selected logical function (AND, OR, XOR). 0 = FALSE, 1 = TRUE. 2.15.2.8 Sensor X – Motion Enable Function Type Size Priority Flags Input DPT_Enable 1 bit Low C,R,W The Sensor X - Motion Enable object allows an external object to dynamically enable/disable the motion control function on the device. It uses a 1 bit data point type. 1=Enabled, 0=Disabled. The dynamic enable/disable does not persist. After a power up the configured enable/disable parameter will initialize the state. 2.15.2.9 Sensor X – Light Scene Function Type Size Priority Flags Input/Output DPT_SceneControl 8 bit Low C,R,W,T,U The Sensor X - Light Scene object is used for recalling predefined scenes configured for lighting channels. When receiving a scene number the channel will fade to the predefined light level using the configured fade time for this scene. Only the lower 6 bits are used to recall scene numbers 1 to 64. 2.15.2.10 Sensor X – Light Lux Level Function Type Size Priority Flags Output DPT_Value_Lux 16 bit Low C,R,T The Sensor X – Light Lux Level object makes the detected lux level value available on the network for monitoring purposes. This can be used by an external controller to control lamps or feedback this information to a BMS or a user interface display. The update frequency depends on the Lux sensor configured values. This is a two byte floating point value. Range is 0 to 670760 lux. Resolution 0.1 lux. Negative values are not allowed. 0x7FFFF = invalid data. Philips LightMaster 67 2.15.2.11 Sensor X – Light Absolute Level Row 1 Function Type Size Priority Flags Output DPT_Scaling 8 bit Low C,R,W,T,U The Sensor X - Light Absolute Level Row 1 object provides a percentage dimming level for lighting channels near incoming daylight. It is primarily used for closed loop light regulation. The sensor modifies the current light level to maintain a constant light level (setpoint) in the area below the sensor. It is essential that the sensor can see the effect of the light modification. Each lighting channel can have a different offset value from the setpoint depending on the location relative to the incoming daylight. When a scene is recalled in which closed loop regulation is enabled, the sensor will request the current light level as the starting level. While regulating the sensor can only regulate the light level between the min level (%) and max level (%) configured for that scene. 2.15.2.12 Sensor X – Light Absolute Level Row 2 Function Type Size Priority Flags Output DPT_Scaling 8 bit Low C,R,W,T,U The Sensor X - Light Absolute Level Row 2 object provides a percentage dimming level for lighting channels near incoming daylight. It is primarily used for closed loop light regulation. The sensor modifies the current light level to maintain a constant light level (setpoint) in the area below the sensor. It is essential that the sensor can see the effect of the light modification. Each lighting channel can have a different offset value from the setpoint depending on the location relative to the incoming daylight. When a scene is recalled in which closed loop regulation is enabled, the sensor will request the current light level as the starting level. While regulating the sensor can only regulate the light level between the min level (%) and max level (%) configured for that scene. 2.15.2.13 Sensor X – Light Absolute Level Row 3 Function Type Size Priority Flags Output DPT_Scaling 8 bit Low C,R,W,T,U The Sensor X - Light Absolute Level Row 3 object provides a percentage dimming level for lighting channels near incoming daylight. It is primarily used for closed loop light regulation. The sensor modifies the current light level to maintain a constant light level (setpoint) in the area below the sensor. It is essential that the sensor can see the effect of the light modification. Each lighting channel can have a different offset value from the setpoint depending on the location relative to the incoming daylight. When a scene is recalled in which closed loop regulation is enabled, the sensor will request the current light level as the starting level. While regulating the sensor can only regulate the light level between the min level (%) and max level (%) configured for that scene. 2.15.2.14 Sensor X – Light On Off Function Type Size Priority Flags Output DPT_Switch 1 bit Low C,R,W,T The Sensor X - Light On Off object is used for switching the lighting channels in open loop mode when light is above a certain threshold.1=ON, 0=OFF. If the channel is OFF and an ON telegram is received then then the lights will fade up to the previous level using the Fade time when switching value. Philips LightMaster 68 2.15.2.15 Sensor X – Light Relative Level Function Type Size Priority Flags Output DPT_Control_Dimming 4 bit Low C,R, T The Sensor X – Light Relative Level object is used for increasing or decreasing the channel level by a set percentage. It provides a way to dim the lights using a relative target level. One variable indicates an increase or decrease in brightness and the other indicates the step code which is converted to a percentage step size. Ramping up will stop after changing by the step size or at the maximum level configured for the channel. Ramping down will stop after changing by the step size or at the minimum level configured for the channel. The lights will make the relative change using the Fade time when ramping value set for the channel. It is not possible to switch lights off with this function. The most significant bit indicates the ramping direction. 1=increase, 0=decrease. The step code is a 3 bit value in the range 0 to 7. A zero code provides the stop ramp function. Step code 0 1 2 3 4 5 6 7 2.15.2.16 100% / Step size Break indication 1 2 4 8 16 32 64 Step size Stop ramp 100% 50% 25% 12.5% 6.25% 3.125% 1.5625% Sensor X – Light Enable Function Type Size Priority Flags Input DPT_Enable 1 bit Low C,R,W The Sensor X - Light Enable object allows an external object to dynamically enable/disable the light control function on the device. It uses a 1 bit data point type. 1=Enabled, 0=Disabled. The dynamic enable/disable does not persist. After a power up the configured enable/disable parameter will initialize the state. 2.15.2.17 Sensor X – Corridor Hold On Enable Function Type Size Priority Flags Input DPT_Enable 1 bit Low C,R,W,T The Sensor X - Corridor Hold On Enable object allows an external object to dynamically enable/disable the Corridor Hold On function on the device. It uses a 1 bit data point type. 1=Enabled, 0=Disabled. The dynamic enable/disable does not persist. After a power up the configured enable/disable parameter will initialize the state. Philips LightMaster 69 2.15.2.18 Sensor X – Corridor Timer Sync Function Type Size Priority Flags Input/Output DPT_Occupancy 1 bit Low C,R,W,T The Sensor X - Corridor Timer Sync object sends/receives a regular heartbeat to signal the occupancy state. 1=Occupied, 0=Unoccupied. It enables child areas to report their occupancy state to parent areas and to other child areas. Heartbeat notification period timers are restarted whenever a heartbeat signal is sent/received. Network traffic is reduced as only the area with the next occurring timeout needs to signal occupancy. The heartbeat signal only operates when an area is in a predefined active scene. Occupied scenes are the active scenes for the Corridor Timer. The Corridor Timer Sync object is a parent object. It is typically linked to the Corridor Activator Sync object in the same area and to the Corridor Notifier Sync objects in the child areas. 2.15.2.19 Sensor X – Corridor Timer Scene Function Type Size Priority Flags Input/Output DPT_SceneControl 8 bit Low C,R,W,T The Sensor X - Corridor Timer Scene object is used for recalling predefined scenes configured for lighting channels. When receiving a scene number the channel will fade to the predefined light level using the configured fade time for this scene. Only the lower 6 bits are used to recall scene numbers 1 to 64. Corridor Timer active scenes are configured to wait for vacancy. When child areas are all vacant then it recalls a suitable unoccupied scene for the parent area. The Corridor Timer Scene object is a parent object. It is typically linked to the Corridor Activator Scene object and to the lighting channel scene objects in the same area. 2.15.2.20 Sensor X – Corridor Activator Sync Function Type Size Priority Flags Input/Output DPT_Occupancy 1 bit Low C,R,W,T The Sensor X - Corridor Activator Sync object sends/receives a regular heartbeat to signal the occupancy state. 1=Occupied, 0=Unoccupied. It enables child areas to report their occupancy state to parent areas and to other child areas. Heartbeat notification period timers are restarted whenever a heartbeat signal is sent/received. Network traffic is reduced as only the area with the next occurring timeout needs to signal occupancy. The heartbeat signal only operates when an area is in a predefined active scene. Unoccupied scenes are the active scenes for the Corridor Activator. The Corridor Activator Sync object is a parent object. It is typically linked to the Corridor Timer Sync object in the same area and to the Corridor Notifier Sync objects in the child areas. Philips LightMaster 70 2.15.2.21 Sensor X – Corridor Activator Scene Function Type Size Priority Flags Input/Output DPT_SceneControl 8 bit Low C,R,W,T The Sensor X - Corridor Activator Scene object is used for recalling predefined scenes configured for lighting channels. When receiving a scene number the channel will fade to the predefined light level using the configured fade time for this scene. Only the lower 6 bits are used to recall scene numbers 1 to 64. Corridor Activator active scenes are configured to wait for occupancy. When a child area is occupied then it recalls a suitable occupied scene for the parent area. The Corridor Activator Scene object is a parent object. It is typically linked to the Corridor Timer Scene object and to the lighting channel scene objects in the same area. 2.15.2.22 Sensor X – Corridor Notifier Sync Function Type Size Priority Flags Input/Output DPT_Occupancy 1 bit Low C,R,W,T The Sensor X - Corridor Notifier Sync object sends/receives a regular heartbeat to signal the occupancy state. 1=Occupied, 0=Unoccupied. It enables child areas to report their occupancy state to parent areas and to other child areas. Heartbeat notification period timers are restarted whenever a heartbeat signal is sent/received. Network traffic is reduced as only the area with the next occurring timeout needs to signal occupancy. The heartbeat signal only operates when an area is in a predefined active scene. Occupied scenes are the active scenes for the Corridor Notifier. The Corridor Notifier Sync object is a child object. It is typically linked to the parent Corridor Timer Sync object, the parent Corridor Activator Sync object and to the other child area Corridor Notifier Sync objects. 2.15.2.23 Sensor X – Corridor Notifier Scene Function Type Size Priority Flags Input/Output DPT_SceneControl 8 bit Low C,R,W,T Corridor Notifier active scenes are configured to signal occupancy. When the child area is occupied then the heartbeat sync signal is sent as long as the child area remains in an active scene. The Corridor Notifier Scene object is a child object. It is typically linked to the child area Sensor Motion Scene object. Philips LightMaster 71 2.15.3 Dry Contact Switch X Objects 2.15.3.1 Switch X.X - Scene Function Type Size Priority Flags Input/Output DPT_SceneControl 8 bit Low C,R,W,T,U The Switch X.X - Scene object is used for recalling predefined scenes configured for lighting channels. When receiving a scene number the channel will fade to the predefined light level using the configured fade time for this scene. Only the lower 6 bits are used to recall scene numbers 1 to 64. 2.15.3.2 Switch X.X – On Off Function Type Size Priority Flags Input/Output DPT_Switch 1 bit Low C,R,W,T,U The Switch X.X – On Off object is used for switching the lighting channels.1=ON, 0=OFF. If the channel is OFF and an ON telegram is received then then the lights will fade up to the previous level using the Fade time when switching value. 2.15.3.3 Switch X.X – Absolute Level Function Type Size Priority Flags Input/Output DPT_Scaling 8 bit Low C,R,W,T,U The Switch X.X - Absolute Level object provides a percentage dimming level for the lighting channels. When receiving a light level different from the current light level, the channel will fade to the new light level using the Fade time when dimming value. Philips LightMaster 72 2.15.3.4 Switch X.X – Relative Level Function Input/Output Type Size Priority Flags DPT_Control_Dimming 4 bit Low C,R, T The Switch X.X - Relative Level object is used for increasing or decreasing the channel level by a set percentage. It provides a way to dim the lights using a relative target level. One variable indicates an increase or decrease in brightness and the other indicates the step code which is converted to a percentage step size. Ramping up will stop after changing by the step size or at the maximum level configured for the channel. Ramping down will stop after changing by the step size or at the minimum level configured for the channel. The lights will make the relative change using the Fade time when ramping value set for the channel. It is not possible to switch lights off with this function. The most significant bit indicates the ramping direction. 1=increase, 0=decrease. The step code is a 3 bit value in the range 0 to 7. A zero code provides the stop ramp function. Step code 0 1 2 3 4 5 6 7 Philips LightMaster 100% / Step size Break indication 1 2 4 8 16 32 64 Step size Stop ramp 100% 50% 25% 12.5% 6.25% 3.125% 1.5625% 73 2.15.4 Lamp Status Objects 2.15.4.1 DALI Lamp Status Request Function Type Size Priority Flags Input DPT_(0xFE03) 8 bit Low C,R,W The DALI Lamp Status Request object enables the user sends a request to find the last known status of a lamp. The result of the request is reported by the DALI Lamp Status Report object. No DALI query is initiated. The object has a one byte data type. • Bits 0-5 represent the DALI channel address (0-63). • Bits 6-7 Not applicable. 2.15.4.2 DALI Lamp Status Report Function Type Size Priority Flags Input/Output DPT_(0xFE04) 8 bit Low C,R,W,T The DALI Lamp Status Report object may be used to detect failures in the DALI network. When an alarm is detected it will cause an unsolicited update of the DALI Lamp Status Report object. When the failure is fixed it will also cause an unsolicited update on the DALI Lamp Status Report object. This object can be linked to a BMS to report lamp or lamp driver failures. When writing to this object: • Bits 0-5 represent the DALI channel address (0-63) • Bits 6 and 7 must be set to 1, otherwise request will be ignored Object responds with: • Bits 0-5 represent the DALI channel address (0-63) • Bit 6 represents Lamp failure (1 = Lamp failure alarm, 0 = no alarm) • Bit 7 represents Lamp driver failure (1 = Lamp driver failure alarm, 0 = no alarm) Philips LightMaster 74 2.15.5 Sector Y/Z Emergency Test Objects DALI Emergency ballasts have relays that allow the user to switch off the maintained live to the emergency inverters so they can be tested if they switch to battery operation. This allows the user to visually check if the system is in emergency mode. The Dimmer Actuator supports DALI inverters that adhere to the DALI 202 specification for selfcontained emergency lighting. The Dimmer Actuator does not hold the testing parameters. They are stored in the DALI ballasts according to EIC62385-202. During enumeration the Dimmer Actuator recognizes DALI emergency inverters and flags them in the Dimmer Actuator memory. Each lamp driver has the following two emergency test reporting (DPT_Alarm) output objects: • Lamp Driver X - Emergency Test Failure • Lamp Driver X – Emergency Test Status Note: Some DALI ballasts support a pending state if they are not ready to start the test immediately. This feature is not supported by the Philips KNX controllers. If a ballast goes into the test pending state the test on this ballast is cancelled and a failure is reported. 2.15.5.1 Sector Y/Z Emergency Functional Test Start Function Type Size Priority Flags Input/Output DPT_Start 1 bit Low C,R,W This object starts and stops the Sector Y/Z Emergency Functional Test. When lamp drivers have been marked as belonging to an emergency sector (Y or Z) then they are included in the emergency test. Testing can be performed on either of the two sectors. In this test the system is placed in emergency mode for a short time to see if the lamps switch to battery power. A Sector Y or Z emergency functional test is started using the 1 bit start/stop object). As long as the test is running the start/stop object is set to “start”. When the Start/Stop emergency functional test object receives a Start test telegram the emergency test opens and closes the emergency test relays in the DALI ballasts. When the object receives a Stop test telegram all tests that are in progress are cancelled. While an emergency functional test is running the lights can still be switched ON and OFF using button panels. At the completion of the test, the Dimmer Actuator will recall the scene that was active before the emergency test. Philips LightMaster 75 2.15.5.2 Sector Y/Z Emergency Duration Test Start Function Type Size Priority Flags Input/Output DPT_Start 1 bit Low C,R,W This object starts and stops the Sector Y/Z Emergency Duration Test. When lamp drivers have been marked as belonging to an emergency sector (Y or Z) then they are included in the emergency test. Testing can be performed on either of the two sectors. In this test the system is placed into emergency mode to test the time period provided under battery power for a period as defined in the DALI inverter (default 90 minutes). A Sector Y or Z emergency duration test is started using the 1 bit start/stop object). As long as the test is running the start/stop object is set to “start”. When the last ballast completes its emergency test the state of the Start/Stop emergency test group object for the requested sector will be automatically set to stop. Different ballasts might have different durations. The group object is updated only when the last driver in the sector is finished. While an emergency test is running all outputs remain ON regardless of internal and external events. At the completion of the test, the Dimmer Actuator will recall the scene that was active before the emergency test and lighting will be controllable again. 2.15.6 Scene Table Start Index Object Function Type Size Priority Flags Input/Output DPT_SceneControl 8 bit Low C,R,W The Scene Table Start Index object enables you to perform a preset offset function by sending a one byte index starting number (DPT_SceneControl) to this input object. Scene numbers will then commence at the index starting number. The index starting number applies to all recall scene telegrams sent to the lamp drivers. For example, if the start index is set to eight then a recall scene 1 telegram will recall scene 8. Philips LightMaster 76 2.16 Group Addresses 2.16.1 Group address linking A group address is a two-byte logical address used for all bus communication in normal operating mode. To operate Lamp drivers/Output channels together, link them to a group address. Each DALI lamp driver channel can receive telegrams from many group addresses. Group address can be represented in three different ways: • • • three digits two digits one digit x/y/z x/z x (x: 0~31 / y: 0~7 / z: 0~255 ) (x: 0~31 / z: 0~2047 ) ( x: 0~65535) Using the customer requirements and reflected ceiling plan, you can identify the lighting functions and channels (lamp groups) required in each area. The example illustrates group addresses for typical lighting functions using three-digit addressing. Tip: In the plug-in make sure you name each Lamp driver/Output channel according to the area where it will be located and record this information to help identify the lamp driver objects. Link DALI lamp drivers to group addresses. 1. Add a Main Group for your office. 2. Add Middle Groups for each type of lighting control. 3. Add a Group Address for every group of lamp drivers that you want to control together. 4. Add an additional group address in each area if you want to control all the lamp drivers in the area together or to control multiple groups. 5. Under each type of lighting control, link the matching lamp driver objects to the group addresses for each channel (lamp group) within an area. Group addresses must be linked to the input and output group objects of each device. Once the lamp drivers have been linked to the group addresses then the Sensor/Switch objects can be linked. Each group address can only be used with one Datapoint type. After group addresses have been linked to all inputs and outputs the KNX application can be downloaded to the controller. Philips LightMaster 77 2.16.2 Group address example The linked group addresses enable each input device (such as an occupancy sensor or button) to trigger an action that sends a telegram via the linked group address to specific DALI lamp drivers to perform the recalled function. The table below shows a typical configuration: GROUP ADDRESSES OFFICE FUNCTIONS DIMMER GROUP OBJECTS DATA POINT TYPES 0/1/0 ALL AREAS FUNCTIONS All areas scenes Lamp Driver/Output channel 1...37 Scene 1 byte scene number 0/2/0 All areas switching Lamp Driver/Output channel 1...37 On Off 1 bit On/Off 0/1/1 RECEPTION FUNCTIONS Reception scenes Lamp Driver 5, 31...33 Scene 1 byte scene control 0/1/2 NORTH CORRIDOR FUNCTIONS North corridor scenes Lamp Driver 26...30 Scene 1 byte scene control 0/1/3 MEETING ROOM FUNCTIONS Meeting room scenes Lamp Driver 4 Scene 1 byte scene control 0/1/4 MEETING + PRESENTATION FUNCTIONS Meeting + Presentation scenes Lamp Driver 2...4 Scene 1 byte scene control 0/4/4 Meeting + Presentation relative levels Lamp Driver 2...4 Relative Dimming 4 bit dimming control 0/1/5 PRESENTATION ROOM FUNCTIONS Presentation room scenes Lamp Driver 2...3 Scene 1 byte scene control 0/4/5 Presentation room relative levels Lamp Driver 2...3 Relative Dimming 4 bit dimming control 0/4/6 Presentation room front relative levels Lamp Driver 2 Relative Dimming 4 bit dimming control 0/4/7 Presentation room rear relative levels Lamp Driver 3 Relative Dimming 4 bit dimming control 0/1/8 BOARDROOM FUNCTIONS Boardroom scenes Lamp Driver 1,6 Scene 1 byte scene control 0/2/8 Boardroom switching Lamp Driver 1,6 On Off 1 bit On/Off 0/3/9 Boardroom channel 1 absolute levels Lamp Driver 1 Absolute Dimming 1 byte percentage 0/3/10 Boardroom channel 2 absolute levels Lamp Driver 6 Absolute Dimming 1 byte percentage 0/1/11 SMALL OFFICE FUNCTIONS Small Office scenes Lamp Driver 11 Scene 1 byte scene control 0/1/12 BREAKOUT AREA FUNCTIONS Breakout area scenes Lamp Driver 16 Scene 1 byte scene control 0/1/13 WEST CORRIDOR FUNCTIONS West Corridor scenes Lamp Driver 21...25 Scene 1 byte scene control 0/2/14 STAFF AMENITIES FUNCTIONS Staff Amenities switching Lamp Driver 34...35 On Off 1 bit On/Off 0/4/15 TOILETS FUNCTIONS Toilets switching Lamp Driver 36...37 On Off 1 bit On/Off Philips LightMaster 78 Reflected ceiling plan example Note: The DALI lamp driver channels connected to the dimmer are called physical channels. The lamp groups that share a common group address are called logical channels. Philips LightMaster 79 2.17 DALI Configuration Wizard All DALI functions can be configured using the DALI Configuration Wizard. Press to run the DALI Configuration Wizard: The DALI Configuration Wizard displays the DALI Lamp Drivers and Devices grouped by universe. The Configuration Wizard Page displays the following information columns: • • • • • • • • • • • Name DALI Address Status (Online, Offline or Unknown) Galaxy DALI Long Address Serial Number Type • • Device Code Firmware Version Group Address Relay (ballasts connected through controller’s power relay) DALI Min Level DALI Max Level The Lamp Driver/Device icons in the main configuration page will show one of the following states: An enumerated DALI ballast/device assigned to a DALI lamp driver channel or device in the project. An enumerated DALI ballast/device NOT assigned to a DALI lamp driver channel or device in the project. An un-enumerated DALI ballast/device. Philips LightMaster 80 2.17.1 DALI configuration toolbar The following buttons are located on the DALI Configuration Toolbar below the main configuration page. Enumerate All/Devices/Lamp Drivers Triggers the enumeration process. Enumeration discovers the DALI addresses for each DALI item in the universe. Clicking the dropdown arrow allows enumeration to be performed for all items, only devices or only lamp drivers (ballasts). Reset Enumeration All/Devices/Lamp Drivers Resets the whole DALI universe. Clears the enumeration data from the ballasts/devices in the universe. Clicking the dropdown arrow allows reset enumeration to be performed for all items, only devices or only lamp drivers (ballasts). Read from Device Reads the enumeration data from the controller. Save to Device saves modified enumeration data to the controller. Update DALI Scenes Creates DALI scenes and groups based on the KNX group addressing and scene values and writes the data to the DALI ballasts. Query Status All Queries the status of all ballasts/devices after enumeration. • Unknown the current state of the ballast/device with this short address is unknown to the controller • Online the ballast/device is online and communicating with the controller • Offline the ballast/device is offline and not communicating with the controller Sign-On Devices/ Clear Sign On Enables manual identification of DALI MultiMaster dry contact devices. It used in place of flashing to locate devices (flashing is not available for dry contact devices). Click the icon then press the service switch on the device. The sign-on icon is then displayed next to the corresponding device. Finish Closes the Configuration Wizard Window Philips LightMaster 81 2.17.2 DALI lamp drivers and devices toolbar Selecting an enumerated ballast/device enables/disables specific buttons on the DALI Lamp Driver and Devices Toolbar above the main configuration page. Flash and Stop Flash Flash and Stop Flash are used to find the physical location of lamps and devices in a project by sending messages to alternate levels between 0% and 100%. This information is then used to determine group address links for commissioning. Query Status Queries the status of the selected ballast(s)/device(s). You can multi-select ballasts to query them at the same time. The status can be: • Unknown the current state of the ballast/device with this short address is unknown to the controller • Online the ballast/device is online and communicating with the controller • Offline the ballast/device is offline and not communicating with the controller Remove/ Unremove Removes or restores the ballast/device from the controller memory. Confirm/ Unconfirm Allows you to record a tick or question mark to indicate that the identity of the Lamp Driver Channel/Device is confirmed or unconfirmed. Confirms the correct DALI address has been assigned after flashing/signing-on. Calibrate Runs the sensor calibration wizard (Refer to the Sensor Calibration topic). Show Log Opens a log pane in the lower part of the window. Clicking the dropdown arrow allows Show Log, Start Log, Stop Log, Hide Log, Clear Log actions to be performed. Philips LightMaster 82 2.17.3 Enumerate DALI network DALI Ballasts/Devices require enumeration before they can be placed into operation. Enumeration is a process where the controller assigns DALI addresses to all the ballasts/devices connected to the DALI network. The DALI controller checks for any known ballasts/devices before enumerating and masks them from the enumeration process. Each ballast/device remembers its own DALI address and the controller remembers the addresses for all ballasts/devices. Click Enumerate All. If more ballasts/devices appear than are installed, click Reset Enumeration All to clear the enumeration data from the ballasts/devices and then click Enumerate All again. After enumeration, the Configuration Wizard updates the ballast/device icons and assigns the DALI addresses to the MultiMaster DALI lamp driver channels or MultiMaster Devices. The channel names are listed in lamp driver number order. This information is held in the ETS project and in the MultiMaster controller. Note: A newly installed or replaced ballast may create a short address conflict. A short address conflict is when two or more DALI ballasts have the same short address. In this situation ballast(s) that have the same short address must be re-enumerated to have unique addresses. Philips LightMaster 83 2.17.4 Locate lamp driver channels and assign DALI addresses Flash and Stop Flash are used to find the physical location of ballasts and sensors in a project by sending messages to alternate levels between minimum level and maximum level. This information is then used to determine DALI lamp driver channels assignments and group address links for that area. Tip: Ensure your channels are named according to their areas before assigning short addresses. The enumeration process randomly assigns DALI short addresses to DALI lamp driver channels and devices. This will most likely not be in the order that you have chosen for your floor layout. The DALI addresses can be swapped to match the correct DALI lamp driver channels/devices. Locate lamp driver channels/devices and assign DALI addresses: 1. Select the lamp driver channel/device in the configuration window. 2. Click Flash to identify the lamp driver channel/device location. (use the sign-on procedure below for DALI dry contact devices). 3. Find the correct channel/device name that belongs to this DALI Address and drag it to the flashing channel. The flashing moves to the correct channel/device name and the swap assignment icon and new short address is displayed (previous assignment is shown in brackets). 4. Click the Confirm icon for the channel/device that is now flashing to confirm that it correctly assigned. 5. Click Stop Flash. 6. Click Save To Device to resolve the assignments. This will refresh the window and remove the swap assignment icons. This can be performed at any time during the assigning procedure. 7. Repeat the assigning procedure until all DALI addresses are assigned to the correct DALI lamp driver channels/devices. 8. Once all addresses have been correctly assigned Click Update DALI Scenes. DALI Sensor devices have a red LED that can be flashed. However, DALI Dry contact devices do not have a built in LED. Both DALI devices have a service switch that can be used to sign-on the device. If the service switch is not accessible devices can be identified by serial number. Locate a DALI Dry Contact or Sensor device: 1. Click Sign-On Devices. 2. Press the service switch on the Dry contact or Sensor. 3. The DALI Configuration Wizard displays the device. Philips LightMaster 84 sign-on icon next to the corresponding 2.17.5 Save configuration data When saving the configuration data for a DALI MultiMaster system the data is saved in three steps. 1. Download Application (or download partial) to the Controller – KNX interface 2. Save to Device to the Controller – DALI interface 3. Update DALI Scenes to the DALI Ballasts The Controller manages the translation between DALI group addressing and KNX group addressing. Step 1 Step 2 Step 3 Controller - KNX interface Controller - DALI interface DALI Ballasts Save to Device: Assigns DALI addresses to DALI Lamp Driver channels and devices Update DALI Scenes: Writes the KNX group addressing and scene values to the DALI ballasts Download Application: Writes the KNX application to the controller Philips LightMaster 85 2.17.6 Maintenance Activities DALI Network configuration and address assignments are easily maintained using the DALI Configuration Wizard. The Wizard provides a simple step by step method for configuring and addressing DALI ballasts/devices connected to each universe. The DALI Configuration Wizard can be used for the following maintenance tasks: • • • • Add Ballasts/Devices Swap Ballasts/Devices Add Ballasts/Devices Remove Ballasts/Devices Replace Ballasts/Devices Remove Ballasts/Devices 1. To add new DALI Ballasts/Devices first enumerate the universe by clicking the Enumerate button. 1. To determine the online status of all DALI Ballasts/Devices click the Query Status All button. 2. When enumeration is complete any new ballasts/devices found will appear in the list with the or image next to them. 2. To remove a DALI Ballast/Device, select it and click the Remove button. An image will be shown to indicate it has been marked for removal. 3. New ballasts/devices can be identified by selecting them and clicking the Flash button. They can then be swapped to a different DALI lamp driver channel by clicking and dragging them onto the other channel. 3. When finished click the Save to Device button to remove all marked Ballasts/Devices from the DALI controller. 4. To link a group address to a new ballast/device, click the Link button. Swap Ballasts/Devices 1. DALI addresses can be swapped to a different Ballast/Device by dragging them onto another Ballast/Device. 2. When finished click the Device button. Save to Note: To factory reset a Dimmer controller you need to click Reset Enumeration in the Plug-in and then in ETS right-click the controller and select unload Application. Replace Ballasts/Devices 1. To determine the online status of all DALI Ballasts/Devices click the Query Status All button. 2. Select the offline DALI ballasts to be replaced and click the Remove button. An image will be shown next to the DALI Ballast to indicate it has been marked for removal. 3. Click the Save to Device button to remove the marked ballasts from the DALI controller. 4. Add the new replacement ballasts by clicking the Enumerate button. 5. When the enumeration is complete any new Ballasts/Devices found will appear in the list with the or image next to them. 6. The new ballasts can be identified by selecting the Ballasts/Device and clicking the Flash button for Ballasts/Sensors or the sign-on button for Dry Contacts. These can then be swapped to a different short address by dragging them onto another DALI lamp driver channel/Device. 7. When finished click the button. Philips LightMaster 86 Save to Device 3 Application Examples 3.1 Scene Control Scene control enables simultaneous recall of individual levels for multiple channels by a single telegram. A switch/sensor recalls a scene number (in the range 1 to 32) for the linked lamp driver channels (Sensor behavior can also be customized to trigger different actions for each scene). The channel levels for each scene are setup in the Scenes page. Create a scene control group address. Link the Switch X.X - Scene object to the Lamp driver X Scene object(s). Dry Contact 1 0/1/1 Switch 1.X - Scene Dimmer 0/1/1 Lamp Driver X - Scene Recall Scene X Setup scenes for lamp driver channels. 1. Select DALI MultiMaster/Scenes page. 2. Enter a scene name. 3. Enter a percentage in the Level (%) column for each DALI channel in your area. 4. Enter a fade time for each channel, if applicable (advanced). 5. Enable the Scene (DPT_SceneControl) group object for each DALI channel in your area. 6. Link the Lamp Driver X – Scene objects for the channels in your area to the scene control group address for that area. Configure a Switch to recall a scene. 1. Select DALI dry contacts/DALI dry contact X/Switches/Switch X. 2. Select Recall Scene from the Switch actions dropdown list. 3. Enter the scene number in Recall Scene. 4. Enable the Scene (DPT_SceneControl) group object for the Switch. 5. Link the Switch X.X – Scene object to the scene control group address for the area. Philips LightMaster 87 3.2 On/Off Control On/Off control is used to switch channels ON and OFF. The switch/sensor switches to the target state using the fade time when switching value specified in the Lamp Driver channels. Create an On/Off control group address. Link the Dry Contact Switch X.X - On Off objects to the Dimmer Lamp Driver X - On Off object(s). Dry Contact 1 0/2/1 Switch 1.1 – On Off Dry Contact 1 Dimmer Target State 1 = ON Target State 0=OFF 0/2/1 Lamp Driver X – On Off 0/2/1 Switch 1.2 – On Off Setup Fade time when switching value for lamp driver channels. 1. Select DALI lamp drivers/Global channel properties page or the DALI lamp driver X/Channel properties page(s). 2. Select a fade time value or select NoFade from the Fade time when switching dropdown list. 3. Enable the ON/OFF (DPT_Switch) group object parameter for each DALI channel in your area. 4. Link the Lamp Driver X – On Off objects for the channels in your area to the On/Off control group address for that area. Philips LightMaster 88 Configure Switch to recall an ON/OFF state. 1. Select DALI dry contacts/DALI dry contact X/Switches/Switch 1. 2. Select Recall On/Off from the Switch actions dropdown list. 3. Select On from the Target State dropdown list. 4. Select DALI dry contacts/DALI dry contact X/Switches/Switch 2. 5. Select Recall On/Off from the Switch actions dropdown list. 6. Select Off from the Target State dropdown list. 7. Enable the ON/OFF (DPT_Switch) group object parameter for the Switch. 8. Link the Switch X.1 – On Off object and the Switch X.2 – On Off object to the On/Off control group address for the area. Philips LightMaster 89 3.3 Absolute Level Control Absolute level control is used to dim channels to a predetermined level. The switch/sensor recalls a percentage target level using the fade time when dimming value specified in the Lamp Driver channels. Create an Absolute level control group address. Link the Switch X.X – Absolute Level object with the Lamp Driver X – Absolute Dimming object(s). Dimmer Dry Contact 1 0/3/1 Switch 1.X – Absolute Level Target Level (%) 0/3/1 Lamp Driver X – Absolute Dimming Set the Fade time when dimming value for lamp driver channels. 1. Select DALI lamp drivers/Global channel properties page or the DALI lamp driver X/Channel properties page(s). 2. Select a fade time value or select NoFade from the Fade time when dimming dropdown list. 3. Enable the Absolute level (DPT_Scaling) group object parameter for each DALI channel in your area. 4. Link the Lamp Driver X – Absolute dimming objects for the channels in your area to the Absolute level control group address for that area. Configure a Switch to recall a channel level. 1. Select DALI dry contacts/DALI dry contact X/Switches/Switch X. 2. Select Recall Level from the Switch actions dropdown list. 3. Enter a percentage channel level in the Target Level (%) parameter. 4. Enable the Absolute level (DPT_Scaling) group object parameter for the Switch. 5. Link the Switch X.X – Absolute Dimming object to the Absolute level control group address for the area. Philips LightMaster 90 3.4 Relative Level Control Relative level control is used to ramp channel levels a by a specified amount from the current level. The switch/sensor ramps the level up or down by the step size using the fade time when ramping value specified in the Lamp Driver channels. Create a Relative level control group address. Link the Switch X.X – Relative Level Objects with the Lamp Driver X – Relative Dimming object(s). Dry Contact 1 0/4/1 Switch 1.1 – Relative Level Ramp Up 100% Dry Contact 1 0/4/1 Switch 1.2 – Relative Level Dimmer Stop Ramp 0/4/1 Lamp Driver X – Relative Dimming Dry Contact 1 0/4/1 Switch 1.3 – Relative Level Ramp Down 100% Setup Fade time when ramping value for lamp driver channels. 1. Select DALI lamp drivers/Global channel properties page or the DALI lamp driver X/Channel properties page(s). 2. Select a fade time value or select NoFade from the Fade time when ramping dropdown list. 3. Enable the Relative level (DPT_Control_Dimming) group object parameter for each DALI channel in your area. 4. Link the Lamp Driver X – Relative Dimming objects for the channels in your area to the Relative level control group address for the area. Philips LightMaster 91 Configure Switches to perform Ramp Up 100%, Stop Ramp and Ramp Down 100% functions. 1. Select DALI dry contacts/DALI dry contact X/Switches/Switch 1. 2. Select Ramp Up from the Switch actions dropdown list. 3. Select 100% from the Step Size dropdown list. 4. Select DALI dry contacts/DALI dry contact X/Switches/Switch 2. 5. Select Stop Ramp from the Switch actions dropdown list. 6. Select DALI dry contacts/DALI dry contact X/Switches/Switch 3. 7. Select Ramp Down from the Switch actions dropdown list. 8. Select 100% from the Step Size dropdown list. 9. Enable the Relative level (DPT_Control_Dimming) group object parameter for the Switch. 10. Link the Switch X.X – Relative level objects to the Relative level control group address for the area. Philips LightMaster 92 3.5 Toggle Scene The Toggle scene function recalls two scenes, an On scene and an Off scene. A switch alternates recalling the On scene number and the number Off scene number (in the range 1 to 32) for the linked lamp driver channels. The channel levels for each scene are setup in the Scenes page. Create a scene control group address. Link the Switch X.X - Scene object to the Lamp driver X Scene object(s). Dry Contact 1 0/1/1 Switch 1.X - Scene Dimmer Recall On Scene Recall Off Scene 0/1/1 Lamp Driver X - Scene Setup two scenes for lamp driver channels. 1. Select DALI MultiMaster/Scenes page/Scene 1. 2. Enter a scene name. 3. Enter a percentage in the Level (%) column for each DALI channel in your area. 4. Enter a fade time for each channel, if applicable (advanced). 5. Select DALI MultiMaster/Scenes page/Scene 2. 6. Enter a scene name. 7. Enter a percentage in the Level (%) column for each DALI channel in your area. 8. Enter a fade time for each channel, if applicable (advanced). 9. Enable the Scene (DPT_SceneControl) group object for each DALI channel in your area. 10. Link the Lamp Driver X – Scene objects for the channels in your area to the scene control group address for that area. Philips LightMaster 93 Configure a Switch to toggle scenes. 1. Select DALI dry contacts/DALI dry contact X/Switches/Switch X. 2. Select Toggle Scene from the Switch actions dropdown list. 3. Enter a scene number in the On Scene parameter. 4. Enter a scene number in the Off Scene parameter. 5. Enable the Scene (DPT_SceneControl) group object for the Switch. 6. Link the Switch X.X – Scene object to the scene control group address for the area. Philips LightMaster 94 3.6 Toggle On/Off Toggle On/Off control enables the switch to work like a standard On/Off power switch, alternating between the ON and OFF target states. The target state is switched using the Fade time when switching value specified in the Lamp Driver channels. Create an On/Off control group address. Link the Dry Contact Switch X.X - On Off objects to the Dimmer Lamp Driver X - On Off object(s). Dimmer Dry Contact 1 0/2/1 Switch X.X – On Off Target State 1 = ON/0=OFF 0/2/1 Lamp Driver X – On Off Setup Fade time when switching value for lamp driver channels. 1. Select DALI lamp drivers/Global channel properties page or the DALI lamp driver X/Channel properties page(s). 2. Select a fade time value or select NoFade from the Fade time when switching dropdown list. 3. Enable the ON/OFF (DPT_Switch) group object parameter for each DALI channel in your area. 4. Link the Lamp Driver X – On Off objects for the channels in your area to the On/Off control group address for that area. Configure Switch to Toggle On/Off. 1. Select DALI dry contacts/DALI dry contact X/Switches/Switch 1. 2. Select Toggle On/Off from the Switch actions dropdown list. 3. Enable the ON/OFF (DPT_Switch) group object parameter for the Switch. 4. Link the Switch X.X – On Off object to the On/Off control group address for the area. Philips LightMaster 95 3.7 Toggle Level Toggle level uses absolute level control to alternate between two dimmed levels. The switch recalls Minimum level and Maximum level using the fade time when dimming value specified in the Lamp Driver channels. Create an Absolute level control group address. Link the Switch X.X – Absolute Level object with the Lamp Driver X – Absolute Dimming object(s). Dry Contact 1 0/3/1 Switch X.X – Absolute Level Dimmer Minimum Level (%) Maximum Level (%) 0/3/1 Lamp Driver X – Absolute Dimming Set the Fade time when dimming value for lamp driver channels. 1. Select DALI lamp drivers/Global channel properties page or the DALI lamp driver X/Channel properties page(s). 2. Select a fade time value or select NoFade from the Fade time when dimming dropdown list. 3. Enable the Absolute level (DPT_Scaling) group object parameter for each DALI channel in your area. 4. Link the Lamp Driver X – Absolute dimming objects for the channels in your area to the Absolute level control group address for that area. Configure a Switch to Toggle Level. 1. Select DALI dry contacts/DALI dry contact X/Switches/Switch X. 2. Select Toggle Level from the Switch actions dropdown list. 3. Enter a percentage channel level in the Minimum Level (%) parameter. 4. Enter a percentage channel level in the Maximum Level (%) parameter. 5. Enable the Absolute level (DPT_Scaling) group object parameter for the Switch. 6. Link the Switch X.X – Absolute Dimming object to the Absolute level control group address for the area. Philips LightMaster 96 3.8 Toggle Ramp Toggle Ramp uses relative level control to alternate between ramping the channel level UP and ramping the channel level DOWN by a specified amount from the current level. Another Switch is usually set to perform the Stop Ramp function. The switch ramps the level up or down by the step size using the fade time when ramping value specified in the Lamp Driver channels. Create a Relative level control group address. Link the Switch X.X – Relative Level Objects with the Lamp Driver X – Relative Dimming object(s). Dry Contact 1 0/4/1 Switch X.1 – Relative Level Dimmer Ramp Up 100% Ramp Down 100% 0/4/1 Lamp Driver X – Relative Dimming Dry Contact 1 0/4/1 Switch X.2 – Relative Level Stop Ramp Setup Fade time when ramping value for lamp driver channels. 1. Select DALI lamp drivers/Global channel properties page or the DALI lamp driver X/Channel properties page(s). 2. Select a fade time value or select NoFade from the Fade time when ramping dropdown list. 3. Enable the Relative level (DPT_Control_Dimming) group object parameter for each DALI channel in your area. 4. Link the Lamp Driver X – Relative Dimming objects for the channels in your area to the Relative level control group address for that area. Philips LightMaster 97 Configure Switches to perform Toggle Ramp and Stop Ramp functions. 1. Select DALI dry contacts/DALI dry contact X/Switches/Switch 1. 2. Select Toggle Ramp from the Switch actions dropdown list. 3. Select 100% from the Step Up Size dropdown list. 4. Select 100% from the Step Down Size dropdown list. 5. Select DALI dry contacts/DALI dry contact X/Switches/Switch 2. 6. Select Stop Ramp from the Switch actions dropdown list. 7. Enable the Relative level (DPT_Control_Dimming) group object parameter for the Switch. 8. Link the Switch X.X – Relative level objects to the Relative level control group address for the area. Philips LightMaster 98 3.9 Ramp Up or Down and Stop A single switch can perform a Ramp Up or Ramp Down upon an extended press action and a Stop Ramp function upon release of the extended press action. Relative level control ramps the channel level UP or DOWN 100% until maximum level or minimum level is reached or the stop ramp command is triggered. The switch ramps the level up or down using the Fade time when ramping value specified in the Lamp Driver channels. Create a Relative level control group address. Link the Switch X.X – Relative Level Objects with the Lamp Driver X – Relative Dimming object(s). Dry Contact 1 0/4/1 Switch X.1 – Relative Level Ramp Up 100% and Stop 0/4/1 Lamp Driver X – Relative Dimming Dry Contact 1 0/4/1 Switch X.2 – Relative Level Dimmer Ramp Down 100% and Stop Setup Fade time when ramping value for lamp driver channels. 1. Select DALI lamp drivers/Global channel properties page or the DALI lamp driver X/Channel properties page(s). 2. Select a fade time value or select NoFade from the Fade time when ramping dropdown list. 3. Enable the Relative level (DPT_Control_Dimming) group object parameter for each DALI channel in your area. 4. Link the Lamp Driver X – Relative Dimming objects for the channels in your area to the Relative level control group address for that area. Philips LightMaster 99 Configure Switches to perform Ramp Up and Stop and Ramp Down and Stop functions. 1. Select DALI dry contacts/DALI dry contact X/Switches/Switch 1. 2. Select Ramp Up and Stop from the Switch actions dropdown list. 3. Select DALI dry contacts/DALI dry contact X/Switches/Switch 2. 4. Select Ramp Down and Stop from the Switch actions dropdown list. 5. Enable the Relative level (DPT_Control_Dimming) group object parameter for the Switches. 6. Link the Switch X.1 – Relative level object and the Switch X.2 – Relative level object to the Relative level control group address for the area. Philips LightMaster 100 3.10 Ramp Up or Down, Stop and Program A single switch can perform a Ramp Up or Ramp Down with an extended press action and can stop ramping and program the level to the specified scene upon release of the extended press action. Relative level control ramps the channel level UP or DOWN 100% until maximum level or minimum level is reached or the stop ramp command is triggered by the programming of the scene. The switch ramps the level up or down using the Fade time when ramping value specified in the Lamp Driver channels. Create a Relative level control group address and a scene control group address. Link the Switch X.X – Relative Level Objects with the Lamp Driver X – Relative Dimming object(s) and link the Switch X.X - Scene object to the Lamp driver X - Scene object(s). Dry Contact 1 0/4/1 Switch X.1 – Relative Level Ramp Up 100% and Stop 0/4/1 Lamp Driver X – Relative Dimming Dry Contact 1 0/4/1 Switch X.2 – Relative Level Dimmer Ramp Down 100% and Stop Dry Contact 1 0/1/1 Switch X.1 - Scene Program Scene X 0/1/1 Lamp Driver X - Scene Dry Contact 1 0/1/1 Switch X.2 - Scene Philips LightMaster Dimmer Program Scene X 101 Setup Fade time when ramping value for lamp driver channels. 1. Select DALI lamp drivers/Global channel properties page or the DALI lamp driver X/Channel properties page(s). 2. Select a fade time value or select NoFade from the Fade time when ramping dropdown list. 3. Enable the Relative level (DPT_Control_Dimming) group object parameter for each DALI channel in your area. 4. Link the Lamp Driver X – Relative Dimming objects for the channels in your area to the Relative level control group address for that area. Configure Switches to perform Ramp Up-Stop and Program scene and Ramp Down-Stop and Program scene. 1. Select DALI dry contacts/DALI dry contact X/Switches/Switch 1. 2. Select Ramp Up-Stop and Program from the Switch actions dropdown list. 3. Enter the Program Scene number 4. Select DALI dry contacts/DALI dry contact X/Switches/Switch 2. 5. Enter the Program Scene number 6. Select Ramp Down-Stop and Program from the Switch actions dropdown list. 7. Enable the Relative level (DPT_Control_Dimming) group object parameter for the Switches. 8. Enable the Scene (DPT_SceneControl) group object for the Switches. 9. Link the Switch X.1 – Relative level object and the Switch X.2 – Relative level object to the Relative level control group address for the area. 10. Link the Switch X.1 – Scene object and the Switch X.2 – Scene object to the scene control group address for the area Philips LightMaster 102 3.11 Lamp Status and Lamp Level Monitoring The system can provide feedback to building management systems of the On/Off status and level of individual lamps. This allows energy monitoring and provides an overall view of lighting usage in a building. Create On Off and Level group addresses for each lamp driver. Link Lamp Driver X – Feedback On Off object to the Monitoring On Off Object of Building Management Software. Link Lamp Driver X – Feedback Level Object to the Lamp X - Monitoring Level Object of Building management Software. Building Management System Dimmer 0/2/1 Lamp Driver X – Feedback On Off 0/3/1 Lamp Driver X – Feedback Level Switched State 1 = ON, 0=OFF 0/2/1 Lamp X Monitoring – On Off Current Level (%) Building Management System 0/3/1 Lamp X Monitoring – Level Setup Lamp Status and Lamp Level Monitoring 1. In DALI Lamp Driver X Page, Under Group Objects, enable Feedback ON/OFF (DPT_Switch) and Feedback level (DPT_Scaling). This will enable Lamp Driver X – Feedback On Off and Lamp Driver X – Feedback Level Objects. 2. Link the Lamp Driver X – Feedback On Off object (and matching BMS object) to the On Off group address for that Lamp Driver. 3. Link Lamp Driver X – Feedback Level Object (and matching BMS object) to the Absolute level group address for that Lamp Driver. Philips LightMaster 103 3.12 Lamp Runtime Reporting The system can log the time a specific luminaire is powered. This can assist in reducing maintenance costs and can improve safety and comfort for the occupant, due to the fact that end-of-life for the lamps can be predicted. This also enables planning of systematic group lamp replacement, which is more economical than individual lamp replacement. Create a running hours group address for each lamp driver. Link Lamp Driver X – Running Hours object to the Lamp Runtime reporting Object of Building Management Software. Dimmer 0/7/X Lamp Driver X – Running Hours Building Management System TimePeriodHrs 0/7/X Lamp X - Runtime Setup Lamp Runtime Reporting. 1. In DALI Lamp Driver X Page, Under Group Objects, enable Running Hours (DPT_TimePeriodHrs). 2. Link the Lamp Driver X – Running Hours object (and matching BMS object) to the group address for that Lamp Driver runtime reporting. Philips LightMaster 104 3.13 Lamp Failure and Communication Failure Reporting The system can automatically signal an alarm if a lamp fails or loses connection. This dramatically reduces maintenance costs and the time to locate and replace faulty lamps. Create group addresses for Lamp Failure Alarm and Communication Failure alarm for each lamp driver. Link Lamp Driver X – Lamp Failure object to the alarm object of Building Management Software. Link Lamp Driver X – Communication Failure object to the alarm object of Building Management Software. Building Management System Dimmer 0/6/1 Lamp Driver X – Lamp Failure Alarm/No Alarm 0/6/1 Lamp Driver X – Communication Failure 0/6/101 Lamp Driver X – Communication Failure Alarm/No Alarm 0/6/101 Lamp Driver X – Communication Failure Configure Lamp Failure and Lamp Communication Failure reporting. 1. In DALI Lamp Driver X/DALI Group objects, enable Lamp failure (DPT_Alarm) and Communication Failure (DPT_Alarm) objects. 2. Link the Lamp Driver X – Lamp failure object (and matching BMS object) to the Alarm group address for that Lamp Driver. 3. Link the Lamp Driver X – Communication failure object (and matching BMS object) to the Alarm group address for that Lamp Driver. Philips LightMaster 105 3.14 Emergency Ballast Testing and Test Failure reporting Emergency Ballast Testing and Test Failure reporting enables ballasts to be selected and tested at regular intervals to ensure emergency lamps and backup batteries are functioning in the event of an emergency. It shall be possible to have two different emergency test sectors. This means that not all batteries are depleted after a test has been executed in case an emergency situation would occur. There are two types of emergency tests 1. Functional test In this test the system is placed in emergency mode for a short time to see if the lamps switch to battery power and that the battery is switching the lights on. 2. Duration test In this test the system is placed in emergency mode for a period as defined in the DALI inverter (default 90 minutes) The results of the emergency test for the drivers that are part of the requested sector are visualized on individual alarm group objects. At the start of a test all alarm group objects that are part of that sector will be cleared. When a test fails the alarm group object for that luminaire will be set. An individual test status group object is available to monitor: • Emergency Test Mode • Emergency Test Status (In progress/Complete) • Emergency Failure Status. Create Start/Stop Sector Y group addresses and Start/Stop Sector Z group addresses for the Functional and Duration tests. Link them with the respective Start/Stop objects of the Dimmer. Create group addresses for Emergency Alarm and Emergency Status for each lamp driver channel. Link them with the Individual Lamp Emergency Test Failure and Emergency Test Status objects. These group addresses are exposed to Building Management Software for monitoring and control purposes. Philips LightMaster 106 Emergency Test Start Building Management System Dimmer 0/2/101 Sector Y – Emergency Functional Test Start/Stop 0/2/101 Sector Y Emergency Functional Test Start 0/2/111 Sector Y – Emergency Duration Test Start/Stop 0/2/111 Sector Y Emergency Duration Test Start 0/2/102 Sector Z – Emergency Functional Test Start/Stop 0/2/102 Sector Z Emergency Functional Test Start 0/2/112 Sector Z – Emergency Duration Test Start/Stop 0/2/112 Sector Z Emergency Duration Test Start Emergency Test Reporting Building Management System Dimmer Philips LightMaster 0/6/X Lamp Driver X – Emergency Test Failure Alarm/No Alarm 0/6/X Emergency Functional/ Duration Test Report 1/6/X Lamp Driver X – Emergency Test Status Status/Mode 1/6/X Emergency Functional/ Duration Test Status 107 Configure Emergency Ballast Testing and Reporting 1. Link Sector Y Emergency Functional Test Start object (and matching BMS object) to the Start/Stop group address for the Dimmer. 2. Link Sector Y Emergency Duration Test Start object (and matching BMS object) to the Start/Stop group address for that Dimmer. 3. Link Sector Z Emergency Functional Test Start object (and matching BMS object) to the Start/Stop group address for the Dimmer. 4. Link Sector Z Emergency Duration Test Start object (and matching BMS object) to the Start/Stop group address for that Dimmer (and matching BMS object). 5. In DALI Lamp Driver X Page, Set the Emergency Test Sector as Sector Y or Sector Z. This will enable the Emergency Test Failure (DPT_Alarm) and Emergency Test Status (DPT_xxx) objects for this Lamp Driver. Repeat for each Emergency lamp driver. 6. Link each Lamp Driver X – Emergency Test Failure object (and matching BMS object) to the Emergency Alarm group address for that Lamp Driver. 7. Link each Lamp Driver X – Emergency Test Status object (and matching BMS object) to the Emergency Status group address for that Lamp Driver. Philips LightMaster 108 3.15 Occupancy Control Occupancy control is used to detect movement of people in an area by detecting infrared radiation. Occupancy control allows hands-free operation of the lighting, and can help to reduce energy consumption. Create a scene control group address. Link Sensor X – Motion Scene object to the Dimmer Lamp Driver X – Scene object(s). If there are multiple sensors in an area, link the Sensor X – Motion Timeout Sync objects for each sensor together so the timeouts will be synchronized. Sensor 0/1/1 Sensor X – Motion Scene Dimmer Recall Scene X 0/1/1 Lamp Driver X - Scene Only required for multiple sensors in the same area: Sensor X Sensor X 0/5/1 Sensor X – Motion Timeout Sync Philips LightMaster Timeout (seconds) 109 0/5/1 Sensor X – Motion Timeout Sync Setup scenes for lamp driver channels. 1. Select DALI MultiMaster/Scenes page. 2. Enter a scene name. 3. Enter a percentage in the Level (%) column for each DALI channel in your area. 4. Enter a fade time for each channel, if applicable (advanced). 5. Enter Level 100% for Occupied Scene (Scene 1) and Level 0% for Unoccupied Scene (Scene 13) 6. Enable the Scene (DPT_SceneControl) group object for each DALI channel in your area. 7. Link the Lamp Driver X – Scene objects for the channels in your area to the scene control group address for that area. Configure a Sensor for Occupancy Control 1. Select a DALI Sensor. 2. On the Sensor Applications page, select any of the following applications: • • • • • • • CellOffice WorkIsland MeetingRoom Kitchen BreakOut Toilet Other 3. Enable Use Motion Sensor 4. Set the motion control type as Auto On Auto Off 5. Enter the Switch off timer in seconds. 6. If there is more than one sensor select Multiple Sensor Area. This enables the Sensor X Motion Timeout Sync object for each sensor. 7. In Sensor Properties Page, under scenes actions enter additional ‘Motion actions’ and ‘No-motion actions’ for the required Scenes, if applicable (advanced). 8. Link Sensor X – Motion scene object to the Scene control group address for that area. 9. For multiple sensor areas only, link the Sensor X -Motion Timeout Sync objects for each sensor so that they will all work together to detect motion/no-motion. Philips LightMaster 110 3.16 Occupancy control with Manual control Occupancy control and Manual control can be combined to work together for a room. This example shows Occupancy control combined with Manual control in two different modes: 1. Presence mode (AutoOnAutoOff) The system uses occupancy control as normal: automatically switch the lights On when the area is occupied, and switch them Off when unoccupied. If the user manually switches the lights Off, the automatic switching is disabled until the area is unoccupied. 2. Absence mode (ManualOnAutoOff) The user must switch the lights On manually. The system will automatically switch the lights Off when the area is unoccupied. Create a scene control group address. Link the Switch X.X - Scene object and the Sensor X – Motion Scene object to the Dimmer Lamp Driver X – Scene object(s). Dimmer Dry Contact X 0/1/1 Switch X.X - Scene Recall Scene X Sensor X 0/1/1 Sensor X – Motion Scene Philips LightMaster 111 0/1/1 Lamp Driver X - Scene Setup Occupied, Unoccupied and Manual Override scenes for lamp driver channels. 1. Select DALI MultiMaster/Scenes page/Scene X. 2. Enter a scene name. 3. Enter a percentage in the Level (%) column for each DALI channel in your area. 4. Enter a fade time for each channel, if applicable (advanced). 5. Enter Level 100% for Occupied Scene (Scene 1), Level 0% for Unoccupied Scene (Scene 13) and On, Off or Intermediate levels for Manual Override scenes (Scene 2 – 8) 6. Enable the Scene (DPT_SceneControl) group object for each DALI lamp driver channel in your area. 7. Link the Lamp Driver X – Scene objects for the channels in your area to the scene control group address for that area. Configure a Sensor for Occupancy Control. 1. Select a DALI Sensor. 2. On the Sensor Applications page, select the Cell Office application. 3. Enable Use Motion Sensor. 4. Set This motion sensor is used for as AutoOnAutoOff. (Presence Mode) 5. If the occupancy control is required to be in Absence mode, then set the option ManualOnAutoOff. 6. Link Sensor X – Motion Scene Object to the scene control group address for that area. Configure a DryContact for combined control. 1. Select DALI dry contacts/DALI dry contact X/Switches/Switch X. 2. Select Toggle Scene or Recall Scene from the Switch actions dropdown list. 3. Enter a scene number in the Recall Scene Parameters. 4. Use Manual Override Scenes 2 to 8 for Manual control if Sensor is configured as AutoOnAutoOff. If ManualOnAutoOff is configured, then Scene 1 to Scene 8 can be configured for Manual control. 5. Enable the Scene (DPT_SceneControl) group object for the Switch. 6. Link the Switch X.X – Scene objects to the scene control group address for the area. Philips LightMaster 112 3.17 Daylight Regulation Daylight regulation (harvesting) is a control strategy using a PE (Photo-Electric) sensor to measure illuminance. This helps to keep a constant light level in all situations where natural light is available. When there is little or no daylight, the luminaires produce the required light level. When there is enough daylight available, the luminaires may dim or switch OFF completely. Daylight regulation can be used in combination with other control functions, such as manual control or occupancy control. Create an absolute level control group address for the Window row. Link the Sensor X – Light Absolute level row 1 object to the Lamp Driver X – Absolute Dimming objects. Create a scene control group address. Link the Sensor X Light Scene object to an object that can set the light regulation scene such as the Sensor X - Motion Scene object (see screenshot below), a Switch X – Scene object or a Timeclock – Scene object for example. Note: If Occupancy control and Day light regulation are combined, then in this example, Sensor X – Motion Scene shall drive the Sensor X – Light Scene Object. Switch or Time clock can also be a Scene control devices to drive Sensor X –Light scene Object. Dimmer – Window Row Sensor 1 Scene control device 0/1/1 Switch/Timeclock - Scene 0/3/1 Sensor X – Abs Level Row 1 Target Level (%) 0/1/1 Sensor X – Light Scene 0/1/1 Sensor X – Motion Scene Dimmer – Window Row Recall Scene Scene X Setup Fade time when dimming value for lamp driver channels. 1. Select DALI lamp drivers/Global channel properties page or the DALI lamp driver X/Channel properties page(s). Philips LightMaster 113 0/3/1 Lamp Driver X – Absolute Dimming 0/1/1 Lamp Driver X – Scene Control 2. Select a fade time value or select NoFade from the Fade time when dimming dropdown list. 3. Enable the Absolute level (DPT_Scaling) group object parameter for each DALI channel in your area. 4. Link the Lamp Driver X – Absolute dimming objects for the channels in your area to the Absolute level control group address for that area. 5. If combined control for Occupancy control and Daylight regulation is required, Link the Lamp Driver X – Scene objects for the channels in your area to the scene control group address for that area. Configure Sensor for Daylight Regulation. 1. Select a Calibrated DALI Sensor. 2. On the Sensor Applications page, select any of the following applications: • • • • • • CellOffice WorkIsland MeetingRoom Kitchen BreakOut Other 3. Enable Use Light Sensor 4. Enter Required Lux level 5. Enter zero for Rows with Offset 6. In Sensor Properties/Light Control page/Closed loop Scenes, Enable/disable or set Target level (Lux) for different scenes if required (uses Scene 1 by default). This will enable the Sensor to operate at different Target Levels (Advanced). 7. Link the Sensor X – Absolute level row 1 object and the window row Lamp driver X Absolute level objects to the Absolute level control group address for the area. 8. Link the Sensor X – Light Scene – Scene control object and a Switch/Timeclock – scene object to a light regulation scene control group address for the area. 9. Enable/disable light regulation by changing scenes for the Sensor X – Light Scene object, if applicable. 10. If combined control for Occupancy control and Daylight regulation is required, Link the Sensor X – Motion Scene to the light regulation scene control group address. Tip: Light regulation can be configured to operate differently in different scenes. Refer to Sensor properties/Light control/Closed loop scenes. Philips LightMaster 114 3.18 Daylight Regulation with Corridor rows The LightMaster Multifunction sensor provides automatic daylight regulation (harvesting) with a dynamic offset for the window and corridor rows. Daylight regulation is a control strategy using a PE (Photo-Electric) sensor to measure illuminance. This helps to keep a constant light level in all situations where natural light is available. When there is little or no daylight, the luminaires produce the required light level. When there is enough daylight available, the luminaires may dim or be switched OFF completely. Since the window area receives more daylight than the corridor area, window and corridor luminaires are controlled separately. Depending on the amount of daylight entering the room, the output of both window and corridor luminaire rows are dimmed to a minimum level with an offset of 30% between the window and corridor side. An additional corridor row is also provided with the maximum offset of 50%. When both window and corridor rows have been dimmed to the minimum level for more than 15 minutes, the window row will be turned off to ensure maximum energy saving. The corridor side, however, will by default only dim to the minimum level, hence indicating to the user that the lighting is operational. Note: The switch-off defaults for the Window Row and Corridor rows can be overridden. Create three absolute level control group addresses, one for the Window row, one for the first corridor row and one for the second corridor row. Link the three Sensor – Light Absolute level row X objects to the Dimmer Lamp Driver X – Absolute Dimming objects of the channels in the window row and two corridor rows. Create a scene control group address. Link the Sensor X Light Scene object to an object that can set the light regulation scene such as the Sensor X - Motion Scene object (see screenshot on next page), a Switch X – Scene object or a Timeclock – Scene object for example. Philips LightMaster 115 Note: If Occupancy control and Day light regulation are combined, then in this example, Sensor X – Motion Scene shall drive the Sensor X – Light Scene Object. Switch or Time clock can also be a Scene control devices to drive Sensor X –Light scene Object. Sensor 1 Dimmer – Window Row 0/3/1 Sensor X – Abs Level Row 1 Target Level (%) Sensor 1 0/3/1 Lamp Driver X – Absolute Dimming Dimmer – Corridor Row 1 0/3/2 Sensor X – Abs Level Row 2 Target Level (%) 0/3/2 Lamp Driver X – Absolute Dimming Dimmer – Corridor Row 2 Sensor 1 0/3/3 Sensor X – Abs Level Row 3 Target Level (%) 0/3/3 Lamp Driver X – Absolute Dimming Scene control device Sensor 1 0/1/1 Switch/Timeclock - Scene 0/1/1 Sensor X – Light Scene 0/1/1 Sensor X – Motion Scene Scene X Philips LightMaster 116 Dimmer – Window row, Corridor row 1 & Corridor row 2 Recall Scene 0/1/1 Lamp Driver X – Scene Control Tip: Light regulation can be configured to operate differently in different scenes. Refer to Sensor properties/Light control/Closed loop scenes. Setup Fade time when dimming value for lamp driver channels. 1. Select DALI lamp drivers/Global channel properties page or the DALI lamp driver X/Channel properties page(s). 2. Select a fade time value or select NoFade from the Fade time when dimming dropdown list. 3. Enable the Absolute level (DPT_Scaling) group object parameter for each DALI channel in your area. 4. Link the Lamp Driver X – Absolute dimming objects for the channels in your area to the Absolute level control group address for Window row area and Corridor row areas. 5. If combined control for Occupancy control and Daylight regulation is required, Link the Lamp Driver X – Scene objects for the channels in your area to the scene control group address for that area. (this includes Lamp drivers in Window row, corridor row 1 and corridor row 2 areas) Philips LightMaster 117 Configure Sensor for Daylight Regulation with Corridor Row Offset. 1. Select a Calibrated DALI Sensor. 2. On the Sensor Applications page, Select any of the following Applications • • • • • • CellOffice WorkIsland MeetingRoom Kitchen BreakOut Other 3. Enable Use Light Sensor 4. Enter Required Lux level 5. Enter the Rows with Offset as either 1 or 2. This will enable the objects Sensor X – Absolute level row 2 and Sensor X – Absolute level row 3. 6. In Sensor Properties/Light Control page/Closed loop Scenes, Enable/disable or set Target level (Lux) for different scenes if required (uses Scene 1 by default). This will enable the Sensor to operate at different Target Levels (Advanced). 7. Link the Sensor X – Absolute level row 1 object to the Absolute level control group address for the Window row. 8. Link the Sensor X – Absolute level row 2 object to the Absolute level control group address for First Corridor row. 9. Link the Sensor X – Absolute level row 3 object to the Absolute level control group address for Second Corridor row. 10. Link the Sensor X – Light Scene – Scene control object and a Switch/Timeclock – scene object to a light regulation scene control group address for the area. 11. Enable/disable light regulation by changing scenes using the Sensor X – Light Scene object, if applicable. 12. If combined control for Occupancy control and Daylight regulation is required, Link the Sensor X – Motion Scene to the light regulation scene control group address for that area. Philips LightMaster 118 3.19 Occupancy Control with Daylight regulation Occupancy control and Daylight regulation can be combined to work together for a room. When the room is occupied the lights are turned ON and daylight regulation is enabled. Once the room is vacant and the delay timer expires, the lights are turned OFF and daylight regulation is disabled automatically. Link the Sensor X – Light Absolute level row object(s) to the Dimmer Lamp Driver X – Absolute Dimming objects of that area. Link Sensor X – Motion Scene and Sensor X – Light Scene of the same sensor to the Dimmer Lamp Driver X – Scene Control of that area. Dimmer – Dimmer Sensor 1 0/3/1 Sensor X – Abs Level Row 1 Target Level (%) Sensor 1 0/1/1 Sensor X – Motion Scene 0/3/1 Lamp Driver X – Absolute Dimming Dimmer – Dimmer Recall Scene 0/1/1 Lamp Driver X – Scene Control Sensor 1 Recall Scene Philips LightMaster 0/1/1 Sensor X – Light Scene 119 Setup Fade time when dimming value for lamp driver channels. 1. Select DALI lamp drivers/Global channel properties page or the DALI lamp driver X/Channel properties page(s). 2. Select a fade time value or select NoFade from the Fade time when dimming dropdown list. 3. Enable the Absolute level (DPT_Scaling) group object parameter for each DALI lamp driver channel in your area. 4. Link the Lamp Driver X – Absolute dimming objects for the channels in your area to the Absolute level control group address for that area. Setup Scenes for lamp driver channels. 1. Select DALI MultiMaster/Scenes page. 2. Enter a scene name. 3. Enter levels for occupied scenes (Scene 1) and levels for unoccupied scenes (Scene 13) for each DALI channel in your area. 4. Enter a fade time for each channel, if applicable (advanced). 5. Enable the Scene (DPT_SceneControl) group object for each DALI lamp driver channel in your area. 6. Link the Lamp Driver X – Scene objects for the channels in your area to the scene control group address for that area. Configure a Sensor for Daylight regulation and Occupancy control. 1. Select a Calibrated DALI Sensor. 2. On the Sensor Applications page, select the CellOffice application. 3. Enable Use Motion Sensor. 4. Enable Use Light Sensor . 5. Set This motion sensor is used for as AutoOnAutoOff. 6. Enter Switch Off timer. 7. Enter Required lux level. 8. Enter Rows with Offset as 0. 9. Link the Sensor X – Absolute level row 1 object to the Absolute level control group address for that area. 10. Link Sensor X – Motion Scene Object to the scene control group address for that area. 11. Link Sensor X – Light Scene Object to the same scene control group address for that area. Philips LightMaster 120 3.20 Daylight Override This feature controls the room light based on the outside light level using Open Loop Light Control. The sensor monitors the outside lux level and controls the output based on the light level bands defined in the sensor configuration. A high level scene is recalled if the detected lux is low and within band 1. A low level scene is recalled if the detected lux is high and within band 2 or above. Link the Sensor 1 – Light Scene object to the Dimmer Lamp Driver X – Scene Control objects for that area. Sensor 1 0/1/1 Sensor 1 – Light Scene Dimmer Recall Scene 0/1/1 Lamp Driver X – Scene Control Setup scenes for lamp driver channels. 1. Select DALI MultiMaster/Scenes/Scene X page. 2. Enter a scene name. 3. Enter a percentage near 100% for insufficient daylight in the Level (%) column for each DALI lamp driver channel in your area. 4. Enter a fade time for each channel, if applicable (advanced). 5. Select another DALI MultiMaster/Scenes/Scene X page. 6. Enter a scene name. 7. Enter a percentage near 0% for sufficient daylight in the Level (%) column for each DALI lamp driver channel in your area. 8. Enter a fade time for each channel, if applicable (advanced). 9. Enable the Scene (DPT_SceneControl) group object for each DALI channel in your area. 10. Link the Lamp Driver X – Scene objects for the channels in your area to the scene control group address for that area. Philips LightMaster 121 Configure a Sensor for Open Loop Light control. 1. Select a Calibrated DALI Sensor. 2. On the Sensor Applications page, select any application. 3. On the Sensor Properties/Light Control page/Open Loop section, Enable Open loop light control enabled/disabled. 4. Click Show Advanced and Enter the Update Period (ms). 5. Click to select the active scene-mask scenes in which open loop light control will be active. For example Scene 13 and Scene 14. 6. Enter the Open loop bands count as 2 (for example). 7. Enter the High Level Band (lux) for Band 1 as 500 Lux. 8. Enter the Action for Band 1 as Scene 13. 9. Enter the Action for Band 2 as Scene 14. 10. Link Sensor 1 – Light Scene to the scene control group address for that area. Philips LightMaster 122 3.21 Corridor Hold On Corridor Hold-on provides the opportunity to make the light level in one area dependent on the occupancy state in another area. This makes it possible, to make a conditional exit path for example, by keeping the corridor lights ON if any of the adjacent rooms are still occupied. Create scene control group addresses for cell office 1, cell office 2 and corridor. Link Sensor 1 - Motion Scene object and Sensor 1 – Notifier Scene object to Lamp Driver X – Scene object(s) for cell office 1. Link Sensor 2 – Motion scene object and Sensor 2 – Notifier Scene object to Lamp Driver X – Scene Object(s) for Cell Office 2. Link Sensor 3 – Motion Scene object, Sensor 3 – Activator scene object, Sensor 3 – Timer scene object to Lamp Driver X – Scene Object(s) for Corridor area. Create an Occupancy sync group address. Link Sensor 1 – Notifier Sync, Sensor 2 – Notifier Sync, Sensor 3 – Timer Sync and Sensor 3 – Activator Sync to the occupancy sync group address. Sensor 01 1/1/1 Motion Scene Dimmer Sensor 03 1/1/1 Lamp Driver X - Scene 1/1/3 Motion Scene 1/1/1 Corridor Notifier Scene 1/1/3 Corridor Activator Scene 1/5/1 Corridor Notifier Sync 1/5/1 Corridor Activator Sync Cell Office 1 1/1/2 Motion Scene 1/1/3 Lamp Driver X - Scene Activator Notifier Sensor 02 Dimmer Dimmer 1/1/2 Lamp Driver X - Scene Timer 1/1/3 Corridor Timer Scene 1/5/1 Corridor Timer Sync Notifier 1/1/2 Corridor Notifier Scene 1/5/1 Corridor Notifier Sync Cell Office 2 Philips LightMaster 123 Corridor Setup scenes for lamp driver channels. 1. On the DALI MultiMaster/Scenes page, enter a scene name. 2. Enter a percentage in the Level (%) column for each DALI channel in your area. 3. Enter a fade time for each channel, if applicable (advanced). 4. Enter level 100% for Occupied scene (Scene 1), level 20% for Switch-off warning scene (scene 10) and level 0% for unoccupied cell office scene (Scene 13). Enter level 100% for unoccupied corridor (Scene 11) and level 0% for corridor hold time out scene (Scene 15). 5. Enable the Scene (DPT_SceneControl) group object for each DALI channel in your areas. 6. Link the Lamp Driver X – Scene objects for the channels in your area to the scene control group address for that area. Philips LightMaster 124 Configure Sensor for Cell Office 1 and Sensor for Cell Office 2. 1. Select a DALI Sensor for Cell Office 1. 2. On Sensor Applications page, select the CellOffice application. 3. Enable the option Use Motion Sensor. 4. Set the option This Motion Sensor is used for AutoOnAutoOff. 5. Enter the Switch Off Timer (s). 6. Enable the option Show Advanced. This will display Use corridor hold-on option. 7. Enable Use corridor hold-on. 8. Select a DALI Sensor for Cell Office 2 and repeat Sensor configuration steps 1 to 7 for Cell Office 2. 9. Link Sensor 1 – Motion Scene and Sensor 1 – Notifier Scene to the Scene Control group address for Cell Office 1. 10. Link Sensor 1 – Notifier Sync Object to the Cell Offices Occupancy Sync group address. 11. Link Sensor 2 – Motion Scene and Sensor 2 – Notifier Scene to the Scene Control group address for Cell Office 2. 12. Link Sensor 2 – Notifier Sync Object to the Cell Offices Occupancy Sync group address. Configure a Sensor for Corridor. 1. Select a DALI Sensor for Corridor. 2. On the Sensor Applications page, Select the Corridor application 3. Enable the option Use Motion Sensor. 4. Set the option This Motion Sensor is used for AutoOnAutoOff. 5. Enter the Switch Off Timer. 6. Enable the option Show Advanced. This will display Use Corridor hold on option. 7. Enable Use Corridor hold-on. 8. Link Sensor 3 – Motion Scene, Sensor 3 – Activator Scene and Sensor 3 – Timer Scene to the scene control group address for Corridor area. 9. Link Sensor 3 – Activator Sync and Sensor 3 – Timer Sync Objects to the Occupancy Sync group address. Philips LightMaster 125 3.22 Cascaded Corridor Hold On The conditional exit path lighting can be cascaded, to create multiple dependencies. This feature allows cell offices to keep corridors lit, corridors to keep lift/lobbies lit, lift/lobbies to keep reception area’s lit, etc. Create scene control group addresses for cell office 1, cell office 2, Corridor and Lobby. Link Sensor 1 - Motion Scene object and Sensor 1 – Notifier Scene object to Lamp Driver X – Scene object(s) for cell office 1. Link Sensor 2 – Motion scene object and Sensor 2 – Notifier Scene object to Lamp Driver X – Scene Object(s) for Cell Office 2. Link Sensor 3 – Motion Scene object, Sensor 3 – Notifier Sensor 3 – Activator scene object, Sensor 3 – Timer scene object to Lamp Driver X – Scene Object(s) for Corridor area. Link Sensor 4 – Motion Scene object, Sensor 4 – Activator scene object, Sensor 4 – Timer scene object to Lamp Driver X – Scene Object(s) for Lobby area Create an Occupancy sync group address for Cell offices and Corridor. Link Sensor 1 – Notifier Sync, Sensor 2 – Notifier Sync, Sensor 3 – Timer Sync and Sensor 3 – Activator Sync to that occupancy sync group address. Create an Occupancy Sync group address for Corridor and Lobby. Link Sensor 3 – Notifier Sync, Sensor 4 - Activator Sync and Sensor 4 – Timer Sync to that occupancy sync group address. 1/1/1 Motion Scene 1/1/1 Lamp Driver X - Scene 1/1/2 Motion Scene 1/1/1 Corridor Notifier Scene 1/1/2 Corridor Notifier Scene 1/5/1 Corridor Notifier Sync 1/5/1 Corridor Notifier Sync Cell Office 1 1/1/3 Motion Scene 1/1/3 Lamp Driver X - Scene 1/1/2 Lamp Driver X - Scene Cell Office 2 1/1/4 Motion Scene 1/1/3 Corridor Notifier Scene 1/1/4 Corridor Activator Scene 1/5/2 Corridor Notifier Sync 1/5/2 Corridor Activator Sync 1/1/3 Corridor Activator Scene 1/1/4 Corridor Timer Scene 1/5/1 Corridor Activator Sync 1/5/2 Corridor Timer Sync 1/1/4 Lamp Driver X - Scene 1/1/3 Corridor Timer Scene 1/5/1 Corridor Timer Sync Corridor Philips LightMaster 126 Lobby Philips LightMaster 127 Setup scenes for lamp driver channels. 1. On the DALI MultiMaster/Scenes page, enter a scene name. 2. Enter a percentage in the Level (%) column for each DALI channel in your area. 3. Enter a fade time for each channel, if applicable (advanced). 4. Enter level 100% for Occupied Scene (Scene 1), level 20% for switch off warning scene (scene 10) and level 0% for unoccupied cell office Scene (Scene 13). Enter level 100% for unoccupied corridor (Scene 11) and level 0% for corridor hold time out scene (Scene 15). 5. Enable the Scene (DPT_SceneControl) group object for each DALI channel in your area. 6. Link the Lamp Driver X – Scene objects for the channels in your area to the scene control group address for that area. Configure Sensor for Cell Office 1 and Sensor for Cell Office 2. 1. Select a DALI Sensor for Cell Office 1. 2. On Sensor Applications page, select the CellOffice application. 3. Enable the option Use Motion Sensor. 4. Set the option This Motion Sensor is used for AutoOnAutoOff. 5. Enter the Switch Off Timer (s). 6. Enable the option Show Advanced. This will display Use corridor hold-on option. 7. Enable Use corridor hold-on. 8. Select a DALI Sensor for Cell Office 2 and repeat Sensor configuration steps 1 to 7 for Cell Office 2. 9. Link Sensor 1 – Motion Scene and Sensor 1 – Notifier Scene to the Scene Control group address for Cell Office 1. 10. Link Sensor 1 – Notifier Sync Object to the Cell Offices Occupancy Sync group address. 11. Link Sensor 2 – Motion Scene and Sensor 2 – Notifier Scene to the Scene Control group address for Cell Office 2. 12. Link Sensor 2 – Notifier Sync Object to the Cell Offices Occupancy Sync group address. Philips LightMaster 128 Configure a Sensor for Corridor 1. Select a DALI Sensor for Corridor. 2. On the Sensor Applications page, Select the Corridor application 3. Enable the option Use Motion Sensor. 4. Set the option This Motion Sensor is used for AutoOnAutoOff. 5. Enter the Switch Off Timer. 6. Enable the option Show Advanced. This will display Use Corridor hold on option. 7. Enable Use Corridor hold-on. 8. Enable Area has a parent. 9. Link Sensor 3 – Motion Scene, Sensor 3 – Activator Scene and Sensor 3 – Timer Scene to the scene control group address for Corridor area. 10. Link Sensor 3 – Activator Sync and Sensor 3 – Timer Sync Objects to the Cell office Occupancy Sync group address. 11. Link Sensor 3 – Notifier Sync to the Corridor – Occupancy sync group address. Configure a Sensor for Lobby. 1. Select a DALI Sensor for Lobby 2. On the Sensor Applications page, Select as Corridor application 3. Enable the option Use Motion Sensor 4. Set the option This Motion Sensor is used for as AutoOnAutoOff. 5. Enter the Switch Off Timer. 6. Enable the option Show Advanced. This will display Use Corridor Hold On option. 7. Enable Use Corridor Hold On. 8. Link Sensor 4 – Motion Scene, Sensor 4 – Activator Scene and Sensor 4 – Timer Scene to the scene control group address for the Lobby area. 9. Link Sensor 4 – Activator Sync and Sensor 4 – Timer Sync Objects to the Corridor Occupancy Sync group address. Philips LightMaster 129 3.23 Background level for Open Plan Also known as adjacent area standby, this feature is used in larger areas equipped with multiple sensors (e.g. modern open plan offices). It can activate or maintain a background lighting level in an open plan office while at least one of the work islands is still occupied. When the last work island area becomes unoccupied, the lights in the open plan will switch off (with a delay). Example demonstrates Open Plan with 4 Work- Islands. Work island configuration • Area 0/1/1, 0/1/2, 0/1/3, 0/1/4 • Scene 1 = 100% • Scene 12 = 20% (background level) • Scene 15 = Off Open plan configuration • Area 0/1/5 • Scene 1 = n.a. • Scene 12 = 100% • Scene 15 = Off 1. Initially everything is off and in Scene 15 2. When the first work island gets occupied it switches on at Scene 1. 3. It sends an occupied signal to the open plan group and other Work Islands. 4. The general lighting in the open plan switches on at Scene12 (100%). 5. The other work islands switch on at Scene 12 (background lighting 20%). Philips LightMaster 130 6. When a second work island gets occupied it switches on at Scene 1(100%) 7. It sends an occupied signal to the open plan group and other Work Islands. 8. Unoccupied Work Islands 3 and Work Island 4 remain at Back ground level. 9. When a work island is vacated it will drop back to background level while there are still occupied signals to its group area. 10. When the last work island is vacated it will drop back to its background level. Philips LightMaster 131 11. When the hold timer expires the open plan will switch to Scene 15 (0%) 12. All work islands will switch to Scene 15 (0%) Scene 15 Scene 15 Scene 15 Scene 15 Scene 15 Create Scene Group addresses for Work Island 1, Work Island 2 Work Island 3 Work Island 4 and Open Plan. Create a group address for Occupancy Sync. Link Sensor 1 – Motion Scene object to the Dimmer Lamp Driver X – Scene Objects in Work Island 1. Also link Sensor 1 – Notifier Scene, Sensor 1 – Activator Scene, Sensor 1 – Timer Scene to the Scene Group address for Work Island 1. Link Sensor 2 – Motion Scene object to the Dimmer Lamp Driver X – Scene Objects in Work Island 2. Also link Sensor 2 – Notifier Scene, Sensor 2 – Activator Scene, Sensor 2 – Timer Scene to the Scene Group address for Work Island 2. Link Sensor 3 – Motion Scene object to the Dimmer Lamp Driver X – Scene Objects in Work Island 3. Also link Sensor 3 – Notifier Scene, Sensor 3 – Activator Scene, Sensor 3 – Timer Scene to the Scene Group address for Work Island 3. Link Sensor 4 – Motion Scene object to the Dimmer Lamp Driver X – Scene Objects in Work Island 4. Also link Sensor 4 – Notifier Scene, Sensor 4 – Activator Scene, Sensor 4 – Timer Scene to the Scene Group address for Work Island 4. Link Sensor 1 – Corridor Object 04 – Scene (Activator) and Sensor 1 – Corridor Object 05 – Scene (Timer) to the Dimmer Lamp Driver X – Scene Objects in Open Plan. Link the entire Sensor - Corridor Sync Objects (Notifier Sync, Activator Sync, and Timer Sync) to Occupancy Sync group address. Philips LightMaster 132 Sensor 01 0/1/1 Motion Scene Dimmer Sensor 01 0/1/1 Lamp Driver X - Scene 0/1/2 Motion Scene Notifier Dimmer 1/1/2 Lamp Driver X - Scene Notifier 0/1/1 Corridor Notifier Scene 0/1/2 Corridor Notifier Scene 0/5/1 Corridor Notifier Sync 1/5/1 Corridor Notifier Sync Activator Activator 0/1/1 Corridor Activator Scene 0/1/2 Corridor Activator Scene 0/5/1 Corridor Activator Sync 0/5/1 Corridor Activator Sync Timer Timer 0/1/1 Corridor Timer Scene 0/1/2 Corridor Timer Scene 0/5/1 Corridor Timer Sync 0/5/1 Corridor Timer Sync Open Plan Work Island 1 Work Island 2 Activator 0/1/5 Corridor Activator Scene Sensor 01 0/1/3 Motion Scene 0/5/1 Corridor Activator Sync Dimmer 0/1/3 Lamp Driver X - Scene Dimmer 0/1/5 Lamp Driver X - Scene Sensor 01 Timer 0/1/4 Motion Scene Dimmer 0/1/4 Lamp Driver X - Scene 0/1/5 Corridor Timer Scene Notifier Notifier 0/5/1 Corridor Timer Sync 0/1/3 Corridor Notifier Scene 0/5/1 Corridor Notifier Sync 0/5/1 Corridor Notifier Sync Activator Activator 0/1/3 Corridor Activator Scene 0/1/4 Corridor Activator Scene 0/5/1 Corridor Activator Sync 0/5/1 Corridor Activator Sync Timer Timer 0/1/1 Corridor Timer Scene 0/1/4 Corridor Timer Scene 0/5/1 Corridor Timer Sync 0/5/1 Corridor Timer Sync Work Island 4 Work Island 3 Philips LightMaster 0/1/4 Corridor Notifier Scene 133 Philips LightMaster 134 Setup scenes for lamp driver channels. 1. On the DALI MultiMaster/Scenes page, enter a scene name. 2. Enter a percentage in the Level (%) column for each DALI channel in your area. 3. Enter a fade time for each channel, if applicable (advanced). 4. Identify the DALI Channels in Work Island Areas, Enter Level 100% for Occupied Scene (Scene 1), Level 20% for switch off warning scene (scene 10) and Level 20% for Unoccupied Scene (Scene 12) 5. Identify the DALI Channels in Open Plan Area. Enter Level 100% for Background Scene (Scene 12) and Level 0% for Unoccupied Open Plan Scene (Scene 15) 6. Enable the Scene (DPT_SceneControl) group object for each DALI channel in your area. 7. Link the Lamp Driver X – Scene objects for the channels in your area to the scene control group address for Work Island 1, Work Island 2, Work Island 3, Work Island 4 and Open Plan. Configure a Sensor for Work Island 1. Select a DALI Sensor for Work Island 1. 2. On Sensor 1 - Sensor Applications Page, Select Application as WorkIsland. 3. Enable the option Use Motion Sensor. 4. Enter the Switch Off Timer. 5. Enable the option Show Advanced. This will display Use Corridor Hold On option. 6. Enable Use Corridor Hold On. 7. Select a DALI Sensor for Work Island 2, Work Island 3 and Work Island 4. 8. Do the same Sensor configuration of Work Island 1 to Sensor 2, Sensor 3 and Sensor 4. 9. Link Sensor 1 – Motion Scene, Sensor 1 – Notifier Scene, Sensor 1 – Activator Scene, Sensor 1 – Timer Scene to the Scene Control group address for Work Island 1. 10. Link Sensor 2 – Motion Scene, Sensor 2 – Notifier Scene, Sensor 2 – Activator Scene, Sensor 2 – Timer Scene to the Scene Control group address for Work Island 2. 11. Link Sensor 3 – Motion Scene, Sensor 3 – Notifier Scene, Sensor 3 – Activator Scene, Sensor 3 – Timer Scene to the Scene Control group address for Work Island 3. 12. Link Sensor 4 – Motion Scene, Sensor 4 – Notifier Scene, Sensor 4 – Activator Scene, Sensor 4 – Timer Scene to the Scene Control group address for Work Island 4. Philips LightMaster 135 Configure the Corridor linking Objects for Open Plan 1. Choose a Sensor of any WorkIsland, (1 for example). 2. On Sensor 1 - Sensor Properties page, Select Corridor hold-on tab. 3. Under Objects, Enable 4th and 5th Object. 4. Set the Object type for 4th object as Activator. 5. Enable Exclude scene Range. 6. Enter Scene Range start as 12, Scene Range End as 12. 7. Enter Activator Action Scene as Scene 12. 8. Set the Object type for 5th object as Timer 9. Enter the Scene Range Start as 12 and Scene Range End as 12. 10. Enter Timer Action Scene as Scene 15. 11. Enter the Timer Timeout as 300sec. 12. Link Sensor 1– Corridor Object 04 Scene, Sensor 1– Corridor Object 05 Scene to the scene control group address for Open plan. 13. Link the entire Sensor - Corridor Sync Objects (Notifier Sync, Activator Sync, and Timer Sync) to Occupancy Sync group address. Philips LightMaster 136 © 2013 Koninklijke Philips Electronics N.V. All rights reserved. Philips International B.V. The Netherlands Document Revision: A