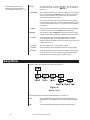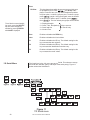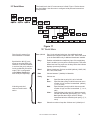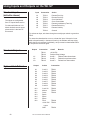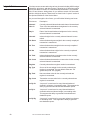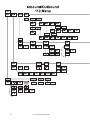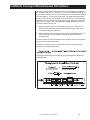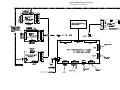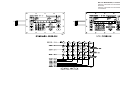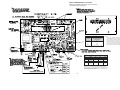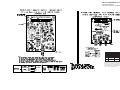
1
WI-127 Indicator
Service Manual
2
WI-127 Indicator Service Manual
Table of Contents
Table of Contents ....................................................................................................... 3
Specifications ............................................................................................................ 4
Introduction ................................................................................................................ 5
Error Messages.......................................................................................................... 5
Service Menu Structure .............................................................................................. 6
Moving Through Menus ...................................................................................... 6
Accessing the Menu .......................................................................................... 7
Exiting the Menu ............................................................................................... 7
Using the Service Menu ............................................................................................. 8
About Menu ................................................................................................................ 8
Audit Menu ................................................................................................................. 9
Test Menu ................................................................................................................ 10
J-Box Deadload Offset ..................................................................................... 10
Setup Menu .............................................................................................................. 12
Top Level of 110 Menu ..................................................................................... 13
110 Adjust Menu ..................................................................................... 13
110 Scale Menu ...................................................................................... 15
Tips on setting up and using the Harmonizer® filtering .................... 18
110 Options Menu ................................................................................... 19
110 Serial Menu ...................................................................................... 20
110 Seal Menu ........................................................................................ 22
Top Level of 127 Menu ..................................................................................... 24
127 Adjust Menu ..................................................................................... 25
127 Scale Menu ...................................................................................... 26
Tips on setting up and using the Harmonizer® filtering .................... 30
127 Options Menu ................................................................................... 31
127 Serial Menu ...................................................................................... 35
127 BCD Out Menu ................................................................................. 36
127 Analog Menu .................................................................................... 36
127 Outputs Menu .................................................................................. 37
127 Inputs Menu ..................................................................................... 38
127 Seal Menu ........................................................................................ 39
127 Transfer Menu .................................................................................. 40
Reset Menu / Master Clear ...................................................................................... 41
Calibrating the WI-127 .............................................................................................. 42
Entering the Calibration Menu ................................................................. 42
Weight Calibration ................................................................................... 43
Count Calibration .................................................................................... 44
Adding Calibration Points ........................................................................ 45
Deleting Calibration Points ...................................................................... 45
Customizing the Serial Output ................................................................................. 47
Predefined Print Layouts .................................................................................. 47
ASCII Strings ................................................................................................... 50
Step by Step Instructions ................................................................................ 52
Entering the Define submenu .................................................................. 52
Creating ASCII strings ............................................................................. 53
Creating Layouts ..................................................................................... 55
Creating Groups ...................................................................................... 58
Broadcast ............................................................................................... 59
Autosend ................................................................................................. 59
Using Inputs and Outputs on the WI-127 .................................................................. 60
WI-127 Disassembly and Reassembly ..................................................................... 61
Installing Option Cards ............................................................................................. 62
Inbound/Outbound (GTN) Software ...................................................................... 63-78
In-Motion Software .............................................................................................. 79-90
Technical Illustrations ............................................................................................... 91
Service Menu .................................................................................................. 100-102
WI-127 Indicator Service Manual
3
WI-127 Specifications*
Power requirements:
115 Volts AC, +10% to -15% @ 0.3Amp maximum
230 Volts AC, +10% to -15% @ 0.15 AMP maximum
50 /60 Hz
Standard inputs:
Seven configurable logic level inputs for functions
such as PB tare, print, zero, units, select, gross and
net.
Excitation: 10 Volts DC
Supports up to twelve 350-ohm weight sensors
Standard outputs:
Three outputs, open collector design (50ma sink)
Relay power supply, 24 VDC at 150mA
Bi-directional serial port (RS-232 or RS-422/485 or
20mA current loop)
Operational keys:
Five yellow standard keys: Zero, Tare, Print, Units,
Select
Three function keys: F1, F2, F3
Numeric keys: 0-9
Operational annunciators:
Gross, Tare, Net, Print, Zero, Motion
Under, Accept, Over, Cutoff, ID,
Three units of measure
Serial Command Inputs
Programmable serial response to ASCII character
input
Self diagnostics:
Display, keys, inputs, outputs, serial port,
A to D converter, loadcell output display, voltages
Display: Eight digit, seven segment, 0. 8-inch high LED
Circuitry protection: RFI, EMI, and ESD protection
Display rate: Selectable (1, 2, 5, 10)
Options:
Two additional serial ports
BCD parallel
10 cutoffs
Analog output
0-5, 0-10 volts
1-5, 4-20, 10-50 mA
Analog Range: ±6.666
Analog to digital conversion rate: 60 times per
second
Unit of measure:
Three, independently programmable:
Pounds, kilograms, grams, ounces, ton, tonne,
custom, Off
Capacity selections:
999,999 with decimal located from zero to five places
Incremental selections:
Multiples and sub-multiples of 1, 2, 5
Programmable selections:
Zero range, motion detection,
automatic zero tracking, five-point linearization.
Time and date / RAM:
Battery backed up real time clock and RAM are
standard
Internal resolution: 6,291,456 counts per mV/V per
sec.
Operating temperature:
-40 to 140° F (-40 to 60° C)
100% relative humidity including washdown
Enclosure: NEMA 4X stainless steel enclosure
Dimensions:
12" W x 8" H x 4" D (without mounting bracket)
12.3" W x 11.0" H x 5.3" D (with mounting bracket)
Weight: 12.5 lb, 5.7 kg
Agencies:
NTEP Class III/IIIL:10,000d, COC #96-140.A1
Consumer and Corporate Affairs, Canada, #AM-5167
UL/CUL/CSA
FCC Class A
HarmonizerTM digital filtering:
Fully programmable to ignore noise and vibration
* Specifications subject to change without notice.
4
WI-127 Indicator Service Manual
Introduction
This manual covers the service issues for the WI-127 indicator. The manual
is divided into the following sections:
When installing the WI-127, the
power socket-outlet must be
nearby and easily accessible.
This equipment uses double
pole/neutral fusing
• Introduction
• Error Messages
• Service Menu Structure
• Using the Service Menu
• About Menu
• Audit Menu
• Test Menu
• Setup Menu
• Reset Menu
• Calibrating the WI-127
• Customizing the Serial Output
• WI-127 Service Menu
• Technical Illustrations
Main sections of this manual are set apart by the large black bar as seen
above. Subsections are labeled in the left column of each page. Notes,
cautions and warnings are also listed in the left hand column.
If you find inaccuracies in this manual or have suggestions on how to
improve it, please call 507-238-4461 or 800-368-2039 and ask for a technical writer.
Error Messages
The following are displays you may see if problems occur or if invalid
operations are attempted with your WI-127:
Display
O. LoAd
Description
Overrange weight.
Underrange weight.
Recovering from lockup or out of range condition.
A-D converter is not functioning.
L.C. Error
A-D converter subjected to an input signal beyond ±5.0000
mV/V
The unit cannot perform a function. Displayed only while key
is held down.
Corrupted data in the reset menus. See the Reset Menu/
Master Clear section. (* = RESET, SETUP, or CAL)
Displayed while a key is pressed when attempting to modify
a sealed selection without edit privileges.
WI-127 Indicator Service Manual
5
Auto. 0
Displayed while waiting for a stable, valid weight to use as a
zero reference on power-up.
Displayed when input voltage to excitation regulator drops
below 10.5 VDC. Will clear when input voltage rises above
11.5 VDC.
1 Busy
Displayed when the ready/busy handshake has exceeded
its time out limit. Default is 2 seconds. This can also apply
to optional 2nd and 3rd serial ports.
Service Menu Structure
Moving Through Menus
You configure, calibrate and do testing of the WI-127 using a menu structure
which you move through using directional keys on the front panel. The
directional keys are shown below:
Figure 1
Directional keys
Press this key to exit a menu parameter without saving any changes. Use to
move “up” in the menus.
Press this key to end digit entry, accept a change made, or select an item
from a function list. Use to move “down” in the menus.
Press this key to access menus. Use to move “right” in the menus.
Press this key to backspace (deletes the last digit or punctuation mark
entered) while in numeric entry. Use to move “left” in the menus.
6
WI-127 Indicator Service Manual
Accessing the Service
Menu
Caution
Do not break any seal on the
indicator unless absolutely
necessary. This may cause the
need for the indicator to be
recertified and resealed.
Entering the service menu disables all outputs and inputs, disables/stops all
serial output, B.C.D. output and analog output.
To enter the service menu structure, key in the default password (127) then
press and hold the ESCAPE key for two seconds. If you do not know the
password you may remove the nylon plug on the back of the WI-127 and
press the SEAL switch inside. If you do not want to make any changes in the
service menu but want to view the items, enter the menu without keying in a
password.
If your password has been changed since leaving the factory, enter your
current password instead of the default.
The display should show About. This is the first item in the menu structure.
The following section explains the menu items.
Exiting the Service
Menu
You may exit the service menu and return to weight display mode at any
time by pressing SELECT.
If you made changes to the menu, the indicator will display SAVE (asking
you if you wish to save your changes) before returning directly to weight
display mode.
To exit and save menu changes:
1. With SAVE displayed, press
SELECT. . .
If you do not press SELECT
with Save displayed, none of
your configuration changes will
be saved.
To exit without saving changes:
1a. With SAVE displayed, press
MENU. . .
OR
1b. With SAVE displayed, press
ESCAPE. . .
2. Press SELECT. . .
WI-127 Indicator Service Manual
The indicator will return to weight
display mode and your changes are
saved.
no SAVE is displayed.
Indicator returns to weight display
mode.
Indicator returns to weight display
mode without saving any changes.
7
Using the Service Menu
Figures 2 through 19 show the service menu structure in the WI-127. Following each figure are explanations for each of the service menu items.
The complete service menu
structure can be viewed on the
last fold out pages in the back
of this manual.
Figure 2
First menu level
To exit back to normal weighing mode, press the SELECT
key and save changes as
needed by pressing ENTER
with SAVE? displayed.
About Menu
Information about the software
Audit Menu
Audit counters for calibration and configuration
Test Menu
For testing the hardware of the indicator.
Setup Menu
For setup of the indicator as a 127 or a 110 clone
About Menu
Figure 3
About menu
These are the items listed in the About menu:
8
127
The unit designation.
12345
Parent part number of the software.
-1234
The dash portion of the software part number.
Rev. A
The revision level of the software.
WI-127 Indicator Service Manual
Audit menu
Figure 4
Audit menu
These are the items listed in the Audit menu:
Cal. 0000
This is an example of how the calibration audit trail counter
will appear. The actual value will be between 0000 and
9999. It is nonresettable and may not be edited.
Cfg. 0000
This is an example of how the configuration audit trail
counter will appear. The actual value will be between 0000
and 9999. It is nonresettable and may not be edited. The
counter is incremented each time a metrological item is
modified in the setup menus and saved and so may be used
as a control audit.
WI-127 Indicator Service Manual
9
Test Menu
Figure 5 shows the Test menu. Use this menu to check functions of the WI127. The description of each menu item follows Figure 5.
Figure 5
Test menu
These are the items listed in the Test menu from left to right:
J-Box Deadload Offset
10
Display
Press
to start and stop a continuous display test.
or
key to
With the test stopped press the
move backward or forward one step at a time. Press
again to resume the automatic test or press
to stop the test and return to diSPLAy.
Buttons
This provides a test of the keypad. The name of the key that is
pressed appears on the display. If no key is pressed, nOnE is
displayed. Press
to return to buttonS.
A to D
Press this key to see the current A to D value. The displayed
resolution is 1 part in 20,000 counts per mV/V. Adjust
deadload offset (zero pot) in your junction box so the display
reads ±200 counts.
WI-127 Indicator Service Manual
You may also use this
screen to view deadload
offset while adjusting the
zero pot in a J-box for 0.0 mV/V.
Loadcell
With LOAdCELL displayed, press the
key to see
a live display of the current counts coming from the loadcell.
400400 is the example shown in Figure 5. Press the UNITS
key to toggle between the counts display mode and the mV/
V display, which appears in this format: 2.00200. This
stands for 2.002 mV/V. The decimal indicates you are
looking at mV/V.
Serial
This item accesses the internal port serial tests. With
SEriAL displayed, press the
key. Port 1 is
displayed. This is always the internal serial port. When the
optional serial boards are installed in the same stack, port
two is always on the bottom. When installed in different
stacks (side by side), port two is always closest to the
power supply. Press the
or
key to select
the port you wish to test.
Ready/
Busy
Loop/
No Loop
To exit back to normal weighing mode, press the SELECT
key and save changes as
needed by pressing ENTER
with SAVE? displayed.
Outputs
Sequence
With motors connected to
external circuits, this is a good
way to test your hardware.
☞
Out 1-3 or
(Out 1-8)
(Out 9-16)
With the port you want to test displayed, press the
key. rEAdy or bUSy is displayed telling you if the hardware
input line is ready or busy. This is useful in tracking down serial
output problems.
key to see the Loop - No Loop test.
Press the
Connect the transmit line to the receive line at some point in the
cabling. The WI-127 checks if it receives the same characters
that it transmits. If it can, LOOP is displayed. If it cannot, no
LOOP is displayed. This is useful in isolating serial output
problems to the WI-127, cable, or connected device by looping
back at the corresponding points.
This test allows you to check the operation of the onboard and
optional outputs. The onboard outputs are copies of the first
three outputs on the optional I/O board when it is installed.
This is the first item in the Outputs submenu. Press the
key to test the outputs. Each output is turned on
and off sequentially. The display will show Out. nn. The nn
being the number of the output being tested. The outputs will
or
sequence every half second. Press the
key to end the test and return to the SEqUEnCE
display.
This is the second item in the Outputs submenu. This allows
you to enable or disable any of the outputs 1-3 (1-16 if the
optional boards are installed). Press the
key to see
the display of the outputs status.
The screen has 0s and 1s displayed in this format: 00.010000.
In this example, output #4 is active. The zeros and ones
represent the status of each output. A 1 means it is activated
and a 0 means it is deactivated. The left digit is output #1 or #9.
To change the status of an output, press the
or
key to move the decimal point to the right of the
key to toggle
output you want to change. Press the
the output from one status to the other.
key to exit the test. The outputs remain
Press the
as selected until you exit the Test menu. Returning to the
normal weigh mode returns the control of the outputs to the
cutoff values.
WI-127 Indicator Service Manual
11
This allows you to test your
remote push button switches
(ie. remote zero, print, etc.)
☞
Inputs
Standard
This test allows you to check the operation of the onboard
key to access the
and optional inputs. Press the
submenu.
This submenu item lets you check the status of the onboard
inputs. In this example, 1000100, inputs #1 and #5 are active.
The inputs are ordered 1-8 from left to right. A 1 means activated and a 0 means deactivated.
As you view the inputs, #8 is actually a flag that is dependent
on the states of inputs 6 and 7. Input 6 resets flag #8 to a false
0. Input 7 sets flag #8 to a true 1. Input 8 does not terminate at
a connector.
Option
Voltages
This menu item is available only if the option board is installed.
It works the same way as the Standard example above.
The submenu under VoltAgES lets you see the power supply
voltages. The voltage readings are updated 2 times per second.
13 volts
This test displays the unregulated weight sensor excitation
power supply voltage. If the voltage drops below 10.5 the
display will show Lo. Volt. The error condition will not clear until
voltage reaches 11.5.
- 5 volts
This test displays the -5 volt excitation voltage.
10 volts
This test displays the unregulated 5 volt logic supply voltage.
24 volts
This test display shows the relay supply voltage. If this voltage
drops too far it may not be possible to activate certain relays.
Nominal level for this power supply voltage is 22.8.
Setup Menu
Setup is the next top level menu item. See Figure 6.
Figure 6
Setup menu
The two top level menu items under Setup are 110 and 127.
12
110
This selection allows access to the menus necessary to
make the WI-127 behave as a clone of the WI-110 indicator.
127
This selection allows all setup menus to be accessed.
WI-127 Indicator Service Manual
Top Level of 110 Menu
The top level menu items of the 110 menu are shown in Figure 7.
Figure 7
110 Menu
To exit back to normal weighing mode, press the SELECT
key and save changes as
needed by pressing ENTER
with SAVE? displayed.
110 Adjust Menu
Be sure the correct capacity
and division sizes have been
selected before calibrating.
Adjust
Use this submenu for calibration of the scale.
Scale
Use this submenu for configuring units, capacity, divisions,
zero, stability, A.Z.T., update rate, averaging and filtering.
Options
Use this submenu to configure the buttons on the front
panel.
Serial
Use this submenu to setup the baud rate, data bits, parity
and stops of the serial ports.
Seal
Use this submenu to setup a custom password and to set
the sealing choices for the unit.
Below is the 110 Adjust submenu. If the factory calibration has become
corrupt, the word AdJUSt will flash on and off. You may use the indicator
under this condition by calibrating with real weights, not by entering previously recorded count values. See note at left.
Press the ZERO key to delete
a displayed calibration point.
Figure 8
110 Adjust menu
WI-127 Indicator Service Manual
13
Points
See the section Calibrating the WI-127 for indepth instructions.
In this submenu you may view, edit, insert or delete calibration points in a list. The WI-127 allows calibration using up
to five calibration points.
The WI-127 comes from the factory with two calibration
points: 0 and 5000 lbs. (These weight values may differ
depending on your unit of measure.)
These points may be calibrated in two ways: 1) by standard
weight calibration or 2) by entering count values. Counts are
calibrated to a 1 mV/V signal from the factory.
To exit back to normal weighing mode, press the SELECT
key and save changes as
needed by pressing ENTER
with SAVE? displayed.
Reset is very helpful if you get
confused and would like to put
working values back in the
WI-127 calibration menu.
14
A 0
When you access the Points submenu the first item is A 0.
This stands for Apply 0 weight. This is the zero calibration
point.
A 5000
The next calibration point in the default list is the calibration
point for full capacity. Your indicator is factory calibrated to
5000 lbs (1 mV/V). You may keep this value or key in a new
value for full capacity.
Deadload
Lets you view the count value for the current deadload.
Press the UNITS key to change the display to mV/V.
Display
Shows the weight display without having to exit the menus.
An example of what is shown—d 5000. The d indicates a
live display of weight and reminds you that the unit is in
calibration. The value you see depends on the selected unit
of measure, the calibration and the weight applied. The
UNITS key works in this mode.
Reset
Use this item to reset the calibration points to factory default
values. If you choose yES the values are set to 0 lbs at 0
mV/V and 5000 lbs at 1 mV/V.
WI-127 Indicator Service Manual
110 Scale Menu
The next item in the 110 menu structure is Scale. In this group of submenus
you set scale related parameters. Figure 9 shows the Scale menu.
Figure 9
110 Scale menu
Units
Unit 1
This submenu lets you select what unit of measure will be
assigned to the three annunciators on the front panel.
The unit of measure you choose for this item will be assigned
to the annunciator labeled “lb” on the front panel. You can
choose from the following list of units of measure:
Pounds = pounds
1000g = kilograms
g = grams
Oz = ounces
Tons = tons
Tonnes = tonnes (metric tons)
None = no unit of measure is assigned.
Unit 2
The unit of measure you choose for this item will be assigned to the annunciator labeled “kg” on the front panel.
You can choose a unit of measure from the same list as
above.
Unit 3
The unit of measure you choose for this item will be assigned to the annunciator labeled “oz” on the front panel.
You can choose a unit of measure from the same list as
above.
WI-127 Indicator Service Manual
15
Don’t forget to re-calibrate your
system after you change
capacity.
Capacity
The next scale menu item is capacity. Use this item to view
or edit the capacity of the unit in any unit of measure
configured under Units. With CAPACity displayed, press
the
key. The current capacity is displayed. Use
the numeric keypad to key in a new value and press
to accept it and return to the CAPACity display.
You can view the capacity in other units of measure by
pressing the UNITS key.
If you change capacity or
division size in any unit of
measure, this automatically
changes all the other enabled
units of measure as well.
If you want leading zeroes in
your printouts or broadcast and
autosend information, key in
leading zeroes when setting
division size.
To exit back to normal weighing mode, press the SELECT
key and save changes as
needed by pressing ENTER
with SAVE? displayed.
Division
This selection allows you to view and edit the division size of
the enabled units of measure. You can enter any division
size. The indicator will use the closest division size for each
enabled unit of measure (1, 2 or 5 divisions).
You can view the division in other units of measure by
pressing the UNITS key. The number is stored in the
resolution you enter but is displayed in the closest valid
division size.
Zero
Use this menu item to set pushbutton zero related options.
Zero range is specified as a percent of capacity referenced
from the deadload. There are two items in the submenu: Range and Range.
-Range
Use this to set the negative range (below reference zero)
within which the unit may be zeroed. 100% is the default
value.
Range
Use this to set the positive range (above reference zero)
within which the unit may be zeroed. 100% is the default
value.
Stable
Use this menu item to set the motion detection parameters.
There are two items in the submenu: Range and Display.
Range
Specifies the number of ±divisions for the motion window.
Use the numeric keypad to enter appropriate value. Most
common settings are 0.5, 1, or 3 divisions.
Display
Choose ON to if you want the display on while the indicator
senses scale motion. Choose OFF to blank the display
while there is scale motion.
A.Z.T.
Range
Update
This stands for Automatic Zero Tracking. Range is the only
item in this submenu.
Use this item to set the range within which the indicator will
automatically adjust the zero balance towards zero. Use the
numeric keypad to enter appropriate value. Most common
settings are 0.5, 1, or 3 divisions.
Use this to set the display update rate from these choices:
1
2
5
10
16
WI-127 Indicator Service Manual
One update per second.
Two updates per second
Five updates per second
Ten updates per second.
Average
The next menu item is Average. This can be entered in one
of two methods: x disp. or x a-ds. Press the UNITS key to
switch back and forth between the two choices.
The suggested method of setting the average is by picking a
value for x disp. Doing this insures that a multiple of the
display rate is always being averaged. This results in a
steadier weight display.
Use x a-ds if you need an exact number of A-D conversions
for your particular situation.
x disp. 1 disp. is the default display when you access this
item. x is the number of display interval(s) over which the
data is internally averaged prior to
being displayed.
The number of A-Ds averaged is based on the display
update rate you set under the Update menu item. Default is
1 disp.
Changing the update rate
changes the x disp. or x a-ds
value based on the new update
rate.
x a-ds x is the number of a-d conversions to average for
each display.
The A-D weight conversion happens 60 times per second in
this indicator. Average is the number of conversions you
want to average for the weight that is displayed. Default is
12 a-ds when Update is at default of 5 and x disp. is at
default value of 1.
Harmonizer® filter is used only
if the average value will not
filter out the vibration by itself.
Values change with unit of
measure.
Filter
Use this menu item to configure the Harmonizer® filter
settings. Constant and Threshld are the two items you can
configure in this submenu.
Constant
This number represents the amount of filtering. Choose a
setting between 1 and 10. Choose 1 for the least amount of
filtering but the fastest response. Choose 10 for the most
filtering but the slowest response. Choose Off to disable the
Harmonizer functions and default to the lowest filtering.
Threshld
This is the window, in the current unit of measure, within
which weight changes are altered according to the constant.
10.0 is the default value shown in Figure 9. You should set
the threshold value between 130 and 150% of the weight
swings that need to be suppressed.
WI-127 Indicator Service Manual
17
Tips on setting up and using the Harmonizer® filtering
We recommend the following
values as a starting point for
Harmonizer filtering:
Display Update = 10 sec
Ave. = 8 disp.
or
48 A-Ds
Constant = Level 4
Threshold = Zero
To find the best settings for your filter needs, follow the steps listed
below.
1. What to Do: Determine the amount of positive and negative force
exerted by the vibration on the scale.
How to Do It: Set Threshld to 0.0, Constant to OFF, and Average
to 1.0 A-Ds. Return to weigh mode and observe the weight swings.
Record the difference between the highest and lowest displayed
weight values. Add 30 to 50% to this value. This is a good starting
value for the Threshld setting. Do not set your indicator to this value
until told to in step 7.
2. Setting the Average to higher values increases the filtering effect.
What to Do: Set Threshld to 0.0, Constant to OFF and Average to
12.0 A-Ds. Check the stability of the scale.
How to Do It: Save changes and exit to normal weight mode.
Observe the Center of Zero light. If it is on all the time your scale is
stable within ¼ division. If the Center of Zero light blinks more
filtering is required. Go to step 3.
3. Repeat step 2 but increase the Average by 12.0 A-Ds. Keep repeating steps 2 and 3 until the scale is stable or you’ve tried the entire
range of Average (300 A-Ds). If the scale is still not stable go to step
4.
4. Setting the Constant to higher values increases the filtering effect.
What to Do: Set Threshld to 0.0, Constant to 1.0 and Average to
300 A-Ds. Check the stability of the scale.
How to Do It: Save changes and exit to normal weight mode.
Observe the Center of Zero light. If it is on all the time your scale is
stable within ¼ division. If the Center of Zero light blinks more
filtering is required. Go to step 5.
5. Repeat step 4 but increase the Constant by 1.0. Keep repeating
steps 4 and 5 until the scale is stable or you’ve tried the entire
range of Constant (10). If the scale is still not stable, decrease your
display update rate and start over at step 1 using the new, slower
display rate.
6. After the Constant value is established you may wish to lower the
Average value to improve display response time.
7. After a final value for Constant and Average has been set, enter the
Threshld value established in step 1. If this value is too small your
scale will act as if the filtering is off or not working. Increase the
Threshld value until your scale stabilizes.
If the Threshld value is too high your scale will react slowly to
weight changes.
When Harmonizer is properly adjusted the scale will be stable at
zero and will rapidly display a stable test weight value.
18
WI-127 Indicator Service Manual
110 Options Menu
The third item in the 110 menu structure is Options. Figure 10 shows the
Options Menu. Use this menu to enable/disable and configure the buttons
on the front panel.
Figure 10
110 Options menu
Select
Enables or disabled the SELECT key.
Units
Enables or disables the UNITS key.
Tare
This parameter enables or disables the pushbutton tare and
numeric tare entry.
PB Tare
Options under this item are Yes (allows pushbutton tare for
all nonnegative values), Non-Zero (enables pushbutton tare
for all nonnegative values excluding zero), and No (disables
pushbutton tare).
n Tare
Enables and disables numeric tare entry.
WI-127 Indicator Service Manual
19
Print
PB Print
To exit back to normal weighing mode, press the SELECT
key and save changes as
needed by pressing ENTER
with SAVE? displayed.
110 Serial Menu
This item determines which layouts are sent to which ports
for pushbutton print. Press
and Group is displayed. From this item you may either disable the pushbutton print option, or select a group to print. To select a group,
press
again. Using the keypad, enter the number
,
of the group you wish to print. To disable, press
then
. The four default print groups are as follows:
1 = Displayed weight
2 = Gross, Tare, Net (default)
3 = Gross and Net
4 = Net and Tare.
Zero
Enables or disables the ZERO key.
User
Enables or disables the User’s Menu.
F1
Enables or disables the F1 key. The default setting for this
key accesses the tare registers.
F2
Enables or disables the F2 key. The default setting for this
key accesses the identification number entry.
F3
Enables or disables the F3 key. The default setting for this
key accesses the cutoff values.
The fourth item in the 110 menu structure is Serial. This submenu sets up
the baud rate, data bits, parity, and stops of the serial port(s). Figure 11
below outlines the Serial Menu.
Figure 11
110 Serial menu
20
All are sent out
of Port #1 only.
WI-127 Indicator Service Manual
Ports 2 and 3 present if optional
hardware is installed.
Port 1, 2 & 3
Port 1 is the onboard serial port. Any additional boards
installed are configured under Ports 2 & 3. Ports 2 & 3 show
up in the Serial Menu only if additional boards are installed.
Busy
Enables or disables the ready/busy input. If the ready/busy
input is enabled, you may enter a timeout period. This value
determines how long a port can be busy before the indicator
displays a port busy message.
Baud
Select a baud rate. Choices are: 9600 (default), 19200, 300,
600, 1200, 2400, 4800.
Data
Choose between 7 (default) & 8 data bits.
Parity
Choices are:
No -
Specifies that no parity bit is to be included.
Even - Specifies that a parity bit which insures an even
number of logic one bits is transmitted. (default) (7,
1or 2, even)
A flashing value
indicates an
invalid combination.
Odd - Specified that a parity bit which insures an odd
number of logic one bits is transmitted. (7, 1 or 2,
odd)
Clear - Specified that a logic zero bit is always transmitted
after the data bits (space parity). (8, 1, none)
Set Stops
Specifies that a logic one bit is always transmitted
after the data bits (mark parity). (7, 2, none)
Select the number of stop bits. Choices are 1 or 2.
WI-127 Indicator Service Manual
21
110 Seal Menu
The last item in the 110 Setup menu is Seal. Use this submenu to set up a
custom password and to set the sealing choices for the unit. Items in the
Setup menu (Figure 6) can be protected from unrecorded changes.
Two internal counters record changes to items in the Setup menu. View
these counters under AUDIT in the Service menu (Figure 4). These
counters cannot be reset and thus can be used by auditors or inspectors to
check if changes have been made. One counter is for scale calibration items
and the other for configuration items. The level of protection is set in the
Seal menu. The Seal menu is shown in Figure 12.
To exit back to normal weighing mode, press the SELECT
key and save changes as
needed by pressing ENTER
with SAVE? displayed.
Figure 12
110 Seal Menu
Code No.
This item allows you to enter a personalized security code
number. Digits are not shown on the display as you key
them in, so the display prompts you to enter the code
number twice.
All & Phys.
The two parameters in the SEAL menu are All and Phys.
Below are explanations of the choices you can make.
ALL set to YES
Any time you access the setup menu and change any item in Table 1, the
appropriate counter increments one count. Changing multiple items on one
visit to the menu increments the counter only one count. It's the number of
visits with changes that are counted, not the number of changes per visit.
ALL set to NO
With this setting the calibration internal counter will increment when you
access the setup menu and change any calibration item in Table 1. The
internal configuration counter will increment only if you change one of the
configuration items in bold print from Table 1.
22
WI-127 Indicator Service Manual
Phys. set to Yes
If Phys. is set to Yes, you must remove the physical seal (rear sealing plug)
of the WI-127 to access an internal switch. When you press this switch you
have full editing privileges and the display shows the first item in the Service
menu, About, without the need to enter the password.
If you enter the Service menu using the password and not the internal
switch, you can change only the configuration items in Table 1 that are in
normal, not bold, print.
PHYS set to NO
If PHYS. is set to NO, you can
still press the internal switch
and have instant setup menu
access and editing privileges.
If PHYS. is set to NO, correct password entry is the only way to have editing
privileges of all the items in Table 1 without breaking the physical seal. See
note to left.
If the password is not entered correctly, the setup menu items can be
viewed but not edited.
Calibration Items
Configuration Items
Any item in the Adjust menu
Any item in the Scale menu
Any item in the Options menu
Any item in the Seal menu
Any item in the Serial menu
Any item in the Analog menu
Any item in the B.C.D. Out menu
Table 1
Calibration and Configuration list
This is the end of the 110 section. The next section covers the 127 section
of the Setup menu.
WI-127 Indicator Service Manual
23
Top Level of 127 Menu
The top level menu items of the 127 menu are shown in Figure 13.
Figure 13
127 Menu
To exit back to normal weighing mode, press the SELECT
key and save changes as
needed by pressing ENTER
with SAVE? displayed.
24
Adjust
Use this submenu for calibration of the scale.
Scale
Use this submenu for configuring units, capacity, divisions,
zero, stability, A.Z.T., update rate, averaging, filtering, and
overload.
Options
Use this submenu to configure the buttons on the front
panel.
Serial
Use this submenu to setup the baud rate, data bits, parity
and stops of the serial ports.
B.C.D. Out
Use this submenu to configure the output of an optional
B.C.D. board. This menu will not appear if the optional
board is not installed.
Analog
Use this to configure the analog output option board.
Outputs
Use this to configure the WI-127’s outputs.
Inputs
Use this to configure the WI-127’s hardwired inputs (ie. PB
Tare).
Seal
Use this submenu to setup a custom password and to set
the sealing choices for the unit.
Transfer
Use this submenu to setup the WI-127 to receive or send
print formats from the WI-127 downloader software package
in your PC.
WI-127 Indicator Service Manual
127 Adjust Menu
Be sure the correct capacity
and division sizes have been
selected before calibrating.
Below is the Adjust submenu for the 127. If the factory calibration has
become corrupt, the word AdJUSt will flash on and off. To correct this you
must send it to the factory. You may use the indicator under this condition by
calibrating with real weights, not by entering previously recorded count
values. See note at left.
A step-by-step description of
calibrating the WI-127 and
using the Adjust menu can be
found in the section titled
Calibrating the WI-127.
Figure 14
127 Adjust menu
Points
See the section Calibrating the WI-127 for indepth instructions.
In this submenu you may view, edit, insert or delete calibration points in a list. The WI-127 allows calibration using up
to five calibration points.
Press the ZERO key to delete
a displayed calibration point.
The WI-127 comes from the factory with two calibration
points: 0 and 5000 lbs. (These weight values may differ
depending on your unit of measure.)
These points may be calibrated in two ways: 1) by standard
weight calibration or 2) by entering count values. Counts are
calibrated to a 1 mV/V signal from the factory.
Reset is very helpful if you get
confused and would like to put
working values back in the WI127 calibration menu.
12/31/99 10:39 AM
lb
mV/V
--------- -------0
0.00000
5000
2.00000
Serial No. --------
A 0
When you access the Points submenu the first item is A 0.
This stands for Apply 0 weight. This is the zero calibration
point.
A 5000
The next calibration point in the default list is the calibration
point for full capacity. Your indicator is factory calibrated to
5000 lbs (1 mV/V). You may keep this value or key in a new
value for full capacity.
Deadload
Lets you view the count value for the current deadload.
Press the UNITS key to change the display to mV/V.
Display
Shows the weight display without having to exit the menus.
An example of what is shown—d 5000. The d indicates a
live display of weight and reminds you that the unit is in
calibration. The value you see depends on the selected unit
of measure, the calibration and the weight applied. The
UNITS key works in this mode.
Reset
Use this item to reset the calibration points to factory default
values. If you choose yES the values are set to 0 lbs at 0
mV/V and 5000 lbs at 1 mV/V.
Print
Use this item to print the calibration information shown in
the left column from port 1 by choosing yes. These numbers
can be valuable if you have an indicator failure.
WI-127 Indicator Service Manual
25
127 Scale Menu
The next item in the 127 menu structure is Scale. In this group of submenus
you set scale related parameters. Figure 15 shows the Scale menu.
Figure 15
127 Scale menu
Units
This submenu lets you select what unit of measure will be
assigned to the three annunciators on the front panel.
Unit 1
The unit of measure you choose for this item will be assigned to the annunciator labeled “lb” on the front panel.
You can choose from the following list of units of measure:
Pounds = pounds
1000g = kilograms
g = grams
Oz = ounces
Tons = tons
Tonnes = tonnes (metric tons)
To exit back to normal weighing mode, press the SELECT
key and save changes as
needed by pressing ENTER
with SAVE? displayed.
Other = This allows you to enter the information to create a
custom unit of measure. You need to enter the ratio
values for the custom unit based upon another unit
of measure and a string of text to use in serial
output.
Under Basis choose the unit and amount upon
which the custom unit is based. Under Equals enter
the equivalent custom unit value.
26
WI-127 Indicator Service Manual
Example 1: To create a ‘stone’ unit of measure, the
Basis would be 14 pounds and Equals should be 1
stone.
Example 2: To create an ounce unit of measure, the
Basis would be 1 pound and Equals should be 16
ounces.
Example 3: To create a kg unit of measure, the
Basis would be 10 pounds and Equals should be
4.5359237 kilograms. Ten pounds is used so all
eight digits can be entered as the Equals value.
Under Label you create the serial label for the
custom unit of measure. With the first ASCII value
displayed you can use the keys to do the following:
Refer to the ASCII character
chart located in the section
Customizing the Serial Output.
Custom label can be a maximum of 16 characters in
length.
ENTER key-
accepts the displayed value and
returns to Label display.
MENU key -
accepts the displayed value and
moves to the next ASCII character
value.
ESCAPE key - exits the display without making a
change.
+/- key -
Inserts a new ASCII value before
the currently displayed ASCII value.
Key in the ASCII value and continue
by pressing another key.
ZERO key -
deletes the currently displayed
ASCII value.
Continue editing, inserting, and deleting until you
are done. Press
to exit the label entry.
None = no unit of measure is assigned.
Unit 2
The unit of measure you choose for this item will be assigned
to the annunciator labeled “kg” on the front panel. You can
choose a unit of measure from the same list as above.
Unit 3
The unit of measure you choose for this item will be assigned
to the annunciator labeled “oz” on the front panel. You can
choose a unit of measure from the same list as above.
Capacity
Don’t forget to re-calibrate your
system after you change
capacity.
The next scale menu item is capacity. Use this item to view
or edit the capacity of the unit in any unit of measure
configured under Units. With CAPACity displayed, press
the
key. The current capacity is displayed. Use
the numeric keypad to key in a new value and press
to accept it and return to the CAPACity display.
You can view the capacity in other units of measure by
pressing the UNITS key. The number is stored in the
resolution you enter but is displayed in the division size
stored in Division.
WI-127 Indicator Service Manual
27
If you change capacity or
division size in any unit of
measure, this automatically
changes all the other enabled
units of measure as well.
Division
You can view the division in other units of measure by
pressing the UNITS key. The number is stored in the
resolution you enter but is displayed in the closest valid
division size. Any additional resolution is used in calculating
division size in the other units of measure.
If you want leading zeroes in
your printouts or broadcast and
autosend information, key in
leading zeroes when setting
division size.
Zero
This feature keeps the indicator
from functioning at power up in
an unstable environment.
Use this menu item to set zero related options. Zero range
is specified as a percent of capacity referenced from the
deadload. There are three items in the submenu: -Range,
Range and Start.
-Range
Use this to set the negative range (below reference zero)
within which the unit may be zeroed. 100% is the default
value.
Range
Use this to set the positive range (above reference zero)
within which the unit may be zeroed. 100% is the default
value.
Start
Use this parameter to determine whether or not the indicator
must reach a stable reading within the above range before it
will exit the start-up sequence, automatically zero the scale
and begin weighing. While trying to acquire a stable zero the
unit displays Auto. 0. Select No if you want no start-up zero
restrictions. Choose Yes if you want the start-up zero
restriction.
Stable
28
Use this menu item to set the motion detection parameters.
There are three items in the submenu: Range, Delay and
Display.
Range
Use this to specify the number of ±divisions for the motion
window. Default is 1.0 division.
Delay
Use this to specify the number of seconds during which the
weight must be within range (described above) before a nomotion condition is displayed. Default value is 0.4 seconds.
Display
Choose ON to if you want the display on while the indicator
senses scale motion. Choose OFF to blank the display
while there is scale motion. Default is ON.
A.Z.T.
To exit back to normal weighing mode, press the SELECT
key and save changes as
needed by pressing ENTER
with SAVE? displayed.
This selection allows you to view and edit the division size of
the enabled units of measure. You can enter any division
size. The indicator will use the closest division size for each
enabled unit of measure.
This stands for Automatic Zero Tracking. There are two
items in this submenu; Range and Net.
Range
A.Z.T. adjusts the zero balance towards zero at the rate of
.1 divisions per second after being within the range given for
at least 2 seconds.
Net
You may also enable or disable automatic zero tracking of
net weight.
Update
Use this to set the display update rate from these choices:
1 One update per second.
2 Two updates per second
5 Five updates per second
10 Ten updates per second.
WI-127 Indicator Service Manual
Average
The next menu item is Average. This can be entered in one
of two methods: x disp. or x a-ds. Press the UNITS key to
switch back and forth between the two choices.
The suggested method of setting the average is by picking a
value for x disp. Doing this insures that a multiple of the
display rate is always being averaged. This results in a
steadier weight display.
Changing the update rate
changes the x disp. or x a-ds
value based on the new update
rate.
Harmonizer® filter is used only
if the average value will not
filter out the vibration by itself.
See Tips on setting up and
using the Harmonizer filtering on the next page.
Values change with unit of
measure.
Use x a-ds if you need an exact number of A-D conversions
for your particular situation.
x disp.
1 disp. is the default display when you access this item. x is
the number of display interval(s) over which the data is
internally averaged prior to
being displayed. The
number of A-Ds averaged is based on the display update
rate you set under the Update menu item. Default is 1 disp.
x a-ds
x is the number of a-d conversions to average for each
display.
The A-D weight conversion happens 60 times per second in
this indicator. Average is the number of conversions you
want to average for the weight that is displayed. Default is
12 a-ds when Update is at default of 5 and x disp. is at
default value of 1.
Filter
Constant
This number represents the amount of filtering. Choose a
setting between 1 and 10. Choose 1 for the least amount of
filtering but the fastest response. Choose 10 for the most
filtering but the slowest response. Choose Off to disable the
Harmonizer functions and default to the lowest filtering.
Threshld
This is the window, in the current unit of measure, within
which weight changes are altered according to the constant.
10.0 is the default value shown in Figure 15. You should set
the threshold value between 130 and 150% of the total
weight oscillations that need to be suppressed. If weight
changes are +20 lbs and -10 lbs, set this value to 130 to
150% of 30 lbs.
Over
When using overload or over
capacity alone, set the other
menu item to its maximum
value to disable any conflicts.
Use this menu item to configure the Harmonizer filter
settings. Constant and Threshld are the two items you can
configure in this submenu.
This submenu lets you setup the overload and capacity
setting which cause the O. load error message.
Overload
This value is expressed as a percent of capacity referenced
from the deadload determined by calibration. Overload is
restricted to 200% or lower. 105% is the default value.
Over Cap.
This value expressed as a number of divisions over the
capacity referenced from the zero value. A value of 9
satisfies UK requirements. Configurable from 0 to 999999
divisions. Default is 9 divisions.
WI-127 Indicator Service Manual
29
Tips on setting up and using the Harmonizer® filtering
We recommend the following
values as a starting point for
Harmonizer filtering:
Display Update = 10 sec
Ave. = 8 disp.
or
48 A-Ds
Constant = Level 4
Threshold = Zero
To find the best settings for your filter needs, follow the steps listed
below.
1. What to Do: Determine the amount of positive and negative force
exerted by the vibration on the scale.
How to Do It: Set Threshld to 0.0, Constant to OFF, and Average
to 1.0 A-Ds. Return to weigh mode and observe the weight swings.
Record the difference between the highest and lowest displayed
weight values. Add 30 to 50% to this value. This is a good starting
value for the Threshld setting. Do not set your indicator to this value
until told to in step 7.
2. Setting the Average to higher values increases the filtering effect.
What to Do: Set Threshld to 0.0, Constant to OFF and Average to
12.0 A-Ds. Check the stability of the scale.
How to Do It: Save changes and exit to normal weight mode.
Observe the Center of Zero light. If it is on all the time your scale is
stable within ¼ division. If the Center of Zero light blinks more
filtering is required. Go to step 3.
3. Repeat step 2 but increase the Average by 12.0 A-Ds. Keep repeating steps 2 and 3 until the scale is stable or you’ve tried the entire
range of Average (300 A-Ds). If the scale is still not stable go to step
4.
4. Setting the Constant to higher values increases the filtering effect.
What to Do: Set Threshld to 0.0, Constant to 1.0 and Average to
300 A-Ds. Check the stability of the scale.
How to Do It: Save changes and exit to normal weight mode.
Observe the Center of Zero light. If it is on all the time your scale is
stable within ¼ division. If the Center of Zero light blinks more
filtering is required. Go to step 5.
5. Repeat step 4 but increase the Constant by 1.0. Keep repeating
steps 4 and 5 until the scale is stable or you’ve tried the entire
range of Constant (10). If the scale is still not stable, decrease your
display update rate and start over at step 1 using the new, slower
display rate.
6. After the Constant value is established you may wish to lower the
Average value to improve display response time.
7. After a final value for Constant and Average has been set, enter the
Threshld value established in step 1. If this value is too small your
scale will act as if the filtering is off or not working. Increase the
Threshld value until your scale stabilizes.
If the Threshld value is too high your scale will react slowly to
weight changes.
When Harmonizer is properly adjusted the scale will be stable at
zero and will rapidly display a stable test weight value.
30
WI-127 Indicator Service Manual
127 Options Menu
The third item in the 127 menu structure is Options. Figure 16 below shows
the Options Menu. Use this menu to configure the keys on the front panel as
well as define print layouts.
Figure 16
127 Options Menu
WI-127 Indicator Service Manual
31
Buttons
Select
Enables or disabled the SELECT key.
Units
Enables or disables the UNITS key.
Tare
This parameter enables or disables the pushbutton tare and
numeric tare entry.
PB Tare
Options under this item are Yes (allows pushbutton tare for all nonnegative values), Non-Zero
(enables pushbutton tare for all nonnegative
values excluding zero), and No (disables pushbutton tare).
n Tare
Enables and disables numeric tare entry.
PB Print
This item determines which layouts are sent to
which ports for pushbutton print. Press
and Group is displayed. From this
item you may either disable the pushbutton print
option, or select a group to print. To select a
again. Using the keypad,
group, press
enter the number of the group you wish to print.
The four default print groups are as follows:
Print
1 = Displayed weight
2 = Gross, Tare, Net
3 = Gross and Net
4 = Net and Tare.
n Print
If Net is removed from Select
mode, the SELECT key cannot
enable net mode, but taring a
nonzero value will put the
indicator temporarily into the
net mode.
32
All are sent out
of Port #1 only.
This item enables or disables group print entry. If
enabled, you may print any group from the front
panel. To use this feature during normal weighing operations, key in the number of the group
you wish to print, then press PRINT.
Zero
Enables or disables the ZERO key.
User
Enables or disables access to the User’s menu.
F1
Enables or disables the F1 key. The default setting for this
key accesses the tare registers.
F2
Enables or disables the F2 key. The default setting for this
key accesses the identification number entry.
F3
Enables or disables the F3 key. The default setting for this
key accesses the cutoff values.
Display
The Display submenu allows you to customize the order in
which the WI-127 cycles through its weight display modes
and units of measure.
Select
Customize the list of weight display modes here. The default
list is: GrossÆTareÆNet. Repeatedly pressing SELECT
while in the weight display mode will cycle through the list in
that order. You may customize the list by inserting and/or
deleting items in the list. The list can contain a maximum of
four items.
WI-127 Indicator Service Manual
To add an item: Determine where in the list you wish to
insert an item. Display the item which will immediately follow
the one you are inserting. Press +/-. The ACCEPT annunciator illuminates. Cycle through the options by pressing the
and
keys until the item you wish to insert is
displayed, then press
. That item is now included
in the list.
To delete an item: With that item displayed, press ZERO.
That item is deleted from the list.
Units
Customize the list of units of measure here. The default list
is: Unit 1ÆUnit 2ÆUnit 3. Repeatedly pressing UNITS while
displaying a weight in the weight display mode will cycle
through the list in that order. You may customize the list by
inserting and/or deleting items in the list. The list can contain
a maximum of four items.
To add an item: Determine where in the list you wish to
insert an item. Display the item which will immediately follow
the one you are inserting. Press +/-. The ACCEPT annunciator illuminates. Cycle through the options by pressing the
and
keys until the item you wish to insert is
displayed, then press
. That item is now included
in the list.
To exit back to normal weighing mode, press the SELECT
key and save changes as
needed by pressing ENTER
with SAVE? displayed.
To delete an item: With that item displayed, press ZERO.
That item is deleted from the list.
Define
Refer to the section “Customizing your Serial Output”
for detailed instructions about this submenu.
The Define submenu allows you to customize printouts,
build ASCII strings, create groups and enable continuous
send.
ASCII
The WI-127 can store up to sixteen ASCII strings, each
containing up to 32 individual ASCII characters. The WI-127
contains one default ASCII string. You may customize this
string as well as build fifteen additional ones.
Layouts
The WI-127 has sixteen available print layouts (of which
eight have default settings) which may include a combination of sixteen items. Build your custom layouts by choosing
among nineteen print items, including ASCII strings, weight
values, time and date, and other layouts.
Groups
Here is where you specify which ports will print which
layouts. A total of nine groups is available. Within each
group, up to three ports can output layouts. Port 1 is standard; ports 2 & 3 are offered only if additional serial boards
are installed. Each port is then assigned a layout to print.
Broadcast
Enables or disables continuous send. To enable continuous
send, a group number must be entered under GrouP. This
number defines the group to be activated at each display
update.
Autosend
Enables or disables autosend. To enable auto send, a group
number must be entered under GrouP. This number
defines the group to be printed each time weight stabilizes
above 1% capacity. The weight must fall below 1% capacity
for the indicator to initiate another print.
WI-127 Indicator Service Manual
33
Protocol
Except for Reply the actions at
right can only be executed if
the character is received while
the indicator is in the Display
mode.
A protocol is defined as the set of input characters assigned
to specific actions for each port. Under this item you choose
a port, choose an input number, assign an ASCII character
(decimal value) to the action, and choose the associated
response or action from the following list (see note at left):
Print -
Causes a Print to occur. You can specify which
group to output.
Reply -
Causes a Print to occur. You can specify which
group to output. This runs as a background
fuction without regard for motion. Reply can be
executed when the indicator is in Display mode
and also in the User Menu.
Zero -
Performs a Zero function.
None -
Assigns no function.
Units -
Switches indicator to the next available unit of
measure.
Unit 1 -
Switches indicator to Unit 1, if available.
Unit 2 -
Switches indicator to Unit 2, if available.
Unit 3 -
Switches indicator to Unit 3, if available.
Select -
Switches indicator to next available display
mode.
Gross -
Switches display to the gross mode.
Net -
Switches display to the net mode.
Tare -
Switches display to the tare mode.
P.B.Tare - Causes a pushbutton tare operation.
Example:
This is how you would set up the indicator if you want to
zero the scale through a serial port from a computer or PLC:
Select a port (1, 2 or 3) under Protocol.
Connect a cable between this port and your computer or
PLC.
Configure a serial Input to perform an action. A maximum
of 16 serial inputs may be configured.
Under the selected input, under Ch (Character), choose an
ASCII character, for example Z, represented by decimal value
90. See Table 5 in the WI-127 Service Manual for a complete
list of ASCII characters.
Go over from Ch to Action. Under Action drop down and
select Zero from the menu choices.
Now when you send a Z from your PC or PLC to the serial
port, this will cause the display to zero out, the same as if
you pressed the front panel ZERO key.
34
WI-127 Indicator Service Manual
127 Serial Menu
The fourth item in the 127 menu structure is Serial. Figure 17 below shows
the Serial Menu. Use this menu to configure serial ports and communications protocols.
Figure 17
127 Serial Menu
Ports 2 and 3 present if optional hardware is installed.
By default the WI-127 ports
accept an enquire (ENQ) (05)
character. If an ENQ character
is received, the group selected
for the pushbutton print will be
output. This is configurable
under Define, Protocol for
each serial port separately.
Port 1, 2 & 3
Port 1 is the onboard serial port. Any additional boards
installed are configured under Ports 2 & 3. Ports 2 & 3 show
up in the Serial Menu only if additional boards are installed.
Busy
Enables or disables the ready/busy input. If the ready/busy
input is enabled, you may enter a timeout period. This value
determines how long a port can be busy before the indicator
displays a port busy message.
Baud
Select a baud rate. Choices are: 9600 (default), 19200, 300,
600, 1200, 2400, 4800.
Data
Choose between 7 (default) & 8 data bits.
Parity
Choices are:
No Even -
A flashing value indicates an invalid combination.
Odd Clear -
Stops
Specifies that no parity bit is to be included.
Specifies that a parity bit which insures an even
number of logic one bits is transmitted. (default)
(7, 1or 2, even)
Specified that a parity bit which insures an odd
number of logic one bits is transmitted. (7, 1 or 2,
odd)
Specified that a logic zero bit is always transmitted after the data bits (space parity). (8, 1, none)
Set -Specifies that a logic one bit is always
transmitted after the data bits (mark parity). (7, 2,
none)
Select the number of stop bits. Choices are 1 (default) or 2.
WI-127 Indicator Service Manual
35
127 BCD Out Menu
The next item in the 127 menu structure is B.C.D. Out. Figure 19 below
shows this menu. This submenu configures what the BCD output board will
print. It is offered only if the BCD board is installed. Choices are: off, displayed weight, gross weight, and net weight.
If you choose displayed weight, BCD will output gross weight or net weight
depending on what you are using at the time. If you access the user menu,
the BCD output will be whatever was last displayed. If you use the SELECT
key to access the tare display mode, BCD output will be Gross if tare = 0,
Net if tare ¹ 0.
To exit back to normal weighing mode, press the SELECT
key and save changes as
needed by pressing ENTER
with SAVE? displayed.
127 Analog Menu
Figure 18
127 B.C.D. Out menu
The Analog submenu is next. This submenu configures the analog output
option board. Choices are: off, displayed weight, gross weight, and net
weight.
If you choose displayed weight, the analog board will output gross weight or
net weight depending on what you are using at the time. If you access the
user menu, the analog output will be whatever was last displayed. If you use
the SELECT key to access the tare display mode, analog output will be
Gross if tare = 0, Net if tare ¹ 0.
Figure 19
127 Analog menu
36
Output
This item specifies which weight the analog output will
follow. Choices are: off, displayed weight, gross weight, or
net weight.
Full
When selected, the indicator will display the last value used
or the default value. You enter the full capacity of the analog
output which may be less than or greater than the capacity
of the scale. For example, the capacity of the indicator
might be 5000 lb, but it may be desirable to have 3000 lbs
as the full capacity of the analog output. In any case, the
WI-127 Indicator Service Manual
analog output has nominal under and over range limits of 20%. After entering
this value, press UNITS to select the unit of measure for the
value. (This selection is not offered if off is selected under
Output.)
Adjust
These choices—Zero and Full—allow the zero and the span
of the analog outputs to be adjusted without actually putting
weights on and off the scale.
Selecting Zero lets you adjust the zero of the analog output
for a zero weight reading. Adjust the zero by entering a
percent value or by pressing
and
to make
incremental adjustments. The number on the display gives a
visual representation of the zero setting with 00.000 being
the nominal value The zero adjustment has a +/- 10%
range, -10.000 to +10.000 on the display.
Selecting Full lets you adjust the span of the analog output
for the full capacity weight reading. Adjust the span by
and
entering a percent value or by pressing
to make incremental adjustments. Holding these
keys will cause the values to change faster and faster. The
number on the display gives a visual representation of the
zero setting with 100.000 being the nominal value The zero
adjustment has a +/- 10% range, 90.000 to 110.000 on the
display. Weight does not have to be on the scale to perform
this task.
127 Outputs Menu
This submenu, shown in Figure 20, is where you configure the WI-127’s
outputs.
Update
Choose an update display rate for the cutoffs.
Display*
This selection updates the cutoffs at the indicator’s configured display update rate:
* denotes default settings
1, 2, 5 or 10 times per second.
Fast
This selection updates the cutoffs at 20 times per second.
The indicator will continue to update at its configured display
update rate.
Onboard
Choose the configuration of the onboard outputs.
Cutoff*
This selection configures the onboard outputs as cutoffs.
Bounds
This selection configures the onboard outputs as over,
under and accept outputs.
Figure 20
Outputs menu
WI-127 Indicator Service Manual
37
127 Inputs Menu
Use this submenu, shown in Figure 20a, to assign actions to the onboard
hardware inputs. The action for each input is selectable from this list: Print;
Reply; Zero; None; Units; Unit 1; Unit 2; Unit 3; Select; Gross; Net; Tare;
P.B. Tare. See the explanations for each of these at the bottom of the page.
Figure 20a
127 Inputs Menu
See the table below for the default assignments. Use this submenu, shown in
Figure 20a, to assign actions to the onboard hardware inputs. See the table
below for the default assignments.
Inputs—Onboard default assignments
Input
I
2
3
4
5
6
7
Except for Reply the actions at
right can only be executed if
the character is received while
the indicator is in the Display
mode.
38
Action
Zero Key
Print Key
Net Display Mode
Gross Display Mode
Push Button Tare
Select Key
Units Key
Print -
Causes a Print to occur. You can specify which group to
output.
Reply -
Causes a Print to occur. You can specify which group to
output. This runs as a background fuction without regard for
motion. Reply can be executed when the indicator is in
Display mode and also in the User Menu.
Zero -
Performs a Zero function.
None -
Assigns no function.
Units -
Switches indicator to the next available unit of measure.
Unit 1 -
Switches indicator to Unit 1, if available.
Unit 2 -
Switches indicator to Unit 2, if available.
Unit 3 -
Switches indicator to Unit 3, if available.
Select -
Switches indicator to next available display mode.
Gross -
Switches display to the gross mode.
Net -
Switches display to the net mode.
Tare -
Switches display to the tare mode.
P.B.Tare -
Causes a pushbutton tare operation.
WI-127 Indicator Service Manual
127 Seal Menu
The next item in the 127 Setup menu is Seal. Use this submenu to set up a
custom password and to set the sealing choices for the unit. The Seal Menu
is shown in Figure 21.
Figure 21
127 Seal Menu
Items in the Setup menu (Figure 6) can be protected from unrecorded
changes.
Two internal counters record changes to items in the Setup menu. View
these counters under AUDIT in the Service menu (Figure 4). These
counters cannot be reset and thus can be used by auditors or inspectors to
check if changes have been made. One counter is for scale calibration items
and the other for configuration items. The level of protection is set in the
Seal menu. The Seal menu is shown in Figure 22.
To exit back to normal weighing mode, press the SELECT
key and save changes as
needed by pressing ENTER
with SAVE? displayed.
Figure 22
110 Seal Menu
Code No.
This item allows you to enter a personalized security code
number. Digits are not shown on the display as you key
them in, so the display prompts you to enter the code
number twice.
All & Phys.
The two parameters in the SEAL menu are All and Phys.
Below are explanations of the choices you can make.
WI-127 Indicator Service Manual
39
All set to Yes
Any time you access the setup menu and change any item in Table 2, the
appropriate counter increments one count. Changing multiple items on one
visit to the menu increments the counter only one count. It's the number of
visits with changes that are counted, not the number of changes per visit.
All set to No
With this setting the calibration internal counter will increment when you
access the setup menu and change any calibration item in Table 2. The
internal configuration counter will increment only if you change one of the
configuration items in bold print from Table 2.
Phys. set to Yes
If Phys. is set to Yes, you must remove the physical seal (rear sealing plug)
of the WI-127 to access an internal switch. When you press this switch you
have full editing privileges and the display shows the first item in the Service
menu, About, without the need to enter the password.
If you enter the Service menu using the password and not the internal
switch, you can change only the configuration items in Table 2 that are in
normal, not bold, print.
Phys. set to No
If Phys. is set to No, you can
still press the internal switch
and have instant setup menu
access and editing privileges.
If Phys. is set to no correct password entry is the only way to have editing
privileges of all the items in Table 2 without breaking the physical seal. See
note to left.
If the password is not entered correctly, the setup menu items can be
viewed but not edited.
Calibration Items
Configuration Items
Any item in the Adjust menu
Any item in the Scale menu
Any item in the Options menu
Any item in the Seal menu
Any item in the Serial menu
Any item in the Analog menu
Any item in the B.C.D. Out menu
Table 2
Calibration and Configuration list
127 Transfer Menu
Use this submenu to setup the WI-127 to receive or send print formats from
the WI-127 downloader software package in your PC. See Figure 21.
This is the end of the 127 section.
40
WI-127 Indicator Service Manual
Reset Menu / Master Clear
User Master Clear as a last
resort before sending in the
unit for repair.
The reset menu shown in Figure 23 appears in two cases.
1. If you do a Master Clear (powering up the unit with both the MENU and F2
keys pressed).
2. If setup, calibration, or data becomes corrupted.
You must press the Seal
switch if the unit is physically
sealed.
The reset menu may not
contain all three items shown in
Figure 23. If an item is at
default and not corrupted it will
not appear in the menu.
Corrupted items will flash.
Items not at default and not
corrupted will appear but will
be solid (not flashing). These
items are not required to be
reset.
In case 1, you will need to enter the password the same way as explained in
the Service menu. After correctly entering, the reset menu will be displayed.
1. With Reset displayed, press the
key. . .
2. Press the
key. . .
3. Choose Yes* to reset to default
values or No to leave the values
as they are. Toggle between the
or
choices with the
key. When the choice
you want is displayed, press the
key. . .
If the SEAL PHYS. selection is
corrupted, the unit assumes
that the selection is YES.
4. Repeat steps 2 and 3 for each
item in the menu. . .
The first menu item will be displayed. See note at left.
No is displayed.
* If the unit is physically sealed,
you must press the internal switch
to select YES.
If you reset the item, the display will
show the next item. When you reset
an item to defaults it disappears
from the menu.
When all items are either accepted
or reset the indicator reboots automatically.
You can press the ESCAPE
key to exit the Reset Menu
when you don’t want to reset
any more items.
A software change requires a
reset. You must press the seal
switch to force the reset to
occur properly.
Figure 23
Reset menu
In case 2, the display bypasses the password and goes right to Reset.
Repeat steps 1 through 4 above.
WI-127 Indicator Service Manual
41
Calibrating the WI-127
The WI-127 allows calibration using up to five calibration points. These points
can be any weight value in any unit of measure. Standard calibration generally uses two calibration points; for linearization, more than two may be used.
Any changes you make within
the calibration menu will be
immediately implemented, so
take care when recalibrating
your system.
The WI-127 comes from the factory with two calibration points: 0 and 5000
lbs. (These weight values may differ depending on your unit of measure.) To
perform linearization, you can insert more calibration points (up to a total of
five points). These points appear in a list and may be inserted and deleted.
The unit will order the points based on increasing count values.
While in the Calibration menu,
you may print the calibration
data out of port #1 by selecting
YES. See sample below.
These points may be calibrated in two ways: 1) by standard weight calibration or 2) by entering count values. Counts are calibrated to a 1 mV/V signal
from the factory. This allows you to view the deadload, calibration point
counts, and loadcell test in our standard count value (200,000 counts per
mV/V) or press UNITS to view and edit the real mV/V. There are benefits to
this feature:
• You can enter these values into a new indicator hooked up to the same
scale. This is useful if the old indicator needs servicing and a quick
turnaround is needed.
• Another benefit is the ability to enter the profile of a weight sensor
without having to calibrate the indicator conventionally. This profile is
used mostly in batching bars and force measurement devices, which
have a standard or known output and are more difficult to calibrate in
the field.
12/31/99 10:39 AM
lb
mV/V
--------- -------0
0.00000
5000
2.00000
Serial No. --------
Entering the
Calibration Menu
Be sure the correct capacity
and division sizes have been
selected before calibrating.
To calibrate your indicator you must enter the calibration menu. See note at
left before following these instructions:
1. From weight display mode, key
in the security code (default
code is 1 2 7). . .
The code number is displayed.
2a. Press and hold
two seconds. . .
About is displayed.
for
OR
To exit back to normal weighing mode, press the SELECT
key and save changes as
needed by pressing ENTER
with SAVE? displayed.
42
2b. Press the SEAL switch inside
the WI-127. . .
About is displayed.
3. Press
SEtUP is displayed.
...
4. Press
...
110 or 127 is displayed.
5. Press
...
AdJuSt is displayed.
6. Press
...
PointS is displayed. You are now in
the calibration menu.
WI-127 Indicator Service Manual
Weight Calibration
To calibrate your scale using live weight calibration, follow these steps:
1. With PointS displayed,
...
press
A
0 is displayed. This is the zero
calibration point.
To view or edit the weight in
another configured unit of
measure, press the UNITS key
at any time during calibration.
2. To calibrate your scale’s zero
point, press
...
CAL. is displayed.
3. Remove all weight from the
scale and press
...
bUSy is displayed for at least ½
second while the unit obtains a
stable value, then d 0 is displayed. Note: Pressing
while bUSy is displayed will abort
the calibration and the indicator will
return to the previous display.
If the scale is too unstable,
BUSY will be displayed for
several seconds. Correct the
filtering and recalibrate.
4. Press
5. Press
...
...
A
0 is displayed.
A 5000 is displayed. This is the full
capacity calibration point. Full
capacity is factory calibrated at 1
mV/V input..
After your system is fully
calibrated, write down and
save the COUNT values for
each calibration point. If your
indicator ever needs replacing
you can key these values into
your new indicator and be
assured the calibration will be
correct.
To exit back to normal weighing mode, press the SELECT
key to save changes.
6. You may use 5000 lbs to
calibrate this point, or you may
change the value for this
calibration point. To change this
calibration point, key in the new
value now and press
or to use the current value,
press
...
CAL. is displayed.
7. Put the appropriate weight
calibration value on the scale
...
and press
bUSy is displayed for at least ½
second while the unit obtains a
stable value, then d XXXX is
displayed.
Note: Pressing
while
bUSy is displayed will abort the
calibration and the indicator will
return to the previous display.
8. Press
...
A XXXX is displayed. You have
now calibrated the two standard
calibration points using live weight.
9. Press SELECT to save your
calibration.
WI-127 Indicator Service Manual
43
Count Calibration
To calibrate your scale using count calibration, follow these steps:
1. With PointS displayed,
press
...
To view or edit the weight in
another configured unit of
measure, press the UNITS key
at any time during calibration.
2. Press
3. Press
4. Press
...
...
...
5. Key in the count value for the
zero calibration point. . .
6. Press
7. Press
8. Press
To exit back to normal weighing mode, press the SELECT
key to save changes.
44
...
...
CAL. is displayed.
CountS is displayed.
Current count value is displayed.
Press UNITS to view and edit the
count in mV/V.
Value is displayed.
Value is accepted and CountS is
displayed.
A
0 is displayed.
A 5000 is displayed. This is the full
capacity calibration point. Full
capacity is factory calibrated at 1
mV/V input..
9.a You may leave this point at
5000 lbs, or you may change the
value for this calibration point.
To change this calibration point,
key in the new value now and
press
...
CAL. is displayed.
9.b To leave the point at 5000
lbs, press
...
CAL. is displayed.
10. Press
CountS is displayed.
11. Press
After your system is fully
calibrated, write down and
save the COUNT values for
each calibration point. If your
indicator ever needs replacing
you can key these values into
your new indicator and be
assured the calibration will be
correct.
...
A 0 is displayed. This is the zero
calibration point.
...
...
12. Key in the count value for the
A XXXXX calibration point. . .
13. Press
14. Press
...
...
15. Press SELECT to save your
calibration.
WI-127 Indicator Service Manual
Current count value is displayed.
Press UNITS to view and edit the
count in mV/V.
Value is displayed.
Value is accepted and CountS is
displayed.
A XXXX is displayed. You have
now calibrated the standard two
calibration points using count
calibration.
Adding Calibration
Points
You have the option of adding one, two or three additional calibration points
for
linearization. You may add these points at the same time you are calibrating
the zero load and full capacity points. Points do not have to be inserted in
the correct order. The WI-127 will automatically order the points based on
count values.
To add linearization points:
1. With A XXXX displayed,
press +/- . . .
A __ is displayed.
2. Key in the calibration value for
the new point. . .
A XXXX is displayed.
3. Press
...
CAL. is displayed.
To perform a live weight calibration:
4a. 1. Put the correct weight on the
scale and press
...
bUSy is displayed for at least ½
second while the unit obtains a
stable value, then d XXXX is
displayed.
2. Press
...
To perform a count calibration:
4b. 1. Press
...
A XXXX is displayed.
CountS is displayed. Press UNITS
to view and edit the count in mV/V.
To exit back to normal weighing mode, press the SELECT
key to save changes.
2. Key in the correct count and
press
...
CountS is displayed.
3. Press
A XXXX is displayed.
...
5. To add more calibration points,
repeat steps 1-4 above.
6. Press SELECT to save changes.
Deleting Calibration
Points
There are two methods of deleting calibration points. NOTE: You may not
have less than two calibration points.
Method A
1. With the point you wish to delete
displayed. . .
A XXXX
2. Press ZERO. . .
Point is deleted.
Method B:
1. With the point you wish to delete
displayed. . .
A XXXXX
2. Press
CAL. is displayed.
...
WI-127 Indicator Service Manual
45
3. Press
...
CountS is displayed.
4. Press
again. . .
dELEtE is displayed.
5. Press
6. Press
7. Press
To exit back to normal weighing mode, press the SELECT
key to save changes.
46
...
...
...
8. Press SELECT to save changes.
WI-127 Indicator Service Manual
no is displayed.
yES is displayed.
The point is deleted and A XXXX
(next calibration point) is displayed.
Customizing the Serial Output
Predefined
Print Layouts
The WI-127 has sixteen available print layouts. Nine have default settings.
Examples of the nine default layouts are shown below in printout form. Their
actual layout codes are shown on the following pages.
Pressing the PRINT key on a new indicator will automatically print Layout
#6.
Layout 1
Prints the weight label, gross weight, and unit of measure.
Layout 2
Prints the tare register number, weight label, tare weight,
and unit of measure.
Layout 3
Prints the tare register number, weight label, net weight, and
unit of measure.
Layout 4
Prints the weight label, displayed weight, and unit of measure.
Layout 5
Prints Layout 4 (weight label, displayed weight, and unit of
measure) plus a form feed.
Layout 6
This is the default printout when the PRINT key is pressed.
Prints Layouts 1, 2 & 3 (tare register numbers, weight
labels, gross, tare and net weights, and units of measure)
plus a form feed.
Layout 7
Prints Layouts 1 & 3 (tare register numbers, weight labels,
gross and net weights, units of measure) plus a form feed.
Layout 8
Prints Layouts 3 & 2 (tare register numbers, weight labels,
net and tare weights, units of measure) plus a form feed.
Layout 9
Prints weight label, displayed weight, unit of measure, time
and date.
WI-127 Indicator Service Manual
47
Use the
key to move
down the list of printable items
in Table 3. Use the
key
move up the list.
Status byte = 8 bits
Transmitted as a single ASCII
character. The bits appear as
follows: 0011LEBM
L has an ASCII value of 8
E has an ASCII value of 4
B has an ASCII value of 2
M has an ASCII value of 1
where L is set to logic 1 when a
Low voltage condition exists;
logic 0 otherwise. E is set to 1
when an a-d Error condition
exists; 0 otherwise. B is 1
when the weight is beyond
displayable range (over- or
under-capacity); 0 otherwise.
And M is set to logic 1 when an
in-motion condition exists;
set to logic 0 when the
weight is stable. The upper
four bits are set to 0011 to
cause the value to be printed
as a digit or symbol in row 3 of
the ASCII character set.
STATUS CODES
These are the most common
characters you will see on a
terminal:
“0” = Valid weight
“1” = Motion
“2” = Range error
(Over/Underlaod)
“4” = A-D error
“8” = Low voltage
Combinations of these errors
can also occur. (e.g., “3” =
Range error (2) plus Motion (1))
END and DELAY are not
printable items.
48
Just as in other Weigh-Tronix indicators (WI-125, WI-150, etc.) the layouts
within the WI-127 may be customized. If the nine default layouts do not fit
your specific applications, or if you wish to include, for example, custom
wording, you may easily customize a print layout. This is done within the
“Options” menu of the service menu. See the section Step by Step Instructions / Entering the Define Submenu located just before Figure 24. But
please read the following section in order to understand what items are
available for customization.
The WI-127’s layouts can be a maximum of sixteen items long. Any combination of the following nineteen items (up to sixteen maximum) may be used
to form a layout. These printable items, along with their descriptions, are
listed below.
Table 3: Layout Print Items (Blocks)
Print Items
Description
GROSS
NET
DISPLAY
Gross weight is transmitted.
Net weight is transmitted.
Current displayed live weight is transmitted (gross or net),
depending on the current display mode.
TARE
Current tare (general or numbered register) is transmitted.
T. REG
Current tare register number is transmitted (a space is
transmitted for the general tare register).
SELECTED Currently selected item from the select list is transmitted
(gross, tare or net).
ID
Identification number is transmitted.
HOUR
Current time is transmitted.
DAY
Current date is transmitted.
STATUS
Current status is transmitted. See note at left.
*LABEL
Weight label is transmitted. Five choices are available:
• gross-outputs the gross label
• net-outputs the net label
• display-outputs gross or net depending on the displayed
live weight
• tare-outputs the tare label
• selected-outputs the label gross, tare or net following
SELECTED item
UNITS
Unit of measure label is transmitted
*LAYOUT
A predefined layout may be included within another layout.
For example, Layout 6 includes Layouts 1, 2, & 3. Note: A
“layout error” will occur if a layout uses its own layout within
itself or if a “loop” of layouts is used (for example, Layout 1
cannot use Layout 2 if Layout 2 includes Layout 1)
*DELAY
Pauses serial port output by this many seconds (0-255)
END
Insert to delete any printable items that follow
*ASCII
A configurable ASCII string can be inserted and transmitted
*Ch.
A character (ASCII value) can be entered to be transmitted
*SPACES
A configurable number of spaces is transmitted
*CRS
A configurable number of carriage returns is transmitted
*LFS
A configurable number of line feeds is transmitted
FF
A form feed is transmitted
* denotes items that require detailed information. For example: if “LABEL”
is inserted within a layout, you must specify the label to be printed; if
“SP” is inserted, you must specify the number of spaces to be transmitted.
WI-127 Indicator Service Manual
Listed below are the predefined print layouts. You may customize these, or
create up to seven new layouts.
Layout 1
Layout 2
Layout 3
Layout 4
Layout 5
Layout 6
Layout 7
Anyplace you see
in
a layout at right, you will
actually see
on your
Layout 8
indicator.
Layout 9
WI-127 Indicator Service Manual
49
ASCII Strings
As mentioned in the previous section, the layouts may include a number of
items, one of which is ASCII strings. These ASCII strings allow you to
customize your printouts with custom wording.
ASCII is an acronym for American Standard Code for Information Interchange. ASCII codes are simply numbers (code values) a computer can
translate into letters, numbers and actions.
The WI-127 can store up to sixteen ASCII strings, each containing up to 32
individual characters. These strings are numbered 1-16. Below is a
worksheet to help define several ASCII strings. Write in your custom wording in the white boxes, then convert the characters to ASCII code values
using the table on the next page. Write these values in the gray boxes. If a
letter or action is repeated several times, place a decimal point after the
code value, then insert the number of times it is to be repeated. For example, 13.3 means three successive carriage returns.
The WI-127 contains one default ASCII string. String #1 will spell out
“WEIGH-TRONIX WI-127” when added to a customized layout. Feel free to
fill in the worksheet below to keep track of your custom defined ASCII
strings.
Complete instructions for programming these ASCII strings into the WI-127
can be found in the section Step by Step Instructions preceding Figure 24.
50
WI-127 Indicator Service Manual
Table 5
ASCII Control Code Values
NOTE: To repeat a control code a number of times, enter the control code #, a decimal, then the number of times
you want it repeated. Spaces, letters, or carriage returns can easily be repeated this way.
WI-127 Indicator Service Manual
51
Step by Step
Instructions
Entering the Define
submenu
To customize layouts and ASCII strings you must enter the Define submenu
of the Service Menu, then follow the flowchart pictured below.
Follow these instructions:
1. From weight display mode, key
in the security code (default code
is 1 2 7). . .
2a. Press and hold
for
two seconds. . .
OR
2b. Press the SEAL switch inside
the WI-127. . .
3. Press
4. Press
...
...
If 110 is displayed, press
...
5. Press
...
About is displayed.
About is displayed.
SEtUP is displayed.
110 or 127 is displayed.
127 is displayed.
AdJuSt is displayed.
6. Press
...
SCALE is displayed.
7. Press
...
OPtionS is displayed.
8. Press
...
buttonS is displayed.
9. Press
...
diSPLAy is displayed.
10. Press
...
dEFINE is displayed. You are now in
the Define submenu shown below.
Figure 24
Define menu
52
The code number is displayed.
WI-127 Indicator Service Manual
Creating ASCII strings
Label
It is within the ASCII submenu that you create/customize the ASCII strings to
be used in your layouts.
This item allows you to edit the gross, net, tare, and ID labels.
1. With LAbEL displayed,
press
...
2. Press
The default labels are: “G” for
gross, “N” for net, “T” for tare,
and ID for ID. You can customize the labels and use up to 16
characters.
again. . .
if you don’t
3a. Press
wish to make a change or your
are done.
GroSS is displayed.
71 (the ASCII value for the letter
“G”) is displayed.
GroSS is displayed.
or
3b. To change this label, press the
+/- key. . .
Key in your next ASCII value(s)
and press
...
4. Press
...
A — (dash) is displayed.
ENd is displayed.
NEt is displayed.
5. Repeat steps 1-4 for Net,
Tare, and ID.
WI-127 Indicator Service Manual
53
Strings
Viewing strings
This item allows the creation of up to sixteen different ASCII strings. On a
new indicator, there is one default ASCII string. You may edit the existing
string as well as create up to fifteen more.
1. With StringS displayed,
press
...
2. Press
...
ASCII 01 (default string) is displayed.
The first ASCII value in the string is
displayed.
3. Press
and
to
scroll through the entire string of
ASCII values.
4. When you are finished viewing
the values, press
...
5. Press
Creating new strings
...
On a new indicator, End is displayed. This means that there is only
one ASCII string (ASCII 01) defined
so far. You may create up to fifteen
more.
1. With StringS displayed,
...
press
ASCII 01 (string #1) is displayed.
2. Press
End is displayed.
until . . .
3. Press +/- . . .
To delete the displayed ASCII
value press the ZERO key.
ASCII 01 is displayed.
4. With ASCII 02 displayed, press
...
5. Press +/-. . .
6. Key in your first ASCII value,
then press
...
The next ASCII string in the list will
be added. On a new indicator, this
will be ASCII 02.
End is displayed. This means that
there are no ASCII values entered
for this string.
—
is displayed.
The value is stored and End is
displayed.
7. Continue repeating steps 5 & 6
until you have entered all your
ASCII values. If you make an
error, refer to the next section:
Editing strings.
8. To view your newly entered
ASCII values, press
repeatedly. . .
9. Repeat steps 2-7 as new ASCII
strings are needed.
54
WI-127 Indicator Service Manual
The indicator scrolls through all the
values.
Editing strings
There are two keys to remember when inserting or deleting ASCII values in a
string: +/- will insert and ZERO will delete. We will use the following example
to illustrate how to edit strings: remove and then replace the hyphen from the
default string ASCII 01: WEIGH-TRONIX WI-127.
1. With StringS displayed,
press
...
2. Press
3. Press
ASCII 01 is displayed.
...
or
87, the first ASCII value in the string,
is displayed.
to
scroll through the entire string
of ASCII values. Stop when the
ASCIIvalue you want to delete
(in this case, 45-hyphen) is
displayed. . .
4. With 45 displayed, press
ZERO. . .
The hyphen character is deleted and
the next value in the list--84--is
displayed.
5. To insert a character, scroll
through the ASCII string until
the value that the character will
precede is displayed. . .
84 is displayed.
6. Press +/- . . .
—
7. Key in your ASCII value,
then press
...
Creating Layouts
45 is displayed.
is displayed.
The character is inserted in the
string and the string name (ASCII
01) is displayed.
After your labels and strings are defined, it is within the Layouts submenu
that you create/customize the items which will be transmitted to a printer.
The WI-127 allows the creation of up to sixteen different layouts. A new
indicator contains nine default layouts. You may edit any or all of these nine,
or create seven additional, new layouts.
Viewing layouts
1. With LAYOutS displayed,
press
...
LAY. 01 (the first default layout) is
displayed.
2. Press
3. Press
...
or
The first item in the layout is displayed.
to
scroll through all the items in the
entire layout.
4. When you are finished viewing
the items, press
...
WI-127 Indicator Service Manual
LAY. 01 is displayed.
55
5. Press
...
LAY. 02 is displayed. On a new
indicator, the nine default layouts are
present. You may create up to seven
more.
6. Repeat steps 1-5 above to view
all the layouts.
Creating new layouts
1. With LAYOutS displayed,
press
...
LAY. 01 (string #1) is displayed.
2. Press
End is displayed.
until . . .
3. Press +/- . . .
4. With the new layout
displayed, press
The next layout in the list will be
added. On a new indicator, this will
be LAY. 10.
...
5. Press +/-. . .
6. Scroll through the list of available
layout items (blocks) (see Table
3) by pressing the
key.
When the item you wish to
insert in the layout is displayed,
press
...
End is displayed. This means that
there are no items entered for this
layout.
GroSS is displayed and the ACCEPT annunciator illuminates
indicating that you are selecting
items.
The ACCEPT annunciator goes off
and that item is displayed. Some
items (the ones with asterisks in
Table 3) require that additional
information be entered after selecting the item. For example, if you
choose LF, you must next enter a
value for the number of line feeds
you want, then press
once again.
7. Continue repeating steps 5 & 6
until you have entered all your
layout items. If you make an
error, refer to the next section:
Editing Layouts.
8. To view your newly entered
layout, press
repeatedly. . .
56
WI-127 Indicator Service Manual
The indicator scrolls through all the
layout items.
Editing layouts
There are two keys to remember when inserting or deleting items in a layout:
+/- will insert and ZERO will delete. We will use the following example to
illustrate how to edit layouts: remove and then replace the line feed from
default layout 01.
1. With LAYoutS displayed,
press
...
2. Press
To delete any displayed block,
press the ZERO key.
...
3. Press
to scroll through
the layout. Stop when the item
you want to delete--1 LF (one
line feed)--is displayed. . .
4. With 1 LF displayed, press
ZERO. . .
LAY. 01 is displayed.
1 SP, the first item in the layout is
displayed.
1 LF is displayed.
The item is deleted and the next
item--in this case, End--is displayed.
5. To insert an item in a layout, you
must display the item it will
precede. In this example, we will
insert a line feed in front of End. . . End is displayed.
6. Press +/- . . .
GroSS is displayed and the ACCEPT annunciator illuminates
indicating that you are selecting
items.
7. Scroll through the list in Table #3
of available items by pressing
the
key until LFS is
displayed. . .
LFS is displayed.
8. Press
0 is displayed.
...
9. Key in the number of line feeds
you want, 1 for this example, and
press
...
1 LF is displayed.
10. Press
LAY. 01
to return to. . .
WI-127 Indicator Service Manual
57
Creating Groups
A group is the combination of your layout and the assigned serial port through
which the data is sent. The Groups submenu is where you specify which
ports will print which layouts.
A total of nine groups is available. Within each group, up to three ports can
output layouts. Port one is standard; ports 2 & 3 are offered only if additional serial boards are installed. Each port is then assigned a layout to
print.
The default for the PRINT key
is Group 2.
You may print other groups by
keying in the correct group
number, then pressing PRINT.
Note: This option must be
enabled in the service menu
first.
The default group settings are:
Group 1:
Port 1 prints Layout 5
Group 2:
Port 1 prints Layout 6
Group 3:
Port 1 prints Layout 7
Group 4:
Port 1 prints Layout 8
Here are two examples of how the groups might be set up using three serial
ports:
Group 1: Port 1 prints Layout 1
Port 2 prints Layout 2
Port 3 prints Layout 3
Group 2: Port 1 prints Layout 5
Port 2 prints nothing
Port 3 prints Layout 2
Follow the instructions below to set up your groups.
1. With GrouPS displayed,
press
...
GrouP 1 is displayed.
2. Press
to scroll through
the list of available groups.
To insert a new group, with End
displayed, press +/-. A total of nine
groups is available. When the
group you wish to define is
displayed, press
...
Port 1 is displayed.
3. Press
...
4. a. If you do not want to print
from this port, press
...
b. If you do want to print from
this port, press
,
then key in the correct layout
number. . .
5. Press
With more than one serial port
installed, the group# must
assign a layout# or the choice
NONE for each serial port for
every group used.
...
6. You may now select a layout for
Port 2 (if available). With Port 1
displayed, press
...
LAYOut is displayed.
NONE is displayed.
XX (layout number) is displayed.
Port 1 is displayed. (If you are only
setting up this one port, go to step
8.)
Port 2 is displayed.
7. Repeat steps 3-5 to set up Port 2.
Press
to set up Port 3
(if available). . .
Port 3 is displayed.
8. Repeat steps 3-5 to set up Port 3.
Press
...
Inhibit is displayed.
58
WI-127 Indicator Service Manual
9. Press
...
YES is displayed.
10. a. If you wish to inhibit the
printout when motion is
detected, press
...
Yes is selected and Inhibit is
displayed.
b. If you do not wish to inhibit
the printout when motion is
detected, press
,
then press
...
11. Press . . .
12. Press
No is selected and Inhibit is displayed.
GrouP 1 is displayed.
...
13. Press
GrouP 2 is displayed.
...
Port 1 is displayed.
14. Repeat steps 3-13 above to set up all the remaining groups.
Broadcast
This item enables or disables continuous send. If you enable this feature, a
group number must be defined.
1. With broAdcSt displayed,
press
...
2. To enable, press
3. Press
If you want leading zeroes in
your printouts or broadcast and
autosend information, key in
leading zeroes when setting
division size.
Autosend
The 1% trigger threshold
cannot be altered.
no is displayed. If you do not wish to
enable continuous send, STOP
HERE.
...
...
GrouP is displayed.
1 is displayed.
4. Key in the group number you
want continuously sent, then
press
...
The new group is selected and
broAdcSt is displayed.
This item enables or disables autosend. Autosend is automatic print after
motion ceases with weight on the scale above 1% of capacity. To retrigger
autosend the scale must go below 1% stable weight and then above 1%
stable weight. If you enable this feature, a group number must be defined.
1. With AutoSEnd displayed,
press
...
2. To enable, press
3. Press
...
...
4. Key in the group number you
want sent, then press
WI-127 Indicator Service Manual
no is displayed. If you do not wish to
enable autosend, STOP HERE.
GrouP is displayed.
1 is displayed.
. . . The new group is selected and
AutoSEnd is displayed.
59
Using Inputs and Outputs on the WI-127
Standard Inputs
(defaults shown)
The inputs are configurable.
See 127 Inputs Menu section.
For Inbound/Outbound or InMotion defaults see the appropriate section in the back of
this manual.
Input
Connection
#1
#2
#3
#4
#5
#6
#7
TB15-2
TB15-3
TB15-4
TB15-5
TB15-6
TB15-7
TB15-8
TB15-9
Action
Remote Zero Key
Remote Print Key
Go to Net Mode
Go to Gross Mode
Remote (pushbutton) Tare Key
Remote Select Key
Remote Unit Key
Ground
To activate an input, wire them through a normally open switch to ground on
TB15.
To cause the related action to occur, activate the input. If the action is not
able to be performed (i.e. because of motion), the indicator will keep trying
while the input is activated. Individually, an input must be deactivated before
it can perform the action again.
Standard Outputs
Output
#1
#2
#3
Optional Cutoff Card
Output
#1
#2
#3
#4
#5
#6
#7
#8
#9
#10
#11
#12
#13
#14
#15
#16
60
Connection
TB14-1
TB14-2
TB14-3
TB14-4
TB14-5
Cutoff
Bounds
+22.8 VDC
Positive Relay Voltage
Cutoff 1
Follows Under Annunciator
Cutoff 2
Follows Accept Annunciator
Cutoff 3
Follows Over Annunciator
Action
Connection
Cutoff 1
Cutoff 2
Cutoff 3
Cutoff 4
Cutoff 5
Cutoff 6
Cutoff 7
Cutoff 8
Cutoff 9
Cutoff 10
Motion
Gross
Spare
Spare
Spare
Fault
+22.8 VDC
output
GND
TB22-1
TB22-2
TB22-3
TB22-4
TB22-5
TB22-6
TB22-7
TB22-8
TB23-1
TB23-2
TB23-3
TB23-4
WI-127 Indicator Service Manual
TB23-8
TB25-2
TB25-4
WI-127 Disassembly and Reassembly
Follow the instructions in this section to disassemble the WI-127.
1. Unplug the WI-127 from the power source.
2. Remove the back of the WI-127 by removing the sixteen acorn nuts and
pulling the back cover from the case. See Figure 25.
Figure 25
Back view of the WI-27
3. If you need to remove the mother board disconnect all the wires and the
ribbon cable leading to the mother board and remove the ten hold-down
screws shown in Figure 26.
Figure 26
Hold-down screws on the motherboard
4. To reassemble the unit reverse the above procedure.
WI-127 Indicator Service Manual
61
Installing Option Cards
1. Follow the disassembly instructions on previous page.
2. Option cards plug into J19 or J20 on the mother board. Remove the
four hold-down screws shown in Figure 27 for J19 or J20.
3. Install the standoffs in these holes and plug in the option card.
When serial boards are installed in the same stack, port
two is always on the bottom.
When installed in different
stacks (side by side) port two is
always closest to the power
supply.
4. Attach the option card to the standoffs with the screws.
Figure 27
Main board
5. Reassemble the unit.
62
WI-127 Indicator Service Manual
WI-127 Inbound/Outbound Software
This section of the WI-127 Service manual covers the optional inbound/
outbound software. This software has the following additions made to the
service menus. The complete service menus are included at the end of this
section. Below are descriptions of each additional item.
G.T.N. (After Define in
the Options menu)
These parameters configure the items that affect the inbound/outbound
functionality of the indicator.
Inbound
Selects the print group for the inbound transaction.
If Group is selected, you may then key in the group number
to print. If None is selected, a group will not be printed.
Group 2 is the default.
Outbound
Selects the print group for the outbound transaction.
If Group is selected, you may then key in the group number
to print. If None is selected, a group will not be printed.
Group 3 is the default.
Report
Selects the print group for the channel report.
If Group is selected, you may then key in the group number
to print. If None is selected, a group will not be printed.
Group 5 is the default.
Edit
Allows editing of the inbound/outbound function.
If Sealed is selected, you may not edit the inbound/outbound data. If Unsealed is selected, editing is allowed.
Sealed is the deafult.
Tares ( After G.T.N. in
the Options menu)
This parameter configures the items that affect the tare register functionality
of the indicator.
Report
Selects the print group for the tare register part of the
indicator.
If Group is selected, you may then key in the group number
to print. If None is selected, a group will not be printed.
Group 6 is the default.
WI-127 Indicator Service Manual
63
WI-127 Inbound/Outbound Serial Communications
Serial communication in the WI-127 involves layouts, ASCII strings, and
groups. Their relationship is this: The ASCII strings allow entry of alphanumeric characters that can be assigned to a layout; the layouts contain the
information sent out each port; and the groups set up each port and what is
transmitted from it.
Layouts
The WI-127 Inbound/Outbound indicator has a total of 32 available print
layouts. These layouts replace the sixteen found in the standard WI-127.
Twenty-nine of these layouts are predefined. You may use them as they are,
or you may customize them to fit your particular application.
Six of these layouts are used as defaults. Below you will find examples of
these regularly used default printouts. Note that the layouts use other layouts
within themselves (see the italics to the right of each element of the printouts). This allows for a high degree of customization. You will find all the
predefined layouts mapped out on the following pages.
Layout #1: Displayed Weight
Layout #25: Inbound ticket
Layout 2
Layout 3
Layout 4
Layout 5
Layout 6
Layout # 26: Outbound Ticket
Layout 7
Layout 3
Layout 8
Layout 4
Layout 5
Layout 9
Layout 10
Layout 11
64
WI-127 Indicator Service Manual
Layout # 28: Inbound/Outbound Report
Layout 12
Layout 17
Layout 21
Layout 21
Layout 21
Layout 21
Layout 21
Layout 18
Layout 22
Layout # 27: Stored Tare Transaction
Layout 12
Layout 13
Layout 14
Layout 15
Layout 16
Layout # 29: Stored Tare Report
Layout 12
Layout 19
Layout 23
Layout 23
Layout 23
Layout 23
Layout 23
Layout 20
Layout 24
Layout 24
Layout 24
Layout 24
Layout 24
WI-127 Indicator Service Manual
65
Predefined layouts
Below are the actual layout codes for the 29 predefined layouts. They are
numbered in the same order in which they are available in the indicator.
Layout 1
Layout 2
Layout 3
Layout 4
Layout 5
Layout 6
Layout 7
Layout 8
Layout 9
Layout 10
Layout 11
Layout 12
Layout 13
Layout 14
66
WI-127 Indicator Service Manual
Layout 15
Layout 16
Layout 17
Layout 18
Layout 19
Layout 20
Layout 21
Layout 22
Layout 23
Layout 24
Layout 25
Layout 26
Layout 27
Layout 28
Layout 29
WI-127 Indicator Service Manual
67
Layout items
Print layouts are constructed using various elements including ASCII strings/
characters, print items, and other layouts. Following are 16 print items which
have been added to the WI-127 Inbound/Outbound indicator. The standard
WI-127 has 19 items. Adding these 16, you will have a total of 35 items with
which to build print layouts.These items are found in the “Layouts” section of
the Options Sub-Menu of the Service Menu.
As you scroll through the list of items, you will find the following new items:
68
Print Items
Description
Channel
Currently selected inbound/outbound channel is transmitted.
Hour in
Time of the inbound/outbound weighment for the currently
selected channel is transmitted.
Day in
Date of the inbound/outbound weighment for the currently
selected channel is transmitted.
Inbound
Inbound weight for the currently selected channel is transmitted.
Ch Gross
Inbound/outbound gross weight for the currently compleyed
transaction is transmitted.
Ch Tare
Inbound/outbound tare weight for the currently completed
transaction is transmitted.
Ch Net
Inbound/outbound net weight for the currently completed
transaction is transmitted.
Ch Total
Inbound/outbound net accumulator value for the currently
selected channel is transmitted.
Ch Count
Inbound/outbound transaction counter value for the currently
selected channel is transmitted.
Register
Currently selected tare register number is transmitted.
Rg Type
Source of the tare weight for the currently selected tare
register is transmitted. The two default values are “Pb”
(pushbutton) and “KP” (keypad).
Rg Total
Net accumulator value for the currently selected tare
register is transmitted.
Rg Count
Transaction counter value for the currently selected tare
register is transmitted.
nn By Ch
“Layout nn” is used once for every inbound/outbound
channel in existence, in ascending order. This supports the
ability to generate inbound/outbound database reports.
nn By In
“Layout nn” is used once for every inbound/outbound
channel that has an inbound weight, in ascending order.
This supports the ability to generate inbound/outbound
database reports.
nn By Rg
“Layout nn” is used once for every tare register in existence,
in ascending order. This supports the ability to generate
tare database reports.
WI-127 Indicator Service Manual
ASCII strings
As mentioned in the previous section, layouts may include a number of
elements, on of which is ASCII strings. These ASCII strings allow you to
customize your printouts with custom wording.
The WI-127 Inbound/Outbound can store up to sixteen ASCII strings, each
containing up to 32 individuals characters. These strings are numbered 116.
The WI-127 Inbound/Outbound contains 15 default ASCII strings. Below is a
table containing the 15 default strings. Use these, or develop your own
custom messages.
WI-127 Indicator Service Manual
69
Printing Groups
In order to print, the layouts in the WI-127 are assigned to groups. These
groups are in turn assigned to specific serial ports. A group may contain
several layouts or only one layout.
Each group can have up to three serial ports. Each port can have a different
layout assigned to it. Port #1 is always the onboard seril port; ports #2 and
#3 are add-on option cards.
The default group settings in the WI-127 are as follows:
Group #
Port 1
Port 2
Port 3
Inhibit
1
Layout 1
None
None
Yes
2
Layout 25
None
None
Yes
3
Layout 26
None
None
Yes
4
Layout 27
None
None
Yes
5
Layout 28
None
None
No
6
Layout 29
None
None
No
Each group can be printed separately by using the “N print” feature under
“Print” in the set-up menu. The operator presses the number of the group
before pressing the PRINT key. The information assigned to that group
number will be printed. Pressing 1 and PRINT will print group #1, pressing 2
and PRINT will print group #2, etc.
70
WI-127 Indicator Service Manual
Reset Menu
An additional parameter is added to the Inbound/Outbound Reset Menu.
Database
This parameter will flash if the database is corrupted. This
parameter is not visible if there are no entered records.
No
Will not reset database to default values.
Yes
Will reset database to default values.
User Menu Modifications
User Menu
These items are offered in the user menu.
G.T.N. - Accesses inbound/outbound function.
Tares - Accesses multiple tare registers.
Hour - View/edit the time.
Day - View/edit the date.
Id - View/edit the ID number.
Bounds - Accesses the checkweighing parameters.
F1
G.T.N. - Accesses inbound/outbound weighing function.
F2
Tares - Accesses multiple tare registers.
F3
Cutoffs - Accesses the cutoff registers.
WI-127 Indicator Service Manual
71
72
WI-127 Indicator Service Manual
Defaults:
Descending lines intersect
the default values for each item.
WI-127 Indicator Service Manual
73
74
WI-127 Indicator Service Manual
WI-127 Indicator Service Manual
75
76
WI-127 Indicator Service Manual
WI-127 Indicator Service Manual
77
78
WI-127 Indicator Service Manual
WI-127 In-Motion Software
This section of the WI-127 Service manual covers the optional in-motion
software for Conveyor/Monorail scales. This software has the following
additions made to the service menus. The complete service menus are
included at the end of this section. Below are descriptions of each additional
item.
Conveyor (After Define
in the Options menu)
No
Choose this if you want the indicator to operate as normal.
The inputs used for in-motion weighing are ignored. The
cutoffs, analog output, B.C.D. output, and displayed weight,
all work as normal.
Yes
Choose this to use the indicator for in-motion weighing. The
indicator uses the built in reset/set inputs to start and stop
averaging weight readings. An in-motion weighment is the
average of all these weight readings. Every time an inmotion weighment is calculated, the indicator does the
following:
Updates the Gross and Net variables with the new
weighment
Updates the Cutoff outputs, Checkweighing outputs,
B.C.D. output and the Analog output for the new weight
Triggers an auto-print, if enabled
Displays the new weighment for 3 seconds or until the
next weighment begins (dashes) or an error occurs.
Tare ( After Conveyor in
the Options menu)
It is always possible to enter tare to any resolution but this selection determines how gross, tare, and net are displayed, printed, and calculated.
0.1 d* The net weight is calculated internally to 10 times the resolution, but
displayed and printed to the nearest division. Tare values are printed
and displayed at 0.1 division.
1d
Allows no extra resolution on the tare value. The net weight is
calculated as on a standard indicator.
Zeroerr ( After Tare in
the Options menu)
Allows the unit have the display ERROR messages disabled. This setting will
allow the unit to transmit a zero weight when the in and out inputs are tripped.
This is a YES or NO choice. Default is NO.
Delay ( After Zeroerr in
the Options menu)
Delay is an adjustment for the time the display indicates the weight, once the
in and out inputs have been tripped. This adjustment is from 1 to 60 seconds.
The default is 1 second.
WI-127 Indicator Service Manual
79
Default Setup
Modifications
Scale
Capacity
100 lb
Division
.02 lb
AZT
3 divisions
Update
1 Update/Second
Filter/Threshold
Filter constant = 3
100 lb (The filter threshold should be set at the configured capacity
as a minumum.)
Options
Define
Autosend
Group 1 (Displayed Weight)
Buttons
Print/P.B. Print
Group 1 (Displayed Weight)
Autoprint
While in the in-motion mode, autoprint changes functionality to automatically
print each time an in-motion weighment is made through the in-motion logic.
The default group for Autoprint is 1. (Displayed weight) While in in-motion
mode, the autoprint functions in the background.
Cutoffs are reset to the off
position when a new weighment
begins.
Cutoffs/Checkweigh
While in the in-motion mode, the cutoffs and over/under/accept outputs are
only updated as each in-motion weighment is made. The outputs follow the
displayed in-motion weighments (gross or net) If an erroneous in-motion
weighment is made, the outputs drop out until the next valid weighment is
made.
Analog output/B.C.D. output
The weight output cards follow the in-motion weighments while in the inmotion mode. As usual configuration determines whether to follow the gross,
net, or displayed weighments.
Dynamic Weighment Serial Output
The Gross and Net weights in the layout menus follow the in-motion
weighments while in the in-motion modes. Each time the indicator calculates
a new average, the gross and net weights are calculated based on the new
weighment. The gross and net change from the last In-motion weighment
value when the indicator returns to live weight display. Dashes are printed if
‘no’ is selected for ‘inhibited’ for that group and dashes are on the display to
indicate in-motion sampling.
80
WI-127 Indicator Service Manual
User Menu
These items are offered in the user menu.
Id - View/edit the ID number.
Hour - View/edit the time.
Day - View/edit the date.
F1
Tare Registers - View/Edit the 10 tare registers.
F2
Over - View/edit the over register.
Under - View/edit the under register.
Target - View/edit the target register.
F3
Cutoffs - View/edit the cutoff registers.
New Layout Items
Label
Averaged
Outputs an ASCII string defined to represent the status of the
Selected weight, Averaged or Live. The default for an averaged
weight is “AVERAGED”. The default for a static weighment is a null
string. Configuration for the two ASCII strings appear in the ASCII/
Labels menu under the headings “Averaged” and “Live”.
Layouts and Groups
No changes are made to the default layouts and groups.
Inputs-Onboard
Inputs are redefined.
Input
Display modes
In-Motion Assignments*
I
Remote Zero Key
2
Remote Print Key
3
Remote Select Key
4
Remote Units Key
5
Remote (push-button) Tare Key
6
In-Motion Sensor Input Entrance
7
In-Motion Sensor Input Exit
In these display modes, the only function that is offered from the front panel
is the entrance into the Service menus. After entering the service menus,
the indicator stops the in-motion functionality.
WI-127 Indicator Service Manual
81
If the indicator is in a user menu or editing a register, these display modes
do not appear on the display. In this case the in-motion operations appear
to occur in the background.
-------This indicates that the indicator is sampling the current item on
the scale. As soon as the sampling is completed, the weight is
calculated and displayed.
Annunciator 5 (ID)
This annunciator is used to indicate that the display is showing
the current in-motion weighment. This display appears for seven
seconds after each in-motion weighment is calculated. This
mode can be interrupted by a new weighment (dashes).
Weighing
Sampling occurs from leading edge to trailing edge of the reset/set input.
The leading edge must correspond to the weight being entirely on the live
rail, and the trailing edge must correspond to the weight just ready to begin
leaving the live rail.
Errors
1) Six seconds maximum are allowed from arrival to exit. This supports a
12 inch package at a minimum speed of 30 ft/min on a 4 ft conveyor
scale. If 6 seconds elapse, an error message is displayed, and autoprint is not initiated. The error message persists until a new weighment
is begun, but no longer than 7 seconds (unless retriggered by a subsequent weighment.) After 7 seconds, the display reverts to live weight.
2) At least two samples are required to be accumulated to consider a
weighment to be valid. This corresponds to 1/30 th of a second (or 1/10
ft at 180 ft/min). This requirement is violated when boxes are too long
or a conveyor is moving too fast. If less than 2 samples are accumulated, the weighment is considered to be in error and is handled in the
same manner as (1) above.
3) Weighments less than the upper limit of the AZT window are considered
to be in error and are handled in the same manner as (1) above.
WI-127 to Conveyor and Monorail Wiring Information
The wiring information to connect a WI-127 indicator to a CVC/CVCS
conveyor scale or in-motion monorail scale is as follows:
Photocell J-box
Wire Color
(conveyor only) (Conv.) (Mono)
82
WI-127
Function
TB1-2
White
White
TB15-8
Set input (exit trigger)
TB1-3
Red
NA
TB14-1
+22 VDC Power
TB1-4
Black
Black
TB15-9
Logic Gnd
TB1-5
Green
Red
TB15-7
Reset input (entrance trigger)
Shield
Shield
WI-127 Indicator Service Manual
Chassis Shield
In-Motion Conveyor Miscellaneous Information
The WI-127 would need to have the special in-motion software installed to
be compatible with the CVC operation. The recommended filter settings for
the in-motion operation is a Filter time constant of 3 and a threshold equal to
full scale capacity. The in motion system will only weigh and transmit data
properly if there is only one package on the scale at a time. With packages
identical in size, this means front edge to front edge spacing of at least the
length of the conveyor. With varying length package applications there are
two criteria which must be met:
1) With a package on the conveyor scale, the next one coming on the
scale must not break the entrance photocell beam prior to the one on
the scale breaking the exit beam.
2) With a package on the conveyor scale, the exiting package must clear
the exit beam prior to the package entering the scale clearing the
entrance beam.
If either of these rules are violated erroneous weights may be transmitted or
weight values not transmitted at all.
This simple formula will help you figure the minimum package spacing
needed for unequal package sizes.
The diagram below shows a formula for figuring throughput of identically
sized packages.
WI-127 Indicator Service Manual
83
84
WI-127 Indicator Service Manual
WI-127 Indicator Service Manual
85
86
WI-127 Indicator Service Manual
WI-127 Indicator Service Manual
87
88
WI-127 Indicator Service Manual
WI-127 Indicator Service Manual
89
90
WI-127 Indicator Service Manual
WI-127 INDICATOR (115/230VAC)
PARTS AND ASSEMBLY
ITEM
NO.
DESCRIPTION
W-T P/N
1
Enclosure,SST
49057-0017
2
Bezel Gasket
49061-0011
1
3
Keypad / Backer Plate Assy (standard)
Keypad / Backer Plate Assy (GTN)
“Std.” Main PCB Assy w/o E-PROM (115VAC)
49060-0012
49060-0038
49067-0015
1
1
1
“Std.” Main” PCB Assy w/o E-PROM (230VAC)
“Std.” Main PCB assy w/ E-PROM (115VAC)
“Std.” Main PCB assy w/ E-PROM (230VAC)
49067-0023
49067-0106
49067-0114
1
1
1
“In Motion” Main PCB assy w/ E-PROM (115VAC)
“In Motion” Main PCB assy w/ E-PROM (230VAC)
“GTN” Main PCB assy w/ E-PROM (115VAC)
49067-0031
49067-0049
49067-0056
1
1
1
6
7
“GTN” Main PCB assy w/ E-PROM (230VAC)
Rear Cover Gasket
Rear Cover
49067-0064
49062-0010
49063-0019
1
1
1
8
10
11
Kep Nut,#8-32
Screw,Sem, #6-32 X .25” L
Cap Nut,Modified,#10-32
1025-00125
14473-0223
26513-0013
23
10
2
12
13
14
Nylon bolt
Flat Washer
Cap Nut,#10-32
1019-11926
1030-12680
15786-0016
1
1
14
15
16
17
Cap Nut,#38-16
Tooth Washer, .38"
Flat Washer, .38"
15771-0070
15698-0179
16163-0066
2
2
2
18
19
20
Neoprene Pad
Screw, #8-32 X .44
Rubber Bumper
19563-0025
14473-0363
15349-0024
2
4
4
21
22
23
Lock Washer, #8
Cap Nut,#8-32
Stand Bracket
14474-0040
15771-0039
49367-0012
4
4
1
24
25
26
Lock Nut
Neoprene Washer
Strain Relief
17777-0021
26357-0053
15257-0057
2
2
2
27
28
29
Strain Relief
Neoprene Washer
Neoprene Washer, (Used W/ Pwr Cord)
15257-0024
26357-0046
26357-0038
3
3
1
30
31
32
Strain Relief (Used W/ Pw Cord)
Power Cord W/ Plug End (USA)
Ground Wire Assy, Front enclosure to rear cover
15257-0040
49180-0017MTS
48712-0032
1
1
1
33
34
35
Switch/Cable Assy
Decal (FCC compliance)
Decal (115VAC / FCC compliance)
48178-0021
29941-0019
49849-0036
1
1
1
36
Decal (230VAC / FCC compliance)
Decal (Fuse Type) 115VAC
Decal (Fuse Type) 230VAC
49849-0044
29348-0034
29348-0026
1
1
1
37
38
39
Decal (Fuse Warning)
Decal (Torque Specs)
Fuse, 1.0 amp 115VAC (Slo Blow)
20958-0018
48933-0019
48561-0141
1
1
2
40
41
Fuse, 0.5 amp 230VAC (Slo Blow)
Nut, Hex, 3/8 x 16 UNC
Panel Mount Bracket
48561-0117
14471-0225
49645-0016
2
2
2
42
43
44
Panel Mtg Gasket
Ground Wire Assy, Front encl. To Main PC Board
“Quick Couple” J-Box intfc. Cable assy (optional)
49647-0014
48712-0065
47900-0010mts
1
1
1
45
46
27429-0014
A/R
45089-0017
18009-0029
A/R
47
Strain Relief Plug (used for all strain reliefs)
Neoprene Tubing (used w/item 45 when plugging
larger strain relief).
Terminal Block (3-pole)
48
Capacity Sticker (blank)
48322-0018
1
5
QTY
1
1
91
WI-127 INDICATOR (115/230VAC)
WALL MOUNT OUTLINE DRAWING
92
WI-127 INDICATOR (115/230VAC)
PANEL MOUNT OUTLINE DRAWING
93
WI-127 INDICATOR (115/230VAC)
SYSTEM BLOCK DIAGRAM
94
WI-127 INDICATOR (115/230VAC
KEYPAD / BACKER PLATE P/N49060-0012 (STANDARD/IN
MOTION)
KEYPAD / BACKER PLATE P/N49060-0038 (GTN)
AND MATRIX
95
WI-127 INDICATOR (115/230VAC
MAIN PC BOARD P/N 49067-0015 (115VAC)
P/N 49067-0023 (230VAC)
EXCITATION CHART
P6 Jumper
Position
Typical EXC Voltage at
weigh bar/load cell
junction box.
typical 3-4
10.0
2-3
5.0
1-2
6.0
1-2, 3-4
*16.0
*
NOTE:
When using barriers, the two pin jumper is not
connected and should be stored on pin-1. The
barrier should drop the excitation voltage down
to the range of (2.0 to 3.8 volts) . If only one load
cell is being used, the voltage could be greater than
3.8 volts. In this case, add a load resistor to increase
the current through the barrier to drop the voltage.
Jumper does not change supplied excitation.
Requires use of an external power supply for excitation.
SERIAL PORT # 1 JUMPER POSITION
TB
TYPE
P8
P9
P10
16
RS-232
1-2
-------
-------
17
RS-422
-------
1-2
-------
17
RS-485
-------
1-2
-------
18
current
loop
-------
-------
1-2
All serial data is transmitted out of TB16, 17, and 18 at the
same time. To configure the serial port for bi-directional
communication you must select which format (RS-232, etc.)
will receive data from the external device. See serial port
chart for correct jumper settings.
96
WI-127 INDICATOR (115/230VAC
OPTION BOARDS
ANALOG OUTPUT AND SERIAL I/O
SERIAL PORT # 2 OR 3 JUMPER POSITION
TB
TYPE
P31
P32
P33
34
RS-232
1-2
-------
-------
35
RS-422
-------
1-2
-------
35
RS-485
-------
1-2
-------
36
current
loop
-------
-------
1-2
All serial data is transmitted out of TB34, 35, and 36 at the
same time. To configure the serial port for bi-directional
communication you must select which format (RS-232, etc.)
will receive data from the external device. See serial port
chart for correct jumper position.
97
WI-127 INDICATOR (115/230VAC
OPTION BOARDS
CUTOFF & INPUT, BCD PARALLEL
98
WI-127 INDICATOR (115/230VAC
OPTION BOARD STACKING PROCEDURE
& INSTALLATION
ITEM
NO.
DESCRIPTION
1
Nut, Kep, #6-32
2
—— NO PART ——
3
4
5
6
Standoff, m/f, 6-32 x .56L
Screw, Sem, #6-32 x .25L
—No Part—
Analog Output pc. Board Assy
<or>
Serial I/O pc Board Assy
Cutoff & Input pc Board Assy
W-T P/N
QTY
1025-00114
4/board
15437-5000
1006-02600
—49148-0018
50097-0017
49152-0011
49156-0017
4/board
4/board
———
——
——
——
BCD Parallel Output pc Board Assy 49160-0011
——
FIELD INSTALLATION KITS
Analog Output PC Board Kit
49070-1018
1
Serial I/O PC Board Kit
49070-1026
1
Cutoff & Input PC Board Kit
49070-1034
1
BCD Parallel Output PC Board Kit
49070-1042
1
99
100
101
102
Declaration of Conformance to SMA Standard
Year of Declaration 2002
Production Meets Type
®*
We the manufacturer of
Model
Type
Certificate and Number
Issued by
WI-127
Indicating Element
Digital Electronic
NTEP CC 96-140A1
NCWM
Declare in our responsibility the conformance of the above listed models and types to the
mentioned certificates and the requirements of the SMA standard.
This declaration becomes valid when the SMA Conformance Logo, having our name or trademark
is applied to the device or its accompanying documentation.
* SMA PRODUCTION MEETS TYPE DEVICE MANUFACTURER Conformance Logo and Design are a registered
trademark of the Scale Manufacturers Association
WI-127 Indicator Service Manual
91
Avery Weigh-Tronix
1000 Armstrong Dr.
Fairmont, MN 56031 USA
Telephone: 507-238-4461
Facsimile: 507-238-4195
e-mail: [email protected]
www.wtxweb.com
Weigh Bar® is a registered trademark of Weigh-Tronix Inc.
09/03/03 127_S.P65 PN 29633-0012i e5 Printed in USA
Avery Weigh-Tronix Canada, ULC
217 Brunswick Boulevard
Pointe Claire, QC H9R 4R7 Canada
Telephone: 514-695-0380
Toll free: 800-561-9461
Facsimile: 514-695-6820
www.weigh-tronix.ca