1
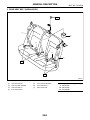
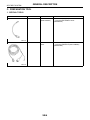
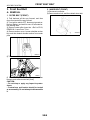
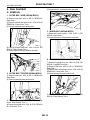
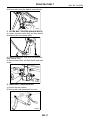
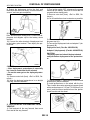
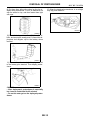
2001 IMPREZA SERVICE MANUAL
QUICK REFERENCE INDEX
BODY SECTION
This service manual has been prepared
to provide SUBARU service personnel
with the necessary information and data
for the correct maintenance and repair
of SUBARU vehicles.
This manual includes the procedures
for maintenance, disassembling, reassembling, inspection and adjustment of
components and diagnostics for guidance of experienced mechanics.
Please peruse and utilize this manual
fully to ensure complete repair work for
satisfying our customers by keeping
their vehicle in optimum condition.
When replacement of parts during
repair work is needed, be sure to use
SUBARU genuine parts.
All information, illustration and specifications contained in this manual are
based on the latest product information
available at the time of publication
approval.
FUJI HEAVY INDUSTRIES LTD.
HVAC SYSTEM
(HEATER, VENTILATOR AND A/C)
AC
HVAC SYSTEM (AUTO A/C)
(DIAGNOSTICS)
AC
AIRBAG SYSTEM
AB
AIRBAG SYSTEM (DIAGNOSTICS)
AB
SEAT BELT SYSTEM
SB
LIGHTING SYSTEM
LI
WIPER AND WASHER SYSTEMS
WW
ENTERTAINMENT
ET
COMMUNICATION SYSTEM
COM
GLASS/WINDOWS/MIRRORS
GW
BODY STRUCTURE
BS
INSTRUMENTATION/DRIVER INFO
IDI
SEATS
SE
SECURITY AND LOCKS
SL
IMMOBILIZER (DIAGNOSTICS)
IM
SUNROOF/T-TOP/CONVERTIBLE TOP
(SUNROOF)
SR
EXTERIOR/INTERIOR TRIM
EI
G1830GE6
2001 IMPREZA SERVICE MANUAL
QUICK REFERENCE INDEX
BODY SECTION
EXTERIOR BODY PANELS
EB
CRUISE CONTROL SYSTEM
CC
CRUISE CONTROL SYSTEM
(DIAGNOSTICS)
CC
G1830GE6
SEAT BELT SYSTEM
SB
1.
2.
3.
4.
5.
Page
General Description ....................................................................................2
Inspection Locations After a Collision .........................................................7
Front Seat Belt ............................................................................................8
Rear Seat Belt...........................................................................................10
Disposal of Pretensioner ...........................................................................13
GENERAL DESCRIPTION
SEAT BELT SYSTEM
1. General Description
A: COMPONENT
1. FRONT SEAT BELT
T2
(1)
(2)
T3
(3)
T1
T2
(4)
T2
BO0239
(1)
(2)
(3)
(4)
Adjuster anchor ASSY
Anchor cover
Outer belt ASSY
Inner belt ASSY
Tightening torque: N·m (kgf-m, ft-lb)
T1: 7.5 (0.76, 5.5)
T2: 30 (3.1, 22)
T3: 53 (5.4, 39)
SB-2
GENERAL DESCRIPTION
SEAT BELT SYSTEM
2. REAR SEAT BELT (SEDAN BODY)
T
(1)
(7)
(2)
(4)
(5)
(6)
(3)
T
T
BO0240
(1)
(2)
(3)
(4)
Outer seat belt RH
Outer seat belt CENTER
Outer seat belt LH
Inner seat belt RH
(5)
(6)
(7)
Inner seat belt CENTER
Inner seat belt LH
Case center ELR
SB-3
Tightening torque: N·m (kgf-m, ft-lb)
T: 30 (3.1, 22)
T2: 30 (3.1, 22)
T3: 53 (5.4, 39)
GENERAL DESCRIPTION
SEAT BELT SYSTEM
3. REAR SEAT BELT (WAGON BODY)
T1
(2)
(1)
T2
T1
T2
(3)
(4)
(5)
T1
T1
BO0241
(1)
(2)
(3)
(4)
Outer seat belt RH
Outer seat belt CENTER
Outer seat belt LH
Inner seat belt RH
(5)
Inner seat belt LH
SB-4
Tightening torque: N·m (kgf-m, ft-lb)
T1: 30 (3.1, 22)
T2: 53 (5.4, 39)
GENERAL DESCRIPTION
SEAT BELT SYSTEM
B: CAUTION
• Before starting, turn the ignition switch OFF, disconnect the battery ground cable and wait for 20
seconds or more.
• The pretension system has a backup power
source. The pretensioner might deploy if you do
not wait for 20 seconds or more before starting
work.
• Do not drop or apply any impact to the pretensioner.
• If oil, grease, or water gets on the pretensioner,
wipe it off immediately with a dry cloth.
• Do not expose the pretensioner to high temperature or flame.
• Do not allow current to flow through or voltage to
reach the pretensioner. Do not use a circuit tester
to check resistance of the pretensioner.
• Do not disassemble or attempt to repair the pretensioner. If it is dented, cracked, or deformed, replace it with a new one.
• Do not use the air bag or pretensioner parts from
other vehicles. Always replace parts with new
parts.
• When handling a seat belt with a deployed pretensioner, wear gloves and goggles. Wash your
hands afterwards.
• Do not re-use a seat belt with a deployed pretensioner again.
• Be sure to deploy pretensioner before disposal.
<Ref. to SB-13, OPERATION, Disposal of Pretensioner.>
• If the material gets in your eyes or on your skin
during deployment, wash it away with clean water,
and then consult a doctor.
SB-5
GENERAL DESCRIPTION
SEAT BELT SYSTEM
C: PREPARATION TOOL
1. SPECIAL TOOLS
ILLUSTRATION
TOOL NUMBER
98299FE010
DESCRIPTION
ADAPTER C
(DEPLOYMENT)
REMARKS
• Used for deploying the pretensioner.
• Used with DEPLOYMENT TOOL
(98299PA030).
DEPLOYMENT
TOOL
• Used for deploying the pretensioner.
• Used with ADAPTER A (DEPLOYMENT)
(98299FC030).
B5M1114
98299PA030
B5M1115
SB-6
INSPECTION LOCATIONS AFTER A COLLISION
SEAT BELT SYSTEM
2. Inspection Locations After a
Collision
A: INSPECTION
Check for the following, and then replace with new
parts if necessary.
• Center pillar lower garnish is discolored or
cracked.
• Wire harness and/or connector is damaged.
SB-7
FRONT SEAT BELT
SEAT BELT SYSTEM
3. Front Seat Belt
2. INNER BELT (FRONT)
A: REMOVAL
1) Disconnect connector.
2) Remove anchor bolt, and then detach inner belt.
1. OUTER BELT (FRONT)
1) Fold backrest all the way forward, and then
move front seat all the way forward.
2) Turn ignition switch OFF, disconnect ground cable from battery, and wait for more 20 seconds before starting work.
3) Remove center pillar lower trim. <Ref. to EI-29,
REMOVAL, Lower Inner Trim.>
4) Remove anchor cover. Loosen shoulder anchor
bolt, and then detach shoulder anchor from center
pillar.
B5M1070
5) Turn over the floor mat to remove bolts.
RE0003
6) Disconnect yellow connector of pretensioner
harness, and remove outer belt (front).
CAUTION:
• Do not drop or apply any impact to pretensioner.
• Pretensioner and bracket should be treated
as an assembly. Do not attempt to disassemble
it.
SB-8
S5M0234
FRONT SEAT BELT
SEAT BELT SYSTEM
B: INSTALLATION
C: INSPECTION
1. OUTER BELT (FRONT)
1. OUTER BELT (FRONT)
Install in the reverse order of removal.
Check for the following, and replace with new parts
if necessary.
• Pretensioner is cracked or deformed.
• Seat belt is slackened, bent, or frayed. Seat belt
is abnormally wound or extended.
CAUTION:
• The parts on left and right are not identical.
Before installation, make sure that the correct
part is used.
• Be careful not to twist belts during installation.
2. INNER BELT (FRONT)
Install in the reverse order of removal.
2. INNER BELT (FRONT)
Check for the following, and replace with new parts
if necessary.
• Inner belt is deformed or damaged.
• Seat belt buckle is engaged improperly.
SB-9
REAR SEAT BELT
SEAT BELT SYSTEM
4. Rear Seat Belt
5) Remove bolts, and then detach seat belt.
A: REMOVAL
1. OUTER BELT SIDE (SEDAN BODY)
1) Remove rear seat. <Ref. to SE-11, REMOVAL,
Rear Seat.>
2) Remove side sill rear lower cover. <Ref. to EI-29,
REMOVAL, Lower Inner Trim.>
3) Remove seat belt lower anchor bolt.
RE0005
3. INNER BELT (SEDAN BODY)
1) Remove the rear cushion. <Ref. to SE-11, REMOVAL, Rear Seat.>
2) Remove bolts, and then detach inner belt.
RE0010
4) Remove quarter pillar trim. <Ref. to EI-30, REMOVAL, Rear Quarter Trim.>
5) Remove bolts, and then detach seat belt.
B5M0814
4. OUTER BELT SIDE (WAGON BODY)
1) Remove luggage floor mat. <Ref. to EI-38, REMOVAL, Luggage Floor Mat.>
2) Remove rear seat. <Ref. to SE-11, REMOVAL,
Rear Seat.>
3) Remove side sill rear lower cover. <Ref. to EI-29,
REMOVAL, Lower Inner Trim.>
4) Remove seat belt lower anchor bolt.
RE0004
2. OUTER BELT CENTER (SEDAN BODY)
1) Remove rear seat. <Ref. to SE-11, REMOVAL,
Rear Seat.>
2) Remove seat belt lower anchor bolt.
RE0006
5) Remove rear quarter trim. <Ref. to EI-30, REMOVAL, Rear Quarter Trim.>
RE0011
3) Remove quarter pillar trim. <Ref. to EI-30, Removal, Rear Quarter Trim.>>
4) Remove rear shelf trim. <Ref. to EI-35, REMOVAL, Rear Shelf Trim.>
SB-10
REAR SEAT BELT
SEAT BELT SYSTEM
6) Remove bolts, and then detach outer belt side.
RE0007
5. OUTER BELT CENTER (WAGON BODY)
1) Loosen shoulder anchor bolt, and then detach
shoulder anchor from quarter pillar.
RE0008
2) Remove quarter trim. <Ref. to EI-30, REMOVAL,
Rear Quarter Trim.>
3) Remove three bolts, and then detach outer belt
center.
RE0009
6. INNER BELT (WAGON BODY)
1) Remove the rear cushion.
2) Remove bolt, and then detach inner belt.
B5M0919
SB-11
REAR SEAT BELT
SEAT BELT SYSTEM
B: INSTALLATION
C: INSPECTION
1. OUTER BELT SIDE (SEDAN BODY)
1. OUTER BELT SIDE (SEDAN BODY)
Install in the reverse order of removal.
Check for the following, and replace with new parts
if necessary.
• Seat belt is slackened, bent, or frayed. Seat belt
is abnormally wound or extended.
CAUTION:
• During installation, make sure that seat belts
are not twisted.
• After installation, make sure that seat belts
can be smoothly extended and wound.
2. OUTER BELT CENTER (SEDAN BODY)
Install in the reverse order of removal.
CAUTION:
• During installation, make sure that seat belts
are not twisted.
• After installation, make sure that seat belts
can be smoothly extended and wound.
2. OUTER BELT CENTER (SEDAN BODY)
Check for the following, and replace with new parts
if necessary.
• Seat belt is slackened, bent, or frayed. Seat belt
is abnormally wound or extended.
3. INNER BELT (SEDAN BODY)
3. INNER BELT (SEDAN BODY)
Check for the following, and replace with new parts
if necessary.
• Inner belt is deformed or damaged.
• Seat belt buckle is engaged improperly.
Install in the reverse order of removal.
4. OUTER BELT SIDE (WAGON BODY)
CAUTION:
During installation, make sure that seat belts
are not twisted.
Check for the following, and replace with new parts
if necessary.
• Seat belt is slackened, bent, or frayed. Seat belt
is abnormally wound or extended.
4. OUTER BELT SIDE (WAGON BODY)
5. OUTER BELT CENTER (WAGON BODY)
Install in the reverse order of removal.
CAUTION:
• During installation, make sure that seat belts
are not twisted.
• After installation, make sure that seat belts
can be smoothly extended and wound.
Check for the following, and replace with new parts
if necessary.
• Seat belt is slackened, bent, or frayed. Seat belt
is abnormally wound or extended.
5. OUTER BELT CENTER (WAGON BODY)
Check for the following, and replace with new parts
if necessary.
• Inner belt is deformed or damaged.
• Seat belt buckle is engaged improperly.
Install in the reverse order of removal.
CAUTION:
• During installation, make sure that seat belts
are not twisted.
• After installation, make sure that seat belts
are smoothly extended and wound.
6. INNER BELT (WAGON BODY)
6. INNER BELT (WAGON BODY)
Install in the reverse order of removal.
CAUTION:
During installation, make sure that seat belts
are not twisted.
SB-12
DISPOSAL OF PRETENSIONER
SEAT BELT SYSTEM
5. Disposal of Pretensioner
B: OPERATION
A: CAUTION
1. DEPLOYING WHILE INSTALLED IN VEHICLE
• Do not discard undeployed pretensioners, because they may cause serious personal injury
when accidentally deployed.
• Deployment of the pretensioners should be done
on a flat place free from any possible danger. Avoid
deploying outdoors during rainy or windy weather.
• Do not drop or damage pretensioner.
• Because deploying the pretensioners causes a
high-explosive noise, be sure to warn people in the
area, and do not allow anyone within a 5-meter (16
ft) radius of the disposal site.
• Some smoke will be emitted after deployment of
the prettensioners. Therefore, it must be deployed
in a well-ventilated area with no smoke alarms
nearby.
• Wear gloves, goggles, and earplugs during this
operation. Wash your hands afterwards.
• After deployment, the pretensioner is especially
hot. Leave it unattended for 40 minutes, and then
discard it.
• Do not let water get on the deployed pretensioner.
• Wrap the deployed the pretensioner in an airtight
vinyl bag, and then discard it.
• If circumstances do not permit pretensioner deployment, contact a SUBARU dealer.
1) Fold backrest all the way forward, and then
move front seat all the way forward.
2) Turn ignition switch OFF, disconnect the ground
cable from the battery, and wait for more than 20
seconds before starting work.
3) Remove center pillar lower trim. <Ref. to EI-29,
REMOVAL, Lower Inner Trim.>
4) Disconnect yellow connector from pretensioner
(a).
B5M0918A
5) Short terminal to alligator clip furnished as deployment tool (A).
6) Connect the deployment tool and adapter C (deployment) (B).
Deployment tool: (Part No. 98299PA030)
Adapter C (deployment) : (Part No. 98299FE010)
CAUTION:
The deployment tool should be kept shorted
until just before deployment of the pretensioner.
S5M0309B
7) Connect adpter C (deployment) connector and
pretensioner yellow connector.
SB-13
DISPOSAL OF PRETENSIONER
SEAT BELT SYSTEM
8) Extend the deployment tool to the limit, and
make sure that vehicle is empty. Close all windows,
sunroof, and rear gate completely.
2) Turn ignition switch OFF, disconnect the ground
cable from the battery, and wait for more than 20
seconds before starting work.
3) Remove outer belt (front). <Ref. to SB-8, Removal.>
4) Cut off seat belt as close to retractor as possible.
B5M1068
9) Move the battery at least 5 m (16 ft) from the vehicle, and secure the nearby area. Connect the deployment tool alligator clip to the battery minus
terminal.
10) Connect the other terminal of deployment tool
to the battery plus terminal. Then deploy the pretensioner.
B5M0494
5) Short terminal to alligator clip furnished as a deployment tool (A).
6) Connect the deployment tool and adapter C (deployment) (B).
Deployment tool: (Part No. 98299PA030)
Adapter C (deployment) : (Part No. 98299FE010)
CAUTION:
The deployment tool should be kept shorted
until just before deployment of the pretensioner.
G5M0531
CAUTION:
• After deployment, pretensioner is especially
hot. Leave it unattended for 40 minutes.
• Do not let water get on the deployed pretensioner.
11) Remove outer belt (front). <Ref. to SB-8, Removal.>
12) Wrap the deployed pretensioner in an airtight
vinyl bag, and then discard it.
S5M0309B
7) Connect adapter C (deployment) connector and
pretensioner yellow connector.
8) Install pretensioner on the wheel with the tire.
Then, bundle three wire automotive harness [each
with a sectional area of 1.25 mm2 (0.00194 sq in) or
more], and bind them twofold around the pretensioner bracket and the wheel.
B5M0500
2. DEPLOYING AFTER REMOVAL FROM
VEHICLE
1) Fold backrest all the way forward, then move
front seat all the way forward.
SB-14
B5M0669
DISPOSAL OF PRETENSIONER
SEAT BELT SYSTEM
9) Put three tires without the wheel on the tire installed with pretensioner. Put on an additional tire
with the wheel on top, and then fasten them tight
with rope.
12) Wrap the deployed pretensioner in an airtight
vinyl bag, and discard it.
B5M0500
G5M0536
10) Move the battery at least 5 m (16 ft) from the vehicle, and secure the nearby area. Connect the deployment tool alligator clip to the battery minus
terminal.
G5M0537
11) Connect the other terminal of deployment tool
to the battery plus terminal. Then deploy pretensioner.
G5M0531
CAUTION:
• After deployment, pretensioner is especially
hot. Leave it unattended for 40 minutes.
• Do not let water get on the deployed pretensioner.
SB-15
DISPOSAL OF PRETENSIONER
SEAT BELT SYSTEM
SB-16