1
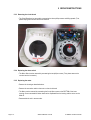
Service Manual for
Mini Centrifuge Z 130 M
Page 1 of 7
SERVICE MANUAL Z 130 M
© HERMLE Labortechnik GmbH
CONTENT
5 SERVICE INSTRUCTIONS
5.1 General technical description
5.2 Electrical und electronically components
5.2.1 Circuit board
5.2.2 Transformer
5.2.3 Lid contact
5.3 Mounting support
5.3.1
5.3.2
5.3.3
5.3.4
5.3.5
Removing the rotor
Removing the housing
Removing the circuit board
Replacing the micro switch
Replacing the motor
6 TROUBLE SHOOTING
6.1 Error Cause / Solution
6.2 Survey of possible error and their solutions
7 MAINTENANCE
7.1 Service and maintenance
7.1.1 Maintenance and cleaning
7.1.2 Glass breakage
7.1.3 Disinfection
8 SPARE PART LIST
Technical modification rights reserved.
© HERMLE Labortechnik GmbH 2014 / 01
Page 2 of 7
SERVICE MANUAL Z 130 M
© HERMLE Labortechnik GmbH
5 SERVICE INSTRUCTIONS
5.1 General technical description
Model Z 130 M is a compact centrifuge.
Please follow below mentioned safety instructions for any kind of service actions:
• Do not leave units unsupervised, when parts of the housing have been removed and the unit is still
connected to the main power supply.
• Do not bypass the lid’s safety contacts and never work with the unit’s lid open.
• The VDE regulations are valid for all electrical work that has to be done.
5.2 Electrical and electronically components
5.2.1 Circuit board
The circuit board is serving the low voltage supply of the centrifuge control system, which is integrated in
the board.
The board can only be exchanged complete.
If there is a defect you have to exchange the complete board.
All signal lines lead to the circuit board.
5.2.2 Transformator
The transformator is serving the low voltage supply of the centrifuge control system.
5.2.3 Lid contact
The micro switch in the mechanism of the lid lock controls the correct closing of the centrifuge lid.
The switch may never be bypassed.
5.3 Mounting support
After performing any kind of assembling work, please make sure all the grounded contacts are
connected correctly!
5.3.1 Removing the rotor
• Place the centrifuge on a clean, level and stable surface.
Unplug the power cord and remove the blue rotor by loosening the set screw (approx. 5 complete
revolutions) with an allen key (1.5mm). Then pull the rotor off the motor shaft.
5.3.2 Removing the housing
• Close the lid and turn the centrifuge upside down to remove the four screws (inside the four rubber
feet). This housing can then be disassembled for access to the components
• Re-assemle the unit in reverse order.
Page 3 of 7
SERVICE MANUAL Z 130 M
© HERMLE Labortechnik GmbH
5 SERVICE INSTRUCTIONS
5.3.3 Removing the circuit board
• The Circuit Board can be removed by unscrewing the three phillips screws and lifting upward. (First,
please unplug the three wire terminal connectors.
5.3.4 Replacing the micro switch
• The Micro Switch can be removed by unscrewing the two phillips screws. (First, please remove the
one wire terminal connector).
5.3.5 Replacing the motor
• Remove the housing as described above.
• Remove the connection cable to the motor on the circuit board.
• The Motor can be removed by unscrewing the four phillips screws on the BOTTOM of the lower
housing. Once unscrewed the rubber base can be separated from the housing and the motor can be
lifted off.
• Re-assemble the unit in reverse order.
Page 4 of 7
SERVICE MANUAL Z 130 M
© HERMLE Labortechnik GmbH
6 TROUBLE SHOOTING
6.1 Error Cause / Solution
Preface:
The error cause are listed to help localize possible errors faster.
The diagnose referred to in this chapter may not always bet he case, as they are only theoretically
occuring errors and solutions.
Always, please keep us informed about any kind of error occuring, which is not listed in this chapter.
Only through your information we are able to improve and complete this service manual.
Many thanks in advance for your support.
HERMLE Labortechnik GmbH
6.2 Survey of possible error and their solutions
Unit does not spin:
• Check that the plug is fully connected
• Check that the lid tab is not broke and is making contact with the micro switch
• Replace the motor
• Replace the circuit board
Lid will not stay closed
• Check that the lid tab has not been cracked, bent or broken
• Check that the lid release tab (on the main housing has not been cracked bent or broken
The Centrifuge is Noisy
• Ensure that the set screw in the motor has been tightened
• Ensure that the rotor is properly centered and not rubbing on the inside chamber
Page 5 of 7
SERVICE MANUAL Z 130 M
© HERMLE Labortechnik GmbH
7 MAINTENANCE
7.1 Service and maintenance
7.1.1 Maintenance and cleaning
Maintenance:
Maintenance of the centrifuge is confined to keeping the rotor, the rotor chamber and the rotor
accessories clean as well as to regularly lubricating the rotor insert bolts of a swing out rotor (if
available).
Vaseline, available in nearly each store, is the most suitable lubricant. The Vaseline must be free of resin
and acids. Lubricants containing molycote and graphite are not allowed.
Please pay special attention to anodized aluminium parts. Breakage of rotors can be caused even by
slightest damages.
In case of rotors, buckets or tube racks getting in touch with corrosive substances the concerned spots
have to be cleaned carefully.
Corrosive substances are for instance:
•
•
•
•
•
•
•
Alkalis
Alkaline soap solutions
Alkaline amines
Concentrated acids
Solutions containing heavy metals
Water-free chlorinated solvents
Saline solutions, e.g. salt water
Cleaning:
Thorough cleaning not only has ist purpose in hygiene but also in avoiding corrosion based pollution.
I order to avoid damaging anodized parts such as rotors, reduction plates etc., only pH-neutral
detergents with a pH-value of 6-8 may be used for cleaning.
Alkaline cleaning agents (pH-value > 8) must not be used.
After cleaning, please ensure all parts are dried thoroughly, either by hand or in a hot-air cabinet
(max. temperature + 50°C).
It is necessary to coat anodized aluminium parts with anti-corrosion oil regularly in order to increase
their life-spans and reduce corrosion predisposition.
Due to humidity or not hermetically sealed samples, condensate may be formed. The condensate
has to be removed from the rotor chamber with a soft cloth regularly.
The maintenance procedure has to be repeated every 10 to 15 runs, but at least once a week!
Page 6 of 7
SERVICE MANUAL Z 130 M
© HERMLE Labortechnik GmbH
7 MAINTENANCE
7.1.2 Glass breakage
With high g-values, the rate of glass tube breakage increases. Glass splinters have to be removed
immediately from rotor, buckets, adapters and the rotor chamber itself. Fine glass splinters will scratch
and therefore damage the protective surface coating of a rotor.
If glass splinters remain in the rotor chamber, fine metal dust will build up due to air circulation. This
very fine, black metal dust will extremely pollute the rotor chamber, the rotor, the buckets and the
samples.
7.1.3 Desinfection
In case of infectious material spilling into the centrifuge, the rotor and rotor chamber have to be
disinfected right after the run. Rotors may be autoclaved at a maximum temperature 121°C, except
rotor 220.58 V08, which must not be autoclaved.
The rotor and rotor chamber should be cleaned with a universal, neutral disinfection agent, e. g. on
formalin base. A disinfection spray is most suitable in order to easily reach all difficult to access spots.
ATTENTION:
Before applying any other cleaning resp. decontamination method than recommended by the
manufacturer, contact the manufacturer to ensure yourself, you would not damage the unit or
the rotor by applying the designated method!
8 SPARE PART LIST
Z 130 M
Article
Circuit board
Motor
Lid
Lid spring
Housing top
Housing bottom
Page 7 of 7
Order
No.
Ident.-no.
914.030
924.010
934.043
934.044
934.045
934.046
C1012-CB
C1012-Mot
C1012-Lid
C1012-spring
C1012-housing top
C1012-housing bottom
SERVICE MANUAL Z 130 M
© HERMLE Labortechnik GmbH