1
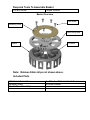
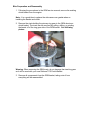
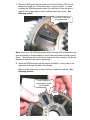
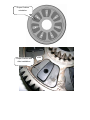
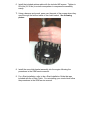
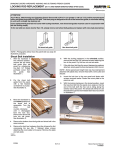
Rekluse Motor Sports
TCS Clutch Baskets
TRX 450R
2004 – 2006
Installation Guide
Copyright 2006 Rekluse Motor Sports
TCS Revision 1.000
RMS 4115
195-4115
Manual Revision: 122005
Rekluse Motor Sports, Inc.
110 E. 43rd Street
Boise, Idaho 83714
208-426-0659
[email protected]
Required Tools To Assemble Basket
1/4-inch Driver
Torque Wrench
Basket Overview
M6 Screw
Retaining Plate
Stock Ring Gear
Basket
Cushion
Note: Rekluse Shim strips not shown above.
Included Parts
TCS Clutch Basket Core
Retaining Plate
(7) x Rekluse Shim Strip
7 – M6 x 1 x 10 Socket Head Screws
M3 Allen Socket
Bike Preparation and Disassembly
1. Following the procedures in the OEM service manual, remove the existing
clutch basket from the engine.
Note: It is a good idea to replace the side case cover gasket when reinstalling the basket and clutch.
2. Remove the rivets holding the primary ring gear to the OEM aluminum
clutch basket. The rivets can be removed by milling, drilling, or grinding
the heads off of the ring gear side of the OEM basket. See following
picture.
Warning: When removing the OEM rivets, do not damage the steel ring gear
as it will be used with your new Rekluse TCS Clutch Basket.
3. Remove all components from the OEM basket, taking note of how
everything will be reassembled.
4. Place the OEM gear (recessed side out) onto the Rekluse TCS Clutch
Basket and install the 7 brass shim strips—one per pocket. To make
installing the OEM dampeners easier, you will need to form the shims
against the ring gear wall so that the shims match the contour. See
following picture.
Form Shim to the side
of ring gear wall.
Note: Over time, the OEM dampeners shrink causing the fit between the ring
gear and basket to loosen leading to clutch hammering and eventually clutch
failure. The Rekluse shims allow you to adjust the slop created by the shrunk
dampeners and eliminate clutch hammering.
5. Install the OEM cushions with the proper orientation—skinny side to the
right when looking at the back of the basket.
Make sure the shims stay in place while you install the cushions. See
following pictures.
Push Cushion in,
compressing it with
your thumbs
shim
Proper Cushion
orientation.
Proper Cushion and
shim installation.
shim
6. Install the included retainer plate with the included M6 screws. Tighten to
80 in-lbs (6.6 ft-lbs) in a criss-cross pattern to compress the assembly
evenly.
7. Using a hammer and punch, peen over the ends of the screws where they
come through the bottom-inside of the clutch basket. See following
picture.
8. Install the new clutch basket assembly into the engine following the
procedures in the OEM service manual.
9. For z-Start installation, refer to the z-Start Installation Guide that was
included with the z-Start Clutch. For re-installing your stock clutch follow
the procedures in the OEM service manual.