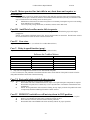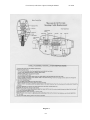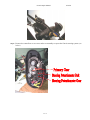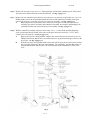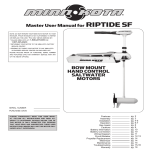
1
Minn Kota Repair Manual
01/15/04
Minn Kota Service Manual
This manual is designed to assist in basic trouble shooting procedures for MinnKota
trolling motors.
Table of Contents
Page
Safety Warnings
ii
Trouble Shooting Tips
iii
Section 1.
1-1
Hand-Control Models with a Speed Coil
(5-speed models)
Section 2.
Hand-Control Models with a Printed Circuit Board
2-1
(Variable-speed models)
Section 3.
PowerDrive (PD) Models
3-1
(Corded foot pedal, non-AutoPilot, non-Genesis models)
Section 4.
AutoPilot (PD/AP) Models
(Corded foot pedal, non-Genesis models)
Part I – motors prior to model year 2001
Part II – 2001 and later motors
Section 5.
4-1
page 4-1
page 4-8
Cordless PowerDrives and AutoPilot Models
5-1
(Radio-frequency controlled models, manufactured between 1996-1999)
Section 6.
Foot-Control Cable Steer Models with a Speed Coil
6-1
(5-speed Maxxum and All Terrain units)
Section 7.
Foot-Control Cable Steer Models with a Control Board
7-1
(Variable-speed Maxxum and All Terrain units)
Section 8.
PowerUp Lifts, Trims, and Tilts
8-1
(Models manufactured between 1996-2002)
Section 9.
Depth Finder Interference
9-1
Section 10.
Vantage Motors
10-1
Section 11.
Genesis Motors
11-1
Section 12.
Minn Kota Universal Sonar
12-1
Section 13.
Lower Unit / Motor Assembly
13-1
(includes instructions to remove motor assembly from composite tube)
Section 14.
Engine Mount (EM) & Neptune (EP)
14-1
Section 15.
DeckHand Electric Anchors
15-1
Section 16.
CoPilot Wireless Accessory
16-1
Section 17.
3X Steering
17-1
i
Minn Kota Repair Manual
10/31/02
SAFETY WARNINGS
¾ To prevent possible eye injury, always wear SAFETY GLASSES while servicing
motors.
¾ Remove propeller from motor during test procedures to eliminate chances of being
cut by rotating blades.
¾ Do not run motor out of water for more than a minute at a time. The motor
assemblies (and speed coils) are designed to dissipate heat through the motor shell
into water. The armature seals can also dry out.
¾ Follow all battery charging precautions to eliminate chances of the escaping fumes
exploding.
ii
Minn Kota Repair Manual
10/31/02
Trouble Shooting Tips…
With all the new features and models being added to our Minn Kota line, motor
troubleshooting and repair can be quite complicated. However, with circuit board
costs rising, it is more important than ever to correctly diagnose the problem before
replacing parts.
Here are a few trouble shooting suggestions:
¾ If possible, locate the failure before replacing any parts. Sometimes disassembly
fixes the problem (pinched wires, poor connections, etc…).
¾ Look at the wiring as closely as you would the control board. There are as many
problems with wires and connectors as with defective control boards. Check the
coil cords on AutoPilot models. An open wire here will look like a bad board.
¾ On control boards with clear sleeves around the quick disconnects, be sure the
female connector does not slip down beside the male connector. It may feel like
the connector went on properly, but this connection will fail.
¾ For quick troubleshooting, use a 12-volt light bulb (automotive dome or brake
light) with wires and alligator clips. Clip it to the board output and vary the speed
to see if the board is working. A voltmeter on the output can sometimes be
misleading. The control board needs some kind of load to work correctly.
¾ If you have replaced a board in the same motor more than once, this is probably a
symptom of a larger problem. Check the wiring in the lower unit. (Shorts on the
motor wires will cause board failures and shorts in PowerDrive drive housings will
cause foot pedal board failures.)
¾ We still see control boards replaced under warranty that are NOT defective. To
help us control costs to all our customers and to ensure that we will honor your
warranty reimbursement claim, please be certain the board is defective.
¾ On AutoPilot motors, seldom do both boards fail at the same time. Please double
check.
iii
Hand-Control w/Speed Coil Repair Manual
10/31/02
Section 1.
Hand-Control Models with a Speed Coil
Case I. Motor fails to operate (on any speed).
Step 1. Check to ensure proper voltage. Inspect all battery connection, trolling motor plug (if installed), and any butt
splice connections in battery leadwire for corrosion and security.
Step 2. Check to see if lower unit runs.
A.
Connect battery lead wire to battery.
B.
Disconnect the black battery leadwire from the switch and connect it directly to the black brush lead.
C.
Disconnect the red battery leadwire from the switch and touch it directly to the red brush lead.
C-1.
If motor does run, proceed to Step 3.
C-2.
If motor does not run, a problem exists in the lower unit. Check the lower unit for voltage at
the brushes, water damage, brushes not making proper contact, or an open or shorted
armature. Repair as needed and test motor for proper operation.
Step 3. If unit being serviced is not a 12/24-volt model, proceed to Step 4. If unit being serviced is a 12/24-volt model,
check 12/24 switch for continuity.
24v
Terminal A
OFF
Terminal C
12v
Terminal B
(front side of switch)
A.
B.
(back side of switch)
Turn the 12/24 switch to 12-volt ON position. Check for continuity between the common “C”
terminal and the “A” terminal.
A-1.
If no continuity is noted, replace the 12/24 switch and test motor for proper operation.
A-2.
If continuity is observed, proceed to Step 3B.
Turn switch to 24-volt ON. Check for continuity between the common terminal (C) and terminal (B).
B-1.
If no continuity is observed, replace 12/24 switch and test motor for proper operation.
B-2.
If continuity is observed, proceed to Step 4.
Step. 4 Speed switch is defective. Replace the speed switch. Test motor for proper operation.
Case II. Motor operates on some speeds, not on others.
Step 1. Check to see if all wires are securely attached to the proper switch terminals.
Step 2. Check speed coil functionality.
A.
Connect battery lead wire to battery.
B.
Disconnect the black battery lead from the switch and connect it directly to the black brush lead.
C.
Disconnect the red battery lead from the switch and touch it to each colored speed coil wire at the
switch terminals, one at a time. The motor should run as you make each connection.
D.
If the motor fails to run as you touch any of the colored speed coil wires, the problem is either: (1) the
speed coil is faulty and needs to be replaced; or (2) the speed coil jumper wire is not connected to the
back of the brush plate (in the lower unit).
D-1.
If the motor runs as you touch the red battery lead to some of the colored speed coil wires, but
not all the speed coil wires, the speed coil is faulty and needs to be replaced.
D-2.
If the motor runs as you touch the red battery lead to each speed coil wire, proceed to Step 3.
Step 3. Speed switch is defective. Replace Speed switch. Test motor for proper operation.
1- 1
Hand-Control w/Control Board Repair Manual
01/20/04
Section 2.
Hand-Control Models with a Printed Circuit Board
Case I. Motor runs intermittently (cuts in and out, fails to run in either forward
or reverse, or kicks from forward into reverse).
Step 1. Check to ensure proper voltage and polarity at battery (red +, black -). Inspect all battery
connections, trolling motor plug (if installed), and any butt splice connections in battery leadwire for
corrosion and security.
Step 2. Check to see if lower unit runs properly.
A.
Connect battery lead wire to battery.
B.
Disconnect the black battery lead from the control board and connect it directly to the black
C.
brush lead.
Disconnect the red battery lead from the control board and touch it directly to the red brush
lead. The motor should run.
C-1.
If motor does not run, a problem exists in the lower unit. Check the lower unit for
voltage at the brushes, water in the lower unit, worn brushes, or an open or shorted
armature.
C-2.
If the motor does run, go to Step 3.
Step 3. Units with soft-pots only: Check soft-pot (P/N 2364005) on control board.
A.
Visually check soft-pot for collapsed dome switches or a break down of the silver conductive
layer for the speed control. If necessary, solder on replacement soft-pot (P/N 2364005) and
test motor for proper operation (per the procedure shown in Service Bulletin dated 1/12/99).
Case II. Motor fails to operate.
Step 1. Check to ensure proper voltage and polarity at battery (red +, black -). Inspect all battery
connections, trolling motor plug (if installed), and any butt splice connections in battery leadwire for
corrosion and security.
Step 2. Check to see if all wires are securely attached to the proper control board terminals. Check for
corroded connections.
Step 3. Check to see if lower unit operates.
A.
Connect battery lead wire to battery.
Disconnect the black battery lead from the control board and connect it directly to the black
B.
C.
brush lead.
Disconnect the red battery lead from the control board and touch it directly to the red brush
lead. The motor should run.
C-1.
If motor does not run, a problem exists in the lower unit. Check the lower unit for
voltage at the brushes, water in the lower unit, worn brushes, or an open or shorted
armature.
C-2.
If the motor does run, go to Step 4.
Step 4. Check control board.
MODELS WITH A SOFT-POT
A.
Remove soft-pot from handle assembly and ensure actuator pin and actuator spring are
making proper contact on the silver conductor layer of the soft-pot. Visually inspect soft-pot
for collapsed dome switches and excess wear on silver conductive layer of soft-pot. If
2- 1
Hand-Control w/Control Board Repair Manual
B.
01/20/04
necessary, solder on replace soft-pot (P/N 2364005) and test motor for proper operation (per
the procedure shown in Service Bulletin dated 1/12/99).
Operate control board manually (without handle assembly actuators). With battery and brush
leads attached to proper terminals of the control board, activate switch in upper right hand
corner and run fingertip around silver conductive layer. The motor should be varying in
speed as you apply pressure to the forward speed portion of the soft-pot. (As per Service
Bulletin dated 1/12/99)
B-1.
If there is no control board output (motor not running), replace control board.
B-2.
If there is control board output, but the soft-pot is worn or either of the dome
switches is bad, replace the soft-pot (solder on replacement soft-pot, P/N 2364005, per
the procedure shown in Service Bulletin dated 1/12/99). When reassembling the
handle pay close attention to ensure that the actuation spring and pin are correctly
installed and making contact with the soft-pot. With the new soft-pot and handle
reassembled, re-test motor for proper operation.
MODELS WITH A MAGNETIC ON/OFF REED SWITCH
A.
After rechecking that all wires are securely attached to the proper connections with proper
voltage, verify the control board is defective:
A-1.
Check for control board output by hooking up a test light (or V.O.M. probes) to
board output terminals (consult appropriate wiring diagram). Remove handle
assembly (with handle pivot and magnet rod) off potentiometer. (The magnet rod
needs to be away from the on/off reed switch.) Connect battery leads to proper
voltage. Vary the potentiometer by turning potentiometer’s stem. The test light
should vary in intensity from off to bright. If there is no control board output, the
main control board is defective.
Case III. Directional Indicator always stays lit (units with magnetic, on/off reed
switch only).
This reed switch is usually open. With the handle bar magnet in close proximity to the reed switch, the reed
switch contacts will close and disengage power to the PWM circuit. Removing the bar magnet from close
proximity to the reed switch will open the switch contacts, energize the PWM circuit, and light the directional
indicator.
A.
Check to ensure that the magnet is in place in the handle pivot assembly.
B.
Check to ensure that the sensor bracket and on/off reed switch are in the proper position.
2- 2
PowerDrive Repair Manual
10/31/02
Section 3.
PowerDrive (PD) Models
(Corded foot pedal, non-AutoPilot & non-Genesis models)
Case I. Drive Housing fails to steer left or right.
Step 1. Check for proper voltage and polarity. Visually check to see that all wires are attached to proper control board
terminals. Consult appropriate wiring diagram for the model and board being tested. Check for any corroded
connections. Clean / rewire, if necessary.
Step 2. Check motor with known good test foot pedal or test the original foot pedal by performing Foot Pedal PCB Test
Procedure (see page 3-4).
A.
If test pedal properly steers motor or if the original pedal tests bad as outlined on page 3-4, then
original foot pedal is faulty. Disassemble faulty pedal to inspect if actuators are properly making
contact on foot pedal board. Visually inspect foot pedal control board for collapsed / burnt dome
switches. Replace foot pedal board, if necessary.
A-1.
If dome switches are burnt, check drive housing for short between either of the drive housing
wires and the metal portion of the drive housing itself. To do this, use a V.O.M. to check for
continuity between the drive housing lead and a screw on the underside of the drive housing.
A-2.
If a short is found, disassemble the drive housing and insulate the wire terminals at the drive
housing’s servo motor to correct the shorted condition.
A-3.
Reassemble the drive housing and again check for shorts.
B.
If test pedal does not properly steer motor or if original pedal tests okay as outlined on page 3-4, then
check the drive housing.
B-1.
Connect 12-volt power source directly to drive housing leads. If drive housing does not steer,
open drive housing. Inspect servo motor and drive gears for binding/lack of lubrication.
Service drive housing to correct malfunction, as needed. If necessary, re-lubricate the
bushing and sleeve contact surfaces with Schaeffer’s #238 Moly Ultra Supreme grease or a
similar lubricant.
Case II. Motor (lower unit) fails to run or runs intermittently.
Step 1. Check for proper voltage and polarity. Visually check to see that all wires are attached to proper control board
terminals. Consult appropriate wiring diagram for the model and board being tested. Check for any corroded
connections. Clean / rewire, if necessary.
Step 2. Check motor with known good test foot pedal or test the original foot pedal by performing Foot Pedal PCB Test
Procedure (see page 3-4).
A.
If test pedal properly controls propeller speed or if the original pedal tested bad as outlined on page 34, then original foot pedal is faulty. Disassemble faulty pedal to inspect if actuators are properly
making contact on foot pedal board. Visually inspect foot pedal control board for collapsed / burnt
dome switches or bad soft pot. Replace foot pedal control board, if necessary.
B.
If test pedal does not properly control propeller or if original pedal tests okay as outlined on page 3-4,
go to Step 3.
Step 3. Check to see if lower unit runs properly.
A.
Connect 12 volts directly to the red and black brush leads at the top of the motor shaft (in the control
box). The motor should run. If not, a problem exists in the lower unit. Check the lower unit for
voltage at the brushes, water in the lower unit, worn brushes, or an open or shorted armature. Repair
as needed. If the motor operates properly, go to Step 4.
Step 4. Check for control board output by hooking up test light (or V.O.M. probes) to board output terminals (consult
appropriate wiring diagram). Use known good test pedal. Connect battery leads to proper voltage. Turn the
foot pedal to CON (constant ON) and vary the speed selector. If there is no control board output, the main
control board is defective. Replace main control board.
3- 1
PowerDrive Repair Manual
10/31/02
Case III. Foot pedal sticks right/left when steering.
Step 1. Inspect actuators on underside of foot pedal for sand/dirt/grit.
A.
Disassemble and clean contaminated actuators. Replace components as required.
B.
Reassemble foot pedal, leave actuators dry or use a dry lubricant to avoid further contamination with
sand/dirt/grit.
C.
NOTE: If foot pedal sticks while customer is fishing, he may simply swish the foot pedal in the water
to temporarily flush the sand/dirt/grit from the actuator surfaces.
Case IV. MOM/CON switch lever will not stay down in CON position.
Step 1. From the underside of the footpedal, remove the 3 screws holding the slide control and switch lever in place.
A.
Remove screw holding the white plastic continuous actuator in place.
B.
Place washer (P/N 2301731) between actuator and foot pedal base.
C.
Reassemble slide-control and MOM/CON switch assembly. Test for proper operation.
Case V. Motor won’t steer or steers slowly at higher thrust settings.
NOTE: this section applies to both PowerDrive and AutoPilot models.
Step 1. Inspect all battery connections, trolling motor plug (if installed), and any butt splice connections in the battery
leadwire for corrosion and security.
Step 2. Check to insure that wire of adequate gauge has been used in the boat’s trolling motor circuit. (Wiring of
inadequate gauge will result in a voltage drop to the motor and steering circuit at higher thrust settings. See
Wiring Gauge chart for recommended minimum wire sizes by amp draw and wire length, page 3-5). If, after
insuring that all wiring and connections are good, the steering is still slow at high thrust settings, go to Step 3.
Step 3. Disassemble motor to separate the drive housing from the motor and tube and bowplate extrusion assembly.
A.
Remove the six screws holding the top and bottom halves of the drive housing together. (Note: the
top and bottom halves of the drive housing are “pinned” together at the corners with roll pins. The two
halves will need to be pried apart.)
B.
Inspect the drive housing motor, paying special attention to the drive housing motor armature shaft and
motor bushings. Test run to verify proper high speed operation and RPM.
C.
Remove the drive housing sleeve and bushings. Thoroughly clean the bushing and sleeve contact
surfaces of all residue and old lubricant. Re-lubricate the bushing and sleeve contact surfaces with
Schaeffer’s #238 Moly Ultra Supreme grease or a similar lubricant. Reassemble the drive housing
taking special care to properly realign the drive housing pins, shafts, motor, and gears. Prior to
installing and tightening the six drive housing case screws, test run the drive housing by applying 12
volts directly to the drive housing wire leads. If the drive housing motor runs properly, then make sure
there are no gaps between the case halves case halves (a rubber mallet works well to seat the case
halves flush/tight). Install and tighten case screws.
D.
Reassemble the drive housing to the bow plate/extrusion assembly. Slide the motor and tube through
the drive housing. Reconnect wires in the control box. Test operation of reassembled motor to
complete the repair.
Case VI.
Motor is loose in the cradle.
Step 1. Check / replace the pivot pads (P/N 2305101), as needed. The pads tend to take a set over time.
Step 2. If unit being serviced is a year 2001 or later “Grip Glide” unit, ensure the Grip Glide latch handle firmly
engages the latch collar on the composite shaft.
A.
Loosen latch collar clamping screw. Rotate the latch collar clockwise on the shaft (when viewed from
above) to screw the latch collar down towards the motor lower unit. (The collar and shaft are
threaded.)
B.
Check to verify that the catch on the latch handle now firmly engages the latch collar. If necessary, readjust latch collar position. Tighten the clamping screw to hold the collar in place.
3- 2
PowerDrive Repair Manual
10/31/02
Case VII. Latch collar on shaft is broken and needs to be replaced (“Grip Glide”
models manufactured for 2001 or later).
Step 1. Remove any remnants of the original collar.
Step 2. Remove control box cover and control box from the motor composite shaft. Loosen drive collar and slide
motor lower unit and shaft out of the drive housing.
Step 3. Using a large blade screwdriver as a wedge, pry open the new latch collar by inserting the blade of the
screwdriver in the split of the new collar. Spread the collar open far enough to allow it to be slid down the shaft
from the top to the bottom threaded section of the shaft (right above the motor lower unit).
Step 4. Reassemble the motor in reverse order of disassembly.
Step 5. Adjust latch collar so that the latch handle firmly engages the collar and the motor lower unit is held tightly in
place on the motor rest. (See Case VI of this section for adjustment procedures.) Retighten the clamping screw
on the collar.
3- 3
PowerDrive Repair Manual
Corded Foot Pedal Test Procedure
3- 4
04/03/03
PowerDrive Repair Manual
10/31/02
Wiring Gauge Chart
The chart below should clarify voltage loss on all of the common wire sizes that we
work with. The number represents voltage loss per foot. In calculating loss, the
length of wire should be doubled and multiplied to the number in the chart.
AWG
5 Amps
10 Amps
20 Amps
30 Amps
40 Amps
50 Amps
4
6
8
10
12
.0012 volts
.002 volts
.0032 volts
.0051 volts
.0081 volts
.0025 volts
.004 volts
.0064 volts
.0102 volts
.0162 volts
.005 volts
.008 volts
.0128 volts
.0204 volts
.0162 volts
.0075 volts
.012 volts
.0192 volts
.0306 volts
.0486 volts
.01 volts
.016 volts
.0256 volts
.0408 volts
.0648 volts
.0125 volts
.02 volts
.032 volts
.051 volts
.081 volts
20 foot of 10 gauge wire at 40 amps = (40) x (.0408) = 1.63 volt drop
3- 5
AutoPilot Repair Manual
05/14/03
Section 4.
AutoPilot (PD/AP) Models
(Corded foot pedal models, non-Genesis)
This AutoPilot Repair Manual (Section 4) is divided into Part I and Part II.
Part I pertains to motors manufactured prior to model year 2001 (prior to S/N MKABxxx).
(AutoPilot switch is located on the lower speed control cover.)
pages 4-1 through 4-7
Part II pertains to 2001 and later models (S/N MKABxxx and later).
(AutoPilot switch is located on the top control box cover.)
pages 4-8 through 4-13
PART I.
Motors manufactured prior to model year 2001 (prior to S/N MKABxxx).
PART I - Case I. Drive Housing will not steer in either direction (in manual
mode).
Step 1. Check to ensure proper voltage and polarity at battery. Inspect all battery connections, trolling motor plug (if
installed), and any butt splice connections in battery leadwire for corrosion and security. Visually check to see
that all wires are attached to proper control board terminals. Consult the appropriate wiring diagram for the
model and board being tested. Clean / rewire, if necessary.
Step 2. Check motor with known good test foot pedal or test the original pedal by performing Foot Pedal PCB Test
Procedure on page 3-4.
A.
If test pedal properly steers motor or if the original pedal tests faulty as outlined on page 3-4, the
original foot pedal is defective. Disassemble defective pedal to inspect if actuators are properly
making contact on foot pedal board. Visually inspect foot pedal board for collapsed or burnt dome
switches. Replace foot pedal, if necessary.
B.
If test pedal does not properly steer motor or if the original pedal tests okay as outlined on page 3-4,
then test steering output of main control board. Use a test light (or V.O.M. probes) connected to the
main control steering output terminals (consult appropriate wiring diagram). Connect known good
foot pedal to main control board. Connect battery leads to proper voltage. If there is no board steering
output as you try to steer left or right, then the main control board is defective and needs to be
replaced.
C.
If main PCB has output voltage, drive housing is faulty. Test drive housing by connecting 12-volt
power source directly to drive housing leads. If drive housing does not steer, open drive housing and
inspect servo motor, drive gears, and sleeve bushings, for binding/lack of lubrication or water damage.
Repair or replace the drive housing, as necessary.
PART I - Case II. Drive Housing steers in one direction only (AutoPilot or
manual mode).
Step 1. Test drive housing by applying 12 volts to drive housing leads. Reverse polarity to verify drive housing does
steer in both directions.
Step 2. Check for a short between either of the drive housing wires and the metal portion of the drive housing itself. To
do this, use a V.O.M. to check for continuity between the drive housing lead and a screw on the underside of the
drive housing.
A.
If a short is found, disassemble the drive housing and insulate the wire terminals at the drive housing’s
servo motor to correct the shorted condition. Reassemble the drive housing and again check for shorts.
B.
If no shorts are found, proceed to Step 3.
Step 3. The steering logic portion of the main control board is faulty. Replace main control board.
4- 1
AutoPilot Repair Manual
05/14/03
PART I - Case III. Drive Housing steers with foot pedal, but will not steer in
AutoPilot mode.
Step 1. Check continuity of brown, yellow, blue, orange, and white wires in the coil cord with the coil cord stretched
out to length. If you find a break in continuity in any of these wires, the coil cord is defective. Replace coil
cord, if required.
Step 2. If no break in the continuity of the coil cord, perform the Control Board /Compass Isolation Test following the
procedure provided with the AutoPilot Test Board - Minn Kota P/N 20 (see page 4-4).
A.
If above test indicates sensor board compass assembly is defective, the replace compass assembly.
B.
If above test indicates main control board is defective, check functionality of AutoPilot ON/OFF
switch (check for continuity through switch when ON and no continuity with switch OFF). Replace
ON/OFF switch if defective, otherwise replace main control board.
PART I - Case IV. AutoPilot changes directions with speed changes.
Step 1. Small direction changes with speed changes are normal.
Step 2. If direction changes are more than 4 to 5 degrees, perform the Compass Calibration Procedure (see page 4-5).
PART I - Case V. Motor won’t steer or steers slowly at higher thrust settings.
Step 1. Inspect all battery connections, trolling motor plug (if installed), and any butt splice connections in the battery
leadwire for corrosion and security.
Step 2. Check to insure that wire of adequate gauge has been used in the boat’s trolling motor circuit. (Wiring of
inadequate gauge will result in a voltage drop to the motor and steering circuit at higher thrust settings. See
Wiring Gauge chart for recommended minimum wire sizes by amp draw and wire length, page 3-4). If, after
insuring that all wiring and connections are good, the steering is still slow at high thrust settings, proceed to
Step 3.
Step 3. Disassemble motor to separate the drive housing from the motor and tube and bowplate/extrusion assembly.
A.
Remove the six screws holding the top and bottom halves of the drive housing together. (Note: the
top and bottom halves of the drive housing are “pinned” together at the corners with roll pins. The two
halves will need to be pried apart.)
B.
Inspect the drive housing motor, paying special attention to the drive housing motor armature shaft and
motor bushings. Test run to verify proper high speed operation and RPM.
C.
Remove the drive housing sleeve and bushings. Thoroughly clean the bushing and sleeve contact
surfaces of all residue and old lubricant. Re-lubricate the bushing and sleeve contact surfaces with
Schaeffer’s #238 Moly Ultra Supreme grease or a similar lubricant. Reassemble the drive housing
taking special care to properly realign the drive housing pins, shafts, motor, and gears. Prior to
installing and tightening the six drive housing case screws, test run the drive housing by applying 12
volts directly to the drive housing wire leads. If the drive housing motor runs properly, then make sure
there are no gaps between the case halves (a rubber mallet works well to seat the case halves
flush/tight). Install and tighten case screws.
D.
Reassemble the drive housing to the bow plate/extrusion assembly. Slide the motor and tube through
the drive housing. Reconnect all wires in the control box and recalibrate AutoPilot compass (see page
4-5). Test for proper operation.
PART I - Case VI. AutoPilot function is erratic and doesn’t maintain a heading.
Step 1. Make sure motor is mounted within 5 degrees of level and there is no ferrous metal object(s) near the motor that
may be affecting the compass (including screws and/or nuts).
Step 2. Check motor for excessive vibration. Inspect propeller and propeller shaft for damage. (Excessive vibration
can cause the AutoPilot compass to oscillate causing erratic operation.)
Step 3. Check for proper voltage to motor while motor is under load. AutoPilot steering is susceptible to erratic
operation in low voltage situations. (Use of adequate wire gauge in boat or any leadwire extension is critical to
avoid voltage drop / low voltage to the motor; as can an inadequate or corroded plug / plug receptacle.)
4- 2
AutoPilot Repair Manual
05/14/03
Step 4. Check continuity of brown, yellow, blue, orange, and white wires in the coil cord with the coil cord stretched
out to length. If you find a break in continuity in any of these wires, the coil cord is defective. Replace coil
cord, if required.
Step 5. Check AutoPilot compass control board for proper voltage levels at the optical sensor circuit. (See Minn Kota
Service Repair Bulletin #SB122099, AutoPilot Compass Control Board Trim Pot Adjustment Procedure – page
4-6.)
Step 6. Perform the Control Board / Compass Isolation Test following the procedure provided with the AutoPilot Test
Board – Minn Kota P/N 20 (see page 4-4). If operation is restored replace the sensor board compass assembly.
If it isn’t restored, replace the main control board.
PART I - Case VII. Motor (lower unit) fails to run or runs intermittently.
Step 1. Check for proper voltage and polarity. Visually check to see that all wires are attached to proper control board
terminals. Consult appropriate wiring diagram for the model and board being tested. Check for corroded
connections. Clean/rewire properly, if necessary.
Step 2. Check motor with known good test foot pedal or test the foot pedal by performing the Foot Pedal Test
Procedure found on page 3-4.
A.
If test pedal properly controls all motor functions or if the original foot pedal tests bad as outlined on
page 3-4, the original foot pedal is faulty. Replace foot pedal.
B.
If motor lower unit does not run properly with test pedal or if the original pedal tests okay as outlined
on page 3-4, go to Step 3.
Step 3. Check to see if lower unit runs properly.
A.
Connect 12 volts directly to the red and black brush leads at the top of the motor shaft (in the control
box). The motor should run. If not, a problem exists in the lower unit. Check the lower unit for
voltage at the brushes, water in the lower unit, worn brushes, or an open or shorted armature. Repair
as necessary. If the motor operates properly, proceed to Step 4.
Step 4. If Steps 1, 2, and 3 test okay, the main control board is faulty and needs to be replaced.
PART I - Case VIII. All functions dead.
Step 1. Check for proper battery voltage and polarity at the control board input terminals. Visually check for poor or
corroded connections. Check for proper wiring of control board (consult appropriate wiring diagram).
Step 2. Defective control board. Replace main control board.
PART I - Case IX. Foot pedal sticks right/left when steering.
Step 1. Inspect actuators on underside of foot pedal for sand/dirt/grit.
A.
Disassemble and clean contaminated actuators. Replace components, if required.
B.
Reassemble foot pedal, leave actuators dry or use a dry lubricant to avoid further contamination with
sand/dirt/grit.
PART I - Case X. MOM/CON switch lever will not stay down in CON position.
Step 1. From the underside of the footpedal, remove the 3 screws holding the slide control and switch lever in place.
A.
Remove screw holding the white plastic continuous actuator in place.
B.
Place shim (P/N 2301731) between actuator and pedal base.
C.
Reassemble slide-control and MOM/CON switch assembly. Test for proper operation.
PART I - Case XI. Motor is loose in the cradle.
Step 1. Check / replace the pivot pads (P/N 2305101), as needed. The pads tend to take a set over time.
4- 3
AutoPilot Repair Manual
05/14/03
AutoPilot Control Board / Sensor Board Isolation Test
(MOTORS PRIOR TO 2001 MODELS ONLY)
The AutoPilot test board is to be used to trouble shoot an AutoPilot that is not “locking” on a
heading, or is failing to properly respond when in the AutoPilot mode.
Step 1. Use the AutoPilot test board (P/N 20) provided through the Minn Kota parts department.
Step 2. Remove the control box cover.
Step 3. Disconnect the 5 wires from the coil cord to the sensor board.
Step 4. Connect the 5 wires to the Test Board and turn Switch B to Position 1.
Step 5. Turn the AutoPilot “ON/OFF” switch ON, and wait 2 seconds.
Step 6. Flip Switch A to Position 1, and then Position 2. Steering motor should pulse both clockwise and counter
clockwise. Steering should stop at center position of Switch A.
Step 7. If no steering is observed in Step 6, check continuity of brown, yellow, blue, orange, and white wires in the coil
cord with the coil cord stretched out to length. If continuity is not observed through each wire, replace coil
cord. If there is continuity through each wire, the main control board is defective and needs to be replaced.
Step 8. Turn AutoPilot ON/OFF switch OFF.
Step 9. Turn Switch B to Position 2.
Step 10. Turn the AutoPilot ON/OFF switch ON, and wait 2 seconds.
Step 11. Flip Switch A to Position 1, and then Position 2. Steering motor should pulse clockwise and counter clockwise.
Steering should stop at center position of Switch A.
Step 12. If Steps 6, 7, and 11 work without fault, the main control board is functioning properly, and the compass sensor
board assembly in the control head should be replaced.
4- 4
AutoPilot Repair Manual
05/14/03
AutoPilot Calibration
(PRIOR TO 2001 MODELS ONLY)
Step 1. Place stall clamp on motor.
Step 2. Face the control head west.
Step 3. Turn foot pedal CON (constant) switch ON, advance
speed selector between speed 4 - 5. Watch the compass disc
for movement. Movement can be minimized by changing
cross over point (B) up or down (gradually tighten tie wrap as
you calibrate). If the compass disc moves clockwise, the
cross-over point must be moved up. You may find it helpful
using a pair of brass needle-nose pliers for these adjustments.
Step 4. Point the motor control head north. Repeat the stall
test while watching the compass disc (usually very little
adjustment is needed at this point). If necessary, adjust while
gradually tightening tie wrap. If excessive movement is
noticed, rotate the coil cord in area (C) the same direction as
the movement to minimize magnetic interference from the
coil cord. Re-check in west direction after this adjustment.
Step 5. Rotate motor to original position. Clip end of cable
tie.
Step 6. Remove stall clamp from motor.
Step 7. Re-check AutoPilot function as directed in previous
position.
Step 8. Apply hot glue around pig-ring and attach control
box cover.
When rechecking AutoPilot function, assure motor finds it direction and doesn’t over-steer. If
necessary, recalibrate compass.
4- 5
AutoPilot Repair Manual
05/14/03
AutoPilot Compass Control Board
Trim Pot Adjustment Procedure
(MOTORS PRIOR TO 2001 MODELS ONLY)
Note: You must use a non-magnetic screwdriver and a good quality digital V.O.M. in order to properly perform this procedure.
Use a V.O.M. with a sharp probe on the red V.O.M. lead, as you will need to pierce through the humiseal coating on the
compass control board to obtain accurate voltage readings. In addition, the compass must be in a level position and away
from any ferrous metal/steel objects or strong magnetic fields. A small fixture such as the one shown in the
accompanying diagrams will allow you to perform these adjustments on your bench top or, if you wish, the compass
control board can be left in the motor control box. Be sure to follow the wiring connections as outlined and shown in this
procedure.
diagram 1
Step 1. Test/adjust the sensor #1 voltage (see diagram 1 for component location)
A.
Tightly cover the compass card with a shop rag to block any light source on the optical sensors.
B.
With the compass level and pointed southeast, connect 12 volts to the orange (+12v) and brown (ground)
terminals. (see diagram 2)
C.
With your digital V.O.M. set to check DC voltage, connect the black V.O.M. lead to the brown (ground)
terminal on the compass control board and firmly touch the red probe of the V.O.M. lead to the sensor #1 resistor
(as shown in diagram 2).
D.
Observe the voltage displayed on the V.O.M. while slightly turning the compass a few degrees each side of the
original southeast heading.
E.
Position the compass so that the lowest voltage is displayed on the digital V.O.M.. If this voltage is 1 volt ( +
.25v) no further adjustment is needed, and go to Step 2. If the voltage needs adjustment, proceed to Step 1F.
F.
Using a small non-magnetic blade screwdriver, adjust trim pot #1 so that the voltage displayed on the V.O.M. is
as close as possible to 1 volt ( + .25v). (Compass is defective if you cannot reach this tolerance.)
Step 2. Test/adjust the sensor #2 voltage (see above diagram 1 for component location)
A.
Tightly cover the compass card with a shop rag to block any light source on the optical sensors.
B.
With the compass level and pointed southwest, connect 12 volts to the orange (+12v) and brown (ground)
terminals.
C.
With the digital V.O.M. set to check DC voltage, connect the black V.O.M. lead to the brown (ground) terminal
and touch the red probe of the V.O.M. lead to the sensor #2 resistor. (as shown in diagram 3)
D.
Observe the voltage displayed on the V.O.M. while slightly turning the compass a few degrees each side of the
original southwest heading.
E.
Position the compass so that the lowest voltage is displayed on the digital V.O.M.. If this voltage is 1 volt ( +
.25v) no further adjustment is needed. If the voltage needs adjustment, proceed to Step 2F.
F.
Using a small non-magnetic blade screwdriver, adjust trim pot #2 so that the voltage displayed on the V.O.M. is
as close as possible to 1 volt ( + .25v). (Compass is defective if you cannot reach this tolerance.)
4-
6
AutoPilot Repair Manual
05/14/03
diagram 2
NOTE: Compass removed from motor and compass card not covered for clarity.
Compass card should be covered to block any light on the optical sensors!
diagram 3
NOTE: Compass removed from motor and compass card not covered for clarity.
Compass card should be covered to block any light on the optical sensors!
This concludes the trim pot adjustment procedure. A small drop of RTV rubber silicone (non-acidic based) sealant over
the trim pots will ensure they will not change due to vibration or extreme heat fluctuation. The properly adjusted compass
control board is now ready to be reinstalled (if necessary) and the motor put back into use.
4-
7
AutoPilot Repair Manual
05/14/03
PART II.
Motors manufactured for model year 2001 (S/N MKABxxx) and later.
This series of motor incorporates the “Grip Glide” mount system.
NOTE: Many of the test procedures for the AutoPilot motors manufactured prior to the 2001
model year do not apply to this series of motors due to several product changes:
¾ AutoPilot and steering/steering logic functions are now incorporated into the new compass
control board assembly located in the control box head. (The existing AutoPilot test board P/N
20 does not work with the new board.) The AP ON/OFF switch is now in the top control box.
¾ The main control board on the 2001 PD/AP serves only two functions. It provides power to the
compass sensor control board assembly and it controls the Maximizer/variable speed function for
the motor lower unit.
¾ The same main control board is now used in both AutoPilot and non-AutoPilot models.
¾ AutoPilot compass calibration is no longer a big issue due to magnetic interference surrounding
the motor leads. To lessen the interference, the coil cord now enters the front of the control box
and the compass is moved further back and higher up than on previous AutoPilot models.
PART II - Case I. Drive Housing will not steer in either direction with AP switch
turned ON or OFF.
Step 1. Check to ensure proper voltage and polarity at battery. Inspect all battery connections, trolling motor plug (if
installed), and any butt splice connections in battery leadwire for corrosion and security. Visually check to see
that all wires are attached proper control board terminals. Consult the appropriate wiring diagram for the model
and board being tested. Clean / rewire, if necessary.
Step 2. Check motor with known good test foot pedal or test pedal by performing Foot Pedal PCB Test Procedure (see
page 3-4).
A.
If test pedal properly steers motor or if the original pedal tests bad as outlined on page 3-4, the original
foot pedal is faulty. Disassemble defective pedal to inspect actuators and dome switches. Replace foot
pedal, if necessary.
B.
If test pedal does not properly steer the motor or if the original pedal test okay as outlined on page 3-4,
test the drive housing for proper operation. Disconnect the drive housing lead wires and apply 12 volts
directly to the white and black wires. Observe drive housing for rotation. Reverse the polarity, and the
drive housing should reverse the direction of rotation. Repair or replace drive housing, if required. If
drive housing test okay, proceed to next step.
C.
Check continuity of the individual coil cord wires with the coil cord stretched out to length. If you find
a break in continuity in any of these wires, the coil cord is defective. Replace coil cord, if required.
D.
If above steps test fine, the AutoPilot compass control board assembly in the upper control box is
faulty. Replace compass board assembly.
PART II - Case II. Motor steers slowly at higher thrust settings.
Step 1. Inspect all battery connections, trolling motor plug (if installed), and any butt splice connections in the battery
leadwire for corrosion and security.
Step 2. Check to insure that wire of adequate gauge has been used in the boat’s trolling motor circuit. (Wiring of
inadequate gauge will result in a voltage drop to the motor and steering circuit at higher thrust settings. See
Wiring Gauge chart for recommended minimum wire sizes by amp draw and wire length, page 3-5). If, after
insuring that all wiring and connections are good, the steering is still slow at high thrust, proceed to Step 3.
Step 3. Disassemble motor to separate the drive housing from the motor and tube and bowplate/extrusion assembly.
A.
Remove the six screws holding the top and bottom halves of the drive housing together. (Note: the
top and bottom halves of the drive housing are “pinned” together at the corners with roll pins. The two
halves will need to be pried apart.)
4- 8
AutoPilot Repair Manual
B.
C.
D.
05/14/03
Inspect the drive housing motor, paying special attention to the drive housing motor armature shaft and
motor bushings. Test run to verify proper high speed operation and RPM.
Remove the drive housing sleeve and bushings. Thoroughly clean the bushing and sleeve contact
surfaces of all residue and old lubricant. Re-lubricate the bushing and sleeve contact surfaces with
Schaeffer’s #238 Moly Ultra Supreme grease or a similar lubricant. Reassemble the drive housing
taking special care to properly realign the drive housing pins, shafts, motor, and gears. Prior to
installing and tightening the six drive housing case screws, test run the drive housing by applying 12
volts directly to the drive housing wire leads. If the drive housing motor runs properly, then make sure
there are no gaps between the case halves (a rubber mallet works well to seat the case halves
flush/tight). Install and tighten case screws.
Reassemble the drive housing to the bow plate/extrusion assembly. Slide the motor and tube through
the drive housing. Reconnect all wires in the control box. Test for proper operation.
PART II – Case III. All functions are dead.
Step 1. Check for proper battery voltage and polarity at the control board input terminals. Visually check for poor or
corroded connections. Check for proper wiring of control board (consult appropriate wiring diagram).
Step 2. Defective main control board. Replace main control board.
PART II – Case IV. Motor steers properly, but motor lower unit does not run.
Step 1. Check for proper voltage and polarity at the control board input terminals. Visually check to see that all wires
are attached to proper control board terminals. Consult appropriate wiring diagram for the model and board
being tested. Check for corroded connections. Clean/rewire properly, if necessary.
Step 2. Check motor with known good test foot pedal or test the foot pedal by performing the Foot Pedal Test
Procedure (see page 3-4).
A.
If test pedal properly controls all motor functions or if the original foot pedal tests bad as outlined on
page 3-4, the original foot pedal is faulty. Replace foot pedal.
B.
If motor lower unit does not run properly with test pedal or if the original pedal tests okay as outlined
on page 3-4, go to Step 3.
Step 3. Check to see if lower unit runs properly.
A.
Connect 12 volts directly to the red and black brush leads at the top of the motor shaft (in the control
box). The motor should run. If not, a problem exists in the lower unit. Check the lower unit for
voltage at the brushes, water in the lower unit, worn brushes, or an open or shorted armature. Repair
as necessary. If the motor operates properly, proceed to Step 4.
Step 4. If Steps 1, 2, and 3 test okay, the main control board is faulty and needs to be replaced.
PART II – Case V. AutoPilot function is erratic and doesn’t maintain a heading.
Step 1. Make sure motor is mounted within 5 degrees of level (the compass card with the graduated markings must be
floating level) and there are no ferrous metal objects near the motor that may be affecting the compass
(including screws/nuts). While maintaining a level compass, spin the control box and observe the compass
card. The card should remain stationary (i.e. card should not have lost its magnetic north reference) as the
control box is turned. If the compass card sticks or “hangs up” it is faulty, and the compass assembly needs to
be replaced.
Step 2. Check motor for excessive vibration. Inspect propeller and propeller shaft for damage. (Excessive vibration
can cause the AutoPilot compass to oscillate causing erratic operation.)
Step 3. Check for proper voltage to motor while motor is under load. AutoPilot steering is susceptible to erratic
operation in low voltage situations. (Use of adequate wire gauge in boat or any leadwire extension is critical to
avoid voltage drop / low voltage to the motor; as can inadequate or a corroded plug / plug receptacle.)
Step 4. Check continuity of brown, red, white, and black small gauge wires in the coil cord with the coil cord stretched
out to length. If you find a break in continuity in any of these wires, the coil cord is defective. Replace coil
cord, if required.
4- 9
AutoPilot Repair Manual
05/14/03
Step 5. Check AutoPilot compass control board for proper voltage levels at the optical sensor circuit. (See Minn Kota
Repair Bulletin #SB72001, AutoPilot Compass Control Board Trim Pot Adjustment Procedure – page 4-11.)
PART II - Case VI. Foot pedal sticks right/left when steering.
Step 1. Inspect actuators on underside of foot pedal for sand/dirt/grit.
A.
Disassemble and clean contaminated actuators. Replace components, if required.
B.
Reassemble foot pedal, leave actuators dry or use a dry lubricant to avoid further contamination with
sand/dirt/grit.
PART II - Case VII. MOM/CON switch lever will not stay down in CON
position.
Step 1. From the underside of the footpedal, remove the 3 screws holding the slide control and switch lever in place.
A.
Remove screw holding the white plastic continuous actuator in place.
B.
Place shim (P/N 2301731) between actuator and pedal base.
C.
Reassemble slide-control and MOM/CON switch assembly. Test for proper operation.
PART II - Case VIII. Motor is loose in the cradle.
Step 1. Check / replace the pivot pads (P/N 2305101), as needed. The pads tend to take a set over time.
Step 2. Ensure the Grip Glide latch handle firmly engages the latch collar on the composite shaft.
A.
Loosen latch collar clamping screw. Rotate the latch collar clockwise on the shaft (when viewed from
above) to screw the latch collar down towards the motor lower unit. (The collar and shaft are
threaded.)
B.
Check to verify that the catch on the latch handle now firmly engages the latch collar. If necessary, readjust latch collar position. Tighten the clamping screw to hold the collar in place.
PART II - Case IX. Latch collar on shaft is broken and needs to be replaced.
Step 1. Remove any remnants of the original collar.
Step 2. Remove control box cover and control box from the motor composite shaft. Loosen drive collar and slide
motor lower unit and shaft out of the drive housing.
Step 3. Using a large blade screwdriver as a wedge, pry open the new latch collar by inserting the blade of the
screwdriver in the split of the new collar. Spread the collar open far enough to allow it to be slid down the shaft
from the top to the bottom threaded section of the shaft (right above the motor lower unit).
Step 4. Reassemble the motor in reverse order of disassembly.
Step 5. Adjust latch collar so that the latch handle firmly engages the collar and the motor lower unit is held tightly in
place on the motor rest. (See Case VIII for adjustment procedures.) Retighten the clamping screw on the
collar.
Effects of Broken or Intermittent Wires in Coil Cords
¾
¾
¾
¾
If either the yellow or green coil cord wires are broken or intermittent, the steering with the foot pedal will not
function or will be intermittent. AP function will not be affected in any way (the AP light will be lit when AP is
turned on and the motor will track and hold a heading in the normal AP manner).
If the brown wire in the coil cord is broken or intermittent, the AP will not function. If the AP function was turned
on, it will turn off and the AP indicator will not be lit. Steering with the foot pedal will be clockwise only,
regardless if either the left or right side of the steering pedal is pressed.
If either the white or small black coil cord wires are broken or intermittent, the steering function will be
inoperative or intermittent. The motor will not respond to the foot pedal, and the AP will not track a heading even
though the AP indicator light is lit.
If the small red coil cord wire is broken or intermittent, the foot pedal steering will be inoperative or
intermittent. If the AP function was turned on, it will turn off and the AP indicator light will not be lit, and the AP
system will not function.
4-10
AutoPilot Repair Manual
06/04/03
AutoPilot Compass Control Board
Trim Pot Adjustment Procedure
(2001 AND LATER MODELS ONLY)
Note: You must use a non-magnetic screwdriver and a good quality digital V.O.M. in order to properly perform this
procedure. Use a V.O.M. with a sharp probe on the red V.O.M. lead, as you will need to pierce through the
humiseal coating on the compass control board to obtain accurate voltage readings. In addition, the compass
must be in a level position and away from any ferrous metal/steel objects or strong magnetic fields. A small
fixture such as the one shown in the accompanying diagrams will allow you to perform these adjustments on
your bench top or, if you wish, the compass control board can be left in the motor control box. Be sure to
follow the wiring connections as outlined and shown in this procedure.
2 Variations of compass boards:
Diagram 1-A
(NOTE: The diagrams show this procedure being performed with the compass board assembly removed from the
AutoPilot control box for clarity. This procedure can be done without removing compass assembly.)
Diagram 1-B
4-11
AutoPilot Repair Manual
05/14/03
(NOTE: The diagrams show this procedure being performed with the compass board assembly removed from the
AutoPilot control box for clarity. This procedure can be done without removing compass assembly.)
Diagram 2
NOTE: Compass removed from motor and not covered for clarification.
Compass card should be covered to block any light on the optical sensors!
STEP 1 Test/adjust the sensor #1 voltage (see diagram 1-A or 1-B for component location)
A.
Tightly cover the compass card with a shop rag to block any light source on the optical sensors.
B.
With the compass level and pointed southeast, connect 12 volts to the red (+12v) and brown (ground)
terminals. (see diagram 2)
C.
With your digital VOM set to check DC voltage, connect the black VOM lead to the brown (ground)
terminal on the compass control board and firmly touch the red probe of the VOM lead to pin #1 of the
I.C. (as shown in diagram 2).
D.
Observe the voltage displayed on the VOM while slightly turning the compass a few degrees each side
of the original southeast heading.
E.
Position the compass so that the lowest voltage is displayed on the digital VOM. If this voltage is 1
volt ( + .25v) no further adjustment is needed, and go to STEP 2. If the voltage needs adjustment,
proceed to STEP 1F.
F.
On compass boards with date of production prior to 11/01/00 - using a small non-magnetic blade
screwdriver, adjust trim pot “A” so that the voltage displayed on the VOM is as close as possible to 1
volt ( + .25v). (Compass is defective if you cannot reach this tolerance.)
On compass boards with date of production after 11/01/00 - using a small non-magnetic blade
screwdriver, adjust trim pot “B” so that the voltage displayed on the VOM is as close as possible to 1
volt ( + .25v). (Compass is defective if you cannot reach this tolerance.)
4-12
AutoPilot Repair Manual
05/14/03
Diagram 3
NOTE: Compass removed from motor and compass card not covered for clarifity.
Compass card should be covered to block any light on the optical sensors!
STEP 2 Test/adjust the sensor #2 voltage (see diagram 1 on prior page for component location)
A.
Tightly cover the compass card with a shop rag to block any light source on the optical sensors.
B.
With the compass level and pointed southwest, connect 12 volts to the red (+12v) and brown (ground)
terminals.
C.
With the digital VOM set to check DC voltage, connect the black VOM lead to the brown (ground)
terminal and touch the red probe of the VOM lead to pin #2 of the I.C. (as shown in diagram 3)
D.
Observe the voltage displayed on the VOM while slightly turning the compass a few degrees each side
of the original southwest heading.
E.
Position the compass so that the lowest voltage is displayed on the digital VOM. If this voltage is 1
volt ( + .25v) no further adjustment is needed. If the voltage needs adjustment, proceed to STEP 2F.
F.
On compass boards with date of production prior to 11/01/00 - using a small non-magnetic blade
screwdriver, adjust trim pot “B” so that the voltage displayed on the VOM is as close as possible to 1
volt ( + .25v). (Compass is defective if you cannot reach this tolerance.)
On compass boards with date of production after 11/01/00 - using a small non-magnetic blade
screwdriver, adjust trim pot “A” so that the voltage displayed on the VOM is as close as possible to 1
volt ( + .25v). (Compass is defective if you cannot reach this tolerance.)
This concludes the trim pot adjustment procedure. A small drop of RTV rubber silicone (non-acidic based)
sealant over the trim pots will ensure they will not change due to vibration or extreme heat fluctuation. The
properly adjusted compass control board is now ready to be reinstalled (if necessary) and the motor put back into
use.
4-13
Cordless Motors Repair Manual
12/17/02
Section 5.
Manufactured between 1996-1999
Cordless Powerdrives and AutoPilot Models
Case I. Motor fails to operate
Step 1. Ensure proper initialization:
A.
Connect motor leadwires to proper voltage and correct polarity.
B.
Check battery leadwire connections, trolling motor plug (if one is installed), all butt splice connections,
and leadwire connections at main printed circuit board.
C.
Turn on receiver sideplate (motor ON/OFF switch) first, then turn on the foot pedal transmitter
ON/OFF switch, then send a signal with the foot pedal transmitter.
Step 2. Check receiver sideplate LED operation. Upon initialization (first command to receiver) the receiver sideplate
LED should light. It will stay on for approximately five minutes, even if no further commands are received.
LED will flash when steering and also flash briefly as speed is changed. If LED operations is OK, then the
radio portion of the circuit (transmitter/receiver) is operating correctly. Diagnose motor per corded model
instructions.
OR
*AutoPilot models:
Use test foot pedal adapter and corded test foot pedal (see page 5-3). NOTE: when
using test pedal adapter, the “MOM/CON” lever of the corded test foot pedal must be in the “CON” position
and the motor ON/OFF switch must be ON. If motor operates correctly with this test procedure, problem lies in
the software (transmitter or receiver i.e. cordless pedal or sideplate). If motor does not operate properly with
this test procedure, diagnose motor per corded model instructions.
*Non-AutoPilot models:
Non-AutoPilot models can be tested with a corded foot pedal (do NOT use the
corded-adapter). As with the AutoPilot models, the motor ON/OFF switch must be ON in order to properly test
all motor functions.
Step 2. If LED does not come on when initialized:
A.
Verify proper battery voltage to trolling motor (12v or 24v)
B.
Make sure that “motor on/off” switch on motor is ON before foot pedal ON/OFF switch is turned ON.
C.
Verify transmitter battery condition. Signal strength decreases as the AA batteries in the foot pedal get
weaker. Using a V.O.M. check for voltage across the red and black wires of the foot pedal battery
holder (with 4 good AA batteries you should see about 6 volts). Check AA battery contacts. Replace
bad batteries, as necessary.
D.
If batteries and connections in the foot pedal check out okay, test receiver sideplate / motor ON/OFF
switch to insure that the switch is functional. This can be accomplished by testing across the switch
leads with a V.O.M. for continuity, or by testing across pins “A” and “E” for voltage with the ON/OFF
switch turned ON.
Plug end from main control board
E.
F.
If no voltage or continuity is noted, inspect the receiver sideplate / motor ON/OFF switch and replace
with switch kit p/n 2880230, if necessary.
Initialize and test for motor operation with new switch to verify function.
5-1
Cordless Motors Repair Manual
10/31/02
Case II. Motor operates fine, but while in use, shuts down and requires reinitialization.
Step 1. Check all battery connections, trolling motor leadwire plug and plug receptacle connections (if plug has been
installed), all butt splice connections, leadwire connections at main control board, and any circuit breakers that
may be installed in the boats trolling motor electrical system.
A.
Malfunctions of this nature are almost always due to a momentary interruption in power to the trolling
motor and RF/receiver sideplate.
B.
Correct any faulty wiring connections, re-initialize, and test motor under load.
Case III. AutoPilot of cordless motor fails to operate.
Step 1. Consult Section 4 AutoPilot Models – Part I. Case III. on page 4-2 for troubleshooting steps and compass
isolation test.
NOTE: motor must be initialized properly first. Be sure both switches are turned ON. The RF/motor switch is
the switch with the wires that run closer to the heat transfer bar.
Case IV. Over-steer
Step 1. Check for “old” software. (see Software for Cordless Motors below)
Case V. Delay in speed function (prop).
Step 1. Check for “old” software. (See Software for Cordless Motors below)
Software for Cordless Motors
Foot Pedal***
Model
Receiver
36 PD/C & 42PD/C
2303927*
2774708*
36PD/AP/C & 42PD/AP/C
2303926**
2774708**
48PD/AP/C
2303926
2774708
MKA-9
2303925
2774708
RT42AP/C
2303926
2774709
RT48AP/C
2303926
2774709
* early units were shipped with 2303923 receiver and 2994705 foot pedal
** early units were shipped with 2303924 receiver and 2994705 foot pedal
*** the 2774708 (new) foot pedal has a black label with white letters on the bottom of the pedal versus the 2774705
(old) pedal which had a white label with black lettering
Case VI. Foot pedal sticks right/left when steering.
Step 1. Inspect actuators on underside of foot pedal for sand/dirt/grit.
A.
Disassemble and clean contaminated actuators, inspect for repair and replace components if required.
B.
Reassemble foot pedal, leave actuators dry or use a dry lubricant to avoid further contamination with
sand/dirt/grit.
C.
NOTE: If foot pedal sticks while customer is fishing, he may simply swish the foot pedal in the water
to temporarily flush the sand/dirt/grit from the actuator surfaces.
Case IV. MOM/CON switch lever will not stay down in CON position.
Step 1. From the underside of the footpedal, remove the 3 screws holding the slide control and switch lever in place.
A.
Remove screw holding the white plastic continuous actuator in place.
B.
Place shim (P/N 2301731) between actuator and foot pedal base.
C.
Reassemble slide control MOM/CON switch assembly and test for proper operation.
5-2
Cordless Motors Repair Manual
Cordless AutoPilot Test Pedal
5-3
10/31/02
Foot-Control, Cable Steer w/Speed Coil Repair Manual
01/26/04
Section 6.
Foot-Control Cable Steer Models with a Speed Coil
Case I. Motor fails to run
Step 1. Check battery connections, circuit breakers, trolling motor plug (if customer has installed a plug), and any butt
splice connections in the battery leadwire.
Step 2. Remove the control box cover. Disconnect motor leads and connect 12 volts across red and black motor leads.
(This applies to 12 or 24 volt models.)
A.
If motor does not run, the problem is in the motor lower unit. Disassemble and check lower unit for
voltage at the brushes, water in lower unit, worn brushes,
bad brush springs, or an open or shorted armature. Repair/replace parts as necessary.
B.
If motor does run, check speed selector switch connections and test speed selector switch for continuity
across “A” terminal to terminals 1, 2, 3, etc… If switch tests okay, proceed to Step 3.
C.
Replace speed switch. Test motor for proper operation.
Step 3. If unit being serviced is not a 12/24-volt model, proceed to Step 4.
If unit being serviced is a 12/24-volt model, check the 12/24 switch for continuity.
24v
Terminal A
OFF
Terminal C
12v
Terminal B
(front side of switch)
A.
B.
(back side of switch)
Turn the 12/24 switch to 12-volt ON position. Check for continuity between the common “C”
terminal and the “A” terminal.
A-1.
If no continuity is noted, replace the 12/24 switch. Test motor for proper operation.
A-2.
If continuity is observed, proceed to Step 3B.
Turn the 12/24 switch to 24-volt ON position. Check for continuity between the common “C”
terminal and the “B” terminal.
B-1.
If no continuity is noted, replace the 12/24 switch. Test motor for proper operation.
B-2.
If continuity is observed, proceed to Step 4.
Step 4. If motor being serviced is not working in the CON position, go to Step 5.
If motor being serviced is not working in the MOM position, go to Step 6.
Step 5. With battery leads connected to power source and MOM/OFF/CON switch in the CON position, connect
V.O.M. test leads across terminal block and battery (+) lead. V.O.M. should read battery voltage.
A.
If no voltage is noted, remove foot pedal base cover and check connections at MOM/OFF/CON
switch.
B.
With switch in CON position, check MOM/OFF/CON switch for continuity across center terminal of
switch to terminal connected to wire going to terminal block. If there is no continuity, replace
MOM/OFF/CON switch. Test motor for proper operation.
Step 6. With the battery leads connected to power source and MOM/OFF/CON switch in the MOM position, connect
V.O.M. test leads to terminal block on under side of foot pedal and to battery (+) leadwire or terminal “A” of
5-speed switch.
A.
With foot pedal momentary ON/OFF switch depressed, V.O.M. should read battery voltage.
6-1
Foot-Control, Cable Steer w/Speed Coil Repair Manual
B.
01/26/04
If no voltage is present, test foot pedal momentary ON/OFF switch for continuity with ON/OFF switch
depressed.
B-1.
If no continuity is noted, replace foot pedal ON/OFF switch. Test motor for proper operation.
B-2.
If continuity is observed, go to Step 7.
Step 7. Check for voltage across battery (+) lead and white wire from MOM/OFF/CON switch.
A.
If no voltage is noted, remove foot pedal base cover and check connections at MOM/OFF/CON
switch.
B.
Check MOM/OFF/CON switch for continuity across center terminal to momentary terminal (white
wire), with switch in the MOM position.
C.
If no continuity, replace MOM/OFF/CON switch. Test motor for proper operation.
Case II. Motor operates on some speeds, not on others.
Step 1. Check to see if all wires are securely attached to the proper switch terminals.
Step 2. Check speed coil functionality.
A.
Remove the control box cover. Disconnect wires from the foot pedal from the wires to the lower unit.
B.
Connect -12 volts to the black motor/brush lead.
C.
Connect +12 volts to each colored speed coil wire coming up from the motor tube. The motor should
run (on the separate speed designations) as you make each connection.
D.
If the motor fails to run as you touch any of the colored speed coil wires, the problem is either: (1) the
speed coil is faulty and needs to be replaced; or (2) the speed coil jumper wire is not connected to the
back of the brush plate (in the lower unit).
E.
If the motor runs as you touch the +12 volt lead to some of the colored speed coil wires, but not all the
speed coil wires, the speed coil is faulty and needs to be replaced.
F.
If the motor runs as you touch the +12 volt lead to each speed coil wire, proceed to Step 3.
Step 3. Speed switch is defective. Replace speed switch. Test motor for proper operation.
Case III. Motor runs fine, but steering is loose/soft or does not function.
Step 1. Remove control box cover and inspect cable conduit bracket where it attaches to the control box.
A.
If conduit bracket is loose or control box attach point is broken, repair/replace parts as needed.
B.
If conduit bracket and control box check out fine, inspect steering cables.
B-1
Tighten steering cables by turning adjusting screw at foot pedal clockwise. Turn counterclockwise to loosen steering cables.
B-2
If steering cable core(s) are broken, replace steering cable assembly per Diagram 1 (page 6-4).
C.
Inspect set screws at upper bearing race /pinion gear assembly. Screws may have backed out or
sheared off. Replace parts, as needed. LocTite screws in place. (Later versions utilize an upper
bearing race assembly with 4 set screws, while earlier version just used 2 set screws.)
Case IV. Rope eyelet is worn and quickly wears through pull ropes
If motor being serviced is a Maxxum motor or a RipTide motor with a bowguard 360 assembly that splits
horizontally (upper and lower halves):
Step 1. Remove existing, defective eyelet from bowmount bracket assembly.
Step 2. Drill out the eyelet hole in the bowguard bracket with a 27/64” drill bit.
Step 3. Thread the hole with a ½” x 13 tap.
TM
Step 4. Screw new eyelet (P/N 2772352) in place and secure it with a drop of red LocTite on the threads.
If motor being serviced is an All Terrain motor with a Hinge Door bracket or a RipTide motor with a bowguard
360 assembly that splits vertically (left and right halves):
Step 1. Remove existing, defective eyelet from bowmount bracket assembly.
Step 2. Drill out the eyelet hole to a 1/2” diameter.
6-2
Foot-Control, Cable Steer w/Speed Coil Repair Manual
01/26/04
Step 3. Slip the new eyelet (P/N 2772352) into the ½” eyelet opening and secure it with the ½” jam nut provided in the
TM
eyelet kit. Use a drop of red LocTite on the eyelet threads prior to installing the jam nut.
Case V. Customer complaint that the motor slides down in the bracket (doesn’t
maintain consistent depth setting).
Step 1. Install Depth Collar Parts Kit, P/N 2771550, using Installation Kit, P/N 2888620. Instructions are included with
Kit. The Depth Collar Kit includes an additional depth collar and a new bearing race assembly that utilizes a
split collar with 4 set screws. The Installation Kit includes a jig and a drill bit so you can properly align the set
screw holes.
6-3
Foot-Control, Cable Steer w/Speed Coil Repair Manual
Diagram 1
6-4
01/26/04
Foot-Control, Cable Steer w/Control Board Repair Manual
01/26/04
Section 7.
Foot-Control Cable Steer Models with a Control
Board
Case I. Motor fails to run
Step 1. Check to ensure proper voltage and check polarity at battery (red +, black -). Inspect all battery connections,
trolling motor plug (if installed), and any butt splice connections in battery lead wire.
Step 2. Check to insure that all wires are securely attached to the proper control board terminals. (Consult appropriate
wiring diagram for the model being diagnosed.) Check for any corroded connections.
Step 3. Remove the control box cover. Disconnect motor leads and connect 12 volts across red and black motor leads.
(This applies to 12, 24, or 36 volt models.)
A.
If motor runs, reconnect motor leads and proceed to Step 4.
B.
If motor does not run, the problem is in the motor lower unit. Disassemble and check lower unit for
voltage at the brushes, water in lower unit, worn brushes, bad brush springs, or an open or shorted
armature. Repair/replace parts as necessary. Test motor for proper operation.
Step 4. If motor being serviced is not working in the CON position, go to Step 5.
If motor being serviced is not working in the MOM position, go to Step 6.
Step 5. With battery leads connected to power source and MOM/OFF/CON switch in the CON position, connect
V.O.M. leads to battery (-) leadwire and the battery (+) lead/terminal at main control board. (Consult
appropriate wiring diagram for motor being diagnosed.)
A.
If voltage is present, replace main control board.
B.
If no voltage is noted, check MOM/OFF/CON switch for continuity across center terminal to
continuous terminal (wire going directly to main control board).
C.
If no continuity, replace MOM/OFF/CON switch. Test motor for proper operation.
Step 6. With battery leads connected to power source and MOM/OFF/CON switch in the MOM position, connect
V.O.M. test leads to the battery (-) leadwire and the battery (+) lead/terminals at the main control board with
ON/OFF switch depressed. (Consult appropriate wiring diagram for the model being diagnosed.)
A.
If voltage is present, replace main control board.
B.
If no voltage is present, test foot pedal ON/OFF switch for continuity with momentary ON/OFF switch
depressed.
B-1.
If no continuity is noted, replace foot pedal ON/OFF switch. Test for proper operation.
Case II. If motor runs in MOM and CON modes but customer states that the
motor starts, stops, or changes speed as the foot pedal is rocked forward and
backward (to steer) the potentiometer leads may be at fault.
Step 1. Remove the control board and potentiometer from foot pedal base.
Step 2. Connect power leads directly to control board (consult appropriate wiring diagram for correct voltage, polarity,
and terminal locations). You should hear the relay on the control board click when the power leads are
connected to the board.
A.
Connect a test light (or a known good motor) to the control board motor output terminals. With
potentiometer shaft turned clockwise to its stop, the test light (or motor) should be off.
B.
As the potentiometer shaft is rotated clockwise, the test light (or motor) should start to light (or run)
and increase in brightness (or speed) as you continue to turn the potentiometer shaft clockwise to the
switch stop.
7- 1
Foot-Control, Cable Steer w/Control Board Repair Manual
C.
01/26/04
If the test light (or motor) is intermittent as the potentiometer shaft is turned clockwise OR as the 3conductor lead connected to the potentiometer is flexed near the potentiometer end, the potentiometer
leads are broken, and the control board needs to be replaced.
Case III. Motor runs fine, but steering is loose/soft or does not function.
Step 1. Remove control box cover and inspect cable conduit bracket where it attaches to the control box.
A.
If conduit bracket is loose or control box attach point is broken, repair/replace parts as needed.
B.
If conduit bracket and control box check out fine, inspect steering cables.
B-1
Tighten steering cables by turning adjusting screw at foot pedal clockwise. Turn counterclockwise to loosen steering cables.
B-2
If steering cable core(s) are broken, replace steering cable assembly per Diagram 1 (page 7-3).
C.
Inspect set screws at upper bearing race /pinion gear assembly. Screws may have backed out or
sheared off. Replace parts, as needed. LocTite screws in place. (Later versions utilize an upper
bearing race assembly with 4 set screws, while earlier version just used 2 set screws.)
Case IV. Rope eyelet is worn and quickly wears through pull ropes
If motor being serviced is a Maxxum motor or a RipTide motor with a bowguard 360 assembly that splits
horizontally (upper and lower casting halves):
Step 1. Remove existing, defective eyelet from bowmount bracket assembly.
Step 2. Drill out the eyelet hole in the bowguard bracket with a 27/64” drill bit.
Step 3. Thread the hole with a ½” x 13 tap.
TM
Step 4. Screw new eyelet (P/N 2772352) in place and secure it with a drop of red LocTite on the threads.
If motor being serviced is an All Terrain motor with a Hinge Door bracket or a RipTide motor with a bowguard
360 assembly that splits vertically (left and right casting halves):
Step 1. Remove existing, defective eyelet from bowmount bracket assembly.
Step 2. Drill out the eyelet hole to a 1/2” diameter.
Step 3. Slip the new eyelet (P/N 2772352) into the ½” eyelet opening and secure it with the ½” jam nut provided in the
TM
eyelet kit. Use a drop of red LocTite on the eyelet threads prior to installing the jam nut.
Case V. Customer complaint that the motor slides down in the bracket (doesn’t
maintain consistent depth setting).
Step 1. Install Depth Collar Parts Kit, P/N 2771550, using Installation Kit, P/N 2888620. Instructions are included with
Kit. The Depth Collar Kit includes an additional depth collar and a new bearing race assembly that utilizes a
split collar with 4 set screws. The Installation Kit includes a jig and a drill bit so you can properly align the set
screw holes.
7- 2
Foot-Control, Cable Steer w/Control Board Repair Manual
Diagram 1
7- 3
01/26/04
PowerUp Repair Manual
Section 8.
10/31/02
Manufactured between 1996 - 2002
PowerUp Lifts, Trims, and Tilts
Case I. PowerUp Models MKN 5100 & MKN 5300 do not lift/tilt
(serial number prefix MKJG and later)
Step 1. Check for proper voltage and good battery connections at leadwire.
Step 2. Check connections from UP/Down push button switch to replay harness (3 wire plug)
A.
Locate relay in relay harness assembly. Actuate UP/DOWN push button switch, you should hear the
relay click as this is being done.
B.
Isolate and disconnect leads from relay harness to lift motor.
C.
With the UP/Down push button switch actuated, a V.O.M. should show battery voltage across relay
harness motor leads. If no voltage is noted, relay harness needs to be replaced. If voltage is noted, go
to Step 3.
Step 3. Apply 12 volts directly to lift motor terminals, reverse polarity to reverse motor rotation.
A.
If motor fails to run, the motor is bad and needs to be replaced.
Case II. PowerUp Models MKN 5400 & MKN 5500 do not lift/trim
(serial number prefix MKJG and later)
Step 1. Check for proper voltage and good battery connections at leadwire.
Step 2. Check connections from UP/Down push button switch to replay harness (3 wire plug)
A.
Locate relay in relay harness assembly. Actuate UP/DOWN push button switch, you should hear the
relay click as this is being done.
B.
Isolate and disconnect leads from relay harness to lift motor.
C.
With the UP/Down push button switch actuated, a V.O.M. should show battery voltage across relay
harness motor leads. If no voltage is noted, relay harness needs to be replaced. If voltage is noted, go
to Step 3.
Step 3. Apply 12 volts directly to hydraulic pump motor, reverse polarity to reverse pump motor rotation.
A.
If pump motor fails to run, pump motor assembly needs to be replaced.
(For units with MKJG serial number prefix, contact Minn Kota for assistance.)
Case III. PowerUp Models MKN 5400 & MKN 5500 (with serial number prefix
MKJG) slowly leak down, won’t stay up, or won’t trim outboard when engine is
in use.
Step 1. Contact Minn Kota for assistance.
Case IV. PowerUp Models MKN 5400& MKN 5500 (with serial number prefix
MKJH and later) will not fully lift/tilt or “jerks” while lifting/tilting.
Step 1. Check fluid level in pump reservoir.
A.
Remove dipstick located in pump body between hydraulic hoses with slotted screw driver (dipstick is
marked to show proper fluid level.)
B.
Fill with ATF (automatic transmission fluid) as required. Do not overfill!
C.
Test unit for proper operation.
For PowerUp models not listed here, contact Minn Kota for assistance.
8- 1
Depth Finder Interference
10/31/02
Section 9.
Depth Finder Interference
Variable speed motors with a PWM speed control / Maximizer circuit can sometimes
interfere with the operation of a depth finder. This can be due to RF (radio
Frequency) or electrical interference.
Here are a few steps to reduce or eliminate the interference problem:
If the motor interferes with the depth finder when both are being operated:
Step 1. Determine if supply voltage for trolling motor and depth finder is provided by the same / common battery.
A.
If yes, disconnect depth finder battery leads from the trolling motor battery and connect them to the
engine cranking battery.
B.
Test depth finder for interference while operating motor.
Step 2. If interference is still present at Step 1B, proceed as follows:
A.
Connect a light gauge wire (18 gauge is fine) from the negative post of the trolling motor battery to the
negative post of the engine’s cranking battery. We suggest installing a 1 or 2 amp inline fuse in this
ground wire. (Minn Kota P/N 2060310)
B.
Test for depth finder interference while operating the motor.
Step 3. If interference is still present after installing the ground wire, proceed as follows:
A.
Check the routing of the depth finder and trolling motor battery leads. If they run parallel to each other
for any length of distance, separate the leads as much as possible or run the leads to the trolling motor
and depth finder on opposite sides of the boat.
B.
Test depth finder for interference while operating the motor.
Step 4. If interference persists after completing the previous steps, proceed as follows:
A.
Check mounting location of the depth finder transducer. If the transducer is on the trolling motor’s
lower unit, try temporarily moving it way from the lower unit while operating the motor and observing
the depth finder display.
B.
If the interference is reduced or eliminated when the transducer is moved away from the motor’s lower
unit, the problem is due to the transducers proximity to the lower unit.
C.
To reduce / eliminate this type of RF interference, a ground wire can be connected to the trolling motor
lower unit. This can be accomplished by means of either an external or internal connection.
Grounding the motor case in this manner creates a “shield” between the motor brushes and the
transducer, trapping / shunting the RFI to the ground.
C-1.
To ground the motor case externally, drill a small diameter hole (1/8”), in the motor skeg.
Attach one end of the ground wire at this point by using a self tapping stainless steel screw
(18 gauge wire may be used for this purpose). Run the ground wire up the motor shaft along
with the transducer coax cable. Connect the other end of the ground wire to the motor
negative battery lead or post.
C-2.
To ground the motor case internally it will be necessary to disassemble, reseal, and
reassemble the motor lower unit. (We recommend this be done only by a Minn Kota
authorized repair center) With the lower unit disassembled, connect one end of a light gauge
wire to the motor brush plate mounting screw (18 gauge wire may be used for this purpose).
Run the ground wire up the fiberglass motor shaft along with the red and black motor brush
leads. Connect the other end of the ground wire to the motor negative battery lead or post.
Reassemble and reseal the motor lower unit.
9- 1
Depth Finder Interference
10/31/02
Step 5. In certain situations, when the above steps do not take care of the interference. One additional step may be tried
(NOTE: this is an external ground situation only, as in above Step 4 C-1).
A.
Because the center section (magnet shell) and the skeg (rudder) are electrically isolated from each
other due to o-rings and/or paint, you may need to run the ground wire to the center section and the
skeg. This involves either baring a spot under the transducer clamp (stainless steel hose clamp), and
placing the ground wire in contact with the bare spot under the loose clamp (or a piece of aluminum
sheet may be used between the motor and transducer - ground the aluminum sheet to the motor skeg).
By following these steps the problem of depth finder interference is usually resolved.
Oftentimes, simply connecting the depth finder to a separate battery will address this
issue. At other times, a separate battery and common negative ground is all that is
required. For other installations, all of the steps outlined will be required. Keep in
mind that the steps should be followed in the order they are written and that the final
steps should be attempted only after completing steps 1, 2, and 3 and testing with the
depth finder.
9- 2
Vantage Repair Manual
12/04/02
Section 10.
Vantage
Case I. Motor fails to operate (prop doesn’t spin).
Step 1. Check to ensure proper voltage and polarity at battery (red +, black -). Inspect all battery
connections, trolling motor plug (if installed), and any butt splice connections in battery leadwire for
corrosion and security.
Step 2. Remove extrusion shield (P/N 2050220) (see figure 1, page 10-6), check to ensure that all wires are
connected to the proper control board terminals, (consult the appropriate Vantage wiring diagram for
proper connections). Visually inspect the wire terminals and connections for corrosion. Clean, if
needed.
Step 3. Check lower unit to see if it will run when all switches and circuit board are bypassed.
A.
Disconnect black and black/red stripe wires from main control board. Apply 12 volts directly
to these two leads.
A-1.
If the motor does not run, a problem exists in the lower unit. Check the lower unit for
voltage at the brushes, water in the lower unit, worn brushes, or an open or shorted
armature. Repair as needed and test motor for proper operation.
A-2.
If the motor does run, go to Step 4.
Step 4. Check ON/OFF switch and speed control potentiometer in the steering handle.
A.
Disconnect black and white coil cord wires located behind the extrusion shield (P/N
B.
C.
2050220). (NOTE: the coil cord wires are the small gauge wires with bullet connectors.)
Connect the black and white wires coming from the handle assembly to your V.O.M..
With your V.O.M. set to test continuity, press and hold the ON/OFF button in the end of the
steering handle.
C-1.
If no continuity is noted, go to Step 5.
C-2.
If continuity is observed, go to Step 6.
Step 5. Disassemble the steering handle assembly (see figure 2, page 10-6).
A.
Remove the gray steering handle grip and unscrew the four handle screws in order to separate
B.
C.
the handle halves.
Visually inspect wire connections at the ON/OFF dome switch, the UP/DOWN switches, and
the speed control potentiometer. If any corrosion is noted at these points, replace the handle
control board assembly (P/N 2994005).
If no corrosion is noted, repeat continuity test across black and white coil cord wires (Step 4),
but press and hold the ON/OFF dome switch with your fingertip. If continuity is now noted
but was not observed in Step 4C, replace switch plunger (P/N 2053700) and actuator button
(P/N 2055115).
Step 6. Disconnect the red, yellow, and green coil cord wires at the main control board.
A.
Check resistance across the red and green coil cord wires coming from the handle assembly.
B.
C.
With your V.O.M. set to test resistance, it should indicate 1k ohm or slightly higher.
With speed control knob off, check resistance across the green and yellow coil cord wires.
Your V.O.M. should indicate about 1 ohm. Observe the V.O.M. reading as the speed control
knob is turned. The resistance should increase from 1 ohm to 1k ohm as the knob is turned to
the highest speed setting.
If your test resistance values differ greatly from those listed in Step 6A & 6B, or no resistance
or continuity is noted, go to Step 5. If the resistance values match those indicated here, and
the motor unit ran at Step 3A, replace the main control board.
10- 1
Vantage Repair Manual
12/04/02
LIFT SYSTEM UPGRADE KIT
NOTE: If you encounter a lift system problem on any Vantage motor with a serial number
MKAA1501460 or below, check to see if the Vantage Lift System Upgrade Kit has been installed.
The upgrade kit consists of the parts shown in figure 7 (page 10-9). Many Vantage motors have already been
updated in the field with the new Lift System Upgrade Kit, so the serial number may not always be a good
indicator if the kit is required. To determine if the motor being serviced has the upgrade kit, examine the lift
motor pulley. The top of the pulley will be machined away to allow the larger diameter pulley flange to clear.
(shown with belt removed for clarity)
Please note that many of the lift system parts shown on your Vantage parts list will automatically substitute to
this kit. To avoid duplication, simply order P/N 2776517 and you will receive the parts you need to retrofit the
new lift system components on earlier Vantage motors. Install the new upgrade kit as per the disassembly and
re-assembly procedures outlined later in this section. To insure proper operation of the lift system, install all of
the new parts included with the upgrade kit. The kit is shipped assembled for ease of installation. Vantage
motors with a serial number MKAA1501460 or above will have the improved lift system already installed from
the factory. Use the upgrade parts list numbers when ordering any lift system parts for later model Vantage
motors.
Case II. The motor runs, but the stow and deploy system fails to operate.
Step 1. Check to ensure proper battery connections. (Consult appropriate wiring diagram for the model being
serviced.) NOTE: On the 24 and 36 volt models the black (-/negative) and the yellow battery lead
must be connected to the negative and positive posts of battery #1. In addition, the red(+/positive)
battery lead must be connected to the positive post of battery #2 (24 volt units) or battery #3 (on 36
volt models). If the unit is not connected properly, the power stow/deploy feature will not operate.
Step 2. If lower unit is stuck in fully deployed (down) position, press and hold both UP and DOWN switches
simultaneously to “re-set” system (motor should start to lift immediately). This should over-ride the
current limit circuit and return the motor lift system to normal operation. Test unit for proper
operation.
A.
If lift/trim system is not corrected, proceed to Step 3.
Step 3. Remove extrusion shield (P/N 2050220) (see figure 1, page 10-6), and check to ensure that all wires are
connected to the proper control board terminals. (Consult appropriate Vantage wiring diagram.)
Visually inspect terminals for corrosion, clean if needed.
Step 4. Test lift system motor to see if it will run when the UP/DOWN switches and control board are
bypassed.
A.
Disconnect the black and white lift motor wires from the main control board.
B.
Apply 12 volts directly to the lift motor leads. (Reverse polarity to reverse the direction of
travel.) If the lift system works while bypassing the UP/DOWN switches and control board,
go to Step 3C.
B-1.
If the lift motor fails to run, it is faulty and needs to be replaced. (See Vantage
Disassembly Procedure Steps 1, 2, 3, 3C, & 3C-1 and exploded drawings at the end of
this section.)
B-2.
If lift motor runs (audible sound), but motor does not deploy or stow, the lift belt may
be slipping due to improper tension (see Vantage Disassembly Procedure Steps 1, 2, 3,
3B, 3B-1, & 3B-2) the lift belt may be broken (see Vantage Disassembly Procedure
Steps 1, 2, 3, 3C, & 3C-1), or the lift yoke is broken or stripped (see Vantage
Disassembly Procedure Steps 1, 2, 3, & 3D).
10- 2
Vantage Repair Manual
C.
12/04/02
Check the switches for function and continuity.
C-1.
Disconnect the black, blue, and orange coil cord wires. With your V.O.M. set to test
continuity, connect the black and orange wires coming from the handle assembly to
the V.O.M. probes while depressing the DOWN button.
a.
If no continuity is observed, go to Case I Step 5 for handle disassembly,
inspection, and control board replacement.
b.
If continuity is noted, proceed to next step.
C-2.
Disconnect the orange wire from the V.O.M. and connect the blue wire in its place
while depressing the UP button.
a.
If no continuity is observed, go to Case I Step 5 for handle disassembly,
inspection, and control board replacement.
Case III. Vantage motor lower unit does not steer when the handle is turned
from side to side.
Step 1. Disassemble to visually inspect the steering rack and pinion gear. (See Disassembly Steps 1 & 2.)
Step 2. Observe steering pinion gear (P/N 2052205) and steering shaft (P/N 2052000) as the steering handle is
moved from side to side.
If the pinion gear rotates, but the steering shaft does not turn with the pinion gear, the drive
lock pin (P/N 2052615) is broken and needs to be replaced. (See Disassembly Steps 1, 2, 3, &
3A.)
A.
Vantage Disassembly / Reassembly
Step 1. Remove extrusion shield (P/N 2050220), pointer plug (P/N 2056700), and the pointer knob (P/N
2050100). Remove the leadwire clamps located on the side of the housing using a long shank phillip's
screwdriver. Then remove the four screws which hold the control head shroud (P/N 2050210) in place,
and disconnect the two indicator lights from the shroud. Note the position of the light with black
wires and the light with the white wires for proper reassembly (black wire light is motor, white wire
light is power indicator). (See figure 1, page 10-6)
Step 2. Remove the three phillip's head screws (P/N 2053415) holding the control head cover assembly (P/N
2050200) in place. Lift the cover off. Remove the latch (P/N 2057500), the latch return spring (P/N
2052711), and the steering shaft roller (P/N 2052210). (NOTE: for reassembly the small end of the
steering shaft roller must be pointed down.)
Step 3. Disconnect the coil cord wires from the main control board. Using a 9/16” socket or box end wrench,
unscrew the top lock nut (P/N 2053107). Remove the flat and cup washers. Lift off the gear housing
upper cap (P/N 2056510) and gear housing ring. Unscrew the three screws (P/N 2053402) and remove
the lower gear housing cap (P/N 2056515) along with the gear housing o-ring (P/N 2054600). (See
figure 3, page 10-7.) Removing the gear housing cap exposes the steering gear and the lift belt/flange
pulley/lift gear assembly of the Vantage motor lift system.
A.
If it was determined in Case III Step 2A that the drive lock pin (P/N 2052615) (see figure 4,
page 10-7) was sheared, the broken pin can be replaced at this point. Use a 1/8” diameter
punch to remove any broken pieces of the pin left in the steering gear/steering shaft. Install a
new pin leaving approximately ¼” to 5/16” protruding from the pinion gear on the same side
as the “D” flat on the steering shaft. Reassemble the unit in reverse order of disassembly to
complete the repair.
B.
If it was determined in Case II Step 3B-2 that the lift belt was slipping, disassemble the
Vantage motor to allow examination of the lift system. This will allow determination if the
Vantage Lift System Upgrade Kit is needed. (See NOTE on top of page 10-2 for information on
how to identify lift system.)
10- 3
Vantage Repair Manual
If examination of the lift system indicates that Lift System Upgrade Kit needs to be
installed, order and install Minn Kota P/N 2776517 (per instructions on page 10-4, Step
3C-1).
B-2.
If examination of the lift system indicates that the motor has the newer lift system
installed, tighten the belt by loosening the 3 screws (P/N 831-070) that hold the lift
motor in place. NOTE: To access one of these screws, you will need to rotate the
flange pulley/cluster gear assembly (figure 7 on page 10-9). Loosen the setscrew (P/N
2053420) and then, using a 5/32” allen wrench, rotate the belt tensioner (P/N 2058411).
Turning the allen wrench CW or CCW will move the motor to adjust the belt tension.
With the belt tight, retighten the 3 motor screws and the belt tensioner setscrew.
Check motor lift system operation, and reassemble in reverse order of disassembly.
If it was determined in Case II Step 3B-1that the lift motor needs to be replaced or in Case II
3B-2 that the lift belt is broken, examine the lift system to determine if it is the new or older
type. (See NOTE on top of page 10-2 for information on how to identify lift system.) If
examination confirms that the motor has the earlier type lift system, order and install P/N
2776517 Lift System Upgrade Kit.
C-1.
To disassemble the Vantage motor for installation of the Lift System Upgrade
Kit, lower the motor about 7 to 8 inches down from the fully retracted
position. If necessary, you may connect the lift motor leads to 12 volts to
lower the motor unit or you may rotate the lift gear (P/N 2052208) counterclockwise (CCW) by hand to lower the motor unit. Failure to lower the
motor will make further disassembly difficult and may result in damage to
the unit.
a.
Use a 1/8” diameter punch to remove the pin (P/N 2052620) from the
lift gear (P/N 2052208) and lift screw shaft (P/N 2053400).
b.
Remove the lift gear from the lift screw shaft. (See figure 5, page 108.)
Remove the 2 screws (P/N 2053414) that hold the steering shaft (P/N
c.
2052000) and steering shaft bearing (P/N 2057306) in place. Note the
position of the “D” flat on the steering shaft in relation to the motor
lower unit. Proper reassembly requires that the “D” flat be in the
same position as it was prior to disassembly (relative to the motor
lower unit).
Lift the steering shaft, steering pinion gear, and bearing assembly
d.
straight up and out of the top plate (P/N 2051900).
Using a 5/16” nut driver, remove the 4 screws (P/N 2053413) that
e.
hold the top plate in place on the housing (P/N 2056505). (See figure
5, page 10-8.)
Remove the screw and washer (P/N 2053415 and 2051716) that hold
f.
the motor leadwire in place.
Disconnect the motor leads and lift motor wires from the control
g.
board. Remove the 2 control board mounting screws and insulating
washers (P/N 2053407and 2261712). (See figure 3, page 10-7.)
Lift the top plate and motor assembly off the housing and install the
h.
new top plate, lift motor, and lift system included with the Lift
System Upgrade Kit (P/N 2776517).
Reassemble the motor in reverse order of disassembly. Adjust lift
i.
belt tension on the new upgrade kit as outlined in Step 3B-2 (above).
Test motor for proper operation upon completion of the Lift System
j.
Upgrade Kit installation.
If it was determined in Case II Step 3B-2 that the lift yoke (P/N 2051510) (see figure 6, page 108) is broken or stripped further disassembly is required. NOTE: the Vantage motor uses a
retractable tape spring to hold/control the two-conductor wire that goes to the motor lower
B-1.
C.
D.
12/04/02
10- 4
Vantage Repair Manual
12/04/02
unit. The wire control system consists of two parts, the wire clamp assembly (P/N 2053200,
2053205, & 2053417) and the tape spring assembly (P/N 2051900, 2052305, 2052610, 2052705, &
2053418). (See figure 5, page 10-8.) Both of these items are slid onto the raised “rib” located
on the inside surface of the housing (P/N 2056505). The lower wire clamp is held in place by
means of a small plastic “finger” that catches in a ¼” diameter hole in the Vantage motor
housing (P/N 2056505). (The hole is located on the transom bracket side of the housing 9
inches down from the top.) Use a 1/4” diameter pin punch in this hole. From the outside,
push in the end of the finger to release the lower wire clamp and slide it up and lift the tape
spring assembly and wire clamp off of the rib. Next, while supporting the Vantage motor
lower unit, use the 5/16” nut driver to remove the four screws (P/N 2053414) that hold the
lower support cage (P/N 2990420) assembly into the housing (P/N 2056505). After removing
these four screws the entire motor lower unit and shaft, lift screw (P/N 2053400), lift screw
yoke (2051510), and yoke bearing race (P/N 2056200) can be lowered out the bottom of the
Vantage housing. (See figures 5 & 6, page 10-8.) Remove the lower wire clamp, wire tie, and
tape spring assembly from the motor wire leads. Then remove the two screws (P/N 2053401)
that hold the yoke bearing to the motor shaft. Remove the coil spring (P/N 2990429) and
washer from the top end of the lift screw shaft. Remove the broken/stripped lift screw yoke
from the lift screw shaft. If necessary, turn the lift screw to unscrew the old yoke and bearing
race assembly. Slide the old parts up and off the motor wire leads. Install the required new
parts and reassemble the Vantage motor in reverse order of disassembly. Take special care
not to twist the motor wire leads and to reinstall the wire tie, lower wire clamp, and the tape
spring in the same manner and position they were in prior to disassembly.
10- 5
Vantage Repair Manual
10- 6
10/31/02
Vantage Repair Manual
10- 7
10/31/02
Vantage Repair Manual
10- 8
10/31/02
Vantage Repair Manual
Figure 7
10- 9
10/31/02
Genesis Repair Manual
12/02/02
Section 11.
Genesis
Tools Required for Servicing Genesis motors:
¾
¾
Test Foot Pedal – Minn Kota P/N 2772040T (has trim actuator removed for programming purposes)
Mini Butane Torch Kit - can be purchased over the Internet from MicroFlame (www.microflame.com) or
equivalent.
¾
¾
¾
¾
¾
360o Rotatable Repair Stand - non-ferrous material for AutoPilot calibration
Quick-Release Mount – Minn Kota P/N 2771895 to mount to your rotatable stand
Loctite #603
V.O.M. – multi-meter
Allen Wrench - .050”
TM
Error Codes & Probable Causes …………………………………
page 11-2
Steering System Module …………………………………….…….
page 11-3
Lift System / Trim System Module ……………………….………
page 11-7
AP/PD Housing Module …………………………………………..
page 11-16
Foot Pedal Module ………………………………………………… page 11-17
To Re-Orient Steering Potentiometer to Motor Position ……..… page 11-19
Lower Shaft Collar Replacement ...……………………………....
page 11-20
Master Reset / Emergency Override …………………………….
page 11-21
Identifying Software Version Code ……………………..……….
page 11-22
Steering Potentiometer Testing & Replacement ………………… page 11-23
Control Board Replacement & Programming
When replacing the control board you will need to do the Initial Programming (and if the unit is an AutoPilot, you
will also need to do the Calibration Procedure).
A. Control Board Replacement ………………………….……… page 11-25
B. Initial Programming Procedure ……………………………. page 11-27
C. Calibrating AutoPilot Compass ……………………..……… page 11-29
AutoPilot Steering Malfunction …………….……………………… page 11-31
11- 1
Genesis Repair Manual
12/02/02
GENESIS - Error Codes & Probable Causes
NOTE:
Neither the steering motor nor the propeller should operate when the motor is in the stowed
position. If so, it is a definite indication that the counter has lost its reference and a Master Reset is required
(see page 11-21). Also, check to insure proper lift belt tension (see page 11-7, Case I).
ER1
Foot pedal is not sending information to motor
¾ Inspect pedal wire for damage
¾ Water may be in plug assembly
¾ Test with new foot pedal (Test Pedal P/N 2772040T)
ER3
Sensor board in control head is sending invalid information
¾ Check orange coil cord wire for continuity
¾ If orange wire is okay, the lower unit may have been rotated more than one full turn
Re-orient steering potentiometer to motor position (see page 11-19)
¾
¾ If motor spins in circles, you may need to re-set park position values (see page 11-6)
ER4
Sensor board in control head is not sending information
¾ Check coil cord brown and yellow wires for continuity
¾ Check to make sure that the steering potentiometer belt is in place and that all wire
connections to the steering potentiometer board are tight
¾ Test steering potentiometer and replace, if necessary (see page 11-23)
ER5
Steering motor has power applied to it, but steering is not functioning
¾ Lower unit assembly may be stuck in underwater obstructions
¾ Primary gear drive screws backed out (see page 11-3)
¾ Check coil cord white and blue wires for continuity
¾ Anti-rattle bushing not in proper place (see page 11-3 & 11-5)
¾ If ER5 occurs while motor is stowed it may be due to improper lift belt tension. Adjust
lift belt tension (see page 11-7, Case I)
¾ Check to ensure setscrew on the steering potentiometer gear is not stripped (causing gear
to spin on steering pot shaft without changing pot values)
¾ Steering motor may be overheated (the steering motor should draw less than two amps
while steering in a “no load” or “on-the-bench” situation)
Check the next 2 circumstances particularly if you can hear the steering motor running in the
control box for a few seconds, but the lower unit does not steer (prior to ER5 being displayed):
¾ Steering motor output gear broken internally (see page 11-4, Case V)
¾ Set screw mating the worm gear to the steering motor shaft is loose (see page 11-4, Case V)
ER6
Lift system is not responding
¾ Motor is blocked and cannot trim up or down – remove obstructions
¾ Shaft position counter lost reference possibly due to improper lift belt tension. Adjust lift
belt tension (see page 11-7, Case I)
¾ Coupler gear broken (see page 11-7, Case III)
LP
Low power - less than 8 volts for 12v units and 16 volts for 24v units (under load)
¾ Check power source, all connections, and external plugs for loose or faulty contacts
(most LP error codes are traced back to faulty/loose connections at battery or plug)
CL
Propeller is blocked
¾ Clear propeller obstructions
Propeller OFF MOM/CON switch is in CON (Constant On) position, turn to MOM (momentary) position
Multiple Error Codes Simultaneously (LCD flickers many codes)
¾
Defective foot pedal – replace pedal (see page 11-18, Case VIII)
11- 2
Genesis Repair Manual
12/02/02
GENESIS - Steering System Module
(see also: Foot Pedal Module, page 11-17 and/or AutoPilot Steering Malfunction, page 11-31)
Case I. Steering Motor tries to run (audible ticking sound in control box), but
motor does not steer (steering is “jammed”).
Step 1. Remove Genesis control box cover and visually inspect the two flathead, countersunk screws that
hold the primary gear into the inner shaft tube (items #49 of the Steering Module parts explosion).
These two screws must be flush with the aluminum-locking collar on the inner shaft/tube. If they are
not flush with the outer surface of the locking collar, the steering system will bind and will not steer.
This will also affect the stow/deploy sequence of the Genesis motor, as the unit must be able to steer
in order to properly deploy and stow.
A.
If screws are loose, remove them one at a time and visually inspect the screw threads and the
threads in the primary gear.
A-1.
If threads are O.K. in both parts, reassemble with Loctite #603 & primer on threads
of retaining screws and fully tighten to seat screws so they are flush with the outer
surface of the aluminum-locking collar.
A-2.
If threads in primary gear or on retaining screws are stripped or cross threaded,
replace them with new parts. Use Loctite #603 & primer when reassembling the
primary gear, locking collar, and retaining screws. Be sure to fully tighten the
retaining screws so that the heads are flush with the surface of the locking collar.
(See Genesis Transducer Routing, Service Bulletin #41400, Part II & III for proper
disassembly).
B.
If screws in primary gear are not loose but steering is binding or “jammed”, the P/N 2227324
anti-rattle bushing may be out of place. This is especially true if the motor has been
disassembled for internal routing of the transducer cable.
B-1.
To correct this malfunction, disassemble the Genesis motor as per the Transducer
Routing Procedure. (See Parts II - VI of Service Bulletin #41400 for proper
disassembly).
B-2.
Replace anti-rattle bushing if detent catch on bushing is damaged/broken.
B-3.
Put anti-rattle bushing back in its proper place making sure that the detent catch is
secure in the hole provided in the outer shaft lift belt channel. (see below)
(On 45” shaft models, the cam profile will extend over the hole in the tube when motor is
fully assembled.)
11- 3
Genesis Repair Manual
12/02/02
Case II. Steering motor has overheated and smoked due to “jammed” steering
condition, (see Steering System Malfunction Case I). Steering motor will need to be
replaced.
Step 1. Correct malfunction that is causing the “jammed” condition as outlined in Case I.
Step 2. Disassemble unit per Parts I, II and III of Transducer Routing Procedure (Service Bulletin #41400)
stopping at Step 2 of Part III.
A.
Remove the four screws holding the steering chassis to the lower control box. (See Genesis
Steering Module parts explosion).
A-1.
Lift steering chassis out of the control box and turn it over to access the steering
motor retaining screws, P/N 2223427. (See parts explosion).
A-2.
Remove the three screws that hold the steering motor onto the underside of the
steering chassis.
Replace the steering motor assembly with the appropriate part (P/N 2777805 for 12V model
B.
and P/N 2777806 for 24V Genesis).
B-1.
Reassemble using the original bronze helical gear, transmission coupler, and motor
gear. (See steering Module parts explosion).
Step 3. Place reassembled steering motor/chassis assembly back into the control box. Reassemble in reverse
order of disassembly. Note: be sure to inspect the threads in the primary gear and on the retaining
screws. Replace if required. Use Loctite #603 and primer on retaining screws. Tighten screws to the
point that they are flush with the aluminum-locking collar on the inner shaft tube.
Step 4. After reassembling Genesis motor, connect it to the appropriate voltage and test for proper operation.
Case III. Genesis unit deployed, lower unit turned but now will not steer or stow.
Step 1. Steer system is “jammed”. (See Genesis Steering System Module, Case I and II to correct cause of
malfunction.
Case IV. Genesis unit responds to heel/toe steering pedal inputs but right
momentary steer button is intermittent, delayed, or not responding.
Step 1. Replace malfunctioning foot pedal assembly. (P/N 2772040).
Step 2. Connect Genesis motor to the appropriate voltage and test for proper operation.
Case V. Genesis steering motor runs (can be heard running in the control box),
but motor lower unit does not turn.
The output gear on the steering motor (item #37 on the Steering Module parts explosion) may
be broken or the set screw (item #33), mating the worm gear, (item #32) to the steering motor
shaft is loose allowing the worm gear to slip.
Step 1. Remove control box cover and visually inspect all steering clutch gears and output shaft gear.
A.
If gears are broken or damaged, replace as required.
A-1.
To replace broken output shaft gear, see Steering System Module Case II, Steps 1 & 2
B.
for steering motor removal and consult your Genesis Steering Module parts explosion
for correct steering motor assembly.
A-2.
Replace broken output gear, reassemble and test Genesis motor for proper steering
functions.
If all gears check okay, the setscrew in the worm gear is loose.
B-1.
Disassemble steering system as per Case II, Step 2 (Steering System Module).
11- 4
Genesis Repair Manual
B-2.
12/02/02
Remove steering motor from chassis and consult Steering Module parts explosion for
location of worm, (item #32) and setscrew (item #33). (The transmission housing
needs to be removed from the steering motor.) The setscrew should tighten against
the flat side of the shaft. Tighten as required using a .050” allen wrench and Loctite
the screw in place. Reassemble and test Genesis motor for proper steering function.
Case VI. If Genesis motor has been disassembled for transducer routing
procedure and is now assembled and will not steer.
Step 1. Check to make certain that the anti-rattle bushing is in its proper place. (see below)
(On 45” shaft models, the cam profile will extend over the hole in the tube when motor is fully assembled.)
A.
The anti-rattle bushing catch must be in the hole provided in the lift belt channel. If it is
pushed out of position during reassembly after transducer routing, the Genesis motor will not
steer or will steer with great difficulty.
A-1.
Disassemble the motor per the transducer routing procedure to correctly position the
anti-rattle bushing back in its proper place.
A-2.
Reassemble the Genesis motor and test all functions for proper operation.
Step 2. Visually inspect the primary gear retaining screws for proper installation and tightness (see Steering
System Module Case I, Step 1 on page 11-3).
Step 3. Correct cause of steering problem, reassemble, and test unit for proper function.
Case VII. Prior to stowing, lower unit doesn’t steer perpendicular to the mount
so that the lower unit lays flat on the motor rests.
Step 1. Re-orient steering potentiometer to the lower unit motor position (see page 11-19). As per this
procedure, it may be necessary to reprogram the left and right park position values into the control
board (page 11-27).
Step 2. Run unit through several stow/deploy cycles to test unit for proper function.
11- 5
Genesis Repair Manual
07/23/03
Case VIII. Motor steers in circles when foot pedal is turned ON.
If motor continues to spin in circles until ER5 is displayed, check to ensure the setscrew on the steering
potentiometer pulley gear is not stripped (causing pulley to spin without changing pot values).
If motor steers until the steering pot hits the end of the 10-turn pot, (may display ER3) proceed to Step 1.
Step 1. Test the steering potentiometer resistance values (per Steering Potentiometer Testing and Replacement - Step 3
on page 11-23).
A.
If steering pot tests bad, follow instructions as directed (page 11-23).
B.
If steering pot tests good, proceed below to Step 2.
Step 2. With Master Switch OFF, remove the control box cover.
A.
Slip the belt off the primary gear and steering potentiometer gear.
B.
Place the motor lower unit in-line with the bowmount / base housing with the prop towards you when
looking straight at the LCD. (NOTE: you may need to forcefully turn the motor by hand to place it in
this position.)
C.
Turn steering potentiometer counter clockwise to its rotational stop.
D.
From the rotation stop, turn the potentiometer exactly five complete turns clockwise and slip the belt
back onto the steering potentiometer and primary gear without turning the steering potentiometer or
lower motor assembly out of position.
Step 3. Reset the Left and Right Park Position values.
IMPORTANT NOTE: The motor may immediately start steering after releasing the buttons described in Step
3A. If this happens, disengage the steering A.S.A. P. by pressing and releasing a momentary steering button!
A.
Using the test foot pedal (P/N 2772040T), press and hold both the TrimUp and TrimDown buttons
while turning the Master Switch ON, then release both trim buttons. Disengage steering if motor starts
to spin as called out in above IMPORTANT NOTE.
B.
LCD display on motor should read “LFT”.
B-1.
If LCD shows “SET PROPELLER” turn pedal OFF and perform Master Reset (as described
on page 11-21). Deploy the motor. Then return to Step 2 above.
B-2.
If LCD shows “SET STRAIGHT AHEAD” then both TrimUp and TrimDown buttons were
not pushed simultaneously. Turn pedal off and return to Step 3 above.
C.
Use the momentary steering buttons to place the motor lower unit in propeller left park position. (Left
park position is motor lower unit at a 90 o angle to the Genesis base housing with the prop pointing to
E.
F.
the left when viewing the LCD.)
Press the “Momentary ON” switch located on heel/toe steering pedal once to enter this setting into the
main board “memory”.
LCD on motor should now read “Rt”.
NOTE: In this step, the motor lower unit must be rotated counterclockwise (when looking down
at the motor lower unit). Use the Left Momentary Steering Switch to rotate motor lower unit from
left park position to right park position. (Right park position is motor lower unit at a 90 o angle to the
G.
Genesis base housing with the prop pointing to right when viewing the LCD.)
Press “Momentary ON” switch located on the heel/toe steering pedal once to enter this setting into the
main board memory.
D.
Step 4. Set the Shaft Length (after setting the Park Positions, the shaft length setting will display)
A.
Use the right momentary steering switch to “toggle” through the shaft lengths until the correct shaft
length for the motor is displayed (45, 52, or 60).
B.
Press the “Momentary ON” switch located on the heel/toe pedal once to enter this correct setting into
the main board memory. (NOTE: if the shaft length is already set correctly, the TrimUp switch may
be pressed to skip or “toggle” through this portion of the procedure.)
Step 5. The TrimUp switch may be pressed to toggle through the Lift Motor Condition, and Offset Tables.
Step 6. After toggling through the Offset Table portion, the LCD on the motor will display “---”. Turn the Master
Switch OFF to “lock” all steps of this procedure in the main board memory and to return motor to normal
operating mode.
Step 7. Test motor for proper operation.
11- 6
Genesis Repair Manual
12/02/02
GENESIS - Lift System / Trim System Module
Case I. Motor makes loud ratcheting sound when deploying / stowing, ER6 may
display.
Step 1. Check lift belt tension for proper adjustment.
A.
With the motor in the DEPLOYED position, trim the motor to its highest trim height.
B.
Torque the lift belt tensioning screw to 6-7 inch/pounds. (Tensioner screw is located on the
C.
D.
underside of the control box.)
Perform the Master Reset Procedure to reset shaft position counter (see page 11-21).
Retest motor for proper deploy/stow sequence. If lift belt is still slipping, tighten lift belt
tension screw one full turn and retest. Repeat if necessary until motor stows/deploys
properly.
Case II. If Genesis displays “use trim” when in the stowed position, or motor
does not stow, deploy, or trim down all of the way (ER6 may also display), the
shaft position counter has lost reference and must be reset.
Step 1. Perform Master Reset (see page 11-21).
Case III. Genesis motor displays ER6 and/or lift motor can be heard running
but motor does not deploy/stow.
Step 1. Inspect lift belt for cuts, damage and proper tension. If all checks okay, proceed to lift motor removal
below. If lift belt is damaged, go to Case IV of this Lift / Trim System.
Unscrew sideplate screws (items #37 and #38) to remove the right sideplate. Consult Genesis
AP/PD Base/Housing Parts explosion for reference.
B.
Remove the three screws, (item #22) that attach the lift motor, (item #20) to the lift motor
mount.
C.
Locate and examine the lift motor drive gear/coupler, (item #19) for damage.
C-1.
If gear is split or if “blade” across the inside diameter of the gear is broken, replace it
with new parts from Minn Kota. This gear has been changed:
serial numbers beginning with MKAA & serial numbers GNAB0002697 and below
need the P/N 2222208 gear.
¾ S/N between GNAB0002698 to GNAC1002726 & all GNRW (Re-worked
serial numbers) need P/N 2222209 gear.
¾ S/N GNAC1002727 and above, need P/N 2222214 coupler gear.
C-2. The P/N is molded on to the end the end of the coupler. Identify the correct coupler
gear needed by checking the broken part.
D.
Reassemble motor in reverse order of disassembly and test all functions for proper operation.
D-1.
Perform Master Reset/Emergency Override procedure to reset shaft position counter
if motor does not fully stow/deploy after lift gear coupler is replaced.
A.
Case IV. If the lift belt has been accidentally cut or damaged but is still routed
through the lift housing; it can be replaced without disassembling the lift
housing. (If it is not still routed through the housing, refer to Case V on page 11-13 for instructions on splitting the lift housing.)
Step 1. With motor in fully stowed position, place “Quick Grip” clamp on lower unit and lift housing. (see
figure below)
11- 7
Genesis Repair Manual
12/02/02
Step 2. Remove the control box cover screws and cover assembly to expose the Genesis steering system. (see
below)
11- 8
Genesis Repair Manual
12/02/02
A.
Mark and tape the steering potentiometer (as shown below).
B.
Disconnect the red and black motor leads and slip steering potentiometer belt up and off of
the primary gear. (Take care not to rotate the steering potentiometer).
C.
Remove the two Phillips Flathead countersunk screws that hold the primary gear assembly in
the inner shaft. Note: Heat will be required to remove these screws, as they are held in place
with LocTite.
11- 9
Genesis Repair Manual
12/02/02
Step 3. Remove the primary gear and top bearing from the steering chassis. Then remove the four screws
that attach the steering chassis to the control box. This will enable you to access the lift belt
tensioner. (see figures below)
11- 10
Genesis Repair Manual
A.
12/02/02
Unscrew lift belt tension screw all the way while observing the lift belt tensioner. Note how
the tensioner engages the teeth on the upper end of the lift belt. (see below)
Step 4. Remove the four screws that attach the lower end of the lift belt to the outer shaft lower collar. (see
below)
11- 11
Genesis Repair Manual
A.
12/02/02
Butt the ends of the new and old lift belt together, add a drop of super glue, and securely tape
them to each other (as shown in the 3 figures below). Note: Be sure that the length of the
new lift belt matches the shaft length of the motor being serviced.
11- 12
Genesis Repair Manual
B.
05/20/03
With the two belts glued and taped together, push the belt into the bottom of the lift housing
while at the same time pulling the lift belt out the opposite side of the lift housing. In this
manner you can push/pull the new lift belt into position for reassembly and attachment to the
outer shaft collar and lift belt tensioner.
Step 5. With new lift belt attached at top and bottom tighten the lift belt tension screw to the point that a
moderate pull on the belt (approx. 10# pull) will deflect the belt ½” to ¾” from the outer tube.
Step 6. Reassemble the steering chassis in the control box and reinstall the primary gear and primary gear
retaining screws. Note: Use Loctite #603 and primer when reassembling). Replace primary gear and
screws if threads in primary gear are stripped, cross-threaded, or damaged in any way.
A.
Reinstall the steering potentiometer belt, reconnect the red and black motor wires, and
reinstall control box cover and directional indicator.
Step 7. Connect Genesis motor to appropriate power source and test for proper deploy/stow as well as all
other motor functions. If necessary, perform Master Reset/Emergency Override procedure (see page
11-21) to reset the shaft position counter. You may also need to re-orient the steering potentiometer
to the lower unit position (page 11-19) if the potentiometer was accidentally moved.
Case V. When the MODE switch is pressed to stow the Genesis motor, the motor
shaft raises vertically and the motor lower unit contacts the underside of the
bowmount. (Motor does not rotate into the horizontal position for proper
stowing.)
NOTE:
Ensure the lift cam is in its proper place in the channel of the outer tube. The catch on the
end of the lift cam needs to prevent the lift cam from sliding in the channel. If this is okay, a faulty
gear/shaft or broken chain in the lift housing assembly causes this malfunction. To determine which
part is at fault, the lift housing must be removed from the base/housing assembly and disassembled for
internal inspection.
Step 1. Consult the step-by-step disassembly procedures outlined in the Genesis Transducer Cable Routing,
(Service Bulletin #41400) Part II, III, and IV-Steps 1 and 2. Disassemble the Genesis motor by
following the steps as indicated.
Step 2. Remove the four screws holding the steering chassis assembly (item #19 of the Steering Module parts
explosion) into the lower control box (item #13 of the Steering Module parts explosion). Disconnect
the steering chassis wires as needed.
A.
Unscrew the lift belt tension screw (item #17 of the Steering Module parts explosion) while
observing the lift belt tensioner. (see figure below) Note how the lift belt is routed and
attached to the tensioner for later reassembly.
11- 13
Genesis Repair Manual
B.
C.
12/02/02
Remove the belt tensioner and control box from the outer tube (item #8 of the Steering
Module parts explosion).
With the lift belt loose from the top and bottom of the outer tube, pull the outer shaft out of
the lift housing (leaving the lift belt in place through the lift housing assembly).
ATTENTION: For proper reassembly you must note the position of the lift housing in the
aluminum base assembly (i.e. stowed or deployed position) and the position of the outer tube
in the lift housing (you may want to mark the parts accordingly). Also note the top/bottom of
the outer tube (the lift cam in the belt channel of the tube is towards the bottom). The lift
housing and outer tube should be reassembled so as to place them in the same positions they
were in prior to disassembly. Failure to do so may disrupt the “timing” of the lift housing
rotation and cause internal gear damage.
Step 3. Remove the right and left Genesis sideplates from the base/housing assembly (item #35 and #36 on
the Base/Housing parts explosion).
A.
If the motor being serviced has a dampener arm (shock absorber), detach the end of the
dampener from the lift housing.
B.
Remove the three screws (item #22 of the Base/Housing parts explosion) that hold the lift
motor in place (item #20 of the Base/Housing parts explosion).
C.
Remove the lift motor and lift motor drive gear (item #19 on the Base/Housing parts
explosion).
D.
Remove the three screws (item #17 of the Base/Housing parts explosion) that attach the
motor mount spacer (item #16 of the Base/Housing parts explosion) to the base extrusion.
E.
On the side opposite the lift motor, remove the screw, encoder bracket, and encoder wheel
(items #26, #25, and #24 of the Base/Housing parts explosion).
F.
Remove the three button head cap screws (item #23 on the Base/Housing parts explosion)
that attach the lift housing to the base extrusion. NOTE: These three screws are secured with
Loctitetm. Apply heat as needed to remove them.
Step 4. Remove the lift housing from the base extrusion and place on workbench with left side/socket head
capscrews up.
A.
Remove the eight ¼ x 20 socket head capscrews (item #50 of the Lift Housing parts
explosion) that hold the left and right halves of the lift housing together.
B.
With the eight screws removed, use a blade screwdriver to carefully pry apart the lift housing
halves. Lift the left half up and off the right half to expose the internal workings of the lift
housing. (see figure below)
C.
Visually inspect the lift chain (item #42 of the Lift Housing parts explosion) for damage. If
the chain is okay, remove the chain-connecting link and then remove the chain to allow
further disassembly and inspection of the lift housing components.
11- 14
Genesis Repair Manual
D.
E.
F.
G.
H.
I.
J.
K.
L.
M.
N.
O.
P.
Q.
12/02/02
With the lift chain removed, the slip clutch assembly (item #23 of the Lift Housing parts
explosion) can be removed by lifting it up and off the input/shaft gear assembly (item #22 of
the Lift Housing parts explosion).
Note how the lift belt is routed inside the lift housing around the input/shaft gear assembly.
Remove the input/shaft gear assembly by lifting it straight up out of the right lift housing half.
Release the tension spring (item #38 on the Lift Housing parts explosion) from the catch on
the latch link pin (item #37 of the Lift Housing parts explosion) and then lift the upper cam
assembly (items #39, #40, and #41 of the Lift Housing parts explosion) up and off the idler
pin.
Lift the lower cam and locking pin assembly (items #34, #35, #36, and #37 of the Lift
Housing parts explosion) up slightly to allow removal and inspection of the shaft/gear, clutch,
and gear assembly (items #28, #29, #30, #31, #32 and #33 of the Lift Housing parts
explosion).
Next, remove the gear/shaft and sprocket assembly (items #25, #26, and #27 on the Lift
Housing parts explosion). If the lift chain and all other gears, shafts, etc… have checked
okay, then the large gear molded on the shaft of the gear/shaft and sprocket assembly is
slipping and needs to be replaced. (This can be verified by clamping the gear in a vise and
applying moderate rotational force to the sprocket.)
Remove the driv lok pin and sprocket from the gear/shaft and replace the faulty part.
Reassemble the sprocket and pin on a new gear/shaft.
Begin reinstalling the lift housing by reinstalling all gears, shafts, belts, springs, washers,
clutch, and lift chain in their proper locations in reverse order of disassembly.
Place the left half of the lift housing back onto the right half taking care to properly position
the lift belt and tube bearings (items #48 and #49 on the Lift Housing parts explosion). Be
certain that the thrust washer is in the proper location (it tends to stick to the greased bushing
on the opposite half of the housing - see figure above).
Reinstall and completely tighten the eight ¼ x 20 socket head capscrews that hold the lift
housing halves together.
Reinstall the lift housing assembly back into the base assembly. Be sure to reinstall the lift
housing with the motor mount bushing in place (item #51 of the Lift Housing parts
explosion). Reattach the dampener arm (if included on the unit being serviced).
Reinstall all fasteners (with fresh Loctitetm where needed) and reassemble the motor mount,
lift motor, encoder wheel, encoder, etc… in their proper locations in reverse order of
disassembly.
Reinstall outer tube in lift housing base/housing assembly making sure that the lift cam end of
the outer tube is toward the motor lower unit (see note of ATTENTION at Step 2-C above,
regarding reassembly and proper positioning of outer tube and lift housing).
Reinstall control box and lower shaft collar back onto the outer tube and reattach the lift belt
to the lift belt tensioning device in the control box.
Reassemble the Genesis motor in reverse order of disassembly per the Internal Transducer
routing procedure (per Service Bulletin #41400) and test for proper operation of
stow/deploy, trim, and steering systems.
Case VI. With motor deployed, when the “TrimUp” foot pedal switch is pressed
the lift motor “stutter / jerks” and the Genesis LCD rapidly flickers and appears
to read “8A.9”, and then may default to ER6.
Step 1. Check all battery connections for proper voltage, security, and corrosion. Correct faults and retest.
Step 2. If all connections are okay, the pedal “TrimUp" switch is faulty. The foot pedal assembly (P/N
2772040) needs replacement.
A.
Replace foot pedal with latest pedal from Minn Kota, and test all motor functions for proper
operation.
11- 15
Genesis Repair Manual
12/02/02
GENESIS - AP/PD Base Housing Module
Case I. Genesis motor operates properly but LCD screen is blank, (has no
display).
Step 1. Remove motor side plates and center housing to access LCD leads (see AP/PD Base/Housing parts
explosion).
A.
Examine the five wires connecting the LCD to the main control board.
A-1.
If any of the five wires are cut, broken, or damaged, reconnect or splice back together
and retest by turning Master Switch ON and observing display.
A-2.
If wires check okay, but LCD does not display, the LCD is faulty and needs to be
replaced.
B.
Install new LCD, P/N 2224015.
B-1.
Cut leads to faulty LCD and solder the leads from the new LCD in its place. (Wires
are color-coded) Be sure to properly connect, solder, and seal the wire connections.
B-2.
Reassemble, turn Master Switch ON, observe LCD for proper function. Test all
motor operations for proper function.
Case II. If motor displays “ER6” and lift system checks out O.K., the shaft
position counter may be out of place.
Step 1. Remove left sideplate of Genesis motor by removing the two-sideplate screws (item #37), and the
small screw in front (item #38). See the AP/PD Base Housing parts explosion.
A.
Note location of encoder wheel (item #24), and examine encoder wheel counter. (It is the
small “U” shaped device with two wires attached).
A-1.
Make certain that the counter is properly snapped in to place, and hold in the encoder
bracket (item #25). If counter is not properly installed, it will be unable to count the
revolutions of the encoder wheel and the motor will not correctly stow or deploy.
A-2.
Correct any errors noted and retest motor for proper function. It may be necessary to
perform the Master Reset /Emergency Stow Procedure to reset shaft position counter
(see page 11-21).
11- 16
Genesis Repair Manual
12/02/02
GENESIS - Foot Pedal Module
**** Current Genesis foot pedals have a sticker indicating the manufacture date
of the pedal (Julian date code). It is on a label on the bottom side of the pedal.
Any foot pedal that does not have this label, or has the Julian date code plus
“INT” (xxxxxxxINT) should automatically be replaced under warranty with a
current design. This will address most of the foot pedals issues.
Case I. When Master Switch is turned ON, the LCD briefly displays “LP” - “1.2
(hours)” then goes blank and motor will not do anything.
Step 1. Check all battery connections for proper voltage, security, polarity, and corrosion. Correct as
required.
Step 2. If all connections check okay, test Master Switch by turning it part way on. Turn the switch on, but
do not push the switch rocker to the full extent of its travel.
A.
If the LCD now stays on, displays “LP” – “1.2” then “99.9” (with the speed selector set to
off) then the Master Switch is faulty and the foot pedal P/N 2772040 needs to be replaced.
B.
Replace foot pedal assembly with latest part from Minn Kota and test all motor functions for
proper operation with new pedal.
Case II. When Master Switch is turned on the LCD briefly displays “LP/1.2 hrs”
then “99.9 hrs” (with speed selector set to off), and stays on 99.9 hrs but goes
blank when the mode switch is depressed.
Step 1. Check all battery connections for proper voltage, security, polarity, and corrosion. Correct any faults
and retest.
Step 2. If all connections and voltage check okay., retest Master Switch by turning switch part way on and
then depressing mode switch to deploy motor.
A.
If unit now deploys and LCD stays on, the Master Switch is intermittent and the foot pedal
P/N 2772040 needs to be replaced.
B.
Replace foot pedal assembly with latest part from Minn Kota and test all motor functions for
proper operation with new pedal.
Case III. When in “AutoPilot” mode and/or when MOM/CON switch is in the
“Constant On” position, the right momentary steer button is intermittent,
delayed, or does not respond.
Step 1. Check for proper right and left steering function with heel/toe pedal.
Step 2. If Genesis motor steers right and left with pedal and with constant/momentary switch in the
momentary position, the left and right steering buttons work.
A.
The foot pedal P/N 2772040 is faulty and must be replaced.
B.
Replace foot pedal assembly with latest part from Minn Kota and test all motor functions for
proper operation with new pedal.
11- 17
Genesis Repair Manual
12/02/02
Case IV. Fine adjust knob on foot pedal “slips” in one or both directions when
attempting to make minor speed changes.
Step 1. Drive belt for fine adjust knob is slipping.
A.
Replace fine adjust pulley P/N 2222310 (item #21 on Genesis Foot Pedal Module parts
B.
explosion).
A-1.
Disassemble foot pedal by removing the nine screws holding the pedal base and
housing together. Note that the housing and base also snap together by means of four
catches/tangs that extend through the foot pedal base to the underside.
A-2.
Release the four tangs and separate the top and bottom housing and base.
Replace the fine adjust pulley (item #21, P/N 2222310) with the latest part from Minn Kota.
B-1.
Test for proper fine adjust operation and reassemble top and bottom housing and
base.
B-2.
Retest for proper fine adjust function after reassembly.
to reset the shaft position counter.
Case V. Genesis motor steers right and left with momentary steering buttons but
does not steer with heel/toe pedal.
Step 1. Check foot pedal heel/toe potentiometer shaft. (Foot pedal potentiometer shaft is visible between the
left side of the heel/toe pedal and top housing).
A.
Potentiometer shaft is white, approx. 1/8” in diameter and should extend from base to pedal.
If shaft is broken, heel/toe steering will not function.
B.
Replace foot pedal assembly P/N 2772040 with latest part from Minn Kota and test for proper
operation of all motor functions with new foot pedal.
Case VI. Genesis heel/toe pedal is too loose or too tight when attempting to steer
the motor right and left.
Step 1.
Locate the tension adjust linkage bar on the underside of the heel/toe pedal.
A.
If pedal is too tight, loosen the steering pedal tension screw, (item #38, P/N 2223412 on
Genesis Foot Pedal parts explosion).
B.
If pedal is too loose, tighten the steering pedal tension screw.
Step 2. Test for proper operation and “feel” per customer preference.
Case VII. ON/OFF switch on Genesis heel/toe steering pedal is inoperative.
Step 1. Replace foot pedal assembly P/N 2772040 with latest part from Minn Kota and test all functions for
proper operation with new pedal.
Case VIII. With motor deployed, when the “TrimUp” switch is pressed the lift
motor “stutter / jerks” and the Genesis LCD rapidly flickers and appears to read
“8A.9”, and then defaults to ER6.
Step 1. Check all battery connections for proper voltage, security, and corrosion. Correct any faults and
retest.
Step 2. If all connections check O.K., the foot pedal “TrimUp” switch is faulty and the foot pedal assembly
(P/N 2772040) needs to be replaced.
A.
Replace foot pedal with latest pedal from Minn Kota, and test all motor functions for proper
operation.
11- 18
Genesis Repair Manual
12/02/02
GENESIS - To Re-Orient Steering Potentiometer to Motor
Position
It will be necessary to Re-Orient the Steering Potentiometer to the Motor
Position in the following circumstances:
Lower unit has been forced to turn (steering clutch slipped) more than one full turn from
its original position (LCD will display ER3)
¾ if motor has been taken apart and the steering potentiometer was turned out of position
when the motor lower unit was removed from outer tube (possibly while routing transducer)
¾ if steering potentiometer board has been replaced
¾
Step 1. If motor is stowed, note if motor is stowed in the left or right “park” position (direction of prop) and
proceed to Step 2 below.
If motor is deployed, turn Master Switch OFF and place the motor lower unit in-line with the
bowmount / base housing with the prop towards you when looking straight at the LCD. (NOTE: you
may need to forcefully turn the motor by hand to place it in this position.)
Step 2. With the Master Switch OFF and the control box cover removed to expose the Genesis primary gear
and potentiometer belt:
A.
Slip the belt off the primary gear and steering potentiometer gear. Turn steering
potentiometer counter clockwise to its rotational stop.
B. From the rotation stop, turn the potentiometer exactly five complete turns clockwise and slip the
belt back onto the steering potentiometer and primary gear without turning the steering
potentiometer or lower motor assembly out of position.
C. Turn Master Switch ON and deploy motor (if stowed), to test steering function.
Step 3. Press and hold the Mode Switch down for two seconds to initiate the stow sequence.
A.
If motor does not turn and position itself in the park left/right position (motor MUST be at a
B.
C.
90o angle to the bowmount / base housing to properly stow), stop the stow sequence by
pressing and releasing any foot pedal switch.
Turn Master Switch OFF. Slip the steering potentiometer belt off the primary gear and
steering potentiometer.
With the belt removed, physically rotate the lower unit into the proper park position (steering
clutch will slip). Then place the steering potentiometer belt back onto the primary gear and
steering potentiometer taking care not to move the potentiometer from its current position.
Step 4. Turn Master Switch ON and press the TrimDown button to fully deploy the motor. When the LCD
again displays the hours-running time - press and hold the Mode Switch for 2 seconds to initiate stow
sequence.
A.
Observe that the motor now rotates into the park position for proper stowing.
B.
If motor is properly aligned (at a 90 o angle to the bowmount / base housing), the steering
potentiometer is now properly oriented to the motor lower position and is ready for
reassembly.
C.
If the motor is not properly aligned, repeat Step 3B and 3C until motor is rotating into position
and properly stowing when the Mode Switch is pressed.
D.
If, after re-orienting the steering potentiometer to motor position, the motor lower unit rotates
more than one full rotation and again displays ER3, it will be necessary to reprogram the left
and right park position values into the control board (see Control Board Initial Programming
Procedure, page 11-27).
11- 19
Genesis Repair Manual
12/02/02
GENESIS - Lower Shaft Collar
Case I. Lower shaft collar has vertical crack or is broken at leading edge/pointed
end.
Step 1. Consult Genesis Transducer Routing Procedure, Parts I, II, III, and IV of Service Bulletin #41400).
A.
Disassemble Genesis motor as outlined in Transducer Cable Routing Procedure.
A-1.
After disassembling the motor to the point listed at Part IV, Step 1, remove the four
B.
screws (P/N 2221301) that attaches the lower belt clamp and belt to the 2221501
lower outer shaft collar.
A-2.
Replace the broken collar with the new improved part. Note: Be sure to attach lift
belt in the same position and manner it was attached prior to disassembly.
Reassemble the Genesis motor in reverse order of disassembly, making certain that the antirattle bushing in the outer shaft stays in its proper place.
B-1.
Visually confirm this by checking for the anti-rattle bushing detent catch in the hole
provided in the belt channel of the outer shaft. (see below)
(On 45” shaft models, the cam profile will extend over the hole in the tube when motor is
fully assembled.)
C.
After reassembling Genesis motor, connect to proper voltage. Deploy the unit and test for
proper function.
11- 20
Genesis Repair Manual
12/02/02
Genesis - Master Reset / Emergency Override
This Master Reset / Emergency Override procedure is required in the following
circumstances:
¾ to reset the shaft position counter (especially if the lift belt was loose or
slipped)
¾ to stow the motor in the case the motor becomes stuck in the deployed position
¾ the steering motor tries to run when the motor is fully stowed
¾ the prop spins when the motor is fully stowed
¾ the LCD shows “Use Trim” when the motor is fully stowed
¾ is the first thing to try whenever something “peculiar or unexpected” occurs
Please read this entire procedure prior before performing the Master Reset so
that you understand the important notes in Step 5!
Master Reset Steps
(left sideplate should be in place over the counter/wheel)
Step 1. Turn the Master Switch OFF.
Step 2. Simultaneously press and hold Mode Switch while turning the Master Switch ON.
Step 3. Continue to hold Mode Switch (LCD should be displaying “---”; if not, then you probably momentarily
released the Mode Switch – restart procedure) until the LCD shows “Sto” (approximately 15 seconds for
earlier software versions and approximately 5 seconds for software version #107).
Step 4. Release Mode Switch
Step 5. Important (if motor is stowed): The motor will be trying to steer (you should be able to hear
the steering motor running). Quickly press either of the momentary steering arrow buttons to
disengage the steering system. If you do not disengage the steering system within 5 seconds
you may overheat and damage the steering motor! Also, you may get an ER5 code after
completing Step 7 below. Simply turn off the Master Switch. The next time you turn it back
on the ER5 code will be cleared.
Important (if motor is deployed): In some situations the motor may be steering in circles,
quickly press either of the momentary steering arrow buttons to disengage the steering
system. Use the momentary steering arrows to orient the lower unit perpendicular to the
mount. The lower unit can also be rotated by hand, ratcheting / slipping the steering clutch.
Step 6. Use the TrimUp Switch to stow the motor. Release the TrimUp when the unit is fully
stowed.
Step 7. Press and release Mode Switch to reset the system (at this point the LCD display should have
switched from “Sto” to the hour meter reading), and then turn the Master Switch OFF.
11- 21
Genesis Repair Manual
12/02/02
GENESIS – Identifying Software Version Code
Step 1. Check to ensure proper voltage and polarity at battery (Genesis 55=12v, Genesis 74=24v).
Step 2. Turn the Master Switch (located on side of foot pedal) ON.
Step 3. Turn the speed control knob on the foot pedal so that it reads 100 (full speed).
Step 4. While watching the LCD, turn Master Switch OFF. The software version will flash
momentarily on the LCD, just before the LCD screen goes blank.
Step 5. If the software version shown is number 102 or less, the main power control board will need
to be replaced (page 11-25), reprogrammed (page 11-27), and recalibrated (page 11-29).
11- 22
Genesis Repair Manual
12/02/02
GENESIS – Steering Potentiometer Testing & Replacement
Case I. If motor LCD defaults to ER4 or steering potentiometer has been
damaged/turned past its rotational stop.
Step 1. Remove control box cover and center housing for the LCD. Inspect the bullet connections from the
coil cord to the potentiometer board and from the coil cord to the main control board.
A.
Correct any questionable connections and retest motor operation.
Step 2. Check to ensure that the steering potentiometer belt is in place on the primary gear and steering
potentiometer.
Step 3. If belt is in place, make sure Master Switch (on foot pedal) is OFF. Then remove the belt, mark the
potentiometer pulley, and test the potentiometer.
A.
The steering potentiometer should rotate smoothly without any catching or “rough” spots,
until it comes to the rotational stop. (NOTE: the steering potentiometer is a 10-turn pot).
B.
If any “rough” spots or catching occurs, replace the potentiometer board as instructed in Step
4 (below).
If the potentiometer rotates smoothly, using a good-quality, digital multi-meter test for the
C.
following resistances:
The resistance across the potentiometer (pot) to the pot board should be 5K ohm (+/C-1.
5%).
C-2.
With the potentiometer centered (5 turns from either rotational stop), the resistance
value across the blue and red or blue and green wires should be 2.5K ohm (+/- 5%).
C-3.
With the potentiometer shaft turned counter-clockwise to the rotational stop, the
resistance across the red and blue wires should be 0. As the pot shaft is turned
clockwise, the resistance should gradually increase until at the end of the clockwise
rotation (10 turns), the resistance should be 5K ohm (+/- 5%).
C-4.
Replace the steering potentiometer if the pot does not test to the above specifications.
D.
If the steering potentiometer tests fine, re-orient Steering Potentiometer to Motor Position
(see page 11-19).
Check the coil cord for continuity (replace if necessary).
E.
Step 4. To replace the steering potentiometer board; disassemble the Genesis motor per Parts I, II, and III of
Transducer Routing Procedure (Service Bulletin #41400) stopping at Step 2 of Part III.
A.
Remove the four screws holding the steering chassis to the lower control box. (See Genesis
Steering Module parts explosion).
A-1.
Lift steering chassis out of the control box and turn it over to access the steering
motor retaining screws, P/N 2223427. (See parts explosion).
A-2.
Remove the three screws that hold the steering motor onto the underside of the
steering chassis.
Disconnect the leads connecting steering chassis potentiometer board and steering motor to
B.
coil cord wires.
C.
Loosen the potentiometer pulley setscrew (item #51 of the Steering Module parts explosion)
and remove the potentiometer gear/pulley.
F.
Unscrew the nut that holds the steering potentiometer into the steering chassis/mounting plate
assembly (item #19 of the Steering Module parts explosion).
G.
Remove the steering potentiometer circuit board from the steering chassis by carefully prying
outward on the board retaining fingers.
11- 23
Genesis Repair Manual
H.
I.
J.
12/02/02
Install the replacement steering potentiometer board and potentiometer.
(NOTE: the steering potentiometer must be inserted into the steering chassis with the
potentiometer leads toward the outside edge of the chassis and with the small locating pin on
the potentiometer inserted into the hole provided in the steering chassis. Failure to position
the locating pin in this hole will result in damage to the new potentiometer when the
potentiometer nut is tightened!)
Reassemble the steering motor and steering chassis. Reattach all wires in their proper
locations, install potentiometer pulley on potentiometer, and reassemble the steering chassis
assembly in the control box. Reinstall primary gear, gear collar, and primary gear screws
(using Loctitetm #603 on the screws).
Re-Orient the new steering potentiometer to motor lower unit (see page 11-19).
11- 24
Genesis Repair Manual
12/02/02
GENESIS – Control Board Replacement
The Genesis main control board should only be replaced if:
¾ the control board has failed
¾ the control board installed in the motor has been identified as having early or
outdated software (see page 11-22)
Control board replacement on a Genesis motor is a complex procedure and, as
such, should never be done unless the warranty repair center knows for certain
that replacement is necessary.
Main Control Board Replacement
(Motor may be either stowed or deployed)
Step 1. Disassembly
A.
Remove the Genesis left and right sideplate retaining screws and then remove the sideplates.
B.
Remove the center display housing (item #33 on the Base/Housing parts explosion) by
C.
D.
E.
F.
G.
H.
I.
pushing in on the retaining tabs to expose the Genesis main control board assembly.
Remove the 2 screws (item #34 on the Base/Housing parts explosion) to separate the LCD
from the center housing.
Remove the strain relief bracket screw and bracket (item #14 and #13 on the Base/Housing
parts explosion) from the base extrusion.
Disconnect the coil cord wires, lift housing lead wires, and battery leads from the control
board. NOTE: if the motor being serviced is a non-AutoPilot motor go to Step 1-G.
Lift the AutoPilot compass assembly up and off the compass-mounting bracket.
Lift the shaft position encoder out of the encoder bracket (item #25 on the Base/Housing parts
explosion).
Remove the 4 screws that hold the control board into the base extrusion.
Lift the control board out of the base extrusion.
Step 2. Reassembly
A.
Place the new control board in the base extrusion.
Reconnect all wiring (refer to wiring diagram with new control board). Reinstall the strain
B.
C.
relief on the battery lead wire and the control board’s plug wire. If the motor being serviced
is a non-AutoPilot go to Step 2-E.
When replacing the main control board on a Genesis AutoPilot motor, install the
compensating magnet bracket and magnet rods (P/N 2881937) which is included with the
new AutoPilot control board assembly (early units did not utilize compensating magnets).
See figure below. (If you order the older control board by the old P/N 2224011 for 12-volt
units or P/N 2224013 for 24-volt units, it will sub to a kit that has everything needed. If you
order the control board by the current part numbers, P/N 2224014 for 12-volt units or P/N
2224016 for 24-volt units, you will not receive the compensating magnet bracket and magnet
rods).
11- 25
Genesis Repair Manual
To install the compensating magnet bracket remove the compass bracket screw, (item
#32 on the Base/Housing parts explosion) and position the compensating magnet
bracket in place below the AutoPilot compass-mounting bracket. Reinstall the
bracket screw to hold both the compass bracket and the compensating magnet bracket
in place. Do not install the 2 magnet rods at this time!
Install the compass assembly on the compass bracket (re-use the orange grommets from the
old compass).
Install the encoder (writing on the encoder to face up) and LCD in their places. Reinstall the
center display housing/LCD and right sideplate.
Proceed to the “Initial Board Programming Procedure” (page 11-27).
C-1.
D.
E.
F.
12/02/02
11- 26
Genesis Repair Manual
07/23/03
GENESIS – Control Board Initial Programming Procedure
We recommend that you have (and use) the specially modified Genesis Test Foot
Pedal, P/N 2772040T, when doing this procedure.
NOTE: These steps should not be done in bright sunlight or under bright fluorescent lighting with the left
sideplate (covers the encoder) removed. The bright light can give false information to the encoder.
Initial Programming Steps
(Motor must be connected to appropriate voltage)
Step 1. Readying the motor for Initial Control Board Programming
A.
Perform the complete Master Reset / Emergency Stow Procedure to set the shaft position
B.
C.
D.
counter (see page 11-21).
Turn the Master Switch back ON.
Deploy the motor by pressing the Mode Switch.
Turn the Master Switch OFF.
Step 2. Setting Left and Right Park Positions
A.
Using the test foot pedal (P/N 2772040T), press and hold both the TrimUp and TrimDown
B.
buttons while turning the Master Switch ON, then release both trim buttons.
LCD display on motor should read “LFT”.
B-1.
B-2.
C.
D.
E.
F.
G.
If LCD shows “SET PROPELLER” turn pedal OFF and return to Step 1 above.
If LCD shows “SET STRAIGHT AHEAD” then both TrimUp and TrimDown buttons were
not pushed simultaneously. Turn pedal off and return to Step 1 above.
Use momentary steering switches to place motor lower unit in propeller left park position.
(Left park position is motor lower unit at a 90 o angle to the Genesis base housing with the
prop pointing to the left when viewing the LCD.)
Using care not to adjust the footpedal (rocker) steering position, press the “Momentary ON”
switch located on heel/toe steering pedal once to enter this setting into the main board
“memory”.
LCD on motor should now read “Rt”.
NOTE: In this step, the motor lower unit must be rotated counterclockwise (when
looking down at the motor lower unit). Use the Left Momentary Steering Switch to rotate
motor lower unit from left park position to right park position. (Right park position is motor
lower unit at a 90 o angle to the Genesis base housing with the prop pointing to right when
viewing the LCD.)
Using care not to adjust the footpedal (rocker) steering position, press “Momentary ON”
switch located on the heel/toe steering pedal once to enter this setting into the main board
memory. (Note: if the left and right park positions are already set correctly, the TrimUp
switch may be pressed to skip or “toggle” through this portion of the procedure.)
Step 3. Setting Shaft Length (after completing Step 2 the shaft length setting will automatically display)
LCD on motor should read 45, 52, or 60 if properly set to match the motor shaft length. (The
A.
B.
C.
memory will default to 45 on a newly installed main board.)
Use the right momentary steering switch to “toggle” through the shaft lengths until the
correct shaft length for the motor is displayed (45, 52, or 60).
Press “Momentary ON” switch located on the heel/toe pedal once to enter this setting into the
main board memory. (NOTE: if the shaft length is already set correctly, the TrimUp switch
may be pressed to skip or “toggle” through this portion of the procedure.)
Step 4. Setting Lift Motor Condition (after completing Step 3 the motor lift condition setting will
automatically display)
11- 27
Genesis Repair Manual
07/23/03
Display should read either “up” or “dn”. (The display will show last setting selected. On a
newly installed board the LCD will default to “dn”.)
B.
Press “Momentary ON” switch located on the heel/toe pedal once to enter this setting into the
main board memory.
Step 5. Selecting the Offset Table (after completing Step 4 the Offset Table will automatically display)
A.
The LCD on motor will display “OF0”, “OF1”, or “OF2”. (The display will show last setting
selected.)
B.
Press and release the right momentary steering switch to select offset table “OF0”.
C.
Press “Momentary ON” switch (located on the heel/toe pedal) once to enter this setting into
the main board memory.
A.
Step 6. After completing Step 5, the LCD on the motor will display “---”
A.
Turn Master Switch OFF to “lock” all steps of this procedure in main board memory and to
B.
C.
return motor to normal operating mode.
If unit is a non-AutoPilot model, this step completes the Initial Programming Procedure.
B-1.
Test unit for proper operation. Service completed.
If the motor being serviced is an AutoPilot model, proceed to the “Calibrating AutoPilot
Compass Software Procedure” (page 11-29).
11- 28
Genesis Repair Manual
12/02/02
GENESIS – Calibrating AutoPilot Compass Software
This procedure should only be used:
¾ After replacing the main control board/compass assembly
¾ When adding the compensating magnet rods and bracket to earlier units
without them
We recommend that you have (and use) the specially modified Genesis Test Foot
Pedal, P/N 2772040T, when doing this procedure.
Calibrating AutoPilot Compass Software Steps
(Motor must be connected to appropriate
voltage and be DEPLOYED for the following procedure and test)
Step 1. Calibrating Compass Software (Note: steering functions will be inactivated during this step)
Using the Genesis Test Pedal, P/N 2772040T, press and hold down the TrimUp, TrimDown, and the
right momentary steering switches while turning the Master Switch ON.
A.
Release TrimUp, TrimDown, and right momentary switches.
B.
LCD should only display the AutoPilot icon. (If the icon is flashing, the motor is trimmed
up too high and will not allow the AutoPilot feature to operate. Use TrimDown switch to
lower motor, then reactivate the AutoPilot feature by pressing the mode switch once.)
C.
Temporarily place the left sideplate in position to cover the compass unit and to block UV
light that could affect the compass sensors. Note: earlier sideplates must be notched out as
shown in the diagram below to clear the compass magnet bracket.
D.
E.
With the motor on a rotatable stand, rotate the entire motor and base extrusion one complete
o
revolution from the starting point, and then rotate it back to the starting point (360 CW, then
o
o
360 CCW). Rotate the unit slowly, 360 in about 15 seconds. Be sure that no large ferrousmetal objects are nearby when doing this step.
Press “Momentary ON” switch located on the heel/toe pedal once to enter this setting into the
main board memory, “---” should be displayed on the LCD. Turn Master Switch OFF.
Step 2. Installing the Compensation Magnet Rods
Remove the sideplate that was temporarily placed over the compass assembly to block the
A.
B.
C.
UV light interference.
Install the N-S (North-South) compensating magnet rod first, positioning the rod with the
screwdriver slot outward and slot parallel to the mounting base/horizon.
Install the E-W (East-West) compensating magnet rod with the screwdriver slot outward and
the slot parallel to the mounting base/horizon. (The E-W rod will snap down into place and
this will hold the N-S rod in place.) NOTE: With the N-S and E-W screwdriver slots
parallel to the base/horizon, the compensating magnet rods are in the neutral position
and the AutoPilot is ready for testing and fine adjustment.
11- 29
Genesis Repair Manual
12/02/02
Step 3. Testing / Adjusting AutoPilot Accuracy
NOTE: When performing these steps place a “shop rag” on the compass assembly. Sunlight or
bright fluorescent lighting can over-power the compass’ optical sensors.
A.
Turn Master Switch ON.
B.
With the motor on rotatable stand, point motor base extrusion and lower unit to the north
(LCD to the south).
C.
Press and release the Mode Switch once to turn AutoPilot ON. (Note: do not hold the Mode
Switch down for more than 2 seconds or the motor will stow.) The AutoPilot icon will
display on the LCD above the hours-running time. (If the icon is flashing, the motor is
trimmed up too high and will not allow the AutoPilot feature to operate. Use TrimDown
switch to lower motor and reactivate the AutoPilot feature by pressing the mode switch once.)
D.
Rotate the motor base extrusion (and stand) slowly to the NW (LCD to the SE). Observe
motor lower unit. The lower unit should still point north with an error of less than 20o. If
error is greater than 20o, adjust the N-S compensating magnet rod as needed with a nonmagnetic screwdriver to reduce the amount of error.
E.
Rotate the motor base extrusion (and stand) to the NE (LCD to the SW), and observe motor
lower unit. The lower unit should still point north with an error of less than 20 o. Adjust the
N-S compensating rod as needed with a non-magnetic screwdriver to reduce the amount of
error.
E-1.
Rotate the motor base extrusion (and stand) back to the north (LCD to the south).
Observe motor lower unit to confirm that the amount of error when pointing north is
less than 20 o. Repeat Steps 3D & 3E, if needed.
F.
Rotate the motor base extrusion (and stand) to the west (LCD to the east). Steer the lower
unit so it points to the west using the left/right momentary steering buttons (AP function still
engaged).
G.
Rotate the motor base extrusion (and stand) slowly to the SW (LCD to the NE). Observe
motor lower unit. The lower unit should still point west with an error of less than 20o. If
error is greater than 20o, adjust the E-W compensating magnet rod as needed with a nonmagnetic screwdriver to reduce the amount of error.
H.
Rotate the motor base extrusion (and stand) to the NW (LCD to the SE), and observe motor
lower unit. The lower unit should still point west with an error of less than 20 o. Adjust the
E-W compensating rod as needed with a non-magnetic screwdriver to reduce the amount of
error.
H-1.
Rotate the motor base extrusion (and stand) back to the west (LCD to the east).
Observe motor lower unit to confirm that the amount of error when pointing west is
less than 20 o. Repeat Steps 3G & 3H, if needed.
I.
If AutoPilot functions properly and tests within the limits specified in Steps 3-D through 3-H,
place a drop of super glue on the E-W compensating magnet rod support to lock it in place.
Install the modified/notched sideplate taking care not to bump or move the compensating
magnet rods out of position.
J.
Test the AutoPilot function with the sideplate in place (over the compass).
J-1.
If it tests within the limits specified in Steps 3-D through 3-G this procedure is
completed.
J-2.
If the motor does not test within these limits, adjust the compensating magnet rods
until the AutoPilot tests fine (i.e. repeat Step 3, above).
11- 30
Genesis Repair Manual
12/02/02
GENESIS – AutoPilot Steering Malfunction
Case I. AutoPilot turns itself off while operating in AutoPilot mode.
Step 1. Determine if motor may have been trimmed too high while running in AP mode.
A.
The AutoPilot icon will flash if the motor is trimmed too high. This indicates that the AP
B.
feature has turned itself off due to magnetic interference from lower unit on the AP compass.
Trim the motor down, and then press the “Mode Switch” once to reactivate the AP function.
Step 2. If the AP function turns itself off while in operation:
A.
Any interruption in power to the motor will disengage the AP system. Check battery leads,
plug, wire connections, etc… as motor power leads may have an intermittent connection.
Customer should be informed of the possibility of voltage interruption stemming from power
supply in boat (breaker kicking off then back on, etc…).
Case II. Jerky AutoPilot steering.
If, while holding a heading, the AP motor steering system seems to “jerk” back and forth a few
degrees it may be due to excessive gear “lash” or looseness in the steering gear system.
Step 1. To dampen this oscillation of the motor lower unit, make sure that the 2-piece aluminum stop collar
on the motor shaft (between the lower shaft collar and motor bung) is firmly slid up against the lower
shaft collar bushing and tightened in place.
Step 2. If problem persists, install new steering clutch gear system and steering motor output gear (P/N
2770215).
Step 3. Refer to “Calibrating AutoPilot Compass Software” Step 3 (page 11-30).
Case III. Motor steers fine in manual mode, but does not steer in AP mode.
Step 1. Verify the motor is an AP model and the LCD AutoPilot icon is displayed.
Step 2. The sideplate must be in place (covering the compass) as a bright fluorescent light or sunshine can
overpower the compass’ optical sensors and inhibit AP steering.
Step 3. Make sure motor is mounted within 5 degrees of level and there is no ferrous metal object near the
motor that is affecting normal compass operation.
Step 4. Ensure the compass assembly is fully snapped in place and seated on the compass bracket (compass is
setting level and able to spin freely).
Step 5. Spin the base of the motor and ensure the internal compass card is spinning freely.
Step 6. If all the above steps test okay, replace main control board assembly.
Case IV. AutoPilot function is erratic (doesn’t maintain proper headings).
Step 1. The sideplate must be in place (covering the compass) as a bright fluorescent light or sunshine can
overpower the compass’ optical sensors and inhibit AP steering.
Step 2. Make sure motor is mounted within 5 degrees of level and there is no ferrous metal object near the
motor that is affecting normal compass operation (including the compass bracket screw).
Step 3. Ensure the compass assembly is fully snapped in place and seated on the compass bracket (compass is
setting level and able to spin freely).
11- 31
Genesis Repair Manual
12/02/02
Step 4. Spin the base of the motor a complete revolution and ensure the internal compass card is spinning
freely (not “hanging up” or sticking in any direction).
Step 5. Early Genesis models did not have compensating magnets under the compass assembly. We
recommend installation of the compensating magnets and bracket assembly (P/N 2881937).
Step 6. Recalibrate AutoPilot Compass Software as outlined on pages 11-29 and 11-30. (Note: do not install
the magnet rods until the procedure instructs you to do so.)
11- 32
Minn Kota Universal Sonar Models
02/19/03
Section 12.
Minn Kota Universal Sonar
Minn Kota Universal Sonar motors are serviced in the same manner as their non-Universal Sonar
counterparts. Consult the appropriate section of the Minn Kota Service Manual for the step-by-step
trouble shooting and repair procedures applicable to the motor being serviced.
This trouble-shooting section DOES NOT take the place of the specific sonar unit’s troubleshooting guide. Consumers should consult their owner’s manual for their sonar unit for all
depth finder problems.
A capacitance meter and a good quality multi-meter (VOM) are needed to test the transducer and
cable installed in the Minn Kota Universal Sonar Motors. We recommend using a Waveteck
Meterman model CR50. This meter can be purchased at most major electronics suppliers. (Some
better multi-meters may also be capable of measuring capacitance.)
Please note that the transducer is held into the Minn Kota lower unit with tamper-resistant, torx-head
screws (T-15). These are torqued to 12-15 inch/pounds. The Minn Kota factory warranty will be
voided if the consumer tampers with these screws!
Case I. Sonar display blacks out while trolling motor is running.
(This case refers to suggestions the customer should try with the sonar unit and with his boat wiring.)
Step 1. Consumer should refer to the user’s manual for the sonar display configuration options. (Many sonar
displays have noise reduction options within their menus.)
Step 2. Reduce gain of sonar display until an adequate display is visible.
Step 3. Determine wiring configuration of the boat
A.
If the power leads of the sonar display are routed next to the power leads for the trolling
motor for a great distance, separate the leads as much as possible.
Case II. Sonar unit not receiving bottom reading.
(Be sure sonar unit is on current list of models compatible with Universal Sonar) see page 12-4
Step 1. Customer should first refer to the sonar unit’s owner’s manual for its specific trouble-shooting guide.
A.
If customer still has the original transducer that came with the sonar unit; he can use this to
determine if the sonar unit faulty or if the Universal transducer is at fault.
A-1.
If sonar works properly with original transducer; proceed to Step 2.
A-2.
If sonar still does not receive bottom reading, problem lies in sonar unit.
Step 2. Verify capacitance measures according to the following picture (Figure 1, page 12-3) and chart (Chart
A, page 12-3).
A.
Measure the capacitance of the transducer at the extension cable plug end that exits the motor
coil cord (PD/AP and Genesis models) or footpedal (Maxxum foot-control models) using
your capacitance meter as per Figure 1. Touch the red and black probes from your
capacitance meter to the correct pins on the plug (transducer + and -). For proper orientation,
be sure the connector key (ridge) is at the top of the plug as in Figure 1, page 12-3 (just above
and between the red and black probes).
12 - 1
Minn Kota Universal Sonar Models
A-1.
A-2.
10/31/02
If the capacitance falls within the minimum and maximum allowable limits (per
Chart A) for the specific Minn Kota Universal Sonar motor being tested, go to Step 3.
If the capacitance falls outside the minimum and maximum allowable limits, go to
Step 4.
Step 3. Perform a continuity check on the adapter cable. (This is the short cable that goes from the sonar unit
to the extension cable plug end.)
A.
Identify Sonar make, then consult pin-out diagram for that adapter cable (starting on page 127). Check continuity from Minn Kota pins to Sonar adapter plug pins.
A-1.
If the adapter has continuity through all three pins, the problem lies with the sonar
unit (not the Minn Kota Universal Sonar motor). The customer should refer to his
sonar unit owner’s manual.
A-2.
If the adapter does not have continuity, adapter is defective. Replace adapter.
Procedure is complete.
Step 4. Measure the capacitance of the Universal transducer assembly.
A.
Remove the control box cover.
B.
Disconnect extension cable and the transducer plug assembly in the control box.
C.
Take the same type of capacitance reading (as above) on the Universal transducer plug
D.
(exiting the shaft of the motor).
Refer to Chart A for the particular Universal Sonar model being tested to find the Minn Kota
transducer part number (P/N). Cross-reference this part number with Chart B (page 12-3) to
find the minimum and maximum specifications for the particular Universal transducer
assembly tested. The capacitance for this reading should fall between the minimum and
maximum allowable limits per Chart B, and Capacitance Chart and Pin-Out Diagram on
page 12-5.
D-1.
If the capacitance falls within the minimum and maximum allowable limits for the
specific Minn Kota Universal Sonar motor being tested, go to Step 5.
D-2.
If the capacitance falls outside the minimum and maximum allowable limits, go to
Step 6.
Step 5. Using your VOM, perform a continuity test through the extension cable (see page 12-6 for pin-out
diagram).
If there is not continuity through all the wires in the extension cable, the extension cable is
defective. Replace extension cable and re-test capacity per Step 2.
B.
If there is continuity through the extension cable, the problem is not with the transducer and
plug assembly or with the extension and plug assembly. Re-check continuity of the adapter
plug (Step 3) or suspect problem with sonar unit.
A.
Step 6. Replace the front-end bell / transducer assembly on the motor and re-test capacitance per above
procedures.
NOTE: on 4” diameter motors the transducer cable is held in place in the center section with a metal
clip between the magnets. For ease of disassembly and reassembly, we recommend that the motor be
removed from the shaft. On 3 5/8” diameter motors you will need to replace the shaft of the motor,
also.
A.
Retest per Step 2.
12 - 2
Minn Kota Universal Sonar Models
10/31/02
connector key
(ridge)
Figure 1
NOTE: you cannot order transducer replacements by the P/N listed below. Order end bell/transducer assembly per
parts manual schematics.
Transducer Capacit.
(pF)
Family
Model
Shaft Length Product Code
Transducer
Extension Cable minimum maximum
P/N
P/N
55
48
1357397
987-003
221-1405 (9 ft)
798.34
1230.10
PD
55
54
1357398
987-004
221-1405
816.87
1252.74
55
60
1357399
987-004
221-1405
816.87
1252.74
55
48
1366019
987-003
221-1405
798.34
1230.10
AutoPilot
55
54
1366023
987-004
221-1405
816.87
1252.74
65
54
1366039
987-004
221-1405
816.87
1252.74
65
60
1366042
987-004
221-1405
816.87
1252.74
55
45
1352711
987-003
221-1405
798.34
1230.10
Genesis
55
52
1352713
987-004
221-1405
816.87
1252.74
74
45
1352721
987-004
221-1405
816.87
1252.74
74
60
1352731
987-005
221-1405
847.74
1290.47
65
42
1368361
987-003
221-1400 (14.5 ft)
930.06
1396.11
Maxxum
65
52
1368363
987-004
221-1400
945.58
1418.75
74
42
1368371
987-004
221-1400
948.58
1418.75
74
52
1368272
987-004
221-1400
948.58
1418.75
74
62
1368374
987-005
221-1400
979.45
1456.48
Chart A
Description
Transducer
P/N
987-003
987-004
987-005
Chart B
12 - 3
Capacitance (pF)
minimum maximum
578.14
945.87
596.66
968.50
623.53
1006.23
Minn Kota Universal Sonar Models
01/13/04
With the proper Minn Kota adapter cable the Universal Sonar transducer will be compatible
with the following sonar units:
Bottom Line:
Tournament NCC 5300, Tournament NCC6500
Minn Kota Adapter: MKR-US-2
Tournament 1250, Tournament 3310, Tournament 4300, Tournament 3100, Tournament 4100,
Tournament 5100, Tournament NCC6300, Tournament 320MAX, Tournament 480MAX
Minn Kota Adapter: MKR-US-3
Eagle:
FishEasy 2, FishEasy 2P (manufactured prior to 2003), FishEasy 2T (manufactured prior to 2003), FishMark 160, FishMark
240, TriFinder 2
Minn Kota Adapter: MKR-US-5
Accura 240, Accura 240FLW, Fish Easy, Fish Easy ST, Fish ID 128, Optima, Strata 128, Strata 128 Plus,
Strataview 128, Trifinder, Trifinder FLW, Ultra Classic, Ultra Classic Plus
Minn Kota Adapter: MKR-US-6
Cuda 128, Cuda 168, Cuda 168EX, Cuda 240GPS, FishEasy 2 (manufactured after 2002), FishEasy 2T (manufactured
after 2002), FishElite 320, FishElite 480DF, FishMark 320, FishMark 480, SeaFinder 240DF, SeaFinder 320DF,
SeaCharter 480DF
Minn Kota Adapter: MKR-US-9
Garmin:
Fishfinder 100, Fishfinder 160, Fishfinder 240, Fishfinder 250, Fishfinder 250C, Fishfinder 320C,
GPSMAP 168, GPSMAP 178C, * Fishfinder 80, *Fishfinder 120 (* with optional Garmin part number
010-10145-00, sold separately)
Minn Kota Adapter: MKR-US-1
Humminbird:
100SX, 405SX, LCRW, N525, Tracker Pro 160, Boater’s World Pro Angler 400+, Legend 1000, Legend 2000
Minn Kota Adapter: MKR-US-4
Legend 3000, 400TX, 300TX, Piranha 1, Piranha 2, Piranha 3, Piranha 4, Piranha 5, PiranhaMAX 10,
PiranhaMAX 15, PiranhaMAX 20, Matrix 10, Matrix 15, Matrix 17, Matrix 20, Matrix 25, Matrix 27,
Matrix 35, Matrix 37, Matrix 55, Matrix 65, Matrix, 67, Matrix 97
Minn Kota Adapter: MKR-US-8
Lowrance:
LCX-15C, LCX-15CI, LCX-15CT, LCX-15MT, LCX-16CI, LCX-16CT, LCX-18C, LCX-19C, LCX-104C,
LMS-240, LMS-320, LMS-320DF, X51, X-58DF, X71, X-87, X-88DF, X91, X-97, X-98DF, 100C,
X-105C DF, X125, X-126 DF, X-135, X-136 DF, LMS-480, LMS-480 DF, LMS-330C, LMS-335C DF
Minn Kota Adapter: MKR-US-5
X24, X28, X29, X38, X48, X49, X58, X65, X75, X85
Minn Kota Adapter: MKR-US-6
X-47, X-47EX, X-67C, M-56, M-68C
Minn Kota Adapter: MKR-US-9
Vexilar:
FL-8, FL-8 SE, FL-8 SLT, FL-10, FL-18CLC-200 Minn Kota Adapter: MKR-US-7
Zercom:
Z160
Minn Kota Adapter: MKR-US-4
For the most current list of sonar units, please visit our web site at www.minnkotamotors.com or call Minn Kota
Technical Services at (800) 227-6433.
12 - 4
Minn Kota Universal Sonar Models
11/08/02
Minn Kota Universal Sonar Transducer & Cable Assembly
Note: Take transducer capacitance readings across the TX(-) and TX(+) pins.
12 - 5
Minn Kota Universal Sonar Models
Minn Kota Cable Extension
Part No. 2211400 and 2211405
12 - 6
11/08/02
Minn Kota Universal Sonar Models
Garmin Adapter Cable
Item No. 1852050 (MKR-US-1)
12 - 7
02/19/03
Minn Kota Universal Sonar Models
Bottom Line 9-Pin Adapter Cable
Item No. 1852051 (MKR-US-2)
12 - 8
02/19/03
Minn Kota Universal Sonar Models
Bottom Line 7-Pin Adapter Cable
Item No. 1852052 (MKR-US-3)
12 - 9
02/19/03
Minn Kota Universal Sonar Models
Humminbird / Zercom (Techsonic) Adapter Cable
Item No. 1852053 (MKR-US-4)
12 - 10
02/19/03
Minn Kota Universal Sonar Models
Lowrance / Eagle Adapter Cable (gray)
Item No. 1852054 (MKR-US-5)
12 - 11
02/19/03
Minn Kota Universal Sonar Models
Lowrance / Eagle Adapter Cable (black)
Item No. 1852055 (MKR-US-6)
12 - 12
02/19/03
Minn Kota Universal Sonar Models
Vexilar Adapter Cable
Item No. 1852056 (MKR-US-7)
12 - 13
02/19/03
Minn Kota Universal Sonar Models
Humminbird (Techsonic) Adapter Cable
Item No. 1852057 (MKR-US-8)
12 - 14
02/19/03
Minn Kota Universal Sonar Models
Lowrance / Eagle Adapter Cable
Part No. 1852058 (MKR-US-9)
12 - 15
02/19/03
Lower Unit Repair
01/27/04
Section 13.
Lower Unit / Motor Assembly
This section refers to the motor assembly only.
Consult the appropriate section of the Service Repair Manual for more information.
Instructions to Remove Lower Unit from Composite Shafts
Step 1. Tighten the shaft and lower unit assembly in a bench vise. Utilize the Tube Holding Block Set (Minn Kota P/N
2001022) to lessen chances of scarring the shaft. The motor assembly should be slid directly next to the block
set.
Step 2. Heat the bung area with a commercial heat gun to loosen the LocTite. If you use a propane torch as a heat
source, you risk blistering the paint. The heat needed to break down the LocTite is 450 degrees Fahrenheit for 5
minutes. We use red LocTite 271 (with #7090 primer) on motors with black shafts and LocTite 661 (#7649
primer) on white motors.
NOTE: Be careful not to heat the shaft itself (this is the reason the tube blocks should be slid down directly next to the
bung when clamped in the vise). While the composite shafts are very strong, the combination of heat and the
twisting force can break them.
Step 3. Unscrew the lower unit from the shaft while hot. Once you break loose the LocTite, do not stop unscrewing or
the LocTite may re-set.
Step 4. Clean the residue out of the threads of the lower unit with the hollow tap kit (Minn Kota P/N 2881021).
A.
Slide the lower unit wires through the hole in the tap.
B.
While holding the lower unit upside down, gently screw the tap into the motor assembly letting the
residue fall out. Be careful not to cross-thread the motor.
Thru-bolt tightening specifications
•
•
•
•
3 ¼” motors = 25-35 inch pounds
3 5/8” motors = 35-40 inch pounds
4” motors = 40-50 inch pounds
4 5/8” motors = 40-50 inch pounds
End Play specifications
•
Endplay should be .015” -.050”, if necessary use extra nylatron washers. Too much or too little endplay will result
in motor running hot or wearing out prematurely.
Case I. Lower unit does not run
Step 1. Check to ensure proper voltage. Inspect all battery connections, trolling motor plug (if installed), and any butt
splice connections in battery leadwire for corrosion and security.
Step 2. Test lower unit directly (bypass all switches and/or control board).
A.
Connect the lead wire to battery.
B.
Hook the black battery lead directly to the black brush lead that exits the motor assembly.
C.
Hook the red battery lead to red brush lead that exits the motor assembly. The motor should run. If
not, a problem exists in the lower unit. Disassemble lower unit and check for voltage at the brushes,
water damage, brushes not making proper contact, and an open armature.
C-1.
An open armature will have some segments on the commutator that are dead. If the brushes
happen to stop on this open segment, it will not run. If you can turn the prop a quarter and the
motor starts and runs fine, the armature may have an open/dead spot. Replace armature.
13-1
Lower Unit Repair
01/27/04
Case II. Motor works on high speed, but missing some or all of the lower speeds
Step 1. Check speed coil functionality.
A.
Connect battery lead wire to battery.
B.
Hook the black battery lead directly to the black brush lead that exits the motor assembly.
C.
Touch the red battery lead to each colored speed coil wire one at a time. The motor should run as you
make each connection.
D.
If the motor fails to run as you touch any of the colored speed coil wires, the problem is either speed
coil is faulty and needs to be replaced or the speed coil jumper wire is not connected to the back of the
brush plate (in the lower unit).
D-1.
If the motor runs as you touch the red battery lead to some of the colored speed coil wires, but
not all the speed coil wires, the speed coil is faulty and needs to be replaced.
Case III. Motor runs backwards
Step 1. Polarity reversed to armature. Possible causes include:
A.
Wired backwards
B.
Brush plate in upside down
C.
Magnet shell upside down (on 3 ¼” or 3 5/8” motor assemblies the marking notch should be on the
bottom towards the skeg)
Case IV. Motor is noisy
Step 1. Possible causes:
A.
Water in lower unit
B.
Broken brush plate
C.
Grease or replace armature bearing (roller bearing, spherical bearing, & flange bearing)
D.
Chipped/broken brushes (new brushes may take a few hours of operation to “seat” or round to the
commutator and quiet down)
E.
Ensure rear seal shield (3 ¼” and 3 5/8” motors only) is securely in place and not “squealing” or
rubbing against armature shaft
F.
Chipped/broken magnets – a rule of thumb is if the magnet that chips out is less than 1 square inch, the
magnet shell is still functional.
G.
On 4” motors (bung on magnet center section), pull up lightly on brush wires to ensure all slack is out
of lower area (so armature does not rub on the slack from the brush leads)
H.
Rough/worn commutator (where brushes ride) on armature. Smooth with fine sandpaper or emery
cloth. If scratched too deeply, replace armature.
Case V. Motor vibrating excessively
Step 1. Possible causes include:
A.
Prop pin bent
B.
Prop – damaged or out-of-balance. Due to variables in materials, leading edge differences, and
tolerance variations, some vibrations can be attributed to the prop. An easy fix is to:
B-1.
Disconnect leads from the battery.
B-2.
Remove the prop nut, keeping the prop pin horizontal.
B-3.
Remove the prop.
B-4.
Rotate the prop 180 degrees from the original position.
B-5.
Re-install the prop and prop nut.
B-6.
Re-test motor in water test tank. If vibration is not cured. Replace with new propeller and retest. If excessive vibration is still present, proceed to Step 1B.
C.
Armature – bent shaft or out-of-balance armature stack.
C-1.
Remove the prop from the armature shaft.
C-2.
Run the motor (never operate the motor for extended periods of time while out of water) on
medium-to-high speed and watch the armature shaft for a “wobble” that may indicate a bent
shaft. If wobble is noted, replace armature. You may also put your finger on the armature
shaft to feel for a wobble, or briefly touch the shaft with a sharp pointed marker while it is
spinning. A solid mark around the armature indicates a fairly straight shaft, while an
inconsistent line may represent a bent armature shaft.
13-2
Lower Unit Repair
01/27/04
Case VI. Customer complains of low power/thrust
Step 1. Check to ensure proper voltage. Inspect all battery connections, trolling motor plug (if installed), and any butt
splice connections in battery leadwire for corrosion and security.
Step 2. Amp draw is a direct correlation to thrust. Test lower unit amp draw directly (bypass all switches and/or control
board) while motor is under load in a water test tank.
A.
If amp draw meets specifications then the lower unit meets thrust specifications (amp specs are listed
in the annual Minn Kota product brochures).
A-1.
Possible problem in wiring, switches, or control boards of motor or in boat’s supply voltage.
A-2.
Test amp draw specifications with voltage through complete trolling motor (remove any plug
the consumer/dealer may have installed on the leadwire) to determine if a trolling motor
problem exists or if there is a supply voltage problem to the trolling motor.
B.
If amp draw is lower than stated specifications:
B-1.
Inspect for water in lower unit.
B-2.
Inspect brushes and armature for discoloration or other signs of overheating (smell burnt).
Replace parts as needed.
B-3.
Suspect low magnetism of motor shell. (Magnets lose power with time and usage.)
C.
If amp draw is higher than stated specifications:
C-1.
Check for proper/even torque of thru bolts.
C-2.
Check for shorted armature (commutator to armature shaft should not show continuity).
Case VII. Customer complains the trolling motor is draining battery / batteries
down too fast
Step 1. Perform amp draw test while motor is under load in a water test tank (amp specs are listed in the annual Minn
Kota product brochures).
A.
If amp draw meets or is less than stated specs, the motor is not the cause of the batteries draining
quickly.
B.
If amp draw is higher than stated specifications:
B-1.
Check for proper/even torque of thru bolts.
B-2.
Check for shorted armature (commutator to armature shaft should not show continuity).
Case VIII. Motor runs rough / prop “catches” as it spins
See Case IV. regarding noisy motor.
13-3
EM & EP
10/31/02
Section 14.
Engine Mount (EM) & Neptune (EP)
Case I. Motor does not run.
Step 1. Check for proper voltage and polarity. Visually check to see that all wires are attached to proper control board
terminals. Consult appropriate wiring diagram for the model and board being tested. Check for any corroded
connections. Clean / rewire, if necessary.
Step 2. Disconnect motor leads from control module and connect motor leads to 12-volt power source. (This applies to
12 or 24-volt models.)
A.
If motor does not run, the problem is in the motor lower unit. Disassemble and check lower unit for
voltage at the brushes, water in lower unit, worn brushes, bad brush springs, or an open or shorted
armature. Repair/replace parts as necessary. Test motor for proper operation.
B.
If motor ran when motor leads were connected directly to 12vdc, the problem is either with the handcontroller or control module.
B-1.
Test hand-controller:
Hand Controller Test Procedure
The test procedure for the hand controller is performed with your V.O.M. set on the Resistance x 1 scale.
1.
With the speed control @ zero, across the brown and green pins you should have approximately 1-2 ohms. As the
speed control is turned, the resistance will gradually increase to 1K.
2.
With the F/R switch in the Forward position, you should see continuity across the black and white wire pins.
3.
With the F/R switch in Reverse, you should see continuity across the black and yellow wire pin locations.
orange
brown
green
Black wire
1K ohm potentiometer
P
Green wire
white
black
yellow
E
Brown
wire
White wire
B
F/R switch
Plug End
Hand Controller
B-2.
Yellow
wire
Open
Orange wire
Plug End
(Pin End View)
If the hand controller tests okay, the problem is with the control module (or “Y” splitter).
Test control module(s) to verify problem:
a.
Connect control module to appropriate power source (12vdc for EM42, EM44, &
EP42 – 24vdc for EM48, EM54, EM96, EP48, EP96, & EP130).
b.
Plug in known good (tested as per above) hand-controller directly to control module
(bypass / remove “Y” splitter from circuit if motor is an EM96, EP96, or EP130 and
check each control module individually).
c.
Check for voltage at module output leads by hooking up test light (or V.O.M.
probes) to board output leads. Turn hand-controller ON to either F or R and vary the
potentiometer / speed control setting.
14-1
EM & EP
d.
10/31/02
NOTE: all EM control modules and early EP modules, (EPs produced prior to
1999), utilize a motor disconnect relay in the output circuit of the module. On
modules with the disconnect relay, test for output voltage directly at the board output
terminals and at the output leads that connect to the motor unit. Testing in this
manner will determine if the disconnect relay is good or defective.
1.
If there is no output voltage at board terminals, the control board is
defective. Replace control board or module, as needed.
2.
If board terminals have output voltage, but there is no output at the leads
that connect to the motor, the disconnect relay is faulty and needs to be
replaced.
If motor is an EM96, EP96, or EP130, test second control module. If both modules
test fine, problem is in the “Y” splitter cable. Replace “Y” cable, as needed.
Case II. Motor runs in one direction only.
Step 1. Check hand controller and control module plug ends pins and connector sleeves for corrosion. Clean, if needed,
reconnect and test again for proper operation.
Step 2. Test hand controller Forward, Off, and Reverse switch for proper operation and check continuity through switch
per hand controller test procedure on page 14-1.
A.
If faulty switch is found, replace hand controller.
B.
If switch tests okay, problem is with control module. Replace module control board or module
assembly, as needed.
Case III. EM 96, EP96/130 twin motor units only: 1 motor runs, 1 doesn’t
Step 1. On the one motor that doesn’t run, disconnect motor leads from the control module and connect motor leads to
12-volt power source. (This applies to 12 or 24-volt models.)
A.
If motor does not run, the problem is in the motor lower unit. Disassemble and check lower unit for
voltage at the brushes, water in lower unit, worn brushes, bad brush springs, or an open or shorted
armature. Repair/replace parts as necessary. Test motor for proper operation.
B.
If motor does run, go to Step 2.
Step 2. If using four 12vdc batteries to power twin EM or EP models, check to make sure that both modules are
connected to the same power source. For proper operation, batteries 1 &2 should be connected in parallel, next
connect batteries 3 & 4 in parallel. Then series connect the two banks of paralleled batteries. The battery leads
from both modules are then connected to the series connected batteries. (See diagram below.)
Battery 1
Battery 2
Battery 3
Battery 4
-
+
-
+
-
+
-
+
Series link
-
-
+
Control Module
+
Control Module
Step 3. Check all hand controller, control module, and “Y” splitter plug end pins and sleeves for corrosion. Clean, if
needed, reconnect and test again for proper operation. If both motors still do not run, go to Step 4.
Step 4. Disconnect “Y” splitter cable from hand controller and control modules. Connect hand controller directly to the
control module for the motor that is not operating. Test motor function.
A.
If the motor that is connected to this control module operates okay, this control module is good. The
problem is in the “Y” splitter cable. Replace “Y” cable, as needed.
14-2
EM & EP
B.
10/31/02
If the motor that is connected to this control module does not operate, something is faulty with this
control module assembly. Test the control module to determine if just the disconnect relay is defective
or the control board is bad.
NOTE: all EM control modules and early EP modules, (EPs produced prior to 1999), utilize a motor
disconnect relay in the output circuit of the module. On modules with the disconnect relay, test for
output voltage right at the board output terminals and at the output leads that connect to the motor unit.
Testing in this manner will determine if the disconnect relay is good or defective.
B-1.
If there is no output voltage at board terminals, the control board is defective. Replace control
board or module, as needed.
B-2.
If board terminals have output voltage, but there is no output at the leads that connect to the
motor, the disconnect relay is faulty and needs to be replaced.
Case IV. EP only: Trim/Tilt lift system does not operate
Step 1. Check all battery connections, plug connections, and terminal connections for corrosion and security. Clean, if
needed, and test for function. The lift system must be connected to 12 volts only (per EP wiring diagram).
Step 2. Disconnect lift motor power leads from relay harness. Connect 12 volts directly to lift motor, and check for
function. Reverse polarity to reverse direction of travel.
A.
If lift system does not function when relay harness is bypassed, the lift motor is faulty and needs to be
replaced.
B.
If lift system functions when relay harness is bypassed, the problem is with either the relay harness or
the Up/Down Switch.
B-1.
Test Up/Down Switch for continuity.
B-2.
If switch tests okay, replace relay harness.
14-3
DeckHand Electric Anchor
12/11/02
Section 15.
DeckHand Electric Anchor
(models DH1, DH18, DH20, & DH35)
Case I. DeckHand does not lower or raise anchor
Step 1. Check to ensure proper voltage. Inspect battery connections and any butt splice connections in battery leadwire
for corrosion and security.
Step 2. Check to see if lift motor works by applying 12 volts directly to lift motor leads (bypass all the existing wires
and switches).
A.
If motor runs fine, go to Step 3.
B.
If motor does not run, replace lift motor (P/N 2887800). Test unit for proper operation.
C.
If motor can be heard running, but the rope spool does not spin, remove the gear motor from the side of
the base. Remove the housing cover gasket so that you can inspect the drive gear (P/N 350-154).
C-1.
If the drive gear is cracked, broken, or the teeth are stripped, replace drive gear (grease new
gear liberally with wheel bearing grease). Reassemble unit and test for proper operation.
NOTE: If new gear seems very tight, you may need to ream out the center hole of the gear
with a 21/64” drill bit.
C-2.
If drive gear looks good, remove gear to inspect the armature/worm shaft. If worm shaft is
broken, replace entire gear motor. Reassemble and test unit for proper operation.
Step 3. Check for continuity through the automatic reset circuit breaker which is located in the positive (+) lead wire
between the battery and the UP / DOWN switch. The circuit breaker is defective if no continuity is noted.
Replace circuit breaker and test unit for proper operation.
Step 4. Disassemble the UP / DOWN switch housing and inspect all connections at the switch terminals for security.
A.
After going through all the above steps, the UP / DOWN switch must be defective. Replace switch
and test unit for proper operation.
Case II. DeckHand does not have enough power to lift anchor (you need to help
by pulling up and “feeding” rope into winch as it lifts)
Step 1. Check to ensure proper voltage. Inspect battery connections and any butt splice connections in battery leadwire
for corrosion and security.
Step 2. Check for proper voltage to motor while DeckHand is under load. Use of adequate gauge wire in boat or any
leadwire extension is critical to avoid voltage drop / low voltage to the motor. Inadequate wiring or corroded
plug / plug receptacle connections can result in considerable voltage loss and poor performance.
Step 3. Possible problem with the drive gear (P/N 350-154) in the gear motor. Remove the gear motor from the side of
the base. Remove the housing cover gasket so that you can inspect the drive gear (P/N 350-154).
A. If the drive gear is cracked, broken, or stripped, replace drive gear (grease new gear liberally with wheel
bearing grease). Reassemble unit and test for proper operation. NOTE: If new gear seems very tight, you
may need to ream out the center hole of the gear with a 21/64” drill bit.
Case III. DeckHand lowers anchor then immediately lifts anchor (or vice versa)
Step 1. Possible knot in rope on spool. If the rope is caught by a knot or part of the rope is buried in the layered
wrappings of the rope, the spool will be turning the proper direction, but the rope will reverse when it catches
the knot.
A.
Remove cover from DeckHand base.
B.
“Feed out” rope from spool while watching for knots and/or the rope being buried underneath other
layers.
B-1.
Re-adjust rope on spool, as needed.
15-1
DeckHand Electric Anchor
12/11/02
Case IV. DeckHand lifts anchor when you push “DOWN” switch and lowers
when you push “UP”
Step 1. Check to ensure proper polarity at the battery and at the Up/Down switch (polarity may be reversed).
Step 2. Possible knot in rope on spool. If the rope is caught by a knot or part of the rope is buried in the layered
wrappings of the rope, the spool will be turning the proper direction, but the rope will reverse when it catches
the knot.
A.
Remove cover from DeckHand base.
B.
“Feed out” rope from spool while watching for knots and/or the rope being buried underneath other
layers.
B-1.
Re-adjust rope on spool, as needed.
Case V. Deckhand will lift anchor, but not deploy the anchor.
NOTE: When the UP / DOWN switch is in the Down position, the anchor rope must have tension applied in
order for the motor to run (play out rope), as the rope tension actuates the momentary switch P/N 2374010.
Step 1. Possible defective momentary switch (P/N 2374010)
A.
Remove spool and test with finger by actuating button
Step 2. Spool bearing (P/N 2370000) may be installed incorrectly. The spool bearing must be free to move forward and
back to actuate the momentary switch.
A.
If the spool bearing cannot move back and forth, remove rope spool and rope guide from DeckHand
base. Remove the spool bearing, rotate it 1/4 turn, and reassemble DeckHand. Test unit for proper
operation.
Case VI. DeckHand lowers anchor, but does not automatically feed out line
when anchor hits bottom
Step 1. Defective momentary switch. Replace as needed.
15-2
CoPilot Wireless Accessory
04/15/03
Section 16.
CoPilot Wireless Accessory
Although the CoPilot transmitter (remote) and receiver are not serviceable in the field, we have included this Section in
the Service Repair Manual to help you understand the product and answer consumer questions regarding the CoPilot.
Consumers with possible defective CoPilots should be directed to the Minn Kota Customer Service hotline toll-free at
(800) 227-6433.
Case I. Remote is not transmitting.
Step 1. The battery may be discharged. Replace battery, if needed.
Step 2. Receiver may not have “learned” the ID number of the remote.
A.
Remote needs to be learned. See “ADDING / REMOVING REMOTES” (below).
Step 3. With the foot pedal connected, the MOM-CON switch is in the CON position. An audio response will be heard
if a button is pressed with the foot pedal in the CON position.
A.
The foot pedal switch must be placed in the MOM position. The receiver will not accept any
commands from the remote with the switch in the CON position.
Step 4. If remote has been taken apart, the keypad and top case may have been installed backwards.
A.
Take remote apart (see BATTERY REPLACEMENT below) and reinstall case halves with the proper
orientation.
Case II. When receiver is powered up, it sounds one of the following beep
patterns:
1 long beep, 2 short beeps, pause, repeat
Step 1. The foot pedal MOM-CON switch is in the CON position
A.
The foot pedal switch must be placed in the MOM position. The beeping sound will continue until the
foot pedal switch is placed in the MOM position.
4 chirps followed by a second long beep
Step 1. Receiver has not “learned” the ID number of the remote (receiver memory is empty).
A.
Remote needs to be learned. See “ADDING / REMOVING REMOTES” (below).
Case III. The prop is not turning, but the “Prop On” audio tick is still going.
Step 1. Prop speed is set at “0”
A.
Increase the prop speed above “0”.
Step 2. PROP ON tick occurs only in Audio mode 3
A.
Switch Audio mode to either Audio 1 or 2.
SYSTEM FEATURES
• CoPilot is a wireless, “plug and play” accessory that allows the angler to control most corded Minn Kota PowerDrive or PowerDrive
AutoPilot trolling motors from anywhere on the boat.
• CoPilot may be used with or without the corded foot pedal.
• CoPilot is compatible with any PowerDrive or AutoPilot motor with the flat foot pedal plug.
• CoPilot will not affect AutoPilot operation.
• Up to 10 remotes may be used interchangeably with the same receiver.
• The CoPilot provides finer steering control than the corded foot pedal.
• The receiver and remote are environmentally sealed and will not be affected by rain, wind or snow.
• System includes three rod mounts which allows the angler to move the remote from rod to rod.
16- 1
CoPilot Wireless Accessory
02/05/03
MISCELLANEOUS INFORMATION
•The five buttons are for PROP ON/OFF, STEER LEFT, STEER RIGHT, INCREASE SPEED, AND DECREASE SPEED.
•Pressing the PROP ON/OFF button will turn the propeller on or off. The button does not need to be held down.
(Press the button once to turn the motor ON; press button a second time to turn it OFF.)
•Pressing either STEERING button will cause the motor to turn in the desired direction as long as the button is held down. If a steering
button is held for more than seven seconds, the steering will automatically stop.
•Pressing and releasing the INCREASE SPEED or DECREASE SPEED buttons will cause the speed to increase or decrease by one
level. The speed is adjustable from level 0-10. At level 0, the prop will not turn.
GENERAL OPERATION
Using the CoPilot with the corded foot pedal
•When the MOM-CON switch is in the MOM position, the angler may begin using the remote at any time.
•As soon as any remote button is pressed, the initial speed setting will be approximately the same as the foot pedal’s speed control
position. However, the prop will not automatically turn on until the remote’s prop on/off button is pressed.
•Pressing the corded foot pedal switches will override the remote and receiver function and control will automatically go to the corded
foot pedal. The prop speed will also revert to the current position of the speed control on the foot pedal.
Using the CoPilot without the corded foot pedal
•Some anglers will prefer to have the deck completely clear of any unnecessary cables and foot pedals.
When using the Copilot in this manner, the receiver will always react to any commands from the remote.
ADDING / REMOVING REMOTES
•The CoPilot receiver in this kit has already “learned” the ID number of the remote it is packaged with.
•To “learn” the ID number of additional remotes, follow these steps:
1.) Press and hold the LEARN button located on the side of the receiver (receiver will emit a continuous tone.)
2.) Press any button on the remote (receiver will beep 4 times confirming that it has “learned” the ID number of the remote and
that the programming is valid and complete.)
•“Re-learning” the ID number of the same remote will not overwrite previously “learned” remotes.
•If the receiver has “learned” the ID number of ten remotes, “learning” an eleventh remote will erase or over write the first “learned”
remote.
•The CoPilot allows the angler to erase all stored remote ID numbers fro the receiver. To do so, follow these steps:
1.) Remove power from the receiver by unplugging the receiver from the motor.
2.) Press and hold the LEARN button and power up the receiver by plugging it back into the motor. Hold the learn button down
for 10 seconds. During this time the receiver audio will emit a warble sound, slowly transitioning to a constant beep,
and then shut off.
3.) Release the LEARN button and the receiver will reboot. The receiver will chirp 4 times followed by a 1 second long beep
indicating memory is empty. This audio pattern will occur each time the receiver powers up until a remote ID number
is learned.
AUDIO MODES UNIT IS FACTORY PRE-SET TO AUDIO MODE 2.
•There are three receiver audio modes available. To switch from one audio mode to another, press and hold both the INCREASE and
DECREASE speed buttons on the remote down for one second. The receiver will respond with 1, 2, or 3 audible beeps indicating the
corresponding receiver audio mode change.
Audio Mode 1 = All of the normal audible sounds mentioned in this owners manual.
Audio Mode 2 = Same as audio mode 1 plus an audible beep for speed increase / decrease and prop on/off.
Audio Mode 3 = Same as audio mode 2 plus the prop on audible click every few seconds.
NOTE: when the corded foot pedal is in control and the propeller is on, the prop on indicator click will be heard if the receiver is set to
audio mode 3.
BATTERY REPLACEMENT
THE REPLACEMENT BATTERY MUST BE A MODEL CR2032 COIN CELL TYPE
To replace the battery, follow these steps:
1.) Temporarily ground yourself by touching a grounded metal object in order to discharge any static electricity in your body.
2.) Remove the four screws on the bottom of the remote case.
3.) Separate the case halves to access the circuit board.
4.) Pull back the retaining fingers of the battery holder to remove the battery (underside of circuit board).
5.) Install the new battery with the positive (+) side of the battery facing up (away from the circuit board). Ensure battery is
snapped securely in place.
6.) Reassemble the remote. Note that the alignment peg in the remote case must line up with the corresponding alignment
hole in the circuit board. Also note that the keypad must be positioned so that the buttons are over the end of the
circuit board opposite from the alignment peg and hole. Reinstall the four case screws and tighten them as required.
16- 2
3X Steering Repair Manual
01/21/04
Section 17.
3X Steering
For step-by-step motor lower unit procedures refer to Sections 1, 2, and 13 of the Minn Kota Service Manual.
For the one-time procedure to initially orient “straight ahead” on bowmount 3X models go to page 17-9.
Case I. Directional Indicator always stays lit.
This reed switch is usually open. With the handle bar magnet in close proximity to the reed switch, the reed
switch contacts will close and disengage power to the PWM circuit. Removing the bar magnet from close
proximity to the reed switch will open the switch contacts, energize the PWM circuit, and light the directional
indicator.
A.
Check to ensure that the magnet is in place in the handle pivot assembly.
B.
Check to ensure that the sensor bracket and on/off reed switch are in the proper position.
Disassembly / Reassembly Procedures
The complete disassembly / reassembly procedures listed here will aid the repair center when repairing any
3X Minn Kota motor. We suggest that this entire 3X repair section be read prior to starting a 3X repair
procedure.
NOTE: The basic disassembly / reassembly procedures outlines in this section apply to both transom and
bowmount, freshwater and saltwater (RipTide) 3X motors.
Fig. 1
Transom mount 3X
Fig. 2
Bow mount 3X
3X Disassembly
Step 1. Start by removing the extension handle from the inner handle by pressing down on the handle by
pressing down on the handle latch / detent button located on the top side of the handle near the control
box. With latch button depressed, slide the extension handle off and clear of the inner handle. (see
Fig. 3, page 17-2)
Step 2. Remove the six Phillips, pan head screws (#6-20 x 5/8”) located on the underside of the control box
assembly. (2 screws at front, middle, and rear of control box) (see Fig. 3, page 17-2)
With the cover screws removed the control box cover can be lifted up and tipped to the side
A.
to access the battery meter wires. Disconnect the red and black battery meter leads from the
speed selector (on 5-speed models) or the red and black wires exiting the control board on
variable-speed 3X motors.
17- 1
3X Steering Repair Manual
01/21/04
Step 3. Lift up the inner handle assembly along with the handle pivot, handle bearing, and potentiometer
(variable-speed motors) or speed selector switch (5-speed motors). Disengage the inner handle
assembly from the “D” shaft on the potentiometer/switch, remove the inner handle, and set it aside for
reassembly. (see Fig. 3)
Step 4. At this point prior to further disassembly, note the routing and positioning of all electrical wiring.
When reassembling the 3X motor the wires must be placed back in the same position to avoid getting
the wires in the circular rack and pinion steering gear mechanism.
A.
Disconnect the motor wires, battery leads, and directional indicator light leads from the speed
selector switch (5-speed motors) or control board (variable-speed motors).
A-1.
On 5-speed 3X models, the switch can easily be separated from the control box when the
wires are disconnected.
A-2.
On variable-speed 3X models, loosen the Phillips pan head screw (P/N 2073414, #6-32 x 3/8”)
holding the P/N 2071905 sensor bracket in place. (Sensor bracket is located in control box
along side the potentiometer support.) Loosening the screw allows removal of the magnetic
on/off reed switch attached to wires exiting the control box. (On/off reed switch is the small
5/8” long, 3/16” diameter black cylinder with 2 small black wires attached.) Then remove the
two P/N 2073416, #8-32 x ½” socket head cap screws (located in recessed openings on the
underside of the control box) using a 9/64” allen wrench/driver. The control board is then
free to be removed. (see Fig. 3)
Fig. 3
Step 5. Once again, prior to further disassembly, note how the 3X motor wires are routed and held in position
by the wire clamp located on the coupler socket retainer / indicator light bracket assembly P/N
2992900. (see Fig. 4, page 17-3) Also note how the directional indicator light wires are twisted and
wire tied to the motor wire to prevent the indicator light wires getting in the circular rack and pinion
steering gear mechanism.
A.
Remove the P/N 2372100 phillips head screw (#8-18 x 5/8”) holding the retainer / light bracket
/ wire clamp assembly P/N 2992900 in place.
17- 2
3X Steering Repair Manual
B.
C.
01/21/04
IMPORTANT – With the control box parallel to the motor lower unit, note how two sides of
the hexagon ID of the coupler socket (P/N 2070800 black coupler socket for bow mount
motors, P/N 2070801 white couple socket for transom mount motors) are parallel to / in-line
with the control box pivot screws (P/N 2073408). When reassembling a 3X motor, the coupler
socket (which drives the directional indicator) must be repositioned in this exact same manner
for proper orientation of the directional indicator arrow. (Directional arrow is parallel to the
motor lower unit pointing towards the direction of boat travel when in the water with the
motor running.)
After removing the retainer / light assembly, remove the coupler socket, idler gear, idler
plate, and preload ring (P/Ns 2070800/2070801, 2072215, 2071900, and 2073000). (see Fig. 4)
Fig. 4
17- 3
3X Steering Repair Manual
01/21/04
Step 6. Remove the two P/N 2332101 #8-32 x ½” tilt stop bracket / detent block retaining screws, then remove
-the P/N 2072815 bracket and P/N 2072810 detent block. (see Fig. 4, page 17-3)
Step 7. Remove the two soft plastic pivot knob covers (P/N 2070117 or 2070118) to expose the two ¼-20 x 7/8”
Phillips head screws (P/N 2073408) that hold the pivot know and control box assembly on the gear
carrier (P/N 2072210) / pivot yoke (P/N 2071512 or 2072513) assembly. (see Fig. 4, page 17-3)
Removing the two P/N 2073408 screws (these two screws go in to two nyloc nuts located
A.
inside the gear carrier) will allow the control box assembly, pivot knobs, and bushings to be
separated from the gear carrier and yoke pivot assembly. (see Fig. 4, page 17-3)
Step 8. With the control box assembly removed, unscrew the 5/16” x ½” socket head, shoulder shank cap
screw (P/N 2073400) that is located in the center of the gear carrier (P/N 2072210). (A 5-32” allen
wrench / driver is required.) (see Fig. 4, page 17-3)
A.
Remove the cap screw along with the washers, then remove the two P/N 2303412 #6-20 x 5/8”
Phillips head screws and P/N 2071714 washers that serve to guide/retain the gear carrier on the
pivot yoke. (see Fig. 4, page 17-3)
B.
With the cap screw and 2 phillips head screws removed, the gear carrier can be removed from
the pivot yoke followed by the gear carrier bearing. For reassembly, note that this bearing is
split and that the split ends key onto a rib located on the inside circumference of the pivot
yoke.
Fig. 5
17- 4
3X Steering Repair Manual
01/21/04
Step 9. Remove the collar halves (P/N 2261622) clamped around the motor inner tube (1-1/8” diameter tube).
The collar halves are located just below the lower collar (P/N 2071500) on the outer tube of either the
transom mount or bowmount 3X motor. (A 3/16” allen wrench / driver is required.) (see Fig. 5, page
17-4)
Step 10. With the collar halves removed, the motor lower unit and inner tube assembly can be pushed / lifted
up to expose the 4-hole collar (P/N 2071560) and four #8-32 x 7/16” Phillips flathead countersunk
screws (P/N 2223468) that hold the pinion gear assembly into the inner tube. (see Fig. 5, page 17-4)
Remove the four screws (P/N 2223468) to allow removal of the pinion assembly (P/N
A.
2992205), upper bearing (P/N 2077305) and 4-hole collar. (see Fig. 5, page 17-4)
NOTE: The four pinion assembly retaining screws are held in place with LocTiteTM during
B.
assembly. Removal may require heat application to the screw head. When reassembling a
3X motor, LocTiteTM primer and #603 compound MUST be reapplied to these four retaining
screws.
With the four retaining screws removed the pinion assembly, upper bearing, and 4-hole collar
can be removed.
Step 11. With the pinion assembly, bearing, and 4-hole collar removed, the motor lower unit / inner tube
assembly along with the lower collar (P/N 2071500) can be slid down and out the bottom of the outer
tube.
Step 12. To remove the pivot yoke from the upper end of the outer tube, loosen the ¼-20 socket head cap
screw and nyloc nut that serves to clamp the pivot yoke on to the outer tube. Loosen the steering
tension knob (P/N 2070105).
A.
With the screw and nut loose the pivot yoke (P/N 2071512 or P/N 2071513) can be lifted up and
off the outer tube. NOTE: When removing the pivot yoke, note its position / orientation on
the outer tube.
A-1.
On transom mount 3X motors, the steering tension knob is positioned towards the
bracket clamp screws.
A-2.
On bow mount 3X motors, the steering tension know is toward the boat when
mounted and positioned for installation of the bow mount orientation collar.
A-3.
Also, note that a tube key (P/N 2076700) is used to properly position the pivot yoke in
relation to the slots / grooves in the outer tube.
Step 13. For further disassembly / replacement of the transom bracket or BowGuard 360º assembly, the outer
tube (or outer tube and pivot yoke assembly) can be slid out of the transom bracket hinge or
BowGuard 360º.
A. On transom mount 3X motors, note that a tension block (P/N 2072800) is located between the
outer tube and the orientation collar on the transom bracket. This block will fall out of place
when the outer tube is removed from the bracket hinge. Be sure to re-install this part when
reassembling a 3X transom mount model.
This concludes the basic disassembly procedures for 3X transom and bow mount, fresh and saltwater motors.
3X motor lower unit trouble shooting, disassembly, and repair procedures are the same as all other Minn Kota
5-speed or variable speed motor units.
For re-assembly instructions go to page 17-6.
17- 5
3X Steering Repair Manual
01/21/04
3X Reassembly
Step 1. With the outer tube and pivot yoke properly positioned and slid into the transom bracket hinge or
BowGuard 360º assembly (reference Disassembly Procedure Step 12), slide the motor lower unit,
inner tube assembly, and lower collar (P/N 2071500) back into place in the outer tube with the upper
end of the inner tube extending out the top of the pivot yoke. (see Fig. 5 on page 17-4)
Step 2. Re-install the 4-hole collar, upper bearing, and pinion assembly on / in the inner tube.
A.
Prior to installing the pinion assembly, examine the upper / top end of the pinion gear teeth.
B.
Two of the gear teeth will have small raised bumps.
A-1.
On transom mount 3X motors, the two teeth with the raised bumps need to be
oriented toward the nose of the motor lower unit when installed in the inner tube.
A-2.
On bow mount 3X motors the two teeth with the raised bumps need to be oriented
toward the prop end of the motor lower unit when installed in the inner tube.
Examine the four pinion assembly retaining screws (P/N 2223468) for any damage. Replace
them with new screws as needed.
B-1.
Re-apply LocTite primer and LocTite #603 compound, then insert and tighten the
screws securely into the 4-hole collar, inner tube, and pinion gear assembly.
Step 3. Place the outer tube / pivot yoke assembly and inner tube, upper bearing, and pinion gear assembly
back into their normal assembled positions. (Normal assembled position is with the upper bearing
supported in its recessed area of the pivot yoke.)
A.
Slip the lower collar (P/N 2071500) up into place on the lower end of the outer tube.
A-1.
Re-install the collar halves (P/N 2261622) on the inner tube using the two ¼-20 x 1”
socket head cap screws.
A-2.
Slide the collar halves up against the bottom of the lower collar and tighten the collar
screws to secure the collar in place.
Step 4. Re-install the gear carrier bearing (P/N 2077320) in the pivot yoke.
A.
Use care to line up the rib in the pivot yoke with the ends of the split gear carrier. (see Fig. 5
page 17-4)
Step 5. Transom mount motors A.
Align the motor lower unit with the transom bracket. Position the lower unit with the “nose”
B.
C.
of the motor towards the transom bracket clamp screws. Block or hold the motor lower unit
in this position.
Place the gear carrier (P/N 27702210) into position in the pivot yoke with the tilt detent spring
(P/N 2072705) towards the prop end of the motor lower unit.
While looking at the two pinion gear teeth with the raised bumps, count two teeth clockwise
(on transom mount 3X models the two raised bumps will be oriented toward the nose of the
motor lower unit).
C-1.
The second tooth clockwise from the bumps must be lined up with the timing mark in
the gear carrier.
NOTE: The timing mark used for transom mount 3X models is a small raised rib on
the inside circumference of the gear carrier. (Located in the 1:30 o’clock position
when the gear carrier is held with the detent spring towards the viewer and viewed
from above.)
Bow mount motors –
A.
Align the motor lower unit with the prop end on the same side as the steering tension knob in
B.
the pivot yoke. Block or hold the motor lower unit in this position.
Place the gear carrier (P/N 27702210) into position in the pivot yoke with the tilt detent spring
(P/N 2072705) towards the “nose” of the motor lower unit.
17- 6
3X Steering Repair Manual
C.
01/21/04
Align the two pinion gear teeth with the raised bumps (on bow mount 3X models these two
teeth will be oriented toward the prop end of the motor lower unit) with the timing mark in
the gear carrier.
NOTE: The timing mark used for bow mount 3X models is a raised bump on the gear tooth.
(Located in the 12:00 o’clock position when the gear carrier is held with the detent spring
towards the viewer and viewed from above.)
Step 6. With the gear carrier in its proper location and position (relative to the appropriate timing marks), reinstall the socket head cap screw (P/N 2073400) and washers. Tighten this screw with a 5/32” allen
wrench / driver.
A.
Re-install the two #6–20 x 5/8” phillips head screws (P/N 2303412) and washers (P/N 2071714)
that retain / guide the gear carrier on the pivot yoke.
Step 7. Re-install the control box with bushing and pivot knobs on to the gear carrier pivot yoke assembly.
(see Fig. 4, page 17-3)
A.
Position the control box so that the handle end of the box is opposite the tilt detent spring in
B.
C.
the gear carrier.
Examine the pivot knobs in the area where they contact the gear carrier. Note the two flat
surfaces on both edges of the pivot knob shank. These two flats must be aligned with the two
ribs along side the hole in the gear carrier for the pivot knob screws (P/N2073408).
With the control box, bushing, pivot knobs, pivot knob screws, and nyloc nuts in their proper
position, securely tighten the two ¼-20 x 7/8” phillips head pivot knob screws.
C-1.
The two soft plastic pivot knob covers can be re-installed at this time. Note the flat
surfaces on the outer edge of the pivot knob as they serve to “key” the pivot knob
covers to prevent their rotation.
Step 8. Re-install the tilt detent block (P/N 2072810) in the control box (teeth towards the detent spring)
followed by the tilt stop bracket (P/N 2072815) and the two #8-32 x ½” phillips head screws that are
used to attach both parts to the control box.
Step 9. Re-install the preload ring (P/N 2073000), idler plate (P/N 2071900) idler gear (P//N 2072215), and
coupler socket (P/N 2070800 or P/N 2070801). (White coupler socket for transom mount motors and
black coupler socket for bow mount motors.)
A.
As noted during disassembly, position the coupler socket so that any two parallel sides of the
hexagon I.D. of the coupler socket are as close as possible to being parallel to the control box
pivot screws.
Coupler Socket
Pivot Screws
Step 10. Re-install the control board or 5-speed switch using the fasteners or parts removed during disassembly. (see Fig. 3, page 17-2)
17- 7
3X Steering Repair Manual
A.
B.
C.
D.
E.
01/21/04
Reconnect motor wires, battery leads, directional indicator light wires, and (if a variable
speed unit) place the on/off reed switch back in its proper location. Tighten the sensor
bracket screw to secure reed switch.
NOTE: if connections were sealed with heat shrink tubing prior to disassembly they MUST
be resealed with new heat shrink!
Re-install the inner handle assembly. Start by engaging the “D” hole in the handle pivot on
the “D” shaft of the potentiometer or 5-speed switch. Then place the handle pivot, inner
handle, and handle bearing in their proper location. (Note that the triangular shaped arrow on
the handle bearing is on top.)
Reconnect the red and black battery meter leads to the appropriate wires (exiting the control
board on variable speed motors or switch on 5-speed motors).
NOTE: the red and black battery meter wires must be routed to the side of the control box
cover and pushed in to the slots in the cover ribs prior to installing the cover on the control
box.
Also prior to cover re-installation, line up the directional indicator with the motor lower unit.
(The directional arrow points toward the “nose of the motor lower unit.)
Position cover in place on control box and secure with the six #6-20 x 5/8” phillips head
screws (P/N 2303412).
Step 11.Re-install extension handle and test the motor for proper full range 3X steering function to make sure
that nothing is binding or restricting the steering system.
Connect the motor battery leads to the appropriate voltage and test run for speed variation and
function. Test the battery meter for proper function. Test the control box tilt adjustment for
proper range and travel. Check and verify overall motor operation and function.
A.
This concludes the basic 3X motor re-assembly procedures. Further step-by-step repair procedures will be
added as needed when field service issues arise
17- 8
3X Steering Repair Manual
01/21/04
(This is a one-time procedure to initially orient “straight ahead” on bowmount 3X models.)
17- 9
3X Steering Repair Manual
17-10
01/21/04