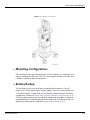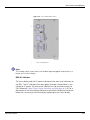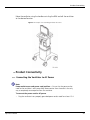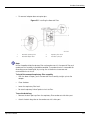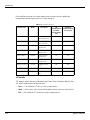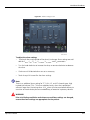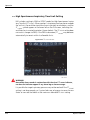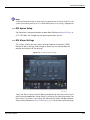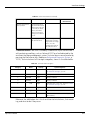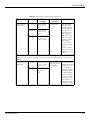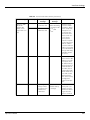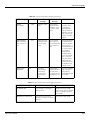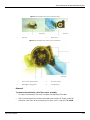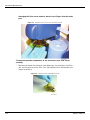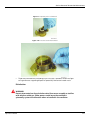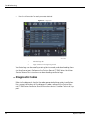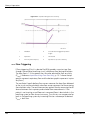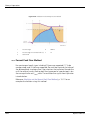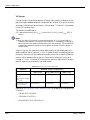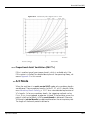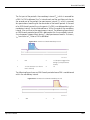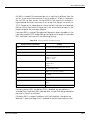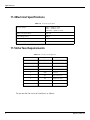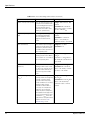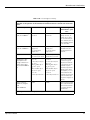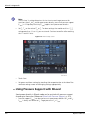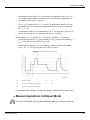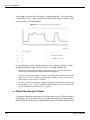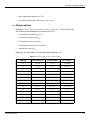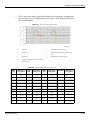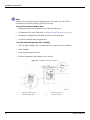
1
Operator's Manual Puritan Bennett 980 Series Ventilator TM Copyright Information COVIDIEN, COVIDIEN with logo, and positive results for life are U.S and internationally registered trademarks of COVIDIEN AG. All other brands are trademarks of a Covidien company or of their respective owners. ©2014 COVIDIEN. The information contained in this manual is the sole property of Covidien and may not be duplicated without permission. This manual may be revised or replaced by Covidien at any time and without notice. Ensure this manual is the most current applicable version. If in doubt, contact Covidien’s technical support department or visit the Puritan Bennett™ product manual web page at: http://www.covidien.com Click: Our Products > Respiratory & Monitoring Products > Brands > Puritan Bennett. Click Sales and Support Center > Product Manuals and Directions for Use, then follow the prompts to select the desired manual. While the information set forth herein is believed to be accurate, it is not a substitute for the exercise of professional judgement. The ventilator should be operated and serviced only by trained professionals. Covidien’s sole responsibility with respect to the ventilator and software, and its use, is as stated in the limited warranty provided. Nothing in this document shall limit or restrict in any way Covidien’s right to revise or otherwise change or modify the equipment (including its software) described herein, without notice. In the absence of an express, written agreement to the contrary, Covidien has no obligation to furnish any such revisions, changes, or modifications to the owner or user of the equipment (including its software) described herein. Table of Contents 1 Introduction 1.1 Overview . . . . . . . . . . . . . . . . . . . . . . . . . . . . . . . . . . . . . . .1-1 1.1.1 Related Documents . . . . . . . . . . . . . . . . . . . . . . . . . . . . . . . .1-1 1.2 Global Symbol Definitions . . . . . . . . . . . . . . . . . . . . . . . . .1-2 1.3 Safety Information . . . . . . . . . . . . . . . . . . . . . . . . . . . . . . .1-3 1.3.1 Safety Symbol Definitions . . . . . . . . . . . . . . . . . . . . . . . . . . .1-3 1.3.2 Warnings Regarding Fire Hazards . . . . . . . . . . . . . . . . . . . . .1-3 1.3.3 General Warnings . . . . . . . . . . . . . . . . . . . . . . . . . . . . . . . . .1-4 1.3.4 Warnings Regarding Environment of Use . . . . . . . . . . . . . . . .1-7 1.3.5 Warnings Before Using Equipment . . . . . . . . . . . . . . . . . . . .1-8 1.3.6 Warnings Regarding Electrical Power . . . . . . . . . . . . . . . . . . .1-8 1.3.7 Warnings Regarding Ventilator Settings . . . . . . . . . . . . . . . . .1-9 1.3.8 Warnings Regarding Hoses, Tubing, and Accessories . . . . . . .1-9 1.3.9 Warnings Regarding Gas Sources . . . . . . . . . . . . . . . . . . . .1-11 1.3.10 Warnings Regarding Infection Control . . . . . . . . . . . . . . . . .1-12 1.3.11 Warnings Regarding Ventilator Maintenance . . . . . . . . . . . .1-13 1.3.12 Cautions . . . . . . . . . . . . . . . . . . . . . . . . . . . . . . . . . . . . . . .1-13 1.3.13 Notes . . . . . . . . . . . . . . . . . . . . . . . . . . . . . . . . . . . . . . . . .1-14 1.4 Obtaining Technical Assistance . . . . . . . . . . . . . . . . . . . .1-15 1.4.1 Technical Services . . . . . . . . . . . . . . . . . . . . . . . . . . . . . . . .1-15 1.4.2 On-Screen Help . . . . . . . . . . . . . . . . . . . . . . . . . . . . . . . . . .1-18 1.5 Warranty Information . . . . . . . . . . . . . . . . . . . . . . . . . . .1-19 1.6 Manufacture Date . . . . . . . . . . . . . . . . . . . . . . . . . . . . . .1-19 1.7 Manufacturer . . . . . . . . . . . . . . . . . . . . . . . . . . . . . . . . . .1-20 1.8 Electromagnetic Compatibility . . . . . . . . . . . . . . . . . . . .1-20 2 Product Overview 2.1 2.2 2.3 2.4 2.5 2.6 Overview . . . . . . . . . . . . . . . . . . . . . . . . . . . . . . . . . . . . . . .2-1 Ventilator Description . . . . . . . . . . . . . . . . . . . . . . . . . . . .2-2 Indications For Use . . . . . . . . . . . . . . . . . . . . . . . . . . . . . . .2-4 Contraindications . . . . . . . . . . . . . . . . . . . . . . . . . . . . . . . .2-4 Components List . . . . . . . . . . . . . . . . . . . . . . . . . . . . . . . . .2-5 Product Views . . . . . . . . . . . . . . . . . . . . . . . . . . . . . . . . . . .2-6 GUI Front View . . . . . . . . . . . . . . . . . . . . . . . . . . . . . . . . . . .2-6 GUI Rear View . . . . . . . . . . . . . . . . . . . . . . . . . . . . . . . . . . . .2-7 BDU Front View . . . . . . . . . . . . . . . . . . . . . . . . . . . . . . . . . . .2-8 BDU Rear View . . . . . . . . . . . . . . . . . . . . . . . . . . . . . . . . . .2-10 2.6.1 2.6.2 2.6.3 2.6.4 i 2.6.5 Ventilator Side Views . . . . . . . . . . . . . . . . . . . . . . . . . . . . . .2-14 Mounting Configurations . . . . . . . . . . . . . . . . . . . . . . . .2-15 Battery Backup . . . . . . . . . . . . . . . . . . . . . . . . . . . . . . . . .2-15 Graphical User Interface . . . . . . . . . . . . . . . . . . . . . . . . . .2-16 2.9.1 Primary Display . . . . . . . . . . . . . . . . . . . . . . . . . . . . . . . . . .2-16 2.10 GUI Controls and Indicators . . . . . . . . . . . . . . . . . . . . . . .2-16 2.10.1 Control Keys . . . . . . . . . . . . . . . . . . . . . . . . . . . . . . . . . . . .2-16 2.10.2 Visual Indicators . . . . . . . . . . . . . . . . . . . . . . . . . . . . . . . . .2-17 2.10.3 On-screen Symbols and Abbreviations . . . . . . . . . . . . . . . . .2-20 2.10.4 Audible Indicators . . . . . . . . . . . . . . . . . . . . . . . . . . . . . . . .2-23 2.11 Breath Delivery Unit . . . . . . . . . . . . . . . . . . . . . . . . . . . . .2-25 2.11.1 BDU Controls and Indicators . . . . . . . . . . . . . . . . . . . . . . . .2-25 2.11.2 Connectors . . . . . . . . . . . . . . . . . . . . . . . . . . . . . . . . . . . . .2-35 2.12 Special Features . . . . . . . . . . . . . . . . . . . . . . . . . . . . . . . .2-35 2.13 Color Definitions . . . . . . . . . . . . . . . . . . . . . . . . . . . . . . . .2-36 2.14 Pneumatic Diagrams . . . . . . . . . . . . . . . . . . . . . . . . . . . . .2-36 2.7 2.8 2.9 3 Installation 3.1 3.2 3.3 Overview . . . . . . . . . . . . . . . . . . . . . . . . . . . . . . . . . . . . . . .3-1 Safety Reminders . . . . . . . . . . . . . . . . . . . . . . . . . . . . . . . .3-1 Product Assembly . . . . . . . . . . . . . . . . . . . . . . . . . . . . . . . .3-2 How to Assemble Ventilator Components . . . . . . . . . . . . . . .3-2 Product Power Sources . . . . . . . . . . . . . . . . . . . . . . . . . . . . .3-2 Product Placement . . . . . . . . . . . . . . . . . . . . . . . . . . . . . . .3-4 Product Connectivity . . . . . . . . . . . . . . . . . . . . . . . . . . . . .3-5 Connecting the Ventilator to AC Power . . . . . . . . . . . . . . . .3-5 Connecting the Gas Supplies . . . . . . . . . . . . . . . . . . . . . . . . .3-7 Filter Installation . . . . . . . . . . . . . . . . . . . . . . . . . . . . . . . . .3-10 Connecting the Patient Circuit . . . . . . . . . . . . . . . . . . . . . . .3-14 How to Install Accessories . . . . . . . . . . . . . . . . . . . . . . . .3-18 Batteries . . . . . . . . . . . . . . . . . . . . . . . . . . . . . . . . . . . . . . .3-18 Battery Testing . . . . . . . . . . . . . . . . . . . . . . . . . . . . . . . . . .3-23 Battery Performance Test Results . . . . . . . . . . . . . . . . . . . . .3-23 Battery Life . . . . . . . . . . . . . . . . . . . . . . . . . . . . . . . . . . . . .3-25 Battery Disposal . . . . . . . . . . . . . . . . . . . . . . . . . . . . . . . . . .3-25 Flex Arm . . . . . . . . . . . . . . . . . . . . . . . . . . . . . . . . . . . . . . .3-25 Humidifier . . . . . . . . . . . . . . . . . . . . . . . . . . . . . . . . . . . . . .3-27 Ventilator Operating Modes . . . . . . . . . . . . . . . . . . . . . .3-30 Normal Mode . . . . . . . . . . . . . . . . . . . . . . . . . . . . . . . . . . .3-30 Quick Start . . . . . . . . . . . . . . . . . . . . . . . . . . . . . . . . . . . . .3-30 3.3.1 3.3.2 3.4 3.5 3.5.1 3.5.2 3.5.3 3.5.4 3.6 3.6.1 3.6.2 3.6.3 3.6.4 3.6.5 3.6.6 3.6.7 3.7 3.7.1 3.7.2 ii 3.7.3 Stand-By State . . . . . . . . . . . . . . . . . . . . . . . . . . . . . . . . . . .3-31 3.7.4 Service Mode . . . . . . . . . . . . . . . . . . . . . . . . . . . . . . . . . . . .3-33 3.8 Product Configuration . . . . . . . . . . . . . . . . . . . . . . . . . . .3-35 3.8.1 Preparing the Ventilator for Use . . . . . . . . . . . . . . . . . . . . . .3-37 3.8.2 Configuring the GUI . . . . . . . . . . . . . . . . . . . . . . . . . . . . . .3-37 3.9 Installation Testing . . . . . . . . . . . . . . . . . . . . . . . . . . . . . .3-46 3.9.1 SST (Short Self Test) . . . . . . . . . . . . . . . . . . . . . . . . . . . . . . .3-46 3.9.2 EST (Extended Self Test) . . . . . . . . . . . . . . . . . . . . . . . . . . . .3-52 3.9.3 EST Test Sequence . . . . . . . . . . . . . . . . . . . . . . . . . . . . . . . .3-54 3.9.4 EST Test Results . . . . . . . . . . . . . . . . . . . . . . . . . . . . . . . . . .3-57 3.10 Operation Verification . . . . . . . . . . . . . . . . . . . . . . . . . . .3-58 4 Operation 4.1 4.2 4.3 4.4 4.5 Overview . . . . . . . . . . . . . . . . . . . . . . . . . . . . . . . . . . . . . . .4-1 Ventilator Function . . . . . . . . . . . . . . . . . . . . . . . . . . . . . . .4-1 Ventilator Setup . . . . . . . . . . . . . . . . . . . . . . . . . . . . . . . . .4-2 User Interface Management . . . . . . . . . . . . . . . . . . . . . . .4-2 Ventilator Operation . . . . . . . . . . . . . . . . . . . . . . . . . . . . .4-7 Ventilator Settings . . . . . . . . . . . . . . . . . . . . . . . . . . . . . . . .4-10 Apnea Settings . . . . . . . . . . . . . . . . . . . . . . . . . . . . . . . . . .4-15 Alarm Settings . . . . . . . . . . . . . . . . . . . . . . . . . . . . . . . . . . .4-16 Alarm Screen During Operation . . . . . . . . . . . . . . . . . . . . . .4-18 Making Ventilator Settings Changes . . . . . . . . . . . . . . . . . .4-19 Constant Timing Variable During Respiratory Rate Changes .4-20 Predicted Body Weight (PBW) Calculation . . . . . . . . . . .4-21 Non-invasive Ventilation (NIV) . . . . . . . . . . . . . . . . . . . .4-22 NIV Intended Use . . . . . . . . . . . . . . . . . . . . . . . . . . . . . . . . .4-22 NIV Breathing Interfaces . . . . . . . . . . . . . . . . . . . . . . . . . . .4-22 NIV Setup . . . . . . . . . . . . . . . . . . . . . . . . . . . . . . . . . . . . . .4-23 Conversion from INVASIVE to NIV Vent Type . . . . . . . . . . . .4-24 Conversion from NIV to INVASIVE Vent Type . . . . . . . . . . . .4-25 High Spontaneous Inspiratory Time Limit Setting . . . . . . . . .4-26 NIV Apnea Setup . . . . . . . . . . . . . . . . . . . . . . . . . . . . . . . . .4-27 NIV Alarm Settings . . . . . . . . . . . . . . . . . . . . . . . . . . . . . . .4-27 Manual Inspiration . . . . . . . . . . . . . . . . . . . . . . . . . . . . . .4-28 Respiratory Mechanics Maneuvers . . . . . . . . . . . . . . . . .4-28 Inspiratory Pause Maneuver . . . . . . . . . . . . . . . . . . . . . . . . .4-30 Expiratory Pause Maneuver . . . . . . . . . . . . . . . . . . . . . . . . .4-31 Other Respiratory Maneuvers . . . . . . . . . . . . . . . . . . . . . . . .4-32 Oxygen Sensor Function . . . . . . . . . . . . . . . . . . . . . . . . .4-32 4.5.1 4.5.2 4.5.3 4.5.4 4.5.5 4.5.6 4.6 4.7 4.7.1 4.7.2 4.7.3 4.7.4 4.7.5 4.7.6 4.7.7 4.7.8 4.8 4.9 4.9.1 4.9.2 4.9.3 4.10 iii 4.10.1 Oxygen Sensor Life . . . . . . . . . . . . . . . . . . . . . . . . . . . . . . .4-33 4.10.2 Oxygen Sensor Calibration . . . . . . . . . . . . . . . . . . . . . . . . . .4-34 4.10.3 Oxygen sensor calibration testing . . . . . . . . . . . . . . . . . . . .4-34 4.11 Ventilator Protection Strategies . . . . . . . . . . . . . . . . . . .4-35 4.11.1 Power on Self Test (POST) . . . . . . . . . . . . . . . . . . . . . . . . . .4-35 4.11.2 Technical Fault . . . . . . . . . . . . . . . . . . . . . . . . . . . . . . . . . . .4-35 4.11.3 SST . . . . . . . . . . . . . . . . . . . . . . . . . . . . . . . . . . . . . . . . . . .4-35 4.11.4 Procedure Error . . . . . . . . . . . . . . . . . . . . . . . . . . . . . . . . . .4-36 4.11.5 Ventilation Assurance . . . . . . . . . . . . . . . . . . . . . . . . . . . . .4-36 4.11.6 Safety Valve Open (SVO) . . . . . . . . . . . . . . . . . . . . . . . . . . .4-36 4.11.7 Ventilator Inoperative (Vent Inop) . . . . . . . . . . . . . . . . . . . .4-37 4.12 Ventilator Shutdown . . . . . . . . . . . . . . . . . . . . . . . . . . . .4-37 5 Product Data Output 5.1 5.2 5.3 5.4 5.6 5.7 5.8 5.9 Overview . . . . . . . . . . . . . . . . . . . . . . . . . . . . . . . . . . . . . . .5-1 Language . . . . . . . . . . . . . . . . . . . . . . . . . . . . . . . . . . . . . . .5-1 Data Display . . . . . . . . . . . . . . . . . . . . . . . . . . . . . . . . . . . .5-1 Data Transfer . . . . . . . . . . . . . . . . . . . . . . . . . . . . . . . . . . .5-1 GUI Screen Capture . . . . . . . . . . . . . . . . . . . . . . . . . . . . . . .5-2 Communication Setup . . . . . . . . . . . . . . . . . . . . . . . . . . . . . .5-3 Comm Port Configuration . . . . . . . . . . . . . . . . . . . . . . . . . . .5-4 Serial Commands . . . . . . . . . . . . . . . . . . . . . . . . . . . . . . . . .5-5 RSET Command . . . . . . . . . . . . . . . . . . . . . . . . . . . . . . . . . . .5-5 SNDA Command . . . . . . . . . . . . . . . . . . . . . . . . . . . . . . . . . .5-6 SNDF Command . . . . . . . . . . . . . . . . . . . . . . . . . . . . . . . . .5-10 Communication Ports . . . . . . . . . . . . . . . . . . . . . . . . . . . .5-17 Port Use . . . . . . . . . . . . . . . . . . . . . . . . . . . . . . . . . . . . . . .5-19 Retrieving Stored Data . . . . . . . . . . . . . . . . . . . . . . . . . . .5-20 Display Configurability . . . . . . . . . . . . . . . . . . . . . . . . . .5-20 Printing Data or Screen Captures . . . . . . . . . . . . . . . . . .5-21 Connectivity to External Systems . . . . . . . . . . . . . . . . . .5-21 6 Performance 5.4.1 5.4.2 5.4.3 5.4.4 5.4.5 5.4.6 5.4.7 5.5 5.5.1 6.1 6.2 6.3 6.4 iv Overview . . . . . . . . . . . . . . . . . . . . . . . . . . . . . . . . . . . . . . .6-1 System Options . . . . . . . . . . . . . . . . . . . . . . . . . . . . . . . . . .6-1 Environmental Considerations . . . . . . . . . . . . . . . . . . . . .6-1 Ventilator Settings . . . . . . . . . . . . . . . . . . . . . . . . . . . . . . .6-1 6.4.1 Ventilation Type . . . . . . . . . . . . . . . . . . . . . . . . . . . . . . . . . .6-2 6.4.2 Mode . . . . . . . . . . . . . . . . . . . . . . . . . . . . . . . . . . . . . . . . . .6-2 6.4.3 Breath Type . . . . . . . . . . . . . . . . . . . . . . . . . . . . . . . . . . . . . .6-2 Alarms . . . . . . . . . . . . . . . . . . . . . . . . . . . . . . . . . . . . . . . . .6-4 6.5.1 Alarm Messages . . . . . . . . . . . . . . . . . . . . . . . . . . . . . . . . . .6-4 6.5.2 Alarm Reset Key . . . . . . . . . . . . . . . . . . . . . . . . . . . . . . . . . .6-8 6.5.3 Alarm Silence Key . . . . . . . . . . . . . . . . . . . . . . . . . . . . . . . . .6-8 6.5.4 Alarm Volume Key . . . . . . . . . . . . . . . . . . . . . . . . . . . . . . . . .6-8 6.5.5 Alarm Testing . . . . . . . . . . . . . . . . . . . . . . . . . . . . . . . . . . . .6-9 6.5.6 Viewing Alarms . . . . . . . . . . . . . . . . . . . . . . . . . . . . . . . . . .6-14 6.5.7 Alarm Delay . . . . . . . . . . . . . . . . . . . . . . . . . . . . . . . . . . . . .6-15 6.5.8 Alarm Handling . . . . . . . . . . . . . . . . . . . . . . . . . . . . . . . . . .6-15 6.5.9 AC POWER LOSS Alarm . . . . . . . . . . . . . . . . . . . . . . . . . . . .6-35 6.5.10 Apnea Alarm . . . . . . . . . . . . . . . . . . . . . . . . . . . . . . . . . . . .6-35 6.5.11 CIRCUIT DISCONNECT Alarm . . . . . . . . . . . . . . . . . . . . . . . .6-35 6.5.12 Loss of Power Alarm . . . . . . . . . . . . . . . . . . . . . . . . . . . . . .6-36 6.5.13 DEVICE ALERT Alarm . . . . . . . . . . . . . . . . . . . . . . . . . . . . . .6-36 6.5.14 High Circuit Pressure (1PPEAK) Alarm . . . . . . . . . . . . . . . . . .6-36 6.5.15 High Delivered O2% (1O2%) Alarm . . . . . . . . . . . . . . . . . . .6-37 . . . . . . . . . . .6-38 6.5.16 High Exhaled Minute Volume (1VE TOT) Alarm 6.5.17 High Exhaled Tidal Volume (1VTE) Alarm . . . . . . . . . . . . . . .6-38 6.5.18 High Inspired Tidal Volume (1VTI) Alarm . . . . . . . . . . . . . . . .6-38 6.5.19 High Respiratory Rate 1(fTOT) Alarm . . . . . . . . . . . . . . . . . . .6-39 6.5.20 INSPIRATION TOO LONG Alarm . . . . . . . . . . . . . . . . . . . . . .6-39 6.5.21 Low Circuit Pressure (3PPEAK) Alarm . . . . . . . . . . . . . . . . . . .6-39 6.5.22 Low Delivered O2% (3O2%) Alarm . . . . . . . . . . . . . . . . . . .6-40 6.5.23 Low Exhaled Mandatory Tidal Volume (3VTE MAND) Alarm . .6-41 6.5.24 Low Exhaled Spontaneous Tidal Volume (3VTE SPONT) Alarm .6-41 . . . . . . .6-41 6.5.25 Low Exhaled Total Minute Volume (3VE TOT) Alarm 6.5.26 PROCEDURE ERROR Alarm . . . . . . . . . . . . . . . . . . . . . . . . .6-42 6.5.27 Severe Occlusion Alarm . . . . . . . . . . . . . . . . . . . . . . . . . . . .6-42 6.6 Monitored Patient Data . . . . . . . . . . . . . . . . . . . . . . . . . .6-42 6.6.1 Total Exhaled Minute Volume (VE TOT) . . . . . . . . . . . . . . . . .6-43 6.6.2 Exhaled Spontaneous Minute Volume (VE SPONT) . . . . . . . . .6-43 6.6.3 Exhaled Tidal Volume (VTE) . . . . . . . . . . . . . . . . . . . . . . . . .6-43 6.6.4 Proximal Exhaled Minute Volume (VE TOTY) . . . . . . . . . . . . . .6-44 6.6.5 Proximal Exhaled Tidal Volume (VTEY) . . . . . . . . . . . . . . . . . .6-44 6.6.6 Exhaled Spontaneous Tidal Volume (VTE SPONT) . . . . . . . . . .6-44 6.6.7 Exhaled Mandatory Tidal Volume (VTE MAND) . . . . . . . . . . . .6-44 6.6.8 Exhaled mL/kg Volume . . . . . . . . . . . . . . . . . . . . . . . . . . . .6-44 6.6.9 Inspired Tidal Volume (VTI) . . . . . . . . . . . . . . . . . . . . . . . . . .6-44 6.6.10 Proximal Inspired Tidal Volume (VTIY) . . . . . . . . . . . . . . . . . .6-45 6.6.11 Delivered mL/kg Volume . . . . . . . . . . . . . . . . . . . . . . . . . . .6-45 6.5 v 6.6.12 I:E Ratio . . . . . . . . . . . . . . . . . . . . . . . . . . . . . . . . . . . . . . . .6-45 6.6.13 Mean Circuit Pressure (PMEAN) . . . . . . . . . . . . . . . . . . . . . . .6-45 6.6.14 Peak Circuit Pressure (PPEAK) . . . . . . . . . . . . . . . . . . . . . . . .6-45 6.6.15 End Inspiratory Pressure (PI END) . . . . . . . . . . . . . . . . . . . . . .6-45 6.6.16 End Expiratory Pressure (PEEP) . . . . . . . . . . . . . . . . . . . . . . .6-46 . . . . . . . . . . . . . . . . . . . . . . . . . . . . . .6-46 6.6.17 Intrinsic PEEP (PEEPI) 6.6.18 PAV-based Intrinsic PEEP (PEEPI PAV) . . . . . . . . . . . . . . . . . . .6-46 6.6.19 Total PEEP (PEEPTOT) . . . . . . . . . . . . . . . . . . . . . . . . . . . . . .6-46 6.6.20 Plateau Pressure (PPL) . . . . . . . . . . . . . . . . . . . . . . . . . . . . . .6-46 6.6.21 Total Respiratory Rate (fTOT) . . . . . . . . . . . . . . . . . . . . . . . . .6-46 6.6.22 PAV-based Lung Compliance (CPAV) . . . . . . . . . . . . . . . . . .6-46 6.6.23 PAV-based Patient Resistance (RPAV) . . . . . . . . . . . . . . . . . .6-47 6.6.24 PAV-based Lung Elastance (EPAV) . . . . . . . . . . . . . . . . . . . . .6-47 6.6.25 Spontaneous Rapid Shallow Breathing Index (f/ VT) . . . . . . .6-47 6.6.26 Spontaneous Inspiratory Time Ratio (TI/TTOT) . . . . . . . . . . . .6-47 6.6.27 Spontaneous Inspiratory Time (TI SPONT) . . . . . . . . . . . . . . . .6-47 6.6.28 PAV-based Total Airway Resistance (RTOT) . . . . . . . . . . . . . .6-47 6.6.29 Static Compliance (CSTAT) and Static Resistance (RSTAT) . . . .6-48 6.6.30 Dynamic Compliance (CDYN) . . . . . . . . . . . . . . . . . . . . . . . .6-49 6.6.31 Dynamic Resistance (RDYN) . . . . . . . . . . . . . . . . . . . . . . . . . .6-50 6.6.32 C20/C . . . . . . . . . . . . . . . . . . . . . . . . . . . . . . . . . . . . . . . . .6-50 6.6.33 End Expiratory Flow (EEF) . . . . . . . . . . . . . . . . . . . . . . . . . . .6-50 6.6.34 Peak Spontaneous Flow (PSF) . . . . . . . . . . . . . . . . . . . . . . .6-50 6.6.35 Displayed O2% . . . . . . . . . . . . . . . . . . . . . . . . . . . . . . . . . .6-50 7 Preventive Maintenance 7.1 7.2 7.3 7.4 7.5 Overview . . . . . . . . . . . . . . . . . . . . . . . . . . . . . . . . . . . . . . .7-1 Ventilator Operational Time . . . . . . . . . . . . . . . . . . . . . . .7-1 Preventive Maintenance Intervals . . . . . . . . . . . . . . . . . . .7-1 Surface Cleaning of Exterior Surfaces . . . . . . . . . . . . . . . .7-4 Component Cleaning and Disinfection . . . . . . . . . . . . . . .7-6 Condensate Vial Cleaning . . . . . . . . . . . . . . . . . . . . . . . . . . .7-8 Expiratory Filter Cleaning . . . . . . . . . . . . . . . . . . . . . . . . . . . .7-9 Exhalation Valve Flow Sensor Assembly Disinfection . . . . . .7-12 Exhalation Valve Flow Sensor Assembly Reassembly . . . . . . .7-20 Exhalation Valve Flow Sensor Assembly Replacement . . . . . .7-22 Storage . . . . . . . . . . . . . . . . . . . . . . . . . . . . . . . . . . . . . . . .7-23 Component Sterilization . . . . . . . . . . . . . . . . . . . . . . . . .7-23 Service Personnel Preventive Maintenance . . . . . . . . . .7-25 Safety Checks . . . . . . . . . . . . . . . . . . . . . . . . . . . . . . . . . .7-25 7.5.1 7.5.2 7.5.3 7.5.4 7.5.5 7.5.6 7.6 7.7 7.8 vi 7.9 7.10 7.11 Inspection and Calibration . . . . . . . . . . . . . . . . . . . . . . . .7-25 Documentation . . . . . . . . . . . . . . . . . . . . . . . . . . . . . . . . .7-25 Storage for Extended Periods . . . . . . . . . . . . . . . . . . . . .7-26 8 Troubleshooting 8.1 8.2 8.3 8.4 8.5 8.6 Overview . . . . . . . . . . . . . . . . . . . . . . . . . . . . . . . . . . . . . . .8-1 Problem Categories . . . . . . . . . . . . . . . . . . . . . . . . . . . . . .8-1 How to Obtain Ventilator Service . . . . . . . . . . . . . . . . . . .8-1 Used Part Disposal . . . . . . . . . . . . . . . . . . . . . . . . . . . . . . .8-1 Ventilator Logs . . . . . . . . . . . . . . . . . . . . . . . . . . . . . . . . . .8-2 Diagnostic Codes . . . . . . . . . . . . . . . . . . . . . . . . . . . . . . . .8-4 9 Accessories 9.1 9.2 Overview . . . . . . . . . . . . . . . . . . . . . . . . . . . . . . . . . . . . . . .9-1 General Accessory Information . . . . . . . . . . . . . . . . . . . . .9-2 10 Theory of Operations 10.1 Overview . . . . . . . . . . . . . . . . . . . . . . . . . . . . . . . . . . . . . .10-1 10.2 Theoretical Principles . . . . . . . . . . . . . . . . . . . . . . . . . . . .10-3 10.3 Applicable Technology . . . . . . . . . . . . . . . . . . . . . . . . . . .10-3 10.4 Inspiration — Detection and initiation . . . . . . . . . . . . . .10-4 10.4.1 Pressure Triggering . . . . . . . . . . . . . . . . . . . . . . . . . . . . . . .10-5 10.4.2 Flow Triggering . . . . . . . . . . . . . . . . . . . . . . . . . . . . . . . . . .10-6 10.4.3 Time Triggers . . . . . . . . . . . . . . . . . . . . . . . . . . . . . . . . . . . .10-8 10.4.4 Operator-initiated Triggers . . . . . . . . . . . . . . . . . . . . . . . . . .10-8 10.4.5 IE Sync Trigger . . . . . . . . . . . . . . . . . . . . . . . . . . . . . . . . . . .10-8 10.5 Exhalation — Detection and Initiation . . . . . . . . . . . . . .10-9 10.5.1 Airway Pressure Method . . . . . . . . . . . . . . . . . . . . . . . . . . .10-9 10.5.2 Percent Peak Flow Method . . . . . . . . . . . . . . . . . . . . . . . .10-10 10.5.3 Time-cycling Method . . . . . . . . . . . . . . . . . . . . . . . . . . . . .10-11 10.5.4 IE Sync Cycling . . . . . . . . . . . . . . . . . . . . . . . . . . . . . . . . .10-11 10.5.5 Backup Methods . . . . . . . . . . . . . . . . . . . . . . . . . . . . . . . .10-12 10.5.6 Time Limit . . . . . . . . . . . . . . . . . . . . . . . . . . . . . . . . . . . . .10-12 10.5.7 High Circuit Pressure Limit . . . . . . . . . . . . . . . . . . . . . . . . .10-12 10.5.8 High Ventilator Pressure Limit . . . . . . . . . . . . . . . . . . . . . .10-12 10.5.9 High Inspired Tidal Volume Limit . . . . . . . . . . . . . . . . . . . .10-12 10.6 Compliance and BTPS Compensation . . . . . . . . . . . . . .10-13 10.6.1 Compliance Compensation in Volume-based Breaths . . . .10-13 vii 10.6.2 BTPS Compensation in Volume-based Breaths . . . . . . . . . .10-17 10.7 Mandatory Breath Delivery . . . . . . . . . . . . . . . . . . . . . .10-17 10.7.1 Volume Control (VC) . . . . . . . . . . . . . . . . . . . . . . . . . . . . .10-18 10.7.2 Pressure Control (PC) . . . . . . . . . . . . . . . . . . . . . . . . . . . . .10-19 10.7.3 VC+ . . . . . . . . . . . . . . . . . . . . . . . . . . . . . . . . . . . . . . . . .10-20 10.7.4 Rise time % . . . . . . . . . . . . . . . . . . . . . . . . . . . . . . . . . . . .10-21 10.7.5 Manual Inspiration . . . . . . . . . . . . . . . . . . . . . . . . . . . . . . .10-22 10.8 Spontaneous Breath Delivery . . . . . . . . . . . . . . . . . . . .10-22 10.8.1 Pressure Support (PS) . . . . . . . . . . . . . . . . . . . . . . . . . . . . .10-25 10.8.2 Volume Support (VS) . . . . . . . . . . . . . . . . . . . . . . . . . . . . .10-25 10.8.3 Tube Compensation . . . . . . . . . . . . . . . . . . . . . . . . . . . . .10-27 10.8.4 Proportional Assist Ventilation (PAV™+) . . . . . . . . . . . . . .10-31 10.9 A/C Mode . . . . . . . . . . . . . . . . . . . . . . . . . . . . . . . . . . . .10-31 10.9.1 Changing to A/C Mode . . . . . . . . . . . . . . . . . . . . . . . . . . .10-34 10.10 SIMV Mode . . . . . . . . . . . . . . . . . . . . . . . . . . . . . . . . . . .10-34 10.10.1Changing to SIMV Mode . . . . . . . . . . . . . . . . . . . . . . . . .10-37 10.11 Spontaneous (SPONT) Mode . . . . . . . . . . . . . . . . . . . . .10-39 10.11.1Changing to SPONT Mode . . . . . . . . . . . . . . . . . . . . . . . .10-40 10.12 Apnea Ventilation . . . . . . . . . . . . . . . . . . . . . . . . . . . . .10-41 10.12.1Apnea Detection . . . . . . . . . . . . . . . . . . . . . . . . . . . . . . .10-41 10.12.2Transition to Apnea Ventilation . . . . . . . . . . . . . . . . . . . .10-43 10.12.3Settings Changes During Apnea Ventilation . . . . . . . . . . .10-43 10.12.4Resetting Apnea Ventilation . . . . . . . . . . . . . . . . . . . . . . .10-44 10.12.5Apnea Ventilation in SIMV . . . . . . . . . . . . . . . . . . . . . . . .10-44 10.12.6Phasing in New Apnea Intervals . . . . . . . . . . . . . . . . . . . .10-45 10.13 Detecting Occlusion and Disconnect . . . . . . . . . . . . . . .10-45 10.13.1Occlusion . . . . . . . . . . . . . . . . . . . . . . . . . . . . . . . . . . . . .10-45 10.13.2Disconnect . . . . . . . . . . . . . . . . . . . . . . . . . . . . . . . . . . . .10-47 10.13.3Annunciating Occlusion and Disconnect Alarms . . . . . . . .10-49 10.14 Respiratory Mechanics . . . . . . . . . . . . . . . . . . . . . . . . . .10-49 10.14.1Inspiratory Pause . . . . . . . . . . . . . . . . . . . . . . . . . . . . . . .10-50 10.14.2Expiratory Pause . . . . . . . . . . . . . . . . . . . . . . . . . . . . . . . .10-53 10.14.3Negative Inspiratory Force (NIF) Maneuver . . . . . . . . . . . .10-54 . . . . . . . . . . . . . . . . .10-55 10.14.4P0.1 Maneuver (Occlusion Pressure) 10.14.5Vital Capacity (VC) Maneuver . . . . . . . . . . . . . . . . . . . . . .10-56 10.15 Ventilator Settings . . . . . . . . . . . . . . . . . . . . . . . . . . . . .10-57 10.15.1Apnea Ventilation . . . . . . . . . . . . . . . . . . . . . . . . . . . . . .10-57 10.15.2Circuit Type and Predicted Body Weight (PBW) . . . . . . . . .10-58 10.15.3Vent Type . . . . . . . . . . . . . . . . . . . . . . . . . . . . . . . . . . . . .10-59 10.15.4Mode and Breath Type . . . . . . . . . . . . . . . . . . . . . . . . . . .10-60 10.15.5Respiratory Rate (f) . . . . . . . . . . . . . . . . . . . . . . . . . . . . . .10-61 viii 10.15.6Tidal Volume (VT) . . . . . . . . . . . . . . . . . . . . . . . . . . . . . . .10-62 . . . . . . . . . . . . . . . . . . . . . .10-62 10.15.7Peak Inspiratory Flow (VMAX) 10.15.8Plateau Time (TPL) . . . . . . . . . . . . . . . . . . . . . . . . . . . . . . .10-63 10.15.9Flow Pattern . . . . . . . . . . . . . . . . . . . . . . . . . . . . . . . . . . .10-63 10.15.10Flow Sensitivity (VSENS) . . . . . . . . . . . . . . . . . . . . . . . . . .10-63 . . . . . . . . . . . . . . . . . . . . . . .10-64 10.15.11Pressure Sensitivity (PSENS) 10.15.12Inspiratory Pressure (PI) . . . . . . . . . . . . . . . . . . . . . . . . . .10-64 10.15.13Inspiratory Time (TI) . . . . . . . . . . . . . . . . . . . . . . . . . . . .10-65 10.15.14Expiratory Time (TE) . . . . . . . . . . . . . . . . . . . . . . . . . . . .10-66 10.15.15I:E Ratio . . . . . . . . . . . . . . . . . . . . . . . . . . . . . . . . . . . . .10-66 10.15.16High Pressure (PH) in BiLevel . . . . . . . . . . . . . . . . . . . . . .10-66 10.15.17Low Pressure (PL) in BiLevel . . . . . . . . . . . . . . . . . . . . . . .10-66 . . . . . . . . . . . . . . . . . . . . . . . .10-66 10.15.18High Time (TH) in BiLevel 10.15.19Low Time (TL) in BiLevel . . . . . . . . . . . . . . . . . . . . . . . . .10-67 10.15.20TH:TL Ratio in BiLevel . . . . . . . . . . . . . . . . . . . . . . . . . . .10-67 10.15.21PEEP . . . . . . . . . . . . . . . . . . . . . . . . . . . . . . . . . . . . . . . .10-67 10.15.22Pressure Support (PSUPP) . . . . . . . . . . . . . . . . . . . . . . . . .10-68 10.15.23Volume Support (VT SUPP) . . . . . . . . . . . . . . . . . . . . . . . .10-68 10.15.24% Supp in TC . . . . . . . . . . . . . . . . . . . . . . . . . . . . . . . . .10-68 10.15.25% Supp in PAV+ . . . . . . . . . . . . . . . . . . . . . . . . . . . . . .10-68 10.15.26Rise Time % . . . . . . . . . . . . . . . . . . . . . . . . . . . . . . . . . .10-69 10.15.27Expiratory Sensitivity (ESENS) . . . . . . . . . . . . . . . . . . . . . .10-69 10.15.28Disconnect Sensitivity (DSENS) . . . . . . . . . . . . . . . . . . . . .10-70 10.15.29High Spontaneous Inspiratory Time Limit (2TI SPONT) . . . .10-70 10.15.30Humidification Type . . . . . . . . . . . . . . . . . . . . . . . . . . . .10-71 10.15.31Humidifier Volume . . . . . . . . . . . . . . . . . . . . . . . . . . . . .10-71 10.16 Safety Net . . . . . . . . . . . . . . . . . . . . . . . . . . . . . . . . . . . .10-71 10.16.1User Error . . . . . . . . . . . . . . . . . . . . . . . . . . . . . . . . . . . . .10-72 10.16.2Patient Related Problems . . . . . . . . . . . . . . . . . . . . . . . . .10-73 10.16.3System Related Problems . . . . . . . . . . . . . . . . . . . . . . . . .10-73 10.16.4Background Diagnostic System . . . . . . . . . . . . . . . . . . . . .10-74 10.17 Power On Self Test (POST) . . . . . . . . . . . . . . . . . . . . . . .10-76 10.18 Short Self Test (SST) . . . . . . . . . . . . . . . . . . . . . . . . . . . .10-77 10.19 Extended Self Test (EST) . . . . . . . . . . . . . . . . . . . . . . . .10-77 11 Specifications 11.1 11.2 11.3 11.4 Overview . . . . . . . . . . . . . . . . . . . . . . . . . . . . . . . . . . . . . .11-1 Measurement Uncertainty . . . . . . . . . . . . . . . . . . . . . . . .11-1 Physical Characteristics . . . . . . . . . . . . . . . . . . . . . . . . . .11-2 Electrical Specifications . . . . . . . . . . . . . . . . . . . . . . . . . .11-6 ix 11.5 Interface Requirements . . . . . . . . . . . . . . . . . . . . . . . . . .11-6 11.6 Environmental Specifications . . . . . . . . . . . . . . . . . . . . .11-7 11.7 Performance Specifications . . . . . . . . . . . . . . . . . . . . . . .11-8 11.7.1 Ranges and Resolutions . . . . . . . . . . . . . . . . . . . . . . . . . . . .11-8 11.8 Regulatory Compliance . . . . . . . . . . . . . . . . . . . . . . . . .11-28 11.9 Manufacturer’s Declaration . . . . . . . . . . . . . . . . . . . . . .11-30 11.10 Safety Tests . . . . . . . . . . . . . . . . . . . . . . . . . . . . . . . . . . .11-35 11.11 Essential Performance Requirements . . . . . . . . . . . . . .11-35 A BiLevel 2.0 Appendix A.1 A.2 A.3 A.4 A.5 A.6 A.7 A.8 A.9 A.9.1 A.9.2 A.9.3 A.9.4 A.10 Overview . . . . . . . . . . . . . . . . . . . . . . . . . . . . . . . . . . . . . . A-1 Intended Use . . . . . . . . . . . . . . . . . . . . . . . . . . . . . . . . . . . A-2 Safety Symbol Definitions . . . . . . . . . . . . . . . . . . . . . . . . A-2 Setting Up BiLevel . . . . . . . . . . . . . . . . . . . . . . . . . . . . . . A-3 Using Pressure Support with BiLevel . . . . . . . . . . . . . . . A-4 Manual Inspirations in BiLevel Mode . . . . . . . . . . . . . . . A-5 Respiratory Mechanics Maneuvers in BiLevel . . . . . . . . A-6 Specifications . . . . . . . . . . . . . . . . . . . . . . . . . . . . . . . . . . A-6 Technical Description . . . . . . . . . . . . . . . . . . . . . . . . . . . . A-6 Synchrony in BiLevel . . . . . . . . . . . . . . . . . . . . . . . . . . . . . . A-7 Patient Monitoring in BiLevel . . . . . . . . . . . . . . . . . . . . . . . . A-8 APRV Strategy in BiLevel . . . . . . . . . . . . . . . . . . . . . . . . . . . A-9 Technical Structure of BiLevel . . . . . . . . . . . . . . . . . . . . . . A-10 Mode Changes . . . . . . . . . . . . . . . . . . . . . . . . . . . . . . . . A-10 B Leak Sync Appendix B.1 B.2 B.3 B.4 B.5 B.6 Overview . . . . . . . . . . . . . . . . . . . . . . . . . . . . . . . . . . . . . . B-1 Intended Use . . . . . . . . . . . . . . . . . . . . . . . . . . . . . . . . . . . B-1 Safety Symbol Definitions . . . . . . . . . . . . . . . . . . . . . . . . B-2 Leak Sync . . . . . . . . . . . . . . . . . . . . . . . . . . . . . . . . . . . . . . B-2 Setting Up Leak Sync . . . . . . . . . . . . . . . . . . . . . . . . . . . . B-3 When Leak Sync is Enabled . . . . . . . . . . . . . . . . . . . . . . . B-4 Adjusting Disconnect Sensitivity (DSENS) . . . . . . . . . . . . . . . . .B-5 Monitored Patient Data . . . . . . . . . . . . . . . . . . . . . . . . . . . . .B-6 Technical Discussion . . . . . . . . . . . . . . . . . . . . . . . . . . . . . B-8 Inspired Tidal Volume (VTL) Accuracy During Leak Sync . . . . .B-8 Exhaled Tidal Volume (VTE) Accuracy During Leak Sync . . . . .B-8 %LEAK Calculation . . . . . . . . . . . . . . . . . . . . . . . . . . . . . . . .B-9 Circuit Disconnect Alarm During Leak Sync . . . . . . . . . . . . . .B-9 B.6.1 B.6.2 B.7 B.7.1 B.7.2 B.7.3 B.7.4 x C IE Sync Appendix C.1 C.2 C.3 C.4 C.5 C.6 C.7 C.8 C.9 Overview . . . . . . . . . . . . . . . . . . . . . . . . . . . . . . . . . . . . . . Intended Use . . . . . . . . . . . . . . . . . . . . . . . . . . . . . . . . . . . Safety Symbol Definitions . . . . . . . . . . . . . . . . . . . . . . . . IE Sync Description . . . . . . . . . . . . . . . . . . . . . . . . . . . . . . Setting Up IE Sync .............................. Setting Up IE Sync for Monitoring Only . . . . . . . . . . . . . IE Sync Monitoring Display . . . . . . . . . . . . . . . . . . . . . . . Technical Description . . . . . . . . . . . . . . . . . . . . . . . . . . . . Alarms during IE Sync ........................... D PAV™+ Appendix D.1 D.2 D.3 D.4 D.4.1 D.4.2 D.4.3 D.4.4 D.4.5 D.4.6 D.4.7 D.4.8 D.5 D.5.1 D.5.2 D.5.3 D.5.4 D.5.5 Overview . . . . . . . . . . . . . . . . . . . . . . . . . . . . . . . . . . . . . . D-1 Intended Use . . . . . . . . . . . . . . . . . . . . . . . . . . . . . . . . . . . D-1 Safety Symbol Definitions . . . . . . . . . . . . . . . . . . . . . . . . D-2 PAV+ . . . . . . . . . . . . . . . . . . . . . . . . . . . . . . . . . . . . . . . . . D-3 Setting Up PAV+ . . . . . . . . . . . . . . . . . . . . . . . . . . . . . . . . . D-5 PBW and Tube ID . . . . . . . . . . . . . . . . . . . . . . . . . . . . . . . . D-6 Apnea Parameters Adjustment . . . . . . . . . . . . . . . . . . . . . . D-7 Alarm Settings Adjustment . . . . . . . . . . . . . . . . . . . . . . . . . D-8 PAV+ Ventilator Settings . . . . . . . . . . . . . . . . . . . . . . . . . . . D-8 PAV+ Alarm Settings . . . . . . . . . . . . . . . . . . . . . . . . . . . . . . D-8 Monitored Data . . . . . . . . . . . . . . . . . . . . . . . . . . . . . . . . . . D-9 PAV+ Alarms . . . . . . . . . . . . . . . . . . . . . . . . . . . . . . . . . . . D-10 Ventilator Settings/Guidance . . . . . . . . . . . . . . . . . . . . D-10 Specified performance . . . . . . . . . . . . . . . . . . . . . . . . . . . . D-11 Graphics Displays in PAV+ . . . . . . . . . . . . . . . . . . . . . . . . . D-11 WOB Terms and Definitions . . . . . . . . . . . . . . . . . . . . . . . . D-12 Technical Description . . . . . . . . . . . . . . . . . . . . . . . . . . . . . D-14 Protection Against Hazard . . . . . . . . . . . . . . . . . . . . . . . . . D-19 E NeoMode 2.0 Appendix E.1 E.2 E.3 E.4 E.5 E.6 Overview . . . . . . . . . . . . . . . . . . . . . . . . . . . . . . . . . . . . . . .E-1 Intended Use . . . . . . . . . . . . . . . . . . . . . . . . . . . . . . . . . . . .E-1 Safety Symbol Definitions . . . . . . . . . . . . . . . . . . . . . . . . .E-1 Safety Information . . . . . . . . . . . . . . . . . . . . . . . . . . . . . . .E-2 Description . . . . . . . . . . . . . . . . . . . . . . . . . . . . . . . . . . . . .E-3 Neonatal Door and Filter Installation . . . . . . . . . . . . . . . .E-3 C-1 C-1 C-1 C-2 C-2 C-4 C-5 C-7 C-7 xi E.7 E.8 E.9 E.9.1 E.9.2 E.9.3 E.9.4 E.9.5 E.9.6 E.9.7 F Proximal Flow Option Appendix F.1 F.2 F.3 F.4 F.5 F.6 Overview . . . . . . . . . . . . . . . . . . . . . . . . . . . . . . . . . . . . . . .F-1 Intended Use . . . . . . . . . . . . . . . . . . . . . . . . . . . . . . . . . . . .F-1 Safety Symbol Definitions . . . . . . . . . . . . . . . . . . . . . . . . .F-1 Software/Hardware Requirements . . . . . . . . . . . . . . . . . .F-2 Safety Information . . . . . . . . . . . . . . . . . . . . . . . . . . . . . . .F-2 Proximal Flow Option Description . . . . . . . . . . . . . . . . . .F-5 Proximal Flow Option components . . . . . . . . . . . . . . . . . . . . F-5 On-screen symbols . . . . . . . . . . . . . . . . . . . . . . . . . . . . . . .F-6 Sensor Calibration and Sensor Line Purging . . . . . . . . . .F-8 SST Requirements . . . . . . . . . . . . . . . . . . . . . . . . . . . . . . . .F-9 Attaching the Proximal Flow Sensor for SST . . . . . . . . . . . . . F-11 Disabling/Enabling the Proximal Flow Option . . . . . . . .F-12 Using the Proximal Flow Sensor . . . . . . . . . . . . . . . . . . .F-13 How to Perform a Manual Purge . . . . . . . . . . . . . . . . . . . . . F-15 Alarms . . . . . . . . . . . . . . . . . . . . . . . . . . . . . . . . . . . . . . . .F-16 Ranges, Resolutions, and Accuracies . . . . . . . . . . . . . . .F-17 Proximal Flow Sensor Specifications . . . . . . . . . . . . . . . . . . . F-17 Part Numbers . . . . . . . . . . . . . . . . . . . . . . . . . . . . . . . . . .F-18 F.6.1 F.7 F.8 F.9 F.9.1 F.10 F.11 F.11.1 F.12 F.13 F.13.1 F.14 Glossary xii How to Empty the Condensate Vial . . . . . . . . . . . . . . . . .E-5 Connecting the Breathing Circuit . . . . . . . . . . . . . . . . . . .E-6 Ventilation Features . . . . . . . . . . . . . . . . . . . . . . . . . . . . . .E-8 Predicted Body Weight (PBW) vs. Patient Length . . . . . . . . . .E-8 Elevate O2 . . . . . . . . . . . . . . . . . . . . . . . . . . . . . . . . . . . . . . .E-8 CPAP Mode . . . . . . . . . . . . . . . . . . . . . . . . . . . . . . . . . . . . . .E-9 Entering CPAP From Other Ventilation Modes . . . . . . . . . . .E-10 Exiting CPAP Mode . . . . . . . . . . . . . . . . . . . . . . . . . . . . . . .E-11 Compliance Compensation . . . . . . . . . . . . . . . . . . . . . . . . .E-11 Settings, Alarms, and Monitored Patient Data . . . . . . . . . . .E-11 List of Tables Table 1-1. Table 1-2. Table 2-1. Table 2-2. Table 2-3. Table 2-4. Table 2-5. Table 2-6. Table 2-7. Table 2-8. Table 2-9. Table 2-10. Table 2-11. Table 3-1. Table 3-2. Table 3-3. Table 3-4. Table 3-5. Table 3-6. Table 3-7. Table 3-8. Table 3-9. Table 4-1. Table 4-2. Table 4-3. Table 4-4. Table 5-1. Table 5-2. Table 6-1. Table 6-2. Table 6-3. Table 6-4. Table 6-5. Table 6-6. Table 7-1. Table 7-2. Table 7-3. Table 7-4. Table 7-5. Shipping Carton Symbols and Descriptions . . . . . . . . . . . . . . . . . . 1-2 Safety Symbol Definitions . . . . . . . . . . . . . . . . . . . . . . . . . . . . . . . . . . . 1-3 Typical Packing List . . . . . . . . . . . . . . . . . . . . . . . . . . . . . . . . . . . . . . . . . 2-5 BDU Front Label Symbols and Descriptions . . . . . . . . . . . . . . . . . . 2-9 BDU Rear Label or Panel Symbols and Descriptions. . . . . . . . . . 2-11 Common Symbols Found on GUI or BDU Labels . . . . . . . . . . . . . 2-13 GUI Control Keys . . . . . . . . . . . . . . . . . . . . . . . . . . . . . . . . . . . . . . . . . . . 2-16 GUI Visual Indicators . . . . . . . . . . . . . . . . . . . . . . . . . . . . . . . . . . . . . . . 2-18 Symbols and Abbreviations . . . . . . . . . . . . . . . . . . . . . . . . . . . . . . . . 2-21 GUI Audible Indicator Functions . . . . . . . . . . . . . . . . . . . . . . . . . . . . 2-24 Status Display Indicators and Descriptions . . . . . . . . . . . . . . . . . . 2-30 BDU Audible Indicator Functions . . . . . . . . . . . . . . . . . . . . . . . . . . . 2-35 Color Legend . . . . . . . . . . . . . . . . . . . . . . . . . . . . . . . . . . . . . . . . . . . . . . 2-36 Patient Types and PBW Values . . . . . . . . . . . . . . . . . . . . . . . . . . . . . . 3-15 Ventilator Configuration. . . . . . . . . . . . . . . . . . . . . . . . . . . . . . . . . . . . 3-35 SST Test Sequence . . . . . . . . . . . . . . . . . . . . . . . . . . . . . . . . . . . . . . . . . 3-49 Humidifier Volumes . . . . . . . . . . . . . . . . . . . . . . . . . . . . . . . . . . . . . . . . 3-50 Individual SST Results . . . . . . . . . . . . . . . . . . . . . . . . . . . . . . . . . . . . . . 3-51 Overall SST Outcomes . . . . . . . . . . . . . . . . . . . . . . . . . . . . . . . . . . . . . . 3-51 EST Test Sequence . . . . . . . . . . . . . . . . . . . . . . . . . . . . . . . . . . . . . . . . . 3-55 Individual EST Results . . . . . . . . . . . . . . . . . . . . . . . . . . . . . . . . . . . . . . 3-57 Overall EST Outcomes . . . . . . . . . . . . . . . . . . . . . . . . . . . . . . . . . . . . . . 3-58 Gestures and Their Meanings . . . . . . . . . . . . . . . . . . . . . . . . . . . . . . . . 4-6 Setting Up a Patient for NIV. . . . . . . . . . . . . . . . . . . . . . . . . . . . . . . . . 4-23 INVASIVE to NIV on Same Patient. . . . . . . . . . . . . . . . . . . . . . . . . . . 4-24 NIV to INVASIVE on Same Patient . . . . . . . . . . . . . . . . . . . . . . . . . . . 4-25 MISCA Response . . . . . . . . . . . . . . . . . . . . . . . . . . . . . . . . . . . . . . . . . . . . 5-6 MISCF Response . . . . . . . . . . . . . . . . . . . . . . . . . . . . . . . . . . . . . . . . . . . 5-11 Alarm Descriptions and Symbols. . . . . . . . . . . . . . . . . . . . . . . . . . . . . 6-6 Alarm Prioritization . . . . . . . . . . . . . . . . . . . . . . . . . . . . . . . . . . . . . . . . 6-16 Technical Alarm Categories. . . . . . . . . . . . . . . . . . . . . . . . . . . . . . . . . 6-17 Technical Alarms . . . . . . . . . . . . . . . . . . . . . . . . . . . . . . . . . . . . . . . . . . 6-18 Non-technical Alarm Summary. . . . . . . . . . . . . . . . . . . . . . . . . . . . . 6-18 Non-Technical Alarms and Suggested Responses . . . . . . . . . . . 6-29 Operator Preventive Maintenance Frequency . . . . . . . . . . . . . . . . 7-2 Surface Cleaning Agents . . . . . . . . . . . . . . . . . . . . . . . . . . . . . . . . . . . . 7-5 Component Cleaning Agents and Disinfection Procedures . . . 7-6 Sterilization Parameters . . . . . . . . . . . . . . . . . . . . . . . . . . . . . . . . . . . . 7-24 Component Sterilization Procedures. . . . . . . . . . . . . . . . . . . . . . . . 7-24 xiii Table 9-1. Table 10-1. Table 10-2. Table 10-3. Table 10-4. Table 10-5. Table 10-6. Table 10-7. Table 10-8. Table 10-9. Table 10-10. Table 11-1. Table 11-2. Table 11-3. Table 11-4. Table 11-5. Table 11-6. Table 11-7. Table 11-8. Table 11-9. Table 11-10. Table 11-11. Table 11-12. Table 11-13. Table 11-14. Table 11-15. Table 11-16. Table 11-17. Table 11-18. Table A-1. Table B-1. Table B-2. Table B-3. Table C-1. Table D-1. Table D-2. Table D-3. Table D-4. Table E-1. Table E-2. Table E-3. xiv Covidien Accessories and Options . . . . . . . . . . . . . . . . . . . . . . . . . . . 9-4 Compliance Volume Factors . . . . . . . . . . . . . . . . . . . . . . . . . . . . . . .10-16 Maximum Pressure Adjustments . . . . . . . . . . . . . . . . . . . . . . . . . .10-21 Spontaneous Breath Delivery Characteristics . . . . . . . . . . . . . . .10-23 Maximum Pressure Adjustments. . . . . . . . . . . . . . . . . . . . . . . . . . .10-26 Inspiratory and Expiratory Pause Events. . . . . . . . . . . . . . . . . . . .10-51 Values for VT Based on Circuit Type . . . . . . . . . . . . . . . . . . . . . . . .10-58 Peak Flow and Circuit Type (Leak Sync Disabled) . . . . . . . . . . .10-59 Modes and Breath Types . . . . . . . . . . . . . . . . . . . . . . . . . . . . . . . . . .10-60 Safety PCV Settings . . . . . . . . . . . . . . . . . . . . . . . . . . . . . . . . . . . . . . .10-72 Inspiratory Backup Ventilation Settings . . . . . . . . . . . . . . . . . . . .10-75 Performance Verification Equipment Uncertainty . . . . . . . . . . . 11-1 Physical Characteristics. . . . . . . . . . . . . . . . . . . . . . . . . . . . . . . . . . . . . 11-2 Pneumatic Specifications . . . . . . . . . . . . . . . . . . . . . . . . . . . . . . . . . . . 11-3 Technical Specifications . . . . . . . . . . . . . . . . . . . . . . . . . . . . . . . . . . . . 11-3 Electrical Specifications. . . . . . . . . . . . . . . . . . . . . . . . . . . . . . . . . . . . . 11-6 Interface Pin Designations. . . . . . . . . . . . . . . . . . . . . . . . . . . . . . . . . . 11-6 Nurse Call Pin Designations. . . . . . . . . . . . . . . . . . . . . . . . . . . . . . . . . 11-7 Environmental Specifications . . . . . . . . . . . . . . . . . . . . . . . . . . . . . . . 11-7 Ventilator Settings Range and Resolution . . . . . . . . . . . . . . . . . . . 11-8 Alarm Settings Range and Resolution . . . . . . . . . . . . . . . . . . . . .11-17 Patient Data Range and Resolution . . . . . . . . . . . . . . . . . . . . . . . .11-19 Delivery Accuracy . . . . . . . . . . . . . . . . . . . . . . . . . . . . . . . . . . . . . . . . .11-26 Monitoring (Patient Data) Accuracy . . . . . . . . . . . . . . . . . . . . . . . .11-27 Computed Value Accuracy . . . . . . . . . . . . . . . . . . . . . . . . . . . . . . . .11-28 Electromagnetic Emissions . . . . . . . . . . . . . . . . . . . . . . . . . . . . . . . .11-30 Electromagnetic Immunity . . . . . . . . . . . . . . . . . . . . . . . . . . . . . . . .11-31 Recommended Separation Distances for RF . . . . . . . . . . . . . . .11-34 . . . . . . . . . . . . . . . . . . . . . . . . . . . . . . . . . . . . . . . . . . . . . . . . . . . . . . . . . . .11-35 Safety Symbol Definitions . . . . . . . . . . . . . . . . . . . . . . . . . . . . . . . . . . . A-3 Safety Symbol Definitions . . . . . . . . . . . . . . . . . . . . . . . . . . . . . . . . . . . B-2 Leak Compensation Volumes Based on Patient Type . . . . . . . . . B-3 DSENS settings. . . . . . . . . . . . . . . . . . . . . . . . . . . . . . . . . . . . . . . . . . . . . . . B-6 Safety Symbol Definitions . . . . . . . . . . . . . . . . . . . . . . . . . . . . . . . . . . . C-2 Safety Symbol Definitions . . . . . . . . . . . . . . . . . . . . . . . . . . . . . . . . . . .D-2 Absolute limits for PAV+ Monitored Data . . . . . . . . . . . . . . . . . . . .D-9 PAV+ Work of Breathing terms. . . . . . . . . . . . . . . . . . . . . . . . . . . . . D-13 Default PBW-based Resistance Values. . . . . . . . . . . . . . . . . . . . . . D-23 Safety Symbol Definitions . . . . . . . . . . . . . . . . . . . . . . . . . . . . . . . . . . . E-2 Recommended Breathing Circuits . . . . . . . . . . . . . . . . . . . . . . . . . . . E-8 Delivered Volume Accuracy . . . . . . . . . . . . . . . . . . . . . . . . . . . . . . . . E-12 Table E-4. Monitored Inspired Volume (VTI) Accuracy . . . . . . . . . . . . . . . . . . E-12 Monitored Exhaled Tidal Volume (VTE) Accuracy . . . . . . . . . . . . E-13 Table E-5. Table F-1. Safety Symbol Definitions . . . . . . . . . . . . . . . . . . . . . . . . . . . . . . . . . . . F-2 Table F-2. Proximal Flow Option Patient Data Symbols . . . . . . . . . . . . . . . . . F-8 Table F-3. Proximal Flow Option SST test Sequence. . . . . . . . . . . . . . . . . . . . F-10 Table F-4. Proximal Flow Sensor Volume Accuracy. . . . . . . . . . . . . . . . . . . . . F-17 Table F-5. Proximal Flow Sensor Specifications . . . . . . . . . . . . . . . . . . . . . . . . F-18 Table F-6. Proximal Flow Option Component Part Numbers. . . . . . . . . . . . F-18 Table Glossary-1. Glossary of Ventilation Terms . . . . . . . . . . . . . . . . . . . . . Glossary-1 Table Glossary-2. Units of Measure. . . . . . . . . . . . . . . . . . . . . . . . . . . . . . . . . . Glossary-9 Table Glossary-3. Technical Abbreviations . . . . . . . . . . . . . . . . . . . . . . . . .Glossary-10 xv Page Left Intentionally Blank xvi List of Figures Figure 2-1. Figure 2-2. Figure 2-3. Figure 2-4. Figure 2-5. Figure 2-6. Figure 2-7. Figure 2-8. Figure 2-9. Figure 2-10. Figure 2-11. Figure 2-12. Figure 3-1. Figure 3-2. Figure 3-3. Figure 3-4. Figure 3-5. Figure 3-6. Figure 3-7. Figure 3-8. Figure 3-9. Figure 3-10. Figure 3-11. Figure 3-12. Figure 3-13. Figure 3-14. Figure 3-15. Figure 4-1. Figure 4-2. Figure 4-3. Figure 4-4. Figure 4-5. Figure 4-6. Figure 4-7. Figure 4-8. Figure 4-9. Figure 4-10. Figure 4-11. Figure 4-12. GUI Front View ............................................................................................2-6 GUI Rear View ..............................................................................................2-7 BDU Front View ..........................................................................................2-8 BDU Rear View ......................................................................................... 2-10 Installed Software Options .................................................................. 2-11 Ventilator Right Side View ................................................................... 2-14 Ventilator Left Side View ...................................................................... 2-15 Ventilator Power Switch and AC Indicator .................................... 2-26 Service Mode Button (TEST) ................................................................ 2-27 Sample Status Display During Normal Ventilation ..................... 2-29 Pneumatic Diagram ............................................................................... 2-37 Pneumatic Diagram — Optional Proximal Flow System .......... 2-38 Example of Freestanding Ventilator Placement .............................3-5 Power Cord Retainer on BDU ................................................................3-7 Connecting the Ventilator to the Gas Supplies ..............................3-9 Adult/Pediatric Filter Installation ...................................................... 3-12 Installing the Neonatal Filter .............................................................. 3-13 Drain Bag ................................................................................................... 3-14 Connecting the Adult or Pediatric Patient Circuit ...................... 3-16 Connecting the Neonatal Patient Circuit ....................................... 3-17 Ventilator Battery .................................................................................... 3-19 Proper Battery Orientation .................................................................. 3-20 Battery Compartment Locations ....................................................... 3-21 Flex Arm Installation .............................................................................. 3-26 Bracket Installation on Rail .................................................................. 3-28 Humidifier Installation to Ventilator ................................................ 3-29 Service Mode Button (TEST) ................................................................ 3-34 Areas of the GUI ..........................................................................................4-3 Pushpin Icon ................................................................................................4-5 New Patient Settings ................................................................................4-9 Open Menu Tab ....................................................................................... 4-11 New Patient setup Screen ................................................................... 4-12 Apnea Setup Screen .............................................................................. 4-15 Alarms Settings Screen ......................................................................... 4-17 Alarm Screen During Operation ........................................................ 4-19 Vent Setup Button “NIV” Indicating NIV vent type ..................... 4-25 2TI SPONT Indicator .................................................................................. 4-26 Default NIV Alarm Settings .................................................................. 4-27 RM in Menu Tab ....................................................................................... 4-29 xvii Figure 4-13. Respiratory Maneuver Tabs ................................................................ 4-29 Figure 4-14. More Settings Screen with O2 Sensor Enabled ............................ 4-33 Figure 5-1. Comm Setup Screen .................................................................................5-4 Figure 5-2. Port Locations .......................................................................................... 5-18 Figure 6-1. Alarm Message Format ............................................................................6-5 Figure 7-1. Condensate Vial .........................................................................................7-9 Figure 7-2. Filter Top and Bottom Views ............................................................. 7-10 Figure 7-3. From Patient Port .................................................................................... 7-11 Figure 7-4. Expiratory Filter Drying Orientation ................................................ 7-12 Figure 7-5. Exhalation Valve Flow Sensor Assembly ........................................ 7-14 Figure 7-6. Exhalation Valve Flow Sensor Components ................................. 7-14 Figure 7-7. Exhalation Valve Flow Sensor Assembly Removal ...................... 7-15 Figure 7-8. Exhalation Valve Diaphragm Removal ............................................ 7-15 Figure 7-9. Expiratory Filter Seal Removal ........................................................... 7-16 Figure 7-10. Pressure Sensor Filter Removal .......................................................... 7-16 Figure 7-11. Immersion Method ................................................................................ 7-18 Figure 7-12. Exhalation Valve Flow Sensor Assembly Reprocessing Kit ...... 7-20 Figure 7-13. Installing the Pressure Sensor Filter ................................................. 7-20 Figure 7-14. Installing the Expiratory Filter Seal ................................................... 7-21 Figure 7-15. Installing the Diaphragm ..................................................................... 7-22 Figure 7-16. Installing the Exhalation Valve Flow Sensor Assembly ............. 7-23 Figure 8-1. Log Screen ....................................................................................................8-4 Figure 9-1. Ventilator with Accessories ....................................................................9-3 Figure 9-2. Additional Accessories .............................................................................9-4 Figure 10-1. Inspiration Using Pressure Sensitivity ............................................. 10-6 Figure 10-2. Inspiration Using Flow Sensitivity ..................................................... 10-7 Figure 10-3. Breath Activity During Time-triggered Inspiration ..................... 10-8 Figure 10-4. Exhalation via the Airway Pressure Method ............................... 10-10 Figure 10-5. Exhalation via the Percent Peak Flow Method ........................... 10-11 Figure 10-6. Square Flow Pattern ............................................................................ 10-13 Figure 10-7. Descending Ramp Flow Pattern ...................................................... 10-14 Figure 10-8. Ideal Waveform Using Square Flow Pattern ............................... 10-18 Figure 10-9. Ideal Waveform Using Descending Ramp Flow Pattern ........ 10-19 Figure 10-10. Ideal Waveform Using Pressure Control Ventilation ................ 10-20 Figure 10-11. ET Tube Target Pressure vs. Flow .................................................... 10-30 Figure 10-12. Tracheostomy Tube Target Pressure vs. Flow ............................ 10-31 Figure 10-13. No Patient Inspiratory Effort Detected .......................................... 10-32 Figure 10-14. Patient Inspiratory Effort Detected ................................................ 10-33 Figure 10-15. Combined VIM and PIM Breaths ...................................................... 10-33 Figure 10-16. Mandatory and Spontaneous Intervals ........................................ 10-34 Figure 10-17. PIM Delivered Within Mandatory Interval ................................... 10-35 xviii Figure 10-18. PIM Not Delivered Within Mandatory Interval ........................... 10-35 Figure 10-19. Apnea Interval Equals Breath Period ............................................. 10-42 Figure 10-20. Apnea Interval Greater Than Breath Period ................................ 10-42 Figure 10-21. Apnea Interval Less Than Breath Period ....................................... 10-43 Figure 10-22. Apnea Ventilation in SIMV ................................................................. 10-45 Figure A-1. Spontaneous Breathing at PL ............................................................... A-1 Figure A-2. BiLevel Mode .............................................................................................. A-2 Figure A-3. BiLevel Setup Screen ............................................................................... A-4 Figure A-4. BiLevel with Pressure Support ............................................................. A-5 Figure A-5. Spontaneous and Synchronous Intervals ........................................ A-8 Figure A-6. APRV With Spontaneous Breathing at PH ........................................ A-9 Figure B-1. Enabling Leak Sync ...................................................................................B-4 Figure B-2. GUI Screen when Leak Sync is Enabled .............................................B-5 Figure B-3. Leak Sync Monitored Patient Data ......................................................B-7 Figure B-4. Circuit Disconnect During VC ................................................................B-9 Figure C-1. Setup Screen ................................................................................................C-3 Figure C-2. Monitoring Setup ......................................................................................C-4 Figure C-3. Monitoring Dialog .....................................................................................C-5 Figure C-4. Monitoring Waveform .............................................................................C-6 Figure D-1. Ventilator Setup Screen .......................................................................... D-6 Figure D-2. Graphics displays in PAV+ ...................................................................D-14 Figure D-3. Use of Default Lung Resistance ........................................................D-23 Figure E-1. Installing Neonatal Filter and Door ..................................................... E-4 Figure E-2. How to Connect the Breathing Circuit ............................................... E-7 Figure E-3. CPAP Setup Screen ..................................................................................E-10 Figure F-1. Proximal Flow Sensor ............................................................................... F-6 Figure F-2. Sample GUI screen Showing Proximal Flow Data .......................... F-7 Figure F-3. Message During Autozero and Purge Processes ............................ F-9 Figure F-4. Attaching Proximal Flow Sensor to Ventilator ..............................F-11 Figure F-5. Enabling/disabling Proximal Flow Sensor ......................................F-13 Figure F-6. Attaching Proximal Flow Sensor ........................................................F-14 Figure F-7. Manual Purge ............................................................................................F-16 Figure F-8. Alarm Message — Prox Inoperative .................................................F-17 xix Page Left Intentionally Blank xx 1 Introduction 1.1 Overview This manual contains information for operating the Puritan Bennett™ 980 Series Ventilators. Before operating the ventilator system, thoroughly read this manual. The latest version of this manual is available on the Internet at: http://www.covidien.com To order an additional copy of this manual, contact Covidien Customer Service or your local representative. 1.1.1 Related Documents Documentation is available online at the URL above. Covidien makes available all appropriate information relevant to use and service of the ventilator. For further assistance, contact your local Covidien representative. • The Puritan Bennett™ 980 Series Ventilator Operator’s Manual — Provides basic information on operating the ventilator and troubleshooting errors or malfunctions. Before using the ventilator, thoroughly read this manual. • The Puritan Bennett™ 980 Series Ventilator Service Manual — Provides information to Covidien-trained service technicians for use when testing, troubleshooting, repairing, and upgrading the ventilator. This chapter contains the following: • Symbol definitions • Safety Information, including Warnings, Cautions, and Notes • Technical assistance information • How to access on-screen Help • How to access warranty information • Serial number interpretation • Information regarding Electromagnetic susceptibility 1-1 Introduction 1.2 Global Symbol Definitions The following table describes the symbols shown on the ventilator shipping cartons. Other symbols appearing on various labels are shown in Chapter 2. Table 1-1. Shipping Carton Symbols and Descriptions Symbol Description Serial number Part number Manufacturer This side up Fragile Humidity limitations: 10% to 95% relative humidity, non-condensing (operation and storage) Temperature limitations: 10°C to 40°C (50°F to 104°F) (operation) -20°C to 70°C (-68°F to 158°F) (storage) Atmospheric pressure limitations: 70 kPa to 106 kPa (10.2 psi to 15.4 psi) Keep dry CSA certification mark that signifies the product has been evaluated to the applicable ANSI/Underwriters Laboratories Inc. (UL) and CSA standards for use in the US and Canada. 1-2 Operator’s Manual Safety Information Table 1-1. Shipping Carton Symbols and Descriptions (Continued) Symbol Description US federal law restricts this device to sale by or on the order of a physician. Refer to instruction manual. 1.3 1.3.1 Safety Information Safety Symbol Definitions This section contains safety information for users, who should always exercise appropriate caution while using the ventilator. Table 1-2. Safety Symbol Definitions Symbol Definition WARNING Warnings alert users to potential serious outcomes (death, injury, or adverse events) to the patient, user, or environment. Caution Cautions alert users to exercise appropriate care for safe and effective use of the product. Note Notes provide additional guidelines or information. 1.3.2 Warnings Regarding Fire Hazards WARNING: Explosion hazard — Do not use in the presence of flammable gases. An oxygen-rich environment accelerates combustibility. Operator’s Manual 1-3 Introduction 1.3.3 1-4 WARNING: To avoid a fire hazard, keep all components of the system away from all sources of ignition (such as matches, lighted cigarettes, flammable medical gases, and/or heaters). Oxygen-rich environments accelerate combustibility. WARNING: In case of fire or a burning smell, immediately take the following actions if it is safe to do so: disconnect the patient from the ventilator and disconnect the ventilator from the oxygen supply, facility power, and all batteries. Provide alternate method of ventilatory support to the patient, if required. WARNING: Replacement of batteries by inadequately trained personnel could result in an unacceptable risk, such as excessive temperatures, fire, or explosion. WARNING: To minimize fire hazard, inspect and clean or replace, as necessary, any damaged ventilator parts that come into contact with oxygen. WARNING: To prevent electrostatic discharge (ESD) and potential fire hazard, do not use antistatic or electrically conductive hoses or tubing in or near the ventilator breathing system. General Warnings WARNING: To ensure proper operation and avoid the possibility of physical injury, only qualified medical personnel should attempt to set up the ventilator and administer treatment with the ventilator. WARNING: In case of ventilator failure, the lack of immediate access to appropriate alternative means of ventilation can result in patient death. An alternative source of ventilation, such as a self-inflating, manually-powered resuscitator (as specified in ISO 10651-4 with mask) should always be available when using the ventilator. Operator’s Manual Safety Information WARNING: Patients on mechanical ventilation should be monitored by clinicians for proper patient ventilation. WARNING: The ventilator system is not intended to be a comprehensive monitoring device and does not activate alarms for all types of conditions. For a detailed understanding of ventilator operations, be sure to thoroughly read this manual before attempting to use the ventilator system. WARNING: To prevent patient injury, do not use the ventilator if it has a known malfunction. Never attempt to override serious malfunctions. Replace the ventilator and have the faulty unit repaired by trained service personnel. WARNING: To prevent patient injury, do not make unauthorized modifications to the ventilator. WARNING: To prevent injury and avoid interfering with ventilator operation, do not insert tools or any other objects into any of the ventilator’s openings or ports. WARNING: The audio alarm volume level is adjustable. The operator should set the volume at a level that allows the operator to distinguish the audio alarm above background noise levels. Reference To adjust alarm volume, p. 3-41 for instructions on alarm volume adjustment. WARNING: Do not silence, disable, or decrease the volume of the ventilator’s audible alarm if patient safety could be compromised. WARNING: If increased pressures are observed during ventilation, it may indicate a problem with the ventilator. Check for blocked airway, circuit occlusion, and/or run SST. Operator’s Manual 1-5 Introduction 1-6 WARNING: The LCD panel contains toxic chemicals. Do not touch broken LCD panels. Physical contact with a broken LCD panel can result in transmission or ingestion of toxic substances. WARNING: If the Graphical User Interface (GUI) display/LCD panel is blank or experiences interference and cannot be read, check the patient, then verify via the status display that ventilation is continuing as set. Because breath delivery is controlled independently from the GUI, problems with the display will not, by themselves, affect ventilation. The ventilator, however, should be replaced as soon as possible and repaired by qualified service personnel. WARNING: The Puritan Bennett™ 980 Series Ventilator contains phthalates. When used as indicated, very limited exposure to trace amounts of phthalates may occur. There is no clear clinical evidence that this degree of exposure increases clinical risk. However, in order to minimize risk of phthalate exposure in children and nursing or pregnant women, this product should only be used as directed. WARNING: Even though the 980 Series Ventilator meets the standards listed in Chapter 11, the internal Lithium-ion battery of the device is considered to be Dangerous Goods (DG) Class 9 - Miscellaneous, when transported in commerce. The 980 Series Ventilator and/or the associated Lithium-ion battery are subject to strict transport conditions under the Dangerous Goods Regulation for air transport (IATA: International Air Transport Association), International Maritime Dangerous Goods code for sea and the European Agreement concerning the International Carriage of Dangerous Goods by Road (ADR) for Europe. Private individuals who transport the device are excluded from these regulations although for air transport some requirements may apply. Operator’s Manual Safety Information 1.3.4 Warnings Regarding Environment of Use WARNING: Do not position the ventilator next to anything that blocks or restricts the gas inlet or cooling air circulation openings, gas exhaust port, fan intake, or alarm speaker, as this may: • limit the air circulation around the ventilator, potentially causing overheating; • limit the ventilator's ability to exhaust patient exhaled gas leading to potential harm; • limit the clinician’s ability to hear ventilator alarms. WARNING: To avoid injury, do not position the ventilator in a way that makes it difficult to disconnect the patient. WARNING: To ensure proper operation, do not position the ventilator in a way that makes it difficult to access the AC power cord. WARNING: Do not use the ventilator in a hyperbaric chamber. It has not been validated for use in this environment. WARNING: Do not use the ventilator in the presence of strong magnetic fields. Doing so could cause a ventilator malfunction. WARNING: Do not use the ventilator during radiotherapy (i.e. cancer treatment using ionizing radiation), as doing so could cause a ventilator malfunction. WARNING: To avoid the risk of ventilator malfunction, operate the ventilator in an environment that meets specifications. Reference Environmental Specifications, p. 11-7. Operator’s Manual 1-7 Introduction 1.3.5 1.3.6 1-8 WARNING: Do not use the ventilator as an EMS transport ventilator. It has not been approved or validated for this use. Warnings Before Using Equipment WARNING: Before activating any part of the ventilator, be sure to check the equipment for proper operation and, if appropriate, run SST as described in this manual. Reference To run SST, p. 3-48. WARNING: Check for leaks in the ventilator breathing system by running SST prior to ventilating a patient. WARNING: Lock the ventilator’s casters during use to avoid the possibility of extubation due to inadvertent ventilator movement. WARNING: The ventilator accuracies listed in the Ventilator Settings, Alarm Settings, and Patient Data tables in Chapter 11 are applicable only under specified operating conditions. Reference Environmental Specifications, p. 11-7. If the ventilator is operated outside specified ranges, the ventilator may supply incorrect information and the accuracies listed in the aforementioned tables do not apply. A hospital Biomedical Technician must verify the ventilator is operated in the environmental conditions specified. Warnings Regarding Electrical Power WARNING: To avoid the risk of electrical shock: • Use only Covidien-branded batteries, adapters, and cables. • Do not use batteries, adapters or cables with visible signs of damage. • Do not touch internal components. Operator’s Manual Safety Information 1.3.7 1.3.8 Warnings Regarding Ventilator Settings WARNING: The ventilator offers a variety of breath delivery options. Throughout the patient's treatment, the clinician should carefully select the ventilation mode and settings to use for that patient, based on clinical judgment, the condition and needs of the patient, and the benefits, limitations and characteristics of the breath delivery options. As the patient's condition changes over time, periodically assess the chosen modes and settings to determine whether or not those are best for the patient's current needs. WARNING: Avoid nuisance alarms by applying appropriate alarm settings. WARNING: To prevent inappropriate ventilation, select the correct Tube Type (ET or Tracheostomy) and tube inner diameter (ID) for the patient’s ventilatory needs. Inappropriate ventilatory support leading to over-or under-ventilation could result if an ET tube or trach tube setting larger or smaller than the actual value is entered. WARNING: Setting expiratory volume alarms to OFF increases the risk of not detecting a low returned volume. WARNING: Setting any alarm limits to OFF or extreme high or low values can cause the associated alarm not to activate during ventilation, which reduces its efficacy for monitoring the patient and alerting the clinician to situations that may require intervention. Warnings Regarding Hoses, Tubing, and Accessories WARNING: To prevent electrostatic discharge (ESD) and potential fire hazard, do not use antistatic or electrically conductive hoses or tubing in or near the ventilator breathing system. Operator’s Manual 1-9 Introduction 1-10 WARNING: Adding accessories to the ventilator can change the pressure gradient across the ventilator breathing system (VBS) and affect ventilator performance. Ensure that any changes to the ventilator circuit configurations do not exceed the specified values for circuit compliance and for inspiratory or expiratory limb total resistance. Reference Technical Specifications, p. 11-3. If adding accessories to the patient circuit, always run SST to establish circuit compliance and resistance prior to ventilating the patient. WARNING: Use of a nebulizer or humidifier can lead to an increase in the resistance of inspiratory and expiratory filters. Monitor the filters frequently for increased resistance or blockage. WARNING: During transport, the use of breathing tubing without the appropriate cuffed connectors may result in the circuit becoming detached from the ventilator. WARNING: The added gas from an external pneumatic nebulizer can adversely affect spirometry, delivered O2%, delivered tidal volumes, and breath triggering. Additionally, aerosolized particulates in the ventilator circuit can lead to an increase in expiratory filter resistance. WARNING: Carefully route patient tubing and cabling to reduce the possibility of patient entanglement or strangulation. WARNING: Always use filters designed for use with the Puritan Bennett™ 980 Series Ventilator. Do not use filters designed for use with other ventilators. Reference Covidien Accessories and Options, p. 9-4 for relevant filter part numbers. WARNING: To avoid liquid entering the ventilator, empty the expiratory condensate vial before fluid reaches the maximum fill line. Operator’s Manual Safety Information 1.3.9 WARNING: Accessory equipment connected to the analog and digital interfaces must be certified according to IEC 60601-1. Furthermore, all configurations shall comply with the system standard IEC 60601-1-1. Any person who connects additional equipment to the signal input part or signal output part of the ventilator system configures a medical system, and is therefore responsible for ensuring the system complies with the requirements of the system standard IEC 60601-1-1. If in doubt, consult Covidien Technical Services at 1.800.255.6774 or your local representative. Warnings Regarding Gas Sources WARNING: Do not use nitric oxide, helium or mixtures containing helium with the ventilator. It has not been validated for use with these gas mixtures. WARNING: To avoid the risk of ventilator malfunction, do not use the ventilator with anesthetic gases. WARNING: For proper ventilator operation, use only clean, dry, medical grade gases when ventilating a patient. WARNING: Use of only one gas source could lead to loss of ventilation and/or hypoxemia if that one gas source fails and is not available. Therefore, always connect at least two gas sources to the ventilator to ensure a constant gas supply is available to the patient in case one of the gas sources fails. The ventilator has two connections for gas sources: air inlet, and oxygen inlet. WARNING: Use of the ventilator in altitudes higher or barometric pressures lower than those specified could compromise ventilator operation. Reference Environmental Specifications, p. 11-7 for a complete list of environmental specifications. Operator’s Manual 1-11 Introduction WARNING: The ventilator should be connected to a gas pipeline system compliant to ISO 7396-1:2007 because: • Installation of the ventilator on a non-ISO 7396-1:2007 compliant gas pipeline system may exceed the pipeline design flow capacity. • 1.3.10 1-12 The ventilator is a high-flow device and can interfere with the operation of other equipment using the same gas source if the gas pipeline system is not compliant to ISO 7396-1:2007. Warnings Regarding Infection Control WARNING: Patients receiving mechanical ventilation may experience increased vulnerability to the risk of infection. Dirty or contaminated equipment is a potential source of infection. It is recognized that cleaning, sterilization, sanitation, and disinfection practices vary widely among health care institutions. Always follow your hospital infection control guidelines for handling infectious material. Follow the instructions in this manual and your institution’s protocol for cleaning and sterilizing the ventilator and its components. Use all cleaning solutions and products with caution. Follow manufacturer’s instructions for individual cleaning solutions. Reference Chapter 7 of this manual. WARNING: To prevent infection and contamination, always ensure inspiratory and expiratory bacteria filters are installed before ventilating the patient. WARNING: Never attempt to re-use single patient use components or accessories. Doing so increases risk of cross-contamination and re-processing of single patient use components or accessories may compromise functionality leading to possible loss of ventilation. Operator’s Manual Safety Information 1.3.11 1.3.12 Warnings Regarding Ventilator Maintenance WARNING: To ensure proper operation and avoid the possibility of physical injury, this ventilator should only be serviced by qualified technicians who have received appropriate Covidien-provided training for the maintenance of this ventilator. WARNING: Follow preventive maintenance according to specified intervals listed in these tables. Reference Operator Preventive Maintenance Frequency, p. 7-2. Reference Service Preventive Maintenance Frequency, p. 1-2 in the Operator’s Manual Addendum on Preventive Maintenance. Cautions Caution: To prevent possible equipment damage, ensure the casters are locked to prevent inadvertent movement of the ventilator during routine maintenance, or when the ventilator is on an incline. Caution: Do not use sharp objects to make selections on the display or keyboard. Caution: To ensure optimal performance, keep the GUI touch screen and keyboard clean and free from foreign substances. Reference Surface Cleaning Agents, p. 7-5. Caution: To avoid moisture entering the ventilator and possibly causing a malfunction, Covidien recommends using a wall air water trap when using piped medical air from a facility-based air compressor. Caution: Use only the cleaning agents specified. Reference Surface Cleaning Agents, p. 7-5. for approved cleaning agents. Operator’s Manual 1-13 Introduction 1.3.13 1-14 Caution: Do not block cooling vents. Caution: Ensure proper connection and engagement of expiratory and inspiratory filters. Caution: Follow instructions for proper GUI and BDU (breath delivery unit) mounting as described in the Puritan Bennett™ 980 Series Ventilator Installation Instructions. Caution: Follow proper battery installation instructions as described in this manual. Caution: When transferring the ventilator from storage conditions, allow its temperature to stabilize at ambient conditions prior to use. Caution: Remove extended and primary batteries from ventilator prior to transporting in a vehicle. Failure to do so could result in damage to the ventilator. Notes Note: Federal law (USA) restricts the sale of this device except by or on the order of a physician. Note: When using non-invasive ventilation (NIV), the patient’s actual exhaled volume may differ from the exhaled volume reported by the ventilator due to leaks around the mask. Operator’s Manual Safety Information 1.4 1.4.1 Note: When utilizing a closed-suction catheter system, the suctioning procedure can be executed using existing mode, breath type, and settings. To reduce potential for hypoxemia during the procedure, elevated delivered oxygen can be enabled using the Elevate O2 control. Reference To adjust the amount of elevated O2 delivered for two minutes, p. 3-40. Obtaining Technical Assistance Technical Services For technical information and assistance, to order parts, or to order an Operator’s Manual or Service Manual, contact Covidien Technical Services at 1.800.255.6774 or a local Covidien representative.Reference the following table for service centers in the USA and other countries. The Puritan Bennett™ 980 Series Ventilator Service Manual includes information necessary to service or repair the ventilator when used by qualified, factory-trained personnel. When calling Covidien Technical Services, or a local Covidien representative, have the BDU and GUI serial numbers available, as well as the firmware version number of the ventilator system. The ventilator’s configuration is available by touching the wrench icon on the GUI screen, then touching the Options tab. Have this information available whenever requesting technical assistance. Information on obtaining the Operator’s and Service Manuals are available on the Internet at: http://www.covidien.com The following table lists Covidien Service Centers, addresses, telephone, and Fax numbers: Operator’s Manual 1-15 Introduction 1-16 Covidien Argentina Aguero 351 Capital Federal - 1171 ABC, Argentina Tel: (5411) 48635300 Fax: (5411) 48634142 Covidien Asia Singapore Regional Service Centre 15 Pioneer Hub, #06-04 Singapore 627753 Tel (65) 6578 5288 Fax (65) 6515 5260 Covidien Australia 52A Huntingwood Drive Huntingwood, NSW 2148 Australia Tel: (+61) 1800 - 350702 Fax: (+61) 2967 - 18118 Covidien Austria GmbH Campus 21 Europaring F09402 A-2345 Brunn am Gebirge Covidien Belgium BVBA/SPRL. Generaal De Wittelaan 9/5 2800 Mechelen Belgium Tel +32 15 29 44 50 Fax +32 15 29 44 55 Covidien Brazil Av. Das Nações Undias 12995 Andar 23 - Brooklin São Paulo, SP Brasil 04578-000 Tel: (5511) 2187-6200 Fax: (5511) 2187-6380 Covidien Canada 19600 Clark Graham Baie d'Urfe, QC, H9X 3R8 Canada Tel:1-514-332-1220, Select Option 2 Fax: 1-514-695-4965 Covidien Chile Camino lo Boza (Ex 8395) Pudehuel Santiago Chile Tel: (562) 739 - 3000 Fax: (562) 783 - 3149 Covidien China 2F, Tyco Plaza 99 Tian Zhou Rd Shang Hai 200233 P.R. China Tel: (+86) 4008 1886 86 Fax: (+86) 2154 4511 18 Covidien Colombia Edificio Prados de la Morea Carretera Central Del Norte (Cra 7a)Kilometro 18, Chia-Cundinamarca Bogota, Colombia Tel: (571) 619-5469 Fax: (571) 619-5425 Covidien Costa Rica Global Park, Parkway 50 La Auroa de Heredia Costa Rica Tel: (506) 2239 - 5386 Fax: (506) 2239 - 5319 Covidien ECE Prosecká 851/ 64 190 00 Prague Czech Republc Tel +42 024 109 57 35 Fax + 42 02 3900 0437 Covidien Danmark A/S Langebrogade 6E, 4. th DK-1411 København K Danmark Tel +45 4368 2171 Fax:+45 4368 2172 Covidien Deutschland GmbH Gewerbepark 1r D-93333 Neustadt/ Donau Germany Tel + 49 (0) 9445 95 9 0 Fax + 49 (0) 9445 95 9 155 Covidien ECE Galvahiho 7 / A 82104 Bratislava Slovakia Tel +420 2 41 095 735 Fax +420 2 39 000 437 Covidien Finland Oy Pursimiehenkatu 26-39C, PL407 FIN-00151 Helsinki Finland Te. +358 9725 192 88 Fax +358 9725 192 89 Covidien France SAS 2 Rue Denis Diderot 78990 Elancourt France Tel +33 (0) 13079 80 00 Fax +33 (0) 130 79 80 30 Covidien Hong Kong Unit 12 - 16, 18/F BEA Tower Millennium City 5 4187 Kwun Tong Road Kwum Tong, Kowloon, Hong Kong Tel + 852 3157 7299 Fax + 852 2838 0749 Covidien India 10th Floor Building No 9B DLF Cyber City Phase III Gurgaon Haryana - 122002 India Tel + 91 1244 709800 Fax + 91 1244 206850 Covidien ECE Mariássy u.7. 1095 Budapest Hungary Tel + 36 1880 7975 Fax + 36 1777 4932 Tel: +43 (0) 2236 37 88 39 Fax: +43 (0) 2236 37 883940 Operator’s Manual Safety Information Covidien Ireland Block G, Ground Floor, Cherrywood Business Park, Loughlinstown County Dublin, Ireland Tel +353 (0) 1.4073173 Fax +353(0) 1.4073174 Covidien Israel 5, Shasham St. North Industrial Park POB3069 Caesarea, 38900 Tel +972 4.627 73 88 Fax+972 4.627 76 88 Covidien Italia S.p.A Via Rivoltana 2/D I-20090 Segrate (Mi) Italy Tel +39 02 703 173 1 Fax +39 02 71740584 Covidien Japan Inc. Technical Support Center 83-1, Takashimadaira 1Chome Itabashi-ku, Tokyo 175-0082 Japan Tel: +81 (0) 3 6859 0120 Fax: +81 (0) 3 6859 0142 Covidien Korea 5F, Hibrand Living Gwan, #215, Yangjae-Dong, Seocho-Gu Seoul, Korea Tel: +822 570 5459 Fax: +822 570 5499 Covidien Mexico Insurgentes Sur # 863, Piso 16 Col. Nápoles Del. Benito Juarez Mexico, D.F. 03810 Mexico Tel: (5255) 5804-1524 Fax: (5255) 5536-1326 Covidien Nederland BV Hogeweg 105 NL5301 LL ZaltbommelNederland Tel0418 57 66 00 Fax 0418 57 67 91 Covidien New Zealand Cnr Manu Tapu Dr & Joseph Hammond Pl. Auckland Airport New Zealand Phone: + 64 508 489 264 Covidien Norge AS Bankveinen 1, Postboks 343 N-1372 Askerr Norway Tel +47 2415 98 87 Fax +47 2415 15 98 88 Covidien Panama Parque Industrial Costa del Esta Calle Primera, Edifio # 109 Panama City, Panama Tel: (507) 264-7337 Fax: (507) 236-7408 Covidien Polska Al. Jerozolimskie 162 02-342 Warszawa. Polska Tel +48 22 312 20 00 Fax +48 22 312 20 20 Covidien Portugal Lda. Produtos De Saúde Ida. Est: Outeiro Polima, Lote 101° Piso Abóboda P-2785-521 S. Domingos de Rana Portugal Tel +351 21 448 10 00 Fax +351 21 445 05 88 Covidien Puerto Rico Palmas Industrial Park Road 869 Km 2.0 Bdlg. #1 Cataño, PR 00962 Tel. 787-993-7250 Ext. 7222 & 7221 Fax 787-993-7234 Covidien Russia 53 bld. 5 Dubininskaya StreetMoscow RUSSIA. 119054 Tel +70 495 933 64 69 Fax +70 495 933 64 68 Covidien Saglik A.S. Maslak Mahallesi Bilim Sokak No: 5, Sun Plaza Kat: 2-3 Sisli, Istanbul 34398 Turkey Tel +90 212 366 20 00 Fax +90 212 276 35 25 Covidien South Africa Corporate Park North 379 Roan Crescent RandjesparkMidrand, South Africa Tel +27 115 429 500 Fax +27 115 429 624 Operator’s Manual 1-17 Introduction Covidien Spain S.L. c/Fructuós Gelabert 6, 8a Planta 08970 Sant JoanDespí Barcelona, Spain Tel +34 93475 86 10 Fax +34 93 477 10 17 Covidien Sverige AB Hemvärnsgatan 9, Box 54 SE-171 74 Solna Sweden Tel +46(0)8517 615 73 Fax + 46 (0)8 517 615 79 Covidien UK 4500 Parkway Whiteley, Fareham Hampshire PO157NY, United Kingdom Tel +44 (0) 1329 2240002 Fax +44 (0) 1329 220213 Covidien USA 2101 Faraday Ave Carlsbad, CA 92008 Phone: 1-800-255-6774 (option 4 Email: [email protected] Covidien Switzerland Roosstrasse 53 Ch-8832 Wollerau Switzerland Tel +41(0)44 786 50 50 Fax +41 (0) 44 78650 10 Covidien Thailand 319 Chamchuri Square 17th Floor, Unit 1-8, Phayathai Road Pathumwan, Bangkok 10330, Thailand Tel +66-2 207-3 100 Fax +66-2 207 - 3101 For online Technical support, visit the SolvITSM Center Knowledge Base at www.covidien.com. The SolvIT Center provides answers to frequently asked questions about the ventilator system and other Puritan Bennett products 24 hours a day, seven days a week. 1.4.2 On-Screen Help The ventilator is equipped with an on-screen help system that enables users to select an item on the screen and display a description of that item. Follow the procedure below to access and use on-screen help. Accessing On-screen Help Topics Help topics on the ventilator are called tooltips. If a tooltip is available, a glowing blue outline appears around the item in question. To access tooltips 1. Touch the item in question for a period of at least 0.5 s, or drag the help icon (the question mark icon appearing at the lower right of the GUI screen) to the item in question. A tooltip appears with a short description of the item. Most screen items have tooltips associated with them, providing the operator with access to a multitude of help topics. 2. 1-18 Touch “more” on the dialog to display an expanded description. Operator’s Manual Safety Information 3. Touch “close” to close the dialog, or let it fade away after five (5) seconds. Note: • Dragging the help icon causes the tooltip to display in its unexpanded state. • Dragging the help icon and pausing causes a tooltip to display. Continue dragging to another item to dismiss the last tooltip and display another tooltip. Other Resources Additional resources for information about the ventilator can be found in the Puritan Bennett™ 980 Series Ventilator Service Manual and appendices in this manual for BiLevel 2.0, IE Sync, Leak Sync, PAV+, NeoMode 2.0, and Proximal Flow Sensor options. 1.5 Warranty Information To obtain warranty information for a covered product, contact Covidien Technical Services at 1.800.255.6774 or call a local Covidien representative. 1.6 Manufacture Date The graphical User Interface (GUI) and Breath Delivery Unit (BDU) each possess a specific year of manufacture applicable only for that assembly. These dates are contained in the serial numbers for each assembly or option. Serial numbers for the 980 Ventilator final units consist of ten digits, in the following format: 35ZYYXXXXX where • 35 signifies the unit was manufactured in Galway, Ireland • Z represents the product code (B= breath delivery unit, G= GUI, P = Proximal Flow Monitoring option). The product codes shown here are typically the most common. There may be other product codes shown in the serial number depending upon the particular option(s) purchased. • YY is a two-digit year code that changes with each year • XXXXX is a sequential number that resets at the beginning of each new year Operator’s Manual 1-19 Introduction Serial numbers are located on labels on the back panels of the GUI and BDU, and in various locations on product options. 1.7 Manufacturer Covidien llc, 15 Hampshire Street, Mansfield, MA 02048 USA. 1.8 Electromagnetic Compatibility The ventilator system complies with the requirements of IEC 60601-1-2:2007 (EMC Collateral Standard) including the E-field susceptibility requirements at a level of 10 volts per meter, at frequencies from 80 MHz to 2.5 GHz. However, even at this level of device immunity, certain transmitting devices (cellular phones, walkie-talkies, cordless phones, paging transmitters, RFID devices, etc.) emit radio frequencies that could interrupt ventilator operation if operated in a range too close to the ventilator. Practitioners should be aware of possible radio frequency interference if portable devices are operated in close proximity to the ventilator. The Puritan Bennett™ 980 ventilator requires special precautions to be taken regarding electromagnetic compatibility (EMC) and must be installed and put into service according to the EMC information provided in Chapter 11 in this manual. 1-20 Operator’s Manual 2 Product Overview 2.1 Overview This chapter contains introductory information for the Puritan Bennett™ 980 Series Ventilator. Note: Items shown in bold-italic font are contained as entries in the glossary. Communication between the ventilator’s graphical user interface (GUI) and the breath delivery unit (BDU) occurs continuously via independent central processing units (CPUs). Reference Pneumatic Diagram, p. 2-37 and its associated reference designators when reading the following paragraphs. Gas delivery starts with the ventilator connected to wall (or bottled) air and oxygen. Gas travels to the mix module where gas pressures are regulated by their respective proportional solenoid valves (PSOLs). The PSOLs meter the gases according to the ventilator settings entered, then the gases flow through individual air and oxygen flow sensors into the mix manifold and accumulator for mixing. The individual gas pressures are continuously monitored both before and after they are mixed in the mix manifold and accumulator assemblies. The mixed gas then flows to the inspiratory pneumatic system where it flows through the breath delivery flow sensor and then the inspiratory PSOL for delivery to the patient. Before the gas reaches the patient, it passes through an internal inspiratory bacteria filter, then through an external inspiratory bacteria filter attached to the ventilator’s gas outlet (the To patient port) where the breathing circuit is attached. When the gas returns from the patient, it flows through the expiratory limb of the breathing circuit, to the From patient port on the expiratory bacteria filter (which includes a condensate vial) before flowing through the exhalation valve flow sensor and exhalation valve (EV). A gas exhaust port allows exhaled gas to exit the ventilator and flow to the room. 2-1 Product Overview The ventilator recognizes the patient’s breathing effort using pressure triggering (P-TRIG), flow triggering (V-TRIG) or IE Sync triggering (if the IE Sync Option is installed).Reference Appendix C for more information on the IE Sync Option. During pressure triggering, as the patient inhales, the airway pressure decreases and the inspiratory pressure transducer (PI) monitors this pressure decrease.When the pressure drops to at least the value of the pressure sensitivity (PSENS) setting, the ventilator delivers a breath. During flow triggering, the difference between inspiratory and expiratory flows is monitored. As the patient inhales, the exhalation valve flow sensor measures less flow, while the delivery flow sensor measurement remains constant. When the difference between the two measurements is at least the value of the operator-set flow sensitivity (VSENS), the ventilator delivers a breath. If the patient is not inhaling, any difference between delivered flow and expiratory flow is due to flow sensor inaccuracy or leaks in the ventilator breathing circuit. To compensate for leaks, which can cause autotriggering, the clinician can increase the VSENS setting or enable Leak Sync, if available. Note: Leak Sync is a software option. Details on its operation are provided in the Leak Sync appendix in this manual. Reference Appendix B. A backup pressure triggering threshold of 2 cmH2O is also in effect. This provides enough pressure sensitivity to avoid autotriggering, but will still allow the ventilator to trigger with acceptable patient effort. The exhalation valve controls Positive End Expiratory Pressure (PEEP) using feedback from the expiratory pressure transducer (PE). The valve controller also cycles the ventilator into the exhalation phase if the PE measurement equals or exceeds the operator-set high circuit pressure limit. The PE measurement also controls when the safety valve (SV) opens. If PE measures 110 cmH2O or more in the ventilator breathing circuit, the safety valve opens, allowing the patient to breathe room air (if able to do so) through the valve. 2.2 Ventilator Description The ventilator system is available in three models. All ventilators provide continuous ventilation to patients requiring respiratory support. • 2-2 Puritan Bennett™ 980 Pediatric - Adult Ventilator — The Pediatric - Adult model ventilates Pediatric or Adult patients with predicted body weights from 3.5 kg to 150 kg, and with tidal volumes from 25 mL to 2500 mL. Operator’s Manual GUI Controls and Indicators • Puritan Bennett™ 980 Neonatal Ventilator — The Neonatal model ventilates Neonatal patients with predicted body weights from 0.3 kg to 7.0 kg, and with tidal volumes for mandatory volume-controlled breaths from 2 mL to 320 mL. • Puritan Bennett™ 980 Universal Ventilator — The Universal model ventilates Neonatal, Pediatric, and Adult patients with predicted body weights from 0.3 kg to 150 kg, and with tidal volumes for mandatory volume-controlled breaths from 2 mL to 2500 mL. To ventilate Neonatal patients on the Pediatric - Adult or Universal models, the NeoMode 2.0 software option is required. For details regarding the NeoMode 2.0 software option, Reference Appendix E in this manual. The estimated service life of the ventilator is approximately 10 years, provided the preventive maintenance schedule stated in the Puritan Bennett™ 980 Series Ventilator Service Manual is followed; however, service life of individual units may vary. The ventilator’s IEC 60601-1/EN 60601-1 classification is: • Protection class I • Type BF • Mobile • Internally powered • IP 21 equipment • Continuous operation • Not suitable for use with flammable medical gases (not AP or APG) Reference BDU Rear Label or Panel Symbols and Descriptions, p. 2-11 for a description of the meaning of the IP classification. The ventilator system uses a graphical user interface (GUI) and breath delivery unit (BDU) for entering patient settings and delivering breaths to the patient. The GUI contains electronics capable of transferring the clinician’s input (by touching the screen) to the BDU where pneumatic and electronic systems, respectively, generate the breathing parameters. Operator’s Manual 2-3 Product Overview 2.3 Indications For Use The Puritan Bennett™ 980 Ventilator System is designed for use on patient population sizes from Neonatal (NICU) through Adult who require respiratory support or mechanical ventilation and weigh a minimum of 0.3 kg (0.66 lb). It is suitable for service in hospital (institutions) and intra-hospital transport to provide continuous positive pressure ventilatory support, delivered invasively or noninvasively, to patients who require the following types of ventilator support: • Positive Pressure Ventilation, delivered invasively (via endotracheal tube or trach tube) or non-invasively (via mask or nasal prongs) • Assist/ Control, SIMV or Spontaneous modes of ventilation Note: Intended typical usage may be defined to include the following for the ventilator system: Hospital Use — Typically covers areas such as general care floors (GCFs), operating rooms, special procedure areas, intensive and critical care areas within the hospital and in hospital-type facilities. Hospital-type facilities include physician office-base facilities, sleep labs, skilled nursing facilities, surgicenters, and sub-acute centers. Intra-hospital transport — Includes transport of a patient within the hospital or hospital-type facility. All external hospital transportation (i.e. ambulance or aircraft) is excluded. 2.4 Note: Federal law (USA) restricts the sale of this device except by or on the order of a physician. Contraindications Do not operate the ventilator in a magnetic resonance imaging (MRI) environment. 2-4 Operator’s Manual GUI Controls and Indicators 2.5 Components List Note: No parts of the ventilator system contain latex. Note: The components in the gas pathway that can become contaminated with bodily fluids or expired gases during both normal and single fault conditions are: • External inspiratory filter • Internal inspiratory filter • Expiratory filter and condensate vial • Exhalation valve assembly The typical ventilator system ships with the following packing list. Depending upon the ventilator system purchased, your list may vary. Table 2-1. Typical Packing List Quantity Operator’s Manual Item 1 Graphical User Interface 1 Breath Delivery Unit 1 Inspiratory filter 1 Expiratory filter 1 Condensate vial 2 Gas hoses (air and oxygen) 1 Standard caster base 1 Power cord 1 Operator’s Manual CD 1 Puritan Bennett™ 980 Series Ventilator Installation Instructions 1 Flex arm 1 Drain bag 1 Gold standard circuit (for running EST) 2-5 Product Overview 2.6 2.6.1 Product Views GUI Front View Figure 2-1. GUI Front View 2-6 1 Display brightness key 6 Inspiratory pause key 2 Display lock key 7 Expiratory pause key 3 Alarm volume key 8 Alarm reset key 4 Manual Inspiration key 9 Alarm silence key 5 Rotary encoder (knob) Operator’s Manual GUI Controls and Indicators 2.6.2 GUI Rear View Figure 2-2. GUI Rear View Reference Common Symbols Found on GUI or BDU Labels, p. 2-13 for symbols found on the GUI or BDU. The “Do Not Push” symbol found on the GUI, only, is shown in this table. Operator’s Manual 2-7 Product Overview 2.6.3 BDU Front View Figure 2-3. BDU Front View 2-8 1 Condensate vial 5 Power switch 2 Expiratory filter 6 Status display 3 Expiratory filter latch 7 Internal inspiratory filter 4 AC power indicator 8 Option connector panel door Operator’s Manual GUI Controls and Indicators Table 2-2. BDU Front Label Symbols and Descriptions Symbol Description To Patient port From Patient port Expiratory filter latch locked (down)/unlocked (up) Operator’s Manual 2-9 Product Overview 2.6.4 BDU Rear View Figure 2-4. BDU Rear View 1 Standard base 5 Service mode button 2 Air inlet 6 Remote alarm port 3 Oxygen inlet 7 Cylinder mount (optional) 4 Labels indicating installed software options Software option labels are applied to the grid located on the back of the ventilator, as shown below and in the previous image (item 4). 2-10 Operator’s Manual GUI Controls and Indicators Figure 2-5. Installed Software Options The following table lists the symbols and descriptions found on BDU or base labels. Table 2-3. BDU Rear Label or Panel Symbols and Descriptions Symbol Description US federal law restricts this device to sale by or on the order of a physician. User must consult instructions for use. Symbol is also found on “Do not obstruct” labels on both left and right sides of the ventilator, and on label indication supply gas connections. Keep away from fire or flame. Oxygen rich environments accelerate combustibility. Atmospheric pressure limitations – The operational atmospheric pressure range 70 kPa to 106 kPa (10.2 psi to 15.4 psi). Humidity limitations – The operational humidity limit range 10% to 95%. Temperature limitations – The operational temperature limit range 50°F to 104°F (10°C to 40°C). Operator’s Manual 2-11 Product Overview Table 2-3. BDU Rear Label or Panel Symbols and Descriptions (Continued) Symbol Description Type BF applied part. IEC Ingress protection classification – Protected against ingress of fingers or similar objects and protected from condensation. Explosive hazard. Do not use in the presence of flammable gases. Authorized to bear the CSA certification mark signifying the product has been evaluated to the applicable ANSI/Underwriters Laboratories Inc. (UL) and CSA standards for use in the US and Canada. The ventilator contains components manufactured with phthalates. Unsafe to use the ventilator in magnetic resonance imaging environments. Potential equalization point (ground) (on AC panel). CB1 BDU Circuit Breaker (on AC panel). CB2 Compressor Circuit Breaker (on AC panel). USB port (at rear of ventilator). HDMI port (at rear of ventilator). Service port (at rear of ventilator). 2-12 Operator’s Manual GUI Controls and Indicators Table 2-3. BDU Rear Label or Panel Symbols and Descriptions (Continued) Symbol Description Service mode button (at rear of ventilator). Remote alarm port (at rear of ventilator). Ethernet connector (at rear of ventilator). Serial port (at rear of ventilator). Table 2-4. Common Symbols Found on GUI or BDU Labels Symbol Description Do Not Push - Do not push on the GUI Manufacturer - Name of the ventilator manufacturer. Serial number. Manufacture date – The manufacture date is contained in the serial number. Reference Manufacture Date, p. 1-19 for details regarding interpretation of the serial number. WEEE – Proper waste disposal. Follow local governing ordinances regarding disposing of waste labeled with the WEEE symbol. Operator’s Manual 2-13 Product Overview 2.6.5 Ventilator Side Views Figure 2-6. Ventilator Right Side View 2-14 Operator’s Manual GUI Controls and Indicators Figure 2-7. Ventilator Left Side View 2.7 Mounting Configurations The ventilator system can be mounted as a free-standing unit standing at the patient’s bedside; the BDU with the GUI is mounted on a base with casters and includes a handle for ease of movement. 2.8 Battery Backup The ventilator system uses a battery to provide backup power in case AC power is lost. When operating on battery power, the status display shows the “On Battery Power” image, and the GUI displays a representation of battery charge levels. Reference Typical Status Display Indicators and Messages, p. 230 to for a description of the status display images and messages. An optional, extended battery is available to lengthen the amount of time the ventilator can operate on battery power. Reference Using Battery Power, p. 3-3. Operator’s Manual 2-15 Product Overview 2.9 Graphical User Interface There are two displays on the ventilator — the primary display (GUI) and the status display. 2.9.1 Primary Display The GUI incorporates a 15” display that rotates throughout a 170° angle about a vertical axis in either direction. The GUI can also be tilted up to 45° from vertical. The clinician enters ventilation parameters via the GUI’s touch screen, also known as the ventilator’s primary display. The GUI’s keys activate other ventilator functions including screen brightness, display lock, alarm volume, manual inspiration, inspiratory pause, expiratory pause, alarm reset, and alarm silence. The GUI displays the following information depending on the state of the ventilator: 2.10 2.10.1 • Ventilator, apnea, and alarm settings • Patient data • Waveforms • Current alarm banners GUI Controls and Indicators Control Keys The GUI bezel has eight off-screen control keys as shown below. Table 2-5. GUI Control Keys Key symbol Description Brightness control key — Adjusts the GUI screen brightness. Press the key and turn the knob to adjust the brightness. 2-16 Operator’s Manual GUI Controls and Indicators Table 2-5. GUI Control Keys (Continued) Key symbol Description Display lock key — Actuates a lock to prevent inadvertent settings changes to the ventilator (including the knob function) while the display is locked. The display lock is useful when cleaning the touch screen. Press the key again to unlock the display. Alarm volume key — Adjusts the alarm volume. The alarm volume cannot be turned OFF. Manual inspiration key — In A/C, SIMV, and SPONT modes, delivers one manual breath to the patient in accordance with the current mandatory breath parameters. In BiLevel mode, transitions from low pressure (PL) to high pressure (PH) (or vice versa). To avoid breath stacking, a manual inspiration is not delivered during inspiration or during the restricted phase of exhalation. Reference Manual Inspiration, p. 10-22 for information on the restricted phase of exhalation. The Manual inspiration key can be used to deliver mandatory breaths to the patient or to run an inspiratory pause maneuver in SPONT mode. The manual inspiration key cannot be used to run an expiratory pause maneuver in SPONT mode. Inspiratory pause key — Initiates an inspiratory pause which closes the inspiratory and exhalation valves and extends the inspiratory phase of a mandatory breath for the purposes of measuring end inspiratory pressure (PI END) for calculation of plateau pressure (PPL), static compliance (CSTAT), and static resistance (RSTAT). Expiratory pause key — Initiates an expiratory pause which extends the expiratory phase of the current breath in order to measure total PEEP (PEEPTOT). Alarm reset key — Clears active alarms or resets high-priority alarms and cancels an active alarm silence. An alarm reset is recorded in the alarm log if there is an active alarm. DEVICE ALERT alarms cannot be reset. Alarm silence key — Silences alarms for two minutes. Cancel the alarm silence function by touching the on-screen “Cancel” button. 2.10.2 Visual Indicators The table below shows the GUI’s visual indicators. Reference Areas of the GUI, p. 4-3 for area names. The alarm silence function has two visual indicators — the alarm silence key on the GUI bezel glows yellow during an alarm silence interval, and a visual count- Operator’s Manual 2-17 Product Overview down timer appears, showing the amount of time the alarm silence interval has remaining. Table 2-6. GUI Visual Indicators Symbol Description Ventilator Setup (Vent Setup) button. Located at the lower left corner of the GUI. Touch this button to open the ventilator setup screen. Adult patient circuit indicator. Indicates adult circuit type tested during SST, and in use. Appears above the Vent Setup button. Pediatric patient circuit indicator. Indicates pediatric circuit type tested during SST, and in use.Appears above the Vent Setup button. Neonatal patient circuit indicator. Indicates neonatal circuit type tested during SST, and in use.Appears above the Vent Setup button. Home icon. A constant access icon. Reference Areas of the GUI, p. 4-3. Touch this icon to dismiss all open dialogs on the GUI screen. The display resumes showing the ventilator waveforms. Alarms icon. A constant access icon. Reference Areas of the GUI, p. 4-3.Touch this icon to display the alarm settings screen, which allows alarm limits to be changed. Logs icon. A constant access icon. Reference Areas of the GUI, p. 4-3. Touch this icon to display the logs screen, which contains tabs for Alarms, Settings, Patient Data, Diagnostics, EST/ SST status, General Event, and Service logs. 2-18 Operator’s Manual GUI Controls and Indicators Table 2-6. GUI Visual Indicators (Continued) Symbol Description Elevate O2 control. A constant access icon. Reference Areas of the GUI, p. 4-3. Touch this icon to increase the set the elevated oxygen concentration to the institutional default O2 configuration (if institutional default has been configured) for two minutes, or allows the operator to determine the additional percentage of oxygen to increase. The O2 concentration for the two-minute increase can be set to any value between 1% and 100% O2. If the Elevate O2 function is active, touching Extend re-starts the two-minute interval. The Elevate O2 function can be terminated prior to completion of the two-minute interval by touching Stop. Any time the Elevate O2 control is activated, an entry is made to the patient data log. Screen capture icon. A constant access icon. Reference Areas of the GUI, p. 4-3. Touch this icon to capture the image displayed on the GUI screen. Reference To capture GUI screens, p. 5-2 to read the complete procedure for capturing screen images. Help icon. A constant access icon. Reference Areas of the GUI, p. 4-3. Drag this icon to the item in question and release. A tooltip will appear describing the item’s function. Unread items icon. When this icon appears overlaid on another icon or tab (the logs icon, for example) it indicates there are unread items at this location. Configure icon. A constant access icon. Reference Areas of the GUI, p. 4-3. Touch this icon to display the configure screen. Tabs with SST results, options, Comm setup, and date/ time change are displayed. Pause icon. Located above the constant access icons. Touch this icon to pause the waveform graph. Waveform layout icon. Located above the constant access icons area.Touch this icon to open the waveform layout dialog. Operator’s Manual 2-19 Product Overview Table 2-6. GUI Visual Indicators (Continued) Symbol Description Grid lines icon. Located above the constant access icons area. Touch this icon to turn waveform grid lines ON or OFF. Maximize waveform icon. Located at the upper right portion of each waveform. Touch this icon to enlarge the waveform to its maximum size. Restore waveform icon. Restores waveform to its original size. Located at the upper right of the maximized waveform. Pushpin icon – pinned state. When in the pinned state, prevents a dialog from closing (under certain conditions). Located in the upper right corner of the GUI on the vent setup screen. Reference Pushpin Icon, p. 4-5. Pushpin icon – unpinned state. When the unpinned icon is touched, the pinned state becomes active. Located in the upper right corner of the GUI on the vent setup screen. Reference Pushpin Icon, p. 4-5. Low priority alarm icon (appears on alarm banner). Medium priority alarm icon (appears on alarm banner). High priority alarm icon (appears on alarm banner). 2.10.3 On-screen Symbols and Abbreviations Touch an on-screen symbol briefly (0.5 s) to display a tooltip on the GUI screen. The tooltip contains a definition of the symbol and other descriptive text, available with either short or long descriptions. The short description expands to show more information by touching “more” on the tooltip dialog or collapses by touching “less”. The tooltip closes by touching “close” or fades in five (5) seconds if left alone. Expanding the tooltip dialog prevents the tooltip from timing out. Touching outside the tooltip causes the dialog to close. The table below summarizes the ventilator’s symbols and abbreviations. 2-20 Operator’s Manual GUI Controls and Indicators Table 2-7. Symbols and Abbreviations Symbol or Abbreviation Definition TA Apnea interval DSENS Disconnect sensitivity CDYN Dynamic compliance RDYN Dynamic resistance EEF End expiratory flow PI END End inspiratory pressure LEAK Exhalation leak VTE MAND Exhaled mandatory tidal volume VE TOT Exhaled minute volume VE SPONT Exhaled spontaneous minute volume VTE SPONT Exhaled spontaneous tidal volume VTE Exhaled tidal volume ESENS Expiratory sensitivity TE Expiratory time Flow pattern (ramp) Flow pattern (square) Operator’s Manual VSENS Flow sensitivity V-TRIG Flow triggering PH High pressure setting (in BiLevel) TH High pressure time (in BiLevel) TH:TL High pressure time to Low pressure time ratio (in BiLevel) I:E Inspiratory Time to Expiratory Time (I:E) C20/C Inspiration compliance ratio VLEAK Inspiratory leak TI Inspiratory time 2-21 Product Overview Table 2-7. Symbols and Abbreviations (Continued) 2-22 Symbol or Abbreviation Definition PI Inspiratory pressure VTI Inspired tidal volume VTL Inspired tidal volume (when Leak Sync is enabled) PEEPI Intrinsic PEEP (auto PEEP) PEEPI PAV PAV-based intrinsic PEEP PL Low pressure setting (in BiLevel) TL Low pressure time (in BiLevel) PMEAN Mean circuit pressure NIF Negative inspiratory force O2% Oxygen percentage P0.1 Airway occlusion pressure at 100 ms CPAV PAV-based lung compliance EPAV PAV-based lung elastance % Supp Percent support setting for Tube Compensation and PAV+ RPAV PAV-based patient resistance RTOT PAV-based total airway resistance WOBTOT PAV-based work of breathing of patient and ventilator during inspiration PPEAK Peak circuit pressure PEF Peak expiratory flow VMAX Peak inspiratory flow PSF Peak spontaneous flow PEEP Set or monitored positive end expiratory pressure %Leak Percent leak PPL Plateau pressure TPL Plateau time PCOMP Compensation pressure Operator’s Manual GUI Controls and Indicators Table 2-7. Symbols and Abbreviations (Continued) Symbol or Abbreviation Definition PSENS Pressure sensitivity PSUPP Pressure support level P-TRIG Pressure triggering VTIY Proximal inspired tidal volume VTEY Proximal exhaled tidal volume VTI MANDY Proximal mandatory inspired tidal volume VTI SPONTY Proximal spontaneous inspired tidal volume VTLY Proximal inspired tidal volume with Leak Sync enabled f Respiratory rate or apnea respiratory rate Rise time percent 2.10.4 f/VT Spontaneous rapid/shallow breathing index TI SPONT Spontaneous inspiratory time TI/TTOT Spontaneous inspiratory time ratio CSTAT Static compliance RSTAT Static Resistance VT Tidal Volume PEEPTOT Total PEEP fTOT Total Respiratory Rate (monitored) VC Vital Capacity VS Volume support Audible Indicators A tone sounds when a button on the GUI is touched, and also when settings are accepted. Audible indicators include pitched tones, beeps, and key clicks. Key clicks sound whenever a key on the GUI is pressed. Various tones annunciate patient alarms. Operator’s Manual 2-23 Product Overview Note: Pressing ALARM SILENCE mutes alarms for the two-minute alarm silence duration period. Caregivers may choose to silence alarms by pressing the ALARM SILENCE key. A two-minute countdown timer appears on the GUI during the alarm silence interval. Cancel the alarm silence function by touching Cancel. Click each icon below to listen to a sample of the corresponding tones: Note: To hear the tones, Adobe Acrobat Reader version 10 or higher must be installed on your computer. Get Adobe Acrobat Reader, free, here. Table 2-8. GUI Audible Indicator Functions Function 2-24 Description Low priority alarm tone A series of two tones. Sounds when a low priority alarm occurs. Medium priority alarm tone A repeating series of three tones. Sounds when a medium priority alarm occurs. High priority alarm tone A repeating series of five tones. Sounds when a high priority alarm occurs. Soft bound tone One tone. Sounds when a soft bound is reached when making changes to ventilator settings. A soft bound is a selected value that exceeds or goes below its limit and requires acknowledgment to continue. Hard bound tone (invalid entry) The invalid entry sound occurs when a hard bound is reached when making changes to ventilator settings. A hard bound defines the upper or lower limit of the setting, where the setting cannot be adjusted higher or lower. Operator’s Manual GUI Controls and Indicators The clinician enters ventilation parameters via the GUI’s touch screen. Reference GUI Front View, p. 2-6. The keys activate other ventilator functions. Reference GUI Control Keys, p. 2-16. 2.11 Breath Delivery Unit The breath delivery unit contains the hardware and software to enable the ventilator to provide patient support. 2.11.1 BDU Controls and Indicators BDU Controls • Operator’s Manual ON/OFF switch — Lift the switch cover and turn the ventilator ON or OFF. 2-25 Product Overview Figure 2-8. Ventilator Power Switch and AC Indicator 1 • 2-26 AC power indicator 2 ON/OFF switch Service mode button — Press and release this button when the Covidien splash screen appears on the status display after powering on the ventilator to enter Service mode. Reference Service Mode Button (TEST), p. 2-27. Reference Status Display Indicators and Descriptions, p. 2-30 for an image of the splash screen. Operator’s Manual GUI Controls and Indicators Figure 2-9. Service Mode Button (TEST) 1 Service mode button Note: The Covidien splash screen shows the Covidien logo and appears momentarily as a banner on the status display. BDU AC Indicator The status display and the AC power indicator are the only visual indicators on the BDU. The AC indicator illuminates green whenever the ventilator is connected to AC power. All other visual indicators on the ventilator are on the GUI. Reference Typical Status Display Indicators and Messages, p. 2-30 for a description of the status display indicators and symbols. Reference the section below for a summary of the information appearing on the status display. Operator’s Manual 2-27 Product Overview Status Display The status display is a separate display located on the BDU. Reference BDU Front View, p. 2-8, item 6. The status display provides the following information according to the state of the ventilator: During normal ventilation the status display shows • Current power source (AC or DC) • Safe State status: (Safety Valve Open (SVO) or Vent Inop • Presence of primary and extended batteries and their charging status • Relative available battery charge level • Circuit pressure graph displaying pressure units, 2PPEAK alarm setting and current PPEAK and PEEP values • Connection of air and oxygen • Ventilator operational hours • Visual indication of current alarm volume setting Note: The status display provides a redundant check of ventilator operation.If the GUI stops operating for any reason, ventilation continues as set. The figure below shows a sample of the status display during normal ventilation. 2-28 Operator’s Manual GUI Controls and Indicators Figure 2-10. Sample Status Display During Normal Ventilation 1 Primary and extended battery status (presence or absence). 6 PPEAK alarm setting 2 Alarm volume setting 7 Measured inspiratory pressure (changes as pressure changes) 3 Gas connection status 8 Selected pressure units 4 Power status 9 Measured PEEP 5 Measured peak circuit pressure (updated at the end of the current breath) During Service mode the status display supplies • Ventilator serial number(s) • Ventilator operational time • EST and SST history • Power On Self Test (POST) status • Hours until next preventive maintenance is due • Gas pressure at the manifold inlets Operator’s Manual 2-29 Product Overview Reference the table below for status display possibilities. Typical Status Display Indicators and Messages The following table lists indicators and messages that appear on the status display: Table 2-9. Status Display Indicators and Descriptions Status Display Indicator or Message Meaning Splash screen. Appears when the ventilator’s power switch is turned on. When this image appears, press and release the TEST button at the back of the ventilator to enter Service mode. POST failure. This image appears if a POST error occurs at ventilator start-up, along with the error code (in this case a missing primary battery). Prior to patient connection. The status display appears as shown when the patient has not been connected to the ventilator. Note the absence of PPEAK and PEEP values. 2-30 Operator’s Manual GUI Controls and Indicators Table 2-9. Status Display Indicators and Descriptions (Continued) Status Display Indicator or Message Meaning Stand-by state. The status display appears as shown when the ventilator is in stand-by state. Battery charged. The ventilator’s primary battery (in the right-most slot) is shown fully charged. The percentage indicator shows 100%. Battery charging/discharging. Identifies that the ventilator’s primary battery and/or extended battery is charging or discharging. This icon is animated; orange bars scroll upward indicating the battery is charging and downward when the battery is discharging. If the orange bars are absent, the battery is neither charging nor discharging. A percentage indicator shows the remaining battery capacity. If an extended battery is installed, the image shows a similar representation in the extended battery location (leftmost slot). Battery icon. Denotes the ventilator is operating on battery power when this image appears on any status display indicator. Alerts the operator there is insufficient AC power to operate the ventilator. The indicator is replaced by the “on AC power” indicator when adequate AC power is restored. Operator’s Manual 2-31 Product Overview Table 2-9. Status Display Indicators and Descriptions (Continued) Status Display Indicator or Message Meaning On battery power. Alerts the operator there is insufficient AC power to operate the ventilator. Ventilator is operating on battery power with greater than ten minutes of capacity remaining. Note the appearance of the battery icon. Low battery. Identifies that the ventilator’s primary battery (right-most slot) is discharging and there are ten minutes or less of battery capacity remaining. A percentage indicator shows the remaining battery capacity. If an extended battery is installed, the image would show a similar representation in the extended battery location (left-most slot). Critically low battery. Identifies that the ventilator’s primary battery has less than five minutes of battery capacity remaining. A percentage indicator shows the remaining battery capacity. If an extended battery is installed, the image would show a similar representation in the extended battery location. Power failure. Alerts the user that the ventilator’s battery is depleted or depletion is imminent. Replace primary or extended battery with a fully charged batter or connect ventilator to AC power. 2-32 Operator’s Manual GUI Controls and Indicators Table 2-9. Status Display Indicators and Descriptions (Continued) Status Display Indicator or Message Meaning Battery inoperative. This image appears on the status display when a battery fault renders the battery inoperative. Battery not installed. This image appears when there is no primary battery installed, and renders ventilator inoperative. This image displays when the primary battery is removed during ventilator operation. Loss of GUI. Indicates a loss of communication between the BDU and the GUI, where the GUI cannot reliably display or receive ventilator information. This loss of communication could be caused by problems such as a GUI hardware failure, faulty Ethernet, or GUI reset. If the indicator is visible, ventilation continues as currently set. Replace the ventilator as soon as it is appropriate to do so. Service the ventilator prior to returning it for use on patients. Ventilator inoperative (Vent Inop). Indicates the ventilator is no longer capable of ventilating a patient and requires service. The alarm reset key cannot be used to restore function to the ventilator during a ventilator inoperative condition. Provide alternate means of ventilation immediately. Note the display of the Safety Valve Open indicator. Operator’s Manual 2-33 Product Overview Table 2-9. Status Display Indicators and Descriptions (Continued) Status Display Indicator or Message Meaning Safety Valve Open (SVO) indicator. During SVO, the patient can breathe room air through the safety valve, to the extent the patient is able to breathe unaided. Reference Safety Valve Open (SVO), p. 4-36 for more information on the SVO state. On AC power indicator. When this image appears on any status display indicator, indicates the ventilator is operating on AC power. Status display appearance when the ventilator is breathing in Normal mode. Note the appearance of the AC power icon. Air available indicator. When this image appears on any status display indicator, indicates the ventilator is connected to a pressurized air source. O2 available indicator. When this image appears on any status display indicator, indicates the ventilator is connected to a pressurized O2 source. 2-34 Operator’s Manual GUI Controls and Indicators BDU Audible Indicators The continuous tone alarm is the only audible indicator in the BDU, and is described in the table, below. Table 2-10. BDU Audible Indicator Functions Indicator Description Continuous tone alarm (Immediate priority) A continuous tone annunciated when there is a Ventilator Inoperative (Vent Inop) condition. This alarm lasts for a minimum of two (2) minutes. 2.11.2 Connectors The ventilator incorporates the following connectors: 2.12 • Ventilator outlet port (To patient) — A coaxial 15 mm (ID) / 22 mm (OD) conical connection to which the external inspiratory bacteria filter attaches. • Exhalation port (From patient) port — The expiratory limb of the patient circuit attaches to the inlet of the expiratory bacteria filter. This port is compatible with a standard 22mm (OD) conical connection. • Proximal Flow sensor — A keyed pneumatic connector for the Proximal Flow Sensor is provided with a locking feature to prevent inadvertent disconnection. The proximal flow sensor measures flow and pressure at the patient wye. The Proximal Flow Sensor is an optional sensor. Details on operation are provided in the appendix in this manual. Reference Appendix F. • Standard interface connectors — USB, HDMI, and Ethernet connectors are provided. The USB connector allows images to be captured on an external USB storage device and allows communication with an external patient monitor via serial-over-USB protocol, and the HDMI connector allows the GUI image to be displayed on an external video display device. The Ethernet connector is used by Service Personnel to upload new software and options. Reference Port Use, p. 519 for more information. Reference To configure Comm ports, p. 5-4 for information on serial-over-USB data transfer when configuring Comm ports for external devices. Special Features A Proximal Flow option is available. The proximal Flow Sensor is used to measure low flows and pressures associated with neonatal ventilation. If the ventilator is configured with this option, Reference Appendix F for more information. Operator’s Manual 2-35 Product Overview 2.13 Color Definitions Reference the following figures to view the ventilator’s pneumatic diagram during inspiration with various colors representing the gases as shown below. Table 2-11. Color Legend Color or Symbol Description High-pressure Oxygen (NFPA 99 designation) High-pressure Air (NFPA 99 designation) Mixed gases, including air Atmosphere Vacuum Water 2.14 Pneumatic Diagrams The following figures illustrate the ventilator’s pneumatics with and without the optional Proximal Flow System. The Proximal Flow System is only for use with neonatal patients. 2-36 Operator’s Manual GUI Controls and Indicators Figure 2-11. Pneumatic Diagram Operator’s Manual 1 Pressure switch, mix accumulator (PS1) 12 Pressure Sensor, barometric (PA) 2 Solenoid Valve, options supply (SOL2) 13 Vial, exhalation condensate (ECV) 3 Pressure sensor, mix accumulator (PMX) 14 Filter, expiratory (F4) 4 Accumulator, mix (ACCM) 15 Flow sensor assembly, exhalation valve 5 Tube, mix (TM) 16 Exhalation valve (EV) 6 Proportional solenoid valve, patient gas delivery (PSOLD) 17 Filter, exhalation pressure line (F5) 7 Solenoid valve, BUV (SOL3) 18 Solenoid valve, exhalation pressure autozero (SOL5) 8 Safety valve (SV) 19 Pressure sensor, exhalation (PE) 9 Pressure Sensor, safety valve (PSV) 20 Humidifier 10 Solenoid valve, inspiratory pressure sensor autozero (SOL4) 21 Filter, External bacterial (FD2) 11 Pressure Sensor, inspiratory (PI) 22 Filter, Internal bacterial (FD1) 2-37 Product Overview 23 Check valve, patient gas delivery (CVD) 34 Check valve, compressor air inlet (CVCAir) 24 Sensor, oxygen (OS) 35 Filter bowl assembly, Air (WT2) 25 Restrictor, breath delivery bypass (R2) 36 Filter element, Air (F2) 26 Flow sensor, patient gas delivery (FSD) 37 Check valve, wall Air inlet (CVWAir) 27 Check valve, Oxygen (CVO2) 38 Filter, Oxygen Impact (F1) 28 Check valve, Air (CVAir) 39 Filter element, Oxygen (F3) 29 Proportional solenoid valve, Oxygen (PSOLO2) 40 Pressure sensor, Oxygen gas inlet (PO2) 30 Flow sensor, Air (FSAir) 41 Flow sensor, Oxygen (FSO2) 31 Proportional solenoid valve, Air (PSOLAir) 42 Restrictor, Prox Flow (R4) 32 Pressure sensor, air gas inlet (PAir) 43 Relief Valve, mix accumulator (RVMA) 33 Restrictor, Wall air bleed outlet (R1) 44 Solenoid Valve, mix accumulator purge (SOL1) Figure 2-12. Pneumatic Diagram — Optional Proximal Flow System 2-38 Operator’s Manual GUI Controls and Indicators Note: Items enclosed by dotted line represent components internal to the ventilator. Operator’s Manual 1 Restrictor, Prox Flow (R4) 6 Wye, patient circuit 2 Solenoid Valve, Prox Flow (SOL 6) 7 Sensor, Proximal Flow 3 Module, Proximal Flow System 8 Filter, neonatal expiratory 4 Pressure Sensor, Prox Flow Accumulator (PPROX) 9 Condensate vial, neonatal expiratory 5 Humidifier 2-39 Running H/F 1 Page Left Intentionally Blank 2-40 Running H/F 3 3 Installation 3.1 Overview This chapter contains information for the installation and set up of the Puritan Bennett™ 980 Series Ventilator. Before operating the ventilator system, thoroughly read this Operator’s Manual. Topics include: 3.2 • Safety reminders • Ventilator setup • Battery information • Ventilator operating modes • Preparing the ventilator for use • Tests to perform prior to ventilating a patient Safety Reminders WARNING: Explosion hazard — Do not use in the presence of flammable gases. An oxygen-rich environment accelerates combustibility. WARNING: To ensure proper operation and avoid the possibility of physical injury, only qualified medical personnel should attempt to set up the ventilator and administer treatment with the ventilator. WARNING: To prevent electrostatic discharge (ESD) and potential fire hazard, do not use antistatic or electrically conductive hoses or tubing in or near the ventilator breathing system. 3-1 Installation 3.3 3.3.1 WARNING: Use only gas supply hoses approved by Covidien. Other hoses may be restrictive and may cause improper ventilator operation. WARNING: To avoid possible injury, lock the ventilator’s casters prior to installing or removing ventilator components. Caution: To ensure optimum performance, Covidien recommends preventive maintenance be performed by factory-trained Biomedical Engineers per the schedule specified. Reference Service Preventive Maintenance Frequency, p. 1-2 in the Operator’s Manual Addendum in this manual. Note: US federal law restricts this device to sale by or on the order of a physician. Product Assembly How to Assemble Ventilator Components Ventilator setup should have already been completed by factory-trained service personnel including successfully passing EST. This manual does not include ventilator assembly instructions. 3.3.2 Product Power Sources Using AC Power The ventilator is normally AC-powered. Reference Connecting the Ventilator to AC Power, p. 3-5 to connect the ventilator to AC power. 3-2 Operator’s Manual Product Connectivity Using Battery Power WARNING: Use only Covidien-branded batteries. Using other manufacturer’s brands could result in the batteries operating the ventilator for less than the specified amount of time or could cause a fire hazard. WARNING: One primary battery must be installed at all times in the BDU’s primary battery slot for proper ventilator operation. The ventilator will not complete the startup process without the primary battery installed. Reference Battery Compartment Locations, p. 3-21 for identification of battery slots. The ventilator’s primary battery must be installed by qualified service personnel (as it is shipped separately) before patient use. The ventilator will not complete Power on Self Test (POST) if the battery is not present, and ventilation is prohibited. Ensure the battery is fully charged before placing the ventilator into service. The ventilator employs a battery backup system if AC power becomes unavailable or drops below approximately 90 volts. A new, fully charged battery provides at least one hour of power to the ventilator assuming ambient temperature of 20°C (68°F) to 25°C (77°F), PBW = 70 kg, and at factory default ventilator settings. The battery back-up system for the ventilator contains one primary battery. Backup power is supplied to the ventilator in the event of an AC power loss. One extended battery slot is available for the ventilator. If both primary and extended ventilator batteries are present, these batteries can power the ventilator for two hours (one hour for the primary battery and one hour for the extended battery) under the environmental conditions described above. When using battery power, the ventilator operates from its extended batteries, if present, first and then switches to the primary batteries. The ventilator primary and extended batteries are charged whenever the ventilator is plugged into AC power (the ventilator does not have to be powered up). If the ventilator is operating on battery power, the status display shows which battery is in use and its charge level, and the remaining time the battery will operate before charging is required again. Operator’s Manual 3-3 Installation Battery Charging Batteries requiring charging are charged whenever the ventilator is connected to AC power, whether operating or not. The ventilator charges its primary battery first, then its extended battery. The time required to charge a single battery (either primary or extended) is approximately six hours at room temperature whether the ventilator is turned off (but connected to AC power) or operating, but charging time can vary based on temperature or depletion state of the battery. The status display provides the battery’s capacity. Green LED bars located on the ends of both primary and extended batteries (if installed) scroll upwards indicating battery charging. A white LED bar represents the battery is in use and a round LED indicator illuminates red if there is a battery fault. When running on battery power, battery capacity is determined by the number of green LED bars illuminated. Reference Proper Battery Orientation, p. 3-20 to view the LEDs. Reference p. 3-19 for information on interpreting the battery capacity. Green LED bars do not scroll if the battery is not charging or is in use. If a battery fault occurs, the fault is annunciated, charging of the faulty battery discontinues, but charging of any other non-faulty battery continues. A faulty battery will cause annunciation of the error and battery power will not be available for the ventilator. The ventilator status display indicates the charge level of the installed batteries, the presence of one or more battery faults, and which battery is being charged. The ventilator operates no differently when its batteries are charging than it does when the batteries are fully charged. The ventilator continues operating as set when the ventilator switches from AC power to battery power and illuminates an indicator on the status display alerting the operator that the ventilator is now operating on battery power and AC POWER LOSS alarm annunciates. A medium priority alarm annunciates when the remaining run-time for the ventilator drops to ten (10) minutes and a high priority alarm annunciates when the remaining time drops to five (5) minutes. 3.4 Product Placement The ventilator is positioned standing on its casters next to the patient’s bedside, as shown below. 3-4 Operator’s Manual Product Connectivity Move the ventilator using the handle encircling the BDU and roll the ventilator to the desired location. Figure 3-1. Example of Freestanding Ventilator Placement 3.5 3.5.1 Product Connectivity Connecting the Ventilator to AC Power Note: Power outlet access and power cord position — Ensure that the power outlet used for the ventilator is easily accessible; disconnection from the outlet is the only way to completely remove power from the ventilator. To connect the power cord to AC power 1. Plug the ventilator into a properly grounded power outlet rated for at least 15 A. Operator’s Manual 3-5 Installation 2. Verify the connection by checking the AC indicator below the power switch on the front of the BDU. Reference Ventilator Power Switch and AC Indicator, p. 226 for the power switch and AC indicator locations. To connect the power cord to the ventilator 1. Remove the power cord retainer and connect the female end of the power cord to the ventilator’s power cord receptacle. Reference Power Cord Retainer on BDU, p. 3-7. 2. Replace the power cord retainer. Use the power cord hook located at the back of the ventilator for power cord storage. 3-6 WARNING: For proper ventilator operation, and to avoid the risk of electric shock, connect the ventilator to a grounded, hospital grade, AC electrical outlet. Operator’s Manual Product Connectivity Figure 3-2. Power Cord Retainer on BDU 3.5.2 Connecting the Gas Supplies The ventilator can be connected to hospital grade wall or bottled air and oxygen. Reference Connecting the Ventilator to the Gas Supplies, p. 3-9. Both air and O2 supply pressure ranges must be between 35 and 87 psig (241.3 kPa to 599.8 kPa) and the average flow requirement for both gases is 60 L/min at 40.61 psi. The transient will not exceed 200 L/min for ≥ three (3) s. Operator’s Manual 3-7 Installation WARNING: Due to excessive restriction of the Air Liquide™, SIS, and Dräger™ hose assemblies, reduced ventilator performance levels may result when oxygen or air supply pressures < 50 psi (345 kPa) are employed. Gas cross flow from one high pressure input port of one type of gas to another high pressure input port of a different gas will not exceed 100 mL/h under normal or single fault conditions. If, during a single fault condition, cross flow exceeds 100 mL/h, an audible alarm annunciates. WARNING: Use of only one gas source could lead to loss of ventilation and/or hypoxemia if that one gas source fails and is not available. Therefore, always connect at least two gas sources to the ventilator to ensure a constant gas supply is available to the patient in case one of the gas sources fails. The ventilator has two connections for gas sources: air inlet, and oxygen inlet. Reference Nontechnical Alarm Summary, p. 6-18 for alarms that occur due to a loss of either gas supply. To connect the gas sources 1. Connect the oxygen hose to the oxygen inlet fitting (item 1) as shown. Ensure use of a medical grade oxygen source. 2. 3-8 Connect the air hose to the air inlet fitting (item 2) Reference Connecting the Ventilator to the Gas Supplies, p. 3-9. Operator’s Manual Product Connectivity Figure 3-3. Connecting the Ventilator to the Gas Supplies 1 O2 gas connection 2 Air gas connection WARNING: To prevent a potential fire hazard and possible damage to the ventilator, ensure the connections to the gas supplies are clean and unlubricated, and there is no water in the supply gas. If water is suspected, use an external wall air water trap to prevent damage to the ventilator or its components. The ventilator system can be purchased with the following gas inlet fittings for both air and O2: BOC, DISS, female, NIST, Air Liquide, SIS, and Dräger. Operator’s Manual 3-9 Installation Reference Covidien Accessories and Options, p. 9-4 for part numbers of gas hoses. For countries outside the USA, contact your local Covidien representative for the proper gas hoses. 3.5.3 Filter Installation The ventilator is shipped with internal and external inspiratory filters. Reference Covidien Accessories and Options, p. 9-4 for the part numbers of expiratory filters. To prevent infection and contamination, both inspiratory and expiratory filters must be used with the ventilator. WARNING: In order to reduce the risk of infection, always use the ventilator with inspiratory and expiratory bacteria filters. WARNING: Do not attempt to use inspiratory or expiratory filters designed for use with ventilators other than the Puritan Bennett 980 Series Ventilator. Reference Covidien Accessories and Options, p. 9-4 for relevant part numbers. WARNING: Refer to the filter’s instructions for use for details such as cleaning and sterilization requirements, filtration efficiency, proper filter usage, and maximum filter resistance, particularly when using aerosolized medications. Caution: Ensure both inspiratory and expiratory filters are properly attached to the ventilator. To install the inspiratory filter 1. Attach the inspiratory filter to the To Patient port. 2. 3-10 Ensure the direction of flow arrow is pointing outward, toward the patient circuit’s inspiratory limb. Note: Refer to the inspiratory filter IFU for information on proper use and handling of the filter. Operator’s Manual Product Connectivity WARNING: Refer to the expiratory filter instructions for use (IFU) for information on reusable filter cleaning and sterilization and filter efficiency. Note: Refer to the expiratory filter IFU for information on proper use and handling of the filter and for emptying the condensate vial for adult and pediatric patients. Reference Appendix E for information on emptying the condensate vial when using neonatal expiratory filters. WARNING: Do not re-use disposable inspiratory or expiratory filters, and dispose according to your institution’s policy for discarding contaminated waste. The condensate vial must be assembled to the reusable expiratory filter prior to installing the assembly to the ventilator. To assemble the Adult/Pediatric reusable expiratory filter and condensate vial 1. Seat the filter to the condensate vial, ensuring alignment of the condensate vial’s seal with the mating edge of the expiratory filter. 2. Twist the condensate vial in a counterclockwise direction until the stops on the vial and expiratory filter meet. To install the Adult/Pediatric expiratory filter 1. If necessary, remove expiratory limb of patient circuit from expiratory filter. 2. Raise the expiratory filter latch to unlock (item 6).Reference Adult/Pediatric Filter Installation, p. 3-12. This raises the exhalation valve assembly and allows the filter door to swing away from the ventilator. 3. Open the expiratory filter door. 4. Remove the existing filter. 5. Insert the new filter by sliding the filter along the tracks in the door. Ensure the From Patient port aligns with the cutout in the door and points away from the ventilator. 6. Close the expiratory filter door. 7. Lower the expiratory filter latch to secure the filter. Operator’s Manual 3-11 Installation WARNING: Do not operate the expiratory filter latch during patient ventilation. Opening the latch during ventilation will result in a patient disconnect condition and corresponding alarm. Figure 3-4. Adult/Pediatric Filter Installation 1 Condensate drain port 5 Condensate drain port cap 2 Condensate vial 6 Expiratory filter latch 3 Expiratory filter 7 Expiratory filter door 4 Condensate vial gasket To install the neonatal expiratory filter adapter door 1. If necessary, remove expiratory limb of patient circuit from expiratory filter. 3-12 2. Lift expiratory filter latch. Reference Installing the Neonatal Filter, p. 3-13 (item 3). 3. Remove existing expiratory filter door by lifting it off of the pivot pins. Operator’s Manual Product Connectivity Fit neonatal adapter door onto pivot pins. 4. Figure 3-5. Installing the Neonatal Filter 1 Neonatal expiratory filter 3 Expiratory filter latch 2 Neonatal adapter door 4 Filter door pivot pin Note: Unlike the pediatric/adult expiratory filter and condensate vial, the neonatal filter and condensate vial assembly is provided assembled. The condensate vial is removable for discarding accumulated liquid, by turning the vial clockwise to remove and counterclockwise to install. To install the neonatal expiratory filter assembly 1. With the door still open, push the neonatal filter assembly straight up into the adapter. 2. Close the door. 3. Lower the expiratory filter latch. 4. Re-attach expiratory limb of patient circuit to filter. To use the drain bag 1. Remove the drain port cap from the expiratory filter condensate vial drain port. 2. Operator’s Manual Attach the drain bag tube to the condensate vial’s drain port. 3-13 Installation 3. Hang the drain bag on the holder located on the ventilator’s accessory rail, as shown below. Reference Covidien Accessories and Options, p. 9-4 for part number of drain bag holder. Figure 3-6. Drain Bag 3.5.4 Connecting the Patient Circuit Reference Connecting the Adult or Pediatric Patient Circuit, p. 3-16 or Reference Connecting the Neonatal Patient Circuit, p. 3-17 to connect the adult, pediatric, or neonatal patient circuits. 3-14 Operator’s Manual Product Connectivity WARNING: Use patient circuits of the lowest compliance possible with the ventilator system to ensure optimal compliance compensation and to avoid reaching the safety limit of five times set tidal volume or the compliance compensation limit. Reference the table below for circuit types corresponding with predicted body weight (PBW). Table 3-1. Patient Types and PBW Values Circuit Type PBW in kg (lb) Allowed but not recommended Neonatal 0.3 kg to 7.0 kg (0.66 to 15 lb) Not applicable Pediatric 7.0 kg to 24 kg (16 lb to 53 lb) 3.5 kg to 6.9 kg and 25 kg to 35 kg (7.7 lb to 15 lb and (55 lb to 77 lb) Adult 25kg to 150 kg (55 lb to 331 lb) 7.0 kg to 24 kg (16 lb to 53 lb) Note: Refer to the patient circuit’s instructions for use (IFU) for information on proper use and handling and care and maintenance of the circuit. A list of breathing system components and accessories is provided. Reference Covidien Accessories and Options, p. 9-4. Use only Covidien- components and accessories in the patient circuit. Follow your institution’s protocol for safe disposal of the patient circuit. Follow the patient circuit’s instructions for use (IFU) for cleaning and disinfection information for reusable circuits. Orient the patient circuit by hanging the patient circuit on the circuit management supports provided with the flex arm. Operator’s Manual 3-15 Installation Figure 3-7. Connecting the Adult or Pediatric Patient Circuit 3-16 1 Humidifier 6 From Patient port 2 Inspiratory limb 7 Expiratory filter 3 Circuit wye 8 To Patient port 4 Expiratory limb 9 Inspiratory filter 5 Condensate vial Operator’s Manual Product Connectivity Figure 3-8. Connecting the Neonatal Patient Circuit 1 Humidifier 6 From patient port 2 Patient circuit inspiratory limb 7 Neonatal expiratory filter (installed in adapter door) 3 Circuit wye 8 To patient port 4 Patient circuit expiratory limb 9 Inspiratory filter 5 Condensate vial Operator’s Manual 3-17 Installation 3.6 3.6.1 3-18 WARNING: Do not attempt to sterilize single-patient use circuits. How to Install Accessories Batteries WARNING: Use only Covidien-branded batteries. Using other manufacturer’s brands or remanufactured batteries could result in the batteries operating the ventilator for less than the specified amount of time or could cause a fire hazard. WARNING: To reduce the risk of infection due to cross-contamination, using a damp cloth, disinfect the batteries with one of the solutions listed before installation and whenever transferring to or from another ventilator. During use, clean external surfaces of batteries as necessary. Reference Surface Cleaning Agents, p. 7-5. Do not spray disinfectant directly onto the battery or its connector. Reference Ventilator Battery, p. 3-19 (item 1). Caution: Ensure the batteries are oriented properly. Reference Proper Battery Orientation, p. 3-20. Operator’s Manual Product Connectivity Figure 3-9. Ventilator Battery 1 Battery connector Primary Batteries The ventilator’s primary battery is located in the rearward battery receptacle on the right side of the BDU. Reference Battery Compartment Locations, p. 3-21. The primary battery may be “hot swapped,” that is it can be replaced while the ventilator is operating. To install or replace the primary battery in the BDU 1. With the battery not installed in the ventilator, or if the ventilator is turned off and not connected to AC power, check the charge level by pressing the charge level button on the battery and verifying the charge level LEDs illuminate. Reference Proper Battery Orientation, p. 3-20. for the location of the charge level button. Five green LED segments illuminate, indicating ≥ 90% battery capacity. From bottom to top, the first LED indicates ≥ 10% capacity, the second LED indicates ≥ Operator’s Manual 3-19 Installation 25% capacity, the third LED indicates ≥ 50% capacity, and the fourth LED indicates ≥ 75% capacity. An illuminated red LED at the top of the battery indicates a battery fault. If no LEDs illuminate it means there is < 10% battery capacity remaining. 2. If the charge level is sufficient, orient the battery as shown, Reference Proper Battery Orientation, p. 3-20, face the front of the ventilator and locate the battery compartments on the right side of the BDU. Reference Battery Compartment Locations, p. 3-21. The receptacle towards the rear of the ventilator houses the primary battery while the receptacle towards the front of the ventilator houses the extended battery. 3. The primary battery is fastened in place with a thumbscrew (item 3). Loosen the thumbscrew approximately four to five turns to allow battery installation. 4. Insert the battery and push into its receptacle all the way until it clicks, indicating it is latched. The battery will only fit into the slot one way. Figure 3-10. Proper Battery Orientation 3-20 1 White battery in-use LED 3 Green charge status LEDs 2 Red battery fault indicator 4 Charge level button Operator’s Manual Product Connectivity Tighten the thumbscrew to secure the battery and prevent the primary battery from being removed. 5. Note: Remove the primary battery by reversing the steps. After loosening the thumbscrew, slide the battery ejector to the left to eject the battery. Figure 3-11. Battery Compartment Locations 1 BDU extended battery receptacle and battery ejector 3 BDU primary battery thumbscrew 2 BDU primary battery receptacle and battery ejector 4 BDU primary battery (positioned for installation) Operator’s Manual 3-21 Installation Extended batteries The extended battery receptacle is located forward of the primary battery. Like the primary battery, the extended battery may be hot swapped. To install or remove an extended battery in the BDU 1. Properly orient the battery as shown above. 2. 3-22 Push the battery into the forward receptacle in the BDU all the way until it clicks, indicating the battery is latched. Reference Battery Compartment Locations, p. 321. Note: Remove the battery by sliding the battery ejector to the left. The battery ejects itself from its receptacle. There is no thumbscrew for extended batteries. WARNING: Even though the Puritan Bennett 980 Ventilator meets the standards listed in Chapter 11, the internal Lithium-ion battery of the device is considered to be Dangerous Goods (DG) Class 9 - Miscellaneous, when transported in commerce. As such, the Puritan Bennett 980 Ventilator and/ or the associated Lithium-ion battery are subject to strict transport conditions under the Dangerous Goods Regulation for air transport (IATA: International Air Transport Association), International Maritime Dangerous Goods code for sea and the European Agreement concerning the International Carriage of Dangerous Goods by Road (ADR) for Europe. Private individuals who transport the device are excluded from these regulations although for air transport some requirements may apply. WARNING: To avoid the risk of fire, explosion, electric shock, or burns, do not short circuit, puncture, crush, heat above 60°C, incinerate, disassemble the battery, or immerse the battery in water. Note: Reference Battery Charging, p. 3-4 for battery charging information when batteries are installed in ventilator. Operator’s Manual Product Connectivity 3.6.2 Battery Testing To test the batteries 1. Push the battery charge level button located on the battery. A series of LEDs illuminates, indicating the charge level of the battery. When the bottom LED is illuminated, there is ≥ 10% of full battery capacity. The next LED illuminates when there is ≥ 25% capacity. the third lamp illuminates when there is ≥ 50% capacity available. The fourth LED illuminates when there is ≥ 75% capacity, and when the top LED is illuminated, it represents ≥ 90% capacity. Reference Proper Battery Orientation, p. 3-20 to view the battery test button and LEDs. 3.6.3 Battery Performance Test Results Performance testing on a sample of new batteries and batteries charged and discharged at least 1000 times was completed to demonstrate that the ventilator’s LOW BATTERY alarms remain effective. Testing demonstrated that the batteries have a minimum of ten (10) minutes time remaining from the activation of the low battery alarm and a minimum of five (5) minutes time remaining from the critically low battery alarm until ventilator shutdown. Reference Status Display Indicators and Descriptions, p. 2-30 for images of the Status Display during low battery and critically low battery conditions. Performance testing on a sample of new batteries and batteries charged and discharged at least 1000 times was completed to demonstrate the expected run time of the ventilator on battery. This testing was performed for both typical ventilator settings and adult high demand ventilator settings. The typical ventilator settings used were: • Operator’s Manual Ventilator settings – Assist/Control Ventilation with Volume Control (VC) mandatory type – Tidal volume (VT) = 500 mL – Peak flow (VMAX) = 30 L/min – Respiratory rate (f) = 20 1/min – PEEP = 8 cmH2O – Oxygen concentration (FiO2) = 60% – Flow trigger (V-TRIG) = 3 L/min 3-23 Installation • • • 3-24 Approximate respiratory monitored parameters during simulation – Peak pressure (PPEAK) = 27 cmH2O – Plateau pressure (PPL) during manual inspiratory pause = 23 cmH2O – Exhaled tidal volume (VTE) 442 mL (BTPS) – Total respiratory rate (RTOT) = 20 1/min – I:E ratio = 1:2 – PEEP = 8 cmH2O / Total PEEP (PEEPTOT) during expiratory pause = 8 cmH2O – Exhaled minute volume (VETOT) = 8.84 L/min Adult high-demand ventilator settings – Assist/Control Ventilation with Pressure Control (PC) mandatory type – Inspiratory pressure (PI) = 55 cmH2O – Inspiratory time (TI) = 0.55 s – Respiratory rate (f) = 60 1/min – PEEP = 35 cmH2O – Oxygen concentration (FiO2) = 60% – Flow trigger (V-TRIG) = 20 L/min Approximate respiratory monitored parameters during adult high-demand simulation – Peak pressure (PPEAK) = 90 cmH2O – Plateau pressure (PPL) during manual inspiratory pause = 79 cmH2O – Exhaled tidal volume (VTE) 900 mL (BTPS) – Total respiratory rate (RTOT) = 60 1/min – I:E ratio = 1:1 Operator’s Manual Product Connectivity – PEEP = 39 cmH2O / Total PEEP (PEEPTOT) during expiratory pause = 49 cmH2O – Exhaled minute volume (VETOT) = 52 L/min The run time does not vary significantly between typical and heavy load settings. The ventilator can be expected to run approximately 75 minutes at typical settings with new batteries. When running batteries nearing end of life (batteries with 1000 charge/discharge cycles were used for this data) the run time can be expected to be approximately 55 minutes. 3.6.4 Battery Life Battery life for both primary and extended batteries is approximately three (3) years. Actual battery life depends on the history of use and ambient conditions. As the batteries age with use, the time the ventilator will operate on battery power from a fully charged battery will decrease. Replace the battery every three (3) years or sooner if battery operation time is insufficient for your usage. 3.6.5 Battery Disposal The battery is considered electronic waste and must be disposed of according to local regulations. Follow local governing ordinances and recycling plans regarding disposal or recycling of the battery. 3.6.6 Flex Arm Use the flex arm to support the patient circuit between the patient and the ventilator. Reference Flex Arm Installation, p. 3-26, which illustrates flex arm installation into the sockets provided. Operator’s Manual 3-25 Installation Figure 3-12. Flex Arm Installation To attach or remove the flex arm 1. Locate the threaded inserts in the ventilator’s handle. 3-26 2. Fasten the flex arm into one of the inserts. 3. Hang the patient circuit using the circuit management supports included with the flex arm. 4. Remove the flex arm by first removing the patient circuit, then un-fastening the flex arm from the threaded fastener in the handle. Operator’s Manual Product Connectivity 3.6.7 Humidifier Use the humidifier to add heat and moisture to the inhaled gas. Connect the humidifier to a hospital grade electrical outlet. Choose the humidifier (type and volume appropriate for the patient). The humidifier may be mounted with the humidifier bracket as shown. Reference Covidien Accessories and Options, p. 9-4 for the part number of the humidifier bracket. WARNING: Selection of the incorrect humidifier type and/or volume during SST or during patient ventilation can affect the accuracy of delivered volume to the patient by allowing the ventilator to incorrectly calculate the compliance correction factor used during breath delivery. This can be a problem, as the additional volume required for circuit compressibility compensation could be incorrectly calculated, resulting in over- or under-delivery of desired volume. WARNING: To ensure proper compliance and resistance calculations, perform SST with the humidifier and all accessories used for patient ventilation installed in the ventilator breathing system. WARNING: Follow the humidifier manufacturer’s Instructions for Use (IFU) when using a humidifier with patient ventilation. Caution: Follow humidifier manufacturer’s instructions for use (IFU) for proper humidifier operation. To install the humidifier bracket 1. Attach humidifier bracket to the ventilator’s accessory rail by placing the bracket behind the railing and fastening the bracket clamp to the bracket with four (4) 5/32 inch hex screws, capturing the railing between the bracket and the clamp. Ensure the humidifier mounting slots are facing outward from the ventilator. Operator’s Manual 3-27 Installation Figure 3-13. Bracket Installation on Rail To install the humidifier 1. Slide the rear of the humidifier into the corresponding slot on the humidifier bracket, until it is fully seated. Reference Humidifier Installation to Ventilator, p. 3-29. Some humidifiers slide into the narrow slot in the humidifier bracket, and some humidifiers use the wide slot. 3-28 Operator’s Manual Product Connectivity Figure 3-14. Humidifier Installation to Ventilator 2. Fill the humidifier with water to the desired fill volume. 3. Install the chamber to the humidifier, connect the patient circuit, then run SST. Operator’s Manual 3-29 Installation 3.7 3.7.1 4. Plug the humidifier into a grounded, hospital grade electrical outlet. 5. Turn the humidifier on. Note: Complete instructions for the humidifier bracket and humidifier installation are given in the Puritan Bennett™ 980 Series VentilatorHumidifier Bracket Installation Instructions, which includes humidifier bracket part numbers and descriptions. Ventilator Operating Modes Normal Mode Normal mode is the default mode used for patient ventilation. The ventilator enters Normal mode after it has been turned on and POST completes, the ventilator is set up, and breath delivery parameters have been entered. If the clinician chooses, s/he can select Quick Start which uses default values or institutionally configured breath delivery settings after PBW has been entered. Entry into Normal mode is not allowed if a primary battery is not detected in the ventilator BDU, a major POST fault occurs, or there is an uncorrected major system fault, or uncorrected Short Self Test (SST) or Extended Self Test (EST) failures or non-overridden alerts. During Normal mode, the omni-directional LED on the top of the GUI appears green in color, in a steadily lit state. If an alarm occurs, the LED flashes in a color corresponding to the priority of the alarm. Reference Alarm Prioritization, p. 616 for details regarding alarm priority. If another alarm occurs concurrently with an existing alarm, the LED displays the color corresponding to the highest priority level. If the alarm de-escalates, the latched area (located on either side of the alarm LED indicator) of the alarm LED displays the color of the highest priority alarm while the center of the LED displays the color of the current alarm’s priority. For more information on specific alarms, touch the logs icon in the constant access icons area of the GUI. 3.7.2 Quick Start Quick Start is an extension of Normal mode, where institutionally configured default settings are applied after the patient’s PBW or gender and height are entered and Quick Start is touched to begin ventilation. 3-30 Operator’s Manual Product Connectivity 3.7.3 Stand-By State Stand-By state can be used when the clinician needs to disconnect the patient for any reason (prior to a suction procedure, for example). The ventilator enters Stand-By state if a request is made by the clinician, a patient is disconnected within a fixed time period determined by the ventilator software, and the clinician confirms the patient has been disconnected intentionally. If a patient becomes disconnected from the patient circuit after the time period elapses, an alarm sounds and the patient-disconnect sequence is initiated. In Stand-by state, gas output is reduced to ten (10) L/min to limit gas consumption and to allow for detection of patient reconnection, and O2 concentration becomes 100% for adult and pediatric circuit types and 40% for neonatal circuit types. Stand-by state is available in all ventilation modes except during Inspiratory and Expiratory BUV, Occlusion Status Cycling (OSC), Safety Valve Open (SVO), or Ventilator Inoperative (Vent Inop) conditions. Note: Do not block patient circuit wye while in Stand-By state. If the wye is blocked, the ventilator detects a patient connection and will attempt to resume normal ventilation. To enter Stand-By state 1. Touch the Menu tab on the left side of the GUI. The menu appears. 2. Touch Stand-By. A Stand-By state pending dialog appears instructing the clinician to disconnect the patient circuit. A timer starts which allows 30 s to disconnect the patient. 3. Disconnect the patient circuit and confirm the disconnection by touching Confirm. A timer starts which allows 30 s for confirmation of disconnect. To exit Stand-by state 1. Reconnect the patient circuit. The ventilator resumes ventilation at the settings in use before the disconnection. The following ventilator settings become active during Stand-by state: • Base flow is set to ten (10) L/min • 100% O2 for adult/pediatric patients • 40% O2 for neonatal patients During Stand-by state Operator’s Manual 3-31 Installation • The exhalation valve is open. • Current ventilator settings are retained in memory. • Flow sensors are monitored to detect patient reconnection. • Patient-related alarms are temporarily suppressed, as described below. • Ventilator settings can be changed, if desired, and will be applied upon patient reconnection. • The ventilator displays an indicator that it is in Stand-by State, and a timer indicating the elapsed time the ventilator has been in Stand-by state. • Ventilator background checks continue to be made. The ventilator automatically exits Stand-by state when patient reconnection is detected, the clinician completes patient setup (if ventilation was mistakenly started before setup was complete), or the ventilator power is cycled. Prior to entering Stand-by state, the ventilator measures pressure and flow in the patient circuit to determine if a patient is attached. If a patient is detected, the ventilator continues ventilation as set prior to the request, alerts the operator that Stand-by state is pending, and requests the patient be disconnected. A countdown timer appears alerting the operator of the time remaining to disconnect the patient. After the patient is disconnected, the ventilator requests confirmation of the disconnection. When the ventilator enters Stand-by state, a message appears on the GUI, any active alarms are silenced and reset and the associated alarm reset entries are logged in the Alarm Event Log. Alarm detection is suspended, and breath delivery is suspended while a bias flow is maintained for patient detection. During Stand-by state, the ventilator displays the elapsed time the patient has been without ventilation. Since the ventilator maintains a bias flow for patient detection, it resumes ventilation at the previous settings when the patient is reconnected. There is no need to touch Exit Stand-By. Reconnecting the patient returns the ventilator to normal operation. During Stand-by state, patient data values are not displayed and the LED located at the top of the GUI cycles between yellow and green. Entry into and exit from Stand-by state is recorded in the General Event log. 3-32 Operator’s Manual Product Connectivity 3.7.4 Service Mode WARNING: Before entering Service Mode, ensure a patient is not connected to the ventilator. Ventilatory support is not available in Service Mode. Service Mode is used for Extended Self Test (EST), ventilator calibration, configuration, software upgrades, option installation (all of which must be performed by Covidien factory-trained service personnel), and for making adjustments to institutional settings. All information stored in the individual logs is available in Service Mode. Service Mode logs include: • System diagnostic Log • System Comm. Log • EST/SST Diagnostic log • Settings Log • Alarms Log • General Event Log • Service log • Patient data Log Reference the Puritan Bennett™ 980 Series Ventilator Service Manual for details about Service Mode logs. A patient must not be attached to the ventilator when entering Service Mode. Specific actions must be performed to enter this mode, prior to POST completion. To access Service Mode 1. Remove the ventilator from patient usage. 2. Turn the ventilator’s power switch ON. 3. Press and release the Service Mode button (TEST) at the back of the ventilator, when the Covidien splash screen appears on the status display after powering on the ventilator. Reference Service Mode Button (TEST), p. 3-34. Reference Status Display Indicators and Descriptions, p. 2-30 for an image of the splash screen. The ventilator prompts to confirm no patient is attached. Operator’s Manual 3-33 Installation Figure 3-15. Service Mode Button (TEST) 1 Service Mode button 4. Wait to enter Service Mode. 5. Confirm a patient is not connected to the ventilator by touching the corresponding button. The message SERVICE MODE VENTILATION SUPPORT IS NOT AVAILABLE appears on the graphical user interface. 6. Perform required service. 7. Touch Exit or turn off the ventilator to exit Service Mode. Reference the Puritan Bennett™ 980 Series Ventilator Service Manual for information on which keys are disabled during EST. In addition to allowing SST to be run, Service Mode also allows configuration of various items. Reference Ventilator Configuration, p. 3-35 for a list of institutionally- and operator-configurable items. 3-34 Operator’s Manual Product Connectivity 3.8 Product Configuration The ventilator is shipped configured with factory defaults for new patient parameters which can be configured to suit institutional preferences. The operator may configure any desired parameter as long as this option has not been locked out and rendered unavailable. When configuring the ventilator, it displays the parameters associated with the operator’s last configuration. The following table lists the factory-configured settings, the institutionally-configurable settings, and the operator-configurable settings. WARNING: If the ventilator fleet in your institution uses multiple institutionally configured presets and/or defaults, there can be risks of inappropriate alarm settings. Table 3-2. Ventilator Configuration Feature Factory Configured Institutionally Configurable Operator Configurable Vital patient data banner X X X X Large font patient data panel X X X X Waveform layout X X X X Display brightness (Light settings) X X X Alarm volume X X X X Elevate O2 control X X X X Date/time format X X X Default mL/kg ratio X X Operator’s Manual Configured by Circuit Type User Lockable X Can’t be changed in Normal mode 3-35 Installation Table 3-2. Ventilator Configuration Feature 3-36 Factory Configured Institutionally Configurable New patient startup defaults (including PBW, vent type, mode, mandatory type, trigger type, O2%, elevate O2) X X Opacity X X Operator Configurable Configured by Circuit Type User Lockable X X X Operator’s Manual Product Connectivity 3.8.1 Preparing the Ventilator for Use Caution: Do not lean on the GUI or use it to move the ventilator. Doing so could break the GUI, its locking mechanism, or tip the ventilator over. Prior to ventilating a patient, configure the GUI so it is capable of displaying all the desired parameters, information, and patient data. This eliminates the necessity for taking the patient off the ventilator, as configuration of many of the items requires the unit to be in Service Mode. To perform institutional configuration 1. Enter Service Mode, and confirm no patient is attached by touching Configuration. Reference Service Mode, p. 3-33 for instructions on entering Service Mode. 2. Touch Configuration at the top of the screen in Service Mode. A list of buttons appears allowing configuration of the corresponding parameters. 3. Reference the sections below for specific instructions on institutional configuration of each parameter. To return to factory default configuration 1. Enter Service mode, and confirm no patient is attached by touching Confirm. Reference Service Mode, p. 3-33, for instructions on entering Service Mode. 3.8.2 2. Touch Configuration at the top of the screen in Service Mode. A list of buttons appears allowing configuration of the corresponding parameters. 3. Select the desired modified setting from the left-hand menu options. 4. Touch Default. Configuring the GUI The display can be configured in various ways.Reference Ventilator Configuration, p. 3-35 for the parameters which are factory configured, institutionallyconfigurable and operator-configurable. Once the factory or institutionally configurable items have been configured, they remain the default values. Factory configured values cannot be changed, however, if the parameters listed in the referenced table are institutionally configured, then those values remain in memory as default settings. If changes are made to operator-config- Operator’s Manual 3-37 Installation urable parameters, they remain in memory during a ventilator power cycle as long as the same patient is set up when returned to ventilation. If a new patient is set up, the factory configured values or institutionally-configured values (if the parameter has been configured) are used. No alarm settings are institutionally configurable, which prevents changes to factory default alarm settings. However, the default mL/kg ratio is institutionally configurable, which can affect the default alarm setting values. Always review the alarm defaults prior to beginning ventilation, and set appropriately. Date and Time Format The date and time may be configured to the institution’s preference. The time can be specified as 12-hour or 24-hour time in HH:MM:SS format with onehour and one-minute resolutions, respectively. The date formats are: • DD-MMM-YYYY where DD is a two-digit day format, MMM is a three-letter abbreviation for the month, and YYYY is a four-digit representation of the year or • MM-DD-YYYY where MM is a two digit month format, DD is a two-digit day format, and YYYY is a four-digit representation of the year The settable date corresponds to the number of days in the set month and accounts for leap years. To institutionally configure the ventilator’s date and time settings 1. Enter Service Mode, and confirm no patient is attached by touching Configuration. Reference Service Mode, p. 3-33 for instructions on entering Service Mode. 3-38 2. Touch Date and Time. 3. Touch the button corresponding to 12-hour or 24-hour time. 4. Touch Hour and turn the knob to enter the correct hour. 5. Repeat for the minutes, and am or pm. 6. Touch the button corresponding to the date format desired (DD-MM-YYYY or MM-DD-YYYY). 7. Touch Accept to confirm the date and time. 8. If done configuring parameters, exit Service Mode. Operator’s Manual Product Connectivity Pressure Units The ventilator’s pressure units can be configured for hPa or cmH2O. To institutionally configure pressure units 1. Enter Service Mode, and confirm no patient is attached by touching Configuration. Reference Service Mode, p. 3-33 for instructions on entering Service Mode. 2. Touch Vent Setup. 3. Touch the button corresponding to the desired pressure units. 4. If done configuring parameters, exit Service Mode by touching Exit. Screen Brightness and Keyboard Backlight (Light Settings) To institutionally configure screen brightness and keyboard backlight 1. Enter Service Mode, and confirm no patient is attached by touching Configuration. Reference Service Mode, p. 3-33 for instructions on entering Service Mode. 2. Touch Light Settings. Sliders appear to adjust the screen brightness and keyboard backlight. 3. Move the sliders to increase or decrease the brightness and backlight levels. Alternatively, turn the knob to increase or decrease the brightness and backlight levels. 4. Touch Accept to apply the changes, or Cancel to revert to original settings. 5. If done configuring parameters, exit Service Mode. To adjust display brightness 1. Press the display brightness key. 2. Slide the brightness slider or turn the knob to adjust the brightness level. 3. Dismiss the slider by touching anywhere on the GUI screen or allow to time out in five (5) s. Operator’s Manual 3-39 Installation New Patient Setup Defaults To institutionally configure new patient default settings 4. Touch the button corresponding to adult, pediatric, or neonatal New Patient Defaults. 5. Touch the Vent type, Mode, Mandatory type, and Trigger type buttons corresponding to the desired parameters. 6. Configure the default PBW and mL/kg ratio, Elevate O2 and O2% by touching its button and turning the knob. 7. Repeat for each patient type by selecting the corresponding button. 8. Touch Accept or Accept ALL when the default configuration is complete. 9. If done configuring parameters, exit Service Mode. Elevate O2 Note: The Elevate O2 control adds a percentage of O2 to the breathing mixture for two minutes. The additional percentage is shown on the icon in the constant access icon area. The allowable range is 1% to 100%. To adjust the amount of elevated O2 delivered for two minutes 1. In the vent setup dialog in Normal mode, touch the Elevate O2 icon in the constant access icons area of the GUI screen. The icon glows and a dialog appears with a countdown timer, Elev O2 button highlighted and ready for changes, and Extend, Stop, and Close buttons. 2. Turn the knob to increase or decrease the amount of oxygen by the amount shown on the button. The allowable range is +1% to +100% oxygen. 3. Touch Extend to extend the two-minute interval. Touching Extend restarts the two-minute countdown timer. 4. Touch Stop to stop additional oxygen from being delivered and dismiss the countdown timer. The Elevate O2 function follows these rules: 3-40 Operator’s Manual Product Connectivity • If the current O2 setting is 80% or above and the selected delivery increment is > 20%, the ventilator will deliver 100% O2 for two (2) minutes, after which the oxygen sensor will be calibrated as long as the full two-minute interval elapses without a change in O2 delivery. • If apnea ventilation occurs during the two-minute interval, the apnea % O2 delivery also increases by the configured amount. • During LOSS OF AIR SUPPLY or LOSS OF O2 SUPPLY alarm conditions, the Elevate O2 function is canceled if in progress, and is temporarily disabled until the alarm condition no longer exists. • During Safety PCV, the Elevate O2 control has no effect. During circuit disconnect and stand-by states (when the ventilator is turned on but not ventilating) the Elevate O2 function affects the currently delivered oxygen concentration, not the set oxygen concentration. Alarm Volume WARNING: The audio alarm volume level is adjustable. The operator should set the volume at a level that allows the operator to distinguish the audio alarm above background noise levels. To institutionally configure the alarm volume 1. Enter Service Mode, and confirm no patient is attached by touching Configuration. Reference Service Mode, p. 3-33 for instructions on entering Service Mode. 2. Touch Alarm Volume Defaults. A screen appears allowing configuration of the alarm volume by circuit type. 3. Slide the alarm slider for each circuit type (adult, pediatric, or neonatal) or turn the knob to configure the alarm volume. The volume settings range from 1 (minimum) to 10 (maximum). 4. If done configuring the alarm volume, exit Service Mode. To adjust alarm volume 1. Set the alarm volume by pressing the alarm volume key, then sliding the alarm volume slider or turning the knob.The alarm values range from 1 (minimum) to 10 (maximum). Operator’s Manual 3-41 Installation Note: A sample alarm tone sounds for verification at each volume level change. If necessary, re-adjust the alarm volume by moving the alarm volume slider to increase or decrease the volume. Note: The alarm volume reverts to the institutionally configured default alarm volume or factory default if the ventilator’s power is cycled. 2. Dismiss the slider by touching anywhere on the GUI screen or allow to time out in five (5) seconds. Vital Patient Data Patient data are displayed in the Vital Patient Data banner. The operator can configure the banner for displaying the desired patient data. Reference Areas of the GUI, p. 4-3. A total of 14 values may be configured at one time, with eight (8) values visible, and six (6) more visible by scrolling the values using the left- and right- pointing arrows in the patient data area. Two pages of additional patient data may be viewed by touching or swiping down on the patient data tab at the top of the GUI. Choose the respective buttons to view page one or page two. Additional patient data values may not be changed. Reference Patient Data Range and Resolution, p. 11-19 for default patient data values. To institutionally configure patient data displayed on the GUI 1. Enter Service mode, and confirm no patient is attached by touching Configuration. Reference Service Mode, p. 3-33 for instructions on entering Service Mode. 3-42 2. Touch Patient Data Defaults. Five (5) layout preset buttons appear along with a list of parameters and descriptions. 3. Touch a preset button and individually select a parameter from the scrollable list below to appear in that preset’s vital patient data banner. Use the right- and leftpointing arrows to configure default values for all available parameters.Additionally, touch the padlock icon above each patient data parameter on the data banner to allow (unlocked) or restrict (locked) operator configurablity of that parameter during normal ventilation. Operator’s Manual Product Connectivity 4. When done configuring the selected preset, touch Accept and select another preset to configure, if desired. 5. Touch Defaults to return configuration to factory settings. 6. If done configuring parameters, exit Service Mode by touching Exit. To configure the patient data displayed on the GUI 1. Double-tap a patient data parameter at the top of the GUI screen. A menu of buttons appears identified with patient data parameters.The parameter at the location touched will be replaced with the new parameter of choice. To view more parameters, touch the left- or right- pointing arrows to reveal more parameters. 2. Touch the button corresponding to the replacement parameter. The existing parameter is replaced with the new parameter. 3. Repeat steps 1 and 2 for as many parameters as desired. Displaying Patient Data With a Larger Font To improve visibility of patient data, a screen is available that appears with a larger font. Up to 14 data values may be displayed which include: • Institutional default patient data values (if configured) • Remaining user selected patient data values (up to 14, including waveforms and loops) To institutionally configure the large font patient data defaults 1. Enter Service Mode, and confirm no patient is attached by touching Configuration. Reference Service Mode, p. 3-33 for instructions on entering Service Mode. 2. Touch Large Font Patient Data Defaults. Five layout presets appear along with a list of parameters and descriptions. 3. Touch a preset button and individually select a parameter for each of the desired patient data values. 4. Choose the desired scalar and loop waveforms for the large font patient data display. Waveform thumbnails appear in the three right-most cells of the large font data panel. 5. Touch any of the padlock icons along the right-most edge of the selected layout to prevent operator configurability of the selected row. Operator’s Manual 3-43 Installation 6. Touch Accept or Accept ALL when finished. 7. If factory defaults are desired for a preset, touch Defaults. 8. If done configuring parameters, exit Service Mode by touching Exit. To display the large font patient data panel 1. Swipe the vital patient data banner tab downward or touch the vital patient data tab. The additional patient data panel appears. 2. Swipe the additional patient data banner’s tab downward or touch the additional patient data banner’s tab. Patient data appear in a larger font. 3. Swipe the large font patient data panel tab upward or touch the tab to return to the banner to its normal font size. The large font patient data parameters are configured in the same way as described in the patient data configuration section above. Waveforms Green waveforms denote a mandatory inspiration, yellow waveforms denote exhalation, and orange waveforms denote a spontaneous inspiration. The GUI can be configured to display up to three waveforms and two loops simultaneously in the waveform area. Reference Areas of the GUI, p. 4-3. The allowable waveforms include flow vs. time, pressure vs. time, volume vs. time, and PSYNC vs. time (if IE Sync is installed and in IE Sync Monitoring). Reference Appendix C for more information on IE Sync. Allowable loops include pressure vs. volume and flow vs. volume. The waveforms display 60 seconds of information and can be shown in a redrawing format, or paused with the ability to enable a cursor to trace the waveform by turning the knob. To institutionally configure waveforms and loops 1. Enter Service Mode, and confirm no patient is attached by touching Configuration. Reference Service Mode, p. 3-33 for instructions on entering Service Mode. 3-44 2. Touch Graph Defaults. Five (5) layout presets appear along with a list of parameters and descriptions. 3. Touch a layout preset button. The parameter(s) button outline glows, signifying that it can be changed. If more than one parameter can be changed, touch that parameter to make its outline glow. Operator’s Manual Product Connectivity 4. Select the parameter from the list whose waveform is desired to appear on the waveforms screen. 5. Configure each of the graphic display layouts as described above. 6. Touch the padlock icon above each graphic layout to prevent operator configuration of the selected layout. 7. If factory defaults are desired for a preset, touch Defaults. 8. If done configuring parameters, exit Service Mode by touching Exit. To configure waveforms and loops 1. Touch Waveform Layout, located below the displayed waveforms or the vent setup screen. The icon glows and a menu of various waveform layouts appears. 2. Touch the desired waveform(s) icon to display. The selected waveform(s) appear on the GUI screen and the dialog closes. To change the axis scaling 1. Touch the desired waveform axis. 2. Turn the knob to change the value. For each axis, turn the knob to the right to decrease the values, and turn to the left to increase the values. To pause waveforms 1. Touch the pause icon, located below the waveforms area. The icon glows yellow and allows the breath to complete. A cursor appears and travels along the waveform while turning the knob, displaying the x- and y-axis values. 2. Touch the pause icon again to re-activate the waveform. Reference To capture GUI screens, p. 5-2 for information on storing waveforms. Opacity To institutionally configure screen opacity 1. Enter Service Mode, and confirm no patient is attached by touching Configuration. Reference Service Mode, p. 3-33 for instructions on entering Service Mode. 2. Touch the Opacity icon. 3. Turn the knob to increase or decrease the opacity. Operator’s Manual 3-45 Installation 4. Touch the padlock icon at the right side of the screen to allow or prevent operator adjustment of the screen opacity. 5. Touch Accept to close the dialog. To adjust the screen opacity 1. Touch the opacity control icon. The icon glows when the opacity can be changed. 2. 3.9 Turn the knob to increase or decrease the opacity. Note: The opacity icon can be found on the vent setup screen and on any of the respiratory mechanics maneuvers screens. Installation Testing Fully charge the batteries before placing the ventilator into clinical use. Reference Battery Charging, p. 3-4 for information on battery charging. Reference p. 3-19 for the meaning of battery charge status LEDs and Reference p. 3-20 for the location of battery test switch and status LEDs. Prior to connecting a patient to the ventilator for the first time, a qualified service technician must have calibrated the ventilator’s exhalation valve, flow sensors, and atmospheric pressure transducer and performed and successfully passed EST. Reference the Puritan Bennett™ 980 Ventilator Service Manual for instructions. In addition, the clinician must also perform SST. 3.9.1 3-46 SST (Short Self Test) WARNING: Always disconnect the patient from the ventilator prior to running SST or EST. If SST or EST is performed while a patient is connected, patient injury may occur. WARNING: Check for circuit occlusion and/or run SST if increased pressures are observed during ventilation. Operator’s Manual Product Connectivity WARNING: When changing any accessories in the patient circuit or changing the patient circuit itself, run SST to check for leaks and to ensure the correct circuit compliance and resistance values are used in ventilator calculations. When a patient is not attached to the ventilator, run SST to check the patient circuit for: • Gas leaks • Circuit compliance and resistance calculations SST is a five-minute test and must be run under any of the following conditions: • Prior to ventilating a new patient • When replacing the patient circuit and expiratory filter • When connecting a different patient circuit to the ventilator • When changing the patient circuit type • When installing a new or sterilized expiratory filter • When changing the humidification device type • When adding or removing accessories to the breathing system such as a humidifier or water trap No external test equipment is required, and SST requires minimal operator participation. Humidification type and volume can be adjusted after running SST, however the ventilator makes assumptions when calculating resistance and compliance if these changes are made without re-running SST. For optimal breath delivery, run SST after changing humidification type and humidifier volume. SST results are recorded in the SST results log, viewable in Service mode and in Normal mode using the configuration (wrench) icon. Required Equipment • Proposed patient circuit for patient ventilation • Accessories (water traps, etc.) • Expiratory filter and condensate vial Operator’s Manual 3-47 Installation • Humidifier, if applicable Other necessary items include: • A no. 1 stopper to block the patient airway at the patient wye • Two gas sources (air and oxygen) connected to the ventilator) at a pressure between 35 psi and 87 psi (241.3 kPa and 599.8 kPa SST Test Sequence To run SST 1. Ensure a patient is NOT connected to the ventilator. 3-48 2. So that the ventilator does not detect a patient connection, ensure that the breathing circuit wye is not attached to a test lung or covered in any way that would cause an increase in pressure at the wye. 3. Turn the ventilator on using the power switch located at the front of the BDU, below the status display. The ventilator runs POST when the power switch is turned on. Ensure the ventilator is operating on full AC power. Otherwise, SST test failures may result. 4. Wait at least 15 minutes to allow the ventilator to warm up and stabilize to ensure accurate results. 5. At the ventilator startup screen, touch SST or the Configure icon (wrench) displayed in the lower right area of the GUI. The SST history log appears along with Patient Setup, Run Leak Test, and Run All SST buttons. 6. Connect the patient circuit, filters, condensate vial, and all accessories to be used in patient ventilation. Ensure the patient wye is not blocked. 7. Touch Run All SST to perform all SST tests or touch Run Leak Test to perform the SST Leak test of the ventilator breathing circuit. 8. Touch Accept to continue or Cancel to go back to the previous screen. 9. After accepting, touch the Circuit Type button corresponding to the patient circuit type used to perform SST and to ventilate the patient (adult, pediatric, or neonatal. 10. Touch the Humidification Type button corresponding to the humidification type used for patient ventilation. If no humidifier is used, touch HME. If a humidifier is used, touch Humidification Volume and turn the knob to enter the volume. Reference Humidifier Volumes, p. 3-50 to determine the correct volume to enter. Operator’s Manual Product Connectivity 11. Touch Accept to start SST. 12. Follow the prompts. Certain SST tests require operator intervention, and will pause indefinitely for a response. Reference Individual SST Results, p. 3-51 for a summary of the SST test sequence and results. 13. After each test, the ventilator displays the results. If a particular test fails, the test result appears on the screen and a choice to repeat the test or perform the next test is given. When all of the SST tests are complete, the SST status screen displays the individual test results. 14. To proceed to patient set up, (if SST did not detect an ALERT or FAILURE) touch EXIT SST, then touch Accept or cycle the ventilator’s power. The following table lists the tests performed during SST. Table 3-3. SST Test Sequence Test step Function SST Flow Sensor Cross Check Test Tests O2 and Air Flow Sensors SST Exhalation Valve Performance Calibrates the exhalation valve and creates a table for use during calculations SST Circuit Pressure Test Exercises delivery PSOL. Checks inspiratory and expiratory autozero solenoids. Cross-checks inspiratory and expiratory pressure transducers at various pressures. SST Leak Test Tests ventilator breathing system for leaks SST Exhalation Filter Test Checks for exhalation filter occlusion and exhalation compartment occlusion. SST circuit Resistance Test Checks for inspiratory and expiratory limb occlusions, and calculates and stores the inspiratory and expiratory limb resistance parameters. SST circuit Compliance Test Calculates the attached patient circuit compliance. SST Prox (if Proximal Flow Option is installed) Verifies functionality of Proximal Flow Subsystem Note: The humidifier volume setting entered during SST should always be equal to the chamber’s or column’s empty compressible volume. Please do not enter either the container’s compressible volume when full or the container’s water volume when full. Operator’s Manual 3-49 Installation For humidifier containers not listed, please enter the manufacturer’s published compressible volume-empty (column A) value during SST. Table 3-4. Humidifier Volumes Model Description (A) Published Compressible Volume-Empty (mL) Humidifier Volume Setting for SST (mL) Fisher & Paykel MR225 Infant/Ped, disposable, Manual Feed 300 300 Fisher & Paykel MR290 Neo/Adult Disposable, Autofeed 380 380 Fisher & Paykel MR250 Adult, Disposable, Manual Feed 480 480 Fisher & Paykel MR210 Adult, Disposable, Manual Feed 480 480 Fisher & Paykel MR370 Adult, Reusable, Manual Feed 725 725 Fisher & Paykel MR340E Infant, Reusable, Manual Feed 310 310 Teleflex (Concha) 382-60 Standard compliance 296 296 Teleflex (Concha) 382-30 Low compliance 300 300 Teleflex (Concha) 385-40 Minimal compliance 164 164 Manufacturer SST Results SST reports results for each individual test.Three status indicators identify the SST results and actions to take for each. 3-50 • Pass — The individual SST test has met its requirements. • Alert — Alerts occur when the ventilator detects one or more non-critical faults. • Fail — The individual SST test did not meet its requirements. Operator’s Manual Product Connectivity Table 3-5. Individual SST Results Test status Meaning Response PASS Individual SST test passed No need to do anything, unless prompted by the ventilator. ALERT The test result is not ideal, but is not critical. If SST is in progress, it halts further testing and prompts for decision. When the system prompts, touch one of these buttons: FAIL The ventilator has detected a critical problem and SST cannot complete until the ventilator passes the failed test. • Repeat Test • Next Test • Exit SST Eliminate leaks in the ventilator breathing system and re-run SST. Otherwise, service the ventilator and rerun SST. SST Outcomes WARNING: Choose to override the ALERT status and authorize ventilation only when absolutely certain this cannot create a patient hazard or add to risks arising from other hazards. When SST completes all of the tests, analyze the results. Table 3-6. Overall SST Outcomes Final Outcome Meaning Response PASS All SST tests passed. Touch Patient Setup to set up the patient for ventilation: ALERT The ventilator detected one or more faults. Choose to override the ALERT status and authorize ventilation only when absolutely certain this cannot create a patient hazard or add to risks arising from other hazards. To override the alert, touch Override SST, then touch Accept. To exit SST, touch Exit SST. FAIL One or more critical faults were detected. The ventilator enters the SVO state and cannot be used for normal ventilation until SST passes. Check the patient circuit to determine the problem or restart SST with a different patient circuit. Touch Repeat Test, Run All SST, or Exit SST, then touch Accept. Operator’s Manual 3-51 Installation If touching Override SST, observe the following warning: A single circuit leak test can be run, but the full suite of SST test must successfully pass before releasing the ventilator for clinical use. If a complete SST is interrupted and ventilation was allowed before starting SST, normal ventilation is allowed if • SST did not detect any failures or alerts before the interruption, and • no other errors that would prevent ventilation occurred, and • there were no changes to the circuit type at the start of the interrupted SST. During SST, the ventilator displays the current SST status, including the test currently in progress, results of completed tests. Test data are available in Service Mode where applicable or are displayed on the screen. The ventilator logs SST results, and that information is available following a power failure. The alarm silence and alarm reset keys are disabled during SST, as well as the Manual Inspiration, Inspiratory Pause, and Expiratory Pause keys. 3.9.2 EST (Extended Self Test) The ventilator’s Extended Self Test (EST) function is designed to verify the ventilator’s operational subsystem integrity. All required software support to perform EST is resident on the ventilator. EST requires approximately ten (10) minutes to complete. Note: SST is not part of the EST test suite. To determine patient circuit resistance and compliance, run SST. EST Self Test Prerequisites Follow all identified guidelines when performing the EST self test. Inspect all equipment required for any self test to ensure it is not damaged in any way. 3-52 1. Collect all required equipment prior to performing any self test of the ventilator. Successful self test is not possible without the use of the listed equipment. 2. Disconnect the ventilator from the patient. 3. Fully charge the primary ventilator battery. Operator’s Manual Product Connectivity 4. Connect the ventilator to AC power using the hospital-grade power cord until completion of any self test. 5. Ensure the ventilator is powered down. 6. Ensure both air and oxygen sources register pressure between 35 and 87 psi (241 to 599 kPa). To perform Extended Self Test (EST) or to access additional service functions, the ventilator must be in Service Mode. Reference Service Mode, p. 3-33. Note: 15. While in the Service Mode, normal ventilation is not allowed. WARNING: Always disconnect the ventilator from the patient before running EST. Running EST while the ventilator is connected to the patient can injure the patient. WARNING: A fault identified during this test indicates the ventilator or an associated component is defective. Rectify the fault and perform any required repairs prior to releasing the ventilator for patient use, unless it can be determined with certainty that the defect cannot create a hazard for the patient, or add to the risks which may arise from other hazards. Perform EST during any of the listed conditions. • Prior to initial installation and first time usage of the ventilator • Every six months • Before any preventive maintenance • Following ventilator service or repair • As part of the ventilator’s routine performance verification During EST, the ventilator displays the current EST status, including the test currently in progress, results of completed tests, and measured data (where applicable). The ventilator logs EST results, and that information is available following a power failure. The ventilator disables several offscreen keys located on the bezel of the GUI during EST. • Operator’s Manual Alarm silence 3-53 Installation • Alarm reset • Manual inspiration • Inspiratory pause • Expiratory pause Run tests either as a group or as single tests for troubleshooting purposes. Equipment for EST 3.9.3 • Covidien gold standard test circuit • Number one stopper • Air and oxygen sources, both at 35 to 87 psi (241 to 599 kPa). • An adult-sized expiratory filter Note: Attempts to run EST with a Neonatal filter can cause some EST tests to fail. Note: If using Air Liquide™*, Dräger™*, and SIS air/oxygen hose assemblies, certain EST tests may fail when using supply pressures less than50 psi (345 kPa) based on excessive hose restriction. EST Test Sequence Note: If the ventilator has not reached normal operating temperature from recent usage, allow it to warm up for at least 15 minutes in Service Mode prior to running EST to ensure accurate testing. To perform EST 1. Review and perform all self test prerequisites. Reference EST Self Test Prerequisites, p. 3-52. 3-54 2. Collect the appropriate equipment. Reference Equipment for EST, p. 3-54. 3. Access Service Mode. Reference Service Mode, p. 3-33. Operator’s Manual Product Connectivity 4. Verify all three CALIBRATION tests under the CALIBRATION tab have passed. 5. Touch the SELF TEST tab from the horizontal banner at the top of the monitoring screen. 6. Touch the EST tab from the left-hand menu options. 7. Touch Run All to run all tests in sequence or select the desired individual test. 8. Choose one of the available options: touch Accept to continue; touch Cancel to go back to the previous screen; or touch Stop to cancel EST. 9. Follow the prompt to remove the inspiratory filter and connect the gold standard circuit. 10. Touch Accept. 11. Follow prompts to complete EST. The EST tests require operator intervention, and will pause indefinitely for a response. Reference EST Test Sequence, p. 3-54. 12. At the DISCONNECT O2 prompt, disconnect the high pressure oxygen source. 13. At the CONNECT AIR AND O2 prompt, connect both high pressure air and oxygen sources. 14. Touch Run All or select the desired individual test. After each test, the ventilator displays the results. 15. If a particular test fails, either repeat the test or perform the next test. 16. When all of the EST tests complete, review test results by pressing each individual test listed on the left side of the GUI. 17. Touch EXIT EST. 18. Touch ACCEPT. The ventilator reruns POST and then displays the ventilator startup screen. Table 3-7. EST Test Sequence EST Test Step Zero Offset Operator’s Manual Function Tests inspiratory and expiratory pressure transducers and flow sensors at ambient pressure. Required User Interaction Follow prompts 3-55 Installation Table 3-7. EST Test Sequence (Continued) EST Test Step 3-56 Function Required User Interaction Leak Test Determines ability of system to hold pressure. Follow prompts Mix Leak Verifies integrity of the mix system. Follow prompts Mix PSOL Verifies mix PSOL function. None Mix Accumulator Verifies mix accumulator pressure sensor and overpressure switch function. None Circuit Pressure • Checks inspiratory and expiratory autozero solenoids • Cross-checks safety valve, inspiratory and expiratory pressure transducers at various pressures • Verify the autozero solenoid’s function None Flow Sensor Cross Check Test Verifies all flow sensors and PSOLs at specified flow volumes. None Delivery PSOL Verifies delivery PSOL current function. None Exhalation Valve (EV) Loopback Verifies exhalation valve.current and loopback current are within range. None Exhalation Valve (EV) Pressure Accuracy Verifies current versus pressure values in flash memory correspond with actual installed exhalation valve. None Exhalation Valve (EV) Performance Verifies the exhalation valve operates within specifications of the last exhalation valve calibration. None Exhalation Valve (EV) Velocity Transducer Verifies the velocity transducer is sending a signal and the control circuit recognizes it. It does not verify the quality of the signal. None Safety System Tests safety valve operation. None Backup Ventilation Verifies backup ventilation systems: mix, inspiratory, and exhalation. None Communication Verifies GUI communication ports function, both serial and ethernet. None Internal Storage Verifies internal storage device function. None LCD Backlight Verifies GUI LCD backlight intensity function. None Operator’s Manual Product Connectivity Table 3-7. EST Test Sequence (Continued) EST Test Step Status Display 3.9.4 Function Required User Interaction Verifies status display function • Verifies LCD function • Communicates with BD CPU None GUI Audio Tests GUI alarm indicators, cycling through each alarm status indication. Follow prompts BD Audio Verifies BD audible alarm is functional. Also verifies power fail capacitor can operate loss-of-power alarm. Follow prompts Rotary Knob Test Verifies knob rotation function. Follow prompts Offscreen Key Test Verifies GUI bezel key function. Follow prompts Ventilator Battery Tests ventilator battery and power distribution. Follow prompts EST Test Results Table 3-8. Individual EST Results Test Status Meaning Response PASS Individual EST test passed No need to do anything unless prompted by the ventilator ALERT The test result is not ideal, but is not critical. If EST is in progress, it halts further testing and prompts for decision. When the system prompts, select: REPEAT TEST, NEXT TEST, or STOP, then touch ACCEPT. FAIL EST not successfully passed. Select: REPEAT TEST, NEXT TEST, or STOP, then touch ACCEPT. NEVER RUN Test still requires successful PASS. Run all EST tests. When EST completes all of the tests, analyze the results. Operator’s Manual 3-57 Installation Table 3-9. Overall EST Outcomes Final Outcome Meaning Response PASS All EST tests passed EST successfully completed. Select other SERVICE MODE functions or prepare for SST tests prior to returning the ventilator for patient usage. ALERT The ventilator detected one or more faults. The test result is not ideal, but is not critical. When the system prompts, select: REPEAT TEST, NEXT TEST, or STOP, then touch ACCEPT. FAIL One or more critical faults were detected. The ventilatorenters the SVO state and cannot be used for normal ventilation until SST passes. Service is required. When the system prompts, select: REPEAT TEST, NEXT TEST, or STOP, then touch ACCEPT. OVERRIDDEN ALERT status overridden by user. Select next desired test. Touching Override Est results in the following warning: 3.10 WARNING: Choose to override the ALERT status and authorize ventilation only when absolutely certain this cannot create a patient hazard or add to risks arising from other hazards. Operation Verification Before ventilating a patient, you must perform SST and alarms tests with passing results. Reference To run SST, p. 3-48 and Reference Alarm Testing, p. 6-9 as well. 3-58 Operator’s Manual 4 Operation 4.1 Overview This chapter describes Puritan Bennett™ 980 Series Ventilator operation and includes the following sections: 4.2 • Setting up the ventilator • How to use the ventilator • How to use the ventilator’s graphical user interface (GUI) • How to set or change main, alarm, or apnea settings • How to test alarms • How to calibrate, enable, or disable the O2 sensor • How to perform inspiratory and expiratory pause maneuvers. • How to use non-invasive ventilation (NIV) Ventilator Function Air and oxygen from wall sources or cylinders enter the ventilator and flow through individual oxygen and air flow sensors. The gases are then mixed in the mix module’s accumulator. A pressure-relief valve in the mix module’s accumulator prevents over-pressurization. The mix module also contains an oxygen sensor which monitors the air-oxygen mixture according to the operator-set O2% setting. After the gas mixes, it flows to the inspiratory pneumatic system, where the breath delivery flow sensor measures the gas flow and controls a PSOL valve for proper breath delivery tidal volumes and pressures. The inspiratory pneumatic system contains a safety valve to avoid over-pressure conditions before flowing through bacteria filters to the patient through the inspiratory limb of the patient circuit. Upon exhalation, gas flows out the patient circuit expiratory limb, through the expiratory bacteria filter, through the exhalation valve, 4-1 Operation which includes the exhalation valve flow sensor, and through the exhalation port. 4.3 Ventilator Setup WARNING: To avoid interrupted ventilator operation or possible damage to the ventilator, always use the ventilator on a level surface in its proper orientation. To set up the ventilator 1. Connect the ventilator to the electrical and gas supplies. Reference Power Cord Retainer on BDU, p. 3-7 and Reference Connecting the Ventilator to the Gas Supplies, p. 3-9. 4.4 2. Connect the patient circuit to the ventilator. Reference the figures on p. 3-16 and p. 3-17 to connect the adult/pediatric or neonatal patient circuits, respectively. 3. Turn the ventilator ON using the power switch. Reference Ventilator Power Switch and AC Indicator, p. 2-26. 4. Before ventilating a patient, run SST to calculate the compliance and resistance with all items included in the patient circuit. Reference To run SST, p. 3-48. User Interface Management The user interface is structured with a GUI and a status display. The GUI provides access to ventilator controls and patient data. The status display is a small LCD panel which acts as a back up to the GUI in the event of a GUI failure. Reference Status Display, p. 2-28 for more information about the status display. The status display is not interactive. During normal ventilator operation, the following information appears on the status display: Current power state (AC or DC) • Batteries installed / charge status 4-2 • Visual indication of audible alarm volume • Circuit pressure graph displaying PPEAK, PEEP, and pressure-related alarm settings Operator’s Manual Ventilator Shutdown Reference Status Display, p. 2-28 for information about displayed items during Service mode. Using the GUI The GUI is used to interact with the ventilator while it is ventilating a patient or in any of its operating modes. Caution: Do not lean on the GUI or use it to move the ventilator. Doing so could break the GUI, its locking mechanism, or tip the ventilator over. The GUI is divided into several areas. Figure 4-1. Areas of the GUI 1. Prompt area — Located beneath the waveforms. Any prompts or messages display here. Examples include soft and hard bound messages, PAV+ and IE Sync startup messages, Oxygen sensor calibration in progress and various other informational messages. Note: A soft bound is a selected value that exceeds its recommended limit and requires acknowledgment to continue. Hard bounds have minimum and maximum limits Operator’s Manual 4-3 Operation beyond which values cannot be selected, however if the desired value is equal to a settings hard bound, then it is allowable. 2. Menu tab — Located on the left side of the GUI screen. Swiping the tab to the right and touching Setup causes the Vent, Apnea, Alarm, and More Settings tabs to appear. Touching those tabs opens screens so that changes to ventilator settings, apnea settings and alarm settings can be made. 3. Waveform area — Located in the center of the GUI screen. Shows various breath waveforms. Reference To configure waveforms and loops, p. 3-45 for information on how to configure graphics. 4. Breath Phase Indicator — During normal ventilation, the GUI displays a breath indicator in the upper left corner which shows the type of breath [Assist (A), Control (C), or Spontaneous (S)] currently being delivered to the patient, and whether it is in the inspiratory or expiratory phase. The breath indicator is updated at the beginning of every inspiration, and persists until the next breath type update. During inspiration, assist (A) and control (C) breath indicators glow green and spontaneous (S) breath indicators glow orange, each appearing in inverse video where the indicator appears black surrounded by the colored glow. Reference Areas of the GUI, p. 4-3. During the expiratory phase the breath indicators appear as solid colors (green during assist or control breaths and orange during spontaneous breaths). 5. Vital Patient data banner — Located across the top of the GUI screen. The patient data banner displays monitored patient data and can be configured to show desired patient data. Reference Vital Patient Data, p. 3-42 for information on configuring patient data for display. 6. Alarm banners — Located on the right side of the GUI screen. Indicates to the operator which alarms are active, and shown in a color corresponding to priority (high is red and flashing, medium is yellow and flashing, low is yellow and steady). 7. Constant access icons — Located at the lower right of the GUI screen. This area allows access to home (house), configure (wrench), logs (clipboard), elevate oxygen percentage (O2), and help (question mark) icon. These icons are always visible regardless of the function selected on the GUI. 8. Constant access area — Consists of the Current Settings area and the Constant access icons. This area allows access to any of the patient setup variables shown in these areas. Touching an icon causes the particular menu for that variable to appear. 9. Current settings area — Located at the lower center of the GUI screen. The ventilator’s current active settings display here. Touching any of the current settings buttons causes a dialog to appear, allowing changes using the knob. 10. Vent Setup Button — Located at the lower left of the GUI screen. Touching this button allows access to the ventilator setup screen. Adjusting GUI Viewing Properties 4-4 Operator’s Manual Ventilator Shutdown Screen Opacity The opacity control enables the operator to adjust the opacity of the displayed information between 50% and 100%. At 50%, the displayed image is semitransparent, and at 100%, the displayed image is opaque. The opacity value remains as set if power is cycled and if the same patient is ventilated. If a new patient is ventilated, the opacity defaults to 85%. Reference To adjust the screen opacity, p. 3-46 for instructions on adjusting this feature. Pushpin Feature The pushpin feature prevents a dialog from closing under certain conditions when it is pinned. Like the opacity control, the pushpin appears on the settings screen after a new patient starts ventilation. Figure 4-2. Pushpin Icon 1 1 Pushpin icon – unpinned state 2 2 Pushpin icon – pinned state To use the pushpin 1. When a dialog is open, for example, if Accept or Accept ALL buttons are available, touch the unpinned pushpin icon to pin the dialog and hold it open. 2. Touch Close to close the dialog. Display Brightness Display brightness can be controlled manually.This feature is institutionally configurable. Reference Screen Brightness and Keyboard Backlight (Light Settings), p. 3-39. The brightness range is from 1% to 100% with 1% resolution. The default value is 80%. To manually adjust display brightness 1. Press the display brightness key. 2. Operator’s Manual Slide the brightness slider to the right to increase the brightness level or to the left to decrease the brightness level. Alternatively, turn the knob to increase or decrease the brightness level. The control disappears from the screen in approximately five (5)seconds. 4-5 Operation Display Lock The primary display provides a display lock key to prevent inadvertent changes to settings. When active, the display lock disables the touch screen, knob, and off-screen keys (other than the display lock key) and illuminates an LED on the display bezel. An image of the display lock icon appears transparently over anything displayed on the GUI, should the operator attempt to use the GUI. Any new alarm condition disables the display lock and enables normal use of the GUI. To lock and unlock the display 1. Press the display lock key on the GUI. The keyboard LED illuminates and a transparent locked icon appears on the screen, indicating display lock. The icon shortly disappears, but if the operator tries to activate any of the touch screen controls, the icon re-appears. 2. To unlock the display, press the display lock key again. The display lock LED turns off and an unlocked image briefly appears on the screen. Using Gestures When Operating the GUI The GUI incorporates a gesture-based interface where features can be actuated with the fingers using different motions. The following table explains gestures used with the GUI. Table 4-1. Gestures and Their Meanings Gesture Swipe 4-6 Description Used for How to Use Quickly brush the screen surface with the fingertip. Opening or closing dialogs or panels that slide in and out from the screen sides or top, moving waveform data, expanding or collapsing tooltips, scrolling lists, or alarm banners, maximizing or minimizing waveforms. Swipe toward the center of the screen to open dialogs or panels. Swipe toward the side of the screen (or upward if viewing the additional patient data or large font patient data panels) to close. To move a paused waveform, swipe in the desired direction. Swipe upward anywhere on a waveform to maximize it, and swipe downward on the maximized waveform to minimize it. Swipe a tooltip upward to expand to a long description and downward to collapse to a short description. A downward swipe anywhere in the patient data area opens the additional patient data panel, and another swipe on the additional patient data tab displays the large font patient data panel. Operator’s Manual Ventilator Shutdown Table 4-1. Gestures and Their Meanings (Continued) Gesture Description Used for How to Use Double-tap Rapidly touch the screen surface twice with one finger. Maximizing or minimizing the viewable area of a dialog, control, or waveform, expanding or collapsing tooltips Double-tapping maximizes the viewable waveform area or shows the long description of a tooltip. Double-tapping again minimizes the viewable waveform area or shows the short description of a tooltip. If the control is configurable, double tapping produces the configuration pop-up menu. Drag Move the fingertip over the screen surface without losing contact. Changing x- and y- axis scales, moving the waveform cursor, moving scrollbars, scrolling lists. Scrolling speed varies depending upon how far outside the list boundary the finger is positioned. Touch the axis and drag to the right to increase the waveform x-axis scale, and to the left to decrease. Touch the axis and drag upward to increase the y-axis scale and downward to decrease. To move the cursor (when the waveform is paused), touch the cursor and drag it right or left. The graph responds similarly. Scroll a list by dragging the scrollbar right or left or up or down. The list scrolls according to the direction of the finger movement. An automatic scrolling feature starts if the finger is dragged from the inside of a list to outside its boundary. The farther outside the boundary the finger is dragged, the faster the list scrolls. Touch and hold Touch an item and hold for at least 0.5 seconds. Displaying a tooltip dialog on whatever item is touched. The tooltip appears to glow indicating the touch and hold action. N/A Drag and drop Touch and drag an item to another location and lift finger to drop. Dragging help icon to describe an onscreen item. Drag the help icon, located at the lower right of the GUI screen, to the item in question and drop. If a blue glow appears, a tooltip is available and appears with information about that item (for example, a control or symbol). 4.5 Ventilator Operation Caution: Do not set containers filled with liquids on the ventilator, as spilling may occur. Operator’s Manual 4-7 Operation After turning on the ventilator, it will display a Covidien “splash screen,” and run Power On Self Test (POST). After the splash screen appears, the ventilator gives a choice to ventilate the same patient or a new patient, or run SST. Ventilation parameters are entered via the graphical user interface (GUI) using the following general steps: 1. Touch the setting displayed on the GUI. 2. Turn the knob to the right to increase or to the left to decrease the value. 3. Touch Accept to apply the setting or Accept ALL to apply several settings at once. Note: Quick Start allows for rapid setup and initiation of mechanical ventilation. Review Quick Start parameters and ensure they are consistent with institutional practice before using this feature. WARNING: Prior to patient ventilation, select the proper tube type and tube ID. To use Quick Start 1. Touch New Patient. 4-8 2. Touch the highlighted PBW button or Gender/Height. 3. Turn the knob to adjust the patient’s PBW or gender and height (if gender is selected, the height selection becomes available). 4. Touch Quick Start. 5. Connect the circuit wye adapter to the patient's airway or interface connection. The patient is ventilated with the institutionally configured or factory configured QUICK START defaults according to the PBW or gender/height entered, and circuit type used during SST. There is no prompt to review the settings and the waveforms display appears. Note: Connecting the circuit wye adapter to the patient's airway or interface connection prior to making the ventilation settings causes the ventilator to begin ventilation using Safety Pressure Control Ventilation (Safety PCV) and annunciate a PROCEDURE ERROR alarm. As soon as the ventilator receives confirmation of its settings (by touching “Accept” or ‘Accept ALL”), it transitions out of safety PCV, resets the alarm, and delivers the chosen settings. Reference Safety PCV Settings, p. 10-72 for a listing of Operator’s Manual Ventilator Shutdown these settings. To resume ventilating the same patient 1. Touch Same Patient on the GUI screen. The previous ventilator settings are displayed on the screen for review prior to applying the settings to the patient. 2. If the settings are acceptable, touch Accept to confirm. To change any settings, touch the setting, turn the knob clockwise to increase the value of the setting or counter-clockwise to decrease the value of the setting, and touch Accept to confirm. To make several settings changes at once, make the desired changes, then touch Accept ALL to confirm. The appearance of the settings changes from white, non-italic font showing the current setting to yellow italics (noting the pending setting). After the settings are accepted, the appearance changes back to white non-italic font. 3. Connect the circuit to the patient’s airway to initiate ventilation. To ventilate a new patient 1. Touch New Patient on the GUI screen. The New Patient settings screen appears to enter the ventilation control parameters. Reference Ventilator Settings Range and Resolution, p. 11-8 for default ventilator parameter settings. Figure 4-3. New Patient Settings 2. Operator’s Manual Enter the patient’s PBW or gender and height (if gender is selected, the height selection becomes available). 4-9 Operation 4.5.1 3. If the default ventilator settings are appropriate for the patient, touch START to confirm the settings, otherwise, touch a ventilator setting and turn the knob to adjust the parameter. Continue this process for all parameters needing adjustment. 4. Touch Accept or Accept ALL to confirm the change(s). 5. Connect the circuit to the patient’s airway to start ventilation. Ventilator Settings WARNING: The ventilator offers a variety of breath delivery options. Throughout the patient's treatment, the clinician should carefully select the ventilation mode and settings to use for that patient based on clinical judgment, the condition and needs of the patient, and the benefits, limitations and characteristics of the breath delivery options. As the patient's condition changes over time, periodically assess the chosen modes and settings to determine whether or not those are best for the patient's current needs. The following ventilator settings appear at the new patient setup screen: 4-10 • Predicted Body Weight (PBW) — Adjust the patient’s PBW, or select the patient’s gender and height. Reference Predicted Body Weight (PBW) Calculation, p. 4-21. • Ventilation type — Determines the type of ventilation to be delivered [Invasive or Non-invasive (NIV)] – Invasive — Conventional ventilation using endotracheal (ET) or tracheostomy (trach) tubes – Non-invasive (NIV) — Ventilation using non-vented full-face masks, nasal masks, infant nasal prongs, or uncuffed ET tubes. Reference Non-invasive Ventilation (NIV), p. 4-22 • Mode — Specify the breathing mode (A/C (assist/control), SIMV (synchronous intermittent mandatory ventilation), SPONT (spontaneous ventilation), BiLevel (if the BiLevel option is installed), or CPAP. CPAP is only available when circuit type is neonatal and vent type is NIV. Reference Ventilator Settings Range and Resolution, p. 11-8, Mode setting. • Mandatory type — Select PC (pressure control), VC (volume control), or VC+ (volume control plus) Operator’s Manual Ventilator Shutdown • Spontaneous type — If SIMV or BiLevel was selected as the Mode, specify PS (pressure support) or TC (tube compensation. If SPONT was selected as the Mode, specify PS (Pressure Support), TC (Tube Compensation), VS (Volume Support) or PAV+ (Proportional Assist Ventilation) (if the PAV+ software option is installed). Note: VS, PAV+, and TC are only available during INVASIVE ventilation. • Trigger type — Select pressure- triggering (P-TRIG), flow-triggering (V-TRIG), or IE Sync- triggering (if the IE Sync option is installed, and only in SPONT mode). Reference Appendix C in this manual for detailed information on the IE Sync software option. Pressure-triggering and IE Sync-triggering are not available when vent type is NIV. If ventilating a neonatal patient, only flow triggering is available. Other ways to access the vent setup screen: • Touch Vent Setup at the bottom left of the GUI display • Swipe the menu tab on the left side of the GUI and touch Setup. Figure 4-4. Open Menu Tab 1 Operator’s Manual Setup button 4-11 Operation Figure 4-5. New Patient setup Screen need new screenshot To enter settings into the ventilator 1. Select Vent type, Mode, Mandatory type, Spontaneous type and Trigger type by touching the corresponding button. 2. Touch the ventilator setting button needing changes. 3. Adjust the setting value. 4. Continue in this manner until all changes are made, then touch Accept or “Accept ALL”. 5. Touch START. Ventilation does not begin until the breathing circuit is connected to the patient’s airway. After ventilation begins, waveforms begin plotting on the displayed waveforms axes. Reference Waveforms, p. 3-44 for information on setting up the graphics display. If changes to any settings are required, return to the Vent Setup screen as described above, or touch a setting icon in the current settings area. Reference Areas of the GUI, p. 4-3, item 9. 4-12 Operator’s Manual Ventilator Shutdown Note: A yellow triangle icon appears on tabs and buttons displayed on the GUI containing unread or un-viewed items. When the item containing the icon is touched, the icon disappears. Note: To make any settings changes after completing patient setup, touch the Vent tab on the left side of the Setup dialog and make settings changes as described above. The current setting appears in white font and changes to yellow italics to note the new value is pending.Touch Accept or Accept ALL to confirm a single change or a batch of changes. Once the settings are accepted, their appearance changes to white font. Note: Selecting QUICK START, Accept, Accept ALL or Start from the Setup dialog implements all settings in ALL four Setup tabs (Vent Setup, Apnea, Alarms, and More Settings) and dismisses the Setup dialog. Tube Compensation Tube Compensation is a spontaneous breath type selected during ventilator setup. It allows the ventilator to deliver additional positive pressure to overcome the resistance imposed by the patient’s artificial airway. Reference p. 4-12 for more information on setting up the ventilator. Reference Ventilator Settings Range and Resolution, p. 11-8 for details of specific tube compensation settings. To enable TC 1. Touch the VENT tab on the GUI screen. Reference New Patient setup Screen, p. 412. 2. Touch SPONT for the mode selection. 3. Touch TC for Spontaneous type. 4. Finish setting up the ventilator as described (reference p. 4-12 for information on entering ventilator settings. 5. Select the tube type (either endotracheal or tracheostomy) and set the tube ID to correspond to patient settings. • After making the changes, touch Accept to apply the new settings, or Cancel to cancel all changes and dismiss the dialog. Operator’s Manual 4-13 Operation Adjust Tube Type, Tube ID, and Humidification WARNING: To prevent inappropriate ventilation with TC, select the correct Tube Type (ET or Tracheostomy) and tube inner diameter (ID) for the patient’s ventilatory needs. Inappropriate ventilatory support leading to over-or under-ventilation could result if an ET tube or trach tube setting larger or smaller than the actual value is entered. To select new settings for the tube, follow these steps 1. Touch Vent Setup on the GUI screen to display the Ventilator setup screen. 2. Touch Tube Type or Tube ID for the value to be changed. 3. Turn the knob to change the setting. 4. Make other tube settings, as necessary. 5. Touch Accept or Accept ALL to apply the new settings, or Cancel to cancel all changes and dismiss the dialog. Note: The tube type and tube ID indicators flash if TC is a new selection, indicating the need for entry of the correct tube type and tube ID. . To select new settings for the humidifier, follow these steps 1. From the Ventilator setup screen, touch the More Settings tab. A dialog appears containing selections for humidifier type and volume. A “Humidifier Volume” button appears below the selection only if “Non-Heated Expiratory Tube” or “Heated Expiratory Tube is selected as the humidifier type. 4-14 2. Turn the knob to enter a value equal to the dry volume of the humidifier chamber being used. 3. Touch Accept or Accept ALL to apply the new settings, or Cancel to cancel all changes and dismiss the dialog. Operator’s Manual Ventilator Shutdown 4.5.2 Apnea Settings After making the necessary changes to the ventilator settings touch the Apnea tab on the left side of the Setup dialog. Although changing the apnea settings is not required, confirm the default settings are appropriate for the patient. Apnea ventilation allows pressure control or volume control breath types. Parameters in pressure-controlled apnea breaths include f, PI, TI O2%, and TA. Volume controlled apnea breath parameters are f, VT, VMAX, Flow pattern, O2%, and TA. Note: If QUICK START is chosen, the apnea tab on the Vent Setup screen shows a yellow triangle, indicating the apnea settings have not been reviewed. Figure 4-6. Apnea Setup Screen need new screenshot To set apnea parameters 1. Select the desired apnea breath type (PC or VC). 2. Enter the desired apnea settings in the same manner as for the ventilator settings. 3. Touch Accept or Accept ALL to confirm apnea settings. Operator’s Manual 4-15 Operation During apnea pressure ventilation, apnea rise time % is fixed at 50%, and the constant parameter during a respiratory rate change is TI. 4.5.3 Alarm Settings After accepting the apnea settings, the display returns once more to show the waveforms. Return to the Vent Setup dialog and touch the Alarms tab on the left side of the GUI screen or touch the alarm icon in the constant access icons area of the GUI screen. The alarms screen appears with the default alarm settings. Reference Alarms Settings Screen, p. 4-17. Review and adjust the alarm settings appropriately for the patient. 4-16 Note: If Quick Start is chosen, the alarms tab on the dialog shows a yellow triangle, indicating the alarm settings have not been reviewed. Note: Reference Alarm Settings Range and Resolution, p. 11-17 for new patient default alarm values. These defaults cannot be changed. The clinician can adjust alarm settings by following the procedure below. The alarm settings are retained in memory when the ventilator’s power is cycled and same patient is selected.Otherwise, current settings revert to new patient defaults when a new patient is selected. Operator’s Manual Ventilator Shutdown Figure 4-7. Alarms Settings Screen 2 1 To adjust the alarm settings 1. Touch each alarm setting slider of the alarm(s) to change. Alarm settings are available for PPEAK, fTOT, VE TOT, VTE MAND, VTE SPONT, and VTI parameters. 2. Turn the knob clockwise to increase the value, or counter-clockwise to decrease the value. 3. Continue until all desired alarms are set as necessary. 4. Touch Accept ALL to confirm the alarm settings. Note: There is an additional alarm setting for TC, PAV+, VS, and VC+ breath types: High inspired tidal volume (2VTI). This alarm condition occurs when the inspired tidal volume is larger than the setting value. A 1VTI alarm will also cause breath delivery to transition to the exhalation phase to avoid delivery of excessive inspiratory volumes. WARNING: Prior to initiating ventilation and whenever ventilator settings are changed, ensure the alarm settings are appropriate for the patient. Operator’s Manual 4-17 Operation WARNING: Setting any alarm limits to OFF or extreme high or low values, can cause the associated alarm not to activate during ventilation, which reduces its efficacy for monitoring the patient and alerting the clinician to situations that may require intervention. Reference To adjust alarm volume, p. 3-41 to ensure alarm volume is adjusted properly. 4.5.4 Note: A sample alarm tone sounds for verification at each volume level change. Re-adjust the alarm volume by moving the alarm volume slider to increase or decrease the alarm volume. Note: Do not block the patient wye while the ventilator is waiting for a patient connection. Otherwise the blockage could imitate a patient connection. Alarm Screen During Operation During ventilator operation, the alarm screen appears with indicators to let the operator know the current patient data value for each parameter (item 1), the parameter alarm settings (items 2 and 3), recent range of patient data values for the last 200 breaths (item 4). If an alarm occurs, the slider and corresponding limit button show a color matching the alarm’s priority. Reference Alarm Screen During Operation, p. 4-19. 4-18 Operator’s Manual Ventilator Shutdown Figure 4-8. Alarm Screen During Operation 4.5.5 1 Pointers show current value of patient data corresponding to the alarm parameter 3 Low alarm setting (in this case 4VTE SPONT) 2 High alarm setting (in this case 2VTE SPONT) 4 Range of patient data values for the particular parameter during the last 200 breaths Making Ventilator Settings Changes If, during ventilation, settings changes are necessary that don’t involve changes to PBW, Mode, Breath types, or Trigger types, the current settings area located at the lower portion of the GUI screen can be used. Reference Areas of the GUI, p. 4-3 for the location of the current settings area. Operator’s Manual 4-19 Operation To change a ventilator setting using the “current settings” area 1. In the current settings area, touch the parameter whose value needs to be changed. A dialog appears containing buttons for all ventilator settings, with the selected setting highlighted. 2. Touch and turn the knob for any other settings that need to be changed. 3. Touch Accept or Accept ALL. To change a setting using the Vent Setup button 1. Touch Vent Setup. 2. Change the settings as described previously. 3. Touch Accept or Accept ALL to confirm the changes. The ventilator settings and the alarm settings chosen remain in memory after the a power cycle, as long as the same patient is chosen when the ventilator is set up again. If a new patient is being ventilated, the ventilator and alarm settings revert to their default values. If all power is lost (both AC and battery), the ventilator and alarm settings in effect prior to the power loss are automatically restored if the power loss duration is five (5)minutes or less. If the power loss lasts longer than five minutes, ventilation resumes in Safety PCV. Ventilator and alarm settings must be reset for the patient being ventilated. Reference Safety PCV Settings, p. 10-72 for a list of these settings. To use the Previous Setup button 1. To return to the previous settings, touch Previous Setup on the GUI screen. The ventilator restores the main control and breath settings previously used, as well as the alarm and apnea settings, and prompts a review by highlighting the previous values in yellow. The ventilator, alarm, and apnea settings tab text is also shown in yellow and the tabs show a yellow triangle, indicating there are previous settings that have not been reviewed. 2. If the settings are acceptable, touch Accept ALL. The Previous Setup button disappears when the previous settings are confirmed and re-appears when ventilating with new settings. 4.5.6 Constant Timing Variable During Respiratory Rate Changes A breath timing graph appears at the bottom of the setup screen which illustrates the relationship between inspiratory time, expiratory time, I:E ratio, 4-20 Operator’s Manual Ventilator Shutdown respiratory rate, and the effects on breath timing due to flow pattern, tidal volume, and VMAX during mandatory PC, VC, BiLevel, or VC+ breaths. With BiLevel, PC and VC+ breaths, three “padlock” icons are located underneath the breath timing graph allowing the operator to select, from left to right, TI, I:E ratio, or TE as the constant variable during rate changes (or TH, TH:TL ratio, or TL in BiLevel). If the ventilation mode is SPONT, the padlock icons do not appear, and the breath timing graph only displays TI for a manual inspiration. If the mandatory type is VC, the icons do not appear, but the breath timing graph displays TI, I:E ratio, and TE. To choose a constant timing variable for rate changes 1. Touch a padlock icon corresponding to the parameter to make constant during rate changes (this changes the padlock’s appearance from unlocked to locked). The “locked” parameter glows in the settings area. 4.6 2. Turn the knob to adjust the parameter’s value. 3. Touch Accept. Predicted Body Weight (PBW) Calculation Many default ventilator and alarm settings are based on patient PBW. Either through the entry of height and gender or directly via setting PBW, the PBW range spans at least 0.3 kg (0.66 lb) through at least the 155 kg (342 lb) male and the 150 kg (331 lb) female. Understanding how the ventilator operates at the very low end of the range of PBW requires awareness that an entry or prediction for PBW drives the value of a delivered volume, which has a lower limit of 2.0 mL (if using the NeoMode 2.0 option).Data for adult male and female PBW as a function of height were calculated by applying the equations presented on www.ards.net. Assume the ventilator (via direct height or PBW entry) registered a PBW of 0.3 kg. If a delivered volume of 4 mL/kg (PBW) was specified, the required volume would equal only 1.2 mL, which is less than the ventilator minimum of 2.0 mL. At a desired 4 mL/kg, the infants’ PBW would need to be at least 0.5 kg or the desired volume must be reset to greater than 4 mL/kg (PBW). Once the PBW of the premature infant approaches 1.0 kg (2.2 lb), this restriction disappears. After entering PBW, review and change all settings as needed. The correlation function PBW = height was derived from the sources referenced. For subjects whose body weight/height data define the range of PBWs Operator’s Manual 4-21 Operation that include the 20- to 23-week gestational-age neonates and the young male and female adolescent adults at the foot of the ARDS tables, their PBW values were taken as the 50th percentile numbers in the Fenton tables and the CDC and NCHS charts and tables, respectively. Note that the Fenton tables provided the exclusive information for premature and infant data between 20 weeks and 50 weeks of fetal and gestational growth.123 4.7 Note: Any repeated values noted in the tables are the result of decimal rounding. Non-invasive Ventilation (NIV) Non-invasive ventilation (NIV) is used when the clinician determines a mask or other non-invasive patient interface rather than an endotracheal tube would result in the desired patient outcome. 4.7.1 NIV Intended Use NIV is intended for use by neonatal, pediatric, and adult patients possessing adequate neural-ventilatory coupling and stable, sustainable, respiratory drive. 4.7.2 NIV Breathing Interfaces Covidien has successfully tested the following non-vented interfaces with NIV: • Full-face Mask: Puritan Bennett® Benefit Full Face Mask (large, part number 4-005253-00), ResMed Mirage™ Non-Vented Full Face Mask (medium) • Nasal Mask: ResMed Ultra Mirage™ Non-vented Mask (medium) • Infant Nasal Prongs: Sherwood Davis & Geck Argyle® CPAP Nasal Cannula (small), Hudson RCI® Infant Nasal CPAP System (No. 3) • Uncuffed neonatal ET tube: Mallinckrodt Uncuffed Tracheal Tube, Murphy (3.0 mm) 1. Fenton TR, BMC Pediatrics 2003, 3:13. http://www.biomedcentral.com/1471-2431/3/13. 2. Hamill, PV V. 1977 NCHS growth curves for children birth to 18 years for the United States: National Center for Health Stat (Vital and Health Statistics: Series 11, Data from the National Health Survey; no. 165) (DHEW publication; (PHS) 78 - 1650). 1977. 3. Kuczmarski RJ, Ogden CL, Guo SS, et al. 2000 CDC growth charts for the United States: Methods and development. National Center for Health Statistics. Vital Health Stat 11(246). 2002. 4-22 Operator’s Manual Ventilator Shutdown 4.7.3 WARNING: Use only non-vented patient interfaces with NIV. Leaks associated with vented interfaces could result in the ventilator’s inability to compensate for those leaks, even if Leak Sync is employed. WARNING: Full-face masks used for non-invasive ventilation should provide visibility of the patient's nose and mouth to reduce the risk of emesis aspiration. WARNING: When Using NIV, the patient’s exhaled tidal volume (VTE) could differ from the ventilator’s monitored patient data VTE reading due to leaks around the interface. To avoid this, ensure Leak Sync is installed. NIV Setup NIV can be initiated from either the New Patient Setup screen during Vent start-up or while the patient is being ventilated invasively. Reference the table below for using NIV patient setup information. Table 4-2. Setting Up a Patient for NIV To set up a new patient 1. Turn the ventilator on. 2. Select New Patient. 3. Enter patient’s PBW or gender and height. 4. Touch NIV vent type. 5. Select mode. 6. Select mandatory type. 7. Complete ventilator settings, including apnea and alarm settings. Operator’s Manual To set up a patient currently being ventilated 1. Touch or swipe the menu tab on the left side of the GUI. 2. Touch Vent Setup. 3. Perform steps 4 through 7 as if setting the ventilator up for a new patient. 4. Review the settings, including apnea and alarm settings and change if necessary. 4-23 Operation 4.7.4 Conversion from INVASIVE to NIV Vent Type WARNING: For proper ventilation when changing the Vent Type on the same patient, review the automatic settings changes described. Adjust appropriately based on the relevant tables. Some ventilator settings available during INVASIVE ventilation are not available during NIV. Reference the following table for automatic settings changes when changing vent type from INVASIVE to NIV. Table 4-3. INVASIVE to NIV on Same Patient Current INVASIVE setting New NIV setting Breath Mode: BiLevel Breath mode: A/C Breath Mode: SIMV or SPONT High TI SPONT (2TI SPONT) limit setting available Mandatory Type: VC+ Mandatory type: Neonatal: PC Adult/Pediatric: VC Spontaneous Type: Any type except PS Spontaneous type: PS Trigger type: Pressure Trigger type: Flow (Flow triggering is the only allowable trigger type during NIV) Alarm settings: 4PPEAK (if applicable), 4VE TOT, Alarm settings: 4PPEAK, 4VE TOT, 4VTE MAND, 4VTE MAND, 4VTE SPONT, INSPIRATION TOO LONG 4VTE SPONT default to NIV new patient values. (not user-settable) Reference Alarm Settings Range and Resolution, p. 11-17. INSPIRATION TOO LONG alarm not available. DSENS DSENS setting defaults to OFF if Leak Sync is enabled. Note: In any delivered spontaneous breath, either INVASIVE or NIV, if Pressure Support is set to 0 cmH2O, there is always a target inspiratory pressure of 1.5 cmH2O applied. When in NIV, the Vent Setup button’s appearance changes, letting the operator know the vent type is NIV. 4-24 Operator’s Manual Ventilator Shutdown Figure 4-9. Vent Setup Button “NIV” Indicating NIV vent type 4.7.5 Conversion from NIV to INVASIVE Vent Type The table below shows automatic settings changes made when changing vent type from NIV to INVASIVE. Table 4-4. NIV to INVASIVE on Same Patient Current NIV setting New INVASIVE setting Ventilator settings: 2TI SPONT N/A Alarm settings: 4PPEAK, 4VE TOT, 4VTE MAND, 4VTE SPONT Alarm settings: Default to new patient values dependent upon selected INVASIVE ventilator settings. Reference Alarm Settings Range and Resolution, p. 11-17. INSPIRATION TOO LONG alarm becomes available. DSENS DSENS setting defaults to INVASIVE new patient value. Reference Ventilator Settings Range and Resolution, p. 11-8. Operator’s Manual 4-25 Operation 4.7.6 High Spontaneous Inspiratory Time Limit Setting NIV includes a setting in SIMV or SPONT modes for High Spontaneous Inspiratory Time limit (2TI SPONT). When a patient’s inspiratory time reaches or exceeds the set limit, the ventilator transitions from inspiration to exhalation, and the 1TI SPONT symbol appears at the lower left on the GUI screen, indicating the ventilator has truncated inspiration (shown below). The 2TI SPONT setting does not restrict changes to PBW; if the PBW is decreased, 2TI SPONT may decrease automatically to remain within its allowable limits. Figure 4-10. 2TI SPONT Indicator WARNING: No audible alarm sounds in conjunction with the visual 2TI SPONT indicator, nor does the indicator appear in any alarm log or alarm message. It is possible the target inspiratory pressure may not be reached if the 2TI SPONT setting is not long enough, or if system leaks are so large as to cause the ventilator to truncate the breath at the maximum allowable2TI SPONT setting. 4-26 Operator’s Manual Ventilator Shutdown 4.7.7 Note: To reduce the potential for not reaching the target pressure, minimize the leaks in the system and increase the Rise time % and/or decrease the ESENS setting, if appropriate. NIV Apnea Setup Set the patient’s apnea parameters as described. Reference Apnea Settings, p. 4-15. NIV does not change the way apnea parameters are set. 4.7.8 NIV Alarm Settings The system initially sets most alarm settings based on the patient’s PBW. Review all alarm settings, and change as necessary, but startup does not require confirmation of the settings. Figure 4-11. Default NIV Alarm Settings Touch the Alarms tab at any time during ventilation to show the current limits and the monitored patient value shown in white on the indicating arrows for each alarm. If an alarm is occurring, the indicator LED color changes based on alarm priority Reference Alarm Prioritization, p. 6-16 for colors and meanings Operator’s Manual 4-27 Operation of alarms and their priorities. 4.8 Note: The upper and lower limits of an alarm cannot conflict with each other. Note: The upper limits for the spontaneous exhaled tidal volume and mandatory exhaled tidal volume alarms are always the same value. Changing the upper limit of one alarm automatically changes the upper limit of the other. Manual Inspiration A manual inspiration is an operator-initiated mandatory (OIM) inspiration. When the operator presses the Manual inspiration key, the ventilator delivers the currently specified apnea breath setting for spontaneous breaths, or the currently specified mandatory breath setting for mandatory breaths, either volume- or pressure-based. A volume-based manual inspiration is compliancecompensated. Pressing the Manual inspiration key while in BiLevel mode will transition from TH to TL or TL to TH depending on when in the breath cycle the key was pressed. 4.9 Respiratory Mechanics Maneuvers To access respiratory mechanics maneuvers 1. Touch or swipe Menu tab on the left side if the GUI. 2. 4-28 Touch RM. Operator’s Manual Ventilator Shutdown Figure 4-12. RM in Menu Tab 3. Touch the particular tab for the desired maneuver. Figure 4-13. Respiratory Maneuver Tabs Need new graphic Operator’s Manual 4-29 Operation 4.9.1 4. Follow the prompts on the GUI screen. 5. Accept or reject the maneuver results. If the result is accepted, its value is saved. Inspiratory Pause Maneuver An inspiratory pause maneuver closes the inspiration and exhalation valves and extends the inspiratory phase of a single, mandatory breath for the purpose of measuring end inspiratory circuit pressure in order to calculate inspiratory Plateau Pressure (PPL), lung Static Compliance (CSTAT), and Static Resistance (RSTAT) of the respiratory system. Pressures on either side of the artificial airway are allowed to equilibrate, which determines the pressure during a no-flow state. A request for an inspiratory pause is rejected during apnea ventilation, safety PCV, OSC, BUV, and in Stand-by state. Inspiratory pauses are allowed in A/C, SIMV, BiLevel and SPONT modes. If an inspiratory pause maneuver has already occurred during the breath, a second inspiratory pause maneuver is not allowed. Inspiratory pauses can be classified as automatic or manual. The automatic inspiratory pause lasts at least 0.5 second but no longer than three seconds. A manual inspiratory pause starts by pressing and holding inspiratory pause key. The pause lasts for the duration of the key-press (up to seven seconds). To perform an automatic inspiratory pause 1. Press and release the inspiratory pause key on the GUI bezel or touch and release Start if performing an inspiratory pause from the GUI screen as shown above. The ventilator performs the inspiratory pause maneuver and displays PPL, CSTAT, and RSTAT along with the date and time. 2. Touch Accept or Reject to save or dismiss results. If Accept is touched, the results are displayed. Cancel an automatic inspiratory pause maneuver by touching Cancel on the GUI screen. To perform a manual inspiratory pause 1. Press and hold the inspiratory pause key on the GUI bezel or touch and hold Start on the GUI screen if performing an inspiratory pause from the GUI screen as shown above. The ventilator prompts that the maneuver has started, and to release to end the maneuver. The ventilator performs the inspiratory pause maneuver and displays PPL, CSTAT, and RSTAT, along with the date and time. 4-30 Operator’s Manual Ventilator Shutdown 2. Touch Accept or Reject to save or dismiss results. If Accept is touched, the results are displayed. Cancel a manual inspiratory pause maneuver by releasing the Inspiratory Pause key. 4.9.2 Expiratory Pause Maneuver An expiratory pause extends the expiratory phase of the current breath for the purpose of measuring end expiratory lung pressure (PEEPTOT) or total PEEP. It has no effect on the inspiratory phase of a breath, and only one expiratory pause per breath is allowed. For I:E ratio calculation purposes, the expiratory pause maneuver is considered part of the exhalation phase. During an expiratory pause, both inspiratory and exhalation valves are closed, allowing the pressures on both sides of the artificial airway to equilibrate. This allows intrinsic PEEP (PEEPI) to be calculated. PEEPI is PEEPTOT minus the set PEEP level. An expiratory pause can be either automatically or manually administered, and is executed at the next mandatory breath in A/C, SIMV, or BiLevel modes. In SIMV, the breath cycle in which the pause becomes active (when the next scheduled ventilator initiated mandatory (VIM) breath occurs) will be extended by the amount of time the pause is active. For A/C and SIMV, the expiratory pause maneuver is scheduled for the next end-of-exhalation prior to a mandatory breath. In BiLevel the expiratory pause maneuver is scheduled for the next end-of-exhalation prior to a transition from PL to PH. During the expiratory pause maneuver, PEEPI and PEEPTOT equilibration time values are displayed and regularly updated because stabilization of one of these values can indicate the pause can be ended. During the expiratory pause, the Apnea Interval TA is extended by the amount of time the pause is active. Expiratory pause requests are ignored if the ventilator is in apnea ventilation, safety PCV,OSC, BUV, and Stand-by state. Additionally, SEVERE OCCLUSION alarms are suspended during expiratory pause maneuvers. If flow triggering is active, backup pressure sensitivity (PSENS) detects patient breathing effort. Maximum duration for a manual expiratory pause is 15 seconds and three (3) seconds for an automatic expiratory pause. During a manual or automatic expiratory pause, PEEPI and PEEPTOT appear on the GUI with the next VIM to allow the clinician to view when these values are stabilized, indicating the maneuver can be ended. Operator’s Manual 4-31 Operation To perform an automatic expiratory pause 1. Press and release the expiratory pause key on the GUI or touch and release Start if performing the expiratory pause from the GUI screen. The ventilator performs the expiratory pause maneuver and displays a circuit pressure graph, PEEPTOT, and PEEPI, along with the date and time. To perform a manual expiratory pause 1. Press and hold the expiratory pause key on the GUI bezel or touch and hold Start if performing the expiratory pause from the GUI screen. The ventilator prompts that the maneuver has started, and to release the button to end the maneuver. The ventilator performs the expiratory pause maneuver and displays a circuit pressure graph, PEEPTOT, and PEEPI, along with the date and time. 2. Accept or reject the pause results. To cancel an expiratory pause maneuver 1. Touch Cancel on the GUI screen. 4.9.3 Other Respiratory Maneuvers To perform other respiratory maneuvers, touch the corresponding tab on the desired maneuver, and follow the prompts on the GUI screen. 4.10 Oxygen Sensor Function The ventilator's oxygen sensor monitors O2%. This cell is mounted in the inspiratory module in the BDU and monitors the percentage of oxygen in the mixed gas delivered to the breathing circuit (it may not reflect the actual oxygen concentration in the gas the patient inspires). Reference the Puritan Bennett™ 980 Series Ventilator Service Manual for instructions on replacing the O2 sensor. New patient default O2% settings are as follows: 4-32 • O2 sensor — enabled • Neonatal — 40% O2 • Pediatric/adult — 100% O2 Operator’s Manual Ventilator Shutdown Note: The oxygen sensor has three states: Enabled, Disabled, and Calibrate. The oxygen sensor is enabled at ventilator startup regardless if New Patient or Same Patient setup is selected. To enable, or disable the O2 sensor 1. Touch Vent Setup. 2. Touch the More Settings tab. The more settings screen appears. Figure 4-14. More Settings Screen with O2 Sensor Enabled 4.10.1 3. Touch the button corresponding to the desired O2 sensor function (Enable or Disable). 4. Touch Accept. Oxygen Sensor Life The O2% setting can range from room air (21% O2) up to a maximum of 100% oxygen. The sensor reacts with oxygen to produce a voltage proportional to the partial pressure of the mixed gas. Since ambient atmosphere contains approximately 21% oxygen, the sensor constantly reacts with oxygen and Operator’s Manual 4-33 Operation always produces a voltage. The useful life of the cell can also be shortened by exposure to elevated temperatures and pressures. During normal use in the ICU, the oxygen sensor lasts for approximately one year — the interval for routine preventive maintenance. Because the oxygen sensor constantly reacts with oxygen, it requires periodic calibration to prevent inaccurate O2% alarm annunciation. Once a calibrated oxygen sensor and the ventilator reach a steady-state operating temperature, the monitored O2% will be within three percentage points of the actual value for at least 24 hours. To ensure the oxygen sensor remains calibrated, recalibrate the oxygen sensor at least once every 24 hours. Typically, the clinician uses an O2 analyzer in conjunction with the information given by the ventilator. If a NO O2 SUPPLY alarm occurs, compare the O2 analyzer reading with the ventilator’s O2 reading for troubleshooting purposes. The ventilator automatically switches to delivering air, only (21% oxygen). 4.10.2 Oxygen Sensor Calibration The oxygen sensor should be calibrated every 24 hours and before use. The calibration function provides a single-point O2 sensor calibration. To calibrate the O2 sensor 4.10.3 1. Touch Vent Setup. 2. Touch More Settings. 3. Touch the Calibrate for the O2 sensor. The oxygen sensor calibrates within two minutes. Reference More Settings Screen with O2 Sensor Enabled, p. 4-33. Oxygen sensor calibration testing To test the O2 sensor calibration 4-34 1. Connect the ventilator’s oxygen hose to a known 100% O2 source (for example, a medical-grade oxygen cylinder). 2. Calibrate the oxygen sensor as described above. Operator’s Manual Ventilator Shutdown 4.11 3. Connect the ventilator oxygen hose to another known 100% O2 source (for example, a second medical-grade oxygen cylinder). 4. Set O2% to each of the following values, and allow one minute after each for the monitored value to stabilize: 21%, 40%, 90% 5. Watch the GUI screen to ensure the value for O2 (delivered O2%) is within 3% of each setting within one minute of selecting each setting. Ventilator Protection Strategies The ventilator incorporates a number of strategies to support patient safety. These include Power On Self-Test (POST), SST and a new strategy called Ventilation Assurance which provides alternate means of ventilation in the case of certain serious faults in the breath delivery system. The descriptions below detail the system response to potential failures. 4.11.1 Power on Self Test (POST) The first strategy is to detect potential problems before the ventilator is placed on a patient. POST checks the integrity of the ventilator's electronics and prevents ventilation if a critical fault is found. (Reference the Puritan Bennett™ 980 Series Ventilator Service Manual for a complete description of POST). POST may detect major or minor system faults which manifest themselves as Device Alerts. Reference DEVICE ALERT Alarm, p. 6-36 for more information. 4.11.2 Technical Fault A technical fault occurs if a POST or background test has failed. Reference Power On Self Test (POST), p. 10-76. Based on the test that failed, the ventilator will either ventilate with current settings, ventilate with modified settings, or enter the Vent Inop state. A technical fault cannot be cleared by pressing the alarm reset key. It can only be cleared by correcting the fault that caused it or if alarm reset criteria have been met. 4.11.3 SST In addition to characterizing the ventilator breathing circuit, SST performs basic checks on the ventilator's pneumatic system including the breath delivery Operator’s Manual 4-35 Operation PSOL, the Flow Sensors and the Exhalation Valve. Faults detected during SST must be corrected before ventilation can be started. 4.11.4 Procedure Error A procedure error occurs when the ventilator senses a patient connection before ventilator setup is complete. The ventilator provides ventilatory support using default Safety Pressure Controlled Ventilation (Safety PCV) settings. Reference Safety PCV Settings, p. 10-72 4.11.5 Ventilation Assurance During ventilation, the ventilator performs frequent background checks of its breath delivery sub-system (Reference Safety Net, p. 10-71). In the event that certain critical components in the pneumatics fail, Ventilation Assurance provides for continued ventilatory support using one of three Backup Ventilation (BUV) strategies, bypassing the fault to maintain the highest degree of ventilation that can be safely delivered (Reference Background Diagnostic System, p. 10-74 for a full description of the Backup Ventilation strategies). 4.11.6 Note: Do not confuse BUV with Safety PCV, which occurs when a patient is connected before ventilator setup is complete, or with Apnea ventilation, which occurs in response to patient apnea. Safety Valve Open (SVO) In the event of a serious fault occurring that cannot be safely bypassed, the ventilator, as a last resort, reverts to a Safe State. In Safe State, the ventilator opens the Safety Valve and the Exhalation Valve, allowing the patient to breathe room air (if able to do so), provided the patient circuit is not occluded, and the inspiratory PSOL valve is closed. During SVO, the patient (if connected) can breathe room air through the safety valve after it releases pressure in the patient circuit. The patient exhales through the exhalation valve with minimal resistance and the exhalation valve also acts like a check valve, limiting gas from being drawn in through the expiratory filter or expiratory limb of the circuit. SVO conditions are logged into the event and alarm logs as are the events leading to the SVO condition. If the condition causing SVO clears, the ventilator clears the SVO state. Patient data do not display on the GUI, but graphics are still plotted. During SVO, the ventilator ignores circuit occlusions and dis- 4-36 Operator’s Manual Ventilator Shutdown connects. If the condition causing SVO can only be corrected by servicing the ventilator, the SVO alarm cannot be reset by pressing the alarm reset key. 4.11.7 Ventilator Inoperative (Vent Inop) Vent Inop occurs when the ventilator detects a catastrophic error which prevents all other safety states from operating. Vent Inop limits pressure to the patient as the ventilator enters the SVO state, disables (closes) the gas mixing PSOL valves, and purges the gas mixing system accumulator. The safety valve is opened and a Vent Inop indicator illuminates and a high priority alarm annunciates from the primary alarm, and the secondary alarm (continuous tone) is activated. The ventilator can only exit the Vent Inop state by power cycling and successfully passing EST. The Vent Inop alarm cannot be reset with the alarm reset key. All detection and annunciation of patient data alarm conditions is suspended. During a Vent Inop condition, the inspiratory and expiratory pressure drop measured at the patient wye does not exceed 6.0 cmH2O at 30 L/min. 4.12 Ventilator Shutdown When the ventilator power switch is turned OFF, the ventilator executes an orderly shutdown routine, saving patient data before removing power. If the ventilator detects a patient connected when the power switch is turned OFF, a high priority alarm is annunciated and a banner on the display requires the operator to confirm that a power down was requested. Only after the operator confirms will the ventilator execute the shutdown command. All logs are retained in the ventilator’s memory upon ventilator shutdown. When the logs reach the maximum number of entries, the oldest values are overwritten with new values. Reference Ventilator Logs, p. 8-2 for information on ventilator logs. Operator’s Manual 4-37 Operation Page Left Intentionally Blank 4-38 Operator’s Manual 5 Product Data Output 5.1 Overview This chapter describes the features of the Puritan Bennett™ 980 Series Ventilator designed to provide output to the clinician. This includes language, methods of displaying and transferring data, types of displayed data, and types of external device ports. Connectivity to an external patient monitoring system is also included. 5.2 Language The language used on the ventilator is configured at the factory. 5.3 Data Display Displayed data are updated in real-time. The practitioner can display up to 60 seconds of waveform data and pause and capture up to two loops using the screen capture function. The operator can pause the displays and when the displays are paused, a cursor appears with the relevant numeric values for the intersecting points of the cursor and waveform or loop. The scalar waveform contains a single value, but loops contain both x- and y-axis data. The operator can move the cursor along the waveform or loop using the knob, and read the corresponding data. Reference Waveforms, p. 3-44 for details regarding configuring and displaying waveforms. 5.4 Data Transfer Data from the ventilator can be accessed via USB or RS-232 connectors. The following data are available for downloading via connection to a remote device or flash drive: • Waveform images (screen capture function): USB port 5-1 Product Data Output 5.4.1 • Waveform data: RS-232 port, USB port with USB to serial conversion capability (per Comm port configuration) • Results from DCI commands: RS-232 port, USB port with USB to serial conversion capability (per Comm port configuration) GUI Screen Capture Caution: The USB interface should be used for saving screen captures and interfacing with an external patient monitor. It should not be used to provide power to other types of devices containing a USB interface. Covidien recommends a minimum 128 MB flash drive storage device formatted in the 32-bit file format. To capture GUI screens 1. Navigate to the desired screen from which you wish to capture an image (for example, the waveforms screen). There is no need to pause the waveform before performing the screen capture. 2. Touch the screen capture icon in the constant access icons area of the GUI screen. If desired, navigate to another screen and repeat steps 1 and 2 for up to ten (10) images. If another image is captured, increasing the queue to eleven images, the newest image overwrites the oldest image so there are always only ten images available. Note: If the camera icon appears dim, it means that the screen capture function is currently processing images and is unavailable. When processing is finished, the camera icon is no longer dim and the screen capture function is available. To transfer the captured images to a USB storage device 1. Swipe the Menu on the left side of the GUI. Reference Open Menu Tab, p. 4-11. 5-2 2. Touch Screen Capture. A list of screen captures appears, identified by time and date. A slider also appears if more images than shown are present. 3. Insert a passive USB storage device (flash drive) into one of the USB ports at the rear of the ventilator. Reference Port Locations, p. 5-18. If more than one USB storage device is installed in the ventilator, touch the button of the destination USB device where the image will be copied. Operator’s Manual Data Transfer 5.4.2 4. In the list of images, touch the image name. 5. Touch Copy. The image is stored on the destination USB storage device. 6. Alternatively, touch Select All, and all images in the list are stored on the USB device and which can then be viewed and printed from a personal computer. Note: The file format of screen captures is .PNG. Communication Setup To specify the communication configuration for the ventilator 1. Touch the Configure icon in the constant access icons area of the GUI. A menu appears with several tabs. 2. Touch Comm Setup tab. The Comm Setup screen appears allowing three (3) ports that can be configured. These ports can be designated as DCI, Philips, Spacelabs, or Waveforms. Note: Waveforms can be selected on any port, but only on one port at a time. Operator’s Manual 5-3 Product Data Output Figure 5-1. Comm Setup Screen 5.4.3 Comm Port Configuration Configuring the Comm port allows the ventilator to communicate with devices listed in the Comm Setup screen, or to capture waveform data (in ASCII format) from the ventilator. To configure Comm ports 1. Touch COM1, COM2, or COM3. 2. Turn the knob indicating the desired device configuration. 3. Select the desired baud rate. If waveforms was selected, the baud rate automatically becomes configured to 38400. 4. Select 7 or 8 data bits. 5. Select parity of even, odd, or none if data bits = 8. Connect the device to the previously configured port. Reference Port Locations, p. 5-18 for a description and the locations of the Comm ports. 5-4 Operator’s Manual Data Transfer Note: When a USB port is configured as a Comm port, it is necessary to use a USB-to-serial adapter cable. This adapter must be based on the chipset manufactured by Prolific. For further information, contact your Covidien representative. Selecting waveforms when configuring a Comm port allows the ventilator to continuously transmit pressure, flow, and sequence numbers in ASCII format from the selected serial port, at a baud rate of 38400 bits/s, and the operatorselected stop bits, and parity. A sample of pressure and flow readings is taken every 20 ms. This sample of readings is transmitted on the selected serial port at the end of each breath at breath rates of 10/min and higher. For longer duration breaths, at least the first eight seconds of the breath is transmitted. The format of the data is as follows: The beginning of inspiration is indicated by “BS, S:nnn,<LF>” where 'BS’ identifies the Breath Start, ‘S:nnn’ is a sequence number incremented at every breath, and <LF> is a line feed character. The fff, and ppp fields show the breath flow and pressure data. The end of exhalation is indicated by: “BE<LF>” where ‘BE’ indicates Breath End, and <LF> is a line feed character. 5.4.4 Serial Commands The ventilator system offers commands that allow communication to and from the ventilator using a Comm port. Commands to the ventilator from a remote device include: 5.4.5 • RSET: Reference RSET Command, p. 5-5 • SNDA: Reference SNDA Command, p. 5-6 • SNDF: Reference SNDF Command, p. 5-10 Note: The ventilator responds only if it receives a carriage return <CR> after the command string. RSET Command The RSET command clears data from the ventilator receive buffer. The ventilator does not send a response to the host system. Enter the RSET command exactly as shown: Operator’s Manual 5-5 Product Data Output RSET<CR> 5.4.6 SNDA Command The SNDA command instructs the ventilator to send information on ventilator settings and monitored patient data to the host system. Enter the SNDA command exactly as shown: SNDA<CR> When the ventilator receives the command SNDA<CR>, it responds with the code MISCA, followed by ventilator settings and monitored patient data information. The MISCA response follows this format: MISCA 706 97 <STX> FIELD 5, … FIELD 101, <ETX> <CR> 1 2 3 4 5 6 7 1 Response code to SNDA command 5 Data field, left-justified and padded with spaces 2 Number of bytes between <STX> and <CR> 6 End of transmission (03 hex) 3 Number of data fields between <STX> and <ETX> 7 Terminating carriage return 4 Start of transmission (02 hex) Fields not available are marked as “Not used.” Underscores represent one or more spaces that pad each character string. The table below lists MISCA responses to SNDA commands. Table 5-1. MISCA Response Component 5-6 Description MISCA Response to SNDA command (5 characters) 706 The number of bytes between <STX> and <CR> (3 characters) 97 The number of fields between <STX> and <ETX> (2 characters <STX> Start of transmission character (02 hex) Operator’s Manual Data Transfer Table 5-1. MISCA Response (Continued) Component Operator’s Manual Description Field 5 Ventilator time (HH:MM_) (6 characters) Field 6 Ventilator ID to allow external hosts to uniquely identify each Puritan Bennett™ 980 Ventilator (18 characters) Field 7 Room number (6 characters) Field 8 Date (MMM_DD_YYYY_) (12 characters) Field 9 Mode (CMV___, SIMV__, CPAP__ or BILEVL) (CMV = A/C) setting (6 characters) Field 10 Respiratory rate setting in breaths per minute (6 characters) Field 11 Tidal volume setting in liters (6 characters) Field 12 Peak flow setting in liters per minute (6 characters) Field 13 O2% setting (6 characters) Field 14 Pressure sensitivity setting in cmH2O (6 characters) Field 15 PEEP or PL (in BiLevel) setting in cmH2O (6 characters) Field 16 Plateau time in seconds (6 characters) Field 17 - 20 Not used (6 characters) Field 21 Apnea interval in seconds (6 characters) Field 22 Apnea tidal volume setting in liters (6 characters) Field 23 Apnea respiratory rate setting in breaths per minute (6 characters) Field 24 Apnea peak flow setting in liters per minute (6 characters) Field 25 Apnea O2% setting (6 characters) Field 26 Pressure support setting in cmH2O (6 characters) Field 27 Flow pattern setting (SQUARE or RAMP__) (6 characters) Field 28 - 29 Not used (6 characters) Field 30 Elevate O2 state (ON____ or OFF___) (6 characters) Field31 - 33 Not used (6 characters) Field 34 Total respiratory rate in breaths per minute (6 characters) Field 35 Exhaled tidal volume in liters (6 characters) Field 36 Exhaled minute volume in liters (6 characters) Field 37 Spontaneous minute volume in liters (6 characters) 5-7 Product Data Output Table 5-1. MISCA Response (Continued) Component 5-8 Description Field 38 Maximum circuit pressure in cmH2O (6 characters) Field 39 Mean airway pressure in cmH2O (6 characters) Field 40 End inspiratory pressure in cmH2O (6 characters) Field 41 Expiratory component of monitored value of I:E ratio, assuming inspiratory component of 1 (6 characters) Field 42 High circuit pressure limit in cmH2O (6 characters) Field 43 - 44 Not used (6 characters) Field 45 Low exhaled tidal volume limit in liters (6 characters) Field 46 Low exhaled minute volume limit in liters (6 characters) Field 47 High respiratory rate limit in breaths per minute (6 characters) Field 48 High circuit pressure alarm status (NORMAL, ALARM_, or RESET_) (6 characters) Field 49 - 50 Not used (6 characters) Field 51 Low exhaled tidal volume (mandatory or spontaneous) alarm status (NORMAL, ALARM_, or RESET_) (6 characters) Field 52 Low exhaled minute volume alarm status (NORMAL, ALARM_, or RESET_) (6 characters) Field 53 High respiratory rate alarm status (NORMAL, ALARM_, or RESET_) (6 characters) Field 54 No O2 supply alarm status (NORMAL, ALARM_, or RESET_) (6 characters) Field 55 No air supply alarm status (NORMAL, ALARM_, or RESET_) (6 characters) Field 56 Not used (6 characters) Field 57 Apnea alarm status (NORMAL, ALARM_, or RESET_) (6 characters) Field 58 - 59 Not used (6 characters) Field 60 Ventilator time (HH:MM_) (6 characters) Field 61 Not used (6 characters) Field 62 Date (MMM_DD_YYYY_) (12 characters) Field 63 Static compliance (CSTAT) from inspiratory pause maneuver in mL/cmH2O (6 characters) Field 64 Static resistance (RSTAT) from inspiratory pause maneuver in cmH2O/L/s (6 characters) Operator’s Manual Data Transfer Table 5-1. MISCA Response (Continued) Component Operator’s Manual Description Field 65 Dynamic compliance (CDYN) in mL/cmH2O (6 characters) Field 66 Dynamic resistance (RDYN) in cmH2O/L/s (6 characters) Field 67 Negative inspiratory force (NIF) in cmH2O (6 characters) Field 68 Vital capacity (VC) in L (6 characters) Field 69 Peak spontaneous flow (PSF) in L/min (6 characters) Field 70 Ventilator-set base flow in liters per minute (6 characters) Field 71 Flow sensitivity setting in L/min (6 characters) Field 72 - 83 Not used (6 characters) Field 84 End inspiratory pressure in cmH2O (6 characters) Field 85 Inspiratory pressure or PH setting in cmH2O (6 characters) Field 86 Inspiratory time or TH setting in seconds (6 characters) Field 87 Apnea interval setting in seconds (6 characters) Field 88 Apnea inspiratory pressure setting in cmH2O (6 characters) Field 89 Apnea respiratory rate setting in breaths per minute (6 characters) Field 90 Apnea inspiratory time setting in seconds (6 characters) Field 91 Apnea O2% setting (6 characters) Field 92 Apnea high circuit pressure limit in cmH2O (6 characters) Field 93 Alarm silence state (ON____ or OFF___) (6 characters) Field 94 Apnea alarm status (NORMAL, ALARM_ or RESET_) (6 characters) Field 95 Severe Occlusion/Disconnect alarm status (NORMAL, ALARM_ or RESET_) (6 characters) Field 96 Inspiratory component of I:E ratio or High component of H:L (BiLevel) setting (6 characters) Field 97 Expiratory component of I:E ratio setting or Low component of H:L (BiLevel) (6 characters) Field 98 Inspiratory component of apnea I:E ratio setting (6 characters) Field 99 Expiratory component of apnea I:E ratio setting (6 characters) 5-9 Product Data Output Table 5-1. MISCA Response (Continued) Component 5.4.7 Description Field 100 Constant during rate setting change for pressure control mandatory breaths (I-TIME or I/E___ or______) (6 characters) (where ______ represents TE or PCV not active) Field 101 Monitored value of I:E ratio (6 characters) <ETX> End of transmission character (03 hex) <CR> Terminating carriage return SNDF Command SNDF is a command sent from an external host device to the ventilator system instructing it to transmit all ventilator settings data, monitored patient data, and alarm settings and occurrences. Enter the SNDF command exactly as shown: SNDF<CR> When the ventilator receives the command SNDF<CR>, it responds with the code MISCF, followed by ventilator settings, monitored patient data, and alarm information The MISCF response follows this format: MISCF 1225* 169 <STX> FIELD 5, … FIELD 169, <ETX> <CR> 1 2 3 4 5 6 7 1 Response code to SNDF command 5 Data field, left-justified and padded with spaces 2 Number of bytes between <STX> and <CR> 6 End of transmission (03 hex) 3 Number of data fields between <STX> and <ETX> 7 Terminating carriage return 4 Start of transmission (02 hex) * 1229 if Philips is selected for serial port in communication setup The table below lists MISCF responses to SNDF commands 5-10 Operator’s Manual Data Transfer Note: Non-applicable fields will either contain zero or be blank. Table 5-2. MISCF Response Component Operator’s Manual Description MISCF Response to SNDF command (5 characters) 1225* Number of bytes between <STX> and <CR> (4 characters) *1229 if Phillips is selected for the Comm port in Communication Setup 169 Number of fields between <STX> and <ETX> (3 characters) <STX> Start of transmission character (02 hex) Field 5 Ventilator time (HH:MM_) (6 characters) Field 6 Ventilator ID to allow external hosts to uniquely identify each Puritan Bennett™ 980 Ventilator (18 characters) Field 7 Date (MMM_DD_YYYY_) (12 characters) Field 8 Vent Type (NIV______ or INVASIVE_) (9 characters) Field 9 Mode (A/C___, SIMV__, SPONT_ or CPAP) (6 characters) Field 10 Mandatory Type (PC____, VC____, VC+___) (6 characters) Field 11 Spontaneous Type (PS____, TC____, VS____, PA____ (6 characters) Field 12 Trigger Type setting (V-TRIG, P-TRIG) (6 characters) Field 13 Respiratory rate setting in breaths/min (6 characters) Field 14 Tidal volume (VT) setting in L (6 characters) Field 15 Peak flow (VMAX) setting in L/min (6 characters) Field 16 O2% setting (6 characters) Field 17 Pressure sensitivity setting in cmH2O (6 characters) Field 18 PEEP/CPAP in cmH2O (6 characters) Field 19 Plateau setting in seconds (6 characters) Field 20 Apnea interval setting in seconds (6 characters) Field 21 Apnea tidal volume setting in L (6 characters) Field 22 Apnea respiratory rate setting in breaths/min (6 characters) Field 23 Apnea peak flow setting in L/min (6 characters) 5-11 Product Data Output Table 5-2. MISCF Response (Continued) Component 5-12 Description Field 24 Apnea O2% setting (6 characters) Field 25 PCV apnea inspiratory pressure setting in cmH2O (6 characters) Field 26 PCV Apnea Inspiratory Time setting in seconds (6 characters) Field 27 Apnea flow pattern setting (SQUARE or RAMP) (6 characters) Field 28 Apnea mandatory type setting (PC or VC) (6 characters) Field 29 Inspiratory component of Apnea I:E ratio (if apnea mandatory type is PC) (6 characters) Field 30 Expiratory component of Apnea I:E ratio (if apnea mandatory type is PC) (6 characters) Field 31 Support pressure setting (cmH2O) Field 32 Flow pattern setting (SQUARE or RAMP) (6 characters) Field 33 Elevate O2 state (ON or OFF) (6 characters) Field 34 High inspiratory pressure alarm setting (2PPEAK) in cmH2O (6 characters) Field 35 Low inspiratory pressure alarm setting (4PPEAK) in cmH2O or OFF (6 characters) Field 36 High exhaled minute volume (2VE TOT) alarm setting in L/min or OFF (6 characters) Field 37 Low exhaled minute volume (4VE TOT) alarm setting in L/min or OFF (6 characters) Field 38 High exhaled mandatory tidal volume (2VTE MAND) alarm setting in mL or OFF (6 characters) Field 39 Low exhaled mandatory tidal volume (4VTE MAND) alarm setting in mL or OFF (6 characters) Field 40 High exhaled spontaneous tidal volume (2VTE SPONT alarm setting in mL or OFF (6 characters) Field 41 Low exhaled spontaneous tidal volume (4VTE SPONT) alarm setting in mL or OFF (6 characters) Field 42 High respiratory rate (2fTOT) alarm setting in breaths/min or OFF (6 characters) Field 43 High inspired tidal volume (2VTI) alarm setting in mL (6 characters) Field 44 Base flow setting in L/min (6 characters) Field 45 Flow sensitivity (VSENS) setting in L/min (6 characters) Operator’s Manual Data Transfer Table 5-2. MISCF Response (Continued) Component Operator’s Manual Description Field 46 PCV inspiratory pressure (PI) setting in cmH2O (6 characters) Field 47 PCV inspiratory time (TI) setting in seconds (6 characters) Field 48 Inspiratory component of I:E ratio setting or High component of H:L ratio setting (6 characters) Field 49 Expiratory component of I:E ratio setting or Low component of H:L ratio setting (6 characters) Field 50 Constant during rate change setting (I-time, I/E, or E-time) (6 characters) Field 51 Tube ID setting in mm (6 characters) Field 52 Tube Type setting (ET or TRACH) (6 characters) Field 53 Humidification type setting (Non-heated exp tube, Heated exp tube, or HME) (18 characters) Field 54 Humidifier volume setting in L (6 characters) Field 55 O2sensor setting (Enabled or Disabled) (9 characters) Field 56 Disconnect sensitivity (DSENS) setting in % or OFF (6 characters) Field 57 Rise time % setting (6 characters) Field 58 PAV+ percent support setting (6 characters) Field 59 Expiratory sensitivity (ESENS) setting in % or L/min for PAV+ breath type (6 characters) Field 60 PBW setting in kg (6 characters) Field 61 Target support volume (VT SUPP) setting in L (6 characters) Field 62 High pressure (PH) setting (in BiLevel) in cmH2O (6 characters) Field 63 Low pressure (PL) setting (in BiLevel) in cmH2O (6 characters) Field 64 High pressure time (TH) setting (in BiLevel) in seconds (6 characters) Field 65 High spontaneous inspiratory time limit (2TI SPONT) setting in seconds (6 characters) Field 66 Circuit type setting (ADULT, PEDIATRIC, or NEONATAL) (9 characters) Field 67 Low pressure time (TL) setting (in BiLevel) in seconds (6 characters) Field 68 Expiratory time (TE) setting in seconds (6 characters) Field 69 End inspiratory pressure (PI END) in cmH2O (6 characters) 5-13 Product Data Output Table 5-2. MISCF Response (Continued) Component 5-14 Description Field 70 Respiratory rate (fTOT) in breaths/min (6 characters) Field 71 Exhaled tidal volume (VTE ) in L (6 characters) Field 72 Patient exhaled minute volume (VE TOT) in L/min (6 characters) Field 73 Peak airway pressure (PPEAK) in cmH2O (6 characters) Field 74 Mean airway pressure (PMEAN) in cmH2O (6 characters) Field 75 Expiratory component of monitored value of I:E ratio, assuming inspiratory component of 1 (6 characters) Field 76 I:E ratio (6 characters) Field 77 Delivered O2% (6 characters) Field 78 Inspired tidal volume (VTI) in L (6 characters) Field 79 Intrinsic PEEP (PEEPI) in cmH2O (6 characters) Field 80 Estimated total resistance (RTOT) in cmH2O/L/s (6 characters) Field 81 Estimated patient resistance (RPAV) in cmH2O/L/s (6 characters) Field 82 Estimated patient elastance (EPAV) in cmH2O/L (6 characters) Field 83 Estimated patient compliance (CPAV) in mL/cmH2O (6 characters) Field 84 Not used Field 85 Rapid shallow breathing index (f/VT) (6 characters) Field 86 Spontaneous percent inspiratory time (TI/TTOT) (6 characters) Field 87 Monitored PEEP in cmH2O (6 characters) Field 88 Spontaneous inspiratory time (TI SPONT) in seconds (6 characters) Field 89 Exhaled spontaneous minute volume (VE SPONT) in L/min (6 characters) Field 90 Intrinsic PEEP (PEEPI) from expiratory pause maneuver in cmH2O (6 characters) Field 91 Total PEEP (PEEPTOT) from expiratory pause maneuver in cmH2O (6 characters) Field 92 Static compliance (CSTAT) from inspiratory pause maneuver in mL/cmH2O (6 characters) Field 93 Static resistance (RSTAT) from inspiratory pause maneuver in cmH2O/L/s (6 characters) Operator’s Manual Data Transfer Table 5-2. MISCF Response (Continued) Component Description Field 94 Plateau pressure (PPL) from inspiratory pause maneuver in cmH2O (6 characters) Field 95 High spontaneous inspiratory time (ALERT_ or blank) (6 characters) Field 96 Dynamic compliance (CDYN) in mL/cmH2O (6 characters) Field 97 Dynamic resistance (RDYN) in cmH2O/L/s (6 characters) Field 98 Peak spontaneous flow (PSF) in L/min (6 characters) Field 99 Peak expiratory flow (PEF) in L/min (6 characters) Field 100 End expiratory flow (EEF) in L/min (6 characters) Field 101 Proximal Flow Sensor state) ON or OFF) Field 102 Negative inspiratory force (NIF) in cmH2O (6 characters) Field 103 P0.1 pressure change in cmH2O (6 characters) Field 104 Vital capacity (VC) in L (6 characters) Field 105 Alarm Silence (ON or OFF) (6 characters) Field 106 Apnea ventilation alarm* (6 characters) Field 107 High exhaled minute volume alarm* (1VE TOT) (6 characters) Field 108 High exhaled tidal volume alarm* (1VTE ) (6 characters) Field 109 High O2% alarm* (6 characters) Field 110 High inspiratory pressure alarm* (1PPEAK) (6 characters) Field 111 High ventilator pressure alarm* (1PVENT) (6 characters) Field 112 High respiratory rate alarm* (1fTOT) (6 characters) Field 113 AC power loss alarm* (6 characters) Field 114 Inoperative battery alarm* (6 characters) Field 115 Low battery alarm* (6 characters) Field 116 Loss of power alarm* (6 characters) Field 117 Low exhaled mandatory tidal volume alarm* (3VTE MAND) (6 characters) Field 118 Low exhaled minute volume alarm* (3VE TOT) (6 characters) * Possible responses are: NORMAL, LOW, MEDIUM, HIGH, or RESET. Operator’s Manual 5-15 Product Data Output Table 5-2. MISCF Response (Continued) Component Description Field 119 Low exhaled spontaneous tidal volume (3VTE SPONT) alarm* (6 characters) Field 120 Low O2% alarm* (6 characters) Field 121 Low air supply pressure alarm* (6 characters) Field 122 Low O2 supply pressure alarm* (6 characters) Field 123 Reserved Field 124 Disconnect alarm* (6 characters) Field 125 Severe occlusion alarm* (6 characters) Field 126 Inspiration too long alarm* (6 characters) Field 127 Procedure error* (6 characters) Field 128 Compliance limited tidal volume (VT) alarm* (6 characters) Field 129 High inspired spontaneous tidal volume* (3TI SPONT) alarm (6 characters) Field 130 High inspired volume* (1VTI) alarm (6 characters) Field 131 High compensation limit (1PCOMP) alarm* (6 characters) Field 132 PAV+ startup too long alarm* (6 characters) Field 133 PAV+ R and C not assessed alarm* (6 characters) Field 134 Volume not delivered (VC+) alarm* (6 characters) Field 135 Volume not delivered (VS) alarm* (6 characters) Field 136 Low inspiratory pressure (3PPEAK) alarm* (6 characters) Field 137 Technical malfunction A5* (6 characters) Field 138 Technical malfunction A10* (6 characters) Field 139 Technical malfunction A15* (6 characters) Field 140 Technical malfunction A20* (6 characters) Field 141 Technical malfunction A25* (6 characters) Field 142 Technical malfunction A30* (6 characters) Field 143 Technical malfunction A35* (6 characters) Field 144 Technical malfunction A40* (6 characters) * Possible responses are: NORMAL, LOW, MEDIUM, HIGH, or RESET. 5-16 Operator’s Manual Data Transfer Table 5-2. MISCF Response (Continued) Component Description Field 145 Technical malfunction A45* (6 characters) Field 146 Technical malfunction A50* (6 characters) Field 147 Technical malfunction A55* (6 characters) Field 148 Technical malfunction A60* (6 characters) Field 149 Technical malfunction A65* (6 characters) Field 150 Technical malfunction A70* (6 characters) Field 151 Technical malfunction A75* (6 characters) Field 152 Technical malfunction A80* (6 characters) Field 153 Technical malfunction A85* (6 characters) Field 154 Spontaneous tidal volume (VTE SPONT) in liters (6 characters) Field 155 Total work of breathing (WOBTOT) in Joules/L (6 characters) Field 156 Leak Sync state (9 characters) (ON, or OFF) Field 157 %LEAK (6 characters) Field 158 LEAK (6 characters) Field 159 VLEAK (6 characters) Field 160 Prox Inop alarm* (ALARM or NORMAL) Field 161 - 171 Reserved <ETX> End of transmission character (03 hex) <CR> Terminating carriage return * Possible responses are: NORMAL, LOW, MEDIUM, HIGH, or RESET. 5.5 Communication Ports WARNING: To avoid possible injury, only connect devices that comply with IEC 60601-1 standard to any of the ports at the rear of the ventilator, with the exception of passive memory storage devices (“flash drives”) and serial-to-USB adapter cables. If a serial-to-USB adapter cable is used, it must be connected to an IEC 60601-1-compliant device. Operator’s Manual 5-17 Product Data Output WARNING: To avoid possible injury, do not connect a device that is attached to the patient to any of the non-clinical ports listed below when the ventilator is ventilating a patient. Figure 5-2. Port Locations 5-18 1 RS-232 Port (COM 1) 2 Ethernet Port (non-clinical use) 3 Nurse call Port (remote alarm port) 4 USB Port (USB 1) (COM 2) (non-clinical use) 5 USB Port (USB 2) (COM 3) (non-clinical use) 6 HDMI Port (non-clinical use) 7 Service Port (non-clinical use) Operator’s Manual Data Transfer 5.5.1 Port Use Reference Data Transfer, p. 5-1 for data transfer details. RS-232 Port To use the RS-232 port 1. Obtain a cable with a male DB-9 connector to connect to the RS-232 port on the ventilator. 2. Make the appropriate connection to a monitoring device. A gender changer, null modem cable or socket saver may be required. Consult with the institution’s Information Technology professional as required. 3. Ensure to specify the baud rate, parity, and data bits in the ventilator communication setup to correctly match the parameters of the monitoring device. 4. A monitor designed to use this port is required for obtaining data from the ventilator. Set up the monitoring device to receive ventilator data. These data can include waveform data. 5. Program the remote device to send the appropriate RS-232 commands as described in the next section. Reference Reference MISCA Response, p. 5-6 and Reference MISCF Response, p. 5-11 for MISCA and MISCF responses to SNDA and SNDF commands. Ethernet Port The Ethernet port is used by Service personnel for accessing various logs and updating ventilator software. Nurse Call Port A remote alarm or nurse call interface is available on the ventilator system which can be used to remotely annunciate the alarm status of the ventilator. Medium and high priority alarms are remotely annunciated. The nurse call connector is located at the back of the ventilator, as shown. Reference Port Locations, p. 5-18. Reference the remote alarm manufacturer’s instructions for use for information regarding proper nurse call connection. Operator’s Manual 5-19 Product Data Output USB Ports The USB ports are used for screen captures, or receiving serial data when a USB port has been configured as a serial port. This is also known as transferring data via a serial-over-USB protocol. Reference Communication Setup, p. 5-3 for Comm setup configuration. Screen captures require an external USB memory storage device (“flash drive”) for screen captures. Instructions for using this port for screen captures are given. Reference To capture GUI screens, p. 5-2. HDMI Port An external display can be used via connection with the HDMI port. To use the HDMI port with an external display 1. Connect one end of an HDMI cable to the HDMI port at the back of the ventilator (item 6, above). 2. Connect the other end of the cable to the external display. An HDMI to DVI adapter may be used. 3. Turn the device on. The appearance of the GUI now displays on the external display device. Service Port The Service port is used by service personnel only. 5.6 Retrieving Stored Data Ventilator data are stored in various logs, accessible using the logs icon. Some logs may be accessed during normal ventilation, and some are only available to Covidien personnel when the ventilator is in Service mode. Reference Ventilator Logs, p. 8-2 for more information on data stored in various logs. 5.7 Display Configurability The operator can configure some ventilator parameters according to personal preference. Reference Ventilator Configuration, p. 3-35 for a table showing which parameters are configurable and by whom. 5-20 Operator’s Manual Data Transfer Reference Preparing the Ventilator for Use, p. 3-37 for information on configuring each display item. 5.8 Printing Data or Screen Captures The ventilator cannot be connected directly to a printer. Save screen captures to an external storage device, such as a USB flash drive, then print from a PC. Reference GUI Screen Capture, p. 5-2 for instructions on using the screen-capture feature. 5.9 Connectivity to External Systems The ventilator is compatible with the Philips Medical IntelliVue MP50 and Spacelabs Ultraview patient monitoring systems. Note: Not all patient monitors are compatible with the Puritan Bennett 980 Series Ventilator. Operator’s Manual 5-21 Product Data Output Page Left Intentionally Blank 5-22 Operator’s Manual 6 Performance 6.1 Overview This chapter contains detailed information about Puritan Bennett™ 980 Series Ventilator performance including: 6.2 • Ventilator settings • Alarm interpretation and alarm testing • A detailed description of selected alarms • Monitored patient data System Options Various software options are available for the ventilator. Details for each of these options are described in the appendices included in this manual. 6.3 6.4 Environmental Considerations WARNING: Use of the ventilator in altitudes higher or barometric pressures lower than those specified could compromise ventilator operation. Reference Environmental Specifications, p. 11-7 for a complete list of environmental specifications. Ventilator Settings Default ventilator settings are based on the circuit type selected during SST. A neonatal, pediatric or adult patient circuit can be used, and all accessories needed to ventilate the patient should be attached when SST is performed. 6-1 Performance 6.4.1 Ventilation Type The clinician enters the vent type, specifying how the patient will be ventilated; invasively or non-invasively (NIV). The vent type optimizes the alarm limits for NIV patients, and disables some settings for NIV ventilation. 6.4.2 Mode Available ventilation modes are mandatory (A/C) or spontaneous (SPONT) modes, as well as two “mixed” modes: SIMV and BiLevel. • A/C (Assist-Control) — A/C mode guarantees delivery of a minimum number of mandatory breaths based on the frequency (f) set by the clinician. Breaths in A/C can be patient-initiated (PIM) or ventilator-initiated (VIM). • SPONT (Spontaneous) — SPONT mode delivers only spontaneous breaths which are all patient-initiated. • SIMV (Synchronized Intermittent Mandatory Ventilation) — SIMV is a mixed mode allowing both mandatory and spontaneous breaths. SIMV guarantees at least one mandatory breath per set breath cycle, which is either patientinitiated or ventilator-initiated. The mandatory type of an SIMV breath can be PC, VC, or VC+. • BiLevel — BiLevel is also a mixed mode which overlays the patient’s spontaneous breaths onto the breath structure for PC mandatory breaths. Two levels of pressure, PL and PH are employed. The breath cycle interval for both SIMV and BiLevel modes is 60/f where f is the respiratory rate set by the operator. • CPAP — CPAP is available only when circuit type is neonatal and vent type is NIV. CPAP mode allows spontaneous breathing with a desired PEEP level. In order to limit inadvertent alarms associated with the absence of returned volumes in nasal CPAP breathing, CPAP does not make available exhaled minute volume and exhaled tidal volume alarm settings. 6.4.3 Breath Type Mandatory breath types for A/C and SIMV modes include volume controlled (VC), pressure controlled (PC), or volume control plus (VC+) breath types, also called Mandatory Type. 6-2 • VC (Volume Control) — The ventilator delivers an operator-set tidal volume. • PC (Pressure Control) — The ventilator delivers an operator-set pressure. • VC+ (Volume Control Plus) — Volume control plus (a mandatory, pressure controlled breath type that does not restrict flow during the inspiratory phase, and Operator’s Manual Ventilator Settings automatically adjusts the inspiratory pressure target from breath to breath to achieve the desired tidal volume despite changing lung conditions. Reference Mandatory Breath Delivery, p. 10-17 for more information on VC+. Mandatory inspirations are triggered in the following ways • Pressure Trigger (P-TRIG) — Changes in circuit pressure cause the ventilator to deliver a breath. These pressure changes relate to the pressure sensitivity (PSENS) set by the operator. If the patient makes an effort to inspire, the airway pressure drops. If the pressure drops by at least the value of PSENS, the ventilator delivers a breath. • Flow Trigger (V-TRIG) — Changes in flow in the circuit cause the ventilator to deliver a breath. The breath delivery and exhalation valve flow sensors measure gas flow in the ventilator breathing system. As the patient inspires, the delivered flow remains constant and the exhalation valve flow sensor measures decreased flow. When the difference between the two flow measurements is at least the operator-set value for flow sensitivity (VSENS), the ventilator delivers a breath. • Time Trigger — The ventilator delivers a Ventilator Initiated Mandatory (VIM) breath after a specific amount of time elapses. • Operator Trigger (OIM) — The operator presses the Manual inspiration key. An operator initiated mandatory breath is also called an OIM breath. During an OIM breath, the breath delivered is based on the current settings for a mandatory breath. Spontaneous breathing modes such as SIMV, BiLevel, and SPONT include the following breath types (called Spontaneous Types): • PS (Pressure Support) — The ventilator delivers an operator-set positive pressure above PEEP (or PL in BiLevel) during a spontaneous breath. If SIMV is selected as the mode, PS is automatically selected for spontaneous type. • VS (Volume Support) — The ventilator delivers an operator-set positive pressure above PEEP during a spontaneous breath and automatically adjusts the pressure level from breath to breath to consistently deliver the set tidal volume. • TC (Tube Compensation) — Additional positive pressure delivered to the patient during spontaneous breaths to overcome resistance of the artificial airway. • PAV+ (Proportional Assist Ventilation)) — A software option that allows the ventilator to reduce the work of breathing (WOB) by assisting the patient’s inspiration by an operator-set amount proportional to the breathing effort generated by the patient. Reference Appendix D for more information on PAV+. The inspiratory trigger methods for spontaneous breaths are • Operator’s Manual Pressure Trigger (P-TRIG) — Same as described for mandatory inspiration triggers. 6-3 Performance • Flow Trigger (V-TRIG) — Same as described for mandatory inspiration triggers. • IE Sync Trigger — When this software option is installed and the IE Sync trigger type is selected, triggering and cycling of spontaneous breaths occur based on the patient’s intra-pleural pressure. • Operator Trigger (OIM) — Since the operator can only initiate a mandatory breath by pressing the Manual inspiration key, spontaneous mode allows OIMs, but the breath delivered is based on the current apnea breath settings. Reference Inspiration — Detection and initiation, p. 10-4 for details on the different trigger methods. 6.5 Alarms This manual uses the following conventions when discussing alarms: A description or name of an alarm without specifying the alarm setting is denoted with an upward or downward pointing arrow (1 or 3) preceding the specific alarm name. An alarm setting is denoted as an upward or downward pointing arrow with an additional horizontal limit symbol (2 or 4) preceding the specific alarm. Some alarm conditions actually limit breath delivery such as 1PPEAK and 1VTI by truncating inspiration and transitioning to the exhalation phase. These alarm conditions are denoted as alarm limits. Reference Alarm Descriptions and Symbols, p. 6-6. 6.5.1 Alarm Messages Alarms are visually annunciated using an indicator on the top of the GUI, which has a 360° field of view. If an alarm occurs, this indicator flashes at a frequency and color matching the alarm priority. The alarms also appear as colored banners on the right side of the GUI screen. If an alarm occurs, this indicator appears in the color matching the alarm priority (yellow for low (!) and medium (!!) priority; red for high (!!!) priority. For technical alarm and non-technical alarm details, reference the respective tables on p. 6-18 and p. 6-29. An alarm is defined as a primary alarm if it is the initial alarm. A dependent alarm arises as a result of conditions that led to the primary alarm. This is also referred to as an augmentation. An augmentation strategy is built into the ventilator software to handle occurrences where the initial cause of the alarm has the potential to precipitate one or more additional alarms. When an alarm occurs, any subsequent alarm related to the cause of this initial alarm aug- 6-4 Operator’s Manual Ventilator Settings ments the initial alarm instead of appearing on the GUI as a new alarm. The initial alarm’s displayed analysis message is updated with the related alarm’s information, and the Alarm Log Event column shows the initial alarm as Augmented. A primary alarm consists of a base message, analysis message, and a remedy message. The base message describes the primary alarm. The analysis message describes the likely cause of the alarm and may include alarm augmentations. The remedy message provides information on what to do to correct the alarm condition. Alarm banners, when dragged leftward from the right side of the GUI, display messages for the indicated active alarms. The figure below, shows the alarm message format. Figure 6-1. Alarm Message Format 1 Base message 2 Analysis message 3 Remedy message A latched alarm is one whose visual alarm indicator remains illuminated even if the alarm condition has autoreset. Latched alarm indicators are located on the sides of the omni-directional LED. A latched alarm can be manually reset by pressing the alarm reset key. If no alarms are active, the highest priority Operator’s Manual 6-5 Performance latched alarm appears on the omni-directional LED on the GUI. A lockable alarm is one that does not terminate an active alarm silence function (it does not sound an audible alert during an active alarm silence function), while a non-lockable alarm cancels the alarm silence period and sounds an audible alert. All patient data alarms and the CIRCUIT DISCONNECT alarm are lockable alarms. Note: When a new lockable alarm occurs, the alarm will not start to sound audibly if the previous lockable alarm was silenced. The following rules define how alarm messages are displayed: • Primary alarms precede any dependent alarms. • The system adds dependent alarms to the analysis messages of each active primary alarm with which they are associated. If a dependent alarm resets, the system removes it from the analysis message of the primary alarm. • The priority level of a primary alarm is equal to or greater than the priority level of any of its active dependent alarms. • An alarm cannot be a dependent alarm of any alarm that occurs subsequently. • If a primary alarm resets, any active dependent alarms become primary unless they are also dependent alarms of another active primary alarm. This is due to different reset criteria for primary and dependent alarms. • The system applies the new alarm limit to alarm calculations from the moment a change to an alarm limit is accepted. • The priority level of a dependent alarm is based solely on its detection conditions (not the priority of any associated alarms. • When an alarm causes the ventilator to enter OSC or safety valve open (SVO), the patient data display (including waveforms) is blanked. The elapsed time without ventilatory support (that is, since OSC or SVO began) appears on the GUI screen. If the alarm causing OSC or SVO is autoreset, the ventilator resets all patient data alarm detection algorithms. Table 6-1. Alarm Descriptions and Symbols Alarm description 6-6 Symbol High compensation pressure 1PCOMP High delivered oxygen percentage 1O2% Operator’s Manual Ventilator Settings Table 6-1. Alarm Descriptions and Symbols (Continued) Alarm description High exhaled minute volume 1VE TOT High exhaled minute volume setting 2VE TOT High exhaled tidal volume 1VTE High exhaled tidal volume setting 2VTE High inspired tidal volume limit 2VTI High internal ventilator pressure 1PVENT High respiratory rate 1fTOT High respiratory rate setting 2fTOT High spontaneous inspiratory time 1TI SPONT High spontaneous inspiratory time limit 2TI SPONT High circuit pressure 1PPEAK High circuit pressure limit 2PPEAK Low circuit pressure 3PPEAK Low circuit pressure setting 4PPEAK Low exhaled mandatory tidal volume 3VTE MAND Low exhaled mandatory tidal volume setting 4VTE MAND Low exhaled minute volume 3VE TOT Low exhaled minute volume setting 4VE TOT Low exhaled spontaneous tidal volume 3VTE SPONT Low exhaled spontaneous tidal volume setting 4VTE SPONT Low delivered oxygen percentage Operator’s Manual Symbol 3O2% 6-7 Performance 6.5.2 Alarm Reset Key The alarm reset function can be used for any non-technical alarm. Reference Alarm Handling, p. 6-15 for an explanation of technical vs. non-technical alarms. Alarm reset reinitializes the algorithm the ventilator uses to initially detect the alarm except for A/C POWER LOSS, LOW BATTERY, NO AIR SUPPLY, NO O2 SUPPLY, PROCEDURE ERROR alarms and active battery alarms. If the cause of the alarm still exists after the Alarm Reset key is pressed, the alarm becomes active again. The ventilator logs all actuations of the alarm reset key. 6.5.3 Alarm Silence Key The alarm silence feature temporarily mutes the audible portion of an alarm for two minutes. After the two-minute period, if the alarm condition still exists, the alarm sounds again. Pressing the alarm silence key again re-starts the two minute interval during which an alarm is muted. An LED within the key illuminates and a count-down timer appears on the GUI next to an alarm silence indicator symbol, indicating an active alarm silence function. The alarm silence feature does not allow the audible alarm to be turned off; the audible portion of the alarm is temporarily muted for two minutes. The GUI’s omni-directional LED flashes during an active alarm state and during an alarm silence period and its appearance changes with the priority if the alarm escalates. Pressing the Alarm Reset key cancels an Alarm Silence. If the condition that caused the alarm still exists, the alarm activates again. 6.5.4 Alarm Volume Key An alarm volume key is available for setting the desired alarm volume. The alarm volume is automatically set to the factory default setting of 10 (maximum) or to the institutional default setting based on circuit type if it has been so configured. When setting the alarm volume, a sample tone is generated, allowing the practitioner to decide the appropriate alarm volume for the surrounding ambient conditions. If a high priority alarm occurs, the alarm volume increases one (1) increment from its current volume level if it is not acknowledged within 30 s. If a high priority alarm is not acknowledged within 60 s, the audible alarm volume escalates to its maximum volume. Reference To adjust alarm volume, p. 3-41 for instructions on adjusting the alarm volume. 6-8 Operator’s Manual Ventilator Settings 6.5.5 WARNING: The audio alarm volume level is adjustable. The operator should set the volume at a level that allows the operator to distinguish the audio alarm above background noise levels. Reference To adjust alarm volume, p. 3-41. Alarm Testing Testing the alarms requires oxygen and air sources and stable AC power. Test the alarms at least every six months, using the procedures described. Required Equipment • Test lung (P/N 4-000612-00) • Adult patient circuit If the alarm does not annunciate as indicated, verify the ventilator settings and repeat the test. The alarm tests check the operation of the following alarms: • CIRCUIT DISCONNECT • LOW EXHALED MANDATORY TIDAL VOLUME (3VTE MAND) • LOW EXHALED TOTAL MINUTE VOLUME (3VE TOT) • HIGH CIRCUIT PRESSURE (1PPEAK) • SEVERE OCCLUSION • AC POWER LOSS • APNEA • LOW EXHALED SPONTANEOUS TIDAL VOLUME (3VTE SPONT) • NO O2 SUPPLY • LOW DELIVERED O2% (3O2%) • HIGH DELIVERED O2% (1O2%) Ventilator setup for alarms tests 1. Disconnect the patient circuit from the ventilator and turn the ventilator off for at least five minutes. 2. Turn the ventilator or on. The ventilator runs POST. Operator’s Manual 6-9 Performance 3. On the GUI, select NEW PATIENT. 4. Set up new patient using the following settings. PBW: 70 kg Vent type: INVASIVE Mode: A/C Mandatory type: VC Trigger type:V-TRIG 5. Set the following new patient settings f: 6.0 1/min VT: 500 mL VMAX: 30 L/min TPL: 0 s Flow pattern: SQUARE VSENS: 3 L/min O2%: 21% PEEP: 5 cmH2O 6. Set the following apnea settings TA: 10 s f: 6.0 1/min O2%: 21% VT: 500 mL 7. Set the following alarm settings 2PPEAK: 70 cmH2O fTOT: OFF 4VE TOT: 1 L/min 2VE TOT: 3.5 L/min 4VTE MAND: 300 mL 2VTE MAND: OFF 4VTE SPONT: OFF 2VTE SPONT: OFF 6-10 Operator’s Manual Ventilator Settings 8. Set the graphics display to a volume-time plot (for use in the APNEA alarm test). 9. Connect an Adult patient circuit to the ventilator and attach a test lung to the patient wye. Note: To ensure proper test results, do not touch the test lung or patient circuit during the CIRCUIT DISCONNECT alarm test. CIRCUIT DISCONNECT alarm test 1. Allow the ventilator to deliver at least four breaths. During the inspiratory phase of a breath, disconnect the inspiratory filter from the To Patient port. The ventilator annunciates a CIRCUIT DISCONNECT alarm after the inspiratory filter is disconnected. 2. Connect the inspiratory filter to the To Patient port to autoreset the alarm. LOW EXHALED MANDATORY TIDAL VOLUME (3VTE MAND) alarm test Set VT to 225 mL. The ventilator annunciates a LOW EXHALED MANDATORY TIDAL VOLUME (3VTE MAND) alarm on the third consecutive breath after Accept is touched. LOW EXHALED TOTAL MINUTE VOLUME (3VE TOT) alarm test Set 4VE TOT alarm limit to 3.45 L/min. The ventilator annunciates a LOW EXHALED TOTAL MINUTE VOLUME (3VE TOT) alarm on the next breath after Accept is touched. HIGH CIRCUIT PRESSURE (1PPEAK) alarm test 1. Make the following patient and alarm settings changes. VT: 500 mL VMAX: 30 L/min 2PPEAK: 20 cmH2O 2. After one breath, the ventilator annunciates a HIGH CIRCUIT PRESSURE (1PPEAK) alarm. If the alarm does not sound, check the patient circuit for leaks. SEVERE OCCLUSION alarm test 1. Make the following alarm settings changes. 2PPEAK: 50 cmH2O Operator’s Manual 6-11 Performance 2. Press the alarm reset key to reset all alarms. 3. Adjust DSENS to the VMAX setting. 4. Disconnect the ventilator breathing circuit from the FROM PATIENT port and block the gas flow. 5. While maintaining the occlusion, ensure the safety valve open indicator appears on the status display, the GUI shows the elapsed time without normal ventilation support, and the test lung inflates and deflates rapidly with small pulses as the ventilator delivers trial pressure-based breaths. 6. Press the alarm reset key to reset all the alarms. AC POWER LOSS alarm test 1. Allow the ventilator to deliver at least four breaths, then disconnect the power cord from AC facility power. If any battery is charged, the GUI annunciates an AC POWER LOSS alarm. If less than ten minutes of battery backup are available, the GUI annunciates a LOW BATTERY alarm. If no battery power is available, the BDU annunciates a LOSS OF POWER alarm. 2. Connect the power cord to AC facility power. The AC POWER LOSS or LOW BATTERY alarm autoresets. APNEA alarm test 1. Make the following alarm settings changes: 2PPEAK: 70 cmH2O Mode: SPONT Spontaneous type: PS Note: To avoid triggering a breath during the apnea interval, do not touch the test lung or patient circuit. Note: For the apnea alarm test, the exhaled tidal volume (VTE) displayed in the patient data area must be greater than half the delivered volume shown on the volumetime plot in the graphics display in order for apnea to autoreset. Reference Apnea Ventilation, p. 10-41 for a technical description of apnea ventilation. 2. 6-12 The GUI annunciates an APNEA alarm within 10 s after touching Accept. Operator’s Manual Ventilator Settings 3. Squeeze the test lung twice to simulate two subsequent patient-initiated breaths. The APNEA alarm autoresets. 4. Let the ventilator return to apnea ventilation. LOW EXHALED SPONTANEOUS TIDAL VOLUME alarm test 1. Make the following patient and alarm settings changes Trigger type: P-TRIG 2PSENS: 4 cmH2O 4VTE SPONT: 2500 mL 2. Press the alarm reset key to reset the apnea alarm. 3. Slowly squeeze the test lung to simulate spontaneous breaths. The ventilator annunciates a LOW EXHALED SPONTANEOUS TIDAL VOLUME (3VTE SPONT) alarm at the start of the fourth consecutive spontaneous inspiration. 4. Make the following patient settings changes: Mode: A/C 4VTE SPONT: OFF 5. Press the alarm reset key to reset the 4VTE SPONT alarm. NO O2 SUPPLY alarm test 1. Disconnect the oxygen inlet supply. The ventilator annunciates a NO O2 SUPPLY alarm within one breath. 2. Connect the oxygen inlet supply. The NO O2 SUPPLY alarm autoresets within two breaths after oxygen is reconnected. LOW DELIVERED O2% and HIGH DELIVERED O2% alarms tests 1. Make the following patient and alarm settings changes: PSENS: 2 cmH2O O2%: 100% 2. Make the following apnea settings changes: TA: 60 s 3. Operator’s Manual Attach the ventilator’s oxygen gas hose to a known air supply (for example, a medical grade air cylinder) or a wall air outlet. 6-13 Performance 6.5.6 4. attach the ventilator’s air gas hose to a known medical oxygen supply. 5. Observe the GUI screen. The delivered O2% display should decrease, and the ventilator should annunciate a medium priority 3O2% alarm within 60 s and a high priority 3O2% alarm within two (2) minutes. 6. Set the O2% to 21%. 7. Observe the GUI screen. The delivered O2% display should increase, and the ventilator should annunciate a a medium priority 1O2% alarm within 60 s and a high priority 1O2% alarm within two (2) minutes. 8. Remove the air gas hose from the oxygen supply and reconnect the hose to a known medical air supply. 9. Remove the oxygen gas hose from the air supply and reconnect the hose to a known oxygen supply. 10. Press the alarm reset key to clear all alarms. WARNING: Before returning the ventilator to service, review all settings and set appropriately for the patient to be ventilated. Viewing Alarms When an alarm occurs, the omni-directional LED at the top of the GUI flashes in a color corresponding to the alarm priority, an audible series of tones sounds, and an alarm banner displays on the GUI. Reference Areas of the GUI, p. 4-3. When the alarm banner appears, it displays its base message. Touching the individual alarm causes an expanded explanation to appear, containing analysis and remedy messages, and may contain a link to the alarm log or the alarms settings screen. Touch the link to display requested information. The omni-directional LED remains steadily lit and may appear multicolored, meaning that multiple alarms with varying priority levels have occurred. During an event that causes multiple alarms, the ventilator simultaneously displays the two highest priority active alarms. 6-14 Operator’s Manual Ventilator Settings 6.5.7 Alarm Delay Determination of an Alarm Condition The delay time from the moment the alarm condition first occurs until the alarm is annunciated is imperceptible. Delay to/from a Distributed Alarm System For alarm conditions relayed via the serial port, the overall delay is dependent upon the polling rate of the external device. The delay from the time the serial port is polled by the external device, until the alarm message leaves the serial port does not exceed 3 seconds. An example of an external device is a patient monitor. 6.5.8 Alarm Handling Current alarm settings are saved in the ventilator’s non-volatile memory (NVRAM). If the alarm settings are changed by another clinician, those settings become applicable. For example, there are no operator-selectable default alarm settings. The ventilator system’s alarm handling strategy is intended to • Detect and call attention to legitimate causes for caregiver concern as quickly as possible, while minimizing nuisance alarms. • Identify the potential cause and suggest corrective action for certain types of alarms. However, the clinician must make the final decision regarding any clinical action. • Make it easy to discern an alarm’s priority level. • Allow quick and easy alarm setup. Ventilator alarms are categorized as high priority, medium priority, or low priority, and are classified as technical or non-technical. The ventilator is equipped with two alarms — the primary alarm and secondary alarm. The primary alarm annunciates high, medium, and low priority alarms when they occur. The secondary alarm (also named “immediate” priority in the table below) is a continuous tone alarm and annunciates during Vent Inop conditions or complete loss of power. This alarm is powered by a capacitor and lasts for at least 120 seconds. Operator’s Manual 6-15 Performance The table below lists alarm priority levels and their visual, audible, and autoreset characteristics. An alarm autoresets when the condition causing the alarm no longer exists. Table 6-2. Alarm Prioritization 6-16 Priority Level Visual indicator Audible indicator Autoreset characteristics Immediate Specific to alarm condition or component failure. Continuous tone alarm sounding for at least 120 s. N/A High: Immediate attention required to ensure patient safety. Flashing red omnidirectional LED located on the top of the GUI, red alarm banner on GUI screen, red bar next to alarm setting icon on Alarms screen. High-priority audible alarm (a sequence of five tones that repeats twice, pauses, then repeats again). Visual alarm does not auto reset. Visual alarm indicators remain steadily illuminated following an autoreset. The alarm reset key must be pressed to extinguish visual indicator. Medium: Prompt attention necessary. Flashing yellow omnidirectional LED located on the top of the GUI, yellow alarm banner on GUI screen, and yellow bar next to alarm setting icon on Alarms screen. Medium-priority audible alarm (a repeating sequence of three tones). LED indicator turns off and autoreset is entered into the alarm log. Low: A change in the patient-ventilator system has occurred. Steadily illuminated yellow omni-directional LED located on the top of the GUI, yellow alarm banner on GUI screen, and yellow bar next to alarm setting icon on Alarms screen. Low-priority audible alarm (two tone, nonrepeating). LED indicator turns off and autoreset is entered into the alarm log. Operator’s Manual Ventilator Settings Table 6-2. Alarm Prioritization (Continued) Priority Level Visual indicator Audible indicator Autoreset characteristics Normal: Normal ventilator operation Steadily illuminated green omni-directional LED located on the top of the GUI, no alarm banner, and white values next to alarm setting icon on Alarms screen. None. None Immediate Status display shows the GUI has failed. The secondary alarm annunciates a repeating sequence of single tones, since the primary alarm (part of the GUI) has failed. None A technical alarm is one that is caused by a violation of any of the ventilator’s self monitoring conditions, such as failure of POST or a fault detected by the ventilator’s background diagnostic system. Technical alarms cannot be reset by pressing the Alarm Reset key. (Reference Background Diagnostic System, p. 10-74). Technical alarms fall into eight categories, shown in the table below. Table 6-3. Technical Alarm Categories Category Name Priority System Response 1 Vent-Inop High Ventilator goes to safe state. Reference Ventilator Protection Strategies, p. 4-35. 2 Exh BUV High Backup ventilation 3 Insp BUV High Backup ventilation 4 Mix BUV High Backup ventilation High Ventilator goes to safe state. Reference Ventilator Protection Strategies, p. 4-35. 5 SVO 6 Caution High Ventilation continues as set 7 Warning Medium Ventilation continues as set 8 Notification Low Ventilation continues as set (not displayed on alarm banner) Reference the table below for a list of ventilator technical alarms, their meaning, and what to do if they occur. Operator’s Manual 6-17 Performance Reference Alarm Settings Range and Resolution, p. 11-17 for the settings, ranges, resolutions, new patient default values, and accuracies of all the ventilator alarms. Table 6-4. Technical Alarms Alarm message Meaning What to do O2 SENSOR O2 sensor is out of calibration or has failed. Re-calibrate or replace O2 sensor. DEVICE ALERT Various. Technical alarm category is described. Reference Technical Alarm Categories, p. 6-17. More information for the particular technical alarm can be found in the System diagnostic log, a link to which is provided on the expanded alarm banner. Follow remedy message displayed on GUI. A non-technical alarm is an alarm caused due to a fault in the patient-ventilator interaction or a fault in the electrical or gas supplies that the practitioner may be able to alleviate. Table 6-5. Non-technical Alarm Summary 6-18 Base message Priority AC POWER LOSS Low Analysis message Operating on vent main battery. Remedy message N/A Comments Ventilator’s power switch is ON. Ventilator automatically switches to battery power. AC power not available. Battery operating indicator on status display turns on. Resets when AC power is restored. Operator’s Manual Ventilator Settings Table 6-5. Non-technical Alarm Summary (Continued) Base message APNEA (patient data alarm) CIRCUIT DISCONNECT COMPLIANCE LIMITED VT (alarm is not adjustable) (patient data alarm) Operator’s Manual Priority Analysis message Medium Apnea ventilation. Breath interval > apnea interval. High Extended apnea duration or multiple apnea events. High Remedy message Comments Check patient & settings. The set apnea interval has elapsed without the ventilator, patient, or operator triggering a breath. Resets after patient initiates a third consecutive breath. Possible dependent alarm: 3VE TOT No ventilation Check patient Reconnect circuit. Ventilator has recovered from unintended power loss lasting more than five minutes, detects circuit disconnect. The GUI screen displays elapsed time without ventilator support. Resets when patient is reconnected. High No ventilation Check patient. Reconnect circuit. Ventilator detects circuit disconnect; the GUI screen displays elapsed time without ventilator support. Resets when patient is reconnected. Low Compliance compensation limit reached Check patient and circuit type. Inspired volume may be < set. Compliance volume required to compensate delivery of a VC, VC+ or VS breath exceeds the maximum allowed for 3 of the last 4 breaths. 6-19 Performance Table 6-5. Non-technical Alarm Summary (Continued) Base message 1PPEAK (patient data alarm) 1PCOMP (patient data alarm) Priority Analysis message Low Last breath ≥ set limit. Medium Last 3 breaths ≥ set limit. High Last 4 or more breaths ≥ set limit. Low Last spont breath ≥ set PPEAK limit - 5 cmH2O. Medium High Last 3 spont breaths ≥ set PPEAK limit - 5 cmH2O. Last 4 or more spont breaths ≥ set PPEAK limit- 5 cmH2O. Remedy message Comments Check patient, circuit & ET tube. Measured airway pressure ≥ set limit. Ventilator truncates current breath unless already in exhalation. Possible dependent alarms: 3VTE MAND, 3 VE TOT, 1fTOT. Corrective action: Check patient. Check tube type/ID setting. Consider reducing % Supp setting or increasing 2PPEAK. In TC: Pressure of spontaneous breaths ≥ set limit. Possible dependent alarms: 3 VTE SPONT, 3 VE TOT, 1fTOT, 3VTE SPONT Corrective action: Check for leaks. Check for the correct tube type. Check that the tube inside diameter corresponds to the patient PBW. • Check for leaks, tube type/ID setting. Check the 2PPEAK setting. 6-20 Operator’s Manual Ventilator Settings Table 6-5. Non-technical Alarm Summary (Continued) Base message 3PPEAK (patient data alarm) Priority Analysis message Low Last 2 breaths, pressure ≤ set limit. Medium Last 4 breaths, pressure ≤ set limit High Last10 or more breaths, pressure ≤ set limit Remedy message Check for leaks. Comments Peak inspiratory pressure ≤ alarm setting. (Available only when Mandatory Type is VC+* or when Vent Type is NIV. Target pressure = the low limit: PEEP + 3 cmH2O. Ventilator cannot deliver target volume. Possible dependent alarms: 1fTOT. Corrective action: Check patient and settings; check for leaks. * Because the VC+ pressure control algorithm does not allow the target inspiratory pressure to fall below PEEP + 3 cmH2O, attempting to set the 4PPEAK alarm limit at or below this level will turn the alarm off. 1O2% (patient data alarm) Operator’s Manual Medium Measured O2% > set for ≥ 30 s but < 2 min High Measured O2% > set for ≥ 2 min. Check patient, gas sources, O2 analyzer & ventilator. The O2% measured during any phase of a breath cycle is 7% (12% during the first hour of operation) or more above the O2% setting for at least 30 seconds. (These percentages increase by 5% for four minutes following a decrease in the O2% setting.) 6-21 Performance Table 6-5. Non-technical Alarm Summary (Continued) Base message Priority Analysis message Remedy message Comments 3O2% (patient data alarm) High Measured O2% < set O2%. Check patient, gas sources, O2 analyzer & ventilator. The O2% measured during any phase of a breath cycle is 7% (12% during the first hour of operation) or more below the O2% setting for at least 30 seconds, or below 18%. (These percentages increase by 5% for four minutes following an increase in the O2% setting.) 1VTE (patient data alarm Low Last 2 breaths ≥ set limit. Medium Last 4 breath s≥ set limit. Check settings, changes in patient's R&C. High Last 10 or more breaths ≥ set limit. Exhaled tidal volume ≥ set limit. Alarm updated whenever exhaled tidal volume is recalculated. Possible dependent alarm: 1VE TOT Low VE TOT ≥ set limit for ≤ 30 s Check patient and settings. Medium VE TOT ≥ set limit for > 30 s High VE TOT ≥ set limit for > 120 s Expiratory minute volume ≥ set limit. Alarm updated whenever an exhaled minute volume is recalculated. Possible dependent alarm: 1VTE. Low fTOT ≥ set limit for ≤ 30 s. Check patient & settings. Medium fTOT ≥ set limit for > 30 s. High fTOT ≥ set limit for > 120 s. Total respiratory rate ≥ set limit. Alarm updated at the beginning of each inspiration. Reset when measured respiratory rate falls below the alarm limit. Possible dependent alarms: 3VTE MAND, 3VTE SPONT, 3VE TOT. 1VE TOT (patient data alarm) 1fTOT (patient data alarm) 6-22 Operator’s Manual Ventilator Settings Table 6-5. Non-technical Alarm Summary (Continued) Base message 1PVENT (patient data alarm) Priority Analysis message Low 1 breath ≥ limit. Medium 2 breaths ≥ limit. High INOPERATIVE BATTERY Operator’s Manual Low Remedy message Check patient, circuit & ET tube. 3 or more breaths ≥ limit. Inadequate charge or nonfunctional ventilator’s primary battery. Service/replace ventilator’s primary battery. Comments Inspiratory pressure > 100 cmH2O and mandatory type is VC or spontaneous type is TC or PAV+. Ventilator truncates current breath unless already in exhalation. Possible dependent alarms: 3VTE MAND, 3VE TOT, 1fTOT. Corrective action: 1. Check patient for agitation. Agitated breathing, combined with high % Supp setting in PAV+ can cause over-assistance. Consider reducing % Supp setting. 2. Provide alternate ventilation. Remove ventilator from use and contact Service. Battery installed but not functioning or charging for ≥ 6 hours. Resets when battery is functional. 6-23 Performance Table 6-5. Non-technical Alarm Summary (Continued) Base message INSPIRATION TOO LONG (patient data alarm) PAV STARTUP TOO LONG (patient data alarm) (occurs only if PAV+ is in use) 6-24 Priority Analysis message Low Last 2 spont breaths = PBW based TI limit. Medium Last 4 spont breaths = PBW based TI limit. High Last 10 or more spont breaths = PBW based TI limit. Low PAV startup not complete for ≥ 45 s. Medium PAV startup not complete for ≥ 90 s. High PAV startup not complete for ≥ 120 s. Remedy message Comments Check patient. Check for leaks. Inspiratory time for spontaneous breath ≥ PBW-based limit. Ventilator transitions to exhalation. Resets when TI falls below PBW-based limit. Active only when Vent Type is INVASIVE. Check for leaks, shallow breathing, & settings for 1VTI and 1PPEAK. Unable to assess patient’s resistance and compliance during PAV startup. Possible dependent alarms 3VTE SPONT, 3VE TOT, 1fTOT. Corrective action: Check patient. (Patient’s inspiratory times may be too short to evaluate resistance and compliance.) Check that selected humidification type and empty humidifier volume are correct. Operator’s Manual Ventilator Settings Table 6-5. Non-technical Alarm Summary (Continued) Base message Priority Analysis message Remedy message Comments PAV R & C NOT ASSESSED (patient data alarm) (occurs only if PAV+ is in use) Low R and/or C over 15 minutes old. Medium R and/or C over 30 minutes old. Check for leaks, shallow breathing, & settings for tube ID, 1VTI and 1PPEAK. Unable to assess resistance and/or compliance during PAV+ steady-state. Startup was successful, but later assessments were unsuccessful. Corrective action: Check patient. (Patient’s inspiratory times may be too short to evaluate resistance and compliance.) Check that selected humidification type and empty humidifier volume are correct. LOSS OF POWER Immediate N/A N/A The ventilator power switch is ON and there is insufficient power from AC and the battery. There may not be a visual indicator for this alarm, but an independent audio alarm sounds for at least 120 seconds. Alarm annunciation can be reset by turning power switch to OFF position. Operating on battery.Ventilator battery operational time < 10 minutes. Replace or allow ventilator battery to recharge. Resets when battery has ≥ ten minutes of operational time remaining or when AC power is restored. LOW BATTERY Operator’s Manual Medium 6-25 Performance Table 6-5. Non-technical Alarm Summary (Continued) Base message Priority Analysis message LOW BATTERY High Operating on battery. Ventilator battery operational time < 5 minutes Replace or allow ventilator battery to recharge Resets when battery has ≥ five minutes of operational time remaining or when AC power is restored. 3VTE MAND (patient data alarm) Low Last 2 mand breaths ≤ set limit. Check for leaks, changes in patient's R & C. Medium Last 4 mand breaths ≤ set limit. Exhaled mandatory tidal volume≤ set limit. Alarm updated whenever exhaled mandatory tidal volume is recalculated. Possible dependent alarms: 3VE TOT, 1fTOT. Check patient & settings. Exhaled spontaneous tidal volume ≤ set limit. Alarm updated whenever exhaled spontaneous tidal volume is recalculated. Possible dependent alarms: 3VE TOT, 1fTOT. 3VTE SPONT (patient data alarm) High Last 10 or more mand breaths ≤ set limit. Low Last 4 spont breaths ≤ set limit Medium Last 7 spont breaths ≤ set limit High 6-26 Last 10 or more spont breaths ≤ set limit Remedy message Comments Operator’s Manual Ventilator Settings Table 6-5. Non-technical Alarm Summary (Continued) Base message Priority 1VTI (patient data alarm) Low Last spont breath ≥ set limit. In TC, VS, or PAV+: Medium Last 3 spont breaths ≥ set limit. • High 3VE TOT (patient data alarm) Operator’s Manual Analysis message Remedy message Check patient and settings. Last 4 or more spont breaths ≥ set limit. Low VE TOT ≤ set limit for ≤ 30 s. Medium VE TOT ≤ set limit for > 30 s. High VE TOT ≤ set limit for > 120 s. Comments Delivered inspiratory volume ≥ inspiratory limit. Ventilator transitions to exhalation. Possible dependent alarms: 3VTE SPONT,3VE TOT, 1fTOT Corrective action: Check for leaks. Check for the correct tube type. Check the VTI or VTI setting. In PAV+, check for patient agitation, which can cause miscalculation of RPAV and CPAV. Consider reducing % Supp setting. Check 2VTI. Check patient & settings. Total minute volume ≤ set limit. Alarm updated whenever exhaled minute volume is recalculated. Possible dependent alarms3VTE MAND, 3VTE SPONT, 1fTOT 6-27 Performance Table 6-5. Non-technical Alarm Summary (Continued) Base message VOLUME NOT DELIVERED (not adjustable) (patient data alarm) Priority Analysis message Remedy message Comments Low Last 2 spont (or mand) breaths pressure > max allowable level. Check patient and setting for 1PPEAK. Medium Last 10 or more spont (or mand) breaths, pressure > max allowable level. Insp target pressure > (PPEAK - PEEP - 3 cmH2O), when spontaneous type is VS or mandatory type is VC+. Ventilator cannot deliver target volume. Possible dependent alarms: For VC+ breaths: 3VTE MAND 3VE TOT 1fTOT For VS breaths: 3VTE SPONT, 1fTOT 3VE TOT, Corrective action: Check patient and settings. NO AIR SUPPLY High Ventilation continues as set except O2= 100% Check patient and air source Switch to 100% O2. NO O2 SUPPLY Low Ventilation continues as set. Only air available. Check O2 source. Operator-set O2% equals 21%. Resets if O2 supply connected High Ventilation continues as set, except O2% = 21. Check patient & O2 source. Ventilator delivers 21% O2 instead of set O2%. Resets if oxygen supply connected. High Patient connected before setup complete Provide alternate ventilation. Complete setup process. Ventilator begins safety ventilation. Resets when ventilator startup procedure is complete. PROCEDURE ERROR 6-28 Operator’s Manual Ventilator Settings Table 6-5. Non-technical Alarm Summary (Continued) Base message Priority Analysis message SEVERE OCCLUSION High Little/no ventilation. Check patient. Provide alternate ventilation. Clear occlusions; drain circuit. Ventilator enters occlusion status cycling (OSC). Patient data displays are blanked and GUI screen displays elapsed time without ventilator support. PROX INOPERATIVE (if Proximal Flow Sensor is in use) Low Data from Proximal Flow Sensor are not being used. Check proximal flow sensor connections and tubes for occlusions or leaks Data obtained from the proximal flow sensor are invalid, non-existent, or unreasonable based on current ventilator settings or purge lines are occluded. Alarm resets when condition is corrected. Data for real time waveforms and monitored volumes are obtained from internal sensors. Ventilator switched OFF with patient connected to breathing circuit. Return power switch to ON position and disconnect patient before turning power off. User must acknowledge turning the power OFF by touching Power Off on the GUI. INADVERTENT POWER OFF High Remedy message Comments Table 6-6. Non-Technical Alarms and Suggested Responses Alarm message Meaning Response AC POWER LOSS The ventilator is running on battery power. Monitor the battery charge level to ensure there is enough power remaining to operate the ventilator. APNEA (patient data alarm) The time between patient breaths exceeds the set apnea interval. Check patient and settings. Operator’s Manual 6-29 Performance Table 6-6. Non-Technical Alarms and Suggested Responses (Continued) Alarm message Meaning Response CIRCUIT DISCONNECT The patient circuit has become disconnected or there is a large leak in the patient circuit. Re-connect the patient circuit, or eliminate the leak. Compliance limited VT (patient data alarm) Compliance volume required to compensate delivery of a VC, VC+, or VS breath exceeds the maximum allowed for three of the last four breaths. Check patient and circuit type. Inspired volume may be less than set. 1PPEAK (patient data alarm) The measured airway pressure is ≥ set limit. Reduced tidal volume likely. • Check the patient • Check the patient circuit • Check the endotracheal tube 3PPEAK (patient data alarm) The peak inspiratory pressure in the patient circuit ≤ alarm setting.This alarm is only available when NIV is the selected Vent Type or when VC+ is the selected Mandatory type during INVASIVE ventilation.* Check for leaks in the patient circuit and VBS. * Because the VC+ pressure control algorithm does not allow the target inspiratory pressure to fall below PEEP + 3 cmH2O, attempting to set the 4PPEAK alarm setting at or below this level will turn the alarm off. 1O2% (patient data alarm) 6-30 The O2% measured during any phase of a breath cycle is 7% (12% during the first hour of operation) or more above the O2% parameter for at least 30 seconds.The percentage window increases by 5% for four minutes after increasing the set O2% value. Check the patient, the air and oxygen supplies, the oxygen analyzer, and the ventilator. Operator’s Manual Ventilator Settings Table 6-6. Non-Technical Alarms and Suggested Responses (Continued) Alarm message 3O2% (patient data alarm) 1VTE (patient data alarm) Meaning The O2% measured during any phase of a breath cycle is 7% (12% during the first hour of operation) or more below the O2% parameter for at least 30 seconds. The percentage window increases by 5% for four minutes after increasing the set O2% value. Exhaled tidal volume ≥ alarm setting for the last two breaths. Response • Check the patient, the air and oxygen supplies, the oxygen analyzer, and the ventilator. • Calibrate oxygen sensor. Reference Oxygen Sensor Calibration, p. 4-34 for details regarding calibrating the oxygen sensor. • Use an external O2 monitor and disable the O2 sensor. • Check patient settings • Check for changes in patient’s resistance and compliance. 1VE TOT (patient data alarm) Minute volume ≥ alarm setting. Check patient settings. 1fTOT (patient data alarm) The breath rate from all breaths is ≥ alarm setting. Check the patient and the ventilator settings. 1PVENT (patient data alarm) The inspiratory pressure transducer has measured a pressure > 110 cmH2O in VC, TC, or PAV+. The ventilator transitions to exhalation. A reduced tidal volume is likely. • Check the patient, the patient circuit (including filters), and the endotracheal tube. Ensure the ET tube ID is the correct size. Check the ventilator flow and/or volume settings. • Re-run SST. • Obtain an alternate ventilation source. • Remove the ventilator from clinical use and obtain service. INOPERATIVE BATTERY Operator’s Manual The battery charge is inadequate after 6 hours of attempted charge time or the battery system is non-functional. Replace the battery or install an extended battery. 6-31 Performance Table 6-6. Non-Technical Alarms and Suggested Responses (Continued) Alarm message INSPIRATION TOO LONG (patient data alarm) LOSS OF POWER Meaning The PBW-based inspiratory time for the last two spontaneous breath exceeds the ventilatorset limit. Active only when Vent Type is INVASIVE. The ventilator power switch is ON, but there is insufficient power from the mains AC and the battery. There may not be a visual indicator for this alarm, but an independent audio alarm (immediate priority) sounds for at least 120 seconds. Response • Check the patient. • Check the patient circuit for leaks. • Check Rise time % and ESENS settings. • Check the integrity of the AC power and battery connections. • Obtain alternative ventilation if necessary. • Install an extended battery If the loss of power event has been resolved, turn the power switch OFF and back ON again to reset the alarm. LOW BATTERY Medium priority alarm indicating < ten (10) minutes of battery power remaining to operate the ventilator. High priority alarm indicating < five (5) minutes of battery power remain to operate the ventilator. Recharge the battery, by plugging the ventilator into AC power or replace the battery, or install an extended battery. 3VTE MAND (patient data alarm) The patient’s exhaled mandatory tidal volume is ≤ alarm setting for the last two mandatory breaths. • Check the patient. • Check for leaks in the patient circuit. • Check for changes in the patient’s resistance or compliance. • Check the patient. • Check the ventilator settings. 3VTE SPONT (patient data alarm) 6-32 The patient’s exhaled spontaneous tidal volume is ≤ alarm setting for the last two spontaneous breaths. Operator’s Manual Ventilator Settings Table 6-6. Non-Technical Alarms and Suggested Responses (Continued) Alarm message 3VE TOT (patient data alarm) NO AIR SUPPLY NO O2 SUPPLY 1PCOMP Meaning The minute volume for all breaths is ≤ alarm setting. Response • Check the patient. • Check the ventilator settings. The air supply pressure is less than the minimum pressure required for correct ventilator operation. The ventilator delivers 100% O2 if available. If an oxygen supply is not available, the safety valve opens. The ventilator displays the elapsed time without ventilator support. This alarm cannot be set or disabled. • Check the patient. • Check the air and oxygen sources. • Obtain alternative ventilation if necessary. The oxygen supply pressure is less than the minimum pressure required for correct ventilator operation. The ventilator delivers 100% air if available. If an air supply is not available, the safety valve opens. The ventilator displays the elapsed time without ventilatory support. This alarm cannot be set or disabled. • Check the patient. • Check the air and oxygen sources. • Obtain alternative ventilation if necessary. Target pressure ≥ (2PPEAK - 5 cmH2O In TC: • Check for leaks and tube type/I.D. setting In PAV+: PROCEDURE ERROR Operator’s Manual The patient is attached before ventilator startup is complete. Safety ventilation is active. • Limit target pressure to 2PPEAK - 5 cmH2O • Provide alternate ventilation if necessary. • Complete ventilator startup procedure. 6-33 Performance Table 6-6. Non-Technical Alarms and Suggested Responses (Continued) Alarm message SEVERE OCCLUSION 1VTI (patient data alarm) Meaning The patient circuit is severely occluded. The ventilator enters occlusion status cycling. The elapsed time without ventilatory support appears. Delivered inspiratory volume ≥ high inspiratory volume limit Response • Check the patient. • Obtain alternative ventilation if necessary. • Check patient circuit for bulk liquid, crimps, blocked filter. • If problem persists, remove ventilator from use and obtain service. Ventilator transitions to exhalation. • Check for leaks and tube type/ID setting. • Check patient and ventilatorsettings. • Check for leaks, tube type/ ID and% Supp settings, and patient agitation. VOLUME NOT DELIVERED (patient data alarm Insp target pressure > (PPEAK PEEP - 3 cmH2O), when spontaneous type is VS or when mandatory type is VC+. Check patient and 1PPEAK setting PAV STARTUP TOO LONG (occurs only if PAV+ option is in use) Unable to assess resistance and/ or compliance during PAV+ startup. Check for leaks, shallow breathing, and settings for 1VTI and 1PPEAK PAV R & C NOT ASSESSED (occurs only if PAV+ option is in use) Unable to assess resistance and/ or compliance during PAV+ steady-state. Check for leaks, shallow breathing, and settings for tube ID, 1VTI and 1PPEAK. PROX INOPERATIVE A malfunction occurred with the Proximal Flow Sensor or the pneumatic lines are occluded. Replace the Proximal Flow Sensor or purge its pneumatic lines. Does not affect data from the ventilator’s delivery or exhalation valve flow sensors. The next sections provide detailed descriptions of selected alarms. 6-34 Operator’s Manual Ventilator Settings 6.5.9 AC POWER LOSS Alarm The AC POWER LOSS alarm indicates the ventilator power switch is on and the ventilator is being powered by the battery and an alternate power source may soon be required to sustain normal ventilator operation. The ventilator annunciates a medium-priority LOW BATTERY alarm when the ventilator has less than ten minutes of battery power remaining. The ventilator annunciates a high-priority LOW BATTERY alarm when less than five minutes of battery power are estimated available. 6.5.10 Apnea Alarm The APNEA alarm indicates neither the ventilator nor the patient has triggered a breath for the operator-selected apnea interval (TA). TA is measured from the start of an inspiration to the start of the next inspiration and is based on the ventilator’s inspiratory detection criteria. TA can only be set via the apnea ventilation settings. The APNEA alarm autoresets after the patient initiates two successive breaths, and is intended to establish the patient's inspiratory drive is reliable enough to resume normal ventilation. To ensure the breaths are patient-initiated (and not due to autotriggering), exhaled volumes must be at least half the inspired VT (this avoids returning to normal ventilation if there is a disconnect). 6.5.11 CIRCUIT DISCONNECT Alarm The CIRCUIT DISCONNECT alarm indicates the patient circuit is disconnected at the ventilator or the patient side of the patient wye, or a large leak is present. The methods by which circuit disconnects are detected vary depending on breath type. Time, pressure, flow, delivered volume, exhaled volume, and the DSENS setting may be used in the circuit disconnect detection algorithms. Reference Disconnect, p. 10-47 for a complete discussion of the CIRCUIT DISCONNECT detection methods. The CIRCUIT DISCONNECT alarm sensitivity is adjusted via the DSENS setting. During a CIRCUIT DISCONNECT condition, the ventilator enters an idle state and delivers a base flow of oxygen to detect a reconnection. When the ventilator determines the patient circuit is reconnected, the CIRCUIT DISCONNECT alarm autoresets and normal ventilation resumes without having to manually reset the alarm (for example, following suctioning). Operator’s Manual 6-35 Performance A disconnected patient circuit interrupts gas delivery and patient monitoring. Notification of a patient circuit disconnect is crucial, particularly when the patient cannot breathe spontaneously. The ventilator does not enter apnea ventilation when a disconnect is detected to avoid changing modes during a routine suctioning procedure. 6.5.12 Note: When utilizing a closed-suction catheter system, the suctioning procedure can be executed using existing mode, breath type and settings. To reduce potential for hypoxemia during the procedure, elevate the oxygen concentration using the Elevate O2 control. Reference To adjust the amount of elevated O2 delivered for two minutes, p. 3-40. Loss of Power Alarm This alarm alerts the operator that there is insufficient battery power and no AC power to support ventilator operation. The alarm annunciates as long as the ventilator’s power switch is in the ON position, and lasts for at least 120 seconds. 6.5.13 DEVICE ALERT Alarm A DEVICE ALERT alarm indicates a background test or Power On Self Test (POST) has failed. Depending on which test failed, the ventilator either continues to ventilate according to current settings, or ventilates with modified settings, or enters the ventilator inoperative state. The DEVICE ALERT alarm relies on the ventilator’s self-testing and notifies the clinician of an abnormal condition requiring service. Reference Background Diagnostic System, p. 10-74. 6.5.14 High Circuit Pressure (1PPEAK) Alarm The 1PPEAK alarm indicates the currently measured airway pressure is equal to or greater than the set limit. The 2PPEAK limit is active during all breath types and phases to provide redundant patient protection (for example, to detect air flow restrictions downstream of the pressure-sensing device). The 1PPEAK limit is active in all normal ventilation modes. The 2 PPEAK alarm new patient default values are separately configurable for neonatal, pediatric, and adult patients. The2PPEAK limit is not active during a SEVERE OCCLUSION alarm. 6-36 Operator’s Manual Ventilator Settings The 1PPEAK alarm truncates inspiration and transitions the ventilator into the exhalation phase and the limit cannot be set less than • PEEP + 7 cmH2O, or • PEEP + PI + 2 cmH2O, or • PEEP + PSUPP + 2 cmH2O nor can it be set less than or equal to 4PPEAK. The 2PPEAK limit cannot be disabled. The ventilator phases in changes to the 2PPEAK limit immediately to allow prompt notification of a high circuit pressure condition. The minimum 2PPEAK limit (7 cmH2O) corresponds to the lowest peak pressures not due to autotriggering anticipated during a mandatory breath. The maximum 2PPEAK limit (100 cmH2O) was selected because it is the maximum pressure required to inflate very low-compliance lungs. The ventilator allows circuit pressure to rise according to a computed triggering profile for the initial phase of PC and PS breaths without activating the 2PPEAK alarm. This triggering profile helps avoid nuisance alarms due to possible transient pressure overshoot in the airway when aggressive values of rise time % are selected. A brief pressure overshoot measured in the patient circuit is unlikely to be present at the carina. 6.5.15 High Delivered O2% (1O2%) Alarm The 1O2% alarm indicates the measured O2% is at or above the error percentage above the O2% setting for at least 30 seconds to eliminate transient O2% delivery variation nuisance alarms. The 1O2% alarm detects malfunctions in ventilator gas delivery or oxygen monitor. The ventilator declares a 1O2% alarm after 30 seconds. Although the ventilator automatically sets the 1O2% alarm limits, the oxygen sensor can be disabled. (The error percentage is 12% above setting for the first hour of ventilator operation, 7% above the setting after the first hour of operation, and an additional 5% above the setting for the first four minutes following a decrease in the setting.) The ventilator automatically adjusts the 1O2% alarm limit when O2% changes due to 100% O2, apnea ventilation, occlusion, circuit disconnect, or a NO AIR/ Operator’s Manual 6-37 Performance O2 SUPPLY alarm. The ventilator checks the 1O2% alarm limit against the measured oxygen percentage at one-second intervals. 6.5.16 High Exhaled Minute Volume (1VE TOT) Alarm The 1VE TOT alarm indicates the measured exhaled total minute volume for spontaneous and mandatory breaths is equal to or greater than the alarm setting. The 1VE TOT alarm is effective immediately upon changing the setting, to ensure prompt notification of prolonged high tidal volumes. The 1VE TOT alarm can be used to detect a change in a patient's breathing pattern, or a change in compliance or resistance. The 1VE TOT alarm can also detect too-large tidal volumes, which could lead to hyperventilation and hypocarbia. 6.5.17 High Exhaled Tidal Volume (1VTE) Alarm The 1VTE alarm indicates the measured exhaled tidal volume for spontaneous and mandatory breaths is equal to or greater than the set 1VTE alarm. The 1VTE alarm is updated whenever a new measured value is available. The 1VTE alarm can detect increased exhaled tidal volume (due to greater compliance and lower resistance) and prevent hyperventilation during pressure control ventilation or pressure support. Turn the 1VTE alarm OFF to avoid nuisance alarms. (Hyperventilation due to increased compliance is not a concern during volume-based ventilation, because the tidal volume is fixed by the clinician's choice and the ventilator’s compliance-compensation algorithm.) 6.5.18 High Inspired Tidal Volume (1VTI) Alarm The high inspired tidal volume alarm indicates the patient’s inspired volume exceeds the set limit. When this condition occurs, the breath terminates and the alarm sounds. The ventilator displays monitored inspired tidal volume values in the patient data area on the GUI screen. When Vent Type is NIV, there is no high inspired tidal volume alarm or setting available, but the monitored inspired tidal volume (VTI) may appear in the patient data area on the GUI screen. 6-38 Operator’s Manual Ventilator Settings 6.5.19 High Respiratory Rate 1(fTOT) Alarm The 1fTOT alarm indicates the measured breath rate is greater than or equal to the 2fTOT alarm setting. The 1fTOT alarm is updated whenever a new total measured respiratory rate is available. The 1fTOT alarm can detect tachypnea, which could indicate the tidal volume is too low or the patient's work of breathing has increased. The ventilator phases in changes to the 2fTOT limit immediately to ensure prompt notification of a high respiratory rate condition. 6.5.20 INSPIRATION TOO LONG Alarm The INSPIRATION TOO LONG alarm, active only when Vent Type is INVASIVE, indicates the inspiratory time of a spontaneous breath exceeds the following time limit (1.99 + 0.02 x PBW) seconds (adult and pediatric circuits) (1.00 + 0.10 x PBW) seconds (neonatal circuits) where PBW is the current setting for predicted body weight in kg. When the ventilator declares an INSPIRATION TOO LONG alarm, the ventilator terminates inspiration and transitions to exhalation. The INSPIRATION TOO LONG alarm applies only to spontaneous breaths and cannot be set or disabled. Because leaks (in the patient circuit, around the endotracheal tube cuff, or through chest tubes) and patient-ventilator mismatch can affect accurate exhalation detection, the INSPIRATION TOO LONG alarm can act as a backup method of safely terminating inspiration. If the INSPIRATION TOO LONG alarm occurs frequently, check for leaks and ensure ESENS and rise time % are properly set. 6.5.21 Low Circuit Pressure (3PPEAK) Alarm The 3PPEAK alarm indicates the measured maximum airway pressure during the current breath is less than or equal to the set alarm level during a non-invasive inspiration or during a VC+ inspiration. Operator’s Manual 6-39 Performance The 3PPEAK alarm is active for mandatory and spontaneous breaths, and is present only when Vent Type is NIV or Mandatory Type is VC+. During VC+, the 3PPEAK alarm can be turned OFF. The 3PPEAK alarm can always be turned OFF during NIV. The 4PPEAK alarm limit cannot be set to a value greater than or equal to the 2PPEAK alarm limit. WARNING: Because the VC+ pressure control algorithm does not allow the target inspiratory pressure to fall below PEEP + 3 cmH2O, attempting to set the 4PPEAK alarm limit at or below this level will turn the alarm off. In VC+, whenever PEEP is changed, 3PPEAK is set automatically to its New Patient value, PEEP + 4 cmH2O when PEEP ≥ 16 cmH2O, or PEEP + 3.5 cmH2O when PEEP < 16 cmH2O. There are no alarms dependent upon 3PPEAK, and the 3PPEAK alarm does not depend on other alarms. 6.5.22 Low Delivered O2% (3O2%) Alarm The 3O2% alarm indicates the measured O2% during any phase of a breath is at or below the error percentage below the O2% setting, or less than or equal to 18%, for at least 30 seconds. Although the ventilator automatically sets the 3O2% alarm, replace (if necessary) or disable the oxygen sensor to avoid nuisance alarms. (The error percentage is 12% below setting for the first hour of ventilator operation following a reset, 7% below setting after the first hour of operation, and an additional 5% below setting for the first four minutes following an increase in the setting.) The ventilator automatically adjusts the 3O2% alarm limit when O2% changes due to apnea ventilation, circuit disconnect, or a NO O2/AIR SUPPLY alarm. The 3O2% alarm is disabled during a safety valve open (SVO) condition. The ventilator checks the 3O2% alarm against the measured oxygen percentage at onesecond intervals. The 3O2% alarm can detect malfunctions in ventilator gas delivery or the oxygen monitor, and can ensure the patient is adequately oxygenated. The ventilator declares a 3O2% alarm after 30 seconds to eliminate nuisance alarms from transient O2% delivery variations. The O2% measured by the 6-40 Operator’s Manual Ventilator Settings oxygen sensor is shown in the patient data area. Reference Vital Patient Data, p. 3-42 to include O2% if it is not displayed. 6.5.23 Low Exhaled Mandatory Tidal Volume (3VTE MAND) Alarm The alarm indicates the measured exhaled mandatory tidal volume is less than or equal to the 3VTE MAND alarm setting. The 3VTE MAND alarm updates when a new measured value of exhaled mandatory tidal volume is available. The 3VTE MAND alarm can detect an obstruction, a leak during volume ventilation, or a change in compliance or resistance during pressure-based ventilation (that is, when the same pressure is achieved but tidal volume decreases). There are separate alarms for mandatory and spontaneous exhaled tidal volumes for use during SIMV, SPONT, and BiLevel. The ventilator phases in a change to the 3VTE MAND alarm immediately to ensure prompt notification of a low exhaled tidal volume condition. 6.5.24 Low Exhaled Spontaneous Tidal Volume (3VTE SPONT) Alarm The 3VTE SPONT alarm indicates the measured exhaled spontaneous tidal volume is less than or equal to the 3VTE SPONT alarm setting. The alarm updates when a new measured value of exhaled spontaneous tidal volume is available. The 3VTE SPONT alarm can detect a leak in the patient circuit or a change in the patient’s respiratory drive during a single breath. The 3VTE SPONT alarm is based on the current breath rather than on an average to detect changes as quickly as possible. There are separate alarms for mandatory and spontaneous exhaled tidal volumes for use during SIMV and BiLevel (if this software option is installed). The ventilator phases in a change to the 4VTE SPONT alarm limit immediately to ensure prompt notification of a low exhaled tidal volume condition. 6.5.25 Low Exhaled Total Minute Volume (3VE TOT) Alarm The 3VE TOT alarm indicates the measured minute volume (for mandatory and spontaneous breaths) is less than or equal to the 3VE TOT alarm setting. The 3VE TOT alarm updates with each new calculation for exhaled minute volume. Operator’s Manual 6-41 Performance The 3VE TOT alarm can detect a leak or obstruction in the patient circuit, a change in compliance or resistance, or a change in the patient's breathing pattern. The 3VE TOT alarm can also detect too-small tidal volumes, which could lead to hypoventilation and hypoxia (oxygen desaturation). The ventilator phases in changes to the 3VE TOT alarm limit immediately to ensure prompt notification of prolonged low tidal volumes. 6.5.26 PROCEDURE ERROR Alarm The ventilator declares a PROCEDURE ERROR alarm if it is powered up (either by turning on the power switch or if power is regained following a power loss of at least five minutes) and the ventilator detects a patient attached before Ventilator Startup is complete. Until confirmation of the ventilator settings, the ventilator annunciates a high-priority alarm and enters Safety PCV. Reference Safety PCV Settings, p. 10-72. The PROCEDURE ERROR alarm requires confirmation of ventilator settings after restoration of ventilator power, in case a new patient is attached to the ventilator. Safety PCV is an emergency mode of ventilation providing ventilation according to displayed settings until settings confirmation, and is not intended for long-term patient ventilation. 6.5.27 Severe Occlusion Alarm A severe occlusion alarm occurs when gas flow in the ventilator breathing system is severely restricted. The ventilator enters Occlusion Status Cycling (OSC) where the ventilator periodically attempts to deliver a pressure-based breath while monitoring inspiration and exhalation breath phases for a severe occlusion. If an occlusion is not detected, the ventilator considers the occlusion condition reset, clears the occlusion alarm, and continues ventilation with the settings in use before the occlusion occurred. The ventilator indicates an occlusion was detected. 6.6 Monitored Patient Data Monitored patient data appear in the Patient Data Banner at the top of the GUI screen above the waveforms display. Reference Areas of the GUI, p. 4-3. 6-42 Operator’s Manual Ventilator Settings Reference Vital Patient Data, p. 3-42 to change the displayed patient data parameters or the order in which they are displayed. If any patient data values are displayed continuously blinking, it means their values are shown clipped to what has been defined as their absolute limits. If the values are displayed in parentheses “( )”, it means they are clipped to their variable limits.Variable limits are calculated values derived from the set PBW and ventilator settings. Displayed patient data values that have been clipped should be viewed as suspect. Dashes (--) are displayed if the patient data value is not applicable based on mode/breath type combinations. Note: If no value is displayed, then the ventilator is in a state where the value cannot be measured. The following sections contain descriptions of all patient data parameters shown in the patient data displays. 6.6.1 Note: All displayed patient volume data represent lung volumes expressed under BTPS conditions. Total Exhaled Minute Volume (VE TOT) The BTPS and compliance compensated sum of exhaled gas volumes from both mandatory and spontaneous breaths for the previous one-minute interval. 6.6.2 Exhaled Spontaneous Minute Volume (VE SPONT) The BTPS- and compliance-compensated sum of exhaled spontaneous volumes for the previous minute. 6.6.3 Exhaled Tidal Volume (VTE) The volume of the patient’s exhaled gas for the previous mandatory or spontaneous breath. Displayed VTE is both compliance-and BTPS compensated, and updates at the next inspiration. Operator’s Manual 6-43 Performance 6.6.4 Proximal Exhaled Minute Volume (VE TOTY) The BTPS- and compliance-compensated sum of exhaled spontaneous volumes for the previous minute. 6.6.5 Proximal Exhaled Tidal Volume (VTEY) The exhaled tidal volume for the previous breath measured by the Proximal Flow Sensor (for neonatal patients, only). VTEY is updated at the beginning of the next inspiration. 6.6.6 Exhaled Spontaneous Tidal Volume (VTE SPONT) The exhaled volume of the last spontaneous breath, updated at the beginning of the next inspiration following a spontaneous breath. 6.6.7 Exhaled Mandatory Tidal Volume (VTE MAND) The exhaled volume of the last mandatory breath, updated at the beginning of the next inspiration following a mandatory breath. If the mode is SPONT and the ventilator has not delivered mandatory breaths in a time period of greater than two minutes (for example via a manual inspiration), the VTE MAND patient data indicator becomes hidden.The indicator reappears when the value updates. 6.6.8 Exhaled mL/kg Volume The patient’s exhaled volume displayed in mL/kg PBW. 6.6.9 Inspired Tidal Volume (VTI) The BTPS- and compliance-compensated volume of inspired gas for all pressure-based or NIV breaths, updated at the beginning of the following expiratory phase. VTI is displayed when data are available. 6-44 Operator’s Manual Ventilator Settings 6.6.10 Proximal Inspired Tidal Volume (VTIY) The inspired tidal volume for a mandatory or spontaneous breath measured by the Proximal Flow Sensor (for neonatal patients, only). VTIY is updated at the beginning of the following expiratory phase and is displayed when data are available. 6.6.11 Delivered mL/kg Volume The delivered gas volume in mL/kg PBW. 6.6.12 I:E Ratio The ratio of inspiratory time to expiratory time for the previous breath, regardless of breath type. Updated at the beginning of the next inspiration. When I:E ratio is ≥ 1:1, it is displayed as XX:1. Otherwise it is displayed as 1:XX. 6.6.13 Note: Due to limitations in setting the I:E ratio in PC ventilation, the monitored data display may not exactly match the I:E ratio setting. Mean Circuit Pressure (PMEAN) The average circuit pressure for a complete breath period, including both inspiratory and expiratory phases whether mandatory or spontaneous. The displayed value can be either positive or negative. 6.6.14 Peak Circuit Pressure (PPEAK) The maximum circuit pressure at the patient wye during the previous breath, including both inspiratory and expiratory phases. 6.6.15 End Inspiratory Pressure (PI END) The pressure at the end of the inspiratory phase of the current breath. Operator’s Manual 6-45 Performance 6.6.16 End Expiratory Pressure (PEEP) The pressure at the end of the expiratory phase of the previous breath, updated at the beginning of the next inspiration. During an expiratory pause, the displayed value includes any active lung PEEP. 6.6.17 Intrinsic PEEP (PEEPI) PEEPI is an estimate of the pressure above the PEEP level at the end of an exhalation. PEEPI is determined during an Expiratory Pause maneuver. 6.6.18 PAV-based Intrinsic PEEP (PEEPI PAV) PEEPI is an estimate of intrinsic PEEP, updated at the end of a spontaneous PAV+ breath. 6.6.19 Total PEEP (PEEPTOT) PEEPTOT is the estimated pressure at the circuit wye during the Expiratory Pause maneuver. 6.6.20 Plateau Pressure (PPL) PPL is the pressure measured and displayed during an Inspiratory Pause maneuver. 6.6.21 Total Respiratory Rate (fTOT) The total number of mandatory and spontaneous breaths per minute delivered to the patient. 6.6.22 PAV-based Lung Compliance (CPAV) For a PAV+ breath, CPAV is the change in pulmonary volume for an applied change in patient airway pressure, measured under zero-flow conditions and 6-46 Operator’s Manual Ventilator Settings updated upon successful completion of each calculation. CPAV is displayed on the waveform screen. 6.6.23 PAV-based Patient Resistance (RPAV) For a PAV+ breath, RPAV is the change in pulmonary pressure for an applied change in patient lung flow and updated upon successful completion of each calculation. RPAV is displayed on the waveform screen. 6.6.24 PAV-based Lung Elastance (EPAV) For a PAV+ breath, EPAV is the inverse of CPAV and is updated upon successful completion of each calculation. 6.6.25 Spontaneous Rapid Shallow Breathing Index (f/ VT) An indication of the patient’s ability to breathe spontaneously. High values generally mean the patient is breathing rapidly, but with low tidal volumes. Low values generally indicate the inverse. 6.6.26 Spontaneous Inspiratory Time Ratio (TI/TTOT) In SPONT mode, the percentage of a spontaneous breath consumed by the inspiratory phase. Updated at the successful completion of a spontaneous breath. 6.6.27 Spontaneous Inspiratory Time (TI SPONT) The duration of the inspiratory phase of a spontaneous breath and updated at the end of each spontaneous breath. TI SPONT is only calculated when the breathing mode allows spontaneous breaths and the breaths are patient-initiated. 6.6.28 PAV-based Total Airway Resistance (RTOT) For a PAV+ breath, RTOT is the change in pulmonary pressure for an applied change in total airway flow and updated upon the successful completion of Operator’s Manual 6-47 Performance each calculation. If the RPAV value appears in parentheses as described at the beginning of this section, the RTOT value also appears in parentheses. 6.6.29 Static Compliance (CSTAT) and Static Resistance (RSTAT) CSTAT is an estimate of the elasticity of the patient’s lungs, expressed in mL/ cmH2O. It is computed during a mandatory breath. RSTAT is the total inspiratory resistance across the artificial airway and respiratory system, displayed at the start of the next inspiration after the Inspiratory Pause maneuver. It is an estimate of how restrictive the patient’s airway is, based on the pressure drop at a given flow, expressed in cmH2O/L/s. RSTAT is computed during a VC mandatory breath with a square flow waveform. CSTAT is calculated using this equation: V pt C STAT = ------------------------------– C ckt P ckt – PEEP C STAT Static compliance P ckt The pressure in the patient circuit measured at the end of the 100 ms interval defining the pause-mechanics plateau V pt Total expiratory volume (patient and breathing circuit) PEEP The pressure in the patient circuit measured at the end of expiration C ckt Compliance of the breathing circuit during the pause maneuver (derived from SST) RSTAT is calculated using this equation after CSTAT is computed and assuming a VC breath type with a SQUARE waveform: R STAT 6-48 Static resistance C STAT Static compliance Operator’s Manual Ventilator Settings R STAT C ckt V· pt C ckt 1 + -------------- P PEAK – P PL C STAT = -------------------------------------------------------------------V· pt Compliance of the breathing circuit during the pause maneuver (derived from SST) P PL Flow into the patient during the last 100 ms of the waveform P PEAK Mean pressure in the patient circuit over the 100 ms interval defining the pause-mechanics plateau Peak circuit pressure During the pause, the most recently selected graphics are displayed and frozen, to determine when inspiratory pressure stabilizes. CSTAT and RSTAT are displayed at the start of the next inspiration following the inspiratory pause and take this format: CSTAT xxx or RSTAT yyy Special formatting is applied if the software determines variables in the equations or the resulting CSTAT or RSTAT values are out of bounds: 6.6.30 • Parentheses ( ) signify questionable CSTAT or RSTAT values, derived from questionable variables. • Flashing CSTAT or RSTAT values are out of bounds. • RSTAT ------ means resistance could not be computed, because the breath was not of a mandatory, VC type with square flow waveform. Dynamic Compliance (CDYN) CDYN is a dynamic estimate of static compliance for each mandatory breath delivered. Operator’s Manual 6-49 Performance 6.6.31 Dynamic Resistance (RDYN) RDYN is a dynamic estimate of static resistance for each mandatory breath delivered. 6.6.32 C20/C C20/C is the ratio of compliance of the last 20% of inspiration to the compliance of the entire inspiration. 6.6.33 End Expiratory Flow (EEF) A measurement of the end expiratory flow for an applicable breath. 6.6.34 Peak Spontaneous Flow (PSF) A measurement of the maximum inspiratory spontaneous flow for an applicable spontaneous breath 6.6.35 Displayed O2% The percentage of oxygen in the gas delivered to the patient, measured at the ventilator’s outlet, upstream of the inspiratory filter. It is intended to provide a check against the set O2% for alarm determination, and not as a measurement of oxygen delivered to the patient. O2% data can be displayed as long as the O2 monitor is enabled. If the monitor is disabled, dashes (--) are displayed. If a device alert occurs related to the O2 monitor, a blinking 0 is displayed. 6-50 Operator’s Manual 7 Preventive Maintenance 7.1 Overview This chapter contains information on maintenance of the Puritan Bennett™ 980 Series Ventilator. It includes 7.2 • How to perform routine preventive maintenance procedures, including frequency • How to clean, disinfect, or sterilize the ventilator and its main components • How to store the ventilator for extended periods • How to dispose of used parts Ventilator Operational Time The ventilator contains an hour meter that records the number of operational hours since the ventilator was manufactured. An additional timer tracks the number of hours since the last preventive maintenance activity was performed. Both the GUI and the status display show the number of hours before the next preventive maintenance is due. 7.3 Preventive Maintenance Intervals WARNING: To ensure proper ventilator operation, perform Preventive Maintenance intervals as specified in the following tables. Reference Operator Preventive Maintenance Frequency, p. 7-2 and Reference Service Preventive Maintenance Frequency, p. 1-2 in the Operator’s Manual Addendum on Preventive Maintenance. 7-1 Preventive Maintenance Table 7-1. Operator Preventive Maintenance Frequency Part Patient circuit: inspiratory and expiratory limbs Several times a day or as required by the institution's policy. Maintenance • Check both limbs for water accumulation. • Empty and clean. Water traps, and drain bag Check and empty as needed. Oxygen sensor calibration From the ventilator setup screen, touch the More Settings tab. To calibrate the oxygen sensor, touch Calibrate in the oxygen sensor area of the screen. Reference Oxygen sensor calibration testing, p. 4-34 for information on testing the oxygen sensor calibration. Inlet air filter bowl • Replace bowl if it is cracked. • If any sign of moisture is visible, remove ventilator from use and contact service personnel. • Inspect and replace if cracked, crazed, or damaged. Sterilize between patients and circuit changes, or according to the institution's policy. Sterilize before non-destructive disposal, or dispose of filter according to the institution’s policy. • Run SST to check resistance of the inspiratory limb. • Use care when changing inspiratory filter to avoid filter damage and minimize the potential for introduction of particles. Reusable inspiratory filter 7-2 Frequency • Before every use • After 15 days of continuous use in the inspiratory limb (replace) • Yearly or after 50 autoclave cycles (replace) • Whenever excess resistance is suspected Operator’s Manual Service Personnel Preventive Maintenance Table 7-1. Operator Preventive Maintenance Frequency (Continued) Part Reusable expiratory filter Condensate vial Frequency • Before every use • After 15 days of continuous use in the exhalation limb (replace) • Yearly or after 50 autoclave cycles (replace) • Whenever excess resistance is suspected • Several times a day or as required by the institution’s policy • Before every use • After 15 days of continuous use with the expiratory filter (replace) Maintenance • Inspect and replace if cracked, crazed, or damaged. Sterilize between patients and circuit changes, or according to the institution's policy. Sterilize before non-destructive disposal, or dispose of filter according to the institution’s policy. • Run SST to check resistance of the expiratory limb and filter. • Use care when changing expiratory filter to avoid filter damage and minimize the potential for introduction of particles. • Check and empty as needed. • Inspect and replace if cracked, crazed, or damaged. • Clean and sterilize between patients and circuit changes. Reference Condensate Vial Cleaning, p. 7-8 for instructions. Reference Component Sterilization, p. 7-24 for sterilization requirements. • Sterilize before nondestructive disposal, or according to the institution’s policy. Disposable inspiratory Filter After 15 days of continuous use (discard) Discard according to the institution’s protocol. Disposable expiratory Filter After 15 days of continuous use (discard) Discard according to the institution’s protocol. Operator’s Manual 7-3 Preventive Maintenance Table 7-1. Operator Preventive Maintenance Frequency (Continued) Part Frequency Maintenance Battery When transferring battery to or from another ventilator Disinfect by wiping with a damp cloth using one of the solutions listed. Reference Surface Cleaning Agents, p. 7-5 for approved cleaning agents. Battery Every three (3) years Replace Exhalation valve flow sensor assembly When contamination is suspected. Reference Component Cleaning and Disinfection, p. 7-6 and Reference Exhalation Valve Flow Sensor Assembly Disinfection, p. 7-13. NOTE: The exhalation valve flow sensor assembly is removable and may be disinfected. DO NOT STERILIZE the exhalation valve flow sensor assembly. Exhalation valve flow sensor assembly. 7.4 Every 25 disinfection cycles. A disinfection cycle is defined as one disinfection event as described. Reference Exhalation Valve Flow Sensor Assembly Disinfection, p. 7-13. Replace. Run flow sensor calibration, exhalation valve calibration, EST and SST after replacing the exhalation valve flow sensor assembly. Caution: Use specified cleaning, disinfecting, and sterilization agents and procedures for the appropriate part as instructed. Surface Cleaning of Exterior Surfaces External surfaces of the GUI, BDU, and ventilator base may become soiled and should be cleaned periodically. To clean the GUI, BDU, and ventilator base surfaces 1. Moisten a soft cloth with one of the surface cleaning agents listed or use SaniCloths (PDI, Inc.). Reference Surface Cleaning Agents, p. 7-5. 7-4 2. Wipe the GUI, BDU, and ventilator base, removing any dirt or foreign substances. 3. Dry all components thoroughly. 4. If necessary, vacuum any cooling vents on the GUI and BDU with an electrostatic discharge (ESD)-safe vacuum to remove any dust. Operator’s Manual Service Personnel Preventive Maintenance Table 7-2. Surface Cleaning Agents Part Ventilator exterior (including touch screen and flex arm Procedure Comments/Cautions Wipe clean with a cloth dampened with one of the cleaning agents listed below or equivalent. Use a damp cloth and water to rinse off chemical residue as necessary. Do not allow liquid or sprays to penetrate the ventilator openings or cable connections. Mild dish washing detergent solution Do not attempt to sterilize the ventilator by exposure to ethylene oxide (ETO) gas. Isopropyl alcohol (70% solution) Do not use pressurized air to clean or dry the ventilator, including the GUI cooling vents. Bleach (10% solution) Do not submerge the ventilator or pour cleaning solutions over or into the ventilator Window cleaning solution (isopropyl alcohol and ammonia) Ammonia (15% solution) Hydrogen peroxide (3% solution) Formula 409® cleaner (Clorox Company) CaviCide® surface disinfectant (Metrex Research Corporation) Control III® germicide (Maril Products, Inc.) Virox (spray or pre-wipes) (Virox Technologies Inc.) Mr. Muscle Window & Glass (SC Johnson Sani Cloths (PDI, Inc.) [Propan-2-ol, Isopropanol, Isopropyl Alcohol]1 Operator’s Manual 7-5 Preventive Maintenance Table 7-2. Surface Cleaning Agents (Continued) Part Ventilator cooling vents Procedure Vacuum the vents at the back of the GUI and BDU to remove dust. Comments/Cautions N/A 1. Chemicals stated are the generic equivalents of Mr. Muscle Window & Glass 7.5 Component Cleaning and Disinfection WARNING: To avoid microbial contamination and potential performance problems, do not clean, disinfect, or reuse single-patient use (SPU) or disposable components. Discard per local or institutional regulations. Risks associated with reuse of single-patient use items include but are not limited to microbial cross-contamination, leaks, loss of part integrity, and increased pressure drop. When cleaning reusable components, do not use hard brushes or implements that could damage surfaces. Table 7-3. Component Cleaning Agents and Disinfection Procedures Part Exhalation valve flow sensor assembly Cleaning Agent/Procedure Comments/Cautions Reference Exhalation Valve Flow Sensor Assembly Disinfection, p. 7-13 for specific instructions. Do not drop the exhalation valve flow sensor assembly or handle roughly during disinfection or storage. • Cidex® (2.5%) (ASP) • Sporox® II (Sultan) • Cidex OPA® (ASP) . Reusable patient circuit tubing 7-6 Disinfect per manufacturer’s instructions-for-use. • Inspect for nicks and cuts, and replace if damaged. • Run SST to check for leaks when reinstalling the circuit or when installing a new circuit. Operator’s Manual Service Personnel Preventive Maintenance Table 7-3. Component Cleaning Agents and Disinfection Procedures (Continued) Part Cleaning Agent/Procedure Comments/Cautions Disposable patient circuit tubing Discard Discard per the institution’s protocol. Breathing circuit in-line water traps Disinfect per manufacturer’s instructions-for-use. • Inspect water traps for cracks and replace if damaged. • Run SST to check for leaks when reinstalling the circuit or when installing new components. • Inspect components for nicks and cuts, and replace if damaged. • Run SST to check for leaks when reinstalling the circuit or when installing a new components. Breathing circuit components Disinfect per manufacturer’s instructions-for-use. Disposable drain bag and tubing (single unit) Discard when filled to capacity or when changing patient circuit. N/A Inlet air filter bowl Wash the bowl with mild soap solution, if needed. • Avoid exposing the inlet air filter bowl to aromatic solvents, especially ketones. • Replace if cracks or crazing are visible. Battery Wipe with a damp cloth using one of the cleaning agents listed. Reference Surface Cleaning Agents, p. 7-5. Do not immerse the battery or get the contacts wet. Cooling fan filter Clean every 250 hours or as necessary. Wash in mild soap solution, rinse, and air dry. Expiratory filter Reference Expiratory Filter Cleaning, p. 7-9 for cleaning instructions. Reference expiratory filter instructions-for-use (IFU) for sterilization instructions. • • Operator’s Manual Metrizyme (Metrex Research Corporation) ENZOL® (ASP) 7-7 Preventive Maintenance Table 7-3. Component Cleaning Agents and Disinfection Procedures (Continued) Part Condensate vial Cleaning Agent/Procedure Reference Condensate Vial Cleaning, p. 7-8 for cleaning instructions. • • Other accessories Comments/Cautions Clean condensate vial Metrizyme (Metrex Research Corporation) ENZOL® (ASP) Follow manufacturer’s instructions-for-use. N/A To clean parts 1. Wash parts in warm water using a mild soap solution. 2. Thoroughly rinse parts in clean, warm water (tap water is acceptable) and wipe dry. 3. Clean or disinfect ventilator surfaces and component parts per the procedures listed for each component. Reference Surface Cleaning Agents, p. 7-5. Reference Component Cleaning Agents and Disinfection Procedures, p. 7-6 for acceptable cleaning and disinfecting agents. 4. 5. Visually inspect the components for cracks or other damage prior to use. Dispose of damaged parts according to the institution’s policy. Whenever replacing or reinstalling a component, run SST before ventilating a patient. 7.5.1 Condensate Vial Cleaning Reference Condensate Vial, p. 7-9 when following the condensate vial cleaning instructions. Note: The o-ring (1) should remain in place during cleaning. To clean the condensate vial 1. Un-cap (2) the drain port from the condensate vial, but do not detach the retainer (3). 7-8 Operator’s Manual Service Personnel Preventive Maintenance 2. Rinse the condensate vial in water to remove any accumulations prior to cleaning. 3. Wipe the condensate vial assembly with the suggested cleaning solution to remove any accumulated material. The vial assembly may be fully immersed in the cleaning solution. Reference Component Cleaning Agents and Disinfection Procedures, p. 7-6 for the proper condensate vial cleaning solution. 4. Rinse the vial assembly with clean water. The assembly may be fully immersed to rinse. 5. Wipe the condensate vial dry. Figure 7-1. Condensate Vial 7.5.2 1 O-ring 2 Drain cap 3 Retainer Expiratory Filter Cleaning Reference the photos in this section when cleaning the expiratory filter. Operator’s Manual 7-9 liquid. To avoid retaining harmful residues, do not immerse housing or filter medium in liquid or sterilize using ethylene oxide (ETO). Preventive Maintenance Caution: Do not immerse the expiratory filter in liquid cleaning agent. Use care to prevent the cleaning agent from making contact with the filter media inside the filter housing. Note: Follow the institution’s protocol for handling, storage, and disposal of potentially biocontaminated waste. To clean the expiratory filter 1. Spray or wipe down surfaces of the exterior housing and housing bottom with cleaning solution. Reference Component Cleaning Agents and Disinfection Procedures, p. 7-6, for appropriate cleaning solutions. Use care to prevent the solution from contacting the filter media via the filter outlet, or entering the filter intake opening or from patient port. 7-10 Operator’s Manual Service Personnel Preventive Maintenance Figure 7-2. Filter Top and Bottom Views 1 Filter outlet (top) 4 External housing 2 Filter intake opening (bottom) 5 From patient port 3 Housing bottom 2. Operator’s Manual Wipe the interior surface of the from patient port with the solution to clean it. 7-11 Preventive Maintenance Figure 7-3. From Patient Port 3. Allow to dry by orienting the filter in the upright position for the contact time period recommended by the solution’s manufacturer. Figure 7-4. Expiratory Filter Drying Orientation 7-12 Operator’s Manual Service Personnel Preventive Maintenance 7.5.3 4. Rinse all filter surfaces that were exposed to the cleaning solution with water, using care to prevent liquid from entering the filter. 5. Allow the filter housing to dry until all liquid has evaporated. Exhalation Valve Flow Sensor Assembly Disinfection Note: Exhalation valve flow sensor assembly disinfection is not required on a routine basis but it may be disinfected. Reference Component Cleaning Agents and Disinfection Procedures, p. 7-6 for a list of appropriate disinfectants. Note: Follow the institution’s infection control protocol for handling, storage, and disposal of potentially bio-contaminated waste. Caution: To avoid damaging the hot film wire, do not insert fingers or objects into the center port when disinfecting the exhalation valve flow sensor assembly. The exhalation valve flow sensor assembly contains the exhalation valve body, exhalation valve flow sensor, exhalation valve diaphragm, expiratory filter seal, and pressure sensor filter. The expiratory flow sensor electronics consist of the hot film wire and the thermistor. Since it is protected by the expiratory filter, it does not require or need replacement or disinfection on a regular basis. It is, however, removable and may be disinfected. Expected service life is 25 disinfection cycles. Caution: To avoid damage to the expiratory flow sensor element • Do not touch the hot film wire or thermistor in the center port • Do not vigorously agitate fluid through the center port while immersed. • Do not forcefully blow compressed air or any fluid into the center cavity. • Do not drop or handle roughly during disinfection or storage. Operator’s Manual 7-13 Preventive Maintenance 7-14 WARNING: Damaging the flow sensor’s hot film wire or thermistor in the center port can cause the ventilator’s spirometry system to malfunction. Operator’s Manual Service Personnel Preventive Maintenance Figure 7-5. Exhalation Valve Flow Sensor Assembly 1 Top view 2 Bottom view Figure 7-6. Exhalation Valve Flow Sensor Components 1 Hot film wire and thermistor 3 Electrical contacts 2 Diaphragm sealing surface 4 Filter grommet Removal To remove the exhalation valve flow sensor assembly 1. Lift up on the expiratory filter latch and open the expiratory filter door. 2. Operator’s Manual With thumb inserted into the plastic exhalation port and four (4) fingers under the exhalation valve flow sensor assembly, pull it down until it snaps out. To avoid 7-15 Preventive Maintenance damaging the flow sensor element, do not insert fingers into the center port. Figure 7-7. Exhalation Valve Flow Sensor Assembly Removal To remove disposable components of the exhalation valve flow sensor assembly 1. Remove and discard the exhalation valve diaphragm, the exhalation valve filter seal, and the pressure sensor filter. Pinch the expiratory filter seal between two fingers to remove it. Figure 7-8. Exhalation Valve Diaphragm Removal 7-16 Operator’s Manual Service Personnel Preventive Maintenance Figure 7-9. Expiratory Filter Seal Removal Figure 7-10. Pressure Sensor Filter Removal 2. Dispose of removed items according to the institution’s protocol. Follow local governing ordinances regarding disposal of potentially bio-contaminated waste. Disinfection WARNING: Do not steam autoclave the exhalation valve flow sensor assembly or sterilize with ethylene oxide gas. Either process could cause the ventilator’s spirometry system to malfunction when reinstalled in the ventilator. Operator’s Manual 7-17 Preventive Maintenance WARNING: Use only the disinfectants described. Reference Component Cleaning Agents and Disinfection Procedures, p. 7-6. Using disinfectants not recommended by Covidien may damage the plastic enclosure or electronic sensor components, resulting in malfunction of the ventilator’s spirometry system. WARNING: Follow disinfectant manufacturer’s recommendations for personal protection (such as gloves, fume hood, etc.) to avoid potential injury. 1. Pre-soak exhalation valve flow sensor assembly in the enzymatic solution.Reference Operator Preventive Maintenance Frequency, p. 7-2. The purpose for this pre-soak is to break down any bio-film that may be present. Follow manufacturer’s instructions regarding duration of soak process. 7-18 Caution: Do not use any type of brush to scrub the exhalation valve flow sensor assembly, as damage to the flow sensing element could occur. 2. Rinse in clean, de-ionized water. 3. Prepare the chemical disinfectant according to the manufacturer’s instructions or as noted in the institution’s protocol. Reference Component Cleaning Agents and Disinfection Procedures, p. 7-6 for the proper disinfecting agents. 4. Immerse the in the disinfectant solution, oriented as shown, and rotate to remove trapped air bubbles in the its cavities. Keep immersed for the minimum time period by the manufacturer or as noted in the institution’s protocol. Operator’s Manual Service Personnel Preventive Maintenance Figure 7-11. Immersion Method 5. At the end of the disinfecting immersion period, remove and drain all disinfectant. Ensure all cavities are completely drained. Rinsing 1. Rinse the exhalation valve flow sensor assembly using clean, de-ionized water in the same manner used for the disinfection step. 2. Drain and repeat rinsing three times with clean, de-ionized water. WARNING: Rinse according to manufacturer’s instructions. Avoid skin contact with disinfecting agents to prevent possible injury. 3. Operator’s Manual After rinsing in de-ionized water, immerse in a clean isopropyl alcohol bath for approximately 15 seconds. Slowly agitate and rotate to empty air pockets. 7-19 Preventive Maintenance Drying 1. Dry in a low temperature warm air cabinet designed for this purpose. Covidien recommends a convective drying oven for this process, with temperature not exceeding 60°C (140°F). Caution: Exercise care in placement and handling in a dryer to prevent damage to the assembly’s flow sensor element. Inspection Reference Exhalation Valve Flow Sensor Components, p. 7-15 while inspecting the exhalation valve flow sensor assembly. 7-20 1. Inspect the plastic body, diaphragm sealing surface, filter grommet and the seal groove on the bottom side for any visible damage, degradation, or contamination. 2. Inspect electrical contacts for contaminating film or material. Wipe clean with a soft cloth if necessary. 3. Inspect the hot film wire and thermistor in the center port for damage and for contamination.DO NOT ATTEMPT TO CLEAN EITHER OF THESE. If contamination exists, rinse again with de-ionized water. If rinsing is unsuccessful or hot film wire or thermistor is damaged, replace the exhalation valve flow sensor assembly. Operator’s Manual Service Personnel Preventive Maintenance 7.5.4 Exhalation Valve Flow Sensor Assembly Reassembly The following illustration shows the reprocessing kit: Figure 7-12. Exhalation Valve Flow Sensor Assembly Reprocessing Kit 1 Diaphragm 2 Pressure sensor filter 1. 3 Expiratory filter seal After drying the exhalation valve flow sensor assembly, remove the pressure sensor filter from the reprocessing kit and install its large diameter into the filter grommet with a twisting motion until flush with the plastic valve body, as shown. The narrow end faces out. Figure 7-13. Installing the Pressure Sensor Filter 2. Remove the expiratory filter seal from the kit and turn the assembly so its bottom is facing up. 3. Install the seal into the recess with the flat side facing outward, away from the recess. Reference Installing the Expiratory Filter Seal, p. 7-22. Operator’s Manual 7-21 Preventive Maintenance Figure 7-14. Installing the Expiratory Filter Seal 1 4. 7-22 Flat side of seal Remove the diaphragm from the kit and install it. The outer seal bead rests in the outer groove. Operator’s Manual Service Personnel Preventive Maintenance Figure 7-15. Installing the Diaphragm 1 5. 7.5.5 Diaphragm bead located in exhalation valve flow sensor assembly’s groove Carefully inspect component placement and the complete assembly. Exhalation Valve Flow Sensor Assembly Replacement 1. Replace the exhalation valve flow sensor assembly any time if cracked or damaged in use, or if a malfunction occurs during SST or EST. 2. Replace the assembly if damage is noted to the hot film wire and thermistor in the center port. 3. Perform required calibrations. Reference Operator Preventive Maintenance Frequency, p. 7-2. To install the exhalation valve flow sensor assembly into the ventilator 1. With the expiratory filter door open, insert the assembly directly under the exhalation valve and push straight up until it snaps into place. Reference Installing the Exhalation Valve Flow Sensor Assembly, p. 7-24. To avoid damaging the hot film wire, do not insert fingers into any opening. 2. Install the expiratory filter by sliding it onto the tracks in the door, and orienting the filter’s From Patient port through the hole in the door. 3. Close expiratory filter door and lower expiratory filter latch. Operator’s Manual 7-23 Preventive Maintenance Figure 7-16. Installing the Exhalation Valve Flow Sensor Assembly 4. 7.5.6 7.6 Run EST after disinfection. Storage 1. Pre-test the exhalation valve flow sensor assembly before storage by installing it into the ventilator and running SST to test the integrity of the breathing system. Reference To run SST, p. 3-48 2. After performing SST, remove the assembly and place it into a protective bag or similar covered container. Component Sterilization To sterilize parts 1. Sterilize per the component’s instructions-for use or the steam sterilization procedure described. Reference Sterilization Parameters, p. 7-25 and Component Sterilization Procedures on page 7-25. 7-24 2. After the components are sterilized, visually inspect them for cracks or other damage. 3. Dispose of damaged parts according to the institution’s policy. Operator’s Manual Service Personnel Preventive Maintenance Table 7-4. Sterilization Parameters Autoclave sterilization Effective sterilization occurs by pre-vac sterilization of wrapped goods (132°C for 4 minutes). Refer to pre-vac system manufacturer’s program parameters or follow the steam sterilizer manufacturer’s instructions. 1. Disassemble the component. 2. Clean the component. 3. Wrap each component in a legally marketed sterilization wrap that has been cleared by FDA for use in pre-vac sterilization using the parameters described above. 4. Sterilize the wrapped parts*. 5. Inspect the sterilized parts for damage, and discard if damaged. 6. Reassemble the component. 7. Install the component on the ventilator. 8. Run SST. *Follow pre-vac system manufacturer’s instructions for use (IFU). Table 7-5. Component Sterilization Procedures Part Procedure Reusable expiratory and inspiratory filters Steam autoclave per manufacturer’s instructions-for-use Expiratory filter condensate vial Operator’s Manual Steam autoclave per manufacturer’s instructions-for-use Comments/Cautions • Do not chemically disinfect or expose to ETO gas • Check filter resistance using ventilator SST or other means before reuse. • Follow manufacturer’s recommendations for reuse. • Inspect the condensate vial for cracks after processing. • Replace condensate vial if damaged 7-25 Preventive Maintenance Table 7-5. Component Sterilization Procedures (Continued) Part Reusable drain bag tubing (short piece of tubing attached to drain bag) and clamp Procedure Clean and autoclave the reusable tubing; clean the clamp. Reference Surface Cleaning Agents, p. 7-5 for approved cleaning agents. Comments/Cautions N/A Whenever replacing or reinstalling a component, run SST before ventilating a patient. 7.7 Service Personnel Preventive Maintenance Covidien recommends only qualified service personnel perform preventive maintenance activities. Complete details are described in the Puritan Bennett™ 980 Series Ventilator Service Manual. At ventilator startup, and in Service mode, the GUI and status display indicate when there are 500 hours or less before preventive maintenance is due. 7.8 Safety Checks Covidien factory-trained service personnel should perform Extended Self Test (EST) on the ventilator after servicing it at the intervals specified in the table above. Reference the Puritan Bennett™ 980 Series Ventilator Service Manual for details on performing EST. 7.9 Inspection and Calibration Ventilator inspection and calibration should be performed by Covidien factorytrained service personnel at the intervals specified in the table above. 7.10 Documentation Covidien factory-trained service personnel should manually enter the service date, time, and nature of repair/preventive maintenance performed into the log using a keyboard on the GUI. 7-26 Operator’s Manual Service Personnel Preventive Maintenance To manually document a service or preventive maintenance activity 1. Enter Service Mode. 7.11 2. Select the Logs tab. 3. Select the Service Log tab. 4. Select Add Entry, and using the buttons to the right of each line, complete the entry. 5. Touch Accept when complete. Storage for Extended Periods To store the ventilator 1. Clean the unit thoroughly. 2. Remove any batteries and accessories. To return the ventilator to service 1. Replace batteries. 2. Recharge batteries prior to patient ventilation. If batteries are older than three (3) years, use new batteries. 3. Perform EST and SST prior to patient ventilation. Operator’s Manual 7-27 Preventive Maintenance Page Left Intentionally Blank 7-28 Operator’s Manual 8 Troubleshooting 8.1 Overview This chapter contains information regarding ventilator logs on the Puritan Bennett™ 980 Series Ventilator. 8.2 WARNING: To avoid a potential electrical shock, do not attempt to correct any electrical problem with the ventilator while it is connected to AC power. Problem Categories For the Puritan Bennett™ 980 Series Ventilator Operator’s Manual, troubleshooting is limited to responding to ventilator alarms and reviewing various ventilator logs. For detailed alarm information, including how to respond to alarms, Reference Chapter 6 to address individual alarms that may occur during ventilator use. Qualified service personnel who have attended the Covidien training class for Puritan Bennett 980 Series Ventilators should consult the Puritan Bennett™ 980 Series Ventilator Service Manual for detailed repair information and ventilator diagnostic codes. 8.3 How to Obtain Ventilator Service To obtain service for the ventilator, call Covidien Customer Service at 1.800.635.5267 and follow the prompts. 8.4 Used Part Disposal Follow local governing ordinances and recycling plans regarding disposal or recycling of device components. Discard all damaged parts removed from the ventilator during the maintenance procedures according to your institution's protocol. Sterilize contaminated parts before non-destructive disposal. 8-1 Troubleshooting 8.5 Ventilator Logs The ventilator uses various logs to store event information for later retrieval when managing a patient’s treatment. Some of the logs are accessible during ventilation and some logs are only available to Covidien personnel when the ventilator is in Service mode. The Puritan Bennett™ 980 Series Ventilator Service Manual gives more details regarding logs available to qualified service personnel. When New Patient is selected during ventilator setup, patient data, ventilator settings, and alarm logs are cleared, but this information is available for Service personnel review following New Patient selection when the ventilator is set up. 8-2 • Alarms Log — The alarm log records up to 1000 alarms that have occurred, whether they have been reset or autoreset, the priority level, and their analysis messages. The alarm log is accessible during normal ventilation and in Service mode. A date- and time-stamped entry is made in the log whenever an alarm is detected, escalated, reset or auto-reset. An entry is also made when an alarm silence interval begins, ends, or is canceled. If one or more alarms have occurred since the last time the alarm log was viewed, a triangular icon appears on the GUI indicating there are unread items. The alarm log is stored in non-volatile memory (NVRAM) and may be re-displayed after the ventilator’s power is cycled.If the ventilator enters BUV for any reason, this is also entered into the alarm log. The alarm log is cleared by setting the ventilator up for a new patient. • Settings Log — The settings log records changes to ventilator settings for retrospective analysis of ventilator-patient management. The time and date, old and new settings. and alarm resets are recorded. A maximum of 500 settings changes can be stored in the log. The settings log is cleared when the ventilator is set up for a new patient. The settings log is accessible in normal ventilation mode and Service mode. • Patient Data Log — This log records every minute (up to 4320 patient data entries) consisting of date and time of the entry, patient data name, and the patient data value during ventilator operation. It is cleared when the ventilator is set up for a new patient. Three tabs are contained in the patient data log: • Vital Patient data — The log contains the same information that the clinician has configured in the patient data banner at the top of the GUI. If the patient data parameters in the banner are changed, these changes are reflected the next time the patient data log is viewed. • Additional Patient Data – 1 — This log corresponds to the patient data parameters set on page 1 of the additional patient data banner. A total of 15 parameters are stored here, consisting of date and time of the entry (recorded every minute), patient data name, and the patient data value during ventilator operation. Operator’s Manual Ventilator Logs • • Additional Patient Data – 2 — This log corresponds to the patient data parameters set on page 2of the additional patient data banner. A total of ten (10) parameters are stored here, consisting of date and time of the entry (recorded every minute), patient data name, and the patient data value during ventilator operation. Diagnostic Log — The Diagnostic Log is accessible during normal ventilation and Service modes and contains tabs for the System Diagnostic Log (default), the System Communication Log, and the EST/SST Diagnostic Log. The diagnostic log contains tabs for the following: • System Diagnostic Log — The System Diagnostic Log contains the date and time when an event occurred, the type of event, the diagnostic code(s) associated with the event and any notes.Reference the Puritan Bennett™ 980 Series Ventilator Service Manual (10078090) for specific information contained in the System Diagnostic Log. The diagnostic log is not cleared when the ventilator is set up for a new patient. • System Communication Log — This log contains diagnostic information generated by the ventilator’s communication software. Reference the Puritan Bennett™ 980 Series Ventilator Service Manual (10078090) for specific information contained in the System Communication Log. • EST/SST Diagnostic Log — The EST/SST diagnostic log displays the time, date, test/event, system code (reference the Puritan Bennett™ 980 Series Ventilator Service Manual), type, and notes. • EST/SST status log — The EST and SST status log displays the time, date, test, test status (passed or failed). • General Event log — The general event log contains ventilator-related information not found in any other logs. It includes changes in alarm volume, when the ventilator entered and exited Stand-By, GUI key presses, respiratory mechanics maneuvers, O2 calibration, patient connection, elevate O2, and warning notifications. The General event log can display up to 256 entries and is not cleared upon new patient setup. • Service Log — The service log is accessible during normal ventilation and Service modes and contains the nature and type of the service, reference numbers specific to the service event (for example, sensor and actuator ID numbers), manual and automatic serial number input, and the time and date when the service event occurred. It is not cleared upon new patient setup. To view ventilator logs 1. Touch the clipboard icon in the constant access icon area of the GUI. The log screen appears with tabs for the various logs. 2. Operator’s Manual Touch the tab of the log desired. 8-3 Troubleshooting 3. View the information for each parameter desired. Figure 8-1. Log Screen 1 Individual logs tabs 2 Pages contained in the log being viewed Ventilator logs can be saved by entering Service mode, and downloading them via the ethernet port. Reference the Puritan Bennett™ 980 Series Ventilator Service Manual for instructions on downloading ventilator logs. 8.6 Diagnostic Codes Refer to the diagnostic log for the codes generated during patient ventilation. For a more information on the diagnostic codes, reference the Puritan Bennett™ 980 Series Ventilator Service Manual or contact Covidien Technical Support. 8-4 Operator’s Manual 9 Accessories 9.1 Overview This chapter includes accessories that can be used with the Puritan Bennett™ 980 Series Ventilator. Reference Covidien Accessories and Options, p. 9-4 for part numbers of any items available through Covidien. The following commonly available accessories from the listed manufacturers can be used with the ventilator system: • Filters — DAR/Covidien, Puritan Bennett • Heated Humidification Systems — Hudson RCI/Teleflex, Fisher & Paykel • Patient Circuits — commonly available breathing circuits with standard ISO 15 mm/22 mm connection for neonatal, pediatric, and adult patients. Manufacturers include Fisher & Paykel, DAR, and Hudson RCI/Teleflex. • Masks — ResMed, Respironics, Fisher & Paykel • Patient Monitoring Systems — Reference Connectivity to External Systems, p. 5-21 for information on which systems can be used with the ventilator • Nasal Interfaces — Hudson RCI/Teleflex, Fisher & Paykel, Argyle • Compressed air filter and water trap — Covidien WARNING: The Puritan Bennett™ 980 Series Ventilator contains phthalates. When used as indicated, very limited exposure to trace amounts of phthalates may occur. There is no clear clinical evidence that this degree of exposure increases clinical risk. However, in order to minimize risk of phthalate exposure in children and nursing or pregnant women, this product should only be used as directed. 9-1 Accessories 9.2 General Accessory Information The patient circuit support arm (flex arm) can be fastened to the ventilator handle on either the right or left side. Flex arms used on the Puritan Bennett™ 840 Ventilator System can also be used on the Puritan Bennett™ 980 Ventilator System. 9-2 Operator’s Manual General Accessory Information Figure 9-1. Ventilator with Accessories Operator’s Manual 9-3 Accessories Figure 9-2. Additional Accessories Reference Ventilator with Accessories, p. 9-3 and the figure above for the parts listed in the following table. Note: Occasionally, part numbers change. If in doubt about a part number, contact your local Covidien representative. Table 9-1. Covidien Accessories and Options Item number 9-4 Accessory or option description Part number 1 Test lung 10005490 2 Drain Bag Tubing (package of 10) 4-048493-00 3 Drain Bag (package of 25) 4-048491-00 4 Drain Bag Tubing Clamp, reusable (package of 5) 4-048492-00 5 Pediatric-Adult Expiratory Filter1 10063033 Pediatric-Adult Expiratory Filtration System (carton of 12) 10043551 6 980 FRU, Exhalation valve flow sensor 10097468 7 Wall air water trap 10086051 Operator’s Manual General Accessory Information Table 9-1. Covidien Accessories and Options (Continued) Item number 8 9 Operator’s Manual Accessory or option description Part number Power cord, 10A, RA, ANZ 10087151 Power cord, 10A, RA, UK 10087159 Power cord, 10A, RA, EU 10087155 Power cord, 10A, RA, Japan 10087157 Power cord, 10A, RA, British 10087152 Power cord, 10A, RA, Switzerland 10087154 Power cord, 10A, RA, USA 10081056 Power cord, 10A, RA, Israel 10087156 Power cord, 10A, RA, Brazil 10087160 Power cord, 10A, RA, China 10087153 Air hose assembly; Norway, Sweden, Finland, Denmark, Greece, France 4-074696-00 9-5 Accessories Table 9-1. Covidien Accessories and Options (Continued) Item number Accessory or option description Part number Air hose assembly; Australia, New Zealand 4-074712-00 Air hose assembly; Canada 4-074709-00 Air hose assembly; Italy, Switzerland, Spain, Belarus, Kazakhstan 4-074706-00 Air hose assembly; Japan, Israel 10001777 Air hose assembly; Poland, Portugal, South Africa 4-074703-00 Air hose assembly; Switzerland 4-074707-00 Air hose assembly; United States, Latin America 4-006541-00 Air hose assembly; Germany, Luxembourg, Austria, Netherlands, Belgium, Croatia, Turkey, Russia, Slovenia, Serbia, Bulgaria, Romania 4-074714-00 Air hose assembly; United Kingdom, Ireland, Switzerland, Hungary, Slovakia, Czech 4-074713-00 Oxygen hose assembly; Norway, Sweden, Finland, Denmark, Greece, France 4-074697-00 Oxygen hose assembly; Canada 4-074710-00 Oxygen hose assembly, Italy, Switzerland, Spain, Belarus, Kazakhstan 4-074705-00 Oxygen hose assembly; Japan, Israel 10001766 Oxygen hose assembly; Poland, Portugal, South Africa 4-074705-00 Oxygen hose assembly; Switzerland 4-074708-00 Oxygen hose assembly; United States, Latin America 4-001474-00 Oxygen hose assembly; Germany, Luxembourg, Austria, Netherlands, Belgium, Croatia, Turkey, Russia, Slovenia, Serbia, Bulgaria, Romania 4-074715-00 Oxygen hose assembly; United Kingdom, Ireland, Switzerland, Hungary, Slovakia, Czech 4-074698-00 For countries not identified, contact your local Covidien representative for the proper air and oxygen hose part numbers. 9-6 10 Cylinder mount for compressed Air and O2 gas 10086050 11 Flex arm assembly 4-032006-00 12 Rechargeable Lithium Ion battery 10086042 Operator’s Manual General Accessory Information Table 9-1. Covidien Accessories and Options (Continued) Item number Accessory or option description Part number 13 Humidifier bracket 10086049 14 Drain Bag Clip 10087137 Inspiratory bacterial filter, reusable (Re/Flex) 4-074600-00 Inspiratory bacterial filter, disposable, (carton of 12) (DAR) 351U5856 16 Condensate vial, reusable 10063031 17 Condensate vial drain cap 4-074613-00 Assy, Patient Circuit, Heated Wire, Adult (reusable) G-061235-00 Assy, Patient Circuit, Heated Wire, Pediatric Patient circuit, Pediatric, reusable G-061237-00 Assy, Patient Circuit, Pediatric, Reusable G-061223-00 Patient circuit, Adult, single use 6-003030-00 Ventilator breathing circuit, Neonatal disposable, DAR™ (not available in USA) 3078447 Ventilator breathing circuit, Neonatal, disposable, Hudson RCI/Teleflex 780-06 Ventilator breathing circuit, Neonatal, disposable, Fisher & Paykel RT235 19 O-ring seal, condensate vial, reusable 10085527 20 Neonatal expiratory filtration system, disposable, with condensate vial 4-076900-00 21 Proximal Flow monitoring sensor (disposable, 10/box) 10047078 Exhalation valve module reprocessing kit (6/carton) 10086048 15 18 Not shown Hardware options Not shown -- Gold standard test circuit, 21 inch (for performing EST) 4-018506-00 Proximal Flow Monitoring Option 10084331 Software options Operator’s Manual Not shown Leak Sync Software 10086418 Not shown Leak Sync Software Upgrade 10096528 Not shown IE Sync Software 10086354 Not shown IE Sync Software Upgrade 10096529 9-7 Accessories Table 9-1. Covidien Accessories and Options (Continued) Item number Accessory or option description Part number Not shown NeoMode 2.0 Software 10086743 Not shown NeoMode 2.0 Software Upgrade 10096526 Not shown PAV+ Software 10086283 Not shown PAV+ Software Upgrade 10096530 Not shown BiLevel 2.0 Software 10086682 Not shown BiLevel 2.0 Software Upgrade 10096527 1. Reusable filtration system does not include condensate vial. Reusable condensate vial must be ordered separately. 9-8 Operator’s Manual 10 Theory of Operations 10.1 Overview This chapter provides specific details on breath delivery functions of the Puritan Bennett™ 980 Series Ventilator. The chapter is organized as shown below. Section Number Title Page 10.1 Overview p. 10-1 10.2 Theoretical Principles p. 10-3 10.3 Applicable Technology p. 10-3 10.4 Inspiration — Detection and initiation p. 10-4 10.5 Exhalation — Detection and Initiation p. 10-9 10.6 Compliance and BTPS Compensation p. 10-13 10.7 Mandatory Breath Delivery p. 10-17 10.8 Spontaneous Breath Delivery p. 10-22 10.9 A/C Mode p. 10-31 10.10 SIMV Mode p. 10-34 10.11 Spontaneous (SPONT) Mode p. 10-39 10.12 Apnea Ventilation p. 10-41 10.13 Detecting Occlusion and Disconnect p. 10-45 10.14 Respiratory Mechanics p. 10-49 10.15 Ventilator Settings p. 10-57 10.16 Safety Net p. 10-71 10.17 Power On Self Test (POST) p. 10-76 10.18 Short Self Test (SST) p. 10-77 10.19 Extended Self Test (EST) p. 10-77 10-1 Theory of Operations WARNING: The ventilator offers a variety of breath delivery options. Throughout the patient's treatment, the clinician should carefully select the ventilation mode and settings to use for that patient based on clinical judgment, the condition and needs of the patient, and the benefits, limitations and characteristics of the breath delivery options. As the patient's condition changes over time, periodically assess the chosen modes and settings to determine whether or not those are best for the patient's current needs. The gas supplies to which the ventilator are connected must be capable of delivering 200 L/min flow with the supply pressure between 35 psig and 87 psig (241.8 kPa to 599.8 kPa). These supplies may be compressed air from an external source (wall or bottled) air or oxygen. Air and oxygen hoses connect directly to fittings at the rear of the breath delivery unit (BDU). The flow of each gas is metered by a Proportional Solenoid (PSOL) valve to achieve the desired mix in the Mix Module. The flow through each PSOL is monitored by separate flow sensors to ensure the accuracy of the mix. The mixed gases then flow to the Inspiratory Module. The blended gas in the Inspiratory Module is metered by the Breath Delivery PSOL and monitored by the Breath Delivery Flow Sensor to ensure that the gas is delivered to the patient according to the settings specified by the operator. Delivered tidal volumes are corrected to standard respiratory conditions (BTPS) to ensure consistent interpretation by the clinician. The Inspiratory Module also incorporates the Safety Valve, which opens to vent excess pressure and allows the patient to breathe room air (if able to do so) in the event of a serous malfunction. Breathing gas exits the Inspiratory Module, passes through an internal bacteria filter leaving the ventilator via the To Patient port. The ventilator breathing circuit, including the external bacteria filter and humidification means, carries the breathing gas to the patient. Exhaled gas leaves the expiratory limb of the breathing circuit through the From Patient port. The gas is conducted through a condensate vial, the expiratory bacteria filter and the exhalation valve assembly (EVQ) which includes a pressure sensing port, a flow sensor, and the exhaust port. The gas then flows through the exhalation valve, which actively controls PEEP while minimizing pressure overshoot and relieving excess pressures. Pressure transducers in the inspiratory pneumatic system (PI) and exhalation compartment (PE) monitor pressures for accurately controlling breath delivery. 10-2 Operator’s Manual Short Self Test (SST) 10.2 Theoretical Principles This theory of operations is described mainly from a clinical standpoint, discussing how the ventilator responds to various patient inputs, but also including a general description of the ventilator’s components and how they work together to manage breath delivery. 10.3 Applicable Technology The ventilator’s control is provided by Breath Delivery (BD) and Graphical User Interface (GUI) Central Processing Units (CPUs). The BD CPU manages all breath delivery functions and provides background checks on the subsystems required for breath delivery. The GUI CPU controls the primary display, operator input devices, and the alarm system. The status display, a small, non-interactive LCD display located on the Breath Delivery Unit (BDU) is controlled by its own processor. Reference Status Display, p. 2-28 for more information. USB, Ethernet, and HDMI interfaces are provided on the ventilator. The USB interface supports items such as transferring data to an external monitor via a serial -over-USB protocol and saving screen captures to a memory storage device or flash drive. Reference To configure Comm ports, p. 5-4 for information on serial-over-USB data transfer. The Ethernet interface is used by qualified service personnel for accessing ventilator logs and performing software options installation, and the HDMI interface provides the ability to display the GUI screen on an external video display device. Pressure and flow sensors in the inspiratory and expiratory modules to manage breath delivery processes. Sensor signals are used as feedback to the breath delivery PSOL and exhalation valve controllers. Additional flow and pressure sensors are used in the mix module to control the breathing gas composition. In addition, gas temperature is measured for temperature compensation of flow readings. Atmospheric pressure is measured in the inspiratory module and used for BTPS compensation. The sensor signals are filtered using antialiasing filters and sampled with A/D converters. Additional low-pass filters precondition the signals, the signals are then used for controls and display purposes. Closed-loop control is used to maintain consistent pressure and flow waveforms in the face of changing patient/system conditions. This is accomplished by using the output as a feedback signal that is compared to the operator-set input. The difference between the two is used to drive the system toward the Operator’s Manual 10-3 Theory of Operations desired output. For example, pressure-control modes use airway pressure as the feedback signal to control gas flow from the ventilator. Reference the figure below. This diagram shows a schematic drawing of a general feedback control system. The input is a reference value (e.g., operator preset inspiratory pressure) that is compared to the actual output value (e.g., instantaneous value of airway pressure). The difference between those two values is the error signal. The error signal is passed to the controller (e.g., the software control algorithm). The controller converts the error signal into a signal that can drive the actuator (e.g., the hardware drivers and valves) to cause a change in the manipulated variable (e.g., inspiratory flow). Disturbances Input + Error signal Controller (software) Actuator (hardware) Manipulated Controlled Plant Variable Variable Feedback Signal 10.4 + Note: In the diagram above, the “plant” is the patient and the connected breathing circuit. – Inspiration — Detection and initiation When ventilator inspiration occurs, it is called triggering. Breaths are delivered to the patient based on ventilator settings the practitioner has entered and are determined by pressure, flow, or time measurements, or operator action. The ventilator uses the following methods to trigger an inspiration: 10-4 • Pressure triggering (P-TRIG) • Flow triggering (V-TRIG) • Time-triggered • Operator-initiated • IE Sync triggered (if the IE Sync option is installed) (in SPONT mode, only) Operator’s Manual Short Self Test (SST) Note: Reference Appendix C in this manual for more information on IE Sync. If the ventilator detects a drop in pressure at the circuit wye or when there is a decrease in base flow measured at the exhalation valve, the patient is said to trigger the breath. Mandatory breaths triggered by the patient are referred to as PIM or patient-initiated mandatory breaths. All spontaneous breaths are patient-initiated, and are also triggered by a decrease in circuit pressure or measured base flow indicating the patient is initiating an inspiration. Another term, autotriggering, is used to describe a condition where the ventilator triggers a breath in the absence of the patient’s breathing effort. Autotriggering can be caused by inappropriate ventilator sensitivity settings, water in the patient circuit, or gas leaks in the patient circuit. 10.4.1 Pressure Triggering If pressure triggering (P-TRIG) is selected, the ventilator transitions into inspiration when the pressure at the patient circuit wye drops below positive end expiratory pressure (PEEP) minus the operator-set sensitivity level (PSENS). Reference the figure below. As the patient begins the inspiratory effort and breathes gas from the circuit (event 5, the A-B interval in the figure, below), pressure decreases below PEEP. When the pressure drops below PEEP minus PSENS (event 6), the ventilator delivers a PIM breath. The pressure-decline time interval between events A and B determines how aggressive the patient’s inspiratory effort is. A short time interval signifies an aggressive breathing effort. The A-B interval is also affected by PSENS. A smaller PSENS setting means a shorter A-B time interval. (The minimum PSENS setting is limited by autotriggering, and the triggering criteria include filtering algorithms that minimize the probability of autotriggering.) Operator’s Manual 10-5 Theory of Operations Figure 10-1. Inspiration Using Pressure Sensitivity 10.4.2 1 Exhalation 4 Event B: Patient-triggered inspiration begins 2 Inspiration 5 A-B interval 3 Event A: (patient inspires) 6 Operator-set pressure sensitivity Flow Triggering If flow triggering (V-TRIG) is selected the BDU provides a constant gas flow through the ventilator breathing circuit (called base flow) during exhalation. The base flow is 1.5 L/m greater than the value selected for flow sensitivity (VSENS). Reference Inspiration Using Flow Sensitivity, p. 10-7 where the top graphic represents expiratory flow and the bottom graphic represents inspiratory flow.] The ventilator’s breath delivery flow sensor measures the base flow delivered to the circuit and the exhalation valve flow sensor measures the flow entering the exhalation valve. The ventilator monitors patient flow by measuring the difference between the inspiratory and exhaled flow measurements. If the patient is not inspiring, any difference in measured flows is due to leaks in the breathing system or flow sensor inaccuracy. The clinician can compensate for leaks in the breathing system by increasing VSENSto a value equal to desired VSENS + leak flow. 10-6 Operator’s Manual Short Self Test (SST) As the patient begins the inspiratory effort and inspires from the base flow, less exhaled flow is measured, while the delivered flow remains constant. Reference the figure below (event A). As the patient continues to inspire, the difference between the delivery and exhalation valve flow sensor measurements increases. The ventilator initiates an inspiration when the difference between the two flow measurements is greater than or equal to the operator-set flow sensitivity value. Reference Inspiration Using Flow Sensitivity, p. 10-7, (event B). As with pressure triggering, the time delay between onset of the patient’s effort and actual gas delivery depends on • How quickly the exhaled flow declines (that is, the aggressiveness of the inspiratory effort). The more aggressive the inspiratory effort, the shorter the interval, and • the flow sensitivity value. The smaller the value, the shorter the delay During flow triggering, a backup pressure sensitivity of 2 cmH2O is present to detect a breath trigger in the event that the flow trigger fails. Figure 10-2. Inspiration Using Flow Sensitivity 1 Software-set base flow (L/min) 5 Operator-set flow sensitivity 2 Start of patient effort 6 1.5 L/min 3 Event A: flow is decreasing 7 Flow delivered to patient 4 Event B: Gas delivery begins Operator’s Manual 10-7 Theory of Operations 10.4.3 Time Triggers The ventilator measures the time interval for each breath and breath phase. If the ventilator is in Assist/Control (A/C) mode (where the ventilator delivers breaths based on the breath rate setting), a VIM or ventilator initiated mandatory breath is delivered after the appropriate time interval. The duration of the breath in seconds (Tb) is 60/f. Figure 10-3. Breath Activity During Time-triggered Inspiration 10.4.4 1 Breath activity (VIM) 2 Breath activity (PIM) 3 Time period (Tb) = 60/f Operator-initiated Triggers If the operator presses the Manual inspiration key, an OIM (operator-initiated mandatory) breath is delivered. The ventilator will not deliver an OIM under the following conditions: • During an active inspiration, whether mandatory or spontaneous • During the restricted phase of exhalation • During circuit disconnect and Occlusion Status Cycling (OSC) conditions Reference Manual Inspiration, p. 10-22 later in this chapter for information on the restricted phase of exhalation. 10.4.5 IE Sync Trigger IE Sync is a software option that allows the ventilator to trigger a breath based on a model of the movement of the patient’s respiratory system. Reference Appendix C in this manual for a detailed description of the IE Sync option. 10-8 Operator’s Manual Short Self Test (SST) 10.5 Exhalation — Detection and Initiation When exhalation occurs, it is called cycling. Mandatory breaths can be volumecycled or time-cycled by the ventilator or pressure cycled by the patient. Spontaneous breaths can be flow-cycled or pressure-cycled by the patient or timecycled by the ventilator. A patient-cycled exhalation relies on measurements such as inspiratory flow rate or airway pressure. The ventilator uses the three (3) methods described below to detect exhalation: 10.5.1 • Airway pressure method (spontaneous breaths) • Percent peak flow method (spontaneous breaths) • Time-cycling method (mandatory breaths) • IE Sync cycled (in SPONT mode only, if the IE Sync option is installed) Airway Pressure Method If expiratory sensitivity (ESENS) is set to a value too low for the patient-ventilator combination, a forceful expiratory effort could cause circuit pressure (PPEAK) to rise to its limit. The ventilator monitors circuit pressure throughout the inspiratory phase, and initiates an exhalation when the pressure equals the inspiratory pressure (PI) target value + an incremental value. This transition to exhalation occurs during spontaneous pressure-based ventilation and in volume support (VS). Note: The allowable incremental value above the target pressure is 1.5 cmH2O once a portion of inspiration time (Tn) has elapsed. Before Tn, the incremental value is higher to allow for transient pressure overshoots. For the first 200 ms of inspiration, the incremental pressure is 10% of the target pressure, up or 8 cmH2O, whichever is greater. From 200 ms to Tn, the incremental pressure decreases in a linear fashion from the initial value to 1.5 cmH2O. Operator’s Manual 10-9 Theory of Operations Figure 10-4. Exhalation via the Airway Pressure Method 10.5.2 1 Pressure target 4 200 ms 2 Pressure target +incremental value (n) 5 Tn 3 Start breath Percent Peak Flow Method For spontaneous breath types including PS (pressure supported), TC (tube compensated), and VS (volume supported, the ventilator captures the value of the delivered peak inspiratory flow, then monitors the inspiratory flow decline until the value of current flow to peak flow (expressed as a percentage) is less than or equal to the set ESENS value. The ventilator then cycles from inspiration into exhalation. Reference Exhalation via the Percent Peak Flow Method, p. 10-11 for an example of exhalation using this method. 10-10 Operator’s Manual Short Self Test (SST) Figure 10-5. Exhalation via the Percent Peak Flow Method 10.5.3 1 Inspiratory flow (0 L/min) 5 Event B: Ventilator initiates exhalation 2 Inspiration 6 Inspiratory flow (L/min) without expiratory trigger 3 Trigger 7 VMAX x ESENS/100 4 Event A: delivered flow begins to decrease (VMAX) Note: PAV+ uses a flow-based cycling method, also called ESENS, but it is expressed in L/min rather than in % of VMAX. Time-cycling Method In pressure ventilation, the set inspiratory time (TI) defines the duration of the inspiratory phase. In volume ventilation, TI depends on the tidal volume (VT) setting, peak flow (VMAX), flow pattern, and plateau time (TPL). The ventilator cycles into exhalation when the set TI (pressure ventilation) or computed TI (volume ventilation) lapses. 10.5.4 IE Sync Cycling IE Sync detects the end of inspiration when a real-time estimate of the timederivative of intra-pleural pressure, threshold. Operator’s Manual (PSYNC), drops below the set ESENS 10-11 Theory of Operations 10.5.5 Backup Methods There are four backup methods for preventing excessive duration or pressure during inspiration 10.5.6 • Time limit • High circuit pressure limit • High ventilator pressure limit • High inspired tidal volume limit Time Limit For adult and pediatric patients, the time limit method ends inspiration and begins exhalation when the duration of a spontaneous inspiration is greater than or equal to [1.99 s + 0.02 x PBW (kg)] s. 10.5.7 High Circuit Pressure Limit During any type of inspiration, inspiration ends and exhalation begins when the monitored airway pressure (PCIRC) is greater than or equal to the set high circuit pressure limit. 10.5.8 High Ventilator Pressure Limit The ventilator transitions from inspiration to exhalation if the high ventilator pressure (2PVENT) limit of 110 cmH2O is reached. 10.5.9 High Inspired Tidal Volume Limit The high inspired tidal volume limit terminates inspiration and commences exhalation during VC+, VS, tube compensated (TC), or proportionally assisted (PAV+) breaths if the delivered volume is greater than or equal to 2VTI. 10-12 Note: The ventilator does not generate subatmospheric airway pressures during exhalation. Operator’s Manual Short Self Test (SST) 10.6 10.6.1 Compliance and BTPS Compensation Compliance Compensation in Volume-based Breaths Compliance compensation accounts for the gas volume not actually delivered to the patient during inspiration. This gas is known as the compliance volume, VC. VC is the gas lost to pressurizing the breathing circuit and includes the volumes of the patient circuit, any accessories such as a humidifier and water traps, and internal ventilator gas passages. Figure 10-6. Square Flow Pattern 1 Flow (y-axis) 4 Compliance volume (VC) 2 Actual VMAX 5 Set VT 3 Set VMAX 6 TI Operator’s Manual 10-13 Theory of Operations Figure 10-7. Descending Ramp Flow Pattern 1 Flow (y-axis) 5 Set VT 2 Actual VMAX 6 TI 3 Set VMAX 7 Minimum VMAX 4 Compliance volume (VC) In the ventilator, an iterative algorithm automatically computes the compliance volume. There is a maximum tubing to- patient compliance ratio to reduce the potential for over-inflation due to an erroneous patient compliance estimation. The maximum ratio is determined by the selected patient circuit type and predicted body weight (PBW): 10-14 Operator’s Manual Short Self Test (SST) C pt ckt Factor = --------------C pt Factor Compliance volume factor C pt ckt Compliance of the patient circuit C pt Compliance of the patient The compliance volume is calculated as V C = C pt ckt P wye – P VC C pt ckt Compliance volume Compliance of the patient circuit P wye Pressure at the patient wye at the end of the current inspiration P Pressure at the end of the current exhalation Without automated compliance compensation, practitioners would have to compute VC to estimate the loss of volume in the patient circuit, then increase the VT setting by that amount. Increasing the tidal volume by a single increment to compensate for compliance volume provides only partial compensation, and requires extra effort and understanding by the practitioner. Additionally, Pwye and P can change with time. Operator’s Manual 10-15 Theory of Operations An iterative algorithm in the ventilator automatically computes the compliance volume and compensates for it. Compliance compensation does not change inspiratory time (TI). It is achieved by increasing flow (increasing the amplitude of the selected flow pattern). Keeping TI constant maintains the original I:E ratio. There is a maximum compliance volume to reduce the potential for overinflation due to an erroneous compliance volume calculation. The maximum compliance volume is determined by the selected patient circuit type and predicted body weight (PBW), and is summarized by this equation: Vcomp,max = Factor x Tidal volume where: Vcomp,max = maximum compliance volume Factor = linear interpolation of the values in the following table for adult, pediatric, and neonatal circuit types. Factor is calculated as: MIN (10, MAX (2.5, 1.0 + (2.0/0.3 x kg PBW))) Table 10-1. Compliance Volume Factors Adult patient circuit type 10-16 Pediatric patient circuit type PBW (kg) Factor PBW (kg) Factor ≤ 10 5 ≤ 10 5 15 4.6 11 3.5 30 3.4 12.5 2.9 60 2.75 15 2.7 ≥ 150 2.5 30 2.5 Note: Compliance compensation calculations are also in effect during exhalation to ensure spirometry accuracy. Operator’s Manual Short Self Test (SST) If the patient’s compliance decreases beyond the limits of compliance compensation, the ventilator relies on the 2PPEAK alarm setting to truncate the breath and switch to exhalation. 10.6.2 BTPS Compensation in Volume-based Breaths Volumes and flows are BTPS compensated, that is, they are reported by the ventilator at existing barometric pressure, 37°C (98.6°F), and fully saturated with water vapor. 10.7 Mandatory Breath Delivery Three mandatory breath types are offered in the ventilator — volume control (VC) which bases breath delivery on the delivered inspiratory tidal volume, pressure control (PC), which bases breath delivery on achieving and sustaining a pressure target for a set period of time, and volume control plus (VC+) which is a pressure-controlled breath based on a target tidal volume. VC+ can be used in situations where a patient’s lungs become more compliant due to treatment as it reduces the target pressure (lessening the forces on the alveoli) to achieve the target tidal volume. Mandatory breaths are delivered by the ventilator, are either assisted (if patient initiated or PIM), or controlled (if ventilator initiated or VIM), or initiated by the operator (OIM). In A/C mode, the breath period (Tb) is calculated using the breath rate (f) according to the equation T b = 60 f If, during Tb, patient effort is detected, a PIM breath is initiated and a new breath period starts. If no patient effort is detected before Tb lapses, the next breath delivered is a VIM, and a new breath period starts. Reference Ventilator Settings Range and Resolution, p. 11-8 for details on the following VC+ settings: • Expiratory time (TE) • I:E ratio • Inspiratory time (TI) Operator’s Manual 10-17 Theory of Operations • Rise time % • Target or tidal volume (VT) VC and PC breath types require no initialization. A VC breath is based on meeting a delivered volume target and a PC breath is based on meeting a specific pressure target. VC+ breaths, however, go through a startup routine. 10.7.1 Volume Control (VC) Volume Control is the control scheme that controls the flow with for the purpose of supplying a predetermined volume (set by the practitioner) to the patient. There are two basic flow wave forms to administer this volume: the “square” that guarantees a constant flow during the inspiration time, or the “descending ramp” whose slope and initial value are determined to provide the required volume target. Reference Ideal Waveform Using Square Flow Patternand Ideal Waveform Using Descending Ramp Flow Pattern. The inspiration time is determined indirectly by the characteristics of the selected flow wave. Figure 10-8. Ideal Waveform Using Square Flow Pattern 10-18 1 Pressure (cmH2O) 4 Inspiration phase 2 Flow (L/min) 5 Expiration phase 3 Volume (mL) 6 Constant flow Operator’s Manual Short Self Test (SST) Figure 10-9. Ideal Waveform Using Descending Ramp Flow Pattern 10.7.2 1 Pressure (cmH2O) 4 Inspiration phase 2 Flow (L/min) 5 Expiration phase 3 Volume (mL) 6 Descending ramp Pressure Control (PC) Pressure Control is the control scheme by which the pressure is controlled at the circuit wye to reach a constant level (set by the practitioner) during inspiration, and a PEEP level during exhalation. Reference Ideal Waveform Using Pressure Control Ventilation on page 10-20. This level is maintained for a time given by the set inspiration time, following followed by an exhalation regulated by the exhalation valve until the PEEP level is reached. As flow is not predetermined, the supplied volume varies depending on the patient's pulmonary response. Operator’s Manual 10-19 Theory of Operations Figure 10-10. Ideal Waveform Using Pressure Control Ventilation 10.7.3 1 Pressure (cmH2O) 5 PEEP 2 Flow (L/min) 6 Inspiration phase 3 Volume (mL) 7 Expiration phase 4 Target pressure VC+ VC+ breaths require initialization and must go through a startup routine. VC+ Startup During VC+ startup, the ventilator delivers at least one breath (test breath) to determine the pressure target needed to deliver the desired (set) volume. During the time the ventilator is delivering the test breaths, the message “VC+ startup” is displayed in the GUI’s prompt area. 10-20 Note: To allow for optimal function of startup and operation of VC+ in the ventilator it is important not to block the tubing while the patient is undergoing suctioning or other treatment that requires disconnection from the ventilator. The ventilator has a disconnect detection algorithm that suspends ventilation while the patient is disconnected. Operator’s Manual Short Self Test (SST) After VC+ Startup, the ventilator will make adjustments to the target pressure in order to deliver the set volume (VT). In order to reach the desired volume promptly, the maximum allowed pressure adjustments for an Adult or Pediatric patient will be greatest during the first five breaths following Startup or a change in VT or VT SUPP. The values of the maximum pressure adjustments for each patient type are summarized below. Table 10-2. Maximum Pressure Adjustments Conditions Maximum change in target pressure PBW ≥ 25 kg 15 ≤ PBW < 25 kg PBW < 15 kg Less than five breaths after: VC+ startup or Change in VT ± 10.0 cmH2O ± 6.0 cmH2O ± 3.0 cmH2O Five breaths or more after VC+ startup ± 3.0 cmH2O ± 3.0 cmH2O ± 3.0 cmH2O Reference Non-technical Alarm Summary, p. 6-18 for details on the following VC+ alarms: • VOLUME NOT DELIVERED • HIGH INSPIRED TIDAL VOLUME (1VTI) • LOW CIRCUIT PRESSURE (3PPEAK) • COMPLIANCE LIMITED VT During VC+, inspiratory target pressure cannot be lower than PEEP + 3 cmH2O and cannot exceed PPEAK - 3 cmH2O. 10.7.4 Rise time % If PC or VC+ is selected as the Mandatory type, adjust rise time % for optimum flow delivery into the lungs. Patients with high impedance (low compliance, high resistance) may benefit from a lower rise time% whereas patients with low impedance may better tolerate a more aggressive rise time setting. The rise time % setting specifies the speed at which the inspiratory pressure reaches Operator’s Manual 10-21 Theory of Operations 95% of the target pressure. The rise time setting applies to PS (including a setting of 0 cmH2O), PC, or VC+ breaths. To match the flow demand of an actively breathing patient, observe simultaneous pressure-time and flow-time curves, and adjust the rise time % to maintain a smooth rise of pressure to the target value. A rise time % setting reaching the target value well before the end of inspiration can cause the ventilator to supply excess flow to the patient. Whether this oversupply is clinically beneficial must be evaluated for each patient. Generally, the optimum rise time % for gently breathing patients is less than or equal to the default (50%), while optimum rise time % for more aggressively breathing patients can be 50% or higher. 10.7.5 WARNING: Under certain clinical circumstances (such as stiff lungs, or a small patient with a weak inspiratory drive), a rise time % setting above 50% could cause a transient pressure overshoot and premature transition to exhalation, or pressure oscillations during inspiration. Carefully evaluate the patient’s condition before setting the rise time % above the default setting of 50%. Manual Inspiration When pressed, the Manual Inspiration key delivers one OIM breath to the patient, using set breath delivery parameters. The ventilator will not allow a manual inspiration during the restricted phase of exhalation or when the ventilator is in the process of delivering a breath (whether mandatory or spontaneous). All manual inspiration attempts are logged in the General Event log. The restricted phase of exhalation is the time period during the exhalation phase where an inspiration trigger is not allowed. The restricted phase of exhalation is defined as the first 200 ms of exhalation OR the time it takes for expiratory flow to drop to ≤ 50% of the peak expiratory flow, OR the time it takes for the expiratory flow to drop to ≤ 0.5 L/min (whichever is longest). The restricted phase of exhalation will end after five (5) s of exhalation have elapsed regardless of the measured expiratory flow rate. 10.8 Spontaneous Breath Delivery The modes allowing spontaneous breaths are SIMV, SPONT, and BiLevel. The spontaneous breath type setting determines which type of pressure-assist will be applied to the patient’s spontaneous breaths (PS, TC, VS, or PAV+). 10-22 Operator’s Manual Short Self Test (SST) After selecting the spontaneous breath type, choose the level of pressure support (PSUPP) for PS, Support volume (VT SUPP) for VS or percent support for TC and PAV+ (if the PAV+ option is installed) and specify the rise time % and ESENS, where available. Changes to the spontaneous breath type setting phase in at the start of the next inspiration. Note: In any delivered spontaneous breath, either INVASIVE or NIV, there is always a target inspiratory pressure of at least 1.5 cmH2O applied. During spontaneous breathing, the patient's respiratory control center rhythmically activates the inspiratory muscles. The support type setting allows selection of pressure-assist to supplement the patient's pressure-generating capability. Table 10-3. Spontaneous Breath Delivery Characteristics Characteristic Implementation Inspiratory detection PSENS, VSENS, or IE Sync depending on the trigger type selected. Pressure or flow during inspiration Spontaneous type = PS and PSUPP < 5 cmH2O Pressure rises according to the selected rise time % and PBW setting, with target pressure equal to the effective pressure + PEEP: PSUPP Effective pressure (cmH2O) 0 1.5 1 2.2 2 2.9 3 3.6 4 4.3 Pressure or flow during inspiration Spontaneous type = PS and PSUPP ≥ 5 cmH2O Pressure rises according to the selected rise time % and PBW setting, and target pressure equals PSUPP + PEEP. Pressure or flow during inspiration Spontaneous type = VS Pressure rises according to the selected rise time % and PBW setting, and target pressure equals the pressure determined during the test breath or pressure target determined from assessment of delivered volume from the previous breath. For more information on VS,Reference Volume Support (VS), p. 10-25. Operator’s Manual 10-23 Theory of Operations Table 10-3. Spontaneous Breath Delivery Characteristics (Continued) Characteristic 10-24 Implementation Tube Compensation (TC) Tube Compensation provides programmable, inspiratory pressure assistance during otherwise unsupported spontaneous breaths. This assists the patient in overcoming the flow resistance of the artificial airway. Pressure is programmed to help the patient overcome part or all of the resistance of the artificial airway. The ventilator continuously calculates the pressure differential based on tube type and tube ID and adjusts the compensation pressure accordingly. For more information regarding TC, Reference Tube Compensation, p. 10-27. Inspiratory flow profile The inspiratory flow profile is determined by patient demand and the rise time % setting. As the rise time % setting is increased from minimum to maximum, the time to achieve the pressure target decreases. The maximum available flow is up to 30 L/min for neonatal circuit types, 80 L/min for pediatric circuit types, and up to 200 L/min for adult circuit types without Leak Sync. Exhalation valve during inspiration Adjusts to minimize pressure overshoot and maintain the target pressure. Inspiratory valve during inspiration Adjust to maintain target pressure. Because the exhalation valve acts as a relief valve venting any excess flow, inspiratory flow can be delivered aggressively and allows reduced work of breathing. Expiratory detection The end-inspiratory flow or airway pressure method or IE Sync cycling (if IE Sync is installed), whichever detects exhalation first. Time backup and the 1PPEAK alarm are also available as backup strategies. Pressure or flow during exhalation Pressure is controlled to PEEP. For pressure triggering: set to deliver a bias flow of 1 L/min near the end of expiratory flow. For flow triggering: set to deliver base flow. Inspiratory valves during exhalation For pressure triggering: set to deliver a bias flow of 1 L/min near the end of expiratory flow. For flow triggering: set to deliver base flow near the end of expiratory flow. Exhalation valve during exhalation Adjusts to maintain the operator-selected value for PEEP. Operator’s Manual Short Self Test (SST) 10.8.1 Pressure Support (PS) Pressure Support is a type of spontaneous breath, similar to PC, by which the pressure is controlled to reach a constant value, preset by the practitioner, once an inspiratory effort is detected. This target value is held until the detection of end of inspiration. Subsequently, the exhalation valve control initiates the exhalation, driving the pressure to the PEEP level. 10.8.2 Volume Support (VS) Volume support is a pressure-supported spontaneous breath type available when SPONT is selected as the mode. The target support volume (VT SUPP) is the target volume for pressure supported breaths. Reference Ventilator Settings Range and Resolution, p. 11-8 for details regarding the following VS settings: • Expiratory sensitivity (ESENS) • Rise time % • Target support volume (VT SUPP) Technical Description Volume Support (VS) breaths are patient-triggered, pressure-supported spontaneous breaths. The VS algorithm varies the inspiratory pressure of each breath to deliver the operator-set target tidal volume (VT SUPP). If the delivered volume for a breath is above or below the set target volume, VS adjusts the target pressure for the next breath up or down, as necessary, to deliver more or less volume. As the patient's condition improves allowing more patient control over spontaneous ventilation, the VS algorithm decreases the amount of inspiratory pressure necessary to deliver the target volume. Conversely, VS increases inspiratory pressure if the patient's respiratory drive becomes compromised. In the absence of leaks or changes in patient resistance or compliance, Volume Support achieves and maintains a steady, breath-to-breath tidal volume within five (5) breaths of VS initiation or startup. During VS, the inspiratory pressure target cannot be lower than PEEP + 1.5 cmH2O, and cannot exceed PPEAK - 3 cmH2O. Operator’s Manual 10-25 Theory of Operations VS Startup During startup, the ventilator delivers a breath (test breath) to determine the pressure target needed to deliver the desired (set) volume. During the time the ventilator is delivering the test breath, the message “VS startup” is displayed in the GUI’s prompt area. Test breaths are defined as: A PS spontaneous breath with PSUPP = the lesser of 15 cmH2O and (PPEAK-PEEP-3) cmH2O Note: To allow for optimal function of startup and operation of VS in the ventilator it is important not to block the tubing while the patient is undergoing suctioning or other treatment that requires disconnection from the ventilator. The ventilator has a disconnect detection algorithm that suspends ventilation while the patient is disconnected. After VS Startup, the ventilator makes adjustments to the target pressure in order to deliver the set volume (VT SUPP). In order to reach the desired volume promptly, the maximum allowed pressure adjustments for an Adult or Pediatric patient will be greatest during the first five breaths following Startup or a change in VT SUPP. The values of the maximum pressure adjustments for each patient type are summarized in the table below. Table 10-4. Maximum Pressure Adjustments Conditions Maximum change in target pressure PBW ≥ 25 kg 15 kg ≤ PBW < 25 kg PBW < 15 kg Less than five breaths after: VS startup or Change in VT SUPP ± 10.0 cmH2O ± 6.0 cmH2O ± 3.0 cmH2O Five breaths or more after VS startup ± 3.0 cmH2O ± 3.0 cmH2O ± 3.0 cmH2O Reference Non-technical Alarm Summary, p. 6-18 for details on the following VS alarms: 10-26 • VOLUME NOT DELIVERED • COMPLIANCE LIMITED VT • HIGH INSPIRED TIDAL VOLUME (1VTI) Operator’s Manual Short Self Test (SST) Monitored Patient Data Reference Patient Data Range and Resolution, p. 11-19 for details on the Spontaneous inspired tidal volume patient data parameter available during VS breaths. 10.8.3 Tube Compensation Tube Compensation (TC) is a pressure-supported spontaneous breath type available in SIMV, SPONT and BiLevel modes. When TC is enabled, the patient’s respiratory muscles are not required to work as hard to draw gases into the lungs as they would in the absence of the pressure assistance provided by the TC feature. This is particularly important for patients whose respiratory systems are already functioning poorly, and would have to exert even greater muscular effort to overcome the increased resistance to flow through the artificial airway. Tube Compensation provides programmable, inspiratory pressure assistance during otherwise unsupported spontaneous breaths. This assists the patient in overcoming the flow resistance of the artificial airway. Pressure is programmed to vary in accordance with the resistance to flow of the artificial airway. The ventilator continuously calculates the pressure differential and adjusts the compensation pressure accordingly. Tube Compensation also includes safety protection, safety checks, and logic checks which prevent the operator from entering certain incompatible settings, such as a large airway size paired with a small predicted body weight. If the type of humidifier has been changed after running SST with TC, the volume can be adjusted at the same time to avoid a reduction in compensation compliance accuracy. Technical Description Tube Compensation is a spontaneous mode enhancement which assists patients’ spontaneous breaths not already supported by specific pressurebased breath types (such as PS, VS, and PAV+) by delivering positive pressure proportional to the flow-based, resistive pressure developed across the artificial airway. TC causes the sensation of breathing through an artificial airway to diminish because the TC algorithm instructs the ventilator to develop just the correct amount of forward pressure to offset (cancel) the back pressure developed across the artificial airway during the inspiratory phase. The degree Operator’s Manual 10-27 Theory of Operations of cancellation can be set by the clinician and is adjustable between 10% an 100% in increments of 5%. Tube Compensation can support all unsupported spontaneous breaths for patients with predicted body weights ≥ 7.0 kg (15.4 lb), and for endotracheal/ tracheostomy tubes with an inside diameter (ID) of ≥ 4.5 mm. TC can be used within SPONT, BiLevel (if this option is installed) or SIMV, all of which permit unsupported spontaneous breaths. With BiLevel selected, TC supports spontaneous breaths at both pressure levels. Tube Compensation checks the flow rate every 5 ms, using an internal lookup table which contains the flow-to-pressure relationship of the selected artificial airway, and is used to calculate the amount of pressure needed to overcome all or part of the resistance of the artificial airway. Based on the TC setting and the instantaneous flow measurement, the ventilator’s PSOL valves are continually adjusted, adjusting the circuit pressure to match the changing tube-pressure compensation requirements. Tube Compensation Alarms Reference Non-technical Alarm Summary, p. 6-18 for details of the 1PCOMP, 1PVENT, and 1VTI alarms associated with TC. Monitored Patient Data Reference Patient Data Range and Resolution, p. 11-19 for details of the inspired tidal volume (VTI) monitored patient data parameter a associated with TC. Tube Inside Diameter (ID) The ventilator uses “soft bound” and “hard bound values for estimated tube inside diameter (ID) based on PBW. Soft bounds are ventilator settings that have reached their recommended high or low limits. When adjusting the tube size, if the inside diameter does not align with a valid predicted body weight, a Continue button appears. Setting the ventilator beyond these soft bounds requires the operator to acknowledge the prompt by touching the Continue button before continuing to adjust the tube size.The limit beyond which the tube ID cannot be adjusted is called a hard bound, and the ventilator emits an invalid entry tone when a hard bound is reached. 10-28 Operator’s Manual Short Self Test (SST) WARNING: Greater than expected ventilatory support, leading to unknown harm, can result if the specified tube type or tube ID is smaller than the actual tube type or tube ID. Ventilator Settings/Guidelines The estimation of settings to use with TC is aided by an understanding of: the ventilator settings, the data used for determination of the compensation values, and the specified performance or accuracy of the TC function. The setting for 2PPEAK must take the estimated tube compensation into consideration. The target pressure (compensation) at the patient wye is derived from the knowledge of the approximate airway resistance of the ET or tracheostomy tube being used. The compensation pressure in cmH2O for available tube sizes and gas flows is shown. Reference ET Tube Target Pressure vs. Flow, p. 10-30 and Reference Tracheostomy Tube Target Pressure vs. Flow, p. 10-31. The estimated compensation must be added to the value of PEEP for calculation and setting of 2PPEAK. Specified Performance Performance using TC is specified to be ± (0.5 + 10% of actual) joules/liter (residual work during inspiration at the 100% support (% Supp) level). Work is computed over the entire inspiratory interval. k P E END – P TR V· dt W = -----------------------------------------------------------------V· dt W Work [J/L] PTR Tracheal pressure PE END End expiratory pressure k Conversion constant (0.098) [J/cmH2O x L) Operator’s Manual 10-29 Theory of Operations The following figures indicate pressures at steady-state flows for ET tubes and tracheostomy tubes, respectively, at 100% support at the wye for sizes between 4.5 mm and 10 mm. Figure 10-11. ET Tube Target Pressure vs. Flow 1 10-30 Pressure (cmH2O) 2 Flow (L/min) Operator’s Manual Short Self Test (SST) Figure 10-12. Tracheostomy Tube Target Pressure vs. Flow 1 10.8.4 Pressure (cmH2O) 2 Flow (L/min) Proportional Assist Ventilation (PAV™+) PAV+ is another type of spontaneous breath, which is available only if the PAV+ option is installed. For detailed description of the operating theory, reference Appendix D in this manual. 10.9 A/C Mode When the ventilator is in assist-control (A/C) mode, only mandatory breaths are delivered. These mandatory breaths can be PC, VC, or VC+ breaths. Reference Mandatory Breath Delivery, p. 10-17 for a more detailed explanation of VC+ breaths. As for any mandatory breath, the triggering methods can be P-TRIG, V-TRIG, time-triggered, or operator initiated. If the ventilator senses the patient initiating the breath, a PIM or assist breath is delivered. Otherwise, VIM breaths (control breaths) are delivered based on the set respiratory rate. The length of the breath period is defined as Operator’s Manual 10-31 Theory of Operations where: Tb = 60 f Tb = breath period (s) f = set respiratory rate (breaths per minute) The inspiratory phase length is determined by the current breath delivery settings. At the end of the inspiratory phase, the ventilator enters the expiratory phase as determined by the following equation: T E = Tb – T I where: TE = length of the expiratory phase (s) TI = length of inspiratory phase(s) including plateau time, TPL The figure shown below illustrates A/C breath delivery when there is no patient inspiratory effort detected (all inspirations are VIMs). Figure 10-13. No Patient Inspiratory Effort Detected 1 10-32 VIM 2 Tb Operator’s Manual Short Self Test (SST) The figure below shows A/C breath delivery when patient inspiratory effort is detected. The ventilator allows PIM breaths to be delivered at a rate greater than or equal to the set respiratory rate. Figure 10-14. Patient Inspiratory Effort Detected 1 PIM 2 Tb set The figure shown below illustrates A/C breath delivery when there are both PIM and VIM breaths. delivered. Figure 10-15. Combined VIM and PIM Breaths 1 VIM 2 PIM 3 Tb set If changes to the respiratory rate are made, they are phased in during exhalation only. The new breath period depends on the new respiratory rate, is based on the start of the current breath, and follows these rules • The current breath’s inspiratory time is not changed. • A new inspiration is not delivered until at least 200 ms of exhalation have elapsed. • The maximum time t until the first VIM for the new respiratory rate is delivered is 3.5 times the current inspiratory time or the length of the new breath period (whichever is longer), but t is no longer than the old breath period. • If the patient generates a PIM after the ventilator recognizes the rate change and before time t, the new rate begins with the PIM. Operator’s Manual 10-33 Theory of Operations 10.9.1 Changing to A/C Mode Switching to A/C mode from any other mode causes the ventilator to phase in a VIM and set the start time for the beginning of the next A/C breath period. Following this VIM, and before the next A/C period begins, the ventilator responds to the patient’s inspiratory efforts by delivering mandatory breaths. The first A/C breath (VIM breath) is phased in while following these rules • The breath is not delivered during an inspiration. • The breath is not delivered during the restricted phase of exhalation. • The ventilator ensures the apnea interval elapses at least five (5) s after the beginning of exhalation. • Any other specially scheduled event (for example, a respiratory mechanics maneuver or any pause maneuver) is canceled and rescheduled at the next interval. When the first VIM of the new A/C mode is delivered depends on the mode and breath type active when the mode change is requested. 10.10 SIMV Mode Synchronous Intermittent Mandatory Ventilation (SIMV) mode is a mixed ventilation mode allowing both mandatory and spontaneous breaths using pressure- or flow-triggering. The mandatory breaths can be PC, VC, or VC+, and the spontaneous breaths are pressure-assisted with either PS or TC. SIMV guarantees one mandatory breath per SIMV breath period, which is either a PIM or VIM. OIM breaths are allowed in SIMV and are delivered at the setting selected for Mandatory Type. Reference the figure below which shows the two parts of the SIMV breath period. Figure 10-16. Mandatory and Spontaneous Intervals 1 Tb = SIMV breath period (includes Tm and Ts 3 Ts = Spontaneous interval (VIM delivered if no PIM delivered during Tm 2 Tm = Mandatory interval (reserved for a PIM breath) 10-34 Operator’s Manual Short Self Test (SST) The first part of the period is the mandatory interval (Tm) which is reserved for a PIM. If a PIM is delivered, the Tm interval ends and the ventilator switches to the second part of the period, the spontaneous interval (Ts), which is reserved for spontaneous breathing for the remainder of the breath period. At the end of an SIMV breath period, the cycle repeats. If a PIM is not delivered during the mandatory interval, the ventilator delivers a VIM at the end of the mandatory interval, then switches to the spontaneous interval. The following figure shows an SIMV breath period where a PIM is delivered within the mandatory interval. Any subsequent trigger efforts during Ts yield spontaneous breaths. As shown, Tm transitions to Ts when a PIM is delivered. Figure 10-17. PIM Delivered Within Mandatory Interval 1 PIM 3 Ts (subsequent trigger efforts during Ts yield spontaneous breaths) 2 Tm (Tm transitions to Ts when a PIM is delivered) 4 Tb The following figure shows an SIMV breath period where a PIM is not delivered within the mandatory interval. Figure 10-18. PIM Not Delivered Within Mandatory Interval 1 Operator’s Manual VIM 3 Ts 10-35 Theory of Operations 2 Tm (VIM delivered at end of Tm if no PIM delivered during Tm 4 Tb In SIMV, mandatory breaths are identical to those in A/C mode if the ventilator’s respiratory rate setting is greater than the patient’s natural respiratory rate. Spontaneous breaths are identical to those in SPONT mode if the ventilator setting for respiratory rate is significantly below the patient’s natural respiratory rate. Patient triggering must meet the requirements for pressure and flow sensitivity. The procedure for setting the respiratory rate in SIMV is the same as in A/C mode. Once the respiratory rate (f) is set, the SIMV interval period Tb in seconds is Tb = 60 f During the mandatory interval, if the patient triggers a breath according to the current setting for pressure or flow sensitivity, the ventilator delivers a PIM. Once a mandatory breath is triggered, Tm ends, Ts begins, and any further trigger efforts yield spontaneous breaths. During the spontaneous interval, the patient can take as many spontaneous breaths as allowed. If no PIM or OIM is delivered by the end of the mandatory interval, the ventilator delivers a VIM and transitions to the spontaneous interval at the beginning of the VIM. The SIMV breathing algorithm delivers one mandatory breath each period interval, regardless of the patient’s ability to breathe spontaneously. Once a PIM or VIM is delivered, all successful patient efforts yield spontaneous breaths until the cycle interval ends. The ventilator delivers one mandatory breath during the mandatory interval, regardless of the number of successful patient efforts detected during the spontaneous interval. (An OIM delivered during the mandatory interval satisfies the mandatory breath requirement, and causes Tm to transition to Ts.) The maximum mandatory interval for any valid respiratory rate setting in SIMV is defined as the lesser of • 0.6 x the SIMV interval period (Tb), or • ten s. There is no minimum value for Tm. In SIMV, the interval from mandatory breath to mandatory breath can be as long as 1.6 x the SIMV period interval (but no longer than the period interval 10-36 Operator’s Manual Short Self Test (SST) + ten (10) s. At high respiratory rates and too-large tidal volumes, breath stacking (the delivery of a second inspiration before the first exhalation is complete) is likely. In volume ventilation, breath stacking during inspiration and early exhalation leads to hyperinflation and increased airway and lung pressures, which can be detected by a high pressure limit alarm. In pressure control ventilation (with inspiratory pressure remaining constant), breath stacking leads to reduced tidal volumes, which can be detected by the low tidal volume and minute ventilation alarms. In SIMV mode it is possible for the respiratory rate to drop temporarily below the f setting (unlike A/C mode, in which fTOT is always greater than or equal to the f setting). If the patient triggers a breath at the beginning of a breath period, then does not trigger another breath until the maximum mandatory interval for the following breath has elapsed, a monitored respiratory rate less than the respiratory rate setting can result. If a spontaneous breath occurs toward the end of the spontaneous interval, inspiration or exhalation can still be in progress when the SIMV interval ends. No VIM, PIM, or OIM is allowed during the restricted phase of exhalation. In the extreme, one or more expected mandatory breaths could be omitted. When the expiratory phase of the spontaneous breath ends, the ventilator reverts to its normal criteria for delivering mandatory breaths. If an OIM is detected during the mandatory interval, the ventilator delivers the currently specified mandatory breath then closes Tm and transitions to Ts. If an OIM is detected during the spontaneous interval, the ventilator delivers the currently specified mandatory breath, but the SIMV cycle timing does not restart if OIM breaths are delivered during Ts. 10.10.1 Changing to SIMV Mode Switching the ventilator to SIMV from any other mode, causes the ventilator to phase in a VIM and set the start time for the next SIMV period. Following this VIM, but before the next SIMV period begins, the ventilator responds to successful patient inspiratory efforts by delivering spontaneous breaths. The first SIMV VIM breath is phased in according to the following rules: • The VIM breath is not delivered during an inspiration or during the restricted phase of exhalation. • If the current mode is A/C, the first SIMV VIM is delivered after the restricted phase of exhalation plus the shortest of the following intervals, referenced to the beginning of the last or current inspiration: 3.5 TI, current TA, or the length of the current breath period. Operator’s Manual 10-37 Theory of Operations • If the current mode is SPONT, and the current or last breath type was spontaneous or OIM, the first SIMV VIM is delivered after the restricted phase of exhalation plus the shortest of the following intervals, referenced to the beginning of the last or current inspiration: 3.5 x TI, or current TA. • If the current mode is BiLevel in the PH state and the current breath is mandatory, the PEEP level will be reduced to PL once the exhalation phase is detected The time t until the first VIM of the new A/C mode is the lesser of: • – PEEP transition time + 2.5 x duration of the active gas delivery phase, or – the length of the apnea interval (TA), or – the length of the current breath cycle If the current mode is BiLevel in the PH state and the current breath is spontaneous: – the PEEP level will be reduced once the exhalation phase is detected The time t until the first VIM of the new A/C mode is the lesser of: • • 10-38 – PEEP transition time + 2.5 x duration of the spontaneous inspiration, or – the start time of the spontaneous breath + the length of the apnea interval (TA). If the current mode is BiLevel in the PL state and the current breath is mandatory, the time t until the first VIM of the new A/C mode is the lesser of: – PEEP transition time + 2.5 x duration of the active gas delivery phase, or – the length of the apnea interval (TA), or – the length of the current breath cycle If the current mode is BiLevel in the PL state and the current breath is spontaneous and the spontaneous start time has occurred during PL, the time t until the first VIM of the new A/C mode is the lesser of: – 3.5 x duration of the spontaneous inspiration, or – the length of the apnea interval (TA) or – the length of the current breath cycle Operator’s Manual Short Self Test (SST) • If the current mode is BiLevel in the PL state and the current breath is spontaneous and the spontaneous start time has occurred during PH, the time t until the first VIM of the new A/C mode is the lesser of: – PEEP transition time + 2.5 x duration of the spontaneous inspiration, or – the start time of the spontaneous breath + the length of the apnea interval (TA). If the command to change to SIMV occurs after the restricted phase of exhalation has ended, and before a next breath or the apnea interval has elapsed, the ventilator delivers the first SIMV VIM at the moment the command is recognized. The point at which the new rate is phased in depends on the current phase of the SIMV interval and when the rate change command is accepted. If the rate change occurs during the mandatory interval, the maximum mandatory interval is that for the new or old rate, whichever is less. If the patient generates a successful inspiratory effort during the spontaneous interval, the ventilator responds by delivering a spontaneous breath. Respiratory rate changes are phased in during exhalation only. The new SIMV interval is determined by the new respiratory rate and is referenced to the start of the current SIMV period interval, following these rules: • Inspiratory time (TI) of current breath is neither truncated nor extended. • The new inspiration is not delivered until 200 ms of exhalation have elapsed. The time until the new SIMV interval begins is 10.11 • whichever is greater: the new SIMV period interval or 3.5 x the last or current TI, • but not greater than the current SIMV period interval. Spontaneous (SPONT) Mode In SPONT mode, the patient initiates inspiration according to the trigger type in effect, but OIM breaths are allowed which are delivered with the currently specified mandatory breath parameters. The following spontaneous breath types are available in SPONT mode: • PS • VS • TC Operator’s Manual 10-39 Theory of Operations • PAV+ (if the PAV+™ option is installed) The inspiratory phase begins when the ventilator detects patient effort during the ventilator’s exhalation phase. Breath delivery during the inspiratory phase is determined by the settings for pressure support, PEEP, rise time%, and expiratory sensitivity, unless the breath is an OIM breath. If Tube Compensation (TC), or Proportional Assist Ventilation (PAV+) (if the PAV+, option is installed) is selected as the spontaneous type, breath delivery during the inspiratory phase is determined by the settings for% support (% Supp), expiratory sensitivity, tube ID, and tube type. Note: Given the current ventilator settings, if PAV+ would be an allowable spontaneous type (except that tube ID < 6 mm) then PAV+ becomes selectable. If selected, tube ID is set to its New Patient default value based on the PBW entered. An attention icon for tube ID appears. If Volume Support (VS) is selected as the spontaneous type, breath delivery during the inspiratory phase is determined by rise time %, volume support level (VT SUPP), expiratory sensitivity, and PEEP. Inspiratory pauses are only possible during OIM breaths, and expiratory pauses are not allowed during SPONT. Expiratory trigger methods include: 10.11.1 • ESENS (% flow deceleration from peak inspiratory flow) • PBW based time limit (TI too long) • 1PPEAK • Inspiratory tidal volume limit (for VS only) • IE Sync (if the IE Sync option is installed) • Airway Pressure Cycling method Changing to SPONT Mode If the operator changes to SPONT mode during an A/C or SIMV inspiration (mandatory or spontaneous), the inspiration is completed, unaffected by the mode change. Because SPONT mode has no special breath timing require- 10-40 Operator’s Manual Short Self Test (SST) ments, the ventilator then enters the exhalation phase and waits for the detection of patient inspiratory effort, a manual inspiration, or apnea detection. 10.12 Apnea Ventilation When a patient stops breathing or is no longer being ventilated, it is called apnea. When apnea is detected by the ventilator the ventilator alarms and delivers apnea ventilation according to the current apnea ventilation settings. 10.12.1 Apnea Detection The ventilator declares apnea when no breath has been delivered by the time the operator-selected apnea interval elapses, plus a small increment of time (350 ms). This increment allows time for a patient who has begun to initiate a breath to trigger inspiration and prevent the ventilator from declaring apnea when the apnea interval is equal to the breath period. The apnea timer resets whenever an inspiration begins, regardless of whether the inspiration is patient-triggered, ventilator-triggered, or operator-initiated. The ventilator then sets a new apnea interval beginning from the start of the current inspiration. To hold off apnea ventilation, another inspiration must be delivered before (the current apnea interval + 350 ms) elapses. Apnea detection is suspended during a disconnect, occlusion, or safety valve open (SVO) state. Apnea is not declared when the apnea interval setting equals or exceeds the breath period. For example, if the respiratory rate setting is 4/min, an apnea interval of 15 s or more means apnea cannot be detected. The ventilator bases apnea detection on inspiratory (not expiratory) flow, and allows detection of a disconnect or occlusion during apnea ventilation. Apnea detection is designed to accommodate interruptions to the typical breathing pattern due to other ventilator features that temporarily extend the inspiratory or expiratory intervals (rate changes, for example) but still detect a true apnea event. The following figure shows an apnea breath where TA equals the breath period. Operator’s Manual 10-41 Theory of Operations Figure 10-19. Apnea Interval Equals Breath Period 1 Tb0 3 PIM 2 Tb1 4 TA (apnea interval) The figure below shows an apnea breath with TA greater than the breath period. Figure 10-20. Apnea Interval Greater Than Breath Period 1 Tb0 4 VIM 2 Tb1 5 TA (apnea interval) 3 PIM The following figure shows an apnea breath with TA less than the breath period. 10-42 Operator’s Manual Short Self Test (SST) Figure 10-21. Apnea Interval Less Than Breath Period 1 Tb0 6 Apnea interval 2 Tb1 7 Apnea Tb0 3 PIM 8 Apnea ventilation 4 Dashed line indicates a PIM to avoid apnea 9 Tb (TA<Tb) 5 Apnea VIM 10.12.2 Transition to Apnea Ventilation When apnea is declared, the ventilator delivers apnea ventilation according to the current apnea ventilation settings and displays the apnea settings on the graphical user interface (GUI). Regardless of the apnea interval setting, apnea ventilation cannot begin until inspiration of the current breath is complete and the restricted phase of exhalation has elapsed. 10.12.3 Settings Changes During Apnea Ventilation All apnea and non-apnea settings remain active on the GUI during apnea ventilation. Both non-apnea and apnea settings changes are phased in according to the applicable rules. If apnea ventilation is active, new settings are accepted but not implemented until non-apnea ventilation begins. Allowing key entries after apnea detection allows adjustment of the apnea interval at setup, regardless of whether apnea has been detected. During apnea ventilation, the Manual Inspiration key is active, but Expiratory Pause and Inspiratory Pause keys are not active. The increase O2 control is active during apnea ventilation, because apnea detection is likely during suctioning. Operator’s Manual 10-43 Theory of Operations The apnea respiratory rate must be ≥ 60/TA. Additionally, apnea settings cannot result in an I:E ratio > 1.00:1. 10.12.4 Resetting Apnea Ventilation Apnea ventilation is intended as an auxiliary mode of ventilation when there is insufficient breath delivery to the patient over a specified period of time. Apnea ventilation can be reset to normal ventilation by the operator (by pressing the Alarm Reset key) or the patient (autoreset). It is also reset when a rate change is made that renders apnea ventilation inapplicable. If the patient regains inspiratory control, the ventilator returns to the operatorselected mode of non-apnea ventilation. The ventilator determines whether the patient has regained respiratory control by monitoring triggered inspirations and exhaled volume. If the patient triggers two consecutive inspirations, and the exhaled volume is equal to or greater than 50% of the delivered volume (including any compliance volume), the ventilator resets to non-apnea ventilation. Exhaled volume is monitored to avoid resetting due to autotriggering caused by large leaks in the patient circuit. 10.12.5 Apnea Ventilation in SIMV The following strategy is designed to allow SIMV to avoid triggering apnea ventilation if a VIM breath can be delivered instead: • If the apnea interval (TA) elapses at any time during the mandatory interval, the ventilator delivers a VIM rather than beginning apnea ventilation. • If TA elapses during the spontaneous interval, apnea ventilation begins. The following figure shows an illustration of how SIMV is designed to deliver a VIM rather than trigger apnea ventilation, when possible. 10-44 Operator’s Manual Short Self Test (SST) Figure 10-22. Apnea Ventilation in SIMV 10.12.6 1 Tb 5 TA 2 Last breath (PIM) 6 Tm (If TA elapses during Tm, ventilator delivers a VIM rather than beginning apnea ventilation 3 VIM 7 Ts 4 Tm max Phasing in New Apnea Intervals How a new apnea interval is phased in depends on whether or not apnea ventilation is active. If apnea ventilation is active, the ventilator accepts and implements the new setting immediately. During normal ventilation (that is, apnea ventilation is not active), these rules apply 10.13 10.13.1 • If the new apnea interval setting is shorter than the current (or temporarily extended) apnea interval, the new value is implemented at the next inspiration. • If the new apnea interval setting is longer than the current (or temporarily extended) apnea interval, the old interval is extended to match the new interval immediately. Detecting Occlusion and Disconnect Occlusion The ventilator detects severe patient circuit occlusions in order to protect the patient from excessive airway pressures, or from receiving little or no gas. Occlusions require immediate attention to remedy. The ventilator detects a severe occlusion if Operator’s Manual 10-45 Theory of Operations • The inspiratory or expiratory limb of the breathing circuit is partially or completely occluded (condensate or secretions collected in a gravity-dependent loop, kinked or crimped tubing, etc.). • The ventilator EXHAUST port is blocked or resistance through the port is too high. • The exhalation valve fails in the closed position (occlusion detection at the From patient port begins after 195 ms of exhalation has passed.) The ventilator does not detect a severe occlusion if: • The pressure difference between the inspiratory and the expiratory transducers is less than or equal to 5 cmH2O. • The exhalation valve fails in the closed position and the pressure in the exhalation limb is less than 2 cmH2O. • Silicone tubing is attached to the EXHAUST port of the ventilator (i.e. for metabolic monitoring purposes). The ventilator checks the patient circuit for occlusions during all modes of breathing (except Stand-by state and Safety Valve Open) at delivery of every breath. Once the circuit check begins, the ventilator detects a severe occlusion of the patient circuit within 200 ms. The ventilator checks the EXHAUST port for occlusions during the expiratory phase of every breath (except during disconnect and safety valve open). Once the EXHAUST port check begins, the ventilator detects a severe occlusion within 100 ms following the first 200 ms of exhalation. All occlusion checking is disabled during pressure sensor autozeroing. When an occlusion is detected, an alarm sounds, the ventilator enters the OSC (Occlusion Status Cycling) state and displays a message indicating the length of time the patient has gone without ventilation (how long the ventilator has been in OSC). This alarm has the capability to autoreset, since occlusions such as those due to patient activity (for example, crimped, or kinked tubing) can correct themselves. Once a severe occlusion is detected, the ventilator acts to minimize airway pressure. Because any severe occlusion places the patient at risk, the ventilator minimizes the risk while displaying the length of time the patient has been without ventilatory support. Severe occlusion is detected regardless of what mode or triggering strategy is in effect. When a severe occlusion is detected, the ventilator terminates normal ventilation, terminates any active alarm silence, annunciates an occlusion alarm, and enters the safe state (exhalation and inspiratory valve de-energized and safety valve open) for 15 s or until inspiratory pressure drops to 5 cmH2O or less, whichever comes first. 10-46 Operator’s Manual Short Self Test (SST) During a severe occlusion, the ventilator enters OSC, in which it periodically attempts to deliver a pressure-based breath while monitoring the inspiration and expiration phases for the existence of a severe occlusion. If the severe occlusion is corrected, the ventilator detects the corrected condition after two complete OSC breath periods during which no occlusion is detected. When the ventilator delivers an OSC breath, it closes the safety valve and waits 500 ms for the safety valve to close completely, delivers a breath with a target pressure of 15 cmH2O for 2000 ms, then cycles to exhalation. This breath is followed by a mandatory breath according to the current settings, but with PEEP = 0 and O2% equal to 100% for adult/pediatric circuit types or 40% for neonatal circuits. During OSC (and only during OSC), the 2PPEAK (high circuit pressure) alarm limit is disabled to ensure it does not interfere with the ability of the ventilator to detect a corrected occlusion. When the ventilator does not detect a severe occlusion, it resets the occlusion alarm, re-establishes PEEP, and reinstates breath delivery according to current settings. Inspiratory and expiratory pause, and manual inspirations are suspended during a severe occlusion. Pause maneuvers are canceled by a severe occlusion. During a severe occlusion, ventilator settings changes are possible. Severe occlusions are not detected when the ventilator is in the Safety Valve Open (SVO) state. A corrected occlusion is detected within 15 s. 10.13.2 Disconnect A circuit disconnect condition is detected when the ventilator cannot ensure that a patient is receiving sufficient tidal volume (due to a large leak or disconnected patient circuit). This discussion applies when Leak Sync is disabled. When a disconnect is detected, an alarm sounds, the ventilator indicates that a disconnect has been detected, and displays a message indicating the length of time the patient has gone without ventilation. Patient data are not displayed during a circuit disconnect condition. The ventilator monitors the expiratory pressure and flow, delivered volume, and exhaled volume to declare a disconnect using any of these methods • Operator’s Manual The ventilator detects a disconnect when the expiratory pressure transducer measures no circuit pressure and no exhaled flow during the first 200 ms of exhalation. The ventilator postpones declaring a disconnect for another 100 ms to allow an occlusion (if detected) to be declared first, because it is possible for an occlusion to match the disconnect detection criteria. 10-47 Theory of Operations • Despite many possible variations of circuit disconnections and/or large leaks, it is possible for a patient to generate some exhaled flow and pressure. The ventilator then uses the disconnect sensitivity (DSENS, the percentage of delivered volume lost during the exhalation phase of the same breath to declare a disconnect) setting to detect a disconnect. • If the disconnect occurs during a spontaneous breath, a disconnect is declared when the inspiration is terminated by maximum inspiratory time (or the 2TI SPONT limit setting when Vent Type is non-invasive [NIV]) and the ventilator detects inspiratory flow rising to the maximum allowable. • If the disconnect occurs at the endotracheal tube, the exhaled volume will be much less than the delivered volume for the previous inspiration. The ventilator declares a disconnect if the exhaled volume is lower than the DSENS setting for three consecutive breaths. The DSENS setting helps avoid false detections due to leaks in the circuit or the patient’s lungs, and the three-consecutive-breaths requirement helps avoid false detections due to a patient out-drawing the ventilator during volume control (VC) breaths. • Flow less than a value determined using the DSENS setting and pressure less than 0.5 cmH2O detected for ten (10) consecutive seconds during exhalation. WARNING: When vent type is NIV, and DSENS setting is turned OFF, the system may not detect large leaks and some disconnect conditions it would declare as alarms during INVASIVE ventilation. Once the ventilator detects a patient circuit disconnect, the ventilator declares a high-priority alarm and discontinues breath delivery, regardless of what mode (including apnea) was active when the disconnect was detected. If there is an active alarm silence when the disconnect occurs, the alarm silence is NOT cancelled. The ventilator displays the length of time the patient has been without ventilatory support. During the disconnect, the exhalation valve closes, idle flow (10 L/min flow at 100% O2 or 40% O2 in NeoMode, if available with Leak Sync disabled and 20 L/min with Leak Sync enabled) begins, and breath triggering is disabled. A message appears identifying how long the patient has gone without ventilatory support. The ventilator monitors both expiratory flow and circuit pressures to detect reconnection. The ventilator declares a reconnect if any of the following criteria are met for the applicable time interval: 10-48 • Exhaled idle flow within the reconnect threshold is detected. • Inspiratory and expiratory pressures are both above or both below reconnect threshold levels or, Operator’s Manual Short Self Test (SST) • Inspiratory pressure rises to a reconnect level. If the disconnect condition is corrected, the ventilator detects the corrected condition within one second. Ventilator triggering, apnea detection, expiratory and inspiratory pause, manual inspirations, and programmed maneuvers or one-time events are suspended during a patient circuit disconnect condition. Spirometry is not monitored during a disconnect, and all alarms based on spirometry values are disabled. During a disconnect condition, ventilator settings changes are possible. If the disconnect alarm is autoreset or manually reset, the ventilator re-establishes PEEP. Once PEEP is reestablished, the ventilator reinstates breath delivery according to settings in effect before the disconnect was detected. Circuit disconnect detection is not active during OSC, SVO, or prior to patient connection. 10.13.3 Annunciating Occlusion and Disconnect Alarms Occlusion and disconnection cannot be declared at the same time. Therefore, the ventilator annunciates only the first event to be declared. 10.14 Respiratory Mechanics Reference Respiratory Mechanics Maneuvers, p. 4-28 for instructions on how to perform these maneuvers. In addition to Inspiratory Pause and Expiratory Pause maneuvers, the ventilator can provide other respiratory maneuvers, including Negative Inspiratory Force (NIF), Occlusion Pressure (P0.1) and Vital Capacity (VC), as well as automatic calculations of lung function and performance, such as Dynamic Compliance (CDYN) and Dynamic Resistance (RDYN), Peak Expiratory Flow (PEF), End Expiratory Flow (EEF), C20/C, and Peak Spontaneous Flow (PSF). Respiratory maneuvers can be performed in all breathing modes (except as noted below) but are not available during the following conditions: • Apnea ventilation • Safety PCV • Occlusion Status Cycling (OSC) Operator’s Manual 10-49 Theory of Operations • Non-invasive ventilation (NIV) • When the circuit type is neonatal • SVO • Ventilator is in Stand-by state • When any other respiratory maneuver has already taken place during the same breath The GUI also displays any maneuver request, distinguishing between requests that are accepted or rejected, and any maneuver that has begun, ended, or has been canceled. When a maneuver is selected, a GUI information panel is opened, displaying the maneuver name, user prompts and controls, and recent calculated results. Any maneuver is canceled automatically upon declaration of any of the following alarms: • 1PPEAK alarm • 1PVENT alarm • 1VTI The following Respiratory Mechanics maneuvers are not available in BiLevel ventilation: • 10.14.1 – Occlusion Pressure • NIF – Negative Inspiratory Force • VC – Vital Capacity Inspiratory Pause Note: Inspiratory pause and expiratory pause maneuvers can be performed directly by pressing the respective keys on the GUI or by swiping the Menu tab on the left side of the GUI. For more information on how to perform Respiratory Mechanics Maneuvers from the Menu tab, Reference Respiratory Mechanics Maneuvers, p. 4-28. An inspiratory pause extends the inspiratory phase of a single mandatory breath for the purpose of measuring end inspiratory circuit pressure which is used to calculate static compliance of the patient’s lungs and thorax (CSTAT), 10-50 Operator’s Manual Short Self Test (SST) static resistance of the respiratory system (RSTAT), and inspiratory plateau pressure (PPL). To calculate these pressures, the inspiratory and exhalation valves are closed, allowing pressures on both sides of the artificial airway to equalize, revealing the actual lung inflation pressure during a no-flow condition. An inspiratory pause can be either automatically or manually administered, and is only available during the next mandatory breath in A/C, SIMV, BiLevel or SPONT modes. In BiLevel, an inspiratory pause maneuver is scheduled for the next inspiration prior to a transition from PH to PL. Only one inspiratory pause is allowed per breath. An inspiratory pause cannot occur during apnea ventilation, safety PCV, Stand-by state, Occlusion, and SVO. An automatic inspiratory pause begins when the inspiratory pause key is pressed momentarily or the maneuver is started from the GUI screen. Reference To access respiratory mechanics maneuvers, p. 4-28 for more information on performing respiratory mechanics maneuvers from the Menu tab on the GUI rather than using the keys on the GUI. The pause lasts at least 0.5 second but no longer than three(3) s. A manual inspiratory pause starts by pressing and holding the inspiratory pause key. The pause lasts for the duration of the key press (up to seven(7) s). An active manual inspiratory pause is considered complete if any of the following occur: • The inspiratory pause key is released and at least two seconds of inspiratory pause have elapsed or pressure stability conditions have been detected for not less than 0.5 s. • Pause duration reaches seven (7) s. A manual inspiratory pause maneuver request (if the maneuver is not yet active) will be canceled if any of events1-10 occur. Reference Inspiratory and Expiratory Pause Events. Table 10-5. Inspiratory and Expiratory Pause Events Event Identifier Operator’s Manual Event 1 There is a loss of communications with the GUI 2 High ventilator pressure limit (2PVENT) is reached 3 High circuit pressure limit (2PPEAK) is reached 4 A disconnect is detected 5 Occlusion is detected 10-51 Theory of Operations Table 10-5. Inspiratory and Expiratory Pause Events (Continued) Event Identifier Event 6 Apnea is detected 7 72 seconds have elapsed without an inspiratory pause after one has been requested 8 INSPIRATION TOO LONG alarm is detected 9 High inspired tidal volume (1VTI) alarm is detected 10 High compensation pressure (1PCOMP) alarm is detected 11 Cancel is touched if maneuver is initiated from the GUI screen. 12 Safety Valve Open (SVO) is detected 13 Patient trigger effort causes circuit pressure to go below sensitivity. The sensitivity level is the setting value for pressure trigger or the backup pressure value for flow trigger 14 BUV is entered 15 Expiratory pause key is pressed (Inspiratory pause key if maneuver is an expiratory pause) During a manual inspiratory pause, the maneuver is terminated if any of events 1,3,5,6,12,or 13 occur. Reference Inspiratory and Expiratory Pause Events, p. 10-51. An inspiratory pause maneuver is ignored if the ventilator is in Apnea ventilation, safety PCV, OSC, SVO, BUV, or Stand-by state. An active automatic inspiratory pause maneuver is terminated and exhalation begun if any of events1-12, or 14 occur. Reference Inspiratory and Expiratory Pause Events, p. 10-51. The active automatic inspiratory pause maneuver is considered complete if the pause duration reaches three seconds or pressure stability conditions have been detected for not less than 0.5 s. An automatic inspiratory pause maneuver request (if the maneuver is not yet active) will be canceled if any of events1-9, 11, 12, 14, or 15 occur. Reference Inspiratory and Expiratory Pause Events, p. 10-51. Other characteristics of inspiratory pause include: 10-52 Operator’s Manual Short Self Test (SST) • During an inspiratory pause, the apnea interval (TA) is extended by the duration of the inspiratory pause. • If the ventilator is in SIMV, the breath period during which the next scheduled VIM occurs will also be extended by the amount of time the inspiratory pause is active. • All activations of the inspiratory pause control are logged in the Patient Data Log. • Severe occlusion detection is suspended • When calculating I:E ratio, inspiratory pause is considered part of the inspiration phase. • The expiratory time remains unchanged, and will result in a change in the I:E ratio for the breath that includes the inspiratory phase. Once the inspiratory Pause maneuver is completed the operator can review the quality of the maneuver waveform and accept or reject the maneuver data. 10.14.2 Expiratory Pause An expiratory pause extends the exhalation phase of a single breath in order to measure end expiratory lung pressure (PEEPTOT) and allows intrinsic PEEP (PEEPI) to be calculated as PEEPTOT minus set PEEP. The pressures on either side of the artificial airway are allowed to equalize by closing the inspiratory and exhalation valves. Expiratory pause is available in A/C, SIMV, and BiLevel modes. For A/C and SIMV, the expiratory pause maneuver is scheduled for the next end-of-exhalation prior to a mandatory breath. In BiLevel, the expiratory pause occurs at the next end-of-exhalation prior to a transition from PL to PH. Only one expiratory pause per breath is allowed, and the expiratory pause request is rejected if an inspiratory pause has already taken place during the same breath. A request for an expiratory pause maneuver is ignored in apnea ventilation, safety PCV, SPONT, OSC, BUV, and Stand-by. Reference To access respiratory mechanics maneuvers, p. 4-28 for more information on performing these maneuvers from the GUI screen rather than using the keys on the GUI. Either manual or automatic expiratory pause maneuvers can occur. A momentary press of the expiratory pause key begins an automatic expiratory pause which lasts at least 0.5 s, but no longer than 3.0 s. A manual expiratory pause starts by pressing and holding the expiratory pause key and lasts for the duration of the key-press (up to 15 s). Operator’s Manual 10-53 Theory of Operations An active manual expiratory pause is terminated if any of events1-12 occur. Reference Reference Inspiratory and Expiratory Pause Events, p. 10-51. An active manual expiratory pause is complete if the expiratory pause key is released and at least three (3) s of expiratory pause have elapsed, pressure stability conditions have been detected for ≥ 0.5 s, or pause duration lasts 15 s. An active automatic expiratory pause is terminated if any of events1,3, or 1113 occur. Reference Inspiratory and Expiratory Pause Events, p. 10-51. An active automatic expiratory pause is complete if pause duration reaches three (3) s or pressure stability conditions have been detected for ≥ 0.5 s, or pause duration lasts 15 s. The automatic expiratory pause maneuver request (the maneuver is not yet active) is canceled if events1-9, 11, 12, or 15 occur. Reference Inspiratory and Expiratory Pause Events, p. 10-51. The automatic expiratory pause maneuver is terminated and inspiration begun if any of events1,3,or 11-13 occur. Reference Inspiratory and Expiratory Pause Events, p. 10-51. Other characteristics of expiratory pause include: • During an active manual expiratory pause, severe occlusion detection is suspended. • When calculating I:E ratio, the expiratory pause is considered part of the exhalation phase. • During the expiratory pause, the inspiratory time remains unchanged, so the I:E ratio is changed for the breath that includes the expiratory pause. • All activations of the expiratory pause control are logged in the Patient Data log. Once the expiratory pause maneuver is completed the operator can review the quality of the maneuver waveform and accept or reject the maneuver data. 10.14.3 Negative Inspiratory Force (NIF) Maneuver The Negative Inspiratory Force (NIF) maneuver is a coached maneuver where the patient is prompted to draw a maximum inspiration against an occluded airway (the inspiratory and exhalation valves are fully closed). A NIF maneuver is canceled if: 10-54 • Disconnect is detected • Occlusion is detected Operator’s Manual Short Self Test (SST) • SVO is detected • 1PPEAK alarm is declared • 1PVENT alarm is declared • 1VTI alarm is declared • Communications with the GUI is lost • The maneuver has been active for 30 s and an inspiration is not detected • INSPIRATION TOO LONG alarm is declared • A manual inspiration is requested When a NIF maneuver is activated, a single pressure-time waveform grid is automatically displayed. During a NIF maneuver, the circuit pressure displays on the waveforms screen and is regularly updated, producing a real-time display. When an active NIF maneuver ends successfully, the calculated NIF result appears on the waveforms screen and on the maneuver panel. The NIF value displayed represents the maximum negative pressure from PEEP. When a NIF maneuver ends, a PEEP restoration breath is delivered to the patient, then normal breath delivery resumes. 10.14.4 P0.1 Maneuver (Occlusion Pressure) P0.1 is the negative airway pressure (delta pressure change) generated during the first 100 ms of an occluded inspiration. It is an estimate of the neuromuscular drive to breathe. When a P0.1 maneuver ends successfully, the calculated airway pressure displays on the waveforms screen and on the maneuver panel. A P0.1 maneuver is terminated if seven (7) s elapse and a trigger has not been detected to activate the maneuver. A P0.1 maneuver is canceled if • Disconnect is detected • Occlusion is detected • SVO is detected Operator’s Manual 10-55 Theory of Operations 10.14.5 • 1PPEAK alarm is declared • 1PVENT alarm is declared • 1VTI alarm is declared • INSPIRATION TOO LONG alarm is declared • Communications with the GUI is lost • A manual inspiration is requested Vital Capacity (VC) Maneuver The Vital Capacity (VC) maneuver is a coached maneuver where the patient is prompted to draw a maximum inspiration (regardless of the current settings) and then to slowly and fully exhale. When the Vital Capacity maneuver becomes active, the ventilator delivers a spontaneous inspiration in response to patient effort (with PSUPP = 0, Rise time % = 50, and ESENS = 0), and then allows for a full exhalation effort. When a Vital Capacity maneuver is requested, a single Volume-Time waveform grid is automatically displayed. A Vital Capacity maneuver is canceled if: 10-56 • Disconnect is detected • Occlusion is detected • SVO is detected • 1PPEAK alarm is declared • 1PVENT alarm is declared • 1VTI alarm is declared • INSPIRATION TOO LONG alarm is declared • Communications with the GUI is lost • A manual inspiration is requested • The maneuver as been active for 15 s and inspiration is not detected • The Cancel is touched Operator’s Manual Short Self Test (SST) When an active VC maneuver ends successfully, the calculated expiratory volume displays on the waveforms screen and on the maneuver panel and a PEEP restoration breath is delivered. 10.15 10.15.1 Ventilator Settings Apnea Ventilation Apnea ventilation is a backup mode and starts if the patient fails to breathe within the apnea interval (TA) set by the operator. TA defines the maximum allowable length of time between the start of inspiration and the start of the next inspiration. Available settings include mandatory type (PC or VC). For PC breaths the allowable settings are • Apnea interval (TA) • Inspiratory pressure (PI) • Inspiratory time (TI) • Respiratory rate (f) For VC breaths, the allowable settings are: • Apnea interval (TA) • Flow pattern • O2 % • Peak inspiratory flow (VMAX) • Respiratory rate (f) • Tidal Volume (VT) During apnea ventilation with PC selected as the mandatory type, rise time % is fixed at 50%, and the constant parameter during a rate change is inspiratory time (TI). If apnea is possible (that is, if (60/f) > TA) increasing the non-apnea O2% setting automatically changes apnea ventilation O2% if it is not already set higher than the new non-apnea O2%. Apnea ventilation O2% does not automatically change by decreasing the non-apnea O2%. Whenever there is an Operator’s Manual 10-57 Theory of Operations automatic change to an apnea setting, a message appears on the GUI, and the apnea settings screen appears. During apnea ventilation, changes to all non-apnea ventilation settings are allowed, but the new settings do not take effect until the ventilator resumes normal ventilation. Being able to change TA during apnea ventilation can avoid immediately re-entering apnea ventilation once normal ventilation resumes. Because the minimum value for TA is ten (10) s, apnea ventilation cannot take place when non-apnea f is greater than or equal to 5.8/min.The ventilator does not enter apnea ventilation if TA is equal to the breath period interval. Set TA to a value less than the expected or current breath period interval as a way of allowing the patient to initiate breaths while protecting the patient from the consequences of apnea. 10.15.2 Circuit Type and Predicted Body Weight (PBW) Together, circuit type and PBW (displayed in lb or kg) provide the basis for new patient values and absolute limits on various ventilator settings such as tidal volume (VT) and Peak flow (VMAX). Run SST in order to change the circuit type.The table below gives the minimum, maximum, and new patient default values for VT based on circuit type. Table 10-6. Values for VT Based on Circuit Type Maximum VT Circuit Type New Patient Default Minimum VT Neonatal When mandatory type is VC+, MAX {2 mL, (mL/kg Ratio x PBW)} mL; When mandatory type is VC, MAX {3 mL, (mL/kg Ratio * PBW)} mL 2 mL if NeoMode 2.0 software option is installed 315 mL Pediatric mL/kg ratio x PBW mL 25 mL 1590 mL Adult mL/kg ratio x PBW mL 25 mL 2500 mL Reference Ventilator Settings Range and Resolution, p. 11-8, VT setting, for more information on VT calculations based on PBW and circuit type. 10-58 Operator’s Manual Short Self Test (SST) Table 10-7. Peak Flow and Circuit Type (Leak Sync Disabled) Circuit Type Maximum peak flow (VMAX) setting Neonatal 30 L/min Pediatric 60 L/min Adult 150 L/min PBW determines constants for breath delivery algorithms, some user-settable alarms, the high spontaneous inspiratory time limit setting (2TI SPONT) in NIV, and the non-settable INSPIRATION TOO LONG alarm. 10.15.3 Vent Type There are two Vent Type choices — INVASIVE and NIV (non-invasive). INVASIVE ventilation is conventional ventilation used with endotracheal or tracheostomy tubes. All installed software options, breathing modes, breath types, and trigger types are available during INVASIVE ventilation. NIV interfaces include non-vented full-faced or nasal masks or nasal prongs. Reference NIV Breathing Interfaces, p. 4-22 for a list of interfaces that have been successfully tested with NIV). NIV enables the ventilator to handle large system leaks associated with these interfaces by providing pressure-based disconnect alarms, minimizing false disconnect alarms, and replacing the INSPIRATION TOO LONG alarm with a High Spontaneous Inspiratory Time limit (2TI SPONT) setting and visual indicator. The following list shows the subset of INVASIVE settings active during NIV: • Mode — A/C, SIMV, SPONT. (BiLevel is not available during NIV.) • Mandatory Type — PC or VC. (VC+ is not available during NIV.) • Spontaneous Type — PS (TC and VS are not available during NIV.) During NIV alarm setup, the clinician may set alarms to OFF and must determine if doing so is appropriate for the patient’s condition. Operator’s Manual 10-59 Theory of Operations 10.15.4 Mode and Breath Type Specifying the mode defines the types and sequences of breaths allowed for both INVASIVE and NIV Vent Types. Table 10-8. Modes and Breath Types Mode Mandatory Breath Type A/C INVASIVE: VC, VC+, or PC Spontaneous Breath Type Sequence Not allowed All mandatory (patient-, ventilator-, or operator-initiated) NIV: VC or PC SIMV INVASIVE: PC, VC, or VC+ NIV: VC or PC Pressure supported (PS) or TC. Each new breath begins with a mandatory interval, during which a patient effort yields a synchronized mandatory breath. If no patient effort is detected during the mandatory interval, the ventilator delivers a mandatory breath. Subsequent patient efforts before the end of the breath yield spontaneous breaths. SPONT Not allowed (PC or VC allowed only for manual inspirations). INVASIVE: Pressure supported (PS), Tube compensated (TC), Volume supported (VS), Proportionally assisted (PAV+) NIV: PS All spontaneous (except for manual inspirations). PC PS, TC Combines mandatory and spontaneous breathing modes. Reference Appendix A for more information on BiLevel ventilation. VC or PC (allowed only for OIM breaths) N/A All spontaneous (except for manual inspirations).Reference Appendix E, NeoMode 2.0 for more information on CPAP. BiLevel (INVASIVE vent type only) CPAP Breath types must be defined before settings can be specified. There are only two categories of breath type: mandatory and spontaneous. Mandatory breaths are volume controlled (VC) or pressure controlled (PC or VC+). The ventilator currently offers spontaneous breaths that are pressure supported (PS) volume supported (VS), tube compensated (TC), or proportionally assisted (PAV+), if the PAV+ option is installed. The figure below shows the modes and breath types available on the ventilator. 10-60 Operator’s Manual Short Self Test (SST) A/C, SIMV, SPONT, BiLevel Mandatory PC VC Spontaneous VC+ PS TC VS PAV+ The mode setting defines the interaction between the ventilator and the patient. • Assist/control (A/C) mode allows the ventilator to control ventilation within boundaries specified by the practitioner. All breaths are mandatory, and can be PC, VC, or VC+. • Spontaneous (SPONT) mode allows the patient to control ventilation. The patient must be able to breathe independently, and exert the effort to trigger ventilator support. • Synchronous Intermittent Mandatory Ventilation (SIMV) is a mixed mode that allows a combination of mandatory and spontaneous interactions. In SIMV, the breaths can be spontaneous or mandatory, mandatory breaths are synchronized with the patient's inspiratory efforts, and breath delivery is determined by the f setting. • BiLevel is a mixed mode that combines both mandatory and spontaneous breath types. Breaths are delivered in a manner similar to SIMV mode with PC selected, but providing two levels of pressure. The patient is free to initiate spontaneous breaths at either pressure level during BiLevel. Changes to the mode are phased in at the start of inspiration. Mandatory and spontaneous breaths can be flow- or pressure-triggered, or IE Sync triggered (if the IE Sync software option is installed). The ventilator automatically links the mandatory type setting to the mode setting. During A/C or SIMV modes, once the operator has specified volume or pressure, the ventilator displays the appropriate breath parameters. Changes in the mandatory type are phased in at the start of inspiration. 10.15.5 Respiratory Rate (f) The f setting determines the minimum number of mandatory breaths per minute for ventilator-initiated mandatory breaths in A/C, SIMV, and BiLevel modes.If the mode is A/C or SIMV and VC is the breath type, specifying VMAX and flow pattern determines TI, TE, and I:E. In PC breaths, specifying TI auto- Operator’s Manual 10-61 Theory of Operations matically determines the other timing variables. Reference Inspiratory Time (TI), p. 10-65 for an explanation of the interdependencies of f, TI, TE, and I:E. Changes to the f setting are phased in at the start of inspiration. The ventilator does not accept a proposed f setting if it would cause the new TI or TE to be less than 0.2 second, the TI to be greater than eight(8) s, or I:E ratio greater than 4.00:1. (The ventilator also applies these restrictions to a proposed change to the apnea respiratory rate, except that apnea I:E cannot exceed 1.00:1. An exception to this rule occurs in BiLevel ventilation where the proposed f setting will allow the I:E ratio to be greater than 4.00:1 only until the minimum TL is reached. 10.15.6 Tidal Volume (VT) The VT setting determines the volume of gas delivered to the patient during a VC mandatory breath. The delivered VT is compensated for BTPS and patient circuit compliance. Changes to the VT setting are phased in at the start of inspiration. The VT setting only affects the delivery of mandatory breaths. When proposing a change to the VT setting, the ventilator compares the new value with the settings for f, VMAX, flow pattern, and TPL. If the proposed setting would result in an I:E ratio that exceeds 4.00:1 or a TI greater than eight(8) s or less than 0.2 s, or a TE less than 0.2 s, the ventilator disallows the change. 10.15.7 Peak Inspiratory Flow (VMAX) The VMAX setting determines the maximum rate of delivery of tidal volume to the patient during mandatory VC breaths, only. Changes to VMAX are phased in at the start of inspiration. Mandatory breaths are compliance compensated, even at the maximum VMAX setting. Circuit compliance compensation does not cause the ventilator to exceed the ventilator’s maximum flow capability. When proposing a change to the VMAX setting, the ventilator compares the new value with the settings for VT, f, flow pattern, and TPL. It is impossible to set a new VMAX that would result in an I:E ratio that exceeds 4.00:1, or a TI greater than 8.0 s or less than 0.2 s, or a TE less than 0.2 s. 10-62 Operator’s Manual Short Self Test (SST) 10.15.8 Plateau Time (TPL) The TPL setting determines the amount of time inspiration is held in the patient's airway after inspiratory flow has ceased. TPL is available only during VC mandatory breaths (for A/C and SIMV mode, and operator-initiated mandatory breaths). TPL is not available for PC mandatory breaths. Changes to the TPL setting are phased in at the start of inspiration. When proposing a change to the TPL setting, the ventilator computes the new I:E ratio and TI, given the current settings for VT, f, VMAX, and flow pattern. It is impossible to set a new TPL that would result in an I:E ratio that exceeds 4.00:1, or a TI greater than eight(8) s or less than 0.2 s, or a TE less than 0.2 s. For the I:E ratio calculation, TPL is considered part of the inspiration phase. 10.15.9 Flow Pattern The flow pattern setting defines the gas flow pattern of volume-controlled (VC) mandatory breaths only. The selected values for VT and VMAX apply to both the square or descending ramp flow patterns. If VT and VMAX and are held constant, TI approximately halves when the flow pattern changes from descending ramp to square (and approximately doubles when flow pattern changes from square to descending ramp), and corresponding changes to the I:E ratio also occur. Changes in flow pattern are phased in at the start of inspiration. The settings for flow pattern, VT,f, TPL, and VMAX are interrelated. If any setting change would cause any of the following, the ventilator does not allow that change • I:E ratio > 4:1 • TI > 8.0 s or TI < 0.2 s • TE < 0.2 s 10.15.10 Flow Sensitivity (VSENS) The VSENS setting defines the rate of flow inspired by a patient that triggers the ventilator to deliver a mandatory or spontaneous breath. When V-TRIG is selected, a base flow of gas (1.5 L/min) travels through the patient circuit during the Operator’s Manual 10-63 Theory of Operations ventilator’s expiratory phase. Once a value for flow sensitivity is selected, the ventilator delivers a base flow equal to VSENS + 1.5 L/min (base flow is not userselectable). When the patient inhales and their inspiratory flow exceeds the VSENS setting, a trigger occurs and the ventilator delivers a breath. Reductions to VSENS are phased in immediately, while increases are phased in at the start of exhalation. When VSENS is active, it replaces pressure sensitivity (PSENS). The VSENS setting has no effect on the PSENS setting. VSENS can be active in any ventilation mode (including pressure supported, volume controlled, pressure controlled, and apnea ventilation). When VSENS is active, a backup PSENS setting of 2 cmH2O is in effect to detect the patient's inspiratory effort, even if the flow sensors do not detect flow. Although the minimum VSENS setting of 0.2 L/min (adult/pediatric circuit types) or 0.1 L/min (neonatal circuit type) can result in autotriggering, it can be appropriate for very weak patients. The maximum setting of 20 L/min (adult/pediatric circuit types) or 10 L/min (neonatal circuit type) is intended to avoid autotriggering when there are significant leaks in the patient circuit. 10.15.11 Pressure Sensitivity (PSENS) The PSENS setting selects the pressure drop below baseline (PEEP) required to begin a patient-initiated breath (either mandatory or spontaneous). Changes to PSENS are phased in immediately. The PSENS setting has no effect on the VSENS setting and is active only if the trigger type is P-TRIG. Lower PSENS settings provide greater patient comfort and require less patient effort to initiate a breath. However, fluctuations in system pressure can cause autotriggering at very low settings. The maximum PSENS setting avoids autotriggering under worst-case conditions if patient circuit leakage is within specified limits. 10.15.12 Inspiratory Pressure (PI) The PI setting determines the pressure at which the ventilator delivers gas to the patient during a PC mandatory breath. The PI setting only affects the delivery of PC mandatory breaths. The selected PI is the pressure above PEEP. (For example, if PEEP is set to five cmH2O, and PI is 20 cmH2O, the ventilator deliv- 10-64 Operator’s Manual Short Self Test (SST) ers gas to the patient at 25 cmH2O.) Changes to the PI setting are phased in at the start of inspiration. The sum of PEEP + PI + 2 cmH2O cannot exceed the high circuit pressure (2PPEAK) limit. To increase this sum of pressures, first raise the 2PPEAK limit before increasing the settings for PEEP or PI. The minimum value for PI is 5 cmH2O and the maximum value is 90 cmH2O. 10.15.13 Inspiratory Time (TI) The TI setting determines the time during which an inspiration is delivered to the patient for PC mandatory breaths. The ventilator accepts a setting as long as the resulting I:E ratio and TE settings are valid. Changes to TI phase in at the start of inspiration. Directly setting TI in VC mandatory breaths is not allowed. The ventilator rejects settings that result in an I:E ratio greater than 4.00:1, a TI greater than eight(8) s or less than 0.2 s, or a TE less than 0.2 s to ensure the patient has adequate time for exhalation. Setting f and TI automatically determines the value for I:E and TE. 60 f – T I = T E This equation summarizes the relationship between TI, I:E,TE, and breath period time 60 T I = ------ I :E 1 + I :E f If the f setting remains constant, any one of the three variables (TI, I:E, or TE) can define the inspiratory and expiratory intervals. If the f setting is low (and additional spontaneous patient efforts are expected), TI can be a more useful variable to set than I:E. As the f setting increases (and the fewer patient-triggered breaths are expected), the I:E setting becomes more relevant. Regardless of which variable is chosen, a breath timing bar always shows the interrelationship between TI, I:E,TE, and f. Operator’s Manual 10-65 Theory of Operations 10.15.14 Expiratory Time (TE) The TE setting defines the duration of exhalation for PC and VC+ mandatory breaths, only. Changes to the TE setting are phased in at the start of exhalation. Setting f and TE automatically determines the value for I:E ratio and TI. Reference Inspiratory Time (TI), p. 10-65 for an explanation of the interdependencies of f, TI, TE, and I:E. 10.15.15 I:E Ratio The I:E ratio setting is available when I:E is selected as the constant during rate change. The I:E setting determines the ratio of inspiratory time to expiratory time for mandatory PC breaths. The ventilator accepts the specified range of direct I:E ratio settings as long as the resulting TI and TE settings are within the ranges established for mandatory breaths. Changes to the I:E ratio phase in at the start of inspiration. Directly setting the I:E ratio in VC mandatory breaths is not allowed. Reference Inspiratory Time (TI), p. 10-65 for an explanation of the interdependencies of f, TI, TE, and I:E. Setting f and I:E automatically determine the values for TI and TE. The maximum I:E ratio setting of 4.00:1 is the maximum that allows adequate time for exhalation and is intended for inverse ratio pressure control ventilation. 10.15.16 High Pressure (PH) in BiLevel The pressure level entered by the operator for the inspiratory phase of the mandatory breath in BiLevel ventilation. 10.15.17 Low Pressure (PL) in BiLevel The pressure level entered by the operator for the expiratory phase of the mandatory breath in BiLevel ventilation. 10.15.18 High Time (TH) in BiLevel The duration of time (in seconds) the ventilator maintains the set high pressure level in BiLevel ventilation. 10-66 Operator’s Manual Short Self Test (SST) 10.15.19 Low Time (TL) in BiLevel The duration of time (in seconds) the ventilator maintains the set low pressure level in BiLevel ventilation. 10.15.20 TH:TL Ratio in BiLevel The ratio of TH to TL in BiLevel ventilation, similar to I:E ratio when ventilating a patient without BiLevel. 10.15.21 PEEP This setting defines the positive end-expiratory pressure (PEEP), also called baseline airway pressure. PEEP is the positive pressure maintained in the patient circuit during exhalation. Changes to the PEEP setting are phased in at the start of exhalation. The sum of • PEEP + 7 cmH2O, or • PEEP + PI + 2 cmH2O (if PC is active), or • PEEP + PSUPP + cmH2O (if PS is on) cannot exceed the 2PPEAK limit. To increase the sum of pressures, first raise the 2PPEAK limit before increasing the settings for PEEP, PI, or PSUPP. If there is a loss of PEEP from occlusion, disconnect, Safety Valve Open, or loss of power conditions, PEEP is re-established (when the condition is corrected) by the ventilator delivering a PEEP restoration breath. The PEEP restoration breath is a 1.5 cmH2O pressure-supported breath with exhalation sensitivity of 25%, and rise time % of 50%. A PEEP restoration breath is also delivered at the conclusion of Vent Startup. After PEEP is restored, the ventilator resumes breath delivery at the current settings. Note: PEEP restoration breath parameters are not user adjustable. Operator’s Manual 10-67 Theory of Operations 10.15.22 Pressure Support (PSUPP) The PSUPP setting determines the level of positive pressure above PEEP applied to the patient's airway during a spontaneous breath. PSUPP is only available in SIMV, SPONT, and BiLevel, in which spontaneous breaths are allowed. The PSUPP setting is maintained as long as the patient inspires, and patient demand determines the flow rate. Changes to the PSUPP setting are phased in at the start of inspiration. The pressure support setting affects only spontaneous breaths. The sum of PEEP +PSUPP +2 cmH2O cannot exceed the 2PPEAK limit. To increase the sum of pressures, first raise the 2PPEAK limit before increasing the settings for PEEP or PSUPP. Since the 2PPEAK limit is the highest pressure considered safe for the patient, a PSUPP setting that would cause a 1PPEAK alarm requires reevaluating the maximum safe circuit pressure. 10.15.23 Volume Support (VT SUPP) Volume support (VT SUPP) is defined as the volume of gas delivered to the patient during spontaneous VS breaths. Changes to the to the VT SUPP setting are phased in at the start of inspiration. 10.15.24 % Supp in TC In TC, the% Supp setting represents the amount of the imposed resistance of the artificial airway the TC breath type will eliminate by applying added pressure at the patient circuit wye. For example, if the % Supp setting is 100%, TC eliminates 100% of the extra work imposed the by the airway. At 50%, TC eliminates 50% of the added work from the airway. TC is also used with BiLevel, and is available during both PH and PL phases. 10.15.25 % Supp in PAV+ In PAV+, the % Supp setting represents the percentage of the total work of breathing provided (WOB) by the ventilator. Higher inspiratory demand yields greater support from the ventilator. The patient performs the remaining work. If the total WOB changes (resulting from a change to resistance or compliance) the percent support remains constant. 10-68 Operator’s Manual Short Self Test (SST) 10.15.26 Rise Time % The rise time % setting allows adjustment of the speed at which the inspiratory pressure reaches 95% of the target pressure. Rise time settings apply to PS (including a setting of 0 cmH2O),VS, PC, or VC+ breaths. The higher the value of rise time %, the more aggressive (and hence, the more rapid) the rise of inspiratory pressure to the target (which equals PEEP + PI (or PSUPP)). The rise time % setting only appears when pressure-based breaths are available. The range of rise time % is 1% to 100%. A setting of 50% takes approximately half the time to reach 95% of the target pressure as a setting of 1. • For mandatory PC, VC+, or BiLevel breaths, a rise time setting of 1 produces a pressure trajectory reaching 95% of the inspiratory target pressure (PEEP + PI) in two (2) s or 2/3 of the TI, whichever is shortest. • For spontaneous breaths (VS, or PS), a rise time setting of 1 produces a pressure trajectory reaching 95% of the inspiratory target (PEEP + PSUPP) in (0.4 x PBWbased TI TOO LONG x 2/3) s. • When both PC and PS breaths are active, the slopes and thus the pressure trajectories can appear to be different. Changes to TI and PI cause PC pressure trajectories to change. Changes in rise time % are phased in at the start of inspiration. • When PSUPP = 0, the rise time % setting determines how quickly the ventilator drives circuit pressure to PEEP + 1.5 cmH2O. 10.15.27 Expiratory Sensitivity (ESENS) The ESENS setting defines the percentage of the measured peak inspiratory flow at which the ventilator cycles from inspiration to exhalation in all spontaneous breath types unless IE Sync has been selected for inspiratory and expiratory detection. When inspiratory flow falls to the level defined by ESENS, exhalation begins. ESENS is a primary setting and is accessible from the GUI screen. Changes to ESENS are phased in at the next patient-initiated spontaneous inspiration. ESENS complements rise time %. Rise time % should be adjusted first to match the patient's inspiratory drive, and then the ESENS setting should cause ventilator exhalation to occur at a point most appropriate for the patient. The higher the ESENS setting, the shorter the inspiratory time. Generally, the most appropriate ESENS is compatible with the patient's condition, neither extending nor shortening the patient's intrinsic inspiratory phase. Operator’s Manual 10-69 Theory of Operations ESENS in a PAV+ breath is expressed in L/min instead of percent. 10.15.28 Disconnect Sensitivity (DSENS) Disconnect sensitivity (DSENS) is defined as the percentage of returned volume lost due to a leak, above which the ventilator declares a CIRCUIT DISCONNECT alarm (when Leak Sync is not enabled). When DSENS is set to its lowest value (20%) it has the highest sensitivity for detecting a leak or disconnect. Conversely, when DSENS is set to its highest value (95%), the ventilator is least sensitive to a leak or disconnect, because greater than 95% of the returned volume must be lost before the alarm annunciates. During NIV, the DSENS value is automatically set to OFF, which is means that returned volume loss is not considered and the alarm will not sound.DSENS with Leak Sync enabled is expressed in L/min instead of percent. Note: If DSENS is set to OFF during NIV, the ventilator is still capable of declaring a CIRCUIT DISCONNECT alarm. Note: DSENS cannot be turned OFF if Leak Sync is enabled. Changes to DSENS are phased in at the start of inspiration. 10.15.29 High Spontaneous Inspiratory Time Limit (2TI SPONT) The high spontaneous inspiratory time limit setting (2TI SPONT) is available only in SIMV or SPONT modes during NIV, and provides a means for setting a maximum inspiratory time after which the ventilator automatically transitions to exhalation. The default 2TI SPONT setting is based upon circuit type and PBW. For pediatric/adult circuit types, the new patient default value is (1.99 + (0.02 x PBW)) s For neonatal circuit types, the new patient default value is ((1.00 + (0.10 x PBW) s The 1TI SPONT indicator appears on the primary display at the beginning of a ventilator-initiated exhalation and remains visible for as long as the ventilator 10-70 Operator’s Manual Short Self Test (SST) truncates breaths in response to the 2TI SPONT setting. The 1TI SPONT indicator disappears when the patient’s inspiratory time returns to less than the 2TI SPONT setting, or after 15 seconds has elapsed after the beginning of exhalation of the last truncated breath. Changes to 2TI SPONT are phased in at the start of inspiration. 10.15.30 Humidification Type The humidification type setting sets the type of humidification system (heated expiratory tube, non-heated expiratory tube, or heat-moisture exchanger -HME) used on the ventilator and can be changed during normal ventilation or short self test (SST). Changes in humidification type phase in at the start of inspiration. SST calibrates spirometry partly based on the humidification type. Changing the humidification type without rerunning SST can affect the accuracy of spirometry and delivery. The accuracy of the exhalation valve flow sensor varies depending on the water vapor content of the expiratory gas, which depends on the type of humidification system in use. Because the temperature and humidity of gas entering the expiratory filter differ based on the humidification type being used, spirometry calculations also differ according to humidification type. For optimum accuracy, rerun SST to change the humidification type. 10.15.31 Humidifier Volume The dry, compressible volume in mL of the humidification chamber for the humidification type entered during SST. Only applies if a humidifier is used. 10.16 Safety Net While the ventilator is designed to be as safe and as reliable as possible, Covidien recognizes the potential for problems to arise during mechanical ventilation, either due to user error, patient-ventilator interactions, or because of problems with the ventilator itself. Safety Net is a broad term that includes strategies for handling problems that arise in the “patient-ventilator” system (patient problems) as well as strategies to minimize the impact of system faults on patient safety. In these scenarios, The ventilator is designed to alarm and to Operator’s Manual 10-71 Theory of Operations provide the highest level of ventilation support possible. in case of ventilator malfunction. If the ventilator is not capable of ventilatory support, it opens the patient circuit and allows the patient to breathe from room air if able to do so (this emergency state is called Safety Valve Open (SVO). Safety mechanisms are designed to be verified periodically or to have redundancy. The ventilator is designed to ensure that a single-point failure does not cause a safety hazard or affect its ability to annunciate a high-priority audible alarm. 10.16.1 User Error The ventilator is designed to prevent the operator from implementing settings that are clearly inappropriate for the patient's predicted body weight (PBW). Each setting has either soft bounds (can be overridden) or hard bounds (no override allowed) that alert the operator to the fact that the settings may be inappropriate for the patient. In the event that the patient is connected without any parameters being specified, the ventilator enters Safety PCV, a safe mode of ventilation regardless of the circuit type in use (neonatal, pediatric, or adult) or patient's PBW. Safety PCV is entered after POST, if a patient connection is made prior to settings confirmation. Safety PCV uses New Patient default settings with exceptions shown in the following table: Table 10-9. Safety PCV Settings Parameter PBW Neonatal: 3 kg Pediatric:15 kg Adult: 50 kg mode A/C mandatory type PC fTOT (total respiratory rate) Neonatal: 25 1/min Pediatric: 16 1/min Adult: 16 1/min TI Neonatal: 0.3 s Pediatric: 0.7 s Adult: 1 s PI 15 cmH2O O2% 10-72 Safety PCV value Neonatal: 40% Pediatric: 100% Adult: 100% Operator’s Manual Short Self Test (SST) Table 10-9. Safety PCV Settings (Continued) Parameter PEEP Trigger type 10.16.2 3 cmH2O Neonatal: V-TRIG Pediatric: P-TRIG Adult: P-TRIG PSENS 2 cmH2O VSENS 1.0 L/min 1PPEAK 20 cmH2O 1VE TOT alarm OFF 3VE TOT alarm 0.05 L/min 1VTE alarm OFF 3VTE MAND alarm OFF 3VTE SPONT alarm OFF Circuit type Safety PCV value Last set value, or adult if none available Humidification type Set value, or 'NON-HEATED EXP TUBE' if none available Humidifier volume Last set value, or 480 mL if none available Note: In Safety PCV, expiratory pauses are not allowed. Patient Related Problems In case of patient problems, the ventilator remains fully operative and annunciates the appropriate alarm. The detection, response, and priority of each patient-related alarm is determined by the actual patient problem. Reference Alarms, p. 6-4 for a comprehensive description of the patient alarm system. 10.16.3 System Related Problems The ventilator is designed to prevent system faults. Its modular design allows the breath delivery unit (BDU) to operate independently of the graphical user Operator’s Manual 10-73 Theory of Operations interface (GUI) and several modules of the breath delivery sub-system have redundancy that, if certain faults occur, provides for ventilatory support using settings that do not depend on the suspect hardware. System faults include the following: 10.16.4 • Hardware faults (those that originate inside the ventilator and affect its performance) • Soft faults (faults momentarily introduced into the ventilator that interfere with normal operation • Inadequate supply (AC power or external gas pressure) • Patient circuit integrity (occluded or disconnected circuit) Background Diagnostic System The ventilator has an extensive system of continuous testing processes. If an error is detected in the background diagnostic system, the ventilator notifies the operator by posting an entry in the diagnostic log. If the ventilator experiences an anomaly which causes an unintended reset, the ventilator will recover from that reset and deliver a breath within three(3) s without any operator intervention. After recovering from a reset, the ventilator uses the same settings that were in effect before the reset occurred. The background test process compares monitored values of ventilator functions with expected values of ventilator sensors under normal conditions regardless of whether the ventilator is in Stand-by or is ventilating a patient. The ventilator will continue to ventilate the patient with the highest level of support possible, and may revert to one of the states described. Reference Ventilator Protection Strategies, p. 4-35. Background tests include • Periodically initiated tests performed at intervals of a specific number of machine cycles. These tests check hardware components directly affecting breath delivery, safety mechanisms, and the GUI, and detect and correct corruption of control variable data. • Boundary checks performed at every analog measurement. These checks verify measurement circuitry, including sensors. Ventilation Assurance is a safety net feature invoked if the Background Diagnostics detect a problem with certain components in either the gas mix subsystem, the inspiratory subsystem, or the expiratory subsystem. Each subsystem has a Backup Ventilation strategy that allows ventilation to continue by bypassing the suspect components giving the operator time to replace the ventilator. 10-74 Operator’s Manual Short Self Test (SST) Mix BUV is invoked if the measured gas mix is significantly different from the set mix, if the accumulator pressure is out of range or if a fault is indicated in the mix PSOLs or flow sensors. During MIX BUV, the normal mix controller is bypassed and ventilation continues as set, except that the gas mix reverts to 100% Oxygen or Air, depending on where the fault indication was detected. Backup circuits then control the pressure in the accumulator to keep it in the proper range for the Inspiratory Module. Inspiratory BUV is invoked if Background Diagnostics detect a problem in the inspiratory module (PSOL and/or flow sensor signal out of range). In inspiratory BUV, ventilation continues with the following settings: Table 10-10. Inspiratory Backup Ventilation Settings Backup Ventilation parameter Setting PBW Previously used setting during Vent Startup Mode A/C Mandatory type PC f Neonatal: 25 1/min Pediatric: 16 1/min Adult: 16 1/min TI Neonatal: 0.3 s Pediatric: 0.7 s Adult: 1 s PI 15 cmH2O above PEEP O2% 100% (21% if O2 not available) PEEP 3 cmH2O TPL 0s Trigger type V-TRIG; 2 L/min (adult/pediatric), 1.5 L/min (neonatal) Gas flow Controlled by pressure in the mix accumulator During inspiratory BUV, the delivery PSOL is disabled, but gas delivery is achieved via an inspiratory BUV solenoid valve, the gas flow being created by pressure in the mix accumulator. Exhalation BUV is invoked if problems with the Exhalation Valve driver are detected. A backup analog circuit is enabled to control the exhalation valve Operator’s Manual 10-75 Theory of Operations though the more advanced control features (active exhalation valve control) are not functional. Note: During Mix and Inspiratory BUV, gas supply to installed options is disabled. Entry into BUV is logged in the alarm log and system diagnostic log, and the status display provides an indicator that the ventilator is in BUV and which subsystem is affected. When in BUV, a high priority alarm is annunciated, and the GUI displays an alarm banner indicating BUV, blanks patient data, and a displays a pressure waveform. If the ventilator cannot provide any degree of reliable ventilatory support and fault monitoring, then the ventilator alarms and enters the safety valve open (SVO) emergency state. During SVO, the ventilator de-energizes the safety, expiratory, and inspiratory valves, annunciates a high-priority alarm, and turns on the SVO indicator. During SVO, a patient can spontaneously inspire room air (if able to do so) and exhale. Check valves on the inspiratory and expiratory sides minimize rebreathing of exhaled gas during SVO. During SVO the ventilator • Displays the elapsed time without ventilatory support • Does not display patient data (including waveforms) • Does not detect patient circuit occlusion or disconnect conditions Visible indicators on the ventilator's GUI and status display illuminate when the ventilator is in the SVO state. Other safeguards built into the ventilator include a one-way valve (check valve) in the inspiratory pneumatic circuit allowing the patient to inhale through the safety valve with limited resistance. This check valve also limits exhaled flow from entering the inspiratory limb to reduce the possibility of re-breathing exhaled CO2 gas. 10.17 Power On Self Test (POST) Every time the ventilator is powered on or resets and at the beginning of Short Self Test (SST) and Extended Self Test (EST) it performs Power On Self Test (POST). POST checks the integrity of the GUI and Breath Delivery subsystems and communication channels without operator intervention and takes approximately twelve(12) s to complete. 10-76 Operator’s Manual Short Self Test (SST) If POST detects a major fault, qualified service personnel must correct the problem and successfully pass EST. Reference the Puritan Bennett™ 980 Series Ventilator Service Manual for more details on POST. 10.18 Short Self Test (SST) • 10.19 SST is a short (about 5 minutes) and simple sequence of tests that verifies proper operation of breath delivery hardware (including pressure and flow sensors), checks the patient circuit (including tubing, humidification device, and filters) for leaks, and measures the circuit compliance and resistance. SST also checks the resistance of the expiratory filter. SST, in normal mode, can only be performed at start up, prior to initiation of ventilation. Covidien recommends running SST every 15 days, between patients, and when changing the patient circuit or its configuration (including changing circuit type, adding or removing in-line water traps, or using a different type or style of patient circuit). Reference To run SST, p. 3-48. The ventilator does not allow access to SST if it senses a patient is connected. Extended Self Test (EST) EST verifies the integrity of the ventilator’s subsystems using operator participation. EST requires a “gold standard” test circuit and a stopper to block the patient wye. All test resources, including the software code to run EST, exist in the ventilator. EST testing, excluding tests of optional equipment (such as the extended battery) takes about ten (10) minutes. Reference EST (Extended Self Test), p. 3-52. WARNING: Do not enter Service mode with a patient attached to the ventilator. Serious injury could result. Operator’s Manual 10-77 Theory of Operations Page Left Intentionally Blank 10-78 Operator’s Manual 11 Specifications 11.1Overview This chapter contains the following specifications for the Puritan Bennett™ 980 Series Ventilator: • Physical • Electrical • Interface • Environmental • Performance (Ranges, resolution, and accuracies for ventilator settings, alarm settings, and patient data) • Regulatory Compliance WARNING: Due to excessive restriction of the Air Liquide™, SIS, and Dräger™ hose assemblies, reduced ventilator performance levels may result when oxygen or air supply pressures < 50 psi (345 kPa) are employed. 11.2Measurement Uncertainty Table 11-1. Performance Verification Equipment Uncertainty Measured Parameter Offset Gain Flow 0.1001 SLPM 2.7642 % reading Pressure 0.121594 cmH2O 0.195756 % reading Oxygen Concentration 0.0168 % O2 0.0973 % reading Temperature 0.886041 °C 0.128726 % reading Atmospheric Pressure 1.76 cmH2O - 1 Specifications During breath delivery performance verification for flow and pressure based measurements, the equipment inaccuracy is subtracted from the acceptance specification as follows: • Net Acceptance Gain = Requirement Specification Gain - Measurement Uncertainty Gain • Net Acceptance Offset = Requirement Specification Offset - Measurement Uncertainty Offset • Acceptance Limit = ± [(Net Acceptance Offset) + (Net Acceptance Gain) x (Setting)] • (Setting- Acceptance Limit) ≤ Measurement ≤ (Setting + Acceptance Limit) For derived parameters, such as volume, compliance, etc., the individual sensor uncertainties are combined and applied as applicable to determine the acceptance limits. 11.3Physical Characteristics Table 11-2. Physical Characteristics 2 Weight 113 lb (51.26 kg) including BDU, GUI, standard base, and primary battery BDU only: 69 lb (31.3 kg) Dimensions Ventilator: 12.5” width x 11.5” depth x 43.5” height (32 cm x 30 cm x 111 cm) (not including GUI screen) Ventilator: 12.5” width x 11.5” depth x 58” height (32 cm x30 cm x 148 cm) (including GUI screen Standard base: 22.5” width x 26” depth (58 cm x 66 cm) A-weighted sound pressure level, ventilator (average) At a distance of one (1) meter, does not exceed 48 dBA at 5 L/min A-weighted sound power level, ventilator Does not exceed 58 dBA below 500 mL/min Connectors Inspiratory and expiratory limb connectors are 22 mm OD conical fittings compliant with ISO 5356-1 Inspiratory/ Expiratory filters Reference filter Instructions For Use for complete specifications Pressure units (chosen by operator) Hectopascal (hPa) centimeters of water (cmH2O) Displayed weight units Kilograms (kg) or Pounds (lb) (user selectable) Displayed length units Centimeters (cm) or Inches (in) (user selectable) Operator's Manual Physical Characteristics Table 11-3. Pneumatic Specifications Oxygen and air inlet supplies Pressure: 241 to 600 kPa (35 psi to 87 psi) Flow: Maximum of 200 L/min Oxygen sensor life Up to one year. Operating life varies depending on oxygen usage and ambient temperature. Gas mixing system Range of flow from the mixing system: Up to 150 L/min for Adult patients. Additional flow is available (peak flow to 200 L/min) for compliance compensation Up to 80 L/min for pediatric circuit type Up to 30 L/min for neonatal circuit type Leakage from one gas system to another: Meets IEC 80601-2-12 standard Operating pressure range: 35 psi to 87 psi (241 to 600 kPa) Table 11-4. Technical Specifications Maximum limited pressure (PLIMmax) A fixed pressure limit to the safety valve limits circuit pressure to < 125 cmH2O (123 hPa) at the patient wye. Maximum working pressure (PWmax) PWmax is ensured by the high pressure limit (2PPEAK) when PI is 125 cmH2O (98.07 hPA) Response time to change in FiO2 setting from 21% to 90% O2 (measured at the patient wye) < 18 s for volumes > 150 mL < 19 s for volumes ≥ 30 mL but ≤ 150 mL < 20 s for volumes ≥ 2 mL but < 30 mL Measuring devices Pressure measurements: Type: Solid stated differential pressure transducer Sensing position: Inspiratory module; expiratory module Mean circuit pressure (PMEAN): -20 cmH2O (-20 hPa) to 130 cmH2O (127 hPa) Peak circuit pressure (PPEAK): -20 cmH2O (-20 hPa) to 130 cmH2O (127 hPa) Volume Measurements: Type: Hot film anemometer Sensing position: Inspiratory module; expiratory module Oxygen measurement: Type: Galvanic cell Sensing position: Inspiratory module Minute volume (VE TOT) capability, ventilator Up to 75 L/min Results of ventilator testing using circuits identified for use with the ventilator system Operator's Manual 3 Specifications Table 11-4. Technical Specifications (Continued) 4 Internal Inspiratory filter bacterial/viral filtration efficiency > 99.999% Internal Inspiratory filter particle filtration efficiency > 99.97% retention of particles 0.3 m nominal at 100 L/min flow Internal Inspiratory filter resistance 0.2 cmH2O < resistance < 2.2 cmH2O at 30 L/min flow 0.2 cmH2O < resistance < 1.7 cmH2O at 15 L/min flow External Inspiratory filter resistance 0.2 cmH2O < resistance < 2.2 cmH2O at 30 L/min flow 0.2 cmH2O < resistance < 2.2 cmH2O at 15 L/min flow Combined inspiratory filter resistance 0.2 cmH2O < resistance < 5.5 cmH2O at 30 L/min flow 0.2 cmH2O < resistance < 1.7 cmH2O at 15 L/min flow External Inspiratory filter resistance 0.2 cmH2O < resistance < 2.2 cmH2O at 30 L/min flow 0.2 cmH2O < resistance < 1.7 cmH2O at 15 L/ min flow External Inspiratory filter bacterial/viral filtration efficiency, reusable > 99.999% External Inspiratory filter particle filtration efficiency, reusable > 99.97% retention of particles 0.3 m nominal at 100 L/min flow External Inspiratory filter resistance, reusable 0.2 cmH2O < resistance < 4.2 cmH2O at 60 L/min 0.2 cmH2O < resistance < 2.2 cmH2O at 30 L/min 0.2 cmH2O < resistance < 1.7 cmH2O at 15 L/min External Inspiratory filter bacterial/viral filtration efficiency, disposable > 99.999% External Inspiratory filter particle filtration efficiency, disposable inspiratory filter > 99.97% retention of particles 0.3 m nominal at 100 L/min flow Expiratory filter particle filtration efficiency, reusable > 99.97% retention of particles 0.3 m nominal at 100 L/min flow Expiratory filter bacterial/viral filtration efficiency, reusable > 99.999% Expiratory filter resistance (pediatric/adult, reusable and disposable) < 2.5 cmH2O at 30 L/min when new < 1.7 cmH2O at 15 L/min Operator's Manual Physical Characteristics Table 11-4. Technical Specifications (Continued) Expiratory filter bacterial/viral filtration efficiency, disposable > 99.999% Expiratory filter particle filtration efficiency, disposable > 99.97% retention of particles 0.3 m nominal at 100 L/min flow Expiratory filter bacterial/viral filtration efficiency neonatal, disposable) > 99.999% Expiratory filter particle filtration efficiency (neonatal, disposable) > 99.97% retention of particles 0.3 m nominal at 100 L/min flow Expiratory filter resistance (neonatal, disposable) < 0.58 cmH2O at 2.5 L/min Circuit compliance NEONATAL: < 0.25 mL/cmH2O to > 3.0 mL/ cmH2O PEDIATRIC: 1.05 mL/cmH2O to 9 mL/cmH2O ADULT: 1.05 mL/cmH2O to 12 mL/cmH2O Inspiratory limb circuit resistance NEONATAL: 0.2 cmH2O/L/s to 3.5 cmH2O/L/s PEDIATRIC: 0.2cmH2O to 7.5 cmH2O/L/s ADULT: 0.2cmH2O to 12.5 cmH2O/L/s Expiratory limb circuit resistance NEONATAL: 0.2 cmH2O/L/s to 3.5 cmH2O/L/s PEDIATRIC: 0.2cmH2O to 7.5 cmH2O ADULT: 0.2cmH2O to 12.5 cmH2O Alarm volume (primary) Measurement uncertainty: ± 3 dBA High priority alarm volume range (dBA): 58 (volume setting 1) to 86 (volume setting 10) Medium priority alarm volume range (dBA): 52 (volume setting 1) to 78 (volume setting 10) Low priority alarm volume range (dBA): 50 (volume setting 1) to 76 (volume setting 10) Measured 1 m from front, rear, and sides of ventilator Reference Alarm Volume Key, p. 6-8 for alarm volume behavior during an alarm condition. Alarm volume (secondary) Measurement uncertainty: ± 3 dBA Minimum 64 dBA measured 1 m from front, rear, and sides of ventilator. Operator's Manual 5 Specifications 11.4Electrical Specifications Table 11-5. Electrical Specifications Electrical ratings 100V ~, 50-60 Hz, 2.25A 120 V ~, 50-60 Hz 1.5A 220-240 V ~, 50-60 Hz, 0.75A Mains overcurrent release CB1: 4A Earth leakage current 300 A Touch current 100 A Patient Leakage current 100 A maximum 11.5Interface Requirements Table 11-6. Interface Pin Designations Pin Signal Name 1 N/C Not connected 2 RxD Receive data 3 TxD Transmit data 4 N/C Not connected 5 GND Ground 6 N/C Not connected 7 RTS Request to send 8 CTS Clear to send 9 N/C Mot connected The pin-out for the nurse call interface is as follows: 6 Operator's Manual Environmental Specifications Table 11-7. Nurse Call Pin Designations Pin Configuration 1 Normally closed (NC) 2 Relay common 3 Normally open (NO) 4 Not connected 11.6Environmental Specifications Table 11-8. Environmental Specifications Specification Operation Storage Temperature 10°C to 40°C (50°F to 104°F) Ventilator 10°C to 35°C (50°F to 95°F) Internal Battery Charger -20°C to 70°C (-68°F to 158°F) 70kPa to 106 kPa (10.15 psi to (15.37 psi) 50 kPa to 106 kPa (7.25 psi to 15.37 psi) -411.5 m to 3048 m (-1350 ft to 10000 ft) 6096 m max (20000 ft max) 10% to 95% non-condensing 10 to 95% non-condensing Atmospheric Pressure Altitude Relative Humidity Note: The limits marked on the device label represent out-of-box storage conditions as follows: • Temperature: (10°C to 40°C (50°F to 104°F) • Pressure: 70kPa to 106 kPa (10.15 psi to 15.37 psi) • Relative Humidity: 10% to 95% non-condensing Operator's Manual 7 Specifications 11.7Performance Specifications 11.7.1Ranges and Resolutions Reference the table below for ranges, resolutions, accuracies, new patient default values, and dependencies, where applicable, for ventilator settings. Reference Alarm Settings Range and Resolution, p. 11-17 for alarm settings, and Reference Patient Data Range and Resolution, p. 11-19 for displayed patient data parameters. Table 11-9. Ventilator Settings Range and Resolution Setting 8 Description Range and Resolution Apnea ventilation A safety mode of ventilation that starts if the patient does not receive a breath for an elapsed time exceeding the apnea interval. See individual apnea settings. Apnea expiratory time (TE) For mandatory PC apnea breaths, the time interval between the end of inspiration and the beginning of the next inspiration. Range:0.20 s to 59.8 s Resolution: 0.01 s Apnea I:E ratio In PC breath types, specifies the ratio of apnea inspiratory time to apenea expiratory time. Range: I:E ≤ 1.00:1 Resolution: 0.01 for values > 1:10.0; 0.1 for values ≤ 1:10 and > 1:100; 1 for values ≤ 1:100 Apnea flow pattern The flow shape of the delivered mandatory volume-based (VC) apnea breath. Range: SQUARE, descending ramp Apnea inspiratory pressure (PI) The pressure above PEEP at which gas is delivered to the patient during mandatory PC apnea breaths. Range: 5 cmH2O to 90-PEEP cmH2O Resolution: 1 cmH2O Apnea inspiratory time (TI) Same as inspiratory time for non-apnea ventilation Range: 0.20 s to 8 s Resolution: 0.01 s in PC or VC+, 0.02 s in VC Operator's Manual Performance Specifications Table 11-9. Ventilator Settings Range and Resolution (Continued) Setting Operator's Manual Description Range and Resolution Apnea interval (TA) The time after which the ventilator transitions to apnea ventilation TA ≥ 60/fA Range: 10 s to 60 s or OFF in CPAP Resolution: 1 s Apnea O2 % Determines the oxygen concentration in a standard mixture of air and oxygen Range: 21%O2 to 100% O2 Resolution: 1% Apnea peak inspiratory flow (VMAX) The maximum rate of tidal volume delivery during mandatory volume-based apnea breaths. Range: When mandatory type is VC: NEONATAL: 1 L/min to 30 L/min PEDIATRIC: 3.0 L/min to 60 L/min ADULT: 3.0 L/min to 150 L/min Resolution: 0.1 L/min for flows < 20 L/min (BTPS); 1 L/min for flows ≥ 20 L/min (BTPS) Apnea respiratory rate (fA) Sets the number of volume- or pressure-based breaths per minute for ventilator initiated mandatory (VIM) apnea breaths Range: 2.0 1/min to 40 1/min Resolution: 0.1 1/min for 2.0 to 9.9; 1 1/min for 10 1/min to 40 1/min Apnea tidal volume (VT) Sets the volume of gas delivered to the patient’s lungs during a mandatory, volume-controlled apnea breath. Apnea tidal volume is compensated for body temperature and pressure, saturated (BTPS) and the compliance of the patient circuit. Range: NEONATAL: 3 mL to 315 mL PEDIATRIC/ADULT: ≥ 25 mL to 2500 mL Resolution: 0.1 mL < 5 mL; 1 mL for 5 mL to 100 mL; 5 mL for100 mL to 395 mL; 10 mL for values ≥ 400 mL Apnea constant during rate change Specifies which of the three operator-adjustable breath timing variables remains constant when respiratory rate is changed during apnea ventilation. Range: TI Apnea mandatory type The type of mandatory breath delivered during apnea ventilation Range: PC, VC Circuit type Specifies the circuit for which compliance and resistance values during SST have been calculated Range: NEONATAL, PEDIATRIC, ADULT 9 Specifications Table 11-9. Ventilator Settings Range and Resolution (Continued) Setting 10 Description Range and Resolution Constant during rate change Specifies which of the three operator-adjustable breath timing variables remains constant when respiratory rate is changed. Range: I:E ratio, TI, TE for PC or VC+ breaths; TH:TL ratio, TH,TL in BiLevel Disconnect sensitivity (DSENS) The percentage of returned volume lost, above which the ventilator declares a circuit disconnect alarm when Leak Sync is not enabled or installed. Range: (if Leak Sync not enabled) 20% to 95% or OFF Range: (if Leak Sync enabled) NEONATAL: 1 L/min to 15 L/min PEDIATRIC: 1 L/min to 40 L/min ADULT: 1L/min to 65 L/min Resolution: (Leak Sync not enabled) 1% Resolution: (Leak Sync enabled) 0.5 L/min for values< 10 L/min; 1 L/min for values ≥ 10 L/min Expiratory sensitivity (ESENS) The percentage of VMAX that, when reached, causes the ventilator to cycle from inspiration to exhalation during spontaneous, pressure-based breaths Range: 1% to 80% 1 L/min to 10 L/min when Spontaneous Type is PAV+. Expiratory time (TE) For PC or VC+ breaths, the time interval between the end of inspiration and the beginning of the next inspiration. The end of the exhalation phase is considered to be when the flow rate at the patient wye remains less than 0.5 L/min above the base flow. Range: 0.20 s Resolution: 0.01 s Flow pattern The flow shape of the delivered mandatory or VC breath Range: SQUARE, descending ramp NOTE: Default value is not expected to need adjustment. Only adjust after becoming experienced with PAV+ and only if it is suspected that the ventilator is not cycling at the patient’s end-of-inspiration. Operator's Manual Performance Specifications Table 11-9. Ventilator Settings Range and Resolution (Continued) Setting Operator's Manual Description Range and Resolution Flow sensitivity (VSENS) For flow triggered breaths, determines the volume of flow (below the base flow) required to begin a mandatory or spontaneous patient initiated breath. Range: NEONATAL: 0.1 L/min to 10 L/min PEDIATRIC/ADULT: 0.2 L/min to 20.0 L/min Resolution: 0.1 L/min Gender The patient’s gender Range: Male or Female Height The patient’s height Range: 19.5 cm to 280 cm; 7.5 in to 110 in Resolution: 0.5 cm for heights < 35 cm; 1 cm for heights < 254 cm; 2 cm for heights ≥ 254 cm; 0.25 in for heights < 14 in; 0.5 in for heights <100 in; 1 in for heights ≥ 100 in Reference Predicted Body Weight (PBW) Calculation, p. 4-21. High spontaneous inspiratory time limit (2TI SPONT) Active in NIV only, allows the operator to select the maximum spontaneous inspiratory time. Range: NEONATAL: 0.2 s to 1.7 s PEDIATRIC/ADULT: 0.4 s to 5 s Humidification type The type of humidification system used on the ventilator Range: HME, non-heated expiratory tube, heated expiratory tube Humidifier volume The empty fluid volume of the currently installed humidifier. Range: 100 mL to 1000 mL Resolution: 10 mL Elevate O2% The percentage of O2 to be added to the current air/O2 mixture for two minutes Range: 1% to 100% Resolution: 1% between 1% and 10; 5% between 5% and 75%; jumps to 100% when increased above 75% I:E ratio In PC and VC+ breath types, specifies the ratio of inspiratory time to expiratory time. Range: 1:299 to 149:1 Resolution: 0.01 for values > 1:10; 0.1 for values ≤ 1:10.0 and > 1:100.0; 1 for values ≤ 1:100 Displayed as XX:1 when I:E ≥ 1; displayed as 1:XX when I:E < 1 Inspiratory pressure (PI) The pressure above PEEP at which gas is delivered to the patient during mandatory PC breaths. Range: 5 cmH2O to 90 cmH2O Resolution:1 cmH2O 11 Specifications Table 11-9. Ventilator Settings Range and Resolution (Continued) Setting 12 Description Range and Resolution Inspiratory time (TI) The time during which an inspiration is delivered to the patient during mandatory PC or VC+ breaths. Range: 0.2 s to 8 s for mandatory PC, and VC+ breaths, (TPL+ 0.2 s to 8 s in VC) Resolution: 0.01 s for PC or VC+ breaths; 0.02 s for VC breaths Leak Sync (leak compensation) Compensates for leaks during INVASIVE or noninvasive (NIV) ventilation. Range: Enabled or Disabled Mandatory type The type of mandatory breath delivered in A/C, SPONT or SIMV modes. SPONT mode allows mandatory type selection for operator initiated mandatory (OIM) breaths. Range: PC, VC, VC+ mL/kg ratio The default tidal volume/ PBW ratio (only adjustable in Service Mode) Range: 5.0 mL/kg to 10 mL/kg Resolution: 0.5 mL/kg Operator's Manual Performance Specifications Table 11-9. Ventilator Settings Range and Resolution (Continued) Setting Operator's Manual Description Range and Resolution Mode The ventilation mode. The mode determines the allowable breath types: A/C – assist/control – a mandatory mode allowing volume controlled (VC), pressure controlled (PC), or VC+ breath types. SPONT – allows the patient to initiate the breath. Applicable SPONT breath types are pressure support (PS), volume support (VS), tube compensated (TC) or PAV+ if the PAV+ option is installed. SIMV – Synchronized Intermittent Mandatory Ventilation – a mixed ventilatory mode providing mandatory breaths and allowing a patient spontaneous breaths during the breath cycle. BiLevel – a mixed ventilatory mode combining the attributes of both mandatory and spontaneous breaths incorporating two pressure levels, PH and PL Range: A/C, SPONT, SIMV, BiLevel (if option installed but not available when vent type is NIV; CPAP (only available when circuit type is NEONATAL and vent type is NIV)) O2% (delivered) Percentage of delivered oxygen in the gas mixture Range: 21% to 100% Resolution: 1% Peak inspiratory flow (VMAX) The maximum rate of tidal volume delivery during mandatory volume-based breaths. Range: When mandatory type is VC: NEONATAL: 1 L/min to 30 L/min PEDIATRIC: 3.0 L/min to 60 L/min ADULT: 3.0 L/min to 150 L/min Resolution: 0.1 L/min for values < 20 L/min (BTPS); 1 L/min for values ≥ 20 L/min (BTPS) PEEP Sets the positive end-expiratory pressure, defined as the pressure targeted in the patient circuit during exhalation. Range: 0 cmH2O to 45 cmH2O Resolution: 0.5 cmH2O from 0.0 to 19.5 cmH2O; 1 cmH2O from 20 to 45 cmH2O 13 Specifications Table 11-9. Ventilator Settings Range and Resolution (Continued) Setting 14 Description Range and Resolution PH The positive pressure during the insufflation phase in BiLevel ventilation. Range: 5 cmH2O to 90 cmH2O Resolution: 1 cmH2O PL The positive pressure in the patient circuit during the expiratory phase of BiLevel ventilation. Range: 0 cmH2O to 45 cmH2O Resolution: 0.5 cmH2O from 0.0 to 19.5 cmH2O; 1 cmH2O from 20 to 45 cmH2O Plateau time (TPL) The amount of time inspiration is held in the patient’s lungs after inspiratory flow ceases for volume-based mandatory breaths. Considered part of inspiratory phase for I:E ratio calculations. Range: 0s to 2 s Resolution: 0.1 s Predicted Body Weight (PBW) Indicates an approximation of the patient’s “ideal” body weight based upon their gender and height (or length for neonatal patients). PBW determines default limits and limits for breath delivery parameters. Range: NEONATAL: 0.3kg (0.66 lb) to 7.0 kg (15 lb) when NeoMode 2.0 option is installed; PEDIATRIC: 3.5 kg (7.7 lb) to 35 kg (77 lb) ADULT: ≥ 25 kg (55.12 lb) Resolution: 0.01 kg for weights < 1 kg, 0.1 kg for weights ≥ 1 kg and < 10 kg, 1 kg for weights ≥ 10 kg Pressure sensitivity (PSENS) For pressure triggered breaths, determines the amount of pressure below PEEP required to begin a mandatory or spontaneous patient initiated breath. Range: 0.1 cmH2O to 20.0 cmH2O Resolution: 0.1 cmH2O Pressure support (PSUPP) or PS The positive pressure above PEEP (or PL in BiLevel) during a spontaneous breath. Range: 0 cmH2O to 70cmH2O Resolution: 1 cmH2O Respiratory rate (f) Sets the number of volume- or pressure-based breaths per minute for ventilator initiated mandatory (VIM) breaths in A/C, SIMV, and BiLevel modes Range: NEONATAL: 1.0 1/min to 150 1/min PEDIATRIC/ADULT: Resolution: 0.1 from 1.0 1/min to 9.9 1/min; 1 1/min from 10 1/min to 150 1/min Operator's Manual Performance Specifications Table 11-9. Ventilator Settings Range and Resolution (Continued) Setting Operator's Manual Description Range and Resolution Rise time % Sets the speed at which inspiratory gas delivered to the patient reaches the pressure target in BiLevel, PC, VC+, VS, or PS. Higher percentages of rise time produce inspiratory pressure trajectories with shorter time to the target value. Range: 1% to 100% Resolution: 1% Spontaneous type The breath type for patient initiated spontaneous breaths in SIMV, SPONT, and BiLevel modes. Range: PS, TC, PAV+, or VS % Supp In Tube Compensation, specifies the additional positive pressure desired to overcome resistance of the artificial airway. Range:10% to 100% Resolution: 5% % Supp In PAV+, specifies the percentage of total inspiratory work of breathing (WOB) performed by the ventilator. Range: 5% to 95% Resolution: 5% TH (time high) The duration of the insufflation phase during BiLevel ventilation. Range: 0.2 s to 30 s Resolution: 0.01 s TL (time low) The duration of the expiratory phase during BiLevel ventilation. Range: ≥ 0.20 s Resolution: 0.01 s TH:TL ratio In BiLevel, specifies the ratio of insufflation time to expiratory time Range: 1:299 to 4:1; in BiLevel TH:TL Resolution: 0.01 for < 10.00:1 and > 1:10.00; 0.1for [< 100.0:1 and ≥ 10.0:1] or[≤ 1:10.0 and > 1:100.0]; 1 for < 1:100.0 or ≥ 100:1 15 Specifications Table 11-9. Ventilator Settings Range and Resolution (Continued) Setting 16 Description Range and Resolution Tidal volume (VT) The volume of gas delivered to the patient during a mandatory volumebased breath. VT compensates for body temperature and pressure, saturated (BTPS) and circuit compliance. Applicable for volume-based breaths. Range: NEONATAL: 2 mL to 315 mL PEDIATRIC: 25 mL to 1590 mL ADULT: 25 mL to 2500 mL Resolution: 0.1 mL < 5 mL; 1 mL for ≥ 5 mL and < 100 mL; 5 mL for 100 mL to 395 mL; 10 mL for values ≥ 400 mL Volume support (VT SUPP) or VS The volume of gas delivered to the patient during spontaneous, volume supported breaths Range: NEONATAL: 2 mL to 310 mL PEDIATRIC: 25 mL to 1590 mL ADULT: 25 mL to 2500 mL Resolution: 0.1 mL for ≤ 5 mL; 1 mL for 5 mL to < 100 mL; 5 mL for 100 mL to < 400 mL; 10 mL ≥ 400 mL Trigger type Determines whether flow changes (V-TRIG), pressure changes (P-TRIG), or intrapleural pressure changes (IE Sync) trigger patient breaths Range: NEONATAL: V-TRIG PEDIATRIC/ADULT: V-TRIG, P-TRIG or IE Sync in SPONT (if IE Sync option installed) Tube ID The internal diameter of the artificial airway used to ventilate the patient. Range: 4.5 mm to 10 mm when spontaneous type is TC Range: 6 mm to 10 mm when spontaneous type is PAV+ Resolution: 0.5 mm Tube type The type of artificial airway used to ventilate the patient. Range: Endotracheal (ET), tracheal (Trach) Ventilation type Invasive or non-invasive (NIV) ventilation type based upon the type of breathing interface used. Invasive: ET or Trach tubes NIV: masks, infant nasal prongs, or uncuffed ET tubes Range: INVASIVE, NIV Operator's Manual Performance Specifications Table 11-10. Alarm Settings Range and Resolution Setting Range and Resolution Alarm volume Controls the volume of alarm annunciations Range: 1 (minimum) to 10 (maximum) Resolution: 1 Apnea Interval (TA) The Apnea alarm condition indicates that neither the ventilator nor the patient has triggered a breath for the operator-selected Apnea Interval (TA). When the Apnea alarm condition is true, the ventilator invokes mandatory ventilation as specified by the operator. Range: 10 s to 60 s or OFF in CPAP Resolution: 1 s High circuit pressure setting (2PPEAK) The 2PPEAK alarm indicates the patient’s airway pressure ≥ the set alarm level Range: 7 cmH2O to 100 cmH2O Resolution: 1 cmH2O Low circuit pressure setting The 3PPEAK alarm indicates the measured airway pressure ≤ the set alarm limit during an NIV or VC+ inspiration. Range: NIV: OFF or ≥ 0.5 cmH2O to <100 cmH2O Resolution: 0.5 cmH2O for values < 20.0 cmH2O; 1 cmH2O for values ≥ 20 cmH2O The 1VE TOT alarm indicates the measured total minute volume ≥ the set alarm limit. Range: OFF and NEONATAL: 0.1 L/min to 10 L/ min PEDIATRIC: 0.1 L/min to 30 L/min ADULT: 0.1 L/min to 100 L/min Resolution: 0.005 L/min for values < 0.50 L/min; 0.05 L/min for values ≥ 0.5 L/min to < 5.0 L/min; 0.5 L/min for values ≥ 5.0 L/min (4PPEAK) High exhaled minute volume alarm setting (2VE TOT) Operator's Manual Description 17 Specifications Table 11-10. Alarm Settings Range and Resolution (Continued) Setting 18 Description Range and Resolution High exhaled tidal volume alarm setting (2VTE) The 1VTEalarm indicates that the measured exhaled tidal volume ≥ the set alarm limit for spontaneous and mandatory breaths. Range: OFF and NEONATAL: 5 mL to 500 mL PEDIATRIC: 25 mL to 1500 mL ADULT: 25 mL to 3000 mL Resolution: 1 mL for values < 100 mL; 5 mL for values ≥ 100 mL and < 400 mL; 10 mL for values ≥ 400 mL High inspired tidal volume alarm limit (2VTI) The 1VTI alarm indicates the delivered volume of any breath ≥ the set alarm limit. Range: 6 mL to 6000 mL Resolution: 1 mL for values < 100 mL; 5 mL for values ≥ 100 mL to < 400 mL; 10 mL for values ≥ 400 mL High respiratory rate alarm setting (2fTOT) The 1fTOT alarm indicates the measured breath rate ≥ the set alarm limit. Range: OFF or NEONATAL: 10 1/min to 170 1/min PEDIATRIC/ADULT: 10 1/min to 110 1/min Resolution: 1 1/min High spontaneous inspiratory time limit (2TI SPONT) The 2TI SPONT indicator allows the operator to select the maximum spontaneous inspiratory time of an NIV breath. No alarm is annunciated; only the symbol 2TI SPONT appears on the screen near the NIV indicator when inspiration time exceeds the setting. If 2TI SPONT is exceeded, the ventilator transitions from inspiration to exhalation. Range: NEONATAL: 0.2 s to ≤ the value of the NIV inspiratory time limit trigger for the patient’s PBW and circuit type s PEDIATRIC/ADULT: 0.4 s to ≤ the value of the NIV inspiratory time limit trigger for the patient’s PBW and circuit type s Resolution: 0.1 s Low exhaled mandatory tidal volume alarm setting (4VTE MAND) The 3VTE MAND alarm indicates the measured mandatory tidal volume ≤ the set alarm limit. Range: OFF and NEONATAL: 1 mL to 300 mL PEDIATRIC: 1 mL to 1000 mL ADULT: 1 mL to 2500 mL Resolution: 1.0 mL for values < 100 mL; 5 mL for values ≥ 100 mL and < 400 mL; 10 mL for values ≥ 400 mL Operator's Manual Performance Specifications Table 11-10. Alarm Settings Range and Resolution (Continued) Setting Description Range and Resolution Low exhaled minute volume alarm setting (4VE TOT) The 4VE TOT alarm indicates the measured exhaled minute volume ≤ the set alarm limit for mandatory and spontaneous breaths. Range: OFF when vent type = NIV and NEONATAL: 0.01 L/min to 10 L/min PEDIATRIC: 0.05 L/min to 30 L/min ADULT: 0.05 L/min to 60 L/min Resolution: 0.005 L/min for values < 0.50 L/min; 0.05 L/min for values ≥ 0.50 L/min and < 5.0 L/min; 0.5 L/min for values > 5.0 L/min Low exhaled spontaneous tidal volume alarm setting (4VTE SPONT) The 3VTE SPONT alarm indicates the measured spontaneous tidal volume ≤ the set alarm limit. Range: OFF and NEONATAL: 1 mL to 300 mL PEDIATRIC: 1 to 1000 mL ADULT: 1 to 2500 mL Resolution: 1 mL for values < 100 mL; 5 mL from 100 mL to < 400 mL; 10 mL for values ≥ 400 mL Table 11-11. Patient Data Range and Resolution Data Value Operator's Manual Description Range and Resolution Breath phase The breath phase indicator displays the breath delivery phase (inspiration or exhalation) currently being delivered to the patient. Range: Control (C), Assist (A), Spontaneous (S) Inspired tidal volume (VTL) during Leak Sync The volume inspired for each breath when Leak Sync is enabled. Range: 0 mL to 6000 mL Resolution: 0.1 mL for values < 10 mL; 1 mL for values 10 mL to 6000 mL Inspired tidal volume (VTI) The volume inspired for a pressure- based breath Range: 0 mL to 6000 mL Resolution: 0.01 mL for 0 mL to 9.9 mL, 1 mL for values 10 mL to 6000 mL Inspired tidal volume (VTL)during Leak Sync The volume inspired for each breath when Leak Sync is enabled. Range: 0 mL to 6000 mL Resolution: 1 mL for values < 10 mL; 1 mL for values 10 mL to 6000 mL 19 Specifications Table 11-11. Patient Data Range and Resolution (Continued) Data Value 20 Description Range and Resolution Dynamic compliance (CDYN) The result of dividing the delivered tidal volume by the peak airway pressure. Range: 0 mL/cmH2O to 200 mL/ cmH2O Resolution: 0.1 mL/cmH2O for values < 10 mL/cmH2O; 1 mL/ cmH2O for values ≥ 10 mL/ cmH2O Dynamic resistance (RDYN) The change in pressure per unit change in flow. Range: 0.0 cmH2O/L/s to 100 cmH2O/L/s Resolution: 0.1 cmH2O/L/ for values < 10 cmH2O/L/s; 1 cmH2O/ L/s for values ≥ 10 cmH2O/L/s End expiratory flow (EEF) The rate of expiratory flow occurring at the end of exhalation. Range: 0 to 150 L/min Resolution: 0.1 L/min for values < 20 L/min; 1 L/min for values ≥ 20 L/min End expiratory pressure (PEEP) The pressure at the end of the expiratory phase of the previous breath (also applies in BiLevel). Range: -20.0 cmH2O to 130 cmH2O Resolution: 0.5 cmH2O between -10.0 and +10.0 cmH2O; 1 cmH2O for values ≤ 10 cmH2O and ≥ 10 cmH2O End inspiratory pressure (PI END) The pressure at the end of the inspiratory phase of the current breath (also applies in BiLevel). Range: -20.0 cmH2O to 130 cmH2O Resolution: 0.1 cmH2O for 20.0 cmH2O to 9.9 cmH2O; 1.0 cmH2O for values 10 cmH2O to 130 cmH2O Exhaled mandatory tidal volume (VTE MAND) The exhaled volume of the last mandatory breath. When the mode is SPONT, and no mandatory breaths have occurred for a time period ≥ 2 minutes, the VTE MAND indicator is hidden. Mandatory breaths can occur during SPONT mode via manual inspiration. Range: 0 mL to 6000 mL Resolution: 0.1 mL for 0 mL to 9.9 mL; 1 mL for 10 mL to 6000 mL Operator's Manual Performance Specifications Table 11-11. Patient Data Range and Resolution (Continued) Data Value Operator's Manual Description Range and Resolution Exhaled minute volume (VE TOT) A calculated sum of the volumes exhaled by the patient for mandatory and spontaneous breaths for the previous one-minute interval (also applies in BiLevel). Range: 0.00 L/min to 99.9 L/min Resolution: 0.01 L/min for 0.00 to 9.99 L/min; 0.1 L/min for 10.0 to 99.9 L/min Exhaled spontaneous minute volume (VE SPONT) The sum of exhaled spontaneous volumes per minute (also applies in BiLevel) Range: 0 L/min to 99.9 L/min Resolution: 0.01 L/min for 0.00 to 9.99 L/min; 0.1 L/min for 10.0 to 99.9 L/min Exhaled spontaneous tidal volume (VTE SPONT) The exhaled volume of the last spontaneous breath. Range: 0 mL to 6000 mL Resolution: 0.1mL for 0 mL to 9.9 mL; 1 mL for 10 mL to 6000 mL Exhaled tidal volume (VTE) The volume exhaled by the patient for the previous mandatory or spontaneous breath (also applies in BiLevel. Range: 0 mL to 6000 mL Resolution: 0.1mL for 0 mL to 9.9 mL; 1 mL for 10 mL to 6000 mL Leak Sync exhaled tidal volume (VTE) The volume exhaled by the patient for the previous mandatory or spontaneous breath during Leak Sync (also applies in BiLevel). Range: 0 mL to 6000 mL Resolution: 0.1mL for 0 mL to 9.9 mL; 1 mL for 10 mL to 6000 mL I:E ratio The ratio of the inspiratory time to expiratory time for the previous breath. Range: 1:599 to 149:1 Resolution: 0.1 for 9.9:1 to 1:9.9; 1 for 149:1 to 10:1 and 1:10 to 1:599 Inspiratory compliance (C20/C) The ratio of compliance of the last 20% of inspiration to the compliance of the entire inspiration Range: 0 to 1.00 Resolution: 0.01 Intrinsic PEEP (PEEPI) A calculated estimate of the pressure above PEEP at the end of exhalation. Range: -20.0 cmH2O to +130 cmH2O Resolution: 0.1 cmH2O between -9.9 and +9.9 cmH2O; 1 cmH2O ≤ -10 cmH2O and ≥ 10 cmH2O 21 Specifications Table 11-11. Patient Data Range and Resolution (Continued) 22 Data Value Description Range and Resolution Mean circuit pressure (PMEAN) The calculated average circuit pressure for an entire breath cycle including both inspiratory and expiratory phases (whether the breath is mandatory or spontaneous). Range: -20.0 cmH2O to 100 cmH2O Resolution: 0.1 cmH2O for 20.0 to 9.9 cmH2O; 1 cmH2O for 10 to 100 cmH2O Negative inspiratory force (NIF) The negative pressure generated during a maximally forced inspiratory effort against an obstruction to flow. Range: ≤ 0 cmH2O to ≥ -50 cmH2O Resolution: 1 cmH2O for values ≤ -10 cmH2O; 0.1 cmH2O for values > -10 cmH2O O2% (monitored) The monitored percentage of oxygen in the gas delivered to the patient, measured at the ventilator outlet upstream of the inspiratory filter. Range: 0% to 103% Resolution: 1% P0.1 The inspiratory depression of airway pressure after 100 ms of occlusion. P0.1 is an indicator of respiratory drive. Range: ≥ -20 cmH2O to 0 cmH2O Resolution: 1 cmH2O when < 10 cmH2O; 0.1 cmH2O when ≥ -10 cmH2O PAV based intrinsic PEEP (PEEPI PAV) The estimated intrinsic PEEP during a PAV+ breath. Intrinsic PEEP is an estimate of the pressure above PEEP at the end of every pause exhalation. Range: 0 to 130 cmH2O Resolution: 0.1 cmH2O for values < 10 cmH2O; 1cmH2O for values ≥ 10 cmH2O PAV-based lung compliance (CPAV)1 The calculated change in pulmonary volume for an applied change in patient airway pressure when measured under conditions of zero flow during a PAV+ plateau maneuver. When PAV+ is selected, the ventilator displays the current filtered value for patient compliance, and updates the display at the successful completion of each estimation. CPAV can be displayed in the vital patient data banner. Reference Vital Patient Data, p. 3-42. Range: 2.5 mL/cmH2O to 200 mL/ cmH2O Resolution: 0.1 mL/cmH2O for values < 10 mL/cmH2O; 1 cmH2O for values ≥ 10 mL/ cmH2O Operator's Manual Performance Specifications Table 11-11. Patient Data Range and Resolution (Continued) Data Value Operator's Manual Description Range and Resolution PAV-based lung elastance (EPAV)1 For a PAV+ breath, EPAV is calculated as the inverse of CPAV (see above). EPAV can be displayed in the vital patient data banner. Reference Vital Patient Data, p. 3-42. Range: 5.0 cmH2O/L to 400 cmH2O/L Resolution: 0.1 cmH2O/L for values < 10 cmH2O/L; 1 cmH2O/L ≥ 10 cmH2O/L PAV-based patient resistance (RPAV)1 The difference between estimated total resistance RTOT and the simultaneously estimated resistance of the artificial airway. When PAV+ is selected, the ventilator displays the current filtered value for patient resistance, and updates the display at the successful completion of each estimation. RPAV can be displayed in the vital patient data banner. Reference Vital Patient Data, p. 3-42. Range: 0.0 cmH2O/L/s to 60 cmH2O/L/s Resolution: 0.1 cmH2O/L/s for values < 10 cmH2O/L/s; 1cmH2O/ L/s for values ≥ 10 cmH2O/L/s PAV-based total airway resistance (RTOT)1 RTOT is an estimated value captured just past peak expiratory flow and is equal to the pressure loss across the patient airway plus respiratory system (patient airway + ET tube + expiratory limb of the VBS)/ expiratory flow. This pressure loss is divided by the expiratory flow estimated at the same moment, yielding the estimate for RTOT.The complete operation is orchestrated and monitored by a software algorithm. When PAV+ is selected, the ventilator displays the current filtered value for total resistance, and updates the display at the successful completion of each calculation. RTOT can be displayed in the vital patient data banner. Reference Vital Patient Data, p. 3-42. Range: 1.0 cmH2O/L/s to 80 cmH2O/L/s Resolution: 0.1 cmH2O/L/s for values < 10 cmH2O/L/s; 1 cmH2O/ L/s for values ≥ 10 cmH2O/L/s 23 Specifications Table 11-11. Patient Data Range and Resolution (Continued) 24 Data Value Description Range and Resolution PAV-based work of breathing (WOBTOT) The estimated effort needed for patient inspiration including both patient and ventilator. Range: 1.0 J/L to10.0 J/L Resolution: 0.1 J/L Peak expiratory flow (PEF) The maximum speed of exhalation. Range: 0 to 150 L/min Resolution: 0.1 L/min for PEF < 20 L/min; 1 L/min for PEF ≥ 20 L/ min Peak circuit pressure (PPEAK) The maximum pressure during the previous breath, relative to the patient wye, including inspiratory and expiratory phases. Range: -20.0 cmH2O to 130 cmH2O Resolution: 0.1 cmH2O for values -20.0 cmH2O to 9.9 cmH2O; 1.0 cmH2O for values 10 cmH2O to 130 cmH2O Peak spontaneous flow (PSF) The maximum flow rate sampled during a spontaneous inspiration. Range: 0 to 200 L/min Resolution: 0.1 L/min for values < 20 L/min; 1L/min for values ≥ 20 L/min Plateau pressure (PPL) The pressure measured during an inspiratory pause maneuver. Range: -20.0 cmH2O to 130 cmH2O Resolution: 0.1 cmH2O for values -20.0 to 9.9 cmH2O; 1.0 cmH2O for values ≥ 10 cmH2O Proximal exhaled tidal volume (VTEY) For neonatal patients, the exhaled volume of the previous breath measured by the Proximal Flow Sensor) (if installed). Range: 0 mL to 500 mL Resolution: 0.1mL for values 0 mL to 9.9 mL; 1 mL for values 10 mL to 500 mL Proximal exhaled total minute volume (VE TOTY) For neonatal patients, the exhaled minute volume measured by the Proximal Flow Sensor) Range: 0.00 to 99.9 L/min Resolution: 0.01 L/min for 0.00 to 9.99 L/min; 0.1 L/min for 10.0 to 99.9 L/min Proximal inspired tidal volume (VTIY) For neonatal patients, the inspired volume of the previous breath measured by the Proximal Flow Sensor) (if installed). Range: 0 mL to 500 mL Resolution: 1 mL Spontaneous inspiratory time (TI SPONT) The duration of the inspiratory phase of a spontaneous breath. Range: 0 s to 10 s Resolution: 0.01 s Operator's Manual Performance Specifications Table 11-11. Patient Data Range and Resolution (Continued) Operator's Manual Data Value Description Range and Resolution Spontaneous inspiratory time ratio (TI/TTOT) The fraction of the total spontaneous breath time used by inspiration. Range: 0 to 1 Resolution: 0.01 Spontaneous rapid shallow breathing index (f/VT) A calculated value using exhaled spontaneous tidal volume. High values indicate the patient is breathing rapidly, but with little volume/ breath. Low values indicate the inverse scenario. Range: 0.1 1/min-L to 600 1/min- L Resolution: 0.1 1/min-L for values < 10 1/min-L; 1 1/min-L; for values ≥ 10 1/min-L Static compliance (CSTAT) An estimate of the patient’s lung-thorax static compliance or elasticity. Range: 0 mL/cmH2O to 500 mL/ cmH2O Resolution: 0.1 mL/cmH2O for values < 10 mL/; 1 mL/cmH2O for values ≥ 10 mL/cmH2O Resistance (RSTAT) An estimate of the restrictiveness of the patient’s lungs and the artificial airway. Range: 0 cmH2O/L/s to 500 cmH2O /L/s Resolution: 0.1 cmH2O/L/s for values < 10 cmH2O/L/s, 1 cmH2O/ L/s for values ≥ 10 cmH2O/L/s Total PEEP (PEEPTOT) The estimated pressure at the circuit wye during an expiratory pause maneuver. Range: -20.0 cmH2O to +130 cmH2O Resolution: 0.1 cmH2O for values < 10 cmH2O; 1 cmH2O for values ≤ -10 cmH2O and ≥ 10 cmH2O Total respiratory rate (fTOT) The number of mandatory or spontaneous breaths/min delivered to the patient. Range: 1 to 200 1/min Resolution: 0.1 1/min for values < 10 1/min; 1 1/min for 10 1/min to 200 1/min Vital capacity (VC) The maximum amount of air that can be exhaled after a maximum inhalation. Range: 0 mL to 6000 mL Resolution: 0.1 mL for values < 10 mL; 1 mL for values ≥ 10 mL VLEAK Inspiratory leak volume, the total volume delivered during inspiration to compensate for the leak. Range: 0 to 9000 mL Resolution: 1 mL 25 Specifications Table 11-11. Patient Data Range and Resolution (Continued) Data Value Description Range and Resolution %LEAK Percent leak, the percentage of total delivered volume during inspiration attributed to the leak calculated as leak volume during inspiration / total delivered inspiratory volume) x 100. Range: 0 to 100% Resolution: 1% LEAK Exhalation leak. The leak rate at PEEP during exhalation. Range: 0L/min to 200 L/min Resolution: 0.1 L/min LEAKY Exhalation Leak at PEEP during Leak Sync, measured by the proximal flow sensor. Range: 0 L/min to 200 L/min Resolution: 0.1 L/min 1. If the estimated value of CPAV, EPAV, RPAV, or RTOT violates expected (PBW-based) limits, parentheses around the value indicate the value is questionable. If the estimated value exceeds its absolute limit, the limit value flashes in parentheses. Table 11-12. Delivery Accuracy Parameter 26 Accuracy Range Inspiratory pressure (PI) ± (3.0 + 2.5% of setting) cmH2O 5 cmH2O to 90 cmH2O End expiratory pressure (PEEP) ± (2.0 + 4% of setting) cmH2O 0 cmH2O to 45 cmH2O Pressure support (PSUPP) ± (3.0 + 2.5% of setting) cmH2O 0 cmH2O to 70 cmH2O Tidal volume (VT) For adult and pediatric circuit type settings: For TI < 600ms: ± (10 + 10% of setting x 600 ms/ TI ms) mL For TI ≥ 600 ms ± (10 + 10% of setting) mL For neonatal circuit type settings: For setting of 2 mL (VC+ only): ± (1 + 10% of setting) mL For setting of 3 mL to 4 mL: ± (2+ 10% of setting) mL (delivered volume shall be ≥ 1 mL For setting of 5 mL to 20 mL: ±(3 + 15% of setting) For setting of ≥ 20 mL: ± (4 +10% of setting) mL For adult and pediatric circuit type settings: 25 mL to 2500 mL For neonatal circuit type settings: 2 mL to 310 mL O2% (delivered) ± 3% 21% to 100% PH ± (2.0 + 4% of setting) cmH2O 5 cmH2O to 90 cmH2O Operator's Manual Performance Specifications Table 11-12. Delivery Accuracy (Continued) Parameter Accuracy PL ± (2.0 + 4% of setting) cmH2O Range 0 cmH2O to 45cmH2O Table 11-13. Monitoring (Patient Data) Accuracy Parameter Operator's Manual Accuracy Range Peak circuit pressure (PPEAK) ± (2 + 4% of reading) cmH2O 5 cmH2O to 90 cmH2O Mean circuit pressure (PMEAN) ± (2 + 4% of reading) cmH2O 3 cmH2O to 70 cmH2O End expiratory pressure (PEEP) ± (2 + 4% of reading) cmH2O 0 cmH2O to 45cmH2O End inspiratory pressure (PI END) ± (2 + 4% of reading) cmH2O 5 cmH2O to 90 cmH2O Inspired tidal volume (VTI) ± (4 mL + 15% of actual) mL 2 mL to 2500 mL Exhaled tidal volume (VTE) ± (4 mL + 10% of actual) mL 2 mL to 2500 mL Inspired tidal volume during Leak Sync (VTL) For adult and pediatric circuit type settings: For TI ≤ 600ms: ± (10 + 20% x 600 ms/TI ms of reading) mL For TI > 600 ms: ± (10 + 20% of reading) mL For neonatal circuit type setting: ± (10 + 20% of reading) mL For readings < 100 mL, the accuracy shall apply when the percentage of inspiratory leak volume is less than 80% For adult and pediatric circuit type settings: 25 mL to 2500 mL For neonatal circuit type settings: 2 mL to 310 mL Exhaled tidal volume (VTE) during Leak Sync For adult and pediatric circuit type settings: For TE ≤ 600ms: ± (10 + 20% x 600 ms/TE ms of reading) mL For TE > 600 ms: ± (10 + 20% of reading) mL For neonatal circuit type setting: ± (10 + 20% of reading) mL For readings < 100 mL, the accuracy shall apply when the percentage of inspiratory leak volume is less than 80% For adult and pediatric circuit type settings: 25 mL to 2500 mL For neonatal circuit type settings: 2 mL to 310 mL 27 Specifications Table 11-13. Monitoring (Patient Data) Accuracy (Continued) Parameter Accuracy Range Proximal exhaled tidal volume (VTEY) ± (1 + 10% of reading) mL 2 mL to 310 mL Proximal inspired tidal volume (VTIY) ± (1 + 10% of reading) mL 2 mL to 310 mL O2% (monitored) ± 3% 15% to 100% Respiratory rate (f) ± 0.8 1/min 1 1/min to 150 1/min Table 11-14. Computed Value Accuracy Parameter Accuracy Range PAV-based lung compliance (CPAV) ± (1 + 20% of measured value) mL/cmH2O 10 mL to 100 mL/cmH2O PAV-based total airway resistance (RTOT) ± (3 + 20% of measured value) cmH2O/L/s 5.0 cmH2O/L/s to 50 cmH2O/L/s PAV-based work of breathing (WOBTOT) ± (0.5 + 10% of measured work) J/L with a percent support setting of 75% 0.7 J/L to 4 J/L WARNING: The ventilator accuracies listed in this chapter are applicable under the operating conditions identified in the table Environmental Specifications on Reference p. 11-7 . Operation outside specified ranges cannot guarantee the accuracies listed in the tables above, and may supply incorrect information. 11.8Regulatory Compliance The ventilator complies with the following standards: 28 • IEC 60601-1:2005 Medical Electrical Equipment, Part 1: General Requirements for Basic safety and essential performance • EN 60601-1:2006, Medical Electrical Equipment, Part 1: General Requirements for Basic safety and essential performance Operator's Manual Regulatory Compliance • ANSI-AAMI ES 60601-1:2005, Medical Electrical Equipment, Part 1: General Requirements for Basic safety and essential performance • CSA C22.2 No. 60601-1:2008 Medical Electrical Equipment, Part 1: General Requirements for Basic safety and essential performance • IEC 60601-1-8: 2006, Medical electrical equipment - Part 1-8: General requirements for basic safety and essential performance, Collateral Standard: General requirements, tests and guidance for alarm systems in medical electrical equipment and medical electrical systems • EN 60601-1-8:2007, Medical electrical equipment - Part 1-8: General requirements for basic safety and essential performance, Collateral Standard: General requirements, tests and guidance for alarm systems in medical electrical equipment and medical electrical systems • IEC 60601-2-12:2001, Medical electrical equipment Part 1-2: General requirements for basic safety and essential performance, Collateral standard: Safety requirements for medical electrical systems • EN 60601-2-12:2005, Medical electrical equipment Part 2-12: Particular requirements for the safety of lung ventilators - Critical care ventilators • ISO/EN 80601-2-12: 2011, Medical electrical equipment Part 2-12: Particular requirements for basic safety and essential performance of critical care ventilators • ISO 80601-2-55: 2011 and EN ISO 80601-2-55: 2012, Medical electrical equipment - Part 2-55: Particular requirements for the basic safety and essential performance of respiratory gas monitors - First Edition • ISO 5356-1:2004, Anesthetic and respiratory equipment Conical connectors Part 1: Cones and sockets • IEC 60601-1-4:2000, Medical Electrical Equipment - Part 1-4: General Requirements for Safety - Collateral Standard: Programmable Electrical Medical Systems • IEC 60601-1-6:2010, Medical electrical equipment - Part 1-6: General requirements for basic safety and essential performance - Collateral Standard: Usability • IEC 62366:2007, Medical devices - Application of usability engineering to medical devices • ANSI/AAMI HE75:2009, Human Factors Engineering - Design of Medical Devices • IEC/EN 60601-1-2:2007, Medical electrical equipment - Part 1-2: General requirements for basic safety and essential performance - Collateral standard: Electromagnetic compatibility - Requirements and tests • ISO 14971:2007/EN ISO 14971:2012, Medical devices - Application of risk management to medical devices Operator's Manual 29 Specifications 11.9Manufacturer’s Declaration The following tables contain the manufacturer’s declarations for the ventilator system electromagnetic emissions, electromagnetic immunity, separation distances between ventilator and portable and mobile RF communications equipment and a list of compliant cables. WARNING: Portable and mobile RF communications equipment can affect the performance of the ventilator system. Install and use this device according to the information contained in this manual. WARNING: The ventilator system should not be used adjacent to or stacked with other equipment, except as may be specified elsewhere in this manual. If adjacent or stacked used is necessary, the ventilator system should be observed to verify normal operation in the configurations in which it will be used. Caution: This equipment is not intended for use in residential environments and may not provide adequate protection to radio communication services in such environments. Table 11-15. Electromagnetic Emissions The ventilator is intended for use in the electromagnetic environment specified below. The customer or the operator of the ventilator should assure that it is used in such an environment. Emissions Test 30 Compliance Electromagnetic environment – guidance Radiated RF emissions CISPR 11 Group 1 Class A The ventilator uses RF energy only for its internal functions. The ventilator is intended to be used only in hospitals and not be connected to the public mains network. Harmonic emissions IEC 61000-3-2 Class A Voltage fluctuations/flicker IEC 61000-3-3 Complies The ventilator is intended to be used only in hospitals and not be connected to the public mains network. Operator's Manual Manufacturer’s Declaration Table 11-16. Electromagnetic Immunity The ventilator is intended for use in the electromagnetic environment specified below. The customer or the operator of the ventilator should assure that it is used in such an environment. Immunity Test IEC 60601 test level Compliance level Electromagnetic environment – guidance Electrostatic discharge (ESD) IEC 61000-4-2 ±6 kV contact ± 8 kV air ±6 kV contact ± 8 kV air Floors should be wood, concrete, or ceramic tile. If floors are covered with synthetic material, the relative humidity should be at least 30%. Electrical fast transient/ burst IEC 61000-4-4 ± 2 kV for power supply lines ± 1 kV for input/ output lines ± 2 kV for power supply lines ± 1 kV for input/ output lines Mains power quality should be that of a typical hospital environment. Surge IEC 61000-4-5 ± 1 kV line(s) to line(s) ± 2 kV line(s) to earth ± 1 kV line(s) to line(s) ± 2 kV line(s) to earth Voltage dips, short interruptions and voltage variations on power supply input lines IEC/EN 61000-411 < 5% UT (> 95% dip in UT) for 0.5 cycle 40% UT(60% dip in UT) for 5 cycles 70% UT(30% dip in UT) for 25 cycles < 5% UT > 95% dip in UT for 5 s < 5% UT (> 95% dip in UT) for 0.5 cycle 40% UT(60% dip in UT) for 5 cycles 70% UT(30% dip in UT) for 25 cycles < 5% UT > 95% dip in UT for 5 s Mains power should be that of a typical hospital environment. If the operator of the ventilator requires continuous operation during power mains interruptions, it is recommended that the ventilator be powered from an uninterruptible power supply or a battery. Power frequency (50/60 Hz) magnetic field IE/EN 61000-4-8 3 A/m 3 A/m Power frequency magnetic fields should be at levels characteristic of a typical hospital environment. NOTE: UT is the AC mains voltage prior to application of the test level. Operator's Manual 31 Specifications Table 11-16. Electromagnetic Immunity (Continued) The ventilator is intended for use in the electromagnetic environment specified below. The customer or the operator of the ventilator should assure that it is used in such an environment. Immunity Test Conducted RF IEC/EN 61000-4-6 IEC 60601 test level 3 Vrms 150 kHz to 80 MHz Compliance level 1 Vrms 159 kHz to 80 MHz Electromagnetic environment – guidance Portable and mobile RF communications equipment should be used no closer to any part of the ventilator system, including cables, than the separation distance calculated from the equation applicable to the frequency of the transmitter. Recommended separation distance d = 3.5 P 10 Vrms in ISM bands1 1 Vrms in ISM bands1 Recommended separation distance d = 12 P 32 Operator's Manual Manufacturer’s Declaration Table 11-16. Electromagnetic Immunity (Continued) The ventilator is intended for use in the electromagnetic environment specified below. The customer or the operator of the ventilator should assure that it is used in such an environment. Immunity Test Radiated RF IEC/EN 61000-4-3 IEC 60601 test level 10 V/m 80 MHz to 2.5 GHz Compliance level Electromagnetic environment – guidance 10 V/m Modulation of 80% AM @ 2 Hz 80 MHz to 2.5 GHz d = 1.2 P 80 MHz to 800 MHz d = 2.3 P 800 MHz to 2.5 GHz Where P is the maximum output power rating of the transmitter in watts (W) according to the transmitter manufacturer and d is the separation distance in meters (m)2. Field strengths from fixed transmitters, as determined by an electromagnetic site survey3, should be less than the compliance level in each frequency range4. Interference may occur in the vicinity of equipment marked with the following symbol: NOTE 1 At 80 MHz and 800 MHz, the higher frequency range applies NOTE 2 these guidelines may not apply in all situations. Electromagnetic propagation is affected by absorption and reflection from structures, objects and people. 1. The ISM (industrial, scientific and medical) bands between 150 kHz and 80 MHz are 6.765 to 6,795 MHz; 13.553 MHz to 13.567 MHz; 26.957 MHz; and 40.66 MHz to 40.70 MHz. The compliance levels in the ISM frequency bands between 150 kHz and 80 MHz and in the frequency range 80 MHz to 2.5 GHz are intended to decrease the likelihood mobile/portable communications equipment could cause interference if it is inadvertently brought into patient areas. For this reason, an additional factor of 10/3 is used in calculating the separation distance for transmitters in these frequency ranges. Operator's Manual 33 Specifications 2. The compliance levels in the ISM frequency bands between 150 kHz and 80 MHz and in the frequency range 80 MHz to 2.5 GHz are intended to decrease the likelihood mobile/portable communications equipment could cause interference if it is inadvertently brought into patient areas. For this reason, an additional factor of 10/3 is used in calculating the separation distance for transmitters in these frequency ranges. 3. Field strengths from fixed transmitters, such as base stations for radio (cellular/cordless) telephones and land mobile radios, amateur radio, AM and FM radio broadcast and TV broadcast cannot be predicted theoretically with accuracy. To assess the electromagnetic environment due to fixed RF transmitters, an electromagnetic site survey should be considered. If the measured field strength in the location in which the 980 Series Ventilator is used exceeds the applicable RF compliance level above, the 980 Series Ventilator should be observed to verify normal operation. If abnormal performance is observed, additional measures may be necessary, such as reorienting or relocating the ventilator. 4. Over the frequency range 150 kHz to 80 MHz, field strengths should be less than 10 V/m. Table 11-17. Recommended Separation Distances for RF The ventilator is intended for use in an electromagnetic environment in which radiated RF disturbances are controlled. The customer or the operator of the ventilator can help prevent electromagnetic interference by maintaining a minimum distance between portable and mobile RF communications equipment (transmitters) and the ventilator as recommended below, according to the maximum output power of the communications equipment. Rated maximum output power of transmitter (W) 150 kHz to 80 MHz outside of ISM bands 150 kHz to 80 MHz inside of ISM bands d = 3.5 P d = 12 P 80MHz to 800 MHz 800 MHz to 2.5 GHz d = 1.2 P d = 2.3 P 0.01 0.35 1.2 0.12 0.23 0.1 1.1 3.8 0.38 0.73 1 3.5 12 1.2 2.3 10 11 38 3.8 7.3 100 35 120 12 23 For transmitters rated at a maximum output power not listed above, the recommended separation distance d in meters (m) can be estimated using the equation applicable to the frequency of the transmitter where P is the maximum output power rating of the transmitter in watts (W) according to the transmitter manufacturer. NOTE 1 At 80 MHz and 800 MHz, the separation distance for the higher frequency range applies. NOTE 2 These guidelines may not apply in all situations. Electromagnetic propagation is affected by absorption and reflection from structures, objects and people. 34 WARNING: The use of accessories and cables other than those specified with the exception of parts sold by Covidien as replacements for internal components, may result in increased emissions or decreased immunity of the ventilator system. Operator's Manual Safety Tests Table 11-18. Part number and description Cable length 10087151, Power cord, 10A, RA, ANZ 10 ft (3 m) 10087159, Power cord, 10A, RA, UK 10 ft (3 m) 10087155, Power cord, 10A, RA, EU 10 ft (3 m) 10087157, Power cord, 10A, RA, Japan 10 ft (3 m) 10087152, Power cord, 10A, RA, British 10 ft (3 m) 10087154, Power cord, 10A, RA, Swtzrlnd 10 ft (3 m) 10081056, Power cord, 10A, RA, USA 10 ft (3 m) 10087156, Power cord, 10A, RA, Israel 10 ft (3 m) 10087160, Power cord, 10A, RA, Brazil 10 ft (3 m) 10087153, Power cord, 10A, RA, China 10 ft (3 m) 11.10Safety Tests All safety tests should be performed by qualified Service personnel at the interval specified. Reference Service Preventive Maintenance Frequency, p. 1-2 in the Operator’s Manual Addendum on Preventive Maintenance. 11.11Essential Performance Requirements Per ISO/EN 80601-2-12: 2011, Medical electrical equipment Part 2-12: Particular requirements for basic safety and essential performance of critical care ventilators, the ventilator’s essential performance requirements are given in Ventilator Settings, Alarm Settings, and Patient Data tables earlier in this chapter. Alarms, including Oxygen level alarms and gas failure alarms, are identified in Chapter 6. AC and battery backup power information is given in Chapter 3, and gas failure cross flow information is given in Chapter 3. Operator's Manual 35 Specifications Page Left Intentionally Blank 36 Operator's Manual A BiLevel 2.0 Appendix A.1 Overview This appendix describes the operation of the BiLevel 2.0 ventilation mode on the Puritan Bennett™ 980 Series Ventilator. BiLevel is a mixed mode of ventilation that combines attributes of mandatory and spontaneous breathing, with the breath timing settings determining which breath type is favored. In BiLevel Mode, mandatory breaths are always pressure-controlled, and spontaneous breaths can be pressure-supported (PS) or tube compensated (TC). Figure A-1. Spontaneous Breathing at PL 1 PCIRC (cmH2O) 4 PH 2 TH 5 PL 3 TL 6 Spontaneous breaths BiLevel resembles SIMV mode, except that BiLevel establishes two levels of positive airway pressure. Cycling between the two levels can be triggered by BiLevel timing settings or by patient effort. A-1 BiLevel 2.0 Appendix Figure A-2. BiLevel Mode 1 Pressure (y-axis) 5 Synchronized transitions 2 PL 6 Pressure support 3 PH 7 Time-based transitions 4 Spontaneous breath NOTE: The Pressure support level is always referenced to PL The two pressure levels are called Low Pressure (PL) and High Pressure (PH). At either pressure level, patients can breathe spontaneously, and spontaneous breaths can be assisted with tube compensation or pressure support. BiLevel monitors mandatory and spontaneous tidal volumes separately. Inspiratory time and expiratory time in BiLevel become Time high (TH) and Time low (TL), respectively. During these inspiratory and expiratory times, PH is maintained during TH and PL is maintained during TL. A.2 Intended Use BiLevel is intended for adult, pediatric, and neonatal patients. A.3 Safety Symbol Definitions This section contains safety information for users, who should always exercise appropriate caution while using the ventilator. A-2 Operator’s Manual Technical Description Table A-1. Safety Symbol Definitions Symbol Definition WARNING Warnings alert users to potential serious outcomes (death, injury, or adverse events) to the patient, user, or environment. Caution Cautions alert users to exercise appropriate care for safe and effective use of the product. Note Notes provide additional guidelines or information. A.4 WARNING: The ventilator offers a variety of breath delivery options. Throughout the patient's treatment, the clinician should carefully select the ventilation mode and settings to use for that patient based on clinical judgment, the condition and needs of the patient, and the benefits, limitations and characteristics of the breath delivery options. As the patient's condition changes over time, periodically assess the chosen modes and settings to determine whether or not those are best for the patient's current needs. Setting Up BiLevel BiLevel is a ventilatory mode (along with A/C, SIMV, and SPONT). To set up BiLevel 1. At the ventilator setup screen, enter PBW or gender and height. 2. Touch BiLevel. After selecting BiLevel mode, the ventilator uses the PC mandatory breath type, which cannot be changed. 3. Choose the spontaneous type (PS or TC). 4. Choose trigger type (P-TRIG or V-TRIG). 5. Operator’s Manual Select desired ventilator settings. The default settings for BiLevel mode appear. To change a setting, touch its button and turn the knob to set its value. PH must always be at least 5 cmH2O greater than PL. A-3 BiLevel 2.0 Appendix Note: The rise time % setting determines the rise time to reach target pressure for transitions from PL to PH and for spontaneous breaths, even when pressure support (PSUPP) = 0. Expiratory sensitivity (ESENS) applies to all spontaneous breaths. 6. Set TL, TH, or the ratio of TH to TL. To select settings that would result in a TH:TL ratio greater than 1:1 or 4:1, you must touch Continue to confirm after reaching the 1:1 and 4:1 limits. Figure A-3. BiLevel Setup Screen A.5 7. Touch Start. 8. Set apnea and alarm settings by touching their respective tabs at the side of the ventilator settings screen and changing settings appropriately. Using Pressure Support with BiLevel Spontaneous breaths in BiLevel mode can be assisted with pressure support according to these rules (Reference BiLevel with Pressure Support, p. A-5): • A-4 Pressure support (PSUPP) can be used to assist spontaneous breaths at PL and PH. PSUPP is always set relative to PL. Target pressure = PL + PSUPP. Operator’s Manual Technical Description • Spontaneous patient efforts at PH are not pressure supported unless PSUPP > (PH PL). All spontaneous breaths (whether or not they are pressure supported) are assisted by a pressure of 1.5 cmH2O. • If PSUPP + PL is greater than PH + 1.5 cmH2O, all spontaneous breaths at PL are assisted by the PSUPP setting, and all spontaneous breaths at PH are assisted by PSUPP - (PH - PL). • All spontaneous breaths not supported by PS or TC (for example, a classic CPAP breath) are assisted with an inspiratory pressure of 1.5 cmH2O. For example, if PL = 5 cmH2O, PH = 15 cmH2O, and PSUPP = 20 cmH2O: • All spontaneous breaths at PL are assisted by 20 cmH2O of pressure support (PL + PSUPP) for a total pressure of 25 cmH2O, and • All spontaneous breaths in PH are assisted by 10 cmH2O of pressure support (PSUPP - (PH - PL)) for the same total pressure of 25 cmH2O. Figure A-4. BiLevel with Pressure Support 1 Pressure (y-axis) 4 PH 2 PH Pressure support = 10 cmH2O 5 PL 3 PL Pressure support = 20 cmH2O During spontaneous breaths, the pressure target is calculated with respect to PL. A.6 Manual Inspirations in BiLevel Mode Pressing the MANUAL INSP key during BiLevel mode causes the ventilator to: Operator’s Manual A-5 BiLevel 2.0 Appendix • Cycle to PH, if the current pressure level is PL. • Cycle to PL, If the current pressure level is PH. To avoid breath stacking, the ventilator does not cycle from one pressure level to another during the earliest stage of exhalation. A.7 Respiratory Mechanics Maneuvers in BiLevel In BiLevel, respiratory mechanics maneuvers are limited to inspiratory pause and expiratory pause maneuvers. A.8 Specifications Reference the table, Ventilator Settings Range and Resolution, in Chapter 11 of this manual for the following specifications: A.9 • Low pressure (PL) • High pressure (PH) • Low pressure time (TL) • High pressure time (TH) • TH:TL ratio • Respiratory rate (f) • Rise time % Technical Description BiLevel is a mode of ventilation that alternately cycles between two operatorset pressure levels, PL and PH. The pressure durations are defined by operatorset timing variables TL and TH. Transitions between the two pressure levels, PL and PH, are analogous to breath phase transitions in PC. At the extreme ranges of TL and TH, BiLevel can resemble the single breath type mode A/C - PC, or the more complex breath type mode, an “inverted-like” IMV. If TH and TL assume “normal” values with respect to PBW (for example A-6 Operator’s Manual Technical Description TH:TL» 1:2 or 1:3), then BiLevel assumes a breathing pattern similar to, if not qualitatively identical to A/C - PC. However, as TL begins to shorten with the TH:TL ratio extending beyond 4:1, the breathing pattern assumes a distinctly different shape. In the extreme, the exaggerated time at PH and abrupt release to PLwould match the pattern patented by John Downs* and defined as APRV. In between the A/C-PC-like pattern and the APRV-like pattern, there would be patterns with moderately long TH and TL intervals, allowing the patient sufficient time to breathe spontaneously at both PH and PL. In these types of breathing patterns, (but less so with APRV) BiLevel, like SIMV, can be thought of as providing both mandatory and spontaneous breath types. In this sense, BiLevel and SIMV are classified as mixed modes. Direct access to any of the three breath timing parameters in BiLevel is accomplished by touching the Padlock icon associated with the TH period, TL period or the TH:TL ratio displayed on the breath timing bar in the setup screen. While in BiLevel mode, spontaneously triggered breaths at either pressure level can be augmented with higher inspiratory pressures using Pressure Support (PS) or Tube Compensation (TC) breath types. A.9.1 Synchrony in BiLevel Just as BiLevel attempts to synchronize spontaneous breath delivery with the patient's inspiratory and expiratory efforts, it also attempts to synchronize the transitions between pressure levels with the patient's breathing efforts. This allows TH to be extended to prevent transitions to PL during the patient's spontaneous inspiration. Likewise, the TL interval may be extended to prevent a transition to PH during the patient's spontaneous exhalation. The trigger sensitivity setting (PSENS or VSENS) is used to synchronize the transition from PL to PH. The transition from PH down to PL is synchronized with the patient's spontaneous expiratory effort. The BiLevel algorithm will vary the TL and TH intervals as necessary to synchronize the transitions between PL and PH to match the patient's breathing pattern. The actual durations of TH and TL vary according to whether or not the patient makes any spontaneous inspiratory efforts during those periods. *. Downs, JB, Stock MC. Airway pressure release ventilation: A new concept in ventilatory support. Crit Care Med 1987;15:459-461 Operator’s Manual A-7 BiLevel 2.0 Appendix To manage synchrony with the patient's breathing pattern, the BiLevel algorithm partitions the TH and TL periods into spontaneous and synchronous intervals as shown in the figure below. Figure A-5. Spontaneous and Synchronous Intervals 1 Pressure (y-axis) 5 TL 2 TH 6 Synchronous interval 3 PH 7 Spontaneous interval 4 PL By partitioning TH and TL into spontaneous and synchronous phases, BiLevel responds to patient efforts (or lack of them) in a predictable pattern: A.9.2 • During the spontaneous interval of each pressure level, successful inspiratory efforts cause the ventilator to deliver spontaneous breaths. • During TL synchronous intervals, successful inspiratory efforts cause the ventilator to cycle from PL to PH. If there is no spontaneous (patient) effort, this transition takes place at the end of the TL period. • During TH synchronous intervals, successful expiratory efforts cause the ventilator to cycle from PH to PL. If there is no spontaneous exhalation, the transition to the PL level takes place at the end of the TH period. Patient Monitoring in BiLevel If the patient breathes spontaneously at either pressure level, BiLevel monitors and displays the total respiratory rate, including mandatory and spontaneous breaths. BiLevel also displays the exhaled tidal volume and total exhaled minute A-8 Operator’s Manual Technical Description volume for both mandatory and spontaneous breaths. A.9.3 APRV Strategy in BiLevel Lengthening the TH period and shortening the TL period to only allow incomplete exhalation of the mandatory breath volume, results in an inverse TH:TL ratio. In this breath timing configuration with TH:TL ratios of greater than 4:1, BiLevel becomes Airway Pressure Release Ventilation (APRV). APRV is characterized as longer TH periods, short TL periods (usually less than one second), and inverse TH:TL ratios. Since, at these breath timing settings, all of the patient-triggered spontaneous breaths occur during the TH period, APRV resembles CPAP ventilation with occasional, short periods of incomplete exhalation referred to as “releases” which are controlled by the f setting. Figure A-6. APRV With Spontaneous Breathing at PH 1 PCIRC (cmH2O) 2 Lengthened inspiratory time (TH) 3 Shortened release time (TL) In APRV, the PH level is set to optimize pulmonary compliance for spontaneous breathing while maintaining an elevated mean airway pressure to promote oxygenation, the PL level is set, along with the TL, to control the expiratory release volume of mandatory breaths to help manage CO2 and alveolar ventilation, and the f setting controls the number of releases per minute which are used to help manage the patient's CO2 levels. The f setting also impacts the mean airway pressure. Operator’s Manual A-9 BiLevel 2.0 Appendix In APRV the operator can configure the BiLevel settings to allow direct control of TL to assure that changes in the f setting will not inadvertently lengthen the TL period resulting in destabilization of end-expiratory alveolar volume. With the TL period locked, changes in set f will change the TH period to accommodate the new f setting while maintaining the set TL period. A.9.4 Technical Structure of BiLevel In BiLevel, the ventilator establishes two levels of baseline pressure. One level is essentially the same as the standard PEEP level set for all common modes of ventilation. The second pressure level is the level established at TH. Both pressure levels permit CPAP, TC and PS breaths. The breath timing settings determine whether the patient can initiate any of these breath types. A.10 Mode Changes Changing to BiLevel mode from other modes follows the general guidelines for mode changes: A-10 • The change is made as soon as possible without compromising inspiration or exhalation. • Breaths are not stacked during inspiration. Operator’s Manual B Leak Sync Appendix B.1 Overview This appendix describes the operation of the Puritan Bennett™ 980 Series Ventilator Leak Sync option. The Leak Sync option enables the ventilator to compensate for leaks in the breathing circuit while accurately detecting the patient’s effort to trigger and cycle a breath. Because Leak Sync allows the ventilator to differentiate between flow due to leaks and flow due to patient respiratory effort, it provides dynamic compensation and enhances patientventilator synchrony. Reference Chapter 4 in this manual for general parameter and operational information. B.2 Intended Use Leak Sync is designed to compensate for leaks in the breathing circuit during noninvasive or invasive ventilation. Leak Sync accurately quantifies instantaneous leak rates, therefore detecting patient respiratory phase transitions correctly and may affect work of breathing. Leak Sync is intended for neonatal, pediatric, and adult patients. B-1 Leak Sync Appendix B.3 Safety Symbol Definitions This section contains safety information for users, who should always exercise appropriate caution while using the ventilator. Table B-1. Safety Symbol Definitions Symbol Definition WARNING Warnings alert users to potential serious outcomes (death, injury, or adverse events) to the patient, user, or environment. Caution Cautions alert users to exercise appropriate care for safe and effective use of the product. Note Notes provide additional guidelines or information. B.4 WARNING: The ventilator offers a variety of breath delivery options. Throughout the patient's treatment, the clinician should carefully select the ventilation mode and settings to use for that patient based on clinical judgment, the condition and needs of the patient, and the benefits, limitations and characteristics of the breath delivery options. As the patient's condition changes over time, periodically assess the chosen modes and settings to determine whether or not those are best for the patient's current needs. Leak Sync Breathing circuit leaks can cause the ventilator to erroneously detect patient inspiratory efforts (called autotriggering) or delay exhalation in pressure support. Patient interfaces such as masks are particularly prone to significant leaks. Inaccurately declaring inspiration or exhalation can result in patient-ventilator dysynchrony and increased work of breathing. Changing inspiratory or expiratory sensitivity settings can temporarily correct the problem, but requires continued frequent clinical intervention to ensure that sensitivity is adjusted appropriately as conditions change (for example, if the patient moves or the circuit leak changes). B-2 Operator’s Manual Technical Discussion Leak Sync adds flow to the breathing circuit to compensate for leaks. The maximum Leak Sync flow applies to the maximum base flow compensation during exhalation. During pressure-based inspirations, the total delivered flow (leak flow plus inspiratory flow) is limited by the maximum total flow. The following table shows the maximum leak rates at set PEEP pressure that Leak Sync will compensate based on patient type. Table B-2. Leak Compensation Volumes Based on Patient Type Patient type B.5 Maximum Leak compensation flow Neonatal 15 L/min Pediatric 40 L/min Adult 65 L/min Setting Up Leak Sync For more information on setting up the ventilator, Reference Chapter 4 of this manual. To enable Leak Sync 1. At the ventilator setup screen, touch the More Settings tab. 2. Touch Enabled in the Leak Sync area. 3. Touch Accept ALL to enable Leak Sync. Operator’s Manual B-3 Leak Sync Appendix Figure B-1. Enabling Leak Sync B.6 Note: The default value for Leak Sync is Disabled when the circuit type is Pediatric or Adult and the Vent Type is Invasive. Otherwise the default value for Leak Sync is Enabled. Note: Leak Sync is not allowed for tube compensated (TC) and Proportional Assist Ventilation (PAV+) breath types. When Leak Sync is Enabled Reference GUI Screen when Leak Sync is Enabled, p. B-5 for an example showing the GUI screen when Leak Sync is enabled. B-4 • The Vent Setup button on the GUI screen indicates Leak Sync is active. • DSENS is displayed in units of L/min, rather than %. • If the ventilator detects a leak during a respiratory mechanics maneuver, the message Leak Detected is displayed. • A new leak or change in leak rate is typically quantified and compensated within three breaths. Monitored patient data stabilizes within a few breaths. Operator’s Manual Technical Discussion • Select inspiratory and expiratory sensitivity settings as usual. If the ventilator autotriggers, try increasing flow sensitivity (VSENS) Note: The absence of the Leak Detected message does not mean there is no leak. Note: Leak Sync is automatically enabled when ventilating a new patient and the circuit type is neonatal, regardless of the Vent Type. If Leak Sync is disabled, it remains disabled when switching between INVASIVE and NIV Vent Types. Figure B-2. GUI Screen when Leak Sync is Enabled 1 B.6.1 LS appears on Vent Setup button notifying the operator that Leak Sync is enabled Adjusting Disconnect Sensitivity (DSENS) When Leak Sync is enabled, the Circuit Disconnect alarm becomes active based on the DSENS setting, which is the maximum allowable leak rate at set PEEP. When Leak Sync is disabled, DSENS is automatically set to 75%. Operator’s Manual B-5 Leak Sync Appendix WARNING: When Vent Type = NIV and Leak Sync is disabled, DSENS is automatically set to OFF. Reference the table below for a summary of DSENS settings when Leak Sync is enabled. Note that it is possible to set DSENS below maximum Leak Sync flow. Table B-3. DSENS settings B.6.2 Breathing circuit type DSENS setting Maximum total flow Neonatal Range: 1 to 15 L/min Default: 2 L/min (INVASIVE ventilation) 5 L/min (NIV) 50 L/min Pediatric Range: 1 to 40 L/min Default: 20 L/min 120 L/min Adult Range: 1 to 65 L/min Default: 40 L/min 200 L/min WARNING: With significant leaks, pressure targets may not be reached due to flow limitations. WARNING: Setting DSENS higher than necessary may prevent timely detection of inadvertent extubation. Monitored Patient Data When Leak Sync is enabled, three additional parameters are displayed on the More Patient Data screen and updated for each breath. Display the More Patient Data screen by swiping the tab on the patient data banner. These leak parameters may also be configured on the patient data banner and the large font patient data panel. B-6 Operator’s Manual Technical Discussion Figure B-3. Leak Sync Monitored Patient Data 1 Leak Sync Parameters Reference the table Patient Data Range and Resolution in Chapter 11 of this manual for information regarding the following monitored patient data parameters: • VLEAK • % LEAK • LEAK Displayed values for Exhaled Tidal Volume (VTE ) and Inspired Tidal Volume (VTL) are leak-compensated, and indicate the estimated inspired or exhaled lung volume. The accuracies for VTE and VTL also change when Leak Sync is enabled (see Technical Discussion for more information). Graphic displays of flow during Leak Sync indicate estimated lung flows. Operator’s Manual B-7 Leak Sync Appendix B.7 Technical Discussion Managing breathing circuit leaks is important to ensure appropriate breath triggering and cycling, ventilation adequacy, and valid patient data. Detecting and monitoring leaks can improve treatment, reduce patient work of breathing, and provide more accurate information for clinical assessments. Leak Sync recognizes that changing pressures lead to varying deflection of interface materials and leak sizes. The Leak Sync leak model includes a rigid leak orifice whose size remains constant under changing pressures, combined with an elastic leak source whose size varies as a function of applied pressure. This algorithm provides a more accurate estimate of instantaneous leak to improve patient-ventilator synchrony under varying airway pressures. Leak Sync allows the ventilator to determine the leak level and allows the operator to set the flow trigger and peak flow sensitivities to a selected threshold. The base flow during exhalation is set to: B.7.1 • Flow triggering: 1.5 L/min + estimated leak flow at PEEP + flow sensitivity. • Pressure triggering: 1.0 L/min + estimated leak flow at PEEP. Inspired Tidal Volume (VTL) Accuracy During Leak Sync Reference Patient Data Range and Resolution, p. 11-19, VTL parameter, for VTL accuracy. For readings < 100 mL, accuracy ranges apply when the percentage of inspiratory leak volume is < 80%, where the percentage of leak volume is: (Leak volume during inspiration / total delivered inspiratory volume) x 100 B.7.2 Note: Inspired tidal volume is labeled as VTL when Leak Sync is enabled, and as VTI when Leak Sync is disabled. Exhaled Tidal Volume (VTE) Accuracy During Leak Sync Reference Patient Data Range and Resolution, p. 11-19, VTE parameter, for accuracy when Leak Sync is enabled. where TE = time to exhale 90% of volume actually exhaled by the patient. B-8 Operator’s Manual Technical Discussion For readings < 100 mL, accuracy ranges apply when the percentage of inspiratory leak volume is < 80%, where the percentage of leak volume is: (Leak volume during inspiration/total delivered inspiratory volume) x 100 B.7.3 %LEAK Calculation Reference Patient Data Range and Resolution, p. 11-19, % LEAK parameter, for specifications. B.7.4 Circuit Disconnect Alarm During Leak Sync The Circuit Disconnect alarm is activated if the overall leak volume during the whole breath exceeds the maximum leak volume derived from the DSENS setting. During VC, the Circuit Disconnect alarm is also activated if the end-inspiratory pressure falls below (set PEEP + 1 cmH2O) for three consecutive breaths. The screen shows this alarm message: Figure B-4. Circuit Disconnect During VC Normal operation resumes if the ventilator detects a patient connection. Operator’s Manual B-9 Leak Sync Appendix Page Left Intentionally Blank B-10 Operator’s Manual C IE Sync Appendix C.1 Overview This appendix describes the operation of the Puritan Bennett™ 980 Ventilator IE Sync option. When a mechanically ventilated patient is capable of some degree of ventilatory effort, it is essential that the ventilator be as responsive as possible to the patient’s efforts. In most modes and breath types, this is done by clinicians estimating PSENS, VSENS, and ESENS. IE Sync is a ventilator triggering and cycling algorithm based on real-time estimation of the patient’s intra-pleural pressure. The algorithm processes ventilator pressure and flow measurements in a way that accounts for the variability of respiratory parameters of the patient population. In a bench-top model simulating patients with flow limitation, incomplete exhalation or weak spontaneous efforts, IE Sync triggering has been shown to decrease the number of missed breaths when compared to flow triggering. C.2 Intended Use IE Sync is intended for invasively ventilated, spontaneously breathing pediatric and adult patients, only, and not for neonatal patients. C.3 Safety Symbol Definitions This section contains safety information for users, who should always exercise appropriate caution while using the ventilator. C-1 IE Sync Appendix Table C-1. Safety Symbol Definitions Symbol Definition WARNING Warnings alert users to potential serious outcomes (death, injury, or adverse events) to the patient, user, or environment. Caution Cautions alert users to exercise appropriate care for safe and effective use of the product. Note Notes provide additional guidelines or information. C.4 WARNING: The ventilator offers a variety of breath delivery options. Throughout the patient's treatment, the clinician should carefully select the ventilation mode and settings to use for that patient based on clinical judgment, the condition and needs of the patient, and the benefits, limitations and characteristics of the breath delivery options. As the patient's condition changes over time, periodically assess the chosen modes and settings to determine whether or not those are best for the patient's current needs. IE Sync Description IE Sync is a triggering and cycling algorithm based on the estimated patient intra-pleural pressure. It is only available in SPONT mode, with the following breath types: PAV+, PS, VS, and TC. A PBW ≥ 25 kg is recommended. IE Sync can also be used in monitoring mode, where it does not control the patient's breath triggering and cycling, but only indicates where in the patient's breath cycle an inspiration and expiration would have started if IE Sync were active. C.5 Setting Up IE Sync To set up IE Sync 1. At the ventilator setup screen, enter the patient’s gender and height or PBW. 2. C-2 Touch the Invasive vent type button. Operator’s Manual Technical Description 3. Touch SPONT mode. 4. Touch PAV+, VS, PS, or TC to choose the spontaneous type. 5. Touch IE Sync as the trigger type. 6. Set the inspiratory triggering threshold (ISENS). 7. Set the expiratory sensitivity threshold (ESENS). 8. Continue setting up the ventilator as described in Chapter 4 of this manual. Figure C-1. Setup Screen Note: If Leak Sync is currently enabled, it becomes disabled when IE Sync is selected as the trigger type. Leak Sync cannot be selected if using IE Sync as the trigger type. Conversely, If IE Sync is disabled, then Leak Sync becomes selectable. A message appears on the GUI stating “IE Sync Startup” until the IE Sync startup period completes. The startup period takes three (3) breaths to reach a steady state, after which it triggers and cycles the ventilator breaths. During the startup period, the default ventilator settings are: • Trigger type — P-TRIG • PSENS — 2 cmH2O Operator’s Manual C-3 IE Sync Appendix • ESENS — 25% if IE Sync has not been used previously, otherwise default ESENS setting for the currently active breath type If IE Sync is enabled while in transition from a different trigger type, then the trigger type, PSENS, and ESENS settings from the prior breath type shall be used during startup instead of those stated above. C.6 Setting Up IE Sync for Monitoring Only To set up IE Sync for monitoring only: 1. At the Vent Setup screen, change the trigger type to a type other than IE Sync. 2. Touch “Accept”. 3. Swipe the Menu tab on the left side of the GUI. Figure C-2. Monitoring Setup 4. C-4 Touch IE Sync. A dialog appears allowing enabling (ON) or disabling (OFF) of IE Sync monitoring. Operator’s Manual Technical Description Figure C-3. Monitoring Dialog C.7 5. Touch ON. 6. Set the inspiratory trigger threshold (ISENS). 7. Set the expiratory sensitivity threshold (ESENS). 8. Touch Close. IE Sync Monitoring Display The waveforms screen shows the PSYNC (intra-pleural pressure) signal and the I:E signal during the delivery of a spontaneous breath. Reference Technical Description, p.C-7 for details regarding PSYNC. Note: IE Sync-related signals are not displayed during Apnea ventilation. IE Sync monitoring displays a waveform indicator marking where in the breath cycle the ventilator would have triggered an inspiration or expiration and started an expiration if IE Sync were in use. Operator’s Manual C-5 IE Sync Appendix When using IE Sync monitoring, the waveform displays an indication of missed breath triggers, if applicable (missed triggers per minute and the percent of missed triggers). Note: IE Sync-related signals are not displayed during Apnea ventilation. When using IE Sync monitoring, the screen appears as shown below. Figure C-4. Monitoring Waveform 1 The points at which the actual inspiration and expiration took place under pressure trigger or flow trigger 2 I:E signal: The points in the breath where IE Sync would have triggered an inspiration and expiration if not in monitoring C-6 Note: In the PCIRC waveform above, red indicates the current breath trigger and cycle timing, and blue indicates where IE Sync would have triggered inspiration and exhalation, had IE Sync been the chosen trigger type. Operator’s Manual Technical Description C.8 Technical Description IE Sync uses a real-time estimate, (PSYNC), of the time-derivative of intrapleural pressure for determining breath phase transitions. PSYNC is computed every five (5) ms based on a proprietary algorithm that uses the ventilator’s pressure and flow sensor readings as its inputs. IE Sync detects the start of inspiration when PSYNC reaches the set ISENS threshold, and detects the end of inspiration when the PSYNC signal reaches the set ESENS threshold. C.9 Alarms during IE Sync If an alarm occurs during IE Sync which causes the ventilator to enter inspiratory or expiratory Back Up Ventilation (BUV), the trigger type automatically changes to the factory default trigger type, which can be institutionally configured. If and when the alarm that caused BUV is corrected, IE Sync will not automatically be re-enabled; if IE Sync is still desired, then the user must re-enable it. An apnea condition during IE Sync causes the trigger type to change to P-TRIG with PSENS of two (2) cmH2O. IE Sync breaths go through a startup period when normal ventilation resumes after the following resets: • Circuit occlusion • Circuit disconnect • Loss of both gas supplies (SVO) • Calculated lung compliance value is invalid • Calculated patient resistance value is invalid If there are five (5) internal resets in a 20-minute period, IE Sync will automatically become disabled, and will be set to V-TRIG with new-patient default sensitivities. Reference the table Ventilator Settings Range and Resolution in Chapter 11 of this manual. A message displays on the GUI if IE Sync becomes disabled due to internal resets, and the unread items icon appears on the ventilator setup dialog. Operator’s Manual C-7 IE Sync Appendix Page Left Intentionally Blank C-4 Operator’s Manual D PAV™+ Appendix D.1 Overview This appendix describes the operation of the PAV™*+ software option for the Puritan Bennett™ 980 Ventilator. Proportional Assist™* Ventilation (PAV+) is designed to improve the work of breathing of a spontaneously breathing patient by reducing the patient’s increased work of breathing when pulmonary mechanics are compromised. The PAV+ breath type differs from the pressure support (PS) breath type in the following way: PAV+ acts as an inspiratory amplifier; the degree of amplification is set by the % Support setting (% Supp). PAV+ software continuously monitors the patient’s instantaneous inspiratory flow and instantaneous lung volume, which are indicators of the patient’s inspiratory effort. These signals, together with ongoing estimates of the patient’s resistance and compliance, allow the software to instantaneously compute the necessary pressure at the patient wye to assist the patient’s inspiratory muscles to the degree selected by the % Supp setting. Higher inspiratory demand yields greater support from the ventilator. PAV+ software reduces the risk of inadvertent entry of incompatible settings, such as small predicted body weight (PBW) paired with a large airway. D.2 Intended Use PAV+ is intended for use in spontaneously breathing adult patients whose ventilator predicted body weight (PBW) setting is at least 25.0 kg (55 lb). Patients must be intubated with either endotracheal (ET) or tracheostomy (Trach) tubes of internal diameter (ID) 6.0 mm to 10.0 mm. Patients must have satisfactory neural-ventilatory coupling, and stable, sustainable inspiratory drive. *. Proportional Assist and PAV are registered trademarks of The University of Manitoba, Canada. Used under license. D-1 PAV™+ Appendix D.3 Safety Symbol Definitions This section contains safety information for users, who should always exercise appropriate caution while using the ventilator. Table D-1. Safety Symbol Definitions Symbol Definition WARNING Warnings alert users to potential serious outcomes (death, injury, or adverse events) to the patient, user, or environment. Caution Cautions alert users to exercise appropriate care for safe and effective use of the product. Note Notes provide additional guidelines or information. D-2 WARNING: The ventilator offers a variety of breath delivery options. Throughout the patient's treatment, the clinician should carefully select the ventilation mode and settings to use for that patient based on clinical judgment, the condition and needs of the patient, and the benefits, limitations and characteristics of the breath delivery options. As the patient's condition changes over time, periodically assess the chosen modes and settings to determine whether or not those are best for the patient's current needs. WARNING: PAV+ is not an available breath type in non-invasive ventilation (NIV). Do not use non-invasive patient interfaces such as masks, nasal prongs, uncuffed ET tubes, etc. as leaks associated with these interfaces may result in over-assist and patient discomfort. WARNING: Breathing circuit and artificial airway must be free from leaks. Leaks may result in ventilator over-assist and patient discomfort. Operator’s Manual Ventilator Settings/Guidance D.4 WARNING: Ensure high and low tidal volume alarm thresholds are set appropriately because an overestimation of lung compliance could result in an undersupport condition resulting in the delivery of smaller than optimal tidal volumes. PAV+ WARNING: Ensure that there are no significant leaks in the breathing circuit or around the artificial airway cuff. Significant leaks can affect the performance of the PAV+ option and the accuracy of resistance (R) and elastance (E) estimates. WARNING: Do not use silicone breathing circuits with the PAV+ option: the elastic behavior of a silicone circuit at the beginning of exhalation can cause pressure-flow oscillations that result in underestimates of patient resistance. The act of inspiration requires the patient’s inspiratory muscles to develop a pressure gradient between the mouth and the alveoli sufficient to draw in breathing gas and inflate the lungs. Some of this pressure gradient is dissipated as gas travels through the artificial airway and the patient’s conducting airways, and some of the pressure gradient is dissipated in the inflation of the lungs and thorax. Each element of pressure dissipation is characterized by a measurable property: the resistance of the artificial and patient airways, and the compliance (or elastance) of the lung and thorax. PAV+ software uses specific information, including resistance of the artificial airway, resistance of the patient’s airways, lung-thorax compliance, instantaneous inspiratory flow and lung volume, and the % Supp setting to compute the instantaneous pressure to be applied at the patient connection port (patient wye). PAV+ software randomly estimates patient resistance and compliance approximately every four to ten breaths. Every five (5) ms, the software estimates lung flow, based on an estimate of flow at the patient wye, and lung volume, based on the integral of the value of estimated lung flow. PAV+ begins to assist an inspiration when flow (generated by the patient’s inspiratory muscles) appears at the patient wye. If the patient ceases inspiration, the assist also ceases. Once inspiratory flow begins, PAV+ software monitors instantaneous flow and volume every 5 ms and applies the pressure Operator’s Manual D-3 PAV™+ Appendix calculated to overcome a proportion (determined by the % Supp setting) of the pressure losses dissipated across the resistances of the artificial and patient airways and lung/thorax compliance. Because the PAV+ algorithm does not know the patient’s mechanics when the PAV+ breath type is selected, the software performs a startup routine to obtain initial data. At startup, PAV+ software delivers four consecutive PAV+ breaths, each of which includes an end-inspiratory pause maneuver that yields estimates of the patient’s resistance and compliance. The first breath, however, is delivered using the predicted resistance for the artificial airway and conservative estimates for patient resistance and compliance, based on the patient’s PBW. Each of the next three PAV+ breaths averages stepwise decreased physiologic values with the estimated resistance and compliance values from the previous breath, weighting earlier estimates less with each successive breath, and yielding more reliable estimates for resistance and compliance. The fifth PAV+ breath (the first non-startup breath) is delivered using the final estimates with the clinician-set % Supp setting. Once startup is complete, the PAV+ software randomly applies a maneuver breath every four to ten breaths after the last maneuver breath to re-estimate patient resistance and compliance. New values are always averaged with former values. The PAV+ option graphically displays estimates of patient lung pressure (intrinsic PEEP), patient compliance, patient resistance, total resistance, total work of inspiration, patient work of inspiration, inspiratory elastic work (an indicator of lung-thorax work), and inspiratory resistive work. The % Supp setting ranges from a minimum of 5% (the ventilator performs 5% of the work of inspiration and the patient performs 95%) to a maximum of 95% (the ventilator performs 95% of the work and the patient performs 5%), adjustable in 5% increments. The PAV+ option also includes alarm limits, safety checks, and logic checks that reject non-physiologic values for patient resistance and compliance as well as inappropriate data. Humidification type and volume can be adjusted after running SST, however the ventilator makes assumptions when calculating resistance and compliance if these changes are made without re-running SST. For optimal breath delivery, run SST after changing humidification type and humidifier volume. D-4 Operator’s Manual Ventilator Settings/Guidance D.4.1 Setting Up PAV+ To set up PAV+ 1. At the ventilator setup screen, enter the patient’s gender and height or the patient’s PBW. 2. Touch INVASIVE vent type. 3. Touch SPONT mode. 4. Touch PAV+ to select Spontaneous type. 5. Touch the desired trigger type (P-TRIG, V-TRIG, or IE Sync (if the IE Sync option is installed). 6. Select tube type 7. Select the tube ID. Initially, a default value is shown based on the PBW entered at ventilator startup. If this ID is not correct for the airway in use, turn the knob to adjust the ID setting. Note: If the operator selects an internal diameter that does not correspond to the PBW/ tube ID range pairs listed in the following table, touch the continue button to override the tube ID setting. If attempts are made to choose a tube ID less than 6.0 mm or greater than 10 mm, a hard bound limit is reached, as PAV+ is not intended for use with tubes smaller than 6.0 mm or larger than 10.0 mm. When touching Dismiss, the setting remains at the last tube ID selected. Touch Accept or Accept ALL to accept changes, or touch Cancel to cancel changes. 8. Operator’s Manual Continue setting up the ventilator as described in Chapter 4 of this manual. Note: If Leak Sync is currently enabled, it becomes disabled when PAV+ is selected. D-5 PAV™+ Appendix Figure D-1. Ventilator Setup Screen D.4.2 Note: When the ventilator is used on the same patient previously ventilated using PAV+, the GUI displays an attention icon and the tube type and tube ID previously used, as a reminder to the clinician to review those settings during ventilator setup. PBW and Tube ID The ventilator uses “soft bound” and “hard bound” values for estimated tube inside diameters based upon PBW. Soft bounds are ventilator settings that have reached their recommended high or low limits. When adjusting the tube size, if the inside diameter does not align with a valid predicted body weight, a Continue button appears. Setting the ventilator beyond these soft bounds requires the operator to acknowledge the prompt by touching Continue button before continuing to adjust the tube size. The limit beyond which the tube ID cannot be adjusted is called a hard bound, and the ventilator emits an invalid entry tone when a hard bound is reached. D-6 WARNING: Ensure that the correct artificial airway ID size is entered. Because PAV+ amplifies flow, entering a smaller-than-actual airway ID causes the flow- Operator’s Manual Ventilator Settings/Guidance based pressure assistance to over-support the patient and could lead to transient over-assist at high values of % Supp. Conversely, entering a largerthan-actual ID results in under-support. PAV+ software monitors the settings for the PBW and artificial airway. If the PBW and tube ID settings do not correspond to the above PBW/tube ID range pairs, confirm or correct the settings. Confirming or correcting the actual ID size minimizes the likelihood that PAV+ will over-support or under-support. To apply new settings for the artificial airway follow these steps 1. Touch Vent Setup at the lower left of the GUI screen. 2. Touch Tube Type and turn the knob to select Trach or ET to set the tube type. 3. Touch tube ID and turn the knob to set the tube ID. 4. Touch Accept or Accept ALL to apply the new settings, or Cancel to cancel. To apply new humidifier settings 1. Touch the More Settings tab. D.4.3 2. Touch the appropriate button for Humidification Type. 3. For non-HME humidification types, touch Humidifier Volume, then turn the knob to adjust the (empty) humidifier volume. 4. Touch Accept ALL to apply the changes. WARNING: To ensure the accuracy of PAV+ breaths and spirometry measurements, run SST following any change to the humidification type or humidification volume settings. Ensure that the intended circuit is used with the SST. Apnea Parameters Adjustment After accepting the PAV+ settings, touch the Apnea Setup screen. Adjust the Apnea parameters as required. Operator’s Manual D-7 PAV™+ Appendix D.4.4 Alarm Settings Adjustment PAV+ includes the high inspired tidal volume 2VTI) and low exhaled spontaneous tidal volume alarm (4VTE SPONT) alarm limit settings. Reference PAV+ Alarms, p. D-10. Note: Because of the breathing variability that PAV+ allows, the 4VTE SPONT alarm, by default, is turned OFF to minimize nuisance alarms. To monitor adequate ventilation, use the 3VE TOT alarm condition instead. To adjust alarm settings 1. Touch the Alarm tab to view the current alarm settings. D.4.5 2. Touch the button for each alarm limit requiring a change. 3. Turn the knob to adjust the value of the alarm limit. Proposed values are highlighted. You can change more than one alarm limit before applying the changes. 4. Touch Accept or Accept All to apply the changes, or Cancel to cancel. PAV+ Ventilator Settings Reference the table Ventilator Settings Range and Resolution, in Chapter 11 of this manual for a summary of PAV+ ventilator settings for the following parameters: D.4.6 • % Supp • Expiratory sensitivity (ESENS) • Tube type • Tube ID • Trigger type PAV+ Alarm Settings Reference the table Alarm Settings Range and Resolution, in Chapter 11 of this manual for a summary of the following alarm settings available when PAV+ is active: D-8 Operator’s Manual Ventilator Settings/Guidance D.4.7 • High inspired tidal volume limit (2VTI) • Low exhaled spontaneous tidal volume (4VTE SPONT) Monitored Data Reference Patient Data Range and Resolution, in Chapter 11 of this manual for the following monitored data associated with PAV+: • PAV-based lung compliance (CPAV) • PAV-based lung elastance (EPAV) • PAV-based lung resistance (RPAV) • PAV-based total airway resistance (RTOT) • Inspired tidal volume (VTI) Reference the table below for monitored data absolute limits. Table D-2. Absolute limits for PAV+ Monitored Data Operator’s Manual PBW (kg) RPAV (cmH2O/L/s) CPAV (mL/cmH2O EPAV (cmH2O/L 25 0 to 50 2.5 to 29 34 to 400 35 0 to 44 3.5 to 41 24 to 286 45 0 to 31 4.5 to 52 19 to 222 55 0 to24 5.5 to 64 16 to 182 65 0 to 20 6.4 to 75 13 to 156 75 0 to 18 7.4 to 87 11 to 135 85 0 to 17 8.4 to 98 10 to 119 95 0 to 16 9.4 to 110 9.1 to 106 105 0 to 15 10 to 121 8.3 to 100 115 0 to 15 11 to 133 7.5 to 91 125 0 to 14 12 to 144 6.9 to 83 135 0 to 14 13to 156 6.4 to 77 145 0 to 14 14 to 167 6.0 to 71 150 0 to 14 15 to 173 5.8 to 67 D-9 PAV™+ Appendix D.4.8 PAV+ Alarms Reference Non-technical Alarm Summary in Chapter 6 of this manual for a summary of the following alarms associated with PAV+: D.5 • High circuit pressure (1PPEAK) • High ventilator pressure(1PVENT) • PAV STARTUP TOO LONG • PAV R&C NOT ASSESSED • 1VTI Ventilator Settings/Guidance WARNING: For optimal performance of PAV+, it is important to select the humidification type, tube type, and tube size that match those in use on the patient. The instantaneous pressure generated at the patient wye during inspiration is a function of the patient effort, % Supp setting, tube type and size, patient resistance and elastance, and the instantaneously measured gas flow and lung volume. Set 2PPEAK to a safe circuit pressure, above which truncation and alarm annunciation are appropriate. D-10 Note: PAV+ has a built-in high pressure compensation (1PCOMP) limit that is determined by the2PPEAK setting minus 5 cmH2O or 35 cmH2O, whichever is less. If the inspiratory pressure at the patient wye (PI wye) reaches the 1PCOMP limit, the inspiration is truncated, and the ventilator transitions to exhalation. Reference p. D-21 for more details regarding 1PCOMP and 1PPEAK. Operator’s Manual Ventilator Settings/Guidance D.5.1 Specified performance Performance using PAV+ is ± 0.5 Joules/liter (J/L), compared to measured, work during inspiration at the 75% support (% Supp) level. Work is computed over the entire inspiratory interval. In ventilation terms, work (W) is expressed as: k P V· dt W = --------------------------------------· i dt V i i i ith sample interval (5 ms) V Flow [L/s] W Work [J/L] k conversion constant (0.098) [J/cmH2O x L) P Synchronous and combined pressures developed by the ventilator and by the patient (PMUS), [cmH2O] D.5.2 Graphics Displays in PAV+ When PAV+ is active (the mode is SPONT and the spontaneous breath type is PAV+), a work of breathing (WOB) graphic is automatically displayed (Reference Graphics displays in PAV+, p. D-14) which shows: • Operator’s Manual estimates of work of breathing relative to normal, subnormal, and above-normal values, including: – the estimated work of breathing in Joules/L) during inspiration (WOBPT) and – the estimated total work of breathing (in Joules/L) of the patient and ventilator during inspiration (WOBTOT) D-11 PAV™+ Appendix • an indicator showing the proportion of patient inspiratory work to overcome the elastance (E) of the lung-thorax and the combined resistance (R) of the artificial airway and the patient. Additional information in the graphics screen includes • a “shadow” trace of the estimated lung pressure, shown as a solid area superimposed on the circuit pressure waveform. • PAV-based patient data estimates, including patient resistance (RPAV), lung compliance (CPAV), and intrinsic PEEP (PEEPI PAV). Note: Graphic displays of lung pressure and patient work of breathing are not actual measurements, and are derived from equations using filtered estimates of pressure and flow. The WOB graphic is only available when SPONT mode and the PAV+ breath type are selected. The shadow trace can be enabled or disabled when selecting the graphic display, or after a display is paused. The act of pausing does not affect the WOB graphic, but does store the shadow trace. Once paused, the operator can enable or disable the shadow trace, then view the paused waveform again with or without the shadow trace. D.5.3 WOB Terms and Definitions The following table provides a definition and description of each of the Work of Breathing (WOB) terms. D-12 Operator’s Manual Ventilator Settings/Guidance Table D-3. PAV+ Work of Breathing terms WOB term Definition Description WOBTOT Total Work of Inspiration With the PAV+ breath type active, the patient and the ventilator always share the in the work of breathing. The percent WOBTOT performed by the ventilator always equals the % Supp setting and the percent WOBTOT performed by the patient always equals (100 minus the % Supp setting). WOBTOT is the sum of the work to move the breathing gas through the artificial airway and the patient's own airways plus the work to inflate the patient's elastic lung-thorax. WOBPT Patient Work of Breathing That part of WOBTOT performed by the patient. WOBPT ELASTIC Inspiratory Elastic Work That part of WOBPT attributed to inflating the patient’s elastic lung-thorax. WOBPT RESISTIVE Inspiratory Resistive Work That part of the WOBPT attributed to moving breathing gas through resistive elements in the gas path. Operator’s Manual D-13 PAV™+ Appendix Figure D-2. Graphics displays in PAV+ D.5.4 1 Total work of breathing (WOBTOT) 2 Patient’s work of breathing (WOBPT) 3 Shadow trace Technical Description When PAV+ is selected, the ventilator acts as an inspiratory amplifier, proportionally assisting the pressure generating capability of the inspiratory muscles (PMUS). Pressure Gradient Equation of Motion During spontaneous breathing, PMUS generates a pressure gradient that drives breathing gas through the artificial airway and the patient’s airways and into the elastic lung-thorax, and is described by the equation of motion: D-14 Operator’s Manual Ventilator Settings/Guidance EQUATION 1 P MUS = V· L R + V L E LUNG – THORAX PMUS Pressure generating capability of patient’s inspiratory muscles R Resistance elements (artificial plus patient airways) VL Flow through the resistance elements and into the lungs ELUNG-THORAX Elastance of the lung and thorax (1/CLUNGTHORAX) VL Insufflation volume of the lung Operator’s Manual D-15 PAV™+ Appendix Estimates of Patient Resistance and Elastance If the PAV+ software estimates of patient resistance and elastance (RPAV and (EPAV) remain stable, this equation could be rewritten as: EQUATION 2 i i i i i P MUS = V· L R airway + V· L K 1 + V L K 2 i Instantaneous value of pressure, flow, or airway resistance, Riairway being a function of flow K2 EPAV K1 RPAV PiMUS could then be estimated at every control period if ViL, Riairway, and ViL were also known. Valid Individual Pressure Measurements Throughout any inspiration, the individual pressure elements that make up PMUS can be expressed as: EQUATION 3 FLOW p MUS = P ARTIFICIAL VOLUME + P PATIENT + P PATIENT PMUS Pressure generating capability of patient’s inspiratory muscles PFLOWPATIENT Flow based pressure drop across the patient PFLOWARTIFI- Flow based pressure drop across the artificial airway PVOLUMEPATIENT Volume based pressure to overcome the lung-thorax elastance CIAL AIRWAY D-16 FLOW AIRWAY Operator’s Manual Ventilator Settings/Guidance Equations 2 and 3 provide the structure to explain how PAV+ operates. The clinician enters the type and size of artificial airway in use, and the software uses this information to estimate the resistance of the artificial airway at any lung flow. Applying a special pause maneuver at the end of selected inspirations provides the information the software needs to estimate patient resistance (RPAV) and compliance (CPAV, which is converted to elastance, EPAV). Immediately following the end of the pause event, software captures simultaneous values for PLUNG, Pwye, and VE which yield an estimate for RTOT at the estimated flow. All raw data are subjected to logic checks, and the estimates of RPAV and CPAV are further subjected to physiologic checks. The estimates of RPAV and CPAV are discarded if any of the logic or physiologic checks fail. If CPAV is rejected, RPAV is also rejected. Valid estimates of RPAV and CPAV are required for breath delivery, and are constantly updated by averaging new values with previous values. This averaging process smooths data and avoids abrupt changes to breath delivery. If new values for RPAV and CPAV are rejected, the previous values remain active until valid new values are obtained. PAV+ software monitors the update process and generates an escalating alarm condition if the old values do not refresh. Maneuver Breaths and % Supp During PAV+, maneuver breaths are randomly performed every four to ten breaths after the last maneuver breath. A maneuver breath is a normal PAV+ inspiration with a pause at end inspiration. Because muscle activity is delayed for at least 300 ms following the end of neural inspiration, the patient’s respiratory control center does not detect the pause. With this approach, maneuver breaths are delivered randomly so that their occurrence is neither consciously recognized nor predictable. A PAV+ breath begins, after the recognition of a trigger signal, with flow detection at the patient wye. The sample and control cycle of the ventilator (the value of i in Equation 2) is frequent enough to yield essentially constant tracking of patient inspiration. At every ith interval, the software identifies instantaneous lung flow (ViL), which is impeded by the resistances of the artificial airway and patient airways) and integrates this flow to yield an estimate of instantaneous lung volume, (ViL), which is impeded by the elastic recoil of the lung and thorax). Operator’s Manual D-17 PAV™+ Appendix Using the values for instantaneous lung flow and lung volume, PAV+ software calculates each of the pressure elements in Equation 2, which gives the value of PMUS at each ith interval. At this point, Equation 2 and the subsequent analysis identifies that an appropriate patient, supported by PAV+ and with an active PMUS (an absolute requirement) will, within a few breaths, enable the algorithm to obtain reasonable estimates of RPAV and EPAV. Once these physiologic data are captured (and over a relatively brief time as they are improved and stabilized), the PAV+ algorithm mirrors the patient's respiratory mechanics, which then allows the ventilator to harmoniously amplify PMUS. The key point to recognize is that patient's continuous breathing effort “drives” the PAV+ support — no effort, no support. The % Supp setting specifies the amount of resistance- and elastic-based pressure to be applied at each ith interval at the patient wye. By taking all of the above information into consideration, EQUATION 2 can be rewritten to include the % Supp setting recognizing that ViL and ViL are driven by the patient, not by the ventilator. (It is important to note that the ventilator is not amplifying its own flow — only the flow generated by PMUS.) EQUATION 4 i i i i i P wye = S V· L R airway + S V· L K 1 + S V L K 2 Piwye D-18 Pressure generated by the ventilator in response to the instantaneous values of lung flow and lung volume at the wye. This value is the sum of the three individual pressure elements (in parentheses) in Equation 4 S % Supp setting/100 (ranges from 0.05 to 0.95 Operator’s Manual Ventilator Settings/Guidance Resulting Pressure Gradient The pressure gradient driving breathing gas into the patient’s lungs is given by the sum of Piwye and the patient’s inspiratory effort, therefore: EQUATION 5 i i i PiMUS Instantaneous pressure generating capability of patient’s inspiratory muscles P GRADIENT = P wye + P MUS PiGRADIENT Instantaneous pressure gradient piwye Pressure generated by the ventilator in response to the instantaneous values of lung flow and lung volume at the wye D.5.5 Protection Against Hazard PAV+ software is designed to reduce the risk that hyperinflation may occur. The potential for hyperinflation could arise if the software were to overestimate actual patient resistance or underestimate actual patient lung-thorax compliance (that is, to overestimate actual elastance). If the software cannot generate valid estimates of RPAV and CPAV, PAV+ cannot start. If, after startup, the values of RPAV and CPAV cannot be updated with valid new values, the previous values become less reliable. The stability of PAV+ is primarily determined by the relationship between the true lung elastance [EL (true)] and the true lung volume [VL(true)]. Although Pi wye (resistive) also plays a part, the following discussion focuses on the elastic component. At all lung volumes, the true state of the lung and thorax is expressed by: Operator’s Manual D-19 PAV™+ Appendix i i P L recoil = V L true E L true PiL recoil True lung recoil pressure EL (true) ViL (true) True instantaneous volume of the lung True lung elastance Over-inflation will not occur as long as Piwye (elastic) < PiL recoil, which is equivalent to the inequality: S[ViL (estimated) x K2] < ViL (true) x EL(true) where: K2 = EPAV1 1. see equations 2 and 4 As long as EPAV (estimated) = EPAV (true) and ViL (estimated) = ViL (true) then Pirecoil> Piwye even at high values of % Supp (i.e. between 85% and 95%). This means that if the pressure applied to the lung-thorax is never greater than EL (true) x VL, lung volume will collapse if wye flow vanishes. As long as EPAV (estimated) ≤ EL (true), ViL (estimated) ≤ ViL (true), and RPAV (estimated) ≤ RL(true), PMUS is the modulator of Piwye. Hyperinflation could occur if the estimated EPAV were greater than the true value of EL. At a high % Supp setting, Piwye (elastic) could exceed PiL recoil, causing a self-generating flow at the patient wye, which in turn would cause a self-generating inflation of the lungs. This is part of the reason that the % Supp setting is limited to 95%. Likewise, if the estimated RPAV were to exceed the true value of RL at a high % Supp setting, Piwye (resistive) could exceed the value necessary to compensate for pressure dissipation across the artificial and patient airways, resulting in early hyperinflation of the lungs. As flow declines after the first third of inspiration, however, the hyperinflating effect would most likely disappear. D-20 Operator’s Manual Ventilator Settings/Guidance PAV+ software includes these strategies to minimize the possibility of hyperinflation of the lungs: 1. The maximum % Supp setting is limited to 95%. 2. The raw data for RPAV and CPAV are checked for graph/math logic, and estimated mechanics values are checked against PBW-based physiologic boundaries. These checks reduce the possibility of overestimating patient resistance or underestimating patient compliance, which could lead to potential over-inflation. 3. The high inspiratory tidal volume limit (2VTI) places an absolute limit on the integral of lung flow (including leak flow), which equals lung volume. If the value of VTI reaches this limit, the ventilator truncates inspiration and immediately transitions to exhalation. 4. The 2VTI setting places an upper limit on the value of the PVOLUMEPATIENT component of Piwye (see Equations 3 and 4). At the beginning of each new inspiration, PAV+ software calculates a value for PVOLUMEPATIENT as follows: P*wye (elastic threshold limit) = 0.75 x (VTI x EPAV) where P*wye is the unique value for the elastic threshold limit of Piwye that will cause the lung volume to expand to 75% of 2VTI. When Piwye (elastic) = P*wye (elastic threshold limit), the software stops increasing Piwye (elastic). This means that any further increase in lung volume must be accomplished by the patient, which tends to hasten the conclusion of inspiratory effort and avoid truncation due to lung volume reaching the 2VTI limit. 5. The high inspiratory pressure limit (2PPEAK) applies to all breaths, and is used by PAV+ software to detect the high compensation pressure condition (1PCOMP): 1PCOMP = 2PPEAK - 5 cmH2O or 35 cmH2O, whichever is less If the user-adjustable 2PPEAK limit is reached, the ventilator truncates inspiration and immediately transitions to exhalation. If Piwye (the targeted wye pressure calculated in Equation 4) equals the 1PCOMP for 500 ms, the inspiration is truncated and exhalation begins. Further, when Piwye = 1PCOMP, Piwye is limited to 1PCOMP. Operator’s Manual D-21 PAV™+ Appendix Although this freezes the value of Piwye, patient activity such as coughing could drive Piwye to 2PPEAK, causing inspiration to end. The rapid rise of Piwye to the 1PCOMP limit would likely occur in the first third of inspiration, and only if RPAV were overestimated and % Supp were set above 85%. The 1PCOMP condition guards against over-inflation due to overestimation of RPAV. 6. The % Supp setting ranges from 5 to 95% in 5% increments. Reducing the level of support decreases the possibility of over-inflation. A significant decrease could produce a sensation of inadequate support, and the patient would absorb the additional work of inspiration or require an increase in the level of support. A significant increase could cause a surge in the ventilator generated value for Pwye, which in turn could cause Piwye to reach 2PCOMP and lead to temporary patient-ventilator disharmony. To minimize this possibility, PAV+ software limits the actual increase in support to increments of 10% every other breath until the new setting is reached. 7. Spirometry remains active during PAV+ operation. 2VTI can be set high enough to allow spontaneous sigh breaths, while 4VE TOT and 2VE TOT remain active to reveal changes in minute ventilation. Because PAV+ cannot operate without valid estimates of RPAV and CPAV, and because those values are unknown when PAV+ starts, a startup routine obtains these values during four maneuver breaths that include an end inspiratory pause that provides raw data for RPAV and CPAV, and both estimated values must be valid. If either value is invalid during any of the four startup breaths, the software schedules a substitute maneuver breath at the next breath. Reference PAV+, p. D-3. A low-priority alarm becomes active if a 45-second interval elapses without valid estimates for RPAV and CPAV. If the condition persists for 90 seconds, the alarm escalates to medium-priority. If the condition persists for 120 seconds, the alarm escalates to high priority. The 3VE TOT and1fTOT alarms are also associated with this condition. Similarly, if RPAV and CPAV cannot be updated with valid values after a successful PAV+ startup, a low-priority alarm is activated if the condition persists for 15 minutes. If the values still cannot be updated with valid values after 30 minutes, the alarm escalates to medium priority. D-22 Operator’s Manual Ventilator Settings/Guidance If PAV+ estimates a high lung resistance following a sharp spike in the expiratory flow waveform, then a PBW-based resistance value is used. Reference the waveform and table below. 8. Figure D-3. Use of Default Lung Resistance 1 Flow (V) 5 High peak expiratory flow 2 Expiration 6 Exhalation with normal return to zero flow 3 Inspiration 7 Normal peak expiratory flow 4 Exhalation with slow, restricted return to zero flow Table D-4. Default PBW-based Resistance Values PBW (kg) Resistance (cmH2O/L/s) PBW (kg) Resistance (cmH2O/L/s) PBW (kg) Resistance (cmH2O/L/s) PBW (kg) 25 18.1 43 13.5 61 11.3 79 10.1 26 17.7 44 13.3 62 11.2 80 10.1 27 17.4 45 13.2 63 11.1 81 to 150 28 17.1 46 13.0 64 11.0 29 16.8 47 12.9 65 10.9 30 16.5 48 12.7 66 10.9 31 16.2 49 12.6 67 10.8 32 15.9 50 12.4 68 10.7 33 15.7 51 12.3 69 10.7 34 15.4 52 12.2 70 10.6 Operator’s Manual Resistance (cmH2O/L/s) 10 D-23 PAV™+ Appendix Table D-4. Default PBW-based Resistance Values (Continued) D-24 PBW (kg) Resistance (cmH2O/L/s) PBW (kg) Resistance (cmH2O/L/s) PBW (kg) Resistance (cmH2O/L/s) 35 15.2 53 12.1 71 10.5 36 14.9 54 12.0 72 10.5 37 14.7 55 11.8 73 10.4 38 14.5 56 11.7 74 10.4 39 14.3 57 11.6 75 10.3 40 14.1 58 11.5 76 10.3 41 13.9 59 11.4 77 10.2 42 13.7 60 11.3 78 10.2 PBW (kg) Resistance (cmH2O/L/s) Operator’s Manual E NeoMode 2.0 Appendix E.1 Overview This appendix describes how to use NeoMode 2.0 software on the Puritan Bennett™ 980 Neonatal Ventilator. NeoMode 2.0 enables the use of the ventilator with neonatal patients and is included with all Puritan Bennett™ 980 Neonatal Ventilators, and Puritan Bennett™ 980 Universal Ventilators. In order for a Puritan Bennett™ 980 Pediatric-Adult Ventilator to be used with Neonatal patients, the NeoMode 2.0 software option must be installed. E.2 Intended Use NeoMode 2.0 is intended to provide respiratory support to neonatal patients with predicted body weights as low as 0.3 kg (0.66 lb). It is intended to cover a wide variety of clinical patient conditions in hospitals and hospital-type facilities, and may be used during intra-hospital and intra-hospital-type facility transport. It supports delivered tidal volumes as low as two (2) mL. E.3 Safety Symbol Definitions This section contains safety information for users, who should always exercise appropriate caution while using the ventilator. E-1 NeoMode 2.0 Appendix Table E-1. Safety Symbol Definitions Symbol Definition WARNING Warnings alert users to potential serious outcomes (death, injury, or adverse events) to the patient, user, or environment. Caution Cautions alert users to exercise appropriate care for safe and effective use of the product. Note Notes provide additional guidelines or information. E.4 E-2 Safety Information WARNING: The Puritan Bennett™ 980 Series Ventilator contains phthalates. When used as indicated, very limited exposure to trace amounts of phthalates may occur. There is no clear clinical evidence that this degree of exposure increases clinical risk. However, in order to minimize risk of phthalate exposure in children and nursing or pregnant women, this product should only be used as directed. WARNING: The ventilator offers a variety of breath delivery options. Throughout the patient's treatment, the clinician should carefully select the ventilation mode and settings to use for that patient based on clinical judgment, the condition and needs of the patient, and the benefits, limitations and characteristics of the breath delivery options. As the patient's condition changes over time, periodically assess the chosen modes and settings to determine whether or not those are best for the patient's current needs. WARNING: Neonatal patients are at risk for hypercarbia or hypoxemia during 3VE TOT alarm conditions. Operator’s Manual Ventilation Features E.5 WARNING: Disabling the low exhaled minute volume (3VE TOT) alarm increases the patient’s risk of Hypercarbia or Hypoxemia. WARNING: When Using NIV, the patient’s exhaled tidal volume (VTE) could differ from the ventilator’s monitored patient data value for VTE due to leaks around the interface. To avoid this, ensure Leak Sync is installed. When NIV is selected, Leak Sync is automatically enabled. Description The ventilator determines values for operational variables and allowable settings based on breathing circuit type and predicted body weight (PBW). The PBW range for neonates is 0.3 kg to 7.0 kg (0.66 lb to 15 lb). Software controls prevent inadvertent mismatching of patient size and breathing circuit type. A neonatal breathing circuit connects to a neonatal expiratory filter which must be used with the neonatal adapter door assembly. E.6 Note: To enable NeoMode 2.0, select the neonatal breathing circuit type in Short Self Test (SST). Breathing circuit type can only be changed during SST. NeoMode 2.0 software restricts the circuit type selection to neonatal. Neonatal Door and Filter Installation WARNING: Removing the expiratory filter while the patient is connected to the ventilator can cause a loss of circuit pressure, ventilator autotriggering, or direct contact with liquid. Caution: Do not pull on door while expiratory filter latch is closed, as damage to the ventilator can result. Operator’s Manual E-3 NeoMode 2.0 Appendix Note: Reference the Inspiratory filter and expiratory filter instructions for use (IFU) for information on filtration efficiency and filter resistance. To install the neonatal adapter door 1. Remove expiratory limb of patient circuit from expiratory filter. 2. Lift expiratory filter latch. Reference Installing Neonatal Filter and Door, p. E-4. 3. Remove existing expiratory filter door. by lifting it off of pivot pins. 4. Fit neonatal adapter door onto pivot pins. To install neonatal expiratory filter assembly 1. With the door still open, push the neonatal filter straight up into the adapter. 2. Close the door. 3. Lower the expiratory filter latch. 4. Re-attach expiratory limb of patient circuit to filter. Figure E-1. Installing Neonatal Filter and Door E-4 1 Neonatal expiratory filter 3 Expiratory filter latch 2 Neonatal adapter door 4 Filter door pivot pin Operator’s Manual Ventilation Features E.7 WARNING: • To ensure all breathing circuit connections are leak tight, perform a circuit leak test by running SST every time the filter is installed. The circuit leak test can be performed as an individual test from the SST startup screen, but after the leak test is performed, the entire suite of SST tests must be performed without a failure before ventilation can begin. • Empty the condensate vial before fluid reaches the maximum fill line. Condensate vial overflow can enter the filter or the breathing circuit, and can cause increased expiratory flow resistance. Change the filter if it appears to be saturated. • The neonatal expiratory filter and condensate vial is a single unit and is for single-patient use, only. Do not attempt to sterilize the filter assembly. WARNING: Adding accessories to the ventilator can change the pressure gradient across the ventilator breathing system (VBS) and affect ventilator performance. Ensure any changes to the recommended ventilator circuit configurations do not exceed the specified values for inspiratory and expiratory pressure drop. Reference the table Technical Specifications on p. 11-3 in this manual. If adding accessories to the patient circuit, always run SST to establish circuit compliance and resistance prior to ventilating the patient. Note: If the ventilator has not reached operating temperature from recent usage, allow it to warm up for at least 15 minutes before running SST to ensure accurate testing. Note: Check the inspiratory and expiratory limbs of the breathing circuit and in-line water traps regularly for water buildup. Under certain conditions, they can fill quickly. Empty and clean the in-line water traps as necessary. Reference the manufacturer’s instructions for additional information. How to Empty the Condensate Vial The condensate vial may accumulate liquid, especially if a non-heated wire patient circuit is in use. Operator’s Manual E-5 NeoMode 2.0 Appendix WARNING: To avoid liquid entering the ventilator, empty the condensate vial before the liquid level reaches the maximum fill line. The condensate vial assembly is integrated with the neonatal expiratory filter and does not contain a drain port. Empty the condensate vial when fluid reaches the maximum fill line. To empty the condensate vial 1. While holding the expiratory filter, twist the condensate vial clockwise approximately one quarter turn to remove it. E.8 2. Remove by carefully lowering the vial all the way down to the base of the exhalation compartment and then slide the vial out. 3. Quickly empty the condensate vial. 4. Replace the condensate vial by carefully sliding the vial into position, lifting it upward to the filter assembly, and turning counterclockwise until it reaches the stop. Note: Condensate vial removal may cause the loss of system pressure and a disconnect alarm. Connecting the Breathing Circuit WARNING: Use one of the ventilator breathing circuits listed, Reference Recommended Breathing Circuits, p. E-8 or their equivalent. This ensures that maximum pressure/flow values specified by EN794-1 are not exceeded. Using a circuit with a higher resistance does not prevent ventilation, but can cause an SST fault or compromise the patient’s ability to breathe through the circuit. Reference How to Connect the Breathing Circuit, p. E-7 to connect the breathing circuit. E-6 Operator’s Manual Ventilation Features Figure E-2. How to Connect the Breathing Circuit 1 Humidifier 6 From Patient port 2 Patient circuit inspiratory limb 7 Neonatal expiratory filter (installed in adapter door) 3 Patient circuit wye 8 To Patient port 4 Patient circuit expiratory limb 9 Inspiratory filter 5 Condensate vial Operator’s Manual E-7 NeoMode 2.0 Appendix Table E-2. Recommended Breathing Circuits Patient Circuit E.9 Part number Ventilator breathing circuit, Neonatal disposable, DAR™ (not available in USA) 3078447 Ventilator breathing circuit, Neonatal, disposable, Hudson RCI/Teleflex 780-06 Ventilator breathing circuit, Neonatal, disposable, Fisher & Paykel RT235 Ventilation Features Ventilation using NeoMode 2.0 is performed exactly as described in Chapter 4 of this manual. Reference Ventilator Operation, p. 4-7. If using a Puritan Bennett™ 980 Neonatal Ventilator, NeoMode 2.0 is already in use and a neonatal patient circuit is the only choice available when performing SST. If using a Puritan Bennett™ 980 Pediatric-Adult Ventilator or Puritan Bennett™ 980Universal Ventilator, the NeoMode 2.0 software option must be installed and SST must be run using a neonatal patient circuit. E.9.1 WARNING: Always run SST prior to patient ventilation, ensuring that all accessories used during ventilation are in the ventilator breathing system when SST is run. This ensures correct calculation of compliance and resistance. Reference SST (Short Self Test), p. 3-46 for more information. Predicted Body Weight (PBW) vs. Patient Length Reference Predicted Body Weight (PBW) Calculation in Chapter 4 of this manual for tables of PBW values associated with patient length in centimeters and inches, respectively. E.9.2 Elevate O2 In NeoMode 2.0, the elevate O2 control works exactly as described in Chapter 3 of this manual, except when the ventilator is in stand-by or circuit disconnect states. If the elevate O2 function is used during these conditions, E-8 Operator’s Manual Ventilation Features the value chosen for elevate O2 applies to the currently delivered oxygen concentration (which is 40% O2 in these cases) and not the set oxygen concentration. E.9.3 CPAP Mode When using NeoMode 2.0 and ventilating with non-invasive ventilation (NIV), a separate CPAP mode allows spontaneous breathing with a desired PEEP level. In order to limit inadvertent alarms associated with the absence of returned volumes in nasal CPAP breathing, CPAP does not make available exhaled minute volume and exhaled tidal volume alarm settings. Since some neonates don’t trigger breaths, the default apnea interval, TA, is set to OFF. Also, some settings changes will initiate a PEEP restoration breath before phasing in those changes. Note: In CPAP, Apnea Time, TA can be adjusted, if desired. It merely defaults to OFF to avoid inadvertent alarms. The message “APNEA DETECTION DISABLED” is displayed at the bottom of the GUI screen. The attention icons are also displayed. To set the ventilator for CPAP 1. Select New Patient from the ventilator’s startup screen or touch Vent Setup. 2. Touch PBW and turn the knob to set the PBW. 3. Select NIV as the Vent type. 4. Touch CPAP. 5. Touch each ventilator setting and turn the knob to select appropriate ventilator settings. When finished, touch Accept or Accept ALL. 6. Complete the setup by setting the apnea parameters and alarm limits from their respective tabs. Operator’s Manual E-9 NeoMode 2.0 Appendix Figure E-3. CPAP Setup Screen E.9.4 Entering CPAP From Other Ventilation Modes Entering CPAP mode from other ventilation modes or vent types requires using the NIV Vent type.The section, Non-invasive Ventilation (NIV) in Chapter 4 of this manual explains how the ventilator transitions from INVASIVE TO NIV vent type. To enter CPAP mode for an existing patient 1. Touch Vent Setup at the lower left of the GUI screen. E-10 2. Touch NIV Vent type. CPAP is only allowed during NIV. 3. Touch CPAP. The ventilator enters CPAP mode. 4. Set an apnea interval, TA, if appropriate, as it defaults to OFF in CPAP. Note: Exhaled minute volume (VE TOT), exhaled tidal volume (VTE SPONT), and inspired tidal volume (VTI) alarms are disabled upon entry into CPAP. Operator’s Manual Ventilation Features E.9.5 Exiting CPAP Mode When changing the mode from CPAP to any other mode, several transition rules take effect: E.9.6 • The VE TOT, VTE MAND, VTE SPONT, and VTI alarms are set to their respective new patient defaults. • When transitioning from apnea interval set to OFF to an apnea interval of time (TA), the new setting is phased in immediately. • The VE TOT, VTE MAND, VTE SPONT, and VTI alarm sliders appear in the alarm settings screen according to their applicability to the selected mode. Compliance Compensation Reference Compliance Compensation in Volume-based Breaths in Chapter 10 of this manual for a complete discussion of compliance compensation. Compliance compensation in NeoMode 2.0 is implemented exactly as described in the aforementioned reference. E.9.7 Note: If the patient’s compliance decreases beyond the limits of compliance compensation, the ventilator relies on the 2PPEAK alarm setting to truncate the breath and switch to exhalation. Settings, Alarms, and Monitored Patient Data WARNING: Monitor the patient closely if alarms are disabled: there are no audible or visual annunciations for out-of-range conditions when volume, pressure, or apnea alarms are disabled (turned OFF). Reference the tables for Ventilator Settings, Alarm Settings, and Patient Data in Chapter 11 of this manual for the ranges for each ventilator setting or data value. Most settings, however, are also limited by other settings or conditions (for example, a low alarm limit is always limited by the corresponding high alarm limit). Review the prompt area when making settings changes. Operator’s Manual E-11 NeoMode 2.0 Appendix Volume Accuracy Volume accuracy testing in VC+ was conducted to demonstrate performance of delivered and monitored parameters. The following tables provide a summary of the actual results obtained within the range of two (2) mL to 25 mL collected during test execution. The first column (Set Tidal Volume) represents the desired volume setting in milliliters (mL). The second column represents the total number of test points for test cases executed at that specific setting. The third column is the mean (Mean Value) of the ventilators and test cases executed for the setting listed. The fourth column represents the standard deviation of measurements taken for the ventilators and test cases executed at the setting listed. The measurements were taken using instrumentation located at the patientconnection port. Accessories such as filters and humidifiers were in the circuit during the test. Values were BTPS and compliance compensated. A sample size of five (5) ventilators was used to conduct the testing. Testing was conducted at 22°C ± 5°C. Table E-3. Delivered Volume Accuracy Set Tidal Volume (mL) Number of Test Points Mean Value STD 2 150 2.067 0.198 5 270 4.853 0.324 15 240 15.108 0.383 25 270 24.608 0.607 Table E-4. Monitored Inspired Volume (VTI) Accuracy E-12 Set Tidal Volume (mL) Number of Test Points Mean Value STD 2 150 2.055 0.192 5 270 4.872 0.346 15 240 15.235 0.379 25 265 24.633 0.566 Operator’s Manual Ventilation Features Table E-5. Monitored Exhaled Tidal Volume (VTE) Accuracy Operator’s Manual Set Tidal Volume (mL) Number of Test Points Mean Value STD 2 150 2.212 0.274 5 270 5.892 0.607 15 240 16.145 0.851 25 265 25.492 0.819 E-13 NeoMode 2.0 Appendix Page Left Intentionally Blank E-14 Operator’s Manual F Proximal Flow Option Appendix F.1 Overview This appendix describes the operation of the Proximal Flow Option for the Puritan Bennett™ 980 Series Ventilator. The Proximal Flow Option is solely used for monitoring flows, pressures, and tidal volumes and does not control these parameters in any way. The Proximal Flow Sensor is designed to measure the lower flows, pressures and tidal volumes at the patient wye typically associated with invasively ventilated neonatal patients. For general parameter and general ventilator setup information, reference Chapter 4 in this manual. F.2 Intended Use The Proximal Flow Option is used for measuring flows, pressures, and tidal volumes of invasively ventilated neonatal patients with predicted body weights (PBW) of 0.3 kg (0.66 lb) to 7.0 kg (15.4 lb) using ET tube sizes from 2.5 mm to 4.0 mm. The NeoMode 2.0 software option must also be installed on the ventilator. F.3 Safety Symbol Definitions This section contains safety information for users who should always exercise appropriate caution while using the ventilator. F-1 Proximal Flow Option Appendix Table F-1. Safety Symbol Definitions Symbol Definition WARNING Warnings alert users to potential serious outcomes (death, injury, or adverse events) to the patient, user, or environment. Caution Cautions alert users to exercise appropriate care for safe and effective use of the product. Note Notes provide additional guidelines or information. F.4 Software/Hardware Requirements The Proximal Flow Option requires installation of the NeoMode 2.0 software option or a Puritan Bennett™ 980 Neonatal Ventilator must be used. Details regarding NeoMode 2.0 can be found in the NeoMode 2.0 Appendix . F.5 F-2 Safety Information WARNING: The Puritan Bennett™ 980 Series Ventilator contains phthalates. When used as indicated, very limited exposure to trace amounts of phthalates may occur. There is no clear clinical evidence that this degree of exposure increases clinical risk. However, in order to minimize risk of phthalate exposure in children and nursing or pregnant women, this product should only be used as directed. WARNING: The ventilator offers a variety of breath delivery options. Throughout the patient's treatment, the clinician should carefully select the ventilation mode and settings to use for that patient based on clinical judgment, the condition and needs of the patient, and the benefits, limitations and characteristics of the breath delivery options. As the patient's condition changes over time, periodically assess the chosen modes and settings to determine whether or not those are best for the patient's current needs. Operator’s Manual Part numbers WARNING: Inspect the Proximal Flow Sensor prior to use, and do not use it if the sensor body, tubing, or connector are damaged, occluded, or broken. WARNING: Do not use the Proximal Flow Sensor if there are kinks in the tubing. WARNING: Prior to patient ventilation with the Proximal Flow Option, run SST with the exact configuration that will be used on the patient. This includes a neonatal patient circuit, Proximal Flow Sensor, and all accessories used with the patient circuit. If SST fails any Proximal Flow Sensor test, check the patient circuit and the Proximal Flow sensor for leaks or occlusions and replace the flow sensor, if necessary. If SST continues to fail, it may indicate a malfunction or a leak within the Proximal Flow hardware which could compromise accuracy or increase the likelihood of cross-contamination; thus, replace the Proximal Flow hardware. WARNING: Changing ventilator accessories can change the system resistance and compliance. Do not add or remove accessories after running SST. WARNING: If the Proximal Flow Option fails to respond as described in this appendix, discontinue use until correct operation is verified by qualified personnel. WARNING: The Proximal Flow Sensor measures gas flow at the patient wye. The actual volume of gas delivered to the patient may be affected by system leaks between the patient and the Proximal Flow Sensor, such as a leak that could occur from the use of an uncuffed endotracheal tube. WARNING: Position the Proximal Flow Sensor exactly as described in this appendix or the Instructions for Use (IFU) provided with the sensor. Operator’s Manual F-3 Proximal Flow Option Appendix F-4 WARNING: Do not position the Proximal Flow Sensor cables or tubing in any manner that may cause entanglement, strangulation or extubation which could lead to hypercarbia or hypoxemia. Use the cable management clips supplied to mitigate this risk. WARNING: To reduce the risk of extubation or disconnection, do not apply tension to or rotate the Proximal Flow Sensor by pulling on the Proximal Flow Sensor’s tubing. WARNING: Do not install the Proximal Flow Sensor in the patient circuit if the sensor is not also connected to the BDU. WARNING: Excessive moisture in the Proximal Flow Sensor tubing may affect the accuracy of the measurements. Periodically check the sensor and tubing for excessive moisture or secretion build-up. WARNING: The Proximal Flow Sensor is intended for single use only. Do not re-use the sensor. Attempts to clean or sterilize the sensor may result in bioincompatibility, infection, or product failure risks to the patient. WARNING: Install the Proximal Flow Sensor as shown. Reference Attaching Proximal Flow Sensor, p. F-14. Improper orientation of the flow sensor could lead to misinterpretation of data or incorrect ventilator settings. Caution: Do not use aerosolized medications with the Proximal Flow Sensor. Such medications may damage the sensor. Caution: To prevent damage to pneumatic lines, use supplied cable management clips. Operator’s Manual Part numbers F.6 Caution: Use only Covidien-branded Proximal Flow Sensors with the Proximal Flow Option. Proximal Flow Option Description The Proximal Flow Option measures pressure, flow, and volume at the patient wye. A Printed Circuit Board Assembly (PCBA) containing the electronics and pneumatics for the Proximal Flow Option is installed in the ventilator on the Option Host Card. Data measured by the Proximal Flow Sensor are displayed on the GUI for monitoring purposes, not for ventilator control. When the ventilator has a Proximal Flow Sensor installed, both proximal flow and proximal pressure measurements are obtained and displayed on the GUI. A manual purge control is also provided to clear pneumatic lines for accurate pressure measurements. When a manual purge is requested, the ventilator will not allow another purge for at least 30 seconds. Reference Sensor Calibration and Sensor Line Purging, p. F-8 for more information on the purge function. F.6.1 Proximal Flow Option components The Proximal Flow Option consists of the following components: Proximal Flow Option PCBA — Installed on the Option Host Card in the BDU, this printed circuit board assembly contains a pressure sensor to measure the pressure difference between the flow sensor lines and the interfaces required to convert analog measurements from the Proximal Flow Sensor into digital data displayed by the ventilator. The PCBA also contains valves and an accumulator for purging the sensor lines from blockages. Proximal Flow Sensor — The Puritan Bennett Proximal Flow Sensor is required for use with the Proximal Flow Option. The sensor is installed near the patient circuit wye. The other end of the sensor connects to the ventilator’s front panel behind a clear door designed to protect the connection point from exposure to spills or from sprayed liquids during cleaning and disinfection. Operator’s Manual F-5 Proximal Flow Option Appendix Figure F-1. Proximal Flow Sensor F.7 On-screen symbols When using the Proximal Flow Option, flow, pressure, and volume waveform data, along with delivered and exhaled volumes are derived from Proximal Flow Sensor measurements at the patient circuit wye. Proximal flow data are displayed on the waveform plot with a Y appearing in inverse video next to the measurement symbol. F-6 Operator’s Manual Part numbers Figure F-2. Sample GUI screen Showing Proximal Flow Data 1 Data measured using Proximal Flow Sensor VY – Flow throughout the breath cycle (at patient circuit wye) PCIRCY – Pressure throughout the breath cycle (at patient circuit wye) Inspired and exhaled flows and volumes at the patient wye are measured and identified by the symbols shown below, and correspond to their non-proximal flow equivalents. These values appear in the patient data panel if so configured. Reference Vital Patient Data on page 3-42, and the figure above. Operator’s Manual F-7 Proximal Flow Option Appendix Table F-2. Proximal Flow Option Patient Data Symbols Data Symbol VTIY Inspired tidal volume (mandatory or spontaneous at patient circuit wye) VTEY Exhaled tidal volume (at patient circuit wye) VTE SPONTY Exhaled spontaneous tidal volume (at patient circuit wye) VTE MANDY Exhaled mandatory tidal volume (at patient circuit wye) VE TOTY VY VTLY Description Exhaled total minute volume (at patient circuit wye) Flow throughout the breath cycle (at patient circuit wye) Inspired tidal volume (at patient circuit wye with Leak Sync enabled) Note: In the patient data symbols shown above, the “Y” appears in inverse video, as shown. Reference Sample GUI screen Showing Proximal Flow Data, p. F-7. Note: When the Proximal Flow and Leak Sync options are enabled, the following parameters are available for display: • VTLY and VTL • LEAK and LEAKY When only the Proximal Flow option is enabled, VTIY and VTI are available for display When a “Y” appears in the symbol, the data are measured with the proximal flow sensor. When a “Y” is absent from the symbol, the data are measured by the ventilator’s internal flow sensors. F.8 Sensor Calibration and Sensor Line Purging To ensure accurate pressure and flow measurements, the ventilator performs an autozero function to calibrate the Proximal Flow Sensor. It does this by periodically opening the pressure sensor on the Proximal Flow Option PCBA to atmosphere during exhalation, and uses the resulting measurements as offset corrections. F-8 Operator’s Manual Part numbers The purge function is designed to clear the pneumatic lines of fluids that may collect, and is performed periodically by sending a brief flow of air through the sensor lines. Autozero and purge functions are only active during exhalation which limits the effect of the purge gas on delivered oxygen concentration. During the autozero or automatic purge processes, the measurement and display of proximal flow data is not shown in real time and a brief message appears on the GUI indicating the purge process is occurring. During autozero or automatic purge processes, the pressure waveforms, when shown display the current PEEP value and the flow waveform, when shown, displays a value of 0. Figure F-3. Message During Autozero and Purge Processes Screenshot of “Prox purge in progress” F.9 SST Requirements SST must be run prior to ventilation and all circuit components and accessories must be installed in the configuration to be used on the patient in order for the ventilator to calculate the correct compliance and resistance. This includes a neonatal patient circuit, Proximal Flow Sensor, and other accessories used during ventilation. Reference To run SST in Chapter 3 of this manual. There is also a table listing the general SST test sequence located in that section. Ref- Operator’s Manual F-9 Proximal Flow Option Appendix erence the table below for a listing of the test sequence when running SST with the Proximal Flow Option. Note: Failure of the Proximal Flow Option to pass SST does not prevent ventilation, but will prevent measurement with the Proximal Flow Option. The ventilator will use its internal flow sensors for measurement instead of the Proximal Flow Option. Table F-3. Proximal Flow Option SST test Sequence Test Step F-10 Function Comments SST Flow Sensor Cross Check Tests O2 and Air Flow Sensors N/A SST EV Performance Calibrates the exhalation valve and creates a table for use during calculations. N/A SST Circuit Pressure Exercises delivery PSOL. Checks inspiratory and expiratory autozero solenoids. Cross-checks inspiratory and expiratory pressure transducers at various pressures. N/A SST Leak Tests ventilator breathing system for leaks. N/A SST Exhalation Filter Checks for exhalation filter occlusion and exhalation compartment occlusion. Ventilator prompts the user to block the proximal flow sensor outlet during Leak test. When prompted to reconnect the patient to the expiratory filter during the Exhalation Filter test, resume blocking the proximal flow sensor outlet. SST Circuit Resistance Checks for inspiratory and expiratory limb occlusions, and calculates and stores the inspiratory and expiratory limb resistance parameters. N/A SST Circuit Compliance Calculates the attached patient circuit compliance. N/A SST Prox Verifies functionality of Proximal Flow System. Includes tests of barometric pressure, autozero, purge, and pressure cross check functions Operator’s Manual Part numbers F.9.1 Attaching the Proximal Flow Sensor for SST During SST the ventilator prompts to attach the Proximal Flow Sensor. To attach the Proximal Flow Sensor to the patient circuit 1. Verify the Proximal Flow Sensor, pneumatic lines, and connector are not damaged. Open the connector panel door and firmly attach the sensor connector to the receptacle in the BDU’s front connector port labeled Prox. 2. Figure F-4. Attaching Proximal Flow Sensor to Ventilator 1 Proximal Flow Sensor connector insertion port 2 Proximal Flow Sensor connector 3. When prompted, block the breathing circuit wye. 4. When prompted to attach the Proximal Flow Sensor, unblock the circuit wye and insert the smaller end of the sensor into the wye. 5. When prompted, cap or seal the larger end of the sensor (marked with “UP” and an arrow). 6. Follow the prompts to complete SST. Operator’s Manual F-11 Proximal Flow Option Appendix If SST fails, check the patient circuit and flow sensor connections for leaks or occlusions and replace the Proximal Flow Sensor, if necessary. Replace the Proximal Flow Option hardware if SST continues to fail, then repeat SST to determine circuit compliance and resistance. Reference the Puritan Bennett™ 980 Series Ventilator Hardware Options Installation Instructions, p/n 10084704 for instructions on replacing the Proximal Flow Option hardware. F.10 Disabling/Enabling the Proximal Flow Option The Proximal Flow Sensor can function in the ENABLED state only if the circuit type is NEONATAL. Assuming the Proximal Flow Option is available and the vent type is INVASIVE, the New Patient default value is ENABLED. If the vent type is NON-INVASIVE, the Proximal Flow Option is DISABLED. The system becomes ENABLED again if the vent type is changed to INVASIVE. After SST has been performed, the clinician may disable the Proximal Flow Option, if desired. To disable or enable the Proximal Flow Option 1. In the constant access icons area, touch the configure icon. A menu containing tabs appears. F-12 2. Touch the Options tab. A screen appears containing the Installed Options and Prox tabs. 3. Touch Enabled or Disabled to enable or disable the Prox Flow option. Operator’s Manual Part numbers Figure F-5. Enabling/disabling Proximal Flow Sensor F.11 Note: If the Proximal Flow Option has been disabled or enabled, SST does not have to be rerun unless the breathing circuit or other breathing system accessories have been changed, removed, or added. Using the Proximal Flow Sensor Review and follow all warnings prior to patient ventilation with the Proximal Flow Sensor. Reference Safety Information, p. F-2, and ensure the Proximal Flow Sensor option is enabled. To connect the Proximal Flow Sensor to the ventilator 1. Verify the Proximal Flow Sensor, pneumatic lines, and connector are not damaged in any way. 2. Operator’s Manual Open the connector panel door and firmly attach the sensor connector to the right-most receptacle in the BDU’s front connector port labeled Prox. Reference Attaching Proximal Flow Sensor to Ventilator, p. F-11. F-13 Proximal Flow Option Appendix To attach the Proximal flow sensor between the endotracheal tube and patient circuit 1. Connect the larger end of the sensor (marked with “UP” and an arrow) to the endotracheal tube. Reference the figure below. Do not force the connection; when the sensor is oriented correctly, insertion requires little effort. Note: If using a Heat-Moisture Exchanger (HME) on the endotracheal tube, place the Proximal Flow Sensor between the HME and the breathing circuit wye. Figure F-6. Attaching Proximal Flow Sensor 1 F-14 Endotracheal tube 2 Breathing circuit wye 2. Connect the smaller end of the sensor to the breathing circuit wye. 3. Ensure the sensor tubing is positioned in an upward direction, as shown in the figure above. If the sensor needs repositioning, DO NOT rotate it by pulling on the tubing. Reposition as follows: a. Grasp the sensor’s plastic body with one hand and the breathing circuit wye with the other hand. b. Rotate the sensor body and wye towards each other until the sensor tubing is upright. c. Confirm a tight connection between the sensor and breathing circuit wye. Operator’s Manual Part numbers 4. F.11.1 Use the three cable management clips provided with the sensor to attach the sensor tubing to the breathing circuit tubing. Space the clips evenly along the length of the sensor tubing. Twist the ends of each clip to close. Note: When the ventilator is set up for Proximal Flow Option operation, the Proximal Flow Sensor can be switched as necessary. There is no need to run SST after switching sensors unless the breathing circuit or other ventilator accessories have been changed. How to Perform a Manual Purge A manual purge may be performed any time the sensor lines contain excessive condensation, moisture, or secretions. To perform a manual purge 1. Touch the Configure icon on the in the constant access icons area of the GUI. 2. Touch the Options tab. A screen appears containing the Installed Options and Prox tabs. 3. Touch the Prox tab. The Prox Setup screen appears. 4. Touch Start that appears next to the text “Prox Manual Purge: To begin touch the Start button”. During the purge, a message appears in the GUI prompt area stating the purge process is being performed.Reference Message During Autozero and Purge Processes, p. F-9. Operator’s Manual F-15 Proximal Flow Option Appendix Figure F-7. Manual Purge F.12 Alarms If the Proximal Flow Option becomes inoperable during ventilation, the ventilator annunciates an alarm and flow sensing reverts to the ventilator’s internal delivery and exhalation valve flow sensors. This switch over may be triggered by any of the following events: • The Proximal Flow Sensor is not detected • Pressure and flow readings are out of range • Hardware problems are reported by the Proximal Flow Option PCBA • There is a communication failure between the ventilator and the Proximal Flow option If any of these conditions occur, the GUI displays an alarm message similar the one shown below.Follow the information contained in the remedy message to troubleshoot the alarm. F-16 Operator’s Manual Part numbers Figure F-8. Alarm Message — Prox Inoperative F.13 Ranges, Resolutions, and Accuracies Reference Patient Data Range and Resolution in Chapter 11 of this manual for Proximal exhaled tidal volume, Proximal inspired tidal volume, Proximal exhaled minute volume, and Proximal flow patient data parameters. F.13.1 Proximal Flow Sensor Specifications Table F-4. Proximal Flow Sensor Volume Accuracy Measurement Accuracy1 Exhaled tidal volume ± (1.0 mL + 10% of reading) Inspired tidal volume ± (1.0 mL + 10% of reading) 1. The conditions under which the accuracy values apply are as follows: Sensor is used as described in this appendix and/or the Instructions for Use provided with the sensor Operator’s Manual F-17 Proximal Flow Option Appendix Table F-5. Proximal Flow Sensor Specifications F.14 Parameter Specification Weight 6.6 g Dead space < 1 mL Pressure drop 1.5 cmH2O at 10 L/min Part Numbers The table below lists the part numbers for the Proximal Flow Option Kit and individual components. Table F-6. Proximal Flow Option Component Part Numbers Item Proximal Flow Option Kit Part Number 10084331 Includes: Installation hardware and accessories F-18 Proximal Flow Sensor, Neonatal (package of 10) NOTE: Includes 3 cable management clips 10047078 Proximal Flow Sensor module 10087622 Interconnect PCBA 10083941 Purge Control Cable 10083940 Purge Supply Line 10083966 PCBA Mounting Screws 10083963 Proximal Flow Option Label 10005748 Operator’s Manual Glossary Table Glossary-1. Glossary of Ventilation Terms analysis message A message displayed on the GUI screen during an alarm condition, identifying the root cause of the alarm. assist breath A mandatory breath triggered by patient inspiratory effort in A/C and SIMV modes. assist-control A/C mode A ventilation mode where only mandatory VC, PC, or VC+ breaths are delivered to the patient. augmented alarm The initial cause of an alarm has precipitated one or more related alarms. When an alarm occurs, any subsequent alarm related to the cause of this initial alarm “augments” the initial alarm. autotriggering The ventilator delivers repeated, unintended breaths triggered by fluctuating flows or pressures as opposed to patient demand. Patient circuit leaks and low flow or pressure sensitivity settings are common causes of autotriggering. background checks Continuously running tests during ventilation that assess the ventilator’s electronics and pneumatics hardware. backup ventilation (BUV) A safety net feature which is invoked if a system fault in the mix subsystem, inspiratory subsystem, or expiratory subsystem occurs compromising the ventilator’s ability to ventilate the patient as set. base flow A constant flow of gas through the patient circuit during the latter part of exhalation during flow triggering (V-TRIG). The value of this base flow is 1.5 L/min greater than the operator selected value for flow sensitivity. base message A message given by the ventilator during an alarm condition, identifying the alarm. batch changes Changes to multiple settings that go into effect at the same time. battery back-up system The system for supplying battery back-up power to a device. The ventilator's battery back-up system consists of a single primary battery to provide up to one (1) hour of battery power to the ventilator. An optional extended battery with the same characteristics as the primary battery is available. BD, BDU Breath delivery or breath delivery unit. The ventilator component that includes inspiratory and expiratory pneumatics and electronics. Glossary-1 Table Glossary-1. Glossary of Ventilation Terms (Continued) Glossary-2 BiLevel mode A mixed ventilation mode combining mandatory and spontaneous breaths, where two levels of pressure are delivered (PL and PH) corresponding to expiratory and inspiratory times TL and TH. BOC British Oxygen Company. A standard for high pressure gas inlet fittings. breath stacking The delivery of a second inspiration before the previous exhalation is complete. BTPS Body temperature and pressure, saturated, 37°C, at ambient barometric pressure, at 100% relative humidity. cmH2O Centimeters of water. A unit of pressure approximately equal to 1 hPa. compliance volume The volume of gas that remains in the patient circuit and does not enter the patient's respiratory system. constant during rate change One of three breath timing variables (inspiratory time, I:E ratio, or expiratory time) the operator can hold constant when the respiratory rate setting changes. Applies only to the pressure control (PC) mandatory breath type (including VC+ and BiLevel). control breath A ventilator-initiated mandatory breath delivered in A/C mode CPU Central processing unit. The electronic components of the ventilator (BD and GUI) responsible for interpreting and executing instructions entered by the operator. dependent alarm An alarm that arises as a result of another primary alarm (also referred to as an augmentation). DSENS Disconnect sensitivity. A setting that specifies the allowable loss (percentage) of delivered tidal volume, which if equaled or exceeded, causes the ventilator to declare a DISCONNECT alarm. The greater the setting, the more returned volume must be lost before DISCONNECT is detected. If the Leak Sync option is in use, DSENS is the maximum allowable leak rate and is expressed in terms of L/min. DISS Diameter index safety standard. A standard for high pressure gas inlet fittings. ESENS Expiratory sensitivity. A setting that determines the percent of peak inspiratory flow (or flow rate expressed in L/min in a PAV breath) at which the ventilator cycles from inspiration to exhalation for spontaneous breaths. Low settings will result in longer spontaneous inspirations. In an IE Sync triggered breath, when the PSYNC signal drops below the ESENS setting, the ventilator cycles to exhalation. EST Extended self test. A comprehensive test of ventilator function, intended to be run by qualified service personnel. Operator’s Manual Table Glossary-1. Glossary of Ventilation Terms (Continued) expiratory pause an operator-initiated maneuver that closes the inspiration (proportional solenoid) and exhalation valves during the exhalation phase of a mandatory breath. The maneuver can be used to determine intrinsic (auto) PEEP (PEEPI). exhalation valve (EV) The valve in the expiratory limb of the ventilator breathing system that controls PEEP. f, fTOT Respiratory rate, as a setting (f) in A/C, SIMV, and BiLevel the minimum number of mandatory breaths the patient receives per minute. As a monitored value (fTOT), the average total number of breaths delivered to the patient. FAILURE A category of condition detected during SST or EST that causes the ventilator to enter the safety valve open state. A ventilator experiencing a FAILURE requires removal from clinical use and immediate service. flow pattern A setting that determines the gas flow pattern of mandatory volumecontrolled breaths. gold standard test circuit Test circuit designed for use with EST. GUI Graphical user interface. The ventilator’s touch screen used to enter patient settings. and alarm settings, including off-screen keys, soft keys, and knobs. hard bound A ventilator setting that has reached its minimum or maximum limit. high-priority alarm As defined by international standards organizations, an alarm that requires immediate attention to ensure patient safety. When a high-priority alarm is active, the red high-priority LED indicator flashes and the high-priority audible alarm sounds (a repeating sequence of five tones that repeats twice, pauses, then repeats again), and the alarm banner on the GUI screen shows an alarm message with the ( !!! ) symbol. HME Heat-moisture exchanger. A humidification device, also called an artificial nose. hPa Hectopascal. A unit of pressure, approximately equal to 1 cmH2O. humidification type A setting for the type of humidification system (HME, non-heated expiratory tube, or heated expiratory tubing) in use on the ventilator. I:E ratio The ratio of inspiratory time to expiratory time. Also, the operator- set timing variable that applies to PC and VC+ mandatory breaths. inspiratory pause An operator-initiated maneuver that closes the inspiration (proportional solenoid) and exhalation valves at the end of the inspiratory phase of a mandatory breath. The maneuver can be used to determine static compliance (CSTAT) and static resistance (RSTAT). Operator’s Manual Glossary-3 Table Glossary-1. Glossary of Ventilation Terms (Continued) Glossary-4 invasive ventilation Patient ventilation while intubated with an endotracheal (or tracheostomy) tube. kPa Kilopascal. A unit of pressure approximately equal to 10 cmH2O. latched alarm An alarm whose visual alarm indicator remains illuminated after the alarm has autoreset. L/min Liters per minute. A unit of flow. low-priority alarm As defined by international standards organizations, an alarm that indicates a change in the patient-ventilator system. During a low-priority alarm, the yellow low-priority LED indicator lights, the low-priority audible alarm (one tone) sounds, and the GUI screen shows an alarm banner with the ( ! ) symbol. lockable alarm An alarm that does not terminate an active alarm silence function. maintenance All actions necessary to keep equipment in, or restore it to, serviceable condition. Includes cleaning, servicing, repair, modification, overhaul, inspection, and performance verification. mandatory breath A breath whose settings and timing are preset; can be triggered by the ventilator, patient, or operator. mandatory type The type of mandatory breath: volume control (VC), VC+, or pressure control (PC). manual inspiration An operator-initiated mandatory (OIM) breath. medium-priority alarm As defined by international standards organizations, an abnormal condition that requires prompt attention to ensure the safety of the patient. When a medium-priority alarm is active, the yellow medium-priority LED indicator flashes, the medium- priority audible alarm (a repeating sequence of three tones) sounds, and the GUI screen shows an alarm banner with the ( !! ) symbol. mode Ventilatory mode. The algorithm that determines type and sequence of breath delivery. NIST Non-interchangeable screw thread. A standard for high pressure gas inlet fittings. non-invasive ventilation (NIV) Patient ventilation without the use of an endotracheal tube; instead using interfaces such as masks, nasal prongs, or uncuffed endotracheal tubes. non-technical alarm An alarm caused due to a fault in the patient-ventilator interaction or a fault in the electrical or gas supplies that the practitioner may be able to alleviate. normal ventilation The state of the ventilator when breathing is in progress and no alarms are active. Operator’s Manual Table Glossary-1. Glossary of Ventilation Terms (Continued) O2% Both a ventilator setting and a monitored variable. The O2% setting determines the percentage of oxygen in the delivered gas. The O2% monitored data is the percentage of oxygen in the gas delivered to the patient, measured at the ventilator outlet upstream of the inspiratory filter. OIM Operator-initiated mandatory breath. A breath delivered when the operator presses the MANUAL INSP key. ongoing background checks Continuously running tests during ventilation that assess the ventilator's electronics and pneumatics hardware. OSC Occlusion status cycling. A state invoked during a severe occlusion. In this mode, the ventilator periodically attempts to deliver a pressure-based breath while monitoring the inspiration and expiration phases for the continuing existence of the occlusion. OVERRIDDEN The final status of an SST or EST run in which the operator used the override feature. (The ventilator must have ended the test with an ALERT condition.) Failures cannot be overridden. patient circuit The entire inspiratory-expiratory conduit, including tubing, humidifier, and water traps. patient data alarm An alarm condition associated with an abnormal condition of the patient's respiratory status. patient problems A definition used by the ventilator's safety net. Patient problems are declared when patient data are measured equal to or outside of alarm thresholds and are usually self-correcting or can be corrected by a practitioner. The alarm monitoring system detects and announces patient problems. Patient problems do not compromise the ventilator's performance. PBW Predicted body weight, a ventilator setting that specifies the patient's body weight assuming normal fat and fluid levels. Determines absolute limits on tidal volume and peak flow, and allows appropriate matching of ventilator settings to the patient. PC Pressure control. A mandatory breath type in which the ventilator delivers an operator-set inspiratory pressure for an operator- set inspiratory time. Available in A/C and SIMV modes, and for operator-initiated mandatory (OIM) breaths in SPONT mode. PE Expiratory pressure transducer. PEEP Positive end expiratory pressure. The measured circuit pressure (referenced to the patient wye) at the end of the expiratory phase of a breath. If expiratory pause is active, the displayed value reflects the level of any active lung PEEP. Operator’s Manual Glossary-5 Table Glossary-1. Glossary of Ventilation Terms (Continued) PEEPI Intrinsic PEEP. Indicates a calculated estimate of the pressure above the PEEP level at the end of exhalation. Determined during an expiratory pause maneuver. PI Inspiratory pressure. The operator-set inspiratory pressure at the patient wye (above PEEP) during a pressure control (PC) mandatory breath. PI Inspiratory pressure transducer. PI END End inspiratory pressure. The pressure at the end of the inspiration phase of the current breath. If plateau is active, the displayed value reflects the level of end-plateau pressure. PIM Patient-initiated mandatory breath. A mandatory breath triggered by patient inspiratory effort. PMEAN Mean circuit pressure, a calculation of the measured average patient circuit pressure over an entire respiratory cycle. PPEAK Maximum circuit pressure, the maximum pressure during the inspiratory and expiratory phases of a breath. primary alarm An initial alarm. PS Pressure support, a spontaneous breath type in which the ventilator delivers an operator-set pressure (in addition to PEEP) during the inspiratory phase. Available in SPONT, SIMV, and BiLevel modes. PSENS Pressure sensitivity. The operator-set pressure drop below PEEP (derived from the patient's inspiratory flow) required to begin a patient-initiated breath when pressure triggering is selected. PSOL Proportional solenoid valve. PSUPP Pressure support. A setting of the level of inspiratory assist pressure (above PEEP) at the patient wye during a spontaneous breath (when spontaneous breath type is PS). P-TRIG Pressure triggering, a method of recognizing patient inspiratory effort in which the ventilator monitors pressure in the patient circuit. The ventilator triggers a breath when the airway pressure drops by at least the value selected for pressure sensitivity (PSENS). Glossary-6 remedy message A message displayed on the GUI during an alarm condition suggesting ways to resolve the alarm. resistance The flow-dependent pressure drop across a conduit. Measured in cmH2O/L/s or hPa/L/s. Operator’s Manual Table Glossary-1. Glossary of Ventilation Terms (Continued) restricted phase of exhalation The time period during the exhalation phase where an inspiration trigger is not allowed. The restricted phase of exhalation is defined as the first 200 ms of exhalation, OR the time it takes for expiratory flow to drop to ≤ 50% of the peak expiratory flow, OR the time it takes for the expiratory flow to drop to ≤ 0.5 L/min (whichever is longest). The restricted phase of exhalation will end after five (5) seconds of exhalation have elapsed regardless of the measured expiratory flow rate. rise time % A setting that determines the rise time to achieve the set inspiratory pressure in pressure-controlled (PC), VC+, BiLevel, or pressure-supported (PS) breaths. The larger the value, the more rapid the rise of pressure. safety net The ventilator's strategy for responding to patient problems and system faults. safety valve (SV) A valve residing in the ventilator’s inspiratory module designed to limit pressure in the patient circuit. When open, it allows the patient to breathe room air (if able to do so). safety ventilation A mode of ventilation active if the patient circuit is connected before ventilator startup is complete, or when power is restored after a loss of five (5) minutes or more. service mode A ventilator mode providing a set of services tailored to the needs of testing and maintenance personnel. When in the service mode, the ventilator does not provide ventilation. SIMV Synchronous intermittent mandatory ventilation. A ventilatory mode in which the ventilator delivers one mandatory breath per breath cycle and as many spontaneous breaths as the patient can trigger during the remainder of the breath cycle. SIS Sleeved index system. A standard for high pressure gas inlet fittings. soft bound A ventilator setting that has reached its recommended high or low limit, accompanied by an audible tone. Setting the ventilator beyond this limit requires the operator to acknowledge a visual prompt to continue. SPONT Spontaneous. A ventilatory mode in which the ventilator delivers only spontaneous breaths. In SPONT mode, the patient triggers all breaths delivered by the ventilator with no set mandatory respiratory rate. The patient controls the breath variables, potentially augmented by support pressure. spontaneous type A setting that determines whether spontaneous breaths are pressuresupported (PS), tube-compensated (TC), volume-supported (VS), or proportionally assisted (PAV). SST Short self test. A test that checks circuit integrity, calculates circuit compliance and filter resistance, and checks ventilator function. Operator should run SST at specified intervals and with any replacement or alteration of the patient circuit. Operator’s Manual Glossary-7 Table Glossary-1. Glossary of Ventilation Terms (Continued) Glossary-8 STPD Standard temperature and pressure, dry. Defined as dry gas at a standard atmosphere (760 mmHg, 101.333 kPa, approximately 1.0 bar) and 0°C. SVO Safety valve open. An emergency state in which the ventilator opens the safety valve so the patient can breathe room air unassisted by the ventilator (if able to do so). An SVO state does not necessarily indicate a ventilator inoperative condition. The ventilator enters an SVO state if a hardware or software failure occurs that could compromise safe ventilation, with the loss of the air and oxygen supplies, or if the system detects an occlusion. system fault A definition used by the ventilator's safety net. System faults include hardware faults (those that originate inside the ventilator and affect its performance), soft faults (faults momentarily introduced into the ventilator that interfere with normal operation), inadequate supply (AC power or external gas pressure), and patient circuit integrity (blocked or disconnected circuit). TA Apnea interval, the operator-set variable that defines the breath-tobreath interval which, if exceeded, causes the ventilator to declare apnea and enter apnea ventilation. Tb Breath time cycle during mechanical ventilation. TE Expiratory time. The expiratory interval of a breath. Also the operator-set timing variable that determines the expiratory period for pressure-controlled (PC) or VC+ mandatory breaths. technical alarm An alarm occurring due to a violation of any of the ventilator's self monitoring conditions, or detected by background checks. TI Inspiratory time, the inspiratory interval of a breath. Also, the operatorset timing variable that determines the inspiratory interval for pressurecontrolled (PC) or VC+ mandatory breaths. Tm Mandatory interval portion of SIMV breath cycle; it is reserved for a PIM. TPL Plateau time. The amount of time the inspiration phase of a mandatory breath is extended after inspiratory flow has ceased and exhalation is blocked. Increases the residence time of gas in the patient's lungs. Ts Spontaneous interval portion of SIMV breath cycle; it is reserved for spontaneous breathing throughout the remainder of the breath cycle. VE TOT Minute volume, the expiratory tidal volume normalized to unit time (L/min). The displayed value is compliance- and BTPS-compensated. VBS Ventilator breathing system. Includes the gas delivery components of the ventilator the patient circuit with tubing, filters, humidifier, and other accessories; and the ventilator's expiratory metering and measurement components. Operator’s Manual Table Glossary-1. Glossary of Ventilation Terms (Continued) VC Volume control, a mandatory breath type in which the ventilator delivers an operator-set tidal volume, peak flow, and flow pattern. Available in A/C and SIMV modes, and for operator-initiated mandatory (OIM) breaths in SPONT mode. Ventilation Assurance A feature on the 980 Series Ventilator which enables ventilation to continue when a critical system error occurs, by entering the Backup Ventilation (BUV) state. Ventilator Inoperative (vent inop) An emergency state the ventilator enters if it detects a hardware failure or a critical software error which could compromise safe ventilation. During a ventilator inoperative condition, the safety valve opens to allow the patient to breathe room air (if able to do so) unassisted by the ventilator. Qualified service personnel must power up the ventilator and run EST before normal ventilation can resume. VIM Ventilator-initiated mandatory breath. A breath that is delivered at a time determined by the ventilator VMAX Peak flow. A setting of the peak (maximum) flow of gas delivered during a VC mandatory breath. (Combined with tidal volume, flow pattern, and plateau, constant peak flow defines the inspiratory time.) To correct for compliance volume, the ventilator automatically increases the peak flow. VSENS Flow sensitivity. A setting that determines the rate of flow inspired by the patient that triggers the ventilator to deliver a mandatory or spontaneous breath (when flow triggering is selected). VT Tidal volume. A setting that determines the volume inspired and expired with each breath. The VT delivered by some Puritan Bennett ventilators is an operator-set variable that determines the volume delivered to the patient during a mandatory, volume-based breath. VT is compliancecompensated and corrected to body temperature and pressure, saturated (BTPS). V-TRIG Flow triggering. A method of recognizing patient inspiratory effort in which the ventilator monitors the difference between inspiratory and expiratory flow measurements. The ventilator triggers a breath when the difference between inspiratory and expiratory flows increases to a value that is at least the value selected for flow sensitivity (VSENS. Table Glossary-2. Units of Measure Operator’s Manual cm Centimeter. A unit of length. ft Feet. A unit of length. Hz Hertz. A unit of frequency, indicating cycles per second. kg Kilogram. A unit of weight Glossary-9 Table Glossary-2. Units of Measure (Continued) L Liter. A unit of volume lb Pound. A unit of weight. m Meter. A unit of length. mL Milliliter. A unit of volume. ms Millisecond. A unit of time. s Second. A unit of time V Volts. A unit of voltage VA Volt-amperes. A unit of power. Table Glossary-3. Technical Abbreviations Glossary-10 AC, also ac Alternating current. The movement of electrical charge that periodically reverses direction. ASCII American Standard Code for Information Interchange. A standard character encoding scheme. CE A certification mark issued under the authority of the European Common Market that indicates compliance with the Medical Device Directive, 93/42/EEC. CSA Canadian Standards Association. CRC Cyclic Redundancy Check or Code. An algorithm or a computational result based on the remainder of a division defined over the ring of polynomials in the Galois field GF(2). CRC algorithms are the basis for data integrity checks. DC, also dc Direct current. The movement of electrical charge flowing in a single direction. EMC Electromagnetic compatibility. EN European norm (referring to the European Common Market). ETO Ethylene oxide. IEC International Electrotechnical Commission. A standards organization. ISO International Standards Organization. A standards organization. LCD Liquid crystal display. A type of visual equipment-operator Interface. LED Light-emitting diode. A means of providing visual indications. MRI Magnetic resonance imaging. Operator’s Manual Table Glossary-3. Technical Abbreviations (Continued) Operator’s Manual NVRAM, also NovRam Non-volatile random access memory. Memory that is kept active across resets and power cycles and is not normally initialized at startup. POST Power-on self-test. Software algorithms to verify the integrity of application software and the hardware environment. Power-on self-test generally occurs at power on, after power loss, or when the device resets due to a detected fault. RAM Random access memory. Glossary-11 Page Left Intentionally Blank Glossary-12 Operator’s Manual A A/C mode . . . . . . . . . . . . . 10-31–10-34 AC power operation . . . . . . . . . . . . 3-2 accessory compatibility 9-1 part numbers 9-4 adjusting waveform layout . . . . . 3-45 alarm AC POWER LOSS 6-35 Apnea 6-35 CIRCUIT DISCONNECT 6-35 dependent 6-4 DEVICE ALERT 6-36 High circuit pressure 6-36 High delivered O2% 6-37 High exhaled minute volume 6-38 High exhaled tidal volume 6-38 High inspired tidal volume 6-38 High respiratory rate 6-39 how to test 6-9 INSPIRATION TOO LONG 6-39 latched 6-5 lockable 6-6 Loss of power 6-36 Low circuit pressure 6-39 Low delivered O2% 6-40 Low exhaled mandatory tidal volume 6-41 Low exhaled spontaneous tidal volume 641 Low exhaled total minute volume 6-41 non-technical 6-18 primary 6-4 prioritization 6-16 PROCEDURE ERROR 6-42 reset 6-8 silence 6-8 symbols 6-6 technical 6-17 volume 6-8 Alarm Functions . . . . . . . . . . . . . . . 6-4 alarm settings range, resolution, accuracy 11-19 alarm settings range, resolution, accuracy 11-17 Apnea Ventilation . . . . . . 10-41–10-45 apnea ventilation . . . . . . . . . . . . 10-57 Apnea Ventilation in SIMV . . . . . 10-44 B Background Diagnostic System . 10-74 battery life 3-25 battery installation . . . . . . . 3-18–3-22 BDU indicators audible 2-35 visual 2-27 BiLevel 2.0 option . . . . . . . . . . . . . .A-1 Breath Delivery Unit . . . . . . . . . . . 2-25 Breath triggers flow 10-6 IE Sync 10-8 operator-initiated 10-8 pressure 10-5 time-cycled 10-8 BUV settings . . . . . . . . . . . . . . . . 10-75 C CircuitType and PBW . . . . . . . . . 10-58 compliance compensation 10-13–10-17 Compliance Compensation in Volume-based Breaths . . . . . . . . . . . . . 10-13 Component Cleaning and Disinfection 7-6 Component Sterilization . . . . . . . 7-23 configurable features alarm volume 3-41 date and time 3-38 large font patient data 3-43 mL/kg ratio 3-40 new patient setup defaults 3-40 O2% 3-40 patient data 3-42 PBW 3-40 pressure units 3-39 screen brightness and keyboard backlight 3-39 screen opacity 3-45 waveforms 3-44 Connect the Ventilator to AC Power 3-5 Connecting the Gas Supplies . . . . . 3-7 Connecting the Patient Circuit . . 3-14 Connectivity to External Patient Monitoring Systems . . . . . . . . . . . . . . 5-21 Constant Timing Variable for Rate Changes 4-20 Covidien Technical Services list of International Service Centers 1-15 phone number 1-15 Solv-IT Center Knowledge Base 1-18 Covidien URL . . . . . . . . . . . . . .1-1, 1-15 D Detecting Occlusion and Disconnect 10-45– 10-49 Disconnect . . . . . . . . . . . . . . . . . . 10-47 Disconnect Sensitivity (DSENS) . . 10-70 Display brightness adjustment 4-5 lock 4-6 E EMC compatibility 1-20 emissions 11-30 immunity 11-31 1 recommended separation distances 11-34 exhalation airway pressure method 10-9 high circuit pressure limit (backup method) 10-12 high inspired tidal volume limit (backup method) 10-12 high ventilator pressure limit (backup method) 10-12 percent peak flow method 10-10 time cycling method 10-11 time limit (backup method) 10-12 Exhalation —Detection and Initiation 10-9– 10-12 expiratory module EVQ removal, disinfection, reassembly 712–7-23 Expiratory Pause . . . . . . . 10-53–10-54 Expiratory Pause Maneuvers . . . . 4-31 Expiratory Sensitivity (ESENS) . . . . 10-69 Expiratory Time (TE) . . . . . . . . . . 10-66 extended battery installation . . . . 3-22 Extended Self Test (EST) . . . . . . . 10-77 F Filter Installation . . . . . . . . . . . . . . 3-10 Flow Pattern . . . . . . . . . . . . . . . . 10-63 Flow Sensitivity (VSENS) . . . . . . . . 10-63 G gas failure cross flow . . . . . . . . . . . 3-8 Gestures 4-6–4-7 double-tap 4-7 drag and drop 4-7 touch and hold 4-7 gestures Drag 4-7 swipe 4-6 Graphical User Interface (GUI) . . . 2-16 GUI Control Keys . . . . . . . . . . . . . . 2-16 GUI control keys . . . . . . . . . . . . . . 2-16 GUI indicators audible 2-23 visual 2-17–2-20 GUI screen capture . . . . . . . . . . . . . 5-2 H hard bound . . . . . . . . . . . . . . . 4-3, 4-4 High Pressure (BiLevel) . . . . . . . . 10-66 High Spontaneous Inspiratory Time Limit (2TI SPONT) . . . . . . . . . . . . . . . 10-70 High Time (BiLevel) . . . . . . . . . . . 10-66 how to enter Service mode . . . . . 3-33 How to Install Accessories . . 3-18–3-30 how to use the ventilator system 4-7–4-21 2 how to use the ventilator’s user interface 42– . . . . . . . . . . . . . . . . . . . . 4-7 how to view ventilator logs . . . . . . 8-3 Humidification Type . . . . . . . . . . 10-71 humidifier installation . . . . . . . . . 3-27 Humidifier Volume . . . . . . . . . . . 10-71 I I:E Ratio . . . . . . . . . . . . . . . . . . . . 10-66 icons configure 2-19 elevate O2 2-19 grid lines 2-20 help 2-19 high priority alarm 2-20 logs 2-18 low priority alarm 2-20 maximize waveform 2-20 medium priority alarm 2-20 pause 2-19 restore waveform 2-20 screen capture 2-19 unread items 2-19 ventilator setup 2-18 waveform layout 2-19 IE Sync option . . . . . . . . . . . . . . . . . C-1 IEC classification . . . . . . . . . . . . . . . 2-3 Inspiration — Detection and Initiation 10-4– 10-8 Inspiratory Pause . . . . . . . 10-50–10-53 Inspiratory pause maneuvers 4-30, 10-50 Inspiratory Pressure (PI) . . . . . . . 10-64 Inspiratory Time (TI) . . . . . . . . . . 10-65 Installation Testing (testing prior to ventilating a patient) 3-46–3-51 L Leak Sync option . . . . . . . . . . . . . . B-1 Low Pressure (BiLevel) . . . . . . . . 10-66 Low Time (BiLevel) . . . . . . . . . . . 10-67 M Mandatory Breath Delivery . . . . 10-17 Manual Inspiration . . . . . . .4-28, 10-22 Manufacturer . . . . . . . . . . . . . . . . 1-20 MISCA response . . . . . . . . . . . . . . . 5-6 MISCF response . . . . . . . . . . . . . . . 5-10 Mode and Breath Type . . . . . . . . 10-60 Monitored Patient Data . . . . . . . . 6-42 N NeoMode 2.0 option . . . . . . . . . . . E-1 NIV alarm settings 4-27 apnea settings 4-27 high spontaneous inspiratory time limit setting 4-26 setup 4-23 Non-invasive ventilation (NIV) 4-22–4-28 RS-232 commands RSET 5-5 SNDA 5-6 SNDF 5-10 O Occlusion . . . . . . . . . . . . . . . . . . . 10-45 Omni-directional LED . . . . . . . . . . 3-30 On-screen Help . . . . . . . . . . . . . . . 1-18 On-screen Symbols and Abbreviations 2-20– 2-23 Operation Verification . . . . . . . . . 3-58 oxygen sensor calibration 4-34 calibration test 4-34 function 4-32 S Safety Net . . . . . . . . . . . . . . . . . . 10-71 Serial commands . . . . . . . . . . . . . . . 5-5 serial number interpretation . . . . 1-19 settings alarm 4-16 apnea 4-15 return to previous 4-20 ventilator 4-10 Short Self Test (SST) . . . . . . . . . . 10-77 SIMV . . . . . . . . . . . . . . . . . . . . . . 10-34 SIMV . . . . . . . . . . . . . . . . . . . . . . 10-39 soft bound . . . . . . . . . . . . . . . . . . . 4-3 Spontaneous (SPONT) Mode 10-39–10-41 Spontaneous Breath Delivery . . 10-22 SST how to run 3-48 outcomes 3-51 results 3-50 test sequence 3-48 Status Display . . . . . . . . . . . . 2-28–2-34 Storage for Extended Periods . . . 7-26 Surface Cleaning of Ventilator Exterior Surfaces . . . . . . . . . . . . . . . 7-4 symbols BDU rear panel label symbols and descriptions 2-11 safety symbol definitions 1-3 shipping label symbols and descriptions 12 System Related Problems . . . . . . 10-73 P P0.1 maneuver . . . . . . . . . . . . . . . 10-55 Patient Data Parameters . . . 6-43–6-50 patient data range and resolution 11-19–1126 PAV+ option . . . . . . . . . . . . . . . . . .D-1 Peak Inspiratory Flow (VMAX) . . . 10-62 PEEP . . . . . . . . . . . . . . . . . . . . . . . 10-67 PEEP restoration . . . . . . . . . . . . . 10-67 Percent Support (PAV+) . . . . . . . 10-68 Percent Support (TC) . . . . . . . . . . 10-68 Plateau Pressure (PPL) . . . . . . . . . . 6-46 Plateau Time (TPL) . . . . . . . . . . . . 10-63 Pneumatic Diagram . . . . . . . . . . . . 2-36 Power On Self Test (POST) . . . . . 10-76 Preparing the Ventilator for Use . 3-37 Pressure Sensitivity (PSENS) . . . . . 10-64 Pressure Support (PSUPP) . . . . . . . 10-68 primary battery installation . . . . . 3-19 Primary display . . . . . . . . . . . . . . . 2-16 Product Assembly . . . . . . . . . . . . . . 3-2 proximal flow option . . . . . . . . . . . F-1 pushpin . . . . . . . . . . . . . . . . . . . . . . 4-5 Q quick start use . . . . . . . . . . . . . . . . . 4-8 R respiratory maneuvers expiratory pause maneuver 10-53 inspiratory pause maneuver 10-50 NIF maneuver 10-54 respiratory mechanics maneuvers Negative Inspiratory Force maneuver (NIF) 10-54 P0.1 maneuver 10-55 vital capacity maneuver (VC) 10-56 Respiratory Rate (f) . . . . . . . . . . . 10-61 Rise Time % . . . . . . . . . . . . . . . . . 10-69 T TC alarms 10-28 monitored patient data 10-28 PBW and tube ID 10-28 technical description 10-27 tube type, tube ID, humidification 4-14 technical assistance . . . . . . . . . . . 1-15 Technical Services . . . . . . . . . . . . . 1-15 TH:TL ratio (BiLevel) . . . . . . . . . . 10-67 Tidal Volume . . . . . . . . . . . . . . . . 10-62 Tube compensation (TC) . . . . . . 10-27 U Used Part Disposal . . . . . . . . . . . . . 8-1 Using Battery Power . . . . . . . . . . . . 3-3 V VC+ maximum pressure adjustments 10-21 3 startup 10-20–10-21 ventilating a new patient . . . . . . . . 4-9 ventilating the same patient . . . . . 4-9 ventilator alarm log 8-2 available languages 5-1 BDU controls and indicators 2-25 BDU front view 2-8 BDU rear label symbols and descriptions 211–2-13 BDU rear view 2-10 BDU right side view 2-14, 2-15 Components List 2-5 connectors 2-35 Description 2-2 EST/SST status log 8-3 function 4-1 gas flow overview 10-2 general event log 8-3 GUI front view 2-6 GUI rear view 2-7 Indications For Use 2-4 Operation 4-7–4-21 patient data log 8-2 service log 8-3 settings log 8-2 system diagnostic log 8-3 Ventilator Logs . . . . . . . . . . . . . . . . 8-2 Ventilator Operating Modes 3-30–3-34 ventilator operating modes Normal mode 3-30 Quick Start mode 3-30 Service mode 3-33 Stand-By state 3-31 Ventilator Protection Strategies 4-35–4-37 ventilator settings apnea ventilation 10-57 circuit type and PBW 10-59 configuration 3-37–3-46 disconnect sensitivity (DSENS) 10-70 DSENS 10-70 ESENS 10-70 flow pattern 10-63 4 flow sensitivity (VSENS) 10-64 high inspiratory time limit (2TI SPONT) 1071 high pressure (BiLevel) 10-66 high time (BiLevel) 10-66 humidification type 10-71 humidifier volume 10-71 I:E ratio 10-66 inspiratory pressure (PI) 10-65 inspiratory time (TI) 10-65 low pressure (BiLevel) 10-66 low time (BiLevel) 10-67 mode and breath type 10-61 peak inspiratory flow 10-62 peak inspiratory flow (VMAX) 10-62 PEEP 10-67 PEEP restoration 10-67 percent support (PAV+) 10-68 percent support (TC) 10-68 plateau time (TPL) 10-63 pressure sensitivity (PSENS) 10-64 pressure support 10-68 pressure support (PSUPP) 10-68 range and resolution 11-8–11-16 respiratory rate (f) 10-62 rise time % 10-69 TH:TL ratio 10-67 tidal volume 10-62 vent type 10-59 volume support (VT SUPP) 10-68 Ventilator Setup . . . . . . . . . . . . . . . 4-2 VentType . . . . . . . . . . . . . . . . . . . 10-59 Volume Support (VT SUPP) . . . . . . 10-68 VS maximum pressure adjustments 10-26 startup 10-26 W Warranty Information . . . . . . . . . 1-19 waveform axis scaling . . . . . . . . . 3-45 Part No. 10077893 A 2014-10 © 2014 Covidien. Covidien llc 15 Hampshire Street, Mansfield, MA 02048 USA ,,. www.covidien.com [T] 1.800.255.6774