1
The J2EE™ 1.4 Tutorial
Eric Armstrong
Stephanie Bodoff
Debbie Carson
Ian Evans
Maydene Fisher
Dale Green
Kim Haase
Eric Jendrock
Monica Pawlan
Beth Stearns
May 30, 2003
Copyright © 2003 Sun Microsystems, Inc., 4150 Network Circle, Santa Clara, California 95054, U.S.A.
All rights reserved.U.S. Government Rights - Commercial software. Government users are subject to the
Sun Microsystems, Inc. standard license agreement and applicable provisions of the FAR and its supplements.
This distribution may include materials developed by third parties.
Sun, Sun Microsystems, the Sun logo, Java, J2EE, JavaServer Pages, Enterprise JavaBeans, Java
Naming and Directory Interface, EJB, JSP, J2EE, J2SE and the Java Coffee Cup logo are trademarks or
registered trademarks of Sun Microsystems, Inc. in the U.S. and other countries.
Unless otherwise licensed, software code in all technical materials herein (including articles, FAQs, samples) is provided under this License.
Products covered by and information contained in this service manual are controlled by U.S. Export Control laws and may be subject to the export or import laws in other countries. Nuclear, missile, chemical
biological weapons or nuclear maritime end uses or end users, whether direct or indirect, are strictly prohibited. Export or reexport to countries subject to U.S. embargo or to entities identified on U.S. export
exclusion lists, including, but not limited to, the denied persons and specially designated nationals lists is
strictly prohibited.
DOCUMENTATION IS PROVIDED "AS IS" AND ALL EXPRESS OR IMPLIED CONDITIONS,
REPRESENTATIONS AND WARRANTIES, INCLUDING ANY IMPLIED WARRANTY OF MERCHANTABILITY, FITNESS FOR A PARTICULAR PURPOSE OR NON-INFRINGEMENT, ARE
DISCLAIMED, EXCEPT TO THE EXTENT THAT SUCH DISCLAIMERS ARE HELD TO BE
LEGALLY INVALID.
Copyright © 2003 Sun Microsystems, Inc., 4150 Network Circle, Santa Clara, California 95054, ÉtatsUnis. Tous droits réservés.
Droits du gouvernement américain, utlisateurs gouvernmentaux - logiciel commercial. Les utilisateurs
gouvernmentaux sont soumis au contrat de licence standard de Sun Microsystems, Inc., ainsi qu aux dispositions en vigueur de la FAR [ (Federal Acquisition Regulations) et des suppléments à celles-ci.
Cette distribution peut comprendre des composants développés pardes tierces parties.
Sun, Sun Microsystems, le logo Sun, Java, JavaServer Pages, Enterprise JavaBeans, Java Naming and
Directory Interface, EJB, JSP, J2EE, J2SE et le logo Java Coffee Cup sont des marques de fabrique ou des
marques déposées de Sun Microsystems, Inc. aux États-Unis et dans d’autres pays.
A moins qu’autrement autorisé, le code de logiciel en tous les matériaux techniques dans le présent (articles y compris, FAQs, échantillons) est fourni sous ce permis.
Les produits qui font l’objet de ce manuel d’entretien et les informations qu’il contient sont régis par la
législation américaine en matière de contrôle des exportations et peuvent être soumis au droit d’autres
pays dans le domaine des exportations et importations. Les utilisations finales, ou utilisateurs finaux, pour
des armes nucléaires, des missiles, des armes biologiques et chimiques ou du nucléaire maritime, directement ou indirectement, sont strictement interdites. Les exportations ou réexportations vers des pays sous
embargo des États-Unis, ou vers des entités figurant sur les listes d’exclusion d’exportation américaines,
y compris, mais de manière non exclusive, la liste de personnes qui font objet d’un ordre de ne pas participer, d’une façon directe ou indirecte, aux exportations des produits ou des services qui sont régi par la
législation américaine en matière de contrôle des exportations ("U .S. Commerce Department’s Table of
Denial Orders "et la liste de ressortissants spécifiquement désignés ("U.S. Treasury Department of Specially Designated Nationals and Blocked Persons "),, sont rigoureusement interdites.
LA DOCUMENTATION EST FOURNIE "EN L’ÉTAT" ET TOUTES AUTRES CONDITIONS, DECLARATIONS ET GARANTIES EXPRESSES OU TACITES SONT FORMELLEMENT EXCLUES,
DANS LA MESURE AUTORISEE PAR LA LOI APPLICABLE, Y COMPRIS NOTAMMENT TOUTE
GARANTIE IMPLICITE RELATIVE A LA QUALITE MARCHANDE, A L’APTITUDE A UNE
UTILISATION PARTICULIERE OU A L’ABSENCE DE CONTREFAÇON.
Contents
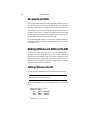
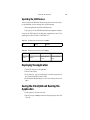
About This Tutorial. . . . . . . . . . . . . . . . . . . . . . . . . . .xix
Who Should Use This Tutorial
How to Read This Tutorial
About the Examples
How to Print This Tutorial
Typographical Conventions
Chapter 1:
xix
xix
xxi
xxiii
xxiii
Overview. . . . . . . . . . . . . . . . . . . . . . . . . . . . . . . . . . . 1
Web Services Support
Extensible Markup Language
HTTP-SOAP Transport Protocol
WSDL Standard Format
UDDI and ebXML Standard Formats
Distributed Multitiered Applications
J2EE Components
J2EE Clients
Web Components
Business Components
Enterprise Information System Tier
J2EE Containers
Container Services
Container Types
Packaging
Development Roles
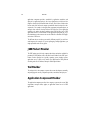
J2EE Product Provider
Tool Provider
Application Component Provider
Application Assembler
Application Deployer and Administrator
2
2
3
3
4
4
5
6
8
8
10
10
10
11
12
13
14
14
14
15
16
iii
iv
CONTENTS
J2EE APIs
Enterprise JavaBeans Technology
JDBC API
Java Servlet Technology
JavaServer Pages Technology
Java Message Service
Java Naming and Directory Interface
Java Transaction API
JavaMail API
JavaBeans Activation Framework
Java API for XML Processing
Java API for XML Registries
Java API for XML-Based RPC
SOAP with Attachments API for Java (SAAJ)
J2EE Connector Architecture
Java Authentication and Authorization Service
Simplified Systems Integration
Chapter 2:
16
16
17
17
17
18
18
18
19
19
19
19
20
20
21
21
21
Understanding XML. . . . . . . . . . . . . . . . . . . . . . . . . .23
Introduction to XML
What Is XML?
Why Is XML Important?
How Can You Use XML?
XML and Related Specs: Digesting the Alphabet Soup
Basic Standards
Schema Standards
Linking and Presentation Standards
Knowledge Standards
Standards That Build on XML
Summary
Generating XML Data
Writing a Simple XML File
Defining the Root Element
Writing Processing Instructions
Introducing an Error
Substituting and Inserting Text
Creating a Document Type Definition (DTD)
Documents and Data
Defining Attributes and Entities in the DTD
Referencing Binary Entities
23
23
28
31
33
34
38
40
42
43
45
45
45
46
50
52
53
56
62
62
69
v
CONTENTS
Defining Parameter Entities and Conditional Sections
Resolving A Naming Conflict
Using Namespaces
Designing an XML Data Structure
Saving Yourself Some Work
Attributes and Elements
Normalizing Data
Normalizing DTDs
Summary
Chapter 3:
71
74
76
79
79
79
82
83
84
Getting Started with Web Applications . . . . . . . . . 85
Web Application Life Cycle
86
J2EE 1.4 Application Server
88
Components
88
Setting Up To Build and Deploy Tutorial Examples
89
Starting and Stopping the J2EE Application Server
90
Starting the deploytool Utility
91
Web Modules
91
Creating a Web Module
92
Configuring Web Modules
93
Mapping URLs to Web Components
94
Declaring Welcome Files
95
Setting Initialization Parameters
96
Specifying Error Mappings
96
Declaring References to Environment Entries, Resource Environment
Entries, or Resources
97
Deploying Web Modules
98
Listing Deployed Web Modules
98
Running Web Applications
98
Updating Web Modules
99
Undeploying Web Modules
101
Duke’s Bookstore Examples
101
Accessing Databases from Web Applications
102
Starting the PointBase Database Server
103
Populating the Example Database
104
Defining a Data Source in the J2EE Server
105
Configuring the Web Application to Reference a Data Source with
JNDI
106
Mapping the Web Application JNDI Name to a Data Source
107
Further Information
107
vi
CONTENTS
Chapter 4:
Java API for XML Processing . . . . . . . . . . . . . . . . .109
The JAXP APIs
An Overview of the Packages
The Simple API for XML (SAX) APIs
The SAX Packages
The Document Object Model (DOM) APIs
The DOM Packages
The XML Stylesheet Language for Transformation (XSLT) APIs
The XSLT Packages
Compiling and Running the Programs
Where Do You Go from Here?
Chapter 5:
109
110
111
114
114
116
117
118
118
118
Simple API for XML . . . . . . . . . . . . . . . . . . . . . . . . .121
When to Use SAX
Echoing an XML File with the SAX Parser
Creating the Skeleton
Importing Classes
Setting up for I/O
Implementing the ContentHandler Interface
Setting up the Parser
Writing the Output
Spacing the Output
Handling Content Events
Compiling and Running the Program
Checking the Output
Identifying the Events
Compressing the Output
Inspecting the Output
Documents and Data
Adding Additional Event Handlers
Identifying the Document’s Location
Handling Processing Instructions
Summary
Handling Errors with the Nonvalidating Parser
Displaying Special Characters and CDATA
Handling Special Characters
Handling Text with XML-Style Syntax
Handling CDATA and Other Characters
Parsing with a DTD
DTD’s Effect on the Nonvalidating Parser
122
123
123
124
124
125
126
127
128
128
133
134
135
137
140
141
141
142
144
145
145
153
153
154
155
156
156
vii
CONTENTS
Tracking Ignorable Whitespace
Cleanup
Empty Elements, Revisited
Echoing Entity References
Echoing the External Entity
Summarizing Entities
Choosing your Parser Implementation
Using the Validating Parser
Configuring the Factory
Validating with XML Schema
Experimenting with Validation Errors
Error Handling in the Validating Parser
Parsing a Parameterized DTD
DTD Warnings
Handling Lexical Events
How the LexicalHandler Works
Working with a LexicalHandler
Using the DTDHandler and EntityResolver
The DTDHandler API
The EntityResolver API
Further Information
Chapter 6:
158
159
160
160
160
161
162
162
162
163
166
168
169
170
171
172
172
178
178
179
180
Document Object Model . . . . . . . . . . . . . . . . . . . 181
When to Use DOM
Documents vs. Data
Mixed Content Model
A Simpler Model
Increasing the Complexity
Choosing Your Model
Reading XML Data into a DOM
Creating the Program
Additional Information
Looking Ahead
Displaying a DOM Hierarchy
Echoing Tree Nodes
Convert DomEcho to a GUI App
Create Adapters to Display the DOM in a JTree
Finishing Up
Examining the Structure of a DOM
Displaying A Simple Tree
182
182
183
184
185
187
188
188
193
195
195
195
195
201
211
211
212
viii
CONTENTS
Displaying a More Complex Tree
Finishing Up
Constructing a User-Friendly JTree from a DOM
Compressing the Tree View
Acting on Tree Selections
Handling Modifications
Finishing Up
Creating and Manipulating a DOM
Obtaining a DOM from the Factory
Normalizing the DOM
Other Operations
Finishing Up
Validating with XML Schema
Overview of the Validation Process
Configuring the DocumentBuilder Factory
Validating with Multiple Namespaces
Further Information
Chapter 7:
214
221
222
222
228
238
238
238
239
242
244
247
247
248
248
250
253
XML Stylesheet Language for Transformations. . .255
Introducing XSLT and XPath
The JAXP Transformation Packages
How XPath Works
XPATH Expressions
The XSLT/XPath Data Model
Templates and Contexts
Basic XPath Addressing
Basic XPath Expressions
Combining Index Addresses
Wildcards
Extended-Path Addressing
XPath Data Types and Operators
String-Value of an Element
XPath Functions
Summary
Writing Out a DOM as an XML File
Reading the XML
Creating a Transformer
Writing the XML
Writing Out a Subtree of the DOM
Summary
255
256
257
257
258
259
259
260
261
261
262
263
263
264
267
268
268
270
272
273
274
ix
CONTENTS
Generating XML from an Arbitrary Data Structure
Creating a Simple File
Creating a Simple Parser
Modifying the Parser to Generate SAX Events
Using the Parser as a SAXSource
Doing the Conversion
Transforming XML Data with XSLT
Defining a Simple <article> Document Type
Creating a Test Document
Writing an XSLT Transform
Processing the Basic Structure Elements
Writing the Basic Program
Trimming the Whitespace
Processing the Remaining Structure Elements
Process Inline (Content) Elements
Printing the HTML
What Else Can XSLT Do?
Transforming from the Command Line with Xalan
Concatenating Transformations with a Filter Chain
Writing the Program
Understanding How the Filter Chain Works
Testing the Program
Conclusion
Further Information
Chapter 8:
275
275
277
279
286
288
289
289
291
292
293
297
299
302
306
311
311
313
314
314
317
318
321
321
Building Web Services With JAX-RPC . . . . . . . . . . 323
Types Supported By JAX-RPC
J2SE SDK Classes
Primitives
Arrays
Value Types
JavaBeans Components
Creating a Web Service with JAX-RPC
Building the Service
Packaging the Service
Specifying the Endpoint Address
Deploying the Service
Creating Web Service Clients with JAX-RPC
Static Stub Client Example
Dynamic Proxy Client Example
324
324
325
325
326
326
326
328
330
331
332
332
332
335
x
CONTENTS
Dynamic Invocation Interface (DII) Client Example
J2EE Application Client Example
Other JAX-RPC Client Examples
Further Information
Chapter 9:
338
342
346
346
SOAP with Attachments API for Java . . . . . . . . . .347
Overview of SAAJ
Messages
Connections
Tutorial
Creating and Sending a Simple Message
Adding Content to the Header
Adding Content to the SOAP Body
Adding Content to the SOAPPart Object
Adding a Document to the SOAP Body
Manipulating Message Content Using SAAJ or DOM APIs
Adding Attachments
Adding Attributes
Using SOAP Faults
Code Examples
Request.java
MyUddiPing.java
HeaderExample.java
SOAPFaultTest.java
DOMExample.java
Conclusion
Further Information
348
348
352
353
354
362
363
364
366
366
367
369
375
380
380
381
389
390
391
393
394
Chapter 10: Java API for XML Registries . . . . . . . . . . . . . . . . . .395
Overview of JAXR
What Is a Registry?
What Is JAXR?
JAXR Architecture
Implementing a JAXR Client
Establishing a Connection
Querying a Registry
Managing Registry Data
Using Taxonomies in JAXR Clients
Running the Client Examples
395
395
396
397
399
400
405
410
416
421
xi
CONTENTS
Before You Compile the Examples
Compiling the Examples
Running the Examples
Using JAXR Clients in J2EE Applications
Coding the Application Client: MyAppClient.java
Coding the PubQuery Session Bean
Compiling the Source Files
Starting the J2EE Application Server
Creating JAXR Resources
Creating and Packaging the Application
Deploying the Application
Saving the Client JAR and Running the Application
Undeploying and Removing the Application
Further Information
422
424
425
429
430
430
431
431
431
432
435
435
436
436
Chapter 11: Java Servlet Technology . . . . . . . . . . . . . . . . . . . . 439
What is a Servlet?
The Example Servlets
Troubleshooting
Servlet Life Cycle
Handling Servlet Life Cycle Events
Handling Errors
Sharing Information
Using Scope Objects
Controlling Concurrent Access to Shared Resources
Accessing Databases
Initializing a Servlet
Writing Service Methods
Getting Information from Requests
Constructing Responses
Filtering Requests and Responses
Programming Filters
Programming Customized Requests and Responses
Specifying Filter Mappings
Invoking Other Web Resources
Including Other Resources in the Response
Transferring Control to Another Web Component
Accessing the Web Context
Maintaining Client State
Accessing a Session
439
440
445
445
446
448
448
448
450
451
452
453
454
456
458
459
461
463
465
466
468
469
470
470
xii
CONTENTS
Associating Attributes with a Session
Session Management
Session Tracking
Finalizing a Servlet
Tracking Service Requests
Notifying Methods to Shut Down
Creating Polite Long-Running Methods
Further Information
470
471
472
473
474
474
475
476
Chapter 12: JavaServer Pages Technology . . . . . . . . . . . . . . .477
What Is a JSP Page?
Example
The Example JSP Pages
The Life Cycle of a JSP Page
Translation and Compilation
Execution
Creating Static Content
Response and Page Encoding
Creating Dynamic Content
Using Objects within JSP Pages
Expression Language
Deactivating Expression Evaluation
Using Expressions
Variables
Implicit Objects
Literals
Operators
Reserved Words
Examples
Functions
JavaBeans Components
JavaBeans Component Design Conventions
Creating and Using a JavaBeans Component
Setting JavaBeans Component Properties
Retrieving JavaBeans Component Properties
Using Custom Tags
Declaring Tag Libraries
Including the Tag Library Implementation
Reusing Content in JSP Pages
Transferring Control to Another Web Component
477
478
482
489
489
490
492
493
493
493
495
496
496
497
498
499
500
500
501
502
503
503
505
506
508
509
509
512
513
514
xiii
CONTENTS
jsp:param Element
Including an Applet
Setting Properties for Groups of JSP Pages
Further Information
514
515
517
520
Chapter 13: JavaServer Pages Standard Tag Library . . . . . . . 521
The Example JSP Pages
Using JSTL
Tag Collaboration
Core Tags
Variable Support Tags
Flow Control Tags
URL Tags
Miscellaneous Tags
XML Tags
Core Tags
Flow Control Tags
Transformation Tags
Internationalization Tags
Setting the Locale
Messaging Tags
Formatting Tags
SQL Tags
query Tag Result Interface
Functions
Further Information
521
525
526
528
528
529
532
533
534
536
537
538
538
539
540
540
541
543
546
547
Chapter 14: Custom Tags in JSP Pages . . . . . . . . . . . . . . . . . . . 549
What Is a Custom Tag?
The Example JSP Pages
Types of Tags
Tags with Attributes
Tags with Bodies
Tags That Define Variables
Communication Between Tags
Encapsulating Reusable Content using Tag Files
Tag File Location
Tag File Directives
Evaluating Fragments Passed to Tag Files
550
550
555
555
558
559
559
560
562
562
571
xiv
CONTENTS
Examples
Tag Library Descriptors
Declaring Tag Files
Declaring Tag Handlers
Declaring Tag Attributes for Tag Handlers
Declaring Tag Variables for Tag Handlers
Programming Simple Tag Handlers
Basic Tags
Tags with Attributes
Tags with Bodies
Tags That Define Variables
Cooperating Tags
Examples
572
576
578
581
582
584
586
587
588
590
591
594
596
Chapter 15: Scripting in JSP Pages . . . . . . . . . . . . . . . . . . . . . . .605
The Example JSP Pages
Using Scripting
Disabling Scripting
Declarations
Initializing and Finalizing a JSP Page
Scriptlets
Expressions
Programming Tags That Accept Scripting Elements
TLD Elements
Tag Handlers
Tags with Bodies
Cooperating Tags
Tags That Define Variables
605
607
607
608
608
609
610
611
611
611
614
615
617
Chapter 16: Internationalizing and Localizing Web Applications .
619
Java Platform Localization Classes
Providing Localized Messages and Labels
Date and Number Formatting
Character Sets and Encodings
Character Sets
Character Encoding
Further Information
619
620
622
622
622
623
626
xv
CONTENTS
Chapter 17: New Features for EJB 2.1 Technology. . . . . . . . . . 627
Overview
Web Service Endpoints
Web Service Example: HelloServiceEJB
Source Code for HelloServiceEJB
Building HelloServiceEJB
Building the Web Service Client
Running the Web Service Client
Timer Service
Creating Timers
Cancelling and Saving Timers
Getting Timer Information
Transactions and Timers
The TimerSessionEJB Example
Building TimerSessionEJB
627
628
628
628
630
633
633
634
634
635
636
636
636
638
Chapter 18: Security . . . . . . . . . . . . . . . . . . . . . . . . . . . . . . . . . . 645
Overview
Users, Realms, and Groups
Security Roles
Declaring and Linking Role References
Mapping Roles to Users and Groups
Web-Tier Security
Protecting Web Resources
Authenticating Users of Web Resources
Using Programmatic Security in the Web Tier
Protecting Web Resources
Installing and Configuring SSL Support
Setting Up Digital Certificates
EJB-Tier Security
Declaring Method Permissions
Using Programmatic Security in the EJB Tier
Unauthenticated User Name
Application Client-Tier Security
EIS-Tier Security
Container-Managed Sign-On
Component-Managed Sign-On
Configuring Resource Adapter Security
Propagating Security Identity
Configuring a Component’s Propagated Security Identity
645
646
647
648
649
650
651
656
660
661
662
663
668
668
669
670
670
671
671
672
672
673
673
xvi
CONTENTS
Configuring Client Authentication
Using Java Authorization Contract for Containers
674
675
Chapter 19: J2EE Connector Architecture . . . . . . . . . . . . . . . . .677
About Resource Adapters
Resource Adapter Contracts
Connector 1.5 Resource Adapters
Common Client Interface
677
678
680
682
Chapter 20: The Java Message Service API . . . . . . . . . . . . . . .685
Overview
685
What Is Messaging?
686
What Is the JMS API?
686
When Can You Use the JMS API?
687
How Does the JMS API Work with the J2EE Platform?
688
Basic JMS API Concepts
689
JMS API Architecture
690
Messaging Domains
690
Message Consumption
693
The JMS API Programming Model
694
Administered Objects
695
Connections
697
Sessions
698
Message Producers
699
Message Consumers
699
Messages
702
Exception Handling
705
Writing Simple JMS Client Applications
705
Setting Your Environment for Running Applications
707
A Simple Example of Synchronous Message Receives
707
A Simple Example of Asynchronous Message Consumption
715
Running JMS Client Programs on Multiple Systems
720
Creating Robust JMS Applications
722
Using Basic Reliability Mechanisms
724
Using Advanced Reliability Mechanisms
731
Using the JMS API in a J2EE Application
743
Using Session and Entity Beans to Produce and to Synchronously Receive Messages
744
Using Message-Driven Beans
745
CONTENTS
Managing Distributed Transactions
748
Using the JMS API with Application Clients and Web Components
751
Specifying Deployment Descriptors
751
Further Information
758
Chapter 21: J2EE Examples Using the JMS API . . . . . . . . . . . . . 759
A Simple J2EE Application that Uses the JMS API
760
Writing the Application Components
761
Creating and Packaging the Application
762
Deploying the Application
766
Saving the Client JAR and Running the Application
766
Undeploying and Removing the Application
767
A J2EE Application that Uses the JMS API with a Session Bean 767
Writing the Application Components
768
Creating and Packaging the Application
770
Deploying the Application
775
Saving the Client JAR and Running the Application
775
Undeploying and Removing the Application
776
A J2EE Application that Uses the JMS API with an Entity Bean 777
Overview of the Human Resources Application
777
Writing the Application Components
779
Creating and Packaging the Application
781
Deploying the Application
788
Saving the Client JAR and Running the Application
788
Undeploying and Removing the Application
790
An Application Example that Consumes Messages from a Remote
J2EE Server
790
Overview of the Applications
791
Writing the Application Components
792
Creating and Packaging the Applications
792
Deploying the Applications
797
Saving the Client JAR and Running the Application Client
797
Undeploying and Removing the Applications
798
An Application Example that Deploys a Message-Driven Bean on Two
J2EE Servers
799
Overview of the Applications
800
Writing the Application Components
801
Creating and Packaging the Applications
802
Deploying the Applications
807
xvii
xviii
CONTENTS
Saving the Client JAR and Running the Application Client
Undeploying and Removing the Applications
808
810
Appendix A: Java Encoding Schemes . . . . . . . . . . . . . . . . . . . .811
Further Information
812
Appendix B: HTTP Overview . . . . . . . . . . . . . . . . . . . . . . . . . . . . .813
HTTP Requests
HTTP Responses
814
814
Glossary . . . . . . . . . . . . . . . . . . . . . . . . . . . . . . . . . .815
About the Authors . . . . . . . . . . . . . . . . . . . . . . . . . .849
Index . . . . . . . . . . . . . . . . . . . . . . . . . . . . . . . . . . . .853
About This Tutorial
THIS tutorial is a beginner’s guide to developing enterprise applications using
the Java™ 2 Platform, Enterprise Edition (J2EE™) version 1.4. Here we cover
all the things you need to know to make the best use of this tutorial.
Who Should Use This Tutorial
This tutorial is intended for programmers interested in developing and deploying
J2EE applications on the J2EE 1.4 Application Server Beta 2.
How to Read This Tutorial
This tutorial is organized into six parts:
• Introduction
The first three chapters introduce basic J2EE concepts and technologies
and we suggest that you read these first in their entirety.
• Java XML technology
These chapters cover the technologies for developing applications that
process XML documents and provide Web services:
•
•
•
•
The Java API for XML Processing (JAXP)
The Java API for XML-based RPC (JAX-RPC)
SOAP with Attachments API for Java (SAAJ)
The Java API for XML Registries (JAXR)
xix
xx
• Web technology
These chapters cover the component technologies used in developing the
presentation layer of a J2EE application or a standalone Web application.
• Java Servlets
• JavaServer Pages
• JavaServer Pages Standard Tag Library
• Enterprise JavaBeans technology
These chapters cover the component technologies used in developing the
business logic of a J2EE application.
•
•
•
•
Session beans
Entity beans
Enterprise JavaBeans Query Language
Timer beans
Note: With the exception of timer beans, Enterprise JavaBeans technology will be
covered in the next release of the tutorial.
• Platform Services
These chapters cover the J2EE platform services used by all the J2EE
component technologies.
•
•
•
•
•
Security
Transactions
Resources
Connectors
Java Message Service
Note: Transactions and Resources will be covered in the next release of the tutorial.
• Appendixes
• Java encoding schemes
• HTTP overview
xxi
About the Examples
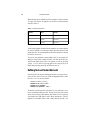
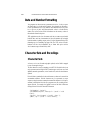
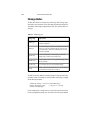
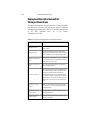
Prerequisites for the Examples
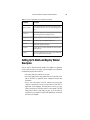
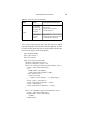
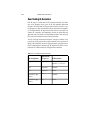
To understand the examples you will need a good knowledge of the Java programming language, SQL, and relational database concepts. The topics listed in
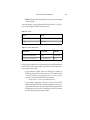
Table P–1 The Java™ Tutorial are particularly relevant:
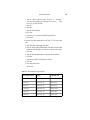
Table P–1 Relevant Topics in The Java™ Tutorial
Topic
Web Page
JDBC™
http://java.sun.com/docs/books/tutorial/jdbc
Threads
http://java.sun.com/docs/books/tutorial/essential/threads
JavaBeans™
http://java.sun.com/docs/books/tutorial/javabeans
Security
http://java.sun.com/docs/books/tutorial/security1.2
Building and Running the Examples
This section tells you everything you need to know to obtain, build, and run the
examples.
Required Software
If you are viewing this online, you need to download The J2EE™ 1.4 Tutorial
from:
http://java.sun.com/j2ee/1.4/download.html#tutorial
Once you have installed the tutorial bundle, the example source code is in the
<INSTALL>/j2eetutorial14/examples/ directory, with subdirectories for each
of the technologies discussed in the tutorial.
xxii
To build, deploy, and run the examples you need a copy of the J2EE 1.4 Application Server Beta 2 and the Java 2 Platform, Standard Edition (J2SE™) SDK
1.4.1. You download this version of the J2EE 1.4 Application Server from:
http://java.sun.com/j2ee/1.4/download.html#sdk
the J2SE 1.4.1 SDK from
http://java.sun.com/j2se/1.4.1/download.html
Building the Examples
Most of the tutorial examples are distributed with a configuration file for asant,
a portable build tool contained in the J2EE 1.4 Application Server, that is an
extension of the Ant tool developed by the Apache Software Foundation (http:/
/www.apache.org). asant contains additional tasks that interact with the J2EE
1.4 Application Server adminstration utility asadmin. Directions for building the
examples are provided in each chapter.
In order to run the asant scripts, you must configure your environment and
properties files as follows:
• Add <JAVA_HOME>/bin to the front of your path.
• Add <J2EE_HOME>/bin and <J2EE_HOME>/share/bin to the front of your
path so that J2EE 1.4 Application Server scripts (asadmin, asant,
deploytool, and wscompile) overrides other installations.
• Set the j2ee.home property in the file <INSTALL>/j2eetutorial14/
examples/common/build.properties to the location of your J2EE
Application Server installation. The build process uses the j2ee.home
property to include the J2EE library archive, <J2EE_HOME>/lib/
j2ee.jar, in the classpath. If you wish to use an IDE or the javac compiler to build J2EE applications, you must add this JAR to your classpath.
• Set the admin.user and admin.password properties in the file
<INSTALL>/j2eetutorial14/examples/common/build.properties to
the values you specified when you installed the J2EE 1.4 Application
Server. The build scripts use these values when you invoke an administration task such as creating a database pool. The default value for
admin.user is set to the installer’s default value, which is admin.
xxiii
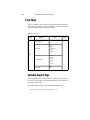
Tutorial Example Directory Structure
To facilitate iterative development and keep application source separate from
compiled files, the source code for the tutorial examples is stored in the following structure under each application directory:
• build.xml - asant build file
• src - Java source of servlets and JavaBeans components, and tag libraries
• web - JSP pages and HTML pages, tag files, images
The asant build files (build.xml) distributed with the examples contain targets
to create a build subdirectory and copy and compile files into that directory and
perform administrative functions on the application server. Build properties and
targets common to a particular technology are specified in the files <INSTALL>/
and
j2eetutorial14/examples/technology/common/build.properties
<INSTALL>/j2eetutorial14/examples/technology/common/targets.xml.
How to Print This Tutorial
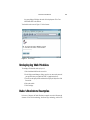
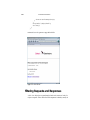
To print this tutorial, follow these steps:
1. Ensure that Adobe Acrobat Reader is installed on your system.
2. Open the PDF version of this book.
3. Click the printer icon in Adobe Acrobat Reader.
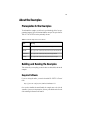
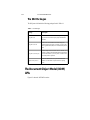
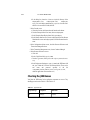
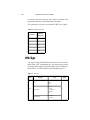
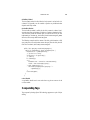
Typographical Conventions
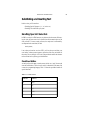
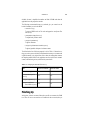
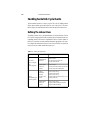
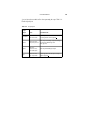
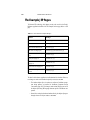
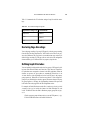
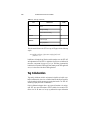
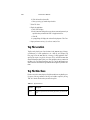
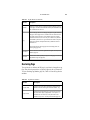
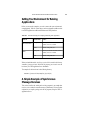
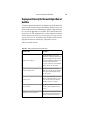
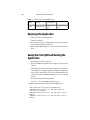
Table P–2 lists the typographical conventions used in this tutorial.
Table P–2 Typographical Conventions
Font Style
Uses
italic
Emphasis, titles, first occurrence of terms
monospace
URLs, code examples, file names, command
names, programming language keywords
italic monospace
Variable names
xxiv
Table P–2 Typographical Conventions
Font Style
Uses
<italic monospace>
Environment variables
Menu selections indicated with the right-arrow character →, for example,
First→Second, should be interpreted as: select the First menu, then choose Second from the First submenu.
1
Overview
Monica Pawlan
T
ODAY, more and more developers want to write distributed transactional
applications for the enterprise and leverage the speed, security, and reliability of
server-side technology. If you are already working in this area, you know that in
today’s fast-moving and demanding world of e-commerce and information technology, enterprise applications have to be designed, built, and produced for less
money, with greater speed, and with fewer resources than ever before.
To reduce costs and fast-track application design and development, Java™ 2
Platform, Enterprise Edition (J2EE™) provides a component-based approach to
the design, development, assembly, and deployment of enterprise applications.
The J2EE platform offers a multitiered distributed application model, reusable
components, a unified security model, flexible transaction control, and Web services support through integrated data interchange on Extensible Markup Language (XML)-based open standards and protocols.
Not only can you deliver innovative business solutions to market faster than ever,
but your platform-independent J2EE component-based solutions are not tied to
the products and application programming interfaces (APIs) of any one vendor.
Vendors and customers enjoy the freedom to choose the products and components that best meet their business and technological requirements.
This tutorial takes an examples-based approach to describing the features and
functionalities available in J2EE version 1.4 for developing enterprise applications. Whether you are a new or an experienced developer, you should find the
examples and accompanying text a valuable and accessible knowledge base for
creating your own solutions.
1
2
OVERVIEW
If you are new to J2EE enterprise application development, this chapter is a good
place to start. Here you will learn development basics, be introduced to the J2EE
architecture and APIs, become acquainted with important terms and concepts,
and find out how to approach J2EE application programming, assembly, and
deployment.
Web Services Support
Web services are Web-based enterprise applications that use open, Extensible
Markup Language (XML)-based standards and transport protocols to exchange
data with calling clients. The J2EE platform provides the XML APIs and tools
you need to quickly design, develop, test, and deploy Web services and clients
that fully interoperate with other Web services and clients running on Java-based
or non-Java-based platforms.
It is easy to write Web services and clients with the J2EE XML APIs. All you do
is pass parameter data to the method calls and process the data returned, or for
document-oriented web services, send documents containing the service data
back and forth. No low-level programming is needed because the XML API
implementations do the work of translating the application data to and from an
XML-based data stream that is sent over the standardized XML-based transport
protocols. These XML-based standards and protocols are introduced in the next
sections.
The translation of data to a standardized XML-based data stream is what makes
Web services and clients written with the J2EE XML APIs fully interoperable.
This does not necessarily mean the data being transported includes XML tags
because the transported data can itself be plain text, XML data, or any kind of
binary data such as audio, video, maps, program files, CAD documents or the
like. The next section, introduces XML and explains how parties doing business
can use XML tags and schemas to exchange data in a meaningful way.
Extensible Markup Language
Extensible Markup Language is a cross-platform, extensible, and text-based
standard for representing data. When XML data is exchanged between parties,
the parties are free to create their own tags to describe the data, set up schemas to
specify which tags can be used in a particular kind of XML document, and use
XML style sheets to manage the display and handling of the data.
HTTP-SOAP TRANSPORT PROTOCOL
For example, a Web service can use XML and a schema to produce price lists,
and companies that receive the price lists and schema can have their own style
sheets to handle the data in a way that best suits their needs.
• One company might put the XML pricing information through a program
to translate the XML to HTML so it can post the price lists to its Intranet.
• A partner company might put the XML pricing information through a tool
to create a marketing presentation.
• Another company might read the XML pricing information into an application for processing.
HTTP-SOAP Transport Protocol
Client requests and Web service responses are transmitted as Simple Object
Access Protocol (SOAP) messages over HTTP to enable a completely interoperable exchange between clients and Web services all running on different platforms and at various locations on the Internet. HTTP is a familiar request and
response standard for sending messages over the Internet, and SOAP is an XMLbased protocol that follows the HTTP request and response model.
The SOAP portion of a transported message handles the following:
• Defines an XML-based envelope to describe what is in the message and
how to process the message.
• Includes XML-based encoding rules to express instances of applicationdefined data types within the message.
• Defines an XML-based convention for representing the request to the
remote service and the resulting response.
WSDL Standard Format
The Web Services Description Language (WSDL) is a standardized XML format
for describing network services. The description includes the name of the service, the location of the service, and how to communicate with the service.
WSDLs can be stored in UDDI registries and/or published on the Web. The
J2EE platform provides a tool for generating the WSDL for a Web service that
uses remote procedure calls to communicate with clients.
3
4
OVERVIEW
UDDI and ebXML Standard Formats
Other XML-based standards such as Universal Description, Discovery, and Integration (UDDI) and ebXML make it possible for businesses to publish information on the Internet about their products and Web services where the information
can be readily and globally accessed by clients who want to do business.
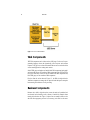
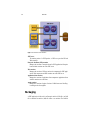
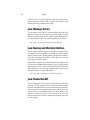
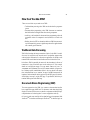
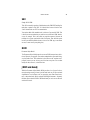
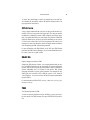
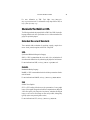
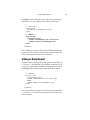
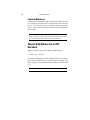
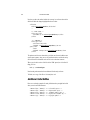
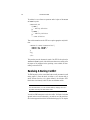
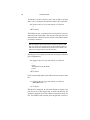
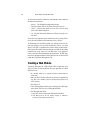
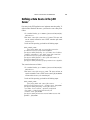
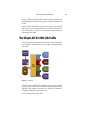
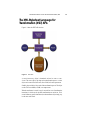
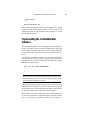
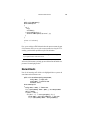
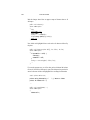
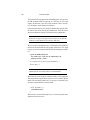
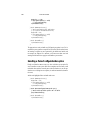
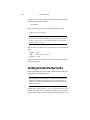
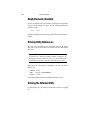
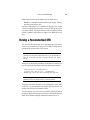
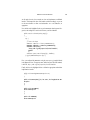
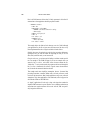
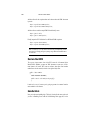
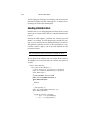
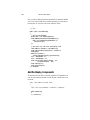
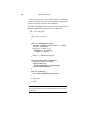
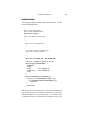
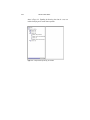
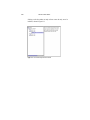
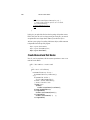
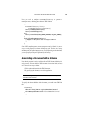
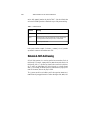
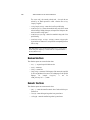
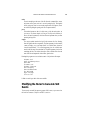
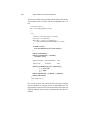
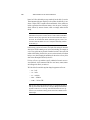
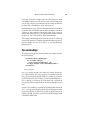
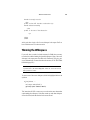
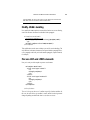
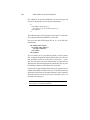
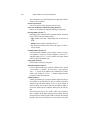
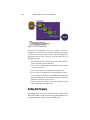
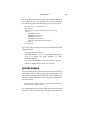
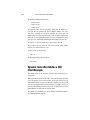
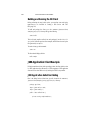
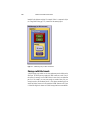
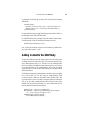
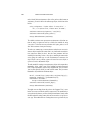
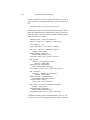
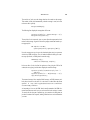
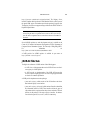
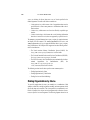
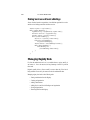
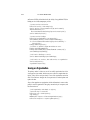
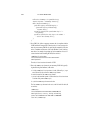
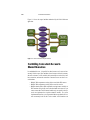
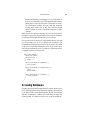
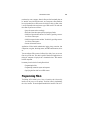
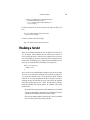
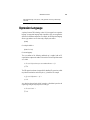
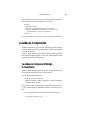
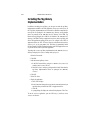
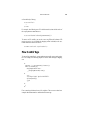
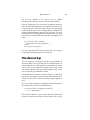
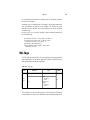
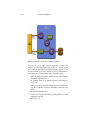
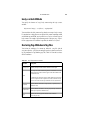
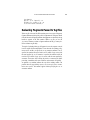
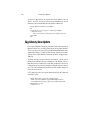
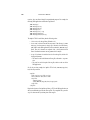
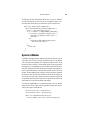
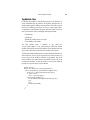
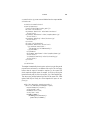
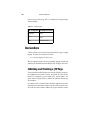
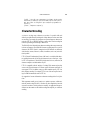
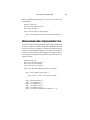
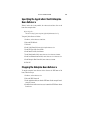
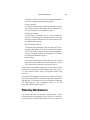
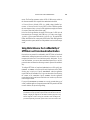
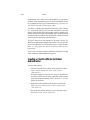
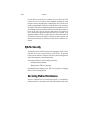
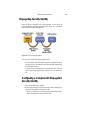
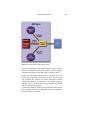
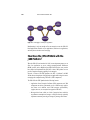
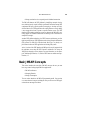
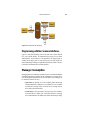
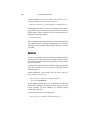
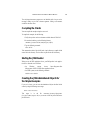
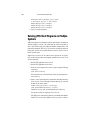
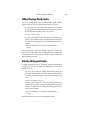
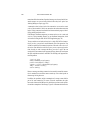
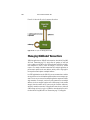
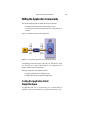
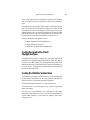
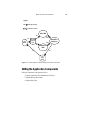
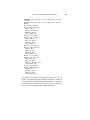
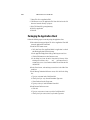
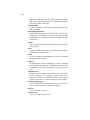
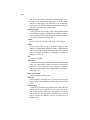
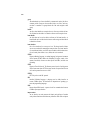
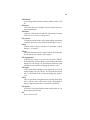
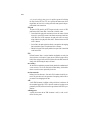
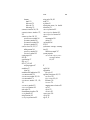
Distributed Multitiered Applications
The J2EE platform uses a multitiered distributed application model for both
enterprise applications. Application logic is divided into components according
to function, and the various application components that make up a J2EE application are installed on different machines depending on the tier in the multitiered
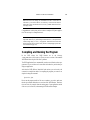
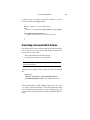
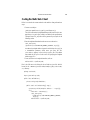
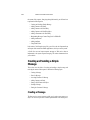
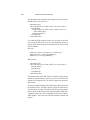
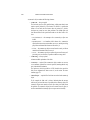
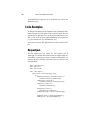
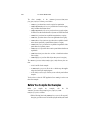
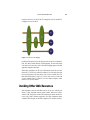
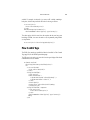
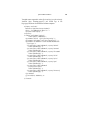
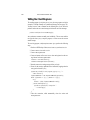
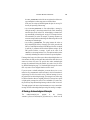
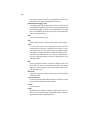
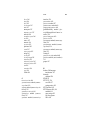
J2EE environment to which the application component belongs. Figure 1–1
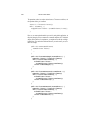
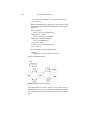
shows two multitiered J2EE applications divided into the tiers described in the
following list. The J2EE application parts shown in Figure 1–1 are presented in
J2EE Components (page 5).
•
•
•
•
Client-tier components run on the client machine.
Web-tier components run on the J2EE server.
Business-tier components run on the J2EE server.
Enterprise information system (EIS)-tier software runs on the EIS server.
Although a J2EE application can consist of the three or four tiers shown in
Figure 1–1, J2EE multitiered applications are generally considered to be threetiered applications because they are distributed over three different locations: client machines, the J2EE server machine, and the database or legacy machines at
the back end. Three-tiered applications that run in this way extend the standard
two-tiered client and server model by placing a multithreaded application server
between the client application and back-end storage.
J2EE COMPONENTS
Figure 1–1 Multitiered Applications
J2EE Components
J2EE applications are made up of components. A J2EE component is a self-contained functional software unit that is assembled into a J2EE application with its
related classes and files and that communicates with other components. The
J2EE specification defines the following J2EE components:
• Application clients and applets are components that run on the client.
• Java Servlet and JavaServer Pages™ (JSP™) technology components are
Web components that run on the server.
• Enterprise JavaBeans™ (EJB™) components (enterprise beans) are business components that run on the server.
J2EE components are written in the Java programming language and are compiled in the same way as any program in the language. The difference between
J2EE components and “standard” Java classes is that J2EE components are
assembled into a J2EE application, verified to be well formed and in compliance
with the J2EE specification, and deployed to production, where they are run and
managed by the J2EE server.
5
6
OVERVIEW
J2EE Clients
A J2EE client can be a Web client or an application client.
Web Clients
A Web client consists of two parts: dynamic Web pages containing various types
of markup language (HTML, XML, and so on), which are generated by Web
components running in the Web tier, and a Web browser, which renders the
pages received from the server.
A Web client is sometimes called a thin client. Thin clients usually do not do
things like query databases, execute complex business rules, or connect to legacy
applications. When you use a thin client, heavyweight operations like these are
off-loaded to enterprise beans executing on the J2EE server where they can
leverage the security, speed, services, and reliability of J2EE server-side technologies.
Applets
A Web page received from the Web tier can include an embedded applet. An
applet is a small client application written in the Java programming language
that executes in the Java virtual machine installed in the Web browser. However,
client systems will likely need the Java Plug-in and possibly a security policy file
in order for the applet to successfully execute in the Web browser.
Web components are the preferred API for creating a Web client program
because no plug-ins or security policy files are needed on the client systems.
Also, Web components enable cleaner and more modular application design
because they provide a way to separate applications programming from Web
page design. Personnel involved in Web page design thus do not need to understand Java programming language syntax to do their jobs.
Application Clients
A J2EE application client runs on a client machine and provides a way for users
to handle tasks that require a richer user interface than can be provided by a
markup language. It typically has a graphical user interface (GUI) created from
Swing or Abstract Window Toolkit (AWT) APIs, but a command-line interface
is certainly possible.
J2EE CLIENTS
Application clients directly access enterprise beans running in the business tier.
However, if application requirements warrant it, a J2EE application client can
open an HTTP connection to establish communication with a servlet running in
the Web tier.
JavaBeans™ Component Architecture
The server and client tiers might also include components based on the JavaBeans component architecture (JavaBeans component) to manage the data flow
between an application client or applet and components running on the J2EE
server or between server components and a database. JavaBeans components are
not considered J2EE components by the J2EE specification.
JavaBeans components have instance variables and get and set methods for
accessing the data in the instance variables. JavaBeans components used in this
way are typically simple in design and implementation, but should conform to
the naming and design conventions outlined in the JavaBeans component architecture.
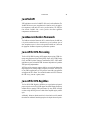
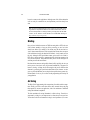
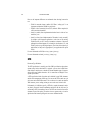
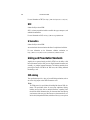
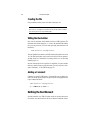
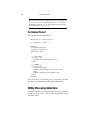
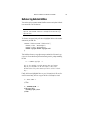
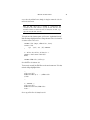
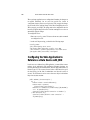
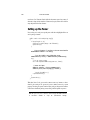
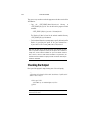
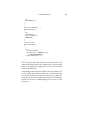
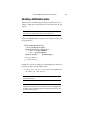
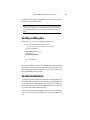
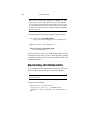
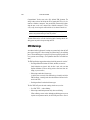
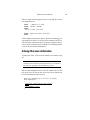
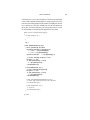
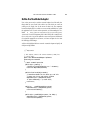
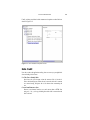
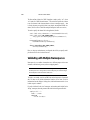
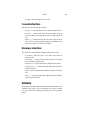
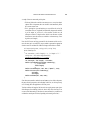
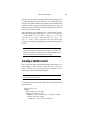
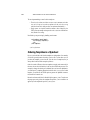
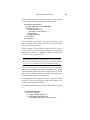
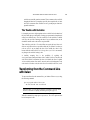
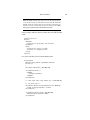
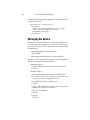
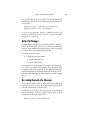
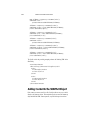
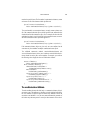
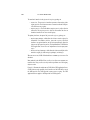
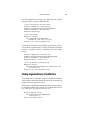
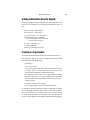
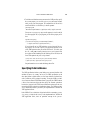
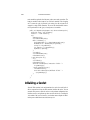
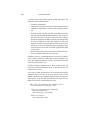
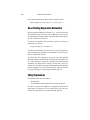
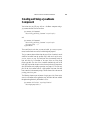
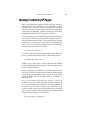
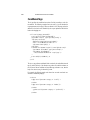
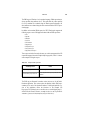
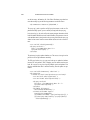
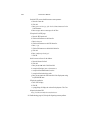
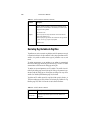
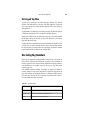
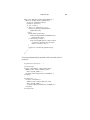
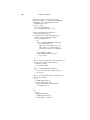
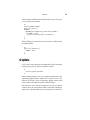
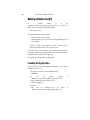
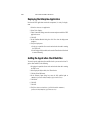
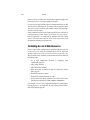
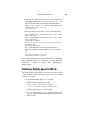
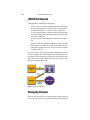
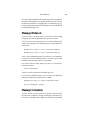
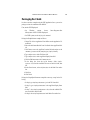
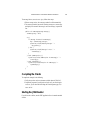
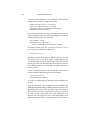
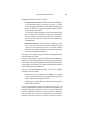
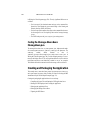
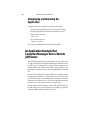
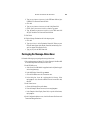
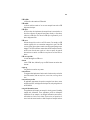
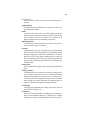
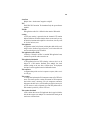
J2EE Server Communications
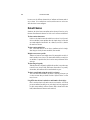
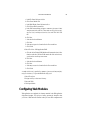
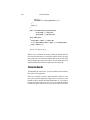
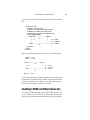
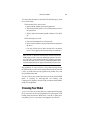
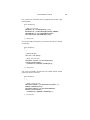
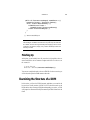
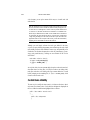
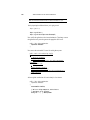
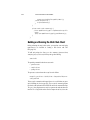
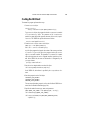
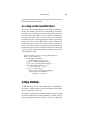
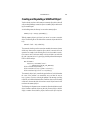
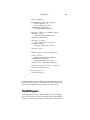
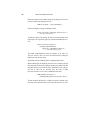
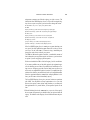
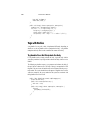
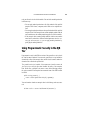
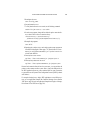
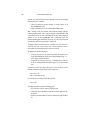
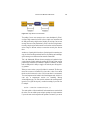
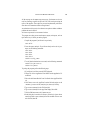
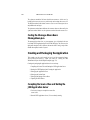
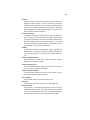
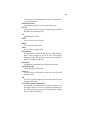
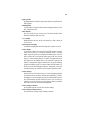
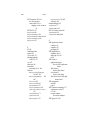
Figure 1–2 shows the various elements that can make up the client tier. The client communicates with the business tier running on the J2EE server either
directly or, as in the case of a client running in a browser, by going through JSP
pages or servlets running in the Web tier.
Your J2EE application uses a thin browser-based client or thick application client. In deciding which one to use, you should be aware of the trade-offs between
keeping functionality on the client and close to the user (thick client) and offloading as much functionality as possible to the server (thin client). The more
functionality you off-load to the server, the easier it is to distribute, deploy, and
manage the application; however, keeping more functionality on the client can
make for a better perceived user experience.
7
8
OVERVIEW
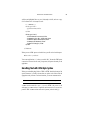
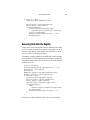
Figure 1–2 Server Communications
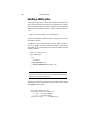
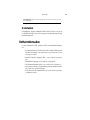
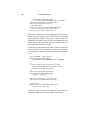
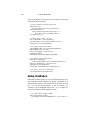
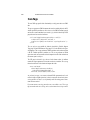
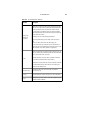
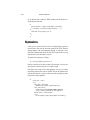
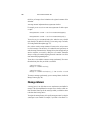
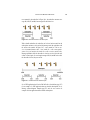
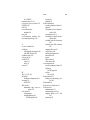
Web Components
J2EE Web components can be either servlets or JSP pages. Servlets are Java programming language classes that dynamically process requests and construct
responses. JSP pages are text-based documents that execute as servlets but allow
a more natural approach to creating static content.
Static HTML pages and applets are bundled with Web components during application assembly, but are not considered Web components by the J2EE specification. Server-side utility classes can also be bundled with Web components and,
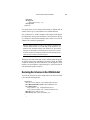
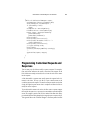
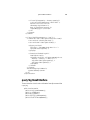
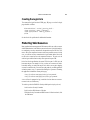
like HTML pages, are not considered Web components.
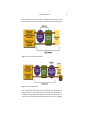
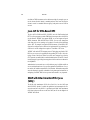
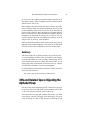
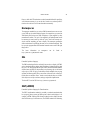
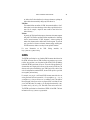
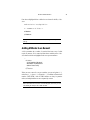
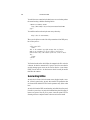
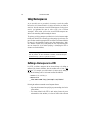
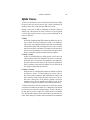
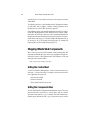
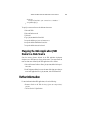
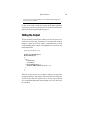
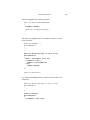
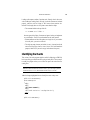
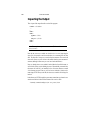
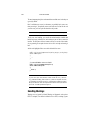
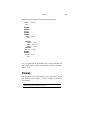
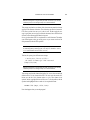
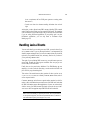
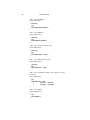
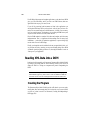
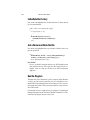
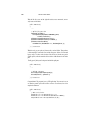
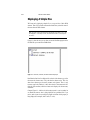
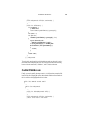
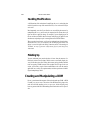
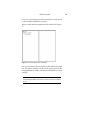
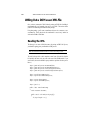
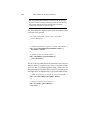
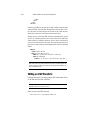
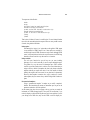
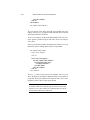
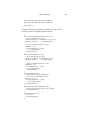
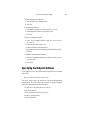
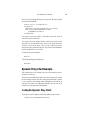
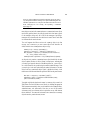
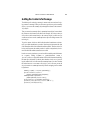
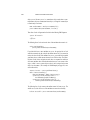
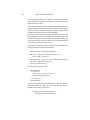
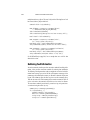
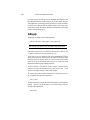
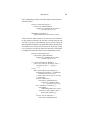
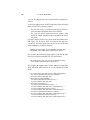
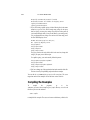
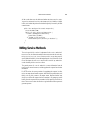
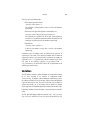
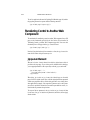
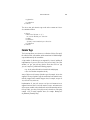
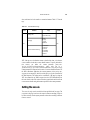
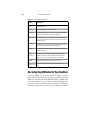
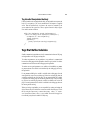
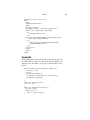
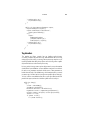
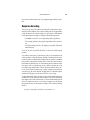
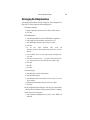
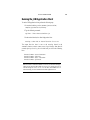
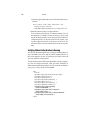
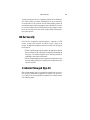
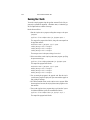
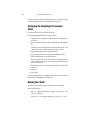
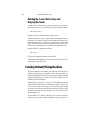
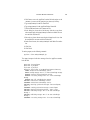
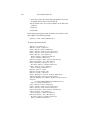
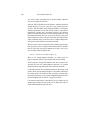
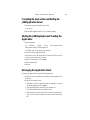
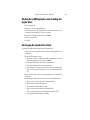
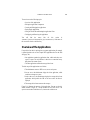
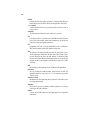
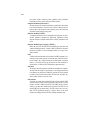
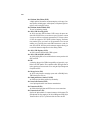
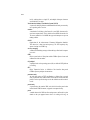
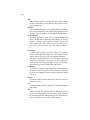
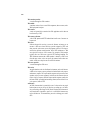
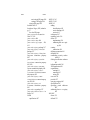
Like the client tier and as shown in Figure 1–3, the Web tier might include a
JavaBeans component to manage the user input and send that input to enterprise
beans running in the business tier for processing.
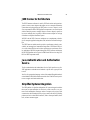
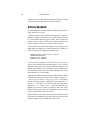
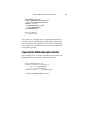
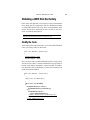
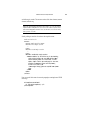
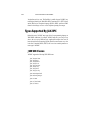
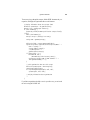
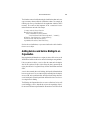
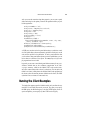
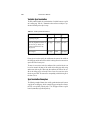
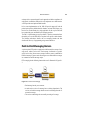
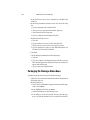
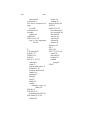
Business Components
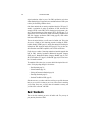
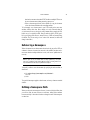
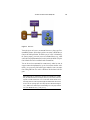
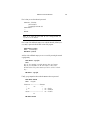
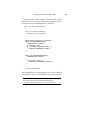
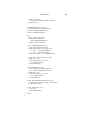
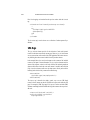
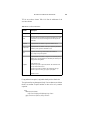
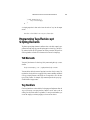
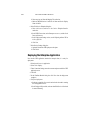
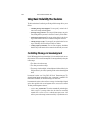
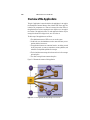
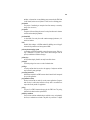
Business code, which is logic that solves or meets the needs of a particular business domain such as banking, retail, or finance, is handled by enterprise beans
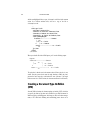
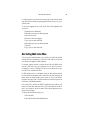
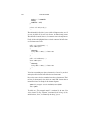
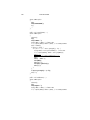
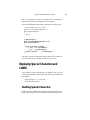
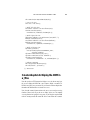
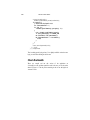
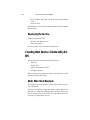
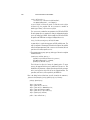
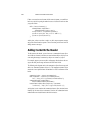
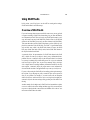
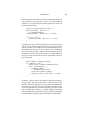
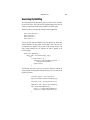
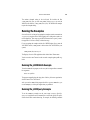
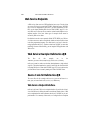
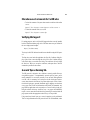
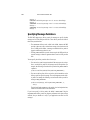
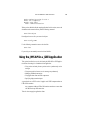
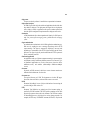
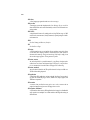
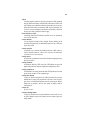
running in the business tier. Figure 1–4 shows how an enterprise bean receives
data from client programs, processes it (if necessary), and sends it to the enter-
BUSINESS COMPONENTS
prise information system tier for storage. An enterprise bean also retrieves data
from storage, processes it (if necessary), and sends it back to the client program.
Figure 1–3 Web Tier and J2EE Applications
Figure 1–4 Business and EIS Tiers
There are three kinds of enterprise beans: session beans, entity beans, and message-driven beans. A session bean represents a transient conversation with a client. When the client finishes executing, the session bean and its data are gone. In
contrast, an entity bean represents persistent data stored in one row of a database
9
10
OVERVIEW
table. If the client terminates or if the server shuts down, the underlying services
ensure that the entity bean data is saved.
A message-driven bean combines features of a session bean and a Java Message
Service (JMS) message listener, allowing a business component to receive JMS
messages asynchronously.
Enterprise Information System Tier
The enterprise information system tier handles enterprise information system
software and includes enterprise infrastructure systems such as enterprise
resource planning (ERP), mainframe transaction processing, database systems,
and other legacy information systems. J2EE application components might need
access to enterprise information systems for database connectivity, for example.
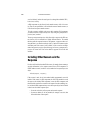
J2EE Containers
Normally, thin-client multitiered applications are hard to write because they
involve many lines of intricate code to handle transaction and state management,
multithreading, resource pooling, and other complex low-level details. The component-based and platform-independent J2EE architecture makes J2EE applications easy to write because business logic is organized into reusable components.
In addition, the J2EE server provides underlying services in the form of a container for every component type. Because you do not have to develop these services yourself, you are free to concentrate on solving the business problem at
hand.
Container Services
Containers are the interface between a component and the low-level platformspecific functionality that supports the component. Before a Web, enterprise
bean, or application client component can be executed, it must be assembled into
a J2EE application and deployed into its container.
The assembly process involves specifying container settings for each component
in the J2EE application and for the J2EE application itself. Container settings
customize the underlying support provided by the J2EE server, which includes
services such as security, transaction management, Java Naming and Directory
CONTAINER TYPES
Interface™ (JNDI) lookups, and remote connectivity. Here are some of the highlights:
• The J2EE security model lets you configure a Web component or enterprise bean so that system resources are accessed only by authorized users.
• The J2EE transaction model lets you specify relationships among methods
that make up a single transaction so that all methods in one transaction are
treated as a single unit.
• JNDI lookup services provide a unified interface to multiple naming and
directory services in the enterprise so that application components can
access naming and directory services.
• The J2EE remote connectivity model manages low-level communications
between clients and enterprise beans. After an enterprise bean is created, a
client invokes methods on it as if it were in the same virtual machine.
The fact that the J2EE architecture provides configurable services means that
application components within the same J2EE application can behave differently
based on where they are deployed. For example, an enterprise bean can have
security settings that allow it a certain level of access to database data in one production environment and another level of database access in another production
environment.
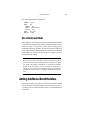
The container also manages nonconfigurable services such as enterprise bean
and servlet life cycles, database connection resource pooling, data persistence,
and access to the J2EE platform APIs described in the section J2EE
APIs (page 16). Although data persistence is a nonconfigurable service, the
J2EE architecture lets you override container-managed persistence by including
the appropriate code in your enterprise bean implementation when you want
more control than the default container-managed persistence provides. For
example, you might use bean-managed persistence to implement your own
finder (search) methods or to create a customized database cache.
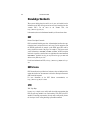
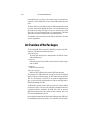
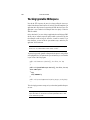
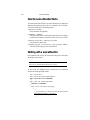
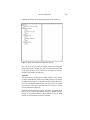
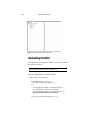
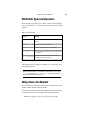
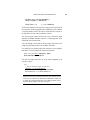
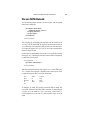
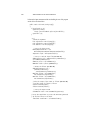
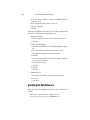
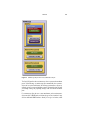
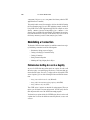
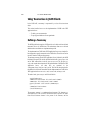
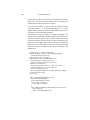
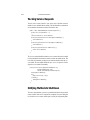
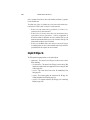
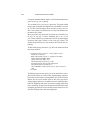
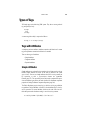
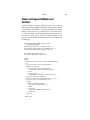
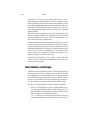
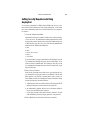
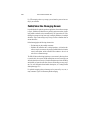
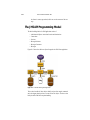
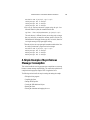
Container Types
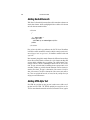
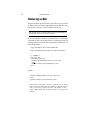
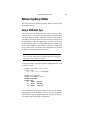
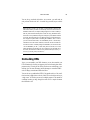
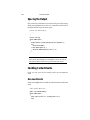
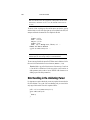
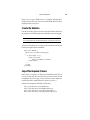
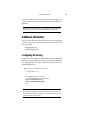
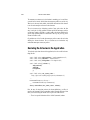
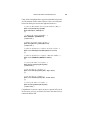
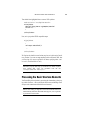
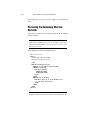
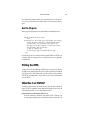
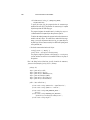
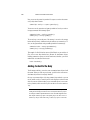
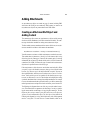
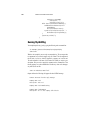
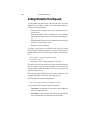
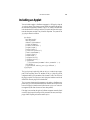
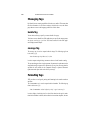
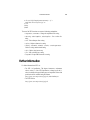
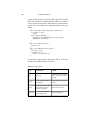
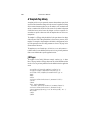
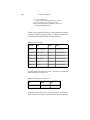
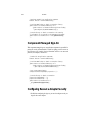
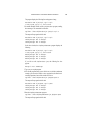
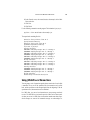
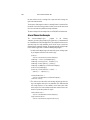
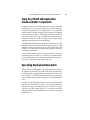
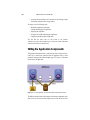
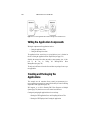
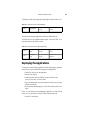
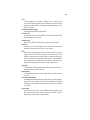
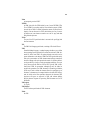
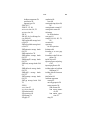
The deployment process installs J2EE application components in the J2EE containers illustrated in Figure 1–5.
11
12
OVERVIEW
Figure 1–5 J2EE Server and Containers
J2EE server
The runtime portion of a J2EE product. A J2EE server provides EJB and
Web containers.
Enterprise JavaBeans (EJB) container
Manages the execution of enterprise beans for J2EE applications. Enterprise
beans and their container run on the J2EE server.
Web container
Manages the execution of JSP page and servlet components for J2EE applications. Web components and their container run on the J2EE server.
Application client container
Manages the execution of application client components. Application clients
and their container run on the client.
Applet container
Manages the execution of applets. Consists of a Web browser and Java Plugin running on the client together.
Packaging
A J2EE application is delivered in an Enterprise Archive (EAR) file. An EAR
file is a standard Java Archive (JAR) file with an .ear extension. The EAR file
DEVELOPMENT ROLES
contains J2EE modules. Using EAR files and modules makes it possible to
assemble a number of different J2EE applications using some of the same components. No extra coding is needed; it is just a matter of assembling various
J2EE modules into J2EE EAR files.
A J2EE module consists of one or more J2EE components for the same container type and one component deployment descriptor of that type. A deployment
descriptor is an XML document with an .xml extension that describes a component’s deployment settings. An enterprise bean module deployment descriptor,
for example, declares transaction attributes and security authorizations for an
enterprise bean. Because deployment descriptor information is declarative, it can
be changed without modifying the bean source code. At run time, the J2EE
server reads the deployment descriptor and acts upon the component accordingly. A J2EE module without an application deployment descriptor can be
deployed as a stand-alone module. The four types of J2EE modules are:
• Enterprise JavaBeans modules contain class files for enterprise beans and
an EJB deployment descriptor. EJB modules are packaged as JAR files
with a .jar extension.
• Web modules contain JSP files, class files for servlets, GIF and HTML
files, and a Web deployment descriptor. Web modules are packaged as JAR
files with a .war (Web ARchive) extension.
• Resource adapter modules contain all Java interfaces, classes, native
libraries, and other documentation, along with the resource adapter
deployment descriptor. Together, these implement the Connector architecture (see J2EE Connector Architecture, page 21) for a particular EIS.
Resource adapter modules are packages as JAR files with a .rar
(Resource adapter ARchive) extension.
• Application client modules contain class files and an application client
deployment descriptor. Application client modules are packaged as JAR
files with a .jar extension.
Development Roles
Reusable modules make it possible to divide the application development and
deployment process into distinct roles so that different people or companies can
perform different parts of the process.
The first two roles involve purchasing and installing the J2EE product and tools.
Once software is purchased and installed, J2EE components can be developed by
13
14
OVERVIEW
application component providers, assembled by application assemblers, and
deployed by application deployers. In a large organization, each of these roles
might be executed by different individuals or teams. This division of labor works
because each of the earlier roles outputs a portable file that is the input for a subsequent role. For example, in the application component development phase, an
enterprise bean software developer delivers EJB JAR files. In the application
assembly role, another developer combines these EJB JAR files into a J2EE
application and saves it in an EAR file. In the application deployment role, a system administrator at the customer site uses the EAR file to install the J2EE application into a J2EE server.
The different roles are not always executed by different people. If you work for a
small company, for example, or if you are prototyping a sample application, you
might perform the tasks in every phase.
J2EE Product Provider
The J2EE product provider is the company that designs and makes available for
purchase the J2EE platform, APIs, and other features defined in the J2EE specification. Product providers are typically operating system, database system,
application server, or Web server vendors who implement the J2EE platform
according to the Java 2 Platform, Enterprise Edition Specification.
Tool Provider
The tool provider is the company or person who creates development, assembly,
and packaging tools used by component providers, assemblers, and deployers.
Application Component Provider
The application component provider is the company or person who creates Web
components, enterprise beans, applets, or application clients for use in J2EE
applications.
APPLICATION ASSEMBLER
Enterprise Bean Developer
An enterprise bean developer performs the following tasks to deliver an EJB
JAR file that contains the enterprise bean:
• Writes and compiles the source code
• Specifies the deployment descriptor
• Bundles the .class files and deployment descriptor into an EJB JAR file
Web Component Developer
A Web component developer performs the following tasks to deliver a WAR file
containing the Web component:
•
•
•
•
Writes and compiles servlet source code
Writes JSP and HTML files
Specifies the deployment descriptor for the Web component
Bundles the .class, .jsp, .html, and deployment descriptor files in the
WAR file
J2EE Application Client Developer
An application client developer performs the following tasks to deliver a JAR file
containing the J2EE application client:
• Writes and compiles the source code
• Specifies the deployment descriptor for the client
• Bundles the .class files and deployment descriptor into the JAR file
Application Assembler
The application assembler is the company or person who receives application
component JAR files from component providers and assembles them into a J2EE
application EAR file. The assembler or deployer can edit the deployment
descriptor directly or use tools that correctly add XML tags according to
interactive selections. A software developer performs the following tasks to
deliver an EAR file containing the J2EE application:
• Assembles EJB JAR and WAR files created in the previous phases into a
J2EE application (EAR) file
15
16
OVERVIEW
• Specifies the deployment descriptor for the J2EE application
• Verifies that the contents of the EAR file are well formed and comply with
the J2EE specification
Application Deployer and Administrator
The application deployer and administrator is the company or person who configures and deploys the J2EE application, administers the computing and networking infrastructure where J2EE applications run, and oversees the runtime
environment. Duties include such things as setting transaction controls and security attributes and specifying connections to databases.
During configuration, the deployer follows instructions supplied by the application component provider to resolve external dependencies, specify security settings, and assign transaction attributes. During installation, the deployer moves
the application components to the server and generates the container-specific
classes and interfaces.
A deployer/system administrator performs the following tasks to install and configure a J2EE application:
• Adds the J2EE application (EAR) file created in the preceding phase to the
J2EE server
• Configures the J2EE application for the operational environment by modifying the deployment descriptor of the J2EE application
• Verifies that the contents of the EAR file are well formed and comply with
the J2EE specification
• Deploys (installs) the J2EE application EAR file into the J2EE server
J2EE APIs
The Sun ONE Application Server provides the following APIs to be used in
J2EE applications.
Enterprise JavaBeans Technology
An Enterprise JavaBeans™ (EJB™) component or enterprise bean is a body of
code with fields and methods to implement modules of business logic. You can
JDBC API
think of an enterprise bean as a building block that can be used alone or with
other enterprise beans to execute business logic on the J2EE server.
There are three kinds of enterprise beans: session beans, entity beans, and message-driven beans. Enterprise beans often interact with databases. One of the
benefits of entity beans is that you do not have to write any SQL code or use the
JDBC™ API directly to perform database access operations; the EJB container
handles this for you. However, if you override the default container-managed
persistence for any reason, you will need to use the JDBC API. Also, if you
choose to have a session bean access the database, you have to use the
JDBC API.
JDBC API
The JDBC™ API lets you invoke SQL commands from Java programing language methods. You use the JDBC API in an enterprise bean when you override
the default container-managed persistence or have a session bean access the
database. With container-managed persistence, database access operations are
handled by the container, and your enterprise bean implementation contains no
JDBC code or SQL commands. You can also use the JDBC API from a servlet or
JSP page to access the database directly without going through an enterprise
bean.
The JDBC API has two parts: an application-level interface used by the application components to access a database, and a service provider interface to attach a
JDBC driver to the J2EE platform.
Java Servlet Technology
Java Servlet technology lets you define HTTP-specific servlet classes. A servlet
class extends the capabilities of servers that host applications accessed by way of
a request-response programming model. Although servlets can respond to any
type of request, they are commonly used to extend the applications hosted by
Web servers.
JavaServer Pages Technology
JavaServer Pages™ (JSP™) technology lets you put snippets of servlet code
directly into a text-based document. A JSP page is a text-based document that
17
18
OVERVIEW
contains two types of text: static template data, which can be expressed in any
text-based format such as HTML, WML, and XML, and JSP elements, which
determine how the page constructs dynamic content.
Java Message Service
The Java Message Service (JMS) is a messaging standard that allows J2EE
application components to create, send, receive, and read messages. It enables
distributed communication that is loosely coupled, reliable, and asynchronous.
For more information on JMS, see the online Java Message Service Tutorial:
http://java.sun.com/products/jms/tutorial/index.html
Java Naming and Directory Interface
The Java Naming and Directory Interface™ (JNDI) provides naming and directory functionality. It provides applications with methods for performing standard
directory operations, such as associating attributes with objects and searching for
objects using their attributes. Using JNDI, a J2EE application can store and
retrieve any type of named Java object.
Because JNDI is independent of any specific implementations, applications can
use JNDI to access multiple naming and directory services, including existing
naming and directory services such as LDAP, NDS, DNS, and NIS. This allows
J2EE applications to coexist with legacy applications and systems. For more
information on JNDI, see the online JNDI Tutorial:
http://java.sun.com/products/jndi/tutorial/index.html
Java Transaction API
The Java Transaction API (JTA) provides a standard interface for demarcating
transactions. The J2EE architecture provides a default auto commit to handle
transaction commits and rollbacks. An auto commit means that any other applications viewing data will see the updated data after each database read or write
operation. However, if your application performs two separate database access
operations that depend on each other, you will want to use the JTA API to
demarcate where the entire transaction, including both operations, begins, rolls
back, and commits.
JAVAMAIL API
JavaMail API
J2EE applications can use the JavaMail™ API to send e-mail notifications. The
JavaMail API has two parts: an application-level interface used by the application components to send mail, and a service provider interface. The J2EE platform includes JavaMail with a service provider that allows application
components to send Internet mail.
JavaBeans Activation Framework
The JavaBeans Activation Framework (JAF) is included because JavaMail uses
it. It provides standard services to determine the type of an arbitrary piece of
data, encapsulate access to it, discover the operations available on it, and create
the appropriate JavaBeans component to perform those operations.
Java API for XML Processing
The Java API for XML Processing (JAXP) supports the processing of XML documents using Document Object Model (DOM), Simple API for XML Parsing
(SAX), and XML Stylesheet Language Transformation (XSLT). JAXP enables
applications to parse and transform XML documents independent of a particular
XML processing implementation.
JAXP also provides namespace support, which lets you work with schemas that
might otherwise have naming conflicts. Designed to be flexible, JAXP lets you
use any XML-compliant parser of XSL processor from within your application
and supports the W3C schema. You can find information on the W3C schema at
this URL: http://www.w3.org/XML/Schema.
Java API for XML Registries
The Java API for XML Registries (JAXR) lets you access business and generalpurpose registries over the Web. JAXR supports the ebXML Registry/Repository
standards and the emerging UDDI specifications. By using JAXR, developers
can learn a single API and get access to both of these important registry technologies.
Additionally, businesses submit material to be shared and search for material
that others have submitted. Standards groups have developed schemas for partic-
19
20
OVERVIEW
ular kinds of XML documents, and two businesses might, for example, agree to
use the schema for their industry’s standard purchase order form. Because the
schema is stored in a standard business registry, both parties can use JAXR to
access it.
Java API for XML-Based RPC
The Java API for XML-based RPC (JAX-RPC) uses the SOAP standard and
HTTP so client programs can make XML-based remote procedure calls (RPCs)
over the Internet. JAX-RPC also supports WSDL so you can import and export
WSDL documents. With JAX-RPC and a WSDL, you can easily interoperate
with clients and services running on Java-based or non-Java-based platforms
such as .NET. For example, based on the WSDL document, a Visual Basic .NET
client can be configured to use a Web service implemented in Java technology or
a Web service can be configured to recognize a Visual Basic .NET client.
JAX-RPC relies on the HTTP transport protocol. Taking that a step further, JAXRPC lets you create service applications that combine HTTP with a Java technology version of the Secure Socket Layer (SSL) and Transport Layer Security
(TLS) protocols to establish basic or mutual authentication. SSL and TLS ensure
message integrity by providing data encryption with client and server authentication capabilities.
Authentication is a measured way to verify whether a party is eligible and able to
access certain information as a way to protect against the fraudulent use of a system and/or the fraudulent transmission of information. Information transported
across the Internet is especially vulnerable to being intercepted and misused, so
configuring a JAX-RPC Web service to protect data in transit is very important.
SOAP with Attachments API for Java
(SAAJ)
The SOAP with Attachments API for Java (SAAJ) is a low-level API upon
which JAX-RPC depends. It enables the production and consumption of messages that conform to the SOAP 1.1 specification and SOAP with Attachments
note. Most developers will not use the SAAJ API, but will use the higher-level
JAX-RPC API instead.
J2EE CONNECTOR ARCHITECTURE
J2EE Connector Architecture
The J2EE Connector architecture is used by J2EE tools vendors and system integrators to create resource adapters that support access to enterprise information
systems that can be plugged into any J2EE product. A resource adapter is a software component that allows J2EE application components to access and interact
with the underlying resource manager. Because a resource adapter is specific to
its resource manager, there is typically a different resource adapter for each type
of database or enterprise information system.
JAX-RPC and the J2EE Connector Architecture are complementary technologies for enterprise application integration (EAI) and end-to-end business integration.
The J2EE Connector Architecture also provides a performance-oriented, secure,
scalable, and message-based transactional integration of J2EE-based Web services with existing EISs that can be either synchronous or asynchronous. Existing applications and EISs integrated through the J2EE Connector Architecture
into the J2EE platform can be exposed as XML-based Web services using JAXRPC and J2EE component models.
Java Authentication and Authorization
Service
The Java Authentication and Authorization Service (JAAS) provides a way for a
J2EE application to authenticate and authorize a specific user or group of users
to run it.
JAAS is a Java programing language version of the standard Pluggable Authentication Module (PAM) framework that extends the Java 2 Platform security architecture to support user-based authorization.
Simplified Systems Integration
The J2EE platform is a platform-independent, full systems integration solution
that creates an open marketplace in which every vendor can sell to every customer. Such a marketplace encourages vendors to compete, not by trying to lock
customers into their technologies but by trying to outdo each other by providing
products and services that benefit customers, such as better performance, better
tools, or better customer support.
21
22
OVERVIEW
The J2EE APIs enable systems and applications integration through the following:
•
•
•
•
•
•
•
Unified application model across tiers with enterprise beans
Simplified response and request mechanism with JSP pages and servlets
Reliable security model with JAAS
XML-based data interchange integration with JAXP
Simplified interoperability with the J2EE Connector Architecture
Easy database connectivity with the JDBC API
Enterprise application integration with message-driven beans and JMS,
JTA, and JNDI
You can learn more about using the J2EE platform to build integrated business
systems by reading J2EE Technology in Practice:
http://java.sun.com/j2ee/inpractice/aboutthebook.html
2
Understanding XML
Eric Armstrong
THIS chapter describes the Extensible Markup Language (XML) and its
related specifications. It also gives you practice in writing XML data, so you
become comfortably familiar with XML syntax.
Note: The XML files mentioned in this chapter can be found in
<INSTALL>/j2eetutorial14/examples/xml/samples.
Introduction to XML
This section covers the basics of XML. The goal is to give you just enough information to get started, so you understand what XML is all about. (You’ll learn
about XML in later sections of the tutorial.) We then outline the major features
that make XML great for information storage and interchange, and give you a
general idea of how XML can be used.
What Is XML?
XML is a text-based markup language that is fast becoming the standard for data
interchange on the Web. As with HTML, you identify data using tags (identifiers
enclosed in angle brackets, like this: <...>). Collectively, the tags are known as
“markup”.
23
24
UNDERSTANDING XML
But unlike HTML, XML tags identify the data, rather than specifying how to display it. Where an HTML tag says something like “display this data in bold font”
(<b>...</b>), an XML tag acts like a field name in your program. It puts a label
on a piece of data that identifies it (for example: <message>...</message>).
Note: Since identifying the data gives you some sense of what means (how to interpret it, what you should do with it), XML is sometimes described as a mechanism
for specifying the semantics (meaning) of the data.
In the same way that you define the field names for a data structure, you are free
to use any XML tags that make sense for a given application. Naturally, though,
for multiple applications to use the same XML data, they have to agree on the tag
names they intend to use.
Here is an example of some XML data you might use for a messaging application:
<message>
<to>[email protected]</to>
<from>[email protected]</from>
<subject>XML Is Really Cool</subject>
<text>
How many ways is XML cool? Let me count the ways...
</text>
</message>
Note: Throughout this tutorial, we use boldface text to highlight things we want to
bring to your attention. XML does not require anything to be in bold!
The tags in this example identify the message as a whole, the destination and
sender addresses, the subject, and the text of the message. As in HTML, the <to>
tag has a matching end tag: </to>. The data between the tag and its matching
end tag defines an element of the XML data. Note, too, that the content of the
<to> tag is entirely contained within the scope of the <message>..</message>
tag. It is this ability for one tag to contain others that gives XML its ability to
represent hierarchical data structures.
Once again, as with HTML, whitespace is essentially irrelevant, so you can format the data for readability and yet still process it easily with a program. Unlike
HTML, however, in XML you could easily search a data set for messages con-
WHAT IS XML?
taining “cool” in the subject, because the XML tags identify the content of the
data, rather than specifying its representation.
Tags and Attributes
Tags can also contain attributes—additional information included as part of the
tag itself, within the tag’s angle brackets. The following example shows an email
message structure that uses attributes for the “to”, “from”, and “subject”
fields:
<message to="[email protected]" from="[email protected]"
subject="XML Is Really Cool">
<text>
How many ways is XML cool? Let me count the ways...
</text>
</message>
As in HTML, the attribute name is followed by an equal sign and the attribute
value, and multiple attributes are separated by spaces. Unlike HTML, however,
in XML commas between attributes are not ignored—if present, they generate
an error.
Since you could design a data structure like <message> equally well using either
attributes or tags, it can take a considerable amount of thought to figure out
which design is best for your purposes. Designing an XML Data
Structure (page 79), includes ideas to help you decide when to use attributes and
when to use tags.
Empty Tags
One really big difference between XML and HTML is that an XML document is
always constrained to be well formed. There are several rules that determine
when a document is well-formed, but one of the most important is that every tag
has a closing tag. So, in XML, the </to> tag is not optional. The <to> element is
never terminated by any tag other than </to>.
Note: Another important aspect of a well-formed document is that all tags are completely nested. So you can have <message>..<to>..</to>..</message>, but never
<message>..<to>..</message>..</to>. A complete list of requirements is contained in the list of XML Frequently Asked Questions (FAQ) at
25
26
UNDERSTANDING XML
http://www.ucc.ie/xml/#FAQ-VALIDWF. (This FAQ is on the w3c “Recommended
Reading” list at http://www.w3.org/XML/.)
Sometimes, though, it makes sense to have a tag that stands by itself. For example, you might want to add a “flag” tag that marks message as important. A tag
like that doesn’t enclose any content, so it’s known as an “empty tag”. You can
create an empty tag by ending it with /> instead of >. For example, the following
message contains such a tag:
<message to="[email protected]" from="[email protected]"
subject="XML Is Really Cool">
<flag/>
<text>
How many ways is XML cool? Let me count the ways...
</text>
</message>
Note: The empty tag saves you from having to code <flag></flag> in order to have
a well-formed document. You can control which tags are allowed to be empty by
creating a Document Type Definition, or DTD. We’ll talk about that in a few
moments. If there is no DTD, then the document can contain any kinds of tags you
want, as long as the document is well-formed.
Comments in XML Files
XML comments look just like HTML comments:
<message to="[email protected]" from="[email protected]"
subject="XML Is Really Cool">
<!-- This is a comment -->
<text>
How many ways is XML cool? Let me count the ways...
</text>
</message>
WHAT IS XML?
The XML Prolog
To complete this journeyman’s introduction to XML, note that an XML file
always starts with a prolog. The minimal prolog contains a declaration that identifies the document as an XML document, like this:
<?xml version="1.0"?>
The declaration may also contain additional information, like this:
<?xml version="1.0" encoding="ISO-8859-1" standalone="yes"?>
The XML declaration is essentially the same as the HTML header, <html>,
except that it uses <?..?> and it may contain the following attributes:
version
Identifies the version of the XML markup language used in the data. This
attribute is not optional.
encoding
Identifies the character set used to encode the data. “ISO-8859-1” is “Latin1” the Western European and English language character set. (The default is
compressed Unicode: UTF-8.)
standalone
Tells whether or not this document references an external entity or an external data type specification (see below). If there are no external references,
then “yes” is appropriate
The prolog can also contain definitions of entities (items that are inserted when
you reference them from within the document) and specifications that tell which
tags are valid in the document, both declared in a Document Type Definition
(DTD) that can be defined directly within the prolog, as well as with pointers to
external specification files. But those are the subject of later tutorials. For more
information on these and many other aspects of XML, see the Recommended
Reading list of the w3c XML page at http://www.w3.org/XML/.
Note: The declaration is actually optional. But it’s a good idea to include it whenever you create an XML file. The declaration should have the version number, at a
minimum, and ideally the encoding as well. That standard simplifies things if the
XML standard is extended in the future, and if the data ever needs to be localized
for different geographical regions.
Everything that comes after the XML prolog constitutes the document’s content.
27
28
UNDERSTANDING XML
Processing Instructions
An XML file can also contain processing instructions that give commands or
information to an application that is processing the XML data. Processing
instructions have the following format:
<?target instructions?>
where the target is the name of the application that is expected to do the processing, and instructions is a string of characters that embodies the information or
commands for the application to process.
Since the instructions are application specific, an XML file could have multiple
processing instructions that tell different applications to do similar things,
though in different ways. The XML file for a slideshow, for example, could have
processing instructions that let the speaker specify a technical or executive-level
version of the presentation. If multiple presentation programs were used, the program might need multiple versions of the processing instructions (although it
would be nicer if such applications recognized standard instructions).
Note: The target name “xml” (in any combination of upper or lowercase letters) is
reserved for XML standards. In one sense, the declaration is a processing instruction that fits that standard. (However, when you’re working with the parser later,
you’ll see that the method for handling processing instructions never sees the declaration.)
Why Is XML Important?
There are a number of reasons for XML’s surging acceptance. This section lists a
few of the most prominent.
Plain Text
Since XML is not a binary format, you can create and edit files with anything
from a standard text editor to a visual development environment. That makes it
easy to debug your programs, and makes it useful for storing small amounts of
data. At the other end of the spectrum, an XML front end to a database makes it
possible to efficiently store large amounts of XML data as well. So XML provides scalability for anything from small configuration files to a company-wide
data repository.
WHY IS XML IMPORTANT?
Data Identification
XML tells you what kind of data you have, not how to display it. Because the
markup tags identify the information and break up the data into parts, an email
program can process it, a search program can look for messages sent to particular people, and an address book can extract the address information from the rest
of the message. In short, because the different parts of the information have been
identified, they can be used in different ways by different applications.
Stylability
When display is important, the stylesheet standard, XSL (page 37), lets you dictate how to portray the data. For example, the stylesheet for:
<to>[email protected]</to>
can say:
1. Start a new line.
2. Display “To:” in bold, followed by a space
3. Display the destination data.
Which produces:
To: you@yourAddress
Of course, you could have done the same thing in HTML, but you wouldn’t be
able to process the data with search programs and address-extraction programs
and the like. More importantly, since XML is inherently style-free, you can use a
completely different stylesheet to produce output in postscript, TEX, PDF, or
some new format that hasn’t even been invented yet. That flexibility amounts to
what one author described as “future-proofing” your information. The XML
documents you author today can be used in future document-delivery systems
that haven’t even been imagined yet.
Inline Reusability
One of the nicer aspects of XML documents is that they can be composed from
separate entities. You can do that with HTML, but only by linking to other documents. Unlike HTML, XML entities can be included “in line” in a document.
The included sections look like a normal part of the document—you can search
29
30
UNDERSTANDING XML
the whole document at one time or download it in one piece. That lets you modularize your documents without resorting to links. You can single-source a section so that an edit to it is reflected everywhere the section is used, and yet a
document composed from such pieces looks for all the world like a one-piece
document.
Linkability
Thanks to HTML, the ability to define links between documents is now regarded
as a necessity. The next section of this tutorial, XML and Related Specs: Digesting the Alphabet Soup (page 33), discusses the link-specification initiative. This
initiative lets you define two-way links, multiple-target links, “expanding” links
(where clicking a link causes the targeted information to appear inline), and links
between two existing documents that are defined in a third.
Easily Processed
As mentioned earlier, regular and consistent notation makes it easier to build a
program to process XML data. For example, in HTML a <dt> tag can be delimited by </dt>, another <dt>, <dd>, or </dl>. That makes for some difficult programming. But in XML, the <dt> tag must always have a </dt> terminator, or
else it will be defined as a <dt/> tag. That restriction is a critical part of the constraints that make an XML document well-formed. (Otherwise, the XML parser
won’t be able to read the data.) And since XML is a vendor-neutral standard, you
can choose among several XML parsers, any one of which takes the work out of
processing XML data.
Hierarchical
Finally, XML documents benefit from their hierarchical structure. Hierarchical
document structures are, in general, faster to access because you can drill down
to the part you need, like stepping through a table of contents. They are also easier to rearrange, because each piece is delimited. In a document, for example,
you could move a heading to a new location and drag everything under it along
with the heading, instead of having to page down to make a selection, cut, and
then paste the selection into a new location.
HOW CAN YOU USE XML?
How Can You Use XML?
There are several basic ways to make use of XML:
• Traditional data processing, where XML encodes the data for a program to
process
• Document-driven programming, where XML documents are containers
that build interfaces and applications from existing components
• Archiving—the foundation for document-driven programming, where the
customized version of a component is saved (archived) so it can be used
later
• Binding, where the DTD or schema that defines an XML data structure is
used to automatically generate a significant portion of the application that
will eventually process that data
Traditional Data Processing
XML is fast becoming the data representation of choice for the Web. It’s terrific
when used in conjunction with network-centric Java-platform programs that
send and retrieve information. So a client/server application, for example, could
transmit XML-encoded data back and forth between the client and the server.
In the future, XML is potentially the answer for data interchange in all sorts of
transactions, as long as both sides agree on the markup to use. (For example,
should an e-mail program expect to see tags named <FIRST> and <LAST>, or
<FIRSTNAME> and <LASTNAME>) The need for common standards will generate a
lot of industry-specific standardization efforts in the years ahead. In the meantime, mechanisms that let you “translate” the tags in an XML document will be
important. Such mechanisms include projects like the RDF (page 42) initiative,
which defines “meta tags”, and the XSL (page 37) specification, which lets you
translate XML tags into other XML tags.
Document-Driven Programming (DDP)
The newest approach to using XML is to construct a document that describes
how an application page should look. The document, rather than simply being
displayed, consists of references to user interface components and business-logic
components that are “hooked together” to create an application on the fly.
Of course, it makes sense to utilize the Java platform for such components. Both
Java BeansTM for interfaces and Enterprise Java BeansTM for business logic can
31
32
UNDERSTANDING XML
be used to construct such applications. Although none of the efforts undertaken
so far are ready for commercial use, much preliminary work has already been
done.
Note: The Java programming language is also excellent for writing XML-processing tools that are as portable as XML. Several Visual XML editors have been written for the Java platform. For a listing of editors, processing tools, and other XML
resources, see the “Software” section of Robin Cover’s SGML/XML Web Page at
http://www.oasis-open.org/cover/.
Binding
Once you have defined the structure of XML data using either a DTD or the one
of the schema standards, a large part of the processing you need to do has
already been defined. For example, if the schema says that the text data in a
<date> element must follow one of the recognized date formats, then one aspect
of the validation criteria for the data has been defined—it only remains to write
the code. Although a DTD specification cannot go the same level of detail, a
DTD (like a schema) provides a grammar that tells which data structures can
occur, in what sequences. That specification tells you how to write the high-level
code that processes the data elements.
But when the data structure (and possibly format) is fully specified, the code you
need to process it can just as easily be generated automatically. That process is
known as binding—creating classes that recognize and process different data
elements by processing the specification that defines those elements. As time
goes on, you should find that you are using the data specification to generate significant chunks of code, so you can focus on the programming that is unique to
your application.
Archiving
The Holy Grail of programming is the construction of reusable, modular components. Ideally, you’d like to take them off the shelf, customize them, and plug
them together to construct an application, with a bare minimum of additional
coding and additional compilation.
The basic mechanism for saving information is called archiving. You archive a
component by writing it to an output stream in a form that you can reuse later.
You can then read it in and instantiate it using its saved parameters. (For exam-
XML AND RELATED SPECS: DIGESTING THE ALPHABET SOUP
ple, if you saved a table component, its parameters might be the number of rows
and columns to display.) Archived components can also be shuffled around the
Web and used in a variety of ways.
When components are archived in binary form, however, there are some limitations on the kinds of changes you can make to the underlying classes if you want
to retain compatibility with previously saved versions. If you could modify the
archived version to reflect the change, that would solve the problem. But that’s
hard to do with a binary object. Such considerations have prompted a number of
investigations into using XML for archiving. But if an object’s state were
archived in text form using XML, then anything and everything in it could be
changed as easily as you can say, “search and replace”.
XML’s text-based format could also make it easier to transfer objects between
applications written in different languages. For all of these reasons, XML-based
archiving is likely to become an important force in the not-too-distant future.
Summary
XML is pretty simple, and very flexible. It has many uses yet to be discovered—
we are just beginning to scratch the surface of its potential. It is the foundation
for a great many standards yet to come, providing a common language that different computer systems can use to exchange data with one another. As each
industry-group comes up with standards for what they want to say, computers
will begin to link to each other in ways previously unimaginable.
For more information on the background and motivation of XML, see this great
article in Scientific American at
http://www.sciam.com/1999/0599issue/0599bosak.html
XML and Related Specs: Digesting the
Alphabet Soup
Now that you have a basic understanding of XML, it makes sense to get a highlevel overview of the various XML-related acronyms and what they mean. There
is a lot of work going on around XML, so there is a lot to learn.
The current APIs for accessing XML documents either serially or in random
access mode are, respectively, SAX (page 35) and DOM (page 35). The specifications for ensuring the validity of XML documents are DTD (page 36) (the
33
34
UNDERSTANDING XML
original mechanism, defined as part of the XML specification) and various
Schema Standards (page 38) proposals (newer mechanisms that use XML syntax
to do the job of describing validation criteria).
Other future standards that are nearing completion include the XSL (page 37)
standard—a mechanism for setting up translations of XML documents (for
example to HTML or other XML) and for dictating how the document is rendered. The transformation part of that standard, XSLT (+XPATH) (page 37), is
completed and covered in this tutorial. Another effort nearing completion is the
XML Link Language specification (XML Linking, page 40), which enables
links between XML documents.
Those are the major initiatives you will want to be familiar with. This section
also surveys a number of other interesting proposals, including the HTMLlookalike standard, XHTML (page 41), and the meta-standard for describing the
information an XML document contains, RDF (page 42). There are also standards efforts that extend XML’s capabilities, such as XLink and XPointer.
Finally, there are a number of interesting standards and standards-proposals that
build on XML, including Synchronized Multimedia Integration Language
(SMIL, page 43), Mathematical Markup Language (MathML, page 43), Scalable Vector Graphics (SVG, page 43), and DrawML (page 44), as well as a number of eCommerce standards.
The remainder of this section gives you a more detailed description of these initiatives. To help keep things straight, it’s divided into:
•
•
•
•
•
Basic Standards (page 34)
Schema Standards (page 38)
Linking and Presentation Standards (page 40)
Knowledge Standards (page 42)
Standards That Build on XML (page 43)
Skim the terms once, so you know what’s here, and keep a copy of this document
handy so you can refer to it whenever you see one of these terms in something
you’re reading. Pretty soon, you’ll have them all committed to memory, and
you’ll be at least “conversant” with XML!
Basic Standards
These are the basic standards you need to be familiar with. They come up in
pretty much any discussion of XML.
BASIC STANDARDS
SAX
Simple API for XML
This API was actually a product of collaboration on the XML-DEV mailing list,
rather than a product of the W3C. It’s included here because it has the same
“final” characteristics as a W3C recommendation.
You can also think of this standard as the “serial access” protocol for XML. This
is the fast-to-execute mechanism you would use to read and write XML data in a
server, for example. This is also called an event-driven protocol, because the
technique is to register your handler with a SAX parser, after which the parser
invokes your callback methods whenever it sees a new XML tag (or encounters
an error, or wants to tell you anything else).
DOM
Document Object Model
The Document Object Model protocol converts an XML document into a collection of objects in your program. You can then manipulate the object model in any
way that makes sense. This mechanism is also known as the “random access”
protocol, because you can visit any part of the data at any time. You can then
modify the data, remove it, or insert new data.
JDOM and dom4j
While the Document Object Model (DOM) provides a lot of power for document-oriented processing, it doesn’t provide much in the way of object-oriented
simplification. Java developers who are processing more data-oriented structures—rather than books, articles, and other full-fledged documents—frequently
find that object-oriented APIs like JDOM and dom4j are easier to use and more
suited to their needs.
35
36
UNDERSTANDING XML
Here are the important differences to understand when choosing between the
two:
• JDOM is somewhat cleaner, smaller API. Where “coding style” is an
important consideration, JDOM is a good choice.
• JDOM is a Java Community Process (JCP) initiative. When completed, it
will be an endorsed standard.
• dom4j is a smaller, faster implementation that has been in wide use for a
number of years.
• dom4j is a factory-based implementation. That makes it easier to modify
for complex, special-purpose applications. At the time of this writing,
JDOM does not yet use a factory to instantiate an instance of the parser
(although the standard appears to be headed in that direction). So, with
JDOM, you always get the original parser. (That’s fine for the majority of
applications, but may not be appropriate if your application has special
needs.)
For more information on JDOM, see http://www.jdom.org/.
For more information on dom4j, see http://dom4j.org/.
DTD
Document Type Definition
The DTD specification is actually part of the XML specification, rather than a
separate entity. On the other hand, it is optional—you can write an XML document without it. And there are a number of Schema Standards (page 38) proposals that offer more flexible alternatives. So it is treated here as though it were a
separate specification.
A DTD specifies the kinds of tags that can be included in your XML document,
and the valid arrangements of those tags. You can use the DTD to make sure you
don’t create an invalid XML structure. You can also use it to make sure that the
XML structure you are reading (or that got sent over the net) is indeed valid.
Unfortunately, it is difficult to specify a DTD for a complex document in such a
way that it prevents all invalid combinations and allows all the valid ones. So
constructing a DTD is something of an art. The DTD can exist at the front of the
document, as part of the prolog. It can also exist as a separate entity, or it can be
split between the document prolog and one or more additional entities.
37
BASIC STANDARDS
However, while the DTD mechanism was the first method defined for specifying
valid document structure, it was not the last. Several newer schema specifications have been devised. You’ll learn about those momentarily.
Namespaces
The namespace standard lets you write an XML document that uses two or more
sets of XML tags in modular fashion. Suppose for example that you created an
XML-based parts list that uses XML descriptions of parts supplied by other
manufacturers (online!). The “price” data supplied by the subcomponents would
be amounts you want to total up, while the “price” data for the structure as a
whole would be something you want to display. The namespace specification
defines mechanisms for qualifying the names so as to eliminate ambiguity. That
lets you write programs that use information from other sources and do the right
things with it.
The
latest
information
on
namespaces
http://www.w3.org/TR/REC-xml-names.
can
be
found
at
XSL
Extensible Stylesheet Language
The XML standard specifies how to identify data, not how to display it. HTML,
on the other hand, told how things should be displayed without identifying what
they were. The XSL standard has two parts, XSLT (the transformation standard,
described next) and XSL-FO (the part that covers formatting objects, also known
as flow objects). XSL-FO gives you the ability to define multiple areas on a page
and then link them together. When a text stream is directed at the collection, it
fills the first area and then “flows” into the second when the first area is filled.
Such objects are used by newsletters, catalogs, and periodical publications.
The latest W3C work on XSL is at http://www.w3.org/TR/WD-xsl.
XSLT (+XPATH)
Extensible Stylesheet Language for Transformations
The XSLT transformation standard is essentially a translation mechanism that
lets you specify what to convert an XML tag into so that it can be displayed—for
example, in HTML. Different XSL formats can then be used to display the same
data in different ways, for different uses. (The XPATH standard is an addressing
38
UNDERSTANDING XML
mechanism that you use when constructing transformation instructions, in order
to specify the parts of the XML structure you want to transform.)
Schema Standards
A DTD makes it possible to validate the structure of relatively simple XML documents, but that’s as far as it goes.
A DTD can’t restrict the content of elements, and it can’t specify complex relationships. For example, it is impossible to specify with a DTD that a <heading>
for a <book> must have both a <title> and an <author>, while a <heading> for a
<chapter> only needs a <title>. In a DTD, once you only get to specify the structure of the <heading> element one time. There is no context-sensitivity.
This issue stems from the fact that a DTD specification is not hierarchical. For a
mailing address that contained several “parsed character data” (PCDATA) elements, for example, the DTD might look something like this:
<!ELEMENT
<!ELEMENT
<!ELEMENT
<!ELEMENT
mailAddress (name, address, zipcode)>
name (#PCDATA)>
address (#PCDATA)>
zipcode (#PCDATA)>
As you can see, the specifications are linear. That fact forces you to come up
with new names for similar elements in different settings. So if you wanted to
add another “name” element to the DTD that contained the <firstname>, <middleInitial>, and <lastName>, then you would have to come up with another identifier. You could not simply call it “name” without conflicting with the <name>
element defined for use in a <mailAddress>.
Another problem with the non hierarchical nature of DTD specifications is that it
is not clear what comments are meant to explain. A comment at the top like <!- Address used for mailing via the postal system --> would apply to
all of the elements that constitute a mailing address. But a comment like <!-Addressee --> would apply to the name element only. On the other hand, a
comment like <!-- A 5-digit string --> would apply specifically to the
#PCDATA part of the zipcode element, to describe the valid formats. Finally,
DTDs do not allow you to formally specify field-validation criteria, such as the
5-digit (or 5 and 4) limitation for the zipcode field.
Finally, a DTD uses syntax which substantially different from XML, so it can’t
be processed with a standard XML parser. That means you can’t read a DTD into
a DOM, for example, modify it, and then write it back out again.
SCHEMA STANDARDS
To remedy these shortcomings, a number of proposals have been made for a
more database-like, hierarchical “schema” that specifies validation criteria. The
major proposals are shown below.
XML Schema
A large, complex standard that has two parts. One part specifies structure relationships. (This is the largest and most complex part.) The other part specifies
mechanisms for validating the content of XML elements by specifying a (potentially very sophisticated) datatype for each element. The good news is that XML
Schema for Structures lets you specify any kind of relationship you can conceive
of. The bad news is that it takes a lot of work to implement, and it takes a bit of
learning to use. Most of the alternatives provide for simpler structure definitions,
while incorporating the XML Schema datatype standard.
For more information on the XML Schema, see the W3C specs XML Schema
(Structures) and XML Schema (Datatypes), as well as other information accessible at http://www.w3c.org/XML/Schema.
RELAX NG
Regular Language description for XML
Simpler than XML Structure Schema, is an emerging standard under the auspices of OASIS (Organization for the Advancement of Structured Information
Systems). RELAX NG use regular expression patterns to express constraints on
structure relationships, and it is designed to work with the XML Schema
datatyping mechanism to express content constraints. This standard also uses
XML syntax, and it includes a DTD to RELAX converter. (“NG” stands for
“Next Generation”. It’s a newer version of the RELAX schema mechanism that
integrates TREX.)
For more information on RELAX NG, see http://www.oasis-open.org/committees/relax-ng/
TREX
Tree Regular Expressions for XML
A means of expressing validation criteria by describing a pattern for the structure and content of an XML document. Now part of the RELAX NG specification.
39
40
UNDERSTANDING XML
For more information on TREX, see http://www.thaiopensource.com/trex/.
SOX
Schema for Object-oriented XML
SOX is a schema proposal that includes extensible data types, namespaces, and
embedded documentation.
For more information on SOX, see http://www.w3.org/TR/NOTE-SOX.
Schematron
Schema for Object-oriented XML
An assertion-based schema mechanism that allows for sophisticated validation.
For more information on the Schematron validation mechanism, see
http://www.ascc.net/xml/resource/schematron/schematron.html.
Linking and Presentation Standards
Arguably the two greatest benefits provided by HTML were the ability to link
between documents, and the ability to create simple formatted documents (and,
eventually, very complex formatted documents). The following standards aim at
preserving the benefits of HTML in the XML arena, and to adding additional
functionality, as well.
XML Linking
These specifications provide a variety of powerful linking mechanisms, and are
sure to have a big impact on how XML documents are used.
XLink
The XLink protocol is a specification for handling links between XML documents. This specification allows for some pretty sophisticated linking,
including two-way links, links to multiple documents, “expanding” links
that insert the linked information into your document rather than replacing
your document with a new page, links between two documents that are created in a third, independent document, and indirect links (so you can point to
LINKING AND PRESENTATION STANDARDS
an “address book” rather than directly to the target document—updating the
address book then automatically changes any links that use it).
XML Base
This standard defines an attribute for XML documents that defines a “base”
address, that is used when evaluating a relative address specified in the document. (So, for example, a simple file name would be found in the baseaddress directory.)
XPointer
In general, the XLink specification targets a document or document-segment
using its ID. The XPointer specification defines mechanisms for “addressing
into the internal structures of XML documents”, without requiring the
author of the document to have defined an ID for that segment. To quote the
spec, it provides for “reference to elements, character strings, and other parts
of XML documents, whether or not they bear an explicit ID attribute”.
For more information on the XML Linking standards, see
http://www.w3.org/XML/Linking.
XHTML
The XHTML specification is a way of making XML documents that look and act
like HTML documents. Since an XML document can contain any tags you care
to define, why not define a set of tags that look like HTML? That’s the thinking
behind the XHTML specification, at any rate. The result of this specification is a
document that can be displayed in browsers and also treated as XML data. The
data may not be quite as identifiable as “pure” XML, but it will be a heck of a lot
easier to manipulate than standard HTML, because XML specifies a good deal
more regularity and consistency.
For example, every tag in a well-formed XML document must either have an
end-tag associated with it or it must end in />. So you might see <p>...</p>, or
you might see <p/>, but you will never see <p> standing by itself. The upshot of
that requirement is that you never have to program for the weird kinds of cases
you see in HTML where, for example, a <dt> tag might be terminated by </DT>,
by another <DT>, by <dd>, or by </dl>. That makes it a lot easier to write code!
The XHTML specification is a reformulation of HTML 4.0 into XML. The latest
information is at http://www.w3.org/TR/xhtml1.
41
42
UNDERSTANDING XML
Knowledge Standards
When you start looking down the road five or six years, and visualize how the
information on the Web will begin to turn into one huge knowledge base (the
“semantic Web”). For the latest on the semantic Web, visit
http://www.w3.org/2001/sw/.
In the meantime, here are the fundamental standards you’ll want to know about:
RDF
Resource Description Framework
RDF is a standard for defining meta data—information that describes what a particular data item is, and specifies how it can be used. Used in conjunction with
the XHTML specification, for example, or with HTML pages, RDF could be
used to describe the content of the pages. For example, if your browser stored
your ID information as FIRSTNAME, LASTNAME, and EMAIL, an RDF description
could make it possible to transfer data to an application that wanted NAME and
EMAILADDRESS. Just think: One day you may not need to type your name and
address at every Web site you visit!
For the latest information on RDF, see http://www.w3.org/TR/REC-rdf-syntax.
RDF Schema
RDF Schema allows the specification of consistency rules and additional information that describe how the statements in a Resource Description Framework
(RDF) should be interpreted.
For
more
information
on
the
RDF
Schema
recommendation,
see
http://www.w3.org/TR/rdf-schema.
XTM
XML Topic Maps
In many ways a simpler, more readily usable knowledge-representation than
RDF, the topic maps standard is one worth watching. So far, RDF is the W3C
standard for knowledge representation, but topic maps could possibly become
the “developer’s choice” among knowledge representation standards.
STANDARDS THAT BUILD ON XML
For
more
information
on
maps.org/xtm/index.html. For
http://www.topicmaps.org/.
XML Topic Maps, http://www.topicinformation on topic maps and the Web, see
Standards That Build on XML
The following standards and proposals build on XML. Since XML is basically a
language-definition tool, these specifications use it to define standardized languages for specialized purposes.
Extended Document Standards
These standards define mechanisms for producing extremely complex documents—books, journals, magazines, and the like—using XML.
SMIL
Synchronized Multimedia Integration Language
SMIL is a W3C recommendation that covers audio, video, and animations. It
also addresses the difficult issue of synchronizing the playback of such elements.
For more information on SMIL, see http://www.w3.org/TR/REC-smil.
MathML
Mathematical Markup Language
MathML is a W3C recommendation that deals with the representation of mathematical formulas.
For more information on MathML, see http://www.w3.org/TR/REC-MathML.
SVG
Scalable Vector Graphics
SVG is a W3C working draft that covers the representation of vector graphic
images. (Vector graphic images that are built from commands that say things like
“draw a line (square, circle) from point xi to point m,n” rather than encoding the
image as a series of bits. Such images are more easily scalable, although they
typically require more processing time to render.)
For more information on SVG, see http://www.w3.org/TR/WD-SVG.
43
44
UNDERSTANDING XML
DrawML
Drawing Meta Language
DrawML is a W3C note that covers 2D images for technical illustrations. It also
addresses the problem of updating and refining such images.
For more information on DrawML, see http://www.w3.org/TR/NOTE-drawml.
eCommerce Standards
These standards are aimed at using XML in the world of business-to-business
(B2B) and business-to-consumer (B2C) commerce.
ICE
Information and Content Exchange
ICE is a protocol for use by content syndicators and their subscribers. It focuses
on “automating content exchange and reuse, both in traditional publishing contexts and in business-to-business relationships”.
For more information on ICE, see http://www.w3.org/TR/NOTE-ice.
ebXML
Electronic Business with XML
This standard aims at creating a modular electronic business framework using
XML. It is the product of a joint initiative by the United Nations (UN/CEFACT)
and the Organization for the Advancement of Structured Information Systems
(OASIS).
For more information on ebXML, see http://www.ebxml.org/.
cxml
Commerce XML
cxml is a RosettaNet (www.rosettanet.org) standard for setting up interactive
online catalogs for different buyers, where the pricing and product offerings are
company specific. Includes mechanisms to handle purchase orders, change
orders, status updates, and shipping notifications.
For more information on cxml, see http://www.cxml.org/
SUMMARY
CBL
Common Business Library
CBL is a library of element and attribute definitions maintained by CommerceNet (www.commerce.net).
For more information on CBL and a variety of other initiatives that work
together to enable eCommerce applications, see http://www.commerce.net/projects/currentprojects/eco/wg/eCo_Framework_Specifications.html.
UBL
Universal Business Language
An OASIS initiative aimed at compiling a standard library of XML business
documents (purchase orders, invoices, etc.) that are defined with XML Schema
definitions.
For more information on UBL, see http://www.oasis-open.org/committees/ubl.
Summary
XML is becoming a widely-adopted standard that is being used in a dizzying
variety of application areas.
Generating XML Data
This section also takes you step by step through the process of constructing an
XML document. Along the way, you’ll gain experience with the XML components you’ll typically use to create your data structures.
Writing a Simple XML File
You’ll start by writing the kind of XML data you could use for a slide presentation. In this exercise, you’ll use your text editor to create the data in order to
become comfortable with the basic format of an XML file. You’ll be using this
file and extending it in later exercises.
45
46
UNDERSTANDING XML
Creating the File
Using a standard text editor, create a file called slideSample.xml.
Note: Here is a version of it that already exists: slideSample01.xml. (The browsable version is slideSample01-xml.html.) You can use this version to compare
your work, or just review it as you read this guide.
Writing the Declaration
Next, write the declaration, which identifies the file as an XML document. The
declaration starts with the characters “<?”, which is the standard XML identifier
for a processing instruction. (You’ll see other processing instructions later on in
this tutorial.)
<?xml version='1.0' encoding='utf-8'?>
This line identifies the document as an XML document that conforms to version
1.0 of the XML specification, and says that it uses the 8-bit Unicode characterencoding scheme. (For information on encoding schemes, see Java Encoding
Schemes (page 811).)
Since the document has not been specified as “standalone”, the parser assumes
that it may contain references to other documents. To see how to specify a document as “standalone”, see The XML Prolog (page 27).
Adding a Comment
Comments are ignored by XML parsers. A program will never see them in fact,
unless you activate special settings in the parser. Add the text highlighted below
to put a comment into the file.
<?xml version='1.0' encoding='utf-8'?>
<!-- A SAMPLE set of slides -->
Defining the Root Element
After the declaration, every XML file defines exactly one element, known as the
root element. Any other elements in the file are contained within that element.
DEFINING THE ROOT ELEMENT
Enter the text highlighted below to define the root element for this file, slideshow:
<?xml version='1.0' encoding='utf-8'?>
<!-- A SAMPLE set of slides -->
<slideshow>
</slideshow>
Note: XML element names are case-sensitive. The end-tag must exactly match the
start-tag.
Adding Attributes to an Element
A slide presentation has a number of associated data items, none of which
require any structure. So it is natural to define them as attributes of the slideshow element. Add the text highlighted below to set up some attributes:
...
<slideshow
title="Sample Slide Show"
date="Date of publication"
author="Yours Truly"
>
</slideshow>
When you create a name for a tag or an attribute, you can use hyphens (“-”),
underscores (“_”), colons (“:”), and periods (“.”) in addition to characters and
numbers. Unlike HTML, values for XML attributes are always in quotation
marks, and multiple attributes are never separated by commas.
Note: Colons should be used with care or avoided altogether, because they are used
when defining the namespace for an XML document.
47
48
UNDERSTANDING XML
Adding Nested Elements
XML allows for hierarchically structured data, which means that an element can
contain other elements. Add the text highlighted below to define a slide element
and a title element contained within it:
<slideshow
...
>
<!-- TITLE SLIDE -->
<slide type="all">
<title>Wake up to WonderWidgets!</title>
</slide>
</slideshow>
Here you have also added a type attribute to the slide. The idea of this attribute
is that slides could be earmarked for a mostly technical or mostly executive audience with type="tech" or type="exec", or identified as suitable for both with
type="all".
More importantly, though, this example illustrates the difference between things
that are more usefully defined as elements (the title element) and things that
are more suitable as attributes (the type attribute). The visibility heuristic is primarily at work here. The title is something the audience will see. So it is an element. The type, on the other hand, is something that never gets presented, so it is
an attribute. Another way to think about that distinction is that an element is a
container, like a bottle. The type is a characteristic of the container (is it tall or
short, wide or narrow). The title is a characteristic of the contents (water, milk, or
tea). These are not hard and fast rules, of course, but they can help when you
design your own XML structures.
Adding HTML-Style Text
Since XML lets you define any tags you want, it makes sense to define a set of
tags that look like HTML. The XHTML standard does exactly that, in fact.
You’ll see more about that towards the end of the SAX tutorial. For now, type the
DEFINING THE ROOT ELEMENT
text highlighted below to define a slide with a couple of list item entries that use
an HTML-style <em> tag for emphasis (usually rendered as italicized text):
...
<!-- TITLE SLIDE -->
<slide type="all">
<title>Wake up to WonderWidgets!</title>
</slide>
<!-- OVERVIEW -->
<slide type="all">
<title>Overview</title>
<item>Why <em>WonderWidgets</em> are great</item>
<item>Who <em>buys</em> WonderWidgets</item>
</slide>
</slideshow>
Note that defining a title element conflicts with the XHTML element that uses
the same name. We’ll discuss the mechanism that produces the conflict (the
DTD), along with possible solutions, later on in this tutorial.
Adding an Empty Element
One major difference between HTML and XML, though, is that all XML must
be well-formed — which means that every tag must have an ending tag or be an
empty tag. You’re getting pretty comfortable with ending tags, by now. Add the
text highlighted below to define an empty list item element with no contents:
...
<!-- OVERVIEW -->
<slide type="all">
<title>Overview</title>
<item>Why <em>WonderWidgets</em> are great</item>
<item/>
<item>Who <em>buys</em> WonderWidgets</item>
</slide>
</slideshow>
Note that any element can be empty element. All it takes is ending the tag with
“/>” instead of “>”. You could do the same thing by entering <item></item>,
which is equivalent.
49
50
UNDERSTANDING XML
Note: Another factor that makes an XML file well-formed is proper nesting. So
<b><i>some_text</i></b> is well-formed, because the <i>...</i> sequence is
completely nested within the <b>..</b> tag. This sequence, on the other hand, is
not well-formed: <b><i>some_text</b></i>.
The Finished Product
Here is the completed version of the XML file:
<?xml version='1.0' encoding='utf-8'?>
<!--
A SAMPLE set of slides
-->
<slideshow
title="Sample Slide Show"
date="Date of publication"
author="Yours Truly"
>
<!-- TITLE SLIDE -->
<slide type="all">
<title>Wake up to WonderWidgets!</title>
</slide>
<!-- OVERVIEW -->
<slide type="all">
<title>Overview</title>
<item>Why <em>WonderWidgets</em> are great</item>
<item/>
<item>Who <em>buys</em> WonderWidgets</item>
</slide
</slideshow>
Save a copy of this file as slideSample01.xml, so you can use it as the initial
data structure when experimenting with XML programming operations.
Writing Processing Instructions
It sometimes makes sense to code application-specific processing instructions in
the XML data. In this exercise, you’ll add a processing instruction to your
slideSample.xml file.
WRITING PROCESSING INSTRUCTIONS
Note: The file you’ll create in this section is slideSample02.xml. (The browsable
version is slideSample02-xml.html.)
As you saw in Processing Instructions (page 28), the format for a processing
instruction is <?target data?>, where “target” is the target application that is
expected to do the processing, and “data” is the instruction or information for it
to process. Add the text highlighted below to add a processing instruction for a
mythical slide presentation program that will query the user to find out which
slides to display (technical, executive-level, or all):
<slideshow
...
>
<!-- PROCESSING INSTRUCTION -->
<?my.presentation.Program QUERY="exec, tech, all"?>
<!-- TITLE SLIDE -->
Notes:
• The “data” portion of the processing instruction can contain spaces, or may
even be null. But there cannot be any space between the initial <? and the
target identifier.
• The data begins after the first space.
• Fully qualifying the target with the complete Web-unique package prefix
makes sense, so as to preclude any conflict with other programs that might
process the same data.
• For readability, it seems like a good idea to include a colon (:) after the
name of the application, like this:
<?my.presentation.Program: QUERY="..."?>
The colon makes the target name into a kind of “label” that identifies the
intended recipient of the instruction. However, while the w3c spec allows “:”
in a target name, some versions of IE5 consider it an error. For this tutorial,
then, we avoid using a colon in the target name.
Save a copy of this file as slideSample02.xml, so you can use it when experimenting with processing instructions.
51
52
UNDERSTANDING XML
Introducing an Error
The parser can generate one of three kinds of errors: fatal error, error, and warning. In this exercise, you’ll make a simple modification to the XML file to introduce a fatal error. Then you’ll see how it’s handled in the Echo app.
Note: The XML structure you’ll create in this exercise is in slideSampleBad1.xml.
(The browsable version is slideSampleBad1-xml.html.)
One easy way to introduce a fatal error is to remove the final “/” from the empty
item element to create a tag that does not have a corresponding end tag. That
constitutes a fatal error, because all XML documents must, by definition, be well
formed. Do the following:
1. Copy slideSample02.xml to slideSampleBad1.xml.
2. Edit slideSampleBad1.xml and remove the character shown below:
...
<!-- OVERVIEW -->
<slide type="all">
<title>Overview</title>
<item>Why <em>WonderWidgets</em> are great</item>
<item/>
<item>Who <em>buys</em> WonderWidgets</item>
</slide>
...
to produce:
...
<item>Why <em>WonderWidgets</em> are great</item>
<item>
<item>Who <em>buys</em> WonderWidgets</item>
...
Now you have a file that you can use to generate an error in any
parser, any time. (XML parsers are required to generate a fatal
error for this file, because the lack of an end-tag for the
<item> element means that the XML structure is no longer wellformed.)
SUBSTITUTING AND INSERTING TEXT
Substituting and Inserting Text
In this section, you’ll learn about:
• Handling Special Characters (“<“, “&”, and so on)
• Handling Text with XML-style syntax
Handling Special Characters
In XML, an entity is an XML structure (or plain text) that has a name. Referencing the entity by name causes it to be inserted into the document in place of the
entity reference. To create an entity reference, the entity name is surrounded by
an ampersand and a semicolon, like this:
&entityName;
Later, when you learn how to write a DTD, you’ll see that you can define your
own entities, so that &yourEntityName; expands to all the text you defined for
that entity. For now, though, we’ll focus on the predefined entities and character
references that don’t require any special definitions.
Predefined Entities
An entity reference like & contains a name (in this case, “amp”) between the
start and end delimiters. The text it refers to (&) is substituted for the name, like
a macro in a programming language. Table 2–1 shows the predefined entities for
special characters.
Table 2–1 Predefined Entities
Character
Reference
&
&
<
<
>
>
"
"
'
'
53
54
UNDERSTANDING XML
Character References
A character reference like “ contains a hash mark (#) followed by a number. The number is the Unicode value for a single character, such as 65 for the
letter “A”, 147 for the left-curly quote, or 148 for the right-curly quote. In this
case, the “name” of the entity is the hash mark followed by the digits that identify the character.
Note: XML expects values to be specified in decimal. However, the Unicode charts
at http://www.unicode.org/charts/ specify values in hexadecimal! So you’ll need to
do a conversion to get the right value to insert into your XML data set.
Using an Entity Reference in an XML
Document
Suppose you wanted to insert a line like this in your XML document:
Market Size < predicted
The problem with putting that line into an XML file directly is that when the
parser sees the left-angle bracket (<), it starts looking for a tag name, which
throws off the parse. To get around that problem, you put < in the file, instead
of “<”.
Note: The results of the modifications below are contained in slideSample03.xml.
SUBSTITUTING AND INSERTING TEXT
Add the text highlighted below to your slideSample.xml file, and save a copy
of it for future use as slideSample03.xml:
<!-- OVERVIEW -->
<slide type="all">
<title>Overview</title>
...
</slide>
<slide type="exec">
<title>Financial Forecast</title>
<item>Market Size < predicted</item>
<item>Anticipated Penetration</item>
<item>Expected Revenues</item>
<item>Profit Margin </item>
</slide>
</slideshow>
When you use an XML parser to echo this data, you will see the desired output:
Market Size < predicted
You see an angle bracket (“<“) where you coded “<”, because the XML parser
converts the reference into the entity it represents, and passes that entity to the
application.
Handling Text with XML-Style Syntax
When you are handling large blocks of XML or HTML that include many of the
special characters, it would be inconvenient to replace each of them with the
appropriate entity reference. For those situations, you can use a CDATA section.
Note: The results of the modifications below are contained in slideSample04.xml.
A CDATA section works like <pre>...</pre> in HTML, only more so—all
whitespace in a CDATA section is significant, and characters in it are not interpreted as XML. A CDATA section starts with <![CDATA[ and ends with ]]>.
55
56
UNDERSTANDING XML
Add the text highlighted below to your slideSample.xml file to define a CDATA
section for a fictitious technical slide, and save a copy of the file as
slideSample04.xml:
...
<slide type="tech">
<title>How it Works</title>
<item>First we fozzle the frobmorten</item>
<item>Then we framboze the staten</item>
<item>Finally, we frenzle the fuznaten</item>
<item><![CDATA[Diagram:
frobmorten <--------------- fuznaten
|
<3>^
| <1> | <1> = fozzle
V
| <2> = framboze
Staten--------------------+<3> = frenzle
<2>
]]></item>
</slide>
</slideshow>
When you echo this file with an XML parser, you’ll see the following output:
Diagram:
frobmorten <--------------fuznaten
|
<3>
^
| <1>
|
<1> = fozzle
V
|
<2> = framboze
staten----------------------+
<3> = frenzle
<2>
The point here is that the text in the CDATA section will have arrived as it was
written. Since the parser doesn’t treat the angle brackets as XML, they don’t
generate the fatal errors they would otherwise cause. (Because, if the angle
brackets weren’t in a CDATA section, the document would not be well-formed.)
Creating a Document Type Definition
(DTD)
After the XML declaration, the document prolog can include a DTD, which lets
you specify the kinds of tags that can be included in your XML document. In
addition to telling a validating parser which tags are valid, and in what arrangements, a DTD tells both validating and nonvalidating parsers where text is
57
CREATING A DOCUMENT TYPE DEFINITION (DTD)
expected, which lets the parser determine whether the whitespace it sees is significant or ignorable.
Basic DTD Definitions
To begin learning about DTD definitions, let’s start by telling the parser where
text is expected and where any text (other than whitespace) would be an error.
(Whitespace in such locations is ignorable.)
Note: The DTD defined in this section is contained in
browsable version is slideshow1a-dtd.html.)
slideshow1a.dtd.
(The
Start by creating a file named slideshow.dtd. Enter an XML declaration and a
comment to identify the file, as shown below:
<?xml version='1.0' encoding='utf-8'?>
<!-DTD for a simple "slide show".
-->
Next, add the text highlighted below to specify that a slideshow element contains slide elements and nothing else:
<!-- DTD for a simple "slide show". -->
<!ELEMENT slideshow (slide+)>
As you can see, the DTD tag starts with <! followed by the tag name (ELEMENT).
After the tag name comes the name of the element that is being defined (slideshow) and, in parentheses, one or more items that indicate the valid contents for
that element. In this case, the notation says that a slideshow consists of one or
more slide elements.
58
UNDERSTANDING XML
Without the plus sign, the definition would be saying that a slideshow consists
of a single slide element. The qualifiers you can add to an element definition
are listed in Table 2–2.
Table 2–2 DTD Element Qualifiers
Qualifier
?
*
+
Name
Meaning
Question Mark
Optional (zero or one)
Asterisk
Zero or more
Plus Sign
One or more
You can include multiple elements inside the parentheses in a comma separated
list, and use a qualifier on each element to indicate how many instances of that
element may occur. The comma-separated list tells which elements are valid and
the order they can occur in.
You can also nest parentheses to group multiple items. For an example, after
defining an image element (coming up shortly), you could declare that every
image element must be paired with a title element in a slide by specifying
((image, title)+). Here, the plus sign applies to the image/title pair to
indicate that one or more pairs of the specified items can occur.
Defining Text and Nested Elements
Now that you have told the parser something about where not to expect text, let’s
see how to tell it where text can occur. Add the text highlighted below to define
the slide, title, item, and list elements:
<!ELEMENT
<!ELEMENT
<!ELEMENT
<!ELEMENT
slideshow (slide+)>
slide (title, item*)>
title (#PCDATA)>
item (#PCDATA | item)* >
The first line you added says that a slide consists of a title followed by zero or
more item elements. Nothing new there. The next line says that a title consists
entirely of parsed character data (PCDATA). That’s known as “text” in most parts
of the country, but in XML-speak it’s called “parsed character data”. (That distinguishes it from CDATA sections, which contain character data that is not
CREATING A DOCUMENT TYPE DEFINITION (DTD)
parsed.) The “#” that precedes PCDATA indicates that what follows is a special
word, rather than an element name.
The last line introduces the vertical bar (|), which indicates an or condition. In
this case, either PCDATA or an item can occur. The asterisk at the end says that
either one can occur zero or more times in succession. The result of this specification is known as a mixed-content model, because any number of item elements
can be interspersed with the text. Such models must always be defined with
#PCDATA specified first, some number of alternate items divided by vertical bars
(|), and an asterisk (*) at the end.
Save a copy of this DTD as slideSample1a.dtd, for use when experimenting with
basic DTD processing.
Limitations of DTDs
It would be nice if we could specify that an item contains either text, or text followed by one or more list items. But that kind of specification turns out to be
hard to achieve in a DTD. For example, you might be tempted to define an item
like this:
<!ELEMENT item (#PCDATA | (#PCDATA, item+)) >
That would certainly be accurate, but as soon as the parser sees #PCDATA and
the vertical bar, it requires the remaining definition to conform to the mixed-content model. This specification doesn’t, so you get can error that says: Illegal
mixed content model for 'item'. Found ( ..., where the hex character 28 is the angle bracket the ends the definition.
Trying to double-define the item element doesn’t work, either. A specification
like this:
<!ELEMENT item (#PCDATA) >
<!ELEMENT item (#PCDATA, item+) >
produces a “duplicate definition” warning when the validating parser runs. The
second definition is, in fact, ignored. So it seems that defining a mixed content
model (which allows item elements to be interspersed in text) is about as good
as we can do.
In addition to the limitations of the mixed content model mentioned above, there
is no way to further qualify the kind of text that can occur where PCDATA has
59
60
UNDERSTANDING XML
been specified. Should it contain only numbers? Should be in a date format, or
possibly a monetary format? There is no way to say in the context of a DTD.
Finally, note that the DTD offers no sense of hierarchy. The definition for the
title element applies equally to a slide title and to an item title. When we
expand the DTD to allow HTML-style markup in addition to plain text, it would
make sense to restrict the size of an item title compared to a slide title, for
example. But the only way to do that would be to give one of them a different
name, such as “item-title”. The bottom line is that the lack of hierarchy in the
DTD forces you to introduce a “hyphenation hierarchy” (or its equivalent) in
your namespace. All of these limitations are fundamental motivations behind the
development of schema-specification standards.
Special Element Values in the DTD
Rather than specifying a parenthesized list of elements, the element definition
could use one of two special values: ANY or EMPTY. The ANY specification says
that the element may contain any other defined element, or PCDATA. Such a specification is usually used for the root element of a general-purpose XML document such as you might create with a word processor. Textual elements could
occur in any order in such a document, so specifying ANY makes sense.
The EMPTY specification says that the element contains no contents. So the DTD
for e-mail messages that let you “flag” the message with <flag/> might have a
line like this in the DTD:
<!ELEMENT flag EMPTY>
Referencing the DTD
In this case, the DTD definition is in a separate file from the XML document.
That means you have to reference it from the XML document, which makes the
DTD file part of the external subset of the full Document Type Definition (DTD)
for the XML file. As you’ll see later on, you can also include parts of the DTD
within the document. Such definitions constitute the local subset of the DTD.
Note: The XML written in this section is contained in
browsable version is slideSample05-xml.html.)
slideSample05.xml.
(The
CREATING A DOCUMENT TYPE DEFINITION (DTD)
To reference the DTD file you just created, add the line highlighted below to
your slideSample.xml file, and save a copy of the file as slideSample05.xml:
<!--
A SAMPLE set of slides
-->
<!DOCTYPE slideshow SYSTEM "slideshow.dtd">
<slideshow
Again, the DTD tag starts with “<!”. In this case, the tag name, DOCTYPE, says
that the document is a slideshow, which means that the document consists of
the slideshow element and everything within it:
<slideshow>
...
</slideshow>
This tag defines the slideshow element as the root element for the document.
An XML document must have exactly one root element. This is where that element is specified. In other words, this tag identifies the document content as a
slideshow.
The DOCTYPE tag occurs after the XML declaration and before the root element.
The SYSTEM identifier specifies the location of the DTD file. Since it does not
start with a prefix like http:/ or file:/, the path is relative to the location of
the XML document. Remember the setDocumentLocator method? The parser
is using that information to find the DTD file, just as your application would to
find a file relative to the XML document. A PUBLIC identifier could also be used
to specify the DTD file using a unique name—but the parser would have to be
able to resolve it
The DOCTYPE specification could also contain DTD definitions within the XML
document, rather than referring to an external DTD file. Such definitions would
be contained in square brackets, like this:
<!DOCTYPE slideshow SYSTEM "slideshow1.dtd" [
...local subset definitions here...
]>
You’ll take advantage of that facility in a moment to define some entities that can
be used in the document.
61
62
UNDERSTANDING XML
Documents and Data
Earlier, you learned that one reason you hear about XML documents, on the one
hand, and XML data, on the other, is that XML handles both comfortably,
depending on whether text is or is not allowed between elements in the structure.
In the sample file you have been working with, the slideshow element is an
example of a data element—it contains only subelements with no intervening
text. The item element, on the other hand, might be termed a document element,
because it is defined to include both text and subelements.
As you work through this tutorial, you will see how to expand the definition of
the title element to include HTML-style markup, which will turn it into a document element as well.
Defining Attributes and Entities in the DTD
The DTD you’ve defined so far is fine for use with the nonvalidating parser. It
tells where text is expected and where it isn’t, which is all the nonvalidating
parser is going to pay attention to. But for use with the validating parser, the
DTD needs to specify the valid attributes for the different elements. You’ll do
that in this section, after which you’ll define one internal entity and one external
entity that you can reference in your XML file.
Defining Attributes in the DTD
Let’s start by defining the attributes for the elements in the slide presentation.
Note: The XML written in this section is contained in
browsable version is slideshow1b-dtd.html.)
slideshow1b.dtd.
(The
Add the text highlighted below to define the attributes for the slideshow element:
<!ELEMENT slideshow (slide+)>
<!ATTLIST slideshow
title
CDATA
#REQUIRED
date
CDATA
#IMPLIED
author
CDATA
"unknown"
>
<!ELEMENT slide (title, item*)>
DEFINING ATTRIBUTES AND ENTITIES IN THE DTD
The DTD tag ATTLIST begins the series of attribute definitions. The name that
follows ATTLIST specifies the element for which the attributes are being defined.
In this case, the element is the slideshow element. (Note once again the lack of
hierarchy in DTD specifications.)
Each attribute is defined by a series of three space-separated values. Commas
and other separators are not allowed, so formatting the definitions as shown
above is helpful for readability. The first element in each line is the name of the
attribute: title, date, or author, in this case. The second element indicates the
type of the data: CDATA is character data—unparsed data, once again, in which a
left-angle bracket (<) will never be construed as part of an XML tag. Table 2–3
presents the valid choices for the attribute type.
Table 2–3 Attribute Types
Attribute Type
Specifies...
(value1 | value2 | ...)
A list of values separated by vertical bars. (Example below)
CDATA
“Unparsed character data”. (For normal people, a text string.)
ID
A name that no other ID attribute shares.
IDREF
A reference to an ID defined elsewhere in the document.
IDREFS
A space-separated list containing one or more ID references.
ENTITY
The name of an entity defined in the DTD.
ENTITIES
A space-separated list of entities.
NMTOKEN
A valid XML name composed of letters, numbers, hyphens,
underscores, and colons.
NMTOKENS
A space-separated list of names.
NOTATION
The name of a DTD-specified notation, which describes a
non-XML data format, such as those used for image files.*
*This is a rapidly obsolescing specification which will be discussed in greater
length towards the end of this section.
63
64
UNDERSTANDING XML
When the attribute type consists of a parenthesized list of choices separated by
vertical bars, the attribute must use one of the specified values. For an example,
add the text highlighted below to the DTD:
<!ELEMENT
<!ATTLIST
type
>
<!ELEMENT
<!ELEMENT
slide (title, item*)>
slide
(tech | exec | all) #IMPLIED
title (#PCDATA)>
item (#PCDATA | item)* >
This specification says that the slide element’s type attribute must be given as
type="tech", type="exec", or type="all". No other values are acceptable.
(DTD-aware XML editors can use such specifications to present a pop-up list of
choices.)
The last entry in the attribute specification determines the attributes default
value, if any, and tells whether or not the attribute is required. Table 2–4 shows
the possible choices.
Table 2–4 Attribute-Specification Parameters
Specification
Specifies...
#REQUIRED
The attribute value must be specified in the document.
#IMPLIED
The value need not be specified in the document. If it isn’t, the
application will have a default value it uses.
“defaultValue”
The default value to use, if a value is not specified in the document.
#FIXED “fixedValue”
The value to use. If the document specifies any value at all, it
must be the same.
Finally, save a copy of the DTD as slideshow1b.dtd, for use when experimenting with attribute definitions.
65
DEFINING ATTRIBUTES AND ENTITIES IN THE DTD
Defining Entities in the DTD
So far, you’ve seen predefined entities like & and you’ve seen that an
attribute can reference an entity. It’s time now for you to learn how to define entities of your own.
Note: The XML you’ll create here is contained in
browsable version is slideSample06-xml.html.)
slideSample06.xml.
(The
Add the text highlighted below to the DOCTYPE tag in your XML file:
<!DOCTYPE slideshow SYSTEM "slideshow.dtd" [
<!ENTITY product "WonderWidget">
<!ENTITY products "WonderWidgets">
]>
The ENTITY tag name says that you are defining an entity. Next comes the name
of the entity and its definition. In this case, you are defining an entity named
“product” that will take the place of the product name. Later when the product
name changes (as it most certainly will), you will only have to change the name
one place, and all your slides will reflect the new value.
The last part is the substitution string that replaces the entity name whenever it is
referenced in the XML document. The substitution string is defined in quotes,
which are not included when the text is inserted into the document.
Just for good measure, we defined two versions, one singular and one plural, so
that when the marketing mavens come up with “Wally” for a product name, you
will be prepared to enter the plural as “Wallies” and have it substituted correctly.
Note: Truth be told, this is the kind of thing that really belongs in an external DTD.
That way, all your documents can reference the new name when it changes. But,
hey, this is an example...
66
UNDERSTANDING XML
Now that you have the entities defined, the next step is to reference them in the
slide show. Make the changes highlighted below to do that:
<slideshow
title="WonderWidget&product; Slide Show"
...
<!-- TITLE SLIDE -->
<slide type="all">
<title>Wake up to WonderWidgets&products;!</title>
</slide>
<!-- OVERVIEW -->
<slide type="all">
<title>Overview</title>
<item>Why <em>WonderWidgets&products;</em> are
great</item>
<item/>
<item>Who <em>buys</em> WonderWidgets&products;</item>
</slide>
The points to notice here are that entities you define are referenced with the same
syntax (&entityName;) that you use for predefined entities, and that the entity
can be referenced in an attribute value as well as in an element’s contents.
When you echo this version of the file with an XML parser, here is the kind of
thing you’ll see:
Wake up to WonderWidgets!
Note that the product name has been substituted for the entity reference.
To finish, save a copy of the file as slideSample06.xml.
Additional Useful Entities
Here are several other examples for entity definitions that you might find useful
when you write an XML document:
<!ENTITY
<!ENTITY
<!ENTITY
<!ENTITY
<!ENTITY
ldquo
rdquo
trade
rtrade
copyr
"“">
"”">
"™">
"®">
"©">
<!-<!-<!-<!-<!--
Left Double Quote -->
Right Double Quote -->
Trademark Symbol (TM) -->
Registered Trademark (R) -->
Copyright Symbol -->
67
DEFINING ATTRIBUTES AND ENTITIES IN THE DTD
Referencing External Entities
You can also use the SYSTEM or PUBLIC identifier to name an entity that is defined
in an external file. You’ll do that now.
Note: The XML defined here is contained in slideSample07.xml and in
versions are slideSample07-xml.html and
right.xml. (The browsable
right-xml.html.)
copycopy-
To reference an external entity, add the text highlighted below to the DOCTYPE
statement in your XML file:
<!DOCTYPE slideshow SYSTEM "slideshow.dtd" [
<!ENTITY product "WonderWidget">
<!ENTITY products "WonderWidgets">
<!ENTITY copyright SYSTEM "copyright.xml">
]>
This definition references a copyright message contained in a file named copyright.xml. Create that file and put some interesting text in it, perhaps something
like this:
<!--
A SAMPLE copyright
-->
This is the standard copyright message that our lawyers
make us put everywhere so we don't have to shell out a
million bucks every time someone spills hot coffee in their
lap...
Finally, add the text highlighted below to your slideSample.xml file to reference the external entity, and save a copy of the file as slideSample07.html:
<!-- TITLE SLIDE -->
...
</slide>
<!-- COPYRIGHT SLIDE -->
<slide type="all">
<item>©right;</item>
</slide>
68
UNDERSTANDING XML
You could also use an external entity declaration to access a servlet that produces
the current date using a definition something like this:
<!ENTITY currentDate SYSTEM
"http://www.example.com/servlet/CurrentDate?fmt=dd-MMMyyyy">
You would then reference that entity the same as any other entity:
Today's date is ¤tDate;.
When you echo the latest version of the slide presentation with an XML parser,
here is what you’ll see:
...
<slide type="all">
<item>
This is the standard copyright message that our lawyers
make us put everywhere so we don't have to shell out a
million bucks every time someone spills hot coffee in their
lap...
</item>
</slide>
...
You’ll notice that the newline which follows the comment in the file is echoed as
a character, but that the comment itself is ignored. That is the reason that the
copyright message appears to start on the next line after the <item> element,
instead of on the same line—the first character echoed is actually the newline
that follows the comment.
Summarizing Entities
An entity that is referenced in the document content, whether internal or external, is termed a general entity. An entity that contains DTD specifications that
are referenced from within the DTD is termed a parameter entity. (More on that
later.)
An entity which contains XML (text and markup), and which is therefore parsed,
is known as a parsed entity. An entity which contains binary data (like images) is
known as an unparsed entity. (By its very nature, it must be external.) We’ll be
discussing references to unparsed entities in the next section of this tutorial.
REFERENCING BINARY ENTITIES
Referencing Binary Entities
This section discusses the options for referencing binary files like image files
and multimedia data files.
Using a MIME Data Type
There are two ways to go about referencing an unparsed entity like a binary
image file. One is to use the DTD’s NOTATION-specification mechanism. However, that mechanism is a complex, non-intuitive holdover that mostly exists for
compatibility with SGML documents. We will have occasion to discuss it in a bit
more depth when we look at the DTDHandler API, but suffice it for now to say
that the combination of the recently defined XML namespaces standard, in conjunction with the MIME data types defined for electronic messaging attachments, together provide a much more useful, understandable, and extensible
mechanism for referencing unparsed external entities.
Note: The XML described here is in slideshow1b.dtd. It shows how binary references can be made, assuming that the application which will be processing the
XML data knows how to handle such references.
To set up the slideshow to use image files, add the text highlighted below to your
slideshow1b.dtd file:
<!ELEMENT
<!ATTLIST
type
>
<!ELEMENT
<!ELEMENT
<!ELEMENT
<!ATTLIST
alt
src
type
>
slide (image?, title, item*)>
slide
(tech | exec | all) #IMPLIED
title (#PCDATA)>
item (#PCDATA | item)* >
image EMPTY>
image
CDATA
#IMPLIED
CDATA
#REQUIRED
CDATA
"image/gif"
These modifications declare image as an optional element in a slide, define it as
empty element, and define the attributes it requires. The image tag is patterned
after the HTML 4.0 tag, img, with the addition of an image-type specifier, type.
(The img tag is defined in the HTML 4.0 Specification.)
69
70
UNDERSTANDING XML
The image tag’s attributes are defined by the ATTLIST entry. The alt attribute,
which defines alternate text to display in case the image can’t be found, accepts
character data (CDATA). It has an “implied” value, which means that it is optional,
and that the program processing the data knows enough to substitute something
like “Image not found”. On the other hand, the src attribute, which names the
image to display, is required.
The type attribute is intended for the specification of a MIME data type, as
defined at ftp://ftp.isi.edu/in-notes/iana/assignments/media-types/.
It has a default value: image/gif.
Note: It is understood here that the character data (CDATA) used for the type attribute
will be one of the MIME data types. The two most common formats are:
image/gif, and image/jpeg. Given that fact, it might be nice to specify an attribute
list here, using something like:
type ("image/gif", "image/jpeg")
That won’t work, however, because attribute lists are restricted to name tokens. The
forward slash isn’t part of the valid set of name-token characters, so this declaration
fails. Besides that, creating an attribute list in the DTD would limit the valid MIME
types to those defined today. Leaving it as CDATA leaves things more open ended,
so that the declaration will continue to be valid as additional types are defined.
In the document, a reference to an image named “intro-pic” might look something like this:
<image src="image/intro-pic.gif", alt="Intro Pic",
type="image/gif" />
The Alternative: Using Entity References
Using a MIME data type as an attribute of an element is a mechanism that is
flexible and expandable. To create an external ENTITY reference using the notation mechanism, you need DTD NOTATION elements for jpeg and gif data. Those
can of course be obtained from some central repository. But then you need to
define a different ENTITY element for each image you intend to reference! In
other words, adding a new image to your document always requires both a new
entity definition in the DTD and a reference to it in the document. Given the
anticipated ubiquity of the HTML 4.0 specification, the newer standard is to use
DEFINING PARAMETER ENTITIES AND CONDITIONAL SECTIONS
the MIME data types and a declaration like image, which assumes the application knows how to process such elements.
Defining Parameter Entities and
Conditional Sections
Just as a general entity lets you reuse XML data in multiple places, a parameter
entity lets you reuse parts of a DTD in multiple places. In this section of the tutorial, you’ll see how to define and use parameter entities. You’ll also see how to
use parameter entities with conditional sections in a DTD.
Creating and Referencing a Parameter Entity
Recall that the existing version of the slide presentation could not be validated
because the document used <em> tags, and those are not part of the DTD. In general, we’d like to use a whole variety of HTML-style tags in the text of a slide,
not just one or two, so it makes more sense to use an existing DTD for XHTML
than it does to define all the tags we might ever need. A parameter entity is
intended for exactly that kind of purpose.
Note: The DTD specifications shown here are contained in slideshow2.dtd and
xhtml.dtd. The XML file that references it is slideSample08.xml. (The browsable
versions are slideshow2-dtd.html and slideSample08-xml.html.)
Open your DTD file for the slide presentation and add the text highlighted below
to define a parameter entity that references an external DTD file:
<!ELEMENT slide (image?, title?, item*)>
<!ATTLIST slide
...
>
<!ENTITY % xhtml SYSTEM "xhtml.dtd">
%xhtml;
<!ELEMENT title ...
Here, you used an <!ENTITY> tag to define a parameter entity, just as for a general entity, but using a somewhat different syntax. You included a percent sign
71
72
UNDERSTANDING XML
(%) before the entity name when you defined the entity, and you used the percent
sign instead of an ampersand when you referenced it.
Also, note that there are always two steps for using a parameter entity. The first
is to define the entity name. The second is to reference the entity name, which
actually does the work of including the external definitions in the current DTD.
Since the URI for an external entity could contain slashes (/) or other characters
that are not valid in an XML name, the definition step allows a valid XML name
to be associated with an actual document. (This same technique is used in the
definition of namespaces, and anywhere else that XML constructs need to reference external documents.)
Notes:
• The DTD file referenced by this definition is xhtml.dtd. You can either
copy that file to your system or modify the SYSTEM identifier in the
<!ENTITY> tag to point to the correct URL.
• This file is a small subset of the XHTML specification, loosely modeled
after the Modularized XHTML draft, which aims at breaking up the DTD
for XHTML into bite-sized chunks, which can then be combined to create
different XHTML subsets for different purposes. When work on the modularized XHTML draft has been completed, this version of the DTD
should be replaced with something better. For now, this version will suffice
for our purposes.
The whole point of using an XHTML-based DTD was to gain access to an entity
it defines that covers HTML-style tags like <em> and <b>. Looking through
xhtml.dtd reveals the following entity, which does exactly what we want:
<!ENTITY % inline "#PCDATA|em|b|a|img|br">
This entity is a simpler version of those defined in the Modularized XHTML
draft. It defines the HTML-style tags we are most likely to want to use -- emphasis, bold, and break, plus a couple of others for images and anchors that we may
or may not use in a slide presentation. To use the inline entity, make the
changes highlighted below in your DTD file:
<!ELEMENT title (#PCDATA %inline;)*>
<!ELEMENT item (#PCDATA %inline; | item)* >
These changes replaced the simple #PCDATA item with the inline entity. It is
important to notice that #PCDATA is first in the inline entity, and that inline is
first wherever we use it. That is required by XML’s definition of a mixed-content
DEFINING PARAMETER ENTITIES AND CONDITIONAL SECTIONS
model. To be in accord with that model, you also had to add an asterisk at the
end of the title definition.
Save the DTD as slideshow2.dtd, for use when experimenting with parameter
entities.
Note: The Modularized XHTML DTD defines both inline and Inline entities,
and does so somewhat differently. Rather than specifying #PCDATA|em|b|a|img|Br,
their definitions are more like (#PCDATA|em|b|a|img|Br)*. Using one of those definitions, therefore, looks more like this:
<!ELEMENT title %Inline; >
Conditional Sections
Before we proceed with the next programming exercise, it is worth mentioning
the use of parameter entities to control conditional sections. Although you cannot conditionalize the content of an XML document, you can define conditional
sections in a DTD that become part of the DTD only if you specify include. If
you specify ignore, on the other hand, then the conditional section is not
included.
Suppose, for example, that you wanted to use slightly different versions of a
DTD, depending on whether you were treating the document as an XML document or as a SGML document. You could do that with DTD definitions like the
following:
someExternal.dtd:
<![ INCLUDE [
... XML-only definitions
]]>
<![ IGNORE [
... SGML-only definitions
]]>
... common definitions
The conditional sections are introduced by “<![”, followed by the INCLUDE or
IGNORE keyword and another “[”. After that comes the contents of the conditional section, followed by the terminator: “]]>”. In this case, the XML definitions are included, and the SGML definitions are excluded. That’s fine for XML
documents, but you can’t use the DTD for SGML documents. You could change
the keywords, of course, but that only reverses the problem.
73
74
UNDERSTANDING XML
The solution is to use references to parameter entities in place of the INCLUDE
and IGNORE keywords:
someExternal.dtd:
<![ %XML; [
... XML-only definitions
]]>
<![ %SGML; [
... SGML-only definitions
]]>
... common definitions
Then each document that uses the DTD can set up the appropriate entity definitions:
<!DOCTYPE foo SYSTEM "someExternal.dtd" [
<!ENTITY % XML "INCLUDE" >
<!ENTITY % SGML "IGNORE" >
]>
<foo>
...
</foo>
This procedure puts each document in control of the DTD. It also replaces the
INCLUDE and IGNORE keywords with variable names that more accurately reflect
the purpose of the conditional section, producing a more readable, self-documenting version of the DTD.
Resolving A Naming Conflict
The XML structures you have created thus far have actually encountered a small
naming conflict. It seems that xhtml.dtd defines a title element which is
entirely different from the title element defined in the slideshow DTD.
Because there is no hierarchy in the DTD, these two definitions conflict.
Note: The Modularized XHTML DTD also defines a title element that is intended
to be the document title, so we can’t avoid the conflict by changing xhtml.dtd—
the problem would only come back to haunt us later.
You could use XML namespaces to resolve the conflict. You’ll take a look at that
approach in the next section. Alternatively, you could use one of the more hierarchical schema proposals described in Schema Standards (page 38). The simplest
RESOLVING A NAMING CONFLICT
way to solve the problem for now, though, is simply to rename the title element in slideshow.dtd.
Note:
The
XML
shown here is contained in slideshow3.dtd and
which references copyright.xml and xhtml.dtd. (The
browsable versions are slideshow3-dtd.html, slideSample09-xml.html, copyright-xml.html, and xhtml-dtd.html.)
slideSample09.xml,
To keep the two title elements separate, you’ll create a “hyphenation hierarchy”.
Make the changes highlighted below to change the name of the title element in
slideshow.dtd to slide-title:
<!ELEMENT slide (image?, slide-title?, item*)>
<!ATTLIST slide
type
(tech | exec | all) #IMPLIED
>
<!-- Defines the %inline; declaration -->
<!ENTITY % xhtml SYSTEM "xhtml.dtd">
%xhtml;
<!ELEMENT slide-title (%inline;)*>
Save this DTD as slideshow3.dtd.
The next step is to modify the XML file to use the new element name. To do that,
make the changes highlighted below:
...
<slide type="all">
<slide-title>Wake up to ... </slide-title>
</slide>
...
<!-- OVERVIEW -->
<slide type="all">
<slide-title>Overview</slide-title>
<item>...
Save a copy of this file as slideSample09.xml.
75
76
UNDERSTANDING XML
Using Namespaces
As you saw earlier, one way or another it is necessary to resolve the conflict
between the title element defined in slideshow.dtd and the one defined in
xhtml.dtd when the same name is used for different purposes. In the previous
exercise, you hyphenated the name in order to put it into a different
“namespace”. In this section, you’ll see how to use the XML namespace standard to do the same thing without renaming the element.
The primary goal of the namespace specification is to let the document author
tell the parser which DTD or schema to use when parsing a given element. The
parser can then consult the appropriate DTD or schema for an element definition.
Of course, it is also important to keep the parser from aborting when a “duplicate” definition is found, and yet still generate an error if the document references an element like title without qualifying it (identifying the DTD or
schema to use for the definition).
Note: Namespaces apply to attributes as well as to elements. In this section, we consider only elements. For more information on attributes, consult the namespace
specification at http://www.w3.org/TR/REC-xml-names/.
Defining a Namespace in a DTD
In a DTD, you define a namespace that an element belongs to by adding an
attribute to the element’s definition, where the attribute name is xmlns (“xml
namespace”). For example, you could do that in slideshow.dtd by adding an
entry like the following in the title element’s attribute-list definition:
<!ELEMENT title (%inline;)*>
<!ATTLIST title
xmlns CDATA #FIXED "http://www.example.com/slideshow"
>
Declaring the attribute as FIXED has several important features:
• It prevents the document from specifying any non-matching value for the
xmlns attribute.
• The element defined in this DTD is made unique (because the parser
understands the xmlns attribute), so it does not conflict with an element
USING NAMESPACES
that has the same name in another DTD. That allows multiple DTDs to use
the same element name without generating a parser error.
• When a document specifies the xmlns attribute for a tag, the document
selects the element definition with a matching attribute.
To be thorough, every element name in your DTD would get the exact same
attribute, with the same value. (Here, though, we’re only concerned about the
title element.) Note, too, that you are using a CDATA string to supply the URI.
In this case, we’ve specified an URL. But you could also specify a URN, possibly by specifying a prefix like urn: instead of http:. (URNs are currently being
researched. They’re not seeing a lot of action at the moment, but that could
change in the future.)
Referencing a Namespace
When a document uses an element name that exists in only one of the.DTDs or
schemas it references, the name does not need to be qualified. But when an element name that has multiple definitions is used, some sort of qualification is a
necessity.
Note: In point of fact, an element name is always qualified by it’s default
namespace, as defined by name of the DTD file it resides in. As long as there as is
only one definition for the name, the qualification is implicit.
You qualify a reference to an element name by specifying the xmlns attribute, as
shown here:
<title xmlns="http://www.example.com/slideshow">
Overview
</title>
The specified namespace applies to that element, and to any elements contained
within it.
Defining a Namespace Prefix
When you only need one namespace reference, it’s not such a big deal. But when
you need to make the same reference several times, adding xmlns attributes
becomes unwieldy. It also makes it harder to change the name of the namespace
at a later date.
77
78
UNDERSTANDING XML
The alternative is to define a namespace prefix, which as simple as specifying
xmlns, a colon (:) and the prefix name before the attribute value, as shown here:
<SL:slideshow xmlns:SL='http:/www.example.com/slideshow'
...>
...
</SL:slideshow>
This definition sets up SL as a prefix that can be used to qualify the current element name and any element within it. Since the prefix can be used on any of the
contained elements, it makes the most sense to define it on the XML document’s
root element, as shown here.
Note: The namespace URI can contain characters which are not valid in an XML
name, so it cannot be used as a prefix directly. The prefix definition associates an
XML name with the URI, which allows the prefix name to be used instead. It also
makes it easier to change references to the URI in the future.
When the prefix is used to qualify an element name, the end-tag also includes the
prefix, as highlighted here:
<SL:slideshow xmlns:SL='http:/www.example.com/slideshow'
...>
...
<slide>
<SL:title>Overview</SL:title>
</slide>
...
</SL:slideshow>
Finally, note that multiple prefixes can be defined in the same element, as shown
here:
<SL:slideshow xmlns:SL='http:/www.example.com/slideshow'
xmlns:xhtml='urn:...'>
...
</SL:slideshow>
With this kind of arrangement, all of the prefix definitions are together in one
place, and you can use them anywhere they are needed in the document. This
example also suggests the use of URN to define the xhtml prefix, instead of an
URL. That definition would conceivably allow the application to reference a
DESIGNING AN XML DATA STRUCTURE
local copy of the XHTML DTD or some mirrored version, with a potentially
beneficial impact on performance.
Designing an XML Data Structure
This section covers some heuristics you can use when making XML design decisions.
Saving Yourself Some Work
Whenever possible, use an existing schema definition. It’s usually a lot easier to
ignore the things you don’t need than to design your own from scratch. In addition, using a standard DTD makes data interchange possible, and may make it
possible to use data-aware tools developed by others.
So, if an industry standard exists, consider referencing that DTD with an external
parameter entity. One place to look for industry-standard DTDs is at the web site
created by the Organization for the Advancement of Structured Information
Standards (OASIS). You can find a list of technical committees at
http://www.oasis-open.org/, or check their repository of XML standards at
http://www.XML.org.
Note: Many more good thoughts on the design of XML structures are at the OASIS
page, http://www.oasis-open.org/cover/elementsAndAttrs.html.
Attributes and Elements
One of the issues you will encounter frequently when designing an XML structure is whether to model a given data item as a subelement or as an attribute of an
existing element. For example, you could model the title of a slide either as:
<slide>
<title>This is the title</title>
</slide>
or as:
<slide title="This is the title">...</slide>
79
80
UNDERSTANDING XML
In some cases, the different characteristics of attributes and elements make it
easy to choose. Let’s consider those cases first, and then move on to the cases
where the choice is more ambiguous.
Forced Choices
Sometimes, the choice between an attribute and an element is forced on you by
the nature of attributes and elements. Let’s look at a few of those considerations:
The data contains substructures
In this case, the data item must be modeled as an element. It can’t be modeled as an attribute, because attributes take only simple strings. So if the title
can contain emphasized text like this: The <em>Best</em> Choice, then the
title must be an element.
The data contains multiple lines
Here, it also makes sense to use an element. Attributes need to be simple,
short strings or else they become unreadable, if not unusable.
Multiple occurrences are possible
Whenever an item can occur multiple times, like paragraphs in an article, it
must be modeled as an element. The element that contains it can only have
one attribute of a particular kind, but it can have many subelements of the
same type.
The data changes frequently
When the data will be frequently modified with an editor, it may make sense
to model it as an element. Many XML-aware editors make it easy modify
element data, while attributes can be somewhat harder to get to.
The data is a small, simple string that rarely if ever changes
This is data that can be modeled as an attribute. However, just because you
can does not mean that you should. Check the “Stylistic Choices” section
next, to be sure.
Using DTDs when the data is confined to a small number of fixed choices
Here is one time when it really makes sense to use an attribute. A DTD can
prevent an attribute from taking on any value that is not in the preapproved
list, but it cannot similarly restrict an element. (With a schema on the other
hand, both attributes and elements can be restricted.)
ATTRIBUTES AND ELEMENTS
Stylistic Choices
As often as not, the choices are not as cut and dried as those shown above. When
the choice is not forced, you need a sense of “style” to guide your thinking. The
question to answer, then, is what makes good XML style, and why.
Defining a sense of style for XML is, unfortunately, as nebulous a business as
defining “style” when it comes to art or music. There are a few ways to approach
it, however. The goal of this section is to give you some useful thoughts on the
subject of “XML style”.
Visibility
One heuristic for thinking about XML elements and attributes uses the concept of visibility. If the data is intended to be shown—to be displayed to
some end user—then it should be modeled as an element. On the other hand,
if the information guides XML processing but is never seen by a user, then it
may be better to model it as an attribute. For example, in order-entry data for
shoes, shoe size would definitely be an element. On the other hand, a manufacturer’s code number would be reasonably modeled as an attribute.
Consumer / Provider
Another way of thinking about the visibility heuristic is to ask who is the
consumer and/or provider of the information. The shoe size is entered by a
human sales clerk, so it’s an element. The manufacturer’s code number for a
given shoe model, on the other hand, may be wired into the application or
stored in a database, so that would be an attribute. (If it were entered by the
clerk, though, it should perhaps be an element.)
Container vs. Contents
Perhaps the best way of thinking about elements and attributes is to think of
an element as a container. To reason by analogy, the contents of the container (water or milk) correspond to XML data modeled as elements. Such
data is essentially variable. On the other hand, characteristics of the container (blue or white pitcher) can be modeled as attributes. That kind of
information tends to be more immutable. Good XML style will, in some
consistent way, separate each container’s contents from its characteristics.
To show these heuristics at work: In a slideshow the type of the slide (executive
or technical) is best modeled as an attribute. It is a characteristic of the slide that
lets it be selected or rejected for a particular audience. The title of the slide, on
the other hand, is part of its contents. The visibility heuristic is also satisfied
here. When the slide is displayed, the title is shown but the type of the slide isn’t.
Finally, in this example, the consumer of the title information is the presentation
81
82
UNDERSTANDING XML
audience, while the consumer of the type information is the presentation program.
Normalizing Data
In Saving Yourself Some Work (page 79), you saw that it is a good idea to define
an external entity that you can reference in an XML document. Such an entity
has all the advantages of a modularized routine—changing that one copy affects
every document that references it. The process of eliminating redundancies is
known as normalizing, so defining entities is one good way to normalize your
data.
In an HTML file, the only way to achieve that kind of modularity is with HTML
links—but of course the document is then fragmented, rather than whole. XML
entities, on the other hand, suffer no such fragmentation. The entity reference
acts like a macro—the entity’s contents are expanded in place, producing a
whole document, rather than a fragmented one. And when the entity is defined in
an external file, multiple documents can reference it.
The considerations for defining an entity reference, then, are pretty much the
same as those you would apply to modularized program code:
• Whenever you find yourself writing the same thing more than once, think
entity. That lets you write it one place and reference it multiple places.
• If the information is likely to change, especially if it is used in more than
one place, definitely think in terms of defining an entity. An example is
defining productName as an entity so that you can easily change the documents when the product name changes.
• If the entity will never be referenced anywhere except in the current file,
define it in the local_subset of the document’s DTD, much as you would
define a method or inner class in a program.
• If the entity will be referenced from multiple documents, define it as an
external entity, the same way that would define any generally usable class
as an external class.
External entities produce modular XML that is smaller, easier to update and
maintain. They can also make the resulting document somewhat more difficult to
visualize, much as a good OO design can be easy to change, once you understand it, but harder to wrap your head around at first.
NORMALIZING DTDS
You can also go overboard with entities. At an extreme, you could make an
entity reference for the word “the”—it wouldn’t buy you much, but you could do
it.
Note: The larger an entity is, the less likely it is that changing it will have unintended effects. When you define an external entity that covers a whole section on
installation instructions, for example, making changes to the section is unlikely to
make any of the documents that depend on it come out wrong. Small inline substitutions can be more problematic, though. For example, if productName is defined
as an entity, the name change can be to a different part of speech, and that can produce! Suppose the product name is something like “HtmlEdit”. That’s a verb. So
you write a sentence that becomes, “You can HtmlEdit your file...” after the entitysubstitution occurs. That sentence reads fine, because the verb fits well in that context. But if the name is eventually changed to “HtmlEditor”, the sentence becomes
“You can HtmlEditor your file...”, which clearly doesn’t work. Still, even if such
simple substitutions can sometimes get you in trouble, they can potentially save a
lot of time. (One alternative would be to set up entities named productNoun, productVerb, productAdj, and productAdverb!)
Normalizing DTDs
Just as you can normalize your XML document, you can also normalize your
DTD declarations by factoring out common pieces and referencing them with a
parameter entity. Factoring out the DTDs (also known as modularizing or normalizing) gives the same advantages and disadvantages as normalized XML—
easier to change, somewhat more difficult to follow.
You can also set up conditionalized DTDs. If the number and size of the conditional sections is small relative to the size of the DTD as a whole, that can let you
“single source” a DTD that you can use for multiple purposes. If the number of
conditional sections gets large, though, the result can be a complex document
that is difficult to edit.
83
84
UNDERSTANDING XML
Summary
Congratulations! You have now created a number of XML files that you can use
for testing purposes. Here’s a table that describes the files you have constructed.
Table 2–5 Listing of Sample XML Files
File
Contents
slideSample01.xml
A basic file containing a few elements and attributes, as well
as comments.
slideSample02.xml
Includes a processing instruction.
SlideSampleBad1.xml
A file that is not well-formed.
slideSample03.xml
Includes a simple entity reference (<).
slideSample04.xml
Contains a CDATA section.
slideSample05.xml
References either a simple external DTD for elements
(slideshow1a.dtd), for use with a nonvalidating parser, or
else a DTD that defines attributes (slideshow1b.dtd) for
use with a validating parser.
slideSample06.xml
Defines two entities locally (product and products), and references slideshow1b.dtd.
slideSample07.xml
References an external entity defined locally (copyright.xml), and references slideshow1b.dtd.
slideSample08.xml
References xhtml.dtd using a parameter entity in
slideshow2.dtd, producing a naming conflict, since title
is declared in both.
slideSample09.xml
Changes the title element to slide-title, so it can reference xhtml.dtd using a parameter entity in
slideshow3.dtd without conflict.
3
Getting Started with
Web Applications
Stephanie Bodoff
A Web application is a dynamic extension of a Web server. There are two
types of Web applications:
• Presentation-oriented. A presentation-oriented Web application generates
dynamic Web pages containing various types of markup language (HTML,
XML, and so on) in response to requests.
• Service-oriented. A service-oriented Web application implements the endpoint of a Web service. Presentation-oriented applications are often clients
of service-oriented Web applications.
In the Java 2 platform, Web components provide the dynamic extension capabilities for a Web server. Web components are either Java Servlets or JSP pages.
Servlets are Java programming language classes that dynamically process
requests and construct responses. JSP pages are text-based documents that execute as servlets but allow a more natural approach to creating static content.
Although servlets and JSP pages can be used interchangeably, each has its own
strengths. Servlets are best suited to service-oriented Web applications and managing the control functions of a presentation-oriented application, such as dispatching requests and handling nontextual data. JSP pages are more appropriate
for generating text-based markup such as HTML, SVG, WML, and XML.
Web components are supported by the services of a runtime platform called a
Web container. The Web container provides services such as request dispatching,
85
86
GETTING STARTED WITH WEB APPLICATIONS
security, concurrency, and life cycle management. It also gives Web components
access to APIs such as naming, transactions, and e-mail.
Certain aspects of Web application behavior can be configured when the application is installed or deployed to the Web container. The configuration information
is maintained in a text file in XML format called a Web application deployment
descriptor. A Web application deployment descriptor (DD) must conform to the
schema described in the Java Servlet specification.
This chapter describes the organization, configuration, and installation and
deployment procedures for Web applications. Chapters 8 and 9 cover how to
develop Web components for service-oriented Web applications. Chapters 11
and 12 cover how to develop the Web components for presentation-oriented Web
applications. Many features of JSP technology are determined by Java Servlet
technology, so you should familiarize yourself with that material even if you do
not intend to write servlets.
Most Web applications use the HTTP protocol, and support for HTTP is a major
aspect of Web components. For a brief summary of HTTP protocol features see
Appendix B.
Web Application Life Cycle
A Web application consists of Web components, static resource files such as
images, and helper classes and libraries. The Web container provides many supporting services that enhance the capabilities of Web components and make
them easier to develop. However, because it must take these services into
account, the process for creating and running a Web application is different from
that of traditional stand-alone Java classes.The process for creating, deploying,
and executing a Web application can be summarized as follows:
1. Develop the Web component code.
2. Develop the Web application deployment descriptor.
3. Build the Web application components along with any static resources (for
example, images) and helper classes referenced by the component.
4. Package the application into a deployable unit.
5. Deploy the application into a Web container.
6. Access a URL that references the Web application.
Developing Web component code is covered in the later chapters. Steps 2
through 4 are expanded on in the following sections and illustrated with a Hello,
WEB APPLICATION LIFE CYCLE
World style presentation-oriented application. This application allows a user to
enter a name into an HTML form (Figure 3–1) and then displays a greeting after
the name is submitted (Figure 3–2):
Figure 3–1 Greeting Form
Figure 3–2 Response
87
88
GETTING STARTED WITH WEB APPLICATIONS
The Hello application contains two Web components that generate the greeting
and the response. This tutorial has two versions of the application: a servlet version called hello1, in which the components are implemented by two servlet
classes, GreetingServlet.java and ResponseServlet.java, and a JSP version called hello2, in which the components are implemented by two JSP
pages, greeting.jsp and response.jsp. The two versions are used to illustrate
the tasks involved in packaging, deploying, and running an application that contains Web components. If you are viewing this tutorial online, you must download the tutorial bundle to get the source code for this example. See About the
Examples (page xxi).
J2EE 1.4 Application Server
This section contains a brief summary of the components comprising the J2EE
1.4 Application Server, the configuration steps required before using the components to build and deploy the tutorial examples, and instructions for starting and
stopping the main components. The last section in this chapter discusses how to
run the PointBase database server; other chapters explain how to use the remaining components.
Components
The J2EE 1.4 Application Server contains the components listed in Table 3–1
Table 3–1 J2EE 1.4 Application Server Components
Component
Description
asadmin
Runs the application server administration utility. Used to start and
stop the application server.
asant
A portable build tool that is an extension of the Ant tool developed
by the Apache Software Foundation. asant contains additional tasks
that interact with the application server administration utility.
appclient
Launches the application client container and invokes the client
application packaged in the application JAR file.
SETTING UP TO BUILD AND DEPLOY TUTORIAL EXAMPLES
Table 3–1 J2EE 1.4 Application Server Components (Continued)
Component
Description
capture-schema
Extracts schema information from a database, producing a schema
file that the application server can use for container-managed persistence.
deploytool
Packages J2EE applications, generates deployment descriptors, and
deploys J2EE applications on the application server.
package-appclient
Packages the application client container libraries and JAR files.
PointBase database
An evaluation copy of the PointBase database server.
verifier
Validates J2EE deployment descriptors.
wscompile
Generates stubs, ties, serializers, and WSDL files used in JAX-RPC
clients and services.
wsdeploy
Generates an implementation-specific, ready-to-deploy WAR file for
Web service applications that use JAX-RPC.
Setting Up To Build and Deploy Tutorial
Examples
You use asant to build the tutorial examples and configure the application
server. In order to run the asant scripts, you must configure your environment
and the tutorial properties files as follows:
• Add <JAVA_HOME>/bin to the front of your path.
• Add <J2EE_HOME>/bin and <J2EE_HOME>/share/bin to the front of your
path so that J2EE 1.4 Application Server components overrides other
installations.
• Set the j2ee.home property in the file <INSTALL>/j2eetutorial14/
examples/common/build.properties to the location of your J2EE 1.4
Application Server installation. The build process uses the j2ee.home
property to include the J2EE library archives in the classpath. The J2EE
library archive is the file <J2EE_HOME>/lib/j2ee.jar. If you wish to use
an IDE or the javac compiler to compile J2EE applications, you must add
this JAR to your classpath.
89
90
GETTING STARTED WITH WEB APPLICATIONS
• Set the admin.user and admin.password properties in the file
<INSTALL>/j2eetutorial14/examples/common/build.properties to
the values you specified when you installed the J2EE 1.4 Application
Server. The build scripts use these values when you invoke an administration task such as creating a database pool. The default value for
admin.user is set to the installer’s default value, which is admin.
Starting and Stopping the J2EE
Application Server
To start and stop the J2EE application server, you use the asadmin utility. To
start the J2EE application server, open a terminal window or command prompt
and execute this command:
asadmin start-domain
A domain is a set of one or more application server instances managed by one
administration server. Associated with a domain is:
• The administration server’s port number. The default is 4848.
• An administration username and password. These passwords are required
when you access the administration server.
You specified these values when you installed the J2EE 1.4 Application Server.
The examples in this tutorial assume that you have chosen the default port.
With no arguments, the start-domain command initiates the default domain,
which is domain1.
On Windows, from the Start menu, choose
Programs→Sun Microsystems→J2EE 1.4 SDK→Start Application Server
After the server has started, you will see the following output:
Domain domain1 Started.
To stop the J2EE application server, execute the following command:
asadmin stop-domain
On Windows, from the Start menu, choose
Programs→Sun Microsystems→J2EE 1.4 SDK→Stop Application Server
STARTING THE DEPLOYTOOL UTILITY
When the server has stopped you will see the following output:
Domain domain1 stopped.
Starting the deploytool Utility
The deploytool utility is the GUI tool used to package Web applications, specify deployment descriptor elements, and deploy applications on the J2EE application server. To start deploytool, open a terminal window or command prompt
and execute this command:
deploytool
On Windows, from the Start menu, choose
Programs→Sun Microsystems→J2EE 1.4 SDK→Deploytool
Web Modules
Web components and static Web content files such as images are called Web
resources. A Web module is the smallest deployable and usable unit of Web
resources in a J2EE application. A J2EE Web module corresponds to a Web
application as defined in the Java Servlet Specification.
Web modules are typically packaged and deployed as Web archive (WAR) files.
The format of a WAR file is identical to that of a JAR file. However, the contents
and use of WAR files differ from JAR files, so WAR file names use a .war extension.
In addition to Web components and Web resources, a Web module can contain
other files including:
• Server-side utility classes (database beans, shopping carts, and so on).
Often these classes conform to the JavaBeans component architecture.
• Client-side classes (applets and utility classes)
The top-level directory of a Web module is the document root of the application.
The document root is where JSP pages, client-side classes and archives, and
static Web resources are stored.
91
92
GETTING STARTED WITH WEB APPLICATIONS
The document root contains a subdirectory called /WEB-INF, which contains the
following files and directories:
• web.xml - The Web application deployment descriptor
• Tag library descriptor files (see Tag Library Descriptors, page 576)
• classes - A directory that contains server-side classes: servlets, utility
classes, and JavaBeans components
• lib - A directory that contains JAR archives of libraries called by serverside classes
You can also create application-specific subdirectories (that is, package directories) in either the document root or the /WEB-INF/classes/ directory.
The WAR structure just described is portable; you could import it into any container that conforms to the Java Servlet Specification. However, you cannot
deploy it on the J2EE 1.4 Application Server until it contains a runtime deployment descriptor. The runtime deployment descriptor is an XML file that contains
information such as the context root, the JNDI names of the application’s
resources, and some J2EE implementation-specific parameters. The J2EE application server Web application runtime DD is named sun-web.xml and is located
in /WEB-INF/ along with the Web application DD.
Creating a Web Module
You package Web module into a WAR using the J2EE 1.4 Application Server
deploytool utility. To build and package the hello1 application into a WAR
named hello1.war:
1. In a terminal window, go to <INSTALL>/j2eetutorial14/examples/
web/hello1/.
2. Run asant build. This target will spawn any necessary compilations and
copy files to the <INSTALL>/j2eetutorial14/examples/web/hello1/
build/ directory.
3. Start deploytool.
4. Create a Web application called hello1 by running the New Web Application Wizard. Select File→New→Web Application WAR.
5. New Web Application Wizard
a. Select the Create New Stand-Alone WAR Module radio button.
b. Click Browse and in the file chooser, navigate to <INSTALL>/
j2eetutorial14/examples/web/hello1/.
CONFIGURING WEB MODULES
c.
d.
e.
f.
g.
h.
i.
j.
k.
l.
In the File Name field, enter hello1.
Click Choose Module File.
In the WAR Display Name field enter hello1.
Click Edit to add the content files.
In the Edit Contents dialog, navigate to <INSTALL>/j2eetutorial14/
examples/web/hello1/build/. Select duke.waving.gif, GreetingServlet.class, and ResponseServlet.class and click Add. Click
OK.
Click Next.
Select the Servlet radio button.
Click Next.
Select GreetingServlet from the Servlet Class combo box.
Click Finish.
6. Select File→New→Web Application WAR.
a. Click the Add to Existing WAR Module radio button and select hello1
from the combo box. Since the WAR contains all of the servlet classes,
you do not have to add any more content.
b. Click Next.
c. Select the Servlet radio button.
d. Click Next.
e. Select ResponseServlet from the Servlet Class combo box.
f. Click Finish.
A sample hello1.war is provided in <INSTALL>/j2eetutorial14/examples/
web/provided-wars/. To open this WAR with deploytool:
1.
2.
3.
4.
Select File→Open.
Navigate to the provided-wars directory.
Select the WAR.
Click Open Module.
Configuring Web Modules
Web applications are configured via elements contained in the Web application
deployment descriptor. The deploytool utility generates the descriptor when
you create a WAR and adds elements when you create Web components and
93
94
GETTING STARTED WITH WEB APPLICATIONS
associated classes. You can modify the elements via the inspectors associated
with the WAR.
The following sections give a brief introduction to the Web application features
you will usually want to configure. A number of security parameters can be
specified; these are covered in Web-Tier Security (page 650).
In the following sections, some examples demonstrate procedures for configuring the Hello, World application. If Hello, World does not use a specific configuration feature, the section gives references to other examples that illustrate how
the deployment descriptor element and describes generic procedures for specifying the feature using deploytool. Extended examples that demonstrate how to
use deploytool are in The Example Servlets (page 440), The Example JSP
Pages (page 482), and The Example JSP Pages (page 521).
Mapping URLs to Web Components
When a request is received by the Web container it must determine which Web
component should handle the request. It does so by mapping the URL path contained in the request to a Web application and a Web component. A URL path
contains the context root and an alias:
http://host:port/context_root/alias
Setting the Context Root
A context root identifies a Web application. A context root must start with a forward slash ’/’ and end with a string. For example, to set the context root of the
hello1 application with deploytool:
1. Select the hello1 WAR.
2. Select the General tab.
3. In the Context Root field, enter /hello1.
Setting the Component Alias
The alias identifies the Web component that should handle a request. The servlet
path must start with a forward slash ’/’ and end with a string or a wildcard
expression with an extension (*.jsp, for example). Since Web containers automatically map an alias that ends with *.jsp, you do not have to specify an alias
DECLARING WELCOME FILES
for a JSP page unless you wish to refer to the page by a name other than its file
name. In the hello2 example, the greeting page has a alias, but response.jsp is
called by name.
To set up the mappings for the servlet version of the Hello application with
deploytool:
1.
2.
3.
4.
5.
6.
7.
8.
Expand the hello1 WAR node.
Select the GreetingServlet Web component.
Select the Aliases tab.
Click Add to add a new mapping.
Type /greeting in the aliases list.
Select the ResponseServlet Web component.
Click Add.
Type /response in the aliases list.
Declaring Welcome Files
The welcome files mechanism allows you to specify a list of files that the Web
container will use for appending to a request for a URL (called a valid partial
request) that is not mapped to a Web component.
For example, suppose you define a welcome file welcome.html. When a client
requests a URL such as host:port/webapp/directory, where directory is
not mapped to a servlet or JSP page, the file host:port/webapp/directory/
welcome.html is returned to the client.
If a Web container receives a valid partial request, the Web container examines
the welcome file list and appends each welcome file in the order specified to the
partial request and checks whether a static resource or servlet in the WAR is
mapped to that request URL. The Web container then sends the request to the
first resource in the WAR that matches.
If no welcome file is specified, the J2EE 1.4 Application Server will use a file
named index.XXX, where XXX can be html or jsp, as the default welcome file. If
there is no welcome file and no file named index.XXX, the application server
returns a directory listing.
To specify welcome files with deploytool:
1. Select the WAR.
2. Select the File Refs tab in the WAR inspector.
95
96
GETTING STARTED WITH WEB APPLICATIONS
3. Click Add in the Welcome Files pane.
4. Select the welcome file from the drop-down list.
Setting Initialization Parameters
The Web components in a Web module share an object that represents their
application context (see Accessing the Web Context, page 469). You can pass
initialization parameters to the context or to a Web component. To add a context
parameter with deploytool:
1. Select the WAR.
2. Select the Context tab in the WAR inspector.
3. Click Add.
For an example context parameter, see The Example JSP Pages (page 482).
To add a Web component initialization parameter with deploytool:
1. Select the Web component.
2. Select the Init Param. tab in the WAR inspector.
3. Click Add.
Specifying Error Mappings
You can specify a mapping between the status code returned in an HTTP
response or a Java programming language exception returned by any Web component and a Web resource (see Handling Errors, page 448). To set up the mapping with deploytool:
1.
2.
3.
4.
Select the WAR.
Select the File Refs tab in the WAR inspector.
Click Add in the Error Mapping pane.
Enter the HTTP status code (see HTTP Responses, page 850) or fullyqualified class name of an exception in the Error/Exception field.
DECLARING REFERENCES TO ENVIRONMENT ENTRIES, RESOURCE ENVIRONMENT ENTRIES, OR RESOURCES97
5. Enter the name of a resource to be invoked when the status code or exception is returned. The name should have a leading forward slash /.
Note: You can also define error pages for a JSP page contained in a WAR. If error
pages are defined for both the WAR and a JSP page, the JSP page’s error page takes
precedence.
For an example error page mapping, see The Example Servlets (page 440).
Declaring References to Environment
Entries, Resource Environment Entries, or
Resources
If your Web components reference environment entries, resource environment
entries, or resources such as databases, you must declare the references in the
Web application deployment descriptor. To add a reference to a resource with
deploytool:
1. Select the WAR.
2. Select the Environment, Enterprise Bean Refs, Resource Env. Refs, or
Resource Refs tab in the WAR inspector.
3. Click Add to add a new reference.
4. Type a JNDI name for the resource.
5. Choose the type of the resource.
6. Choose whether the container or the application performs authentication
when the resource is accessed.
7. Choose whether the resource can be shared by more than one Web application.
For an example resource reference, see Configuring the Web Application to Reference a Data Source with JNDI (page 106).
98
GETTING STARTED WITH WEB APPLICATIONS
Deploying Web Modules
Before a Web application can be accessed, it must be deployed as a Web module
in the application server. For example, to deploy the hello1 Web module using
deploytool:
1. Select the hello1 WAR.
2. Start the J2EE application server.
3. Select File→Save, to ensure that all deployment settings are saved in the
WAR.
4. Select Tools→Deploy.
5. In the Connection Settings frame, enter the user name and password you
specified when you installed the J2EE 1.4 Application Server.
6. Click OK.
7. A popup dialog will display the results of the deployment. Click Close.
You can also deploy a WAR by copying it into the <J2EE_HOME>/domains/
domain1/server/autodeploy/ directory.
Listing Deployed Web Modules
To list all Web modules currently deployed on the application server with
deploytool:
1. Select localhost:4848 from the servers list.
2. In the Deployment Managers dialog, enter the administration server user
name and password you specified when you installed the J2EE 1.4 Application Server.
3. You will see the deployed Web modules in the Deployed Objects list of the
General tab.
Running Web Applications
A Web application is executed when a Web browser references a URL that is
mapped to component. Once you have installed or deployed the hello1 application, you can run the Web application by pointing a browser at
http://host:port/hello1/greeting
UPDATING WEB MODULES
Replace host with the name of the host running the application server. If your
browser is running on the same host as the application server, you can replace
host with localhost.
Replace port with value you specified for the HTTP server port when you
installed the J2EE 1.4 Application Server. The default value is 1024.
The examples in this tutorial assume that your application server host and port is
localhost:1024.
Updating Web Modules
During development, you will often need to make changes to Web applications.
After you have made the changes and want to run the modified application, you
must:
1.
2.
3.
4.
Recompile any modified classes.
Repackage any modified components or resources.
Redeploy the application.
Reload the URL in the client.
To try this feature, first build and deploy the hello2 application. A sample
hello2.war is provided in <INSTALL>/j2eetutorial14/examples/web/provided-wars/.
1. In a terminal window, go to <INSTALL>/j2eetutorial14/examples/
web/hello2/.
2. Run asant build. The default target will copy the JSP pages to the
<INSTALL>/j2eetutorial14/examples/web/hello2/build/ directory.
3. Start deploytool.
4. Create a Web application called hello2 by running the New Web Application Wizard. Select File→New→Web Application WAR.
5. New Web Application Wizard
a. Select the Create New Stand-Alone WAR Module radio button.
b. Click Browse and in the file chooser, navigate to <INSTALL>/
j2eetutorial14/examples/web/hello2/.
c. In the File Name field, enter hello2.
d. Click Choose Module File.
e. In the WAR Display Name field enter hello2.
99
100
GETTING STARTED WITH WEB APPLICATIONS
f. In the Context Root field, enter /hello2.
g. Click Edit to add the content files.
h. In the Edit Contents dialog, navigate to <INSTALL>/j2eetutorial14/
examples/web/hello2/build/. Select duke.waving.gif, greeting.jsp, and response.jsp and click Add. Click OK.
i. Click Next.
j. Select the JSP radio button.
k. Click Next.
l. Select greeting.jsp from the Servlet Class combo box.
m.Click Finish.
6. Add an alias to the greeting Web component.
a. Select the greeting Web component.
b. Select the Aliases tab.
c. Click Add to add a new mapping.
d. Type /greeting in the aliases list.
7. Select File→Save.
8. Deploy the WAR.
9. Open your browser to http://localhost:1024/hello2/greeting
Open the file <INSTALL>/j2eetutorial14/examples/web/hello2/greetin an editor and change the greeting returned by greeting.jsp to be:
ing.jsp
<h2>Hi, my name is Duke. What's yours?</h2>
To update the Web application:
1. Run asant build. This task copies the modified JSP page into the build
directory.
2. Select the hello2 WAR.
3. Select Tools→Update. A popup dialog will display the modified file. Click
OK.
4. Select File→Save.
5. Select Tools→Deploy. A popup dialog will query whether you want to
redeploy. Click Yes.
6. In the Deployment Managers dialog, enter the user name and password
you specified when you installed the J2EE 1.4 Application Server.
7. Click OK.
UNDEPLOYING WEB MODULES
8. A popup dialog will display the results of the deployment. Click Close.
9. Reload the URL in the browser.
You should see the screen in Figure 3–3 in the browser:
Figure 3–3 New Greeting
Undeploying Web Modules
To undeploy a Web module with deploytool:
1. Select localhost:4848 from the servers list.
2. In the Deployment Managers dialog, enter the user name and password
you specified when you installed the J2EE 1.4 Application Server.
3. You will see the deployed Web modules in the Deployed Objects list of the
General tab.
4. Select the module.
5. Click Undeploy.
Duke’s Bookstore Examples
In the next 5 chapters, the Duke’s Bookstore examples are used to illustrate the
elements of Java Servlet technology, JavaServer Pages technology, and the JSP
101
102
GETTING STARTED WITH WEB APPLICATIONS
Standard Tag Library. The examples emulate a simple online shopping application. They provide a book catalog from which users can select books and add
them to a shopping cart. Users can view and modify the shopping cart. Once
users are finished shopping, they can purchase the books in the cart.
The Duke’s Bookstore examples share common classes and a database schema.
These files are located in the directory <INSTALL>/j2eetutorial/examples/
web/bookstore/. The common classes are packaged into a JAR. To create the
bookstore library JAR:
1. In a terminal window, go to <INSTALL>/j2eetutorial14/examples/
web/bookstore/.
2. Run asant build to compile the bookstore files.
3. Run asant package-bookstore to create a library named bookstore.jar
in <INSTALL>/j2eetutorial14/examples/bookstore/dist/.
The next section describes how to create the bookstore database table and application server resources required to run the examples.
Accessing Databases from Web
Applications
Data that is shared between Web components and persistent between invocations
of a Web application is usually maintained in a database. Web applications use
the JDBC 2.0 API to access relational databases. For information on this API,
see
http://java.sun.com/docs/books/tutorial/jdbc
In the JDBC API, databases are accessed via DataSource objects. A DataSource has a set of properties that identify and describe the real world data
source that it represents. These properties include information like the location
of the database server, the name of the database, the network protocol to use to
communicate with the server, and so on.
Applications access a data source using a connection, and a DataSource object
can be thought of as a factory for connections to the particular data source that
the DataSource instance represents. In a basic DataSource implementation, a
call to the method DataSource.getConnection returns a connection object that
is a physical connection to the data source.
STARTING THE POINTBASE DATABASE SERVER
If a DataSource object is registered with a JNDI naming service, an application
can use the JNDI API to access that DataSource object, which can then be used
to connect to the data source it represents.
objects that implement connection pooling also produce a connection to the particular data source that the DataSource class represents. The connection object that the method DataSource.getConnection returns is a handle
to a PooledConnection object rather than being a physical connection. An
application uses the connection object like any other connection. Connection
pooling has no effect on application code except that a pooled connection, like
all connections, should always be explicitly closed. When an application closes a
connection that is pooled, the connection is returned to a pool of reusable connections. The next time DataSource.getConnection is called, a handle to one
of these pooled connections will be returned if one is available. Because connection pooling avoids creating a new physical connection every time one is
requested, it can help applications run significantly faster.
DataSource
The Duke’s Bookstore examples use the PointBase evaluation database included
with the J2EE 1.4 Application Server to maintain the catalog of books. This section describes how to:
•
•
•
•
Start the PointBase database server
Populate the database
Define a data source in the application server
Configure a Web application to reference the data source with a JNDI
name
• Map the JNDI name to the data source defined in the application server
Starting the PointBase Database Server
To start the PointBase database server:
1. In a terminal window, go to <J2EE_HOME>/pointbase/tools/serveroption.
2. Execute the startserver script.
On Windows, from the Start menu, choose
Programs→Sun Microsystems→J2EE 1.4 SDK→Start PointBase
103
104
GETTING STARTED WITH WEB APPLICATIONS
Populating the Example Database
To populate the database for the Duke’s Bookstore examples:
1. In a terminal window, go to <INSTALL>/j2eetutorial14/examples/
web/bookstore.
2. Run asant create-db_common. This asant task runs a PointBase commander tool command to read the file books.sql and execute the SQL
commands contained in the file. The table named books is created for the
user pbpublic in the sun-appserv-samples PointBase database.
3. At the end of the processing, you should see the following output:
...
[java] SQL> INSERT INTO books VALUES('207', 'Thrilled', 'Ben',
[java] 'The Green Project: Programming for Consumer Devices',
[java] 30.00, false, 1998, 'What a cool book', 20);
[java] 1 row(s) affected
[java] SQL> INSERT INTO books VALUES('208', 'Tru', 'Itzal',
[java] 'Duke: A Biography of the Java Evangelist',
[java] 45.00, true, 2001, 'What a cool book.', 20);
[java] 1 row(s) affected
You can check that the table exists with the PointBase console tool as follows:
1. In a terminal window, go to <J2EE_HOME>/pointbase/tools/serveroption/.
2. Execute startconsole.
3. In the Connect to Database dialog enter jdbc:pointbase:server://
localhost/sun-appserv-samples in the URL field.
4. Click OK.
5. Expand the SCHEMAS→PBPUBLIC→TABLES nodes. Notice that there
is a table named BOOKS.
6. To see the contents of the books table:
a. In the Enter SQL commands text area, enter select * from books;.
b. Click the Execute button.
DEFINING A DATA SOURCE IN THE J2EE SERVER
Defining a Data Source in the J2EE
Server
Data sources in the J2EE application server implement connection pooling. To
define the Duke’s Bookstore data source, you first need to create a data pool as
follows:
1. In a terminal window, go to <INSTALL>/j2eetutorial14/examples/
web/bookstore.
2. Run asant create-jdbc-connection-pool_common. This asant task
runs an asadmin command to create a JDBC connection pool named
bookstore-pool.
3. At the end of the processing, you should see the following output:
admin_command_common:
[echo] Doing admin task set server.jdbc-connectionpool.bookstore-pool.property.Password=pbpublic
[sun-appserv-admin] Executing: set --port 4848 --host localhost
--password yourpassword --user admin server.jdbc-connectionpool.bookstore-pool.property.Password=pbpublic
[sun-appserv-admin] Unable to read system environment. No
system environment will be used.
[sun-appserv-admin] Attribute property.Password set to pbpublic
Then, create the data source as follows:
1. In a terminal window, go to <INSTALL>/j2eetutorial14/examples/
web/bookstore.
2. Run asant create-jdbc-resource_common. This asant task runs an
asadmin command to create a JDBC resource named jdbc/BookDB that
references the bookstore-pool connection pool.
3. At the end of the processing, you should see the following output:
admin_command_common:
[echo] Doing admin task create-jdbc-resource
-connectionpoolid bookstore-pool --instance server jdbc/BookDB
[sun-appserv-admin] Executing: create-jdbc-resource
--port 4848 --host localhost --password yourpassword
--user admin --connectionpoolid bookstore-pool
--instance server jdbc/BookDB
[sun-appserv-admin] Created the external JDBC resource with
jndiname = jdbc/BookDB
105
106
GETTING STARTED WITH WEB APPLICATIONS
When you change application server configuration information, the changes are
not applied immediately, but are saved into special files, located in
<J2EE_HOME>/domains/domain1/config/backup. Until you apply the changes,
they do not take effect. Applying changes is also called reconfiguring the server.
When you apply your changes, all changes made to the configuration since the
last time you applied changes take effect. Note that restarting the server does not
automatically apply the changes.
To reconfigure the server:
1. Run asant reconfig_common. This asant task runs an asadmin command
to reconfigure the server.
2. At the end of the processing, you should see the following output:
reconfig_common:
[echo] Reconfiguring server server
[sun-appserv-admin] Executing: reconfig --port 4848
--host localhost --password yourpassword --user admin server
[sun-appserv-admin] Successfully reconfigured
Configuring the Web Application to
Reference a Data Source with JNDI
In order to access a database from a Web application, you must declare resource
reference in the application’s Web application deployment descriptor (see
Declaring References to Environment Entries, Resource Environment Entries, or
Resources, page 97). The resource reference declares a JNDI name, the type of
the data resource, and the kind of authentication used when the resource is
accessed. The JNDI name is used to create a data source object in the database
helper class database.BookDB:
public BookDB () throws Exception {
try {
Context initCtx = new InitialContext();
Context envCtx = (Context)
initCtx.lookup("java:comp/env");
DataSource ds = (DataSource) envCtx.lookup("jdbc/BookDB");
con = ds.getConnection();
System.out.println("Created connection to database.");
} catch (Exception ex) {
System.out.println("Couldn't create connection." +
ex.getMessage());
MAPPING THE WEB APPLICATION JNDI NAME TO A DATA SOURCE
throw new
Exception("Couldn't open connection to database: "
+ex.getMessage());
}
To specify a resource reference to the bookstore data source:
1.
2.
3.
4.
5.
6.
7.
Select the WAR.
Select the References tab.
Click Add.
Type jdbc/BookDB in the Name field.
Accept the default type javax.sql.DataSource.
Accept the default authorization Container.
Accept the default Shareable selected.
Mapping the Web Application JNDI
Name to a Data Source
Since the resource reference declared in the Web application deployment
descriptor uses a JNDI name to refer to the data source, you must connect the
name to a data source defined by the J2EE application server as follows:
1. Select the Resource Reference Name, jdbc/BookDB, defined in the previous section.
2. In the Deployment Setting box, enter the name of the data source that you
create in the application server, jdbc/BookDB, in the JNDI Name field.
Further Information
For more information about Web applications, refer to the following:
• Resources listed on the Web site http://java.sun.com/products/
servlet.
• The Java Servlet 2.3 Specification.
107
108
GETTING STARTED WITH WEB APPLICATIONS
4
Java API for XML
Processing
Eric Armstrong
THE Java API for XML Processing (JAXP) is for processing XML data using
applications written in the Java programming language. JAXP leverages the
parser standards SAX (Simple API for XML Parsing) and DOM (Document
Object Model) so that you can choose to parse your data as a stream of events or
to build an object representation of it. JAXP also supports the XSLT (XML
Stylesheet Language Transformations) standard, giving you control over the presentation of the data and enabling you to convert the data to other XML documents or to other formats, such as HTML. JAXP also provides namespace
support, allowing you to work with DTDs that might otherwise have naming
conflicts.
Designed to be flexible, JAXP allows you to use any XML-compliant parser
from within your application. It does this with what is called a “pluggability
layer”, which allows you to plug in an implementation of the SAX or DOM
APIs. The pluggability layer also allows you to plug in an XSL processor, letting
you control how your XML data is displayed.
The JAXP APIs
The main JAXP APIs are defined in the javax.xml.parsers package. That
package contains two vendor-neutral factory classes: SAXParserFactory and
109
110
JAVA API FOR XML PROCESSING
DocumentBuilderFactory that give you a SAXParser and a DocumentBuilder,
respectively. The DocumentBuilder, in turn, creates DOM-compliant Document
object.
The factory APIs give you the ability to plug in an XML implementation offered
by another vendor without changing your source code. The implementation you
get depends on the setting of the javax.xml.parsers.SAXParserFactory and
javax.xml.parsers.DocumentBuilderFactory system properties. The default
values (unless overridden at runtime) point to Sun’s implementation.
The remainder of this section shows how the different JAXP APIs work when
you write an application.
An Overview of the Packages
The SAX and DOM APIs are defined by XML-DEV group and by the W3C,
respectively. The libraries that define those APIs are:
javax.xml.parsers
The JAXP APIs, which provide a common interface for different vendors’
SAX and DOM parsers.
org.w3c.dom
Defines the Document class (a DOM), as well as classes for all of the components of a DOM.
org.xml.sax
Defines the basic SAX APIs.
javax.xml.transform
Defines the XSLT APIs that let you transform XML into other forms.
The “Simple API” for XML (SAX) is the event-driven, serial-access mechanism
that does element-by-element processing. The API for this level reads and writes
XML to a data repository or the Web. For server-side and high-performance
apps, you will want to fully understand this level. But for many applications, a
minimal understanding will suffice.
The DOM API is generally an easier API to use. It provides a relatively familiar
tree structure of objects. You can use the DOM API to manipulate the hierarchy
of application objects it encapsulates. The DOM API is ideal for interactive
applications because the entire object model is present in memory, where it can
be accessed and manipulated by the user.
On the other hand, constructing the DOM requires reading the entire XML structure and holding the object tree in memory, so it is much more CPU and memory
THE SIMPLE API FOR XML (SAX) APIS
intensive. For that reason, the SAX API will tend to be preferred for server-side
applications and data filters that do not require an in-memory representation of
the data.
Finally, the XSLT APIs defined in javax.xml.transform let you write XML
data to a file or convert it into other forms. And, as you’ll see in the XSLT section, of this tutorial, you can even use it in conjunction with the SAX APIs to
convert legacy data to XML.
The Simple API for XML (SAX) APIs
The basic outline of the SAX parsing APIs are shown at right. To start the process, an instance of the SAXParserFactory class is used to generate an instance
of the parser.
Figure 4–1 SAX APIs
The parser wraps a SAXReader object. When the parser’s parse() method is
invoked, the reader invokes one of several callback methods implemented in the
application. Those methods are defined by the interfaces ContentHandler,
ErrorHandler, DTDHandler, and EntityResolver.
Here is a summary of the key SAX APIs:
111
112
JAVA API FOR XML PROCESSING
SAXParserFactory
A SAXParserFactory object creates an instance of the parser determined
the system property, javax.xml.parsers.SAXParserFactory.
by
SAXParser
The SAXParser
interface defines several kinds of parse() methods. In general, you pass an XML data source and a DefaultHandler object to the
parser, which processes the XML and invokes the appropriate methods in the
handler object.
SAXReader
The SAXParser wraps a SAXReader. Typically, you don’t care about that, but
every once in a while you need to get hold of it using SAXParser’s getXMLReader(), so you can configure it. It is the SAXReader which carries on the
conversation with the SAX event handlers you define.
DefaultHandler
Not shown in the diagram, a DefaultHandler implements
tentHandler, ErrorHandler, DTDHandler, and EntityResolver
the Coninterfaces
(with null methods), so you can override only the ones you’re interested in.
ContentHandler
Methods like startDocument, endDocument, startElement, and endElement are invoked when an XML tag is recognized. This interface also
defines methods characters and processingInstruction, which are
invoked when the parser encounters the text in an XML element or an inline
processing instruction, respectively.
ErrorHandler
Methods error, fatalError,
and warning are invoked in response to various parsing errors. The default error handler throws an exception for fatal
errors and ignores other errors (including validation errors). That’s one reason you need to know something about the SAX parser, even if you are using
the DOM. Sometimes, the application may be able to recover from a validation error. Other times, it may need to generate an exception. To ensure the
correct handling, you’ll need to supply your own error handler to the parser.
DTDHandler
Defines methods you will generally never be called upon to use. Used when
processing a DTD to recognize and act on declarations for an unparsed
entity.
EntityResolver
The resolveEntity
method is invoked when the parser must identify data
identified by a URI. In most cases, a URI is simply a URL, which specifies
the location of a document, but in some cases the document may be identified by a URN—a public identifier, or name, that is unique in the Web space.
THE SIMPLE API FOR XML (SAX) APIS
The public identifier may be specified in addition to the URL. The Entitycan then use the public identifier instead of the URL to find the
document, for example to access a local copy of the document if one exists.
A typical application implements most of the ContentHandler methods, at a
minimum. Since the default implementations of the interfaces ignore all inputs
except for fatal errors, a robust implementation may want to implement the
ErrorHandler methods, as well.
Resolver
113
114
JAVA API FOR XML PROCESSING
The SAX Packages
The SAX parser is defined in the following packages listed in Table 4–1.
Table 4–1 SAX Packages
Package
Description
org.xml.sax
Defines the SAX interfaces. The name org.xml is the package prefix that was settled on by the group that defined the
SAX API.
org.xml.sax.ext
Defines SAX extensions that are used when doing more
sophisticated SAX processing, for example, to process a document type definitions (DTD) or to see the detailed syntax for
a file.
org.xml.sax.helpers
Contains helper classes that make it easier to use SAX—for
example, by defining a default handler that has null-methods
for all of the interfaces, so you only need to override the ones
you actually want to implement.
javax.xml.parsers
Defines the SAXParserFactory class which returns the
SAXParser. Also defines exception classes for reporting
errors.
The Document Object Model (DOM)
APIs
Figure 4–2 shows the JAXP APIs in action:
THE DOCUMENT OBJECT MODEL (DOM) APIS
Figure 4–2 DOM APIs
You use the javax.xml.parsers.DocumentBuilderFactory class to get a DocumentBuilder instance, and use that to produce a Document (a DOM) that conforms to the DOM specification. The builder you get, in fact, is determined by
the System property, javax.xml.parsers.DocumentBuilderFactory, which
selects the factory implementation that is used to produce the builder. (The platform’s default value can be overridden from the command line.)
You can also use the DocumentBuilder newDocument() method to create an
empty Document that implements the org.w3c.dom.Document interface. Alternatively, you can use one of the builder’s parse methods to create a Document
from existing XML data. The result is a DOM tree like that shown in the diagram.
Note: Although they are called objects, the entries in the DOM tree are actually
fairly low-level data structures. For example, under every element node (which corresponds to an XML element) there is a text node which contains the name of the
element tag! This issue will be explored at length in the DOM section of the tutorial,
but users who are expecting objects are usually surprised to find that invoking the
text() method on an element object returns nothing! For a truly object-oriented
tree, see the JDOM API at http://www.jdom.org.
115
116
JAVA API FOR XML PROCESSING
The DOM Packages
The Document Object Model implementation is defined in the packages listed in
Table 4–2.:
Table 4–2 DOM Packages
Package
Description
org.w3c.dom
Defines the DOM programming interfaces for XML (and, optionally, HTML) documents, as specified by the W3C.
javax.xml.parsers
Defines the DocumentBuilderFactory class and the DocumentBuilder class, which returns an object that implements the
W3C Document interface. The factory that is used to create the
builder is determined by the javax.xml.parsers system property, which can be set from the command line or overridden when
invoking the new Instance method. This package also defines
the ParserConfigurationException class for reporting
errors.
THE XML STYLESHEET LANGUAGE FOR TRANSFORMATION (XSLT) APIS
The XML Stylesheet Language for
Transformation (XSLT) APIs
Figure 4–3 shows the XSLT APIs in action.
Figure 4–3 XSLT APIs
A TransformerFactory object is instantiated, and used to create a Transformer. The source object is the input to the transformation process. A source
object can be created from SAX reader, from a DOM, or from an input stream.
Similarly, the result object is the result of the transformation process. That object
can be a SAX event handler, a DOM, or an output stream.
When the transformer is created, it may be created from a set of transformation
instructions, in which case the specified transformations are carried out. If it is
created without any specific instructions, then the transformer object simply copies the source to the result.
117
118
JAVA API FOR XML PROCESSING
The XSLT Packages
The XSLT APIs are defined in the following packages:
Table 4–3 XSLT Packages
Package
Description
javax.xml.transform
Defines the TransformerFactory and
Transformer classes, which you use to get a
object capable of doing transformations. After
creating a transformer object, you invoke its
transform() method, providing it with an
input (source) and output (result).
javax.xml.transform.dom
Classes to create input (source) and output
(result) objects from a DOM.
javax.xml.transform.sax
Classes to create input (source) from a SAX
parser and output (result) objects from a SAX
event handler.
javax.xml.transform.stream
Classes to create input (source) and output
(result) objects from an I/O stream.
Compiling and Running the Programs
In the J2EE 1.4 Application Server, the JAXP libraries are distributed in the
directory <J2EE_HOME>/lib/endorsed. To run the sample programs, you'll need
to used the Java 2 platform’s “endorsed standards” mechanism to access those
libraries. For details, see Compiling and Running the Program (page 133).
Where Do You Go from Here?
At this point, you have enough information to begin picking your own way
through the JAXP libraries. Your next step from here depends on what you want
to accomplish. You might want to go to:
WHERE DO YOU GO FROM HERE?
Simple API for XML (page 121)
If the data structures have already been determined, and you are writing a
server application or an XML filter that needs to do fast processing.
Document Object Model (page 181)
If you need to build an object tree from XML data so you can manipulate it
in an application, or convert an in-memory tree of objects to XML. This part
of the tutorial ends with a section on namespaces.
XML Stylesheet Language for Transformations (page 255)
If you need to transform XML tags into some other form, if you want to generate XML output, or (in combination with the SAX API) if you want to
convert legacy data structures to XML.
119
120
JAVA API FOR XML PROCESSING
5
Simple API for XML
Eric Armstrong
I
N this chapter we focus on the Simple API for XML (SAX), an event-driven,
serial-access mechanism for accessing XML documents. This is the protocol that
most servlets and network-oriented programs will want to use to transmit and
receive XML documents, because it’s the fastest and least memory-intensive
mechanism that is currently available for dealing with XML documents.
The SAX protocol requires a lot more programming than the Document Object
Model (DOM). It’s an event-driven model (you provide the callback methods,
and the parser invokes them as it reads the XML data), which makes it harder to
visualize. Finally, you can’t “back up” to an earlier part of the document, or rearrange it, any more than you can back up a serial data stream or rearrange characters you have read from that stream.
For those reasons, developers who are writing a user-oriented application that
displays an XML document and possibly modifies it will want to use the DOM
mechanism described in the next part of the tutorial, Document Object
Model (page 181).
However, even if you plan to build with DOM apps exclusively, there are several
important reasons for familiarizing yourself with the SAX model:
• Same Error Handling
When parsing a document for a DOM, the same kinds of exceptions are
generated, so the error handling for JAXP SAX and DOM applications
are identical.
• Handling Validation Errors
121
122
SIMPLE API FOR XML
By default, the specifications require that validation errors (which you’ll
be learning more about in this part of the tutorial) are ignored. If you want
to throw an exception in the event of a validation error (and you probably
do) then you need to understand how the SAX error handling works.
• Converting Existing Data
As you’ll see in the DOM section of the tutorial, there is a mechanism you
can use to convert an existing data set to XML—however, taking advantage of that mechanism requires an understanding of the SAX model.
Note:
The
XML
files
used
in
this
chapter
can
be
found
in
<INSTALL>/j2eetutorial14/examples/xml/samples.
The
programs
and
output
listings
can
be
found
in
<INSTALL>/j2eetutorial14/examples/jaxp/sax/samples.
When to Use SAX
When it comes to fast, efficient reading of XML data, SAX is hard to beat. It
requires little memory, because it does not construct an internal representation
(tree structure) of the XML data. Instead, it simply sends data to the application
as it is read — your application can then do whatever it wants to do with the data
it sees.
In effect, the SAX API acts like a serial I/O stream. You see the data as it streams
in, but you can’t go back to an earlier position or leap ahead to a different position. In general, it works well when you simply want to read data and have the
application act on it.
It is also helpful to understand the SAX event model when you want to convert
existing data to XML. As you’ll see in Generating XML from an Arbitrary Data
Structure (page 275), the key to the conversion process is modifying an existing
application to deliver the appropriate SAX events as it reads the data.
But when you need to modify an XML structure — especially when you need to
modify it interactively, an in-memory structure like the Document Object Model
(DOM) may make more sense.
However, while DOM provides many powerful capabilities for large-scale documents (like books and articles), it also requires a lot of complex coding. (The
details of that process are highlighted in When to Use DOM (page 182).)
ECHOING AN XML FILE WITH THE SAX PARSER
For simpler applications, that complexity may well be unnecessary. For faster
development and simpler applications, one of the object-oriented XML-programming standards may make the most sense, as described in JDOM and
dom4j (page 35).
Echoing an XML File with the SAX
Parser
In real life, you are going to have little need to echo an XML file with a SAX
parser. Usually, you’ll want to process the data in some way in order to do something useful with it. (If you want to echo it, it’s easier to build a DOM tree and
use that for output.) But echoing an XML structure is a great way to see the SAX
parser in action, and it can be useful for debugging.
In this exercise, you’ll echo SAX parser events to System.out. Consider it the
“Hello World” version of an XML-processing program. It shows you how to use
the SAX parser to get at the data, and then echoes it to show you what you’ve
got.
Note: The code discussed in this section is in Echo01.java. The file it operates on
is slideSample01.xml, as described in Writing a Simple XML File (page 45). (The
browsable version is slideSample01-xml.html.)
Creating the Skeleton
Start by creating a file named Echo.java and enter the skeleton for the application:
public class Echo
{
public static void main(String argv[])
{
}
}
Since we’re going to run it standalone, we need a main method. And we need
command-line arguments so we can tell the application which file to echo.
123
124
SIMPLE API FOR XML
Importing Classes
Next, add the import statements for the classes the application will use:
import
import
import
import
import
import
java.io.*;
org.xml.sax.*;
org.xml.sax.helpers.DefaultHandler;
javax.xml.parsers.SAXParserFactory;
javax.xml.parsers.ParserConfigurationException;
javax.xml.parsers.SAXParser;
public class Echo
{
...
The classes in java.io, of course, are needed to do output. The org.xml.sax
package defines all the interfaces we use for the SAX parser. The SAXParserFactory class creates the instance we use. It throws a ParserConfigurationException if it is unable to produce a parser that matches the specified
configuration of options. (You’ll see more about the configuration options later.)
The SAXParser is what the factory returns for parsing, and the DefaultHandler
defines the class that will handle the SAX events that the parser generates.
Setting up for I/O
The first order of business is to process the command line argument, get the
name of the file to echo, and set up the output stream. Add the text highlighted
below to take care of those tasks and do a bit of additional housekeeping:
public static void main(String argv[])
{
if (argv.length != 1) {
System.err.println("Usage: cmd filename");
System.exit(1);
}
try {
// Set up output stream
out = new OutputStreamWriter(System.out, "UTF8");
}
catch (Throwable t) {
t.printStackTrace();
}
IMPLEMENTING THE CONTENTHANDLER INTERFACE
System.exit(0);
}
static private Writer out;
When we create the output stream writer, we are selecting the UTF-8 character
encoding. We could also have chosen US-ASCII, or UTF-16, which the Java
platform also supports. For more information on these character sets, see Java
Encoding Schemes (page 811).
Implementing the ContentHandler
Interface
The most important interface for our current purposes is the ContentHandler
interface. That interface requires a number of methods that the SAX parser
invokes in response to different parsing events. The major event handling methods are: startDocument, endDocument, startElement, endElement, and characters.
The easiest way to implement that interface is to extend the DefaultHandler
class, defined in the org.xml.sax.helpers package. That class provides donothing methods for all of the ContentHandler events. Enter the code highlighted below to extend that class:
public class Echo extends DefaultHandler
{
...
}
Note: DefaultHandler also defines do-nothing methods for the other major events,
defined in the DTDHandler, EntityResolver, and ErrorHandler interfaces. You’ll
learn more about those methods as we go along.
Each of these methods is required by the interface to throw a SAXException. An
exception thrown here is sent back to the parser, which sends it on to the code
that invoked the parser. In the current program, that means it winds up back at
the Throwable exception handler at the bottom of the main method.
When a start tag or end tag is encountered, the name of the tag is passed as a
String to the startElement or endElement method, as appropriate. When a
start tag is encountered, any attributes it defines are also passed in an
125
126
SIMPLE API FOR XML
Attributes list. Characters found within the element are passed as an array of
characters, along with the number of characters (length) and an offset into the
array that points to the first character.
Setting up the Parser
Now (at last) you’re ready to set up the parser. Add the text highlighted below to
set it up and get it started:
public static void main(String argv[])
{
if (argv.length != 1) {
System.err.println("Usage: cmd filename");
System.exit(1);
}
// Use an instance of ourselves as the SAX event handler
DefaultHandler handler = new Echo();
// Use the default (non-validating) parser
SAXParserFactory factory = SAXParserFactory.newInstance();
try {
// Set up output stream
out = new OutputStreamWriter(System.out, "UTF8");
// Parse the input
SAXParser saxParser = factory.newSAXParser();
saxParser.parse( new File(argv[0]), handler );
} catch (Throwable t) {
t.printStackTrace();
}
System.exit(0);
}
With these lines of code, you created a SAXParserFactory instance, as determined by the setting of the javax.xml.parsers.SAXParserFactory system
property. You then got a parser from the factory and gave the parser an instance
of this class to handle the parsing events, telling it which input file to process.
Note: The javax.xml.parsers.SAXParser class is a wrapper that defines a number
of convenience methods. It wraps the (somewhat-less friendly)
WRITING THE OUTPUT
org.xml.sax.Parser object. If
Parser’s getParser() method.
needed, you can obtain that parser using the SAX-
For now, you are simply catching any exception that the parser might throw.
You’ll learn more about error processing in a later section of the tutorial, Handling Errors with the Nonvalidating Parser (page 145).
Writing the Output
The ContentHandler methods throw SAXExceptions but not IOExceptions,
which can occur while writing. The SAXException can wrap another exception,
though, so it makes sense to do the output in a method that takes care of the
exception-handling details. Add the code highlighted below to define an emit
method that does that:
static private Writer out;
private void emit(String s)
throws SAXException
{
try {
out.write(s);
out.flush();
} catch (IOException e) {
throw new SAXException("I/O error", e);
}
}
...
When emit is called, any I/O error is wrapped in SAXException along with a
message that identifies it. That exception is then thrown back to the SAX parser.
You’ll learn more about SAX exceptions later on. For now, keep in mind that
emit is a small method that handles the string output. (You’ll see it called a lot in
the code ahead.)
127
128
SIMPLE API FOR XML
Spacing the Output
Here is another bit of infrastructure we need before doing some real processing.
Add the code highlighted below to define a nl() method that writes the kind of
line-ending character used by the current system:
private void emit(String s)
...
}
private void nl()
throws SAXException
{
String lineEnd = System.getProperty("line.separator");
try {
out.write(lineEnd);
} catch (IOException e) {
throw new SAXException("I/O error", e);
}
}
Note: Although it seems like a bit of a nuisance, you will be invoking nl() many
times in the code ahead. Defining it now will simplify the code later on. It also provides a place to indent the output when we get to that section of the tutorial.
Handling Content Events
Finally, let’s write some code that actually processes the ContentHandler
events.
Document Events
Add the code highlighted below to handle the start-document and end-document
events:
static private Writer out;
public void startDocument()
throws SAXException
{
emit("<?xml version='1.0' encoding='UTF-8'?>");
nl();
HANDLING CONTENT EVENTS
}
public void endDocument()
throws SAXException
{
try {
nl();
out.flush();
} catch (IOException e) {
throw new SAXException("I/O error", e);
}
}
private void echoText()
...
Here, you are echoing an XML declaration when the parser encounters the start
of the document. Since you set up the OutputStreamWriter using the UTF-8
encoding, you include that specification as part of the declaration.
Note: However, the IO classes don’t understand the hyphenated encoding names,
so you specified “UTF8” rather than “UTF-8”.
At the end of the document, you simply put out a final newline and flush the output stream. Not much going on there.
Element Events
Now for the interesting stuff. Add the code highlighted below to process the
start-element and end-element events:
public void startElement(String namespaceURI,
String sName, // simple name
String qName, // qualified name
Attributes attrs)
throws SAXException
{
String eName = sName; // element name
if ("".equals(eName)) eName = qName; // not namespaceAware
emit("<"+eName);
if (attrs != null) {
for (int i = 0; i < attrs.getLength(); i++) {
String aName = attrs.getLocalName(i); // Attr name
if ("".equals(aName)) aName = attrs.getQName(i);
129
130
SIMPLE API FOR XML
emit(" ");
emit(aName+"=\""+attrs.getValue(i)+"\"");
}
}
emit(">");
}
public void endElement(String namespaceURI,
String sName, // simple name
String qName // qualified name
)
throws SAXException
{
String eName = sName; // element name
if ("".equals(eName)) eName = qName; // not namespaceAware
emit("<"+eName+">");
}
private void emit(String s)
...
With this code, you echoed the element tags, including any attributes defined in
the start tag. Note that when the startElement() method is invoked, the simple
name (“local name”) for elements and attributes could turn out to be the empty
string, if namespace processing was not enabled. The code handles that case by
using the qualified name whenever the simple name is the empty string.
Character Events
To finish handling the content events, you need to handle the characters that the
parser delivers to your application.
Parsers are not required to return any particular number of characters at one
time. A parser can return anything from a single character at a time up to several
thousand, and still be standard-conforming implementation. So, if your application needs to process the characters it sees, it is wise to accumulate the characters
in a buffer, and operate on them only when you are sure they have all been found.
HANDLING CONTENT EVENTS
Add the line highlighted below to define the text buffer:
public class Echo01 extends DefaultHandler
{
StringBuffer textBuffer;
public static void main(String argv[])
{
...
Then add the code highlighted below to accumulate the characters the parser
delivers in the buffer:
public void endElement(...)
throws SAXException
{
...
}
public void characters(char buf[], int offset, int len)
throws SAXException
{
String s = new String(buf, offset, len);
if (textBuffer == null) {
textBuffer = new StringBuffer(s);
} else {
textBuffer.append(s);
}
}
private void emit(String s)
...
Next, add this method highlighted below to send the contents of the buffer to the
output stream.
public void characters(char buf[], int offset, int len)
throws SAXException
{
...
}
private void echoText()
throws SAXException
{
if (textBuffer == null) return;
131
132
SIMPLE API FOR XML
String s = ""+textBuffer
emit(s);
textBuffer = null;
}
private void emit(String s)
...
When this method is called twice in a row (which will happens at times, as we’ll
see next), the buffer will be null. So in that case, the method simply returns.
When the buffer is non-null, however, it’s contents are sent to the output stream.
Finally, add the code highlighted below to echo the contents of the buffer whenever an element starts or ends:
public void startElement(...)
throws SAXException
{
echoText();
String eName = sName; // element name
...
}
public void endElement(...)
throws SAXException
{
echoText();
String eName = sName; // element name
...
}
You’re done accumulating text when an element ends, of course. So you echo it
at that point, which clears the buffer before the next element starts.
But you also want to echo the accumulated text when an element starts! That’s
necessary for document-style data, which can contain XML elements that are
intermixed with text. For example, in this document fragment:
<para>This paragraph contains <bold>important</bold>
ideas.</para>
The initial text, “This paragraph contains” is terminated by the start of the
<bold> element. The text, “important” is terminated by the end tag, </bold>,
and the final text, “ideas.”, is terminated by the end tag, </para>.
COMPILING AND RUNNING THE PROGRAM
Note: Most of the time, though, the accumulated text will be echoed when an
endElement() event occurs. When a startElement() event occurs after that, the
buffer will be empty. The first line in the echoText() method checks for that case,
and simply returns.
Congratulations! At this point you have written a complete SAX parser application. The next step is to compile and run it.
Note: To be strictly accurate, the character handler should scan the buffer for
ampersand characters ('&');and left-angle bracket characters ('<') and replace them
with the strings “&” or “<”, as appropriate. You’ll find out more about that
kind of processing when we discuss entity references in Displaying Special Characters and CDATA (page 153).
Compiling and Running the Program
In
the
J2EE
release,
the
JAXP libraries are in the directory
These are newer versions of the standard
JAXP libraries that are part of the Java 2 platform.
<J2EE_HOME>/share/lib/endorsed.
The J2EE Application Server automatically uses the newer libraries when a program runs. So you won’t have to be concerned with where they reside when you
deploy an application.
And since the JAXP APIs are identical in both versions, you won’t need to be
concerned at compile time either. So compiling the program you created is as
simple as issuing the command:
javac Echo.java
But to run the program outside of the server container, you need to make sure
that the java runtime finds the newer versions of the JAXP libraries. That situation can occur, for example, when unit-testing parts of your application outside
of the sever, as well as here, when running the XML tutorial examples.
133
134
SIMPLE API FOR XML
There are two ways to make sure that the program uses the latest version of the
JAXP libraries:
• Copy
the
<J2EE_HOME>/share/lib/endorsed
directory
to
<J2EE_HOME>/jdk/jre/lib. You can then run the program with this
command:
<J2EE_HOME>/jdk/bin/java Echo slideSample.xml
The libraries will then be found in the endorsed standards directory,
<J2EE_HOME>/jdk/jre/lib/endorsed.
• Use the endorsed directories system property to specify the location of the
libraries, by specifying this option on the java command line: D”java.endorsed.dirs=<J2EE_HOME>/share/lib/endorsed”
Note: Since the JAXP APIs are already built into the Java 2 Platform, they don’t
need to be specified at compile time. (In fact, the -D option is not even allowed at
compile time, because endorsed standards are required to maintain consistent
APIs.) However, when the JAXP factories instantiate an implementation, the
endorsed directories mechanism is employed to make sure that the desired implementation is instantiated.
Checking the Output
Here is part of the program’s output, showing some of its weird spacing:
...
<slideshow title="Sample Slide Show" date="Date of publication"
author="Yours Truly">
<slide type="all">
<title>Wake up to WonderWidgets!</title>
</slide>
...
Note: The program’s output is contained in
sion is Echo01-01.html.)
Echo01-01.txt.
(The browsable ver-
IDENTIFYING THE EVENTS
Looking at this output, a number of questions arise. Namely, where is the excess
vertical whitespace coming from? And why is it that the elements are indented
properly, when the code isn’t doing it? We’ll answer those questions in a
moment. First, though, there are a few points to note about the output:
• The comment defined at the top of the file
<!-- A SAMPLE set of slides -->
does not appear in the listing. Comments are ignored, unless you implement
a LexicalHandler. You’ll see more about that later on in this tutorial.
• Element attributes are listed all together on a single line. If your window
isn’t really wide, you won’t see them all.
• The single-tag empty element you defined (<item/>) is treated exactly the
same as a two-tag empty element (<item></item>). It is, for all intents and
purposes, identical. (It’s just easier to type and consumes less space.)
Identifying the Events
This version of the echo program might be useful for displaying an XML file,
but it’s not telling you much about what’s going on in the parser. The next step is
to modify the program so that you see where the spaces and vertical lines are
coming from.
Note: The code discussed in this section is in Echo02.java. The output it produces
is shown in Echo02-01.txt. (The browsable version is Echo02-01.html)
Make the changes highlighted below to identify the events as they occur:
public void startDocument()
throws SAXException
{
nl();
nl();
emit("START DOCUMENT");
nl();
emit("<?xml version='1.0' encoding='UTF-8'?>");
nl();
}
public void endDocument()
135
136
SIMPLE API FOR XML
throws SAXException
{
nl();
emit("END DOCUMENT");
try {
...
}
public void startElement(...)
throws SAXException
{
echoText();
nl();
emit("ELEMENT: ");
String eName = sName; // element name
if ("".equals(eName)) eName = qName; // not namespaceAware
emit("<"+eName);
if (attrs != null) {
for (int i = 0; i < attrs.getLength(); i++) {
String aName = attrs.getLocalName(i); // Attr name
if ("".equals(aName)) aName = attrs.getQName(i);
emit(" ");
emit(aName+"=\""+attrs.getValue(i)+"\"");
nl();
emit("
ATTR: ");
emit(aName);
emit("\t\"");
emit(attrs.getValue(i));
emit("\"");
}
}
if (attrs.getLength() > 0) nl();
emit(">");
}
public void endElement(...)
throws SAXException
{
echoText();
nl();
emit("END_ELM: ");
String eName = sName; // element name
if ("".equals(eName)) eName = qName; // not namespaceAware
COMPRESSING THE OUTPUT
emit("<"+eName+">");
}
...
private void echoText()
throws SAXException
{
if (textBuffer == null) return;
nl();
emit("CHARS: |");
String s = ""+textBuffer
emit(s);
emit("|");
textBuffer = null;
}
Compile and run this version of the program to produce a more informative output listing. The attributes are now shown one per line, which is nice. But, more
importantly, output lines like this one:
CHARS: |
|
show that both the indentation space and the newlines that separate the attributes
come from the data that the parser passes to the characters() method.
Note: The XML specification requires all input line separators to be normalized to
a single newline. The newline character is specified as in Java, C, and UNIX systems, but goes by the alias “linefeed” in Windows systems.
Compressing the Output
To make the output more readable, modify the program so that it only outputs
characters containing something other than whitespace.
Note: The code discussed in this section is in Echo03.java.
137
138
SIMPLE API FOR XML
Make the changes shown below to suppress output of characters that are all
whitespace:
public void echoText()
throws SAXException
{
nl();
emit("CHARS: |");
emit("CHARS:
");
String s = ""+textBuffer;
if (!s.trim().equals("")) emit(s);
emit("|");
}
Next, add the code highlighted below to echo each set of characters delivered by
the parser:
public void characters(char buf[], int offset, int len)
throws SAXException
{
if (textBuffer != null) {
echoText();
textBuffer = null;
}
String s = new String(buf, offset, len);
...
}
If you run the program now, you will see that you have eliminated the indentation as well, because the indent space is part of the whitespace that precedes the
start of an element. Add the code highlighted below to manage the indentation:
static private Writer out;
private String indentString = "
private int indentLevel = 0;
...
public void startElement(...)
throws SAXException
{
indentLevel++;
"; // Amount to indent
COMPRESSING THE OUTPUT
nl();
emit("ELEMENT: ");
...
}
public void endElement(...)
throws SAXException
{
nl();
emit("END_ELM: ");
emit("</"+sName+">");
indentLevel--;
}
...
private void nl()
throws SAXException
{
...
try {
out.write(lineEnd);
for (int i=0; i < indentLevel; i++)
out.write(indentString);
} catch (IOException e) {
...
}
This code sets up an indent string, keeps track of the current indent level, and
outputs the indent string whenever the nl method is called. If you set the indent
string to "", the output will be un-indented (Try it. You’ll see why it’s worth the
work to add the indentation.)
You’ll be happy to know that you have reached the end of the “mechanical” code
you have to add to the Echo program. From here on, you’ll be doing things that
give you more insight into how the parser works. The steps you’ve taken so far,
though, have given you a lot of insight into how the parser sees the XML data it
processes. It’s also given you a helpful debugging tool you can use to see what
the parser sees.
139
140
SIMPLE API FOR XML
Inspecting the Output
There is part of the output from this version of the program:
ELEMENT: <slideshow
...
>
CHARS:
CHARS:
ELEMENT: <slide
...
END_ELM: </slide>
CHARS:
CHARS:
Note: The complete output is
Echo03-01.txt.
(The browsable version is
Echo03-01.html)
Note that the characters method was invoked twice in a row. Inspecting the
source file slideSample01.xml shows that there is a comment before the first
slide. The first call to characters comes before that comment. The second call
comes after. (Later on, you’ll see how to be notified when the parser encounters a
comment, although in most cases you won’t need such notifications.)
Note, too, that the characters method is invoked after the first slide element, as
well as before. When you are thinking in terms of hierarchically structured data,
that seems odd. After all, you intended for the slideshow element to contain
slide elements, not text. Later on, you’ll see how to restrict the slideshow element using a DTD. When you do that, the characters method will no longer be
invoked.
In the absence of a DTD, though, the parser must assume that any element it sees
contains text like that in the first item element of the overview slide:
<item>Why <em>WonderWidgets</em> are great</item>
DOCUMENTS AND DATA
Here, the hierarchical structure looks like this:
ELEMENT: <item>
CHARS:
Why
ELEMENT: <em>
CHARS:
WonderWidgets
END_ELM: </em>
CHARS:
are great
END_ELM: </item>
Documents and Data
In this example, it’s clear that there are characters intermixed with the hierarchical structure of the elements. The fact that text can surround elements (or be prevented from doing so with a DTD or schema) helps to explain why you
sometimes hear talk about “XML data” and other times hear about “XML documents”. XML comfortably handles both structured data and text documents that
include markup. The only difference between the two is whether or not text is
allowed between the elements.
Note: In an upcoming section of this tutorial, you will work with the ignorablemethod in the ContentHandler interface. This method can only be
invoked when a DTD is present. If a DTD specifies that slideshow does not contain
text, then all of the whitespace surrounding the slide elements is by definition
ignorable. On the other hand, if slideshow can contain text (which must be
assumed to be true in the absence of a DTD), then the parser must assume that
spaces and lines it sees between the slide elements are significant parts of the document.
Whitespace
Adding Additional Event Handlers
Besides ignorableWhitespace, there are two other ContentHandler methods
that can find uses in even simple applications: setDocumentLocator and processingInstruction. In this section of the tutorial, you’ll implement those two
event handlers.
141
142
SIMPLE API FOR XML
Identifying the Document’s Location
A locator is an object that contains the information necessary to find the document. The Locator class encapsulates a system ID (URL) or a public identifier
(URN), or both. You would need that information if you wanted to find something relative to the current document—in the same way, for example, that an
HTML browser processes an href="anotherFile" attribute in an anchor tag—
the browser uses the location of the current document to find anotherFile.
You could also use the locator to print out good diagnostic messages. In addition
to the document’s location and public identifier, the locator contains methods
that give the column and line number of the most recently-processed event. The
setDocumentLocator method is called only once at the beginning of the parse,
though. To get the current line or column number, you would save the locator
when setDocumentLocator is invoked and then use it in the other event-handling methods.
Note: The code discussed in this section is in Echo04.java. Its output is in Echo0401.txt. (The browsable version is Echo04-01.html.)
Start by removing the extra character-echoing code you added for the last example:
public void characters(char buf[], int offset, int len)
throws SAXException
{
if (textBuffer != null) {
echoText();
textBuffer = null;
}
String s = new String(buf, offset, len);
...
}
IDENTIFYING THE DOCUMENT’S LOCATION
Next. add the method highlighted below to the Echo program to get the document locator and use it to echo the document’s system ID.
...
private String indentString = "
private int indentLevel = 0;
"; // Amount to indent
public void setDocumentLocator(Locator l)
{
try {
out.write("LOCATOR");
out.write("SYS ID: " + l.getSystemId() );
out.flush();
} catch (IOException e) {
// Ignore errors
}
}
public void startDocument()
...
Notes:
• This method, in contrast to every other ContentHandler method, does not
return a SAXException. So, rather than using emit for output, this code
writes directly to System.out. (This method is generally expected to simply save the Locator for later use, rather than do the kind of processing
that generates an exception, as here.)
• The spelling of these methods is “Id”, not “ID”. So you have getSystemId
and getPublicId.
When you compile and run the program on slideSample01.xml, here is the significant part of the output:
LOCATOR
SYS ID: file:<path>/../samples/slideSample01.xml
START DOCUMENT
<?xml version='1.0' encoding='UTF-8'?>
...
Here, it is apparent that setDocumentLocator is called before startDocument.
That can make a difference if you do any initialization in the event handling
code.
143
144
SIMPLE API FOR XML
Handling Processing Instructions
It sometimes makes sense to code application-specific processing instructions in
the XML data. In this exercise, you’ll modify the Echo program to display a processing instruction contained in slideSample02.xml.
Note: The code discussed in this section is in Echo05.java. The file it operates on
is slideSample02.xml, as described in Writing Processing Instructions (page 50). The
output is in Echo05-02.txt. (The browsable versions are slideSample02xml.html and Echo05-02.html.)
As you saw in Writing Processing Instructions (page 50), the format for a processing instruction is <?target data?>, where “target” is the target application
that is expected to do the processing, and “data” is the instruction or information
for it to process. The sample file slideSample02.xml contains a processing
instruction for a mythical slide presentation program that queries the user to find
out which slides to display (technical, executive-level, or all):
<slideshow
...
>
<!-- PROCESSING INSTRUCTION -->
<?my.presentation.Program QUERY="exec, tech, all"?>
<!-- TITLE SLIDE -->
SUMMARY
To display that processing instruction, add the code highlighted below to the
Echo app:
public void characters(char buf[], int offset, int len)
...
}
public void processingInstruction(String target, String data)
throws SAXException
{
nl();
emit("PROCESS: ");
emit("<?"+target+" "+data+"?>");
}
private void echoText()
...
When your edits are complete, compile and run the program. The relevant part of
the output should look like this:
ELEMENT: <slideshow
...
>
PROCESS: <?my.presentation.Program QUERY="exec, tech, all"?>
CHARS:
...
Summary
With the minor exception of ignorableWhitespace, you have used most of the
ContentHandler methods that you need to handle the most commonly useful
SAX events. You’ll see ignorableWhitespace a little later on. Next, though,
you’ll get deeper insight into how you handle errors in the SAX parsing process.
Handling Errors with the Nonvalidating
Parser
The parser can generate one of three kinds of errors: fatal error, error, and warning. In this exercise, you’ll how the parser handles a fatal error.
145
146
SIMPLE API FOR XML
This version of the Echo program uses the nonvalidating parser. So it can’t tell if
the XML document contains the right tags, or if those tags are in the right
sequence. In other words, it can’t tell you if the document is valid. It can, however, tell whether or not the document is well-formed.
In this section of the tutorial, you’ll modify the slideshow file to generate different kinds of errors and see how the parser handles them. You’ll also find out
which error conditions are ignored, by default, and see how to handle them.
Note: The XML file used in this exercise is slideSampleBad1.xml, as described in
Introducing an Error (page 52). The output is in Echo05-Bad1.txt. (The browsable
versions are slideSampleBad1-xml.html and Echo05-Bad1.html.)
When you created slideSampleBad1.xml, you deliberately created an XML file
that was not well-formed. Run the Echo program on that file now. The output
now gives you an error message that looks like this (after formatting for readability):
org.xml.sax.SAXParseException:
The element type "item" must be terminated by the
matching end-tag “</item>”.
...
at org.apache.xerces.parsers.AbstractSAXParser...
...
at Echo.main(...)
Note: The message above was generated by the JAXP 1.2 libraries. If you are using
a different parser, the error message is likely to be somewhat different.
When a fatal error occurs, the parser is unable to continue. So, if the application
does not generate an exception (which you’ll see how to do a moment), then the
default error-event handler generates one. The stack trace is generated by the
Throwable exception handler in your main method:
...
} catch (Throwable t) {
t.printStackTrace();
}
That stack trace is not too useful, though. Next, you’ll see how to generate better
diagnostics when an error occurs.
HANDLING ERRORS WITH THE NONVALIDATING PARSER
Handling a SAXParseException
When the error was encountered, the parser generated a SAXParseException—a
subclass of SAXException that identifies the file and location where the error
occurred.
Note: The code you’ll create in this exercise is in Echo06.java. The output is in
Echo06-Bad1.txt. (The browsable version is Echo06-Bad1.html.)
Add the code highlighted below to generate a better diagnostic message when
the exception occurs:
...
} catch (SAXParseException spe) {
// Error generated by the parser
System.out.println("\n** Parsing error"
+ ", line " + spe.getLineNumber()
+ ", uri " + spe.getSystemId());
System.out.println("
" + spe.getMessage() );
} catch (Throwable t) {
t.printStackTrace();
}
Running this version of the program on slideSampleBad1.xml generates an
error message which is a bit more helpful, like this:
** Parsing error, line 22, uri file:<path>/slideSampleBad1.xml
The element type "item" must be ...
Note: The text of the error message depends on the parser used. This message was
generated using JAXP 1.2.
Note: Catching all throwables like this is not generally a great idea for production
applications. We’re doing it now so we can build up to full error handling gradually.
In addition, it acts as a catch-all for null pointer exceptions that can be thrown when
the parser is passed a null value.
147
148
SIMPLE API FOR XML
Handling a SAXException
A more general SAXException instance may sometimes be generated by the
parser, but it more frequently occurs when an error originates in one of application’s event handling methods. For example, the signature of the startDocument
method in the ContentHandler interface is defined as returning a SAXException:
public void startDocument() throws SAXException
All of the ContentHandler methods (except for setDocumentLocator) have
that signature declaration.
A SAXException can be constructed using a message, another exception, or
both. So, for example, when Echo.startDocument outputs a string using the
emit method, any I/O exception that occurs is wrapped in a SAXException and
sent back to the parser:
private void emit(String s)
throws SAXException
{
try {
out.write(s);
out.flush();
} catch (IOException e) {
throw new SAXException("I/O error", e);
}
}
Note: If you saved the Locator object when setDocumentLocator was invoked,
you could use it to generate a SAXParseException, identifying the document and
location, instead of generating a SAXException.
When the parser delivers the exception back to the code that invoked the parser,
it makes sense to use the original exception to generate the stack trace. Add the
code highlighted below to do that:
...
} catch (SAXParseException err) {
System.out.println("\n** Parsing error"
+ ", line " + err.getLineNumber()
+ ", uri " + err.getSystemId());
System.out.println("
" + err.getMessage());
HANDLING ERRORS WITH THE NONVALIDATING PARSER
} catch (SAXException sxe) {
// Error generated by this application
// (or a parser-initialization error)
Exception x = sxe;
if (sxe.getException() != null)
x = sxe.getException();
x.printStackTrace();
} catch (Throwable t) {
t.printStackTrace();
}
This code tests to see if the SAXException is wrapping another exception. If so,
it generates a stack trace originating from where that exception occurred to make
it easier to pinpoint the code responsible for the error. If the exception contains
only a message, the code prints the stack trace starting from the location where
the exception was generated.
Improving the SAXParseException Handler
Since the SAXParseException can also wrap another exception, add the code
highlighted below to use the contained exception for the stack trace:
...
} catch (SAXParseException err) {
System.out.println("\n** Parsing error"
+ ", line " + err.getLineNumber()
+ ", uri " + err.getSystemId());
System.out.println("
" + err.getMessage());
// Use the contained exception, if any
149
150
SIMPLE API FOR XML
Exception x = spe;
if (spe.getException() != null)
x = spe.getException();
x.printStackTrace();
} catch (SAXException sxe) {
// Error generated by this application
// (or a parser-initialization error)
Exceptionx = sxe;
if (sxe.getException() != null)
x = sxe.getException();
x.printStackTrace();
} catch (Throwable t) {
t.printStackTrace();
}
The program is now ready to handle any SAX parsing exceptions it sees. You’ve
seen that the parser generates exceptions for fatal errors. But for nonfatal errors
and warnings, exceptions are never generated by the default error handler, and
no messages are displayed. In a moment, you’ll learn more about errors and
warnings and find out how to supply an error handler to process them.
Handling a ParserConfigurationException
Finally, recall that the SAXParserFactory class could throw an exception if it
were for unable to create a parser. Such an error might occur if the factory could
not find the class needed to create the parser (class not found error), was not permitted to access it (illegal access exception), or could not instantiate it (instantiation error).
Add the code highlighted below to handle such errors:
} catch (SAXException sxe) {
Exceptionx = sxe;
if (sxe.getException() != null)
x = sxe.getException();
x.printStackTrace();
} catch (ParserConfigurationException pce) {
// Parser with specified options can't be built
pce.printStackTrace();
} catch (Throwable t) {
t.printStackTrace();
HANDLING ERRORS WITH THE NONVALIDATING PARSER
Admittedly, there are quite a few error handlers here. But at least now you know
the kinds of exceptions that can occur.
Note: A javax.xml.parsers.FactoryConfigurationError could also be thrown
if the factory class specified by the system property cannot be found or instantiated.
That is a non-trappable error, since the program is not expected to be able to recover
from it.
Handling an IOException
Finally, while we’re at it, let’s add a handler for IOExceptions:
} catch (ParserConfigurationException pce) {
// Parser with specified options can't be built
pce.printStackTrace();
} catch (IOException ioe) {
// I/O error
ioe.printStackTrace();
}
} catch (Throwable t) {
...
We’ll leave the handler for Throwables to catch null pointer errors, but note that
at this point it is doing the same thing as the IOException handler. Here, we’re
merely illustrating the kinds of exceptions that can occur, in case there are some
that your application could recover from.
Handling NonFatal Errors
A nonfatal error occurs when an XML document fails a validity constraint. If the
parser finds that the document is not valid, then an error event is generated. Such
errors are generated by a validating parser, given a DTD or schema, when a document has an invalid tag, or a tag is found where it is not allowed, or (in the case
of a schema) if the element contains invalid data.
You won’t actually dealing with validation issues until later in this tutorial. But
since we’re on the subject of error handling, you’ll write the error-handling code
now.
151
152
SIMPLE API FOR XML
The most important principle to understand about non-fatal errors is that they are
ignored, by default.
But if a validation error occurs in a document, you probably don’t want to continue processing it. You probably want to treat such errors as fatal. In the code
you write next, you’ll set up the error handler to do just that.
Note: The code for the program you’ll create in this exercise is in Echo07.java.
To take over error handling, you override the DefaultHandler methods that
handle fatal errors, nonfatal errors, and warnings as part of the ErrorHandler
interface. The SAX parser delivers a SAXParseException to each of these methods, so generating an exception when an error occurs is as simple as throwing it
back.
Add the code highlighted below to override the handler for errors:
public void processingInstruction(String target, String data)
throws SAXException
{
...
}
// treat validation errors as fatal
public void error(SAXParseException e)
throws SAXParseException
{
throw e;
}
Note: It can be instructive to examine the error-handling methods defined in
org.xml.sax.helpers.DefaultHandler. You’ll see that the error() and warning() methods do nothing, while fatalError() throws an exception. Of course,
you could always override the fatalError() method to throw a different exception.
But if your code doesn’t throw an exception when a fatal error occurs, then the SAX
parser will — the XML specification requires it.
Handling Warnings
Warnings, too, are ignored by default. Warnings are informative, and require a
DTD. For example, if an element is defined twice in a DTD, a warning is gener-
DISPLAYING SPECIAL CHARACTERS AND CDATA
ated—it’s not illegal, and it doesn’t cause problems, but it’s something you
might like to know about since it might not have been intentional.
Add the code highlighted below to generate a message when a warning occurs:
// treat validation errors as fatal
public void error(SAXParseException e)
throws SAXParseException
{
throw e;
}
// dump warnings too
public void warning(SAXParseException err)
throws SAXParseException
{
System.out.println("** Warning"
+ ", line " + err.getLineNumber()
+ ", uri " + err.getSystemId());
System.out.println("
" + err.getMessage());
}
Since there is no good way to generate a warning without a DTD or schema, you
won’t be seeing any just yet. But when one does occur, you’re ready!
Displaying Special Characters and
CDATA
The next thing we want to do with the parser is to customize it a bit, so you can
see how to get information it usually ignores. In this section, you’ll learn how the
parser handles:
• Special Characters ("<", “&”, and so on)
• Text with XML-style syntax
Handling Special Characters
In XML, an entity is an XML structure (or plain text) that has a name. Referencing the entity by name causes it to be inserted into the document in place of the
153
154
SIMPLE API FOR XML
entity reference. To create an entity reference, the entity name is surrounded by
an ampersand and a semicolon, like this:
&entityName;
Earlier, you put an entity reference into your XML document by coding:
Market Size < predicted
Note: The file containing this XML is slideSample03.xml, as described in Using
an Entity Reference in an XML Document (page 54). The results of processing it
are shown in Echo07-03.txt. (The browsable versions are slideSample03xml.html and Echo07-03.html.)
When you run the Echo program on slideSample03.xml, you see the following
output:
ELEMENT:
CHARS:
END_ELM:
<item>
Market Size < predicted
</item>
The parser converted the reference into the entity it represents, and passed the
entity to the application.
Handling Text with XML-Style Syntax
When you are handling large blocks of XML or HTML that include many of the
special characters, you use a CDATA section.
Note: The XML file used in this example is slideSample04.xml, as described in
Handling Text with XML-Style Syntax (page 154). The results of processing it are
shown in Echo07-04.txt. (The browsable versions are slideSample04-xml.html
and Echo07-04.html.)
A CDATA section works like <pre>...</pre> in HTML, only more so—all
whitespace in a CDATA section is significant, and characters in it are not interpreted as XML. A CDATA section starts with <![CDATA[ and ends with ]]>. The
HANDLING CDATA AND OTHER CHARACTERS
file slideSample04.xml contains this a CDATA section for a fictitious technical
slide:
...
<slide type="tech">
<title>How it Works</title>
<item>First we fozzle the frobmorten</item>
<item>Then we framboze the staten</item>
<item>Finally, we frenzle the fuznaten</item>
<item><![CDATA[Diagram:
frobmorten <--------------- fuznaten
|
<3>
^
|
<1>
|
<1> = fozzle
V
|
<2> = framboze
Staten-------------------------+
<3> = frenzle
<2>
]]></item>
</slide>
</slideshow>
When you run the Echo program on the new file, you see the following output:
ELEMENT: <item>
CHARS:
Diagram:
frobmorten <--------------fuznaten
|
<3>
^
| <1>
|
<1> = fozzle
V
|
<2> = framboze
staten---------------------+
<3> = frenzle
<2>
END_ELM: </item>
You can see here that the text in the CDATA section arrived as it was written. Since
the parser didn’t treat the angle brackets as XML, they didn’t generate the fatal
errors they would otherwise cause. (Because, if the angle brackets weren’t in a
CDATA section, the document would not be well-formed.)
Handling CDATA and Other Characters
The existence of CDATA makes the proper echoing of XML a bit tricky. If the
text to be output is not in a CDATA section, then any angle brackets, ampersands, and other special characters in the text should be replaced with the appro-
155
156
SIMPLE API FOR XML
priate entity reference. (Replacing left angle brackets and ampersands is most
important, other characters will be interpreted properly without misleading the
parser.)
But if the output text is in a CDATA section, then the substitutions should not
occur, to produce text like that in the example above. In a simple program like
our Echo application, it’s not a big deal. But many XML-filtering applications
will want to keep track of whether the text appears in a CDATA section, in order
to treat special characters properly. (Later in this tutorial, you will see how to use
a LexicalHandler to find out whether or not you are processing a CDATA section.)
One other area to watch for is attributes. The text of an attribute value could also
contain angle brackets and semicolons that need to be replaced by entity references. (Attribute text can never be in a CDATA section, though, so there is never
any question about doing that substitution.)
Parsing with a DTD
After the XML declaration, the document prolog can include a DTD, or reference an external DTD, or both. In this section, you’ll see the effect of the DTD
on the data that the parser delivers to your application.
DTD’s Effect on the Nonvalidating Parser
In this section, you’ll use the Echo program to see how the data appears to the
SAX parser when the data file references a DTD.
Note: The XML file used in this section is slideSample05.xml, which references
slideshow1a.dtd, as described in Parsing with a DTD (page 156). The output is
shown in Echo07-05.txt. (The browsable versions are slideshow1a-dtd.html,
slideSample05-xml.html, and Echo07-05.html.)
Running the Echo program on your latest version of slideSample.xml shows
that many of the superfluous calls to the characters method have now disappeared.
DTD’S EFFECT ON THE NONVALIDATING PARSER
Where before you saw:
...
>
PROCESS: ...
CHARS:
ELEMENT: <slide
ATTR: ...
>
ELEMENT: <title>
CHARS:
Wake up to ...
END_ELM: </title>
END_ELM: </slide>
CHARS:
ELEMENT: <slide
ATTR: ...
>
...
Now you see:
...
>
PROCESS: ...
ELEMENT: <slide
ATTR: ...
>
ELEMENT: <title>
CHARS:
Wake up to ...
END_ELM: </title>
END_ELM: </slide>
ELEMENT: <slide
ATTR: ...
>
...
It is evident here that the whitespace characters which were formerly being echoed around the slide elements are no longer being delivered by the parser,
because the DTD declares that slideshow consists solely of slide elements:
<!ELEMENT slideshow (slide+)>
157
158
SIMPLE API FOR XML
Tracking Ignorable Whitespace
Now that the DTD is present, the parser is no longer calling the characters
method with whitespace that it knows to be irrelevant. From the standpoint of an
application that is only interested in processing the XML data, that is great. The
application is never bothered with whitespace that exists purely to make the
XML file readable.
On the other hand, if you were writing an application that was filtering an XML
data file, and you wanted to output an equally readable version of the file, then
that whitespace would no longer be irrelevant—it would be essential. To get
those characters, you need to add the ignorableWhitespace method to your
application. You’ll do that next.
Note: The code written in this section is contained in Echo08.java. The output is
in Echo08-05.txt. (The browsable version is Echo08-05.html.)
To process the (generally) ignorable whitespace that the parser is seeing, add the
code highlighted below to implement the ignorableWhitespace event handler
in your version of the Echo program:
public void characters (char buf[], int offset, int len)
...
}
public void ignorableWhitespace char buf[], int offset, int Len)
throws SAXException
{
nl();
emit("IGNORABLE");
}
public void processingInstruction(String target, String data)
...
This code simply generates a message to let you know that ignorable whitespace
was seen.
Note: Again, not all parsers are created equal. The SAX specification does not
require this method to be invoked. The Java XML implementation does so whenever the DTD makes it possible.
CLEANUP
When you run the Echo application now, your output looks like this:
ELEMENT: <slideshow
ATTR: ...
>
IGNORABLE
IGNORABLE
PROCESS: ...
IGNORABLE
IGNORABLE
ELEMENT: <slide
ATTR: ...
>
IGNORABLE
ELEMENT: <title>
CHARS:
Wake up to ...
END_ELM: </title>
IGNORABLE
END_ELM: </slide>
IGNORABLE
IGNORABLE
ELEMENT: <slide
ATTR: ...
>
...
Here, it is apparent that the ignorableWhitespace is being invoked before and
after comments and slide elements, where characters was being invoked before
there was a DTD.
Cleanup
Now that you have seen ignorable whitespace echoed, remove that code from
your version of the Echo program—you won’t be needing it any more in the
exercises ahead.
Note: That change has been made in Echo09.java.
159
160
SIMPLE API FOR XML
Empty Elements, Revisited
Now that you understand how certain instances of whitespace can be ignorable,
it is time revise the definition of an “empty” element. That definition can now be
expanded to include
<foo>
</foo>
where there is whitespace between the tags and the DTD says that whitespace as
ignorable.
Echoing Entity References
When you wrote slideSample06.xml, you defined entities for the product
name. Now it’s time to see how they’re echoed when you process them with the
SAX parser.
Note: The XML used here is contained in slideSample06.xml, which references
slideshow1b.dtd, as described in Defining Attributes and Entities in the
DTD (page 62). The output is shown in Echo09-06.txt. (The browsable versions
are slideSample06-xml.html, slideshow1b-dtd.html and Echo09-06.html.)
When you run the Echo program on slideSample06.xml, here is the kind of
thing you see:
ELEMENT:
CHARS:
END_ELM:
<title>
Wake up to WonderWidgets!
</title>
Note that the product name has been substituted for the entity reference.
Echoing the External Entity
In slideSample07.xml, you defined an external entity to reference a copyright
file.
SUMMARIZING ENTITIES
Note: The XML used here is contained in slideSample07.xml and in copyright.xml. The output is shown in Echo09-07.txt. (The browsable versions are
slideSample07-xml.html, copyright-xml.html and Echo09-07.html.)
When you run the Echo program on that version of the slide presentation, here is
what you see:
...
END_ELM: </slide>
ELEMENT: <slide
ATTR: type "all"
>
ELEMENT: <item>
CHARS:
This is the standard copyright message that our lawyers
make us put everywhere so we don't have to shell out a
million bucks every time someone spills hot coffee in their
lap...
END_ELM: </item>
END_ELM: </slide>
...
Note that the newline which follows the comment in the file is echoed as a character, but that the comment itself is ignored. That is the reason that the copyright
message appears to start on the next line after the CHARS: label, instead of immediately after the label—the first character echoed is actually the newline that follows the comment.
Summarizing Entities
An entity that is referenced in the document content, whether internal or external, is termed a general entity. An entity that contains DTD specifications that
are referenced from within the DTD is termed a parameter entity. (More on that
later.)
An entity which contains XML (text and markup), and which is therefore parsed,
is known as a parsed entity. An entity which contains binary data (like images) is
known as an unparsed entity. (By its very nature, it must be external.) We’ll be
discussing references to unparsed entities in the next section of this tutorial.
161
162
SIMPLE API FOR XML
Choosing your Parser Implementation
If no other factory class is specified, the default SAXParserFactory class is
used. To use a different manufacturer’s parser, you can change the value of the
environment variable that points to it. You can do that from the command line,
like this:
java -Djavax.xml.parsers.SAXParserFactory=yourFactoryHere ...
The factory name you specify must be a fully qualified class name (all package
prefixes included). For more information, see the documentation in the newInstance() method of the SAXParserFactory class.
Using the Validating Parser
By now, you have done a lot of experimenting with the nonvalidating parser. It’s
time to have a look at the validating parser and find out what happens when you
use it to parse the sample presentation.
Two things to understand about the validating parser at the outset are:
• A schema or Document Type Definition (DTD) is required.
• Since the schema/DTD is present, the ignorableWhitespace method is
invoked whenever possible.
Configuring the Factory
The first step is modify the Echo program so that it uses the validating parser
instead of the nonvalidating parser.
Note: The code in this section is contained in
Echo10.java.
To use the validating parser, make the changes highlighted below:
public static void main(String argv[])
{
if (argv.length != 1) {
...
}
VALIDATING WITH XML SCHEMA
// Use the default (non-validating) parser
// Use the validating parser
SAXParserFactory factory = SAXParserFactory.newInstance();
factory.setValidating(true);
try {
...
Here, you configured the factory so that it will produce a validating parser when
newSAXParser is invoked. You can also configure it to return a namespace-aware
parser using setNamespaceAware(true). Sun’s implementation supports any
combination of configuration options. (If a combination is not supported by any
particular implementation, it is required to generate a factory configuration
error.)
Validating with XML Schema
Although a full treatment of XML Schema is beyond the scope of this tutorial,
this section will show you the steps you need to take to validate an XML document using an existing schema written in the XML Schema language. (To learn
more about XML Schema, you can review the online tutorial, XML Schema Part
0: Primer, at http://www.w3.org/TR/xmlschema-0/. You can also examine the
sample programs that are part of the JAXP download. They use a simple XML Schema
definition to validate personnel data stored in an XML file.)
Note: There are multiple schema-definition languages, including RELAX NG,
Schematron, and the W3C “XML Schema” standard. (Even a DTD qualifies as a
“schema”, although it is the only one that does not use XML syntax to describe
schema constraints.) However, “XML Schema” presents us with a terminology
challenge. While the phrase “XML Schema schema” would be precise, we’ll use the
phrase “XML Schema definition” to avoid the appearance of redundancy.
To be notified of validation errors in an XML document, the parser factory must
be configured to create a validating parser, as shown in the previous section. In
addition,
1. The appropriate properties must be set on the SAX parser.
2. The appropriate error handler must be set.
3. The document must be associated with a schema.
163
164
SIMPLE API FOR XML
Setting the SAX Parser Properties
It’s helpful to start by defining the constants you’ll use when setting the properties:
static final String JAXP_SCHEMA_LANGUAGE =
"http://java.sun.com/xml/jaxp/properties/schemaLanguage";
static final String W3C_XML_SCHEMA =
"http://www.w3.org/2001/XMLSchema";
Next, you need to configure the parser factory to generate a parser that is
namespace-aware parser, as well as validating:
...
SAXParserFactory factory = SAXParserFactory.newInstance();
factory.setNamespaceAware(true);
factory.setValidating(true);
You’ll learn more about namespaces in Validating with XML
Schema (page 247). For now, understand that schema validation is a namespaceoriented process. Since JAXP-compliant parsers are not namespace-aware by
default, it is necessary to set the property for schema validation to work.
The last step is to configure the parser to tell it which schema language to use.
Here, you will use the constants you defined earlier to specify the W3C’s XML
Schema language:
saxParser.setProperty(JAXP_SCHEMA_LANGUAGE, W3C_XML_SCHEMA);
In the process, however, there is an extra error to handle. You’ll take a look at
that error next.
Setting up the Appropriate Error Handling
In addition to the error handling you’ve already learned about, there is one error
that can occur when you are configuring the parser for schema-based validation.
If the parser is not 1.2 compliant, and therefore does not support XML Schema,
it could throw a SAXNotRecognizedException.
VALIDATING WITH XML SCHEMA
To handle that case, you wrap the setProperty() statement in a try/catch
block, as shown in the code highlighted below.
...
SAXParser saxParser = factory.newSAXParser();
try {
saxParser.setProperty(JAXP_SCHEMA_LANGUAGE, W3C_XML_SCHEMA);
}
catch (SAXNotRecognizedException x) {
// Happens if the parser does not support JAXP 1.2
...
}
...
Associating a Document with A Schema
Now that the program is ready to validate the data using an XML Schema definition, it is only necessary to ensure that the XML document is associated with
one. There are two ways to do that:
• With a schema declaration in the XML document.
• By specifying the schema to use in the application.
Note: When the application specifies the schema to use, it overrides any schema
declaration in the document.
To specify the schema definition in the document, you would create XML like
this:
<documentRoot
xmlns:xsi="http://www.w3.org/2001/XMLSchema-instance"
xsi:noNamespaceSchemaLocation='YourSchemaDefinition.xsd'
>
...
The first attribute defines the XML NameSpace (xmlns) prefix, “xsi”, where
“xsi” stands for “XML Schema Instance”. The second line specifies the schema
to use for elements in the document that do not have a namespace prefix — that
is, for the elements you typically define in any simple, uncomplicated XML document.
165
166
SIMPLE API FOR XML
Note: You’ll be learning about namespaces in Validating with XML
Schema (page 247). For now, think of these attributes as the “magic incantation”
you use to validate a simple XML file that doesn’t use them. Once you’ve learned
more about namespaces, you’ll see how to use XML Schema to validate complex
documents that use them. Those ideas are discussed in Validating with Multiple
Namespaces (page 250).
You can also specify the schema file in the application, using code like this:
static final String JAXP_SCHEMA_SOURCE =
"http://java.sun.com/xml/jaxp/properties/schemaSource";
...
SAXParser saxParser = spf.newSAXParser();
...
saxParser.setProperty(JAXP_SCHEMA_SOURCE,
new File(schemaSource));
Now that you know how to make use of an XML Schema definition, we’ll turn
our attention to the kinds of errors you can see when the application is validating
its incoming data. To that, you’ll use a Document Type Definition (DTD) as you
experiment with validation.
Experimenting with Validation Errors
To see what happens when the XML document does not specify a DTD, remove
the DOCTYPE statement from the XML file and run the Echo program on it.
Note: The output shown here is contained in Echo10-01.txt. (The browsable version is Echo10-01.html.)
The result you see looks like this:
<?xml version='1.0' encoding='UTF-8'?>
** Parsing error, line 9, uri .../slideSample01.xml
Document root element "slideshow", must match DOCTYPE root
"null"
EXPERIMENTING WITH VALIDATION ERRORS
Note: The message above was generated by the JAXP 1.2 libraries. If you are using
a different parser, the error message is likely to be somewhat different.
This message says that the root element of the document must match the element
specified in the DOCTYPE declaration. That declaration specifies the document’s
DTD. Since you don’t have one yet, it’s value is “null”. In other words, the message is saying that you are trying to validate the document, but no DTD has been
declared, because no DOCTYPE declaration is present.
So now you know that a DTD is a requirement for a valid document. That makes
sense. What happens when you run the parser on your current version of the
slide presentation, with the DTD specified?
Note: The output shown here is produced using slideSample07.xml, as described
in Referencing Binary Entities (page 69). The output is contained in Echo1007.txt. (The browsable version is Echo10-07.html.)
This time, the parser gives a different error message:
** Parsing error, line 29, uri file:...
The content of element type "slide" must match
"(image?,title,item*)
Note: The message above was generated by the JAXP 1.2 libraries. If you are using
a different parser, the error message is likely to be somewhat different.
This message says that the element found at line 29 (<item>) does not match the
definition of the <slide> element in the DTD. The error occurs because the definition says that the slide element requires a title. That element is not
optional, and the copyright slide does not have one. To fix the problem, add the
question mark highlighted below to make title an optional element:
<!ELEMENT slide (image?, title?, item*)>
Now what happens when you run the program?
167
168
SIMPLE API FOR XML
Note: You could also remove the copyright slide, which produces the same result
shown below, as reflected in Echo10-06.txt. (The browsable version is Echo1006.html.)
The answer is that everything runs fine until the parser runs into the <em> tag
contained in the overview slide. Since that tag was not defined in the DTD, the
attempt to validate the document fails. The output looks like this:
...
ELEMENT: <title>
CHARS:
Overview
END_ELM: </title>
ELEMENT: <item>
CHARS:
Why ** Parsing error, line 28, uri: ...
Element "em" must be declared.
org.xml.sax.SAXParseException: ...
...
Note: The message above was generated by the JAXP 1.2 libraries. If you are using
a different parser, the error message is likely to be somewhat different.
The error message identifies the part of the DTD that caused validation to fail. In
this case it is the line that defines an item element as (#PCDATA | item).
Exercise: Make a copy of the file and remove all occurrences of <em> from
it. Can the file be validated now? (In the next section, you’ll learn how to
define parameter entries so that we can use XHTML in the elements we are
defining as part of the slide presentation.)
Error Handling in the Validating Parser
It is important to recognize that the only reason an exception is thrown when the
file fails validation is as a result of the error-handling code you entered in the
early stages of this tutorial. That code is reproduced below:
public void error(SAXParseException e)
throws SAXParseException
{
throw e;
}
PARSING A PARAMETERIZED DTD
If that exception is not thrown, the validation errors are simply ignored.
Exercise: Try commenting out the line that throws the exception. What happens when you run the parser now?
In general, a SAX parsing error is a validation error, although we have seen that
it can also be generated if the file specifies a version of XML that the parser is
not prepared to handle. The thing to remember is that your application will not
generate a validation exception unless you supply an error handler like the one
above.
Parsing a Parameterized DTD
This section uses the Echo program to see what happens when you reference
xhtml.dtd in slideshow2.dtd. It also covers the kinds of warnings that are
generated by the SAX parser when a DTD is present.
Note: The XML file used here is slideSample08.xml, which references
slideshow2.dtd. The output is contained in Echo10-08.txt. (The browsable versions are slideSample08-xml.html, slideshow2-dtd.html, and Echo1008.html.)
When you try to echo the slide presentation, you find that it now contains a new
error. The relevant part of the output is shown here (formatted for readability):
<?xml version='1.0' encoding='UTF-8'?>
** Parsing error, line 22, uri: .../slideshow.dtd
Element type "title" must not be declared more than once.
Note: The message above was generated by the JAXP 1.2 libraries. If you are using
a different parser, the error message is likely to be somewhat different.
The problem is that xhtml.dtd defines a title element which is entirely different from the title element defined in the slideshow DTD. Because there is no
hierarchy in the DTD, these two definitions conflict.
The slideSample09.xml version solves the problem by changing the name of
the slide title. Run the Echo program on that version of the slide presentation. It
should run to completion and display output like that shown in Echo10-09.
169
170
SIMPLE API FOR XML
Congratulations! You have now read a fully validated XML document. The
change in that version of the file had the effect of putting the DTD’s title element into a slideshow “namespace” that you artificially constructed by hyphenating the name, so the title element in the “slideshow namespace” (slidetitle, really) was no longer in conflict with the title element in xhtml.dtd.
Note: As mentioned in Using Namespaces (page 76), namespaces let you accomplish the same goal without having to rename any elements.
To finish off this section, we’ll take a look at the kinds of warnings that the validating parser can produce when processing the DTD.
DTD Warnings
As mentioned earlier in this tutorial, warnings are generated only when the SAX
parser is processing a DTD. Some warnings are generated only by the validating
parser. The nonvalidating parser’s main goal is operate as rapidly as possible, but
it too generates some warnings. (The explanations that follow tell which does
what.)
The XML specification suggests that warnings should be generated as result of:
• Providing additional declarations for entities, attributes, or notations.
(Such declarations are ignored. Only the first is used. Also, note that
duplicate definitions of elements always produce a fatal error when validating, as you saw earlier.)
• Referencing an undeclared element type.
(A validity error occurs only if the undeclared type is actually used in the
XML document. A warning results when the undeclared element is referenced in the DTD.)
• Declaring attributes for undeclared element types.
The Java XML SAX parser also emits warnings in other cases, such as:
• No <!DOCTYPE ...> when validating.
• Referencing an undefined parameter entity when not validating.
(When validating, an error results. Although nonvalidating parsers are not
required to read parameter entities, the Java XML parser does so. Since it
HANDLING LEXICAL EVENTS
is not a requirement, the Java XML parser generates a warning, rather
than an error.)
• Certain cases where the character-encoding declaration does not look
right.
At this point, you have digested many XML concepts, including DTDs, external
entities. You have also learned your way around the SAX parser. The remainder
of the SAX tutorial covers advanced topics that you will only need to understand
if you are writing SAX-based applications. If your primary goal is to write
DOM-based applications, you can skip ahead to Document Object
Model (page 181).
Handling Lexical Events
You saw earlier that if you are writing text out as XML, you need to know if you
are in a CDATA section. If you are, then angle brackets (<) and ampersands (&)
should be output unchanged. But if you’re not in a CDATA section, they should be
replaced by the predefined entities < and &. But how do you know if
you’re processing a CDATA section?
Then again, if you are filtering XML in some way, you would want to pass comments along. Normally the parser ignores comments. How can you get comments so that you can echo them?
Finally, there are the parsed entity definitions. If an XML-filtering app sees
it needs to echo the same string—not the text that is inserted in its
place. How do you go about doing that?
&myEntity;
This section of the tutorial answers those questions. It shows you how to use
to identify comments, CDATA sections, and references to parsed entities.
org.xml.sax.ext.LexicalHandler
Comments, CDATA tags, and references to parsed entities constitute lexical information—that is, information that concerns the text of the XML itself, rather than
the XML’s information content. Most applications, of course, are concerned only
with the content of an XML document. Such apps will not use the LexicalEventListener API. But apps that output XML text will find it invaluable.
Note: Lexical event handling is a optional parser feature. Parser implementations
are not required to support it. (The reference implementation does so.) This discussion assumes that the parser you are using does so, as well.
171
172
SIMPLE API FOR XML
How the LexicalHandler Works
To be informed when the SAX parser sees lexical information, you configure the
XmlReader that underlies the parser with a LexicalHandler. The LexicalHandler interface defines these even-handling methods:
comment(String comment)
Passes comments to the application.
startCDATA(), endCDATA()
Tells when a CDATA section
is starting and ending, which tells your application what kind of characters to expect the next time characters() is called.
startEntity(String name), endEntity(String name)
Gives the name of a parsed entity.
startDTD(String name, String publicId, String systemId), endDTD()
Tells when a DTD is being processed, and identifies it.
Working with a LexicalHandler
In the remainder of this section, you’ll convert the Echo app into a lexical handler and play with its features.
Note: The code shown in this section is in Echo11.java. The output is shown in
Echo11-09.txt. (The browsable version is Echo11-09.html.)
To start, add the code highlighted below to implement the LexicalHandler
interface and add the appropriate methods.
import org.xml.sax.*;
import org.xml.sax.helpers.DefaultHandler;
import org.xml.sax.ext.LexicalHandler;
...
public class Echo extends HandlerBase
implements LexicalHandler
{
public static void main(String argv[])
{
...
// Use an instance of ourselves as the SAX event handler
DefaultHandler handler = new Echo();
Echo handler = new Echo();
...
WORKING WITH A LEXICALHANDLER
At this point, the Echo class extends one class and implements an additional
interface. You changed the class of the handler variable accordingly, so you can
use the same instance as either a DefaultHandler or a LexicalHandler, as
appropriate.
Next, add the code highlighted below to get the XMLReader that the parser delegates to, and configure it to send lexical events to your lexical handler:
public static void main(String argv[])
{
...
try {
...
// Parse the input
SAXParser saxParser = factory.newSAXParser();
XMLReader xmlReader = saxParser.getXMLReader();
xmlReader.setProperty(
"http://xml.org/sax/properties/lexical-handler",
handler
);
saxParser.parse( new File(argv[0]), handler);
} catch (SAXParseException spe) {
...
Here, you configured the XMLReader using the setProperty() method defined
in the XMLReader class. The property name, defined as part of the SAX standard,
is the URL, http://xml.org/sax/properties/lexical-handler.
Finally, add the code highlighted below to define the appropriate methods that
implement the interface.
public void warning(SAXParseException err)
...
}
public void comment(char[] ch, int start, int length)throws SAXException
{
}
public void startCDATA()
throws SAXException
{
}
pubic void endCDATA()
throws SAXException
173
174
SIMPLE API FOR XML
{
}
public void startEntity(String name)
throws SAXException
{
}
public void endEntity(String name)
throws SAXException
{
}
public void startDTD(
String name, String publicId, String systemId)
throws SAXException
{
}
public void endDTD()
throws SAXException
{
}
private void echoText()
...
You have now turned the Echo class into a lexical handler. In the next section,
you’ll start experimenting with lexical events.
Echoing Comments
The next step is to do something with one of the new methods. Add the code
highlighted below to echo comments in the XML file:
public void comment(char[] ch, int start, int length)
throws SAXException
{
String text = new String(ch, start, length);
nl();
emit("COMMENT: "+text);
}
WORKING WITH A LEXICALHANDLER
When you compile the Echo program and run it on your XML file, the result
looks something like this:
COMMENT:
A SAMPLE set of slides
COMMENT: FOR WALLY / WALLIES
COMMENT:
DTD for a simple "slide show".
COMMENT:
COMMENT:
Defines the %inline; declaration
...
The line endings in the comments are passed as part of the comment string, once
again normalized to newlines. You can also see that comments in the DTD are
echoed along with comments from the file. (That can pose problems when you
want to echo only comments that are in the data file. To get around that problem,
you can use the startDTD and endDTD methods.)
Echoing Other Lexical Information
To finish up this section, you’ll exercise the remaining LexicalHandler methods.
Note: The code shown in this section is in Echo12.java. The file it operates on is
slideSample09.xml. The results of processing are in Echo12-09.txt (The browsable versions are slideSample09-xml.html and Echo12-09.html.)
Make the changes highlighted below to remove the comment echo (you don’t
need that any more) and echo the other events, along with any characters that
have been accumulated when an event occurs:
public void comment(char[] ch, int start, int length)
throws SAXException
{
String text = new String(ch, start, length);
nl();
emit("COMMENT: "+text);
}
175
176
SIMPLE API FOR XML
public void startCDATA()
throws SAXException
{
echoText();
nl();
emit("START CDATA SECTION");
}
public void endCDATA()
throws SAXException
{
echoText();
nl();
emit("END CDATA SECTION");
}
public void startEntity(String name)
throws SAXException
{
echoText();
nl();
emit("START ENTITY: "+name);
}
public void endEntity(String name)
throws SAXException
{
echoText();
nl();
emit("END ENTITY: "+name);
}
public void startDTD(String name, String publicId, String
systemId)
throws SAXException
{
nl();
emit("START DTD: "+name
+"
publicId=" + publicId
+"
systemId=" + systemId);
}
public void endDTD()
throws SAXException
{
nl();
emit("END DTD");
}
WORKING WITH A LEXICALHANDLER
Here is what you see when the DTD is processed:
START DTD: slideshow
publicId=null
systemId=slideshow3.dtd
START ENTITY: ...
...
END DTD
Note: To see events that occur while the
org.xml.sax.ext.DeclHandler.
DTD
is being processed, use
Here is some of the additional output you see when the internally defined products entity is processed with the latest version of the program:
START ENTITY: products
CHARS:
WonderWidgets
END ENTITY: products
And here is the additional output you see as a result of processing the external
copyright entity:
START ENTITY: copyright
CHARS:
This is the standard copyright message that our lawyers
make us put everywhere so we don't have to shell out a
million bucks every time someone spills hot coffee in their
lap...
END ENTITY: copyright
Finally, you get output that shows when the CDATA section was processed:
START CDATA SECTION
CHARS:
Diagram:
frobmorten <--------------fuznaten
|
<3>
^
| <1>
|
<1> = fozzle
V
|
<2> = framboze
staten---------------------+
<3> = frenzle
<2>
END CDATA SECTION
177
178
SIMPLE API FOR XML
In summary, the LexicalHandler gives you the event-notifications you need to
produce an accurate reflection of the original XML text.
Note: To accurately echo the input, you would modify the characters() method to
echo the text it sees in the appropriate fashion, depending on whether or not the program was in CDATA mode.
Using the DTDHandler and
EntityResolver
In this section of the tutorial, we’ll carry on a short discussion of the two remaining SAX event handlers: DTDHandler and EntityResolver. The DTDHandler is
invoked when the DTD encounters an unparsed entity or a notation declaration.
The EntityResolver comes into play when a URN (public ID) must be
resolved to a URL (system ID).
The DTDHandler API
In the section Choosing your Parser Implementation (page 162) you saw a
method for referencing a file that contains binary data, like an image file, using
MIME data types. That is the simplest, most extensible mechanism to use. For
compatibility with older SGML-style data, though, it is also possible to define an
unparsed entity.
The NDATA keyword defines an unparsed entity, like this:
<!ENTITY myEntity SYSTEM "..URL.." NDATA gif>
The NDATA keyword says that the data in this entity is not parsable XML data, but
is instead data that uses some other notation. In this case, the notation is named
“gif”. The DTD must then include a declaration for that notation, which would
look something like this:
<!NOTATION gif SYSTEM "..URL..">
THE ENTITYRESOLVER API
When the parser sees an unparsed entity or a notation declaration, it does nothing
with the information except to pass it along to the application using the DTDHandler interface. That interface defines two methods:
notationDecl(String name, String publicId, String systemId)
unparsedEntityDecl(String name, String publicId,
String systemId, String notationName)
The notationDecl method is passed the name of the notation and either the
public or system identifier, or both, depending on which is declared in the DTD.
The unparsedEntityDecl method is passed the name of the entity, the appropriate identifiers, and the name of the notation it uses.
Note: The DTDHandler interface is implemented by the DefaultHandler class.
Notations can also be used in attribute declarations. For example, the following
declaration requires notations for the GIF and PNG image-file formats:
<!ENTITY image EMPTY>
<!ATTLIST image
...
type NOTATION (gif | png) "gif"
>
Here, the type is declared as being either gif, or png. The default, if neither is
specified, is gif.
Whether the notation reference is used to describe an unparsed entity or an
attribute, it is up to the application to do the appropriate processing. The parser
knows nothing at all about the semantics of the notations. It only passes on the
declarations.
The EntityResolver API
The EntityResolver API lets you convert a public ID (URN) into a system ID
(URL). Your application may need to do that, for example, to convert something
like href="urn:/someName" into "http://someURL".
The EntityResolver interface defines a single method:
resolveEntity(String publicId, String systemId)
179
180
SIMPLE API FOR XML
This method returns an InputSource object, which can be used to access the
entity’s contents. Converting an URL into an InputSource is easy enough. But
the URL that is passed as the system ID will be the location of the original document which is, as likely as not, somewhere out on the Web. To access a local
copy, if there is one, you must maintain a catalog somewhere on the system that
maps names (public IDs) into local URLs.
Further Information
For further information on the Simple API for XML processing (SAX) standard,
see:
• The SAX standard page: http://www.saxproject.org/
For more information on schema-based validation mechanisms, see:
• The
W3C
standard
validation
mechanism,
XML Schema:
http://www.w3c.org/XML/Schema
• RELAX NG’s
regular-expression
based
validation
mechanism:
http://www.oasis-open.org/committees/relax-ng/
• Schematron’s
assertion-based
validation
mechanism:
http://www.ascc.net/xml/resource/schematron/schematron.html
6
Document Object
Model
Eric Armstrong
IN the SAX chapter, you wrote an XML file that contains slides for a presentation. You then used the SAX API to echo the XML to your display.
In this chapter, you’ll use the Document Object Model (DOM) to build a small
SlideShow application. You’ll start by constructing a DOM and inspecting it,
then see how to write a DOM as an XML structure, display it in a GUI, and
manipulate the tree structure.
A Document Object Model is a garden-variety tree structure, where each node
contains one of the components from an XML structure. The two most common
types of nodes are element nodes and text nodes. Using DOM functions lets you
create nodes, remove nodes, change their contents, and traverse the node hierarchy.
In this chapter, you’ll parse an existing XML file to construct a DOM, display
and inspect the DOM hierarchy, convert the DOM into a display-friendly JTree,
and explore the syntax of namespaces. You’ll also create a DOM from scratch,
and see how to use some of the implementation-specific features in Sun’s JAXP
implementation to convert an existing data set to XML.
First though, we’ll make sure that DOM is the most appropriate choice for your
application. We’ll do that in the next section, When to Use DOM.
181
182
DOCUMENT OBJECT MODEL
Note: The examples in this chapter can be found in <J2EE_HOME>/doc/tutorial/
examples/jaxp/dom/samples.
When to Use DOM
The Document Object Model (DOM) is a standard that is, above all, designed for
documents (for example, articles and books). In addition, the JAXP 1.2 implementation supports XML Schema, which may be an important consideration for
any given application.
On the other hand, if you are dealing with simple data structures, and if XML
Schema isn’t a big part of your plans, then you may find that one of the more
object-oriented standards like JDOM and dom4j (page 35) is better suited for
your purpose.
From the start, DOM was intended to be language neutral. Because it was
designed for use with languages like C or Perl, DOM does not take advantage of
Java's object-oriented features. That fact, in addition to the document/data distinction, also helps to account for the ways in which processing a DOM differs
from processing a JDOM or dom4j structure.
In this section, we'll examine the differences between the models underlying
those standards to give help you choose the one that is most appropriate for your
application.
Documents vs. Data
The major point of departure between the document model used in DOM and the
data model used in JDOM or dom4j lies in:
• The kind of node that exists in the hierarchy.
• The capacity for “mixed-content”.
It is the difference in what constitutes a “node” in the data hierarchy that primarily accounts for the differences in programming with these two models. However, it is the capacity for mixed-content which, more than anything else,
accounts for the difference in how the standards define a “node”. So we'll start
by examining DOM's “mixed-content model”.
MIXED CONTENT MODEL
Mixed Content Model
Recall from the discussion of Document-Driven Programming (DDP) (page 31)
that text and elements can be freely intermixed in a DOM hierarchy. That kind of
structure is dubbed “mixed content” in the DOM model.
Mixed content occurs frequently in documents. For example, to represent this
structure:
<sentence>This is an <bold>important</bold> idea.</sentence>
The hierarchy of DOM nodes would look something like this, where each line
represents one node:
ELEMENT: sentence
+ TEXT: This is an
+ ELEMENT: bold
+ TEXT: important
+ TEXT: idea.
Note that the sentence element contains text, followed by a subelement, followed
by additional text. It is that intermixing of text and elements that defines the
“mixed-content model”.
Kinds of Nodes
In order to provide the capacity for mixed content, DOM nodes are inherently
very simple. In the example above, for instance, the “content” of the first element
(it’s value) simply identifies the kind of node it is.
First time users of a DOM are usually thrown by this fact. After navigating to the
<sentence> node, they ask for the node's “content”, and expect to get something
useful. Instead, all they get is the name of the element, “sentence”.
Note: The DOM Node API defines nodeValue(), node.nodeType(), and nodeName() methods. For the first element node, nodeName() returns “sentence”, while
nodeValue() returns null. For the first text node, nodeName() returns “#text”, and
nodeValue() returns “This is an “. The important point is that the value of an element is not the same as its content.
183
184
DOCUMENT OBJECT MODEL
Instead, obtaining the content you care about when processing a DOM means
inspecting the list of subelements the node contains, ignoring those you aren't
interested in, and processing the ones you do care about.
For example, in the example above, what does it mean if you ask for the “text” of
the sentence? Any of the following could be reasonable, depending on your
application:
•
•
•
•
This is an
This is an idea.
This is an important idea.
This is an <bold>important</bold> idea.
A Simpler Model
With DOM, you are free to create the semantics you need. However, you are also
required to do the processing necessary to implement those semantics. Standards
like JDOM and dom4j, on the other hand, make it a lot easier to do simple
things, because each node in the hierarchy is an object.
Although JDOM and dom4j make allowances for elements with mixed content,
they are not primarily designed for such situations. Instead, they are targeted for
applications where the XML structure contains data.
As described in Traditional Data Processing (page 31), the elements in a data
structure typically contain either text or other elements, but not both. For example, here is some XML that represents a simple address book:
<addressbook>
<entry>
<name>Fred</name>
<email>fred@home</email>
</entry>
...
</addressbook>
Note: For very simple XML data structures like this one, you could also use the regular expression package (java.util.regex) built into version 1.4 of the Java platform.
In JDOM and dom4j, once you navigate to an element that contains text, you
invoke a method like text() to get it's content. When processing a DOM,
INCREASING THE COMPLEXITY
though, you would have to inspect the list of subelements to “put together” the
text of the node, as you saw earlier -- even if that list only contained one item (a
TEXT node).
So for simple data structures like the address book above, you could save yourself a bit of work by using JDOM or dom4j. It may make sense to use one of
those models even when the data is technically “mixed”, but when there is
always one (and only one) segment of text for a given node.
Here is an example of that kind of structure, which would also be easily processed in JDOM or dom4j:
<addressbook>
<entry>Fred
<email>fred@home</email>
</entry>
...
</addressbook>
Here, each entry has a bit of identifying text, followed by other elements. With
this structure, the program could navigate to an entry, invoke text() to find out
who it belongs to, and process the <email> sub element if it is at the correct
node.
Increasing the Complexity
But to get a full understanding of the kind of processing you need to do when
searching or manipulating a DOM, it is important to know the kinds of nodes
that a DOM can conceivably contain.
Here is an example that tries to bring the point home. It is a representation of this
data:
<sentence>
The &projectName; <![CDATA[<i>project</i>]]> is
<?editor: red><bold>important</bold><?editor: normal>.
</sentence>
This sentence contains an entity reference — a pointer to an “entity” which is
defined elsewhere. In this case, the entity contains the name of the project. The
example also contains a CDATA section (uninterpreted data, like <pre> data in
HTML), as well as processing instructions (<?...?>) that in this case tell the
editor to which color to use when rendering the text.
185
186
DOCUMENT OBJECT MODEL
Here is the DOM structure for that data. It’s fairly representative of the kind of
structure that a robust application should be prepared to handle:
+ ELEMENT: sentence
+ TEXT: The
+ ENTITY REF: projectName
+ COMMENT: The latest name we're using
+ TEXT: Eagle
+ CDATA: <i>project</i>
+ TEXT: is
+ PI: editor: red
+ ELEMENT: bold
+ TEXT: important
+ PI: editor: normal
This example depicts the kinds of nodes that may occur in a DOM. Although
your application may be able to ignore most of them most of the time, a truly
robust implementation needs to recognize and deal with each of them.
Similarly, the process of navigating to a node involves processing subelements,
ignoring the ones you don't care about and inspecting the ones you do care
about, until you find the node you are interested in.
Often, in such cases, you are interested in finding a node that contains specific
text. For example, in The DOM API (page 9) you saw an example where you
wanted to find a <coffee> node whose <name> element contains the text,
“Mocha Java”. To carry out that search, the program needed to work through the
list of <coffee> elements and, for each one: a) get the <name> element under it
and, b) examine the TEXT node under that element.
That example made some simplifying assumptions, however. It assumed that
processing instructions, comments, CDATA nodes, and entity references would
not exist in the data structure. Many simple applications can get away with such
assumptions. Truly robust applications, on the other hand, need to be prepared to
deal with the all kinds of valid XML data.
(A “simple” application will work only so long as the input data contains the
simplified XML structures it expects. But there are no validation mechanisms to
ensure that more complex structures will not exist. After all, XML was specifically designed to allow them.)
CHOOSING YOUR MODEL
To be more robust, the sample code described in The DOM API (page 9), would
have to do these things:
1. When searching for the <name> element:
a. Ignore comments, attributes, and processing instructions.
b. Allow for the possibility that the <coffee> subelements do not occur in
the expected order.
c. Skip over TEXT nodes that contain ignorable whitespace, if not validating.
2. When extracting text for a node:
a. Extract text from CDATA nodes as well as text nodes.
b. Ignore comments, attributes, and processing instructions when gathering the text.
c. If an entity reference node or another element node is encountered,
recurse. (That is, apply the text-extraction procedure to all subnodes.)
Note: The JAXP 1.2 parser does not insert entity reference nodes into the
DOM. Instead, it inserts a TEXT node containing the contents of the reference. The JAXP 1.1 parser which is built into the 1.4 platform, on the other
hand, does insert entity reference nodes. So a robust implementation which
is parser-independent needs to be prepared to handle entity reference nodes.
Many applications, of course, won’t have to worry about such things, because
the kind of data they see will be strictly controlled. But if the data can come from
a variety of external sources, then the application will probably need to take
these possibilities into account.
The code you need to carry out these functions is given near the end of the DOM
tutorial in Searching for Nodes (page 244) and Obtaining Node
Content (page 245). Right now, the goal is simply to determine whether DOM is
suitable for your application.
Choosing Your Model
As you can see, when you are using DOM, even a simple operation like getting
the text from a node can take a bit of programming. So if your programs will be
handling simple data structures, JDOM, dom4j, or even the 1.4 regular expression package (java.util.regex) may be more appropriate for your needs.
187
188
DOCUMENT OBJECT MODEL
For full-fledged documents and complex applications, on the other hand, DOM
gives you a lot of flexibility. And if you need to use XML Schema, then once
again DOM is the way to go for now, at least.
If you will be processing both documents and data in the applications you
develop, then DOM may still be your best choice. After all, once you have written the code to examine and process a DOM structure, it is fairly easy to customize it for a specific purpose. So choosing to do everything in DOM means you'll
only have to deal with one set of APIs, rather than two.
Plus, the DOM standard is a standard. It is robust and complete, and it has many
implementations. That is a significant decision-making factor for many large
installations — particularly for production applications, to prevent doing large
rewrites in the event of an API change.
Finally, even though the text in an address book may not permit bold, italics, colors, and font sizes today, someday you may want to handle things. Since DOM
will handle virtually anything you throw at it, choosing DOM makes it easier to
“future-proof” your application.
Reading XML Data into a DOM
In this section of the tutorial, you’ll construct a Document Object Model (DOM)
by reading in an existing XML file. In the following sections, you’ll see how to
display the XML in a Swing tree component and practice manipulating the
DOM.
Note: In the next part of the tutorial, XML Stylesheet Language for
Transformations (page 255), you’ll see how to write out a DOM as an XML file.
(You’ll also see how to convert an existing data file into XML with relative ease.)
Creating the Program
The Document Object Model (DOM) provides APIs that let you create nodes,
modify them, delete and rearrange them. So it is relatively easy to create a DOM,
as you’ll see in later in section 5 of this tutorial, Creating and Manipulating a
DOM (page 238).
CREATING THE PROGRAM
Before you try to create a DOM, however, it is helpful to understand how a
DOM is structured. This series of exercises will make DOM internals visible by
displaying them in a Swing JTree.
Create the Skeleton
Now that you’ve had a quick overview of how to create a DOM, let’s build a simple program to read an XML document into a DOM then write it back out again.
Note: The code discussed in this section is in DomEcho01.java. The file it operates
on is slideSample01.xml. (The browsable version is slideSample01-xml.html.)
Start with a normal basic logic for an app, and check to make sure that an argument has been supplied on the command line:
public class DomEcho {
public static void main(String argv[])
{
if (argv.length != 1) {
System.err.println(
"Usage: java DomEcho filename");
System.exit(1);
}
}// main
}// DomEcho
Import the Required Classes
In this section, you’re going to see all the classes individually named. That’s so
you can see where each class comes from when you want to reference the API
documentation. In your own apps, you may well want to replace import statements like those below with the shorter form: javax.xml.parsers.*.
Add these lines to import the JAXP APIs you’ll be using:
import
import
import
import
javax.xml.parsers.DocumentBuilder;
javax.xml.parsers.DocumentBuilderFactory;
javax.xml.parsers.FactoryConfigurationError;
javax.xml.parsers.ParserConfigurationException;
189
190
DOCUMENT OBJECT MODEL
Add these lines for the exceptions that can be thrown when the XML document
is parsed:
import org.xml.sax.SAXException;
import org.xml.sax.SAXParseException;
Add these lines to read the sample XML file and identify errors:
import java.io.File;
import java.io.IOException;
Finally, import the W3C definition for a DOM and DOM exceptions:
import org.w3c.dom.Document;
import org.w3c.dom.DOMException;
Note: A DOMException is only thrown when traversing or manipulating a DOM.
Errors that occur during parsing are reporting using a different mechanism that is
covered below.
Declare the DOM
The org.w3c.dom.Document class is the W3C name for a Document Object
Model (DOM). Whether you parse an XML document or create one, a Document instance will result. We’ll want to reference that object from another
method later on in the tutorial, so define it as a global object here:
public class DomEcho
{
static Document document;
public static void main(String argv[])
{
It needs to be static, because you’re going to generate its contents from the
main method in a few minutes.
Handle Errors
Next, put in the error handling logic. This logic is basically the same as the code
you saw in Handling Errors with the Nonvalidating Parser (page 145) in the
CREATING THE PROGRAM
SAX tutorial, so we won’t go into it in detail here. The major point worth noting
is that a JAXP-conformant document builder is required to report SAX exceptions when it has trouble parsing the XML document. The DOM parser does not
have to actually use a SAX parser internally, but since the SAX standard was
already there, it seemed to make sense to use it for reporting errors. As a result,
the error-handling code for DOM and SAX applications are very similar:
public static void main(String argv[])
{
if (argv.length != 1) {
...
}
try {
} catch (SAXParseException spe) {
// Error generated by the parser
System.out.println("\n** Parsing error"
+ ", line " + spe.getLineNumber()
+ ", uri " + spe.getSystemId());
System.out.println("
" + spe.getMessage() );
// Use the contained exception, if any
Exception x = spe;
if (spe.getException() != null)
x = spe.getException();
x.printStackTrace();
} catch (SAXException sxe) {
// Error generated during parsing
Exception x = sxe;
if (sxe.getException() != null)
x = sxe.getException();
x.printStackTrace();
} catch (ParserConfigurationException pce) {
// Parser with specified options can't be built
pce.printStackTrace();
} catch (IOException ioe) {
// I/O error
ioe.printStackTrace();
}
}// main
191
192
DOCUMENT OBJECT MODEL
Instantiate the Factory
Next, add the code highlighted below to obtain an instance of a factory that can
give us a document builder:
public static void main(String argv[])
{
if (argv.length != 1) {
...
}
DocumentBuilderFactory factory =
DocumentBuilderFactory.newInstance();
try {
Get a Parser and Parse the File
Now, add the code highlighted below to get a instance of a builder, and use it to
parse the specified file:
try {
DocumentBuilder builder = factory.newDocumentBuilder();
document = builder.parse( new File(argv[0]) );
} catch (SAXParseException spe) {
Save This File!
By now, you should be getting the idea that every JAXP application starts
pretty much the same way. You’re right! Save this version of the file as a
template. You’ll use it later on as the basis for an XSLT transformation
application.
Run the Program
Throughout most of the DOM tutorial, you’ll be using the sample slideshows
you saw in the SAX section. In particular, you’ll use slideSample01.xml, a
simple XML file with nothing much in it, and slideSample10.xml, a more complex example that includes a DTD, processing instructions, entity references,
and a CDATA section.
For instructions on how to compile and run your program, see Compiling and
Running the Program from the SAX tutorial. Substitute “DomEcho” for “Echo”
as the name of the program, and you’re ready to roll.
ADDITIONAL INFORMATION
For now, just run the program on slideSample01.xml. If it ran without error,
you have successfully parsed an XML document and constructed a DOM. Congratulations!
Note: You’ll have to take my word for it, for the moment, because at this point you
don’t have any way to display the results. But that feature is coming shortly...
Additional Information
Now that you have successfully read in a DOM, there are one or two more things
you need to know in order to use DocumentBuilder effectively. Namely, you
need to know about:
• Configuring the Factory
• Handling Validation Errors
Configuring the Factory
By default, the factory returns a nonvalidating parser that knows nothing about
namespaces. To get a validating parser, and/or one that understands namespaces,
you configure the factory to set either or both of those options using the command(s) highlighted below:
public static void main(String argv[])
{
if (argv.length != 1) {
...
}
DocumentBuilderFactory factory =
DocumentBuilderFactory.newInstance();
factory.setValidating(true);
factory.setNamespaceAware(true);
try {
...
Note: JAXP-conformant parsers are not required to support all combinations of
those options, even though the reference parser does. If you specify an invalid combination of options, the factory generates a ParserConfigurationException when
you attempt to obtain a parser instance.
193
194
DOCUMENT OBJECT MODEL
You’ll be learning more about how to use namespaces in the last section of the
DOM tutorial, Validating with XML Schema (page 247). To complete this section, though, you’ll want to learn something about...
Handling Validation Errors
Remember when you were wading through the SAX tutorial, and all you really
wanted to do was construct a DOM? Well, here’s when that information begins
to pay off.
Recall that the default response to a validation error, as dictated by the SAX
standard, is to do nothing. The JAXP standard requires throwing SAX exceptions, so you use exactly the same error handling mechanisms as you used for a
SAX application. In particular, you need to use the DocumentBuilder’s setErrorHandler method to supply it with an object that implements the SAX
ErrorHandler interface.
Note: DocumentBuilder also has a setEntityResolver method you can use
The code below uses an anonymous inner class to define that ErrorHandler.
The highlighted code is the part that makes sure validation errors generate an
exception.
builder.setErrorHandler(
new org.xml.sax.ErrorHandler() {
// ignore fatal errors (an exception is guaranteed)
public void fatalError(SAXParseException exception)
throws SAXException {
}
// treat validation errors as fatal
public void error(SAXParseException e)
throws SAXParseException
{
throw e;
}
// dump warnings too
public void warning(SAXParseException err)
throws SAXParseException
{
System.out.println("** Warning"
+ ", line " + err.getLineNumber()
+ ", uri " + err.getSystemId());
LOOKING AHEAD
System.out.println("
" + err.getMessage());
}
);
This code uses an anonymous inner class to generate an instance of an object
that implements the ErrorHandler interface. Since it has no class name, it’s
“anonymous”. You can think of it as an “ErrorHandler” instance, although technically it’s a no-name instance that implements the specified interface. The code
is substantially the same as that described in Handling Errors with the Nonvalidating Parser (page 145). For a more complete background on validation issues,
refer to Using the Validating Parser (page 162).
Looking Ahead
In the next section, you’ll display the DOM structure in a JTree and begin to
explore its structure. For example, you’ll see how entity references and CDATA
sections appear in the DOM. And perhaps most importantly, you’ll see how text
nodes (which contain the actual data) reside under element nodes in a DOM.
Displaying a DOM Hierarchy
To create a Document Object Hierarchy (DOM) or manipulate one, it helps to
have a clear idea of how the nodes in a DOM are structured. In this section of the
tutorial, you’ll expose the internal structure of a DOM.
Echoing Tree Nodes
What you need at this point is a way to expose the nodes in a DOM so you can
see what it contains. To do that, you’ll convert a DOM into a JTreeModel and
display the full DOM in a JTree. It’s going to take a bit of work, but the end
result will be a diagnostic tool you can use in the future, as well as something
you can use to learn about DOM structure now.
Convert DomEcho to a GUI App
Since the DOM is a tree, and the Swing JTree component is all about displaying
trees, it makes sense to stuff the DOM into a JTree, so you can look at it. The
195
196
DOCUMENT OBJECT MODEL
first step in that process is to hack up the DomEcho program so it becomes a GUI
application.
Note: The code discussed in this section is in DomEcho02.java.
Add Import Statements
Start by importing the GUI components you’re going to need to set up the application and display a JTree:
// GUI
import
import
import
import
components and layouts
javax.swing.JFrame;
javax.swing.JPanel;
javax.swing.JScrollPane;
javax.swing.JTree;
Later on in the DOM tutorial, we’ll tailor the DOM display to generate a userfriendly version of the JTree display. When the user selects an element in that
tree, you’ll be displaying subelements in an adjacent editor pane. So, while we’re
doing the setup work here, import the components you need to set up a divided
view (JSplitPane) and to display the text of the subelements (JEditorPane):
import javax.swing.JSplitPane;
import javax.swing.JEditorPane;
Add a few support classes you’re going to need to get this thing off the ground:
// GUI
import
import
import
import
import
support classes
java.awt.BorderLayout;
java.awt.Dimension;
java.awt.Toolkit;
java.awt.event.WindowEvent;
java.awt.event.WindowAdapter;
Finally, import some classes to make a fancy border:
// For
import
import
import
creating borders
javax.swing.border.EmptyBorder;
javax.swing.border.BevelBorder;
javax.swing.border.CompoundBorder;
CONVERT DOMECHO TO A GUI APP
(These are optional. You can skip them and the code that depends on them if you
want to simplify things.)
Create the GUI Framework
The next step is to convert the application into a GUI application. To do that, the
static main method will create an instance of the main class, which will have
become a GUI pane.
Start by converting the class into a GUI pane by extending the Swing JPanel
class:
public class DomEcho02 extends JPanel
{
// Global value so it can be ref'd by the tree-adapter
static Document document;
...
While you’re there, define a few constants you’ll use to control window sizes:
public class DomEcho02 extends JPanel
{
// Global value so it can be ref'd by the tree-adapter
static Document document;
static
static
static
static
final
final
final
final
int
int
int
int
windowHeight = 460;
leftWidth = 300;
rightWidth = 340;
windowWidth = leftWidth + rightWidth;
Now, in the main method, invoke a method that will create the outer frame that
the GUI pane will sit in:
public static void main(String argv[])
{
...
DocumentBuilderFactory factory ...
try {
DocumentBuilder builder = factory.newDocumentBuilder();
document = builder.parse( new File(argv[0]) );
makeFrame();
} catch (SAXParseException spe) {
...
197
198
DOCUMENT OBJECT MODEL
Next, you’ll need to define the makeFrame method itself. It contains the standard
code to create a frame, handle the exit condition gracefully, give it an instance of
the main panel, size it, locate it on the screen, and make it visible:
...
} // main
public static void makeFrame()
{
// Set up a GUI framework
JFrame frame = new JFrame("DOM Echo");
frame.addWindowListener(new WindowAdapter() {
public void windowClosing(WindowEvent e)
{System.exit(0);}
});
// Set up the tree, the views, and display it all
final DomEcho02 echoPanel = new DomEcho02();
frame.getContentPane().add("Center", echoPanel );
frame.pack();
Dimension screenSize =
Toolkit.getDefaultToolkit().getScreenSize();
int w = windowWidth + 10;
int h = windowHeight + 10;
frame.setLocation(screenSize.width/3 - w/2,
screenSize.height/2 - h/2);
frame.setSize(w, h);
frame.setVisible(true)
} // makeFrame
Add the Display Components
The only thing left in the effort to convert the program to a GUI application is to
create the class constructor and make it create the panel’s contents. Here is the
constructor:
public class DomEcho02 extends JPanel
{
...
static final int windowWidth = leftWidth + rightWidth;
public DomEcho02()
{
} // Constructor
CONVERT DOMECHO TO A GUI APP
Here, you make use of the border classes you imported earlier to make a regal
border (optional):
public DomEcho02()
{
// Make a nice border
EmptyBorder eb = new EmptyBorder(5,5,5,5);
BevelBorder bb = new BevelBorder(BevelBorder.LOWERED);
CompoundBorder cb = new CompoundBorder(eb,bb);
this.setBorder(new CompoundBorder(cb,eb));
} // Constructor
Next, create an empty tree and put it a JScrollPane so users can see its contents
as it gets large:
public DomEcho02(
{
...
// Set up the tree
JTree tree = new JTree();
// Build left-side view
JScrollPane treeView = new JScrollPane(tree);
treeView.setPreferredSize(
new Dimension( leftWidth, windowHeight ));
} // Constructor
Now create a non-editable JEditPane that will eventually hold the contents
pointed to by selected JTree nodes:
public DomEcho02(
{
....
// Build right-side view
JEditorPane htmlPane = new JEditorPane("text/html","");
htmlPane.setEditable(false);
JScrollPane htmlView = new JScrollPane(htmlPane);
htmlView.setPreferredSize(
new Dimension( rightWidth, windowHeight ));
}
// Constructor
199
200
DOCUMENT OBJECT MODEL
With the left-side JTree and the right-side JEditorPane constructed, create a
JSplitPane to hold them:
public DomEcho02()
{
....
// Build split-pane view
JSplitPane splitPane =
new JSplitPane(JSplitPane.HORIZONTAL_SPLIT,
treeView, htmlView );
splitPane.setContinuousLayout( true );
splitPane.setDividerLocation( leftWidth );
splitPane.setPreferredSize(
new Dimension( windowWidth + 10, windowHeight+10 ));
}
// Constructor
With this code, you set up the JSplitPane with a vertical divider. That produces
a “horizontal split” between the tree and the editor pane. (More of a horizontal
layout, really.) You also set the location of the divider so that the tree got the
width it prefers, with the remainder of the window width allocated to the editor
pane.
Finally, specify the layout for the panel and add the split pane:
public DomEcho02()
{
...
// Add GUI components
this.setLayout(new BorderLayout());
this.add("Center", splitPane );
} // Constructor
Congratulations! The program is now a GUI application. You can run it now to
see what the general layout will look like on screen. For reference, here is the
completed constructor:
public DomEcho02()
{
// Make a nice border
EmptyBorder eb = new EmptyBorder(5,5,5,5);
BevelBorder bb = new BevelBorder(BevelBorder.LOWERED);
CompoundBorder CB = new CompoundBorder(eb,bb);
CREATE ADAPTERS TO DISPLAY THE DOM IN A JTREE
this.setBorder(new CompoundBorder(CB,eb));
// Set up the tree
JTree tree = new JTree();
// Build left-side view
JScrollPane treeView = new JScrollPane(tree);
treeView.setPreferredSize(
new Dimension( leftWidth, windowHeight ));
// Build right-side view
JEditorPane htmlPane = new JEditorPane("text/html","");
htmlPane.setEditable(false);
JScrollPane htmlView = new JScrollPane(htmlPane);
htmlView.setPreferredSize(
new Dimension( rightWidth, windowHeight ));
// Build split-pane view
JSplitPane splitPane =
new JSplitPane(JSplitPane.HORIZONTAL_SPLIT,
treeView, htmlView )
splitPane.setContinuousLayout( true );
splitPane.setDividerLocation( leftWidth );
splitPane.setPreferredSize(
new Dimension( windowWidth + 10, windowHeight+10 ));
// Add GUI components
this.setLayout(new BorderLayout());
this.add("Center", splitPane );
} // Constructor
Create Adapters to Display the DOM in
a JTree
Now that you have a GUI framework to display a JTree in, the next step is get
the JTree to display the DOM. But a JTree wants to display a TreeModel. A
DOM is a tree, but it’s not a TreeModel. So you’ll need to create an adapter class
that makes the DOM look like a TreeModel to a JTree.
Now, when the TreeModel passes nodes to the JTree, JTree uses the toString
function of those nodes to get the text to display in the tree. The standard
toString function isn’t going to be very pretty, so you’ll need to wrap the DOM
nodes in an AdapterNode that returns the text we want. What the TreeModel
201
202
DOCUMENT OBJECT MODEL
gives to the JTree, then, will in fact be AdapterNode objects that wrap DOM
nodes.
Note: The classes that follow are defined as inner classes. If you are coding for the
1.1 platform, you will need to define these class as external classes.
Define the AdapterNode Class
Start by importing the tree, event, and utility classes you’re going to need to
make this work:
// For
import
import
import
creating a TreeModel
javax.swing.tree.*;
javax.swing.event.*;
java.util.*;
public class DomEcho extends JPanel
{
Moving back down to the end of the program, define a set of strings for the node
element types:
...
} // makeFrame
// An array of names for DOM node-types
// (Array indexes = nodeType() values.)
static final String[] typeName = {
"none",
"Element",
"Attr",
"Text",
"CDATA",
"EntityRef",
"Entity",
"ProcInstr",
"Comment",
"Document",
"DocType",
"DocFragment",
"Notation",
};
} // DomEcho
203
CREATE ADAPTERS TO DISPLAY THE DOM IN A JTREE
These are the strings that will be displayed in the JTree. The specification of
these nodes types can be found in the Document Object Model (DOM) Level 2
Core Specification at http://www.w3.org/TR/2000/REC-DOM/Level-2-Core20001113, under the specification for Node. That table is reproduced below, with
the headings modified for clarity, and with the nodeType() column added:
Table 6–1 Node Types
Node
nodeName()
nodeValue()
attributes
nodeType()
Attr
name of
attribute
value of
attribute
null
2
CDATASection
#cdata-section
content of
the CDATA
section
null
4
Comment
#comment
content of the
comment
null
8
Document
#document
null
null
9
DocumentFragment
#documentfragment
null
null
11
DocumentType
document
type name
null
null
10
Element
tag name
null
NamedNodeMap
1
Entity
entity name
null
null
6
EntityReference
name of entity
referenced
null
null
5
Notation
notation name
null
null
12
ProcessingInstruction
target
entire content
excluding the
target
null
7
Text
#text
content of the
text node
null
3
204
DOCUMENT OBJECT MODEL
Suggestion:
Print this table and keep it handy. You need it when working with the DOM,
because all of these types are intermixed in a DOM tree. So your code is forever asking, “Is this the kind of node I’m interested in?”.
Next, define the AdapterNode wrapper for DOM nodes as an inner class:
static final String[] typeName = {
...
};
public class AdapterNode
{
org.w3c.dom.Node domNode;
// Construct an Adapter node from a DOM node
public AdapterNode(org.w3c.dom.Node node) {
domNode = node;
}
// Return a string that identifies this node
//
in the tree
public String toString() {
String s = typeName[domNode.getNodeType()];
String nodeName = domNode.getNodeName();
if (! nodeName.startsWith("#")) {
s += ": " + nodeName;
}
if (domNode.getNodeValue() != null) {
if (s.startsWith("ProcInstr"))
s += ", ";
else
s += ": ";
// Trim the value to get rid of NL's
//
at the front
String t = domNode.getNodeValue().trim();
int x = t.indexOf(");
if (x >= 0) t = t.substring(0, x);
s += t;
}
return s;
}
} // AdapterNode
} // DomEcho
CREATE ADAPTERS TO DISPLAY THE DOM IN A JTREE
This class declares a variable to hold the DOM node, and requires it to be specified as a constructor argument. It then defines the toString operation, which
returns the node type from the String array, and then adds to that additional
information from the node, to further identify it.
As you can see in the table of node types in org.w3c.dom.Node, every node has
a type, and name, and a value, which may or may not be empty. In those cases
where the node name starts with “#”, that field duplicates the node type, so there
is in point in including it. That explains the lines that read:
if (! nodeName.startsWith("#")) {
s += ": " + nodeName;
}
The remainder of the toString method deserves a couple of notes, as well. For
instance, these lines:
if (s.startsWith("ProcInstr"))
s += ", ";
else
s += ": ";
Merely provide a little “syntactic sugar”. The type field for a Processing Instructions end with a colon (:) anyway, so those codes keep from doubling the colon.
The other interesting lines are:
String t = domNode.getNodeValue().trim();
int x = t.indexOf(");
if (x >= 0) t = t.substring(0, x);
s += t;
Those lines trim the value field down to the first newline (linefeed) character in
the field. If you leave those lines out, you will see some funny characters (square
boxes, typically) in the JTree.
Note: Recall that XML stipulates that all line endings are normalized to newlines,
regardless of the system the data comes from. That makes programming quite a bit
simpler.
Wrapping a DomNode and returning the desired string are the AdapterNode’s
major functions. But since the TreeModel adapter will need to answer questions
like “How many children does this node have?” and satisfy commands like
205
206
DOCUMENT OBJECT MODEL
“Give me this node’s Nth child”, it will be helpful to define a few additional utility methods. (The adapter could always access the DOM node and get that information for itself, but this way things are more encapsulated.)
Next, add the code highlighted below to return the index of a specified child, the
child that corresponds to a given index, and the count of child nodes:
public class AdapterNode
{
...
public String toString() {
...
}
public int index(AdapterNode child) {
//System.err.println("Looking for index of " + child);
int count = childCount();
for (int i=0; i<count; i++) {
AdapterNode n = this.child(i);
if (child == n) return i;
}
return -1; // Should never get here.
}
public AdapterNode child(int searchIndex) {
//Note: JTree index is zero-based.
org.w3c.dom.Node node =
domNode.getChildNodes().item(searchIndex);
return new AdapterNode(node);
}
public int childCount() {
return domNode.getChildNodes().getLength();
}
} // AdapterNode
} // DomEcho
Note: During development, it was only after I started writing the TreeModel adapter
that I realized these were needed, and went back to add them. In just a moment,
you’ll see why.
CREATE ADAPTERS TO DISPLAY THE DOM IN A JTREE
Define the TreeModel Adapter
Now, at last, you are ready to write the TreeModel adapter. One of the really nice
things about the JTree model is the relative ease with which you convert an
existing tree for display. One of the reasons for that is the clear separation
between the displayable view, which JTree uses, and the modifiable view, which
the application uses. For more on that separation, see Understanding the TreeModel
at
http://java.sun.com/products/jfc/tsc/articles/jtree/
index.html. For now, the important point is that to satisfy the TreeModel interface we only need to (a) provide methods to access and report on children and
(b) register the appropriate JTree listener, so it knows to update its view when
the underlying model changes.
Add the code highlighted below to create the TreeModel adapter and specify the
child-processing methods:
...
} // AdapterNode
// This adapter converts the current Document (a DOM) into
// a JTree model.
public class DomToTreeModelAdapter implements
javax.swing.tree.TreeModel
{
// Basic TreeModel operations
public Object getRoot() {
//System.err.println("Returning root: " +document);
return new AdapterNode(document);
}
public boolean isLeaf(Object aNode) {
// Determines whether the icon shows up to the left.
// Return true for any node with no children
AdapterNode node = (AdapterNode) aNode;
if (node.childCount() > 0) return false;
return true;
}
public int
getChildCount(Object parent)
AdapterNode node = (AdapterNode) parent;
return node.childCount();
}
public Object getChild(Object parent, int index) {
AdapterNode node = (AdapterNode) parent;
return node.child(index);
207
208
DOCUMENT OBJECT MODEL
}
public int
getIndexOfChild(Object parent, Object child) {
AdapterNode node = (AdapterNode) parent;
return node.index((AdapterNode) child);
}
public void valueForPathChanged(
TreePath path, Object newValue)
{
// Null. We won't be making changes in the GUI
// If we did, we would ensure the new value was
// really new and then fire a TreeNodesChanged event.
}
} // DomToTreeModelAdapter
} // DomEcho
In this code, the getRoot method returns the root node of the DOM, wrapped as
an AdapterNode object. From here on, all nodes returned by the adapter will be
AdapterNodes that wrap DOM nodes. By the same token, whenever the JTree
asks for the child of a given parent, the number of children that parent has, etc.,
the JTree will be passing us an AdapterNode. We know that, because we control
every node the JTree sees, starting with the root node.
JTree uses the isLeaf method to determine whether or not to display a clickable
expand/contract icon to the left of the node, so that method returns true only if
the node has children. In this method, we see the cast from the generic object
JTree sends us to the AdapterNode object we know it has to be. We know it is
sending us an adapter object, but the interface, to be general, defines objects, so
we have to do the casts.
The next three methods return the number of children for a given node, the child
that lives at a given index, and the index of a given child, respectively. That’s all
pretty straightforward.
The last method is invoked when the user changes a value stored in the JTree. In
this app, we won’t support that. But if we did, the application would have to
make the change to the underlying model and then inform any listeners that a
change had occurred. (The JTree might not be the only listener. In many an
application it isn’t, in fact.)
CREATE ADAPTERS TO DISPLAY THE DOM IN A JTREE
To inform listeners that a change occurred, you’ll need the ability to register
them. That brings us to the last two methods required to implement the TreeModel interface. Add the code highlighted below to define them:
public class DomToTreeModelAdapter ...
{
...
public void valueForPathChanged(
TreePath path, Object newValue)
{
...
}
private Vector listenerList = new Vector();
public void addTreeModelListener(
TreeModelListener listener ) {
if ( listener != null
&& ! listenerList.contains(listener) ) {
listenerList.addElement( listener );
}
}
public void removeTreeModelListener(
TreeModelListener listener )
{
if ( listener != null ) {
listenerList.removeElement( listener );
}
}
} // DomToTreeModelAdapter
Since this application won’t be making changes to the tree, these methods will
go unused, for now. However, they’ll be there in the future, when you need them.
Note: This example uses Vector so it will work with 1.1 apps. If coding for 1.2 or
later, though, I’d use the excellent collections framework instead:
private LinkedList listenerList = new LinkedList();
209
210
DOCUMENT OBJECT MODEL
The operations on the List are then add and remove. To iterate over the list, as in
the operations below, you would use:
Iterator it = listenerList.iterator();
while ( it.hasNext() ) {
TreeModelListener listener = (TreeModelListener) it.next();
...
}
Here, too, are some optional methods you won’t be using in this application. At
this point, though, you have constructed a reasonable template for a TreeModel
adapter. In the interests of completeness, you might want to add the code highlighted below. You can then invoke them whenever you need to notify JTree listeners of a change:
public void removeTreeModelListener(
TreeModelListener listener)
{
...
}
public void fireTreeNodesChanged( TreeModelEvent e ) {
Enumeration listeners = listenerList.elements();
while ( listeners.hasMoreElements() ) {
TreeModelListener listener =
(TreeModelListener) listeners.nextElement();
listener.treeNodesChanged( e );
}
}
public void fireTreeNodesInserted( TreeModelEvent e ) {
Enumeration listeners = listenerList.elements();
while ( listeners.hasMoreElements() ) {
TreeModelListener listener =
(TreeModelListener) listeners.nextElement();
listener.treeNodesInserted( e );
}
}
public void fireTreeNodesRemoved( TreeModelEvent e ) {
Enumeration listeners = listenerList.elements();
while ( listeners.hasMoreElements() ) {
TreeModelListener listener =
(TreeModelListener) listeners.nextElement();
listener.treeNodesRemoved( e );
}
}
FINISHING UP
public void fireTreeStructureChanged( TreeModelEvent e ) {
Enumeration listeners = listenerList.elements();
while ( listeners.hasMoreElements() ) {
TreeModelListener listener =
(TreeModelListener) listeners.nextElement();
listener.treeStructureChanged( e );
}
}
} // DomToTreeModelAdapter
Note: These methods are taken from the TreeModelSupport class described in
Understanding the TreeModel. That architecture was produced by Tom Santos and
Steve Wilson, and is a lot more elegant than the quick hack going on here. It seemed
worthwhile to put them here, though, so they would be immediately at hand when
and if they’re needed.
Finishing Up
At this point, you are basically done. All you need to do is jump back to the constructor and add the code to construct an adapter and deliver it to the JTree as
the TreeModel:
// Set up the tree
JTree tree = new JTree(new DomToTreeModelAdapter());
You can now compile and run the code on an XML file. In the next section, you
will do that, and explore the DOM structures that result.
Examining the Structure of a DOM
In this section, you’ll use the GUI-fied DomEcho application you created in the
last section to visually examine a DOM. You’ll see what nodes make up the
DOM, and how they are arranged. With the understanding you acquire, you’ll be
well prepared to construct and modify Document Object Model structures in the
future.
211
212
DOCUMENT OBJECT MODEL
Displaying A Simple Tree
We’ll start out by displaying a simple file, so you get an idea of basic DOM
structure. Then we’ll look at the structure that results when you include some of
the more advanced XML elements.
Note: The code used to create the figures in this section is in DomEcho02.java. The
file displayed is slideSample01.xml. (The browsable version is slideSample01xml.html.)
Figure 6–1 shows the tree you see when you run the DomEcho program on the
first XML file you created in the DOM tutorial.
Figure 6–1 Document, Comment, and Element Nodes Displayed
Recall that the first bit of text displayed for each node is the element type. After
that comes the element name, if any, and then the element value. This view
shows three element types: Document, Comment, and Element. There is only
Document type for the whole tree—that is the root node. The Comment node displays the value attribute, while the Element node displays the element name,
“slideshow”.
Compare Figure 6–1 with the code in the AdapterNode’s toString method to
see whether the name or value is being displayed for a particular node. If you
need to make it more clear, modify the program to indicate which property is
being displayed (for example, with N: name, V: value).
DISPLAYING A SIMPLE TREE
Expanding the slideshow element brings up the display shown in Figure 6–2.
Figure 6–2 Element Node Expanded, No Attribute Nodes Showing
Here, you can see the Text nodes and Comment nodes that are interspersed
between Slide elements. The empty Text nodes exist because there is no DTD to
tell the parser that no text exists. (Generally, the vast majority of nodes in a
DOM tree will be Element and Text nodes.)
Important!
Text nodes exist under element nodes in a DOM, and data is always stored in
text nodes. Perhaps the most common error in DOM processing is to navigate to
an element node and expect it to contain the data that is stored in that element.
Not so! Even the simplest element node has a text node under it. For example,
given <size>12</size>, there is an element node (size), and a text node under
it which contains the actual data (12).
Notably absent from this picture are the Attribute nodes. An inspection of the
table in org.w3c.dom.Node shows that there is indeed an Attribute node type.
But they are not included as children in the DOM hierarchy. They are instead
obtained via the Node interface getAttributes method.
213
214
DOCUMENT OBJECT MODEL
Note: The display of the text nodes is the reason for including the lines below in the
AdapterNode’s toString method. If your remove them, you’ll see the funny characters (typically square blocks) that are generated by the newline characters that are
in the text.
String t = domNode.getNodeValue().trim();
int x = t.indexOf(");
if (x >= 0) t = t.substring(0, x);
s += t;
Displaying a More Complex Tree
Here, you’ll display the example XML file you created at the end of the SAX
tutorial, to see how entity references, processing instructions, and CDATA sections appear in the DOM.
Note: The file displayed in this section is slideSample10.xml. The
slideSample10.xml file references slideshow3.dtd which, in turn, references
copyright.xml and a (very simplistic) xhtml.dtd. (The browsable versions are
slideSample10-xml.html, slideshow3-dtd.html, copyright-xml.html, and
xhtml-dtd.html.)
DISPLAYING A MORE COMPLEX TREE
Figure 6–3 shows the result of running the DomEcho application on
slideSample10.xml, which includes a DOCTYPE entry that identifies the document’s DTD.
Figure 6–3 DocType Node Displayed
The DocType interface is actually an extension of w3c.org.dom.Node. It defines
a getEntities method that you would use to obtain Entity nodes—the nodes
that define entities like the product entity, which has the value “WonderWidgets”. Like Attribute nodes, Entity nodes do not appear as children of DOM
nodes.
215
216
DOCUMENT OBJECT MODEL
When you expand the slideshow node, you get the display shown in Figure 6–4.
Figure 6–4 Processing Instruction Node Displayed
Here, the processing instruction node is highlighted, showing that those nodes do
appear in the tree. The name property contains the target-specification, which
identifies the application that the instruction is directed to. The value property
contains the text of the instruction.
Note that empty text nodes are also shown here, even though the DTD specifies
that a slideshow can contain slide elements only, never text. Logically, then,
you might think that these nodes would not appear. (When this file was run
through the SAX parser, those elements generated ignorableWhitespace
events, rather than character events.)
DISPLAYING A MORE COMPLEX TREE
Moving down to the second slide element and opening the item element under
it brings up the display shown in Figure 6–5.
Figure 6–5 JAXP 1.2 DOM — Item Text Returned from an Entity Reference
217
218
DOCUMENT OBJECT MODEL
Here, you can see that a text node containing the copyright text was inserted into
the DOM, rather than the entity reference which pointed to it.
For most applications, the insertion of the text is exactly what you want. That
way, when you’re looking for the text under a node, you don’t have to worry
about an entity references it might contain.
For other applications, though, you may need the ability to reconstruct the original XML. For example, an editor application would need to save the result of
user modifications without throwing away entity references in the process.
Various DocumentBuilderFactory APIs give you control over the kind of DOM
structure that is created. For example, add the highlighted line below to produce
the DOM structure shown in Figure 6–6.
public static void main(String argv[])
{
...
DocumentBuilderFactory factory =
DocumentBuilderFactory.newInstance();
factory.setExpandEntityReferences(true);
...
DISPLAYING A MORE COMPLEX TREE
Figure 6–6 JAXP 1.1 in 1.4 Platform— Entity Reference Node Displayed
Here, the Entity Reference node is highlighted. Note that the entity reference
contains multiple nodes under it. This example shows only comment and a text
nodes, but the entity could conceivably contain other element nodes, as well.
219
220
DOCUMENT OBJECT MODEL
Finally, moving down to the last item element under the last slide brings up the
display shown in Figure 6–7.
Figure 6–7 CDATA Node Displayed
Here, the CDATA node is highlighted. Note that there are no nodes under it. Since
a CDATA section is entirely uninterpreted, all of its contents are contained in the
node’s value property.
Summary of Lexical Controls
Lexical information is the information you need to reconstruct the original syntax of an XML document. As we discussed earlier, preserving lexical information is important for editing applications, where you want to save a document
that is an accurate reflection of the original—complete with comments, entity
references, and any CDATA sections it may have included at the outset.
A majority of applications, however, are only concerned with the content of the
XML structures. They can afford to ignore comments, and they don’t care
whether data was coded in a CDATA section, as plain text, or whether it included
an entity reference. For such applications, a minimum of lexical information is
221
FINISHING UP
desirable, because it simplifies the number and kind of DOM nodes that the
application has to be prepared to examine.
The following DocumentBuilderFactory methods give you control over the
lexical information you see in the DOM:
• setCoalescing()
To convert CDATA nodes to Text node and append to an adjacent Text
node (if any).
• setExpandEntityReferences()
To expand entity reference nodes.
• setIgnoringComments()
To ignore comments.
• setIgnoringElementContentWhitespace()
To ignore ignorable whitespace in element content.
The default values for all of these properties is false. Table 6–2 shows the settings you need to preserve all the lexical information necessary to reconstruct the
original document, in its original form. It also shows the settings that construct
the simplest possible DOM, so the application can focus on the data’s semantic
content, without having to worry about lexical syntax details.
Table 6–2 Configuring DocumentBuilderFactory
API
Preserve Lexical Info
Focus on Content
setCoalescing()
false
true
setExpandEntityReferences()
true
false
setIgnoringComments()
false
true
setIgnoringElement
ContentWhitespace()
false
true
Finishing Up
At this point, you have seen most of the nodes you will ever encounter in a DOM
tree. There are one or two more that we’ll mention in the next section, but you
222
DOCUMENT OBJECT MODEL
now know what you need to know to create or modify a DOM structure. In the
next section, you’ll see how to convert a DOM into a JTree that is suitable for an
interactive GUI. Or, if you prefer, you can skip ahead to the 5th section of the
DOM tutorial, Creating and Manipulating a DOM (page 238), where you’ll learn
how to create a DOM from scratch.
Constructing a User-Friendly JTree from
a DOM
Now that you know what a DOM looks like internally, you’ll be better prepared
to modify a DOM or construct one from scratch. Before going on to that, though,
this section presents some modifications to the JTreeModel that let you produce
a more user-friendly version of the JTree suitable for use in a GUI.
Compressing the Tree View
Displaying the DOM in tree form is all very well for experimenting and to learn
how a DOM works. But it’s not the kind of “friendly” display that most users
want to see in a JTree. However, it turns out that very few modifications are
needed to turn the TreeModel adapter into something that will present a userfriendly display. In this section, you’ll make those modifications.
Note: The code discussed in this section is in DomEcho03.java. The file it operates
on is slideSample01.xml. (The browsable version is slideSample01-xml.html.)
Make the Operation Selectable
When you modify the adapter, you’re going to compress the view of the DOM,
eliminating all but the nodes you really want to display. Start by defining a boolean variable that controls whether you want the compressed or uncompressed
view of the DOM:
public class DomEcho extends JPanel
{
static Document document;
boolean compress = true;
static final int windowHeight = 460;
...
COMPRESSING THE TREE VIEW
Identify Tree Nodes
The next step is to identify the nodes you want to show up in the tree. To do that,
add the code highlighted below:
...
import org.w3c.dom.Document;
import org.w3c.dom.DOMException;
import org.w3c.dom.Node;
public class DomEcho extends JPanel
{
...
public static void makeFrame() {
...
}
// An array of names for DOM node-type
static final String[] typeName = {
...
};
static final int ELEMENT_TYPE = Node.ELEMENT_NODE;
// The list of elements to display in the tree
static String[] treeElementNames = {
"slideshow",
"slide",
"title",
// For slideshow #1
"slide-title",
// For slideshow #10
"item",
};
boolean treeElement(String elementName) {
for (int i=0; i<treeElementNames.length; i++) {
if ( elementName.equals(treeElementNames[i]) )
return true;
}
return false;
}
With this code, you set up a constant you can use to identify the ELEMENT node
type, declared the names of the elements you want in the tree, and created a
method tells whether or not a given element name is a “tree element”. Since
slideSample01.xml has title elements and slideSample10.xml has slide-
223
224
DOCUMENT OBJECT MODEL
title elements, you set up the contents of this arrays so it would work with
either data file.
Note: The mechanism you are creating here depends on the fact that structure nodes
like slideshow and slide never contain text, while text usually does appear in content nodes like item. Although those “content” nodes may contain subelements in
slideShow10.xml, the DTD constrains those subelements to be XHTML nodes.
Because they are XHTML nodes (an XML version of HTML that is constrained to
be well-formed), the entire substructure under an item node can be combined into
a single string and displayed in the htmlPane that makes up the other half of the
application window. In the second part of this section, you’ll do that concatenation,
displaying the text and XHTML as content in the htmlPane.
Although you could simply reference the node types defined in the class,
org.w3c.dom.Node, defining the ELEMENT_TYPE constant keeps the code a little
more readable. Each node in the DOM has a name, a type, and (potentially) a list
of subnodes. The functions that return these values are getNodeName(), getNodeType, and getChildNodes(). Defining our own constants will let us write
code like this:
Node node = nodeList.item(i);
int type = node.getNodeType();
if (type == ELEMENT_TYPE) {
....
As a stylistic choice, the extra constants help us keep the reader (and ourselves!)
clear about what we’re doing. Here, it is fairly clear when we are dealing with a
node object, and when we are dealing with a type constant. Otherwise, it would
be fairly tempting to code something like, if (node == ELEMENT_NODE), which
of course would not work at all.
Control Node Visibility
The next step is to modify the AdapterNode’s childCount function so that it
only counts “tree element” nodes—nodes which are designated as displayable in
the JTree. Make the modifications highlighted below to do that:
public class DomEcho extends JPanel
{
...
public class AdapterNode
{
COMPRESSING THE TREE VIEW
...
public AdapterNode child(int searchIndex) {
...
}
public int childCount() {
if (!compress) {
// Indent this
return domNode.getChildNodes().getLength();
}
int count = 0;
for (int i=0;
i<domNode.getChildNodes().getLength(); i++)
{
org.w3c.dom.Node node =
domNode.getChildNodes().item(i);
if (node.getNodeType() == ELEMENT_TYPE
&& treeElement( node.getNodeName() ))
{
++count;
}
}
return count;
}
} // AdapterNode
The only tricky part about this code is checking to make sure the node is an element node before comparing the node. The DocType node makes that necessary,
because it has the same name, “slideshow”, as the slideshow element.
Control Child Access
Finally, you need to modify the AdapterNode’s child function to return the Nth
item from the list of displayable nodes, rather than the Nth item from all nodes in
the list. Add the code highlighted below to do that:
public class DomEcho extends JPanel
{
...
public class AdapterNode
{
...
public int index(AdapterNode child) {
...
}
public AdapterNode child(int searchIndex) {
//Note: JTree index is zero-based.
225
226
DOCUMENT OBJECT MODEL
org.w3c.dom.Node node =
domNode.getChildNodes()Item(searchIndex);
if (compress) {
// Return Nth displayable node
int elementNodeIndex = 0;
for (int i=0;
i<domNode.getChildNodes().getLength(); i++)
{
node = domNode.getChildNodes()Item(i);
if (node.getNodeType() == ELEMENT_TYPE
&& treeElement( node.getNodeName() )
&& elementNodeIndex++ == searchIndex) {
break;
}
}
}
return new AdapterNode(node);
} // child
} // AdapterNode
There’s nothing special going on here. It’s a slightly modified version the same
logic you used when returning the child count.
Check the Results
When
you
compile and run this version of the application on
and then expand the nodes in the tree, you see the results
shown in Figure 6–8. The only nodes remaining in the tree are the high-level
“structure” nodes.
slideSample01.xml,
COMPRESSING THE TREE VIEW
Figure 6–8 Tree View with a Collapsed Hierarchy
Extra Credit
The way the application stands now, the information that tells the application
how to compress the tree for display is “hard-coded”. Here are some ways you
could consider extending the app:
Use a Command-Line Argument
Whether you compress or don’t compress the tree could be determined by a
command line argument, rather than being a hard-coded boolean variable.
On the other hand, the list the list of elements that goes into the tree is still
hard coded, so maybe that option doesn’t make much sense, unless...
Read the treeElement list from a file
If you read the list of elements to include in the tree from an external file,
that would make the whole application command driven. That would be
good. But wouldn’t it be really nice to derive that information from the DTD
or schema, instead? So you might want to consider...
Automatically Build the List
Watch out, though! As things stand right now, there are no standard DTD
parsers! If you use a DTD, then, you’ll need to write your parser to make
sense out of its somewhat arcane syntax. You’ll probably have better luck if
you use a schema, instead of a DTD. The nice thing about schemas is that
227
228
DOCUMENT OBJECT MODEL
use XML syntax, so you can use an XML parser to read the schema the same
way you use any other file.
As you analyze the schema, note that the JTree-displayable structure nodes
are those that have no text, while the content nodes may contain text and,
optionally, XHTML subnodes. That distinction works for this example, and
will likely work for a large body of real-world applications. It’s pretty easy
to construct cases that will create a problem, though, so you’ll have to be on
the lookout for schema/DTD specifications that embed non-XHTML elements in text-capable nodes, and take the appropriate action.
Acting on Tree Selections
Now that the tree is being displayed properly, the next step is to concatenate the
subtrees under selected nodes to display them in the htmlPane. While you’re at
it, you’ll use the concatenated text to put node-identifying information back in
the JTree.
Note: The code discussed in this section is in DomEcho04.java.
Identify Node Types
When you concatenate the subnodes under an element, the processing you do is
going to depend on the type of node. So the first thing to is to define constants
for the remaining node types. Add the code highlighted below to do that:
public class DomEcho extends JPanel
{
...
// An array of names for DOM node-types
static final String[] typeName = {
...
};
static final int ELEMENT_TYPE =
1;
static final int ATTR_TYPE =Node.ATTRIBUTE_NODE;
static final int TEXT_TYPE =Node.TEXT_NODE;
static final int CDATA_TYPE = Node.CDATA_SECTION_NODE;
static final int ENTITYREF_TYPE =
Node.ENTITY_REFERENCE_NODE;
static final int ENTITY_TYPE =Node.ENTITY_NODE;
static final int PROCINSTR_TYPE =
Node.PROCESSING_INSTRUCTION_NODE;
ACTING ON TREE SELECTIONS
static
static
static
static
static
final
final
final
final
final
int
int
int
int
int
COMMENT_TYPE = Node.COMMENT_NODE;
DOCUMENT_TYPE =Node.DOCUMENT_NODE;
DOCTYPE_TYPE =Node.DOCUMENT_TYPE_NODE;
DOCFRAG_TYPE =Node.DOCUMENT_FRAGMENT_NODE;
NOTATION_TYPE =Node.NOTATION_NODE;
Concatenate Subnodes to Define Element
Content
Next, you need to define add the method that concatenates the text and subnodes
for an element and returns it as the element’s “content”. To define the content
method, you’ll need to add the big chunk of code highlighted below, but this is
the last big chunk of code in the DOM tutorial!.
public class DomEcho extends JPanel
{
...
public class AdapterNode
{
...
public String toString() {
...
}
public String content() {
String s = "";
org.w3c.dom.NodeList nodeList =
domNode.getChildNodes();
for (int i=0; i<nodeList.getLength(); i++) {
org.w3c.dom.Node node = nodeList.item(i);
int type = node.getNodeType();
AdapterNode adpNode = new AdapterNode(node);
if (type == ELEMENT_TYPE) {
if ( treeElement(node.getNodeName()) )
continue;
s += "<" + node.getNodeName() + ">";
s += adpNode.content();
s += "</" + node.getNodeName() + ">";
} else if (type == TEXT_TYPE) {
s += node.getNodeValue();
} else if (type == ENTITYREF_TYPE) {
// The content is in the TEXT node under it
s += adpNode.content();
} else if (type == CDATA_TYPE) {
StringBuffer sb = new StringBuffer(
node.getNodeValue() );
for (int j=0; j<sb.length(); j++) {
229
230
DOCUMENT OBJECT MODEL
if (sb.charAt(j) == '<') {
sb.setCharAt(j, '&');
sb.insert(j+1, "lt;");
j += 3;
} else if (sb.charAt(j) == '&') {
sb.setCharAt(j, '&');
sb.insert(j+1, "amp;");
j += 4;
}
}
s += "<pre>" + sb + "</pre>";
}
}
return s;
}
...
} // AdapterNode
Note: This code collapses EntityRef nodes, as inserted by the JAXP 1.1 parser that
ins included in the 1.4 Java platform. With JAXP 1.2, that portion of the code is not
necessary because entity references are converted to text nodes by the parser. Other
parsers may well insert such nodes, however, so including this code “future proofs”
your application, should you use a different parser in the future.
Although this code is not the most efficient that anyone ever wrote, it works and
it will do fine for our purposes. In this code, you are recognizing and dealing
with the following data types:
Element
For elements with names like the XHTML “em” node, you return the node’s
content sandwiched between the appropriate <em> and </em> tags. However,
when processing the content for the slideshow element, for example, you
don’t include tags for the slide elements it contains so, when returning a
node’s content, you skip any subelements that are themselves displayed in
the tree.
Text
No surprise here. For a text node, you simply return the node’s value.
Entity Reference
Unlike CDATA nodes, Entity References can contain multiple subelements.
So the strategy here is to return the concatenation of those subelements.
ACTING ON TREE SELECTIONS
CDATA
Like a text node, you return the node’s value. However, since the text in this
case may contain angle brackets and ampersands, you need to convert them
to a form that displays properly in an HTML pane. Unlike the XML CDATA
tag, the HTML <pre> tag does not prevent the parsing of character-format
tags, break tags and the like. So you have to convert left-angle brackets (<)
and ampersands (&) to get them to display properly.
On the other hand, there are quite a few node types you are not processing with
the code above. It’s worth a moment to examine them and understand why:
Attribute
These nodes do not appear in the DOM, but are obtained by invoking
getAttributes on element nodes.
Entity
These nodes also do not appear in the DOM. They are obtained by invoking
getEntities on DocType nodes.
Processing Instruction
These nodes don’t contain displayable data.
Comment
Ditto. Nothing you want to display here.
Document
This is the root node for the DOM. There’s no data to display for that.
DocType
The DocType node contains the DTD specification, with or without external
pointers. It only appears under the root node, and has no data to display in
the tree.
Document Fragment
This node is equivalent to a document node. It’s a root node that the DOM
specification intends for holding intermediate results during cut/paste operations, for example. Like a document node, there’s no data to display.
Notation
We’re just flat out ignoring this one. These nodes are used to include binary
data in the DOM. As discussed earlier in Choosing your Parser Implementation and Using the DTDHandler and EntityResolver (page 178), the MIME
types (in conjunction with namespaces) make a better mechanism for that.
231
232
DOCUMENT OBJECT MODEL
Display the Content in the JTree
With the content-concatenation out of the way, only a few small programming
steps remain. The first is to modify toString so that it uses the node’s content
for identifying information. Add the code highlighted below to do that:
public class DomEcho extends JPanel
{
...
public class AdapterNode
{
...
public String toString() {
...
if (! nodeName.startsWith("#")) {
s += ": " + nodeName;
}
if (compress) {
String t = content().trim();
int x = t.indexOf(");
if (x >= 0) t = t.substring(0, x);
s += " " + t;
return s;
}
if (domNode.getNodeValue() != null) {
...
}
return s;
}
Wire the JTree to the JEditorPane
Returning now to the app’s constructor, create a tree selection listener and use to
wire the JTree to the JEditorPane:
public class DomEcho extends JPanel
{
...
public DomEcho()
{
...
// Build right-side view
JEditorPane htmlPane = new JEditorPane("text/html","");
htmlPane.setEditable(false);
JScrollPane htmlView = new JScrollPane(htmlPane);
htmlView.setPreferredSize(
ACTING ON TREE SELECTIONS
new Dimension( rightWidth, windowHeight ));
tree.addTreeSelectionListener(
new TreeSelectionListener() {
public void valueChanged(TreeSelectionEvent e)
{
TreePath p = e.getNewLeadSelectionPath();
if (p != null) {
AdapterNode adpNode =
(AdapterNode)
p.getLastPathComponent();
htmlPane.setText(adpNode.content());
}
}
}
);
Now, when a JTree node is selected, it’s contents are delivered to the htmlPane.
Note: The TreeSelectionListener in this example is created using an anonymous
inner-class adapter. If you are programming for the 1.1 version of the platform,
you’ll need to define an external class for this purpose.
If you compile this version of the app, you’ll discover immediately that the htmneeds to be specified as final to be referenced in an inner class, so add
the keyword highlighted below:
lPane
public DomEcho04()
{
...
// Build right-side view
final JEditorPane htmlPane = new
JEditorPane("text/html","");
htmlPane.setEditable(false);
JScrollPane htmlView = new JScrollPane(htmlPane);
htmlView.setPreferredSize(
new Dimension( rightWidth, windowHeight ));
Run the App
When you compile the application and run it on slideSample10.xml (the
browsable version is slideSample10-xml.html), you get a display like that
233
234
DOCUMENT OBJECT MODEL
shown in Figure 6–9. Expanding the hierarchy shows that the JTree now
includes identifying text for a node whenever possible.
Figure 6–9 Collapsed Hierarchy Showing Text in Nodes
ACTING ON TREE SELECTIONS
Selecting an item that includes XHTML subelements produces a display like
that shown in Figure 6–10:
Figure 6–10 Node with <em> Tag Selected
235
236
DOCUMENT OBJECT MODEL
Selecting a node that contains an entity reference causes the entity text to be
included, as shown in Figure 6–11:
Figure 6–11 Node with Entity Reference Selected
ACTING ON TREE SELECTIONS
Finally, selecting a node that includes a CDATA section produces results like those
shown in Figure 6–12:
Figure 6–12 Node with CDATA Component Selected
Extra Credit
Now that you have the application working, here are some ways you might think
about extending it in the future:
Use Title Text to Identify Slides
Special case the slide element so that the contents of the title node is
used as the identifying text. When selected, convert the title node’s contents
to a centered H1 tag, and ignore the title element when constructing the
tree.
Convert Item Elements to Lists
Remove item elements from the JTree and convert them to HTML lists
using <ul>, <li>, </ul> tags, including them in the slide’s content when the
slide is selected.
237
238
DOCUMENT OBJECT MODEL
Handling Modifications
A full discussion of the mechanisms for modifying the JTree’s underlying data
model is beyond the scope of this tutorial. However, a few words on the subject
are in order.
Most importantly, note that if you allow the user to modifying the structure by
manipulating the JTree, you have take the compression into account when you
figure out where to apply the change. For example, if you are displaying text in
the tree and the user modifies that, the changes would have to be applied to text
subelements, and perhaps require a rearrangement of the XHTML subtree.
When you make those changes, you’ll need to understand more about the interactions between a JTree, it’s TreeModel, and an underlying data model. That
subject is covered in depth in the Swing Connection article, Understanding the
TreeModel at http://java.sun.com/products/jfc/tsc/articles/jtree/
index.html.
Finishing Up
You now understand pretty much what there is know about the structure of a
DOM, and you know how to adapt a DOM to create a user-friendly display in a
JTree. It has taken quite a bit of coding, but in return you have obtained valuable
tools for exposing a DOM’s structure and a template for GUI apps. In the next
section, you’ll make a couple of minor modifications to the code that turn the
application into a vehicle for experimentation, and then experiment with building and manipulating a DOM.
Creating and Manipulating a DOM
By now, you understand the structure of the nodes that make up a DOM. A DOM
is actually very easy to create. This section of the DOM tutorial is going to take
much less work than anything you’ve see up to now. All the foregoing work,
however, generated the basic understanding that will make this section a piece of
cake.
OBTAINING A DOM FROM THE FACTORY
Obtaining a DOM from the Factory
In this version of the application, you’re still going to create a document builder
factory, but this time you’re going to tell it create a new DOM instead of parsing
an existing XML document. You’ll keep all the existing functionality intact,
however, and add the new functionality in such a way that you can “flick a
switch” to get back the parsing behavior.
Note: The code discussed in this section is in DomEcho05.java.
Modify the Code
Start by turning off the compression feature. As you work with the DOM in this
section, you’re going to want to see all the nodes:
public class DomEcho05 extends JPanel
{
...
boolean compress = true;
boolean compress = false;
Next, you need to create a buildDom method that creates the document object.
The easiest way to do that is to create the method and then copy the DOM-construction section from the main method to create the buildDom. The modifications shown below show you the changes you need to make to make that code
suitable for the buildDom method.
public class DomEcho05 extends JPanel
{
...
public static void makeFrame() {
...
}
public static void buildDom()
{
DocumentBuilderFactory factory =
DocumentBuilderFactory.newInstance();
try {
DocumentBuilder builder =
factory.newDocumentBuilder();
document = builder.parse( new File(argv[0]) );
document = builder.newDocument();
} catch (SAXException sxe) {
239
240
DOCUMENT OBJECT MODEL
...
} catch (ParserConfigurationException pce) {
// Parser with specified options can't be built
pce.printStackTrace();
} catch (IOException ioe) {
...
}
}
In this code, you replaced the line that does the parsing with one that creates a
DOM. Then, since the code is no longer parsing an existing file, you removed
exceptions which are no longer thrown: SAXException and IOException.
And since you are going to be working with Element objects, add the statement
to import that class at the top of the program:
import org.w3c.dom.Document;
import org.w3c.dom.DOMException;
import org.w3c.dom.Element;
Create Element and Text Nodes
Now, for your first experiment, add the Document operations to create a root
node and several children:
public class DomEcho05 extends JPanel
{
...
public static void buildDom()
{
DocumentBuilderFactory factory =
DocumentBuilderFactory.newInstance();
try {
DocumentBuilder builder =
factory.newDocumentBuilder();
document = builder.newDocument();
// Create from whole cloth
Element root =
(Element)
document.createElement("rootElement");
document.appendChild(root);
root.appendChild(
document.createTextNode("Some") );
root.appendChild(
document.createTextNode(" ")
);
root.appendChild(
OBTAINING A DOM FROM THE FACTORY
document.createTextNode("text") );
} catch (ParserConfigurationException pce) {
// Parser with specified options can't be built
pce.printStackTrace();
}
}
Finally, modify the argument-list checking code at the top of the main method so
you invoke buildDom and makeFrame instead of generating an error, as shown
below:
public class DomEcho05 extends JPanel
{
...
public static void main(String argv[])
{
if (argv.length != 1) {
System.err.println("...");
System.exit(1);
buildDom();
makeFrame();
return;
}
That’s all there is to it! Now, if you supply an argument the specified file is
parsed and, if you don’t, the experimental code that builds a DOM is executed.
Run the App
Compile and run the program with no arguments produces the result shown in
Figure 6–13:
241
242
DOCUMENT OBJECT MODEL
Figure 6–13 Element Node and Text Nodes Created
Normalizing the DOM
In this experiment, you’ll manipulate the DOM you created by normalizing it
after it has been constructed.
Note: The code discussed in this section is in DomEcho06.java.
Add the code highlighted below to normalize the DOM:.
public static void buildDom()
{
DocumentBuilderFactory factory =
DocumentBuilderFactory.newInstance();
try {
...
root.appendChild( document.createTextNode("Some") );
root.appendChild( document.createTextNode(" ")
);
root.appendChild( document.createTextNode("text") );
document.getDocumentElement().normalize();
} catch (ParserConfigurationException pce) {
...
NORMALIZING THE DOM
In this code, getDocumentElement returns the document’s root node, and the
normalize operation manipulates the tree under it.
When you compile and run the application now, the result looks like Figure 6–
14:
Figure 6–14 Text Nodes Merged After Normalization
Here, you can see that the adjacent text nodes have been combined into a single
node. The normalize operation is one that you will typically want to use after
making modifications to a DOM, to ensure that the resulting DOM is as compact
as possible.
Note: Now that you have this program to experiment with, see what happens to
other combinations of CDATA, entity references, and text nodes when you normalize
the tree.
243
244
DOCUMENT OBJECT MODEL
Other Operations
To complete this section, we’ll take a quick look at some of the other operations
you might want to apply to a DOM, including:
•
•
•
•
•
Traversing nodes
Searching for nodes
Obtaining node content
Creating attributes
Removing and changing nodes
• Inserting nodes
Traversing Nodes
The org.w3c.dom.Node interface defines a number of methods you can use to
traverse nodes, including getFirstChild, getLastChild, getNextSibling,
getPreviousSibling, and getParentNode. Those operations are sufficient to
get from anywhere in the tree to any other location in the tree.
Searching for Nodes
However, when you are searching for a node with a particular name, there is a bit
more to take into account. Although it is tempting to get the first child and
inspect it to see if it is the right one, the search has to account for the fact that the
first child in the sublist could be a comment or a processing instruction. If the
XML data wasn’t validated, it could even be a text node containing ignorable
whitespace.
In essence, you need to look through the list of child nodes, ignoring the ones
that are of no concern, and examining the ones you care about. Here is an example of the kind of routine you need to write when searching for nodes in a DOM
hierarchy. It is presented here in its entirety (complete with comments) so you
can use it for a template in your applications.
/**
* Find the named subnode in a node's sublist.
* <li>Ignores comments and processing instructions.
* <li>Ignores TEXT nodes (likely to exist and contain
ignorable whitespace,
*
if not validating.
* <li>Ignores CDATA nodes and EntityRef nodes.
OTHER OPERATIONS
* <li>Examines element nodes to find one with the specified
name.
* </ul>
* @param name the tag name for the element to find
* @param node the element node to start searching from
* @return the Node found
*/
public Node findSubNode(String name, Node node) {
if (node.getNodeType() != Node.ELEMENT_NODE) {
System.err.println("Error: Search node not of element
type");
System.exit(22);
}
if (! node.hasChildNodes()) return null;
NodeList list = node.getChildNodes();
for (int i=0; i < list.getLength(); i++) {
Node subnode = list.item(i);
if (subnode.getNodeType() == Node.ELEMENT_NODE) {
if (subnode.getNodeName() == name) return subnode;
}
}
return null;
}
For a deeper explanation of this code, see Increasing the Complexity (page 185)
in When to Use DOM.
Note, too, that you can use APIs described in Summary of Lexical
Controls (page 220) to modify the kind of DOM the parser constructs. The nice
thing about this code, though, is that will work for most any DOM.
Obtaining Node Content
When you want to get the text that a node contains, you once again need to look
through the list of child nodes, ignoring entries that are of no concern, and accumulating the text you find in TEXT nodes, CDATA nodes, and EntityRef nodes.
Here is an example of the kind of routine you need to use for that process:
/**
* Return the text that a node contains. This routine:<ul>
* <li>Ignores comments and processing instructions.
* <li>Concatenates TEXT nodes, CDATA nodes, and the results of
*
recursively processing EntityRef nodes.
245
246
DOCUMENT OBJECT MODEL
* <li>Ignores any element nodes in the sublist.
*
(Other possible options are to recurse into element
sublists
*
or throw an exception.)
* </ul>
* @param
node a DOM node
* @return
a String representing its contents
*/
public String getText(Node node) {
StringBuffer result = new StringBuffer();
if (! node.hasChildNodes()) return "";
NodeList list = node.getChildNodes();
for (int i=0; i < list.getLength(); i++) {
Node subnode = list.item(i);
if (subnode.getNodeType() == Node.TEXT_NODE) {
result.append(subnode.getNodeValue());
}
else if (subnode.getNodeType() ==
Node.CDATA_SECTION_NODE)
{
result.append(subnode.getNodeValue());
}
else if (subnode.getNodeType() ==
Node.ENTITY_REFERENCE_NODE)
{
// Recurse into the subtree for text
// (and ignore comments)
result.append(getText(subnode));
}
}
return result.toString();
}
For a deeper explanation of this code, see Increasing the Complexity (page 185)
in When to Use DOM.
Again, you can simplify this code by using the APIs described in Summary of
Lexical Controls (page 220) to modify the kind of DOM the parser constructs.
But the nice thing about this code, once again, is that will work for most any
DOM.
Creating Attributes
The org.w3c.dom.Element interface, which extends Node, defines a setAttribute operation, which adds an attribute to that node. (A better name from the
FINISHING UP
Java platform standpoint would have been addAttribute, since the attribute is
not a property of the class, and since a new object is created.)
You can also use the Document’s createAttribute operation to create an
instance of Attribute, and use an overloaded version of setAttribute to add
that.
Removing and Changing Nodes
To remove a node, you use its parent Node’s removeChild method. To change it,
you can either use the parent node’s replaceChild operation or the node’s setNodeValue operation.
Inserting Nodes
The important thing to remember when creating new nodes is that when you create an element node, the only data you specify is a name. In effect, that node
gives you a hook to hang things on. You “hang an item on the hook” by adding to
its list of child nodes. For example, you might add a text node, a CDATA node,
or an attribute node. As you build, keep in mind the structure you examined in
the exercises you’ve seen in this tutorial. Remember: Each node in the hierarchy
is extremely simple, containing only one data element.
Finishing Up
Congratulations! You’ve learned how a DOM is structured and how to manipulate it. And you now have a DomEcho application that you can use to display a
DOM’s structure, condense it down to GUI-compatible dimensions, and experiment with to see how various operations affect the structure. Have fun with it!
Validating with XML Schema
You’re now ready to take a deeper look at the process of XML Schema validation. Although a full treatment of XML Schema is beyond the scope of this tutorial, this section will show you the steps you need to take to validate an XML
document using an XML Schema definition. (To learn more about XML
Schema, you can review the online tutorial, XML Schema Part 0: Primer, at
http://www.w3.org/TR/xmlschema-0/. You can also examine the sample programs
247
248
DOCUMENT OBJECT MODEL
that are part of the JAXP download. They use a simple XML Schema definition to validate personnel data stored in an XML file.)
Note: There are multiple schema-definition languages, including RELAX NG,
Schematron, and the W3C “XML Schema” standard. (Even a DTD qualifies as a
“schema”, although it is the only one that does not use XML syntax to describe
schema constraints.) However, “XML Schema” presents us with a terminology
challenge. While the phrase “XML Schema schema” would be precise, we’ll use the
phrase “XML Schema definition” to avoid the appearance of redundancy.
At the end of this section, you’ll also learn how to use an XML Schema definition to validate a document that contains elements from multiple namespaces.
Overview of the Validation Process
To be notified of validation errors in an XML document,
1. The factory must configured, and the appropriate error handler set.
2. The document must be associated with at least one schema, and possibly
more.
Configuring the DocumentBuilder
Factory
It’s helpful to start by defining the constants you’ll use when configuring the factory. (These are same constants you define when using XML Schema for SAX
parsing.)
static final String JAXP_SCHEMA_LANGUAGE =
"http://java.sun.com/xml/jaxp/properties/schemaLanguage";
static final String W3C_XML_SCHEMA =
"http://www.w3.org/2001/XMLSchema";
CONFIGURING THE DOCUMENTBUILDER FACTORY
Next, you need to configure DocumentBuilderFactory to generate a
namespace-aware, validating parser that uses XML Schema:
...
DocumentBuilderFactory factory =
DocumentBuilderFactory.newInstance()
factory.setNamespaceAware(true);
factory.setValidating(true);
try {
factory.setAttribute(JAXP_SCHEMA_LANGUAGE, W3C_XML_SCHEMA);
}
catch (IllegalArgumentException x) {
// Happens if the parser does not support JAXP 1.2
...
}
Since JAXP-compliant parsers are not namespace-aware by default, it is necessary to set the property for schema validation to work. You also set a factory
attribute specify the parser language to use. (For SAX parsing, on the other hand,
you set a property on the parser generated by the factory.)
Associating a Document with a Schema
Now that the program is ready to validate with an XML Schema definition, it is
only necessary to ensure that the XML document is associated with (at least)
one. There are two ways to do that:
1. With a schema declaration in the XML document.
2. By specifying the schema(s) to use in the application.
Note: When the application specifies the schema(s) to use, it overrides any schema
declarations in the document.
To specify the schema definition in the document, you would create XML like
this:
<documentRoot
xmlns:xsi="http://www.w3.org/2001/XMLSchema-instance"
xsi:noNamespaceSchemaLocation='YourSchemaDefinition.xsd'
>
...
249
250
DOCUMENT OBJECT MODEL
The first attribute defines the XML NameSpace (xmlns) prefix, “xsi”, where
“xsi” stands for “XML Schema Instance”. The second line specifies the schema
to use for elements in the document that do not have a namespace prefix — that
is, for the elements you typically define in any simple, uncomplicated XML document. (You’ll see how to deal with multiple namespaces in the next section.)
To can also specify the schema file in the application, like this:
static final String schemaSource = "YourSchemaDefinition.xsd";
static final String JAXP_SCHEMA_SOURCE =
"http://java.sun.com/xml/jaxp/properties/schemaSource";
...
DocumentBuilderFactory factory =
DocumentBuilderFactory.newInstance()
...
factory.setAttribute(JAXP_SCHEMA_SOURCE,
new File(schemaSource));
Here, too, there are mechanisms at your disposal that will let you specify multiple schemas. We’ll take a look at those next.
Validating with Multiple Namespaces
Namespaces let you combine elements that serve different purposes in the same
document, without having to worry about overlapping names.
Note: The material discussed in this section also applies to validating when using
the SAX parser. You’re seeing it here, because at this point you’ve learned enough
about namespaces for the discussion to make sense.
To contrive an example, consider an XML data set that keeps track of personnel
data. The data set may include information from the w2 tax form, as well as
information from the employee’s hiring form, with both elements named <form>
in their respective schemas.
If a prefix is defined for the “tax” namespace, and another prefix defined for the
“hiring” namespace, then the personnel data could include segments like this:
<employee id=”...”>
<name>....</name>
<tax:form>
...w2 tax form data...
VALIDATING WITH MULTIPLE NAMESPACES
</tax:form>
<hiring:form>
...employment history, etc....
</hiring:form>
</employee>
The contents of the tax:form element would obviously be different from the
contents of the hiring:form, and would have to be validated differently.
Note, too, that there is a “default” namespace in this example, that the unqualified element names employee and name belong to. For the document to be properly validated, the schema for that namespace must be declared, as well as the
schemas for the tax and hiring namespaces.
Note: The “default” namespace is actually a specific namespace. It is defined as the
“namespace that has no name”. So you can’t simply use one namespace as your
default this week, and another namespace as the default later on. This “unnamed
namespace” or “null namespace” is like the number zero. It doesn’t have any value,
to speak of (no name), but it is still precisely defined. So a namespace that does have
a name can never be used as the “default” namespace.
When parsed, each element in the data set will be validated against the appropriate schema, as long as those schemas have been declared. Again, the schemas
can either be declared as part of the XML data set, or in the program. (It is also
possible to mix the declarations. In general, though, it is a good idea to keep all
of the declarations together in one place.)
Declaring the Schemas in the XML Data Set
To declare the schemas to use for the example above in the data set, the XML
code would look something like this:
<documentRoot
xmlns:xsi="http://www.w3.org/2001/XMLSchema-instance"
xsi:noNamespaceSchemaLocation="employeeDatabase.xsd"
xsi:schemaLocation=
”http://www.irs.gov/ fullpath/w2TaxForm.xsd
http://www.ourcompany.com/ relpath/hiringForm.xsd“
xmlns:tax="http://www.irs.gov/"
xmlns:hiring="http://www.ourcompany.com/"
>
...
251
252
DOCUMENT OBJECT MODEL
The noNamespaceSchemaLocation declaration is something you’ve seen before,
as are the last two entries, which define the namespace prefixes tax and hiring.
What’s new is the entry in the middle, which defines the locations of the schemas
to use for each namespace referenced in the document.
The xsi:schemaLocation declaration consists of entry pairs, where the first
entry in each pair is a fully qualified URI that specifies the namespace, and the
second entry contains a full path or a relative path to the schema definition. (In
general, fully qualified paths are recommended. That way, only one copy of the
schema will tend to exist.)
Of particular note is the fact that the namespace prefixes cannot be used when
defining the schema locations. The xsi:schemaLocation declaration only
understands namespace names, not prefixes.
Declaring the Schemas in the Application
To declare the equivalent schemas in the application, the code would look something like this:
static final String employeeSchema = "employeeDatabase.xsd";
static final String taxSchema = "w2TaxForm.xsd";
static final String hiringSchema = "hiringForm.xsd";
static final String[] schemas = {
employeeSchema,
taxSchema,
hiringSchema,
};
static final String JAXP_SCHEMA_SOURCE =
"http://java.sun.com/xml/jaxp/properties/schemaSource";
...
DocumentBuilderFactory factory =
DocumentBuilderFactory.newInstance()
...
factory.setAttribute(JAXP_SCHEMA_SOURCE, schemas);
Here, the array of strings that points to the schema definitions (.xsd files) is
passed as the argument to factory.setAttribute method. Note the differences from
when you were declaring the schemas to use as part of the XML data set:
• There is no special declaration for the “default” (unnamed) schema.
FURTHER INFORMATION
• You don’t specify the namespace name. Instead, you only give pointers to
the .xsd files.
To make the namespace assignments, the parser reads the .xsd files, and finds in
them the name of the target namespace they apply to. Since the files are specified with URIs, the parser can use an EntityResolver (if one has been defined) to
find a local copy of the schema.
If the schema definition does not define a target namespace, then it applies to the
“default” (unnamed, or null) namespace. So, in the example above, you would
expect to see these target namespace declarations in the schemas:
• employeeDatabase.xsd — none
• w2TaxForm.xsd — http://www.irs.gov/
• hiringForm.xsd — http://www.ourcompany.com
At this point, you have seen two possible values for the schema source property
when invoking the factory.setAttribute() method, a File object in factory.setAttribute(JAXP_SCHEMA_SOURCE, new File(schemaSource)). and
an array of strings in factory.setAttribute(JAXP_SCHEMA_SOURCE, schemas). Here is a complete list of the possible values for that argument:
•
•
•
•
•
String that points to the URI of the schema
InputStream with the contents of the schema
SAX InputSource
File
an array of Objects, each of which is one of the types defined above.
Note: An array of Objects can be used only when the schema language (like http:/
/java.sun.com/xml/jaxp/properties/schemaLanguage) has the ability to
assemble a schema at runtime. Also: When an array of Objects is passed it is illegal
to have two schemas that share the same namespace.
Further Information
For further information on the TreeModel, see:
• Understanding the TreeModel: http://java.sun.com/products/jfc/
tsc/articles/jtree/index.html
For further information on the W3C Document Object Model (DOM), see:
253
254
DOCUMENT OBJECT MODEL
• The DOM standard page: http://www.w3.org/DOM/
For more information on schema-based validation mechanisms, see:
• The W3C standard validation mechanism, XML Schema: http://
www.w3.org/XML/Schema
• RELAX NG’s regular-expression based validation mechanism: http://
www.oasis-open.org/committees/relax-ng/
• Schematron’s
assertion-based
validation
mechanism:
www.ascc.net/xml/resource/schematron/schematron.html
http://
7
XML Stylesheet
Language for
Transformations
Eric Armstrong
T
HE XML Stylesheet Language for Transformations (XSLT) defines mechanisms for addressing XML data (XPath) and for specifying transformations on
the data, in order to convert it into other forms. JAXP includes an interpreting
implementation of XSLT, called Xalan.
In this chapter, you’ll learn how to use Xalan. You’ll write out a Document
Object Model (DOM) as an XML file, and you’ll see how to generate a DOM
from an arbitrary data file in order to convert it to XML. Finally, you’ll convert
XML data into a different form, unlocking the mysteries of the XPath addressing
mechanism along the way.
Note: The examples in this chapter can be found in <INSTALL>/j2eetutorial14/
examples/jaxp/xslt/samples.
Introducing XSLT and XPath
The XML Stylesheet Language (XSL) has three major subcomponents:
255
256
XML STYLESHEET LANGUAGE FOR TRANSFORMATIONS
XSL-FO
The “flow object” standard. By far the largest subcomponent, this standard
gives mechanisms for describing font sizes, page layouts, and how information “flows” from one page to another. This subcomponent is not covered by
JAXP, nor is it included in this tutorial.
XSLT
This is the transformation language, which lets you define a transformation
from XML into some other format. For example, you might use XSLT to
produce HTML, or a different XML structure. You could even use it to produce plain text or to put the information in some other document format.
(And as you’ll see in Generating XML from an Arbitrary Data
Structure (page 275), a clever application can press it into service to manipulate non-XML data, as well.)
XPath
At bottom, XSLT is a language that lets you specify what sorts of things to
do when a particular element is encountered. But to write a program for different parts of an XML data structure, you need to be able to specify the part
of the structure you are talking about at any given time. XPath is that specification language. It is an addressing mechanism that lets you specify a path to
an element so that, for example, <article><title> can be distinguished
from <person><title>. That way, you can describe different kinds of translations for the different <title> elements.
The remainder of this section describes the packages that make up the JAXP
Transformation APIs.
The JAXP Transformation Packages
Here is a description of the packages that make up the JAXP Transformation
APIs:
javax.xml.transform
This package defines the factory class you use to get a Transformer object.
You then configure the transformer with input (Source) and output (Result)
objects, and invoke its transform() method to make the transformation
happen. The source and result objects are created using classes from one of
the other three packages.
javax.xml.transform.dom
Defines the DOMSource and DOMResult
classes that let you use a DOM as an
input to or output from a transformation.
HOW XPATH WORKS
javax.xml.transform.sax
Defines the SAXSource and SAXResult
classes that let you use a SAX event
generator as input to a transformation, or deliver SAX events as output to a
SAX event processor.
javax.xml.transform.stream
Defines the StreamSource and StreamResult classes that let you use an I/O
stream as an input to or output from a transformation.
How XPath Works
The XPath specification is the foundation for a variety of specifications, including XSLT and linking/addressing specifications like XPointer. So an understanding of XPath is fundamental to a lot of advanced XML usage. This section
provides a thorough introduction to XPATH in the context of XSLT, so you can
refer to it as needed later on.
Note: In this tutorial, you won’t actually use XPath until you get to the end of this
section, Transforming XML Data with XSLT (page 289). So, if you like, you can
skip this section and go on ahead to the next section, Writing Out a DOM as an
XML File (page 268). (When you get to the end of that section, there will be a note
that refers you back here, so you don’t forget!)
XPATH Expressions
In general, an XPath expression specifies a pattern that selects a set of XML
nodes. XSLT templates then use those patterns when applying transformations.
(XPointer, on the other hand, adds mechanisms for defining a point or a range,
so that XPath expressions can be used for addressing.)
257
258
XML STYLESHEET LANGUAGE FOR TRANSFORMATIONS
The nodes in an XPath expression refer to more than just elements. They also
refer to text and attributes, among other things. In fact, the XPath specification
defines an abstract document model that defines seven different kinds of nodes:
•
•
•
•
•
•
•
root
element
text
attribute
comment
processing instruction
namespace
Note: The root element of the XML data is modeled by an element node. The XPath
root node contains the document’s root element, as well as other information relating to the document.
The XSLT/XPath Data Model
Like the DOM, the XSLT/XPath data model consists of a tree containing a variety of nodes. Under any given element node, there are text nodes, attribute
nodes, element nodes, comment nodes, and processing instruction nodes.
In this abstract model, syntactic distinctions disappear, and you are left with a
normalized view of the data. In a text node, for example, it makes no difference
whether the text was defined in a CDATA section, or if it included entity references. The text node will consist of normalized data, as it exists after all parsing
is complete. So the text will contain a < character, regardless of whether an entity
reference like < or a CDATA section was used to include it. (Similarly, the
text will contain an & character, regardless of whether it was delivered using
& or it was in a CDATA section.)
In this section of the tutorial, we’ll deal mostly with element nodes and text
nodes. For the other addressing mechanisms, see the XPath Specification.
TEMPLATES AND CONTEXTS
Templates and Contexts
An XSLT template is a set of formatting instructions that apply to the nodes
selected by an XPATH expression. In an stylesheet, a XSLT template would look
something like this:
<xsl:template match="//LIST">
...
</xsl:template>
The expression //LIST selects the set of LIST nodes from the input stream.
Additional instructions within the template tell the system what to do with them.
The set of nodes selected by such an expression defines the context in which
other expressions in the template are evaluated. That context can be considered
as the whole set — for example, when determining the number of the nodes it
contains.
The context can also be considered as a single member of the set, as each member is processed one by one. For example, inside of the LIST-processing template, the expression @type refers to the type attribute of the current LIST node.
(Similarly, the expression @* refers to all of attributes for the current LIST element.)
Basic XPath Addressing
An XML document is a tree-structured (hierarchical) collection of nodes. As
with a hierarchical directory structure, it is useful to specify a path that points a
particular node in the hierarchy. (Hence the name of the specification: XPath.) In
fact, much of the notation of directory paths is carried over intact:
•
•
•
•
•
The forward slash / is used as a path separator.
An absolute path from the root of the document starts with a /.
A relative path from a given location starts with anything else.
A double period .. indicates the parent of the current node.
A single period . indicates the current node.
For example, In an XHTML document (an XML document that looks like
HTML, but which is well-formed according to XML rules) the path /h1/h2/
would indicate an h2 element under an h1. (Recall that in XML, element names
are case sensitive, so this kind of specification works much better in XHTML
than it would in plain HTML, because HTML is case-insensitive.)
259
260
XML STYLESHEET LANGUAGE FOR TRANSFORMATIONS
In a pattern-matching specification like XSLT, the specification /h1/h2 selects
all h2 elements that lie under an h1 element. To select a specific h2 element,
square brackets [] are used for indexing (like those used for arrays). The path /
h1[4]/h2[5] would therefore select the fifth h2 element under the fourth h1 element.
Note: In XHTML, all element names are in lowercase. That is a fairly common convention for XML documents. However, uppercase names are easier to read in a tutorial like this one. So, for the remainder of the XSLT tutorial, all XML element
names will be in uppercase. (Attribute names, on the other hand, will remain in lowercase.)
A name specified in an XPath expression refers to an element. For example, “h1”
in /h1/h2 refers to an h1 element. To refer to an attribute, you prefix the attribute
name with an @ sign. For example, @type refers to the type attribute of an element. Assuming you have an XML document with LIST elements, for example,
the expression LIST/@type selects the type attribute of the LIST element.
Note: Since the expression does not begin with /, the reference specifies a list
node relative to the current context—whatever position in the document that happens to be.
Basic XPath Expressions
The full range of XPath expressions takes advantage of the wildcards, operators,
and functions that XPath defines. You’ll be learning more about those shortly.
Here, we’ll take a look at a couple of the most common XPath expressions, simply to introduce them.
The expression @type="unordered" specifies an attribute named type whose
value is “unordered”. And you already know that an expression like LIST/
@type specifies the type attribute of a LIST element.
You can combine those two notations to get something interesting! In XPath, the
square-bracket notation ([]) normally associated with indexing is extended to
specify selection criteria. So the expression LIST[@type="unordered"] selects
all LIST elements whose type value is “unordered”.
Similar expressions exist for elements, where each element has an associated
string-value. (You’ll see how the string-value is determined for a complicated
COMBINING INDEX ADDRESSES
element in a little while. For now, we’ll stick with simple elements that have a
single text string.)
Suppose you model what’s going on in your organization with an XML structure
that consists of PROJECT elements and ACTIVITY elements that have a text string
with the project name, multiple PERSON elements to list the people involved and,
optionally, a STATUS element that records the project status. Here are some more
examples that use the extended square-bracket notation:
• /PROJECT[.="MyProject"]—selects a PROJECT named "MyProject".
• /PROJECT[STATUS]—selects all projects that have a STATUS child element.
• /PROJECT[STATUS="Critical"]—selects all projects that have a STATUS
child element with the string-value “Critical”.
Combining Index Addresses
The XPath specification defines quite a few addressing mechanisms, and they
can be combined in many different ways. As a result, XPath delivers a lot of
expressive power for a relatively simple specification. This section illustrates
two more interesting combinations:
• LIST[@type="ordered"][3]—selects all LIST elements of type
“ordered”, and returns the third.
• LIST[3][@type="ordered"]—selects the third LIST element, but only if
it is of type “ordered”.
Note: Many more combinations of address operators are listed in section 2.5 of the
XPath Specification. This is arguably the most useful section of the spec for defining an XSLT transform.
Wildcards
By definition, an unqualified XPath expression selects a set of XML nodes that
matches that specified pattern. For example, /HEAD matches all top-level HEAD
261
262
XML STYLESHEET LANGUAGE FOR TRANSFORMATIONS
entries, while /HEAD[1] matches only the first. Table 7–1 lists the wildcards that
can be used in XPath expressions to broaden the scope of the pattern matching.
Table 7–1 XPath Wildcards
Wildcard
Meaning
*
Matches any element node (not attributes or text).
node()
Matches any node of any kind: element node, text node, attribute node,
processing instruction node, namespace node, or comment node.
@*
Matches any attribute node.
In the project database example, for instance, /*PERSON[.="Fred"] matches
any PROJECT or ACTIVITY element that names Fred.
Extended-Path Addressing
So far, all of the patterns we’ve seen have specified an exact number of levels in
the hierarchy. For example, /HEAD specifies any HEAD element at the first level in
the hierarchy, while /*/* specifies any element at the second level in the hierarchy. To specify an indeterminate level in the hierarchy, use a double forward
slash (//). For example, the XPath expression //PARA selects all paragraph elements in a document, wherever they may be found.
The // pattern can also be used within a path. So the expression /HEAD/LIST//
PARA indicates all paragraph elements in a subtree that begins from /HEAD/LIST.
XPATH DATA TYPES AND OPERATORS
XPath Data Types and Operators
XPath expressions yield either a set of nodes, a string, a boolean (true/false
value), or a number. Table 7–2 lists the operators that can be used in an Xpath
expression
Table 7–2 XPath Operators
Operator
Meaning
|
Alternative. For example, PARA|LIST selects all PARA and LIST
elements.
or, and
Returns the or/and of two boolean values.
=, !=
Equal or not equal, for booleans, strings, and numbers.
<, >, <=, >=
Less than, greater than, less than or equal to, greater than or equal
to—for numbers.
+, -, *, div, mod
Add, subtract, multiply, floating-point divide, and modulus
(remainder) operations (e.g. 6 mod 4 = 2)
Finally, expressions can be grouped in parentheses, so you don’t have to worry
about operator precedence.
Note: “Operator precedence” is a term that answers the question, “If you specify a
does that mean (a+b) * c or a + (b*c)?”. (The operator precedence is
roughly the same as that shown in the table.)
+ b * c,
String-Value of an Element
Before continuing, it’s worthwhile to understand how the string-value of a more
complex element is determined. We’ll do that now.
The string-value of an element is the concatenation of all descendent text nodes,
no matter how deep. So, for a “mixed-model” XML data element like this:
<PARA>This paragraph contains a <B>bold</B> word</PARA>
263
264
XML STYLESHEET LANGUAGE FOR TRANSFORMATIONS
The string-value of <PARA> is “This paragraph contains a bold word”. In particular, note that <B> is a child of <PARA> and that the text contained in all children is
concatenated to form the string-value.
Also, it is worth understanding that the text in the abstract data model defined by
XPath is fully normalized. So whether the XML structure contains the entity reference < or “<” in a CDATA section, the element’s string-value will contain
the “<” character. Therefore, when generating HTML or XML with an XSLT
stylesheet, occurrences of “<” will have to be converted to < or enclosed in a
CDATA section. Similarly, occurrences of “&” will need to be converted to
&.
XPath Functions
This section ends with an overview of the XPath functions. You can use XPath
functions to select a collection of nodes in the same way that you would use an
an element specification like those you have already seen. Other functions return
a string, a number, or a boolean value. For example, the expression /PROJECT/
text() gets the string-value of PROJECT nodes.
Many functions depend on the current context. In the example above, the context
for each invocation of the text() function is the PROJECT node that is currently
selected.
There are many XPath functions—too many to describe in detail here. This section provides a quick listing that shows the available XPath functions, along with
a summary of what they do.
Note: Skim the list of functions to get an idea of what’s there. For more information,
see Section 4 of the XPath Specification.
Node-set functions
Many XPath expressions select a set of nodes. In essence, they return a node-set.
One function does that, too.
• id(...)—returns the node with the specified id.
(Elements only have an ID when the document has a DTD, which specifies
which attribute has the ID type.)
XPATH FUNCTIONS
Positional functions
These functions return positionally-based numeric values.
• last()—returns the index of the last element.
For example: /HEAD[last()] selects the last HEAD element.
• position()—returns the index position.
For example: /HEAD[position() <= 5] selects the first five HEAD elements
• count(...)—returns the count of elements.
For example: /HEAD[count(HEAD)=0] selects all HEAD elements that have
no subheads.
String functions
These functions operate on or return strings.
• concat(string, string, ...)—concatenates the string values
• starts-with(string1, string2)—returns true if string1 starts with
string2
• contains(string1,
string2)—returns
true if string1 contains
string2
• substring-before(string1, string2)—returns the start of string1
before string2 occurs in it
• substring-after(string1,
string2)—returns the remainder of
string1 after string2 occurs in it
• substring(string, idx)—returns the substring from the index position
to the end, where the index of the first char = 1
• substring(string, idx, len)—returns the substring from the index
position, of the specified length
• string-length()—returns the size of the context-node’s string-value
265
266
XML STYLESHEET LANGUAGE FOR TRANSFORMATIONS
The context node is the currently selected node — the node that was
selected by an XPath expression in which a function like stringlength() is applied.
• string-length(string)—returns the size of the specified string
• normalize-space()—returns the normalized string-value of the current
node (no leading or trailing whitespace, and sequences of whitespace characters converted to a single space)
• normalize-space(string)—returns the normalized string-value of the
specified string
• translate(string1, string2, string3)—converts string1, replacing occurrences of characters in string2 with the corresponding character
from string3
Note: XPath defines 3 ways to get the text of an element: text(), string(object),
and the string-value implied by an element name in an expression like this: /
PROJECT[PERSON="Fred"].
Boolean functions
These functions operate on or return boolean values:
•
•
•
•
not(...)—negates
the specified boolean value
true()—returns true
false()—returns false
lang(string)—returns true if the language of the context node (specified
by xml:Lang attributes) is the same as (or a sublanguage of) the specified
language.
For
example:
Lang("en")
is
true
for
<PARA_xml:Lang="en">...</PARA>
Numeric functions
These functions operate on or return numeric values.
• sum(...)—returns the sum of the numeric value of each node in the specified node-set
• floor(N)—returns the largest integer that is not greater than N
• ceiling(N)—returns the smallest integer that is greater than N
SUMMARY
• round(N)—returns the integer that is closest to N
Conversion functions
These functions convert one data type to another.
• string(...)—returns the string value of a number, boolean, or node-set
• boolean(...)—returns a boolean value for a number, string, or node-set
(a non-zero number, a non-empty node-set, and a non-empty string are all
true)
• number(...)—returns the numeric value of a boolean, string, or node-set
(true is 1, false is 0, a string containing a number becomes that number, the
string-value of a node-set is converted to a number)
Namespace functions
These functions let you determine the namespace characteristics of a node.
• local-name()—returns the name of the current node, minus the
namespace prefix
• local-name(...)—returns the name of the first node in the specified
node set, minus the namespace prefix
• namespace-uri()—returns the namespace URI from the current node
• namespace-uri(...)—returns the namespace URI from the first node in
the specified node set
• name()—returns the expanded name (URI plus local name) of the current
node
• name(...)—returns the expanded name (URI plus local name) of the first
node in the specified node set
Summary
XPath operators, functions, wildcards, and node-addressing mechanisms can be
combined in wide variety of ways. The introduction you’ve had so far should
give you a good head start at specifying the pattern you need for any particular
purpose.
267
268
XML STYLESHEET LANGUAGE FOR TRANSFORMATIONS
Writing Out a DOM as an XML File
Once you have constructed a DOM, either by parsing an XML file or building it
programmatically, you frequently want to save it as XML. This section shows
you how to do that using the Xalan transform package.
Using that package, you’ll create a transformer object to wire a DomSource to a
StreamResult. You’ll then invoke the transformer’s transform() method to
write out the DOM as XML data.
Reading the XML
The first step is to create a DOM in memory by parsing an XML file. By now,
you should be getting pretty comfortable with the process.
Note: The code discussed in this section is in TransformationApp01.java.
The code below provides a basic template to start from. (It should be familiar.
It’s basically the same code you wrote at the start of the DOM tutorial. If you
saved it then, that version should be pretty much the equivalent of what you see
below.)
import
import
import
import
javax.xml.parsers.DocumentBuilder;
javax.xml.parsers.DocumentBuilderFactory;
javax.xml.parsers.FactoryConfigurationError;
javax.xml.parsers.ParserConfigurationException;
import org.xml.sax.SAXException;
import org.xml.sax.SAXParseException;
import org.w3c.dom.Document;
import org.w3c.dom.DOMException;
import java.io.*;
public class TransformationApp
{
static Document document;
public static void main(String argv[])
{
if (argv.length != 1) {
READING THE XML
System.err.println (
"Usage: java TransformationApp filename");
System.exit (1);
}
DocumentBuilderFactory factory =
DocumentBuilderFactory.newInstance();
//factory.setNamespaceAware(true);
//factory.setValidating(true);
try {
File f = new File(argv[0]);
DocumentBuilder builder =
factory.newDocumentBuilder();
document = builder.parse(f);
} catch (SAXParseException spe) {
// Error generated by the parser
System.out.println("\n** Parsing error"
+ ", line " + spe.getLineNumber()
+ ", uri " + spe.getSystemId());
System.out.println(" " + spe.getMessage() );
// Use the contained exception, if any
Exception x = spe;
if (spe.getException() != null)
x = spe.getException();
x.printStackTrace();
} catch (SAXException sxe) {
// Error generated by this application
// (or a parser-initialization error)
Exception x = sxe;
if (sxe.getException() != null)
x = sxe.getException();
x.printStackTrace();
} catch (ParserConfigurationException pce) {
// Parser with specified options can't be built
pce.printStackTrace();
} catch (IOException ioe) {
// I/O error
ioe.printStackTrace();
}
} // main
}
269
270
XML STYLESHEET LANGUAGE FOR TRANSFORMATIONS
Creating a Transformer
The next step is to create a transformer you can use to transmit the XML to System.out.
Note: The code discussed in this section is in TransformationApp02.java. The file
it runs on is slideSample01.xml. The output is in TransformationLog02.txt.
(The
browsable
versions
are
slideSample01-xml.html
and
TransformationLog02.html.)
Start by adding the import statements highlighted below:
import
import
import
import
javax.xml.transform.Transformer;
javax.xml.transform.TransformerFactory;
javax.xml.transform.TransformerException;
javax.xml.transform.TransformerConfigurationException;
import javax.xml.transform.dom.DOMSource;
import javax.xml.transform.stream.StreamResult;
import java.io.*;
Here, you’ve added a series of classes which should now be forming a standard
pattern: an entity (Transformer), the factory to create it (TransformerFactory), and the exceptions that can be generated by each. Since a transformation
always has a source and a result, you then imported the classes necessary to use
a DOM as a source (DomSource), and an output stream for the result (StreamResult).
Next, add the code to carry out the transformation:
try {
File f = new File(argv[0]);
DocumentBuilder builder = factory.newDocumentBuilder();
document = builder.parse(f);
// Use a Transformer for output
TransformerFactory tFactory =
TransformerFactory.newInstance();
Transformer transformer = tFactory.newTransformer();
CREATING A TRANSFORMER
DOMSource source = new DOMSource(document);
StreamResult result = new StreamResult(System.out);
transformer.transform(source, result);
Here, you created a transformer object, used the DOM to construct a source
object, and used System.out to construct a result object. You then told the transformer to operate on the source object and output to the result object.
In this case, the “transformer” isn’t actually changing anything. In XSLT terminology, you are using the identity transform, which means that the “transformation” generates a copy of the source, unchanged.
Note: You can specify a variety of output properties for transformer objects, as
defined in the W3C specification at http://www.w3.org/TR/xslt#output. For example, to get indented output, you can invoke:
transformer.setOutputProperty("indent", "yes");
Finally, add the code highlighted below to catch the new errors that can be generated:
} catch (TransformerConfigurationException tce) {
// Error generated by the parser
System.out.println ("* Transformer Factory error");
System.out.println(" " + tce.getMessage() );
// Use the contained exception, if any
Throwable x = tce;
if (tce.getException() != null)
x = tce.getException();
x.printStackTrace();
} catch (TransformerException te) {
// Error generated by the parser
System.out.println ("* Transformation error");
System.out.println(" " + te.getMessage() );
// Use the contained exception, if any
Throwable x = te;
if (te.getException() != null)
x = te.getException();
x.printStackTrace();
} catch (SAXParseException spe) {
...
271
272
XML STYLESHEET LANGUAGE FOR TRANSFORMATIONS
Notes:
• TransformerExceptions are thrown by the transformer object.
• TransformerConfigurationExceptions are thrown by the factory.
• To preserve the XML document’s DOCTYPE setting, it is also necessary to add the
following code:
import javax.xml.transform.OutputKeys;
...
if (document.getDoctype() != null){
String systemValue = (new
File(document.getDoctype().getSystemId())).getName();
transformer.setOutputProperty(
OutputKeys.DOCTYPE_SYSTEM, systemValue
);
}
Writing the XML
For instructions on how to compile and run the program, see Compiling and
Running the Program (page 133) from the SAX tutorial. (If you’re working
along, substitute “TransformationApp” for “Echo” as the name of the program.
If you are compiling the sample code, use “TransformationApp02”.) When you
run the program on slideSample01.xml, this is the output you see:
<?xml version="1.0" encoding="UTF-8"?>
<!-- A SAMPLE set of slides -->
<slideshow author="Yours Truly" date="Date of publication"
title="Sample Slide Show">
<!-- TITLE SLIDE -->
<slide type="all">
<title>Wake up to WonderWidgets!</title>
</slide>
<!-- OVERVIEW -->
<slide type="all">
<title>Overview</title>
<item>Why <em>WonderWidgets</em> are great</item>
<item/>
<item>Who <em>buys</em> WonderWidgets</item>
</slide>
</slideshow>
273
WRITING OUT A SUBTREE OF THE DOM
Note: The order of the attributes may vary, depending on which parser you are
using.
To find out more about configuring the factory and handling validation errors, see Reading XML Data into a DOM, Additional Information (page 193).
Writing Out a Subtree of the DOM
It is also possible to operate on a subtree of a DOM. In this section of the tutorial, you’ll experiment with that option.
Note: The code discussed in this section is in
output is in TransformationLog03.txt.
TransformationLog03.html.)
TransformationApp03.java.
(The
browsable
version
The
is
The only difference in the process is that now you will create a DOMSource using
a node in the DOM, rather than the entire DOM. The first step will be to import
the classes you need to get the node you want. Add the code highlighted below
to do that:
import
import
import
import
org.w3c.dom.Document;
org.w3c.dom.DOMException;
org.w3c.dom.Node;
org.w3c.dom.NodeList;
The next step is to find a good node for the experiment. Add the code highlighted
below to select the first <slide> element:
try {
File f = new File(argv[0]);
DocumentBuilder builder = factory.newDocumentBuilder();
document = builder.parse(f);
// Get the first <slide> element in the DOM
NodeList list = document.getElementsByTagName("slide");
Node node = list.item(0);
274
XML STYLESHEET LANGUAGE FOR TRANSFORMATIONS
Finally, make the changes shown below to construct a source object that consists
of the subtree rooted at that node:
DOMSource source = new DOMSource(document);
DOMSource source = new DOMSource(node);
StreamResult result = new StreamResult(System.out);
transformer.transform(source, result);
Now run the app. Your output should look like this:
<?xml version="1.0" encoding="UTF-8"?>
<slide type="all">
<title>Wake up to WonderWidgets!</title>
</slide>
Clean Up
Because it will be easiest to do now, make the changes shown below to back out
the additions you made in this section. (TransformationApp04.java contains
these changes.)
Import org.w3c.dom.DOMException;
import org.w3c.dom.Node;
import org.w3c.dom.NodeList;
...
try {
...
// Get the first <slide> element in the DOM
NodeList list = document.getElementsByTagName("slide");
Node node = list.item(0);
...
DOMSource source = new DOMSource(node);
StreamResult result = new StreamResult(System.out);
transformer.transform(source, result);
Summary
At this point, you’ve seen how to use a transformer to write out a DOM, and how
to use a subtree of a DOM as the source object in a transformation. In the next
section, you’ll see how to use a transformer to create XML from any data structure you are capable of parsing.
GENERATING XML FROM AN ARBITRARY DATA STRUCTURE
Generating XML from an Arbitrary Data
Structure
In this section, you’ll use XSLT to convert an arbitrary data structure to XML.
In general outline, then:
1. You’ll modify an existing program that reads the data, in order to make it
generate SAX events. (Whether that program is a real parser or simply a
data filter of some kind is irrelevant for the moment.)
2. You’ll then use the SAX “parser” to construct a SAXSource for the transformation.
3. You’ll use the same StreamResult object you created in the last exercise,
so you can see the results. (But note that you could just as easily create a
DOMResult object to create a DOM in memory.)
4. You’ll wire the source to the result, using the transformer object to make
the conversion.
For starters, you need a data set you want to convert and a program capable of
reading the data. In the next two sections, you’ll create a simple data file and a
program that reads it.
Creating a Simple File
We’ll start by creating a data set for an address book. You can duplicate the process, if you like, or simply make use of the data stored in PersonalAddressBook.ldif.
The file shown below was produced by creating a new address book in Netscape
Messenger, giving it some dummy data (one address card) and then exporting it
in LDIF format.
Note: LDIF stands for LDAP Data Interchange Format. LDAP, turn, stands for
Lightweight Directory Access Protocol. I prefer to think of LDIF as the “Line
Delimited Interchange Format”, since that is pretty much what it is.
Figure 7–1 shows the address book entry that was created.
275
276
XML STYLESHEET LANGUAGE FOR TRANSFORMATIONS
Figure 7–1 Address Book Entry
Exporting the address book produces a file like the one shown below. The parts
of the file that we care about are shown in bold.
dn: cn=Fred Flintstone,[email protected]
modifytimestamp: 20010409210816Z
cn: Fred Flintstone
xmozillanickname: Fred
mail: [email protected]
xmozillausehtmlmail: TRUE
givenname: Fred
sn: Flintstone
telephonenumber: 999-Quarry
homephone: 999-BedrockLane
facsimiletelephonenumber: 888-Squawk
pagerphone: 777-pager
277
CREATING A SIMPLE PARSER
cellphone: 555-cell
xmozillaanyphone: 999-Quarry
objectclass: top
objectclass: person
Note that each line of the file contains a variable name, a colon, and a space followed by a value for the variable. The sn variable contains the person’s surname
(last name) and the variable cn contains the DisplayName field from the address
book entry.
Creating a Simple Parser
The next step is to create a program that parses the data.
Note: The code discussed in this section is in
output is in AddressBookReaderLog01.txt.
AddressBookReader01.java.
The
The text for the program is shown below. It’s an absurdly simple program that
doesn’t even loop for multiple entries because, after all, it’s just a demo!
import java.io.*;
public class AddressBookReader
{
public static void main(String argv[])
{
// Check the arguments
if (argv.length != 1) {
System.err.println (
"Usage: java AddressBookReader filename");
System.exit (1);
}
String filename = argv[0];
File f = new File(filename);
AddressBookReader01 reader = new AddressBookReader01();
reader.parse(f);
}
/** Parse the input */
public void parse(File f)
{
try {
278
XML STYLESHEET LANGUAGE FOR TRANSFORMATIONS
// Get an efficient reader for the file
FileReader r = new FileReader(f);
BufferedReader br = new BufferedReader(r);
// Read the file and display it's contents.
String line = br.readLine();
while (null != (line = br.readLine())) {
if (line.startsWith("xmozillanickname: "))
break;
}
output("nickname", "xmozillanickname", line);
line = br.readLine();
output("email",
"mail",
line);
line = br.readLine();
output("html",
"xmozillausehtmlmail", line);
line = br.readLine();
output("firstname","givenname",
line);
line = br.readLine();
output("lastname", "sn",
line);
line = br.readLine();
output("work",
"telephonenumber", line);
line = br.readLine();
output("home",
"homephone",
line);
line = br.readLine();
output("fax",
"facsimiletelephonenumber",
line);
line = br.readLine();
output("pager",
"pagerphone",
line);
line = br.readLine();
output("cell",
"cellphone",
line);
}
catch (Exception e) {
e.printStackTrace();
}
}
void output(String name, String prefix, String line)
{
int startIndex = prefix.length() + 2;
// 2=length of ": "
String text = line.substring(startIndex);
System.out.println(name + ": " + text);
}
}
This program contains three methods:
MODIFYING THE PARSER TO GENERATE SAX EVENTS
main
The main method gets the name of the file from the command line, creates
an instance of the parser, and sets it to work parsing the file. This method
will be going away when we convert the program into a SAX parser. (That’s
one reason for putting the parsing code into a separate method.)
parse
This method operates on the File object sent to it by the main routine. As
you can see, it’s about as simple as it can get. The only nod to efficiency is
the use of a BufferedReader, which can become important when you start
operating on large files.
output
The output method contains the logic for the structure of a line. Starting
from the right It takes three arguments. The first argument gives the method
a name to display, so we can output “html” as a variable name, instead of
“xmozillausehtmlmail”. The second argument gives the variable name
stored in the file (xmozillausehtmlmail). The third argument gives the line
containing the data. The routine then strips off the variable name from the
start of the line and outputs the desired name, plus the data.
Running this program on PersonalAddressBook.ldif produces this output:
nickname: Fred
email: [email protected]
html: TRUE
firstname: Fred
lastname: Flintstone
work: 999-Quarry
home: 999-BedrockLane
fax: 888-Squawk
pager: 777-pager
cell: 555-cell
I think we can all agree that’s a bit more readable.
Modifying the Parser to Generate SAX
Events
The next step is to modify the parser to generate SAX events, so you can use it as
the basis for a SAXSource object in an XSLT transform.
279
280
XML STYLESHEET LANGUAGE FOR TRANSFORMATIONS
Note: The code discussed in this section is in AddressBookReader02.java.
Start by importing the additional classes you’re going to need:
import java.io.*;
import org.xml.sax.*;
import org.xml.sax.helpers.AttributesImpl;
Next, modify the application so that it extends XmlReader. That change converts
the application into a parser that generates the appropriate SAX events.
public class AddressBookReader
implements XMLReader
{
Now, remove the main method. You won’t be needing that any more.
public static void main(String argv[])
{
// Check the arguments
if (argv.length != 1) {
System.err.println ("Usage: Java AddressBookReader
filename");
System.exit (1);
}
String filename = argv[0];
File f = new File(filename);
AddressBookReader02 reader = new AddressBookReader02();
reader.parse(f);
}
Add some global variables that will come in handy in a few minutes:
public class AddressBookReader
implements XMLReader
{
ContentHandler handler;
// We're not doing namespaces, and we have no
// attributes on our elements.
String nsu = ""; // NamespaceURI
MODIFYING THE PARSER TO GENERATE SAX EVENTS
Attributes atts = new AttributesImpl();
String rootElement = "addressbook";
String indent = "\n
"; // for readability!
The SAX ContentHandler is the object that is going to get the SAX events the
parser generates. To make the application into an XmlReader, you’ll be defining
a setContentHandler method. The handler variable will hold a reference to
the object that is sent when setContentHandler is invoked.
And, when the parser generates SAX element events, it will need to supply
namespace and attribute information. Since this is a simple application, you’re
defining null values for both of those.
You’re also defining a root element for the data structure (addressbook), and
setting up an indent string to improve the readability of the output.
Next, modify the parse method so that it takes an InputSource as an argument,
rather than a File, and account for the exceptions it can generate:
public void parse(File f)InputSource input)
throws IOException, SAXException
Now make the changes shown below to get the reader encapsulated by the
InputSource object:
try {
// Get an efficient reader for the file
FileReader r = new FileReader(f);
java.io.Reader r = input.getCharacterStream();
BufferedReader Br = new BufferedReader(r);
Note: In the next section, you’ll create the input source object and what you put in
it will, in fact, be a buffered reader. But the AddressBookReader could be used
by someone else, somewhere down the line. This step makes sure that the processing will be efficient, regardless of the reader you are given.
281
282
XML STYLESHEET LANGUAGE FOR TRANSFORMATIONS
The next step is to modify the parse method to generate SAX events for the start
of the document and the root element. Add the code highlighted below to do
that:
/** Parse the input */
public void parse(InputSource input)
...
{
try {
...
// Read the file and display its contents.
String line = br.readLine();
while (null != (line = br.readLine())) {
if (line.startsWith("xmozillanickname: ")) break;
}
if (handler==null) {
throw new SAXException("No content handler");
}
handler.startDocument();
handler.startElement(nsu, rootElement,
rootElement, atts);
output("nickname", "xmozillanickname", line);
...
output("cell",
"cellphone",
line);
handler.ignorableWhitespace("\n".toCharArray(),
0, // start index
1 // length
);
handler.endElement(nsu, rootElement, rootElement);
handler.endDocument();
}
catch (Exception e) {
...
Here, you first checked to make sure that the parser was properly configured
with a ContentHandler. (For this app, we don’t care about anything else.) You
then generated the events for the start of the document and the root element, and
finished by sending the end-event for the root element and the end-event for the
document.
MODIFYING THE PARSER TO GENERATE SAX EVENTS
A couple of items are noteworthy, at this point:
• We haven’t bothered to send the setDocumentLocator event, since that is
optional. Were it important, that event would be sent immediately before
the startDocument event.
• We’ve generated an ignorableWhitespace event before the end of the
root element. This, too, is optional, but it drastically improves the readability of the output, as you’ll see in a few moments. (In this case, the
whitespace consists of a single newline, which is sent the same way that
characters are sent to the characters method: as a character array, a starting index, and a length.)
Now that SAX events are being generated for the document and the root element, the next step is to modify the output method to generate the appropriate
element events for each data item. Make the changes shown below to do that:
void output(String name, String prefix, String line)
throws SAXException
{
int startIndex = prefix.length() + 2; // 2=length of ": "
String text = line.substring(startIndex);
System.out.println(name + ": " + text);
int textLength = line.length() - startIndex;
handler.ignorableWhitespace(indent.toCharArray(),
0, // start index
indent.length()
);
handler.startElement(nsu, name, name /*"qName"*/, atts);
handler.characters(line.toCharArray(),
startIndex,
textLength);
handler.endElement(nsu, name, name);
}
Since the ContentHandler methods can send SAXExceptions back to the parser,
the parser has to be prepared to deal with them. In this case, we don’t expect any,
so we’ll simply allow the application to fail if any occur.
You then calculate the length of the data, and once again generate some ignorable whitespace for readability. In this case, there is only one level of data, so we
can use a fixed-indent string. (If the data were more structured, we would have to
calculate how much space to indent, depending on the nesting of the data.)
283
284
XML STYLESHEET LANGUAGE FOR TRANSFORMATIONS
Note: The indent string makes no difference to the data, but will make the output a
lot easier to read. Once everything is working, try generating the result without that
string! All of the elements will wind up concatenated end to end, like this:
<addressbook><nickname>Fred</nickname><email>...
Next, add the method that configures the parser with the ContentHandler that is
to receive the events it generates:
void output(String name, String prefix, String line)
throws SAXException
{
...
}
/** Allow an application to register a content event handler. */
public void setContentHandler(ContentHandler handler) {
this.handler = handler;
}
/** Return the current content handler. */
public ContentHandler getContentHandler() {
return this.handler;
}
There are several more methods that must be implemented in order to satisfy the
XmlReader interface. For the purpose of this exercise, we’ll generate null methods for all of them. For a production application, though, you may want to consider implementing the error handler methods to produce a more robust app. For
now, though, add the code highlighted below to generate null methods for them:
/** Allow an application to register an error event handler. */
public void setErrorHandler(ErrorHandler handler)
{ }
/** Return the current error handler. */
public ErrorHandler getErrorHandler()
{ return null; }
MODIFYING THE PARSER TO GENERATE SAX EVENTS
Finally, add the code highlighted below to generate null methods for the remainder of the XmlReader interface. (Most of them are of value to a real SAX parser,
but have little bearing on a data-conversion application like this one.)
/** Parse an XML document from a system identifier (URI). */
public void parse(String systemId)
throws IOException, SAXException
{ }
/** Return the current DTD handler. */
public DTDHandler getDTDHandler()
{ return null; }
/** Return the current entity resolver. */
public EntityResolver getEntityResolver()
{ return null; }
/** Allow an application to register an entity resolver. */
public void setEntityResolver(EntityResolver resolver)
{ }
/** Allow an application to register a DTD event handler. */
public void setDTDHandler(DTDHandler handler)
{ }
/** Look up the value of a property. */
public Object getProperty(String name)
{ return null; }
/** Set the value of a property. */
public void setProperty(String name, Object value)
{ }
/** Set the state of a feature. */
public void setFeature(String name, boolean value)
{ }
/** Look up the value of a feature. */
public boolean getFeature(String name)
{ return false; }
Congratulations! You now have a parser you can use to generate SAX events. In
the next section, you’ll use it to construct a SAX source object that will let you
transform the data into XML.
285
286
XML STYLESHEET LANGUAGE FOR TRANSFORMATIONS
Using the Parser as a SAXSource
Given a SAX parser to use as an event source, you can (easily!) construct a transformer to produce a result. In this section, you’ll modify the TransformerApp
you’ve been working with to produce a stream output result, although you could
just as easily produce a DOM result.
Note: The code discussed in this section is in TransformationApp04.java. The
results of running it are in TransformationLog04.txt.
Important!
Make sure you put the AddressBookReader aside and open up the TransformationApp. The work you do in this section affects the TransformationApp! (The
look pretty similar, so it’s easy to start working on the wrong one.)
Start by making the changes shown below to import the classes you’ll need to
construct a SAXSource object. (You won’t be needing the DOM classes at this
point, so they are discarded here, although leaving them in doesn’t do any harm.)
import
import
import
import
import
import
...
import
import
import
org.xml.sax.SAXException;
org.xml.sax.SAXParseException;
org.xml.sax.ContentHandler;
org.xml.sax.InputSource;
org.w3c.dom.Document;
org.w3c.dom.DOMException;
javax.xml.transform.dom.DOMSource;
javax.xml.transform.sax.SAXSource;
javax.xml.transform.stream.StreamResult;
Next, remove a few other holdovers from our DOM-processing days, and add the
code to create an instance of the AddressBookReader:
public class TransformationApp
{
// Global value so it can be ref'd by the tree-adapter
static Document document;
public static void main(String argv[])
{
...
DocumentBuilderFactory factory =
DocumentBuilderFactory.newInstance();
USING THE PARSER AS A SAXSOURCE
//factory.setNamespaceAware(true);
//factory.setValidating(true);
// Create the sax "parser".
AddressBookReader saxReader = new AddressBookReader();
try {
File f = new File(argv[0]);
DocumentBuilder builder =
factory.newDocumentBuilder();
document = builder.parse(f);
Guess what! You’re almost done. Just a couple of steps to go. Add the code highlighted below to construct a SAXSource object:
// Use a Transformer for output
...
Transformer transformer = tFactory.newTransformer();
// Use the parser as a SAX source for input
FileReader fr = new FileReader(f);
BufferedReader br = new BufferedReader(fr);
InputSource inputSource = new InputSource(br);
SAXSource source = new SAXSource(saxReader, inputSource);
StreamResult result = new StreamResult(System.out);
transformer.transform(source, result);
Here, you constructed a buffered reader (as mentioned earlier) and encapsulated
it in an input source object. You then created a SAXSource object, passing it the
reader and the InputSource object, and passed that to the transformer.
When the application runs, the transformer will configure itself as the ContentHandler for the SAX parser (the AddressBookReader) and tell the parser to
operate on the inputSource object. Events generated by the parser will then go
to the transformer, which will do the appropriate thing and pass the data on to the
result object.
Finally, remove the exceptions you no longer need to worry about, since the
TransformationApp no longer generates them:
catch (SAXParseException spe) {
// Error generated by the parser
System.out.println("\n** Parsing error"
+ ", line " + spe.getLineNumber()
+ ", uri " + spe.getSystemId());
System.out.println("
" + spe.getMessage() );
287
288
XML STYLESHEET LANGUAGE FOR TRANSFORMATIONS
// Use the contained exception, if any
Exception x = spe;
if (spe.getException() != null)
x = spe.getException();
x.printStackTrace();
} catch (SAXException sxe) {
// Error generated by this application
// (or a parser-initialization error)
Exception x = sxe;
if (sxe.getException() != null)
x = sxe.getException();
x.printStackTrace();
} catch (ParserConfigurationException pce) {
// Parser with specified options can't be built
pce.printStackTrace();
} catch (IOException ioe) {
...
You’re done! You have now created a transformer which will use a SAXSource as
input, and produce a StreamResult as output.
Doing the Conversion
Now run the application on the address book file. Your output should look like
this:
<?xml version="1.0" encoding="UTF-8"?>
<addressbook>
<nickname>Fred</nickname>
<email>[email protected]</email>
<html>TRUE</html>
<firstname>Fred</firstname>
<lastname>Flintstone</lastname>
<work>999-Quarry</work>
<home>999-BedrockLane</home>
<fax>888-Squawk</fax>
<pager>777-pager</pager>
<cell>555-cell</cell>
</addressbook>
TRANSFORMING XML DATA WITH XSLT
You have now successfully converted an existing data structure to XML. And it
wasn’t even that hard. Congratulations!
Transforming XML Data with XSLT
The XML Stylesheet Language for Transformations (XSLT) can be used for
many purposes. For example, with a sufficiently intelligent stylesheet, you could
generate PDF or PostScript output from the XML data. But generally, XSLT is
used to generate formatted HTML output, or to create an alternative XML representation of the data.
In this section of the tutorial, you’ll use an XSLT transform to translate XML
input data to HTML output.
Note: The XSLT specification is large and complex. So this tutorial can only scratch
the surface. It will give you enough of a background to get started, so you can undertake simple XSLT processing tasks. It should also give you a head start when you
investigate XSLT further. For a more thorough grounding, consult a good reference
manual, such as Michael Kay's XSLT Programmer's Reference.
Defining a Simple <article> Document
Type
We’ll start by defining a very simple document type that could be used for writing articles. Our <article> documents will contain these structure tags:
•
•
•
•
•
•
— The title of the article
<SECT> — A section, consisting of a heading and a body
<PARA> — A paragraph
<LIST> — A list.
<ITEM> — An entry in a list
<NOTE> — An aside, which will be offset from the main text
<TITLE>
The slightly unusual aspect of this structure is that we won’t create a separate
element tag for a section heading. Such elements are commonly created to distinguish the heading text (and any tags it contains) from the body of the section
(that is, any structure elements underneath the heading).
289
290
XML STYLESHEET LANGUAGE FOR TRANSFORMATIONS
Instead, we’ll allow the heading to merge seamlessly into the body of a section.
That arrangement adds some complexity to the stylesheet, but that will give us a
chance to explore XSLT’s template-selection mechanisms. It also matches our
intuitive expectations about document structure, where the text of a heading is
directly followed by structure elements, which can simplify outline-oriented
editing.
Note: However, that structure is not easily validated, because XML’s mixed-content
model allows text anywhere in a section, whereas we want to confine text and inline
elements so that they only appear before the first structure element in the body of
the section. The assertion-based validator (Schematron (page 40)) can do it, but
most other schema mechanisms can’t. So we’ll dispense with defining a DTD for
the document type.
In this structure, sections can be nested. The depth of the nesting will determine
what kind of HTML formatting to use for the section heading (for example, h1
or h2). Using a plain SECT tag (instead of numbered sections) is also useful with
outline-oriented editing, because it lets you move sections around at will without
having to worry about changing the numbering for that section or for any of the
other sections that might be affected by the move.
For lists, we’ll use a type attribute to specify whether the list entries are unordered (bulleted), alpha (enumerated with lower case letters), ALPHA (enumerated with uppercase letters), or numbered.
We’ll also allow for some inline tags that change the appearance of the text:
•
•
•
•
•
— bold
<I> — italics
<U> — underline
<DEF> — definition
<LINK> — link to a URL
<B>
Note: An inline tag does not generate a line break, so a style change caused by an
inline tag does not affect the flow of text on the page (although it will affect the
appearance of that text). A structure tag, on the other hand, demarcates a new segment of text, so at a minimum it always generates a line break, in addition to other
format changes.
CREATING A TEST DOCUMENT
The <DEF> tag will be used for terms that are defined in the text. Such terms will
be displayed in italics, the way they ordinarily are in a document. But using a
special tag in the XML will allow an index program to find such definitions and
add them to an index, along with keywords in headings. In the Note above, for
example, the definitions of inline tags and structure tags could have been marked
with <DEF> tags, for future indexing.
Finally, the LINK tag serves two purposes. First, it will let us create a link to a
URL without having to put the URL in twice — so we can code <link>http//
...</link> instead of <a href="http//...">http//...</a>. Of course,
we’ll also want to allow a form that looks like <link
target="...">...name...</link>. That leads to the second reason for the
<link> tag—it will give us an opportunity to play with conditional expressions
in XSLT.
Note: Although the article structure is exceedingly simple (consisting of only 11
tags), it raises enough interesting problems to get a good view of XSLT’s basic
capabilities. But we’ll still leave large areas of the specification untouched. The last
part of this tutorial will point out the major features we skipped.
Creating a Test Document
Here, you’ll create a simple test document using nested <SECT> elements, a few
<PARA> elements, a <NOTE> element, a <LINK>, and a <LIST type="unordered">. The idea is to create a document with one of everything, so we can
explore the more interesting translation mechanisms.
Note: The sample data described here is contained in article1.xml. (The browsable version is article1-xml.html.)
To make the test document, create a file called article.xml and enter the XML
data shown below.
<?xml version="1.0"?>
<ARTICLE>
<TITLE>A Sample Article</TITLE>
<SECT>The First Major Section
<PARA>This section will introduce a subsection.</PARA>
<SECT>The Subsection Heading
<PARA>This is the text of the subsection.
291
292
XML STYLESHEET LANGUAGE FOR TRANSFORMATIONS
</PARA>
</SECT>
</SECT>
</ARTICLE>
Note that in the XML file, the subsection is totally contained within the major
section. (In HTML, on the other hand, headings do not contain the body of a section.) The result is an outline structure that is harder to edit in plain-text form,
like this, but is much easier to edit with an outline-oriented editor.
Someday, given an tree-oriented XML editor that understands inline tags like
<B> and <I>, it should be possible to edit an article of this kind in outline form,
without requiring a complicated stylesheet. (Such an editor would allow the
writer to focus on the structure of the article, leaving layout until much later in
the process.) In such an editor, the article-fragment above would look something
like this:
<ARTICLE>
<TITLE>A Sample Article
<SECT>The First Major Section
<PARA>This section will introduce a subsection.
<SECT>The Subheading
<PARA>This is the text of the subsection. Note that ...
Note: At the moment, tree-structured editors exist, but they treat inline tags like <B>
and <I> the same way that they treat other structure tags, which can make the “outline” a bit difficult to read.
Writing an XSLT Transform
In this part of the tutorial, you’ll begin writing an XSLT transform that will convert the XML article and render it in HTML.
Note: The transform described in this section is contained in article1a.xsl. (The
browsable version is article1a-xsl.html.)
Start by creating a normal XML document:
<?xml version="1.0" encoding="ISO-8859-1"?>
PROCESSING THE BASIC STRUCTURE ELEMENTS
Then add the lines highlighted below to create an XSL stylesheet:
<?xml version="1.0" encoding="ISO-8859-1"?>
<xsl:stylesheet
xmlns:xsl="http://www.w3.org/1999/XSL/Transform"
version="1.0"
>
</xsl:stylesheet>
Now, set it up to produce HTML-compatible output:
<xsl:stylesheet
...
>
<xsl:output method="html"/>
...
</xsl:stylesheet>
We’ll get into the detailed reasons for that entry later on in this section. But for
now, note that if you want to output anything besides well-formed XML, then
you’ll need an <xsl:output> tag like the one shown, specifying either “text”
or “html”. (The default value is “xml”.)
Note: When you specify XML output, you can add the indent attribute to produce
nicely indented XML output. The specification looks like this:
<xsl:output method="xml" indent="yes"/>.
Processing the Basic Structure Elements
You’ll start filling in the stylesheet by processing the elements that go into creating a table of contents — the root element, the title element, and headings. You’ll
also process the PARA element defined in the test document.
Note: If on first reading you skipped the section of this tutorial that discusses the
XPAth addressing mechanisms, How XPath Works (page 257), now is a good time
to go back and review that section.
293
294
XML STYLESHEET LANGUAGE FOR TRANSFORMATIONS
Begin by adding the main instruction that processes the root element:
<xsl:template match="/">
<html><body>
<xsl:apply-templates/>
</body></html>
</xsl:template>
</xsl:stylesheet>
The new XSL commands are shown in bold. (Note that they are defined in the
“xsl” namespace.) The instruction <xsl:apply-templates> processes the children of the current node. In this case, the current node is the root node.
Despite its simplicity, this example illustrates a number of important ideas, so
it’s worth understanding thoroughly. The first concept is that a stylesheet contains a number of templates, defined with the <xsl:template> tag. Each template contains a match attribute, which selects the elements that the template will
be applied to, using the XPath addressing mechanisms described in How XPath
Works (page 257).
Within the template, tags that do not start with the xsl: namespace prefix are
simply copied. The newlines and whitespace that follow them are also copied,
which helps to make the resulting output readable.
Note: When a newline is not present, whitespace is generally ignored. To include
whitespace in the output in such cases, or to include other text, you can use the
<xsl:text> tag. Basically, an XSLT stylesheet expects to process tags. So everything it sees needs to be either an <xsl:..> tag, some other tag, or whitespace.
In this case, the non-XSL tags are HTML tags. So when the root tag is matched,
XSLT outputs the HTML start-tags, processes any templates that apply to children of the root, and then outputs the HTML end-tags.
Process the <TITLE> Element
Next, add a template to process the article title:
<xsl:template match="/ARTICLE/TITLE">
<h1 align="center"> <xsl:apply-templates/> </h1>
</xsl:template>
</xsl:stylesheet>
PROCESSING THE BASIC STRUCTURE ELEMENTS
In this case, you specified a complete path to the TITLE element, and output
some HTML to make the text of the title into a large, centered heading. In this
case, the apply-templates tag ensures that if the title contains any inline tags
like italics, links, or underlining, they will be processed as well.
More importantly, the apply-templates instruction causes the text of the title to
be processed. Like the DOM data model, the XSLT data model is based on the
concept of text nodes contained in element nodes (which, in turn, can be contained in other element nodes, and so on). That hierarchical structure constitutes
the source tree. There is also a result tree, which contains the output.
XSLT works by transforming the source tree into the result tree. To visualize the
result of XSLT operations, it is helpful to understand the structure of those trees,
and their contents. (For more on this subject, see The XSLT/XPath Data
Model (page 258).)
Process Headings
To continue processing the basic structure elements, add a template to process
the top-level headings:
<xsl:template match="/ARTICLE/SECT">
<h2> <xsl:apply-templates
select="text()|B|I|U|DEF|LINK"/> </h2>
<xsl:apply-templates select="SECT|PARA|LIST|NOTE"/>
</xsl:template>
</xsl:stylesheet>
Here, you’ve specified the path to the topmost SECT elements. But this time,
you’ve applied templates in two stages, using the select attribute. For the first
stage, you selected text nodes using the XPath text() function, as well as inline
tags like bold and italics. (The vertical pipe (|) is used to match multiple items —
text, or a bold tag, or an italics tag, etc.) In the second stage, you selected the
other structure elements contained in the file, for sections, paragraphs, lists, and
notes.
Using the select attribute let you put the text and inline elements between the
<h2>...</h2> tags, while making sure that all of the structure tags in the section
are processed afterwards. In other words, you made sure that the nesting of the
headings in the XML document is not reflected in the HTML formatting, which
is important for HTML output.
295
296
XML STYLESHEET LANGUAGE FOR TRANSFORMATIONS
In general, using the select clause lets you apply all templates to a subset of the
information available in the current context. As another example, this template
selects all attributes of the current node:
<xsl:apply-templates select="@*"/></attributes>
Next, add the virtually identical template to process subheadings that are nested
one level deeper:
<xsl:template match="/ARTICLE/SECT/SECT">
<h3> <xsl:apply-templates
select="text()|B|I|U|DEF|LINK"/> </h3>
<xsl:apply-templates select="SECT|PARA|LIST|NOTE"/>
</xsl:template>
</xsl:stylesheet>
Generate a Runtime Message
You could add templates for deeper headings, too, but at some point you have to
stop, if only because HTML only goes down to five levels. But for this example,
you’ll stop at two levels of section headings. But if the XML input happens to
contain a third level, you’ll want to deliver an error message to the user. This section shows you how to do that.
Note: We could continue processing SECT elements that are further down, by
selecting them with the expression /SECT/SECT//SECT. The // selects any SECT
elements, at any depth, as defined by the XPath addressing mechanism. But we’ll
take the opportunity to play with messaging, instead.
Add the following template to generate an error when a section is encountered
that is nested too deep:
<xsl:template match="/ARTICLE/SECT/SECT/SECT">
<xsl:message terminate="yes">
Error: Sections can only be nested 2 deep.
</xsl:message>
</xsl:template>
</xsl:stylesheet>
WRITING THE BASIC PROGRAM
The terminate="yes" clause causes the transformation process to stop after the
message is generated. Without it, processing could still go on with everything in
that section being ignored.
As an additional exercise, you could expand the stylesheet to handle sections
nested up to four sections deep, generating <h2>...<h5> tags. Generate an error
on any section nested five levels deep.
Finally, finish up the stylesheet by adding a template to process the PARA tag:
<xsl:template match="PARA">
<p><xsl:apply-templates/></p>
</xsl:template>
</xsl:stylesheet>
Writing the Basic Program
In this part of the tutorial, you’ll modify the program that used XSLT to echo an
XML file unchanged, changing it so it uses your stylesheet.
Note: The code shown in this section is contained in Stylizer.java. The result is
stylizer1a.html. (The browser-displayable version of the HTML source is
stylizer1a-src.html.)
Start by copying TransformationApp02, which parses an XML file and writes
to System.out. Save it as Stylizer.java.
Next, modify occurrences of the class name and the usage section of the program:
public class TransformationAppStylizer
{
if (argv.length != 1 2) {
System.err.println (
"Usage: java TransformationApp filename");
"Usage: java Stylizer stylesheet xmlfile");
System.exit (1);
}
...
297
298
XML STYLESHEET LANGUAGE FOR TRANSFORMATIONS
Then modify the program to use the stylesheet when creating the Transformer
object.
...
import javax.xml.transform.dom.DOMSource;
import javax.xml.transform.stream.StreamSource;
import javax.xml.transform.stream.StreamResult;
...
public class Stylizer
{
...
public static void main (String argv[])
{
...
try {
File f = new File(argv[0]);
File stylesheet = new File(argv[0]);
File datafile = new File(argv[1]);
DocumentBuilder builder =
factory.newDocumentBuilder();
document = builder.parse(f datafile);
...
StreamSource stylesource =
new StreamSource(stylesheet);
Transformer transformer =
Factory.newTransformer(stylesource);
...
This code uses the file to create a StreamSource object, and then passes the
source object to the factory class to get the transformer.
Note: You can simplify the code somewhat by eliminating the DOMSource class
entirely. Instead of creating a DOMSource object for the XML file, create a StreamSource object for it, as well as for the stylesheet.
Now compile and run the program using article1a.xsl on article1.xml. The
results should look like this:
<html>
<body>
<h1 align="center">A Sample Article</h1>
TRIMMING THE WHITESPACE
<h2>The First Major Section
</h2>
<p>This section will introduce a subsection.</p>
<h3>The Subsection Heading
</h3>
<p>This is the text of the subsection.
</p>
</body>
</html>
At this point, there is quite a bit of excess whitespace in the output. You’ll see
how to eliminate most of it in the next section.
Trimming the Whitespace
If you recall, when you took a look at the structure of a DOM, there were many
text nodes that contained nothing but ignorable whitespace. Most of the excess
whitespace in the output came from these nodes. Fortunately, XSL gives you a
way to eliminate them. (For more about the node structure, see The XSLT/XPath
Data Model (page 258).)
Note: The stylesheet described here is article1b.xsl. The result is
stylizer1b.html. (The browser-displayable versions are article1b-xsl.html
and stylizer1b-src.html.)
To remove some of the excess whitespace, add the line highlighted below to the
stylesheet.
<xsl:stylesheet ...
>
<xsl:output method="html"/>
<xsl:strip-space elements="SECT"/>
...
This instruction tells XSL to remove any text nodes under SECT elements that
contain nothing but whitespace. Nodes that contain text other than whitespace
will not be affected, and other kinds of nodes are not affected.
299
300
XML STYLESHEET LANGUAGE FOR TRANSFORMATIONS
Now, when you run the program, the result looks like this:
<html>
<body>
<h1 align="center">A Sample Article</h1>
<h2>The First Major Section
</h2>
<p>This section will introduce a subsection.</p>
<h3>The Subsection Heading
</h3>
<p>This is the text of the subsection.
</p>
</body>
</html>
That’s quite an improvement. There are still newline characters and white space
after the headings, but those come from the way the XML is written:
<SECT>The First Major Section
____<PARA>This section will introduce a subsection.</PARA>
^^^^
Here, you can see that the section heading ends with a newline and indentation
space, before the PARA entry starts. That’s not a big worry, because the browsers
that will process the HTML routinely compress and ignore the excess space. But
there is still one more formatting tool at our disposal.
Note: The stylesheet described here is article1c.xsl. The result is
stylizer1c.html. (The browser-displayable versions are article1c-xsl.html
and stylizer1c-src.html.)
To get rid of that last little bit of whitespace, add this template to the stylesheet:
<xsl:template match="text()">
<xsl:value-of select="normalize-space()"/>
</xsl:template>
</xsl:stylesheet>
TRIMMING THE WHITESPACE
The output now looks like this:
<html>
<body>
<h1 align="center">A Sample Article</h1>
<h2>The First Major Section</h2>
<p>This section will introduce a subsection.</p>
<h3>The Subsection Heading</h3>
<p>This is the text of the subsection.</p>
</body>
</html>
That is quite a bit better. Of course, it would be nicer if it were indented, but that
turns out to be somewhat harder than expected! Here are some possible avenues
of attack, along with the difficulties:
Indent option
Unfortunately, the indent="yes" option that can be applied to XML output
is not available for HTML output. Even if that option were available, it
wouldn’t help, because HTML elements are rarely nested! Although HTML
source is frequently indented to show the implied structure, the HTML tags
themselves are not nested in a way that creates a real structure.
Indent variables
The <xsl:text> function lets you add any text you want, including
whitespace. So, it could conceivably be used to output indentation space.
The problem is to vary the amount of indentation space. XSLT variables
seem like a good idea, but they don’t work here. The reason is that when you
assign a value to a variable in a template, the value is only known within that
template (statically, at compile time value). Even if the variable is defined
globally, the assigned value is not stored in a way that lets it be dynamically
known by other templates at runtime. Once <apply-templates/> invokes
other templates, they are unaware of any variable settings made in other templates.
Parameterized templates
Using a “parameterized template” is another way to modify a template’s
behavior. But determining the amount of indentation space to pass as the
parameter remains the crux of the problem!
At the moment, then, there does not appear to be any good way to control the
indentation of HTML-formatted output. That would be inconvenient if you
needed to display or edit the HTML as plain text. But it’s not a problem if you do
your editing on the XML form, only use the HTML version for display in a
301
302
XML STYLESHEET LANGUAGE FOR TRANSFORMATIONS
browser. (When you view stylizer1c.html, for example, you see the results you
expect.)
Processing the Remaining Structure
Elements
In this section, you’ll process the LIST and NOTE elements that add additional
structure to an article.
Note: The sample document described in this section is article2.xml, and the
stylesheet used to manipulate it is article2.xsl. The result is stylizer2.html.
(The browser-displayable versions are article2-xml.html, article2-xsl.html,
and stylizer2-src.html.)
Start by adding some test data to the sample document:
<?xml version="1.0"?>
<ARTICLE>
<TITLE>A Sample Article</TITLE>
<SECT>The First Major Section
...
</SECT>
<SECT>The Second Major Section
<PARA>This section adds a LIST and a NOTE.
<PARA>Here is the LIST:
<LIST type="ordered">
<ITEM>Pears</ITEM>
<ITEM>Grapes</ITEM>
</LIST>
</PARA>
<PARA>And here is the NOTE:
<NOTE>Don't forget to go to the hardware store
on your way to the grocery!
</NOTE>
</PARA>
</SECT>
</ARTICLE>
Note: Although the list and note in the XML file are contained in their respective
paragraphs, it really makes no difference whether they are contained or not—the
PROCESSING THE REMAINING STRUCTURE ELEMENTS
generated HTML will be the same, either way. But having them contained will
make them easier to deal with in an outline-oriented editor.
Modify <PARA> handling
Next, modify the PARA template to account for the fact that we are now allowing
some of the structure elements to be embedded with a paragraph:
<xsl:template match="PARA">
<p><xsl:apply-templates/></p>
<p> <xsl:apply-templates select="text()|B|I|U|DEF|LINK"/>
</p>
<xsl:apply-templates select="PARA|LIST|NOTE"/>
</xsl:template>
This modification uses the same technique you used for section headings. The
only difference is that SECT elements are not expected within a paragraph. (However, a paragraph could easily exist inside another paragraph, as quoted material,
for example.)
Process <LIST> and <ITEM> elements
Now you’re ready to add a template to process LIST elements:
<xsl:template match="LIST">
<xsl:if test="@type='ordered'">
<ol>
<xsl:apply-templates/>
</ol>
</xsl:if>
<xsl:if test="@type='unordered'">
<ul>
<xsl:apply-templates/>
</ul>
</xsl:if>
</xsl:template>
</xsl:stylesheet>
The <xsl:if> tag uses the test="" attribute to specify a boolean condition. In
this case, the value of the type attribute is tested, and the list that is generated
changes depending on whether the value is ordered or unordered.
303
304
XML STYLESHEET LANGUAGE FOR TRANSFORMATIONS
The two important things to note for this example are:
• There is no else clause, nor is there a return or exit statement, so it takes
two <xsl:if> tags to cover the two options. (Or the <xsl:choose> tag
could have been used, which provides case-statement functionality.)
• Single quotes are required around the attribute values. Otherwise, the
XSLT processor attempts to interpret the word ordered as an XPath function, instead of as a string.
Now finish up LIST processing by handling ITEM elements:
<xsl:template match="ITEM">
<li><xsl:apply-templates/>
</li>
</xsl:template>
</xsl:stylesheet>
Ordering Templates in a Stylesheet
By now, you should have the idea that templates are independent of one another,
so it doesn’t generally matter where they occur in a file. So from here on, we’ll
just show the template you need to add. (For the sake of comparison, they’re
always added at the end of the example stylesheet.)
Order does make a difference when two templates can apply to the same node. In
that case, the one that is defined last is the one that is found and processed. For
example, to change the ordering of an indented list to use lowercase alphabetics,
you could specify a template pattern that looks like this: //LIST//LIST. In that
template, you would use the HTML option to generate an alphabetic enumeration, instead of a numeric one.
But such an element could also be identified by the pattern //LIST. To make sure
the proper processing is done, the template that specifies //LIST would have to
appear before the template the specifies //LIST//LIST.
PROCESSING THE REMAINING STRUCTURE ELEMENTS
Process <NOTE> Elements
The last remaining structure element is the NOTE element. Add the template
shown below to handle that.
<xsl:template match="NOTE">
<blockquote><b>Note:</b><br/>
<xsl:apply-templates/>
</p></blockquote>
</xsl:template>
</xsl:stylesheet>
This code brings up an interesting issue that results from the inclusion of the
<br/> tag. To be well-formed XML, the tag must be specified in the stylesheet as
<br/>, but that tag is not recognized by many browsers. And while most browsers recognize the sequence <br></br>, they all treat it like a paragraph break,
instead of a single line break.
In other words, the transformation must generate a <br> tag, but the stylesheet
must specify <br/>. That brings us to the major reason for that special output tag
we added early in the stylesheet:
<xsl:stylesheet ... >
<xsl:output method="html"/>
...
</xsl:stylesheet>
That output specification converts empty tags like <br/> to their HTML form,
<br>, on output. That conversion is important, because most browsers do not
recognize the empty tags. Here is a list of the affected tags:
area
base
basefont
br
col
frame
hr
img
input
isindex
link
meta
param
To summarize, by default XSLT produces well-formed XML on output. And
since an XSL stylesheet is well-formed XML to start with, you cannot easily put
a tag like <br> in the middle of it. The “<xsl:output method="html"/>”
solves the problem, so you can code <br/> in the stylesheet, but get <br> in the
output.
305
306
XML STYLESHEET LANGUAGE FOR TRANSFORMATIONS
The other major reason for specifying <xsl:output method="html"/> is that,
as with the specification <xsl:output method="text"/>, generated text is not
escaped. For example, if the stylesheet includes the < entity reference, it will
appear as the < character in the generated text. When XML is generated, on the
other hand, the < entity reference in the stylesheet would be unchanged, so it
would appear as < in the generated text.
Note: If you actually want < to be generated as part of the HTML output, you’ll
need to encode it as &lt;—that sequence becomes < on output, because
only the & is converted to an & character.
Run the Program
Here is the HTML that is generated for the second section when you run the program now:
...
<h2>The Second Major Section</h2>
<p>This section adds a LIST and a NOTE.</p>
<p>Here is the LIST:</p>
<ol>
<li>Pears</li>
<li>Grapes</li>
</ol>
<p>And here is the NOTE:</p>
<blockquote>
<b>Note:</b>
<br>Don't forget to go to the hardware store on your way to the
grocery!
</blockquote>
Process Inline (Content) Elements
The only remaining tags in the ARTICLE type are the inline tags — the ones that
don’t create a line break in the output, but which instead are integrated into the
stream of text they are part of.
Inline elements are different from structure elements, in that they are part of the
content of a tag. If you think of an element as a node in a document tree, then
each node has both content and structure. The content is composed of the text
PROCESS INLINE (CONTENT) ELEMENTS
and inline tags it contains. The structure consists of the other elements (structure
elements) under the tag.
Note: The sample document described in this section is article3.xml, and the
stylesheet used to manipulate it is article3.xsl. The result is stylizer3.html.
(The browser-displayable versions are article3-xml.html, article3-xsl.html,
and stylizer3-src.html.)
Start by adding one more bit of test data to the sample document:
<?xml version="1.0"?>
<ARTICLE>
<TITLE>A Sample Article</TITLE>
<SECT>The First Major Section
...
</SECT>
<SECT>The Second Major Section
...
</SECT>
<SECT>The <I>Third</I> Major Section
<PARA>In addition to the inline tag in the heading,
this section defines the term <DEF>inline</DEF>,
which literally means "no line break". It also
adds a simple link to the main page for the Java
platform (<LINK>http://java.sun.com</LINK>),
as well as a link to the
<LINK target="http://java.sun.com/xml">XML</LINK>
page.
</PARA>
</SECT>
</ARTICLE>
Now, process the inline <DEF> elements in paragraphs, renaming them to HTML
italics tags:
<xsl:template match="DEF">
<i> <xsl:apply-templates/> </i>
</xsl:template>
307
308
XML STYLESHEET LANGUAGE FOR TRANSFORMATIONS
Next, comment out the text-node normalization. It has served its purpose, and
now you’re to the point that you need to preserve important spaces:
<!-<xsl:template match="text()">
<xsl:value-of select="normalize-space()"/>
</xsl:template>
-->
This modification keeps us from losing spaces before tags like <I> and <DEF>.
(Try the program without this modification to see the result.)
Now, process basic inline HTML elements like <B>, <I>, <U> for bold, italics,
and underlining.
<xsl:template match="B|I|U">
<xsl:element name="{name()}">
<xsl:apply-templates/>
</xsl:element>
</xsl:template>
The <xsl:element> tag lets you compute the element you want to generate.
Here, you generate the appropriate inline tag using the name of the current element. In particular, note the use of curly braces ({}) in the name=".." expression. Those curly braces cause the text inside the quotes to be processed as an
XPath expression, instead of being interpreted as a literal string. Here, they cause
the XPath name() function to return the name of the current node.
Curly braces are recognized anywhere that an attribute value template can occur.
(Attribute value templates are defined in section 7.6.2 of the XSLT specification,
and they appear several places in the template definitions.). In such expressions,
curly braces can also be used to refer to the value of an attribute, {@foo}, or to
the content of an element {foo}.
Note: You can also generate attributes using <xsl:attribute>. For more information, see Section 7.1.3 of the XSLT Specification.
PROCESS INLINE (CONTENT) ELEMENTS
The last remaining element is the LINK tag. The easiest way to process that tag
will be to set up a named template that we can drive with a parameter:
<xsl:template name="htmLink">
<xsl:param name="dest" select="UNDEFINED"/>
<xsl:element name="a">
<xsl:attribute name="href">
<xsl:value-of select="$dest"/>
</xsl:attribute>
<xsl:apply-templates/>
</xsl:element>
</xsl:template>
The major difference in this template is that, instead of specifying a match
clause, you gave the template a name with the name="" clause. So this template
only gets executed when you invoke it.
Within the template, you also specified a parameter named dest, using the
<xsl:param> tag. For a bit of error checking, you used the select clause to give
that parameter a default value of UNDEFINED. To reference the variable in the
<xsl:value-of> tag, you specified “$dest”.
Note: Recall that an entry in quotes is interpreted as an expression, unless it is further enclosed in single quotes. That’s why the single quotes were needed earlier, in
"@type='ordered'"—to make sure that ordered was interpreted as a string.
The <xsl:element> tag generates an element. Previously, we have been able to
simply specify the element we want by coding something like <html>. But here
you are dynamically generating the content of the HTML anchor (<a>) in the
body of the <xsl:element> tag. And you are dynamically generating the href
attribute of the anchor using the <xsl:attribute> tag.
The last important part of the template is the <apply-templates> tag, which
inserts the text from the text node under the LINK element. Without it, there
would be no text in the generated HTML link.
Next, add the template for the LINK tag, and call the named template from within
it:
<xsl:template match="LINK">
<xsl:if test="@target">
<!--Target attribute specified.-->
<xsl:call-template name="htmLink">
<xsl:with-param name="dest" select="@target"/>
309
310
XML STYLESHEET LANGUAGE FOR TRANSFORMATIONS
</xsl:call-template>
</xsl:if>
</xsl:template>
<xsl:template name="htmLink">
...
The test="@target" clause returns true if the target attribute exists in the
LINK tag. So this <xsl-if> tag generates HTML links when the text of the link
and the target defined for it are different.
The <xsl:call-template> tag invokes the named template, while <xsl:withparam> specifies a parameter using the name clause, and its value using the
select clause.
As the very last step in the stylesheet construction process, add the <xsl-if> tag
shown below to process LINK tags that do not have a target attribute.
<xsl:template match="LINK">
<xsl:if test="@target">
...
</xsl:if>
<xsl:if test="not(@target)">
<xsl:call-template name="htmLink">
<xsl:with-param name="dest">
<xsl:apply-templates/>
</xsl:with-param>
</xsl:call-template>
</xsl:if>
</xsl:template>
The not(...) clause inverts the previous test (remember, there is no else
clause). So this part of the template is interpreted when the target attribute is
not specified. This time, the parameter value comes not from a select clause,
but from the contents of the <xsl:with-param> element.
Note: Just to make it explicit: Parameters and variables (which are discussed in a
few moments in What Else Can XSLT Do? (page 311) can have their value specified either by a select clause, which lets you use XPath expressions, or by the content of the element, which lets you use XSLT tags.
PRINTING THE HTML
The content of the parameter, in this case, is generated by the <xsl:apply-templates/> tag, which inserts the contents of the text node under the LINK element.
Run the Program
When you run the program now, the results should look something like this:
...
<h2>The <I>Third</I> Major Section
</h2>
<p>In addition to the inline tag in the heading, this section
defines the term <i>inline</i>, which literally means
"no line break". It also adds a simple link to the
main page for the Java platform (<a href="http://java.
sun.com">http://java.sun.com</a>),
as well as a link to the
<a href="http://java.sun.com/xml">XML</a> page.
</p>
Good work! You have now converted a rather complex XML file to HTML. (As
seemingly simple as it appear at first, it certainly provided a lot of opportunity
for exploration.)
Printing the HTML
You have now converted an XML file to HTML. One day, someone will produce
an HTML-aware printing engine that you’ll be able to find and use through the
Java Printing Service API. At that point, you’ll have ability to print an arbitrary
XML file by generating HTML—all you’ll have to do is set up a stylesheet and
use your browser.
What Else Can XSLT Do?
As lengthy as this section of the tutorial has been, it has still only scratched the
surface of XSLT’s capabilities. Many additional possibilities await you in the
XSLT Specification. Here are a few of the things to look for:
import (Section 2.6.2) and include (Section 2.6.1)
Use these statements to modularize and combine XSLT stylesheets. The
include statement simply inserts any definitions from the included file. The
311
312
XML STYLESHEET LANGUAGE FOR TRANSFORMATIONS
statement lets you override definitions in the imported file with definitions in your own stylesheet.
for-each loops (Section 8)
Loop over a collection of items and process each one, in turn.
choose (case statement) for conditional processing (Section 9.2)
Branch to one of multiple processing paths depending on an input value.
generating numbers (Section 7.7)
Dynamically generate numbered sections, numbered elements, and numeric
literals. XSLT provides three numbering modes:
• single: Numbers items under a single heading, like an ordered list in
HTML.
• multiple: Produces multi-level numbering like “A.1.3”.
• any: Consecutively numbers items wherever they appear, as with footnotes in a chapter.
import
formatting numbers (Section 12.3)
Control enumeration formatting, so you get numerics (format="1"), uppercase alphabetics (format="A"), lowercase alphabetics (format="a"), or
compound numbers, like “A.1”, as well as numbers and currency amounts
suited for a specific international locale.
sorting output (Section 10)
Produce output in some desired sorting order.
mode-based templates (Section 5.7)
Process an element multiple times, each time in a different “mode”. You add
a mode attribute to templates, and then specify <apply-templates
mode="..."> to apply only the templates with a matching mode. Combine
with the <apply-templates select="..."> attribute to apply mode-based
processing to a subset of the input data.
variables (Section 11)
Variables, like parameters, let you control a template’s behavior. But they are
not as valuable as you might think. The value of a variable is only known
within the scope of the current template or <xsl:if> tag (for example) in
which it is defined. You can’t pass a value from one template to another, or
even from an enclosed part of a template to another part of the same template.
These statements are true even for a “global” variable. You can change its
value in a template, but the change only applies to that template. And when
the expression used to define the global variable is evaluated, that evaluation
takes place in the context of the structure’s root node. In other words, global
TRANSFORMING FROM THE COMMAND LINE WITH XALAN
variables are essentially runtime constants. Those constants can be useful for
changing the behavior of a template, especially when coupled with include
and import statements. But variables are not a general-purpose data-management mechanism.
The Trouble with Variables
It is tempting to create a single template and set a variable for the destination of
the link, rather than go to the trouble of setting up a parameterized template and
calling it two different ways. The idea would be to set the variable to a default
value (say, the text of the LINK tag) and then, if target attribute exists, set the
destination variable to the value of the target attribute.
That would be a good idea—if it worked. But once again, the issue is that variables are only known in the scope within which they are defined. So when you
code an <xsl:if> tag to change the value of the variable, the value is only
known within the context of the <xsl:if> tag. Once </xsl:if> is encountered,
any change to the variable’s setting is lost.
A
similarly
tempting
idea is the possibility of replacing the
specification with a variable ($inline). But since the
value of the variable is determined by where it is defined, the value of a global
inline variable consists of text nodes, <B> nodes, and so on, that happen to exist
at the root level. In other words, the value of such a variable, in this case, is null.
text()|B|I|U|DEF|LINK
Transforming from the Command Line
with Xalan
To run a transform from the command line, you initiate a Xalan Process using
the following command:
java org.apache.xalan.xslt.Process
-IN article3.xml -XSL article3.xsl
Note: Remember to use the endorsed directories mechanism to access the Xalan
libraries, as described in Compiling and Running the Program (page 133).
With this command, the output goes to System.out. The -OUT option can also
be used to output to a file.
313
314
XML STYLESHEET LANGUAGE FOR TRANSFORMATIONS
The Process command allows for a variety of other options, as well. For details,
see http://xml.apache.org/xalan-j/commandline.html.
Concatenating Transformations with a
Filter Chain
It is sometimes useful to create a filter chain — a concatenation of XSLT transformations in which the output of one transformation becomes the input of the
next. This section of the tutorial shows you how to do that.
Writing the Program
Start by writing a program to do the filtering. This example will show the full
source code, but you can use one of the programs you’ve been working on as a
basis, to make things easier.
Note: The code described here is contained in FilterChain.java.
The sample program includes the import statements that identify the package
locations for each class:
import
import
import
import
javax.xml.parsers.FactoryConfigurationError;
javax.xml.parsers.ParserConfigurationException;
javax.xml.parsers.SAXParser;
javax.xml.parsers.SAXParserFactory;
import
import
import
import
import
org.xml.sax.SAXException;
org.xml.sax.SAXParseException;
org.xml.sax.InputSource;
org.xml.sax.XMLReader;
org.xml.sax.XMLFilter;
import
import
import
import
javax.xml.transform.Transformer;
javax.xml.transform.TransformerException;
javax.xml.transform.TransformerFactory;
javax.xml.transform.TransformerConfigurationException;
import javax.xml.transform.sax.SAXTransformerFactory;
import javax.xml.transform.sax.SAXSource;
import javax.xml.transform.sax.SAXResult;
WRITING THE PROGRAM
import javax.xml.transform.stream.StreamSource;
import javax.xml.transform.stream.StreamResult;
import java.io.*;
The program also includes the standard error handlers you’re used to. They’re
listed here, just so they are all gathered together in one place:
}
catch (TransformerConfigurationException tce) {
// Error generated by the parser
System.out.println ("* Transformer Factory error");
System.out.println("
" + tce.getMessage() );
// Use the contained exception, if any
Throwable x = tce;
if (tce.getException() != null)
x = tce.getException();
x.printStackTrace();
}
catch (TransformerException te) {
// Error generated by the parser
System.out.println ("* Transformation error");
System.out.println("
" + te.getMessage() );
// Use the contained exception, if any
Throwable x = te;
if (te.getException() != null)
x = te.getException();
x.printStackTrace();
}
catch (SAXException sxe) {
// Error generated by this application
// (or a parser-initialization error)
Exception x = sxe;
if (sxe.getException() != null)
x = sxe.getException();
x.printStackTrace();
}
catch (ParserConfigurationException pce) {
// Parser with specified options can't be built
pce.printStackTrace();
}
catch (IOException ioe) {
// I/O error
ioe.printStackTrace();
}
315
316
XML STYLESHEET LANGUAGE FOR TRANSFORMATIONS
In between the import statements and the error handling, the core of the program
consists of the code shown below.
public static void main (String argv[])
{
if (argv.length != 3) {
System.err.println (
"Usage: java FilterChain style1 style2 xmlfile");
System.exit (1);
}
try {
// Read the arguments
File stylesheet1 = new File(argv[0]);
File stylesheet2 = new File(argv[1]);
File datafile = new File(argv[2]);
// Set up the input stream
BufferedInputStream bis = new
BufferedInputStream(newFileInputStream(datafile));
InputSource input = new InputSource(bis);
// Set up to read the input file (see Note #1)
SAXParserFactory spf = SAXParserFactory.newInstance();
spf.setNamespaceAware(true);
SAXParser parser = spf.newSAXParser();
XMLReader reader = parser.getXMLReader();
// Create the filters (see Note #2)
SAXTransformerFactory stf =
(SAXTransformerFactory)
TransformerFactory.newInstance();
XMLFilter filter1 = stf.newXMLFilter(
new StreamSource(stylesheet1));
XMLFilter filter2 = stf.newXMLFilter(
new StreamSource(stylesheet2));
// Wire the output of the reader to filter1 (see Note #3)
// and the output of filter1 to filter2
filter1.setParent(reader);
filter2.setParent(filter1);
// Set up the output stream
StreamResult result = new StreamResult(System.out);
// Set up the transformer to process the SAX events generated
// by the last filter in the chain
Transformer transformer = stf.newTransformer();
UNDERSTANDING HOW THE FILTER CHAIN WORKS
SAXSource transformSource = new SAXSource(
filter2, input);
transformer.transform(transformSource, result);
} catch (...) {
...
Notes:
1. The Xalan transformation engine currently requires a namespace-aware
SAX parser.
2. This weird bit of code is explained by the fact that SAXTransformerFactory extends TransformerFactory, adding methods to obtain filter
objects. The newInstance() method is a static method defined in TransformerFactory, which (naturally enough) returns a TransformerFactory
object. In reality, though, it returns a SAXTransformerFactory. So, to get
at the extra methods defined by SAXTransformerFactory, the return value
must be cast to the actual type.
3. An XMLFilter object is both a SAX reader and a SAX content handler. As
a SAX reader, it generates SAX events to whatever object has registered to
receive them. As a content handler, it consumes SAX events generated by
its “parent” object — which is, of necessity, a SAX reader, as well. (Calling the event generator a “parent” must make sense when looking at the
internal architecture. From an external perspective, the name doesn’t
appear to be particularly fitting.) The fact that filters both generate and consume SAX events allows them to be chained together.
Understanding How the Filter Chain
Works
The code listed above shows you how to set up the transformation. Figure 7–2
should help you understand what’s happening when it executes.
317
318
XML STYLESHEET LANGUAGE FOR TRANSFORMATIONS
Figure 7–2 Operation of Chained Filters
When you create the transformer, you pass it at a SAXSource object, which
encapsulates a reader (in this case, filter2) and an input stream. You also pass
it a pointer to the result stream, where it directs its output. The diagram shows
what happens when you invoke transform() on the transformer. Here is an
explanation of the steps:
1. The transformer sets up an internal object as the content handler for
filter2, and tells it to parse the input source.
2. filter2, in turn, sets itself up as the content handler for filter1, and tells
it to parse the input source.
3. filter1, in turn, tells the parser object to parse the input source.
4. The parser does so, generating SAX events which it passes to filter1.
5. filter1, acting in its capacity as a content handler, processes the events
and does its transformations. Then, acting in its capacity as a SAX reader
(XMLReader), it sends SAX events to filter2.
6. filter2 does the same, sending its events to the transformer’s content
handler, which generates the output stream.
Testing the Program
To try out the program, you’ll create an XML file based on a tiny fraction of the
XML DocBook format, and convert it to the ARTICLE format defined here. Then
you’ll apply the ARTICLE stylesheet to generate an HTML version.
TESTING THE PROGRAM
Note: This example processes small-docbook-article.xml using docbookToArand article1c.xsl. The result is filterout.html (The browser-displayable versions are small-docbook-article-xml.html, docbookToArticlexsl.html, article1c-xsl.html, and filterout-src.html.) See the O’Reilly
Web pages for a good description of the DocBook article format.
ticle.xsl
Start by creating a small article that uses a minute subset of the XML DocBook
format:
<?xml version="1.0"?>
<Article>
<ArtHeader>
<Title>Title of my (Docbook) article</Title>
</ArtHeader>
<Sect1>
<Title>Title of Section 1.</Title>
<Para>This is a paragraph.</Para>
</Sect1>
</Article>
Next, create a stylesheet to convert it into the ARTICLE format:
<xsl:stylesheet
xmlns:xsl="http://www.w3.org/1999/XSL/Transform"
version="1.0"
>
<xsl:output method="xml"/> (see Note #1)
<xsl:template match="/">
<ARTICLE>
<xsl:apply-templates/>
</ARTICLE>
</xsl:template>
<!-- Lower level titles strip element tag --> (see Note #2)
<!-- Top-level title -->
<xsl:template match="/Article/ArtHeader/Title"> (Note #3)
<TITLE> <xsl:apply-templates/> </TITLE>
</xsl:template>
<xsl:template match="//Sect1"> (see Note #4)
<SECT><xsl:apply-templates/></SECT>
</xsl:template>
319
320
XML STYLESHEET LANGUAGE FOR TRANSFORMATIONS
<xsl:template match="Para">
<PARA><xsl:apply-templates/></PARA> (see Note #5)
</xsl:template>
</xsl:stylesheet>
Notes:
1. This time, the stylesheet is generating XML output.
2. The template that follows (for the top-level title element) matches only the
main title. For section titles, the TITLE tag gets stripped. (Since no template
conversion governs those title elements, they are ignored. The text nodes
they contain, however, are still echoed as a result of XSLT’s built in template rules— so only the tag is ignored, not the text. More on that below.)
3. The title from the DocBook article header becomes the ARTICLE title.
4. Numbered section tags are converted to plain SECT tags.
5. This template carries out a case conversion, so Para becomes PARA.
Although it hasn’t been mentioned explicitly, XSLT defines a number of built-in
(default) template rules. The complete set is listed in Section 5.8 of the specification. Mainly, they provide for the automatic copying of text and attribute nodes,
and for skipping comments and processing instructions. They also dictate that
inner elements are processed, even when their containing tags don’t have templates. That is the reason that the text node in the section title is processed, even
though the section title is not covered by any template.
Now, run the FilterChain program, passing it the stylesheet above (docbookToArticle.xsl), the ARTICLE stylesheet (article1c.xsl), and the small DocBook file (small-docbook-article.xml), in that order. The result should like
this:
<html>
<body>
<h1 align="center">Title of my (Docbook) article</h1>
<h2>Title of Section 1.</h2>
<p>This is a paragraph.</p>
</body>
</html>
Note: This output was generated using JAXP 1.0. However, the first filter in the
chain is not currently translating any of the tags in the input file. Until that defect
is fixed, the output you see will consist of concatenated plain text in the HTML
CONCLUSION
output, like this: “Title of my (Docbook) article Title of Section 1. This
is a paragraph.”.
Conclusion
Congratulations! You have completed the XSLT tutorial. There is a lot you can
do with XML and XSLT, and you are now prepared to explore the many exciting
possibilities that await.
Further Information
For more information on XSL stylesheets, XSLT, and transformation engines,
see:
• A great introduction to XSLT that starts with a simple HTML page and
uses XSLT to customize it, one step at a time: http://www.xfront.com/
rescuing-xslt.html
• Extensible Stylesheet Language (XSL): http://www.w3.org/Style/
XSL/
• The XML Path Language: http://www.w3.org/TR/xpath
• The Xalan transformation engine: http://xml.apache.org/xalan-j/
• Output properties that can be programmatically specified on transformer objects:
http://www.w3.org/TR/xslt#output.
• Using Xalan from the command line: http://xml.apache.org/xalanj/commandline.html
321
322
XML STYLESHEET LANGUAGE FOR TRANSFORMATIONS
8
Building Web Services
With JAX-RPC
Dale Green
JAX-RPC stands for Java API for XML-based RPC. It’s an API for building
Web services and clients that use remote procedure calls (RPC) and XML. Often
used in a distributed client/server model, an RPC mechanism enables clients to
execute procedures on other systems.
In JAX-RPC, a remote procedure call is represented by an XML-based protocol
such as SOAP. The SOAP specification defines the envelope structure, encoding
rules, and convention for representing remote procedure calls and responses.
These calls and responses are transmitted as SOAP messages (XML files) over
HTTP.
Although SOAP messages are complex, the JAX-RPC API hides this complexity
from the application developer. On the server side, the developer specifies the
remote procedures by defining methods in an interface written in the Java programming language. The developer also codes one or more classes that implement those methods. Client programs are also easy to code. A client creates a
proxy, a local object representing the service, and then simply invokes methods
on the proxy. With JAX-RPC, the developer does not generate or parse SOAP
messages. It is the JAX-RPC runtime system that converts the API calls and
responses to and from SOAP messages.
With JAX-RPC, clients and Web services have a big advantage—the platform
independence of the Java programming language. In addition, JAX-RPC is not
restrictive: a JAX-RPC client can access a Web service that is not running on the
323
324
BUILDING WEB SERVICES WITH JAX-RPC
Java platform and vice versa. This flexibility is possible because JAX-RPC uses
technologies defined by the World Wide Web Consortium (W3C): HTTP, SOAP,
and the Web Service Description Language (WSDL). WSDL specifies an XML
format for describing a service as a set of endpoints operating on messages.
Types Supported By JAX-RPC
Behind the scenes, JAX-RPC maps types of the Java programming language to
XML/WSDL definitions. For example, JAX-RPC maps the java.lang.String
class to the xsd:string XML data type. Application developers don’t need to
know the details of these mappings, but they should be aware that not every class
in the Java 2 Standard Edition (J2SE™) can be used as a method parameter or
return type in JAX-RPC.
J2SE SDK Classes
JAX-RPC supports the following J2SE SDK classes:
java.lang.Boolean
java.lang.Byte
java.lang.Double
java.lang.Float
java.lang.Integer
java.lang.Long
java.lang.Short
java.lang.String
java.math.BigDecimal
java.math.BigInteger
java.net.URI
java.util.Calendar
java.util.Date
PRIMITIVES
This release of JAX-RPC also supports several implementation classes of the
java.util.Collection interface. See Table 8–1.
Table 8–1 Supported Classes of the Java Collections Framework
java.util.Collection
Subinterface
Implementation Classes
List
ArrayList
LinkedList
Stack
Vector
Map
HashMap
Hashtable
Properties
TreeMap
Set
HashSet
TreeSet
Primitives
JAX-RPC supports the following primitive types of the Java programming language:
boolean
byte
double
float
int
long
short
Arrays
JAX-RPC also supports arrays with members of supported JAX-RPC types.
Examples of supported arrays are int[] and String[]. Multidimensional
arrays, such as BigDecimal[][], are also supported.
325
326
BUILDING WEB SERVICES WITH JAX-RPC
Value Types
A value type is a class whose state may be passed between a client and remote
service as a method parameter or return value. For example, in an application for
a university library, a client might call a remote procedure with a value type
parameter named Book, a class that contains the fields Title, Author, and Publisher.
To be supported by JAX-RPC, a value type must conform to the following rules:
• It must have a public default constructor.
• It must not implement (either directly or indirectly) the java.rmi.Remote
interface.
• Its fields must be supported JAX-RPC types.
The value type may contain public, private, or protected fields. The field of a
value type must meet these requirements:
• A public field cannot be final or transient.
• A non-public field must have corresponding getter and setter methods.
JavaBeans Components
JAX-RPC also supports JavaBeans components, which must conform to the
same set of rules as application classes. In addition, a JavaBeans component
must have a getter and setter method for each bean property. The type of the
bean property must be a supported JAX-RPC type. For an example of a JavaBeans component, see the section TBD.
Creating a Web Service with JAX-RPC
This section shows how to build and deploy a simple Web service called MyHelloService. A later section, Creating Web Service Clients with JAXRPC (page 332), provides examples of JAX-RPC clients that access this service.
The source code required by MyHelloService is in <INSTALL>/
j2eetutorial14/examples/jaxrpc/helloservice/.
These are the basic steps for creating the service:
1. Code the the service endpoint interface and implementation class.
2. Build and generate the files required by the service.
CREATING A WEB SERVICE WITH JAX-RPC
3. Use deploytool to package the service’s files into a WAR file.
4. Deploy the WAR file.
The sections that follow cover these steps in greater detail. Before proceeding,
you should try out the examples in the Getting Started with Web Applications
chapter. Make sure that you’ve followed the instructions in Setting Up To Build
and Deploy Tutorial Examples (page 89).
Coding the Service Endpoint Interface and
Implementation Class
A service endpoint interface declares the methods that a remote client may
invoke on the service. In this example, the interface declares a single method
named sayHello.
A service endpoint interface must conform to a few rules:
• It extends the java.rmi.Remote interface.
• It must not have constant declarations, such as public final static.
• The methods must throw the java.rmi.RemoteException or one of its
subclasses. (The methods may also throw service-specific exceptions.)
• Method parameters and return types must be supported JAX-RPC types.
See the section Types Supported By JAX-RPC (page 324).
In this example, the service endpoint interface is HelloIF.java:
package helloservice;
import java.rmi.Remote;
import java.rmi.RemoteException;
public interface HelloIF extends Remote {
public String sayHello(String s) throws RemoteException;
}
In addition to the interface, you’ll need the class that implements the interface. In
this example, the implementation class is called HelloImpl:
package helloservice;
public class HelloImpl implements HelloIF {
public String message =“Hello“;
327
328
BUILDING WEB SERVICES WITH JAX-RPC
public String sayHello(String s) {
return message + s;
}
}
Building the Service
To build MyHelloService, in a terminal window go to the <INSTALL>/
j2eetutorial14/examples/jaxrpc/helloservice/ directory and type the
following:
asant build
The preceding command executes three asant tasks:
1. compile-service
2. generate-wsdl
3. generate-mapping
compile-service
This asant task compiles HelloIF.java and HelloImpl.java, writing the class
files to the build subdirectory.
generate-wsdl
The generate-wsdl task runs the wscompile tool, which creates the MyHelloService.wsdl file in the build directory. The generate-wsdl task runs wscompile as follows:
wscompile -define -d build/server -nd build
-classpath build config-interface.xml
BUILDING THE SERVICE
The -define flag instructs the tool to read the service endpoint interface and to
create a WSDL file. The -d and -nd flags tell the tool to write output to the
build subdirectory. The tool reads the following config-interface.xml file:
<?xml version=”1.0” encoding=”UTF-8”?>
<configuration
xmlns=”http://java.sun.com/xml/ns/jax-rpc/ri/config”>
<service
name=”MyHelloService”
targetNamespace=”urn:Foo”
typeNamespace=”urn:Foo”
packageName=”helloservice”>
<interface name=”helloservice.HelloIF”/>
</service>
</configuration>
The config.xml-interface file tells wscompile to create a WSDL file with the
following information:
• The service name is MyHelloService.
• The WSDL namespace is urn:Foo. (To understand this namespace, you
need to be familiar with WSDL technology. See Further
Information, page 346)
• The classes for the MyHelloService are in the helloservice package.
• The service endpoint interface is helloservice.HelloIF.
generate-mapping
This asant task also runs wscompile, this time to create a mapping.xml file and
a set of runtime classes. The mapping.xml file maps the package names of the
service classes to a namespace URI of the WSDL file. The set of runtime classes
is made up of serializers, deserializers, and ties. The generate-maping task runs
wscompile as follows:
wscompile -gen -d build -nd build -mapping build/mapping.xml
-classpath build config-wsdl.xml
The -gen flag instructs the tool to read the WSDL file and to create the runtime
classes. The -d and -nd flags tell the tool to write output to the build subdirec-
329
330
BUILDING WEB SERVICES WITH JAX-RPC
tory, and the -mapping flag specifies the mapping file. The tool reads the following config-wsdl.xml file:
<?xml version=”1.0” encoding=”UTF-8”?>
<configuration
xmlns=”http://java.sun.com/xml/ns/jax-rpc/ri/config”>
<wsdl location=”build/MyHelloService.wsdl”
packageName=”helloservice”/>
</configuration>
Packaging the Service
Behind the scenes, a JAX-RPC Web service is actually a servlet. Because a servlet is a Web component, to package the service you run the New Web Component wizard of the deploytool utility. During this process the wizard performs
the following tasks.
• Creates the Web application deployment descriptor
• Creates a WAR file
• Adds the deployment descriptor and service files to the WAR file
To start the New Web Component wizard, select File→New→Web Application
WAR. The wizard displays the following dialog boxes.
1. Introduction dialog box
a. Read the explanatory text for an overview of the wizard’s features.
b. Click Next.
2. WAR File dialog box
a. Select the button labelled Create New Stand-Alone WAR Module.
b. In the WAR Location field, enter <INSTALL>/j2eetutorial14/examples/jaxrpc/helloservice/MyHelloService.war.
c. In the WAR Display Field, enter MyHelloService.
d. Click Edit.
e. In the tree under Available Files, locate the <INSTALL>/j2eetutorial14/
examples/jaxrpc/helloservice/ directory.
f. Select the build subdirectory.
g. Click Add.
h. Click OK.
i. Click Next.
SPECIFYING THE ENDPOINT ADDRESS
3. Choose Component Type dialog box
a. Select the Web Services Endpoint button.
b. Click Next.
4. Choose Service dialog box
a. In the WSDL File combo box, select MyHelloService.wsdl.
b. In the Mapping File combo box, select mapping.xml.
c. Click Next.
5. Web Service Endpoint dialog box
a. In the Service Endpoint Interface combo box, select helloservice.HelloIF.
b. In the Namespace field, enter urn:Foo.
c. In the Local Part field, enter HelloIFPort.
d. Bug 4866894: Do not enter the Endpoint Address URI in this dialog.
e. Click Next.
6. Component General Properties dialog box
a. In the Service Endpoint Implementation combo box, select helloservice.HelloImpl.
b. Click Finish.
Specifying the Endpoint Address
To access MyHelloService, the tutorial clients will specify this service endpoint
address URI:
http://localhost:1024/hello-jaxrpc/hello
The /hello-jaxrpc string is the context root of the servlet that implements
MyHelloService. The /hello string is the servlet alias. To specify the endpoint
address, you set the context root and alias as follows:
1.
2.
3.
4.
5.
In deploytool, select MyHelloService in the tree.
Select the General tab.
In the Context Root field, enter hello-jaxrpc.
In the tree, select HelloImpl.
Select the Aliases tab.
331
332
BUILDING WEB SERVICES WITH JAX-RPC
6. In the Component Aliases table, add /hello. (Don’t forget the forward
slash.)
7. Select File→Save.
Bug 4866894: Do not enter the Service Endpoint Address URI in the Endpoint
tab of HelloImpl.
Deploying the Service
In deploytool, perform these steps:
1. In the tree, select MyHelloService.
2. Select Tools→Deploy.
Now you are ready to create a client that accesses this service.
Creating Web Service Clients with JAXRPC
This section shows how to create and run four types of clients:
•
•
•
•
Static stub
Dynamic proxy
Dynamic invocation interface (DII)
J2EE application client
When you run these client examples, they will access the MyHelloService that
you deployed in the preceding section.
Static Stub Client Example
This example resides in the <INSTALL>/j2eetutorial14/examples/jaxrpc/
staticstub directory.
HelloClient is a stand-alone program that calls the sayHello method of the
MyHelloService. It makes this call through a stub, a local object which acts as a
proxy for the remote service. Because the stub is created before runtime (by
wscompile), it is usually called a static stub.
STATIC STUB CLIENT EXAMPLE
Coding the Static Stub Client
Before it can invoke the remote methods on the stub the client performs these
steps:
1. Creates a Stub object:
(Stub)(new MyHelloService_Impl().getHelloIFPort())
The code in this method is implementation-specific because it relies on a
MyHelloService_Impl object, which is not defined in the specifications.
The MyHelloService_Impl class will be generated by wscompile in the
following section.
2. Sets the endpoint address that the stub uses to access the service:
stub._setProperty
(javax.xml.rpc.Stub.ENDPOINT_ADDRESS_PROPERTY, args[0]);
At runtime, the endpoint address is passed to HelloClient in args[0] as
a command-line parameter, which asant gets from the endpoint.address property in the build.properties file. This address
must match the one you set for the service in Specifying the Endpoint
Address (page 331).
3. Casts stub to the service endpoint interface, HelloIF:
HelloIF hello = (HelloIF)stub;
Here is the full source code listing for the HelloClient.java file, which is
located in the <INSTALL>/j2eetutorial14/examples/jaxrpc/staticstub/
src/ directory:
package staticstub;
import javax.xml.rpc.Stub;
public class HelloClient {
private String endpointAddress;
public static void main(String[] args) {
System.out.println(“Endpoint address = “ + args[0]);
try {
Stub stub = createProxy();
stub._setProperty
(javax.xml.rpc.Stub.ENDPOINT_ADDRESS_PROPERTY,
args[0]);
HelloIF hello = (HelloIF)stub;
333
334
BUILDING WEB SERVICES WITH JAX-RPC
System.out.println(hello.sayHello(“Duke!”));
} catch (Exception ex) {
ex.printStackTrace();
}
}
private static Stub createProxy() {
// Note: MyHelloService_Impl is implementation-specific.
return
(Stub) (new MyHelloService_Impl().getHelloIFPort());
}
}
Building and Running the Static Stub Client
Before performing the steps in this section, you must first create and deploy
MyHelloService as described in Creating a Web Service with JAXRPC (page 326).
To build and package the client, go to the <INSTALL>/j2eetutorial14/
examples/jaxrpc/staticstub/ directory and type the following:
asant build
The preceding command invokes three asant tasks:
• generate-stubs
• compile-client
• package-client
The generate-stubs task runs the wscompile tool as follows:
wscompile -gen:client -d build/client -classpath build/server
config-wsdl.xml
This wscompile command reads the MyHelloService.wsdl file that was generated in Building the Service (page 328). The wscompile command generates
files based on the information in the WSDL file and on the command-line flags.
The -gen:client flag instructs wscompile to generate the stubs and other runtime files. The -d flag tells the tool to write the output to the build/client sub-
DYNAMIC PROXY CLIENT EXAMPLE
directory. The tool reads the following config-wsdl.xml file, which specifies
the location of the WSDL file:
<?xml version=”1.0” encoding=”UTF-8”?>
<configuration
xmlns=”http://java.sun.com/xml/ns/jax-rpc/ri/config”>
<wsdl location=”build/MyHelloService.wsdl”
packageName=”staticstub”/>
</configuration>
The compile-client task compiles src/HelloClient.java and writes the
class file to the build subdirectory.
The package-client task packages the files created by the generate-stubs
and compile-client tasks into the dist/client.jar file. Except for the HelloClient.class, all of the files in client.jar were created by wscompile.
Note that wscompile generated the HelloIF.class based on the information it
read from the MyHelloService.wsdl file.
To run the client, type the following:
asant run
The client should display the following line:
Hello Duke!
Dynamic Proxy Client Example
This example resides in the <INSTALL>/j2eetutorial14/examples/jaxrpc/
dynamicproxy/ directory.
The client in the preceding section used a static stub for the proxy. In contrast,
the client example in this section calls a remote procedure through a dynamic
proxy, a class that is created during runtime. Although the source code for the
static stub client relied on an implementation-specific class, the code for the
dynamic proxy client does not have this limitation.
Coding the Dynamic Proxy Client
The DynamicProxyHello program constructs the dynamic proxy as follows:
1. Creates a Service object named helloService:
335
336
BUILDING WEB SERVICES WITH JAX-RPC
Service helloService =
serviceFactory.createService(helloWsdlUrl,
new QName(nameSpaceUri, serviceName));
A Service object is a factory for proxies. To create the Service object
(helloService), the program calls the createService method on
another type of factory, a ServiceFactory object.
The createService method has two parameters, the URL of the WSDL
file and a QName object. At runtime, the client gets information about the
service by looking up its WSDL. In this example, the URL of the WSDL
file points to the WSDL that was deployed with MyHelloService:
http://localhost:1024/jaxrpc-hello/hello?WSDL
A QName object is a tuple that represents an XML qualified name. The
tuple is composed of a namespace URI and the local part of the qualified
name. In the QName parameter of the createService invocation, the local
part is the service name, MyHelloService.
2. The program creates a proxy (myProxy) with a type of the service endpoint
interface (HelloIF):
dynamicproxy.HelloIF myProxy =
(dynamicproxy.HelloIF)helloService.getPort(
new QName(nameSpaceUri, portName),
dynamicproxy.HelloIF.class);
The helloService object is a factory for dynamic proxies. To create
myProxy, the program calls the getPort method of helloService. This
method has two parameters: a QName object that specifies the port name
and a java.lang.Class object for the service endpoint interface. The
port name, HelloIFPort, is also specified by the WSDL file.
Here is the listing for the HelloClient.java file, located in the <INSTALL>/
j2eetutorial14/examples/jaxrpc/dynamicproxy/src/ directory:
package dynamicproxy;
import
import
import
import
import
import
java.net.URL;
javax.xml.rpc.Service;
javax.xml.rpc.JAXRPCException;
javax.xml.namespace.QName;
javax.xml.rpc.ServiceFactory;
dynamicproxy.HelloIF;
public class HelloClient {
DYNAMIC PROXY CLIENT EXAMPLE
public static void main(String[] args) {
try {
String
String
String
String
UrlString = args[0] + “?WSDL”;
nameSpaceUri = “urn:Foo”;
serviceName = “MyHelloService”;
portName = “HelloIFPort”;
System.out.println(“UrlString = “ + UrlString);
URL helloWsdlUrl = new URL(UrlString);
ServiceFactory serviceFactory =
ServiceFactory.newInstance();
Service helloService =
serviceFactory.createService(helloWsdlUrl,
new QName(nameSpaceUri, serviceName));
dynamicproxy.HelloIF myProxy =
(dynamicproxy.HelloIF)
helloService.getPort(
new QName(nameSpaceUri, portName),
dynamicproxy.HelloIF.class);
System.out.println(myProxy.sayHello(“Buzz”));
} catch (Exception ex) {
ex.printStackTrace();
}
}
}
Building and Running the Dynamic Proxy
Client
Before performing the steps in this section, you must first create and deploy
MyHelloService as described in Creating a Web Service with JAXRPC (page 326).
To build and package the client, go to the <INSTALL>/j2eetutorial14/
examples/jaxrpc/dynamicproxy/ directory and type the following:
asant build
337
338
BUILDING WEB SERVICES WITH JAX-RPC
The preceding command runs these tasks:
• generate-stubs
• compile-client
• package-proxy
The generate-stubs task runs wscompile, which reads the MyHelloService.wsdl file and generates the service endpoint interface class (HelloIF.class). Although this wscompile invocation also creates stubs, the
dynamic proxy client does not use these stubs, which are required only by static
stub clients. For more information about the wscompile command that is run by
generate-stubs, see Building and Running the Static Stub Client (page 334).
The compile-client task compiles the src/HelloClient.java file.
The package-proxy task creates the dist/client.jar file, which contains
HelloIF.class and HelloClient.class.
To run the client, type the following:
asant run
The client should display the following line:
Hello Buzz!
Dynamic Invocation Interface (DII)
Client Example
This example resides in the <INSTALL>/j2eetutorial14/examples/jaxrpc/
dii directory.
With the dynamic invocation interface (DII), a client can call a remote procedure
even if the signature of the remote procedure or the name of the service are
unknown until runtime. In contrast to a static stub or dynamic proxy client, a DII
client does not require runtime classes generated by wscompile. However, as
you’ll see in the following section, the source code for a DII client is more complicated than the code of the other two types of clients.
This example is for advanced users who are familiar with WSDL documents.
(See Further Information, page 346.)
DYNAMIC INVOCATION INTERFACE (DII) CLIENT EXAMPLE
Coding the DII Client
The DIIHello program performs these steps:
1. Creates a Service object.
Service service =
factory.createService(new QName(qnameService));
To get a Service object, the program invokes the createService method
of a ServiceFactory object. The parameter of the createService
method is a QName object that represents the name of the service, MyHelloService. The WSDL file specifies this name as follows:
<service name=”MyHelloService”>
2. From the Service object, creates a Call object:
QName port = new QName(qnamePort);
Call call = service.createCall(port);
A Call object supports the dynamic invocation of the remote procedures
of a service. To get a Call object, the program invokes the Service
object’s createCall method. The parameter of createCall is a QName
object that represents the service endpoint interface, MyHelloServiceRPC. In the WSDL file, the name of this interface is designated by the
portType element:
<portType name=”HelloIF”>
3. Sets the service endpoint address on the Call object:
call.setTargetEndpointAddress(endpoint);
In the WSDL file, this address is specified by the <soap:address> element.
4. Sets these properties on the Call object:
SOAPACTION_USE_PROPERTY
SOAPACTION_URI_PROPERTY
ENCODING_STYLE_PROPERTY
To learn more about these properties, refer to the SOAP and WSDL documents listed in Further Information (page 346).
5. Specifies the method’s return type, name, and parameter:
QName QNAME_TYPE_STRING = new QName(NS_XSD, “string”);
call.setReturnType(QNAME_TYPE_STRING);
call.setOperationName(new QName(BODY_NAMESPACE_VALUE,
“sayHello”));
339
340
BUILDING WEB SERVICES WITH JAX-RPC
call.addParameter(“String_1”, QNAME_TYPE_STRING,
ParameterMode.IN);
To specify the return type, the program invokes the setReturnType
method on the Call object. The parameter of setReturnType is a QName
object that represents an XML string type.
The program designates the method name by invoking the setOperationName method with a QName object that represents sayHello.
To indicate the method parameter, the program invokes the addParameter
method on the Call object. The addParameter method has three arguments: a String for the parameter name (String_1), a QName object for
the XML type, and a ParameterMode object to indicate the passing mode
of the parameter (IN).
6. Invokes the remote method on the Call object:
String[] params = { “Murphy” };
String result = (String)call.invoke(params);
The program assigns the parameter value (Murphy) to a String array
(params) and then executes the invoke method with the String array as
an argument.
Here is the listing for the HelloClient.java file, located in the <INSTALL>/
j2eetutorial14/examples/jaxrpc/dii/src/ directory:
package dii;
import
import
import
import
import
import
javax.xml.rpc.Call;
javax.xml.rpc.Service;
javax.xml.rpc.JAXRPCException;
javax.xml.namespace.QName;
javax.xml.rpc.ServiceFactory;
javax.xml.rpc.ParameterMode;
public class HelloClient {
private static String qnameService = “MyHelloService”;
private static String qnamePort = “HelloIF”;
private static String BODY_NAMESPACE_VALUE =
“urn:Foo”;
private static String ENCODING_STYLE_PROPERTY =
“javax.xml.rpc.encodingstyle.namespace.uri”;
private static String NS_XSD =
DYNAMIC INVOCATION INTERFACE (DII) CLIENT EXAMPLE
“http://www.w3.org/2001/XMLSchema”;
private static String URI_ENCODING =
“http://schemas.xmlsoap.org/soap/encoding/”;
public static void main(String[] args) {
System.out.println(“Endpoint address = “ + args[0]);
try {
ServiceFactory factory =
ServiceFactory.newInstance();
Service service =
factory.createService(
new QName(qnameService));
QName port = new QName(qnamePort);
Call call = service.createCall(port);
call.setTargetEndpointAddress(args[0]);
call.setProperty(Call.SOAPACTION_USE_PROPERTY,
new Boolean(true));
call.setProperty(Call.SOAPACTION_URI_PROPERTY
““);
call.setProperty(ENCODING_STYLE_PROPERTY,
URI_ENCODING);
QName QNAME_TYPE_STRING =
new QName(NS_XSD, “string”);
call.setReturnType(QNAME_TYPE_STRING);
call.setOperationName(
new QName(BODY_NAMESPACE_VALUE,“sayHello”));
call.addParameter(“String_1”, QNAME_TYPE_STRING,
ParameterMode.IN);
String[] params = { “Murph!” };
String result = (String)call.invoke(params);
System.out.println(result);
} catch (Exception ex) {
ex.printStackTrace();
}
}
}
341
342
BUILDING WEB SERVICES WITH JAX-RPC
Building and Running the DII Client
Before performing the steps in this section, you must first create and deploy
MyHelloService as described in Creating a Web Service with JAXRPC (page 326).
To build and package the client, go to the <INSTALL>/j2eetutorial14/
examples/jaxrpc/dii/ directory and type the following:
asant build
This build task compiles HelloClient and packages it into the dist/client.jar file. Unlike the previous client examples, the DII client does not require
files generated by wscompile.
To run the client, type this command:
asant run
The client should display this line:
Hello Murph!
J2EE Application Client Example
Unlike the stand-alone clients in the preceding sections, the client in this section
is a J2EE application client. Because it’s a J2EE component, a J2EE applicatino
client can locate a local Web service by invoking the JNDI lookup method.
J2EE Application HelloClient Listing
Here is the listing for the HelloClient.java file, located in the <INSTALL>/
j2eetutorial14/examples/jaxrpc/appclient/src/ directory:
package appclient;
import javax.xml.rpc.Stub;
import javax.naming.*;
public class HelloClient {
private String endpointAddress;
J2EE APPLICATION CLIENT EXAMPLE
public static void main(String[] args) {
System.out.println(“Endpoint address = “ + args[0]);
try {
Context ic = new InitialContext();
MyHelloService myHelloService = (MyHelloService)
ic.lookup(“java:comp/env/service/MyJAXRPCHello”);
appclient.HelloIF helloPort =
myHelloService.getHelloIFPort();
((Stub)helloPort)._setProperty
(Stub.ENDPOINT_ADDRESS_PROPERTY,args[0]);
System.out.println(helloPort.sayHello(“Jake!”));
System.exit(0);
} catch (Exception ex) {
ex.printStackTrace();
System.exit(1);
}
}
}
Building the J2EE Application Client
In a terminal window, go to the <INSTALL>/j2eetutorial14/examples/jaxrpc/
appclient directory and type the following:
asant build
The preceding command compiles HelloClient.java and runs wscompile by
invoking the generate-mapping target. For more information on this target, see
the section generate-mapping (page 329).
Packaging the J2EE Application Client
Packaging this client is a two-step process:
1. Create an EAR file for a J2EE application.
2. Create a JAR file for the application client and add it to the EAR file.
To create the EAR file, follow these steps:
1. In deploytool, select File→New→Application EAR.
2. Click Browse.
343
344
BUILDING WEB SERVICES WITH JAX-RPC
3. In the file chooser, navigate to <INSTALL>/j2eetutorial14/examples/
jaxrpc/appclient.
4. In the File Name field, enter HelloServiceApp.ear.
5. Click New Application.
6. Click OK.
To start the New Application Client wizard, select File→New→Application Client JAR. The wizard displays the following dialog boxes.
1. Introduction dialog box
a. Read the explanatory text for an overview of the wizard’s features.
b. Click Next.
2. JAR File Contents dialog box
a. Select the button labelled Create New AppClient Module in Application.
b. In the combo box below this button, select HelloServiceApp.
c. In the AppClient Display Name field, enter HelloClient.
d. Click Edit.
e. In the tree under Available Files, locate the <INSTALL>/examples/
jaxrpc/appclient directory.
f. Select the build directory.
g. Click Add.
h. Click OK.
i. Click Next.
3. General dialog box
a. In the Main Class combo box, select appclient.HelloClient.
b. Click Next.
c. Click Finish.
Specifying the Web Reference
When it invokes the lookup method, the HelloClient refers to the Web service
as follows:
MyHelloService myHelloService = (MyHelloService)
ic.lookup("java:comp/env/service/MyJAXRPCHello");
J2EE APPLICATION CLIENT EXAMPLE
You specify this reference as follows.
1. In the tree, select HelloClient.
2. Select the Web Service Refs tab.
3. Click Add.
4. In the Coded Name field, enter service/MyJAXRPCHello.
5. In the Service Interface combo box, select appclient.MyHelloService.
6. In the WSDL File combo box, select MyHelloService.wsdl.
7. In the Namespace field, enter urn:Foo.
8. In the Local Part field, enter MyHelloService.
9. In the Mapping File combo box, select mapping.xml.
10.Click OK.
Deploying and Running the J2EE Application
Client
Before performing the steps in this section, you must first create and deploy the
MyHelloService as described in Creating a Web Service with JAXRPC (page 326).
To deploy the J2EE application client, follow these steps:
1. Select the HelloServiceApp application.
2. Select Tools→Deploy.
3. In the Deploy Module dialog select the checkbox labelled Return Client
JAR.
4. In the field below the checkbox, enter this directory:
<INSTALL>/j2eetutorial14/examples/jaxrpc/appclient
5. Click OK.
To run the client:
1. In a terminal window, go to the <INSTALL>/j2eetutorial14/examples/
jaxrpc/appclient/ directory.
2. Type the following on a single line:
appclient -client HelloServiceAppClient.jar
http://localhost:1024/hello-jaxrpc/hello
345
346
BUILDING WEB SERVICES WITH JAX-RPC
The client should display this line:
Hello Jake!
Other JAX-RPC Client Examples
Chapter 15 shows how a JSP page can be a static stub client that accesses a
remote Web service. See the section, The Example JSP Pages (page 605).
Further Information
For more information about JAX-RPC and related technologies, refer to the following:
• Java API for XML-based RPC 1.1 Specification
http://java.sun.com/xml/downloads/jaxrpc.html
• JAX-RPC Home
http://java.sun.com/xml/jaxrpc/index.html
• Simple Object Access Protocol (SOAP) 1.1 W3C Note
http://www.w3.org/TR/SOAP/
• Web Services Description Language (WSDL) 1.1 W3C Note
http://www.w3.org/TR/wsdl
9
SOAP with
Attachments API for
Java
Maydene Fisher and Kim Haase
SOAP with Attachments API for Java (SAAJ) is used mainly for the SOAP
messaging that goes on behind the scenes in JAX-RPC and JAXR implementations. Secondarily, it is an API that developers can use when they choose to write
SOAP messaging applications directly rather than using JAX-RPC. The SAAJ
API allows you to do XML messaging from the Java platform: By simply making method calls using the SAAJ API, you can create, send, and consume XML
messages over the Internet. This chapter will help you learn how to use the SAAJ
API.
The SAAJ API conforms to the Simple Object Access Protocol (SOAP) 1.1
specification and the SOAP with Attachments specification. The SOAP with
Attachments API for Java (SAAJ) 1.2 specification defines the javax.xml.soap
package, which contains the API for creating and populating a SOAP message.
This package has all the API necessary for sending request-response messages.
(Request-response
messages
are
explained
in
SOAPConnection
Objects, page 352.)
Note: The javax.xml.messaging package, defined in the Java API for XML
Messaging (JAXM) 1.1 specification, is not part of the J2EE 1.4 platform and is not
347
348
SOAP WITH ATTACHMENTS API FOR JAVA
discussed in this chapter. The JAXM API is available as a separate download
from http://java.sun.com/xml/jaxm/.
This chapter starts with an overview of messages and connections, which gives
some of the conceptual background behind the SAAJ API to help you understand why certain things are done the way they are. Next the tutorial shows you
how to use the basic SAAJ API, giving examples and explanations of the more
commonly used features. The code examples in the last part of the tutorial show
you how to build an application.
Overview of SAAJ
This overview presents a high level view of how SAAJ messaging works and
explains concepts in general terms. Its goal is to give you some terminology and
a framework for the explanations and code examples that are presented in the
tutorial section.
The overview looks at SAAJ from two perspectives:
• Messages
• Connections
Messages
SAAJ messages follow SOAP standards, which prescribe the format for messages and also specify some things that are required, optional, or not allowed.
With the SAAJ API, you can create XML messages that conform to the SOAP
1.1 and WS-I Basic Profile 1.0 specifications simply by making Java API calls.
The Structure of an XML Document
Note: For more complete information on XML documents, see Chapters 2 and 4.
An XML document has a hierarchical structure with elements, subelements, subsubelements, and so on. You will notice that many of the SAAJ classes and interfaces represent XML elements in a SOAP message and have the word element or
SOAP or both in their names.
MESSAGES
An element is also referred to as a node. Accordingly, the SAAJ API has the
interface Node, which is the base class for all the classes and interfaces that represent XML elements in a SOAP message. There are also methods such as
SOAPElement.addTextNode, Node.detachNode, and Node.getValue, which
you will see how to use in the tutorial section.
What Is in a Message?
The two main types of SOAP messages are those that have attachments and
those that do not.
Messages with No Attachments
The following outline shows the very high level structure of a SOAP message
with no attachments. Except for the SOAP header, all the parts listed are required
to be in every SOAP message.
I. SOAP message
A. SOAP part
1. SOAP envelope
a. SOAP header (optional)
b. SOAP body
The SAAJ API provides the SOAPMessage class to represent a SOAP message,
the SOAPPart class to represent the SOAP part, the SOAPEnvelope interface to
represent the SOAP envelope, and so on. Figure 9–1 illustrates the structure of a
SOAP message with no attachments.
When you create a new SOAPMessage object, it will automatically have the parts
that are required to be in a SOAP message. In other words, a new SOAPMessage
object has a SOAPPart object that contains a SOAPEnvelope object. The SOAPEnvelope object in turn automatically contains an empty SOAPHeader object followed by an empty SOAPBody object. If you do not need the SOAPHeader object,
which is optional, you can delete it. The rationale for having it automatically
included is that more often than not you will need it, so it is more convenient to
have it provided.
The SOAPHeader object may contain one or more headers with information about
the sending and receiving parties. The SOAPBody object, which always follows
the SOAPHeader object if there is one, provides a simple way to send information
349
350
SOAP WITH ATTACHMENTS API FOR JAVA
intended for the ultimate recipient. For example, if there is a SOAPFault object
(see Using SOAP Faults, page 375), it must be in the SOAPBody object.
Figure 9–1 SOAPMessage Object with No Attachments
Messages with Attachments
A SOAP message may include one or more attachment parts in addition to the
SOAP part. The SOAP part may contain only XML content; as a result, if any of
the content of a message is not in XML format, it must occur in an attachment
part. So, if for example, you want your message to contain a binary file, your
message must have an attachment part for it. Note that an attachment part can
contain any kind of content, so it can contain data in XML format as well. Figure
9–2 shows the high-level structure of a SOAP message that has two attachments.
MESSAGES
Figure 9–2 SOAPMessage Object with Two AttachmentPart Objects
The SAAJ API provides the AttachmentPart class to represent the attachment
part of a SOAP message. A SOAPMessage object automatically has a SOAPPart
object and its required subelements, but because AttachmentPart objects are
optional, you have to create and add them yourself. The tutorial section will walk
you through creating and populating messages with and without attachment
parts.
If a SOAPMessage object has one or more attachments, each AttachmentPart
object must have a MIME header to indicate the type of data it contains. It may
also have additional MIME headers to identify it or to give its location, which
351
352
SOAP WITH ATTACHMENTS API FOR JAVA
are optional but can be useful when there are multiple attachments. When a
SOAPMessage object has one or more AttachmentPart objects, its SOAPPart
object may or may not contain message content.
SAAJ and DOM
At SAAJ 1.2, the SAAJ APIs extend their counterparts in the org.w3c.dom
package:
• The Node interface extends the org.w3c.dom.Node interface.
• The SOAPElement interface extends both the Node interface and the
org.w3c.dom.Element interface.
• The SOAPPart class implements the org.w3c.dom.Document interface.
• The Text interface extends the org.w3c.dom.Text interface.
Moreover, the SOAPPart of a SOAPMessage is also a DOM Level 2 Document,
and can be manipulated as such by applications, tools and libraries that use
DOM. See Chapter 6 for details about DOM. See Adding Content to the SOAPPart Object (page 364) and Adding a Document to the SOAP Body (page 366)
for details on how to use DOM documents with the SAAJ API.
Connections
All SOAP messages are sent and received over a connection. With the SAAJ
API, the connection is represented by a SOAPConnection object, which goes
from the sender directly to its destination. This kind of connection is called a
point-to-point connection because it goes from one endpoint to another endpoint.
Messages sent using the SAAJ API are called request-response messages. They
are sent over a SOAPConnection object with the method call, which sends a
message (a request) and then blocks until it receives the reply (a response).
SOAPConnection Objects
The following code fragment creates the SOAPConnection object connection,
and then, after creating and populating the message, uses con to send the message. As stated previously, all messages sent over a SOAPConnection object are
sent with the method call, which both sends the message and blocks until it
receives the response. Thus, the return value for the method call is the SOAP-
TUTORIAL
Message
request
object that is the response to the message that was sent. The parameter
is the message being sent; endpoint represents where it is being sent.
SOAPConnectionFactory factory =
SOAPConnectionFactory.newInstance();
SOAPConnection connection = factory.createConnection();
. . .// create a request message and give it content
java.net.URL endpoint =
new URL("http://fabulous.com/gizmo/order");
SOAPMessage response = connection.call(request, endpoint);
Note that the second argument to the method call, which identifies where the
message is being sent, can be a String object or a URL object. Thus, the last two
lines of code from the preceding example could also have been the following:
String endpoint = "http://fabulous.com/gizmo/order";
SOAPMessage response = connection.call(request, endpoint);
A Web service implemented for request-response messaging must return a
response to any message it receives. The response is a SOAPMessage object, just
as the request is a SOAPMessage object. When the request message is an update,
the response is an acknowledgement that the update was received. Such an
acknowledgement implies that the update was successful. Some messages may
not require any response at all. The service that gets such a message is still
required to send back a response because one is needed to unblock the call
method. In this case, the response is not related to the content of the message; it
is simply a message to unblock the call method.
Now that you have some background on SOAP messages and SOAP connections, in the next section you will see how to use the SAAJ API.
Tutorial
This tutorial will walk you through how to use the SAAJ API. First, it covers the
basics of creating and sending a simple SOAP message. Then you will learn
more details about adding content to messages, including how to create SOAP
faults and attributes. Finally, you will learn how to send a message and retrieve
353
354
SOAP WITH ATTACHMENTS API FOR JAVA
the content of the response. After going through this tutorial, you will know how
to perform the following tasks:
•
•
•
•
•
•
•
•
•
Creating and Sending a Simple Message
Adding Content to the Header
Adding Content to the SOAP Body
Adding Content to the SOAPPart Object
Adding a Document to the SOAP Body
Manipulating Message Content Using SAAJ or DOM APIs
Adding Attachments
Adding Attributes
Using SOAP Faults
In the section Code Examples (page 380), you will see the code fragments from
earlier parts of the tutorial in runnable applications, which you can test yourself.
A SAAJ client can send request-response messages to Web services that are
implemented to do request-response messaging. This section demonstrates how
you can do this.
Creating and Sending a Simple
Message
This section covers the basics of creating and sending a simple message and
retrieving the content of the response. It includes the following topics:
•
•
•
•
•
•
•
Creating a Message
Parts of a Message
Accessing Elements of a Message
Adding Content to the Body
Getting a SOAPConnection Object
Sending a Message
Getting the Content of a Message
Creating a Message
The first step is to create a message, which you do using a MessageFactory
object. The SAAJ API provides a default implementation of the MessageFac-
CREATING AND SENDING A SIMPLE MESSAGE
tory class, thus making it easy to get an instance. The following code fragment
illustrates getting an instance of the default message factory and then using it to
create a message.
MessageFactory factory = MessageFactory.newInstance();
SOAPMessage message = factory.createMessage();
As is true of the newInstance method for SOAPConnectionFactory, the
newInstance method for MessageFactory is static, so you invoke it by calling
MessageFactory.newInstance.
Parts of a Message
A SOAPMessage object is required to have certain elements, and, as stated previously, the SAAJ API simplifies things for you by returning a new SOAPMessage
object that already contains these elements. So message, which was created in
the preceding line of code, automatically has the following:
I. A SOAPPart object that contains
A. A SOAPEnvelope object that contains
1. An empty SOAPHeader object
2. An empty SOAPBody object
The SOAPHeader object is optional and may be deleted if it is not needed. However, if there is one, it must precede the SOAPBody object. The SOAPBody object
can hold the content of the message and can also contain fault messages that
contain status information or details about a problem with the message. The section Using SOAP Faults (page 375) walks you through how to use SOAPFault
objects.
Accessing Elements of a Message
The next step in creating a message is to access its parts so that content can be
added. There are two ways to do this. The SOAPMessage object message, created
in the previous code fragment, is the place to start.
The first way to access the parts of the message is to work your way through the
structure of the message. The message contains a SOAPPart object, so you use
the getSOAPPart method of message to retrieve it:
SOAPPart soapPart = message.getSOAPPart();
355
356
SOAP WITH ATTACHMENTS API FOR JAVA
Next you can use the getEnvelope method of soapPart to retrieve the SOAPEnobject that it contains.
velope
SOAPEnvelope envelope = soapPart.getEnvelope();
You can now use the getHeader and getBody methods of envelope to retrieve
its empty SOAPHeader and SOAPBody objects.
SOAPHeader header = envelope.getHeader();
SOAPBody body = envelope.getBody();
The second way to access the parts of the message is to retrieve the message
header and body directly, without retrieving the SOAPPart or SOAPEnvelope. To
do so, use the getSOAPHeader and getSOAPBody methods of SOAPMessage:
SOAPHeader header = message.getSOAPHeader();
SOAPBody body = message.getSOAPBody();
This example of a SAAJ client does not use a SOAP header, so you can delete it.
(You will see more about headers later.) Because all SOAPElement objects,
including SOAPHeader objects, are derived from the Node interface, you use the
method Node.detachNode to delete header.
header.detachNode();
Adding Content to the Body
To add content to the body, you need to create a SOAPBodyElement object to hold
the content. When you create any new element, you also need to create an associated Name object so that it is uniquely identified.
One way to create Name objects is by using SOAPEnvelope methods, so you can
use the variable envelope from the previous code fragment to create the Name
object for your new element. Another way to create Name objects is to use SOAPFactory methods, which are useful if you do not have access to the SOAPEnvelope.
Note: The SOAPFactory class also lets you create XML elements when you are not
creating an entire message or do not have access to a complete SOAPMessage object.
For example, JAX-RPC implementations often work with XML fragments rather
than complete SOAPMessage objects. Consequently, they do not have access to a
SOAPEnvelope object, which makes using a SOAPFactory object to create Name
357
CREATING AND SENDING A SIMPLE MESSAGE
objects very useful. In addition to a method for creating Name objects, the SOAPFactory class provides methods for creating Detail objects and SOAP fragments. You
will find an explanation of Detail objects in the SOAP Fault sections Overview of
SOAP Faults (page 375)
Object (page 377).
and
Creating
and
Populating
a
SOAPFault
Name objects associated with SOAPBodyElement or SOAPHeaderElement objects
must be fully qualified; that is, they must be created with a local name, a prefix
for the namespace being used, and a URI for the namespace. Specifying a
namespace for an element makes clear which one is meant if there is more than
one element with the same local name.
The code fragment that follows retrieves the SOAPBody object body from
message, uses a SOAPFactory to create a Name object for the element to be
added, and adds a new SOAPBodyElement object to body.
SOAPBody body = message.getSOAPBody();
SOAPFactory soapFactory = SOAPFactory.newInstance();
Name bodyName = soapFactory.createName("GetLastTradePrice",
"m", "http://wombat.ztrade.com");
SOAPBodyElement bodyElement = body.addBodyElement(bodyName);
At this point, body contains a SOAPBodyElement object identified by the Name
object bodyName, but there is still no content in bodyElement. Assuming that
you want to get a quote for the stock of Sun Microsystems, Inc., you need to create a child element for the symbol using the method addChildElement. Then
you need to give it the stock symbol using the method addTextNode. The Name
object for the new SOAPElement object symbol is initialized with only a local
name because child elements inherit the prefix and URI from the parent element.
Name name = soapFactory.createName("symbol");
SOAPElement symbol = bodyElement.addChildElement(name);
symbol.addTextNode("SUNW");
You might recall that the headers and content in a SOAPPart object must be in
XML format. The SAAJ API takes care of this for you, building the appropriate
XML constructs automatically when you call methods such as addBodyElement,
addChildElement, and addTextNode. Note that you can call the method
addTextNode only on an element such as bodyElement or any child elements
that are added to it. You cannot call addTextNode on a SOAPHeader or SOAPBody
object because they contain elements, not text.
358
SOAP WITH ATTACHMENTS API FOR JAVA
The content that you have just added to your SOAPBody object will look like the
following when it is sent over the wire:
<SOAP-ENV:Envelope
xmlns:SOAP-ENV="http://schemas.xmlsoap.org/soap/envelope/">
<SOAP-ENV:Body>
<m:GetLastTradePrice xmlns:m="http://wombat.ztrade.com">
<symbol>SUNW</symbol>
</m:GetLastTradePrice>
</SOAP-ENV:Body>
</SOAP-ENV:Envelope>
Let’s examine this XML excerpt line by line to see how it relates to your SAAJ
code. Note that an XML parser does not care about indentations, but they are
generally used to indicate element levels and thereby make it easier for a human
reader to understand.
SAAJ code:
SOAPMessage message = messageFactory.createMessage();
SOAPHeader header = message.getSOAPHeader();
SOAPBody body = message.getSOAPBody();
XML it produces:
<SOAP-ENV:Envelope
xmlns:SOAP-ENV="http://schemas.xmlsoap.org/soap/envelope/">
<SOAP-ENV:Header/>
<SOAP-ENV:Body>
. . .
</SOAP-ENV:Body>
</SOAP-ENV:Envelope>
The outermost element in this XML example is the SOAP envelope element,
indicated by SOAP-ENV:Envelope. Envelope is the name of the element, and
SOAP-ENV is the namespace prefix. The interface SOAPEnvelope represents a
SOAP envelope.
The first line signals the beginning of the SOAP envelope element, and the last
line signals the end of it; everything in between is part of the SOAP envelope.
The second line is an example of an attribute for the SOAP envelope element.
Because a SOAP Envelope element always contains this attribute with this value,
a SOAPMessage object comes with it automatically included. xmlns stands for
“XML namespace,” and its value is the URI of the namespace associated with
Envelope.
CREATING AND SENDING A SIMPLE MESSAGE
The next line is an empty SOAP header. We could remove it by calling
header.detachNode after the getSOAPHeader call.
The next two lines mark the beginning and end of the SOAP body, represented in
SAAJ by a SOAPBody object. The next step is to add content to the body.
SAAJ code:
Name bodyName = soapFactory.createName("GetLastTradePrice",
"m", "http://wombat.ztrade.com");
SOAPBodyElement bodyElement = body.addBodyElement(bodyName);
XML it produces:
<m:GetLastTradePrice
xmlns:m="http://wombat.ztrade.com">
. . . .
</m:GetLastTradePrice>
These lines are what the SOAPBodyElement bodyElement in your code represents. GetLastTradePrice"is its local name, m is its namespace prefix, and
http://wombat.ztrade.com is its namespace URI.
SAAJ code:
Name name = soapFactory.createName("symbol");
SOAPElement symbol = bodyElement.addChildElement(name);
symbol.addTextNode("SUNW");
XML it produces:
<symbol>SUNW</symbol>
The String “SUNW” is the text node for the element <symbol>. This String
object is the message content that your recipient, the stock quote service,
receives.
Getting a SOAPConnection Object
The SAAJ API is focused primarily on creating messages. Once you have a message, you can send it using various mechanisms (JMS or JAXM, for example).
The SAAJ API does, however, provide a simple mechanism for request-response
messaging.
359
360
SOAP WITH ATTACHMENTS API FOR JAVA
To send a message, a SAAJ client may use a SOAPConnection object. A SOAPConnection object is a point-to-point connection, meaning that it goes directly
from the sender to the destination (usually a URL) that the sender specifies.
The first step is to obtain a SOAPConnectionFactory object that you can use to
create your connection. The SAAJ API makes this easy by providing the SOAPConnectionFactory class with a default implementation. You can get an
instance of this implementation with the following line of code.
SOAPConnectionFactory soapConnectionFactory =
SOAPConnectionFactory.newInstance();
Now you can use soapConnectionFactory to create a SOAPConnection object.
SOAPConnection connection =
soapConnectionFactory.createConnection();
You will use connection to send the message that you created.
Sending a Message
A SAAJ client calls the SOAPConnection method call on a SOAPConnection
object to send a message. The call method takes two arguments, the message
being sent and the destination to which the message should go. This message is
going to the stock quote service indicated by the URL object endpoint.
java.net.URL endpoint = new URL(
"http://wombat.ztrade.com/quotes”);
SOAPMessage response = connection.call(message, endpoint);
The content of the message you sent is the stock symbol SUNW; the SOAPMesobject response should contain the last stock price for Sun Microsystems,
which you will retrieve in the next section.
sage
A connection uses a fair amount of resources, so it is a good idea to close a connection as soon as you are through using it.
connection.close();
CREATING AND SENDING A SIMPLE MESSAGE
Getting the Content of a Message
The initial steps for retrieving a message’s content are the same as those for giving content to a message: Either you use the Message object to get the SOAPBody
object, or you access the SOAPBody object through the SOAPPart and SOAPEnvelope objects.
Then you access the SOAPBody object’s SOAPBodyElement object, because that is
the element to which content was added in the example. (In a later section you
will see how to add content directly to the SOAPPart object, in which case you
would not need to access the SOAPBodyElement object for adding content or for
retrieving it.)
To get the content, which was added with the method SOAPElement.addTextNode, you call the method Node.getValue. Note that getValue returns the value
of the immediate child of the element that calls the method. Therefore, in the following code fragment, the method getValue is called on bodyElement, the element on which the method addTextNode was called.
In order to access bodyElement, you need to call the method getChildElements
on soapBody. Passing bodyName to getChildElements returns a
java.util.Iterator object that contains all of the child elements identified by
the Name object bodyName. You already know that there is only one, so just calling the method next on it will return the SOAPBodyElement you want. Note that
the method Iterator.next returns a Java Object, so it is necessary to cast the
Object it returns to a SOAPBodyElement object before assigning it to the variable
bodyElement.
SOAPBody soapBody = response.getSOAPBody();
java.util.Iterator iterator =
soapBody.getChildElements(bodyName);
SOAPBodyElement bodyElement =
(SOAPBodyElement)iterator.next();
String lastPrice = bodyElement.getValue();
System.out.print("The last price for SUNW is ");
System.out.println(lastPrice);
361
362
SOAP WITH ATTACHMENTS API FOR JAVA
If there were more than one element with the name bodyName, you would have
had to use a while loop using the method Iterator.hasNext to make sure that
you got all of them.
while (iterator.hasNext()) {
SOAPBodyElement bodyElement =
(SOAPBodyElement)iterator.next();
String lastPrice = bodyElement.getValue();
System.out.print("The last price for SUNW is ");
System.out.println(lastPrice);
}
At this point, you have seen how to send a very basic request-response message
and get the content from the response. The next sections provide more detail on
adding content to messages.
Adding Content to the Header
To add content to the header, you need to create a SOAPHeaderElement object.
As with all new elements, it must have an associated Name object, which you can
create using the message’s SOAPEnvelope object or a SOAPFactory object.
For example, suppose you want to add a conformance claim header to the message to state that your message conforms to the WS-I Basic Profile.
The following code fragment retrieves the SOAPHeader object from message and
adds a new SOAPHeaderElement object to it. This SOAPHeaderElement object
contains the correct qualified name and attribute for a WS-I conformance claim
header.
SOAPHeader header = message.getSOAPHeader();
Name headerName = soapFactory.createName("Claim",
"wsi", "http://ws-i.org/schemas/conformanceClaim/");
SOAPHeaderElement headerElement =
header.addHeaderElement(headerName);
headerElement.addAttribute(soapFactory.createName(
"conformsTo"), "http://ws-i.org/profiles/basic1.0/");
At this point, header contains the SOAPHeaderElement object headerElement
identified by the Name object headerName. Note that the addHeaderElement
method both creates headerElement and adds it to header.
ADDING CONTENT TO THE SOAP BODY
A conformance claim header has no content. This code produces the following
XML header:
<SOAP-ENV:Header>
<wsi:Claim conformsTo="http://ws-i.org/profiles/basic1.0/"
xmlns:wsi="http://ws-i.org/schemas/conformanceClaim/"/>
</SOAP-ENV:Header>
For more information about creating SOAP messages that conform to WS-I, see
the Messaging section of the WS-I Basic Profile.
For a different kind of header, you might want to add content to headerElement.
The following line of code uses the method addTextNode to do this.
headerElement.addTextNode("order");
Now you have the SOAPHeader object header that contains a SOAPHeaderEleobject whose content is "order".
ment
Adding Content to the SOAP Body
The process for adding content to the SOAPBody object is the same as the process
for adding content to the SOAPHeader object. You access the SOAPBody object,
add a SOAPBodyElement object to it, and add text to the SOAPBodyElement
object. It is possible to add additional SOAPBodyElement objects, and it is possible to add subelements to the SOAPBodyElement objects with the method
addChildElement. For each element or child element, you add content with the
method addTextNode.
The following example shows adding multiple SOAPElement objects and adding
text to each of them. The code first creates the SOAPBodyElement object
purchaseLineItems, which has a fully qualified name associated with it. That
is, the Name object for it has a local name, a namespace prefix, and a namespace
URI. As you saw earlier, a SOAPBodyElement object is required to have a fully
qualified name, but child elements added to it, such as SOAPElement objects,
may have Name objects with only the local name.
SOAPBody body = soapFactory.getSOAPBody();
Name bodyName = soapFactory.createName("PurchaseLineItems",
"PO", "http://sonata.fruitsgalore.com");
SOAPBodyElement purchaseLineItems =
body.addBodyElement(bodyName);
363
364
SOAP WITH ATTACHMENTS API FOR JAVA
Name childName = soapFactory.createName("Order");
SOAPElement order =
purchaseLineItems.addChildElement(childName);
childName = soapFactory.createName("Product");
SOAPElement product = order.addChildElement(childName);
product.addTextNode("Apple");
childName = soapFactory.createName("Price");
SOAPElement price = order.addChildElement(childName);
price.addTextNode("1.56");
childName = soapFactory.createName("Order");
SOAPElement order2 =
purchaseLineItems.addChildElement(childName);
childName = soapFactory.createName("Product");
SOAPElement product2 = order2.addChildElement(childName);
product2.addTextNode("Peach");
childName = soapFactory.createName("Price");
SOAPElement price2 = order2.addChildElement(childName);
price2.addTextNode("1.48");
The SAAJ code in the preceding example produces the following XML in the
SOAP body:
<PO:PurchaseLineItems
xmlns:PO="http://www.sonata.fruitsgalore/order">
<Order>
<Product>Apple</Product>
<Price>1.56</Price>
</Order>
<Order>
<Product>Peach</Product>
<Price>1.48</Price>
</Order>
</PO:PurchaseLineItems>
Adding Content to the SOAPPart Object
If the content you want to send is in a file, SAAJ provides an easy way to add it
directly to the SOAPPart object. This means that you do not access the SOAPBody
object and build the XML content yourself, as you did in the previous section.
ADDING CONTENT TO THE SOAPPART OBJECT
To add a file directly to the SOAPPart object, you use a javax.xml.transform.Source object from JAXP (the Java API for XML Processing). There are
three types of Source objects: SAXSource, DOMSource, and StreamSource. A
StreamSource object holds content as an XML document. SAXSource and DOMSource objects hold content along with the instructions for transforming the
content into an XML document.
The following code fragment uses the JAXP API to build a DOMSource object
that is passed to the SOAPPart.setContent method. The first three lines of code
get a DocumentBuilderFactory object and use it to create the DocumentBuilder object builder. Because SOAP messages use namespaces, you should
set the NamespaceAware property for the factory to true. Then builder parses
the content file to produce a Document object.
DocumentBuilderFactory dbFactory =
DocumentBuilderFactory.newInstance();
dbFactory.setNamespaceAware(true);
DocumentBuilder builder = dbFactory.newDocumentBuilder();
Document document =
builder.parse("file:///music/order/soap.xml");
DOMSource domSource = new DOMSource(document);
The following two lines of code access the SOAPPart object (using the SOAPMesobject message) and set the new Document object as its content. The
method SOAPPart.setContent not only sets content for the SOAPBody object but
also sets the appropriate header for the SOAPHeader object.
sage
SOAPPart soapPart = message.getSOAPPart();
soapPart.setContent(domSource);
The XML file you use to set the content of the SOAPPart object must include
Envelope and Body elements, like this:
<SOAP-ENV:Envelope
xmlns="http://schemas.xmlsoap.org/soap/envelope/">
<SOAP-ENV:Body>
...
</SOAP-ENV:Body>
</SOAP-ENV:Envelope>
You will see other ways to add content to a message in the sections Adding a
Document to the SOAP Body (page 366) and Adding Attachments (page 367).
365
366
SOAP WITH ATTACHMENTS API FOR JAVA
Adding a Document to the SOAP Body
In addition to setting the content of the entire SOAP message to that of a DOMobject, you can add a DOM document directly to the body of the message. This capability means that you do not have to create a
javax.xml.transform.Source object. After you parse the document, you can
add it directly to the message body:
Source
SOAPBody body = message.getSOAPBody();
SOAPBodyElement docElement = body.addDocument(document);
Manipulating Message Content Using
SAAJ or DOM APIs
Because SAAJ nodes and elements implement the DOM Node and Element
interfaces, you have many options for adding or changing message content:
•
•
•
•
Use only DOM APIs
Use only SAAJ APIs
Use SAAJ APIs and then switch to using DOM APIs
Use DOM APIs and then switch to using SAAJ APIs
The first three of these cause no problems. Once you have created a message,
whether or not you have imported its content from another document, you can
start adding or changing nodes using either SAAJ or DOM APIs.
But if you use DOM APIs and then switch to using SAAJ APIs to manipulate the
document, any references to objects within the tree that were obtained using
DOM APIs are no longer valid. If you must use SAAJ APIs after using DOM
APIs, you should set all of your DOM typed references to null, because they can
become invalid. For more information about the exact cases in which references
become invalid, see the SAAJ API documentation.
The basic rule is that you can continue manipulating the message content using
SAAJ APIs as long as you want to, but once you start manipulating it using
DOM, you should not use SAAJ APIs after that.
ADDING ATTACHMENTS
Adding Attachments
An AttachmentPart object can contain any type of content, including XML.
And because the SOAP part can contain only XML content, you must use an
AttachmentPart object for any content that is not in XML format.
Creating an AttachmentPart Object and
Adding Content
The SOAPMessage object creates an AttachmentPart object, and the message
also has to add the attachment to itself after content has been added. The SOAPMessage class has three methods for creating an AttachmentPart object.
The first method creates an attachment with no content. In this case, an AttachmentPart method is used later to add content to the attachment.
AttachmentPart attachment = message.createAttachmentPart();
You add content to attachment with the AttachmentPart method setContent.
This method takes two parameters, a Java Object for the content, and a String
object that gives the content type. Content in the SOAPBody part of a message
automatically has a Content-Type header with the value "text/xml" because the
content has to be in XML. In contrast, the type of content in an AttachmentPart
object has to be specified because it can be any type.
Each AttachmentPart object has one or more headers associated with it. When
you specify a type to the method setContent, that type is used for the header
Content-Type. Content-Type is the only header that is required. You may set
other optional headers, such as Content-Id and Content-Location. For convenience, SAAJ provides get and set methods for the headers Content-Type,
Content-Id, and Content-Location. These headers can be helpful in accessing
a particular attachment when a message has multiple attachments. For example,
to access the attachments that have particular headers, you call the SOAPMessage
method getAttachments and pass it the header or headers you are interested in.
The following code fragment shows one of the ways to use the method setContent. This method takes two parameters, the first being a Java Object containing the content and the second being a String giving the content type. The Java
Object may be a String, a stream, a javax.xml.transform.Source object, or a
javax.activation.DataHandler object. The Java Object being added in the
following code fragment is a String, which is plain text, so the second argument
must be "text/plain". The code also sets a content identifier, which can be
367
368
SOAP WITH ATTACHMENTS API FOR JAVA
used to identify this AttachmentPart object. After you have added content to
attachment, you need to add it to the SOAPMessage object, which is done in the
last line.
String stringContent = "Update address for Sunny Skies " +
"Inc., to 10 Upbeat Street, Pleasant Grove, CA 95439";
attachment.setContent(stringContent, "text/plain");
attachment.setContentId("update_address");
message.addAttachmentPart(attachment);
The variable attachment now represents an AttachmentPart object that contains the string stringContent and has a header that contains the string
"text/plain". It also has a Content-Id header with "update_address" as its
value. And attachment is now part of message.
The other two SOAPMessage.createAttachment methods create an AttachmentPart object complete with content. One is very similar to the AttachmentPart.setContent method in that it takes the same parameters and does
essentially the same thing. It takes a Java Object containing the content and a
String giving the content type. As with AttachmentPart.setContent, the
Object may be a String, a stream, a javax.xml.transform.Source object, or
a javax.activation.DataHandler object.
The other method for creating an AttachmentPart object with content takes a
DataHandler object, which is part of the JavaBeans Activation Framework
(JAF). Using a DataHandler object is fairly straightforward. First you create a
java.net.URL object for the file you want to add as content. Then you create a
DataHandler object initialized with the URL object:
URL url = new URL("http://greatproducts.com/gizmos/img.jpg");
DataHandler dataHandler = new DataHandler(url);
AttachmentPart attachment =
message.createAttachmentPart(dataHandler);
attachment.setContentId("attached_image");
message.addAttachmentPart(attachment);
You might note two things about the previous code fragment. First, it sets a
header for Content-ID with the method setContentId. This method takes a
String that can be whatever you like to identify the attachment. Second, unlike
the other methods for setting content, this one does not take a String for Content-Type. This method takes care of setting the Content-Type header for you,
ADDING ATTRIBUTES
which is possible because one of the things a DataHandler object does is determine the data type of the file it contains.
Accessing an AttachmentPart Object
If you receive a message with attachments or want to change an attachment to a
message you are building, you will need to access the attachment. The SOAPMessage class provides two versions of the method getAttachments for retrieving
its AttachmentPart objects. When it is given no argument, the method SOAPMessage.getAttachments returns a java.util.Iterator object over all the
AttachmentPart objects in a message. When getAttachments is given a MimeHeaders object, which is a list of MIME headers, it returns an iterator over the
AttachmentPart objects that have a header that matches one of the headers in
the list. The following code uses the getAttachments method that takes no arguments and thus retrieves all of the AttachmentPart objects in the SOAPMessage
object message. Then it prints out the content ID, content type, and content of
each AttachmentPart object.
java.util.Iterator iterator = message.getAttachments();
while (iterator.hasNext()) {
AttachmentPart attachment =
(AttachmentPart)iterator.next();
String id = attachment.getContentId();
String type = attachment.getContentType();
System.out.print("Attachment " + id +
" has content type " + type);
if (type == "text/plain") {
Object content = attachment.getContent();
System.out.println("Attachment " +
"contains:\n" + content);
}
}
Adding Attributes
An XML element may have one or more attributes that give information about
that element. An attribute consists of a name for the attribute followed immediately by an equals sign (=) and its value.
The SOAPElement interface provides methods for adding an attribute, for getting
the value of an attribute, and for removing an attribute. For example, in the following code fragment, the attribute named id is added to the SOAPElement
369
370
SOAP WITH ATTACHMENTS API FOR JAVA
object person. Because person is a SOAPElement object rather than a SOAPBodyElement object or SOAPHeaderElement object, it is legal for its Name object
to contain only a local name.
Name attributeName = envelope.createName("id");
person.addAttribute(attributeName, "Person7");
These lines of code will generate the first line in the following XML fragment.
<person id="Person7">
...
</person>
The following line of code retrieves the value of the attribute whose name is id.
String attributeValue =
person.getAttributeValue(attributeName);
If you had added two or more attributes to person, the previous line of code
would have returned only the value for the attribute named id. If you wanted to
retrieve the values for all of the attributes for person, you would use the method
getAllAttributes, which returns an iterator over all of the values. The following lines of code retrieve and print out each value on a separate line until there
are no more attribute values. Note that the method Iterator.next returns a Java
Object, which is cast to a Name object so that it can be assigned to the Name
object attributeName. (The example in DOMExample.java (page 391) uses
code similar to this.)
Iterator iterator = person.getAllAttributes();
while (iterator.hasNext()){
Name attributeName = (Name) iterator.next();
System.out.println("Attribute name is " +
attributeName.getQualifiedName());
System.out.println("Attribute value is " +
element.getAttributeValue(attributeName));
}
The following line of code removes the attribute named id from person. The
variable successful will be true if the attribute was removed successfully.
boolean successful = person.removeAttribute(attributeName);
ADDING ATTRIBUTES
In this section you saw how to add, retrieve, and remove attributes. This information is general in that it applies to any element. The next section discusses
attributes that may be added only to header elements.
Header Attributes
Attributes that appear in a SOAPHeaderElement object determine how a recipient
processes a message. You can think of header attributes as offering a way to
extend a message, giving information about such things as authentication, transaction management, payment, and so on. A header attribute refines the meaning
of the header, while the header refines the meaning of the message contained in
the SOAP Body.
The SOAP 1.1 specification defines two attributes that can appear only in SOAPHeaderElement objects: actor and mustUnderstand. The next two sections discuss these attributes.
The Actor Attribute
The attribute actor is optional, but if it is used, it must appear in a SOAPHeaderElement object. Its purpose is to indicate the recipient of a header element. The
default actor is the message’s ultimate recipient; that is, if no actor attribute is
supplied, the message goes directly to the ultimate recipient.
An actor is an application that can both receive SOAP messages and forward
them to the next actor. The ability to specify one or more actors as intermediate
recipients makes it possible to route a message to multiple recipients and to supply header information that applies specifically to each of the recipients.
For example, suppose that a message is an incoming purchase order. Its SOAPHeader object might have SOAPHeaderElement objects with actor attributes that
route the message to applications that function as the order desk, the shipping
desk, the confirmation desk, and the billing department. Each of these applications will take the appropriate action, remove the SOAPHeaderElement objects
relevant to it, and send the message on to the next actor.
Note: Although the SAAJ API provides the API for adding these attributes, it does
not supply the API for processing them. For example, the actor attribute requires
that there be an implementation such as a messaging provider service to route the
message from one actor to the next.
371
372
SOAP WITH ATTACHMENTS API FOR JAVA
An actor is identified by its URI. For example, the following line of code, in
which orderHeader is a SOAPHeaderElement object, sets the actor to the given
URI.
orderHeader.setActor("http://gizmos.com/orders");
Additional actors may be set in their own SOAPHeaderElement objects. The following code fragment first uses the SOAPMessage object message to get its SOAPHeader object header. Then header creates four SOAPHeaderElement objects,
each of which sets its actor attribute.
SOAPHeader header = message.getSOAPHeader();
SOAPFactory soapFactory = SOAPFactory.newInstance();
String nameSpace = "ns";
String nameSpaceURI = "http://gizmos.com/NSURI";
Name order = soapFactory.createName("orderDesk",
nameSpace, nameSpaceURI);
SOAPHeaderElement orderHeader =
header.addHeaderElement(order);
orderHeader.setActor("http://gizmos.com/orders");
Name shipping =
soapFactory.createName("shippingDesk",
nameSpace, nameSpaceURI);
SOAPHeaderElement shippingHeader =
header.addHeaderElement(shipping);
shippingHeader.setActor("http://gizmos.com/shipping");
Name confirmation =
soapFactory.createName("confirmationDesk",
nameSpace, nameSpaceURI);
SOAPHeaderElement confirmationHeader =
header.addHeaderElement(confirmation);
confirmationHeader.setActor(
"http://gizmos.com/confirmations");
Name billing = soapFactory.createName("billingDesk",
nameSpace, nameSpaceURI);
SOAPHeaderElement billingHeader =
header.addHeaderElement(billing);
billingHeader.setActor("http://gizmos.com/billing");
The SOAPHeader interface provides two methods that return a java.util.Iterator object over all of the SOAPHeaderElement objects with an actor that
ADDING ATTRIBUTES
matches the specified actor. The first method, examineHeaderElements, returns
an iterator over all of the elements with the specified actor.
java.util.Iterator headerElements =
header.examineHeaderElements("http://gizmos.com/orders");
The second method, extractHeaderElements, not only returns an iterator over
all of the SOAPHeaderElement objects with the specified actor attribute but also
detaches them from the SOAPHeader object. So, for example, after the order desk
application has done its work, it would call extractHeaderElements to remove
all of the SOAPHeaderElement objects that applied to it.
java.util.Iterator headerElements =
header.extractHeaderElements("http://gizmos.com/orders");
Each SOAPHeaderElement object may have only one actor attribute, but the
same actor may be an attribute for multiple SOAPHeaderElement objects.
Two additional SOAPHeader methods, examineAllHeaderElements and
extractAllHeaderElements, allow you to examine or extract all the header elements, whether or not they have an actor attribute. For example, you could use
the following code to display the values of all the header elements:
Iterator allHeaders =
header.examineAllHeaderElements();
while (allHeaders.hasNext()) {
SOAPHeaderElement headerElement =
(SOAPHeaderElement)allHeaders.next();
Name headerName =
headerElement.getElementName();
System.out.println("\nHeader name is " +
headerName.getQualifiedName());
System.out.println("Actor is " +
headerElement.getActor());
System.out.println("MustUnderstand is " +
headerElement.getMustUnderstand());
}
The mustUnderstand Attribute
The other attribute that must be added only to a SOAPHeaderElement object is
mustUnderstand. This attribute says whether or not the recipient (indicated by
the actor attribute) is required to process a header entry. When the value of the
mustUnderstand attribute is true, the actor must understand the semantics of
the header entry and must process it correctly to those semantics. If the value is
373
374
SOAP WITH ATTACHMENTS API FOR JAVA
false, processing the header entry is optional. A SOAPHeaderElement object
with no mustUnderstand attribute is equivalent to one with a mustUnderstand
attribute whose value is false.
The mustUnderstand attribute is used to call attention to the fact that the semantics in an element are different from the semantics in its parent or peer elements.
This allows for robust evolution, ensuring that the change in semantics will not
be silently ignored by those who may not fully understand it.
If the actor for a header that has a mustUnderstand attribute set to true cannot
process the header, it must send a SOAP fault back to the sender. (See the section
Using SOAP Faults, page 375 for information.) The actor must not change state
or cause any side-effects, so that to an outside observer, it appears that the fault
was sent before any header processing was done.
The following code fragment creates a SOAPHeader object with a SOAPHeaderobject that has a mustUnderstand attribute.
Element
SOAPHeader header = message.getSOAPHeader();
Name name = soapFactory.createName("Transaction", "t",
"http://gizmos.com/orders");
SOAPHeaderElement transaction = header.addHeaderElement(name);
transaction.setMustUnderstand(true);
transaction.addTextNode("5");
This code produces the following XML:
<SOAP-ENV:Header>
<t:Transaction
xmlns:t="http://gizmos.com/orders"
SOAP-ENV:mustUnderstand="1">
5
</t:Transaction>
</SOAP-ENV:Header>
You can use the getMustUnderstand method to retrieve the value of the MustUnderstand attribute. For example, you could add the following to the code
fragment at the end of the previous section:
System.out.println("MustUnderstand is " +
headerElement.getMustUnderstand());
USING SOAP FAULTS
Using SOAP Faults
In this section, you will see how to use the API for creating and accessing a
SOAP Fault element in an XML message.
Overview of SOAP Faults
If you send a message that was not successful for some reason, you may get back
a response containing a SOAP Fault element that gives you status information,
error information, or both. There can be only one SOAP Fault element in a message, and it must be an entry in the SOAP Body. Further, if there is a SOAP Fault
element in the SOAP Body, there can be no other elements in the SOAP Body.
This means that when you add a SOAP Fault element, you have effectively completed the construction of the SOAP Body. The SOAP 1.1 specification defines
only one Body entry, which is the SOAP Fault element. Of course, the SOAP
Body may contain other kinds of Body entries, but the SOAP Fault element is
the only one that has been defined.
A SOAPFault object, the representation of a SOAP Fault element in the SAAJ
API, is similar to an Exception object in that it conveys information about a
problem. However, a SOAPFault object is quite different in that it is an element
in a message’s SOAPBody object rather than part of the try/catch mechanism
used for Exception objects. Also, as part of the SOAPBody object, which provides a simple means for sending mandatory information intended for the ultimate recipient, a SOAPFault object only reports status or error information. It
does not halt the execution of an application the way an Exception object can.
If you are a client using the SAAJ API and are sending point-to-point messages,
the recipient of your message may add a SOAPFault object to the response to
alert you to a problem. For example, if you sent an order with an incomplete
address for where to send the order, the service receiving the order might put a
SOAPFault object in the return message telling you that part of the address was
missing.
Another example of who might send a SOAP fault is an intermediate recipient,
or actor. As stated in the section Adding Attributes, page 369, an actor that cannot process a header that has a mustUnderstand attribute with a value of true
must return a SOAP fault to the sender.
375
376
SOAP WITH ATTACHMENTS API FOR JAVA
A SOAPFault object contains the following elements:
• A fault code — always required
The fault code must be a fully qualified name, which means that it must
contain a prefix followed by a local name. The SOAP 1.1 specification
defines a set of fault code local name values in section 4.4.1, which a
developer may extend to cover other problems. The default fault code
local names defined in the specification relate to the SAAJ API as follows:
• VersionMismatch — the namespace for a SOAPEnvelope object was
invalid
• MustUnderstand — an immediate child element of a SOAPHeader
object had its mustUnderstand attribute set to true, and the processing
party did not understand the element or did not obey it
• Client — the SOAPMessage object was not formed correctly or did not
contain the information needed to succeed
• Server — the SOAPMessage object could not be processed because of a
processing error, not because of a problem with the message itself
• A fault string — always required
A human-readable explanation of the fault
• A fault actor — required if the SOAPHeader object contains one or more
actor attributes; optional if no actors are specified, meaning that the only
actor is the ultimate destination
The fault actor, which is specified as a URI, identifies who caused the
fault. For an explanation of what an actor is, see the section The Actor
Attribute, page 371.
• A Detail object — required if the fault is an error related to the SOAPBody
object
If, for example, the fault code is Client, indicating that the message
could not be processed because of a problem in the SOAPBody object, the
SOAPFault object must contain a Detail object that gives details about
the problem. If a SOAPFault object does not contain a Detail object, it
can be assumed that the SOAPBody object was processed successfully.
USING SOAP FAULTS
Creating and Populating a SOAPFault Object
You have already seen how to add content to a SOAPBody object; this section will
walk you through adding a SOAPFault object to a SOAPBody object and then adding its constituent parts.
As with adding content, the first step is to access the SOAPBody object.
SOAPBody body = message.getSOAPBody();
With the SOAPBody object body in hand, you can use it to create a SOAPFault
object. The following line of code both creates a SOAPFault object and adds it to
body.
SOAPFault fault = body.addFault();
The SOAPFault interface provides convenience methods that create an element,
add the new element to the SOAPFault object, and add a text node all in one
operation. For example, in the following lines of code, the method setFaultCode creates a faultcode element, adds it to fault, and adds a Text node with
the value "SOAP-ENV:Server" by specifying a default prefix and the namespace
URI for a SOAP envelope.
Name faultName =
soapFactory.createName("Server",
"", SOAPConstants.URI_NS_SOAP_ENVELOPE);
fault.setFaultCode(faultName);
fault.setFaultActor("http://gizmos.com/orders");
fault.setFaultString("Server not responding");
The SOAPFault object fault, created in the previous lines of code, indicates that
the cause of the problem is an unavailable server and that the actor at
http://gizmos.com/orders is having the problem. If the message were being
routed only to its ultimate destination, there would have been no need for setting
a fault actor. Also note that fault does not have a Detail object because it does
not relate to the SOAPBody object.
The following code fragment creates a SOAPFault object that includes a Detail
object. Note that a SOAPFault object may have only one Detail object, which is
simply a container for DetailEntry objects, but the Detail object may have
377
378
SOAP WITH ATTACHMENTS API FOR JAVA
multiple DetailEntry objects. The Detail object in the following lines of code
has two DetailEntry objects added to it.
SOAPFault fault = body.addFault();
Name faultName = soapFactory.createName("Client",
"", SOAPConstants.URI_NS_SOAP_ENVELOPE);
fault.setFaultCode(faultName);
fault.setFaultString("Message does not have necessary info");
Detail detail = fault.addDetail();
Name entryName = soapFactory.createName("order",
"PO", "http://gizmos.com/orders/");
DetailEntry entry = detail.addDetailEntry(entryName);
entry.addTextNode("Quantity element does not have a value");
Name entryName2 = soapFactory.createName("confirmation",
"PO", "http://gizmos.com/confirm");
DetailEntry entry2 = detail.addDetailEntry(entryName2);
entry2.addTextNode("Incomplete address: no zip code");
See SOAPFaultTest.java (page 390) for an example that uses code like that
shown in this section.
Retrieving Fault Information
Just as the SOAPFault interface provides convenience methods for adding information, it also provides convenience methods for retrieving that information.
The following code fragment shows what you might write to retrieve fault information from a message you received. In the code fragment, newMessage is the
SOAPMessage object that has been sent to you. Because a SOAPFault object must
be part of the SOAPBody object, the first step is to access the SOAPBody object.
Then the code tests to see if the SOAPBody object contains a SOAPFault object. If
so, the code retrieves the SOAPFault object and uses it to retrieve its contents.
The convenience methods getFaultCode, getFaultString, and getFaultActor make retrieving the values very easy.
SOAPBody body = newMessage.getSOAPBody();
if ( body.hasFault() ) {
SOAPFault newFault = body.getFault();
Name code = newFault.getFaultCodeAsName();
String string = newFault.getFaultString();
String actor = newFault.getFaultActor();
USING SOAP FAULTS
Next the code prints out the values it just retrieved. Not all messages are required
to have a fault actor, so the code tests to see if there is one. Testing whether the
variable actor is null works because the method getFaultActor returns null
if a fault actor has not been set.
System.out.println("SOAP fault contains: ");
System.out.println(" Fault code = " +
code.getQualifiedName());
System.out.println(" Fault string = " + string);
if ( actor != null ) {
System.out.println("
}
Fault actor = " + actor);
The final task is to retrieve the Detail object and get its DetailEntry objects.
The code uses the SOAPFault object newFault to retrieve the Detail object
newDetail, and then it uses newDetail to call the method getDetailEntries.
This method returns the java.util.Iterator object entries, which contains
all of the DetailEntry objects in newDetail. Not all SOAPFault objects are
required to have a Detail object, so the code tests to see whether newDetail is
null. If it is not, the code prints out the values of the DetailEntry objects as
long as there are any.
Detail newDetail = newFault.getDetail();
if ( newDetail != null) {
Iterator entries = newDetail.getDetailEntries();
while ( entries.hasNext() ) {
DetailEntry newEntry =
(DetailEntry)entries.next();
String value = newEntry.getValue();
System.out.println(" Detail entry = " + value);
}
}
In summary, you have seen how to add a SOAPFault object and its contents to a
message as well as how to retrieve the contents. A SOAPFault object, which is
optional, is added to the SOAPBody object to convey status or error information. It
must always have a fault code and a String explanation of the fault. A SOAPFault object must indicate the actor that is the source of the fault only when
there are multiple actors; otherwise, it is optional. Similarly, the SOAPFault
object must contain a Detail object with one or more DetailEntry objects only
when the contents of the SOAPBody object could not be processed successfully.
379
380
SOAP WITH ATTACHMENTS API FOR JAVA
See SOAPFaultTest.java (page 390) for an example that uses code like that
shown in this section.
Code Examples
The first part of this tutorial used code fragments to walk you through the fundamentals of using the SAAJ API. In this section, you will use some of those code
fragments to create applications. First, you will see the program Request.java.
Then you will see how to run the programs MyUddiPing.java, HeaderExample.java, SOAPFaultTest.java, and DOMExample.java.
You do not have to start the J2EE Application Server in order to run these examples.
Request.java
The class Request.java puts together the code fragments used in
Tutorial (page 353) and adds what is needed to make it a complete example of a
client sending a request-response message. In addition to putting all the code
together, it adds import statements, a main method, and a try/catch block with
exception handling.
import javax.xml.soap.*;
import java.util.*;
import java.net.URL;
public class Request {
public static void main(String[] args){
try {
SOAPConnectionFactory soapConnectionFactory =
SOAPConnectionFactory.newInstance();
SOAPConnection connection =
soapConnectionFactory.createConnection();
SOAPFactory soapFactory =
SOAPFactory.newInstance();
MessageFactory factory =
MessageFactory.newInstance();
SOAPMessage message = factory.createMessage();
SOAPHeader header = message.getSOAPHeader();
SOAPBody body = message.getSOAPBody();
MYUDDIPING.JAVA
header.detachNode();
Name bodyName = soapFactory.createName(
"GetLastTradePrice", "m",
"http://wombats.ztrade.com");
SOAPBodyElement bodyElement =
body.addBodyElement(bodyName);
Name name = soapFactory.createName("symbol");
SOAPElement symbol =
bodyElement.addChildElement(name);
symbol.addTextNode("SUNW");
URL endpoint = new URL
("http://wombat.ztrade.com/quotes");
SOAPMessage response =
connection.call(message, endpoint);
connection.close();
SOAPBody soapBody = response.getSOAPBody();
Iterator iterator =
soapBody.getChildElements(bodyName);
SOAPBodyElement bodyElement =
(SOAPBodyElement)iterator.next();
String lastPrice = bodyElement.getValue();
System.out.print("The last price for SUNW is ");
System.out.println(lastPrice);
} catch (Exception ex) {
ex.printStackTrace();
}
}
}
In order for Request.java to be runnable, the second argument supplied to the
method call would have to be a valid existing URI, which is not true in this
case. However, the application in the next section is one that you can run.
MyUddiPing.java
The program MyUddiPing.java is another example of a SAAJ client application. It sends a request to a Universal Description, Discovery and Integration
(UDDI) service and gets back the response. A UDDI service is a business regis-
381
382
SOAP WITH ATTACHMENTS API FOR JAVA
try and repository from which you can get information about businesses that
have registered themselves with the registry service. For this example, the MyUddiPing application is not actually accessing a UDDI service registry but rather a
test (demo) version. Because of this, the number of businesses you can get information about is limited. Nevertheless, MyUddiPing demonstrates a request being
sent and a response being received.
Setting Up
The myuddiping example is in the following directory:
<INSTALL>/j2eetutorial14/examples/saaj/myuddiping/
Note: <INSTALL> is the directory where you installed the J2EE Tutorial bundle.
In the myuddiping directory, you will find two files and the src directory. The
src directory contains one source file, MyUddiPing.java.
The file uddi.properties contains the URL of the destination (the UDDI test
registry) and the proxy host and proxy port of the sender. Edit this file to supply
the correct proxy host and proxy port if you access the Internet from behind a
firewall. If you are not sure what the values for these are, consult your system
administrator or another person with that information.
The file build.xml is the build file for this example. It includes the file
<INSTALL>/j2eetutorial14/examples/saaj/common/targets.xml,
which
contains a set of targets common to all the SAAJ examples.
The prepare target creates a directory named build. To invoke the prepare target, you type the following at the command line:
asant prepare
The target named build compiles the source file MyUddiPing.java and puts the
resulting .class file in the build directory. So to do these tasks, you type the
following at the command line:
asant build
MYUDDIPING.JAVA
Examining MyUddiPing
We will go through the file MyUddiPing.java a few lines at a time, concentrating on the last section. This is the part of the application that accesses only the
content you want from the XML message returned by the UDDI registry.
The first few lines of code import the packages used in the application.
import
import
import
import
javax.xml.soap.*;
java.net.*;
java.util.*;
java.io.*;
The next few lines begin the definition of the class MyUddiPing, which starts
with the definition of its main method. The first thing it does is check to see if
two arguments were supplied. If not, it prints a usage message and exits. The
usage message mentions only one argument; the other is supplied by the
build.xml target.
public class MyUddiPing {
public static void main(String[] args) {
try {
if (args.length != 2) {
System.err.println("Argument required: " +
"-Dbusiness-name=<name>");
System.exit(1);
}
The following lines create a java.util.Properties object that contains the
system properties and the properties from the file uddi.properties that is in the
myuddiping directory.
Properties myprops = new Properties();
myprops.load(new FileInputStream(args[0]));
Properties props = System.getProperties();
Enumeration enum = myprops.propertyNames();
while (enum.hasMoreElements()) {
String s = (String)enum.nextElement();
props.put(s, myprops.getProperty(s));
}
383
384
SOAP WITH ATTACHMENTS API FOR JAVA
The next four lines create a SOAPMessage object. First, the code gets an instance
of SOAPConnectionFactory and uses it to create a connection. Then it gets an
instance of MessageFactory and uses it to create a message.
SOAPConnectionFactory soapConnectionFactory =
SOAPConnectionFactory.newInstance();
SOAPConnection connection =
soapConnectionFactory.createConnection();
MessageFactory messageFactory =
MessageFactory.newInstance();
SOAPMessage message =
messageFactory.createMessage();
The next lines of code retrieve the SOAPHeader and SOAPBody objects from the
message and remove the header.
SOAPHeader header = message.getSOAPHeader();
SOAPBody body = message.getSOAPBody();
header.detachNode();
The following lines of code create the UDDI find_business message. The first
line gets a SOAPFactory instance that we will use to create names. The next line
adds the SOAPBodyElement with a fully qualified name, including the required
namespace for a UDDI version 2 message. The next lines add two attributes to
the new element: the required attribute generic, with the UDDI version number
2.0, and the optional attribute maxRows, with the value 100. Then the code adds a
child element with the Name object name and adds text to the element with the
method addTextNode. The text added is the business name you will supply at the
command line when you run the application.
SOAPFactory soapFactory =
SOAPFactory.newInstance();
SOAPBodyElement findBusiness =
body.addBodyElement(soapFactory.createName(
"find_business", "",
"urn:uddi-org:api_v2"));
findBusiness.addAttribute(soapFactory.createName(
"generic"), "2.0");
findBusiness.addAttribute(soapFactory.createName(
"maxRows"), "100");
SOAPElement businessName =
findBusiness.addChildElement(
soapFactory.createName("name"));
businessName.addTextNode(args[1]);
MYUDDIPING.JAVA
The next line of code saves the changes that have been made to the message.
This method will be called automatically when the message is sent, but it does
not hurt to call it explicitly.
message.saveChanges();
The following lines display the message that will be sent:
System.out.println("\n--- Request Message ---\n");
message.writeTo(System.out);
The next line of code creates the java.net.URL object that represents the destination for this message. It gets the value of the property named URL from the system property file.
URL endpoint = new URL(
System.getProperties().getProperty("URL"));
Next the message message is sent to the destination that endpoint represents,
which is the UDDI test registry. The call method will block until it gets a SOAPMessage object back, at which point it returns the reply.
SOAPMessage reply =
connection.call(message, endpoint);
In the next lines of code, the first line prints out a line giving the URL of the
sender (the test registry), and the others display the returned message.
System.out.println("\n\nReceived reply from: " +
endpoint);
System.out.println("\n---- Reply Message ----\n");
reply.writeTo(System.out);
The returned message is the complete SOAP message, an XML document, as it
looks when it comes over the wire. It is a businessList that follows the format
specified in http://uddi.org/pubs/DataStructure-V2.03-Published20020719.htm#_Toc25130802.
As interesting as it is to see the XML that is actually transmitted, the XML document format does not make it easy to see the text that is the message’s content.
To remedy this, the last part of MyUddiPing.java contains code that prints out
just the text content of the response, making it much easier to see the information
you want.
385
386
SOAP WITH ATTACHMENTS API FOR JAVA
Because the content is in the SOAPBody object, the first thing you need to do is
access it, as shown in the following line of code.
SOAPBody replyBody = reply.getSOAPBody();
Next the code displays a message describing the content:
System.out.println("\n\nContent extracted from " +
"the reply message:\n");
To display the content of the message, the code uses the known format of the
reply message. First it gets all the reply body’s child elements named businessList:
Iterator businessListIterator =
replyBody.getChildElements(
soapFactory.createName("businessList",
"", "urn:uddi-org:api_v2"));
The method getChildElements returns the elements in the form of a
java.util.Iterator object. You access the child elements by calling the
method next on the Iterator object.
An immediate child of a SOAPBody object is a SOAPBodyElement object.
We know that the reply can contain only one businessList element, so the code
then retrieves this one element by calling the iterator’s next method. Note that
the method Iterator.next returns an Object, which has to be cast to the specific kind of object you are retrieving. Thus, the result of calling
businessListIterator.next is cast to a SOAPBodyElement object:
SOAPBodyElement businessList =
(SOAPBodyElement)businessListIterator.next();
The next element in the hierarchy is a single businessInfos element, so the
code retrieves this element the same way it retrieved the businessList. Chil-
MYUDDIPING.JAVA
dren of SOAPBodyElement objects and all child elements from there down are
SOAPElement objects.
Iterator businessInfosIterator =
businessList.getChildElements(
soapFactory.createName("businessInfos",
"", "urn:uddi-org:api_v2"));
SOAPElement businessInfos =
(SOAPElement)businessInfosIterator.next();
The businessInfos element contains zero or more businessInfo elements. If
the query returned no businesses, the code prints a message saying that none
were found. If the query returned businesses, however, the code extracts the
name and optional description by retrieving the child elements with those names.
The method Iterator.hasNext can be used in a while loop because it returns
true as long as the next call to the method next will return a child element.
Accordingly, the loop ends when there are no more child elements to retrieve.
Iterator businessInfoIterator =
businessInfos.getChildElements(
soapFactory.createName("businessInfo",
"", "urn:uddi-org:api_v2"));
if (! businessInfoIterator.hasNext()) {
System.out.println("No businesses found " +
"matching the name '" + args[1] +
"'.");
} else {
while (businessInfoIterator.hasNext()) {
SOAPElement businessInfo = (SOAPElement)
businessInfoIterator.next();
// Extract name and description from the
// businessInfo
Iterator nameIterator =
businessInfo.getChildElements(
soapFactory.createName("name",
"", "urn:uddi-org:api_v2"));
while (nameIterator.hasNext()) {
businessName =
(SOAPElement)nameIterator.next();
System.out.println("Company name: " +
businessName.getValue());
}
Iterator descriptionIterator =
businessInfo.getChildElements(
387
388
SOAP WITH ATTACHMENTS API FOR JAVA
soapFactory.createName(
"description", "",
"urn:uddi-org:api_v2"));
while (descriptionIterator.hasNext()) {
SOAPElement businessDescription =
(SOAPElement)
descriptionIterator.next();
System.out.println("Description: " +
businessDescription.getValue());
}
System.out.println("");
}
Running MyUddiPing
You compile MyUddiPing.java by typing the following at the command line:
cd <INSTALL>/j2eetutorial14/examples/saaj/myuddiping
asant build
With the code compiled, you are ready to run MyUddiPing. The run target takes
two arguments, but you need to supply only one of them. The first argument is
the file uddi.properties, which is supplied by a property set in build.xml.
The other argument is the name of the business for which you want to get a
description, and you need to supply this argument on the command line. Note
that any property set on the command line overrides any value set for that property in the build.xml file.
asant run -Dbusiness-name=”food”
Output similar to the following will appear after the full XML message:
Content extracted from the reply message:
Company name: Food
Description: Test Food
Company name: Food Manufacturing
Company name: foodCompanyA
Description: It is a food company sells biscuit
HEADEREXAMPLE.JAVA
If you want to run MyUddiPing again, you may want to start over by deleting the
build directory and the .class file it contains. You can do this by typing the following at the command line:
asant clean
HeaderExample.java
The example HeaderExample.java, based on the code fragments in the section
Adding Attributes (page 369), creates a message with several headers. It then
retrieves the contents of the headers and prints them out. You will find the code
for HeaderExample in the following directory:
<INSTALL>/j2eetutorial14/examples/saaj/headers/src/
Running HeaderExample
To run HeaderExample, you use the file build.xml that is in the directory
<INSTALL>/j2eetutorial14/examples/saaj/headers/.
To run HeaderExample, use the following command:
asant run
This command executes the prepare, build, and run targets in the build.xml
and targets.xml files.
When you run HeaderExample, you will see output similar to the following:
----- Request Message ---<SOAP-ENV:Envelope
xmlns:SOAP-ENV="http://schemas.xmlsoap.org/soap/envelope/">
<SOAP-ENV:Header>
<ns:orderDesk SOAP-ENV:actor="http://gizmos.com/orders"
xmlns:ns="http://gizmos.com/NSURI"/>
<ns:shippingDesk SOAP-ENV:actor="http://gizmos.com/shipping"
xmlns:ns="http://gizmos.com/NSURI"/>
<ns:confirmationDesk
SOAP-ENV:actor="http://gizmos.com/confirmations"
xmlns:ns="http://gizmos.com/NSURI"/>
<ns:billingDesk SOAP-ENV:actor="http://gizmos.com/billing"
xmlns:ns="http://gizmos.com/NSURI"/>
<t:Transaction SOAP-ENV:mustUnderstand="1"
389
390
SOAP WITH ATTACHMENTS API FOR JAVA
xmlns:t="http://gizmos.com/orders">5</t:Transaction>
</SOAP-ENV:Header><SOAP-ENV:Body/></SOAP-ENV:Envelope>
Header name is ns:orderDesk
Actor is http://gizmos.com/orders
MustUnderstand is false
Header name is ns:shippingDesk
Actor is http://gizmos.com/shipping
MustUnderstand is false
Header name is ns:confirmationDesk
Actor is http://gizmos.com/confirmations
MustUnderstand is false
Header name is ns:billingDesk
Actor is http://gizmos.com/billing
MustUnderstand is false
Header name is t:Transaction
Actor is null
MustUnderstand is true
SOAPFaultTest.java
The example SOAPFaultTest.java, based on the code fragments in the sections
Creating and Populating a SOAPFault Object (page 377) and Retrieving Fault
Information (page 378), creates a message with a SOAPFault object. It then
retrieves the contents of the SOAPFault object and prints them out. You will find
the code for SOAPFaultTest in the following directory:
<INSTALL>/j2eetutorial14/examples/saaj/fault/src/
Running SOAPFaultTest
To run SOAPFaultTest, you use the file build.xml that is in the directory
<INSTALL>/j2eetutorial14/examples/saaj/fault/.
To run SOAPFaultTest, use the following command:
asant run
DOMEXAMPLE.JAVA
When you run SOAPFaultTest, you will see output like the following (line
breaks have been inserted in the message for readability):
Here is what the XML message looks like:
<SOAP-ENV:Envelope
xmlns:SOAP-ENV="http://schemas.xmlsoap.org/soap/envelope/">
<SOAP-ENV:Header/><SOAP-ENV:Body>
<SOAP-ENV:Fault><faultcode>SOAP-ENV:Client</faultcode>
<faultstring>Message does not have necessary info</faultstring>
<faultactor>http://gizmos.com/order</faultactor>
<detail>
<PO:order xmlns:PO="http://gizmos.com/orders/">
Quantity element does not have a value</PO:order>
<PO:confirmation xmlns:PO="http://gizmos.com/confirm">
Incomplete address: no zip code</PO:confirmation>
</detail></SOAP-ENV:Fault>
</SOAP-ENV:Body></SOAP-ENV:Envelope>
SOAP fault contains:
Fault code = SOAP-ENV:Client
Local name = Client
Namespace prefix = SOAP-ENV, bound to
http://schemas.xmlsoap.org/soap/envelope/
Fault string = Message does not have necessary info
Fault actor = http://gizmos.com/order
Detail entry = Quantity element does not have a value
Detail entry = Incomplete address: no zip code
DOMExample.java
The example DOMExample.java shows how to add a DOM document to the body
of a message and then to traverse its contents. You will find the code for DOMExample in the following directory:
<INSTALL>/j2eetutorial14/examples/saaj/dom/src/
This example first creates a DOM document by parsing an XML document,
almost exactly like the JAXP example DomEcho01.java in the directory
391
392
SOAP WITH ATTACHMENTS API FOR JAVA
<INSTALL>/j2eetutorial14/examples/jaxp/dom/samples/. The file it parses
is one that you specify on the command line.
static Document document;
...
DocumentBuilderFactory factory =
DocumentBuilderFactory.newInstance();
factory.setNamespaceAware(true);
try {
DocumentBuilder builder =
factory.newDocumentBuilder();
document = builder.parse( new File(args[0]) );
...
Next, the example creates a SOAP message in the usual way. Then it adds the
document to the message body:
SOAPBodyElement docElement =
body.addDocument(document);
This example does not change the content of the message. Instead, it displays the
message content and then uses a recursive method, getContents, to traverse the
element tree using SAAJ APIs and display the message contents in a readable
form.
public void getContents(Iterator iterator,
String indent) {
while (iterator.hasNext()) {
SOAPElement element =
(SOAPElement)iterator.next();
Name name = element.getElementName();
System.out.println(indent + "Name is " +
name.getQualifiedName());
String content = element.getValue();
if (content != null) {
System.out.println(indent + "Content is " +
content);
}
Iterator attrs = element.getAllAttributes();
while (attrs.hasNext()){
Name attrName = (Name)attrs.next();
System.out.println(indent +
" Attribute name is " +
attrName.getQualifiedName());
System.out.println(indent +
CONCLUSION
" Attribute value is " +
element.getAttributeValue(attrName));
}
if (content == null) {
Iterator iter2 = element.getChildElements();
getContents(iter2, indent + " ");
}
}
}
Running DOMExample
To run DOMExample, you use the file build.xml that is in the directory
<INSTALL>/j2eetutorial14/examples/saaj/dom/. This directory also contains several sample XML files you can use:
• FindBusiness.xml, a simple UDDI query message
• uddimsg.xml, an example of a reply to a UDDI query (specifically, some
sample output from the MyUddiPing example)
• slide.xml,
similar
to
the
slideSample01.xml
file
in
<INSTALL>/j2eetutorial14/examples/jaxp/dom/samples/
To run DOMExample, use a command like the following:
asant run -Dxml-file=FindBusiness.xml
After running DOMExample, you will see output something like the following:
Running DOMExample.
Name is find_business
Attribute name is generic
Attribute value is 2.0
Attribute name is xmlns
Attribute value is urn:uddi-org:api_v2
Name is name
Content is: %Coff%
Conclusion
SAAJ provides a Java API for writing and sending XML messages. You have
seen how to use this API to write client code for SAAJ request-response messages. You have also seen how to get the content from a response message.
393
394
SOAP WITH ATTACHMENTS API FOR JAVA
You now have first-hand experience of how SAAJ makes it easier to do XML
messaging.
Further Information
For more information about SAAJ, SOAP, and WS-I, see the following:
• SAAJ 1.2 specification, available from
http://java.sun.com/xml/downloads/saaj.html
• SAAJ website:
http://java.sun.com/xml/saaj/
• Simple Object Access Protocol (SOAP) 1.1 Specification:
http://www.w3.org/TR/SOAP/
• WS-I Basic Profile:
http://www.ws-i.org/Profiles/Basic/2003-01/
BasicProfile-1.0-WGAD.html
• JAXM website:
http://java.sun.com/xml/jaxm/
10
Java API for XML
Registries
Kim Haase
THE Java API for XML Registries (JAXR) provides a uniform and standard
Java API for accessing different kinds of XML registries.
After providing a brief overview of JAXR, this chapter describes how to implement a JAXR client to publish an organization and its Web services to a registry
and to query a registry to find organizations and services. Finally, it explains how
to run the examples provided with this tutorial and offers links to more information on JAXR.
Overview of JAXR
This section provides a brief overview of JAXR. It covers the following topics:
• What Is a Registry?
• What Is JAXR?
• JAXR Architecture
What Is a Registry?
An XML registry is an infrastructure that enables the building, deployment, and
discovery of Web services. It is a neutral third party that facilitates dynamic and
395
396
JAVA API FOR XML REGISTRIES
loosely coupled business-to-business (B2B) interactions. A registry is available
to organizations as a shared resource, often in the form of a Web-based service.
Currently there are a variety of specifications for XML registries. These include
• The ebXML Registry and Repository standard, which is sponsored by the
Organization for the Advancement of Structured Information Standards
(OASIS) and the United Nations Centre for the Facilitation of Procedures
and Practices in Administration, Commerce and Transport
(U.N./CEFACT)
• The Universal Description, Discovery, and Integration (UDDI) project,
which is being developed by a vendor consortium
A registry provider is an implementation of a business registry that conforms to a
specification for XML registries.
What Is JAXR?
JAXR enables Java software programmers to use a single, easy-to-use abstraction API to access a variety of XML registries. A unified JAXR information
model describes content and metadata within XML registries.
JAXR gives developers the ability to write registry client programs that are portable across different target registries. JAXR also enables value-added capabilities beyond those of the underlying registries.
The current version of the JAXR specification includes detailed bindings
between the JAXR information model and both the ebXML Registry and the
UDDI version 2 specifications. You can find the latest version of the specification at
http://java.sun.com/xml/downloads/jaxr.html
At this release of the J2EE platform, JAXR implements the level 0 capability
profile defined by the JAXR specification. This level allows access to both UDDI
and ebXML registries at a basic level. At this release, JAXR supports access
only to UDDI version 2 registries.
Currently several public UDDI version 2 registries exist.
The Java Web Services Developer Pack (Java WSDP) Registry Server provides a
UDDI version 2 registry that you can use to test your JAXR applications in a private environment. You can download the Java WSDP from
JAXR ARCHITECTURE
http://java.sun.com/webservices/download.html.
The Registry Server
includes a database based on the native XML database Xindice, which is part of
the Apache XML project. This database provides the repository for registry data.
The Registry Server does not support messages defined in the UDDI Version 2.0
Replication Specification.
Note: If you use the Java WSDP Registry Server to test JAXR applications that you
develop using the J2EE 1.4 Application Server, make sure that in your PATH you
place the J2EE 1.4 Application Server bin directories before the Java WSDP bin
directories.
Several ebXML registries are under development, and one is available at the
Center for E-Commerce Infrastructure Development (CECID), Department of
Computer Science Information Systems, The University of Hong Kong (HKU).
For
information,
see
http://www.cecid.hku.hk/Release/PR09APR2002.html.
A JAXR provider for ebXML registries is available in open source at
http://ebxmlrr.sourceforge.net.
JAXR Architecture
The high-level architecture of JAXR consists of the following parts:
• A JAXR client: a client program that uses the JAXR API to access a business registry via a JAXR provider.
• A JAXR provider: an implementation of the JAXR API that provides
access to a specific registry provider or to a class of registry providers that
are based on a common specification.
A JAXR provider implements two main packages:
• javax.xml.registry, which consists of the API interfaces and classes
that define the registry access interface.
• javax.xml.registry.infomodel, which consists of interfaces that define
the information model for JAXR. These interfaces define the types of
objects that reside in a registry and how they relate to each other. The basic
interface in this package is the RegistryObject interface. Its subinterfaces include Organization, Service, and ServiceBinding.
397
398
JAVA API FOR XML REGISTRIES
The most basic interfaces in the javax.xml.registry package are
• Connection. The Connection interface represents a client session with a
registry provider. The client must create a connection with the JAXR provider in order to use a registry.
• RegistryService. The client obtains a RegistryService object from its
connection. The RegistryService object in turn enables the client to
obtain the interfaces it uses to access the registry.
The primary interfaces, also part of the javax.xml.registry package, are
• BusinessQueryManager, which allows the client to search a registry for
information in accordance with the javax.xml.registry.infomodel
interfaces. An optional interface, DeclarativeQueryManager, allows the
client to use SQL syntax for queries. (The implementation of JAXR in the
J2EE Application Server does not implement DeclarativeQueryManager.)
• BusinessLifeCycleManager, which allows the client to modify the information in a registry by either saving it (updating it) or deleting it.
When an error occurs, JAXR API methods throw a JAXRException or one of its
subclasses.
Many methods in the JAXR API use a Collection object as an argument or a
returned value. Using a Collection object allows operations on several registry
objects at a time.
Figure 10–1 illustrates the architecture of JAXR. In the J2EE Application Server,
a JAXR client uses the capability level 0 interfaces of the JAXR API to access
the JAXR provider. The JAXR provider in turn accesses a registry. The J2EE
Application Server supplies a JAXR provider for UDDI registries.
IMPLEMENTING A JAXR CLIENT
Figure 10–1 JAXR Architecture
Implementing a JAXR Client
This section describes the basic steps to follow in order to implement a JAXR
client that can perform queries and updates to a UDDI registry. A JAXR client is
a client program that can access registries using the JAXR API. It covers the following topics:
•
•
•
•
Establishing a Connection
Querying a Registry
Managing Registry Data
Using Taxonomies in JAXR Clients
This tutorial does not describe how to implement a JAXR provider. A JAXR provider provides an implementation of the JAXR specification that allows access to
an existing registry provider, such as a UDDI or ebXML registry. The implementation of JAXR in the J2EE Application Server itself is an example of a JAXR
provider.
The J2EE 1.4 Application Server provides JAXR in the form of a resource
adapter using the J2EE Connector Architecture. The resource adapter is
399
400
JAVA API FOR XML REGISTRIES
<J2EE_HOME>/lib/jaxr-ra.rar. (<J2EE_HOME> is the directory where the J2EE
Application Server is installed.)
This tutorial includes several client examples, which are described in Running
the Client Examples (page 421), and a J2EE application example, described in
Using JAXR Clients in J2EE Applications (page 429).The examples are in the
directory <INSTALL>/j2eetutorial14/examples/jaxr. (<INSTALL> is the
directory where you installed the tutorial bundle.) Each example directory has a
build.xml file that refers to a targets.xml file and a build.properties file in
the directory <INSTALL>/j2eetutorial14/examples/jaxr/common.
Establishing a Connection
The first task a JAXR client must complete is to establish a connection to a registry. Establishing a connection involves the following tasks:
•
•
•
•
•
Preliminaries: Getting Access to a Registry
Creating or Looking Up a Connection Factory
Creating a Connection
Setting Connection Properties
Obtaining and Using a RegistryService Object
Preliminaries: Getting Access to a Registry
Any user of a JAXR client may perform queries on a registry. In order to add
data to the registry or to update registry data, however, a user must obtain permission from the registry to access it. To register with one of the public UDDI
version 2 registries, go to one of the following Web sites and follow the instructions:
• http://test.uddi.microsoft.com/ (Microsoft)
• http://uddi.ibm.com/testregistry/registry.html (IBM)
• http://udditest.sap.com/ (SAP)
These UDDI version 2 registries are intended for testing purposes. When you
register, you will obtain a user name and password. You will specify this user
name and password for some of the JAXR client example programs.
You do not have to register with the Java WSDP Registry Server in order to add
or update data. You can use the default user name and password, testuser and
testuser.
ESTABLISHING A CONNECTION
Note: The JAXR API has been tested with the Microsoft and IBM registries and
with the Java WSDP Registry Server, but not with the SAP registry.
Creating or Looking Up a Connection Factory
A client creates a connection from a connection factory. A JAXR provider may
supply one or more preconfigured connection factories that clients can obtain by
looking them up using the Java Naming and Directory Interface (JNDI) API.
At this release of the J2EE Application Server, JAXR supplies a connection factory through the JAXR RA, but you need to use the asadmin command to create
a connector resource whose JNDI API name (“JNDI name”) is eis/JAXR to
access this connection factory from a J2EE application. To look up this connection factory in a J2EE component, use code like the following:
import javax.xml.registry.*;
import javax.naming.*;
...
Context context = new InitialContext();
ConnectionFactory connFactory = (ConnectionFactory)
context.lookup("java:comp/env/eis/JAXR");
To use JAXR in a standalone client program, you must create an instance of the
abstract class ConnectionFactory:
import javax.xml.registry.*;
...
ConnectionFactory connFactory =
ConnectionFactory.newInstance();
Creating a Connection
To create a connection, a client first creates a set of properties that specify the
URL or URLs of the registry or registries being accessed. For example, the following code provides the URLs of the query service and publishing service for
the IBM test registry. (There should be no line break in the strings.)
Properties props = new Properties();
props.setProperty("javax.xml.registry.queryManagerURL",
"http://uddi.ibm.com/testregistry/inquiryapi");
props.setProperty("javax.xml.registry.lifeCycleManagerURL",
"https://uddi.ibm.com/testregistry/publishapi");
401
402
JAVA API FOR XML REGISTRIES
With the J2EE Application Server implementation of JAXR, if the client is
accessing a registry that is outside a firewall, it must also specify proxy host and
port information for the network on which it is running. For queries it may need
to specify only the HTTP proxy host and port; for updates it must specify the
HTTPS proxy host and port.
props.setProperty("com.sun.xml.registry.http.proxyHost",
"myhost.mydomain");
props.setProperty("com.sun.xml.registry.http.proxyPort",
"8080");
props.setProperty("com.sun.xml.registry.https.proxyHost",
"myhost.mydomain");
props.setProperty("com.sun.xml.registry.https.proxyPort",
"8080");
The client then sets the properties for the connection factory and creates the connection:
connFactory.setProperties(props);
Connection connection = connFactory.createConnection();
The makeConnection method in the sample programs shows the steps used to
create a JAXR connection.
Setting Connection Properties
The implementation of JAXR in the J2EE Application Server allows you to set a
number of properties on a JAXR connection. Some of these are standard properties defined in the JAXR specification. Other properties are specific to the implementation of JAXR in the J2EE Application Server. Table 10–1 and Table 10–2
list and describe these properties.
Table 10–1 Standard JAXR Connection Properties
Property Name and Description
Data
Type
Default Value
String
None
javax.xml.registry.queryManagerURL
Specifies the URL of the query manager service within the target registry provider
403
ESTABLISHING A CONNECTION
Table 10–1 Standard JAXR Connection Properties
Data
Type
Property Name and Description
javax.xml.registry.lifeCycleManagerURL
Specifies the URL of the life cycle manager service within the
target registry provider (for registry updates)
Default Value
String
Same as the specified queryManagerURL value
String
None
String
UDDI_GET_AUTHTOKEN is the only
javax.xml.registry.semanticEquivalences
Specifies semantic equivalences of concepts as one or more
tuples of the ID values of two equivalent concepts separated
by a comma; the tuples are separated by vertical bars:
id1,id2|id3,id4
javax.xml.registry.security.authenticationMethod
None;
Provides a hint to the JAXR provider on the authentication
method to be used for authenticating with the registry provider
supported value
javax.xml.registry.uddi.maxRows
The maximum number of rows to be returned by find operations. Specific to UDDI providers
Integer
None
String
None
javax.xml.registry.postalAddressScheme
The ID of a ClassificationScheme to be used as the
default postal address scheme. See Specifying Postal
Addresses (page 419) for an example
Table 10–2 Implementation-Specific JAXR Connection Properties
Property Name and Description
Data
Type
Default Value
String
None
com.sun.xml.registry.http.proxyHost
Specifies the HTTP proxy host to be used for accessing external registries
404
JAVA API FOR XML REGISTRIES
Table 10–2 Implementation-Specific JAXR Connection Properties
Property Name and Description
Data
Type
Default Value
String
None
String
Same as HTTP proxy
host value
String
Same as HTTP proxy
port value
String
None
String
None
Boolean,
passed in
as String
True
com.sun.xml.registry.http.proxyPort
Specifies the HTTP proxy port to be used for accessing external registries; usually 8080
com.sun.xml.registry.https.proxyHost
Specifies the HTTPS proxy host to be used for
accessing external registries
com.sun.xml.registry.https.proxyPort
Specifies the HTTPS proxy port to be used for
accessing external registries; usually 8080
com.sun.xml.registry.http.proxyUserName
Specifies the user name for the proxy host for HTTP
proxy authentication, if one is required
com.sun.xml.registry.http.proxyPassword
Specifies the password for the proxy host for HTTP
proxy authentication, if one is required
com.sun.xml.registry.useCache
Tells the JAXR implementation to look for registry
objects in the cache first and then to look in the registry if not found
You can set these properties as follows:
• Most of these properties must be set in a JAXR client program. For example:
Properties props = new Properties();
props.setProperty("javax.xml.registry.queryManagerURL",
"http://uddi.ibm.com/testregistry/inquiryapi");
props.setProperty("javax.xml.registry.lifeCycleManagerURL",
"https://uddi.ibm.com/testregistry/publishapi");
QUERYING A REGISTRY
ConnectionFactory factory = (ConnectionFactory)
context.lookup("java:comp/env/eis/JAXR");
factory.setProperties(props);
connection = factory.createConnection();
• The postalAddressScheme and useCache properties may be set in a
<sysproperty> tag in a build.xml file for the asant tool. For example:
<sysproperty key="useCache" value="true"/>
These properties may also be set with the -D option on the java command
line.
An additional system property specific to the implementation of JAXR in the
J2EE Application Server is com.sun.xml.registry.userTaxonomyFilenames.
For details on using this property, see Defining a Taxonomy (page 416).
Obtaining and Using a RegistryService Object
After creating the connection, the client uses the connection to obtain a RegistryService object and then the interface or interfaces it will use:
RegistryService rs = connection.getRegistryService();
BusinessQueryManager bqm = rs.getBusinessQueryManager();
BusinessLifeCycleManager blcm =
rs.getBusinessLifeCycleManager();
Typically, a client obtains both a BusinessQueryManager object and a BusinessLifeCycleManager object from the RegistryService object. If it is using
the registry for simple queries only, it may need to obtain only a BusinessQueryManager object.
Querying a Registry
The simplest way for a client to use a registry is to query it for information about
the organizations that have submitted data to it. The BusinessQueryManager
interface supports a number of find methods that allow clients to search for data
using the JAXR information model. Many of these methods return a BulkRe-
405
406
JAVA API FOR XML REGISTRIES
sponse (a collection of objects) that meets a set of criteria specified in the
method arguments. The most useful of these methods are:
• findOrganizations, which returns a list of organizations that meet the
specified criteria—often a name pattern or a classification within a classification scheme
• findServices, which returns a set of services offered by a specified organization
• findServiceBindings, which returns the service bindings (information
about how to access the service) that are supported by a specified service
The JAXRQuery program illustrates how to query a registry by organization name
and display the data returned. The JAXRQueryByNAICSClassification and
JAXRQueryByWSDLClassification programs illustrate how to query a registry
using classifications. All JAXR providers support at least the following taxonomies for classifications:
• The North American Industry Classification System (NAICS). See
http://www.census.gov/epcd/www/naics.html for details.
• The Universal Standard Products and Services Classification (UNSPSC).
See http://www.eccma.org/unspsc/ for details.
• The ISO 3166 country codes classification system maintained by the International
Organization
for
Standardization
(ISO).
See
http://www.iso.org/iso/en/prods-services/iso3166ma/index.html for details.
The following sections describe how to perform some common queries:
• Finding Organizations by Name
• Finding Organizations by Classification
• Finding Services and ServiceBindings
Finding Organizations by Name
To search for organizations by name, you normally use a combination of find
qualifiers (which affect sorting and pattern matching) and name patterns (which
specify the strings to be searched). The findOrganizations method takes a collection of findQualifier objects as its first argument and a collection of namePattern objects as its second argument. The following fragment shows how to
QUERYING A REGISTRY
find all the organizations in the registry whose names begin with a specified
string, qString, and to sort them in alphabetical order.
// Define find qualifiers and name patterns
Collection findQualifiers = new ArrayList();
findQualifiers.add(FindQualifier.SORT_BY_NAME_DESC);
Collection namePatterns = new ArrayList();
namePatterns.add(qString);
// Find using the name
BulkResponse response =
bqm.findOrganizations(findQualifiers,
namePatterns, null, null, null, null);
Collection orgs = response.getCollection();
A client can use percent signs (%) to specify that the query string can occur anywhere within the organization name. For example, the following code fragment
performs a case-sensitive search for organizations whose names contain
qString:
Collection findQualifiers = new ArrayList();
findQualifiers.add(FindQualifier.CASE_SENSITIVE_MATCH);
Collection namePatterns = new ArrayList();
namePatterns.add("%" + qString + "%");
// Find orgs with name containing qString
BulkResponse response =
bqm.findOrganizations(findQualifiers, namePatterns, null,
null, null, null);
Collection orgs = response.getCollection();
Finding Organizations by Classification
To find organizations by classification, you need to establish the classification
within a particular classification scheme and then specify the classification as an
argument to the findOrganizations method.
The following code fragment finds all organizations that correspond to a particular classification within the NAICS taxonomy. (You can find the NAICS codes at
http://www.census.gov/epcd/naics/naicscod.txt.)
ClassificationScheme cScheme =
bqm.findClassificationSchemeByName(null,
"ntis-gov:naics");
Classification classification =
407
408
JAVA API FOR XML REGISTRIES
blcm.createClassification(cScheme,
"Snack and Nonalcoholic Beverage Bars", "722213");
Collection classifications = new ArrayList();
classifications.add(classification);
// make JAXR request
BulkResponse response = bqm.findOrganizations(null,
null, classifications, null, null, null);
Collection orgs = response.getCollection();
You can also use classifications to find organizations that offer services based on
technical specifications that take the form of WSDL (Web Services Description
Language) documents. In JAXR, a concept is used as a proxy to hold the information about a specification. The steps are a little more complicated than in the
previous example, because the client must find the specification concepts first,
then the organizations that use those concepts.
The following code fragment finds all the WSDL specification instances used
within a given registry. You can see that the code is similar to the NAICS query
code except that it ends with a call to findConcepts instead of findOrganizations.
String schemeName = "uddi-org:types";
ClassificationScheme uddiOrgTypes =
bqm.findClassificationSchemeByName(null, schemeName);
/*
* Create a classification, specifying the scheme
* and the taxonomy name and value defined for WSDL
* documents by the UDDI specification.
*/
Classification wsdlSpecClassification =
blcm.createClassification(uddiOrgTypes,
"wsdlSpec", "wsdlSpec");
Collection classifications = new ArrayList();
classifications.add(wsdlSpecClassification);
// Find concepts
BulkResponse br = bqm.findConcepts(null, null,
classifications, null, null);
To narrow the search, you could use other arguments of the findConcepts
method (search qualifiers, names, external identifiers, or external links).
QUERYING A REGISTRY
The next step is to go through the concepts, find the WSDL documents they correspond to, and display the organizations that use each document:
// Display information about the concepts found
Collection specConcepts = br.getCollection();
Iterator iter = specConcepts.iterator();
if (!iter.hasNext()) {
System.out.println("No WSDL specification concepts found");
} else {
while (iter.hasNext()) {
Concept concept = (Concept) iter.next();
String name = getName(concept);
Collection links = concept.getExternalLinks();
System.out.println("\nSpecification Concept:\n\tName: " +
name + "\n\tKey: " +
concept.getKey().getId() +
"\n\tDescription: " +
getDescription(concept));
if (links.size() > 0) {
ExternalLink link =
(ExternalLink) links.iterator().next();
System.out.println("\tURL of WSDL document: '" +
link.getExternalURI() + "'");
}
// Find organizations that use this concept
Collection specConcepts1 = new ArrayList();
specConcepts1.add(concept);
br = bqm.findOrganizations(null, null, null,
specConcepts1, null, null);
// Display information about organizations
...
}
If you find an organization that offers a service you wish to use, you can invoke
the service using the JAX-RPC API.
409
410
JAVA API FOR XML REGISTRIES
Finding Services and ServiceBindings
After a client has located an organization, it can find that organization’s services
and the service bindings associated with those services.
Iterator orgIter = orgs.iterator();
while (orgIter.hasNext()) {
Organization org = (Organization) orgIter.next();
Collection services = org.getServices();
Iterator svcIter = services.iterator();
while (svcIter.hasNext()) {
Service svc = (Service) svcIter.next();
Collection serviceBindings =
svc.getServiceBindings();
Iterator sbIter = serviceBindings.iterator();
while (sbIter.hasNext()) {
ServiceBinding sb =
(ServiceBinding) sbIter.next();
}
}
}
Managing Registry Data
If a client has authorization to do so, it can submit data to a registry, modify it,
and remove it. It uses the BusinessLifeCycleManager interface to perform
these tasks.
Registries usually allow a client to modify or remove data only if the data is
being modified or removed by the same user who first submitted the data.
Managing registry data involves the following tasks:
•
•
•
•
•
•
Getting Authorization from the Registry
Creating an Organization
Adding Classifications
Adding Services and Service Bindings to an Organization
Saving an Organization
Removing Data from the Registry
MANAGING REGISTRY DATA
Getting Authorization from the Registry
Before it can submit data, the client must send its user name and password to the
registry in a set of credentials. The following code fragment shows how to do
this.
String username = "myUserName";
String password = "myPassword";
// Get authorization from the registry
PasswordAuthentication passwdAuth =
new PasswordAuthentication(username,
password.toCharArray());
Set creds = new HashSet();
creds.add(passwdAuth);
connection.setCredentials(creds);
Creating an Organization
The client creates the organization and populates it with data before saving it.
An Organization object is one of the more complex data items in the JAXR
API. It normally includes the following:
• A Name object
• A Description object
• A Key object, representing the ID by which the organization is known to
the registry. This key is created by the registry, not by the user, and is
returned after the organization is submitted to the registry.
• A PrimaryContact object, which is a User object that refers to an authorized user of the registry. A User object normally includes a PersonName
object and collections of TelephoneNumber, EmailAddress, and/or PostalAddress objects.
• A collection of Classification objects
• Service objects and their associated ServiceBinding objects
For example, the following code fragment creates an organization and specifies
its name, description, and primary contact. When a client creates an organization, it does not include a key; the registry returns the new key when it accepts
the newly created organization. The blcm object in this code fragment is the
BusinessLifeCycleManager object returned in Obtaining and Using a Registry-
411
412
JAVA API FOR XML REGISTRIES
Service Object (page 405). An InternationalString object is used for string
values that may need to be localized.
// Create organization name and description
Organization org =
blcm.createOrganization("The Coffee Break");
InternationalString s =
blcm.createInternationalString("Purveyor of " +
"the finest coffees. Established 1914");
org.setDescription(s);
// Create primary contact, set name
User primaryContact = blcm.createUser();
PersonName pName = blcm.createPersonName("Jane Doe");
primaryContact.setPersonName(pName);
// Set primary contact phone number
TelephoneNumber tNum = blcm.createTelephoneNumber();
tNum.setNumber("(800) 555-1212");
Collection phoneNums = new ArrayList();
phoneNums.add(tNum);
primaryContact.setTelephoneNumbers(phoneNums);
// Set primary contact email address
EmailAddress emailAddress =
blcm.createEmailAddress("[email protected]");
Collection emailAddresses = new ArrayList();
emailAddresses.add(emailAddress);
primaryContact.setEmailAddresses(emailAddresses);
// Set primary contact for organization
org.setPrimaryContact(primaryContact);
Adding Classifications
Organizations commonly belong to one or more classifications based on one or
more classification schemes (taxonomies). To establish a classification for an
organization using a taxonomy, the client first locates the taxonomy it wants to
use. It uses the BusinessQueryManager to find the taxonomy. The
findClassificationSchemeByName method takes a set of FindQualifier
objects as its first argument, but this argument can be null.
// Set classification scheme to NAICS
ClassificationScheme cScheme =
bqm.findClassificationSchemeByName(null, "ntis-gov:naics");
MANAGING REGISTRY DATA
The client then creates a classification using the classification scheme and a concept (a taxonomy element) within the classification scheme. For example, the
following code sets up a classification for the organization within the NAICS
taxonomy. The second and third arguments of the createClassification
method are the name and value of the concept.
// Create and add classification
Classification classification =
blcm.createClassification(cScheme,
"Snack and Nonalcoholic Beverage Bars", "722213");
Collection classifications = new ArrayList();
classifications.add(classification);
org.addClassifications(classifications);
Services also use classifications, so you can use similar code to add a classification to a Service object.
Adding Services and Service Bindings to an
Organization
Most organizations add themselves to a registry in order to offer services, so the
JAXR API has facilities to add services and service bindings to an organization.
Like an Organization object, a Service object has a name and a description.
Also like an Organization object, it has a unique key that is generated by the
registry when the service is registered. It may also have classifications associated
with it.
A service also commonly has service bindings, which provide information about
how to access the service. A ServiceBinding object normally has a description,
an access URI, and a specification link, which provides the linkage between a
service binding and a technical specification that describes how to use the service using the service binding.
The following code fragment shows how to create a collection of services, add
service bindings to a service, then add the services to the organization. It specifies an access URI but not a specification link. Because the access URI is not real
413
414
JAVA API FOR XML REGISTRIES
and because JAXR by default checks for the validity of any published URI, the
binding sets its validateURI property to false.
// Create services and service
Collection services = new ArrayList();
Service service = blcm.createService("My Service Name");
InternationalString is =
blcm.createInternationalString("My Service Description");
service.setDescription(is);
// Create service bindings
Collection serviceBindings = new ArrayList();
ServiceBinding binding = blcm.createServiceBinding();
is = blcm.createInternationalString("My Service Binding " +
"Description");
binding.setDescription(is);
// allow us to publish a bogus URL without an error
binding.setValidateURI(false);
binding.setAccessURI("http://TheCoffeeBreak.com:8080/sb/");
serviceBindings.add(binding);
// Add service bindings to service
service.addServiceBindings(serviceBindings);
// Add service to services, then add services to organization
services.add(service);
org.addServices(services);
Saving an Organization
The primary method a client uses to add or modify organization data is the
saveOrganizations method, which creates one or more new organizations in a
registry if they did not exist previously. If one of the organizations exists but
some of the data have changed, the saveOrganizations method updates and
replaces the data.
After a client populates an organization with the information it wants to make
public, it saves the organization. The registry returns the key in its response, and
the client retrieves it.
// Add organization and submit to registry
// Retrieve key if successful
Collection orgs = new ArrayList();
orgs.add(org);
BulkResponse response = blcm.saveOrganizations(orgs);
Collection exceptions = response.getException();
MANAGING REGISTRY DATA
if (exceptions == null) {
System.out.println("Organization saved");
Collection keys = response.getCollection();
Iterator keyIter = keys.iterator();
if (keyIter.hasNext()) {
javax.xml.registry.infomodel.Key orgKey =
(javax.xml.registry.infomodel.Key) keyIter.next();
String id = orgKey.getId();
System.out.println("Organization key is " + id);
org.setKey(orgKey);
}
}
Removing Data from the Registry
A registry allows you to remove from the registry any data that you have submitted to it. You use the key returned by the registry as an argument to one of the
BusinessLifeCycleManager delete methods: deleteOrganizations, deleteServices, deleteServiceBindings, and others.
The JAXRDelete sample program deletes the organization created by the JAXRPublish program. It deletes the organization that corresponds to a specified key
string and then displays the key again so that the user can confirm that it has
deleted the correct one.
String id = key.getId();
System.out.println("Deleting organization with id " + id);
Collection keys = new ArrayList();
keys.add(key);
BulkResponse response = blcm.deleteOrganizations(keys);
Collection exceptions = response.getException();
if (exceptions == null) {
System.out.println("Organization deleted");
Collection retKeys = response.getCollection();
Iterator keyIter = retKeys.iterator();
javax.xml.registry.infomodel.Key orgKey = null;
if (keyIter.hasNext()) {
orgKey =
(javax.xml.registry.infomodel.Key) keyIter.next();
id = orgKey.getId();
System.out.println("Organization key was " + id);
}
}
A client can use a similar mechanism to delete services and service bindings.
415
416
JAVA API FOR XML REGISTRIES
Using Taxonomies in JAXR Clients
In the JAXR API, a taxonomy is represented by a ClassificationScheme
object.
This section describes how to use the implementation of JAXR in the J2EE
Application Server:
• To define your own taxonomies
• To specify postal addresses for an organization
Defining a Taxonomy
The JAXR specification requires a JAXR provider to be able to add user-defined
taxonomies for use by JAXR clients. The mechanisms clients use to add and
administer these taxonomies are implementation-specific.
The implementation of JAXR in the J2EE Application Server uses a simple filebased approach to provide taxonomies to the JAXR client. These files are read at
run time, when the JAXR provider starts up.
The taxonomy structure for the J2EE Application Server is defined by the JAXR
Predefined Concepts DTD, which is declared both in the file jaxrconcepts.dtd
and, in XML schema form, in the file jaxrconcepts.xsd. The file jaxrconcepts.xml contains the taxonomies for the implementation of JAXR in the J2EE
Application
Server.
All
these
files
are
contained
in
the
<J2EE_HOME>/share/lib/jaxr-impl.jar file. This JAR file also includes files
that define the well-known taxonomies that the implementation of JAXR in the
J2EE Application Server uses: naics.xml, iso3166.xml, and unspsc.xml.
The entries in the jaxrconcepts.xml file look like this:
<PredefinedConcepts>
<JAXRClassificationScheme id="schId" name="schName">
<JAXRConcept id="schId/conCode" name="conName"
parent="parentId" code="conCode"></JAXRConcept>
...
</JAXRClassificationScheme>
</PredefinedConcepts>
The taxonomy structure is a containment-based structure. The element Preroot of the structure and must be present. The JAXRelement is the parent of the structure, and the
definedConcepts is the
ClassificationScheme
USING TAXONOMIES IN JAXR CLIENTS
JAXRConcept elements are children and grandchildren. A JAXRConcept element
may have children, but it is not required to do so.
In all element definitions, attribute order and case are significant.
To add a user-defined taxonomy, follow these steps.
1. Publish the JAXRClassificationScheme element for the taxonomy as a
ClassificationScheme object in the registry that you will be accessing.
For example, you can publish the ClassificationScheme object to the
Java WSDP Registry Server. In order to publish a ClassificationScheme
object, you must set its name. You also give the scheme a classification
within a known classification scheme such as uddi-org:types. In the following code fragment, the name is the first argument of the LifeCycleManager.createClassificationScheme method call.
ClassificationScheme cScheme =
blcm.createClassificationScheme("MyScheme",
"A Classification Scheme");
ClassificationScheme uddiOrgTypes =
bqm.findClassificationSchemeByName(null,
"uddi-org:types");
if (uddiOrgTypes != null) {
Classification classification =
blcm.createClassification(uddiOrgTypes,
"postalAddress", "categorization" );
postalScheme.addClassification(classification);
ExternalLink externalLink =
blcm.createExternalLink(
"http://www.mycom.com/myscheme.html",
"My Scheme");
postalScheme.addExternalLink(externalLink);
Collection schemes = new ArrayList();
schemes.add(cScheme);
BulkResponse br =
blcm.saveClassificationSchemes(schemes);
}
The BulkResponse object returned by the saveClassificationSchemes
method contains the key for the classification scheme, which you need to
retrieve:
if (br.getStatus() == JAXRResponse.STATUS_SUCCESS) {
System.out.println("Saved ClassificationScheme");
417
418
JAVA API FOR XML REGISTRIES
Collection schemeKeys = br.getCollection();
Iterator keysIter = schemeKeys.iterator();
while (keysIter.hasNext()) {
javax.xml.registry.infomodel.Key key =
(javax.xml.registry.infomodel.Key)
keysIter.next();
System.out.println("The postalScheme key is " +
key.getId());
System.out.println("Use this key as the scheme“ +
“ uuid in the taxonomy file");
}
}
2. In an XML file, define a taxonomy structure that is compliant with the
JAXR Predefined Concepts DTD. Enter the ClassificationScheme element in your taxonomy XML file by specifying the returned key ID value
as the id attribute and the name as the name attribute. For the code fragment above, for example, the opening tag for the JAXRClassificationScheme element looks something like this (all on one line):
<JAXRClassificationScheme
id="uuid:nnnnnnnn-nnnn-nnnn-nnnn-nnnnnnnnnnnn"
name="MyScheme">
The ClassificationScheme id must be a UUID.
3. Enter each JAXRConcept element in your taxonomy XML file by specifying the following four attributes, in this order:
a. id is the JAXRClassificationScheme id value, followed by a / separator, followed by the code of the JAXRConcept element
b. name is the name of the JAXRConcept element
c. parent is the immediate parent id (either the ClassificationScheme
id or that of the parent JAXRConcept)
d. code is the JAXRConcept element code value
The first JAXRConcept element in the naics.xml file looks like this (all
on one line):
<JAXRConcept
id="uuid:C0B9FE13-179F-413D-8A5B-5004DB8E5BB2/11"
name="Agriculture, Forestry, Fishing and Hunting"
parent="uuid:C0B9FE13-179F-413D-8A5B-5004DB8E5BB2"
code="11"></JAXRConcept>
USING TAXONOMIES IN JAXR CLIENTS
4. To add the user-defined taxonomy structure to the JAXR provider, specify
the system property com.sun.xml.registry.userTaxonomyFilenames
when you run your client program. The command line (all on one line)
would look like this. A vertical bar (|) is the file separator.
java myProgram
-DuserTaxonomyFilenames=c:\mydir\xxx.xml|c:\mydir\xxx2.xml
You can use a <sysproperty> tag to set this property in a build.xml file
for a client program. Or, in your program, you can set the property as follows:
System.setProperty
("com.sun.xml.registry.userTaxonomyFilenames",
"c:\mydir\xxx.xml|c:\mydir\xxx2.xml");
If your client will run in a J2EE application, you need to specify the system property com.sun.xml.registry.userTaxonomyFilenames as one
of the JVM arguments when you start the J2EE server. To do this, open
the file <J2EE_HOME>/domains/domain1/server/config/domain.xml
in an editor and add something like the following (all on one line) to the
list of JVM options in the java-config element:
<jvm-options>-Dcom.sun.xml.registry.userTaxonomyFilenames=
c:\mydir\xxx.xml|c:\mydir\xxx2.xml</jvm-options>
Stop and restart the server to make this change take effect.
Specifying Postal Addresses
The JAXR specification defines a postal address as a structured interface with
attributes for street, city, country, and so on. The UDDI specification, on the
other hand, defines a postal address as a free-form collection of address lines,
each of which may also be assigned a meaning. To map the JAXR PostalAddress format to a known UDDI address format, you specify the UDDI format as
a ClassificationScheme object and then specify the semantic equivalences
between the concepts in the UDDI format classification scheme and the comments in the JAXR PostalAddress classification scheme. The JAXR PostalAddress classification scheme is provided by the implementation of JAXR in the
J2EE Application Server.
In the JAXR API, a PostalAddress object has the fields streetNumber, street,
city, state, postalCode and country. In the implementation of JAXR in the
J2EE Application Server, these are predefined concepts in the jaxrcon-
419
420
JAVA API FOR XML REGISTRIES
cepts.xml
tributes.
file, within the ClassificationScheme named PostalAddressAt-
To specify the mapping between the JAXR postal address format and another
format, you need to set two connection properties:
• The javax.xml.registry.postalAddressScheme property, which specifies a postal address classification scheme for the connection
• The javax.xml.registry.semanticEquivalences property, which
specifies the semantic equivalences between the JAXR format and the
other format
For example, suppose you want to use a scheme that has been published to the
IBM registry with the known UUID uuid:6eaf4b50-4196-11d6-9e2b000629dc0a2b. This scheme already exists in the jaxrconcepts.xml file under
the name IBMDefaultPostalAddressAttributes.
<JAXRClassificationScheme id="uuid:6EAF4B50-4196-11D6-9E2B000629DC0A2B" name="IBMDefaultPostalAddressAttributes">
First, you specify the postal address scheme using the id value from the JAXRClassificationScheme element (the UUID). Case does not matter:
props.setProperty("javax.xml.registry.postalAddressScheme",
"uuid:6eaf4b50-4196-11d6-9e2b-000629dc0a2b");
Next, you specify the mapping from the id of each JAXRConcept element in the
default JAXR postal address scheme to the id of its counterpart in the IBM
scheme:
props.setProperty("javax.xml.registry.semanticEquivalences",
"urn:uuid:PostalAddressAttributes/StreetNumber," +
"urn:uuid:6eaf4b50-4196-11d6-9e2b000629dc0a2b/StreetAddressNumber|" +
"urn:uuid:PostalAddressAttributes/Street," +
"urn:uuid:6eaf4b50-4196-11d6-9e2b000629dc0a2b/StreetAddress|" +
"urn:uuid:PostalAddressAttributes/City," +
"urn:uuid:6eaf4b50-4196-11d6-9e2b-000629dc0a2b/City|" +
"urn:uuid:PostalAddressAttributes/State," +
"urn:uuid:6eaf4b50-4196-11d6-9e2b-000629dc0a2b/State|" +
"urn:uuid:PostalAddressAttributes/PostalCode," +
"urn:uuid:6eaf4b50-4196-11d6-9e2b-000629dc0a2b/ZipCode|" +
"urn:uuid:PostalAddressAttributes/Country," +
"urn:uuid:6eaf4b50-4196-11d6-9e2b-000629dc0a2b/Country");
RUNNING THE CLIENT EXAMPLES
After you create the connection using these properties, you can create a postal
address and assign it to the primary contact of the organization before you publish the organization:
String streetNumber = "99";
String street = "Imaginary Ave. Suite 33";
String city = "Imaginary City";
String state = "NY";
String country = "USA";
String postalCode = "00000";
String type = "";
PostalAddress postAddr =
blcm.createPostalAddress(streetNumber, street, city, state,
country, postalCode, type);
Collection postalAddresses = new ArrayList();
postalAddresses.add(postAddr);
primaryContact.setPostalAddresses(postalAddresses);
A JAXR query can then retrieve the postal address using PostalAddress methods, if the postal address scheme and semantic equivalences for the query are the
same as those specified for the publication. To retrieve postal addresses when
you do not know what postal address scheme was used to publish them, you can
retrieve them as a collection of Slot objects. The JAXRQueryPostal.java sample program shows how to do this.
In general, you can create a user-defined postal address taxonomy for any postalAddress tModels that use the well-known categorization in the uddiorg:types taxonomy, which has the tModel UUID uuid:c1acf26d-96724404-9d70-39b756e62ab4 with a value of postalAddress. You can retrieve the
tModel overviewDoc, which points to the technical detail for the specification of
the scheme, where the taxonomy structure definition can be found. (The JAXR
equivalent of an overviewDoc is an ExternalLink.)
Running the Client Examples
The simple client programs provided with this tutorial can be run from the command line. You can modify them to suit your needs. They allow you to specify
the IBM registry, the Microsoft registry, or the Java WSDP Registry Server for
queries and updates; you can specify any other UDDI version 2 registry.
421
422
JAVA API FOR XML REGISTRIES
The
client
examples,
in
the
<INSTALL>/j2eetutorial14/examdirectory, are as follows:
ples/jaxr/simple/src
• JAXRQuery.java shows how to search a registry for organizations
• JAXRQueryByNAICSClassification.java shows how to search a registry
using a common classification scheme
• JAXRQueryByWSDLClassification.java shows how to search a registry
for Web services that describe themselves by means of a WSDL document
• JAXRPublish.java shows how to publish an organization to a registry
• JAXRDelete.java shows how to remove an organization from a registry
• JAXRSaveClassificationScheme.java shows how to publish a classification scheme (specifically, a postal address scheme) to a registry
• JAXRPublishPostal.java shows how to publish an organization with a
postal address for its primary contact
• JAXRQueryPostal.java shows how to retrieve postal address data from an
organization
• JAXRDeleteScheme.java shows how to delete a classification scheme
from a registry
• JAXRGetMyObjects.java lists all the objects that you own in a registry
The <INSTALL>/j2eetutorial14/examples/jaxr/simple directory also contains:
• A build.xml file for the examples
• A JAXRExamples.properties file, in the src subdirectory, that supplies
string values used by the sample programs
• A file called postalconcepts.xml that you use with the postal address
examples
You do not have to have the J2EE Application Server running in order to run
these client examples.
Before You Compile the Examples
Before
you
compile
the
examples,
edit
the
file
<INSTALL>/j2eetutorial14/examples/jaxr/simple/src/JAXRExamples.properties as follows.
1. Edit the following lines in the JAXRExamples.properties file to specify
the registry you wish to access. For both the queryURL and the publishURL
BEFORE YOU COMPILE THE EXAMPLES
assignments, comment out all but the registry you wish to access. The
default is the Java WSDP Registry Server, so if you will be using the Registry Server on your own system, you do not need to change this section.
## Uncomment one pair of query and publish URLs.
## IBM:
#query.url=http://uddi.ibm.com/testregistry/inquiryapi
#publish.url=https://uddi.ibm.com/testregistry/publishapi
## Microsoft:
#query.url=http://test.uddi.microsoft.com/inquire
#publish.url=https://test.uddi.microsoft.com/publish
## Registry Server:
query.url=http://localhost:8080/RegistryServer
publish.url=http://localhost:8080/RegistryServer
If the Java WSDP Registry Server is running on a system other than your
own, specify the fully qualified host name instead of localhost. Do not
use https: for the publishURL. If Tomcat is using a nondefault port,
change 8080 to the correct value for your system.
The IBM and Microsoft registries both have a considerable amount of
data in them that you can perform queries on. Moreover, you do not have
to register if you are only going to perform queries.
We have not included the URLs of the SAP registry; feel free to add them.
If you want to publish to any of the public registries, the registration process for obtaining access to them is not difficult (see Preliminaries: Getting Access to a Registry, page 400). Each of them, however, allows you
to have only one organization registered at a time. If you publish an organization to one of them, you must delete it before you can publish another.
Since the organization that the JAXRPublish example publishes is fictitious, you will want to delete it immediately anyway.
The Java WSDP Registry Server gives you more freedom to experiment
with JAXR. You can publish as many organizations to it as you wish.
However, this registry comes with an empty database, so you must publish organizations to it yourself before you can perform queries on the
data.
2. Edit the following lines in the JAXRExamples.properties file to specify
the user name and password you obtained when you registered with the
registry. The defaults are the Registry Server default username and password.
423
424
JAVA API FOR XML REGISTRIES
## Specify username and password if needed
## testuser/testuser are defaults for Registry Server
registry.username=testuser
registry.password=testuser
3. If you will be using a public registry, edit the following lines in the JAXRExamples.properties file, which contain empty strings for the proxy
hosts, to specify your own proxy settings. The proxy host is the system on
your network through which you access the Internet; you usually specify
it in your Internet browser settings. You can leave this value empty to use
the Java WSDP Registry Server.
## HTTP and HTTPS proxy host and port;
##
ignored by Registry Server
http.proxyHost=
http.proxyPort=8080
https.proxyHost=
https.proxyPort=8080
The proxy ports have the value 8080, which is the usual one; change this
string if your proxy uses a different port.
For a public registry, your entries usually follow this pattern:
http.proxyHost=proxyhost.mydomain
http.proxyPort=8080
https.proxyHost=proxyhost.mydomain
https.proxyPort=8080
4. Feel free to change any of the organization data in the remainder of the file.
This data is used by the publishing and postal address examples.
You can edit the src/JAXRExamples.properties file at any time. The asant
targets that run the client examples will use the latest version of the file.
Compiling the Examples
To
compile
the
programs,
<INSTALL>/j2eetutorial14/examples/jaxr/simple
go
to
the
directory. A build.xml
file allows you to use the command
asant compile
to compile all the examples. The asant tool creates a subdirectory called build.
RUNNING THE EXAMPLES
The runtime classpath setting in the build.xml file includes the files
<J2EE_HOME>/lib/j2ee.jar and <J2EE_HOME>/lib/appserv-rt.jar and the
JAR files in the directory <J2EE_HOME>/share/lib/. All JAXR client examples
require this classpath setting.
Running the Examples
Some of the build.xml targets for running the examples contain commented-out
<sysproperty> tags that set the JAXR logging level to debug and set other connection properties. These tags are provided to illustrate how to specify connection properties. Feel free to modify or delete these tags.
If you are running the examples with the Java WSDP Registry Server, start the
Java WSDP Tomcat (<JWSDP_HOME> is the location of the Java WSDP on your
system):
<JWSDP_HOME>/bin/startup.sh
The Registry Server is a Web application that is loaded when Tomcat starts.
You do not need to start Tomcat in order to run the examples against public registries.
Running the JAXRPublish Example
To run the JAXRPublish program, use the run-publish target with no command
line arguments:
asant run-publish
The program output displays the string value of the key of the new organization,
which is named “The Coffee Break.”
After you run the JAXRPublish program but before you run JAXRDelete, you
can run JAXRQuery to look up the organization you published.
Running the JAXRQuery Example
To run the JAXRQuery example, use the asant target run-query. Specify a
query-string argument on the command line to search the registry for organizations whose names contain that string. For example, the following command
425
426
JAVA API FOR XML REGISTRIES
line searches for organizations whose names contain the string “coff” (searching
is not case-sensitive):
asant -Dquery-string=coff run-query
Running the JAXRQueryByNAICSClassification
Example
After you run the JAXRPublish program, you can also run the JAXRQueryByNAICSClassification example, which looks for organizations that use the “Snack
and Nonalcoholic Beverage Bars” classification, the same one used for the organization created by JAXRPublish. To do so, use the asant target run-querynaics:
asant run-query-naics
Running the JAXRDelete Example
To run the JAXRDelete program, specify the key string returned by the JAXRPubprogram as input to the run-delete target:
lish
asant -Dkey-string=keyString run-delete
Running the JAXRQueryByWSDLClassification
Example
You can run the JAXRQueryByWSDLClassification example at any time. Use
the asant target run-query-wsdl:
asant run-query-wsdl
This example returns many results from the public registries and is likely to run
for several minutes.
Publishing a Classification Scheme
In order to publish organizations with postal addresses to public registries, you
must publish a classification scheme for the postal address first.
RUNNING THE EXAMPLES
To run the JAXRSaveClassificationScheme program, use the target run-savescheme:
asant run-save-scheme
The program returns a UUID string, which you will use in the next section.
You do not have to run this program if you are using the Java WSDP Registry
Server, because it does not validate these objects.
The public registries allow you to own more than one classification scheme at a
time (the limit is usually a total of about 10 classification schemes and concepts
put together).
Running the Postal Address Examples
Before you run the postal address examples, open the file postalconcepts.xml
in an editor. Wherever you see the string uuid-from-save, replace it with the
UUID string returned by the run-save-scheme target. For the Java WSDP Registry Server, you may use any string that is formatted as a UUID.
For a given registry, you only need to save the classification scheme and edit
postalconcepts.xml once. After you perform those two steps, you can run the
JAXRPublishPostal and JAXRQueryPostal programs multiple times.
1. Run the JAXRPublishPostal program. Notice that in the build.xml file,
the run-publish-postal target contains a <sysproperty> tag that sets
the userTaxonomyFilenames property to the location of the postalconcepts.xml file in the current directory:
<sysproperty
key="com.sun.xml.registry.userTaxonomyFilenames"
value="postalconcepts.xml"/>
Specify the string you entered in the postalconcepts.xml file as input to
the run-publish-postal target:
asant -Duuid-string=uuidstring run-publish-postal
The program output displays the string value of the key of the new organization.
2. Run the JAXRQueryPostal program. The run-query-postal target contains the same <sysproperty> tag as the run-publish-postal target.
427
428
JAVA API FOR XML REGISTRIES
As input to the run-query-postal target, specify both a query-string
argument and a uuid-string argument on the command line to search
the registry for the organization published by the run-publish-postal
target:
asant -Dquery-string=coffee
-Duuid-string=uuidstring run-query-postal
The postal address for the primary contact will appear correctly with the
JAXR PostalAddress methods. Any postal addresses found that use
other postal address schemes will appear as Slot lines.
3. If you are using a public registry, make sure to follow the instructions in
Running the JAXRDelete Example (page 426) to delete the organization
you published.
Deleting a Classification Scheme
To delete the classification scheme you published after you have finished using
it, run the JAXRDeleteScheme program using the run-delete-scheme target:
asant -Duuid-string=uuidstring run-delete-scheme
For a UDDI registry, deleting a classification scheme removes it from the registry logically but not physically. You can no longer use the classification scheme,
but it will still be visible if, for example, you call the method QueryManager.getRegisteredObjects. Since the public registries allow you to own up
to 10 of these objects, this is not likely to be a problem.
Getting a List of Your Registry Objects
To get a list of the objects you own in the registry, both organizations and classification schemes, run the JAXRGetMyObjects program by using the run-getobjects target:
asant run-get-objects
If you run this program with the Java WSDP Registry Server, it returns all the
standard UDDI taxonomies provided with the Registry Server, not just the
objects you have created.
USING JAXR CLIENTS IN J2EE APPLICATIONS
Other Targets
To remove the build directory and class files, use the command
asant clean
To obtain a syntax reminder for the targets, use the command
asant -projecthelp
Using JAXR Clients in J2EE Applications
You can create J2EE applications that use JAXR clients to access registries. This
section explains how to write, compile, package, deploy, and run a J2EE application that uses JAXR to publish an organization to a registry and then query the
registry for that organization. The application in this section uses two components, an application client and a stateless session bean.
The section covers the following topics:
•
•
•
•
•
•
•
•
•
Coding the Application Client: MyAppClient.java
Coding the PubQuery Session Bean
Compiling the Source Files
Starting the J2EE Application Server
Creating JAXR Resources
Creating and Packaging the Application
Deploying the Application
Saving the Client JAR and Running the Application
Undeploying and Removing the Application
You will find the source files for this section in the directory
<INSTALL>/j2eetutorial14/examples/jaxr/clientsession. Path names in
this section are relative to this directory.
429
430
JAVA API FOR XML REGISTRIES
Coding the Application Client:
MyAppClient.java
The application client class, src/MyAppClient.java, obtains a handle to the
PubQuery enterprise bean’s remote home interface, using the JNDI API naming
context java:comp/env. The program then creates an instance of the bean and
calls the bean’s two business methods, executePublish and executeQuery.
Before you compile the application, edit the PubQueryBeanExamples.properties file the same way you edited the JAXRExamples.properties file to run the
simple examples.
1. Leave the queryManagerURL and lifeCycleManagerURL entries as they
are if you are using the Java WSDP Registry Server on your local system.
To use another registry, comment out the property that specifies the Registry Server and remove the comment from the other registry.
2. If you are using a public registry, change the values for the
http.proxyHost and https.proxyHost entries so that they specify the
the system on your network through which you access the Internet.
Coding the PubQuery Session Bean
The PubQuery bean is a stateless session bean with one create method and two
business methods. The bean uses remote interfaces rather than local interfaces
because it is accessed from outside the EJB container.
The remote home interface source file is src/PubQueryHome.java.
The remote interface, src/PubQueryRemote.java, declares two business methods, executePublish and executeQuery.The bean class, src/PubQueryBean.java, implements the executePublish and executeQuery methods and
their helper methods getName, getDescription, and getKey. These methods are
very similar to the methods of the same name in the simple examples JAXRQuery.java and JAXRPublish.java. The executePublish method uses information in the file PubQueryBeanExample.properties to create an organization
named The Coffee Enterprise Bean Break. The executeQuery method uses the
string “Coff”, specified in the application client code, to locate this organization.
The bean class also implements the required methods ejbCreate, setSessionContext, ejbRemove, ejbActivate, and ejbPassivate.
COMPILING THE SOURCE FILES
The ejbCreate method of the bean class allocates resources—in this case, by
looking up the ConnectionFactory and creating the Connection.
The ejbRemove method must deallocate the resources that were allocated by the
ejbCreate method. In this case, the ejbRemove method closes the Connection.
Compiling the Source Files
To compile the application source files, use the following command:
asant compile
The compile target places the properties file and the class files in the build
directory.
Starting the J2EE Application Server
To run this example, you need to start the J2EE Application Server.
• On
Windows
systems,
choose
Start→Programs→Sun
Microsystems→J2EE 1.4 SDK→Start Application Server.
• On UNIX systems, use the following command:
asadmin start-domain
Creating JAXR Resources
In order to use JAXR in a J2EE application that uses the J2EE 1.4 Application
Server, you need to access the JAXR resource adapter (see Implementing a
JAXR Client (page 399). The following commands (each must be all on one
line) create the resources needed to access the resource adapter:
asadmin create-connector-connection-pool --user username
--password password --raname jaxr-ra --connectiondefinition
javax.xml.registry.ConnectionFactory jaxr-pool
asadmin create-connector-resource --user username --password
password --poolname jaxr-pool eis/JAXR
431
432
JAVA API FOR XML REGISTRIES
The build.xml file for this example has targets named create-pool and create-resource that automate this task. The create-resource task depends on
create-pool.
After you start the server, perform the following steps:
1. Specify the following asant target:
asant create-resource
2. Reconfigure the server:
asant reconfig_common
If the output from this command says that an instance restart is required, stop
and restart the server.
Creating and Packaging the Application
Creating and packaging this application involve several steps:
1.
2.
3.
4.
Starting the J2EE Deploytool and Creating the Application
Packaging the Application Client
Packaging the Session Bean
Checking the JNDI Names
Starting the J2EE Deploytool and Creating the
Application
1. Start the deploytool:
deploytool
2. Choose File→New→Application EAR.
3. Click Browse next to the Application File Name field and use the file
chooser to locate the directory clientsession.
4. In the File Name field, type ClientSessionApp.
5. Click New Application.
6. Click OK.
CREATING AND PACKAGING THE APPLICATION
Packaging the Application Client
1. Choose File→New→Application Client JAR to start the Application Client Wizard, then click Next.
2. In the JAR File Contents screen:
a. Make sure that Create New AppClient Module in Application is
selected and that the application is ClientSessionApp.
b. In the AppClient Display Name field, type MyAppClient.
c. Click the Edit button next to the Contents text area.
d. In the dialog box, locate the clientsession/build directory. Select
MyAppClient.class from the Available Files tree area and click Add,
then OK.
3. In the General screen, select MyAppClient in the Main Class combo box.
4. In the EJB References screen, click Add. In the dialog box:
a. Type ejb/remote/PubQuery in the Coded Name field.
b. Choose Session from the EJB Type menu.
c. Type PubQueryHome in the Home Interface field.
d. Type PubQueryRemote in the Local/Remote Interface field.
e. Leave the Enterprise Bean Name field empty.
When you return to the EJB References screen, choose the JNDI Name
radio button and type PubQuery. The session bean uses remote interfaces,
so the client accesses the bean through the JNDI name rather than the
bean name.
5. Click Finish.
Packaging the Session Bean
1. Choose File→New→Enterprise JavaBean JAR to start the Enterprise Bean
Wizard, then click Next.
2. In the EJB JAR screen:
a. Select Create New JAR Module in Application and make sure that the
application is ClientSessionApp.
b. In the JAR Display Name field, type PubQueryJAR.
c. Click the Edit button next to the Contents text area.
433
434
JAVA API FOR XML REGISTRIES
d. In the dialog box, locate the clientsession/build directory. Select
PubQueryBean.class,
PubQueryHome.class,
PubQueryRemote.class, and PubQueryBeanExample.properties from the Available Files tree area and click Add, then OK.
3. In the General screen:
a. Choose the Session radio button, then the Stateless radio button.
b. From the Enterprise Bean Class menu, choose PubQueryBean.
c. In the Enterprise Bean Display Name field, type PubQuery.
d. In the Remote Interfaces area, choose PubQueryHome from the Remote
Home Interface menu and PubQueryRemote from the Remote Interface
menu.
4. In the Configuration Options screen, check the Resource References and
Transaction Management boxes.
5. In the Transaction Management screen, choose Container-Managed.
6. In the Resource References screen:
a. Click Add.
b. In the Coded Name field, type eis/JAXR.
c. From the Type menu, choose javax.xml.registry.ConnectionFactory.
d. In the Deployment Settings area, type eis/JAXR in the JNDI name field
and j2ee in both the User Name and Password fields. (These are the
user
name
and
password
specified
in
the
file
<J2EE_HOME>/domains/domain1/server/config/sun-acc.xml,
which the application client container uses.)
Checking the JNDI Names
Verify that the JNDI names for the application components are correct. They
should appear as shown in Table 10–3 and Table 10–4.
Table 10–3 Application Pane
Component Type
Component
JNDI Name
EJB
PubQuery
PubQuery
435
DEPLOYING THE APPLICATION
Table 10–4 References Pane
Ref. Type
Referenced By
Reference Name
JNDI Name
EJB Ref
MyAppClient
ejb/remote/PubQuery
PubQuery
Resource
PubQuery
eis/JAXR
eis/JAXR
Deploying the Application
1. Choose File→Save to save the application.
2. Choose Tools→Deploy.
3. In the dialog box, type your administrative user name and password (if
they are not already filled in) and click OK.
4. In the dialog box that asks if you wish to save the application, click Yes.
5. In the Distribute Module dialog box, click Close when the process completes.
Saving the Client JAR and Running the
Application
1. If you are using the Java WSDP Registry Server, start it by starting Tomcat.
Windows systems: Choose Start→Programs→Java(TM) Web Services
Developer Pack→Start Tomcat.
UNIX systems:
<JWSDP_HOME>/bin/startup.sh
Starting Tomcat takes some time.
2. In the deploytool, select the server node.
3. Select ClientSessionApp from the list of deployed objects, then click Client Jar.
4. Choose Browse to navigate to the directory from which you will run the
client; we suggest the examples/jaxr/clientsession directory. When
you reach the directory, click Select, then click OK. Click OK in the information dialog. You will find a file named ClientSessionAppClient.jar
in the specified directory.
436
JAVA API FOR XML REGISTRIES
5. To run the client, use the following command:
appclient -client ClientSessionAppClient.jar
The program output in the terminal window looks like this:
Looking up EJB reference
Looked up home
Narrowed home
Got the EJB
See server log for bean output
In the server log, you will find the output from the executePublish and exemethods.
cuteQuery
Undeploying and Removing the
Application
To undeploy and remove the application, perform the following steps:
1. Select the deployed application in the server pane and click Undeploy.
2. Select the application in the left-hand pane and choose File→Close.
3. Remove the build directory created by the compile target:
asant clean
4. If you wish, stop the server:
asadmin stop-domain
If you wish, you can manually delete the EAR and client JAR files.
Further Information
For more information about JAXR, registries, and Web services, see the following:
• Java Specification Request (JSR) 93: JAXR 1.0:
http://jcp.org/jsr/detail/093.jsp
• JAXR home page:
http://java.sun.com/xml/jaxr/index.html
• Universal Description, Discovery, and Integration (UDDI) project:
FURTHER INFORMATION
http://www.uddi.org/
• ebXML:
http://www.ebxml.org/
• Open Source JAXR Provider for ebXML Registries:
http://ebxmlrr.sourceforge.net/
• Java 2 Platform, Enterprise Edition:
http://java.sun.com/j2ee/
• Java Technology and XML:
http://java.sun.com/xml/
• Java Technology & Web Services:
http://java.sun.com/webservices/index.html
437
438
JAVA API FOR XML REGISTRIES
11
Java Servlet
Technology
Stephanie Bodoff
AS soon as the Web began to be used for delivering services, service providers
recognized the need for dynamic content. Applets, one of the earliest attempts
toward this goal, focused on using the client platform to deliver dynamic user
experiences. At the same time, developers also investigated using the server platform for this purpose. Initially, Common Gateway Interface (CGI) scripts were
the main technology used to generate dynamic content. Though widely used,
CGI scripting technology has a number of shortcomings, including platform
dependence and lack of scalability. To address these limitations, Java Servlet
technology was created as a portable way to provide dynamic, user-oriented content.
What is a Servlet?
A servlet is a Java programming language class used to extend the capabilities of
servers that host applications accessed via a request-response programming
model. Although servlets can respond to any type of request, they are commonly
used to extend the applications hosted by Web servers. For such applications,
Java Servlet technology defines HTTP-specific servlet classes.
439
440
JAVA SERVLET TECHNOLOGY
The javax.servlet and javax.servlet.http packages provide interfaces and
classes for writing servlets. All servlets must implement the Servlet interface,
which defines life-cycle methods.
When implementing a generic service, you can use or extend the GenericServclass provided with the Java Servlet API. The HttpServlet class provides
methods, such as doGet and doPost, for handling HTTP-specific services.
let
This chapter focuses on writing servlets that generate responses to HTTP
requests. Some knowledge of the HTTP protocol is assumed; if you are unfamiliar with this protocol, you can get a brief introduction to HTTP in HTTP
Overview (page 813).
The Example Servlets
This chapter uses the Duke’s Bookstore application to illustrate the tasks
involved in programming servlets. Table 11–1 lists the servlets that handle each
bookstore function. Each programming task is illustrated by one or more servlets. For example, BookDetailsServlet illustrates how to handle HTTP GET
requests, BookDetailsServlet and CatalogServlet show how to construct
responses, and CatalogServlet illustrates how to track session information.
Table 11–1 Duke’s Bookstore Example Servlets
Function
Servlet
Enter the bookstore
BookStoreServlet
Create the bookstore banner
BannerServlet
Browse the bookstore catalog
CatalogServlet
Put a book in a shopping cart
CatalogServlet,
BookDetailsServlet
Get detailed information on a specific book
BookDetailsServlet
Display the shopping cart
ShowCartServlet
Remove one or more books from the shopping cart
ShowCartServlet
Buy the books in the shopping cart
CashierServlet
THE EXAMPLE SERVLETS
Table 11–1 Duke’s Bookstore Example Servlets (Continued)
Function
Servlet
Receive an acknowledgement for the purchase
ReceiptServlet
The data for the bookstore application is maintained in a database and accessed
through the helper class database.BookDB. The database package also contains
the class BookDetails, which represents a book. The shopping cart and shopping cart items are represented by the classes cart.ShoppingCart and
cart.ShoppingCartItem, respectively.
The source code for the bookstore application is located in the <INSTALL>/
directory created when you
unzip the tutorial bundle (see Building and Running the Examples, page xxi). A
sample bookstore1.war is provided in <INSTALL>/j2eetutorial14/
examples/web/provided-wars/. To build, package, deploy, and run the example:
j2eetutorial14/examples/web/bookstore1/
1. Build and package the bookstore common files as described in Duke’s
Bookstore Examples (page 101).
2. In a terminal window, go to <INSTALL>/j2eetutorial14/examples/
web/bookstore1/.
3. Run asant build. This target will spawn any necessary compilations and
copy files to the <INSTALL>/j2eetutorial14/examples/web/
bookstore1/build/ directory.
4. Start the J2EE application server.
5. Perform all the operations described in Accessing Databases from Web
Applications, page 102.
6. Start deploytool.
7. Create a Web application called bookstore1 by running the New Web
Application Wizard. Select File→New→Web Application WAR.
8. New Web Application Wizard
a. Select the Create New Stand-Alone WAR Module radio button.
b. Click Browse and in the file chooser, navigate to <INSTALL>/docs/
tutorial/examples/web/bookstore1/build/.
c. In the File Name field, enter bookstore1.
d. Click Choose Module File.
441
442
JAVA SERVLET TECHNOLOGY
e.
f.
g.
h.
In the WAR Display Name field, enter bookstore1.
In the Context Root field, enter /bookstore1.
Click Edit.
In the Edit Archive Contents dialog box, navigate to <INSTALL>/
Select
j2eetutorial14/examples/web/bookstore1/build/.
errorpage.html, duke.books.gif, BannerServlet.class, BookStoreServlet.class, BookDetailsServlet.class, CatalogServShowCartServlet.class,
CashierServlet.class,
let.class,
ReceiptServlet.class, and the database, filters, listeners, and
util packages. Click Add.
i. Add the shared bookstore library. Navigate to
<INSTALL>/
j2eetutorial14/examples/build/web/bookstore/dist/.
Select
bookstore.jar and Click Add.
j. Click OK.
k. Click Next.
l. Select the Servlet radio button.
m.Click Next.
n. Select BannerServlet from the Servlet Class combo box.
o. Click Finish.
9. Add each of the Web components listed in Table 11–2. For each servlet:
a. Select File→New→Web Application WAR.
b. Click the Add to Existing WAR Module radio button. Since the WAR
contains all of the servlet classes, you do not have to add any more content.
c. Click Next.
d. Select the Servlet radio button and the Component Aliases checkbox.
e. Click Next.
f. Select the servlet from the Servlet Class combo box.
g. Click Next.
h. Click Add. Enter the alias.
443
THE EXAMPLE SERVLETS
i. Click Finish.
Table 11–2 Duke’s Bookstore Web Components
Web Component Name
Servlet Class
Component Alias
BookStoreServlet
BookStoreServlet
/bookstore
CatalogServlet
CatalogServlet
/bookcatalog
BookDetailsServlet
BookDetailsServlet
/bookdetails
ShowCartServlet
ShowCartServlet
/bookshowcart
CashierServlet
CashierServlet
/bookcashier
ReceiptServlet
ReceiptServlet
/bookreceipt
10.Add the listener class listeners.ContextListener (described in Handling Servlet Life Cycle Events, page 446).
a. Select the Event Listeners tab.
b. Click Add.
c. Select the listeners.ContextListener class from drop down field in
the Event Listener Classes panel.
11.Add an error page (described in Handling Errors, page 448).
a. Select the File Refs tab.
b. Click Add in the Error Mapping panel.
c. Enter exception.BookNotFoundException in the Error/Exception
field.
d. Enter /errorpage.html in the Resource to be Called field.
e. Repeat for exception.BooksNotFoundException and javax.servlet.UnavailableException.
12.Add the filters filters.HitCounterFilter and filters.OrderFilter
(described in Filtering Requests and Responses, page 458).
a. Select the Filter Mapping tab.
b. Click Edit Filter List.
c. Click Add.
444
JAVA SERVLET TECHNOLOGY
d. Select filters.HitCounterFilter from the Filter Class column. The
deploytool will automatically enter HitCounterFilter in the Display
Name column.
e. Click Add.
f. Select filters.OrderFilter from the Filter Class column. The
deploytool will automatically enter OrderFilter in the Display Name
column.
g. Click OK.
h. Click Add.
i. Select HitCounterFilter from the Filter Name column.
j. Select Servlet from the Target Type column.
k. Select BookStoreServlet from the Target column.
l. Repeat for OrderFilter. The target type is Servlet and the target is
ReceiptServlet.
13.Add a resource reference for the database.
a. Select the Resource Refs tab.
b. Click Add.
c. Enter jdbc/BookDB in the Coded Name field.
d. Accept the default type javax.sql.DataSource.
e. Accept the default authorization Container.
f. Accept the default selected Shareable.
g. Enter jdbc/BookDB in the JNDI name field of the Deployment setting
for jdbc/BookDB frame.
14.Select File→Save.
15.Deploy the application.
a. Select Tools→Deploy.
b. In the Connection Settings frame, enter the user name and password you
specified when you installed the J2EE 1.4 Application Server.
c. Click OK.
d. A popup dialog will display the results of the deployment. Click Close.
16.To run the application, open the bookstore URL
http://localhost:1024/bookstore1/bookstore.
TROUBLESHOOTING
Troubleshooting
The Duke’s Bookstore database access object returns the following exceptions:
• BookNotFoundException—Returned if a book can’t be located in the
bookstore database. This will occur if you haven’t loaded the bookstore
database with data by running asant create-db_common or if the database
server hasn’t been started or it has crashed.
• BooksNotFoundException—Returned if the bookstore data can’t be
retrieved. This will occur if you haven’t loaded the bookstore database
with data or if the database server hasn’t been started or it has crashed.
• UnavailableException—Returned if a servlet can’t retrieve the Web
context attribute representing the bookstore. This will occur if the database
server hasn’t been started.
Because we have specified an error page, you will see the message The application is unavailable. Please try later. If you don’t specify an error
page, the Web container generates a default page containing the message A
Servlet Exception Has Occurred and a stack trace that can help diagnose the
cause of the exception. If you use errorpage.html, you will have to look in the
server log to determine the cause of the exception. The server log file is
<J2EE_HOME>/domains/domain1/server/logs/server.log.
Servlet Life Cycle
The life cycle of a servlet is controlled by the container in which the servlet has
been deployed. When a request is mapped to a servlet, the container performs
the following steps.
1. If an instance of the servlet does not exist, the Web container
a. Loads the servlet class.
b. Creates an instance of the servlet class.
c. Initializes the servlet instance by calling the init method. Initialization
is covered in Initializing a Servlet (page 452).
2. Invokes the service method, passing a request and response object. Service methods are discussed in Writing Service Methods (page 453).
If the container needs to remove the servlet, it finalizes the servlet by calling the
servlet’s destroy method. Finalization is discussed in Finalizing a
Servlet (page 473).
445
446
JAVA SERVLET TECHNOLOGY
Handling Servlet Life Cycle Events
You can monitor and react to events in a servlet’s life cycle by defining listener
objects whose methods get invoked when life cycle events occur. To use these
listener objects you must define the listener class and specify the listener class.
Defining The Listener Class
You define a listener class as an implementation of a listener interface. Servlet
Life Cycle Events (page 446) lists the events that can be monitored and the corresponding interface that must be implemented. When a listener method is
invoked, it is passed an event that contains information appropriate to the event.
For example, the methods in the HttpSessionListener interface are passed an
HttpSessionEvent, which contains an HttpSession.
Table 11–3 Servlet Life Cycle Events
Object
Web context
(See Accessing the
Web
Context, page 469)
Session
(See Maintaining Client State, page 470)
Event
Listener Interface and Event Class
Initialization and
destruction
javax.servlet.
ServletContextListener and
ServletContextEvent
Attribute added,
removed, or
replaced
javax.servlet.
ServletContextAttributeListener and
ServletContextAttributeEvent
Creation,
invalidation,
activation,
passivation, and
timeout
javax.servlet.http.
HttpSessionListener,
javax.servlet.http.
HttpSessionActivationListener, and
HttpSessionEvent
Attribute added,
removed, or
replaced
javax.servlet.http.
HttpSessionAttributeListener and
HttpSessionBindingEvent
HANDLING SERVLET LIFE CYCLE EVENTS
Table 11–3 Servlet Life Cycle Events (Continued)
Object
Request
Event
Listener Interface and Event Class
A servlet request
has started being
processed by Web
components
javax.servlet.
ServletRequestListener and
ServletRequestEvent
Attribute added,
removed, or
replaced
javax.servlet.
ServletRequestAttributeListener and
ServletRequestAttributeEvent
The listeners.ContextListener class creates and removes the database
helper and counter objects used in the Duke’s Bookstore application. The methods retrieve the Web context object from ServletContextEvent and then store
(and remove) the objects as servlet context attributes.
import database.BookDB;
import javax.servlet.*;
import util.Counter;
public final class ContextListener
implements ServletContextListener {
private ServletContext context = null;
public void contextInitialized(ServletContextEvent event) {
context = event.getServletContext();
try {
BookDB bookDB = new BookDB();
context.setAttribute("bookDB", bookDB);
} catch (Exception ex) {
System.out.println(
"Couldn't create database: " + ex.getMessage());
}
Counter counter = new Counter();
context.setAttribute("hitCounter", counter);
counter = new Counter();
context.setAttribute("orderCounter", counter);
}
public void contextDestroyed(ServletContextEvent event) {
context = event.getServletContext();
BookDB bookDB = context.getAttribute(
"bookDB");
bookDB.remove();
447
448
JAVA SERVLET TECHNOLOGY
context.removeAttribute("bookDB");
context.removeAttribute("hitCounter");
context.removeAttribute("orderCounter");
}
}
Specifying Event Listener Classes
You specify an event listener class in the Event Listener tab of the WAR inspector. Review step 10. in The Example Servlets (page 440) for the deploytool
procedure for specifying the ContextListener listener class.
Handling Errors
Any number of exceptions can occur when a servlet is executed. The Web container will generate a default page containing the message A Servlet Exception Has Occurred when an exception occurs, but you can also specify that the
container should return a specific error page for a given exception. Review step
11. in The Example Servlets (page 440) for deploytool procedures for mapping
the exceptions exception.BookNotFound, exception.BooksNotFound, and
exception.OrderException returned by the Duke’s Bookstore application to
errorpage.html.
Sharing Information
Web components, like most objects, usually work with other objects to accomplish their tasks. There are several ways they can do this. They can use private
helper objects (for example, JavaBeans components), they can share objects that
are attributes of a public scope, they can use a database, and they can invoke
other Web resources. The Java Servlet technology mechanisms that allow a Web
component to invoke other Web resources are described in Invoking Other Web
Resources (page 465).
Using Scope Objects
Collaborating Web components share information via objects maintained as
attributes of four scope objects. These attributes are accessed with the
USING SCOPE OBJECTS
[get|set]Attribute
methods of the class representing the scope. Table 11–4
lists the scope objects.
Table 11–4
Scope
Object
Scope Objects
Class
Accessible From
Web context
javax.servlet.
ServletContext
Web components within a Web context. See
Accessing the Web Context (page 469).
session
javax.servlet.
http.HttpSession
Web components handling a request that belongs to
the session. See Maintaining Client
State (page 470).
subtype of
request
page
javax.servlet.
ServletRequest
Web components handling the request.
javax.servlet.
jsp.JspContext
The JSP page that creates the object. See Implicit
Objects (page 493).
449
450
JAVA SERVLET TECHNOLOGY
Figure 11–1 shows the scoped attributes maintained by the Duke’s Bookstore
application.
Figure 11–1 Duke’s Bookstore Scoped Attributes
Controlling Concurrent Access to
Shared Resources
In a multithreaded server, it is possible for shared resources to be accessed concurrently. Besides scope object attributes, shared resources include in-memory
data such as instance or class variables, and external objects such as files, database connections, and network connections. Concurrent access can arise in several situations:
• Multiple Web components accessing objects stored in the Web context
• Multiple Web components accessing objects stored in a session
• Multiple threads within a Web component accessing instance variables. A
Web container will typically create a thread to handle each request. If you
want to ensure that a servlet instance handles only one request at a time, a
servlet can implement the SingleThreadModel interface. If a servlet
implements this interface, you are guaranteed that no two threads will execute concurrently in the servlet’s service method. A Web container can
ACCESSING DATABASES
implement this guarantee by synchronizing access to a single instance of
the servlet, or by maintaining a pool of Web component instances and dispatching each new request to a free instance. This interface does not prevent synchronization problems that result from Web components
accessing shared resources such as static class variables or external
objects. In addition, the Servlet 2.4 specification deprecates SingleThreadModel.
When resources can be accessed concurrently, they can be used in an inconsistent fashion. To prevent this, you must control the access using the synchronization techniques described in the Threads lesson in The Java Tutorial.
In the previous section we showed five scoped attributes shared by more than
one servlet: bookDB, cart, currency, hitCounter, and orderCounter. The
bookDB attribute is discussed in the next section. The cart, currency, and counters
can be set and read by multiple multithreaded servlets. To prevent these objects
from being used inconsistently, access is controlled by synchronized methods.
For example, here is the util.Counter class:
public class Counter {
private int counter;
public Counter() {
counter = 0;
}
public synchronized int getCounter() {
return counter;
}
public synchronized int setCounter(int c) {
counter = c;
return counter;
}
public synchronized int incCounter() {
return(++counter);
}
}
Accessing Databases
Data that is shared between Web components and is persistent between invocations of a Web application is usually maintained by a database. Web components
use the JDBC 2.0 API to access relational databases. The data for the bookstore
application is maintained in a database and accessed through the helper class
database.BookDB. For example, ReceiptServlet invokes the BookDB.buy-
451
452
JAVA SERVLET TECHNOLOGY
Books method to update the book inventory when a user makes a purchase. The
buyBooks method invokes buyBook for each book contained in the shopping
cart. To ensure the order is processed in its entirety, the calls to buyBook are
wrapped in a single JDBC transaction. The use of the shared database connection is synchronized via the [get|release]Connection methods.
public void buyBooks(ShoppingCart cart) throws OrderException {
Collection items = cart.getItems();
Iterator i = items.iterator();
try {
getConnection();
con.setAutoCommit(false);
while (i.hasNext()) {
ShoppingCartItem sci = (ShoppingCartItem)i.next();
BookDetails bd = (BookDetails)sci.getItem();
String id = bd.getBookId();
int quantity = sci.getQuantity();
buyBook(id, quantity);
}
con.commit();
con.setAutoCommit(true);
releaseConnection();
} catch (Exception ex) {
try {
con.rollback();
releaseConnection();
throw new OrderException("Transaction failed: " +
ex.getMessage());
} catch (SQLException sqx) {
releaseConnection();
throw new OrderException("Rollback failed: " +
sqx.getMessage());
}
}
}
Initializing a Servlet
After the Web container loads and instantiates the servlet class and before it
delivers requests from clients, the Web container initializes the servlet. You can
customize this process to allow the servlet to read persistent configuration data,
initialize resources, and perform any other one-time activities by overriding the
init method of the Servlet interface. A servlet that cannot complete its initialization process should throw UnavailableException.
WRITING SERVICE METHODS
All the servlets that access the bookstore database (BookStoreServlet, CatalogServlet, BookDetailsServlet, and ShowCartServlet) initialize a variable
in their init method that points to the database helper object created by the Web
context listener:
public class CatalogServlet extends HttpServlet {
private BookDB bookDB;
public void init() throws ServletException {
bookDB = (BookDB)getServletContext().
getAttribute("bookDB");
if (bookDB == null) throw new
UnavailableException("Couldn't get database.");
}
}
Writing Service Methods
The service provided by a servlet is implemented in the service method of a
GenericServlet, the doMethod methods (where Method can take the value Get,
Delete, Options, Post, Put, Trace) of an HttpServlet, or any other protocolspecific methods defined by a class that implements the Servlet interface. In the
rest of this chapter, the term service method will be used for any method in a
servlet class that provides a service to a client.
The general pattern for a service method is to extract information from the
request, access external resources, and then populate the response based on that
information.
For HTTP servlets, the correct procedure for populating the response is to first
retrieve an output stream from the response, then fill in the response headers, and
finally write any body content to the output stream. Response headers must
always be set before the response has been committed. Any attempt to set/add
headers after the response has been committed will be ignored by the Web container. The next two sections describe how to get information from requests and
generate responses.
453
454
JAVA SERVLET TECHNOLOGY
Getting Information from Requests
A request contains data passed between a client and the servlet. All requests
implement the ServletRequest interface. This interface defines methods for
accessing the following information:
• Parameters, which are typically used to convey information between clients and servlets
• Object-valued attributes, which are typically used to pass information
between the servlet container and a servlet or between collaborating servlets
• Information about the protocol used to communicate the request and the
client and server involved in the request
• Information relevant to localization
For example, in CatalogServlet the identifier of the book that a customer
wishes to purchase is included as a parameter to the request. The following code
fragment illustrates how to use the getParameter method to extract the identifier:
String bookId = request.getParameter("Add");
if (bookId != null) {
BookDetails book = bookDB.getBookDetails(bookId);
You can also retrieve an input stream from the request and manually parse the
data. To read character data, use the BufferedReader object returned by the
request’s getReader method. To read binary data, use the ServletInputStream
returned by getInputStream.
HTTP servlets are passed an HTTP request object, HttpServletRequest, which
contains the request URL, HTTP headers, query string, and so on.
An HTTP request URL contains the following parts:
http://[host]:[port][request path]?[query string]
The request path is further composed of the following elements:
• Context path: A concatenation of a forward slash / with the context root
of the servlet’s Web application.
• Servlet path: The path section that corresponds to the component alias
that activated this request. This path starts with a forward slash /.
455
GETTING INFORMATION FROM REQUESTS
• Path info: The part of the request path that is not part of the context path
or the servlet path.
If the context path is /catalog and for the aliases listed in Table 11–5, Table 11–
6 gives some examples of how the URL will be parsed.
Table 11–5 Aliases
Pattern
Servlet
/lawn/*
LawnServlet
/*.jsp
JSPServlet
Table 11–6 Request Path Elements
Request Path
Servlet Path
Path Info
/catalog/lawn/index.html
/lawn
/index.html
/catalog/help/feedback.jsp
/help/feedback.jsp
null
Query strings are composed of a set of parameters and values. Individual parameters are retrieved from a request with the getParameter method. There are two
ways to generate query strings:
• A query string can explicitly appear in a Web page. For example, an
HTML page generated by the CatalogServlet could contain the link
<a href="/bookstore1/catalog?Add=101">Add To Cart</a>. CatalogServlet extracts the parameter named Add as follows:
String bookId = request.getParameter("Add");
• A query string is appended to a URL when a form with a GET HTTP
method is submitted. In the Duke’s Bookstore application, CashierServlet generates a form, then a user name input to the form is appended to the
URL that maps to ReceiptServlet, and finally ReceiptServlet extracts
the user name using the getParameter method.
456
JAVA SERVLET TECHNOLOGY
Constructing Responses
A response contains data passed between a server and the client. All responses
implement the ServletResponse interface. This interface defines methods that
allow you to do the following:
• Retrieve an output stream to use to send data to the client. To send character data, use the PrintWriter returned by the response’s getWriter
method. To send binary data in a MIME body response, use the ServletOutputStream returned by getOutputStream. To mix binary and text
data, for example, to create a multipart response, use a ServletOutputStream and manage the character sections manually.
• Indicate the content type (for example, text/html), being returned by the
response with the setContentType(String) method. This method must
be called before the response is committed. A registry of content type
names is kept by the Internet Assigned Numbers Authority (IANA) at:
http://www.iana.org/assignments/media-types/
• Indicate whether to buffer output with the setBufferSize(int) method.
By default, any content written to the output stream is immediately sent to
the client. Buffering allows content to be written before anything is actually sent back to the client, thus providing the servlet with more time to set
appropriate status codes and headers or forward to another Web resource.
The method must be called before any content is written or the response is
committed.
• Set localization information such as locale and character encoding. See
Chapter 16 for details.
HTTP response objects, HttpServletResponse, have fields representing HTTP
headers such as
• Status codes, which are used to indicate the reason a request is not satisfied
or that a request has been redirected.
• Cookies, which are used to store application-specific information at the client. Sometimes cookies are used to maintain an identifier for tracking a
user’s session (see Session Tracking, page 472).
In Duke’s Bookstore, BookDetailsServlet generates an HTML page that displays information about a book that the servlet retrieves from a database. The
servlet first sets response headers: the content type of the response and the buffer
size. The servlet buffers the page content because the database access can generate an exception that would cause forwarding to an error page. By buffering the
response, the client will not see a concatenation of part of a Duke’s Bookstore
CONSTRUCTING RESPONSES
page with the error page should an error occur. The doGet method then retrieves
a PrintWriter from the response.
For filling in the response, the servlet first dispatches the request to BannerServwhich generates a common banner for all the servlets in the application.
This process is discussed in Including Other Resources in the
Response (page 466). Then the servlet retrieves the book identifier from a
request parameter and uses the identifier to retrieve information about the book
from the bookstore database. Finally, the servlet generates HTML markup that
describes the book information and commits the response to the client by calling
the close method on the PrintWriter.
let,
public class BookDetailsServlet extends HttpServlet {
public void doGet (HttpServletRequest request,
HttpServletResponse response)
throws ServletException, IOException {
// set headers before accessing the Writer
response.setContentType("text/html");
response.setBufferSize(8192);
PrintWriter out = response.getWriter();
// then write the response
out.println("<html>" +
"<head><title>+
messages.getString("TitleBookDescription")
+</title></head>");
// Get the dispatcher; it gets the banner to the user
RequestDispatcher dispatcher =
getServletContext().
getRequestDispatcher("/banner");
if (dispatcher != null)
dispatcher.include(request, response);
//Get the identifier of the book to display
String bookId = request.getParameter("bookId");
if (bookId != null) {
// and the information about the book
try {
BookDetails bd =
bookDB.getBookDetails(bookId);
...
//Print out the information obtained
out.println("<h2>" + bd.getTitle() + "</h2>" +
...
} catch (BookNotFoundException ex) {
response.resetBuffer();
457
458
JAVA SERVLET TECHNOLOGY
throw new ServletException(ex);
}
}
out.println("</body></html>");
out.close();
}
}
BookDetailsServlet
generates a page that looks like:
Figure 11–2 Book Details
Filtering Requests and Responses
A filter is an object that can transform the header and content (or both) of a
request or response. Filters differ from Web components in that they usually do
PROGRAMMING FILTERS
not themselves create a response. Instead, a filter provides functionality that can
be “attached” to any kind of Web resource. As a consequence, a filter should not
have any dependencies on a Web resource for which it is acting as a filter, so that
it can be composable with more than one type of Web resource. The main tasks
that a filter can perform are as follows:
• Query the request and act accordingly.
• Block the request and response pair from passing any further.
• Modify the request headers and data. You do this by providing a customized version of the request.
• Modify the response headers and data. You do this by providing a customized version of the response.
• Interact with external resources.
Applications of filters include authentication, logging, image conversion, data
compression, encryption, tokenizing streams, and XML transformations, and so
on.
You can configure a Web resource to be filtered by a chain of zero, one, or more
filters in a specific order. This chain is specified when the Web application containing the component is deployed and is instantiated when a Web container
loads the component.
In summary, the tasks involved in using filters include
• Programming the filter
• Programming customized requests and responses
• Specifying the filter chain for each Web resource
Programming Filters
The filtering API is defined by the Filter, FilterChain, and FilterConfig
interfaces in the javax.servlet package. You define a filter by implementing
the Filter interface. The most important method in this interface is the doFil-
459
460
JAVA SERVLET TECHNOLOGY
method, which is passed request, response, and filter chain objects. This
method can perform the following actions:
ter
• Examine the request headers.
• Customize the request object if it wishes to modify request headers or data.
• Customize the response object if it wishes to modify response headers or
data.
• Invoke the next entity in the filter chain. If the current filter is the last filter
in the chain that ends with the target Web component or static resource, the
next entity is the resource at the end of the chain; otherwise, it is the next
filter that was configured in the WAR. It invokes the next entity by calling
the doFilter method on the chain object (passing in the request and
response it was called with, or the wrapped versions it may have created).
Alternatively, it can choose to block the request by not making the call to
invoke the next entity. In the latter case, the filter is responsible for filling
out the response.
• Examine response headers after it has invoked the next filter in the chain
• Throw an exception to indicate an error in processing
In addition to doFilter, you must implement the init and destroy methods.
The init method is called by the container when the filter is instantiated. If you
wish to pass initialization parameters to the filter, you retrieve them from the
FilterConfig object passed to init.
The Duke’s Bookstore application uses the filters HitCounterFilter and
OrderFilter to increment and log the value of a counter when the entry and
receipt servlets are accessed.
In the doFilter method, both filters retrieve the servlet context from the filter
configuration object so that they can access the counters stored as context
attributes. After the filters have completed application-specific processing, they
invoke doFilter on the filter chain object passed into the original doFilter
method. The elided code is discussed in the next section.
public final class HitCounterFilter implements Filter {
private FilterConfig filterConfig = null;
public void init(FilterConfig filterConfig)
throws ServletException {
this.filterConfig = filterConfig;
}
public void destroy() {
this.filterConfig = null;
PROGRAMMING CUSTOMIZED REQUESTS AND RESPONSES
}
public void doFilter(ServletRequest request,
ServletResponse response, FilterChain chain)
throws IOException, ServletException {
if (filterConfig == null)
return;
StringWriter sw = new StringWriter();
PrintWriter writer = new PrintWriter(sw);
Counter counter = (Counter)filterConfig.
getServletContext().
getAttribute("hitCounter");
writer.println();
writer.println("===============");
writer.println("The number of hits is: " +
counter.incCounter());
writer.println("===============");
// Log the resulting string
writer.flush();
System.out.println(sw.getBuffer().toString());
...
chain.doFilter(request, wrapper);
...
}
}
Programming Customized Requests and
Responses
There are many ways for a filter to modify a request or response. For example, a
filter could add an attribute to the request or insert data in the response. In the
Duke’s Bookstore example, HitCounterFilter inserts the value of the counter
into the response.
A filter that modifies a response must usually capture the response before it is
returned to the client. The way to do this is to pass a stand-in stream to the
servlet that generates the response. The stand-in stream prevents the servlet from
closing the original response stream when it completes and allows the filter to
modify the servlet’s response.
To pass this stand-in stream to the servlet, the filter creates a response wrapper
that overrides the getWriter or getOutputStream method to return this stand-in
stream. The wrapper is passed to the doFilter method of the filter chain. Wrapper methods default to calling through to the wrapped request or response object.
This approach follows the well-known Wrapper or Decorator pattern described
461
462
JAVA SERVLET TECHNOLOGY
in Design Patterns, Elements of Reusable Object-Oriented Software (AddisonWesley, 1995). The following sections describe how the hit counter filter
described earlier and other types of filters use wrappers.
To override request methods, you wrap the request in an object that extends
ServletRequestWrapper or HttpServletRequestWrapper. To override
response methods, you wrap the response in an object that extends ServletResponseWrapper or HttpServletResponseWrapper.
wraps the response in a CharResponseWrapper. The
wrapped response is passed to the next object in the filter chain, which is BookStoreServlet. BookStoreServlet writes its response into the stream created
by CharResponseWrapper. When chain.doFilter returns, HitCounterFilter
retrieves the servlet’s response from PrintWriter and writes it to a buffer. The
filter inserts the value of the counter into the buffer, resets the content length
header of the response, and finally writes the contents of the buffer to the
response stream.
HitCounterFilter
PrintWriter out = response.getWriter();
CharResponseWrapper wrapper = new CharResponseWrapper(
(HttpServletResponse)response);
chain.doFilter(request, wrapper);
CharArrayWriter caw = new CharArrayWriter();
caw.write(wrapper.toString().substring(0,
wrapper.toString().indexOf("</body>")-1));
caw.write("<p>\n<center>" +
messages.getString("Visitor") + "<font color='red'>" +
counter.getCounter() + "</font></center>");
caw.write("\n</body></html>");
response.setContentLength(caw.toString().getBytes().length);
out.write(caw.toString());
out.close();
public class CharResponseWrapper extends
HttpServletResponseWrapper {
private CharArrayWriter output;
public String toString() {
return output.toString();
}
public CharResponseWrapper(HttpServletResponse response){
super(response);
output = new CharArrayWriter();
}
SPECIFYING FILTER MAPPINGS
public PrintWriter getWriter(){
return new PrintWriter(output);
}
}
Figure 11–3 shows the entry page for Duke’s Bookstore with the hit counter.
Figure 11–3 Duke’s Bookstore
Specifying Filter Mappings
A Web container uses filter mappings to decide how to apply filters to Web
resources. A filter mapping matches a filter to a Web component by name or to
Web resources by URL pattern. The filters are invoked in the order in which filter mappings appear in the filter mapping list of a WAR. You specify a filter
463
464
JAVA SERVLET TECHNOLOGY
mapping list for a WAR using a deploytool or by coding them directly in the
Web application deployment descriptor as follows
• Declare the filter. This element creates a name for the filter and declares
the filter’s implementation class and initialization parameters.
• Map the filter to a Web resource by name or by URL pattern.
• Constrain how the filter will be applied to requests by choosing one of the
enumerated dispatcher options:
• REQUEST-Only when the request come directly from the client.
• FORWARD-Only when the request has been forwarded to a component
(see Transferring Control to Another Web Component, page 468).
• INCLUDE-Only when the request is being processed by a component that
has been included (see Including Other Resources in the
Response, page 466).
• ERROR-Only when the request is being processed with the error page
mechanism (see Handling Errors, page 448).
You can direct the filter to be applied in any combination of the preceding
situations by including multiple dispatcher elements. If no elements are
specified, the default option is REQUEST.
If you want to log every request to a Web application, you would map the hit
counter filter to the URL pattern /*. Step 12. in The Example
Servlets (page 440) shows how to create and map the filters for the Duke’s
Bookstore application. Table 11–7 summarizes the filter definition and mapping
list for the Duke’s Bookstore application. The filters are matched by servlet
name and each filter chain contains only one filter.
Table 11–7 Duke’s Bookstore Filter Definition and Mapping List
Filter
Class
Servlet
HitCounterFilter
filters.HitCounterFilter
BookStoreServlet
OrderFilter
filters.OrderFilter
ReceiptServlet
You can map a filter to one or more Web resources and you can map more than
one filter to a Web resource. This is illustrated in Figure 11–4, where filter F1 is
INVOKING OTHER WEB RESOURCES
mapped to servlets S1, S2, and S3, filter F2 is mapped to servlet S2, and filter F3
is mapped to servlets S1 and S2.
Figure 11–4 Filter to Servlet Mapping
Recall that a filter chain is one of the objects passed to the doFilter method of a
filter. This chain is formed indirectly via filter mappings. The order of the filters
in the chain is the same as the order in which filter mappings appear in the Web
application deployment descriptor.
When a filter is mapped to servlet S1, the Web container invokes the doFilter
method of F1. The doFilter method of each filter in S1’s filter chain is invoked
by the preceding filter in the chain via the chain.doFilter method. Since S1’s
filter chain contains filters F1 and F3, F1’s call to chain.doFilter invokes the
doFilter method of filter F3. When F3’s doFilter method completes, control
returns to F1’s doFilter method.
Invoking Other Web Resources
Web components can invoke other Web resources in two ways: indirectly and
directly. A Web component indirectly invokes another Web resource when it
embeds a URL that points to another Web component in content returned to a
client. In the Duke’s Bookstore application, most Web components contain
embedded URLs that point to other Web components. For example, ShowCart-
465
466
JAVA SERVLET TECHNOLOGY
Servlet indirectly invokes
bookstore1/catalog.
the CatalogServlet through the embedded URL /
A Web component can also directly invoke another resource while it is executing. There are two possibilities: it can include the content of another resource, or
it can forward a request to another resource.
To invoke a resource available on the server that is running a Web component,
you must first obtain a RequestDispatcher object using the getRequestDispatcher("URL") method.
You can get a RequestDispatcher object from either a request or the Web context, however, the two methods have slightly different behavior. The method
takes the path to the requested resource as an argument. A request can take a relative path (that is, one that does not begin with a /), but the Web context requires
an absolute path. If the resource is not available, or if the server has not implemented a RequestDispatcher object for that type of resource, getRequestDispatcher will return null. Your servlet should be prepared to deal with this
condition.
Including Other Resources in the
Response
It is often useful to include another Web resource, for example, banner content or
copyright information, in the response returned from a Web component. To
include another resource, invoke the include method of a RequestDispatcher
object:
include(request, response);
If the resource is static, the include method enables programmatic server-side
includes. If the resource is a Web component, the effect of the method is to send
the request to the included Web component, execute the Web component, and
then include the result of the execution in the response from the containing servlet. An included Web component has access to the request object, but it is limited
in what it can do with the response object:
• It can write to the body of the response and commit a response.
• It cannot set headers or call any method (for example, setCookie) that
affects the headers of the response.
INCLUDING OTHER RESOURCES IN THE RESPONSE
The banner for the Duke’s Bookstore application is generated by BannerServlet. Note that both the doGet and doPost methods are implemented because
BannerServlet can be dispatched from either method in a calling servlet.
public class BannerServlet extends HttpServlet {
public void doGet (HttpServletRequest request,
HttpServletResponse response)
throws ServletException, IOException {
PrintWriter out = response.getWriter();
out.println("<body bgcolor=\"#ffffff\">" +
"<center>" + "<hr> <br> " + "<h1>" +
"<font size=\"+3\" color=\"#CC0066\">Duke's </font>" +
<img src=\"" + request.getContextPath() +
"/duke.books.gif\">" +
"<font size=\"+3\" color=\"black\">Bookstore</font>" +
"</h1>" + "</center>" + "<br> <hr> <br> ");
}
public void doPost (HttpServletRequest request,
HttpServletResponse response)
throws ServletException, IOException {
PrintWriter out = response.getWriter();
out.println("<body bgcolor=\"#ffffff\">" +
"<center>" + "<hr> <br> " + "<h1>" +
"<font size=\"+3\" color=\"#CC0066\">Duke's </font>" +
<img src=\"" + request.getContextPath() +
"/duke.books.gif\">" +
"<font size=\"+3\" color=\"black\">Bookstore</font>" +
"</h1>" + "</center>" + "<br> <hr> <br> ");
}
}
Each servlet in the Duke’s Bookstore application includes the result from Banwith the following code:
nerServlet
RequestDispatcher dispatcher =
getServletContext().getRequestDispatcher("/banner");
if (dispatcher != null)
dispatcher.include(request, response);
}
467
468
JAVA SERVLET TECHNOLOGY
Transferring Control to Another Web
Component
In some applications, you might want to have one Web component do preliminary processing of a request and have another component generate the response.
For example, you might want to partially process a request and then transfer to
another component depending on the nature of the request.
To transfer control to another Web component, you invoke the forward method
of a RequestDispatcher. When a request is forwarded, the request URI is set to
the path of the forwarded page. The original URI and its constituent parts are
saved as a request attributes javax.servlet.forward.[request_uri|context-path|servlet_path|path_info|query_string]. The Dispatcher servlet, used by a version of the Duke’s Bookstore application described in The
Example JSP Pages (page 550), saves the path information from the original
URL, retrieves a RequestDispatcher from the request, and then forwards to the
JSP page template.jsp.
public class Dispatcher extends HttpServlet {
public void doGet(HttpServletRequest request,
HttpServletResponse response) {
RequestDispatcher dispatcher = request.
getRequestDispatcher("/template.jsp");
if (dispatcher != null)
dispatcher.forward(request, response);
}
public void doPost(HttpServletRequest request,
...
}
The forward method should be used to give another resource responsibility for
replying to the user. If you have already accessed a ServletOutputStream or
PrintWriter object within the servlet, you cannot use this method; it throws an
IllegalStateException.
ACCESSING THE WEB CONTEXT
Accessing the Web Context
The context in which Web components execute is an object that implements the
ServletContext interface. You retrieve the Web context with the getServletContext method. The Web context provides methods for accessing:
•
•
•
•
Initialization parameters
Resources associated with the Web context
Object-valued attributes
Logging capabilities
The Web context is used by the Duke’s Bookstore filters filters.HitCounterand OrderFilter, which were discussed in Filtering Requests and
Responses (page 458). The filters store a counter as a context attribute. Recall
from Controlling Concurrent Access to Shared Resources (page 450) that the
counter’s access methods are synchronized to prevent incompatible operations
by servlets that are running concurrently. A filter retrieves the counter object
with the context’s getAttribute method. The incremented value of the counter
is recorded in the log.
Filter
public final class HitCounterFilter implements Filter {
private FilterConfig filterConfig = null;
public void doFilter(ServletRequest request,
ServletResponse response, FilterChain chain)
throws IOException, ServletException {
...
StringWriter sw = new StringWriter();
PrintWriter writer = new PrintWriter(sw);
ServletContext context = filterConfig.
getServletContext();
Counter counter = (Counter)context.
getAttribute("hitCounter");
...
writer.println("The number of hits is: " +
counter.incCounter());
...
System.out.println(sw.getBuffer().toString());
...
}
}
469
470
JAVA SERVLET TECHNOLOGY
Maintaining Client State
Many applications require a series of requests from a client to be associated with
one another. For example, the Duke’s Bookstore application saves the state of a
user’s shopping cart across requests. Web-based applications are responsible for
maintaining such state, called a session, because the HTTP protocol is stateless.
To support applications that need to maintain state, Java Servlet technology provides an API for managing sessions and allows several mechanisms for implementing sessions.
Accessing a Session
Sessions are represented by an HttpSession object. You access a session by
calling the getSession method of a request object. This method returns the current session associated with this request, or, if the request does not have a session, it creates one.
Associating Attributes with a Session
You can associate object-valued attributes with a session by name. Such
attributes are accessible by any Web component that belongs to the same Web
context and is handling a request that is part of the same session.
The Duke’s Bookstore application stores a customer’s shopping cart as a session
attribute. This allows the shopping cart to be saved between requests and also
allows cooperating servlets to access the cart. CatalogServlet adds items to the
cart; ShowCartServlet displays, deletes items from, and clears the cart; and
CashierServlet retrieves the total cost of the books in the cart.
public class CashierServlet extends HttpServlet {
public void doGet (HttpServletRequest request,
HttpServletResponse response)
throws ServletException, IOException {
// Get the user's session and shopping cart
HttpSession session = request.getSession();
ShoppingCart cart =
(ShoppingCart)session.
SESSION MANAGEMENT
getAttribute("cart");
...
// Determine the total price of the user's books
double total = cart.getTotal();
Notifying Objects That Are Associated with a
Session
Recall that your application can notify Web context and session listener objects
of servlet life cycle events (Handling Servlet Life Cycle Events, page 446). You
can also notify objects of certain events related to their association with a session
such as the following:
• When the object is added to or removed from a session. To receive this
notification, your object must implement the javax.http.HttpSessionBindingListener interface.
• When the session to which the object is attached will be passivated or activated. A session will be passivated or activated when it is moved between
virtual machines or saved to and restored from persistent storage. To
receive this notification, your object must implement the
javax.http.HttpSessionActivationListener interface.
Session Management
Since there is no way for an HTTP client to signal that it no longer needs a session, each session has an associated timeout so that its resources can be
reclaimed. The timeout period can be accessed with a session’s [get|set]MaxInactiveInterval methods. You can also set the time-out period with deploytool:
1.
2.
3.
4.
Select the WAR.
Select the General tab.
Click the Advanced Setting button.
Enter the time-out period in the Session timeout field.
To ensure that an active session is not timed out, you should periodically access
the session via service methods because this resets the session’s time-to-live
counter.
471
472
JAVA SERVLET TECHNOLOGY
When a particular client interaction is finished, you use the session’s invalimethod to invalidate a session on the server side and remove any session
data.
date
The bookstore application’s ReceiptServlet is the last servlet to access a client’s session, so it has responsibility for invalidating the session:
public class ReceiptServlet extends HttpServlet {
public void doPost(HttpServletRequest request,
HttpServletResponse response)
throws ServletException, IOException {
// Get the user's session and shopping cart
HttpSession session = request.getSession();
// Payment received -- invalidate the session
session.invalidate();
...
Session Tracking
A Web container can use several methods to associate a session with a user, all of
which involve passing an identifier between the client and server. The identifier
can be maintained on the client as a cookie or the Web component can include
the identifier in every URL that is returned to the client.
If your application makes use of session objects, you must ensure that session
tracking is enabled by having the application rewrite URLs whenever the client
turns off cookies. You do this by calling the response’s encodeURL(URL) method
on all URLs returned by a servlet. This method includes the session ID in the
URL only if cookies are disabled; otherwise, it returns the URL unchanged.
The doGet method of ShowCartServlet encodes the three URLs at the bottom
of the shopping cart display page as follows:
out.println("<p> <p><strong><a href=\"" +
response.encodeURL(request.getContextPath() +
"/bookcatalog") +
"\">" + messages.getString("ContinueShopping") +
"</a> " +
"<a href=\"" +
response.encodeURL(request.getContextPath() +
"/bookcashier") +
"\">" + messages.getString("Checkout") +
"</a> " +
"<a href=\"" +
FINALIZING A SERVLET
response.encodeURL(request.getContextPath() +
"/bookshowcart?Clear=clear") +
"\">" + messages.getString("ClearCart") +
"</a></strong>");
If cookies are turned off, the session is encoded in the Check Out URL as follows:
http://localhost:1024/bookstore1/cashier;
jsessionid=c0o7fszeb1
If cookies are turned on, the URL is simply
http://localhost:1024/bookstore1/cashier
Finalizing a Servlet
When a servlet container determines that a servlet should be removed from service (for example, when a container wants to reclaim memory resources, or
when it is being shut down), it calls the destroy method of the Servlet interface. In this method, you release any resources the servlet is using and save any
persistent state. The following destroy method releases the database object created in the init method described in Initializing a Servlet (page 452):
public void destroy() {
bookDB = null;
}
All of a servlet’s service methods should be complete when a servlet is removed.
The server tries to ensure this by calling the destroy method only after all service requests have returned, or after a server-specific grace period, whichever
comes first. If your servlet has operations that take a long time to run (that is,
operations that may run longer than the server’s grace period), the operations
could still be running when destroy is called. You must make sure that any
threads still handling client requests complete; the remainder of this section
describes how to:
• Keep track of how many threads are currently running the service method
• Provide a clean shutdown by having the destroy method notify long-running threads of the shutdown and wait for them to complete
• Have the long-running methods poll periodically to check for shutdown
and, if necessary, stop working, clean up, and return
473
474
JAVA SERVLET TECHNOLOGY
Tracking Service Requests
To track service requests, include in your servlet class a field that counts the
number of service methods that are running. The field should have synchronized
access methods to increment, decrement, and return its value.
public class ShutdownExample extends HttpServlet {
private int serviceCounter = 0;
...
//Access methods for serviceCounter
protected synchronized void enteringServiceMethod() {
serviceCounter++;
}
protected synchronized void leavingServiceMethod() {
serviceCounter--;
}
protected synchronized int numServices() {
return serviceCounter;
}
}
The service method should increment the service counter each time the method
is entered and should decrement the counter each time the method returns. This
is one of the few times that your HttpServlet subclass should override the service method. The new method should call super.service to preserve all of the
original service method’s functionality:
protected void service(HttpServletRequest req,
HttpServletResponse resp)
throws ServletException,IOException {
enteringServiceMethod();
try {
super.service(req, resp);
} finally {
leavingServiceMethod();
}
}
Notifying Methods to Shut Down
To ensure a clean shutdown, your destroy method should not release any shared
resources until all of the service requests have completed. One part of doing this
is to check the service counter. Another part is to notify the long-running meth-
CREATING POLITE LONG-RUNNING METHODS
ods that it is time to shut down. For this notification another field is required. The
field should have the usual access methods:
public class ShutdownExample extends HttpServlet {
private boolean shuttingDown;
...
//Access methods for shuttingDown
protected synchronized void setShuttingDown(boolean flag) {
shuttingDown = flag;
}
protected synchronized boolean isShuttingDown() {
return shuttingDown;
}
}
An example of the destroy method using these fields to provide a clean shutdown follows:
public void destroy() {
/* Check to see whether there are still service methods /*
/* running, and if there are, tell them to stop. */
if (numServices() > 0) {
setShuttingDown(true);
}
/* Wait for the service methods to stop. */
while(numServices() > 0) {
try {
Thread.sleep(interval);
} catch (InterruptedException e) {
}
}
}
Creating Polite Long-Running Methods
The final step in providing a clean shutdown is to make any long-running methods behave politely. Methods that might run for a long time should check the
value of the field that notifies them of shutdowns and should interrupt their work,
if necessary.
public void doPost(...) {
...
for(i = 0; ((i < lotsOfStuffToDo) &&
!isShuttingDown()); i++) {
475
476
JAVA SERVLET TECHNOLOGY
try {
partOfLongRunningOperation(i);
} catch (InterruptedException e) {
...
}
}
}
Further Information
For further information on Java Servlet technology see:
• Java Servlet 2.4 Specification
http://java.sun.com/products/servlet/download.html#specs
• The Java Servlets Web site
http://java.sun.com/products/servlet.
12
JavaServer Pages
Technology
Stephanie Bodoff
J
AVASERVER Pages (JSP) technology allows you to easily create Web content
that has both static and dynamic components. JSP technology makes available
all the dynamic capabilities of Java Servlet technology but provides a more natural approach to creating static content. The main features of JSP technology are
• A language for developing JSP pages, which are text-based documents that
describe how to process a request and construct a response
• An expression language for accessing server-side objects
• Mechanisms for defining extensions to the JSP language
JSP technology also contains an API that is used by developers of Web containers, but this API is not covered in this tutorial.
What Is a JSP Page?
A JSP page is a text document that contains two types of text: static template
data, which can be expressed in any text-based format, such as HTML, SVG,
WML, and XML, and JSP elements, which construct dynamic content.
The JSP elements in a JSP page can be expressed in two syntaxes: standard and
XML, though an individual page can only use one syntax. A JSP page in XML
syntax is an XML document and can be manipulated by tools and APIs for XML
477
478
JAVASERVER PAGES TECHNOLOGY
documents. The chapters in this tutorial that cover JSP technology currently document only the standard syntax. The XML syntax will be addressed in a future
release of the tutorial. A syntax card and reference that summarizes both syntaxes is available at
http://java.sun.com/products/jsp/docs.html#syntax
Example
The Web page in Figure 12–1 is a form that allows you to select a locale and displays the date in a manner appropriate to the locale.
Figure 12–1 Localized Date Form
The source code for this example is in the <INSTALL>/j2eetutorial14/
directory. The JSP page, index.jsp, used to create the
form appears below; it is a typical mixture of static HTML markup and JSP elements. If you have developed Web pages, you are probably familiar with the
HTML document structure statements (<head>, <body>, and so on) and the
HTML statements that create a form (<form>) and a menu (<select>).
examples/web/date/
EXAMPLE
The lines in bold in the example code contain the following types of JSP constructs:
• A page directive (<%@page ... %>) sets the content type returned by the
page.
• Tag library directives (<%@taglib ... %>) import custom tag libraries.
• jsp:useBean creates an object containing a collection of locales and initializes an identifier that points to that object.
• JSP expression language expressions (${ }) retrieve the value of object
properties. The value of an are used to set tag attribute values.
• Custom tags set a variable (c:set), iterate over a collection of locale
names (c:forEach), and conditionally insert HTML text into the response
(c:if, c:choose, c:when, c:otherwise).
• jsp:setProperty sets the value of an object property.
• A function (f:equals) tests the equality of an attribute and the current
item of a collection. (Note: a built-in == operator is usually used to test
equality).
<%@ page contentType="text/html; charset=UTF-8" %>
<%@ taglib uri="http://java.sun.com/jsp/jstl/core"
prefix="c" %>
<%@ taglib uri="/functions" prefix="f" %>
<html>
<head><title>Localized Dates</title></head>
<body bgcolor="white">
<jsp:useBean id="locales" scope="application"
class="mypkg.MyLocales"/>
<form name="localeForm" action="index.jsp" method="post">
<c:set var="selectedLocaleString" value="${param.locale}" />
<c:set var="selectedFlag"
value="${!empty selectedLocaleString}" />
<b>Locale:</b>
<select name=locale>
<c:forEach var="localeString" items="${locales.localeNames}" >
<c:choose>
<c:when test="${selectedFlag}">
<c:choose>
<c:when
test="${f:equals(selectedLocaleString,
localeString)}" >
<option selected>${localeString}</option>
</c:when>
<c:otherwise>
479
480
JAVASERVER PAGES TECHNOLOGY
<option>${localeString}</option>
</c:otherwise>
</c:choose>
</c:when>
<c:otherwise>
<option>${localeString}</option>
</c:otherwise>
</c:choose>
</c:forEach>
</select>
<input type="submit" name="Submit" value="Get Date">
</form>
<c:if test="${selectedFlag}" >
<jsp:setProperty name="locales"
property="selectedLocaleString"
value="${selectedLocaleString}" />
<jsp:useBean id="date" class="mypkg.MyDate"/>
<jsp:setProperty name="date" property="locale"
value="${locales.selectedLocale}"/>
<b>Date: </b>${date.date}
</c:if>
</body>
</html>
A sample date.war is provided in <INSTALL>/j2eetutorial14/examples/
web/provided-wars/. To build, package, deploy, and execute this example:
1. In a terminal window, go to <INSTALL>/j2eetutorial14/examples/
web/date/.
2. Run asant build. This target will spawn any necessary compilations and
copy files to the <INSTALL>/j2eetutorial14/examples/web/date/
build directory.
3. Start the J2EE application server.
4. Start deploytool.
5. Create a Web application called date by running the New Web Application
Wizard. Select File→New→Web Application WAR.
6. New Web Application Wizard
a. Select the Create New Stand-Alone WAR Module radio button.
b. Click Browse and in the file chooser, navigate to <INSTALL>/docs/
tutorial/examples/web/date/.
c. In the File Name field, enter date.
d. Click Choose Module File.
EXAMPLE
e. In the WAR Display Name field, enter date.
f. In the Deployment Setting frame, set the Context Root field value to /
date.
g. Click Edit.
h. In the Edit Contents dialog, navigate to <INSTALL>/docs/tutorial/
examples/web/date/build/. Select the index.jsp and date.jsp JSP
pages and the mypkg package and click Add, then click OK.
i. Click Next.
j. Select the JSP radio button.
k. Click Next.
l. Select index.jsp from the JSP file combo box.
m.Click Finish.
7. Select File→Save.
8. Deploy the application.
a. Select Tools→Deploy.
b. In the Connection Settings frame, enter the user name and password you
specified when you installed the J2EE 1.4 Application Server.
c. Click OK.
d. A popup dialog will display the results of the deployment. Click Close.
9. Set the character encoding in your browser to UTF-8.
10.Open the URL http://localhost:1024/date in a browser.
You will see a combo box whose entries are locales. Select a locale and click Get
Date. You will see the date expressed in a manner appropriate for that locale.
481
482
JAVASERVER PAGES TECHNOLOGY
The Example JSP Pages
To illustrate JSP technology, this chapter rewrites each servlet in the Duke’s
Bookstore application introduced in The Example Servlets (page 440) as a JSP
page:
Table 12–1 Duke’s Bookstore Example JSP Pages
Function
JSP Pages
Enter the bookstore
bookstore.jsp
Create the bookstore banner
banner.jsp
Browse the books offered for sale
bookcatalog.jsp
Add a book to the shopping cart
bookcatalog.jsp and bookdetails.jsp
Get detailed information on a specific
book
bookdetails.jsp
Display the shopping cart
bookshowcart.jsp
Remove one or more books from the
shopping cart
bookshowcart.jsp
Buy the books in the shopping cart
bookcashier.jsp
Receive an acknowledgement for the
purchase
bookreceipt.jsp
The data for the bookstore application is still maintained in a database. However,
two changes are made to the database helper object database.BookDB:
• The database helper object is rewritten to conform to JavaBeans component design patterns as described in JavaBeans Component Design
Conventions (page 503). This change is made so that JSP pages can access
the helper object using JSP language elements specific to JavaBeans components.
• Instead of accessing the bookstore database directly, the helper object goes
through a data access object database.BookDBAO.
THE EXAMPLE JSP PAGES
The implementation of the database helper object follows. The bean has two
instance variables: the current book and the data access object.
package database;
public class BookDB {
private String bookId = "0";
private BookDBAO database = null;
public BookDB () throws Exception {
}
public void setBookId(String bookId) {
this.bookId = bookId;
}
public void setDatabase(BookDAO database) {
this.database = database;
}
public BookDetails getBookDetails()
throws Exception {
return (BookDetails)database.getBookDetails(bookId);
}
...
}
This version of the Duke’s Bookstore application is organized along the ModelView-Controller (MVC) architecture. The MVC architecture is a widely-used
architectural approach for interactive applications that separates functionality
among application objects so as to minimize the degree of coupling between the
objects. To achieve this, it divides applications into three layers: model, view,
and controller. Each layer handles specific tasks and has responsibilities to the
other layers:
• The model represents business data and business logic or operations that
govern access and modification of this business data. The model notifies
views when it changes and provides the ability for the view to query the
model about its state. It also provides the ability for the controller to access
application functionality encapsulated by the model. In the Duke’s Bookstore application, the shopping cart and database helper object contain the
business logic for the application.
• The view renders the contents of a model. It gets data from the model and
specifies how that data should be presented. It updates data presentation
when the model changes. A view also forwards user input to a controller.
The Duke’s Bookstore JSP pages format the data stored in the sessionscoped shopping cart and the page-scoped database helper object.
483
484
JAVASERVER PAGES TECHNOLOGY
• The controller defines application behavior. It dispatches user requests and
selects views for presentation. It interprets user inputs and maps them into
actions to be performed by the model. In a Web application, user inputs are
HTTP GET and POST requests. A controller selects the next view to display based on the user interactions and the outcome of the model operations. In the Duke’s Bookstore application, the Dispatcher servlet is the
controller. It examines the request URL, creates and initializes a sessionscoped JavaBeans component—the shopping cart—and dispatches
requests to view JSP pages.
Note: When employed in a Web application, the MVC architecture is often referred
to as a Model-2 architecture. The bookstore example discussed in the previous
chapter, which intermixes presentation and business logic, follows what is known
as a Model-1 architecture. The Model-2 architecture is the recommended approach
to designing Web applications.
In addition, this version of the application uses several custom tags from the JavaServer Pages Standard Tag Library (JSTL) (see Chapter 13):
•
•
•
•
and c:choose, c:when, and c:otherwise for flow control
c:set for setting scoped variables
c:url for encoding URLs
fmt:message, fmt:formatNumber, and fmt:formatDate for providing
locale-sensitive messages, numbers, and dates
c:if
Custom tags are the preferred mechanism for performing a wide variety of
dynamic processing tasks, including accessing databases, using enterprise services such as e-mail and directories, and flow control. In earlier versions of JSP
technology, such tasks were performed with JavaBeans components in conjunction with scripting elements (discussed in Chapter 15). Though still available in
JSP 2.0, scripting elements tend to make JSP pages more difficult to maintain
because they mix presentation and logic, which is discouraged in page design.
Custom tags are introduced in Using Custom Tags (page 509) and described in
detail in Chapter 14.
Finally, this version of the example contains an applet to generate a dynamic digital clock in the banner. See Including an Applet (page 515) for a description of
the JSP element that generates HTML for downloading the applet.
1. The source code for the application is located in the <INSTALL>/
j2eetutorial14/examples/web/bookstore2/ directory (see Building
THE EXAMPLE JSP PAGES
and Running the Examples, page xxi). A sample bookstore2.war is provided in <INSTALL>/j2eetutorial14/examples/web/provided-wars/.
To build, package, deploy, and run the example:
1. Build and package the bookstore common files as described in Duke’s
Bookstore Examples (page 101).
2. In a terminal window, go to <INSTALL>/j2eetutorial14/examples/
web/bookstore2/.
3. Run asant build. This target will spawn any necessary compilations and
copy files to the <INSTALL>/j2eetutorial14/examples/web/
bookstore2/build/ directory.
4. Start the J2EE application server.
5. Perform all the operations described in Accessing Databases from Web
Applications, page 102.
6. Start deploytool.
7. Create a Web application called bookstore2 by running the New Web
Application Wizard. Select File→New→Web Application WAR.
8. New Web Application Wizard
e. Select the Create New Stand-Alone WAR Module radio button.
f. Click Browse.
g. In the file chooser, navigate to <INSTALL>/j2eetutorial14/
examples/web/bookstore2/.
h. In the File Name field, enter bookstore2.
i. Click Choose Module File.
j. In the WAR Display Name field, enter bookstore2.
k. In the Context Root field, enter /bookstore2.
l. Click Edit.
m.In the Edit Contents dialog, navigate to <INSTALL>/j2eetutorial14/
examples/web/web/bookstore2/build/. Select the JSP pages bookstore.jsp,
bookdetails.jsp,
bookcatalog.jsp,
bookshowcart.jsp,
bookcashier.jsp,
bookordererror.jsp,
bookreceipt.jsp, duke.books.gif, Dispatcher.class, DigitalClock.class and the database, listeners, and template directories
and click Add.
n. Move /WEB-INF/classes/DigitalClass.class to the root directory
of the WAR. By default, deploytool packages all classes in /WEB-INF/
classes/. Since DigitalClock.class is a client-side class, it must be
485
486
JAVASERVER PAGES TECHNOLOGY
o.
p.
q.
r.
s.
t.
u.
stored in the root directory. To do this, simply drag DigitalClock.class from /WEBINF/classes/ to the root directory in the pane labeled Contents of bookstore2.
Add the shared bookstore library. Navigate to <INSTALL>/j2eetutorial14/
examples/build/web/bookstore/dist/. Select bookstore.jar and Click Add.
Click OK.
Click Next.
Select the Servlet radio button.
Click Next.
Select Dispatcher from the Servlet class combo box.
Click Finish.
9. Add the listener class listeners.ContextListener (described in Handling Servlet
Life Cycle Events, page 446).
a. Select the Event Listeners tab.
b. Click Add.
c. Select the listeners.ContextListener class from drop down field in the Event
Listener Classes panel.
10.Add the aliases.
a. Select the Dispatcher web component.
b. Select the Aliases tab.
c. Click Add and then type /bookstore in the Aliases field. Repeat to add the aliases
/bookcatalog, /bookdetails, /bookshowcart, /bookcashier, /bookordererror, and /bookreceipt.
11.Add the JSTL resource bundle basename context parameter.
a. Select the Context tab.
b. Click Add.
c. Enter javax.servlet.jsp.jstl.fmt.localizationContext for the Coded
Parameter.
d. Enter messages.BookstoreMessages for the Value.
12.Set prelude and codas for all JSP pages.
a. Select the JSP Properties tab.
b. Click the Add button next to the Name list.
c. Enter bookstore2.
d. Click the Add button next to the URL Pattern list.
e. Enter /*.jsp.
THE EXAMPLE JSP PAGES
f. Click the Edit button next to the Include Preludes list.
g. Click Add.
h. Enter /template/prelude.jspf.
i. Click OK.
j. Click the Edit button next to the Include Codas list.
k. Click Add.
l. Enter /template/coda.jspf.
m.Click OK.
13.Add a resource reference for the database.
a. Select the Resource Refs tab.
b. Click Add.
c. Enter jdbc/BookDB in the Coded Name field.
d. Accept the default type javax.sql.DataSource.
e. Accept the default authorization Container.
f. Accept the default selected Shareable.
g. Enter jdbc/BookDB in the JNDI name field of the Deployment setting
for jdbc/BookDB frame.
14.Select File→Save.
15.Deploy the application.
a. Select Tools→Deploy.
b. In the Connection Settings frame, enter the user name and password you
specified when you installed the J2EE 1.4 Application Server.
c. Click OK.
d. A popup dialog will display the results of the deployment. Click Close.
487
488
JAVASERVER PAGES TECHNOLOGY
16.Open the bookstore URL http://localhost:1024/bookstore2/bookstore. Click
on the Start Shopping link and you will see the screen in Figure 12–2:
Figure 12–2 Book Catalog
See Troubleshooting (page 445) for help with diagnosing common problems related to the
database server. If the messages in your pages appear as strings of the form ??? Key ???, the
likely cause is that you have not provided the correct resource bundle basename as a context
parameter.
THE LIFE CYCLE OF A JSP PAGE
The Life Cycle of a JSP Page
A JSP page services requests as a servlet. Thus, the life cycle and many of the
capabilities of JSP pages (in particular the dynamic aspects) are determined by
Java Servlet technology. You will notice that many sections in this chapter refer
to classes and methods described in Chapter 11.
When a request is mapped to a JSP page, the Web container first checks whether
the JSP page’s servlet is older than the JSP page. If the servlet is older, the Web
container translates the JSP page into a servlet class and compiles the class. During development, one of the advantages of JSP pages over servlets is that the
build process is performed automatically.
Translation and Compilation
During the translation phase each type of data in a JSP page is treated differently.
Template data is transformed into code that will emit the data into the response
stream. JSP elements are treated as follows:
• Directives are used to control how the Web container translates and executes the JSP page.
• Scripting elements are inserted into the JSP page’s servlet class. See
Chapter 15 for details.
• Expression language expressions are passed as parameters to calls to the
JSP expression evaluator.
• jsp:[set|get]Property elements are converted into method calls to
JavaBeans components.
• jsp:[include|forward] elements are converted to invocations of the
Java Servlet API.
• The jsp:plugin element is converted to browser-specific markup for activating an applet.
• Custom tags are converted into calls to the tag handler that implements the
custom tag.
In the J2EE application server, the source for the servlet created from a JSP page
named pageName is in the file:
<J2EE_HOME>/domains/domain1/server/applications/
j2ee-modules/context_root/pageName_jsp.java
489
490
JAVASERVER PAGES TECHNOLOGY
For example, the source for the index page (named index.jsp) for the date
localization example discussed at the beginning of the chapter would be named:
<J2EE_HOME>/domains/domain1/server/applications/
j2ee-modules/date_XXX/index_jsp.java
Both the translation and compilation phases can yield errors that are only
observed when the page is requested for the first time. If an error is encountered
during either phase, the server will return JasperException and a message that
includes the name of the JSP page and the line where the error occurred.
Once the page has been translated and compiled, the JSP page’s servlet for the
most part follows the servlet life cycle described in Servlet Life
Cycle (page 445):
1. If an instance of the JSP page’s servlet does not exist, the container
a. Loads the JSP page’s servlet class
b. Instantiates an instance of the servlet class
c. Initializes the servlet instance by calling the jspInit method
2. The container invokes the _jspService method, passing a request and
response object.
If the container needs to remove the JSP page’s servlet, it calls the jspDestroy
method.
Execution
You can control various JSP page execution parameters by using page directives.
The directives that pertain to buffering output and handling errors are discussed
here. Other directives are covered in the context of specific page authoring tasks
throughout the chapter.
Buffering
When a JSP page is executed, output written to the response object is automatically buffered. You can set the size of the buffer with the following page directive:
<%@ page buffer="none|xxxkb" %>
EXECUTION
A larger buffer allows more content to be written before anything is actually sent
back to the client, thus providing the JSP page with more time to set appropriate
status codes and headers or to forward to another Web resource. A smaller buffer
decreases server memory load and allows the client to start receiving data more
quickly.
Handling Errors
Any number of exceptions can arise when a JSP page is executed. To specify that
the Web container should forward control to an error page if an exception occurs,
include the following page directive at the beginning of your JSP page:
<%@ page errorPage="file_name" %>
The Duke’s Bookstore application page prelude.jsp contains the directive
<%@ page errorPage="errorpage.jsp"%>
The beginning of errorpage.jsp indicates that it is serving as an error page
with the following page directive:
<%@ page isErrorPage="true" %>
This directive makes an object of type javax.servlet.jsp.ErrorData available to the error page, so that you can retrieve, interpret, and possibly display
information about the cause of the exception in the error page. You access the
error data object in an EL expression via the page context. Thus, ${pageContext.errorData.statusCode} is used to retrieve the status code and ${pageContext.errorData.throwable} retrieves the exception. If the exception is
generated during the evaluation of an EL expression, you can retrieve the root
cause
of
the
exception
with
the
expression
${pageContext.errorData.throwable.rootCause}. For example, the error
page for the Duke’s Bookstore is:
<%@ page isErrorPage="true" %>
<%@ taglib uri="http://java.sun.com/jsp/jstl/core"
prefix="c" %>
<%@ taglib uri="http://java.sun.com/jsp/jstl/fmt"
prefix="fmt" %>
<html>
<head>
<title><fmt:message key="ServerError"/></title>
</head>
491
492
JAVASERVER PAGES TECHNOLOGY
<body bgcolor="white">
<h3>
<fmt:message key="ServerError"/>
</h3>
<p>
${pageContext.errorData.throwable}
<c:choose>
<c:when test="${!empty
pageContext.errorData.throwable.cause}">
: ${pageContext.errorData.throwable.cause}
</c:when>
<c:when test="${!empty
pageContext.errorData.throwable.rootCause}">
: ${pageContext.errorData.throwable.rootCause}
</c:when>
</c:choose>
</body>
</html>
Note: You can also define error pages for the WAR that contains a JSP page. If error
pages are defined for both the WAR and a JSP page, the JSP page’s error page takes
precedence.
Creating Static Content
You create static content in a JSP page by simply writing it as if you were creating a page that consisted only of that content. Static content can be expressed in
any text-based format, such as HTML, WML, and XML. The default format is
HTML. If you want to use a format other than HTML, you include a page directive with the contentType attribute set to the content type at the beginning of
your JSP page. The purpose of the contentType directive is to allow the browser
to correctly interpret the resulting content. So, if you want a page to contain data
expressed in the wireless markup language (WML), you need to include the following directive:
<%@ page contentType="text/vnd.wap.wml"%>
A registry of content type names is kept by the IANA at:
http://www.iana.org/assignments/media-types/
RESPONSE AND PAGE ENCODING
Response and Page Encoding
You also use the contentType attribute to specify the encoding of the response.
For example, the date application specifies that the page should be encoded
using UTF-8, an encoding that supports almost all locales, with the following
page directive:
<%@ page contentType="text/html; charset=UTF-8" %>
If the response encoding weren’t set, the localized dates would not be rendered
correctly.
To set the source encoding of the page itself, you would use the following page
directive.
<%@ page pageEncoding="UTF-8" %>
You can also set the page encoding of a set of JSP pages. The value of the page
encoding varies depending on the configuration specified in the JSP configuration section of the Web application deployment descriptor (see Declaring Page
Encodings, page 519).
Creating Dynamic Content
You create dynamic content by accessing Java programming language object
properties.
Using Objects within JSP Pages
You can access a variety of objects, including enterprise beans and JavaBeans
components, within a JSP page. JSP technology automatically makes some
objects available, and you can also create and access application-specific objects.
Implicit Objects
Implicit objects are created by the Web container and contain information related
to a particular request, page, session, or application. Many of the objects are
defined by the Java Servlet technology underlying JSP technology and are dis-
493
494
JAVASERVER PAGES TECHNOLOGY
cussed at length in Chapter 11. The section Implicit Objects (page 498) explains
how you access implicit objects using the JSP expression language.
Application-Specific Objects
When possible, application behavior should be encapsulated in objects so that
page designers can focus on presentation issues. Objects can be created by developers who are proficient in the Java programming language and in accessing
databases and other services. The main way to create and use application-specific objects within a JSP page is to use JSP standard tags discussed in JavaBeans
Components (page 503) to create JavaBeans components and set their properties, and EL expressions to access their properties. You can also access JavaBeans components and other objects in scripting elements, which are described
in Chapter 15.
Shared Objects
The conditions affecting concurrent access to shared objects described in Controlling Concurrent Access to Shared Resources (page 450) apply to objects
accessed from JSP pages that run as multithreaded servlets. You can indicate
how a Web container should dispatch multiple client requests with the following
page directive:
<%@ page isThreadSafe="true|false" %>
When isThreadSafe is set to true, the Web container may choose to dispatch
multiple concurrent client requests to the JSP page. This is the default setting. If
using true, you must ensure that you properly synchronize access to any shared
objects defined at the page level. This includes objects created within declarations, JavaBeans components with page scope, and attributes of the page context
object (see Implicit Objects, page 498).
If isThreadSafe is set to false, requests are dispatched one at a time, in the
order they were received, and access to page level objects does not have to be
controlled. However, you still must ensure that access to attributes of the application or session scope objects and to JavaBeans components with application
or session scope is properly synchronized.
Note: The Servlet 2.4 specification deprecates SingleThreadModel, which is the
most common mechanism for Web containers to implement isThreadSafe. You are
EXPRESSION LANGUAGE
advised against using
cated code.
isThreadSafe,
as the generated servlet may contain depre-
Expression Language
A primary feature of JSP technology version 2.0 is its support for an expression
language. An expression language makes it possible to easily access application
data stored in JavaBeans components. For example, the JSP expression language
allows a page author to access a bean using a simple syntax such as
${name}
for a simple variable or
${name.foo.bar}
for a nested property.
The test attribute of the following conditional tag is supplied with an EL
expression that compares the number of items in the session-scoped bean named
cart with 0:
<c:if test="${sessionScope.cart.numberOfItems > 0}">
...
</c:if>
The JSP expression evaluator is responsible for handling EL expressions, which
may include literals and are enclosed by the ${ } characters. For example:
<c:if test="${bean1.a < 3}" >
...
</c:if>
Any value that does not begin with ${ is treated as a literal that is parsed to the
expected type using the PropertyEditor for the type:
<c:if test="true" >
...
</c:if>
495
496
JAVASERVER PAGES TECHNOLOGY
Literal values that contain the ${ characters must be escaped as follows:
<mytags:example attr1="an expression is ${'${'}true}" />
Deactivating Expression Evaluation
Since the pattern that identifies EL expressions—${ }—was not reserved in the
JSP specifications before JSP 2.0, there may be applications where such a pattern is intended to pass through verbatim. To prevent the pattern from being evaluated, EL evaluation can be deactivated.
To deactivate the evaluation of EL expressions you specify the isELIgnored
attribute of the page directive
<%@ page isELIgnored ="true|false" %>
The valid values of this attribute are true and false. If true, EL expressions are
ignored when they appear in template text or tag attributes. If false, EL expressions are evaluated by the container.
The default value varies depending on the version of the Web application
deployment descriptor. The default mode for JSP pages delivered using a Servlet
2.3 or earlier descriptor is to ignore EL expressions; this provides backwards
compatibility. The default mode for JSP pages delivered with a Servlet 2.4
descriptor is to evaluated EL expressions; this automatically provides the default
that most applications want. You can also deactivate EL expression evaluation
for a group of JSP pages (see Deactivating EL Evaluation, page 518).
Using Expressions
EL Expressions can be used in two situations:
• In template text
• In any standard or custom tag attribute that can accept an expression
The value of an expression in template text is computed and inserted into the
current output. An expression will not be evaluated if the body of the tag is
declared to be tagdependent (see body-content Attribute, page 565).
VARIABLES
Three ways to set a tag attribute value:
• With a single expression construct:
<some:tag value="${expr}"/>
The expression is evaluated and the result is coerced to the attribute’s
expected type.
• With one or more expressions separated or surrounded by text:
<some:tag value="some${expr}${expr}text${expr}"/>
The expressions are evaluated from left to right. Each expression is
coerced to a String and then concatenated with any intervening text. The
resulting String is then coerced to the attribute’s expected type.
• With only text:
<some:tag value="sometext"/>
In this case, the attribute’s String value is coerced to the attribute's
expected type.
Expressions used to set attribute values are evaluated in the context of an
expected type. If the result of the expression evaluation does not match the
expected type exactly a type conversion will be performed. For example, the
expression ${1.2E4 + 1.4} provided as the value of an attribute of type float,
will result in the following conversion: Float.valueOf(“1.2E4
+
1.4”).floatValue(). See Section JSP2.8 of the JSP 2.0 Specification for the
complete type conversion rules.
Variables
The JSP container evaluates a variable that appears in an expression by looking
up its value according to the behavior of PageContext.findAttribute(String). For example, when evaluating the expression ${product},
the container will look for product in the page, request, session, and application
scopes and will return its value. If product is not found, null is returned. A
variable that matches one of the implicit objects described in Implicit
Objects (page 498) will return that implicit object instead of the variable’s value.
Properties of variables are accessed using the . operator, and may be nested arbitrarily.
The JSP expression language unifies the treatment of the . and [] operators.
expr-a.expr-b is equivalent to a["expr-b"]; that is, the expression expr-b is
497
498
JAVASERVER PAGES TECHNOLOGY
used to construct a literal whose value is the identifier, and then the [] operator
is used with that value.
To evaluate expr-a[expr-b], evaluate expr-a into value-a and evaluate exprb into value-b. If either value-a or value-b is null, return null.
• If value-a is a Map, return value-a.get(value-b). If !value-a.containsKey(value-b), then return null.
• If value-a is a List or array, coerce value-b to int and return valuea.get(value-b) or Array.get(value-a, value-b), as appropriate. If
the coercion couldn’t be performed, an error is returned. If the get call
returns an IndexOutOfBoundsException, null is returned. If the get call
returns another exception, an error is returned.
• If value-a is a JavaBeans object, coerce value-b to String. If value-b
is a readable property of value-a, then return the result of a get call. If the
get method throws an exception, an error is returned.
Implicit Objects
The JSP expression language defines a set of implicit objects:
• pageContext - The context for the JSP page. Provides access to various
objects including:
• servletContext - The context for the JSP page’s servlet and any Web
components contained in the same application. See Accessing the Web
Context (page 469).
• session - The session object for the client. See Maintaining Client
State (page 470).
• request - The request triggering the execution of the JSP page. See
Getting Information from Requests (page 454).
• response - The response returned by the JSP page. See Constructing
Responses, page 456).
LITERALS
In addition, several implicit objects are available that allow easy access to the
following objects:
•
•
•
•
•
•
- maps a request parameter name to a single value
paramValues - maps a request parameter name to an array of values
header - maps a request header name to a single value
headerValues - maps a request header name to an array of values
cookie - maps a cookie name to a single cookie
initParam - maps a context initialization parameter name to a single value
param
Finally, there are objects that allow access to the various scoped variables
described in Using Scope Objects (page 448).
•
•
•
•
- maps page-scoped variable names to their values
requestScope - maps request-scoped variable names to their values
sessionScope - maps session-scoped variable names to their values
applicationScope - maps application-scoped variable names to their values
pageScope
When an expression references one of these objects by name, the appropriate
object is returned instead of the corresponding attribute. For example: ${pageContext} returns the PageContext object, even if there is an existing pageContext attribute containing some other value.
Literals
The JSP expression language defines the following literals:
•
•
•
•
Boolean: true and false
Integer: as in Java
Floating point: as in Java
String: with single and double quotes. " is escaped as \", ' is escaped as
\', and \ is escaped as \\.
• Null: null
499
500
JAVASERVER PAGES TECHNOLOGY
Operators
In addition to the . and [] operators discussed in Variables (page 497), the JSP
expression language provides the following operators:
• Arithmetic: +, - (binary), *, / and div, % and mod, -(unary)
• Logical: and, &&, or, ||, not, !
• Relational: ==, eq, !=, ne, <, lt, >, gt, <=, ge, >=, le. Comparisons may be
made against other values, or against boolean, string, integer, or floating
point literals.
• Empty: The empty operator is a prefix operation that can be used to determine if a value is null or empty.
• Conditional: A ? B : C. Evaluate B or C, depending on the result of the
evaluation of A.
The precedence of operators highest to lowest, left to right is:
•
•
•
•
•
•
•
•
•
•
[] .
- Used to change the precedence of operators.
- (unary) not ! empty
()
* / div % mod
+ -
(binary)
< > <= >= lt gt le ge
== != eq ne
&& and
|| or
? :
Reserved Words
The following words are reserved for the JSP expression language and should
not be used as identifiers.
and
or
not
eq
ne
lt
gt
le
ge
true
false
null
instanceof
empty
div
mod
Note that many of these words are not in the language now, but they may be in
the future, so you should avoid using them.
EXAMPLES
Examples
Table 12–2 contains example EL expressions and the result of evaluating the
expressions.
Table 12–2 Example Expressions
EL Expression
Result
${1 > (4/2)}
false
${4.0 >= 3}
true
${100.0 == 100}
true
${(10*10) ne 100}
false
${'a' < 'b'}
true
${'hip' gt 'hit'}
false
${4 > 3}
true
${1.2E4 + 1.4}
12001.4
${3 div 4}
0.75
${10 mod 4}
2
${!empty param.Add}
True if the request parameter named Add is
null or an empty string.
${pageContext.request.contextPath}
The context path
${sessionScope.cart.numberOfItems}
The value of the numberOfItems property
of the session-scoped attribute named cart
${param['mycom.productId']}
The value of the request parameter named
mycom.productId
${header["host"]}
The host
${departments[deptName]}
The value of the entry named deptName in
the departments map
${requestScope['javax.servlet.
forward.servlet_path']}
The value of the request-scoped attribute
named javax.servlet.
forward.servlet_path
501
502
JAVASERVER PAGES TECHNOLOGY
Functions
The JSP expression language allows you to define a function that can be invoked
in an expression. Functions are defined using the same mechanisms as custom
tags (See Using Custom Tags, page 509 and Chapter 14).
Using Functions
Functions can appear in template text and tag attribute values.
To use a function in a JSP page, you import the tag library containing the function using a taglib directive. Then, you preface the function invocation with the
prefix declared in the directive.
For example, the date example page index.jsp imports the /functions library
and invokes the function equals in an expression:
<%@ taglib prefix="f" uri="/functions"%>
...
<c:when
test="${f:equals(selectedLocaleString,
localeString)}" >
Defining Functions
To define a function you program it as a public static method in a public class.
The mypkg.MyLocales class in the date example defines a function that tests the
equality of two Strings as follows:
package mypkg;
public class MyLocales {
...
public static boolean equals( String l1, String l2 ) {
return l1.equals(l2);
}
}
Then, you map the function name as used in the EL expression to the defining
class and function signature in a TLD. The following functions.tld file in the
JAVABEANS COMPONENTS
date example maps the equals function to the class containing the implementation of the function equals and the signature of the function:
<function>
<name>equals</name>
<function-class>mypkg.MyLocales</function-class>
<function-signature>boolean equals( java.lang.String,
java.lang.String )</function-signature>
</function>
A tag library can only have one function element with any given name element.
JavaBeans Components
JavaBeans components are Java classes that can be easily reused and composed
together into applications. Any Java class that follows certain design conventions
is a JavaBeans component.
JavaServer Pages technology directly supports using JavaBeans components
with standard JSP language elements. You can easily create and initialize beans
and get and set the values of their properties.
JavaBeans Component Design
Conventions
JavaBeans component design conventions govern the properties of the class and
govern the public methods that give access to the properties.
A JavaBeans component property can be
• Read/write, read-only, or write-only
• Simple, which means it contains a single value, or indexed, which means
it represents an array of values
A property does not have to be implemented by an instance variable. It must simply be accessible using public methods that conform to the following conventions:
• For each readable property, the bean must have a method of the form
PropertyClass getProperty() { ... }
503
504
JAVASERVER PAGES TECHNOLOGY
• For each writable property, the bean must have a method of the form
setProperty(PropertyClass pc) { ... }
In addition to the property methods, a JavaBeans component must define a constructor that takes no parameters.
The Duke’s Bookstore application JSP pages enter.jsp, bookdetails.jsp,
catalog.jsp, and showcart.jsp use the database.BookDB and database.BookDetails JavaBeans components. BookDB provides a JavaBeans component front end to the access object database.BookDBAO. The JSP pages
showcart.jsp and cashier.jsp access the bean cart.ShoppingCart, which
represents a user’s shopping cart.
The BookDB bean has two writable properties, bookId and database, and three
readable properties, bookDetails, numberOfBooks, and books. These latter
properties do not correspond to any instance variables, but are a function of the
bookId and database properties.
package database
public class BookDB {
private String bookId = "0";
private BookDBAO database = null;
public BookDB () {
}
public void setBookId(String bookId) {
this.bookId = bookId;
}
public void setDatabase(BookDBAO database) {
this.database = database;
}
public BookDetails getBookDetails() throws
BookNotFoundException {
return (BookDetails)database.getBookDetails(bookId);
}
public Collection getBooks() throws BooksNotFoundException {
return database.getBooks();
}
public void buyBooks(ShoppingCart cart)
throws OrderException {
database.buyBooks(cart);
}
public int getNumberOfBooks() throws BooksNotFoundException {
return database.getNumberOfBooks();
}
}
CREATING AND USING A JAVABEANS COMPONENT
Creating and Using a JavaBeans
Component
You declare that your JSP page will use a JavaBeans component using a
jsp:useBean element. There are two forms:
<jsp:useBean id="beanName"
class="fully_qualified_classname" scope="scope"/>
and
<jsp:useBean id="beanName"
class="fully_qualified_classname" scope="scope">
<jsp:setProperty .../>
</jsp:useBean>
The second form is used when you want to include jsp:setProperty statements, described in the next section, for initializing bean properties.
The jsp:useBean element declares that the page will use a bean that is stored
within and accessible from the specified scope, which can be application,
session, request, or page. If no such bean exists, the statement creates the
bean and stores it as an attribute of the scope object (see Using Scope
Objects, page 448). The value of the id attribute determines the name of the
bean in the scope and the identifier used to reference the bean in EL expressions,
other JSP elements, and scripting expressions (see Chapter 15). The value supplied for the class attribute must be a fully-qualified class name. Note that
beans cannot be in the unnamed package. Thus the format of the value must be
package_name.class_name.
The following element creates an instance of mypkg.myLocales if none exists,
stores it as an attribute of the application scope, and makes the bean available
throughout the application by the identifier locales:
<jsp:useBean id="locales" scope="application"
class="mypkg.MyLocales"/>
505
506
JAVASERVER PAGES TECHNOLOGY
Setting JavaBeans Component
Properties
The standard way to set JavaBeans component properties in a JSP page is with
the jsp:setProperty element. The syntax of the jsp:setProperty element
depends on the source of the property value. Table 12–3 summarizes the various
ways to set a property of a JavaBeans component using the jsp:setProperty
element.
Table 12–3 Valid Bean Property Assignments from String Values
Value Source
Element Syntax
String constant
<jsp:setProperty name="beanName"
property="propName" value="string constant"/>
Request parameter
<jsp:setProperty name="beanName"
property="propName" param="paramName"/>
Request parameter name
matches bean property
<jsp:setProperty name="beanName"
property="propName"/>
<jsp:setProperty name="beanName"
property="*"/>
<jsp:setProperty name="beanName"
property="propName" value="expression"/>
Expression
<jsp:setProperty name="beanName"
property="propName" >
<jsp:attribute name="value">
expression
</jsp:attribute>
</jsp:setProperty>
1. beanName must be the same as that specified for the id
attribute in a useBean element.
2. There must be a setPropName method in the JavaBeans
component.
3. paramName must be a request parameter name.
A property set from a constant string or request parameter must have a type
listed in Table 12–4. Since both a constant and request parameter are strings, the
SETTING JAVABEANS COMPONENT PROPERTIES
Web container automatically converts the value to the property’s type; the conversion applied is shown in the table.
String values can be used to assign values to a property that has a PropertyEditor class. When that is the case, the setAsText(String) method is used. A
conversion failure arises if the method throws an IllegalArgumentException.
The value assigned to an indexed property must be an array, and the rules just
described apply to the elements.
Table 12–4 Valid Property Value Assignments from String Values
Property Type
Conversion on String Value
Bean Property
Uses setAsText(string-literal)
boolean or Boolean
As indicated in java.lang.Boolean.valueOf(String)
byte or Byte
As indicated in java.lang.Byte.valueOf(String)
char or Character
As indicated in java.lang.String.charAt(0)
double or Double
As indicated in java.lang.Double.valueOf(String)
int or Integer
As indicated in java.lang.Integer.valueOf(String)
float or Float
As indicated in java.lang.Float.valueOf(String)
long or Long
As indicated in java.lang.Long.valueOf(String)
short or Short
As indicated in java.lang.Short.valueOf(String)
Object
new String(string-literal)
You use an expression to set the value of a property whose type is a compound
Java programming language type. The type returned from an expression must
match or be castable to the type of the property.
507
508
JAVASERVER PAGES TECHNOLOGY
The Duke’s Bookstore application demonstrates how to use the setProperty
element to set the current book from a request parameter in the database helper
bean in bookstore2/web/bookdetails.jsp:
<c:set var="bid" value="${param.bookId}"/>
<jsp:setProperty name="bookDB" property="bookId"
value="${bid}" />
The following fragment from the page bookstore2/web/bookshowcart.jsp
illustrates how to initialize a BookDB bean with a database object. Because the
initialization is nested in a useBean element, it is only executed when the bean is
created.
<jsp:useBean id="bookDB" class="database.BookDB" scope="page">
<jsp:setProperty name="bookDB" property="database"
value="${bookDBAO}" />
</jsp:useBean>
Retrieving JavaBeans Component
Properties
The main way to retrieve JavaBeans component properties is with the JSP
expression language. Thus, to retrieve a book title, the Duke’s Bookstore application uses the following expression:
${bookDB.bookDetails.title}
Another way to retrieve component properties is to use the jsp:getProperty
element. This element converts the value of the property into a String and
inserts the value into the response stream:
<jsp:getProperty name="beanName" property="propName"/>
Note that beanName must be the same as that specified for the id attribute in a
useBean element, and there must be a getPropName method in the JavaBeans
component. Although the preferred approach to getting properties is to use an
EL expression, the getProperty element is available if you need to disable
expression evaluation.
USING CUSTOM TAGS
Using Custom Tags
Custom tags are user-defined JSP language elements that encapsulate recurring
tasks. Custom tags are distributed in a tag library, which defines a set of related
custom tags and contains the objects that implement the tags.
Custom tags have the syntax
<prefix:tag attr1="value" ... attrN="value" />
or
<prefix:tag attr1="value" ... attrN="value" >
body
</prefix:tag>
where prefix distinguishes tags for a library, tag is the tag identifier, and attr1
... attrN are attributes that modify the behavior of the tag.
To use a custom tag in a JSP page, you must:
• Declare the tag library containing the tag
• Make the tag library implementation available to the Web application
See Chapter 12 for detailed information on the different types of tags and how to
implement tags.
Declaring Tag Libraries
You declare that a JSP page will use tags defined in a tag library by including a
taglib directive in the page before any custom tag from that tag library is used.
<%@ taglib prefix="tt" [tagdir=/WEB-INF/tags/dir | uri=URI ] %>
The prefix attribute defines the prefix that distinguishes tags defined by a given
tag library from those provided by other tag libraries.
If the tag library is defined with tag files (see Encapsulating Reusable Content
using Tag Files, page 560), you supply the tagdir attribute to identify the location of the files. The value of the attribute must start with /WEB-INF/tags/ and a
translation error will occur if the value points to a directory that doesn’t exist or
if used in conjunction with the uri attribute.
509
510
JAVASERVER PAGES TECHNOLOGY
The uri attribute refers to a URI that uniquely identifies the tag library descriptor (TLD), a document that describes the tag library (See Tag Library
Descriptors, page 576).
Tag library descriptor file names must have the extension .tld. TLD files are
stored in the WEB-INF directory or subdirectory of the WAR file or in the METAINF/ directory or subdirectory of a tag library packaged in a JAR. You can reference a TLD directly or indirectly.
The following taglib directive directly references a TLD filename:
<%@ taglib prefix="tlt" uri="/WEB-INF/iterator.tld"%>
This taglib directive uses a short logical name to indirectly reference the TLD:
<%@ taglib prefix="tlt" uri="/tlt"%>
The iterator example defines and uses a simple iteration tag. The JSP pages
use a logical name to reference the TLD. A sample iterator.war is provided in
<INSTALL>/j2eetutorial14/examples/web/provided-wars/. To build and
package the example:
1. In a terminal window, go to <INSTALL>/j2eetutorial14/examples/
web/iterator/.
2. Run asant build. This target will spawn any necessary compilations and
copy files to the <INSTALL>/j2eetutorial14/examples/web/iterator/build/ directory.
3. Start the J2EE server.
4. Start deploytool.
5. Create a Web application called iterator by running the New Web Application Wizard. Select File→New→Web Application WAR.
6. New Web Application Wizard
a. Select the Create New Stand-Alone WAR Module radio button.
b. Click Browse.
c. In the file chooser, navigate to <INSTALL>/docs/tutorial/examples/
web/iterator/.
d. In the File Name field, enter iterator.
e. Click Choose Module File.
f. In the WAR Display Name field, enter iterator.
g. In the Context Root field, enter /iterator.
DECLARING TAG LIBRARIES
h. Click Edit. In the Edit Contents dialog, navigate to <INSTALL>/docs/
tutorial/examples/web/iterator/build/. Select the index.jsp
and list.jsp JSP pages and iterator.tld and click Add. Notice that
iterator.tld is put into /WEB-INF/.
i. Click Next.
j. Select the JSP radio button.
k. Click Next.
l. Select index.jsp from the JSP file combo box.
m.Click Finish.
You map a logical name to an absolute location in the Web application deployment descriptor. To specify the mapping of the logical name /tlt to the absolute
location /WEB-INF/iterator.tld with deploytool:
1.
2.
3.
4.
Select the File Refs tab.
Click the Add button in the JSP Tag Libraries tab.
Enter the relative URI /tlt in the Coded Reference field.
Enter the absolute location /WEB-INF/iterator.tld in the Tag Library
field.
You can also reference a TLD in a taglib directive with an absolute URI. For
example, the absolute URIs for the JSTL library are:
•
•
•
•
•
Core: http://java.sun.com/jsp/jstl/core
XML: http://java.sun.com/jsp/jstl/xml
Internationalization: http://java.sun.com/jsp/jstl/fmt
SQL: http://java.sun.com/jsp/jstl/sql
Functions: http://java.sun.com/jsp/jstl/functions
When you reference a tag library with an an absolute URI that exactly matches
the URI declared in the taglib element of the TLD (see Tag Library
Descriptors, page 576), you do not have to add the taglib element to web.xml;
the JSP container automatically locates the TLD inside the JSTL library implementation.
511
512
JAVASERVER PAGES TECHNOLOGY
Including the Tag Library
Implementation
In addition to declaring the tag library, you also need to make the tag library
implementation available to the Web application. There are several ways to do
this. Tag library implementations can be included in a WAR in an unpacked format: tag files are packaged in the /WEB-INF/tag/ directory and tag handler
classes are packaged in the /WEB-INF/classes/ directory of the WAR. Tag
libraries already packaged into a JAR file are included in the /WEB-INF/lib/
directory of the WAR. Finally, an application server may load a tag library into
all the Web applications running on the server. For example, in the J2EE 1.4
Application Server, the JSTL TLDs and libraries are distributed in the archive
appserv-jstl.jar in <J2EE_HOME>/lib/. This library is automatically loaded
into the classpath of all Web applications running on the J2EE application server
so you don’t need to add it to your Web application.
To package the iterator tag library implementation in the /WEB-INF/classes/
directory and deploy the iterator example with deploytool:
1. Select the General tab.
2. Click Edit.
3. Add the iterator tag library classes.
a. In the Edit Contents dialog, navigate to <INSTALL>/docs/tutorial/
examples/web/iterator/build/.
b. Select the iterator and myorg packages and click Add. Notice that the
tag library implementation classes are packaged into /WEB-INF/
classes/.
4. Click OK.
5. Select File→Save.
6. Deploy the application.
a. Select Tools→Deploy.
b. In the Connection Settings frame, enter the user name and password you
specified when you installed the J2EE 1.4 Application Server.
c. Click OK.
d. A popup dialog will display the results of the deployment. Click Close.
To run the iterator application, open the URL http://localhost:1024/
iterator in a browser.
REUSING CONTENT IN JSP PAGES
Reusing Content in JSP Pages
There are many mechanisms for reusing JSP content in a JSP page. Three mechanisms that can be categorized as direct reuse—the include directive, preludes
and codas, and the jsp:include element—are discussed below. An indirect
method of content reuse occurs when a tag file is used to define a custom tag that
is used by many Web applications. Tag files are discussed in the section Encapsulating Reusable Content using Tag Files (page 560) in Chapter 14.
The include directive is processed when the JSP page is translated into a servlet
class. The effect of the directive is to insert the text contained in another file—
either static content or another JSP page—in the including JSP page. You would
probably use the include directive to include banner content, copyright information, or any chunk of content that you might want to reuse in another page.
The syntax for the include directive is as follows:
<%@ include file="filename" %>
For example, all the Duke’s Bookstore application pages could include the file
banner.jspf which contains the banner content, with the following directive:
<%@ include file="banner.jspf" %>
Another way to do a static include is with the prelude and coda mechanism
described in Defining Implicit Includes (page 519). This is the approach used by
the Duke’s Bookstore application.
Because you must put an include directive in each file that reuses the resource
referenced by the directive, this approach has its limitations. Preludes and codas
can only be applied to the beginning and end of pages. For a more flexible
approach to building pages out of content chunks, see A Template Tag
Library (page 598).
The jsp:include element is processed when a JSP page is executed. The
include action allows you to include either a static or dynamic resource in a JSP
file. The results of including static and dynamic resources are quite different. If
the resource is static, its content is inserted into the calling JSP file. If the
resource is dynamic, the request is sent to the included resource, the included
page is executed, and then the result is included in the response from the calling
JSP page. The syntax for the jsp:include element is:
<jsp:include page="includedPage" />
513
514
JAVASERVER PAGES TECHNOLOGY
The hello2 application discussed in Updating Web Modules (page 99) includes
the page that generates the response with the following statement:
<jsp:include page="response.jsp"/>
Transferring Control to Another Web
Component
The mechanism for transferring control to another Web component from a JSP
page uses the functionality provided by the Java Servlet API as described in
Transferring Control to Another Web Component (page 468). You access this
functionality from a JSP page with the jsp:forward element:
<jsp:forward page="/main.jsp" />
Note that if any data has already been returned to a client, the jsp:forward element will fail with an IllegalStateException.
jsp:param Element
When an include or forward element is invoked, the original request object is
provided to the target page. If you wish to provide additional data to that page,
you can append parameters to the request object with the jsp:param element:
<jsp:include page="..." >
<jsp:param name="param1" value="value1"/>
</jsp:include>
When doing jsp:include or jsp:forward, the included page or forwarded
page will see the original request object, with the original parameters augmented
with the new parameters and new values taking precedence over existing values
when applicable.For example, if the request has a parameter A=foo and a parameter A=bar is specified for forward, the forwarded request shall have A=bar,foo.
Note that the new parameter has precedence.
The scope of the new parameters is the jsp:include or jsp:forward call; that
is in the case of an jsp:include the new parameters (and values) will not apply
after the include.
INCLUDING AN APPLET
Including an Applet
You can include an applet or JavaBeans component in a JSP page by using the
jsp:plugin element. This element generates HTML that contains the appropriate client-browser-dependent constructs (<object> or <embed>) that will result
in the download of the Java Plug-in software (if required) and client-side component and subsequent execution of any client-side component. The syntax for the
jsp:plugin element is as follows:
<jsp:plugin
type="bean|applet"
code="objectCode"
codebase="objectCodebase"
{ align="alignment" }
{ archive="archiveList" }
{ height="height" }
{ hspace="hspace" }
{ jreversion="jreversion" }
{ name="componentName" }
{ vspace="vspace" }
{ width="width" }
{ nspluginurl="url" }
{ iepluginurl="url" } >
{ <jsp:params>
{ <jsp:param name="paramName" value= paramValue" /> }+
</jsp:params> }
{ <jsp:fallback> arbitrary_text </jsp:fallback> }
</jsp:plugin>
The jsp:plugin tag is replaced by either an <object> or <embed> tag as appropriate for the requesting client. The attributes of the jsp:plugin tag provide
configuration data for the presentation of the element as well as the version of
the plug-in required. The nspluginurl and iepluginurl attributes override the
default URL where the plug-in can be downloaded.
The jsp:params element specifies parameters to the applet or JavaBeans component. The jsp:fallback element indicates the content to be used by the client
browser if the plug-in cannot be started (either because <object> or <embed> is
not supported by the client or because of some other problem).
If the plug-in can start but the applet or JavaBeans component cannot be found
or started, a plug-in-specific message will be presented to the user, most likely a
pop-up window reporting a ClassNotFoundException.
515
516
JAVASERVER PAGES TECHNOLOGY
The Duke’s Bookstore page /template/prelude.jspf creates the banner that
displays a dynamic digital clock generated by DigitalClock:
Figure 12–3 Duke’s Bookstore with Applet
The jsp:plugin element used to download the applet follows:
<jsp:plugin
type="applet"
code="DigitalClock.class"
codebase="/bookstore2"
jreversion="1.4"
align="center" height="25" width="300"
nspluginurl="http://java.sun.com/j2se/1.4.1/download.html"
iepluginurl="http://java.sun.com/j2se/1.4.1/download.html" >
<jsp:params>
<jsp:param name="language"
SETTING PROPERTIES FOR GROUPS OF JSP PAGES
value="${pageContext.request.locale.language}" />
<jsp:param name="country"
value="${pageContext.request.locale.country}" />
<jsp:param name="bgcolor" value="FFFFFF" />
<jsp:param name="fgcolor" value="CC0066" />
</jsp:params>
<jsp:fallback>
<p>Unable to start plugin.</p>
</jsp:fallback>
</jsp:plugin>
Setting Properties for Groups of JSP
Pages
It is possible to specify certain properties for a group of JSP pages:
•
•
•
•
Expression language evaluation
Treatment of scripting elements (see Disabling Scripting, page 607)
Page encoding
Automatic prelude and coda includes
A JSP property group is defined by naming the group and specifying one or
more URL patterns; all the properties in the group apply to the resources that
match any of the URL patterns. If a resource matches URL patterns in more than
one group, the pattern that is most specific applies. To define a property group
with deploytool:
1.
2.
3.
4.
5.
6.
Select the WAR.
Select the JSP Properties tab.
Click the Add button next to the Name list.
Enter the name of the property group.
Click the Add button next to the URL Pattern list.
Enter the URL pattern (a / followed by a regular expression).
The following sections discuss the properties and how they are interpreted for
various combinations of group properties, individual page directives, and Web
application deployment descriptor version.
517
518
JAVASERVER PAGES TECHNOLOGY
Deactivating EL Evaluation
Each JSP page has a default mode for EL expression evaluation. The default
value varies depending on the version of the Web application deployment
descriptor. The default mode for JSP pages delivered using a Servlet 2.3 or earlier descriptor is to ignore EL expressions; this provides backwards compatibility. The default mode for JSP pages delivered with a Servlet 2.4 descriptor is to
evaluated EL expressions; this automatically provides the default that most
applications want. For tag files (see Encapsulating Reusable Content using Tag
Files, page 560), the default is to always evaluate expressions.
You can override the default mode through the isELIgnored attribute of the
page directive in JSP pages and the isELIgnored attribute of the tag directive in
tag files. The default mode can also be explicitly changed by setting the value of
the EL Evaluation Ignored checkbox in the JSP Properties tab. Table 12–5 summarizes the EL evaluation settings for JSP pages and their meanings:
Table 12–5 EL Evaluation Settings for JSP Pages
Page Directive
JSP Configuration
isELIgnored
EL Encountered
Unspecified
Unspecified
Evaluated if 2.4 web.xml
Ignored if <= 2.3 web.xml
false
Unspecified
Evaluated
true
Unspecified
Ignored
Overridden by page
directive
false
Evaluated
Overridden by page
directive
true
Ignored
SETTING PROPERTIES FOR GROUPS OF JSP PAGES
Table 12–6 summarizes the EL evaluation settings for tag files and their meanings:
Table 12–6 EL Evaluation Settings for Tag Files
Tag Directive isELIgnored
EL Encountered
Unspecified
Evaluated
false
Evaluated
true
Ignored
Declaring Page Encodings
You set the page encoding of a group of JSP pages by selecting a page encoding
from the Page Encoding drop-down list. Valid values are the same as the pageEncoding attribute of the page directive. A translation-time error results if you
define the page encoding of a JSP page with one value in the JSP configuration
element and then give it a different value in a pageEncoding directive.
Defining Implicit Includes
You can implicitly include preludes and codas for a group of JSP pages by adding items to the Include Preludes and Codas lists. Their values are context-relative paths that must correspond to elements in the Web application. When the
elements are present, the given paths are automatically included (as in an
include directive) at the beginning and end of each JSP page in the property
group respectively. When there is more than one include or coda element in a
group, they are included in the order they appear. When more than one JSP property group applies to a JSP page, the corresponding elements will be processed
in the same order as they appear in the JSP configuration section.
For example, the Duke’s Bookstore uses the files /template/prelude.jspf and
/template/coda.jspf to include the banner and other boilerplate in each
screen. To add these files to the Duke’s Bookstore property group with deploytool:
1. Define a property group with name bookstore2 and URL pattern /*.jsp.
2. Click the Edit button next to the Include Preludes list.
519
520
JAVASERVER PAGES TECHNOLOGY
3.
4.
5.
6.
7.
8.
9.
Click Add.
Enter /template/prelude.jspf.
Click OK.
Click the Edit button next to the Include Codas list.
Click Add.
Enter /template/coda.jspf.
Click OK.
Preludes and codas can only put the included code at the beginning and end of
each file. For a more flexible approach to building pages out of content chunks,
see A Template Tag Library (page 598).
Further Information
For further information on JavaServer Pages technology see:
• JavaServer Pages 2.0 Specification
http://java.sun.com/products/jsp/download.html#specs
• The JavaServer Pages Web site
http://java.sun.com/products/jsp
13
JavaServer Pages
Standard Tag Library
Stephanie Bodoff
THE JavaServer Pages Standard Tag Library (JSTL) encapsulates core functionality common to many JSP applications. For example, instead of iterating
over lists using a scriptlet or different iteration tags from numerous vendors,
JSTL defines a standard set of tags. This standardization allows you to learn a
single set of tags and use them on multiple JSP containers. Also, a standard tag
library is more likely to have an optimized implementation.
JSTL has support for common, structural tasks such as iteration and conditionals, tags for manipulating XML documents, internationalization tags, and tags
for accessing databases using SQL. It also introduces the concept of an expression language to simplify page development. JSTL also provides a framework
for integrating existing tag libraries with JSTL.
This chapter demonstrates JSTL through excerpts from the JSP version of the
Duke’s Bookstore application discussed in the previous chapter. It assumes that
you are familiar with the material in the Using Custom Tags (page 509) section
of Chapter 12.
The Example JSP Pages
This chapter illustrates JSTL with excerpts from the JSP version of the Duke’s
Bookstore application discussed in Chapter 12 rewritten to replace the Java-
521
522
JAVASERVER PAGES STANDARD TAG LIBRARY
Beans component database helper object with direct calls to the database via the
JSTL SQL tags. For most applications, it is better to encapsulate calls to a database in a bean. JSTL includes SQL tags for situations where a new application is
being prototyped and the overhead of creating a bean may not be warranted.
The source for the Duke’s Bookstore application is located in the <INSTALL>/
j2eetutorial14/examples/web/bookstore4/ directory created when you
unzip the tutorial bundle (see About the Examples, page xxi). A sample
bookstore4.war is provided in <INSTALL>/j2eetutorial14/examples/web/
provided-wars/. To build, package, deploy, and run the example:
1. Build and package the bookstore common files as described in Duke’s
Bookstore Examples (page 101).
2. In a terminal window, go to <INSTALL>/j2eetutorial14/examples/
web/bookstore4/.
3. Run asant build. This target will spawn any necessary compilations and
copy files to the <INSTALL>/j2eetutorial14/examples/web/
bookstore4/build/ directory.
4. Start the J2EE application server.
5. Perform all the operations described in Accessing Databases from Web
Applications, page 102.
6. Start deploytool.
7. Create a Web application called bookstore4 by running the New Web
Application Wizard. Select File→New→Web Application WAR.
8. New Web Application Wizard
a. Select the Create New Stand-Alone WAR Module radio button.
b. Click Browse and in the file chooser, navigate to <INSTALL>/
j2eetutorial14/examples/web/bookstore4/.
c. In the File Name field, enter bookstore4.
d. Click Choose Module File.
e. In the WAR Display Name field, enter bookstore4.
f. In the Context Root field, enter /bookstore4.
g. Click Edit to add the content files.
h. In the Edit Contents dialog, navigate to <INSTALL>/j2eetutorial14/
examples/web/bookstore4/build/. Select the JSP pages bookstore.jsp,
bookdetails.jsp,
bookcatalog.jsp,
bookshowcart.jsp, bookcashier.jsp, bookreceipt.jsp and the database
and template directories and click Add. Click OK.
523
THE EXAMPLE JSP PAGES
i. Add the shared bookstore library. Navigate to
<INSTALL>/
Select
j2eetutorial14/examples/build/web/bookstore/dist/.
bookstore.jar and Click Add.
j. Click OK.
k. Click Next.
l. Select the JSP radio button.
m.Click Next.
n. Select bookstore.jsp from the JSP Filename combo box.
o. Click Finish.
9. Add each of the Web components listed in Table 13–1. For each component:
a. Select File→New→Web Application WAR.
b. Click the Add to Existing WAR Module radio button Since the WAR
contains all of the JSP pages, you do not have to add any more content.
c. Click Next.
d. Select the JSP radio button and the Component Aliases checkbox.
e. Click Next.
f. Select the page from the JSP Filename combo box.
g. Click Next.
h. Click Add. Enter the alias.
i. Click Finish.
Table 13–1 Duke’s Bookstore Web Components
Web Component Name
JSP Page
Component Alias
bookstore
bookstore.jsp
/bookstore
bookcatalog
bookcatalog.jsp
/bookcatalog
bookdetails
bookdetails.jsp
/bookdetails
bookshowcart
bookshowcart.jsp
/bookshowcart
bookcashier
bookcashier.jsp
/bookcashier
bookreceipt
bookreceipt.jsp
/bookreceipt
524
JAVASERVER PAGES STANDARD TAG LIBRARY
10.Add the JSTL resource bundle basename context parameter.
a. Select the Context tab.
b. Click Add.
c. Enter javax.servlet.jsp.jstl.fmt.localizationContext for the
Coded Parameter.
d. Enter messages.BookstoreMessages for the Value.
11.Set prelude and codas for all JSP pages.
a. Select the JSP Properties tab.
b. Click the Add button next to the Name list.
c. Enter bookstore4.
d. Click the Add button next to the URL Pattern list.
e. Enter /*.jsp.
f. Click the Edit button next to the Include Preludes list.
g. Click Add.
h. Enter /template/prelude.jspf.
i. Click OK.
j. Click the Edit button next to the Include Codas list.
k. Click Add.
l. Enter /template/coda.jspf.
m.Click OK.
12.Add a resource reference for the database.
a. Select the Resource Refs tab.
b. Click Add.
c. Enter jdbc/BookDB in the Coded Name field.
d. Accept the default type javax.sql.DataSource.
e. Accept the default authorization Container.
f. Accept the default selected Shareable.
g. Enter jdbc/BookDB in the JNDI name field of the Deployment setting
for jdbc/BookDB frame.
13.Select File→Save.
14.Deploy the application.
a. Select Tools→Deploy.
b. Click OK.
525
USING JSTL
c. A popup dialog will display the results of the deployment. Click Close.
15.Open the bookstore URL http://localhost:1024/bookstore4/bookstore.
See Troubleshooting (page 445) for help with diagnosing common problems.
Using JSTL
JSTL includes a wide variety of tags that fit into discrete functional areas. To
reflect this, as well as to give each area its own namespace, JSTL is exposed as
multiple tag libraries. The URIs for the libraries are:
•
•
•
•
•
Core: http://java.sun.com/jsp/jstl/core
XML: http://java.sun.com/jsp/jstl/xml
Internationalization: http://java.sun.com/jsp/jstl/fmt
SQL: http://java.sun.com/jsp/jstl/sql
Functions: http://java.sun.com/jsp/jstl/functions
Table 13–2 summarizes these functional areas along with the prefixes used in
this tutorial.
Table 13–2 JSTL Tags
Area
Subfunction
Prefix
Variable Support
Flow Control
Core
c
URL Management
Miscellaneous
Core
XML
Flow Control
Transformation
x
526
JAVASERVER PAGES STANDARD TAG LIBRARY
Table 13–2 JSTL Tags (Continued)
Area
Subfunction
Prefix
Locale
I18n
Message formatting
fmt
Number and date formatting
Database
SQL
sql
Collection length
Functions
fn
String manipulation
Thus, the tutorial references the JSTL core tags in JSP pages with the following
taglib:
<%@ taglib uri="http://java.sun.com/jsp/jstl/core"
prefix="c" %>
In addition to declaring the tag libraries, tutorial examples access the JSTL API
and implementation. In the J2EE 1.4 Application Server, these are distributed in
the archive <J2EE_HOME>/lib/appserv-jstl.jar. This library is automatically
loaded into the classpath of all Web applications running on the J2EE application
server, so it does not need be added to Web applications.
Tag Collaboration
Tags usually collaborate with their environment in implicit and explicit ways.
Implicit collaboration is done via a well defined interface that allows nested tags
to work seamlessly with the ancestor tag exposing that interface. The JSTL conditional tags employ this mode of collaboration.
Explicit collaboration happens when a tag exposes information to its environment. JSTL tags expose information as JSP EL variables; the convention JSTL
follows is to use the name var for any tag attribute that exports information
TAG COLLABORATION
about the tag. For example, the forEach tag exposes the current item of the
shopping cart it is iterating over in the following way:
<c:forEach var="item" items="${sessionScope.cart.items}">
...
</c:forEach>
In situations where a tag exposes more than one piece of information, the name
var is used for the primary piece of information being exported, and an appropriate name is selected for any other secondary piece of information exposed.
For example, iteration status information is exported by the forEach tag via the
attribute status.
For situations where you want to use an EL variable exposed by a JSTL tag in an
expression in the page’s scripting language (see Chapter 15), you use the standard JSP element jsp:useBean to declare a scripting variable.
For example, bookshowcart.jsp removes a book from a shopping cart using a
scriptlet. The ID of the book to be removed is passed as a request parameter. The
value of the request parameter is first exposed as an EL variable (to be used later
by the JSTL sql:query tag) and then declared as scripting variable and passed
to the cart.remove method:
<c:set var="bookId" value="${param.Remove}"/>
<jsp:useBean id="bookId" type="java.lang.String" />
<% cart.remove(bookId); %>
<sql:query var="books"
dataSource="${applicationScope.bookDS}">
select * from PUBLIC.books where id = ?
<sql:param value="${bookId}" />
</sql:query>
527
528
JAVASERVER PAGES STANDARD TAG LIBRARY
Core Tags
Table 13–3 summarizes the core tags, which include those related to expressions,
flow control, and a generic way to access URL-based resources whose content
can then be included or processed within the JSP page.
Table 13–3 Core Tags
Area
Function
Tags
Variable Support
remove
set
Flow Control
choose
when
otherwise
forEach
forTokens
if
URL Management
import
param
redirect
param
url
param
Miscellaneous
catch
out
Prefix
c
Core
Variable Support Tags
The set tag sets the value of an EL variable or the property of an EL variable in
any of the JSP scopes (page, request, session, application). If the variable does
not already exist, it is created.
The JSP EL variable or property can be set either from attribute value:
<c:set var="foo" scope="session" value="..."/>
FLOW CONTROL TAGS
or from the body of the tag:
<c:set var="foo">
...
</c:set>
For example, the following sets a EL variable named bookID with the value of
the request parameter named Remove:
<c:set var="bookId" value="${param.Remove}"/>
To remove an EL variable, you use the remove tag. When the bookstore JSP
page bookreceipt.jsp is invoked, the shopping session is finished, so the cart
session attribute is removed as follows:
<c:remove var="cart" scope="session"/>
Flow Control Tags
To execute flow control logic, a page author must generally resort to using scriptlets. For example, the following scriptlet is used to iterate through a shopping
cart:
<%
Iterator i = cart.getItems().iterator();
while (i.hasNext()) {
ShoppingCartItem item =
(ShoppingCartItem)i.next();
...
%>
<tr>
<td align="right" bgcolor="#ffffff">
${item.quantity}
</td>
...
<%
}
%>
Flow control tags eliminate the need for scriptlets. The next two sections have
examples that demonstrate the conditional and iterator tags.
529
530
JAVASERVER PAGES STANDARD TAG LIBRARY
Conditional Tags
The if tag allows the conditional execution of its body according to value of a
test attribute. The following example from bookcatalog.jsp tests whether the
request parameter Add is empty. If the test evaluates to true, the page queries the
database for the book record identified by the request parameter and adds the
book to the shopping cart:
<c:if test="${!empty param.Add}">
<c:set var="bid" value="${param.Add}"/>
<jsp:useBean id="bid" type="java.lang.String" />
<sql:query var="books"
dataSource="${applicationScope.bookDS}">
select * from PUBLIC.books where id = ?
<sql:param value="${bid}" />
</sql:query>
<c:forEach var="bookRow" begin="0" items="${books.rows}">
<jsp:useBean id="bookRow" type="java.util.Map" />
<jsp:useBean id="addedBook"
class="database.BookDetails" scope="page" />
...
<% cart.add(bid, addedBook); %>
...
</c:if>
The choose tag performs conditional block execution by the embedded when sub
tags. It renders the body of the first when tag whose test condition evaluates to
true. If none of the test conditions of nested when tags evaluate to true, then the
body of an otherwise tag is evaluated, if present.
For example, the following sample code shows how to render text based on a
customer’s membership category.
<c:choose>
<c:when test="${customer.category == 'trial'}" >
...
</c:when>
<c:when test="${customer.category == 'member'}" >
...
</c:when>
<c:when test="${customer.category == 'preferred'}" >
...
</c:when>
FLOW CONTROL TAGS
<c:otherwise>
...
</c:otherwise>
</c:choose>
The choose, when, and otherwise tags can be used to construct an if-thenelse statement as follows:
<c:choose>
<c:when test="${count == 0}" >
No records matched your selection.
</c:when>
<c:otherwise>
${count} records matched your selection.
</c:otherwise>
</c:choose>
Iterator Tags
The forEach tag allows you to iterate over a collection of objects. You specify
the collection via the items attribute, and the current item is available through a
scope variable named by the item attribute.
A large number of collection types are supported by forEach, including all
implementations of java.util.Collection and java.util.Map. If the items
attribute is of type java.util.Map, then the current item will be of type
java.util.Map.Entry, which has the following properties:
• key - the key under which the item is stored in the underlying Map
• value - the value that corresponds to the key
Arrays of objects as well as arrays of primitive types (for example, int) are also
supported. For arrays of primitive types, the current item for the iteration is automatically wrapped with its standard wrapper class (for example, Integer for
int, Float for float, and so on).
Implementations of java.util.Iterator and java.util.Enumeration are
supported but these must be used with caution. Iterator and Enumeration
objects are not resettable so they should not be used within more than one iteration tag. Finally, java.lang.String objects can be iterated over if the string
contains a list of comma separated values (for example: Monday,Tuesday,Wednesday,Thursday,Friday).
531
532
JAVASERVER PAGES STANDARD TAG LIBRARY
Here’s the shopping cart iteration from the previous section with the forEach
tag:
<c:forEach var="item" items="${sessionScope.cart.items}">
...
<tr>
<td align="right" bgcolor="#ffffff">
${item.quantity}
</td>
...
</c:forEach>
The forTokens tag is used to iterate over a collection of tokens separated by a
delimiter.
URL Tags
The jsp:include element provides for the inclusion of static and dynamic
resources in the same context as the current page. However, jsp:include cannot
access resources that reside outside of the Web application and causes unnecessary buffering when the resource included is used by another element.
In the example below, the transform element uses the content of the included
resource as the input of its transformation. The jsp:include element reads the
content of the response, writes it to the body content of the enclosing transform
element, which then re-reads the exact same content. It would be more efficient
if the transform element could access the input source directly and avoid the
buffering involved in the body content of the transform tag.
<acme:transform>
<jsp:include page="/exec/employeesList"/>
<acme:transform/>
The import tag is therefore the simple, generic way to access URL-based
resources whose content can then be included and or processed within the JSP
page. For example, in XML Tags (page 534), import is used to read in the XML
document containing book information and assign the content to the scoped variable xml:
<c:import url="/books.xml" var="xml" />
<x:parse doc="${xml}" var="booklist"
scope="application" />
533
MISCELLANEOUS TAGS
The param tag, analogous to the jsp:param tag (see jsp:param
Element, page 514), can be used with import to specify request parameters.
In Session Tracking (page 472) we discussed how an application must rewrite
URLs to enable session tracking whenever the client turns off cookies. You can
use the url tag to rewrite URLs returned from a JSP page. The tag includes the
session ID in the URL only if cookies are disabled; otherwise, it returns the URL
unchanged. Note that this feature requires the URL to be relative. The url tag
takes param subtags for including parameters in the returned URL. For example,
bookcatalog.jsp rewrites the URL used to add a book to the shopping cart as
follows:
<c:url var="url" value="/catalog" >
<c:param name="Add" value="${bookId}" />
</c:url>
<p><strong><a href="${url}">
The redirect tag sends an HTTP redirect to the client. The redirect
param subtags for including parameters in the returned URL.
tag takes
Miscellaneous Tags
The catch tag provides a complement to the JSP error page mechanism. It
allows page authors to recover gracefully from error conditions that they can
control. Actions that are of central importance to a page should not be encapsulated in a catch, so their exceptions will propagate to an error page. Actions
with secondary importance to the page should be wrapped in a catch, so they
never cause the error page mechanism to be invoked.
The exception thrown is stored in the variable identified by var, which always
has page scope. If no exception occurred, the scoped variable identified by var is
removed if it existed. If var is missing, the exception is simply caught and not
saved.
The out tag evaluates an expression and outputs the result of the evaluation to
the current JspWriter object. The syntax and attributes are
<c:out value="value" [escapeXml="{true|false}"]
[default="defaultValue"] />
If the result of the evaluation is a java.io.Reader object, data is first read from
the Reader object and then written into the current JspWriter object. The spe-
534
JAVASERVER PAGES STANDARD TAG LIBRARY
cial processing associated with Reader objects improves performance when
large amount of data must be read and then written to the response.
If escapeXml is true, the character conversions listed in Table 13–4 are applied:
Table 13–4 Character Conversions
Character
Character
Entity Code
<
<
>
>
&
&
'
'
"
"
XML Tags
A key aspect of dealing with XML documents is to be able to easily access their
content. XPath, a W3C recommendation since 1999, provides an easy notation
for specifying and selecting parts of an XML document. The JSTL XML tag set,
listed in Table 13–5, is based on XPath (see How XPath Works, page 257).
Table 13–5 XML Tags
Area
XML
Function
Tags
Core
out
parse
set
Flow Control
choose
when
otherwise
forEach
if
Transformation
transform
param
Prefix
x
535
XML TAGS
The XML tags use XPath as a local expression language; XPath expressions are
always specified using attribute select. This means that only values specified
for select attributes are evaluated using the XPath expression language. All
other attributes are evaluated using the rules associated with the JSP 2.0 expression language.
In addition to the standard XPath syntax, the JSTL XPath engine supports the
following scopes to access Web application data within an XPath expression:
•
•
•
•
•
•
•
•
•
$foo
$param:
$header:
$cookie:
$initParam:
$pageScope:
$requestScope:
$sessionScope:
$applicationScope:
These scopes are defined in exactly the same way as their counterparts in the JSP
expression language discussed in Implicit Objects (page 498). Table 13–6 shows
some examples of using the scopes.
Table 13–6 Example XPath Expressions
XPath Expression
Result
$sessionScope:profile
The session-scoped EL variable named profile
$initParam:mycom.productId
The String value of the mycom.productId context
parameter
The XML tags are illustrated in another version (bookstore5) of the Duke’s
Bookstore application. This version replaces the database with an XML representation (books.xml) of the bookstore database. To build and install this version of the application, follow the directions in The Example JSP
Pages (page 521) replacing bookstore4 with bookstore5 and skipping step 13.,
which creates the resource reference. A sample bookstore5.war is provided in
<INSTALL>/j2eetutorial14/examples/web/provided-wars/.
536
JAVASERVER PAGES STANDARD TAG LIBRARY
Core Tags
The core XML tags provide basic functionality to easily parse and access XML
data.
The parse tag parses an XML document and saves the resulting object in the EL
variable specified by attribute var. In bookstore5, the XML document is parsed
and saved to a context attribute in parseBooks.jsp, which is included by all JSP
pages that need access to the document:
<c:if test="${applicationScope:booklist == null}" >
<c:import url="/books.xml" var="xml" />
<x:parse doc="${xml}" var="booklist" scope="application" />
</c:if>
The set and out tags parallel the behavior described in Variable Support
Tags (page 528) and Miscellaneous Tags (page 533) for the XPath local expression language. The set tag evaluates an XPath expression and sets the result into
a JSP EL variable specified by attribute var. The out tag evaluates an XPath
expression on the current context node and outputs the result of the evaluation to
the current JspWriter object.
The JSP page bookdetails.jsp selects a book element whose id attribute
matches the request parameter bookId and sets the abook attribute. The out tag
then selects the book’s title element and outputs the result.
<x:set var="abook"
select="$applicationScope.booklist/
books/book[@id=$param:bookId]" />
<h2><x:out select="$abook/title"/></h2>
As you have just seen, x:set stores an internal XML representation of a node
retrieved using an XPath expression; it doesn’t convert the selected node into a
String and store it. Thus, x:set is primarily useful for storing parts of documents for later retrieval.
If you want to store a String, you need to use x:out within c:set. The x:out
tag converts the node to a String, and c:set then stores the String as an EL
FLOW CONTROL TAGS
variable. For example, bookdetails.jsp stores an EL variable containing a
book price, which is later provided as the value of a fmt tag, as follows:
<c:set var="price">
<x:out select="$abook/price"/>
</c:set>
<h4><fmt:message key="ItemPrice"/>:
<fmt:formatNumber value="${price}" type="currency"/>
The other option, which is more direct but requires that the user have more
knowledge of XPath, is to coerce the node to a String manually using XPath’s
string function.
<x:set var="price" select="string($abook/price)"/>
Flow Control Tags
The XML flow control tags parallel the behavior described in Flow Control
Tags (page 529) for the XPath expression language.
The JSP page bookcatalog.jsp uses the forEach tag to display all the books
contained in booklist as follows:
<x:forEach var="book"
select="$applicationScope:booklist/books/*">
<tr>
<c:set var="bookId">
<x:out select="$book/@id"/>
</c:set>=
<td bgcolor="#ffffaa">
<c:url var="url"
value="/bookdetails" >
<c:param name="bookId" value="${bookId}" />
<c:param name="Clear" value="0" />
</c:url>
<a href="${url}">
<strong><x:out select="$book/title"/>
</strong></a></td>
<td bgcolor="#ffffaa" rowspan=2>
<c:set var="price">
<x:out select="$book/price"/>
</c:set>
<fmt:formatNumber value="${price}" type="currency"/>
</td>
537
538
JAVASERVER PAGES STANDARD TAG LIBRARY
<td bgcolor="#ffffaa" rowspan=2>
<c:url var="url" value="/catalog" >
<c:param name="Add" value="${bookId}" />
</c:url>
<p><strong><a href="${url}">
<fmt:message key="CartAdd"/> </a>
</td>
</tr>
<tr>
<td bgcolor="#ffffff">
<fmt:message key="By"/> <em>
<x:out select="$book/firstname"/>
<x:out select="$book/surname"/></em></td></tr>
</x:forEach>
Transformation Tags
The transform tag applies a transformation, specified by a XSLT stylesheet set
by the attribute xslt, to an XML document, specified by the attribute doc. If the
doc attribute is not specified, the input XML document is read from the tag’s
body content.
The param subtag can be used along with transform to set transformation
parameters. The attributes name and value are used to specify the parameter. The
value attribute is optional. If it is not specified the value is retrieved from the
tag’s body.
Internationalization Tags
Chapter 16 covers how to design Web applications so that they conform to the
language and formatting conventions of client locales. This section describes
tags that support the internationalization of JSP pages.
JSTL defines tags for: setting the locale for a page, creating locale-sensitive messages, and formatting and parsing data elements such as numbers, currencies,
539
SETTING THE LOCALE
dates, and times in a locale-sensitive or customized manner. Table 13–7 lists the
tags.
Table 13–7 Internationalization Tags
Area
Function
Tags
Setting Locale
setLocale
requestEncoding
Messaging
bundle
message
param
setBundle
I18n
Number and Date Formatting
Prefix
fmt
formatNumber
formatDate
parseDate
parseNumber
setTimeZone
timeZone
JSTL i18n tags use a localization context to localize their data. A localization
context contains a locale and a resource bundle instance. To specify the localization context, you define the context parameter javax.servlet.jsp.jstl.fmt.localizationContext,
whose value can be a
javax.servlet.jsp.jstl.fmt.LocalizationContext or a String. A String
context parameter is interpreted as the name of a resource bundle basename. For
the Duke’s Bookstore application, the context parameter is the String messages.BookstoreMessages, which is set with deploytool in the Context tab of
the WAR inspector. This setting can be overridden in a JSP page by using the
JSTL fmt:setBundle tag. When a request is received, JSTL automatically sets
the locale based on the value retrieved from the request header and chooses the
correct resource bundle using the basename specified in the context parameter.
Setting the Locale
The setLocale tag is used to override the client-specified locale for a page. The
requestEncoding tag is used to set the request’s character encoding, in order to
be able to correctly decode request parameter values whose encoding is different
from ISO-8859-1.
540
JAVASERVER PAGES STANDARD TAG LIBRARY
Messaging Tags
By default, browser-sensing capabilities for locales are enabled. This means that
the client determines (via its browser settings) which locale to use, and allows
page authors to cater to the language preferences of their clients.
bundle Tag
You use the bundle tag to specify a resource bundle for a page.
To define a resource bundle for a Web application you specify the context parameter javax.servlet.jsp.jstl.fmt.localizationContext in the Web application deployment descriptor.
message Tag
The message tag is used to output localized strings. The following tag from
bookcatalog.jsp
<h3><fmt:message key="Choose"/></h3>
is used to output a string inviting customers to choose a book from the catalog.
The param subtag provides a single argument (for parametric replacement) to the
compound message or pattern in its parent message tag. One param tag must be
specified for each variable in the compound message or pattern. Parametric
replacement takes place in the order of the param tags.
Formatting Tags
JSTL provides a set of tags for parsing and formatting locale-sensitive numbers
and dates.
The formatNumber tag is used to output localized numbers. The following tag
from bookshowcart.jsp
<fmt:formatNumber value="${book.price}" type="currency"/>
is used to display a localized price for a book. Note that since the price is maintained in the database in dollars, the localization is somewhat simplistic, because
541
SQL TAGS
the formatNumber tag is unaware of exchange rates. The tag formats currencies
but does not convert them.
Analogous tags for formatting dates (formatDate), and parsing numbers and
dates (parseNumber, parseDate) are also available. The timeZone tag establishes the time zone (specified via the value attribute) to be used by any nested
formatDate tags.
In bookreceipt.jsp, a “pretend” ship date is created and then formatted with
the formatDate tag:
<jsp:useBean id="now" class="java.util.Date" />
<jsp:setProperty name="now" property="time"
value="${now.time + 432000000}" />
<fmt:message key="ShipDate"/>
<fmt:formatDate value="${now}" type="date"
dateStyle="full"/>.
SQL Tags
The JSTL SQL tags listed in Table 13–8 are designed for quick prototyping and
simple applications. For production applications, database operations are normally encapsulated in JavaBeans components.
Table 13–8 SQL Tags
Area
Function
Tags
Prefix
setDataSource
Database
SQL
query
dateParam
param
transaction
update
dateParam
param
sql
The setDataSource tag is provided to allow you to set data source information
for the database. You can provide a JNDI name or DriverManager parameters to
542
JAVASERVER PAGES STANDARD TAG LIBRARY
set the data source information. All of the Duke’s Bookstore pages that have
more than one SQL tag use the following statement to set the data source:
<sql:setDataSource dataSource="jdbc/BookDB" />
The query tag is used to perform an SQL query that returns a result set. For
parameterized SQL queries, you use a nested param tag inside the query tag.
In bookcatalog.jsp, the value of the Add request parameter determines which
book information should be retrieved from the database. This parameter is saved
as the attribute name bid and passed to the param tag. Notice that the query tag
obtains its data source from the context attribute bookDS set in the context listener.
<c:set var="bid" value="${param.Add}"/>
<sql:query var="books" >
select * from PUBLIC.books where id = ?
<sql:param value="${bid}" />
</sql:query>
The update tag is used to update a database row. The transaction tag is used to
perform a series of SQL statements atomically.
The JSP page bookreceipt.jsp page uses both tags to update the database
inventory for each purchase. Since a shopping cart can contain more than one
book, the transaction tag is used to wrap multiple queries and updates. First
the page establishes that there is sufficient inventory, then the updates are performed.
<c:set var="sufficientInventory" value="true" />
<sql:transaction>
<c:forEach var="item" items="${sessionScope.cart.items}">
<c:set var="book" value="${item.item}" />
<c:set var="bookId" value="${book.bookId}" />
<sql:query var="books"
sql="select * from PUBLIC.books where id = ?" >
<sql:param value="${bookId}" />
</sql:query>
<jsp:useBean id="inventory"
class="database.BookInventory" />
<c:forEach var="bookRow" begin="0"
items="${books.rowsByIndex}">
<jsp:useBean id="bookRow" type="java.lang.Object[]" />
<jsp:setProperty name="inventory" property="quantity"
value="${bookRow[7]}" />
QUERY
TAG RESULT INTERFACE
<c:if test="${item.quantity > inventory.quantity}">
<c:set var="sufficientInventory" value="false" />
<h3><font color="red" size="+2">
<fmt:message key="OrderError"/>
There is insufficient inventory for
<i>${bookRow[3]}</i>.</font></h3>
</c:if>
</c:forEach>
</c:forEach>
<c:if test="${sufficientInventory == 'true'}" />
<c:forEach var="item" items="${sessionScope.cart.items}">
<c:set var="book" value="${item.item}" />
<c:set var="bookId" value="${book.bookId}" />
<sql:query var="books"
sql="select * from PUBLIC.books where id = ?" >
<sql:param value="${bookId}" />
</sql:query>
<c:forEach var="bookRow" begin="0"
items="${books.rows}">
<sql:update var="books" sql="update PUBLIC.books set
inventory = inventory - ? where id = ?" >
<sql:param value="${item.quantity}" />
<sql:param value="${bookId}" />
</sql:update>
</c:forEach>
</c:forEach>
<h3><fmt:message key="ThankYou"/>
${param.cardname}.</h3><br>
</c:if>
</sql:transaction>
query Tag Result Interface
The Result interface is used to retrieve information from objects returned from
a query tag.
public interface Result
public String[] getColumnNames();
public int getRowCount()
public Map[] getRows();
public Object[][] getRowsByIndex();
public boolean isLimitedByMaxRows();
543
544
JAVASERVER PAGES STANDARD TAG LIBRARY
For complete information about this interface, see the API documentation for the
javax.servlet.jsp.jstl.sql package.
The var attribute set by a query tag is of type Result. The getRows method
returns an array of maps that can be supplied to the items attribute of a forEach
tag. The JSTL expression language converts the syntax ${result.rows} to a
call to result.getRows. The expression ${books.rows} in the following example returns an array of maps.
When you provide a array of maps to the forEach tag, the var attribute set by
the tag is of type Map. To retrieve information from a row, use the
get("colname") method to get a column value. The JSTL expression language
converts the syntax ${map.colname} to a call to map.get("colname"). For
example, the expression ${book.title} returns the value of the title entry of a
book map.
The Duke’s Bookstore page bookdetails.jsp retrieves the column values from
the book map as follows.
<c:forEach var="book" begin="0" items="${books.rows}">
<h2>${book.title}</h2>
<fmt:message key="By"/> <em>${book.firstname}
${book.surname}</em>
(${book.year})<br> <br>
<h4><fmt:message key="Critics"/></h4>
<blockquote>${book.description}</blockquote>
<h4><fmt:message key="ItemPrice"/>:
<fmt:formatNumber value="${book.price}" type="currency"/>
</h4>
</c:forEach>
The following excerpt from bookcatalog.jsp uses the Row interface to retrieve
values from the columns of a book row using scripting language expressions.
First the book row that matches a request parameter (bid) is retrieved from the
database. Since the bid and bookRow objects are later used by tags that use
scripting language expressions to set attribute values and a scriptlet that adds a
book to the shopping cart, both objects are declared as scripting variables using
the jsp:useBean tag. The page creates a bean that describes the book and scripting language expressions are used to set the book properties from book row column values. Finally the book is added to the shopping cart.
QUERY
TAG RESULT INTERFACE
You might want to compare this version of bookcatalog.jsp to the versions in
JavaServer Pages Technology (page 477) and Custom Tags in JSP
Pages (page 549) that use a book database JavaBeans component.
<sql:query var="books"
dataSource="${applicationScope.bookDS}">
select * from PUBLIC.books where id = ?
<sql:param value="${bid}" />
</sql:query>
<c:forEach var="bookRow" begin="0"
items="${books.rowsByIndex}">
<jsp:useBean id="bid" type="java.lang.String" />
<jsp:useBean id="bookRow" type="java.lang.Object[]" />
<jsp:useBean id="addedBook" class="database.BookDetails"
scope="page" />
<jsp:setProperty name="addedBook" property="bookId"
value="${bookRow[0]}" />
<jsp:setProperty name="addedBook" property="surname"
value="${bookRow[1]}" />
<jsp:setProperty name="addedBook" property="firstName"
value="${bookRow[2]}" />
<jsp:setProperty name="addedBook" property="title"
value="${bookRow[3]}" />
<jsp:setProperty name="addedBook" property="price"
value="${bookRow[4])}" />
<jsp:setProperty name="addedBook" property="year"
value="${bookRow[6]}" />
<jsp:setProperty name="addedBook"
property="description"
value="${bookRow[7]}" />
<jsp:setProperty name="addedBook" property="inventory"
value="${bookRow[8]}" />
</jsp:useBean>
<% cart.add(bid, addedBook); %>
...
</c:forEach>
545
546
JAVASERVER PAGES STANDARD TAG LIBRARY
Functions
Table 13–9 lists the JSTL functions
Table 13–9 Functions
Area
Function
Tags
Collection
length
length
String
manipulation
toUpperCase, toLowerCase
substring, substringAfter,
substringBefore
trim
replace
indexOf, startsWith, endsWith,
contains, containsIgnoreCase
split, join
escapeXml
Functions
Prefix
fn
While the java.util.Collection interface defines a size method, it does not
conform to the JavaBeans design pattern for properties and cannot be accessed
via the JSP expression language. The length function can be applied to any collection supported by the c:forEach and returns the length of the collection.
When applied to a String, it returns the number of characters in the string.
For example, the greeting.jsp page of the hello2 application introduced in
Updating Web Modules (page 99) uses the fn:length function and c:test tag
to determine whether to include a response page:
<%@ taglib uri="http://java.sun.com/jsp/jstl/core"
prefix="c" %>
<%@ taglib uri="http://java.sun.com/jsp/jstl/functions"
prefix="fn" %>
<html>
<head><title>Hello</title></head>
...
<input type="text" name="username" size="25">
<p></p>
<input type="submit" value="Submit">
<input type="reset" value="Reset">
</form>
FURTHER INFORMATION
<c:if test="${fn:length(param.username) > 0}" >
<%@include file="response.jsp" %>
</c:if>
</body>
</html>
The rest of the JSTL functions are concerned with string manipulation:
• toUpperCase, toLowerCase - Changes the capitalization of a string.
• substring, substringBefore, substringAfter - Gets a subset of a
string.
• trim - Trims whitespace from a string.
• replace - Replaces characters in a string.
• indexOf, startsWith, endsWith, contains, containsIgnoreCase Checks if a string contains another string.
• split - Splits a string into an array.
• join - Joins a collection into a string.
• escapeXml - Escapes XML characters in a string.
Further Information
For further information on JSTL see:
• The JSTL 1.0 Specification. This chapter documents a maintenance
release, version 1.1, of the JSTL Specification. A change log for the 1.1
release is available on the specification page, and an updated version of the
specification will be available during the summer.
http://java.sun.com/products/jsp/jstl/index.html#specs
• The JSTL Web site
http://java.sun.com/products/jsp/jstl
547
548
JAVASERVER PAGES STANDARD TAG LIBRARY
14
Custom Tags in JSP
Pages
Stephanie Bodoff
THE standard JSP tags simplify JSP page development and maintenance. JSP
technology also provides a mechanism for encapsulating other types of dynamic
functionality in custom tags, which are extensions to the JSP language. Some
examples of tasks that can be performed by custom tags include operations on
implicit objects, processing forms, accessing databases and other enterprise services such as e-mail and directories, and flow control. Custom tags increase productivity because they can be reused across more than one application.
Custom tags are distributed in a tag library, which defines a set of related custom
tags and contains the objects that implement the tags. The object that implements
a custom tag is called a tag handler. JSP technology defines two types of tag
handlers: simple and classic. Simple tag handlers can only be used for tags that
do not use scripting elements in attribute values or the tag body. Classic tag handlers must be used if scripting elements are required. Simple tag handlers are
covered in this chapter and classic tag handlers are discussed in Chapter 15.
You can write simple tag handlers with the JSP language or with the Java language. A tag file is a source file containing a reusable fragment of JSP code that
is translated into a simple tag handler by the Web container. Tag files can be used
to develop custom tags that are presentation-centric or that can take advantage of
existing tag libraries, or by page authors who do not know Java. For occasions
when the flexibility of the Java programming language is needed to define the
549
550
CUSTOM TAGS IN JSP PAGES
tag, JSP technology provides a simple API for developing a tag handler in the
Java programming language.
This chapter assumes you are familiar with the material in Chapter 12, especially
the section Using Custom Tags (page 509). For more information about tag
libraries and for pointers to some freely-available libraries, see
http://java.sun.com/products/jsp/taglibraries.html
What Is a Custom Tag?
A custom tag is a user-defined JSP language element. When a JSP page containing a custom tag is translated into a servlet, the tag is converted to operations on
a tag handler. The Web container then invokes those operations when the JSP
page’s servlet is executed.
Custom tags have a rich set of features. They can
•
•
•
•
Be customized via attributes passed from the calling page.
Pass variables back to the calling page.
Access all the objects available to JSP pages.
Communicate with each other. You can create and initialize a JavaBeans
component, create a public EL variable that refers to that bean in one tag,
and then use the bean in another tag.
• Be nested within one another and communicate via private variables.
The Example JSP Pages
This chapter describes the tasks involved in defining tags. The chapter illustrates
the tasks with excerpts from the JSP version of the Duke’s Bookstore application
discussed in The Example JSP Pages (page 482) rewritten to take advantage of
several new custom tags:
• A catalog tag for rendering the book catalog
• A shipDate tag for rendering the ship date of an order
• A template library for ensuring a common look and feel among all screens
and composing screens out of content chunks
THE EXAMPLE JSP PAGES
The last section in the chapter, Examples (page 596), describes several tags in
detail: a simplified iteration tag and the set of tags in the tutorial-template
tag library.
The tutorial-template tag library defines a set of tags for creating an application template. The template is a JSP page with placeholders for the parts that
need to change with each screen. Each of these placeholders is referred to as a
parameter of the template. For example, a simple template could include a title
parameter for the top of the generated screen and a body parameter to refer to a
JSP page for the custom content of the screen. The template is created with a set
of nested tags—definition, screen, and parameter—that are used to build a
table of screen definitions for Duke’s Bookstore and with an insert tag to insert
parameters from the table into the screen.
Figure 14–1 shows the flow of a request through the following Duke’s Bookstore
Web components:
• template.jsp, which determines the structure of each screen. It uses the
insert tag to compose a screen from subcomponents.
• screendefinitions.jsp, which defines the subcomponents used by each
screen. All screens have the same banner, but different title and body content (specified by the JSP Page column in Table 12–1).
• Dispatcher, a servlet, which processes requests and forwards to template.jsp.
551
552
CUSTOM TAGS IN JSP PAGES
Figure 14–1 Request Flow Through Duke’s Bookstore Components
The source code for the Duke’s Bookstore application is located in the
<INSTALL>/j2eetutorial14/examples/web/bookstore3/ directory created
when you unzip the tutorial bundle (see About the Examples, page xxi). A sample bookstore3.war is provided in <INSTALL>/j2eetutorial14/examples/
web/provided-wars/. To build, package, deploy, and run the example:
1. Build and package the bookstore common files as described in Duke’s
Bookstore Examples (page 101).
2. In a terminal window, go to <INSTALL>/j2eetutorial14/examples/
bookstore3/.
3. Run asant build. This target will spawn any necessary compilations and
copy files to <INSTALL>/j2eetutorial14/examples/web/bookstore3/
build/.
4. Start the J2EE application server.
5. Perform all the operations described in Accessing Databases from Web
Applications, page 102.
6. Start deploytool.
THE EXAMPLE JSP PAGES
7. Create a Web application called bookstore3.
a. Select File→New→Web Application WAR.
b. Select the Create New Stand-Alone WAR Module radio button.
c. Click Browse.
d. In the file chooser, navigate to <INSTALL>/j2eetutorial14/
examples/web/bookstore3/.
e. In the File Name field, enter bookstore3.
f. Click Choose Module File.
g. In the WAR Display Name field, enter bookstore3.
8. Add Web application files and libraries.
a. Click Edit.
b. Add the application content. In the Edit Contents dialog, navigate to
<INSTALL>/j2eetutorial14/examples/web/bookstore3/build/.
Select the JSP pages bookstore.jsp, bookdetails.jsp, bookcatalog.jsp, bookshowcart.jsp, bookcashier.jsp, bookreceipt.jsp,
bookordererror.jsp, Dispatcher.class and the database, listeners, and template directories and click Add. Click OK.
c. Add the shared bookstore library. Navigate to
<INSTALL>/
j2eetutorial14/examples/build/web/bookstore/dist/.
Select
bookstore.jar and Click Add.
9. Define the Web component.
a. Click Next.
b. Select the Servlet radio button.
c. Click Next.
d. Select Dispatcher from the Servlet class combo box.
e. Click Finish.
10.In the Deployment Setting frame, set the Context Root field value to /
bookstore3.
11.Add the aliases.
a. Select Dispatcher.
b. Select the Aliases tab.
c. Click Add and then type /bookstore in the Aliases field. Repeat to
add the aliases /bookcatalog, /bookdetails, /bookshowcart, /
bookcashier, /bookordererror, and /bookreceipt.
553
554
CUSTOM TAGS IN JSP PAGES
12.Add the JSTL resource bundle basename context parameter.
a. Select the Context tab.
b. Click Add.
c. Enter javax.servlet.jsp.jstl.fmt.localizationContext for the
Coded Parameter.
d. Enter messages.BookstoreMessages for the Value.
13.Set prelude for all JSP pages.
a. Select the JSP Properties tab.
b. Click the Add button next to the Name list.
c. Enter bookstore3.
d. Click the Add button next to the URL Pattern list.
e. Enter /*.jsp.
f. Click the Edit button next to the Include Preludes list.
g. Click Add.
h. Enter /template/prelude.jspf.
i. Click OK.
14.Add a resource reference for the database.
a. Select the Resource Refs tab.
b. Click Add.
c. Enter jdbc/BookDB in the Coded Name field.
d. Accept the default type javax.sql.DataSource.
e. Accept the default authorization Container.
f. Accept the default selected Shareable.
g. Enter jdbc/BookDB in the JNDI name field of the Deployment setting
for jdbc/BookDB frame.
15.Deploy the application.
a. Select Tools→Deploy.
b. Click OK.
c. A popup dialog will display the results of the deployment. Click Close.
16.Open the bookstore URL
http://localhost:1024/bookstore3/bookstore.
See Troubleshooting (page 445) for help with diagnosing common problems.
TYPES OF TAGS
Types of Tags
JSP simple tags are invoked using XML syntax. They have a start tag and end
tag, and possibly a body:
<tt:tag>
body
</tt:tag>
A custom tag with no body is expressed as follows:
<tt:tag /> or <tt:tag></tt:tag>
Tags with Attributes
A simple tag can have attributes. Attributes customize the behavior of a custom
tag just as parameters customize the behavior of a method.
There are three types of attributes:
• Simple attributes
• Fragment attributes
• Dynamic attributes
Simple Attributes
Simple attributes are evaluated by the container prior to being passed to the tag
handler. Simple attributes are listed in the start tag and have the syntax
attr="value". You can set a simple attribute value from a String constant, an
EL expression, or with a jsp:attribute element (see jsp:attribute
Element, page 557). The conversion process between the constants and expressions and attribute types follows the rules described for JavaBeans component
properties in Setting JavaBeans Component Properties (page 506).
The Duke’s Bookstore page bookcatalog.jsp calls the catalog tag which has
two attributes. The first attribute, a reference to a book database object, is set by
an EL expression. The second attribute, which sets the color of the rows in a
table that represents the bookstore catalog, is set with a String constant.
<sc:catalog bookDB ="${bookDB}" color="#cccccc">
555
556
CUSTOM TAGS IN JSP PAGES
Fragment Attributes
A JSP fragment is a portion of JSP code passed to a tag handler that can be
invoked as many times as needed. You can think of a fragment as a template that
is used by a tag handler to produce customized content. Thus, unlike simple
attributes which are evaluated by the container, fragment attributes are evaluated
by tag handlers during tag invocation.
You declare an attribute to be a fragment by using the fragment attribute in a tag
file attribute directive (see Declaring Tag Attributes in Tag Files, page 565) or
by using the fragment subelement of the attribute TLD element (see Declaring Tag Attributes for Tag Handlers, page 582). You define the value of fragment
attribute with a jsp:attribute element. When used to specify a fragment
attribute, the body of the jsp:attribute element can only contain template text
and standard and custom tags; it cannot contain scripting elements (see
Chapter 15).
JSP fragments can be parametrized via expression language (EL) variables in the
JSP code that composes the fragment. The EL variables are set by the tag handler, thus allowing the handler to customize the fragment each time it is invoked
(see Declaring Tag Variables in Tag Files, page 566 and Declaring Tag Variables
for Tag Handlers, page 584).
The catalog tag discussed earlier accepts two fragments: normalPrice, which
is displayed for a product that’s full price, and onSale, which is displayed for a
product that’s on sale.
<sc:catalog bookDB ="${bookDB}" color="#cccccc">
<jsp:attribute name="normalPrice">
<fmt:formatNumber value="${price}" type="currency"/>
</jsp:attribute>
<jsp:attribute name="onSale">
<strike><fmt:formatNumber value="${price}"
type="currency"/></strike><br/>
<font color="red"><fmt:formatNumber value="${salePrice}"
type="currency"/></font>
</jsp:attribute>
</sc:catalog>
The tag executes the normalPrice fragment, using the values for the price EL
variable, if the product is full price. If the product is on sale, the tag executes the
onSale fragment, using the price and salePrice variables.
TAGS WITH ATTRIBUTES
Dynamic Attributes
A dynamic attribute is an attribute that is not specified in the definition of the
tag. Dynamic attributes are primarily used by tags whose attributes are treated in
a uniform manner, but whose names are not necessarily known at development
time.
For example, this tag accepts an arbitrary number of attributes whose values are
colors and outputs a bulleted list of the attributes colored according to the values:
<colored:colored color1="red" color2="yellow" color3="blue"/>
You can also set the value of dynamic attributes with an EL expression or using
the jsp:attribute element.
jsp:attribute Element
The jsp:attribute element allows you to define the value of a tag attribute in
the body of an XML element instead of in the value of an XML attribute.
For example, the Duke’s Bookstore template page screendefinitions.jsp
uses jsp:attribute to use the output of fmt:message to set the value of the
value attribute of tt:parameter:
...
<tt:screen id="/bookcatalog">
<tt:parameter name="title" direct="true">
<jsp:attribute name="value" >
<fmt:message key="TitleBookCatalog"/>
</jsp:attribute>
</tt:parameter>
<tt:parameter name="banner" value="/template/banner.jsp"
direct="false"/>
<tt:parameter name="body" value="/bookcatalog.jsp"
direct="false"/>
</tt:screen>
...
jsp:attribute accepts a name attribute and a trim attribute. The name attribute
identifies which tag attribute is being specified. The optional trim attribute
determines whether whitespace appearing at the beginning and end of the element body should be discarded or not. By default, the leading and trailing
whitespace is discarded. The whitespace is trimmed when the JSP page is translated. If a body contains a custom tag that produces leading or trailing
557
558
CUSTOM TAGS IN JSP PAGES
whitespace, that whitespace is preserved regardless of the value of the trim
attribute.
An empty body is equivalent to specifying "" as the value of the attribute.
The body of jsp:attribute is restricted according to the type of attribute being
specified:
• For simple attributes that accept an EL expression, the body can be any JSP
content.
• For simple attributes that do not accept an EL expression, the body can
only contain template text.
• For fragment attributes, the body must not contain any scripting elements
(See Chapter 15).
Tags with Bodies
A simple tag can contain custom and core tags, HTML text, and tag-dependent
body content between the start and end tag.
In the following example, the Duke’s Bookstore application page bookshowuses the JSTL c:if tag to print the body if the request contains a
parameter named Clear:
cart.jsp
<c:if test="${param.Clear}">
<font color="#ff0000" size="+2"><strong>
You just cleared your shopping cart!
</strong><br> <br></font>
</c:if>
jsp:body Element
You can also specify the body of a simple tag explicitly using the jsp:body element. If one or more attributes are specified with the jsp:attribute element,
then jsp:body is the only way to specify the body of the tag. If one or more
jsp:attribute elements appear in the body of a tag invocation but you don’t
include a jsp:body element, the tag has an empty body.
TAGS THAT DEFINE VARIABLES
Tags That Define Variables
A simple tag can define an EL variable that can be used within the calling page.
In the following example, the iterator tag sets the value of the EL variable
departmentName as it iterates through a collection of department names.
<tlt:iterator var="departmentName" type="java.lang.String"
group="${myorg.departmentNames}">
<tr>
<td><a href="list.jsp?deptName=${departmentName}">
${departmentName}</a></td>
</tr>
</tlt:iterator>
Communication Between Tags
Custom tags communicate with each other through shared objects. There are two
types of shared objects: public and private.
In the following example, the c:set tag creates a public EL variable called
aVariable, which is then reused by anotherTag.
<c:set var="aVariable" value="aValue" />
<tt:anotherTag attr1="${aVariable}" />
Nested tags can share private objects. In the next example, an object created by
outerTag is available to innerTag. The inner tag retrieves its parent tag and then
retrieves an object from the parent. Since the object is not named, the potential
for naming conflicts is reduced.
<tt:outerTag>
<tt:innerTag />
</tt:outerTag>
The Duke’s Bookstore page template.jsp uses a set of cooperating tags that
share public and private objects to define the screens of the application. These
tags are described in A Template Tag Library (page 598).
559
560
CUSTOM TAGS IN JSP PAGES
Encapsulating Reusable Content using
Tag Files
A tag file is a source file that contains a fragment of JSP code that is reusable as
a custom tag. Tag files allow you to create custom tags using JSP syntax. Just as
a JSP page gets translated into a servlet class and then compiled, a tag file gets
translated into a tag handler and then compiled.
The recommended file extension for a tag file is .tag. As is the case with JSP
files, the actual tag may be composed of a top file that includes other files that
contain either a complete tag or a fragment of a tag file. Just as the recommended
extension for a fragment of a JSP file is .jspf, the recommended extension for a
fragment of a tag file is .tagf.
The following version of the Hello, World application introduced in Chapter 3
uses a tag to generate the response. The response tag, which accepts two
attributes—a greeting string and a name—is encapsulated in response.tag:
<%@ attribute name="greeting" required="true" %>
<%@ attribute name="name" required="true" %>
<h2><font color="black">${greeting}, ${name}!</font></h2>
The highlighted line in greeting.jsp page invokes the response tag if the
length of the username request parameter is greater than 0:
<%@ taglib tagdir="/WEB-INF/tags" prefix="h" %>
<%@ taglib uri="http://java.sun.com/jsp/jstl/core"
prefix="c" %>
<%@ taglib uri="http://java.sun.com/jsp/jstl/functions"
prefix="fn" %>
<html>
<head><title>Hello</title></head>
<body bgcolor="white">
<img src="duke.waving.gif">
<c:set var="greeting" value="Hello" />
<h2>${greeting}, my name is Duke. What's yours?</h2>
<form method="get">
<input type="text" name="username" size="25">
<p></p>
<input type="submit" value="Submit">
<input type="reset" value="Reset">
</form>
<c:if test="${fn:length(param.username) > 0}" >
ENCAPSULATING REUSABLE CONTENT USING TAG FILES
<h:response greeting=”${greeting}”
name="${param.username}"/>
</c:if>
</body>
</html>
A sample hello3.war
web/provided-wars/.
is provided in <INSTALL>/j2eetutorial14/examples/
To build, package, deploy, and run the hello3 applica-
tion:
1. In a terminal window, go to <INSTALL>/j2eetutorial14/examples/
web/hello3/.
2. Run asant build. This target will copy the JSP pages to the <INSTALL>/
j2eetutorial14/examples/web/hello3/build/ directory.
3. Start deploytool.
4. Create a Web application called hello3 by running the New Web Application Wizard. Select File→New→Web Application WAR.
5. New Web Application Wizard
a. Select the Create New Stand-Alone WAR Module radio button.
b. Click Browse and in the file chooser, navigate to <INSTALL>/
j2eetutorial14/examples/web/hello3/.
c. In the File Name field, enter hello3.
d. Click Choose Module File.
e. In the WAR Display Name field enter hello3.
f. In the Context Root field, enter /hello3.
g. Click Edit to add the content files.
h. In the Edit Contents dialog, navigate to <INSTALL>/j2eetutorial14/
examples/web/hello3/build/. Select duke.waving.gif, greeting.jsp, and response.tag and click Add. Click OK.
i. Click Next.
j. Select the JSP radio button.
k. Click Next.
l. Select greeting.jsp from the Servlet Class combo box.
m.Click Finish.
6. Set greeting.jsp to be a welcome file (see Declaring Welcome
Files, page 95).
a. Select the File Refs tab.
561
562
CUSTOM TAGS IN JSP PAGES
b. Click Add to add a welcome file.
c. Select greeting.jsp from the drop-down list.
7. Select File→Save.
8. Deploy the application.
a. Select Tools→Deploy.
b. In the Connection Settings frame, enter the user name and password you
specified when you installed the J2EE 1.4 Application Server.
c. Click OK.
d. A popup dialog will display the results of the deployment. Click Close.
9. Open your browser to http://localhost:1024/hello3
Tag File Location
Tag files can be placed in one of two locations: in the /WEB-INF/tags/ directory
or subdirectory of a Web application or in a JAR file (see Packaged Tag
Files, page 581) in the /WEB-INF/lib/ directory of a Web application. Packaged tag files require a tag library descriptor (TLD), an XML document that
contains information about a library as a whole and about each tag contained in
the library. (See Tag Library Descriptors, page 576). Tag files that appear in any
other location are not considered tag extensions and are ignored by the Web container.
Tag File Directives
Directives are used to control aspects of tag file translation to a tag handler, specify aspects of the tag, attributes of the tag, and variables exposed by the tag.
Table 14–1 lists the directives that you can use in tag files.
Table 14–1 Tag File Directives
Directive
Description
taglib
Identical to taglib directive (see Declaring Tag Libraries, page 509) for JSP
pages.
TAG FILE DIRECTIVES
Table 14–1 Tag File Directives (Continued)
Directive
Description
include
Identical to include directive (see Reusing Content in JSP Pages, page 513)
for JSP pages. Note that if the included file contains syntax unsuitable for tag
files, a translation error will occur.
tag
Similar to the page directive in a JSP page, but applies to tag files instead of
JSP pages. Like the page directive, a translation unit can contain more than
one instance of the tag directive. All the attributes apply to the complete
translation unit. However, there can be only one occurrence of any attribute/
value defined by this directive in a given translation unit. With the exception
of the import attribute, multiple attribute/value (re)definitions result in a
translation error.
Also used for declaring custom tag properties such as display name. See
Declaring Tags (page 563).
attribute
Declares attributes of the custom tag defined in the tag file. See body-content
Attribute (page 565).
variable
Declares an EL variable exposed by the tag to the calling page. See Declaring
Tag Variables in Tag Files (page 566).
Declaring Tags
The tag directive is similar to the JSP page’s page directive, but applies to tag
files. Some of the elements in the tag directive appear in the tag element of a
TLD (see Declaring Tag Handlers, page 581). Table 14–2 lists the tag directive
attributes.
Table 14–2 tag Directive Attributes
Attribute
Description
display-name
(optional) A short name that is intended to be displayed by tools.
Defaults to the name of the tag file without the extension .tag.
body-content
(optional) Provides information on the content of the body of the
tag. Can be either empty, tagdependent, or scriptless. A
translation error will result if JSP or any other value is used.
Defaults to scriptless. See body-content Attribute (page 565).
563
564
CUSTOM TAGS IN JSP PAGES
Table 14–2 tag Directive Attributes (Continued)
Attribute
Description
(optional) Indicates whether this tag supports additional attributes
with dynamic names. The value identifies a scoped attribute in
which to place a Map containing the names and values of the
dynamic attributes passed during invocation of the tag.
dynamic-attributes
A translation error results if the value of the dynamicattributes of a tag directive is equal to the value of a namegiven of a variable directive or the value of a name attribute of
an attribute directive.
small-icon
(optional) Relative path, from the tag source file, of an image file
containing a small icon that can be used by tools. Defaults to no
small icon.
large-icon
(optional) Relative path, from the tag source file, of an image file
containing a large icon that can be used by tools. Defaults to no
large icon.
description
(optional) Defines an arbitrary string that describes this tag.
Defaults to no description.
example
(optional) Defines an arbitrary string that presents an informal
description of an example of a use of this action. Defaults to no
example.
language
(optional) Carries the same syntax and semantics of the language
attribute of the page directive.
import
(optional) Carries the same syntax and semantics of the import
attribute of the page directive.
pageEncoding
(optional) Carries the same syntax and semantics of the pageEncoding attribute in the page directive.
isELIgnored
(optional) Carries the same syntax and semantics of the isELIgnored attribute of the page directive.
TAG FILE DIRECTIVES
body-content Attribute
You specify the character of a tag’s body content using the body-content
attribute:
bodycontent="empty | scriptless | tagdependent"
You must declare the body content of tags that do not accept a body as empty.
For tags that have a body there are two options. Body content containing custom
and standard tags and HTML text is specified as scriptless. All other types of
body content—for example, SQL statements passed to the query tag—is specified as tagdependent. If no attribute is specified, the default is scriptless.
Declaring Tag Attributes in Tag Files
You declare the attributes of a custom tag defined in a tag file with the
attribute directive. A TLD has an analogous attribute element (see Declaring Tag Attributes for Tag Handlers, page 582). Table 14–3 lists the attribute
directive attributes:
Table 14–3 attribute Directive Attributes
Attribute
Description
description
(optional) Description of the attribute. Defaults to no description.
The unique name of the attribute being declared. A translation error results
if more than one attribute directive appears in the same translation unit
with the same name.
name
A translation error results if the value of a name attribute of an attribute
directive is equal to the value of dynamic-attributes attribute of a tag
directive or the value of a name-given attribute of a variable directive.
required
(optional) Whether this attribute is required (true) or optional (false).
Defaults to false.
rtexprvalue
(optional) Whether the attribute’s value may be dynamically calculated at
runtime by an expression. Defaults to true.
type
(optional) The runtime type of the attribute’s value. Defaults to
java.lang.String.
565
566
CUSTOM TAGS IN JSP PAGES
Table 14–3 attribute Directive Attributes (Continued)
Attribute
Description
(optional) Whether this attribute is a fragment to be evaluated by the tag
handler (true) or a normal attribute to be evaluated by the container prior to
being passed to the tag handler.
fragment
If this attribute is true:
You do not specify the rtexprvalue attribute. The container fixes the
rtexprvalue attribute at true.
You do not specify the type attribute. The container fixes the type attribute
at javax.servlet.jsp.tagext.JspFragment.
Defaults to false.
Declaring Tag Variables in Tag Files
Tag attributes are used to customize tag behavior much like parameters are used
to customize the behavior of object methods. In fact, using tag attributes and EL
variables, is it possible to emulate various types of parameters—IN, OUT, and
nested.
To emulate IN parameters, use tag attributes. A tag attribute is communicated
between the calling page and the tag file when the tag is invoked. No further
communication occurs between the calling page and tag file.
To emulate OUT or nested parameters, use EL variables. The variable is not initialized by the calling page, but set by the tag file. Each type of parameter is synchronized with the calling page at various points according to the scope of the
variable. See Variable Synchronization (page 568) for details.
You declare an EL variable exposed by a tag file with the variable directive. A
TLD has an analogous variable element (see Declaring Tag Variables for Tag
Handlers, page 584). Table 14–4 lists the variable directive attributes:
Table 14–4 variable Directive Attributes
Attribute
Description
description
(optional) An optional description of this variable. Defaults to no
description.
TAG FILE DIRECTIVES
Table 14–4 variable Directive Attributes
Attribute
name-given |
name-fromattribute
Description
Defines an EL variable to be used in the page invoking this tag. Either
name-given or name-from-attribute must be specified. If namegiven is specified, the value is the name of the variable. If namefrom-attribute is specified, the value is the name of an attribute
whose (translation-time) value at of the start of the tag invocation will
give the name of the variable.
Translation errors arise in the following circumstances:
1. Specifying neither name-given or name-from-attribute or
both.
2. If two variable directives have the same name-given.
3. If the value of name-given attribute of a variable directive is
equal to the value of a name attribute of an attribute directive or the
value of dynamic-attributes attribute of a tag directive.
Defines a variable, local to the tag file, to hold the value of the EL variable. The container will synchronize this value with the variable whose
name is given in name-from-attribute.
alias
Required when name-from-attribute is specified. A translation
error results if used without name-from-attribute.
A translation error results if the value of alias is the same as the value
of a name attribute of an attribute directive or the name-given
attribute of a variable directive.
variable-class
(optional) The name of the class of the variable. The default is
java.lang.String.
declare
(optional) Whether the variable is declared or not. True is the default.
scope
(optional) The scope of the variable. Can be either AT_BEGIN, AT_END,
or NESTED. Defaults to NESTED.
567
568
CUSTOM TAGS IN JSP PAGES
Variable Synchronization
The Web container handles the synchronization of variables between a tag file
and a calling page. Table 14–5 summarizes when and how each object is synchronized according to the object’s scope.
Table 14–5 Variable Synchronization Behavior
AT_BEGIN
NESTED
AT_END
Beginning of tag file
not synch.
save
not synch.
Before any fragment invocation via
jsp:invoke or jsp:doBody (see
tag→page
tag→page
not synch
tag→page
restore
tag→page
Evaluating Fragments Passed to Tag
Files, page 571)
End of tag file
If name-given is used to specify the variable name, the name of the variable in
the calling page and the name of the variable in the tag file are the same and are
equal to the value of name-given.
The name-from-attribute and alias attributes of the variable directive can
be used to customize the name of the variable in the calling page while using
another name in the tag file. When using these attributes, the name of the variable in the calling page is set from the value of name-from-attribute at the
time the tag was called. The name of the corresponding variable in the tag file is
the value of alias.
Synchronization Examples
The following examples illustrate how variable synchronization works between
a tag file and its calling page. All the example JSP pages and tag files reference
the JSTL core tag library with the prefix c. The JSP pages reference a tag file
located in /WEB-INF/tags with the prefix my.
TAG FILE DIRECTIVES
AT_BEGIN Scope
In this example, the AT_BEGIN scope is used to pass the value of the variable
named x to the tag’s body and at the end of the tag invocation.
<%-- callingpage.jsp --%>
<c:set var="x" value="1"/>
${x} <%-- (x == 1) --%>
<my:example>
${x} <%-- (x == 2) --%>
</my:example>
${x} <%-- (x == 4) --%>
<%-- example.tag --%>
<%@ variable name-given="x" scope="AT_BEGIN" %>
${x} <%-- (x == null) --%>
<c:set var="x" value="2"/>
<jsp:doBody/>
${x} <%-- (x == 2) --%>
<c:set var="x" value="4"/>
NESTED Scope
In this example, the NESTED scope is used to make a variable named x available
only to the tag’s body. The tag sets the variable to 2 and this value is passed to
the calling page before the body is invoked. Since the scope is NESTED, and the
calling page also had a variable named x, its original value, 1, is restored when
the tag completes.
<%-- callingpage.jsp --%>
<c:set var="x" value="1"/>
${x} <%-- (x == 1) --%>
<my:example>
${x} <%-- (x == 2) --%>
</my:example>
${x} <%-- (x == 1) --%>
<%-- example.tag --%>
<%@ variable name-given="x" scope="NESTED" %>
${x} <%-- (x == null) --%>
<c:set var="x" value="2"/>
<jsp:doBody/>
${x} <%-- (x == 2) --%>
<c:set var="x" value="4"/>
569
570
CUSTOM TAGS IN JSP PAGES
AT_END Scope
In this example, the AT_END scope is used to return a value to the page. The body
of the tag is not affected.
<%-- callingpage.jsp --%>
<c:set var="x" value="1"/>
${x} <%-- (x == 1) --%>
<my:example>
${x} <%-- (x == 1) --%>
</my:example>
${x} <%-- (x == 4) --%>
<%-- example.tag --%>
<%@ variable name-given="x" scope="AT_END" %>
${x} <%-- (x == null) --%>
<c:set var="x" value="2"/>
<jsp:doBody/>
${x} <%-- (x == 2) --%>
<c:set var="x" value="4"/>
AT_BEGIN and name-from-attribute
In this example the AT_BEGIN scope is used to pass an EL variable to the tag’s
body, and make it available to the calling page at the end of the tag invocation.
The name of the variable is specified via the value of the attribute var. The variable is referenced by a local name, result, in the tag file.
<%-- callingpage.jsp --%>
<c:set var="x" value="1"/>
${x} <%-- (x == 1) --%>
<my:example var="x">
${x} <%-- (x == 2) --%>
${result} <%-- (result == null) --%>
<c:set var="result" value="invisible"/>
</my:example>
${x} <%-- (x == 4) --%>
${result} <%-- (result == ‘invisible’) --%>
<%-- example.tag --%>
<%@ attribute name="var" required="true" rtexprvalue="false"%>
<%@ variable alias="result" name-from-attribute="var"
scope="AT_BEGIN" %>
${x} <%-- (x == null) --%>
${result} <%-- (result == null) --%>
<c:set var="x" value="ignored"/>
<c:set var="result" value="2"/>
EVALUATING FRAGMENTS PASSED TO TAG FILES
<jsp:doBody/>
${x} <%-- (x == ‘ignored’) --%>
${result} <%-- (result == 2) --%>
<c:set var="result" value="4"/>
Evaluating Fragments Passed to Tag Files
When a tag file is executed, the Web container passes it two types of fragments:
fragment attributes and the tag body, which is implemented as a fragment. Recall
from the discussion of fragment attributes that fragments are evaluated by the tag
handler as opposed to the Web container. Within a tag file, you use the
jsp:invoke element to evaluate a fragment attribute and the jsp:doBody element to evaluate a tag file body.
The result of evaluating either type of fragment is sent to the response or stored
in an EL variable for later manipulation. To store the result of evaluating a fragment to an EL variable, you specify the var or varReader attributes. If var is
specified, the container stores the result in an EL variable of type String with
the name specified by var. If varReader is specified, the container stores the
result in an EL variable of type java.io.Reader with the name specified by
varReader. The Reader object can then be passed to a custom tag for further
processing. A translation error occurs if both var and varReader are specified.
An optional scope attribute indicates the scope of the resulting variable. The
possible values are page (default), request, session, or application. A translation error occurs if this attribute appears without specifying the var or
varReader attribute.
571
572
CUSTOM TAGS IN JSP PAGES
Examples
Simple Attributes
The Duke’s Bookstore shipDate tag, defined in shipDate.tag, is a custom tag
with a simple attribute. The tag generates the date of a book order according to
the type of shipping requested.
<%@ taglib prefix="sc" tagdir="/WEB-INF/tags" %>
<h3><fmt:message key="ThankYou"/> ${param.cardname}.</h3><br>
<fmt:message key="With"/>
<em><fmt:message key="${param.shipping}"/></em>,
<fmt:message key="ShipDateLC"/>
<sc:shipDate shipping="${param.shipping}" />
The tag determines the number of days until shipment from the shipping
attribute passed to it by the page bookreceipt.jsp. From the days, the tag computes the ship date. It then formats the ship date.
<%@ attribute name="shipping" required="true" %>
<jsp:useBean id="now" class="java.util.Date" />
<jsp:useBean id="shipDate" class="java.util.Date" />
<c:choose>
<c:when test="${shipping == 'QuickShip'}">
<c:set var="days" value="2" />
</c:when>
<c:when test="${shipping == 'NormalShip'}">
<c:set var="days" value="5" />
</c:when>
<c:when test="${shipping == 'SaverShip'}">
<c:set var="days" value="7" />
</c:when>
</c:choose>
<jsp:setProperty name="shipDate" property="time"
value="${now.time + 86400000 * days}" />
<fmt:formatDate value="${shipDate}" type="date"
dateStyle="full"/>.<br><br>
EXAMPLES
Simple and Fragment Attributes and
Variables
The Duke’s Bookstore catalog tag, defined in catalog.tag, is a custom tag
with simple and fragment attributes and variables. The tag renders the catalog of
a book database as an HTML table. The tag file declares that it sets variables
named price and salePrice via variable directives. The fragment normalPrice uses the variable price and the fragment onSale uses the variables price
and salePrice. Before the tag invokes the fragment attributes with the
jsp:invoke element, the Web container passes values for the variables back to
the calling page.
<%@ attribute name="bookDB" required="true"
type="database.BookDB" %>
<%@ attribute name="color" required="true" %>
<%@ attribute name="normalPrice" fragment="true" %>
<%@ attribute name="onSale" fragment="true" %>
<%@ variable name-given="price" %>
<%@ variable name-given="salePrice" %>
<center>
<table>
<c:forEach var="book" begin="0" items="${bookDB.books}">
<tr>
<c:set var="bookId" value="${book.bookId}" />
<td bgcolor="${color}">
<c:url var="url" value="/bookdetails" >
<c:param name="bookId" value="${bookId}" />
</c:url>
<a href="${url}"><
strong>${book.title} </strong></a></td>
<td bgcolor="${color}" rowspan=2>
<c:set var="salePrice" value="${book.price * .85}" />
<c:set var="price" value="${book.price}" />
<c:choose>
<c:when test="${book.onSale}" >
<jsp:invoke fragment="onSale" />
</c:when>
<c:otherwise>
<jsp:invoke fragment="normalPrice"/>
</c:otherwise>
</c:choose>
</td>
573
574
CUSTOM TAGS IN JSP PAGES
...
</table>
</center>
The page bookcatalog.jsp invokes the catalog tag with simple attributes
bookDB, which contains catalog data, and color, which customizes the coloring
of the table rows. The formatting of the book price is determined by two fragment attributes—normalPrice and onSale—that are conditionally invoked by
the tag according to data retrieved from the book database.
<sc:catalog bookDB ="${bookDB}" color="#cccccc">
<jsp:attribute name="normalPrice">
<fmt:formatNumber value="${price}" type="currency"/>
</jsp:attribute>
<jsp:attribute name="onSale">
<strike>
<fmt:formatNumber value="${price}" type="currency"/>
</strike><br/>
<font color="red">
<fmt:formatNumber value="${salePrice}" type="currency"/>
</font>
</jsp:attribute>
</sc:catalog>
The screen produced by bookcatalog.jsp is shown in Figure 14–2. You can
compare it to the version in Figure 12–2.
EXAMPLES
Figure 14–2 Book Catalog
Dynamic Attributes
The following code implements the tag discussed in Dynamic
Attributes (page 557). An arbitrary number of attributes whose values are colors
575
576
CUSTOM TAGS IN JSP PAGES
are stored in a Map named by the dynamic-attributes attribute of the tag
directive. The JSTL forEach tag is used to iterate through the Map and the
attribute keys and colored attribute values are printed in a bulleted list.
<%@ tag dynamic-attributes="colorMap"%>
<ul>
<c:forEach var="color" begin="0" items="${colorMap}">
<li>${color.key} =
<font color="${color.value}">${color.value}</font><li>
</c:forEach>
</ul>
Tag Library Descriptors
If you want to redistribute your tag files or implement your custom tags with tag
handlers written in Java, you need to declare the tags in a tag library descriptor
(TLD). A tag library descriptor (TLD) is an XML document that contains information about a library as a whole and about each tag contained in the library.
TLDs are used by a Web container to validate the tags and by JSP page development tools.
Tag library descriptor file names must have the extension .tld and must be
packaged in the /WEB-INF/ directory or subdirectory of the WAR file or in the /
META-INF/ directory or subdirectory of a tag library packaged in a JAR. If a tag
is implemented as a tag file and is packaged in /WEB-INF/tags/or a subdirectory, a TLD will be automatically generated by the Web container, though you
can provide one if you wish.
A TLD must begin with a root taglib element that specifies the schema and
required JSP version:
<taglib xmlns="http://java.sun.com/xml/ns/j2ee"
xmlns:xsi="http://www.w3.org/2001/XMLSchema-instance"
xsi:schemaLocation="http://java.sun.com/xml/ns/j2ee/webjsptaglibrary_2_0.xsd"
version="2.0">
TAG LIBRARY DESCRIPTORS
Table 14–6 lists the subelements of the taglib element:
Table 14–6 taglib Subelements
Element
Description
description
(optional) A string describing the use of the tag library.
display-name
(optional) Name intended to be displayed by tools.
icon
(optional) Icon that can be used by tools.
tlib-version
The tag library’s version.
short-name
(optional) Name that could be used by a JSP page authoring tool to create names with a mnemonic value.
uri
A URI that uniquely identifies the tag library.
validator
See validator Element (page 578).
listener
See listener Element (page 578).
tag-file | tag
Declares the tag files or tags defined in the tag library. See Declaring Tag
Files (page 578) and Declaring Tag Handlers (page 581). A tag library is
considered invalid if a tag-file element has a name subelement with
the same content as a name subelement in a tag element.
function
Zero or more EL functions (see Functions, page 502) defined in the tag
library.
tag-extension
(optional) Extensions that provide extra information about the tag library
for tools.
This section describes the top-level elements of TLDs. Subsequent sections
describe how to declare tags defined in tag files, how to declare tags defined in
tag handlers, and how to declare tag attributes and variables.
577
578
CUSTOM TAGS IN JSP PAGES
validator Element
This element defines an optional tag library validator that can be used to validate
the conformance of any JSP page importing this tag library to its requirements.
Table 14–7 lists the subelements of the validator element:
Table 14–7 validator Subelements
Element
validator-class
init-param
Description
The class implementing
javax.servlet.jsp.tagext.TagLibraryValidator
(optional) Initialization parameters.
listener Element
A tag library can specify some classes that are event listeners (see Handling
Servlet Life Cycle Events, page 446). The listeners are listed in the TLD as listener elements, and the Web container will instantiate the listener classes and
register them in a way analogous to listeners defined at the WAR level. Unlike
WAR-level listeners, the order in which the tag library listeners are registered is
undefined. The only subelement of the listener element is the listenerclass element, which must contain the fully qualified name of the listener class.
Declaring Tag Files
Although not required for tag files, providing a TLD allows you to share the tag
across more than one tag library and lets you import the tag library using a URI
instead of the tagdir attribute.
DECLARING TAG FILES
tag-file TLD Element
A tag file is declared in the TLD with a tag-file element, whose subelements
are listed in Table 14–8:
Table 14–8 tag-file Subelements
Element
Description
description
(optional) A description of the tag.
display-name
(optional) Name intended to be displayed by tools.
icon
(optional) Icon that can be used by tools.
name
The unique tag name.
path
Where to find the tag file implementing this tag, relative to the root of
the Web application or the root of the JAR file for a tag library packaged
in a JAR. This must begin with /WEB-INF/tags/ if the tag file resides
in the WAR, or /META-INF/tags/ if the tag file resides in a JAR.
example
(optional) Informal description of an example use of the tag.
tag-extension
(optional) Extensions that provide extra information about the tag for
tools.
Unpackaged Tag Files
Tag files placed in a subdirectory of /WEB-INF/tags/ do not require a TLD file
and don’t have to be packaged. Thus, to create reusable JSP code, you simply
create a new tag file and place the code inside of it.
The Web container generates an implicit tag library for each directory under and
including /WEB-INF/tags/. There are no special relationships between subdi-
579
580
CUSTOM TAGS IN JSP PAGES
rectories—they are allowed simply for organizational purposes. For example, the
following Web application contains three tag libraries:
/WEB-INF/tags/
/WEB-INF/tags/a.tag
/WEB-INF/tags/b.tag
/WEB-INF/tags/foo/
/WEB-INF/tags/foo/c.tag
/WEB-INF/tags/bar/baz/
/WEB-INF/tags/bar/baz/d.tag
The implicit TLD for each library has the following values:
• tlib-version for the tag library. Defaults to 1.0.
• short-name is derived from the directory name. If the directory is /WEBINF/tags/, the short name is simply tags. Otherwise, the full directory
path (relative to the Web application) is taken, minus the /WEB-INF/tags/
prefix. Then, all / characters are replaced with -, which yields the short
name. Note that short names are not guaranteed to be unique.
• A tag-file element is considered to exist for each tag file, with the following sub-elements:
• The name for each is the filename of the tag file, without the .tag extension.
• The path for each is the path of the tag file, relative to the root of the
Web application.
So, for the previous example, the implicit TLD for the /WEB-INF/tags/bar/
baz/ directory would be:
<taglib>
<tlib-version>1.0</tlib-version>
<short-name>bar-baz</short-name>
<tag-file>
<name>d</name>
<path>/WEB-INF/tags/bar/baz/d.tag</path>
</tag-file>
</taglib>
Despite the existence of an implicit tag library, a TLD in the Web application can
still create additional tags from the same tag files. To accomplish this, you add a
tag-file element with a path that points to the tag file.
DECLARING TAG HANDLERS
Packaged Tag Files
Tag files can be packaged in the /META-INF/tags/ directory in a JAR file
installed in the /WEB-INF/lib/ directory of the Web application. Tags placed
here are typically part of a reusable library of tags that can be easily used in any
Web application.
Tag files bundled in a JAR require a tag library descriptor. Tag files that appear in
a JAR but are not defined in a TLD are ignored by the Web container.
When used in a JAR file, the path subelement of the tag-file element specifies
the full path of the tag file from the root of the JAR. Therefore, it must always
begin with /META-INF/tags/.
Tag files can also be compiled into Java classes and bundled as a tag library. This
is useful when you wish to distribute a binary version of the tag library without
the original source. If you choose this form of packaging you must use a tool that
produces portable JSP code that uses only standard APIs.
Declaring Tag Handlers
When tags are implemented with tag handlers written in Java, each tag in the
library must be declared in the TLD with the tag element. The tag element contains the tag name, the class of its tag handler, information on the tag’s attributes,
and information on the variables created by the tag (see Tags That Define
Variables, page 559).
Each attribute declaration contains an indication of whether the attribute is
required, whether its value can be determined by request-time expressions, the
type of the attribute, and whether the attribute is a fragment. Variable information can be given directly in the TLD or through a tag extra info class. Table 14–
9 lists the subelements of the tag element:
Table 14–9 tag Subelements
Element
Description
description
(optional) A description of the tag.
display-name
(optional) name intended to be displayed by tools.
icon
(optional) Icon that can be used by tools.
581
582
CUSTOM TAGS IN JSP PAGES
Table 14–9 tag Subelements (Continued)
Element
Description
name
The unique tag name.
tag-class
The fully-qualified name of the tag handler class.
tei-class
(optional) Subclass of javax.servlet.jsp.tagext.TagExtraInfo.
See Declaring Tag Variables for Tag Handlers (page 584).
body-content
The body content type. Carries the same syntax and semantics as the
body-content attribute of a tag directive of a tag file. See body-content
Attribute (page 565).
variable
(optional) Declares an EL variable exposed by the tag to the calling page.
See Declaring Tag Variables for Tag Handlers (page 584).
attribute
Declares attributes of the custom tag. See Declaring Tag Attributes for Tag
Handlers (page 582).
dynamicattributes
Whether the tag supports additional attributes with dynamic names.
Defaults to false. If true, the tag handler class must implement the
javax.servlet.jsp.tagext.DynamicAttributes interface.
example
(optional) Informal description of an example use of the tag.
tag-extension
(optional) Extensions that provide extra information about the tag for
tools.
Declaring Tag Attributes for Tag Handlers
For each tag attribute, you must specify whether the attribute is required,
whether the value can be determined by an expression, optionally, the type of the
attribute in an attribute element, and whether the attribute is a fragment. If the
rtexprvalue element is true or yes, then the type element defines the return
type expected from any expression specified as the value of the attribute.For
static values, the type is always java.lang.String. An attribute is specified in a
DECLARING TAG ATTRIBUTES FOR TAG HANDLERS
TLD in an attribute element. Table 14–10 lists the subelements of the
attribute element.
Table 14–10 attribute Subelements
Element
Description
description
(optional) A description of the attribute.
name
The unique name of the attribute being declared. A translation error results
if more than one attribute element appears in the same tag with the
same name.
required
(optional) Whether the attribute is required. The default is false.
rtexprvalue
(optional) Whether the attribute’s value may be dynamically calculated at
runtime by an EL expression. The default is false.
type
(optional) The runtime type of the attribute’s value. Defaults to
java.lang.String if not specified.
(optional) Whether this attribute is a fragment to be evaluated by the tag
handler (true) or a normal attribute to be evaluated by the container prior to
being passed to the tag handler.
fragment
If this attribute is true:
You do not specify the rtexprvalue attribute. The container fixes the
rtexprvalue attribute at true.
You do not specify the type attribute. The container fixes the type
attribute at javax.servlet.jsp.tagext.JspFragment.
Defaults to false.
If a tag attribute is not required, a tag handler should provide a default value.
The tag element for a tag that outputs its body if a test evaluates to true declares
that the test attribute is required and that its value can be set by a runtime
expression.
<tag>
<name>present</name>
<tag-class>condpkg.IfSimpleTag</tag-class>
<body-content>scriptless</body-content>
...
583
584
CUSTOM TAGS IN JSP PAGES
<attribute>
<name>test</name>
<required>true</required>
<rtexprvalue>true</rtexprvalue>
</attribute>
...
</tag>
Declaring Tag Variables for Tag Handlers
The example described in Tags That Define Variables (page 559) defines an EL
variable departmentName:
<tlt:iterator var="departmentName" type="java.lang.String"
group="${myorg.departmentNames}">
<tr>
<td><a href="list.jsp?deptName=${departmentName}">
${departmentName}</a></td>
</tr>
</tlt:iterator>
When the JSP page containing this tag is translated, the Web container generates
code to synchronize the variable with the object referenced by the variable. To
generate the code, the Web container requires certain information about the variable:
•
•
•
•
Variable name
Variable class
Whether the variable refers to a new or existing object
The availability of the variable.
There are two ways to provide this information: by specifying the variable
TLD subelement or by defining a tag extra info class and including the teiclass element in the TLD (see TagExtraInfo Class, page 593). Using the variable element is simpler, but less dynamic. With the variable element, the only
aspect of the variable that you can specify at runtime is its name (via the namefrom-attribute element). If you provide this information in a tag extra info
class, you can also specify the type of the variable at runtime.
DECLARING TAG VARIABLES FOR TAG HANDLERS
Table 14–11 lists the subelements of the variable element.
Table 14–11 variable Subelements
Element
Description
description
(optional) A description of the variable.
name-given |
name-fromattribute
Defines an EL variable to be used in the page invoking this tag. Either
name-given or name-from-attribute must be specified. If namegiven is specified, the value is the name of the variable. If name-fromattribute is specified, the value is the name of an attribute whose (translation-time) value at of the start of the tag invocation will give the name of
the variable.
Translation errors arise in the following circumstances:
1. Specifying neither name-given or name-from-attribute or both.
2. If two variable elements have the same name-given.
variableclass
(optional) The fully qualified name of the class of the object.
java.lang.String is the default.
declare
(optional) Whether the object is declared or not. True is the default.A
translation error results if both declare and fragment are specified.
scope
(optional) The scope of the variable defined. Can be either AT_BEGIN,
AT_END, or NESTED (see Table 14–12). Defaults to NESTED.
Table 14–12 Variable Availability
Value
Availability
NESTED
Between the start tag and the end tag.
AT_BEGIN
From the start tag until the scope of any enclosing
tag. If there's no enclosing tag, then to the end of the
page.
AT_END
After the end tag until the scope of any enclosing tag.
If there's no enclosing tag, then to the end of the
page.
585
586
CUSTOM TAGS IN JSP PAGES
You could define the following variable element for the tlt:iterator tag:
<tag>
<variable>
<name-given>var</name-given>
<variable-class>java.lang.String</variable-class>
<declare>true</declare>
<scope>NESTED</scope>
</variable>
</tag>
Programming Simple Tag Handlers
The classes and interfaces used to implement simple tag handlers are contained
in the javax.servlet.jsp.tagext package. Simple tag handlers implement the
SimpleTag interface. Interfaces can be used to take an existing Java object and
make it a tag handler. For most newly created handlers, you would use the SimpleTagSupport classes as a base class.
The heart of a simple tag handler is a single method—doTag—which gets
invoked when the end element of the tag is encountered. Note that the default
implementation of the doTag method of SimpleTagSupport does nothing.
A tag handler has access to an API that allows it to communicate with the JSP
page. The entry point to the API is the JSP context object (javax.servlet.jsp.JspContext). JspContext provides access to implicit objects. PageContext extends JspContext with servlet-specific behavior. A tag handler can
retrieve all the other implicit objects (request, session, and application) accessible from a JSP page through these objects. If the tag is nested, a tag handler also
has access to the handler (called the parent) associated with the enclosing tag.
Packaging Tag Handlers
Tag handlers can be made available to a Web application in two basic ways. The
classes implementing the tag handlers can be stored in an unpacked form in the
WEB-INF/classes/ subdirectory of the Web application. Alternatively, if the
library is distributed as a JAR, it is stored in the WEB-INF/lib/ directory of the
Web application.
BASIC TAGS
How Is a Simple Tag Handler Invoked?
The SimpleTag interface defines the basic protocol between a simple tag handler
and a JSP page’s servlet. The JSP page’s servlet invokes the setJspContext,
setParent, and attribute setting methods before calling doStartTag.
ATag t = new ATag();
t.setJSPContext(...);
t.setParent(...);
t.setAttribute1(value1);
t.setAttribute2(value2);
...
t.setJspBody(new JspFragment(...))
t.doTag();
The following sections describe the methods that you need to develop for each
type of tag introduced in Types of Tags (page 555).
Basic Tags
The handler for a basic tag without a body must implement the doTag method of
the SimpleTag interface. The doTag method is invoked when the start tag is
encountered.
The basic tag discussed in the first section,
<tt:basic />
would be implemented by the following tag handler:
public HelloWorldSimpleTag extends SimpleTagSupport {
public void doTag() throws JspException, IOException {
getJspContext().getOut().write("Hello, world.");
}
}
587
588
CUSTOM TAGS IN JSP PAGES
Tags with Attributes
Defining Attributes in a Tag Handler
For each tag attribute, you must define a set method in the tag handler that conforms to the JavaBeans architecture conventions. For example, the tag handler
for the JSTL c:if tag,
<c:if test="${Clear}">
contains the following method:
public void setTest(boolean test) {
this.test = test;
}
Attribute Validation
The documentation for a tag library should describe valid values for tag
attributes. When a JSP page is translated, a Web container will enforce any constraints contained in the TLD element for each attribute.
The attributes passed to a tag can also be validated at translation time with the
validate method of a class derived from TagExtraInfo. This class is also used
to provide information about variables defined by the tag (see TagExtraInfo
Class, page 593).
The validate method is passed the attribute information in a TagData object,
which contains attribute-value tuples for each of the tag’s attributes. Since the
validation occurs at translation time, the value of an attribute that is computed at
request time will be set to TagData.REQUEST_TIME_VALUE.
The tag <tt:twa attr1="value1"/> has the following TLD attribute element:
<attribute>
<name>attr1</name>
<required>true</required>
<rtexprvalue>true</rtexprvalue>
</attribute>
This declaration indicates that the value of attr1 can be determined at runtime.
TAGS WITH ATTRIBUTES
The following validate method checks that the value of attr1 is a valid Boolean value. Note that since the value of attr1 can be computed at runtime, validate must check whether the tag user has chosen to provide a runtime value.
public class TwaTEI extends TagExtraInfo {
public ValidationMessage[] validate(TagData data) {
Object o = data.getAttribute("attr1");
if (o != null && o != TagData.REQUEST_TIME_VALUE) {
if (((String)o).toLowerCase().equals("true") ||
((String)o).toLowerCase().equals("false") )
return null;
else
return new ValidationMessage(data.getId(),
"Invalid boolean value.");
}
else
return null;
}
}
Dynamic Attributes
Tag handlers that support dynamic attributes must declare that they do so in the
tag element of the TLD (see Declaring Tag Handlers, page 581). In addition,
your tag handler must implement the setDynamicAttribute method of the
DynamicAttributes interface. For each attribute specified in the tag invocation
that does not have a corresponding attribute element in the TLD, the Web container calls setDynamicAttribute, passing in the namespace of the attribute (or
null if in the default namespace), the name of the attribute, and the value of the
attribute. You must implement the setDynamicAttribute method to remember
the names and values of the dynamic attributes so that they can be used later on
when doTag is executed. If the setDynamicAttribute method an exception, the
doTag method is not invoked for the tag, and the exception must be treated in the
same manner as if it came from an attribute setter method.
The following implementation of setDynamicAttribute saves the attribute
names and values in lists. Then, in the doTag method, the names and values are
echoed to the response in an HTML list.
private ArrayList keys = new ArrayList();
private ArrayList values = new ArrayList();
public void setDynamicAttribute(String uri,
String localName, Object value ) throws JspException {
589
590
CUSTOM TAGS IN JSP PAGES
keys.add( localName );
values.add( value );
}
public void doTag() throws JspException, IOException {
JspWriter out = getJspContext().getOut();
for( int i = 0; i < keys.size(); i++ ) {
String key = (String)keys.get( i );
Object value = values.get( i );
out.println( "<li>" + key + " = " + value + "</li>" );
}
}
Tags with Bodies
A tag handler for a tag with a body is implemented differently depending on
whether or not the tag handler needs to manipulate the body. A tag handler
manipulates the body when it reads or modifies the contents of the body.
Tag Handler Does Not Manipulate the Body
If a tag handler needs to simply evaluate the body, it gets the body with the
getJspBody method of SimpleTag and then evaluates the body with the invoke
method.
The following tag handler accepts a test parameter and evaluates the body of
the tag if the test evaluates to true. The body of the tag is encapsulated in a JSP
fragment. If the test is true, the handler retrieves the fragment with the getJspBody method. The invoke method directs all output to a supplied writer or to the
JspWriter returned by the getOut method of the JspContext associated with
the tag handler if the writer is null.
public class IfSimpleTag extends SimpleTagSupport {
private boolean test;
public void setTest(boolean test) {
this.test = test;
}
public void doTag() throws JspException, IOException {
if(test){
getJspBody().invoke(null);
}
}
}
TAGS THAT DEFINE VARIABLES
Tag Handler Manipulates the Body
If the tag handler needs to manipulate the body, the tag handler must capture the
body in a StringWriter. The invoke method directs all output to a supplied
writer. Then the modified body is written to the JspWriter returned by the
getOut method of the JspContext. Thus, a tag that converts its body to upper
case could be written as follows:
public class SimpleWriter extends SimpleTagSupport {
public void doTag() throws JspException, IOException {
StringWriter sw = new StringWriter();
jspBody.invoke(sw);
jspContext().
getOut().println(sw.toString().toUpperCase());
}
}
Tags That Define Variables
Similar communication mechanisms exist for communication between JSP page
and tag handlers as for JSP pages and tag files.
To emulate IN parameters, use tag attributes. A tag attribute is communicated
between the calling page and the tag handler when the tag is invoked. No further
communication occurs between the calling page and tag handler.
To emulate OUT or nested parameters, use variables with availability AT_BEGIN,
AT_END, or NESTED. The variable is not initialized by the calling page, but set by
the tag handler.
For AT_BEGIN availability, the variable is available in the calling page from the
start tag until the scope of any enclosing tag. If there's no enclosing tag, then the
variable is available to the end of the page. For AT_END availability, the variable
is available in the calling page after the end tag until the scope of any enclosing
tag. If there's no enclosing tag, then the variable is available to the end of the
page. For nested parameters, the variable is available in the calling page between
the start tag and the end tag.
When you develop a tag handler you are responsible for creating and setting the
object referenced by the variable into a context accessible from the page. You do
this by using the JspContext().setAttribute(name, value) or JspContext.setAttribute(name, value, scope) method. You retrieve the page context with the getJspContext method of SimpleTag.
591
592
CUSTOM TAGS IN JSP PAGES
Typically, an attribute passed to the custom tag specifies the name of the variable
and the value of the variable is dependent on another attribute. For example, the
iterator tag retrieves the name of the variable from the var attribute and determines the value of the variable from a computation performed on the group
attribute.
public void doTag() throws JspException, IOException {
if (iterator == null)
return;
while (iterator.hasNext()) {
getJspContext().setAttribute(var, iterator.next());
getJspBody().invoke(null);
}
}
public void setVar(String var) {
this.var = var;
}
public void setGroup(Collection group) {
this.group = group;
if(group.size() > 0)
iterator = group.iterator();
}
The scope that an variable can have is summarized in Table 14–13. The scope
constrains the accessibility and lifetime of the object.
Table 14–13 Scope of Objects
Name
Accessible From
Lifetime
page
Current page
Until the response has been sent back
to the user or the request is passed to
a new page
request
Current page and any included or
forwarded pages
Until the response has been sent back
to the user
session
Current request and any subsequent
request from the same browser
(subject to session lifetime)
The life of the user’s session
application
Current and any future request in
the same Web application
The life of the application
TAGS THAT DEFINE VARIABLES
TagExtraInfo Class
In Declaring Tag Variables for Tag Handlers (page 584) we discussed how to
provide information about tag variable in the tag library descriptor. Here we
describe another approach: defining a tag extra info class. You define a tag extra
info class by extending the class javax.servlet.jsp.tagext.TagExtraInfo.
A TagExtraInfo must implement the getVariableInfo method to return an
array of VariableInfo objects containing the following information:
•
•
•
•
The
Variable name
Variable class
Whether the variable refers to a new object
The availability of the variable
Web
container
passes a parameter of type javax.servto the getVariableInfo method that contains
attribute-value tuples for each of the tag’s attributes. These attributes can be used
to provide the VariableInfo object with an EL variable’s name and class.
let.jsp.tagext.TagData
The following example demonstrates how to provide information about the variable created by the iterator tag in a tag extra info class. Since the name (var)
and class (type) of the variable are passed in as tag attributes, they can be
retrieved with the data.getAttributeString method and used to fill in the
VariableInfo constructor. To allow the variable var to be used only within the
tag body, the scope of the object is set to be NESTED.
package iterator;
public class IteratorTei extends TagExtraInfo {
public VariableInfo[] getVariableInfo(TagData data) {
String type = data.getAttributeString("type");
if (type == null)
type = "java.lang.Object";
return new VariableInfo[] {
new VariableInfo(data.getAttributeString("var"),
type,
true,
VariableInfo.NESTED)
};
}
}
593
594
CUSTOM TAGS IN JSP PAGES
The fully qualified name of the tag extra info class defined for an EL variable
must be declared in the TLD in the tei-class subelement of the tag element.
Thus, the tei-class element for IteratorTei would be as follows:
<tei-class>
iterator.IteratorTei
</tei-class>
Cooperating Tags
Tags cooperate by sharing objects. JSP technology supports two styles of object
sharing.
The first style requires that a shared object be named and stored in the page context (one of the implicit objects accessible to both JSP pages and tag handlers).
To access objects created and named by another tag, a tag handler uses the pageContext.getAttribute(name, scope) method.
In the second style of object sharing, an object created by the enclosing tag handler of a group of nested tags is available to all inner tag handlers. This form of
object sharing has the advantage that it uses a private namespace for the objects,
thus reducing the potential for naming conflicts.
To access an object created by an enclosing tag, a tag handler must first obtain its
enclosing tag with the static method SimpleTagSupport.findAncestorWithClass(from, class) or the SimpleTagSupport.getParent method. The
former method should be used when a specific nesting of tag handlers cannot be
guaranteed. Once the ancestor has been retrieved, a tag handler can access any
statically or dynamically created objects. Statically created objects are members
of the parent. Private objects can also be created dynamically. Such objects can
be stored in a tag handler with the setValue method and retrieved with the
getValue method.
The following example illustrates a tag handler that supports both the named and
private object approaches to sharing objects. In the example, the handler for a
query tag checks whether an attribute named connectionId has been set. If the
connectionId attribute has been set, the handler retrieves the connection object
from the page context. Otherwise, the tag handler first retrieves the tag handler
for the enclosing tag, and then retrieves the connection object from that handler.
COOPERATING TAGS
public class QueryTag extends SimpleTagSupport {
public int doTag() throws JspException {
String cid = getConnectionId();
Connection connection;
if (cid != null) {
// there is a connection id, use it
connection =(Connection)pageContext.
getAttribute(cid);
} else {
ConnectionTag ancestorTag =
(ConnectionTag)findAncestorWithClass(this,
ConnectionTag.class);
if (ancestorTag == null) {
throw new JspTagException("A query without
a connection attribute must be nested
within a connection tag.");
}
connection = ancestorTag.getConnection();
...
}
}
}
The query tag implemented by this tag handler could be used in either of the following ways:
<tt:connection cid="con01" ... >
...
</tt:connection>
<tt:query id="balances" connectionId="con01">
SELECT account, balance FROM acct_table
where customer_number = ?
<tt:param value="${requestScope.custNumber}" />
</tt:query>
<tt:connection ... >
<tt:query cid="balances">
SELECT account, balance FROM acct_table
where customer_number = ?
<tt:param value="${requestScope.custNumber}" />
</tt:query>
</tt:connection>
595
596
CUSTOM TAGS IN JSP PAGES
The TLD for the tag handler indicates that the connectionId attribute is
optional with the following declaration:
<tag>
...
<attribute>
<name>connectionId</name>
<required>false</required>
</attribute>
</tag>
Examples
The custom tags described in this section demonstrate solutions to two recurring
problems in developing JSP applications: minimizing the amount of Java programming in JSP pages and ensuring a common look and feel across applications. In doing so, they illustrate many of the styles of tags discussed in the first
part of the chapter.
An Iteration Tag
Constructing page content that is dependent on dynamically generated data often
requires the use of flow control scripting statements. By moving the flow control
logic to tag handlers, flow control tags reduce the amount of scripting needed in
JSP pages.
The iterator tag retrieves objects from a collection stored in a JavaBeans component and assigns them to an EL variable. This tag is a very simplified example
of the an iterator tag. Web applications requiring such functionality should use
the JSTL forEach tag, which is discussed in Iterator Tags (page 531). The body
of the tag retrieves information from the variable. While elements remain in the
collection, the iterator tag causes the body to be reevaluated.
JSP Page
The index.jsp page invokes the iterator tag to iterate through a collection of
department names. Each item in the collection is assigned to the departmentName variable.
EXAMPLES
<%@ taglib uri="/tlt" prefix="tlt" %>
<html>
<head>
<title>Departments</title>
</head>
<body bgcolor="white">
<jsp:useBean id="myorg" class="myorg.Organization"/>
<table border=2 cellspacing=3 cellpadding=3>
<tr>
<td><b>Departments</b></td>
</tr>
<tlt:iterator var="departmentName" type="java.lang.String"
group="${myorg.departmentNames}">
<tr>
<td><a href="list.jsp?deptName=${departmentName}">
${departmentName}</a></td>
</tr>
</tlt:iterator>
</table>
</body>
</html>
Tag Handler
The tag handler passes the current element of the group back to the page in an
EL variable called var, which is accessed using the expression language in the
calling page. After the variable is set, the body is evaluated with the invoke
method.
public void doTag() throws JspException, IOException {
if (iterator == null)
return;
while (iterator.hasNext()) {
getJspContext().setAttribute(var, iterator.next());
getJspBody().invoke(null);
}
}
public void setVar(String var) {
this.var = var;
}
public void setGroup(Collection group) {
this.group = group;
if(group.size() > 0)
iterator = group.iterator();
}
597
598
CUSTOM TAGS IN JSP PAGES
A Template Tag Library
A template provides a way to separate the common elements that are part of each
screen from the elements that change with each screen of an application. Putting
all the common elements together into one file makes it easier to maintain and
enforce a consistent look and feel in all the screens. It also makes development
of individual screens easier because the designer can focus on portions of a
screen that are specific to that screen while the template takes care of the common portions.
The template is a JSP page with placeholders for the parts that need to change
with each screen. Each of these placeholders is referred to as a parameter of the
template. For example, a simple template could include a title parameter for the
top of the generated screen and a body parameter to refer to a JSP page for the
custom content of the screen.
The template uses a set of nested tags—definition, screen, and parameter—
to define a table of screen definitions and uses an insert tag to insert parameters
from a screen definition into a specific application screen.
JSP Pages
The template for the Duke’s Bookstore example, template.jsp, is shown
below. This page includes a JSP page that creates the screen definition and then
uses the insert tag to insert parameters from the definition into the application
screen.
<%@ taglib uri="/tutorial-template" prefix="tt" %>
<%@ page errorPage="/template/errorinclude.jsp" %>
<%@ include file="/template/screendefinitions.jsp" %>
<html>
<head>
<title>
<tt:insert definition="bookstore" parameter="title"/>
</title>
</head>
<body bgcolor="#FFFFFF">
<tt:insert definition="bookstore" parameter="banner"/>
<tt:insert definition="bookstore" parameter="body"/>
<center><em>Copyright © 2002 Sun Microsystems, Inc. </
em></center>
</body>
</html>
EXAMPLES
screendefinitions.jsp
selectedScreen:
creates a screen definition based on a request attribute
<tt:definition name="bookstore"
screen="${requestScope
['javax.servlet.forward.servlet_path']}">
<tt:screen id="/bookstore">
<tt:parameter name="title" value="Duke's Bookstore"
direct="true"/>
<tt:parameter name="banner" value="/template/banner.jsp"
direct="false"/>
<tt:parameter name="body" value="/bookstore.jsp"
direct="false"/>
</tt:screen>
<tt:screen id="/bookcatalog">
<tt:parameter name="title" direct="true">
<jsp:attribute name="value" >
<fmt:message key="TitleBookCatalog"/>
</jsp:attribute>
</tt:parameter>
<tt:parameter name="banner" value="/template/banner.jsp"
direct="false"/>
<tt:parameter name="body" value="/bookcatalog.jsp"
direct="false"/>
</tt:screen>
...
</tt:definition>
The template is instantiated by the Dispatcher servlet. Dispatcher first gets the
requested screen and stores it as an attribute of the request. This is necessary
because when the request is forwarded to template.jsp, the request URL
doesn’t contain the original request (for example, /bookstore3/catalog) but
instead reflects the path (/bookstore3/template.jsp) of the forwarded page.
Then Dispatcher performs business logic based on the request URL, which
updates model objects. Finally, the servlet dispatches the request to template.jsp:
public class Dispatcher extends HttpServlet {
public void doGet(HttpServletRequest request,
HttpServletResponse response) {
String bookId = null;
BookDetails book = null;
String clear = null;
BookDBAO bookDBAO =
(BookDBAO)getServletContext().
getAttribute("bookDBAO");
599
600
CUSTOM TAGS IN JSP PAGES
HttpSession session = request.getSession();
String selectedScreen = request.getServletPath();
ShoppingCart cart = (ShoppingCart)session.
getAttribute("cart");
if (cart == null) {
cart = new ShoppingCart();
session.setAttribute("cart", cart);
}
request.setAttribute("selectedScreen",
request.getServletPath());
if (selectedScreen.equals("/bookcatalog")) {
bookId = request.getParameter("Add");
if (!bookId.equals("")) {
try {
book = bookDBAO.getBookDetails(bookId);
if ( book.getOnSale() ) {
double sale = book.getPrice() * .85;
Float salePrice = new Float(sale);
book.setPrice(salePrice.floatValue());
}
cart.add(bookId, book);
} catch (BookNotFoundException ex) {
// not possible
}
}
} else if (selectedScreen.equals("/bookshowcart")) {
bookId =request.getParameter("Remove");
if (bookId != null) {
cart.remove(bookId);
}
clear = request.getParameter("Clear");
if (clear != null && clear.equals("clear")) {
cart.clear();
}
} else if (selectedScreen.equals("/bookreceipt")) {
// Update the inventory
try {
bookDBAO.buyBooks(cart);
} catch (OrderException ex) {
request.setAttribute("selectedScreen",
"/bookOrderError");
}
}
try {
request.
getRequestDispatcher(
"/template/template.jsp").
forward(request, response);
EXAMPLES
} catch(Exception ex) {
ex.printStackTrace();
}
}
public void doPost(HttpServletRequest request,
HttpServletResponse response) {
request.setAttribute("selectedScreen",
request.getServletPath());
try {
request.
getRequestDispatcher(
"/template/template.jsp").
forward(request, response);
} catch(Exception ex) {
ex.printStackTrace();
}
}
}
Tag Handlers
The template tag library contains four tag handlers—DefinitionTag,
ScreenTag, ParameterTag, and InsertTag—that demonstrate the use of cooperating tags. DefinitionTag, ScreenTag, and ParameterTag comprise a set of
nested tag handlers that share private objects. DefinitionTag creates a public
object named bookstore that is used by InsertTag.
In doTag, DefinitionTag creates a private object named screens that contains
a hash table of screen definitions. A screen definition consists of a screen identifier and a set of parameters associated with the screen. These parameters are
loaded when the body of the definition tag, which contains nested screen and
parameter tags, is invoked. DefinitionTag creates a public object of class Definition, selects a screen definition from the screens object based on the URL
passed in the request, and uses it to initialize a public Definition object.
public int doTag() {
try {
screens = new HashMap();
getJspBody().invoke(null);
Definition definition = new Definition();
PageContext context = (PageContext)getJspContext();
ArrayList params = (ArrayList) screens.get(screenId);
Iterator ir = null;
if (params != null) {
ir = params.iterator();
601
602
CUSTOM TAGS IN JSP PAGES
while (ir.hasNext())
definition.setParam((Parameter)ir.next());
// put the definition in the page context
context.setAttribute(definitionName, definition,
context.APPLICATION_SCOPE);
}
}
The table of screen definitions is filled in by ScreenTag and ParameterTag from
text provided as attributes to these tags. Table 14–14 shows the contents of the
screen definitions hash table for the Duke’s Bookstore application.
Table 14–14 Screen Definitions
Screen Id
Title
Banner
Body
/bookstore
Duke’s Bookstore
/banner.jsp
/bookstore.jsp
/bookcatalog
Book Catalog
/banner.jsp
/bookcatalog.jsp
/bookdetails
Book Description
/banner.jsp
/bookdetails.jsp
/bookshowcart
Shopping Cart
/banner.jsp
/bookshowcart.jsp
/bookcashier
Cashier
/banner.jsp
/bookcashier.jsp
/bookreceipt
Receipt
/banner.jsp
/bookreceipt.jsp
If the URL passed in the request is /bookstore, the Definition contains the
items from the first row of Table 14–14:
Table 14–15 Definition for URL /bookstore
Title
Banner
Body
Duke’s Bookstore
/banner.jsp
/bookstore.jsp
The parameters for the URL /bookstore are shown in Table 14–16. The parameters specify that the value of the title parameter, Duke’s Bookstore, should be
EXAMPLES
inserted directly into the output stream, but the values of banner and body
should be dynamically included.
Table 14–16 Parameters for the URL /bookstore
Parameter
Name
Parameter Value
isDirect
title
Duke’s Bookstore
true
banner
/banner.jsp
false
body
/bookstore.jsp
false
InsertTag inserts parameters
doTag method, it retrieves the
of the screen definition into the response. In the
definition object from the page context and then
inserts the parameter value. If the parameter is direct, it is directly inserted into
the response; otherwise, the request is sent to the parameter, and the response is
dynamically included into the overall response.
public void doTag() throws JspTagException {
Definition definition = null;
Parameter parameter = null;
boolean directInclude = false;
PageContext context = (PageContext)getJspContext();
// get the definition from the page context
definition = (Definition)context.getAttribute(
definitionName, context.APPLICATION_SCOPE);
// get the parameter
if (parameterName != null && definition != null)
parameter = (Parameter)
definition.getParam(parameterName);
if (parameter != null)
directInclude = parameter.isDirect();
try {
// if parameter is direct, print to out
if (directInclude && parameter != null)
context.getOut().print(parameter.getValue());
// if parameter is indirect,
include results of dispatching to page
else {
603
604
CUSTOM TAGS IN JSP PAGES
if ((parameter != null) &&
(parameter.getValue() != null))
context.include(parameter.getValue());
}
} catch (Exception ex) {
throw new JspTagException(ex.getMessage());
}
}
15
Scripting in JSP Pages
Stephanie Bodoff
J
SP scripting elements allow you to use Java programming language statements in your JSP pages. Scripting element are typically used to create and
access objects, define methods, and manage the flow of control. Many tasks that
require the use of scripts can be eliminated by using custom tag libraries, in particular the JSP Standard Tag Library. Since one of the goals of JSP technology is
to separate static template data from the code needed to dynamically generate
content, very sparing use of JSP scripting is recommended. Nevertheless, there
may be some circumstances that require its use.
There are three ways to create and use objects in scripting elements:
• Instance and class variables of the JSP page’s servlet class are created in
declarations and accessed in scriptlets and expressions.
• Local variables of the JSP page’s servlet class are created and used in
scriptlets and expressions.
• Attributes of scope objects (see Using Scope Objects, page 448) are created and used in scriptlets and expressions.
This chapter briefly describes the syntax and usage of JSP scripting elements.
The Example JSP Pages
This chapter illustrates JSP scripting elements using a version of the hello2
example introduced in Chapter 3—webclient—that accesses a Web service. To
build, package, deploy, and run the webclient example:
605
606
SCRIPTING IN JSP PAGES
1. Build and deploy the JAX-RPC Web service MyHelloService described
in Creating a Web Service with JAX-RPC (page 326).
2. In a terminal window, go to <INSTALL>/j2eetutorial14/examples/
jaxrpc/webclient/.
3. Run asant build. This target copies the JSP pages to the <INSTALL>/
j2eetutorial14/examples/jaxrpc/webclient/build/ directory and
runs wscompile to generate the JAX-RPC client stubs.
4. Start deploytool.
5. Create a Web application called webclient by running the New Web
Application Wizard. Select File→New→Web Application WAR.
6. New Web Application Wizard
a. Select the Create New Stand-Alone WAR Module radio button.
b. Click Browse and in the file chooser, navigate to <INSTALL>/
j2eetutorial14/examples/jaxrpc/webclient/.
c. In the File Name field, enter webclient.
d. Click Choose Module File.
e. In the WAR Display Name field enter webclient.
f. In the Context Root field, enter /webclient.
g. Click Edit to add the content files.
h. In the Edit Contents dialog, navigate to <INSTALL>/j2eetutorial14/
examples/jaxrpc/webclient/build/. Select duke.waving.gif,
greeting.jsp, response.jsp, and the webclient directory and click
Add.
i. Click OK.
j. Click Next.
k. Select the JSP radio button.
l. Click Next.
m.Select greeting.jsp from the Servlet Class combo box.
n. Click Finish.
7. Add an alias to the greeting Web component.
a. Select the greeting Web component.
b. Select the Aliases tab.
c. Click Add to add a new mapping.
d. Type /greeting in the aliases list.
USING SCRIPTING
8. Select File→Save.
9. Deploy the WAR.
10.Open your browser to http://localhost:1024/webclient/greeting
Using Scripting
JSP technology allows a container to support any scripting language that can call
Java objects. If you wish to use a scripting language other than the default, java,
you must specify it in the language attribute of the page directive at the beginning of a JSP page:
<%@ page language="scripting language" %>
Since scripting elements are converted to programming language statements in
the JSP page’s servlet class, you must import any classes and packages used by a
JSP page. If the page language is java, you import a class or package with the
import attribute of the page directive:
<%@ page import="fully_qualified_classname, packagename.*" %>
The webclient JSP page response.jsp imports the classes needed to access
the JAX-RPC stub class and the Web service client classes with the following
page directive:
<%@ page import="javax.xml.rpc.Stub,webclient.*" %>
Disabling Scripting
By default, scripting in JSP pages is valid. Since scripting can make pages difficult to maintain, some JSP page authors or page authoring groups may want to follow a methodology where scripting elements are not allowed.
You can invalidate scripting for a group of JSP pages with deploytool by
setting the value of the Scripting Invalid checkbox in the JSP Properties tab of a
WAR. For information on how to define a group of JSP pages, see Setting Properties for Groups of JSP Pages (page 517). When scripting is invalid, scriptlets,
scripting expressions, and declarations will produce a translation error if present
607
608
SCRIPTING IN JSP PAGES
in any of the pages in the group. Table 15–1 summarizes the scripting settings
and their meanings:
Table 15–1 Scripting Settings
JSP Configuration
Scripting Encountered
unspecified
Valid
false
Valid
true
Translation Error
Declarations
A JSP declaration is used to declare variables and methods in a page’s scripting
language. The syntax for a declaration is as follows:
<%! scripting language declaration %>
When the scripting language is the Java programming language, variables and
methods in JSP declarations become declarations in the JSP page’s servlet class.
Initializing and Finalizing a JSP Page
You can customize the initialization process to allow the JSP page to read persistent configuration data, initialize resources, and perform any other one-time
activities by overriding the jspInit method of the JspPage interface. You
release resources using the jspDestroy method. The methods are defined using
JSP declarations.
For example, an older version of the Duke’s Bookstore application retrieved the
object that accesses the bookstore database from the context and stored a reference to the object in the variable bookDBAO in the jspInit method.The variable
SCRIPTLETS
definition and the initialization and finalization methods jspInit and jspDestroy were defined in a declaration:
<%!
private BookDBAO bookDBAO;
public void jspInit() {
bookDBAO =
(BookDBAO)getServletContext().getAttribute("bookDB");
if (bookDBAO == null)
System.out.println("Couldn’t get database.");
}
%>
When the JSP page was removed from service, the jspDestroy method released
the BookDBAO variable.
<%!
public void jspDestroy() {
bookDBAO = null;
}
%>
Scriptlets
A JSP scriptlet is used to contain any code fragment that is valid for the scripting
language used in a page. The syntax for a scriptlet is as follows:
<%
scripting language statements
%>
When the scripting language is set to java, a scriptlet is transformed into a Java
programming language statement fragment and is inserted into the service
method of the JSP page’s servlet. A programming language variable created
within a scriptlet is accessible from anywhere within the JSP page.
In the Web service version of the hello2 application, greeting.jsp contains a
scriptlet to retrieve the request parameter named username and test whether it is
empty. If the if statement evaluates to true, the response page is included. Since
609
610
SCRIPTING IN JSP PAGES
the if statement opens a block, the HTML markup would be followed by a
scriptlet that closes the block.
<%
String username = request.getParameter("username");
if ( username != null && username.length() > 0 ) {
%>
<%@include file="response.jsp" %>
<%
}
%>
Expressions
A JSP expression is used to insert the value of a scripting language expression,
converted into a string, into the data stream returned to the client. When the
scripting language is the Java programming language, an expression is transformed into a statement that converts the value of the expression into a String
object and inserts it into the implicit out object.
The syntax for an expression is as follows:
<%= scripting language expression %>
Note that a semicolon is not allowed within a JSP expression, even if the same
expression has a semicolon when you use it within a scriptlet.
In the Web service version of the hello2 application, response.jsp contains
the following scriptlet which creates a JAX-RPC stub, sets the endpoint on the
stub, and then invokes the sayHello method on the stub, passing the user name
retrieved from a request parameter:
<%
String resp = null;
try {
Stub stub = (Stub)(new
MyHelloService_Impl().getHelloIFPort());
stub._setProperty(
javax.xml.rpc.Stub.ENDPOINT_ADDRESS_PROPERTY,
"http://localhost:1024/hello-jaxrpc/hello");
HelloIF hello = (HelloIF)stub;
resp =
hello.sayHello(request.getParameter("username"));
PROGRAMMING TAGS THAT ACCEPT SCRIPTING ELEMENTS
} catch (Exception ex) {
resp = ex.toString();
}
%>
A scripting expression is then used to insert the value of resp into the output
stream:
<h2><font color="black"><%= resp %>!</font></h2>
Programming Tags That Accept
Scripting Elements
Tag that accept scripting elements in attribute values or the body cannot be programmed as simple tags; they must be implemented as classic tags. The following sections describe the TLD elements and JSP tag extension API specific to
classic tag handlers. All other TLD elements are the same as for simple tags.
TLD Elements
You specify the character of a classic tag’s body content using the body-content
element:
<body-content>empty | JSP | tagdependent</body-content>
You must declare the body content of tags that do not have a body as empty. For
tags that have a body, there are two options. Body content containing custom and
core tags, scripting elements, and HTML text is categorized as JSP. All other
types of body content—for example, SQL statements passed to the query tag—
would be labeled tagdependent.
Tag Handlers
Classic tag handlers are written with the Java language and implement either the
Tag, IterationTag, or BodyTag interface. Interfaces can be used to take an
existing Java object and make it a tag handler. For newly created handlers, you
can use the TagSupport and BodyTagSupport classes as base classes.
611
612
SCRIPTING IN JSP PAGES
The classes and interfaces used to implement classic tag handlers are contained
in the javax.servlet.jsp.tagext package. Classic tag handlers implement
either the Tag, IterationTag, or BodyTag interface. Interfaces can be used to
take an existing Java object and make it a tag handler. For newly created classic
tag handlers, you can use the TagSupport and BodyTagSupport classes as base
classes. These classes and interfaces are contained in the javax.servlet.jsp.tagext package.
Tag handler methods defined by the Tag and BodyTag interfaces are called by the
JSP page’s servlet at various points during the evaluation of the tag. When the
start element of a custom tag is encountered, the JSP page’s servlet calls methods
to initialize the appropriate handler and then invokes the handler’s doStartTag
method. When the end element of a custom tag is encountered, the handler’s
doEndTag method is invoked for all but simple tags. Additional methods are
invoked in between when a tag handler needs to manipulate the body of the tag.
For further information, see Tags with Bodies (page 614). In order to provide a
tag handler implementation, you must implement the methods, summarized in
Table 15–2, that are invoked at various stages of processing the tag.
Table 15–2 Tag Handler Methods
Tag Type
Interface
Methods
Basic
Tag
doStartTag, doEndTag
Attributes
Tag
doStartTag, doEndTag,
setAttribute1,...,N, release
Body
Tag
doStartTag, doEndTag, release
Body, iterative
evaluation
IterationTag
doStartTag, doAfterBody, doEndTag,
release
Body, manipulation
BodyTag
doStartTag, doEndTag, release,
doInitBody, doAfterBody
A tag handler has access to an API that allows it to communicate with the JSP
page. The entry points to the API are two objects: the JSP context (javax.servlet.jsp.JspContext) for simple tag handlers and the page context
(javax.servlet.jsp.PageContext) for classic tag handlers. JspContext provides access to implicit objects. PageContext extends JspContext with HTTPspecific behavior. A tag handler can retrieve all the other implicit objects
TAG HANDLERS
(request, session, and application) accessible from a JSP page through these
objects. In addition, implicit objects can have named attributes associated with
them. Such attributes are accessed using [set|get]Attribute methods.
If the tag is nested, a tag handler also has access to the handler (called the parent) associated with the enclosing tag.
How Is a Classic Tag Handler Invoked?
The Tag interface defines the basic protocol between a tag handler and a JSP
page’s servlet. It defines the life cycle and the methods to be invoked when the
start and end tags are encountered.
The JSP page’s servlet invokes the setPageContext, setParent, and attribute
setting methods before calling doStartTag. The JSP page’s servlet also guarantees that release will be invoked on the tag handler before the end of the page.
Here is a typical tag handler method invocation sequence:
ATag t = new ATag();
t.setPageContext(...);
t.setParent(...);
t.setAttribute1(value1);
t.setAttribute2(value2);
t.doStartTag();
t.doEndTag();
t.release();
The BodyTag interface extends Tag by defining additional methods that let a tag
handler access its body. The interface provides three new methods:
• setBodyContent—Creates body content and adds to the tag handler
• doInitBody—Called before evaluation of the tag body
• doAfterBody—Called after evaluation of the tag body
A typical invocation sequence is:
t.doStartTag();
out = pageContext.pushBody();
t.setBodyContent(out);
// perform any initialization needed after body content is set
t.doInitBody();
t.doAfterBody();
// while doAfterBody returns EVAL_BODY_AGAIN we
// iterate body evaluation
613
614
SCRIPTING IN JSP PAGES
...
t.doAfterBody();
t.doEndTag();
out = pageContext.popBody();
t.release();
Tags with Bodies
A tag handler for a tag with a body is implemented differently depending on
whether or not the tag handler needs to manipulate the body. A tag handler
manipulates the body when it reads or modifies the contents of the body.
Tag Handler Does Not Manipulate the Body
If the tag handler does not need to manipulate the body, the tag handler should
implement the Tag interface. If the tag handler implements the Tag interface and
the body of the tag needs to be evaluated, the doStartTag method needs to
return EVAL_BODY_INCLUDE; otherwise it should return SKIP_BODY.
If a tag handler needs to iteratively evaluate the body, it should implement the
IterationTag interface. The tag handler should return EVAL_BODY_AGAIN doAfterBody method if it determines that the body needs to be evaluated again.
Tag Handler Manipulates the Body
If the tag handler needs to manipulate the body, the tag handler must implement
BodyTag (or be derived from BodyTagSupport).
When a tag handler implements the BodyTag interface, it must implement the
doInitBody and the doAfterBody methods. These methods manipulate body
content passed to the tag handler by the JSP page’s servlet.
Body content supports several methods to read and write its contents. A tag handler can use the body content’s getString or getReader methods to extract
information from the body, and the writeOut(out) method to write the body
contents to an out stream. The writer supplied to the writeOut method is
obtained using the tag handler’s getPreviousOut method. This method is used
to ensure that a tag handler’s results are available to an enclosing tag handler.
If the body of the tag needs to be evaluated, the doStartTag method needs to
return EVAL_BODY_BUFFERED; otherwise, it should return SKIP_BODY.
COOPERATING TAGS
doInitBody Method
The doInitBody method is called after the body content is set but before it is
evaluated. You generally use this method to perform any initialization that
depends on the body content.
doAfterBody Method
The doAfterBody method is called after the body content is evaluated. doAfterBody must return an indication of whether to continue evaluating the body.
Thus, if the body should be evaluated again, as would be the case if you were
implementing an iteration tag, doAfterBody should return EVAL_BODY_AGAIN;
otherwise, doAfterBody should return SKIP_BODY.
The following example reads the content of the body (which contains a SQL
query) and passes it to an object that executes the query. Since the body does not
need to be reevaluated, doAfterBody returns SKIP_BODY.
public class QueryTag extends BodyTagSupport {
public int doAfterBody() throws JspTagException {
BodyContent bc = getBodyContent();
// get the bc as string
String query = bc.getString();
// clean up
bc.clearBody();
try {
Statement stmt = connection.createStatement();
result = stmt.executeQuery(query);
} catch (SQLException e) {
throw new JspTagException("QueryTag: " +
e.getMessage());
}
return SKIP_BODY;
}
}
release Method
A tag handler should reset its state and release any private resources in the
release method.
Cooperating Tags
Tags cooperate by sharing objects. JSP technology supports two styles of object
sharing.
615
616
SCRIPTING IN JSP PAGES
The first style requires that a shared object be named and stored in the page context (one of the implicit objects accessible to both JSP pages and tag handlers).
To access objects created and named by another tag, a tag handler uses the pageContext.getAttribute(name, scope) method.
In the second style of object sharing, an object created by the enclosing tag handler of a group of nested tags is available to all inner tag handlers. This form of
object sharing has the advantage that it uses a private namespace for the objects,
thus reducing the potential for naming conflicts.
To access an object created by an enclosing tag, a tag handler must first obtain its
enclosing tag with the static method TagSupport.findAncestorWithClass(from, class) or the TagSupport.getParent method. The former
method should be used when a specific nesting of tag handlers cannot be guaranteed. Once the ancestor has been retrieved, a tag handler can access any statically
or dynamically created objects. Statically created objects are members of the
parent. Private objects can also be created dynamically. Such objects can be
stored in a tag handler with the setValue method and retrieved with the
getValue method.
The following example illustrates a tag handler that supports both the named and
private object approaches to sharing objects. In the example, the handler for a
query tag checks whether an attribute named connectionId has been set. If the
connection attribute has been set, the handler retrieves the connection object
from the page context. Otherwise, the tag handler first retrieves the tag handler
for the enclosing tag, and then retrieves the connection object from that handler.
public class QueryTag extends BodyTagSupport {
public int doStartTag() throws JspException {
String cid = getConnectionId();
Connection connection;
if (cid != null) {
// there is a connection id, use it
connection =(Connection)pageContext.
getAttribute(cid);
} else {
ConnectionTag ancestorTag =
(ConnectionTag)findAncestorWithClass(this,
ConnectionTag.class);
if (ancestorTag == null) {
throw new JspTagException("A query without
a connection attribute must be nested
within a connection tag.");
}
connection = ancestorTag.getConnection();
TAGS THAT DEFINE VARIABLES
...
}
}
}
The query tag implemented by this tag handler could be used in either of the following ways:
<tt:connection cid="con01" ... >
...
</tt:connection>
<tt:query id="balances" connectionId="con01">
SELECT account, balance FROM acct_table
where customer_number = ?
<tt:param value="${requestScope.custNumber}" />
</tt:query>
<tt:connection ... >
<tt:query cid="balances">
SELECT account, balance FROM acct_table
where customer_number = ?
<tt:param value="${requestScope.custNumber}" />
</tt:query>
</tt:connection>
The TLD for the tag handler indicates that the connectionId attribute is
optional with the following declaration:
<tag>
...
<attribute>
<name>connectionId</name>
<required>false</required>
</attribute>
</tag>
Tags That Define Variables
The mechanisms for defining EL variables in classic tags are similar to those
described in Chapter 14. You must declare the variable in a variable element of
the
TLD
or
in
a
tag
extra
info
class.
You
use
PageContext().setAttribute(name, value) or PageContext.setAttribute(name, value, scope) methods in the tag handler to create or update
an association between a name accessible in the page context and the object that
617
618
SCRIPTING IN JSP PAGES
is the value of the variable. For classic tag handlers, Table 15–3 illustrates how
the availability of a variable affects when you may want to set or update the variable’s value.
Table 15–3 Scripting Variable Availability
Value
Availability
In Methods
NESTED
Between the start
tag and the end tag
doStartTag, doInitBody, and doAfterBody.
AT_BEGIN
From the start tag
until the end of the
page
doStartTag, doInitBody, doAfterBody, and
doEndTag.
AT_END
After the end tag
until the end of the
page
doEndTag
An EL variable defined by a custom tag can also be accessed in a scripting
expression. For example, the Web service described in the previous section could
be encapsulated in a custom tag that returns the response in an EL variable
named by the var attribute and then var could be accessed in a scripting expression as follows:
<ws:hello var="response"
name="<%=request.getParameter("username")%>" />
<h2><font color="black"><%= response %>!</font></h2>
Remember that in situations where scripting is not allowed:
• In a tag body where the body-content is declared as scriptless
• In a page where scripting is specified to be invalid
you wouldn’t be able to access the EL variable in a scriptlet or expression.
Instead, you would have to use the JSP expression language to access the variable.
16
Internationalizing and
Localizing Web
Applications
Stephanie Bodoff
Internationalization is the process of preparing an application to support more
than one language and data format. Localization is the process of adapting an
internationalized application to support a specific region or locale. Examples of
locale-dependent information include messages and user interface labels, character sets and encoding, and date and currency formats.Although all client user
interfaces should be internationalized and localized, it is particularly important
for Web applications because of the global nature of the Web.
Java Platform Localization Classes
In the Java 2 platform, java.util.Locale represents a specific geographical,
political, or cultural region. The string representation of a locale consists of the
international standard 2-character abbreviation for language and country and an
optional variant, all separated by underscore _ characters. Examples of locale
strings include fr (French), de_CH (Swiss German), and en_US_POSIX (United
States English on a POSIX-compliant platform).
619
620
INTERNATIONALIZING AND LOCALIZING WEB APPLICATIONS
Locale-sensitive data is stored in a java.util.ResourceBundle. A resource
bundle contains key-value pairs, where the keys uniquely identify a locale-specific object in the bundle. A resource bundle can be backed by a text file (properties resource bundle) or a class (list resource bundle) containing the pairs. A
resource bundle instance is constructed by appending a locale string representation to a base name.
For more details on internationalization and localization in the Java 2 platform,
see
http://java.sun.com/docs/books/tutorial/i18n/index.html
In the Web technology chapters, the Duke’s Bookstore example contains
resource bundles with the base name messages.BookstoreMessages for the
locales en_US and es_ES. See Internationalization Tags (page 538) for information on the JSTL i18n tags.
Providing Localized Messages and
Labels
Messages and labels should be tailored according to the conventions of a user's
language and region. There are two approaches to providing localized messages
and labels in a Web application:
• Provide a version of the JSP page in each of the target locales and have a
controller servlet dispatch the request to the appropriate page depending
on the requested locale. This approach is useful if large amounts of data on
a page or an entire Web application need to be internationalized.
• Isolate any locale-sensitive data on a page into resource bundles, and
access the data so that the corresponding translated message is fetched
automatically and inserted into the page. Thus, instead of creating strings
directly in your code, you create a resource bundle that contains translations and read the translations from that bundle using the corresponding
key.
PROVIDING LOCALIZED MESSAGES AND LABELS
The Duke’s Bookstore application follows the second approach. Here are a few
lines from the default resource bundle messages.BookstoreMessages.java:
{"TitleCashier", "Cashier"},
{"TitleBookDescription", "Book Description"},
{"Visitor", "You are visitor number "},
{"What", "What We're Reading"},
{"Talk", " talks about how Web components can transform the way
you develop applications for the Web. This is a must read for
any self respecting Web developer!"},
{"Start", "Start Shopping"},
To get the correct strings for a given user, a Web component retrieves the locale
(set by a browser language preference) from the request using the getLocale
method, opens the resource bundle for that locale, and then saves the bundle as a
session attribute (see Associating Attributes with a Session, page 470):
ResourceBundle messages = (ResourceBundle)session.
getAttribute("messages");
if (messages == null) {
Locale locale=request.getLocale();
messages = ResourceBundle.
getBundle("messages.BookstoreMessages", locale);
session.setAttribute("messages", messages);
}
A Web component retrieves the resource bundle from the session:
ResourceBundle messages =
(ResourceBundle)session.getAttribute("messages");
and looks up the string associated with the key TitleCashier as follows:
messages.getString("TitleCashier");
The JSP versions of the Duke’s Bookstore application uses the fmt:message tag
to provide localized strings for introductory messages, HTML link text, button
labels, and error messages. For more information on the JSTL messaging tags,
see Messaging Tags (page 540).
621
622
INTERNATIONALIZING AND LOCALIZING WEB APPLICATIONS
Date and Number Formatting
Java programs use the DateFormat.getDateInstance(int, locale) to parse
and format dates in a locale-sensitive manner. Java programs use the NumberFormat.getXXXInstance(locale) method, where XXX can be Currency, Number, or Percent, to parse and format numerical values in a locale-sensitive
manner. The servlet version of Duke’s Bookstore uses the currency version of
this method to format book prices.
JSTL applications use the fmt:formatDate and fmt:parseDate tags to handle
localized dates, and fmt:formatNumber and fmt:parseNumber tags to handle
localized numbers, including currency values. For more information on the JSTL
formatting tags, see Formatting Tags (page 540). The JSTL version of Duke’s
bookstore uses the fmt:formatNumber tag to format book prices and the
fmt:formatDate tag to format delivery dates.
Character Sets and Encodings
Character Sets
A character set is a set of textual and graphic symbols, each of which is mapped
to a set of nonnegative integers.
The first character set used in computing was ASCII. It is limited in that it can
only represent American English. ASCII contains upper- and lower-case Latin
alphabets, numerals, punctuation, a set of control codes, and a few miscellaneous
symbols.
Unicode defines a standardized, universal character set that can be extended to
accommodate additions. Unicode characters may be represented as escape
sequences, using the notation \uXXXX, where XXXX is the character’s 16-bit representation in hexadecimal when the Java program source file encoding doesn’t
support Unicode. For example, the Spanish version of the Duke’s Bookstore
message file uses Unicode for non-ASCII characters:
{"TitleCashier", "Cajero"},
{"TitleBookDescription", "Descripci" + "\u00f3" + "n del
Libro"},
{"Visitor", "Es visitanten" + "\u00fa" + "mero "},
{"What", "Qu" + "\u00e9" + " libros leemos"},
CHARACTER ENCODING
{"Talk", " describe como componentes de software de web pueden
transformar la manera en que desrrollamos aplicaciones para el
web. Este libro es obligatorio para cualquier programador de
respeto!"},
{"Start", "Empezar a Comprar"},
Character Encoding
A character encoding maps a character set to units of a specific width, and
defines byte serialization and ordering rules. Many character sets have more than
one encoding. For example, Java programs can represent Japanese character sets
using the EUC-JP or Shift-JIS encodings, among others. Each encoding has
rules for representing and serializing a character set.
The ISO 8859 series defines thirteen character encodings that can represent texts
in dozens of languages. Each ISO 8859 character encoding may have up to 256
characters. ISO 8859-1 (Latin-1) comprises the ASCII character set, characters
with diacritics (accents, diaereses, cedillas, circumflexes, and so on), and additional symbols.
UTF-8 (Unicode Transformation Format, 8 bit form) is a variable-width character encoding that encodes 16-bit Unicode characters as one to four bytes. A byte
in UTF-8 is equivalent to 7-bit ASCII if its high-order bit is zero; otherwise, the
character comprises a variable number of bytes.
UTF-8 is compatible with the majority of existing Web content and provides
access to the Unicode character set. Current versions of browsers and email clients support UTF-8. In addition, many new Web standards specify UTF-8 as
their character encoding. For example, UTF-8 is one of the two required encodings for XML documents (the other is UTF-16).
See Appendix A for more information on character encodings in the Java 2 platform.
Web components usually use PrintWriter to produce responses, which automatically encodes using ISO 8859-1. Servlets may also output binary data with
OutputStream classes, which perform no encoding. An application that uses a
character set that cannot use the default encoding must explicitly set a different
encoding.
623
624
INTERNATIONALIZING AND LOCALIZING WEB APPLICATIONS
For Web components, three encodings must be considered:
• Request
• Page (JSP pages)
• Response
Request Encoding
The request encoding is the character encoding in which parameters in an
incoming request are interpreted. Currently, many browsers do not send a
request encoding qualifier with the Content-Type header. In such cases, a Web
container will use the default encoding—ISO-8859-1—to parse request data.
If the client hasn’t set character encoding and the request data is encoded with a
different encoding than the default, the data won’t be interpreted correctly. To
remedy this situation, you can use the ServletRequest.setCharacterEncoding(String enc) method to override the character encoding supplied by the
container. This method must be called prior to reading request parameters or
reading input using getReader. To control the request encoding from JSP pages,
you can use the JSTL fmt:requestEncoding tag.
This method must be called prior to parsing any request parameters or reading
any input from the request. Calling this method once data has been read will not
affect the encoding.
Page Encoding
For JSP pages, the page encoding is the character encoding in which the file is
encoded. The page encoding is determined from the following sources:
• The Page Encoding value of a JSP property group (see Setting Properties
for Groups of JSP Pages, page 517) whose URL pattern matches the page.
• The pageEncoding attribute of the page directive of the page. It is a translation-time error to name different encodings in the pageEncoding
attribute of the page directive of a JSP page and in a JSP property group.
• The CHARSET value of the contentType attribute of the page directive.
If none of the above is provided, ISO-8859-1 is used as the default page encoding.
The pageEncoding and contentType attributes determine the page character
encoding of only the file that physically contains the page directive. A Web con-
CHARACTER ENCODING
tainer raises a translation-time error if an unsupported page encoding is specified.
Response Encoding
The response encoding is the character encoding of the textual response generated from a Web component. The response encoding must be set appropriately
so that the characters are rendered correctly for a given locale. A Web container
sets an initial response encoding for a JSP page from the following sources:
• The CHARSET value of the contentType attribute of the page directive.
• The encoding specified by the pageEncoding attribute of the page directive
• The Page Encoding value of a JSP property group whose URL pattern
matches the page.
If none of the above is provided, ISO-8859-1 is used as the default response
encoding.
The setCharacterEncoding, setContentType, and setLocale methods can be
called repeatedly to change the character encoding. Calls made after the servlet
response’s getWriter method has been called or after the response is committed
have no effect on the character encoding. Data is sent to the response stream on
buffer flushes for buffered pages, or on encountering the first content on unbuffered pages. Calls to setContentType set the character encoding only if the
given content type string provides a value for the charset attribute. Calls to setLocale set the character encoding only if neither setCharacterEncoding nor
setContentType has set the character encoding before.To control the response
encoding from JSP pages, you can use the JSTL fmt.setLocale tag.
The first application in Chapter 12 allows a user to choose an English string representation of a locale from all the locales available to the Java 2 platform and
then outputs a date localized for that locale. To ensure that the characters in the
date can be rendered correctly for a wide variety of character sets, the JSP page
that generates the date sets the response encoding to UTF-8 with the following
directive:
<%@ page contentType="text/html; charset=UTF-8" %>
625
626
INTERNATIONALIZING AND LOCALIZING WEB APPLICATIONS
Further Information
For a detailed discussion on internationalizing Web applications, see the Java
BluePrints for the Enterprise:
http://java.sun.com/blueprints/enterprise
17
New Features for EJB
2.1 Technology
Ian Evans, Dale Green
Beta Note: This chapter is intended for advanced developers who are already
familiar with EJB technology. To learn the basics about EJB technology, see the
1.3 version of The J2EE Tutorial.
Overview
The J2EE 1.4 Application Server includes an implementation of the EJB 2.1
specifications. The new features for 2.1 include the following:
• Web service endpoints implemented by stateless session beans
• Timer service
• Message-driven bean generalization with corresponding support in J2EE
Connector 1.5
• EJB QL enhancements
The following sections provide examples that illustrate the first two items on the
list. For information about the last two items, see the EJB 2.1 specifications.
627
628
NEW FEATURES FOR EJB 2.1 TECHNOLOGY
Web Service Endpoints
A Web service client can access J2EE applications in two ways. First, the client
can access a Web service created with JAX-RPC. Behind the scenes, JAX-RPC
uses a servlet to implement the Web service. (For more information on JAXRPC, see the chapter, Building Web Services With JAX-RPC, page 323.) Second, a Web service client can access a stateless session bean through the service
endpoint interface of the bean. Other types of enterprise beans cannot be
accessed by Web service clients.
Provided that it uses the correct protocols (SOAP, HTTP, WSDL), any Web service client can access a stateless session bean, whether or not the client is written
in the Java programming language. The client doesn’t even “know” what technology implements the service—stateless session bean, JAX-RPC, or some other
technology. Because of this flexibility, you can integrate J2EE applications with
Web services.
Web Service Example: HelloServiceEJB
The
files
for
this
example
are
<INSTALL>/j2eetutorial14/examples/ejb/helloservice/
in
directory.
the
HelloServiceEJB is a stateless session bean that implements
sayHello. This method matches the sayHello invoked by the
a single method,
clients described
in Creating Web Service Clients with JAX-RPC (page 332). Later in this section,
you’ll test the HelloServiceEJB by running one of these JAX-RPC clients.
Source Code for HelloServiceEJB
The source files for this example, HelloService.java and HelloServiceare located in the helloservice/src/ subdirectory.
Bean.java,
Web Service Endpoint Interface
is the bean’s Web service endpoint interface. It provides the client’s
view of the Web service, hiding the stateless session bean from the client. A Web
service endpoint interface must conform to the rules of a JAX-RPC service endpoint interface. For a summary of those rules, see Coding the Service Endpoint
HelloIF
SOURCE CODE FOR HELLOSERVICEEJB
Interface and Implementation Class (page 327). Here is the source code for the
HelloIF interface:
package helloservice;
import java.rmi.RemoteException;
import java.rmi.Remote;
public interface HelloIF extends Remote {
public String sayHello(String name) throws RemoteException;
}
Stateless Session Bean Implementation Class
The HelloServiceBean class implements the sayHello method defined by the
HelloService interface. The interface decouples the implementation class from
the type of client access. For example, if you added remote and home interfaces
to HelloServiceEJB, the methods of the HelloServiceBean class could also be
accessed by remote clients that are J2EE components. No changes to the HelloServiceBean class would be necessary. The source code for the HelloServiceBean class follows:
package helloservice;
import java.rmi.RemoteException;
import javax.ejb.SessionBean;
import javax.ejb.SessionContext;
public class HelloServiceBean implements SessionBean {
public String sayHello(String name) {
return “Hello “ + name + “from HelloServiceEJB”;
}
public
public
public
public
public
public
}
HelloServiceBean() {}
void ejbCreate() {}
void ejbRemove() {}
void ejbActivate() {}
void ejbPassivate() {}
void setSessionContext(SessionContext sc) {}
629
630
NEW FEATURES FOR EJB 2.1 TECHNOLOGY
Building HelloServiceEJB
In
a
terminal
window,
go
<INSTALL>/j2eetutorial14/examples/ejb/helloservice/
build HelloServiceEJB, type the following command:
to
the
directory. To
asant build-service
This command performs the following tasks:
• Compiles the bean’s source code files
• Creates the MyHelloService.wsdl file by running the following wscompile command:
wscompile -define -d build/output -nd build -classpath build mapping build/mapping.xml config-interface.xml
The wscompile tool writes the MyHelloService.wsdl file to the helloservice/build/ subdirectory. For more information about the wscompile tool, see
Building Web Services With JAX-RPC (page 323).
Use deploytool to package and deploy this example.
Creating the Application
In this section, you’ll create a J2EE application named HelloService, storing it
in the file HelloService.ear.
1. In deploytool, select File→New→Application EAR.
2. Click Browse.
3. In
the
file
chooser,
navigate
to
<INSTALL>/j2eetutorial14/examples/ejb/helloservice/.
4.
5.
6.
7.
In the File Name field, enter HelloService.ear.
Click New Application.
Click OK.
Verify
that
the
HelloService.ear
file
resides
<INSTALL>/j2eetutorial14/examples/ejb/helloservice/.
in
BUILDING HELLOSERVICEEJB
Packaging the Enterprise Bean
Start the Edit Enterprise Bean wizard by selecting File→New→Enterprise JavaBean JAR. The wizard displays the following dialog boxes.
1. Introduction dialog box
a. Read the explanatory text for an overview of the wizard’s features.
b. Click Next.
2. EJB JAR dialog box
a. Select the button labelled Create New JAR Module in Application.
b. In the combo box below this button, select HelloService.
c. In the JAR Display Name field, enter HelloServiceJAR.
d. Click Edit.
e. In
the
tree
under
Available
Files,
locate
the
<INSTALL>/j2eetutorial14/examples/ejb/helloservice/build/
f.
g.
h.
i.
j.
directory.
In the Available Files tree select mapping.xml and MyHelloService.wsdl.
Select these classes from the .../helloservice/build/helloservice/ directory: HelloIF.class and HelloServiceBean.class.
Click Add.
Click OK.
Click Next.
3. General dialog box
a. Under Bean Type, select the Session button.
b. Select the Stateless button.
c. In the Enterprise Bean Class combo box, select helloservice.HelloServiceBean.
d. In the Enterprise Bean Name field, enter HelloServiceEJB.
e. Click Next.
4. In the Configuration Options dialog box, click Next. The wizard will automatically select the Yes button for Expose Bean as Web Service Endpoint.
5. In the Choose Service dialog box:
a. Select META-INF/wsdl/MyHelloService.wsdl in the WSDL File
combo box.
631
632
NEW FEATURES FOR EJB 2.1 TECHNOLOGY
b. Select mapping.xml from the Mapping File combo box.
c. Make sure MyHelloService is in the Service Name and Service Display
Name edit boxes.
6. In the Web Service Endpoint dialog box:
a. Select helloservice.HelloIF in the Service Endpoint Interface
combo box.
b. In the WSDL Port section, set the Namespace to urn:Foo, and the Local
Part to HelloIFPort.
c. In the Deployment Settings section, set the Endpoing Address URI to
hello-ejb/hello.
d. Click Next.
7. In the Review Settings dialog box:
a. Optional: Examine the EJB deployment descriptor.
b. Click Finish.
Deploying the Enterprise Application
Now that the J2EE application contains the enterprise bean, it is ready for
deployment.
1. Select the HelloService application.
2. Select Tools→Deploy.
3. Under Connection Settings, enter the user name and password for the J2EE
application server.
4. Click OK.
5. In the Distribute Module dialog box click Close when the deployment
completes.
6. Verify the deployment.
a. In the tree, expand the Servers node and select the host that is running
the J2EE application server.
b. In the Deployed Objects table, make sure that HelloService is listed and
its status is Running.
633
BUILDING THE WEB SERVICE CLIENT
Building the Web Service Client
In the next section, to test the Web service implemented by HelloServiceEJB,
you will run the JAX-RPC client described in Building Web Services With JAXRPC (page 323).
To build the static stub client, perform these steps:
1. Go to the <INSTALL>/j2eetutorial14/examples/jaxrpc/helloservice/ directory and type:
asant build
2. Go to the <INSTALL>/j2eetutorial14/examples/jaxrpc/staticstub/
directory and type:
asant build
3. Edit the build.properties file and change the endpoint.address property to
http://localhost:1024/hello-ejb/hello
For details about creating the JAX-RPC service and client, see these sections:
Creating a Web Service with JAX-RPC (page 326) and Static Stub Client
Example (page 332).
Running the Web Service Client
Verify that the HelloServiceEJB has been deployed by clicking on the target
application server in the Servers tree in deploytool. In the Deployed Objects
tree you should see HelloService.
To
run
the
client,
go
<INSTALL>/j2eetutorial14/examples/jaxrpc/staticstub/
enter:
asant run
The client should display the following line:
Hello Duke! (from HelloServiceEJB)
to
the
directory and
634
NEW FEATURES FOR EJB 2.1 TECHNOLOGY
Timer Service
Applications that model business work-flows often rely on timed notifications.
The timer service of the EJB container enables you to schedule timed notifications for all types of enterprise beans except for stateful session beans. You can
schedule a timed notification to occur at a specific time, after a duration of time,
or at timed intervals. For example, you could set timers to go off at 10:30 AM on
May 23, in 30 days, or every 12 hours.
When a timer expires (goes off), the EJB container calls the ejbTimeout method
of the bean’s implementation class. The ejbTimeout method contains the business logic that handles the timed event. Because ejbTimeout is defined by the
javax.ejb.TimedObject interface, the bean class must implement TimedObject.
There are four interfaces in the javax.ejb package that are related to timers:
•
•
•
•
TimedObject
Timer
TimerHandle
TimerService
Creating Timers
To create a timer, the bean invokes one of the createTimer methods of the TimerService interface. (For details on the method signatures, see the TimerService API documentation.) When the bean invokes createTimer, the timer
service begins to count down the timer duration.
The bean described in The TimerSessionEJB Example (page 636) creates a
timer as follows:
TimerService timerService = context.getTimerService();
Timer timer = timerService.createTimer(intervalDuration,
“created timer”);
In the TimerSessionEJB example, createTimer is invoked in a business
method, which is called by a client. An entity bean can also create a timer in a
business method. If you want to create a timer for each instance of an entity
bean, you could code the createTimer call in the bean’s ejbCreate method.
CANCELLING AND SAVING TIMERS
Timers are persistent. If the server is shut down (or even crashes), timers are
saved and will become active again when the server is restarted. If a timer
expires while the server is down, the container will call ejbTimeout when the
server is restarted.
A timer for an entity bean is associated with the bean’s identity—that is, with a
particular instance of the bean. If an entity bean sets a timer in ejbCreate, for
example, each bean instance will have its own timer. In contrast, stateless session
and message-driven beans do not have unique timers for each instance.
The Date and long parameters of the createTimer methods represent time with
the resolution of milliseconds. However, because the timer service is not
intended for real-time applications, a callback to ejbTimeout might not occur
with millisecond precision. The timer service is for business applications, which
typically measure time in hours, days, or longer durations.
Cancelling and Saving Timers
Timers may cancelled by the following events:
• When a single-event timer expires, the EJB container calls ejbTimeout
and then cancels the timer.
• When an entity bean instance is removed, the container cancels the timers
associated with the instance.
• When the bean invokes the cancel method of the Timer interface, the container cancels the timer.
If a method is invoked on a cancelled timer, the container throws the
javax.ejb.NoSuchObjectLocalException.
To save a Timer object for future reference, invoke its getHandle method and
store the TimerHandle object in a database. (A TimerHandle object is serializable.) To re-instantiate the Timer object, retrieve the handle from the database
and invoke getTimer on the handle. A TimerHandle object cannot be passed as
an argument of a method defined in a remote or Web service interface. In other
words, remote clients and Web service clients cannot access a bean’s TimerHandle object. Local clients, however, do not have this restriction.
635
636
NEW FEATURES FOR EJB 2.1 TECHNOLOGY
Getting Timer Information
In addition to defining the cancel and getHandle methods, the Timer interface
also defines methods for obtaining information about timers:
public long getTimeRemaining();
public java.util.Date getNextTimeout();
public java.io.Serializable getInfo();
The getInfo method returns the object that was the last parameter of the createTimer invocation. For example, in the createTimer code snippet of the preceding section, this information parameter is a String object with the value,
created timer.
To retrieve all of a bean’s active timers, call the getTimers method of the Timinterface. The getTimers method returns a collection of Timer
objects.
erService
Transactions and Timers
An enterprise bean usually creates a timer within a transaction. If this transaction
is rolled back, the timer creation is also rolled back. Similarly, if a bean cancels a
timer within a transaction that gets rolled back, the timer cancellation is rolled
back. In this case, the timer’s duration is reset as if the cancellation had never
occurred.
In beans with container-managed transactions, the ejbTimeout method usually
has the RequiresNew transaction attribute. With this attribute, the EJB container
begins the new transaction before calling ejbTimeout. If the transaction is rolled
back, the container will try to call ejbTimeout at least one more time.
The TimerSessionEJB Example
The
source
code
for
this
example
is
<INSTALL>/j2eetutorial14/examples/ejb/timersession/src/
in
the
directory.
is a stateless session bean that shows how to set a timer. The
implementation class for TimerSessionEJB is called TimerSessionBean. In the
source code listing of TimerSessionBean that follows, note the myCreateTimer
and ejbTimeout methods. Because it’s a business method, myCreateTimer is
defined in the bean’s remote interface (TimerSession) and may be invoked by
TimerSessionEJB
THE TIMERSESSIONEJB EXAMPLE
the client. In this example, the client invokes myCreateTimer with an interval
duration of 30000 milliseconds. The myCreateTimer method fetches a TimerService object from the bean’s SessionContext. Then it creates a new timer
by invoking the createTimer method of TimerService. Now that the timer is
set, the EJB container will invoke the ejbTimer method of TimerSessionBean
when the timer expires—in about 30 seconds. Here’s the source code for the
TimerSessionBean class:
import javax.ejb.*;
public class TimerSessionBean implements SessionBean,
TimedObject {
private SessionContext context;
public TimerHandle myCreateTimer(long intervalDuration) {
System.out.println
(“TimerSessionBean: start createTimer “);
TimerService timerService =
context.getTimerService();
Timer timer =
timerService.createTimer(intervalDuration,
“created timer”);
}
public void ejbTimeout(Timer timer) {
System.out.println(“TimerSessionBean: ejbTimeout “);
}
public void setSessionContext(SessionContext sc) {
System.out.println(“TimerSessionBean:
setSessionContext”);
context = sc;
}
public void ejbCreate() {
System.out.println(“TimerSessionBean: ejbCreate”);
}
public
public
public
public
}
TimerSessionBean() {}
void ejbRemove() {}
void ejbActivate() {}
void ejbPassivate() {}
637
638
NEW FEATURES FOR EJB 2.1 TECHNOLOGY
Note: To run the TimerSessionEJB example, you must start the PointBase server
before you start the J2EE application server. If you don't start the PointBase server,
or if you start it after the J2EE application server, then you will get a
java.rmi.RemoteException with the message, EJB Timer service not available.
Building TimerSessionEJB
In
a
terminal
window,
go
<INSTALL>/j2eetutorial14/examples/ejb/timersession/
build TimerSessionEJB, type the following command:
to
the
directory. To
asant build
Use deploytool to package and deploy this example.
Creating the Application
In this section, you’ll create a J2EE application named TimerSession, storing it
in the file TimerSession.ear.
1. In deploytool, select File→New→Application EAR.
2. Click Browse.
3. In
the
file
chooser,
navigate
to
<INSTALL>/j2eetutorial14/examples/ejb/timersession/.
4.
5.
6.
7.
In the File Name field, enter TimerSession.ear.
Click New Application.
Click OK.
Verify
that
the
TimerSesson.ear
file
resides
in
<INSTALL>/j2eetutorial14/examples/ejb/timersession/.
Packaging the Enterprise Bean
Start the Edit Enterprise Bean wizard by selecting File→New→Enterprise JavaBean JAR. The wizard displays the following dialog boxes.
1. In the Introduction dialog box:
a. Read the explanatory text for an overview of the wizard’s features.
639
BUILDING TIMERSESSIONEJB
b. Click Next.
2. In the EJB JAR dialog box:
a. Select the button labelled Create New JAR Module in Application.
b. In the combo box below this button, select TimerSession.
c. In the JAR Display Name field, enter TimerSessionJAR.
d. Click Edit.
e. In
the
tree
under
Available
Files,
locate
the
<INSTALL>/j2eetutorial14/examples/ejb/timersession/build/
f.
g.
h.
i.
directory.
Select these classes: TimerSession.class,
Bean.class, and TimerSessionHome.class.
Click Add.
Click OK.
Click Next.
TimerSession-
3. General dialog box
a. Under Bean Type, select the Session button.
b. Select the Stateless button.
c. In the Enterprise Bean Class combo box, select TimerSessionBean.
d. In the Enterprise Bean Name field, enter TimerSessionEJB.
e. In the Remote Interfaces section, select TimerSessionHome for the
Remote Home Interface and TimerSession for the Remote Interface.
4. In the Configure Options dialog box:
a. Select No for Expose Bean as Web Service Endpoint.
b. Click Next.
5. In the Review Settings dialog box:
a. Optional: Examine the EJB deployment descriptor.
b. Click Finish.
Compiling the Application Client
The application client files are compiled at the same time as the enterprise bean
files.
640
NEW FEATURES FOR EJB 2.1 TECHNOLOGY
Packaging the Application Client
To package an application client component, you run the New Application Client
wizard of the deploytool. During this process the wizard performs the following tasks.
• Creates the application client’s deployment descriptor
• Puts the deployment descriptor and client files into a JAR file
• Adds the JAR file to the application’s TimerSession.ear file
To start the New Application Client wizard, select File→New→Application Client JAR. The wizard displays the following dialog boxes.
1. Introduction dialog box
a. Read the explanatory text for an overview of the wizard’s features.
b. Click Next.
2. JAR File Contents dialog box
a. Select the button labelled Create New AppClient Module in Application.
b. In the combo box below this button, select TimerSession.
c. In the AppClient Display Name field, enter TimerSessionClient.
d. Click Edit.
e. In
the
tree
under
Available
Files,
locate
the
<INSTALL>/examples/ejb/timersession/build directory.
f. Select the TimerSessionClient.class file
g. Click Add.
h. Click OK.
i. Click Next.
3. General dialog box
a. In the Main Class combo box, select TimerSessionClient.
b. Click Next.
c. Click Finish.
BUILDING TIMERSESSIONEJB
Specifying the Application Client’s Enterprise
Bean Reference
When it invokes the lookup method, the TimerSessionClient refers to the
home of an enterprise bean:
Object objref =
initial.lookup("java:comp/env/ejb/SimpleTimerSession");
You specify this reference as follows.
1.
2.
3.
4.
5.
6.
7.
8.
In the tree, select TimerSessionClient.
Select the EJB Refs tab.
Click Add.
In the Coded Name field, enter ejb/SimpleTimerSession.
In the EJB Type field, select Session.
In the Interfaces field, select Remote.
In the Home Interface field, enter timersession.TimerSessionHome.
In the Local/Remote Interface field, enter timersession.TimerSession.
9. In the Enterprise Bean Name field, enter TimerSessionEJB.
10.Click OK.
Mapping the Enterprise Bean Reference
To map the enterprise bean references in the clients to the JNDI name of the
bean, follow these steps.
1. In the tree, select TimerSession.
2. Select the JNDI Names tab.
3. In the Application table, note that the JNDI name for the enterprise bean is
TimerSessionEJB.
4. In the References table enter TimerSessionEJB in the JNDI Name column
for each row.
641
642
NEW FEATURES FOR EJB 2.1 TECHNOLOGY
Deploying the Enterprise Application
Now that the J2EE application contains the components, it is ready for deployment.
1. Select the TimerSession application.
2. Select Tools→Deploy.
3. Under Connection Settings, enter the user name and password for the J2EE
application server.
4. Click OK.
5. In the Distribute Module dialog box click Close when the deployment
completes.
6. Verify the deployment.
a. In the tree, expand the Servers node and select the host that is running
the J2EE server.
b. In the Deployed Objects table, make sure that TimerSession is listed and
its status is Running.
Getting the Application Client Stub Files
You need to get the application client stub files before you can run the client. To
get the client stub files, do the following:
1. In deploytool expand the Servers node and select the host that is running
the J2EE server.
2. In the Deployed Objects table, select TimerSession.
3. Click the Client JAR button.
4. In the Directory Input dialog box, enter the fully qualified path to
<INSTALL>/j2eetutorial14/examples/ejb/timersession/.
5.
6.
7.
8.
Click Select.
Click OK.
Click OK.
Verify the TimerSessionClient.jar file is located in <INSTALL>/
j2eetutorial14/examples/ejb/timersession/.
BUILDING TIMERSESSIONEJB
Running the J2EE Application Client
To run the J2EE application client, perform the following steps.
1. In a terminal window, go to the <INSTALL>/j2eetutorial14/
examples/ejb/timersession/ directory.
2. Type the following command:
appclient -client TimerSessionClient.jar
3. In the terminal window, the client displays these lines:
Creating a timer with an interval duration of 30000 ms.
The output from the timer is sent to the server.log located in the
<INSTALL>/domains/<domain name>/server/logs/ directory. After about 30
seconds, open up server.log in a text editor and you will see the following
lines:
TimerSessionBean:
TimerSessionBean:
TimerSessionBean:
TimerSessionBean:
setSessionContext
ejbCreate
start createTimer
ejbTimeout
Note: You must have started the PointBase server before you started the J2EE application server in order to run this example. If you get a java.rmi.RemoteException
with the message EJB Timer service not available, the PointBase server is
either not running, or was not started before the J2EE application server.
643
644
NEW FEATURES FOR EJB 2.1 TECHNOLOGY
18
Security
Eric Jendrock and Debbie Bode Carson
T
HE J2EE application programming model insulates developers from mechanism-specific implementation details of application security. The J2EE platform
provides this insulation in a way that enhances the portability of applications,
allowing them to be deployed in diverse security environments.
Some of the material in this chapter assumes that you have an understanding of
basic security concepts. To learn more about these concepts, we highly recommend that you explore the Security trail in The Java™ Tutorial (see http://
java.sun.com/docs/books/tutorial/security1.2/index.html) before you
begin this chapter.
Overview
The J2EE platform defines declarative contracts between those who develop and
assemble application components and those who configure applications in operational environments. In the context of application security, application providers are required to declare the security requirements of their applications in such
a way that these requirements can be satisfied during application configuration.
The declarative security mechanisms used in an application are expressed in a
declarative syntax in a document called a deployment descriptor. An application
deployer then employs container-specific tools to map the application requirements that are in a deployment descriptor to security mechanisms that are implemented by J2EE servers or Web containers.
645
646
SECURITY
Programmatic security refers to security decisions that are made by securityaware applications. Programmatic security is useful when declarative security
alone is not sufficient to express the security model of an application. For example, an application might make authorization decisions based on the time of day,
the parameters of a call, or the internal state of an enterprise bean or Web component. Another application might restrict access based on user information
stored in a database.
J2EE and Web Services applications are made up of components that can be
deployed into different containers. These components are used to build a multitier enterprise application. The goal of the J2EE security architecture is to
achieve end-to-end security by securing each tier.
The tiers can contain both protected and unprotected resources. Often, you need
to protect resources to ensure that only authorized users have access. Authorization provides controlled access to protected resources. Authorization is based on
identification and authentication. Identification is a process that enables recognition of an entity by a system, and authentication is a process that verifies the
identity of a user, device, or other entity in a computer system, usually as a prerequisite to allowing access to resources in a system.
Authorization and authentication are not required to access unprotected
resources. Accessing a resource without authentication is referred to as unauthenticated or anonymous access.
Users, Realms, and Groups
A J2EE user is similar to an operating system user. Typically, both types of users
represent people. However, these two types of users are not the same. The J2EE
server authentication service has no knowledge of the user name and password
you provide when you log on to the operating system. The J2EE server authentication service is not connected to the security mechanism of the operating system. The two security services manage users that belong to different realms.
The J2EE server’s authentication service includes the following components:
• Realm - For a Web application, a realm is a complete database of roles,
users, and groups that identify valid users of a Web application (or a set of
Web applications). For a J2EE application, a realm is a collection of users
that are controlled by the same authentication policy.
• User - An individual (or application program) identity that has been
authenticated (authentication was discussed in the previous section). In a
SECURITY ROLES
Web application, a user can have a set of roles associated with that identity,
which entitles them to access all resources protected by those roles. In a
J2EE application, users can be associated with a group, which categorizes
users by common traits.
• Group - Aset of authenticated users classified by common traits such as job
title or customer profile. In most cases for Web applications, you will map
users directly to roles and have no need to define a group.
• Role - An abstract name for the permission to access a particular set of
resources in a Web application. A role can be compared to a key that can
open a lock. Many people might have a copy of the key, and the lock
doesn’t care who you are, just that you have the right key.
The J2EE server authentication service governs users in multiple realms. Certificates are used with the HTTPS protocol to authenticate Web browser clients. To
verify the identity of a user in the certificate realm, the authentication service
verifies an X.509 certificate. For step-by-step instructions, see Setting Up Digital
Certificates, page 663. The common name field of the X.509 certificate is used
as the principal name.
In most cases, the J2EE server authentication service verifies user identity by
checking the file realm. This realm is used for the authentication of all clients
except for Web browser clients that use the HTTPS protocol and certificates.
A J2EE user of the file realm can belong to a J2EE group. (A user in the cerrealm cannot.) A J2EE group is a category of users classified by common traits, such as job title or customer profile. For example, most customers of
an e-commerce application might belong to the CUSTOMER group, but the big
spenders would belong to the PREFERRED group. Categorizing users into groups
makes it easier to control the access of large numbers of users. The section EJBTier Security, page 668 explains how to control user access to enterprise beans.
tificate
Security Roles
When you design an enterprise bean or Web component, you should always
think about the kinds of users who will access the component. For example, a
Web application for a Human Resources department might have a different
request URL for someone who has been assigned the role of admin than for
someone who has been assigned the role of director. The admin role may let
you view some employee data, but the director role enables you to view salary
information. Each of these security roles is an abstract logical grouping of users
that is defined by the person who assembles the application. When an application
647
648
SECURITY
is deployed, the deployer will map the roles to security identities in the operational environment.
A J2EE group also represents a category of users, but it has a different scope
from a role. A J2EE group is designated for the entire J2EE server, whereas a
role covers only a specific application in a J2EE server.
To create a role for a J2EE application, you declare it for the application EAR
file. For example, you could use the following procedure to create a role with
deploytool:
1. Select an application.
2. In the Roles tabbed pane, click Add to add a row to the table.
3. In the Name column, enter the security role name, bankCustomer for
example.
4. Click the folded-paper icon to add a description of the security role, Customer-of-Bank for example.
5. Click OK.
Declaring and Linking Role References
A security role reference allows an enterprise bean or Web component to reference an existing security role. A security role is an application-specific logical
grouping of users, classified by common traits such as customer profile or job
title. When an application is deployed, roles are mapped to security identities,
such as principals (identities assigned to users as a result of authentication) or
groups, in the operational environment. Based on this, a user with a certain security role has associated access rights to a J2EE application. The link is the actual
name of the security role that is being referenced.
During application assembly, the assembler creates security roles for the application and associates these roles with available security mechanisms. The assembler then resolves the security role references in individual servlets and JSP
pages by linking them to roles defined for the application.
The security role reference defines a mapping between the name of a role that is
called from a Web component using isUserInRole(String name) (see Using
Programmatic Security in the Web Tier, page 660) or from an enterprise bean
using isCallerInRole(String name) (see Using Programmatic Security in the
EJB Tier, page 669) and the name of a security role that has been defined for the
application.
MAPPING ROLES TO USERS AND GROUPS
For example, use deploytool to map the security role reference cust to the
security role with role name bankCustomer:
1. Select the application.
2. Select the Security Role Mapping tabbed pane.
3. Select the bankCustomer entry in the Role names referenced pane. This
role name would have been previously defined for the application as
described in Security Roles, page 647.
4. Click Add User/Group to Role.
5. Select the available user name from the User name tab.
6. Click Map to Role.
7. Select the component that you want to create a role reference in.
8. Select the Security tabbed pane.
9. Select Use Caller ID (default) or Run As Role.
10.Click Add in the Role names referenced in code pane.
11.Enter cust in the Role name text field.
12.Select bankCustomer in the Role Link pull-down menu.
In this example, isUserInRole("bankCustomer") and isUserInRole("cust")
will both return true.
Because a coded name is linked to a role name, you can change the role name at
a later time without having to change the coded name. For example, if you were
to change the role name from bankCustomer to something else, you wouldn’t
need to change the cust name in the code. You would, however, need to relink
the cust coded name to the new role name.
Mapping Roles to Users and Groups
When you are developing a J2EE application, you don’t need to know what roles
have been defined for the realm in which the application will be run. In the J2EE
platform, the security architecture provides a mechanism for automatically mapping the roles defined in the application to the roles defined in the runtime realm.
After your application has been deployed, the administrator of the J2EE server
will map the roles of the application to the users, groups, or roles of the files
realm.
649
650
SECURITY
Use deploytool to map roles defined for an application to J2EE users and/or
groups:
1.
2.
3.
4.
Select the J2EE application.
In the Security tab, select the appropriate role from the Role Name list.
Click Add.
In the Users or Groups dialog box, select the users or groups that should
be assigned to the selected role.
Web-Tier Security
The Web-tier security model used in this release of the J2EE platform is based
on the Java Servlet specification. This specification can be downloaded from
http://java.sun.com/products/servlet/download.html.
Your Web application is defined using a standard J2EE web.xml deployment
descriptor. The deployment descriptor must indicate which version of the Web
application schema (2.3 or 2.4) it is using, and the elements specified within the
deployment descriptor must comply with the rules for processing that version of
the deployment descriptor. For version 2.4 of the Java Servlet Specification, this
is “SRV.13.3, Rules for Processing the Deployment Descriptor”. For more information on deployment descriptors, see Chapter 3, Getting Started with Web
Applications.
The deployment descriptor is used to convey the elements and configuration
information of a Web application. Security in a Web application is configured
using deploytool to set the following options. When the settings are entered in
deploytool, they are saved to a web.xml deployment descriptor which is contained in the WAR. To view the generated deployment descriptor, select Descriptor Viewer from deploytool’s Tools menu. Use the Security pane of
deploytool to configure the following Security elements for a Web application
WAR file. See Setting Security Requirements Using deploytool, page 653 for
more information on using deploytool to accomplish these tasks:
• User Authentication Method
The User Authentication Method box on the Security tab of deploytool
enables you to specify how the user is prompted to login in. If specified,
the user must be authenticated before it can access any resource that is
PROTECTING WEB RESOURCES
constrained by a Security Constraint. The User Authentication Method is
discussed in Configuring Login Authentication, page 658.
• Security Constraints
The Security Constraint is used to define the access privileges to a collection of resources using their URL mapping. Security constraints are discussed in Controlling Access to Web Resources, page 652.
• Web Resource Collections
The Web Resource Collections is part of a security constraint and
describes a URL pattern and HTTP method pair that refer to resources
that need to be protected. Web Resource Collections are discussed in Protecting Web Resources, page 651.
• Network Security Requirement
The Network Security Requirement is used to configure HTTP basic or
form-based authentication over SSL. Select a Network Security Requirement for each Security Constraint. Network Security Requirements are
discussed in Using SSL to Enhance the Confidentiality of HTTP Basic
and Form-Based Authentication, page 659.
• Authorized Roles
The Authorized Roles section represents which roles from a defined
group for the realm are authorized to access this Web Resource Collection. Authorized roles are discussed in Security Roles, page 647.
These elements of the deployment descriptor may be entered directly into the
web.xml file, or created using an application deployment tool, such as deploytool. This document describes creating the deployment descriptor using
deploytool.
Some elements of Web application security need to be addressed in the deployment descriptor for the Web server, rather than the deployment descriptor for the
Web application. This information is discussed in Installing and Configuring
SSL Support, page 662, Using Programmatic Security in the Web
Tier, page 660, and Security Roles, page 647.
Protecting Web Resources
You can protect Web resources by specifying a security constraint. A security
constraint determines who is authorized to access a Web resource collection, a
list of URL patterns and HTTP methods that describe a set of resources to be
651
652
SECURITY
protected. Security constraints can be defined using an application deployment
tool, such as deploytool, or using a deployment descriptor.
If you try to access a protected Web resource as an unauthenticated user, the Web
container will try to authenticate you. The container will only accept the request
after you have proven your identity to the container and have been granted permission to access the resource.
Security constraints only work on the original request URI, not on calls made via
a RequestDispatcher (which include <jsp:include> and <jsp:forward>).
Inside the application, it is assumed that the application itself has complete
access to all resources and would not forward a user request unless it had
decided that the requesting user had access also.
Controlling Access to Web Resources
You can set up a security constraint using an application deployment tool, such
as deploytool, or by coding the information directly into the deployment
descriptor between <security-constraint></security-constraint> tags.
When you define security constraints, you need to make sure you have addressed
the following issues:
• Set up login authentication (discussed in Configuring Login
Authentication, page 658).
• Add a security constraint.
• Add a Web resource collection.
• Define and include an authorized security role (discussed in Security
Roles, page 647).
• Identify URL patterns to constrain.
• Identify HTTP methods to constrain (POST, GET).
• Specify whether there are any guarantees on how the data will be transported between client and server (NONE, INTEGRAL, CONFIDENTIAL).
If, for example, we were to create a deployment descriptor for a simple application using deploytool, we would follow the steps in Setting Security Requirements Using deploytool, page 653.
PROTECTING WEB RESOURCES
Setting Security Requirements Using
deploytool
To set security requirements for a WAR, select the WAR in the deploytool tree,
then select the Security tabbed pane. In the Security tabbed pane, you can define
how users are authenticated to the server and which users have access to particular resources.
1. Choose the Authentication Method.
Authentication refers to the method by which a client verifies the identity
of a user to a server. The authentication methods supported in this release
are shown below and are discussed in more detail in Authenticating Users
of Web Resources, page 656. Select one of the following authentication
methods from the Authentication Method list:
a. None
b. Basic
c. Client Certificate
d. Digest
e. Form Based
If you selected Basic or Digest authentication, click Settings to go to the
User Authentication Settings dialog and enter the Realm Name. If you
selected Form Based authentication, click Settings to enter the go to the
User Authentication Settings dialog and enter the Realm Name, Login
Page, and Error Page.
2. Define a Security Constraint.
In the Security Constraints section of the screen, you can define the security constraints for accessing the content of your WAR file. Click the Add
button adjacent to the Security Constraints field to add a security constraint. Double-click the cell containing the Security Constraint to change
its name. Each Security Constraint consists of:
a. A Web Resource Collection, which describes a URL pattern and HTTP
method pair that refer to resources that need to be protected.
b. An Authorization Constraint, which is a set of roles that are defined to
have access to the Web Resource Collection.
c. A User Data Constraint, which defines whether a resource is accessed
with confidentiality protection, integrity protection, or no protection.
3. Define a Web Resource Collection for this Security Constraint.
653
654
SECURITY
With the security constraint selected, click the Add button adjacent to the
Web Resource Collections field to add a Web resource collection to the
security constraint. A Web Resource Collection is part of a Security Constraint and describes a URL pattern and HTTP method pair that refer to
resources that need to be protected. Double-click the cell containing the
Web Resource Collection to edit its name.
4. Edit the contents of the Web Resource Collection by selecting it in the list,
then clicking the Edit button. The Edit Contents dialog box displays. Use
it to add individual files or whole directories to the Web resource collection, to add a URL pattern, or to specify which HTTP methods will be governed by this Web Resource Collection.
a. Select the files and directories that you want to the Web Resource Collection (WRC) in the top text field and then click the Add button to add
them to the Web Resource Collection.
b. Add URL patterns to the Web Resource Collection by clicking Add
URL and entering the URL in the edit field.
c. Specify which HTTP Methods are to be added to the Web application.
The options are: Delete, Get, Head, Options, Post, Put, and Trace.
You must select at least one of the HTTP methods.
d. Click OK to return to the Security tabbed pane. The contents of the
WRC display in the box beside the Edit button.
5. Select the Network Security Requirement for this Security Constraint. The
choices are None, Integral, and Confidential.
a. Specify NONE when the application does not require a security constraint.
b. Specify CONFIDENTIAL when the application requires that data be transmitted so as to prevent other entities from observing the contents of the
transmission.
c. Specify INTEGRAL when the application requires that the data be sent
between client and server in such a way that it cannot be changed in
transit.
If you specify CONFIDENTIAL or INTEGRAL as a security constraint, that
type of security constraint applies to all requests that match the URL patterns in the Web Resource Collection, not just to the login dialog. For further discussion on Network Security Requirements, see Using SSL to
Enhance the Confidentiality of HTTP Basic and Form-Based
Authentication, page 659
PROTECTING WEB RESOURCES
6. Select which roles are authorized to access the secure application. In the
Authorized Roles pane, click Edit to specify which defined roles are authorized to access this secure application.
Select the role for which you want to authorize access from the list of
Roles and click the Add button to add it to the list of Authorized Roles.
If Roles have not been defined for this application, click the Edit Roles
button and add the Roles for this application. If you add Roles in this
fashion, make sure to select the Security Role Mapping tab and map the
roles to the appropriate users and groups. For more information on Role
Mapping, see Mapping Roles to Users and Groups, page 649.
7. To add security specifically to a JSP page or to a servlet in the application,
select the JSP page or servlet in the deploytool tree and select the Security tab. For more information on the options displayed on this page, see
Declaring and Linking Role References, page 648.
The resulting deployment descriptor, which can be viewed by selecting the WAR
file in the deploytool tree and then selecting Descriptor Viewer from the Tools
menu, might look something like this:
<?xml version='1.0' encoding='UTF-8'?>
<web-app
version="2.4"
xmlns="http://java.sun.com/xml/ns/j2ee"
xmlns:xsi="http://www.w3.org/2001/XMLSchema-instance"
xsi:schemaLocation="http://java.sun.com/xml/ns/j2ee
http://java.sun.com/xml/ns/j2ee/web-app_2_4.xsd"
>
<display-name>SimpleWebWar</display-name>
<servlet>
<display-name>GreetingServlet</display-name>
<servlet-name>GreetingServlet</servlet-name>
<servlet-class>GreetingServlet</servlet-class>
</servlet>
<!-- SECURITY-ROLE-REF -->
<security-role-ref>
<role-name>SimpleAppUser</role-name>
<role-link>user</role-link>
</security-role-ref>
</servlet>
<session-config>
<session-timeout>30</session-timeout>
</session-config>
655
656
SECURITY
<!-- SECURITY CONSTRAINT -->
<security-constraint>
<display-name>SecurityConstraint1</display-name>
<web-resource-collection>
<web-resource-name>WRCollection1</web-resource-name>
<http-method>GET</http-method>
</web-resource-collection>
<web-resource-collection>
<web-resource-name>WRCollection2</web-resource-name>
<url-pattern>/WEB-INF/classes/GreetingServlet.class
</url-pattern>
<http-method>POST</http-method>
<http-method>GET</http-method>
</web-resource-collection>
<auth-constraint>
<role-name>admin</role-name>
</auth-constraint>
<user-data-constraint>
<transport-guarantee>
CONFIDENTIAL
</transport-guarantee>
</user-data-constraint>
</security-constraint>
<!-- LOGIN AUTHENTICATION -->
<login-config>
<auth-method>BASIC</auth-method>
</login-config>
<!-- SECURITY ROLES -->
<security-role>
<role-name>user</role-name>
</security-role>
<security-role>
<role-name>mgr</role-name>
</security-role>
<security-role>
<role-name>admin</role-name>
</security-role>
</web-app>
Authenticating Users of Web Resources
When you try to access a protected Web resource, the Web container activates
the authentication mechanism that has been configured for that resource. With a
AUTHENTICATING USERS OF WEB RESOURCES
Web Application selected in the deploytool tree, select the Security tabbed
pane and select one of the following User Authentication Methods:
• None
If you do not specify one of the following methods, the user will not be
authenticated.
• Basic
If you specify HTTP basic authentication, the Web server will authenticate a user by using the user name and password obtained from the Web
client.
• Client Certificate
Client-certificate authentication is a more secure method of authentication than either basic or form-based authentication. It uses HTTP over
SSL, in which the server and, optionally, the client authenticate one
another with Public Key Certificates. Secure Sockets Layer (SSL) provides data encryption, server authentication, message integrity, and
optional client authentication for a TCP/IP connection. You can think of a
public key certificate as the digital equivalent of a passport. It is issued by
a trusted organization, which is called a certificate authority (CA), and
provides identification for the bearer. If you specify client-certificate
authentication, the Web server will authenticate the client using the client’s X.509 certificate, a public key certificate that conforms to a standard
that is defined by X.509 Public Key Infrastructure (PKI). Prior to running
an application that uses SSL, you must configure SSL support on the
server (see Installing and Configuring SSL Support, page 662) and set up
the public key certificate (see Setting Up Digital Certificates, page 663).
• Digest
Digested password authentication supports the concept of digesting user
passwords. This causes the stored version of the passwords to be encoded
in a form that is not easily reversible, but that the Web server can still utilize for authentication.
From a user perspective, digest authentication acts almost identically to
basic authentication in that it triggers a login dialog. The difference
between basic and digest authentication is that on the network connection
between the browser and the server, the password is encrypted, even on a
non-SSL connection. In the server, the password can be stored in clear
text or encrypted text, which is true for all login methods and is independent of the choice that the application deployer makes.
• Form-based
657
658
SECURITY
If you specify form-based authentication, you can customize the login
screen and error pages that are presented to the end user by an HTTP
browser.
Neither form-based authentication nor HTTP basic authentication is particularly secure. In form-based authentication, the content of the user dialog is sent as plain text, and the target server is not authenticated. Basic
authentication sends user names and passwords over the Internet as text
that is uu-encoded, but not encrypted. This form of authentication, which
uses Base64 encoding, can expose your user names and passwords unless
all connections are over SSL. If someone can intercept the transmission,
the user name and password information can easily be decoded.
Configuring Login Authentication
You can set up login authentication using an application deployment tool, such
as deploytool, or by coding the information directly into the deployment
descriptor between <login-config></login-config> tags. To configure the
authentication mechanism that the Web resources in a WAR will use, select the
WAR in the deploytool tree, and select the Security tabbed pane, then proceed
as follows:
• Specify one of the User Authentication Methods described in Authenticating Users of Web Resources, page 656.
• Specify a security realm. Basic, form-based, and digest authentication
have realm parameters. Select the Settings button beside the User Authentication Mechanism field to specify the realm. If omitted, the default
realm is assumed.
• If the authentication method is specified as Form-based, specify a form
login page and form error page. Select the Settings button beside the User
Authentication Mechanism field to specify the Login Page and the Error
Page to be used for form-based authentication.
The form login page defines the location of the form that will be used to
authenticate the user. The form error page is the resource that responds to
a failed authentication.
The <form-login-page> element Login Page parameter provides the URI of a
Web resource relative to the document root that will be used to authenticate the
user. The login page can be an HTML page, a JSP page, or a servlet, and must
return an HTML page containing a form that conforms to specific naming conventions (see the Servlet 2.4 specification for more information on these require-
AUTHENTICATING USERS OF WEB RESOURCES
ments). The Error Page parameter requires a URI of a Web resource relative to
the document root that send a response when authentication has failed.
A Universal Resource Identifier (URI), is a globally unique identifier for a
resource. A Universal Resource Locator (URL) is a kind of URI that specifies
the retrieval protocol (http or https for Web applications) and physical location
of a resource (host name and host-relative path).
In the Java Servlet specification, the request URI is the part of a URL after the
host name and port. For example, in the URL http://localhost:8080/myApp/
jsp/hello.jsp, the request URI would be /jsp/hello.jsp. The request URI is
further subdivided into the context path (which decides which Web application
should process the request) and the rest of the path that is used to select the target
servlet.
Using SSL to Enhance the Confidentiality of
HTTP Basic and Form-Based Authentication
Passwords are not protected for confidentiality with HTTP basic or form-based
authentication, meaning that passwords sent between a client and a server on a
non-protected session can be viewed and intercepted by third parties. To overcome this limitation, you can run these authentication protocols over an SSLprotected session and ensure that all message content is protected for confidentiality.
To configure HTTP basic or form-based authentication over SSL, specify CONor INTEGRAL as the Network Security Requirement on the WAR’s
Security page in deploytool. Specify CONFIDENTIAL when the application
requires that data be transmitted so as to prevent other entities from observing
the contents of the transmission. Specify INTEGRAL when the application
requires that the data be sent between client and server in such a way that it cannot be changed in transit.
FIDENTIAL
If you specify CONFIDENTIAL or INTEGRAL as a security constraint, that type of
security constraint applies to all requests that match the URL patterns in the Web
resource collection, not just to the login dialog.
Note: Good Security Practice: If you are using sessions, once you switch to SSL
you should never accept any further requests for that session that are non-SSL. For
example, a shopping site might not use SSL until the checkout page, then it may
switch to using SSL in order to accept your card number. After switching to SSL,
you should stop listening to non-SSL requests for this session. The reason for this
659
660
SECURITY
practice is that the session ID itself was non-encrypted on the earlier communications, which is not so bad when you’re just doing your shopping, but once the credit
card information is stored in the session, you don’t want a bad guy trying to fake the
purchase transaction against your credit card. This practice could be easily implemented using a filter.
Using Programmatic Security in the Web
Tier
Programmatic security is used by security-aware applications when declarative
security alone is not sufficient to express the security model of the application.
Programmatic security consists of the following methods of the HttpServletRequest interface:
• getRemoteUser - used to determine the user name with which the client
authenticated.
• isUserInRole - used to determine if a user is in a specific security role.
• getUserPrincipal - returns a java.security.Principal object.
These APIs allow servlets to make business logic decisions based on the logical
role of the remote user. They also allow the servlet to determine the principal
name of the current user.
For example, to use the isUserInRole(“admin”) method in your application,
you need to do the following with deploytool:
1.
2.
3.
4.
5.
Select the Web component (servlet, in this case).
Select the Security tab.
In the Role names referenced in code pane, click Add.
Enter admin in the Role name field.
Select the available Role Link from the pull-down. The role names that
appear in the Role links pull-down menu have previously been defined for
the application. See Security Roles, page 647 for information about defining role names for an application.
PROTECTING WEB RESOURCES
Creating the Login Form
The content of the login form in an HTML page, JSP page, or servlet for a login
page should be as follows:
<form method="POST" action="j_security_check" >
<input type="text" name= "j_username" >
<input type="password" name= "j_password" >
</form>
See the Servlet 2.4 specification for additional information.
Protecting Web Resources
Many applications feature unprotected Web content, which any caller can access
without authentication. In the Web tier, unrestricted access is provided simply by
not configuring a security constraint for that particular request URI. It is common to have some unprotected resources and some protected resources. In this
case, you will have security constraints and a login method defined, but it will
not be used to control access to the unprotected resources. The user won’t be
asked to log on until the first time they enter a protected request URI.
In the Java Servlet specification, the request URI is the part of a URL after the
host name and port. For example, let’s say you have an e-commerce site with a
browsable catalog you would want anyone to be able to access and a shopping
cart area for customers only. You could set up the paths for your Web application
so that the pattern /cart/* is protected, but nothing else is protected. Assuming
the application is installed at context path /myapp,
• http://localhost:8080/myapp/index.jsp is not protected
• http://localhost:8080/myapp/cart/index.jsp is protected
A user will not be prompted to log in until the first time that user accesses a
resource in the cart subdirectory.
To set this up, select the WAR file’s Security tabbed pane in deploytool and,
1. Add or select a Security Constraint.
2. Add or select a Web Resource Collection.
3. With the Security Constraint and Web Resource Collection selected, click
the Edit button.
661
662
SECURITY
4. Click the Add URL Pattern button to identify the URL pattern that is protected. Click OK.
5. Select the HTTP Methods to be protected. Click OK.
When the WAR file is deployed, access to these resources will be protected.
Installing and Configuring SSL Support
What is Secure Socket Layer
Technology?
Secure Socket Layer (SSL) is a technology that allows Web browsers and Web
servers to communicate over a secured connection. In this secure connection, the
data that is being sent is encrypted before being sent, then decrypted upon
receipt and prior to processing. Both the browser and the server encrypt all traffic
before sending any data. SSL addresses the following important security considerations.
• Authentication
During your initial attempt to communicate with a Web server over a
secure connection, that server will present your Web browser with a set of
credentials in the form of a server certificate. The purpose of the certificate is to verify that the site is who and what it claims to be. In some
cases, the server may request a certificate that the client is who and what it
claims to be (which is known as client authentication).
• Confidentiality
When data is being passed between the client and server on a network,
third parties can view and intercept this data. SSL responses are encrypted
so that the data cannot be deciphered by the third-party and the data
remains confidential.
• Integrity
When data is being passed between the client and server on a network,
third parties can view and intercept this data. SSL helps guarantee that the
data will not be modified in transit by that third party.
SETTING UP DIGITAL CERTIFICATES
Setting Up Digital Certificates
In order to use SSL, a J2EE server must have an associated certificate for each
external interface, or IP address, that accepts secure connections. The theory
behind this design is that a server should provide some kind of reasonable assurance that its owner is who you think it is, particularly before receiving any sensitive information. It may be useful to think of a certificate as a “digital driver’s
license” for an Internet address. It states with which company the site is associated, along with some basic contact information about the site owner or administrator.
The digital certificate is cryptographically signed by its owner and is difficult for
anyone else to forge. For sites involved in e-commerce, or any other business
transaction in which authentication of identity is important, a certificate can be
purchased from a well-known Certificate Authority (CA) such as Verisign or
Thawte.
If authentication is not really a concern, such as if an administrator simply wants
to ensure that data being transmitted and received by the server is private and
cannot be snooped by anyone eavesdropping on the connection, you can simply
save the time and expense involved in obtaining a CA certificate and simply use
a self-signed certificate.
SSL uses public key cryptography, which is based on key pairs. Key pairs contain one public key and one private key. If data is encrypted with one key, it can
only be decrypted with the other key of the pair. This property of is fundamental
to establishing trust and privacy in transactions. For example, using SSL, the
server computes a value and encrypts the value using its private key. The
encrypted value is called a digital signature. The client decrypts the encrypted
value using the server’s public key and compares the value to its own computed
value. If the two values match, the client can trust that the signature is authentic
since only the private key could have been used to produce such a signature.
Digital certificates are used with the HTTPS protocol to authenticate Web clients. The HTTPS service of most Web servers will not run unless a digital certificate has been installed. Use the procedure outlined below to set up a digital
certificate that can be used by your Web server to enable SSL.
One tool that can be used to set up a digital certificate is keytool, a key and certificate management utility that ships with J2EE 1.4 Application Server. It
enables users to administer their own public/private key pairs and associated certificates for use in self-authentication (where the user authenticates himself/herself to other users/services) or data integrity and authentication services, using
663
664
SECURITY
digital signatures. It also allows users to cache the public keys (in the form of
certificates) of their communicating peers. For a better understanding of public
key cryptography, read the keytool documentation at http://java.sun.com/
j2se/1.4.1/docs/tooldocs/solaris/keytool.html.
A certificate is a digitally-signed statement from one entity (person, company,
etc.), saying that the public key (and some other information) of some other
entity has a particular value. When data is digitally signed, the signature can be
verified to check the data integrity and authenticity. Integrity means that the data
has not been modified or tampered with, and authenticity means the data indeed
comes from whoever claims to have created and signed it.
The keytool stores the keys and certificates in a file termed a keystore. The
default keystore implementation implements the keystore as a file. It protects private keys with a password. For more information on keytool, read its documentation
at
http://java.sun.com/j2se/1.4.1/docs/tooldocs/solaris/
keytool.html.
You can create a self-signed certificate by following the instructions in Creating
a Client Certificate for Mutual Authentication, page 664.
Creating a Client Certificate for Mutual
Authentication
To create a client certificate:
1. Use keytool to create a client certificate in a keystore file of your choice:
keytool -genkey -keyalg RSA -alias client -keystore
client.keystore
You will be prompted for a password. Enter changeit, the default password. When requested, enter the name, organization, and other prompts
for the client. Do not enter anything at the Key password for <client>
prompt, just press Return.
2. Export the new client certificate from the keystore to a certificate file:
keytool -keystore client.keystore -export -alias client
-file client.cer
3. Enter the keystore password (changeit). Keytool returns this message:
Certificate stored in file <client.cer>
SETTING UP DIGITAL CERTIFICATES
4. Import the new client certificate into the server’s trustStore file
<J2EE_HOME>/domains/domain1/server/config/cacerts.jks.
This
allows the server to trust the client during SSL mutual authentication.
keytool -import -alias root -keystore $J2EE_HOME/domains/
domain1/server/config/ cacerts.jks
-file client.cer
5. Enter the keystore password (changeit). Keytool returns this message:
Owner: CN=J2EE Client, OU=Java Web Services, O=Sun, L=Santa
Clara, ST=CA, C=US
Issuer: CN=J2EE Client, OU=Java Web Services, O=Sun, L=Santa
Clara, ST=CA, C=US
Serial number: 3e39e66a
Valid from: Thu Jan 30 18:58:50 PST 2003 until: Wed Apr 30
19:58:50 PDT 2003
Certificate fingerprints:
MD5: 5A:B0:4C:88:4E:F8:EF:E9:E5:8B:53:BD:D0:AA:8E:5A
SHA1:90:00:36:5B:E0:A7:A2:BD:67:DB:EA:37:B9:61:3E:26:B3:89:
46:
32
Trust this certificate? [no]: yes
Certificate was added to keystore
For an example application that uses mutual authentication, see Configuring
Mutual Authentication, page 813. For information on verifying that mutual
authentication is running, see Verifying Mutual Authentication is
Running, page 666.
Obtaining a Digitally-Signed Certificate
This example assumes a keystore named client.keystore (created in Creating
a Client Certificate for Mutual Authentication, page 664) and the certificate
request file csr_filename.
1. Get your certificate digitally signed by a CA. To do this,
a. Generate a Certificate Signing Request (CSR).
keytool -certreq -alias client -keyalg RSA
-file <csr_filename> -keystore client.keystore
b. Send the contents of the csr_filename for signing.
c. If you are using Verisign CA, go to http://digitalid.verisign.com/. Verisign will send the signed certificate in E-mail. Store this
certificate in a file.
665
666
SECURITY
d. Import the signed certificate that you received in E-mail into the server’s
trustStore:
keytool -import -alias client -trustcacerts -file
<signed_cert_file> -keystore
<J2EE_HOME>/domains/domain1/server/config/cacerts.jks
2. Import the certificate (if using a CA-signed certificate).
If your certificate will be signed by a Certification Authority (CA), you
must import the CA certificate. You may skip this step if you are using
only the self-signed certificate. If you are using a self-signed certificate or
a certificate signed by a CA that your browser does not recognize, a dialog will be triggered the first time a user tries to access the server. The
user can then choose to trust the certificate for this session only or permanently.
Verifying Mutual Authentication is Running
You can verify that mutual authentication is working by obtaining debug messages. This should be done at the client end, and this examples shows how to
pass a system property in targets.xml so that targets.xml forks a client with
javax.net.debug in its system properties.
To enable debug messages for SSL mutual authentication, pass the system property javax.net.debug=ssl,handshake, which will provide information on
whether mutual authentication is working or not. This can be done by adding the
sysproperty to targets.xml file as shown in bold:
<java
fork="on"
classpath="${dist}/${client-jar}:${j2ee-path}"
classname="${client-class}" >
<arg value="${trustStore}" />
<arg value="${trustStorePassword}" />
<arg value="${key-store}" />
<arg value="${key-store-password}" />
<arg value="${endpoint-address}" />
<sysproperty key="javax.net.debug"
value="ssl,handshake" />
<sysproperty key="javax.net.ssl.keyStore"
value="${key-store}" />
<sysproperty key="javax.net.ssl.keyStorePassword"
value="${key-store-password}" /
</java>
SETTING UP DIGITAL CERTIFICATES
Miscellaneous Commands for Certificates
• To check the contents of a keystore that contains a certificate with an alias
server:
keytool -list -keystore server.keystore -alias server -v
• To check the contents of the cacerts file:
keytool -list -keystore cacerts.jks
Verifying SSL Support
For testing purposes, and to verify that SSL support has been correctly installed,
load the default introduction page with a URL that connects to port defined in
the server deployment descriptor:
https://localhost:1043/
The https in this URL indicates that the browser should be using the SSL protocol.
The first time a user loads this application, the New Site Certificate dialog displays. Select Next to move through the series of New Site Certificate dialogs,
select Finish when you reach the last dialog. The certificates will only display
the first time. When you accept the certificates, subsequent hits to this site
assume that you still trust the content.
General Tips on Running SSL
The SSL protocol is designed to be as efficient as securely possible. However,
encryption/decryption is a computationally expensive process from a performance standpoint. It is not strictly necessary to run an entire Web application
over SSL, and it is customary for a developer to decide which pages require a
secure connection and which do not. Pages that might require a secure connection include login pages, personal information pages, shopping cart checkouts,
or any pages where credit card information could possibly be transmitted. Any
page within an application can be requested over a secure socket by simply prefixing the address with https: instead of http:. Any pages which absolutely
require a secure connection should check the protocol type associated with the
page request and take the appropriate action if https: is not specified.
Using name-based virtual hosts on a secured connection can be problematic.
This is a design limitation of the SSL protocol itself. The SSL handshake, where
667
668
SECURITY
the client browser accepts the server certificate, must occur before the HTTP
request is accessed. As a result, the request information containing the virtual
host name cannot be determined prior to authentication, and it is therefore not
possible to assign multiple certificates to a single IP address. If all virtual hosts
on a single IP address need to authenticate against the same certificate, the addition of multiple virtual hosts should not interfere with normal SSL operations on
the server. Be aware, however, that most client browsers will compare the
server’s domain name against the domain name listed in the certificate, if any
(applicable primarily to official, CA-signed certificates). If the domain names do
not match, these browsers will display a warning to the client. In general, only
address-based virtual hosts are commonly used with SSL in a production environment.
EJB-Tier Security
The following sections describe declarative and programmatic security mechanisms that can be used to protect resources in the EJB tier. The protected
resources include methods of enterprise beans that are called from application
clients, Web components, or other enterprise beans.
You can protect EJB-tier resources by doing the following:
• Declaring method permissions
• Mapping roles to J2EE users and groups
For information about mapping roles to J2EE users and groups, see Mapping
Roles to Users and Groups, page 649.
Declaring Method Permissions
After you’ve defined the roles (see Security Roles, page 647), you can define the
method permissions of an enterprise bean. Method permissions indicate which
USING PROGRAMMATIC SECURITY IN THE EJB TIER
roles are allowed to invoke which methods. You can define method permissions
in different ways.
• You can apply method permissions to all of the methods of the specified
enterprise bean’s home, component, and/or Web service endpoint interfaces.
• You can apply method permissions to the specified method of the specified
enterprise bean. If the enterprise bean contains multiple methods with the
same method name, the method permission applies to all of the methods.
• If the enterprise bean contains multiple methods with the same method
name but the methods have different method parameters (such as create(a,b) and create(a,b,c)), you can apply method permissions by
specifying the method parameters.
Using Programmatic Security in the EJB
Tier
Programmatic security in the EJB tier consists of the getCallerPrincipal and
the isCallerInRole methods. You can use the getCallerPrincipal method to
determine the caller of the enterprise bean, and the isCallerInRole method to
determine if the caller has the specified role.
The getCallerPrincipal method of the EJBContext interface returns the
java.security.Principal object that identifies the caller of the enterprise
bean. (In this case, a principal is the same as a user.) In the following example,
the getUser method of an enterprise bean returns the name of the J2EE user that
invoked it:
public String getUser() {
return context.getCallerPrincipal().getName();
}
You can determine whether an enterprise bean’s caller belongs to the Customer
role.
boolean result = context.isCallerInRole("Customer");
669
670
SECURITY
Unauthenticated User Name
Web applications accept unauthenticated Web clients and allow these clients to
make calls to the EJB container. The EJB specification requires a security credential for accessing EJB methods. Typically, the credential will be that of a
generic unauthenticated user.
Application Client-Tier Security
Authentication requirements for J2EE application clients are the same as the
requirements for other J2EE components. Access to protected resources in either
the EJB tier or the Web tier requires user authentication, whereas access to
unprotected resources does not.
An application client can use the Java Authentication and Authorization Service
(JAAS) for authentication. JAAS implements a Java version of the standard
Pluggable Authentication Module (PAM) framework, which permits applications to remain independent from underlying authentication technologies. You
can plug new or updated authentication technologies under an application without making any modifications to the application itself. Applications enable the
authentication process by instantiating a LoginContext object, which, in turn,
references a configuration to determine the authentication technologies or login
modules that will be used to perform the authentication.
A typical login module could prompt for and verify a user name and password.
Other modules could read and verify a voice or fingerprint sample.
In some cases, a login module needs to communicate with the user to obtain
authentication information. Login modules use a javax.security.auth.callback.CallbackHandler for this purpose. Applications implement the CallbackHandler interface and pass it to the login context, which forwards it directly
to the underlying login modules. A login module uses the callback handler both
to gather input (such as a password or smart card PIN number) from users or to
supply information (such as status information) to users. By allowing the application to specify the callback handler, an underlying login module can remain
independent of the different ways applications interact with users.
For example, the implementation of a callback handler for a GUI application
might display a window to solicit user input. Or, the implementation of a callback handler for a command line tool might simply prompt the user for input
directly from the command line.
EIS-TIER SECURITY
The login module passes an array of appropriate callbacks to the callback handler’s handle method (for example, a NameCallback for the user name and a
PasswordCallback for the password), and the callback handler performs the
requested user interaction and sets appropriate values in the callbacks. For example, to process a NameCallback, the CallbackHandler may prompt for a name,
retrieve the value from the user, and call the setName method of the NameCallback to store the name.
EIS-Tier Security
In the EIS tier, an application component requests a connection to an EIS
resource. As part of this connection, the EIS may require a sign-on to the
resource. The application component provider has two choices for the design of
the EIS sign-on:
• With the container-managed sign-on approach, the application component
lets the container take the responsibility of configuring and managing the
EIS sign-on. The container determines the user name and password for
establishing a connection to an EIS instance.
• With the component-managed sign-on approach, the application component code manages EIS sign-on by including code that performs the signon process to an EIS.
Container-Managed Sign-On
With container-managed sign-on, an application component does not have to
pass any security information for signing on to the resource to the getConnection() method. The security information is supplied by the container, as shown
in the following example.
671
672
SECURITY
// Business method in an application component
Context initctx = new InitialContext();
// Perform JNDI lookup to obtain a connection factory
javax.resource.cci.ConnectionFactory cxf =
(javax.resource.cci.ConnectionFactory)initctx.lookup(
“java:comp/env/eis/MainframeCxFactory”);
// Invoke factory to obtain a connection. The security
// information is not passed in the getConnection method
javax.resource.cci.Connection cx = cxf.getConnection();
...
Component-Managed Sign-On
With component-managed sign-on, an application component is responsible for
passing the security information that is needed for signing on to the resource to
the getConnection() method. Security information could be a user name and
password, for example, as shown here:
// Method in an application component
Context initctx = new InitialContext();
// Perform JNDI lookup to obtain a connection factory
javax.resource.cci.ConnectionFactory cxf =
(javax.resource.cci.ConnectionFactory)initctx.lookup(
“java:comp/env/eis/MainframeCxFactory”);
// Get a new ConnectionSpec
com.myeis.ConnectionSpecImpl properties = //..
// Invoke factory to obtain a connection
properties.setUserName(“...”);
properties.setPassword(“...”);
javax.resource.cci.Connection cx =
cxf.getConnection(properties);
...
Configuring Resource Adapter Security
1. In addition to configuring the sign-on, you can also configure security settings for the resource adapter.
PROPAGATING SECURITY IDENTITY
Propagating Security Identity
When you deploy an enterprise bean or Web component, you can specify the
security identity that will be propagated (illustrated in Figure 18–1) to enterprise
beans invoked from within that component.
Figure 18–1 Security Identity Propagation
You can choose one of the following propagation styles:
• The caller identity of the intermediate component is propagated to the target enterprise bean. This technique is used when the target container trusts
the intermediate container.
• A specific identity is propagated to the target enterprise bean. This technique is used when the target container expects access via a specific identity.
Configuring a Component’s Propagated
Security Identity
1. Select the enterprise bean to configure.
2. In the Security Identity pane, select which security identity should be propagated to the beans that this enterprise bean calls:
• Choose Use Caller ID if you want the principal of this enterprise bean’s
caller to be propagated to other beans that it calls.
673
674
SECURITY
• Choose Run as Specified Role and select the role from the menu if you
want a security identity other than the caller’s identity propagated to
other beans.
3. If the role that you want to use as the security identity is not in the list, click
Edit Roles and add it.
You may also click on the Edit Roles and type in a role not in the list.
1. Select the Web component to configure.
2. In the Security Identity pane, select Use Caller ID if the caller ID is to be
propagated to methods of other components called from this Web component. Otherwise, select Run as Role and select a role from the list of known
roles in the WAR file.
3. If the role that you want to use as the security identity is not in the list, click
Edit Roles and add it.
Configuring Client Authentication
If an application component in an application client container accesses a protected method on a bean, use client authentication.
Trust between Containers
When an enterprise bean is designed so that either the original caller identity or a
designated identity is used to call a target bean, the target bean will receive the
propagated identity only; it will not receive any authentication data.
There is no way for the target container to authenticate the propagated security
identity. However, since the security identity is used in authorization checks (for
example, method permissions or with the isCallerInRole() method), it is
vitally important that the security identity be authentic. Since there is no authentication data available to authenticate the propagated identity, the target must
trust that the calling container has propagated an authenticated security identity.
By default, the J2EE 1.4 Application Server is configured to trust identities that
are propagated from different containers. Therefore, there are no special steps
that you need to take to set up a trust relationship.
USING JAVA AUTHORIZATION CONTRACT FOR CONTAINERS
Using Java Authorization Contract for
Containers
Java Authorization Contract for Containers (JACC) is a set of security contracts
defined for the EJB and Web containers. The containers in the J2EE server
restrict client access to the resources and services they contain based on the client’s identity.
JACC contracts enhance this functionality by defining roles as collections of permissions and new subclasses of the java.security.Permission class. JACC
contracts also provide a means for containers to make access decisions by operating on these permissions and defines the mechanism by which authorization
providers are installed and configured for use by containers.
JACC contracts provide the following benefits:
• JACC moves security administration and decision-making responsibility
from the container to the security providers.
• JACC enables the use of a common policy across different security systems.
• J2EE system integrators can integrate containers with existing authorization policy infrastructure.
675
676
SECURITY
19
J2EE Connector
Architecture
Dale Green and Beth Stearns
THE other chapters in this book are intended for business application developers, but this chapter is for advanced users such as system integrators and tools
developers.
The J2EE Connector architecture enables J2EE components such as enterprise
beans to interact with enterprise information systems (EISs). EIS software
includes various types of systems: enterprise resource planning (ERP), mainframe transaction processing, and non-relational databases, among others. The
J2EE Connector architecture simplifies the integration of diverse EISs. Each EIS
requires just one implementation of the J2EE Connector architecture. Because
an implementation adheres to the J2EE Connector Specification, it is portable
across all compliant J2EE servers.
About Resource Adapters
A resource adapter is a J2EE component that implements the J2EE Connector
architecture for a specific EIS. It is through the resource adapter that a J2EE
application and an EIS communicate with each other (see Figure 19–1).
Stored in a Resource Adapter Archive (RAR) file, a resource adapter may be
deployed on any J2EE server, much like the EAR file of a J2EE application. A
RAR file may be contained in an EAR file or it may exist as a separate file.
677
678
J2EE CONNECTOR ARCHITECTURE
A resource adapter is analogous to a JDBC driver. Both provide a standard API
through which an application can access a resource that is outside the J2EE
server. For a resource adapter, the outside resource is an EIS; for a JDBC driver,
it is a DBMS. Resource adapters and JDBC drivers are rarely created by application developers. In most cases, both types of software are built by vendors who
sell products such as tools, servers, or integration software.
Resource Adapter Contracts
Figure 19–1 shows the application and system contracts, the two principal contracts implemented by a resource adapter. The application contract defines the
API through which a J2EE component such as an enterprise bean accesses the
EIS. This API is the only view that the component has of the EIS. The resource
adapter itself and its system contracts are transparent to the J2EE component.
The system contracts link the resource adapter to important services—connection, transaction, and security—that are managed by the J2EE server.
RESOURCE ADAPTER CONTRACTS
Figure 19–1 Accessing an EIS Through a Resource Adapter
The connection management contract supports connection pooling, a technique
that enhances application performance and scalability. Connection pooling is
transparent to the application, which simply obtains a connection to the EIS.
Because of the transaction management contract, a call to the EIS may be
enclosed in an XA transaction. XA transactions are global—they may contain
calls to multiple EISs, databases, and enterprise bean business methods.
Although often appropriate, XA transactions are not mandatory. Instead, an
application may use local transactions, which are managed by the individual
EIS, or it may use no transactions at all.
To protect the information in an EIS, the security management contract provides
these mechanisms: authentication, authorization, and secure communication
between the J2EE server and the EIS.
679
680
J2EE CONNECTOR ARCHITECTURE
Connector 1.5 Resource Adapters
With the latest release of the Connector architecture (Connector 1.5), EISs and
external systems can supply resource adapters for connecting from an EIS to a
J2EE application server. The architecture specifies additional contracts, including a lifecycle management contract, a work management contract, and pluggability contracts for message providers and for importing transactions. By
following the specification, a resource adapter provider has the flexibility to
implement those services that it desires or needs.
Extending Messaging Capabilities
To enable external systems to connect to a J2EE application server, the Connector architecture has extended the capabilities of message-driven beans to handle
messages from any message provider. That is, message-driven beans are no
longer limited to handling JMS messages. Instead, EISs and message providers
can plug any message provider, including their own custom or proprietary message providers, into a J2EE container.
To use this feature, a message provider or an EIS provides a resource adapter
according to the Connector 1.5-specified contract. The contract details APIs for
message handling and message delivery. A conforming resource adapter is
assured of the ability to send messages from any provider to a message-driven
bean, plus it can be plugged into a J2EE container in a standard manner.
Work Management Contract
The Connector 1.5 work management contract ensures that resource adapters use
threads in the proper, recommended manner. It also enables the J2EE application
server to manage threads for resource adapters.
Resource adapters that improperly use threads can create problems for the entire
application server environment. For example, a resource adapter might create too
many threads or it might not properly release threads it has created. Poor thread
handling inhibits application server shutdown. It also impacts the application
server’s performance because creating and destroying threads are expensive
operations.
The work management contract establishes a means for the application server to
pool and reuse threads, similar to pooling and reusing connections. By adhering
to this contract, the resource adapter does not have to manage threads itself.
CONNECTOR 1.5 RESOURCE ADAPTERS
Instead, the resource adapter has the application server create and provide
needed threads. When the resource adapter is finished with a given thread, it
returns the thread to the application server. The application server manages the
thread: it can return the thread to a pool and reuse it later, or it may destroy the
thread. Handling threads in this manner results in increased application server
performance and more efficient use of resources.
In addition to moving thread management to the application server, the Connector 1.5 architecture also provides a flexible model for a resource adapter that uses
threads:
• The requesting thread can choose to block—stop its own execution—until
the work thread completes.
• Or, the requesting thread can block while it waits to get the thread. When
the application server provides a work thread, then the requesting thread
and the work thread execute in parallel.
• The resource adapter can opt to submit the work for the thread to a queue.
The thread executes the work from the queue at some later point. The
resource adapter continues its own execution from the point it submitted
the work to the queue, regardless of when the thread executes it.
With the latter two approaches, the resource adapter and the thread may execute
simultaneously or independently from each other. For these approaches, the contract specifies a listener mechanism to notify the resource adapter that the thread
has completed its operation. The resource adapter can also specify the execution
context for the thread and the work management contract controls the context in
which the thread executes.
Transaction Inflow
The Connector 1.5 architecture also expands the transaction support for resource
adapters. Previously, transaction flow went from the J2EE application server to
an EIS. That is, the transaction started from an enterprise bean on the J2EE
application server, and the same transaction remained in force during operati