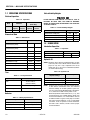
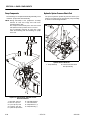
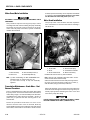
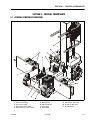
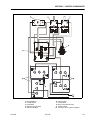
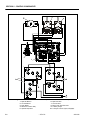
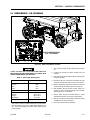
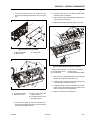
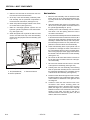
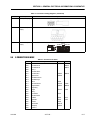
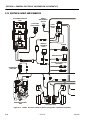
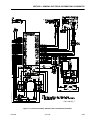
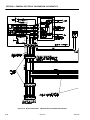
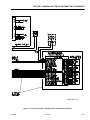
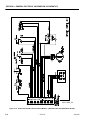
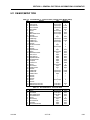
1
Service and Maintenance Manual Model(s) 1230ES P/N - 3121222 February 22, 2012 NOTES: INTRODUCTION - MAINTENANCE SAFETY PRECAUTIONS MAINTENANCE SAFETY PRECAUTIONS A. GENERAL C. MAINTENANCE This section contains the general safety precautions which must be observed during maintenance of the aerial platform. It is of utmost importance that maintenance personnel pay strict attention to these warnings and precautions to avoid possible injury to themselves or others or damage to the equipment. A maintenance program must be established by a qualified person and must be followed to ensure that the machine is safe to operate. MODIFICATION OF THE MACHINE WITHOUT CERTIFICATION BY A RESPONSIBLE AUTHORITY THAT THE MACHINE IS AT LEAST AS SAFE AS ORIGINALLY MANUFACTURED IS A SAFETY VIOLATION. The specific precautions to be observed during machine maintenance are inserted at the appropriate point in the manual. These precautions are, for the most part, those that apply when servicing hydraulic and larger machine component parts. Your safety, and that of others, is the first consideration when engaging in the maintenance of equipment. Always be conscious of component weight and never attempt to move heavy parts without the aid of a mechanical device. Do not allow heavy objects to rest in an unstable position. When raising a portion of the equipment, ensure that adequate support is provided. SINCE THE MACHINE MANUFACTURER HAS NO DIRECT CONTROL OVER THE FIELD INSPECTION AND MAINTENANCE, SAFETY IN THIS AREA IS THE RESPONSIBILITY OF THE OWNER/ OPERATOR. FAILURE TO COMPLY WITH SAFETY PRECAUTIONS LISTED IN THIS SECTION COULD RESULT IN MACHINE DAMAGE, PERSONNEL INJURY OR DEATH AND IS A SAFETY VIOLATION. • REMOVE ALL RINGS, WATCHES, AND JEWELRY WHEN PERFORMING ANY MAINTENANCE. • DO NOT WEAR LONG HAIR UNRESTRAINED, OR LOOSE FITTING CLOTHING AND NECKTIES WHICH ARE APT TO BECOME CAUGHT ON OR ENTANGLED IN EQUIPMENT. • OBSERVE AND OBEY ALL DANGER, WARNING, CAUTION AND OTHER INSTRUCTIONS ON MACHINE AND IN SERVICE MANUAL. • KEEP STANDING SURFACES AND HAND HOLDS FREE OF OIL, GREASE, WATER, ETC. • NEVER WORK UNDER AN ELEVATED PLATFORM UNTIL PLATFORM HAS BEEN SAFELY RESTRAINED FROM ANY MOVEMENT BY BLOCKING OR OVERHEAD SLING. • BEFORE MAKING ADJUSTMENTS, LUBRICATING OR PERFORMING ANY OTHER MAINTENANCE, SHUT OFF ALL POWER CONTROLS. • BATTERY SHOULD ALWAYS BE DISCONNECTED DURING REPLACEMENT OF ELECTRICAL COMPONENTS. • KEEP ALL SUPPORT EQUIPMENT AND ATTACHMENTS STOWED IN THEIR PROPER PLACE. • USE ONLY APPROVED, NONFLAMMABLE CLEANING SOLVENTS. B. HYDRAULIC SYSTEM SAFETY 1. It should be particularly noted that the machines hydraulic systems operate at extremely high and potentially dangerous pressures. Every effort should be made to relieve any system pressure prior to disconnecting or removing any portion of the system. 2. Relieve system pressure by lowering the platform completely to direct any line pressure back into the return line to the reservoir. Pressure feed lines to system components can then be disconnected with minimal fluid loss. 3121222 – JLG Lift – a INTRODUCTION - REVISION LOG REVISION LOG Original Issue of Manual . . . . . . . . . . . . . . . . . . June 8, 2006 Manual Revised. . . . . . . . . . . . . . . . . . . . . . . . . July 13, 2006 Manual Revised. . . . . . . . . . . . . . . . . . . . . . . . . January 23, 2007 Manual Revised. . . . . . . . . . . . . . . . . . . . . . . . . February 26, 2007 Manual Revised. . . . . . . . . . . . . . . . . . . . . . . . . March 22, 2007 Manual Revised. . . . . . . . . . . . . . . . . . . . . . . . . March 30, 2007 Manual Revised. . . . . . . . . . . . . . . . . . . . . . . . . April 11, 2007 Manual Revised. . . . . . . . . . . . . . . . . . . . . . . . . May 15, 2007 Manual Revised. . . . . . . . . . . . . . . . . . . . . . . . . November 30, 2007 Manual Revised. . . . . . . . . . . . . . . . . . . . . . . . . June 4, 2008 Manual Revised. . . . . . . . . . . . . . . . . . . . . . . . . November 11, 2008 Manual Revised. . . . . . . . . . . . . . . . . . . . . . . . . August 18, 2010 Manual Revised. . . . . . . . . . . . . . . . . . . . . . . . . August 31, 2011 Manual Revised. . . . . . . . . . . . . . . . . . . . . . . . . February 22, 2012 b – JLG Lift – 3121222 TABLE OF CONTENTS TABLE OF CONTENTS SUBJECT - SECTION, PARAGRAPH PAGE NO. MAINTENANCE SAFETY PRECAUTIONS . . . . . . . . . . . . . . . . . . . . . . . . . . . . . . . . . . . . . . . . . . . . . . . . . A A GENERAL . . . . . . . . . . . . . . . . . . . . . . . . . . . . . . . . . . . . . . . . . . . . . . . . . . . . . . . . . . . . . . . . . . . . . . A B HYDRAULIC SYSTEM SAFETY . . . . . . . . . . . . . . . . . . . . . . . . . . . . . . . . . . . . . . . . . . . . . . . . . . . . . A C MAINTENANCE . . . . . . . . . . . . . . . . . . . . . . . . . . . . . . . . . . . . . . . . . . . . . . . . . . . . . . . . . . . . . . . . . A REVISION LOG ....................................................................B SECTION 1 - MACHINE SPECIFICATIONS 1.1 OPERATING SPECIFICATIONS . . . . . . . . . . . . . . . . . . . . . . . . . . . . . . . . . . . . . . . . . . . . . . . . . . . . 1-2 Platform Capacities . . . . . . . . . . . . . . . . . . . . . . . . . . . . . . . . . . . . . . . . . . . . . . . . . . . . . . . . . 1-2 Dimensional Data. . . . . . . . . . . . . . . . . . . . . . . . . . . . . . . . . . . . . . . . . . . . . . . . . . . . . . . . . . . 1-2 Tires . . . . . . . . . . . . . . . . . . . . . . . . . . . . . . . . . . . . . . . . . . . . . . . . . . . . . . . . . . . . . . . . . . . . . 1-2 Batteries . . . . . . . . . . . . . . . . . . . . . . . . . . . . . . . . . . . . . . . . . . . . . . . . . . . . . . . . . . . . . . . . . . 1-2 Critical Stability Weights . . . . . . . . . . . . . . . . . . . . . . . . . . . . . . . . . . . . . . . . . . . . . . . . . . . . . 1-2 1.2 LUBRICATION . . . . . . . . . . . . . . . . . . . . . . . . . . . . . . . . . . . . . . . . . . . . . . . . . . . . . . . . . . . . . . . . . 1-2 Lubrication Capacities . . . . . . . . . . . . . . . . . . . . . . . . . . . . . . . . . . . . . . . . . . . . . . . . . . . . . . . 1-2 Hydraulic Oil . . . . . . . . . . . . . . . . . . . . . . . . . . . . . . . . . . . . . . . . . . . . . . . . . . . . . . . . . . . . . . 1-2 Lubrication Specifications . . . . . . . . . . . . . . . . . . . . . . . . . . . . . . . . . . . . . . . . . . . . . . . . . . . . 1-3 Oil Check Procedure . . . . . . . . . . . . . . . . . . . . . . . . . . . . . . . . . . . . . . . . . . . . . . . . . . . . . . . . 1-3 1.3 CYLINDER SPECIFICATIONS . . . . . . . . . . . . . . . . . . . . . . . . . . . . . . . . . . . . . . . . . . . . . . . . . . . . . 1-3 1.4 TORQUE REQUIREMENTS . . . . . . . . . . . . . . . . . . . . . . . . . . . . . . . . . . . . . . . . . . . . . . . . . . . . . . . 1-3 1.5 SERIAL NUMBER LOCATIONS . . . . . . . . . . . . . . . . . . . . . . . . . . . . . . . . . . . . . . . . . . . . . . . . . . . . 1-3 SECTION 2 - GENERAL SERVICE INFORMATION 2.1 MACHINE PREPARATION, INSPECTION, AND MAINTENANCE . . . . . . . . . . . . . . . . . . . . . . . . . . 2-1 General. . . . . . . . . . . . . . . . . . . . . . . . . . . . . . . . . . . . . . . . . . . . . . . . . . . . . . . . . . . . . . . . . . . 2-1 Preparation, Inspection, and Maintenance . . . . . . . . . . . . . . . . . . . . . . . . . . . . . . . . . . . . . . . 2-1 Pre-Start Inspection . . . . . . . . . . . . . . . . . . . . . . . . . . . . . . . . . . . . . . . . . . . . . . . . . . . . . . . . . 2-1 Pre-Delivery Inspection and Frequent Inspection . . . . . . . . . . . . . . . . . . . . . . . . . . . . . . . . . . 2-1 Annual Machine Inspection . . . . . . . . . . . . . . . . . . . . . . . . . . . . . . . . . . . . . . . . . . . . . . . . . . . 2-1 Preventative Maintenance . . . . . . . . . . . . . . . . . . . . . . . . . . . . . . . . . . . . . . . . . . . . . . . . . . . . 2-1 2.2 PREVENTIVE MAINTENANCE AND INSPECTION SCHEDULE . . . . . . . . . . . . . . . . . . . . . . . . . . . 2-2 Maintenance and Inspection Table Codes: . . . . . . . . . . . . . . . . . . . . . . . . . . . . . . . . . . . . . . 2-4 Footnotes: . . . . . . . . . . . . . . . . . . . . . . . . . . . . . . . . . . . . . . . . . . . . . . . . . . . . . . . . . . . . . . . . 2-4 2.3 SERVICING AND MAINTENANCE GUIDELINES . . . . . . . . . . . . . . . . . . . . . . . . . . . . . . . . . . . . . . . 2-5 General. . . . . . . . . . . . . . . . . . . . . . . . . . . . . . . . . . . . . . . . . . . . . . . . . . . . . . . . . . . . . . . . . . . 2-5 Safety and Workmanship . . . . . . . . . . . . . . . . . . . . . . . . . . . . . . . . . . . . . . . . . . . . . . . . . . . . 2-5 Cleanliness. . . . . . . . . . . . . . . . . . . . . . . . . . . . . . . . . . . . . . . . . . . . . . . . . . . . . . . . . . . . . . . . 2-5 Components Removal and Installation . . . . . . . . . . . . . . . . . . . . . . . . . . . . . . . . . . . . . . . . . . 2-5 Component Disassembly and Reassembly . . . . . . . . . . . . . . . . . . . . . . . . . . . . . . . . . . . . . . 2-5 Pressure-Fit Parts. . . . . . . . . . . . . . . . . . . . . . . . . . . . . . . . . . . . . . . . . . . . . . . . . . . . . . . . . . . 2-5 Bearings . . . . . . . . . . . . . . . . . . . . . . . . . . . . . . . . . . . . . . . . . . . . . . . . . . . . . . . . . . . . . . . . . . 2-6 Gaskets . . . . . . . . . . . . . . . . . . . . . . . . . . . . . . . . . . . . . . . . . . . . . . . . . . . . . . . . . . . . . . . . . . 2-6 Bolt Usage and Torque Application . . . . . . . . . . . . . . . . . . . . . . . . . . . . . . . . . . . . . . . . . . . . 2-6 Hydraulic Lines and Electrical Wiring . . . . . . . . . . . . . . . . . . . . . . . . . . . . . . . . . . . . . . . . . . . 2-6 Hydraulic System. . . . . . . . . . . . . . . . . . . . . . . . . . . . . . . . . . . . . . . . . . . . . . . . . . . . . . . . . . . 2-6 Lubrication and Servicing . . . . . . . . . . . . . . . . . . . . . . . . . . . . . . . . . . . . . . . . . . . . . . . . . . . . 2-6 Batteries . . . . . . . . . . . . . . . . . . . . . . . . . . . . . . . . . . . . . . . . . . . . . . . . . . . . . . . . . . . . . . . . . . 2-6 2.4 LUBRICATION INFORMATION. . . . . . . . . . . . . . . . . . . . . . . . . . . . . . . . . . . . . . . . . . . . . . . . . . . . . 2-6 Hydraulic System. . . . . . . . . . . . . . . . . . . . . . . . . . . . . . . . . . . . . . . . . . . . . . . . . . . . . . . . . . . 2-6 Lubrication Specifications . . . . . . . . . . . . . . . . . . . . . . . . . . . . . . . . . . . . . . . . . . . . . . . . . . . . 2-7 3121222 – JLG Lift – i TABLE OF CONTENTS Hydraulic Oil . . . . . . . . . . . . . . . . . . . . . . . . . . . . . . . . . . . . . . . . . . . . . . . . . . . . . . . . . . . . . . 2-7 Changing Hydraulic Oil . . . . . . . . . . . . . . . . . . . . . . . . . . . . . . . . . . . . . . . . . . . . . . . . . . . . . . 2-7 SECTION 3 - THEORY OF OPERATION - 1230ES 3.1 OVERVIEW . . . . . . . . . . . . . . . . . . . . . . . . . . . . . . . . . . . . . . . . . . . . . . . . . . . . . . . . . . . . . . . . . . . . 3-1 3.2 MODES OF OPERATION . . . . . . . . . . . . . . . . . . . . . . . . . . . . . . . . . . . . . . . . . . . . . . . . . . . . . . . . . 3-1 Ground Mode. . . . . . . . . . . . . . . . . . . . . . . . . . . . . . . . . . . . . . . . . . . . . . . . . . . . . . . . . . . . . . 3-1 Platform mode . . . . . . . . . . . . . . . . . . . . . . . . . . . . . . . . . . . . . . . . . . . . . . . . . . . . . . . . . . . . . 3-1 3.3 CAN COMMUNICATIONS . . . . . . . . . . . . . . . . . . . . . . . . . . . . . . . . . . . . . . . . . . . . . . . . . . . . . . . . 3-1 3.4 CONTROLS & SENSORS . . . . . . . . . . . . . . . . . . . . . . . . . . . . . . . . . . . . . . . . . . . . . . . . . . . . . . . . 3-3 Elevation . . . . . . . . . . . . . . . . . . . . . . . . . . . . . . . . . . . . . . . . . . . . . . . . . . . . . . . . . . . . . . . . . 3-3 Joystick . . . . . . . . . . . . . . . . . . . . . . . . . . . . . . . . . . . . . . . . . . . . . . . . . . . . . . . . . . . . . . . . . . 3-3 Tilt. . . . . . . . . . . . . . . . . . . . . . . . . . . . . . . . . . . . . . . . . . . . . . . . . . . . . . . . . . . . . . . . . . . . . . . 3-3 3.5 TRACTION . . . . . . . . . . . . . . . . . . . . . . . . . . . . . . . . . . . . . . . . . . . . . . . . . . . . . . . . . . . . . . . . . . . . 3-3 Personalities. . . . . . . . . . . . . . . . . . . . . . . . . . . . . . . . . . . . . . . . . . . . . . . . . . . . . . . . . . . . . . . 3-4 Interlocks . . . . . . . . . . . . . . . . . . . . . . . . . . . . . . . . . . . . . . . . . . . . . . . . . . . . . . . . . . . . . . . . . 3-4 3.6 PUMP/LIFT/MAST. . . . . . . . . . . . . . . . . . . . . . . . . . . . . . . . . . . . . . . . . . . . . . . . . . . . . . . . . . . . . . . 3-5 Personalities. . . . . . . . . . . . . . . . . . . . . . . . . . . . . . . . . . . . . . . . . . . . . . . . . . . . . . . . . . . . . . . 3-6 Interlocks . . . . . . . . . . . . . . . . . . . . . . . . . . . . . . . . . . . . . . . . . . . . . . . . . . . . . . . . . . . . . . . . . 3-6 3.7 STEER . . . . . . . . . . . . . . . . . . . . . . . . . . . . . . . . . . . . . . . . . . . . . . . . . . . . . . . . . . . . . . . . . . . . . . . 3-6 Personalities. . . . . . . . . . . . . . . . . . . . . . . . . . . . . . . . . . . . . . . . . . . . . . . . . . . . . . . . . . . . . . . 3-6 Interlocks . . . . . . . . . . . . . . . . . . . . . . . . . . . . . . . . . . . . . . . . . . . . . . . . . . . . . . . . . . . . . . . . . 3-6 SECTION 4 - BASE COMPONENTS 4.1 BASE ASSEMBLY COMPONENTS . . . . . . . . . . . . . . . . . . . . . . . . . . . . . . . . . . . . . . . . . . . . . . . . . 4-1 4.2 BASE FRAME COVERS . . . . . . . . . . . . . . . . . . . . . . . . . . . . . . . . . . . . . . . . . . . . . . . . . . . . . . . . . . 4-2 Base Top Cover - Installation . . . . . . . . . . . . . . . . . . . . . . . . . . . . . . . . . . . . . . . . . . . . . . . . . 4-2 Step Plate/Battery Charger Cover - Installation . . . . . . . . . . . . . . . . . . . . . . . . . . . . . . . . . . . 4-2 Battery Tray/Side Door - Installation . . . . . . . . . . . . . . . . . . . . . . . . . . . . . . . . . . . . . . . . . . . . 4-2 4.3 WHEELS AND TIRES - DRIVE AND REAR. . . . . . . . . . . . . . . . . . . . . . . . . . . . . . . . . . . . . . . . . . . . 4-3 Tire Wear and Damage . . . . . . . . . . . . . . . . . . . . . . . . . . . . . . . . . . . . . . . . . . . . . . . . . . . . . . 4-3 Wheel and Tire Replacement . . . . . . . . . . . . . . . . . . . . . . . . . . . . . . . . . . . . . . . . . . . . . . . . . 4-3 Wheel Installation. . . . . . . . . . . . . . . . . . . . . . . . . . . . . . . . . . . . . . . . . . . . . . . . . . . . . . . . . . . 4-3 4.4 REAR WHEEL HUB - INSTALLATION . . . . . . . . . . . . . . . . . . . . . . . . . . . . . . . . . . . . . . . . . . . . . . . 4-4 4.5 STEERING LINKAGE ASSEMBLY - INSTALLATION . . . . . . . . . . . . . . . . . . . . . . . . . . . . . . . . . . . . 4-5 4.6 STEER CYLINDER - SERVICING . . . . . . . . . . . . . . . . . . . . . . . . . . . . . . . . . . . . . . . . . . . . . . . . . . . 4-6 Steer Cylinder Disassembly . . . . . . . . . . . . . . . . . . . . . . . . . . . . . . . . . . . . . . . . . . . . . . . . . . 4-7 Hydraulic Cylinder Component Inspection . . . . . . . . . . . . . . . . . . . . . . . . . . . . . . . . . . . . . . . 4-8 Steer Cylinder - Assembly . . . . . . . . . . . . . . . . . . . . . . . . . . . . . . . . . . . . . . . . . . . . . . . . . . . . 4-8 4.7 DRIVE MOTOR/SPINDLE ASSEMBLY - INSTALLATION . . . . . . . . . . . . . . . . . . . . . . . . . . . . . . . . 4-10 4.8 WHEEL DRIVE ASSEMBLY - SERVICING . . . . . . . . . . . . . . . . . . . . . . . . . . . . . . . . . . . . . . . . . . . 4-11 Drive Motor Electrical Evaluation. . . . . . . . . . . . . . . . . . . . . . . . . . . . . . . . . . . . . . . . . . . . . . 4-11 Roll And Leak Testing . . . . . . . . . . . . . . . . . . . . . . . . . . . . . . . . . . . . . . . . . . . . . . . . . . . . . . 4-12 Oil Type & Capacity . . . . . . . . . . . . . . . . . . . . . . . . . . . . . . . . . . . . . . . . . . . . . . . . . . . . . . . . 4-12 Drive Motor Power Harness Routing . . . . . . . . . . . . . . . . . . . . . . . . . . . . . . . . . . . . . . . . . . . 4-12 Wheel Drive Brake - Manual Disengage Procedure . . . . . . . . . . . . . . . . . . . . . . . . . . . . . . . 4-13 Wheel Drive Motor Assembly - Removal From Machine. . . . . . . . . . . . . . . . . . . . . . . . . . . . 4-14 Drive Motor Disassembly. . . . . . . . . . . . . . . . . . . . . . . . . . . . . . . . . . . . . . . . . . . . . . . . . . . . 4-15 Drive Motor Inspection and Servicing . . . . . . . . . . . . . . . . . . . . . . . . . . . . . . . . . . . . . . . . . . 4-16 Drive Motor - Reassembly . . . . . . . . . . . . . . . . . . . . . . . . . . . . . . . . . . . . . . . . . . . . . . . . . . . 4-17 Main Gear Box Disassembly . . . . . . . . . . . . . . . . . . . . . . . . . . . . . . . . . . . . . . . . . . . . . . . . . 4-18 Input Carrier Disassembly . . . . . . . . . . . . . . . . . . . . . . . . . . . . . . . . . . . . . . . . . . . . . . . . . . . 4-19 Hub - Disassembly. . . . . . . . . . . . . . . . . . . . . . . . . . . . . . . . . . . . . . . . . . . . . . . . . . . . . . . . . 4-20 ii – JLG Lift – 3121222 TABLE OF CONTENTS Spindle Disassembly . . . . . . . . . . . . . . . . . . . . . . . . . . . . . . . . . . . . . . . . . . . . . . . . . . . . . . . 4-21 Spindle Sub-Assembly . . . . . . . . . . . . . . . . . . . . . . . . . . . . . . . . . . . . . . . . . . . . . . . . . . . . . 4-22 Hub Sub-Assembly . . . . . . . . . . . . . . . . . . . . . . . . . . . . . . . . . . . . . . . . . . . . . . . . . . . . . . . . 4-24 Input Carrier Sub-Assembly . . . . . . . . . . . . . . . . . . . . . . . . . . . . . . . . . . . . . . . . . . . . . . . . . 4-25 Main Gear Box Sub-Assembly. . . . . . . . . . . . . . . . . . . . . . . . . . . . . . . . . . . . . . . . . . . . . . . . 4-26 Motor Assembly . . . . . . . . . . . . . . . . . . . . . . . . . . . . . . . . . . . . . . . . . . . . . . . . . . . . . . . . . . . 4-28 4.9 HYDRAULIC PUMP/MOTOR/VALVE ASSEMBLY - SERVICE PROCEDURE . . . . . . . . . . . . . . . . 4-29 Common Difficulties. . . . . . . . . . . . . . . . . . . . . . . . . . . . . . . . . . . . . . . . . . . . . . . . . . . . . . . . 4-29 Pump Components . . . . . . . . . . . . . . . . . . . . . . . . . . . . . . . . . . . . . . . . . . . . . . . . . . . . . . . . 4-32 Hydraulic System Pressure Check Port . . . . . . . . . . . . . . . . . . . . . . . . . . . . . . . . . . . . . . . . 4-32 Hydraulic System Pressure Settings . . . . . . . . . . . . . . . . . . . . . . . . . . . . . . . . . . . . . . . . . . . 4-33 Pump/Motor/Valve Assembly - Removal/Installation . . . . . . . . . . . . . . . . . . . . . . . . . . . . . . 4-34 Motor Cover/Motor Installation . . . . . . . . . . . . . . . . . . . . . . . . . . . . . . . . . . . . . . . . . . . . . . . 4-36 Preventative Maintenance - Brush Wear - Dust Removal Procedure . . . . . . . . . . . . . . . . . . 4-36 Motor Brush Installation. . . . . . . . . . . . . . . . . . . . . . . . . . . . . . . . . . . . . . . . . . . . . . . . . . . . . 4-36 4.10 POT HOLE PROTECTION SYSTEM . . . . . . . . . . . . . . . . . . . . . . . . . . . . . . . . . . . . . . . . . . . . . . . 4-37 SECTION 5 - CONTROL COMPONENTS 5.1 CONTROL COMPONENTS OVERVIEW . . . . . . . . . . . . . . . . . . . . . . . . . . . . . . . . . . . . . . . . . . . . . 5-1 5.2 CONTROL COMPONENTS - SERVICE . . . . . . . . . . . . . . . . . . . . . . . . . . . . . . . . . . . . . . . . . . . . . . 5-2 Main Power Contactor Relay . . . . . . . . . . . . . . . . . . . . . . . . . . . . . . . . . . . . . . . . . . . . . . . . . . 5-2 Elevation Limit Switch . . . . . . . . . . . . . . . . . . . . . . . . . . . . . . . . . . . . . . . . . . . . . . . . . . . . . . . 5-2 Ground Alarm . . . . . . . . . . . . . . . . . . . . . . . . . . . . . . . . . . . . . . . . . . . . . . . . . . . . . . . . . . . . . 5-2 Warning Beacon - Frame Mounted . . . . . . . . . . . . . . . . . . . . . . . . . . . . . . . . . . . . . . . . . . . . . 5-2 Manual Brake Release Switch . . . . . . . . . . . . . . . . . . . . . . . . . . . . . . . . . . . . . . . . . . . . . . . . . 5-3 AC Power - Breaker Box Installation (CE Specification Machines ONLY) . . . . . . . . . . . . . . . 5-3 5.3 TRACTION SYSTEM. . . . . . . . . . . . . . . . . . . . . . . . . . . . . . . . . . . . . . . . . . . . . . . . . . . . . . . . . . . . . 5-4 Common Traction System Difficulties . . . . . . . . . . . . . . . . . . . . . . . . . . . . . . . . . . . . . . . . . . . 5-4 5.4 POWER MODULE - P/N-1600346 . . . . . . . . . . . . . . . . . . . . . . . . . . . . . . . . . . . . . . . . . . . . . . . . . . 5-7 Removal . . . . . . . . . . . . . . . . . . . . . . . . . . . . . . . . . . . . . . . . . . . . . . . . . . . . . . . . . . . . . . . . . . 5-7 Installation . . . . . . . . . . . . . . . . . . . . . . . . . . . . . . . . . . . . . . . . . . . . . . . . . . . . . . . . . . . . . . . . 5-7 Power Module Electrical Evaluation . . . . . . . . . . . . . . . . . . . . . . . . . . . . . . . . . . . . . . . . . . . . 5-8 Power Module Diagnostics . . . . . . . . . . . . . . . . . . . . . . . . . . . . . . . . . . . . . . . . . . . . . . . . . . . 5-9 5.5 POWER MODULE - P/N-1001092456 . . . . . . . . . . . . . . . . . . . . . . . . . . . . . . . . . . . . . . . . . . . . . . 5-11 ZAPI Power Module Electrical Evaluation . . . . . . . . . . . . . . . . . . . . . . . . . . . . . . . . . . . . . . . 5-12 5.6 GROUND CONTROL MODULE - SERVICE PROCEDURE . . . . . . . . . . . . . . . . . . . . . . . . . . . . . . 5-13 Ground Control Station . . . . . . . . . . . . . . . . . . . . . . . . . . . . . . . . . . . . . . . . . . . . . . . . . . . . . 5-13 Printed Circuit Board (PCB) Replacement . . . . . . . . . . . . . . . . . . . . . . . . . . . . . . . . . . . . . . 5-13 5.7 PLATFORM CONTROL STATION - SERVICE INFORMATION . . . . . . . . . . . . . . . . . . . . . . . . . . . 5-16 Platform Control Station Assembly . . . . . . . . . . . . . . . . . . . . . . . . . . . . . . . . . . . . . . . . . . . . 5-16 Upper Control Box - Component Replacement . . . . . . . . . . . . . . . . . . . . . . . . . . . . . . . . . . 5-16 Lower Control Box - Component Replacement . . . . . . . . . . . . . . . . . . . . . . . . . . . . . . . . . . 5-18 5.8 BATTERY/BATTERY CHARGER. . . . . . . . . . . . . . . . . . . . . . . . . . . . . . . . . . . . . . . . . . . . . . . . . . . 5-19 Battery Maintenance and Safety Practices . . . . . . . . . . . . . . . . . . . . . . . . . . . . . . . . . . . . . . 5-19 Battery Installation . . . . . . . . . . . . . . . . . . . . . . . . . . . . . . . . . . . . . . . . . . . . . . . . . . . . . . . . . 5-20 5.9 BATTERY CHARGER - INSTALLATION . . . . . . . . . . . . . . . . . . . . . . . . . . . . . . . . . . . . . . . . . . . . . 5-20 Battery Charger Troubleshooting . . . . . . . . . . . . . . . . . . . . . . . . . . . . . . . . . . . . . . . . . . . . . 5-21 5.10 BATTERY CHARGER/INVERTER (OPTION) - INSTALLATION . . . . . . . . . . . . . . . . . . . . . . . . . . . 5-24 SECTION 6 - MAST COMPONENTS 6.1 MAST COMPONENTS OVERVIEW . . . . . . . . . . . . . . . . . . . . . . . . . . . . . . . . . . . . . . . . . . . . . . . . . 6-1 6.2 PLATFORM TOOL TRAY - INSTALLATION . . . . . . . . . . . . . . . . . . . . . . . . . . . . . . . . . . . . . . . . . . . 6-2 6.3 MAST COVER PLATE - INSTALLATION. . . . . . . . . . . . . . . . . . . . . . . . . . . . . . . . . . . . . . . . . . . . . . 6-2 3121222 – JLG Lift – iii TABLE OF CONTENTS 6.4 PLATFORM AC RECEPTACLE BOX - INSTALLATION . . . . . . . . . . . . . . . . . . . . . . . . . . . . . . . . . . 6-2 6.5 MAST ASSEMBLY - COMPONENTS . . . . . . . . . . . . . . . . . . . . . . . . . . . . . . . . . . . . . . . . . . . . . . . . 6-3 6.6 PLATFORM ASSEMBLY . . . . . . . . . . . . . . . . . . . . . . . . . . . . . . . . . . . . . . . . . . . . . . . . . . . . . . . . . . 6-4 Platform - Extending Mast Unpowered . . . . . . . . . . . . . . . . . . . . . . . . . . . . . . . . . . . . . . . . . . 6-4 Platform Removal. . . . . . . . . . . . . . . . . . . . . . . . . . . . . . . . . . . . . . . . . . . . . . . . . . . . . . . . . . . 6-4 Platform Installation . . . . . . . . . . . . . . . . . . . . . . . . . . . . . . . . . . . . . . . . . . . . . . . . . . . . . . . . . 6-5 6.7 MAST ASSEMBLY . . . . . . . . . . . . . . . . . . . . . . . . . . . . . . . . . . . . . . . . . . . . . . . . . . . . . . . . . . . . . . 6-6 Mast Removal . . . . . . . . . . . . . . . . . . . . . . . . . . . . . . . . . . . . . . . . . . . . . . . . . . . . . . . . . . . . . 6-7 Mast Disassembly . . . . . . . . . . . . . . . . . . . . . . . . . . . . . . . . . . . . . . . . . . . . . . . . . . . . . . . . . . 6-8 Mast - Reassembly . . . . . . . . . . . . . . . . . . . . . . . . . . . . . . . . . . . . . . . . . . . . . . . . . . . . . . . . . 6-9 Mast Installation . . . . . . . . . . . . . . . . . . . . . . . . . . . . . . . . . . . . . . . . . . . . . . . . . . . . . . . . . . . 6-10 Multi-Stage Hydraulic Cylinder - Cylinder Bleeding Procedure . . . . . . . . . . . . . . . . . . . . . . 6-11 Mast Installation Completion . . . . . . . . . . . . . . . . . . . . . . . . . . . . . . . . . . . . . . . . . . . . . . . . . 6-11 6.8 MULTI-STAGE HYDRAULIC CYLINDER - SERVICING . . . . . . . . . . . . . . . . . . . . . . . . . . . . . . . . . 6-12 Overview . . . . . . . . . . . . . . . . . . . . . . . . . . . . . . . . . . . . . . . . . . . . . . . . . . . . . . . . . . . . . . . . 6-12 Hydaulic Cylinder - Disassembly. . . . . . . . . . . . . . . . . . . . . . . . . . . . . . . . . . . . . . . . . . . . . . 6-14 Hydraulic Cylinder Component Inspection . . . . . . . . . . . . . . . . . . . . . . . . . . . . . . . . . . . . . . 6-16 Hydraulic Cylinder - Assembly . . . . . . . . . . . . . . . . . . . . . . . . . . . . . . . . . . . . . . . . . . . . . . . 6-16 Hydraulic Cylinder Assembly Testing . . . . . . . . . . . . . . . . . . . . . . . . . . . . . . . . . . . . . . . . . . 6-17 SECTION 7 - JLG CONTROL SYSTEM 7.1 ELECTRONIC CONTROL SYSTEM . . . . . . . . . . . . . . . . . . . . . . . . . . . . . . . . . . . . . . . . . . . . . . . . . 7-1 To Connect the Hand Held Analyzer: . . . . . . . . . . . . . . . . . . . . . . . . . . . . . . . . . . . . . . . . . . . 7-1 Using the Analyzer: . . . . . . . . . . . . . . . . . . . . . . . . . . . . . . . . . . . . . . . . . . . . . . . . . . . . . . . . . 7-1 Changing the Access Level of the Hand Held Analyzer: . . . . . . . . . . . . . . . . . . . . . . . . . . . . 7-2 Machine Setup. . . . . . . . . . . . . . . . . . . . . . . . . . . . . . . . . . . . . . . . . . . . . . . . . . . . . . . . . . . . . 7-3 Diagnostic Trouble Codes (DTC) . . . . . . . . . . . . . . . . . . . . . . . . . . . . . . . . . . . . . . . . . . . . . . 7-3 7.2 MACHINE CONFIGURATION PROGRAMMING INFORMATION . . . . . . . . . . . . . . . . . . . . . . . . . . 7-9 7.3 MACHINE PERSONALITY - ADJUSTMENT SETTINGS. . . . . . . . . . . . . . . . . . . . . . . . . . . . . . . . . 7-11 7.4 TILT SENSOR CALIBRATION . . . . . . . . . . . . . . . . . . . . . . . . . . . . . . . . . . . . . . . . . . . . . . . . . . . . 7-12 Ground Module Software Version 1.5 . . . . . . . . . . . . . . . . . . . . . . . . . . . . . . . . . . . . . . . . . . 7-12 Ground Module Software Version 1.4 . . . . . . . . . . . . . . . . . . . . . . . . . . . . . . . . . . . . . . . . . . 7-12 Calibration Failures . . . . . . . . . . . . . . . . . . . . . . . . . . . . . . . . . . . . . . . . . . . . . . . . . . . . . . . . 7-12 7.5 TILT SENSOR ELECTRICAL EVALUATION . . . . . . . . . . . . . . . . . . . . . . . . . . . . . . . . . . . . . . . . . . 7-13 7.6 ELEVATION ANGLE SENSOR ELECTRICAL EVALUATION . . . . . . . . . . . . . . . . . . . . . . . . . . . . . 7-13 Tilt vs. Allowed Height Evaluation . . . . . . . . . . . . . . . . . . . . . . . . . . . . . . . . . . . . . . . . . . . . . 7-13 7.7 ELEVATION SENSOR CALIBRATION . . . . . . . . . . . . . . . . . . . . . . . . . . . . . . . . . . . . . . . . . . . . . . 7-13 SECTION 8 - DIAGNOSTIC TROUBLE CODES 8.1 INTRODUCTION. . . . . . . . . . . . . . . . . . . . . . . . . . . . . . . . . . . . . . . . . . . . . . . . . . . . . . . . . . . . . . . . 8-1 8.2 X-CONNECTOR REFERENCES. . . . . . . . . . . . . . . . . . . . . . . . . . . . . . . . . . . . . . . . . . . . . . . . . . . . 8-1 8.3 DTC INDEX . . . . . . . . . . . . . . . . . . . . . . . . . . . . . . . . . . . . . . . . . . . . . . . . . . . . . . . . . . . . . . . . . . . . 8-1 8.4 DTC CHECK TABLES. . . . . . . . . . . . . . . . . . . . . . . . . . . . . . . . . . . . . . . . . . . . . . . . . . . . . . . . . . . . 8-5 0-0 Help Comments. . . . . . . . . . . . . . . . . . . . . . . . . . . . . . . . . . . . . . . . . . . . . . . . . . . . . . . . . 8-5 2-1 Power-Up . . . . . . . . . . . . . . . . . . . . . . . . . . . . . . . . . . . . . . . . . . . . . . . . . . . . . . . . . . . . . . 8-6 2-2 Platform Controls. . . . . . . . . . . . . . . . . . . . . . . . . . . . . . . . . . . . . . . . . . . . . . . . . . . . . . . . 8-6 2-3 Ground Controls . . . . . . . . . . . . . . . . . . . . . . . . . . . . . . . . . . . . . . . . . . . . . . . . . . . . . . . . 8-8 2-5 Function Prevented . . . . . . . . . . . . . . . . . . . . . . . . . . . . . . . . . . . . . . . . . . . . . . . . . . . . . . 8-8 3-1 Line Contactor Open Circuit . . . . . . . . . . . . . . . . . . . . . . . . . . . . . . . . . . . . . . . . . . . . . . 8-10 3-2 Line Contactor Short Circuit . . . . . . . . . . . . . . . . . . . . . . . . . . . . . . . . . . . . . . . . . . . . . . 8-10 3-3 Ground Output Driver . . . . . . . . . . . . . . . . . . . . . . . . . . . . . . . . . . . . . . . . . . . . . . . . . . . 8-11 4-2 Thermal Limit (SOA) . . . . . . . . . . . . . . . . . . . . . . . . . . . . . . . . . . . . . . . . . . . . . . . . . . . . 8-13 4-4 Battery Supply . . . . . . . . . . . . . . . . . . . . . . . . . . . . . . . . . . . . . . . . . . . . . . . . . . . . . . . . . 8-14 iv – JLG Lift – 3121222 TABLE OF CONTENTS 6-6 Communication . . . . . . . . . . . . . . . . . . . . . . . . . . . . . . . . . . . . . . . . . . . . . . . . . . . . . . . . 8-14 6-7 Accessory . . . . . . . . . . . . . . . . . . . . . . . . . . . . . . . . . . . . . . . . . . . . . . . . . . . . . . . . . . . . 8-16 7-7 Electric Motor. . . . . . . . . . . . . . . . . . . . . . . . . . . . . . . . . . . . . . . . . . . . . . . . . . . . . . . . . . 8-16 8-1 Tilt Sensor . . . . . . . . . . . . . . . . . . . . . . . . . . . . . . . . . . . . . . . . . . . . . . . . . . . . . . . . . . . . 8-18 8-2 Platform Load Sense . . . . . . . . . . . . . . . . . . . . . . . . . . . . . . . . . . . . . . . . . . . . . . . . . . . . 8-18 9-9 Hardware . . . . . . . . . . . . . . . . . . . . . . . . . . . . . . . . . . . . . . . . . . . . . . . . . . . . . . . . . . . . . 8-18 SECTION 9 - GENERAL ELECTRICAL INFORMATION & SCHEMATICS 9.1 GENERAL . . . . . . . . . . . . . . . . . . . . . . . . . . . . . . . . . . . . . . . . . . . . . . . . . . . . . . . . . . . . . . . . . . . . . 9-1 9.2 MULTIMETER BASICS . . . . . . . . . . . . . . . . . . . . . . . . . . . . . . . . . . . . . . . . . . . . . . . . . . . . . . . . . . . 9-1 Grounding . . . . . . . . . . . . . . . . . . . . . . . . . . . . . . . . . . . . . . . . . . . . . . . . . . . . . . . . . . . . . . . . 9-1 Backprobing . . . . . . . . . . . . . . . . . . . . . . . . . . . . . . . . . . . . . . . . . . . . . . . . . . . . . . . . . . . . . . 9-1 Min/Max . . . . . . . . . . . . . . . . . . . . . . . . . . . . . . . . . . . . . . . . . . . . . . . . . . . . . . . . . . . . . . . . . . 9-1 Polarity . . . . . . . . . . . . . . . . . . . . . . . . . . . . . . . . . . . . . . . . . . . . . . . . . . . . . . . . . . . . . . . . . . . 9-1 Scale . . . . . . . . . . . . . . . . . . . . . . . . . . . . . . . . . . . . . . . . . . . . . . . . . . . . . . . . . . . . . . . . . . . . 9-1 Continuity Measurement Over Long Distances . . . . . . . . . . . . . . . . . . . . . . . . . . . . . . . . . . . 9-4 Requirements: . . . . . . . . . . . . . . . . . . . . . . . . . . . . . . . . . . . . . . . . . . . . . . . . . . . . . . . . . . . . . 9-4 Procedure . . . . . . . . . . . . . . . . . . . . . . . . . . . . . . . . . . . . . . . . . . . . . . . . . . . . . . . . . . . . . . . . 9-4 9.3 ELECTRICAL SWITCH TESTING . . . . . . . . . . . . . . . . . . . . . . . . . . . . . . . . . . . . . . . . . . . . . . . . . . . 9-5 Basic Check . . . . . . . . . . . . . . . . . . . . . . . . . . . . . . . . . . . . . . . . . . . . . . . . . . . . . . . . . . . . . . . 9-5 Limit Switches . . . . . . . . . . . . . . . . . . . . . . . . . . . . . . . . . . . . . . . . . . . . . . . . . . . . . . . . . . . . . 9-5 Automatic Switches . . . . . . . . . . . . . . . . . . . . . . . . . . . . . . . . . . . . . . . . . . . . . . . . . . . . . . . . . 9-6 Switch Wiring - Low Side, High Side . . . . . . . . . . . . . . . . . . . . . . . . . . . . . . . . . . . . . . . . . . . . 9-6 9.4 APPLYING SILICONE DIELECTRIC COMPOUND TO AMP CONNECTORS . . . . . . . . . . . . . . . . . 9-7 Assembly . . . . . . . . . . . . . . . . . . . . . . . . . . . . . . . . . . . . . . . . . . . . . . . . . . . . . . . . . . . . . . . . . 9-8 Disassembly. . . . . . . . . . . . . . . . . . . . . . . . . . . . . . . . . . . . . . . . . . . . . . . . . . . . . . . . . . . . . . 9-10 Wedge Lock . . . . . . . . . . . . . . . . . . . . . . . . . . . . . . . . . . . . . . . . . . . . . . . . . . . . . . . . . . . . . . 9-10 Service - Voltage Reading . . . . . . . . . . . . . . . . . . . . . . . . . . . . . . . . . . . . . . . . . . . . . . . . . . . 9-10 9.5 WORKING WITH DEUTSCH CONNECTORS . . . . . . . . . . . . . . . . . . . . . . . . . . . . . . . . . . . . . . . . 9-12 DT/DTP Series Assembly. . . . . . . . . . . . . . . . . . . . . . . . . . . . . . . . . . . . . . . . . . . . . . . . . . . . 9-12 DT/DTP Series Disassembly . . . . . . . . . . . . . . . . . . . . . . . . . . . . . . . . . . . . . . . . . . . . . . . . . 9-12 HD30/HDP20 Series Assembly . . . . . . . . . . . . . . . . . . . . . . . . . . . . . . . . . . . . . . . . . . . . . . . 9-12 HD30/HDP20 Series Disassembly. . . . . . . . . . . . . . . . . . . . . . . . . . . . . . . . . . . . . . . . . . . . . 9-13 9.6 X-CONNECTOR REFERENCES. . . . . . . . . . . . . . . . . . . . . . . . . . . . . . . . . . . . . . . . . . . . . . . . . . . 9-13 9.7 CONNECTOR LOADING DIAGRAMS . . . . . . . . . . . . . . . . . . . . . . . . . . . . . . . . . . . . . . . . . . . . . . 9-14 9.8 X-CONNECTOR ID INDEX . . . . . . . . . . . . . . . . . . . . . . . . . . . . . . . . . . . . . . . . . . . . . . . . . . . . . . . 9-17 9.9 MACHINE LOCATION OF COMPONENT X-CONNECTORS . . . . . . . . . . . . . . . . . . . . . . . . . . . . 9-20 9.10 ELECTRICAL LAYOUT AND SCHEMATICS. . . . . . . . . . . . . . . . . . . . . . . . . . . . . . . . . . . . . . . . . . 9-22 9.11 PIN INPUT/OUTPUT TYPES. . . . . . . . . . . . . . . . . . . . . . . . . . . . . . . . . . . . . . . . . . . . . . . . . . . . . . 9-33 9.12 AC POWER RECEPTACLES AND WIRING (PLATFORM) - CE SPEC MACHINES ONLY . . . . . . 9-38 9.12 HYDRAULIC SCHEMATIC . . . . . . . . . . . . . . . . . . . . . . . . . . . . . . . . . . . . . . . . . . . . . . . . . . . . . . . 9-42 3121222 – JLG Lift – v TABLE OF CONTENTS LIST OF FIGURES FIGURE NO. 1-1. 1-2. 1-3. 1-4. 1-5. 1-6. 1-7. 1-8. 2-1. 3-1. 3-2. 3-3. 3-4. 3-5. 3-6. 4-1. 4-2. 4-3. 4-4. 4-5. 4-6. 4-7. 4-8. 4-9. 4-10. 4-11. 4-12. 4-13. 5-1. 5-2. 5-3. 5-4. 5-5. 5-6. 5-45. 5-46. 5-7. 5-8. 6-1. 6-2. 6-3. 6-4. 6-5. 6-6. 6-7. 6-8. 6-10. 6-9. 6-11. 6-12. 6-14. 6-13. 6-15. 6-16. vi TITLE PAGE NO. Hydraulic Oil Check Procedure. . . . . . . . . . . . . . . . . . . . . . . . . . . . . . . . . . . . . . . . . . . . . . . . . . . .1-3 Torque Chart (SAE Fasteners - Sheet 1 of 7) . . . . . . . . . . . . . . . . . . . . . . . . . . . . . . . . . . . . . . . . .1-4 Torque Chart (SAE Fasteners - Sheet 2 of 7)) . . . . . . . . . . . . . . . . . . . . . . . . . . . . . . . . . . . . . . . .1-5 Torque Chart (SAE Fasteners - Sheet 3 of 7) . . . . . . . . . . . . . . . . . . . . . . . . . . . . . . . . . . . . . . . . .1-6 Torque Chart (SAE Fasteners - Sheet 4 of 7) . . . . . . . . . . . . . . . . . . . . . . . . . . . . . . . . . . . . . . . . .1-7 Torque Chart (METRIC Fasteners - Sheet 5 of 7)) . . . . . . . . . . . . . . . . . . . . . . . . . . . . . . . . . . . . .1-8 Torque Chart (METRIC Fasteners - Sheet 6 of 7). . . . . . . . . . . . . . . . . . . . . . . . . . . . . . . . . . . . . .1-9 Torque Chart (METRIC Fasteners - Sheet 7 of 7). . . . . . . . . . . . . . . . . . . . . . . . . . . . . . . . . . . . . .1-10 Platform Mast Support Tool. . . . . . . . . . . . . . . . . . . . . . . . . . . . . . . . . . . . . . . . . . . . . . . . . . . . . . .2-5 Basic Electronic Module Connections . . . . . . . . . . . . . . . . . . . . . . . . . . . . . . . . . . . . . . . . . . . . . .3-2 Drive Motors Schematic - 1600346 (SEVCON) Power Module . . . . . . . . . . . . . . . . . . . . . . . . . . .3-3 Drive Motors Schematic - 1001092456 (ZAPI) Power Module . . . . . . . . . . . . . . . . . . . . . . . . . . . .3-4 LIFT SYSTEM . . . . . . . . . . . . . . . . . . . . . . . . . . . . . . . . . . . . . . . . . . . . . . . . . . . . . . . . . . . . . . . . .3-5 Hydraulic Pump Electrical Schematic - 1600423 (SEVCON) Power Module. . . . . . . . . . . . . . . . .3-6 STEER SYSTEM . . . . . . . . . . . . . . . . . . . . . . . . . . . . . . . . . . . . . . . . . . . . . . . . . . . . . . . . . . . . . . .3-6 Base Assembly Components.. . . . . . . . . . . . . . . . . . . . . . . . . . . . . . . . . . . . . . . . . . . . . . . . . . . . .4-1 Wheel Lug Nut Tightening Sequence . . . . . . . . . . . . . . . . . . . . . . . . . . . . . . . . . . . . . . . . . . . . . . .4-3 Drive Motor Power Harness Routing. . . . . . . . . . . . . . . . . . . . . . . . . . . . . . . . . . . . . . . . . . . . . . . .4-12 Brake Manual Disengage Procedure . . . . . . . . . . . . . . . . . . . . . . . . . . . . . . . . . . . . . . . . . . . . . . .4-13 Drive Motor Disassembly . . . . . . . . . . . . . . . . . . . . . . . . . . . . . . . . . . . . . . . . . . . . . . . . . . . . . . . .4-15 Drive Motor Side View . . . . . . . . . . . . . . . . . . . . . . . . . . . . . . . . . . . . . . . . . . . . . . . . . . . . . . . . . . .4-16 Drive Motor End View (Brake End) . . . . . . . . . . . . . . . . . . . . . . . . . . . . . . . . . . . . . . . . . . . . . . . . .4-16 Motor Terminal Assembly . . . . . . . . . . . . . . . . . . . . . . . . . . . . . . . . . . . . . . . . . . . . . . . . . . . . . . . .4-17 Bearing Replacement Procedure . . . . . . . . . . . . . . . . . . . . . . . . . . . . . . . . . . . . . . . . . . . . . . . . . .4-17 Main Electrical Power Connections - (1600346 - SEVCON Power Module) . . . . . . . . . . . . . . . . .4-30 Main Electrical Power Connections - (1001092456 - ZAPI Power Module) . . . . . . . . . . . . . . . . . .4-31 Hydraulic Pump - Hydraulic Line and Electrical Connections . . . . . . . . . . . . . . . . . . . . . . . . . . . .4-32 Relief Pressure Setting Locations . . . . . . . . . . . . . . . . . . . . . . . . . . . . . . . . . . . . . . . . . . . . . . . . . .4-33 Main Electrical Power Connections - (1600346 - SEVCON Power Module) . . . . . . . . . . . . . . . . .5-5 Main Electrical Power Connections - (1001092456 - ZAPI Power Module) . . . . . . . . . . . . . . . . . .5-6 Power Module - Installation. . . . . . . . . . . . . . . . . . . . . . . . . . . . . . . . . . . . . . . . . . . . . . . . . . . . . . .5-7 Sevcon Power Module Terminals . . . . . . . . . . . . . . . . . . . . . . . . . . . . . . . . . . . . . . . . . . . . . . . . . .5-8 ZAPI Power Module Location . . . . . . . . . . . . . . . . . . . . . . . . . . . . . . . . . . . . . . . . . . . . . . . . . . . . .5-11 Ground Control Station Assembly . . . . . . . . . . . . . . . . . . . . . . . . . . . . . . . . . . . . . . . . . . . . . . . . .5-14 Tilt Sensor Location. . . . . . . . . . . . . . . . . . . . . . . . . . . . . . . . . . . . . . . . . . . . . . . . . . . . . . . . . . . . .5-15 Tilt Sensor Removal . . . . . . . . . . . . . . . . . . . . . . . . . . . . . . . . . . . . . . . . . . . . . . . . . . . . . . . . . . . .5-15 Platform Control Station Assembly . . . . . . . . . . . . . . . . . . . . . . . . . . . . . . . . . . . . . . . . . . . . . . . . .5-16 Battery Fluid Level. . . . . . . . . . . . . . . . . . . . . . . . . . . . . . . . . . . . . . . . . . . . . . . . . . . . . . . . . . . . . .5-19 Mast Components. . . . . . . . . . . . . . . . . . . . . . . . . . . . . . . . . . . . . . . . . . . . . . . . . . . . . . . . . . . . . .6-1 Mast Assembly - Components . . . . . . . . . . . . . . . . . . . . . . . . . . . . . . . . . . . . . . . . . . . . . . . . . . . .6-3 Mast Assembly - Orientation (Top View) . . . . . . . . . . . . . . . . . . . . . . . . . . . . . . . . . . . . . . . . . . . .6-3 Extending Mast Unpowered . . . . . . . . . . . . . . . . . . . . . . . . . . . . . . . . . . . . . . . . . . . . . . . . . . . . . .6-4 Platform to Mast - Installation . . . . . . . . . . . . . . . . . . . . . . . . . . . . . . . . . . . . . . . . . . . . . . . . . . . . .6-5 Mast - Installation . . . . . . . . . . . . . . . . . . . . . . . . . . . . . . . . . . . . . . . . . . . . . . . . . . . . . . . . . . . . . .6-6 Mast Base Mounting Hardware. . . . . . . . . . . . . . . . . . . . . . . . . . . . . . . . . . . . . . . . . . . . . . . . . . . .6-7 Power-Trak - Removal . . . . . . . . . . . . . . . . . . . . . . . . . . . . . . . . . . . . . . . . . . . . . . . . . . . . . . . . . . .6-7 Hydraulic Cylinder Bottom End Bolts - Removal . . . . . . . . . . . . . . . . . . . . . . . . . . . . . . . . . . . . . .6-8 Hydraulic Cylinder Connections - Removal . . . . . . . . . . . . . . . . . . . . . . . . . . . . . . . . . . . . . . . . . .6-8 Hydraulic Cylinder Top End Bolts - Removal . . . . . . . . . . . . . . . . . . . . . . . . . . . . . . . . . . . . . . . . .6-8 Hydraulic Cylinder - Removal . . . . . . . . . . . . . . . . . . . . . . . . . . . . . . . . . . . . . . . . . . . . . . . . . . . . .6-8 Mast Sections - Disassembly . . . . . . . . . . . . . . . . . . . . . . . . . . . . . . . . . . . . . . . . . . . . . . . . . . . . .6-9 Power-Trak - Removal . . . . . . . . . . . . . . . . . . . . . . . . . . . . . . . . . . . . . . . . . . . . . . . . . . . . . . . . . . .6-9 1230ES Lift Cylinder Internal Components - Top End . . . . . . . . . . . . . . . . . . . . . . . . . . . . . . . . . .6-12 1230ES Lift Cylinder Internal Components - Lower End . . . . . . . . . . . . . . . . . . . . . . . . . . . . . . . .6-13 – JLG Lift – 3121222 TABLE OF CONTENTS 6-17. 6-18. 6-19. 6-20. 6-21. 7-1. 7-2. 7-3. 7-4. 7-5. 9-1. 9-2. 9-3. 9-4. 9-5. 9-6. 9-7. 9-8. 9-9. 9-10. 9-11. 9-12. 9-13. 9-14. 9-15. 9-16. 9-17. 9-18. 9-19. 9-20. 9-21. 3121222 Valve Block - Removal. . . . . . . . . . . . . . . . . . . . . . . . . . . . . . . . . . . . . . . . . . . . . . . . . . . . . . . . . . .6-14 Cylinder #2 and #3 Assembly - Removal . . . . . . . . . . . . . . . . . . . . . . . . . . . . . . . . . . . . . . . . . . .6-14 Cylinder Rod/Gland - Removal . . . . . . . . . . . . . . . . . . . . . . . . . . . . . . . . . . . . . . . . . . . . . . . . . . . .6-15 Cylinder Rod Piston - Removal . . . . . . . . . . . . . . . . . . . . . . . . . . . . . . . . . . . . . . . . . . . . . . . . . . . .6-15 Cyl. #2/3 to Cylinder Joint Assembly . . . . . . . . . . . . . . . . . . . . . . . . . . . . . . . . . . . . . . . . . . . . . . .6-17 Analyzer Menu Flow Chart - Sevcon vP1.14 - Sheet 1 of 2 - (4170032 -15) . . . . . . . . . . . . . . . . .7-4 Analyzer Menu Flow Chart - Sevcon vP1.14 - Sheet 2 - (4170032 - 15) . . . . . . . . . . . . . . . . . . . .7-5 Analyzer Menu Flow Chart - Sheet 1 of 3 - (1001096495) (Machines Equipped with ZAPI - 1001092456 Power Module Only) . . . . . . . . . . . . . . . . . . . . . . .7-6 Analyzer Menu Flow Chart - Sheet 2 of 3 - (1001096495) (Machines Equipped with ZAPI - 1001092456 Power Module Only) . . . . . . . . . . . . . . . . . . . . . . .7-7 Analyzer Menu Flow Chart - Sheet 3 of 3 - (1001096495) (Machines Equipped with ZAPI - 1001092456 Power Module Only) . . . . . . . . . . . . . . . . . . . . . . .7-8 Voltage Measurement (DC). . . . . . . . . . . . . . . . . . . . . . . . . . . . . . . . . . . . . . . . . . . . . . . . . . . . . . .9-2 Resistance Measurement . . . . . . . . . . . . . . . . . . . . . . . . . . . . . . . . . . . . . . . . . . . . . . . . . . . . . . . .9-2 Continuity Measurement . . . . . . . . . . . . . . . . . . . . . . . . . . . . . . . . . . . . . . . . . . . . . . . . . . . . . . . . .9-3 Current Measurement (DC). . . . . . . . . . . . . . . . . . . . . . . . . . . . . . . . . . . . . . . . . . . . . . . . . . . . . . .9-3 Connector Installation . . . . . . . . . . . . . . . . . . . . . . . . . . . . . . . . . . . . . . . . . . . . . . . . . . . . . . . . . . .9-11 DT/DTP Contact Installation . . . . . . . . . . . . . . . . . . . . . . . . . . . . . . . . . . . . . . . . . . . . . . . . . . . . . .9-12 DT/DTP Contact Removal . . . . . . . . . . . . . . . . . . . . . . . . . . . . . . . . . . . . . . . . . . . . . . . . . . . . . . . .9-12 HD/HDP Contact Installation . . . . . . . . . . . . . . . . . . . . . . . . . . . . . . . . . . . . . . . . . . . . . . . . . . . . . .9-12 HD/HDP Locking Contacts Into Position . . . . . . . . . . . . . . . . . . . . . . . . . . . . . . . . . . . . . . . . . . . .9-13 HD/HDP Contact Removal . . . . . . . . . . . . . . . . . . . . . . . . . . . . . . . . . . . . . . . . . . . . . . . . . . . . . . .9-13 HD/HDP Unlocking Contacts . . . . . . . . . . . . . . . . . . . . . . . . . . . . . . . . . . . . . . . . . . . . . . . . . . . . .9-13 1230ES - Location of Component X-Connectors on Machine. . . . . . . . . . . . . . . . . . . . . . . . . . . .9-20 1230ES -Location of Component X-Connectors on Ground Control Module.. . . . . . . . . . . . . . . .9-21 1230ES - Overview of Electrical System Components. (1600346 Drive Module) . . . . . . . . . . . . .9-22 1230ES - Overview of Electrical System Components. (1001092456 Drive Module) . . . . . . . . . .9-24 Electrical Schematic. (Machines with 1600346 Drive Module). . . . . . . . . . . . . . . . . . . . . . . . . . .9-26 Electrical Schematic. (Machines with 1001092546 Drive Module). . . . . . . . . . . . . . . . . . . . . . . .9-28 Electrical Schematic. (Machines with 1001092546 Drive Module). . . . . . . . . . . . . . . . . . . . . . . .9-30 Electrical Schematic (Ground Control Module) - (Machines with 1001092546 Drive Module) . . .9-32 Battery Charger/Inverter Electrical Connection Schematic . . . . . . . . . . . . . . . . . . . . . . . . . . . . . .9-37 Hydraulic Diagram. (2792703_B) . . . . . . . . . . . . . . . . . . . . . . . . . . . . . . . . . . . . . . . . . . . . . . . . . .9-42 – JLG Lift – vii TABLE OF CONTENTS LIST OF TABLES TABLE NO. 1-1 1-2 1-3 1-4 1-5 1-6 1-7 1-8 1-9 1-10 1-11 2-1 2-2 4-1 4-2 4-3 5-1 5-2 5-3 5-4 5-5 7-1 7-2 7-3 7-4 7-5 9-1 9-2 9-3 9-4 9-5 9-6 9-7 9-8 9-9 9-10 9-11 viii TITLE PAGE NO. Operating Specifications . . . . . . . . . . . . . . . . . . . . . . . . . . . . . . . . . . . . . . . . . . . . . . . . . . . . . . . . .1-1 Capacities . . . . . . . . . . . . . . . . . . . . . . . . . . . . . . . . . . . . . . . . . . . . . . . . . . . . . . . . . . . . . . . . . . . .1-2 Dimensions . . . . . . . . . . . . . . . . . . . . . . . . . . . . . . . . . . . . . . . . . . . . . . . . . . . . . . . . . . . . . . . . . . .1-2 Tire Specifications . . . . . . . . . . . . . . . . . . . . . . . . . . . . . . . . . . . . . . . . . . . . . . . . . . . . . . . . . . . . . .1-2 Battery Specifications . . . . . . . . . . . . . . . . . . . . . . . . . . . . . . . . . . . . . . . . . . . . . . . . . . . . . . . . . . .1-2 Critical Stability Weights . . . . . . . . . . . . . . . . . . . . . . . . . . . . . . . . . . . . . . . . . . . . . . . . . . . . . . . . .1-2 Capacities . . . . . . . . . . . . . . . . . . . . . . . . . . . . . . . . . . . . . . . . . . . . . . . . . . . . . . . . . . . . . . . . . . . .1-2 Hydraulic Oil . . . . . . . . . . . . . . . . . . . . . . . . . . . . . . . . . . . . . . . . . . . . . . . . . . . . . . . . . . . . . . . . . .1-2 Lubrication Specifications . . . . . . . . . . . . . . . . . . . . . . . . . . . . . . . . . . . . . . . . . . . . . . . . . . . . . . . .1-3 Hydraulic Oil Specifications . . . . . . . . . . . . . . . . . . . . . . . . . . . . . . . . . . . . . . . . . . . . . . . . . . . . . .1-3 Cylinder Specifications . . . . . . . . . . . . . . . . . . . . . . . . . . . . . . . . . . . . . . . . . . . . . . . . . . . . . . . . . .1-3 Maintenance and Inspection Requirements. . . . . . . . . . . . . . . . . . . . . . . . . . . . . . . . . . . . . . . . . .2-2 Preventive Maintenance & Inspection Schedule. . . . . . . . . . . . . . . . . . . . . . . . . . . . . . . . . . . . . . .2-3 Wheel Torque Chart . . . . . . . . . . . . . . . . . . . . . . . . . . . . . . . . . . . . . . . . . . . . . . . . . . . . . . . . . . . .4-3 Hydraulic System - Pressure Settings . . . . . . . . . . . . . . . . . . . . . . . . . . . . . . . . . . . . . . . . . . . . . .4-33 Hydraulic Pump - Selenoid Specifications . . . . . . . . . . . . . . . . . . . . . . . . . . . . . . . . . . . . . . . . . . .4-33 ZAPI Power Module Specs . . . . . . . . . . . . . . . . . . . . . . . . . . . . . . . . . . . . . . . . . . . . . . . . . . . . . . .5-11 Module Terminal Functions. . . . . . . . . . . . . . . . . . . . . . . . . . . . . . . . . . . . . . . . . . . . . . . . . . . . . . .5-12 Tilt Sensor Harness for 1810140. . . . . . . . . . . . . . . . . . . . . . . . . . . . . . . . . . . . . . . . . . . . . . . . . . .5-15 Tilt Sensor Harness for 1001114936. . . . . . . . . . . . . . . . . . . . . . . . . . . . . . . . . . . . . . . . . . . . . . . .5-15 Battery Algorithms . . . . . . . . . . . . . . . . . . . . . . . . . . . . . . . . . . . . . . . . . . . . . . . . . . . . . . . . . . . . . .5-23 Machine Configuration Programming Information (4150473-F) - Machines Equipped with Sevcon (1600346) Power Module ONLY . . . . . . . . . . . . . . . . . . . . . . . . . . . . . . . . . . . . . . . . . . . .7-9 Machine Configuration Programming Information (1001115626-B) - Machines Equipped with ZAPI - 1001092456 Power Module Only . . . . . . . . . . . . . . . . . . . . . . . . . . . . . . . . . . . . . . . . . . . . .7-10 Machine Personality Adjustment (4150472-H) - Machines Equipped with Sevcon (1600346) Power Module. . . . . . . . . . . . . . . . . . . . . . . . . . . . . . . . . . . . . . . . . . . . . . . . . .7-11 Machine Personality Adjustment (1001115627-B) - Machines Equipped with ZAPI (1001092456) Power Module . . . . . . . . . . . . . . . . . . . . . . . . . . . . . . . . . . . . . . . . . . . . . . . . .7-11 Tilt Cutout Settings . . . . . . . . . . . . . . . . . . . . . . . . . . . . . . . . . . . . . . . . . . . . . . . . . . . . . . . . . . . . .7-13 Connector Loading Diagrams. . . . . . . . . . . . . . . . . . . . . . . . . . . . . . . . . . . . . . . . . . . . . . . . . . . . .9-14 X-Connector ID Index . . . . . . . . . . . . . . . . . . . . . . . . . . . . . . . . . . . . . . . . . . . . . . . . . . . . . . . . . . .9-17 Ground Board J1 - Connector X001 (1600346 Power Module ONLY). . . . . . . . . . . . . . . . . . . . . .9-33 Ground Board J2 - Connector X002 . . . . . . . . . . . . . . . . . . . . . . . . . . . . . . . . . . . . . . . . . . . . . . . .9-33 Ground Board J3 - Connector X003 . . . . . . . . . . . . . . . . . . . . . . . . . . . . . . . . . . . . . . . . . . . . . . . .9-34 Platform Board J1 - Connector X050 . . . . . . . . . . . . . . . . . . . . . . . . . . . . . . . . . . . . . . . . . . . . . . .9-34 Platform Board J3 . . . . . . . . . . . . . . . . . . . . . . . . . . . . . . . . . . . . . . . . . . . . . . . . . . . . . . . . . . . . . .9-34 Platform Board J4 . . . . . . . . . . . . . . . . . . . . . . . . . . . . . . . . . . . . . . . . . . . . . . . . . . . . . . . . . . . . . .9-34 Power Module - Connector X027 (1600346 Power Module) . . . . . . . . . . . . . . . . . . . . . . . . . . . . .9-34 Power Module - J1 (1001092456 Power Module ONLY) . . . . . . . . . . . . . . . . . . . . . . . . . . . . . . . .9-35 Power Module - J2 (1001092456 Power Module ONLY) . . . . . . . . . . . . . . . . . . . . . . . . . . . . . . . .9-36 – JLG Lift – 3121222 SECTION 1 - MACHINE SPECIFICATIONS SECTION 1. MACHINE SPECIFICATIONS Table 1-1. Operating Specifications Description Model 1230ES Platform Maximum Platform Height 12 ft. (3.66 m) Lift Up Time - w/maximum rated load 11 - 17 seconds Lift Down Time - w/maximum rated load 11 - 25 seconds Driving Maximum Drive Speed Stowed: Elevated: Maximum Stowed Travel Grade (Gradeability) 3 mph (4.8 kph) 0.5 mph (0.8 kph) 25% (14°) Maximum Stowed Travel Grade (Sideslope) 5° Inside Turning Radius 4.4 in. (11.2 cm) Outside Turning Radius 57.6 in. (1.46 m) Chassis Approximate Gross Machine Weight - Global 1775 lb. (805 kg) - ANSI/CSA 1740 lb. (790 kg) - CE/AUS/JPN Maximum Tire Load (per wheel) 880 lb (400 kg) Ground Bearing Pressure Ground Clearance: 123 PSI ( 8.7 kg/cm2 ) (pot hole protection system up): (pot hole protection system down): Maximum Operating Wind Speed 28 mph - ANSI/CSA 0 m/s - CE/AUST - Indoor Use Only Maximum Horizontal Manual Side Force: (Platform fully extended with Maximum load) 45 Pound Force (200 Newtons) Maximum Hydraulic System Pressure Setting 1600 psi (110 bar) - Lift 1250 psi (86 bar) - Steer Electrical System Voltage (DC) 3121222 2.6 in (66 mm) 0.5 in (12.2 mm) 24V – JLG Lift – 1-1 SECTION 1 - MACHINE SPECIFICATIONS 1.1 OPERATING SPECIFICATIONS Critical Stability Weights Platform Capacities Table 1-2. Capacities Model DO NOT REPLACE ITEMS CRITICAL TO STABILITY, SUCH AS BATTERIES OR SOLID TIRES, WITH ITEMS OF DIFFERENT WEIGHT OR SPECIFICATION. DO NOT MODIFY UNIT IN ANY WAY TO AFFECT STABILITY. CE/AUST (Indoor Only) ANSI/CSA Max Capacity Max Persons Max Capacity Max Persons 500 lb 2 230 kg 1 1230ES Component Dimensional Data Table 1-3. Dimensions Description Table 1-6. Critical Stability Weights Model 1230ES Wheel and Tire Assembly (each) 15 lb. 7 kg Wheel/Tire and Drive Assembly (each) 93 lb. 42 kg Batteries - Standard (each) 62 lb. 28 kg Batteries - Standard - Combined 248 lb. 112 kg 1.2 LUBRICATION Platform Height - Elevated (Platform base to ground) 12 ft. 3.66m Platform Height - Stowed (Platform base to ground) 22 in. 56cm Working Height 18 ft. 5.48m Component Overall Stowed Machine Height 65.25 in. 166cm Rail Height (From platform floor) 43.8 in. 111.2cm Hydraulic Tank Hydraulic System (Including Tank) 30 in. 76cm Overall Machine Length 53.5 in. 1.36m Platform Size - Length 49.4 in. 1.26m 27 in. 69cm 40.75 in. 103.5cm Overall Machine Width Platform Size - Width Wheelbase Lubrication Capacities Table 1-7. Capacities 1230ES 0.80 Gal. 1.75 Gal. 3L 4.1 L Hydraulic Oil NOTE: Machines built in Europe installed hydraulic oil (Nervofluid 15) which has a BLUE TINT for identification purposes only, but is fully compatible and can be mixed with any of the JLG recommended hydraulic oils mentioned following. Table 1-8. Hydraulic Oil Tires Hydraulic System Operating Temperature Range Table 1-4. Tire Specifications Description 12.72 in. x 3.937 in. ( 323mm x 100mm) Max Tire Load 2500 lb. (1134 kg) Wheel Bolt Torque 120 ft lb (163 Nm) 0? F to +23? F (-18? C to -5? C) 10W 10W-20, 10W-30 50? F to 210? F (+10? C to +210? C) 20W-20 NOTE: Batteries Table 1-5. Battery Specifications Description Model 1230ES Voltage (24V System - Series) 6 V per battery (deep cycle) Amp Hour (Standard Battery) 220 Amp Hour @ 20 HR. Rate Reserve Capacity 447 Minutes SAE Viscosity Grade 0? F to 210? F (-18? C to + 99? C) Model 1230ES Size 1-2 Model 1230 ES – JLG Lift – Hydraulic oils must have anti-wear qualities at least to API Service Classification GL-3, and sufficient chemical stability for mobile hydraulic system service. JLG recommends Mobilfluid DTE 11M hydraulic oil, which has an SAE viscosity index of 140. When temperatures remain below 20° F (-7° C), JLG recommends the use of Mobil DTE13. Aside from JLG recommendations, it is not advisable to mix oils of different brands or types, as they may not contain the same required additives or be of comparable viscosities. If use of hydraulic oil other than Mobilfluid DTE 11M is desired, contact JLG for proper recommendations. 3121222 SECTION 1 - MACHINE SPECIFICATIONS Lubrication Specifications NOTE: Care should be taken not to introduce any impurities (dirt, water etc.) while cap is removed. Table 1-9. Lubrication Specifications Key Specifications MPG Multipurpose Grease having a minimum dripping point of 350° F. Excellent water resistance and adhesive qualities, and being of extreme pressure type. (Timken OK 40 pounds minimum.) EPGL Extreme Pressure Gear Lube (oil) meeting API service classification GL-5 or MIL-Spec MIL-L-2105. HO Hydraulic Oil - Mobil DTE 11M or Nervofluid 15 (Europe) Table 1-10. Hydraulic Oil Specifications Specification Mobil DTE 11M Nervofluid 15 ISO Viscosity Grade #15 #15 Gravity API 31.9 — Pour Point, Max -40° F (-40° C) -40° C (-40° F) Flash Point, Min. 330° F (166° C) 175° C (347° F) at 40° C 15 cSt 14.9 mm2/s at 100° C 4.1 cSt 3.8 mm2/s at 100° F 80 SUS — 1.3 CYLINDER SPECIFICATIONS at 210° F 43 SUS — cp at -30° F 3.200 — 140 153 NOTE: All dimensions are given in inches (in), with the metric equivalent, centimeters (cm), given in parentheses. Figure 1-1. Hydraulic Oil Check Procedure NOTE: Viscosity Specifications Viscosity Index Recommended lubricating intervals are based on machine operations under normal conditions. For machines used in multi-shift operations and/or exposed to hostile environments or conditions, lubrication frequencies must be increased accordingly. Table 1-11. Cylinder Specifications Oil Check Procedure NOTE: Be certain the hydraulic oil has warmed to operating temperature before checking the oil level in the reservoir. 1. From either side of the machine, open the side access door on the base frame (1). Locate the hydraulic oil reservoir (2) on the pump unit (3). Check the oil level in the hydraulic reservoir by looking at the markings on the side of the tank. The reservoir is marked with MIN (minimum) and MAX (maximum) markings (4). The oil level must be within these markings to operate properly. 2. If additional oil is required, wipe all dirt and debris from the filler/breather cap (5) area, add proper grade of oil by using a funnel with a flexible spout or a plastic squeeze bottle. Fill until oil level is between the MIN and MAX markings (4). 3121222 Bore in./(cm) Stroke in./(cm) Rod Dia. in./(cm) Lift Cylinder 1.57 (4) 124 (315) 1.18 (3) Steer Cylinder 1.97 (5) 4.21 (10.7) 0.98 (2.5) Description Lube Point(s) - Hydraulic Reservoir Reservoir Capacity: 0.80 Gal. (3 L) Lube - Hydraulic Oil Interval - Check Daily 1.4 TORQUE REQUIREMENTS When maintenance becomes necessary or a fastener has loosened, refer to the applicable Torque Chart in this section of the manual to determine proper torque values for various size fasteners. 1.5 SERIAL NUMBER LOCATIONS For machine identification, a metal serial number plate is affixed to the machine. The plate is mounted behind the left rear wheel on the side of the base frame. The machine serial number can also be found on a bar code label placed on the platform control station mounting plate in the platform. – JLG Lift – 1-3 SECTION 1 - MACHINE SPECIFICATIONS Values for Zinc Yellow Chromate Fasteners (Ref 4150707) SAE GRADE 5 BOLTS & GRADE 2 NUTS Torque Lubricated Torque (Dry) Tensile Clamp Load Stress Area Torque Torque (Loctite® 242TM or 271TM (Loctite® 262TM or VibraTM OR Vibra-TITE 111 or TITETM 131) 140) Size TPI Bolt Dia In Sq In LB IN-LB [N.m] IN-LB [N.m] IN-LB [N.m] 4 40 48 32 40 32 36 24 32 20 28 0.1120 0.1120 0.1380 0.1380 0.1640 0.1640 0.1900 0.1900 0.2500 0.2500 0.00604 0.00661 0.00909 0.01015 0.01400 0.01474 0.01750 0.02000 0.0318 0.0364 380 420 580 610 900 940 1120 1285 2020 2320 8 9 16 18 30 31 43 49 96 120 0.9 1.0 1.8 2.0 3.4 3.5 4.8 5.5 10.8 13.5 6 7 12 13 22 23 32 36 75 86 0.7 0.8 1.4 1.5 2.5 2.6 3.5 4 9 10 105 135 12 15 18 24 16 24 14 20 13 20 12 18 11 18 10 16 9 14 8 12 7 12 7 12 6 12 6 12 In 0.3125 0.3125 0.3750 0.3750 0.4375 0.4375 0.5000 0.5000 0.5625 0.5625 0.6250 0.6250 0.7500 0.7500 0.8750 0.8750 1.0000 1.0000 1.1250 1.1250 1.2500 1.2500 1.3750 1.3750 1.5000 1.5000 Sq In 0.0524 0.0580 0.0775 0.0878 0.1063 0.1187 0.1419 0.1599 0.1820 0.2030 0.2260 0.2560 0.3340 0.3730 0.4620 0.5090 0.6060 0.6630 0.7630 0.8560 0.9690 1.0730 1.1550 1.3150 1.4050 1.5800 LB 3340 3700 4940 5600 6800 7550 9050 10700 11600 12950 14400 16300 21300 23800 29400 32400 38600 42200 42300 47500 53800 59600 64100 73000 78000 87700 FT-LB 17 19 30 35 50 55 75 90 110 120 150 170 260 300 430 470 640 700 800 880 1120 1240 1460 1680 1940 2200 [N.m] 23 26 41 47 68 75 102 122 149 163 203 230 353 407 583 637 868 949 1085 1193 1518 1681 1979 2278 2630 2983 FT-LB 13 14 23 25 35 40 55 65 80 90 110 130 200 220 320 350 480 530 600 660 840 920 1100 1260 1460 1640 [N.m] 18 19 31 34 47 54 75 88 108 122 149 176 271 298 434 475 651 719 813 895 1139 1247 1491 1708 1979 2224 FT-LB 19 21 35 40 55 60 85 100 120 135 165 190 285 330 475 520 675 735 840 925 1175 1300 1525 1750 2025 2300 [N.m] 26 29 48 54 75 82 116 136 163 184 224 258 388 449 646 707 918 1000 1142 1258 1598 1768 2074 2380 2754 3128 6 8 10 1/4 5/16 3/8 7/16 1/2 9/16 5/8 3/4 7/8 1 1 1/8 1 1/4 1 3/8 1 1/2 NOTES: 1. THESE TORQUE VALUES DO NOT APPLY TO CADMIUM PLATED FASTENERS 2. ALL TORQUE VALUES ARE STATIC TORQUE MEASURED PER STANDARD AUDIT METHODS TOLERANCE = ±10% 3. * ASSEMBLY USES HARDENED WASHER IN-LB [N.m] FT-LB 16 17 28 32 45 50 68 80 98 109 135 153 240 268 386 425 579 633 714 802 1009 1118 1322 1506 1755 1974 [N.m] 22 23 38 43 61 68 92 108 133 148 183 207 325 363 523 576 785 858 968 1087 1368 1516 1792 2042 2379 2676 NO. 5000059 REV. J REFERENCE JLG ANEROBIC THREAD LOCKING COMPOUND JLG P/N Loctite® P/N ND Industries P/N 0100011 0100019 0100071 242TM 271TM 262TM Vibra-TITE TM 121 Vibra-TITE TM 140 Vibra-TITE TM 131 Description Medium Strength (Blue) High Strength (Red) Medium - High Strength (Red) Figure 1-2. Torque Chart (SAE Fasteners - Sheet 1 of 7) 1-4 – JLG Lift – 3121222 SECTION 1 - MACHINE SPECIFICATIONS SAE GRADE 8 (HEX HD) BOLTS & GRADE 8 NUTS* Tensile Clamp Load Stress Area Torque (Dry or Loctite® 263) K= 0.20 Torque Torque (Loctite® 242TM or 271TM (Loctite® 262TM or VibraOR Vibra-TITE TM 111 or TITETM 131) 140) K=.18 K=0.15 Size TPI Bolt Dia In Sq In LB IN-LB [N.m] IN-LB [N.m] 4 40 48 32 40 32 36 24 32 20 28 0.1120 0.1120 0.1380 0.1380 0.1640 0.1640 0.1900 0.1900 0.2500 0.2500 0.00604 0.00661 0.00909 0.01015 0.01400 0.01474 0.01750 0.02000 0.0318 0.0364 1320 1580 1800 2860 3280 43 60 68 143 164 5 7 8 16 19 129 148 15 17 18 24 16 24 14 20 13 20 12 18 11 18 10 16 9 14 8 12 7 12 7 12 6 12 6 12 In 0.3125 0.3125 0.3750 0.3750 0.4375 0.4375 0.5000 0.5000 0.5625 0.5625 0.6250 0.6250 0.7500 0.7500 0.8750 0.8750 1.0000 1.0000 1.1250 1.1250 1.2500 1.2500 1.3750 1.3750 1.5000 1.5000 Sq In 0.0524 0.0580 0.0775 0.0878 0.1063 0.1187 0.1419 0.1599 0.1820 0.2030 0.2260 0.2560 0.3340 0.3730 0.4620 0.5090 0.6060 0.6630 0.7630 0.8560 0.9690 1.0730 1.1550 1.3150 1.4050 1.5800 LB 4720 5220 7000 7900 9550 10700 12750 14400 16400 18250 20350 23000 30100 33600 41600 45800 51500 59700 68700 77000 87200 96600 104000 118100 126500 142200 FT-LB 25 25 45 50 70 80 105 120 155 170 210 240 375 420 605 670 860 995 1290 1445 1815 2015 2385 2705 3165 3555 [N.m] 35 35 60 70 95 110 145 165 210 230 285 325 510 570 825 910 1170 1355 1755 1965 2470 2740 3245 3680 4305 4835 FT-LB 20 25 40 45 65 70 95 110 140 155 190 215 340 380 545 600 770 895 1160 1300 1635 1810 2145 2435 2845 3200 [N.m] 25 35 55 60 90 95 130 150 190 210 260 290 460 515 740 815 1045 1215 1580 1770 2225 2460 2915 3310 3870 4350 6 8 10 1/4 5/16 3/8 7/16 1/2 9/16 5/8 3/4 7/8 1 1 1/8 1 1/4 1 3/8 1 1/2 NOTES: IN-LB [N.m] FT-LB 20 20 35 35 50 60 80 90 115 130 160 180 280 315 455 500 645 745 965 1085 1365 1510 1785 2030 2370 2665 [N.m 25 25 50 50 70 80 110 120 155 175 220 245 380 430 620 680 875 1015 1310 1475 1855 2055 2430 2760 3225 3625 NO. 5000059 REV. J 1. THESE TORQUE VALUES DO NOT APPLY TO CADMIUM PLATED FASTENERS 2. ALL TORQUE VALUES ARE STATIC TORQUE MEASURED PER STANDARD AUDIT METHODS TOLERANCE = ±10% 3. * ASSEMBLY USES HARDENED WASHER Figure 1-3. Torque Chart (SAE Fasteners - Sheet 2 of 7)) 3121222 – JLG Lift – 1-5 SECTION 1 - MACHINE SPECIFICATIONS SOCKET HEAD CAP SCREWS Magni Coating (Ref 4150701)* Tensile Stress Area Clamp Load See Note 4 Torque (Dry) K = .17 Torque (Loctite® 242TM or 271TM OR Vibra-TITE TM 111 or 140 OR Precoat 85® K=0.16 Size TPI Bolt Dia In Sq In LB IN-LB [N.m] IN-LB [N.m] 4 40 48 32 40 32 36 24 32 20 28 0.1120 0.1120 0.1380 0.1380 0.1640 0.1640 0.1900 0.1900 0.2500 0.2500 0.00604 0.00661 0.00909 0.01015 0.01400 0.01474 0.01750 0.02000 0.0318 0.0364 2860 3280 122 139 14 16 114 131 13 15 18 24 16 24 14 20 13 20 12 18 11 18 10 16 9 14 8 12 7 12 7 12 6 12 6 12 In 0.3125 0.3125 0.3750 0.3750 0.4375 0.4375 0.5000 0.5000 0.5625 0.5625 0.6250 0.6250 0.7500 0.7500 0.8750 0.8750 1.0000 1.0000 1.1250 1.1250 1.2500 1.2500 1.3750 1.3750 1.5000 1.5000 Sq In 0.0524 0.0580 0.0775 0.0878 0.1063 0.1187 0.1419 0.1599 0.1820 0.2030 0.2260 0.2560 0.3340 0.3730 0.4620 0.5090 0.6060 0.6630 0.7630 0.8560 0.9690 1.0730 1.1550 1.3150 1.4050 1.5800 LB 4720 5220 7000 7900 9550 10700 12750 14400 16400 18250 20350 23000 30100 33600 41600 45800 51500 59700 68700 77000 87200 96600 104000 118100 126500 142200 FT-LB 20 25 35 40 60 65 90 100 130 145 180 205 320 355 515 570 730 845 1095 1225 1545 1710 2025 2300 2690 3020 [N.m] 25 35 50 55 80 90 120 135 175 195 245 280 435 485 700 775 995 1150 1490 1665 2100 2325 2755 3130 3660 4105 FT-LB 20 20 35 40 55 60 85 95 125 135 170 190 300 335 485 535 685 795 1030 1155 1455 1610 1905 2165 2530 2845 [N.m] 25 25 50 55 75 80 115 130 170 185 230 260 410 455 660 730 930 1080 1400 1570 1980 2190 2590 2945 3440 3870 6 8 10 1/4 5/16 3/8 7/16 1/2 9/16 5/8 3/4 7/8 1 1 1/8 1 1/4 1 3/8 1 1/2 Torque (Loctite® 262TM TM or Vibra-TITE 131) K=0.15 IN-LB [N.m] FT-LB 20 20 35 35 50 60 80 90 115 130 160 180 280 315 455 500 645 745 965 1085 1365 1510 1785 2030 2370 2665 [N.m] 25 25 50 50 70 80 110 120 155 175 220 245 380 430 620 680 875 1015 1310 1475 1855 2055 2430 2760 3225 3625 NO. 5000059 REV. J NOTES: 1. THESE TORQUE VALUES DO NOT APPLY TO CADMIUM PLATED FASTENERS 2. ALL TORQUE VALUES ARE STATIC TORQUE MEASURED PER STANDARD AUDIT METHODS TOLERANCE = ±10% *3. ASSEMBLY USES HARDENED WASHER OR FASTENER IS PLACED AGAINST PLATED STEEL OR RAW ALUMINUM 4. CLAMP LOAD LISTED FOR SHCS IS SAME AS GRADE 8 OR CLASS 10.9 AND DOES NOT REPRESENT FULL STRENGTH CAPABILITY OF SHCS. IF HIGHER LOAD IS REQUIRED, ADDITIONAL TESTING IS REQUIRED. Figure 1-4. Torque Chart (SAE Fasteners - Sheet 3 of 7) 1-6 – JLG Lift – 3121222 SECTION 1 - MACHINE SPECIFICATIONS SOCKET HEAD CAP SCREWS Zinc Yellow Chromate Fasteners (Ref 4150707)* Tensile Stress Area Clamp Load See Note 4 Torque (Loctite® 242TM or 271TM OR Vibra-TITE TM 111 or 140 OR Precoat 85® K=0.18 Torque (Dry) K = .20 Size TPI Bolt Dia In Sq In LB IN-LB [N.m] IN-LB [N.m] 4 40 48 32 40 32 36 24 32 20 28 0.1120 0.1120 0.1380 0.1380 0.1640 0.1640 0.1900 0.1900 0.2500 0.2500 0.00604 0.00661 0.00909 0.01015 0.01400 0.01474 0.01750 0.02000 0.0318 0.0364 2860 3280 143 164 16 19 129 148 15 17 18 24 16 24 14 20 13 20 12 18 11 18 10 16 9 14 8 12 7 12 7 12 6 12 6 12 In 0.3125 0.3125 0.3750 0.3750 0.4375 0.4375 0.5000 0.5000 0.5625 0.5625 0.6250 0.6250 0.7500 0.7500 0.8750 0.8750 1.0000 1.0000 1.1250 1.1250 1.2500 1.2500 1.3750 1.3750 1.5000 1.5000 Sq In 0.0524 0.0580 0.0775 0.0878 0.1063 0.1187 0.1419 0.1599 0.1820 0.2030 0.2260 0.2560 0.3340 0.3730 0.4620 0.5090 0.6060 0.6630 0.7630 0.8560 0.9690 1.0730 1.1550 1.3150 1.4050 1.5800 LB 4720 5220 7000 7900 9550 10700 12750 14400 16400 18250 20350 23000 30100 33600 41600 45800 51500 59700 68700 77000 87200 96600 104000 118100 126500 142200 FT-LB 25 25 45 50 70 80 105 120 155 170 210 240 375 420 605 670 860 995 1290 1445 1815 2015 2385 2705 3165 3555 [N.m] 35 35 60 70 95 110 145 165 210 230 285 325 510 570 825 910 1170 1355 1755 1965 2470 2740 3245 3680 4305 4835 FT-LB 20 25 40 45 65 70 95 110 140 155 190 215 340 380 545 600 775 895 1160 1300 1635 1810 2145 2435 2845 3200 [N.m] 25 35 55 60 90 95 130 150 190 210 260 290 460 515 740 815 1055 1215 1580 1770 2225 2460 2915 3310 3870 4350 6 8 10 1/4 5/16 3/8 7/16 1/2 9/16 5/8 3/4 7/8 1 1 1/8 1 1/4 1 3/8 1 1/2 Torque (Loctite® 262TM TM or Vibra-TITE 131) K=0.15 IN-LB [N.m] FT-LB 20 20 35 35 50 60 80 90 115 130 160 180 280 315 455 500 645 745 965 1085 1365 1510 1785 2030 2370 2665 [N.m] 25 25 50 50 70 80 110 120 155 175 220 245 380 430 620 680 875 1015 1310 1475 1855 2055 2430 2760 3225 3625 NO. 5000059 REV. J NOTES: 1. THESE TORQUE VALUES DO NOT APPLY TO CADMIUM PLATED FASTENERS 2. ALL TORQUE VALUES ARE STATIC TORQUE MEASURED PER STANDARD AUDIT METHODS TOLERANCE = ±10% *3. ASSEMBLY USES HARDENED WASHER OR FASTENER IS PLACED AGAINST PLATED STEEL OR RAW ALUMINUM 4. CLAMP LOAD LISTED FOR SHCS IS SAME AS GRADE 8 OR CLASS 10.9 AND DOES NOT REPRESENT FULL STRENGTH CAPABILITY OF SHCS. IF HIGHER LOAD IS REQUIRED, ADDITIONAL TESTING IS REQUIRED. Figure 1-5. Torque Chart (SAE Fasteners - Sheet 4 of 7) 3121222 – JLG Lift – 1-7 SECTION 1 - MACHINE SPECIFICATIONS CLASS 8.8 METRIC BOLTS CLASS 8 METRIC NUTS Size PITCH Tensile Stress Area Sq mm Clamp Load Torque (Dry or Loctite® 263TM) Torque (Lub) KN [N.m] [N.m] Torque Torque (Loctite® (Loctite® 262TM 242TM or 271TM OR VibraOR VibraTITETM 131) TITETM 111 or 140) [N.m] [N.m] 3 0.5 5.03 2.19 1.3 1.0 1.2 1.4 3.5 0.6 6.78 2.95 2.1 1.6 1.9 2.3 4 0.7 8.78 3.82 3.1 2.3 2.8 3.4 5 0.8 14.20 6.18 6.2 4.6 5.6 6.8 6 1 20.10 8.74 11 7.9 9.4 12 7 1 28.90 12.6 18 13 16 19 8 1.25 36.60 15.9 26 19 23 28 10 1.5 58.00 25.2 50 38 45 55 12 1.75 84.30 36.7 88 66 79 97 14 16 2 2 115 157 50.0 68.3 140 105 126 154 219 164 197 241 18 2.5 192 83.5 301 226 271 331 20 2.5 245 106.5 426 320 383 469 22 2.5 303 132.0 581 436 523 639 24 3 353 153.5 737 553 663 811 27 3 459 199.5 1080 810 970 1130 30 3.5 561 244.0 1460 1100 1320 1530 33 3.5 694 302.0 1990 1490 1790 2090 36 4 817 355.5 2560 1920 2300 2690 42 4.5 1120 487.0 4090 3070 3680 4290 NO. 5000059 REV. J NOTES: 1. THESE TORQUE VALUES DO NOT APPLY TO CADMIUM PLATED FASTENERS 2. ALL TORQUE VALUES ARE STATIC TORQUE MEASURED PER STANDARD AUDIT METHODS TOLERANCE = ±10% *3. ASSEMBLY USES HARDENED WASHER OR FASTENER IS PLACED AGAINST PLATED STEEL OR RAW ALUMINUM 4. CLAMP LOAD LISTED FOR SHCS IS SAME AS GRADE 8 OR CLASS 10.9 AND DOES NOT REPRESENT FULL STRENGTH CAPABILITY OF SHCS. IF HIGHER LOAD IS REQUIRED, ADDITIONAL TESTING IS REQUIRED. Figure 1-6. Torque Chart (METRIC Fasteners - Sheet 5 of 7)) 1-8 – JLG Lift – 3121222 SECTION 1 - MACHINE SPECIFICATIONS CLASS 10.9 METRIC BOLTS CLASS 10 METRIC NUTS CLASS 12.9 SOCKET HEAD CAP SCREWS M3 - M5* Size PITCH Tensile Stress Area Clamp Load Torque (Dry or Loctite® 263TM) K = 0.20 Sq mm KN [N.m] Torque (Lub OR Loctite® 242TM or 271TM OR Vibra-TITE TM 111 or 140) K= 0.18 Torque (Loctite® 262TM OR Vibra-TITE TM 131) K=0.15 [N.m] [N.m] 3 0.5 5.03 3.13 3.5 0.6 6.78 4.22 4 0.7 8.78 5.47 5 0.8 14.20 8.85 6 1 20.10 12.5 7 1 28.90 18.0 25.2 22.7 18.9 8 1.25 36.60 22.8 36.5 32.8 27.4 10 1.5 58.00 36.1 70 65 55 12 1.75 84.30 52.5 125 115 95 14 16 2 2 115 157 71.6 97.8 200 180 150 315 280 235 18 2.5 192 119.5 430 385 325 20 2.5 245 152.5 610 550 460 22 2.5 303 189.0 830 750 625 24 3 353 222.0 1065 960 800 27 3 459 286.0 1545 1390 1160 30 3.5 561 349.5 2095 1885 1575 33 3.5 694 432.5 2855 2570 2140 36 4 817 509.0 3665 3300 2750 42 4.5 1120 698.0 5865 5275 4395 NO. 5000059 REV. J NOTES: 1. THESE TORQUE VALUES DO NOT APPLY TO CADMIUM PLATED FASTENERS 2. ALL TORQUE VALUES ARE STATIC TORQUE MEASURED PER STANDARD AUDIT METHODS TOLERANCE = ±10% *3. ASSEMBLY USES HARDENED WASHER OR FASTENER IS PLACED AGAINST PLATED STEEL OR RAW ALUMINUM 4. CLAMP LOAD LISTED FOR SHCS IS SAME AS GRADE 8 OR CLASS 10.9 AND DOES NOT REPRESENT FULL STRENGTH CAPABILITY OF SHCS. IF HIGHER LOAD IS REQUIRED, ADDITIONAL TESTING IS REQUIRED. Figure 1-7. Torque Chart (METRIC Fasteners - Sheet 6 of 7) 3121222 – JLG Lift – 1-9 SECTION 1 - MACHINE SPECIFICATIONS Magni Coating (Ref 4150701)* CLASS 12.9 SOCKET HEAD CAP SCREWS M6 AND ABOVE* Size PITCH Tensile Stress Area Sq mm Torque Torque (Lub OR Loctite® Torque (Loctite® 262TM Clamp Load (Dry or Loctite® 242TM or 271TM OR Vibra-TITE TM See Note 4 263TM) OR Vibra-TITE TM 131) K = .17 111 or 140) K = .15 K = .16 kN [N.m] [N.m] [N.m] 11 3 0.5 5.03 3.5 0.6 6.78 4 0.7 8.78 5 0.8 14.20 6 1 20.10 12.5 13 12 7 1 28.90 18.0 21 20 19 8 1.25 36.60 22.8 31 29 27 10 1.5 58.00 36.1 61 58 54 12 1.75 84.30 52.5 105 100 95 14 16 2 2 115 157 71.6 170 160 150 97.8 265 250 235 18 2.5 192 119.5 365 345 325 20 2.5 245 152.5 520 490 460 22 2.5 303 189.0 705 665 625 24 3 353 220.0 900 845 790 27 3 459 286.0 1315 1235 1160 30 3.5 561 349.5 1780 1680 1575 33 3.5 694 432.5 2425 2285 2140 36 4 817 509.0 3115 2930 2750 42 4.5 1120 698.0 4985 4690 4395 NO. 5000059 REV. J NOTES: 1. THESE TORQUE VALUES DO NOT APPLY TO CADMIUM PLATED FASTENERS 2. ALL TORQUE VALUES ARE STATIC TORQUE MEASURED PER STANDARD AUDIT METHODS TOLERANCE = ±10% *3. ASSEMBLY USES HARDENED WASHER OR FASTENER IS PLACED AGAINST PLATED STEEL OR RAW ALUMINUM 4. CLAMP LOAD LISTED FOR SHCS IS SAME AS GRADE 8 OR CLASS 10.9 AND DOES NOT REPRESENT FULL STRENGTH CAPABILITY OF SHCS. IF HIGHER LOAD IS REQUIRED, ADDITIONAL TESTING IS REQUIRED. Figure 1-8. Torque Chart (METRIC Fasteners - Sheet 7 of 7) 1-10 – JLG Lift – 3121222 SECTION 2 - GENERAL SERVICE INFORMATION SECTION 2. GENERAL SERVICE INFORMATION 2.1 MACHINE PREPARATION, INSPECTION, AND MAINTENANCE General This section provides the necessary information needed by those personnel that are responsible to place the machine in operation readiness and maintain its safe operating condition. For maximum service life and safe operation, ensure that all the necessary inspections and maintenance have been completed before placing the machine into service. Preparation, Inspection, and Maintenance It is important to establish and conform to a comprehensive inspection and preventive maintenance program. The following table outlines the periodic machine inspections and maintenance recommended by JLG Industries, Inc. Consult your national, regional, or local regulations for further requirements for aerial work platforms. The frequency of inspections and maintenance must be increased as environment, severity and frequency of usage requires. Pre-Start Inspection It is the User’s or Operator’s primary responsibility to perform a Pre-Start Inspection of the machine prior to use daily or at each change of operator. Reference the Operator’s and Safety Manual for completion procedures for the Pre-Start Inspection. The Operator and Safety Manual must be read in its entirety and understood prior to performing the Pre-Start Inspection. Pre-Delivery Inspection and Frequent Inspection The Pre-Delivery Inspection and Frequent Inspection shall be performed by a qualified JLG equipment mechanic. JLG Industries, Inc. recognizes a qualified JLG equipment mechanic as a person who, by possession of a recognized degree, certificate, extensive knowledge, training, or experience, has successfully demonstrated the ability and proficiency to service, repair, and maintain the subject JLG product model. The Pre-Delivery Inspection and Frequent Inspection procedures are performed in the same manner, but at different times. The Pre-Delivery Inspection shall be performed prior to each sale, lease, or rental delivery. The Frequent Inspection shall be accomplished for each machine in service for 3 months; out of service for a period of more than 3 months; or when purchased used. The frequency of this inspection must be increased as environment, severity and frequency of usage requires. 3121222 Reference the JLG Pre-Delivery and Frequent Inspection Form and the Inspection and Preventative Maintenance Schedule for items requiring inspection during the performance of these inspections. Reference the appropriate areas of this manual for servicing and maintenance procedures. Annual Machine Inspection The Annual Machine Inspection must be performed by a qualified JLG equipment mechanic on an annual basis, no later than thirteen (13) months from the date of the prior Annual Machine Inspection. JLG Industries, Inc. recognizes a qualified JLG equipment mechanic as a person who has successfully completed the JLG Service Training School for the subject JLG product model. Reference the machine Service and Maintenance Manual and appropriate JLG inspection form for performance of this inspection. Reference the JLG Annual Machine Inspection Form and the Inspection and Preventative Maintenance Schedule for items requiring inspection during the performance of this inspection. Reference the appropriate areas of this manual for servicing and maintenance procedures. For the purpose of receiving safety-related bulletins, it is important that JLG Industries, Inc. has updated ownership information for each machine. When performing each Annual Machine Inspection, notify JLG Industries, Inc. of the current machine ownership. Preventative Maintenance In conjunction with the specified inspections, maintenance shall be performed by a qualified JLG equipment mechanic. JLG Industries, Inc. recognizes a qualified JLG equipment mechanic as a person who, by possession of a recognized degree, certificate, extensive knowledge, training, or experience, has successfully demonstrated the ability and proficiency to service, repair, and maintain the subject JLG product model. Reference Table 2-2, Preventive Maintenance & Inspection Schedule., and the appropriate areas of this manual for servicing and maintenance procedures. The frequency of service and maintenance must be increased as environment, severity and frequency of usage requires. – JLG Lift – 2-1 SECTION 2 - GENERAL SERVICE INFORMATION Table 2-1. Maintenance and Inspection Requirements. TYPE FREQUENCY PRIMARY RESPONSIBILITY SERVICE QUALIFICATION REFERENCE Pre-Start Inspection Prior to use each day; or At each Operator change. User or Operator User or Operator Operator and Safety Manual Pre-Delivery Inspection Prior to each sale, lease, or rental delivery. Owner, Dealer, or User Qualified JLG Mechanic Service and Maintenance Manual and applicable JLG inspection form. Frequent Inspection In service for 3 months; or Out of service for a period of more than 3 months; or Purchased used. Owner, Dealer, or User Qualified JLG Mechanic Service and Maintenance Manual and applicable JLG inspection form. Annual Machine Inspection Annually, no later than 13 months from the date of the prior inspection. Owner, Dealer, or User Qualified JLG Mechanic (Recommended) Service and Maintenance Manual and applicable JLG inspection form. Preventative Maintenance At intervals as specified in the Service and Maintenance Manual. Owner, Dealer, or User Qualified JLG Mechanic Service and Maintenance Manual 2.2 PREVENTIVE MAINTENANCE AND INSPECTION SCHEDULE (See Table 2-2.) The preventive maintenance and inspection checks are listed and defined in the following table. This table is divided into two basic parts, the “AREA” to be inspected and the “INTERVAL” at which the inspection is to take place. Under the “AREA” portion of the table, the various systems along with the components that make up that system are listed. The “INTERVAL” portion of the table is divided into five columns representing the various inspection time periods. The numbers listed within the interval column represent the applicable inspection code for which that component is to be checked. The checks and services listed in this schedule are not intended to replace any local or regional regulations that may pertain to this type of equipment nor should the lists be considered as all inclusive. Variances in interval times may occur due to climate and/or conditions and depending on the location and use of the machine. 2-2 – JLG Lift – 3121222 SECTION 2 - GENERAL SERVICE INFORMATION Table 2-2. Preventive Maintenance & Inspection Schedule. INTERVAL AREA ON MACHINE PRE-START (a) INSPECTION 3 MONTH PREVENTATIVE MAINTENANCE 6 MONTH PREVENTATIVE MAINTENANCE PRE-DELIVERY (b) OR FREQUENT (c) INSPECTION ANNUAL (d) (YEARLY) INSPECTION 2, 5 2, 5 MAST ASSEMBLY Mast Sections Covers and Shields 1 Slide Pads 1, 2 PLATFORM ASSEMBLY Platform 1 1 1, 2, 4 1, 2, 4 Gate 1, 5 1, 5 Floor 1, 2 1, 2 Lanyard Anchorage Point 1, 4 1, 4 1, 7 1, 7 1 1 2, 15 2, 15 — — Guard Rails CHASSIS ASSEMBLY Covers Installation Static Strap Wheel and Tire Assemblies 1 Drive Motors Drive Motor Brushes ** 1, 7, 9 — — — FUNCTIONS/CONTROLS Platform Controls 5, 6, 7 5, 6, 7 Ground Controls 5, 6 5, 6, 14 5 5 Function Control Locks, Guards, or Detents Function Enable System 5 Emergency Stop Switches (Ground & Platform) 5 Function Limit or Cutout Switch Systems 5 Brake Release 5 Manual Descent or Auxiliary Power 5 5 9 18 POWER SYSTEM Batteries 19 Battery Charger 5 HYDRAULIC/ELECTRIC SYSTEM Hydraulic Lift/Steer Pump 1, 2, 9 Hydraulic Cylinders (mast and steering) 1, 2, 5, 9, 25 2, 7, 9 2, 9 Steer Cylinder Attachment Pins and Pin Retainers 1, 2 1, 2 Hydraulic Hoses, Lines, and Fittings 1, 9 1, 9 Hydraulic Reservoir, Cap, and Breather 5, 7 5, 7 11 11 20 20 Hydraulic Fluid *** 11 Electrical Connections Instruments, Gauges, Switches, Lights, Horn 3121222 5 – JLG Lift – 2-3 SECTION 2 - GENERAL SERVICE INFORMATION Table 2-2. Preventive Maintenance & Inspection Schedule. (Continued) INTERVAL AREA ON MACHINE PRE-START (a) INSPECTION 3 MONTH PREVENTATIVE MAINTENANCE 6 MONTH PREVENTATIVE MAINTENANCE PRE-DELIVERY (b) OR FREQUENT (c) INSPECTION ANNUAL (d) (YEARLY) INSPECTION GENERAL Operation & Safety Manual in Storage Box 21 21 21 ANSI & EMI Handbooks in Storage Box 21 21 21 Capacity Decals Installed, Secure, Legible 21 21 21 All Decals/Placards Installed, Secure, Legible 21 21 21 "Walk-Around" Inspection Performed 22 Annual Machine Inspection Due 21 No Unauthorized Modifications or Additions 21 21 All Relevant Safety Publications Incorporated 21 21, 22 General Structural Condition and Welds 2, 4 All Fasteners, Pins, Shields, and Covers Grease and Lubricate to Specifications Function Test of All Systems 2, 4 1, 2 22 22 22 22 Paint and Appearance 7 Notify JLG of change in Machine Ownership 7 22 * Change only when serviced, Fill half full. ** Replace when system brush wear indicator warning is activated. *** Every two years, drain and remove hydraulic oil reservoir , clean pick-up screen, refill with fresh hydraulic fluid. Maintenance and Inspection Table Codes: 18. Proper and authorized components. 19. Fully charged. 1. Check for proper and secure installation. 2. Visual inspection for damage, cracks, distortion, or excessive wear. 20. No loose connections, corrosion, or abrasions. 21. Verify. 3. Check for proper adjustment. 22. Perform. 4. Check for cracked or broken welds. 23. Sealed properly. 5. Operates properly. 24. Overrides Platform controls. 6. Returns to neutral or "off" position when released. 25. Remove pump motor cover and blow away any brush wear dust from cover, brushes, and brush holder assembly. 7. Clean and free of debris. 8. Interlocks function properly. 9. Check for signs of leakage. Footnotes: 10. Decals installed and legible. (a) Prior to use each day; or at each Operator change 11. Check for proper fluid level. (b) Prior to each sale, lease, or delivery 12. Check for chafing and proper routing. 13. Check for proper tolerances. 14. Properly lubricated. 15. Torqued to proper specification. (c) In service for 3 months; or Out of service for 3 months or more; or Purchased used (d) Annually, no later than 13 months from the date of the prior inspection 16. No gouges, excessive wear, or cords showing. 17. Properly inflated and seated around rim. 2-4 – JLG Lift – 3121222 SECTION 2 - GENERAL SERVICE INFORMATION 2.3 SERVICING AND MAINTENANCE GUIDELINES Cleanliness General The following information is provided to assist you in the use and application of servicing and maintenance procedures contained in this chapter. Safety and Workmanship Your safety, and that of others, is the first consideration when engaging in the maintenance of equipment. Always be conscious of component weight. Never attempt to move heavy parts without the aid of a mechanical device. Do not allow heavy objects to rest in an unstable position. When raising a portion of the equipment, ensure that adequate support is provided. NEVER WORK UNDER AN ELEVATED PLATFORM UNTIL PLATFORM HAS BEEN SAFELY RESTRAINED FROM ANY MOVEMENT BY BLOCKING OR OVERHEAD SLING. The most important single item in preserving the long service life of a machine is to keep dirt and foreign materials out of the vital components. Precautions have been taken to safeguard against this. Shields, covers, seals, and filters are provided to keep the wheel bearings, mast sections and oil supply clean; however, these items must be maintained on a scheduled basis in order to function properly. At any time when oil lines are disconnected, clear adjacent areas as well as the openings and fittings themselves. As soon as a line or component is disconnected, cap or cover all openings to prevent entry of foreign matter. Clean and inspect all parts during servicing or maintenance, and assure that all passages and openings are unobstructed. Cover all parts to keep them clean. Be sure all parts are clean before they are installed. New parts should remain in their containers until they are ready to be used. Components Removal and Installation Use adjustable lifting devices, whenever possible, if mechanical assistance is required. All slings (chains, cables, etc.) should be parallel to each other and as near perpendicular as possible to top of part being lifted. Should it be necessary to remove a component on an angle, keep in mind that the capacity of an eyebolt or similar bracket lessens, as the angle between the supporting structure and the component becomes less than 90 degrees. If a part resists removal, check to see whether all nuts, bolts, cables, brackets, wiring, etc., have been removed and that no adjacent parts are interfering. Component Disassembly and Reassembly When disassembling or reassembling a component, complete the procedural steps in sequence. Do not partially disassemble or assemble one part, then start on another. Always recheck your work to assure that nothing has been overlooked. Do not make any adjustments, other than those recommended, without obtaining proper approval. Pressure-Fit Parts Figure 2-1. Platform Mast Support Tool. 1. Elevate platform/outer mast (1) approximately 3 ft. (1m). 2. Place (JLG P/N-1001094004) mast support tool (2) between the mast and the front frame by hooking the bracket (3) over the front frame plate at bottom as shown above. 3. Lower the platform until the bottom edge of the platform/outer mast section (1) is resting on the hook bracket (4) at the top of the mast support tool. 3121222 When assembling pressure-fit parts, use an “anti-seize” or molybdenum disulfide base compound to lubricate the mating surface. – JLG Lift – 2-5 SECTION 2 - GENERAL SERVICE INFORMATION Bearings Lubrication and Servicing When a bearing is removed, cover it to keep out dirt and abrasives. Clean bearings in nonflammable cleaning solvent and allow to drip dry. Compressed air can be used but do not spin the bearing. Discard bearings if the races and balls (or rollers) are pitted, scored, or burned. If bearing is found to be serviceable, apply a light coat of oil and wrap it in clean (waxed) paper. Do not unwrap reusable or new bearings until they are ready to install. Lubricate new or used serviceable bearings before installation. When pressing a bearing into a retainer or bore, apply pressure to the outer race. If the bearing is to be installed on a shaft, apply pressure to the inner race. Components and assemblies requiring lubrication and servicing are shown in Section 1.2, LUBRICATION. Service applicable components with the amount, type, and grade of lubricant recommended in this manual, at the specified intervals. When recommended lubricants are not available, consult your local supplier for an equivalent that meets or exceeds the specifications listed. Batteries Clean batteries, using a non-metallic brush and a solution of baking soda and water. Rinse with clean water. After cleaning, thoroughly dry batteries and coat terminals with an anti-corrosion compound. 2.4 LUBRICATION INFORMATION Gaskets Check that holes in gaskets align with openings in the mating parts. If it becomes necessary to hand-fabricate a gasket, use gasket material or stock of equivalent material and thickness. Be sure to cut holes in the right location, as blank gaskets can cause serious system damage. Bolt Usage and Torque Application Use bolts of proper length. A bolt which is too long will bottom before the head is tight against its related part. If a bolt is too short, there will not be enough thread area to engage and hold the part properly. When replacing bolts, use only those having the same specifications of the original, or one which is equivalent. Unless specific torque requirements are given within the text, standard torque values should be used on heattreated bolts, studs, and steel nuts, in accordance with recommended shop practices or the Torque Chart Figures in Section 1 of this Service Manual. Hydraulic Lines and Electrical Wiring Clearly mark or tag hydraulic lines and electrical wiring, as well as their receptacles, when disconnecting or removing them from the unit. This will assure that they are correctly reinstalled. Hydraulic System Keep the system clean. If evidence of metal or rubber particles is found in the hydraulic system, drain and flush the entire system. Hydraulic System The primary enemy of a hydraulic system is contamination. Contaminants enter the system by various means, e.g., using inadequate hydraulic oil, allowing moisture, grease, filings, sealing components, sand, etc., to enter when performing maintenance, or by permitting the pump to cavitate due to insufficient system warm-up or leaks in the pump supply. The design and manufacturing tolerances of the component working parts are very close, therefore, even the smallest amount of dirt or foreign matter entering a system can cause wear or damage to the components and generally results in faulty operation. Every precaution must be taken to keep hydraulic oil clean, including reserve oil in storage. Cloudy oils indicate a high moisture content which permits organic growth, resulting in oxidation or corrosion. If this condition occurs, the system must be drained, flushed, and refilled with clean oil. It is not advisable to mix oils of different brands or types, as they may not contain the same required additives or be of comparable viscosities. Good grade mineral oils, with viscosities suited to the ambient temperatures in which the machine is operating, are recommended for use. NOTE: Metal particles may appear in the oil of new machines due to the wear-in of meshing components. Disassemble and reassemble parts on clean work surface. Clean all metal parts with non-flammable cleaning solvent. Lubricate components, as required, to aid assembly. 2-6 – JLG Lift – 3121222 SECTION 2 - GENERAL SERVICE INFORMATION Lubrication Specifications Changing Hydraulic Oil Specified lubricants, as recommended by the component manufacturers, are always the best choice, however, multi-purpose greases usually have the qualities which meet a variety of single purpose grease requirements. Should any question arise regarding the use of greases in maintenance stock, consult your local supplier for evaluation. Refer to Section 1.2, LUBRICATION of this Service Manual for an explanation of the lubricant key designations appearing in the Lubrication Chart. Hydraulic Oil For best performance, JLG recommends the use of ISOVg grade 15 oil with a viscosity range between 15-250 SUS at 100 degrees F (32-54 cST at 40 degrees C). Refer to Section 1.2, LUBRICATION of this Service Manual for recommended hydraulic oils. 3121222 Use of any of the recommended hydraulic oils eliminates the need for changing the oil on a regular basis. If it is necessary to change the oil, use only those oils meeting or exceeding the specifications appearing in this manual. If unable to obtain the same type of oil supplied with the machine, consult local supplier for assistance in selecting the proper equivalent. Avoid mixing petroleum and synthetic base oils. JLG Industries recommends changing the hydraulic oil annually. Use every precaution to keep the hydraulic oil clean. If the oil must be poured from the original container into another, be sure to clean all possible contaminants from the service container. While the unit is shut down, a good preventive maintenance measure is to make a thorough inspection of all hydraulic components, lines, fittings, etc., as well as a functional check of each system, before placing the machine back in service. – JLG Lift – 2-7 SECTION 2 - GENERAL SERVICE INFORMATION NOTES: 2-8 – JLG Lift – 3121222 SECTION 3 - THEORY OF OPERATION - 1230ES SECTION 3. THEORY OF OPERATION - 1230ES 3.1 OVERVIEW Platform mode The GROUND MODULE is the master system controller. Most functions are dispatched and coordinated from this module, all other system modules handle sub-tasks. All characterized information (values) are stored into the ground module (i.e., Personalities, Machine Setups or Calibrations). If the ground module is reprogrammed, this information is lost. The technician should record Personalities and Machine Setups before programming so they can be restored afterwards. Otherwise, default values can be used as a starting point to restore previous configuration. The PLATFORM MODULE reads switch and joystick positions and relays that information to the GROUND MODULE. It uses information from the CAN bus for operator display. It also reports faults pertaining to devices in the Platform Control Station. In ground mode, the platform control station may be removed from the vehicle without affecting operation. The POWER MODULE controls the main contactor, drive motors and hydraulic pump motor via commands from the CAN bus. It also measures current applied to these loads and input voltage for fault protection and reporting. For safe operation of the vehicle, the control system will not allow certain functions under certain conditions. These are called interlocks. Specific interlocks are discussed below. The interlocks discussed assume that all control system devices are functioning properly unless indicated. Fault conditions will generate DTC’s and additional interlocks. Some faults only show up at power-up when the control system performs a self-test. All controls should be left alone during this test. Note that the market and model of the machine affects what personalities and setups are visible by the Analyzer. The appropriate information is displayed for the given model and market. The market and model must be set properly for safe and lawful operation of the machine. 3.2 MODES OF OPERATION Ground Mode In Ground Mode, all visual indicators (LED) in the Platform are off. In fact, the Platform Control Box may be entirely disconnected as a normal measure (to secure the vehicle), and this does not prevent Ground Mode operation. When the machine is powered up in ground mode, only the functions in the Ground control station are operational, namely Lift Up and Down. Lift Up and Down is controlled by a two-position, momentary toggle switch with a center off position. The switch has the same effect as placing the joystick in the full up or full down position. 3121222 In platform mode the Platform Control Box is enabled. It is the primary control station for the vehicle. At power-up indicators applicable to the vehicle configuration illuminate for a lamp check: Battery Discharge Indicator, System Distress Indicator and Tilt Indicator. 3.3 CAN COMMUNICATIONS CAN (Controller Area Network) is the type of two-wire differential serial communication link used between the platform board, ground board, and the power module for control of the vehicle. This type of network has matured since its invention in 1986 and is used extensively in many kinds of machines. Two-Wire Differential: The signal meaning is derived from the difference in voltage between two wires, usually twisted together in a common "jacket". This jacket can also contain a shield surrounding the wires inside for noise protection. Any noise that does penetrate the shield will affect both wires the same. However, the difference in voltage stays the same, therefore signal meaning is not corrupted. This differs from one-wire signals in that onewire signals derive the signal meaning from the difference between the signal wire and system ground wire. The system ground is the ground for many signals, as well as power. Any noise on either wire will change the signal and may corrupt it. Serial Communication Link: Modules on the link send messages digitally, bit by bit along the wires where different voltage levels represent a "1" or a "0". The 1’s and 0’s are assembled by the receiver according to the protocol used to determine the messages meaning. Using serial communication allows two wires to replace many more. It also allows use of sensor and switch information in multiple places without duplicating those sensors and switches. CAN: On a bus, all modules on the bus are connected to the same wires. A CAN bus could be represented on a schematic by a long pair of straight lines with multiple modules connected to them by short pairs of lines. It has a termination resistor at both ends of the long lines placed between the two wires, These resistors are approximately 120 Ohms. On a JLG aerial work platform, this is typically in the platform and in the chassis. These resistors may be in the harness or in the module. A complete CAN circuit measures approximately 60 Ohms between the two wires and these wires are open to the shield. Each module on the CAN bus broadcasts its messages according to a priority assigned to the message. All the other modules will receive the message and determine if it is important to them. Typical message traffic is 300 - 500 messages per second. The high bus speed allow all modules to be constantly updated around 20 times per second. A CAN network also has error detection and handling for robust communications. – JLG Lift – 3-1 SECTION 3 - THEORY OF OPERATION - 1230ES Platform Control Station X050 1 E STOP X048 B 2 X047 C 4 3 D A G F Ignition Ground CAN High X046 E 120 3 4 7 6 5 3 4 7 6 5 X108 X105 X106 J1 1 Ignition 2 Ground 9 10 3 4 7 6 5 3 4 7 6 5 X10⁸ 2 3 4 7 6 5 1 2 3 4 7 6 5 FOOTSWITCH ACCY MODULE (OPTIONAL) X107 J2 1 PLATFORM BOARD CAN Low CAN High CAN Low X104 X017 OPTIONAL POWER MODULE BVbatt (-) X027 X017 120 1 Ignition 11 CAN Low 10 CAN High Ground Box X001 Ground board E STOP J1 X002 33 CAN Shield 32 CAN Low 31 CAN High 19 Ignition 11 CAN High 12 CAN Low 13 Shield 6 Ground 7 Ignition 5 PLT EMS 8 PLT EMS Source B+ 39 40 CIRCUIT BREAKER X035 X036 J2 B+ 1 X034 X033 KEY SW. X040 PLT EMS Source 3 Ground Mode Select 4 X038 X039 PLATFORM GROUND B- Vbatt (+) 24 V Vbatt (-) Battery + Battery CAN HI CAN LO Figure 3-1. Basic Electronic Module Connections 3-2 – JLG Lift – 3121222 SECTION 3 - THEORY OF OPERATION - 1230ES 3.4 CONTROLS & SENSORS other markets, the vehicle is considered Tilted if the vehicle tilt angle front to back is greater than or equal to 3.0 or tilt left to right is greater than or equal to 1.5. Elevation The elevation sensor is an inductive proximity switch. It must be powered to operate. There is a 1.3k Ohm resistor where it connects to the ground module to produce the proper signal for the ground module. (See electrical schematic in Section 9 for details.) If Ferrous material is present, i.e. the mast is fully retracted, it will close. The sensor is calibrated mechanically. The control system uses a combination of the elevation proximity switch and pothole protection switches to determine if the platform is elevated. If these sensors do not agree a fault is thrown. Joystick The joystick is used to "command" both lift and drive. The Lift/Drive switch selects which one is applicable. This command may be modified by the control system based on interlocks and personalities. On the joystick there are three switches and the control handle. The joystick control handle sensor is not a simple potentiometer. There is a position sensing element, and signal conditioning circuitry in it to generate the position signal. It is powered by 5VDC supplied from the platform controller. When centered it will output approximately 2.5VDC. Fully forward, it will output approximately 1 VDC. Fully backward, it will output approximately 4 VDC. On the handle is the trigger switch that must be depressed in order to operate the vehicle. This prevents unintentional movement. To pass start-up tests the three switches must be open and the joystick must be centered. Joystick personalities to define the centered position (where command is 0%), minimum and maximum forward, as well as minimum and maximum reverse can be accessed. Joystick system Personality settings can be changed via ANALYZER -> PERSONALITIES -> ACCELERATOR as follows: 3.5 TRACTION The traction, or drive system, moves the vehicle along the ground by electric motors. The Armatures (rotating windings) of the separately-excited drive motors are wired in parallel to the Power Module's M1 and M2 terminals. The M1 Terminal is always at the same voltage as the +B (Battery Voltage when the Line Contactor is closed) and allows the module to measure current with the internal shunt (extremely low impedance). The M2 Terminal is pulled to Ground by the Armature Switch MOSFET's (connected to -B Terminal). To provide variable speed control, the Armature MOSFET transistors switch On and Off at high frequencies (PWM/ pulse-width modulation; 16kHz). The Duty Cycle (On & Off time) is varied to control the voltage applied to the Armatures. When the MOSFET's spend 50% of the period On and 50% Off, approximately ½ of the available power will be applied to the Armatures (50% Duty Cycle). Similarly, the MOSFET are On continuously (100% Duty Cycle) to apply all available Battery power to the Armatures (as in Driving at Full Speed). Instead of permanent magnets, the separately-excited drive motors use electro-magnets (called Field Windings) located in the stator (non-rotating) portion of the motor. Field windings are preferable to permanent magnets because the Power Module can adjust the stator's magnetism for optimum motor performance. When climbing a grade at low speeds, the Power Module may apply as much as 40A to the field windings for more electro-motive force. On level terrain, the Power Module will apply as little as 14A to the fields for higher rotational speeds and better electrical efficiency. Line Contactor • FWD MIN - The forward extent of the centered position. Values between this and REV MIN are where 0% is commanded. Right Field Winding Shunt +B • REV MIN - The reverse extent of the centered position. Values between this and FWD MIN are where 0% is commanded. M1 Left Armature • FWD MAX - Joystick voltage where 100% will be commanded. Right Armature F1 Field Switches M2 Left Field Winding 24V F2 Armature Switch Tilt 3121222 2 3 • REV MAX - Joystick signal voltage where -100% will be commanded. The control system monitors the tilt sensor to determine if the vehicle is tilted excessively. This condition is called "Tilted". In the CE, Australia and Japan markets, if the vehicle tilt angle in any direction is greater than or equal to 3.5°, the control system considers the machine tilted. In 1 4 –B Power Module Figure 3-2. Drive Motors Schematic - 1600346 (SEVCON) Power Module – JLG Lift – 3-3 SECTION 3 - THEORY OF OPERATION - 1230ES 24V Line Contactor + + + Left Armature + Right Armature BF1 BF2 T +B + + Right Field Winding B F2 F1 Armature MOSFET Field MOSFETS Shunt Left Field Winding Power Module Figure 3-3. Drive Motors Schematic - 1001092456 (ZAPI) Power Module The Field Windings also provide direction reversal for traction. When driving forward, MOSFET switches 1 and 4 turn On to apply positive potential to F2 and ground potential to F1. In reverse, MOSFET switches 2 and 3 turn On to apply positive potential to F1 and ground potential to F2. Theses switches are pulse-width modulated by the Power Module to maintain a fixed relationship between Field and Armature Current. Two electrically-released parking brakes are mounted to the rear of the drive motors. The Ground Module energizes the two 24V electro-magnets when appropriate to allow vehicle motion. The parking brakes can be released electrically for emergency vehicle towing. Personalities Traction system Personality settings can be changed via ANALYZER -> PERSONALITIES -> DRIVE: • ACCEL - Time to ramp from 0% to 100% of command • DECEL - Time to ramp from 0% to 100% of command Interlocks As the machine travels down an incline the drive power output will be reduced proportionally to avoid overspeeding the vehicle. A bad tilt sensor will force the control system to assume maximum incline and reduce drive power accordingly. Creep mode (reduced drive speed) will be active if the control system determines the platform is elevated. Drive may be prevented by a different interlock, however. Drive will be prevented if any of the following occur: • Vehicle is tilted, elevated and ANALYZER -> MACHINE SETUP -> TILT CUTOUT is set to YES. • Batteries are being charged (0V is applied to ground board J1-29) • Vehicle is elevated above the calibrated Drive Cutout height and ANALYZER -> MACHINE SETUP -> DRIVE CUTOUT is set to YES. • MINIMUM - Minimum drive speed (Creep) • MAXIMUM - Maximum drive speed when platform is stowed • ELEV. MAX - Maximum drive speed when platform is elevated 3-4 – JLG Lift – 3121222 SECTION 3 - THEORY OF OPERATION - 1230ES 3.6 PUMP/LIFT/MAST An electrically driven hydraulic pump provides hydraulic pressure to actuate the steering and lift up. Lift down is "powered" by gravity. The lift actuator is a three stage hydraulic cylinder. The cylinder pistons are not sealed so fluid can flow from one cylinder to the next. The area of the piston that fluid touches on both sides does not provide lift because the forces on both sides cancel each other. The area of the piston with the rod behind it provides the lifting force necessary because no pressure is there to cancel the force applied by the pressure on the other side. PLATFORM To lift the platform, the solenoid energizes and opens the lift up valve. The pump speed is set proportional to joystick position. Fluid flows into the first cylinder, through the hollow rod. This extends the barrel of the first cylinder. The rod to the second cylinder is attached to the barrel of the first cylinder. Fluid is passed by a port in the first cylinder to the hollow rod of the second cylinder. That extends the second cylinder. The barrel of the second cylinder is attached to the barrel of the third cylinder. A port in the barrel of the second cylinder passes fluid to the third cylinder. This extends the third cylinder, and lifts the platform. To bring down the platform, the lift down valve opens, proportional to joystick position, and allows fluid out of the cylinder, allowing it to retract by gravity. ATTACHMENT CHASSIS Figure 3-4. LIFT SYSTEM The Power Module is essentially a "low-side" switch for the pump motor. The positive terminal of the pump is tied to Battery Positive after the Line Contactor. The negative terminal of the pump connects to the P Terminal of the Power Module, which switches current through MOSFET transistors to the Battery Negative. For variable speed pump operation, the MOSFET transistors switch On and Off at high frequencies (16kHz). The Duty Cycle is varied to control the voltage applied to the pump motor. When the MOSFET's spend 50% of the period On and 50% Off, approximately ½ of the available Battery power will be applied to the pump motor. Similarly, the MOSFET are On continuously (100% Duty Cycle) to 3121222 – JLG Lift – 3-5 SECTION 3 - THEORY OF OPERATION - 1230ES apply all available Battery power to the pump motor (as in Lift Up at full speed). Line Contactor +B Series DC Pump Motor 3.7 STEER Steering is actuated by a double action hydraulic cylinder. To change steering angle of the drive wheels, the steer left or steer right solenoid is energized and the pump is energized. Pressure is applied to one side of the piston and drained from the other. The pump speed, and thereby the rate of steering angle change, is adjusted based on drive speed. This adjustment is modified by steer personality settings. 24V P –B Power Module Figure 3-5. Hydraulic Pump Electrical Schematic 1600423 (SEVCON) Power Module When the Control System is energized, the voltage at the P Terminal will be approximately +24V (referenced to -B) when the pump is static. The P Terminal will be approximately at +1V (referenced to -B) when the pump is running at full speed (Lift Up from Ground Mode). Personalities Lift system Personality settings can be changed via ANALYZER -> PERSONALITIES -> LIFT: • ACCEL - Time to ramp from 0% to 100% command • DECEL - Time to ramp from 100% to 0% command Figure 3-6. STEER SYSTEM • UP MIN - Minimum pump speed up (Creep) • UP MAX - Maximum pump speed up Personalities • DN MIN - Minimum pump speed down (Creep) Steer system Personality settings can be changed via ANALYZER -> PERSONALITIES -> STEER: • DN MAX - Maximum pump speed down • STATIC - Pump commanded % power when drive command is 0% Interlocks Lift up will be prevented under the following circumstances. • Vehicle is tilted, elevated and ANALYZER -> MACHINE SETUP -> TILT CUTOUT is set to YES. • Charging of the vehicle’s battery is in progress and ANALYZER -> MACHINE SETUP -> CHARGER INTERLOC is set to DRV & LIFT UP. 3-6 • DRIVE - Pump commanded % power when drive command is 100% Interlocks Steering is prevented whenever conditions are present to prevent drive. See Interlocks on Pg. 4 – JLG Lift – 3121222 SECTION 4 - BASE COMPONENTS SECTION 4. BASE COMPONENTS 4.1 BASE ASSEMBLY COMPONENTS Figure 4-1. Base Assembly Components. 1. Hydraulic Pump/Tank/Valve Assy. 2. Steering Linkage Assembly 3. Drive Motor/Spindle Assemblies 4. Pot Hole Protection Assembly 5. Static Strap 6. Steer Cylinder Assembly 7. Left Side (Battery Tray) Door 8. Right Side (Battery Tray) Door 9. Rear Wheel Assembly NOTE: Base assembly shown without base top weldment for illustrative purposes only. 3121222 – JLG Lift – 4-1 SECTION 4 - BASE COMPONENTS 4.2 BASE FRAME COVERS Battery Tray/Side Door - Installation Base Top Cover - Installation NEVER WORK UNDER AN ELEVATED PLATFORM UNTIL THE PLATFORM HAS BEEN SAFELY RESTRAINED FROM ANY MOVEMENT BY BLOCKING OR OVERHEAD SLING. Battery Tray/Side Door - Installation (Same for both sides) Base Top Cover Installation 1. Base Top Cover 2. (4) Attach Screws/Washers Step Plate/Battery Charger Cover - Installation 1. Battery Tray/Door 2. Cutout in Base Frame 3. Washer(s) NOTE: 4. Base Frame Hinge 5. Door Latch Pin Before assembly lubricate (coat) the door hinge pins with Loctite Moly Paste Lubricant (JLG Part No. - 3020039). Lift door (1) into cutout in base frame (2), align the upper and lower hinge pins on the door with the holes in the upper and lower base frame hinge (4) and lower door until set. If door needs any adjustment up or down to align with the latch pin slot (5), remove the door and add or remove washers (3) at the upper hinge pin. Step Plate/Battery Charger Cover Installation 1. Step Plate Cover 4-2 2. Attach Screws/Washers/Nuts – JLG Lift – 3121222 SECTION 4 - BASE COMPONENTS 4.3 WHEELS AND TIRES - DRIVE AND REAR 1. Start all lug nuts by hand to prevent cross threading. DO NOT use a lubricant on threads or nuts. Tire Wear and Damage 2. Tighten lug nuts in the following sequence. Inspect tires periodically for wear or damage. Tires with worn edges or distorted profiles require replacement. Tires with significant damage in the tread area or side wall, require immediate evaluation before replacing the machine into service. Wheel and Tire Replacement Replacement wheels must have the same diameter and profile as the original. Replacement tires must be the same size and rating as the tire being replaced. Wheel Installation It is extremely important to apply and maintain proper wheel mounting torque. WHEEL LUG NUTS MUST BE INSTALLED AND MAINTAINED AT THE PROPER TORQUE TO PREVENT LOOSE WHEELS, BROKEN LUG NUTS, AND POSSIBLE SEPARATION OF WHEEL FROM THE AXLE. BE SURE TO USE ONLY THE LUG NUTS MATCHED TO THE CONE ANGLE OF THE WHEEL. Tighten the lug nuts to the proper torque to prevent wheels from coming loose. Use a torque wrench to tighten the fasteners. If you do not have a torque wrench, tighten the fasteners with a lug wrench, then immediately have a service garage or dealer tighten the lug nuts to the proper torque. Over-tightening will result in breaking the lug nuts or permanently deforming the mounting holes in the wheels. The proper procedure for attaching wheels is as follows: 3121222 – JLG Lift – Figure 4-2. Wheel Lug Nut Tightening Sequence 3. The tightening of the lug nuts should be done in stages. Following the recommended sequence, tighten lug nuts per wheel torque. Table 4-1. Wheel Torque Chart TORQUE SEQUENCE 1st Stage 2nd Stage 3rd Stage 20-30 ft lbs (28 - 42 Nm) 65-80 ft lbs (91 - 112 Nm) 105 -120 ft lbs (142 - 163 Nm) 4. Wheel lug nuts should be torqued after the first 50 hours of operation and after each wheel removal. Check torque every 3 months or 150 hours of operation. 4-3 SECTION 4 - BASE COMPONENTS 4.4 REAR WHEEL HUB - INSTALLATION Rear Wheel Hub Installation 1. 2. 3. 4. 5. Hub Cap Cotter Pin Spindle Nut Washer Outer Tapered Roller Bearing (a) 6. 7. 8. 9. 10. Outer Bearing Race (a) Wheel Mounting Hub (a) Inner Bearing Race (a) Inner Tapered Roller Bearing (a) Hub Seal NOTE: (a) Bearing race (6, 8) are press fitted to wheel mounting hub (7) and are only available for service as a complete hub assembly. Also before installing or re-installing the inner and outer taper roller bearings, be certain they are lubricated (packed) with multipurpose grease. Later design incorporated wheels lugs into hub, tighten wheel lug nuts same as lug bolts, per step 6 below. NOTE: Before assembly check that inner and outer taper roller bearings are lubricated (packed) with mutli-purpose grease. 5. Before installing the hub cap, check wheel hub for excessive end play. 1. Tighten spindle nut to 30-40 ft. lbs. (40-54 nm) to properly seat bearings. a. Rotate hub by hand, hub should rotate freely, if too tight, back the nut off to the next cotter pin hole. 2. Loosen spindle nut completely until it can be turned by hand. b. Hub should not be noticeably loose when moved parallel with spindle center-line. 3. Then finger tighten spindle nut by hand without rotating the wheel mounting hub. 6. Install wheel, torque wheel per specification in Section 4.3 on page 4-3. 4. Install cotter pin, if necessary nut may be backed off to nearest slot, if more than 1/2 the cotter pin hole is visible, the nut may be tightened slightly to get the cotter pin installed. 4-4 – JLG Lift – 3121222 SECTION 4 - BASE COMPONENTS 4.5 STEERING LINKAGE ASSEMBLY - INSTALLATION 4 3 1 2 8 12 11 7 5 10 6 9 Steering Linkage Assembly - Installation (Shown with top of base frame weldment removed for illustrative purposes only) 1. 2. 3. 4. 5. 6. NOTE: 3121222 Left Steering Knuckle Lug Left Steering Arm Link Right Steering Arm Link Right Steering Knuckle Lug Steering Cross Link Hydraulic Steer Cylinder 7. 8. 9. 10. 11. 12. Steer Cylinder Anchor Pin Cross Link Anchor Pin Steer Cylinder - Steer Right Port Steer Cylinder - Steer Left Port King Pin Steering Knuckle Stop All pinned journals must have the proper bushings installed. On final assembly apply Loctite #242 to screw threads of the steer cylinder anchor pin keeper screw. On final assembly, apply Loctite #271 to the spindle to knuckle lug attach screws and torque to 70 ft. lbs (97 N,m) – JLG Lift – 4-5 SECTION 4 - BASE COMPONENTS 4.6 STEER CYLINDER - SERVICING 9 8 7 6 5 4 3 2 1 10 11 12 13 Steer Cylinder Components 1. 2. 3. 4. 5. NOTE: Rod End Bushing Cylinder Head (Gland) (a) O’Ring Seal Backing Ring O’Ring Seal 6. 7. 8. 9. 10. Cylinder Rod Piston (b) Piston Seal Bushing Piston Set Screw 11. Main Gland Seal 12. Wiper Seal 13. O’Ring Seal (a) On final assembly torque cylinder head (Gland) to 500Nm (112 ft. lb.) (b) Apply Loctite #242 to threads before final assembly and torque to 260Nm (55 ft. lb.) Refer to Section 3.7, STEER - Theory of Operation for more detailed information on Steer Cylinder System. 4-6 – JLG Lift – 3121222 SECTION 4 - BASE COMPONENTS Steer Cylinder Disassembly DISASSEMBLY OF THE CYLINDER SHOULD BE PERFORMED ON A CLEAN WORK SURFACE IN A DIRT FREE WORK AREA. PROTECT THE CYLINDER ROD SURFACE. DAMAGE TO THE CYLINDER ROD CHROME FINISH DUE TO SCRATCHING, INDENDATION, CHIPPING OR OTHERWISE WILL CAUSE EVENTUAL GLAND SEAL FAILURE. THE CYLINDER ROD MUST BE REPLACED IF DAMAGED. Piston - Removal 1. Piston (Kban) Seal 2. Piston Set Screw 3. Piston 4. Spanner Wrench 1. Remove the piston (kban) seal from the piston. 2. Loosen and remove the piston set screw from the hole in the side of the piston. 3. Using the proper spanner wrench, remove the piston from the cylinder rod. 4. Slide the cylinder head (gland) off the piston end of the cylinder rod. Cylinder Head (Gland) - Removal 1. Cylinder Head (Gland) 2. Spanner Wrench (48mm - 1.89" Dia. - 5mm Pin Dia.) 5. Remove all the seals, o’rings, and backing ring from the cylinder head (gland). 6. If replacing, remove the bushings from the end of the cylinder rod and the cylinder barrel. 1. Using the proper size spanner wrench (48mm - 1.89" Dia., 5mm Pin Dia.), remove the cylinder head (gland) turning the head counterclockwise until it is free of the cylinder barrel. 2. Carefully slide the complete cylinder rod, cylinder head (gland), piston assembly out of the cylinder barrel. 3121222 – JLG Lift – 4-7 SECTION 4 - BASE COMPONENTS Steer Cylinder - Assembly Hydraulic Cylinder Component Inspection Cylinder Rod There should be no scratches or pits deep enough to catch the fingernail. Pits that go to the base metal are unacceptable. Scratches that catch the fingernail but are not to the base metal, less than 0.5 inch long and primarily in the circumferential direction are acceptable provided they cannot cut the rod seal. Chrome should be present over the entire surface of the rod and the lack thereof is unacceptable. In the event that an unacceptable condition occurs, the rod should be repaired or replaced. NOTE: Prior to cylinder assembly, ensure the proper JLG seal kits are used, see the JLG Parts Manual. APPLY A LIGHT FILM OF THE HYDRAULIC OIL TO BE USED FOR OPERATION TO ALL CO MPONENTS TO BE ASSEM BLED, EXCEPT THE THREADED AREAS WHERE LOCTITE IS TO BE APPLIED. Cylinder Head (Gland) Visually inspect the inside bore for scratches or polishing. Deep scratches are unacceptable. Polishing indicates uneven loading and when this occurs, the bore should be checked for out-of-roundness. If out-of-roundness exceed 0.007", this is unacceptable. Check the condition of the dynamic seals (wiper, rod seals) looking particularly for metallic particles embedded in the seal surface. It is normal to cut the static seal on the retaining ring groove upon disassembly. Remove the rod seal, static o-ring and backup and rod wiper. Damage to the seal grooves, particularly on the sealing surfaces, is unacceptable. In the event that an unacceptable condition occurs, the head should be replaced. Piston Visually inspect the outside surface for scratches or polishing. Deep scratches are unacceptable. Polishing indicates uneven loading and when this occurs, the diameter should be checked for out-of-roundness. If out-of-roundness exceeds 0.007", this is unacceptable. Check the condition of the dynamic seals and bearings looking particularly for metallic particles embedded in the bearing and in the piston seal surface. Remove the seals and bearings. Damage to the seal grooves, particularly on the sealing surfaces, is unacceptable. In the event that an unacceptable condition occurs, the piston should be replaced. Piston Installation 1. Threaded End of Rod (a) 2. Piston (b) 3. Cylinder Head (Gland) NOTE: Tube Assembly Visually inspect the inside bore for scratches and pits. There should be no scratches or pits deep enough to catch the fingernail. Scratches that catch the fingernail but are less than 0.5 inch long and primarily in the circumferential direction are acceptable provided they cannot cut the piston seal. The roughness of the bore should be between 10 and 20 μ inches RMS. Significant variation (greater than 8 μ inches difference) are unacceptable. In the event that an unacceptable condition occurs, the tube assembly should be repaired or replaced. 4. Piston Set Screw (c) 5. Piston (Kban) Seal (a) Apply Loctite #242 on final assembly (b) Torque piston to 260Nm (55 ft. lb.) (c) Apply Loctite #222 and torque to 20Nm (5 ft. lb.) 1. Load the seals, o’rings, and backing ring onto the cylinder head (gland). 2. Lubricate the cylinder rod surface with clean hydraulic oil, then slide the cylinder head (gland) assembly onto the rod. 3. Check that the threads on the cylinder rod and inside the piston are clean and free of any hydraulic oil. 4. Apply Loctite #242 to the threads of the cylinder rod and thread the piston onto the end of the cylinder rod, tighten piston with the proper spanner wrench and torque the piston to 260Nm (55 ft. lb.). 4-8 – JLG Lift – 3121222 SECTION 4 - BASE COMPONENTS 5. Apply Loctite #222 to the threads of the piston set screw, thread the screw into the hole in the side of the piston and tighten to 20Nm (5 ft. lb.). 7. Lubricate the o’ring seals on the cylinder head. Check that the threads on the cylinder head and inside the cylinder barrel are clean and free of any debris. 6. Place a new piston (kban) seal onto the piston. EXTREME CARE SHOULD BE TAKEN WHEN INSTALLING THE CYLINDER ROD, HEAD, AND PISTON INTO THE CYLINDER BARREL. AVOID PULLING THE ROD OFF CENTER, WHICH COULD CAUSE DAMAGE TO THE PISTON AND CYLINDER BARREL SURFACES. 8. Carefully slide the loaded cylinder rod assembly into the cylinder barrel. 9. Screw the cylinder head in until tight, torque the cylinder head to 55Nm (112 ft. lb.), using the proper spanner wrench. 10. Reinstall the steer cylinder back onto the machine. 11. Power up machine and cycle the steering left and right until the steering is working smoothly. 12. Check the hydraulic oil level in the hydraulic oil tank located on the pump/valve/tank assembly. Oil level should be between min. and max. on the side of the tank. Cylinder Head Installation 1. Cylinder Head (Gland) 3121222 2. Spanner Wrench (48mm 1.89" Dia., 5mm Pin Dia.) – JLG Lift – 4-9 SECTION 4 - BASE COMPONENTS 4.7 DRIVE MOTOR/SPINDLE ASSEMBLY - INSTALLATION Drive Motor/Spindle Assembly - Installation (Left front shown - installation same for both sides) 1. 2. 3. 4. NOTE: 4-10 DriveMotor/Spindle Assembly 60mm External Retaining Ring Spindle Retaining Washer Knuckle Lug Attach Screws (a) 5. 6. 7. 8. 60mm Thrush Washer King Pin (welded to frame) (b) Steering Knuckle Lug Drive Motor Power Harness (c) Before removing the drive motor/spindle assembly, disconnect machine power then disconnect the drive motor wiring harness (item 8) either from the power module and unstrap from the harness from the steering arms, or by removing the drive motor cover and disconnecting from the motor. (a) Remove the spindle retaining ring (item 2), lower and support drive motor/spindle assembly just enough to access the top of the knuckle attach screws and remove them. On final assembly, apply Loctite #271 to the spindle to knuckle lug attach screws and torque to 70 ft. lbs (97 N,m) (b) Coat king pin with moly paste lubricant prior to installation of spindle assembly. – JLG Lift – 3121222 SECTION 4 - BASE COMPONENTS 4.8 WHEEL DRIVE ASSEMBLY - SERVICING The component parts of the left and right drive motor assemblies are identical. The left drive motor is run in the reverse direction of the right motor. FOR DETAILS ON THE TRACTION SYSTEM ELECTRICAL THEORY OF OPERATION SEE SECTION 4. Drive Motor Electrical Evaluation Several basic electrical tests can be performed on the Drive Motors. Failure of one of these evaluations is significant and may indicate that the device is physically damaged. Make all measurements with a voltmeter set to resistance scale (Ohms). Disconnect the Main Battery Disconnect and all drive motor cables during this analysis. 1. Resistance < 2 Ohms Red to Black Armature Wires. The heavy red and black conductors are connected to the motor's armature winding. The winding is a very low impedance and should appear to be a short-circuit for an ordinary voltmeter (other tests can determine if the armature is truly shorted). High resistance can signal corrosion, improper crimps, damaged cabling, worn brushes, a faulty commutator, or an open armature winding. 2. Resistance < 2 Ohms Blue to Orange Field Wires. The blue and orange conductors are connected to the motor's field winding. In order to make this measurement, it will be necessary to disconnect the buttsplice on the two orange wires or use a piercing meter probe. As with the armature, the field is a very low impedance and should appear to be a short-circuit for an ordinary voltmeter. High resistance can signal corrosion, improper crimps, damaged connectors, damaged cabling, or an open field winding. 3121222 – JLG Lift – 3. Resistance 15-25 Ohms Yellow to Brown Brake Wires. The yellow and brown wires are connected to the integral brake. Improper resistance can signal corrosion, improper crimps, damaged cabling, or a fault solenoid. 4. Resistance > 1 mOhm Red Armature Wire to Motor Housing. The armature winding should be electrically isolated from the motor housing. Low resistance may be an indication of a crushed cable, a burned cable, or a burned armature winding. Investigate by disconnecting the drive motor cable from the motor and remeasure resistance (isolation). 5. Resistance > 1 mOhm Blue Field Wire to Motor Housing. The field winding should also be electrically isolated from the motor housing. Low resistance may be an indication of a crushed cable, a burned cable, or a burned field winding. Investigate by disconnecting the drive motor cable from the motor and re-measure resistance (isolation). 6. Resistance > 1 mOhm Red Armature Wire to Blue Field Wire. The armature and field windings should also be electrically isolated from one another. Low resistance may be an indication of a crushed cable, a burned cable, damaged windings. Investigate by disconnecting the drive motor cable from the motor and re-measure resistance (isolation). 4-11 SECTION 4 - BASE COMPONENTS Roll And Leak Testing Oil Type & Capacity Torque-Hub units should always be roll and leak tested before disassembly and after assembly to make sure that the unit's gears, bearings and seals are working properly. The following information briefly outlines what to look for when performing these tests. NOTE: The brake must be released before performing the roll test. This can be accomplished by supplying 24 Volts D.C. to the gray 2-pin brake connector. This torque hub unit is shipped with ISO 68 viscosity oil (hydraulic fluid). It is designed to utilize the same oil throughout its service life. However, should it need to be serviced the oil will need to be drained and replaced. When serviced, fill the unit with ISO grade 68 oil or oil of a similar viscosity (80W gear oil or 20W engine oil). The gearbox will need to be filled with 10 oz. of oil. Oil Filling Instructions The Roll Test The purpose of the roll test is to determine if the unit's gears are rotating freely and properly. You should be able to rotate the wheel or hub of the gearbox by hand. If you feel more drag in the gears only at certain points, then the gears are not rolling freely and should be examined for improper installation or defects. Some gear packages roll with more difficulty than others. Do not be concerned if the gears in your unit seem to roll hard as long as they roll with consistency. The Leak Test 10 oz. of gearbox oil will fill the gearbox cavity approximately half full. To check the oil level, rotate the wheel so that the cover plugs are at 12 o-clock and 3 o-clock. Allow the oil to settle. Slowly loosen the 3 o-clock plug. If oil begins to come out then the oil level is sufficient. If no oil is noticed at the 3 o-clock plug location, then remove both plugs. Slowly add oil at the 12 o-clock plug location until oil begins to seep out of the 3-clock plug location. Reinstall and tighten plugs to 6-8 ft-lbs. Drive Motor Power Harness Routing The purpose of a leak test is to make sure the unit is air tight. You can tell if your unit has a leak if the pressure gauge reading on your leak checking fitting starts to fall after the unit has been pressurized and allowed to equalize. Leaks will most likely occur at the pipe plugs, the main seal or wherever o-rings are located. The exact location of a leak can usually be detected by brushing a soap and water solution around the main seal and where the orings or gaskets meet on the exterior of the unit, then checking for air bubbles. If a leak is detected in a seal, oring or gasket, the part must be replaced, and the unit rechecked. Leak test at 10 psi for 20 minutes. NOTE: Due to the small air volume inside this Torque-Hub, it will pressurize to 10 psi very quickly. If the pressure becomes excessive in the unit the seals will be destroyed. Figure 4-3. Drive Motor Power Harness Routing 4-12 – JLG Lift – 3121222 SECTION 4 - BASE COMPONENTS Wheel Drive Brake - Manual Disengage Procedure Figure 4-4. Brake Manual Disengage Procedure In the event of a power loss to the Torque-Hub, the parking brake will engage as a safety precaution. Should the unit need to be towed or pushed to an area where it can be serviced or recharged the operator will need to manually disengage the parking brakes. The following procedure outlines how this is to be done. 3. Remove the 2 Cover Plate Bolts (2) from the front of the cover area near the cable exit. The size of the Cover Plate Bolts is (#8 -32UNC x .500 inches long) 4. Remove the Cover Plate (6), Strain Relief (4), Back Cover (7), and Cover O'ring (3). 5. Insert the Back Cover Bolts (1) into the two holes in the brake housing at the 3 and 9 o'clock positions. 6. Tighten down bolts and the brake will disengage. IF THE MACHINE IS ON ANY INCLINE, THE WHEELS MUST BE ADEQUATELY BLOCKED PRIOR TO MANUALLY DISENGAGING THE BRAKES. FAILURE TO DO SO MAY RESULT IN INJURY OR EVEN DEATH. 1. Make sure the E-stop plunger is pushed in and the key is removed from the key switch on the Ground Control Station. 2. Remove the 2 Back Cover Bolts (1). The Back Cover Bolts are also the release bolts for the brake. The size of the back cover bolts (5) is 0.8 x 20mm long. 3121222 7. Repeat this procedure for the other wheel drive. THE DISENGAGE BOLTS MUST BE REMOVED FROM THE BRAKE HOUSING AFTER THE MACHINE IS TOWED OR PUSHED TO ITS SERVICING LOCATION. THE BRAKES CAN NOT BE ENGAGED WITH THE DISENGAGE BOLTS IN THE BRAKE HOUSING. THIS WILL CAUSE THE MACHINE TO ROLL WHEN PARKED ON AN INCLINE. – JLG Lift – 4-13 SECTION 4 - BASE COMPONENTS Wheel Drive Motor Assembly - Removal From Machine 4. Remove the drive wheel mounting lugs and remove the wheel(s). The electric wheel drive assemblies are mounted indepentent of each other on the base frame at the front of the machine. The wheel drive assembly consists of an 24V DC electric motor driving a 45.13:1 ratio gear box, the assembly also included a friction disk parking brake assembly. This brake assembly is mounted on the end of the drive motor assembly. 1. Elevate the machine enough to remove the drive wheel(s). 2. Before disconnecting machine power at the batteries, power up the machine and turn the steering to expose the back of the drive motor to be removed. 3. Now disconnect machine power at the quick-disconnect (short cable) on the machine right side batteries. 5. Disconnect the power/brake harness to the drive motor to be removed at the power module. 6. Mark the position of and remove the tie straps holding the drive motor power harness to the steering linkage. Pull the harness throught the base frame until free. 7. Before removing the drive motor from the gear box, remove the pipe plugs on the gear box cover (wheel side) and drain the oil from the gear box. 8. Remove the two (2) long cap screws attaching the drive motor to the spindle and gear box. 9. Carefully slide the drive motor assembly out of the gear box/spindle assembly and place on workbench. Wheel Drive Assembly - Removal 1. Drive Motor Assembly 2. Mounting Bolt Washers NOTE: 4-14 3. Drive Motor Mounting Bolts Removal same for left and right drive motor. – JLG Lift – 3121222 SECTION 4 - BASE COMPONENTS Drive Motor Disassembly Figure 4-5. Drive Motor Disassembly 1. Remove the 2 (#8-32UNC x .500in long) screws holding the cover plate (12) in place (See Figure 4-6.) and remove the cover plate from the motor. 2. Remove the 2 (M5 x 0.8 x 20mm long) screws holding the cover (15) in place and set aside. These screws are needed later to manually release the brake. Slide the strain relief bushing (14) and wire harness out of the cover and remove the cover from the motor. Remove strain relief bushing from wire harness and set aside. 3. Discard the O-ring (13) located inside the cover. 4. Remove the wire harness (8) from the motor by disconnecting the field connection, brake connection, and armature connections. (See Figure 4-7.). 5. Install the 2 cover mounting screws into the threaded holes in the brake assembly and tighten to manually release the brake. (See Figure 4-7.) or image in the "Manual Disengage Procedure" (See Figure 4-4.). 6. Remove the 3 screws holding the brake assembly (11) to the motor. Carefully remove the brake assembly and friction disk (10) from the motor by sliding off of the shaft. (See Figure 4-7.). 7. Remove the screws holding the commutator end head (9) in place and remove the commutator end head from the frame and field assembly (1). The armature (2) will be attached to the commutator end head. 8. Pull back the brush springs (4) in the commutator end head, pull the brush back and rest the springs on the side of the brush. The brushes should move freely within the holders. 9. Use an arbor press or a bearing puller to remove the armature from the commutator end head assembly. 10. Remove the snap ring (6) and bearing (7) from the commutator end head. Discard the bearing. 3121222 – JLG Lift – 4-15 SECTION 4 - BASE COMPONENTS Figure 4-6. Drive Motor Side View Figure 4-7. Drive Motor End View (Brake End) Drive Motor Inspection and Servicing (Reference Figure 4-5. - Drive Motor Disassembly Illustration) 1. Carefully blow out any accumulated carbon dust and dirt from the end head and the frame and field assembly using clean, oil free, compressed air. 2. Replace brushes (3) that are worn below their usable length (.600 in.), show signs of uneven wear or signs of overheating, such as discolored brush shunts and brush springs. Brushes should always be replaced in complete sets of four or eight. Use identical replacement parts; do not substitute brush grades as the brushes are matched to the motor type and application to provide the best service. Substituting brushes of the wrong grade can cause premature commutator failure and excessive brush wear. 5. Visually inspect the armature (2) assembly for signs of overheating or physical damage. Visually inspect the seal surface of the shaft for excessive wear. Check for grounded circuits using a dielectric tester by applying voltage between the commutator and the shaft. Visually inspect the commutator for excessive wear and overheating. Replace as necessary. 6. Visually inspect the brake surfaces for excessive wear. Remove any RTV Silicone sealant that may be present on the friction disc, cover, or commutator end head. Replace brake assembly (11) if necessary. 7. Visually inspect the wire harness (8) for frayed insulation, loose terminals, or other damage. Replace as necessary. 3. Make sure the brush box assembly (5) is tight on the commutator end head. Replace brush box assemblies in the commutator end head if they are physically damaged or brush holders are loose on the brush plate. 4. Visually inspect the frame and field assembly (1) for overheating or other signs of damage. Check all wiring to insure that the insulation is in good condition. Verify that pole screws are torqued to 250-300 in-lb [28.2-33.9 N-m]. Verify field resistance using a suitable ohmmeter per the appropriate motor specification. Verify that the field is electrically isolated from the frame using a dielectric tester. Replace as necessary. 4-16 – JLG Lift – 3121222 SECTION 4 - BASE COMPONENTS Drive Motor - Reassembly motor aligning wires with groove in commutator end head. Secure brake assembly to commutator end head using 3 bolts and apply small bead of RTV Silicone sealant around wires between friction disc and commutator end head and in notch in friction disc. (See Figure 4-5.) 1. After inspection and servicing, reassemble the wiring in the commutator end head (9) as originally found. Ensure the wiring does not contact metal parts and that it allows the brushes to move unrestricted in the holders. Motor terminals must be assembled as shown (See Figure 4-8.). Torque bottom terminal nut to 110-140 in-lb [12.4-15.8 N-m]. 7. Install wire harness (8) to motor by connecting the field and brake connectors and securing the armature terminals to the terminal studs. Refer to Figure 4-7. for proper connections. Motor terminals must be assembled as shown (See Figure 4-8.). Always secure the bottom nut with a wrench as you tighten the top nut. Torque top nut to 90-110 in-lb [10.2-12.4 N-m]. 2. After the motor has been disassembled, it is recommended that new bearings be installed because bearings may have been damaged during removal. Although the bearings may appear and feel good, the bearing races could be "brinelled" (races or balls deformed) and may exhibit noise and vibration problems or fail within a relatively short period of service. Press a new bearing into the commutator end head, pressing on the outer race only. (See Figure 4-9.) Replace the snap ring (6) in the snap ring groove. 3. Press the armature (2) commutator end into the commutator end head and bearing assembly, carefully supporting the inner-race of the bearing. (See Figure 4-9.). Figure 4-8. Motor Terminal Assembly 8. Remove manual release screws from brake assembly. Apply new o-ring (13) and affix cover (15) to motor using the 2 manual release screws. A small dab of RTV Silicone sealant may be used to secure the o-ring into the o-ring groove in the cover to aid in assembly. 4. Carefully release the brush springs (4) allowing the brushes to contact the commutator. Make sure brush shunts do not interfere with spring movement. 5. Assemble the commutator end head to the frame and field assembly (1) and tighten the screws to 120-140 in-lb [13.6-15.8 N-m]. Make sure to align the field connection with the notch in the commutator end head. Seal wires where they exit from commutator end head with a small amount of RTV Silicone Sealant. 6. Align wires from brake assembly (11) into notch in friction disc (10). Install both items onto shaft of 9. Assemble strain relief bushing (14) around jacket of wire harness and slide into slot in cover. 10. Align cover plate (12) with groove in frame and field and affix using 2 screws. 11. Reinstall motor per instructions - See Page 4-28. Figure 4-9. Bearing Replacement Procedure 3121222 – JLG Lift – 4-17 SECTION 4 - BASE COMPONENTS Main Gear Box Disassembly Main Gear Box isassembly 1. Using a screwdriver, pry the end of the Retaining Ring (19) out of the groove in the Hub Subassembly, then grasp the loose end of the Retaining Ring (19) with pliers and pull the rest of the way out. 2. Remove Cover (11). Thrust Washer (21) should remain in the inner counterbore of the Cover (11) when removed. NOTE: To remove the cover the motor must be removed. Slide a rod through the motor shaft hole and gently tap with a rubber hammer to force the cover out. 3. Remove Input Sun Gear (4). 4. Remove Input Carrier Subassembly. 5. Remove Cover (11) O-ring (20). 6. Remove Input Ring Gear (3). NOTE: The Input Ring Gear (3) is held in with a press fit on its outside diameter. Insert jacking screws (1/4-20UNC, grade 8) with at least 1.5 inches of thread length into each of the three tapped holes to force the ring gear out. Be sure and alternate between the jacking screws to keep the ring gear from becoming misaligned in the bore. The screws will push against the outer race of the main bearing. This bearing will have to be replaced afterwards. 7. Using a screwdriver, remove Spiral Retaining Ring (27). 8. Pull Hub Subassembly off of the Spindle (1) Subassembly. 4-18 – JLG Lift – 3121222 SECTION 4 - BASE COMPONENTS Input Carrier Disassembly Input Carrier Disassembly 1. Remove Retaining Rings (18) from each of the three Planet Shafts (6). NOTE: Do not overstress these Retaining Rings when removing them. 2. Remove Thrust Plate (23). 3. Remove Thrust Washer (25) from each Planet Shaft (6). 4. Slide each Input Planet Gear (5) off the Planet Shaft (6). 5. Press out Bushing (26) from the bore of each Planet Gear (5). Bushings cannot be reused when removed. 6. Remove the other Thrust Washer (25) from each Planet Shaft (6). 7. Remove Retaining Ring (24) from Output Sun Gear (8). 8. Slide Output Sun Gear (8) out from the center of the Input Carrier (7). 9. Remove the three Planet Shafts (6) from the Input Carrier. NOTE: 3121222 The Planet Shafts (6) are held in with a press fit. To avoid damage to the parts, use an arbor or hydraulic press to remove the Planet Shafts (6). – JLG Lift – 4-19 SECTION 4 - BASE COMPONENTS Hub - Disassembly Hub Disassembly 1. Remove Main Wheel Bearing (14). NOTE: This part is held in the hub with a press fit. To remove have the hub setting seal side up. Use a plate or rod with a large enough diameter push in the inner race of the bearing. Apply force to the push the bearing out. This bearing will need to be replaced upon reassembly. 2. Remove main Lip Seal (16). NOTE: 4-20 This Lip Seal (16) is also held in with a press fit. Remove the Lip Seal only if the hub or seal needs to be replaced. The Lip Seal will most likely become damaged during removal. Try not to damage the hub bore. – JLG Lift – 3121222 SECTION 4 - BASE COMPONENTS Spindle Disassembly Spindle Disassembly 1. Place unit on bench with Planet Gears (9) facing up. 2. Remove three Output Planet Shafts (10) NOTE: These Planet Shafts are held in with a press fit. Use the tapped hole in the end of the pin in conjunction with a slide hammer or similar tool to remove them. 3. Remove the Output Planet Gear (9), Thrust Washer (25), and Tanged Washer (32) out each of gear "window" of the Spindle (1). NOTE: The Output Planet Gears (9) are a very similar size to the Input Planet Gears (5), tag or label the Planet Gears to avoid confusion. 4. Press out Bushing (26) from the bore of each Planet Gear (9). Bushings cannot be reused when removed 5. Use appropriate tool to remove the shaft bearing Retaining Ring (28). 6. Remove the shaft Ball Bearing (15) from the center bore. 7. Press out the Motor Shaft Seal (17) from the center bore. 8. Remove the Main Bearing (14) from the outside diameter of the Spindle (1). NOTE: This bearing is held in with a press fit. You will need to pry against the Spindle (1) to remove it. A new bearing should be used when the unit is reassembled. 9. Press out the Main Bushings (12) at the top of the Spindle (1) neck. 3121222 – JLG Lift – 4-21 SECTION 4 - BASE COMPONENTS Spindle Sub-Assembly Spindle Sub-Assembly 1. Using the appropriate pressing tool (T-207925), press in the 2 Main Bushings (12) in the upper bore of the Spindle (1). The lower bushing needs to flush with the bottom of the bore and the upper bushing needs to be flush with the bottom of the bore. 2. Using the appropriate pressing tool (T-182377), press on Main Bearing (14) until it is fully seated. 3. Insert the Motor Shaft Bearing (15) into the center bore of the Spindle (1). The bearing is a slight slip fit, but it may require some press to assemble if the bearing becomes misaligned. 4. Retain the Motor Shaft Bearing (15) installing Spiral Retaining Ring (28) into groove in Spindle (1). 5. Use the Output Planet Pin (10) as a pressing tool to install the Planet Bushing (26) into the bore of each Planet Gear (9). The shaft will help guide the bushing into the bore as well as prevent damage from the press. 6. Place Tanged Thrust Washer (32) into each planet "window" of the Spindle (1). Make sure the tang sits in the cast groove on the inside of the window. 7. Place a Thrust Washer (25) onto the Output Planet Gear (9). Line up the bores as best as you can. Use grease to hold the Thrust Washer in place. 8. Slide the Output Planet Gear (9) into the window with the Tanged Thrust Washer (32) until the bores line up. 9. Insert an Output Planet Shaft (10) into the Planet Shaft hole of the Spindle (1) and through the bores of the Thrust Washers (25) & (32) and the Planet Gear (9). 10. Before pressing the Output Planet Shaft (10) into the Spindle (1), make sure the gear spins freely. (continued next page) 4-22 – JLG Lift – 3121222 SECTION 4 - BASE COMPONENTS 11. Press the Output Planet Shaft (10) into the Spindle (1) until it bottoms out. Make sure the Output Planet Gear (9) turns freely after the Planet Shaft is pressed in. 12. Repeat Steps 5-11 for the other two Output Planet Gears (9). 13. Turn the Spindle (1) over so that the carrier end is down. 14. Using a flat plate or rod, press the Motor Shaft Seal (17) into the center bore so that it is flush with the face of the Spindle (1). 3121222 – JLG Lift – 4-23 SECTION 4 - BASE COMPONENTS Hub Sub-Assembly Hub Sub-Assembly 1. Put Hub (2) on a table with the tapped holes facing down. 2. Using a flat plate in conjunction with a pressing tool, press in the Seal (16) so it is flush with the edge of the hub. NOTE: NOTE: The Seal has a thin outer shell that can be easily damaged if not installed with care. It is a good idea to start the Seal into the bore with a rubber mallet before pressing. 3. Flip the Hub (2) over 4. Using the appropriate pressing tool (T-174356), press the Main Bearing (15) into the bore until it bottoms out. 4-24 – JLG Lift – 3121222 SECTION 4 - BASE COMPONENTS Input Carrier Sub-Assembly Input Carrier Sub-Assembly 1. Use the Input Planet Shaft (6) as a pressing tool to install the Planet Bushing (26) into the bore of each Planet Gear (5). The shaft will help guide the bushing into the bore as well as prevent damage from the press. 2. Press three Input Planet Shafts (6) into the three holes of the Input Carrier (7). The head of the Input Planet Shaft (6) needs to sit flush in the counterbore of the Input Carrier (7) hole 3. Insert Output Sun Gear (8) into the splined bore of the Input Carrier (7). The gear tooth end of the Output Sun Gear (8) should protrude in the opposite direction of the Input Planet Shafts (6). 4. Using retaining ring pliers, install the Retaining Ring (24) into the groove of the Output Sun Gear (8). Make sure that the Retaining Ring (24) is correctly seated in the groove and that the Output Sun Gear (8) cannot be pulled out of the Input Carrier (7). 5. Place a Thrust Washer (25) on each side of the Input Planet Gear (5). Line up the bores as well as you can visually. Additional grease may help hold everything together. 6. Place the Input Planet Gear (5) and Thrust Washers (25) onto the Input Planet Shaft (6) sticking out from the Input Carrier (7). 7. Repeat 5 & 6 for the other 2 Planet Gears. 8. Put the Thrust Plate (23) onto the three Input Planet Shafts (6). Use the three holes on the innermost bolt circle. The other three holes are for a different gear ratio. 9. Using the appropriate retaining ring pliers put a Retaining Ring (18) into the groove of each Input Planet Shaft (6). NOTE: 3121222 Do not overstress the Retaining Rings (18). – JLG Lift – 4-25 SECTION 4 - BASE COMPONENTS Main Gear Box Sub-Assembly Main Gear Box Sub-Assembly 1. Inspect seal surface of Spindle (1). Remove any debris that may be present. 2. Apply a coating of grease to the Lip Seal (not shown) in the Hub Subassembly. 3. Place Spindle (1) Sub-Assembly on table with carrier side up. 4. Carefully install the Hub Subassembly (seal side down) onto the Spindle (1). This installation should be a slip fit and takes place in 3 stages. 5. Stage 1: The hub slides together until the gear teeth of the hub hit the gear teeth of the 3 output planets. 6. Stage 2: Find the Planet Gear that is tight and turn it until you feel it go into mesh with the hub gear teeth, apply slight downward pressure to the hub and then find the next gear that is tight and do the same. 7. Stage 3: Once all the Planet Gears are in mesh apply pressure to the hub, it should push on the rest of the way. 8. Install Retaining Ring (27) into the groove on the OD of the Spindle (1) carrier. This is a Spiral Retaining Ring so it will not require pliers. You will need to pull the Retaining Ring (27) apart and work it into the groove. (continued next page) 4-26 – JLG Lift – 3121222 SECTION 4 - BASE COMPONENTS 9. Using the appropriate pressing tool (T-174356), press in the Input Ring Gear (3) into the bore of Hub Subassembly. NOTE: Do not use excessive pressing force because it will be reacted by the main wheel bearings. 10. Install the Input Carrier Subassembly into mesh. The Output Sun Gear (8) portion of the Input Carrier Subassembly will mesh with the Output Planet Gears (9) and the Input Planet Gears (5) mounted on the Input Carrier Subassembly will mesh with the Input Ring Gear (3). 11. Install the Input Sun Gear (4) into the area between the three Input Planet Gears (5). 12. Apply a coating of grease to the Cover (11) O-ring (20) and install it into the o-ring groove of the Hub Subassembly. NOTE: It may be helpful to stretch the O-ring (20) out prior to assembly to avoid pinching or shearing when the Cover (11) is assembled. 13. Apply Loctite 380 or 480 glue to Cover Thrust Washer (21) and place it in the center counter bore of the Cover (11) so that the steel face of the washer is out of the bore. NOTE: Make sure that both the Cover Thrust Washer (21) and the Cover (11) have good clean surfaces for the Loctite to properly adhere. 14. Center the Cover (11) in the hub bore so that the "JLG" logo is up. Push it into the bore. 15. Install the Cover Retaining Ring (19) into the groove of the Hub Sub-assembly. 3121222 – JLG Lift – 4-27 SECTION 4 - BASE COMPONENTS Motor Assembly Motor Assembly 1. Insert motor (13) into back of the gearbox. Motor will pilot on the 4 bosses in the gearbox. Try to keep the end of the motor shaft from causing damage to the lip seal in the gearbox. NOTE: The motor may need to be rotated to line up the sun gear splines with the motor shaft splines. 2. Install the 2 Motor Mounting Bolts (M7) and Washers (M8). Tighten to 9-11 ft-lbs. 3. Connect the end of the power cable to the power controller, route cable per instruction in Figure 4-3. 4. Fill the gearbox with oil, See Oil Type & Capacity on Page 4-12. 4-28 – JLG Lift – 3121222 SECTION 4 - BASE COMPONENTS 4.9 HYDRAULIC PUMP/MOTOR/VALVE ASSEMBLY - SERVICE PROCEDURE Refer to Section 3.6, PUMP/LIFT/MAST - Theory of Operation for more detailed information on Pump/Motor/Valve System. Common Difficulties The following difficulties can be examined using the JLG Analyzer, a voltmeter, and simple hand tools. Unless otherwise noted, the Control System shall be energized in Ground Mode during testing. For a convenient Ground Reference, place the black meter lead on the negative post of the left battery in the left-side battery compartment. The vehicle should be placed on a firm, level surface for all analysis. 1. Ground Module Interlocks There are a variety of interlocks that prevent Lift Up due to system events (Tilted, Elevation Angle Sensor Not Calibrated, etc). Before investigating Pump System issues, examine the JLG Analyzer's HELP Menu while attempting to Lift Up from Ground Mode. Refer to Section 5 for explanations of the Analyzer Help Messages. After ensuring there is not an Open-Circuit between the +B Terminal and Pump Motor Positive Terminal, check that the voltage measured between the Pump Motor Negative Terminal and Ground Reference is 24V. If not, examine the issues within Open-Circuit Pump Motor. This voltage should ramp to approximately 0V when Lift Up is operated from Ground Mode. If not, examine the cable between the terminal and the Power Module compartment (P Terminal). Inspect crimps for corrosion and ensure that bolted connections are tight. Ensure that the cable is not crushed where it passes between the frame side sheets and the cylinder assembly. 5. Open-Circuit Pump Motor This issue will allow the vehicle to drive, but Lift Up and Steer Functionality will be lost and the Pump Motor will not operate. Under DIAGNOSTICS PUMP, the JLG Analyzer will show PUMP PWM 100% and PUMP CUR 0.0A when Lift Up is operated from Ground Mode. The Power Module executes a self-test during every power-up to ensure proper functionality. If a Diagnostic Issue is detected, the Power Module will not energize the Line Contactor. Instead, it will flash the Green LED. Since these issues may impact both the Traction and Pump Systems, please refer to the section for Power Module Diagnostics. Pull the Main Battery Disconnect to completely deenergize the Control System. Next, detach the cable from Pump Motor Positive Terminal. Using a voltmeter set for resistance measurement (Ohms), ensure that the resistance between the Pump Motor Positive and Negative Terminals is less than 2 Ohms. If not, examine the pump motor for worn brushes or broken terminals. After examination, re-connect the Pump Motor Positive Terminal and the Main Battery Disconnect. 3. Open-Circuit between +B Terminal and Pump Motor Positive Terminal 6. Short-Circuit between Pump Motor Positive and Negative Terminals This issue will allow the vehicle to drive, but Lift Up and Steer Functionality will be lost and the Pump Motor will not operate. Under DIAGNOSTICS PUMP, the JLG Analyzer will show PUMP PWM 100% and PUMP CUR 0.0A when Lift Up is operated from Ground Mode. This issue will allow the vehicle to drive, but Lift Up and Steer Functionality will be lost and the Pump Motor will not operate. Under DIAGNOSTICS PUMP, the JLG Analyzer will show an erratic reading for PUMP PWM % and PUMP CUR will hover around 150A when Lift Up is operated from Ground Mode. Pull the Main Battery Disconnect to completely deenergize the Control System. Next, detach both Pump Motor Terminals and insulate them independently. Re-connect the Main Battery Disconnect and re-try Lift Up. If the same symptoms persist (erratic PUMP PWM%, PUMP CUR around 150A), examine the cabling between the Pump Motor and Power Module compartment for a short-circuit (most likely near area where cylinder retracts between frame side sheets or near pot-hole mechanism). If the symptoms change, suspect a short-circuited (or mechanically frozen) pump motor. A clamp-on ammeter (set for 200A DC) can be placed on either Pump Motor Cable for verification. During Lift Up, the ammeter will read approximately 150A. 2. Power Module Diagnostic Issues As shown in the diagram, the voltage measured between the Pump Motor Positive Terminal and Ground Reference should be 24V. If it is not, examine the cable between the terminal and the Power Module compartment. Inspect crimps for corrosion and ensure that bolted connections are tight. Ensure that the cable is not crushed where it passes between the frame side sheets and the cylinder assembly. 4. Open-Circuit between Pump Motor Negative Terminal and P Terminal This issue will allow the vehicle to drive, but Lift Up and Steer Functionality will be lost and the Pump Motor will not operate. Under DIAGNOSTICS PUMP, the JLG Analyzer will show PUMP PWM 100% and PUMP CUR 0.0A when Lift Up is operated from Ground Mode. 3121222 – JLG Lift – 4-29 SECTION 4 - BASE COMPONENTS Figure 4-10. Main Electrical Power Connections - (1600346 - SEVCON Power Module) 1. 2. 3. 4. 5. 4-30 Right Side Batteries Left Side Batteries Power Module Main Power Contactor Relay Hydraulic Pump Motor 6. 7. 8. 9. 10. – JLG Lift – Right Drive Motor Left Drive Motor Battery Power Quick-Disconnect To Battery Charger To Charger or Inverter (Option, If Equipped) 3121222 SECTION 4 - BASE COMPONENTS 6 A1 A2 A1 A2 4 3 Figure 4-11. Main Electrical Power Connections - (1001092456 - ZAPI Power Module) 1. 2. 3. 4. 5. 3121222 Right Side Batteries Left Side Batteries Power Module Main Power Contactor Relay Hydraulic Pump Motor 6. 7. 8. 9. 10. – JLG Lift – Right Drive Motor Left Drive Motor Battery Power Quick-Disconnect To Battery Charger To Charger or Inverter (Option, If Equipped) 4-31 SECTION 4 - BASE COMPONENTS Pump Components Hydraulic System Pressure Check Port The following is a complete disassembly/assembly of the machines’ pump/motor/valve assembly. NOTE: During reassembly of the pump/motor assembly, lubricate all seals and o-rings with JLG recommended hydraulic fluid. Also keep all internal metal parts clean and coated with hydraulic fluid to prevent surface corrosion. JLG recommends replacing all seals and o-rings when disassembling and reassembling the pump/ motor unit. The port for hydraulic system lift pressure check is provided on the valve body of the hydraulic pump assembly as shown in the following illustration. Hydraulic Pressure Check Port 1. Pump Valve Body 2. Pressure Check Port Shown with Optional Fitting Figure 4-12. Hydraulic Pump - Hydraulic Line and Electrical Connections 1. 2. 3. 4. 5. 4-32 Steer Right - Hyd. Line Steer Left - Hyd. Line Cyl. Lift-Up - Hyd. Line Cyl. Return - Hyd. Line Cylinder Lift-Up Solenoid 6. 7. 8. 9. Steer Right Solenoid Steer Left Solenoid Pump Motor Pos (+) Pump Motor Neg (–) – JLG Lift – 3121222 SECTION 4 - BASE COMPONENTS Hydraulic System Pressure Settings Perform final hydraulic pressure setting with oil at normal operating temperature. If pressure is set when cold, function may not operate properly after oil has warmed. Turning relief adjustment screw clockwise - increases pressure, turning adjustment screw counterclockwise decreases pressure. DO NOT EXCEED MAXIMUM PRESSURE SETTINGS. (See Figure 4-13.) Table 4-2. Hydraulic System - Pressure Settings 1230ES MAXIMUM PRESSURE SETTING Main 1600 PSI (110 Bar) Steer - Left/Right 1250 PSI (86 Bar) 1. To check the lift pressure, attach pressure gauge to the check port on top of the valve body. To check steer pressure remove either the left or right steer hose fitting on the valve body and plumb a pressure gauge at that point. 2. Power up machine, warm up oil to normal operating temperature. 3. Check initial pressure for each function, lift and steering. 4. Adjust pressure relief according to settings shown in Table 4-2. Lift pressure setting must be adjusted to raise the maximum capacity allowed in the platform with the mast fully extended. Do not exceed the MAXIMUM pressure settings. Table 4-3. Hydraulic Pump - Solenoid Specifications Component Coil Rating Lift-Up Solenoid 28 Ohm Steer - Left/Right Solenoid 33 Ohm Figure 4-13. Relief Pressure Setting Locations 1. Pump Valve Body 2. Steering Right Pressure Relief 3. Steering Left Pressure Relief 3121222 4. Main Pressure Relief 5. Pressure Gauge Check Port – JLG Lift – 4-33 SECTION 4 - BASE COMPONENTS Pump/Motor/Valve Assembly - Removal/Installation Hydraulic Pump/Valve/Tank - Installation 1. Pump/Valve/Tank Assembly 2. Pump Assy. Mounting Screw/Nuts 3. Static Strap 4. Valve Bank Solenoid Connections 5. Steer/Lift-Up/Return Hydraulic Lines 6. Pump Motor Power Connection Terminals (a) NOTE: (a) Apply dielectric grease to terminals during installation of cables. Torque nuts to 5 - 7 ft. lb. (7 - 9 Nm) BE CERTAIN THE MAST IS FULLY LOWERED BEFORE REMOVING ANY HYDRAULIC LINES FROM THE PUMP UNIT. WEAR PROTECTIVE GEAR WHEN WORKING AROUND PRESSURIZED HYDRAULIC LINES. REMOVE CONNECTIONS CAREFULLY AND CAP ALL LINES. 1. Disconnect machine electrical power using the quick disconnect on the left side batteries. 2. Disconnect the pump motor power cables from the power terminals on the side of the motor housing. 4-34 – JLG Lift – 3. Label and then unplug the harness connectors from the lift-up, and steer solenoids on the pump valve bank assembly. 4. Label and carefully disconnect the hydraulic lines from the top of the valve bank assembly. 5. Finally remove the two (2) mounting screws and nuts from pump mounting plate under the pump and remove the pump/motor/valve assembly from the machine. 3121222 SECTION 4 - BASE COMPONENTS Hydraulic Pump/Valve/Tank - Assembly 1. 2. 3. 4. 5. 6. 7. 8. 3121222 Pump Motor Assembly Motor to Pump Coupler Pump to Frame Mounting Flange Pump Valve Body Tank Oil Ring Seal Hydraulic Pump Pick-Up w/Filter Screen Return Flow Filter/Diffuser 9. 10. 11. 12. 13. 14. 15. 16. – JLG Lift – Tank Tank Breather Cap Main Pressure Relief Left Steer Pressure Relief Right Steer Pressure Relief Lift/Steer Valve Body Lift Selenoid Valve Left/Right Steer Selenoid Valve 4-35 SECTION 4 - BASE COMPONENTS Motor Cover/Motor Installation for wear, replace if necessary. Once complete, reassemble for operation, do not overtighten the motor cover bolts into the aluminum valve body, 8 Nm (70 in. lb.). DISCONNECT THE BATTERIES BEFORE PERFORMING THESE PROCEDURES. This procedure requires removing the pump to frame mounting bolts and nuts and rotating the pump assembly horizonally far enough to allow removal of the pump motor cover. No pump connections, hyraulic or electrical need be disconnected. Motor Brush Installation Once pump motor cover has been removed, inspect the rotor commutator for excessive wear before installing a new brush set. Brush Installation 1. Brush Holder 2. Brush 3. Brush Terminal Screw Motor Cover/Motor Installation 1. Motor Assembly 2. Motor Cover 3. Motor Assembly Screws (a) 4. Disassembly Marks (b) 4. Brush Tension Spring 5. Commutator on Armature 6. Motor Cover Bearing Installation the same for all four (4) brush assemblies. NOTE: (a) When reassembling, DO NOT OVERTIGHTEN motor assembly screws (3), torque is 8 Nm (70 in. lb.). (b) Place marks on body to help with reassembly alignment. Preventative Maintenance - Brush Wear - Dust Removal Procedure Due to a possible build-up of dust from brush wear inside the pump motor cover around the brushes and armature under heavy usage. It is recommended per the Preventative Maintenance and Inspection Schedule - Section-2 (Table 2-2), to perform this dust cleaning task on an annual basis. Note: Clean the rotor commutator and brushes with a non-conductive electrical cleaner before assembly. Attach the brush terminal end to the terminal post using the terminal screw (3), then push the brush (2) down into it’s holder (1), slide the tension spring (4) onto the top of the brush. After final assembly of the brushes check that all brush terminal screws are tight and the brush springs are positioned properly before installing the motor cover and motor to the pump valve body. DO NOT OVERTIGHTEN THE PUMP MOTOR ASSEMBLY SCREWS INTO THE ALUMINUM VALVE BODY. (8 NM OR 70 IN. LB.) Follow the procedure show above for motor cover removal. Once the motor cover is removed, blow any accumulated brush dust from inside the cover and around the brushes, and armature commutator. Check brushes 4-36 – JLG Lift – 3121222 SECTION 4 - BASE COMPONENTS 4.10 POT HOLE PROTECTION SYSTEM Pot-Hole-Protection System Components (Some components hidden for illustrative purposes only.) 1. 2. 3. 4. PHP Actuator (Platform) Right/Left PHP Limit Switch Right Side Counterbalance Link Left Side Counterbalance Link 5. 6. 7. 8. PHP Link Plate Right PHP Bar Left PHP Bar Spacer Tube and Torsion Springs PHP Pin and Flange Bearing Installation 1. PHP Link Plate Pin 3121222 2. Flange Bearing 3. PHP Counterweight Link – JLG Lift – 4. Retaining Ring 4-37 SECTION 4 - BASE COMPONENTS 1 2 3 4 5 6 7 8 9 10 Actuator - Limit Switch - Counterweight Installation (Machines Prior to S/N-0130013258) 1. 2. 3. 4. 5. Actuator Attach Screws/Nuts PHP Actuator Assembly Limit Switch (a) Limit Switch Mounting Block (b) Limit Switch Attach Screws 6. 7. 8. 9. 10. Torsion Spring (c) Tube Spacer Counterbalance Link Mounting Pin Pin Retaining Ring Left Side Countbalance Link NOTE: Assembly same for both the left and right side PHP components. (a) When the pothole is in the deployed position (bars down), adjust limit switch plunger just past "click", re-tighten mounting block screws to frame. (b) Apply Loctite #222 to mounting block screw threads on final tightening. (c) Hook spring through slot in frame and the other end around the counterweight lug, then slide the attach pin through the frame, spring, counterweight, tube spacer, install the pin retaining ring. 4-38 – JLG Lift – 3121222 SECTION 4 - BASE COMPONENTS 1 2 3 4 5 6 7 8 9 10 Actuator - Limit Switch - Counterweight Installation (Machines S/N-0130013258 to Present) 1. 2. 3. 4. 5. Actuator Attach Screws/Nuts PHP Actuator Assembly Limit Switch (a) Limit Switch Mounting Bracket (b) Limit Switch Attach Screws 6. 7. 8. 9. 10. Torsion Spring (c) Tube Spacer Counterbalance Link Mounting Pin Pin Retaining Ring Left Side Countbalance Link NOTE: Assembly same for both the left and right side PHP components. (a) When the pothole is in the deployed position (bars down), adjust limit switch plunger just past "click", re-tighten mounting block screws to frame. (b) Apply Loctite #222 to mounting screw threads on final tightening. (c) Hook spring through slot in frame and the other end around the counterweight lug, then slide the attach pin through the frame, spring, counterweight, tube spacer, install the pin retaining ring. 3121222 – JLG Lift – 4-39 SECTION 4 - BASE COMPONENTS NOTES: 4-40 – JLG Lift – 3121222 SECTION 5 - CONTROL COMPONENTS SECTION 5. CONTROL COMPONENTS 5.1 CONTROL COMPONENTS OVERVIEW Control Components Overview 1. 2. 3. 4. Platform Control Station Ground Control Station Manual Brake Release Switch Battery Charger or Inverter/Charger 3121222 5. 6. 7. 8. Warning Beacon Right Side Batteries Ground Alarm Power Module – JLG Lift – 9. Main Contactor Power Relay 10. Elevation Cut-Back Sensor 11. Left Side Batteries 5-1 SECTION 5 - CONTROL COMPONENTS 5.2 CONTROL COMPONENTS - SERVICE Ground Alarm Main Power Contactor Relay The main power contactor relay is located on the bulkhead on the right-front, inside the compartment as shown following. Ground Alarm - Installation 1. Ground Alarm Note: Remove the charger/step-plate cover on the rear of the machine, mounted just above the battery charger. Main Power Relay - Installation 1. Main Power Relay 2. Attach Screws 2. Attach Screws Warning Beacon - Frame Mounted Note: See (See Figure 5-1.) for electrical wiring connections. Elevation Limit Switch Elevation Limit Switch - Installation 1. Attach Screws 2. Elevation Limit Switch 3. Switch Mounting Block 4. Mounting Holes in Frame 5. Attach Nuts Note: Located on right-front of machine frame behind drive wheel assembly next to mast. 5-2 Warning Beacon - Installation 1. Beacon Assembly 2. Attach Screws Note: Located on base frame just above the left rear wheel. – JLG Lift – 3121222 SECTION 5 - CONTROL COMPONENTS Manual Brake Release Switch AC Power - Breaker Box Installation (CE Specification Machines ONLY) The AC power breaker box is wired inline on the power circuit of the AC receptacle box mounted in the platform. See illustration below for mounting instructions, for Information on the various plugs types and specific wiring for each plug type see Section 9.12, AC POWER RECEPTACLES AND WIRING (PLATFORM) - CE SPEC MACHINES ONLY in Section 9 of this manual. Manual Brake Release Switch - Installation 1. Release Switch 2. Washer 3. Nut 4. Charger/Step Plate Cover Note: Located on rear of machine, under charger/step plate cover. 7 8 6 5 4 3 1 2 AC Power - Breaker Box - Installation (CE Specification Machines ONLY) 1. 2. 3. 4. Cover Plate Mounting Screws Cover Plate Breaker Assembly Mounting Screw Plugs 5. 6. 7. 8. Box to Frame Mounting Screws Breaker Box Base Breaker Box Shield Box to Frame Mounting Screw - Nuts and Washers Note: Located on left rear of machine, just above the machine nameplate. 3121222 – JLG Lift – 5-3 SECTION 5 - CONTROL COMPONENTS 5.3 TRACTION SYSTEM Refer to Section 3.5, TRACTION - Theory of Operation for more detailed information on Traction System. Common Traction System Difficulties 1. Ground Module Interlocks There are a variety of interlocks that prevent Drive due to system events (Elevated but Pot-Hole Mechanism Failed to Deploy, etc.). Before investigating Traction System issues, examine the JLG Analyzer's HELP Menu while attempting to Drive from Platform Mode. Refer to the Section 5 for explanation of the JLG Analyzer Help Messages. 2. Power Module Diagnostic Issues The Power Module executes a self-test during every power-up to ensure proper functionality. If a Diagnostic Issue is detected, the Power Module will not energize the Line Contactor. Instead, it will flash the Green LED, please refer to Power Module Diagnostics in Section 5.4, POWER MODULE - P/N-1600346. To find the source of the difficulty, pull the Main Battery Disconnect and disconnect the Armature Wiring (heavy red and black conductors) from the suspected drive motor leading to the Power Module's M1 and M2 Terminals. Re-test the traction function. If the remaining drive motor is able to reach full speed (and Armature Current is less than 50A), the drive motor that has been disconnected is fault. Investigate for crushed and burned cables. Note if the drive motor smells burned. 5. Open-Circuit Motor Field This issue will allow the vehicle to drive very slowly or not at all. Rapid motor overheating (both motors) will result. This issue will allow the vehicle to drive, but one motor will handle the entire traction load. Motor overheating and excessive tire wear will result, along with a lack of traction control. This situation can be detected by elevating the vehicle's front wheels and engaging drive (platform stowed). Under DIAGNOSTICS - TRACTION, the JLG Analyzer's ARM CUR display (Armature Current Reading) will hover around 350A. The FLD CUR display (Field Current Reading) will be erratic or low (less than 10A). Neither wheel will rotate at normal speed, but it will be possible to rotate the drive wheel by hand. This situation can be detected by elevating the vehicle's front wheels and engaging drive (platform stowed). Under DIAGNOSTICS - TRACTION, the JLG Analyzer's ARM CUR display (Armature Current Reading) should be less than 50A. One wheel will rotate at full speed, while the other will not rotate at all. The Power Module's self-diagnostics cannot detect this fault unless both armatures are open-circuit. To find the source of the difficulty, pull the Main Battery Disconnect and disconnect the Field Wiring (two blue wires leading to F1 and F2 Terminals) from the Power Module. Using a voltmeter set for resistance scale (Ohms), investigate if there is a short-circuit (less than 5 Ohms) between the two blue wires (this is normal). If not, investigate for improper crimps, burned cables, damaged cables, or damaged field windings. 3. Open-Circuit Motor Armature To find the source of the difficulty, pull the Main Battery Disconnect and investigate the wiring pathways from the Power Controller's M1 and M2 terminals to the armature on the motor that does not rotate. Investigate for issues like improper crimps, loose terminals, and corrosion. 4. Short-Circuit Motor Armature This issue will allow the vehicle to drive very slowly or not at all. Rapid motor overheating (one motor) will result. This situation can be detected by elevating the vehicle's front wheels and engaging drive (platform stowed). Under DIAGNOSTICS - TRACTION, the JLG Analyzer's ARM CUR display (Armature Current Reading) will hover around 350A. The FLD CUR display (Field Current Reading) will hover around 40A. Neither wheel will rotate at normal speed, but it will 5-4 be possible to rotate the drive wheel by hand. The Power Module's self-diagnostics cannot detect this fault since the situation appears identical to climbing a steep grade. – JLG Lift – 6. Short-Circuit Brake Release This issue will not allow the vehicle to drive. Rapid motor overheating (both motors) will result. Continued attempts to drive the vehicle may result in armature damage. This situation can be detected by elevating the vehicle's front wheels and engaging drive (platform stowed). Under DIAGNOSTICS - TRACTION, the JLG Analyzer's ARM CUR display (Armature Current Reading) will hover around 350A. The FLD CUR display (Field Current Reading) will hover around 40A. Neither wheel will rotate, and it will be impossible to rotate either drive wheel by hand. The Ground Module cannot detect this fault during power-up or selftest since energizing the brakes could pose a hazard. However, it may detect this issue during Drive (investigate using JLG Analyzer). 3121222 SECTION 5 - CONTROL COMPONENTS Figure 5-1. Main Electrical Power Connections - (1600346 - SEVCON Power Module) 1. 2. 3. 4. 5. 3121222 Right Side Batteries Left Side Batteries Power Module Main Power Contactor Relay Hydraulic Pump Motor 6. 7. 8. 9. 10. – JLG Lift – Right Drive Motor Left Drive Motor Battery Power Quick-Disconnect To Battery Charger To Charger or Inverter (Option, If Equipped) 5-5 SECTION 5 - CONTROL COMPONENTS 6 A1 A2 A1 A2 4 3 Figure 5-2. Main Electrical Power Connections - (1001092456 - ZAPI Power Module) 1. 2. 3. 4. 5. 5-6 Right Side Batteries Left Side Batteries Power Module Main Power Contactor Relay Hydraulic Pump Motor 6. 7. 8. 9. 10. – JLG Lift – Right Drive Motor Left Drive Motor Battery Power Quick-Disconnect To Battery Charger To Charger or Inverter (Option, If Equipped) 3121222 SECTION 5 - CONTROL COMPONENTS To find the source of the difficulty, remove the rear cover from either drive motor. Insert voltmeter leads into the white connector leading to the brake solenoid (yellow and brown wires) and attempt to drive (Platform Mode). The Ground Module will apply approximately 24V to the brake release solenoids (wired in parallel) during drive, but will reduce this voltage in the event of a short-circuit. If this voltage is improper (less than 8V), investigate using resistance measurement (refer to Drive Motor Electrical Evaluation). Suspect damaged cabling, burned cabling, or faulty brake release solenoids. Trace the brake release cabling from the Power Module Compartment to the Ground Module Connector J1-24. 5.4 POWER MODULE - P/N-1600346 1230ES SCISSORS BUILT STARTING IN MID YEAR 2010 REPLACED THE SEVCON POWER MODULE (P/N-1600473) WITH THE ZAPI POWER MODULE (P/N-1001092456). The Sevcon Power Module is located at the front-left side of the machine inside the compartment as shown in Figure 5-3. below. Use the following instructions when removing and installing the power module. 11. Open-Circuit Brake Release This issue will not allow the vehicle to drive. Rapid motor overheating (both motors) will result. Continued attempts to drive the vehicle may result in armature damage. This situation can be detected by elevating the vehicle's front wheels and engaging drive (platform stowed). Under DIAGNOSTICS - TRACTION, the JLG Analyzer's ARM CUR display (Armature Current Reading) will hover around 350A. The FLD CUR display (Field Current Reading) will hover around 40A. It is possible that one wheel may rotate, or neither may rotate (depending on the location of the opencircuit). Listen for the brake release solenoid when activating drive. The Ground Module cannot detect this fault during power-up or self-test since energizing the brakes could pose a hazard. However, it may detect this issue during Drive (investigate using JLG Analyzer). If one wheel rotates, the open-circuit is located in the wiring for that specific drive motor (Power Module compartment or Drive Motor Cable). Investigate for improper crimps, unlatched connectors, damaged cables, or open brake release solenoids (refer to Drive Motor Electrical Evaluation). If neither wheel rotates, the open-circuit is located in the wiring between the Power Module compartment and Ground Module. Using a voltmeter, measure the brake release voltage on either brake connector in the Power Module compartment during drive (should be approximately 24V). Investigate for improper crimps, unlatched connectors, damaged harnessing, or a faulty Ground Module. As an alternative, insert a short piece of wire with a Deutsch Female Crimp directly into Ground Module's J1-24 and measure voltage as a diagnostic measure (eject vehicle harness from that pin). 3121222 Figure 5-3. Power Module - Installation 1. Power Module 2. Mounting Screws Removal 1. Turn off power machine power and disconnect the batteries. NOTE: Note the wire terminal locations when removing the Power Module (See Figure 5-1.). 2. Disconnect all wires from the power module and remove the module mounting bolts, remove module from the machine. Installation – JLG Lift – 1. Be sure that the terminals are oriented as shown. 2. After installing the power module, begin connecting the wires back to the controller. (Reference Figure 51.) 5-7 SECTION 5 - CONTROL COMPONENTS DO NOT OVERTIGHTEN THE TERMINAL BOLTS, OR DAMAGE TO THE UNIT COULD OCCUR. 3. Torque the terminal bolts to 5 ft lb. (7 Nm). 4. After all connections to the power module are made, the battery can be reconnected. 1. RESISTANCE >100K OHMS ALL TERMINALS TO HOUSING. Ensure that there is an open-circuit between all terminals of the Power Module and the module's aluminum housing. The device is fully potted and all electronics are insulted from the housing. Place the Black meter lead on the housing and use the Red meter lead to probe all terminals. 2. RESISTANCE < 2 OHMS BETWEEN +B AND M1. Ensure that there is a short-circuit between the +B and M1 Terminals. Internally, there is a low-impedance current measurement shunt for the Armature portion of Traction. Place the Red meter lead on +B, and the Black meter lead on M1. 3. RESISTANCE >1M OHMS BETWEEN F1 AND -B; F2 AND -B. Ensure that there is an open-circuit between the two Field Terminals (F1 & F2) and -B. Internally, there are MOSFET transistors between these terminals that should be high-impedance when the module is unpowered. Place the Black meter lead on -B and the Red meter lead on F1 / F1. 4. RESISTANCE >1M OHMS BETWEEN F1 AND +B; F2 AND +B. Ensure that there is an open-circuit between the two Field Terminals (F1 & F2) and +B. Internally, there are MOSFET transistors between these terminals that should be high-impedance when the module is un-powered. Place the Black meter lead on +B and the Red meter lead on F1 / F1. Figure 5-4. Sevcon Power Module Terminals 1. 2. 3. 4. 5. B – (battery (–) terminal) 6. F1 (motor field terminal) 7. B+ (battery (+) terminal) 8. P - (pump (–) terminal) 9. Mini-Fit Jr/B-Connector 10. F2 - (motor field terminal) M1 - (motor armature terminal) M2 - (motor armature terminal) DTC Flash Code LED Indicator Unused 5. RESISTANCE >100K OHMS BETWEEN P AND -B. Ensure that there is an open-circuit between the P and the -B Terminals. Internally, there are MOSFET transistors between these terminals that should be high-impedance when the module is un-powered. Place the Black meter lead on -B, and the Red meter lead on P. Note that a measurement of increasing resistance (capacitor charge) is normal, but a persistently low impedance is not. Several basic electrical tests can be performed on the Power Module. Failure of one of these evaluations is significant and may indicate that the device is physically damaged. If a Power Module is suspected to be faulty, thoroughly examine the rest of the system for possible damage. 6. RESISTANCE >1K OHMS BETWEEN M2 AND -B. Ensure that there is an open-circuit between the M2 and -B Terminals. Internally, there are MOSFET transistors between these terminals that should be highimpedance when the module is unpowered. Place the Black meter lead on -B, and the Red meter lead on M2. Note that a measurement of increasing resistance (capacitor charge) is normal, but a persistently low impedance is not. Make all measurements with a voltmeter set to resistance scale (Ohms) (Refer to Section 9 - Figure 9-2., Resistance Measurement). Disconnect the Main Battery Disconnect and all cables from the Power Module during this analysis. Wait 60 seconds after power is disconnected to allow internal charge to dissipate (risk of hazard, improper readings otherwise). 7. RESISTANCE 120 OHMS BETWEEN PINS 10 & 11. Ensure that the resistor that terminates the CANbus is within tolerance between pins 10 and 11 on the 12 position Mini-Fit Jr (Connector "B"). Place the Red meter lead on pin 10, and the Black meter lead on pin 11. The resistance should measure between 110 - 130 Ohms. Power Module Electrical Evaluation 5-8 – JLG Lift – 3121222 SECTION 5 - CONTROL COMPONENTS Power Module Diagnostics The Power Module has the ability to detect many fault scenarios and communicate them to the JLG Analyzer. Useful diagnostic information can also be determined from the Green LED located on the Power Module. 1. OPEN CIRCUIT LINE CONTACTOR (3-1) a. The Power Module's Line Contactor Drive Circuitry passed power-up self-tests, but the Line Contactor did not close when energized. b. May signal an open-circuit between +B and the Line Contactor, a faulty Line Contactor, or an open-circuit between the Line Contactor and the Power Module +B Terminal. c. 4 Flashes on Power Module. b. May indicate that the vehicle is operating in extremely high ambient temperatures, or a faulty Power Module. c. 8 Flashes on Power Module. 6. DRIVING AT CUTBACK -- POWER MODULE CURRENT LIMIT (4-2) a. The Traction portion of the Power Module has reached thermal limit. Allow to cool by waiting for temperature to fall. b. May indicate that the vehicle is operating on excessive grades, or there is a drive motor issue that causes high armature current (brake applied when driving, short-circuited armature, etc). c. 8 Flashes on Power Module. d. Drive, Steer, & Lift Up Prevented. 2. CONTACTOR DRIVER PERMANENTLY OFF (3-1) 7. LIFT UP AT CUTBACK -- POWER MODULE CURRENT LIMIT (4-2) a. The Power Module's Line Contactor Drive Circuitry failed to energize during power-up selftests. a. The Pump portion of the Power Module has reached thermal limit. Allow to cool by waiting for temperature to fall. b. May indicate a faulty Line Contactor, difficulty with Line Contactor coil wiring, or a faulty Power Module. c. No Flash Code on Power Module. b. May indicate that the vehicle's lift function is being used outside duty cycle considerations, or there is a pump motor issue that causes high current (worn brushes, worn commutator, etc). d. Drive, Steer, & Lift Up Prevented. c. 8 Flashes on Power Module. 3. LINE CONTACTOR MISWIRED ON OR WELDED (3-2) 8. BATTERY VOLTAGE TOO LOW - SYSTEM SHUTDOWN (4-4) a. The Power Module's Line Contactor Drive Circuitry passed power-up self-tests, but the Line Contactor was closed at power-up or failed to open when de-energized. a. Battery Voltage momentarily dropped below 14.5V. With a low battery charge, this can occur during heavy current demand due to Drive, Steer, or Lift Up. Recharge batteries or check for damaged batteries. b. May indicate a faulty Line Contactor, difficulty with Line Contactor coil wiring, or difficulty with power wiring. b. May indicate low battery charge, a battery charger issue, or a power wiring issue. c. 4 Flashes on Power Module. c. 7 Flashes on Power Module. d. Drive, Steer, & Lift Up Prevented. d. Drive, Steer, & Lift Up Prevented. 4. CONTACTOR DRIVER PERMANENTLY ON (3-2) a. The Power Module's Line Contactor Drive Circuitry failed to de-energize during power-up selftests. b. May indicate difficulty with Line Contactor coil wiring, or a faulty Power Module. c. No Flash Code on Power Module. d. Drive, Steer, & Lift Up Prevented. 5. POWER MODULE TOO HOT - PLEASE WAIT (4-2) a. The Power Module for Drive, Steer, and Lift Up has reached thermal cutout. Allow to cool by powering down. 3121222 – JLG Lift – 9. BATTERY VOLTAGE TOO HIGH - SYSTEM SHUTDOWN (4-4) a. The Power Module momentarily measured excessively high Battery Voltage (>37.0V) and the Ground Module de-energized the Ignition Relay to protect system devices. This may be due to improper battery charging or incorrect voltage batteries being used. b. May indicate a battery charger issue, wrong battery type is installed, or a faulty Power Module. c. 7 Flashes on Power Module. d. Drive, Steer, & Lift Prevented. 5-9 SECTION 5 - CONTROL COMPONENTS 10. CANBUS FAILURE: POWER MODULE (6-6) a. The control system failed to receive messages from the Power Module. Check wiring at the Ground Control Box and Power Module. Recycle power to clear difficulty. 12. POWER MODULE FAILURE: RANGE ERROR (9-9) a. The Power Module detected an out-of-range or corrupt personality setting. b. Enter Access Level 1 on the JLG Analyzer, reselect Model, and cycle EMS after 5 seconds. May indicate a Power Module issue if it cannot be reset. b. May indicate harness difficulty or a faulty Power Module. c. Resistance between CANH (Power Module Pin 10) and CANL (Power Module Pin 11) should be 60 ohms (+/- 5%) with the Power Module connected. d. Resistance between Power Module Pins 10 and 11 (harness disconnected) should be 120 ohms (+/- 5%). c. 1 Flash on Power Module. 13. POWER MODULE FAILURE: INTERNAL ERROR (9-9) a. The Power Module detected an internal error via self-test. b. May indicate that the Line Contactor Coil is Open-Circuit in Power Module's prior to V1.10, a Power Wiring Issue, or a faulty Power Module. e. 10 Flashes on Power Module. f. Drive, Steer, & Lift Up Prevented. c. 11 Flashes on Power Module. 11. OPEN-CIRCUIT DRIVE MOTOR WIRING (7-7) a. The Power Module detected an error in the Power Wiring (M1, M2, F1 & F2 Terminals) for the Drive Motors. Check power wiring and recycle power to clear difficulty. Alternately, there may be an issue (open field, armature, or brush) with one of the Drive Motors. 14. POWER MODULE FAILURE: CHECK POWER CIRCUITS OR MOSFET SHORT CIRCUIT (9-9) b. May indicate field wiring or winding issues. c. 5 Flashes on Power Module. d. Drive & Steer Prevented. 5-10 PERSONALITY a. The Power Module detected an error in the Power Wiring for the Drive or Pump. Alternately, the Power Module has failed a self-test. b. 3 Flashes on Power Module may indicate a Short-Circuit in the Armature Wiring or a faulty Power Module. c. No Flashes on Power Module may indicate a faulty Power Module. – JLG Lift – 3121222 SECTION 5 - CONTROL COMPONENTS 5.5 POWER MODULE - P/N-1001092456 ZAPI POWER MODULE P/N - 1001092456 Figure 5-5. ZAPI Power Module Location 1. Turn machine power off and disconnect the batteries. 1230ES SCISSORS BUILT STARTING IN MID YEAR 2010 REPLACED THE SEVCON POWER MODULE (P/N-1600473) WITH THE ZAPI POWER MODULE (P/N-1001092456). Table 5-1. ZAPI Power Module Specs 2. Locate and remove the power module from the machine. 3. Note the wire terminal locations when removing the old power module. Operating Voltage ( B+) 14.5 to 40 VDC Maximum Current Limits: Armature Field Pump 4. Disconnect all wire connectors and cables from the old power module and remove it from the machine. 300 A 40 A 180 A 5. When installing the new power module, be sure that the terminals are oriented as shown in Figure 5-5. Standby Current 6. After installing the new power module, begin connecting the wire connectors/cables to the module, refer to Figure 5-2. if necessary. 150 mA Temperature Range: Operating Storage Thermal Limit -40°C to 75°C -40°C to 125°C 75°C to 90°C Switching Frequency 16 kHz 7. Where noted, torque all terminal bolts to torque specifications shown on the front of the module. 8. After all connections to the power module are made, the batteries can be reconnected. The power module is located inside the left side access door as shown in Figure 5-5., ZAPI Power Module Location. Use the following instructions when replacing the power module. 3121222 – JLG Lift – 9. Check for normal machine operation. 5-11 SECTION 5 - CONTROL COMPONENTS ZAPI Power Module Electrical Evaluation "HEALTH" (STATUS LED) INTEGRATED HEALTH INDICATOR The ZAPI Power Module provides a green STATUS LED that shines through the cover to indicate module "health" status. The LED shall be illuminated when the device is powered on. The LED blinks (2Hz) when an internal issue is detected that cannot be repaired by a technician, this will trigger replacement of the device. Table 5-2. Module Terminal Functions 5-12 + BF1 Controller to Main Line Contactor + BF2 Positive Pump Connection +B Left and Right Positive Armature (X7) –B Controll to Negative Battery –T Left and Right Negative Armature (X8) –P Negative Pump Connection F1 To Motor Fields Wired in Series (X9) F2 LT MFR Field Wires (X10) P/N - 1001092456 ZAPI Power Module - "HEALTH" (Status LED) – JLG Lift – 3121222 SECTION 5 - CONTROL COMPONENTS 5.6 GROUND CONTROL MODULE - SERVICE PROCEDURE NOTE: The Ground Control Station supplied with the ZAPI Power Module P/N-1001092456 (production start mid-year 2010) does not require use of the printed circuit board inside the ground control module. However box installation and removal instructions shown are exactly the same as the ground control box which does contain a printed circuit board and is used with previous machines supplied with the SEVCON Power Module. Ground Control Station 2. Remove the four screws where the control cable enters into the control box. (See Figure 5-6., Ground Control Station Assembly) DO NOT ATTEMPT TO DISASSEMBLE THE GROUND CONTROL MODULE IF MACHINE IS STILL UNDER WARRANTY. OPENING THE GROUND CONTROL MODULE WHILE THE MACHINE IS UNDER WARRANTY WILL VOID THE WARRANTY. IF UNDER WARRANTY REQUEST A REPLACEMENT MODULE FROM THE FACTORY. 3. Remove plug and place control box face down on a suitable work bench.. The Ground Control Module allows for field replacement of components internal to the module. Printed Circuit Board (PCB) Replacement NOTE: Anytime the ground control box is removed the tilt sensor must be recalibrated. Refer to Section 7.4, TILT SENSOR CALIBRATION to recalibrate the tilt. 4. Remove the six screws at the back of the ground control and separate. 5. Pull the pin connectors from the printed circuit board. 1. Remove the three bolts at the bottom of the ground control station. 6. Remove the two screws inside the control box that affix the printed circuit board to the control box. 7. Replace the printed circuit board and reassemble the ground control box. 3121222 – JLG Lift – 5-13 SECTION 5 - CONTROL COMPONENTS Figure 5-6. Ground Control Station Assembly 1. Rear Cover 2. Battery LED Circuit Board 3. Main Ground Control Circuit Board - (1600473 Drive Module Only) 4. Front Cover 5. LED Indicator Decal 6. Control Functions Decal 7. Hourmeter 8. Blank Plug 9. Unused 10. Controls/Indicators Mounting Plate 5-14 – JLG Lift – 11. 12. 13. 14. 15. 16. 17. 18. 19. 20. Torx Screws - Main Connector (X001) Torx Screws - Controls/Indicators Mouting Plate Torx Screws - Rear Cover to Front Cover Plastite Screws - Main Board to Rear Cover 10 Amp Circuit Breaker Ground Control - Platform Lift UP/DOWN Switch Keyswitch - Ground/Platform/OFF Control Emergency Stop Switch Tilt Module Battery LED Indicator Connector Harness (X010) 3121222 SECTION 5 - CONTROL COMPONENTS Tilt Sensor, JLG P/N 1810140 and 1001114933: 4 1 3 2 1 2 1. Ground Control Station 2. Tilt Sensor (JLG P/N 1810140 or 1001114936) Figure 5-45. Tilt Sensor Location Tilt Sensor Removal: NOTE: Refer to Figure 5-46., Tilt Sensor Removal for numbers in parenthesis. 1. Tilt Sensor (JLG P/N 1810140 or 1001114936) 2. Sensor Mount 1. Disconnect the batteries. 3. Screw, 3.5 x 0.6 x 16 LG 2. Open the Ground Control Station to gain access to the Tilt Sensor Assembly. (refer to prior mentioned procedures) 4. Screw, 3.5 x 0.6 x 10 LG 3. Remove the four Screws (3), to remove the Tilt Sensor (1) and Sensor Mount (2) from the Ground Control Box. 4. The Tilt Sensor (1) can be removed from the Sensor Mount (2) by removing the three Screws (4). NOTE: Follow the above procedures in reverse order when installing the tilt sensor assembly. After installing, be sure to calibrate the tilt sensor (refer to Section 5.2, Tilt Sensor Calibration). Figure 5-46. Tilt Sensor Removal Table 5-3. Tilt Sensor Harness for 1810140 Wire Color Function Connector Pin Red VCC 1 Green PWMX 2 White PWMY 3 Black Ground 4 Table 5-4. Tilt Sensor Harness for 1001114936 3121222 – JLG Lift – Wire Color Function Connector Pin Red VCC 1 White CANH 2 Green CANL 3 Black Ground 4 5-15 SECTION 5 - CONTROL COMPONENTS 5.7 PLATFORM CONTROL STATION - SERVICE INFORMATION Platform Control Station Assembly 5 2 4 3 4 7 1 6 4 1 Figure 5-7. Platform Control Station Assembly 1. 2. 3. 4. Assembly Bolts Nuts Side Panel Mounting/Reinforcement Plates 5. Upper Control Box 6. Lower Control Box 7. Upper Control Box Wiring Harness Upper Control Box - Component Replacement 1. Disconnect the platform control box and remove from the machine. 2. Place the platform control box on a suitable work bench. 5-7.) NOTE: You may have to only loosen the two power bolts and remove the two closest the top in order to get to the printed circuit board located in the top of the control box where the drive/lift select switch is located. 3. Loosen and remove the long through bolts that hold the two side control housings together. (See Figure 5-16 – JLG Lift – 3121222 SECTION 5 - CONTROL COMPONENTS 4. Loosen and remove the four (4) screws from the upper box assembly that hold the cover to the upper box. 2. Disconnect the two (2) front button switch ribbon cables from the circuit board. 3. Remove the five (5) screws attaching the printed circuit board to the control box. 4. Replace board and reassemble upper control box. 1 2 2 3 4 3 5 5 3 Upper Control Box Cover - Installation 1. Upper Box Assembly 2. Upper Box Cover 3. Attach Screws 1 6 2 1 Upper Control Box Faceplate Component - Installation 3 1. Upper Control Box Housing 2. Face Plate Attach Screws 3. Face Plate Decal 4. Face Plate - Backing Plate 5. Button Switch 6. Drive/Lift Mode Select Switch 1. Remove the six (6) faceplate attach screws and the lift/drive mode selector switch attach nut. 2. Carefully lift the faceplate decal and backing plate out of the upper control box housing. 3. If replacing either of the button switches, the ribbon cable must be disconnected from the printed circuit board on the back, if not already done. 4 Upper Control Box Circuit Board - Installation 1. Circuit Board Assembly 2. Board Attach Screws 4. Replace component and reassemble. 3. Upper to Lower Control Box Harness Connector 4. Front Button Switch to Circuit Board Ribbon Cables 1. Disconnect the upper to lower box harnness connector from the printed circuit board, and unplug the lift/drive switch blade terminals. 3121222 – JLG Lift – 5-17 SECTION 5 - CONTROL COMPONENTS Lower Control Box - Component Replacement Emergency Stop/Shut-Down Switch - Installation 1. Switch Base 2. Switch Button/Barrel 3. Base Release Screw 1. Loosen the release screw, then spin the switch base if necessary to access the barrel release lever. Lower Control Box Cover - Installation 1. Lower Control Box Cover 4. Barrel Release Lever 5. Switch 2. Attach Screws 1. Remove the four (4) attach screws and remove the cover from the other half. 2. Pull the barrel release lever straight out with the blade of a screwdriver and pull barrel out of the switch base from the front of the control box. 3. Reverse steps to install. NOTE: Note wiring connections and routing when taking apart. Joystick Control - Installation 1. Joystick Assembly 2. Attach Screws 5-18 – JLG Lift – 3. Lower Control Box 3121222 SECTION 5 - CONTROL COMPONENTS 5.8 BATTERY/BATTERY CHARGER Battery Maintenance and Safety Practices JLG MACHINES EQUIPPED WITH DELTA Q BATTERY CHARGERS ARE DESIGNED FOR THE BEST PERFORMANCE WITH OEM FACTORY APPROVED BATTERIES. ENSURE THAT BATTERY ACID DOES NOT COME INTO CONTACT WITH SKIN OR CLOTHING. WEAR PROTECTIVE CLOTHING AND EYEWEAR WHEN WORKING WITH BATTERIES. NEUTRALIZE ANY BATTERY ACID SPILLS WITH BAKING SODA AND WATER. APPROVED JLG REPLACEMENT BATTERIES ARE AVAILABLE THROUGH JLG' S AFTERMARKET PARTS DISTRIBUTION CENTERS OR JLG' S AFTERMARKET PROGRAMS. FOR ASSISTANCE WITH PROPER BATTERY REPLACEMENT, PLEASE CONTACT YOUR LOCAL JLG SUPPORT OFFICE. BATTERY ACID RELEASES AN EXPLOSIVE GAS WHILE CHARGING, ALLOW NO OPEN FLAMES, SPARKS OR LIGHTED TOBACCO PRODUCTS IN THE AREA WHILE CHARGING BATTERIES. CHARGE BATTERIES ONLY IN A WELL VENTILATED AREA. BATTERIES APPROVED BY JLG HAVE BEEN TESTED FOR COMPATIBILITY WITH THE ALGORITHM PROGRAMMING OF THE DELTA Q BATTERY CHARGER TO OPTIMIZE BATTERY LIFE AND MACHINE CYCLE TIMES. THE USE OF NON APPROVED BATTERIES IN YOUR JLG EQUIPMENT MAY RESULT IN PERFORMANCE ISSUES OR BATTERY CHARGER FAULT CODES. JLG ASSUMES NO RESPONSIBILITY FOR SERVICE OR PERFORMANCE ISSUES ARISING FROM THE USE OF NON APPROVED BATTERIES. BEFORE REMOVING ANY COMPONENT FROM THE ELECTRICAL SYSTEM, DISCONNECT THE BATTERIES USING THE QUICK-DISCONNECT LOCATED ON THE RIGHT SIDE BATTERIES. ADD ONLY DISTILLED WATER TO BATTERIES. WHEN ADDING WATER TO THE BATTERIES, A NON-METALLIC CONTAINER AND/ OR FUNNEL MUST BE USED. DO NOT REPLACE ITEMS CRITICAL TO STABILITY, SUCH AS BATTERIES, WITH ITEMS OF DIFFERENT WEIGHT OR SPECIFICATION. DO NOT MODIFY UNIT IN ANY WAY TO AFFECT STABILITY. Check the electrolyte level of the batteries often, adding only distilled water when required. When fully charged, battery fluid level should be 1/8" below vent tubes. (See Figure 5-8.). • DO NOT fill to bottom of vent tubes. • DO NOT allow fluid level to go below the top of the plates when charging or operating. BATTERY FILLER CAP FLUID LEVEL OF FULLY CHARGED BATTERY VENT TUBE 1/8 " PLATES Figure 5-8. Battery Fluid Level. 3121222 – JLG Lift – 5-19 SECTION 5 - CONTROL COMPONENTS 5.9 BATTERY CHARGER - INSTALLATION Battery Installation The battery charger is located in the compartment at the rear of the machine, remove the charger/step-plate cover to gain access to the charger. 2 3 4 5 6 1 Left Side Battery Installation 1. Batteries 2. Bolt 3. Hold Down Clamp 4. Washer 5. Locking Nut 6. Attach Battery Temperature Sensor To This Terminal Battery Charger Assembly - Installation 1. Battery Charger Assembly 2. Attach Screws/Washers 3. AC Voltage - Input Cable 4. LED/Power/Interlock Cables Right Side Battery Installation 1. Batteries 2. Bolt 3. Hold Down Clamp 4. Washer 5. Locking Nut See Section-1 of this manual for battery specifications. 5-20 LED/Power/Interlock Cable - Identification 1. Charger Interlock Cable 2. DC Power Cable to Batteries – JLG Lift – 3. LED Indicator, Battery Temp. Sensor Cable 3121222 SECTION 5 - CONTROL COMPONENTS BATTERY CHARGER Battery Charger Troubleshooting SPECIFICATION No Lights at all OUTPUT Nominal DC Output Voltage 24V No Lights at all indicate that AC power to the charger is not connected or that the AC voltage is too low. It could also indicate an internal failure in the charger. Maximum DC Output Voltage 33.6V Maximum DC Output Current 25A Maximum Interlock Current 1A 1. Check the connections to AC power. Check for AC voltage between 90 and 260 VAC at the charger. AC Input Voltage 85-265VAC Nominal AC Input Voltage 120VAC - 230VAC RMS 2. If the AC voltage is verified to be correct at the connection to the charger, and the charger still displays no lights at all, return the charger for service. AC Input Frequency 45-65 HZ Maximum AC Input Current 12A RMS@108VAC INPUT FAULT LED Flashing The Fault LED flashes to indicate the micro-controller inside the battery charger has detected a fault. The fault detected is indicated by the number of flashes. Count the number of flashes to determine the fault. OPERATION Charging Indicator Yellow LED 100% Charge Indicator Green LED Fault Indicator Red LED With any battery system, the most common problem will be a faulty battery connection. Because of the high likelihood of a battery connection problem, it is always worthwhile to confirm that all connections are good before checking for any other problems. PROTECTION Output Reverse Polarity Electronic Protection - Automatic Reset Output Short Circuit Electronic Protection - Automatic Reset AC Overload Current Limited DC Overload Current Limited [1 Flash] - High Battery Voltage 1. Indicates a high battery voltage. Check that the battery charger voltage is consistent with the battery pack voltage. The first two digits of the four digit model name indicate the battery voltage the charger supports. MECHANICAL 2. Check for wiring errors. Operating Temperature –22°F to +122°F (–30°C to +50°C) Housing Shock and Water Resistant Aluminum 3. This fault will automatically clear and the charger will restart charging when this problem is removed. 4. High battery voltage could also occur if there is another source charging the battery. Disconnect any other sources during charging. Also see Section 8 - Electrical Schematics for more detailed electrical connection information. 5. If this problem does not clear after the battery voltage is confirmed to be less than 2.4V per cell, return the charger for service. [2 Flashes] - Low Battery Voltage 1. Indicates either a battery failure, no battery connected, or a lower than expected battery voltage. Check the battery and battery connections. 2. Check the nominal battery voltage. The first two digits of the four digit model name indicate the battery voltage the charger supports. Confirm that a nominal battery voltage is the same as the charger voltage. 3. This fault will clear automatically when the low battery voltage problem is rectified. 3121222 – JLG Lift – 5-21 SECTION 5 - CONTROL COMPONENTS 4. If this problem does not clear after the battery voltage is confirmed to be higher than 1.0V per cell and all connections are good, return the charger for service. [5 Flashes] - Over Temperature This fault indicates the charger has become too hot during operation. Though not damaging to the charger, charge time will be extended significantly. [3 Flashes] - Charge Time-out 1. This fault indication will not clear automatically, but the charger will restart charging automatically when the temperature drops. The fault indication must be cleared manually by unplugging the AC, waiting 30 seconds and reconnecting the AC power. Indicates the battery failed to charge within the allowed time. This could occur if the battery is of larger capacity than the algorithm is intended for. In unusual cases it could mean charger output is reduced due to high ambient temperature. It can also occur if the battery is damaged, old, or in poor condition. 2. If possible, move the machine to a cooler location. 3. Confirm that dirt or mud is not blocking the cooling fins of the charger. Clean the charger. Rinse the charger with a low pressure hose if required. Do no use high pressure. Do not us a pressure washer. 1. Check the battery for damage such as shorted cells and insufficient water. Try the charger on a good battery. 2. If the same fault occurs on a good battery, check the connections on the battery and connection to AC, and the AC voltage itself. 3. Confirm that the nominal battery pack voltage is the same as the battery charger voltage. 4. This fault must be cleared manually by unplugging the AC, waiting 30 seconds and reconnecting the AC power. [6 Flashes] - Over Load/Over Temperature This fault indicates that the batteries will not accept charge current, or an internal fault has been detected in the charger. This fault will nearly always be set within the first 30 seconds of operation. If it occurs after the charger has started charging normally, be sure to make a note of it. 5. If a charger displays this fault on a battery pack, and the pack is of questionable status, reset the charger by disconnecting AC for 30 seconds, and then reconnect the AC to start a new charge cycle. After a few charge cycles, this problem could stop occurring as the pack "recovers." [4 Flashes] - Check Battery This fault indicates the battery pack could not be trickle charged up to the minimum level required for the normal charge cycle to be started. 1. Check that none of the battery pack connections between modules are reversed or incorrectly connected. 2. Check that one or more cells in the battery are no shorted. 3. Confirm that the nominal battery pack voltage is the same as the battery charger voltage. 4. Try the charger on a good battery. 1. Remove excessive AC loads from inverter if installed. 2. Try to clear the fault by unplugging the AC, waiting 30 seconds and reconnecting the ac power. 3. Check all battery connections. Look for a high resistance connection.The most likely reason for this fault is a fault in the battery such as a bad battery connection, an open cell, or insufficient water. 4. This fault will occur if an internal fuse inside the charger blows. If the green wire is shorted to ground even momentarily, this fuse will blow. To check the fuse, measure with an ohmmeter between the green and red wires with the AC disconnected. If a short circuit is not measured, the fuse has blown. Return unit to a service depot to have this fuse replaced. 5. If this fault occurs after battery charging has started, confirm that AC power was not interrupted and that all battery connections are good. 6. If all battery connections are good, an internal fault has been detected and the charger must be brought to a qualified service depot. 5. If this fault occurs, the battery is likely in poor condition. Try to recover the pack with a charger that can charge the individual cells - such as an automotive charger. Be sure to set this charger to the appropriate voltage - 6V per 6V battery, 12V per 12V string/ battery. 5-22 – JLG Lift – 3121222 SECTION 5 - CONTROL COMPONENTS Excessive Battery Watering Requirements or Strong Sulphur (Rotten Egg) Smell These symptoms indicate over-charging or high battery temperature. These symptoms are unlikely to be caused by too high a charge current since the maximum charge current of the charger will be small compared to even a moderately sized battery pack. The most likely cause for this problem is incorrect charge algorithm setting and/or high ambient temperatures. desired Algorithm is displayed, touch the charger connector to the battery positive terminal until the output relay makes a clicking noise (approx. 10 seconds). The algorithm is now in the permanent memory. 3. Remove the AC power from the charger and reconnect the charger’s positive connector to the battery. It is recommended to check a newly changed algorithm by repeating the above steps 1 and 3. 1. Confirm that the battery pack is not too small - usually > 50Ah. 2. Confirm that the nominal battery voltage matches the charger output voltage. 3. Confirm the correct battery charge algorithm. If the battery pack is new, the algorithm will need to be changed if the pack is not the same as the old one. for instructions on how to determine and change the battery charge algorithm see the following sub-section. 4. If the output voltage of the charger seems excessive, return the charger for service. Contact JLG to get the expected battery voltage settings for the charger in question. Be sure to have the charger’s serial number and charge algorithm setting available when calling. Checking/Changing the Battery Charge Algorithm The charger is pre-loaded with programming algorithms for the specific batteries detailed in Table 5-5, Battery Algorithms. Contact JLG if your specific battery model is not listed. Each time AC power is applied with the battery pack not connected, the charger enters an algorithm select/display mode for approximately 11 seconds. During this time, the current Algorithm # is indicated on the Yellow Charging LED. A single digit Algorithm # is indicated by the number of blinks separated by a pause. A two digit Algorithm # is indicated by the number of blinks for the first digit followed by a short pause, then the number of blinks for the second digit followed by a longer pause. Table 5-5. Battery Algorithms Algorithm # Battery Type 43 Harris Battery Discover EVGGC6A-A 35 JLG P/N 0400242 23 Douglas Flooded (JLG default) GES Battery A1055 Trojan T105 East Penn GC-110-WNL Trojan T105 PLUS Champion CHGC2 GC2 US BATT EV-145-WNL US BATT 2200 XC 8 Concorde 10xAh AGM 7 J305 DV/DT CP 6 DEKA 8G31 Gel 5 Trojan 30/31XHS 4 US Battery USB2200 3 T105 DV/DT CP 2 Trojan T105 tapped 1 Trojan T105 To check / change the charging algorithm: 1. Disconnect the charger positive connector from the battery pack. Apply AC power and after the LED test, the Algorithm # will display for 11 seconds. 2. To change the algorithm, touch the connector to the battery’s positive terminal for 3 seconds during the 11 second display period and then remove. The Algorithm # will advance after 3 seconds. Repeat this procedure until the desired Algorithm # is displayed. A 30 second timeout is extended for every increment. Incrementing beyond the last Algorithm will recycle back to the first Algorithm. When the 3121222 – JLG Lift – 5-23 SECTION 5 - CONTROL COMPONENTS 5.10 BATTERY CHARGER/INVERTER (OPTION) - INSTALLATION The battery charger-AC-inverter is located in the compartment at the rear of the machine, remove the charger/stepplate cover to gain access to the charger. BATTERY CHARGER/AC INVERTER SPECIFICATION AC INVERTER - SPECS Output Power (Continuous) 1000 W Output Power (Surge) 3000 W AC Output Current 36 A AC Output Voltage 115 to 125 VAC Output Frequency 60 Hz DC Input Voltage 21.2 to 29 VDC Remote ON/OFF Yes CHARGER - SPECS Nominal DC Output Voltage 28 VDC Maximum DC Output Voltage 33 VDC Maximum DC Output Current 23 to 27 ADC Required Interlock Current 1A Input Voltage (AC) 100 to 130 VAC Nominal Input Voltage (AC) 120 VAC Input Frequency 54 to 66 Hz OPERATION Battery Charger/Inverter Assembly - Installation 1. Charger/Inverter Assembly 2. Insulate Mounting Pad 3. Attach Screws (a) 4. Nylon Shoulder Washers Charging Indicator Yellow LED 100% Charge Indicator Green LED Fault Indicator Red LED PROTECTION Note: (a) On final assembly apply Loctite #242 to screw threads Output Reverse DC Polarity 125 A Replaceable Fuse Output AC Short Circuit Electronic Protection Automatic Reset AC Overload 20 A Internal Slow Blow Charger Fuse DC Overload Voltage Limited - Internally Controlled MECHANICAL Operating Temperature –40°F to +185°F (–40°C to +85°C) Housing Shock and Water Resistant Aluminum For further specification and troubleshooting information refer to the manufacturers’ Charger/Inverter Owner’s Guide shipped with the machine. Publication - RM1024JLG - Part # 3128406. LED/Power/Interlock Cable - Identification 1. AC Output Connector 2. AC Input Connector 3. Remote On/Off Switch Cable 5-24 4. External DC Fuse Location 5. DC (–) Connection 6. DC (+) Connection Also see Section 8 - Figure 9-20., Battery Charger/Inverter Electrical Connection Schematic for more detailed connection information. – JLG Lift – 3121222 SECTION 6 - MAST COMPONENTS SECTION 6. MAST COMPONENTS 6.1 MAST COMPONENTS OVERVIEW Figure 6-1. Mast Components. 1. Platform Assembly 2. Tool Tray 3. Mast Cover Plate 3121222 4. Mast Assembly 5. AC Power Receptacle 6. Manual Storage Box – JLG Lift – 6-1 SECTION 6 - MAST COMPONENTS 6.2 PLATFORM TOOL TRAY - INSTALLATION 6.4 PLATFORM AC RECEPTACLE BOX INSTALLATION Platform Tool Tray - Installation 1. Tool Tray AC Receptacle Box - Installation 2. Attach Screws (a) 1. AC Voltage - Receptacle Box Components 2. Attach Screws Note: (a) Do not use a screw with the threaded portion longer than 1/2 in. (12mm) when attaching to the side of the mast. 6.3 MAST COVER PLATE - INSTALLATION 3. Platform/Mast Assembly Note: (See AC POWER RECEPTACLES AND WIRING (PLATFORM) - CE SPEC MACHINES ONLY on page 9-38) for receptacle wiring connections of available AC plug types. Mast Cover Plate Installation 1. Mast Cover Plate 2. Rivet Nuts 6-2 3. Top of Mast Assembly – JLG Lift – 3121222 SECTION 6 - MAST COMPONENTS 6.5 MAST ASSEMBLY - COMPONENTS Figure 6-3. Mast Assembly - Orientation (Top View) 1. Front of Machine 2. Rear of Machine 3. Platform/Outer Mast Section 4. Outer Mid Mast Section 5. Inner Mid Mast Section 6. Mount/Inner Mast Section Note: (a) Always mount slide pads with the groove oriented to the side of the mast not the front or rear, for clearance of the pad mounting rivets during operation. The slide pads are available in two thicknesses: JLG P/N-1001092165 - 9,7mm thick - round notch on ends JLG P/N - 4700042 - 8,7mm thick - NO round notch on end Always use the 1001092165 slide pad unless mast tube clearances prevent installation. Figure 6-2. Mast Assembly - Components (Mast shown cutaway for illustrative purposes only) 1. 2. 3. 4. 5. 6. 7. Hydraulic Cylinder Compartment 8. Power-Trak Compartment 9. Cylinder #1 Bleeder Valve 10. Cylinder #2 Bleeder Valve 11. Cylinder #3 Bleeder Valve 12. Corner Slide Pads (a) Platform/Outer Mast Section 7. Hydraulic Cylinder #3 Outer Mid Mast Section 8. Top (External) Slide Pads Inner Mid Mast Section 9. Power-Trak System Mount/Inner Mast Section 10. Power-Trak Guide Hydraulic Cylinder #1 11. Power-Trak Shield Assy. Hydraulic Cylinder #2 12. Bottom (Internal) Slide Pads 3121222 – JLG Lift – 6-3 SECTION 6 - MAST COMPONENTS 6.6 PLATFORM ASSEMBLY This procedure shows the platform assembly (only) removal/installation to the mast assembly. The platform and outer mast section are a one piece manufactured weldment. Platform - Extending Mast Unpowered IF LIFT IS DISABLED AND THE MAST CANNOT BE EXTENDED UNDER THE MACHINE’S OWN POWER, THE PLATFORM MUST BE HOISTED OR LIFTED BY OTHER MEANS - LIFT PER ILLUSTRATION BELOW - BEFORE EXTENDING THE MAST, PRESS AND HOLD THE MANUAL DESCENT VALVE BUTTON ON THE FRONT OF THE MACHINE - WHEN DESIRED PLATFORM HEIGHT IS REACHED, RELEASE THE MANUAL DESCENT VALVE. Platform Removal 1. Extend the mast and raise the platform far enough out of the base assembly to allow access to the slide pads on the bottom corners of the outer mast section, but not to high that you cannot easily get to the top of the mast to work on it. 2. Support platform for later liting, with either an overhead crane or a fork truck attaching a lifting strap to remove the platform once the following steps are completed. (See Figure 6-5.) 3. Disconnect machine power at the right side battery tray using the quick disconnect. 4. At the four bottom corners of the outer mast section, remove the pop rivets securing each slide pad to the mast section. (See Figure 6-5.) - Item 1. Two (2) rivets per slide pad. The pads may not slide out of the mast section until the platform is lifted later and the upper slide pads on outer-mid section pushes them out. 5. Disconnect the platform control box main harness connector from the bottom of the platform control box and allow to hang loose for now. Remove the platform control box from the platform. 6. Remove the AC outlet receptacle box from the outside of the outer mast section. Allow the receptacle box to hang loose for now. 7. Remove the screws holding the cover plate consealing the cables for the receptacle box and platform box to the right side of the mast. 8. At the top of the mast, (See Figure 6-5.) - Item 2) the cylinder rod for hydraulic cylinder #3 is attached to platform mast section cross support with a bolt and nut through a detent on the side of the rod. Remove the locking nut from the hex head bolt holding the cylinder rod in place to the mast cross support. Remove the bolt from the cross support. It may be necessary to lift or lower slightly on the platform assembly with the lifting strap to remove the bolt. 9. Also at the top of the mast opening, (See Figure 6-5.) - Item 3) remove the two (2) bolts and nuts attaching the power-trak cable guide to the platform rail for the AC receptacle and platform control station electrical cables. Figure 6-4. Extending Mast Unpowered 1. Sling Position -1 2. Sling Position - 2 6-4 3. Lifting Ring/Hook 4. Manual Descent Valve Location NOTE: It may be necessary to pull down or push up on the rear of the platform to keep the platform level while lifting it off of the mast assembly. – JLG Lift – 3121222 SECTION 6 - MAST COMPONENTS Figure 6-5. Platform to Mast - Installation 1. Platform Outer Mast Section - Lower Slide Pad Location 2. Lift Cylinder #3 - Attach Bolt and Nut Location 10. While feeding the electric harness cables for both the AC receptacle box and the platform control station into the top of the mast, carefully start to lift the platform sliding it up off of the mast assembly. Once clear of the mast assembly, move to a suitable area for later assembly. 3121222 3. Power-Trak Guide Plate Attach Bolts and Nuts Platform Installation – JLG Lift – 1. Using an overhead crane with lifting strap, lift the platform assembly up over the main mast assembly. 2. Before lowering the platform assembly onto the mast, be certain the electrical cables for the AC receptacle box and platform control station are within the top of the mast assembly to prevent damage to the cables. 6-5 SECTION 6 - MAST COMPONENTS NOTE: It may be necessary to pull down or push up on the rear of the platform to keep the platform level while lifting it off of the mast assembly. 3. Lower the platform assembly approximately half way down the mast, then reinstall the slide pads at the bottom corners of the platform mast section. (See Figure 6-5.) - Item 1. 6.7 MAST ASSEMBLY It is recommended that the platform assembly be removed (See Section 6.6) before removing the mast assembly separately. 4. Continue to lower the platform assembly, at the top of the mast guide the cylinder rod of hydraulic cylinder #3 into the cross support located at the top of the platform assembly mast section. Install the detent bolt and nut, tighten securely. (See Figure 65.) - Item 2. 5. Pull the electrical harness cables out through the top of the platform mast section and lay over the right side of the mast. 6. Reattach the power-trak cable guide using the two (2) bolts and nuts to the lug at the top of the platform mast section. (See Figure 6-5.) - Item 2. 7. Route the electrical cables down the right side of the mast section and reinstall the metal cable cover using the two (2) screws previously removed. 8. Reattach the AC receptacle box to the side of the mast and install the platform control box to the platform control box mounting plate. Attach the platform control box - cable harness to the bottom of the control box. 9. Reconnect machine power at the right side batteries quick-disconnect connector. 10. Power machine up and cycle the mast up and down a few times, look inside the top of the mast to be certain the power-trak and harness cables are free of interference and not being pinched in any way. 11. If operation is OK, reinstall the mast section top cover. Figure 6-6. Mast - Installation (Front of frame shown cutaway for illustrative purposes only) 1. Mast Assembly 6-6 – JLG Lift – 2. Fastening Hardware 3121222 SECTION 6 - MAST COMPONENTS Mast Removal NOTE: To ease removal and installation of the mast assembly it is recommended that the complete machine be elevated on suitable stands to allow easy access to the mounting bolts on the base of the mast assembly. 3 1. Lower the mast assembly completely before beginning the mast removal process to ensure no residual pressure remains in the lift cylinder. 2. Attach an overhead crane by strap through the cross supports on the top of mast sections. 1 2 Figure 6-8. Power-Trak - Removal 1. Attach Screws 2. Power-Trak Hanger Bracket (a) 3. Power-Trak Guide (b) 4. Hyd. Cyl. #1 Bleeder Valve Note: (a) Remove hanger bracket from slot in mast and push down into the mast. (b) If platform has already been removed this will be hanging loose. 4. If removing the power-trak from the mast use the following steps; (See illustration above) Figure 6-7. Mast Base Mounting Hardware (Front of frame shown cutaway for illustrative purposes only) 1. Mast Assembly 2. Fastening Hardware a. Remove the attach screws from the power-trak guide bracket. 3. 20 Ga. (.0359 in.)Mounting Shim b. Push the power track and cables down into the mast past the hanger bracket slot in the side of the mast. 3. Remove the four (4) bolts, nuts, washers, and shims from the base mount of the mast. Access the bolts and nuts through the access holes in the bottom and front of the base frame. NOTE: Before removing the mast off the machine, you must decide which way you want to disconnect the harness cables to the AC receptacle box and platform control box running through the power-trak in the mast. You can either disconnect the cables from their source at the rear of the machine in the charger compartment and free the cables through to the front of the machine so the cables come out with the mast. Or disconnect the power-trak from the top of the mast and allow it slide out through the bottom of the mast as it is lifted off of the machine. This method also requires the AC receptacle box and the platform control box cable to be disconnected and feed down through the mast with the power-trak. 3121222 5. At the top of the mast, carefully open the bleeder valve on the top of the main hydraulic cylinder #1 attached to the base frame. NOTE: While lifting the mast assembly out of the frame, hydraulic cylinder #1 will still be attached to the base frame, lift slowly straight up ONLY, do not attempt to lift on an angle or the hydraulic cylinder may be damaged. NOTE: Also when lifting the mast assembly, if you detached the power-trak from the top of the mast it will need to be lowered out the bottom of the mast as the mast is lifted upwards. – JLG Lift – 6. Carefully lift the mast assembly up out of the frame far enough to gain access to the wire harness connector for the lift down selenoid, and the hydraulic lines connected to hydraulic cylinder #1, still attached to the base frame. 6-7 SECTION 6 - MAST COMPONENTS Mast Disassembly Figure 6-9. Hydraulic Cylinder Connections - Removal 1. Lift Down Valve Selenoid Harness 2. Extend and Return Hydraulic Lines (a) Note: (a) Open hydraulic lines carefully, have a container ready to catch draining oil, cap ports and lines immediately once lines are removed. Figure 6-11. Hydraulic Cylinder Top End Bolts - Removal 1. Cylinder #1 Attach Bolt/ Nut 7. Disconnect the wire harness connector from the lift down valve selenoid. Disconnect and cap the extend and return hydraulic lines on the bottom of hydraulic cylinder #1. Figure 6-10. Hydraulic Cylinder Bottom End Bolts - Removal 1. Cylinder Attach Bolts 2. Hydraulic Cylinder #3 9. Lift the mast assembly free of the frame, place on a suitable workbench for disassembly. 6-8 1. At the top of the mast, remove the bolts and nuts attaching the cylinder rods for cylinder #1 and #2 to their cylinder anchor cross bars. Figure 6-12. Hydraulic Cylinder - Removal 1. Multi-stage Hydraulic Cylinder Assembly 8. Remove the two (2) bolts attaching hydraulic cylinder #1 to the underside of the base frame. – JLG Lift – 2. Cylinder #2 Attach Bolt/ Nut 2. Lifting Strap 2. Using suitable lifting equipment and strap, slide the cylinder assembly out the bottom of the mast assembly, place on a suitable workbench. 3121222 SECTION 6 - MAST COMPONENTS Mast - Reassembly (Refer to the Mast Disassembly illustrations when required) 3 1. If required, assemble the external slide pads to the top of the outer-mid, inner-mid and mount/inner mast section. Orient the groove in the pads to the side of the mast and attach with the proper rivets from the inside of the mast. (See Figure 6-3.) 1 2 Figure 6-13. Power-Trak - Removal 1. Attach Screws 3. Power-Trak Guide 2. Power-Trak Hanger Bracket (a) Note: (a) Remove bracket from slot in mast and remove power-trak harness from the mast. NOTE: Always mount slide pads with the groove oriented to the side of the mast not the front or rear, for clearance of the pad mounting rivets during operation.(See Figure 6-3.) The slide pads are available in two thicknesses: JLG P/N-1001092165 - (9,7 mm thick) - round notch on ends JLG P/N - 4700042 - (8,7 mm thick) - NO round notch on end Always use the 1001092165 slide pad unless mast tube clearances prevent installation. 3. If the power-trak assembly was left attached to the the mast assembly, to remove it now, remove the two (2) screws attaching the power-trak guide to the mounting lug at the top of the mast. Slide the hanger bracket out of the slot in the front of the mast section. Now slide the complete power-trak assembly with cables out of the top of the mast assembly. 2. Slide the inner-mid and the mount/inner mast sections into the outer-mid mast section. Allow the mounting holes for the bottom slide pads of the inner-mid mast section to be exposed. (See Figure 6-14.) 3. Push the bottom slide pads into the bottom of the outer-mid and the inner-mid mast sections, mount with the groove in the pad towards the side of the mast. Attach with the proper rivets. (See Figure 614.) Figure 6-14. Mast Sections - Disassembly 1. Outer-Mid Mast Section 4. Slide Pads 2. Inner-Mid Mast Section 5. Pad Attach Rivets 3. Mount/Inner Mast Section 4. To remove the mast sections from each other, slide the mast sections apart until the rivets attaching the slide pads to the bottom corners of the mast sections are exposed. Remove the rivets from the slide pads on the mast sections you want to remove at the bottom of the outer-mid and inner-mid mast sections, then slide the mast section out the bottom. 3121222 – JLG Lift – Power-Trak Shield - Installation 1. 2. 3. 4. Power-Trak Cable Power-Trak Guide Power-Trak Assy. Tie Strap 5. Shield Mounting Bolts 6. Mounting Nuts 7. Power-Trak Shield Assy. 6-9 SECTION 6 - MAST COMPONENTS 4. Slide the inner-mid and the mount/inner mast sections into the outer-mid mast section. Mast Installation 1. Move the mast assembly near the machines base frame. At the top of the mast assembly attach a lifting strap and lift the mast assembly into a vertical position. 5. At the top of the mast assembly, install the powertrak assembly into the power-trak compartment of the mount/inner mast section. (See Figure 6-13.) 6. Attach the power-trak hanger bracket to the mount/ inner mast section. (See Figure 6-13.) 2. Open the bleeder valve at the top of hydraulic cylinder #1, then pull the cylinder rod out the bottom of the cylinder approximately 2 ft. (61cm). 7. Slide the multi-stage hydraulic cylinder into the hydraulic cylinder compartment of the mast assembly. (See Figure 6-12.) 3. Carefully lift the mast assembly over the machine and center it into the opening where the mast is mounted on the machine. 8. Attach the cylinder rod of cylinder #1 and 2 into their anchor cross bars at the top of the mast assembly. Secure using the proper bolt and nut assembly. (See Figure 6-11.) 4. If the power-trak assembly harness was left attached to the base frame when the mast was removed, lift it off the base frame and hold it vertically. As the mast assembly is lowered take the top end of the powertrak assembly and feed it into the power-trak compartment on the front side of the mast assembly. 5. Lower mast assembly down or pull cylinder rod out of cylinder #1 and align the holes in the bottom of the rod assembly with the holes in the base frame. Secure using the proper bolts, apply Loctite #242 to the threads of the rod attach bolts on final assembly. (See Figure 6-10.) 6. Re-connect the lift down valve harness connector to the lift down valve mounted on the front of the cylinder rod assembly. 7. Re-connect the extend and return lines to the back of the cylinder rod assembly. (See Figure 6-9.) 8. Carefully lower the mast assembly, while lowering feed the power-trak assembly into the mast and lift the power-trak assembly till it is completely over top of the lift down valve assembly. (See Figure 6-2.) Hydraulic Cylinder - lnstallation 1. Tool (Simular/Fabricate) 2. Detent in Cylinder Rod 3. Rod Anchor Brackets 9. Feed the control cables through the notch in the baffle plate inside the mast. Install the P-clamp onto the control cables for attachment to the right-rear mast mounting bolt. 10. Continue to lower the mast until the holes in the mount/inner mast section mounting plates are aligned with the holes in the base frame mounting plates. (See Figure 6-7.) Check the side to side play between the mast mount and the frame mount, shim equally to both sides until side to side play is removed. Install the mast mounting bolts, nuts, and washers, with the nuts inboard. 6-10 – JLG Lift – 3121222 SECTION 6 - MAST COMPONENTS 11. Before tightening the mast mounting bolts/nuts, check mast for vertical front/rear and left/right plumb. Per following table: Plumb, maximum - Front/Rear Plumb, maximum - Left/Right 3 in. (76mm) 2 in. (50mm) Multi-Stage Hydraulic Cylinder - Cylinder Bleeding Procedure THE THREE STAGE CYLINDER MUST BE BLED IN THE SEQUENCE OF CYL. #1, THEN CYL. #2, THEN CYL. #3. Tighten the mast mounting bolts/nuts to 62 ft. lbs. (88Nm), in the following sequence: 1. Left Front 2. Right Rear 1. First check that hydraulic oil level is between the min./max. markings on the side of the pump reservoir. 3. Left Rear 4. Right Front 2. In the platform, if necessary, remove the mast cover from the top of the mast assembly. 3. Place the proper size 90° angled line wrench on the bleeder valve of cylinder #1. (See Figure 6-3.) for orientation of bleeder valves. 4. Attach a plastic tube to the bleeder valve on cylinder #1, use a tube long enough to hang over the side of the mast assembly and place the loose end into a container to catch the hydraulic fluid. 2 5. Power up the machine. 6. Loosen the bleeder valve on the cylinder being bled. Be certain the other end of the bleeder tube is in the catch container. 7. Set the platform control station to platform lift mode and push the joystick to lift the platform. Do not allow the platform to lift to far off the stowed position, re-lower and lift again if necessary. 1 8. Watch the bleeder tube, when a constant flow of oil (no bubbles) is visible, close the bleeder valve. 3 Mast Lower End - Installation 1. Control Cable P-Clamp (a) 2. Route Cable Through Notch in Mast Baffle Plate 9. Remove the bleeder tube and line wrench and move to the next cylinder in sequence. Repeat steps 6 through 8 until all three cylinders are bleed. 3. Left-Front Mast Mounting Bolt (b) Note: (a) Install clamp between washer and nut of the right-rear mast mounting bolt. (b) An extra washer may be required to space the screw away from the RED manual descent button on the lift cylinder. Torque mast mounting bolts to 62 ft. lbs. (88 Nm), tighten in an X (cross) tightening pattern. 12. At the top of the mast, if reinstalling the power-trak, reach down into the power-trak compartment and pull the power-trak assembly up, attach the hanger bracket to the top of the mast assembly. (See Figure 6-13.) 10. It is recommended that the platform be cycled up and down a few full lifts. Then repeat step 1. 11. Finally repeat steps 6 through 10 again then cylinder bleeding is completed. Mast Installation Completion Once mast is installed and properly bled to remove the air from the hydraulic lift system, wipe off any excess hydraulic oil from accessible surfaces of the mast and hydraulic cylinder. If necessary, check the lift system hydraulic pressure setting. Cycle the mast up and down a few times then check at the top and bottom of the mast for any hydraulic oil leaks. 13. Re-install the platform assembly (See Platform Installation on page 6-5). 3121222 – JLG Lift – 6-11 SECTION 6 - MAST COMPONENTS 6.8 MULTI-STAGE HYDRAULIC CYLINDER - SERVICING Refer to Section 3.6, PUMP/LIFT/MAST - Theory of Operation for more detailed information on Hydraulic System. Overview The hydraulic cylinder for this machine is a multi-stage - three cylinder design. Figure 6-15. 1230ES Lift Cylinder Internal Components - Top End 1. 2. 3. 4. 5. 6. 6-12 Cyl. #3 - Gland Cyl. #3 - Wiper Seal Cyl. #3 - Main Seal Cyl. #3 - Gland Wire Retaining Ring Cyl. #3 - Gland O-Ring Seal Cyl. #1 - End Cap (a) 7. 8. 9. 10. 11. – JLG Lift – Cyl. #1 - Piston Retaining Ring Cyl. #1 - Piston Cyl. #1 - Piston Guide Ring Cyl. #1 - Piston Damping Spring Cyl. #1 - Rod Guide/Spacer 3121222 SECTION 6 - MAST COMPONENTS Figure 6-16. 1230ES Lift Cylinder Internal Components - Lower End 1. 2. 3. 4. 5. 6. 7. 8. 9. 10. 11. 12. Note: (a) (b) (c) (d) (e) 3121222 Extend Port (a) Return Port Proportional Lift Selenoid (b) Valve Port Block (c) O-Ring Seal Cyl. #1 - Rod Wiper Seal Cyl. #1 - Gland (d) Cyl. #1 - Main Seal Cyl. #1 - Gland Wire Retaining Ring Cyl. #1 - O-Ring Seal Cylinder Joint Cyl. #2 and #3 - End Attach Cap (c, d) 13. 14. 15. 16. 17. 18. 19. 20. 21. 22. 23. 24. Cyl. #2 - Cap O-Ring Seal Cyl. #2 - Joint O-Ring Seals Cyl. #2 - Rod Wiper Seal Cyl. #2 - Gland (d) Cyl. #2 - Main Seal Cyl. #2 - Gland Wire Retaining Ring Cyl. #2 - O-Ring Cyl. #3 - Barrel End Cap (e) Cyl. #3 - Piston Retaining Ring Cyl. #3 - Piston Cyl. #3 - Piston Damping Spring Cyl. #3 - Piston Guide Ring Small orifice rated at 4 GPM (115 Liters/minute). The proportional selenoid coil has a 28 ohm rating. Apply Loctite #242 to the threads of the cylinder rod on final assembly to the valve port block. Torque to 45 ft. lb. (200 Nm). Removeable. Fixed Non-Removeable - Welded to cylinder barrel. – JLG Lift – 6-13 SECTION 6 - MAST COMPONENTS Hydraulic Cylinder - Disassembly Cylinder #2 and #3 - Removal from Stack The following disassembly procedures shows the complete disassembly sequence of the cylinder assembly. However, your situation may not require complete disassembly, choose which procedures are required to repair the cylinder assembly for your situation. DISASSEMBLY OF THE CYLINDER SHOULD BE PERFORMED ON A CLEAN WORK SURFACE IN A DIRT FREE WORK AREA. Removing the Valve Block Assembly Figure 6-18. Cylinder #2 and #3 Assembly - Removal 1. Rod Attach Cap 2. Cylinder Joint 3. Cyl. #2 and #3 Assembly 1. Using the proper size wrench, (44mm - 1.732") remove cylinder #2 rod attach cap by turning the cap counterclockwise to remove. 2. Once the attach cap is removed from cylinder #2 rod, slide the cylinder #2 and #3 assembly out of the joint sleeve. Move the cylinder #2 and #3 assembly to a suitable workbench for disassembly. Figure 6-17. Valve Block - Removal 1. Valve Block 2. Cyl. #1 - Cylinder Rod 3. O-Ring Seal 4. Direction for Removing 5. Direction for Installing PROTECT THE CYLINDER ROD SURFACE. DAMAGE TO THE CYLINDER ROD CHROME FINISH DUE TO SCRATCHING, INDENDATION, CHIPPING OR OTHERWISE WILL CAUSE EVENTUAL GLAND SEAL FAILURE. THE CYLINDER ROD MUST BE REPLACED IF DAMAGED. 1. Wrap the cylinder rod to protect it from damage, then clamp the cylinder rod into a vise or device to keep it from turning while removing the valve block assembly. 2. Using the proper size wrench, (approx. 55mm 2.165"), turn the valve block assembly counterclockwise to remove it from the end of the cylinder rod. 6-14 – JLG Lift – 3121222 SECTION 6 - MAST COMPONENTS Cylinder Rod Assembly - Removal from the Cylinder Barrel Piston - Removal from Cylinder Rod The following disassembly procedure for removing the gland end of the cylinder is the same for cylinders 1, 2, and 3. Figure 6-20. Cylinder Rod Piston - Removal 1. Piston Retaining Ring 2. Piston 3. Compression Spring Figure 6-19. Cylinder Rod/Gland - Removal 1. Cylinder Barrel 2. Gland Wire Retaining Ring 3. Retaining Ring Slot/Hole 4. Piston Guide Ring 5. Retaining Ring Slot on Cylinder Rod 1. Remove the piston retaining ring from slot in the end of the cylinder rod. 4. Cylinder Gland 5. Spanner Wrench Tool (48mm - 1.889" Dia.) 2. Slide piston, compression spring and piston guide ring off the end of the cylinder rod. 1. Using pliers and small screwdriver fish the end of wire retaining ring out of the slot on the gland end of the cylinder barrel. 2. Place the spanner wrench pins (48mm - 1.889" diameter) into the slots in the end of the gland. 3. Now slowly rotate the gland pulling the gland retaining ring out of the slot in the side of the cylinder barrel. Keep rotating gland until the hood end of the retaining ring is aligned with the hole in the slot and lift the retaining ring completely free of the cylinder barrel. 4. Place a container below the end of the cylinder barrel and carefully pull the gland out of the end of the cylinder barrel. Allow any hydraulic oil to drain. EXTREME CARE SHOULD BE TAKEN WHEN REMOVING THE CYLINDER ROD, HEAD, AND PISTON. AVOID PULLING THE ROD OFF CENTER, WHICH COULD CAUSE DAMAGE TO THE PISTON AND CYLINDER BARREL SURFACES. 5. Carefully slide the rod assembly out of the cylinder barrel and place on a clean surface preferably a workbench. 3121222 – JLG Lift – 6-15 SECTION 6 - MAST COMPONENTS Hydraulic Cylinder Component Inspection Hydraulic Cylinder - Assembly Cylinder Rod There should be no scratches or pits deep enough to catch the fingernail. Pits that go to the base metal are unacceptable. Scratches that catch the fingernail but are not to the base metal, less than 0.5 inch long and primarily in the circumferential direction are acceptable provided they cannot cut the rod seal. Chrome should be present over the entire surface of the rod and the lack thereof is unacceptable. In the event that an unacceptable condition occurs, the rod should be repaired or replaced. NOTE: Prior to cylinder assembly, ensure the proper JLG seal kits are used, see the JLG Parts Manual. APPLY A LIGHT FILM OF THE HYDRAULIC OIL TO BE USED FOR OPERATION TO ALL CO MPONENTS TO BE ASSEM BLED, EXCEPT THE THREADED AREAS WHERE LOCTITE IS TO BE APPLIED. Cylinder Assembly This procedure is same for all three cylinders. Cylinder Head (Gland) Visually inspect the inside bore for scratches or polishing. Deep scratches are unacceptable. Polishing indicates uneven loading and when this occurs, the bore should be checked for out-of-roundness. If out-of-roundness exceed 0.007", this is unacceptable. Check the condition of the dynamic seals (wiper, rod seals) looking particularly for metallic particles embedded in the seal surface. It is normal to cut the static seal on the retaining ring groove upon disassembly. Remove the rod seal, static o-ring and backup and rod wiper. Damage to the seal grooves, particularly on the sealing surfaces, is unacceptable. In the event that an unacceptable condition occurs, the head should be replaced. 1. Reassemble the piston/compression spring/piston guide onto the end of the cylinder rod secure using the piston retaining ring. (See Figure 6-20.) EXTREME CARE SHOULD BE TAKEN WHEN INSTALLING THE CYLINDER ROD, HEAD, AND PISTON INTO THE CYLINDER BARREL. AVOID PULLING THE ROD OFF CENTER, WHICH COULD CAUSE DAMAGE TO THE PISTON AND CYLINDER BARREL SURFACES. Piston Visually inspect the outside surface for scratches or polishing. Deep scratches are unacceptable. Polishing indicates uneven loading and when this occurs, the diameter should be checked for out-of-roundness. If out-of-roundness exceeds 0.007", this is unacceptable. Check the condition of the dynamic seals and bearings looking particularly for metallic particles embedded in the bearing and in the piston seal surface. Remove the seals and bearings. Damage to the seal grooves, particularly on the sealing surfaces, is unacceptable. In the event that an unacceptable condition occurs, the piston should be replaced. Tube Assembly Visually inspect the inside bore for scratches and pits. There should be no scratches or pits deep enough to catch the fingernail. Scratches that catch the fingernail but are less than 0.5 inch long and primarily in the circumferential direction are acceptable provided they cannot cut the piston seal. The roughness of the bore should be between 10 and 20 μ inches RMS. Significant variation (greater than 8 μ inches difference) are unacceptable. In the event that an unacceptable condition occurs, the tube assembly should be repaired or replaced. 6-16 – JLG Lift – 2. Lubricate the piston assembly and rod with hydraulic oil, slide the rod assembly into the cylinder barrel. 3. Install new o-rings and seals into the cylinder head gland. 4. Lubricate the o-rings and seals with hydraulic oil then carefully slide the gland assembly onto the end of the cylinder rod and into the end of the cylinder barrel. 5. Rotate the gland until the hole for the retaining ring is lined up with the hole in the cylinder barrel. 6. Insert a new retaining ring into the slot with the hook end of the retaining ring facing down and inserted into the hole in the gland. (See Figure 6-19.) 7. Using the proper spanner wrench (48mm - 1.889" diameter) slowly rotate the gland 360° until all the retaining ring has pulled into the slot. Fill the open slot with a silicone sealant to prevent dirt from entering. 3121222 SECTION 6 - MAST COMPONENTS Cylinder #2 and #3 Assembly to Cylinder #1 Valve Body Installation PROTECT THE CYLINDER ROD SURFACE. DAMAGE TO THE CYLINDER ROD CHROME FINISH DUE TO SCRATCHING, INDENTATION, CHIPPING OR OTHERWISE WILL CAUSE EVENTUAL GLAND SEAL FAILURE. THE CYLINDER ROD MUST BE REPLACED IF DAMAGED. 1. Lubricate and place a new o-ring in the groove on the tapered end of cylinder rod #1. NOTE: The cylinder rod and valve body threads need to be clean and free of oil when the valve body is assembled to the cylinder assembly, so the loctite applied to the cylinder rod threads will set properly. 2. Clean the threads of the tapered end of the cylinder rod of cylinder #1 and apply Loctite #242 to the threads. 3. Apply a light film of hydraulic oil to the rod surface above the threaded area to lubricate the o-ring when installing the valve body to the cylinder rod end. Figure 6-21. Cyl. #2/3 to Cylinder Joint Assembly 1. Cyl. #2 - Cylinder Rod 2. Cyl. #2 - Hole in Rod 3. Passage Hole in Joint 4. Cyl. #1 - Cylinder Rod 4. Be certain the threads inside the valve body are clean and dry of any debris or oil. 1. Replace the o-rings in the cylinder joint and rod attach cap. Lubricate the o-rings with hydraulic oil, however keep any oil off of the threads in the rod attach cap. NOTE: The attach cap threads need to be clean and free of oil when assembled to the cylinder rod, so the loctite applied to the cylinder rod threads will set properly. 2. Lay cylinder #1 assembly and cylinder #2/3 assembly on the workbench in their approximate assembled position. 3. At the bottom end of the cylinder #2/3 assembly, locate the hole on the side of the tapered cylinder rod end on cylinder #2. This hole should be closely aligned with the hole passage inside the cylinder joint of cylinder #1 assembly when assembled. (See Figure 6-21.) 4. Just before final assembly apply Loctite #242 to the threads on the tapered end of the cylinder rod of the cylinder #2/3 assembly. Slide the cylinder #2/3 assembly tapered cylinder rod end into the cylinder joint attached to cylinder #1 aligning the hole in the tapered cylinder rod end to the hole in the cylinder joint. 5. Using the proper fixture to keep the cylinder rod from turning and protect the cylinder rod from damage, insert the valve body onto the end of the cylinder rod and tighten, then torque to 200 Nm (45 ft. lb.). Hydraulic Cylinder Assembly Testing If a hydraulic cylinder testing fixture is not available to fully pressurize the cylinder, then the cylinder must be checked for proper operation and leaks after installation of the mast assembly to the machine. IF A TEST FIXTURE IS USED TO TEST THE HYDRAULIC CYLINDER, DO NOT EXCEED THE MAXIMUM RATED PRESSURE SETTING OF THE HYDRAULIC SYSTEM. (SEE SECTION-1 SPECIFICATIONS FOR MAXIMUM HYDRAULIC SYSTEM PRESSURE SETTINGS.) 5. Install the rod attach cap to the tapered end of the cylinder rod and torque the cap to 200 Nm (45 ft. lb.). 3121222 – JLG Lift – 6-17 SECTION 6 - MAST COMPONENTS NOTES: 6-18 – JLG Lift – 3121222 SECTION 7 - JLG CONTROL SYSTEM SECTION 7. JLG CONTROL SYSTEM 7.1 ELECTRONIC CONTROL SYSTEM The top level menus are as follows: (Also see menu flow charts - Figure 7-1. and Figure 7-2.) To Connect the Hand Held Analyzer: HELP 1. Connect the four pin end of the cable supplied with the analyzer, to the four position connector on the PCB and connect the remaining end of the cable to the analyzer. DIAGNOSTICS ACCESS LEVEL PERSONALITIES (See Table 7-3 on Page 7-11) NOTE: The cable has a four pin connector at each end of the cable; the cable cannot be connected backwards. 2. Power up the Control System by turning the lower key to the platform position and pulling both emergency stop buttons on. Using the Analyzer: With the machine power on and the analyzer connected properly, the analyzer will display the following: MACHINE SETUP (See Table 7-1 on Page 7-9) ACTIVATE TESTS CALIBRATION If you press ENTER, at the HELP:PRESS ENTER display, and a fault is present during power up, the analyzer display will scroll the fault across the screen. If there was no fault detected during power up, the display will read: In platform mode, HELP: (001) EVERYTHING OK, In ground mode, HELP: (002) GROUND MODE OK If ENTER is pressed again, the display moves to the following display: MENU: HELP:PRESS ENTER l og: ( 211) HELP: PRESS ENTER At this point, using the RIGHT and LEFT arrow keys, you can move between the top level menu items. To select a displayed menu item, press ENTER. To cancel a selected menu item, press ESC; then you will be able to scroll using the right and left arrow keys to select a different menu item. LOGGED HELP LOG: (211) 1: Power Cycle (Or last recorded fault) At this point, the analyzer will display the current fault, if 3121222 – JLG Lift – 7-1 SECTION 7 - JLG CONTROL SYSTEM any are present. You may scroll through the fault logs to view what the last fifteen faults were. Use the right and left arrow keys to scroll through the fault logs. To return to the beginning, press ESC two times. For example: When a top level menu is selected, a new set of menu items may be offered; If for example you choose Personalities: Press ENTER to select the ACCESS LEVEL menu. DRIVE MENU: ACCESS LEVEL 2 Using the UP or DOWN arrow keys, enter the first digit of the password, 3. Then using the RIGHT arrow key, position the cursor to the right one space to enter the second digit of the password. LIFT STEER Use the UP or DOWN arrow key to enter the second digit of the password which is 3. GROUND Pressing ENTER with any of the above displayed menus, will display additional sub-menus within the selected menu. In some cases the next level is the parameter or information to be changed. Refer to the flow chart for what menus are available within the top level menus. You may only view the personality settings for selected menus while in access level 2. Remember, you may always cancel a selected menu item by pressing the ESC key. Repeat this process until you have entered all five digits of the password which is 33271. Once the correct password is displayed, press ENTER. The access level should display the following, if the password was entered correctly: Changing the Access Level of the Hand Held Analyzer: MENU: ACCESS LEVEL 1 When the analyzer is first connected, you will be in access level 2 which enables you to only view most configuration settings which cannot be changed until you enter a password to advance to a lower level. This ensures that a setting cannot be accidentally altered. To change the access level, the correct password must be entered. To enter the password, scroll to the ACCESS LEVEL menu. MENU: ACCESS LEVEL 2 MENU: ACCESS LEVEL 1 Repeat the above steps if the correct access level is not displayed or you can not adjust the personality settings: 7-2 – JLG Lift – 3121222 SECTION 7 - JLG CONTROL SYSTEM Machine Setup When a machine digit item is selected, press the UP or DOWN arrow keys to adjust its value. NOTE: Refer to the appropriate Machine Personality Settings Table, and the Machine Setup Table on the following pages in this Service Manual for the default settings. Password 33271 will give you access to level 1, which will permit you to change all machine personality and/or machine setup settings. FAILURE TO MAKE THE PROPER SETTINGS FOR THE PARTICULAR MACHINE CAN RESULT IN IMPROPER OPERATION. CHANGING THESE SETTINGS MAY ADVERSELY AFFECT THE PERFORMANCE OF YOUR MACHINE. GROUND ALARM: 1=MOTION IT IS A GOOD PRACTICE TO AVOID PRESSURE-WASHING ELECTRICAL/ELECTRONIC COMPONENTS. SHOULD PRESSUREWASHING BE UTILIZED TO WASH AREAS CONTAINING ELECTRICAL/ELECTRONIC COMPONENTS, JLG INDUSTRIES, INC. RECOMMENDS A MAXIMUM PRESSURE OF 750 PSI (52 BAR) AT A MINIMUM DISTANCE OF 12 INCHES (30.5 CM) AWAY FROM THESE COMPONENTS. IF ELECTRICAL/ELECTRONIC COMPONENTS ARE SPRAYED, SPRAYING MUST NOT BE DIRECT AND BE FOR BRIEF TIME PERIODS TO AVOID HEAVY SATURATION. Diagnostic Trouble Codes (DTC) DTC (Diagnostic Trouble Codes) are indicated on the face of the platform control box as shown: SYSTEM FAULT For example: GROUND ALARM: 1=MOTION The effect of the machine digit value is displayed along with its value. The above display would be selected if the machine was equipped with a ground alarm and you wanted it to sound when driving. There are certain settings allowed to install optional features or select the machine model. NOTE: Flash codes are also displayed on the handheld analyzer. For descriptions see Section 8, DIAGNOSTIC TROUBLE CODES When selecting the machine model to match the size of the machine, the personality settings will return to default settings. 3121222 – JLG Lift – 7-3 7-4 LIFT: DECEL 0.1-1.0S LIFT: UP MIN 0-50% LIFT: UP MAX 1-100% LIFT: UP MIN 0-60% DRIVE: ACCEL 0.1-5.0 S DRIVE: DECEL 0.1-10.0 S DRIVE: MINIMUM 0-25% DRIVE: MAXIMUM 0-100% DRIVE: ELEV.MAX 0-25% – JLG Lift – MENU: CALIBRATIONS MENU: MACHINE SETUP LIFT: ACCEL 0.1-5.0S PERSONALITIES: DRIVE MENU: PERSONALITIES * * * LOAD: * YES:ENTER,NO:ESC CALIBRATIONS: LOAD TILT CUTOUT: 1=YES TILT CUTOUT: 0=NO STEER: DRIVE 0-100% STEER: STATIC 0-100% PERSONALITIES: STEER * DRIVE CUTOUT: * YES:ENTER,NO:ESC CALIBRATIONS: DRIVE CUTOUT DRIVE CUTOUT: 1=YES DRIVE CUTOUT: 0=NO ACCELERATOR: REV MAX 3.80V ACCELERATOR: REV MIN 2.75V ACCELERATOR: FWD MAX 1.20V ACCELERATOR: FWD MIN 2.25V PERSONALITIES: ACCELERATOR CHARGER INTRLOC* 1=DRV&LIFT UP CHARGER INTRLOC* 0=DRIVE ONLY GROUND: ALARM 87DB GROUND: HORN 107DB PERSONALITIES: GROUND * * GROUND ALARM: 2=MOTION GROUND ALARM: 1=DESCENT * * GROUND ALARM: * 0=NOT INSTALLED LOAD: OVR HOLD 5.0S LOAD: * OVR DBNCE 3.0S LOAD: ACC'Y 0-200KG PERSONALITIES: * LOAD LOAD: 2=CUTOUT ALL LOAD: 1=CUTOUT PLT * * LOAD: * 0=NOT INSTALLED DRIVE MOTORS: 1=ADVANCED DC DRIVE MOTORS: 0=PEERLESS ELEV PROX: 1=INSTALLED * ELEV PROX: * 0=NOT INSTALLED Figure 7-1. Analyzer Menu Flow Chart - Sevcon vP1.14 - Sheet 1 of 2 - (4170032 -15) SET ELEV SENSOR: * 0.10-1.20V X.XXV MARKET: 5=JAPAN MODEL NUMBER: 3246ES UNCALED TILT: +X.XX, +Y.YY MARKET: 4=AUSTRALIA MODEL NUMBER: 2646ES SET ELEV SENSOR: * YES:ENTER,NO:ESC MARKET: 3=CE MODEL NUMBER: 2630ES CALIBRATIONS: * SET ELEV SENSOR MARKET: 2=CSA MODEL NUMBER: 2030ES LEVEL VEHICLE: YES:ENTER,NO:ESC MARKET: 1=ANSI EXPORT MODEL NUMBER: 1930ES CALIBRATIONS: TILT SENSOR MARKET: 0=ANSI USA MODEL NUMBER: 1230ES LIFT: DN MAX 1-100% PERSONALITIES: LIFT ACCESS LEVEL: CODE 00000 MENU: ACCESS LEVEL 1 ACCESS LEVEL: CODE 33271 ANALYZER SCREEN LAYOUT BATTERY: 0=FLOODED BATTERY: 1=AGM FOOTSWITCH: 1=YES FOOTSWITCH: 0=NO * * SECTION 7 - JLG CONTROL SYSTEM 3121222 3121222 DIAGNOSTICS: GROUND GROUND: LIFT UP OPEN GROUND: LIFT DN OPEN CURRENT HELP MESSAGE DIAGNOSTICS: PLATFORM PLATFORM: DRIVE SEL OPEN PLATFORM: LIFT SEL OPEN MENU: DIAGNOSTICS – JLG Lift – TRACTION: ARM VOLT XX.XV TRACTION: ARM PWM 0-100% * * PLATFORM: STEER RT OPEN PLATFORM: IN/OUT OPEN PLATFORM: ZONE A/B OPEN TRACTION: FLD CUR XX.XA PLATFORM: JOYSTICK 0% PUMP: PUMP CUR XXX.XA PUMP: PUMP PWM 0-100% PUMP: MODE: NEUTRAL DIAGNOSTICS: PUMP RUN SYSTEM TEST: ALARM ON RUN SYSTEM TEST: HORN ON RUN SYSTEM TEST: OVERLOAD ON RUN SYS TEST:(3) TEST OVLD&ALRM? RUN SYSTEM TEST: SYS DISTRESS ON RUN SYSTEM TEST: TILT LAMP ON RUN SYSTEM TEST: INDOOR ON RUN SYSTEM TEST: OUTDOOR ON RUN SYSTEM TEST: OVERLOAD ON RUN SYSTEM TEST: PLAT ALARM ON RUN SYSTEM TEST: OPEN IN/OUT SEL RUN SYSTEM TEST: CLOSE TRIGGER RUN SYSTEM TEST: CLOSE IN/OUT SEL RUN SYSTEM TEST: OPEN TRIGGER RUN SYSTEM TEST: CLOSE HORN SW RUN SYSTEM TEST: OPEN HORN SW * SYSTEM: HORN ON/OFF SYSTEM: * PHP RET/EXT/FAULTY SYSTEM: * RT PHP OPEN/CLOSED SYSTEM: * LT PHP OPEN/CLOSED SYSTEM: PHP OPEN/CLOSED SYSTEM: BRK RELES OPEN ELEV SENSOR: CALIB X.XXV * ELEV SENSOR: PPS SPEED STOWED SYSTEM: * FIXED TILT +X.X SYSTEM: BRAKE ON/OFF ELEV SENSOR: * PLATFORM STOWED SYSTEM: TILT +X.X +Y.Y * * ELEV SENSOR: PROX SW OPEN ELEV SENSOR: ZEROED X.XXV ELEV SENSOR: * ANGLE SNSR XX.XV SYSTEM: * PLT BATT XX.XV SYSTEM: BATTERY XX.XV SYSTEM: MODE GROUND DIAGNOSTICS: SYSTEM RUN SYSTEM TEST: SELECT LIFT DIAGNOSTICS: ELEV SENSOR RUN SYSTEM TEST: BATTERY 4 (FULL) RUN SYSTEM TEST: OPEN RT STEER RUN SYSTEM TEST: SELECT DRIVE RUN SYSTEM TEST: BATTERY 3 (3/4) RUN SYSTEM TEST: BATTERY 2 (1/2) RUN SYSTEM TEST: BATTERY 1 (1/4) RUN SYS TEST:(4) TEST LEDS&ALRM? RUN SYSTEM TEST: CLOSE RT STEER RUN SYSTEM TEST: OPEN STEER LT RUN SYSTEM TEST: CLOSE STEER LT RUN SYS TEST:(4) TEST PLT SW? VALVES: LIFT DOWN 0-100% VALVES: LIFT UP OFF/ON VALVES: STEER RIGHT OFF/ON VALVES: STEER LEFT OFF/ON DIAGNOSTICS: VALVES RUN SYSTEM TEST: CNTRL BACK TO MN RUN SYSTEM TEST: CNTRL BACK TO MX RUN SYSTEM TEST: CNTRL FWD TO MIN RUN SYSTEM TEST: CNTRL FWD TO MAX RUN SYS TEST:(4) TEST PROP CNTRL? CHARGER: AC (NOT) CONNECTED DIAGNOSTICS: CHARGER RUN SYSTEM TEST: TEST COMPLETE * LOAD: CELL 4 XXXXKG LOAD: CELL 3 XXXXKG LOAD: CELL 2 XXXXKG LOAD: CELL 1 XXXXKG * * * * LOAD: * OVERLOADED? YES LOAD: * PLTGROS XXXXKG LOAD: * PLTLOAD XXXXKG DIAGNOSTICS: LOAD CLEAR RENTAL: YES:ENTER,NO:ESC DATALOG: ERASE RENTAL? DATALOG: RENTAL XXH XXM DATALOG: LIFT XXH XXM DATALOG: DRIVE XXH XXM DIAGNOSTICS: DATALOG Figure 7-2. Analyzer Menu Flow Chart - Sevcon vP1.14 - Sheet 2 - (4170032 - 15) TRACTION: TEMP XXC TRACTION: FLD PWM 0-100% PLATFORM: TRIGGER OPEN PLATFORM: * FOOTSWTCH OPEN TRACTION: FLD VOLT XX.XV PLATFORM: HORN OPEN TRACTION: ARM CUR XXX.XA TRACTION: DRV VOLT XX.XV TRACTION: SPEED 0-100% TRACTION: MODE: NEUTRAL PLATFORM: STEER LT OPEN LOGGED HELP 1 TO 16 DIAGNOSTICS: TRACTION RUN SYSTEM TEST: GND LIFT DN RUN SYSTEM TEST: RT STEER MENU: HELP:PRESS ENTER RUN SYSTEM TEST: GND LIFT UP RUN SYSTEM TEST: LT STEER RUN SYSTEM TEST: LIFT UP RUN SYS TEST:(3) TEST GND SW? RUN SYSTEM TEST: TEST VAVLES? ACTIVATE TEST: YES:ENTER,NO:ESC MENU: SYSTEM TEST VERSIONS: LSS HW ? VERSIONS: LSS SW P?.? VERSIONS: POWER MOD V?.?? VERSIONS: PM SN ????? VERSIONS: PM HW REV ? VERSIONS: PM SW P?.? VERSIONS: GM SN ????? VERSIONS: GM HW REV ? VERSIONS: GM SW P?.? DIAGNOSTICS: VERSIONS * * SECTION 7 - JLG CONTROL SYSTEM 7-5 Figure 7-3. Analyzer Menu Flow Chart - Sheet 1 of 3 - (1001096495) (Machines Equipped with ZAPI - 1001092456 Power Module Only) SECTION 7 - JLG CONTROL SYSTEM 7-6 – JLG Lift – 3121222 Figure 7-4. Analyzer Menu Flow Chart - Sheet 2 of 3 - (1001096495) (Machines Equipped with ZAPI - 1001092456 Power Module Only) SECTION 7 - JLG CONTROL SYSTEM 3121222 – JLG Lift – 7-7 Figure 7-5. Analyzer Menu Flow Chart - Sheet 3 of 3 - (1001096495) (Machines Equipped with ZAPI - 1001092456 Power Module Only) SECTION 7 - JLG CONTROL SYSTEM 7-8 – JLG Lift – 3121222 SECTION 7 - JLG CONTROL SYSTEM 7.2 MACHINE CONFIGURATION PROGRAMMING INFORMATION ality settings first and then changing the model number of the machine configuration will cause the personality settings to return to default. NOTE: When configuring an 1230ES machine, the machine configuration must be completed before any personality settings can be changed. Changing the person- Shaded entries are not available for the selected market. Table 7-1. Machine Configuration Programming Information (4150473-F) Machines Equipped with Sevcon (1600346) Power Module ONLY Configuration Digit Setting Range 1 (Model #) 0 1 2 3 4 5 2 (Market) 3 (Tilt Cutout) 4 (Drive Cutout) 5 (Charger Interlock) 6 (Ground Alarm) 0 1 2 3 4 5 0 1 0 1 0 1 0 1 2 7 (Load) 0 1 2 8 (Drive Motors) 9 (Elev. Prox.) 0 1 0 1 10 (Battery) 0 1 11 (Footswitch) 0 1 3121222 Description 1230ES 1930ES 2030ES 2630ES 2646ES 3246ES ANSI USA ANSI EXPORT CSA CE AUSTRALIA JAPAN NO - Drive and lift up NOT PREVENTED while tilted (Ground and Platform Mode). YES - Drive and lift up PREVENTED while tilted (Ground and Platform Mode). NO - Drive and lift up NOT PREVENTED while elevated. YES - Drive and lift up PREVENTED while elevated. DRIVE ONLY - Drive motion PREVENTED while vehicle is charging. DRIVE AND LIFT UP - Drive and lift up motions ARE PREVENTED while vehicle is charging. Required for CE. NOT INSTALLED - Vehicle alarm will function for Arm Guard (if enabled), Overload (if LSS enabled), and as a horn. DESCENT - Vehicle alarm will function for Arm Guard (if enabled), Overload (if LSS enabled), as a horn and during Lift Down motion. MOTION - Vehicle alarm will function for Arm Guard (if enabled), Overload (if LSS enabled), as a horn and during Drive and Lift motion. NOT INSTALLED – Load Sensing System (LSS) is not fitted to the vehicle CUTOUT PLT – Load Sensing System (LSS) is fitted, and Platform Controls are prevented in the event of an Overload. Ground Controls remain functional. This is the default setting for CE machines. CUTOUT ALL – Load Sensing System (LSS) is fitted. Platform and Ground Controls are prevented in the event of an Overload. PEERLESS - Vehicle is fitted with Peerless drive motors. ADVANCED DC - Vehicle is fitted with Advanced DC drive motors. 0=NOT INSTALLED – Vehicle is not fitted with an Elevation Prox Sensor. Vehicle has Left & Right Brake Release Outputs, and Maintained Brake Release functionality. 1=INSTALLED – Vehicle is fitted with an Elevation Prox Sensor (original ESSeries). Vehicle has a single Brake Release Output, and Momentary Brake Release functionality. 0=FLOODED – Batteries are conventional lead-acid type. 1=AGM – Batteries are absorbed glass mat type. NO - Vehicle is not fitted with a footswitch YES - Vehicle is fitted with a footswitch – JLG Lift – Model Default Setting per Market 0 1 2 3 4 5 0 0 0 0 0 0 0 0 0 0 0 0 1 1 1 0 1 1 0 0 0 0 0 0 0 0 0 0 0 0 2 2 2 0 2 2 o 1 0 1 0 1 1 1 1 1 1 1 0 0 0 0 0 0 0 0 0 0 0 0 0 0 0 0 0 1 7-9 SECTION 7 - JLG CONTROL SYSTEM Table 7-2. Machine Configuration Programming Information (1001115626-B) (Machines Equipped with ZAPI - 1001092456 Power Module Only) Market Default Setting Configuration Digit Setting Range Description 1 (Model #) 0 1 2 3 4 5 1230ES 1930ES 2030ES 2630ES 2646ES 3246ES (Set to your applicable ES Model 0 through 5) 2 (Market *) 0 1 2 3 4 5 ANSI USA ANSI EXPORT CSA CE AUSTRALIA JAPAN 0 - (ANSI USA) (Set to your applicable market) 3 (Tilt Cutout) 0 1 NO - Drive and lift up not prevented while tilted (Ground and Platform Mode). YES - Drive and lift up prevented while tilted (Ground and Platform Mode). 4 (Drive Cutout) 0 1 NO - Drive and lift up not prevented while elevated. YES - Drive and lift up prevented while elevated. 0 DRIVE ONLY - Drive motion prevented while vehicle is charging. DRIVE AND LIFT UP - Drive and lift up motions are prevented while vehicle is charging. Required for CE. 0 0 NOT INSTALLED - Vehicle alarm will function for Arm Guard (if enabled), Overload (if LSS enabled, and as a horn. DESCENT - Vehicle alarm will function for Arm Guard (if enabled), Overload (if LSS enabled, as a horn and during Lift Down motion. MOTION - Vehicle alarm will function for Arm Guard (if enabled), Overload (if LSS enabled, as a horn and during Drive and Lift motion. 2 NOT INSTALLED - Load Sensing System (LSS) is not fitted to the vehicle. CUTOUT PLT - Load Sensing System (LSS) is fitted and Platform Controls are prevented in the event of an Overload. Ground Controls remain functional. This is the default setting for CE machines. CUTOUT ALL - Load Sensing System (LSS) is fitted. Platform and GRound Controls are prevented in the event of an overload. 0 5 (Charger Interlock) 1 0 6 (Ground Alarm) 1 2 0 1 7 (Load) 2 8 (Battery) 0 1 FLOODED - Batteries are conventional lead-acid type. AGM - Batteries are absorbed glass mat type. 9 (Footswitch) 0 1 NO - Vehicle is not fitted with a footswitch YES - Vehicle is fitted with a footswitch 7-10 – JLG Lift – 0 1 1 1 2 3 1 4 5 0 1 1 0 0 0 0 2 2 0 2 2 1 0 1 0 1 0 0 1 1 0 0 0 0 3121222 SECTION 7 - JLG CONTROL SYSTEM 7.3 MACHINE PERSONALITY - ADJUSTMENT SETTINGS Table 7-3. Machine Personality Adjustment (4150472-H) Machines Equipped with Sevcon (1600346) Power Module Function Adjustment Range Table 7-4. Machine Personality Adjustment (1001115627B) - Machines Equipped with ZAPI (1001092456) Power Module 1230ES (Factory Setting) Function Adjustment Range 1230ES (Factory Setting) ACCEL 0.1 - 5.0 (Sec) 0.8 1.0 DRIVE DRIVE ACCEL 0.1 - 5.0 (Sec) 0.8 DECEL 0.1 - 1.0 (Sec) 1.0 DECEL 0.1 - 1.0 (Sec) MINIMUM 0 - 25% 0 MINIMUM 0 - 25% 0 0 -100% 100 MAXIMUM 0 -100% 100 MAXIMUM ELEV. MAX. 0 - 25% 18 ELEV. MAX. 0 - 30% 25 ACCEL 0.1 - 5.0 (Sec) 0.5 0.1 LIFT LIFT ACCEL 0.1 - 5.0 (Sec) 0.5 DECEL 0.1 - 1.0 (Sec) 0.1 DECEL 0.1 - 1.0 (Sec) UP MIN 0 - 50% 10 UP MIN 0 - 50% 20 UP MAX 0 - 100% 100 UP MAX 0 - 100% 100 DN MIN 1 - 60% 42 DN MIN 1 - 60% 45 DN MAX 0 - 100% 61 DN MAX 0 - 100% 85 STEER STEER STATIC 0 - 100% 100 STATIC 0 - 100% 100 DRIVE 0 - 100% 60 DRIVE 0 - 100% 60 ACCELERATOR ACCELERATOR FWD MIN 2.20 - 2.40 V 2.25 FWD MIN 2.20 - 2.40 V 2.23 FWD MAX 1.00 - 1.50 V 1.20 FWD MAX 1.00 - 1.50 V 1.19 REV MIN 2.60 - 2.80 V 2.75 REV MIN 2.60 - 2.80 V 2.74 REV MAX 3.50 - 4.00 V 3.80 REV MAX 3.50 - 4.00 V 3.78 GROUND GROUND HORN 87 - 107 dB 107 HORN 87 - 107 dB 107 ALARM 87 - 107 dB 87 ALARM 87 - 107 dB 87 LOAD LOAD ACCY 0 - 200 Kg N/A ACCY 0 - 200 Kg 0 OVR DBNCE 0.0 - 5.0 Sec N/A OVR DBNCE 0.0 - 5.0 Sec 3.0 OVR HOLD 0.0 - 5.0 Sec N/A OVR HOLD 0.0 - 5.0 Sec 5.0 NOTE: These settings may change in order to achieve optimal performance on a machine by machine basis. 3121222 NOTE: These settings may change in order to achieve optimal performance on a machine by machine basis. – JLG Lift – 7-11 SECTION 7 - JLG CONTROL SYSTEM 7.4 TILT SENSOR CALIBRATION carefully. Observe whether the tilt sensor is properly seated. Be sure that the machine is parked and stowed on level ground. c. Tilt sensor has developed an offset shift: Remove the tilt sensor from the Ground Control box but keep both the tilt sensor and Ground Control box electrically connected. Level one axis of the tilt sensor and observe the raw reading (should be within ± 2.0). Do the same for the other axis. If either axis is greater than ± 2.0, replace the tilt sensor. Ground Module Software Version 1.5 1. Enter Access Level 1 and go to the CALIBRATION/ TILT SENSOR/LEVEL VEHICLE screen. 2. Choose the right arrow key to view the raw, uncalibrated tilt sensor values. If either raw angle reads 5.0 or more, the machine is too unlevel and the software will prohibit calibration. Therefore, attempt to dissect the three areas of error to find the primary contributor: Calibration Failures Some possible reasons that the tilt sensor won’t calibrate are: a. Machine mounting and/or grade: Try to measure the top of the Ground Control box for levelness. If unable to get a good reading, unbolt the Ground Control box and check the box’s mounting surface for levelness. a. The surface the machine is sitting on is off level by a few degrees (flat doesn’t imply level; parking lots are often not level). b. Tilt sensor mounting on machine or wedged crooked in control box: If the machine mounting/grade appears acceptable, remove and open the Ground Control box carefully. Observe whether the tilt sensor is properly seated in its grooves. c. Tilt sensor has moisture intrusion that has shifted its output. c. Tilt sensor has developed an offset shift: Remove the tilt sensor from the Ground Control box but keep both the tilt sensor and Ground Control box electrically connected. Level one axis of the tilt sensor and observe the raw reading (should be within ± 2.0). Do the same for the other axis. If either axis is greater than ±2.0, replace the tilt sensor. e. The Ground Control Box, as mounted on the machine, does not allow the tilt sensor to be level. b. The tilt sensor has failed one or both of the channels (X axis and Y axis). d. Water and/or corrosion in the box has corrupted electrical connections or caused a tilt sensor or ground control board failure (observe any cracks in the box) For the following troubleshooting steps, a bubble level (smaller is better) will be needed and the machine must be on a level surface: Ground Module Software Version 1.4 1. Enter Access Level 1 and go to the CALIBRATION/ TILT SENSOR/LEVEL VEHICLE screen. 2. Choose the right arrow key to view the raw, uncalibrated tilt sensor values. If either raw angle reads 5.0 or more, the machine is too unlevel and the software will prohibit calibration. Therefore, attempt to dissect the three areas of error to find the primary contributor: 7-12 1. On the Analyzer, go the Diagnostics/System and read the tilt angle. If either angle reports +20.0°, there is an electrical/electronic failure (tilt sensor, control board, electrical connections). a. Take the Ground Control box off of the machine and open. b. Disconnect the sensor and clean any corrosion off of the tilt sensor and control board connections. c. Reassemble and test. If fault persists, replace tilt sensor. a. Machine mounting and/or grade: Try to measure the top of the Ground Control box for levelness. If unable to get a good reading, unbolt the Ground Control box and check the box’s mounting surface for levelness. 2. If the Analyzer displays angles other than +20.0°, attempt to calibrate. If machine won’t calibrate, note the reason displayed on Analyzer: b. Tilt sensor mounting on machine or wedged crooked in control box.: If the machine mounting/grade appears acceptable, remove and open the Ground Control box b. NOT LEVEL - tilt sensor has either developed an offset or it is too unlevel as mounted on the machine. – JLG Lift – a. SENSOR FAILURE – tilt sensor internal frequency is out of range (replace sensor). 3121222 SECTION 7 - JLG CONTROL SYSTEM 7.5 TILT SENSOR ELECTRICAL EVALUATION This basic check using the JLG Analyzer can be used to test the Tilt Sensor. • If angle measurements read +20.0, then a sensor/ wiring/connector fault exists. If the readings intermittently display expected angles, then there is likely a wiring/connector problem and not a failed sensor. In either case, open the ES Ground box. Disconnect the sensor, check the wire terminations, and clean any corrosion on the tilt sensor and control board connections. Reconnect and test. If the fault persists, replace the tilt sensor and return the faulty tilt sensor to JLG with a detailed description of the diagnostic steps taken. 7.6 ELEVATION ANGLE SENSOR ELECTRICAL EVALUATION These basic checks using the JLG Analyzer can be used to test the Elevation Atrecrqwetngle Sensor. If the problem is still occurring, perform the Tilt vs. Allowed Height Evaluation described below. • On a level surface, with the Analyzer under DIAGNOSTICS/ELEV SENSOR, verify that the elevation angle sensor voltage increases (ranges from 0.2V0.8V to 3.6V-4.2V) with platform height. If not, check the sensor mounting. If necessary, unbolt sensor and rotate by hand while monitoring with the Analyzer to check the integrity of the sensor output. • For machines equipped with an elevation proximity switch, if the Elevation Sensor appears satisfactory, verify that the Elevation Prox switch is opening and closing appropriately by watching the change of state between the stowed and elevated positions (monitor PROX SWITCH under DIAGNOSTICS/ELEV SENSOR). If a change of state is not observed, check prox mounting and operability by placing metal in front of the prox sensor face. Tilt vs. Allowed Height Evaluation First, find a level surface (not just flat like a parking lot; must be level). The surface should be a plane in which the wheels are within 00.2. Find this surface by taking a digital level and measuring the areas on which the wheels would rest in both the X and Y directions. Mark the locations and drive the machine to these points. If a level surface can not be found, flat shims or plates may be place under the wheels to create a level plane for the wheels. In determining the existing tilt angle, read the angle on the Analyzer under DIAGNOSTICS/SYSTEM. Do not place a hand-held level on the machine to determine whether the machine is level and lifting to the appropriate height. Such a measurement will likely be different than the Ground box/tilt sensor angle reading due to manufacturing and 3121222 mounting tolerances. The tilt angle in both directions should read within 0.5 while on a level surface. If not, then either the machine has a drifting tilt sensor or has been erroneously re-calibrated since the original factory calibration. Check the service records to determine whether a re calibration has been performed. If so, re-calibrate on the level surface. If there is no record of an earlier calibration, we must assume that the sensor output has drifted. Therefore, replace the sensor and return to JLG with a detailed troubleshooting description. NOTE: There is a rare case in which an attempted calibration will be unsuccessful for machines with Ground module software version P1.5 or earlier. If this occurs while performing a calibration, the Analyzer will display: LEVEL VEHICLE TILT +20.0 +20.0 and the following fault will also be logged. TILT SENSOR NOT CALIBRATED (2/3) [DTC 811] If no other faults have been logged since the last startup, this fault indicates that the software needs to be updated to P1.6 or later. Update the software and continue troubleshooting evaluation before replacing any components. If the tilt sensor readings are within range for a level machine, compare the allowed Tilt vs. Height in the chart below. Being within 6” of the target height is considered acceptable. Table 7-5. Tilt Cutout Settings 1230ES Tilt Setting (front to back) Tilt Setting (side to side) ANSI/CSA CE/AUS 3° 3.4° 1.5° 3.4° If the machine does not appear to track the lift cutout heights and no fault exists as described above, stow the machine and re-calibrate the Elevation Sensor. 7.7 ELEVATION SENSOR CALIBRATION 1. Be sure that the machine is parked and stowed on level ground. 2. Attach the analyzer near the ground control station. 3. Go to Access Level 1 and scroll through to CALIBRATION. 4. Under Calibrations go to SET ELEV SENSOR. 5. Press enter for Yes and the Elevation Sensor will set. NOTE: Check the elevation sensor by lifting the scissor arms, from the platform, and driving until the drive speed cuts back. Refer to the Maximum High Drive Cut Out Height table in section 1 of this manual for proper speed cut out height. – JLG Lift – 7-13 SECTION 7 - JLG CONTROL SYSTEM NOTES: 7-14 – JLG Lift – 3121222 SECTION 8 - DIAGNOSTIC TROUBLE CODES SECTION 8. DIAGNOSTIC TROUBLE CODES 8.1 INTRODUCTION This section provides a reference for Diagnostic Trouble Codes (DTC) read from the Multifunction Digital Indicator (MDI). This section should only be used for machines equipped with a SEVCON Power Module-(ground board software version P1.13 or higher) or ZAPI Power Module-(ground board software version P1.0 or higher). For more information on any sensors or indicators, refer to the appropriate section for the machine area. Many of the checks below require configuring and using a multimeter. Refer to Section 7: General Electrical Information & Schematics for multimeter basics. DTCs are sorted in groups by the first two digits, which is also the system distress lamp flash code. To troubleshoot multiple DTCs, start with the DTC with the higher first two digits. The machine is powered by four 6 Volt batteries in series, providing a nominal 24 Volts to the control system. Some procedures below refer to this nominal voltage (VMN) as 24V. Actual voltage measurements may differ based on the charge of the batteries. If a correction is made during a check, conclude the check by cycling the machine power, using the emergency stop switch. It may also be helpful to run a system test, ANALYZER -> SYSTEM TEST for intermittent or difficult problems. 8.2 X-CONNECTOR REFERENCES Throughout the following DTC troubleshooting procedures, electrical connectors are given a three digit identifier number preceded with an “X” for identifying and locating the specific connector on the machine. See Section 9.8, X-CONNECTOR ID INDEX for description of "X" connectors and Figure 9-12. on page 9-20, and Figure 9-13. on page 9-21 for location of "X" connectors on the machine. Example of "X" connector usage nomenclature: [X006.21] refers to terminal 21 (pin and socket) of connector X006. [X006.21.soc] refers to the socket side of terminal 21, connector X006. [X006.21.pin] refers to the pin side of terminal 21, connector X006. 8.3 DTC INDEX 0-0 2-1 2-2 2-3 001 EVERYTHING OK ........................................................................................................................................................... 6-3 002 GROUND MODE OK ...................................................................................................................................................... 6-3 003 ALARM SOUNDING - TILTED & ABOVE ELEVATION .................................................................................................. 6-3 004 DRIVING AT CUTBACK - ABOVE ELEVATION ............................................................................................................. 6-3 005 DRIVE & LIFT UP PREVENTED - TILTED & ELEVATED ............................................................................................... 6-4 006 LIFT UP PREVENTED - MAX HEIGHT ZONE A ............................................................................................................. 6-4 007 DRIVING AT CUTBACK - POTHOLE STILL ENGAGED ................................................................................................ 6-4 008 FUNCTIONS LOCKED OUT - SYSTEM POWERED DOWN ......................................................................................... 6-4 009 DRIVE PREVENTED - ELEVATED ABOVE DRIVE CUTOUT HEIGHT .......................................................................... 6-4 211 POWER CYCLE ............................................................................................................................................................. 6-4 212 KEYSWITCH FAULTY .................................................................................................................................................... 6-5 221 FUNCTION PROBLEM - HORN PERMANENTLY SELECTED ...................................................................................... 6-5 222 FUNCTION PROBLEM - INDOOR / OUTDOOR PERMANENTLY SELECTED ............................................................. 6-5 223 FUNCTION PROBLEM - DRIVE & LIFT ACTIVE TOGETHER ....................................................................................... 6-5 224 FUNCTION PROBLEM - STEER LEFT PERMANENTLY SELECTED ............................................................................ 6-5 225 FUNCTION PROBLEM - STEER RIGHT PERMANENTLY SELECTED ......................................................................... 6-5 226 ACCELERATOR FAULTY - WIPER OUT OF RANGE .................................................................................................... 6-5 227 STEER SWITCHES FAULTY .......................................................................................................................................... 6-6 228 FUNCTION LOCKED OUT - ACCELERATOR NOT CENTERED ................................................................................... 6-6 229 FUNCTION PROBLEM - TRIGGER PERMANENTLY CLOSED ..................................................................................... 6-6 2210 TRIGGER CLOSED TOO LONG WHILE IN NEUTRAL ................................................................................................ 6-6 2232 FUNCTION PROBLEM - DRIVE & LIFT BOTH OPEN .................................................................................................. 6-6 231 FUNCTION PROBLEM - LIFT PERMANENTLY SELECTED ......................................................................................... 6-6 3121222 – JLG Lift – 8-1 SECTION 8 - DIAGNOSTIC TROUBLE CODES 2-5 3-1 3-2 3-3 4-2 4-4 232 GROUND LIFT UP / DOWN ACTIVE TOGETHER .........................................................................................................6-6 233 FUNCTION PROBLEM - BRAKE RELEASE PERMANENTLY SELECTED ....................................................................6-6 251 ELEV ANGLE SENSOR FAULTY - VOLTAGE OUT OF RANGE ....................................................................................6-7 252 ELEV ANGLE SENSOR HAS NOT BEEN CALIBRATED ...............................................................................................6-7 253 DRIVE PREVENTED - CHARGER CONNECTED ...........................................................................................................6-7 254 DRIVE & LIFT UP PREVENTED - CHARGER CONNECTED .........................................................................................6-7 255 PLATFORM OVERLOADED ...........................................................................................................................................6-7 256 DRIVE PREVENTED - POTHOLE NOT ENGAGED .......................................................................................................6-7 257 ELEV PROX PERMANENTLY CLOSED - CHECK PROX AND ANGLE ADJUSTMENT ................................................6-8 258 DRIVE & LIFT PREVENTED - BRAKES ELECTRICALLY RELEASED FOR TOWING ....................................................6-8 259 MODEL CHANGED - HYDRAULICS SUSPENDED - CYCLE EMS ................................................................................6-8 2510 DRIVE PREVENTED - BRAKES NOT RELEASING ......................................................................................................6-8 2511 ELEV ANGLE SENSOR FAULTY - NOT MOUNTED ....................................................................................................6-8 2512 ELEV ANGLE SENSOR NOT DETECTING CHANGE ..................................................................................................6-8 311 OPEN CIRCUIT LINE CONTACTOR ..............................................................................................................................6-8 312 CONTACTOR DRIVER PERMANENTLY OFF ................................................................................................................6-8 321 LINE CONTACTOR MISWIRED ON OR WELDED .........................................................................................................6-9 322 CONTACTOR DRIVER PERMANENTLY ON ..................................................................................................................6-9 331 BRAKE SHORT TO BATTERY ........................................................................................................................................6-9 332 BRAKE OPEN CIRCUIT .................................................................................................................................................6-9 333 LIFT UP SHORT TO BATTERY ......................................................................................................................................6-9 334 LIFT UP OPEN CIRCUIT ................................................................................................................................................6-9 335 LIFT DN SHORT TO BATTERY ......................................................................................................................................6-9 336 LIFT DN OPEN CIRCUIT ..............................................................................................................................................6-10 337 STEER LEFT SHORT TO BATTERY ............................................................................................................................6-10 338 STEER LEFT OPEN CIRCUIT ......................................................................................................................................6-10 339 STEER RIGHT SHORT TO BATTERY ..........................................................................................................................6-10 3310 STEER RIGHT OPEN CIRCUIT ..................................................................................................................................6-10 3311 GROUND ALARM SHORT TO BATTERY ...................................................................................................................6-10 3312 LEFT BRAKE SHORT TO BATTERY ..........................................................................................................................6-10 3313 RIGHT BRAKE SHORT TO BATTERY ........................................................................................................................6-10 3314 LEFT BRAKE OPEN CIRCUIT ....................................................................................................................................6-11 3315 RIGHT BRAKE OPEN CIRCUIT ..................................................................................................................................6-11 33297 LEFT BRAKE - SHORT TO GROUND ......................................................................................................................6-11 33298 STEER LEFT VALVE - SHORT TO GROUND ..........................................................................................................6-11 33299 LINE CONTACTOR COIL - SHORT TO BATTERY...................................................................................................6-11 33302 NEGATIVE SUPPLY - SHORT TO BATTERY ...........................................................................................................6-11 33303 NEGATIVE SUPPLY - SHORT TO GROUND ...........................................................................................................6-11 33304 RIGHT BRAKE - SHORT TO GROUND....................................................................................................................6-11 33305 STEER RIGHT VALVE - SHORT TO GROUND ........................................................................................................6-11 33406 LIFT UP VALVE - SHORT TO GROUND ..................................................................................................................6-11 33407 LIFT DN VALVE - SHORT TO GROUND ..................................................................................................................6-11 421 POWER MODULE TOO HOT - PLEASE WAIT ............................................................................................................6-12 422 DRIVING AT CUTBACK - POWER MODULE CURRENT LIMIT ...................................................................................6-12 423 LIFT UP AT CUTBACK - POWER MODULE CURRENT LIMIT .....................................................................................6-12 441 BATTERY VOLTAGE TOO LOW - SYSTEM SHUTDOWN ...........................................................................................6-12 442 BATTERY VOLTAGE TOO HIGH - SYSTEM SHUTDOWN ..........................................................................................6-12 443 LSS BATTERY VOLTAGE TOO HIGH ..........................................................................................................................6-12 444 LSS BATTERY VOLTAGE TOO LOW ...........................................................................................................................6-12 446 LOGIC SUPPLY VOLTAGE OUT OF RANGE ..............................................................................................................6-12 4421 LOGIC SUPPLY VOLTAGE OUT OF RANGE .............................................................................................................6-12 4422 LOGIC SUPPLY VOLTAGE OUT OF RANGE .............................................................................................................6-13 8-2 – JLG Lift – 3121222 SECTION 8 - DIAGNOSTIC TROUBLE CODES 6-6 6-7 7-7 8-1 8-2 9-9 661 CANBUS FAILURE - POWER MODULE ...................................................................................................................... 6-13 662 CANBUS FAILURE - PLATFORM MODULE ................................................................................................................ 6-14 663 CANBUS FAILURE - LOAD SENSING SYSTEM MODULE ......................................................................................... 6-15 664 CANBUS FAILURE - ACCESSORY MODULE ............................................................................................................. 6-15 6635 CANBUS FAILURE - CHASSIS TILT SENSOR ........................................................................................................... 6-15 671 ACCESSORY FAULT ................................................................................................................................................... 6-15 771 OPEN CIRCUIT DRIVE MOTOR WIRING .................................................................................................................... 7-15 772 STALLED TRACTION MOTOR OR POWER WIRING ERROR..................................................................................... 7-16 773 CAPACITOR BANK FAULT - CHECK POWER CIRCUITS........................................................................................... 7-16 774 SHORT CIRCUIT FIELD WIRING................................................................................................................................. 7-16 775 OPEN CIRCUIT FIELD WIRING ................................................................................................................................... 7-16 776 STALLED PUMP MOTOR OR POWER WIRING ERROR ............................................................................................ 7-16 777 OPEN CIRCUIT PUMP MOTOR WIRING..................................................................................................................... 7-16 778 TRACTION T HIGH - CHECK POWER CIRCUITS ....................................................................................................... 7-16 779 TRACTION T LOW - CHECK POWER CIRCUITS........................................................................................................ 7-16 7710 PUMP P HIGH - CHECK POWER CIRCUITS ............................................................................................................ 7-16 7711 PUMP P LOW - CHECK POWER CIRCUITS ............................................................................................................. 7-16 7741 ARMATURE BRAKING CURRENT TOO HIGH .......................................................................................................... 7-16 7742 FIELD VOLTAGE IMPROPER .................................................................................................................................... 7-17 811 TILT SENSOR NOT CALIBRATED ............................................................................................................................... 6-17 812 NO DATA FROM TILT SENSOR - NOT CONNECTED OR FAULTY ........................................................................... 6-17 821 LSS CELL #1 ERROR .................................................................................................................................................. 6-17 822 LSS CELL #2 ERROR .................................................................................................................................................. 6-17 823 LSS CELL #3 ERROR .................................................................................................................................................. 6-17 824 LSS CELL #4 ERROR .................................................................................................................................................. 6-17 825 LSS HAS NOT BEEN CALIBRATED ............................................................................................................................ 6-17 991 LSS WATCHDOG RESET ............................................................................................................................................ 6-17 992 LSS EEPROM ERROR ................................................................................................................................................. 6-17 993 LSS INTERNAL ERROR - PIN EXCITATION ................................................................................................................ 6-17 994 LSS INTERNAL ERROR - DRDY MISSING FROM A/D ............................................................................................... 6-17 995 POWER MODULE FAILURE - PERSONALITY RANGE ERROR .................................................................................. 6-17 996 POWER MODULE FAILURE - INTERNAL ERROR ...................................................................................................... 6-18 997 POWER MODULE FAILURE - CHECK POWER CIRCUITS OR MOSFET SHORT CIRCUIT ...................................... 6-18 998 EEPROM FAILURE - CHECK ALL SETTINGS ............................................................................................................. 6-18 999 FUNCTION LOCKED OUT - POWER MODULE SOFTWARE VERSION IMPROPER ................................................. 6-18 9910 FUNCTION LOCKED OUT - PLATFORM MODULE SOFTWARE VERSION IMPROPER ......................................... 6-18 9911 FUNCTION LOCKED OUT - LSS MODULE SOFTWARE VERSION IMPROPER ...................................................... 6-18 9912 POWER MODULE FAILURE - SYSTEM MONITOR ................................................................................................... 6-18 9924 FUNCTIONS LOCKED OUT - MACHINE NOT CONFIGURED ................................................................................. 6-18 9950 POWER MODULE FAILURE - INTERNAL ERROR .................................................................................................... 9-19 9951 POWER MODULE FAILURE - INTERNAL ERROR .................................................................................................... 9-19 9952 POWER MODULE FAILURE - INTERNAL ERROR .................................................................................................... 9-19 9953 POWER MODULE FAILURE - INTERNAL ERROR .................................................................................................... 9-19 9954 POWER MODULE FAILURE - INTERNAL ERROR .................................................................................................... 9-19 9955 POWER MODULE FAILURE - INTERNAL ERROR .................................................................................................... 9-19 9956 POWER MODULE FAILURE - INTERNAL ERROR .................................................................................................... 9-20 9957 POWER MODULE FAILURE - INTERNAL ERROR .................................................................................................... 9-20 9958 POWER MODULE FAILURE - INTERNAL ERROR ..................................................................................................... 9-20 9960 POWER MODULE FAILURE - INTERNAL ERROR .................................................................................................... 9-20 9962 POWER MODULE FAILURE - INTERNAL ERROR .................................................................................................... 9-20 9963 POWER MODULE FAILURE - INTERNAL ERROR .................................................................................................... 9-20 9964 POWER MODULE FAILURE - INTERNAL ERROR .................................................................................................... 9-20 9969 POWER MODULE FAILURE - INTERNAL ERROR .................................................................................................... 9-20 9970 POWER MODULE FAILURE - INTERNAL ERROR .................................................................................................... 9-20 3121222 – JLG Lift – 8-3 SECTION 8 - DIAGNOSTIC TROUBLE CODES 9971 POWER MODULE FAILURE - INTERNAL ERROR.....................................................................................................9-20 99143 POWER MODULE FAILURE - INTERNAL ERROR...................................................................................................9-20 99144 POWER MODULE FAILURE - INTERNAL ERROR...................................................................................................9-20 99145 POWER MODULE FAILURE - INTERNAL ERROR...................................................................................................9-21 99146 POWER MODULE FAILURE - INTERNAL ERROR...................................................................................................9-21 99147 POWER MODULE FAILURE - INTERNAL ERROR...................................................................................................9-21 99148 POWER MODULE FAILURE - INTERNAL ERROR...................................................................................................9-21 99149 POWER MODULE FAILURE - INTERNAL ERROR...................................................................................................9-21 8-4 – JLG Lift – 3121222 SECTION 8 - DIAGNOSTIC TROUBLE CODES 8.4 DTC CHECK TABLES 0-0 Help Comments DTC FAULT MESSAGE DESCRIPTION CHECK 001 EVERYTHING OK The normal help message in platform mode. Displays on the analyzer only. 002 GROUND MODE OK The normal help message in ground mode. Displays on the analyzer only. 003 ALARM SOUNDING - TILTED Control system senses that the platform & ABOVE ELEVATION is elevated and the vehicle is tilted, and the machine not configured to cutout. 004 DRIVING AT CUTBACK ABOVE ELEVATION The platform is elevated and the machine • Fully stow the platform. is driving. • Check that the elevation angle sensor is securely mounted. • Check that the pothole protection switches are securely mounted. • Check the lift/drive switch. • Backprobing ground board J1-18 should show about 0 volts. • Backprobing ground board J1-10 should show about 0 volts. • Check function of elevation angle sensor. ANALYZER -> DIAGNOSTICS -> ELEV SENSOR -> ZEROED should be about 0V when stowed and about 0.15V at cutback. 005 DRIVE & LIFT UP PREVENTED - TILTED & ELEVATED Driving is not possible since the platform • Check that the machine is tilted. If so, lower the platform and is elevated and the chassis is not level. reposition the machine to a level surface. • Fully stow the platform. • The tilt sensor is part of the ground control box. Check that the ground control box is secured to the machine. • Check that the pothole protection switches are securely mounted. • Check that the elevation angle sensor is securely mounted. • Check the ANALYZER -> MACHINE SETUP -> MARKET configuration. • If MARKET is set to CE, ensure ANALYZER -> MACHINE SETUP > TILT CUTOUT parameter is set as desired. • Check pothole protection switch adjustment. • Backprobing ground board J1-18 should show about 0 volts. • Backprobing ground board J1-10 should show about 0 volts. • Calibrate the elevation sensor, see Section 5.5. • Calibrate the tilt sensor, see Section 5.2. 3121222 • Check that the machine is tilted. If so, lower the platform and reposition the machine to a level surface. • Fully stow the platform. • The tilt sensor is part of the ground control box. Check that the ground control box is secured to the machine. • Check that the pothole protection switches are securely mounted. • Check that the elevation angle sensor is securely mounted. • Check the ANALYZER -> MACHINE SETUP -> MARKET configuration. • If MARKET is set to CE, ensure ANALYZER -> MACHINE SETUP > TILT CUTOUT parameter is set as desired. • Backprobing ground board J1-18 should show about 0 volts. • Backprobing ground board J1-10 should show about 0 volts. • Check pothole protection switch adjustment. • Calibrate the elevation sensor, see Section 5.5. • Calibrate the tilt sensor, see Section 5.2. – JLG Lift – 8-5 SECTION 8 - DIAGNOSTIC TROUBLE CODES 0-0 Help Comments DTC FAULT MESSAGE DESCRIPTION CHECK The vehicle has reached the maximum • Check that the zone is set appropriately for the platform load. height and further lift up motion is not pos- • Check that the platform height is at the rated maximum height sible. Applicable to 2630ES or 3246ES. specification (20’ for 2630 or 26’ for the 3246). • Check that the elevation angle sensor is securely mounted. • If there are any elevation sensor faults (DTC 251, 252, 2511, or 2512), troubleshoot those first. • Check that ANALYZER -> MACHINE SETUP -> MODEL setting is correct. • Check that ANALYZER -> MACHINE SETUP -> MARKET setting is correct. • Check ANALYZER -> DIAGNOSTICS -> ELEV SENSOR -> ZEROED is about 1.53V for the 3246 or about 1.22V for the 2630 when at full height. If not, repair or replace the elevation angle sensor. 006 LIFT UP PREVENTED - MAX HEIGHT ZONE A 007 DRIVING AT CUTBACK - POT- While stowed, drive speed is reduced • Check for obstructions around the pot-hole protection mechaHOLE STILL ENGAGED since the control system detected that the nisms. pot-hole protection mechanism failed to • Check that the PHP switches are securely mounted. retract. • Check PHP switches wiring from the ground board and for proper operation. The left PHP input (24V) is from J1-9 and its output (24V when deployed) is to J1-10. The right PHP input (24V) is from J1-17 and its output (24V when deployed) is to J1-18. 008 FUNCTIONS LOCKED OUT - After 2 hours without activity, the control SYSTEM POWERED DOWN system enters a low-power state to preserve battery charge. • Normal operation should resume after a power cycle. • Check batteries charge, condition, etc. 009 DRIVE PREVENTED - ELEVATED ABOVE DRIVE CUTOUT HEIGHT • Check that the elevation angle sensor is securely mounted. • Check the ANALYZER -> MACHINE SETUP -> MARKET configuration. • If MARKET is set to Japan, ensure ANALYZER -> MACHINE SETUP -> DRIVE CUTOUT parameter is set as desired. The platform is elevated above the calibrated cutout height. 2-1 Power-Up DTC FAULT MESSAGE DESCRIPTION CHECK 211 POWER CYCLE This help message is issued at each power cycle. Displays on the analyzer only. Normal operation. No check necessary. 212 KEYSWITCH FAULTY Both platform and ground modes are selected simultaneously. Defaults to ground mode. • Check key switch function. • Backprobe J2-3 with the keyswitch in the ground position. Voltage should be under 6V. Otherwise, keyswitch or wiring faulty. • Backprobe J2-4 with the keyswitch in the platform position. Voltage should be under 6V. Otherwise, keyswitch or wiring faulty. • Check key switch wiring to ground board J2-3 and J2-4 and to emergency stop switch. • Replace ground board. 2-2 Platform Controls DTC FAULT MESSAGE 221 FUNCTION PROBLEM HORN PERMANENTLY SELECTED 8-6 DESCRIPTION CHECK The horn switch was closed during power-up in platform mode. • Check if the horn switch is damaged, obstructed or jammed. • Disconnect the horn switch ribbon cable on the platform board. If DTC still present, replace the platform board. If DTC 221 is no longer present, replace the horn switch or platform board. – JLG Lift – 3121222 SECTION 8 - DIAGNOSTIC TROUBLE CODES 2-2 Platform Controls DTC FAULT MESSAGE DESCRIPTION CHECK • Check if the indoor/outdoor (zone A / zone B) capacity switch is damaged, obstructed or jammed. • Replace platform board. 222 FUNCTION PROBLEM INDOOR / OUTDOOR PERMANENTLY SELECTED The indoor / outdoor (zone A / zone B) switch was closed during power-up in platform mode. 223 FUNCTION PROBLEM DRIVE & LIFT ACTIVE TOGETHER The drive and lift inputs are closed simul- • Check drive/lift switch for visible damage. taneously in platform mode. • Check switch continuity. There should only be continuity from the center post to one of the outer posts at a time. Otherwise, replace the switch. • Check drive/lift switch signal and wiring to the platform board. Its input (0V) is from platform board terminal J1-11. "Lift" selection output (0V when selected) is to platform board terminal J1-9. "Drive" selection output (0V when closed) is to platform board terminal J1-10. • Replace platform board. 224 FUNCTION PROBLEM STEER LEFT PERMANENTLY SELECTED The steer left switch was closed during power-up in platform mode. 225 FUNCTION PROBLEM STEER RIGHT PERMANENTLY SELECTED The steer right switch was closed during • Check if the steer right switch is obstructed or jammed. power-up in platform mode. • Check steer right switch and its wiring to the platform board. The steer right switch input (24V) is from platform board terminal J11, and its output (24V when closed) is to platform board terminal J1-16. • Replace platform board. 226 ACCELERATOR FAULTY WIPER OUT OF RANGE The joystick signal is outside the accept- • Center joystick and check to see if a power cycle will clear DTC. able range of 0.50V - 4.5V, or is unstable. • Check the joystick signal and its wiring. The joystick input (5V) is from the platform board terminal J1-5, its output (2.5V with joystick at center) to the platform board terminal J1-6, and its ground (0V) is to the platform board terminal J1-7. Observe output signal while slowly operating joystick. • Replace platform board. 227 STEER SWITCHES FAULTY The steer left and steer right inputs were • Check if the steer switches are damaged, obstructed or jammed. closed simultaneously. • Check the steer switch signals and wiring to the platform board. The steer switch input (24V) is from platform board terminal J1-1, outputs (24V when closed) are to platform board terminals J1-15 and J1-16 (left and right). • Replace platform board. 228 FUNCTION LOCKED OUT ACCELERATOR NOT CENTERED The joystick was not centered at powerup. • Release joystick and allow to center. • Check if the joystick is obstructed or jammed. • Check the joystick signal and its wiring. The joystick input (5V) is from the platform board terminal J1-5, its output (2.5V with joystick at center) to the platform board terminal J1-6, and its ground (0V) is to the platform board terminal J1-7. Observe output signal while slowly operating joystick. • Replace platform board. 229 FUNCTION PROBLEM TRIGGER PERMANENTLY CLOSED The trigger switch was closed during power-up in platform mode. • Check if the trigger switch is obstructed or jammed. • Check the trigger switch signal and wiring to the platform board. The trigger input (24V) is from platform board terminal J1-1, and its output (24V when closed) is to platform board terminal J1-8. • Replace platform board. 3121222 • Check if the steer left switch is obstructed or jammed. • Check steer left switch and its wiring. The steer left switch input (24V) is from platform board terminal J1-1, and its output (24V when closed) is to platform board terminal J1-15. • Replace platform board. – JLG Lift – 8-7 SECTION 8 - DIAGNOSTIC TROUBLE CODES 2-2 Platform Controls DTC FAULT MESSAGE DESCRIPTION CHECK 2210 TRIGGER CLOSED TOO LONG WHILE IN NEUTRAL The trigger switch was closed for more than five seconds while the joystick was centered. • Check if the trigger switch is obstructed or jammed. • Check the trigger switch signal and wiring to the platform board. The trigger input (24V) is from platform board terminal J1-1, and its output (24V when closed) is to platform board terminal J1-8. • Replace platform board. 2232 FUNCTION PROBLEM DRIVE & LIFT BOTH OPEN The drive and lift inputs are both deenergized in Platform Mode. • Check if either function is active, if Yes; • Repair the wiring or switch to clear the message. • ZAPI - HEALTH (Status LED) - ON 2-3 Ground Controls DTC FAULT MESSAGE DESCRIPTION CHECK • Check if the lift switch is obstructed or jammed. • Check the lift switch signal and wiring to the ground board. The lift switch input (24V) is from ground board terminal J2-4, and its outputs (24V when closed) are to ground board terminals J2-6, J2-7 (up and down). • Replace ground board. 231 FUNCTION PROBLEM - LIFT The ground control box lift switch was PERMANENTLY SELECTED closed up or down, during power-up in ground mode. 232 GROUND LIFT UP / DOWN ACTIVE TOGETHER The lift up / down inputs are closed simul- • Check if the lift switch is obstructed or jammed. taneously. • Check the lift switch signal and wiring to the ground board. The lift switch input (24V) is from ground board terminal J2-4, and its outputs (24V when closed) are to ground board terminals J2-6 (up), J2-7 (down). • Replace ground board. 233 FUNCTION PROBLEM BRAKE RELEASE PERMANENTLY SELECTED The manual brake release switch was closed during power-up. • Check if the brake release switch is obstructed or jammed. • Check the brake release switch signal and wiring to the ground board. The brake release switch input (24V) is from ground board terminal J1-19, and its output (24V when closed) is to ground board terminal J1-20. • If the brakes are released, the machine can be pushed or moved without drive motor power. • Replace ground board. 2-5 Function Prevented DTC FAULT MESSAGE DESCRIPTION CHECK 251 ELEV ANGLE SENSOR FAULTY - VOLTAGE OUT OF RANGE The elevation angle sensor input voltage • Check that the platform elevation sensor is securely mounted and is outside the acceptable range of 0.10V undamaged. 4.50V. • Check voltage as displayed on ANALYZER -> DIAGNOSTICS -> ELEV SENSOR -> ANGLE SNSR. Backprobe ground board J1-15. If this voltage disagrees with the ANGLE SNSR voltage, replace the ground board. • Backprobe the elevation angle sensor connector. Terminal A should be 4.7V, terminal C should be 0V. • Check the elevation angle sensor signal and wiring to the ground board. The elevation angle sensor input is from ground board terminal J1-14 (4.7V), its output (0.1 - 1.2V when stowed) is to ground board terminal J1-15, and its ground is to ground board terminal J1-16. • Replace the ground board. 252 ELEV ANGLE SENSOR HAS NOT BEEN CALIBRATED The elevation angle sensor has not been • Calibrate the elevation angle sensor to clear fault. See Section 5.5. calibrated. 8-8 – JLG Lift – 3121222 SECTION 8 - DIAGNOSTIC TROUBLE CODES 2-5 Function Prevented DTC FAULT MESSAGE DESCRIPTION CHECK 253 DRIVE PREVENTED CHARGER CONNECTED Driving is not possible while the vehicle is • Check if the charger is connected to off board power source and charging. disconnect if desired. • Check ANALYZER -> MACHINE SETUP -> CHARGER INTERLOC is set as desired. • Check that charger's red (positive) battery wire connector terminal is receiving power (24V) from batteries. • Check signal from charger interlock connector terminal 2 to ground board terminal J1-29, where 0VDC indicates charging in process. 254 DRIVE & LIFT UP PREVENTED - CHARGER CONNECTED Drive or lift is not possible while the vehi- • Check if the charger is connected to off board power source and cle is charging AND is configured to predisconnect if desired. vent all motion. • Check ANALYZER -> MACHINE SETUP -> CHARGER INTERLOC is set as desired. (Must be in ACCESS LEVEL 1 to change.) • Check that charger's red (positive) battery wire connector terminal is receiving power (24V) from batteries. • Check signal from charger interlock connector terminal 2 to ground board terminal J1-29, where 0VDC indicates charging in process. 255 PLATFORM OVERLOADED The load sensing system measured plat- • Remove excess weight from the platform. form load is excessive. • Check that the platform is not caught on something, preventing up or down movement. • If any CAN bus faults are active, troubleshoot those first. • Refer to Section 2.3: Troubleshooting in the LSS manual, 3124288. 256 DRIVE PREVENTED - POTHOLE NOT ENGAGED Driving is not possible while elevated since the pot-hole protection system failed to deploy. 257 ELEV PROX PERMANENTLY The elevation proximity switch shows the • Verify that an elevation proximity switch is present on the CLOSED - CHECK PROX AND platform to be stowed, while the elevation machine. If not, ensure ANALYZER -> MACHINE SETUP -> ANGLE ADJUSTMENT angle sensor shows the platform to be ELEV PROX is set to NOT INSTALLED. If the switch is present, set raised. The elevation proximity switch is ELEV PROX to INSTALLED and check switch continuity. The only found on certain older lifts. This switch should close when placed in close proximity to ferrous switch is not used on current machines so metal. this DTC should not occur. 258 DRIVE & LIFT PREVENTED BRAKES ELECTRICALLY RELEASED FOR TOWING 3121222 • Check for obstructions or mechanical problems around the pothole protection mechanisms. • Check that the PHP switches are securely mounted. • Adjust pot-hole protection switches. • Check the pothole protection switches signal and wiring to the ground board. The left pot-hole protection switch input (24V) is from ground board terminal J1-9, and its output (24V when deployed) is to ground board terminal J1-10. The right pot-hole protection switch input (24V) is from ground board terminal J117, and its output (24V when deployed) is to ground board terminal J1-18. Manual brake release mode is activated • Push manual brake release switch again or cycle power to clear with the switch in the battery box near the manual brake release mode. ground control box. Drive or lift is not pos- • Check if the brake release switch is obstructed or jammed. sible. • Check the brake release switch signal and wiring to the ground board. The switch input (24V) is from ground board terminal J119, and its output (24V when closed) is to ground board terminal J1-20. • Replace ground board. – JLG Lift – 8-9 SECTION 8 - DIAGNOSTIC TROUBLE CODES 2-5 Function Prevented DTC 259 FAULT MESSAGE DESCRIPTION CHECK MODEL CHANGED The model selection has been changed. • Check ANALYZER -> MACHINE SETUP -> MODEL NUMBER. HYDRAULICS SUSPENDED • Replace ground board. CYCLE EMS 2510 DRIVE PREVENTED BRAKES NOT RELEASING While driving on a level surface, armature • Ensure vehicle is not stuck on something preventing movement. current was > 150A for five seconds. • Check / repair drive motor wiring, brakes or mechanical issues. Brakes assumed to not be releasing properly. 2511 The input voltage from the elevation angle sensor indicates the elevation angle sensor is not mounted. ELEV ANGLE SENSOR FAULTY - NOT MOUNTED 2512 ELEV ANGLE SENSOR NOT DETECTING CHANGE • Check that the elevation angle sensor is securely mounted. • Check that the elevation angle sensor mechanisms are intact. • Replace elevation angle sensor. The input voltage from the elevation • Check that the elevation angle sensor is securely mounted. angle sensor did not change while vehicle • Check elevation angle sensor is not jammed or obstructed. was lifting up. • If there are any other elevation angle sensor, joystick, or lift up faults, troubleshoot them before continuing. • Replace elevation angle sensor. 3-1 Line Contactor Open Circuit DTC FAULT MESSAGE DESCRIPTION CHECK The power modules line contactor did not • Check contactor main contact wiring to battery (+) terminal and close when energized. Drive, steer and lift power controller terminal B+. up prevented. • Contactor solenoid resistance should measure about 52 Ohms. • Check contactor solenoid wiring to power module 12 position connector terminal 8 and ground board terminal J1-19. • Check that power module 12 position connector terminal 8 goes from 24V to near 0V while contactor should be closing. If this happens replace contactor. • Replace the line contactor. 311 OPEN CIRCUIT LINE CONTACTOR 312 CONTACTOR DRIVER PER- The power modules line contactor drive MANENTLY OFF circuitry failed to energize when requested. Drive, steer and lift up prevented. • Check continuity between contactor connector pin 1 and ground board socket J1-19. • Contactor solenoid resistance should measure about 52 Ohms. • Check continuity between contactor connector pin 2 and power module connector socket 8. • Replace power module. 3-2 Line Contactor Short Circuit DTC FAULT MESSAGE 321 LINE CONTACTOR MISWIRED ON OR WELDED 8-10 DESCRIPTION CHECK Battery voltage was present at the power • Check wiring of contactor. module B+ terminal at power up. Drive, • Check resistance between the studs of the contactor while dissteer and lift up prevented. connected from the machine. • Check contactor main contact wiring to battery (+) terminal and power module terminal B+. • Check continuity between contactor connector pin 1 and ground board socket J1-19. • Check continuity between contactor connector pin 2 and power module 12 position connector terminal 8. • Measure voltage between power model B+ and B- terminals. If 24V is present, replace line contactor. • Replace power module. – JLG Lift – 3121222 SECTION 8 - DIAGNOSTIC TROUBLE CODES 3-2 Line Contactor Short Circuit DTC 322 FAULT MESSAGE DESCRIPTION CHECK CONTACTOR DRIVER PER- The power modules line contactor drive MANENTLY ON circuitry failed to de-energize when requested. Drive, steer and lift up prevented. • Check continuity between contactor connector pin 1 and ground board socket J1-19. • Check continuity between contactor connector pin 2 and power module 12 position connector terminal 8. • Replace power module. 3-3 Ground Output Driver DTC FAULT MESSAGE DESCRIPTION CHECK 331 BRAKE SHORT TO BATTERY The ground board detected voltage while • Ensure ANALYZER -> MACHINE SETUP -> ELEV PROX is set to the brake solenoid was commanded off. NOT INSTALLED. 332 BRAKE OPEN CIRCUIT 333 LIFT UP SHORT TO BATTERY The ground board detected voltage while • Check for continuity through this circuit. The lift up solenoid resisthe lift up solenoid was commanded off at tance should measure about 30 Ohms. The lift up solenoid is power up. powered with 24V from ground board J1-25, and its ground is to ground board J1-30, 37. • Inspect the wiring for physical damage. • Replace ground board. 334 LIFT UP OPEN CIRCUIT 335 LIFT DN SHORT TO BATTERY The ground board detected voltage while • Check ANALYZER -> MACHINE SETUP -> ELEV PROX is set to NOT INSTALLED the lift down solenoid was commanded • Check for continuity through this circuit. The lift down solenoid off. resistance should measure about 20 Ohms. The lift down solenoid is powered (PWM) by ground board J1-26, and its ground is to ground board J1-27. • Inspect the wiring for physical damage. • Replace ground board. 336 LIFT DN OPEN CIRCUIT 337 STEER LEFT SHORT TO BAT- The ground board detected voltage while • Check for continuity through this circuit. Steer left solenoid resisTERY the steer left solenoid was commanded tance should measure about 30 Ohms. The steer left solenoid is off at power up. powered with 24V from ground board J1-21, and its ground is to ground board J1-30, 37. • Inspect the wiring for physical damage. • Replace ground board. 3121222 The ground board did not detect current • Ensure ANALYZER -> MACHINE SETUP -> ELEV PROX is set to flow to the brake solenoid during normal NOT INSTALLED. operation. The ground board did not detect current flow to the lift up solenoid during power up. The ground board did not detect current flow to the lift down solenoid during normal operation. • Check for continuity through this circuit. The lift up solenoid resistance should measure about 30 Ohms. The lift up solenoid is powered with 24V from ground board J1-25, and its ground is to ground board J1-30, 37. • Inspect the wiring for physical damage. • Replace ground board. • Check for continuity through this circuit. The lift down solenoid resistance should measure about 20 Ohms. The lift down solenoid is powered (PWM) by ground board J1-26, and its ground is to ground board J1-27. • Inspect the wiring for physical damage. • Replace ground board. – JLG Lift – 8-11 SECTION 8 - DIAGNOSTIC TROUBLE CODES 3-3 Ground Output Driver DTC FAULT MESSAGE DESCRIPTION CHECK • Check for continuity through this circuit. Steer left solenoid resistance should measure about 30 Ohms. The steer left solenoid is powered with 24V from ground board J1-21, and its ground is to ground board J1-30, 37. • Inspect the wiring for physical damage. • Replace ground board. 338 STEER LEFT OPEN CIRCUIT The ground board did not detect current flow to the steer left solenoid during normal operation. 339 STEER RIGHT SHORT TO BATTERY The ground board detected voltage while • Check for continuity through this circuit. Steer right solenoid the steer right solenoid was commanded resistance should measure about 30 Ohms. The steer right soleoff. noid is powered with 24V from ground board J1-22, and its ground is to ground board J1-30, 37. • Inspect the wiring for physical damage. • Replace ground board. 3310 STEER RIGHT OPEN CIRCUIT The ground board did not detect current • Check for continuity through this circuit. Steer right solenoid flow to the steer right solenoid during norresistance should measure about 30 Ohms. The steer right solemal operation. noid is powered with 24V from ground board J1-22, and its ground is to ground board J1-30, 37. • Inspect the wiring for physical damage. • Replace ground board. 3311 GROUND ALARM SHORT TO The ground board detected voltage while • Check for continuity through this circuit. The ground alarm soleBATTERY the ground alarm was commanded off. noid is powered with 24V from ground board J1-19, its PWM signal is from ground board J1-28, and its ground is to ground board J1-30, 37. There should be about 1500 Ohms between ground alarm connector pin 1 and pin 3. • Inspect the wiring for physical damage. • Replace ground board. 3312 LEFT BRAKE SHORT TO BAT- The ground board detected voltage while • Check for continuity through this circuit. The left brake is powered TERY the left brake was commanded off. with 24V from ground board J1-23, and its ground is to ground board J1-30, 37. Brake solenoid resistance should measure about 20 Ohms. • Inspect the wiring for physical damage. • Replace ground board. 3313 RIGHT BRAKE SHORT TO BATTERY Voltage was detected on the right brake solenoid when the ground board output was commanded off during power-up. • Check for continuity through this circuit. Brake solenoid resistance should measure about 20 Ohms. The right brake is powered with 24V from ground board J1-24, and its ground is to ground board J1-30, 37. • Inspect the wiring for physical damage. • Replace ground board. 3314 LEFT BRAKE OPEN CIRCUIT Current flow to the left brake solenoid was • Check for continuity through this circuit. The left brake is powered not detected during normal left brake with 24V from ground board J1-23, and its ground is to ground operation. board J1-30, 37. Brake solenoid resistance should measure about 20 Ohms. • Inspect the wiring for physical damage. • Replace ground board. 3315 RIGHT BRAKE OPEN CIRCUIT 8-12 The ground board did not detect current • Check for continuity through this circuit. Brake solenoid resisflow to the right brake during normal opertance should measure about 20 Ohms. The right brake is powered ation. with 24V from ground board J1-24, and its ground is to ground board J1-30, 37. • Inspect the wiring for physical damage. • Replace ground board. – JLG Lift – 3121222 SECTION 8 - DIAGNOSTIC TROUBLE CODES 3-3 Ground Output Driver DTC FAULT MESSAGE 33297 LEFT BRAKE - SHORT TO GROUND DESCRIPTION CHECK Drive and Steer Prevented • Excessive current flow to the Left Brake Solenoid was detected (J134 NLB). • ZAPI - HEALTH (Status LED) - ON 33298 STEER LEFT VALVE - SHORT Drive, Steer and Lift Up Prevented TO GROUND • Excessive current flow to the steer left solenoid detected (J2-9 NLV). • ZAPI - HEALTH (Status LED) - ON 33299 LINE CONTACTOR COIL SHORT TO BATTERY Drive, Lift and Steer Prevented • Voltage from an external source was detected on the Negative Main Line Contactor. • ZAPI - HEALTH (Status LED) - ON 33302 NEGATIVE SUPPLY - SHORT Drive, Lift, and Steer Prevented TO BATTERY • At power-up, the system module detected an external short on J1-12, J1-17, J1-23, J2-14 or J2-15. Normally these pins are grounded by the System Module. All functions are prevented to protect the control system. • ZAPI - HEALTH (Status LED) - ON 33303 NEGATIVE SUPPLY - SHORT Drive, Lift and Steer Prevented TO GROUND • At power-up, the System Module detected an external short on J1-12, J1-17, J2-14 or J2-15. Normally these pins are grounded by the System Module. Since the external ground may compromise integrity, all functions will be prevented. • ZAPI - HEALTH (Status LED) - ON 33304 RIGHT BRAKE - SHORT TO GROUND Drive, and Steer Prevented • Excessive current flow to the Right Brake solenoid was detected (J1-33 NRB). • ZAPI - HEALTH (Status LED) - ON 33305 STEER RIGHT VALVE SHORT TO GROUND Drive, Steer, and Lift Up Prevented • Excessive current flow to the Steer Right Solenoid was detected (J2-18 NRV). • ZAPI - HEALTH (Status LED) - ON 33406 LiFT UP VALVE - SHORT TO GROUND Drive, Steer, and Lift Up Prevented • Excessive current flow to the Lift Up Solenlid was detected at (J22 PDV or J2-16 NDV). • ZAPI - HEALTH (Status LED) - ON 33407 LIFT DN VALVE - SHORT TO GROUND Lift Up and Down Prevented • Excessive current flow to the Lift Down Solenoid was detected (J2-16 NDV). • ZAPI - HEALTH (Status LED) - ON 4-2 Thermal Limit (SOA) DTC FAULT MESSAGE DESCRIPTION CHECK 421 POWER MODULE TOO HOT - The power module has reached thermal • Power down and allow to cool. PLEASE WAIT cutout. • Do not operate in ambients over 140° F (60° C). • Check for jammed or obstructed drive motors. • Check for excessively high current consumption in the pump, ANALYZER -> DIAGNOSTICS -> PUMP -> PUMP CUR over 130 Amps with an empty deck. • Check for excessively high traction current consumption, ANALYZER -> DIAGNOSTICS -> TRACTION -> ARM CUR over 120 Amps while driving on the level. 422 DRIVING AT CUTBACK The drive portion of the power module POWER MODULE CURRENT has reached thermal limit. LIMIT 3121222 • Check for jammed or obstructed drive motors. • Check for excessively high traction current consumption, ANALYZER -> DIAGNOSTICS -> TRACTION -> ARM CUR over 120 Amps while driving on the level. – JLG Lift – 8-13 SECTION 8 - DIAGNOSTIC TROUBLE CODES 4-2 Thermal Limit (SOA) DTC 423 FAULT MESSAGE DESCRIPTION CHECK LIFT UP AT CUTBACK The lift up portion of the power module POWER MODULE CURRENT has reached thermal limit. LIMIT • Check for jammed or obstructed arm stack or pivot bushing. • Check for excessively high current consumption in the pump, ANALYZER -> DIAGNOSTICS -> PUMP -> PUMP CUR over 130 Amps with an empty deck. • Refer to Pump Motor Electrical Evaluation in Section 4.8. 4-4 Battery Supply DTC FAULT MESSAGE DESCRIPTION CHECK 441 BATTERY VOLTAGE TOO The power module momentarily mea• Recharge batteries or check for damaged batteries. LOW - SYSTEM SHUTDOWN sured battery voltage under 14.5V • Check battery charger function. between ground board J1-39 and ground board J1-40. 442 BATTERY VOLTAGE TOO The power module momentarily meaHIGH - SYSTEM SHUTDOWN sured battery voltage > 37.0V. 443 LSS BATTERY VOLTAGE TOO HIGH The load sensing system module • May be due to improper battery charging or incorrect voltage batmomentarily measured battery voltage > teries being used. 34.0V. • Refer to Section 2.3: Troubleshooting in the LSS manual, 3124288. 444 LSS BATTERY VOLTAGE TOO LOW The load sensing system module • Recharge batteries or check for damaged batteries. momentarily measured battery voltage < • Refer to Section 2.3: Troubleshooting in the LSS manual, 9V. 3124288. 446 LOGIC SUPPLY VOLTAGE OUT OF RANGE The system module logic supply voltage • This may be caused by a loose battery terminal, severely diswas measured to be out of normal operatcharged batteries, damaged battery, or an improper wire harness ing range by the interface PCB (<11V). connection. • Drive, Steer, and Lift Prevented • ZAPI - HEALTH (Status LED) - ON 4421 LOGIC SUPPLY VOLTAGE OUT OF RANGE The system module logic supply voltage • This may be caused by a loose battery terminal, severely discharged batteries, damaged battery, or an improper wire harness was measured by the power PCB to be connection. more than 34V for 10uS. • Drive, Steer, and Lift Prevented • ZAPI - HEALTH (Status LED) - ON 4422 LOGIC SUPPLY VOLTAGE OUT OF RANGE The system module logic supply voltage • This may be caused by a loose battery terminal, severely diswas measured by the power PCB to be charged batteries, damaged battery, or an improper wire harness less than 11V for 10uS. connection. • Drive, Steer, and Lift Prevented • ZAPI - HEALTH (Status LED) - ON • May be due to improper battery charging or incorrect voltage batteries being used. 6-6 Communication DTC 661 8-14 FAULT MESSAGE DESCRIPTION CHECK CANBUS FAILURE - POWER The control system failed to receive mes- • Check for 24V between power module 12 position connector terMODULE sages from the power module. minal 1 and the power module B- terminal. If this is the problem, the line contactor may be cycling on and off, making a clicking noise when the machine is powered. • Disconnect ground board J1 and power module connector. Ground board socket J1-31 to power module connector socket 10 should have continuity. Ground board socket J1-32 to power module connector socket 11 should have continuity. • Turn on machine in platform mode. If DTC 662 is present, troubleshoot that DTC before continuing. – JLG Lift – 3121222 SECTION 8 - DIAGNOSTIC TROUBLE CODES 6-6 Communication DTC FAULT MESSAGE DESCRIPTION CHECK CANBUS FAILURE - PLATFORM MODULE In platform mode, the control system • Turn on machine in ground mode. If DTC 661 is not present check failed to receive messages from the platfor 24V between platform box connector terminals D and A. If not form board. 24V, test continuity from platform box connector socket A to ground board connector socket J1-6 and test continuity from platform box connector socket D to ground board connector socket J1-7. • If DTC 661 was present in the previous check, disconnect armstack passthru connector located near the ladder on the left. Turn on in ground mode. If DTC 661 is not present then there is a problem in armstack harness. Armstack passthru socket 5 to platform box terminal E should have continuity. Armstack passthru socket 6 to platform box connector terminal F should have continuity. Armstack passthru socket 7 to platform box connector terminal G should have continuity. Armstack passthru socket 5 to armstack passthru socket 6 resistance should be 120 Ohms +/- 5%. Armstack passthru socket 5 to armstack passthru socket 7 should measure open circuit. Armstack passthru socket 6 to armstack passthru socket 7 should measure open circuit. • Disconnect armstack passthru and ground board J1. Armstack passthru pin 5 to ground board socket J1-11 should have continuity. Armstack passthru pin 6 to ground board socket J1-12 should have continuity. Armstack passthru pin 7 to ground board socket J1-13 should have continuity. Armstack passthru pin 5 to armstack passthru pin 6 should measure open circuit. Armstack passthru pin 5 to armstack passthru pin 7 should measure open circuit. Armstack passthru pin 6 to armstack passthru pin 7 should measure open circuit. • Disconnect ground board J1 and power module connector. Ground board socket J1-31 to power module connector socket 10 should have continuity. Ground board socket J1-32 to power module connector socket 11 should have continuity. Ground board socket J1-31 to J1-32 should measure open circuit. Ground board socket J1-31 to J1-33 should measure open circuit. Ground board socket J1-32 to J1-33 should measure open circuit. • Ensure all connections opened above are reconnected. Disconnect power module connector. Turn on in platform mode. If DTC 662 is no longer present replace power module. • If DTC 661 and 662 have been present through above steps replace ground board. Continued Next Page 662 CANBUS FAILURE - PLAT(Cont.) FORM MODULE (Continued) In platform mode, the control system • Disconnect platform box connector. Open platform box. Disconfailed to receive messages from the platnect platform board connector. Platform box socket E to platform form board. board J1-3 should have continuity. Platform box socket F to platform board J1-4 should have continuity. Platform box pin E to pin F should measure open circuit. Platform box pin E to pin G should measure open circuit. Platform box pin F to pin G should measure open circuit. If these checks are OK replace platform board. 662 3121222 – JLG Lift – 8-15 SECTION 8 - DIAGNOSTIC TROUBLE CODES 6-6 Communication DTC FAULT MESSAGE DESCRIPTION CHECK 663 CANBUS FAILURE - LOAD With load sensing system enabled, the • Check ANALYZER -> MACHINE SETUP -> MODEL NUMBER is SENSING SYSTEM MODULE control system failed to receive mescorrect. sages from the load sensing system mod- • Check ANALYZER -> MACHINE SETUP -> MARKET is correct. ule. • Check ANALYZER -> MACHINE SETUP -> LOAD is correct. • Check for 24V between load sense system module connector J11 and J1-2. • Turn on machine in platform mode. If DTC 662 is present, troubleshoot that DTC before continuing. • Refer to Section 2.3: Troubleshooting in the LSS manual, 3124288. 664 CANBUS FAILURE - ACCES- An accessory module has stopped com- • Turn on machine in platform mode. If DTC 662 is present, troubleSORY MODULE munication. shoot that DTC before continuing. • See accessory module documentation for troubleshooting. 6635 CANBUS FAILURE - CHASSIS Chassis Tilt Sensor messages not TILT SENSOR received for 1000 mS while B+ is present on J1-28 • The control system failed to receive messages from the Chassis Tilt Sensor located inside the Ground Control Box. • Ensure that +B is present on pin 1 of the sensor, and -B is present on pin 4. Check the CANbus wiring to pins 2 and 3 of the sensor. • ZAPI - HEALTH (Status LED) - ON 6-7 Accessory DTC 671 FAULT MESSAGE ACCESSORY FAULT DESCRIPTION CHECK An accessory module is reporting a fault. • See accessory module documentation for troubleshooting. 7-7 Electric Motor DTC FAULT MESSAGE DESCRIPTION CHECK The power module detected a problem in • Refer to Drive Motor Electrical Evaluation in Section 3.5. the drive motors' power circuit wiring. • Refer to Power Module Electrical Evaluation in Section 3.6. 771 OPEN CIRCUIT DRIVE MOTOR WIRING 772 STALLED TRACTION MOTOR Drive, Steer, and Lift Prevented OR POWER WIRING ERROR • The System Module detected armature current feedback > 4.5V or < 0.5V. This is mostly likely caused by a stalled traction motor or power wiring issue. Alternately, it could be an internal fault. • ZAPI - HEALTH (Status LED) - ON 773 CAPACITOR BANK FAULT CHECK POWER CIRCUITS Drive, Steer, and Lift Prevented • There is an internal or external fault that prevents the System Module’s capacitor bank from charging. • The System Module detected that the VMN of the pump and traction has not increased more than 1.3V in 1000mS. Alternately, the VMN of the pump or traction is less than 20% of battery voltage. • If this message persists after disconnecting the drive and pump wiring, there is an internal fault. • ZAPI - HEALTH (Status LED) - ON 774 SHORT CIRCUIT FIELD WIR- Drive, Steer, and Lift Prevented ING • The field wiring passed System Module power-up diagnostics. However, an external short circuit was detected when current was applied to F1 / F2. This situation is caused by improper field wiring or a damaged motor. • ZAPI - HEALTH (Status LED) - ON 8-16 – JLG Lift – 3121222 SECTION 8 - DIAGNOSTIC TROUBLE CODES 7-7 Electric Motor DTC FAULT MESSAGE DESCRIPTION CHECK 775 OPEN CIRCUIT FIELD WIRING Drive, Steer, and Lift Prevented • The System Module applied field current, but could regulate the desired current. The situation is caused by improper field wiring or a damaged motor. • ZAPI - HEALTH (Status LED) - ON 776 STALLED PUMP MOTOR OR Drive, Steer, and Lift Prevented POWER WIRING ERROR • The System Module measured improper pump current feedback (>4.5V or <0.5V) for 240mS. This is caused by a stalled pump motor, a power wiring issue, or a System Module malfunction. • ZAPI - HEALTH (Status LED) - ON 777 OPEN CIRCUIT PUMP MOTOR WIRING Drive, Steer, and Lift Prevented • The System Module measured pump current less than 8A while the motor voltage was greater than 7V for 1200mS. This indicates there is an open-circuit between the System Module’s –P terminal and the pump motor. • ZAPI - HEALTH (Status LED) - ON 778 TRACTION T HIGH - CHECK POWER CIRCUITS Drive, Steer, and Lift Prevented • While driving, the voltage measured at the System Module’s T terminal did not agree with the predicted value for at least 300mS. This issue may be caused by a power wiring error or an internal fault. • ZAPI - HEALTH (Status LED) - ON 779 TRACTION T LOW - CHECK POWER CIRCUITS Drive, Steer, and Lift Prevented • While driving, the voltage measured at the System Module’s T terminal did not agree with the predicted value for at least 1000mS. This issue may be caused by an opencircuit of the armature wiring (+B and –T terminals) or an internal fault. • VMN does not increase more than 1.3V • VMN is less than 20% Battery Voltage • Battery Voltage . VMN is greater than 4V • ZAPI - HEALTH (Status LED) - ON 7710 PUMP P HIGH - CHECK POWER CIRCUITS Drive, Steer, and Lift Prevented • While steering or lifting up, the voltage measured at the System Module’s P terminal did not agree with the predicted value for at least 240mS. This issue may be caused by a power wiring error or an internal fault. • Pump Feedback . Predicted >7V • ZAPI - HEALTH (Status LED) - ON 7711 PUMP P LOW - CHECK POWER CIRCUITS Drive, Steer, and Lift Prevented • While steering or lifting up, the voltage measured at the System Module’s P terminal did not agree with the predicted value for at least 1000mS. This issue may be caused by an open-circuit of the pump wiring (+BF2 and –P terminals) or an internal fault. • Pump feedback does not increase more than 1.3V • Pump feedback is less than 20% Battery Voltage • Battery Voltage - pump feedback is greater than 4V • ZAPI - HEALTH (Status LED) - ON 7741 ARMATURE BRAKING CUR- Drive, Steer, and Lift Prevented RENT TOO HIGH • The System Module detected excessive braking current for more than 5000mS. This can be caused by transporting an excessive load on a steep grade. Alternately, this may indicate an internal fault. • ZAPI - HEALTH (Status LED) - ON 3121222 – JLG Lift – 8-17 SECTION 8 - DIAGNOSTIC TROUBLE CODES 7-7 Electric Motor DTC FAULT MESSAGE 7742 FIELD VOLTAGE IMPROPER DESCRIPTION CHECK Drive, Steer, and Lift Prevented • The System Module voltage at the F1 and F2 terminals was improper at power-up (expected to be ½ Battery Voltage). This is caused by an open- or short-circuit in the field wiring or motor. Disconnect the field and motor wiring from the System Module and connect F1 / F2 with a short wire. If the situation persists after a power cycle, it may be an internal issue. • ZAPI - HEALTH (Status LED) - ON 8-1 Tilt Sensor DTC FAULT MESSAGE DESCRIPTION 811 TILT SENSOR NOT CALIBRATED 812 NO DATA FROM TILT SEN- No signal from tilt sensor. SOR - NOT CONNECTED OR FAULTY CHECK The tilt sensor calibration has not been performed. • Calibrate the tilt sensor, see Section 5.2. • Replace then calibrate tilt sensor, see Section 5.2. • Check tilt sensor connections and wiring in ground control box. • Calibrate the tilt sensor, see Section 5.2. • Replace then calibrate tilt sensor, see Section 5.2. 8-2 Platform Load Sense DTC FAULT MESSAGE DESCRIPTION CHECK 821 LSS CELL #1 ERROR A problem has been detected with the load sense system. • Refer to Section 2.3: Troubleshooting in the LSS manual, 3124288. 822 LSS CELL #2 ERROR A problem has been detected with the load sense system. • Refer to Section 2.3: Troubleshooting in the LSS manual, 3124288. 823 LSS CELL #3 ERROR A problem has been detected with the load sense system. • Refer to Section 2.3: Troubleshooting in the LSS manual, 3124288. 824 LSS CELL #4 ERROR A problem has been detected with the load sense system. • Refer to Section 2.3: Troubleshooting in the LSS manual, 3124288. 825 LSS HAS NOT BEEN CALIBRATED The load sensing system module has not • Empty platform. Calibrate LSS, see Section 2.2: Calibration in the been calibrated LSS manual, 3124288. • Refer to Section 2.3: Troubleshooting in the LSS manual, 3124288. 9-9 Hardware DTC FAULT MESSAGE DESCRIPTION CHECK 991 LSS WATCHDOG RESET A problem has been detected with the load sense system. • Refer to Section 2.3: Troubleshooting in the LSS manual, 3124288. 992 LSS EEPROM ERROR A problem has been detected with the load sense system. • Refer to Section 2.3: Troubleshooting in the LSS manual, 3124288. 993 LSS INTERNAL ERROR - PIN A problem has been detected with the EXCITATION load sense system. • Refer to Section 2.3: Troubleshooting in the LSS manual, 3124288. 994 LSS INTERNAL ERROR DRDY MISSING FROM A/D A problem has been detected with the load sense system. • Refer to Section 2.3: Troubleshooting in the LSS manual, 3124288. 995 POWER MODULE FAILURE - The power module detected an out-ofPERSONALITY RANGE range or corrupt personality setting ERROR • Record all personality settings in ANALYZER -> PERSONALITIES and ANALYZER -> MACHINE SETUP. Reset control system personalities to default settings by selecting a different model than indicated, cycle power then select proper model. Then, enter personality settings recorded above. 8-18 – JLG Lift – 3121222 SECTION 8 - DIAGNOSTIC TROUBLE CODES 9-9 Hardware DTC FAULT MESSAGE DESCRIPTION CHECK 996 POWER MODULE FAILURE - Drive, Steer, & Lift Prevented INTERNAL ERROR • The System Module’s analog to digital converter does not respond for the power PCB. This is an internal failure. • Cycle machine, if error still exists, replace System Module. • ZAPI - HEALTH (Status LED) - FLASHING 997 POWER MODULE FAILURE - The power module detected an error in CHECK POWER CIRCUITS the power wiring for the drive or pump. OR MOSFET SHORT CIRCUIT • Refer to Drive Motor Electrical Evaluation in Section 3.5. • Refer to Pump Motor Electrical Evaluation in Section 4.8. • Refer to Power Module Electrical Evaluation in Section 3.6. 998 EEPROM FAILURE - CHECK The control system detected an ALL SETTINGS EEPROM failure. • Replace ground board. 999 FUNCTION LOCKED OUT - The power module software version is not • Replace power module to clear fault. POWER MODULE SOFTcompatible with the rest of the system. WARE VERSION IMPROPER 9910 FUNCTION LOCKED OUT - The platform board software version is • Reprogram platform board. PLATFORM MODULE SOFT- not compatible with the rest of the system. WARE VERSION IMPROPER 9911 FUNCTION LOCKED OUT LSS MODULE SOFTWARE VERSION IMPROPER The load sensing system module software version is not compatible with the rest of the system. • Replace LSS module to clear fault. • Refer to Drive Motor Electrical Evaluation in Section 3.5. 9912 POWER MODULE FAILURE - The ground board detected armature, SYSTEM MONITOR field, or pump current while function was • Refer to Pump Motor Electrical Evaluation in Section 4.8. not commanded. • Refer to Power Module Electrical Evaluation in Section 3.6. 9924 FUNCTIONS LOCKED OUT - The control system' s memory indicates • Use the JLG analyzer to adjust all machine setup and personality MACHINE NOT CONFIGthat the vehicle has not been configured settings, refer to 5.7 Machine Configuration Programming InforURED (new control system components). mation. 9950 POWER MODULE FAILURE - Drive, Steer, & Lift Prevented INTERNAL ERROR • The System Module’s armature power circuitry is driven without PWM command for 100mS. • Cycle machine, if error still exists, replace System Module. • ZAPI - HEALTH (Status LED) - FLASHING 9951 POWER MODULE FAILURE - Drive, Steer, & Lift Prevented INTERNAL ERROR • The System Module’s pump power circuitry is driven without enable from the interface PCB for 100mS. • Cycle machine, if error still exists, replace System Module. • ZAPI - HEALTH (Status LED) - FLASHING 9952 POWER MODULE FAILURE - Drive, Steer, & Lift Prevented INTERNAL ERROR • The System Module’s pump power circuitry is driven without PWM command for 100mS. • Cycle machine, if error still exists, replace System Module. • ZAPI - HEALTH (Status LED) - FLASHING 9953 POWER MODULE FAILURE - Drive, Steer, & Lift Prevented INTERNAL ERROR • The System Module’s field power circuitry is driven without enable from the interface PCB for 100mS. • Cycle machine, if error still exists, replace System Module. • ZAPI - HEALTH (Status LED) - FLASHING 9954 POWER MODULE FAILURE - Drive, Steer, & Lift Prevented INTERNAL ERROR • The System Module’s field power circuitry is driven without reverse direction from the power PCB for 100mS. • Cycle machine, if error still exists, replace System Module. • ZAPI - HEALTH (Status LED) - FLASHING 9955 POWER MODULE FAILURE - Drive, Steer, & Lift Prevented INTERNAL ERROR • The System Module’s field power circuitry is driven without forward selection from the power PCB for 100mS. • Cycle machine, if error still exists, replace System Module. • ZAPI - HEALTH (Status LED) - FLASHING 3121222 – JLG Lift – 8-19 SECTION 8 - DIAGNOSTIC TROUBLE CODES 9-9 Hardware DTC FAULT MESSAGE DESCRIPTION CHECK 9956 POWER MODULE FAILURE - Drive, Steer, & Lift Prevented INTERNAL ERROR • The System Module’s field current control or MOSFET’s are malfunctioning. • Cycle machine, if error still exists, replace System Module. • ZAPI - HEALTH (Status LED) - FLASHING 9957 POWER MODULE FAILURE - Drive, Steer, & Lift Prevented INTERNAL ERROR • The System Module’s hardware that generates an interrupt at 36V and 12V did not respond properly at power-up. • Cycle machine, if error still exists, replace System Module. • ZAPI - HEALTH (Status LED) - FLASHING 9958 POWER MODULE FAILURE - Drive, Steer, & Lift Prevented INTERNAL ERROR • The System Module’s pump current measurement or MOSFET are malfunctioning. • Pump current measurement >2.74V or <2.26V for 200mS while idle. • Cycle machine, if error still exists, replace System Module. • ZAPI - HEALTH (Status LED) - FLASHING 9960 POWER MODULE FAILURE - Drive, Steer, & Lift Prevented INTERNAL ERROR • The System Module detected an issue with the traction current measurement or the MOSFET’s. • Armature current feedback >2.74V or < 2.26V while idle • Cycle machine, if error still exists, replace System Module. • ZAPI - HEALTH (Status LED) - FLASHING 9962 POWER MODULE FAILURE - Drive, Steer, & Lift Prevented INTERNAL ERROR • The System Module’s temperature feedback is >4.9V or <0.1V. • Cycle machine, if error still exists, replace System Module. • ZAPI - HEALTH (Status LED) - FLASHING 9963 POWER MODULE FAILURE - Drive, Steer, & Lift Prevented INTERNAL ERROR • The System Module detected a mismatch in the redundant RAM information stored in the power PCB. • Cycle machine, if error still exists, replace System Module. • ZAPI - HEALTH (Status LED) - ON 9964 POWER MODULE FAILURE - Drive, Steer, & Lift Prevented INTERNAL ERROR • The System Module’s analog to digital converter does not respond for the interface PCB. • Cycle machine, if error still exists, replace System Module. • ZAPI - HEALTH (Status LED) - FLASHING 9969 POWER MODULE FAILURE - Drive, Steer, & Lift Prevented INTERNAL ERROR • The System Module’s MC/EB/EV/DV Enable is always on. This is internal fault. • Cycle machine, if error still exists, replace System Module. • ZAPI - HEALTH (Status LED) - FLASHING 9970 POWER MODULE FAILURE - Drive, Steer, & Lift Prevented INTERNAL ERROR • The System Module detected a mismatch in the redundant RAM information stored in the interface PCB. • Cycle machine, if error still exists, replace System Module. • ZAPI - HEALTH (Status LED) - ON 9971 POWER MODULE FAILURE - Drive, Steer, & Lift Prevented INTERNAL ERROR • The System Module’s MC/EB valve activation pin is shorted. This is an internal fault. • Cycle machine, if error still exists, replace System Module. • ZAPI - HEALTH (Status LED) - FLASHING 99143 POWER MODULE FAILURE - Drive, Steer, & Lift Prevented INTERNAL ERROR • The System Module’s power and interface PCB digital inputs do not agree. • Cycle machine, if error still exists, replace System Module. • ZAPI - HEALTH (Status LED) - FLASHING 99144 POWER MODULE FAILURE - Drive, Steer, & Lift Prevented INTERNAL ERROR • The System Module’s MC feedback from the interface PCB disagrees with the feedback from the power PCB. • Cycle machine, if error still exists, replace System Module. • ZAPI - HEALTH (Status LED) - FLASHING 8-20 – JLG Lift – 3121222 SECTION 8 - DIAGNOSTIC TROUBLE CODES 9-9 Hardware DTC FAULT MESSAGE DESCRIPTION CHECK 99145 POWER MODULE FAILURE - Drive, Steer, & Lift Prevented INTERNAL ERROR • The System Module’s enable for the power PCB requested a drive motor or valve activation when not expected. • Cycle machine, if error still exists, replace System Module. • ZAPI - HEALTH (Status LED) - FLASHING 99146 POWER MODULE FAILURE - Drive, Steer, & Lift Prevented INTERNAL ERROR • The System Module’s lift down feedback voltage to the interface and power PCB’s disagrees. • Cycle machine, if error still exists, replace System Module. • ZAPI - HEALTH (Status LED) - FLASHING 99147 POWER MODULE FAILURE - Drive, Steer, & Lift Prevented INTERNAL ERROR • The System Module’s VMN feedback voltage to the interface and power PCB’s disagrees. • Cycle machine, if error still exists, replace System Module. • ZAPI - HEALTH (Status LED) - FLASHING 99148 POWER MODULE FAILURE - Drive, Steer, & Lift Prevented INTERNAL ERROR • The System Module’s setpoint request from the interface PCB does not match the input state. • Cycle machine, if error still exists, replace System Module. • ZAPI - HEALTH (Status LED) - FLASHING 99149 POWER MODULE FAILURE - Drive, Steer, & Lift Prevented INTERNAL ERROR • The System Module encountered an unexpected software issue. • Cycle machine, if error still exists, replace System Module. • ZAPI - HEALTH (Status LED) - FLASHING 3121222 – JLG Lift – 8-21 SECTION 8 - DIAGNOSTIC TROUBLE CODES NOTES: 8-22 – JLG Lift – 3121222 SECTION 9 - GENERAL ELECTRICAL INFORMATION & SCHEMATICS SECTION 9. GENERAL ELECTRICAL INFORMATION & SCHEMATICS 9.1 GENERAL This section contains schematics to be used for locating and correcting most of the operating problems which may develop. If a problem should develop which is not presented in this section or which is not corrected by listed corrective actions, technically qualified guidance should be obtained before proceeding with any maintenance. 9.2 MULTIMETER BASICS A wide variety of multimeters or Volt Ohm Meters (VOM) can be used for troubleshooting your equipment. A digital meter with reasonable accuracy (within 7%) is recommended for the measurements in these procedures. This section shows diagrams of a common, digital VOM configured for several different circuit measurements. Instructions for your VOM may vary. Please consult the meter operator’s manual for more information. Grounding "Grounding the meter" means to take the black lead (which is connected to the COM (common) or negative port) and touch it to a good path to the negative side of the voltage source. Backprobing To "backprobe" means to take the measurement by accessing a connector’s contact on the same side as the wires, the back of the connector. Readings can be done while maintaining circuit continuity this way. If the connector is the sealed type, great care must be taken to avoid damaging the seal around the wire. It is best to use probes or probe tips specifically designed for this technique, especially on sealed connectors. Whenever possible insert probes into the side of the connector such that the test also checks both terminals of the connection. It is possible to inspect a connection within a closed connector by backprobing both sides of a connector terminal and measuring resistance. Do this after giving each wire a gentle pull to ensure the wires are still attached to the contact and contacts are seated in the connector. Min/Max Use of the "Min/Max" recording feature of some meters can help when taking measurements of intermittent conditions while alone. For example, you can read the voltage applied to a solenoid when it is only operational while a switch, far from the solenoid and meter, is held down. Polarity Finding a negative voltage or current reading when expecting a positive reading frequently means the leads are reversed. Check what reading is expected, the location of the signal and that the leads are connected to the device under test correctly. Also check that the lead on the "COM" port goes to the ground or negative side of the signal and the lead on the other port goes to the positive side of the signal. Scale M = Mega = 1,000,000 * (Displayed Number) k = kilo = 1,000 * (Displayed Number) m = milli = (Displayed Number) / 1,000 μ = micro = (Displayed Number) / 1,000,000 Example: 1.2 k = 1200 Example: 50 mA = 0.05 A 3121222 – JLG Lift – 9-1 SECTION 9 - GENERAL ELECTRICAL INFORMATION & SCHEMATICS Voltage Measurement Resistance Measurement Figure 9-1. Voltage Measurement (DC) Figure 9-2. Resistance Measurement • If meter is not auto ranging, set it to the correct range (See multimeter’s operation manual) • First test meter and leads by touching leads together. Resistance should read a short circuit (very low resistance) • Use firm contact with meter leads • Circuit power must be turned OFF before testing resistance • Disconnect component from circuit before testing • If meter is not auto ranging, set it to the correct range (See multimeter’s operation manual) • Use firm contact with meter leads 9-2 – JLG Lift – 3121222 SECTION 9 - GENERAL ELECTRICAL INFORMATION & SCHEMATICS Continuity Measurement Current Measurement Figure 9-3. Continuity Measurement Figure 9-4. Current Measurement (DC) • Some meters require a separate button press to enable audible continuity testing • Circuit power must be turned OFF before testing continuity • Set up the meter for the expected current range • Be sure to connect the meter leads to the correct jacks for the current range you have selected • Disconnect component from circuit before testing • If meter is not auto ranging, set it to the correct range (See multi meter’s operation manual) • Use firm contact with meter leads • Use firm contact with meter leads • First test meter and leads by touching leads together. Meter should produce an audible alarm, indicating continuity 3121222 – JLG Lift – 9-3 SECTION 9 - GENERAL ELECTRICAL INFORMATION & SCHEMATICS Continuity Measurement Over Long Distances When trying to determine continuity of a harness or wire, longer than the reach of standard instrument leads, is possible to perform the check without excessively long leads. Using the other wires in the harness one can determine the condition of a particular wire in the harness. Requirements: • Harness with at least three separate wires including the wire under test. • These wires must be able to be isolated from other wires, etc. • Jumper or method to connect contacts on one side of harness. • Meter that can measure resistance or continuity. Procedure Test multimeter leads resistance. Subtract this value from the measured resistance of the wires to get a more accurate measurement. Consult the circuit schematic to determine which wires to use in addition to wire under test, here called wire #1 and wire #2, and how to isolate these wires. These wires should appear in the same connectors as the wire under test or are within reach of the jumper. 1. Disconnect all connections associated with the wire under test and the two additional wires. If harness is not completely isolated disconnect battery terminals also, as a precaution. 2. Measure continuity between all three wires, the wire under test, wire #1 and wire #2. These should be open. If not, repair the shorted wires or replace the harness. 3. On one side, jumper from contact of wire #1 and wire #2. 4. Measure continuity between wire #1 and wire #2. If there is continuity, both wires are good and can be used for this test. If there is not continuity, either wire could be bad. Check connections and measurement setup. Redo measurement. If still no continuity, repair wires or consult schematic for other wires to use for test. 5. Jumper from wire under test to wire #1. 6. Measure continuity. If there is continuity, the wire under test is good. Resistance of a wire increases as the length increases and as the diameter decreases. One can find the continuity of two wires, here #1 and #2, at once by following steps 1 through 4. If there is a problem the third wire is used to troubleshoot the other wires. To find the problem, start at step 1 and use the entire procedure. 9-4 – JLG Lift – 3121222 SECTION 9 - GENERAL ELECTRICAL INFORMATION & SCHEMATICS 9.3 ELECTRICAL SWITCH TESTING Basic Check The following check determines if the switch is functioning properly, not the circuit in which the switch is placed. A switch is functioning properly when there is continuity between the correct terminals or contacts only when selected. 1. De-energize the circuit. 2. Isolate the switch from the rest of the circuit if possible. If not possible, keep in mind it may affect readings. 3. Access the terminals to the switch. 4. If the switch has two terminals: a. Measure resistance across the terminals. b. Change the switch position. c. Measure resistance again with the leads in the same positions. If the meter was reading short, it should read an open. If the meter was reading open it should read short. 5. If the switch has more than two terminals, consult the schematic or switch diagram to determine what terminals will be connected. The test is similar to testing a switch with two terminals. a. Place one meter lead on the common contact and the other on a different contact in the same circuit. b. Cycle through all positions of the switch. The meter should read short only when the switch connects the two terminals and open otherwise. c. If the switch has more than one common contact repeat the process for that circuit. Limit Switches Limit switches are used to control movement or indicate position. Mechanical limit switches are just like manually operated switches except that the moving object operates the switch. These switches can be tested the same way as a standard switch by manually operating the sensing arm. Another type of limit switch used by JLG is the inductive proximity switch, also referred to as a "prox switch". Inductive proximity switches are actuated only by ferrous metal (metal that contains Iron, such as steel) near the switch. They do not require contact, and must be energized to actuate. These types of switches can be used to detect boom or platform position, for example. These switches have a sensing face where the switch can detect ferrous metal close to it. To find the sensing face, take note how the switch is mounted and how the mechanisms meet the switch. Test this type of switch as follows: 1. Remove prox switch from its mount. 2. Reconnect harness if it was disconnected for step 1, and turn on machine. 3. Hold switch away from metal and observe switch state in the control system diagnostics using the Analyzer. See vehicle or control system documentation on how to do this. 4. Place sensing face of switch on the object to be sensed by the switch. If that is not available, use a piece of ferrous metal physically similar to it. The switch state in the control system diagnostics should change. 5. When reinstalling or replacing switch be sure to follow mounting instructions and properly set the gap between the switch and object sensed. 3121222 – JLG Lift – 9-5 SECTION 9 - GENERAL ELECTRICAL INFORMATION & SCHEMATICS Automatic Switches If the switch is actuated automatically, by temperature or pressure for example, find a way to manually actuate the switch to test it. Do this either by applying heat or pressure, for example, to the switch. These switches may need to be energized to actuate. 1. Connect instrumentation to monitor and/or control the parameter the switch is measuring. 2. Observe switch state in control system with the Analyzer. See vehicle or control system documentation on how to do this. 3. Operate system such that the switch actuates. This could be going over a certain pressure or temperature, for example. The state indicated in the control system should change. Switch Wiring - Low Side, High Side When controlling a load, a switch can be wired between the positive side of the power source and the load. This switch is called a "high side" switch. The switch supplies the power to the load. When a switch is wired between the negative side of the power source and the load, it is a "low side" switch. The switch provides the ground to the load. A low side switch will allow voltage to be present on the load. No power is applied because the switch is stopping current flow. This voltage can be seen if the measurement is taken with one test lead on the load and the other on the battery negative side or grounded to the vehicle. What is actually being measured is the voltage drop across the switch. This could mislead a technician into thinking the load is receiving power but not operating. To produce an accurate picture of power or voltage applied to the load, measure voltage across the load’s power terminals. Also, the technician can measure the voltage at both power terminals with respect to battery ground. The difference between those two measurements is the voltage applied to the load. 9-6 – JLG Lift – 3121222 SECTION 9 - GENERAL ELECTRICAL INFORMATION & SCHEMATICS 9.4 APPLYING SILICONE DIELECTRIC COMPOUND TO AMP CONNECTORS Silicone Dielectric Compound must be used on the AMP connections for the following reasons: • To prevent oxidation at the mechanical joint between male and female pins. • To prevent electrical malfunction caused by low level conductivity between pins when wet. Use the following procedure to apply Silicone Dielectric Compound to the electrical connectors. 1. To prevent oxidation and low level conductivity, silicone dielectric grease must be packed completely around male and female pins on the inside of the connector after the mating of the housing to the header. This is easily achieved by using a syringe to fill the header with silicone dielectric compound, to a point just above the top of the male pins inside the header. When assembling the housing to the header, it is possible that the housing will become air locked, thus preventing the housing latch from engaging. 2. Pierce one of the unused wire seals to allow the trapped air inside the housing to escape. 3. Install a hole plug into this and/or any unused wire seal that has silicone dielectric compound escaping from it. AMP Connector 3121222 – JLG Lift – 9-7 SECTION 9 - GENERAL ELECTRICAL INFORMATION & SCHEMATICS Assembly Check to be sure the wedge lock is in the open, or as-shipped, position (See Connector Assembly Figure 1). Proceed as follows: Connector Assembly Figure 1 1. To insert a contact, push it straight into the appropriate circuit cavity as far as it will go (See Connector Assembly Figure 2). 2. Pull back on the contact wire with a force of 1 or 2 lbs. to be sure the retention fingers are holding the contact (See Connector Assembly Figure 2). 3. After all required contacts have been inserted, the wedge lock must be closed to its locked position. Release the locking latches by squeezing them inward (See Connector Assembly Figure 3). 4. Slide the wedge lock into the housing until it is flush with the housing (See Connector Assembly Figure 4). Connector Assembly Figure 2 9-8 – JLG Lift – 3121222 SECTION 9 - GENERAL ELECTRICAL INFORMATION & SCHEMATICS Connector Assembly Figure 3 Connector Assembly Figure 4 3121222 – JLG Lift – 9-9 SECTION 9 - GENERAL ELECTRICAL INFORMATION & SCHEMATICS Disassembly 5. Insert a 4.8 mm (3/16”) wide screwdriver blade between the mating seal and one of the red wedge lock tabs. 6. Pry open the wedge lock to the open position. 7. While rotating the wire back and forth over a half turn (1/4 turn in each direction), gently pull the wire until the contact is removed. Connector Disassembly NOTE: The wedge lock should never be removed from the housing for insertion or removal of the contacts. Wedge Lock The wedge lock has slotted openings in the forward, or mating end. These slots accommodate circuit testing in the field, by using a flat probe such as a pocket knife. DO NOT use a sharp point such as an ice pick. Service - Voltage Reading DO NOT PIERCE WIRE INSULATION TO TAKE VOLTAGE READINGS. It has been common practice in electrical troubleshooting to probe wires by piercing the insulation with a sharp point. This practice should be discouraged when dealing with the AMPSEAL plug assembly, or any other sealed connector system. The resulting pinholes in the insulation will allow moisture to invade the system by traveling along the wire strands. This nullifies the effectiveness of the connector seals and could result in system failure. 9-10 – JLG Lift – 3121222 SECTION 9 - GENERAL ELECTRICAL INFORMATION & SCHEMATICS Figure 9-5. Connector Installation 3121222 – JLG Lift – 9-11 SECTION 9 - GENERAL ELECTRICAL INFORMATION & SCHEMATICS 9.5 WORKING WITH DEUTSCH CONNECTORS DT/DTP Series Assembly Figure 9-6. DT/DTP Contact Installation 1. Grasp crimped contact about 25mm behind the contact barrel. 2. Hold connector with rear grommet facing you. 3. Push contact straight into connector grommet until a click is felt. A slight tug will confirm that it is properly locked in place. 4. Once all contacts are in place, insert wedgelock with arrow pointing toward exterior locking mechanism. The wedgelock will snap into place. Rectangular wedges are not oriented. Thy may go in either way. NOTE: The receptacle is shown - use the same procedure for plug. DT/DTP Series Disassembly Figure 9-7. DT/DTP Contact Removal 5. Remove wedgelock using needlenose pliers or a hook shaped wire to pull wedge straight out. 6. To remove the contacts, gently pull wire backwards, while at the same time releasing the locking finger by moving it away from the contact with a screwdriver. 7. Hold the rear seal in place, as removing the contact may displace the seal. HD30/HDP20 Series Assembly Figure 9-8. HD/HDP Contact Installation 8. Grasp contact about 25mm behind the contact crimp barrel. 9. Hold connector with rear grommet facing you. 9-12 – JLG Lift – 3121222 SECTION 9 - GENERAL ELECTRICAL INFORMATION & SCHEMATICS 10. Push contact straight into connector grommet until a positive stop is felt. A slight tug will confirm that it is properly locked in place. Figure 9-9. HD/HDP Locking Contacts Into Position NOTE: For unused wire cavities, insert sealing plugs for full environmental sealing HD30/HDP20 Series Disassembly Figure 9-10. HD/HDP Contact Removal 11. With rear insert toward you, snap appropriate size extractor tool over the wire of contact to be removed. 12. Slide tool along into the insert cavity until it engages contact and resistance is felt. 13. Pull contact-wire assembly out of connector. Figure 9-11. HD/HDP Unlocking Contacts NOTE: Do Not twist or insert tool at an angle. 9.6 X-CONNECTOR REFERENCES Throughout this Service Manual, electrical connectors are given a three digit identifier number preceded with an “X” for identifying and locating the specific connector. See Section 9.8, X-CONNECTOR ID INDEX for description of "X" connectors and Figure 9-12. on page 9-20, and Figure 913. on page 9-21 for location of "X" connectors on the machine. Example of "X" connector usage nomenclature: [X006.21] refers to terminal 21 (pin and socket) of connector X006. [X006.21.soc] refers to the socket side of terminal 21, connector X006. [X006.21.pin] refers to the pin side of terminal 21, connector X006. 3121222 – JLG Lift – 9-13 SECTION 9 - GENERAL ELECTRICAL INFORMATION & SCHEMATICS 9.7 CONNECTOR LOADING DIAGRAMS Table 9-1. Connector Loading Diagrams ID AMP02P Description Diagram Amp 2 position plug 2 1 AMP02R Amp 2 position receptacle 2 1 Amp Commercial 2 position plug 2 AMPC02P 1 2 1 AMP04P Amp 4 position plug 4 3 2 1 AMP04R Amp 4 position receptacle 4 3 1 AMP09P Amp 9 position plug 2 1 3 6 4 9 7 8 CXA08P Conxall 8 position plug 7 1 2 6 8 5 3 4 9-14 – JLG Lift – 3121222 SECTION 9 - GENERAL ELECTRICAL INFORMATION & SCHEMATICS Table 9-1. Connector Loading Diagrams (Continued) ID DHD14P Description Diagram Deutsch 14 position HD series alum. Plug PE N D M F A C G B L H K J REAR VIEW DHD14R Deutsch 14 position HD series alum. Receptacle EP N D F G M C A B L K H J REAR VIEW DRC40P Deutsch 40 position plug 1 5 6 10 11 21 20 30 31 DT02P 35 36 40 Deutsch 2 position DT series plug 1 DT02R 2 Deutsch 2 position DT series receptacle 2 DT03P 1 Deutsch 3 position DT series plug A B C 3121222 – JLG Lift – 9-15 SECTION 9 - GENERAL ELECTRICAL INFORMATION & SCHEMATICS Table 9-1. Connector Loading Diagrams (Continued) ID Description DT06AP Deutsch 6 position DT series plug DT06R Deutsch 6 position DT series receptacle DT08AP Deutsch 8 position DT series plug with A keys DT08AR Deutsch 8 position DT series receptacle with A keys DTM12AP Deutsch 12 position DT series mini plug with A key DTM12BP Deutsch 12 position DT series mini plug with B key Diagram 7 9-16 9 10 11 12 6 5 4 3 7 8 9 10 11 12 6 E06P 8 5 4 3 2 2 1 1 Eaton Toggle Switch – JLG Lift – 1 4 2 5 3 6 3121222 SECTION 9 - GENERAL ELECTRICAL INFORMATION & SCHEMATICS Table 9-1. Connector Loading Diagrams (Continued) ID Description MMF03P Diagram Molex 3 position plug 3 MMF12P 2 1 Molex Mini Fit 12 position plug 7 8 1 MMF16P Molex Mini Fit 16 position plug 9 2 10 3 11 4 12 5 6 12 13 9 10 11 14 15 16 1 2 3 4 5 6 7 8 9.8 X-CONNECTOR ID INDEX ID X001 X002 X003 X008 X009 X010 X011 X012 X013 X014 X017 X018 X019 X020 X021 X022 X023 X024 X025 X026 X027 X028 X029 3121222 Table 9-2. X-Connector ID Index Description End 1 ID Ground Module J1 Ground Module J2 Ground Module J3 Battery + RH Pothole Switch Ground Passthru Diagnostic Port Brake Release Power Brake Release Ign Beacon Arm Stack Passthru Charger Interlock Charger Plug Charger Battery Ground Alarm LH Pothole Switch Left Brake Right Brake Contactor Power Module LED Display Overload + End 2 ID DRC40P AMP09P AMP04P AMP04P AMP04R AMP04R DT02R DT08AR AMP02P DT08AP AMP02R DT06AP DT06R DT03P DT02R DT02R DT02R MMF12P AMP04R – JLG Lift – DT02P DT02P 9-17 SECTION 9 - GENERAL ELECTRICAL INFORMATION & SCHEMATICS ID X030 X031 X032 X033 X034 X035 X036 X037 X038 X039 X040 X041 X042 X043 X044 X046 X047 X048 X049 X050 X051 X052 X053 X054 X056 X057 X058 X059 X060 X061 X062 X063 X064 X065 X066 X069 X070 X071 X072 X073 X074 X075 X076 X077 X078 X079 X080 9-18 Table 9-2. X-Connector ID Index Description End 1 ID Overload Hourmeter Hourmeter + Circuitbreaker Out Circuitbreaker In Gnd E-Stop In Gnd E-Stop Out Lift Switch Key Common Key Ground Key Platform Lift Down Valve Steer Right Valve Lift Up Valve Steer Left Valve Platform Box Platform E-Stop Out Platform E-Stop In Joystick Platform Module J1 Platform Lift Drive Switch Platform Alarm + Platform Alarm Platform Horn Switch Inverter Switch Out Inverter Switch In Contactor Supply Contactor Out Power Module BPower Module F1 Power Module F2 Left Motor Power Mod M1 Power Module P Power Module B+ from Contactor Left Motor Power Mod M2 Pump Motor + Pump Motor Battery 1 + to Contactor Battery 1 Battery 2 + Battery 2 Battery Disconnect Battery 3 + Battery 3 Battery 4 + Battery 4 - to Power Mod Right Motor Field Cross – JLG Lift – End 2 ID E06P DT02P DT02P DT02P DT02P DHD14P DHD14R AMP09P MMF16P MMF03P 3121222 SECTION 9 - GENERAL ELECTRICAL INFORMATION & SCHEMATICS ID X081 X082 X083 X084 X085 X086 X087 X088 X089 X090 X091 X092 X093 X094 X095 X096 X097 X098 X099 X104 X105 X106 X107 X108 X109 X110 X111 X112 3121222 Table 9-2. X-Connector ID Index Description End 1 ID Left Motor Field Cross Inverter Control Right Motor Power Mod M1 Power Mod B + to Pump Motor Right Motor Power Mod M2 Battery 1 + to Inverter + Inverter + Battery 4 - to Inverter Inverter Right Wheel Brake Solenoid Left Wheel Brake Solenoid Right Wheel + Left Wheel + Right Wheel Left Wheel Right Wheel Field from F1 Left Wheel Field from F2 Right Wheel Field Common Left Wheel Field Common 1230 Footswitch Chassis 1230 Footswitch Platform 1230 Footswitch J1 1230 Footswitch J2 1230 Mast Passthru 1230 Proximity Switch Inverter AC input Inverter AC output Charger AC input – JLG Lift – End 2 ID CXA08P AMPC02P AMPC02P DT08AP DT08AR DTM12BP DTM12AP DT08AP DT02P 9-19 SECTION 9 - GENERAL ELECTRICAL INFORMATION & SCHEMATICS 9.9 MACHINE LOCATION OF COMPONENT X-CONNECTORS X029 X060 X016 X062 X063 X064 X065 X066 X083 X084 X085 X047 X048 X049 X052 X053 X050 X051 X052 X026 X058 X059 X046 X021 X076 X077 X078 X079 X088 X091 X093 X095 X097 X099 X014 X090 X092 X094 X096 X098 X023 X109 X009 X018 X019 X020 X082 X087 X089 X110 X111 X112 X104 X105 X106 X107 X108 X022 X011 X024 X025 X080 X081 X056 X057 X012 X013 SEE GROUND MODULE DETAIL X008 X071 X072 X073 X074 X075 X086 X041 X042 X043 X069 X070 Figure 9-12. 1230ES - Location of Component X-Connectors on Machine. 9-20 – JLG Lift – 3121222 SECTION 9 - GENERAL ELECTRICAL INFORMATION & SCHEMATICS X003 X002 X001 X029 X030 X033 X034 X028 X031 X032 (1 WIRE) X035 X040 X003 X038 X010 X039 X036 X037 (2 WIRES) Figure 9-13. 1230ES -Location of Component X-Connectors on Ground Control Module. 3121222 – JLG Lift – 9-21 SECTION 9 - GENERAL ELECTRICAL INFORMATION & SCHEMATICS 9.10 ELECTRICAL LAYOUT AND SCHEMATICS PLATFORM CONSOLE BOX BRAKE DISCONNECT SWITCH PLATFORM RECEPTACLE PUMP/ MOTOR/ TANK MODULE (JAPANESE SPEC) J2 ALARM J1 BEACON LIGHT POTHOLE PROTECTION SWITCHES R DIAGNOSTIC ANALYZER L GROUND CONTROL BOX DRIVE MOTORS Figure 9-14. 1230ES - Overview of Electrical System Components. (1600346 Drive Module) 9-22 – JLG Lift – 3121222 SECTION 9 - GENERAL ELECTRICAL INFORMATION & SCHEMATICS BATTERIES BATTERY CHARGER BATTERY CHARGER/ INVERTER INVERTER POWER SWITCH TO AC POWER CONTACTOR RELAY PROXIMITY SENSOR LIFT CYLINDER POWER MODULE Figure 9-14., 1230ES - Overview of Electrical System Components. (1600346 Drive Module) 3121222 – JLG Lift – 9-23 SECTION 9 - GENERAL ELECTRICAL INFORMATION & SCHEMATICS BRAKE DISCONNECT SWITCH PLATFORM CONSOLE BOX PLATFORM RECEPTACLE PUMP/ MOTOR/ TANK ALARM BEACON LIGHT HANDHELD ANALYZER CONNECTION GROUND CONTROL BOX POTHOLE PROTECTION SWITCHES DRIVE MOTORS Figure 9-15. 1230ES - Overview of Electrical System Components. (1001092456 Drive Module) 9-24 – JLG Lift – 3121222 SECTION 9 - GENERAL ELECTRICAL INFORMATION & SCHEMATICS BATTERIES BATTERY CHARGER BATTERY CHARGER/ INVERTER INVERTER POWER SWITCH TO AC POWER RELAY DRIVE CONTROLLER +BF1 –T PROXIMITY SENSOR J1 +B LIFT CYLINDER +BF2 –B J2 –P CONTACTOR RELAY F1 F2 Figure 9-15., 1230ES - Overview of Electrical System Components. (1001092456 Drive Module) 3121222 – JLG Lift – 9-25 SECTION 9 - GENERAL ELECTRICAL INFORMATION & SCHEMATICS Figure 9-16. Electrical Schematic. (Machines with 1600346 Drive Module) 9-26 – JLG Lift – 3121222 SECTION 9 - GENERAL ELECTRICAL INFORMATION & SCHEMATICS 1870188_E Figure 9-16., Electrical Schematic. (Machines with 1600346 Drive Module) 3121222 – JLG Lift – 9-27 SECTION 9 - GENERAL ELECTRICAL INFORMATION & SCHEMATICS Figure 9-17. Electrical Schematic. (Machines with 1001092546 Drive Module) 9-28 – JLG Lift – 3121222 SECTION 9 - GENERAL ELECTRICAL INFORMATION & SCHEMATICS 1001114879_F-1 Figure 9-17., Electrical Schematic. (Machines with 1001092546 Drive Module) 3121222 – JLG Lift – 9-29 SECTION 9 - GENERAL ELECTRICAL INFORMATION & SCHEMATICS Figure 9-18. Electrical Schematic. (Machines with 1001092546 Drive Module) 9-30 – JLG Lift – 3121222 SECTION 9 - GENERAL ELECTRICAL INFORMATION & SCHEMATICS 1001114879_F-2 Figure 9-17., Electrical Schematic. (Machines with 1001092546 Drive Module) 3121222 – JLG Lift – 9-31 SECTION 9 - GENERAL ELECTRICAL INFORMATION & SCHEMATICS 1001114879_F-3 Figure 9-19. Electrical Schematic (Ground Control Module) - (Machines with 1001092546 Drive Module) 9-32 – JLG Lift – 3121222 SECTION 9 - GENERAL ELECTRICAL INFORMATION & SCHEMATICS 9.11 PIN INPUT/OUTPUT TYPES Table 9-3. Pin 1 2 3 4 5 6 7 8 9 10 11 12 13 14 15 16 17 18 19 20 21 22 23 24 25 26 27 28 29 30 31 32 33 34 35 36 37 38 39 40 Pin 1 2 3 4 5 6 7 8 9 3121222 Ground Board J1 - Connector X001 (1600346 Power Module ONLY) Function Type Range (V) Ground Power Output 0 Analyzer Power Power Output 12 RS-232 Receive Input/Output Comm RS-232 Transmit Input/Output Comm Platform EMS Input Vbatt Ground Power Output 0 Ignition Power Output Vbatt Platform EMS Source Power Output Vbatt Not Used --Left PHP Switch Input Vbatt CAN Bus high Input/Output Comm CAN Bus Low Input/Output Comm CAN Bus Shield Power Output 0 Not Used --Elevation Prox Switch Input 5 Ground Power Output 0 Not Used --Right PHP Switch Input Vbatt Ignition Power Output Vbatt Brake Release Swtich Input Vbatt Steer Left Coil Output Vbatt Steer Right Coil Output Vbatt Right Brake Release Output Vbatt Left Brake Release Output Vbatt Lift Up Coil Output Vbatt Lift Down Coil Output PWM Ground Power Output 0 Ground Alarm Output PWM Charger Interlock Input Vbatt Not Used --CAN Bus High Input/Output Comm CaN Bus Low Input/Output Comm CAN Bus Shield Output 0 Not Used --Not Used --Not Used --Ground Power Output 0 Not Used --Master Ignition Connection Power Input Vbatt Master Ground Connection Power Input 0 Table 9-4. Ground Board J2 - Connector X002 Function Type Range (V) Ignition Power Output Vbatt Ground EMS Power Input Vbatt Platform EMS Source Power Input Vbatt Ground Mode Select Input Vbatt Ground Power Output 0 Ground Lift Up Input Vbatt Ground Lift Down Input Vbatt Hour Meter Output Vbatt Ground Overload Lamp Output Vbatt – JLG Lift – 9-33 SECTION 9 - GENERAL ELECTRICAL INFORMATION & SCHEMATICS Pin 1 2 3 4 Table 9-5. Ground Board J3 - Connector X003 Function Type Range (V) Tilt Sensor Power Power Output 12 Tilt Sensor X-Axis (PWM) Input 12 Tilt Sensor Y-Axis (PWM) Input 12 Ground Power Output 0 Pin 1 2 3 4 5 6 7 8 9 10 11 12 13 14 15 16 Table 9-6. Platform Board J1 - Connector X050 Function Type Range (V) Master Ignition Power Input Vbatt Master Ground Power Input 0 CAN Bus High Input/Output Comm CAN Bus Low Input/Output Comm Joystick Power Supply Power Output 5 Joystick Signal Input 5 Ground Power Output 0 Trigger Switch Input Vbatt Lift Select Switch (Active Low) Input Vbatt Drive Select Switch (Active Low) Input Vbatt Ground Power Output 0 Platform Alarm (Active Low) Output Vbatt Not Used --Not Used --Steer Left Switch Input Vbatt Steer Right Switch Input Vbatt Pin 1 2 3 4 5 6 7 Table 9-7. Platform Board J3 Function Type Ground Power Output Not Used -Not Used -Not Used -Not Used -Not Used -Indoor/Outdoor Select Switch (Active Low) Input Range (V) 0 -----Vbatt Pin 1 2 3 4 5 6 7 Table 9-8. Platform Board J4 Function Type Ground Power Output Not Used -Not Used -Not Used -Not Used -Not Used -Horn Switch (Active Low) Input Range (V) 0 -----Vbatt Table 9-9. Power Module - Connector X027 (1600346 Power Module) Pin Function Type Range (V) 1 Ignition Power Input Vbatt 2 Not Used --3 Not Used --4 Not Used --5 Not Used --6 Not Used --7 Not Used --8 Line Contactor High Side Power Output Vbatt 9 Not Used --10 CAN Bus High Input/Output Comm 11 CAN Bus Low Input/Output Comm 12 Not Used --- 9-34 – JLG Lift – 3121222 SECTION 9 - GENERAL ELECTRICAL INFORMATION & SCHEMATICS Pin 1 2 3 4 5 6 7 8 9 10 11 12 13 14 15 16 17 18 19 20 21 22 23 24 25 26 27 28 29 30 31 32 33 34 35 3121222 Table 9-10. Power Module - J1 (1001092456 Power Module ONLY) Function Type Primary Elevation Sensor Analog Input (0-5V) Spare - Analog Input Control for Ground Alarm (PWM) Positive for Analyzer (+12V) Ground Select (Logic Supply for Ground Mode) Positive for Tilt Sensor (Connect to +BATT) Positive for Ground Alarm (Connect to +BATT) Ground Lift Up Switch (High-Sensing) Right Pothole Switch (High Sensing) Ground Lift Down Switch (High-Sensing) Left Pothole Switch (High-Sensing) Spare Negative Reference Positive Main Line Contactor (Connect to GNDS diode OR’d with EMS) Spare Digital Input (High-Sensing) Spare Digital Input (High-Sensing) Positive Rotary Sensor Reference (+5V) Negative for Rotary Sensor Positive Left Pothole Switch Reference (Connect to +BATT) Positive Right Pothole Switch Reference (Connect to +BATT) RS-232 Receive RS-232 Transmit Negative for Analyzer (Connect to -B ) Spare Negative Reference (Connect to -B) Spare Digital Input (High-Sensing) Elevation Proximity Switch (High-Sensing; 1230ES only) Charger Interlock (High-Sensing) Foot Switch (High-Sensing; 1230ES only) Battery Supply from External Relay Positive Left Brake Release (Connect to +BATT) Positive Right Brake Release (Connect to +BATT) Positive Manual Brake Release (Connect to +BATT) Negative Main Line Contactor (Low-Side Driver) Negative Right Brake Solenoid (Low-Side Driver) Negative Left Brake Solenoid (Low-Side Driver) Spare Digital Output (Low-Side Driver) / Digital Input (High-Sensing) – JLG Lift – Analog Analog Digital Power Power Power Power Digital Digital Digital Digital Power Power Digital Digital Power Power Power Power Serial Serial Power Power Digital Digital Digital Digital Power Power Power Power Digital Digital Digital Digital Input Input Output Output Input Output Output Input Input Input Input Output Output Input Input Output Output Output Output Input Output Output Output Input Input Input Input Input Output Output Output Output Output Output Output 9-35 SECTION 9 - GENERAL ELECTRICAL INFORMATION & SCHEMATICS Pin 1 2 3 4 5 6 7 8 9 10 11 12 13 14 15 16 17 18 19 20 21 22 23 9-36 Table 9-11. Power Module - J2 (1001092456 Power Module ONLY) Function Type Spare - (Connect to +BATT) Positive Lift Down Valve (High-Side Driver) Spare Digital Input (High-Sensing) Spare Digital Input (High-Sensing) CANbus Low CANbus High Spare Positive Analog Reference (+5V ) Platform EMS (Logic Supply for Platform Mode) Negative Steer Left Solenoid Valve (Low-Side Driver) Switch Manual Brake Release (High-Sensing) Spare Digital Input (High-Sensing) Spare Digital Input (High-Sensing) Spare Digital Input (High-Sensing) Spare Negative Analog Reference (Connect to -B) CANbus Shield (Connect to -B) Negative Lift Down Valve (Low-Side Driver) Negative Lift Up Solenoid Valve (Low-Side Driver) Negative Steer Right Solenoid Valve (Low-Side Driver) Spare Analog Input (0-5V) Spare Digital Output (Low-Side Driver) Spare Digital Output (Low-Side Driver) Negative for Overload Lamp (Low-Side Driver) Negative for Hourmeter (Low-Side Driver) – JLG Lift – Power Power Digital Digital Serial Serial Power Power Digital Digital Digital Digital Digital Power Power Power Digital Digital Analog Digital Digital Digital Digital Output Output Input Input I/O I/O Output Input Output Input Input Input Input Output Output Output Output Output Input Output Output Output Output 3121222 SECTION 9 - GENERAL ELECTRICAL INFORMATION & SCHEMATICS Figure 9-20. Battery Charger/Inverter Electrical Connection Schematic 3121222 – JLG Lift – 9-37 SECTION 9 - GENERAL ELECTRICAL INFORMATION & SCHEMATICS 9.12 AC POWER RECEPTACLES AND WIRING (PLATFORM) - CE SPEC MACHINES ONLY 9-38 – JLG Lift – 3121222 SECTION 9 - GENERAL ELECTRICAL INFORMATION & SCHEMATICS 3121222 – JLG Lift – 9-39 SECTION 9 - GENERAL ELECTRICAL INFORMATION & SCHEMATICS 9-40 – JLG Lift – 3121222 SECTION 9 - GENERAL ELECTRICAL INFORMATION & SCHEMATICS 3121222 – JLG Lift – 9-41 SECTION 9 - GENERAL ELECTRICAL INFORMATION & SCHEMATICS 9.12 HYDRAULIC SCHEMATIC Figure 9-21. Hydraulic Diagram. (2792703_B) 9-42 – JLG Lift – 3121222 CALIFORNIAN PROPOSITION 65 BATTERY WARNING Battery posts, terminals and related accessories contain lead and lead compounds, chemical known to the State of Califormia to cause cancer and reproductive harm. WASH HANDS AFTER HANDLING! 3121222 Corporate Office JLG Industries, Inc. 1 JLG Drive McConnellsburg PA. 17233-9533 USA (717) 485-5161 (717) 485-6417 JLG Worldwide Locations JLG Industries (Australia) P.O. Box 5119 11 Bolwarra Road Port Macquarie N.S.W. 2444 Australia +61 2 65 811111 JLG Latino Americana Ltda. Rua Eng. Carlos Stevenson, 80-Suite 71 13092-310 Campinas-SP Brazil +55 19 3295 0407 +55 19 3295 1025 JLG Industries (UK) Ltd Bentley House Bentley Avenue Middleton Greater Manchester M24 2GP - England +44 (0)161 654 1000 +61 2 65 813058 JLG Deutschland GmbH Max-Planck-Str. 21 D - 27721 Ritterhude - Ihlpohl Germany +49 (0)421 69 350 20 +49 (0)421 69 350 45 JLG France SAS Z.I. de Fauillet 47400 Tonneins France +33 (0)5 53 88 31 70 +33 (0)5 53 88 31 79 +44 (0)161 654 1001 JLG Equipment Services Ltd. Rm 1107 Landmark North 39 Lung Sum Avenue Sheung Shui N. T. Hong Kong JLG Industries (Italia) s.r.l. Via Po. 22 20010 Pregnana Milanese - MI Italy (852) 2639 5783 +39 029 359 5210 (852) 2639 5797 +39 029 359 5845 Oshkosh - JLG Singapore T. E. P. Ltd. 29 Tuas Ave 4 Jurong Industrial Estate 639379 Singapore +65-6591-9030 +65-6591-9031 Plataformas Elevadoras JLG Iberica, S.L. Trapadella, 2 P.I. Castellbisbal Sur 08755 Castellbisbal, Barcelona Spain +34 93 772 4700 +34 93 771 1762 JLG Sverige AB Enkopingsvagen 150 Box 704 SE - 176 27 Jarfalla Sweden +46 (0)850 659 500 +46 (0)850 659 534 www.jlg.com