1
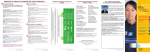
Service Bulletin
Applies To:
10-053
October 9, 2010
2011 Odyssey With Navigation – ALL
2011 Odyssey: PDI of the Navigation System
(Supersedes 10-053, dated September 16, 2010, to revise the information marked by the black bars)
NAVIGATION SYSTEM CONTROLS
REVISION SUMMARY
Under NAVIGATION SYSTEM SETUP AT THE PDI,
the In Line Diagnosis screen procedure was updated.
SCREEN
This bulletin provides information for the PDI, including
testing, of the navigation system. These topics are
covered:
• Navigation System Controls
• Voice Control System
• Navigation System Setup at the PDI
TIME (SET BY NAVIGATION SYSTEM)
• Rearview Camera
MAP/
GUIDE
BUTTON
• System Limitations
• Map Coverage Areas
DEST/
ROUTE
BUTTON
AUDIO
BUTTON
• Hawaii System Setup
• TMC (Traffic Message Channel) Information
PHONE
BUTTON
INFO
BUTTON
CANCEL
BUTTON
• Ordering Navigation Update Software
For more information about the navigation system and
its operation, refer to these resources:
• Technology Reference Guide
• Technical Information Guide – Use the keyword
NM224 for more information about the navigation
system.
DISPLAY MODE
BUTTON
INTERFACE DIAL/
ENTER BUTTON
The buttons listed above are used in this service
bulletin. For more information on the button functions,
see Getting Started in the navigation manual.
• Navigation Manual – Besides the one that comes
with the vehicle, the navigation manual is also
available online. Under Search By Vehicle, then
enter keywords NAVIGATION MANUAL.
WARRANTY CLAIM INFORMATION
None. These procedures are considered part of the
normal PDI.
© 2010 American Honda Motor Co., Inc. – All Rights Reserved
ATB 44567-45071 (1010)
1 of 6
CUSTOMER INFORMATION: The information in this bulletin is intended for use only by skilled technicians who have the proper tools, equipment,
and training to correctly and safely maintain your vehicle. These procedures should not be attempted by “do-it-yourselfers,” and you should not assume
this bulletin applies to your vehicle, or that your vehicle has the condition described. To determine whether this information applies, contact an
authorized Honda automobile dealer.
VOICE CONTROL SYSTEM
The navigation system features a voice control system
that allows you to operate most of the navigation,
HVAC, and audio controls with only your voice. This is
the primary way to give commands to the system. To
interact with the navigation system, use the TALK and
BACK buttons. The microphone is located on the
ceiling.
PICK-UP
BUTTON
Improving Recognition
If the system does not understand your voice
commands, refer to Improving Voice Recognition in the
navigation manual.
NOTE:
• The navigation system does not respond and
displays the Cellular phone menu if you have
activated the PICK-UP button. Press the MAP/
GUIDE button before using the navigation system.
• You must be in the driver’s seat to use voice
commands with the navigation system.
• Close all the windows and moonroof. Make sure the
vents are pointed away from the microphone.
TALK BUTTON
• If you speak a command with something in your
mouth, with a heavy accent, or have a high-pitched
voice, the system may misinterpret your voice
command.
BACK BUTTON
NAVIGATION SYSTEM SETUP AT THE PDI
HANG-UP BUTTON
The navigation system is basically ready to use when
the vehicle is delivered to the dealership. Since the
system interfaces with other vehicle systems, it is
important that all of the systems are initialized. To
initialize the navigation system, follow these steps:
1. Do the normal PDI of the vehicle, including the
audio system.
2. You may see the factory In Line Diagnosis screen
below. If so, do the following. If not, go to step 3.
MICROPHONE (ON THE CEILING)
TALK button – Press and release this button on the
steering wheel to activate the voice control system.
After pressing and releasing the TALK button, wait for
the beep, and then speak the command.
BACK button – Press this button to return to the
previous screen. After the previous screen appears,
the system prompts you for a command, and then
beeps. Press and release the TALK button to say your
next command. The BACK button has the same
function as the CANCEL button located next to the
interface dial.
Microphone – Receives voice commands.
2 of 6
• Press and hold the DEST/ROUTE, MAP/GUIDE,
and CANCEL buttons at the same time until the
Select Diagnosis Items screen comes up. Then
release the buttons.
• Press and hold the MAP/GUIDE button for at
least 15 seconds.
• Set the Inline Diag Setting to Complete, then
select Return twice to exit the diagnostic mode.
10-053
3. Start the engine, and drive the vehicle outside,
away from buildings, tall trees, and power lines.
Then enter the 5-digit anti-theft code for the audio
and navigation system. The code is on the
Navigation Anti-Theft Code card.
4. The instructions below appear on the screen to
indicate that the system is initializing (determining
its location from the GPS satellites). Follow the onscreen instructions.
NOTE:
• There are two code labels and a plastic code
card located in a small plastic bag in the glove
box.
• You must enter the anti-theft code the very first
time. After that, if the audio-navigation unit loses
power, you can bypass entering the anti-theft
code by pressing and holding the VOLUME/
POWER knob.
Attach one of the labels to the code card, put it in
the plastic bag, and return it to the glove box.
Attach the other label to the PDI repair order, or put
it in the plastic bag, and return it to the glove box for
the customer
NOTE: Never attach a label to the side of the glove
box or other location where both the serial number
and code are easily visible. This defeats the
purpose of the anti-theft protection.
If the code card is lost or unavailable, you can get
the code from the iN (Interactive Network) using the
navigation system serial number. The system serial
number can easily be obtained without removing
the navigation unit. To get the serial number and
the code, do this:
• Press and hold the DEST/ROUTE, MAP/GUIDE,
and CANCEL buttons at the same time.
NOTE: The average initialization takes about 10
minutes, but it can take as long as 45 minutes. If
initialization completes within 10 minutes, the
display changes to the globe screen.
5. If the system does not initialize within 10 minutes,
a second screen (shown below) appears. The
system is still inializing but will not automatically
exit to the globe screen when the initialization is
complete. Do not immediately follow the
instructions on the screen. After 30 minutes, try
restarting the engine to see if the navigation system
completed the initialization. If it did not, follow the
instructions on the screen.
• At the Select Diagnosis Items screen, select
Detail Information & Settings, then select Unit
Check, then ECU Info. The system runs a brief
diagnostic, then the navigation unit serial number
is displayed at the bottom of the screen.
• Use the navigation Anti-theft code inquiry
option on the iN to look up the 5-digit navigation
anti-theft code.
• If the code does not work, call the American
Honda Warranty department at 310-783-3240.
Do not call Tech Line.
10-053
NOTE: The initialization screen may appear after
battery voltage to the navigation control unit has
been disconnected for more than 5 minutes. If this
happens, follow the on-screen instructions. If you
are still unable to obtain GPS initialization, refer to
the service manual for diagnostic information.
3 of 6
6. When initialization is complete, the disclaimer
screen appears. Select OK.
11. Rotate the interface dial to highlight your
dealership, then push in on the ENTER button.
12. On the Calculate Route to screen, select OK. The
system then calculates a route and displays it as a
blue line. If you are in a rural area with unverified
roads, you may see a blue vector line or a blue/pink
dotted line pointing in the direction of your
destination.
13. Follow the voice guidance back to your dealership.
The voice guidance should work even with the
audio system turned off.
NOTE: Do not enter a destination yet. For the
navigation system to calculate a route, it must align
the current location to a mapped road (map
matching). This happens when you start driving.
7. Verify that the XM® Radio dealer demo account is
set up by tuning to XM stations 000, 001, 007, 009,
047, 122, and 247. If you receive these stations,
the demo account is fully active.
NOTE:
• For 2011 models with navigation, XM Radio is
free to the customer for the first 3 months. After
that, customers must subscribe to XM Radio to
continue receiving coverage by calling 800-8529696, or going online to www.xmradio.com. They
will need their XM radio ID (displayed when you
tune to channel 0) and a major credit card.
• Traffic (TMC) is broadcast on the FM radio band
and is free in available areas. Refer to TMC
(TRAFFIC MESSAGE CHANNEL)
INFORMATION.
8. Drive the vehicle at least a half-mile from your
dealership, and find a safe place to park. Then set
the map scale to 1/20.
• Make sure the VP (vehicle position) icon moves
smoothly as you drive and does not jerk from one
point to another. Also make sure the icon points
in the direction the vehicle is traveling; it does not
“dog track” or spin.
14. With the map screen displayed, check the system
interaction with the audio system and the lower
display. Press and release the TALK button. After
the beep, say “XM channel 122.” The lower display
should change to XM channel 122 and show CNN
News.
15. With the map screen displayed, check the system
interaction with the climate control system. Turn on
the climate control system by selecting AUTO.
Then press and release the TALK button. After the
beep, say “temperature 68 degrees.” The lower
display should change to 68 degrees.
16. Make sure the time shown in the subdisplay is
correct; the system gets it from the GPS satellites.
For areas that do not follow daylight saving time,
you may have to adjust the time settings. Go to
clock adjustment in the Setup screen, and set Auto
Daylight to OFF.
NOTE: If your dealership is located near a time
zone boundary, set Auto Time Zone by GPS to
OFF. The clock then keeps the “home” time if the
client routinely drives across the time zone
boundary.
17. Press the DISPLAY MODE (
) button to verify
that the display changes between Day, Night, and
OFF modes.
• After driving a few hundred feet, the name of the
road you are driving on should appear at the
bottom of the screen. The navigation system is
now map-matched.
NOTE: If the navigation system fails to map-match
after the vehicle is driven more than a couple of
miles on a displayed road, refer to the service
manual symptom troubleshooting.
9. With the map screen displayed, press and release
the TALK button.
10. When you hear the beep, say “Find nearest Honda
dealer.” The system should display a list of Honda
dealers.
4 of 6
10-053
18. If your dealership is located in a metropolitan area
that has traffic incident or traffic flow data available
(see TMC (TRAFFIC MESSAGE CHANNEL)
INFORMATION), do this:
• Select one of the traffic map scales 1/2-, 1-, 2-, or
5-mile scales by rotating the dial.
• Use the interface dial to scroll to the downtown
area of your city. If your metro area has traffic
flow data, freeways and other main roads should
show traffic flow data as red, yellow, or green
lines for traffic flow in one or both directions on
the road.
• Small diamond-shaped “traffic incident” icons
may be shown. If so, scroll over an icon and
press in the interface dial to see the details.
• Partially displayed traffic data does not indicate a
problem with the navigation system. Traffic flow
and density varies from day to day and from one
road to another. If your area has traffic, but it is
not displaying on the screen, refer to the
Navigation section of the 2011 Odyssey Service
Manual.
19. Clear the hard disc drive (HDD):
• Turn the ignition switch to ON (II).
• Turn the audio-navigation unit on.
• Press and hold the DEST/ROUTE, MAP/GUIDE,
and CANCEL buttons at the same time until the
Select Diagnosis Items screen comes up. Then
release the buttons.
• Select Detail Information & Setting.
• Select Function setup.
• Select All clear. A confirmation screen appears.
Select Yes.
• A second confirmation screen appears. Select
Yes again.
REARVIEW CAMERA
Turn the ignition switch to ON (II), then shift to R. The
rearview image appears on the navigation display.
Make sure the distance guidelines appear on the
screen. Change the camera views by pushing in on the
interface dial. Rotate the interface dial to adjust the
image brightness. The rearview camera brightness
adjustment is not affected by the screen brightness
adjustment in Setup.
NOTE:
• When you are in R, only the interface dial works. The
other buttons are locked out.
SYSTEM LIMITATIONS
If you think you found any problems with the navigation
system during the PDI or after installing replacement
parts to repair the system, refer to System Limitations
and Database Limitations in the navigation manual.
This helps you to avoid replacing parts when the issue
may be a system characteristic.
To minimize distractions while driving, always use the
voice control system to operate the navigation system.
Always verify the audio and visual route information by
carefully observing roadway signs, signals, etc. Use
your own good judgment, and obey traffic laws while
driving.
The navigation system has these limitations:
• The GPS (Global Positioning System) satellites used
by the navigation system are operated by the U.S.
Department of Defense. For security reasons,
certain inaccuracies are built into the GPS. This can
cause occasional positioning errors of up to several
hundred feet. If the navigation system indicates your
position incorrectly, wait several seconds until it
corrects itself. The system may also correct itself
after you make a turn or cross a road.
• The routes calculated by the system may not always
be what you consider the most direct ones. Try
different routing methods to obtain the best route.
Even the direction your vehicle is pointing influences
the route calculation.
• Since businesses close or relocate, some
information may be inaccurate. Also, route guidance
may conflict with actual road conditions, such as
street closures, construction, and detours.
• The GPS antenna receives location information from
orbiting satellites. Anything that blocks or interferes
with the signal affects accuracy. The GPS signal can
be blocked or interfered with (vehicle position shown
incorrectly on the map) by:
- Aftermarket metallic window tinting above or to the
sides of the GPS antenna.
- Aftermarket vehicle tracking systems mounted
near the navigation unit or the display.
- Radar detectors, cell phones, or other aftermarket
electronic accessories placed near the navigation
unit or the display.
- Outside electrical interference from overhead
power lines, trolley lines, or broadcast sources.
- Tall trees or buildings near or over the vehicle.
They can cause the system to show the vehicle on
an adjacent street. This should automatically
correct itself when the obstruction is gone.
• If the image is foggy or dirty, clean the rearview
camera lens.
10-053
5 of 6
• In some cases, a city name, road name, or address
may be incorrect or missing from the system. These
are the possible causes:
- The city name may be listed under a larger
metropolitan area or as an unincorporated area.
Try selecting the street name first. If it is a smaller
city in a rural area, only the main road may be
shown.
- If the street name cannot be found, is shown
incorrectly on the map, or is not drawn correctly, it
may be because it is a new road or it is in an
unverified area.
NOTE: See the navigation manual for more
information.
• If the location of your dealership is shown incorrectly
or needs to be changed, report it to your DPSM.
HAWAII SYSTEM SETUP
The navigation system comes with map information for
the entire United States, including Hawaii. Contrary to
previous models, a customer does not need to change
the navigation settings when relocating to or from
Hawaii.
NOTE: XM radio is not available in Hawaii.
TMC (TRAFFIC MESSAGE CHANNEL)
INFORMATION
TMC is available in many metropolitan areas. The
amount and type of coverage varies. Traffic incidents
(diamond-shaped icons) are shown on the screen for
most metropolitan cities. Many of these cities also
display traffic flow, shown as red or orange bands,
alongside major roads or freeways.
INCIDENT ICONS
MAP COVERAGE AREAS
The map database covers the United States, Puerto
Rico, and Canada. The map coverage for the U.S.
contains accurately mapped (verified) metropolitan
areas and less accurate (unverified) rural coverage. In
Canada, the database covers major metropolitan areas
and major roads connecting those metropolitan areas.
For more coverage information, go to
www.hondanavi.com.
Detailed Coverage and Non-Detailed Coverage
Many cities and metropolitan areas are fully mapped
with detailed coverage while rural areas typically have
less accurate, incomplete, or non-verified information.
Refer to the Introduction and Getting Started in the
navigation manual for more information.
For a list of current detailed coverage areas by country
and state/province, refer to the navigation manual, or
go online to www.hondanavi.com. Online, use the pulldown menu to select the Model and the Year, select
Map Coverage, then select Map Coverage Details.
5 mi
SCALES
1/20 mi
TMC traffic uses information broadcast on the FM
band. You must be in or near a traffic-enabled city to
receive coverage of that area. TMC traffic is available
in the 48 contiguous United States and Hawaii.
Go to go to http://automobiles.honda.com/traffic for a
list of metro areas that have TMC.
ORDERING NAVIGATION UPDATE SOFTWARE
Update navigation DVDs can be ordered online at
www.hondanavi.com. Under Find Updates, use the
pull-down menu to select the vehicle Model and Year.
You can also call the Honda Disc Fulfillment Center at
888-549-3798. Both methods require a major credit
card.
6 of 6
10-053