1
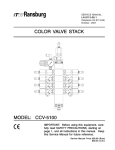
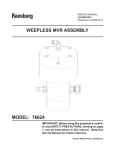
Ransburg SERVICE MANUAL LN-9113-06.3 (Replaces LN-9113-06.2) March - 2013 COLOR VALVE STACK MODEL: CCV-5100 IMPORTANT: Before using this equipment, carefully read SAFETY PRECAUTIONS, starting on page 1, and all instructions in this manual. Keep this Service Manual for future reference. Service Manual Price: $30.00 (U.S.) Color Valve Stack - Safety Ransburg NOTE: This manual has been changed from revision LN-9113-06.2 to revision LN-9113-06.3. Reasons for this change are noted under “Manual Change Summary” page 23 of this manual. LN-9113-06.3 Ransburg Color Valve Stack - Contents CONTENTS PAGE SAFETY: 1-5 SAFETY PRECAUTIONS .......................................................................................................1 HAZARDS / SAFEGUARDS ...................................................................................................2-5 INTRODUCTION: 6-8 DESCRIPTION .......................................................................................................................6 SPECIFICATIONS ..................................................................................................................6 COLOR STACK SELECTION CHART ...................................................................................7 PRE-ENGINEERED COLOR VALVE STACK ASSEMBLIES .................................................8 INSTALLATION: 9-10 INSTALLATION ......................................................................................................................9-10 OPERATION: 11 OPERATION ...........................................................................................................................11 MAINTENANCE: 12-14 MAINTENANCE .....................................................................................................................12-13 TROUBLESHOOTING GUIDE ...............................................................................................14 PARTS IDENTIFICATION: 15-21 COLOR VALVE STACK / PARTS LIST .................................................................................. 15-16 COLOR VALVE STACK ASSEMBLY MODEL IDENTIFICATION .......................................... 17 TABLE A - NUMBER OF COLOR VALVES ........................................................................... 18 TABLE B - AIR PUSH VALVES ............................................................................................. 19 TABLE C - CHECK VALVE OPTIONS ................................................................................... 19 TABLE D - FLUID INLET FITTINGS ...................................................................................... 19 CCV-403-SS CUTAWAY / PARTS LIST ................................................................................. 20-21 ACCESSORIES .................................................................................................................... 21 WARRANTY POLICIES: 22 LIMITED WARRANTY ............................................................................................................22 LN-9113-06.3 Ransburg Color Valve Stack - Safety SAFETY SAFETY PRECAUTIONS Before operating, maintaining or servicing any Ransburg electrostatic coating system, read and understand all of the technical and safety literature for your Ransburg products. This manual contains information that is important for you to know and understand. This information relates to USER SAFETY and PREVENTING EQUIPMENT PROBLEMS. To help you recognize this information, we use the following symbols. Please pay particular attention to these sections. A WARNING! states information to alert you to a situation that might cause serious injury if instructions are not followed. A CAUTION! states information that tells how to prevent damage to equipment or how to avoid a situation that might cause minor injury. A NOTE is information relevant to the procedure in progress. While this manual lists standard specifications and service procedures, some minor deviations may be found between this literature and your equipment. Differences in local codes and plant requirements, material delivery requirements, etc., make such variations inevitable. Compare this manual with your system installation drawings and appropriate Ransburg equipment manuals to reconcile such differences. ! WARNING The user MUST read and be familiar with the Safety Section in this manual and the Ransburg safety literature therein identified. This manual MUST be read and thoroughly understood by ALL personnel who operate, clean or maintain this equipment! Special care should be taken to ensure that the WARNINGS and safety requirements for operating and servicing the equipment are followed. The user should be aware of and adhere to ALL local building and fire codes and ordinances as well as NFPA-33 SAFETY STANDARD, LATEST EDITION, prior to installing, operating, and/or servicing this equipment. ! WARNING The hazards shown on the following pages may occur during the normal use of this equipment. Please read the hazard chart beginning on page 2. Careful study and continued use of this manual will provide a better understanding of the equipment and process, resulting in more efficient operation, longer trouble-free service and faster, easier troubleshooting. If you do not have the manuals and safety literature for your Ransburg system, contact your local Ransburg representative or Ransburg. 1 LN-9113-06.3 Ransburg Color Valve Stack - Safety AREA HAZARD Spray Area Fire Hazard Tells where hazards may occur. Tells what the hazard is. Improper or inadequate operation and maintenance procedures will cause a fire hazard. Protection against inadvertent arcing that is capable of causing fire or explosion is lost if any safety interlocks are disabled during operation. Frequent Power Supply or Controller shutdown indicates a problem in the system requiring correction. SAFEGUARDS Tells how to avoid the hazard. Fire extinguishing equipment must be present in the spray area and tested periodically. Spray areas must be kept clean to prevent the accumulation of combustible residues. Smoking must never be allowed in the spray area. The high voltage supplied to the atomizer must be turned off prior to cleaning, flushing or maintenance. When using solvents for cleaning: •• Those used for equipment flushing should have flash points equal to or higher than those of the coating material. •• Those used for general cleaning must have flash points above 100°F (37.8°C). Spray booth ventilation must be kept at the rates required by NFPA-33, OSHA, country, and local codes. In addition, ventilation must be maintained during cleaning operations using flammable or combustible solvents. Electrostatic arcing must be prevented. Safe sparking distance must be maintained between the parts being coated and the applicator. A distance of 1 inch for every 10KV of output voltage is required at all times. Test only in areas free of combustible material. Testing may require high voltage to be on, but only as instructed. Non-factory replacement parts or unauthorized equipment modifications may cause fire or injury. If used, the key switch bypass is intended for use only during setup operations. Production should never be done with safety interlocks disabled. Never use equipment intended for use in waterborne installations to spray solvent based materials. The paint process and equipment should be set up and operated in accordance with NFPA33, NEC, OSHA, local, country, and European Health and Safety Norms. LN-9113-06.3 2 Ransburg Color Valve Stack - Safety AREA Tells where hazards may occur. Spray Area HAZARD Tells what the hazard is. SAFEGUARDS Tells how to avoid the hazard. Explosion Hazard Improper or inadequate operation and maintenance procedures will cause a fire hazard. Protection against inadvertent arcing that is capable of causing fire or explosion is lost if any safety interlocks are disabled during operation. Frequent Power Supply or Controller shutdown indicates a problem in the system requiring correction. Electrostatic arcing must be prevented. Safe sparking distance must be maintained between the parts being coated and the applicator. A distance of 1 inch for every 10KV of output voltage is required at all times. Unless specifically approved for use in hazardous locations, all electrical equipment must be located outside Class I or II, Division 1 or 2 hazardous areas, in accordance with NFPA-33. Test only in areas free of flammable or combustible materials. The current overload sensitivity (if equipped) MUST be set as described in the corresponding section of the equipment manual. Protection against inadvertent arcing that is capable of causing fire or explosion is lost if the current overload sensitivity is not properly set. Frequent power supply shutdown indicates a problem in the system which requires correction. Always turn the control panel power off prior to flushing, cleaning, or working on spray system equipment. Before turning high voltage on, make sure no objects are within the safe sparking distance. Ensure that the control panel is interlocked with the ventilation system and conveyor in accordance with NFPA-33, EN 50176. Have fire extinguishing equipment readily available and tested periodically. General Use and Maintenance Improper operation or maintenance may create a hazard. Personnel must be given training in accordance with the requirements of NFPA-33, EN 60079-0. Personnel must be properly trained in the use of this equipment. Instructions and safety precautions must be read and understood prior to using this equipment. Comply with appropriate local, state, and national codes governing ventilation, fire protection, operation maintenance, and housekeeping. Reference OSHA, NFPA-33, EN Norms and your insurance company requirements. 3 LN-9113-06.3 Ransburg AREA Tells where hazards may occur. Spray Area / High Voltage Equipment Color Valve Stack - Safety HAZARD Tells what the hazard is. SAFEGUARDS Tells how to avoid the hazard. Electrical Discharge There is a high voltage device that can induce an electrical charge on ungrounded objects which is capable of igniting coating materials. Inadequate grounding will cause a spark hazard. A spark can ignite many coating materials and cause a fire or explosion. Parts being sprayed and operators in the spray area must be properly grounded. Parts being sprayed must be supported on conveyors or hangers that are properly grounded. The resistance between the part and earth ground must not exceed 1 meg ohm. (Refer to NFPA-33.) Operators must be grounded. Rubber soled insulating shoes should not be worn. Grounding straps on wrists or legs may be used to assure adequate ground contact. Operators must not be wearing or carrying any ungrounded metal objects. When using an electrostatic handgun, operators must assure contact with the handle of the applicator via conductive gloves or gloves with the palm section cut out. NOTE: REFER TO NFPA-33 OR SPECIFIC COUNTRY SAFETY CODES REGARDING PROPER OPERATOR GROUNDING. All electrically conductive objects in the spray area, with the exception of those objects required by the process to be at high voltage, must be grounded. Grounded conductive flooring must be provided in the spray area. Always turn off the power supply prior to flushing, cleaning, or working on spray system equipment. Unless specifically approved for use in hazardous locations, all electrical equipment must be located outside Class I or II, Division 1 or 2 hazardous areas, in accordance with NFPA-33. LN-9113-06.3 4 Ransburg Color Valve Stack - Safety AREA Tells where hazards may occur. Electrical Equipment HAZARD Tells what the hazard is. Tells how to avoid the hazard. Electrical Discharge An electrical arc can ignite coating materials and cause a fire or explosion. Unless specifically approved for use in hazardous locations, the power supply, control cabinet, and all other electrical equipment must be located outside Class I or II, Division 1 and 2 hazardous areas in accordance with NFPA-33 and EN 50176. Turn the power supply OFF before working on the equipment. Test only in areas free of flammable or combustible material. Testing may require high voltage to be on, but only as instructed. Production should never be done with the safety circuits disabled. Before turning the high voltage on, make sure no objects are within the sparking distance. Certain material may be harmful if inhaled, or if there is contact with the skin. Follow the requirements of the Material Safety Data Sheet supplied by coating material manufacturer. High voltage equipment is utilized in the process. Arcing in the vicinity of flammable or combustible materials may occur. Personnel are exposed to high voltage during operation and maintenance. Protection against inadvertent arcing that may cause a fire or explosion is lost if safety circuits are disabled during operation. Frequent power supply shutdown indicates a problem in the system which requires correction. Toxic Substances SAFEGUARDS Adequate exhaust must be provided to keep the air free of accumulations of toxic materials. Use a mask or respirator whenever there is a chance of inhaling sprayed materials. The mask must be compatible with the material being sprayed and its concentration. Equipment must be as prescribed by an industrial hygienist or safety expert, and be NIOSH approved. Spray Area Explosion Hazard – Incompatible Materials Halogenated hydrocarbon solvents for example: methylene chloride and 1,1,1,-Trichloroethane are not chemically compatible with the aluminum that might be used in many system components. The chemical reaction caused by these solvents reacting with aluminum can become violent and lead to an equipment explosion. 5 Aluminum is widely used in other spray application equipment - such as material pumps, regulators, triggering valves, etc. Halogenated hydrocarbon solvents must never be used with aluminum equipment during spraying, flushing, or cleaning. Read the label or data sheet for the material you intend to spray. If in doubt as to whether or not a coating or cleaning material is compatible, contact your coating supplier. Any other type of solvent may be used with aluminum equipment. LN-9113-06.3 Ransburg Color Valve Stack - Introductions INTRODUCTION DESCRIPTION SPECIFICATIONS CCV-5100 Color Valve Stack Environmental/Physical The CCV-5100 Color Valve Stack is a manually controlled pneumatic color change valve assembly. The stack allows for up to and including 30 different colors. Color changes are made using CCV-403-SS color change valves. CCV-403-SS Color Valve Stack The CCV-403-SS Color Valve Stack is a pneumatically operated fluid valve designed for use in paint spray application systems. The valve can be used in a variety of other applications. The valve can be used separately for on/off control of paint to a spray atomizer; or, as part of a multi-color manifold assembly where colors can be quickly flushed and changed when a color change is desired. The CCV-403-SS includes a red indicator (visible through holes in the valve body) that can be seen when the valve is turned “on.” All parts that come in contact with the fluid material are made of either stainless steel or that is impervious to most solvents. All other parts of the valve are made of brass, stainless steel, nickel-plated brass, or hard coated (anodized) aluminum. The valve is constructed with a smooth, unobstructed fluid path that allows for faster flush cleaning, and also less pressure restriction. The valve body has two fluid inlet ports that allow fluid to circulate through the valve on a continuous basis. A plug is provided when this feature is not to be used. The double inlet ports also allow two valves to be used as a fluid on/off control and dump system. Nominal Dimensions: See “Color Valve Stack Figure” in the “Parts Identification” section. Mechanical Air Requirements: 70-100 psig (4.8-6.9 bar) Operating Pressure Air Inlet/Outlet Connections: 1/4-inch OD Tubing Fluid Pressure: 300 psig (20.6 bar) maximum Fluid Inlet: 1/4-inch NPT(F) X 2 port (Fitting installed 3/8inch OD tubing) Fluid Outlet: 1/4-inch NPT(F) X 1 port (Fitting installed 3/8- inch OD tubing) Fluid Flow Capacity: 3800 cc/min @ 47 psi pressure drop (Paint viscosity @ 700 entipoise)Varies according to material pressure and viscosity. Valve Actuation Speed, On-Off Cyle: 55 cycles/min Colors: Up to and including 30 colors total. * If CCV valve is used for “Air Push” air leakage may occur if pressure is excessive. LN-9113-06.3 6 Ransburg Color Valve Stack - Introductions COLOR VALVE STACK SELECTION CHART Identification No. CCV51 - XX X X X Color Stack Assembly Number of Color Valves Fluid Inlet Fittings 0 = No Fittings Required 1 = Elbows Only 2 = Tee Only Air Push Valves Check Valves 0 = No Air Push Assembly 1 = One Air Push Assembly 2 = Two Air Push Assemblies 0 = No Check Valves 1 = Check Valves On All Color Valves Note: Includes check valve, regulator, and gauge. 7 LN-9113-06.3 Ransburg Color Valve Stack - Introductions PRE-ENGINEERED COLOR VALVE STACK ASSEMBLIES The following is for “Pre-Engineered Color Valve Stack Assemblies”. Please reference “Color Valve Stack Selection Chart” for the stack assembly number. Part Number CCV-51XX-XXX identifies the configuration of the stack assembly. (CCV-51)XX-XXX - Color Stack Assembly Includes the top block and solvent valve. The solvent valve is always supplied with a check valve and a 3/8-inch ODT stainless steel female elbow for fluid inlet. CCV-51XX-X(X)X - Check Valves (Selection 0, 1). This number indicates whether check valves are supplied on the paint inlet valves. Check valves are used to prevent materials from contaminating each other in the event that two valves would be opened at the same time. NOTE: Check valves will always be supplied on solvent and air valves, regardless of selection made here. CCV-51XX-XX(X) - Fluid Inlet Fittings CCV-51(XX)-XXX - Number of Color Valves (Selection 0, 1, 2). This number indicates whether no fitting, elbows, or tees are supplied for the fluid inlet to the color valves. Elbows are typically utilized for fluid inlet. Tees are used for circulating the paint at the color valve. The elbows and tees are stainless steel and accept a 1/4-inch OD fluid line. CCV-51XX-(X)XX - Air Push Valves All valves are supplied with a brass push style, swivel elbow for the air pilot. This fitting accepts a 1/4-inch OD tube. (Selection 00-30). These two numbers indicate the number of valves required for paint inlet to the stack assembly. (Selection 0, 1, 2). This number indicates the number of “air push” valves required. Each valve is supplied with a check valve, gauge, regulator, and 3/8-inch ODT brass push style fitting for air inlet. The air push is used to push out residual paint in the fluid supply line. This air is also pulsed on and off with the solvent to create a scrubbing action. In the event that two different pressures are required, two air push valves can be supplied. LN-9113-06.3 8 Ransburg Color Valve Stack - Installation INSTALLATION The CCV-403-SS valve mounted at this position is used for solvent flushing of the manifold assembly. Connect the solvent feed line to this valve. (Check valve is always used on input port of CCV). NOTE: Check valves are always used on input ports of Air Push and Solvent CCV’s They are optional for Color CCV’s. GA-338 Gauge HAR-503-1 Air Regulator SS-10022* Cap Screw (4) required CCV-17-SS End Valve Manifold Block 23165-430* O-Ring (not shown) Fluid Inlets - Fittings must be specified on Standard Stacks. Tee fittings (SSP6810, 3/8” Male Branch Tee) or 3/8” Elbows (SSP-6435) may be used. Plug opposite port with SSP-1421 Pipe Plug if necessary. The CCV-403-SS valve mounted at this position is used for air push of the manifold assembly. Connect the main air line to the regulator. (Check valve is always used on input port of CCV.) Use nylon tubing for all fluid lines, 1/4” O.D. or larger. Do not use polyethylene for fluid. CCV-16-SS Manifold Block CCV-18-SS Open Manifold End Cap SSF-6504* Threaded rod - 4 required. Cut to proper length at assembly. LSFI0033 Adapter SS-655-ZN* Nut - 4 required. (tighten to 110-130 in lbs) C C V- 3 7 M a n i f o l d Mounting Bracket - 2 required * Included in KK-4901 Manifold Assembly Kit. Figure 1: Typical Color Change Stack 9 LN-9113-06.3 Ransburg Color Valve Stack - Installation CCV-36-SS Separator Plate CCV-18-SS Open Manifold End Cap LSFI0033 Adapter Figure 2: Two Valve Manifold Assembly Figure 3 shows the four manifold blocks that can be used in a manifold system. In additon, CCV36-SS separator plate (Figure 2) can also be used. In Figure 4, shown by the block inlets/outlets, are numbers indicating hardware to be installed at these locations. T`he dotted lines indicate the path of the mounting studs which hold the blocks in place. The o-ring slots are shown (o-rings are not included on CCV-18-SS). O-rings are included in KK-4901 Manifold Assembly Kit. KK-4901 Manifold Assembly Kit 41-FTC-1002 Adapter CCV-38-SS Manifold Divider Block Figure 3: Manifold Divider Block CCV-17-SS End Valve Manifold Block CCV-38-SS Manifold Divider Block 1 or 2 3 1 or 2 3 1 or 2 1 or 2 1 or 2 CCV-16-SS Manifold Block 1 or 2 The kit includes threaded rod, lockwashers, nuts, two (2) mounting brackets, and twelve (12) o-rings which will allow assembly. A spanner tool, part CCV-7, is also included in this kit. This tool inserts into any one of the holes in the spanner nut and is used to tighten or loosen the nut. This is convenient in close clearances where a wrench may not fit. NOTE > Tighten CCV-403-SS valve assembly and KK-4370 plug kit (when used) to manifold using 132-156 lbs•in torque. Do Not Over-Tighten. Use a good quality pipe sealant on all threads of air and fluid connections. Do not use sealant or tape on CCV-403-SS valve when assembling to manifold. CCV-18-SS Open Manifold End Cap 1 = CCV-403-SS = Valve Assembly 2 = KK-4370 = Plug Kit 3 = LSFI0033 = Adapter Figure 4: Available Manifold Blocks LN-9113-06.3 10 Ransburg Color Valve Stack - Operation OPERATION Installation and Operation Overview NOTES The coating material is supplied from the users pressurized system that may be a pressure tank, paint circulating system or other suitable pressure paint supply system. 3/8-inch OD fluid tubing is connected between the users paint supply and the CCV. An air signal supplied to the CCV activates the paint being delivered to the applicator. ! CAUTION > CCV Valve must be supported while tightening the tube fittings to prevent damage to the valve seats, or remove the valve before tightening the fluid inlet fittings. > Circulation system lines must have a flexible connection between the “hard piping” and the valve. 11 LN-9113-06.3 Ransburg Color Valve Stack - Maintenance MAINTENANCE Cleaning The valve and associated parts through which fluid passes should be cleaned after use by flushing with an appropriate solvent. While flushing, the valve should be triggered several times in order to flush particles from the seat and stem seal areas. NOTE > The stem should be held steady while the nut is rotated. Rotating the stem can scratch the stem finish causing premature valve needle seal wear and valve leakage. Wear Parts Wear parts include the poppet seat, stem, valve needle seal, and piston cup. All of these parts are except for the stem that is stainless steel. Wear parts should be inspected and replaced on a regular maintenance schedule. The frequency of replacement depends upon cycle rate and material abrasiveness. Valves should be inspected after six months usage. If any parts are worn, or if paint leakage is evident, replace all wear parts with Valve Repair Kit KK-4841. Valve Removal 1. Disconnect air and fluid lines from valve. 2. Insert the Spanner Tool (CCV-7) into one of the holes in the spanner nut and rotate counterclockwise (as viewed from the rear air inlet fitting in valve). If the Spanner Tool is not available, a 1-1/6-inch open-end wrench can also be used to loosen the spanner nut. CCV-403-SS Valve Disassembly 1. Remove valve cap (CCV-43) from valve body. Hold hex valve body with 1-1/16” wrench while turning cap counter-clockwise with a 1-1/8-inch wrench. 2. Place 7/16-inch socket on clamping nut (CCV45), and insert a 9/32-inch socket onto the end of the stem at opposite end of valve (Note: Older style valves used a Phillips screwdriver slot on the end of the stem. Use a Phillips screwdriver in place of nut driver). Rotate the socket counterclockwise until the clamping nut is free from the stem. LN-9113-06.3 3. The piston cup (VA-246) is held onto the clamping nut by a brass nut (CCV-3), which has an 11/16-inch hex. Use a 7/16” hex socket and an 11/16-inch wrench to disassemble the nut from the clamping nut so that the piston cup can be removed. 4. The valve indicator (CCV-42) and piston spring (CCV-41-K2) will be free and can be removed when the clamping nut is off the stem. 5. The stem can now be pulled from the front of the valve body. After the stem is removed, reach into the rear of the valve body and pull out the spring washer (CCV-4) and the needle seal (CCV8). The poppet seal (CCV-40) that is behind the stem seat can be removed from the body after the stem is removed. Valve Reassembly Reassemble the CCV-403-SS valve in reverse order, but follow these additional instructions: 1. Use adhesive (medium strength, adhesive grade #242) on the threads of the clamping nut (2) and stem (13) as shown on the parts breakdown in Figure 6. 2. With stem fully inserted into assembly, tighten the clamping nut onto the stem and torque to 12 Ransburg Color Valve Stack - Maintenance specifications shown in “CCV-403-SS Cutaway Parts List Note” in the “Parts Identification” section. Do not rotate the stem during assembly. 3. Apply a thin film of lubricant (light grease type) to the valve cap bore and cup as shown in “Figure 6” in the “Parts Identification” section. Tighten the valve cap to the torque specification shown “CCV-403-SS Cutaway Parts List Note” in the “Parts Identification” section. NOTES NOTE > Make sure all seating surfaces of the stem, poppet seat, needle seal, and cup are clean and free of nicks and scratches to prevent leakage. Manifold Reassembly 1. When reinstalling the CCV-403-SS back into the manifold block or valve adapter, torque the spanner nut to 132-156 lbs•in. Do not over-tighten. 2. If the manifold blocks are disassembled, do not reuse o-ring 23165-430 which goes between each block. Replace with new o-rings. Reusing the old o-rings may cause leakage. 3. Torque the four SS-655-ZN nuts (which hold the manifold blocks together) to 110-130 lbs•in. 4. When reinstalling air and fluid connections, use a good quality pipe sealant on the threads. However, do not use sealant or tape on the spanner nut threads when installing the CCV-403-SS valve into the manifold block or valve adapter. 13 LN-9113-06.3 Ransburg Color Valve Stack - Maintenance TROUBLESHOOTING GUIDE General Problem Possible Cause Solution 1. No main supply air 1. Turn supply air on. 2. 2. Reconnect paint. DELIVERY Fluid No paint connected to CCV 3. Paint not pressurized 3. Check users supply. 1. No main supply air 1. Turn supply air On. 2. Loose connection 2. Tighten connections. 1. Hole in tubing 1. Replace worn tubing. 2. Loose connections 2. Tighten connections. 1. Loose connection 1. Tighten connections. 2. Worn fluid tubing 2. Replace worn fluid tubing. Air 1. Insufficient supply air 1. Check air regulator. Fluid 1. Low supply pressure 1. Increase supply pressure. 2. Clogged or obstructed fluid lines 2. Clean or replace. 3. Clogged or obstructed CCV stack 3. Clean as required. Air (to CCV) LEAKAGE Air Fluid DEFICIENT DELIVERY LN-9113-06.3 14 Color Valve Stack - Parts Identification Ransburg PARTS IDENTIFICATION Figure 5: Color Valve Stack 15 LN-9113-06.3 Ransburg Color Valve Stack - Parts Identification COLOR VALVE STACK - PARTS LIST (Figure 5) Item # Part # 1 CCV-17-SS 2 CCV-16-SS 3 CCV-18-SS 4 CCV-403-SS 5 CCV-37 6 SS-10022 7 SSF-6504 8 SS-655-ZN 9 SS-1505-CD 10 SSP-1421 11 Table B - “K” 12 SSP-6427 13---- 14---- 15 SSV-809 1623165-430 17---- 18 SSP-6443 19 LSFI0033-00 20 KK-4370 21 SSP-6810 22 SSP-6435 23 SSP-6812 24---- 25 CCV-7 26 LN-9100-00 27 A11846-00 LN-9113-06.3 Description Qty. Manifold Block 1 Manifold Block 1 Manifold Block 1 Color Valve Assembly Table A - “H” Bracket2 Cap Screw 4 Threaded Rod (Cut to suit) Table A - “G” Hex Nut 4 Lockwasher4 Pipe Plug (Included with valve assemblies) Ref. Air Push Assembly 1 Male, Swivel Elbow Table A - “H” ----------Check Valve, 1/4” NPT, MBE, Solventborne Table C - “J” O-Ring Table A - “L” -----Female Elbow, 3/8” ODT X 1/4” NPT, SS Table D - “M” Connector, 3/8” ODT X 3/8” AN, SS 1 Plug Kit Table A - “E” Male Tee, 3/8” ODT X 1/4” NPT, SS Table D - “N” Male Elbow, 3/8” ODT X 1/4” NPT, SS Table D - “O” Female Tee, 3/8” ODT X 1/4” NPT, SS Table D - “P” -----Valve Tool (Included but not shown) 1 Literature (Included but not shown) 1 Caution Tag (Included but not shown) 1 16 Ransburg Color Valve Stack - Parts Identification COLOR VALVE STACK ASSEMBLY MODEL IDENTIFICATION When ordering, use CCV-51AA-BCD as indicated by Tables A thru D.Three characters must follow the basic part number: Model No. CCV-51 02 2 1 2 Basic Part Number # of Color Valves Air Push Valves 17 Table A Table B Table D Table C Fluid Inlet Fittings Check Valve Options LN-9113-06.3 Ransburg Color Valve Stack - Parts Identification Table “A” - Number of Color Valves Dash # Description “E” “F” “G” x(4) “H” “L” 0 3” 1 1 00 No Color 0 01 One Color 1 0 3” 2 1 02 Two Color 0 0 3” 3 1 03 Three Color 1 1 4-3/8” 4 2 04 Four Color 0 1 4-3/8” 5 2 05 Five Color 1 2 5-3/4” 6 3 06 Six Color 0 2 5-3/4” 7 3 07 Seven Color 1 3 7-1/8” 8 4 08 Eight Color 0 3 7-1/8” 9 4 09 Nine Color 1 4 8-1/2” 10 5 10 Ten Color 0 4 8-1/2” 11 5 11 Eleven Color 1 5 9-7/8” 12 6 12 Twelve Color 0 5 9-7/8” 13 6 13 Thirteen Color 1 6 11-1/4” 14 7 14 Fourteen Color 0 6 11-1/4” 15 7 15 Fifteen Color 1 7 12-5/8” 16 8 16 Sixteen Color 0 7 12-5/8” 17 8 17 Seventeen Color 1 8 14” 18 9 18 Eightteen Color 0 8 14” 19 9 19 Nineteen Color 1 9 15-3/8” 20 10 20 Twenty Color 0 9 15-3/8” 21 10 21 Twenty-One Color 1 10 16-3/4” 22 11 22 Twenty-Two Color 0 10 16-3/4” 23 11 23 Twenty-Three Color 1 11 18-1/8” 24 12 24 Twenty-Four Color 0 11 18-1/8” 25 12 25 Twenty-Five Color 1 12 19-1/2” 26 13 26 Twenty-Six Color 0 12 19-1/2” 27 13 27 Twenty-Seven Color 1 13 20-7/8” 28 14 28 Twenty-Eight Color 0 13 20-7/8” 29 14 29 Twenty-Nine Color 1 14 22-1/4” 30 15 30 Thirty Color 0 14 22-1/4” 31 15 LN-9113-06.3 18 Ransburg Color Valve Stack - Parts Identification Table B - Air Push Valves Dash # Description “K” 0 No Air Push Assembly -- 1 One Air Push Assembly 79309-01 2 Two Air Push Assemblies 79309-02 Table C - Check Valve Options Dash # 0 1 “J” Description “R” “S” “U” “T” Table A-“H” Table A-“H” No Check Valves On Color Valves 0 1 0 0 Check Valves On All Color Valves Table A-“H” Table A-“H” 0 Table A-“H” Table D- Fluid Inlet Fittings Dash # 0 1 2 19 Description No Fittings Elbows Only Tees Only “M” “N” “O” “P” 0 Table C-“R” 0 0 0 Table C-“T” 0 Table C-“S” 0 0 0 Table C-”U” LN-9113-06.3 Ransburg Color Valve Stack - Parts Identification Figure 6: CCV-403-SS Cutaway LN-9113-06.3 20 Color Valve Stack - Parts Identification Ransburg CCV-403-SS CUTAWAY - PARTS LIST (Figure 6) Item # Part # 1 ---- 2 CCV-45 3 VA-246 4CCV-3 5 CCV-41-K2 6 CCV-4 7 CCV-8-K2 8 ---- 9 CCV-13 10 CCV-44 11 SST-8436-K5 12 CCV-40-K2 13 CCV-39 14 SSP-1421 15 CCV-15-SS 16 CCV-42 17 CCV-43 18 ---- 19 ---- -- CCV-7 Description Air Inlet, 1/8” NPT (F) Clamping Nut * Cup * Nut Spring Kit Spring Washer Valve Needle Seal Kit * Fluid Inlet (2 ports), 1/4” NPT (F) Spanner Nut Ring Retainer Retaining Ring Kit Poppet Seat Kit * Stem (Order KK-4841) * Pipe Plug (Shipped loose with valve) (Not used if material is recirculated) Valve Body Valve Indicator Valve Cap Use adhesive (Medium Strength, Grade #242) on threads - 2 places Apply a thin film of lubricant (light grease) to bore and cup at assembly. Spanner Tool (Not Shown) * Supplied in Repair Kit KK-4841. Note: Tighten CCV-45 to CCV-3 with VA-246 in between, using 12-18 lbs.•in torque. Tighten CCV-45, CCV-3, VA-246 assembly to CCV-39 using 3 lbs•in torque maximum (finger tight). Do Not Over-Tighten. ACCESSORIES Part # KK-4901 21 Description Paint Manifold Assembly Kit LN-9113-06.3 Ransburg Color Valve Stack - Warranty Policies WARRANTY POLICIES LIMITED WARRANTY Ransburg will replace or repair without charge any part and/or equipment that falls within the specified time (see below) because of faulty workmanship or material, provided that the equipment has been used and maintained in accordance with Ransburg’s written safety and operating instructions, and has been used under normal operating conditions. Normal wear items are excluded. THE USE OF OTHER THAN RANSBURG APPROVED PARTS, VOID ALL WARRANTIES. SPARE PARTS: One hundred and eighty (180) days from date of purchase, except for rebuilt parts (any part number ending in “R”) for which the warranty period is ninety (90) days. EQUIPMENT: When purchased as a complete unit, (i.e., guns, power supplies, control units, etc.), is one (1) year from date of purchase. WRAPPING THE APPLICATOR IN PLASTIC, ASSOCIATED VALVES AND TUBING, AND SUPPORTING HARDWARE IN PLASTIC, SHRINK-WRAP, OR ANY OTHER NON-APPROVED COVERING, WILL VOIDE THIS WARRANTY. LN-9113-06.3 RANSBURG’S ONLY OBLIGATION UNDER THIS WARRANTY IS TO REPLACE PARTS THAT HAVE FAILED BECAUSE OF FAULTY WORKMANSHIP OR MATERIALS. THERE ARE NO IMPLIED WARRANTIES NOR WARRANTIES OF EITHER MERCHANTABILITY OR FITNESS FOR A PARTICULAR PURPOSE. RANSBURG ASSUMES NO LIABILITY FOR INJURY, DAMAGE TO PROPERTY OR FOR CONSEQUENTIAL DAMAGES FOR LOSS OF GOODWILL OR PRODUCTION OR INCOME, WHICH RESULT FROM USE OR MISUSE OF THE EQUIPMENT BY PURCHASER OR OTHERS. EXCLUSIONS: If, in Ransburg’s opinion the warranty item in question, or other items damaged by this part was improperly installed, operated or maintained, Ransburg will assume no responsibility for repair or replacement of the item or items. The purchaser, therefore will assume all responsibility for any cost of repair or replacement and service related costs if applicable. 22 Color Valve Stack - Manual Change Ransburg MANUAL CHANGE SUMMARY This manual was published to supercede Service Manuals LN-9113-06.2 Color Valve Stack to make the following changes: 1. Change logo. 23 LN-9113-06.3 Service Manual Price: $30.00 (U.S.) Manufacturing 1910 North Wayne Street Angola, Indiana 46703-9100 Telephone: 260/665-8800 Fax: 260/665-8516 Technical/Service Assistance Telephone: 800/ 233-3366 Fax: 419/ 470-2071 www.ransburg.com Technical Support Representative will direct you to the appropriate telephone number for ordering Spare Parts. © 2013 Ransburg. All rights reserved. Models and specifications subject to change without notice. Form No. LN-9113-06.3 Litho in U.S.A. 03/13