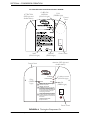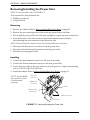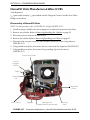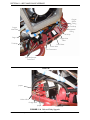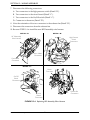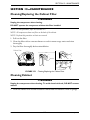
1
Service Manual
HomeFill® II AW
Compressor
NOTE: Compressor shown without cylinder attached.
DEALER: Keep this manual. The
procedures in this manual MUST be
performed by a qualified technician.
For more information regarding
Invacare products, parts, and services,
please visit www.invacare.com
REFERENCE DOCUMENTS
WARNING
THE PROCEDURES IN THIS SERVICE MANUAL MUST BE
PERFORMED BY A QUALIFIED TECHNICIAN.
DO NOT use this product or any available optional equipment without
first completely reading and understanding these instructions and any
additional instructional material such as owner’s manuals, service
manuals or instruction sheets supplied with this product or optional
equipment. If you are unable to understand the warnings, cautions or
instructions, contact a healthcare professional, dealer or technical
personnel before attempting to use this equipment - otherwise, injury
or damage may occur.
REFERENCE DOCUMENTS
Refer to the following table for part numbers of additional documents which are referenced in this manual.
MANUAL
PART NUMBER
LANGUAGES*
HomeFill AW Compressor Owner’s Manual
1116444
English
1145804
Northern
1145805
Southern
1145806
Scandinavian
1134866
English
1141491
Northern
1141492
Southern
1141493
Scandinavian
1118396
English
Platinum Concentrator Owner’s Manual
Platinum Concentrator Service Manual
*NOTE: Northern languages include English, Czech, French, German, Italian and Polish. Southern languages include English, Dutch, French, Greek, Italian, Portuguese and Spanish. Scandinavian languages include English, Danish, Finnish, Norwegian and Swedish.
NOTE: Updated versions of this manual are available on www.invacare.com.
HomeFill® II AW Compressor
2
Part No 1154316
TABLE OF CONTENTS
TABLE OF CONTENTS
REFERENCE DOCUMENTS ................................................................. 2
SPECIAL NOTES ................................................................................ 6
TYPICAL PRODUCT PARAMETERS .................................................... 7
LABEL LOCATION ............................................................................ 8
SECTION 1—GENERAL GUIDELINES ................................................... 9
Operating Information...............................................................................................................................9
Handling ......................................................................................................................................................10
Maintenance ...............................................................................................................................................10
Radio Frequency Interference ...............................................................................................................10
To Reduce the Risk of Burns, Electrocution, Fire or Injury to Persons......................................11
SECTION 2— CONCENTRATOR VERIFICATION AND MAINTENANCE 12
Performance Verification ........................................................................................................................12
Connecting the Compressor to the Concentrator..........................................................................12
SECTION 3—CHECKLIST AND CYLINDER INSPECTION ..................... 14
Compressor Operation Checklist........................................................................................................14
Cylinder Prefill Inspection ......................................................................................................................14
Hydrostatic Testing Date...................................................................................................................14
External Examination ..........................................................................................................................15
SECTION 4—COMPRESSOR OPERATION .......................................... 17
Connecting/Disconnecting Cylinder to/from Compressor ............................................................17
Connecting the Cylinder to the Compressor...............................................................................17
Disconnecting Cylinder From Compressor ..................................................................................19
Turning the Compressor On.................................................................................................................20
SECTION 5—CABINET ASSEMBLY .................................................... 23
Removing/Installing the Cabinet............................................................................................................23
Removing ...............................................................................................................................................23
Installing..................................................................................................................................................23
Removing/Installing the Cabinet Filter Grid .......................................................................................24
Removing ...............................................................................................................................................24
Installing..................................................................................................................................................24
Replacing Non-Skid Adhesive Back Pad ..............................................................................................25
Replacing Foam Gasket ...........................................................................................................................25
Part No 1154316
3
HomeFill® II AW Compressor
TABLE OF CONTENTS
TABLE OF CONTENTS
SECTION 6—PANEL ASSEMBLY ....................................................... 26
Replacing Exhaust Fan..............................................................................................................................26
Removing/Installing Control Panel........................................................................................................27
Installing ......................................................................................................................................................27
Testing/Replacing the Power Switch ....................................................................................................29
Replacing Circuit Board ..........................................................................................................................30
Replacing Accumulator Assembly.........................................................................................................31
SECTION 7—BASE COMPONENTS .................................................... 33
Replacing Fuse ...........................................................................................................................................33
Removing/Installing the Power Inlet.....................................................................................................34
Removing ...............................................................................................................................................34
Installing..................................................................................................................................................34
Replacing Hour Meter .............................................................................................................................35
Replacing O2 Inlet Connector/Inlet Connector Dust Cap.............................................................35
Replacing Transformer ............................................................................................................................36
Testing/Replacing Capacitor...................................................................................................................37
Testing ....................................................................................................................................................37
Replacing Capacitor.............................................................................................................................38
Removing Connector Fillport Dust Cover and Lanyard - Units Manufactured Before
10/03/2005 .................................................................................................................................................39
Removing ...............................................................................................................................................39
Removing/Installing Connector Fillport Dust Cover and Lanyard - Units Manufactured After
10/02/2005 .................................................................................................................................................40
Replacing the High Pressure Switch.....................................................................................................41
Replacing Burst Disk Fitting ...................................................................................................................42
SECTION 8—BASE REPLACEMENT ................................................... 44
Disassembly................................................................................................................................................44
Reassembly.................................................................................................................................................50
SECTION 9—MOTOR REPLACEMENT ON HOMEFILL UNITS MADE ON OR
AFTER 8/1/05 ................................................................................. 52
Disassembly ...........................................................................................................................................52
Reassembly ............................................................................................................................................57
HomeFill® II AW Compressor
4
Part No 1154316
TABLE OF CONTENTS
TABLE OF CONTENTS
SECTION 10—COMPRESSOR REPLACEMENT .................................... 59
HomeFill Units Manufactured Before 8/1/05 .....................................................................................59
Disassembly ...........................................................................................................................................59
Assembly of New Motor/Pump Assembly .....................................................................................64
Reassembly ............................................................................................................................................66
HomeFill Units Manufactured After 8/1/05........................................................................................68
Disassembly of HomeFill Units .........................................................................................................68
Reassembly of HomeFill Units ..........................................................................................................73
SECTION 11—BELT AND PULLEY UPGRADE ..................................... 75
Disassembly................................................................................................................................................75
Reassembly.................................................................................................................................................81
SECTION 12—TIMING BELT REPLACEMENT ..................................... 84
Disassembly................................................................................................................................................84
Reassembly.................................................................................................................................................89
SECTION 13—WIRING ASSEMBLIES .................................................. 91
Replacing Wiring Assemblies .................................................................................................................91
Full View of Wiring Harnesses .........................................................................................................91
Replacing Transformer Assembly.....................................................................................................91
Replacing Bleed Resistor Assemblies ..............................................................................................92
Replacing HFII Assembly Wire Harness .........................................................................................93
SECTION 14—TROUBLESHOOTING/CYLINDER FILL TIMES ................. 95
Indicator Light Explanation.....................................................................................................................95
Troubleshooting........................................................................................................................................95
Cylinder Fill Times ...................................................................................................................................97
Leak Test ....................................................................................................................................................97
Cylinder Fill Test ......................................................................................................................................98
HomeFill 2000 psi Switch/P.C.B. Shut Down Test ........................................................................ 101
SECTION 15—MAINTENANCE ....................................................... 103
Cleaning/Replacing the Cabinet Filter............................................................................................... 103
Cleaning Cabinet.................................................................................................................................... 103
Verification Process - Invacare HomeFill Compressor ................................................................ 104
Function Test.......................................................................................................................................... 104
Verification Process - Invacare HomeFill Cylinder ........................................................................ 105
Function Test.......................................................................................................................................... 106
LIMITED WARRANTY ................................................................... 107
Part No 1154316
5
HomeFill® II AW Compressor
SPECIAL NOTES
SPECIAL NOTES
Signal words are used in this manual and apply to hazards or unsafe practices which could result in personal injury or property damage. Refer to the table below for definitions of the signal words.
SIGNAL WORD
MEANING
DANGER
Danger indicates an imminently hazardous situation which,
if not avoided, will result in death or serious injury.
WARNING
Warning indicates a potentially hazardous situation which, if
not avoided, could result in death or serious injury.
CAUTION
Caution indicates a potentially hazardous situation which, if
not avoided, may result in property damage or minor injury
or both.
NOTICE
THE INFORMATION CONTAINED IN THIS DOCUMENT IS SUBJECT TO
CHANGE WITHOUT NOTICE.
DANGER
DO NOT SMOKE while using this device. Keep all matches, lit cigarettes or other
sources of ignition out of the room in which this product is located and away from
where oxygen is being delivered.
NO SMOKING signs should be prominently displayed. Textiles and other materials
that normally would not burn are easily ignited and burn with great intensity in
oxygen enriched air. Failure to observe this warning can result in severe fire,
property damage and cause physical injury or death.
ACCESSORIES WARNING
Invacare products are specifically designed and manufactured for use in conjunction
with Invacare accessories. Accessories designed by other manufacturers have not
been tested by Invacare and are not recommended for use with Invacare products.
HomeFill® II AW Compressor
6
Part No 1154316
TYPICAL PRODUCT PARAMETERS
TYPICAL PRODUCT PARAMETERS
Regulatory Listing:
EN/IEC 60601-1
Alternating Current
Type BF equipment
Unit running
Unit not running
Attention - Consider Accompanying Documents
DO NOT smoke
Class II, Double Insulation
TYPICAL PRODUCT PARAMETERS - COMPRESSOR
Operating temperature:
50 to 95° F (10 to 35° C) @ 20 to 60% non-condensing humidity
Storage temperature:
-10 to 150° F (-23 to 65° C) @ 15 to 95% humidity
Input Pressure Required:
14 - 21 PSI (96.5-144.7 kPa)
Input Flow Required:
2 L/min
Input O2% Required:
>90% O2
Width:
20 ¼ inches (51.44 cm)
Height:
15 inches (38.1 cm)
Depth:
16 inches (40.64 cm)
Weight:
33 lbs (14.97 kg)
Shipping Weight:
39 lbs (17.69 kg)
CONSERVER/REGULATOR SPECIFICATIONS
Oxygen Output
Part No 1154316
Settings 1 - 5 L/min pulse
2 L/min. continuous
7
HomeFill® II AW Compressor
LABEL LOCATION
LABEL LOCATION
NOTE: Compressor shown without cylinder attached.
LABEL PART NUMBER
LANGUAGE
1148080
English
1148081
Spanish
1148082
French
1148083
German
1148084
Portuguese
1148085
Norwegian
1148086
Finnish
1148087
Danish
1148088
Italian
1148089
Polish
1148090
Czech
1148091
Greek
1148092
Dutch
1148093
Swedish
HomeFill® II AW Compressor
8
Part No 1154316
SECTION 1—GENERAL GUIDELINES
SECTION 1—GENERAL GUIDELINES
WARNING
SECTION 1 - GENERAL GUIDELINES contains important information for the safe
operation and use of this product.
In order to ensure the safe installation, assembly, and operation of the HomeFill Compressor, these instructions MUST be followed.
CAUTION
“Caution: Federal law restricts this device to sale or rental by or on order of a physician, or any other practitioner licensed by the law of the State in which he/she practices to use or order the use of this device.”
Operating Information
The use of this device is limited to the oxygen patient. Cylinders MUST be used only by the oxygen patient and are not to be distributed to any other individual for any purpose.
The use of oxygen therapy requires that special care be taken to reduce the risk of fire. Any materials that will burn in air, and some that will not, are easily ignited and burn rapidly in high concentrations of oxygen. For safety concerns, keep all sources of ignition out of the room in which this product is located and away from areas where oxygen is being delivered. Textiles, oil and other combustibles are easily ignited and will burn with great intensity in oxygen‐enriched air. NO SMOKING signs should be prominently displayed.
A spontaneous and violent ignition may occur if oil, grease or greasy substances come in contact with oxygen under pressure. These substances MUST be kept away from the oxygen concentrator, tubing and connections, and all other oxygen equipment. DO NOT use any lubricants unless recommended by Invacare.
DO NOT allow oil from your hands or other sources to come into contact with the compressor coupling or bottle fittings. These substances may become flammable in the presence of oxygen and cause injury. Avoid touching the bottle fitting whenever possible. Example of items to avoid are hand creams or lotions, cooking oils, suntan oils or sunblocks and similar oily products. If you use these types of products, wash your hands prior to using the HomeFill unit. If the bottle fitting should come in contact with such substances it should be cleaned off with a damp cloth prior to connecting it to the compressor.
NEVER oil or lubricate the compressor coupler or bottle fittings. NEVER use any penetrating oil or lubricant. If connection difficulty is experienced verify that the bottle fitting is being inserted straight down into the compressor coupler. If continued difficulty is experienced contact your supplier for assistance.
The HomeFill is equipped with a High Pressure Relief Valve to ensure the user’s safety. When activated, this safety feature will make an extremely loud noise. If this noise occurs, turn the unit Off. DO NOT use. Service unit before use. Refer to Replacing Burst Disk Fitting on page 42.
Part No 1154316
9
HomeFill® II AW Compressor
SECTION 1—GENERAL GUIDELINES
Before moving or repositioning either the compressor or the concentrator, ALWAYS disconnect the AC power cords and the interconnect hose between the compressor and concentrator. Failure to do so may result in damage to the unit or personal injury.
Keep the oxygen tubing, cord, and unit away from heated or hot surfaces, including space heaters, electric blankets, stoves and similar electrical appliances. NEVER drop or insert any object into any opening.
NEVER block the air openings of the product or place it on a soft surface, such as a bed or couch, where the air opening may be blocked. Keep the openings free from lint, hair and the like.
NEVER use near any type of flame or flammable/explosive substances, vapors or atmosphere.
ALWAYS keep hands and fingers clear of moving parts to avoid injury.
If the compressor has a damaged cord or plug, if it is not working properly, if it has been dropped or damaged, or submersed in water, call a qualified technician for examination and repair.
If any leakage of the oxygen cylinder is detected, DO NOT attempt to use the cylinder. Turn the flow selector knob on the regulator to “Off”. If leakage persists, place the cylinder outdoors and notify your Home Health Care Provider or Service Representative of this condition.
Handling
Use extreme care when handling and filling an oxygen cylinder. Full oxygen cylinders are under pressure and can become projectiles if dropped or mishandled.
NEVER transport a compressor with a cylinder connected to or stored on the compressor. Otherwise, injury or damage can occur.
DO NOT store filled oxygen bottles near a furnace, hot water tank, in the trunk of a car or other high temperature area. Storage in areas such as this can result in bursting of the bottle or fire.
Maintenance
The HomeFill compressor was specifically designed to minimize routine preventive maintenance. Only professionals of the healthcare field or persons fully conversant with this process, such as authorized or factory trained personnel, should perform preventive maintenance or performance adjustments on the compressor.
Radio Frequency Interference
Most electronic equipment is influenced by Radio Frequency Interference (RFI). CAUTION should be exercised with regard to the use of portable communications equipment in the area around such equipment.
HomeFill® II AW Compressor
10
Part No 1154316
SECTION 1—GENERAL GUIDELINES
To Reduce the Risk of Burns, Electrocution, Fire or
Injury to Persons
DO NOT come in contact with the compressor while you are wet.
DO NOT place or store product where it can drop into water or other liquids.
DO NOT reach for product that has fallen into water. Unplug IMMEDIATELY.
No adjustments should be made to the flowrate unless prescribed by a physician or therapist.
The product should NEVER be left unattended when it is plugged in.
The compressor is intended to be used only as an oxygen supplement as described in the Ownerʹs Manual. DO NOT connect the compressor in parallel or series with other compressors or oxygen therapy devices.
Avoid creation of any spark near medical oxygen equipment. This includes sparks from static electricity created by any type of friction.
Part No 1154316
11
HomeFill® II AW Compressor
SECTION 2—CONCENTRATOR VERIFICATION AND MAINTENANCE
SECTION 2— CONCENTRATOR VERIFICATION
AND MAINTENANCE
Performance Verification
NOTE: A dedicated concentrator should be used to test HomeFill compressors.
NOTE: The test concentrator MUST have its performance verified and documented prior to testing HomeFill compressors.
NOTE: All performance verification and maintenance performed on the test concentrator MUST be documented on a log sheet that is attached to the concentrator.
1. Turn On the concentrator and set the flow rate to 5 L/min.
2. Allow the concentrator to warm up for a minimum of 30 minutes.
3. After the 30 minute warm‐up, check the oxygen concentration using a calibrated oxygen analyzer. NOTE: The oxygen concentration reading MUST be above 90% at 5 L/min.
4. Provided the oxygen concentration is 90% or higher at 5 L/min., record the following on the repair statement and on the test concentrator maintenance log:
A. Date of the performance test and when any service is performed.
B. Hour meter reading.
C. Oxygen concentration.
D. If service is performed, record all details of repair, including preventative maintenance.
E. Record all parts replaced, and list all detailed performance results.
NOTE: A new entry MUST be made for each performance test, or when any service type items are performed.
5. Turn the concentrator flow rate down to 3 L/min.
6. Connect the test concentrator to the HomeFill compressor to be tested. Refer to Connecting the Compressor to the Concentrator on page 12.
7. Test the HomeFill compressor. Refer to Troubleshooting/Cylinder Fill Times on page 95.
Connecting the Compressor to the Concentrator
NOTE: For this procedure, refer to FIGURE 2.1 on page 13.
1. Insert one end of the interconnect hose into the outlet fitting on the back of the concentrator (Detail “A”).
2. Insert the opposite end of the interconnect hose into the inlet fitting on the side of the compressor (Detail “B”).
HomeFill® II AW Compressor
12
Part No 1154316
SECTION 2—CONCENTRATOR VERIFICATION AND MAINTENANCE
NOTE: The metal tabs on the concentrator outlet fitting and the compressor inlet fitting will pop out with an audible “click” when the end of the interconnect hose is properly installed (Detail “C”).
3. For models that DO NOT have coiled tubing, loop any excess interconnect hose and secure to the back of the concentrator with the fastening straps.
DETAIL “C”
DETAIL “A”
Interconnect
Hose (or
Coiled tubing)
Insert End of
Interconnect Hose into
Inlet/Outlet Fitting
CONCENTRATOR
TOP VIEW
Outlet Fitting
Inlet/Outlet Fitting
Metal
Tab
DETAIL “B”
Power
Cord
Compressor
Inlet Fitting
FIGURE 2.1 Concentrator Verification and Maintenance
Part No 1154316
13
HomeFill® II AW Compressor
SECTION 3—CHECKLIST AND CYLINDER INSPECTION
SECTION 3—CHECKLIST AND CYLINDER
INSPECTION
Compressor Operation Checklist
Each time the HomeFill Compressor is used to fill a cylinder, complete the following checklist:
❑ Ensure the concentrator has been on for at least 30 minutes.
❑ Perform the prefill inspection on the cylinder.
❑ Connect the cylinder to the compressor.
❑ Turn the compressor On.
❑ Examine the indicator lights on the control panel.
❑ Disconnect and remove the full cylinder.
❑ Turn the compressor Off.
❑ If filling another cylinder, repeat this checklist.
Cylinder Prefill Inspection
WARNING
Use only cylinders that have the Invacare HomeFill connection and the label,
FIGURE 3.1 on page 16.
CAUTION
All cylinders MUST be inspected before attempting to fill. Otherwise, injury or
damage may occur.
NOTE: For this procedure, refer to FIGURE 3.1 on page 16.
Hydrostatic Testing Date
Aluminum cylinders MUST undergo testing every five years.
WARNING
DO NOT fill cylinders that have not been tested in the past five years. Otherwise,
serious personal injury may result. Contact your dealer for replacement.
HomeFill® II AW Compressor
14
Part No 1154316
SECTION 3—CHECKLIST AND CYLINDER INSPECTION
External Examination
1. Examine the outside of the cylinder for the following conditions, and replace the cylinder if they exist:
• Dents or dings
• Arc burns
• Oil or grease
• Any other signs of damage that might cause a cylinder to be unacceptable or unsafe for use.
2. Examine the cylinder for evidence of fire or thermal damage. Evidence includes charring or blistering of the paint, or other protective coating or heat sensitive indicator. If fire or thermal damage is found, replace the cylinder.
3. Inspect the Invacare valve for the following and replace if found:
• Debris, oil or grease
• Noticeable signs of damage
• Signs of corrosion inside the valve
• Signs of excessive heat or fire damage
Part No 1154316
15
HomeFill® II AW Compressor
SECTION 3—CHECKLIST AND CYLINDER INSPECTION
FIGURE 3.1 Cylinder Prefill Inspection
HomeFill® II AW Compressor
16
Part No 1154316
SECTION 4—COMPRESSOR OPERATION
SECTION 4—COMPRESSOR OPERATION
Connecting/Disconnecting Cylinder to/from Compressor
Connecting the Cylinder to the Compressor
WARNING
DO NOT modify any connections on the HomeFill compressor.
NEVER use tools of any kind to connect/disconnect the cylinder and the
compressor. Otherwise, severe injury and/or damage may occur.
DO NOT drop oxygen cylinders. Use two hands when handling/transporting oxygen
cylinders. Otherwise, injury or damage may occur.
DO NOT use a liquid leak detector to test for leaks.
NOTE: For this procedure, refer to FIGURE 4.1 on page 18 and FIGURE 4.2 on page 19.
1. Examine the cylinder gauge. If the cylinder pressure is less than 1500 psig. (10342 kPa), proceed to STEP 2.
NOTE: If the cylinder pressure is greater than 1500 psig (10342 kPa), DO NOT attempt to top off the cylinder. It may not fill. Bleed the cylinder or select another cylinder.
2. Set the regulator flow dial on the cylinder to Off (Detail “B” of FIGURE 4.2).
3. Remove the cylinder and connector fillport covers (if present).
CAUTION
DO NOT connect the outlet (cannula) connection to the HomeFill unit. Otherwise,
the conserving cylinder will not work properly.
NOTE: On older models, the green dots do not exist.
4. To reset the connector, momentarily push down on the outer ring (sleeve) of the connector fillport until GREEN dots are visible (FIGURE 4.1).
NOTE: If the outer ring (sleeve) is in the up position (GREEN dots not visible), the connector fillport will not be able to accept the cylinder fillport. Pushing down momentarily will reset the connector fillport (GREEN dots visible) to accept the cylinder fillport.
Part No 1154316
17
HomeFill® II AW Compressor
SECTION 4—COMPRESSOR OPERATION
PUSH
DOWN
Outer Ring (Sleeve)
Connector Fillport
GREEN Dots
BEFORE
COUPLING
CYLINDER,
PUSH DOWN
ON SLEEVE
UNTIL
GREEN DOTS
ARE VISIBLE.
FIGURE 4.1 Resetting Connector Fillport
5. Grasp the cylinder/regulator assembly in the area behind the cylinder gauge in FIGURE 4.2 on page 19.
6. Position the cylinder in the compressor cradle (Detail “A” of FIGURE 4.2).
7. Align the cylinder fillport with the connector fillport (Detail “B” of FIGURE 4.2).
8. Pull up on the outer ring (sleeve) of the connector fillport while pushing down on the cylinder/regulator assembly to couple the cylinder fillport into the connector fillport (Detail “A” of FIGURE 4.2).
NOTE: The cylinder is properly connected when an audible “click” is heard.
HomeFill® II AW Compressor
18
Part No 1154316
SECTION 4—COMPRESSOR OPERATION
DETAIL “A”
Compressor
Cylinder/Regulator
Assembly
Cylinder
Fillport
Connector
Fillport
Outer Ring
(Sleeve)
Cylinder
Gauge
PULL UP
DETAIL “B”
Regulator
Cylinder
Cylinder
Gauge
Regulator
Flow Dial
Outlet (Cannula)
Connection
Cylinder Fillport
Power
Switch
Connector
Fillport
Compressor
Cradle
Outer Ring
(Sleeve)
NOTE: Fillport covers not shown for clarity.
FIGURE 4.2 Connecting the Cylinder to the Compressor
Disconnecting Cylinder From Compressor
WARNING
DO NOT modify any connections on the HomeFill compressor. NEVER use tools of
any kind to connect/disconnect the cylinder and the compressor. Otherwise, severe
injury and/or damage may occur.
NOTE: For this procedure, refer to FIGURE 4.3 on page 20.
Part No 1154316
19
HomeFill® II AW Compressor
SECTION 4—COMPRESSOR OPERATION
1. Press the compressor power switch to the Off (O) position.
2. Grasp the cylinder/regulator assembly in the area behind the cylinder gauge.
3. With the other hand, grasp the outer ring (sleeve) of the connector fillport and push down.
4. Lift up on the cylinder/regulator assembly to remove from the connector fillport.
5. When the cylinder fillport is disconnected from the connector fillport, release the outer ring (sleeve) of the connector fillport and use two hands to remove the cylinder from the compressor cradle.
6. Place the fillport covers onto the connector and cylinder fillports.
NOTE: The fillport covers should be used whenever cylinders are not being filled.
Cylinder/Regulator
Assembly
Cylinder Gauge
PUSH DOWN
Outer Ring
(Sleeve)
Cylinder
Fillport
Compressor
Cradle
Power Switch
Connector Fillport
FIGURE 4.3 Disconnecting Cylinder From Compressor
Turning the Compressor On
NOTE: For this procedure, refer to FIGURE 4.4 on page 22.
1. Make sure the concentrator is On and runs a minimum of 30 minutes.
CAUTION
The concentrator flow rate to the patient MUST be set at maximum: 2.5 L/min. or
less for Platinum 5, Platinum S, Perfecto2 and 5 L/min. for Platinum 9. Otherwise,
the oxygen level to the compressor will be <90% and the compressor will not fill the
cylinder.
2. Set the concentrator flow rate to the patient to 2.5 L/min. or less for Platinum 5, Platinum S, Perfecto2 and 5 L/min. for Platinum 9. 3. Make sure the cylinder is connected to the compressor. Refer to Connecting the Cylinder to the Compressor on page 17.
HomeFill® II AW Compressor
20
Part No 1154316
SECTION 4—COMPRESSOR OPERATION
4. Push the power switch on the control panel to the On position.
5. Perform one of the following:
A. For HomeFill units manufactured before 02/02/06 ‐ Examine the control panel. The following sequence of events should occur:
• 0‐3 minutes ‐ The WAIT (YELLOW) light will be lit while the compressor warms up.
• After three minutes ‐ The FILLING (GREEN) light will be on while the cylinder is filling.
• The FULL (GREEN) light will be on when the cylinder is finished filling. Proceed to STEP 6.
B. For HomeFill units manufactured after 02/02/06 ‐ Examine the control panel. The following sequence of events should occur:
• 0‐3 minutes ‐ The O2 Below Normal (YELLOW) light will be lit while the compressor warms up.
• After three minutes ‐ The FILLING (GREEN) light will be on while the cylinder is filling.
• The FULL (GREEN) light will be on when the cylinder is finished filling. Proceed to STEP 6.
NOTE: The O2 BELOW NORMAL (YELLOW) light may come on if the oxygen level from the concentrator has not yet reached or drops below 90%. The compressor will begin or resume filling when the oxygen level reaches 90%. If light does not go Off within 10 minutes, refer to Troubleshooting on page 95.
NOTE: If the ATTENTION (RED) light and audible alarm are on, refer to Troubleshooting on page 95.
6. Remove the full cylinder. Refer to Disconnecting Cylinder From Compressor on page 19.
Part No 1154316
21
HomeFill® II AW Compressor
SECTION 4—COMPRESSOR OPERATION
For HomeFill units manufactured before 02/02/06
ATTENTION
(RED Light and
Audible Alarm)
O2 BELOW
NORMAL
(YELLOW Light)
FULL
(GREEN Light)
Control
Panel
O2 BELOW NORMAL
USE NO OIL
I
O
WAIT
(YELLOW Light)
FILLING
(GREEN Light)
Power Switch
For HomeFill units manufactured after 02/02/06
Attention (RED light and
Audible Alarm)
Control Panel
HOMEFILL™II
ATTENTION
Filling
(GREEN
Light)
O2 BELOW NORMAL
FULL
FILLING
DANGER - RISK OF ELECTRICAL SHOCK
DO NOT remove cover, refer servicing to
qualified service personnel.
WARNING - RISK OF FIRE
NO SMOKING - Keep all sources of ignition
out of the room in which this product is
located and from areas where oxygen is being
delivered. Textiles, oil and other combustibles
are easily ignited and will burn with great
intensity in oxygen enriched air.
“Caution: Federal law restricts this device to
sale by or on order of a physician, or any other
practitioner licensed by the law of the State in
which he/she practices to use or order the use
of this device.”
O2 below normal
(YELLOW light)
Full
(GREEN Light)
I
O
OPERATING INSTRUCTIONS
See Operator’s Manual
Power Switch
FIGURE 4.4 Turning the Compressor On
HomeFill® II AW Compressor
22
Part No 1154316
SECTION 5—CABINET ASSEMBLY
SECTION 5—CABINET ASSEMBLY
Removing/Installing the Cabinet
DANGER
To prevent electrical shock, ALWAYS disconnect HomeFill from electrical outlet
before servicing.
NOTE: For this procedure, refer to FIGURE 5.1.
Tools required for this procedure are: • Phillips screwdriver
Removing
1. Unplug the power cord from the electrical outlet.
2. Remove cylinder (if attached). Refer to Disconnecting Cylinder From Compressor on page 19.
3. Remove the four mounting screws that secure the cabinet assembly to the base assembly.
4. Lift the cabinet straight up off of the base assembly.
Installing
1. Position the cabinet on the base assembly as shown.
2. Secure the cabinet to the base assembly with four mounting screws. Securely tighten.
3. Reattach cylinder. Refer to Connecting the Cylinder to the Compressor on page 17.
4. Plug power cord into electrical outlet.
REAR VIEW
Cabinet
Cabinet
Mounting Screws
Base Assembly
Mounting Screws
FIGURE 5.1 Removing/Installing the Cabinet
Part No 1154316
23
HomeFill® II AW Compressor
SECTION 5—CABINET ASSEMBLY
Removing/Installing the Cabinet Filter Grid
NOTE: For this procedure, refer to FIGURE 5.2.
Tools required: Flat head screwdriver and .09 mm drill bit
Removing
1. Remove the cabinet. Refer to Removing/Installing the Cabinet on page 23.
2. Perform one of the following:
• For units that have plastic rivets, remove the plastic rivets by pushing the rivets from the inside out with a .09 mm drill bit, proceed to STEP 3.
• For units without plastic rivets, proceed to STEP 3.
3. Using the flat head screwdriver, pry the lip of the cabinet filter grid out of the cabinet (Detail “C”).
Installing
NOTE: For units that have plastic rivets, the cabinet MUST be replaced to use the new filter grid.
1. Install the cabinet filter grid (Detail “B”) to the inside of the cabinet. Ensure that the lip of the cabinet filter grid is on the outside of the cabinet.
2. Install the cabinet. Refer to Removing/Installing the Cabinet on page 23.
DETAIL “B”
DETAIL “A”
Cabinet Filter
Grid
Lip
Filter Grid
Plastic Rivets
DETAIL “C”
Lip
NOTE: Lip of the filter grid MUST be on the outside of the cabinet to secure the filter grid in place.
FIGURE 5.2 Removing/Installing the Cabinet Filter Grid
HomeFill® II AW Compressor
24
Part No 1154316
SECTION 5—CABINET ASSEMBLY
Replacing Non-Skid Adhesive Back Pad
NOTE: For this procedure, refer to FIGURE 5.3.
Pad
1. Peel the existing pad from the cabinet and discard.
2. Peel the backing from the new pad.
3. Attach the new pad to the cabinet.
FIGURE 5.3 Replacing Non-Skid Adhesive
Back Pad
Replacing Foam Gasket
NOTE: For this procedure, refer to FIGURE 5.4.
Foam Gasket
Control Panel
Opening
1. Remove the cabinet. Refer to Removing/Installing the Cabinet on page 23.
2. Peel the existing foam gasket from the inside of the control panel opening and discard.
3. Peel the backing from the new foam gasket.
4. Attach the new foam gasket to the inside of control panel opening.
FIGURE 5.4 Replacing Foam Gasket
Part No 1154316
25
HomeFill® II AW Compressor
SECTION 6—PANEL ASSEMBLY
SECTION 6—PANEL ASSEMBLY
Replacing Exhaust Fan
NOTE: For this procedure, refer to FIGURE 6.1.
Tools required for this procedure are: • Phillips screwdriver
• Torque Wrench
1. Remove the cabinet. Refer to Removing/Installing the Cabinet on page 23. 2. Note the wire orientation of the two wires located on the exhaust fan.
3. Disconnect the two wires from exhaust fan wire connectors.
4. Remove the four mounting screws securing the fan inlet seal to the exhaust fan (Detail “B”). 5. Set the fan inlet seal aside for re‐use.
6. Remove the four mounting screws securing the exhaust fan to the isolator plate.
NOTE: Before securing exhaust fan in place, ensure airflow arrow (molded into the side of the fan) points toward the back and out of the unit. 7. Secure the exhaust fan to the isolator plate with four mounting screws. The mounting screws MUST be torqued to 20–30 in‐lbs (2.26‐3.39 Nm).
8. Secure the fan inlet seal to the exhaust fan with four mounting screws. The mounting screws MUST be torqued to 20–30 in‐lbs (2.26‐3.39 Nm).
9. Connect the two wires to the exhaust fan in the orientation previously noted.
10. Install cabinet. Refer to Removing/Installing the Cabinet on page 23.
DETAIL “A”
Fan Mounting
Bracket
Isolator Plate
Mounting
Screws
DETAIL “B”
Exhaust Fan
Fan Inlet Seal
Airflow
Arrow points
to back of
unit
Isolator Plate
Wire
Connectors
(Not shown)
Mounting
Screws
Mounting Screw
FIGURE 6.1 Replacing Exhaust Fan
HomeFill® II AW Compressor
26
Part No 1154316
SECTION 6—PANEL ASSEMBLY
Removing/Installing Control Panel
NOTE: For this procedure, refer to FIGURE 6.2.
Tools required for this procedure are: • Phillips screwdriver
1. Remove the cabinet. Refer to Removing/Installing the Cabinet on page 23.
2. Remove the two mounting screws securing the top of the control panel (Detail “A”).
3. Loosen the two mounting screws securing the bottom of the control panel (Detail “A”).
4. Slowly pull the control panel back to expose the circuit board and its connections.
5. Disconnect the three wiring harnesses from the three connectors on the circuit board (Detail “B”).
CAUTION
DO NOT disconnect the opaque oxygen sensor tube from the sensor as this may
damage the circuit board.
6. Disconnect the opaque oxygen sensor tube from the barbed fitting opposite the sensor (Detail “B”). 7. Note the location of the two wire connectors of the power switch for later replacement.
8. Disconnect the two wire connectors from the power switch (Detail “B”). 9. Disconnect bleed resistor from the control panel (Detail “C”).
10. Remove the control panel.
Installing
1. Connect bleed resistor to the control panel (Detail “C”).
2. Connect the two wire connectors to the power switch (Detail “B”) in the orientation noted previously. 3. Connect the opaque oxygen sensor tube to the barbed fitting on the opposite end of the sensor (Detail “B”). 4. Connect the three wiring harnesses to the three connectors on the circuit board (Detail “B”).
5. Secure the bottom of the control panel with two mounting screws. Securely tighten.
6. Secure the top of the control panel with two mounting screws. Securely tighten.
7. Install the cabinet. Refer to Removing/Installing the Cabinet on page 23.
Part No 1154316
27
HomeFill® II AW Compressor
SECTION 6—PANEL ASSEMBLY
DETAIL “A”
Mounting
Screws
Control Panel
Base Assembly
Mounting
Screws
CAUTION
DO NOT disconnect
the opaque oxygen
sensor tube from the
sensor.
Opaque Oxygen
Sensor Tube
Sensor
Wiring Harness
Connection
Power Switch
Circuit
Board
Wire Connectors
Wiring Harness
Connection
Wiring Harness
Connection
Control Panel
Partial View of
Circuit Board
Bleed Resistor
Assembly 2
FIGURE 6.2 Removing/Installing Control Panel
HomeFill® II AW Compressor
28
Part No 1154316
SECTION 6—PANEL ASSEMBLY
Testing/Replacing the Power Switch
NOTE: For this procedure, refer to FIGURE 6.3 on page 29.
Tools required for this procedure are: • Ohmmeter
1. Remove the cabinet. Refer to Removing/Installing the Cabinet on page 23.
2. Remove the control panel. Refer to Removing/Installing Control Panel on page 27.
3. Note the location of the two wire connectors of the power switch for later replacement.
4. Remove the two wire connectors from the power switch. A. Using an ohmmeter, test the continuity of the switch by placing the meter leads on the switch terminals where the wires were connected.
B. Turn the switch to the On position.
C. If no indication of continuity is achieved, proceed to step 5. If continuity is achieved, proceed to Step 7.
5. Release the four retaining clips and push the power switch out of the control panel.
6. Install power switch into control panel as shown.
7. Install the two wire connectors onto the power switch.
8. Install the control panel. Refer to Removing/Installing Control Panel on page 27.
9. Install the cabinet. Refer to Removing/Installing the Cabinet on page 23.
Wire
Connectors
Retaining Clips
Control Panel
Power Switch
Retaining Clips
FIGURE 6.3 Testing/Replacing the Power Switch
Part No 1154316
29
HomeFill® II AW Compressor
SECTION 6—PANEL ASSEMBLY
Replacing Circuit Board
CAUTION
Before handling any circuit boards, you need to be properly grounded to prevent
static damage to the components of the circuit board. A static strap MUST be worn
and properly grounded using an alligator clip. Electrical conduit or a water pipe is
normally sufficient when a known good ground is not available. Care should be
taken to ensure that the alligator clip contacts with a bare metal surface.
When removing quick disconnect terminals, DO NOT pull on the wire itself as
damage to the connection may occur. Hold down the circuit board with one hand
and use an upward force with a slight rocking motion to remove the wire
connections.
Circuit Boards were changed on 7/3/06. Circuit boards manufactured before 7/3/06
are not interchangeable with circuit boards manufactured after 7/3/06. Otherwise,
damage may occur. Consult the HomeFill parts book for the correct circuit board.
NOTE: For this procedure, refer to FIGURE 6.4 on page 31.
1. Remove the cabinet. Refer to Removing/Installing the Cabinet on page 23.
2. Remove the control panel. Refer to Removing/Installing Control Panel on page 27.
3. Push in on each of the four standoff securing tabs one at a time while pulling the circuit board away from the control panel.
CAUTION
Before installing the circuit board, ensure that all insulators are in place.
4. Install new circuit board onto standoff tabs. NOTE: When installing the circuit board to the control panel, make sure that the standoff securing tabs are out. You will hear an audible click when the securing tab locks the circuit board in place.
5. Install the control panel. Refer to Removing/Installing Control Panel on page 27.
6. Install the cabinet. Refer to Removing/Installing the Cabinet on page 23.
7. Operate the compressor.
8. To ensure proper operation, perform a cylinder fill test. Refer to Cylinder Fill Test on page 98.
HomeFill® II AW Compressor
30
Part No 1154316
SECTION 6—PANEL ASSEMBLY
Standoff
Securing
Tab
Circuit
Board
FIGURE 6.4 Replacing Circuit Board
Replacing Accumulator Assembly
DANGER
To prevent electrical shock, ALWAYS disconnect compressor from electrical
outlet before servicing.
NOTE: For this procedure, refer to FIGURE 6.5 on page 32.
Tools required for this procedure are:
• Phillips screwdriver
Removing Accumulator Assembly
1. Remove the cabinet. Refer to Removing/Installing the Cabinet on page 23.
2. Remove the control panel. Refer to Removing/Installing Control Panel on page 27.
3. Remove the two mounting screws securing the accumulator assembly to the main brackets.
4. Cut the two tie‐wraps securing the two fittings to the oxygen hoses.
5. Remove the existing accumulator assembly.
Installing Accumulator Assembly
1. Install the accumulator assembly to the main brackets with two mounting screws.
2. Connect the two fittings to the oxygen hoses.
3. Secure the two fittings to the oxygen hoses with two tie‐wraps.
4. Install the control panel. Refer to Removing/Installing Control Panel on page 27.
5. Install the cabinet. Refer to Removing/Installing the Cabinet on page 23.
Part No 1154316
31
HomeFill® II AW Compressor
SECTION 6—PANEL ASSEMBLY
Fitting
Oxygen Hose
Main Bracket
Fitting
Tie Wrap
Main Bracket
Mounting Screw
Accumulator
Assembly
FIGURE 6.5 Replacing Accumulator Assembly
HomeFill® II AW Compressor
32
Part No 1154316
SECTION 7—BASE COMPONENTS
SECTION 7—BASE COMPONENTS
Replacing Fuse
NOTE: For this procedure, refer to FIGURE 7.1.
1. Unplug the power cord from the electrical outlet.
2. Remove the power cord from the power inlet on the compressor base.
3. Pull out the fuse drawer at the bottom of the power inlet.
4. Using a fuse puller or a small flat blade screw driver, remove the rear fuse inside the fuse drawer and discard (Detail “A”).
NOTE: The fuse drawer contains space for two fuses. The front location is for the operational fuse. The rear location is for a spare fuse. When replacing the front fuse, insure that there is also a spare fuse in place in the fuse drawer.
5. Install replacement fuse in front fuse slot.
6. Push fuse drawer back into the power inlet.
7. Install power cord into the power inlet on the compressor base.
8. Plug power cord into electrical outlet.
DETAIL “A”
Power Inlet
Rear Fuse
(Spare)
Power Inlet
Fuse Drawer
(Operational)
Front Fuse
Compressor Base
Fuse Drawer
FIGURE 7.1 Replacing Fuse
Part No 1154316
33
HomeFill® II AW Compressor
SECTION 7—BASE COMPONENTS
Removing/Installing the Power Inlet
NOTE: For this procedure, refer to FIGURE 7.2.
Tools required for this procedure are: • Phillips screwdriver • Torque Wrench
Removing
1. Remove the cabinet. Refer to Removing/Installing the Cabinet on page 23.
2. Remove the two mounting screws that secure the power inlet to the base.
3. Slowly pull the power inlet out of the base assembly to expose the wire connections.
4. Note the location of the wire connector and dual terminal connector before disconnecting the wire connectors from the power inlet.
NOTE: The dual terminal connector houses the top and middle wire connectors.
5. Disconnect the bottom wire connector from the power inlet.
6. Disconnect the dual terminal connector from the power inlet.
7. Discard the existing power inlet.
Installing
1. Connect the dual terminal connector to the new power inlet.
2. Connect the bottom terminal connector to the new power inlet.
3. Secure the power inlet to the base with two mounting screws. Torque the mounting screws to 20–25 in‐lbs (2.26‐2.82 Nm).
4. Install the cabinet. Refer to Removing/Installing the Cabinet on page 23.
NOTE: Top and Middle Top Wire
Connector
wire connectors attach to dual terminal Middle Wire
connector.
Connector
Base
Bottom Wire
Connectors
Mounting Screws
Power Inlet
FIGURE 7.2 Removing/Installing the Power Inlet
HomeFill® II AW Compressor
34
Part No 1154316
SECTION 7—BASE COMPONENTS
Replacing Hour Meter
NOTE: For this procedure, refer to FIGURE 7.3 on page 35.
1. Remove the cabinet. Refer to Removing/Installing the Cabinet on page 23. 2. Note the orientation of the two wire connectors before removing.
3. Remove the two wire connectors from the hour meter.
NOTE: The hour meter and retaining clip are separate components. Both of these components hold the other component in place. When the hour meter is removed, in STEP 3, the retaining clip will become a loose component. 4. Pull the retaining clip away from the sides of the hour meter while pushing out the hour meter from the inside of the base.
5. Position the retaining clip on the inside of the compressor base assembly.
6. Insert the hour meter through the front of the base assembly and through the retaining clip. 7. Pull the retaining clip forward toward the base assembly so that the hour meter and retaining clip are snug against the base assembly.
8. Install the two wire connectors onto the hour meter in the orientation previously noted. 9. Install the cabinet. Refer to Removing/Installing the Cabinet on page 23. Wire Connector
Wire
Connector
Retaining
Clip
Hour Meter
FIGURE 7.3 Replacing Hour Meter
Replacing O2 Inlet Connector/Inlet Connector Dust
Cap
NOTE: For this procedure, refer to FIGURE 7.4 on page 36.
Tools required for this procedure are:
•
5/ inch wrench
8
• side cutters
1. Remove the cabinet. Refer to Removing/Installing the Cabinet on page 23.
Part No 1154316
35
HomeFill® II AW Compressor
SECTION 7—BASE COMPONENTS
CAUTION
Be careful not to cut the tubing when performing the following step.
2. Using the side cutters, cut the tie‐wrap securing the tubing to the O2 connector.
3. Remove the tubing from the O2 connector.
4. Using a 5/8‐inch wrench, remove the locknut securing the connector to the base.
5. Remove the connector and dust cap from the base.
6. Install the connector and dust cap to the base.
7. Secure the connector to the base with the locknut. Torque the locknut to 8‐10 inch‐
pounds.
8. Secure the tubing to the O2 connector with a tie‐wrap.
9. Install the cabinet. Refer to Removing/Installing the Cabinet on page 23.
Tubing
Locknut
(Not Shown)
Base
O2 Connector
Tie-Wrap
Dust Cap
FIGURE 7.4 Replacing O2 Inlet Connector/Inlet Connector Dust Cap
Replacing Transformer
NOTE: For this procedure, refer to FIGURE 7.5 on page 37.
Tools required for this procedure are:
• Phillips screwdriver
1. Remove the cabinet. Refer to Removing/Installing the Cabinet on page 23.
2. Note the four wire colors and sizes and four jumper colors and sizes for the connectors located on the transformer.
3. Disconnect the four wire connectors and four jumper connectors from the transformer.
4. Remove the two mounting screws that secure the transformer to the base.
5. Remove the transformer from the base.
6. Install the new transformer into the base.
HomeFill® II AW Compressor
36
Part No 1154316
SECTION 7—BASE COMPONENTS
7. Secure the transformer to the base with two mounting screws. Securely tighten.
8. Connect the four wire connectors to the transformer in the orientation (for colors and sizes) noted previously.
9. Install the cabinet. Refer to Removing/Installing the Cabinet on page 23.
Wire
Jumper
Wires
Wire and Jumper
Connectors
Base
Transformer
Mounting Screw
FIGURE 7.5 Replacing Transformer
Testing/Replacing Capacitor
Testing
WARNING
The capacitor is an electrical storage device that stores an electronic charge.
ALWAYS discharge the capacitor before testing or handling. Failure to discharge
the capacitor may result in bodily harm and/or damage to test equipment.
NOTE: For this procedure, refer to FIGURE 7.6 on page 39.
1. Remove the cabinet. Refer to Removing/Installing the Cabinet on page 23.
2. Remove the two wire connectors from the capacitor.
3. Discharge the capacitor by placing a screw driver with an insulated handle across the wire connectors on the top of the capacitor.
4. Connect the leads of a capacitance meter to the terminals on the capacitor.
NOTE: For the capacitor to be within specification, the meter should read 10 mfd +10% or –5%. Part No 1154316
37
HomeFill® II AW Compressor
SECTION 7—BASE COMPONENTS
5. Perform one of the following:
• If the capacitor is out of specification, replace the capacitor. Refer to Replacing Capacitor on page 38.
• If the capacitor is in specification, reconnect the two wires and proceed to STEP 7.
6. Install the cabinet. Refer to Removing/Installing the Cabinet on page 23.
Replacing Capacitor
WARNING
The capacitor is an electrical storage device that stores an electric charge.
ALWAYS discharge the capacitor before testing or handling. Failure to discharge
the capacitor may result in bodily harm and/or damage to test equipment.
NOTE: For this procedure, refer to FIGURE 7.6.
Tools required for this procedure are:
• screwdriver
• side cutters
1. Remove the cabinet. Refer to Removing/Installing the Cabinet on page 23.
2. Remove the two wire connectors from the capacitor.
3. Discharge the capacitor by placing a screw driver with an insulated handle across the wire connectors on the top of the capacitor.
4. Cut and remove the tie‐wrap securing the capacitor to the base.
5. Remove the capacitor.
6. Install a new capacitor and tie‐wrap.
7. Reconnect the two wire connectors.
8. Install the cabinet. Refer to Removing/Installing the Cabinet on page 23.
HomeFill® II AW Compressor
38
Part No 1154316
SECTION 7—BASE COMPONENTS
Tie-Wrap
Capacitor
Connectors
Base
Wire
Connectors
FIGURE 7.6 Testing/Replacing Capacitor
Removing Connector Fillport Dust Cover and Lanyard Units Manufactured Before 10/03/2005
DANGER
To prevent electrical shock, ALWAYS disconnect compressor from electrical
outlet before servicing.
Removing
NOTE: For this procedure, refer to FIGURE 7.7 on page 40.
Tools required for this procedure are:
•
7
/16 Wrench, Phillips screwdriver
NOTE: Because the parts for the this style fillport are no longer available, remove the existing fillport by following the instructions below and install new style fillport.
1. Remove the locknut connecting the oxygen line to the connector fillport.
2. Remove the quick‐release pin.
3. Remove the mounting screw connecting the flange to the base.
4. Remove the connector fillport from the base.
5. Remove the locknut and the two washers at the bottom of the connector fillport.
6. Remove the flange from the connector fillport assembly.
7. Remove the existing lanyard from the shaft.
Part No 1154316
39
HomeFill® II AW Compressor
SECTION 7—BASE COMPONENTS
8. Install new style fillport. Refer to Removing/Installing Connector Fillport Dust Cover and Lanyard ‐ Units Manufactured After 10/02/2005 on page 40.
Dust Cover
NOTE: Lanyard not shown.
Connector Fillport
Shaft
Locknut
Washer
Washer
Flange
Quick-Release Pin
Washers
Locknut
Locknut for
Oxygen Line
Mounting Screw
Connecting Flange
to Base
FIGURE 7.7 Removing Connector Fillport Dust Cover and Lanyard - Units Manufactured
Before 10/03/2005
Removing/Installing Connector Fillport Dust Cover and
Lanyard - Units Manufactured After 10/02/2005
NOTE: For this procedure, refer to FIGURE 7.8 on page 41.
Tools required for this procedure are:
•
7
/16 Wrench
• Phillips screwdriver
•
9
/64 Allen Wrench
Removing
1. Remove the locknut connecting the oxygen line to the connector fillport.
2. Remove the mounting screw that connects the bracket to the base assembly.
3. Remove the mounting screw that connects the flange to the base assembly.
4. Remove the quick‐release pin and remove the connector fillport and two washers from the compressor.
5. Remove the three mounting screws at the bottom of the connector fillport.
6. Remove the flange.
7. Remove the existing lanyard from the shaft.
HomeFill® II AW Compressor
40
Part No 1154316
SECTION 7—BASE COMPONENTS
Installing
1. Install the new lanyard onto the shaft.
2. Secure the flange to the bottom of the connector fillport with the three mounting screws. Securely tighten.
3. Secure the two washers and connector fillport to the compressor with the quick release pin.
4. Secure the flange to the base assembly with a mounting screw. Securely tighten.
5. Secure the bracket to the base assembly with a mounting screw. Securely tighten.
6. Connect the oxygen line to the connector fillport with the locknut. Securely tighten.
Dust Cover
Connector Fillport
Shaft
Mounting Screw
Washers
Mounting Screw
Quick Release Pin
Bracket
Flange
Locknut for Oxygen Line
Mounting Screws
NOTE: Lanyard not shown.
FIGURE 7.8
- Removing/Installing Connector Fillport Dust Cover and Lanyard - Units
Manufactured After 10/02/2005
Replacing the High Pressure Switch
NOTE: For this procedure, refer to FIGURE 7.9.
Tools required:
11/8 inch crows foot
1. Install an empty cylinder onto the compressor. Refer to Connecting/Disconnecting Cylinder to/from Compressor on page 17.
2. Bleed off any internal pressure.
3. Remove the cylinder from the compressor. Refer to Connecting/Disconnecting Cylinder to/from Compressor on page 17.
4. Remove the cabinet. Refer to Removing/Installing the Cabinet on page 23.
5. Remove the two wires from the high pressure switch.
Part No 1154316
41
HomeFill® II AW Compressor
SECTION 7—BASE COMPONENTS
6. Using a 11/8” crows foot, remove the high‐ pressure switch.
CAUTION
Gloves MUST be worn during the re-installation process to prevent oil from skin
contacting the high-pressure switch.
7. Using a 11/8” crows foot, install the high pressure switch. Torque the high pressure switch to 50‐55 in‐lbs (5.65‐6.21 Nm).
8. Install the two wires from the high pressure switch.
9. Perform Leak Test procedure. Refer to Leak Test on page 97
10. Perform Fill Test procedure. Refer to Cylinder Fill Test on page 98.
11. Install the cabinet. Refer to Removing/Installing the Cabinet on page 23.
Replacing Burst Disk Fitting
NOTE: For this procedure, refer to FIGURE 7.9.
Tools Required:
9
/16 inch Wrench
1. Remove the cabinet. Refer to Removing/Installing the Cabinet on page 23.
CAUTION
While performing STEP 2, gloves MUST be worn during to prevent oil from skin
contacting the burst disk fitting. Otherwise, damage to the fitting may occur.
2. Using a 9/16” wrench, remove the burst disk fitting from the stage 5 cylinder head. 3. Using a 9/16” wrench, install new burst disk fitting by threading fitting into the cylinder head. Torque to 65‐70 in‐lbs (7.34‐7.91 Nm).
4. Perform Leak Test procedure. Refer to Leak Test on page 97
5. Perform Fill Test procedure. Refer to Cylinder Fill Test on page 98.
6. Install the cabinet. Refer to Removing/Installing the Cabinet on page 23.
HomeFill® II AW Compressor
42
Part No 1154316
SECTION 7—BASE COMPONENTS
High Pressure Switch
Burst Disk Fitting
FIGURE 7.9 Replacing the High Pressure Switch/Replacing Burst Disk Fitting
Part No 1154316
43
HomeFill® II AW Compressor
SECTION 8—BASE REPLACEMENT
SECTION 8—BASE REPLACEMENT
Tools Required: 7/16 open ended wrench, 5/8 open ended wrench, Diagonal Cutters, Needle Nose Pliers, Phillips screwdriver.
Disassembly
NOTE: For this procedure, refer to FIGURE 8.1 through FIGURE 8.7.
1. Install an empty cylinder onto the compressor to release pressure in lines. Refer to Connecting/Disconnecting Cylinder to/from Compressor on page 17
2. Remove cylinder. Refer to Connecting/Disconnecting Cylinder to/from Compressor on page 17.
3. Disconnect power from the HomeFill unit.
4. Remove the cabinet. Refer to Removing/Installing the Cabinet on page 23.
5. Disconnect the two pin connector that connects the motor to the wiring harness (FIGURE 8.1).
6. Using needle nose pliers, disconnect the two wires from the capacitor (FIGURE 8.1).
7. Using needle nose pliers, disconnect the grounding clip from the motor (FIGURE 8.1).
Control Panel Gusset
Two Pin
Connector
(STEP 4)
Motor
Grounding
Clip
Control Panel
Gusset
Wires (STEP 5)
Capacitor
Mounting Screw
(Hidden behind wiring assembly)
Mounting
Screw
FIGURE 8.1 Base Replacement
HomeFill® II AW Compressor
44
Part No 1154316
SECTION 8—BASE REPLACEMENT
8. Disconnect the two wires from the high pressure switch (FIGURE 8.2).
Wires
High Pressure Switch
FIGURE 8.2 Base Replacement
9. Using the 7/16 open ended wrench, loosen the nut and disconnect the high pressure oxygen line from the cylinder fillport connector (FIGURE 8.3).
10. Loosen the two screws that secure the bottom of the control panel in place (FIGURE 8.3).
11. Remove the two screws that secure the control panel gussets to the rear of the base assembly (FIGURE 8.1).
Cylinder Fillport
Connection
Mounting Screws
Nut (Underneath)
High Pressure Oxygen Line
FIGURE 8.3 Base Replacement
Part No 1154316
45
HomeFill® II AW Compressor
SECTION 8—BASE REPLACEMENT
CAUTION
DO NOT cut the tubing or damage (score) the tubing when removing tie-wraps.
Otherwise HomeFill unit will not fill cylinders correctly.
12. Using diagonal cutters, cut the tie wrap that secures the oxygen inlet hose to the inlet of stage 1 (FIGURE 8.4).
13. Disconnect the oxygen inlet hose from the inlet of stage 1 (FIGURE 8.4).
14. Using diagonal cutters, cut the tie wrap that secures the oxygen inlet hose to the receptacle fitting (FIGURE 8.4).
15. Remove the oxygen inlet hose from the receptacle fitting (FIGURE 8.4).
16. Using diagonal cutters, cut the tie wrap that secures the oxygen sensor tubing to the oxygen inlet hose (FIGURE 8.4).
17. Remove the oxygen sensor tubing from the oxygen inlet hose (FIGURE 8.4).
18. Note where each of the four wires and two jumpers are connected to the transformer.
19. Using needle nose pliers, disconnect the connectors from the transformer. See Detail “A” in FIGURE 8.4.
20. Using needle nose pliers, disconnect the two connectors from the power inlet (FIGURE 8.4).
21. Using needle nose pliers, disconnect the two connectors (not shown) from the hour meter (FIGURE 8.4).
22. Lift control panel assembly off of base and set aside (FIGURE 8.4).
HomeFill® II AW Compressor
46
Part No 1154316
SECTION 8—BASE REPLACEMENT
Oxygen
Sensor
Tubing
Tie Wrap
Receptacle
Fitting
Oxygen
Inlet Hose
Tie Wrap
Stage 1
Oxygen Inlet
Hose
Tie Wrap
Hour Meter
Power Inlet
Two Connectors
Wire and Jumper
Connectors
Detail “A”
Jumper
Yellow Wires
Orange Wire
Jumper
Transformer
FIGURE 8.4 Base Replacement
Part No 1154316
47
HomeFill® II AW Compressor
SECTION 8—BASE REPLACEMENT
23. Remove the six mounting screws that secure the pump/motor assembly to the base (FIGURE 8.5).
TOP VIEW WITH CONTROL PANEL ASSEMBLY REMOVED
Base
Mounting Screws
Motor/Pump Assembly
Mounting
Screws
Mounting
Screws
FIGURE 8.5 Base Replacement
24. Cut the tie wrap that secures the capacitor in place and remove capacitor (FIGURE 8.6). NOTE: Located underneath the capacitor is a tie wrap mount. 25. Remove the mounting screw that secures the tie wrap mount (not shown) to the base.
26. Remove the tie wrap mount (not shown).
27. Remove the two mounting screws that secure the transformer to the base (FIGURE 8.6).
28. Remove the transformer from the base (FIGURE 8.6).
29. Remove the two mounting screws that secure the power inlet to the base (FIGURE 8.6).
30. Remove the power inlet from the base (FIGURE 8.6).
HomeFill® II AW Compressor
48
Part No 1154316
SECTION 8—BASE REPLACEMENT
31. Remove the retaining clip and hour meter from the base (FIGURE 8.6).
32. Using the 5/8 open ended wrench remove the nut from the receptacle fitting (FIGURE 8.6).
33. Remove the receptacle fitting from the base (FIGURE 8.6).
Hour Meter
Retaining Clip
Mounting
Screw
Mounting
Screw
Transformer
Power
Inlet
Mounting Screw
Base
Tie Wrap
Capacitor
Receptacle
Fitting
FIGURE 8.6 Base Replacement
34. Perform one of the following (FIGURE 8.7):
• For units manufactured before 10/2/2005:
i. Remove the mounting screw that secures the bracket to the base.
ii. Remove pin partially out. iii. Lift connector fillport assembly up off of base.
• For units manufactured after 10/2/2005:
i. Remove the two mounting screws that secure the bracket to the base.
ii. Remove pin partially out. iii. Lift connector fillport assembly up off of base.
Part No 1154316
49
HomeFill® II AW Compressor
SECTION 8—BASE REPLACEMENT
Mounting Screw location
(For units manufactured
before 10/2/2005
Mounting Screw location
(For units manufactured
after 10/2/2005
Pin
FIGURE 8.7 Base Replacement
Reassembly
NOTE: For this procedure, refer to FIGURE 8.1 through FIGURE 8.7.
1. Perform one of the following (FIGURE 8.7):
• For units manufactured before 10/2/2005:
i. Position the connector fillport assembly as shown.
ii. Secure the bracket to the base with a mounting screw.
iii. Push pin in. • For units manufactured after 10/2/2005:
i. Position the connector fillport assembly as shown.
ii. Secure the bracket to the base with a mounting screw.
iii. Push pin in. 2. Install the receptacle fitting into the base and secure with nut. Securely tighten. (FIGURE 8.6).
3. Install hour meter into the base and secure with retaining clip. (FIGURE 8.6)
4. Install the power inlet into the base and secure with two mounting screws (FIGURE 8.6).
5. Install the transformer into the base and secure with two mounting screws. (FIGURE 8.6)
6. Install the tie wrap mount (not shown) and secure in place with one mounting screw. (FIGURE 8.6)
7. Position capacitor as shown and secure to tie wrap mount with tie wrap (FIGURE 8.6).
8. Secure the pump/motor assembly to the base with six mounting screws. Torque mounting screws to 25‐30 in‐lbs (2.82‐3.4 Nm) (FIGURE 8.5).
9. Position control panel assembly on base (FIGURE 8.4).
10. Connect the two connectors (not shown) to the hour meter (FIGURE 8.4).
HomeFill® II AW Compressor
50
Part No 1154316
SECTION 8—BASE REPLACEMENT
11. Connect the two connectors to the power inlet (FIGURE 8.4).
12. Connect the four connectors to the transformer as noted in STEP 18 on page 46.
13. Connect the oxygen sensor tubing to the oxygen inlet hose and secure with tie wrap (FIGURE 8.4)
14. Connect the oxygen inlet hose to the receptacle fitting (FIGURE 8.4).
15. Secure the oxygen inlet hose to the receptacle fitting with a tie wrap (FIGURE 8.4).
16. Connect the oxygen inlet hose to the inlet of stage 1 (FIGURE 8.4).
17. Secure the hose with a tie wrap using a tie wrap gun set at #8 (FIGURE 8.4).
18. Secure the control panel gussets to the rear of the base assembly with two mounting screws (FIGURE 8.1).
19. Secure the bottom of the control panel to the pump assembly with the two mounting screws (FIGURE 8.3).
20. Connect the high pressure oxygen line to the cylinder fillport connector. Securely tighten using the 7/16 open ended wrench (FIGURE 8.3).
21. Connect the two wires to the high pressure switch (FIGURE 8.2).
22. Connect the grounding clip to the motor (FIGURE 8.1)
23. Connect the two wires to the capacitor (FIGURE 8.1)
24. Connect the two pin connector that connects the motor to the wiring harness (FIGURE 8.1).
25. Install the cabinet. Refer to Removing/Installing the Cabinet on page 23.
Part No 1154316
51
HomeFill® II AW Compressor
SECTION 9—MOTOR REPLACEMENT ON HOMEFILL UNITS MADE ON OR AFTER 8/1/05
SECTION 9—MOTOR
REPLACEMENT ON HOMEFILL
UNITS MADE ON OR AFTER 8/1/05
NOTE: For replacing the motor on HomeFill units manufactured before 8/1/05 refer to Belt and Pulley Upgrade on page 75.
Tools Required:
7/ open ended wrench, 5/ open ended wrench, Diagonal Cutters, Needle Nose Pliers
16
8
Phillips screwdriver
Disassembly
NOTE: For this procedure, refer to FIGURE 9.1 through FIGURE 9.6.
1. Install an empty cylinder onto the compressor to release the pressure in the lines.
2. Remove the cylinder. Refer to Removing/Installing the Cabinet on page 23.
3. Disconnect power from the HomeFill unit.
4. Remove the cabinet. Refer to Removing/Installing the Cabinet on page 23.
5. Disconnect the two pin connector that connects the motor to the wiring harness (FIGURE 9.1).
6. Using needle nose pliers, disconnect the two wires from the capacitor (FIGURE 9.1).
7. Using needle nose pliers, disconnect the grounding clip from the motor (FIGURE 9.1).
HomeFill® II AW Compressor
52
Part No 1154316
SECTION 9—MOTOR REPLACEMENT ON HOMEFILL UNITS MADE ON OR AFTER 8/1/05
Two Pin
Connector
(STEP 4)
Control Panel
Gusset
Motor
Grounding
Clip
Control Panel
Gusset
Wires (STEP 5)
Capacitor
Mounting
Screw
Mounting Screw
(Hidden behind wiring assembly)
FIGURE 9.1 Motor Replacement on HomeFill Units Made On Or After 8/1/05
8. Disconnect the two wires from the high pressure switch (FIGURE 9.2).
Wires
High Pressure Switch
FIGURE 9.2 Motor Replacement
9. Using the 7/16 open ended wrench, loosen the nut and disconnect the high pressure oxygen line from the cylinder fillport connector (FIGURE 9.3).
10. Loosen the two screws that secure the bottom of the control panel in place (FIGURE 9.3).
11. Remove the two screws that secure the control panel gussets to the rear of the base assembly (FIGURE 9.1).
Part No 1154316
53
HomeFill® II AW Compressor
SECTION 9—MOTOR REPLACEMENT ON HOMEFILL UNITS MADE ON OR AFTER 8/1/05
Cylinder Fillport
Connection
Nut (Underneath)
Mounting Screws
High Pressure Oxygen Line
FIGURE 9.3 Motor Replacement
CAUTION
DO NOT cut the tubing or damage (score) the tubing when removing tie-wraps.
Otherwise HomeFill unit will not fill cylinders correctly.
12. Using diagonal cutters, cut the tie wrap that secures the inlet hose to the inlet of stage 1 (FIGURE 9.4).
13. Disconnect the oxygen inlet hose from the inlet of stage 1 (FIGURE 9.4).
14. Using diagonal cutters, cut the tie wrap that secures the oxygen inlet hose to the receptacle fitting (FIGURE 9.4).
15. Remove the oxygen inlet hose from the receptacle fitting (FIGURE 9.4).
16. Using diagonal cutters, cut the tie wrap that secures the oxygen sensor tubing to the oxygen inlet hose (FIGURE 9.4).
17. Remove the oxygen sensor tubing from the oxygen inlet hose (FIGURE 9.4).
18. Note where each of the four wires and two jumpers are connected to the transformer.
19. Using needle nose pliers, disconnect the connectors from the transformer. See Detail “A” in FIGURE 9.4.
20. Using needle nose pliers, disconnect the two connectors from the power inlet (FIGURE 9.4).
21. Using needle nose pliers, disconnect the two connectors (not shown) from the hour meter (FIGURE 9.4).
22. Lift control panel assembly off of base and set aside (FIGURE 9.4).
HomeFill® II AW Compressor
54
Part No 1154316
SECTION 9—MOTOR REPLACEMENT ON HOMEFILL UNITS MADE ON OR AFTER 8/1/05
Oxygen
Sensor
Tubing
Tie Wrap
Receptacle
Fitting
Oxygen
Inlet Hose
Tie Wrap
Stage 1
Oxygen Inlet
Hose
Tie Wrap
Hour Meter
Power Inlet
Two Connectors
Wire and Jumper
Connectors
Detail “A”
Jumper
Yellow Wires
Orange Wire
Jumper
Transformer
FIGURE 9.4 Motor Replacement
Part No 1154316
55
HomeFill® II AW Compressor
SECTION 9—MOTOR REPLACEMENT ON HOMEFILL UNITS MADE ON OR AFTER 8/1/05
23. Remove the six mounting screws that secure the pump/motor assembly to the base (FIGURE 9.5).
TOP VIEW WITH CONTROL PANEL ASSEMBLY REMOVED
Base
Mounting Screws
Mounting
Screws
Motor/Pump Assembly
Mounting
Screws
FIGURE 9.5 Motor Replacement
24. Carefully place the pump assembly upside down on the table.
25. Remove the timing belt by gently pulling the belt away from the large pulley and motor pulley. Refer to Detail “A” in FIGURE 9.6.
26. Rotate pump assembly 180° so that the motor is facing up.
27. Remove the two mounting screws, two bushings, and two washers that secure the motor to the pump assembly. Refer to Detail “B” and “C” in FIGURE 9.6.
28. Remove the motor from the pump assembly.
NOTE: Retain the two mounting screws, two bushings, and two washers for reassembly.
HomeFill® II AW Compressor
56
Part No 1154316
SECTION 9—MOTOR REPLACEMENT ON HOMEFILL UNITS MADE ON OR AFTER 8/1/05
Pump Assembly
Timing
Belt
Large Pulley
DETAIL “A”
Motor Pulley
DETAIL “B”
Motor
Pump
Assembly
Bushing
Mounting
Screw
DETAIL “C”
Pump
Assembly
Bushing
Mounting
Screw
Washers
FIGURE 9.6 Motor Replacement
Reassembly
NOTE: For this procedure, refer to FIGURE 9.1 through FIGURE 9.6.
1. Position the washers on the pump assembly. Refer to Detail “C” in FIGURE 9.6.
2. Position the motor on the pump assembly. Refer to Detail “B” in FIGURE 9.6.
3. Secure the two washers and motor to the pump assembly with two mounting screws and two bushings. Torque mounting screws to 60‐70 in‐lbs (6.78‐7.9 Nm). Refer to Detail “B” in FIGURE 9.6
Part No 1154316
57
HomeFill® II AW Compressor
SECTION 9—MOTOR REPLACEMENT ON HOMEFILL UNITS MADE ON OR AFTER 8/1/05
4. Install the belt over the large pulley and the small motor pulley. Refer to Detail “A” in FIGURE 9.6.
5. Turn the large pulley and ensure the belt is tracking properly across both pulleys.
6. Position the motor/pump assembly on the base (FIGURE 9.5).
7. Secure the pump/motor assembly to the base with six mounting screws. Torque mounting screws to 2.82‐3.79 Nm (FIGURE 9.5).
8. Position control panel assembly on base (FIGURE 9.4).
9. Connect the two connectors (not shown) to the hour meter (FIGURE 9.4).
10. Connect the two connectors to the power inlet (FIGURE 9.4).
11. Connect the four connectors to the transformer as noted in STEP 18 on page 54 (FIGURE 9.4).
12. Connect the oxygen sensor tubing to the oxygen inlet hose and secure with tie wrap (FIGURE 9.4)
13. Connect the oxygen inlet hose to the receptacle fitting (FIGURE 9.4).
14. Secure the oxygen inlet hose to the receptacle fitting with a tie wrap (FIGURE 9.4).
15. Connect the oxygen inlet hose to the inlet of stage 1 (FIGURE 9.4).
16. Secure the hose with a tie wrap using a tie wrap gun set at #8 (FIGURE 9.4).
17. Secure the control panel gussets to the rear of the base assembly with two mounting screws (FIGURE 9.1).
18. Secure the bottom of the control panel to the pump assembly with the two mounting screws (FIGURE 9.3).
19. Connect the high pressure oxygen line to the cylinder fillport connector. Securely tighten using the 7/16 open ended wrench (FIGURE 9.3).
20. Connect the two wires to the high pressure switch (FIGURE 9.2).
21. Connect the grounding clip to the motor (FIGURE 9.1)
22. Connect the two wires to the capacitor (FIGURE 9.1)
23. Connect the two pin connector that connects the motor to the wiring harness (FIGURE 9.1).
24. Install the cabinet. Refer to Removing/Installing the Cabinet on page 23.
HomeFill® II AW Compressor
58
Part No 1154316
SECTION 10—COMPRESSOR REPLACEMENT
SECTION 10—COMPRESSOR
REPLACEMENT
HomeFill Units Manufactured Before 8/1/05
Tools Required: 7/16 open ended wrench, 5/8 open ended wrench, Diagonal Cutters, Needle Nose Pliers, Phillips screwdriver
Disassembly
NOTE: For this procedure, refer to FIGURE 10.1 through FIGURE 10.5.
1. Install an empty cylinder onto the compressor to release the pressure in the lines.
2. Remove the cylinder. Refer to Removing/Installing the Cabinet on page 23.
3. Disconnect power from the HomeFill unit.
4. Remove the cabinet. Refer to Removing/Installing the Cabinet on page 23.
5. Disconnect the two pin connector that connects the motor to the wiring harness (FIGURE 10.1).
6. Using needle nose pliers, disconnect the two wires from the capacitor (FIGURE 10.1).
7. Using needle nose pliers, disconnect the grounding clip from the motor (FIGURE 10.1).
Part No 1154316
59
HomeFill® II AW Compressor
SECTION 10—COMPRESSOR REPLACEMENT
Two Pin
Connector
(STEP 4)
Control Panel
Gusset
Motor
Grounding
Clip
Control Panel
Gusset
Wires (STEP 5)
Capacitor
Mounting Screw
(Hidden behind wiring assembly)
Mounting
Screw
FIGURE 10.1 Compressor Replacement - HomeFill Units Manufactured Before 8/1/05
HomeFill® II AW Compressor
60
Part No 1154316
SECTION 10—COMPRESSOR REPLACEMENT
8. Disconnect the two wires from the high pressure switch (FIGURE 10.2).
Wires
High Pressure Switch
FIGURE 10.2 Compressor Replacement - HomeFill Units Manufactured Before 8/1/05
9. Using the 7/16 open ended wrench, loosen the nut and disconnect the high pressure oxygen line from the cylinder fillport connector (FIGURE 10.3).
10. Loosen the two screws that secure the bottom of the control panel in place (FIGURE 10.3).
11. Remove the two screws that secure the control panel gussets to the rear of the base assembly (FIGURE 10.1).
Cylinder Fillport
Connection
Nut (Underneath)
Mounting Screws
High Pressure Oxygen Line
FIGURE 10.3 Compressor Replacement - HomeFill Units Manufactured Before 8/1/05
CAUTION
DO NOT cut the tubing or damage (score) the tubing when removing tie-wraps.
Otherwise, HomeFill unit will not fill cylinders correctly.
Part No 1154316
61
HomeFill® II AW Compressor
SECTION 10—COMPRESSOR REPLACEMENT
12. Using diagonal cutters, cut the tie wrap that secures the inlet hose to the inlet of stage 1 (FIGURE 10.4).
13. Disconnect the oxygen inlet hose from the inlet of stage 1 (FIGURE 10.4).
14. Using diagonal cutters, cut the tie wrap that secures the oxygen inlet hose to the receptacle fitting (FIGURE 10.4).
15. Remove the oxygen inlet hose from the receptacle fitting (FIGURE 10.4).
16. Using diagonal cutters, cut the tie wrap that secures the oxygen sensor tubing to the oxygen inlet hose (FIGURE 10.4).
17. Remove the oxygen sensor tubing from the oxygen inlet hose (FIGURE 10.4).
18. Note where each of the four wires and two jumpers are connected to the transformer.
19. Using needle nose pliers, disconnect the connectors from the transformer. See Detail “A” in FIGURE 10.4.
20. Using needle nose pliers, disconnect the two connectors from the power inlet (FIGURE 10.4).
21. Using needle nose pliers, disconnect the two connectors (not shown) from the hour meter (FIGURE 10.4).
22. Lift control panel assembly off of base and set aside (FIGURE 10.4).
HomeFill® II AW Compressor
62
Part No 1154316
SECTION 10—COMPRESSOR REPLACEMENT
7
Oxygen
Sensor
Tubing
Tie Wrap
Receptacle
Fitting
Oxygen
Inlet Hose
Tie Wrap
Stage 1
Oxygen Inlet
Hose
Tie Wrap
Hour Meter
Power Inlet
Two Connectors
Wire and Jumper
Connectors
Detail “A”
Jumper
Yellow Wires
Orange Wire
Jumper
Transformer
FIGURE 10.4 Compressor Replacement - HomeFill Units Manufactured Before 8/1/05
Part No 1154316
63
HomeFill® II AW Compressor
SECTION 10—COMPRESSOR REPLACEMENT
23. Remove the six mounting screws that secure the compressor/motor assembly to the base (FIGURE 10.5).
24. Remove the existing compressor/motor assembly from the base and set aside.
TOP VIEW WITH CONTROL PANEL ASSEMBLY REMOVED
Base
Mounting Screws
Mounting
Screws
Motor/Pump Assembly
Mounting
Screws
FIGURE 10.5 Compressor Replacement - HomeFill Units Manufactured Before 8/1/05
Assembly of New Motor/Pump Assembly
NOTE: For this procedure, refer to FIGURE 10.6.
New Components Needed: Motor with Pulley (and attaching hardware), Timing Belt, Pump Assembly.
NOTE: Pump assembly comes with the connecting lines between stages (FIGURE 10.6).
1. Position the washers on the pump assembly. Refer to Detail “C” in FIGURE 10.6.
2. Position the motor on the pump assembly. Refer to Detail “B” in FIGURE 10.6.
3. Press the large pulley onto the pump assembly crankshaft. Refer to Detail “A” FIGURE 10.6 on page 66.
HomeFill® II AW Compressor
64
Part No 1154316
SECTION 10—COMPRESSOR REPLACEMENT
4. Secure the large pulley to the pump assembly crankshaft with a mounting screw and washer. Torque to 25‐30 in‐lbs (2.82‐3.74 Nm). Refer to Detail “A” in FIGURE 10.6 on page 66.
5. Secure the two washers and motor to the pump assembly with two mounting screws and two bushings. Torque mounting screws to 60‐70 in‐lbs (6.78‐7.9 Nm). Refer to Detail “B” and “C” in FIGURE 10.6
6. Install the timing belt over the large pulley and the small motor pulley. Refer to Detail “A” in FIGURE 10.6.
7. Turn the large pulley and ensure the timing belt is tracking properly across both pulleys.
Part No 1154316
65
HomeFill® II AW Compressor
SECTION 10—COMPRESSOR REPLACEMENT
Pump Assembly
Timing
Belt
Large Pulley
DETAIL “A”
Mounting Screw
and Washer
Motor Pulley
Pump Assembly
Crankshaft
Connecting Lines
Between Stages
DETAIL “B”
Motor
Pump
Assembly
Bushing
Mounting
Screw
DETAIL “C”
Bushing
Pump
Assembly
Mounting
Screw
Washers
FIGURE 10.6 Compressor Replacement - Assembly of New Motor/Pump Assembly
Reassembly
NOTE: For this procedure, refer to FIGURE 10.1 through FIGURE 10.5.
1. Position the motor/pump assembly on the base (FIGURE 10.5).
2. Secure the motor/pump assembly to the base with six mounting screws. Torque mounting screws to 25‐30 in‐lbs (2.82‐3.39 Nm) (FIGURE 10.5).
3. Position control panel assembly on base (FIGURE 10.4).
4. Connect the two connectors (not shown) to the hour meter (FIGURE 10.4).
HomeFill® II AW Compressor
66
Part No 1154316
SECTION 10—COMPRESSOR REPLACEMENT
5. Connect the two connectors to the power inlet (FIGURE 10.4).
6. Connect the four connectors to the transformer as noted in STEP 18 on page 62 (FIGURE 10.4).
7. Connect the oxygen sensor tubing to the oxygen inlet hose and secure with tie wrap (FIGURE 10.4).
8. Connect the oxygen inlet hose to the receptacle fitting (FIGURE 10.4).
9. Secure the oxygen inlet hose to the receptacle fitting with a tie wrap (FIGURE 10.4).
10. Connect the oxygen inlet hose to the inlet of stage 1 (FIGURE 10.4).
11. Secure the hose with a tie wrap using a tie wrap gun set at #8 (FIGURE 10.4).
12. Secure the control panel gussets to the rear of the base assembly with two mounting screws (FIGURE 10.1).
13. Secure the bottom of the control panel to the pump assembly with the two mounting screws (FIGURE 10.3).
14. Connect the high pressure oxygen line to the cylinder fillport connector. Securely tighten using the 7/16 open ended wrench (FIGURE 10.2).
15. Connect the two wires to the high pressure switch (FIGURE 10.2).
16. Connect the grounding clip to the motor (FIGURE 10.1).
17. Connect the two wires to the capacitor (FIGURE 10.1).
18. Connect the two pin connector that connects the motor to the wiring harness (FIGURE 10.1).
19. Install the cabinet. Refer to Removing/Installing the Cabinet on page 23.
Part No 1154316
67
HomeFill® II AW Compressor
SECTION 10—COMPRESSOR REPLACEMENT
HomeFill Units Manufactured After 8/1/05
Tools Required:
7
/16 open ended wrench, 5/8 open ended wrench, Diagonal Cutters, Needle Nose Pliers
Phillips screwdriver
Disassembly of HomeFill Units
NOTE: For this procedure, refer to FIGURE 10.7 through FIGURE 10.12.
1. Install an empty cylinder onto the compressor to release the pressure in the lines.
2. Remove the cylinder. Refer to Removing/Installing the Cabinet on page 23.
3. Disconnect power from the HomeFill unit.
4. Remove the cabinet. Refer to Removing/Installing the Cabinet on page 23.
5. Disconnect the two pin connector that connects the motor to the wiring harness (FIGURE 10.7).
6. Using needle nose pliers, disconnect the two wires from the capacitor (FIGURE 10.7).
7. Using needle nose pliers, disconnect the grounding clip from the motor (FIGURE 10.7).
Control Panel Gusset
Two Pin
Connector
(STEP 4)
Motor
Grounding
Clip
Control Panel
Gusset
Wires (STEP 5)
Capacitor
Mounting Screw
(Hidden behind wiring assembly)
Mounting
Screw
FIGURE 10.7 Compressor Replacement - HomeFill Units Manufactured After 8/1/05
HomeFill® II AW Compressor
68
Part No 1154316
SECTION 10—COMPRESSOR REPLACEMENT
8. Disconnect the two wires from the high pressure switch (FIGURE 10.8).
Wires
High Pressure Switch
FIGURE 10.8 Compressor Replacement - HomeFill Units Manufactured After 8/1/05
9. Using the 7/16 open ended wrench, loosen the nut and disconnect the high pressure oxygen line from the cylinder fillport connector (FIGURE 10.9).
10. Loosen the two screws that secure the bottom of the control panel in place (FIGURE 10.9).
11. Remove the two screws that secure the control panel gussets to the rear of the base assembly (FIGURE 10.7).
Cylinder Fillport
Connection
Nut (Underneath)
Mounting Screws
High Pressure Oxygen Line
FIGURE 10.9 Compressor Replacement - HomeFill Units Manufactured After 8/1/05
CAUTION
DO NOT cut the tubing or damage (score) the tubing when removing tie-wraps.
Otherwise, HomeFill unit will not fill cylinders correctly.
Part No 1154316
69
HomeFill® II AW Compressor
SECTION 10—COMPRESSOR REPLACEMENT
12. Using diagonal cutters, cut the tie wrap that secures the inlet hose to the inlet of stage 1 (FIGURE 10.10).
13. Disconnect the oxygen inlet hose from the inlet of stage 1 (FIGURE 10.10).
14. Using diagonal cutters, cut the tie wrap that secures the oxygen inlet hose to the receptacle fitting (FIGURE 10.10).
15. Remove the oxygen inlet hose from the receptacle fitting (FIGURE 10.10).
16. Using diagonal cutters, cut the tie wrap that secures the oxygen sensor tubing to the oxygen inlet hose (FIGURE 10.10).
17. Remove the oxygen sensor tubing from the oxygen inlet hose (FIGURE 10.10).
18. Note where each of the four wires and two jumpers are connected to the transformer.
19. Using needle nose pliers, disconnect the connectors from the transformer. See Detail “A” in FIGURE 10.10.
20. Using needle nose pliers, disconnect the two connectors from the power inlet (FIGURE 10.10).
21. Using needle nose pliers, disconnect the two connectors (not shown) from the hour meter (FIGURE 10.10).
22. Lift control panel assembly off of base and set aside (FIGURE 10.10).
HomeFill® II AW Compressor
70
Part No 1154316
SECTION 10—COMPRESSOR REPLACEMENT
Oxygen
Sensor
Tubing
Tie Wrap
Receptacle
Fitting
Oxygen
Inlet Hose
Tie Wrap
Stage 1
Oxygen Inlet
Hose
Tie Wrap
Hour Meter
Power Inlet
Two Connectors
Wire and Jumper
Connectors
Detail “A”
Jumper
Yellow Wires
Orange Wire
Jumper
Transformer
FIGURE 10.10 Compressor Replacement - HomeFill Units Manufactured After 8/1/05
Part No 1154316
71
HomeFill® II AW Compressor
SECTION 10—COMPRESSOR REPLACEMENT
23. Remove the six mounting screws that secure the compressor/motor assembly to the base (FIGURE 10.11).
24. Remove the compressor/motor assembly from the base.
TOP VIEW WITH CONTROL PANEL ASSEMBLY REMOVED
Base
Mounting Screws
Mounting
Screws
Motor/Pump Assembly
Mounting
Screws
FIGURE 10.11 Compressor Replacement - HomeFill Units Manufactured After 8/1/05
25. Carefully place the pump assembly upside down on the table.
26. Remove the timing belt by gently pulling the belt away from the large pulley and motor pulley. Refer to Detail “A” in FIGURE 10.12.
27. Rotate pump assembly 180° so that the motor is facing up.
28. Remove the two mounting screws, two bushings, and two washers that secure the motor to the pump assembly. Refer to Detail “B” and “C” in FIGURE 10.12.
29. Remove the motor from the pump assembly.
NOTE: Retain the two mounting screws, two bushings, and two washers for reassembly.
30. Remove the mounting screw and washer (Detail “A”) that secure the large pulley to the pump assembly crankshaft. Refer to FIGURE 10.12 on page 73.
HomeFill® II AW Compressor
72
Part No 1154316
SECTION 10—COMPRESSOR REPLACEMENT
31. Remove the large pulley from the pump assembly crankshaft.
Pump Assembly
Timing
Belt
Large Pulley
DETAIL “A”
Mounting Screw
and Washer
Motor Pulley
Pump Assembly
Crankshaft
DETAIL “B”
Motor
Pump
Assembly
Bushing
Mounting
Screw
DETAIL “C”
Bushing
Pump
Assembly
Mounting
Screw
Washers
FIGURE 10.12 Compressor Replacement - HomeFill Units Manufactured After 8/1/05
Reassembly of HomeFill Units
NOTE: For this procedure, refer to FIGURE 10.7 through FIGURE 10.12.
1. Position the washers on the new pump assembly. Refer to Detail “C” in FIGURE 10.12.
2. Position the motor on the new pump assembly. Refer to Detail “B” in FIGURE 10.12.
3. Press the large pulley onto the new pump assembly crankshaft. Refer to Detail “A” FIGURE 10.12 on page 73.
Part No 1154316
73
HomeFill® II AW Compressor
SECTION 10—COMPRESSOR REPLACEMENT
4. Secure the large pulley to the pump assembly shaft with a mounting screw and washer. Torque to 25‐30 in‐lbs (2.82‐3.39 Nm). Refer to Detail “A” in FIGURE 10.12 on page 73.
5. Secure the two washers and motor to the pump assembly with two mounting screws and two bushings. Torque mounting screws to 60‐70 in‐lbs (6.78‐7.9 Nm). Refer to Detail “B” and “C” in FIGURE 10.12.
6. Install the timing belt over the large pulley and the small motor pulley. Refer to Detail “A” in FIGURE 10.12.
7. Turn the large pulley and ensure the belt is tracking properly across both pulleys.
8. Position the motor/pump assembly on the base (FIGURE 10.11).
9. Secure the pump/motor assembly to the base with six mounting screws. Torque mounting screws to 25‐30 in‐lbs (2.82‐3.39 Nm) (FIGURE 10.11).
10. Position control panel assembly on base (FIGURE 10.10).
11. Connect the two connectors (not shown) to the hour meter (FIGURE 10.10).
12. Connect the two connectors to the power inlet (FIGURE 10.10).
13. Connect the four connectors to the transformer as noted in STEP 18 on page 70 (FIGURE 10.10).
14. Connect the oxygen sensor tubing to the oxygen inlet hose and secure with tie wrap (FIGURE 10.10)
15. Connect the oxygen inlet hose to the receptacle fitting (FIGURE 10.10).
16. Secure the oxygen inlet hose to the receptacle fitting with a tie wrap (FIGURE 10.10).
17. Connect the oxygen inlet hose to the inlet of stage 1 (FIGURE 10.10).
18. Secure the hose with a tie wrap using a tie wrap gun set at #8 (FIGURE 10.10).
19. Secure the control panel gussets to the rear of the base assembly with two mounting screws (FIGURE 10.7).
20. Secure the bottom of the control panel to the pump assembly with the two mounting screws (FIGURE 10.9).
21. Connect the high pressure oxygen line to the cylinder fillport connector. Securely tighten using the 7/16 open ended wrench (FIGURE 10.9).
22. Connect the two wires to the high pressure switch (FIGURE 10.8).
23. Connect the grounding clip to the motor (FIGURE 10.7)
24. Connect the two wires to the capacitor (FIGURE 10.7)
25. Connect the two pin connector that connects the motor to the wiring harness (FIGURE 10.7).
26. Install the cabinet. Refer to Removing/Installing the Cabinet on page 23.
HomeFill® II AW Compressor
74
Part No 1154316
SECTION 11—BELT AND PULLEY UPGRADE
SECTION 11—BELT AND PULLEY
UPGRADE
NOTE: For HomeFill units manufactured before 8/1/05.
Disassembly
NOTE: For this procedure, refer to FIGURE 11.1 through FIGURE 11.8.
1. Install an empty cylinder onto the compressor to release pressure in lines. Refer to Connecting/Disconnecting Cylinder to/from Compressor on page 17
2. Remove cylinder. Refer to Connecting/Disconnecting Cylinder to/from Compressor on page 17
3. Disconnect power from the HomeFill unit.
4. Remove the cabinet. Refer to Removing/Installing the Cabinet on page 23.
5. Disconnect the two pin connector that connects the motor to the wiring harness (FIGURE 11.1).
6. Using needle nose pliers, disconnect the two wires from the capacitor (FIGURE 11.1).
7. Using needle nose pliers, disconnect the grounding clip from the motor (FIGURE 11.1).
Two Pin
Connector
(STEP 4)
Control Panel
Gusset
Motor
Grounding
Clip
Control Panel
Gusset
Wires (STEP 5)
Capacitor
Mounting Screw
(Hidden behind wiring assembly)
Mounting
Screw
FIGURE 11.1 Belt and Pulley Upgrade
Part No 1154316
75
HomeFill® II AW Compressor
SECTION 11—BELT AND PULLEY UPGRADE
8. Disconnect the two wires from the high pressure switch (FIGURE 11.2).
Wires
High Pressure Switch
FIGURE 11.2 Belt and Pulley Upgrade
9. Using the 7/16 open ended wrench, loosen the nut and disconnect the high pressure oxygen line from the cylinder fillport connector (FIGURE 11.3).
10. Loosen the two screws that secure the bottom of the control panel in place (FIGURE 11.3).
11. Remove the two screws that secure the control panel gussets to the rear of the base assembly (FIGURE 11.1).
Cylinder Fillport
Connector
Mounting Screws
Nut (Underneath)
High Pressure Oxygen Line
FIGURE 11.3 Belt and Pulley Upgrade
12. Using diagonal cutters, cut the tie wrap that secures the inlet hose to the inlet of stage 1 (FIGURE 11.4).
NOTE: DO NOT cut the tubing.
13. Disconnect the oxygen inlet hose from the inlet of stage 1 (FIGURE 11.4).
HomeFill® II AW Compressor
76
Part No 1154316
SECTION 11—BELT AND PULLEY UPGRADE
14. Using diagonal cutters, cut the tie wrap that secures the oxygen inlet hose to the receptacle fitting (FIGURE 11.4).
15. Remove the oxygen inlet hose from the receptacle fitting (FIGURE 11.4).
16. Using diagonal cutters, cut the tie wrap that secures the oxygen sensor tubing to the oxygen inlet hose (FIGURE 11.4).
17. Remove the oxygen sensor tubing from the oxygen inlet hose (FIGURE 11.4).
18. Note where each of the four wires and two jumpers are connected to the transformer.
19. Using needle nose pliers, disconnect the connectors from the transformer. See Detail “A” in FIGURE 11.4.
20. Using needle nose pliers, disconnect the two connectors from the power inlet (FIGURE 11.4).
21. Using needle nose pliers, disconnect the two connectors (not shown) from the hour meter (FIGURE 11.4).
22. Lift control panel assembly off of base and set aside (FIGURE 11.4).
Part No 1154316
77
HomeFill® II AW Compressor
SECTION 11—BELT AND PULLEY UPGRADE
Oxygen
Sensor
Tubing
Tie Wrap
Receptacle
Fitting
Oxygen
Inlet Hose
Tie Wrap
Stage 1
Oxygen Inlet
Hose
Tie Wrap
Hour Meter
Power Inlet
Two Connectors
Wire and Jumper
Connectors
Detail “A”
Jumper
Yellow Wires
Orange Wire
Jumper
Transformer
FIGURE 11.4 Belt and Pulley Upgrade
HomeFill® II AW Compressor
78
Part No 1154316
SECTION 11—BELT AND PULLEY UPGRADE
23. Remove the six mounting screws that secure the pump/motor assembly to the base (FIGURE 11.5).
TOP VIEW WITH CONTROL PANEL ASSEMBLY REMOVED
Base
Mounting Screws
Motor/Pump Assembly
Mounting
Screws
Mounting
Screws
FIGURE 11.5 Belt and Pulley Upgrade
24. Carefully place the pump assembly upside down on the table.
25. Using a 7/16 open ended wrench, loosen the two nuts securing the motor to the pump assembly (FIGURE 11.6).
26. Slide the motor to remove the belt tension and remove the timing belt (FIGURE 11.6).
27. Remove the two nuts (Detail “A”), two washers (Detail “C”), two mounting screws (Detail “B”), and two bushings (Detail “B”). Refer to FIGURE 11.6 on page 80. 28. Remove the motor from the pump assembly.
29. Retain the bushings, mounting screws, washers and nuts for re‐ assembly.
30. Remove the mounting screw and washer (Detail “A”) that secure the large pulley to the pump assembly shaft. Refer to FIGURE 11.6 on page 80.
31. Remove the large pulley from the pump crankshaft.
Part No 1154316
79
HomeFill® II AW Compressor
SECTION 11—BELT AND PULLEY UPGRADE
32. Retain mounting screw and washer for re‐assembly.
Timing
Belt
Nut
Large Pulley
DETAIL “A”
Pump Assembly Shaft
Motor Pulley
Mounting Screw
and Washer (Not
Shown)
Pump
Assembly
Nut
Motor
DETAIL “B”
Motor
Bushing
Mounting
Screw
DETAIL “C”
Pump
Assembly
Pump
Assembly
Bushing
Mounting
Screw
Washers
FIGURE 11.6 Belt and Pulley Upgrade
HomeFill® II AW Compressor
80
Part No 1154316
SECTION 11—BELT AND PULLEY UPGRADE
Reassembly
NOTE: For this procedure, refer to FIGURE 11.1 through FIGURE 11.8.
1. Rotate pump assembly 180°. 2. Place the new motor (with motor pulley) assembly and washers onto the pump assembly. Refer to Details “B” and “C” of FIGURE 11.6.
3. Install the two mounting screws, bushings and nuts. DO NOT fully tighten hardware at this time. Refer to Details “A”, “B” and “C” of FIGURE 11.6.
4. Rotate pump assembly 180° so that the motor is facing down and motor pulley is facing up (FIGURE 11.7).
5. Slide the motor spacing tool over the pump crankshaft.
6. Slide the motor towards the pump until the motor shaft is in contact with the motor spacing tool. Ensure that the motor spacing tool is under the motor pulley.
7. While holding the motor against the motor spacing tool”, tighten the motor mounting hardware to between 60‐70 in‐lbs (6.78‐7.9 Nm).
8. Rotate the motor spacing tool away from the motor.
9. Remove the motor spacing tool from the pump crankshaft.
Mounting Screw and nut
Pump
Crankshaft
Motor Pulley
Motor Spacing Tool
Mounting Screw, Washer and nut
FIGURE 11.7 Belt and Pulley Upgrade
10. Press the new large pulley onto the pump crankshaft (FIGURE 11.8).
11. Install the mounting screw and washer onto the pump crankshaft to secure the large pulley in place. Torque to 25‐30 in‐lbs (2.82‐3.39 Nm) (FIGURE 11.8).
12. Install the new timing belt over the large pulley and motor pulley (FIGURE 11.8).
13. Turn the large pulley and ensure the timing belt is tracking properly across both pulleys (FIGURE 11.8).
Part No 1154316
81
HomeFill® II AW Compressor
SECTION 11—BELT AND PULLEY UPGRADE
Timing Belt
Large Pulley
Mounting Screw and Washer
Attached to Pump
Crankshaft
Motor Pulley
FIGURE 11.8 Belt and Pulley Upgrade
14. Position the motor/pump assembly on the base (FIGURE 11.5).
15. Secure the pump/motor assembly to the base with six mounting screws. Torque mounting screws to 25‐30 in‐lbs (2.82‐3.39 Nm) (FIGURE 11.5).
16. Position control panel assembly on base (FIGURE 11.4).
17. Connect the two connectors (not shown) to the hour meter (FIGURE 11.4).
18. Connect the two connectors to the power inlet (FIGURE 11.4).
19. Connect the four connectors to the transformer as noted in STEP 18 on page 77 (FIGURE 11.4).
20. Connect the oxygen sensor tubing to the oxygen inlet hose and secure with tie wrap (FIGURE 11.4)
21. Connect the oxygen inlet hose to the receptacle fitting (FIGURE 11.4).
22. Secure the oxygen inlet hose to the receptacle fitting with a tie wrap (FIGURE 11.4).
23. Connect the oxygen inlet hose to the inlet of stage 1 (FIGURE 11.4).
24. Secure the hose with a tie wrap using a tie wrap gun set at #8 (FIGURE 11.4).
25. Secure the control panel gussets to the rear of the base assembly with two mounting screws (FIGURE 11.1).
26. Secure the bottom of the control panel to the pump assembly with the two mounting screws (FIGURE 11.3).
27. Connect the high pressure oxygen line to the cylinder fillport connector. Securely tighten nut using the 7/16 open ended wrench (FIGURE 11.3).
28. Connect the two wires to the high pressure switch (FIGURE 11.2).
29. Connect the grounding clip to the motor (FIGURE 11.1).
HomeFill® II AW Compressor
82
Part No 1154316
SECTION 11—BELT AND PULLEY UPGRADE
30. Connect the two wires to the capacitor (FIGURE 11.1).
31. Connect the two pin connector that connects the motor to the wiring harness (FIGURE 11.1).
32. Install the cabinet. Refer to Removing/Installing the Cabinet on page 23.
Part No 1154316
83
HomeFill® II AW Compressor
SECTION 12—TIMING BELT REPLACEMENT
SECTION 12—TIMING BELT
REPLACEMENT
NOTE: This procedure is for HomeFill units manufactured on or after 8/1/2005. Units manufactured before 8/1/2005 MUST have the drive system upgraded. Refer to Belt and Pulley Upgrade on page 75.
Tools Required:
7
/16 open ended wrench, 5/8 open ended wrench, Diagonal Cutters, Needle Nose Pliers
Phillips screwdriver
Disassembly
NOTE: For this procedure, refer to FIGURE 12.1 through FIGURE 12.6.
1. Install an empty cylinder onto the compressor to release the pressure in the lines.
2. Remove the cylinder. Refer to Removing/Installing the Cabinet on page 23.
3. Disconnect power from the HomeFill unit.
4. Remove the cabinet. Refer to Removing/Installing the Cabinet on page 23.
5. Disconnect the two pin connector that connects the motor to the wiring harness (FIGURE 12.1).
6. Using needle nose pliers, disconnect the two wires from the capacitor (FIGURE 12.1).
7. Using needle nose pliers, disconnect the grounding clip from the motor (FIGURE 12.1).
HomeFill® II AW Compressor
84
Part No 1154316
SECTION 12—TIMING BELT REPLACEMENT
Two Pin
Connector
(STEP 4)
Control Panel
Gusset
Motor
Grounding
Clip
Control Panel
Gusset
Wires (STEP 5)
Capacitor
Mounting
Screw
Mounting Screw
(Hidden behind wiring assembly)
FIGURE 12.1 Timing Belt Replacement
8. Disconnect the two wires from the high pressure switch (FIGURE 12.2).
Wires
High Pressure Switch
FIGURE 12.2 Timing Belt Replacement
9. Using the 7/16 open ended wrench, loosen the nut and disconnect the high pressure oxygen line from the cylinder fillport connector (FIGURE 12.3).
10. Loosen the two screws that secure the bottom of the control panel in place (FIGURE 12.3).
11. Remove the two screws that secure the control panel gussets to the rear of the base assembly (FIGURE 12.1).
Part No 1154316
85
HomeFill® II AW Compressor
SECTION 12—TIMING BELT REPLACEMENT
Cylinder Fillport
Connection
Nut (Underneath)
Mounting Screws
High Pressure Oxygen Line
FIGURE 12.3 Timing Belt Replacement
12. Using diagonal cutters, cut the tie wrap that secures the inlet hose to the inlet of stage 1 (FIGURE 12.4).
NOTE: DO NOT cut the tubing.
13. Disconnect the oxygen inlet hose from the inlet of stage 1 (FIGURE 12.4).
14. Using diagonal cutters, cut the tie wrap that secures the oxygen inlet hose to the receptacle fitting (FIGURE 12.4).
15. Remove the oxygen inlet hose from the receptacle fitting (FIGURE 12.4).
16. Using diagonal cutters, cut the tie wrap that secures the oxygen sensor tubing to the oxygen inlet hose (FIGURE 12.4).
17. Remove the oxygen sensor tubing from the oxygen inlet hose (FIGURE 12.4).
18. Note where each of the four wires and two jumpers are connected to the transformer.
19. Using needle nose pliers, disconnect the connectors from the transformer. See Detail “A” in FIGURE 12.4.
20. Using needle nose pliers, disconnect the two connectors from the power inlet (FIGURE 12.4).
21. Using needle nose pliers, disconnect the two connectors (not shown) from the hour meter (FIGURE 12.4).
22. Lift control panel assembly off of base and set aside (FIGURE 12.4).
HomeFill® II AW Compressor
86
Part No 1154316
SECTION 12—TIMING BELT REPLACEMENT
Oxygen
Sensor
Tubing
Tie Wrap
Receptacle
Fitting
Oxygen
Inlet Hose
Tie Wrap
Stage 1
Oxygen Inlet
Hose
Tie Wrap
Hour Meter
Power Inlet
Two Connectors
Wire and Jumper
Connectors
Detail “A”
Jumper
Yellow Wires
Orange Wire
Jumper
Transformer
FIGURE 12.4 Timing Belt Replacement
Part No 1154316
87
HomeFill® II AW Compressor
SECTION 12—TIMING BELT REPLACEMENT
23. Remove the six mounting screws that secure the pump/motor assembly to the base (FIGURE 12.5).
TOP VIEW WITH CONTROL PANEL ASSEMBLY REMOVED
Base
Mounting Screws
Mounting
Screws
Motor/Pump Assembly
Mounting
Screws
FIGURE 12.5 Timing Belt Replacement
24. Carefully place the pump assembly upside down on the table.
25. Remove the timing belt by gently pulling the belt away from the large pulley and motor pulley (FIGURE 12.6).
HomeFill® II AW Compressor
88
Part No 1154316
SECTION 12—TIMING BELT REPLACEMENT
Pump Assembly
Motor Pulley
Timing
Belt
Large Pulley
FIGURE 12.6 Timing Belt Replacement
Reassembly
NOTE: For this procedure, refer to FIGURE 12.1 through FIGURE 12.6.
1. Install new belt over the large pulley and the small motor pulley. Refer to Detail “A” in FIGURE 12.6.
2. Turn the large pulley and ensure the belt is tracking properly across both pulleys.
3. Position the motor/pump assembly on the base (FIGURE 12.5).
4. Secure the pump/motor assembly to the base with six mounting screws. Torque mounting screws to 25‐30 in‐lbs (2.82‐3.39 Nm) (FIGURE 12.5).
5. Position control panel assembly on base (FIGURE 12.4).
6. Connect the two connectors (not shown) to the hour meter (FIGURE 12.4).
7. Connect the two connectors to the power inlet (FIGURE 12.4).
8. Connect the four connectors to the transformer as noted in STEP 18 on page 86 (FIGURE 12.4).
9. Connect the oxygen sensor tubing to the oxygen inlet hose and secure with tie wrap (FIGURE 12.4).
10. Connect the oxygen inlet hose to the receptacle fitting (FIGURE 12.4).
11. Secure the oxygen inlet hose to the receptacle fitting with a tie wrap (FIGURE 12.4).
12. Connect the oxygen inlet hose to the inlet of stage 1 (FIGURE 12.4).
13. Secure the hose with a tie wrap using a tie wrap gun set at #8 (FIGURE 12.4).
14. Secure the control panel gussets to the rear of the base assembly with two mounting screws (FIGURE 12.1).
15. Secure the bottom of the control panel to the pump assembly with the two mounting screws (FIGURE 12.3).
16. Connect the high pressure oxygen line to the cylinder fillport connector. Securely tighten using the 7/16 open ended wrench (FIGURE 12.3).
17. Connect the two wires to the high pressure switch (FIGURE 12.2).
Part No 1154316
89
HomeFill® II AW Compressor
SECTION 12—TIMING BELT REPLACEMENT
18. Connect the grounding clip to the motor (FIGURE 12.1).
19. Connect the two wires to the capacitor (FIGURE 12.1).
20. Connect the two pin connector that connects the motor to the wiring harness (FIGURE 12.1).
21. Install the cabinet. Refer to Removing/Installing the Cabinet on page 23.
HomeFill® II AW Compressor
90
Part No 1154316
SECTION 13—WIRING ASSEMBLIES
SECTION 13—WIRING ASSEMBLIES
Replacing Wiring Assemblies
DANGER
To prevent electrical shock, ALWAYS disconnect compressor from electrical
outlet before servicing.
Full View of Wiring Harnesses
NOTE: For this procedure, refer to FIGURE 13.1.
HF Wire
Assembly Harness
Bleed Resistor
Assembly 2
NOTE: The bleed resistors in this view are for units made before 7/
3/06. On units made after 7/3/06, bleed resistors are on the PC board with a separate wiring harness.
Transformer
Assembly Wire
Harness
Bleed Resistor
Assembly 1
FIGURE 13.1 Full View of Wiring Harnesses
Replacing Transformer Assembly
NOTE: For this procedure, refer to FIGURE 13.2 on page 92.
Tools required for this procedure are:
• Phillips screwdriver
1. Remove the cabinet. Refer to Removing/Installing the Cabinet on page 23. 2. Remove the control panel. Refer to Removing/Installing Control Panel on page 27. 3. Remove the two mounting screws that secure the transformer to the base (Detail “A”).
4. Disconnect the connector from the circuit board (Detail “B”).
5. Remove the transformer assembly wire harness from the HomeFill compressor.
Part No 1154316
91
HomeFill® II AW Compressor
SECTION 13—WIRING ASSEMBLIES
6. Secure the new transformer to the base with the two mounting screws (Detail “A”). Securely tighten
7. Connect the transformer assembly wire harness to the circuit board (Detail “B”).
8. Install the control panel. Refer to Removing/Installing Control Panel on page 27.
9. Install the cabinet. Refer to Removing/Installing the Cabinet on page 23
DETAIL “A”
DETAIL “B”
Transformer Assembly Wire Harness
Transformer
Assembly Wire
Harness
Circuit Board
Connector
Mounting Screw
FIGURE 13.2 Replacing Transformer Assembly
Replacing Bleed Resistor Assemblies
Units Manufacture Before 7/3/06
NOTE: For this procedure, refer to FIGURE 13.3 on page 93.
1. Remove the cabinet. Refer to Removing/Installing the Cabinet on page 23.
2. Disconnect bleed resistor assembly 1 from the power inlet (Detail “A”).
3. Disconnect the bleed resistor assembly 1 from the grounding clip on the motor assembly (Detail “B”).
4. Disconnect bleed resistor assembly 2 from the control panel (Detail “C”).
5. Disconnect the bleed resistor assembly 2 from the grounding clip on the motor assembly (Detail “B”).
6. Connect one end of the new bleed resistor assembly 1 to the power inlet.
7. Connect the other end of the new bleed resistor assembly 1 to the grounding clip on the motor assembly.
8. Connect one end of the new bleed resistor assembly 2 to the other connection point on the grounding clip on the motor assembly.
9. Connect the other end of the new bleed resistor assembly 2 to the control panel.
10. Install the cabinet. Refer to Removing/Installing the Cabinet on page 23.
HomeFill® II AW Compressor
92
Part No 1154316
SECTION 13—WIRING ASSEMBLIES
DETAIL “A”
Bleed Resistor
Assembly 1
DETAIL “B”
Bleed Resistor
Assembly 2
Motor Assembly
Power Inlet
Grounding Clip
Bleed Resistor
Assembly 1
DETAIL “C”
Control Panel
Bleed Resistor
Assembly 2
FIGURE 13.3 Replacing Bleed Resistor Assemblies - Units Manufacture Before 7/3/06
Units Manufacture After 7/3/06
NOTE: The bleed resistors in this view are for units made before 7/3/06. On units made after 7/3/
06, bleed resistors are on the PC board with a separate wiring harness.
Replacing HFII Assembly Wire Harness
NOTE: For this procedure, refer to FIGURE 13.4 on page 94.
1. Remove the cabinet. Refer to Removing/Installing the Cabinet on page 23.
2. Remove the control panel. Refer to Removing/Installing Control Panel on page 27. 3. Note the orientation of the connectors on the power inlet (Detail “A”).
4. Disconnect the two connectors from the power inlet.
5. Note the orientation of the two connectors on the hour meter (Detail “A”).
6. Disconnect the two connectors from the hour meter.
Part No 1154316
93
HomeFill® II AW Compressor
SECTION 13—WIRING ASSEMBLIES
7. Disconnect the following connectors:
A. Two connectors to the high pressure switch (Detail “B”).
B. Two connectors to the circuit board (Detail “C”).
C. Two connectors to the On/Off switch (Detail “C”).
D. Connector to the motor (Detail “D”).
8. Note the orientation of the two connectors to the exhaust fan (Detail “D”).
9. Disconnect the connectors from the exhaust fan.
10. Reverse STEPS 1‐9 to install the new HFII assembly wire harness.
DETAIL “A”
DETAIL “B”
HF II Assembly
Wire Harness
High Pressure
Switch
Connectors
Hour Meter
Connectors
Power Inlet
Connectors
DETAIL “D”
DETAIL “C”
Motor
Connector
On/Off
Switch
Connectors
Exhaust Fan
Connectors
Circuit
Board
Connectors
FIGURE 13.4 Replacing HFII Assembly Wire Harness
HomeFill® II AW Compressor
94
Part No 1154316
SECTION 14—TROUBLESHOOTING/CYLINDER FILL TIMES
SECTION 14—TROUBLESHOOTING/CYLINDER
FILL TIMES
Indicator Light Explanation
INDICATOR LIGHT
COLOR
COMPRESSOR STATUS
EFFECT
NONE
Compressor is Off.
O2 flowing to user if concentrator is On.
WAIT
Compressor is On and warming up (0-3
minutes after Power is On).
O2 BELOW NORMAL YELLOW
O2 from the concentrator is <90% (any
time after 3 min warm up).
Cylinder filling not started. O2 flowing to
user if concentrator is On.
Cylinder filling stops, will restart when
O2>90%.
O2 flowing to user if concentrator is On.
FILLING - GREEN
Compressor is On cylinder filling O2 from
the concentrator is >90%. (any time after
3 min warm-up).
Compressor is On.
Cylinder is finished filling (full):
- Remove cylinder
(Full light is On in > 10 mins)
or Cylinder is not attached properly
- Check connection
(Full light is On in <10 mins).
Compressor is On.
FULL - GREEN
ATTENTION - RED
(Audible Alarm)
Cylinder is filling O2 flowing to user.
Cylinder filling stops.
Cannot fill another cylinder until
compressor is turned Off and On again.
O2 flowing to user if concentrator is On.
Compressor does not begin to fill or stops
filling.
Cylinder not filling.
Causes:
Full cylinder attached when unit turned
On.
Replace with empty cylinder or internal
failure.
Unit MUST be turned Off and On before
filling can occur.
O2 flowing to user if concentrator is On.
Troubleshooting
PROBLEM
No indicator lights On
when compressor turned
On.
Part No 1154316
SOLUTION
1. Turn compressor Off.
2. Check that power cord is properly plugged into compressor and wall outlet.
3. Check the fuse on the compressor. If bad, replace.
4. Turn the compressor On.
5. If performing STEPS 1-4 does not cause any indicator lights to come on, contact
Invacare for service.
95
HomeFill® II AW Compressor
SECTION 14—TROUBLESHOOTING/CYLINDER FILL TIMES
PROBLEM
SOLUTION
RED Light On
1.Check the cylinder gauge to see if it is FULL. Cylinder full - Remove the cylinder and
turn the unit Off. Perform the Cylinder Prefill Inspection on page 14 with a cylinder
that is NOT FULL.
Cylinder not full- Proceed to STEP 2. Cylinder MUST be below 1500 psi (10342 kPa)
for
compressor to start. If the psi is above 1500 psi (10342 kPa) the compressor identifies
the cylinder as full.
2. Check that the cylinder is connected properly. Turn the compressor Off. Remove
the cylinder and reinstall. Turn the compressor On.
3. If cylinder is not full and is connected properly, the compressor may have internal
failure. Contact Invacare for service.
Compressor cycles On
and Off
or
O2 BELOW NORMAL
(YELLOW) and FILLING
(GREEN) lights are alternating
or
O2 BELOW NORMAL
(YELLOW) light goes On
and Off
1. Check the concentrator liter flow setting is at 3 L/min. or less.
If necessary, adjust the liter flow setting (refer to the HomeFill owner’s manual). Wait
at least 20 minutes for the GREEN light to appear. If it does not appear, proceed to
STEP 2.
2. The concentrator may need service, contact Invacare for service.
O2 BELOW NORMAL
1. Ensure the concentrator has warmed up for at least 30 minutes. If it has not been
(YELLOW) light stays On. 30 minutes, turn the compressor Off until the concentrator warms up. If the
YELLOW light still remains on proceed to STEP 2.
2. Inspect the connection between the compressor and the concentrator for damage
or pinching. If damaged, replace. If pinched, straighten tubing. Turn the compressor
Off for at least 10 seconds.
Turn the compressor On. If the YELLOW light still remains On proceed to STEP 3.
3. The concentrator may need service, contact Invacare for service.
Fill times exceed
maximum as
recommended fill times or
GREEN
FILLING light stays On.
1. Ensure the cylinder regulator is set to Off.
2. Check the recommended fill times shown in Cylinder Fill Times on page 97.
3. Check that the cylinder is connected properly. Turn the compressor Off. Remove
the cylinder and reinstall. Turn the compressor On.
4. Check the compressor/concentrator line for proper connection and/or damage
(i.e., leaks or kinks).
5. Check the concentrator liter flow setting is at three L/min. or less. If necessary,
adjust the liter flow setting (refer to the HomeFill owner’s manual). If the GREEN filling light does not go Off, the compressor and/or concentrator may need service.
Contact Invacare for service.
Excessive noise when
compressor is On.
1. Contact Invacare for service.
Hissing sound from Regulator when flow selector
is Off.
1. Turn flow selector Off.
2. If hissing sounds continue, contact Invacare for service.
Regulator is On but O2 is
not being delivered.
1. Refill cylinder.
2. Check that cannula is straight and not pinched. If damaged, replace.
3. Contact Invacare for service.
HomeFill® II AW Compressor
96
Part No 1154316
SECTION 14—TROUBLESHOOTING/CYLINDER FILL TIMES
Cylinder Fill Times
Concentrator Flow Rate to Patient:
(Up to 3 L/min)
Size: M6 and ML6
1 hr 12 min
NOTE: Filling time is approximate and may vary with environmental conditions.
Leak Test
WARNING
Use extreme caution when testing this device. It may start unexpectedly, and it
contains many pinch points.
DO NOT spray electrical connections with leak-tek.
NEVER allow HomeFill to continue running above 2100 psi (14479 kPa).
DO NOT tighten fittings beyond a ¼ turn. Tightening beyond ¼ turn risks
stretching and weakening the copper material and causing a ruptured fitting.
Tools and Supplies Needed:
• High Pressure Gauge • Leak Tek 50/50 Mix
• Flashlight
1. Plug HomeFill into an electrical outlet.
2. Attach a high pressure gauge to the fill line disconnect.
3. Attach the oxygen concentrator line to the inlet fitting. Refer to Concentrator Verification and Maintenance on page 12.
4. Ensure that the concentrator output is greater than 90% at 3 L/min. Refer to Concentrator Verification and Maintenance on page 12.
5. Turn the power switch On.
6. Note that four of the five LEDs and the FILLING LED light at start‐up.
7. If unit does not start within three minutes, confirm power and oxygen inputs are present.
8. Once HomeFill starts, remove the input tubing. Unit should shut down within 30 seconds.
9. Reinstall the input tubing, unit should restart within 30 seconds.
NOTE: The high pressure gauge should start to indicate raising pressure. 10. Once the pressure is above 500 psi (3447 kPa), start leak checking the unit at the test points in the following table.
NOTE: If necessary, use a flashlight to aid in the identification of bubbles.
Part No 1154316
97
HomeFill® II AW Compressor
SECTION 14—TROUBLESHOOTING/CYLINDER FILL TIMES
STAGE
TEST POINTS
1
2
3,4
Inlet tubing–Including bulk head fitting, plastic tee, check valve, outlet HEPA filter, accumulator
assembly, tubing connections, inlet fitting (bottom), head/cylinder seal, output fitting (top), and copper tubing.
Inlet fitting (top), head / cylinder seal, output fitting (bottom) and copper tubing.
Inlet fitting (bottom), head / cylinder seal, output fitting.
Inlet fitting (bottom), head / cylinder seal, output fitting, high pressure switch, burst disk, and copper
tubing–including disconnect assembly.
5
WARNING
DO NOT tighten fittings beyond a ¼ turn. Tightening beyond a ¼ turn risks
stretching and weakening the copper material and causing an explosion.
11. If a leak is found at a fitting, carefully tighten the fitting up to a ¼ turn to eliminate the leak.
12. Continue inspection until pressure reaches 2000 psi (13790 kPa).
13. Once the high pressure gauge reaches 2000 ± 100 psi (13790 ± 689 kPa), the unit should shut Off.
14. Bleed the pressure down to 1000 ± 200 psi (6895 ± 1379 kPa) and repeat STEP 13 to confirm.
Cylinder Fill Test
NOTE: For this procedure, refer to FIGURE 14.2 on page 100.
The following procedure describes the cylinder fill test process for the HomeFill.
Tools and Supplies Needed:
• Timer (See Figure 9.1)
• O2 analyzer
• Flow meter
• Pressure gauge
• Leak Tek 50/50 mix
FIGURE 14.1 Timer
HomeFill® II AW Compressor
98
Part No 1154316
SECTION 14—TROUBLESHOOTING/CYLINDER FILL TIMES
WARNING
Use extreme caution when testing this device. It may start unexpectedly, and it
contains many pinch points.
DO NOT spray electrical connections with leak-tek.
NEVER allow HomeFill to continue running above 2100 psi (14479 kPa).
Before testing begins, make sure the test compressor is in good condition.
Perform leak checks on the HomeFill compressor throughout testing.
Perform periodic maintenance on test concentrator to ensure consistent results.
1. Place an empty M6 cylinder into the connector fillport on the HomeFill. Refer to Connecting the Cylinder to the Compressor on page 17.
2. Ensure that the flow selector on cylinder is positioned at “0”. 3. Connect the concentrator bulkhead fitting to the HomeFill inlet fitting. Refer to Concentrator Verification and Maintenance on page 12. 4. Attach the timer to the HomeFill:
A. Note the orientation of the BROWN and BLUE HomeFill harness wires connected to the hour meter for later reconnection.
B. Disconnect both HomeFill harness wires from the hour meter.
C. Attach the BROWN HomeFill harness wire to the BROWN timer harness connector (i.e., BROWN wire to BROWN wire).
D. Attach the BLUE HomeFill harness wire to the BLUE timer harness connector (i.e., BLUE wire to BLUE wire).
E. Attach the BROWN timer harness wire to the connector on the hour meter to which the BROWN HomeFill harness wire is normally connected.
F. Attach the BLUE timer harness wire to the connector on the hour meter to which the BLUE HomeFill harness wire is normally connected.
5. Plug the HomeFill into 220 VAC power source.
6. Turn the power switch On.
7. Reset the timer to zero.
8. The HomeFill should start filling within three minutes. If HomeFill fails to start filling, check connections and confirm the concentrator output is greater than 90% @ 3 L/min.
NOTE: After the fill has completed, the HomeFill will shut down and the cylinder pressure gauge should read 2000 ± 100 psi (13790 ± 689 kPa).
Part No 1154316
99
HomeFill® II AW Compressor
SECTION 14—TROUBLESHOOTING/CYLINDER FILL TIMES
9. Check the fill time on the timer:
NOTE: The display is ALWAYS on.
A. The fill time should be less than 01:12:00. If so, record the time on the repair statement.
B. If the fill time is greater than 01:12:00, verify the test concentrator output is greater than 90%, the cylinder is in the “0” position, and there are no leaks in the HomeFill unit. Refer to Leak Test on page 97.
10. Remove the full cylinder from the HomeFill and bleed the pressure out completely.
11. After the first successful fill, repeat STEP 5 to STEP 9.
12. After the second consecutive fill, proceed to STEP 14.
13. Turn the power switch to the Off position.
14. Remove the timer.
15. Unplug the power cord.
16. Disconnect the inlet hose from the inlet fitting.
17. Reconnect the HomeFill harness wires to the hour meter:
A. Disconnect the BLUE timer harness wire from the connector on the hour meter.
B. Disconnect the BROWN timer harness wire from the connector on the hour meter.
C. Disconnect the BLUE HomeFill harness wire from the BLUE timer harness connector.
D. Disconnect the BROWN HomeFill harness wire from the BROWN timer harness connector.
E. Connect both HomeFill harness wires to the hour meter in the orientation previously noted.
Brown Wire
Connector
Blue Wire
Connector
Hour Meter
FIGURE 14.2 Cylinder Fill Test
HomeFill® II AW Compressor
100
Part No 1154316
SECTION 14—TROUBLESHOOTING/CYLINDER FILL TIMES
HomeFill 2000 psi Switch/P.C.B. Shut Down Test
NOTE: For this procedure, refer to FIGURE 14.3 on page 102.
Tools and Supplies Needed:
• 2000 psi (13790 kPa) test gauge
• Dedicated test concentrator
1. Warm concentrator up for 30 min.
2. Attach 2000 psi (13790 kPa) gauge end to HomeFill connector fillport.
3. Turn valve on end clockwise to close.
4. Attach HomeFill to your test concentrator, and set flow to 3 L/min (not shown).
5. After three minutes the HomeFill will start to fill the test gauge, the needle will move off of zero and begin to climb steadily.
6. The HomeFill unit will shut down when the pressure reaches 2000 ± 100 psi (13790 ± 689 kPa):
CAUTION
If the HomeFill unit exceeds 2100 psi (14479 kPa) without shutting down, manually
turn the unit off, otherwise damage to the unit can occur.
A. Watch the needle on the gauge to insure pressure does not exceed 2100 psi (14479 kPa), if the unit exceeds 2100 psi (14479 kPa) without shutting down, manually turn the unit off otherwise damage to the unit can occur. If this happens replace the high pressure switch and re‐test. If unit fails this test again, replace P.C. board. Refer to Replacing Circuit Board on page 30.
B. If the unit fails to reach 2000 psi (13790 kPa) within three minutes, a leak in the compressor stages is present and the pump assembly MUST be replaced. Refer to Compressor Replacement on page 59.
7. When the HomeFill has completed the deadhead fill, it will shut down and state FULL on the control panel.
8. Turn the HomeFill Off.
9. Slowly open the valve counter‐clockwise to bleed the pressure in the gauge line.
10. Remove the test gauge connector end from the connector fillport.
Part No 1154316
101
HomeFill® II AW Compressor
SECTION 14—TROUBLESHOOTING/CYLINDER FILL TIMES
HomeFill
Connector
Fillport
2000 psi gauge
FIGURE 14.3 HomeFill 2000 psi Switch/P.C.B. Shut Down Test
HomeFill® II AW Compressor
102
Part No 1154316
SECTION 15—MAINTENANCE
SECTION 15—MAINTENANCE
Cleaning/Replacing the Cabinet Filter
WARNING
Unplug the compressor when cleaning.
DO NOT operate the compressor without the filter installed.
NOTE: For this procedure, refer to FIGURE 15.1.
NOTE: All compressors have one filter on the back of the cabinet.
NOTE: Perform this procedure at least once a week.
1. Pull out the filter.
2. Clean the filter with a vacuum cleaner or wash in warm soapy water and rinse thoroughly.
3. Dry the filter thoroughly before reinstallation.
Cabinet Filter
FIGURE 15.1 Cleaning/Replacing the Cabinet Filter
Cleaning Cabinet
WARNING
Unplug the compressor when cleaning. To avoid electrical shock, DO NOT remove
cabinet.
1. Clean the cabinet with a mild household cleaner and non‐abrasive cloth or sponge.
Part No 1154316
103
HomeFill® II AW Compressor
SECTION 15—MAINTENANCE
Verification Process - Invacare HomeFill Compressor
NOTE: Inspection to be performed upon delivery of unit from Invacare and upon return of unit from rental periods.
MODEL No.________________________ SERIAL No._______________________
ON EACH INSPECTION
Record Date of Service
Record Elapsed Hours on the
Hour Meter
Clean and disinfect the
equipment per Cleaning/
Disinfection policy
VISUAL INSPECTION
Check the electrical cord for
damage
Inspect the cabinet for damage
Inspect the oxygen intake
connection for damage, and/or
the presence of oil or grease
Inspect the cylinder fillport for
damage, and/or the presence
of oil or grease
Inspect that the three warning
labels are present
Clean/Replace the filter
(located in back of cabinet –
IVC Part # 2000489)
NOTE: If any damage is found, return unit to Invacare. If any of the warning labels are missing, please order replacement labels from Invacare.
Function Test (procedure
below)
Function Test
1. Set test concentrator to 3 L/Min. and verify oxygen concentration > 90%.
2. Plug the unit in.
3. Connect the concentrator to the compressor.
4. Connect an empty HomeFill cylinder to the cylinder fillport.
5. Turn the compressor on and observe for the following:
A. The Wait (YELLOW) light comes on for 3 minutes.
B. After 3 minutes, the Fill (GREEN) light will come on when the O2 from the concentrator is > 90%.
HomeFill® II AW Compressor
104
Part No 1154316
SECTION 15—MAINTENANCE
C. The compressor begins to fill the cylinder.
D. Disconnect the concentrator oxygen supply line and observe that the “O2 below Normal” (YELLOW) light comes on.
E. Reconnect the concentrator supply line and observe that Fill (GREEN) light comes on and the cylinder begins to fill.
F. Continue to fill cylinder and verify fill time to meet chart below.
Cylinder
Filling
Times
Concentrator Flow Rate to Patient:
(Up to 3 L/min)
Size
ML4
M6 and ML6
C (M9)
NORMAL
45 min
1 hr 25 min
2 hr 20 min
MAXIMUM
50 min
1 hr 50 min
2 hr 45 min
NOTE: All filling times are approximate and may vary with environmental conditions.
Verification Process - Invacare HomeFill Cylinder
NOTE: Inspection to be performed upon delivery of unit from Invacare and upon return of unit from rental periods.
MODEL No.________________________ SERIAL No._______________________
ON EACH INSPECTION
Record Date of Service
Clean and disinfect the
equipment per Cleaning/
Disinfection policy
CAUTION
Hand wipe conserver
and regulator. DO NOT
soak or spray fluids
directly onto conserver
or regulator.
Visual Inspection
Check the cylinder Hydrostatic
test date. If the cylinder is within
6 months of needing to be recertified, remove the cylinder
from service and send it to be
Hydrostatic tested/re-certified
Bleed the cylinder down until it is
empty (use 2 L/min. continuous
flow setting on conserver)
Part No 1154316
105
HomeFill® II AW Compressor
SECTION 15—MAINTENANCE
Examine the cylinder for: Dents
or Dings, Arc Burns, Oil or
Grease, Any other signs of
damage, Any signs of Fire or
Heat damage, Presence of legible
label
Inspect the valve for: Debris, Oil,
or Grease, Noticeable signs of
damage, Signs of corrosion inside
of the valve, Signs of heat damage
Inspect the gauge for visual
damage or needle inaccuracy. If
damaged or inaccurate, remove
the cylinder from service.
NOTE: If damage is found, return unit to Invacare. Function Test (Procedure
below)
Function Test
1. Make sure the cylinder fill port properly connects to the HomeFill filling unit.
2. Partially fill the cylinder to check for proper filling operation (15 min).
3. Verify movement on gauge.
4. Check the cylinder for leaks. CAUTION
DO NOT soak conserver or regulator – focus on cylinder/conserver interface.
5. Test the flow of the regulator at continuous flow. It should read 2 L/min.
6. Connect an oxygen cannula to the conserving device at each setting.
7. Breathe with the cannula to see if it pulses. 8. Bleed the cylinder down until empty (use 2 L/min. continuous flow setting on conserver).
9. Verify gauge is at 0 psi (0 kPa) when cylinder is empty.
10. If it does not pulse, discontinue use. Return to Invacare for repair.
HomeFill® II AW Compressor
106
Part No 1154316
LIMITED WARRANTY
LIMITED WARRANTY
Belgium & Luxemburg:
Invacare nv, Autobaan 22, B‐8210 Loppem
Tel: (32) (0) 50 83 10 10
Fax: (32) (0) 50 83 10 11
[email protected]
Danmark: Invacare A/S, Sdr. Ringvej 37, DK‐2605 Brøndby
Tel: (45) (0)36 90 00 00
Fax: (45) (0)36 90 00 01
[email protected] Deutschland:
Invacare Aquatec GmbH, Alemannenstraße 10, D‐
88316 Isny
Tel: (49) (0)75 62 7 00 0
Fax: (49) (0)75 62 7 00 66
info@invacare‐aquatec.com European Distrbutor Organisation:
Invacare, Kleiststraße 49, D‐32457 Porta Westfalica Tel: (49) (0)57 31 754 540
Fax: (49) (0)57 31 754 541
[email protected]
España:
Invacare SA, c/Areny s/n, Polígon Industrial de Celrà, E‐17460 Celrà (Girona)
Tel: (34) (0)972 49 32 00
Fax: (34) (0)972 49 32 20
[email protected] France:
Invacare Poirier SAS, Route de St Roch, F‐
37230 Fondettes
Tel: (33) (0)2 47 62 64 66
Fax: (33) (0)2 47 42 12 24
[email protected] Ireland:
Invacare Ireland Ltd, Unit 5 Seatown Business Campus,
Seatown Road, Swords, County Dublin – Ireland
Tel: (353) 1 810 7084
Fax: (353) 1 810 7085
[email protected]
Italia:
Invacare Mecc San s.r.l., Via dei Pini 62, I‐36016 Thiene (VI)
Tel: (39) 0445 38 00 59
Fax: (39) 0445 38 00 34
[email protected] Nederland:
Invacare BV, Celsiusstraat 46, NL‐6716 BZ Ede
Tel: (31) (0)318 695 757
Fax: (31) (0)318 695 758
[email protected] [email protected] Norge:
Invacare AS, Grensesvingen 9, Postboks 6230, Etterstad, N‐0603 Oslo
Tel: (47) (0)22 57 95 00
Fax: (47) (0)22 57 95 01
[email protected] [email protected] Part No 1154316
107
Õsterreich:
Invacare Austria GmbH, Herzog Odilostrasse 101, A‐
5310 Mondsee
Tel: (43) 6232 5535 0
Fax: (43) 6232 5535 4
info@invacare‐austria.com Sverige & Suomi:
Invacare AB, Fagerstagatan 9, S‐163 91 Spånga
Tel: (46) (0)8 761 70 90
Fax: (46) (0)8 761 81 08
[email protected]
[email protected] Switzerland:
Invacare AG, Benkenstrasse 260, CH‐4108 Witterswil
Tel: (41) (0)61 487 70 80
Fax: (41) (0)61 487 70 81
[email protected]
United Kingdom:
Invacare Limited, Pencoed Technology Park, Pencoed, Bridgend CF35 5HZ
Tel: (44) (0) 1656 776200
Fax: (44) (0) 1656 776201
Customer Services:
Tel: (44) (0) 1656 776222
Fax: (44) (0) 1656 776220
[email protected]
Portugal:
Invacare Lda, Rua Estrada Velha, 949, P‐4465‐784 Leça do Balio
Tel: (351) (0)225 1059 46/47
Fax: (351) (0)225 1057 39
[email protected]
HomeFill® II AW Compressor
0434
Invacare Corporation
www.invacare.com
USA
One Invacare Way
Elyria, Ohio USA
44036-2125
440-329-6000
800-333-6900
Technical Services
440-329-6593
800-832-4707
Manufacturer:
Invacare Rehabilitation Equipment
(Suzhou) Co., Ltd.
No. 435 Xieyu Street, SIP
Suzhou, Jiangsu, PRC 215026
Tel: 86-512-62586180
Fax: 86-512-62586167
EC
REP
EU Representative
Invacare International Sarl
Route de Cité Ouest 2
1196 Gland Switzerland
Tel: +41 22 354 60 10
Fax: +41 22 354 60 11
© 2010 Invacare Corporation. All rights reserved.
Republication, duplication or modification in whole or in
part is prohibited without prior written permission from
Invacare. Trademarks are identified by ™ and ®. All
trademarks are owned by or licensed to Invacare
Corporation or its subsidiaries unless otherwise noted.
3-in-1 Oil is a registered trademark of American Home
Products Corporation.
WD-40 is a registered trademark of the WD-40
Company.
Part No 1154316
Rev B - 12/10