1
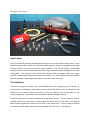
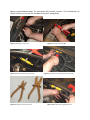
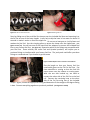
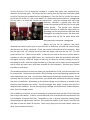
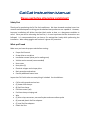
Cal Cat Instruction Manual
Please read before attempting installation!! Safety First Thank you for purchasing the Cal Cat fuel conditioner. We have invested countless hours into research and development to bring you the absolute best product we are capable of. However, improper installation will deliver less‐than‐ideal results at best, or a dangerous condition at worst. Since you will be relocating the fuel line, it is most important that the instructions are followed. It is recommended that you have a fire extinguisher handy while performing the installation. Wear safety goggles and mechanic’s gloves for protection. What you’ll need Make sure you have the proper tools before starting: •
•
•
•
•
•
•
•
•
Proper fuel line tool Screw driver or nut driver Installation manual (what you’re reading now) Vehicle service manual (recommended) Hose cutter Hose pliers (2) Electrical stripper and crimper pliers Basic wrenches and sockets Possibly additional heater hose Inspect the Cal Cat kit to be sure everything is included. You should have: •
•
•
•
•
•
•
•
•
•
Cal Cat with ground stud and nut (2) heater hose clamps (8) fuel line clamps Fuel hose cutter (red) Fuel hose clamp crimping tool Wire (2) blue crimp connectors; one small eyelet and one medium eyelet (4) assorted plastic fuel line adaptors (2) steel fuel line adaptors Plastic fuel line See picture for a visual. How it works The Cal Cat absorbs normally wasted engine heat from one of the vehicle’s heater hoses. Since liquid fuel doesn’t burn, hotter fuel will more readily vaporize when it is sprayed from the high pressure injector into the low pressure intake manifold. The Cal Cat utilizes a multi‐stage catalyst system to ionize the fuel and break down larger molecular chains, making the fuel more combustible. This results in more of the fuel burning inside the engine within the “magic window of opportunity” before the exhaust valve opens. You will feel better throttle response and overall power. Most people also realize an increase in fuel economy. The Installation Since we are tying into a heater hose, you should find the “hot” side going to the firewall. By trial and error, try finding an ideal place to locate the Cal Cat where it can be spliced into the heater hose, be relatively close to the fuel rail, and not interfere with throttle cable or any other moving parts. Keep away from the exhaust manifold! (see figures 1 and 3) It may be necessary to remove components to get better access. The air induction system, possibly coolant over‐flow tank, or other pieces can block access to the hoses. (see figure 2) Many modern engines use metal lines for much of the heater hose. You may have to replace the metal line with rubber heater hose (not included in the Cal Cat kit). (see figure 4) Figure 1 Locate heater hose and fuel line Figure 3 Find a location for the Cal Cat Figure 2 Remove obstructions to gain better access Figure 4 Metal coolant line is bypassed If you have a rubber heater hose with a long and straight section, simply cut this hose and splice in the Cal Cat using the included clamps. It might make for a neater installation if you remove a section of the stock hose to account for the length of the Cal Cat. Using hose pliers will minimize coolant loss while cutting heater hose to install the Cal Cat. (see figure 9) If you are replacing metal line with rubber hose, you may just have to remove the rubber connector hose from the heater core at the firewall and replace with new hose. (see figures 5 and 6) Attach the hose to the Cal Cat and clamp in place. (see figure 7) Attach another piece of heater hose (using clamps) to the block and run it to the Cal Cat. Cut to length and clamp in place. (see figure 8) You can fabricate a bracket to permanently mount the Cal Cat to the firewall, fenderwell, or an engine bracket. Suspending the Cal Cat freely from the heater hose is acceptable so long as it cannot sag and cause problems; like fall on the exhaust manifold or vibrate against something. With the Cal Cat mounted securely in the heater hose, it is time to run the fuel to it. You will most likely need a special fuel line disconnect tool. (see figure 11) Set the tool in place to remove the fuel line, then wrap the junction with a rag to prevent spraying gasoline everywhere. (see figure 17; rag not shown for clarity) The fuel system will be under pressure. The included fuel line should only ever be cut with the included cutting tool. (see figure 12) Figure 5 Installing the heater hose Figure 6 Cut heater hose to length Figure 7 Heater hose attached to the Cal Cat Figure 8 Run a section to the other side, cut, and clamp Figure 9 Hose pliers reduce coolant loss Figure 10 Mounted Cal Cat, tightening clamp Figure 11 Fuel line disconnect tools Figure 12 Cutting fuel line Start by sliding one of the small fuel line clamps over the included fuel hose and mounting it to the Cal Cat on one of the brass nipples. It may help to dip the hose in hot water for about 10 seconds to make it easier to force the nipple on. Do not use a heat gun as it will distort and weaken the fuel line! Use the crimping pliers to secure the clamp over the nipple/hose. (see figures 14 and 15) You will use one of the metal fuel line adapters to connect the included fuel line to your factory fuel line. (see figure 13) Determine which of the fittings are compatible with your fuel line. Some vehicles, like some Ford and Hyundai products, will require you to purchase fittings to interface with your factory fuel line. The junk yards could offer you these fittings at a reduced cost if you choose to go that route. Figure 13 Metal adapter used to connect to stock fuel line Size the length so that your factory fuel line comfortably goes to the Cal Cat fuel line. Pay close attention to routing so that the fuel line never comes near the exhaust or moving parts. With the one side hooked up, we need to connect the other side of the Cal Cat to the fuel rail. Connect the remaining hose to the other side of the Cal Cat using one of the included clamps. Again, choose the appropriate fitting and determine if the straight or 90 degree fitting is best. Connect everything together as previously outlined. (see figures 17 and 18) Figure 14 Fuel line is pressed onto fitting with clamp Figure 15 and crimped with the special pliers Figure 16 This is how it will look when properly done Figure 17 Using the disconnect tool Figure 18 Plugging in fitting is a snap Figure 19 A mostly finished installation At this point the Cal Cat should be installed in a heater hose away from excessive heat, vibration, and moving parts. The factory fuel line coming from the fuel tank should be routed to the Cal Cat using the included fuel line and adaptors. From the Cal Cat, the fuel line returns to the fuel rail so that it is “put in the middle” of a heater hose and the fuel line. (see figure 19) The last step is to make and connect the ground wire. Using the included wire and crimp terminals, fabricate a ground wire that will connect the ground stud of the Cal Cat to a good chassis ground. The ground wire prevents galvanic corrosion of aluminum engine parts by grounding out the stray electrons that have been dislodged in the catalytic process. We have even had reports that the Cal Cat works better with Figure 20 Installed ground wire the ground wire connected. (see figure 20 Before you put the air induction and other removed items back in place, pull on your fuel lines to make sure you used the correct fittings and that they are firmly connected. Check your coolant level and top off as necessary. Next turn the key to the “on” position but do not start the engine, then turn the key “off”. This will prime the fuel line. Check for fuel leaks. If there are no leaks at this time, connect what is necessary to start the engine (MAF sensor, etc.) and check for both fuel and coolant leaks with the engine running. Allow the engine to warm up for about 10 minutes, keeping an eye on everything for leaks. With the engine warmed up, if there are still no leaks, shut the engine off and re‐install any other items that were removed for the installation. Re‐check your coolant level after it cools down. If increased performance is the main reason you purchased the Cal Cat, you can now take it out for a test‐thrash. Realize that the vehicle’s ECU will adapt to the new operating conditions and make adjustments over time. In most cases, performance impressions remain constant. If fuel economy was the motive for your purchase, you should have performed a base‐line mileage test prior to installation. Afterwards, go for another mileage run (as identical as possible to the base‐line) and compare your results. Re‐check mileage after about 2 weeks when the ECU adaptives have settled in. Use the accompanying “Mileage and Performance Product Research Data” form for mileage records. Due to additives in the fuel, it may be necessary to occasionally clean out the Cal Cat’s fuel side with a spray carb cleaner. To do so, remove both fuel lines at the disconnects and drain the Cal Cat backwards of normal fuel flow. Remember to use a rag and protective clothing when disconnecting the high‐pressure fuel line. Then spray carb cleaner in the “outlet” (fuel rail) side and allow to soak for about 20 minutes. Drain and re‐spray until the carb cleaner comes out clean, then reconnect the lines. And that’s all there is to it! Congratulations, you’re now a pro! First time installations usually take between 2‐3 hours, and seasoned veterans can usually install the Cal Cat in an hour or less on most applications. Remember, you have a 30‐day unconditional satisfaction guarantee. If you don’t like the results, return it for a full purchase price refund. Refunds do not include extra parts purchased for the installation or for labor costs. You also have a full 1 year manufacturer’s defect warrantee. If for any reason a part should fail, return it and we’ll replace it for free! Cal Cat MPG Bottling Co. PO Box 363 Franklin, NJ 07416