1
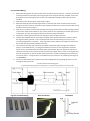
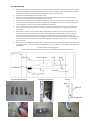
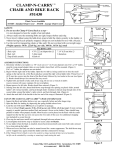
Installation Manual
Congratulations on your purchase of a Thermorail Heated Towel Rail. The rail can be hard wired or plug in on
either left or right hand side
Please read these instructions carefully and keep them handy for future reference
Thermorail Heated Towel Rails are manufactured to the following standards:
1.
2.
CE Registration certificate ATS2007165
ATE20071008 & ROHS Certificate A07051606F
3. AS/NZ 3350.1.2002
4. IP Rating – IP45.
All Thermorail Heated Towel Rails are crafted using high quality products and will provide years of service if
installed and used according to the manufacturer’s instructions. This towel rail must be wired by a qualified
electrician and must be earthed.
The Thermorail Heated Towel Rail is designed to work below a stabilised temperature of 60°C under towels;
this will depend on towel dryness and ambient temperature.
This product comes with a 3 or 5 year warranty depending on the model. If you have a warranty complaint
please contact the retailer from whom you purchased the product. Thermorail will endeavour to provide a
satisfactory outcome to your complaint. For any other enquiries please contact the technical helpdesk on 1300
368 631
All Thermorail Heated Towel Rails must be installed in accordance with local wiring regulations and we recommend
that they are installed 600mm above the floor level for hard wired models. For exposed wiring, a three pin plug is included
to be plugged into a standard GPO. Alternatively they can be hard wired by a licensed electrician.
Care and Cleaning
The polished stainless steel finish of your Thermorail Heated Towel Rail is hard wearing and easy to maintain. Clean
with a soft clean cloth and a non abrasive cleaning agent. Any harsh scrubbing or scratching will damage the surface as well
as the use of any cleaning products which contain acid or corrosive agents will damage the surface.
Concealed Wiring Bracket.
This Thermorail Heated Towel Rail contains a kit for both concealed and exposed wiring. If you have access to the wall
cavity, the concealed option will allow for a neater and more visually appealing installation.
Installation
Thermorail Heated Towel Rail should be installed by a registered electrician and in accordance with local regulations.
We recommend that the rail is installed onto a flat uniform wall, at least 600mm from the floor and with a 300 mm
clearance from permanent fixtures and where possible screwed, into studs or other suitable drywall anchors. If fixing to
hollow cavity walls, suitable anchors should be used.
Tools required (excluding electrical connection)
For Concealed Wiring
1.
2.
3.
4.
5.
6.
7.
8.
Mount the two legs that do not have holes at the curved end onto the rail first. To do this remove the
mounting bracket from the leg by loosening the grub screw using the allen key provided. Then screw
through the centre of the leg into the rail at the non powered end using the two machine screws
provided.
Now select which side wiring you require (left or right).
Mount the third leg with the mounting bracket in it onto the side of the rail that will not have the
wiring and secure it to the rail using the screws already mounted on the rail. Do the same with the leg
that will have the wire through it.
Hold the rail in position and mark the wall where the legs will be and then hold the mounting brackets
in the centre of this and drill holes for your anchor which will vary depending on the wall type you are
screwing into. For ease of drilling hard tiles we recommend using Thermodrill..
Screw the 3 mounting brackets to the wall making sure they are tight and secure.
Feed the lead supplied with the rail through the white plastic grommet with the connection end on
the large end of the grommet. Then connect the lead to the rail lead making sure you line it up
correctly and tighten the connection. The 4th leg slides over the cable and connection and secures to
the rail with the screw already attached to the rail.
The connection lead will now need to be connected to the power supply through a wall switch or
timer by a licensed electrician. The plug will need to be cut off as it is not required for concealed
wiring. On the concealed bracket, the white plastic grommet then goes into the wall to protect the
cable (you will need to drill a 12mm hole for this and screw it tight). If this is loose it can be glued into
the wall using silicone or max bond. (We recommend a timer is used to prolong the element life and
to conserve power. A range of timers are available from your stockist or by contacting Thermogroup
on 1300368631)
The rail is now fitted over the brackets on the wall and tightened up using the grub screws. Do not
over tighten the grub screws.
You will be left with the following parts
1 spare leg with black grommet, 1 plastic spacer, 1 metal mounting bracket, Flat round bracket
Legs for concealed wiring
Wire Connection
Installation
For Exposed Wiring
1.
2.
3.
4.
5.
6.
7.
8.
Mount the two legs that do not have holes at the curved end onto the rail first. To do this remove the mounting
bracket from the leg by loosening the grub screw using the allen key provided. Then screw through the centre of
the leg into the rail at the non powered end using the two machine screws provided.
Now select which side wiring you require (left or right).
Mount the third leg with the mounting bracket in it onto the side of the rail that will not have the wiring and
secure it to the rail using the screws already mounted on the rail.
Feed the lead supplied with the rail through the black plastic grommet. You will need to cut the grommet to slip
over wire as per attached photo’s.Now the 4th leg slides over the cable and you need to connect the lead to the
rail lead making sure you line it up correctly and tighten the connection.
The 4th leg then slides over the cable and connection and secures to the rail with the screw already attached to
the rail. The lead passes through the hole in the end of the leg and the black grommet protects the cable from
any damage.
Hold the rail in position and mark the wall where the legs will be and then hold the mounting brackets in the
centre of this and drill holes for your anchor which will vary depending on the wall type you are screwing into.
For ease of drilling hard tiles we recommend using Thermodrill. Screw the 3 mounting brackets for the legs
without the lead and the angle bracket for the leg with the lead to the wall making sure they are tight and secure.
The rail is now fitted over the brackets on the wall and tightened up using the grub screws. Do not over tighten
the grub screws.
Now the lead can be plugged into a power point. We recommend a timer is used to prolong the element life and
to conserve power. A range of timers are available from your stockist or by contacting Thermogroup on
1300368631.
You will be left with the following parts
1 spare leg with black grommet, 1 plastic spacer, 1 metal mounting bracket, Flat round bracket
Legs for Exposed Wiring
Completed Installation
Wiring
Warranty
Thermogroup covers all its products with a satisfaction guarantee. In addition Thermogroup
will supply a replacement product where a fault is shown to be caused by manufacture,
materials or workmanship providing the goods have been installed correctly and according
to installation instructions. This guarantee does not include removal, freight or installation
costs. Thermogroups products come with guarantees that cannot be excluded under the
Australian Consumer Law and you are entitled to a replacement or refund for a major failure
& compensation for any other reasonable foreseeable loss or damage. You are also entitled
to have the goods repaired or replaced if the goods fail to be of acceptable quality and the
failure does not amount to a major failure.
All of the standard Thermorail Heated Towel Rails come with a 5 year warranty and the
Budget range with a 3 year warranty. To use the warranty, repair or service the customer
must provide purchase invoice/receipt, and any other relevant details.
The consumer shall in the first instance of a fault or claim contact the retailer from whom
the product was purchased. If the product develops a fault within the warranty period due
to normal wear and tear, Thermorail will at its discretion recognise whether it’s a faulty
product or not. If it is impossible or not economical for the manufacturer to repair the
product, the manufacturer will replace the faulty product with a new unit of the same
model or if there is no stock available of the same model as the product, the manufacturer
will replace the product with a new unit of a similar size. No responsibility can be taken for
altered dimensions and lining up of existing holes.
The repair service offered within the warranty period only covers the faults and problems as
developed from the manufacturer’s errors. Any damage caused by improper use or
carelessness or incorrect wiring is not covered.
Thermorail is not responsible for any monetary loss or injuries caused by improper use of
this product.
Thermogroup PTY Ltd
ABN: 65 239 653 898
Phone 1300 368 631
Fax 1300 655 532
PO BOX 822 LEETON NSW 2705
www.thermogroup.com.au email [email protected]