1
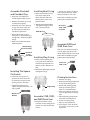
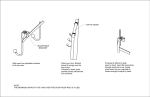
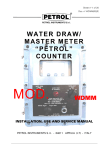
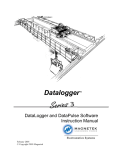
RK20075-01
Complete Seal Service Kit
For All 200 Series Filters
Instruction Part Number 12935 Rev A
This is a complete seal service kit
for all 200 Series Fuel Filter/Water
Separators.
Please have these customer
supplied items on hand before
starting installation:
• Straight slot screwdriver
• Sharp knife
• Shop towels
• Clean motor oil or diesel fuel
• 1/2” standard socket
• Clean solvent for washing parts
Note: keep installation away from
open flame.
Contact Information
Parker Hannifin Corporation
Racor Division
P.O. Box 3208
3400 Finch Road
Modesto, CA 95353
phone 800 344 3286
209 521 7860
fax 209 529 3278
[email protected]
Top View of
Mounting Head
Vent Port
3/8˝ SAE
Primer Pump Port
Checkball Port
Outlet Port
1/4˝ NPT
Outlet Port
1/4˝ NPT
www,racorcustomers.com
www.parker.com/racor
Inlet Port
1/4 NPT
Complete Kit Includes
1
5
8
Pump Plunger
Check Ball Cap
O-ring
2
Square Cut
Gasket
6
9
Check Ball
Plunger Support
3
Vent Plug
Drain Seal
(215R, 230R,
and 245R)
7
4
10
Probe Plug
O-ring
Bowl O-ring
To Install The Vent Plug
1.L
ubricate new vent plug
o-ring with clean motor
oil or diesel fuel.
2. Thread into vent port
tighten snugly.
Vent Plug
Drain Seal
(220R and 225R)
4. Remove existing pump plunger
and plunger support ring. (see
image below).
Note: Be careful not to nick
or damage other component
surfaces.
5. Remove existing pump knob
and shaft.
6. Using a straight slot
screwdriver, remove existing
checkball cap from port.
7. Remove existing checkball and
dispose properly.
6. Clean entire head and primer
pump area free of dirt and
debris. Ideally, the head
should be cleaned in a solvent
bath and dried.
Disassemble Primer Pump
1. Drain filter assembly.
2. Remove spin-on filter and bowl
from mounting head, discard
old bowl and filter gaskets
dispose properly.
3. I f possible, un-mount head for
ease of service.
1
Check Ball Cap O-ring
(all models)
2
Check Ball
(all models)
3
Vent Plug
(all models)
4
Probe Plug O-ring
(all models)
5
Pump Plunger
(all models)
6
Plunger Support
(all models)
7
Bowl O-ring
(all models)
8
Square Cut Gasket
(all models)
9
Drain Seal
(215R, 230R, and 245R)
10
Drain Seal
(220R and 225R)
3. Turn head over then drop
plunger support onto primer
knob shaft with cup facing
upward.
4. Apply a coating of clean oil or
diesel fuel to pump plunger.
5. Press pump plunger onto
primer knob shaft with cup
facing upwards until it snaps
into place behind pump knob
shaft retaining edge as shown.
6. Remount head, if applicable.
Pump
Plunger
Plunger
Support
Re-assemble Primer
Pump
1. Guide primer knob shaft into
pump port.
2. Tighten primer knob snugly
(hand tight only -do not use
tools).
Knob
Assemble Checkball
and Checkball Cap
1. Drop new check ball into
checkball port where shown.
2. Remove checkball cap o-ring
and dispose properly.
2. Lubricate new check ball cap
o-ring with clean motor oil
or diesel fuel and slide over
checkball cap threads.
Installing Bowl O-ring
1.L
ubricate new bowl o-ring
with clean motor oil or
diesel fuel and slide over
threads place into o-ring
grove on bowl.
2. Thread onto bottom of filter
and tighten snugly by hand
only - do not use tools.
2. Install new seal by pushing it
until seated into place. (Note:
this kit includes a new seal).
Prime filter assembly using the
priming instructions below.
Drain Seal
215R, 230R,
and 245R
Bowl O-ring
3. Thread check ball cap into
same port as check-ball using a
straight slot screwdriver tighten
snugly.
4. Wipe excess lubrication from
mounting head.
Assemble 220R and
225R Drain Seal
Checkball Cap
(not included)
Checkball
O-ring
Checkball
The seal seats onto the knob so
it easily pops right off and on.
(Note: this kit includes a new seal).
Installing Plug O-ring
1.L
ubricate new probe plug
o-ring with clean motor oil
or diesel fuel and slide over
threads untill it bottoms on
plug.
Installing The Square
Cut Gasket
Square cut
Gasket
Drain Seal
220R, 225R
2. Thread into probe port on bowl
and tighten snugly.
Priming Instructions
1.L
ubricate new square cut
gasket with clean motor oil
or diesel fuel and place into
gasket grove on new filter.
2. Spin filter onto head and
tighten snugly by hand only - do
not use tools.
Prime filter assembly using the
priming instructions below.
Plug O-ring
Assemble 215R, 230R,
and 245R Drain Seal
1. Remove old drain seal by
carefully cutting through seal
without scarring drain knob
surface.
1. Remove vent plug.
2. Unthread priming pump knob
on top of mounting head.
3. Slowly pull priming pump
knob up and then push it
down in a smooth motion.
4. Continue pumping until fuel
starts to spill out of vent plug
port.
5. Thread priming pump knob
back into mounting head.
6. Install vent plug snugly.
7. Wipe up any spilled fuel.
8. Start engine, check for leaks
and correct as necessary with
engine off.
Limited Warranties Statement
All products manufactured
or distributed by Racor are
subject to the following, and
only the following, LIMITED
EXPRESS WARRANTIES, and
no others: For a period of
one (1) year from and after
the date of purchase of a new
Racor product, Racor warrants
and guarantees only to the
original purchaser-user that
such a product shall be free
from defects of materials
and workmanship in the
manufacturing process. The
warranty period for pumps and
motors is specifically limited
to ninety (90) days from date of
purchase. A product claimed to
be defective must be returned
to the place of purchase. Racor,
at its sole option, shall replace
the defective product with a
comparable new product or
repair the defective product.
This express warranty shall be
inapplicable to any product not
properly installed and properly
used by the purchaser-user
or to any product damaged or
impaired by external forces.
THIS IS THE EXTENT OF
WARRANTIES AVAILABLE
ON THIS PRODUCT. RACOR
SHALL HAVE NO LIABILITY
WHATSOEVER FOR
CONSEQUENTIAL DAMAGES
© Parker Hannifin Corporation
FLOWING FROM THE USE OF
ANY DEFECTIVE PRODUCT
OR BY REASON OF THE
FAILURE OF ANY PRODUCT.
RACOR SPECIFICALLY
DISAVOWS ALL OTHER
WARRANTIES, EXPRESS
OR IMPLIED INCLUDING,
WITHOUT LIMITATION, ALL
WARRANTIES OF FITNESS
FOR A PARTICULAR PURPOSE
(EXCEPT FOR THOSE WHICH
APPLY TO PRODUCT OR
PART THEREOF THAT IS
USED OR BOUGHT FOR USE
PRIMARILY FOR PERSONAL,
FAMILY, OR HOUSEHOLD
PURPOSES), WARRANTIES OF
DESCRIPTION, WARRANTIES
OF MERCHANTABILITY,
TRADE USAGE OR
WARRANTIES OR TRADE
USAGE.
Warning
Failure or improper selection
or improper use of the
products and/or systems
described herein or related
items can cause death,
personal injury and property
damage. This document and
other information from Parker
Hannifin Corporation, its
subsidiaries and authorized
distributors provide product
and/or system options for
further investigation by users
having technical expertise.
It is important that you
analyze all aspects of your
application and review the
information concerning the
product or system in the
current product catalog. Due
to the variety of operating
conditions and applications
for these products or systems,
the user, through its own
analysis and testing, is solely
responsible for making the
final selection of the products
and systems and assuring that
all performance, safety and
warning requirements of the
applications are met.
The products described
herein, including with
limitation, product features,
specifications, designs,
availability and pricing, are
subject to change by Parker
Hannifin Corporation and
its subsidiaries at any time
without notice.
The following statement
is required pursuant to
proposition 65, applicable
in the State of California:
‘This product may contain a
chemical known to the State of
California to cause cancer or
reproductive toxicity’.
Febuary 2010