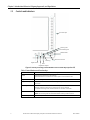
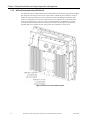
1
GFK-2789D GE Intelligent Platforms Industrial Computer Products Wolverine* III Industrial Display Computer Hardware Reference Manual, GFK-2789D October 2014 g October 2014 1 Warnings, Cautions, and Notes as Used in this Publication Warning Warning notices are used in this publication to emphasize that hazardous voltages, currents, temperatures, or other conditions that could cause personal injury exist in this equipment or may be associated with its use. In situations where inattention could cause either personal injury or damage to equipment, a Warning notice is used. Caution Caution notices are used where equipment might be damaged if care is not taken. Note: Notes merely call attention to information that is especially significant to understanding and operating the equipment. These instructions do not purport to cover all details or variations in equipment, nor to provide for every possible contingency to be met during installation, operation, and maintenance. The information is supplied for informational purposes only, and GE makes no warranty as to the accuracy of the information included herein. Changes, modifications, and/or improvements to equipment and specifications are made periodically and these changes may or may not be reflected herein. It is understood that GE may make changes, modifications, or improvements to the equipment referenced herein or to the document itself at any time. This document is intended for trained personnel familiar with the GE products referenced herein. GE may have patents or pending patent applications covering subject matter in this document. The furnishing of this document does not provide any license whatsoever to any of these patents. GE PROVIDES THE FOLLOWING DOCUMENT AND THE INFORMATION INCLUDED THEREIN AS-IS AND WITHOUT WARRANTY OF ANY KIND, EXPRESSED OR IMPLIED, INCLUDING BUT NOT LIMITED TO ANY IMPLIED STATUTORY WARRANTY OF MERCHANTABILITY OR FITNESS FOR PARTICULAR PURPOSE. * indicates a trademark of General Electric Company and/or its subsidiaries. All other trademarks are the property of their respective owners. Copyright © 2013-2014 by General Electric Company All Rights Reserved GFK-2789D October 2014 i Waste Disposal The mark or symbol on any electrical or electronic product shows that this product may not be disposed of in a trash bin. Such goods have to be returned to the original vendor or to a properly authorized collection point. Electronic waste disposal symbol with black bar as explained below The black bar underneath the waste bin symbol shows that the product was placed on the market after 13 August 2005. Alternatively, the date of ‘placement on the market’ is shown in place of the bar symbol. CE Conformance Declaration CE certification can only be granted to complete and operational systems. The Wolverine III system is certified as required. The CE mark and year of production is shown on the type label. ii Wolverine III Industrial Display Computer Hardware Reference Manual GFK-2789D Contact Information Contact Information If you purchased this product through an Authorized Channel Partner, please contact the seller directly. General Contact Information Online technical support and GlobalCare www.ge-ip.com/support Additional information www.ge-ip.com/ Solution Provider [email protected] Technical Support If you have technical problems that cannot be resolved with the information in this guide, please contact us by telephone or email, or on the web at www.ge-ip.com/support Americas Online Technical Support www.ge-ip.com/support Phone 1-800-433-2682 International Americas Direct Dial 1-780-420-2010 (if toll free 800 option is unavailable) Technical Support Email [email protected] Customer Care Email [email protected] Primary language of support English Europe, the Middle East, and Africa Online Technical Support www.ge-ip.com/support Phone +800-1-433-2682 EMEA Direct Dial +420-23-901-5850 (if toll free 800 option is unavailable or dialing from a mobile telephone) Technical Support Email [email protected] Customer Care Email [email protected] Primary languages of support English, French, German, Italian, Czech, Spanish Asia Pacific Online Technical Support www.ge-ip.com/support Phone +86-400-820-8208 +86-21-3877-7006 (India, Indonesia, and Pakistan) Technical Support Email [email protected] (China) [email protected] (Japan) [email protected] (remaining Asia customers) Customer Care Email [email protected] [email protected] (China) GFK-2789D October 2014 iii Contents Warnings, Cautions, and Notes as Used in this Publication ................................................................. i Contact Information .................................................................................................................................... iii Contents.......................................................................................................................................................... v Chapter 1 Introduction ......................................................................................................................... 1 1.1 Certification ...................................................................................................................................................... 1 1.2 Altitude ................................................................................................................................................................ 1 1.3 Wolverine III Features and Options ..................................................................................................... 2 1.3.2 Wolverine III Ordering Information........................................................................................... 3 1.4 Environmental and Mechanical Specifications ............................................................................. 3 1.5 Controls and Indicators .............................................................................................................................. 4 1.6 Wolverine III Accessories ........................................................................................................................... 5 1.7 Related Documents ...................................................................................................................................... 5 1.8 Additional Support ........................................................................................................................................ 6 Chapter 2 Getting Started.................................................................................................................... 1 2.1 Unpacking and Inspection ....................................................................................................................... 1 2.2 Safety ................................................................................................................................................................... 1 2.3 Hardware Installation ................................................................................................................................. 2 2.3.1 General Warnings.............................................................................................................................. 2 2.3.2 Warnings for Hazardous Areas .................................................................................................. 3 2.3.3 General Torque Values for Screws ........................................................................................... 4 2.3.4 Mounting Location ............................................................................................................................ 5 2.3.5 Wolverine III Dimensions ............................................................................................................... 6 2.3.6 Mounting Options .............................................................................................................................. 8 2.3.7 Panel Mounting ................................................................................................................................... 8 2.3.8 Wall and Desktop Mounting (VESA Mount) ........................................................................ 10 2.3.9 Floor Mounting ................................................................................................................................. 11 2.3.10 Keyboard Tray, Visor, and Handle ................................................................................... 13 Chapter 3 Connectors and Cabling .................................................................................................. 15 3.1 Gland Plate..................................................................................................................................................... 15 3.1.1 Removing the Gland Plate ......................................................................................................... 16 3.1.2 Routing Cables through the Gland Plate ............................................................................ 16 3.1.3 Torque Values for Cable Glands ............................................................................................. 16 3.1.4 Installing the Gland Plate............................................................................................................ 17 3.1.5 Bonding ................................................................................................................................................ 17 3.2 I/O Plates (IOPs)............................................................................................................................................ 17 3.2.1 AC Units................................................................................................................................................ 17 3.2.2 DC Units ............................................................................................................................................... 19 3.3 Printer Port LPT1 ......................................................................................................................................... 21 3.4 Serial Communication Ports ................................................................................................................. 21 3.4.2 RS-422 and RS-485 Operating Mode ................................................................................... 21 3.4.3 Shielding .............................................................................................................................................. 22 3.4.4 USB Ports............................................................................................................................................. 22 3.4.5 Intrinsically Safe Ex ic USB Port / Nonincendive USB Wiring for Class 1 Division 2 Groups ABCD................................................................................................................. 23 GFK-2789D October 2014 v Contents 3.5 Ethernet LAN Ports..................................................................................................................................... 24 3.5.2 Ethernet Indicators ........................................................................................................................... 24 3.5.3 WLAN Port (Optional) .................................................................................................................... 25 3.6 Horn Output .................................................................................................................................................. 25 3.7 VGA Port .......................................................................................................................................................... 26 3.8 Mouse and Keyboard Ports ................................................................................................................... 26 3.9 Remote Power Button (PWR BTN) ...................................................................................................... 27 3.10 Audio (Mic, Line, Out) ................................................................................................................................. 27 Chapter 4 4.1 4.2 4.3 4.4 4.6 Chapter 5 Embedded Controller ....................................................................................................... 29 Tasks of the Embedded Controller .................................................................................................... 29 Environmental Control ............................................................................................................................. 29 Heat up times ............................................................................................................................................... 29 Advanced Configuration and Power Interface (ACPI).............................................................. 29 Power and Heater LEDs .......................................................................................................................... 30 Field Maintenance ............................................................................................................ 31 5.1 Inspection ....................................................................................................................................................... 31 5.2 Field Serviceable Components ............................................................................................................ 32 5.3 O-Rings ............................................................................................................................................................ 33 5.4 Gland Plate Removal and Replacement ........................................................................................ 33 5.4.1 Removing the Gland Plate ......................................................................................................... 33 5.4.2 Routing Cables through the Gland Plate ............................................................................ 34 5.4.3 Installing the Gland Plate............................................................................................................ 34 5.4.4 Bonding ................................................................................................................................................ 34 5.4.5 Replacing Fuses ............................................................................................................................... 34 5.5 Replacement of the Gland Plate Retention Screws ................................................................. 34 5.6 Service Lid ...................................................................................................................................................... 37 5.6.1 Removing the Service Lid ........................................................................................................... 37 5.6.2 Installing the Service Lid ............................................................................................................. 38 5.6.3 Changing the Desiccator ............................................................................................................ 38 5.6.4 Changing the SSD or HDD.......................................................................................................... 39 5.6.5 Installing an ExpressCard Device ........................................................................................... 39 5.7 Changing the Battery ............................................................................................................................... 40 5.8 Front Plate ...................................................................................................................................................... 41 5.8.1 Removing the Front Plate ........................................................................................................... 41 5.8.2 Installing the Front Plate ............................................................................................................. 41 5.9 Replacing the Fans .................................................................................................................................... 43 Appendix A A.1 A.2 Wolverine III Agency Approvals, and Regulations ..................................................... 45 Agency Approvals ...................................................................................................................................... 45 Government Regulations ....................................................................................................................... 46 Index ................................................................................................................................................................ 1 vi Wolverine III Industrial Display Computer Hardware Reference Manual GFK-2789D Chapter 1 Introduction The Wolverine III industrial computers are rugged panel computers running Windows operating systems. They are designed to be suitable for use in hazardous and harsh environments. Each member of the Wolverine III industrial computer family is a fully self-contained personal computer (PC)-compatible computer with a built-in flat screen display and resistive touch screen. The unit is housed in a rugged metal case to protect the system against dust, water, and mechanical damage. Wolverine III industrial computers are available as either 24 V dc units that accept a range of 11–32 V dc, or as 115/230 V ac units that accept a range of 100–240 V ac. Wolverine III AC and Wolverine III DC computers provide an enhanced feature set including heaters for extended temperature operation and a front keypad overlay. The unit is supplied completely assembled and requires only mounting and connecting. 1.1 Certification Wolverine III is certified for Zone 2 environments according to ATEX 94/9/EG and Class 1 Division 2 per ANSI/ISA 12.12.01. 1.2 Altitude Altitude, air pressure and ambient temperature influence the thermal operation of the components described in this manual. They have been developed and tested at approximately 1000 m (3300 ft.) above sea level at ambient temperatures of -40°C to +60°C. Because of only marginal variations within a limited range of altitudes these products operate as specified within altitudes from sea level to 1000 m. For thermal derating at altitudes above 1000 m, contact GE Intelligent Platforms. GFK-2789D October 2014 1 Chapter 1 Introduction Wolverine III Agency Approvals, and Regulations 1.3 Wolverine III Features and Options This manual describes the basic product plus options. Your product may not have all options implemented. Please check your purchase contract to verify which options are implemented. Table 1: Common Features CPU RAM Display Touch Screen Ports Expansion Slot System Management Power Supply Dedicated controls Intel Core 2 Duo up to 2.26 GHz, soldered Up to 4 GB, soldered 15” TFT, XGA, sunlight readable Resistive Four USB 2.0 ports Two Ethernet ports (10/100/1000 Mbit/s) Two RS-232/RS-422/RS-485 ports (configurable via BIOS) Two RS-232 ports One parallel port Two PS2 ports One audio port (Mic, Line, Out) One VGA port One horn output terminal block ExpressCard, supports 34 mm and 54 mm modules Accelerometer, Thermal Monitoring and Management, Elapsed time indicator (All available through Operating System) ETL Listed Right mouse button, dimming, cleaning function, disable indicator LEDs and function keys (Availability depends on Overlay option.) Table 2: Options Processor Speed and RAM Mass Storage Front Panel Overlay Power feed Wireless Local Area Network (WLAN} Operating System 2.26 GHz, 4 GB RAM, 2.26 GHz, 2 GB RAM, or 1.2 GHz, 2 GB RAM 32, 40 or 64 GB 2.5” SATA Solid State Drive( SSD), or 100 GB Hard Disk Drive (HDD) No buttons, Control buttons only, or Control buttons and function keys 11-32 V dc or 100-240 V ac, 47-63 Hz None or 802.11 b/g/n None, Windows XP Professional, or Windows 7 Professional Caution An operating system version designed specifically for use with SSDs is required to minimize write cycles, enhancing the lifespan of the SSD. System Recovery USB Flash Drive 2 A USB flash drive capable of restoring your system disk to its asshipped condition is available on request. Wolverine III Industrial Display Computer Hardware Reference Manual GFK-2789D Chapter 1 Introduction 1.3.2 Wolverine III Ordering Information The following table lists the part numbers used to order the standard Wolverine III configurations. Table 3: Wolverine III Standard Part Numbers Power Required Wireless Ethernet WV3402114010 DC No Windows XP Pro Rear exit WV3402114020 DC No Windows 7 Pro Rear exit WV3402124010 AC No Windows XP Pro Rear exit WV3402124020 AC No Windows 7 Pro Rear exit WV340212402E AC No Windows 7 Pro Rear exit WV340212412E AC Yes Windows 7 Pro Rear exit WV3402414010 DC No Windows XP Pro Bottom exit WV3402414020 DC No Windows 7 Pro Bottom exit WV3402424010 AC No Windows XP Pro Bottom exit WV3402424020 AC No Windows 7 Pro Bottom exit Part Number Operating System Gland Plate All standard units include the 2.26 GHz Processor with 4 GB RAM, plus a front-panel overlay with control and function buttons. For configurations or options not listed, please contact GE Intelligent Platforms. 1.4 Environmental and Mechanical Specifications Table 4: Environmental Conditions Operation Temperature -40°C to +70°C 5 % to 95 % RH NEMA4x, IP66 2 g, 10 Hz – 500 Hz (only with SSD) 40 g saw tooth 11ms pulse, 3 – Axis (only with SSD) Less than 1000 m (3300 ft.) Note: For thermal derating at altitudes above 1000 m, contact GE Intelligent Platforms. Humidity Enclosure Protection† Vibration (Operating) Shock (Operating) Altitude (Operating) † -40°C to +60°C Storage Note: The Gland Plate must be fixed to the main chassis to maintain the enclosure protection rating Caution Modification of any part of the housing invalidates the enclosure protection. Table 5: Mechanical Specifications Main chassis construction Weight GFK-2789D The main chassis is manufactured from aluminum and houses all electronics. 10.2 kg ( 22.5 lbs.) with Gland Plate October 2014 3 Chapter 1 Introduction Wolverine III Agency Approvals, and Regulations 1.5 Controls and Indicators Function Keys Cleaning LED Preheating LED PWR (Power) Cleaning Right Mouse Ethernet Link LEDs LEDs Brightness Adjust Figure 1: Overlay Including Control Buttons and Function Keys (Option O3) Table 6: Control Buttons and Function Keys Button 4 Description PWR Switches the Wolverine III ON and OFF; Hold this button for at least 4 seconds to perform a hard switch OFF. Right mouse Provides a right mouse button press. Brightness adjust Use the up-arrow to increase the backlight brightness, down arrow to decrease. Cleaning Hold button for 3 seconds to enable Cleaning mode. This mode disables all buttons and the touchscreen so that the unit can be cleaned. To disable Cleaning mode, hold this button for another 3 seconds. LED off Disables all status LEDs, except the Cleaning LED on the overlay. Note: The Cleaning LED still illuminates when Cleaning mode is active. Function Keys Function Keys F1 to F12 Wolverine III Industrial Display Computer Hardware Reference Manual GFK-2789D Chapter 1 Introduction Table 7: Indicators Indicator 1.6 Description Cleaning LED LED is on while the unit is in cleaning mode. Preheating LED Indicates that the system is heating up to get into Operating mode. LED automatically turns off when the unit is in Operating mode. Ethernet Link LED Indicates a link on the particular Ethernet line. PWR LED The PWR button is illuminated green when the unit is in operation. Wolverine III Accessories The following table lists optional accessories that are available for the Wolverine III industrial computer: Table 8: Accessories for Wolverine III Item Part Number Description Panel Mounting Kit WV3ACCPANLMT For panel mounting. See section 2.3.7 Panel Mounting for details. Replacement Gasket for panel mounting WV3SPPMOUNT0 For panel mounting. See page 7. Keyboard WVKBUSB001A ATEX USB Intrinsically Safe ( IS) keyboard. See GFK-2910, Intrinsically Safe Keyboard Datasheet for details. Floor Stand WV3FLRSTD For floor mounting. See section 2.3.9 Floor Mounting for details. Keyboard Tray WV3KBTRY For use with wall-mounted or floor standmounted units Visor WV3KBVISR For use with wall-mounted or floor standmounted units Handle WV3HDLSET For use with wall-mounted or floor standmounted units Please contact your sales representative for latest information on options and accessories. Accessories are subject to change without notice. 1.7 Related Documents Additional information about the Wolverine III can be found in the following documents, available on the GE Intelligent Platforms support website, www.ge-ip.com/support. GFK-2790, Wolverine III Extended Service Manual GFK-2791, Wolverine III Quick Start Guide GFK-2797, Wolverine III Rugged Panel PCs Extended Service Kits GFK-2894, Wolverine III Rugged Panel PCs USB Recovery Procedure GFK-2910, Wolverine III Keyboard WVKBUSB001A Datasheet GFK-2943, Wolverine III Software Development Kit Reference Manual GFK-2789D October 2014 5 Chapter 1 Introduction Wolverine III Agency Approvals, and Regulations 1.8 Additional Support For support and information, visit GE Intelligent Platforms’ website at http://www.ge-ip.com. The files for this manual and other related documentation are available there. Additional region- and language-specific websites and telephone numbers are found on the Contacts page at the front of this manual. Information for components and driver software can be found at the following locations: Intel Corp. Microsoft Corp. MetaPlume Corp. 6 www.intel.com www.microsoft.com www.viaarena.com Wolverine III Industrial Display Computer Hardware Reference Manual GFK-2789D Chapter 2 Getting Started This chapter covers the initial preparation of your Wolverine III for use: unpacking, inspection, and installation of the hardware. Following these procedures will ensure proper operation after shipping and ease the integration with your application. 2.1 Unpacking and Inspection Please check that the delivered package contains the following items: Table 9: Wolverine III Package Contents Qty. 2.2 Item 1 Wolverine III industrial computer 1 Antenna kit (supplied only with the Wireless option.) Safety Warnings Please read these safety instructions carefully. Place this equipment on a stable surface during installation. Dropping it or letting it fall could cause damage. GFK-2789D Position the power cord so that people cannot step on it. Do not place anything over the power cord. All cautions and warnings on the equipment should be complied with. Never pour any liquid into an opening. This could cause fire or electrical shock. Only qualified service personnel should open the equipment. If any of the following situations arises, get the equipment checked by qualified service personnel: - Liquid has penetrated into the equipment. - The equipment has been dropped and damaged. - The equipment has obvious signs of breakage. October 2014 1 Chapter 2 Getting Started Wolverine III Agency Approvals, and Regulations 2.3 Hardware Installation The Wolverine III has been designed to ensure simple installation of the system. 2.3.1 General Warnings Warnings Input and output wiring methods and cable types must be in accordance with ordinary location wiring methods and in accordance with the authority having jurisdiction. Do not remove the Service Lid while power is applied to the system. Dangerous power levels may be present in the industrial computer or on power input terminals while power is connected, even if the Power On/Off indicator is not illuminated. The proper method for removing power from the unit is to switch off power at the circuit breaker, which is not part of the Wolverine III. (DC version) Power supply is to be connected to an isolated secondary voltage, which is separated from the primary circuit by reinforced or double insulation. The power supply shall be properly bonded to the main grounding terminal in the end product. Ensure a connection between protective earth and negative somewhere in the DC Power Net. Power is to be connected to a supply no greater than 50 A maximum. (AC version) Product shall be connected to no greater than a 20 A branch circuit. The battery used in this device may present a fire or chemical burn hazard if mistreated. Do not disassemble, heat above 100 °C (212 °F) or incinerate. Dispose of used batteries safely, in accordance with the battery manufacturer’s Material Safety Data Sheet (MSDS). Caution The touch screen, control buttons and function keys are intended for use with hands or gloved hands. Do not use tools, such as screwdrivers, that have metal parts, which may damage the touch screen and controls. 2 Wolverine III Industrial Display Computer Hardware Reference Manual GFK-2789D Chapter 2 Getting Started 2.3.2 Warnings for Hazardous Areas Warning GFK-2789D This equipment is suitable for use in ATEX Zone 2, Class 1 Division 2, or non-hazardous locations only. WARNING: EXPLOSION HAZARD. DO NOT DISCONNECT WHILE THE CIRCUIT IS LIVE OR UNLESS THE AREA IS KNOWN TO BE FREE OF IGNITIBLE CONCENTRATIONS. AVERTISSEMENT - RISQUE D'EXPLOSION - AVANT DE DECONNECTER L'EQUIPEMENT, COUPER LE COURANT OU S'ASSURER QUE L'EMPLACEMENT EST DESIGNE NON DANGEREUX. WARNING-EXPLOSION HAZARD-SUBSTITUTION OF COMPONENTS MAY IMPAIR SUITABILITY FOR USE IN DIVISION 2. AVERTISSEMENT - RISQUE D'EXPLOSION - LA SUBSTITUTION DE COMPOSANTS PEUT RENDRE CE MATERIEL INACCEPTABLE POUR LES EMPLACEMENTS DE DIVISION 2. Enclosure Cover Warning – Explosion hazard - Do not remove cover unless area is known to be non-hazardous. (This warning applies to any removable cover on the unit – Service Lid, Gland Plate etc.) Input and output wiring methods and cable types must be in accordance with ATEX Zone 2 or Class 1 Division 2 wiring methods and in accordance with the authority having jurisdiction. All cable glands must be equipped with a cable or with a blind plug. Antenna Warning – Explosion hazard - Do not remove or install antenna unless area is known to be non-hazardous. Only isolated antennas are allowed, where the inner part is not touchable after mounting. If the case is damaged or if the touch cover sheet is broken or perforated, the unit must be taken out of service and repaired. October 2014 3 Chapter 2 Getting Started Wolverine III Agency Approvals, and Regulations ATEX – Specific Conditions of Use – Symbol “X” The equipment avoids electrostatic charging that occurs during standard handling such as wet cleaning and touching. But charging processes directly beside the equipment must be avoided. The device shall be used in areas where the risk of mechanical danger is low. The intended mounting orientation is that the screen is landscape and perpendicular to the floor. The equipment may lean backward or forward by an angle of 45°. The protection level of the device is maintained by the gas tightness of its case. After installation and service all lids and openings need to be closed as described within this manual. ATEX Markings for Hazardous Area Approvals II 3G Ex nC ic IIC T4 Gc X -40 °C <= Ta <= 60 °C Definitions of Markings for Hazardous Area Approvals Protection against ignition of explosive atmospheres II 3G Category 3 for Gases; Zone 2 Equipment Ex Protection against ignition of explosive atmospheres nC General protection concept: Sealed Device ic Second protection concept: Intrinsically safe circuits; (EPL) Equipment Protection Level c IIC Group II subdivision C, a typical gas is hydrogen T4 Maximum surface temperature is 135°C Gc X 2.3.3 Group II Protection for explosive gases; Equipment Protection Level (EPL) c specific conditions of use – symbol “X” General Torque Values for Screws Use a PH1 screwdriver for the cross head (Phillips) screws. Unless otherwise specified, use the following torque values when tightening screws: Table 10: Recommended Screw Torque Values 4 Screw size Torque in Nm Torque in lbf-in M2.5 0.6 5 M3 0.7 6 M4 1.0 8.9 M5 2.0 18 M6 3.7 33 Wolverine III Industrial Display Computer Hardware Reference Manual GFK-2789D Chapter 2 Getting Started 2.3.4 Mounting Location This unit is designed to operate in an outdoor environment. The mounting method must be able to support the weight of the unit under shock and vibration conditions for the given application. To insure proper operation, take care not to install unit in tight confined areas. During mid-day operations when the effect of solar heating is at its peak, surrounding walls and surfaces can reflect additional solar energy and cause the unit to overheat. (If this happens, shut down until temperatures fall back to normal operating conditions.) The unit must have a minimum clearance of 154 mm (6”) per side, behind, below and above for cooling. This does not include mounting parts and wiring to and from the unit. This clearance needs to be increased if surrounding surfaces radiate heat. When operating the Wolverine III in a hazardous environment, all cabling with the exception of the WLAN antennas must access the I/O Plate through the Gland Plate. For additional requirements for Gland Plate removal and installation, see section 3.1 Gland Plate. Caution When operating the Wolverine III in a hazardous environment all cabling must access the I/O Panel through the Gland Plate with the exception of the WLAN antennas. Warning When operating the Wolverine III in a hazardous environment, WLAN antennas, extension cables with WLAN antennas or dust caps must be mounted on all WLAN outputs. Only isolated antennas are allowed where the inner part is not touchable after mounting. For antenna locations, refer to Figure 15. GFK-2789D October 2014 5 Chapter 2 Getting Started Wolverine III Agency Approvals, and Regulations 2.3.5 Wolverine III Dimensions Figure 2: Wolverine III Dimensions (Front View) Figure 3: Wolverine III Dimensions (Top View) 6 Wolverine III Industrial Display Computer Hardware Reference Manual GFK-2789D Chapter 2 Getting Started Figure 4: Wolverine III Dimensions (Rear View) Figure 5: Wolverine III Dimensions (Left Side View) GFK-2789D October 2014 7 Chapter 2 Getting Started Wolverine III Agency Approvals, and Regulations 2.3.6 Mounting Options Depending on your system configuration and mounting requirements, several different methods of mounting can be used. The three basic methods are listed below: Panel Mounting The Wolverine III can be mounted in a panel opening using the Panel Mount Kit WV3ACCPANLMT. For details, see section 2.3.7 Panel Mounting. Wall or Desktop Mounting (VESA Mount) Mounting points in accordance with the VESA Mounting Interface Standard are located on the rear of the unit. (See Figure 2 - Rear view.) Use M6 screws to mount the Wolverine III. Free thread length is 8 mm. For details, see section 2.3.8 Wall and Desktop Mounting (VESA Mount). Floor Mounting A floor stand is available for the Wolverine III. The stand provides adjustments for the height, rotation, and tilt of the screen. For details, see section 2.3.9 Floor Mounting. 2.3.7 Panel Mounting The Wolverine III can be panel mounted using the optional WV3ACCPANLMT Panel Mounting Kit. Begin by locating a cutout 332 mm high x 387 mm wide (13.1 x 15.2”), with a maximum corner radius of 18 mm (0.7”) in the target panel, using the following figure as a guide. Panel thickness must be at least 2 mm, but no more than 10 mm (0.08 to 0.40”). Figure 6: Wolverine III Panel Cutout 8 Wolverine III Industrial Display Computer Hardware Reference Manual GFK-2789D Chapter 2 Getting Started Instructions for use of the WV3ACCPANLMT Panel Mounting Kit The WV3ACCPANLMT Panel Mounting Kit Includes: eight brackets with frames one WV3SPPMOUNT0 gasket 1. Place the gasket on the unit by sliding the gasket over the back of the unit and positioning it behind the front panel (faceplate). 2. Attach the brackets to the unit as shown in Figure 7, below. 3. Insert the Wolverine III into the cutout and open the set screws on the rear of the brackets. 4. Open the brackets (90° angle between bracket and frame) and slightly tighten the set screws. 5. After all screws have been slightly tightened and the Wolverine III is adjusted to the final position, tighten all the set screws to a final torque of no more than 1.5 Nm (13.3 lbf-in). Figure 7: Wolverine III Panel Mount Option GFK-2789D October 2014 9 Chapter 2 Getting Started Wolverine III Agency Approvals, and Regulations 2.3.8 Wall and Desktop Mounting (VESA Mount) The Video Electronics Standards Association (VESA) publishes the Mounting Interface Standard (the VESA MIS, colloquially known as the “VESA mount” standard), which defines a variety of means for mounting flat panel monitors, televisions, and other displays to stands or wall mounts. The Wolverine III conforms to VESA MIS-D, which requires four screw attachment holes on the panel back in a 75 mm or 100 mm square pattern. The Wolverine III has M6 screw holes matching both patterns, allowing its use with a wide range of commercially available wall mounts, desk mounts, swing arms, articulated arms, and so forth. Figure 8: Wolverine III VESA Mount Option 10 Wolverine III Industrial Display Computer Hardware Reference Manual GFK-2789D Chapter 2 Getting Started 2.3.9 Floor Mounting The Wolverine III can be floor mounted using the optional WV3ACCFLRMT floor stand. This stand, pictured at right with with the Wolverine III installed along with the optional keyboard tray and visor, provides adjustments for the height, rotation, and tilt of the screen. It is contructed of stainless steel. Installation of the Floor Stand The floor stand base is 250 mm (9.84 in) in diameter. It is provided with eight 18 mm (0.71 in) mounting holes arranged in a 200 mm (7.87 in) circle, as shown in the figure below, for mounting to the floor or other flat surface. Figure 10: Wolverine III Floor Stand Base Figure 9: Wolverine III Floor Stand Option GFK-2789D October 2014 11 Chapter 2 Getting Started Wolverine III Agency Approvals, and Regulations Attaching the Wolverine III to the Floor Stand After the floor stand has been secured, mount the Wolverine III to the floor stand. 1. First loosen the locking nut and locking bolt as shown in the figure below to allow the display attachment plate to be lifted upwards off of its hinge at the top of the floor stand mounting plate. Figure 11: Wolverine III Floor Stand Attachment (from Right-hand Side) 2. The display attachment plate should be fitted to the back of the Wolverine III using four M6 x 8mm flat-head screws into the 100 mm VESA mount screw holes. (See section 2.3.8 Wall and Desktop Mounting (VESA Mount)). Torque to no more than 3.7 Nm (33 lbf-in). Figure 12: Wolverine III Display Attachment Plate 3. 4. 12 Next, hang the display on the floor stand mounting plate using the hook at the top of the attachment plate. Lower it into position, lock it with the locking pin, then retighten the locking bolt, followed by the locking nut. Finally, for added security, insert two M6 x 12mm cap screws through the right-hand 75 mm VESA mounting holes in the floor stand mounting plate and display attachment plate into the tapped holes in the back of the display. Tighten to no more than 3.7 Nm (33 lbf-in). Wolverine III Industrial Display Computer Hardware Reference Manual GFK-2789D Chapter 2 Getting Started 2.3.10 Keyboard Tray, Visor, and Handle Three Wolverine III options are particularly useful with VESA and Floor Stand mounting: the keyboard tray (WV3KBTRY), the visor (WV3KBVISR), and the handle (WV3HDLSET). (None of these items are useable when the Wolverine III is panel mounted.) The visor is helpful in outdoor installations or anywhere that overhead lighting might cause glare in the display screen. The keyboard tray and visor are shown in Figure 9: Wolverine Floor Stand Option, above, and in the figure below. Both mount to the side of the display in a similar fashion, with a pair of flat M4 x 8 mm screws through brackets on either side into tapped holes in the side of the Wolverine III Figure 13: Wolverine III Keyboard Tray and Visor Attachment The optional handle mounts to the top of the Wolverine III as shown in the following figure. Figure 14: Wolverine III Handle Option GFK-2789D October 2014 13 Chapter 2 Getting Started Wolverine III Agency Approvals, and Regulations 14 Wolverine III Industrial Display Computer Hardware Reference Manual GFK-2789D Chapter 3 Connectors and Cabling This chapter describes the connector layout and cabling on Wolverine III industrial computers. Power and communication connectors are described in this section. Connectors are located on the back I/O plate. When operating the unit in a hazardous area, all cables to the I/O plate must be fed through the glands on the Gland Plate. PS/2 Keyboard PS/2 Mouse port Four serial ports, COM1, COM2, COM3, COM4 Parallel port Four USB 2.0 ports (One USB connector –optional– in Gland Plate) Two Ethernet 10/100/1000baseT ports (RJ-45) Remote PWR BTN Horn Output VGA port Audio (Mic, Line, Out) Power AC or DC WLAN (beside I/O plate) The grade of protection by the enclosure is determined by its gas tightness. Not only the cable gland needs to be sealed, but also the cable itself. This only needs to be considered for cables that end in the ATEX Zones. Input and output wiring methods and cable types must be in accordance with ATEX Zone 2 and Class 1 Division 2 wiring methods, in accordance with the authority having jurisdiction and the manufacturer recommendations and suitable for the environmental conditions in which the unit is used. NEC section 500 applies in the US and EN 60079-14 applies in Europe. For the lower operating temperature the lowest ambient temperature (down to –40 °C) and for the upper temperature the highest ambient temperature (up to +60 °C) plus 30 K (90 °C) is required. (Tlow ambient <= Twiring <= Thigh ambient +30 K). All cables brought through the cable glands need a support to avoid forces or movement of the cables in the glands. If glands are connectorized, the cables need to be supported to avoid high forces on the Gland Plate. The support for the cables should be mounted to the Wolverine III or to the mount when Wolverine III is fixed to the mount. 3.1 Gland Plate The unit is available with different pass through glands for cable connections (required to maintain enclosure protection rating). These glands are water and gas tight and must be tightened with a torque described in the gland manufacturer’s instructions provided with the unit. Cables must be passed through the glands and wired to the associated I/O connectors. Four glands and one USB connector are available on the Gland Plate shown in Figure 15. Note: GFK-2789D Figure 15 indicates all available I/O for the Gland Plate, but does not cover all available configurations. Contact your GE Intelligent Platforms sales representative for a quote for a customized Gland Plate. October 2014 15 Chapter 3 Connectors and Cabling Wolverine III Agency Approvals, and Regulations Caution When operating the Wolverine III in a hazardous environment all cabling (with the exception of the WLAN antennas) must access the I/O Panel through the Gland Plate. Figure 15: Gland Plate Warning Modification of the Gland Plate invalidates enclosure protection and the ATEX certification. 3.1.1 Removing the Gland Plate To remove the Gland Plate, 3.1.2 1. Loosen the 15 captive screws that secure the Gland Plate to the unit as shown in Figure 15 2. Disengage the Gland Plate from the unit, being careful not to strain the cable connecting the USB gland to the USB1 port. Routing Cables through the Gland Plate All plugs connected to the I/O Plate must be protected from unplugging by shock and vibration. Use securing means of the plugs when available and glue all others where securing means are not available. 3.1.3 Torque Values for Cable Glands Torque values for cable glands are determined by gland type, cable type and diameter. For torque values, refer to the manufacturer’s instructions for the cable glands. 16 Wolverine III Industrial Display Computer Hardware Reference Manual GFK-2789D Chapter 3 Connectors and Cabling 3.1.4 Installing the Gland Plate To install the Gland Plate: 3.1.5 1. Ensure that the O-ring is in its groove and is not damaged. Further ensure that the flange of the Gland Plate and the I/O Panel are clean. 2. Apply a thin layer of DC4 silicon grease from DOW CORNING on the O-ring. This prevents the O-ring from sticking. For replacement O-rings, see page 33, 3. Place the Gland Plate on the unit and tighten the captive screws to 0.8 Nm (7 lbf-in) to ensure the unit is sealed correctly to maintain the hazardous location certifications and the IP66 enclosure rating. Bonding Connect the external bonding stud below the Gland Plate to a minimum 4 mm² bonding wire. It has an M4 thread. Use means such as a ring terminal to ensure proper connection. Warning The nut with washers should always be installed, even if no ground connection is present to ensure resistance to impact of the case. For example, this situation could occur during transportation of the device. 3.2 I/O Plates (IOPs) 3.2.1 AC Units Figure 16: I/O Plate AC Units GFK-2789D October 2014 17 Chapter 3 Connectors and Cabling Wolverine III Agency Approvals, and Regulations AC Power Warning Serious injury due to shock is possible if unit is wired incorrectly or connected to voltage exceeding the input voltage range. To power your Wolverine III AC unit, connect the following lines to the AC Power terminal block: L: Line : PE (Protective Earth) Ground N: Neutral Caution Make sure that the polarization of the Power lines is correct and complete, including the Protective Earth (PE) ground. Improper connection will result in serious damage of the Wolverine III. Table 11: Power Requirements – Wolverine III AC AC Input 115 / 230 V ac; 50 / 60 Hz Voltage Range 100-240 V ac; 47-63 Hz Power Rating 200 W; 2.2 A max Table 12: Surge Protection – Wolverine III AC EN61131-2 EN 61000-6-2 Line to ground 2KV peak EN 61000-4-5 Line to ground 1KV peak The power supply input to the industrial computer uses a terminal block that shall be connected to no greater than a 20 A branch circuit for AC units. Connect PE to on the terminal block. The terminal block is rated for wire size AWG 22–12 (0.5-4 mm2) and has a torque rating of 7 in-lbs. (79 Ncm) max. It is recommended to use at least AWG 18 (1 mm2) wire for the power input. If you are using a flexible conductor it is mandatory to use a cable end sleeve (ferrule) or similar means. Do not connect more than two wires to each screw terminal of the terminal block. To remove power from the unit, the proper method is to switch off power at the circuit breaker. There is one user-serviceable fuse on the back I/O plate. See Chapter 5 Field Maintenance for replacement fuse details. Note: 18 When unit is shut down, it still needs power. The amount of power that is required depends on the ambient temperature. Leaving the unit connected to power provides instant-on capability down to -40°C. Wolverine III Industrial Display Computer Hardware Reference Manual GFK-2789D Chapter 3 Connectors and Cabling 3.2.2 DC Units Figure 17: I/O Plate DC Units DC Power Warning Serious injury due to shock is possible if unit is wired incorrectly or connected to voltage exceeding the input voltage range. To power your Wolverine III DC unit, connect the following lines to the DC Power terminal block and chassis: +: E: -: Positive line Earth ground DC Net Negative line : PE (Protective Earth) GFK-2789D October 2014 19 Chapter 3 Connectors and Cabling Wolverine III Agency Approvals, and Regulations Table 13: Power Requirements – Wolverine III DC DC Input 24 V dc Voltage Range 11–32 V dc Power Rating 190 W, 19.0 A max Caution Make sure that the polarization of the power lines is correct and complete, including both earth ground and Protective Earth (PE) ground. Incorrect polarization will result in serious damage to the Wolverine III. The power supply input to the Wolverine III uses a terminal block that shall be connected to no greater than a 50 A branch circuit for DC units. Connect the PE wire to the stud. Connect earth ground of the DC power supply to the “E” terminal of the terminal block. If such earth ground does not exist in the DC power supply, connect the “E” terminal to the stud. Ensure that the DC power supply has a connection between the negative supply ("‒") and PE (“ ”). If this connection cannot be ensured somewhere in the DC power supply, connect it directly on the I/O plate of the Wolverine III. The terminal block is rated for wire size AWG 22 - 12 (0.5-4 mm2) and has a torque rating of 7 in-lbs. (79 Ncm) max. It is recommended to use at least AWG 18 (1 mm2) wire for the power input. If flexible conductor is used, it is mandatory to use a cable end sleeve, ferrule, or similar means. Do not connect more than two wires to each screw terminal of the terminal block. To remove power from the unit, the proper method is to switch off power at the external circuit breaker supply power to the unit. 20 Note: There is one user-serviceable fuse on the back I/O plate. See Replacing Fuses on page 34 for replacement fuse details. Note: When unit is shut down, it still needs power. The amount of power that is required depends on the ambient temperature. Leaving the unit connected to power provides instant-on capability down to -40°C. Wolverine III Industrial Display Computer Hardware Reference Manual GFK-2789D Chapter 3 Connectors and Cabling 3.3 Printer Port LPT1 A 25-pin D-type female printer port connector is located on the back I/O plate and labeled accordingly. In order to provide higher EMC immunity and maintain CE Mark compliance, the LPT cable must be shielded. Table 14: Printer Port Pin Assignments Pin 3.4 Assignment Pin Assignment 1 #Strobe 10 #Acknowledge 2 Data Bit 0 11 Busy 3 Data Bit 1 12 Paper End 4 Data Bit 2 13 Select Out 5 Data Bit 3 14 #Auto Feed 6 Data Bit 4 15 #Error 7 Data Bit 5 16 #Initialize Printer 8 Data Bit 6 17 #Select In 9 Data Bit 7 18 to 25 Ground Serial Communication Ports Four COM ports (1–4) are available on the back I/O plate. COM1 and COM2 can be configured for RS-232 or RS-422/RS-485 operation. The preselected mode is RS-232. To select COM1 or COM2 operating mode, enter BIOS and go to the Advanced -> Super IO Configuration -> Serial Port Mode menu. COM3 and COM4 are used as RS-232 interfaces. Transient protection is enhanced on the COM3 and COM4 ports. Therefore those ports should be used first. Table 15: COM Port Pin Assignments for RS-232 Pin 3.4.2 Assignment 1 DCD (Data Carrier Detect) 2 RXD (Receive Data) 3 TXD (Transmit Data) 4 DTR (Data Terminal Ready) 5 GND (Signal Ground) 6 DSR (Data Set Ready) 7 RTS (Request to Send) 8 CTS (Clear to Send) 9 RI (Ring Indicator) RS-422 and RS-485 Operating Mode COM1 and COM2 can be selected as RS-422/RS-485 through BIOS. GFK-2789D October 2014 21 Chapter 3 Connectors and Cabling Wolverine III Agency Approvals, and Regulations Table 16: COM Port Pin Assignments for RS-422/RS-485 Pin 3.4.3 Assignment 1 RX+ (Receive Data positive) 2 RX- (Receive Data negative) 3 TX+ (Transmit Data positive) 4 TX- (Transmit Data negative) 5 GND (Signal Ground) 6 RTS- (Request to Send negative) 7 RTS+ (Request to Send positive) 8 CTS+ (Clear to Send positive) 9 CTS- (Clear to Send negative) Shielding In order to provide higher EMC immunity and maintain CE Mark compliance, the serial cables must be shielded. 3.4.4 USB Ports The four USB ports are 2.0 compliant and are located on the back I/O Plate. In order to provide higher EMC immunity and maintain CE Mark compliance, the USB cables must be shielded. 22 Wolverine III Industrial Display Computer Hardware Reference Manual GFK-2789D Chapter 3 Connectors and Cabling 3.4.5 Intrinsically Safe Ex ic USB Port / Nonincendive USB Wiring for Class 1 Division 2 Groups ABCD Control Drawing: YMXIC-WV3 Caution To avoid moisture, dust or liquids in the connector keep the dust cap closed when port is unused. GFK-2789D October 2014 23 Chapter 3 Connectors and Cabling Wolverine III Agency Approvals, and Regulations Caution Ex ic connections must be verified against EN 60079-25. For permanently installed USB devices, the following mating plug is recommended: Manufacturer: Amphenol Part Number: USBFTV6N 3.5 Ethernet LAN Ports Two RJ-45 Ethernet connectors are available on the back I/O plate for connecting standard, unshielded or shielded twisted pair cable. Both ports support Boot over LAN. Wake on LAN is supported with magic packet. Table 17: LAN Port Pin Assignments Pin 3.5.2 10/100base 1000base 1 TxD+ LP_DA+ 2 TxD- LP_DA- 3 RxD+ LP_DB+ 4 NC LP_DC+ 5 NC LP_DC- 6 RxD- LP_DB- 7 NC LP_DD+ 8 NC LP_DD- Ethernet Indicators Note: Activity is not shown. LED1 Yellow The link is physically connected. Off No Link LED2 24 Function - Link Function – Network Data Speed Green 100base Orange 1000base Off 10base when LED1 is yellow Wolverine III Industrial Display Computer Hardware Reference Manual GFK-2789D Chapter 3 Connectors and Cabling 3.5.3 WLAN Port (Optional) The Wolverine III offers an 802.11a/b/g/n/i wireless network adapter with two external antenna connectors beside the I/O Plate. For better signal quality, an extension cable can be used to locate the antennas away from the system housing. Warning When operating the Wolverine III in a hazardous environment, WLAN antennas, extension cables with WLAN antennas or dust caps must be mounted on all the WLAN outputs. Antennas certified for the hazardous area of the intended installation must be used. For antenna locations, refer to Figure 15 on page 16. 3.6 Horn Output The Horn output is available on the back I/O Plate through a terminal block. The horn output voltage is derived from the input voltage of the system. Due to a voltage loss at the solid state relay, the AC voltage is lowered by 1 V and the DC voltage is lowered by 0.5 V compared to the input voltage. The maximum allowed current is 1 A. The current drawn on the Horn Output has to be limited by the user with a fuse of 1.25 A. The terminal block is rated for wire size AWG 12 – 22 (4 mm2 – 0.5 mm2) and has a torque rating of 7 in-lbs. (79 Ncm) max. For DC-powered Wolverines, the terminal denoted by the (H) sign is +V dc switched through an internal relay; the (-) terminal is DC return. In addition it is required that for DC-powered Wolverines inductive loads must be diode suppressed. For AC-powered Wolverines, the terminal denoted by the (H) sign is AC Line voltage switched through an internal relay; the (N) terminal is AC return. Maximum cable length is limited to 3 meters (10 ft) or less. It is recommended to use at least AWG 18 (1 mm2) wire for the terminal block. If using a flexible conductor, the use of a cable end sleeve (ferrule) or similar means of supporting the cable is required. Do not connect more than two wires to each screw terminal of the terminal block. GFK-2789D October 2014 25 Chapter 3 Connectors and Cabling Wolverine III Agency Approvals, and Regulations 3.7 VGA Port The VGA connector is located on the back I/O plate. The standard 15-pin D-sub connector pin out is shown below. Table 18: VGA Port Pin Assignments Pin 3.8 Assignment Pin Assignment 1 Red 9 +5V 2 Green 10 Ground 3 Blue 11 Not connected 4 N/C 12 DDC Data 5 V Ground 13 HSYNC 6 V Ground 14 VSYNC 7 V Ground 15 DDC Clock 8 V Ground Mouse and Keyboard Ports PS/2 ports for Mouse & Keyboard are available on the back I/O plate and labeled accordingly. Table 19: Keyboard Port (purple) Pin Assignments Pin Signal 1 KB Data 2 NC 3 GND 4 +5V 5 KB Clock 6 NC Table 20: Mouse Port (green) Pin Assignments Pin 26 Signal 1 Mouse Data 2 NC 3 GND 4 +5V 5 Mouse Clock 6 NC Wolverine III Industrial Display Computer Hardware Reference Manual GFK-2789D Chapter 3 Connectors and Cabling 3.9 Remote Power Button (PWR BTN) For use of the remote Power Button use the following connector. Table 21: PWR BTN Pin Assignments Pin Assignment 1 Reserved (do not use) 2 Reserved (do not use) 3 Reserved (do not use) 4 PWR_BTN_RTN 5 PWR_BTN 6 Reserved (do not use) 7 Reserved (do not use) 8 Reserved (do not use) 9 Reserved (do not use) 3.10 Audio (Mic, Line, Out) Mating Plug has to comply with JIS C 6560 JC35P3, 3,5 mm, 3-pin/stereo. Maximum level to be applied to the ports is 1Vrms. Sleeve Ring Tip Table 22: Audio (Mic, Line, Out) Signals GFK-2789D Line In (blue) Out (green) Pin Pin Signal Signal Microphone (red) Pin Signal Tip Left Tip Left Tip Left Ring Right Ring Right Ring Right Sleeve GND Sleeve GND Sleeve GND October 2014 27 Chapter 4 Embedded Controller 4.1 Tasks of the Embedded Controller The embedded controller (EC): 4.2 acts as an environmental controller to ensure safe operation conditions. as an ACPI embedded controller to show conditions to the operating system. provides the ability to monitor and change many parameters. Environmental Control The Wolverine III is prevented from starting until all thermal requirements are fulfilled. With its integral heater system, the Wolverine III has the capability to heat and cool specific parts of the system to reach internal requirements. 4.3 Heat up times System heat-up times depend on the starting temperature. Start up from -20 °C will last less than 3 minutes Start up from -30 °C will last less than 7 minutes Start up from -40 °C will last less than 19 minutes If an unsupported temperature is measured, the EC will remove power to the whole system to ensure safe behavior. 4.4 Advanced Configuration and Power Interface (ACPI) The ACPI EC operates with an ACPI capable operating system and includes five thermal zones: 1. SYSTEM 2. DISPLAY 3. HDD 4. HDA 5. WLAN For these zones the operating system can display the temperatures as well as reacting at critical thresholds with an operating system specific behavior (for example emergency shutdown). GFK-2789D October 2014 29 Chapter 4 Embedded Controller Wolverine III Agency Approvals, and Regulations 4.5 Power and Heater LEDs The following table of shows the PWR and HTR LED conditions and their meaning. Table 23: PWR and HTR LEDs PWR LED HTR LED Off Off On Flashing ---------- On Off ----------On Flashing Slow Operating Status Standby WV III is Operating. Power On is requested. As soon as all required circumstances are reached the WV III will start. This can be set and reset by power button press. Waiting for proper temperatures. Temperatures are out of specification and WV III thermal management tries to generate valid ones. One or more temperatures are out of specification. Please save and close all applications and shut the system down to prevent damage. - Please check ambient temperature. On Flashing Fast One or more thermal sensors are not readable. Proper system thermal management cannot be guaranteed. Save and close all applications and shut system down to prevent damage. Disconnect the WV III from power for several minutes and then reconnect. - If this does not solve the issue contact Support Off Flashing Slow One or more temperatures became out of specification after operating conditions were already reached. System is prevented from starting until this error is confirmed from the user by pressing the PWR button one time. - Check ambient Temperature. Off Flashing Fast One or more Thermal Sensors are not readable. Proper system thermal management cannot be guaranteed. System is prevented from starting. -Disconnect the WV III from power for several minutes and then reconnect. -If this does not solve the issue contact Support. 30 Wolverine III Industrial Display Computer Hardware Reference Manual GFK-2789D Chapter 5 Field Maintenance 5.1 Inspection The Wolverine III industrial computer is housed in a sealed gastight enclosure with an IP65 enclosure rating. Care must be taken to insure the enclosure is not damaged due to mishandling etc. which could compromise the gastight seal. If the enclosure is damaged, the unit must be returned to the manufacturer for repair. Do not open any plates or connections of the housing that are not described in this manual. The O-rings (gaskets) are an integral part of the gas tight seal. If any access plate is removed, the O-ring should be inspected before re-installing the plate to insure it has not been damaged. If visible damage is apparent, the O-ring must be replaced. The unit can be returned to the manufacturer for repair or an O-ring kit can be ordered for field replacement. All components and interconnects in the Wolverine III industrial computers are firmly secured during the assembly process. It is not necessary to inspect the internal components. If internal damage is suspected, the unit should be returned to the manufacturer for repair. GFK-2789D October 2014 31 Chapter 5 Field Maintenance Wolverine III Agency Approvals, and Regulations 5.2 Field Serviceable Components Warning The Field Maintenance procedures must be performed in a nonhazardous environment, such as a lab. Caution When performing this procedure, care must be taken that no liquids or dust particles penetrate into the unit. Table 24: Field Replaceable Parts The Wolverine III industrial computer is designed to be serviced in the field. The following components can be replaced in the field: Component Replacement Part Number Accessed Through O-Rings WV3SPORINGS0 Front Plate, Gland Plate, Service Lid Gland Plate, rear access WV3SPGLNDPL0 NA Gland Plate, bottom access WV3SPGLNDPL1 NA Replacement Gland Plate retention screws WV3SPIOPSCW0 NA Fuse for AC Unit WV3SPFUSEAC0 Gland Plate Fuse for DC Unit WV3SPFUSEDC0 Gland Plate Desiccant WV3SPDESICNT Service Lid SATA SSD, 2.5” WV3SPSSD32G0 Service Lid SATA HDD, 2.5” WV3SPHDD100G Service Lid SATA SSD, 2.5” WV3SPSSD64G0 Service Lid Battery WV3SPBATT000 Service Lid Front Plate O1 (no control buttons or function keys) WV3SPFPLATE1 NA Front Plate O3 (with control buttons and function keys) WV3SPFPLATE0 NA Fan assembly (two per package) WV3SPFANKIT0 Front Plate Panel Mount brackets WV3SPPMOUNT0 NA Service only in accordance with the applicable chapters in this document. 32 Wolverine III Industrial Display Computer Hardware Reference Manual GFK-2789D Chapter 5 Field Maintenance 5.3 O-Rings A field replacement kit is available for the O-rings and gaskets that are used to seal the various access plates on the Wolverine III industrial computer. Table 25: Contents of O-ring Replacement Kit, WV3SPORINGS0 O-ring Description Service Lid O-Ring Gland Plate O-Ring Front Plate O-Ring Rear Plate O-ring DC4 silicon grease from DOW CORNING 5.4 Gland Plate Removal and Replacement The Gland Plate, also known as the I/O Plate Cover, can be exchanged in the field. Also, to exchange a fuse, the Gland Plate must be removed and re-installed. Figure 18: Gland Plate Warning Modification of the Gland Plate invalidates enclosure protection and the ATEX certification. 5.4.1 Removing the Gland Plate To remove the Gland Plate, GFK-2789D 1. Loosen the 15 captive screws that secure the Gland Plate to the unit as shown in Figure 18. 2. Disengage the Gland Plate from the unit, being careful not to strain the cable connecting the USB gland to the USB1 port. October 2014 33 Chapter 5 Field Maintenance Wolverine III Agency Approvals, and Regulations 5.4.2 Routing Cables through the Gland Plate All plugs connected to the I/O Plate must be protected from unplugging by shock and vibration. Use securing means of the plugs when available and glue all others where securing means are not available. Torque Values for Cable Glands Torque values for cable glands are determined by gland type, cable type and diameter. For torque values, refer to the manufacturer’s instructions for the cable glands. 5.4.3 Installing the Gland Plate The Gland Plate kits, WV3SGLANDPL0 and WV3SGLANDPL1, include: • a Gland Plate with all connectors and cable glands, • the O-ring required for the gland plate, and • a tube of Dow Corning DC4 silicon grease To install the Gland Plate: 5.4.4 1. Ensure that the O-ring is in its groove and is not damaged. Further ensure that the flange of the Gland Plate and the I/O Panel are clean. 2. Apply a thin layer of DC4 silicon grease from DOW CORNING on the O-ring. This prevents the O-ring from sticking. For replacement O-rings, see page 33, 3. Place the Gland Plate on the unit and tighten the captive screws to 0.8 Nm (7 lbf-in) to ensure the unit is sealed correctly to maintain the hazardous location certifications and the IP66 enclosure rating. Bonding Connect the external bonding stud below the Gland Plate to a minimum 4 mm² bonding wire. It has an M4 thread. Use means such as a ring terminal to ensure proper connection. Warning The nut with washers should always be installed, even if no ground connection is present to ensure resistance to impact of the case. For example, this situation could occur during transportation of the device. 5.4.5 Replacing Fuses There is one user-serviceable fuse on the back I/O plate. The Gland Plate must be removed to access the fuse holder. Fuse sizes and required replacements are listed below. Table 26: Fuses 5.5 Model # Fuse Size Wolverine III AC GE Intelligent Platforms Part No. 8 A 250 V ac (5 x 20) mm Fast-Acting Ceramic Tube WV3SPFUSEAC0 Wolverine III DC 20 A 250 V ac / 125 V dc Fast Blow 3AB WV3SPFUSEDC0 Replacement of the Gland Plate Retention Screws If one or more of the captive Gland Plate retention screws is damaged or lost, the Replacement Gland Plate retention screws found in the WV3SPIOPSCW0 kit provides replacement parts. To replace, use the following procedure. 34 Wolverine III Industrial Display Computer Hardware Reference Manual GFK-2789D Chapter 5 Field Maintenance 1. Remove the Gland Plate as described in section 5.4.1 Removing the Gland Plate. 2. Remove any damaged screw by turning counter-clockwise while pulling slightly to engage the threads with the retainer ring. 3. If the retainer ring is intact and in good condition, skip to step 6, below. 4. Position the cover as shown in Figure 19. Place a new O-ring at the opening of the screw retainer body as shown. Figure 19: Initial placement of the retainer ring 5. Use a 4 mm (5/32”) punch to press the O-ring fully into the retainer body as shown in Figure 20. The inside shaft of the retainer body is slightly tapered to compress the ORing and thereby retain the screw. Figure 20: Press fit of the retainer ring GFK-2789D October 2014 35 Chapter 5 Field Maintenance Wolverine III Agency Approvals, and Regulations 6. Carefully insert a new screw and spring as shown in Figure 21. Applying slight pressure, turn the screw clockwise to engage the screw threads with the retainer ring, taking care not to press hard enough to dislodge the O-ring. Figure 21: Insertion of the retention screw into the retainer body 7. Continue turning until the screw threads are past the retainer ring and the head is flush with the retainer body as shown in Figure 22. Figure 22: Threading the retention screw through the retainer ring 36 Wolverine III Industrial Display Computer Hardware Reference Manual GFK-2789D Chapter 5 Field Maintenance 5.6 Service Lid The Service Lid is accessed from the left hand side of the unit. It allows access to the SSD, ExpressCard slot, desiccator and battery. The lid, desiccator and SSD carrier are integrated as one unit. Desiccator (saturation indicator on top) Express Card (34mm or 54mm module) 2.5” SSD or HDD Figure 23: Service Lid 5.6.1 Removing the Service Lid Caution To avoid damage to this assembly when removing the Service Lid, turn each screw in sequence a maximum of two turns counterclockwise. Continue loosening screws in sequence two turns at most until all four screws are loose. Use a PH1 screwdriver to turn the screws. Figure 24: Service Lid screws GFK-2789D October 2014 37 Chapter 5 Field Maintenance Wolverine III Agency Approvals, and Regulations 5.6.2 Installing the Service Lid Before reinstalling the service lid ensure that the O-ring is in its groove and is not damaged. Further ensure that the flange of the wrapper and the service lid are clean. Apply a thin layer of DC4 silicon grease from DOW CORNING onto the O-ring to prevent the O-ring from sticking. When reinstalling the service lid, the screws must be tightened to 0.8 Nm (7 lbf-in) to ensure the unit is sealed correctly to maintain the hazardous location certifications and the IP66 enclosure rating. Refer also to Figure 24. Figure 25: Service Lid assembly 5.6.3 Changing the Desiccator Desiccator WV3SPDESICNT Typically the desiccator does not need to be changed when the Service Lid and Gland Plate are mounted with all holes in the Gland Plate closed. But if your application requires frequent opening of the Service Lid or other actions which lead to an increased exchange of humidity, it could be necessary to exchange the desiccator. The indicator on top of the cartridge will turn pink when an exchange is required. The desiccator is threaded and must be screwed into the metal plate assembled with the Service Lid. The desiccator has a right-hand thread and can be easily exchanged. The desiccator is secured by a rubber washer. During installation make sure the desiccator is turned ¼ turn after the rubber washer contacts the metal plate. To access the desiccant, remove the Service Lid as described in section 5.6.1 Removing the Service Lid. 38 Wolverine III Industrial Display Computer Hardware Reference Manual GFK-2789D Chapter 5 Field Maintenance To activate the desiccant, remove the cap as shown in Figure 26. Figure 26: Desiccator Activation 5.6.4 Changing the SSD or HDD SATA SSD, 2.5”, 32 GB WV3SPSSD32G0 SATA SSD, 2.5”, 40 GB WV3SPSSD40G0 SATA SSD, 2.5”, 64 GB WV3SPSSD64G0 SATA HDD, 2.5”, 100 GB WV3SPHDD100G0 (obsolete) To access the SSD or HDD, remove the Service Lid as described on page 34. To exchange an SSD or HDD device remove the four M3 counter sunk screws and lift up the device as shown in Figure 25. The installation of an SSD or HDD device is in the opposite sequence. Caution Make sure that the SSD or HDD device has the correct orientation as shown in Figure 10 on page 49. 5.6.5 Installing an ExpressCard Device The Wolverine III supports 34 mm and 54 mm ExpressCard modules. It is not possible to bring out any cables from an ExpressCard device. The Wolverine III supports only standard form factors with a length of 75 mm and thickness of 5mm. To access the ExpressCard slot, remove the Service Lid as described on page 34. Warning Due to safety certifications and environmental conditions, only ExpressCard devices that are approved for use with the Wolverine III should be installed. GE Intelligent Platforms should be contacted for a list of approved ExpressCard devices. GFK-2789D October 2014 39 Chapter 5 Field Maintenance Wolverine III Agency Approvals, and Regulations 5.7 Changing the Battery The part number of the replaceable battery kit is WV3SPBATT000. This kit includes one battery and a cable tie wrap. In addition to the kit, you will also need a small screw driver, a small pair of wire cutters and a small gripper tool, such as needle nose pliers. Warning • The battery used in this device may present a fire or chemical burn hazard if mishandled. Do not disassemble, heat above 100 °C (212 °F) or incinerate. Dispose of used batteries safely, in accordance with the battery manufacturer’s Material Safety Data Sheet (MSDS). • Do not leave any loose parts such as batteries or tools in the unit. They could cause short circuit. When replacing the Battery, only use Manufacturer: Rayovac Europe B.V. Part Number: BR2032-BA. The Battery must be secured by a cable tie wrap. To exchange the battery do the following steps: Put the unit with the display downward onto a table. Find the Battery as shown in Figure 27. Cut the cable tie wrap off with a wire cutter. Then take the loose cable tie wrap out of the unit. Take a small screwdriver and push the battery out of the battery clamp. The red arrow shows where the battery can be pushed out. Use the pliers to take the battery out of the unit. Battery in battery clamp Cable Tie Wrap Figure 27: Service Lid Opening with Battery Place the new battery in front of the battery clamp with “+” side up. Use the gripper to slide the battery in. Form the cable tie wrap as shown in Figure 28. Figure 28: Bent Cable Tie Wrap Push the cable tie wrap down through the first hole and up through the second. Use the pliers to close the cable tie wrap. Cut the long unused end of cable tie wrap off. Refer to Figure 27 for correct position of the cable tie wrap. 40 Wolverine III Industrial Display Computer Hardware Reference Manual GFK-2789D Chapter 5 Field Maintenance 5.8 Front Plate The two Front Plate assemblies, WV3SPFPLATE0 and WV3SPFPLATE1, both include one assembled front plate, one set of mounting screws plus two spare screws, an O-ring for the front plate, and a tube of DC4 silicon grease. The exchangeable Front Plate consists of a metal frame, a touch screen, and an overlaid key pad. The Front Plate must be exchanged as one piece to ensure the unit is sealed correctly and to maintain the hazardous location certifications and the IP66 enclosure rating. 5.8.1 Removing the Front Plate To open the Front Plate remove the 34 M3x6 counter-sunk screws as shown in Figure 29. Carefully lift up the Front Plate a small amount. Caution Before the front plate can be removed, two flat cables have to be disconnected. The cable to the overlay key pad has a self-locking connector. Disconnect this one first by pushing onto the sides and pulling it off. Then loosen the screws of the touch cable holder and pull the connector off the touch cable. 5.8.2 Installing the Front Plate When reinstalling the Front Plate ensure that the O-ring is in its groove and is not damaged. Further ensure that the flange of the front plate and the housing are clean. Apply a thin layer of DC4 silicon grease from DOW CORNING on the O-ring to prevent the O-ring from sticking. Connect the touch screen cable first. Watch for correct polarity as indicated by the “1” on the PCB and the connector. Secure the touch screen cable with the touch cable holder and two screws. Connect the flat cable to the overlay key pad. To reinstall the Front Plate, the screws must be tightened to 0.8 Nm (7 lbf-in) to ensure the unit is sealed correctly to maintain the hazardous location certifications and the IP66 enclosure rating. GFK-2789D October 2014 41 Chapter 5 Field Maintenance Wolverine III Agency Approvals, and Regulations Figure 29: Front Plate 42 Wolverine III Industrial Display Computer Hardware Reference Manual GFK-2789D Chapter 5 Field Maintenance 5.9 Replacing the Fans The Fan Assembly kit WV3SPFANKIT0 includes two assembled Fans (left and right) with supports and connectors, screws to mount fan supports, plus a set of screws for mounting the front plate (one set of screws + two spare). To replace the fans, remove the Front Plate as described in section 5.8.1 Removing the Front Plate. Unplug the two fan connectors and loosen the four fan support screws as marked in Figure 30 below. Fan Connectors Screws Screws Figure 30: Fans Take the fan assemblies off. When mounting the new ones, first insert the shackle at the bottom side of the fan assemblies into the display mount. Then secure the fan assemblies with the four screws and plug the connectors in. Re-install the Front Plate as described in section 5.8.2 Installing the Front Plate. GFK-2789D October 2014 43 Appendix A A.1 Wolverine III Agency Approvals, and Regulations Agency Approvals Description Comments N.A. Safety for ITE Equipment for use in Hazardous Locations Class 1 Division 2 Group ABCD Conforms to STD UL60950-1 Conforms to STD UL60950-22 Conforms to STD ISA12.12.01 Certifies to CSA STD C22.2 No 60950-1 Certifies to CSA STD C22.2 No 60950-22 Certifies to CSA STD C22.2 No 213 Low Voltage Directive European Safety for Industrial Control Equipment Self-Declaration in accordance with European LVD Directive 2006/95/EC; Independent 3rd party assessment Electromagnetic Compatibility Directive European EMC for Industrial Control Equipment Self-Declaration in accordance with European EMC Directive 2004/108/EC; Independent 3rd party assessment FCC 47 Part 15, Subpart B Tested by an independent third party Explosive Atmospheres Directive European Safety for Hazardous Locations Equipment Group II, Category 3, Gas Group IIC Self-Declaration in accordance with ATEX Directive 94/9/EC; Independent 3rd party assessment Note: GFK-2789D Agency Standard or Marking A product’s approval should be verified by the marking on the unit. October 2014 45 Appendix A Wolverine III Agency Approvals, and Regulations A.2 Government Regulations U.S. and European regulations are intended to prevent equipment from interfering with approved transmissions or with the operation of other equipment through the AC power source. The Wolverine industrial computer has been tested by a third party and found to meet or exceed the requirements of U.S. (FCC 47 Part 15, Code of Federal Regulations- Title 47 Telecommunication- Part 15 Radio Frequency devices, Subpart B: 2010 - 10), European (EN55022) regulations for Class A digital devices when installed in accordance with the guidelines noted in the appropriate product section. These various regulations share commonality in content and test levels with that of CISPR 22 and based on this commonality testing to the each individual standard was deemed inappropriate. The FCC requires the following to be published according to FCC guidelines: This equipment has been tested and found to comply with the limits for a Class A digital device, pursuant to Part 15 of the FCC Rules. These limits are designed to provide reasonable protection against harmful interference when the equipment is operated in a commercial environment. This equipment generates, uses, and can radiate radio frequency energy and, if not installed and used in accordance with the instruction manual, may cause harmful interference to radio communications. Operation of this equipment in a residential area is likely to cause harmful interference in which case the user will be required to correct the interference at his own expense. Any changes or modifications to the product or installation that are not expressly approved by GE Intelligent Platforms could void the user's authority to operate the equipment under FCC rules. 46 Wolverine III Industrial Display Computer Hardware Reference Manual GFK-2789D Index Accessories, 5 Advanced configuration and power interface (ACPI), 33 Agency approvals, 48 ATEX conditions of use, 9 Audio (Mic, Line, Out), 32 Bonding, 22, 38 Cleaning mode Wolverine III, 4 Components, field serviceable, 36 fans, 47 front plate, 45 O-rings, 37 Connectors and cabling, 20 AC units overview, 22 Audio, 32 DC units overview, 24 power, 24 Ethernet LAN ports, 29 Ex ic USB port, 28 horn output, 30 printer port, LPT1, 26 PS/2 mouse and keyboard, 31 remote PWR BTN, 32 RS-422 and RS-485, 26 serial communication ports, 26 shielding, 27 USB ports, 27 VGA port, 31 WLAN port, 30 Control drawing, 28 Controls, 4 Desiccant, 42 Dimensions, 12 Embedded controller (EC), 33 advanced configuration and power interface (ACPI), 33 environmental control, 33 heat up times, 33 monitoring interface, 33 power and heater LEDs, 34 GFK-2789D October 2014 Environmental and Mechanical Specifications, 3 Environmental control thermal, 33 Environmental specifications Wolverine III, 3 Ethernet LAN ports, 29 Ex ic USB port, 28 ExpressCard devices installing, 43 Fans replacing, 47 Features, Wolverine III, 2 Field maintenance, 35 components, 36 inspection, 35 Field serviceable components, 36 Floor Stand, 5 Front plate, 45 Fuses replacement, 38 Gland Plate installing after cable connection, 22 removing to install cables, 20 repair, 37 Retention Screw Replacement, 38 torque values for glands, 21, 38 Government regulations, 49 Handle, 19 Hard disk drive (HDD), 43 Heat up times, 33 Horn output, 30 I/O Plates (IOPs), 22 Indicators, 4, 5 Inspection routine maintenance, 35 unpacking, 7 Installation Wolverine III industrial display computer, 8 Intrinsically Safe Ex ic USB Port, 28 Intrinsically Safe keyboard, WVKBUSB001A, 5 1 Index Keyboard Intrinsically Safe, WVKBUSB001A, 5 PS/2 port, 31 Keyboard Tray, 19 LEDs, 4, 5 HTR (heater), 34 PWR (power), 34 Maintenance, 35 inspection, 35 Mechanical specifications, 3 Monitoring interface, 33 Mounting Floor, 17 Location, 11 options, 14 floor mount, 14 panel, 14 wall, 14 Panel, 14 Wall and Desktop (VESA Mount), 16 Nonincendive USB wiring for Class 1 Division 2 Groups ABCD, 28 Options, Wolverine III, 2 Ordering Information Wolverine III, 3 O-rings, 37 Part numbers, 5 Power AC, 23 DC, 24 Power and Heater LEDs, 34 Printer port LPT1, 26 2 PS/2 Mouse and keyboard ports, 31 Remote PWR BTN connector, 32 Replacing the Fans, 47 RS-422 and RS-485, 26 Safety, 7 Serial communication ports, 26 Service lid, 41 Solid state drive (SSD), 43 Specifications Wolverine III environmental, 3 functional, 2 mechanical, 3 Standard Part Numbers, Wolverine III, 3 Technical Support, iii Thermal zones, 33 Torque values cable glands, 21, 38 screws, 10 Unpacking, 7 USB ports, 27 VGA port, 31 Visor, 19 Warnings General, 8 hazardous areas, 9 Weight, 3 WLAN port, 30 Wolverine III Ordering Information, 3 WV3ACCPANLMT Panel Mounting Kit, 15 Wolverine III Industrial Display Computer Hardware Reference Manual GFK-2789D GE Intelligent Platforms Information Centers Headquarters: 1-800-433-2682 or 1-434-978-5100 g Global regional phone numbers are available on our web site www.ge-ip.com Additional Resources For more information, please visit the GE Intelligent Platforms web site: www.ge-ip.com Copyright ©2013-2014 General Electric Company. All Rights Reserved *Trademark of General Electric Company and/or its subsidiaries. All other brands or names are property of their respective holders. GFK-2789D