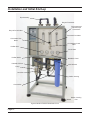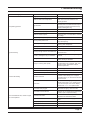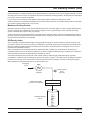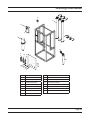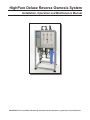
1
HighPure Deluxe Reverse Osmosis System
Installation, Operation and Maintenance Manual
IMPORTANT: Fill in Installation & Start-Up Checklist and the Operation Log Sheet for Future Reference
Commercial/Industrial Reverse Osmosis System
Deluxe 1,800 to 12,240 GPD
Applications
•
•
•
•
•
•
•
Ingredient water
High purity rinse water for plating, electronics and automotive
Ion exchange pretreatment
Whole building water loop
Boiler feed water
Vapor/Steam generators
Manufacturing process water
•
•
•
•
•
•
Laboratory and analytical testing
Drip irrigation
Horticulture/floriculture/green houses
Misting and humidification systems
Cooling tower make-up water
Community water vending including RV and
manufactured home parks and marinas
Features
•
•
•
•
•
•
•
•
Nominal salt rejection 95–99%
Energy efficient, low pressure membranes.
High efficiency stainless steel Berkeley® multistage pump
Genuine PENTEK® prefilter housing with 20" Versaflex™ 5 micron Pentair Industrial technology prefilter
Stainless steel membrane housing, control panel, hardware and coated membrane brackets
Ashcroft® prefilter, postfilter, primary and final pressure gauges
Blue-White® permeate, concentrate and recycle flow meters with integrated recirculation control
Industrial grade solenoid valves
No part of this document may be copied or reproduced in any form or by any means without the prior written permission
of Pentair Water Commercial & Industrial Purity Solutions (CIPS). Pentair believes the information and data contained
herin to be accurate and useful. The information and data are offered in good faith, but without guarantee, as conditions
and methods of use of our products are beyond our control. Pentair Water CIPS makes no warranties with respect
to this documentation. Information in this document is subject to change without notice. Pentair Water CIPS shall
not be held liable for technical or editorial errors or omissions that may appear in this document; nor for incidental or
consequential damages resulting from the furnishing, performance, or use of this document. Pentair assumes no liability
for results obtained or damages incurred through the application of the presented information and data. It is the user's
responsibility to determine the appropriateness of Pentairs' products for the user's specific end users.
Pentair Water Commercial & Industrial Purity Solutions (CIPS)
Pentair Water CIPS is a global provider of technologies and solutions
for a variety of commercial and industrial applications. We offer world
class products and systems that combine quality, global branding,
application knowledge, and Technical Support to meet our customers'
needs anywhere in the world.
Page 3
Table of Contents
Commercial/Industrial Reverse Osmosis System.................................................................................................. 3
Installation and Start-up Checklist.......................................................................................................................... 6
Important Information............................................................................................................................................. 7
Safety, Cautions, & Warnings................................................................................................................................. 8
Installation and Initial Start-up.............................................................................................................................. 10
Start-up................................................................................................................................................................. 17
Membrane Production Capabilities...................................................................................................................... 18
Daily Start-up and Operation................................................................................................................................ 19
Troubleshooting.................................................................................................................................................... 20
Maintenance......................................................................................................................................................... 23
General.......................................................................................................................................................... 23
Maintenance and Servicing............................................................................................................................ 23
Replacing Inlet Cartridge Filters..................................................................................................................... 23
TDS Calibration.............................................................................................................................................. 23
Rebuilding Pump............................................................................................................................................ 23
Cleaning the Membranes............................................................................................................................... 24
RO Membrane Fouling and Cleaning............................................................................................................ 24
Types of Foulants........................................................................................................................................... 27
Selection and Use of Cleaning Chemicals..................................................................................................... 28
RO Membrane Element Cleaning and Flushing Procedures......................................................................... 33
General Storage Procedures for Composite Polyamide ESPA1 RO Membrane Elements........................... 35
Glossary............................................................................................................................................................... 37
HighPure Deluxe RO System Layout - 1 Membrane............................................................................................ 39
HighPure Deluxe RO System Layout - 2 Membrane............................................................................................ 40
HighPure Deluxe RO System Layout - 3 Membrane............................................................................................ 41
HighPure Deluxe RO System Layout - 4 Membrane............................................................................................ 42
HighPure Deluxe RO System Layout - 5 Membrane............................................................................................ 43
HighPure Deluxe RO System Layout - 6 Membrane............................................................................................ 44
Silt Density Index (SDI)........................................................................................................................................ 45
HighPure Deluxe Specifications........................................................................................................................... 47
Controller Specifications....................................................................................................................................... 48
Ordering Information............................................................................................................................................ 49
Appendix A - Temperature Correction................................................................................................................... 51
Appendix B - Conductivity, Resistivity and TDS Conversion Chart...................................................................... 52
Appendix C - Water Corrosivity............................................................................................................................ 53
Limited Warranty.................................................................................................................................................. 54
Operation Log Sheet............................................................................................................................................ 55
Page 4
Table of Contents
Tables
Table 1: Concentrate vs Recycled at Standard Recoveries Table........................................................................ 17
Table 2: Operation Trends.................................................................................................................................... 25
Table 3: RO Troubleshooting Matrix .................................................................................................................... 26
Table 4: Hydranautics Recommended Chemical Cleaning Solutions.................................................................. 29
Table 5: Hydranautics Recipes for Cleaning Solutions......................................................................................... 31
Table 6: Hydranautics pH and Temperature Limits for Cleaning.......................................................................... 31
Table 7: Cleaning and Flushing Flow Rates per RO Pressure Tube.................................................................... 31
Table 8: Cleaning Solution Volume Requirement per RO Element. .........................................................................32
Figures
Figure 1 - RO System Controller LED Layout...................................................................................................... 10
Figure 2 Deluxe RO Circuit Board.........................................................................................................................11
Figure 3 Machine Feature Identification Front...................................................................................................... 12
Figure 4 Machine Feature Identification Back...................................................................................................... 13
Figure 5 Position of Membranes.......................................................................................................................... 14
Figure 6 Union O-ring........................................................................................................................................... 15
Figure 7 CIP Connections.................................................................................................................................... 32
Page 5
Installation & Start-Up Checklist
•
•
•
•
Use this form to record initial system hardware and site conditions.
Retain a copy for future reference.
Fill in the appropriate data (if available).
Checklist data should be collected and logged on this form for each system installed.
Start-up Data:
Checklist of Installation
Installation Date:___________________________
Installer:__________________________________
Installation Site:____________________________
Application:_ ______________________________
System Model:_____________________________
Serial Number:_____________________________
Water Source:_____________________________
Pretreatment Installed:_ _____________________
Clean in Place Installed: Yes ________ No ______
Feed Water Analysis:
1. Installation location allows access to membrane(s) ___
2. Listed components/fittings present ___
3. Loose components assembled to system ___
4. Membranes and prefilter installed ___
5. System securely in place ___
6. Plumbing connections completed ___
7. Initial flush w/o leaks ___
8. Leak detection system installed ___
9. Electrical power connected single phase
Volts___ Hz___
SDI:________________________________
10. System sanitized ___
TDS: Design ________ Start-up__________
11. Controller display okay ___
Turbidity:______________________________
12. Proper operation verified ___
Total Iron:_ ____________________________
13. Installation/Set-Up information entered onto form ___
Chlorine:______________________________
14. Clean in place connections /valves installed ___
Feed Water Temperature:_________________
15. Pre-treatment is installed, flushed and working ___
Prefilter Cartridge Model No._ ___________
Installation Feedback Notes: _ ______________
Starting Prefilter Inlet Pressure:_ _________
______________________________________
Starting Prefilter Outlet Pressure:_________
______________________________________
∆ Pressure at start-up__________________
______________________________________
Flow Meter Readings:
______________________________________
Concentrate: Design _____ Start-up_____
______________________________________
Recycle:
Design _____ Start-up_____
______________________________________
Permeate:
Design _____ Start-up_____
______________________________________
Permeate Back Pressure (PSI):___________
______________________________________
Expected Recovery: Design_ _________________
______________________________________
Expected Recovery: Start-up_________________
Installation Address: ______________________
______________________________________
Signature of Installer
______________________________________
______________________________________
______________________________________
This page must be filled out and a copy sent to:
Pentair Water Technical Support
220 Park Drive
Chardon, OH 44024
Email - [email protected]
Page 6
Important Information
IMPORTANT! READ THIS FIRST
Read this service manual thoroughly before first use.
• Check the HighPure RO System periodically to ensure proper operation (i.e.: flushing, flow rate, pressure drop, etc)
• Do not allow the HighPure RO System to be exposed to freezing temperatures. Freezing will damage the system.
• Ensure the membrane does not dry out. Opened membranes should be preserved with a 0.1% sodium bisulfite
solution.
• Keep this service manual near the HighPure RO System for future reference.
• The HighPure RO System is intended to treat only potable quality water. It is not intended as the primary treatment
of water from a source that is contaminated, such as from radon, pesticides, insecticides, sewage, wastewater,
seawater or brackish water.
• Use lubricants (such as glycerin) sparingly.
• A leak detection device must be used to detect water leaking onto the floor.
• In addition to meeting codes, laws, and regulations, the user should understand the care and maintenance of the
HighPure RO System. Please read the information found in this service manual.
NOTE: Read all safety precautions before installing, operating, or servicing the HighPure RO System.
IMPORTANT PLEASE READ:
• The information, specifications and illustrations in this manual are based on the latest
information available at the time of printing. The manufacturer reserves the right to make
changes at any time without notice.
• This product should be installed by a qualified electrical and plumbing professional.
• This unit is designed to be installed on potable water systems only.
• This product must be installed in compliance with all local, state, provincial, and municipal
plumbing and electrical codes and regulations. Permits may be required at the time of
installation.
• Do not install the unit where temperatures may drop below 35°F (2°C) or above 104°F (40°C).
• Do not place the unit in direct sunlight.
• Do not strike any of the components.
• Misapplication of this product may result in failure to properly condition water, or damage to
product.
• In some applications local municipalities treat water with Chlorine and or Chloramines. High
Chlorine and or Chloramine levels may damage system components.
• Correct and constant voltage must be supplied to the controller to maintain proper function.
• Proper pretreatment must be installed before the RO system to meet the minimum water
quality requirements. Failure to meet these requirements will void the warranty.
• The correct prefilter must be used and changed according to the instructions or the warranty
will be void.
Page 7
Safety, Cautions, & Warnings
Safety
•
•
•
•
•
•
•
•
The HighPure RO System must be wired according to local electrical codes to prevent the possibility of
electrical shock.
The HighPure RO System has been designed and tested to offer reliable service when installed by a qualified
professional and operated and maintained according to the instructions in this service manual.
Any corrosive chemicals used in the HighPure RO System are to be for membrane cleaning only. Other chemicals
may damage the RO System. See section on cleaning.
Do not install the HighPure RO System if it has been damaged or dropped.
Disconnect the HighPure RO System from the power source before performing any service or maintenance.
If membrane elements cannot be loaded into the system upon delivery, store elements in a cool dry location out of
direct sunlight. Do not allow the elements to freeze.
Always shut off the water flow and release water pressure before cleaning or maintaining the HighPure RO System
or changing cartridges.
The HighPure RO System is intended for indoor use only. The controller must not be exposed to weather elements.
CAUTION
• Minimum water pressure 40 psig (2.8 Kg/cm2).
• Maximum water pressure 80 psig (5.6 Kg/cm2).
• Minimum water temperature 35°F (2°C).
• Maximum water temperature 104°F (40°C).
• Disconnect all power sources before servicing.
WARNING
The system MUST be depressurized before
removing any connections for servicing.
Lubricants
•
•
At no time should petroleum based lubricants (oil, grease, or petroleum jelly) be used when lubricating
interconnector O-rings, end adapter O-rings or the membrane element brine seal. An acceptable lubricant is
glycerin.
Use a mixture of 50% glycerin in water to lubricate O-rings and brine seals.
NOTE: Permeate flow for individual membrane elements may vary + or -15%. All membrane elements are
supplied with a brine seal, interconnector, and O-rings. Elements are enclosed in a sealed polyethylene
bag containing less than 1% sodium meta-bisulfite solution and 10% propylene glycol in a cardboard
box.
Page 8
Safety, Cautions, & Warnings
Permeate Valve Operation
Install a permeate check valve between the storage tank and permeate line from the RO system. The membrane
element shall not, at any time, be exposed to permeate back pressure (where permeate static pressure exceeds
concentrate static pressure). There shall be no permeate back pressure at shutdown. At no time during operation of a
membrane element system should the permeate valve(s) be closed. Closing the permeate valve during any phase of
operation causes a pressure differential across the tail end of the system and will likely result in irreparable damage
to the glue lines of the tail element(s). This damage will cause immediate increase in TDS passage through the RO
membrane.
NOTE: The Composite Polyamide type of RO membrane elements supplied must not be exposed to chlorinated
water under any circumstances. Any such exposure will cause irreparable damage to the membrane.
Absolute care must be taken following any disinfection of piping or equipment or the preparation of
cleaning or storage solutions to ensure that no trace of chlorine is present in the feedwater to the RO
membrane elements. If there is any doubt about the presence of chlorine, perform chemical testing to
make sure. Neutralize any chlorine residual with a sodium bisulfite solution or activated carbon, and
ensure adequate mixing and contact time to accomplish complete dechlorination. Dosing rate is 1.8 to
3.0 ppm sodium bisulfite per 1.0 ppm of free chlorine.
Presence of Total or Free Chlorine in Feed Water of Thin Film (Polyamide) Membrane
Elements
At no time should there be a Total or Free Chlorine residual in the feed water. Even very low levels of chlorine/
chloramine in the feed stream will result in irreparable oxidation damage of the membrane. Therefore, operators should
ensure that oxidant does not enter the RO system. To ensure that membranes are not harmed by oxidant, Pentair
recommends that the feed to the RO system is equipped with an ORP (Oxidation-Reduction Potential) meter. The
feedwater can then be continuously monitored for the presence of oxidant. The ORP meter reading should always be
below 180 mV. If it exceeds 180 mV, the plant operator should receive a warning that a dangerous level of oxidant is
getting to the membrane and should take action, such as changing the carbon tank or adding or increasing the dose
of sodium bisulfite (SBS), to reduce the oxidant concentration. If the ORP value reaches 200 mV, the plant should be
shut down until the oxidant concentration can be reduced to a safe value (ORP <180 mV). Please contact your system
provider for various methods of removing Total or Free Chlorine prior to the membrane system.
NOTE: The oxidative effects of Chlorine are strongly catalyzed in the presence of metals such as chromium,
iron and manganese. If transition metals are present, it is recommended that there be NO Chlorine in
the feed water.
Permeate Water Production During 5 Minute Flush
Some permeate water will be produced during the systems 5 minute flush. Size the storage tank appropriately or
provide for a permeate overflow on the tank to prevent damage to the system.
NOTE: Maximum permeate back pressure must not exceed 60 psi.
Page 9
Installation and Initial Start-up
Low Pressure
Run
Full Tank
Flush
Pre-Treat Lock-Out
Power On/Off
Display for TDS Reading
LOW PRESSURE / BAJA PRESION
LP
PRE-TREAT LOCK OUT / FILTROS EN REGENERACION
FULL TANK / TANQUE LLENO
STEADY AMBER / AMBAR ENCENDIDO
Figure 1 - RO System Controller LED Layout
Page 10
Installation and Initial Start-up
Connected at
Installation Site
Pretreat Switch
Pressure Switch
PF
PT
16
15
14
TF LED
PT LED
PF LED
Enable
12
11
13
Flush
Relay
K2
Inlet
Relay
K3
MDA 20
RO Relay
K1
MDA 20
GMA 2A
Flush
RO Pump
Inlet Valve
Flush Valve
Power In
Inlet
P9
P8
P7
P6
P5
P4
P3
P2
P1
RO Pump
Power
TF
SP ADJ
WARNING
Use only plastic non-conducting flat blade
screwdriver.
Tank Full Switch
TDS Input
RD
BK
VH
GN
SH
CELL
CAL
J10
C R
TDS Meter Adjustment
Figure 2 Deluxe RO Circuit Board
Page 11
Installation and Initial Start-up
Pipe Assembly
Recycle Flow Meter
Concentrate and
Permeate Pipe
Connections
Recycle Control Valve
Permeate Flow Meter
Concentrate Flow
Meter
Concentrate Control
Valve
Prefilter Inlet
Concentrate
Prefilter Outlet
Membrane Feed
Potential CIP Port
Inlet Solenoid
Pump
Permeate
Prefilter Housing
Concentrate
Rubber Leveling
Feet
Figure 3 Machine Feature Identification Front
Page 12
Installation and Initial Start-up
TDS Sensor Wires
TDS Sensor
Pressure Switch
Concentrate Flush
Solenoid
Tank Level Switch
Inlet Solenoid
Permeate Tube
Figure 4 Machine Feature Identification Back
Page 13
Installation and Initial Start-up
1. Locate machine with access to power, water supply piping, drain and space to service unit. Use the leveling feet
to level the system. Be certain to allow room for maintenance and 46 inches of clearance above the membrane
housing for changing of the of the RO membranes. If 46 inches of clearance is not available the membranes are
changed by removing the membrane housings. Be certain to leave room for a person to work behind the unit.
2. Remove pipe assemblies at the top of the housings. Loosen the end clamps and remove the end caps using a slide
hammer or a tee.
3. Load membranes into pressure vessels according to the concentrate flow direction. Note the position of the brine
seal placement on the membrane (Figure 5). Each housing has an arrow indicating the direction of flow for that
housing (Figure 5). The brine seal must be at the water inlet of the housing.
CAUTION
When inserting the membranes with the brine seal end first, it is possible for the brine seal
to flip or bend backwards. To help avoid this the walls of housing should be lubricated with
glycerin.
Concentrate Water
Pipe assemblies
may be loose or
removed
End Cap
Concentrate Water
Concentrate Water
Brine Seal
Direction of Flow
Direction of Concentrate Flow
Direction of Concentrate Flow
Permeate
Concentrate Water
Brine Seal must point against
the input water flow
Permeate
Permeate
Input Water for
first membrane
Figure 5 Position of Membranes
Some HighPure models may have pipe assemblies removed for protection during shipment (Figure 3). These
assemblies need to be removed and reconnected after the membranes are installed. Proper placement of the union
O-rings is required prior to tightening the union connections (Figure 6).
CAUTION
Use glycerin on O-rings. Make certain O-ring is seated in groove. Do not overtighten
unions. Hand tighten only.
Page 14
Installation and Initial Start-up
O-ring
Figure 6 Union O-ring
4. If using external tank level, and pretreat lock-out switches, connect "normally open" switches to tank level (TF),
and pretreat lock-out (PF) on appropriate terminals on circuit board for non-powered, dry contact control (Figure
2). The pretreatment inputs must be wired in parallel. The terminals are located in the upper right corner of the
control panel box when viewed from the back. Use small gauge, 2 conductor wire connections, see Figure 2. The
back of the control panel will need to be removed and the power to the system turned off. Confirm that the two input
signals (tank level switch and pretreat switch) are all normally open dry contacts. Systems with pretreatment can
have a normally open contact switch wired to the control. This switch should operate (close) when the pretreatment
device is out of service. This switch must not supply voltage. Be sure to coil and leave some slack wire inside the
enclosure.
NOTE: Installing the Clean-In-Place (CIP) Hardware. CIP valves and piping are not included with the
HighPure System. Valves and piping are purchased and installed seperately. When Installing CIP
valves a three-way valve should be installed on the feed water line to the RO unit. Tees on the
permeate and concentrate lines should use two-way valves. The valves should allow circulation of
cleaning chemicals through the RO unit and back to the CIP tank.
NOTE: The system requires sufficient pressure to operate and will shut down if inlet pressure falls below
7 psi.
NOTE: Maximum permeate backpressure is 60 psi.
5. Use only Teflon tape to connect water piping to RO system. Connect water supply piping that has sufficient flow and
pressure to operate at prescribed permeate production and concentrate flow to drain. Refer to Specification Table
for requirements.
CAUTION
Make certain all pretreatment equipment has been rinsed/purged of carbon fines and other
materials. Pretreatment equipment that cycles and may allow untreated water to pass must
be wired by normally open, dry contacts to the pre-treatment terminals on the control board.
Failure to do so will cause equipment failure and possibly void any warranty.
6. Connect concentrate drain piping with appropriate air-gap according to national, state and local codes. Drain pipe
must be suitable to handle concentrate flush flows. Concentrate flush is approximately 12 gpm for 1-3 membrane
systems and approximately 25 gpm for 4-6 membrane systems for 5 minutes at shut-down. The drain piping and
reservoir if applicable should be sized appropriately.
7. Connect temporary permeate piping directed to drain. Make certain to have an air gap between the piping and the
drain. The initial flushing of the permeate system should go to drain to remove any residual disinfectant from the RO
membranes.
WARNING
To reduce the chance of contamination of the RO system a separate (disposable) hose
should be used for permeate flushing. This hose must have an air gap at the drain and must
be secured.
Page 15
Installation and Initial Start-up
Preservative Flushing
To protect elements from biological growth and to help maintain performance over time, Hydranautics composite
type ESPA1 membranes are stored in a combination of 1% sodium bisulfite and 10% propylene glycol solution. It is
therefore advised to flush membranes prior to use to eliminate residual preservatives in the product stream. The
standard ESPA1-4040 membrane supplied are stored in the sodium bisulfite and propylene glycol solution.
Once the elements have had the preservatives flushed from them, they would need to have preservatives
re-applied for long term storage.
Preservative Flushing during Start-up
Once elements have been loaded and vessels sealed, it is recommended to flush the system to drain with
feedwater at design operating pressure for a minimum of 2-24 hours. If the elements are to be used in systems with
potable water for drinking, food or requiring ultrapure water, a minimum flushing time of 24 hours is recommended
to reduce the TOC concentration to below 50 ppb (assuming zero TOC in the feedwater). Always test permeate
after each flush for residual preservative or other critical contaminants.
WARNING
For potable applications using models that are preserved with both sodium bisulfite and
propylene glycol, discard the product water for at least 24 hours prior to drinking or using in
food applications. Ingestion of the preservative may cause irritation of the gastrointestinal
tract, colic, diarrhea, or other similar symptoms.
The membrane preservative may be harmfull to humans and animals when taken internally.
WARNING
This system produces high purity water that can corrode standard galvanized, copper piping
and brass fittings in common piping systems. Use appropriate plumbing materials after
system to prevent unnecessary corrosion and contamination of permeate water.
The hose connecting to the storage tank must remain clean to prevent possible contamination of the water storage.
Connect permeate piping to storage tank.
8. Unwrap and install Versaflex™ prefilter into the blue housing on the inlet side of the system. Make certain O-ring is
in the groove in the sump below the threads and hand-tighten housing into cap. Only use supplied housing wrench
to loosen housing, never to tighten.
9. Open water supply to system and confirm prefilter and postfilter pressures. Typical feed pressure is 40-80 psi.
Check for leaks. The pressure readings should be the same because the inlet valve is closed. IF the feed pressure
is higher than 80 psi install a pressure reducing valve before the system to maintain the proper feed pressure.
10. The power cord is located on the lower left of the control panel when viewed from the back. If using the installed
power cord, replace the back panel of the control box. If a longer cord needs to be installed, connect the new
power cord to the board first per the circuit diagram Figure 2, AC power for the unit is connected to terminal strip
P1. Connect the ground wire of the AC power to P1 (GND). For AC power with a neutral and hot wire, the hot
wire connects to P2 (L1) and the neutral wire connects to P3 (L2). For AC power with 2 hot wires, either wire can
connect to L1 and L2. Replace the back panel. Make appropriate electrical connections with fused disconnect or
Ground Fault Protection. Use 20 amp service 240 VAC, single phase, for the 1 hp 1-3 membrane systems and for
the 2 hp 4-6 membrane systems. Turn on the electrical power to the RO system and go through start up procedure.
11. Check all connections for leaks before leaving system.
Page 16
Start-up
Read completely before starting.
1. Fully open concentrate control valve by turning counterclockwise (to the left). Never start the system with the
concentrate valve closed.
2. To purge air from system. Push power button to START system - wait 4 seconds and push button to STOP. This will
prevent the pump from turning on and prevent any damage from high velocity air and water in the system. When
the POWER button is pushed, the system will open the inlet solenoid allowing water to flow into system.
3. Allow air to purge from system. Repeat pushing start button and then pushing it again after 4 seconds until air is
purged from system and water flows through the concentrate flow meter.
4. Press power and release. After a 5 second delay the pump will start and the green RUN light will come on. If
prefilter water pressure is less than 7 psi, the pump will not operate.
5. Slowly close the concentrate valve. The concentrate flow should be set at a level slightly below maximum. Flush for
20 minutes.
6. After the initial 20 minute flush adjust the concentrate valve. The membrane feed pressure will increase. Adjust until
pressure is between 100 to 180 psi.
7. Fully open recycle control valve on recycle flow meter by turning counterclockwise (to the left). After air is purged
from the system set the recycle flow rate. Make adjustments as needed. See Table 1: Concentrate vs Recycled
at Standard Recoveries below for additional information on adjusting the recycle flow. Check to make sure all
flowrates are withing designed ranges. Adjust accordingly.
8. The permeate flow should run through the temporary permeate piping to a drain for 2 to 24 hours to remove
residual sanitizing chemicals. After flushing is complete connect permanent permeate piping to tank. A permeate
check valve must be installed between the storage tank and the membrane.
9. Check all flow rates again. Allow tank to fill.
10. Inspect all connections for leaks periodically until storage tank reaches full pressure or level. All Pentair systems are
tested for leaks before shippment. Leaks may occur due to vibration in shipping.
11. Check that TDS is at or below designed level. Make appropriate adjustments as needed.
12. Make sure concentrate flush starts when tank full switch is closed. This can be simulated by manualy moving the
switch. Check that drain flow is appropriate to handle concentrate flush for 5 minutes.
13. Fill out the Installation and Start-up checklist at the front of this manual and the Operation Log Sheet in the back.
14. Verify the correct operation of the pretreatment lockout. Cycle all components and check light on operator panel.
15. Verify the leak detection device works.
16. E-mail or send a copy of the Installation and Start-up Checklist to Technical Support.
Table 1: Concentrate vs Recycled at Standard Recoveries Table
Recovery
Number
of 4" x 40"
Membrane
33%
50%
60%
75%
Total
Concentrate
plus recycle
flow (gpm)
Concentrate
Recycle
Concentrate
Recycle
Concentrate
Recycle
Concentrate
Recycle
1 Housing
9.4
2.5
6.9
1.25
8.2
0.8
8.6
0.4
9
2 Housings
9.4
5
4.4
2.5
6.9
1.6
7.8
0.8
8.6
3 Housings
8.3
7.5
0.8
3.75
4.6
2.5
5.8
1.25
7.05
4 Housings
19
10
9
5
14.05
3.3
15.7
1.7
17.3
5 Housings
17.6
12.5
5.1
6.3
11.3
4.2
13.4
2.1
15.5
6 Housings
16.6
15
1.6
7.5
9.1
5
11.6
2.5
14.1
Settings not recommended. Not within range of flowmeter.
All flows in gpm. Flows based on 1800 gpd/element.
Page 17
Membrane Production Capabilities
Each membrane is capable of producing "clean" permeate water at a certain flow (gallons per day). The HighPure RO
systems use multiple membranes to increase the flow of permeate (clean) water. The information below shows the
production guidelines of one 4" x 40" membrane.
Recommended Guidelines on RO Machine Production per 4"x 40" Membrane
Inlet TDS
Flow gpd
<50
2040
50-200
1950
200-500
1900
500-700
1850
700+
1800
Recommended Guidelines per 4x40 membrane
2100
2050
2000
1950
1900
1850
1800
1750
1700
1650
2040
1950
1900
Flow GPD
1850
1800
Inlet TDS
< 50
50-200
200-500
500-700
700+
NOTE: SDI<1, well water, no colloids present, 77°F (25°C) water. Operating at higher flux rates can limit and
affect membrane life, and increase frequency of cleanings. Actual water conditions and levels of
contaminants will vary performance. No saturation constituents in the concentrate. Check standard
feed water quality requirements for additional information.
For further information contact Technical and Application Support at [email protected].
Page 18
Daily Start-up and Operation
1. Push the START button. The pump motor will start after five seconds.
2. Observe the pressure gauges and flow meters. Consult the Installation and Start-up Checklist for operating
pressures and flow meter settings.
3. Use the concentrate valve to adjust system pressure. Deluxe models have an adjustable flow meter for recycle that
can be used to further increase/decrease recovery percentage and change membrane cross flow.
4. Once the system has stabilized, record data in the Daily Log Sheet. It may take several days for the permeate flow
rate to stabilize.
5. After starting up the system, the steady green RUN LED will light. During the 5 second delay before the pump
starts, the digital display will show "---". If the concentrate and recycle flows are set correctly, the system will
operate automatically, even after a power failure.
6. On Deluxe models, once permeate is present at the TDS sensor, the digital TDS display will show the temperature
corrected TDS based on the conductivity of the water. If the TDS is above 999 ppm, the digital display will
show "L L L". The TDS of the permeate water can also be measured manually.
7. After the system has been running, the permeate water tank (supplied separately) will fill. When the water level
rises and closes the normally open full tank sensor for 5 seconds, the FULL TANK LED will light Green and the
digital display will show "FUL".
8. Once the tank is full, the steady yellow FLUSH LED will light, the inlet solenoids will remain open and the pump
will run for 5 minutes while the concentrate bypass solenoid will open to flush concentrate to drain for five minutes.
The digital display on Deluxe models will show "FLS" then "---". After five minutes, the inlet solenoid will close, the
pump will turn off and the concentrate bypass solenoid will close.
9. After the water level has dropped in the tank and the top water level switch of the tank opens, the green FULL
TANK LED light will flash for 15 minutes. After 15 minutes the FULL TANK light will turn off and the system will
start up again to fill the tank.
10. If the pretreat system goes into bypass or shuts off for 2 seconds, the PRE-TREAT lock-out will be steady green,
the inlet solenoid will close and the pump will shut off so untreated water does not run through the RO system. The
digital display will show "PL" then "---".
11. If the system experiences low pressure for more than 2 seconds, the pump will shut off, the inlet solenoid will
close, the red LOW PRESSURE LED will flash and the digital display will show "LP" then "---". After 30 seconds,
the system will attempt to restart. If the pressure is still too low, the shutoff and restart cycle will repeat again at 5
minutes and then at 30 minutes. If the pressure is still too low after 30 minutes, the system will shut down and the
RUN button will have to be pressed twice to clear the fault. Before restarting the system, the water supply to the
system including pretreatment, valves and the prefilter should be checked for adequate pressure at the required
water flow. If the pressure fault clears by running for more than 10 seconds, the retry function is reset and will
function normally
System Requirements
The HighPure RO System will run effectively only when the feed water meets certain requirements. The specifications
table details the feed water for each model of HighPure RO System.
When the RO system is installed and made operational it is important to fill in the Installation and Start-up Checklist at
the front of this manual. If the RO system is not performing properly review the check list and be certain the feed water
is within specifications.
Page 19
Troubleshooting
CAUTION
Hazardous voltages are present when power is applied to the controller. Pressing the Power key
DOES NOT remove these voltages. The power must be disconnected from the power source.
When connecting or disconnecting any wiring to the unit, be sure the power is turned off at
disconnect or breaker. Lock out/Tag out rules may apply.
Note that if fuse F1 or F2 is blown, none of the outputs will operate. If fuse F3 is blown, the
Controller will be inoperative. Refer to Figure 2 for the location of components.
This troubleshooting guide can assist in identifying common operating problems that may be experienced with the
machine. The operator can easily correct many of these problems. For those that persist or are not understood, contact
the Pentair Technical Support Center. Have the following Information available when calling the Customer Support
Center:
1. Installation and start-up checklist
2. Detailed description of problem
3. Operation Log
Symptom
Low permeate flow rate
Machine not operating.
Page 20
Possible Causes
Remedies
Low membrane pressure.
See possible causes for low operating
pressure.
Dirty or fouled membrane elements.
Flush and clean the membrane elements.
Operating on cold water see temperature
correction table.
Install a hot/cold feed water tempering valve
if more permeate flow is needed. Operate at
higher feed water temperature up to
72 –77°F (22–25°C).
Membrane elements installed backward or
damaged concentrate seal.
Install membrane elements in the direction
of fluid flow. Flush and clean the machine
immediately.
Flow meter inaccurate.
Check the flow rate manually with a
stopwatch and calibrated container.
No power to machine or display.
Check the controller internal fuses and check
circuit breakers. Measure the voltage. Check
electrical outlet.
Defective board in controller.
External contacts have shut machine down.
Check for closed contacts - tank full, pretreat lockout and pressure fault.
Thermal overload in motor has tripped.
Allow the machine to cool. Check the feed
water supply and/or amp draw to the motor.
Motor and/or pump not operating properly.
See pump instructions. Contact Pentair for
possible repair or replacement.
Check Fuses F1 and F2.
Low pressure condition has turned OFF
machine. The low pressure LED will flash.
Check for minimum inlet pressure and push
power button twice.
See low operating pressure.
Tank level switch has shut off the machine.
If tank is full LED will be on - wait for tank to
empty. If LED is flashing the control is in a
delayed restart for up to 15 minutes
Fuse F3 bad.
The water quality display will not be lit.
Check or replace fuse F3 located below the
transformer.
No power at terminals L1 and L2.
Use VOM meter to check for power.
Control board defective.
Check for power at terminals L1 and L2. If
power is present control board may need
replacing.
Troubleshooting
Symptom
Low operating pressure.
High TDS reading.
Incorrect TDS reading.
Low concentrate flow rate, normal or higher
than normal pressure.
Possible Causes
Remedies
Clogged prefilter cartridge.
Replace prefilter cartridge.
Insufficient feed water flow/pressure.
Increase the feed pressure. Open the feed
water valve. Check for restrictions and
proper pipe sizes.
High flow rates.
Close the concentrate valve. Check the
permeate and concentrate flow rates. Adjust
if necessary. Excessive permeate flow may
indicate a damaged O-ring.
Dirty or fouled membrane elements.
Flush and clean the membrane elements.
Solenoid valve not opening.
Clean or replace the solenoid valve.
Insufficient electrical power.
Check the fuses or circuit breakers: measure
the voltage.
Pump not operating correctly.
See pump instructions.
Incoming water pressure low.
Increase water pressure to prefilter. Prefilter
may need replacing.
Water temperature high.
Consult water temperature tables. Lower
incoming water temperature.
High recycle.
Adjust recycle flow meter.
TDS probe not calibrated.
Calibrate probe.
Recovery too high with low concentrate flow.
Lower the recovery by increasing
concentrate flow.
Pinched or damaged O-ring on membrane
Replace O-ring and check O-ring sealing
surfaces.
Damaged membrane.
Clean or replace membrane.
Check chlorine pre-treatment.
Change in incoming water quality.
Open the concentrate valve and flush. Test
the feed water for pH, hardness, TDS, silica
and iron content. A feed water analysis
should be performed.
Sensor not wired correctly.
Check wiring and correct.
Sensor not installed correctly.
Check installation and reinstall.
Not calibrated correctly.
Recalibrate.
Controller board bad.
Remove green and white wires from sensor
to board. Is TDS reading 0? If no replace
controller board. If yes, see "sensor bad" and
reconnect wires.
Sensor bad.
Remove sensor from piping and dry off.
Display should show 0. If no, replace sensor.
If yes, short the pins of the sensor. Display
should show "L L L". If no replace board.
Concentrate valve plugged.
Remove the concentrate valve and /or
diassemble the piping. Clean the valve.
Concentrate out line restricted.
Examine the concentrate line for obstructions
or kinks, repair or replace the tubing.
Flow meter inaccurate.
Check the flow rate manually with a
stopwatch and calibrated container.
Dirty concentrate valve.
Disassemble and clean the piping to the
valve.
Improper pump operation.
Rebuild or replace.
Extremely fouled membranes.
Clean or replace.
Recycle flow too high.
Adjust down.
Page 21
Troubleshooting
Symptom
Water flowing when machine is turned OFF.
High operating pressure.
Inlet valve not operating.
RO pump not operating.
Possible Causes
Remedies
Inlet Solenoid valve not closing or seating
properly.
Clean or replace the valve. Water must not
pass through the inlet when the machine is
OFF.
Faulty permeate check valve.
Verify proper air gap at drain replace the
permeate check valve.
Recycle or concentrate valve closed,
plugged or damaged.
Disassemble the piping to the recycle valve
and remove foreign particles. Check the
concentrate valve.
Inaccurate pressure gauge.
Replace or calibrate the gauge as required.
Restricted flow after pump outlet.
Check for blockage of the concentrate flow
at the inlets and outlets of the membrane
element housings.
Plugged/fouled membranes.
Clean or replace membranes as needed.
Controller board inactive.
Is controller turned on? Are any shut-down
conditions active? If no is the inlet LED lit?
If no the controller board may be bad. If yes
check fuses F1 and F2. Check inlet terminals
for power. If no replace controller board. If
yes check valve and valve wiring.
Controller board inactive.
Is controller turned on? Are any shut-down
conditions active? If no is the inlet LED lit?
If no the controller board may be bad. If
yes check fuses F1 and F2. If bad replace
fuse(s). If ok, check RO pump terminals for
power. If no replace controller board. If yes
check the pump motor and wiring.
Troubleshoooting and rebuilding pump. See Berkeley Pump Owners manual provided with system or go to:
http://www.berkeleypumps.com/pdf/BE327.PDF
For customer support contact:
Pentair Water Commerical and Industrial Purity Solutions Technical and Application Support
Phone: 877.372.8265
E-mail: [email protected]
Page 22
Maintenance
General
WARNING
To prevent electrical hazards, disconnect power supply to the RO system before servicing the
unit.
WARNING
Water supply should come from a reliable potable source that will comply with feed water
requirements. Failure to comply will result in improper operation, damage to the equipment and
will void the warranty.
CAUTION
Proper pre-treatment must be maintained. Regular carbon changes and proper maintenance of
pre-treatment salts and chemicals is required. Do not install a chemical feed in the permeate line
as this could damage the membranes when unit shuts down. To add a chemical to the permeate
water, feed the chemical directly into the permeate storage tank. If chemical feed is connected
directly to the feed water then a flow sensor must be used.
Maintenance and Servicing
The most trouble free systems are those that are not turned off and run continuously. A well kept Operating Log must be maintained and acted upon as soon as needed to avoid complications.
Replacing Inlet Cartridge Filters
The pressure drop across the inlet cartridge filter will increase with time as the volume of filtered water increases, and
the load of solids removed clogs the filter. This will clearly be seen in the Operating Log. The inlet cartridge filter needs
to be replaced when the pressure drop across the filter doubles or exceeds 6 psi higher than the ∆ pressure at start-up,
whichever is lower.
Failure to replace the cartridge on time may cause the cartridge to fail and allow suspended solids to pass into the RO
system and void the warranty. During normal operation the pressure drop will continue to increase lowering the pressure
at the pump inlet and lowering the system's capabilities.
To change the cartridge, you will need to shut down the system and the feed water supply. Replace cartridge, clean and
sanitize the housing if needed. Place new clean cartridge into the sump. Lubricate the O-ring with glycerin and replace
in the groove of sump below threads. Screw sump to filter head. Purge out air before start-up.
Record in the Operating Log the cartridge replacement on the day it happened, together with all the other operating
data.
TDS Calibration
The TDS calibration of the TDS monitor should rarely have to be adjusted. To adjust the calibration screw shown as
CAL on the circuit board inside the control box in Figure 2; measure the incoming water supply with a meter calibrated
to a known standard. Using a small non-conducting plastic bladed screwdriver, adjust the CAL screw to get the correct
reading on the display.
WARNING
Never use a metal screwdriver to adjust the CAL screw. Remove any jewelry that could contact
any electrical components in the control box. Any contact with the electrical circuit on the board
could cause death or severe injury or damage to the controller.
Rebuilding Pump
See Berkeley Pump Owners manual provided with system or go to: http://www.berkeleypumps.com/pdf/BE327.PDF
Page 23
Maintenance
Cleaning the Membranes
The following membrane cleaning summary is taken from several papers by Hydranautics.
Common foulants affecting the performance of the supplied Hydranautics' ESPA1 Composite Polyamide Reverse
Osmosis (RO) membrane elements and the removal of these foulants. The information applies to 4-inch diameter RO
membrane elements.
NOTE: It is recommended that all RO membrane cleaning operations should be closely coordinated with
Hydranautics. Hydranautics field service personnel are available to be on site for cleaning assistance.
Please contact Hydranautics for current charges for this service.
NOTE: The use of cationic surfactant should be avoided in cleaning solutions, since irreversible fouling of the
membrane elements may occur.
If additional information is needed, please contact the Technical Services Department at:
HYDRANAUTICS
401 Jones Rd.
Oceanside, CA 92058
Tel# (760) 901-2500
Fax# (760) 901-2664
e-mail: [email protected]
Internet: www.membranes.com
RO Membrane Fouling and Cleaning
During normal operation over a period of time, RO membranes are subject to fouling by suspended or sparingly soluble
materials that may be present in the feed water. Common examples of foulants are:
• Calcium carbonate scale
• Sulfate scale of calcium, barium or strontium
• Metal oxides (iron, manganese, copper, nickel, aluminum, etc.)
• Polymerized silica scale
• Inorganic colloidal deposits
• Mixed inorganic/organic colloidal deposits
• NOM organic material (Natural Organic Matter)
• Man-made organic material (e.g. antiscalant/dispersants, cationic polyelectrolytes)
• Biological (bacterial bioslime, algae, mold, or fungi)
The nature and rapidity of fouling depends on a number of factors, such as the quality of the feed water and the
system recovery rate. Typically, fouling is progressive, and if not controlled early, will impair the RO membrane element
performance in a relatively short time. Cleaning should occur when the RO shows evidence of fouling, just prior to a
long-term shutdown, or as a matter of scheduled routine maintenance. The elements shall be maintained in a clean or
“nearly clean” condition to prevent excessive fouling by the foulants listed above. Some fouling is allowed as long as:
• normalized permeate flow decrease is less than 10%
• normalized permeate quality decrease is less than 10%
• normalized pressure drop, as measured between the feed and concentrate headers, increase is less than 15%.
Organic fouling of the membranes can cause an increase in the feed pressure and an improved permeate water quality
and reduce permeate flow. For more information contact your membrane cleaner supplier.
Page 24
Maintenance
WARNING
Failure to clean the membranes on time may cause irreversible fouling of the membranes
requiring their early replacement.
Indicators can be seen in the Operation Log. All of these problems develop slowly and are easy to see in the log as the
problem progresses. A close monitoring of the Operation Log will reveal the problem on time and you won't need to find
the normalized flows to proceed to clean the membranes. Membranes should be kept as clean as possible at all times.
Given that all other variables are held constant, Table 2 gives general trends that can be followed in the daily logs.
Table 2: Operation Trends
If:
Increases
or Decreases:
Then:
Increases
or Decreases:
And Permeate Flow
or TDS
Increases
or Decreases:
Temp
↑
Rejection
↓
Permeate
↑
Temp
↓
Rejection
↑
Permeate
↓
Pressure
↑
Rejection
↑
Permeate
↑
Pressure
↓
Rejection
↓
Permeate
↓
Recovery
↑
Potential Fouling
↑
TDS
↑
Recovery
↓
Potential Fouling
↓
TDS
↓
Provide feed water quality and Operating Log data to the system designer or any other reputable service to seek advice
on identifying the cause of the fouling/scaling and what will be the most acceptable cleaning procedure.
Cleaning should be carried out before these values are exceeded to maintain the elements in a clean or “nearly clean”
condition. Effective cleaning is evidenced by the return of the normalized parameters to their initial Start-up value. In
the event you do not normalize your operating data, the above values still apply if you do not have major changes in
critical operating parameters. The operating parameters that have to stay constant are permeate flow, permeate backpressure, recovery, temperature, and feed TDS. If these operating parameters fluctuate, then it is highly recommended
that you normalize the data to determine if fouling is occurring or if the RO is actually operating normally based on the
change in a critical operating parameter. Hydranautics offers a free normalization software program called ROData,
which can be downloaded from their web site at www.membranes.com.
Monitoring overall system performance on a regular basis is an essential step in recognizing when membrane elements
are becoming fouled. Performance is affected progressively and in varying degrees, depending on the nature of the
foulants. Table 1 “RO Troubleshooting Matrix” provides a summary of the expected effects that common foulants have
on performance.
RO cleaning frequency due to fouling will vary by site. A rough rule of thumb as to an acceptable cleaning frequency is
once every 3 to 12 months. If you have to clean more than once a month, you should be able to justify further capital
expenditures for improved RO pretreatment or a re-design of the RO operation. If the cleaning frequency is every
one to three months, you may want to focus on improving the operation of your existing equipment but further capital
expenditure may be harder to justify.
It is important to clean the membranes when they are only lightly fouled, not heavily fouled. Heavy fouling can impair
the effectiveness of the cleaning chemical by impeding the penetration of the chemical deep into the foulant and in the
flushing of the foulant out of the elements. If normalized membrane performance drops 30 to 50%, it may be impossible
to fully restore the performance back to baseline conditions.
Page 25
Maintenance
When inorganic coagulants are used in the pretreatment process, there can often be incomplete reaction of the
inorganic salt and thus insufficient formation of a filterable floc. The user should ensure that excessive amounts of
inorganic coagulant are not fed to the RO system. Excessive amounts of coagulant can be measured by using SDI filter
equipment. In the case of iron, the iron on the SDI filter pad should typically be 3 μg/pad and never above 5 μg/pad.
In addition to the use of turbidity and SDI, particle counters are also very effective to accurately measure the suitability
of the feedwater for NF/RO elements. The measure of particles greater than 2 microns in size should be < 100 particles
per milliliter.
What you clean for can vary site by site depending on the foulant. Complicating the situation frequently is that more than
one foulant can be present, which explains why cleanings frequently require a low pH and high pH cleaning regiment.
NOTE: The membrane elements shall not be exposed to feed water containing oil, grease, oxidizers or other
foreign matter which proves to chemically or physically damage the integrity of the membrane.
Table 3: RO Troubleshooting Matrix
Pressure Drop is defined as the Feed pressure minus the Concentrate pressure.
This table was created by Hydranautics, a Nitto Denko Company.
Possible Location
Pressure Drop
Feed Pressure
Salt Passage
Metal Oxide Fouling
(e/g/ Fe, Mn, Cu, Ni, Zn)
Possible Cause
1st stage lead elements
Rapid increase
Rapid increase
Rapid increase
Colloidal Fouling
(organic and/or inorganic
complexes)
1st stage lead elements
Gradual increase
Gradual increase
Slight increase
Mineral Scaling
(e.g. Ca, Mg, Ba, Sr)
Last stage tail elements
Moderate increase
Slight increase
Marked increase
Polymerized Silica
Last stage tail elements
Normal to increased
Increased
Normal to increased
Biological Fouling
Any stage, usually lead
elements
Marked increase
Marked increase
Normal to increased
All stages
Gradual increase
Increased
Decreased
Organic Fouling
(dissolved Natural Organic Matter,
NOM)
Antiscalant Fouling
2nd stage most severe
Normal to increased
Increased
Normal to increased
Oxidant damage
(e.g. Cl2, ozone, KMnO4)
1st stage most severe
Normal to decreased
Decreased
Increased
All stages
Normal to decreased
Decreased
Increased
Abrasion damage
(carbon fines, etc)
1st stage most severe
Normal to decreased
Decreased
Increased
O-ring leaks
(at interconnectors or adapters)
Random, typically at
feed adapter
Normal to decreased
Normal to decreased
Increased
Glue line leaks
(due to permeate backpressure in
service or standby)
1st stage most severe
Normal to decreased
Normal to decreased
Increased
Glue line leaks
(due to closed permeate valve
while cleaning or flushing)
Tail element of a stage
Increased
(based on prior fouling
and high delta P)
Increased
(based on prior fouling
and high delta P)
Increased
Hydrolysis damage
(out of range pH)
Page 26
Maintenance
Types of Foulants
Calcium Carbonate Scale: Calcium carbonate is a mineral scale and may be deposited from almost any feedwater
if there is a failure in the antiscalant/dispersant addition system or in the acid injection pH control system that results
in a high feedwater pH. An early detection of the resulting calcium carbonate scaling is absolutely essential to prevent
the damage that crystals can cause on the active membrane layers. Calcium carbonate scale that has been detected
early can be removed by lowering the feedwater pH to between 3.0 and 5.0 for one or two hours. Longer resident
accumulations of calcium carbonate scale can be removed by a low pH cleaning with a citric acid solution.
Calcium, Barium & Strontium Sulfate Scale: Sulfate scale is a much “harder” mineral scale than calcium carbonate
and is harder to remove. Sulfate scale may be deposited if there is a failure in the antiscalant/dispersant feed system
or if there is an over feed of sulfuric acid in pH adjustment. Early detection of the resulting sulfate scaling is absolutely
essential to prevent the damage that crystals can cause on the active membrane layers. Barium and strontium sulfate
scales are particularly difficult to remove as they are insoluble in almost all cleaning solutions, so special care should be
taken to prevent their formation.
Calcium Phosphate Scale: This scale is particularly common in municipal waste waters and polluted water supplies
which may contain high levels of phosphate. This scale can generally be removed with acidic pH cleaners.
Metal Oxide/Hydroxide Foulants: Typical metal oxide and metal hydroxide foulants are iron, zinc, manganese, copper,
aluminum, etc. They can be the result of corrosion products from unlined pipes and tanks, or result from the oxidation
of the soluble metal ion with air, chlorine, ozone, potassium permanganate, or they can be the result of a pretreatment
filter system upset that utilizes iron or aluminum based coagulant aids.
Polymerized Silica Coating: A silica gel coating resulting from the super-saturation and polymerization of soluble silica
can be very difficult to remove. It should be noted that this type of silica fouling is different from silica-based colloidal
foulants, which may be associated with either metal hydroxides or organic matter. Silica scale can be very difficult to
remove by traditional chemical cleaning methods. Contact Hydranautics technical department if the traditional methods
are unsuccessful. Harsher cleaning chemicals, like ammonium biflouride, have been used successfully at some sites
but are considered rather hazardous to handle and can damage equipment.
Colloidal Foulants: Colloids are inorganic or mixed inorganic/organic based particles that are suspended in water and
will not settle out due to gravity. Colloidal matter typically contains one or more of the following major components: iron,
aluminum, silica, sulfur, or organic matter.
Dissolved NOM Organic Foulants: The sources of dissolved NOM (Natural Organic Matter) foulants are typically
derived from the decomposition of vegetative material into surface waters or shallow wells. The chemistry of organic
foulants is very complex, with the major organic components being either humic acid or fulvic acid. Dissolved NOMs
can quickly foul RO membranes by being absorbed onto the membrane surface. Once absorption has occurred, then a
slower fouling process of gel or cake formation starts. It should be noted that the mechanism of fouling with dissolved
NOM should not be confused with the mechanism of fouling created by NOM organic material that is bound up with
colloidal particles.
Microbiological Deposits: Organic-based deposits resulting from bacterial slimes, fungi, molds, etc. can be difficult to
remove, particularly if the feed path is plugged. Plugging of the feed path makes it difficult to introduce and distribute
the cleaning solutions. To inhibit additional growth, it is important to clean and sanitize not only the RO system, but also
the pretreatment, piping, dead-legs, etc. The membranes, once chemically cleaned, will require the use of an approved
biocide and an extended exposure requirement to be effective.
Page 27
Maintenance
Selection and Use of Cleaning Chemicals
There are a number of factors involved in the selection of a suitable cleaning chemical (or chemicals) and proper
cleaning protocol. The first time you have to perform a cleaning, it is recommended to contact the manufacturer of
the equipment, the RO element manufacturer, or a RO specialty chemical and service supplier. Once the suspected
foulant(s) are identified, one or more cleaning chemicals will be recommended. These cleaning chemical(s) can be
generic or can be private-labeled proprietary chemicals. Typically, the generic chemicals can be of technical grades and
are available from local chemical supply companies. The proprietary RO cleaning chemicals can be more expensive,
but may be easier to use and you cannot rule out the advantage of the intellectual knowledge supplied by these
companies. Some independent RO service companies can determine the proper chemicals and cleaning protocol for
your situation by testing at their facility a fouled element pulled from your system.
It is not unusual to use a number of different cleaning chemicals in a specific sequence to achieve the optimum
cleaning. Typically, a high pH cleaning is used first to remove foulants like oil or biological matter, followed by a low pH
cleaning to remove foulants like mineral scale or metal oxides/hydroxides fouling. There are times that order of high and
low pH cleaning solutions is reversed or one solution only is required to clean the membranes. Some cleaning solutions
have detergents added to aid in the removal of heavy biological and organic debris, while others have a chelating
agent like EDTA added to aid in the removal of colloidal material, organic and biological material, and sulfate scale.
An important thing to remember is that the improper selection of a cleaning chemical, or the sequence of chemical
introduction, can make the foulant worse.
It is recommended that the membrane system operator thoroughly investigate the signs of fouling before they select a
cleaning chemical and a cleaning protocol. Some forms of fouling (iron deposits and scaling commonly associated with
well waters) may require only a simple low pH cleaning. However, for most complex fouling phenomena, the following
sequence is recommended:
1. Flushing with permeate with addition of non oxidizing biocide Isothiazolin (Kathon) or Sodium Bisulfite or similar
type) at the end of the flushing.
2. High pH CIP – Temperature versus pH as per recommendations
3. Flushing with permeate until pH on the brine side is below pH 8.5
4. Low pH CIP
5. Acid flushing with permeate and non oxidizing biocide (Isothiazolin [Kathon] or Sodium Bisulfite or similar type)
General Precautions in Cleaning Chemical Selection and Usage
•
•
•
•
•
•
•
•
•
•
•
If you are using a proprietary chemical, make sure the chemical has been qualified for use with your membrane
by the chemical supplier. The chemical supplier’s instructions should not be in conflict with membrane suppliers
recommended cleaning parameters.
If you are using generic chemicals, make sure the chemical has been qualified for use with your membrane.
Use the least harshest cleaning regiment to get the job done. This includes the cleaning parameters of pH,
temperature, and contact time. This will optimize the useful life of the membrane.
Clean at the recommended target temperatures to optimize cleaning efficiency and membrane life.
Use the minimal amount of chemical contact time to optimize membrane life.
Be prudent in the adjustment of pH at the low and high pH range to extend the useful life of the membrane. A
“gentle” pH range is 4 to 10, while the harshest is 2 to 12.
Oil and biologically-fouled membranes should not use a low pH clean-up first as the oil and biological matter will
congeal.
Cleaning and flushing flows should be in the same direction as the normal feed flow to avoid potential telescoping
and element damage.
When cleaning a multi-stage RO, the most effective cleaning is one stage at a time so cleaning flow velocities can
be optimized and foulants from upstream stages don’t have to pass through downstream stages.
Flushing out detergents with higher pH permeate can reduce foaming problems.
Verify that proper disposal requirements for the cleaning solution are followed.
Page 28
Maintenance
•
•
•
•
•
If your system has been fouled biologically, you may want to consider the extra step of introducing a sanitizing
biocide chemical before and after a successful cleaning. Biocides can be introduced before and immediately after
cleaning, periodically (e.g. once a week), or continuously during service. You must be sure that the biocide is
compatible with the membrane, does not create any health risks, is effective in controlling biological activity, and is
not cost prohibitive.
For safety reasons, make sure all hoses and piping can handle the temperatures, pressures and pH’s encountered
during a cleaning.
For safety reasons, always add chemicals slowly to an agitated batch of make-up water.
For safety reason, always wear safety glasses and protective gear when working with chemicals.
For safety reasons, don’t mix acids with caustics. Thoroughly rinse the 1st cleaning solution from the RO system
before introducing the next solution.
Description of Cleaning Solutions
NOTE: The notation (w) denotes that the diluted chemical solution strength is based on the actual weight of
the 100% pure chemical or active ingredient.
Solution 1: This is a low pH cleaning solution of 2.0% (w) citric acid (C6H8O7). It is useful in removing inorganic scale
(e.g. calcium carbonate, calcium sulfate, barium sulfate, strontium sulfate) and metal oxides/hydroxides (e.g. iron,
manganese, nickel, copper, zinc), and inorganic-based colloidal material. Note: Citric acid is available as a powder.
Solution 2: This is a high pH cleaning solution (target pH of 10.0) of 2.0% (w) of STPP (sodium tripolyphosphate)
(Na5P3O10) and 0.8% (w) of Na-EDTA (sodium salt of ethylaminediaminetetraacetic acid). It is specifically recommended
for removing calcium sulfate scale and light to moderate levels of organic foulants of natural origin. STPP functions as
an inorganic-based chelating agent and detergent. Na-EDTA is an organic-based chelating cleaning agent that aids
in the sequestering and removal of divalent and trivalent cations and metal ions. STPP and Na-EDTA are available as
powders.
Solution 3: This is a high pH cleaning solution (target pH of 10.0) of 2.0% % (w) of STPP (sodium tripolyphosphate)
(Na5P3O10) and 0.025% (w) Na-DDBS [C6H5(CH2)12-SO3Na] (sodium salt of dodecylbenzene sulfonate). It is specifically
recommended for removing heavier levels of organic foulants of natural origin. STPP functions as an inorganic-based
chelating agent and detergent. Na-DDBS functions as an anionic detergent.
Solution 4: This is a low pH cleaning solution (target pH of 2.5) of 0.5% (w) of HCL (hydrochloric) acid. It is useful in
removing inorganic scale (e.g. calcium carbonate, calcium sulfate, barium sulfate, strontium sulfate and metal oxides/
hydroxides (e.g. iron, manganese, nickel, copper, zinc) and inorganic-based colloidal material. This cleaning solution is
considered to be harsher than Solution 1. HCL acid, a strong mineral acid, is also known as muriatic acid. HCL acid is
available in a number of concentrations: (18 0 Baume = 27.9%), (20 0 Baume = 31.4%), (22 0 Baume = 36.0%).
Solution 5: This is a lower pH cleaning solution (natural pH is between pH 4 and 6. No pH adjustment is required) 1.0%
(w) of Na2S2O4 (sodium hydrosulfite). It is useful in the removal of metal oxides and hydroxides (especially iron fouling),
and to a lesser extent calcium sulfate, barium sulfate and strontium sulfate. Sodium hydrosulfite is strong reducing
agent and is also known as sodium dithionite. The solution will have a very strong odor so proper ventilation is required.
Sodium hydrosulfite is available as a powder.
Solution 6: This is a high pH cleaning solution (target pH of 11.5) of 0.1% (w) of NaOH (sodium hydroxide) and 0.03%
(w) of SDS (sodium dodecylsulfate). It is useful in the removal of organic foulants of natural origin, colloidal foulants of
mixed organic/inorganic origin, and biological material (fungi, mold, slimes and biofilm). SDS is a detergent that is an
anionic surfactant that will cause some foaming. This is considered to be a harsh cleaning regiment.
Solution 7: This is a high pH cleaning solution (target pH of 11.5) of 0.1% (w) of NaOH (sodium hydroxide). It is useful
in the removal of polymerized silica. This is considered to be a harsh cleaning regiment.
IMPORTANT: It is recommended that the MSDS of the cleaning chemicals be procured from the chemical
supplier and that all safety precautions be utilized in the handling and storage of all chemicals.
Page 29
Maintenance
Selecting a Cleaning Solution
Table 4 lists the recommended generic chemical solutions for cleaning an RO membrane element based on the foulant
to be removed.
IMPORTANT: It is recommended that the MSDS of the cleaning chemicals be procured from the chemical
supplier and that all safety precautions be utilized in the handling and storage of all chemicals.
Table 4: Hydranautics Recommended Chemical Cleaning Solutions
Foulant
Gentle Cleaning Solution
Harsher Cleaning Solution
Calcium carbonate scale
1
4
Calcium, barium or strontium sulfate scale
2
4
Metal oxides/hydroxides (Fe, Mn, Zn, Cu, Al)
1
5
Inorganic colloidal foulants
1
4
Mixed Inorganic/organic colloidal foulants
2
6
Polymerized silica coating
None
7
Biological matter
2 or 3
6
NOM organic matter (naturally occurring)
2 or 3
6
Table 5, Hydranautics Recipes for Cleaning Solutions, offers instructions on the volumes of bulk chemical to be added
to 100 U.S. gallons (379 liters) of make-up water. Prepare the solutions by proportioning the amount of chemicals to the
amount of make-up water to be used. Make-up water quality should be of RO permeate or deionized (DI) quality, and be
free of chlorine and hardness. Before forwarding the cleaning solution to the membranes, it is important to thoroughly
mix it, adjust the pH according to the target pH, and stabilize the temperature at the target temperature. Unless
otherwise instructed, the cleaning design parameters are based on a chemical recirculation flow period of one hour and
an optional chemical soak period of one hour.
Page 30
Maintenance
Table 5: Hydranautics Recipes for Cleaning Solutions
The quantities listed below are to be added to 100 U.S. gallons (379 liters) of dilution water.
Cleaning Solution
Bulk Ingredients
Quantity
Target pH Adjustment
1
Citric acid
(as 100% powder)
17.0 pounds (7.7 kg)
2
STPP
(sodium tripolyphosphate)
(as 100% powder)
17.0 pounds (7.7 kg)
Na-EDTA
(Versene 220 or equal)
(as 100% powder)
7.0 pounds (3.18 kg)
STPP
(sodium tripolyphosphate)
(as 100% powder)
17.0 pounds (7.7 kg)
Na-DDBS
(Na-dodecylbenzene sulfonate)
0.21 pounds (0.1 kg)
3
4
HCI acid
(hydrochloric acid)
(as 22° Baume or 36% HCL)
5
Sodium hydrosulfite
(as 100% powder)
6
NaOH
(sodium hydroxide)
(as 100% powder)
(or as 50% liquid)
SDS
(sodium dodecylsufate)
7
No pH adjustment is required.
104°F (40°C)
Adjust to pH 10.0 with sulfuric
or hydrochloric acid.
104°F (40°C)
Adjust down to pH 10.0 with
sulfuric or hydrochloric acid.
104°F (40°C)
0.47 gallons (1.78 liters)
Slowly adjust pH down to 2.5
with HCL acid. Adjust pH up
with sodium hydroxide.
95°F (35°C)
8.5 pounds (3.86 kg)
No pH adjustment is required.
95°F (35°C)
0.83 pounds (0.38 kg)
0.13 gallons (0.49 liters)
Slowly adjust pH up to 11.5
with sodium hydroxide. Adjust
pH down to 11.5 by adding
HCL acid.
86°F (30°C)
Slowly adjust pH up to 11.5
with sodium hydroxide. Adjust
pH down to 11.5 by adding
HCL acid.
86°F (30°C)
0.25 pounds (0.11 kg)
NaOH
(sodium hyydroxide)
(as 100% powder)
(or as 50% liquid)
Target Temp.
0.83 pounds (0.38 kg)
0.13 gallons (0.49 liters)
Table 6, Hydranautics pH and Temperature Limits for Cleaning, highlights the maximum pH and temperature limits for
specific membranes, after which irreparable membrane damage can occur. A suggested minimum temperature limit
is 70 F (21 C), but cleaning effectiveness and the solubility of the cleaning chemical is significantly improved at higher
temperatures.
Table 6: Hydranautics pH and Temperature Limits for Cleaning
See Table 5 for target pH and temperatures
Membrane
ESPA
45°C (113°F)
40°C (105°F)
30°C (86°F)
2-10
2-11.5
2-12
NOTE: The above cleaning parameters denote the maximum temperature limits for a corresponding range of
pH. Cleaning operations performed at the extremes may result in a more effective cleaning, but can
shorten the useful life of the membrane due to hydrolysis. To optimize the useful life of a membrane,
it is recommended to use the weakest cleaning solutions and minimize the contact time whenever
possible.
Table 7: Cleaning and Flushing Flow Rates per RO Pressure Tube
Pressures are not to exceed 60 psi (4 bar) at inlet to tubes.
Element Diameter
4-inches
GPM
LPM
6 to 10
23 to 38
Page 31
Maintenance
Table 8: Cleaning Solution Volume Requirement per RO Element
(these volumes do not include volumes required for piping, filters, etc)
(these volumes do not include inital 20% of volume dumped to drain)
Element Size
4 x 40 inches
Normal Fouling
(Gallons)
Heavy Fouling
(Gallons)
Normal Fouling
(Liters)
Heavy Fouling
(Liters)
2.5
5
9.5
19
RO Cleaning Skid
The successful cleaning of an RO system on-site requires a well designed RO cleaning skid. Normally this skid is
not hard piped to the RO skid and uses temporary hosing for connections. It is recommended to clean a multi-stage
RO one stage at a time to optimize cross-flow cleaning velocity. The source water for chemical solution make-up and
rinsing should be clean RO permeate or DI water and be free of hardness, transition metals (e.g. iron), and chlorine.
Components must be corrosion proof. Major cleaning system components are:
RO Cleanup Skid
10-micron
Filter
Clean-in-Place
Clean-in-Place
Pump
Tank
RO Stage
Concentrate
Permeate
Figure 7 CIP Connections
•
•
•
•
•
•
•
•
RO Cleaning Tank: This tank needs to be sized properly to accommodate the displacement of water in the hose,
piping, and RO elements. The tank should be designed to allow 100 % drainage, easy access for chemical
introduction and mixing, a recirculation line from the RO Cleaning Pump, proper venting, overflow, and a return line
located near the bottom to minimize foam formation when using a surfactant.
RO Cleaning Pump: This pump needs to be sized to develop the proper cross-flow velocity to scrub the membrane
clean. The maximum recommended pressure is 60 psi (4 bar) at the inlet to the pressure vessels to minimize
the production of permeate during cleaning and reduce the convective redeposition of foulant back on to the
membrane surface. The table below denotes the flow rate ranges for each pressure tube.
RO Cleaning Cartridge Filter: Normally 5 to 10-micron and is designed to remove foulants that have been displaced
from the cleaning process.
RO Tank Heater or Cooler: The maximum design temperature for cleaning is 113° F (45° C). It should be noted that
heat is generated and imparted by the RO Cleaning Pump during recirculation.
RO Tank Mixer: This is recommended to get optimal mixing of chemical, though some designers rely solely on the
slow introduction of chemical while maintaining a recirculation through the RO Cleaning Pump back to the tank.
Instrumentation: Cleaning system instrumentation should be included to monitor flow, temperature, pressure, and
tank level.
Sample Points: Sample valves should be located to allow pH and TDS measurements off the RO Cleaning Pump
discharge and the concentrate side recirculation return line.
Permeate Return Line: A small amount of the cleaning solution can permeate through the membranes and so a
permeate-side return line back to the RO Cleaning Tank is required.
IMPORTANT: The permeate line and any permeate valves must always be open to atmospheric pressure during
the cleaning and flushing steps or damage to RO elements can occur. If the permeate line is
closed, the permeate pressure can build up and become higher than the feed-side pressure of
the tail elements. This can result in excessive permeate back-pressure which can damage the
membrane glue lines in the tail elements.
Page 32
Maintenance
RO Membrane Element Cleaning and Flushing Procedures
The RO membrane elements can be cleaned in place in the pressure tubes by recirculating the cleaning solution across
the high-pressure side of the membrane at low pressure and relatively high flow. A cleaning unit is needed to do this.
RO cleaning procedures may vary dependent on the situation. The time required to clean a stage can take from 4 to 8
hours.
A general procedure for cleaning the RO membrane elements is as follows:
1. Perform a low pressure flush at 60 psi (4.2 Kg/cm2) or less of the pressure tubes by pumping clean water from the
cleaning tank (or equivalent source) through the pressure tubes to drain for several minutes. Flush water should be
clean water of RO permeate or DI quality and be free of hardness, transition metals, and chlorine.
2. Mix a fresh batch of the selected cleaning solution in the cleaning tank. The dilution water should be clean water of
RO permeate or DI quality and be free of hardness, transition metals, and chlorine. The temperature and pH should
be adjusted to their target levels.
3. Circulate the cleaning solution through the pressure tubes for approximately one hour or the desired period of time.
At the start, send the displaced water to drain so you don’t dilute the cleaning chemical and then divert up to 20%
of the most highly fouled cleaning solution to drain before returning the cleaning solution back to the RO Cleaning
Tank. For the first 5 minutes, slowly throttle the flow rate to 1/3 of the maximum design flow rate. This is to minimize
the potential plugging of the feed path with a large amount of dislodged foulant. For the second 5 minutes, increase
the flow rate to 2/3 of the maximum design flow rate, and then increase the flow rate to the maximum design flow
rate. If required, readjust the pH back to the target when it changes more than 0.5 pH units.
4. An optional soak and recirculation sequence can be used, if required. The soak time can be from 1 to 8 hours
depending on the manufacturer’s recommendations. Caution should be used to maintain the proper temperature
and pH. Also note that this does increase the chemical exposure time of the membrane.
5. Upon completion of the chemical cleaning steps, a low pressure Cleaning Rinse with clean water (RO permeate
or DI quality and free of hardness, transition metals, and chlorine) is required to remove all traces of chemical from
the Cleaning Skid and the RO Skid. Drain and flush the cleaning tank; then completely refill the Cleaning Tank with
clean water for the Cleaning Rinse. Rinse the pressure tubes by pumping all of the rinse water from the Cleaning
Tank through the pressure tubes to drain. A second cleaning can be started at this point, if required.
6. Once the RO system is fully rinsed of cleaning chemical with clean water from the Cleaning Tank, a Final Low
Pressure Clean-up Flush can be performed using pretreated feed water. The permeate line should remain open
to drain. Feed pressure should be less than 60 psi (4 Kg/cm2). This final flush continues until the flush water flows
clean and is free of any foam or residues of cleaning agents. This usually takes 15 to 60 minutes. The operator
can sample the flush water going to the drain for detergent removal and lack of foaming by using a clear flask and
shaking it. A conductivity meter can be used to test for removal of cleaning chemicals, such that the flush water to
drain is within 10-20% of the feed water conductivity. A pH meter can also be used to compare the flush water to
drain to the feed pH.
7. Once all the stages of a train are cleaned, and the chemicals flushed out, the RO can be restarted and placed into
a Service Rinse. The RO permeate should be diverted to drain until it meets the quality requirements of the process
(e.g. conductivity, pH, etc.). It is not unusual for it to take from a few hours to a few days for the RO permeate
quality to stabilize, especially after high pH cleanings.
Page 33
Maintenance
Membrane Shutdown, and Preservative Flushing Guidelines Biocides for Disinfection and Storage of
Supplied ESPA1 Hydranautics Membrane Elements
One should confirm which brand and type of membrane elements are actually in the system. Since elements may be
composed of composite polyamide membrane types it is imperative to be certain of the type to be disinfected. If any
uncertainty exists regarding the type of elements in use, please contact the membrane supplier for confirmation of
compatibility of specific procedurers with membrane types. If the feed water contains any hydrogen sulfide or dissolved
iron or manganese, oxidating disinfectants such as hydrogen peroxide should not be used.
WARNING
The biocides listed in this procedure are toxic in some degree to humans. Allow ample time
for system flushing, from 2 to 24 hours, to remove the presence of the biocides before starting
normal operation. It is the responsibility of the end user to ensure that the system is properly
flushed for each application. Pentair assumes no liability for the misuse of any chemical listed
herin, and all safety issues are the responsibility of the end user. Consult manufacturers' Material
Safety Data Sheets (MSDS's) for proper handling and disposal of any of the listed chemicals.
Biocides which can be used with Composite Polyamide ESPA1 Membrane Elements
Isothiazolin
Isothiazolin is distributed by manufacturers of water treatment chemicals under the trade name Kathon. The commercial
solution contains 1.5% of the active ingredient. The recommended concentration of Kathon for disinfection and storage
is 15 to 25 ppm.
Sodium Bisulfite
Sodium bisulfite (SBS) can be used as an inhibitor of biological growth. To control biological growth with sodium
bisulfite, it is applied at a dosing rate of 500 ppm for 30 to 60 minutes daily. The membrane must be flushed for 2-24
hours after dosing the membrane with SBS. Sodium bisulfite at a 1% concentration can also be used as a preservative
during long term storage of the membrane elements.
Page 34
Maintenance
General Storage Procedures for Composite Polyamide ESPA1 RO Membrane Elements
Guidelines for storing the supplied Hydranautics' ESPA1 Composite Polyamide Reverse Osmosis (RO) membrane
elements.
NOTE: Before undertaking any long-term or short-term storage operation, contact Hydranautics for specific
instructions related to the local environment.
The general storage procedures included in this bulletin are as follows:
A. Short-term storage of RO membrane elements in place in membrane housings.
B. Long-term storage of RO membrane elements in place in membrane housings.
C. Dry storage of RO membrane elements as spares, prior to installation or before start-up.
NOTE: The composite polyamide type of RO membrane elements supplied may not be exposed to chlorinated
water under any circumstances. Any such exposure will cause irreparable damage to the membrane.
Absolute care must be taken following any disinfection of piping or equipment or the preparation of
cleaning or storage solutions to ensure that no trace of chlorine is present in feedwater to the RO
membrane elements. If there is any doubt about the presence of chlorine, perform chemical testing
to make sure. Neutralize any chlorine residual with a sodium bisulfite solution, and ensure adequate
contact time to accomplish complete dechlorination.
A. Short-Term Storage
Short-term storage is for periods where an RO system must remain out of operation for more than five days, but fewer
than thirty days, with the RO elements in place. Prepare each RO train as follows:
1. Flush the RO section with feedwater, while simultaneously venting any gas from the system. Flushing with RO
permeate water instead of feedwater has added benefits, and may help remove build up of foulants.
2. When the pressure tubes are filled, close the appropriate valves to prevent air from entering the system.
3. Reflush as described above at 5-day intervals.
B. Long-Term Storage
Long-term storage is for periods where an RO system must remain out of operation for more than thirty days with the
RO elements in place. Prepare each RO train as follows:
1. Clean the RO membrane elements in place with Sodium Bisulfite or Isothiazolin (Kathon).
2. Flush the RO section with an approved biocide or check with Hydranautics for recommendations and approvals of
currently available products) prepared from permeate.
3. When the RO section is filled with this solution (make sure that it is completely filled), close the valves to retain the
solution in the RO section.
4. Repeat Steps 2 and 3 with fresh solution every thirty days if the temperature is below 80°F (27°C), or every fifteen
days if the temperature is above 80°F (27°C).
5. When the RO system is ready to be returned to service, flush the system for approximately 2-24 hours with the
product dump valve open to drain or temporary piping plumbed to the drain with the appropriate air-gap. Before
returning the RO system to service, check for any residual biocide in the product.
C. Prior To Installation
When RO elements are stored prior to installation, they should be protected from direct sunlight and stored in a cool,
dry place with an ambient temperature range of 40°F to 95°F (4.4°C to 35°C). During the period of transit between
the factory and the plant site, the elements should not be exposed to temperatures below freezing, 32°F (0°C), or
above 113°F (45°C). New Elements are enclosed in a sealed polyethylene bag containing a storage solution, and then
packaged in a cardboard box.
Page 35
Maintenance
Length of Storage
RO elements are typically stored with a preservative solution and enclosed in a vacuum sealed bag. The preservative
is sodium bisulfite (SBS) with propylene glycol. Only store RO membranes up to 1 year after purchase. Elements
could be stored for an extended period of time and still perform as expected. If the storage conditions listed above
are followed and the vacuum in the bag is maintained, it may be possible to successfully store elements in excess of
three years which is not recommended and not covered under warranty. Installation of elements which are stored for
such long periods may result in lower flow rates or higher operating pressures than expected. In such instances, it is
recommended to clean the elements using a caustic solution, as outlined in (Solution 7), in order to improve flux.
Sanitizing
Based on the application, sanitizing may be needed.
Always clean membranes prior to sanitizing system. For most normal applications, cleaning at low and high pH levels
provides suitable sanitization.
For special applications, seek advice from the local systems provider regarding how to sanitize.
Storing the Unit
Always clean membranes prior to storing unit.
Membrane Replacement
Membranes may require early replacement because of irreversible fouling. Failure to clean on time or a foulant not
previously defined will cause most problems. Cleaning is based on the known contaminants that were found when the
inlet water was tested. It is important to know the cause of the problem to prevent future early membrane replacements.
Silica, oil, cationic surfactants, polymers, etc. may be some of the probable culprits. Operating Log data will be of great
help to define the potential culprit.
Page 36
Glossary
Brackish Water: Brackish water is defined as a fresh low TDS water source that experiences a large increase in normal
TDS due to seawater intrusion. In regards to RO, brackish water is defined as feed water with low to medium TDS
levels (up to 10,000 to 15,000 ppm) that can be treated with a “brackish RO element” designed for 600 psi maximum
applied feed pressure.
Concentrate Water: Also known as brine, reject or drain water. It is the water that doesn't go through the
semipermeable membrane and carries the concentrated ions to drain.
Concentrating Factor (CF): Is the number of times that the TDS of the RO feed water is concentrated in the reject
water. Where SR = Salt Rejection and R = Recovery.
CF = %SR/(1-R)
Grains (per gallon): Ion exchange and boiler water chemists report the concentration of hardness as “Grains per
Gallon (as calcium carbonate equivalents)”. One Grain per U.S. Gallon (as calcium carbonate) is equal to 17.1 ppm (as
calcium carbonate).
mg/l: A method of reporting the “actual” weight (milligrams) of an ion or substance in a given volume of water (liter). For
dilute solutions, mg/l and ppm are equivalent. For example, a 1,000 mg/l (ppm) sodium chloride solution would result in
a residue of 1,000 mg of NaCl after evaporation of one liter of water. RO chemists use mg/l frequently in the calculation
of TDS
Permeate Water: It is the water that passes through a semipermeable reverse osmosis membrane.
pH: The pH of the feed water measures the acidity or basicity. A pH of 7.0 is considered neutral. A pH between 0.0 and
7.0 is acidic. A pH between 7.0 and 14.0 is basic. To the analytical chemist, pH is a method of expressing hydrogen
ion concentration in terms of the power of 10 with the pH value being the negative logarithm of the hydrogen ion
concentration. To the water chemist, pH is important in defining the alkalinity equilibrium levels of carbon dioxide,
bicarbonate, carbonate and hydroxide ions. The concentrate pH is typically higher than the feed due to the higher
concentration of bicarbonate/carbonate ions relative to the concentration of carbon dioxide. The user can adjust the
pH of the feed water using hydrochloric or sulfuric acid. Lowering the feed pH with acid results in a lower LSI (Langlier
Saturation Index) value, which reduces the scaling potential for calcium carbonate. Feed and concentrate (reject) pH
can also effect the solubility and fouling potential of silica, aluminum, organics and oil. Variations in feed pH can also
affect the rejection of ions. For example, fluoride, boron and silica rejection are lower when the pH becomes more
acidic.
ppm (parts per million): A method for reporting the concentration of an ion or substance in a water. The following
conversions apply for dilute waters with a specific gravity of 1.0: One ppm is equal to one mg/L. One Grain per U.S.
Gallon is equal to 17.1 ppm. One Pound per 1,000 U.S. Gallons is equal to 120 ppm. A one per cent solution is equal to
10,000 ppm. One ppm is equal to 1,000 ppb.
ppm as CaCO3: A method of reporting the concentration or “equivalent” weight of an ion or substance in a given
volume of water as “ppm as calcium carbonate”. Reporting the concentration of ions as “ppm as calcium carbonate”
is popular by ion exchange chemists for the calculation of ionic loading of cation or anion resins. It is also popular
in determining whether a water analysis is “balanced” where the sum of the cations equals the sum of the anions
when the concentration of the ions are reported as calcium carbonate equivalents. Water chemists use the concept
of “equivalency” when balancing cation and anion electroneutrality levels since ions combine in nature based on their
valence state and available electrons, not on their “actual” weight. Calcium carbonate was arbitrarily picked because
its molecular weight is 100 and its equivalent weight is 50 since it is divalent. The formula to convert an ion reported
as “mg/l as the ion” to “ppm as calcium carbonate” is to multiply “mg/l as the ion” times the ratio of the “equivalent
weight of the ion” by the “equivalent weight of calcium carbonate”. As an example, a water with sodium at 100 ppm as
calcium carbonate and chloride at 100 ppm as calcium carbonate are in ionic balance since every sodium ion has a
corresponding chloride ion. However, sodium concentration at 100 ppm as calcium carbonate is only 47 mg/l of actual
substance (since its equivalent weight is 23.0) and 100 ppm of chloride as calcium carbonate is only 71 mg/l of actual
substance (since its equivalent weight is 35.5). The calculated TDS of this solution is 118 mg/l.
Raw Water: Water entering into a water treatment system that may be coming directly from a municipal system or
directly from sources such as rivers, lakes, wells, etc.
Recirculating Water: A term sometimes used in pumps, in this manual it refers to a portion of the reject water
coming out of the last membrane element(s) that it is brought back to be blended with the RO feed water to make the
membrane feed water.
Page 37
Glossary
RO Feed Water: Water entering into a reverse osmosis system. In the case of having a recirculating system,
membrane feed water will be the blend of the RO feed water and the recirculating water.
Silica (SiO2): Silica (silicon dioxide), in some cases, is an anion. The chemistry of silica is a complex and somewhat
unpredictable subject. In similar fashion as TOC reports the total concentration of organics (as carbon) without detailing
what the organic compounds are, silica reports the total concentration of silicon (as silica) without detailing what the
silicon compounds are. The “Total Silica” content of water is composed of “Reactive Silica” and “Unreactive Silica”.
Reactive silica (e.g. silicates SiO4 ) is dissolved silica that is slightly ionized and has not been polymerized into a long
chain. Reactive silica is the form that RO and ion exchange chemists hope for. Reactive silica is the form of silica to
be used in RO projection programs. Reactive silica, though it has anionic characteristics, is not counted as an anion in
terms of balancing a water analysis but it is counted as a part of total TDS. Unreactive silica is polymerized or colloidal
silica, acting more like a solid than a dissolved ion. Silica, in the colloidal form, can be removed by a RO but it can
cause colloidal fouling of the front-end of a RO. Colloidal silica, with sizes as small as 0.008 micron can be measured
empirically by the SDI (Silt Density Index) test, but only that portion that is larger than 0.45 micron or larger. Particulate
silica compounds (e.g. clays, silts and sand) are usually 1 micron or larger and can be measured using the SDI test.
Polymerized silica, which uses silicon dioxide as the building block, exists in nature (e.g. quartzes and agates). Silica,
in the polymerized form, also results from exceeding the reactive silica saturation level. The solubility of reactive silica
is typically limited to 200-300% with the use of silica dispersant. Reactive silica solubility increases with increasing
temperature, increases at a pH less than 7.0 or more than 7.8, and decreases in the presence of iron which acts as a
catalyst in the polymerization of silica. Silica rejection is pH sensitive, with increasing rejection at a more basic pH as
the reactive silica exists more in the salt form than in the acidic form.
TDS (Total Dissolved Solids): TDS, in water treatment, is the inorganic residue left after the filtration of colloidal
and suspended solids and then the evaporation of a known volume of water. TDS is reported as ppm or mg/l. TDS,
in RO design projections, is determined by calculation using the sum of the cations, anions and silica ions (with the
ion reported “as such”, not “as calcium carbonate”). Feed or permeate TDS, in RO design projections, can also be
estimated by applying a conversion factor to the conductivity of the solution. TDS can also be determined in the field
by use of a TDS meter. TDS meters measure the conductivity of the water and then apply a conversion factor that
reports TDS to a known reference solution (e.g. ppm sodium chloride or ppm potassium chloride). The user is cautioned
that TDS levels for waters with a mixture of ions and determined from conductivity measurements may not agree with
TDS calculated as a sum of the ions. As a rough rule of thumb, one ppm of TDS (when referenced to a NaCl solution)
correlates to a conductivity of two micromhos/cm (microSiemens/cm).
Temperature: Temperature is a critical design parameter. It has significant effects on feed pump pressure requirements,
hydraulic flux balance between stages, permeate quality, and solubility of sparingly soluble salts. As a rough rule of
thumb, every 10-degree Fahrenheit decrease in feed temperature increases the feed pump pressure requirement 15
%. The hydraulic flux balance between stages (or in other words the amount of permeate produced by each stage)
is impacted by temperature. When water temperature increases, the elements located in the front end of the system
produce more permeate which results in reduced permeate flow by the elements located at the rear of the system. A
better hydraulic flux balance between stages occurs at colder temperatures. At warmer temperatures, salt passage
increases due to the increased mobility of the ions through the membrane. Warmer temperatures decrease the solubility
of calcium carbonate. Colder temperatures decrease the solubility of calcium sulfate, barium sulfate, strontium sulfate,
and silica.
Turbidity: Turbidity is a suspension of fine colloidal particles that do not readily settle out of solution and can result in
“cloudiness”. Turbidity is determined by a Nephelometer that measures the relative amount of light able to pass through
a solution with the amount of light scattered at an angle of 90 degrees. Turbidity is reported as NTU (Nephelometric
Turbidity Units). Typical RO element warranties list a maximum of 1.0 NTU for the feed water.
% Recovery (%R): It defines how efficient the reverse osmosis system is on producing permeate (clean) water. R, the
recovery is used to calculate the system's concentratting factor.
%R = (permeate water, in gpm)/(RO feed water, in gpm)
% Salt Rejection (%SR): The percentage of salt in the RO feed water that is rejected by the reverse osmosis
membrane.
%SR = [1-(permeate water TDS/feed water TDS)] x 100
Page 38
Page 39
HighPure Deluxe RO System Layout - 1 Membrane
Page 40
HighPure Deluxe RO System Layout - 2 Membranes
Page 41
HighPure Deluxe RO System Layout - 3 Membranes
Page 42
HighPure Deluxe RO System Layout - 4 Membranes
Page 43
HighPure Deluxe RO System Layout - 5 Membranes
Page 44
HighPure Deluxe RO System Layout - 6 Membranes
Silt Density Index (SDI)
Suspended solids, insoluble precipitants and colloidal materials in feed water are one of the biggest problems in reverse
osmosis systems. Even though most systems have some pretreatment including prefilters, fine particles are responsible
for fouling of reverse osmosis membranes.
In order to have some measure of the degree of this fouling problem, Silt Density Index (SDI) is used.
A SDI of less than 3 is considered acceptable for the reverse osmosis systems. This means that SDI values of less than
five, should foul the membranes at a very low rate.
Membrane Fouling Control
Membrane fouling is the main cause of permeate decline and loss of product quality in reverse osmosis (RO) Systems.
Sources of fouling can be divided into four principal categories: scale, silt (particulates), silica, bacterial (bio fouling,
growth of bacteria) and organic fouling (oil, grease).
Control over fouling involves pre-treatment of the feed water to minimize fouling. Fouling by particulates (silt), bacteria,
silica and organics generally affects the first modules the most. Scaling is worse with more concentrated feed solutions,
therefore the last modules are most affected.
Silt Density Index
Silt is composed of suspended particulates of all types that accumulate on the RO membrane surface. Sources of silt
are organic colloids, iron corrosion products, precipitated iron hydroxide, algae and fine particulates. Silt Density Index
testing is a widely accepted method for estimating the rate at which colloidal and particle fouling will occur in reverse
osmosis water purification systems.
SDI is a measurement of the fouling potential of suspended solids. Turbidity is a measurement of the amount of
suspended solids. They are not the same and their is no direct correlation between the two. In practice the membranes
show very little fouling when the feed water has a turbidity of <1NTU.
The SDI test measures the time required to filter a fixed volume of water through a standard 0.45µm pore size
microfiltration membrane with a constant given pressure of 30 psi (2.1 Kg/cm2). The SDI value is the difference between
the test time in seconds of the first test and a second measurement after normally 15 minutes of filtering SDI (SD15).
Water temperature should be kept close to normal and within ±1F°.
Feed supply
>2 bar
Pressure
Regulator
Pressure Gauge
30 psi
(2.07 bar)
Millipore filter holder
0.45 µm, 47 mm diameter
Graduated Cylinder
500 ml
Page 45
Silt Density Index (SDI)
The feed water has to be supplied with a pressure of 30 psi (2.1 Kg/cm2), which will be regulated with the pressure
regulator and reading off the value on the pressure gauge.
Measure the amount of time in seconds required for 500 ml of feed water to flow through the filter.
The water should continue to flow with a pressure of 30 psi (2.1 Kg/cm2) through the filter.
After 15 minutes measure again the time in seconds required for 500 ml of feed water to pass the filter. The 15-minute
index should be used for filter sizing purpose.
The 15-minute SDI (SDI 15) is defined by ASTM as the interval required for accurate and standardized testing.
How to Calculate Silt Density Index and Plugging Factor
After completing the test, calculate the SDI by using the equation below.
SDI =
100 * (1-ti / tf )
tt
ti = Initial time in seconds required to collect the 500 ml sample
tf = Final time in seconds required to collect the second sample after test time
tt = Total elapsed test time (either 5, 10 or 15 min)
Page 46
HighPure Deluxe Specifications
Model
Nominal Capacity: gpd (m3/day)
System Recovery
CMDLX1M
CMDLX2M
CMDLX3M
CMDLX4M
CMDLX5M
CMDLX6M
1800–2040
(6.7–7.7)
3600–4080
(13.7–15.4)
5400–6120
(19.2–23.2)
7200–8160
(27.4–30.9)
9000–10200
(34.1–38.6)
10800–12240
(40.8–46.3)
38–71%
33–75%
43–75%
33–75%
39–75%
43–75%
Permeate Rate: gpm (m /hr)
1.25–1.42
(0.28–0.32)
2.5–2.83
(0.57–0.64)
3.75–4.25
(0.80–0.97)
5.0–5.67
(1.14–1.29)
6.25–7.08
(1.42–1.61)
7.5–8.5
(1.70–1.93)
Concentrate Rate: gpm (m3/hr)
2.0–0.58
(0.46–0.13)
5.0–0.94
(1.13–0.21)
5.0–1.42
(1.13–0.32)
10–1.89
(2.27–0.42)
10–2.36
(2.27–0.53)
10–2.83
(2.27–0.64)
Feed Water Rate: gpm (m3/hr)
3.25–2.0
(0.74–0.45)
7.5–3.77
(1.7–0.85)
8.75–5.67
(2.0–1.28)
15–7.56
(3.41–1.71)
16.25–9.44
(3.69–2.14)
17.5–11.33
(3.97–2.57)
3
Dynamic Feed Water Inlet Pressure - Min: psi (Kg/cm2)
40 psi (2.8)
Feed Water Inlet Pressure - Max: psi (Kg/cm2)
80 psi (5.6)
Standard Feed Water Temperature: °F (°C)
35–104 (2–40)
Membranes
Membrane Size: nominal inches
4 x 40
Membrane Quantity
1
2
3
4
5
6
Elements Array
1
1–1
1–1–1
2–2
2–2–1
2–2–2
Nominal Salt Rejection
95-99%
Vessel Material
Stainless Steel
Piping
Inlet: inches (mm)
3/4 (19)
1 (25)
Permeate Outlet: inches (mm)
1/2 (13)
3/4 (19)
Concentrate Outlet: inches (mm)
1/2 (13)
3/4 (19)
Pump
Centrifugal Pump
(MGPS10E)
Boost Pressure: psi (Kg/cm )
(MGPS20G)
80–220 (5.6–15.5)
2
Pump Material
Stainless Steel
Horsepower (KW)
1 (0.75)
2 (1.49)
Voltage 60 Hz, Single Phase
230
Amps
11
13
System Dimensions
Height: inches (cm)
66 (168)
Width: inches (cm)
25 (64)
Depth: inches (cm)
Weight of System Without Water: lbs (Kg)
28 (71)
20 (51)
155 (71)
23 (59)
180 (82)
255 (116)
280 (127)
40 (102)
25 (64)
320 (145)
345 (157)
Filter Dimensions
Filter Housing Quantity & Size: inches
Versaflex™ Replacement Filter
1–2.9 x 20
1–4.5 x 20
VF5-20BMXXXDX
VF5-20FGXXXDX
Standard Feed Water Quality Requirements
Softened Water
Silt Density Index (SDI)
Total Dissolve Solids (TDS)
Silica: ppm
Turbidity: NTU
pH
<1 grain / gallon
SDI < 3
TDS < 2000
Si02 < 20
Turbidity < 1.0
pH = 3 to 10
Iron & Manganese: ppm
< 0.01
Chlorine/Chloramine - Max: mg/l
<0.01
Chloride: ppm
<350
Page 47
Controller Specifications
Power:
240 VAC -15%+10%, 60 Hz, 6 watts
Display:
3 digit red LED for measuring TDS
Switch Inputs, Dry Contact, Normally Open:
Pressure fault
Pretreat lockout
Tank full
Relay Outputs:
RO pump relay
Inlet valve relay
Flush valve relay
240 VAC/3 HP
240 VAC, 5 A
240 VAC, 5 A
Relays supply same output voltage as board power (240 VAC)
Page 48
Ordering Information
15
2
12
11
1
14
8
10 9
7
3
4
5
Item
6
13
Description
Item
Description
1
High Pressure Pump
9
Permeate Flowmeter
2
Membrane Housing
10
Adjustable Recycle Flowmeter
3
Prefilter Inlet Gauge
11
Conductivity Display
4
Prefilter Outlet Gauge
12
Control
5
Membrane Feed Gauge
13
Concentrate Control Valve
6
Concentrate Gauge
14
Solenoid Inlet
7
Prefilter
15
Solenoid Flushing
8
Concentrate Flow Meter
Page 49
Ordering Information
Part Number
Standard Systems and Parts
CM801005
HighPure RO CMDLX1M
CM801006
HighPure RO CMDLX2M
CM801007
HighPure RO CMDLX3M
CM801008
HighPure RO CMDLX4M
CM801009
HighPure RO CMDLX5M
CM801010
HighPure RO CMDLX6M
CM490001
Motor, 230V Single Phase, 1 HP
CM490002
Motor, 230V, Single Phase 2 HP
CM490003
Pump Rebuild Kit, 1 HP
CM490004
Pump Rebuild Kit, 2 HP
CM490012
Versaflex™ VF5-20BMXXXDX 25/Case
CM490013
Versaflex™ VF5-20FGXXXDX 12/Case
CM490005
Membrane, RO, 2500 gpd, 4" dia. x 40" length
CM490008
Pump, Booster, Stainless Steel, 1 HP, 10 gpm
CM490010
Pump, Booster, Stainless Steel, 2 HP, 20 gpm
CM400085
Valve, Solenoid, 230 Vac, 1/2" Connection
CM400086
Valve, Solenoid, 230 Vac, 3/4" Connection
CM400087
Valve, Solenoid, 230 Vac, 1" Connection
CM200001
Deluxe RO Manual
M490014
SW-2 Wrench 20"
M490015
SW-4 Wrench 20" BB
Page 50
Appendix A - Temperature Correction
Temperature of the feed water across the element must be taken into account before comparing or evaluating the
performance of a membrane element or a reverse osmosis system.
Temperature Correction Factor
The water temperature is one of the key factors in the performance of the reverse osmosis membrane element. The
higher the temperature, the more the product flow, and the lower the temperature the lower the flow. All reverse osmosis
membrane elements and systems are rated at 77°F (25°C). Operating the system at pressures and temperatures
different than the ones designed will change the permeate flow.
If system is running at a different temperature than the standard, a product flow calculation should be made. A
membrane's productivity changes substantially with temperature.
The expected permeate at 77°F is 5 gpm. If your water temperature is different than 77°F divide or multiply the
expected flow (5 gpm) by the temperature correction factor from the table below to determine the actual flow.
Example:
60°F (15.6°C) water temp
5/1.34 = 3.73 gpm
5 x 0.75 = 3.75 gpm
Permeate Temperature Correction Factors
Running Water Temperature
°F (°C)
Divisor
Multiplier
35 (2.0)
2.16
0.46
40 (4.4)
1.96
0.51
45 (7.2)
1.78
0.56
50 (10.0)
1.62
0.62
55 (12.8)
1.47
0.68
60 (15.6)
1.34
0.75
65 (18.3)
1.23
0.81
70 (21.1)
1.13
0.88
75 (23.9)
1.03
0.97
77 (25.0)
1.00
1.00
80 (26.7)
0.95
1.05
85 (29.4)
0.88
1.14
90 (32.2)
0.81
1.23
95 (35.0)
0.75
1.33
100 (38.0)
0.69
1.45
104 (40.0)
0.65
1.54
Page 51
Appendix B - Conductivity, Resistivity and TDS
Conversion Chart
Note:
Conductivity
Microsiemens-cm or
Micromhos-cm
@25°C
Resistivity
Ohms-cm
@25°C
Meg Ohms-cm
or
Siemen-cm
Controller Display
Dissolved Solids
Parts per Million (ppm)
Approximate
Grains/Gallon (Gpg)
as CaCO3
0.056
0.059
0.063
18,000,000
17,000,000
16,000,000
18.0
17.0
16.0
0.0277
0.0294
0.0313
0.00164
0.00170
0.00181
0.067
0.072
0.077
15,000,000
14,000,000
13,000,000
15.0
14.0
13.0
0.0333
0.0357
0.038
0.00193
0.00211
0.00222
0.084
0.091
0.100
12,000,000
11,000,000
10,000,000
12.0
11.0
10.0
0.0417
0.0455
0.0500
0.00240
0.00263
0.00292
0.111
0.125
0.143
9,000,000
8,000,000
7,000,000
9.0
8.0
7.0
0.0556
0.0625
0.0714
0.00322
0.00358
0.00415
0.167
0.200
0.250
6,000,000
5,000,000
4,000,000
6.0
5.0
4.0
0.0833
0.100
0.125
0.00485
0.00585
0.00731
0.333
0.500
1.00
3,000,000
2,000,000
1,000,000
3.0
2.0
1.0
0.167
0.250
0.500
0.00971
0.0146
0.0292
1.11
1.25
1.43
900,000
800,000
700,000
0.9
0.8
0.7
0.556
0.625
0.714
0.0322
0.0368
0.0415
1.67
2.00
2.50
600,000
500,000
400,000
0.6
0.5
0.4
0.833
1.00
1.25
0.0485
0.0585
0.0731
3.33
5.00
10.0
300,000
200,000
100,000
0.3
0.2
0.1
1.67
2.50
5.00
0.0971
0.146
0.292
11.1
12.5
14.3
90,000
80,000
70,000
0.09
0.08
0.07
5.58
6.25
7.14
0.322
0.368
0.415
16.7
20.0
25.0
60,000
50,000
40,000
0.06
0.05
0.04
8.33
10.0
12.5
0.485
0.585
0.731
33.3
50.0
100.0
30,000
20,000
10,000
0.03
0.02
0.01
16.7
25.0
50.0
0.971
1.46
2.92
111
125
143
9,000
8,000
7,000
0.009
0.008
0.007
55.6
62.5
71.4
3.22
3.68
4.15
167
200
250
6,000
5,000
4,000
0.006
0.005
0.004
83.3
100
125
4.85
5.85
7.31
333
500
1,000
3,000
2,000
1,000
0.003
0.002
0.001
167
250
500
9.71
14.6
29.2
1,110
1,250
1,430
900
800
700
0.0009
0.0008
0.0007
556
625
714
32.2
36.8
41.5
1,670
2,000
2,500
600
500
400
0.0006
0.0005
0.0004
833
1,000
1,250
48.5
58.5
73.1
3,330
5,000
10,000
300
200
100
0.0003
0.0002
0.0001
1,670
2,500
5,000
97.1
146
292
All non-charged (non-ionic) materials will not be registered by conductivity/TDS instruments alcohols,
bacteria, viruses, colloidal material, sugars, oils etc.
Page 52
Appendix C - Water Corrosivity
LSI (Langlier Saturation Index): LSI is a method of reporting the scaling or corrosive potential of low TDS brackish water
based on the level of saturation of calcium carbonate. LSI is important to boiler water and municipal plant chemists in
determining whether a water is corrosive (has a negative LSI) or will tend to scale calcium carbonate (has a positive
LSI). LSI is important to RO chemists as a measurement of the scaling potential for calcium carbonate. The LSI value
is calculated by subtracting the calculated pH of saturation of calcium carbonate from the actual feed pH. Calcium
carbonate solubility decreases with increasing temperature (as evidenced by the liming of a teakettle), higher pH, higher
calcium concentration, and higher alkalinity levels. The LSI value can be lowered by reducing pH by the injection of
an acid (typically sulfuric or hydrochloric) into the RO feed water. A recommended target LSI in the RO concentrate is
negative 0.2 (which indicates that the concentrate is 0.2 pH units below the point of calcium carbonate saturation). A
negative 0.2 LSI allows for pH excursions in actual plant operation. A polymer-based antiscalant can also be used to
inhibit the precipitation of calcium carbonate. Some antiscalant suppliers have claimed the efficacy of their product up to
a positive LSI value of 2.5 in the RO concentrate (through a more conservative design LSI level is +1.8).
According to Reverse Osmosis, A Practical Guide for Industrial Users (Byrne), LSI is estimated as the difference
between the current pH of the water (pH) and the pH at which calcium carbonate reaches saturation (pHLSI).
The following link will take you to the American Water Works Association website and a calculator that can be used to
calculate two useful corrosion indices: The Langlier Saturation Index and the Ryznar Stability Index.
http://www.awwa.org/Resources/RTWCorrosivityCalc.cfm?navItemNumber=1576
Page 53
Limited Warranty
The Manufacturer is referred to herein as “Manufacturer”, “we”, “us”, or “our” and the purchaser is referred to herein as “Buyer” or “you”. This Limited
Warranty is applicable to the HighPure Reverse Osmosis System (the “Product”).
Warranty Terms
Subject to the terms and conditions set forth herein, Manufacturer warrants to the original Buyer that the Product, as manufactured by us is and will
be free of defects in material and workmanship for twelve (12) months from the Warranty Commencement Date (as defined below) when used in strict
accordance with the applicable operating instructions and manual and within the range of the operating conditions specified by us for the Product.
This Warranty does not extend to equipment or components manufactured by others into which our Product has been incorporated or to equipment or
components which have been incorporated into our Product, but if allowable, we will assign to you any such warranty made by the manufacturer of such
equipment or component. This Warranty does not cover disposable items such as fuses, lamps, filters, cartridges, reverse osmosis membranes or other
disposable items, which must be replaced periodically under normal and foreseeable operating conditions of the Product.
Warranty Commencement Date
The Warranty Commencement Date for the Product shall be the later of the date of: (1) receipt by you or (2) the date of installation, provided that such
installation must occur within three (3) months of shipment from our facility. In no event shall the Warranty Commencement Date exceed three (3)
months from the date of shipment from our manufacturing facility. You shall provide proof of purchase in order to exercise the rights granted under this
Warranty. If we request, you must also provide proof of the installation date. Proof of the installation date can be made by providing us with a completed
copy of the Installation & Start-Up Checklist supplied with the Product and signed by the authorized Product installer.
Warranty Service
OUR SOLE OBLIGATION UNDER THIS WARRANTY IS LIMITED TO REPAIR OR REPLACEMENT, AT OUR OPTION, OF THE PRODUCT OR PART
THEREOF, PROVED TO BE DEFECTIVE IN MATERIAL OR WORKMANSHIP DURING THE WARRANTY PERIOD. You, at your risk and expense,
shall be responsible for returning the defective Product or component(s), upon obtaining a Return Goods Authorization (RGA) number from us, freight
prepaid, insured and in conformance with any special packaging and shipping instructions set forth in the operating documentation or RGA instructions,
or as otherwise reasonably required, to the address provided to you, together with (1) the RGA number issued by us at your request; (2) proof of
purchase and, if necessary, proof of installation date; (3) a description of the suspected defects; (4) the serial number of the Product alleged to be
defective; and (5) a description of the type of water pretreatment equipment that has been utilized in connection with the Product, if any. We shall, in our
sole and reasonable discretion, determine whether a returned Product or component is defective in material or workmanship. We will pay the outbound
freight (but not express freight) for any replacement Product or component that we ship to you in fulfillment of our obligations under this Warranty. In
an emergency situation, as determined by us, we will, at our option, forward replacement Product or components to you without requiring an RGA for
the questionable part(s); provided, however that you shall: (i) issue a purchase order or other payment guarantee prior to shipment; and (ii) return the
questionable Product or component as soon as possible. If the questionable Product or component is found to have been misused or if the defective
part is not received by us within thirty (30) days of the date you first notify us of the issue, you will be invoiced for the replacement Product or component
(s) we provided. This Warranty does not cover or include labor or any travel related to the repairs. Charges will be made for our usual and customary
costs and associated expenses incurred in providing Warranty Service at any location other than our factory and we reserve the right to precondition
travel to your premises on prepayment of our anticipated costs.
Voiding of Warranty
This Warranty shall be void and unenforceable as to any Product which has been damaged by accident, mishandling, or misuse or has been repaired,
modified, altered, disassembled or otherwise tampered with by anyone other than us or an authorized service representative. This Warranty shall be
void and unenforceable if any unauthorized replacement part has been used or if the Product has not been installed, operated and maintained in strict
accordance with the Product operating documentation and manuals. Any representation or performance metrics set forth in the Product operating
documentation shall be void and unenforceable unless the feed water requirements set forth in the Product operating documentation are strictly
adhered to.
Limitations and Exclusions
THIS WARRANTY AND THE REMEDIES DESCRIBED HEREIN ARE EXCLUSIVE AND ARE IN LIEU OF ANY AND ALL OTHER WARRANTIES OR
REMEDIES, EXPRESS OR IMPLIED, INCLUDING WITHOUT LIMITATION, ANY IMPLIED WARRANTY OF MERCHANTABILITY OR FITNESS FOR A
PARTICULAR PURPOSE.
NO LIABILITY FOR CONSEQUENTIAL DAMAGES. To the maximum extent permitted by law, in no event shall we be liable for any damages
whatsoever (including without limitation, loss of time, inconvenience, expenses such as telephone calls, labor or material charges) incurred
in connection with the removal or replacement of the Product or component(s), special, incidental, consequential, or indirect damages
for loss of business profits, business interruption, loss of business information, or any other pecuniary loss arising out of the use of or
inability to use the Product or component (s), even where advised of the possibility of such damages. In any case, our entire liability under
any provision of this Limited Warranty shall be limited to the amount actually paid by you for the Product or component(s). PLEASE NOTE:
Certain of the above limitations or exclusions may not apply where prohibited by applicable state law.
WARRANTIES OR REPRESENTATIONS BY OTHERS.
No dealer, distributor or other person has any authority to make any warranties or representations concerning us or the Product or components.
Accordingly, we are not responsible for any such warranties or representations. NO PERSON HAS ANY AUTHORITY TO BIND US TO OTHER THAN
WHAT IS SET FORTH ABOVE. THIS WARRANTY GIVES YOU SPECIFIC LEGAL RIGHTS AND YOU MAY ALSO HAVE OTHER RIGHTS WHICH
VARY FROM JURISDICTION TO JURISDICTION. THE PARTIES RECOGNIZE AND AGREE THAT IN ALL RESPECTS, THE LAWS OF THE STATE
OF MINNESOTA SHALL GOVERN THIS LIMITED WARRANTY.
Page 54
ppm
Permeate TDS (ppm)
1.
2.
3.
4.
5.
6.
Operator Name:
Model Number
Serial Number
Make copies of blank Log Sheet for future use.
Record start-up data after 10 hours.
Log new data every week.
Change prefilter when the ∆P has doubled or increased by 6 psi, whichever is less.
Postfilter pressure must be ≥ 40 psi dynamic.
Membranes should be cleaned when permeate flow drops by 10%.
When contacting Technical Support, copies of Operation Log Sheets as well as Installation and Start-up Checklists should be E-mailed or sent
before making contact.
Guidelines:
pH
Feedwater Hardness (gpg or ppm)
Total Chlorine/Chloramine (ppm)
Membrane Cleaned (Yes = √) Method Used
ppm
ppm
Concentrate TDS (ppm)
Cartridge Filter Changed (Yes = √)
ppm
%
Units
Time:
Date:
Company Location
Feed TDS (ppm)
Recovery [PER/(PER + CON)] x 100%
Recycle Flow (gpm or m3/h)
Concentrate Flow (gpm or m3/h): CON
Permeate Flow (gpm or m3/h): PER
Feed Water Temperature (°F or °C)
Concentrate Pressure (psi or Kg/cm2)
Membrane Feed Pressure (psi or Kg/cm2)
∆ P Cartridge Filter (psi or Kg/cm2): P1-P2
Postfilter Pressure (psi or Kg/cm2): P2
Prefilter Pressure (psi or Kg/cm2): P1
Date Installed:
Company Name
Operation Log Sheet
Page 55
220 Park Drive
Chardon, OH USA 44024
Customer Care - 877.261.2257
[email protected]
Technical and Application Support - 877.372.8265
[email protected]
©2009 Pentair Residential Filtration, LLC
P/N CM200001 Rev. A JL09