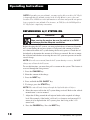
1
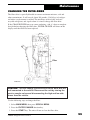
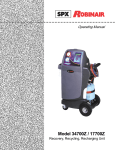
○ ○ ○ ○ ○ ○ ○ ○ ○ ○ ○ ○ ○ ○ ○ ○ ○ ○ ○ ○ ○ ○ ○ ○ ○ ○ ○ ○ ○ ○ ○ ○ ○ ○ ○ ○ ○ ○ ○ ○ ○ ○ ○ ○ ○ ○ ○ ○ ○ ○ ○ ○ ○ ○ ○ ○ ○ ○ ○ ○ ○ ○ ○ ○ ○ ○ ○ ○ ○ ○ ○ ○ ○ ○ ○ ○ ○
Operating
Manual
Model 342000
Refrigerant Service Solution
Refrigerant: R-134a
Series: 342000
Air Conditioning and Refrigerant
Service Solution
SAFETY DEFINITIONS: Follow all WARNING, CAUTION, IMPORTANT, and NOTE messages in this manual. These
messages are defined as follows: WARNING means you may risk serious personal injury or death; CAUTION means
you may risk personal injury, property damage, or serious unit damage; IMPORTANT means you may risk unit damage;
and NOTEs provide clarity and helpful tips. These safety messages cover situations ROBINAIR is aware of. ROBINAIR
cannot know, evaluate, and advise you as to all possible hazards. You must make sure all conditions and procedures do
not jeopardize your personal safety.
COPYRIGHT: No part of this manual may be reproduced, stored in a retrieval system, or transmitted in any form or by
any means (electronic, mechanical, photocopy, recorded, or otherwise) without the prior written permission of ROBINAIR.
DISCLAIMER: All information, illustrations, and specifications contained in this manual are based on the latest
information available at the time of publication. The right is reserved to make changes at any time without obligation to
notify any person or organization of such revisions or changes. Further, ROBINAIR shall not be liable for errors contained
herein or for incidental or consequential damages (including lost profits) in connection with the furnishing, performance, or
use of this material. If necessary, obtain additional health and safety information from the appropriate government
agencies and the vehicle, refrigerant, and lubricant manufacturers.
WARNINGS
ALLOW ONLY QUALIFIED PERSONNEL TO OPERATE THE UNIT. Before operating the unit, read and follow
the instructions and warnings in this manual. The operator must be a certified technician and must be familiar with
air conditioning and refrigeration systems, refrigerants, and the dangers of pressurized components. If the
operator cannot read English, operating instructions and safety precautions must be read and discussed in the
operator’s native language.
Si el operador no puede leer el inglés, las instrucciones de operación y las precauciones de seguridad deberán
leerse y comentarse en el idioma nativo del operador.
Si l’utilisateur ne peut lire l’anglais, les instructions et les consignes de sécurité doivent lui être expliquées dans sa
langue maternelle.
PRESSURIZED TANK CONTAINS LIQUID REFRIGERANT. Do not overfill the internal storage vessel because
overfilling may cause explosion and serious personal injury or death. Do not recover or charge refrigerants into
non-refillable containers; use only federally authorized refillable containers.
ALL HOSES MAY CONTAIN LIQUID REFRIGERANT UNDER PRESSURE. Contact with refrigerant may cause
personal injury. Wear correct protective equipment, including safety goggles. Disconnect hoses with extreme
caution.
HIGH VOLTAGE ELECTRICITY INSIDE THE UNIT HAS A RISK OF ELECTRICAL SHOCK. Exposure may
cause personal injury. Refer to the instruction manual for correct procedure when disconnecting the power.
TO REDUCE THE RISK OF FIRE, do not use the unit in the vicinity of spilled or open containers of gasoline or
other flammable substances. An extension cord may overheat and cause fire. If an extension cord is needed, use
the shortest possible cord with a minimum size of No. 14 AWG.
DO NOT BREATHE REFRIGERANT. Exposure may cause personal injury, especially to the eyes, nose, throat,
and lungs. Use this equipment in locations with mechanical ventilation that provides at least four air changes per
hour or locate the equipment at least 18 inches above the floor. To remove HFC-134a from the A/C system, use
service equipment certified to meet the requirements of SAE J2210 (HFC-134a recycling equipment). If accidental
system discharge occurs, ventilate the work area before resuming service.
R-134a
USE THE UNIT WITH ONLY R-134a REFRIGERANT. The unit is for recovering, recycling, and recharging only
R-134a refrigerant! Do not attempt to adapt the unit for another refrigerant. Do not mix refrigerant types through a
system or in the same container; mixing of refrigerants will cause severe damage to the unit and the vehicle air
conditioning system.
DO NOT USE COMPRESSED AIR TO PRESSURE TEST OR LEAK TEST THE UNIT OR VEHICLE AIR
CONDITIONING SYSTEM. Some mixtures of air and R-134a refrigerant are combustible at elevated pressures.
These mixtures are potentially dangerous and may result in fire or explosion causing personal injury or property
damage.
Additional health and safety information may be obtained from refrigerant and lubricant manufacturers.
This equipment is protected by one or more of the following patents: US: 4,938,031; 5,005,369; 5,248,125; 4,261,178;
4,768,347. Other U.S. and Foreign Patents Pending.
Table of Contents
Introduction .............................................................................................. 2
Glossary of Terms ................................................................................ 2
General Operating Guidelines .............................................................. 3
Component Location and Identification ................................................ 4
342000 Overview ...................................................................................... 6
342000 Function Keys .......................................................................... 8
Number Keys, Up/Down Arrows, Pressure Gauges ............................. 9
Set-Up Instructions ................................................................................ 10
Initial Set-Up Instructions .................................................................... 10
Power Up ............................................................................................ 12
Vehicles with Contaminated Systems ................................................. 12
Testing Source Tanks ......................................................................... 12
Operating Instructions ........................................................................... 14
Diagnosing System Operation Using Snapshot Mode ........................ 14
Snapshot Mode Operation .................................................................. 14
Recovering Refrigerant ....................................................................... 16
Making Repairs ................................................................................... 17
Pulling a Vacuum ................................................................................ 17
Replenishing A/C System Oil .............................................................. 18
Charging the Vehicle .......................................................................... 19
Flushing the A/C System .................................................................... 21
Help Screens ...................................................................................... 23
Maintenance Instructions ...................................................................... 25
Changing the Filter-Drier .................................................................... 25
Electrical Protection ........................................................................... 27
Replacing the Source Tank ................................................................ 27
Oil Time Warning ............................................................................... 28
Oil Change Menu/Process ................................................................. 28
Replacing the Printer Paper ............................................................... 28
Replacing the ID Filter ........................................................................ 29
General Maintenance ......................................................................... 29
Replacement Parts ............................................................................. 30
Warranty Information .................................................. Inside back cover
342000 Refrigerant Service Solution
1
Introduction
This manual contains important safety procedures concerning the operation, use and maintenance of this product. Failure to follow the instructions contained in this manual may result in serious injury. If you are
unable to understand any of the contents of this manual, please bring it
to the attention of your supervisor. Do not operate this equipment unless
you have read and understand the contents of this manual.
The 342000 is a complete air conditioning service center for R-134a. It recovers,
recycles, evacuates, and recharges refrigerant quickly, accurately and
automatically, with little attention needed from the technician. A microprocessor
controls the unit’s functions and prompts on the display lead you through the
operation. These prompts are written so they are easy to understand and follow.
The entire service procedure can be done with one hook-up to the vehicle. A
built-in refrigerant identifier checks for contaminated refrigerant prior to recovery.
Pressures are shown on the high and low side gauges, and other operating
information is shown on the display.
Refrigerant is recovered into and charged out of an internal storage vessel (ISV).
The 342000 unit automatically refills this vessel with refrigerant from an external
source tank as needed in order to maintain a constant 12 –15 lbs. (5.45 – 6.82 kgs)
of refrigerant available to be charged. Quick connections are all that’s needed to
replace the source tank when it’s empty.
Other time-saving features include automatic air purge, single pass recycling, and
automatic oil drain. The unit also automatically clears refrigerant after every job. A
red light on the top of the unit flashes whenever a process is complete or when the
unit needs attention from the user.
The 342000 is UL listed and meets SAE specifications for recycled refrigerant.
Glossary of Terms
A/C
A/C System
Unit
Source Tank
ISV
2
Air conditioner or air conditioning
The vehicle air conditioning system
The refrigerant recovery/recycling/recharging unit (342000)
The refrigerant source tank
Internal Storage Vessel
© 1999 Robinair, SPX Corporation
Introduction
GENERAL OPERATING GUIDELINES
Use the following guidelines when operating the 342000:
1.
The voltage at the unit must be ±10% of the unit’s rated voltage. Errors
will be displayed on the screen. Extension cords must be a minimum of 14
AWG and kept as short as possible. Common causes for electrical problems include:
• Long extension cords
• Faulty, overloaded electrical circuits
• Drop lights
• Imcorrect ground or polarity
NOTE: If your electrical circuits have reversed polarity, the screen displays the following messages:
VOLTAGE LINE ERROR
CHECK POLARITY
VOLTAGE READOUT WILL BE DISABLED
with an option to continue.
NOTE: If you choose the CONTINUE option, the over- and under-voltage
protection built into the circuit board will be disabled. The unit may not
operate correctly. To ensure correct operation, you must use a circuit with
the correct polarity.
2. The display shows options and gives instructions for most service maintenance tasks. Read the display prompts and follow the directions given
there.
3. To interrupt any function, press the PAUSE key, then press the
CONTINUE key to restart the procedure.
4. The 342000 prompts you to check the system oil drain bottle on the back of
the unit for recovered oil. Any system oil that is lost will automatically drain
during recovery. You must measure and record the lost amount so that you
know how much new oil to add during charging. Refer to the A/C system
manufacturer’s service manuals for oil specifications. Dispose of used oil
according to local, state, and federal regulations.
5. In general, it is best to leave the 342000 main power ON throughout the
workday. This allows plenty of time for the unit to purge air from the tank and
refill the internal storage vessel. Turn the unit OFF at the end of the day.
IMPORTANT OPERATING NOTES
•
•
Change the filter-drier when the display shows the CHANGE FILTER message. Follow the instructions for the changeover.
At temperatures exceeding 120oF / 49oC, wait 10 minutes between recovery
jobs.
342000 Refrigerant Service Solution
3
Introduction
COMPONENT LOCATION AND IDENTIFICATION
342000 CONTROL PANEL
Low Side
Gauge
High Side
Gauge
Display
Function
Keys
Numeric Keys
Refrigerant
Identifier Filter
Main Power
Switch
Printer
Arrow
Keys
Display Contrast
Keys
INST 0684
4
© 1999 Robinair, SPX Corporation
Introduction
COMPONENT LOCATION AND IDENTIFICATION
342000 FRONT VIEW
Control Panel
“Cycle Complete”
Red Indicator
Light
Convenient
Built-in Handle
and Hose Storage
Shelf for tools
and accessories
Oil Injection
Bottle
Filter-Drier
Access
Oil Drain Bottle
Polypropylene
Cabinet for
durability and
light weight
INST 0685
Large Wheels
for mobility across
air lines, power
cords, grates
Locking
Casters
342000 SIDE VIEW
Convenient Handle
for moving unit
Vacuum Pump
Oil Level Sight Glass
and Oil Fill Port
Oil Drain
Bottle
High Side and Low Side Hoses
with Field Service Couplers,
color coded
Power Cord
Source Tank
(disposable, inverted)
Tank Strap
to secure tank to unit
Shelf for
Source Tank
Source Tank
Hose
INST 0686
342000 Refrigerant Service Solution
5
Introduction
342000 OVERVIEW
Before you begin any procedure, familiarize yourself with its functions, the
components of the unit (see diagrams in this section) and its operation.
1. POWER UP—When the power is turned ON, the unit performs selfdiagnostics. When tests are complete, the display shows SELECT OPERATION. Use the function keys (F-1 to F-5) to select the desired
operating mode.
2. MAIN MENU—Shows the amount of refrigerant available for charging,
the current temperature, humidity, date, time, inlet valve status, and
operational status. The information appears in the upper corners of the
display. Use the function keys (F-1 to F-5) to select the mode or press
SCROLL MENU for more choices.
3. SNAPSHOT MODE—Displays operating data about the vehicle’s
A/C system, including refrigerant purity, system pressure, A/C outlet
temperature; also A/C outlet air velocity with optional anemometer
attachment.
4. RECOVER MODE—Removes refrigerant from the A/C system and
filters it during recovery for reuse.
5. VACUUM MODE—Evacuates air from the A/C system.
6. CHARGE MODE—Recharges the A/C system; charge amount can be
entered into pounds and hundredths of a pound, pounds and ounces, or
kilograms.
7. HOSE RECOVER MODE—Removes all excess refrigerant from the
hoses.
8. FLUSH MODE—Clears oil from the A/C system by reversing the flow
of refrigerant, then filters out the contaminants.
9. SET-UP MODE—Allows you to configure the 342000 and run internal
diagnostics.
IMPORTANT: For your safety, observe all warnings and cautions
printed in this manual.
6
© 1999 Robinair, SPX Corporation
Introduction
COMPONENT LOCATION AND IDENTIFICATION
342000
Temperature and Velocity Probes
(located on back panel)
Circuit
Breakers
Blue
Temp
Probe
Red
Temp
Probe
Anemometer
RS232 Outlet
INST0687
A/C System
Close-Up of Oil Drain Connection
(located on side panel near tank)
Oil Drain Bottle
simply snaps
into place
(Be sure the
drain tube is
inside the bottle)
INST0688
342000 Refrigerant Service Solution
7
Introduction
FUNCTION KEYS
The function keys (F-1 to F-5) change depending on the service operation and the
unit’s status. The display shows five labels along the bottom with arrows pointing
to the function keys below. Each label shows what action a particular function
key will activate. To make a selection, press the function key immediately below
the label/arrow. This display is not a touch screen—you must press the key.
As an example, the last label in the illustration shows SCROLL MENU. To see
what other options are available, press the key immediately below SCROLL
MENU (F-5) to go to another menu. All five keys are not always active. Follow
the labels on the display. There is always a selection for MAIN MENU.
Keypad and Function Keys
TEMP. 70OF
HUMIDITY 58%
VOLTAGE : 115 VAC
HIGH: 13" Hg
24-Jun-1999
8:09 AM
CHARGEABLE 7.30 lbs.
Low: 7" Hg
MAIN MENU
SELECT OPERATION
Display &
Prompts
Vacuum
Charge
Snapshot
Scroll Menu
F1
F2
F3
F4
F5
1
2
3
4
5
6
7
8
9
0
Main Menu shown with sample messages
8
p
p
UP/DOWN
RIGHT/LEFT
Arrow Keys
Recover
Function
Choices
Function
Keys
Contrast
Darker
Contrast
Lighter
© 1999 Robinair, SPX Corporation
Introduction
Set
NUMBER KEYS
Use these keys to change the evacuation time, vacuum level, or recharge weight if
you want an amount different than the default one shown on the display. These keys
are also used to enter other numeric values, such as your area’s elevation above sea
level.
UP/DOWN AND LEFT/RIGHT ARROW KEYS
Pressing the UP/DOWN and RIGHT/LEFT keys moves the cursor on the screen
in that direction (Up, Down, Right, or Left). In addition, during numeric programming, pressing the UP arrow increases the number. Pressing the DOWN arrow
decreases the number.
PRESSURE GAUGES
Both the high and low side gauges are equipped with red "follower" needles to
show the maximum and the minimum pressures reached during operation. The
follower is carried with the pressure gauge to the highest or lowest operating
pressure and stays there when the regular needle indicates other pressures.
1. The follower on the low side gauge should be adjusted so it rests on the
bottom side of the black needle when the A/C system is not in operation.
2. The follower on the high side gauge should be adjusted so it rests on the top
side of the black needle when the A/C system is not in operation.
When set up this way, the follower will be carried to the highest pressure or lowest
pressure registered by the individual gauge.
Low Side
Pressure Indicating
Needle (black)
(adjust so red needle rests
below the black needle)
High Side Pressure
Indicating Needle
(black)
High Side
Follower
Needle (red)
(adjust so red
needle rests
above the black
needle)
Low Side
Follower
Needle (red)
342000 Refrigerant Service Solution
9
Initial Set-Up
INITIAL SET-UP INSTRUCTIONS
CAUTION! It is extremely important to follow these instructions! DO
NOT attach any hoses or accessories until prompted by the unit.
Improper set-up will result in unit failure!
Use the following steps for initially setting up the 34200:
1. Attach the power cord to a 115V 60 Hz, 15 amp grounded outlet. Do not
use extension cords.
The unit display
gives directions
and explanations based on
current vehicle/
service status.
Read and follow
these display
prompts at all
times!
2. Switch the Power Switch to the ON position.
3. There is a brief initialization period of several seconds. You will be
prompted for the initial set-up of the 342000. (This sequence occurs
ONLY during initial start-up of a new 342000. Subsequent changes can be
made in the Set-Up Menu at any time).
4. Prompts are as follows:
a. Select Language—Press the UP/DOWN arrow to toggle between selections. Press ENTER when your choice appears on the screen.
b. Select Units—English or Metric; follow the same procedure as above.
c. Set Elevation above sea level for your location ± 500 feet (Call your
area airport or library for your area’s elevation. On the Internet, go to
www.topozone.com and type your city name to view an elevation chart
at no charge).
IMPORTANT!
You can access
the Set-Up Menu
at any time to
change any of
these selections
by pressing
SET-UP MENU.
d. Calibrate the Pressure Transducer—follow the prompts. You must
disconnect the hoses from the 342000 during calibration.
e. Set Date and Time.
You will be prompted to connect the proper hoses and accessories to the 342000.
5. Open the accessory box packaged with the 342000.
6. Attach the high and low side service hoses (found in the accessory box) to
the 1/2" acme connections below the handle on the unit. Connect the blue
low side hose to the bottom fitting, marked “LOW.” Connect the red high
side hose to the top fitting, marked “HIGH.”
WARNING
Always wear eye protection when working with refrigerants.
Refrigerants can cause injury. Read and follow all warnings
at the beginning of this manual before operating this unit.
CAUTION! R-134a systems have special fittings (per SAE specifications)
to avoid cross-contamination with R-12 systems. Do not attempt to adapt
your unit for another refrigerant type—system failure will result!
10
© 1999 Robinair, SPX Corporation
Initial Set-Up
7. Attach the red (front) 15-foot temperature probe and blue (rear) 30-foot
temperature probes and optional airflow sensor to the appropriately labeled connections at the upper rear.
8. The display will prompt you to add oil:
ADD 5.0 OUNCES OF NEW OIL TO VACUUM PUMP
PRESS START TO CONTINUE
Add 5 ounces of oil, and press START. The vacuum pump will start, and the
display will show:
FILL WITH NEW OIL TO CENTER OF SIGHT GLASS (APPROX. 13.0 OUNCES)
PRESS ENTER WHEN COMPLETE
After the user presses ENTER, the pump will stop, and the unit starts the first
fill procedure.
9. Install a tank of new R-134a refrigerant on the lower shelf of the unit,
below the handle—the 342000 can handle 30 lbs. (14 kgs) or 50 lbs. (23
kgs) tanks. The source tank should be installed so that liquid refrigerant is
available:
• Virgin tank should be inverted.
• Refillable tank should be upright with hose connected to liquid valve.
Secure the tank to the unit by placing the strap around the tank and tightening it.
IMPORTANT:
Always test
source tanks
prior to
installation on
the 342000. See
the following
page for
procedure.
NOTE: For initial set-up of the 342000, it is imperative that a new tank of
R-134a refrigerant be used and the source tank should be tested for contamination (see page 12). The tank of refrigerant used for initial fill of the internal
storage vessel is not automatically identified, and introduction of contaminated
refrigerant to the unit will require service which is not covered under warranty.
10. Attach the black hose coming from behind the tank to the source tank
fitting. Open the source tank valve. Press START.
11. The 342000 now automatically evacuates all air from the internal circuit
and tanks and precharges the tank with 12 pounds of R-134a available for
charge. This process takes approximately 15 to 20 minutes.
To avoid the possibility of lost refrigerant, virgin tanks should be checked for
leakage around the tank valve after being connected and the valve opened. If
leakage is found, close the valve and keep it closed at all times EXCEPT during
manual tank refill. (Before pressing MANUAL TANK REFILL button, open the
valve. Close the valve immediately after the process is complete.) The manufacturer does not reimburse for lost refrigerant.
The 342000 is now set up and ready for operation.
342000 Refrigerant Service Solution
11
Set-Up Instructions
POWER UP
After the initial setup is complete, the 342000 will be ready to be powered up.
Use the following steps to power up the 342000:
1. Turn the Main Power Switch ON.
2. The display shows MAIN MENU and SELECT OPERATION when the
unit is ready for operation.
VEHICLES WITH CONTAMINATED SYSTEMS
Before every recovery, the 342000 automatically samples the refrigerant in the
vehicle system. The operator may not bypass this procedure. If a system fails the
purity level required, the 342000 tests a second time. In the event the system fails a
second time, the 342000 prompts you to disconnect the hoses from the vehicle.
Follow the on-screen prompts in order to clear out the 342000.
NOTE: The 342000 must be disconnected from the vehicle before starting the
cleaning process. It is illegal to knowingly vent or allow refrigerant to vent to the
atmosphere. This illegal venting will occur if the machine is left attached to the
vehicle.
Please refer to your shop’s policy for dealing with contaminated refrigerant.
TESTING SOURCE TANKS
Robinair recommends that all source tanks be sampled prior to installation on the
342000. The 342000 does not automatically test the contents of the source tank
prior to adding refrigerant to the internal storage vessel. If a source tank contains
contaminants, these contaminants are transferred to the internal storage vessel.
After a tank fill, the unit samples the contents of the internal storage vessel. When
the internal storage vessel is contaminated, the unit displays:
INTERNAL TANK CONTAMINATION or ID-MALFUNCTION
CONTACT SERVICE
The 342000 locks out all functions until a certified service center decontaminates
the machine. This decontamination is not covered by the warranty.
12
© 1999 Robinair, SPX Corporation
Set-Up Instructions
TESTING SOURCE TANKS
(continued)
To sample a source tank, follow these instructions:
1. Recover any refrigerant left in the hoses by pressing the RECOVER key.
2. Attach a 1/2" acme x low side adapter to the source tank. Use the vapor valve
on the refillable tanks.
3. Attach the blue low side service hose to the adapter and open the coupler.
4. Open the source tank valve.
5. Turn ON the 342000.
6. Press the SNAPSHOT key.
7. Press the START key.
8. The 342000 now samples the contents of the source tank.
9. Once the sampling process is complete:
a. close the tank valves,
b. recover the refrigerant from the hoses, and
c. reattach the blue low side hose to the low side port on the unit.
10. Check the unit’s display to determine if the source tank is contaminated. Then
do one of the following:
• If the source tank is uncontaminated, press the TANK REFILL key and
follow the instructions on the display.
• If the source tank is contaminated, disconnect the blue hose and remove the
tank from the unit.
342000 Refrigerant Service Solution
13
Operating Instructions
DIAGNOSING SYSTEM OPERATION USING
SNAPSHOT MODE
WARNING
Always wear eye protection and protective clothing when
working with refrigerants. Observe all warnings at the
beginning of this manual.
Be sure the vehicle is in PARK before turning on the engine.
Provide adequate ventilation or pipe exhaust to outside.
Vehicle exhaust fumes can cause injury or death.
To assist in system diagnostics, the 342000 Snapshot mode allows the techniIMPORTANT:
cian to monitor and record key operating information from the vehicle being
The automatic
serviced. This data includes:
air purge
periodically
• Date/Time
vents air. Any
• Ambient Temperature and Humidity
brief release of
• Low Side System Pressure minimum value
air you hear is
• High Side System Pressure maximum value
normal
• Front Duct Temperature minimum value
activation of the
• Rear Duct Temperature minimum value
air purge.
• Refrigerant Identifier Results
Additionally, the amount of refrigerant recovered and refrigerant charged can be
captured after completion of each of these operations.
SNAPSHOT MODE OPERATION
IMPORTANT:
Let the A/C
system run
long enough to
reach typical
operating temperatures/
pressures.
Snapshot Mode displays operating data about the vehicle’s A/C system,
including refrigerant purity, system pressure, A/C outlet temperature; also
A/C outlet air velocity with optional anemometer attachment. The following
steps will guide you through the Snapshot Mode operation:
1. Press the SNAPSHOT key or the SCROLL MENU key to reach a
screen with the SNAPSHOT key.
2. You will be prompted to perform the following steps:
a. Connect service hoses.
b. Open the service couplers.
c. Connect both the red (15 ft.) and the blue (30 ft.) duct temperature
probes.
d. Start the vehicle and turn the vehicle A/C system to Maximum Cool or
Recirculate setting.
14
© 1999 Robinair, SPX Corporation
Operating Instructions
3. Press the START key.
4. After identifying the vehicle refrigerant, the 342000 displays and updates
minimum and maximum values described above. Pressing the RESET
MIN/MAX key resets and begins tracking new Minimum and Maximum
values. You can press the PRINT key at any time to capture and print the
screen information. The print-out contains the following data:
SNAPSHOT SUMMARY
Date
Time
AMBIENT DATA
Humidity
Temperature (F° or C°)
The unit
display gives
directions and
explanations
based on
current
vehicle/service
status. Read
and follow
these display
prompts at all
times!
VEHICLE DATA
Main Vent Temperature (minimum)
Back Vent Temperature (minimum)
High Side Maximum Pressure (psi/KPA)
Low Side Minimum Pressure
IDENTIFIER RESULTS
R134a: % (This percent refers to the percent of R-134a that is
present in proportion to any other refrigerants present.)
Air:
% (This percent refers to the amount of air, by weight,
that is present in the system.)
5. When you have the necessary information, turn OFF the engine. Press
the RECOVERY key to go directly into Recovery, or you can exit to the
MAIN MENU using the MAIN MENU key.
If all data is satisfactory and you will not be doing any service work,
allow system to equalize in order to minimize refrigerant loss. Close the
service couplers on the high and low side hoses. Disconnect the hoses
from the vehicle access ports.
342000 Refrigerant Service Solution
15
Operating Instructions
RECOVERING REFRIGERANT
IMPORTANT: If
you operate the
engine during
recovery, see
warnings at the
front of this
manual and
take extreme
care to avoid
moving parts.
Recovery speed and accuracy is highly dependent on underhood temperature
and air flow across components. Cold refrigerant can pool in the accumulator,
evaporator or condenser and will continue to increase system pressures even
after the recovery process has ended. For maximum recovery speed and accuracy, bring the engine to operating temperature prior to recovering refrigerant.
Run the heater on maximum temperature, maximum blower and recirculate.
DO NOT run the A/C system as excessive oil loss will result.
NOTE: There must be 25 psi in the system to recover refrigerant. If there is
not sufficient pressure, you will be prompted to evacuate the system. This step
prevents inadvertent recovery of air or other contaminants from a leaking system.
Use the following steps to recover refrigerant:
1. Be sure the vehicle engine is OFF.
2. From the MAIN MENU, press the RECOVER key or the SCROLL
MENU key to move to the screen showing the RECOVER key.
3. Follow the on-screen prompts to connect the service hoses to the vehicle
and open the service couplers, if they are not already connected.
4. Empty the 342000 oil drain bottle before starting the recovery process.
5. Press the START key to begin the recovery process.
IMPORTANT:
Press PAUSE
to stop
recovery at
any time.
6. If sufficient pressure is detected, the 342000 tests the vehicle system to
determine the purity of the refrigerant in the vehicle system. If the purity
is sufficient, recovery begins. If the refrigerant is contaminated, see page
12, “Vehicles with Contaminated Refrigerant.”
7. Before and immediately after recovery, the 342000 will, if necessary, go
into a clearing mode. This mode clears all refrigerant from hoses and
internal components into the tank to provide maximum recovery accuracy.
8. When the system has been recovered to a vacuum of 9" Hg, the recovery
process stops automatically. Several things occur at this time:
• The red indicator light flashes and the beeper sounds at completion.
• The display reads RECOVER COMPLETE and shows the weight of
the recovered refrigerant.
• System oil is automatically drained into the oil drain bottle.
NOTE: The unit will not go to any other function until the oil is fully drained.
9. You now have the following options:
• Proceed with evacuation or repairs, if needed.
• Press the RESTART RECOVERY key to remove any additional
refrigerant which may have vaporized in the system.
16
© 1999 Robinair, SPX Corporation
Operating Instructions
• Wait for the 342000 to automatically restart and pull any additional
!
!
refrigerant which has vaporized in the system (this occurs after five
minutes if a positive pressure is detected).
Additional recovered refrigerant is added to the amount shown on the screen.
NOTE: If you have entered the RECOVERY mode through the SNAPSHOT
mode, the unit will automatically return to SNAPSHOT when you exit RECOVERY and will give you an updated printout.
MAKING REPAIRS
When all refrigerant has been removed from the vehicle, make any repairs or
component replacements. Take the following steps before making repairs:
1. Disconnect the unit from the vehicle.
2. Close the high and low side service coupler valves.
3. Disconnect the hoses from the vehicle access ports.
PULLING A VACUUM
Prior to recharging a vehicle, it is critical that you evacuate the system to
remove any air. Air can affect system operation, but evacuation ensures air
and other contaminants have been removed and that the system is ready for a
recharge.
1. If you have disconnected the 342000 to make repairs, reconnect the blue
low side and red high side service hoses and open the service connectors.
2. Press the VACUUM key (or press the SCROLL MENU key to find the
screen with the VACUUM function key, then press VACUUM) to begin
operation. OR, from the SNAPSHOT recovery mode, press the SNAPSHOT SUMMARY key, then press the MAIN MENU key.
3. The default evacuation time of 15.00 minutes appears on the screen. This
function provides a minimum of three minutes of evacuation, and will
then shut off if a vacuum of 28" Hg is achieved.
4. If you desire to evacuate for more than fifteen minutes, change the time
using the numeric keypad or use the UP arrow to increase the time
(see page 9).
5. Press the START key to accept the evacuation time and begin the process.
6. When the unit reaches a vacuum of 28" Hg., the red indicator light
flashes and the beeper sounds to indicate the process is complete. If
28" Hg is not achieved after 15 minutes of evacuation, the process stops,
the light and beeper signal that attention is needed, and you are prompted
to check for a leak.
342000 Refrigerant Service Solution
17
Operating Instructions
NOTE: Depending on your altitude, you may not be able to achieve 28" Hg. It
is important that the altitude setting in the Set-Up Menu is correct for your
location. The 342000 uses this information to calculate and provide an equivalent set point for your altitude. For instance, at 7000 feet, the 342000 pulls to
21" Hg before completing evacuation.
REPLENISHING A/C SYSTEM OIL
WARNING!
When running the engine, be sure the vehicle is in PARK
and always provide adequate ventilation.
Before charging the A/C system, you must replenish any oil removed from the
A/C system during the recovery process. Charge only the amount of oil that
was removed from the A/C system during the recovery process. Check the oil
drain bottle to determine the amount of oil that was removed. Be sure to empty
the oil drain bottle before recovering the next A/C system to prevent an inaccurate oil charge.
NOTE: If no oil was removed from the A/C system during recovery, DO NOT
charge any oil into the A/C system.
To use this function, you must first pull a vacuum on the system. This feature is
accessed through the charge menu.
1. Press the CHARGE key.
2. Enter the amount of the charge.
3. Press the NEXT key.
4. Press and hold the OIL INJECT key.
5. To charge, press the START key.
NOTE: The unit will only charge through the high side after oil inject.
6. Select the correct oil for the A/C system being serviced. Refer to the vehicle
manufacturer’s service manual.
7. Adjust the O-Ring around the oil injector bottle to the required oil charge
level. For example, if the bottle’s oil level is at 4 ounces and you need 1/2
ounce of oil to replenish the A/C system, place the O-ring at the 3-1/2
ounce level.
8. Press the CHARGE key. Press the NEXT key.
18
© 1999 Robinair, SPX Corporation
Operating Instructions
NOTE: Oil is injected through the High Side (Red) Service Hose and the High
Side Hose must be connected to the A/C system with the coupler valve open.
NOTE: In order to draw oil into the A/C system, the system must be under
vacuum (see page 17).
9. Press and hold the INJECT OIL key until the oil level reaches the O-ring.
NOTE: Refrigerant must be charged through the high side into the A/C system
after oil is injected to flush the oil from the hoses into the A/C system.
You are now ready to recharge the A/C system with refrigerant.
CHARGING THE VEHICLE
The 342000 has a built-in default charge amount of two pounds (.91 kgs.).
Other charge amounts can be programmed in pounds and hundredths, pounds
and ounces, or kilograms. NOTE: To achieve optimum performance, it is
important to pull a good vacuum prior to charging (see page 17). The 342000
automatically prevents you from starting a full charge into an insufficiently
evacuated system. If this occurs, follow display prompts.
Use the following steps to charge an A/C system:
IMPORTANT:
For greatest
accuracy, do
not disturb the
unit during
charging.
1. Service hoses should be connected to the system and the service couplers
should be open.
2. Press the CHARGE key, or the SCROLL MENU key, to reach the
screen with the CHARGE function key, then press CHARGE.
3. You now have several options:
• Press the NEXT key to accept the 2.00 lbs. default.
• Press the UNITS key to change programming units. If you press the
UNITS key again, the program toggles through pounds and hundredths,
pounds and ounces, and kilograms. Stop on the unit of measure you
want.
• Use the numeric keypad and directional arrows to change the
programmed amount of the charge.
• Change the default charge program. The unit will charge through the
High Side unless you program it for Low Side charging. To do this,
press the LOW SIDE key.
4. After you have selected the units, high or low side charging, and the
amount to charge, press the NEXT key to enter your selections.
5. You will now be prompted to press the START key to begin the charging
process or the BACK key to change variables.
342000 Refrigerant Service Solution
19
Operating Instructions
6. Upon pressing the START key, the 342000 begins to charge the A/C
system.
IMPORTANT:
If the coupler
valves on the
high or low
side are left
open, the
system will
pull the
refrigerant
back out of the
vehicle.
IMPORTANT: Do not disturb or bump the 342000 during charge
as any jarring movement can affect the charge accuracy.
NOTE: If insufficient pressure differential exists between the tank and
system, charging suspends and the 342000 goes into a power charge mode
to increase tank pressure to complete the charge. This normally occurs
only when the 342000 has been in a very cool environment prior to use.
7. When charging is complete, the red indicator light flashes and the beeper
sounds to indicate the process is complete. The 342000 automatically goes
to the SNAPSHOT mode, allowing you to provide an after-service snapshot of key operating information. See page 14 for details on the SNAPSHOT mode.
8. Press the DONE key to exit the SNAPSHOT mode and prepare for the
next service job or press CHARGE MORE to add more refrigerant.
IMPORTANT: You are now prompted to close the service couplers and disconnect the service hoses. This step is very important to ensure the 342000 recovers any residual refrigerant
from the hoses.
Failure to disconnect hoses will result in recovery of the
vehicle’s refrigerant.
Replace caps on the vehicle’s access ports.
9. Press the START key to recover refrigerant from the hoses.
WARNING!
Always close the service couplers prior to disconnecting
from the system to prevent any release of refrigerant.
20
© 1999 Robinair, SPX Corporation
Operating Instructions
FLUSHING PROCESS
The 342000 provides a method of removing oil by forcing liquid refrigerant
through the A/C system or components of the A/C system. A special flushing
adapter to access the system at the compressor block is available as an accessory. After flushing, the refrigerant is recovered by the 342000 and is filtered
by the recycling circuit, returning it to SAE purity levels. A/C system configurations vary and may require adapting and flushing of individual components.
NOTE: The 342000 must have at least 7 lbs. of refrigerant available for
charging in the internal storage vessel.
Use the following procedure which works with an orifice tube system:
1. Locate the 342000 MAIN MENU on the control panel and do the following:
a. Press the SCROLL MENU key.
b. Press the OIL FLUSH key.
2. Follow the on-screen instructions and consult any service bulletins as
needed:
IMPORTANT!
Always follow
vehicle
manufacturer’s
instructions
for flushing.
a. Recover refrigerant as described under RECOVER on page 16 of this
manual.
b. Make sure the 342000 oil drain bottle on the side of the unit
is empty and in place at this time.
c. Close service coupler valves and disconnect hoses from the vehicle
access ports.
d. Close the valve on the external source tank.
NOTE: During flushing, most of the refrigerant is charged into the vehicle A/C system. If you exit the flushing cycle prior to completion without
having closed the valve, the 342000 will automatically add refrigerant to
the internal storage vessel and there will be no room to recover the refrigerant used for flushing.
The orifice
tube must be
removed and a
TXV needs to
be bypassed.
e. Remove the A/C system orifice tube and reconnect the fittings to create
a bypass.
f. Disconnect the compressor block at the rear of the compressor.
g. Attach the compressor block adapter (provided in the flushing kit) to
the system side of the compressor block.
h. Configure the block connectors as desired to provide forward or back
flushing of the refrigerant. The red high side connection hose from the
342000 is the refrigerant source and refrigerant flows through it into
the system. Open the red service coupler.
i. Connect the filter housing to the desired return side of the adapter block
and to the blue low side hose. Open the blue service coupler.
j. Make sure a flushing filter is properly installed in the flushing filter
housing. Open the isolation valve on the hose.
342000 Refrigerant Service Solution
21
Operating Instructions
3. Press the NEXT key.
If the refrigerant has not been recovered, the 342000 will now identify and
recover. It then prompts you to make proper system connections (as
outlined above) prior to evacuation or pulling a vacuum.
IMPORTANT!
Remember to
replace system
oil. Flushing
removes all oil
from the
system. Follow
instructions
packed with
the oil injector.
4. Press the VACUUM key. Choose the default or program the evacuation
time, then press the START key. The unit begins evacuation to remove air
in the system.
5. Next, the display asks for a flush time. The default time is 10 minutes.
You can change the flush time using the numeric keys. Press the START
key to accept the time and begin the flush procedure.
WARNING!
Do not disconnect service couplers during flushing. Doing
so will cause refrigerant to spray out of the fittings!
6. The 342000 flushes the system for the designated amount of time, then
goes into a CLEAR mode as it recovers refrigerant from the system.
NOTE: If the external flushing filter plugs, you will be prompted to
change the filter.
7. The unit automatically drains any collected oil into the graduated oil drain
bottle on the side of the 342000. Remove this bottle, measure the oil, and
dispose of the oil according to local, state, and federal regulations. Be sure
to replace lost oil with an equal amount of new oil.
8. The display shows FLUSHING COMPLETE when the process is finished.
Close service couplers on hoses and remove them.
9. Reconfigure the vehicle’s A/C system to the way it was prior to flushing.
10. Open the valve on the source tank.
11. Evacuate and recharge the vehicle following instructions on page 19.
22
© 1999 Robinair, SPX Corporation
Operating Instructions
HELP SCREENS
The following Help Screens appear on the 342000 for your convenience:
VACUUM
• Connect service hoses to vehicle and open coupler valves.
• The system must have less than 25 psi of pressure for correct operation
of the vacuum pump.
• If greater than 25 psi, you must recover the refrigerant before proceeding.
OIL FLUSH
• Recover any refrigerant in the vehicle.
• Remove and bypass the Orifice Tube or TXV.
• Install compressor bypass block and filter kit.
• Connect blue low side service hose to the filter, then open the service
coupler.
• Connect the filter to the compressor bypass block. Open the service coupler.
• Empty the oil drain bottle.
• Press the OIL FLUSH key on the 342000 to begin the process.
• Program increased vacuum and flushing time, or press the ENTER key to
accept default values.
• Install compressor and expansion devices.
• Evacuate; replenish lost oil; charge refrigerant.
• See Service Bulletins for specific vehicle instructions.
SNAPSHOT
• Install red (15 ft.) temperature probe into vehicle front air outlet duct.
• Install blue (30 ft.) temperature probe into vehicle rear air outlet duct (as
required).
• Install airflow probe into the front duct (optional).
• Start the vehicle and set A/C to MAX COOL.
• Press the PRINT key to capture and print, or reset MAX/MIN to update.
CHARGE
• The vehicle’s A/C system must be evacuated before charging.
• If the A/C system did not hold a vacuum, it may have a leak.
• If not evacuated, the charge amount is limited to .5 lb.
342000 Refrigerant Service Solution
23
Operating Instructions
RECOVER
• Verify that the service hoses are connected and the coupler valves are
open.
• The system must have at least 25 psi of pressure for correct operation of
the refrigerant ID.
SET-UP MENU (Use the UP/DOWN arrows to highlight selections)
• Language
- Press TOGGLE SELECTION to select English, Spanish, or French.
- Press the MAIN key to exit.
• Select Units (Selects the units of measure in English or Metric)
- Press TOGGLE SELECTION.
- Press the MAIN key to exit.
• Clock Adjust (Adjusts the date and time)
- Press the ENTER key.
- Use the UP/DOWN arrows to change the date and time.
• Change Elevation (Sets the altitude above sea level for your location)
- Enter the numeric value.
• Calibrate Pressure (Calibrates high and low side pressure transducers)
- Disconnect service hoses and press the ENTER key.
• Anemometer (Enables and calibrates optional anemometer)
- Instruction detail included with the anemometer.
• Manual Oil Drain (Allows user to manually drain any oil from the
342000)
- Press the ENTER key.
- Press the EXIT key.
• Hose Length
- Allows accurate charging with varying lengths of hose.
• Refrigerant Management
- Displays details on refrigerant usage.
24
© 1999 Robinair, SPX Corporation
Maintenance
CHANGING THE FILTER-DRIER
The filter-drier is specially blended to remove maximum moisture, acid and
other contaminants. It will recycle about 300 pounds (136.36 kgs) of refrigerant before a replacement is needed. The unit keeps track of jobs and total
recycled refrigerant, and signals when it’s time to change the filter-drier.
If the CHANGE FILTER message comes on during a job, it’s best to complete
that job before changing the filter-drier. FILTER CHANGE will show on the
display until the filter has been replaced.
Filter
INST0719
CAUTION! The filter change process should not be done with the
unit connected to the vehicle. Disconnect the unit by closing the
service coupler valves and disconnecting the high and low side
hoses from the vehicle.
Use the following steps to change the filter:
1. Select MAIN MENU, then press SCROLL MENU.
2. Press the FILTER CHANGE function key.
3. Press the START key. The unit will run to clear the filter-drier.
342000 Refrigerant Service Solution
25
Maintenance
CHANGING THE FILTER-DRIER
(continued)
4. When the clearing is complete, follow the on-screen prompts.
5. Turn the unit OFF and disconnect the power cord from the power outlet.
WARNING
Always disconnect the unit from the power source before
making any repairs or replacements to components. Risk of
electrical shock!
6. Open the unit’s front panel, remove the old filter-drier and replace it with
a new one. Hand-tighten the new filter. Dispose of the used filter-drier
properly.
7. Close the front panel door.
8. Plug the power cord into an appropriate power supply. Turn ON the main
power switch. The display will show the FILTER CHANGE mode. Follow
the on-screen prompts.
9. Press the START key. The unit will run briefly to pull an internal
vacuum, removing any air that entered the system during the changeover.
10. Press MAIN MENU to exit when the process is complete.
26
© 1999 Robinair, SPX Corporation
Maintenance
ELECTRICAL PROTECTION
The 342000 monitors voltage and disables circuitry if the voltage drops below
103.5 volts or increases above 135 volts. It also detects incorrectly wired
connections and warns of the potential hazard. Additionally, the 342000 is
protected by circuit breakers located on the back panel (see page 7). If the
circuit breaker trips, all power to the unit is lost. Press the circuit breaker
button to reset.
REPLACING THE SOURCE TANK
Periodically, the source tank on the back of the unit will run out of refrigerant.
The internal storage vessel contains enough refrigerant for several jobs, but
it’s important to replace the tank soon after the message is displayed so that
you don’t deplete the refrigerant supply in the internal vessel.
1. The message CHECK SOURCE TANK is displayed.
2. Close the source tank valve. Disconnect the black tank hose from the
source tank valve.
3. Release the tank strap and remove the tank from the back of the unit.
To reduce the
likelihood of
leakage, the
black hose
should always
be connected
to a source
tank.
4. Before installing a new source tank, test the contents for contamination
following instructions on page 12, “Testing Source Tanks.”
5. Place a new disposable tank on the platform and secure it with the tank
strap. The tank must be set up to supply liquid—usually this means it is
inverted (see page 11, step 9).
6. Connect the black tank hose to the tank’s fitting. Open the tank valve.
7. The automatic refill will add refrigerant to the internal storage vessel as
the unit works. However, if you want to fill it immediately,
a. press MAIN MENU,
b. press SCROLL MENU, then
c. press the TANK REFILL key.
342000 Refrigerant Service Solution
27
Maintenance
OIL TIME WARNING
If the vacuum pump has accumulated 600 minutes of operation without an oil
change, the following message will appear when the user enters vacuum mode:
CHANGE THE VACUUM OIL AS SOON AS POSSIBLE!
SEE THE MANUAL FOR INSTRUCTIONS
Press START to continue with the vacuum procedure.
OIL CHANGE MENU/PROCESS
Under the setup menu, one of the choices is CHANGE VACUUM OIL.
When entered, the display shows:
REMAINING VACUUM TIME: XXX.X MINUTES
(xxx.x is the current remaining time. 501.4, for example)
PRESS START TO BEGIN OIL CHANGE
When the START key is pressed, the vacuum pump starts and the display shows
a two-minute countdown. The pump runs until the countdown reaches zero. This
warms and circulates the vacuum pump oil so it drains easier. The display will
then show:
DRAIN OIL FROM PUMP
REPLACE WITH 5.0 OUNCES OF NEW OIL
PRESS START WHEN COMPLETE
Drain the old oil and replace 5 ounces. Press START. The display will then
show:
FILL WITH NEW OIL TO CENTER OF SIGHT GLASS (APPROX. 13.0 OUNCES)
PRESS ENTER WHEN COMPLETE
After the user presses ENTER, the pump will stop and return to the start-up
screen.
REPLACING PRINTER PAPER
1. Open the printer cover.
2. Press the PUSH button on the right side of the printer and the entire
printer mechanism will lift up.
3. Insert paper as shown on the lid of the printer. The paper will feed automatically. Push the printer mechanism down.
4. Tear off paper at the top of the feed slot.
5. Close the printer cover. Press and hold the FEED button; paper will feed
up through the printer cover.
28
© 1999 Robinair, SPX Corporation
Maintenance
REPLACING THE IDENTIFIER FILTER
CAUTION! Visually inspect the identifier filter every day. If it
begins to turn red, replace it immediately! You risk damaging the
identifier if the filter isn’t replaced.
The built-in refrigerant identifier has an inlet filter to protect the sensor. Periodically, this becomes clogged with contaminants and must be replaced.
REPLACE THIS FILTER IMMEDIATELY!
1. The filter is located on the top of the unit’s control panel. Unplug it and
remove it from the unit.
2. Plug in a new inlet filter.
GENERAL MAINTENANCE
1. On a regular basis, wipe off the unit with a clean cloth to remove grease,
dust and other dirt.
2. Periodically check the internal components for leaks—over time, fittings
can loosen as the unit is moved. Turn OFF the unit. Disconnect it from
the power source. Open the front door panel and trace lines with a leak
detector. Also check connections on the back and sides of the unit.
Tighten any loose fittings or connections you may find. You may also
contact your local service center for maintenance instructions.
342000 Refrigerant Service Solution
29
Replacement Parts
Description
30
Part Number
Anemometer
19698
Filter Drier (spin-on)
34724
Hose, Red (96")
63096
Hose, Blue (96")
62096
Identifier Filter
16912
Oil Bottle
17756
Printer Paper
34215
Service Coupler (red)
18191
Service Coupler (blue)
18190
Temp. Probe, 15'
17915
Temp. Probe, 30'
17930
© 1999 Robinair, SPX Corporation
Notes
342000 Refrigerant Service Solution
31
Notes
32
© 1999 Robinair, SPX Corporation
Limited Warranty
This product is warranted to be free from defects in workmanship, materials, and
components for a period of one year from date of purchase. All parts and labor
required to repair defective products covered under the warranty will be at no
charge. The following restrictions apply:
1. The limited warranty applies to the original purchaser only.
2. The warranty applies to the product in normal usage situations only, as described in the Operating Manual. The product must also be serviced and
maintained as specified.
3. If the product fails, it will be repaired or replaced at the option of the manufacturer.
4. Transportation charges for warranty service will be reimbursed by the factory
upon verification of the warranty claim and submission of a freight bill for
normal ground service. Approval from Robinair must be obtained prior to
shipping to either an authorization service center or the factory.
5. Warranty service claims are subject to factory inspection for product
defect(s).
6. Robinair shall not be responsible for any additional costs associated with a
product failure, including, but not limited to, loss of work time, loss of refrigerant, and unauthorized shipping and/or labor charges.
7. All warranty service claims must be made within the specified warranty
period. Proof-of-purchase date must be supplied to the manufacturer.
8. Use of Robinair recovery/recycling equipment with unauthorized refrigerants
will void our warranty. Authorized refrigerants are listed on the equipment or
are available through our Technical Service Department.
This Limited Warranty Does Not Apply If:
• The product, or product part, is broken by accident.
• The product is misused, tampered with, or modified.
• The product is used for recovering or recycling any substance other than the
specified refrigerant type.
• Source tanks are not tested for purity prior to installation on the unit.
342000 Refrigerant Service Solution
CONVERSION
TABLE
OZ.
LBS.
0.5
1.0
1.5
2.0
2.5
3.0
3.5
4.0
4.5
5.0
5.5
6.0
6.5
7.0
7.5
8.0
8.5
9.0
9.5
10.0
10.5
11.0
11.5
12.0
12.5
13.0
13.5
14.0
14.5
15.0
15.5
16.0
0.03
0.06
0.09
0.13
0.16
0.19
0.22
0.25
0.28
0.31
0.34
0.38
0.41
0.44
0.47
0.50
0.53
0.56
0.59
0.63
0.69
0.69
0.72
0.75
0.78
0.81
0.84
0.88
0.91
0.94
0.97
1 lb.
Visit our web site at
%
www.robinair.com
or
call our toll-free
Technical Support Line at
800-822-5561
in the continental U.S. and Canada
Certain state and local jurisdictions dictate that using this equipment to sell
refrigerant by weight may not be permitted. We recommend charging for any
A/C service by the job performed.
This weight scale provides a means of metering the amount of refrigerant
needed for optimum A/C system performance as recommended by OEM
manufacturers.
Due to ongoing product improvements, we reserve the right to
change design, specifications, and materials without notice.
SPX Corporation
655 Eisenhower Drive
Owatonna, MN 55060-0995 USA
Tech Services:1-800-822-5561
Fax: 1-800-822-7805
Customer Service: 1-800-533-6127
Fax: 1-800-322-2890
Web site: www.robinair.com
122247—Rev. D (4/19/04)
342000 Refrigerant Service Solution
© SPX Corporation