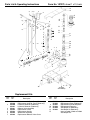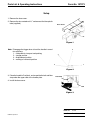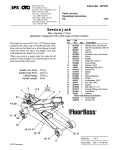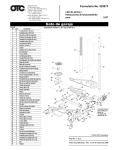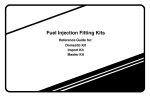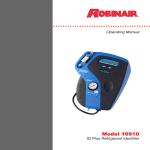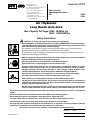
1
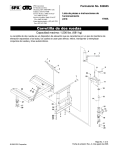
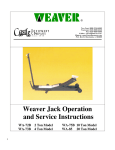
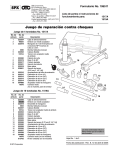
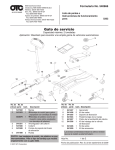
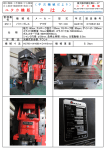
SPX Corporation
655 Eisenhower Drive
Owatonna, MN 55060-0995 USA
Phone: (507) 455-7000
Tech. Serv.: (800) 533-6127
Fax: (800) 955-8329
Order Entry: (800) 533-6127
Fax: (800) 283-8665
International Sales: (507) 455-7223
Fax: (507) 455-7063
Form No. 107273
Parts List and
Operating Instructions
for:
5093
5094
Air / Hydraulic
Long Reach Axle Jack
Max. Capacity Per Stage: 5093 - 20/40/60 Ton
5094 - 14/25/40/60Ton
Safety Precautions
CAUTION: To prevent personal injury and damage to equipment,
•
Read, understand, and follow all instructions, including ASME PALD Part 10 for service jacks.
If the operator cannot read English, operating instructions and safety precautions must be
read and discussed in the operator’s native language.
Si el operador no puede leer el inglés, las instrucciones de operación y las precauciones de
seguridad deberán leerse y comentarse en el idioma nativo del operador.
Si l’utilisateur ne peut lire l’anglais, les instructions et les consignes de sécurité doivent lui être
expliquées dans sa langue maternelle.
•
Before using the service jack to lift a vehicle, refer to the vehicle service manual to determine
recommended lifting surfaces on the vehicle chassis.
•
Wear eye protection that meets ANSI Z87.1 and OSHA standards.
•
Ensure that there are no passengers in the vehicle to be lifted.
•
Inspect the jack before each use; do not use the jack if it’s damaged, altered, or in poor
condition. Take corrective action if any of the following conditions are found: cracked or
damaged housing; excessive wear, bending, or other damage; leaking hydraulic fluid;
scored or damaged piston rod; loose hardware; modified or altered equipment.
•
Maintain correct air pressure, and keep the air hose away from hot or sharp edges.
•
The load to be lifted must never exceed the rated capacity of the jack.
•
•
Never operate the jack beyond the maximum stroke indicated on the label.
Use the jack on a hard, level surface. The jack must be free to roll without any obstructions
while lifting or lowering the vehicle. The wheels of the vehicle must be in the straight-ahead
position, and the hand brake released.
•
Use the jack for lifting purposes only. Do not use it for the purpose of moving a vehicle. Stay
clear of a lifted load. Place support stands under the axles before working on the vehicle.
•
Center the load on the jack saddle. Off-center loads can damage seals and cause jack failure. Lift only dead
weight.
•
Do not use blocks or other extenders between the saddle and the load being lifted.
•
•
Do not modify the jack or use adapters unless approved or supplied by OTC.
•
Lower the jack slowly and carefully while watching the position of the jack saddle.
•
Use only approved hydraulic fluid (Chevron AW Hydraulic Oil or equivalent). The use of alcohol, hydraulic
brake fluid, or transmission oil could damage seals and result in jack failure.
The jack is fitted with an overload valve, which is factory set. Do not tamper with this valve.
This guide cannot cover every situation, so always do the job with safety first.
Sheet No.
© SPX Corporation
1 of 3
Issue Date: Rev. C 10-02-2002
Parts List & Operating Instructions
Form No. 107273, sheet 1 of 3, back
8
3 3
3
8
7
7
f
5
f
f
f
3
5
4
3
3
5
4
5
1
1
1
1
5
f
1
5
5
f
1
1
5
1
1
1
1
1
1
5
4
9
1, f 1
1
1
1
1 1
12
1, f
1
1
12
1, f
1
4
1, f 1 1
1 1
12
1
12
f
1, f
9
f
f
1, f
1, f
1 1
1 1
1
f
1
1
1
1 1 1, f
1 1
1
4
1
11
1
2
2
1
1 1
2
1
f
f
f
2
10
6
6
(Includes
both wheels)
6
6
Replacement Kits
Item
No.
Part
No.
1
515339
515350
515340
515351
515341
515342
515343
515344
515345
2
3
4
5
6
7
Description
Replacement Air/Hydr. Pump (5093 only)
Replacement Air/Hydr. Pump (5094 only)
Hydraulic Reservoir (5093 only)
Hydraulic Reservoir (5094 only)
Release Valve Assembly
Replacement Tubes
Replacement Handle
Wheel/Axle Assembly
Replacement Release Valve Cover
Item
No.
Part
No.
8
515346
515352
515347
515348
515349
515353
9
10
11
12
f
Description
Replacement Cover (5093 only)
Replacement Cover (5094 only)
Replacement Handle Stop Bolt
Replacement Extension
Seal Repair Kit (5093 only)
Seal Repair Kit (5094 only)
Items included in 5093 and 5094
Seal Repair Kits
Parts List & Operating Instructions
Form No. 107273
Setup
1. Remove the base cover.
2. Remove the zinc-coated rod “A,” and connect the blue plastic
tube (supplied).
Base Cover
"A"
Figure 1
Note: Disengage the trigger lever to lock the handle in one of
four positions:
1.
2.
3.
4.
2
collapsible for transport and packing
storage position
displacement position
working or horizontal position
3
1
4
Figure 2
3. Place the handle in Position 4, and assemble the bolt and floor
stop under the upper side of the handle plate.
Floor Stop
4. Install the base cover.
Bolt
Figure 3
Sheet No.
© SPX Corporation
2 of 3
Issue Date: Rev. C 10-02-2002
Parts List & Operating Instructions
Form No. 107273, sheet 2 of 3, back
Operating Instructions
1. Move the control lever to the OFF position.
2. Connect the air supply. Recommended air pressure is 100 – 145 PSI (7 – 10 BAR). The shop air line must
have an air filter/lubricator unit; water in the air line will damage the jack.
Note: Air can accumulate within a hydraulic system during shipment or after prolonged use. This entrapped
air causes the jack to respond slowly or feel “spongy.” To remove the air:
A. Push the control lever DOWN, and hold it there for a few seconds.
B. Push the control lever UP to effect a complete lifting cycle.
C. Push the control lever DOWN to retract the jack pistons. (The pistons should react in a smooth motion.
If not, repeat Steps A – C.)
3. Push the control lever UP to raise the saddle to the contact point.
4. Check the placement of the jack; the load must be centered on the jack saddle. IMPORTANT: Avoid wheel
obstructions such as gravel, tools, or uneven expansion joints.
5. Finish lifting the vehicle. Do not attempt to raise the jack beyond its travel stops.
6. Place approved support stands under the vehicle’s lifting points (points recommended by vehicle manufacturer)
that will provide stable support. Before making repairs on the vehicle, lower it onto the support stands by
SLOWLY and CAREFULLY pushing the control lever DOWN.
Preventive Maintenance
IMPORTANT: The greatest single cause of failure in hydraulic units is dirt. Keep the service jack clean
and well lubricated to prevent foreign matter from entering the system. If the jack has been exposed to rain,
snow, sand, or grit, it must be cleaned before it is used.
1. Store the jack with the pistons completely retracted in a well-protected area where it will not be exposed to
corrosive vapors, abrasive dust, or any other harmful elements.
2. Always use original parts to avoid damage to the jack.
3. Regularly lubricate the moving parts in the wheels, arm, and handle.
4. Replace the oil in the reservoir at least once per year. To check the oil level, lower the jack pistons completely.
The oil level should be between the two marks on the dipstick. If necessary, add approved anti-wear hydraulic
jack oil, and install the dipstick again. IMPORTANT: The use of alcohol, hydraulic brake fluid, or
transmission oil could damage the seals and result in jack failure. Use only HL or HM type hydraulic
oil with an ISO viscosity grade of 22 or SAE viscosity grade of SW.
5. Inspect the jack before each use. Take corrective action if any of the following problems are found:
a. cracked, damaged housing
b. excessive wear, bending, other damage
c. leaking hydraulic fluid
d. scored, damaged piston rod
e. loose hardware
f. modified equipment
6. Keep warning labels and instructional decals clean and readable. Use a mild soap solution to wash external
surfaces of the jack.
Parts List & Operating Instructions
Form No. 107273
Troubleshooting Guide
Repair procedures must be performed in a dirt-free environment by qualified personnel who are familiar with
this equipment.
CAUTION: All inspection, maintenance, and repair procedures must be performed when the jack is free
of a load (not in use) and disconnected from the air supply.
Trouble
Jack does not lift
Cause
Solution
1.Control valve in wrong position.
1.Move control valve to UP position.
2.Low/no oil in reservoir.
2.Fill with oil and bleed system.
3.Air-locked system.
3.Bleed system.
4.Load is above capacity of jack.
4.Use correct equipment.
5.Delivery valve and/or bypass valve
not working correctly.
5.Clean to remove dirt or foreign
matter. Replace oil.
6.Packing worn out or defective.
6.Replace hydraulic unit.
Jack lifts only partially
1.Too much or not enough oil.
1.Check oil level.
Jack advances slowly
1.Pump not working correctly.
1.Replace hydraulic unit.
2.Leaking seals.
2.Replace hydraulic unit.
Jack lifts load, but doesn't hold 1.Cylinder packing is leaking.
1.Replace hydraulic unit.
2.Valve not working correctly
(suction, delivery, release, or
bypass).
2.Inspect valves. Clean and repair seat
surfaces.
3.Air-locked system.
3.Bleed system.
Jack leaks oil
1.Worn or damaged seals.
1.Replace hydraulic unit.
Jack will not retract
1.Control valve in wrong position.
1.Move control valve to DOWN
position.
Jack retracts slowly
1.Cylinder damaged internally.
1.Send jack to OTC-authorized service
center. (Refer to OTC Form No.
104031.)
Sheet No.
© SPX Corporation
3 of 3
Issue Date: Rev. C 10-02-2002