1
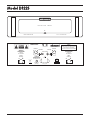
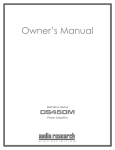
Owner's Manual
D E F I N I T I O N
S E R I E S
Model DS225
STEREO POWER AMPLI FIER
3900 ANNAPOLIS LANE NORTH / PLYMOUTH, MINNESOTA 55447-5447 / PHONE: 763-577-9700 FAX: 763-577-0323
www.audioresearch.com
Contents
Model DS225
Page No.
Preface . . . .. . . . . . . . . . . . . . . . . . . . . . . . . . . . . . . . . . . . . . . . . . . . . . . . . . . 1
Warnings . . . . . . . . . . . . . . . . . . . . . . . . . . . . . . . . . . . . . . . . . . . . . . . . . . . . . 1
Packaging . . . . . . . . . . . . . . . . . . . . . . . . . . . . . . . . . . . . . . . . . . . . . . . . . . .1
Unpacking . . . . . . . . . . . . . . . . . . . . . . . . . . . . . . . . . . . . . . . . . . . . . . . . . . . 1
Accessories. . . . . . . . . . . . . . . . . . . . . . . . . . . . . . . . . . . . . . . . . . . . . . . . . . . .1
Description of Controls . . . . . . . . . . . . . . . . . . . . . . . . . . . . . . . . . . . . . . . . . . .1
Connections . . . . . . . . . . . . . . . . . . . . . . . . . . . . . . . . . . . . . . . . . . . . . . . . . 1, 2
Single-Ended Operation . . . . . . . . . . . . . . . . . . . . . . . . . . . . . . . . . . . . . . . . . 2
Balanced Operation . . . . . . . . . . . . . . . . . . . . . . . . . . . . . . . . . . . . . . . . . . . . 2
Installation . . . . . . . . . . . . . . . . . . . . . . . . . . . . . . . . . . . . . . . . . . . . . . . . . 2, 3
Remote Turn-on Connections . . . . . . . . . . . . . . . . . . . . . . . . . . . . . . . . . . . . . . 3
Operating Procedure . . . . . . . . . . . . . . . . . . . . . . . . . . . . . . . . . . . . . . . . . . . . 3
Start-Up Following “Protect” Shutdown . . . . . . . . . . . . . . . . . . . . . . . . . . . . . 3
Servicing . . . . . . . . . . . . . . . . . . . . . . . . . . . . . . . . . . . . . . . . . . . . . . . . . . . . . 3
Cleaning . . . . . . . . . . . . . . . . . . . . . . . . . . . . . . . . . . . . . . . . . . . . . . . . . . . . . 4
Disposal and Recycling Guidelines . . . . . . . . . . . . . . . . . . . . . . . . . . . . . . . . . 4
Limited Warranty . . . . . . . . . . . . . . . . . . . . . . . . . . . . . . . . . . . . . . . . . . . . . . 4
Specifications . . . . . . . . . . . . . . . . . . . . . . . . . . . . . . . . . . . . . . . . . . . . . . . . . 5
Model DS225
D E F I N I T I O N
S E R I E S
l
POWER
STEREO POWER AMPLIFIER
D S 2 2 5 HIGH DEFINITION ®
MODEL DS225
WARNING
STEREO AMPLIFIER
IN
PLYMOUTH, MINNESOTA
MADE IN U. S. A.
OUT
12V REMOTE
BALANCED
WARNING!
RIGHT
OUTPUT
– +
- DO NOT OPERATE WITH COVERS REMOVED UNIT CONTAINS VOLTAGES WHICH MAY BE HAZARDOUS
BALANCED
RIGHT INPUT
LEFT INPUT
WARNING!
SINGLE - ENDED
RISK OF HAZARDOUS ENERGY!
MAKE PROPER SPEAKER
CONNECTIONS
SEE OWNERS MANUAL
CAUTION
FOR PROTECTION AGAINST
FIRE HAZARD, REPLACE ONLY
WITH SAME RATING FUSES.
RISK OF HAZARDOUS ENERGY!
MAKE PROPER SPEAKER
CONNECTIONS
SEE OWNERS MANUAL
LEFT
OUTPUT
CC
VOLTS
SERIAL
6A FUSE SLO-BLO
(T3.2A 230V)
TO PREVENT FIRE AND SHOCK HAZARD, DO NOT
EXPOSE THIS DEVICE TO RAIN OR MOISTURE.
UNIT MUST BE OPERATED IN A HORIZONTAL POSITION.
MAX POWER CONSUMPTION
720 W 50/60 HZ
˜
–
+
Model DS225
Preface
Please take time to carefully read and understand the following instructions before you install or attempt to operate
this equipment. Becoming familiar with the product and its
correct operating procedures will help assure you of maximum musical enjoyment and reliable operation. The effort
you invest now will be well rewarded in the years ahead.
Warnings
1. DO NOT POWER “ON” THIS AMPLIFIER WITHOUT INPUTS OR SPEAKER LOAD CONNECTED
TO IT.
2. To prevent fire or shock hazard, do not expose
this product to rain or moisture.
3. This unit operates on voltages which can cause
serious injury or death. Do not operate with covers removed. Any necessary servicing should be
carried out by your authorized Audio Research
dealer or other qualified personnel.
4. The 14-gauge, 3-conductor power cord on this
unit is equipped with a standard 3-prong
grounding plug. If used normally, it will provide a
safe earth ground connection of the chassis.
Refer to section on “AC Power Connections” for
detailed information.
5. For safe operation and protection against fire
hazard, replace fuses only with those of the same
type and rating of fuses as specified.
the flaps to the sides and while holding the inner
carton in place, roll the unit upside down. You can
now lift the outer carton off and set it and the filler
panels aside. Now slit the inner carton's taped
seams on the bottom (now facing upward). Again,
fold the flaps over and while holding the unit in, roll
it over as before. You can now lift the inner carton
off to find your DS225 sitting upright, undamaged
and uncartoned. Carefully remove the plastic wrap.
Now, while it is fresh in your mind, reassemble the
carton system for future use.
Accessories
Spare Fuses:
2 – 6 Amp MDA slo-blo (100 & 120v)
2 – T3.2A Amp Super-Time-Lag TT (220 -240V)
Description of Controls
The front panel has:
1 Power line On-Off switch
1 Power “On” LED (Green) indicator
POWER ON-OFF SWITCH: Press the power switch
to initiate or terminate AC line power to the amplifier. When the LED is illuminated the amp is “on” and
ready to play.
Connections
Packaging
Save all packaging accompanying this product. You
have purchased a precision electronic instrument,
and it should be properly cartoned any time shipment becomes necessary. It is very possible that this
unit could be damaged during shipment if repackaged in cartoning other than that designed for it.
The original packaging materials help protect your
investment from unnecessary damage, delay and
added expense whenever shipment of this unit is
required.
Unpacking
The DS225 is packed within two cartons (inner and
outer) which have foam supports in between. Because of the weight of the unit and because it is a
precision electronic instrument it is necessary to
take reasonable care during unpacking and preparation for use.
It is best to have a large, open work area with
available help. Set the carton upright in the center
of the work area and with a small knife carefully slit
the taped edges of the outer carton's top flaps. Fold
The rear panel has:
2 – RCA input connectors, for single-ended
connections, L & R
2 – XLR input connectors, for balanced connection,
L&R
4 – Output binding posts, (+) and (-), L & R
1 – Power line fuseholder
1 – Power line cord 15A IEC connector for removable power cord (supplied)
2 – 12V remote start in and out jacks
2 – Switches for XLR or RCA input operation, L & R
IMPORTANT: Use the best available speaker wires
and interconnects. As your system improves in resolution from the addition of quality components, it
becomes increasingly important to avoid the limitations of inferior system interconnections.
It is important sonically that your entire system be
connected so that the audio signal arriving at the
speakers has correct absolute polarity or phase (i.e.
is not inverted). Connect the black or (-) speaker terminal to the wire that connects to the appropriate-
1
Model DS225
channel (-) binding post on the amplifier. Connect
the red or (+) speaker terminal to the wire that connects to the appropriate-channel (+) binding post on
the DS225. Using the knurled black knob, tighten
the binding posts firmly to assure good contact for
best sonic results.
For “bi-wired” loudspeaker systems (i.e. running
separate wires to bass and treble speaker terminals), simply repeat the above instructions, taking
care that all connections have the same (+) or (-)
polarity.
AC POWER CONNECTIONS: It is essential that the
DS225 amplifier be connected to a wall AC power
receptacle, or a similar heavy-duty source. If it is
connected to convenience receptacles on preamplifiers, etc., the full sonic capabilities of both the amplifier and the preamplifier will be compromised.
The AC power source for the amplifier should be
capable of supplying 6 amperes for 100 or 120 volt
units, or 3 amperes for 220 or 240 volt units.
For the very best performance on domestic 100 or
120 volt circuits, the DS225 should be connected to
its own AC power circuit branch protected by a 15
amp breaker. The preamplifier and other audio
equipment should be connected to a different power
circuit and breaker. Avoid the use of extension
cords. If they must be used on a temporary
basis, use 14-gauge or heavier cords.
The DS225 utilizes a compatible grounding system
that generally does not require a “ground lifter”
adapter plug on the AC power cord to minimize
hum. The power cord on your DS225 has a standard three-prong grounding plug to provide maximum safety when it is connected to a grounded wall
receptacle. If there is any question regarding the
safety of grounding procedures, be certain to seek
competent help with the installation. Do not substitute a lighter gauge power cord for the one supplied with this unit.
If an electronic crossover or other AC powered
equipment is used with the amplifier it may be necessary to use “ground lifter” adapters on the power
plugs of that equipment to minimize system hum.
Generally, the lowest hum is achieved when the
only direct connection between audio common
“ground” and true earth ground occurs in the preamplifier, through its grounded power cord. Other
equipment in the system should have some form of
isolation to prevent ground loops and associated
hum.
2
Single-Ended Operation
Single-ended inputs should be used with a preamplifier (or electronic crossover, etc.) having singleended outputs which does not invert overall phase
or polarity. When using single-ended inputs, set
two rear-panel toggles to SE position. Disconnect
any balanced cables.
Balanced Operation
Balanced inputs can be used with a preamplifier (or
electronic crossover, etc.) having balanced outputs.
When using the balanced inputs, set two rear-panel
toggles to BAL position. Disconnect any single-ended cables.
Installation
The amplifier may be installed in a ventilated cabinet; observe the following guidelines to maximize
the performance and service of your amplifier.
With proper installation, the DS225 may be left on
continuously for maximum performance on demand;
it will draw approximately 35 watts of AC power at
idle. However, the DS225 has been designed and
engineered to minimize any “warm up” necessary
for best sonics; generally, a half-hour or 45 minutes
of actual playing time will bring the amplifier
around to more than acceptable performance levels, with some additional improvement noticeable
over the next hour or two. Warm-up characteristics
will depend upon ambient room temperature at
start-up, the nature of the installation and the resolving power of the associated equipment.
Operate the DS225 only in a horizontal (upright)
position. Adequate airflow and proper cooling can
be maintained only if there is no restriction around
the unit.
The five (5) non-marring feet provide adequate
spacing and mechanical damping only from a
smooth, hard surface. Never operate the unit while
it is sitting on a soft, irregular surface such as a
rug or carpet.
If the unit is to be operated in an enclosure such as
an equipment rack, make certain that adequate air
flow above and below the unit is provided. The
“ambient” operating temperature should never exceed 120 F or 49 C. Improper installation will
cause premature component failure and will affect
your warranty, as well as the service life of
the unit.
Model DS225
It is normal for the DS225 power amplifier to run
lightly to moderately warm to the touch. All components within are operated at safe, conservative levels and will not be improperly affected, providing
the requirements outlined above are adhered to.
Remote Turn-on Connections
The DS225 has a built-in 12VDC remote turn-on/off
circuit for operation by a master control system in a
home theater or large audio system. Use a 3.5mm
(.140") diameter mini plug to connect to the +12V IN
jack on the rear of the DS225. Two identical paralleled jacks are provided to allow chaining connections to control two or more DS225s or other equipment.
The +12V IN jack should be connected to the
+12VDC output of the master control system, using
a continuous +12VDC signal at 20mA per DS225 for
the duration of amplifier on-time. Do not use a momentary or data pulse control signal.
The front power switch on the DS225 must be off to
use the remote turn-on. Front power switch is disabled when 12 volt trigger is energized. The front
power switch will not turn the DS225 off if the 12
volt trigger is energized.
The +12VDC remote jacks have polarity protection,
so they will not operate if a -12VDC signal is accidentally connected, or if the control wires are
reversed.
Operating Procedure
1. Make sure you have read and followed the INSTALLATION and CONNECTION instructions
prior to attempting operation.
2. Secure all rear panel connections between
DS225, and input source, and loudspeakers.
3. Make sure the amplifier is properly connected to
a high-current AC power receptacle via the supplied power cord (see CONNECTIONS).
4. Your preamplifier should be “On” and muted
and/or set at minimum gain.
5. Turn Power switch from “Off ” to “On”. Unit is
ready to play when LED is on. Note: if the power
indicator LED fails to light, turn the Power switch
to “Off ” and check the appropriate fuse for possible failure. Extra fuses for AC power are included with the unit. If green light is blinking after
turn on, a low line voltage condition exists – turn
off amplifier and check line voltage.
6. Your amplifier should now operate satisfactorily.
It may be played immediately, although best sonic performance will in most cases not be achieved
for an hour or so (see INSTALLATION for further
details.)
Start-Up Following “ Protect ”
Shutdown:
The DS225 amplifier uses a sophisticated, non-fused
sensing circuit to protect the amplifier from D C at
the input, from thermal overload, and from shorting
conditions at the output (e.g. defective speaker
leads, etc.). This circuit also helps prevent damage
to your loudspeakers.
When the amplifier senses a fault condition in either
channel from excessive D C or excessive output current, it will automatically shut off left or right outputs
from the amplifier. Amplifier will automatically return to normal operation when fault is removed.
If the amplifier fails to resume normal operation after removal of a fault condition, contact your authorized dealer for further assistance.
Servicing
Because of its careful design and exacting standards of manufacture, your DS225 amplifier should
normally require only minimal service to maintain its
high level of performance.
CAUTION: The DS225 amplifier contains sufficient
levels of voltage and current to be lethal . Do not
tamper with a component or part inside the unit.
Even with the power turned off, a charge remains in
the energy storage capacitors for some time. Refer
any needed service to your authorized Audio
Research dealer or other qualified technician.
Additional questions regarding the operation, maintenance or servicing of your amplifier may be referred to the Customer Service Department of Audio
Research Corporation at 763-577-9700 (CST). When
ordering a service manual from Audio Research or
an authorized dealer, be sure to identify the serial
number on your amplifier.
3
Model DS225
Cleaning
Limited Warranty
To maintain the new appearance of this unit, occasionally wipe the front panel and top cover with a
soft, damp (not wet) cloth to remove dust. A mild,
non-alkaline soap solution or dilute isopropyl alcohol may be used to remove fingerprints or similar
smudges. Cleaners containing abrasives should not
be used as they will damage the anodized finish of
the front panel. A small, soft paint brush is effective
in removing dust from bevels, the recessed nameplate and other features of the front panel.
Audio Research Corporation products are covered
by a 3-Year Limited Warranty, or a 90-Day Limited
Warranty (vacuum tubes). This Limited Warranty initiates from the date of purchase, and is limited to
the original purchaser, or in the case of demonstration equipment, limited to the balance of warranty
remaining after original shipment to the retailer or
importer.
Disposal and Recycling Guidelines
To dispose of this electronic product, do not place
in landfill. In accordance with the European Union
Waste Electrical and Electronic Equipment (WEEE)
directive effectiveAugust 2005, this product may
contain regulated materials which upon disposal require special reuse and recycling processing.
Please contact your dealer or importing distributor
for instructions on proper disposal of this product in
your country. Or, contact Audio Research Corporation (763-577-9700) for the name of your importing
distributor and how to contact them.
Packing and shipping materials may be disposed of
in a normal manner.
4
In the United States, the specific terms, conditions
and remedies for fulfillment of this Limited Warranty
are listed on the warranty card accompanying the
product in its shipping carton, or may be obtained
from the authorized retailer or from the Audio
Research Customer Service Department. Outside the
United States, the authorized importing retailer or
distributor has accepted the responsibility for warranty of Audio Research products sold by them. The
specific terms and remedies for fulfillment of the
Limited Warranty may vary from country to country.
Warranty service should normally be obtained from
the importing retailer or distributor from whom the
product was purchased.
In the unlikely event that technical service beyond
the ability of the importer is required, Audio
Research will fulfill the terms and conditions of the
Limited Warranty. Such product must be returned at
the purchaser's expense to the Audio Research factory, along with a photocopy of the dated purchase
receipt for the product, a written description of the
problem(s) encountered, and any information
necessary for return shipment. The cost of return
shipment is the responsibility of the purchaser.
Model DS225
Specifications
POWER OUTPUT: 225 watts per channel into 8 ohms,
1% THD; 360 watts per channel into 4 ohms, both
channels driven.
FREQUENCY RESPONSE: (-3dB points at 1 watt) 5Hz to
55 kHz.
INPUT SENSITIVITY: 2.15V RMS for rated output (26.0dB
Gain) single-ended or balanced.
INPUT IMPEDANCE: 150K ohms single-ended, 300K ohms
balanced differential.
OUPUT POLARITY: Non-inverting from single-ended
inputs. Balanced pin 2+ (IEC-268).
OUTPUT REGULATION: 0.06dB 8 ohm load to open
circuit (Damping factor 167).
OUTPUT CURRENT: 15 amps peak at protective shutdown.
SLEW RATE: 5 volts/microsecond. (20% maximum duty
cycle).
RISE TIME: 5.0 microseconds.
HUM & NOISE: 300 microvolts RMS (103dB below rated
output IHF A-weighted).
POWER SUPPLY CAPACITANCE: 160,000 uF total.
POWER REQUIREMENTS: 100-125VAC 60Hz (200250VAC 50Hz) 488 watts at rated output (225WPC
8 ohms), 758 watts at 360WPC 4 ohms, 35 watts idle,
Standby 1 watt.
DIMENSIONS: 19" (48 cm) W (standard rack panel) x
51/4" (13.3 cm) H x 141/4" (36.2 cm) D (front panel back).
Optional handles extend 11/2" (3.8 cm) forward of the
1/4 " thick front panel. Output connectors extend 0.9" behind rear panel.
WEIGHT: 34.9 lbs. (15.8 kg) Net; 41 lbs. (18.6 kg)
Shipping.
Specifications subject to change without notice.
© 2010 Audio Research Corporation.
5