1
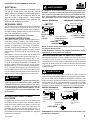
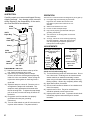
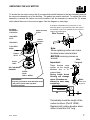
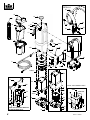
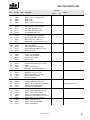
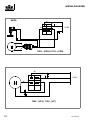
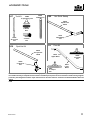
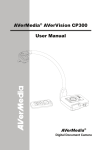
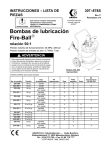
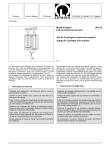
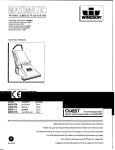
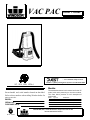
VAC PAC
Owner’s Guide
. . . for Continuous Improvement.
Windsor’s Quality Management System is Certified ISO 9001.
VP, VP-J, VPH, VPH-J
Models:
Record model and serial number located on data label.
Refer to these numbers when calling Windsor dealer for
parts or service.
MODEL :
SERIAL NO. :
PURCHASE DATE :
The assemblies shown in this manual are for the VP
model, with notes pertaining to the other models.
The chart below provides a brief description of
each model.
MODEL
Approvals
VP
C-UL
VP-J
VPH
VPH-J
DESCRIPTION
115V Vac Pac for use in North America
100V Vac Pac for use in Japan
C-UL
115V Vac Pac for use in Hospitals (HEPA)
100V Vac Pac for use in Hospitals (HEPA)
REV.
B
98179 12/9/97
INDUSTRIES, INC., 1351 W. Stanford Ave., Englewood CO 80110 USA
*303-762-1800*FAX 303-762-0817
IMPORTANT SAFETY INSTRUCTIONS
When using an electrical appliance, basic precaution must
always be followed, including the following:
READ ALL INSTRUCTIONS BEFORE USING THIS MACHINE.
This machine is for commercial use.
WARNING
To reduce the risk of fire, electric shock, or injury:
•
Do not operate without filters (dry or wet) in place.
•
Use only as described in this manual. Use only manufacturer’s recommended attachments.
•
Use indoors only. Do not use outdoors and do not expose to rain.
•
Machine can cause a fire when operating near flammable vapors or materials. Do not operate this
machine near flammable fluids, dust or vapors.
•
Do not pick up flammable fluids, dust or vapors.
•
Do not vacuum anything that is burning or smoking, such as cigarettes, matches, or hot ashes.
•
Do not handle the plug or machine with wet hands.
•
This machine is not suitable for picking up health endangering dust.
•
This machine is for dry use only.
•
Do not leave the machine unattended. Unplug machine from outlet when not in use and before servicing.
•
Do not unplug machine by pulling on cord. To unplug, grasp the plug, not the cord.
•
Do not use with damaged cord or plug. Follow all instructions in this manual concerning grounding the
machine.
•
If the machine is not working properly, has been dropped, damaged, left outdoors, or cropped into
water, return it to an Authorized service center.
•
Do not pull or carry by cord, use cord as a handle, close a door on cord, or pull cord around
sharp edges or corners.
•
Do not pull/run machine over cord. Keep cord away from heated surfaces.
•
Do not allow to be used as a toy. Close attention is necessary when used by or near children.
•
Do not operate machine with any openings blocked. Keep openings free of debris that may
reduce airflow.
•
Keep hair, loose clothing, fingers, and all parts of the body away from openings and moving
parts.
•
Use extra caution when cleaning on stairs
•
Connect to a properly grounded outlet. See Grounding Instructions.
•
Maintenance and repairs must be done by qualified personnel.
•
Rotating fan blades inside the cover. Before opening cover, switch off machine. Wait until the
fan/brush stops completely or dust and debris may be ejected.
SAVE THESE INSTRUCTIONS
2
98179 8/22/96
IMPORTANTES MESURES DE SÉCURITÉ
L’utilisation d’un appareil électrique demande certaines précautions:
LIRE TOUTES LES INSTRUCTIONS AVANT DE FAIRE
FONCTIONNER (CET APPAREIL)
AVERTISSEMENT
Pour réduire les risques d’incendie, de choc électrique ou de
blessure:
•
Cet appareil ne doit être connecter qu a des prises ayant une sortie de terre. Se reporter
aux instructions de mise à la terre.
•
Ne pas laisser l’appareil sans surveillance lorsqu’il est branché. Débrancher lorsque
l’appareil n’est pas utilisé et avant l’entretien.
•
Avertissement. Pour reduire les risques de choc electrique, ne pas utiliser à
l exterieur et ne pas aspirer de matières humides.
•
Ne pas permettre aux enfants de jouer avec l’appareil. Une attention particulière est
nécessaire lorsque l’appareil est utilisé par des enfants ou à proximité de ces derniers.
•
N’utiliser que conformément à cette notice avec les accessoires recommandés par le
fabricant.
•
Ne pas utiliser si le cordon ou la fiche est endommagé. Retourner l’appareil à un atelier de réparation
s’il ne fonctionne pas bien, s’il est tombé ou s’il a été endommagé, oublié à
l’extérieur ou immergé.
•
Ne pas tirer soulever ou traîner l’appareil par le cordon. Ne pas utiliser le cordon comme une poignée,
le coincer dans l’embrasure d’unée porte ou l’appuyer contre des arêtes vives ou des coins. Ne pas
faire rouler l’appareil sur le cordon. Garder le cordon à l’écart des surfaces chaudes.
•
Ne pas débrancher en tirant sur le cordon. Tirer plutôt la fiche.
•
Ne pas toucher la fiche ou l’appareil lorsque vos mains sont humides.
•
N’insérer aucun objet dans les ouvertures. Ne pas utiliser l’appareil lorsqu’une ouverture est bloquée.
S’assure que de la poussière, de la peluche, des cheveux ou d’autres
matières ne réduisent pas le débit d’air.
•
Maintenir les cheveux, les vêtements amples, les doigts et toutes les parties du corps à l’écart des
ouvertures et des pièces mobiles.
•
Ne pas aspirer de matiéres en combustion ou qui dégagent de la fumée, comme des
cigarettes, des allumettes ou des cendres chaudes.
•
Ne pas utiliser l’appareil si le sac à poussière ou le filtre n’est pas en place.
•
Mettre toutes les commandes à la position ARRÊT avant de débrancher l’appareil.
•
Usser de prudence lors du nettoyage des escaliers.
•
Ne pas aspirer des liquides inflammables ou combustibles, comme de l’essence, et ne pas faire fonctionner dans des endroits où peuvent se trouver de tels liquides.
•
Ventilateur sous ce couvèrcle. Arretèr la machine avant D’ouvtir le couvercle. Attendre
que le ventilateur ait fini de tourner.
•
Cette machine ne peut être utilisée que pour des applications séches.
•
Cette machine ne peut être utilisée pour aspirer des poussières dangereuses pour la santé
98179 8/22/96
CONSERVER CES INSTRUCTIONS
3
INSTRUCCIONES IMPORTANTES PARA
SU SEGURIDAD
Durante la utilzación de un dispositivo eléctrico hay que tener en cuenta una
serie de medidas básicas de precaución, que incluyen las siguientes
ADVERTENCIA
Para reducir el riesgo de incendios, descargas eléctricas
o lesiones:
•
Conecte la aspiradora solamente a tomas de corriente con puesta a tierra. Tenga en cuenta
las instrucciones.
•
No deje nunca el aparato conectado a la red. Después de su uso, y antes de cualquier revisión o
reparación, desconecte el aparato de la toma de corriente.
•
No usar nunca el aparato al aire libre, ni sobre superfivies húmedas.
•
No permita que se utilice el aparato como un juguete. Hay que prestar especial atencion al utilizarlo
en las cercanias de ninos.
•
Utilzar el aparato sólo como se describe en este manual. Emplear exclusivamente los accesorios
recomendados por el fabricante.
•
No poner en marcha el aparato con un cable eléctrico deteriorado. Si el aparato no funciona como
deberia, si se ha caido, danado, si ha permanecido al aire libre o si se ha caido al agua, dirijase a un
taller de servicio.
•
No tire del aparato ni lo transporte utilzando el cable eléctrico; no use el cable a modo de asa, ni cierre
una puerta con el cable pillado; no tienda el cable en torro a aristas vivas o esquinas. No pase con el
aparato por encima del cable. Mantenga el cable simpre lejos de superficies calientes.
•
No desconecte el enchufe de la red tirando del cable. Para desconectar el aparato hay que
tirar del enchufe, no del cable..
•
No maneje el enchufe ni el aparato con las manos húmedas..
•
No introduzca ningún objeto en las aberturas del aparato. No utilice el aparato mientras esta bloqueada
uns de las aberturas; evite la penetración de polvo, hilachas, pelos o cualquier objeto que pueda inhibir
la circulación del aire.
•
Mantenga su cabello, la ropa suelta, los dedos y todas las partes de su cuerpo alejadas de las aberturas
y piezas en movimiento.
•
No utilice el aspirador para recoger cuerpos en llamas o humeantes, tales como cigarrillos, cerillas o
cenizas calientes.
•
No utilizar nunca el aspirador sin la bolsa y/o los filtros colocados en su lugar previsto..
•
Desconecte todos los interruptores antes de desenchufar el aspirador..
•
La aspiradora no es adecuada para recoger agentes que dañen la salud.
•
Tenga especial cuidado al manejar la aspiradora en una escalera..
•
Solo use la aspiradora en superficies secas.
•
No utilice el aspirador para recoger liquidos inflamables o combustibles, tales como gasolina, ni maneje
el aspirador en zonas donde pueda haber liquidos de este tipo..
CONSERVE ESTAS INSTRUCCIONES A MANO
4
98179 8/22/96
THIS PRODUCT IS FOR COMMERCIAL USE ONLY.
ELECTRICAL:
In the USA this vacuum operates on a standard 15 amp
115 volt A.C. power circuit (120V nominal). Special
voltage models are available for international applications. The amp, hertz, and voltage are listed on the
data label found on each machine. Using voltages
above or below those indicated on the data label will
cause serious damage to the motors.
EXTENSION CORDS:
This wide area vacuum is designed to operate on a standard
15 amp, 115 volt, 60 hz, AC household current. Check that
the voltage shown on the serial number plate is suitable for
the supply available. Voltages below 105 volts or above 125
volts could cause damage to the motor.
NOTE: 230/250 volt 50 hz models are available.
GROUNDING INSTRUCTIONS:
This appliance must be grounded. If it should malfunction or
break down, grounding provides a path of least resistance
for electric current to reduce the risk of electric shock. This
appliance is equipped with a cord having an equipmentgrounding conductor and grounding plug. The plug must be
inserted into an appropriate outlet that is properly installed
and grounded in accordance with all local codes and ordinances.
This appliance is for use on a nominal 120-volt circuit, and
has a grounded plug that looks like the plug in “Fig. A”. A
temporary adaptor that looks like the adaptor in “Fig . C” may
be used to connect this plug to a 2-pole receptacle as shown
in “Fig. B”, if a properly grounded outlet is not available. The
temporary adaptor should be used only until a properly
grounded outlet (Fig. A) can be installed by a qualified electrician. The green colored rigid ear, lug, or the like extending
from the adaptor must be connected to a permanent ground
such as a properly grounded outlet box cover. Whenever the
adaptor is used, it must be held in place by a metal screw.
WARNING
Improper connection of the equipment-grounding conductor can result in a risk of electric shock. Check with
a qualified electrician or service person if you are in
doubt as to whether the outlet is properly grounded. Do
not modify the plug provided with the appliance - if it will
not fit the outlet, have a proper outlet installed by a qual-
AVERTISSEMENT
Un conducteur de terre mal raccordé peut entraîner un risque de choc
électrique. Consulter un électricien ou un technicien d’entretien qualifié si vous n’êtes pas certain que la prise est correctement mise à la
terre. Ne pas modifier la fiche fournie avec l’appareil - si elle ne peut
être insérée dans la prise, faire installer une prise adéquate par un
PROPER GROUNDING
GROUNDING CONNECTION
Grounding Pin
Prise de courant
avec mise a la terre
Metal Screw Fig. B
Vis metallique
Adaptor
Grounded
Outlet
Adaptateur Grounded Outlet Box
Broche de Fig. A
mise
a la terre
Screw
Tab For Grounding
Platte destinee a la
vise de terre
ADAPTOR
Adaptateur
Fig. C
NOTE: In Canada, the use of a temporary adaptor is not permitted by
the Canadian Electrical Code
NOTE: Au Canada, l’utilisation d’un adaptateur temporaire n’est pas
autorisée par le Code canadien de l’électricité.
INSTRUCCIONES PARA LA PUESTA A TIERRA
Este dispositivo tiene que ser puesto debidamente a tierra. Si se produce
una averiá o rotura, la conexíon a tierra constituye el camino de menor
resistencia para la corriente eléctrica, reduciéndose el riesgo de descargas
peligrosas. El aparato cuenta con un cable con conductor de puesta a tierra
y un enchufe con clavija de puesta a tierra de acuerdo con las normas y
ordenanzas locales.
ADVERTENCIA
Si se conecta de modo inadecuado el conductor de puesta a tierra del
aparato pueden producirse descargas eléctricas peligrosas para el usuario.
Én caso de dudas, pedir a un electricista debidamente cualificado o a ún
tecnico del servicio postventa que verifique que la toma de corriente esta
bien puesta a tierra. Si el enchufe suministrado con el aparato no se adapta
a la toma de corriente disponible, no hay que modificar el enchufe, sino
dirigirse a un electricista para que instale una toma corriene adecuada.
PROPER GROUNDING
GROUNDING CONNECTION
Clavija de puesta a tierra
Tornillo metálico
ified electrician.
INSTRUCTIONS VISANT LA MISE
À LA TERRE
Cet appareil doit être mis à la terre. En cas de défaillance ou
de panne éventuelles, la mise à la terre fournit au courant un
chemin de moindre résistance qui réduit le risque de choc
électrique. Cet appareil est pourvu d’un cordon muni d’un
conducteur de terre et d’une fiche avec broche de terre. La
fiche doit être brancheé dans une prise appropriée correctement installée et mise à la terre conformément aux règlements
et ordonnances municipaux.
98179 8/22/96
Boite de sortie
mise a la terre
Toma de
corriente
conectada a Fig. A
tierra
Fig. B
Adaptador
Apendice para
tornillo de
Apéndice para
tornillo de conexíon
a tierra
ADAPTADOR
Fig. C
ADVERTENCIA: en Canada, la Canadian Electrical Code prohibe el uso
de adaptadores temporáles.
5
INSPECTION:
OPERATION:
Carefully unpack your vacuum and inspect it for any
shipping damage. Any damage which occurred
during shipping is the responsibility of the carrier,
who must be notified immediately.
The Vac Pac is a commercial vacuum designed only for dry pick-up.
1.) Put a paper bag and a cloth bag or just thecloth
bag into the vac chamber. Be sure the round
foam filter is in place in the bottom of the vac
chamber.
2.) Attach the accessories to be used.
3.) Put unit on back and adjust straps.
4.) Plug unit into properly grounded wall outlet (see
grounding instructions).
5.) Turn machine on or off using switch on lower left
side of machine.
6.) To empty, remove the cover and dump paper bag
into trash receptacle. Shake cloth bag vigorously
each time paper bag is emptied to prevent soil
build-up which would clog filter.
39405
Hose
27622
Cover
14872
Paper Bag
14803
Cloth Bag
Clamp
ADJUSTMENTS
The straps are easily adjusted while the unit is
being worn.
34203
Vac Intake
ON
14805
Harness
OF
Vac Switch
On - Off
To
loosen
lift up
on tab.
To tighten
pull on
strap
Torso length
adjustment:
Harness
mounting
bracket
Loosen screws,
slide to next
position.
EQUIPMENT SET-UP:
1.) Slide the hose onto the fixture at the top of the
unit. Attach accessories to be used.
2.) Open the top by releasing the two clamps.
Check to be sure the cloth bag with a paper bag
inside it is in the vac chamber. When closing the
top be sure rubber gasket on cloth bag forms a
good seal.
3.) Adjust the straps to a loose fit. Place the unit on
and tighten the straps until comfortable. The
straps are easily tightened and loosened while
the unit is being worn. To tighten the strap simply
pull on the end; to loosen the strap, lift the tab on
the buckle.
4.) Plug power cord from machine into properly
grounded wall outlet (see grounding
instructions).
5.) Turn vac motor switch on and off to be sure there
is power at the machine. The power switch is
6
DAILY MAINTENANCE
(At the end of each working day)
1.) Turn cloth filter bag inside out and brush clean. Do not
use a wire brush. Cloth bags can be vacuumed with
another machine or washed occasionally in warm
water using a mild water based soap without harming
filtering capacity. Allow to dry completely before using.
2.) Wipe down exterior of machine.
3.) Check round foam filter at bottom of vac chamber and
clean if necessary.
4.) Inspect hose for wear. Frayed or cracked hoses
should be replaced to avoid vacuum loss.
5.) Inspect power cord for wear. To prevent electric shock
immediately replace cords with frayed or cracked
insulation.
notes:
98179 8/22/96
SERVICING THE VAC MOTOR
To access the vac motor remove the (4) screws which attach the base to the tank assembly and pull
the vac motor assembly out of the housing. The gasket can now be serviced. To replace the motor
assembly or service the carbon vac motor brushes it will be necessary to remove the (2) screws
which attach the motor to the motor support. See the diagram on next page.
Vac Motor
Assemblies:
115V 53738
Motor End Cap
27538
100V HEPA
53777
If armature commutator is not concentric, or it is
extremely pitted, or grooved the motor will need to
be replaced or sent to a qualified service center to
restore vac performance.
Wire Terminal
Carbon
Brushes
14045
100V 53575
115V HEPA
53576
Note:
When replacing carbon vac motor
brushes loosen wire terminal
BEFORE removing screws on
bracket.
Wire
Gasket
35118
Screen
73461
Terminal
Important:
SELF ADHESIVE
BACKING
Gasket
35123
(35011 - HEPA)
WARNING:
The green ground wire must attach the motor
to the power cord for safe operation.
See wiring diagram.
These brushes wear
quicker as the length
shortens due to increased heat.
Spring inside brush
housing will damage
motor if brushes are
allowed to wear away
completely.
(actual size)
2
Note:
Place stop
in groove.
3
8
Periodically check the length of the
carbon brushes, (Part # 14045).
Replace both carbon brushes when
either is less than 3/8” long.
98179 8/22/96
7
DETAIL A
25
19
16
20
14
26
21
31
18
11
23
22
13
12
SEE DETAIL
17
29a,b
39
35
10a
21
30
26
2
8
37
38
27
1b
6abcd
5b*
7*
5a
10b*
*NOTE: HEPA MODELS ONLY
2*
26*
5b*
9*
28ab
4c*
2
4abc
Model/S.N.
Label
32*
3b*
3a
15
36*
33*
NOTE: PLACE GROUND WIRES ON
SCREW BETWEEN NUTS.
8
24
1a
34
24*
1b*
98179 12/9/97
VAC PAC PARTS LIST
Ref
Part No.
1
2
3A
3B
4A
70021
70092
08049
08046
70361
4B
4C
5A
5B
6A
6B
6C
6D
7
8
9
10A
10B
11
12
13
14
15
16
17
18
19
20
21
22
23
24
25
26
27
28
28B
29A
29B
30
31
32
33
34
35
36
37
38
39
70114
70383
71107
71115
53738
53575
53576
53577
88657
23511
57104
57208
57176
75173
57049
48062
70056
50535
34203
14803
14804
27622
39405
57030
14854
70162
87095
14805
70160
62372
50571
50650
72076
72145
27376
87014
34233
50639
50656
73735
99812
67005
62395
50776
Qty
Serial No.
Description
From
To
Notes:
SCR, 10-32 X 2 FHMS
SCR, 10-32 X 1.5 PHMS (VPH’S_
BASE, VP’S
BASE, VPH’S
SCR, 10-32 X 1/2 PHTR PLTD
SCR, #10 X 3/4 POLYFAST (VPJ)
SCR, 10-32 X 3/4 PHTR PLT DL
SUPPORT, MOTOR (VP’S)
SUPPORT, MOTOR (VPH’S)
VAC MOTOR ASM, 115V
VAC MOTOR ASM, 100V
VAC MOTOR ASM, 115V HEPA
VAC MOTOR ASM., 100V HEPA
WIRE ASM, 18/3 - VPH 115V
CORD ASM, 115V 18/3 X 40’ SJT (VP,J,H)
NUT, 10-32 W/ STAR WASHER (VPH)
NUT, PG11 METAL
NUT, NYLON 3/8-18 NPT (VPH)
TANK, MAIN HOUSING 115V-100V
NUT, 6-32 LOCK
LATCH & KEEPER
SCR, 6-32 X 1/2 PHMS
LABEL, VAC PAC MAIN
FILTER, VAC INTAKE
BAG, CLOTH
BAG, PAPER
COVER, ROTOMOLD (VP’S ,VPH’S)
HOSE
NUT, 10-32 NYLOCK
BRACKET, SHOULDER STRAPS
SCR, 10-32 X 3/8 PHMS
WASHER, #10 FLAT PLTD
SHOULDER STRAP, VAC PAC
SCR, 10-32 X 5/8 PHMS
PLATE, HARNESS
LABEL, WARNING - VP ONLY
LABEL, WARNING - VPH ONLY
SWITCH, DPST 250V 16(6) A ROCKER
SWITCH, 125V DPST (VPH’S)
CLIP, SWITCH RETAINING
WASHER, #8 INT. STAR
FILTER, HEPA W/GASKET (VPH’S)
LABEL, HEPA (VPH’S ONLY)
LABEL, C-UL LISTING (VP, VPH’S)
SPACER, 1” OD X .234 ID X 1” LG. NYL
FOAM TAPE, 1/4T X 1/2 (VPH’S)
RIVET, 1/8 OD WHITE AL
PLATE, DATA PLATE LABEL
LABEL, FOR SAFETY
98179 12/9/97
(ALL EXCEPT VPH’S)
9
WIRING DIAGRAMS
HEPA
W
W
CORD
100V - (VPHJ) 115V - (VPH)
W
W
1
4
2
5
3
6
CORD
100V - (VPJ), 115V - (VP)
10
98179 8/22/96
ACCESORY TOOLS
VPT
Tool Kit
02084
5” Upholstery Tool
02086
19”Extension
VQS
Vac Quick Sweep
89079
Spotter Tool
Wand
02085
5” Brush
Asm
02293
28” Crevice
Tool
VPS
78277
Quick Sweep
Tool
02083
3” Brush
Tool
VPF
Spot-Lite Kit
89079
42” Spot-Lite
Wand
Floor Kit
89071
Upper Wand
78263
6” Spot-Lite
Tool
78067
17” Carpet
Tool
78066
16” Bristle
Tool
89077
Lower
Wand
NOTE: Maintenance and repairs must be done by qualified personnel. Using non-Windsor parts to repair this machine
will void the warranty. A complete service manual is available upon request. The service manual includes a wiring diagram,
parts lists, parts diagrams and basic repair instructions for the entire machine. Contact an authorized Windsor dealer for
details.
notes
98179 4/24/97
11