1
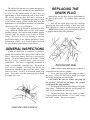
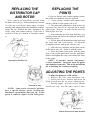
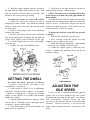
HOW - TO ENGINE TUNE-UP BASICS Tool And Material Checklist Service Manual Battery Clamp Cleaning Tool Masking Tape Spark Plug Socket and Ratchet Wire Spark Plug Gauge Dwell Meter Oil and Oil Filter Power Timing Light Rags Knife Screwdrivers Allen Wrench Feeler Gauge Safety Glasses or Goggles * This How-To Guide is designed as a general overview of a vehicle repair procedure. You should always refer to a service manual designed for your vehicle for detailed instructions. incorrect procedure. Parts Plus assumes no liability for an The object of a tune-up is to restore the engine to the performance levels intended by the manufacturer. It calls for the replacement of parts that are approaching or have reached the end of their useful life, and for servicing those that can be restored to “new part” reliability. Adjustments must also be made to the various engine systems so that they meet the manufacturer’s specifications and thus can contribute effectively to the car’s performance. A complete tune-up should be performed at least every 10,000 to 12,000 miles on cars with contact ignition systems. On vehicles with lectronic ignition systems, tune the engine ever 15,000 to 20,000 miles. Refer to a service manual, a tune-up specification book, or the Vehicle Emissions Control Information (VECI) decal located under the hood for specifications pertaining to your vehicle. REPLACING THE SPARK PLUG Spark plugs are the most critical replacement of the tune-up procedure. To remove them, proceed as follows: 1. Pull off the spark plug wires by carefully grasping the boot and twisting it back and forth. Work one plug at a time to avoid mixing up the wires NOTE: Protect your eyes by wearing safety glasses or goggles when doing this procedure. GENERAL INSPECTIONS A tune-up should be as complete as possible. Change the oil and oil filter, the air filter, and the fuel filter. Check the battery fluid level and specific gravity. Clean the battery posts and clamps. Check the PCV valve, vacuum hoses, and electrical connections. The latter is especially important in today’s electronically controlled cars. Diagrams in your service manual will help you locate the 2. Label each plug with masking tape so that it is components and their connectors and fuses. Also check for loose, cracked, or hardened spark plug reinstalled on the correct cylinder. 3. Use a spark plug socket and ratchet to remove wires. Every three years the spark plug wires should the plugs. If they are difficult to reach, you might be replaced as a set. also need extensions and universals. CAUTION: Be sure to center the plug in the socket. If held at an angle, the socket could break the plug insulator. 4. Set the gap on the new plugs using a wire spark plug gauge. Consult the tune-up specifications for your car to determine the correct gap. 5. Thread the plugs into the holes by hand. Finger tighten them another 1/8 of a turn, using the socket wrench. Do not over tighten. REPLACING THE DISTRIBUTOR CAP AND ROTOR Next, remove the distributor cap and clean the inside with a dry rag. If the terminals are corroded or if the cap is cracked or shows signs of carbon tracking (lines running from one terminal to another), replace the cap. Remove the rotor. Examine it for cracks, chips, and carbon tracking. If the rotor is cracked or if the tip is burned or corroded, replace it. REPLACING THE POINTS If your car has the older contact ignition system, the points and condenser must be replaced: 1. If your car has a window radio antenna, there will be a shield over the points; pull it off. 2. The points and condenser are held in place by set screws; two wires fit in a clip and can be simply pulled loose. However, on some cars the wires are held in place by a nut. 3. After removing the wires from the points, very carefully loosen and remove the condenser and point’s hold-down screws. 4. Lift the parts off the distributor plate and clean the plate and cam with solvent. If lubricant is supplied with the tune-up kit, coat the cam. 5. Place the new condenser on the plate exactly as the old on came off. Secure it with the screws. 6. Place the points on the plate, with the guide hole on the points positioned over the guidepost. Replace and tighten the screws and connect the wires to the points. NOTE: If possible, install “uni-points” or their equivalent. Uni-points house the points and condenser in one unit. This avoids the difficult job of installing the condenser separately. ADJUSTING THE POINTS To adjust the points on a GM vehicle: 1. Replace the rotor and distributor cap. 2. Locate the access window and insert an Allen wrench into the set screw adjusting nut. 3. Start the engine. If it fails to start, turn the wrench one way, then the other until it fires. NOTE: Some newer electronic ignitions have a special silicone grease covering the distributor cap terminals and rotor tip. If this grease is removed, replace it with fresh grease. 4. With the engine running, turn the wrench to 5. Dwell that is too high means the points are the right until the engine starts to miss or dies. Then staying closed too long – widen the gap. NOTE: The easiest way to remember this is that turn the wrench a half turn back to the left. This should be the correct point gap setting. if the dwell is too small, the point gaps should be made smaller. To set the dwell on a GM car, simply insert an Allen To adjust the points on a non-GM vehicle: 1. Rotate the engine by turning the fan or wrench into the adjusting nut and turn it until the bumping the starter switch. Stop when the rubbing dwell is correct. If the dwell is high, turn the nut block is on the peak of the cam lobe and the points clockwise to open the points. If the dwell is low, go counterclockwise to close the points. are fully open. 2. Insert a feeler gauge of the correct thickness To adjust the dwell on a non-GM car, proceed between the points. 3. Insert a screw driver into the special adjusting as follows: 1. Remove the distributor cap and rotor. slots on the points plate and adjust the gap until the 2. Have a helper crank the engine just long gauge drags lightly when inserted in the gap. 4. Carefully tighten the set screw and double- enough to get a reading on the meter. 3. Make the point gap adjustment – high reading check the gap. a wider gap; low reading, a narrower gap. 5. Replace the rotor and distributor cap. 4. Crank the engine again to check the new setting. Continue this procedure until you get an accurate reading. SETTING THE DWELL To check the dwell, proceed as follows: 1. Install a dwell meter according to the manufacturer’s instruction. 2. Set the meter to “dwell” if it is a combination tach/dwell. Flip the switch to either 6- or 8-cylinder – whichever is appropriate. If testing a 4-cylinder engine, set the selector on 8-cylinder and mentally double the reading. 3. Start the engine and allow it to warm up. Make sure the idle is reasonably close to the proper speed to ensure a correct dwell reading. 4. If the dwell angle is not to specifications, the points must be readjusted. ADJUSTING THE IDLE SPEED If your car has a computer-controlled ignition system, refer to a service manual or the VECI decal for instructions on setting the idle speed. On vehicles with conventional systems, locate the idle set screw at the throttle linkage or anti-dieseling solenoid. Turned clockwise, it increased idle speed; turned counterclockwise, it decreases idle speed. Here are some points to remember when adjusting idle speed: 1. Be sure the engine is fully warm and off the fast idle cam when adjusting the curb idle. 2. If the isle is set with the air cleaner off, doublecheck it with the cleaner unit in place. 3. Never try to smooth out the idle by turning up the speed; a higher idle just wastes gas and contributes to dieseling. ADJUSTING THE IGNITION TIMING You’re now ready to make the final and most important adjustment: the ignition timing. 1. Hook up a power timing light. Attach the red lead to the positive battery terminal and the black lead to the negative terminal. 2. A third lead has a special connector that attaches to the number one cylinder plug wire. (The service manual will show the location of the number one cylinder pickup at the distributor cap.) 3. Consult the service manual for the location of the timing marks. Rotate the engine by hand or tap the ignition switch until the marks are visible. 4. Clean the dirt off the timing marks with solvent to see them better. 5. Very carefully make a neat line with white chalk or white enamel paint over the correct timing mark. This will help you see the mark when the engine is running. 6. Start the engine and let it warm. The engine must be fully warmed and idling at the proper speed to set the timing. 7. While the engine warms, check the service manual or the VECI decal to see if there are any special timing procedures. Most engines with contact ignition systems must be timed with the vacuum advance line removed at the distributor and plugged. The best way to do this is by attaching a vacuum gauge in the end of the line. 8. Aim the light carefully at the timing marks; not aiming the light properly is one of the primary causes of timing error. Keep the light at about a 45° angle and sight directly down the light. CAUTION: Stay away from the cooling fan blades at all times. 9. The light flashes when the number one cylinder fires and makes the timing marks appear to stand still. The specified mark and timing pointer will align on each flash if the engine is in time. 10. If they don’t line up, you will have to adjust the timing by rotating the distributor. To do this, first loosen the clamp bolt that holds the distributor in place. On most older engines that bolt is easy to get to; however, on many newer engines the bolt is located behind the distributor. You might need a special distributor wrench or swivel attachment on a ratchet extension to get to the bolt. 11. To adjust the timing, rotate the distributor slowly until the timing mark and pointer align. Then carefully lock down the clamp bolt and double-check to be sure the setting did not change when the distributor was tightened.