1
from the
TECH FILES
of Liberty Parts Team...
Maintenance Resets in HP LaserJets
Laser printers are remarkably durable. With proper care and maintenance,
most of them will continue to work for many years. But there are parts that
require periodic replacement. Most obvious of these is the toner cartridge, but
this is considered a consumable item (like paper) rather than a part, and it is
usually replaced by the end user. Parts that need to be replaced by a technician
are considered maintenance items, and these are usually conveniently packaged by the printer manufacturer, or by printer service companies like Liberty
Parts Team, as a maintenance kit. Typically, kits include the fuser, transfer
roller, and the major paper-moving rollers.
In most printers, maintenance items are rated to last for a certain number
of printed pages, after which replacement is recommended. This maintenance
interval differs from one printer model to the next. For any given printer, you
can usually find the nominal maintenance interval listed in the service manual.
However, for early models like the HP LaserJet Series II and III, or low-level
models without LED/LCD displays, like the 5L and 6L, the service manual
is the only place you will find this information. On these models, it is up to
the end user or technician to keep track of page counts and usage, and determine when it is time for a maintenance kit, because the printer will give no
indication.
On later printer models, the maintenance interval is programmed into the
printer, and when it has printed the rated number of pages, a message will appear on the display informing you that maintenance is required. In a few rare
cases, the printer will automatically reset itself when the maintenance item is
replaced, but most of the time, you will have to perform a procedure to reset
the maintenance count and clear the message. Specific procedures vary on different printer models, and remembering them all is difficult. In fact, one of the
most common tech support calls is “How do I reset the maintenance count on
my printer?” This article will attempt to answer that question as comprehensively as possible, with specific procedures for most common models of HP
laser printers.
HP: Early Monochrome Printers
IIISi/4Si/5Si: Of the first generation of HP monochrome laser printers
(those with Roman numeral or single-digit model numbers), these are the only
ones that had maintenance counts or maintenance resets. In the ideal case,
where you wait until the printer’s display indicates “Perform User Maintenance,” the reset procedure is simple, and identical for all three printer models:
go into the Configuration Menu, find the item “Service Message = On*,” use
the “+” key to change it to “Off,” and then press “Enter” or “Select” to put an
asterisk after it. This turns the message off and resets the maintenance count.
However, if the maintenance kit is installed early (before the “User Maintenance” message appears), there will be nothing in the Configuration Menu to
turn off. You will have to go into service mode (see sidebar), and then into the
service menu, and directly manipulate the maintenance count. Do not confuse
this with the page count. In most cases (there is one exception, which will
be discussed below), it is neither necessary nor desirable to change the page
count. Change the maintenance count only. Details vary, depending on the
printer model:
IIISi: This is the simplest of the three – just set the maintenance count to
zero (using the “+/-” key), press “Enter” to save the setting, and then press “On
Line” or “Continue” to exit service mode.
4Si: This is the most complicated of the three. To avoid confusion, we will
simply give the procedure without attempting to explain the reasoning behind
it. First, print a self test from service mode. This will be similar to the regular
self test, except that it will show the service menu in addition to the other
menus. In the service menu, you will see two counts: “Pages” (the printer’s total
page count) and “Maint” (the maintenance count). “Maint” will always be higher than “Pages” (except in one case – see Note below). Subtract “Pages” from
“Maint” and note the result. Now go into the service menu and find “Maint.”
Note that this is not the same “Maint” count that appeared on the self test
print – in fact, in this menu it will always show as zero. Using the “+/-” key,
adjust it to be equal to or greater than the result of the subtraction performed
earlier. Press “Enter” to save this adjustment, and then “On Line” or “Continue”
to exit service mode. Now print a regular self test (or any other kind of print
job). Immediately after it prints, the “User Maintenance” message should appear on the display. Now you can use the normal procedure (described earlier)
to turn off the message and reset the count.
Note: On some older 4Si printers with page counts of 1.3 million or greater, these procedures will not work – even after you turn off the message in the
Configuration Menu, it will return as soon as you print anything. Again, we
will not attempt to explain this – we will simply give the solution, which is to
go into service mode and reduce the page count to something well below 1.3
million (this is the one exception to the advice given earlier about not changing page counts). Once you have done that, print the service mode self test
as described above. In this case only, “Maint” may or may not be higher than
“Pages.” If “Pages” is higher, just go into the Configuration Menu and turn off
the message as described earlier. If “Maint” is higher, follow the procedure in
the previous paragraph – note that you may have to do it more than once if the
difference between “Maint” and “Pages” is greater than 200,000.
5Si: This is similar to the IIISi, but with one additional step. Set the maintenance count to zero (be sure to “Select” each digit), then adjust it to be equal
to or greater than the result of the subtraction performed earlier. Press
“Enter” to save this adjustment, and then “On Line” or “Continue” to exit
service mode. Now print a regular self test (or any other kind of print
job). Immediately after it prints, the “User Maintenance” message should
appear on the display. Now you can use the normal procedure (described
earlier) to turn off the message and reset the count.
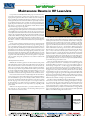
Some Early HP
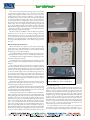
LaserJet Control
Panels Left: 4Si.
Right: 5Si
from the
TECH FILES
of Liberty Parts Team...
Note: On some older 4Si printers with page counts of 1.3 million
or greater, these procedures will not work – even after you turn off the
message in the Configuration Menu, it will return as soon as you print
anything. Again, we will not attempt to explain this – we will simply give
the solution, which is to go into service mode and reduce the page count
to something well below 1.3 million (this is the one exception to the advice given earlier about not changing page counts). Once you have done
that, print the service mode self test as described above. In this case only,
“Maint” may or may not be higher than “Pages.” If “Pages” is higher, just
go into the Configuration Menu and turn off the message as described
earlier. If “Maint” is higher, follow the procedure in the previous paragraph
– note that you may have to do it more than once if the difference between
“Maint” and “Pages” is greater than 200,000.
5Si: This is similar to the IIISi, but with one additional step. Set the
maintenance count to zero (be sure to “Select” each digit), then press
“Menus” followed by “On Line” to exit service mode. Now print a self
test (or any other kind of print job). Immediately after it prints, the “User
Maintenance” message should appear on the display. Now you can use the
normal procedure (described earlier) to turn off the message and reset
the count.
HP: Later Monochrome Printers
All HP monochrome laser printers since the 5Si have had 4-digit
model numbers (e.g., 2100, 4000, 8150, etc.). These printers have three
general types of control panels, each with its own characteristic methods
of performing resets and other procedures:
(1) No LED/LCD display, just buttons and lights (none of these models have maintenance counts or resets, so we will not discuss them here);
(2) LCD display with several lights and buttons, including a green “Go”
key and an orange “Job Cancel” key;
(3) LCD display with several lights and buttons, including a green key
with a “√” symbol on it (we will call this the “Select” key, since that is its
function).
Many of these printers have a service message or maintenance message
that can be turned off in the menus, but this is not a reliable procedure on
any printer after the 5Si. It usually does not reset the maintenance count,
and only turns the message off temporarily. This can be useful if you do
not have a kit handy and just want to turn off the message until you can
get one, but if you are installing a kit and want to do a full reset, do not
use this method. There are better ways, which will be discussed below.
Whichever method you use, we recommend that you print a configuration page and check the “Pages Since Last Maintenance.” If the reset was
successful, this should go to zero.
We will discuss the simple methods first, the ones that do not involve
going into service mode. There are two basic methods, corresponding to
control panel types (2) and (3) as described above:
Control panel type (2): Start with the printer powered off. Press and
hold the left ("-") side of both the “Item” and “Value” keys while powering
on, until the display reads “Reset Maintenance Count” (on some models,
it will just read “Count”), then release the keys.
Control panel type (3): There are two different ways to start this procedure, depending on printer model: (a) Press and hold the “Select” key
while powering on (this tends to be used on older models like the 4200
and 4300); or (b) Power on first, watch the display, and when it starts
the memory count, then press and hold the “Select” key (this tends to be
used on newer models like the 4250 and 4350). If in doubt, try it both
ways – one or the other will work on any monochrome printer with this
type of control panel. In either case, continue holding the “Select” key until all control panel lights blink once and then come back on and stay on
(this should take about 10 seconds), and then release the key. The display
should come up reading “Select Language.” Now use the up or down arrow key to scroll the display until it reads “New Maintenance Kit,” and
Control Panel Types. Top: LaserJet 2100, Type 1.
Middle: CLJ 4500, Type 2. Bottom: LJ 4200, Type 3.
then press the “Select” key.
In theory, these procedures should both clear the maintenance message (if it has appeared on the display) and reset the maintenance count
(whether or not the message has appeared yet). However, we have seen
cases where these procedures do not work, especially when done prematurely (before the maintenance message appears). If in doubt, print the
configuration page and check “Pages Since Last Maintenance.” If this has
not gone to zero, you will have to go into service mode (see sidebar) and
directly reset the maintenance count. Note that some printers will show
both “Maintenance Count” and “Maintenance Interval.” In general, you do
not want to change the maintenance interval, and you should definitely
never set it to zero – in some cases, this can cause a permanent 49 error
and necessitate replacement of the formatter board.
To set the maintenance count to zero, note that on most printers the
count will appear with a cursor under one digit. Use the “Value” (“+/-”) or
arrow keys to change the underlined digit to zero, then “Enter” or “Select”
from the
TECH FILES
of Liberty Parts Team...
to set that digit and move to the next one. Make sure
to select each digit (even the ones that are already zero)
– some printers will not actually reset the count until
each digit has been selected. If performed correctly, this
procedure always works – it will either reset the count
directly, or it will force the maintenance message to appear, in which case you can use the simpler methods
described earlier.
HP: Color Printers
Color printers are inherently more complex than
monochrome printers, and thus have more items that
require regular replacement – and different maintenance intervals for the different items. So they generally have multiple kits and resets. On the original
Color LaserJet and Color LaserJet 5, most of the maintenance items had “first-time-use” fuses, so that the
printer would recognize new items and automatically
reset the counters. On newer models, only toner cartridges and drums work this way (although the fuses
have given way to memory chips, and you often have
to cycle the power before the printer will read the chip
and recognize the new cartridge or drum). For other
maintenance items (typically a fuser kit and a transfer
kit), you will have to do something to reset the maintenance count(s).
As with the monochrome printers, in most cases
there is a simple way. Details vary on different printer
models, but we can split the procedures into two groups
based on control panel type, just as we did earlier for
monochrome printers – in fact, the control panels are
the same types as described earlier:
Control panel type (2): These printers have only
one level of menus, and you can scroll through them
by repeatedly pressing either side of the “Menu” key.
Look for the “Resets” menu, and then use the “Item”
key to scroll through this menu. Ideally, you should
find fuser and transfer resets, and all you need to do is
select the appropriate one. However, on some printers,
the reset(s) will not show in the menu if you install
the kit(s) early (i.e., before the maintenance message
appears on the display). In this case, you will have to go
into service mode.
Control panel type (3): Most of these printers have
hierarchical menus – i.e., the menus are arranged in a
multi-level tree structure, so finding the resets is a bit
trickier. The best way to navigate the menus is to go
into the Information Menu (this is always at the top
level) and print a menu map, which will show you the
entire tree. But in most cases, you can find the resets by
selecting “Configure Device” at the top level of the tree.
Under that, go to “Resets”, and then “Reset Supplies.”
Again, there will be separate resets for fuser and transfer kits. Just choose the appropriate one.
If the reset as described above does not take, or if
you can not find it in the menus, you still have the option of going into service mode (see sidebar) and directly setting the count(s) to zero, just as in the monochrome models. The only difference is that there will
be separate counts for fuser and transfer kits, and in a
few cases, the count will appear as “remaining life” – in
this case, set it to 100 (for 100%) rather than zero. If it
is expressed as a count, set it to zero.
—Dennis Kosterman
LPT Tech Support Manager
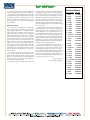
HP Service PIN Codes
Printer Model
PIN Code
LJ 2300
11230002
LJ 2410
10241004
LJ 2420
10242004
LJ 2430
10243004
CLJ 3000
11300005
CLJ 3500
10350003
CLJ 3550
10350003
CLJ 3600
11360005
CLJ 3700
10370003
CLJ 3800
11380005
LJ 4100 MFP
04410002
LJ 4101 MFP
04410002
LJ 4200
11420002
LJ 4240
04424005
LJ 4250
09425004
LJ 4300
11430002
LJ 4345 MFP
11434504
LJ 4350
09435004
CLJ 4600
04460002
CLJ 4610
05465004
CLJ 4650
05465004
CLJ 4700
09470005
CLJ 4730 MFP 09473005
LJ 5200
05520006
CLJ 5500
04550002
CLJ 5550
09555004
LJ 9000
00900001
LJ 9000 MFP
00900001
LJ 9050
09905004
CLJ 9500
04950003