1
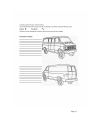
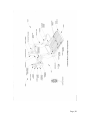
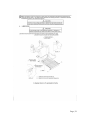
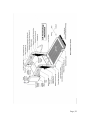
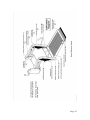
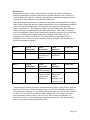
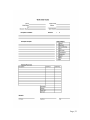
Florida Department of Transportation
Preventative Maintenance Standards
MANUAL
Third Edition
the Marketing Institute
Preventative Maintenance Standards
Manual
Sponsored by
The Florida Department of Transportation
Public Transit Office
(850) 414-4500
(revised 11/01/11)
Written by
The Preventative Maintenance Planning, Training and Technical Assistance
Program
The Marketing Institute
College of Business
Florida State University
(850) 644-2509
www.prmpt.org
For questions regarding maintenance standards,
please contact:
Laurie Revell, Program Coordinator
(850) 644-6956
[email protected]
Julie Eck, Maintenance Review Specialist
(850) 644-6954
[email protected]
Steve Stopiak, Maintenance Technical Consultant
(863) 602-8515
[email protected]
Fleet Management
Managing a fleet of vehicles that are funded by the Florida Department of Transportation
requires following a set of minimum requirements established by Chapter 14-90 of the
Florida Administrative Code. These standards are created to ensure maximum vehicle
life and passenger safety through regularly scheduled preventive maintenance. The
Preventive Maintenance Standards Manual is a description of the minimum requirements
regarding preventive maintenance inspections and includes basic maintenance oversight
practices.
Pre-trip/Post-trip Daily Inspections
Vehicles should be inspected each day before they enter into service. Chapter 14-90
states that the following components must be checked during this inspection:
1. Service Brakes –
From the driver’s seat pump the brake pedal three or four times, and then hold
constant downward pressure on pedal for at least five seconds. The brake pedal
should hold firm and not drift down.
If equipped with a hydraulic brake reserve system, with the key off, depress the
brake pedal and listen for the sound of the reserve system electric motor.
If equipped with hydro boost system or vacuum assist system, with the key off,
pump the brake at least five times and depress the brake pedal. It should feel
firm. Remain holding the pedal and start the engine. The pedal should move
slightly to the floor and then rise.
Check that the warning buzzer or light is off.
2.
Parking Brakes –
Apply the parking brake and shift vehicle into low gear slightly pulling against
the brakes. Vehicle should not move.
3.
Tires and Wheels –
The minimum tire tread depth on steering axle is 4/32 inch in every major
groove. No re-caps are allowed on the steering axle.
The minimum tread depth on all other tires is 2/32 inch in every major groove.
Check all tires for uneven tread wear and cuts or damage to tread and sidewalls.
Check for tire inflation by hitting the tires with a mallet or similar device to
check for flats. To check for exact tire inflation a tire air gauge must be used.
Check rims for bends, damage, or welds. Rims must not have any welding
repairs.
Check valve stems for damage and for missing valve caps.
Check that the wheels and hubs are free of oil or grease. Oil or grease present
could indicate a leaking hub or axle seal.
Check that all lug nuts are present. Check for signs of rust streaks or shiny
threads that could indicate loose lug nuts.
4. Steering –
With the engine running turn the wheel back and forth. Steering play should not
exceed 2 inches (on a 20 inch wheel) until the front wheels barely move.
5. Horn –
Check that the horn works properly.
6.
Lighting devices –
Turn on exterior lights. Turn on 4-way Flashers. Perform a complete walk
around of the exterior of the vehicle and check all lights for proper operation
and lens for cleanliness.
Turn off 4-way flashers and turn on left turn signal and check left signal lights for
operation.
Turn on right turn signal and check right signal lights for operation.
Turn on hi-beam head lights and check for operation.
Checking brake lights and back-up lights may require assistance. With someone
in the driver’s seat instruct them to step on the brake pedal while observing the
operation of the brake lights. At this time have the assistance place the vehicle
in reverse. Check back-up light operation and back-up alarm if equipped.
Turn on all interior lights and check for operation.
7. Windshield wipers –
Check that the wipers operate smoothly and the arms and blades are secure.
Check that the windshield washer works correctly.
Windshield should be clean with no obstructions or damage to glass.
8.
Rear vision mirrors –
Mirrors should be secure with no mirror bracket damage. Check for proper
adjustment. Check mirror glass for cleanliness or fading.
9.
Passenger doors –
Check doors for damage and that they operate smoothly. Hinges should be
secure with seals intact.
Check door entry area for debris and any loose or extensively worn flooring.
10. Exhaust system –
Check tailpipe for placement and secure mounting.
Start engine and listen for exhaust leaks and check for exhaust fumes in areas
other than the tailpipe end.
11. Equipment for transporting wheelchairs –
Check wheelchair lift doors for operation and damage.
Cycle lift from stow position to floor level and check outboard roll stop barrier
for proper latching.
Page | 2
Cycle lift to ground level and check for any leaking, damaged, missing parts, and
for smooth operation.
Raise lift from ground level. With platform slightly off ground make sure
outboard roll stop barrier raises and it is latched securely. This must be
performed by visually inspecting the latching mechanism to ensure it is in the
correct locked position and by physically attempting to pull/push barrier down
with an adequate amount of force to make certain the barrier is securely
latched.
Continue to raise lift to floor level and check for any unusual noises or abnormal
operation.
Check all warning lights and audible signals for proper operation. Due to varying
lift configurations refer to your lifts Owner’s Manual for a list of warning lights
and audible alarms to ensure all of these safety warning devices are working
properly.
Stow lift.
With lift door in the open position check shift interlock by trying to shift vehicle
into gear. Bus should not shift out of park.
Inspect retractors for damaged webbing and proper locking.
Inspect shoulder belts.
Inspect foldaway seats for operation.
Inspect floor anchors.
12. Safety, security and emergency equipmentInspect for three red reflective triangles.
Check for properly charged and rated fire extinguisher.
Check two-way communication equipment.
13. Additional items Your agency may require additional items to be checked during the pretrip/post-trip inspection, such as fluid checks, engine, hoses and belts under the
hood. Check additional items as necessary using procedures set forth by your
agency.
A Pre-trip/Post-trip Inspection checklist should be completed with each component
either marked “Ok” or with a defect noted. These checklists should be reviewed by a
manager prior to the vehicle entering service for the day. Vehicles with defects that pose
a safety risk should be repaired immediately before the vehicle returns to service. Other
defects can be scheduled for repair in the near future.
Post-trip Daily Inspections should also be conducted when a vehicle completes service
for the day and should be performed similar to the Pre-trip inspection. Post-trip
inspections are important because the driver can note defects that were observed while
driving the vehicle as well as other defects noted during the inspection process. These
checklists should be reviewed by a manager so adjustments to the fleet can be made in
the case of a vehicle needing repair.
Page | 3
All Pre-trip/Post-trip inspection checklists should be kept on file for a minimum of two
weeks, or up to one year depending on the preference of your FDOT District
Representatives.
Page | 4
Page | 5
Page | 6
Scheduled Preventive Maintenance Inspections
According to Chapter 14-90 of the Florida Statutes, vehicles must be maintained using
regular preventive maintenance inspections. The Florida Department of Transportation
recommends conducting progressive inspections that meet or exceed OEM manufacturer
recommendations. For a vehicle to remain under warranty its components must be
inspected within the mileage projection noted in the vehicle’s owners manual and these
inspections must be documented in the vehicle history file.
FDOT recommends that preventive maintenance inspections be performed in ABC
sequence. Mileage projections can be determined by the agency but must not exceed
6,000 miles. These mileage projections are determined by keeping several factors in
mind: the age of the vehicle, the number of miles traveled by each vehicle, and the road
conditions that the vehicle regularly travels.
The following is an example of a preventive maintenance schedule with vehicle
inspections performed at 6,000 mile intervals:
A
B
A
C
A
B
A
C
6,000 miles
12,000 miles
18,000 miles
24,000 miles
30,000 miles
36,000 miles
42,000 miles
48,000 miles
Page | 7
Page | 8
The following components must be checked during an “A” inspection:
Interior Inspection:
1.
Fire Extinguisher (s)/ First Aid Kit / Safety Triangles
Inspect the above mentioned safety equipment to ensure it is in proper working
order, securely mounted, and easily accessible. Fire extinguisher must be fully
charged with a dry chemical or carbon dioxide, having at least a 1A:BC rating
and bearing the label Underwriters Laboratory Inc.
If equipped with fire suppression system check “System OK” LED is illuminated.
Check that system is properly charged and that all instruction labels are intact,
clean, and legible.
Check maintenance tag for expiration date and condition of all components for
damage or conditions that may prevent operation. Nozzle outlets must be
unobstructed and properly aimed.
2.
All Seats / Seat Belts
Seat covering for the driver and passenger seats should be inspected for rips,
tears, gouges, exposed springs, and security of floor mounting. Seat belts should
be inspected for proper retraction mechanisms. Arm rest(s) should be inspected
for proper attachment to seat(s). Check folding seats for proper operation of
adjustment controls. Check the driver’s seat for proper fore and aft movement
and tracks should be lubricated as necessary.
3.
Doors / Hinges / Latches/Emergency Exits
Lubricate door hinges and latches, check operation of windows, doors, and the
condition of the glass.
Check condition of all exit signs to ensure location and operation decals are in
place and legible. Check emergency exits to insure all exits function properly
and stay shut after opening.
4.
Interlock System
Check to ensure interlock system is working properly. Vehicle should not come
out of park with either the front door or lift door open.
Page | 9
If the rear emergency exit door is open or closed and locked the vehicle should
not start. Check for audible alarm and warning light if rear door is open with
vehicle running.
5.
Flooring /Headliner / Side Panels /Grab Rails
Inspect floor covering for tears, rips, or gouges. Inspect headliner for damage,
sag, or dirt. Inspect the condition of side panels.
On vehicles designed to allow standees check the condition of the standee line
and sign. The line must be of contrasting color at least two inches wide and the
sign, prohibiting anyone from occupying a space forward of the line, must be
posted at or near the front of the vehicle. Check steps for yellow edge or nosing
to pronounce presence of steps.
Inspect condition of the grab rails and stanchions for the standee passengers.
Tighten grab rails as necessary. Note if extensive repairs are necessary.
6.
Mirrors
Check inside rear view mirror(s) for proper mounting, adjustment, and condition
of the glass. Also check the right and left exterior mirrors for adequate field of
vision.
7.
Interior Lights
Inspect the interior lights. Check step well lights if applicable for proper function
by opening door. Check dome light switch/rheostat. Check turn signal and the
hi-lo beam switches as well as the indicators on dash for proper function.
Check all emergency exit lights at emergency windows and rear exit door.
8.
Exterior Lights / Horn
Outside assistance may be required when making this check. Check parking, low
and hi beam headlights, turn signal operation front and rear, and hazard
flashers. Turn on all outside clearance lights and check operation. At this time
also check license plate lights, back-up lights, and brake lights. All lighting must
comply with the minimum requirements set for the in Florida Statutes 316.220,
316.221, 316.224, 316.225, 316.226, 316.234, and 316.235. Check horn. The
horn must be capable of emitting a sound audible under normal conditions from
a distance of not less than 200 feet.
9.
Warning system
Page | 10
Activate ignition switch and check all warning indicator lights (oil, battery,
engine, etc.) for proper operation. If the vehicle is equipped with gauges check
proper readings after the engine has been started. Check all switches, levers,
and knobs for proper function.
10.
Starter System / Back-up Alarm
When starting engine listen for starter drag or grind, belt squeal, and any other
unusual noises. As engine warms monitor all gauges. Check shift selector for
smooth operation and can be shifted into all ranges. While depressing the
brakes shift the vehicle into reverse and check the audible back-up alarm. Check
fast idle system for proper operation.
11.
Air System Check
Build air system to maximum air pressure and observe governor cut out (100125 psi). Shut off engine and chock wheels if necessary. Release emergency
brake and make a full brake application and hold for one minute. Check air
gauge to see if pressure drops more than three pounds in one minute. Next
rapidly pump the foot brake. Buzzer should activate before air pressure drops
below 60 psi. Continue to pump brakes until emergency brake pops up. This
should occur at approximately 40 psi. Drain all air tanks and check operation of
system drier.
12.
Windshield / Windshield Wipers / Washers / Blades
Inspect windshield for cracks, scratches, and any visible damage. Operate
windshield wipers through all ranges on wet glass. Inspect condition of
windshield wiper blades and arms. Replace if needed. Check washer fluid level.
13.
Windows
Inspect side and rear windows for cracks, scratches, and proper function of
opening mechanisms.
14.
Comfort System
Operate and check heater and air conditioning controls through all selector
ranges and check varying fan speed for proper function. Check rear unit output
as applicable.
Page | 11
Exterior Inspection
15.
Exterior Body and Components
Inspect exterior of vehicle for signs of body damage, missing trim, decals, paint
condition, and any signs of developing rust. Inspect the outside of all windows
for cracks, blemishes, or other damage. Inspect mirror brackets for secure
mounting or rusting. Check mirrors for broken/fading glass.
16.
Tires and Wheels
Inspect all tires for signs of uneven wear due to imbalance or improper front
end alignment, check for exposed cord or steel belts, inspect valve cores, and
check sidewalls for scrubbing or damage. Determine tread depth using tread
depth gauge. Tread group pattern depth shall not be any less that 4/32 (1/8)
inch, measured at any point on a major tread groove for tires on the steering
axle and no less that 2/32 (1/16) inch measured at any point on a major tread
groove for all other tires. Check air pressure in all tires including spare using tire
air gauge. Check condition of spare tire and mounting.
Check tires for cuts, nails, or other embedded foreign objects. Check wheel lugs
for proper torque. Check all wheels, including spare, for any damage, welds, or
improper bead seating of tire. Check for missing balance weights. Check
hubcaps for secure mounting.
17.
Access Doors
Inspect exterior access doors and lubricate hinges or spring latches as necessary.
Check fuel cap for proper fit and any signs of damage to fuel servicing piping/
hoses. Check hood latch and lubricate. Check hood retainer bar.
Service and Operation Inspection
18.
Engine and Oil Filter
Page | 12
Change oil according to manufacturer’s specifications either under the normal
or severe duty operating conditions. The information listed below defines which
schedule you need to follow for each vehicle.
1. Normal Operating Conditions:
o Everyday driving conditions
2. Severe Operating Conditions:
o Making frequent short trips (less than five miles)
o Making frequent short trips (less than 10 miles) when temperatures are
below freezing
o Driving in hot weather stop-and-go traffic
o Extensive idling and/or low speed driving for long periods of time (taxi,
police, door-to-door delivery, etc.)
o Driving at sustained high speeds during hot weather
o Towing a trailer
o Driving in areas with heavy dust (gravel roads, construction zones, etc.)
Note: Fluid change interval mileages can be different from the 6,000 mile Preventive
Maintenance Inspections.
19.
Ball Joints / Steering / Drive Line (Lubricate)
Inspect all ball joints according to manufacturer’s recommendations. Lubricate
after inspection.
Due to the varying road conditions, vehicle type, age of vehicle, and type of
joint, it is recommended to check the ball joints on every “A” inspection or if any
of the symptoms listed below occur.
* Front wheel shimmy at low speed
* Steering wander
* Clunking noises from the front suspension
* Camber wear on the tires
Note: Most original equipment ball joints today are designed to provide many
miles of durability. Many never make it that far for a variety of reasons. One is
wear. The constant friction created by turning and driving creates friction
between the ball stud and bearing. The rougher the roads and the heavier the
vehicle, the faster the rate of wear will occur. Wear can be further accelerated
by contamination and/or lack of lubrication. With a greaseable joint, lubing the
chassis periodically is necessary to maintain a layer of grease within the joint.
Lubing the joint also helps flush out the old grease and contaminants, which
Page | 13
extends the service life of the joint. Most OEM ball joints today as well as some
aftermarket replacement joints are "sealed for life" and have no grease fittings.
Load carrying ball joints do tend to wear at a faster rate than their unloaded
counterparts because of the weight they carry. That's why the lower ball joints
on an SLA (short long arm) suspension typically wear out before the upper joints.
Check steering column for any absence or looseness of U-bolts or positioning
parts; worn, faulty, or any welded universal joints. Check steering wheel broken
spokes or cracks and for securement.
Check steering box for any mounting bolts loose or missing, any cracks in gear
box or mounting brackets. Check for any looseness of the pitman arm on the
steering gear output shaft. Check for leaks.
Check for any motion, other than rotational, between any linkage member and
its attachment point. Check for loose clamps or clamp bolt on tie rod or drag
link. Check for linkage components that are not secured with proper pins or
devices. Check for any looseness in any threaded joint.
Lubricate all steering zirk fittings.
Lubricate driveline u-joints and slip yoke.
20.
Battery
Check battery mounting tray condition (corrosion and wear) and battery holddown. Check battery case for cracking or damage. Check post and fasteners for
corrosion – clean and cover with protectant. Check cables for fraying or signs of
deterioration. If applicable check and service water levels. If it is maintenance
free battery check “green” indicator. Record output voltage.
21.
Cooling System
Visually check cooling system for leaks. Check the overflow tank for adequate
coolant, and inspect the cleanliness and condition of the coolant. Inspect the
condition of the upper and lower radiator hoses and check the security of the
fasteners. Check butterfly drain for snugness. Inspect water pump and engine
intake at the thermostat housing for signs of leaks.
Inspect radiator cap for signs of leaks or pressure loss. Before removing the cap
allow the engine to cool down. Relieve any built-up pressure in the system.
Page | 14
Remove and inspect the radiator cap. At this time, the radiator cores and the
interior of the radiator housing may be visually inspected for corrosion or
clogging. Also, if circulation problems are suspected, operation of the water
pump and circulation of the coolant may be verified with the engine running.
22.
Air Cleaner / Filters
Remove air filter and inspect. Inspect air intake hoses and clamps. Visually
inspect all vacuum hoses and connections. Inspect fuel lines for leaks or
damage.
23.
Belts / Hoses / Wiring
Inspect all belts for signs of wear, fraying, cracks, glazing, and proper tension.
Inspect heater hoses and connections. Inspect wiring for signs of chafing,
corrosion, loss of insulation and crimping. Ensure wiring does not come in
contact with moving parts or heated surfaces.
24.
Under Hood / Exhaust System
Check transmission fluid level with the fluid warm and the engine running.
Check color of fluid for any signs of overheating. Visually inspect the
transmission pan, front and rear seal, speedometer drive, and dipstick tube for
signs of leakage. Visually check the transmission oil cooler, lines, and
connections for signs of a leak. Check the exhaust system for mounting, routing,
leaks and restrictions.
25.
Service and Parking Brakes
From the driver’s seat pump the brake pedal three or four times, and then hold
constant downward pressure on pedal for at least five seconds. . The brake
pedal should hold firm and not drift down. If equipped with a hydraulic brake
reserve system, with the key off, depress the brake pedal and listen for the
sound of the reserve system electric motor.
If equipped with hydro boost system or vacuum assist system, with the key off,
pump the brake at least five times and depress the brake pedal. It should feel
firm. Remain holding the pedal and start the engine. The pedal should move
slightly to the floor and then rise.
Check that the warning buzzer or light is off.
Page | 15
Apply the parking brake and shift vehicle into low gear slightly pulling against
the brakes. Vehicle should not move.
26.
Accelerator/ Brake Pedal
Check pedals for sticking, binding, or failure to return to normal position. Check
pedals for excessive pad wear.
The following components must be checked during a “B” inspection, in
addition to the components that are checked during an “A” inspection:
27.
Brakes
Remove wheels and inspect all brake pads/linings for wear. Check rotors/drums
for wear, scoring, and warping. Check calipers/cylinders and brake lines for signs
of wear or leaks. Check for any dirt or grease accumulation on the brake system.
28.
Operational Check
Check for smoothness of acceleration, centering of steering wheel, and the
proper tracking of the vehicle, smoothness of turns, balance of tires, and front
end alignment. Also check for looseness in steering wheel. Check operation of
speedometer.
29.
Transmission
Check operation and position of shift lever and indicator. Check operation in
each gear. Check shift points through all gear ranges in drive position.
The following components must be checked during a “C” inspection, in
addition to the components that are checked during an “A” and “B”
inspection:
30.
Wheel Bearings / Driveshaft
Remove and inspect front wheel bearings, clean and lubricate or replace if
necessary.
Check the driveshaft chock wheels if needed and place transmission in neutral.
Grasp either side of the u-joint and rotate it back and forth while
Page | 16
watching/feeling for any play between the cross and the yoke. If the cross
moves inside the yoke, replacement of the u-joint is warranted. Check slip joint
for play.
Lubricate all zirk fittings.
31.
Shocks / Springs
Inspect shock absorber cylinders for signs of leakage. Check bushings for signs of
wear and the mounting brackets for secure mounting. Inspect coil and/or leaf
springs for signs of damage or wear. Check MOR/ryde shear springs if equipped.
If equipped with air springs check for leaks, cracks and dry rotting.
32.
Rear Differential
Inspect rear axles and axle housing for signs of stress, wear, and leaks. Check
differential level. (Note: Change differential fluid every other “C” inspection.
33.
Fuel Tank
Check fuel tank for secure attachment to vehicle by inspecting for loose, broken
or missing mounting bolts or brackets (some fuel tanks use springs or rubber
bushings to permit movement).
Check fuel system for any visible leak at any point.
34.
Engine Tune-Up
See vehicle service manual for details.
35.
Cooling System
Test coolant with pH test strips. Change out coolant or add additive as
necessary.
36.
Change Transmission Fluid and Filter
Remove transmission pan and drain fluid. If the transmission torque converter is
equipped with a drain plug, drain fluid from it as well. Inspect debris in the
bottom of pan for signs of internal transmission damage. Check the color of fluid
for signs of overheating. Remove and replace filter screen. Note any
abnormalities on the check off sheet.
Page | 17
Note: Always check manufacturers recommended transmission change interval
as some vehicles come from the factory equipped with synthetic oil and have an
extended mileage change interval.
Accessories
37.
Wheel Chair Lift and Accessories
Cycle lift from stow position to floor level and check outboard roll stop barrier
for proper latching. Continue to lower lift to ground level and check for any
leaking, damaged, missing parts, and for smooth operation. Raise lift from
ground level. With platform slightly off ground make certain the outboard roll
stop barrier raises and it is latched securely. This must be performed by visually
inspecting the latching mechanism to ensure it is in the correct locked position
and by physically attempting to pull/push barrier down with an adequate
amount of force to make certain the barrier is secured.
Continue to raise lift to floor level and check for any unusual noises or abnormal
operation. Stand on lift platform or place at least 50 pounds of weight on
platform and attempt to stow lift. Lift should not fold in. Remove weight and
stow lift.
Due to varying lift configurations refer to your lifts Owner’s Manual for a list of
warning lights and audible alarms to ensure all of these safety warning devices
are working properly.
Inspect tie down retractors for damaged webbing and proper locking. Inspect
floor tie down anchors.
Check lift padding and labels. Check lift manual operation and instruction label.
Lubricate appropriate lube points. (see illustrations at the end of this section)
Refer to original owners manual for lift adjustments if necessary.
38.
License Plates / Registration / Operators Manual
Check condition and currency of license plate and registration and appropriate
manuals. Insure accident report forms and other appropriate documents are up
to date and available in the vehicle. Check for operating manual for the
wheelchair lift.
39.
Air Conditioning Systems Check
Each spring, prior to the season for constant air conditioning use, the air
conditioning system should be scheduled for a thorough operational check. The
system should be checked with the appropriate air conditioning service
equipment and gauges. Check the entire system for leaks.
Page | 18
Note: The Freon level should be checked and serviced as necessary.
If the system is to be serviced with the opening of a closed system, the complete
system should be evacuated; the receiver dryer replaced and the system must
be completely recharged, including refrigerant oil.
Note: All air conditioning work involving opening the system for repair and
recharging must be performed by a licensed certified technician.
Page | 19
Page | 20
Page | 21
Page | 22
Page | 23
Annual Inspections
An Annual Safety Inspection is similar to an FDOT “C” level inspection. An agency
may use a “C” level inspection for a vehicle to serve as the Annual Safety Inspection as
long as the vehicle receives a “C” level inspection at least once annually. An agency may
make a copy of the “C” level inspection and write “Annual Safety Inspection” across the
top of the page to identify it and place the inspection in the vehicle’s history file, or a
separate filing area for all Annual Safety Inspections.
All vehicle components for an Annual Safety Inspection must be checked at the same
time, or within 48 hours if the inspection is being performed by utilizing partial
inspections, for the inspection to be determined complete.
Chapter 14-90 requires that all agencies perform an Annual Safety Inspection on each
public transit vehicle. These inspections must be performed once a year using a certified
mechanic and proper lift equipment. Chapter 14-90 of the Florida Statutes states:
14-90.009 Bus Safety Inspections.
(1) Each bus transit system shall require that all buses operated by such bus transit
system, and all buses operated by a private contract transit provider, be inspected at least
annually in accordance with bus inspection procedures set forth in this rule.
(2) It shall be the bus transit system’s responsibility to ensure that each individual
performing a bus safety inspection is qualified as follows:
(a) Understands the requirements set forth in this rule chapter and can identify
defective components.
(b) Is knowledgeable of and has mastered the methods, procedures, tools, and
equipment used when performing an inspection.
(c) Has at least one year of training and/or experience as a mechanic or inspector in a
vehicle maintenance program, and has sufficient general knowledge of buses owned and
operated by the bus transit system to recognize deficiencies or mechanical defects.
(3) Each bus receiving a safety inspection shall be checked for compliance with the
requirements for safety devices and equipment, as referenced or specified herein. Specific
operable equipment and devices as required by this rule chapter, include the following as
applicable to Type I and II buses:
(a) Horn.
(b) Windshield wipers.
(c) Mirrors.
(d) Wiring and batteries.
(e) Service and parking brakes.
(f) Warning devices.
(g) Directional signals.
(h) Hazard warning signals.
(i) Lighting systems and signaling devices.
(j) Handrails and stanchions.
Page | 24
(k) Standee line and warning.
(l) Doors and brake interlock devices.
(m) Stepwells and flooring.
(n) Emergency exits
(o) Tires and wheels.
(p) Suspension system.
(q) Steering system.
(r) Exhaust system.
(s) Seat belts.
(t) Safety equipment.
(u) Equipment for transporting wheelchairs.
(v) Working speedometer.
(4) A safety inspection report shall be prepared by the individual(s) performing the
inspection and shall include the following:
(a) Identification of the individual(s) performing the inspection.
(b) Identification of the bus transit system operating the bus.
(c) The date of the inspection.
(d) Identification of the bus inspected.
(e) Identification of the equipment and devices inspected including the identification
of equipment and devices found deficient or defective.
(f) Identification of corrective action(s) for any deficient or defective items found and
date(s) of completion of corrective action(s).
(5) Records of annual safety inspections and documentation of any required
corrective actions shall be retained a minimum of four years by the bus transit system for
compliance review.
Rulemaking Authority 334.044(2), 341.041(3), 341.061(2)(a) FS. Law Implemented
341.061(2) FS. History–New 9-7-87, Amended 11-10-92, 8-7-05, 9-16-10.
Page | 25
Page | 26
Standards for Contractors
Preventive maintenance inspections can be performed using an in-house maintenance
program, an outsourced maintenance facility, or a combination of in-house and
outsourced maintenance.
If your agency wishes to use outsourced maintenance, standards must be provided to the
contractor to follow when conducting preventive maintenance inspections on your
vehicles. This can be accomplished by providing this handbook to the outsource facility
or developing a service agreement that outlines expectations, price, and maintenance
procedures that are agreed upon by both your agency and the outsource facility.
If your agency wishes to use an on-site mobile maintenance contractor to perform
preventive maintenance inspections on your vehicles, the following requirements must be
met by the contractor:
If the contractor is performing preventive maintenance inspections based on time
projections rather than mileage projections, all vehicle components must be inspected
within the mileage projections stated in the OEM recommendations for your vehicle
while the vehicle is under warranty. When the vehicle is no longer under warranty,
vehicle components must be inspected at least every 6,000 miles using the ABC
inspection procedures previously mentioned. For example, all items listed for the “A”
inspection must be inspected by the contractor before 6,000 miles, all of the items listed
for the “B” inspection must be inspected by the contractor within 12,000 miles, etc.
The contractor must use proper equipment when performing preventive maintenance
inspections on your vehicles. The following vehicle components must be inspected while
your vehicle is suspended on a lift:
Ball joints
A-frames bushings
Physical check of suspension parts
Steering
U-joints
Front wheel bearings
Rear wheel bearings
If a preventive maintenance inspection is going to be performed using a combination of
an on-site inspection and maintenance garage inspection for components needing
specialized vehicle equipment, both partial inspections should be performed within 48
hours of each other for the preventive maintenance inspection to be considered complete.
The maintenance contractor must provide a completed inspection checklist for the items
that were examined during the preventive maintenance inspection. This checklist must
be signed and dated by the contractor and filed in your vehicle history file. Your agency
will need to monitor the maintenance contractor just as you would with an in-house
Page | 27
maintenance program or an outsourced maintenance facility. These practices are listed in
the section Maintenance Oversight.
Maintenance Plans
The Federal Transit Administration requires all agencies with grant funded vehicles to
develop and maintain a written maintenance plan. A maintenance plan is a “living”
document that describes an agency’s maintenance procedures and practices in the
following areas:
Maintenance Goals
Fleet Inventory
Preventive Maintenance
Standards for Contractors
Annual Safety Inspections
Pre-trip/Post-trip Inspections
Road Calls
Accidents
Cleaning
Warranty
Parts Inventory, if applicable
On-site Fueling, if applicable
Maintenance plans must be revised as maintenance procedures, practices or fleet
inventory changes. Maintenance plans are used by FDOT representatives to evaluate
your current maintenance department so it is important that these maintenance plans
remain current and customized to your agency’s specific maintenance procedures and
practices. Maintenance plans can also assist an agency with employee turnover by
providing written instructions on how your agency’s maintenance department functions.
If your agency needs assistance developing a maintenance plan, contact your FDOT
District Representative to request this technical assistance.
Maintenance Oversight
It should be the goal of every transportation provider to be running an optimal
maintenance program, one that is operating at the highest efficiency. No matter the size
of the agency or the amount of transportation the agency offers, vehicle maintenance is
the only area an agency can utilize to improve service and save money. Whether your
agency utilizes in-house maintenance or outsourced maintenance, it is imperative that
vehicle maintenance is being monitored. Your agency may have software designed to
analyze vehicle inspection and repair data. If not, it is still possible to analyze this
information manually. A successful maintenance manager will be consistently looking
for ways to improve their maintenance program. The following are five ways to get the
most out of your maintenance program:
Page | 28
Be Proactive
Maintenance activities must be scheduled to be considered preventive maintenance.
Scheduled maintenance includes repairs that are scheduled ahead of time, and not as a
result of failure or breakdown. Agencies with optimum maintenance programs perform
virtually all of their maintenance as scheduled maintenance.
Some agencies perform preventive maintenance inspections and change fluids and filters
at their regular inspection intervals without making other checks or adjustments and make
repairs only when something fails. Unfortunately, these agencies are performing
“reactive maintenance.” Responding to failures, instead of anticipating them, limits the
ability of the agency to plan and schedule their maintenance. This creates a continual
cycle of responding to chance failures and making emergency repairs to get vehicles back
in service creating an unmanageable and costly situation. Take control of your
maintenance by actively searching for defects and failures to repair them before a
breakdown occurs. Below are some examples of how your agency will benefit from a
proactive maintenance program:
Bus #
Type of
Maintenance
Scheduled
Unscheduled
Work
Performed
Rear Brake Job
Rear Brake Job
including tow
service
Parts
Replaced
Pads only
Calipers, Pads,
and Rotors
Total Cost
Parts
Replaced
Front Seals
Bus 2
Unscheduled
Work
Performed
Repack front
wheel bearings
Bus towed;
replace all front
end parts on
failed side
Total Cost
Bus 1
Type of
Maintenance
Scheduled
Spindle, Brake
rotor, pads,
caliper,
bearings, seals,
and new wheel
$1,630.00
Bus 1
Bus 2
Bus #
$253.40
$1,358.88
$150.00
Some managers succumb to reactive maintenance because they would prefer to limit the
breaks in service due to vehicle downtime. However, this line of thinking is harmful to
your maintenance program. By scheduling your maintenance, you will be able to plan for
a vehicle to be out of service, and make other arrangements. You do not receive this
same opportunity when a vehicle is out of service due to failure or breakdown. Be
proactive in your preventive maintenance inspections and repairs. This practice alone
will save your agency money and valuable time.
Page | 29
Cover Your Bases
Quality assurance is key with developing an optimal maintenance program. When a
state-purchased vehicle is involved in a serious accident, FDOT may be called to perform
an investigation. Your agency is liable for the vehicles in service and it is the job of the
maintenance manager, or the person who oversees maintenance at your agency, to ensure
that maintenance inspections and repairs are thoroughly performed and that all inspection
and repair documentation is accurate.
A successful maintenance manager will set up a quality assurance system that will
monitor inspections and repairs by randomly inspecting vehicles that have just been
inspected or repaired, regardless of whether your agency uses in-house maintenance or
outsourced maintenance.
Performing a quality assurance check on a recently inspected vehicle can be as easy as
performing an identical preventive maintenance inspection on that vehicle and comparing
your findings to those that were marked on the inspection checklist. For example, if you
found a defect that was marked “OK” on the checklist, then you know that vehicle
component was not properly inspected.
If your agency is not capable of performing these inspections, quality assurance can also
be accomplished by manually reviewing vehicle repair files. This can be done in the
same manner that was mentioned above. A maintenance manager can review
unscheduled repairs that have been made between preventive maintenance inspections to
determine whether the unscheduled repair could have been avoided. Unscheduled repairs
can occur due to in-service failures or defects noted on pre-trip/post-trip inspections. For
each unscheduled repair, the maintenance manager can review the previous preventive
maintenance inspection and see whether the defective item was checked “ok” during the
time of the inspection. The maintenance manager should then attempt to make a
determination about whether the defect could have been identified at the time of the
preventive maintenance inspection.
A maintenance manager needs to be informed on all maintenance repairs, scheduled or
not. If your agency outsources your maintenance, you need to provide authorization on
all repairs before they are made. By doing so, you can avoid a common error such as a
repeat repair. Below is an example of an agency that did not practice quality assurance
and that used outsourced maintenance without requiring authorization for repairs:
Unit #
Bus 101
Date
1/13/2009
Miles
99,029
Bus 101
4/23/2009
99,558
Complaint
Engine
misfiring
Jerking
Repairs
Ignition coil
replaced
Ignition coil
replaced
Cost
$254.09
$269.57
Several questions needed to be asked after the second identical repair was made. Why
did the coil have to be replaced a second time? Did this fix the root of the problem or is
it another temporary repair? In slightly over 500 miles, why was the part not covered
under warranty? Why is the cost of the part higher the second time? There could be a
logical explanation for this repeat repair. If you are not monitoring your shop, mistakes
can be made and if the invoice is paid the agency is at a loss.
Page | 30
Developing a good quality assurance program is all about staying informed. By
analyzing inspections and repairs, you will be reassured that your maintenance
inspections and repairs are being performed properly. Preventive maintenance
checklists should not always come back with all items marked “OK.” That is a big clue
that preventive maintenance inspections are not being performed thoroughly. Repairs
due to preventive maintenance inspections should be made fairly regularly. It is your job
to reinforce that the service your agency is paying for is expected to be completed
correctly.
Start a Campaign
Once your agency begins to track maintenance activities, repair patterns will start to
surface and maintenance becomes more predictable. You do not have to be a
maintenance expert to oversee a maintenance program. The key to developing good
preventive maintenance is being able to analyze failure trends and use this information to
predict future failures.
Some examples are:
Alternators: You find that the alternators on a particular order of buses are failing at
65,000 miles. With each failure there was a road call involved resulting in a tow charge,
the bus was down until parts were shipped and the emergency repair could be made.
To avoid the unscheduled repair and added costs, the alternators can be scheduled to be
replaced at 60,000 miles.
Brakes: Say your buses run an average of 20,000 miles until the rear brakes are re-lined.
At close to this mileage you should expect the brakes to be re-lined at an upcoming
inspection. Notify your shop of the anticipated brake lining replacement and ask for an
estimated mileage of the life of the pads if they are not changed. As discussed earlier, the
price of total failure can lead to over $1,000 in unnecessary costs.
Transmissions: This is another component that has predictable failure patterns. Pay
close attention to the failure mileages on transmissions to avoid tow charges, unscheduled
down time, and possibly higher shipping charges for the emergency repair.
There are instances when new vehicles are placed into service and unforeseen problems
occur that you may not have experienced on your existing fleet.
Example: you notice that you have a belt on the engine that seems to fail twice the rate
than you can remember. This is when you need to notify the dealer and see if this is a
known problem and if there is a fix for the premature failures. Until the solution is
found, you should start a campaign on changing the belt at a predetermined mileage
before it is noted to fail.
Page | 31
Reduce Your Costs
The task of beginning a preventive maintenance program with an existing fleet can be
overwhelming at first, and many may be confused about how to begin this process. You
should start with your next upcoming preventive maintenance inspections. If these
inspections have not been thorough in the past, the amount of defects that are initially
found will increase with the improved inspections, along with the cost of your
maintenance. This is due to the extra labor hours and parts cost to repair mechanical
problems that have escalated due to minimum maintenance performed in the past. This
increase will depend on the size of your fleet, the age of your fleet and how many repairs
need to be made. But this increase in maintenance costs is temporary! Once this period
of adjustment is over, the unscheduled repairs decline increasing efficiency which results
in a better control of costs.
By implementing a thorough preventive maintenance program, you will be avoiding
several hidden costs that arise when dealing with unscheduled repairs. These costs are
often found in administrative duties such as:
Contacting wrecker services to arrange towing
Rescheduling trips to cover routes
Notifying clients of the delay
Extra invoicing
Opportunity cost
Scheduling your repairs will put an end to these hidden administrative costs and give you
valuable time to plan for purchasing the parts needed for such replacement repairs,
whereas when unscheduled repairs occur there is no time to plan for new parts. Having
this unique opportunity to plan major purchases will help you control your maintenance
budget. Also, being able to plan for scheduled repairs gives your operations team time to
make other service arrangements while the vehicle is temporarily out of service. The
amount of down time for the vehicle is reduced when the repairs are scheduled. All of
these advantages to preparing for scheduled repairs will help reduce your overall
maintenance costs by improving fleet efficiency.
Take Advantage
The last suggestion for optimizing your maintenance program is utilizing the tools and
training opportunities that have been made available to you. The Florida Department of
Transportation has contracts in place to help agencies with technical assistance
concerning maintenance. These assistance programs are offered at no cost to your
agency.
Each agency should also ensure that they are getting the most out of their state and
federal financial assistance. Agencies are encouraged to be proactive about their search
for financial aid. There may be financial opportunities available to you that you are
unaware of.
If you have any questions about FDOT technical assistance programs or financial
assistance, please contact your local FDOT District Representative to discuss these items
further.
Page | 32
Page | 33
Road Call Information Sheet
Dispatch Informtion
1. Date:_________________
2. Vehicle Number:__________
3. Time of Call:__________
4. Operator:________________
5. Route:________________
6. Received By:______________
Location of Vehicle:
(Street, Address, City, etc.)
Reported Problem
Technicians Report
1. Time of Call:_________
2.Time Arrived at Vehicle__________
3. Circle One: In-Service Repair
Vehicle Exchanged
Towed
4. Problem Found/ Action Taken
5. Time of Road Call Completion__________________
___________________________
Mechanics Signature
___________________________
Fleet Managers Signature
__________________
Date
Page | 34