1
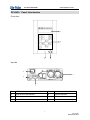
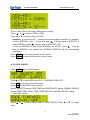
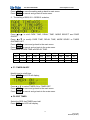
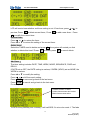
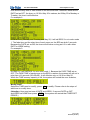
ISO 9001 CERTIFIED
www.liteputer.com.tw
DP-E450
Ethernet to DMX Interface
【User Manual】
Lite-Puter Enterprise Co., Ltd.
Website:www.liteputer.com.tw E‐mail:[email protected] Lite-Puter
DP-E450 [EUM-C]
ISO 9001 CERTIFIED
www.liteputer.com.tw
Index
DP-E450 FEATURE .................................................................................................. 1
DP-E450 SPECIFICATIONS ........................................................................................ 2
DP-E450 PANEL INTRODUCTION ................................................................................ 3
DP-E450 WITH EDX CONTROL SOFTWARE AND STAGE SOFTWARE ................................. 4
................................................................................. 4
DP-E450 OPERATION ................................................................................................ 6
1. Main menu ....................................................................................................................................... 6
2. F1:SET IP ................................................................................................... 6
3. F2:SET MAC............................................................................................... 6
4. F3:MODIFY CLOCK ................................................................................... 7
5. F4:ABOUT ME ............................................................................................ 7
6. Memory initialization ...................................................................................... 7
7. Key lock......................................................................................................... 8
8. Other ............................................................................................................. 8
FUNCTION AND WIRING DIAGRAM
DP-E450 WITH RGB LED CONTROL SOFTWARE............................................................ 8
FUNCTION AND WIRING DIAGRAM ................................................................................. 8
DP-E450 OPERATION .............................................................................................. 10
▲ Main menu..................................................................................................... 10
▲ F1: CALL SEQ............................................................................................... 10
▲ F2: MODIFY CH ............................................................................................ 11
▲ F3: EDIT SCENE........................................................................................... 12
▲ F4: LOAD BACKSC....................................................................................... 13
▲ F5: EDIT SEQ................................................................................................ 13
▲ F6: SEQ CONFIG.......................................................................................... 14
▲ F7: TIMER ON/OFF....................................................................................... 15
▲ F8: EDIT TIMER ............................................................................................ 15
▲ F9:EDIT PATCH............................................................................................. 18
▲ F10: MODIFY CLOCK ................................................................................... 19
▲ F11: SET IP ................................................................................................... 19
▲ F12: SET MAC .............................................................................................. 19
▲ F13:ABOUT ME............................................................................................. 20
DP-E450 MEMORY INITIALIZATION ........................................................................... 20
DP-E450 KEY UNLOCK/LOCK .................................................................................. 21
DP-E450 IR REMOTE CONTROL: ............................................................................. 21
PC UPLOAD/ DOWNLOAD DP-E450’S DATA: ............................................................. 21
Lite-Puter
DP-E450 [EUM-C]
ISO 9001 CERTIFIED
www.liteputer.com.tw
DP-E450 WITH HOME LIGHTING SOFTWARE .............................................................. 22
FUNCTION AND WIRING DIAGRAM ............................................................................... 22
DP-E450 OPERATION .............................................................................................. 24
1.Main menu.................................................................................................... 24
F1:SCENE EDIT.............................................................................................. 24
F2:SCENE FADE............................................................................................. 25
F3:TIMER SCEDIT(TIMER SCENE EDIT) ...................................................... 25
F4:TIMER ON/OFF.......................................................................................... 26
F5:TIMER EDIT............................................................................................... 26
F6:SCH EDIT .................................................................................................. 28
F7:PATCH EDIT .............................................................................................. 29
F8:PATCH LOAD............................................................................................. 30
F9:MODIFY CLOCK ........................................................................................ 30
F10:SET IP...................................................................................................... 31
F11:SET MAC.................................................................................................. 31
F12:ABOUT ME............................................................................................... 31
MEMORY INITIALIZATION ............................................................................................ 31
KEY LOCK ................................................................................................................ 32
OTHER .................................................................................................................... 32
ONLINE UPDATE ....................................................................................................... 32
CONTROL SOFTWARE SHIFT ....................................................................................... 36
Lite-Puter
DP-E450 [EUM-C]
ISO 9001 CERTIFIED
www.liteputer.com.tw
DP-E450 Feature
■ Can
exchange data between Ethernet and DMX controller to realize the PC-based
lighting control.
■ Can be used as dimmer.
■ Connectable to PC. PC-based setting can copy the memory file in case files lose
and data exchange between several devices through software. Workable with 4
lighting control softwares make lighting control much easier.
■ Two group of standard DMX512 signal, which can control up to 1024 channels.
■ Large memory for scene, timer and channel setting file saving and execution.
■ SEQ function:
1.SCENE SEQ
2.Edit SEQ speed
3.Select SEQ mix color mode
■ Recall
in fixed time
■ System online update
■ Built-in IR remote control function
■ LCD display and easy operation
■ Portable and user-friendly
1
Lite- Puter
DP-E450 [EUM-C]
ISO 9001 CERTIFIED
www.liteputer.com.tw
DP-E450 Specifications
■ Power input:DC 12V /1A
■ Protocol: DMX-512 / 1990
■ Signal connector:6P6C PHONE JECK*6/XLS 5-PIN*4
■ Dimension: 110(W)* 176(H)* 40(D)
■ Weight:0.66 kg
2
Lite- Puter
DP-E450 [EUM-C]
ISO 9001 CERTIFIED
DP-E450
www.liteputer.com.tw
Panel Introduction
Front side:
1
2
3
4
Up side
5
8
6
7
1
LCD screen
2
Keypad and LED indicator
5
6
Power
Ethernet interface
3
IR receiver
7
Ethernet interface
4
LINK&DATA indicator
8
DMX-512 interface
3
Lite- Puter
DP-E450 [EUM-C]
ISO 9001 CERTIFIED
www.liteputer.com.tw
Connection port description
DP-E450 with EDX Control software and STAGE software
Function and wiring diagram
Instruction:When DP-E450 work with EDX control software and STAGE control
software , the operation on the DP-E450 is exactly the same, we only introduce the
operation with EDX control software here.
1. When DP-E450 work with EDX control software, the software send EDX and DMX
signal to the controller.
2. If use other software, it need memory initialization.
4
Lite- Puter
DP-E450 [EUM-C]
ISO 9001 CERTIFIED
www.liteputer.com.tw
Wiring (EDX Control)
:
Internet signal
DP-E450
EDX signal
EDX-610
Control Panel
IR remote controller
·
·
·
·
·
·
5
Lite- Puter
DP-E450 [EUM-C]
ISO 9001 CERTIFIED
www.liteputer.com.tw
DP-E450 Operation
1
Main menu
Press FCN to enter main menu.
Select one from F1~F4 and press
2
ENT
to enter it.
F1:SET IP
STEP1 :Press▲ or ▼ to select F1. Press ENT
and LCD will display ,
STEP2:Press▲ or ▼ to adjust the number.
Press
or
shift to next item.
Press ENT to save IP address and go back to main menu.
Press FCN to cancel and go back to main menu.
3.F2:SET MAC
STEP1 :Press ▲ or▼ to select F2, Press ENT and LCD will display,
first digit
forth digit
STEP2 :Press
or to
shift from 1 to 6 digit.
6
Lite- Puter
DP-E450 [EUM-C]
ISO 9001 CERTIFIED
Press
Press
www.liteputer.com.tw
ENT to save MAC address and go back to main menu.
FCN to cancel and go back to main menu.
4.F3:MODIFY CLOCK
STEP1 :Press ▲ or▼ to select F3, Press ENT
STEP2 :Press
or
and LCD will display,
to select year, month, day, hour, minute and second.
Press
or to select year(00~99), month(JAN, FEB, MAR, ARP, MAY,
JUN, JUL, AUG, SEP, OCT, NOV, DEC), day(01~31), date(SUN, MON,
TUE, WED, THU, FRI, SAT), hour(00~23), minute(00~59), second
(00~59).
Press ENT to save the setting and go back to main menu.
Press FCN to cancel and go back to main menu.
5.F4:ABOUT ME
Select F4 and press ENT LCD will display the software name and version no. .
6.Memory initialization
Press FCN + OFF at the same time, and switch on the device. LCD will remind
whether to initialize.
Press 1 to initialize, or press 2 to quit.
Please wait a moment.
When initialization is finished, it will display,
7
Lite- Puter
DP-E450 [EUM-C]
ISO 9001 CERTIFIED
7.
www.liteputer.com.tw
Key lock
If the key is unlocked, press
ENT and OFF
to lock the key.
Press ENT and OFF once again to unlock the key.
8.
Other
a. When it’s unconnected with PC and LCD will display,
It shows the IP address of DP-E450.
b. When it’s connected with PC, LCD will display,
The IP address is PC’s address now.
DP-E450 with RGB LED Control software
Function and wiring diagram
1. When DP-E450 work with RGB LED Control Software, the system receive internet
signal, DMX1 and DMX 2 send two group of DMX-512 separately to control LED
controller. The system can control 1024 channels at most.
2. When use other software, the system need to initialization.
8
Lite- Puter
DP-E450 [EUM-C]
ISO 9001 CERTIFIED
www.liteputer.com.tw
With RGB LED Control:
Ethernet signal
DP-E450
DMX signal
9
Lite- Puter
DP-E450 [EUM-C]
ISO 9001 CERTIFIED
www.liteputer.com.tw
DP-E450 Operation
▲ Main menu
Press FCN
and select any one from F1~F13 and press ENT to enter each setting.
▲ F1: CALL SEQ
SEQ call:
Call SEQ OFF and SEQ 1~SEQ 512.
Press FCN to enter main menu and press ▲ or ▼ to select any one from
F1~F13,. Select F1 and LCD will display,
Press ENT to enter CALL SEQ setting and LCD displays as below,
Blink
10
Lite- Puter
DP-E450 [EUM-C]
ISO 9001 CERTIFIED
www.liteputer.com.tw
Press ▲ or ▼ to select SEQ OFF and SEQ 1~SEQ 512.
If call SEQ 255, press ▲ till it displays SEQ 255.
Press scene 1
Press scene 2
key to call SEQ 255 and go back to main menu.
key to exit and go back to main menu.
Attention:
1. When call SEQ OFF and SEQ 001~SEQ 006, the indicator on scene OFF key and
scene 1~6 key will turn on.
When call SEQ 007~ SEQ512, no indicator will turn on.
2. On the main interface, user can directly call SEQ1~ SEQ 006 and SEQ OFF.
SEQ pause and close :
For example: When call SEQ 001, the second line on LCD will display,
Press OFF to stop to calling the current SEQ and the second line on LCD will display,
Press OFF once again, continue to call current SEQ
Press OFF for 3 seconds to execute SEQ OFF function, it means the dimming value
of all channel is 0 and the second line on the LCD will display,
▲ F2: MODIFY CH
Modify all channels’ dimming value.
After enter it, user can modify each channel’s dimming value and save it to any
scene.
Attention:
When modify the dimming value, all SEQ stop executing, the output is the current
scene before the stop. The post-modified dimming value of the certain channels will
immediately output to facilitate on-spot setting.
11
Lite- Puter
DP-E450 [EUM-C]
ISO 9001 CERTIFIED
www.liteputer.com.tw
Press ENT and LCD displays as below,
Press▲ or ▼ to modify channel’s dimming value, it can range from 0% to 100%.
Press
or
to select the channel.
Press FUN to cancel and exit.
Press ENT and LCD will display,
Press ▲ or ▼ to select the scene no. want to save to, user can choose from 001~
512 .
Press 1
Press 2
to save the scene and go back to the main menu.
to cancel and go back to the main menu.
▲ F3: EDIT SCENE
User can modify the channel’s dimming value of the scene from 000-512. If select
SC000, user can modify the dimming value on the base of 0%; if select
SC001~SC512, user can modify the dimming value on the base of current value.
After setting, user can save it to any scene.
Attention: After enter it, the SEQ is continue executing and the post-modified
dimming value can’t directly output.
Press ENT and LCD will display,
Press▲ or ▼ to select scene from 000~512.
Press 2 go back to main menu.
Press 1 to enter scene setting.
12
Lite- Puter
DP-E450 [EUM-C]
ISO 9001 CERTIFIED
www.liteputer.com.tw
The no. after SC is the current scene need to modify.
Press ▲ or ▼ to modify channel’s dimming value, it ranges from 0%~100%.
Press
or
to select channel.
Press FCN to cancel and exit.
Press ENT to enter
Press ▲ or ▼ to select the scene no. want to save to, user can select from 001~
512.
Press 1 to save and go back to the main menu.
Press 2 to cancel and go back to the main menu.
▲ F4: LOAD BACKSC
When SEQ is executing, user can call the BACK scene.
Press ENT and LCD will display,
Press ▲ or ▼to select Back scene from scene 000~512. SC000 means call no
Back scene.
Press 1 to save scene and go back to the main menu.
Press 2 don’t save scene and go back to the main menu.
(Attention: if select SEQ OFF, the Back scene output is closed)
▲ F5: EDIT SEQ
Set the scene on SEQ step.
Press ENT and LCD will display,
Press▲ or ▼ to select SEQ no. from 001~512.
Press 2 goes back to last menu.
Press 1 to enter SEQ setting.
13
Lite- Puter
DP-E450 [EUM-C]
ISO 9001 CERTIFIED
www.liteputer.com.tw
The no. after SEQ is the current SEQ need to modify.
Press
or
to select STEP on SEQ.
Press ▲ or ▼ to select scene on STEP.
(Attention:If user select SC---, it means the following step is useless. For example,
if select STEP236 = SC---, at this time press
, it will go back to STEP001; if
select STEP001, press
it will go back to STEP236 = SC---.
If user set STEP001~STEP010 and STEP005 set as SC--, press
, it will go
back to STEP001, the setting from STEP006~STEP010 will be automatically
cancelled.)
Press
Press
ENT to save and go back to main menu.
FCN to cancel and go back to main menu.
▲ F6: SEQ CONFIG
Press
ENT
and LCD will display,
Press▲ or ▼ to select SEQ from 001~512(SEQ00= SEQ OFF).
Press 2 to go back to the main menu.
Press 1 to enter SEQ hotkey setting.
Notice:SEQ OFF include FADE TIME and FADE ON/OFF setting;SEQ001~SEQ512
include FADE TIME, DELAY TIME, MODE SELECT and FADE ON/OFF setting.
1.SEQ OFF setting
Press
them.
or
to select FADE TIME or FADE ON/OFF. Press ▲ or ▼ to modify
14
Lite- Puter
DP-E450 [EUM-C]
ISO 9001 CERTIFIED
Press
Press
www.liteputer.com.tw
ENT to save the setting and go back to main menu.
FCN to cancel and go back to main menu.
2.The setting of SEQ 001~SEQ512 as below,
Press
or
to shift FADE TIME, DELAY TIME, MODE SELECT and FADE
ON/OFF.
Press ▲or▼ to modify FADE TIME, DELAY TIME, MODE SELEC or TIMER
ON/TIMER OFF.
Press ENT to save and go back to the main menu.
Press FCN to cancel and go back to the main menu.
Parameters of FADE TIME and DELAY TIME:
0.1S
0.2S
0.3S
0.4S
0.5S
0.6S
0.7S
0.8S
0.9S
01S
01S
02S
03S
04S
05S
06S
07S
08S
09S
10S
12S
14S
16S
18S
20S
25S
30S
35S
40S
45S
50S
55S
01M
02M
03M
97M
98M
99M
……….
▲ F7: TIMER ON/OFF
Modify timer’s on/off time.
Press ENT and LCD will display,
Press▲ or ▼ to select TIMER ON or TIMER OFF.
Press ENT to save and go back to the main menu.
Press FCN to cancel and go back to the main menu.
▲ F8: EDIT TIMER
Select the SEQ that TIMER need call.
Press ENT and LCD will display,
15
Lite- Puter
DP-E450 [EUM-C]
ISO 9001 CERTIFIED
www.liteputer.com.tw
LCD will remind user whether exit timer setting or not. If has timer, press
preview; Press
2
to delete current timer;. Press
3
or
to
to add a new timer;Press
4 to modify the current timer.
Review timer:
Press
or
to review the timer.
Press ▲ or ▼ to review the setting of the current timer.
Delete timer:
Select the TIMER need to delete and press 2 the system will remind you that
whether to delete this timer? Press 1 to delete; press 2 to cancel delete.
Add timer:
The timer setting includes DATE, TIME, WEEK, MODE, SEQUENCE, FADE and
DELAY.
If DATE set as OFF, the DATE setting is useless; if WEEK (WDAY) set as NONE, the
WEEK is useless.
Press ▲ or ▼ to modify the setting.
Press
or
shift from each setting.
Press ENT to save and go back to the last menu.
Press FCN to cancel and go back to the last menu.
For example 1:
It stands for Mon. to SUN.
Hollow frame means don’t select.
Black frame means select.
16:38 on every Monday and Tuesday, it will call SEQ 2 in mix color mode 1. The fade
16
Lite- Puter
DP-E450 [EUM-C]
ISO 9001 CERTIFIED
www.liteputer.com.tw
time and the relay time of each scene on the SEQ are both 3 seconds. Because the
DATE set as OFF, the timer on 16:38 in May 20 is useless; but if May 20 is Monday or
Tuesday, the timer is still effective.
For example 2:
16:38 on every Monday and Tuesday and May 20, it will call SEQ 2 in mix color mode
1. The fade time and the relay time of each scene on the SEQ are both 3 seconds.
Because the DATE set as ON, the timer will effective as long as it fit in with either
DATE or WEEK setting.
For example 3:
On May 20, it will call SEQ 2 in mix color mode 1. Because the FADE TIME set as
OFF, The FADE TIME of each scene on the SEQ is useless, the scenes will call out in
relay time of 6 seconds (3S+3S=6S). It will effective only on 16:38 on May 20.
When the TIME memory capacity is full, the system will remind the user as below,
Modify timer:
Select the TIMR need to modify, press 4 to modify. Please refer to the steps of
add timer to modify timer.
(Attention: User must set one of DATE and WEEK. If user set DATE as OFF
and WEEK as NONE then press ENT , the system will remind that TIMER SET
ERROR.)
17
Lite- Puter
DP-E450 [EUM-C]
ISO 9001 CERTIFIED
www.liteputer.com.tw
▲ F9:EDIT PATCH
This device has patch function.
On EDIT PATCH menu, user can check build-in patch setting and modify the patch
setting.
Press
FCN
to enter the main menu and then press ▲ or ▼ to select F1~F13.
Select F9 and LCD will displays,
Press ENT to enter EDIT PATCH setting and LCD will display,
Blink
Press ▲ or ▼ to modify the channel no., for example, DMX0001=CH0025
DMX0255=CH0002
Press ▲ till LCD displays ,
Blink
It means DMX0001correspond to channel 25.
Press
or
to change DMX address.
Press
till LCD displays,
Blink
Press ▼ to modify channel no. till LCD displays,
Blink
It means DMX0255 corresponds to channel 2.
After setting, press ENT to save it and go back to the main menu.
Attention: Patch can make any channel correspond to any DMX address.
18
Lite- Puter
DP-E450 [EUM-C]
ISO 9001 CERTIFIED
www.liteputer.com.tw
▲ F10: MODIFY CLOCK
Set clock, year, month, day, week, hour, minute, and second.
Press ENT and LCD displays as below:
Press ▲ or ▼ to select year(00~99), month(JAN, FEB, MAR, ARP, MAY, JUN, JUL,
AUG, SEP, OCT, NOV, DEC), day(01~31), week(SUN, MON, TUE, WED, THU,
FRI, SAT), hour(00~23), minute(00~59), second(00~59)。
Press ENT to save and go back to the main menu.
Press FCN to cancel and go back to the main menu.
▲ F11: SET IP
Set device’s IP address.
Press ENT and LCD will display,
Press ▲ or ▼ to modify the value.
Press
or
to shift digit.
Press ENT to save IP address and go back to the main menu.
Press FCN to cancel and go back to the main menu.
(Attention: IP address can’t be same as that of other devices in the system.)
▲ F12: SET MAC
Set device’s MAC address.
Press ENT
and LCD will display,
Press ▲ or ▼ to modify the value.
Press or
to shift the digit.
Press
Press
ENT to save the MAC address and go back to the main menu.
FCN to cancel and go back to the main menu.
19
Lite- Puter
DP-E450 [EUM-C]
ISO 9001 CERTIFIED
www.liteputer.com.tw
▲ F13:ABOUT ME
Select F13 and press
version no..
ENT , LCD displays lighting control software name and
DP-E450 Memory Initialization
Press FCN and OFF at the same time and then switch on the device, the
device will remind user that whether to initial memory? Press 1 to start the
memory initialization or press 2 to cancel it and switch on without initialization..
Press
1
to enter memory initialization, please wait a moment.
When initialization is finished, it will display,
Memory initialization include(default) :
1. Control method: DP-E450 self-control
2. SEQ in TIMER : ON
3. SEQ FADE TIME and DELAY TIME: 3S
4. SEQ mix color mode: MODE-1
5. SEQ FADE mode: ON
6. LOAD SC: SC000, load no back scene
7. Key status: unlock
8. Call current SEQ: OFF
9. Clear all TIMER setting
10. Clear all SEQ setting
11. Set the channel‘s dimming value on all scene as 0
20
Lite- Puter
DP-E450 [EUM-C]
ISO 9001 CERTIFIED
www.liteputer.com.tw
DP-E450 Key Unlock/lock
If the key is unlock, press
line of LCD will display,
ENT
If the key is locked, press ENT
line of LCD will display,
and then
and then
OFF
to lock the key and the second
OFF to unlock the key and the second
(Attention:when the key is unlock , press
FCN
,
ENT
, ▲ ,▼ ,
,
LCD will display the key is locked and the LED beside those 6 keys will blink once. It
can only lock above 6 key, but the SEQ call key is still effective. (SEQ1~SEQ6 and
SEQ OFF).
When the setting is in process, key lock function is useless.
DP-E450 IR Remote Control:
Lite-Puter’s remote controller’ control distance is about 10 to 15 meters.
PC upload/ download DP-E450’s data:
DP-E450 can exchange SEQUENCE, SCENE and TIMER file between PC.
Download data
When SEQUENCE is downloading, LCD will display,
When SCENE is downloading, LCD will display,
When TIMER is downloading, LCD will display,
When download is succeed, the second line of LCD will display,
Wrong Use
●File transmission over time. The LCD will display time out, if the device doesn’t
receive the file for a period.
21
Lite- Puter
DP-E450 [EUM-C]
ISO 9001 CERTIFIED
www.liteputer.com.tw
●File receiving is succeed, but saving to FLASH is failed.
Upload data
When SEQUENCE is uploading to PC, LCD will display,
When SCENE is uploading to PC, LCD will display,
When TIMER is uploading to PC, LCD will display,
After uploading is succeed, the second line of LCD will display,
Wrong Use
●File transmission over time. The LCD displays time out, if the device doesn’t receive
the file for a period.
Attention: when the device is controlled by PC, the SEQ can’t be called
and TIMER is ineffective.
DP-E450and HOME LIGHTING SOFTWARE
Function and Wiring Diagram
1. When DP-E450 work with HOME LIGHTING SOFTWARE, the DMX-512 signal
from DMX1 port will send to controller; the DMX2 connected to ECP control panel will
send EDX signal to the controller. The maximal channel no. is 512.
2. If user wants to use other software, the device needs initialization.
22
Lite- Puter
DP-E450 [EUM-C]
ISO 9001 CERTIFIED
www.liteputer.com.tw
Wiring Diagram((HOME LIGHTING)):
Internet signal
DP-E450
DMX Signal
EDX-610
Control Panel
IR remote controller
·
·
·
·
·
·
23
Lite- Puter
DP-E450 [EUM-C]
ISO 9001 CERTIFIED
www.liteputer.com.tw
DP-E450 Operation
1.Main menu
Choose any one from F1~F12, then press
ENT to enter it.
F1:SCENE EDIT
STEP1:Press ▲ or ▼ to select F1,then press ENT
and LCD will display,
STEP2:Press ▲ or ▼ to choose scene no. and then press 1
cancel the setting.
Press 1 and LCD will display,
Press
or
to continue or 2
to
to select channel.
Press ▲ or ▼ to modify each channel’s dimming value.
24
Lite- Puter
DP-E450 [EUM-C]
ISO 9001 CERTIFIED
STEP3:After setting, press
www.liteputer.com.tw
ENT and LCD will display,
Press 1 to save the setting to SC 0001; press 2 to exit.
Attention: when DP-E450 work with home lighting software, OFF key on the
panel corresponds to SC1; 1 corresponds to SC2; 2 corresponds to SC3, and so on.
NC means no output in the current scene, but it will be replaced by its output of
next scene.
F2:SCENE FADE
STEP1:Press ▲ or ▼ to select F2, press ENT
and LCD will display,
STEP2:Press▲ or ▼ to select scene no. and then press 1 to continue or 2 to cancel
the setting.
Press 1 and LCD will display,
Press
or
to select scene no.
Press ▲ or ▼ to modify current scene’s fade in/out time.
STEP3:After setting, press ENT to save.
F3:TIMER SCEDIT(TIMER SCENE EDIT)
STEP1:Press▲ or ▼ to select F3, press
ENT
and LCD will display,
Blink
STEP2:Press ▲ or ▼to select the scene no.
(can set 500 TIMER SCENE at most.)
25
Lite- Puter
DP-E450 [EUM-C]
ISO 9001 CERTIFIED
www.liteputer.com.tw
For example, edit scene 100 as TIMER SCENE and LCD will display,
STEP3:After selection, press
1
to continue or
2
to cancel the setting. Press
1 and LCD will display,
It means the channel is
out of control.
Press
or
to select the channel no. (512 channels in total.)
Press ▲ or ▼ to modify each channel’s dimming value.
STEP4:After setting, press ENT to save and LCD will display,
Blink
STEP5:Press▲ or ▼ to select other TIMER SCENE no.
(500 TIMER SCENE in total )
STEP6:After setting, press
1
to continue or
2
to cancel the setting.
F4:TIMER ON/OFF
STEP1:Press ▲ or▼ to select F4,then press
ENT
and LCD will display,
STEP2:Press▲ or ▼ to select timer’s on or off.
F5:TIMER EDIT
Press ▲ or ▼ to select F5, then press
ENT
and LCD will display,
26
Lite- Puter
DP-E450 [EUM-C]
ISO 9001 CERTIFIED
www.liteputer.com.tw
LCD display DAY, MONTH and WEEK setting.
1)Press ▲ or ▼ to select F3-1, then press
ENT
and LCD will display,
It will remind user whether exit timer or not. If it exits, press
or to review TIMER,
press 2 to cancel the current timer; press 3 to add a timer; press 4 to edit
the timer.
Review timer
Press
or
to review the timer.
Delete timer
choose the TIMER need to delete then press
whether to delete or not; press 1
Add timer
Press 3 and LCD will display,
2 ,the device will remind the user that
to delete and 2 to exit.
NO means the no. of timer
Press
or
to select month, day and the SCH, press▲ or ▼ to modify the
value.
After setting, press
ENT to go back.
2)Press ▲ or ▼ to select F3-2, then press ENT
and LCD will display,
27
Lite- Puter
DP-E450 [EUM-C]
ISO 9001 CERTIFIED
www.liteputer.com.tw
It means the SCH that will be executed on each day in a month.
Press
or
to select the day and corresponded SCH, and press▲ or ▼ to
change the value.
After setting, press ENT to go back.
3)Press▲ or▼ to select F3-3, press
ENT
and LCD will display,
It means the SCH that will be executed each month in a year
Press
to select week and the corresponded SCH, press▲ or ▼ to change
or
the value.After setting, press ENT to go back.
4)Press ▲ or ▼ to select F3-4, then press
ENT
and LCD will display,
It means the SCH that will be executed each day in a week.
Press
or
to select week and the corresponded SCH, press▲ or ▼ to modify
the value. After setting, press ENT to go back.
F6:SCH EDIT
STEP1: Press▲ or ▼ to select F6, then press
ENT
and LCD will display,
STEP2:Press▲ or ▼ to select SCH no. and press 1 enter setting.
Press
or
to review the setting of SCH. Press
2
to delete, press
3
to add
28
Lite- Puter
DP-E450 [EUM-C]
ISO 9001 CERTIFIED
and 4 to edit.
STEP3:Press
3
www.liteputer.com.tw
and LCD will display,
NO. means the data no. on the current SC setting, if there is preset data, the new
data no.will follow in order.
Execution time
Scene No.
Fade in/out
Press
or
to select time, scene no. and FADE; press ▲ or ▼ to modify the
value.
After setting, press ENT to go back.
F7:PATCH EDIT
STEP1: Press ▲ or ▼ to select F7, press
ENT
and LCD will display,
STEP2:Press▲ or ▼ to select PATCH no., then press 1
will display,
to enter setting and LCD
It means channel 2 corresponds to DMX address 001.
Press
or
to change DMX address and press▲ or ▼to select the channel no..
For example:
29
Lite- Puter
DP-E450 [EUM-C]
ISO 9001 CERTIFIED
www.liteputer.com.tw
DMX address 001 corresponds to channel 2 and 5. When DMX 001 receives the
DMX signal, it will be send to both channel 2 and 5.
STEP3 :After setting, press ENT
and LCD will display,
It means save the setting to which PATCH. Press▲ or▼ to select PATCH no. and
Press
1
to save the setting.
F8:PATCH LOAD
STEP1 Press ▲ or ▼ to select F8, press ENT
and LCD will display,
means it calls PATCH2;NC means recall no PATCH.
STEP2 Press▲ or ▼ to select PATCH no. After setting, press ENT
to save.
F9:MODIFY CLOCK
Clock setting includes year, month, day, week, hour, minute, and second.
STEP1 Press ▲ or ▼ to select F9, press
ENT
and LCD will display,
Press▲ or ▼ to select year(00~99), month(JAN, FEB, MAR, ARP, MAY, JUN, JUL,
AUG, SEP, OCT, NOV, DEC), day(01~31), week(SUN, MON, TUE, WED, THU,
FRI, SAT),hour(00~23), minute(00~59), second(00~59).
STEP2: Press
ENT
to save setting and go back to main menu.
30
Lite- Puter
DP-E450 [EUM-C]
ISO 9001 CERTIFIED
www.liteputer.com.tw
F10:SET IP
STEP1:Press ▲ or ▼ to select F10, press
ENT
and LCD will display,
STEP2 Press ▲ or ▼to change the value.
Press
or to shift the item.
Press ENT to save IP address then go back to main menu.
F11:SET MAC
STEP1: Press ▲ or ▼ to select F11, press
ENT
and LCD will display,
STEP2: Press ▲ or▼ to modify the value.
Press
or
to shift the item.
Press ENT to save MAC address and go back to main menu.
F12:ABOUT ME
Select F12 and press
ENT
LCD will show the software name and version no.
Memory Initialization
Press FCN and OFF at the same time and then switch on the device,
The device will remind whether to initial memory? Press 1 to start the memory
initialization or press 2 to cancel and switch on without initialization.
Press
1
to enter memory initialization, please wait a moment.
31
Lite- Puter
DP-E450 [EUM-C]
ISO 9001 CERTIFIED
www.liteputer.com.tw
After initialization, LCD will display,
Key Lock
If the key is unlock, press ENT and then OFF to lock the key and the second line of
LCD will display,
If the key is locked, press ENT and then OFF to unlock the key and the second
line of LCD will display,
Other
a. When it was unconnected to PC, LCD will display,
It shows DP-E450’s IP address.
b. When it was connected to PC, LCD will display,
It shows PC’s address.
Online Update
Switch on the device and press
below,
or
,there will be 2 more functions display as
32
Lite- Puter
DP-E450 [EUM-C]
ISO 9001 CERTIFIED
www.liteputer.com.tw
STEP1: Press▲ or ▼ to select F5, then press
ENT and LCD will display,
STEP2: Press ▲ to start updating and Press▼ to exit.
STEP3: When the connection is ok, double click the update icon on the desktop and
update interface will come out.
STEP4: Set the IP address on Device IP setting, after setting press Link On.
33
Lite- Puter
DP-E450 [EUM-C]
ISO 9001 CERTIFIED
www.liteputer.com.tw
When connection is ok, Device info will show the link device name.
STEP5:Choose the first one of Flash Address and then click Update File to choose
the software.
34
Lite- Puter
DP-E450 [EUM-C]
ISO 9001 CERTIFIED
www.liteputer.com.tw
STEP6: The interface will show the software name.
STEP7:Turn off DP-E450 and press
and
at the same time, switch on the
device, then there will be 2 more functions on the main menu. Choose F13-SYS
UPDATE and click ENTER to enter update interface.
STEP8 :The interface reminds whether to update or not, and press▲ to enter
update.
STEP9 :It will show READY TO UPDATE DP-E450! LINK, it means the connection is
ok for updating. The wait time is 30 s, otherwise the system will remind error.
STEP10:Click Update to finish the download.
35
Lite- Puter
DP-E450 [EUM-C]
ISO 9001 CERTIFIED
www.liteputer.com.tw
STEP11: After updating, DP-E450 will show UPDATE SUCCEED.
Control software shift
DP-E450 can work with 4 control software: EDX/STAGE Control Software, Home
Lighting Control Software and LED Control Software.
User can shift to other control software in two modes,
1. When connected with PC, DP-E450 will automatically shift its control software to
that of PC.
2. Select control software on DP-E450, please refer to the following steps,
a. EDX /STAGE Control Software——press FCN and 1 at the same time to switch
on the device, the screen displays as below,
Press 1 to shift to EDX /STAGE Control software.
Press 2 to cancel the shift.
b. Home Lighting Software——press FCN and 1 at the same time and switch on
the device.(Please repeat the operation steps as above.)
c. LED Control Software——press FCN and 3 at the same time and switch on the
device.(Please repeat the operation steps as above.)
36
Lite- Puter
DP-E450 [EUM-C]
ISO 9001 CERTIFIED
www.liteputer.com.tw
Guarantee
Lite-Puter promises to fulfill the following acceptances:
1. Lite-Puter is only responsible for DP-E450 itself.
2. Lite-Puter guarantees to keep Lite-Puter’s fault products caused by
techniques, materials and any other logical reasons in good repair for free
within a year since the distributing date.
3. We do not offer door-visiting service. If the trouble appears in
Lite-Puter’s products, please deliver the equipment to local distributors or
Taipei headquarter.
*** Special Statement***
Any fault caused by false usage, imprudence (collision or inadequate
installation) or force majeure factors are not in Lite-Puter’s service.
Revision Record
Version
A
B
C
Record
First edition
Add control software shift description
Add connection port description
Issued on: May, 2009
37
Lite- Puter
DP-E450 [EUM-C]
ISO 9001 CERTIFIED
www.liteputer.com.tw
World Headquarter:
Lite-Puter Enterprise Co., Ltd.
Address: 9F, No. 196, Sec. 3, Da Tung Rd., Shijr City, Taipei, Taiwan
Zip Code: 22103
Tel: +886-2-86472828
Fax: +886-2-86472727
Website: www.liteputer.com.tw
E-mail: [email protected]
Shanghai Factory:
Lite-Puter Technology (Shanghai) Co., Ltd.
Address: Building B5, No. 298, Lane 3509, Hongmei S. Road, Shanghai, China
Zip Code: 201108
Tel: +86-21-54408210
Fax: +86-21-64978079
Shanghai Sales Center:
Address: Room 701, Building Gem, No. 487, Tianlin Road, Shanghai, China
Zip Code: 201103
Tel: +86-21-33674316/33674850
Fax: +86-21-33674013
Website: www.liteputer.com.cn
E-mail: [email protected]
38
Lite- Puter
DP-E450 [EUM-C]