1
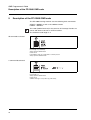
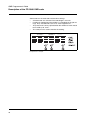
Programmer's
Guide
FPi 2000 Inserting Machine
Issue September 2004
OMR Programmer's Guide
Machine data
Machine type
FPi 2025
Serial number
OMR code
OMR-2
FP code level (OMR-2)
Low Level
Customer service settings for OMR-2
Commands
Command
Active
Start
Inserting
Parity
Safety
Code length
characters
Line spacing
mm
2
inch
pt
OMR Programmer’s Guide
Contents
1
Preface _______________________________________________________ 5
2
Useful information for processing with the machine__________________ 6
Rules for processing with OMR-2__________________________________________6
Configuration levels ____________________________________________________7
Job settings __________________________________________________________8
Machine configuration __________________________________________________ 8
3
Specification: Documents, number and processing of sheets__________ 9
4
Basic read code structure ______________________________________ 10
OMR-2 code command set (low level) _____________________________________10
Explanation of graphical symbols _________________________________________10
Description of the minimum code (basic commands)__________________________11
Additional OMR-2 code marks ___________________________________________12
5
Description of the FPi 2000 OMR code ____________________________ 14
Comprehensive example _______________________________________________15
6
Arrangement of marks and print quality ___________________________ 17
Position, printable areas, and spacing _____________________________________17
Mark width, number of characters and font size______________________________18
Print quality__________________________________________________________19
7
Test on the machine ___________________________________________ 20
Safety tip ___________________________________________________________20
Test material _________________________________________________________20
Notes on printing the test material ________________________________________20
Recommended test procedure ___________________________________________21
Further documents and assistance _______________________________________22
8
Tips for malfunctions and errors _________________________________ 23
OMR error codes _____________________________________________________23
9
Small OMR Lexicon ____________________________________________ 26
FPi 2000 Inserting machine with OMR Option
Issue September 2004
3
OMR Programmer’s Guide
4
OMR Programmer's Guide
Preface
1
Preface
The present guide describes the rules for programming OMR marks in
order to process documents in FPi 2000 Inserting machines.
You will not always have access to all commands described here in your
machine. For further information please refer to chapter 4 “Basic read
code structure”.
What is OMR?
OMR - Optical Mark Recognition
is an additional function for document processing in accordance with
barcodes printed directly on the documents. In the FPi 2000 display this
function is referred to as OMR.
FPi 2025 machines from our FPi 2000 Inserting machines series can
optionally be fitted with this function.
Target group
This guide is aimed at programmers who are responsible for preparing
documents for OMR processing on FPi 2000 Inserting machines.
Operator Manual
If you need further information on the use of the inserting machine,
please refer to the appropriate operator manual.
This manual describes all actions by the operator for job programming,
loading the machine and processing with and without the OMR function.
Warning! Risk of injury! Please refer to the safety instructions in the
operator manual if you are performing tests on the machine.
Further documents and
assistance
Test material is available from Francotyp-Postalia. This enables you to
check the machine’s optical reading features.
Check cards enable quick checking of the read codes.
The Service Manual describes the settings that the Service technician
must undertake.
Terms
At the end of this guide there is a “Small OMR Lexicon” which explains
some important technical terms.
FPi 2000 Inserting machine with OMR Option
Issue September 2004
5
OMR Programmer's Guide
Useful information for processing with the machine
2
Useful information for processing with the machine
Rules for processing with OMR-2
Read code on documents
The read code must be printed in the same position on all documents
that are to be processed together in a job.
The code must be always of the same length, i.e. the same number of
marks including spacers for marks which are not present. The code
length is set for the machine by the FP customer service.
The first sheet of a set is always the address carrier. It bears the address that is to appear in the address window of the envelope.
If the code includes marks for parity checking, these checks will be performed on every sheet of the set.
The last sheet will carry marks for further processing (folding and/or inserting). If the set comprises only a single sheet, this is taken to be the
“last” sheet.
Supplements
Supplements do not carry read codes.
Supplements can be fed into every set by means of appropriate job settings.
Collating and further
processing
The machine first passes the set (document and any supplements) as
a complete entity into the collating area.
The mark for further processing identifies the set as being complete; the
set is transferred to the folding/inserting unit.
6
OMR Programmer's Guide
Useful information for processing with the machine
Configuration levels
Configuration of an FPi 2000 for processing documents with the OMR function occurs at four levels:
Available hardware and software
Hard- / Software
FPi 2025 machine type
OMR-2 code
Dongle for Low Level
Customer-specific settings in the service mode
FP customer service
Activation of the requested commands from the command set
Code length
Line spacing of marks
Settings during programming
Programmer
Distance of start mark from top of sheet (read window)
Lateral position of read window
Heed the specific service setting conditions
(command set, line spacing)
Job settings and machine configuration
Operator
Activate the OMR function
Set up read window (distance of start mark from top of sheet)
Maximum number of sheets
Read head position
Envelope settings
Form settings for supplements
Fold settings
Activate double feed control (as required)
You can note your special configuration settings on the second jacket page.
FPi 2000 Inserting machine with OMR Option
Issue September 2004
7
OMR Programmer's Guide
Useful information for processing with the machine
Job settings
Documents
Documents with OMR marks can be only fed via feeder 3 (top feeder).
Heed the correct sequence when loading the machine. The feeder
should always hold complete sets.
The following read parameters are stored in the job:
– Activation of the read codes for documents (OMR on/off)
– Start mark position (margin from top edge of sheet)
– Maximum number of sheets per set.
Supplements
During job programming it is determined from which of the available
feeders any supplements will be appended. The selected supplements
are appended to each set.
Machine configuration
Before starting to program the OMR code marks, you should have available the following information regarding the machine configuration (see
also the second jacket page of this guide).
OMR code
Francotyp-Postalia FPi 2000 Inserting machines are supplied with
OMR-2 code (FE8 one track code) as standard.
Level dongle
Releasing the OMR-2 code occurs with a level dongle. The low level is
available for the FPi 2000.
Command set
The required commands require activation by a Service technician in
service mode. The number of commands actually used can be less than
the number of commands available.
For further information please refer to chapter 5 “Description of the FPi
2000 OMR code”.
8
OMR Programmer's Guide
Specification: Documents, number and processing of sheets
3
Specification: Documents, number and processing of sheets
This section describes typical further processing options recommended
by Francotyp-Postalia for the FPi 2000 Inserting machines with OMR
functionality.
The following specifications are proven:
Letter fold/
double parallel fold
For insertion of DIN A4 formats into C6 long envelopes, use double folding as letter fold.
Single fold
For insertion of DIN A4 formats into C5 envelopes, use the single fold
type.
Inserting only
(envelope sized)
Unfolded envelope sized material: All sheets of the set can be inserted
into the intended envelopes without folding.
The minimum length of documents with OMR marks is 115 mm.
Supplements to be fed from feeders 1 and 2 must have a minimum
length of 90 mm.
Further variants (e.g. Z folding) are technically practicable.
Please contact us if you have special requirements.
Maximum number of sheets per set
The maximum number of sheets that can be processed in a set is determined by various aspects (fold capacity, collating area capacity,
postal tariff bands, reliability aspects).
Maximum number of sheets
5 (subject to technical restrictions)
The specification relates to 80 g/m2 paper.
The number refers to the entire set, including supplements.
Job settings
This “Max. sheets” parameter is held in the “OMR 2” menu. If the values
are exceeded, the machine will interrupt processing. The operator must
remove the defective set and re-start the machine.
FPi 2000 Inserting machine with OMR Option
Issue September 2004
9
OMR Programmer's Guide
Basic read code structure
4
Basic read code structure
This section describes the basic structure of the read code in the sequence the commands are read by the read head.
OMR-2 code command set (low level)
The following table gives a summary of the overall set of commands /
functions.
Command
Function
Start
Read code start
Inserting
Quit collating → Folding/inserting
Parity check
Completeness check of marks
Safety check
Read direction check
The scope of available commands/functions depends on which commands were activated in the service mode.
Explanation of graphical symbols
This guide uses the following symbols:
10
–
Paper running direction
–
Print code marks
–
No code mark
(Spacer where no mark is printed)
–
Code marking in example not relevant
–
Command not activated in service mode
–
Line grid for printing code marks
with track of the read head
–
Inserting
OMR Programmer's Guide
Basic read code structure
Description of the minimum code (basic commands)
The minimum code comprises two commands: START and INSERT.
The FP service technician can set the minimum code by deactivating
additional commands on any machine, using service mode.
Start
The “Start” command begins the read activity. This mark must be printed on every sheet. The distance of this mark from the top edge of the
sheet must be set in the job settings of the machine.
Inserting
If there is no mark printed in this line of code, the sheet in question will
be collated. If the mark is set, the sheets collated so far will be folded /
inserted, including any supplements.
Note: The INSERT command also marks the end of the document in
the paper stack.
–
–
–
START (always print mark in the first code line)
ACCUMULATE (do not print mark in the second code line)
INSERT (print mark in the second code line)
The minimum code
FPi 2000 Inserting machine with OMR Option
Issue September 2004
11
OMR Programmer's Guide
Basic read code structure
Additional OMR-2 code marks
All code marks that are printed in addition to the minimum code are here
referred to as “Additional marks”. They are part of the read code.
Additional marks control the read code completeness and monitor reading as such. They are available as activated by the FP customer service
in the service mode.
Caution!
If the customer requests the Service technician not to activate additional commands on the machine, then the respective additional
marks are deactivated. The other marks in the read code are displaced upwards, i.e. the code length is reduced.
Parity check
The parity check allows the read code to be checked:
Under the OMR-2 code used here, the number of marks on each sheet
must be even.
The parity mark must therefore always be printed when the number of
other marks is odd, in which case the parity mark will round up the
number of marks to “even”.
Additional mark for checking that the PARITY is “even”
Complete command set
Additional mark for checking that the PARITY is “even”
Safety check not activated
12
OMR Programmer's Guide
Basic read code structure
Safety check
The safety mark increases the read reliability. The machine will issue an
error message if the safety mark is not detected.
The safety mark is part of the read code and is placed as the last mark
on each sheet.
Example: Read head does not read all the marks (sheet fed in askew)
FPi 2000 Inserting machine with OMR Option
Issue September 2004
13
OMR Programmer's Guide
Description of the FPi 2000 OMR code
5
Description of the FPi 2000 OMR code
The FPi 2000 inserting machine uses the following basic commands:
START + INSERT as well as the additional marks
PARITY + SAFETY.
This code (OMR-2/low level) is the same for all Francotyp-Postalia machines and allows to be run on all FPi machines.
The maximum code length is 4.
All commands activated
Example 1, all commands activated:
Code length: 4 (= maximum)
Always print the START mark
Collate sheet
Print PARITY mark only if odd number of marks present
Always print the SAFETY mark
1 command deactivated
Example 2, PARITY command deactivated,
Code length = 3
Always print the START mark
Collate sheet
SAFETY mark gone one position up, print always,
14
OMR Programmer's Guide
Description of the FPi 2000 OMR code
Comprehensive example
Customer A receives: 3 sheets
(document with reading)
+ 1 supplement
(from feeder 2)
Customer B receives: 1 sheet
(document with reading)
+ 1 supplement
(from feeder 2)
Customer C receives: 2 sheets
(document with reading)
+ 1 supplement
(from feeder 2)
Example:
FPi 2025 feeders
Material has been loaded as follows:
1. All documents with read code are in feeder 3
(top feeder)
• Document for customer A is on top in the stack
• Address carrier (sheet 1) on top of the document
• printed side with code marks facing upward
• headers to the front in feed direction.
2. Supplements are in feeder 2.
FPi 2000 Inserting machine with OMR Option
Issue September 2004
15
OMR Programmer's Guide
Description of the FPi 2000 OMR code
Some notes on the read code and machine settings:
– All commands are activated. The code length is 4 marks.
– Feeding of supplements from feeder 2 is controlled via the job settings. They are added to each set as “fixed supplements”.
– The parity mark is always printed when the number of marks needs
to be made up to “even”.
– The safety mark is used to monitor the reading.
Comprehensive example
16
OMR Programmer's Guide
Arrangement of marks and print quality
3
Arrangement of marks and print quality
The present chapter describes how the read codes must be arranged
and gives hints on the optimum print quality.
You can also use our FP test material in order to assess the print quality
of marks on your documents.
Position, printable areas, and spacing
Print position
The print position must be identical on all sheets.
The distance of the first mark from the top edge of the sheet is by default
set to 100 mm (3.9 inches). The operator must set this variable, depending on the documents to be processed, to the value actually required.
Recommendation:
Print the marks at about the same level as the address field. Experience
shows this position will minimize the effect on other characters.
Printable areas
Maintain the following minimum distance from the sheet edge in feed direction:
– 15 mm from the top
– 30 mm from the bottom
– 4.2 mm from the sides
Printable and print-free areas of the document
FPi 2000 Inserting machine with OMR Option
Issue September 2004
17
OMR Programmer's Guide
Arrangement of marks and print quality
Mark length
The length of marks is made up of the code length, the line spacing selected, and the upper and lower free spaces.
There must be unprinted areas of 8.5 mm (2 lines = 1/3 inch) before the
first mark and after the last mark.
8.5 mm
Blank line
8.5 mm
Example:
Code marks for
Start + Insert (minimum code)
Code line: marking / no marking
Blank line
Code line: START marking
Blank line
Blank line
Spacing in paper feed direction
Line spacing
The line spacing can be set between 2.54 mm and 6.3 mm.
(1/10 to 1/4 inch). The FP customer service sets it in the service mode.
Recommendation:
We recommend a line spacing of 4.2 mm = 1/6 inch = 12 pt. We offer
test material and check cards for this line spacing, so that you can easily
check the printed marks.
Mark width, number of characters and font size
Example:
Code marks for
Start + Insert
4.2 mm
4.2 mm
6.3 mm
Margins transversely to paper feed direction
The minimum width of the code marks is seven characters.
From left to right it is made up of:
– two empty spaces (about 4.2 mm; 1/6 inch)
– three printed characters for marks (6.3 mm = 1/4 inch)
– two empty spaces (about 4.2 mm; 1/6 inch)
The font size is 12 pt (Pica). We recommend that you use the underscore (_) character as mark.
18
OMR Programmer's Guide
Arrangement of marks and print quality
Print quality
Mark
Code marks should be printed in black.
Matrix printers must be set to “Near Letter Quality” (NLQ) to attain an
optimum print density (over-striking).
The density of all code marks on a sheet must be the same. This means
you need to monitor the quality of the printer ribbon or toner.
Background
Heed the background in the mark area. The read head could read shaded areas on the document, background graphics or a logo / printed area
on the back of the sheet that shine through as a mark.
Note:
There are two systems of units for font size:
– the Pica Point System, which is common on European personal
computers;
abbreviation: “pt”
12 pt = 4.2332 mm = 1/6 inch.
– The Didot Point System;
abbreviation: “p”
12 p = 4.5113 mm
The FPi 2000 machine reads and supports both point systems.
FPi 2000 Inserting machine with OMR Option
Issue September 2004
19
OMR Programmer's Guide
Test on the machine
4
Test on the machine
To learn how to use the machine and how to set it up, we recommend
that you first perform a test using FP test material.
Safety tip
Warning! Risk of injury! Please refer to the safety instructions in the
Operator Manual if you are performing tests on the machine.
Job programming and operation are comprehensively covered in the
Operator Manual.
Test material
The test documents refer to the example given in the present guide. The
following paper formats are available: DIN A4 and Letter (in English only).
Each set of test documents comes with a summary of the individual
sheets, an explanation of the commands used and the necessary machine settings.
The test material matches the recommendations given in this guide,
and uses a underscore as the mark, with a font size of 12 pt and a line
spacing of exactly 12 pt.
To check test material that you have printed yourself, and your own documents, you can use our check cards.
Notes on printing the test material
–
–
–
20
In the print window, check the paper size.
Deactivate all check boxes for scaling, zoom in, zoom out when
printing test material.
Deactivate all features such as “Sorted printing”,
“Reverse pages”, ...
OMR Programmer's Guide
Test on the machine
Recommended test procedure
Step
1. Programming a job with OMR settings:
– in the “OMR 1” menu: Choose Read ON
– Enter the OMR position
(distance of first character from top of sheet,
in mm)
Please refer to
Operator Manual
chapter “Optical Mark Recognition
(optional)”
– Specify maximum number of sheets per set
– Save job
Recommendation: Select the job settings without moistening the envelope flap. This allows you to quickly
check the processing quality.
Operator Manual,
chapter “Adjustments for envelope feeding”
2. Align the read head and the paper guides.
Operator Manual,
chapters
“Adjustments for document feeding”,
“Adjustments for envelope feeding”,
“Optical Mark Recognition (optional)”
3. Call up the job that was programmed as above.
Operator Manual,
chapter “Other job”
4. Call up the JOB INFO menu. The display will show
the feeders in which material must be placed:
Operator Manual,
chapter “Job Info”
– Documents with OMR marks in the feeder 3
(top feeder)
– Insert supplements in the feeders if needed
Note: Place document stack in the feeder with addresses facing upward, headers to the front and first sheet facing upward.
5. Check mechanical settings
– Read head position
Operator Manual,
section “Machine operation”
– Side guides in the feeders
– Stops in the collator
– Separation in the respective feeders as necessary.
6. Start the job, and stop it again after a few cycles.
Operator Manual,
chapter “Display”
FPi 2000 Inserting machine with OMR Option
Issue September 2004
21
OMR Programmer's Guide
Test on the machine
Step
Please refer to
7. Check the processing result. Make corrections.
OMR-specific errors are listed in this
guide.
For a complete list of error messages,
refer to the Operator Manual.
8. Repeat these steps as necessary until processing is
stable and generates the desired result.
Note: Do not forget (where necessary) to activate envelope closing before starting routine processing.
Further documents and assistance
Operator Manual
The operator manual describes all operator actions for loading the machine and processing documents.
You will also find:
– Safety tips
– Tips for errors with a complete list of error codes, and
– A description of how to program jobs.
Quick Start Guide
The Quick Start Guide provides a concise overview of:
– How to prepare the machine for operation
(unpacking, removing packing material, fitting feeder hoppers, fitting catch basket)
– Quick start
(connection, filling of water tank, loading documents/supplements/
envelopes in feeders, starting).
Brochure
The brochure also provides information on:
– Specification of processable material
– Fold and insertion capacity of the machine.
Service Manual
All necessary settings and tests for the OMR function, which are undertaken by the FP customer service through the service menu of the inserting machine are described in the Service Manual.
Test material
Test material is available from Francotyp-Postalia. This enables you to
check the machine’s optical reading features.
The sample documents are available as Adobe Acrobat files and as
copied sets.
Check card
22
A check card is available for quick checking of the read codes.
OMR Programmer's Guide
Tips for malfunctions and errors
5
Tips for malfunctions and errors
Caution! For error codes with the message “Technical error”, note the
error code and power cycle the machine. If the error recurs, call the customer service.
In case of an error the display shows the error code, an error description, and suggestions on how to eliminate the error.
Error codes of OMR-related errors are easily identified by their 3:xxx
numbers.
OMR error codes
Error code 3:112
Reading error.
Remove documents.
Troubleshooting
The reading window is activated after the document that contains
OMR info has passed the reading head. Adjust the reading
window parameters.
Wrong window position.
Error code 3:114
Suspected set.
Remove suspected set.
Suspected set after error.
Error code 3:120
Reading error.
Reset & start to finish set.
Not enough marks.
Error code 3:121
Reading error.
Remove documents
Multiple basic commands
Troubleshooting
This error is issued after a previous reading error and the reading
of an insert mark. It is very likely that the reading error probably
occurred during the processing of the current set, causing this set
and the next set being not complete.
Troubleshooting
Less marks have been detected than based on the applied
reading code. The set can be removed from the collator, but this is
not strictly necessary. After a restart the rest of the set is
processed and error 3:114 (suspected set) is issued.
Troubleshooting
More than one paper flow-related commands (accumulate, insert,
divert or stop mark) have been detected. The set can be removed
from the collator, but this is not strictly necessary. After a restart
the rest of the set is processed and error 3:114 (suspected set) is
issued.
FPi 2000 Inserting machine with OMR Option
Issue September 2004
23
OMR Programmer's Guide
Tips for malfunctions and errors
Error code 3:122
Reading error.
Reset & start to finish set.
No basic command.
Error code 3:126
Reading error.
Reset & start to finish set.
Troubleshooting
No mark defining the paper flow (accumulate, insert, divert or
stop mark) has been detected. The set can be removed from the
collator, but this is not strictly necessary. After a restart the rest of
the set is processed and error 3:114 (suspected set) is issued.
Troubleshooting
The parity of the processed code appears to be not correct. After
a restart the rest of the set is processed and error 3:114
(suspected set) is issued.
Wrong parity in code.
Error code 3:127
Reading error.
Reset & start to finish set.
Undefined mark found.
Error code 3:128
Reading error.
Reset & start to finish set.
Wrong mark distance.
Error code 3:129
Reading error.
Remove documents.
Too many marks.
24
Troubleshooting
This error code is displayed if a mark is found at a position where
no mark is supposed to be present (too many marks or mark
conflicting with other marks). The set can be removed from the
collator, but this is not strictly necessary. After a restart the rest of
the set is processed and error 3:114 (suspected set) is issued.
Troubleshooting
This error message occurs if the position of a mark has shifted in
such a way that is present in the so-called forbidden zone. This is
defined as a percentage of the line distance around a line halfway
between two successive lines. After a restart the rest of the set is
processed and error 3:114 (suspected set) is issued.
Troubleshooting
This error code is displayed if more reading code marks have
been detected than may be possible, based on the applied
reading code. After a restart the rest of the set is processed and
error 3:114 (suspected set) is issued.
OMR Programmer's Guide
Tips for malfunctions and errors
Error code 3:134
Too many sheets.
Remove documents.
Set size exceeded.
Error code 3:135
Final set part.
Remove documents.
Part of previous set.
Troubleshooting
The maximum set size is specified in the OMR settings menu.
The maximum size is 5, including insets (i.e. selective feeds).
Suppose this maximum is X. If sheet X is processed and an
accumulation mark has been read or the insert mark has been
read and selective feeds must be added to the set, this error is
issued.
Remove the paper from the collator, reset and press the Start/
Stop key to restart the process.
Troubleshooting
This is a follow-up of error 3:134. The rest of the oversized set is
collated. After this is done, error 3:135 is issued. If the maximum
set size is exceeded for the second time, error 3:134 is issued
once again.
Further information regarding treatment of errors can be found in operator manual and in the Service Manual for the machine.
FPi 2000 Inserting machine with OMR Option
Issue September 2004
25
OMR Programmer's Guide
Small OMR Lexicon
6
Small OMR Lexicon
In the present guide a job's components are called as follows:
Document
Consists of address carrier and, if applicable, subsequent sheets;
all sheets bear OMR marks
Supplement
Attachment to the document, e.g. advertisement, card or reply
envelope;
Supplements do not bear any OMR marks
Set
Consists of a document (with OMR marks)
and, if applicable, supplements (without OMR marks)
Important terms for optical mark recognition on FPi series Inserting machines
Additional mark
All marks that control machine functions over and above the basic commands “Start” and “Insert” or serve to control the read safety.
Basic commands
Commands “Start” and “Insert” which are represented by combinations
of two marks.
Code
Sum of marks for expressing a single control command or sequence of
commands.
Code length
Number of marks (including spaces for marks that are not set), which
must be the same on all sheets. The FP customer service sets it in the
service mode.
Collating
All sheets of a document and any supplements are firstly collated as a
set in the collation area of the machine. The full set will be further processed (e.g. folded and inserted).
Fixed supplement
Attachment to a document attached to each set via the job settings.
Level
Designates the compilation of individual commands from the overall
command set for a particular code.
The level installed on a machine determines the level at which the
processing can be controlled.
Level, available on the
FPi 2000
Low Level:
Basic commands Start and Insert
and Parity and Safety check
Level dongle
Memory chip releasing OMR-2 mark reading at the respective
Minimum code
See
Basic commands. Also called minimum code in some documents.
OMR
OMR - Optical Mark Recognition
Control of document processing using barcode marks on documents.
OMR mark
Designation used here for a code character (mark dash on the document to be read).
26
level.
OMR Programmer's Guide
Small OMR Lexicon
OMR-2
Particular OMR code, which is used as standard for the FPi series Inserting machines from Francotyp-Postalia. The descriptions in the
present guide refer to this code.
Parity check
A check mark. It allows monitoring that the correct number of marks
have been printed and recognized.
(The FPi 2000 uses an even number of marks.)
Read code
Commands for document control are encoded as barcode marks and
are printed directly on to the document in the specified area. Barcode
marks are printed on to all sheets of the document in accordance with
the chosen code.
Read feeder
The feeder from which the document with the address field and the
OMR marks is supplied. For the FPi 2000: feeder 3 (top feeder).
Read window
Area of code marks including the necessary clear space. To compensate for possible positioning tolerances in the marks, the machine
opens the window at a particular distance before the start mark and
does not close it immediately after the last character.
The position of the read window is determined within the job by setting
the distance of the first character from the top edge of the sheet.
Safety mark
A control mark that is placed at the end of the read code. This allows
monitoring that all characters are written in the read direction and have
been captured by the read head.
Selective supplement
Attachment to a document, which under the control of OMR marks is attached only to selected sets. This function is not available for the
FPi 2000.
FPi 2000 Inserting machine with OMR Option
Issue September 2004
27
OMR Programmer's Guide
Small OMR Lexicon
28
OMR Programmer’s Guide
Index
A
L
Accumulate 11
Additional commands. See Additional mark
Additional mark 12, 26
Letter fold. See Fold types
Level 8, 26
available 26
Level dongle 8, 26
Line spacing 18
B
Basic commands 11, 26
Basic rules. see Rules
Brochure 22
C
Check cards 5, 18, 20, 22
Code 26
Code length 12, 26
Collating 26
Command set 8, 10
D
Document 8, 26
Double parallel fold. See Fold types
E
Errors 23
Example 15
F
Fold and insertion capacity 22
Fold types
Double parallel fold 9
Letter fold 9
Single fold 9
without folding – inserting only 9
Font size 18, 19
Form. See Document
FPi 2000 OMR code 14
M
Mark
Length 18
Width 18
Mark length 18
Mark width 18
Material specification 22
Minimum code 26
Minimum code. see also Basic commands 11,
26
N
Number of characters 18
Number of sheets 9
maximum 7, 9
O
OMR 5, 26
Small OMR lexicon 26
OMR 2 code 5, 27
OMR mark 26
Operator Manual 22
P
Parity check 12, 27
Print position 17
Print quality 17, 19
Printable areas 17
Print-free area 18
G
Graphical symbols 10
Q
I
Quality. See Print quality
Quick Start Guide 22
Inserting 11
J
Job settings 7
FPi 2000 Inserting machine with OMR Option
Issue September 2004
29
OMR Programmer’s Guide
Index
R
Read code 6, 27
Structure of … 10
Read code structure 10
Read feeder 27
Read window 23, 27
Rules 6
S
Safety check 13
Safety mark 27
Service 31
Service Manual 5, 22, 25
Set 26
Single fold. See Fold types
Start 11
Supplement 6, 8, 26
fixed 26
selective 27
T
Test 20
Test cards. See Check cards
Test material 5, 17, 18, 20, 22
30
OMR Programmer's Guide
Service
Please contact our Support Center when you have questions regarding
OMR code programming or special processing tasks not covered in the
present guide.
The FP Support Center is open for you:
Monday - Thursday
Friday
07:30 a.m. - 05:30 p.m.
07:30 a.m. - 05:00 p.m.
Francotyp-Postalia AG & Co. KG
Postfach
16542 Birkenwerder, Germany
Phone
Fax
+49 3303 / 53 02 34
+49 3303 / 52 51 93
Email
Internet
[email protected]
www.francotyp.com
FPi 2000 Insertion Machine with OMR Option
Issue September 2004
31
2004-10 / helbig berlin
51.0064.1003.00


![[mailcredit / ENG] User Manual](http://vs1.manualzilla.com/store/data/005957121_1-8f833d5244dc8652c61044097905507f-150x150.png)