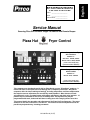
1
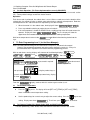
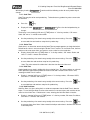
DQGUHWDLQWKLVPDQXDOIRUWKHOLIHRIWKHHTXLSPHQW 0RGHO BBBBBBBBBBBBBBBBBBBBBBBBBB 6HULDO BBBBBBBBBBBBBBBBBBBBBBBBBB 'DWH3XUFKDVHG BBBBBBBBBBBBBBBBBBB Service Manual Covering Pitco P/N 60126804 Single Vat Control with Remote Beeper Pizza Hut Fryer Control 3 Lane Computer for a Fryer with 3 baskets. Models i.e.: Gas units: SG14R, SSH55 Electric units: SE14, SE14R (3 Lane Color Overlay Only replacement P/N is A6090701) 4 Lane Computer for a Fryer with 4 baskets $QPG $QPG +P 1WV 9KPIU 9KPIU 0GY 6TCF 6CVGTU 2KGU %JGGUG 5VKEM Models i.e.: Electric units: SEF184 (4 Lane Color Overlay Only replacement P/N is A6095401) This computer was developed specifically for Pizza Hut for use on “WingStreet” products. It utilizes the latest in microprocessor technology and is completely solid state. WingStreet computers offer the latest cooking technology, including temperature and time compensation that requires no user adjustment for consistently cooked product. Other features include selectable melt cycles, a remote beeper with volume adjustment, and drain valve interlock. 10 product keys are available to each of 3 or 4 cooking lanes. Each product key may be programmed with cook, shake and hold times to keep pace with changing menus over time. This manual details the operation and adjustment of the Pizza Hut Fryer Computer. The target audience for this text is the Service Technician. This manual reveals all adjustments that are possible by keyboard entry, including passwords. L22-304 Rev 0 (11/07) English ,03257$17,1)250$7,21)25)8785(5()(5(1&( 5HFRUGWKHIROORZLQJLQIRUPDWLRQIURPWKHDSSOLDQFH,'SODWH I12 Cooking Computer: Pizza Hut WingStreet with Remote Beeper Pitco P/N 60126804 1 Key Locations and Functions: ..........................................................................................................4 1.1 To turn the appliance ON: ______________________________________________________4 1.2 To turn the appliance OFF:______________________________________________________4 1.3 To start a cook:_______________________________________________________________4 1.4 To cancel a cook: _____________________________________________________________5 1.5 To view Vat temperature: _______________________________________________________5 1.6 To view Cooking Set temperature: ________________________________________________5 1.7 To view Set Back temperature: __________________________________________________5 1.8 To view Current Settings for Cook, Shake, Hold, and Hold Pre-Alarm:____________________5 1.9 Set back Operation: (For Future Implementation currently DISABLED) ___________________6 2 To Enter Programming Level 1 (for the Store Manager): ...............................................................6 2.1 To Set Cook Temperature: ______________________________________________________6 2.2 To Change a Product Key–Cook, Shake, Hold, and Hold Pre-Alarm Times: _______________6 2.2.1 2.2.2 2.2.3 2.2.4 Cook Time ............................................................................................................................................................. 7 Shake Time ........................................................................................................................................................... 7 Hold Time .............................................................................................................................................................. 7 Hold Pre-Alarm ...................................................................................................................................................... 7 2.3 To Exit Level 1 programming: ___________________________________________________8 3 To Change Options Level 2 ( for the Store Manager): ....................................................................9 3.1 Fahrenheit or Celsius Display: ___________________________________________________9 3.2 Password Change or Required? _________________________________________________9 3.3 Beeper Volume and Tone: _____________________________________________________10 3.4 Language Selection:__________________________________________________________10 3.5 Melt Cycle Type:_____________________________________________________________10 3.6 Recovery Test Value: _________________________________________________________11 3.7 Control or Timer Selection:_____________________________________________________11 3.8 Lane Selection 3 or 4:_________________________________________________________11 3.9 Setback Time and Temperature settings: _________________________________________12 3.10 To Exit Programming Level 2 ___________________________________________________12 4 To Enter Programming Level 3 (for the Technician).....................................................................13 4.1 Offset the Temperature Display: ________________________________________________13 4.2 Melt Cycle ON Time __________________________________________________________13 4.3 Minimum ON and OFF Cycle Time ______________________________________________14 4.4 Recovery Time ______________________________________________________________14 4.5 Diagnostic Menu Entry ________________________________________________________14 4.5.1 4.5.2 4.5.3 4.5.4 4.5.5 4.5.6 4.5.7 4.5.8 2 Left Basket Lift Output ......................................................................................................................................... 14 Right Basket Lift Output ....................................................................................................................................... 14 Heat Demand Output ........................................................................................................................................... 14 Side On Output .................................................................................................................................................... 15 Drain Switch Input................................................................................................................................................ 15 Lamp Test............................................................................................................................................................ 15 Heat Feedback Input............................................................................................................................................ 15 Exit Diagnostic Menu ........................................................................................................................................... 15 L22-304 Rev 0 (11/07) 4.6 I12 Cooking Computer: Pizza Hut WingStreet with Remote Beeper Pitco P/N 60126804 Ready Level ________________________________________________________________15 4.7 Temperature Operating Range _________________________________________________15 More Service Menu Entry _____________________________________________________________16 4.8.1 4.8.2 4.8.3 4.8.4 4.8.5 4.8.6 4.8.7 4.8.8 4.8.9 4.8.10 Cook Now ............................................................................................................................................................ 16 Turbo Select (Single Only) ................................................................................................................................... 16 Heat Demand Profile............................................................................................................................................ 16 Shake Alarm Duration.......................................................................................................................................... 17 Hold Alarm Duration............................................................................................................................................. 17 Cancel Duration ................................................................................................................................................... 17 Configuration Value ............................................................................................................................................. 17 Factory Reset ...................................................................................................................................................... 17 Standing Pilot Toggle........................................................................................................................................... 17 Exit More Service sub menu ................................................................................................................................ 18 4.9 To Exit Programming Level 3 ___________________________________________________18 5 Factory Menu Level 4 (for the Technician).....................................................................................19 5.1 Offset Temperature Display ____________________________________________________19 5.2 Melt Cycle ON Time __________________________________________________________19 5.3 Minimum ON and OFF Cycle Time ______________________________________________20 5.4 Recovery Test Values ________________________________________________________20 5.5 Diagnostic Menu Entry ________________________________________________________20 5.6 Ready Level ________________________________________________________________20 5.7 Operating Temperature Range _________________________________________________21 5.8 High Limit Value _____________________________________________________________21 5.9 Basket Lift__________________________________________________________________21 5.10 Test On/Off _________________________________________________________________21 5.11 To Exit Factory Menu (Level 4): _________________________________________________21 6 Other Displays: .................................................................................................................................22 7 Mechanical Dimensions:..................................................................................................................23 8 Electrical Connections:....................................................................................................................24 9 Probe Resistance Chart: ..................................................................................................................25 L22-304 Rev 0 (11/07) 3 I12 Cooking Computer: Pizza Hut WingStreet with Remote Beeper Pitco P/N 60126804 1 Key Locations and Functions: Computer Overlay (4 Lane Version shown, 3 Lane version is the same except heat demand indicator is in B (Blue) key box.) $QPG $QPG +P 1WV 9KPIU 9KPIU 1.1 0GY 6TCF 6CVGTU 2KGU %JGGUG 5VKEM To turn the appliance ON: If power is applied to the appliance, the displays will show . Press the key. Displays will show one of the following: ; ; or . Some messages may show in both left and right displays. Wait for the appliance to heat up to the [READY] condition before cooking. 1.2 To turn the appliance OFF: Press the key. Display will momentarily show the software version number, and then . 1.3 To start a cook: When the display is showing the appliance OR OR + 6[RKECN has reached set temperature and is ready to cook. Press a 2TQFWEV INDICATOR FLASHES WHEN SET -G[ basket key then the desired product key. Place cooking basket into the vat. The left display will show the basket color and the product key, while the right display shows the time remaining in the cook. In the example above, GREEN lane is cooking product 4 (left display) with 2 minute and 42seconds remaining (right display). All cook lanes may run together. While cooks are running, the displays will always show the cook with the least time remaining. Longer running cooks will flash their indicators at a slower rate. Cook time remaining on these keys may be checked by momentarily pressing the basket keys. 4 L22-304 Rev 0 (11/07) I12 Cooking Computer: Pizza Hut WingStreet with Remote Beeper Pitco P/N 60126804 1.4 To cancel a cook: Press and hold a colored basket key to cancel a cook in that lane. The indicator above a running product key will turn off, indicating a canceled cook. If no other cooks are pending, controller displays will return to . 1.5 To view Vat temperature: To view the actual vat temperature, press the key. The display will show or , where “F’ is Fahrenheit, and “C” is Celsius. After a few moments, the display will return to [READY], [MELT], [HEATING] or [NOTREADY]-[SET BACK] if no cooks are running. 1.6 To view Cooking Set temperature: To view the set temperature, press the key twice. The display will show or , where “F’ is Fahrenheit, and “C” is Celsius. After a few moments, the display will return to [READY], [MELT ], [HEATING] or [NOTREADY]-[SET BACK] if no cooks are running. 1.7 To view Set Back temperature: To view the set temperature, press the key three times. The display will show or , where “F’ is Fahrenheit, and “C” is Celsius. After a few moments, the display will return to [READY], [MELT ], [HEATING] or [NOTREADY]-[SET BACK] if no cooks are running. 1.8 To view Current Settings for Cook, Shake, Hold, and Hold Pre-Alarm: To view the current settings for any product key, press the key, followed by the desired product key. The display will show [nCK mm:ss], followed by [nSH mm:ss], then [nHD mm:ss], ending with [nPA mm:ss]. Where “n” is the key number, and “mm:ss” is the time setting. After a few moments, the display will return to ; , , or when no cooks are running. If cooks are running, the least time remaining will be displayed. Typical displays using key 4 as an example: Key 4 Cook Time [4CK] is set for 3 minutes and 28 seconds. + Key 4 Shake Time [4SH] is set for 2 minutes and :00 seconds before the end of the Cook. Default value is 00:00, or inactive. Key 4 Hold Time [4HD] is set for 15:00 minutes. This is the amount of time cooked product may sit in holding bins before a new batch is started. Default value is 00:00, or inactive. Key 4 Hold Pre-Alarm [4PA] is set for 00:00 and is inactive (default setting). When activated his alarm warns the operators that the Hold Time is about to run out. Default value is 00:00, or inactive. In a few moments, the display to , ; , or L22-304 Rev 0 (11/07) 5 I12 Cooking Computer: Pizza Hut WingStreet with Remote Beeper Pitco P/N 60126804 1.9 Set back Operation: (For Future Implementation currently DISABLED) Operation of the setback features requires set up values be entered (refer to service manual section 3.8). Factory default settings are with this feature inactive. Operation: Each time a cook is performed, the setback timer is reset. When no cooks occur for the duration of the setback time, the control will enter a setback state and maintain a reduced vat temperature. Both time and temperature of this setback feature are adjustable by the store manager. 1. When the control is in the setback state, the display will show 2. Press any colored basket key or product key to exit setback. 3. If the vat temperature is below the READY band, a rapidly pulsing alarm will sound to warn the operator. Display will show . The m:ss display will show the approximate time needed for the vat temperature to rise to cooking temperature. Wait for the temperature to return to the fryer. 2 condition before lowering basket into the To Enter Programming Level 1 (for the Store Manager): Note: The factory default setting for this control does not require a password to be entered. However, the password requirement and value may be changed in section 3.2. Entry of a password when NOT required will not interfere with the programming process. With no cook timers running, displays will show one of the following displays: , , or , . Press the key. If display shows: If display shows: ; you do not need , a password is required. to enter a password. Level 1 & 2 Password Enter password using the product keys as a numeric keypad for entry. With correct password entry, display will show . From the 2.1 display, continue with this section or go to section 3, or 4. To Set Cook Temperature: Press the key once. The display will show [SET xxxF] [TEMP] or [SET xxxC] [TEMP], where “xxx” is the current temperature setting. Use the product keys for numeric entry to adjust the current setting. Press the setting. Display now shows 2.2 . To exit here, press key to save again, or continue. To Change a Product Key–Cook, Shake, Hold, and Hold Pre-Alarm Times: For each product key, Cook, Shake, Hold, and Hold Pre-alarm times are set in this section. 6 L22-304 Rev 0 (11/07) I12 Cooking Computer: Pizza Hut WingStreet with Remote Beeper Pitco P/N 60126804 , continue with the following section for each product key to With display showing change. 2.2.1 Cook Time Cook Time may be set for each product key. To deactivate any product key enter a zero value for cook time. Press the Display will show key. . Press the desired product key to change. The display is now showing [nCK mm:ss] [TIME] where “n” is the key number, “CK” means Cook, and “mm:ss” is minutes and seconds. Use the product keys for numeric entry to adjust the current setting. Press the key to save cook time and continue setup for this product key. 2.2.2 Shake Time Shake time is an alarm that sounds during Cook Time to prompt operators to shake the basket. Default for this value is zero, meaning the Shake Time is inactive. To use Shake Time, the time value must be a non-zero value, and, must be set to a value less than cook time. Display shows [nSH mm:ss] [TIME] where “n” is the key number, “SH” means Shake, and “mm:ss” is time in minutes and seconds. Use the product keys for numeric entry to adjust the current setting. Press the key to save shake time and continue setup for this product key. Note: The value entered for shake time is the time from the end of the cook. 2.2.3 Hold Time Cooked product may stand in holding bins for a period of time. This timer produces an alarm to inform operators to discard old product and start a new cook. Default for this value is zero, meaning the Hold Time is inactive. Display is showing [nHD mm:ss] [TIME], where “n” is the key number, “HD means HOLD, and “mm:ss” is minutes and seconds. Use the product keys for numeric entry to adjust the current setting. Press the key to save hold time and continue setup for this product key. 2.2.4 Hold Pre-Alarm Hold Pre-Alarm is a timer setting that is used to warn operators that the Hold Time is about to expire. To use Hold Pre-Alarm, the time value must be a non-zero value, and, must be set to a value less than Hold Time. Default value is zero, meaning the Hold Pre-Alarm is inactive. Display is showing [nPA mm:ss] [TIME] where “n” is the key number, PA means Pre-Alarm, and “mm:ss” is minutes and seconds. Use the product keys for numeric entry to adjust the current setting. Press the key to save pre-alarm time. Note: Value entered for hold pre-alarm time is the time from the end of the hold period. L22-304 Rev 0 (11/07) 7 I12 Cooking Computer: Pizza Hut WingStreet with Remote Beeper Pitco P/N 60126804 Display will again return to . Repeat steps from section 2.2 to make changes to any other product keys or continue. 2.3 To Exit Level 1 programming: Display shows Press the . key. Display shows . Continue to section 3 “To Change Options”, or, exit here in the next step. To exit Level 1 programming, press the Displays will show are running. 8 key again. ; L22-304 Rev 0 (11/07) , or , when no active cooks I12 Cooking Computer: Pizza Hut WingStreet with Remote Beeper Pitco P/N 60126804 3 To Change Options Level 2 ( for the Store Manager): The display must show from section 2 to change these options. When the . Indicator product key [0] is pressed, the display will show lights above product keys will illuminate to represent options that may be changed. Each option listed below uses the product key [0] to toggle or scroll through available choices in the display. When the correct value is displayed, press the display will again return to 3.1 key to save choice. The for another option selection. Fahrenheit or Celsius Display: The Controller will display temperatures in the Fahrenheit or Celsius scales. The default scale is °F. With display showing , press the product key [0]. Display shows . Press product key 1, display shows [DEGREE n] [F OR C], where “n” is the current setting. Use the product key [0] to scroll through choices (F or C). Press key to save choice. 3.2 Display shows . Password Change or Required? With factory settings, an operator password is not required to enter programming Levels 1 and 2. The password may be activated or changed in these steps. With display showing , press the product key [0]. Display will show . Press product key 2, display shows [SET PAS] [NEW PASS]. Use the product key [0] to scroll through choices [NO PASS] or [PASS REQ]. Press key to save choice. If [NO PASS] is selected Display returns to . If [PASS REQ]. is selected, display will show [PASSnnnn] [NEW PASS] to prompt for new password. Displayed value “nnnn” is the current password. Use the product keys for numeric entry to change password. Press Display then shows key to save choice. . Note: The factory default password (6684) will always work even if a different password is selected here. L22-304 Rev 0 (11/07) 9 I12 Cooking Computer: Pizza Hut WingStreet with Remote Beeper Pitco P/N 60126804 3.3 Beeper Volume and Tone: Volume and Tone of the beeper alarm may be changed in this section. Volume ranges are 1,2, and 3, where 3 is the loudest setting. This model also has a selection for tone. With display showing 3.4 , press the product key [0]. . Press product key 3, display Display will show shows [VOLUME n] [BEEPER]. Use the product key [0] to scroll through choices (n= 1,2,3, or T). Beeper volume will change as each selection is made. If “T” is selected an additional display is shown, [TONE n] [BEEPER]. Use the product key [0] to scroll through choices (n= 1,2,3). Beeper tone will change as each selection is made. Press key to save choice. Display shows . Language Selection: With display showing , press the product key [0]. Press product key 4, display shows [ENGLISH] [LANGUAGE]. Press 3.5 Display will show . Use the product key [0] to scroll through choices (ENGLISH, ESPANOL, FRANCAIS, DEUTSCH, HOLLAND). key to save choice. Display shows . Melt Cycle Type: This adjustment allows selection of the melt cycle type and requirement when starting the appliance from a cold start. With display showing 10 , press the product key [0]. Press product key 5, display shows [LIQUID], the default setting. Press Display will show . Use the product key [0] to scroll through choices (liquid, solid, or, no melt). key to save choice. Display will again return to L22-304 Rev 0 (11/07) . I12 Cooking Computer: Pizza Hut WingStreet with Remote Beeper Pitco P/N 60126804 3.6 Recovery Test Value: This controller maintains a record of heat up times for the appliance. A poorly running appliance will have increased recovery times stored in this display. There is no selection done here, just the display of recovery time values. With display showing , press the product key [0]. Press product key 6; display will show [RECOVERY] [TEST]. After recording these values, press the Display will show . Press the product key [0]. Display will show [FnnnLyyy], where nnn is the factory recovery value, and yyy is the last warm- up recovery value. key. Display will again return to . 3.7 Control or Timer Selection: With display showing , press the product key [0]. Press product key 7; display will show [CONTROL]. Press Display will show . Use the product key [0] to scroll through choices; Control or Timer. key to save choice. Display shows . Note: If timer is selected, heat control outputs are disabled, leaving only the timer functions active. Do not make this selection on Solstice fryer models. 3.8 Lane Selection 3 or 4: Computer P/N 60126804 offers a selection of 3 or 4 active cook lanes. In the three lane mode, the control responds to basket key location shown on the cover of this manual. Lanes are defined as Yellow, Blue, and Red. In the four lane mode, lane colors are Yellow, Blue, Red, and Green. To change to four lane mode follow these steps. With display showing , press the product key [0]. Display will show . Press product key 8; display will show [LANES n] [ 3 or 4 ], where n is the default setting. Use the product key [0] to scroll through choices. Press key to save choice. Display shows . Factory default setting is for 3 Lane Control. L22-304 Rev 0 (11/07) 11 I12 Cooking Computer: Pizza Hut WingStreet with Remote Beeper Pitco P/N 60126804 3.9 Setback Time and Temperature settings: With display showing , press the product key [0]. Display will show . Press key [9]. Display shows, [TIME nn] [SET BACK], where nn is the time the control must be idle (not cooking) to enter the setback state. The default setting is 00, meaning that the setback feature is disabled. Entry on any non-zero value will activate this feature. Enter the number of minutes [nn] using the numbered keys … . The valid range of time entry is 0 to 99 minutes. Entering 00 will disable the setback feature. Typical values are 30 minutes. Press Display shows Enter a new setback temperature using the numbered keys key to save. . … . The valid range of temperature entry is 225 to (SetPoint -15) °F. Factory default value is 275°F. Press key to save setting. Display shows . 3.10 To Exit Programming Level 2 With display showing , press the key. Display will return one of the normal displays: , or 12 , .. L22-304 Rev 0 (11/07) , I12 Cooking Computer: Pizza Hut WingStreet with Remote Beeper Pitco P/N 60126804 4 To Enter Programming Level 3 (for the Technician) With no cook timers running, displays will show one of the following displays: ; Press the , or . key. The left display will show . The right display will be blank. Level 3 Password Enter password using the product keys as a numeric keypad for entry. Display will show . Product key indicators will illuminate to prompt operator to select a key. This section details parameters that may be changed in Level 3 programming. 4.1 Offset the Temperature Display: This adjustment allows the displayed temperature value to be offset to reflect the true center vat temperature while reading the probe tip temperature. Default value is zero. With zero value set, displayed values are the probe temperature. With display showing press product key 1. Display shows [OFF nn F] [DEGREES], where “nn” is the value of the adjustment. Negative values are preceded with a minus sign. To change this value, use the product keys for numeric entry of a new value. Press the Use the product key [0] to scroll choices (Positive or Negative value). After key. Display will show [POSITIVE] [DEGREES]. selection, press the 4.2 key. Display returns to . Melt Cycle ON Time With display showing press product key 2. Display shows [MLTON :nn] [MELT ON], where “nn” is the value, in seconds, of time for a melt cycle heat pulse. To change this value, use the product keys for numeric entry of a new value. Press the key. Display returns to L22-304 Rev 0 (11/07) . 13 I12 Cooking Computer: Pizza Hut WingStreet with Remote Beeper Pitco P/N 60126804 4.3 Minimum ON and OFF Cycle Time press product key 3. With display showing Display shows [MIN ON:nn] [MIN ON], where “nn” is the value, in seconds, of time for minimum heat pulse period. To change this value, use the product keys for numeric entry of a new value, then press the 4.4 key to save. Display shows [MIN OFF:nn] [MIN OFF], where “nn” is the value, in seconds, of time for minimum heat off period. Use the product keys for numeric entry of a new value. Press the key. Display now shows . Recovery Time press product key 4. With display showing 4.5 Display shows [RECY nnn] [RECOVERY], where nnn is the last cold start recovery time. No adjustments are permitted here. This is an information display only. Press the key. Display returns to . Diagnostic Menu Entry The diagnostic menu is used to determine the functionality of controller outputs and inputs. By exercising each output and examining inputs, a determination can be made if an appliance problem is controller related. In the diagnostic menu, product keys are assigned specific inputs or outputs. All outputs in the ON state should produce 22VDC at the appropriate pins on the controller connector. Controller inputs can be verified by the on or off state of the indicator above the product key. This section details the process of checking each input and output. press product key 5. With display showing Display will show [DIAGNOST] [DIAGNOST]. The following list describes the function of each key in the diagnostic mode. 4.5.1 Left Basket Lift Output Press the product key 1 to toggle the left basket lift output ON. Display will show [L BASKET]. Press again to toggle output OFF. 4.5.2 Right Basket Lift Output Press the product key 2 to toggle the right basket lift output ON. Display will show [R BASKET]. Press again to toggle output OFF. 4.5.3 Heat Demand Output Press and hold the product key 3 to force Heat Demand output ON. Display will show [HEAT DEM]. Releasing the key will force output OFF. 14 L22-304 Rev 0 (11/07) I12 Cooking Computer: Pizza Hut WingStreet with Remote Beeper Pitco P/N 60126804 4.5.4 Side On Output Press the product key 4 to toggle the Side ON output ON. Display will show [SIDE ON] Press again to toggle output OFF. 4.5.5 Drain Switch Input Press the product key 5. Display will show state of the Drain Valve input. Display will show [DRN ON (or OFF)]. Product key 5 indicator shows the ON or OFF state of the input. 4.5.6 Lamp Test Press the product key 6. All display indicators will be forced on. The purpose is to reveal non-functional indicators or displays. 4.5.7 Heat Feedback Input Press the product key 7. Display will show state of the Heat Feedback input [FB xxx], where xxx is ON or OFF. Key 7 indicator shows the ON or OFF state of this input. 4.5.8 Exit Diagnostic Menu To exit diagnostic menu, press the key. Display will return to . Other service menu items may be selected for changes. To return to programming, press the key again. Display will show . Other settings can be made in section 2. To return to normal operations, press the ; normal displays: 4.6 key again. Display will show one of the , or . Ready Level With display showing press product key 6. Display shows [READY nn], where “nn” is the value, in degrees below set temperature that the message is displayed. To change this value, use the product keys for numeric entry of a new value. Press the 4.7 key. Display now shows . Temperature Operating Range Forces the control to display the range of temperatures that may be set by operators. With display showing press product key 7. Display shows [RANGE 1] [200 380]. No adjustments are permitted here. This is an information display only. Press the key. Display returns to L22-304 Rev 0 (11/07) . 15 I12 Cooking Computer: Pizza Hut WingStreet with Remote Beeper Pitco P/N 60126804 4.8 More Service Menu Entry press product key 8 to enter submenu. Display now . With display showing shows Product keys will illuminate where adjustments are permitted; all other keys are inactive. The menu. following section details each product key function in the 4.8.1 Cook Now Should operators be forced to acknowledge a Cook Done Alarm before starting another cook? This setting forces that requirement. Factory default value is OFF. , press product key 1. With display showing Display will show [NOW xxx] [COOK NOW], where “xxx” is ON or OFF. Use product key [0] change value. Press the Display returns to to save choice. . Note: With OFF value selection, operators must acknowledge a done cook [ DONE n] display before starting any another cooks. With an ON value, operators are permitted to start a cook on the opposite side before acknowledging a cook done alarm. Example: The left display is showing [DONE 2] with the beeper alarm sounding. Indicator 2 is flashing needing to be acknowledged. All other product indicators are off. With a set value of OFF, no other cooks can start until product key 2 is pressed to acknowledge and clear the cook done alarm. With a value of ON set, a cook on the right side of the control (keys 6-R) may be started before operator clears the cook done alarm for product key #2 on the left side. 4.8.2 Turbo Select (Single Only) With display showing , press product key 3. Display will show [TRBO OFF] [TURBO]. This setting is for use on Pitco’s Turbo-Fry appliance. It should remain OFF for all other applications. Use product key [0] change value, then press the Display returns to to save choice. . 4.8.3 Heat Demand Profile With display showing , press product key 3. Display will show [xxxxxxx] [HEAT DEM], where xxxxxxx may be one of 5 heat control profiles listed below. 1. [GENERIC 1] for gas fired fryer appliance. This is the factory default. 2. [GENERIC 2] for electric fryer appliances, for example model SE184. 3. [T-STAT] control operates as a mechanical thermostat for general applications on gas or electric fryers. This setting offers the quickest possible recovery times at the expense of temperature overshoot suppression. 4. [HE RPB] for use with High Efficiency RPB models only. 5. [HE ADV] for use with High Efficiency Advance models only. 16 L22-304 Rev 0 (11/07) I12 Cooking Computer: Pizza Hut WingStreet with Remote Beeper Pitco P/N 60126804 Use product key [0] change value, then press the to save choice Display returns to . 4.8.4 Shake Alarm Duration With display showing , press product key 4. Display will show [SH-DUR:nn] [DURATION], where “nn” is the time in seconds the shake alarm will sound. Use product keys for numeric entry of desired value, then press the returns to to save choice. Display . 4.8.5 Hold Alarm Duration With display showing , press product key 5. Display will show [HD-DUR:nn] [DURATION], where “nn” is the time in seconds the hold alarm will sound. Use product keys for numeric entry of desired value, then press the returns to to save choice. Display . 4.8.6 Cancel Duration With display showing , press product key 6. Display will show [CANCEL:nn] [DELAY] , where “nn” is the time in seconds the operators must press a product key to cancel a cook. Use product keys for numeric entry of desired value, then press the to save choice. Display returns to . Default value is 2 seconds. 4.8.7 Configuration Value With display showing , press product key 7. Display will show [CFG hhhh], where “hhhh” is a hexadecimal check sum of the program contained in the controller. Modifications to any part of the setup of this control will change the check sum value. Press the display will return to . 4.8.8 Factory Reset Factory Reset provides a quick way to erase all setup changes and restore control to factory settings. Warning: Any settings made prior to a factory reset will be lost. This includes customer specific downloads performed at Pitco Frialator. Heat profile after a reset is Generic 1 for gas appliances. , press 8 product key. After a few With display showing moments, the display will show [ P ]. Press the display will return to . 4.8.9 Standing Pilot Toggle For some applications, it is desirable to maintain the gas pilot flame when the appliance is OFF. Heat from the pilot keeps solid shortening in the liquid state for quicker warm-ups in the morning. Default setting for standing pilot is off. Note: Heat Demand Profile (section 4.8.3) must be set to Generic 1, or T-stat. Standing Pilot toggle has no effect in with any other setting. L22-304 Rev 0 (11/07) 17 I12 Cooking Computer: Pizza Hut WingStreet with Remote Beeper Pitco P/N 60126804 With display showing , press product key 9. Display will show [STANDING] [PILOT n], where “n” is ON or OFF. Use product key [0] change value, then press the to save choice. Display returns to . 4.8.10 Exit More Service sub menu With display showing , press key. Display will show . Continue with Level 3 programming in this section (display showing [SERVICE]), or continue. 4.9 To Exit Programming Level 3 With display showing , press the . Continue with changes in sections 2 or3, or continue exit with the Display will show key. next step. To return to normal operations, press the key again. Display will return one of the normal displays: ; 18 L22-304 Rev 0 (11/07) , or . I12 Cooking Computer: Pizza Hut WingStreet with Remote Beeper Pitco P/N 60126804 5 Factory Menu Level 4 (for the Technician) With no cook timers running, displays will show one of the following displays: [HEATING], [MELT ], or [READY]. Press the program key. Left display will show [PROGRAM]. Right display will be blank. Enter password number 1993 using the product keys as numeric keypad for entry. Display will show . The key indicators will illuminate to prompt operator to select a key. This section details parameters that may be changed in Factory menu. 5.1 Offset Temperature Display This adjustment allows the displayed temperature value to be offset to reflect the true center vat temperature while reading the probe tip temperature. Default value is zero. With zero value set, displayed values are the probe temperature. With display showing press product key 1. Display shows [OFF nn F] [DEGREES], where “nn” is the value of the adjustment. Negative values are preceded with a minus sign. To change this value, use the product keys for numeric entry of a new value. Press the key. Display will show [POSITIVE] [DEGREES]. Use the product key to scroll choices (Positive or Negative value). After selection, press the key. Display shows . Note: Computer Display Temp – Center Vat Temp = Offset (+/-). Example: Computer Display shows 350F while Center Vat Temp measures 352F. 350F – 352F = - 3 °F. A negative offset value. Proper equipment and expertise is required to correctly adjust this value. Even small changes may negatively effect cooking performance. 5.2 Melt Cycle ON Time With display showing press product key 2. Display shows [MLTON :nn] [MELT ON], where “nn” is the value, in seconds, of time for a melt cycle heat pulse. To change this value, use the product keys for numeric entry of a new value. Press the key. Display returns to L22-304 Rev 0 (11/07) . 19 I12 Cooking Computer: Pizza Hut WingStreet with Remote Beeper Pitco P/N 60126804 5.3 Minimum ON and OFF Cycle Time press product key 3. With display showing Display shows [MIN ON:nn] [MIN ON], where “nn” is the value, in seconds, of time for minimum heat pulse period. To change this value, use the product keys for numeric entry of a new value, then press the 5.4 key to save. Display shows [MIN OFF:nn] [MIN OFF], where “nn” is the value, in seconds, of time for minimum heat off period. Use the product keys for numeric entry of a new value. Press the key. Display now shows . Recovery Test Values This controller maintains a record of heat up times for this appliance. A poorly running appliance will have increased recovery times stored in this display. There is no selection done here, just the display of recovery time values. press product key 4. With display showing Display will show [RECOVERY] [TEST]. Press the product key [0]. Display will show [FnnnLyyy], where nnn is the factory recovery value, and yyy is the last warm- up recovery value. After recording these values, press the key. Display will again return to . 5.5 Diagnostic Menu Entry This menu is identical to Diagnostic Menu section 4.5 except is displayed instead of [SERVICE]. 5.6 Ready Level With display showing 20 press product key 6. Display shows [READY nn], where “nn” is the value, in degrees below set temperature that the READY message is displayed. To change this value, use the location keys for numeric entry of a new value. Press the key. Display now shows L22-304 Rev 0 (11/07) . I12 Cooking Computer: Pizza Hut WingStreet with Remote Beeper Pitco P/N 60126804 5.7 Operating Temperature Range With display showing press product key 7. This forces the control to display the range of temperatures that may be set by operators. Display shows [RANGE ] [200 380]. No adjustments are permitted here. This is an information display only. Press the 5.8 key. Display returns to . High Limit Value press product key 8. With display showing Pressing product key 8 forces the control to display the temperature above set temperature, the high limit alarm will sound. Changes may be made buy using the location keys for numeric entry. Press the Display now shows key. . Factory default value is 40°F over set temperature, or 320°F absolute, whichever is less. 5.9 Basket Lift ; press key 9. With display showing Display will show ; where the number is the current setting for basket lift outputs. Use product key [0] to scroll through choices: 0 = no basket lift outputs 1 = one basket lift output for all keys. 2 = two outputs – keys L-5 on left side, 6-R on the right. Press the to save choice. . Display returns to . 5.10 Test On/Off press product key 9. With display showing Display shows [TEST xx], where “xx” is ON or OFF. If ON is selected, temperatures displayed by the controller are probe tip temperatures unaltered by values set in section 4.1, or 5.1. For normal operations, this setting should remain OFF. To change this value, use product key 0 to toggle choice (ON or OFF). Press the key. Display now shows . 5.11 To Exit Factory Menu (Level 4): To exit Factory Programming, Press the key. Display will show . Continue with settings in section 2 or 3, or exit in the next step. To return to normal operations, press the • ; , or key again. . L22-304 Rev 0 (11/07) 21 I12 Cooking Computer: Pizza Hut WingStreet with Remote Beeper Pitco P/N 60126804 6 Other Displays: Open probe detection is standard on all Pitco controls. If probe is detected open, normal heating and cooking activities are suspended. This display warns operators that the vat temperature has exceeded set temperature by +40°F (+22°C), or an absolute maximum of 410°F (210°C). This display does NOT show the status of the mechanical high limit switch. This message indicates that the drain valve has been opened, the vat is assumed to be empty by the controller. Normal heat control activities are suspended. To restore to normal operation, close the drain value. Display will show [TURN OFF] [TURN OFF]. Turn controller off, and refill the vat. Continue with normal operations at section 1. This message indicates that the heating system failed to respond. Typically, the high temperature limit switch has tripped and is in need of resetting. In the case on gas fired appliances, this message will display if the pilot fails to light or is detected marginal by the ignition module. This message indicates a shorted probe. If probe is detected as a short circuit, normal heating and cooking activities are suspended. 22 L22-304 Rev 0 (11/07) I12 Cooking Computer: Pizza Hut WingStreet with Remote Beeper Pitco P/N 60126804 7 Mechanical Dimensions: . L22-304 Rev 0 (11/07) 4 23 I12 Cooking Computer: Pizza Hut WingStreet with Remote Beeper Pitco P/N 60126804 8 Electrical Connections: Turn power completely off to the fryer before disconnecting or connecting the computer from its wiring harness. Permanent computer damage may occur if this practice is not followed. Tip: Use the diagnostic menu to verify operation of outputs, and inputs. 24 L22-304 Rev 0 (11/07) I12 Cooking Computer: Pizza Hut WingStreet with Remote Beeper Pitco P/N 60126804 9 Probe Resistance Chart: Probe Resistance in 5°F Increments. Probe Temp (°F) 10 15 20 25 30 35 40 45 50 55 60 65 70 75 80 85 90 95 100 105 110 115 120 125 130 135 140 145 150 155 160 165 170 Probe Temp (°C) -12.2 -9.4 -6.7 -3.9 -1.1 1.7 4.4 7.2 10.0 12.8 15.6 18.3 21.1 23.9 26.7 29.4 32.2 35.0 37.8 40.6 43.3 46.1 48.9 51.7 54.4 57.2 60.0 62.8 65.6 68.3 71.1 73.9 76.7 Resistance (Ohms) 562734 483875 417167 360589 312474 271446 236370 206311 180491 158252 139055 122489 108051 95539 84644 75136 66823 59540 53146 47523 42569 38195 34328 30902 27862 25161 22755 20610 18695 16981 15446 14069 12823 Probe Temp (°F) 175 180 185 190 195 200 205 210 215 220 225 230 235 240 245 250 255 260 265 270 275 280 285 290 295 300 305 310 315 320 325 330 335 Probe Temp (°C) 79.4 82.2 85.0 87.8 90.6 93.3 96.1 98.9 101.7 104.4 107.2 110.0 112.8 115.6 118.3 121.1 123.9 126.7 129.4 132.2 135.0 137.8 140.6 143.3 146.1 148.9 151.7 154.4 157.2 160.0 162.8 165.6 168.3 Resistance (Ohms) 11719 10716 9812 8995 8255 7586 6979 6427 5926 5470 5055 4675 4329 4013 3723 3458 3214 2991 2785 2597 2422 2262 2113.9 1977.3 1851.0 1734.3 1626.1 1525.9 1433.0 1346.7 1266.6 1192.1 1122.8 Probe Temp (°F) 340 345 350 355 360 365 370 375 380 385 390 395 400 405 410 415 420 425 430 435 440 445 450 455 460 465 470 475 480 485 490 495 500 Probe Temp (°C) 171.1 173.9 176.7 179.4 182.2 185.0 187.8 190.6 193.3 196.1 198.9 201.7 204.4 207.2 210.0 212.8 215.6 218.3 221.1 223.9 226.7 229.4 232.2 235.0 237.8 240.6 243.3 246.1 248.9 251.7 254.4 257.2 260.0 Resistance (Ohms) 1058.23 998.09 942.00 889.67 840.78 795.10 752.38 712.41 674.95 639.87 606.96 576.09 547.09 519.86 494.24 470.16 447.49 426.13 406.02 387.04 369.14 352.24 336.29 321.21 306.94 293.46 280.69 268.61 257.15 246.30 236.00 226.24 216.96 Notes: The resistance of either probe lead to the frame of the appliance should read as “open’ on the meter. Typically this is 1Meg ohms or more. °C = 5/9 (°F-32) °F = (9/5 * °C) +32 L22-304 Rev 0 (11/07) 25 I12 Cooking Computer: Pizza Hut WingStreet with Remote Beeper Pitco P/N 60126804 Notes (This page was intentionally left blank) 26 L22-304 Rev 0 (11/07) I12 Cooking Computer: Pizza Hut WingStreet with Remote Beeper Pitco P/N 60126804 Notes (This page was intentionally left blank) L22-304 Rev 0 (11/07) 27 I12 Cooking Computer: Pizza Hut WingStreet with Remote Beeper Pitco P/N 60126804 In the event of problems with or questions about your order, please contact the Pitco Frialator factory at (800) 258-3708 US and Canada only (603) 225-6684 World Wide In the event of problems with or questions about your equipment, please contact the Pitco Frialator Authorized Service and Parts representative (ASAP) covering your area, or contact Pitco at the numbers listed to the left. MAILING ADDRESS – P.O. BOX 501, CONCORD, NH 03302-0501 SHIPPING ADDRESS – 10 FERRY ST., CONCORD, NH 03301 L22-304 Rev 0 (11/07)