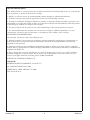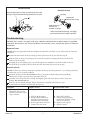
1
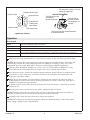
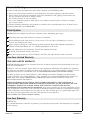
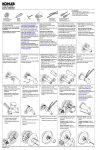
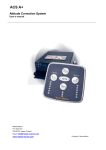
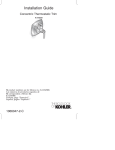
Homeowners Guide
Bath Whirlpool
with Heater
K-1158-H2, K-1158-HB, K-1158-HE,
K-1158-HJ
Write model number here:
Écouter le numéro du modèle ici:
Escriba el número del modelo aquí: ___________________
M product numbers are for Mexico (i.e. K-12345M)
Los números de productos seguidos de M corresponden a México
(Ej. K-12345M)
Français, page “Français-1”
Español, página “Español-1”
1043843-5-C
Important Information
INSTRUCTIONS PERTAINING TO A RISK OF FIRE,
ELECTRICAL SHOCK, OR INJURY TO PERSONS
READ AND FOLLOW ALL INSTRUCTIONS
SAVE THESE INSTRUCTIONS
WARNING: When using electrical products, basic precautions should always be followed,
including the following:
DANGER: Risk of personal injury. To reduce the risk of injury, do not permit children to use this
unit unless they are closely supervised at all times.
WARNING: Risk of personal injury. To avoid injury, exercise care when entering or exiting the
whirlpool.
WARNING: Risk of electric shock. Do not permit electric appliances (such as a hair dryer, lamp,
telephone, radio, or television) within 5’ (1.5 m) of this whirlpool.
WARNING: The use of alcohol, drugs, or medication can greatly increase the risk of fatal
hyperthermia. Prolonged immersion in hot water may induce hyperthermia. Hyperthermia occurs
when the internal temperature of the body reaches a level several degrees above the normal body
temperature of 98.6°F (37°C). The symptoms of hyperthermia include an increase in the internal
temperature of the body, dizziness, lethargy, drowsiness, and fainting. The effects of hyperthermia
include: (a) failure to perceive heat, (b) failure to recognize the need to exit the bath, (c)
unawareness of impending hazard, (d) fetal damage in pregnant women, (e) physical inability to
exit the bath, and (f) unconsciousness resulting in the danger of drowning.
WARNING: Risk of hyperthermia. People using medications and/or having an adverse medical
history should consult a physician before using a whirlpool equipped with a heater.
WARNING: Risk of scalding. Do not allow the water temperature in the whirlpool to exceed 104°F
(40°C).
The heater will automatically maintain the water temperature when the whirlpool is running, as long as the
water temperature does not exceed 104°F (40°C). The heater will disengage at higher temperatures.
An equipment grounding terminal is provided in the field wiring compartment. To reduce the risk of electric
shock, this terminal must be connected to the grounding means provided in the electric supply panel with a
conductor equivalent in size to the circuit conductors supplying this whirlpool.
A pressure wire connector is provided on the exterior of the pump or control within this unit to permit
connection of a bonding conductor between this unit and all other exposed metal in the vicinity, as needed to
comply with local requirements.
Use this whirlpool only for its intended purpose as described in this guide. Do not use attachments not
recommended by the manufacturer.
Never drop or insert any object into any opening. Keep small objects such as bath toys and bathing
accessories out of the whirlpool while the unit is running.
Do not operate this unit without the guard (cover) over the suction fitting.
The whirlpool must be connected only to a supply circuit that is protected by a Ground-Fault
Circuit-Interrupter (GFCI) or Residual Current Device (RCD). Such a GFCI or RCD should be provided by
the installer and should be tested on a routine basis. To test the GFCI or RCD, press the test button. The
GFCI or RCD should interrupt power. Press the reset button. Power should be restored. If the GFCI or RCD
fails to operate in this manner, the GFCI or RCD is defective. If the GFCI or RCD interrupts power to the
bath without the test button being pressed, a ground current is flowing, indicating the possibility of an
1043843-5-C
2
Kohler Co.
Important Information (cont.)
electric shock. Do not use this whirlpool bath. Disconnect the whirlpool and have the problem corrected by a
qualified service representative before using.
Flush your whirlpool system twice a month or more depending upon usage, as described in the ″Flush
System″ section of this guide.
Repeated use of personal care products containing oils can damage plastic whirlpool components. Do not use
heavy, vegetable-based shampoos or bath oils.
Whirlpool hydro-massage action can cause even a small amount of bubble bath, bath soap, shampoo, or bath
oil to foam excessively. For this reason, please don’t use these products during whirlpool operation.
Thank You For Choosing Kohler Company
Thank you for choosing Kohler Company. Your Kohler Company product reflects the true passion for design,
craftsmanship, artistry, and innovation Kohler Company stands for. We are confident its dependability and
beauty will surpass your highest expectations, satisfying you for years to come.
All information in this guide is based upon the latest product information available at the time of
publication. At Kohler Company, we strive to fulfill our mission of improving the level of gracious living for
each person who is touched by our products and services. We reserve the right to make changes in product
characteristics, packaging, or availability at any time without notice.
Please take a few minutes to review this guide. Pay special attention to the care and cleaning instructions.
Components
Your new whirlpool is designed to stimulate, invigorate, and energize your body with comforting
hydro-massage therapy. The whirlpool consists of the following components:
Bath - Acts as a reservoir for water, and provides a location for the hydro-massage action.
User Keypad - Located within easy reach, the user keypad allows you to turn the pump and heater
on and off and regulate the water flow through the jets.
Pump Motor - Provides quiet, variable speed power to circulate the water and create the soothing
hydro-massage action.
Adjustable Jets - Positioned to optimize their hydro-massage effect, the jets allow you to adjust the
air and water flow and control the flow direction as you desire.
Heater - Designed to automatically help maintain the temperature of the water up to 104°F (40°C) to
enhance your hydro-massage experience. The heater turns on automatically when the whirlpool is
operating, and turns off when the pump motor is turned off. The heater may be turned off through
the keypad, at any time while the pump is operating.
Kohler Co.
3
1043843-5-C
Fill with water at least 2" (5.1 cm)
above the highest jet.
Heater Indicator Light
Heater On/Off
Increases Flow
Turn the jet trim ring
clockwise to
decrease the flow.
Indicator Bar Shows water
flow volume
Power On/Off
Position the jet
nozzles to direct
the water flow as
desired.
Decreases Flow
Turn the jet trim ring counterclockwise
to increase the flow.
Lighted User Keypad
Operation
User Keypad
Power
Up Arrow
Down Arrow
Heater
Indicator Bar
Turns the whirlpool pump on and off.
Increases the water flow.
Decreases the water flow.
Automatically engages when the whirlpool pump is powered on. Press the heater button
once to turn the heater off. Press the button a second time to turn the heater back on.
Displays the water flow volume.
Whirlpool
Turn the jet trim fully counterclockwise. Position the jet nozzles so they face down toward the basin.
NOTICE: Do not allow the water temperature in the whirlpool to exceed 104°F (40°C). The heater will
automatically maintain the water temperature when the whirlpool is running, as long as the water
temperature does not exceed 104°F (40°C). The heater will disengage at higher temperatures.
Close the drain, then fill the whirlpool to a level at least 2″ (5.1 cm) above the highest jet. Using
your hand, test the water temperature for comfort and safety. Carefully enter the bath.
Press the power icon to turn on the whirlpool pump and heater. Water will flow at medium volume.
Press the up or down arrow icons to increase or decrease the water flow. The indicator bar will
display the water flow volume.
Adjust the jets for optimum air/water mixture. Turn the jet trim clockwise to reduce the flow or
counterclockwise to increase the flow. If desired, position the jet nozzles to direct the water flow to
maximize your hydro-massage experience.
If desired, turn the heater off by pressing the heater icon. Press the button a second time to turn the
heater back on.
Press the power icon a second time to turn off the whirlpool pump and heater.
NOTE: The pump and heater will automatically stop after approximately 20 minutes of continuous
operation. If desired, press the power icon to reactivate the pump and heater.
Carefully exit the bath, then open the drain to empty the whirlpool.
NOTE: If the whirlpool is not operating properly, consult the ″Troubleshooting″ section of this guide
before calling a qualified service representative.
1043843-5-C
4
Kohler Co.
Care and Cleaning
For best results, keep the following in mind when caring for your KOHLER product:
• Always test your cleaning solution on an inconspicuous area before applying to the entire surface.
• Wipe surfaces clean and rinse completely with water immediately after applying cleaner. Rinse and
dry any overspray that lands on nearby surfaces.
• Do not allow cleaners to soak on surfaces.
• Use a soft, dampened sponge or cloth. Never use an abrasive material such as a brush or scouring
pad to clean surfaces.
For detailed cleaning information and products to consider, visit www.kohler.com/clean. To order Care &
Cleaning information, call 1-800-456-4537.
Flush System
NOTE: Flush your whirlpool system twice a month or more, depending upon usage.
Turn the jet trim rings fully clockwise to remove air induction.
Fill the whirlpool with warm water to a level at least 2″ (5.1 cm) above the highest jets, or leave
water in the whirlpool after using.
Add 2 teaspoons (10 ml) of a low-foaming, powder automatic dishwasher detergent and 20 ounces
(590 ml) of household bleach (5% - 6% sodium hypochlorite) to the water.
Run the whirlpool for 5 to 10 minutes. Turn off the whirlpool and drain.
If desired, rinse the bath surfaces with water.
Rinse the surfaces of the jets, faucet, handrails, and drain, and wipe them dry with a soft cloth.
One-Year Limited Warranty
ONE-YEAR LIMITED WARRANTY
KOHLER plumbing products are warranted to be free of defects in material and workmanship for one year
from date of installation.
Kohler Co. will, at its election, repair, replace or make appropriate adjustment where Kohler Co. inspection
discloses any such defects occurring in normal usage within one (1) year after installation. Kohler Co. is not
responsible for removal or installation costs. Use of in-tank toilet cleaners will void the warranty.
To obtain warranty service contact Kohler Co. either through your Dealer, Plumbing Contractor, Home
Center or E-tailer, or by writing Kohler Co., Attn.: Customer Care Center, 444 Highland Drive, Kohler, WI
53044, USA, or by calling 1-800-4KOHLER (1-800-456-4537) from within the USA and Canada, and
001-877-680-1310 from within Mexico.
IMPLIED WARRANTIES INCLUDING THAT OF MERCHANTABILITY AND FITNESS FOR A
PARTICULAR PURPOSE ARE EXPRESSLY LIMITED IN DURATION TO THE DURATION OF THIS
WARRANTY. KOHLER CO. AND/OR SELLER DISCLAIM ANY LIABILITY FOR SPECIAL,
INCIDENTAL OR CONSEQUENTIAL DAMAGES. Some states/provinces do not allow limitations on how
long an implied warranty lasts, or the exclusion or limitation of special, incidental or consequential damages,
so these limitations and exclusions may not apply to you. This warranty gives you specific legal rights. You
may also have other rights which vary from state/province to state/province.
This is Kohler Co.’s exclusive written warranty.
One-Year Warranty
KOHLER CO.
It is recommended that at the time of purchase, you verify that all accessories and components are complete
in this package.
Kohler Co.
5
1043843-5-C
One-Year Warranty (cont.)
This Kohler product is warranted to be free of defects in material and workmanship for one (1) year from the
date of purchase as shown on the invoice or receipt.
1. Kohler Co. will only service its commercialized products through its authorized distributors.
2. To obtain warranty service, please present the invoice and corresponding warranty.
3. Through its authorized distributors, Kohler Co. promises to repair the defective product or provide a new
replacement or an equivalent model (in those cases that the model has been discontinued) when the product
is beyond repair, without any charge to the consumer.
4. The time of repair will not exceed six (6) weeks commencing on the date the product is received.
5. It is recommended that the consumer save the invoice or receipt as additional protection, as it may
substitute the warranty in the case that there is a discrepancy in the validity of the warranty.
EXCEPTIONS AND RESTRICTIONS
The Warranty will not be valid in the following cases:
1. When the product is not operated in accordance with the instructions concerning use and operation set
forth in the owner’s manual or installation instructions, and when the recommendations and warnings
included are not observed.
2. When the product has been modified or dismantled partially or totally; or has been used in a negligent
fashion and as a consequence has suffered damages attributable to the consumer, individual, or hardware not
authorized by Kohler Co.
3. This warranty does not cover the damages as a result of disaster such as fire or acts of God, including
flooding, earthquake, or electric storms, etc. To obtain a list of distributors in your area where you can
exercise your rights under this warranty, please call 001-877-680-1310.
KOHLER CO., KOHLER, WI 53044 U.S.A.
IMPORTER:
INTERNACIONAL DE CERÁMICA, S.A.B. DE C.V.
AV. CARLOS PACHECO NO. 7200
CHIHUAHUA, CHIH., MEXICO C.P. 31060
TEL: 52 (14) 29-11-11
1043843-5-C
6
Kohler Co.
Remove the Jets
Reinstall the Jets
Insert the tool hook as shown and pull the jet out of the
housing. The jet should be facing up when this is done.
Housing
Inspect and
lubricate the O-ring.
Slide the O-ring
onto the first
shoulder of the jet.
Insert the jet into the housing, and lightly
push and rotate until it snaps in position.
Troubleshooting
NOTICE: This section is for general aid only. A Kohler Authorized Service Representative or qualified
electrician should correct any electrical problems. For warranty service, contact your dealer or wholesale
distributor.
Remove the Jets
NOTE: The jet tool (provided with the whirlpool and trim kit) will allow you to remove the jets from the
whirlpool.
Position the ball nozzle of the jet facing up. This will ensure the jet tool will not slip off.
With the hook of the jet too facing up, insert the jet tool into the opening of the jet and hook the
inside top of the nozzle.
Grasping the jet tool firmly, place your thumb against the whirlpool wall. Pull steadily on the jet
tool until the jet assembly pulls free from the hole. Be careful not to lose the O-ring.
Reinstall the Jets
NOTE: To allow easy rotation and proper operation of the jet, the O-ring must be: (1) correctly positioned,
(2) lubricated, and (3) in good condition.
Install the O-ring onto the first shoulder of the jet. Using the silicone lube packet (provided),
lubricate the O-ring to prevent noisy operation of the jet.
Carefully insert the jet into the housing, then lightly push and rotate the jet until it snaps into
position. Do not force the jet.
Verify the jet is installed correctly. The jet should turn smoothly both clockwise and
counterclockwise. Remove and reinstall, if necessary.
Symptoms
1. User keypad does not
illuminate when power
button is pressed or outer
ring is rotated.
Kohler Co.
Probable Causes
A. No power to control.
Recommended Action
A. Check wiring and connect power.
B. GFCI or RCD tripped.
C. Wiring harness from user
keypad to control is loose,
disconnected or damaged.
D. User keypad does not work.
E. Control does not work.
B. Reset GFCI or RCD.
C. Check wiring for proper
connections. Replace wiring
harness if necessary.
D. Replace user keypad.
E. Replace control.
7
1043843-5-C
Troubleshooting (cont.)
Symptoms
2. Motor starts, but all jets
are not functioning.
Probable Causes
A. Jet is closed.
C. Jets are blocked.
A. Control program is locked.
Recommended Action
A. Rotate jet trim counterclockwise to
open.
B. Reinstall jet; check for O-ring
damage.
C. Remove blockage.
A. Reset GFCI or RCD.
B. Wiring harness from user
keypad to control is loose,
disconnected or damaged.
C. User keypad does not work.
D. Control does not work.
A. Control program is locked.
B. Check wiring for proper
connections. Replace wiring
harness if necessary.
C. Replace user keypad.
D. Replace control.
A. Reset GFCI or RCD.
B. Wiring harness from user
keypad to control is loose,
disconnected or damaged.
C. User keypad does not work.
D. Control does not work.
A. Power cord from pump to
control is loose, disconnected or
damaged.
B. Pump does not work.
C. Control does not work.
A. Pump is shimmed too high.
B. Check wiring for proper
connections. Replace wiring
harness if necessary.
C. Replace user keypad.
D. Replace control.
A. Check wiring for proper
connections.
B. Jet not installed correctly.
3.
4.
5.
6.
User keypad is
illuminated, but does not
respond to buttons or
outer ring.
User keypad indicator bar
keeps scanning at
power-up.
User keypad is
illuminated, but pump
won’t start.
Motor runs but pump
won’t prime (cavitates).
B. Small air leak at pump inlet.
7.
Pump stops before 18
minutes.
C. Motor/pump does not work.
D. Control does not work.
A. GFCI or RCD tripped.
B. Suction is blocked.
C. Jets are blocked.
D. Motor overheated and
protection device activated.
Pump does not
A.
automatically stop after 22
minutes.
9. Pump won’t turn off
A.
when the power button
on user keypad is
pressed.
B.
10. Pump operates but
A.
variable speed feature
does not work.
B.
11. Bath water cools while
A.
pump is operating.
8.
1043843-5-C
20-minute timer inadvertently
disabled.
B. Replace pump.
C. Replace control.
A. Lower pump/control to subfloor
level.
B. Securely tighten nut(s) on intake
side of pump.
C. Replace motor/pump.
D. Replace control.
A. Identify source of fault, and correct.
Reset GFCI or RCD.
B. Remove obstruction.
C. Remove blockage.
D. Check for blockage at suction
and/or jets. Remove blockage and
allow motor to cool.
A. See service manual.
User keypad does not work.
A. Replace user keypad.
Control does not work.
Motor/pump does not work.
B. Replace control.
A. Replace motor/pump.
Control does not work.
Water temperature above 104°F
(40°C).
B. Replace control.
A. Allow bath water to cool.
8
Kohler Co.
Troubleshooting (cont.)
Symptoms
12. Noisy operation.
Kohler Co.
Probable Causes
B. Heater is turned off on user
keypad.
C. Wiring from heater to control is
loose, disconnected or damaged.
D. Heater does not work.
E. Control does not work.
A. Pump banding straps have not
been cut.
B. Dry or dislodged jet O-ring
(squeal).
9
Recommended Action
B. Turn heater on.
C. Check wiring for proper
connections.
D. Replace heater.
E. Replace control.
A. Cut pump banding straps with tin
snips.
B. Remove jet, replace and lubricate
O-ring, and reinstall jet.
1043843-5-C
*Note: All tubing 1" unless otherwise noted.
1-1/2" Tubing
1-1/2" Tubing
1-1/2" Tubing
1015008
Wire Harness
**Finish/color code must be specified when ordering.
Service Parts
1043843-5-C
10
Kohler Co.
1003065
Suction Flange
Removal Tool
73518
Plug
93685
Housing
96708
Flange
65886 (Acrylic and FRP)
60050 (Cast Iron)
Gasket
65054**
Screw
65226**
Suction Cover Plug
96895** (Colored Finishes)
65061** (Metal Finishes)
Cover
93836 (1/2")
93837 (3/4")
93838 (1")
93839 (1-1/4")
94853 (1-1/2")
Tube (w/Couplings)
91967
Check Valve
1086350
Flange Removal Wrench
67665
Plug
67429
Flange
67889
Jet Housing
65885 (Acrylic and FRP)
67668 (Cast Iron)
Gasket
34353
O-Ring
Single Jet For Whirlpools
With 5 or Less Jets
1045715-P
Silicone Lube
Packet
88532** (Colored Finishes)
88531** (Metal Finishes)
Jet
Single Jet For Whirlpools
With 6 or More Jets
88530**(Colored Finishes)
88529**(Metal Finishes)
Jet
30739
Jet Tool
**Finish/color code must be specified when ordering.
Kohler Co.
11
1043843-5-C
67065
Ground Lug
61776
Lock Washer
1033678
Screw
60320
Screw
1018964
1001794 Bracket
Locknut
93892-A
Electrical Box
61776
Lock Washer
67065
Ground Lug
60320
Screw
61845-K
Copper Grounding Wire
94821
O-Ring
94821
O-Ring
1080775
Pump Tee
93003
Strain Relief
1080774
Union Assy
93893
Cover
To Tee Heater
1016953
Pump
1019433
Carriage Bolt
90153
Nut
1016954
Motor
1010673
Seal
1010548
Volute
1010676
Cover
1010677
Screw
1013755
Impeller
1010675
O-Ring
1019719
Connector
94821
O-Ring
1012855
Nut
To In-line Heater
1019444-A [3/4" (1.9 cm)]
1019444-B [1-3/4" (4.4 cm)]
1019444-C [2" (5.1 cm)]
1019444-D [1-1/2" (3.8 cm)]
1019444-E [1" (2.5 cm)]
1019444-F [1-1/4" (3.2 cm)]
1019444-G [2-1/4" (5.7 cm)]
1019444-H [2-1/2" (6.4 cm)]
1019444-J [2-3/4" (7 cm)]
1019444-K [3" (7.6 cm)]
1019444-L [1/2" (1.3 cm)]
1019444-M [1/4" (6 mm)]
Spacer
1019446-A [1-3/4" (4.4 cm)]
1019446-B [2-3/4" (7 cm)]
1019446-C [3" (7.6 cm)]
1019446-D [2-1/2" (6.4 cm)]
1019446-E [2" (5.1 cm)]
1019446-F [2-1/4" (5.7 cm)]
1019446-G [3-1/4" (8.3 cm)]
1019446-H [3-1/2" (8.9 cm)]
1019446-J [3-3/4" (9.5 cm)]
1019446-K [4" (10.2 cm)]
1019446-L [1-1/2" (3.8 cm)]
1019446-M [1-1/4" (3.2 cm)]
Stud
1018660 (One Outlet)
1018662 (Two Outlets)
Control
Outlet
1019447-A [1/4" (6 mm)]
1019447-B [1/2" (1.3 cm)]
1019447-C [3/4" (1.9 cm)]
Isolation Mount
**Finish/color code must be specified when ordering.
1043843-5-C
12
Kohler Co.
1022408
In-line Heater
1032545
Housing
1012653
Adapter
1012916
Nut w/Screws
94821
O-Ring
1011679
Gasket
94821
O-Ring
1012653
Adapter
1012977
Adapter
1018710
Tee Heater
94821
O-Ring
1012916
Nut with Screws
94821
O-Ring
1012977
Adapter
1011679
Gasket
**Finish/color code must be specified when ordering.
Kohler Co.
13
1043843-5-C
65157
Nut
59588
Screw
1020677
Gasket
1013460
Housing
1020679-A
Cover/Circuit Board
94110
O-Ring
1013459-A
Decal
1013469**
Trim Ring
**Finish/color code must be specified when ordering.
1043843-5-C
14
Kohler Co.
1013464-A
Decal
1013822-A**
Remote w/Stand
1023091**
Cap
1022253-A**
Remote
1013471**
Stand
1013822-B**
Remote w/Stand
1013464-B
Decal
1023091**
Cap
1022253-B**
Remote
1013471**
Stand
**Finish/color code must be specified when ordering.
Kohler Co.
15
1043843-5-C