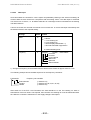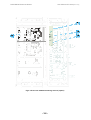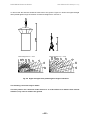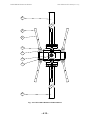
1
RHOTHETA Elektronik GmbH
User Manual RT-1000 [Rev. 2.01]
User Manual
VHF Direction Finder System
RHOTHETA RT-1000
RHOTHETA Elektronik GmbH
User Manual RT-1000 [Rev. 2.01]
Edited by:
RHOTHETA Elektronik GmbH
Kemmelpark
Dr.-Ingeborg-Haeckel-Str. 2
82418 Murnau
Deutschland
Tel.:
Fax:
+49 8841 4879 - 0
+49 8841 4879 - 15
Internet:
E-Mail:
www.rhotheta.de
[email protected]
Copyright © RHOTHETA Elektronik GmbH
All rights reserved
- Issue: 2012/07/10 [Rev 2.01]
- Document-ID: 12-9-1-0004-3-1-2
Note
The manufacturer reserve the right to make modifications at any time and without previous information
of the here described product.
RHOTHETA Elektronik GmbH
User Manual RT-1000 [Rev. 2.01]
Section 1
General Information
General Description, Characteristics, Flexible System Configuration,
Bearing Display and Bearing Quality Analysis, Antenna System,
Antenna Mast,Technical Data
Section 2
Controller
RTC 1100.A
Section 3
Receiver Unit
RTR 1200.A
Section 4
Direction Finder Antenna
RTA 1300.A
Section 5
Appendix
Approval of Direction Finder System
Interwiring of the Direction Finder
Test Record
RHOTHETA Elektronik GmbH
1
User Manual RT-1000 [Rev. 2.01]
GENERAL INFORMATION
List of Contents:
1 GENERAL INFORMATION ............................................................ 1.1
1.1
General Description ......................................................................................1.2
1.1.1
Antenna Mast (Option) ......................................................................................................1.2
1.1.2
Flexible System Configuration .........................................................................................1.2
1.1.3
Configuration A: Standard................................................................................................1.3
1.1.4
Configuration B: operation with Slave display...............................................................1.4
1.1.5
Configuration C .................................................................................................................1.5
1.1.6
Configuration D .................................................................................................................1.6
1.1.7
Configuration E: simultaneous 2 channel operation .....................................................1.6
1.2
Technical Data ...............................................................................................1.7
1.3
Supplied Accessories .................................................................................1.10
1.4
Options .........................................................................................................1.10
- 1.1 -
RHOTHETA Elektronik GmbH
1.1
User Manual RT-1000 [Rev. 2.01]
General Description
The direction finder system RT-1000 is designed for ATC (air traffic control) and VTS (vessel traffic
service) application. The system can be used in stationary and mobile applications.
1.1.1
Antenna Mast (Option)
The special Mast RTA 1306 is recommended for the antenna system. The mast has a fixture which
makes it possible to tilt the antenna down to working level to facilitate assembly and maintenance of
the antenna. The integrated rotating stand makes it possible to rotate the antenna in 10° steps to effectively check the direction finding system. In addition, there is a weatherproof housing for the receiver
unit.
1.1.2
Flexible System Configuration
All known radio direction finding methods are based on the utilization of the electromagnetic wave field
generated by the transmitter to be found. Good results are only possible if this wave field at the direction finding position is largely undisturbed. Regrettably, incoming wave fields are distorted significantly
in the tower area due to reflections and shadows from surrounding buildings. Even large and costly
antenna systems can only solve these problems, resulting from physical facts, unsatisfactorily.
With "remote operation" the direction finder system RT 1000 realizes a concept permitting an antenna
position to be chosen, which is almost totally independent from the controller's position. Hence, the
antenna with its weatherproof receiver unit may be installed at a location within the area which is optimal for direction finding. The connection to the controller is made through a 6-wire line. Expensive
equipment and costly infrastructures are eliminated in contrast to usual direction finding systems.
The Direction Finder System RT 1000 realizes an equipment family which can be utilized in a flexible
manner. Apart from the advantage of being service-friendly, the consequent modular design makes it
possible to have several system components variously equipped, so that the optimum system configuration is available with a minimum of equipment, depending on the application. There are four major
variants for the traffic direction finding area.
- 1.2 -
RHOTHETA Elektronik GmbH
1.1.3
User Manual RT-1000 [Rev. 2.01]
Configuration A: Standard
The system operates in "remote mode". The direction finding antenna is installed remotely from the
controller, at a location favourable for direction finding. Receiver, demodulator and antenna control
module are integrated in the receiver unit located at the antenna position. They are connected to the
controller by means of a 6-wire line.
Application:
Standard configuration. The controller operator's position is independently from the DF
antenna position. This makes it possible to choose a physically optimal antenna position to benefit of the full system performance.
DF Antenna
Receiver Unit
Controller
RTA 1300.A
RTR 1200.A
RTC 1100.A
Antenna
controll
6-wire telephon cable
RF-Kabel
max. 10 km
- 1.3 -
RHOTHETA Elektronik GmbH
1.1.4
User Manual RT-1000 [Rev. 2.01]
Configuration B: operation with Slave display
Like A, however, with additional slave display .
Application:
For applications described under A, where the bearing information has to be available
on a 2. operator's position.
DF Antenna
Receiver Unit
Controller
RTA 1300.A
RTR 1200.A
RTC 1100.A
antenna
controll
6 wire telephone cable
RF cable
max. 10 km
RS 232 & audio
max. length 10m
Slave Display
RTS 1100.A
- 1.4 -
RHOTHETA Elektronik GmbH
1.1.5
User Manual RT-1000 [Rev. 2.01]
Configuration C
System configuration like 1.1.4 but with additional modem which makes it possible to bridge a distance
between controller and slave display up to 10 km.
Application: The cable distance between the controller and slave display is longer than 10 m.
DF Antenna
Controller
Receiver Unit
RTA 1300.A
RTR 1200.A
RTC 1100.A
antenna
control
6 wire data cable
RF-cable
max. 10 km
with modem and 6 wire c able
max. length 10km
Slave Display
RTS 1100.B
- 1.5 -
RHOTHETA Elektronik GmbH
1.1.6
User Manual RT-1000 [Rev. 2.01]
Configuration D
The bearing data and the remote control has to work over long distance via Intranet or Internet
Application:
if DF location is far away from the operators location (triangulation)
DF Antenna
Receiver Unit
R TA 1300.A
Controller
RTR 1200. A
RTC 1100. A
Antenna
Controll
6 w ire data cable
max. 10 km
RF- Kabel
R S232 & Audio
Modem
R S232/ RS485 to TCP/UD P Converter
Line Audio to Streaming-Audio C onver ter
Intanet /I nt er net/ VPN
Modem
TCP/UD P to RS232/R S485 Converter
Streaming-Audio t o Line Audio C onver ter
R S232 & Audio
Slave Display
RTS 1100.A
1.1.7
Configuration E: simultaneous 2 channel operation
The DF system is equipped with a 2. receiver module and a additional Controller. This offers 2 independent operator sides. This configuration can be combine with all other configurations.
Application: At locations where the system has to operate simultaneous on 2 different frequencies.
DF Antenna
Receiver Unit
Controller
RTA 1300.A
RTR 1200.A
RTC 1100.A
6 wire telephone cabl
max. 10 km
Antenna
controll
Controller
RF-Kabel
RTC 1100.A
6 wire telephone cable
max. 10 km
- 1.6 -
RHOTHETA Elektronik GmbH
1.2
User Manual RT-1000 [Rev. 2.01]
Technical Data
1)
Frequency range air band .............................................................. 118 to 136.975 MHz
1)
Frequency range marine band ...................................................... 156 to 174.000 MHz
Operating channels air band............................................................. 760; 10 preselected
Channel spacing ............................................................................... 25 kHz
Type of modulation to be detected ................................................... A3E, F3E, A2X (ELT modulation)
2)
3)
System accuracy ............................................................................ ±2° (±1°) RMS (with antenna)
4)
Sensitivity ....................................................................................... ≤2 µV / m (without antenna amplifier)
Polarisation........................................................................................ vertical
Polarisation error ............................................................................... ≤1° (with field vector rotation up to 45°)
Cone of silence ................................................................................. approx. 35° referred to the vertical
Power supply
AC ........................................................................................... 115 / 230 V ±15 %;
47 to 63 Hz
DC........................................................................................... 24 V -10 % / +20 %;
automatic switch-over to DC voltage
in case of AC mains failure
Power consumption
Controller unit ......................................................................... max. 15 VA
Receiver unit........................................................................... max. 10 VA
(52 VA with heater)
Temperature ranges
Operating temperature
Antenna ....................................................................... -40° to +80° C
Receiver unit ................................................................ -40° to +60° C
Controller unit .............................................................. -20° to +55° C
Storage temperature .............................................................. -40° to +60° C
Interfaces .......................................................................................... serial V.24 (RS-232-C)
parallel
- 1.7 -
RHOTHETA Elektronik GmbH
User Manual RT-1000 [Rev. 2.01]
Bearing display.................................................................................. Response time ≤0.3 s
A)
Digital ........................................................................... 3 digits with 7-segment LED indicator
Resolution .................................................................... 1°
Bearing reference ........................................................ QDM; QDR; QUJ; QTE
Updating rate ............................................................... approx. 1 indication / s
B)
Dual compass dial ....................................................... 2 concentrical circles of LED points
Resolution .................................................................... 10°
Bearing reference ........................................................ QDR
Updating rate
Outer circle........................................................ approx. 1 indication / s
Inner circle......................................................... 47 indications / s
Monitoring
Built-in loudspeaker
Modulation mode .................................................................... A3E
Monitor output......................................................................... approx. 500 mW 4 to 8 Ω
Line output .............................................................................. 600 Ω, balanced, 0 dBm, m = 0.6
Ground transmitter suppression ...................................................... with external contact to ground
Dimensions / Mass
Controller
.......................................................................... 19"-desk-top model 3 UH,
prepared for rack installation
Dimensions (H x W x D).............................................. 132.5 x 448 x 370 mm
Weight .....................................................................
8.1 kg
Receiver unit .......................................................................... Plastic cabinet for
wall mounting (IP 65)
Dimensions (H x W x D).............................................. 250 x 340 x 285 mm
Weight .....................................................................
6.9 kg
Antenna system
Dimensions (Diameter x H) ......................................... 400 x 1120 mm
with lightning rod and mast .............................. 400 x 3400 mm
Weight antenna head ................................................
3.0 kg
Weight antenna including antenna rods ....................
3.8 kg
Weight antenna complete with mast an lightning rod .
10.2 kg
- 1.8 -
RHOTHETA Elektronik GmbH
User Manual RT-1000 [Rev. 2.01]
Lateral thrust due to wind
with constant wind speed
150 km / h .................................................................... approx. 135 N
180 km / h .................................................................... approx. 195 N
(data with lightning rod and mast)
Notes:
1)
2)
3)
4)
Depend on the software configuration
Not for configuration B (dependent on the type of receiver).
For undistorted wave reception and sufficient field strength. Measurement is made with
continues vertical polarised signal, without modulation at constant frequency by changing
the angle of incidence; in order to exclude site errors, angle variation is done by rotating
the DF antenna on a rotator.
With Option “bearing precision improvement”
System sensitivity for ±1° bearing fluctuations (cable attenuation of less than 2 dB
between antenna and the receiver, received signal vertically polarised).
- 1.9 -
RHOTHETA Elektronik GmbH
1.3
User Manual RT-1000 [Rev. 2.01]
Supplied Accessories
-
Set of antenna cables
-
AC cable
-
Operating instructions
-
Adapter for rack installation of controller
-
Interface connector
-
Antenna rod
-
Lightning rod
1.4
Options
-
Special antenna mast
-
Mast extension
-
Hazard light
-
Dummy antenna
-
Service kit
-
Service manual
-
Slave display
-
Set of cables
-
Antenna amplifier
- 1.10 -
RHOTHETA Elektronik GmbH
2
User Manual RT-1000 [Rev 2.01]
CONTROLLER RTC 1100.A
List of Contents:
2 CONTROLLER RTC 1100.A .......................................................... 2.1
2.1
Key to Front and Rear Views ........................................................................2.4
2.2
Preparation for Use .......................................................................................2.8
2.2.1
Earthing ..............................................................................................................................2.8
2.2.2
Mains Voltage ....................................................................................................................2.8
2.2.3
Mains Fuse .........................................................................................................................2.9
2.2.4
DC Voltage Connection.....................................................................................................2.9
2.2.5
Power Supply ...................................................................................................................2.10
2.2.6
Connection of the Receiver Unit ....................................................................................2.10
2.2.7
Rack Mounting .................................................................................................................2.11
2.2.8
Switching on / Reaction from Unit .................................................................................2.11
2.2.9
Phase Adjustment ...........................................................................................................2.11
2.2.9.1
Adjustment Using RTM 1500 Dummy Antenna (Option) ......................................2.12
2.2.9.2
Adjustment Using a Transmitter .............................................................................2.12
2.2.10
North Adjustment ............................................................................................................2.12
2.2.11
Variation Adjustment ......................................................................................................2.13
2.2.12
Disable Selection of Reference Direction .....................................................................2.14
2.2.13
Ground Transmitter Suppression ..................................................................................2.15
2.3
Display and Operating Functions...............................................................2.16
2.3.1
Bearing Display and Bearing Quality Analysis .............................................................2.16
2.3.2
Test Function ...................................................................................................................2.16
2.3.3
Repetition of Bearing Indication ....................................................................................2.17
2.3.4
Frequency Selection .......................................................................................................2.17
2.3.4.1
Direct Frequency Selection .....................................................................................2.17
2.3.4.2
Calling up Frequency Memory ................................................................................2.18
2.3.4.3
Programming the Frequency Memory ...................................................................2.18
2.3.5
Direct Selection of Channel Number in Maritime Radio Communication..................2.19
2.3.6
Scanning ..........................................................................................................................2.20
2.3.6.1
Selection of Scan Mode ...........................................................................................2.20
2.3.6.2
Ending Scanning ......................................................................................................2.20
2.3.7
Calling up the Distress Frequency 121.500 MHz ..........................................................2.21
- 2.1 -
RHOTHETA Elektronik GmbH
User Manual RT-1000 [Rev 2.01]
2.3.8
Selection of the reference directions QDM, QDR, QUJ und QTE ...............................2.21
2.3.9
Checking the Variation adjustment ...............................................................................2.22
2.3.10
North Adjustment ............................................................................................................2.23
2.3.11
Frequency Deviation .......................................................................................................2.23
2.3.12
Error Indication ................................................................................................................2.23
2.3.13
Dimmer (01) "DIM" ...........................................................................................................2.24
2.3.14
Volume Control (09) ........................................................................................................2.24
2.3.15
Headphones Connection (10) .........................................................................................2.24
2.3.16
"STANDBY" Indicator (11) ..............................................................................................2.24
2.3.17
ON / OFF Switch (12) .......................................................................................................2.24
2.3.18
"Line" Mains Switch (15) ................................................................................................2.25
2.3.19
Power Supply "OK" Indicator (19) .................................................................................2.25
2.3.20
"Data-Port" Data Interface (20) .......................................................................................2.25
2.3.21
"Sync" Synchronisation Indicators (21, 22) ..................................................................2.27
2.3.22
"DF Signal 2" Test Plug (24) ...........................................................................................2.27
2.3.23
"R/L" Test Connector (23) ..............................................................................................2.27
2.3.24
"Ser. Port" Serial Interface (28) ......................................................................................2.27
2.3.24.1
Data Output ...............................................................................................................2.29
2.3.24.2
Data Input ..................................................................................................................2.31
2.3.24.3
Technical Data ..........................................................................................................2.32
2.3.24.4
"Ser. Port" Plug Wiring (28).....................................................................................2.32
2.3.24.5
Connection to a Data Terminal or Data Transmission Device.............................2.33
2.3.25
2.4
"Par. Port" Parallel Interface (29) ...................................................................................2.34
2.3.25.1
"Par. Port" Terminal Wiring (29) .............................................................................2.34
2.3.25.2
Time Sequence .........................................................................................................2.35
Installation Dimensions ..............................................................................2.36
- 2.2 -
RHOTHETA Elektronik GmbH
User Manual RT-1000 [Rev 2.01]
List of Figures:
2-1
Front view ...................................................................................................................................2.6
2-2
Rear view .......................................................................................................................................... 2.7
2-3
Mains voltage selector ...............................................................................................................2.8
2-4
Mains power connection, mains fuse holder .............................................................................. 2.9
2-5
Wiring diagram for ground transmitter suppression...........................................................2.15
2-6
Wiring diagram for ground transmitter suppression with non-floating contact ..............2.15
2-7
D-sub-jack 9-way ........................................................................................................................... 2.15
2-8
Bearing display ........................................................................................................................2.16
- 2.3 -
RHOTHETA Elektronik GmbH
2.1
User Manual RT-1000 [Rev 2.01]
Key to Front and Rear Views
All the position numbers refer to operating elements shown in the front and rear views (Figure 2-1 and
Figure 2-2).
No.
Designation
Function
see Section
1
DIM /
Dimmer
2.3.13
Digital bearing display
2.3.1
2
3
N/E/S/W
Bearing direction (Ref.: QDR)
2.3.1
4
N/E/S/W
Live bearing direction (Ref.: QDR)
2.3.1
5
>⋅<
Frequency deviation
2.3.11
6
!
Error indication
2.3.12
7
TEST
Test function
2.3.2
8
Frequency
Display of frequency, north adjustment and error code
2.3.4/5/7
9
Volume control
2.3.14
10
Headphones connection
2.3.15
11
STANDBY
Control lamp for STANDBY mode
2.2.8
2.3.16
12
OFF / ON
ON/OFF switch
2.3.17
Keypad for entering frequency
2.3.4
13
14
REPEAT
Repetition of bearing indication
2.3.3
15
121.500 MHz
Call-up of distress frequency 121.500 MHz
2.3.7
16
STOP/SCAN
Termination or selection of scan mode
2.3.6
17
Reference direction Indicator
18
QDM; QDR;
QUJ; QTE
selection switch for reference direction
19
Line
Mains switch
2.3.13
20
F1
24-V DC fuse
2.2.4
21
OK
Power supply control lamp
2.3.14
22
Data-Port
Data interface
2.3.15
23
Sync
Control indication: synchronisation NOK
2.3.16
- 2.4 -
RHOTHETA Elektronik GmbH
User Manual RT-1000 [Rev 2.01]
No.
Designation
Function
see Section
24
Sync
Control indication: synchronisation. OK
2.3.16
25
R/L
Test plug R/L signal
2.3.18
26
DF-Signal 2
DF signal (filtered)
2.3.17
27
PTT
Connection jack for ground transmitter suppression
2.2.11
28
North-Adj. +
Positive variation of north adjustment value
2.2.10
29
North-Adj. -
Negative variation of north adjustment value
2.2.10
30
Ser. Port
Serial port
2.3.19
31
Par. Port
Parallel port
2.3.20
32
fine
Rotary switch 1 for fine phase adjustment
2.2.9
33
coarse
Rotary switch 2 for coarse phase adjustment
2.2.9
34
Phase-Adj.
Control lamp for phase adjustment
2.2.9
Earth connection (M6)
2.2.1
35
36
Power Select
Mains voltage selector (115/230 V)
2.2.2
37
24V DC +
+24-V battery connection
2.2.4
38
24V DC -
0-V battery connection
2.2.4
39
F2, F3
Mains fuse holder
40
41
Mains connection
RF-Ant
Dummy panel
- 2.5 -
RHOTHETA Elektronik GmbH
User Manual RT-1000 [Rev 2.01]
Fig. 2-1 Front view
- 2.6 -
RHOTHETA Elektronik GmbH
User Manual RT-1000 [Rev 2.01]
Fig. 2-2 Rear view
- 2.7 -
RHOTHETA Elektronik GmbH
2.2
2.2.1
User Manual RT-1000 [Rev 2.01]
Preparation for Use
Earthing
The RTC 1100 Controller housing is earthed by means of the earthing contact in the mains plug. At the
rear of the housing there is an earthing screw 31 (M 6). This should be used to make a low-impedance
and low-inductivity connection between the unit and earth potential (system earth). Connect the controller to earth using the same connection as for the other equipment at your workplace, in order to
avoid dangerous voltage peaks between the different units in case of a lightning strike. If using the
direction finder as a portable unit, it must be earthed using an appropriate earthing rod, surface earth
or earthing plate. If possible, connect the unit to the metal operating environment (vehicle or shelter).
WARNING:
Observe all local safety regulations.
2.2.2
Mains Voltage
The RTC 1100 Controller can be operated using mains voltage of 115 V or 230 V ±15 %. The unit is
factory-set to 230 V mains voltage.
Before using the unit, check that the correct operating voltage range is set. Use a screw-driver to move
the mains voltage selector (32, Fig. 2-2) on the front panel of the RTX 1401 Power Pack module.
230
Selector position for 230 Volt range :
Permissible operating voltages:
115
Vmin = 195.5 Vrms
Vmax = 264.5 Vrms
Selector position for 115 Volt range:
Permissible operating voltages:
Vmin = 97.75 Vrms
Vmax = 132.25 Vrms
Fig. 2-3 Mains voltage selector
After setting the mains voltage, make sure that the appropriate mains fuses F2 and F3 are in the mains
fuse holder (35).
- 2.8 -
RHOTHETA Elektronik GmbH
User Manual RT-1000 [Rev 2.01]
CAUTION:
If the mains voltage selector is not set correctly, the unit may be damaged beyond repair.
2.2.3
Mains Fuse
The mains fuses are contained in the mains power connection (36, Fig. 2-2). There is a separate fuse
for phase and the neutral wire. The fuse holder (35) can be easily unlatched by inserting a screwdriver
into the slot in the upper part of the fuse holder. Insert fuses F2 and F3 into the fuse holder according
to the selected mains voltage :
115 V : IEC 127 T315H / 250V
230 V : IEC 127 T160H / 250V
Mains power connection
Mains fuse holder
Fig. 2-4 Mains power connection, mains fuse holder
WARNING:
Before opening the fuse holder, make sure that the unit is disconnected from the mains supply.
2.2.4
DC Voltage Connection
The RTC 1100 Controller is fitted with a DC supply connection. This allows the unit to be operated
using batteries or a 24-V DC mains connection. Connection is through the red pole terminal (33, Fig. 22) to the positive pole and blue pole terminal (34) to the negative pole of the power supply. The pole
terminal (34) connection is connected to the housing earth inside the unit.
- 2.9 -
RHOTHETA Elektronik GmbH
User Manual RT-1000 [Rev 2.01]
Fuse F1 inserted in the fuse holder (16) protects the unit during DC operation. Use a IEC 127 T1.0H /
250-V fuse. The supply voltage range for DC voltage is 24 V DC, with a permitted tolerance range of
-10 / +20 %.
CAUTION:
Voltages greater than 30 V may lead to the unit being damaged beyond repair.
2.2.5
Power Supply
The unit can be alternatively used with mains power or 24-VDC supply.
When connecting the unit to a power supply, ensure that the mains ON/OFF switch (15, Fig. 2-2) at the
rear of the unit and the ON/OFF switch (12, Fig. 2-1) at the front are both switched off.
In order to operate the unit off the mains, plug the mains cable into the mains power connection (36,
Fig. 2-2) to connect the unit to the mains supply. In order to operate the unit using DC, connect the unit
to the DC supply via pole terminals (33) and (34).
WARNING:
Only connect the unit to the mains using an earthing contact
socket outlet.
If the unit is connected to both power supply types and the mains ON/OFF switch (15) is switched on,
the unit is normally operated off the mains. If mains supply is interrupted, the unit switches over to DC
supply internally. This allows an automatic change-over to a DC emergency power source. If mains
supply is switched off at the mains ON/OFF switch (15), the DC supply only is effective.
2.2.6
Connection of the Receiver Unit
The RTC 1100 Controller is connected to the RTR 1200 Receiver Unit by means of a six-wire communications cable. On the RTC 1100 Controller, use the 25-pole D-SUB jack, "Data-Port" (18, Fig. 2-2).
See section 3.2.6 and section 5.2 for plug allocations.
- 2.10 -
RHOTHETA Elektronik GmbH
2.2.7
User Manual RT-1000 [Rev 2.01]
Rack Mounting
Use the adapters (supplied) to mount the RTC 1100 Controller in 19" racks. When mounting in a rack,
ensure that permissible ambient temperatures are not exceeded. This is especially important when
mounting with other units which give off heat.
2.2.8
Switching on / Reaction from Unit
Ensure that the mains ON/OFF switch (15, Fig. 2-2) and the ON/OFF switch (12, Fig. 2-1) are both
switched off. If the unit is to be operated off the mains, connect the unit to the mains supply and move
the mains ON/OFF switch (15, Fig. 2-2) at the rear of the unit to "ON". The unit is now in standby
mode. The yellow control lamp "STANDBY" (11, Fig. 2-1) lights up. The unit is ready to operate when
the ON/OFF switch (12) at the front of the unit is moved to "ON".
If the unit is to be operated off a DC source, connect the unit to the DC supply. The unit is ready to
operate when the ON/OFF switch (12) is moved to "ON".
In both cases, the power supply control lamp (08) lights up to show that the unit is ready to operate.
The test function is now activated automatically. All positions in the digital displays of the bearing (02)
and frequency (08) show the figure "8". The individual lamps of bearing direction displays (03) and (04)
light up one after the other. The frequency deviation (05) and error indication (06) lamps light up.
The reference display shows “VAR” (Variation) while the test function is running.
After the test function is completed, the bearing frequency selected before the unit was last switched
off appears on the frequency display (08).
2.2.9
Phase Adjustment
A special feature of the RT-1000 Direction Finder is its phase compensation by left / right rotation of
the antenna. This allows complete compensation of direction finding errors caused by signal phase
variations in the reception channel. However, it is only possible to compensate for a limited phase value. For this reason, make a pre-adjustment to the centre of the variation range.
The adjustment can be made either using the RTM 1500 Dummy Antenna or aligning of the labelled
antenna radiator (North dipole) onto a transmitter.
- 2.11 -
RHOTHETA Elektronik GmbH
2.2.9.1
User Manual RT-1000 [Rev 2.01]
Adjustment Using RTM 1500 Dummy Antenna (Option)
•
Connect the dummy antenna instead of the RTA 1300 Direction Finder Antenna (see description
of RTM 1500 Dummy Antenna).
•
Feed in a VHF signal in the ATC band range with a signal level of approx. 100 mV at the dummy
antenna RF input and adjust the receiver to the appropriate frequency. Move the antenna signal
switch on the dummy antenna to the 180° position.
Since the direction finder was pre-set in the factory, the bearing display must show QDM 180° and
QDR 0° on condition that the north adjustment is set to 0° (see 2.2.10). QDM 0° and QDR 180°
may also be displayed if the phase is completely misaligned.
•
Phase adjustment can be set using the two rotary switches, (28, Fig. 2-2) "fine" and (29) "coarse".
The total of 256 steps (8 bit) on the coarse switch are divided into 16 steps, and these coarse
steps are sub-divided into a further 16 steps on the fine switch. Use these rotary switches (28)
and (29) to find the middle of the range where the green control lamp (30) lights up. The QDM
display should then show 180°.
2.2.9.2
Adjustment Using a Transmitter
Position a test transmitter (e.g. walkie-talkie) approx. 100 m away, exactly to the north of the direction
finder antenna (dipole north with label pointing towards the transmitter). The bearing display should
show QDM 180° and QDR 0°. The north adjustment on the controller should be set to 0° (see 2.2.10).
Phase adjustment is set as described in 2.2.9.1.
2.2.10
North Adjustment
The bearing display (QDM/QDR) is relative to magnetic north, on condition that the antenna is mechanically adjusted towards north (see section 3, Antenna).
Perform exact adjustment using the north adjustment on the controller. The correction value for north
adjustment appears on the frequency display (08, Fig. 2-1) when buttons TEST (07) and REPEAT (14)
are pressed simultaneously.
Example :
Display indicates correction value +3.5° :
N +03.5
- 2.12 -
RHOTHETA Elektronik GmbH
User Manual RT-1000 [Rev 2.01]
Correction is possible in 0.5° steps in a ±90° range. Press the following buttons simultaneously to perform the adjustment:
TEST (07), REPEAT (14), NORTH-ADJ.+ (24, Fig. 2-2) or
TEST (07), REPEAT (14), NORTH-ADJ.- (25, Fig. 2-2).
During this procedure bearings must be taken of a transmitter located in a known direction referred to
the antenna position. Correct the bearing display (02, Fig. 2-1) to this direction (QDM) using the north
adjustment.
2.2.11
Variation Adjustment
To show directions with magnetic reference as well as directions with true north reference, it is necessary to set the local variation
For this please act as follows:
1. unscrew the front panel and remove it a little bit out of the rack.
2. now you can see the rotary code switches ; and as well as the switch and .
; and . Switch
dreds, switch equivalent to tens and switch equivalent to ones.
3. The adjustment value has to find out as follows:
east Variation has to be direct adjusted (prefix „+“)
example:
Variation: 3° E . → 000° + 003° = 003°
adjustment: switch value 0
switch value 0
switch value 3
The variation will be adjusted by the rotary switch
Variation to the west has to be adjusted wit negative prefix
example: Variation 3° W → 360° - 003° = 357°
adjustment: switch value 3
switch value 5
switch value 7
The Variation change all the time and has to be checked once a year.
- 2.13 -
equivalent to hun-
RHOTHETA Elektronik GmbH
2.2.12
User Manual RT-1000 [Rev 2.01]
Disable Selection of Reference Direction
There are applications where a change of reference direction from QDM to another direction is not
allowed or makes no sense. For this cases it is possible to disable the reference direction switch. If it is
disabled digital display (02) always shows the QDM value.
For this please act as follows:
1. unscrew the front panel and remove it a little bit out of the rack
2. now you can see the switch and .
3. turn the switch
in to position OFF (up away from the board) → the switch function is disabled.
- 2.14 -
RHOTHETA Elektronik GmbH
2.2.13
User Manual RT-1000 [Rev 2.01]
Ground Transmitter Suppression
If you do not want to take the bearing of the ground transmitter, connect the PTT jack (23, Fig. 2-2) on
the rear of the unit with a normally open contact of the transmit button. See Figure 2-5 for wiring diagram.
PTT
Controller
RTC 1100
3
Transmit button
Ground transmitter
1
Fig. 2-5 Wiring diagram for ground transmitter suppression
If the normally open contact is not floating, arrange the wiring according to Figure 2-6.
PTT
Controller
RTC 1100
3
Transmit button
Ground transmitter
1
Fig. 2-6 Wiring diagram for ground transmitter suppression with non-floating contact
Ground transmitter suppression is operative when contacts 1 and 3 of the PTT jack (23, Fig. 2-2) are
connected and thus contact 3 is connected to earth potential.
5
9
4
8
Fig. 2-7 D-sub-jack 9-way
3
7
2
6
1
- 2.15 -
RHOTHETA Elektronik GmbH
User Manual RT-1000 [Rev 2.01]
2.3
Display and Operating Functions
2.3.1
Bearing Display and Bearing Quality Analysis
The bearing is displayed on a
luminous, 3-figure digital display (02, Fig. 2-1) which may
be dimmed for use in darkened rooms (01). The resolution is 1°. Additionally, there is
a display (QDR) in 10° steps
using light dots arranged
around a compass scale (03).
The reference direction display
(17) indicates the selected
reference direction (QDM,
QDR,QTE or QUJ)
DF Direction averaged
DF direction not averaged
Reference direction
Digital DF Display
Fig. 2-8 Bearing Display
To obtain an optimally settled display, the bearing signal is averaged and then processed using a special algorithm. In order to infer the quality of the displayed bearing, there is a second concentric circle
of light dots (04) in the display area which displays the actual, i.e. not averaged ("live") bearing direction in a 20-ms rhythm.
This dual compass scale allows optimum bearing quality analysis because the non-average bearing is
displayed in direct relation to the mean bearing.
If the "live" bearing display (04, circle of green lamps) shows considerable variations or differences to
the averaged mean bearing display (03, circle of red lamps), the operator can see that the direction
finder is being affected by noise, shadowing reflections or strong modulation.
2.3.2
Test Function
After switching on the controller, the unit automatically performs a test routine. If the system is used
continually over longer periods, we recommend activating the test function every day.
The test function is activated using the test button (07, Fig. 2-1). The test routine runs through the internal self-test functions and controls the displays for bearings (02, 03, 04) and frequency (08): numerical display (02) shows 888, the orientation displays (03) and (04) are switched on in 10° steps and the
frequency display (08) shows 8888888. The lamps for frequency deviation (05) and error (06) are illuminated.
Additionally the evaluation of the bearing is inhibited when the test function is activated. When releasing the test key (07) the bearing evaluation is started again.
- 2.16 -
RHOTHETA Elektronik GmbH
2.3.3
User Manual RT-1000 [Rev 2.01]
Repetition of Bearing Indication
The repeat function, called up using the REPEAT button (14, Fig. 2-1), is used to display the last bearing calculated. In addition, when the REPEAT button is pressed, the current bearing is retained. In this
function, the "live" bearing direction indication (04) is not active.
2.3.4
Frequency Selection
Range:
118.000 to 136.975 MHz and /or 156.000 to 174.000 MHz
Resolution:
25 kHz
Frequencies may be entered directly using the key pad or may be called up from the frequency
memory. The unit makes available 10 frequency memories which are retained when the unit is
switched off. The display (08, Fig. 2-1) indicates the active frequency.
2.3.4.1
Direct Frequency Selection
Frequencies can be entered directly using buttons F (frequency) and 0 to 9 on the keypad for entering
frequencies (13, Fig. 2-1).
Example:
Entering a frequency of 118.975 MHz
Input
Frequency display (08)
F
_ _ _ . _ _ _
1
1 _ _ . _ _ _
1
1 1 _ . _ _ _
8
1 1 8 . _ _ _
9
1 1 8 . 9 _ _
7
1 1 8 . 9 7 5
It is not necessary to input the last figure (kHz figure), because the controller generates this automatically.
- 2.17 -
RHOTHETA Elektronik GmbH
User Manual RT-1000 [Rev 2.01]
If the frequency is not entered correctly within 10 seconds., the controller switches back to the last
frequency set.
2.3.4.2
Calling up Frequency Memory
Frequencies may be called up from frequency memories 0 to 9 using the R (Recall) button and buttons
0 to 9 in the key pad for entering frequencies (13, Fig. 2-1). First press the R button and then number 0
to 9 as required.
Example:
Call up frequency memory 0
Input
Frequency display (08)
R
R C L _
0
e.g.
1 2 1 . 5 0 0
If the frequency has not been called up from the frequency memory within 10 secs. after pressing the
R button, the controller switches back to the last frequency set.
2.3.4.3
Programming the Frequency Memory
The current frequency set can be entered into the frequency memory position 0 to 9. This is done by
pressing the store button and buttons 0 to 9 in the key pad for entering frequencies (13, Fig. 2-1).
Press the store button and the button for the desired memory number simultaneously.
Example:
Program frequency memory 0
STORE
0
The last frequency set is automatically programmed into an additional frequency memory. Thus the
frequency set is retained even after the unit is switched off.
Note:
It is also possible to store channel numbers for maritime radio communication into the frequency
memory. This may be useful for scanning of frequency memories 0 to 9 (see section 2.3.6)
- 2.18 -
RHOTHETA Elektronik GmbH
2.3.5
User Manual RT-1000 [Rev 2.01]
Direct Selection of Channel Number in Maritime Radio Communication
Channel number ranges in
duplex operation: 01 to 07,
simplex operation: 08 to 17,
18 to 28, 60 to 66 and 78 to 88
and 67 to 77
For direct channel number selection (for maritime radio communication only), use the buttom C (Channel) and keyes 0 to 9 of the keypad (13, Fig. 2-1).
The last digit of the channel display (08) shows the selected mode in the upper and lower sidebands.
• S = (Sea) bearing of sea station (lower sideband)
• C = (Coast) bearing of a coast station (upper sideband)
• X = channel number in simplex operation (upper sideband = nlower sideband)
Selection of the upper or lower sideband (coast or sea station) is made by repeatedly pressing button
C when entering the channel number.
Example: Enter channel number 78 (bearing mode, reception of a sea station)
Input
Channel display (08)
C
CH
__
S
7
CH
7_
S
8
CH
78
S
If the channel number is not entered correctly within 10 secs., the controller switches back to the last
frequency or channel set.
- 2.19 -
RHOTHETA Elektronik GmbH
2.3.6
User Manual RT-1000 [Rev 2.01]
Scanning
In scan mode the frequency is changed continually. While a signal is being received the current frequency stays turned. When reception stops scanning resumes after approx. 2.5 seconds.
2.3.6.1
Selection of Scan Mode
In order to start scanning first press button STOP/SCAN (16,Fig. 2-1) and then one of the four possible
scan mode keys (key: 1= DOWN, 3= UP, 2 = M0..9, 0 = ACT/M0).
Scan modes:
- DOWN = The entire currently active frequency band (aeronautical or maritime radio communication) is scanned continuously in downward direction. The frequency increment is 25 kHz. Once the
lowest frequency of the band has been reached, scanning restarts at the highest one.
- UP = the frequency band is scanned in upward direction (otherwise as in DOWN scanning)
- M0..9 = The ten frequency memories (see section 2.3.4.3) are scanned continuously.
- ACT/M0 = Two frequencies are scanned, namely the active frequency and that in memory 0.
Example:
Scanning frequency memories 0 to 9
STOP/SCAN
M 0..9
Remarks:
-
-
While scanning is in progress the display (08, Fig. 2-1) briefly shows the message SCANNING
every tow seconds
While scanning is in progress, the scan mode is only changed by pressing the relevant mode key.
If, for example, you wish to change from UP to DOWN scanning, just press the DOWN key.
If you wish to continue scanning although a signal is being received, press the relevant scan mode
key and keep pressing until a new frequency is set. (Example: In UP scanning a signal is being received at 125.000 MHz and scanning stops. If you still wish to continue UP scanning, press key UP
until 125.025 MHz appears and UP scanning continues automatically)
You may also store channel numbers for maritime radio communication in frequency memories 0
to 9 for scanning.
2.3.6.2
Ending Scanning
To stop all active scanning processes immediately press the STOP/SCAN button (16) or any other
function key.
- 2.20 -
RHOTHETA Elektronik GmbH
2.3.7
User Manual RT-1000 [Rev 2.01]
Calling up the Distress Frequency 121.500 MHz
By pressing button 121.500 MHz (15,Fig. 2-1) this frequencies immediately activated (international
distress frequency in civil aviation)
2.3.8
Selection of the reference directions QDM, QDR, QUJ und QTE
With the reference direction switch (18) the reference directions QDM, QDR, QUJ and QTE can be
displayed on the digital bearing display. The selected reference direction is shown at the reference
display (17) and at the legend of the switch position (18).
Switch position /
Reference direction display
Meaning
Reference Direction
QDM
Magnetic bearing (course) of
aircraft / vessel to the DF
station
Magnetic north
QDM = QDR ± 180°
QDM = QUJ + VAR
QDR
Magnetic bearing from the
DF to the aircraft / vessel
Magnetic north
QDR = QDM ± 180° QDR
= QTE + VAR
QTE
True bearing from the DF to
the aircraft / vessel
True north
QTE = QUJ ± 180° QTE =
QDR - VAR
QUJ
True bearing (track) of aircraft / vessel to the DF station
True north
QUJ = QTE ± 180° QDM =
QUJ + VAR
VAR
1
1
Variation
Wobei westliche Variatonswerte mit dem Vorzeichen “-“ und östliche mit dem Vorzeichen „+“ bewertet werden.
- 2.21 -
RHOTHETA Elektronik GmbH
User Manual RT-1000 [Rev 2.01]
The interrelation will be shown in the following Figure:
acronym
meaning
TN
True north
MN
Magnetic North
Caution!:
Just forward to an aircraft pilot only QDM bearings. Other reference directions will cause a
significant danger of confusion!
2.3.9
Checking the Variation adjustment
After switching on the Controller Unit the test routine will start. The reference display (17) shows „VAR“
for variation. At the end of the test routine the adjusted value fort he variation is shown for 3 seconds
on the digital bearing display (02)
- 2.22 -
RHOTHETA Elektronik GmbH
2.3.10
User Manual RT-1000 [Rev 2.01]
North Adjustment
The correction value set for north adjustment is shown on the frequency display (8, Fig. 2-1) when the
buttons TEST (7) and REPEAT (14) are pressed simultaneously. Corrections can be made in 0.5°
steps in a range of ± 90°.
2.3.11
Frequency Deviation
The RTC 1100 controller incorporates a measuring device to monitor the frequency deviation of the
signal being received. If the frequency drift becomes excessive (±5 kHz), bearing evaluation is interrupted. This condition is signalled by the LED (05, Fig. 2-1) in the display field.
2.3.12
Error Indication
The equipment has a wide range of self-test devices. If an error is discovered, lamp (06, Fig. 2-1) in
the bearing display field lights up. Additionally, the error code is shown flashing at 1 sec. intervals in the
frequency display (08).
Display:
E R R
7
Error code
Error type
1
Processor
2
EPROM
3
RAM
4
Power supply
5
EEPROM
6
Synchronisation
7
Phase measurement
8
Data transfer or power supply or receiver unit
9
Receiver control
CAUTION:
If an error message appears, the unit no longer functions.
- 2.23 -
RHOTHETA Elektronik GmbH
2.3.13
User Manual RT-1000 [Rev 2.01]
Dimmer (01) "DIM"
The dimmer (01, Fig. 2-1) is used to change the brightness of the QDM display (02), line of bearing
display (03), line of "live" bearing display (04), error display (06) and frequency deviation display (05).
The dimmer has no effect on the frequency display (08). When set to minimum, the line of bearing
display (04) is almost completely extinguished.
2.3.14
Volume Control (09)
The volume control (09, Fig. 2-1) is used to change the volume of the AF signal (speech signal) which
can be monitored in the speaker or headphones. When set to minimum the AF signal is no longer audible.
2.3.15
Headphones Connection (10)
Headphones can be connected to jack socket (10, Fig. 2-1) for monitoring the AF (speech) signal. The
speaker in the controller is silenced when the jack plug is inserted.
Suitable jack plug :
6.35 mm
Terminal allocation :
Centre terminal :
Outer connection :
+ (audio signal)
- (ground)
2.3.16
"STANDBY" Indicator (11)
With power applied, power switch (12, Fig. 2-1) set to "ON" and the controller is in STANDBY because
voltage is present at the power transformer. This state is indicated by the yellow "STANDBY" indicator
(11).
2.3.17
ON / OFF Switch (12)
This switch (12, Fig. 2-1) is used to switch the controller on and off. The switch activates or blocks the
power supply regulator. In the OFF position it also cuts off the DC power supply. The transformer is not
disconnected from mains supply.
- 2.24 -
RHOTHETA Elektronik GmbH
2.3.18
User Manual RT-1000 [Rev 2.01]
"Line" Mains Switch (15)
Mains switch (17, Fig. 2-2) provides a double-pole disconnection of the power supply module from the
mains. The DC power supply is not affected, which means that with the switch in the "OFF"-position
the power supply module is switched to the DC power supply.
Modes:
Mains switch
setting
(17, Fig. 2-2)
DC power supply
OFF
not connected
OFF
Controller
"Standby"
Indicator
(11)
ON
OFF
OFF
not connected
OFF
OFF
OFF
OFF
connected
OFF
OFF
OFF
OFF
connected
ON
operates in DC mode
ON
ON
not connected
OFF
OFF
ON
ON
not connected
ON
operates in mains mode
ON
ON
connected
OFF
OFF
ON
ON
connected
ON
operates in mains mode
ON
2.3.19
ON / OFF switch
setting
(12, Fig. 2-1)
Power Supply "OK" Indicator (19)
After switch-on the green indicator (19, Fig. 2-2) lights up. This indicates that the power module is operating correctly.
2.3.20
"Data-Port" Data Interface (20)
The data port is used to connect the RTR 1200 Receiver Unit to the controller. Additionally, the internal
power supply voltages and the AF signal (audio signal, floating, via a separate amplifier) are applied to
this connector.
Plug type:
D sub miniature female multipoint connector, 25-way
- 2.25 -
RHOTHETA Elektronik GmbH
User Manual RT-1000 [Rev 2.01]
13
25
14
1
D-sub-jack 25-way
Plug wiring:
Pin
Signal
Meaning
01
NF 2
AF audio signal (floating)
02
PHI-1
Bearing signal 1
03
PHI-2
Bearing signal 2
04
PHI-2
Bearing signal 2
05
Data-1
Data communication line 1
06
Data-1
Data communication line 1
07
-15V
-15-Volt power supply
08
Data-2
Data communication line 2
09
Data-2
Data communication line 2
10
48kHz-1
Reference signal 1
11
48kHz-1
Reference signal 1
12
48kHz-2
Reference signal 2
13
48kHz-2
Reference signal 2
14
NF1
AF audio signal (floating)
15
TXD-5V
Serial 5-V interface
16
RXD-5V
Serial 5-V interface
17
RXD
RS-232 interface (receive)
18
TXD
RS-232 interface (transmit)
19
NF-X2
20
PTT-X2
AF input
Input for ground transmitter
suppression
21
SQU
Squelch input
22
GND
Ground
23
GND
Ground
24
+15V
+15-V power supply
25
5V
+5-V power supply
- 2.26 -
RHOTHETA Elektronik GmbH
2.3.21
User Manual RT-1000 [Rev 2.01]
"Sync" Synchronisation Indicators (21, 22)
The green indicator (22, Fig. 2-2) lights up if in the controller the electronics in the Frequency Processing module RTC 1107 is synchronised with the reference signal from the Antenna Control module
RTR 1201.
The red indicator (21) lights up if the above mentioned synchronisation is not achieved.
When this indicator is on it indicates the following possible malfunctions :
− Receiver unit not ready for operation (e.g. switched off)
− Data line defective
− RTR 1201 Antenna Control module defective
− RTC 1107 Frequency Processing module defective
2.3.22
"DF Signal 2" Test Plug (24)
The test signal for bearing determination is applied to the test connector (24, Fig. 2-2). The signal can
be monitored using an oscilloscope. It indicates the quality of the bearing value (refer to section
4.4.3.1).
Plug type:
2.3.23
SMB
"R/L" Test Connector (23)
The signal for changing over the fictitious antenna rotation from clockwise to counter-clockwise is applied to the test plug (23, Fig. 2-2). This signal is used for triggering the oscilloscope when monitoring
the DF signal described in 2.3.17.
Plug type:
2.3.24
SMB
"Ser. Port" Serial Interface (28)
The serial interface (28, Fig. 2-2) enables the transmission of bearing data to an external display unit
and also permits remote control from an external control unit.
The characters to be transferred are transmitted in ASCII code from the RTC 1100 Controller. The
data bit sequence, which is assigned in each case to the characters to be transmitted, is preceded by a
start bit and followed by a stop bit. Both additional bits ensure that both transmitter and receiver are
time-synchronized.
The data traffic via the serial interface is in asynchronous mode. For time-synchronisation of the data
transmitter and receiver the data receiver is triggered by the rising edge of the start bit at the beginning
of the bit sequence of a character.
- 2.27 -
RHOTHETA Elektronik GmbH
User Manual RT-1000 [Rev 2.01]
The transmission of a message begins with the header consisting of an alphanumeric character. The
actual message content forms a string of (ASCII) decimal numbers. The transmission of a message is
ended by the final identifier "CR" (decimal code 13).
The signal level on the data lines corresponds to the RS-232 standard, i.e. a high is defined as a voltage between +3 V and +15 V and a low as a voltage between -3 V and -15 V. The data is transmitted
in negative logic.
The bearings are output as QDR values and therefore differ by 180° from the values shown in the
QDM display (02).
- 2.28 -
RHOTHETA Elektronik GmbH
2.3.24.1
User Manual RT-1000 [Rev 2.01]
Data Output
The data output is continuous, i.e. no control by means of a handshake signal or control characters is
necessary.
Message
Header Content
"Average" bearing
(QDR value)
A
XXX
0 to 359° (QDR)
Units
Tens
Hundreds
"Live" bearing
(QDR value)
L
XXX
0 to 359° (QDR)
Units
Tens
Hundreds
Status
S
XXX
Error code, units
Error code, tens
0: Bearing signal off
1: Bearing signal on
2: Deviation
3: Test
4: Ground transmitter suppression
Receive level
P
Frequency
F
XX
XXXXXX
0 to 99%
Units
Tens
118.000 to 136.975 MHz
kHz units
kHz tens
kHz hundreds
MHz units
MHz tens
MHz hundreds
The following example shows the output of the average QDR bearing 315° as a sequence of ASCII
characters :
A315CR
Average bearing 315° (QDR)
Final character
Content (bearing)
Header
{= decimal: 13}
{= decimal: 51, 49, 53}
{= decimal: 65}
- 2.29 -
RHOTHETA Elektronik GmbH
User Manual RT-1000 [Rev 2.01]
Time sequence
The status of the bearing signal determines the bearing data output. If no usable bearing signal is present, the RTC 1100 Controller transmits the data for status and frequency at intervals of approximately
one second.
Immediately after any usable bearing signal is applied the controller transmits the status message.
This is followed by the transmission of the bearing values "average" and "live". The average bearing is
transmitted approximately four times per second and the live bearing approximately 18 times per second. In between, the messages "status" and "frequency" are output at intervals of approximately one
second. If the bearing signal changes to the "off" state, the controller immediately transmits the status
information.
Bearing signal off
SF
Bearing signal on
SF
SALLLLALLLLALLLLALLLLASFLLLLALLLLALLLLALLLLSFALLLLALLSFS
S: Status
F: Frequency
A: Average bearing
L: Live bearing
- 2.30 -
Bearing signal off
SF
RHOTHETA Elektronik GmbH
2.3.24.2
User Manual RT-1000 [Rev 2.01]
Data Input
All received data are checked for correct syntax and plausibility referring to the actual unit setting. All
received data are also checked for compliance with the limiting values. The data input is monitored
over a time-out of 100 ms, i.e. all ASCII characters of a message must be transmitted to the bearing
unit within this time.
If errors are found, the received commands are not carried out. A correct data input momentarily sets
the direction finder to the required setting.
Message
Header Content
Status
S
X
0: Reset
1: "Live" bearing off
2: "Live" bearing on
3: Slave display identification 1)
4: Ground transmitter suppression
9: Initate watchdog reset
Frequency
F
XXXXXX
118.000 ... 136.975 MHz
kHz units
kHz tens
kHz hundreds
MHz units
MHz tens
MHz hundreds
1) Changes of frequency via serial data interface will be stored. Status is approx active for 1 sec.
The following example shows the data sequence for the frequency command:
F125375CR
Frequency 125.375 MHz
Final character
Content
Header
{= decimal: 13}
{= decimal: 49, 50, 53, 51, 55, 53}
{= decimal: 70}
After switch-on of the RTC 1100 Controller, the serial interface is in the "live bearing on" state. If
transmission of the live value is not required, the instruction "live bearing off" must be transmitted each
time after the controller is switched on or the supply voltage is interrupted.
- 2.31 -
RHOTHETA Elektronik GmbH
2.3.24.3
User Manual RT-1000 [Rev 2.01]
Technical Data
Data format:
ASCII-8-Bit (7 data bits + 1 parity bit)
(ASCII-II-character format)
Stop bit:
1
Parity:
ODD
Baud rate:
1200
Mode:
asynchronous
Level:
RS-232
High: +3 V to +15 V
Low: -3 V to -15 V
Bearing output:
QDR
2.3.24.4
6
7
8
9
"Ser. Port" Plug Wiring (28)
1
2
Multipoint connector, 9-way
Type: D sub miniature
3
4
5
PIN
Designation
Function
1
-
not wired
2
RxD
Receive Data
3
TxD
Transmit Data
4
-
5
SG
6
-
not wired
7
-
not wired
8
-
not wired
9
-
not wired
not wired
Signal Ground
- 2.32 -
Input
Output
X
X
RHOTHETA Elektronik GmbH
2.3.24.5
User Manual RT-1000 [Rev 2.01]
Connection to a Data Terminal or Data Transmission Device
Controller
RTC
1100
Data terminal or data
transmission device
RxD
TxD
2
3
3
2
5
5
TxD
RxD
SG
SG
RTS
7
CTS
8
DSR
6
DTR
4
DCD
1
The plug wiring of the data terminal device applies for most PCs with 9-way D subminiature multipoint
connectors. The terminal wiring is to be individually checked.
- 2.33 -
RHOTHETA Elektronik GmbH
2.3.25
User Manual RT-1000 [Rev 2.01]
"Par. Port" Parallel Interface (29)
The parallel interface (29, Fig. 2-2) enables the transmission of bearing data to an external display or
evaluation unit.
Data output is by means of nine data bits and a transfer signal. A signal is also available which indicates the availability of valid bearing data. In this case the determined QDR bearing (average) is output
in binary form with positive 5 V logic (low = 0 V, high = 5 V). If no valid bearing is present (bearing signal off, D9-OUT is low), the D0 to D8-OUT outputs are high. The status of the data lines (D0 to D8OUT) is valid only during the high phase of the transfer signal (STR1).
The repetition time is approximately 15 ms, i.e. approximately 66 bearings are output per second.
2.3.25.1
15
"Par. Port" Terminal Wiring (29)
8
15-way female multipoint connector (29, Fig. 2-2)
Type: D subminiature
9
1
PIN
Designation
Function
1
+5V
+5-Volt supply
2
D1
Data bit 1
3
D3
Data bit 3
4
D5
Data bit 5
5
D7
Data bit 7
6
STR1
Transfer signal
7
D8-IN
No function
8
D8-OUT
Data bit 8
9
D0
Data bit 0
10
D2
Data bit 2
11
D4
Data bit 4
12
D6
Data bit 6
13
STR2
No function
14
D9-OUT
Bearing signal ON / OFF
Low: OFF, High: ON
15
GND
Ground
- 2.34 -
RHOTHETA Elektronik GmbH
2.3.25.2
User Manual RT-1000 [Rev 2.01]
Time Sequence
not valid
valid
not valid
valid
not valid
D9-OUT
not valid
D0 .. D8-OUT
STR1
T1
T2
min.
max.
T1
25 ms
---
T2
25 ms
35 ms
T3
25 ms
---
- 2.35 -
T3
RHOTHETA Elektronik GmbH
2.4
User Manual RT-1000 [Rev 2.01]
Installation Dimensions
- 2.36 -
RHOTHETA Elektronik GmbH
User Manual RT-1000 [Rev 2.01]
Mounting Cutout
465.1
450
- 2.37 -
RHOTHETA Elektronik GmbH
3
User Manual RT-1000 [Rev. 2.01]
RECEIVER UNIT RTR 1200.A
List of Contents:
3 RECEIVER UNIT RTR 1200.A........................................................ 3.1
3.1
Front View of Receiver Unit ..........................................................................3.3
3.2
Preparation for Use .......................................................................................3.7
3.2.1
Setting the Mains Voltage .................................................................................................3.7
3.2.2
Mains Fuses .......................................................................................................................3.8
3.2.3
DC Supply Connection......................................................................................................3.8
3.2.4
DC Fuse ..............................................................................................................................3.9
3.2.5
Connection of RTA 1300 Direction Finder Antenna .......................................................3.9
3.2.6
Controller / Receiver Unit Data Connection..................................................................3.10
3.2.7
Setting the Receiver ........................................................................................................3.11
3.3
Using the RTR 1200 Receiver Unit .............................................................3.12
3.3.1
Switching on the Receiver Unit......................................................................................3.12
3.3.2
Switch-on Reaction, Operation, Control Equipment ...................................................3.12
3.4
3.3.2.1
Receiver Self-test .....................................................................................................3.12
3.3.2.2
Power Supply OK Control Lamp .............................................................................3.12
3.3.2.3
Control Data Transmission .....................................................................................3.13
3.3.2.4
Squelch Control Lamp “Sql” (7) .............................................................................3.13
3.3.2.5
F-, F+ Deviation Recognition Control Lamps (6)...................................................3.13
3.3.2.6
Control Lamp “No Sync” (5) ...................................................................................3.13
3.3.2.7
“IF” Intermediate Frequency Jack (9) ....................................................................3.13
3.3.2.8
R/L OFF Button .........................................................................................................3.13
3.3.2.9
Antenna Control Jack ..............................................................................................3.14
3.3.2.10
Receiver Operation ..................................................................................................3.15
3.3.2.10.1
Remote / Local Switch (13) ................................................................................3.15
3.3.2.10.2
“Level-Frequency-Special” Switch (17) ............................................................3.15
3.3.2.10.3
Frequency Selection key ↑ / ↓ (14; 15) ..............................................................3.15
3.3.2.10.4
Squelch adjustment potentiometer (18) ...........................................................3.15
Installation Dimensions ..............................................................................3.16
- 3.1 -
RHOTHETA Elektronik GmbH
User Manual RT-1000 [Rev. 2.01]
List of Figures:
3-1
Front view of receiver unit.........................................................................................................3.5
3-2
Front view additional bearing receiver (option) ........................................................................ 3.6
3-3
Mains voltage selector .................................................................................................................. 3.7
3-4
Antenna connection .................................................................................................................3.10
- 3.2 -
RHOTHETA Elektronik GmbH
3.1
User Manual RT-1000 [Rev. 2.01]
Front View of Receiver Unit
No.
Designation
Significance
see section
1
1401
Power supply module
2
Antenna control
Plug for connection of dummy antenna
3.3.2.9
3
R/L off
Test button (R/L off)
3.3.2.8
4
1201
Antenna control module
5
No Sync
Control lamp for error in receiver
3.3.2.6
6
F+, F-
Control lamp, frequency deviation positive, negative
3.3.2.5
7
Sql
Control lamp for receiver squelch
3.3.2.4
8
1204
Receiver module
9
IF
Receiver test jack
3.3.2.7
10
Power
Control lamp receiver supply voltage
3.3.2.2
11
1205
Receiver interface
12
Frequency
Receiver display
13
Remote/Local
Switch remote operation or manual for test purposes
3.3.2.10.1
14
↑
Button for upward frequency change in local mode
3.3.2.10.3
15
↓
Button for downward frequency change in local mode
3.3.2.10.3
16
Mode
Button without function
17
Level / Frequency
/ Special
Switch for level or frequency indication
3.3.2.10.2
18
Sql
Slot for manual squelch adjustment
3.3.2.10.4
19
X16
BNC jack for RF antenna signal
3.2.5
20
X5
Antenna control terminal strip
21
X15
Antenna control connection
3.2.5
22
X4
Data signals terminal strip
3.2.6
23
Data cable bushing
3.2.6
24
Data cable
3.2.6
25
X3
Power supply terminal strip
26
F6
Fuse for DC heating (Option)
27
F5
Fuse for 24-V power supply
28
3.2.4
Dummy cover for additional cable bushing
29
F4
Fuse: receiver unit
3.2.2
30
F3
Fuse: receiver unit
3.2.2
31
F2
Fuse: receiver unit and AC heating
3.2.2
32
F1
Fuse: receiver unit and AC heating
3.2.2
33
Mains power cable
- 3.3 -
RHOTHETA Elektronik GmbH
No.
Designation
User Manual RT-1000 [Rev. 2.01]
Significance
see section
34
Mains power cable bushing
35
Earth connection screw
3.2.5
Mains voltage selector
3.2.1
Power supply control lamp
3.3.2.2
36
Power Select
115/230V
37
OK
+5V,+15V,-15V
38
1204 / 1205
39
Additional bearing channel (Option)
Terminal field additional bearing channel (Option)
40
X15
Audio signal terminal strip
41
X11; X12; X13
Data signals terminal strip
- 3.4 -
RHOTHETA Elektronik GmbH
User Manual RT-1000 [Rev. 2.01]
Fig 3-1 Front view of receiver unit
- 3.5 -
RHOTHETA Elektronik GmbH
User Manual RT-1000 [Rev. 2.01]
Fig 3-2 Front view additional bearing receiver (option)
- 3.6 -
RHOTHETA Elektronik GmbH
3.2
User Manual RT-1000 [Rev. 2.01]
Preparation for Use
3.2.1
Setting the Mains Voltage
The RTR 1200 Receiver Unit can be operated on 115 V or 230 V (± 15 %) mains voltage. The unit is
factory-set for a mains power supply of 230 V.
Before using the unit, check that the correct operating voltage range is set. Use a slot screw-driver to
move the mains voltage selector (39, Fig. 3-1). This selector is on the front panel of the RTX 1401 (01)
Power Pack module.
230
Selector position for 230-Volt range:
Permissible operating voltages:
115
Vmin = 195.5 Vrms
Vmax = 264.5 Vrms
Selector position for 115-Volt range:
Permissible operating voltages:
Vmin = 97.75 Vrms
Vmax = 132.25 Vrms
Bild 3-3 Mains voltage selector
In addition, make sure mains voltage fuses F2 and F3 are correct for mains voltage range selected
(see section 3.2.2).
WARNING:
If the mains voltage selector is not set correctly, the unit may be damaged beyond repair.
- 3.7 -
RHOTHETA Elektronik GmbH
3.2.2
User Manual RT-1000 [Rev. 2.01]
Mains Fuses
Before beginning to use the unit, check that the correct fuses are fitted and are appropriate for the
operating voltage range selected.
The fuses are underneath the switch box cover of the housing. Remove the cover by loosening the
three fixing screws.
Designation
No.
F1
AC heating and receiver unit
35
IEC 127T500H/250V
(500 mA, slow-blow)
IEC 127T500H/250V
(500 mA, slow-blow)
F2
AC heating and receiver unit
34
IEC 127T500H/250V
(500 mA, slow-blow)
IEC 127T500H/250V
(500 mA, slow-blow)
F3
Receiver unit
33
IEC 127T315H/250V
(315 mA, slow-blow)
IEC 127T160H/250V
(160 mA, slow-blow)
F4
Receiver unit
31
IEC 127T315H/250V
(315 mA, slow-blow)
IEC 127T160H/250V
(160 mA, slow-blow)
3.2.3
115-V range
230-V range
DC Supply Connection
The RTR 1200 Receiver Unit is fitted with a DC supply connection. This allows the unit to be operated
using batteries or a 24 V DC mains connection.
For DC supply, replace dummy panel (28, Fig. 3-1) by the included cable bushing. Then insert the DC
supply cable through the cable bushing and screw in. To guarantee correct sealing of the cable bushing, use a 2-core round cable with an external diameter of 3 - 6.5 mm. Select appropriate conductor
cross-section for 2 A continuous current.
Connect the cable to terminal strip (25), marked X3. Connect the positive voltage pole to X3.1 and the
negative to X3.2.
If mains voltage is present, power supply will always be off the mains. However, if mains voltage is
interrupted, the power supply module switches automatically over to DC supply. Since Receiver Unit
RTR 1200 can only be switched off by separation from the supply voltages, a suitable switching device
is required for the DC voltage supply facility.
Allocation of terminals:
Terminal
Designation
No. DC voltage source
X3.1
+24V BAT
28
Positive pole: +24 VDC
X3.2
-24V BAT
28
Negative pole 0 V earth
- 3.8 -
RHOTHETA Elektronik GmbH
3.2.4
User Manual RT-1000 [Rev. 2.01]
DC Fuse
The DC voltage input is protected by fuse F5 (27, Fig. 3-1).
Designation
No.
Type
F5
DC voltage supply
30
IEC 127T1.0H/250V
(1 A, slow-blow)
Input voltage range:
Vmin = 21.5 V
Vmax = 29.0 V
WARNING:
Voltages greater than 30 V may lead to the unit being damaged beyond repair.
3.2.5
Connection of RTA 1300 Direction Finder Antenna
The RTA 1300 Direction Finder Antenna
is connected to the receiver unit via an RF
and control cable, each.
Direction Finder
Antenna
RTA 1300
Ensure that the antenna mast is well
earthed and that there is also a low impedance and low inductivity connection
between the RTR 1200 Receiver Unit
earth screw (35, Fig. 3-1) and earth potential. Ensure that all applicable safety
guidelines are observed.
Receiver Unit
RTR 1200
X15 X16
Antenna Control Cable
RF Cable
Fig. 3-3 Antenna connection
Plug
No. Signal name
Cable
X15
24
Control signal
Control cable
X16
22
RF signal
RF cable
- 3.9 -
RHOTHETA Elektronik GmbH
User Manual RT-1000 [Rev. 2.01]
X15 antenna control plug (21) pin allocation:
X15 plug (No. 21)
PIN-No. Signal
1
NORTH
2
SOUTH
3
WEST
4
EAST
5
Ground
6
+15V
PE
4
3
5
2
6
1
PE
Screen
Fig. 3-4 Plug for control cable
3.2.6
Controller / Receiver Unit Data Connection
The RTR 1200 Receiver Unit is connected to the controller via a communications cable with three pairs
of wires. This cable is used to transmit the bearing signal, a reference signal, the AF (speech) signal
and data signals for receiver control and errors signalling.
Cable type e.g.:
A-2Y (L) 2Y ... x2 x0,6 St III Bd
At the receiver unit end, the data cable (24. Fig. 3-1) is inserted through the housing bushing (23) and
screwed in. The individual pairs of wires are connected to terminal strip X4 (22). Fit a 25-pole D-Sub
plug to the controller end of the cable. Then plug the cable into the "data port" on the line interface
(module RTC 1103).
Connection plan for data cable:
Terminal block X4 (25)
Receiver unit
Terminal
Signal
Name
D-Sub plug
controller
Terminal No.
X 4.1
48 kHz-2
48 kHz-2
12
X 4.2
48 kHz-1
48 kHz-1
10
X 4.3
P-PHI-1
P-PHI-1
2
X 4.4
P-PHI-2
P-PHI-2
4
X 4.5
DATA-1
DATA-1
5
X 4.6
DATA-2
DATA-2
8
- 3.10 -
RHOTHETA Elektronik GmbH
User Manual RT-1000 [Rev. 2.01]
Connection plan fort data cable additional bearing channel (option)
terminal block X4 (25)
Receiver Unit
Terminal
Signal
Name
D-Sub-Stecker
2. Controller
Terminal No.
X 11.1
48 kHz-1B
48 kHz-2
10
X 11.2
48 kHz-2B
48 kHz-1
12
X 12.1
P-PHI-1B
P-PHI-1
2
X 12.2
P-PHI-2B
P-PHI-2
4
X 13.1
DATA-1B
DATA-1
5
X 13.2
DATA-2B
DATA-2
8
a The matched signals DATA-1 and DATA-2, P-PHI-1 and P-PHI-2 and 48kHz-1 and 48kHz-2 are
assigned to one pair of wires each in the communications cable.
If the communications cable used as the data cable is of the star-quad type (i.e. the four wires of two
pairs are twisted together), the signals DATA-1,2 and 48kHz-1,2 are to be assigned to one and the
same star-quad (see section 5.2).
3.2.7
Setting the Receiver
The Bearing Receiver is integrated in the Receiver Module RTR 1204/1205 (8; 11) which also contains
the receiver interface. Both units are set correctly at the factory. Nevertheless, before using the direction finder for the first time, all settings should be checked once again.
Setting of receiver:
-
Move Remote/Local switch (13) to Remote position.
- 3.11 -
RHOTHETA Elektronik GmbH
3.3
User Manual RT-1000 [Rev. 2.01]
Using the RTR 1200 Receiver Unit
Once all checks listed in section 3.2 have been carried out, the receiver unit can be used.
3.3.1
Switching on the Receiver Unit
The receiver unit is switched on by plugging the mains cable into the mains. Ensure that the socket for
the mains connection is close to the receiver unit and can be reached at any time to enable the unit to
be immediately disconnected from the mains if necessary.
The RTR 1200 Receiver Unit is designed for continuous operation. To preclude incorrect operation, the
receiver unit is not provided with its own mains switch. If a shut-down facility is required, an external
mains switch, e.g. at the controller position, is to be provided. It must be noted that at low temperatures
a warm-up phase lasting up to 30 minutes may be possible after switching on the receiver unit.
3.3.2
Switch-on Reaction, Operation, Control Equipment
The receiver unit is designed for remote operation. The unit is operated by remote control using the
RTC 1100 A Controller (see section 2). All relevant control functions and indications are transmitted to
the controller via the data cable and evaluated in the controller. The indications and settings on the
receiver unit are present only for test purposes if the unit has to be serviced and for carrying out function checks on the whole system.
3.3.2.1
Receiver Self-test
After the receiver unit has been switched on, an automatic test of the receiver display (12, Fig.3-1) is
started. This involves the numerical series 88888888 flashing for approximately 4 secs. Following this,
the actual software version is shown for some seconds. When the self test is finished the last frequency set appears.
3.3.2.2
Power Supply OK Control Lamp
After switching on, the green control lamp (37 and 10, Fig. 3-1) of the Power Supply module RTX 1400
(01) and on the receiver RTR 1204 (8), lights up. This shows that the power supply module is functioning correctly.
- 3.12 -
RHOTHETA Elektronik GmbH
3.3.2.3
User Manual RT-1000 [Rev. 2.01]
Control Data Transmission
If the receiver works in “Remote” mode (standard) the display (12) shows the frequency which is sett at
the Controller side. It indicate that the data connection between receiver Unit and controller is established, the data line works and is connected to the controller and the controller is switched on. If the
communication is disturbed, the error message “No Remote” is displayed.
3.3.2.4
Squelch Control Lamp “Sql” (7)
The yellow squelch control lamp (07, Fig. 3-1) lights up as soon as a signal of sufficient strength is
received. This shows that a bearing signal is being transmitted to the controller.
3.3.2.5
F-, F+ Deviation Recognition Control Lamps (6)
The red control lamps (07, Fig. 3-1) light up if a signal with a frequency deviation larger than ± 5 kHz is
received. This shows that a signal is being received which is not suitable for direction finding purposes.
3.3.2.6
Control Lamp “No Sync” (5)
In case of an PLL lock error the red lamp “No Sync” (5) illuminate. It indicate an failure on the receiver
RTR 1204.
3.3.2.7
“IF” Intermediate Frequency Jack (9)
The intermediate frequency signal supplied by the receiver can be tapped at the IF SMB jack (09).
Only for service use.
3.3.2.8
R/L OFF Button
The R/L OFF button (3) interrupts the right/left antenna rotation control. If this button is pressed and a
received signal is present, the value 000° or 180°+ north adjustment (set on the controller) appears on
the QDM display of the controller.
- 3.13 -
RHOTHETA Elektronik GmbH
3.3.2.9
User Manual RT-1000 [Rev. 2.01]
Antenna Control Jack
The antenna control D-Sub jack (2) is used to connect the RTM 1500 Dummy Antenna. The same
signals are transmitted as at the antenna control connection (21). Additionally, the R/L signal is available.
PIN
7
6
Function
5
1
OST-X2
Antenna control signal, east
4
2
WEST-X2
Antenna control signal, west
3
GND
Ground
4
GND
Ground
5
+15V-X2
+15-V supply
6
SUED-X2
Antenna control signal, south
7
NORD-X2
Antenna control signal, north
8
R/L
Right/left rotation change-over signal
9
+15V-X2
+15-V supply
9
8
Signal
3
2
1
- 3.14 -
RHOTHETA Elektronik GmbH
3.3.2.10
User Manual RT-1000 [Rev. 2.01]
Receiver Operation
The receiver in Receiver Module RTR 1204 /1205 (8; 11) is controlled exclusively by the controller in
normal operation (receiver setting as described in section 3.2.7). If a different operating mode is required for test purposes or if the unit has to be serviced, the receiver can also be manually adjusted.
3.3.2.10.1
Remote / Local Switch (13)
“Remote” position:
“Local” position:
3.3.2.10.2
Standard operation mode; Receiver controlled by Controller Unit.
For test purpose the working frequency can be changed locally. In this position
the frequency display at the Controller side shows “ERR 9”
“Level-Frequency-Special” Switch (17)
Standard position of the switch is “frequency” The display (12) shows the actual frequency. In position
“Level” the display (12) shows the signal level (0..99 %, not calibrated). The position “Special” has no
function yet.
3.3.2.10.3
Frequency Selection key ↑ / ↓ (14; 15)
At mode “local” it is possible to increase the frequency in 25 kHz steps by pressing the key ↑ (14) or
decreasing the frequency in 25 kHz steps by pressing the key ↓ (15).
3.3.2.10.4
Squelch adjustment potentiometer (18)
Behind the hole (18) there is a potentiometer which allows a squelch adjustment. For this a small
screw driver is necessary. Normally the factory setting is all right.
If turning clockwise the squelch threshold god down, counterclockwise the squelch threshold rise.
.
- 3.15 -
RHOTHETA Elektronik GmbH
Installation Dimensions
120
146.7
11
79.1
271
332
2 10
236.7
3.4
User Manual RT-1000 [Rev. 2.01]
Ø5
340
355
- 3.16 -
,5 0
RHOTHETA Elektronik GmbH
4
User Manual RT-1000 [Rev. 2.01]
DIRECTION FINDER ANTENNA RTA-1300.A
List of Contents:
4 DIRECTION FINDER ANTENNA RTA-1300.A ............................... 4.1
4.1
Set-up Notes ..................................................................................................4.3
4.2
Notes on Fig. 4-7 a/b, RTA 1300 A Direction Finder Antenna ..................4.11
4.3
Assembly Instructions ................................................................................4.14
4.4 North Alignment of the Direction Finder Antenna and
Determining the System Accuracy at the Installation Site .......................4.16
4.4.1
North Alignment Using a Ground Transmitter (Presetting) ........................................4.16
4.4.2
Flight Checking for Exact North Alignment and Determining
the System Accuracy at the Installation Site ................................................................4.17
4.4.2.1
Determining the Position Using a Theodolite .......................................................4.18
4.4.2.2
Determining the Position Using a GPS Receiver ..................................................4.18
4.4.2.3
Simplified Method ....................................................................................................4.18
4.4.3
4.4.3.1
Evaluation of Direction Finding Signal ..................................................................4.19
4.4.3.2
Evaluation of QDR Live Display (Green Light Dot Circle) ....................................4.22
4.4.3.3
Evaluation of Measuring Results............................................................................4.23
4.4.4
4.5
Evaluation ........................................................................................................................4.19
Determining the North Correction .................................................................................4.24
Installation Dimensions ..............................................................................4.25
- 4.1 -
RHOTHETA Elektronik GmbH
User Manual RT-1000 [Rev. 2.01]
List of Figures:
4-1
Free-space propagation of radio waves .................................................................................4.3
4-2
Field of lines of equal phase relations for two coherent waves ............................................... 4.5
4-3
Reflected path distance and direct path distance of the radio wave ...................................4.6
4-4
The phases between a direct wave W and reflected wave R .................................................... 4.7
4-5
Signal strength lobes plotted against angle of elevation......................................................4.8
4-6
Surveying the direction finder using criss-cross and circular flights ...............................4.10
4-7a RTA 1300.A Direction Finder Antenna ........................................................................................ 4.12
4-7b RTA 1300.A Direction Finder Antenna (bottom view)............................................................... 4.13
4-8
Fitting O-ring.................................................................................................................................. 4.14
4-9
Allocation of connections ............................................................................................................ 4.14
4-10 Assembly of radiators .................................................................................................................. 4.15
4-11 Setting up the ground transmitter .............................................................................................. 4.16
4-12 DF signal 2 and R/L signal for undisturbed reception.........................................................4.20
4-13 DF signal 2 and R/L signal with a modulated reception signal ..........................................4.20
4-14 DF signal 2 and R/L signal with noisy reception signal ......................................................4.21
- 4.2 -
RHOTHETA Elektronik GmbH
4.1
User Manual RT-1000 [Rev. 2.01]
Set-up Notes
Normally, the major factor concerning radio reception is to transmit music, speech and pictures without
distortion. How and by what route the radio waves get from the transmitter to the receiver is of little
importance.
However, everyone must have realized that although when using a portable radio, medium wave reception (0.5 to 1.5 MHz = wavelength λ = 600 m to 200 m) is hardly affected by the position and environment of the receiver, but excellent VHF reception (87 to 102 MHz = λ ≈ 3 m) depends heavily on the
position and direction of the rod antenna.
Moving the radio even fractions of 1 m is decisive in this case as can be heard from radio reception in
a traffic jam. Such reception changes are even more noticeable with portable television sets using rod
antennas to receive UHF broadcasts. In this case, the wavelengths are approx. 0.5 m.
a)
Degree
Dipole
Dipole
+
+
+
+
+
Transmitter
Receiver
0
0
-
0
0
-
0
0
0
0
0
0
-
Path
= Wavelength
at v = c
v = Velocity of Propagation
c = Velocity of light
b)
Transmitter
Receiver
Isophases
Fig. 4-1 Free-space propagation of radio waves
- 4.3 -
RHOTHETA Elektronik GmbH
User Manual RT-1000 [Rev. 2.01]
The cause of these effects is the propagation behaviour of electro-magnetic waves. Figure 4-1 gives
an extremely simplified representation of even radio wave propagation in free space. The sine wave in
Part a) corresponds to the instantaneous value of the electric field on the plane path to the receiver.
Part b) is the vertical projection of Part a). The circles represent the lines of equal phase relations for
even waves.
If the distance between transmitter and receiver is adequate, these are practically straight lines when
they reach the receiver location. Such an idealized situation is not to be found in built-up areas, and
especially not in mountainous regions. In such areas, the propagation path is obstructed by obstacles,
mirror reflectors, diffuse reflectors with and without absorption characteristics, diffracting edges and
resonators. Reflectors and conducting rods are effective as resonators if their size is approximately
that of the wavelength to be received. Therefore, reflections increase as wavelengths become shorter,
diffractions at edges however are reduced and so the effect of shadowing obstacles is more important.
Accordingly, the propagation characteristics of radio waves from approximately λ < 10 m increasingly
resemble those of light. Coming back to VHF radio and UHF television reception using portable units
with antenna, it is almost impossible in urban areas to find the actual direction of the transmitter by
adjusting the antenna.
At a wavelength of 1 m to 3 m, wave propagation requires a direct path and if this is not available, only
reflected waves are received. In urban areas, these may come from several directions simultaneously.
But that is not all: the mostly horizontal or vertical plane polarized waves propagated by the transmitter
are also rotated to a certain degree due to diffuse reflectors and diffracting edges. When the wave
arrives at the receiver, it may be oblique, elliptically, or even circular polarized. This fact becomes apparent by the often curious antenna positions which are necessary to obtain the best reception of radio
or television waves.
These points are meant to indicate that in the VHF, UHF range, direction finding of a stationary transmitter using a stationary direction finder in a built-up area or even inside a building is practically impossible.
- 4.4 -
RHOTHETA Elektronik GmbH
User Manual RT-1000 [Rev. 2.01]
Conditions at airports are much
more favourable. These instructions are intended to allow the best
positioning of the direction finder
antenna.
Of course, airports are not without
their reflectors, but these do not
normally cause noticeable problems. All direction finders with field
probes calculate the angle of signal
incidence by finding out the path
direction (vector), at which the largest phase modification per unit of
distance is present.
Transmitter
2
Reflection
Fig. 4-2 Field of lines of equal phase relations for two coherent waves
In Figure 4-1 this vector is vertical to the lines of equal phase relations. Figure 4-2 shows the distorted
field of lines of equal phase relations for two coherent waves (reflection) from different directions with
different field strengths.
The advantage of wide base direction finders is most noticeable in static conditions. Static conditions
indicate that the position of the transmitter and direction finder as well as the transmitter frequency
does not change with time. Should one of the three named items change (e.g. transmitter in aeroplane)
the direction finder antenna and the field of lines of equal phase relations begin to move in relation to
one another. This movement accelerates in proportion to the relationship between the reflected path
distance and the direct path distance of the radio wave (Figure 4-3).
As shown in Figure 4-2, this movement in the case of wide base direction finders causes slight azimuth
oscillation. In contrast, this oscillation is larger in the case of narrow base direction finders - the series
of small circles in Figure 4-2. When several values are averaged out however, both systems give the
same azimuth.
- 4.5 -
RHOTHETA Elektronik GmbH
User Manual RT-1000 [Rev. 2.01]
a)
b)
Aeroplane
Aeroplane
R1
Reflector
R2
W2
W1
W1
W2
R2
Direction finder
Direction finder
favourable:
unfavourable:
W 1/W 2 » R1/R2
W 1/W 2 ≈ R1/R2
R1
Reflector
With moving transmitter:
Rapid phase shifting between W and
Only very slow phase shifting between W and
R signal, therefore good bearing
R signal, so no averaging possible. The
average possible displayed bearing oscillates slowly around
the rated value.
Fig. 4-3 Reflected path distance and direct path distance of the radio wave
The following conclusions can be drawn:
Vertical reflector surfaces e.g. buildings, hangars, metal fences, metal masts, overhead lines as
well as bushes and trees should not be within 100 m of the direction finder antenna if possible.
- 4.6 -
RHOTHETA Elektronik GmbH
User Manual RT-1000 [Rev. 2.01]
a)
W
R
R
unfavourable
R
h = large
A moving transmitter causes rapid
phase shifts between W and R signals
and therefore a lot of amplitude
fluctuations at the direction finder.
Ground
b)
W
R
W
R
W
R
favourable
A moving transmitter causes slow
phase shifts between W and R signals
and therefore few amplitude fluctuations
at the direction finder.
h = small
Ground
Fig. 4-4 The phases between a direct wave W and reflected wave R
Ground reflection causes a special problem. Reflections from an ideal, level ground surface around the
direction finder antenna do not actually lead to errors in direction finding, but dependent on the angle of
elevation, lead to field strength indentations which with ideal ground reflection may go down to zero.
It must now also be mentioned that reflections of course influence the reception level, after all this is
the critical factor in VHF radio reception. Because the resulting reception field strength at the direction
finder antenna is made up of the vectorial addition of direct and reflected beams, the phase relation
between both signals is critical.
Figure 4-4 shows that if the transmitter is moving (e.g. aeroplane), the phases between a direct wave
W and reflected wave R should shift as slowly as possible in relation to the movement of the transmitter.
This is exactly the opposite of requirements for vertical reflectors! The following conclusions can be
drawn: the horizontal reflector should be as near as possible to the direction finder antenna.
- 4.7 -
RHOTHETA Elektronik GmbH
User Manual RT-1000 [Rev. 2.01]
In other words the antenna should be fixed close to the ground. Figure 4-5 shows the signal strength
lobes plotted against angle of elevation for antenna heights 23 m and 3.5 m.
Vertical diagram for h = 23 m
Vertical diagram for h = 3.5 m
Fig. 4-5 Signal strength lobes plotted against angle of elevation
The following conclusion may be drawn:
The best position for a direction finder antenna is on a flat surface at a distance from vertical
reflectors, only 3.5 to 4 m above the ground.
- 4.8 -
RHOTHETA Elektronik GmbH
User Manual RT-1000 [Rev. 2.01]
For reasons of cost, we often receive the request that the direction finder antenna should be put on the
roof of the tower containing the direction finder equipment. Such requests must be handled on a strictly
case-to-case basis.
This position on top of the tower may be successful if the surrounding area forms a very absorbent
diffuse reflector, e.g. wood, grassed runways, wooden hangars covered with roof tiles, bushes. In contrast, lakes, rivers, concrete runways, flat tin roofs, a high ground-water level, i.e. all surfaces which are
mirror reflectors make the tower an unsuitable set-up position.
Particular problems are caused by sloping tin roofs because their reflections are not in the azimuth and
so can be expected to cause bearing errors. Wide base direction finders are more susceptible to the
field strength being cancelled out (see Figure 4-5) than narrow base direction finders because the gaps
in the area diagram are severely limited and so the probability that individual dipoles will be affected by
this rises as the base area increases.
In order to carry out checking and acceptance, the direction finder is subjected to a "flight test" (Figure
4-6). By means of circular flights approx. 5 to 10 km away, the angular accuracy and influences due to
vertical reflectors are calculated. These circular flights should be carried out in both directions in order
to eliminate any possible "lag error" in the direction finder display. The aeroplane is tracked using a
theodolite erected next to the direction finder antenna and angle values from this are compared with
those from the direction finder display.
During the criss-cross flights, the aeroplane flies across the direction finder from various directions to
find out detrimental ground reflections and the cone of silence, the area above the direction finder
where no usable information can be gained from the direction finder. These over-flight measurements
are especially important for testing the usefulness of a direction finder antenna set-up on the tower.
- 4.9 -
RHOTHETA Elektronik GmbH
User Manual RT-1000 [Rev. 2.01]
Circular flight
Direction finder antenna place
Fig. 4-6 Surveying the direction finder using criss-cross and circular flights
In conclusion: if the direction finder antenna is positioned in an open area a few metres above the
ground and several 100 m away from reflecting obstacles, results will be satisfactory. If the antenna is
set up on buildings more than 10 m above the ground, problems are likely and before such a position
is definitively selected, it is most important to test the position by means of criss-cross over-flights.
- 4.10 -
RHOTHETA Elektronik GmbH
4.2
User Manual RT-1000 [Rev. 2.01]
Notes on Fig. 4-7 a/b, RTA 1300 A Direction Finder Antenna
No.
Designation
Function
1
Lightning conductor rod
2
Radiator cover
3
Radiator
4
Clamping nut
5
Radiator flange
6
Antenna head
7
North dipole label
8
Mast tube
9
X 21
Flat plug for control cable connection
10
X 13
Flat plug for control cable connection
11
X 17
Flat plug for control cable connection
12
X 15
Flat plug for control cable connection
13
X 19
Flat plug for control cable connection
14
Radiator housing
15
BNC jack for antenna cable
16
Cord grip
17
18
X 22
Flat plug for control cable connection
Radiator housing cover
- 4.11 -
RHOTHETA Elektronik GmbH
User Manual RT-1000 [Rev. 2.01]
01
02
03
04
05
06
07
08
Fig. 4-7a RTA 1300.A Direction Finder Antenna
- 4.12 -
RHOTHETA Elektronik GmbH
User Manual RT-1000 [Rev. 2.01]
15
09
16
10
11
17
12
13
18
14
Fig. 4-7b RTA 1300.A Direction Finder Antenna (bottom view)
- 4.13 -
RHOTHETA Elektronik GmbH
User Manual RT-1000 [Rev. 2.01]
4.3 Assembly Instructions
1.
Fit O-ring on mast tube.
(see Figure 4-8).
2.
Pull antenna cable through mast tube.
3.
Connect RF cable.
4.
Screw cord grip tight to clamp RF cable
5.
Plug the control cable into the connection board.
- Push back guard sockets.
- Using pointed flat-nose pliers, grip the flat plug covers and push
fully onto the flat plugs.
- Push guard sockets back on again.
O-ring
Fig. 4-8
Fitting O-ring
ground
X22 Connection
brown
west signal
X19 Connection
orange
RF connection
Connection east signal
X15 yellow
Connection south signal
Cord grip tight
X17 green
Connection board
Connection north signal
X13 black
+15 V voltage
X21 Connection
red
Fig. 4-9 Allocation of connections
Allocation of connections
Flat plug name,
Control cable color
Signal
X22 (GND)
brown
Earth
X13 (NORTH)
black
North dipole control current
X17 (SOUTH)
green
South dipole control current
X15 (EAST)
yellow
East dipole control current
X19 (WEST)
orange
West dipole control current
X21 (+15 V)
red
15-V supply voltage
- 4.14 -
RHOTHETA Elektronik GmbH
User Manual RT-1000 [Rev. 2.01]
6.
Apply a thin coat of grease to the antenna head / mast
tube contact faces.
7.
Screw antenna head onto mast tube.
8.
Fit O-ring to lightning conductor rod (see Fig. 4-8).
9.
Apply thin coat of grease to antenna head / lightning conductor rod contact faces.
10.
Screw lightning conductor rod onto antenna head.
11.
Fix radiators (see Fig. 4-10).
- Push clamping nut, clamping cone, washer and rubber
seal onto radiator.
- Push radiator fully into recess for radiator.
- Carefully tighten clamping nuts.
12.
Erect mast tube (if not already done).
13.
Earth mast tube.
Rubber seal
14.
Align antenna
- Point north dipole (marked by red point on radiator
housing) northwards.
Clamping nut
Radiator
Fig. 4-10 Assembly of radiators
WARNING:
Observe all appropriate guidelines, especially VDE regulations
when conducting all building work, installation of electrical
equipment and lightning protection measures.
- 4.15 -
RHOTHETA Elektronik GmbH
4.4
User Manual RT-1000 [Rev. 2.01]
North Alignment of the Direction Finder Antenna and
Determining the System Accuracy at the Installation Site
The north alignment is used to harmonize the angle determined by the direction finder with the actual
(magnetic) north-related azimuth values.
4.4.1
North Alignment Using a Ground Transmitter (Presetting)
Presetting, which requires further correction by the north adjustment on the controller in the ± 90 range
(resolution 0.5°) as described in section 2.2.10, is achieved by the mechanical alignment of the direction finder antenna.
Nevertheless, the setting of the antenna should be carried out as accurately as possible since this
makes subsequent measurements easier.
Procedure:
a)
Mount the direction finder antenna on the antenna mast so that it is free to rotate. Point the
marked dipole to the north. For the RTA 1306 Antenna Mast, loosen the clamping screws provided for the purpose.
b)
Switch on the direction finding system. Set the north adjustment to zero. Carry out a phase
adjustment (refer to section 2.2.9).
c)
Set up a transmitter at an adequate distance (at least 100 m). From there, use a compass to
determine the direction to the direction finder antenna.
Caution : When measuring using the compass, ensure that during the measurement there
are no objects (transmitters, cars..) in the vicinity of the compass which could affect the magnetic field.
d)
Activate the transmitter and transmit a continuous signal.
Caution : When transmitting with a monopole antenna (e.g. a hand held RT
unit), care must be taken due to undefinable radiation conditions to ensure
that the antenna is as free as possible from disturbance, i.e. vertically installed.
For hand held radio units it is advisable to hold the unit above your head.
In this case the antenna points vertically upwards (refer to Fig. 4-11).
Fig. 4-11 Setting up
the ground transmitter
- 4.16 -
RHOTHETA Elektronik GmbH
e)
User Manual RT-1000 [Rev. 2.01]
Rotate the direction finder antenna in the mast mounting until the controller, which is set to the
transmitter frequency, indicates the QDM value determined by the compass (set the north adjustment to zero). In this case correcting the antenna setting by rotating clockwise (viewed
from above the single dipole moves in the north -- east -- south -- west direction) reduces the
indicated QDM value, a counter-clockwise rotation causes an increase.
Caution : The direction finder antenna should be rotated slowly with pauses because a considerable lag error occurs in the determination in the direction finding unit. For the final adjustment, the person rotating the antenna must move away from the antenna after each correction
so as not to disturb the near field of the antenna and therefore influence the direction finding.
Caution : When carrying out the above measurements there must be no objects (vehicles,
parking aircraft, buildings etc) in the vicinity of the transmitter or the direction finder which
could disturb the wave propagation.
4.4.2
Flight Checking for Exact North Alignment and Determining
the System Accuracy at the Installation Site
For exact north alignment under operating conditions and for determining the system accuracy at the
actual installation site, a flight check should be carried out.
To do this, a continuous-signal transmitter is fitted in the aircraft, which then performs circular flights
about the site of the direction finder. If the communication system of the aircraft is used as a transmitter, check beforehand whether this is suitable for continuous operation.
The radius of the circle and the flight speed shall be selected such that the "lag error" effect when determining the bearing is negligibly low. It must therefore be ensured that the angular velocity does not
exceed 0.3°/s.
In the case of all flight checking measurements, it must be ensured that an adequate reception field
strength is present at the site of the direction finder antenna. Because of the quasi-optical wave propagation characteristic of VHF signals, there must also be a theoretical sight contact to the transmitter. If
the transmitter is masked by hills, mountains, buildings or woods, the direction finder antenna cannot
evaluate the directly transmitted signal, but instead assesses a signal which reaches the direction finder antenna via reflections. This normally leads to considerable bearing errors.
The instantaneous position of the aircraft can be determined by tracking with a theodolite or using a
GPS receiver on the aircraft.
- 4.17 -
RHOTHETA Elektronik GmbH
4.4.2.1
User Manual RT-1000 [Rev. 2.01]
Determining the Position Using a Theodolite
-
Set up the theodolite in the immediate vicinity of the direction finder antenna, aligned with
magnetic north.
-
The calibration aircraft then flies a circular flight path around the direction finder antenna and
transmits a continuous signal.
-
Track the aircraft using a theodolite.
-
If the aircraft flies through a 10° mark, report this from the theodolite to the controller (e.g. by
radio).
-
Record the instantaneous bearing at the controller.
4.4.2.2
Determining the Position Using a GPS Receiver
-
Store the site coordinates of the direction finder antenna in the GPS receiver.
-
During the circular flight around the direction finder antenna record the QDM values determined by the GPS receiver and transmit them by radio to the direction finder where they are
then compared with the bearing.
4.4.2.3
Simplified Method
If no theodolite or GPS receiver is available, a simplified measuring procedure must be used at the
actual antenna installation site to precisely north align the system and determine its accuracy.
Route points:
With this method, the calibration aircraft overflies prominent landmarks (route points) the position of
which has been previously determined from conformal maps (scale approximately 1 : 200000). Note
that the angular values determined using the map are relative to geographical north and must therefore
be corrected with the magnetic declination.
As the aircraft overflies the route point this is transmitted by RT to the direction finder. At the direction
finder the instantaneous bearing is recorded and compared with the desired value from the map. To
achieve a constant bearing during the overflight, the aircraft must fly radially relative to the direction
finder antenna, i.e. must fly either towards the direction finder antenna or away from it.
- 4.18 -
RHOTHETA Elektronik GmbH
User Manual RT-1000 [Rev. 2.01]
Due to the unavoidable errors when overflying, the route points chosen should be at least 10 km from
the direction finder antenna (at a distance of 10 km a lateral offset of 175 m, with regard to the direction finder, when overflying the route point produces an error of 1°).
The PTT button should be pressed and held for at least 10 seconds before and after the overflight, to
enable the "before" and "after" history of the direction finding to be evaluated.
4.4.3
Evaluation
The actual values measured by the direction finder (QDM bearings) are entered in a record for comparison with the desired values (theodolite bearings, GPS bearings, route points from the map).
4.4.3.1
Evaluation of Direction Finding Signal
To assess the fitness of the antenna site as accurately as possible and therefore assess the functioning of the direction finder system, the direction finding signal (DF signal) relevant for determining the
bearing should be observed on an oscilloscope during the measurements. The signal can be taken
from the "DF signal 2" test output on the rear of the controller. The right / left rotation signal at the "R/L"
test output is used to trigger the oscilloscope. It is taken from the "R/L" test output on the rear of the
controller. The connecting cables for the test outputs are contained in the RTM 1500 Service Kit or can
be ordered from your dealer.
a)
Where there is correct reception without reflections the bearing signal appears as shown in
Figure 4-12.
-
Both blocks, clockwise and counter-clockwise rotation, have the same amplitudes. The
envelope curve of the oscillation increases steadily (in accordance with e function) and has
no "dips".
-
The blocks also experience no amplitude fluctuations over a long time period (5 seconds).
→ If the bearing signal has the above shape, it can be assumed that the bearing indicated by
the controller is correct.
- 4.19 -
RHOTHETA Elektronik GmbH
User Manual RT-1000 [Rev. 2.01]
Fig. 4-12 DF signal 2 and R/L signal
for undisturbed reception
DF signal
R/L signal
b)
The amplitude of the bearing signal fluctuates within the individual blocks (refer to Fig 4-13).
The fluctuation coincides with the rhythm of the audio signal.
Possible causes:
- the carrier is modulated (e.g. by speech)
→ has no influence on the bearing accuracy
Fig. 4-13 DF signal 2 and R/L signal
with a modulated reception signal
DF signal
R/L signal
c)
The direction finding signal is very noisy
Possible causes:
- The field strength of the transmission signal is too low.
- The transmitter is masked by hills, buildings, forests etc. There is no "theoretical" line of
sight to the transmitter.
→ The direction finding looses accuracy or is distorted by the masking.
- 4.20 -
RHOTHETA Elektronik GmbH
User Manual RT-1000 [Rev. 2.01]
Fig. 4-14 DF signal 2 and R/L signal
with noisy reception signal
DF signal
R/L signal
d)
-
Amplitudes of clockwise rotation blocks or counter-clockwise rotation blocks "pump"
-
The amplitudes of the clockwise rotation blocks and counter-clockwise rotation blocks are
different
Possible causes:
e)
-
Effect of reflection
-
Extreme flight manoeuvres of the calibration aircraft
-
Jamming transmitter on same channel
Amplitude of R/L blocks is very large
-
Effect of reflection
It is not possible to list all the possible disturbances and influences of direction finding signals here. As
a rule it is assumed that if the direction finding signal is undisturbed the bearing shown by the controller
is correct.
If the direction finding signal is observed during the complete circular flight, this provides a very good
indication of the quality of the direction finding. This applies also for the azimuths at which no measuring points were recorded.
- 4.21 -
RHOTHETA Elektronik GmbH
4.4.3.2
User Manual RT-1000 [Rev. 2.01]
Evaluation of QDR Live Display (Green Light Dot Circle)
The QDR live display (green light dot circle) serves as a further criterium of the quality of the direction
finding (including during every day operation).
During a circular flight the green light dot circle should "wander" steadily around the compass-card
corresponding to the direction of movement of the aircraft. The green light dot circle display, because it
is not averaged, precedes that of the red. The display jumps backwards and forwards between a maximum of two light dots.
Malfunctions which can be detected by the green light dot circle:
a)
-
Rapid jumping backwards and forwards (spreading out) of the light dots around the averaged value.
Possible causes:
→ Received power too low due to the long distance from the transmitter.
→ The transmitter is masked.
b)
-
During circular flight the light dots do not "wander" steadily around the compass-card, corresponding to the movement of the aircraft.
Possible causes:
→ Influence of reflections
→ Aircraft performs extreme flight manoeuvres
→ Jamming transmitter on same channel
c)
-Light dots jump (spontaneously) backwards and forwards in large areas of the compass-card.
Possible cause:
→ Reflections
d)
Light dots jump backwards and forwards around the averaged value (red light dot) (spreading
out).
Possible cause:
→ Reception signal is modulated. The spreading out area depends on the type and strength
of the modulation.
- 4.22 -
RHOTHETA Elektronik GmbH
4.4.3.3
User Manual RT-1000 [Rev. 2.01]
Evaluation of Measuring Results
The deviations between the desired and actual values are entered in the test record compiled with the
aid of the flight check. If in the case of a calibration aircraft the direction finding signal or the green light
dot indication is evaluated, the observations made at the corresponding measured values are to be
annotated. Bearing errors can be easily interpreted in this way. A test record of the following kind is
obtained.
Example:
Test record
DESIRED
ACT
Deviation
000°
010°
020°
030°
040°
050°
060°
070°
080°
090°
100°
110°
000°
011°
025°
032°
041°
049°
060°
072°
083°
091°
099°
104°
0°
+1°
+5°
+2°
+1°
-1°
±0°
+2°
+3°
+1°
-1°
-6°
120°
130°
140°
150°
160°
170°
180°
190°
200°
210°
220°
230°
240°
250°
260°
270°
280°
290°
300°
310°
120°
131°
142°
150°
158°
170°
181°
189°
200°
217°
222°
231°
240°
251°
259°
270°
280°
290°
302°
311°
±0°
+1°
+2°
±0°
-2°
±0°
+1°
-1°
±0°
+7°
+2°
+1°
±0°
+1°
-1°
±0°
±0°
±0°
+2°
+1°
Remarks
Direction finding signal is noisy, indication fluctuates
Direction finding signal has amplitude fluctuations, display
fluctuates by ±5°
Direction finding signal "pumps", green light dot circle ±20°
- 4.23 -
RHOTHETA Elektronik GmbH
320°
330°
340°
350°
319°
330°
343°
351°
User Manual RT-1000 [Rev. 2.01]
-1°
±0°
+3°
-1°
In the example, larger deviations occur when measuring for the 20°, 110° and 210° desired values. As
can be seen by the evaluation of the direction finding signal and the green light dot circle, they are due
to masking of the transmitter and reflections. The measurements are no longer taken into account in
further assessment. If interference of this kind occurs, the site of the antenna is to be changed.
In the example, the deviations are in the -2° to +3° range. In practice, the deviations can be greater
due to measuring uncertainties or reflections at the antenna site. The details of the system accuracy
given in the section 1 technical data "System Accuracy" apply to reflection-free reception conditions at
the antenna site but in practice such conditions are never found. Whether an antenna site is suitable
must therefore be assessed in the light of the requirements of everyday operation.
4.4.4
Determining the North Correction
To determine the final north adjustment, the average value of the deviation is determined from the test
record. To do this, the sum of all the different values (the signs must be taken into account) are added
and divided by the number of measurements.
Sum of all deviations
average deviation = ──────────────────────────
Number of measurements
Example:
+ 18°
+0.55° = ───────
33
In the example the direction finder has a bearing which is on average 0.55° too great. This can now be
corrected with the aid of the north adjustment in steps of 0.5° (refer to section 2.2.10). The correction
value to be set is obtained as follows:
Correction value = average deviation x (-1)
Example:
0.55 = 0.55 x (-1)
→ The value -0.5 is used as the correction value.
The direction finder system is now ready for operation but before the bearings can be transmitted to
the aircraft approval by the relevant authorities in the respective country is necessary (refer also to
section 5.1).
- 4.24 -
RHOTHETA Elektronik GmbH
4.5
User Manual RT-1000 [Rev. 2.01]
Installation Dimensions
RTA 1300 Direction Finding Antenna
with mast pole and lightning conductor rod
Mast pole
410
+1
40 -0
- 4.25 -
RHOTHETA Elektronik GmbH
5
User Manuale RT-1000 [Rev. 2.01]
APPENDIX
List of Contents:
5 APPENDIX...................................................................................... 5.1
5.1
Approval of Direction Finder System ...........................................................5.2
5.1.1
Approval in the Federal Republic of Germany ...............................................................5.2
5.1.2
BFS Series Approval .........................................................................................................5.2
5.1.3
BZT Series Approval .........................................................................................................5.3
5.1.4
Approval Plate....................................................................................................................5.3
5.1.5
CE Declaration of Conformity ..........................................................................................5.4
5.1.6
Declaration of Interoparability..........................................................................................5.5
5.1.7
Approval Certificate BZT ..................................................................................................5.8
5.1.8
Approval Certificate BFS ................................................................................................5.10
5.2
Interwiring of the Direction Finder RT 1000C ............................................5.13
5.3
Interwiring oft he Direction Finder RT 1000 C / 2 Channel.......................5.14
5.4
Test Record ..................................................................................................5.15
- 5.1 -
RHOTHETA Elektronik GmbH
5.1
User Manuale RT-1000 [Rev. 2.01]
Approval of Direction Finder System
After successful installation of all components and north alignment of the direction finder antenna as
described in section 4.4, the system is ready for operation. But before bearings may be transmitted to
aircraft, approval from the appropriate authority must be obtained. This approval is regulated differently
in every country.
5.1.1
Approval in the Federal Republic of Germany
In the Federal Republic of Germany fixed flight navigational radio stations can be registered and operated by natural or juristic persons only with the approval of the air traffic control authority responsible
for the particular area (§ 81 LuftVZO).
To do this an "application for agreement and approval for the setting up, erection and operation of a
fixed flight navigational radio station" is to be made to the appropriate air transport authority of the
German Land. This application is to be obtained from the relevant Telecommunication Office/Superior
Post Director or from the Federal Department for Post and Telecommunication.
After successful testing and acceptance by the Federal Institute for Flight Safety (BFS) (from 1993
German Flight Safety DFS), the Aviation Department issues the agreement.
The approval is issued by the Federal Department for Post and Telecommunication, Eschborn Branch
Office through the local Telecommunication Office. A certificate is made out for this purpose.
(The details given refer to 1992. The right to make changes or deviations is reserved.)
CAUTION:
The direction finding system may only be brought into service after receipt of the certificate.
5.1.2
BFS Series Approval
The RT 1000 A/C Direction Finding System has the series approval of the "Federal Institute for Flight
Safety" (BFS).
Series test number: B - 458/92 (for a copy of the approval certificate refer to section 5.1.6).
- 5.2 -
RHOTHETA Elektronik GmbH
5.1.3
User Manuale RT-1000 [Rev. 2.01]
BZT Series Approval
The direction finder system is approved by the "Federal Department for Approval in Telecommunication" (BZT) :
Approval No: A102841C
Additional marking: LO
Refer to section 5.1.5 for a copy of the approval certificate.
CAUTION:
The series approval for the direction finding system by the BFS and by the BZT does not permit
the setting up or operation of the system, but is instead a precondition for application for such
approval.
5.1.4
Approval Plate
The components of the RT 1000 A/C Direction Finder System are provided with plates which carry the
approval number of the Federal Department for Approval in Telecommunication and the series test
number of the Federal Institute for Flight Safety. These information plates must not be removed or
covered.
They are fitted at the following positions of the system:
Controller:
Receiver unit:
Direction finding antenna:
on the back side
on the bottom left of the clear view cover
on the antenna housing close to the radiator housing of the north
radiator
Approval plate:
- 5.3 -
RHOTHETA Elektronik GmbH
5.1.5
User Manuale RT-1000 [Rev. 2.01]
CE Declaration of Conformity
- 5.4 -
RHOTHETA Elektronik GmbH
5.1.6
User Manuale RT-1000 [Rev. 2.01]
Declaration of Interoparability
- 5.5 -
RHOTHETA Elektronik GmbH
User Manuale RT-1000 [Rev. 2.01]
- 5.6 -
RHOTHETA Elektronik GmbH
User Manuale RT-1000 [Rev. 2.01]
- 5.7 -
RHOTHETA Elektronik GmbH
5.1.7
User Manuale RT-1000 [Rev. 2.01]
Approval Certificate BZT
- 5.8 -
RHOTHETA Elektronik GmbH
User Manuale RT-1000 [Rev. 2.01]
Translation
FEDERAL OFFICE FOR LICENCES IN TELECOMMUNICATION
LICENCE
Licence No.:
A102841C
Add. Identifier:
LO
Name of Object:
RT 1000 (* = "A" or "C")
Licensee:
RHOTHETA Elektronik GmbH
Unterfeldring 11
D-85256 Vierkirchen Pasenbach
Licence Type:
General Licence
Type of Object:
Stationary local VHF direction finder system
The approved object fully meets the technical regulations of Guideline FTZ 17 TR
2013, Issue June 1989.
The licence, dated 31-03-92, is no longer valid.
Saarbrücken, 21st of November 1994
Official stamp / Signature
1 item enclosed
- 5.9 -
RHOTHETA Elektronik GmbH
5.1.8
User Manuale RT-1000 [Rev. 2.01]
Approval Certificate BFS
- 5.10 -
RHOTHETA Elektronik GmbH
User Manuale RT-1000 [Rev. 2.01]
Translation
FEDERAL INSTITUTE FOR FLIGHT SAFETY
The VHF Small-range Doppler Direction Finder
Type RT 1000 (VAR A / C)
Frequency range 118.000 to 136.975 MHz
manufactured by Rhotheta, Schwarzfischer & Co. OHG, 8495 Roding
consists of: Antenna System RTA 1300.A, Receiver Unit RTR 1200.A,
Controller RTC 1200.A (B)
for Class of Emission:
A3E, A2X (ELT modulation); bearing error ±2°
has been tested for compliance with the requirements laid down in the Technical
Regulations of the Federal Institute for Flight Safety:
TV 201, Standard Specifications for automatic direction finder systems, extracts from
Technical Regulations for direction finder systems used in flight communication.
The unit fully complies with the rules laid down by the Federal Institute for Flight Safety (BFS) in
agreement with the Central Telecommunications Office (FTZ) of the German Federal Post, based on
the Regulations for radio service of the international telecommunication treaty. The unit also meets the
requirements of the Federal Ministers for Transport (BMV) and Postal and Telecommunication Affairs
(BPM) as well as corresponding to the guidelines and recommendations of the International Civil Aviation Organisation (ICAO) for aeronautical telecommunications. Taking into account the conditions stated overleaf, it is therefore approved as sample for production and distribution in the Federal Republic
of Germany.
The unit carries the series test No. B - 458 / 92.
Frankfurt / Main, 17th of March 1992
Signature / Official Stamp
- 5.11 -
RHOTHETA Elektronik GmbH
User Manuale RT-1000 [Rev. 2.01]
Translation
CONDITIONS
1.
Every unit carrying the FTZ series test number as well as the number on the front and designated RT 1000 (VAR A/C) must fully comply, both electrically and mechanically, with the sample
tested by the Federal Institute for Flight Safety
2.
Each change or addition to design or circuit of the unit deviating from the sample necessitates
additional testing of this unit by the BFS.
3.
Concerning the production of series units, complying with the sample, BFS reserves the right to
carry out random tests of individual units.
4.
Permission to manufacture and distribute this unit becomes extinct after a period of five years.
An extension can be granted. The extension must be applied for in writing six months prior to extinction.
5.
This certificate in itself does not permit the unit to be taken into operation. Set-up and operation
of radio facilities using this unit, even for demonstration purposes, depend upon a licence issued
by the DBP (German Federal Post). Application is to be made to the BFS which will pass the
forms on to FTZ with the request to issue the licence. The licence will be handed over to the applicant by the respective OPD (Oberpostdirektion)
6.
The issued test certificate does not entitle the licensee to make any demands under patent law.
It does not relieve the licensee in any way from observing the protective rights of others and
does not include any protective claim as provided for under patent law.
7.
The manufacturer himself is fully responsible for meeting any safety requirements, applicable to
the unit, laid down in the VDE Regulations. The keeping of the VDE Regulations is not object of
the sample test.
- 5.12 -
RHOTHETA Elektronik GmbH
5.2
User Manuale RT-1000 [Rev. 2.01]
Interwiring of the Direction Finder RT 1000C
Direction Finder Antenna
RTA 1300A
6 x Flat cable
plug
BNC
jack
Antenna cable
RTA 1307 A
X15
Round plug
connection
X16 BNC
jack
Receiver Unit RTR 1200A
X4
Terminal strip
Earth connection
screw
02 01 03 04 05 06
115/230 V 16 A
Data cable
115/230 V 16 A
Earth connection 10 12 02 04 06 08
screw
25-pin D-Sub connector
Data Port
Controller RTC 1100 A
- 5.13 -
RHOTHETA Elektronik GmbH
Interwiring oft he Direction Finder RT 1000 C / 2 Channel
DF-Antenna RTA 1300A
GND
+15V
GND
+15V
X11
X21
OST
OST
X22
WEST
X15
SUED
WEST
X19
NORD
NORD
X17
BNCJack
SUED
X13
6 x flat
male tab
06
05
04
03
sheeld
PE
01
02
antenna cable
RTA 1307 A
circular
X15 connector
BNCX16 Jack
X4
DATA-2
DATA-1
P-P H I-2
P-P H I-1
48kHz-1
48kHz-2
DATA-2B
DATA-1B
02 01 03 04 05 06
P-P H I-2B
01 02 01 02 01 02
P-P H I-1B
terminal block
48kHz-1B
terminal block
48kHz-2B
GND bolt
X13
X11
X12
Receiver Unit RTR 1200A
115/230V 16A
data cable
DA TA -2
DA TA -1
P -PHI-2
P -PHI-1
48 kHz-1
10 12 02 04 06 08
4 8kHz-2
115/230V 16A
DA TA -2B
DA TA -1B
P -PHI-1B
P -PHI-2B
4 8kHz-2B
115/230V 16A
48 kHz-1B
5.3
User Manuale RT-1000 [Rev. 2.01]
10 12 02 04 06 08
GN D bolt
GND bolt
25-pol. D-Sub female connector
25-pol. D-Sub female connector
Data Port
Data Port
Controller RTC 1100 A
Controller RTC 1100 A
DF-channel B
DF channel A
- 5.14 -
RHOTHETA Elektronik GmbH
5.4
User Manuale RT-1000 [Rev. 2.01]
Test Record
1 Objective of test
To determine the direction finding accuracy and check the correct function of the complete system at
different operating frequencies.
2 Test layout
Test Stand equipment as listed:
•
PC with RHOTHETA LabVIEW application software running : “Drehstand.exe” [Rev ≥ 4.00]
•
USB/Serial adapter MOXA UPort 1450
•
Colibri Positioning Control
•
RF signal generator (R&S SML)
•
Modulation source DAQ module NI USB-6211
•
RF measuring antenna with 6dB attenuator
•
DUT (complete DF System RT-1000)
- 5.15 -
RHOTHETA Elektronik GmbH
User Manuale RT-1000 [Rev. 2.01]
3 Preparation for test
See work instruction and protocol
4 Performance of test
See document 12-9-1-0004-8-1-1
„Procedure Factory Acceptance Test“ Direction Finder System RT-1000
- 5.16 -