1
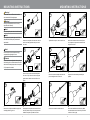
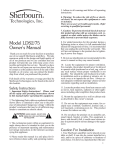
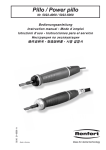
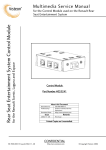
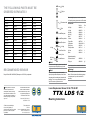
A:Circlip
THE FOLLOWING PARTS MUST BE
ORDERED SEPARATELY
Damper
Top pin
Extension shaft
Suitable kit
TTX NK56
-
06228-01
TTX LDS1
TTX NK16
-
06228-01
TTX LDS1
TTX NI16
06210-11
06228-01
TTX LDS1
TTX NH16
06210-11
06228-01
TTX LDS1
POF 5K00
-
06228-02
TTX LDS1
POF 5J01
-
06228-05
TTX LDS1
POF 5J00
-
06228-02
TTX LDS1
POF 5H00
06210-11
06228-02
TTX LDS1
BMF 5L12
-
06228-04
TTX LDS2
BMF 5K12
-
06228-04
TTX LDS2
BMF 5K02
-
06228-04
TTX LDS2
BMF 5K01
-
06228-01
TTX LDS1
BMF 5H02
06210-11
06228-01
TTX LDS1
BMF 5H01
-
06228-01
TTX LDS1
BMF 5G00
06210-11
06228-01
TTX LDS1
B:Top pin
Before installing this product, check the contents of the
kit. If anything is missing, please contact an Öhlins dealer.
C:Extension shaft
D:Nut
E:End piece
F:Bump rubber
G:End piece
J:O-ring
H:O-ring
I:Foam filter
K:Cover
M:O-ring
N:Nut
L:Screws
Note!
Please note that this image is a general representation of
the product and may differ slightly from your product.
Recommended Sensor
Penny & Giles MLS130/150/S/N (Öhlins part no. 06235-01) or equivalent.
Öhlins products are subject to
continuous improvement and
development, therefore, although
these instructions include the most
up-to-date information available at
the time of printing, minor updates
may occur.
© Öhlins Racing AB. All rights
reserved. Any reprinting or
unauthorized use without the written
permission of Öhlins Racing AB
is prohibited.
To find the latest information
contact an Öhlins distributor.
Please contact Öhlins if you have
any questions regarding the
contents in this document.
Part no. MI_TTX_LDS1/2_0
Issued 2011-12-05
Öhlins Racing AB
Box 722
S-194 27 Upplands Väsby, Sweden
Phone +46 8 590 025 00
fax +46 8 590 025 80
Note!
Please note that during storage and transportation,
especially at high ambient temperature, some of the oil
and grease used for assembling may leak and stain the
packaging. This is in no way detrimental to the product,
wipe off the excessive oil/grease with a cloth.
Kit Contents
Part No A:Circlip
00329-19
J:O-ring
00338-53
M:O-ring
00338-60
H:O-ring
00338-93
N:Nut
00437-07
L:Screw
01046-41
I:Foam filter
06057-04
G:End piece
06214-02/03
E:End piece
06215-02
F:Bump rubber
06217-11
K:Cover
06227-01
D:Nut
06236-01
Ordered separately:
C:Extension shaft
06228-0X
B:Top pin
06210-XX
1
(1)*
* See last page for recommended shaft end.
Warning!
Before installing this product, read the Öhlins Owner’s
Manual. The shock absorber/front fork/steering damper
is an important part of your vehicle and will affect
the stability.
Linear Displacement Sensor Kit for TTX 46 MT
TTX LDS 1/2
Mounting Instructions
Pcs
1
1
1
1
1
4
1
1
1
1
1
1
mounting instructions
Warning!
mounting instructions
2
It is advisable to have an Öhlins dealer to install the
shock absorber/front fork/steering damper.
8
5
Warning!
If working on a raised vehicle, ensure it is securely
supported so that it will not tip.
Note!
Before mounting this product clean the vehicle thoroughly.
3 Nm
Loctite 242
3 Nm
Note!
When working on this product, always see the Vehicle
Service Manual for vehicle specific procedures and
important data.
2
5
8
Remove the end piece from the tube, use tool
Tighten the end piece, use tool 00797-06.
Mount the extension shaft to the end piece.
00797-06. Gently push the end piece out of
Use a spanner to prevent the rotation of the
the shaft.
end piece and rod.
6
3
Note!
Lower the vehicle so that the suspension is slightly
compressed before tightening the screws.
9
Sensor assembly
Sensor
Caution!
Ensure that all screws are tightened to the correct torque
and that nothing fouls or restricts movement of the shock
absorber/front fork/steering damper when the suspension
is fully compressed or extended.
3 Nm
Loctite 242
3 Nm
Loctite 242
3
Put the o-ring on the sensor end and place
the cover on top. Place the other o-ring and
tighten the nut. Make sure the air filter is in
6
9
Place the sensor assembly inside the end
Compress the rod assembly carefully into
piece and tighten the four screws.
position.
place.
1
10
7
4
Loctite 242
1
4
7
10
Remove the circlip that holds the top pin and
Gently tap the end piece into the shaft. Place
Connect the extension shaft to the rod.
Secure the installation with the circlip. Make
carefully pull the top pin out.
the bump rubber on top of the end piece and
sure that the bent end of the circlip is secured
install the end piece by hand in the tube.
in the slot of the top pin.
1
2