1
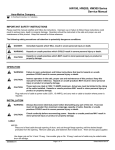
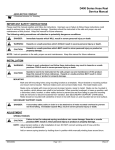
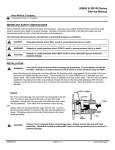
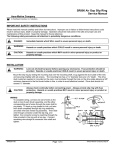
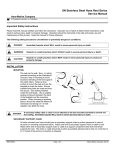
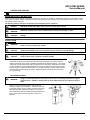
RB2 & RB4 SERIES
Service Manual
AERO-MOTIVE COMPANY
A Woodhead Industries, Inc. Subsidiary
IMPORTANT SAFETY INSTRUCTIONS
Please read this manual carefully and follow its instructions. Improper use or failure to follow these instructions could result in serious
injury, death or property damage. Operators should be instructed in the safe and proper use and maintenance of this product. Keep
this manual for future reference.
The following safety precautions call attention to potentially dangerous conditions.
DANGER:
WARNING:
CAUTION:
Immediate hazards which WILL result in severe personal injury or death.
Hazards or unsafe practices which COULD result in severe personal injury or death.
Hazards or unsafe practices which MAY result in minor personal injury or product or property
damage.
NOTE: Instruct operators in the safe, proper use and maintenance. Keep this manual for future reference.
INSTALLATION
WARNING:
CAUTION:
Improper use or failure to follow these instructions lead to hazards or unsafe practices that COULD
result in severe personal injury or death.
Operator should be instructed in the safe, proper use and maintenance of this product. Hazards or
unsafe practices MAY result in minor personal injury or product or property damage.
SWIVEL MOUNTING
CAUTION:
Always use a NEW cotter pin when securing clevis pin. Hazards or unsafe practices MAY result in
minor personal injury or product or property damage.
Hang balancer directly over work area by the swivel fork provided at the top of the balancer.
Support component must confirm to guidelines indicated by the adjacent diagram. The support
component must allow swivel fork to pivot 30 degrees from vertical axis, perpendicular to clevis
pin axis. Balancer must not be pulled sideways more than 30 degrees or exceed the free play
between support component and swivel fork. To complete balancer mounting, install clevis pin
through swivel fork and support component. Install flat washer and secure with a new cotter
pin (in plastic bag).
SECONDARY SUPPORT
WARNING:
Always use secondary cable to protect personnel in case of mounting components or support
structure failure. Hazards or unsafe practices which COULD result in severe personal injury or
death.
Attach one end of secondary support chain or cable to
secondary support point on balancer. Attach the other end
of secondary support chain or cable to a support component
other than that which supports the balancer. The chain or
cable should be as short as possible allowing the balancer to
drop no more than 6 inches if the primary connection is
released.
SM1110-06A
Page 1 of 2
©Mar-03
ADJUSTMENT
WARNING:
Never pull cable to device to be retracted. Always lift object to hook. If the hook is accidentally
released when it is extended, it will snap back. Hazards or unsafe practices which COULD result in
severe personal injury or death.
TOOL ATTACHMENT
Balancer is furnished with a tool clip. Attach tool complete with hose or cable along fittings. To
adjust length of overhang, remove all tension. Pull cable down and position hook at desired
height. Loosen cable stop, slide cable stop upward to roller guide, and tighten. Move cable
stop upward and lengthen overhang of cable will reduce active travel distance 6’3”. For every
foot more of overhang, the active travel will be reduced by a foot.
Overhang can be adjusted by moving cable stop. If, after installation, it is
determined that the overhang of the reel for the active travel required is not
sufficient, an overhang extension cable can be used to extend overhang
without reducing active travel. This is available as an optional item from
AERO-MOTIVE.
SPRING TENSIONING
WARNING:
Failure to hold knob could result in damage to internal ratchet components. Hazards or
unsafe practices which COULD result in severe personal injury or death.
NOTE: Attach full load including all attachments before adjusting tension.
If the tool attached to balancer cable descends, there is not
enough tension on the balancer mainspring. To increase
tension, turn knob (on the front of the balancer) clockwise
until desired tension is achieved. Make sure knob has
engaged ratchet teeth on front case before releasing knob.
If the cable stop is tight up against the cable guide, there is
too much tension on the balancer main spring. To
decrease tension, pull knob out and turn counter-clockwise
until pre-load is relieved from cable stop. Make sure knob
has engaged ratchet teeth on front case before releasing
knob. After adjusting tension, pull cable to fullest extension
to ensure proper travel is achieved. If cable does not reach
full extension, some tension must be released. If proper
tension and extension cannot be achieved, consult factory.
SERVICE
WARNING:
This unit is NOT to be disassembled. Hazards or unsafe practices which COULD result in severe
personal injury or death.
Aero-Motive Company
W
A Woodhead Industries Inc. Subsidiary
PO Box 2678
Kalamazoo, MI 49003-2678
(616) 337-7700
(800)-999-8559
FAX: (800) 333-6119
SM1110-06A
AKAPP Electro Industrie
W
A Woodhead Industries Inc. Subsidiary
Nijverheidsweg 14 Box 54
NL-3771 ME Barneveld
NL-3771 AB Barneveld
Holland
011-31-3420-14022
FAX: 011-31-3420-92384
Aero-Motive (UK) Limited
W
A Woodhead Industries Inc. Subsidiary
Rassau Industrial Estate
Ebbw Vale Gwent NP3 5SD
United Kingdom
(0495) 350436
FAX: (0495) 350877
Page 2 of 2
Woodhead Asia PTE LTD
W
A Woodhead Industries Inc. Subsidiary
401 Commonwealth Drive #0404
Haw Par Technocentre
Singapore 0314
(65) 479 6533
FAX: (65) 479 3588
Woodhead Canada LTD.
W
A Woodhead Industries Inc. Subsidiary
1090 Brevik Place
Mississauga Ontario
L4W 3Y5 Canada
(905) 624-6518
FAX: (905) 624-9151
©Mar-03