1
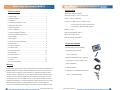
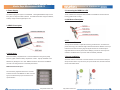
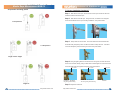
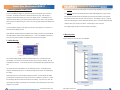
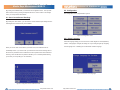
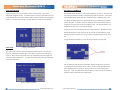
Mobile Rope Tension Measuring
System MSM12
Operating Instructions
Exclusive US Distributor for
Installation &MSM
Service
Mobile Rope Measurement
12 Manual
Exclusive U.S. Distributor for
Technical Data
Table of Contents
1. Contents of System..................................................................................3
Part Number: 455100 or 455200
2. Power Supply...........................................................................................4
Dimensions L x W x H: 7.5 in x 5.4 in x 1.8 in.
3. MSM12 Description.................................................................................4
Weight: 1.5 lbs. (incl. batteries)
4. Initial Setup..............................................................................................4
Interfaces: 1 x USB1.1 for the connection to a PC
5. Connecting the MSM12 to a PC..............................................................5
12 x connections to the rope load sensor LSM
6. LSM Sensor Description..........................................................................5
6.1 Mode of Operation.................................................................................5
1 x connection for Bluetooth aerial (optional)
7. Sensor Installation...................................................................................5
Batteries: 4 x AA
7.1 Sensor Installation Continued................................................................7
Data Transfer: Bluetooth Class 2
7.2 Switching MSM12 display unit on..........................................................8
Degree of protection: IP 00
7.3 Main Display..........................................................................................8
Class of protection: SKIII (SELV)
8. Menu System...........................................................................................9
8.1 Save Current Sensor Readings............................................................10
8.2 Configuration.........................................................................................11
1. Contents of System
8.2.1 Select Language................................................................................11
8.2.2. Sensor Type.....................................................................................12
8.2.3 Suspension Ratio..............................................................................12
1 x Mobile Rope Load meter (MSM12)
1 x External antenna (Optional)
8.2.4 Time/Date..........................................................................................13
8.2.5 Delete Memory..................................................................................14
(Part no. 45000404)
8.2.6 Set Tolerance....................................................................................14
1 x Bluetooth USB Adapter class 1 (Optional)
8.2.7 Units..................................................................................................15
8.2.8 Rope Load Wizard.............................................................................21
(Including driver and documentation CD)
(Part no. 45000403)
Warranty
This description has been drawn up by Henning GmbH to the best of their knowledge. all
technical statements have been carefully established and checked. They correspond to
1 x USB-A-B cable 6ft.
4 x LSM sensors or 6 x Mobile Rope Sensors
the state of the art. Changes and errors excepted. Our application engineering advice spoken and written - shall support your own work. It is regarded as an indication without
(Part no.: 455100 or 455200)
obligation - also with regard to possible third party industrial property rights - and does
not release you from your own obligation to carry out appropriate testing of the products
regarding their suitability for the intended application. Product descriptions do not contain
statements about the liability for possible damages. However, should a liability be
involved, it would be limited for all damages to the value of the goods supplied and used.
2
Buy Online! wurtec.com
Buy Online! wurtec.com
3
Installation &MSM
Service
Mobile Rope Measurement
12 Manual
Exclusive U.S. Distributor for
2. Power Supply
5. Connecting the MSM12 to a PC
The MSM12 display unit requires 4 x AA batteries. Rechargeable batteries may be used
The PC software that corresponds with the MSM12 is available for download at www.
if they have an output of at least 2,000mAh. The MSM12 does NOT charge the batteries;
henning-gmbh.de free of charge.
a battery charger must be supplied by the user.
6. LSM Sensor Description
3. MSM12 Description
6.1. Mode of Operation
The rope sensor is based on a patented measuring procedure which, for the first time,
permits the carrying out of absolute weight measurements without calibration in the rope.
Inside the sensor there is a strain gauge the signals of which are conditioned by the
integrated electronics and are passed via the USB plug of the sensor to the rope load
evaluation unit MSM12. Each rope sensor LSM is individually calibrated.
4. Initial Setup
Remove the battery compartment door. Insert the batteries according to the polarity
shown on graphic inside the battery compartment. Caution: Improper installation of the
batteries may damage the unit! Note: Batteries should be removed from the MSM12
unit if the unit is being stored for an extended period of time.
7. Sensor Installation
The sensor must be mounted with a minimum distance of 8 inches from the cable joint.
See photo below. Note: Only one sensor per rope should be used, otherwise will result
isninaccurate measurement.
MSM12 with Bluetooth option:
Screw the factory supplied antenna to the connector
located on the side of the MSM12 unit. Note: For best
signal, it is advised that you point the antenna in an
upward direction.
4
Buy Online! wurtec.com
Buy Online! wurtec.com
5
Installation &MSM
Service
Mobile Rope Measurement
12 Manual
Suspension mounting points
Exclusive U.S. Distributor for
7.1 Sensor Installation Continued
Step 1 -
With sensor lever open, use the thumb screw to open the sensor as far as
needed to fit sensor around the rope.
Step 2 -
With sensor lever still open. Using the scale, use thumb screw to tighten
sensor to the diameter of the rope it is being installed on. See photos below.
1:1 Suspension
Step 3 -
Clamp down the sensor lever. The lever should have some resistant but
should be easily clamped by hand. DO NOT use tools to clamp the lever. If the lever
2:1 Suspension
cannot be clamped by hand, something is incorrect. See photo below.
weigh counter weight
Step 4 - Using the green gasket on the thumb screw as a guide; fine tune the sensor
for the most accurate reading. Using an Allen wrench either tighten or loosen the thumb
screw until half of the green gasket is exposed. See photos below.
green gasket
green gasket
weigh car
6
Incorrect - Too Tight!
Incorrect - Too Loose!
No green gasket showing
Too much green gasket showing
green gasket
Correct!
Step 5 - Repeat for all sensors
Buy Online! wurtec.com
Buy Online! wurtec.com
7
Installation &MSM
Service
Mobile Rope Measurement
12 Manual
Exclusive U.S. Distributor for
7.2 Switching MSM12 display unit on
The maximum individual rope load displays the highest weight displayed by a given sensor.
To turn on the MSM12 display unit, press and hold the “on/off” button for a minimum of
The minimum individual rope load displays the lowest weight displayed by a given sensor.
3 seconds. The display should turn on and show the Henning logo. After the logo is
displayed it should automatically jump to the main display screen. The MSM12 is now
operational and will start to give real time readings of the sensors. Note: If this procedure
does not work, the batteries may be too low to run the unit, please replace the batteries and
The maximum deviation shows the absolute and percentage of deviation of the rope with
the greatest deviation from the mean value of all ropes. The example in figure 1, (page 8),
shows the total weight of 1,516 lbs. distributed among 6 ropes. This means that under ideal
conditions each rope should carry 252 lbs. corresponding to 52% more load.
try again.
To turn the MSM12 display unit off, press and hold the “on/off” button for a minimum of 3
The voltage display shows the real time voltage of the battery.
seconds until the display turns off.
Spent batteries should be replaced completely and promptly. Do NOT mix spent batteries
with fresh batteries. Replace all 4 batteries at once.
Note: If the MSM12 is left without
power for more than 20 minutes, the MSM12 clock will need to be set again.
8. Menu System
Figure 2 shows the menu structure of the MSM12.
7.3 Main Display
Figure 1
The individual weight display shows the measured load of each connected rope load
sensor(LSM). If no sensor is connected to the port or if the sensor is defective, Err1 will
be displayed at that port. If a connected sensor is overloaded Err2 will be displayed at that
port.
The suspension ratio of the elevator can be selected by the user. The displayed total
weight is calculated by this factor. The individual weight of each sensor is not affected by
this setting.
Total weight is the sum of all individual readings measured. The total weight will display
according to the suspension ratio chosen by the user. For example, if you have a 1:1 ratio,
the total weight will be the exact total of each sensor reading. If you have a 2:1 ratio, the
rope weights will display actual weight, but a calculation is done to display the correct total
weight for a 2:1 system.
8
Figure 2
Buy Online! wurtec.com
Buy Online! wurtec.com
9
Installation &MSM
Service
Mobile Rope Measurement
12 Manual
By pressing the CONFIG button you will access the configuration menu. The rope load
Exclusive U.S. Distributor for
8.2. Configuration
wizard can be found by pressing the Adjust button and in order to switch to the storage
The configuration menu is represented in figure 5.
menu, you must press the Save Button.
8.1. Save Current Sensor Readings
By pressing the “Save” button, you can store the current individual rope readings and the
total weight in the internal memory of the MSM12.
Figure 5: Configuration menu
8.2.1 Select Language
Under the language setting you have the choice of either English or German(Deutsch).
Caution: If language is changed; this setting can only be changed again by navigating
Figure 3: Saving of the rope loads
to the language menu. Resetting the unit does NOT reset the language.
When you choose “YES” when asked if you’d like to save, the measurements are
immediately stored. If you choose “NO” you will exit the menu and the readings will not
be saved. It is possible to save a measurement under a specific ID for easier retrieval or
archiving. When the ID button is pressed it will take you to a virtual keyboard allowing
you to enter your unique ID (up to 16 characters).
Figure 6: Selection of the language
Figure 4: Assignment of the measurement ID
10
Buy Online! wurtec.com
Buy Online! wurtec.com
11
Installation &MSM
Service
Mobile Rope Measurement
12 Manual
Exclusive U.S. Distributor for
8.2.2. Sensor Type
8.2.4. Time/Date
The MSM12 has the ability to work with 3 different sensor types, they are as follows:
In this section you can set the internal time clock of the MSM12 unit. You can also set the
date in this section. When a load measurement is saved, it is time and date stamped so it is
-LSM1
Diameter ¼”(6mm) – 5/8”(16mm)
-LSM2
Diameter 1/6”(4mm) – 1/3”(10mm)
-LSM-XL
Diameter 5/8”(16mm) – 1”(24mm)
important that the time and date are set correctly. Note: If the MSM12 is without power for
more than 20 minutes, the time and date will have to be reset again.
Depending on which sensor is used, it must be selected by the user. The MSM12 unit will
NOT automatically detect which sensor type is being used. By default the sensor type
selected is LSM1. Note: The sensor setting is stored in memory, restarting the MSM12 unit
will NOT change this setting back to default (LSM1).
8.2.5 Delete Memory
Figure 9: Set data/time
In this section you can choose to clear out all stored measurement data. If “YES” is pressed,
all measurement data is cleared. If “NO” is pressed, all stored measurements remain intact
and you will exit from this menu. Note: Clearing memory only deletes stored measurements,
Figure 7: Selection of the sensor type
all settings will remain unaffected.
CAUTION: Once measurements are deleted they are IRRETREIVABLE.
8.2.3. Suspension Ratio
In this menu section you can choose the suspension ratio of the current elevator. The ratio
is displayed on the main display in the upper left corner. Note: This setting is not stored in
memory. Once the MSM12 and has been switched off, it will default back to 1:1 ratio.
Figure 10: Delete Storage
Figure 8: Suspension ratio setting
12
Buy Online! wurtec.com
Buy Online! wurtec.com
13
Installation &MSM
Service
Mobile Rope Measurement
12 Manual
Exclusive U.S. Distributor for
8.2.6 Set Tolerance
8.2.8 Rope Load Wizard
Under this section you can set the tolerance of the rope load wizard. This is a user
The rope load wizard will assist you in the uniform adjustment of the ropes. The wizard uses
definable percentage of accuracy. If a specific job does not require a great deal of accuracy
the current rope loads and calculates a new desired rope load for each rope. The changed
of rope deviation the tolerance can be set at a higher number to allow a lower percentage of
rope load distribution is already taken into consideration when re-adjusting a rope. Due
accuracy. 0 would be very accurate, 9 would 9% deviation in either direction allowable.
to a special calculating algorithm it is possible that after only one adjustment run all ropes
bear the same load. In addition, during each adjustment process the wizard searches for
a reference rope which does not have to be adjusted. Note: The rope load wizard is only
available for use when two or more ropes are present.
In figure 13 you see the connected sensors, in this case six sensors. The MSM12 unit has
determined that sensor 2 is the reference rope; this rope will not need adjustment. While
adjusting the ropes the goal for each rope is to reduce its shaded area down to the center
line.
As soon as all ropes are adjusted, you may exit the rope wizard by pressing “OK”.
8.2.7 Units
Figure 11: Set tolerance
This section allows the user to change the displayed units of measure. The user has 3
choices of measurement: Kilograms (kg), Pounds (lbs) in short tons, and Pounds (lbs) in
long tons.
Note: Short tons should be used in the United States if the user is looking for
accurate readings in Pounds (lbs.)
Long tons are generally used in Europe and kilograms
Figure 13: Rope load wizard
in other parts of the world.
After completing the rope adjustment and pressing “OK” the unit will prompt you to save.
If you wish to save the measurement press “YES”, if you wish to name the measurement
with a unique ID and save it, press “ID”, and if you wish to not save the measurement,
press “NO”.
Note: The measurement must be saved if you plan to use the PC software to
generate a report of maintenance for a particular job.
Figure 12: Display unit setting
14
Buy Online! wurtec.com
Buy Online! wurtec.com
15
Exclusive US Distributor for
Ph:419.726.1066 | Buy Online wurtec.com