1
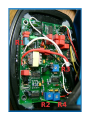
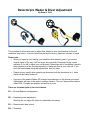
Detectorpro Wader & Diver Adjustment
By Sven S. 2010
This is written for those who want to adjust their Wader for max. performance for the soil
conditions they hunt in. It will run hotter than set by the factory, expect an increase of depth.
Please note:
• When you open up your earcup, you break the white warranty seal. If you are the
original owner of the unit, it will no longer be covered by Detectorpro's orig. owner
warranty. If you fail to adjust your unit properly, Detectorpro will to recalibrate it back to
factory specs for a fee. Any adjustments you make are done at your own risk. If you
don't feel comfortable doing the adjustments, don't do them.
•
Please be very careful when opening up the earcup with the electronics in it, wires
inside can be easily broken off.
•
On some of the newer Waders DP changed manufacturers of the trimmer pots used.
Adjustments will have to be made in reverse direction. The unit I have pictured below
dates 2005. Compare pot position and setting to yours.
There are 4 trimmer pots on the circuit board:
R1-----Ground Balance compensation
R2-----Frequency audio adjustment
Warning, do not adjust R2 unless it is absolutely necessary.
R3-----Discrimination bias control
R4-----Threshold
You must perform the adjustments in the following sequence.
STEP 1
Threshold adjustment
Set outside earcup sensitivity control to max.
Adjust R4 for some crackle/ snap/ pop sound.
The factory adjusts this control so the unit produces a relatively smooth sound at maximum
sensitivity.
Adjusting R4 for snap/ crackle/ pop at max. sens. setting will increase detection depth,
adjusting for more s/c/p will also increase the noise ratio. You can adjust this until you
can no longer tolerate the noise. You can adjust too far so that the detector will not be
a joy to use. But, you should be able to control the noise by reducing the sensitivity
using the control on the earcup.
STEP 2
Discrimination adjustment
Set outside the earcup Disc. Control to max.
Adjust R3 trimmer pot using a “copper” penny until you get a solid smooth sound, then go the
other direction until the sound breaks up..then back toward the smooth sound till it JUST gets
smooth again. This is a critical adjustment.
STEP 3
Ground Balance adjustment
Set outside Disc. Control to minimum.
Adjust R1, using a ferrite pot core at about 2” from the searchcoil so you hear a faint audio or
or no audio change.
I believe you can adjust the ground balance to your soil by bobbing the searchcoil up and
down from 1 foot above the ground down to 2”. You want to make sure there is no audio
change or a slight increase to adjust the unit slightly positive. This can be done on other
motion disc. Metal detectors.
Step 4
Audio adjustment
R2
Do not adjust unless you positively have to.
It adjusts the clarity of the audio produced when detecting a target.
If the target signal sounds crisp and clear, leave it a lone.
This is a multi turn trimmer pot, your on your own if you mis adjust this pot.
=======================================================================
From a reliable source, the Detectorpro VLF discriminating Wader/ Diver is basically a
modified Fisher 1280x in a micro format. If you can obtain a Fisher 1280x Service Manual
it will be possible to calibrate the
Wader/ Diver on a oscilloscope,
using the information found
within.