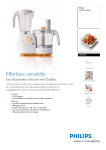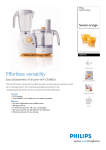
1
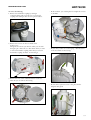
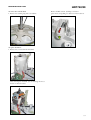
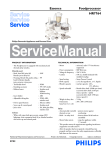
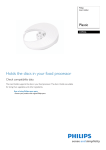
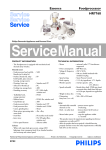
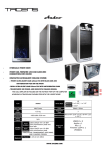
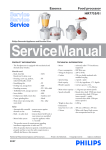
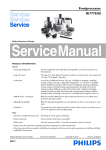
Foodprocessor
HR7740/80
Philips Domestic Appliances and Personal Care
Service Manual
PRODUCT INFORMATION
Features
- Click & Go
- Powerful (800 W)
- Large bowl
(3,6 L dry, 1,8 L liquid capacity)
- Easy Clean button
- 2 speeds and pulse function
- Graphics on the appliance
- Suction feet
- Cord Storage
Accessories
- Extra thick, break resistant Blender Jar
(2,0 L dry, 1,5 L liquid capacity)
- Stainless steel metal blade
-
Plastic insert holder
Stainless steel slicing insert medium
Stainless steel shredding insert medium
Stainless steel shredding insert fine
Stainless steel granulating disc
Plastic kneading accessory
- Metal balloon beater
- Citrus press
- Plastic pusher
Safety
- Automatic resettable thermal cut off
- Built-in safety lock
- Brake system
Published by Philips Domestic Appliances and Personal Care
05/01
: Easy assembly and dissasembly system.
: Capable of handling even the toughest tasks.
: Capable of processing large batches at once.
:
:
:
:
:
Easy cleaning of chopper bowl, which is also dishwasher safe.
Optimally adjusting the speed to the job.
Quickly choosing the right accessory for the job.
Keeping the appliance perfectly stable and safe during operation.
Adjusting the cord length to the specific situation.
: Blending, pureeing and shaking of fruits, dairy, batters, soups, vegetables,
meat and fish.
: Chopping, blending, pureeing, and mixing of meat, fish, vegetables, dairy,
fruits and nuts.
: Disc-shaped space-saving tool holder for different inserts.
: Slicing vegetables and fruits.
: Shredding vegetables, fruits and cheese.
: Shredding vegetables, fruits and cheese very fine.
: Granulating vegetables and fruits.
: Kneading all kinds of dough (up to 1,3 kg dough) and mixing cake batters
(up to 0,8 kg of batter).
: For all kinds of whipping, whisking and emulsifying jobs.
: For making large quantities (1,8L) of citrus juice in a short time.
: Pushing the ingredients in the bowl during the process.
: The pusher has a hole, so that oil can gradually be added.
: Protecting the motor against overheating.
: Detects whether lid & bowl are assembled.
: Stops the accessories within 1,5 seconds.
Printed in the Netherlands
© Copyright reserved
Subject to modification
TECHNICAL INFORMATION
-
Motor
Power consumption
Voltage and frequency
Cord set
Speed setting
Bowl capacity
Blender capacity
HR7740/80
:
:
:
:
:
:
:
Materials used
- Bowl, lid, blender jar, blender cup,
safety cap
- Housing, blender lid, pusher, inlay bowl
and blender handle, citrus press (sieve
and cone), kneading accessory
- Balloon Beater
- Insert holder
Universal, radio/TV interference suppressed
800 Watt max
220 V - 240 V, 50 Hz
100 cm, double insulated with moulded on plug
2 speeds & pulse
3,6 L dry ingredients, 1,8 L liquid ingredients
2,0 L dry ingredients, 1,5 L liquid ingredients
: SAN
: PP
: Metal Balloon, POM housing
: ABS
Colours
- White with orange and yellow accents, clear transparent bowl and jar.
Preliminary data
- F-box
No. of pcs
1
Weight (kg)
5,90
Dimensions (mm)
390 x 290 x 400
PARTS LIST
Pos
Service code
Description
Pos
Service code
Description
1
4
5
6
7
4203 065 65480
4203 065 65150
4203 065 65140
4203 065 65310
4203 065 65320
Housing Cap
Screw cap (3 pcs.)
Housing Top
Coupling Toolholder
Toolholder
26
27
28
29
30
4203 065 65420
4203 065 65440
4203 065 65260
4203 065 65410
4203 065 65460
Coupling Fork
Coupling Assy
Tension Assy
Toothed Wheel Assy
Belt
8
9
10
11
12
4203 065 65160
4203 065 65240
4203 065 65250
4203 065 65270
4203 065 65330
Blender Coupling
Power Knob
Quick Clean Knob
Spring - Quick Clean Knob
Cordset Holder
35
36
37
38
40
4203 065 65620
4203 065 65610
4203 065 65630
4203 065 65600
4203 065 65520
Pusher Chopper Bowl
Chopping Bowl Lid
Rubber Sealing Ring
Chopper Bowl
Citrus Press Cone
13
14
15
16
17
4203 065 65180
4203 065 65360
4203 065 65390
4203 065 65190
4203 065 65220
Detection Lever - Jar
Housing HR7740
Spring Bowl Detection
Horizontal Lever
PCB Frame Assy HR7730-40
41
45
46
47
50
4203 065 65530
4203 065 65560
4203 065 65550
4203 065 65540
4203 065 61540
Citrus Press Sieve
Stopper lid - Jar
Jar Lid
Blender Jar Assy
Slicing Insert medium
18
19
PCB Assy HR7735-40
Cordset EU
Cordset UK
Cordset Swiss
Airtunnel
52
53
54
4203 065 61560
4203 065 61550
4203 065 61570
20
4203 065 65210
4203 065 64020
4203 065 64000
4203 065 65400
4203 065 65170
55
4203 065 65510
Shredding Insert medium
Shredding Insert fine
Granulating Insert
(Reibekuchen)
Insert Holder Assy
21
22
23
24
25
4203 065 65450
4203 065 65290
4203 065 65300
4203 065 65780
4203 065 65770
Motor Assy
Decoupling lever
Bottom Assy
Retaining Ring
Washer
60
61
62
63
4203 065 65590
4203 065 65580
4203 065 65500
4203 065 65490
Balloon Beater Gearbox
Metal Balloon Beater
Plastic Kneader
Chopping Knife Assy
2-9
EXPLODED VIEW
HR7740/80
4
5
6
12
1
7
14
19
18
17
15
9
13
16
26
11
27
10
8
24
21
20
22
25
30
28
29
23
Shown parts without Pos. no. are not available as spareparts!
3-9
EXPLODED VIEW
HR7740/80
45
35
46
36
37
47
50
38
52
53
40
54
41
55
4-9
EXPLODED VIEW
HR7740/80
60
62
61
63
5-9
REPAIR INSTRUCTION
HR7740/80
To repair something inside the foodprocessor:
1. Remove the screw of the cord holder.
To remove the Top Housing:
1. Push a screwdriver through the 3 Screw Caps to remove
them.
2. Use a screwdriver Torx T15 to remove the 3 screws from
the Top Housing.
6-9
REPAIR INSTRUCTION
To remove the Housing:
1. Remove the Toolholder coupling by turning it
counterclockwise with protected tongs to prevent the
coupling from damages (You can use e.g. foam rubber).
2. Remove the 4 screws on the bottomside of the
foodprocessor.
The green arrow shows you the hole, where you can stick
through a pin to fixate the acc. drive wheel, when you want
to remove the blender coupling. After that you can turn
the blender coupling clockwise ´for removing it.
HR7740/80
- In this situation, you could replace for example the cord set
or the PCB.
- Be sure, that you don´t loose the Spring – Bowl detection
on the bottomside of the housing!
3. Remove the 2 last screws (marked with the red arrows).
After this you can remove the housing.
- Be sure, that a replaced cord set is also placed in the
designed cable guide.
7-9
REPAIR INSTRUCTION
HR7740/80
To remove the PCB´s:
1. Remove the 2 screws to loosen the Main PCB.
To remove the upper part of the coupling:
1. Remove the retaining ring with a screwdriver.
To remove the PCB Frame:
1. Release the 3 snaphooks, which hold the PCB on the
frame.
To remove the lower part of the coupling:
1. Remove the retaining ring with a screwdriver.
Soldering of Motor wires on PCB:
- Here you can see the colours of the Motor wires and their
soldering points on the PCB.
In this situation you can exchange for example the
coupling fork.
If you want to exchange the toothed wheel, you have to
remove the coupling fork and also the small axle from the
„click & go“ system (green arrow).
Solder point 2 - white wire
Solder point 3 - yellow wire
Solder point 4 - brown wire
Solder point 5 - black wire
Solder point 1 - red wire
8-9
REPAIR INSTRUCTION
To remove the toothed wheel:
1. Remove the retaining ring with a screwdriver.
HR7740/80
Remove the Belt tension, by lifting it a little bit
(green arrow) and pulling it in direction of the red arrow.
To replace the Motor:
1. Remove the 3 screws from the Airtunnel.
After removing the Airtunnel, you can exchange the motor,
the belt or the belt tension.
9-9