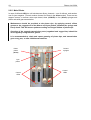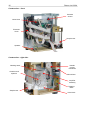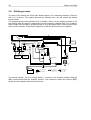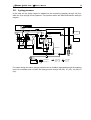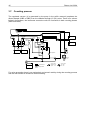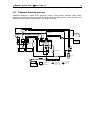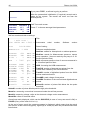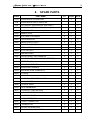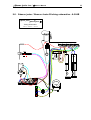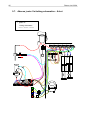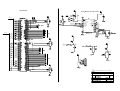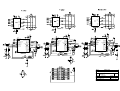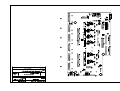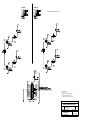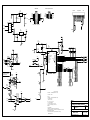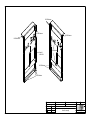
1
Abacus junior
Abacus junior vet
Abacus junior B
Hematology Analyzer
Service Manual
3.0 release
DIATRON Messtechnik Ges.m.B.H.
A-1141 Wien, Ameisgasse 49-51/2. AUSTRIA
Tel.: (431) 914-85-00, 911-38-48
Fax: 914-85-07-15
Web: www.diatron.com
E-mail: [email protected]
Abacus junior /vet / B Service Manual
1
TABLE OF CONTENTS
1.
INTRODUCTION ...................................................................................................................................... 4
1.1.
1.2.
1.3.
2.
NAME AND SERIAL NUMBER.................................................................................................................. 4
INTENDED USE ...................................................................................................................................... 4
INTEGRATED SOFTWARE ....................................................................................................................... 5
FUNCTIONAL DESCRIPTION............................................................................................................... 6
2.1.
MAIN ELECTRONIC PARTS OF THE ANALYZERS ...................................................................................... 6
2.1.1.
Counting chamber with electrodes and measuring aperture ...................................................... 8
2.1.2.
HGB Head................................................................................................................................... 8
2.1.3.
Cell counter Amplifier Board...................................................................................................... 9
2.1.4.
Control and Measurement Board (COMB) with Dimm-PC core - AJ/AJvet ............................ 10
2.1.5.
Dimm-PC* Module – AJ/AJvet ................................................................................................. 11
2.1.6.
Configuration and ID E2PROM board (IDEPROM) - AJ/AJvet............................................... 11
2.1.7.
Pneumatic and Power Board (PPB) - AJ/AJvet........................................................................ 12
2.1.8.
Opto-boards for stepper motors................................................................................................ 12
2.1.9.
Valve boards ............................................................................................................................. 13
2.1.10.
Pressure Sensor......................................................................................................................... 14
2.1.11.
Digital Reagent Sensor Board .................................................................................................. 14
2.1.12.
LCD Display Module with High Voltage Board of AJ/AJvet.................................................... 15
2.1.13.
LCD Display Module with High Voltage Board of Abacus Junior B ....................................... 16
2.1.14.
Keypad of Abacus junior/Abacus junior vet.............................................................................. 17
2.1.15.
Keypad of Abacus junior B ....................................................................................................... 18
2.1.16.
Floppy Disk Drive and CD-ROM Drive - AJ/AJvet .................................................................. 18
2.1.17.
External Power Supply.............................................................................................................. 19
2.1.18.
MAIN board - AJB .................................................................................................................... 19
2.2.
MAIN MECHANIC AND FLUIDIC PARTS OF THE ANALYZER ................................................................... 21
2.2.1.
Sample rotor.............................................................................................................................. 22
2.2.2.
Sampling needle ........................................................................................................................ 22
2.2.3.
Washing head............................................................................................................................ 22
2.2.4.
H&V moving unit ...................................................................................................................... 23
2.2.5.
Main Dilutor ............................................................................................................................. 24
2.2.6.
Micro Dilutor ............................................................................................................................ 25
2.2.7.
Puffer reservoir ......................................................................................................................... 25
2.2.8.
Pump ......................................................................................................................................... 25
2.3.
ASSEMBLED ANALYZER ..................................................................................................................... 26
2.3.1.
Abacus junior / Abacus junior vet............................................................................................. 26
2.3.2.
Abacus junior B......................................................................................................................... 29
3.
OPERATION OF THE FLUIDIC SYSTEM......................................................................................... 32
3.1.
3.2.
3.3.
3.4.
3.5.
3.6.
3.7.
3.8.
3.9.
3.10.
4.
FLOW DIAGRAM OF MEASUREMENT .................................................................................................... 33
INITIALIZATION OF THE FLUIDIC SYSTEM ........................................................................................... 36
SAMPLING PROCESS ............................................................................................................................ 36
NEEDLE WASHING PROCESS ................................................................................................................ 37
DILUTING PROCESS ............................................................................................................................. 38
LYSING PROCESS ................................................................................................................................. 39
COUNTING PROCESS ............................................................................................................................ 40
CHAMBER DRAINING PROCESS ............................................................................................................ 41
CLEANING PROCESS ............................................................................................................................ 42
SHUTDOWN PROCESS .......................................................................................................................... 42
ADJUSTMENT......................................................................................................................................... 43
4.1.
MECHANICAL SETTINGS ...................................................................................................................... 43
4.1.1.
Opto wheel setting..................................................................................................................... 43
4.1.2.
Sampling needle setting............................................................................................................. 44
4.2.
HARDWARE SETTINGS ......................................................................................................................... 44
4.2.1.
Amplifier offset setting .............................................................................................................. 44
2
5.
Diatron Ltd. 2004
CHECKING THE PROPER OPERATION ..........................................................................................45
5.1.
SELF TEST OF ABACUS JUNIOR AND VET .............................................................................................45
5.1.1.
Self test Screens (AJ/AJvet) .......................................................................................................45
5.1.2.
Normal range of Self Test parameters (AJ/AJvet).....................................................................46
5.1.3.
Troubleshooting Guide for Self test...........................................................................................46
5.2.
SELF TEST OF ABACUS JUNIOR B ........................................................................................................47
5.2.1.
Self Test Menu ...........................................................................................................................47
5.2.2.
Normal range of Self Test parameters (AJB) ............................................................................49
5.3.
SERVICE MENU - AJ/AJVET ................................................................................................................50
5.3.1.
Entering to Service Menu ..........................................................................................................50
5.3.2.
Main Service Menu....................................................................................................................50
5.3.3.
Edit service contact ...................................................................................................................50
5.3.4.
Device Information....................................................................................................................50
5.3.5.
Service Calibration....................................................................................................................51
5.3.6.
Software Settings .......................................................................................................................51
5.3.7.
Service Testing Menu ................................................................................................................53
5.3.8.
Valve Test Menu ........................................................................................................................53
5.3.9.
Display and Keyboard Test .......................................................................................................53
5.3.10.
Stress Mode ...............................................................................................................................53
5.3.11.
Miscellaneous Settings ..............................................................................................................54
5.3.12.
Multi-user Rescue Code ............................................................................................................54
5.4.
SERVICE MENU (AJB).........................................................................................................................55
5.4.1.
MAIN Service Menu ..................................................................................................................55
5.4.2.
Service Calibration of Abacus Junior B....................................................................................56
6.
SERVICE OPERATION .........................................................................................................................57
6.1.
OPENING THE INSTRUMENT .................................................................................................................57
6.2.
MDA (MONOCHROME DISPLAY ADAPTER) EMULATION MODE – AJ/AJVET ......................................57
6.3.
KEY BIOS SETTINGS FOR CORRECT OPERATION – AJ/AJVET ..............................................................58
6.4.
CHECKING THE BIOS SETUP – AJ/AJVET ...........................................................................................59
6.5.
BIOS-DESCRIPTION – AJ/AJVET ........................................................................................................59
6.6.
DOS FUNCTIONS ON THE INSTRUMENT – AJ/AJVET ...........................................................................61
6.7.
ERROR MESSAGES – AJ/AJVET ...........................................................................................................61
6.7.1.
Abacus Junior / Abacus Junior Vet error code list ...................................................................62
6.7.2.
Abacus Junior / Abacus Junior Vet message code list ..............................................................65
6.8.
WARNINGS AND ERROR CODES FOR ABACUS JUNIOR B......................................................................66
6.9.
POSSIBLE CAUSES OF NOISE................................................................................................................68
6.9.1.
Contaminated reagent............................................................................................................68
6.9.2.
Bad earth grounding ..............................................................................................................68
6.9.3.
External electrical noise............................................................................................................69
6.9.4.
Internal noise sources ............................................................................................................69
7.
MAINTENANCE......................................................................................................................................71
7.1.
WEEKLY MAINTENANCE BY USER ......................................................................................................71
7.1.1.
Cleaning the washing head .......................................................................................................71
7.2.
PERIODIC MAINTENANCE BY SERVICE ................................................................................................71
7.2.1.
Check Self test and Device statistics..........................................................................................71
7.2.2.
Cleaning and Greasing Dilutor Block.......................................................................................71
7.2.3.
Checking and Lubricating Dilutor Piston Tips .........................................................................71
7.2.4.
Cleaning and Lubricating Needle Moving Mechanics ..............................................................71
7.2.5.
Checking and Replacing Washing Head ...................................................................................71
7.2.6.
Checking and Replacing Peristaltic Pump Tube.......................................................................71
7.2.7.
Checking of the Power Supply...................................................................................................72
7.2.8.
Bleaching of Fluidic System ......................................................................................................72
8.
SPARE PARTS .........................................................................................................................................73
Abacus junior /vet / B Service Manual
9.
3
APPENDICES........................................................................................................................................... 76
9.1.
WARNING FLAGS - AJ/AJVET ONLY.................................................................................................... 76
9.2.
SERIAL COMMUNICATION PROTOCOL ................................................................................................. 77
9.2.1.
General Description.................................................................................................................. 77
9.2.2.
Format of Packages Sent .......................................................................................................... 78
9.2.3.
Format of Acknowledge of the Receiver ................................................................................... 78
9.2.4.
Detailed Description of Packages............................................................................................. 78
9.3.
UPLOADER: SOFTWARE UPGRADING TOOL FOR ABACUS JUNIOR B................................................. 82
9.3.1.
Process of SW download (AJB)................................................................................................. 83
9.3.2.
Troubleshooting of SW download (AJB)................................................................................... 86
9.4.
ABACUS JUNIOR CABLING DIAGRAM - AJ/AJVET ............................................................................... 87
9.5.
ABACUS JUNIOR B CABLING DIAGRAM - AJB..................................................................................... 88
9.6.
ABACUS JUNIOR / ABACUS JUNIOR B TUBING SCHEMATICS - AJ/AJB ................................................ 89
9.7.
ABACUS JUNIOR VET TUBING SCHEMATICS - AJVET........................................................................... 90
9.8.
RECOMMENDED KIT OF TOOLS ............................................................................................................ 91
9.9.
ELECTRONIC SCHEMATICS .................................................................................................................. 91
4
Diatron Ltd. 2004
1.
INTRODUCTION
Since Abacus junior / Abacus junior vet / Abacus junior B have so much common
characteristics, we issue a common Service Manual covering all instruments.
Information herein applies for all instruments unless otherwise noted.
To be well up in the instruments, please read this manual carefully to have the
knowledge for servicing the instruments perfectly and avoid extra costs and wasting
precious time.
In this manual, we are using the following conventions:
AJ – stands for Abacus junior
AJvet – stands for Abacus junior vet
AJB – stands for Abacus junior B
This Abacus junior / Abacus junior vet / Abacus junior B Service Manual contains the
functional descriptions of all analyzers, operation of the fluidic systems, adjustments and
settings, and very important information for the Service Personnel about the service
operations and possible problems.
1.1. Name and serial number
Name:
Serial No.:
Abacus junior / Abacus junior vet / Abacus junior B Hematology Analyzer
Every instrument has its own serial number, which is printed on the rear panel
label and it can be read out from Device Information or from the self test
submenu. This identity number is write-protected by DIATRON.
1.2. Intended use
Abacus junior / Abacus junior vet / Abacus junior B hematology analyzers are fully
automated cell counters for in vitro diagnostic use. The compact instruments were developed
for small clinics, point-of-cares and vet offices.
Abacus junior can process 30, Abacus junior vet can process 20-25 samples per hour and
they are intended to determine the following 18 hematology parameters from a 25µl whole
blood sample:
• WBC - LYM# - MID# - GRA# - LYM% - MID% - GRA% (three-part WBC differential)
• HGB - RBC - HCT - MCV - RDW - MCH - MCHC
• PLT - MPV - PCT – PDW
Abacus junior B can process 30 samples per hour and intended to determine the following
12 hematology parameters from a 25µl whole blood sample:
• WBC
• HGB - RBC - HCT - MCV – RDW-cv - MCH – MCHC
• PLT - MPV - PCT – PDW-cv
Abacus junior /vet / B Service Manual
5
1.3. Integrated software
The integrated software controls the instrument operations, displays, stores, recalls data, and
allows the user to perform QC and calibration procedures and modify the user settings. The
software version number can be read out from the Device Information or from the Self test
submenu.
Software is absolutely “Plug and Play”, it can read out and detect the type and the serial
number of the instrument, therefore it will run the correct program for the hardware, without
any user or service help. Every Abacus junior / Abacus junior vet software version is
upgradeable (using a floppy disk) by the latest program developed by DIATRON.
Software upgrade of Abacus Junior B requires a special SW downloading application (more
about this in Section 9.3) running on a separate PC, a standard null-modem serial cable –
with 9-pin connector, and an upgrade SW from web page of DIATRON:
www.diatron.com
6
Diatron Ltd. 2004
2.
FUNCTIONAL DESCRIPTION
2.1. Main electronic parts of the analyzers
Abacus junior / Abacus junior vet contains the following electronic parts:
1.
2.
3.
4.
5.
6.
7.
8.
9.
10.
11.
12.
13.
14.
15.
16.
17.
Counting chamber with electrodes and measuring aperture
HGB Measuring Head
Cell Counter Amplifier Board (behind the chamber)
CPU Board with Dimm-PC and measurement processing unit (COMB Board)
Safe configuration E2PROM board connecting CPU board and PPB
Pneumatic and Power Board with 6 motor controllers, valve & pneumatic controller,
pump driver and power supply for internal printer (+8V) and digital circuitry (+5V)
Motors with common opto-board of needle moving motors (H/V) and sample rotor
Main dilutor block with opto-board for diluent, lyse and rinse (AJVet)
Micro-dilutor block with opto-board for sampling
Valve boards (set of 5 and max. 7)
Peristaltic Pump
Pressure Sensor
Digital Reagent Sensor Board
Floppy Disk Drive and CD-ROM Drive (optional)
Graphic LCD Display Module with High Voltage Board
LCD and Keyboard controller and Keyboard Panel
Internal Printer
Fluidic System
Pneumatic and Power Board
Internal printer
power and I/F
+8V
Internal Printer
Pneumatic I2C bus
Motor controller/driver #1
Motor controller/driver #2
Motor controller/driver #3
Motor controller/driver #4&5
Motor controller/driver #6
Amplifier
Opto board of
needle moving
motors H/V and
sample rotor
Counting
chamber with
electrodes
Cell
counter
amplifier
Motors
Opto board of
main dilutor
Opto board of
microdilutor
HGB
measuring
head
HGB I/F
12Vdc External
Power Supply
Valve drivers
Pump driver
Pump
Reagent sensors
IDE I/F
Floppy I/F
Valves
Pressure sensor
Display Assembly
FPGA
A/D converter
Optical
isolation
Ext.Printer
CD-ROM Drive
Valve blocks
Reagent sensor I/F
Power Board Interface
Pressure sensor I/F
+5V, +12V, Pneum I2C
Serial No.
IDEPROM
CPU Board
Config. Data
DC/DC
Configuration Pneum
DC/DC converter
I/F
microcontroller converter
+12V / -12V
+12V, -12V
analog power
Legacy I/O I/F
Ext. Computer
Valve controller
Digital power
+5V
Dimm-PC
AMD Elan
SC-520
LCD
LCD I/F
Keyboard I/F
12Vdc
LCD and
Keypad
controller
Floppy drive
START button
Status LEDs
DC/DC
converter
LCD Lamp
Keypad
High
Voltage
Inverter
300VAC
High
Voltage
Board
+50V
+150V
Ext. Keyboard
Abacus junior / Abacus junior vet Electronic Functional Block Diagram
Abacus junior /vet / B Service Manual
7
Abacus junior B contains the following electronic parts:
1. Counting chamber with electrodes and measuring aperture
2. HGB Measuring Head
3. Cell Counter Amplifier Board (behind the chamber)
4. Motors with common opto-board of needle moving motors (H/V) and sample rotor
5. Main dilutor block with opto-board for diluent and lyse
6. Micro-dilutor block with opto-board for sampling
7. Valve boards (set of 5)
8. Peristaltic Pump
9. Pressure Sensor
10. Digital Reagent Sensor Board
11. Alphanumeric LCD Display Module with High Voltage Board
12. Keyboard Panel
13. Internal Printer
14. MAIN board
Fluidic System
MAIN Board
Motor driver #1
Internal printer
power and I/F
+8V
Internal Printer
12Vdc External
Power Supply
Motor driver #3
Motor driver #4 & #5
Power regulating
and filtering
+3.3V, +5V,
+8V, +12V,
RS-232
Serial No.
Config. Data
Real Time Clock
Battery
Ext. Computer
(SW Uploader)
Motor driver #2
Microcontroller,
CPLD and
some digital chips
Motor driver #6
Amplifier
Opto board of
needle moving
motors H/V and
sample rotor
Counting
chamber with
electrodes
Motors
Opto board of
main dilutor
Opto board of
microdilutor
Valve drivers
Valve blocks
Pump driver
Pump
Reagent sensor I/F
Reagent sensors
Pressure sensor I/F
Pressure sensor
HGB
measuring
head
HGB I/F
Valves
Measurement
processing unit
and control I/F
LCD I/F
Cell
counter
amplifier
Display Assembly
LCD
(backlight internally
controlled)
Keyboard I/F
Keypad
START button
Status LEDs
Abacus junior B Electronic Functional Block Diagram
High
Voltage
Board
+50V
+150V
8
Diatron Ltd. 2004
2.1.1. Counting chamber with electrodes and measuring aperture
Impedance method is used for determination of volume and number of cells. In this method a
known volume of dilution is drawn through a small aperture. Constant current is passed
through the aperture from one side to the other. When a cell passes through the aperture, it
causes a change in resistance, which generates a voltage pulse.
The amplitude of the voltage pulse is proportional to the ratio of cell volume per aperture
volume. This is used to determine the volume of cells. The number of cells can be obtained
by counting the pulses.
In the instruments there is one cell-counter probe: the aperture size is 80 µm and has a
reference electrode assembly and U-shaped metal fixing as it is shown in the figure below.
Assembled Cell-counter Probe
Measuring tube
O-ring
Aperture (80µm)
U-shaped metal fixing
Measuring tube
Reference electrode
The aperture is made of ruby and it is molded into the measuring tube.
2.1.2. HGB Head
Hemoglobin head is placed around the measuring chamber in all instruments.
It contains: light source (LED) at 540 nm wavelength and Photo Detector (TSL235). The
Photo Detector converts the light to frequency. The HGB concentration is a logarithmic
function of this frequency measured by
• the FPGA circuit of the COMB card in AJ/AJvet
• the micro-controller of the MAIN board in AJB
Connection to the amplifier
LED
TSL235
Abacus junior /vet / B Service Manual
9
The analyzers perform enhanced Hemoglobin measurement technology for HGB
measurement. The output of HGB head is frequency (TSL235 detector is light to frequency
converter). This signal is counted by a digital counter in the FPGA circuit/micro-controller.
This counter counts up while the LED is on and counts down while the LED is off, the LED
and the counter directions are switched with a 100 Hz signal. This method provides “real time
backlight correction”, which makes the HGB measurement more precise in changing
backlight environment situation as well.
There are two kinds of HGB measurements:
• Sample measurement
• Diluent measurement
(before RBC counting)
(in WBC washing phase)
The HGB result is calculated from these measurements by:
HGB ≅ log (CNTdiluent light / CNTsample light)
Due to enhanced HGB technology, junior is less sensitive to incident light changes.
It is recommended to keep side door closed during measurements.
2.1.3. Cell counter Amplifier Board
Amplifier board includes its own voltage regulator, connection interfaces to HGB head, to
high voltage board and to COMB in AJ/AJvet (to MAIN in AJB). In this board there is a
current generator circuit, which works from 50V measuring voltage (generated by High
Voltage Board) and the probe voltage (DC) is amplified with a voltage follower (output: ELV).
Nominal measuring current is 870 µA.
Amplifier board includes one input connector for the chamber (measuring electrode). There
are two opto switches (U1, U3) to connect high voltage to the probe with HSW signal and
isolate the input of the amplifier. Test circuit makes possible to generate test pulses (with
TEST and PLS signals through FETs) for checking the proper operation of the amplifier
channel.
Connection to:
CSA1 on COMB (AJ/AJvet)
CS_IMP on MAIN (AJB)
Connection
to HVB
Connection to:
CSA1 on COMB (AJ/AJvet)
CS_ANALOG on MAIN (AJB)
Amplifier board includes a 3-stage main amplifier channel, which gains input signal to the
0...5 V range (this is the input range of the A/D converter, which is placed on the COMB
card). The RSW signal changes the gain (RBC, WBC) in the feedback of the second
amplifier stage with U2 (MAX319) analog switch. There is an offset potentiometer, P1 in the
third amplifier stage, manufacturer sets the correct offset voltage.
Adjust the offset voltage only in case it is out of the +/- 5mV range.
10
Diatron Ltd. 2004
DHON signal (from the COMB board - AJ/AJvet; from the MAIN board - AJB) switches on
the LED and the MVON signal – which is active during counting – switches off the Photo
Detector in the HGB head, to prevent noise generated by the HGB detector.
The other side of the amplifier board contains special connectors for the chamber and the
HGB head (JP4).
2.1.4. Control and Measurement Board (COMB) with Dimm-PC core - AJ/AJvet
The compact COMB incorporates a single PC and its environmental functions, as well as the
specific measurement processing functions in one board.
LPT port
COM port
USB port
PS2 port
keyboard
Speaker
connection
CD-ROM
connection
CSINTCON
ID board
connection
CSDIGIO
CSA1
Amplifier
connections
CSHEAT
Reagent
heater
connection
CSD
Keyboard & Display and
Start key/LED connection
CSFLOPPY
Floppy
connection
CSHVBP
High voltage
board connection
PC system of the COMB board is based on the Dimm-PC module, which is a credit card size
PC with AMD Elan SC520 133 MHz micro-controller. Dimm-PC itself contains 16 or 32Mbyte
RAM and same size of SanDisk that acts like a hard disk. Dimm-PC module is easily
replaceable as it has an open socket (it has also a screw for safe fixing). COMB card
contains single ICs and some drivers/protection-circuits for the interfaces such as LPT,
COM1, PS2, USB, IDE, Floppy and Speaker.
Measurement processing is based on FPGA circuit. After power on, FPGA holds the DimmPC in wait state (with –IOCHRDY signal) until the PIC configures the FPGA circuit from the
IDEPROM (status LED is red during configuration). After that the FPGA controls the entire
pneumatic system through the Pneumatic I2C bus, the Keyboard and Display module with
video RAM for MDA (Monochrome Display Adapter) emulation, and Start button & status
LED. FPGA circuit also performs measurement data acquisition by using the 10-bit A/D chip.
FPGA makes digital data processing and stores the results in the internal FIFO memory. Cell
parameters are sent to the Dimm-PC by single DMA cycles.
Abacus junior /vet / B Service Manual
11
2.1.5. Dimm-PC* Module – AJ/AJvet
The MB4 board incorporates a credit-card sized PC, named Dimm-PC*. The processor on
the Dimm-PC is a 133MHz Pentium-class core, with 32Mbytes on-board RAM, and 32Mbytes
on-board SanDisk. This is the HDD (hard disk drive) of the analyzer, so instrument software
with all user settings, calibration, database, etc. is stored on the Dimm-PC.
* DimmPC® is the Trade Mark of Kontron Embedded Modules GmbH
Flash BIOS
Hard Disk
(SanDisk)
32 Mbytes RAM
SanDisk
controller
CMOS EEPROM
Real-time clock
On-board SMPS
Super I/O
Edge connector
AMD Elan
SC520 CPU
2.1.6. Configuration and ID E2PROM board (IDEPROM) - AJ/AJvet
This board is the interconnection between COMB and PPB cards: Pneumatic I2C bus, power
lines and internal printer signals are connected through this card. The board also contains a
24FC256 serial E2PROM, which stores the FPGA’s configuration data and identity
information of the instrument (Serial Number, OEM, model, etc.).
E2PROM
Keeping the hardware identity information (write-protected), IDEPROM makes possible to
run the correct software (Human or Vet).
12
Diatron Ltd. 2004
2.1.7. Pneumatic and Power Board (PPB) - AJ/AJvet
PPB card contains the main power regulator circuits, valve and motor driver circuits and
other connections for the fluidic and pneumatic system’s parts.
X_Y_SR
Horizontal, Vertical & Sample
rotor connection
DIL_MDIL
Main Dilutor
connection
FLOPPY/CD
Power to
Floppy/CD
MDIL
Micro dilutor
connection
I_PCB_CONN
ID board
connection
PUMP
Peristaltic pump
connection
PRESSURE
Pressure sensor
connection
5V voltage
regulator
(on chassis)
+12V_IN
Power input
REAGENT_SENSOR
VALVES
Reagent sensor
Valves connection
connection
PRINTER
Internal printer
connection
Power system generates +5V (Digital power), +8V (Printer power) and +12V (Motor and
valve power) from the single +12V DC input signal.
Motor driver part consists of six separated PIC micro-controllers with power drivers.
Horizontal, Vertical and Sample rotor motors have one combined ribbon cable connection.
Main Dilutor (with two motors) and Micro-dilutor have separated connectors.
Valve driver section is based on the valve driver PIC micro-controller and two 8-bit, powered
output shift registers (with built in protection diodes) and there is one common ribbon cable
connection for the valve boards. The peristaltic pump has a separated Darlington driver
circuit for more reliable operation.
2.1.8. Opto-boards for stepper motors
There are six stepper motors in the system: Horizontal and Vertical motors, which make the
movements of the sampling needle; the main Dilutor motors (2), which move the syringes
(macro, lyse, rinse); the micro Dilutor motor, which drives the sampling phase and the motor
moving the sample rotor. The stepper motor opto boards make the connections between the
motor driver ICs and motors, and have opto switches for the motor’s home and end
positions. The actual status of the stepper motor’s optos is indicated by two LEDs on each
stepper motor opto boards.
Dilutor and Micro-dilutor have its own separated opto-board, located directly in the units.
Abacus junior /vet / B Service Manual
13
Horizontal and Vertical motors and the sample rotor unit have a common Opto-board, called
XYOpto Board:
LEDs for Sample rotor
Opto switches & LEDs for Horizontal motor
Connections for Hoirizontal &
Vertical motors
Opto switches & LEDs for Vertical motor
The other side of the board contains the connection for the Sample rotor and a ribbon cable
connection to the COMB (AJ/AJvet) or to the MAIN board (AJB).
2.1.9. Valve boards
There are two kinds of valve boards: Valve board 1-5 and Valve board 6-12.
AJ and AJB have 5 valves, while AJvet has 6 valves in Valve board 6-12 module. The
valve boards are connected to controller and driver chips are located on the PPB.
Valves
Valve Board
Connection to PPB
14
Diatron Ltd. 2004
2.1.10. Pressure Sensor
This is an MPX5100AP calibrated pressure sensor, which can measure the required air
pressure and vacuum. The Pressure Sensor is connected directly to the PPB card (AJ/Ajvet)
or to the MAIN board (AJB).
Connection to Puffer reservoir
Connection to:
PPB (AJ/Ajvet)
MAIN (AJB)
The pressure sensor can operate from +5V only. It is a calibrated sensor with 0-1.1 Bar input
range. Do not apply more than 1.5 Bar to it, because it can ruin the pressure sensor.
2.1.11. Digital Reagent Sensor Board
This board contains four liquid detector opto-detectors (optos) and a reference opto for
automatic temperature and stray light compensation. The reference opto is located in the
middle and it has the same temperature and backlight conditions as the sensing ones.
Reagent detectors
Reference detector
Control LEDs
Connection to:
PPB (AJ/Ajvet)
MAIN (AJB)
The Reagent Sensor Board is connected to the PPB card in AJ/AJvet, and the valve driver
micro-controller makes the sensing and compensating operations. In AJB, this board is
connected to the MAIN board and the micro-controller controls the operation of the Reagent
Sensor Board.
Instrument makes automatic initialization – called calibration – of reagent sensors during
priming phase of fluidics.
Abacus junior /vet / B Service Manual
15
2.1.12. LCD Display Module with High Voltage Board of AJ/AJvet
LCD &
Keypad
controller
LCD backlight
lamp
LCD module
HVB with
inverter
Keypad connector
Start key and
status LED board
Display assembly contains the 240x128 dots graphics LCD display and the high voltage
board. LCD has a high voltage backlight lamp (high voltage board generates the required
voltage).
There is a special temperature compensation circuit in the display module, which makes
possible to use the LCD module in wide temperature ranges with the adjusted contrast.
High Voltage Board (HVB) generates LCD backlight voltage (300V), aperture cleaning
voltage (150V), and measuring voltage (50V). The high voltage board is connected to the
system through the amplifier board and the COMB card. This unit contains INVC191 inverter,
which is a high voltage, high frequency circuit producing suitable voltage for CCFL (cold
cathode fluorescent lamp) of the LCD.
The CFSW digital signal (from the COMB card) controls HVB: logical LOW turns inverter on.
The MVON digital signal (from the COMB card) switches the measuring voltage (50 V) on/off
by O1 opto switch.
Warning! Be careful with servicing this board in active state, because the high
voltage (300V) at LCD lamp connector can cause damages or electric shock.
Never operate the analyzer without the LCD backlight connected to the HVB,
because the over-voltage on the output of the HVB can damage the HVB board and
the amplifier.
16
Diatron Ltd. 2004
Connection to
COMB and
amplifier
Connection
to LCD lamp
In Abacus Junior B, we needed a new high voltage board, because in this instrument there’s
no need for the inverter on the previous HVB (the alphanumeric display has no CCFL
backlight), but the measuring and cleaning voltage generation based on the inverter’s high
voltage. That’s why we developed HVB v2.1, which is still capable to carry and feed the
inverter, but the board has its own high voltage generation circuitry, so can be used without
the inverter placed on it.
HVB v2.1:
Connection to
COMB and
amplifier
Connection
to LCD lamp
Start key is a micro-switch, connected to the COMB card (through the Display ribbon cable).
The status LED indicates the actual status of the analyzer and it has three colors: red, green
and amber (See User’s Manual). The LED has three pins and the actual color depends on
the controlled pins. Start key and status LED are controlled by COMB.
2.1.13. LCD Display Module with High Voltage Board of Abacus Junior B
The display assembly in Abacus Junior B contains a 4x20 characters alphanumeric display,
a high voltage board, a Start key and status LED board. The alphanumeric display has
internal LED based backlight, which is driven and controlled by the MAIN board.
HVB
without inverter
Start key and status
LED board
Alphanumeric LCD
Keypad connector
Abacus junior /vet / B Service Manual
17
High Voltage Board (HVB) generates the aperture cleaning voltage (150V), and measuring
voltage (50V). The high voltage board is connected to the system through the amplifier board
and the MAIN board.
Connection to
MAIN board
Uninstalled
inverter board
CFSW signal (from MAIN board) controls HVB: logical LOW turns inverter on. MVON signal
(from MAIN board) switches the measuring voltage (50 V) on/off by O1 opto switch.
Warning! Be careful with servicing this board in active state, because the high
voltage can make damages or electric shock!
Start key is a micro-switch, connected to the MAIN board (through the Display ribbon cable).
The status LED indicates the actual status of the analyzer and it has three colors: red, green
and amber (See User’s Manual). The LED has three pins and the actual color depends on
the controlled pins. The MAIN board controls start key and status LED.
In Abacus Junior B the LCD controlling and keypad reading are handled by the microcontroller of the MAIN board via some interface circuitry.
2.1.14. Keypad of Abacus junior/Abacus junior vet
The analyzer has a 29-button foil keypad including numerical keypad (0-9, “.”), cursor
moving, OK and Del buttons, and 6-6 function buttons, above and under the LCD display as
it is shown in the picture below:
Function buttons
Function buttons
Cursor buttons
Status LED
START button
18
Diatron Ltd. 2004
2.1.15. Keypad of Abacus junior B
The analyzer has a 21-button foil keypad including numerical keypad (0-9, “.”), OK and Del
buttons, and 4-4 function buttons, above and under the LCD display as it is shown in the
picture below:
Function buttons
Function buttons
Status LED
Start button
2.1.16. Floppy Disk Drive and CD-ROM Drive - AJ/AJvet
The built-in Floppy Disk Drive makes possible to save data on floppy disks, and to install (or
upgrade) the software. The optional CD-ROM drive can be used to install software (only read
actions from CD-ROM, as write operations are not supported by the instrument’s operating
system). Both units are connected to COMB card: CD-ROM to IDE interface, FDD to Floppy
interface.
CD-ROM
Drive
Floppy Disk
Drive
Abacus junior /vet / B Service Manual
19
2.1.17. External Power Supply
The analyzer works with an external power supply. The next figure shows the power supply
unit generating 12VDC.
115V or 230V
AC inlet
12V DC outlet
The power supply modules have an auto range input, which makes possible to use them with
230V or 115V mains outlet and it has the CE and UL safety certification. The input socket of
the power supply is a standard 3-terminal plug, with power cable connection; the output is a
special, lockable socket as it is shown in the picture.
2.1.18. MAIN board - AJB
MAIN board is responsible to control the instrument: contains the main power regulator
circuits, valve and motor driver circuits and other connections for the fluidic and pneumatic
system’s parts, responsible for the specific measurement processing functions.
The board also contains two 24FC256 serial E2PROMs, which store the settings and identity
information of the instrument (Serial Number, OEM, model, etc.) and the measurement
database.
The central micro-controller with a CPLD and with several other digital chips (buffers,
decoder, multiplexer) handles the pneumatic system, displaying, measurement and data
management.
Power system: filtering the +12V Input and generates +3.3V (CPLD), +5V (Digital power),
+8V (Printer power). Filtered +12V is used for the power of motors and valves.
Motor drivers: 6 power drivers; Horizontal, Vertical and Sample rotor motors have one
combined ribbon cable connection. Main Dilutor (with two motors) and Micro-dilutor have
separated connectors.
Valve driver: consists two 8-bit, powered output shift registers (with built in protection diodes)
and there is one common ribbon cable connection for the valve boards. The peristaltic pump
has a separated Darlington driver circuit for more reliable operation.
Real Time Clock: for TIME/DATE functions; powered by Battery at switched off state.
Measurement processing: the A/D conversion made by the micro-controller itself, but several
preprocessing steps (time limits, noise handling, pulse integration) taken by the external
analog circuitry.
External communication through RS232 makes possible to update the firmware of the microcontroller with an external PC.
20
Diatron Ltd. 2004
Pressure
sensor
connection
Peristaltic
Pump
connection
Micro
dilutor
connection
Horizontal, Vertical & Sample
rotor connection
Reagent
Sensor
connection
Main Dilutor
connection
Valves
connection
+12V
Power Input
+5V voltage
regulator
(on chassis)
High Voltage
Board
connection
Speaker
connection
Printer
connection
COM port
LCD, Keypad and
Startkey/LED
connection
CS_ANALOG and CS_IMP
amplifier connections
Abacus junior /vet / B Service Manual
21
2.2. Main mechanic and fluidic parts of the Analyzer
Abacus junior / Abacus junior vet / Abacus junior B Hematology Analyzers consist of the
following mechanic and fluidic parts:
1. Sample rotor
2. Sampling needle
3. Washing head
4. H&V moving unit
5. Micro Dilutor
6. Dilutor
7. Chamber
8. Cell-counter probe
9. Puffer reservoir
10.Pump
11.Valves
12.Tubing
Abacus junior
&
Abacus junior vet
&
B
Abacus junior
Fluidic Schematics
Version 2.1
M4
3
1
2
V7 DilChamber
1
2
1
V6 DilWash
Micro-dilutor
V8 DilNeedle
3
2
V11Rinse
1
Main
dilutor
2
DILUENT
3
V9LyseWbc
1
2
Pressure
Meter
3
Rinse
Sensor
Lyse
Sensor
LDL
LDR
Diluent & Cleaner
Sensor
LDD
P
3
1
Lyse
Puffer
Reservoir
CLEANER
RBC
WBC
3
M6
V3 Bubble
2
M3
Rinse
1
Dil
V10 Cleaner
V4 DilAperture
2
3
M1
HGB
Hor
RINSE
LYSE
M2
Ver
V2 DrainAperture
V5 DrainPuffer
1
2
V1 DrainChamber
3
M5
Sample
rotor
Pump
LDx
WASTE
M1
Liquid Detector
Stepper Motor
2-way Valve
Closed = Off
Open = On
1
2
3
3-way
Valve
1-3 = Off
2-3 = On
The main fluidic schematics are almost the same for the three models. The only exception is
the Rinse reagent and the corresponding Rinse syringe and Rinse valve (V11), which is
present for the AJvet model only.
22
Diatron Ltd. 2004
2.2.1. Sample rotor
Abacus junior / Abacus junior vet / Abacus junior B hematology Analyzers has a sample
rotor for safety and more precise sample handling. Commonly used sample tubes are
supported by replaceable tube adapters.
The Sample rotor unit uses a stepper motor, connected to the PPB (AJ/AJvet) or to the
MAIN board (AJB), through the XY opto board. The rotor has micro switches for positioning.
The unit blocks itself in the home and end position with mechanical parts and has a special
cap that prevents the damage of the electronic and mechanic parts caused by any fluid.
Sample rotor is maintenance-free.
Replaceable tube adapter
2.2.2.
Micro switches for positioning
Sampling needle
Sampling needle is assembled in the H&V moving unit and it makes the sample aspirations.
Correct setting of sampling needle is necessary and very important (see Chapter
Adjustments).
2.2.3. Washing head
Washing head is located at the bottom of the H&V moving unit and it is for cleaning the outer
surface of the sampling needle. This washing process is made with diluent reagent and the
fluid is drained by the pump. The arrows on the picture show the direction of diluent flow
during sampling needle washing.
Clean diluent
Pump to waste
Clean or replace washing head yearly, or after 10 000 measurements.
Abacus junior /vet / B Service Manual
23
2.2.4. H&V moving unit
All three instruments use the same H&V moving unit.
This unit contains slides to move the sample sampling needle in Horizontal and Vertical
directions, two stepper motors, XYR opto board, opto wheel, washing head and the sampling
needle. It moves the needle to the desired position: from sampling position, to washing head,
and to the measuring chamber.
Sampling needle
holder
XYR opto board
Vertical opto wheel
Sampling needle
Washing head
Horizontal
motor
Vertical
motor
Both stepper motors have optical end-switch sensors for detecting these positions. These
are required for correct initialization and error detection. All sensors have status LEDs to
show actual conditions.
The Vertical motor works with a special opto wheel for detecting home & end positions. See
the Adjustment section of this manual to place this wheel to the proper position.
Greasing of the horizontal/vertical guiding rods should be done regularly using
“Photorub”, a PTFE-based thin lubricant.
It is recommended to check and repeat greasing of guiding rods every year, or after
10000 measurements.
24
Diatron Ltd. 2004
2.2.5. Main Dilutor
In case of AJ and AJB this unit includes two dilutor channels – one for diluent, and another
one for lyse reagents. (There’s another channel for Rinse in the AJvet model). There are two
stepper motors, a common motor opto board, three (AJ/AJB) or four (AJvet) syringes and
piston rods with gear transmission.
Maintenance should be provided to the piston tips, by applying neutral silicon
grease to the cogged end of the Macro and Lyse pistons, between the syringe and
the tip itself. This will ensure optimum sealing and longer lifetime of piston tips.
Greasing of the cogged transmission parts (cogwheel and cogged bar) should be
done regularly using machine grease.
It is recommended to check and repeat greasing of piston tips, and transmission
gear every year, or after 10000 measurements.
Rinse
piston
Diluent
syringes
(AJvet)
Lyse
piston
Control
LEDs
Control
LEDs
Abacus junior /vet / B Service Manual
25
2.2.6. Micro Dilutor
Micro dilutor is taking the precise sample (25 or 50µl) into the sampling needle. It includes a stepper
motor, a motor opto board and the micro syringe.
Connection to Valve
Connection to needle
Connection to
PPB (AJ/AJvet)
MAIN board (AJB)
Motor opto board
Transmission gear
Stepper motor
2.2.7. Puffer reservoir
The glass puffer reservoir is directly connected to the pressure sensor.
During measurement, there is no pump activity, so the puffer reservoir maintains measuring
vacuum stable. The instrument measures atmospheric pressure and adjusts measuring
vacuum according to it.
2.2.8. Pump
Pump generates regulated vacuum and drains the fluidic system. It is connected to the PPB
(AJ/AJvet) or to the MAIN board (AJB) and it has its own driver circuit (Darlington).
If the tube of the peristaltic pump becomes worn, it can be broken, causing Pressure error.
It is recommended to check the state of the tube, and replace it every 2 years, or
after 20 000 measurements. Always replace the peristaltic pump tube to the same
PharMed® type, with the same length.
For servicing the tube of the pump, open the peristaltic pump from its top (see picture) and
remove the tube together with the white plastic side wall (see picture):
In case of damaged tubes, it can be replaced by a new one by opening the two metal locks
located at the two ends of the tube (see picture).
26
Diatron Ltd. 2004
2.3. Assembled Analyzer
2.3.1. Abacus junior / Abacus junior vet
Front Panel (note display logo: it is an Abacus Junior model; and missing optional CD-ROM
drive module):
Built-in thermal
printer (optional)
240x128 dots
Graphic LCD
Function keys
Foil keypad
START button
Sample tube
adapters
Sample rotor
Floppy drive
Rear panel (note reagent inlets: it is an Abacus Junior model as there is no Rinse
connection):
Back door to
access pump and
main dilutor
Power switch
12V DC inlet
Keyboard
Serial Port
Printer Port
Reagent inlets
Abacus junior /vet / B Service Manual
27
Construction – front (note optional CD-ROM drive):
Pressure
sensor
Valve block
Electronic
block
Sample rotor
Speaker
CD-ROM, FDD
Construction – right side (note white reagent inlet for Rinse: it is an Abacus Junior Vet
model):
Washing head
Needle
moving
mechanics
Chamber and
aperture
Micro dilutor
Adapter
Amplifier
assembly
Reagent
inlets
Sample rotor
Valve block
28
Diatron Ltd. 2004
Construction – back (note white reagent inlet for Rinse, main dilutor and valve block with 6
valves: it is an Abacus Junior Vet model):
Valve block
Reagent
sensors
Reagent
connectors
Main Dilutor
Peristaltic
pump
Construction – left side (note connected IDE ribbon cable):
Pneumatic
and Power
Board (PPB)
Display
assembly
ID Eprom Board
(IDEPROM)
Control and
Measurement
Board (COMB)
Speaker
Abacus junior /vet / B Service Manual
29
2.3.2. Abacus junior B
Front panel (note missing floppy and CD-ROM drives):
Built-in thermal
printer
4x20 character
Alphanumeric LCD
Function keys
Foil keypad
START button
Sample tube
adapters
Sample rotor
Rear panel (note Serial Port as the only interface):
Power switch
Back door to
access pump and
main dilutor
12V DC inlet
Serial Port
Reagent inlets
30
Diatron Ltd. 2004
Construction – front:
Pressure
sensor
Valve block
Electronic
block
Sample rotor
Speaker
Construction - right side:
Washing head
Needle
moving
mechanics
Chamber and
aperture
Micro dilutor
Amplifier
assembly
Reagent
inlets
Sample rotor
Valve block
Abacus junior /vet / B Service Manual
31
Construction – back (note valve block with 5 valves):
Valve block
Reagent
sensors
Main Dilutor
Reagent
connectors
Peristaltic
pump
Construction - left side:
Display
assembly
MAIN board
Speaker
32
Diatron Ltd. 2004
3.
OPERATION OF THE FLUIDIC SYSTEM
This section describes the main fluidic steps of Abacus junior / Abacus junior vet /
Abacus junior B measurement cycle. The instrument’s Fluidic Schematics are shown in
Section 2.2. of this manual. The following figures show total measurement flow diagram and
detailed descriptions of processes for understanding the fluidic system work.
The following steps are introduced in this section:
1.
2.
3.
4.
5.
6.
7.
8.
9.
10.
Flow diagram of measurement
Initialization process
Sampling process
Needle washing process
Diluting process
Lysing process
Counting process
Chamber draining process
Cleaning process
Shutdown process
In the detailed process description figures, the active tube is filled with black color, while an
arrow (→) shows the direction of the flow. Moving mechanic parts have another arrow
indicating direction of movement. Only opened (On) valves are mentioned in this section
while all the other valves are closed (Off).
Abacus junior / Abacus junior vet / Abacus junior B employs a software waste full
checking feature. Software integrates volume of the reagents used, and gives a message
when this volume reaches the preset tank capacity.
Abacus junior /vet / B Service Manual
33
3.1. Flow diagram of measurement
Previous RBC
dilution in chamber
Diluent of washing
process in chamber
(6 ml)
Chamber draining
Diluent of standby
state in chamber
(3 ml)
Horizontal motor
moves out, sample
rotor turn in, needle
moves down
Chamber flush
Fill up with 1 ml
diluent for WBC
dilution
Sampling process
Needle washnig,
needle positioning
into the chamber
First dilution (1:160)
WBC only?
Needle washing
Lysing process
Filling of electrode
lines; generating
measuring vacuum
HGB measurement
RBC sampling
34
Diatron Ltd. 2004
WBC measurement
Lyse2 > 0 ?
(Ajvet)
High voltage
cleaning pulses;
backflush
Lysing process
Measuring vacuum
WBC2
measurement
Lyse retract
Small washing
Cleaning (cleaner)
High voltage
cleaning pulses;
backflush
Vet?
Washing (diluent)
Blank HGB
measurement
Rinse flush
Abacus junior /vet / B Service Manual
WBC only?
Fill up with 1 ml
diluent for RBC
dilution
RBC dilution
(1:32000)
Filling of electrode
lines; generating
measuring vacuum
RBC measurement
RBC2 ?
(AJvet)
Rinse (1,6 ml);
waiting (5 sec)
RBC2 measurement
Motor
synchronizations
End
35
36
Diatron Ltd. 2004
3.2. Initialization of the Fluidic System
Fluidic initialization process performs the following steps:
•
Checking of valves by turning all on/off
•
Checking of pump and pressure sensor by generating measuring vacuum
•
Positioning all mechanical components by scanning moving range (with endswitches)
•
Priming of reagents and calibrating reagent sensors
•
Cleaning of tubing & measuring chamber
•
Cleaning of aperture with high-pressure back-flush, cleaner reagent & high-voltage
burning
3.3. Sampling process
The aspirating needle aspirates 25 µl (50 µl in prediluted mode) of blood sample. The Microdilutor syringe makes the aspirating while the M4 Micro-dilutor motor moves down.
M4
Micro-dilutor
3
V7 DilChamber
3
2
3
DILUENT
V9 LyseWbc
Lyse
Sensor
2
3
3
Pressure
Meter
LDL
Rinse
Sensor
LDR
Diluent & Cleaner
Sensor
LDD
P
3
1
1
V10 Cleaner
V4 DilAperture
2
V11 Rinse
2
2
1
1
2
1
V6 DilWash
V8 DilNeedle
1
CLEANER
Rinse
Macro
1
Puffer
Reservoir
Lyse
RBC
WBC
3
V3 Bubble
M3
2
Dil
M1
HGB
RINSE
Hor
LYSE
M2
V2 DrainAperture
1
2
V1 DrainChamber
Ver
3
V5 DrainPuffer
M5
Sample
rotor
Pump
LDx
WASTE
M1
Liquid Detector
Stepper Motor
2-way Valve
Closed = Off
Open = On
1
2
3
3-way Valve
1-3 = Off
2-3 = On
There is also another sampling process for the second (RBC) dilution, 25 µl of primary
dilution is aspirated by the sampling needle from the chamber but it is kept in the sampling
needle during the WBC measurement and the cleaning process.
Abacus junior /vet / B Service Manual
37
3.4. Needle washing process
Both instruments clean the sampling needle with diluent in the washing head after sampling.
It is important to clean the outer surface of the sampling needle to avoid inaccurate sampling.
The Macro syringe doses and the pump drains the diluent from the washing head, while the
sampling needle moves upwards so that the total length of it is washed and cleaned. This
process is called total sampling needle washing, and it is mainly used after taking primary
sample from sample tube.
Another process, which is washing only a smaller part of the sampling needle, is the same
but the needle does not move in the total length. Some procedures perform this kind of
sampling needle washing.
M4
Micro-dilutor
3
V7 DilChamber
3
2
3
DILUENT
V9 LyseWbc
Lyse
Sensor
2
3
Pressure
Meter
LDL
Rinse
Sensor
LDR
Diluent & Cleaner
Sensor
LDD
P
3
1
1
3
V10 Cleaner
V4 DilAperture
2
V11 Rinse
2
2
1
1
2
1
V6 DilWash
V8 DilNeedle
1
CLEANER
Rinse
Macro
1
Puffer
Reservoir
Lyse
RBC
WBC
3
V3 Bubble
M3
2
Dil
M1
HGB
RINSE
Hor
LYSE
M2
V2 DrainAperture
1
2
V1 DrainChamber
Ver
3
V5 DrainPuffer
M5
Sample
rotor
Pump
LDx
WASTE
M1
Liquid Detector
Stepper Motor
2-way Valve
Closed = Off
Open = On
1
2
3
3-way Valve
1-3 = Off
2-3 = On
The Macro syringe pushes the diluent through V8 (Off), V7 (Off), V6 (On). The Pump
aspirates the diluent from the washing head through V5 (On), while the M2 Vertical motor
moves the sampling needle up.
38
Diatron Ltd. 2004
3.5. Diluting process
The parts of the fluidics are rinsed with diluent reagent. The measuring chamber is filled up
with 1 ml of diluent. This method prevents the chamber from dirt and makes the diluting
process faster.
The sampling process has aspirated 25 µl of sample, which is in the sampling needle. In the
first diluting step the sample is dispensed into the measuring chamber with 3 ml of diluent,
which comes from the Macro syringe through V8 (On) and Micro-dilutor, while the M3 Dilutor
motor moves upwards. This process makes the 1:160 first dilution rate in the chamber.
M4
Micro-dilutor
3
V7 DilChamber
3
2
3
DILUENT
V9 LyseWbc
Lyse
Sensor
2
3
Pressure
Meter
LDL
Rinse
Sensor
LDR
Diluent & Cleaner
Sensor
LDD
P
3
1
1
3
V10 Cleaner
V4 DilAperture
2
V11 Rinse
2
2
1
1
2
1
V6 DilWash
V8 DilNeedle
1
CLEANER
Rinse
Macro
1
Puffer
Reservoir
Lyse
RBC
WBC
3
V3 Bubble
2
Dil
M3
M1
HGB
RINSE
Hor
LYSE
M2
V2 DrainAperture
1
2
V1 DrainChamber
Ver
3
V5 DrainPuffer
M5
Sample
rotor
Pump
LDx
WASTE
M1
Liquid Detector
Stepper Motor
2-way Valve
Closed = Off
Open = On
1
2
3
3-way Valve
1-3 = Off
2-3 = On
The second sample – 25 µl of primary dilution – is stored in the sampling needle during the
WBC measurement and the cleaning process. The instrument makes the second (RBC)
dilution into the chamber after these processes.
Abacus junior /vet / B Service Manual
39
3.6. Lysing process
In this step the set lysing reagent is added into the measuring chamber through V9 (On),
while the Lyse syringe moves upwards. This process makes the WBC/HGB dilution with lyse
reagent.
M4
Micro-dilutor
3
V7 DilChamber
3
2
3
DILUENT
V9 LyseWbc
Lyse
Sensor
2
3
3
Pressure
Meter
LDL
Rinse
Sensor
LDR
Diluent & Cleaner
Sensor
LDD
P
3
1
1
V10 Cleaner
V4 DilAperture
2
V11 Rinse
2
2
1
1
2
1
V6 DilWash
V8 DilNeedle
1
CLEANER
Rinse
Macro
1
Puffer
Reservoir
Lyse
RBC
WBC
3
V3 Bubble
2
Dil
M3
M1
HGB
RINSE
Hor
LYSE
M2
V2 DrainAperture
1
2
V1 DrainChamber
Ver
3
V5 DrainPuffer
M5
Sample
rotor
Pump
LDx
WASTE
M1
Liquid Detector
Stepper Motor
2-way Valve
Closed = Off
Open = On
1
2
3
3-way Valve
1-3 = Off
2-3 = On
For better mixing the macro syringe pushes some air bubbles (aspirated through the washing
inlet of the chamber and V3) after the lysing process through V8 (Off), V7 (On), V4 (Off) V3
(On).
40
Diatron Ltd. 2004
3.7. Counting process
The regulated vacuum (it is generated by the pump in the puffer reservoir) aspirates the
diluted sample (WBC or RBC) from the chamber through V2 (On) valve. There is no volume
limiter in the system, the instrument counts the cells for 8 seconds in both counting phases
(WBC and RBC).
M4
Micro-dilutor
3
V7 DilChamber
3
2
3
DILUENT
V9 LyseWbc
Lyse
Sensor
2
3
3
Pressure
Meter
LDL
Rinse
Sensor
LDR
Diluent & Cleaner
Sensor
LDD
P
3
1
1
V10 Cleaner
V4 DilAperture
2
V11 Rinse
2
2
1
1
2
1
V6 DilWash
V8 DilNeedle
1
CLEANER
RBC
WBC
Rinse
Macro
1
Puffer
Reservoir
Lyse
3
V3 Bubble
2
Dil
M3
M1
HGB
RINSE
Hor
LYSE
M2
V2 DrainAperture
1
2
V1 DrainChamber
Ver
3
V5 DrainPuffer
M5
Sample
rotor
Pump
LDx
WASTE
M1
Liquid Detector
Stepper Motor
2-way Valve
Closed = Off
Open = On
1
2
3
3-way Valve
1-3 = Off
2-3 = On
For noise prevention there is no mechanical or electronic activity during the counting process
and the door should be closed for better shielding.
Abacus junior /vet / B Service Manual
41
3.8. Chamber draining process
Chamber draining is made under pressure control. Pump drains chamber while puffer
reservoir and thus the pressure sensor is connected to the draining tube. The instrument can
detect the empty state of the chamber from drop of vacuum.
M4
Micro-dilutor
3
V7 DilChamber
3
2
3
DILUENT
V9 LyseWbc
Lyse
Sensor
2
3
3
Pressure
Meter
LDL
Rinse
Sensor
LDR
Diluent & Cleaner
Sensor
LDD
P
3
1
1
V10 Cleaner
V4 DilAperture
2
V11 Rinse
2
2
1
1
2
1
V6 DilWash
V8 DilNeedle
1
CLEANER
RBC
WBC
Rinse
Macro
1
Puffer
Reservoir
Lyse
3
V3 Bubble
2
Dil
M3
M1
HGB
RINSE
Hor
LYSE
M2
V2 DrainAperture
1
2
V1 DrainChamber
Ver
3
V5 DrainPuffer
M5
Pump
LDx
WASTE
M1
Liquid Detector
Stepper Motor
2-way Valve
Closed = Off
Open = On
1
2
3
3-way Valve
1-3 = Off
2-3 = On
Sample
rotor
42
Diatron Ltd. 2004
3.9. Cleaning process
The pump aspirates the cleaner through the V5 (On), V2 (On), V4 (On) and V10 (On) valves
to puffer the cleaner reagent in the tubes between V7 and V4.
M4
Micro-dilutor
3
V7 DilChamber
3
2
3
DILUENT
V9 LyseWbc
Lyse
Sensor
2
3
3
Pressure
Meter
LDL
Rinse
Sensor
LDR
Diluent & Cleaner
Sensor
LDD
P
3
1
1
V10 Cleaner
V4 DilAperture
2
V11 Rinse
2
2
1
1
2
1
V6 DilWash
V8 DilNeedle
1
CLEANER
RBC
WBC
Rinse
Macro
1
Puffer
Reservoir
Lyse
3
V3 Bubble
2
Dil
M3
M1
HGB
RINSE
Hor
LYSE
M2
V2 DrainAperture
1
2
V1 DrainChamber
Ver
3
V5 DrainPuffer
M5
Sample
rotor
Pump
LDx
WASTE
M1
Liquid Detector
Stepper Motor
2-way Valve
Closed = Off
Open = On
1
2
3
3-way Valve
1-3 = Off
2-3 = On
After that the Macro syringe pushes the cleaner reagent remaining in the tube between V10
and V4 into the chamber. The liquid detector (Diluent & Cleaner detector) can detect the
existence of cleaner solution.
3.10. Shutdown process
The fluidic shutdown performs the following steps:
•
Priming chamber with reagent to avoid drying out of aperture
•
Sampling needle is positioned above counting chamber, needle up
•
Lyse and Rinse syringes are positioned up
•
Diluent syringes are positioned down
•
Sample rotor moved out
Abacus junior /vet / B Service Manual
4.
43
ADJUSTMENT
Mechanical and hardware adjustments are described in this section. Software settings are
included in Section 5.2.
4.1. Mechanical settings
There are two important mechanical settings in the system:
• Opto wheel setting (Vertical motor)
• Sampling needle setting
The manufacturer adjusts the analyzer during production. However, in case of
repairs in the mechanical system, these adjustments should be checked. The
omission of these settings can cause malfunction or damages to the instrument.
4.1.1. Opto wheel setting
This setting is necessary for the vertical motor movements because this adjustment sets the
opto end-switches of the H&V moving unit. The top of this block is called HV head and it is
shown in the figure below.
Set the distance to 1-2 mm between the moving
carriage and the stable part of the head.
Loose „A” screws to allow free movement of the timing
belt.
Adjust the opto wheel to home position, i.e. home hole
must be in home sensor, and LED corresponding to
home opto sensor goes on.
Fasten „A” screws.
End opto
Home opto
Screw „B”
Screw „A”
Opto wheel
End hole
Home hole
Check the end position as well: move the needle down. Adjustment is successful if end LED
goes on before moving part reaches end of mechanical range.
Once this adjustment is necessary, never miss sampling needle setting described in the next
section.
44
Diatron Ltd. 2004
4.1.2. Sampling needle setting
This adjustment sets the sampling needle to the operational position.
In Service menu, in Miscellaneous submenu of AJ/AJvet and in Service menu of AJB select
Needle setting.
The software moves the needle back and up, and turns on horizontal and vertical motors
(AJ/AJvet) to keep needle in place. AJB holds only the vertical motor during needle setting.
Sampling needle
Bottom plane of
washing head
Teflon stuffing ring
Tubes to/from the
washing head
Check the setting of the needle. If end of the needle is at the bottom of the washing head,
needle is set correctly. If not, open screws “B” (see above), and adjust the needle to the
bottom of the washing head. Fasten “B” screws.
Set the end of the tip to the washing head’s bottom plane, while the carriage is held
by motors. (Needle setting menu). Fix the „B” screws.
Be careful with the bent upper end of the sampling needle, because if badly aligned,
during movement it can hit other mechanical components causing mechanical jam,
and therefore damages or error.
4.2. Hardware settings
4.2.1. Amplifier offset setting
Amplifier offset should be between ±5mV. Run self test to determine whether offset is within
this range. If it is out of range, it should be re-set, by the following way.
1. Locate the opening for offset setting potentiometer on the
measuring block (see enclosed picture).
2. In Service menu select Offset adjustment menu.
3. Adjust the potentiometer to reach 0 mV.
Opening for offset adjustment on measuring block
Abacus junior /vet / B Service Manual
5.
45
CHECKING THE PROPER OPERATION
There is a built-in Self test and Service menu in each models.
5.1. Self test of Abacus junior and Vet
5.1.1. Self test Screens (AJ/AJvet)
Self test can be used to check the operation of
the instrument.
Self test results
Date of testing:
07.03.2003
Model:
Abacus Junior
Serial No:
1541
Version:
AJV V1.0
Compiled:
21.03.2003
PCPNIF Firmware version
MPU Firmware version:
Self test results
HGB light
Electr. Voltage:
current:
offset
Ampl. test:
peak:
dev:
Noise test:
17723
51.2
879
-1.9
20000
1641
53
1
V
uA
mV
pls
mV
mV
pls/5 sec
The first panel shows general information about
the instrument. (See menu on the left.)
--3.0
OK
OK
OK
OK
OK
OK
OK
OK
With the new COMB card, the PCPNIF firmware
version is empty, and the MPU firmware version
holds the COMB version number.
The second and third panel contains tested
parameters, as follow:
HGB light (LED is on).
Measuring
offset.
Electrode voltage, current and
Amplifier transfer by generating 20000 test
pulses, incl. gain related peak value, noise
related deviation.
Amplifier Noise test during a 5-second period.
Self test results
Atm
Vacuum:
drift:
Power +12V:
Power –12V:
Power Batt:
Core Temp:
Overall result:
978
218
3
11.2
-11.5
3.2
44.8
mBar
OK
mBar
OK
mBar/10sec OK
V
OK
V
OK
V
OK
°C
OK
Successful
Atmospheric
pressure.
pressure
stands
for
outer
Vacuum reports pump operation (vacuum made
by the pump in a 10-second period of time).
Drift represents pressure loss of vacuum
measured in a 10-second period of time.
Power ±12V shows the amplifier voltage value.
Power Batt reports the voltage value of the
battery. If battery fails, system time will stop.
Core Temp shows CPU temperature of the Control and Measurement Board (COMB).
Overall test result is displayed, which can be Successful (in case of every test result is OK)
or Errors (if HIGH, LOW or ERROR).
At the end of a result line status message is displayed, which means that the actual test
result is at the normal range (OK), higher (HIGH), lower (LOW) than the pre-determined
limits, or the result is an error (ERROR).
46
Diatron Ltd. 2004
5.1.2. Normal range of Self Test parameters (AJ/AJvet)
Parameter
Unit
Lower bound
Upper bound
HGB light
count
3000
50000
Electrode voltage
V
45
55
Current
µA
830
930
Offset
mV
-5.0
5.0
Amplifier test
count
19990
20050
Peak of test pulses
mV
1300
1700
deviation (noise)
mV
0
100
Noise test
pls/5sec
0
50
Outer pressure
mBar
600
1100
Vacuum
mBar
125
250
Drift
mBar/10sec
0
10
Power +12V
V
11.0
12.5
Power –12V
V
-12.5
-11.0
Power Batt.
V
3.0
4.5
Core Temp.
°C
-
-
5.1.3. Troubleshooting Guide for Self test
Parameter
Mark
Possible reason
Remedy
HGB dark
HIGH
Instrument door open
Close instrument door
LOW
check HGB LED during
measurement
Instrument door open or
Close door or replace HGB
HGB LED too bright
LED resistor on amplifier board
LOW
Fault on High Voltage
or HIGH
or Amplifier board
Check measuring voltage (50V) on
High voltage and Amplifier boards
Fault on Amplifier board
Check current generator, and test
generator FET on Amplifier board
HIGH
LOW
Current
Check HGB head connections
HGB LED out of order
HGB light
Electrode voltage
HGB head not connected or
or HIGH
LOW
Fault on Amplifier board
Check the offset potentiometer on
Amplifier board
LOW
Amplifier Boards is not
connected to main board
Check cables and connectors
coming from the Amplifier
HIGH
Instrument not grounded
Check mains ground lead
or HIGH
Fault on Amplifier board
Check current generator, and test
generator FET on Amplifier board
Dev. (noise)
HIGH
Instrument not grounded
Check mains ground lead
Noise
HIGH
Instrument not grounded
Check mains ground lead
LOW
Check pressure sensor, cable
connections and controller board
pressure connector
Offset
or HIGH
Amplifier test
Peak of pulses
LOW
Outer pressure
or HIGH
Pressure sensor, cable or
connector problem
Vacuum
LOW
Peristaltic pump failure
Check peristaltic pump
Drift
HIGH
Leakage in pneumatics
Check tubing in pneumatics
Abacus junior /vet / B Service Manual
47
5.2. Self Test of Abacus Junior B
There is a built-in Self test and Service menu in Abacus junior B.
5.2.1. Self Test Menu
UTILITIES
Select Submenu
DATA SET
To run a self test go to UTILITIES menu, by pressing
then press ‘DIAG’ function to reach DIAGNOSTICS menu.
,
DIAG PNEU
Diagnostics
DIAGNOSTICS menu.
Press ‘TEST’ to perform Self test
TEST STAT
Press ‘STAT’ to check statistics of instrument’s operation.
Statistics
↓
DB capacity:41/100
Samples run:
21
Pneumatic Errors:
STATistics contain: database capacity, number of samples,
pneumatic errors listed in order: Clogging, Sensor, Vacuum,
MDilu, MMicro, MLyse, MRotor, MHori, MVert.
You can also print Statistics list:
DIATRON Abacus Junior B
- Statistics –
S/N: 140001 SW: 1.56/1.0
Date
04.06.2004.
SWDate: Jun
3 2004
Statistics
DB capacity: 40/100
Samples run: 31
Pneumatical Errors
Clogging
Sensor
Vacuum
Mdilu
MMicro
Mlyse
MRotor
MHori
MVert
:0
:0
:0
:0
:0
:0
:1
:0
:0
Press ’↓’ to browse amongst listed parameters.
48
Diatron Ltd. 2004
SelfTest
If you press ‘TEST’, a self-test is going to perform.
After the pneumatical initialization (if required) several test is
made by the system. The results will come out from the
internal printer.
≡≡≡≡≡≡≡≡
SelfTest
AtmPres:
MeaPres:
Drift :
SUCCESS ↓
977
OK
387
OK
2
OK
Self Test result screen.
Press ’↓’ to browse amongst listed parameters.
Self test results and their meanings:
Title
DIATRON Abacus Junior B
- Self test –
S/N: 140001 SW: 1.56/1.0 Instruments
Date
04.06.2004.
SWDate:Jun
serial
number,
Software
version
Date of testing
Software compilation date
3 2004
AtmPres: stands for Atmospheric or ambient pressure.
AtmPres:
MeaPres:
Drift :
979
398
1
mBar OK
mBar OK MeaPres: stands for Measurement pressure: reports
mBar OK pump operation. (Vacuum made by the pump in a 10second period of time)
7587
pls
OK Drift: represents pressure loss of vacuum measured in
TestPLS: 9998
TestA/D: 10000
TestAMP: 1426
TestDEV:
80
NoiseLO:
0
NoiseHI:
0
pls
pls
mV
mV
pls
pls
OK
OK
OK
OK
OK
OK
MeasCur:
MeasVlt:
MeasOfs:
uA
V
mV
OK TestAMP: peak voltage of test pulses.
OK TestDEV: deviation of the received and digitalized test
OK pulses.
HGB
:
a 10-second period of time.
Overall:
868
50
0
SUCCESS
HGB: for testing the HGB measurement.
TestPLS: number of detected test pulses from the
10000 ones created by the microcontroller.
TestA/D: number of digitalized pulses from the 10000
pulses mentioned before.
NoiseLO: number of pulses falls below the low pulse
threshold.
NoiseHi: number of pulses falls beyond the high pulse threshold.
MeasCur: measuring current that is measured under the self test process.
MeasVlt: measuring voltage: refers to the electrode voltage under measurement.
MeasOffs: refers to electrode offset.
Overall test result displayed, which can be SUCCESS (in case of every test result is OK) or
FAILED (If any of the result is Hi or Lo).
At the end of every result line a status message is displayed, which means that the actual
test result is at the normal range(OK), higher(Hi) or Lower(Lo) than the pre-determined limits
listed below.
Abacus junior /vet / B Service Manual
49
5.2.2. Normal range of Self Test parameters (AJB)
Parameter
Unit
Lower bound
Upper bound
Outer pressure
mBar
600
1050
Vacuum
mBar
200
450
Drift
mBar(/10sec)
-5
10
HGB light
pulse
3000
25000
Amplifier test
pulse
8000
10000
TEST A/D
pulse
8000
10000
deviation (noise)
mV
0
120
Amp pulse peak
mV
1300
1600
NOISELo
pulse
0
90
NOISEHI
pulse
0
90
Current
µA
800
950
Electrode voltage
V
45
55
Offset
mV
-10
10
50
Diatron Ltd. 2004
5.3. Service Menu - AJ/AJvet
5.3.1. Entering to Service Menu
There is a Service menu for servicing and operation checking purposes. The entry point is in
the User’s Service screen, where Service Information is displayed.
Enter the code to access Service menu: 6484
5.3.2. Main Service Menu
The Main Service menu provides access to submenus and service utilities.
Service menu
1. Edit Service contact
2. Device information
3. Calibration
4. Settings
5. Testing
6. Miscellaneous
►
►
►
5.3.3. Edit service contact
Service information
Your service partner:
Your Distributor
Address:
Phone:
Contact Person:
Here you can edit the Information card fields by
cursor keys, or by an external keyboard.
Press the OK button, if a field is completed.
This information will appear in the User Service
menu.
5.3.4. Device Information
Device information
Model:
Abacus Junior
Serial No:
1359
Version:
1.74
Compiled:
21.12.2003.
In the Device Information menu the model name,
the serial number, the software version and
compilation date appear.
Abacus junior /vet / B Service Manual
51
5.3.5. Service Calibration
The analyzer provides a menu for Service calibration purposes.
In result calculations the service calibration factors are used as the user calibration factors,
so they are multiplied for each parameter: RBCDisp. = FactRBC User * FactRBC Serv. * RBCMeasured
If the user factor is near the bound (0.80 - 1.20), by setting the corresponding service factor,
the user factor can be adjusted to 1.00.
Example:
Fact RBC User = 1.19 and Fact RBC Serv = 0.96, and
Fact RBC User = 1.00 and Fact RBC Serv = 1.14 gives the same result for RBC.
Apply user calibration factors function is used to combine user and service calibration
factors. The software will multiply the existing factors, and move them to the Service level to
set user factors to 1.00.
5.3.6. Software Settings
Service Person can set the parameters of the automatic functions in this dialog menu.
Settings
Autoclean cycle (0..50):
Standby time (10..60 min):
Reblank time (0..8 hours):
Rinse Time (0..3 hours):
Serial I/O speed (Baud)
Serial Protocol Version
20
15
1
1
Offline
2.20
Autoclean cycle: after how many measurements
the instrument makes an autocleaning
Standby time: after how many minutes the
instrument goes to standby mode (default = 15
min).
Reblank time: after how many minutes the
instrument makes a blank measurement if it was
in standby mode (default = 1 hour). If it is set to 0,
then no ReBlank is performed.
Rinse time: If this time is set, then the instrument will make an automatic, extended washing
procedure (with more diluent) of the chamber(s) to get wash dirt out of the chambers (dust).
If it is set to 0, then no Rinse is performed.
Serial I/O speed: instrument can send results to a host computer via serial port with the RS
232 V24 protocol. The baud rate of this serial communication must be selected at this point.
For details of the serial communication protocol, see Appendix 9.2 in this manual.
Serial Protocol Version: with this option, the used protocol (sending specific fields of data)
can be selected. This is useful when you upgrade the analyzer with new software, but the
laboratory system is compatible with an earlier serial protocol. Just select the previous
protocol number from the list.
Settings
Laboratory header lines
Waste container capacity (1..60 l)
Disable multiuser mode:
Disable 3 part diff:
Disable markers
Stretch histograms
2
20
No
No
No
No
Laboratory header lines: you can choose how
many lines to contain the header of the blood
result.
Waste container capacity: it essential to set the
correct volume of the waste container for proper
usage of the software ”waste full” alert. Set this
value two liters less than the total volume of
waste container.
52
Diatron Ltd. 2004
Disable multi-user mode: by this setting the multi-user mode can be disabled
Disable 3-part diff.: for using quick lyse (without 3-part differential) the errors and the bad 3part parameters can be excluded from the results
Disable markers: setting this option to Yes will omit the vertical markers from printed reports
Stretch histogram: setting this option to Yes will modify the WBC histogram range from 0300 fl instead of 0-400 fl (this is recommended for Veterinary mode)
Settings
Language
Native keyboard
Maintenance day
Patient data
Reagent code:
Extended probe voltages
English
No
Thursday
Birthdate
9
Yes
Language: this setting will adjust the user
language. The Service menu always uses
English language.
Available languages: Chinese, English, French,
German, Greek, Indonesian, Italian, Persian,
Polish,
Portuguese,
Romanian,
Russian,
Spanish, Turkish, and Vietnamese.
Native keyboard: Setting it to Yes will utilize the
external PC keyboard with the language specific
layout.
Maintenance day: You can select from week days. According to this setting, the instrument
will ask the user to do weekly maintenance during shut down.
Patient data: There are two options: Birthdate and Age. According to this setting, both in the
sample information dialog and in the database, the instrument will prompt for the age or the
date of birth. If age is specified, it can be given in years or months.
Reagent code: This code can be used to modify the offset of the HGB function. Enter a
value between 0 and 30 (default is 9).
Extend Probe Voltages: This option is ON by default. It makes the instrument accept the
physically highest probe voltages to allow operation at lower operating temperature range.
Settings
Calendar Mode
LCD light off delay (hrs):
Instrument startup procedure:
Gregorian
1
Database
Calendar mode: You can select between the
Gregorian and the Jalaali (Persian) calendar. All
dates will be converted accordingly.
LCD light off delay: LCD backlight switches off
after 4 hours, by pressing key switches back.
Still the light is off, the LED is flashing yellow.
Instrument startup procedure: You can select to start the instrument with Database screen
(without any pneumatic initialization) or with Measurement screen (with pneumatic
initialization).
Abacus junior /vet / B Service Manual
53
5.3.7. Service Testing Menu
Service Testing menu provides tools for checking hardware.
Testing
1. Self test
2. Valve test
3. Display test
4. Stress
5. Cleaning (5 cycles)
From this submenu the Service Person can
directly run the built-in Self test (see 5.1).
5.3.8. Valve Test Menu
Valve test
01 02 03 04 05 06 07 08 09 10 11 P
0 0 0 0 0 0 0 0 0 0 0 0
Select valve: <LEFT> <RIGHT>
Set valve on: <UP> off: <DOWN>
Toggle valve: <OK>
929,5 mBar
In the menu on the left you can see the valve
numbers and a number under each that
represents the actual state of the valve. P means
peristaltic pump.
Selected valve number is shown in inverse. 0 is
Off state, 1 is On state.
Use cursor keys for selecting and setting valve
state, or press OK to toggle state.
5.3.9. Display and Keyboard Test
Display and keyboard test is provided to check
keypad and LCD panel.
Last pressed key:
none
Press a key to test and the LCD will show the
code of the pressed key, and will be invert the
colors at each touch of a key for testing that every
LCD dot is functioning.
5.3.10. Stress Mode
In Stress mode, the instrument performs measuring cycles without sample (blank
measurements) continuously. This can be used for burn-in tests, or to check pneumatic
system after changing any main fluidic parts.
You can have information about stability, cleanliness, HGB operation, and counting time
stability. Results of the last 10 PLT and HGB blank is displayed as well.
You can detect any kind of noise, or bubbles in the system if the PLT is not stable low, or
HGB has big variation. To exit from this mode press the START button (at the end of a
normal cycle) until the Stress operation is finished.
54
Diatron Ltd. 2004
5.3.11. Miscellaneous Settings
Miscalleneous
1. Software upgrade
2. Clear device statisctics
3. Clear database
4. Offset adjustment
5. Needle setting
Log in as supervisor
In this menu, you can directly perform Software
upgrade (this will restart the instrument).
Clear Device Statistics: Device statistics
(number of measurements, aperture-clogging and
other errors) can be cleared.
Clear
Database:
The
whole
Database
(measurement results including histograms) can
be cleared.
Offset adjustment: You can adjust the offset on the amplifier board.
Needle setting: By entering this menu the needle will go to the position you can adjust it.
You can Log in as supervisor if the Multi-user mode was selected in the User’s Settings
submenu. (Number 4 if present, shows the availability of this function.)
In supervisor mode, you have the ability to change any user passwords and you have full
access over user settings. Always log out after this supervisor log in.
5.3.12. Multi-user Rescue Code
It the supervisor password has been forgotten, there is a rescue code for service purposes to
access the supervisor level. The Service user data are as follows:
User ID:
Name:
Password:
0
(zero),
Service,
729456 (This forms a capital "A" on the keypad)
Abacus junior /vet / B Service Manual
55
5.4. Service Menu (AJB)
Service menu is provided for servicing and checking proper operation. The entry point is the
Utilities menu.
Enter the code to access Service menu: 6484
5.4.1. MAIN Service Menu
The main Service Menu provides access to submenus
and service utilities.
Service Menu
MAINT
CAL
CLR
In this Menu you can reach MAINTainance, CALibration
or CLeaR menu.
With the CLEAR option, you can erase all the data in the pneumatic error statistics (what you
can reach in Utilities\Diagnostics\STAT).
Serv. Adjustments
MAINTENANCE Menu
OFFS
In this menu you can access OFFSET setting, NEEDLE
setting, STRESS, Valve and Motor tests under TEST
submenu.
NDLE STRSS TEST
OFFSET:
3mV
OFFSET setting screen
You can set the offset to zero with the potentiometer of
amplifier board, while then actual offset is displayed.
SET THE NEEDLE AND
PRESS OK TO
CONTINUE!
OK
CODE: 13
NEEDLE Setting screen
By pressing ‘NDLE’ function button, instrument moves
the needle to a safe location where you can check and
set the needle into the proper position.
(Code: 13 is an internal code, representing this Needle setting process)
STRESS Menu
STRESS Menu
10
20
STRESS 1/26
MIN MAX
P
0/
0/
H
0/
0/
50
100
STOP
ACT
0
0
Select the number of Blank measurement cycles to run,
by pressing the corresponding function button: ‘10’, ‘20’,
‘50’ or ‘100’.
STRESS screen
During Stress PLT and HGB blank results are displayed,
in the following order MINimum, MAXimum and ACTual
value. You can monitor stability, and cleanliness.
The first line indicates number of stress cycles/all cycles run.
56
Diatron Ltd. 2004
Valve Test
EXIT
1 2 3 4 5 6 7 8 9 10
X
x
Pump:ON
875mBar
Motor Test
2 Dilu
3 Lyse
4 Micro
1
5
6
7
All
Rotor
Hori
Vert x
VALVE TEST screen
Press numeric buttons ‘1’ to ‘9’ to turn on/off
corresponding valve. Use ‘0’ for valve10 and ‘.’ for pump.
Active state is indicated by ‘x’ under each valve number.
Pressure of vacuum chamber is indicated as well.
MOTOR TEST screen
Press a number button from ‘1’ to ‘7’ to make the
corresponding motor move. Pressing ‘1’ pneumatic
initialization will run. Moving motor is marked by ‘x’.
5.4.2. Service Calibration of Abacus Junior B
The analyzer provides a menu for Service Calibration purposes.
In result calculations the service calibration factors are used as the user calibration factors,
so they are multiplied for each parameter: RBCDisp. = FactRBC User * FactRBC Serv. * RBCMeasured
If the user factor is near the bound (0.80 - 1.20), by setting the corresponding service factor,
the user factor can be adjusted to 1.00.
Example:
Fact RBC User = 1.19 and Fact RBC Serv = 0.96, and
Fact RBC User = 1.00 and Fact RBC Serv = 1.14 gives the same result for RBC.
By pressing ‘AUTO’ key, user and service calibration factors can be combined automatically.
The software will multiply the existing factors, and move them to the Service level to set user
factors to 1.00.
If all service factors were 1.00, after this function all service factors hold the previous user
factors, and all user factors become 1.00.
Calibr. Service
↓
> WBC = 1.00
<
RBC = 1.02
AUTO EDIT
ACPT
In CALIB screen you can review/modify actual Service
Calibration Factors, in the following order: WBC, RBC,
HGB, MCV, RDWc, PLT, MPV, PDWc.
Calibr. Service 0..9
> WBC = 1.00
<
RBC = 1.00
EDIT
ACPT
Press EDIT to modify a factor. 0..9 in the upper right corner
indicates you can use the number buttons on the keypad.
To stop editing a calibration factor press OK. To accept
new calibration factors press ACPT button.
Abacus junior /vet / B Service Manual
6.
57
SERVICE OPERATION
6.1. Opening the instrument
On the right side and the rear side of both instruments there is a side door, which allows
reaching of the fluidic system and the mechanical parts. Other parts of the analyzer
(electronic parts, etc.) can be reached by opening the front and rear covers.
•
How to take off the rear cover:
First unscrew the 5 cover fixing screws located on the rear panel, 2 screws on the upper side
and 3 screws on the vertical side. After this, pull the cover backwards a few centimeters to
release sliding locks, and then you can turn it upwards to take it off completely. In this way
you will be able to reach the electronics: COMB and PPB (AJ/AJvet), or MAIN board (AJB).
In AJ/AJvet, do not forget that you can take them off only if you take off IDEPROM Card first.
•
How to take off the front cover:
First unscrew the 2 screws located on right and left part of the upper side and the 3 screws
located on the bottom side. After this, pull the cover towards you to take it off.
6.2. MDA (Monochrome Display Adapter) emulation mode –
AJ/AJvet
MDA emulation mode was developed to help the manufacturer and Service Personnel in the
checking phase of the instruments. This mode is available during the total operation but
especially useful for checking the BIOS setup and OS functions. This mode should be
handled the same as the service menu, the user does not have to know these options.
At power-on, the controller PIC display module displays the greeting screen. After 6 seconds,
it starts to scan the keypad and behaves like an MDA adapter to the PC, although the
displayed screen is still holding the greeting screen.
If you switch to MDA emulation mode, the system boot events can be displayed, and the
CMOS SETUP program can be started, if necessary.
If the main program will not start in 90 seconds, the PIC will automatically switch to MDA
displaying mode to give information about the reason of hang-up. This can be some CMOS
failure, if the motherboard settings are lost for some reason, and the system is waiting for
user confirmation: F1 on external keyboard, or running setup - both require external
keyboard to be connected.
Hold the „i” button, and press and release the „.” button on the foil keyboard of the analyzer
to activate the MDA mode, which uses the LCD like a primary computer monitor (80
characters by 25 rows). The LCD is smaller than the standard monitor area therefore just
about a quarter of the total screen is displayed (40 characters by 16 rows).
Quarter 1 on LCD
Quarter 3 on LCD
Quarter 2 on LCD
Quarter 4 on LCD
−
to change the actual quarter displayed,
use the arrows (cursor keys) on the
keypad,
−
to find the cursor, press the „i” button,
−
to go back to the normal graphic
displaying mode press „i .” again.
Definition of displayed LCD quarters in
MDA emulation mode
58
Diatron Ltd. 2004
6.3. Key BIOS settings for correct operation – AJ/AJvet
The required settings are enclosed in this section.
(In MDA mode, continuous changing of screen may appear. To avoid this, press left and up
arrow on the keypad in any order.)
•
−
−
•
•
−
−
−
•
−
MAIN:
Legacy Diskette A:
1.44/1.25 MB
Primary Master:
SanDisk SDTE-XX
ADVANCED:
– PNP OS Installed:
No
– Reset Configuration Data:
No
▶ I/O device configuration:
− Local Bus IDE Adapter:
Enabled ; [in case of CD-ROM]
− Floppy disk controller:
Enabled ; [in case of Floppy drive]
Base I/O address:
Primary
− Serial Port A:
Enabled
Base I/O address:
3F8
Interrupt:
IRQ4
− Serial Port B:
Enabled
Base I/O address:
2F8
Interrupt:
IRQ3
− Parallel Port:
Enabled
Mode:
EPP
Base I/O address:
378
Interrupt:
IRQ7
▶
Watchdog Settings
Mode:
Disabled
▶
I/O Chip Select:
I/O Base:
Disabled
–
Halt on Errors:
No
SECURITY:
Fixed disk boot sector:
Normal
Virus check reminder:
Disabled
System backup reminder:
Disabled
BOOT:
Quick Boot mode:
Enabled
▶ Boot Device Priority:
– CD-ROM Drive
– Hard Drive
DV-XX (Slave device)
SanDisk SDTE-XX
Bootable Add-in Cards
– Removable Devices
Legacy Floppy Drives
– Network Boot
Abacus junior /vet / B Service Manual
59
6.4. Checking the BIOS setup – AJ/AJvet
It is suggested to check it if the instrument hangs after switching on, or software does not
start (or cannot be upgraded from floppy disk).
•
•
•
•
•
•
Connect an external keyboard (US layout) to the instrument and switch it on
Press F2 repeatedly until the instrument beeps.
Switch the instrument to MDA emulation mode (by pressing "i." on the keypad)
Check the key points listed above (or from the enclosed Main Board Manual), if you find
differences, set these settings
Go to the Exit menu (upper right quarter of the display) and select Exit Saving
Changes. Confirm this by selecting Yes in the pop up window.
The instrument will restart with the new (correct) BIOS setup configurations
6.5. BIOS-Description – AJ/AJvet
The DIMM-PC/520-I is equipped with a JUMPtec Embedded BIOS, which is located in a
Flash EPROM onboard. This device has an 8bit wide access. Faster access is provided by
the shadow RAM feature (default). For a detailed description of the BIOS Setup, please refer
to the section below.
The Setup Guide
With the PhoenixBIOS Setup program, it is possible to modify BIOS settings and control the
special features of the computer. The setup program uses a number of menus for making
changes and turning the special features on or off.
General Information
To start the PhoenixBIOS setup utility press <F2> during the string, Press <F2> to enter,
setup is displayed during boot-up. The Main Menu will be displayed.
The Menu Bar
The Menu Bar at the top of the window lists all the different menus. Use the left/right arrows
to make a selection.
The Legend Bar
Use the keys listed in the legend bar on the bottom to make your selection or exit the current
menu. The list below describes the legend keys and their alternates:
60
Diatron Ltd. 2004
Key Function
<F1> or <Alt-H>
General help window
<Esc>
Exit this menu
¬ or ® Arrow key
Select a different menu
- or ¯ Arrow key
Move cursor up and down
<Tap> or <Shift-Tap>
Cycle cursor up and down
<Home> or <End>
Move cursor to top or bottom of current window
<PgUp> or <PgDn>
Move cursor to next or previous page
<F5> or <->
Select the previous value for the current field
<F6> or <+> or <Space>
Select the next value for the current field
<F9>
Load default configuration values for this menu
<F10>
Save and Exit
<Enter>
Execute command or select submenu
<Alt-R>
Refresh screen
To select an item, simply use the arrow key to move the cursor to the field you want. Then
use the plus and minus keys to select a value for that field. The Save Value commands in the
Exit Menu save the values currently displayed in all the menus.
To display a sub menu, use the arrow keys to move the cursor to the sub menu you want.
Then press <Enter>. A pointer (4) marks all sub menus.
The Field Help Window
The help window on the right side of each menu displays the help text for the currently
selected field. It is updates as the cursor is moved to each field.
The General Help Window
Pressing <F1> or <Alt-F1> on any menu brings up the General Help Window that describes
the legend keys and their alternates. Press <Esc> to exit the General Help Window.
The Main Menu
You can make the following selections on the Main Menu itself. Use the sub menus for other
selections.
Abacus junior /vet / B Service Manual
61
6.6. DOS functions on the instrument – AJ/AJvet
To run the computer part of the instrument like a normal PC, the Service Personnel should
have an MS-DOS 6.22 operating system boot floppy disk.
•
•
•
•
•
•
•
•
Connect an external keyboard
Put the MS-DOS boot floppy into the floppy disk drive
After turning on, go to the BIOS setup (press F2 repeatedly on the keyboard and switch
to MDA mode by pressing "i." ).
Change the Boot Device Priority in the BOOT menu: The Removable Devices must
be the first in the list. Select Removable Devices and move it up by pressing “+” on the
keyboard.
Save the actual settings to CMOS, the instrument will restart (Exit Saving Changes)
The instrument will boot from the floppy and the software will be terminated
Switch to MDA mode by pressing "i."
Do not forget to restart the instrument and set back Boot Priority list after servicing,
(Hard Drive first)
6.7. Error messages – AJ/AJvet
The analyzer checks the operations of several mechanic, fluidic and electronic parts during
measurement. The system shows the type of the error on the LCD display if any kind of
malfunction is detected.
The electronic parts have a very little chance to fail, only the connections and cables could
disconnect, which can cause the malfunction of the electronic system. The mechanic and
fluidic system have a bit more chance to go wrong because it has moving parts.
In 6.7.1 section there is the total error code list.
62
Diatron Ltd. 2004
6.7.1. Abacus Junior / Abacus Junior Vet error code list
%s: filename concerned, %d: error type concerned, %u: error specific string
Code
1000
Error text
Out of memory in %s
1001
Error %d on opening file %s
1002
1003
1004
1100
1101
1102
1103
1105
1106
Reason(s)
Fatal system or
program error!
Fatal system or
program error!
Cannot create file %s
Fatal system or
program error!
Data file %s is corrupt, new Stored data file is
corrupt or missing!
will be created, all stored
Disk or software
measure data will be lost
error.
Error %d on indexing file %s Fatal system or
program error!
Pressure error.\n
Cannot make the
measuring
Power off the system
vacuum!!
Waste is full!
Waste container is
full!
Empty waste container!
The system assumes that
you will do it before going
on!
Check Diluent container!
Diluent tank is
empty, or the
dil./clean sensor is
too sensitive (try
recalibrating the
sensors), or there
are lot of bubbles
in the diluent tube
Check Lyse container!
Lyse tank is
empty, or the lyse
sensor is too
sensitive (try
recalibrating the
sensors), or there
are lot of bubbles
in the lyse tube
Vacuum error
The measuring
vacuum has been
dramatically
decreasing during
the measurement
or absolutely lost!
Pneumatical error occurred!
Fatal error in
Device: %s
mechanical
Error code: %s
subsystem.
Status: %x
Retry?
Remedy
Check the COMB card and Dimm-PC
module for proper insertion.
Try to make a software upgrade.
The same as in case of error
code 1000.
The same as in case of error
code 1000.
New stored data file will be
created automatically (by a User
confirmation).
The same as in case of error
code 1000.
Check the pump and the tubes,
fittings and valves around the
puffer reservoir.
Empty waste container! If it is not
full, there is a clogging in the
waste sensor line.
Replace the diluent reagent
container with a filled one.
If this is still a problem with a filled
diluent container, run Reagent
sensor calibration and check the
tubing and fittings of diluent path.
Replace the lyse reagent
container with a filled one.
If this is still a problem with a filled
lyse reagent container, run
Reagent sensor calibration and
check the tubing and fittings of
lyse path.
Leakage in the pneumatic system
(check the pump, fittings, tubing,
pressure sensor, puffer reservoir
and valves).
If frequently happens this error
check the proper operation of the
motor modules (home/end opto
switches, ribbon cables and
moving of motors).
Abacus junior /vet / B Service Manual
Code
1107
1110
1111
1112
1113
1200
1201
1300
1301
1302
1400
Error text
Check Cleaner container!
Reason(s)
Cleaner tank is
empty, or the
dil./cleaner sensor
is too sensitive (try
recalibrating the
sensors), or there
are lot of bubbles
in the cleaner tube
Check Rinse container!
Rinse tank is
empty, or the rinse
sensor is too
sensitive (try
recalibrating the
sensors), or there
are lot of bubbles
in the rinse tube
The sampler rotor was jammed Cap was not taken
during sampling process!
off from the
Retry sampling?
sample tube, or
tube is not placed
correctly, or other
mechanical jam
The sampler rotor was Mechanical
jammed!
problems like
adapter is moved
out from the right
place
Unrecoverable pneumatical Fatal error in
mechanical
error occurred!\n
subsystem.
Device: %s\n
Possibly
Error code: %s\n
mechanical jam.
Status: %x\n
Please turn off the
instrument and turn it on
again!
Fatal MeasInit error.
Fatal COMB error.
Power off the system!
Fatal HGB error.
HGB channel did
not give a ready
Power off the system!
signal!
Cannot write archive data! Cannot write
Check disk!
It may be archive data
unformatted, full or bad! Do because some
disk errors!
you want to retry?
Cannot read archive data!
Archive disk is
damaged or not
Do you want to retry?
an archive disk!
Cannot load archive data.
Disk is not an
archive disk or
damaged!
Printer error %d
Printer error!
63
Remedy
Replace the cleaner reagent
container with a filled one.
If this is still a problem with a filled
cleaner container, run Reagent
sensor calibration and check the
tubing and fittings of cleaner path.
Replace the rinse reagent
container with a filled one.
If this is still a problem with a filled
rinse container, run Reagent
sensor calibration and check the
tubing and fittings of rinse path.
Check the adapter and the tube.
Press Retry or Stop.
Check the adapter and the tube.
Press the
button
Check the proper operation of the
motor modules (home/end opto
switches, ribbon cables and the
motor moving).
Replace the COMB board.
Replace the COMB board.
Change the floppy disk.
Change the floppy disk (archive).
Change the floppy disk (archive).
Check the connections between
instrument and printer and check
printer setup in Printer Settings
64
Code
Diatron Ltd. 2004
1401
Error text
Printer is out of paper and
error %d
Reason(s)
Printer is out of
paper and there
are some other
printer errors!
1402
Printer is out of paper
1403
Printer was not set up
correctly
1404
Paper width is too large
Printer is out of
paper!
The selected
printer type does
not match to the
printer!
Paper width
overstep the
margin.
Paper height
overstep the
margin!
Paper width
overstep the
margin!
Paper height
overstep the
margin!
Left margin is too
large!
1405
1406
1407
1408
1409
1410
1411
1900
1921
Remedy
Feed the printer with paper.
Check the connections between
the instrument and the printer and
check the printer setup in the
Settings/Printer settings submenu.
Feed the printer with paper.
Modify the printer setup in the
Settings/Printer settings submenu.
Modify the paper setup in the
Settings/Printer settings submenu.
Modify the paper setup in the
Paper height is too large
Settings/Printer settings submenu.
Modify the paper setup in the
Paper width is too small
Settings/Printer settings submenu.
Modify the paper setup in the
Paper height is too small
Settings/Printer settings submenu.
Left margin is too large
Modify the margin setup in the
Settings/Printer settings submenu.
Top margin is too large
Top margin is too Modify the margin setup in the
large!
Settings/Printer settings submenu.
Modify the vertical spacing setup
Spacing is too large
The distance
in the Settings/Printer settings
between two
results is too high! submenu.
Error #%d in printer
Printer software
Check the connections between
initialization!
error!
the instrument and the printer and
check the printer setup in the
Settings/Printer settings submenu.
Try to make a software upgrade.
You have to add at least one Multi-user
Follow the instruction, or change
user to use multi user mode! problem.
to single user mode in the User
settings submenu.
%s sensor calibration failed! Reagent container Replace the reagent container
The system turned off the became empty, or with a filled one.
there are lot of
%s sensor.
If this is still a problem with a filled
bubbles in reagent reagent container, turn on the
tubes.
sensor and try recalibrating and
check the tubings and the fittings.
Abacus junior /vet / B Service Manual
65
6.7.2. Abacus Junior / Abacus Junior Vet message code list
Code
Message text
5001
Remove reagent tubing at rear reagent inputs (Diluent, Lyse, and Cleaner).
5002
Connect min. 100 ml distilled water to reagent inputs using cleaning tube kit.
5003
Remove cleaning tube kit. Keep reagent inputs free.
5004
You can power off the system!
5005
Apertures are partially clogged. Try cleaning!
5006
Please empty waste container!
5100
%u data record(s) will be copied to the database.
5101
%u data record(s) is selected.
5102
Insert data disk!
5103
Insert data disk #1 of 1!
5104
xx data record(s) will be saved on 1 disk(s).
Insert an empty floppy disk!
5105
Insert next empty floppy disk!
5106
No such type of data
5200
Your previous QC data will be lost.
Are you sure?
5300
Some or all of the calibration factors are out of range!
5400
+12V too low!
5401
+12V too high!
5402
Battery voltage too low!
5900
This function is not available because there are no accepted blank values.
Try blank measurement!
5901
Insert software update disk!
The system will restart.
5902
Are you sure to delete all device statistics?
5903
This function will delete all measured results.
Are you sure?
5904
This function will delete all selected records.
Are you sure?
5905
Are you sure?
5906
You can power off the system now or restart it by pressing any key!
5907
Now it is time to clean the washing head with a damp cloth, and check the pump
cleanliness. Make sure they are all clean, then you can proceed.
5908
Set the needle and press any key to continue!
66
Diatron Ltd. 2004
6.8. Warnings and Error Codes for Abacus Junior B
Code
Message
Remedy
10
REMOVE REAGENT TUBINGS!
LEAVE WASTE CONNECTED!
Message during Preparing for shipment.
Disconnect reagent tubes but Waste.
11
CONNECT DISTILLED WATER!
Message during Preparing for shipment.
Connect distilled water to all inlets.
12
REMOVE DISTILLED WATER!
LEAVE WASTE CONNECTED!
Message during Preparing for shipment.
Disconnect reagent tubes but Waste.
13
SET THE NEEDLE AND
PRESS OK TO CONTINUE!
Message during needle setting. Adjust
needle to bottom of washing head.
80
Some factors are out of range
Use the Service calibration factors to
extend user calibration range if needed.
81
No results found for selected operation
No CAL/QC type of measurement has
been selected before trying to use them.
20
REMOVE ALL TUBINGS FROM INPUTS!
LEAVE WASTE CONNECTED!
Message during Preparing for shipment.
Disconnect reagent tubes but Waste.
21
CONNECT DISTILLED WATER!
Message during Preparing for shipment.
Connect distilled water to all inlets.
22
CHECK DILUENT CONTAINER!
Check Diluent tank, probably it is empty.
23
CHECK CLEANER CONTAINER!
Check Cleaner tank, probably it is empty.
24
CHECK LYSE CONTAINER!
Check Lyse tank, probably it is empty.
25
SAMPLER ROTOR WAS JAMMED!!
Sample rotor blocked, check for reason.
26
SAMPLING ERROR!!
Needle is blocked while sampling. Check
needle height setting for sample tube.
27
PNEUMATICAL ERROR OCCURED!
See below.
28
FATAL PNEUMATICAL ERROR
OCCURED!
See below.
29
VACUUM ERROR!
Pressure drop in vacuum chamber is too
high. Check for diluent reagent (maybe
DIL sensor is off, while diluent tank is
empty), fittings of tubing, and integrity of
pump tube. Replace if necessary.
30
PRINTER ERROR!
There is no paper loaded in printer.
In case of Pneumatic errors (Code 27,28), you will see one of these screens:
Name corresponds to one of the motors detailed below.
Pneumatical
error occurred!
Name, number
EXIT RETRY
CODE:27
FATAL pneumatical
error occurred!
Name, number
EXIT
CODE:28
Press ‘RETRY’ to make initialization, and then retry the last action. Press ‘EXIT’ to turn off
machine.
Abacus junior /vet / B Service Manual
Number
1
2
3
4
5
6
7
8
9
10
11
12
13
14
15
16
17
18
19
20
21
22
23
24
25
26
27
28
29
30
31
Name
MHori
MVert
MRotor
MMicro
MDilu
MLyse
MHori
MHori
MVert
MVert
MMicro
MMicro
MRotor
MRotor
MDilu
MDilu
MLyse
MLyse
Vacuum
Vacuum
Vacuum
Vacuum
Vacuum
Sensor
MRotor
Sensor
MDilu
MLyse
MMicro
MVert
MHori, MVert,
MLyse, MDilu,
MMicro, MRotor
67
Explanation
can’t reach HOME opto (step error)
can’t reach HOME opto (step error)
can’t reach HOME opto (step error)
can’t reach HOME opto (step error)
can’t reach HOME opto (step error)
can’t reach HOME opto (step error)
can’t reach HOME opto (step error)
HOME-END distance too long/short
can’t reach END opto (step error)
HOME-END distance too long/short (range error)
can’t reach HOME opto (step error)
HOME-END distance too long/short (range error)
turn-in error
turn-out error
can’t reach END opto (step error)
HOME-END distance too long/short (range error)
can’t reach END opto
HOME-END distance too long/short (range error)
Can’t create/sense vacuum
Can’t execute vacuum controlled draining
Can’t measure ambient pressure
Ambient pressure out of 600-1100 mBar region
Can’t create vacuum to v. controlled draining
Can’t discriminate between empty and full state (Diluent)
Can’t turn out (or before can’t turn in)
Can’t discriminate between empty and full state (Lyse)
Opto found ! (range error)
Opto found ! (range error)
Opto found ! (range error)
Opto found ! (range error)
Can’t reach opto (step error)
Step error: the motor moves to either of end switches. This should be done within a
specified number of steps, but it failed, due to one of the reasons:
− Mechanics is jammed, so that movement is not possible
− The corresponding opto sensor is bad
− Connector of the erroneous motor is off.
Range error: the motor moves specified number of steps, and it should not have reached
one of the end switches, but it did. Possible reasons:
− Mechanics is partly jammed, or blocked, so that the previous movement was shorter
− Connector of the erroneous motor is off.
Always check reagent tubing for blockage or clogging if MDilu or Mlyse range/step error.
Distance error: number of steps from home opto to end opto is too low.
68
Diatron Ltd. 2004
6.9. Possible Causes of Noise
Generally high count of any particle - even if you think it should be low, or near zero - can be
caused by NOISE, i.e. something interferes with measurement.
The most important thing in these cases to identify the source of NOISE, otherwise you
cannot protect the system against it.
NOISE can come from has several sources, and the different NOISE sources are added.
Sometimes we have to fight one of them, but sometimes more. Only one of them is enough
to make problem.
6.9.1. Contaminated reagent
The most probable cause: real particles are in the reagent, and therefore the PLT blank is
continuously high (e.g. always 30-40). You can easily sort out this case by replacing
diluent by opening a new tank. PLT blank must go down is several blank measurements
(below 10).
How can a good reagent become bad by time?
−
If the reagent tube was contaminated, and some bacteria begin to grow inside, once you
put an infected reagent tube into a new tank, by time it can become infected as well, i.e.
the background (PLT blank) becomes high. Wash the reagent tube - which is in
connection with the reagent - with 1% of bleach solution, then rinse with clean distilled
water or diluent. It can avoid the bacteria to grow inside.
−
If tank is open – and cap is not installed or closed - external dust can make reagent dirty.
6.9.2. Bad earth grounding
In this case external - ground referenced - noise can get into the system by ground
coupling. If system ground is not good enough, ground terminal can become a noise source
as well, i.e. external signals will be coupled into the system instead of protecting it.
If no earth ground is available, you can use a screw at the rear panel to connect a ground
potential to the case, so that noise immunity can be increased.
Measure voltage on ground terminal to make sure earth grounding is correct. AC voltage
lower than 1V is accepted in this case.
At some places - as a bad practice - electricians like to connect earth ground terminal to
neutral wire. Depending on the resistance of the neutral back wire (where it is really earthed),
several volts can appear, and this way any inductive noise will be coupled into the
instrument. It is better to create a real earth grounding and connecting it to the rear screw.
Abacus junior /vet / B Service Manual
69
6.9.3. External electrical noise
If another instrument is near the analyzer can radiate electromagnetic signals in the 1 kHz 100 kHz frequency region it can be picked up by the system (especially if they are very close
to each other, or the grounding is not quite perfect).
You can easily identify this noise source: by relocating the instrument noise (high PLT blank)
disappears. In this case you have to identify the possible noise source (switch mode power
supplies, computer monitors, since they are not shielded, centrifuges due to high switching
noise of rotor contacts, etc.), the power of the electromagnetic source, because if high power
is present, maybe relocation does not solve your problems, sometimes the electric power
supply makes the coupling, so UPS solves the problem.
Another source of coupling in external noise can be the reagent tanks and tubes. Especially
radio transmitters can cause problems of radiating so that even the reagents (diluent) guides
in the noise. A metal pack for the diluent tank, then a good earth grounding of this metal box
allows this coupling to disappear forever.
6.9.4. Internal noise sources
The most annoying but real cause is some sort of internal noise. The reason for this
phenomenon is that inside electrode - hot point - of the measuring circuit must be well
insulated from surrounding electronics, otherwise inside noise sources can take their effect.
A. Bad chamber insulation:
−
bad shielding of the chamber (floating shield couples signals to the chamber, and does
not prevent against them). Check grounding of shield, remove it and clean the surface
between the shield and the metal base.
−
bad reference electrode connection (floating ground reference). Repair is required.
−
bad sealing of aperture. Replacement of measuring tube is required.
−
broken measuring chamber starts to conduct through the gaps (ground path).
Replacement of chamber is required.
−
contaminated draining tube starts to conduct due to protein or lipid build-up. It is very
easy to identify this case. After replacing the drain tube of the measuring chamber
(mainly WBC), WBC histogram peak, or PLT becomes low soon. Normally a good
cleaner is required to dissolve lipid or protein build-up. Sometimes the cleaner is not
strong enough to keep this tube clean enough. Periodic washing using 1% hand warm
bleach solution helps.
70
Diatron Ltd. 2004
B. Bad insulation of electronic signal paths:
In these cases check for any capacitive coupling of electronic signals to the chamber:
−
interference with HGB head (high-frequency signal is coupled to the chamber). HGB
head metal parts must be grounded. The ground comes externally, it must be in place,
otherwise HGB head does not shield, but couples in noise.
−
interference with internal high voltage inverter (high-frequency signal is coupled to
the chamber). Repair is required: avoid near contact of HVB cable to chamber or
shielded amplifier cable.
−
interference with internal start button (polling signal to start button may cause noise).
Guide start button wires as far from chamber as possible. You may try mix them up on
the start micro-switch if applicable.
−
interference with display cable (high-frequency LCD signal is coupled to the chamber
by the ribbon cable). Keep the ribbon cable far from the chamber.
−
interference with CPU fan or other digital logic traces (CPU fan or other digital signal
radiates to chamber or to the shielded amplifier cable). Try keeping the ribbon cables far
from the chamber and shielded cable.
C. Bad components, or connections:
−
bad soldering, salt residuals or component failure on amplifier (especially if some
reagent could get in the amplifier section). Cleaning of PCB/electrode socket or
replacement of amplifier is required. Check for the correct soldering of reference cable
and its connector.
−
circuit board bad soldering or component failure. Check the shielded cable
connections as well. Sometimes inside out connection (hot electrode goes outside as a
shield) is the problem: both ends of amplifier signal cable must be reversed.
−
analog signal ribbon cable (it picks up noise). Check the ribbon cable between the
circuit board and the amplifier. Maybe it is pinched under some screws or components.
This may cause trouble and even noise.
D. Pneumatic failures, liquid paths that conduct noise into the chamber:
−
liquid remains under the chamber in drain tube (during measurement the conducting
liquid remains inside the drain tube making noise to appear there).
Check chamber draining path for clogging or salt crystals.
Check the pump operation. Since draining of the chamber goes under pressure
control, maybe a bad pressure sensor or connection can cause trouble.
Clean the draining path. Do not use alcohol, but bleach. Replace chamber if
necessary.
−
liquid remains in the washing inlet at top of the chamber (during measurement the
conducting liquid remains inside the chamber wash tube making noise to appear). The
software is not compatible with the mechanics, or related valve is bad/partly clogged, or
the tubing is clogged/loose.
−
lyse path guides in noise (during counting, if the a liquid in the draining tube is touching
lyse reagent in T-fitting, noise can appear). Check the lyse path, and the lyse valve as
well.
Abacus junior /vet / B Service Manual
7.
71
MAINTENANCE
7.1. Weekly Maintenance by User
User should carry out on the first workday, before starting up the analyzer.
7.1.1. Cleaning the washing head
User should clean the lower surface of the sampling needle washing head using a
soft cloth, immersed in warm tap water to remove salt build-up.
7.2. Periodic Maintenance by Service
The instruments should be checked and maintenance must be carried out in every 612 months, or after 10 000 measurement cycles.
7.2.1. Check Self test and Device statistics
Run the built-in Self test and check the overall test result. Check the device statistics
to find common problems.
7.2.2. Cleaning and Greasing Dilutor Block
The dilutor block driving wheels and gear bar should be cleaned from dirt and must
be greased between the gear bar and the support, and between cogged wheels.
7.2.3. Checking and Lubricating Dilutor Piston Tips
The cogged end of PTFE dilutor pistons should be cleaned and lubricated by neutral
silicon grease. Apply just a thin layer, and move it along the perimeter of the piston,
so that some of the material goes into the gaps between the sealing rings.
Repeat this step for lyse and dilutor pistons as well. Check the condition of the micro
piston sealing, and replace if necessary.
7.2.4. Cleaning and Lubricating Needle Moving Mechanics
The H&V moving mechanics sliding bars should be cleaned from dust.
Lubricating of the sliding bars must be made using „Photorube” oil containing PTFE.
Grease or pure lubricating oil is not suitable.
7.2.5. Checking and Replacing Washing Head
Check the state of the washing head, and replace if necessary. After replacing
washing head, do not forget to perform correct adjustment of sampling needle height
(see Section 4.1.2).
7.2.6. Checking and Replacing Peristaltic Pump Tube
Replace peristaltic pump tube if needed. You can check it by opening the lock, and
removing the tube for inspection.
Check for leakage of the tubing. Reassemble the head.
72
Diatron Ltd. 2004
Warning! Be careful, DO NOT twist the tube while reposition it into the head,
because it will cause malfunction in a very short period of time.
7.2.7. Checking of the Power Supply
Open the instrument for regular cleaning inside. Check the cleanliness and operation
of the cooling fan of the power supply. Clean or replace the fan if necessary.
7.2.8. Bleaching of Fluidic System
It is recommended to run a bleaching procedure to remove stains from the fluidic
system.
1. Connect 2-5%, hand warm, clean bleach solution to all reagent inputs, and perform
priming on all reagent inputs.
2. Leave it in the tubing for not more than 2-3 minutes.
3. Remove the bleach, prime on air.
4. Connect distilled water (100 ml), and perform priming all reagents, again.
Connect reagents, and run priming again.
Abacus junior /vet / B Service Manual
8.
CODE
73
SPARE PARTS
PART NAME
AJ
AJ-Vet
x
x
AJ-B
A133
HVB BOARD WITH INVERTER
J134
HVB BOARD WITHOUT INVERTER
x
J135
LCD DISPLAY (Alpha-Numeric, 4x20 chars.)
x
A136
LCD DISPLAY (Graphics, 240x128 pixels)
x
x
A137
LAMP FOR LCD
x
x
A192
DIMMPC (CPU)
x
x
A193
HEAT SINK FOR DIMMPC
x
x
A302
STEPPER MOTOR
x
x
x
A304
TIMING PULLEY FOR X
x
x
x
A305
TIMING PULLEY FOR Y
x
x
x
A308
OPTO SWITCH I.
x
x
x
A309
OPTO SWITCH II.
x
x
x
A310
WASHING HEAD
x
x
x
A402
SEALING RING FOR CHAMBERS
x
x
x
A403
U-SHAPED METAL FIXING FOR APERTURE
x
x
x
A421
APERTURE (80 µm)
x
x
x
A422
GROUND ELECTRODE
x
x
x
A430
MEASURING CHAMBER
x
x
x
A434
HGB MEAS HEAD (COMPLETE)
x
x
x
A504
2/2 VALVE
x
x
x
A505
3/2 VALVE
x
x
x
A506
VALVE COIL FOR BOTH VALVES
x
x
x
A507
2/2 VALVE HEAD
x
x
x
A508
3/2 VALVE HEAD
x
x
x
A509
VALVE MEMBRANE
x
x
x
A541
4/2 PLASTIC TUBE (SILICON)
x
x
x
A542
5/3 PLASTIC TUBE (SILICON)
x
x
x
A543
4/1.8 TYGON TUBE
x
x
x
A544
5/3 REAGENT TUBE
x
x
x
A545
3,2 mm T CONNECTOR
x
x
x
A546
Y CONNECTOR
x
x
x
A551
COLOUR LOCKING RING
x
x
x
A552
COLOUR LOCK NUT (INSIDE)
x
x
x
74
Diatron Ltd. 2004
CODE
PART NAME
AJ
AJ-Vet
AJ-B
A553
COLOUR CODING RING (OUTSIDE)
x
x
x
A554
LUER FEMALE
x
x
x
A555
LUER MALE
x
x
x
A556
2,3 mm T-CONNECTOR
x
x
x
A560
PERISTALTIC PUMP
x
x
x
A561
TUBE FOR PERISTALTIC PUMP
x
x
x
A563
CASSETTE FOR PUMP
x
x
x
A564
FIXING FOR PUMP (PAIR)
x
x
x
A565
CONNECTOR FOR PUMP (PAIR)
x
x
x
A640
INSTRUMENT FOOT
x
x
x
A701
MAINS CABLE (220V)
x
x
x
A702
MAINS CABLE (110V)
x
x
x
S800
THERMAL PRINTER (INTERNAL)
x
x
x
S801
MECHANICS FOR INTERNAL PRINTER
x
x
x
S802
ELECTRONICS FOR INTERNAL PRINTER
x
x
x
S803
CASE FOR INTERNAL PRINTER
x
x
x
C400
MEASURING BLOCK EXCLUDING AMPLIFIER
x
x
x
C510
PUFFER RESERVOIR
x
x
x
J100
POWER & PNEUMATIC BOARD (PPB)
x
x
J110
CONTROL BOARD (COMB)
x
x
J111
CONTROL BOARD (COMB) & DIMMPC
x
x
J120
MAIN BOARD
x
J139
FOIL KEYBOARD (Junior B)
x
J132
FOIL KEYBOARD (Junior, Junior Vet)
x
x
J138
DISPLAY BOARD
x
x
J140
AMPLIFIER BOARD
x
x
x
J156
POWER SUPPLY
x
x
x
J157
MAINS SWITCH
x
x
x
J170
IDEPROM BOARD
x
x
J214
DILUTOR BOARD
x
x
x
J224
MICRODILUTOR BOARD
x
x
x
J240
REAGENT SENSOR BOARD
x
x
x
J250
DILUTOR BLOCK COMPLETE (2 MOTORS)
x
x
x
J251
SYRINGE+PISTON (MOUNTED /2ML)
x
x
x
J252
PISTON LOCKING SCREW
x
x
x
Abacus junior /vet / B Service Manual
CODE
PART NAME
75
AJ
AJ-Vet
AJ-B
J300
XY MOVEMENT BLOCK
x
x
x
J301
TIMING BELT FOR X
x
x
x
J302
TIMING BELT FOR Y
x
x
x
J306
GEAR FOR Y OPTO
x
x
x
J307
H&V MOTOR OPTO BOARD
x
x
x
J311
SAMPLING NEEDLE
x
x
x
J501
VALVE UNIT I. (valve 1-5)
x
x
x
J502
VALVE UNIT II. (valve 11-15)
x
J503
VALVE UNIT II. (valve 11-16) (Junior VET)
J530
PRESSURE SENSOR (COMPLETE)
x
J558
REAGENT TUBING SET (HUMAN)
x
J559
REAGENT TUBING SET (VET)
J610
MICRO SWITCH
x
x
x
J613
LED BOARD
x
x
x
J721
AMPLIFIER BOARD CABLE
x
x
x
J750
CABLE SET (Junior, Junior Vet)
x
x
J751
CABLE SET (Junior B)
J900
MICRODILUTOR UNIT
x
x
x
J901
MICRO PISTON
x
x
x
J902
MICRO SYRINGE COVER
x
x
x
ADAPTOR I. for 1-0,3ml microtainers (Greiner, BD,..)
max. Ø11mm
x
x
x
J903
ADAPTOR II. for 3ml vacutainers max. Ø12,5mm,
max. height 76mm
x
x
x
J904
J905
ADAPTOR III. for R&D 2ml blood control
x
x
x
S210
BEARING FOR DILUTOR
x
x
x
S211
SEEGER RING
x
x
x
x
x
x
x
x
x
x
76
Diatron Ltd. 2004
9.
APPENDICES
9.1. Warning flags - AJ/AJvet only
Uppercase letters refer to WBC or HGB problems:
Flag
E
H
B
C, Q
Meaning
No WBC 3-part
differential
HGB blank is high, or no
HGB blank
Recommended user action
Possible lyse problem. May occur in pathological
lymphocytosis.
Repeat blank measurement. If HGB blank is not
stable, there are probably bubbles in the WBC
chamber: Run a cleaning and try blank again. Close
the side door if it was open during measurement.
WBC blank is high, or no Repeat blank measurement, or run prime lyse and try
WBC blank
blank again.
Possible lyse contamination, or noise problem.
WBC clogging
Aperture clogging. Perform cleaning and repeat the
measurement. If it is a general problem, please
contact your Service Personnel.
Low temperature reagents can cause it as well (mainly
diluent), in this case you will have to wait until they
reach room temperature.
Warning flags in lowercase refer to RBC or PLT problems:
Flag
p
Meaning
Recommended user action
PLT blank is high, or no Run cleaning and repeat the blank measurement.
PLT blank
Diluent or system cleanliness problem. If it is stable high,
replace the diluent by opening a new tank.
b
RBC blank is high, or no
Same action as in case of warning flag p.
RBC blank
c
RBC/PLT clogging
The same action as in case of the C warning flag.
Abacus junior /vet / B Service Manual
77
9.2. Serial Communication Protocol
9.2.1. General Description
The analyzer is able to make serial connection link to a receiver device (e.g. computer)
connected to the serial port. If Baud Rate setting in Service Menu is set to a valid value
(other than Not Connected), the instrument will try to initiate a communication sequence.
Once the analyzer starts serial communication, the receiver should respond to it.
The hardware protocol: 8 data bit, 1 stop bit, no parity. If the other side is not responding in
1 second, the instrument will repeat the transmission twice, but if there is still no response,
the other side will be supposed to be not ready to receive data, and thus the analyzer will not
try to communicate any more.
From this state it can wake up by receiving an <ENQ> (ASCII code 5) character from the
other side, and the instrument will immediately respond an <ACK> (ASCII code 6). From this
point the instrument will send data if it is ready for transmission.
The communication is based on packages.
There are 5 package types:
•
INIT package: Device identification, software version, current date and time.
•
DATA package: Sample and patient information, measured parameters, and markers.
•
RBC package: Sample information, RBC histogram.
•
WBC package: Sample information, WBC histogram.
•
PLT package:
Sample information, PLT histogram.
The communication sequence is always started with an INIT package. If the link is
successful, the instrument will send DATA package, and the receiver can request RBC, WBC
and PLT packages at acknowledge.
Special characters used in the communication:
Character
ASCII code
<SOH>
1
<STX>
2
<ETX>
3
<EOT>
4
<ENQ>
5
<ACK>
6
<HT>
9
<LF>
10
<NAK>
21
<SPACE>
32
78
Diatron Ltd. 2004
9.2.2. Format of Packages Sent
Packages sent by the analyzer are always between <SOH> and <EOT> characters, and they
consist of header, data and tail. The header consists of a package identifier and a package
type descriptor. The tail includes the checksum. Typical format:
<SOH>MID CMD<STX>MESSAGE<ETX>CHKSUM<EOT>
MID:
CMD:
MESSAGE:
CHKSUM:
Message ID, one capital letter between ’A’ and ’Z’
Command, one capital letter, package type descriptor
•
’I’ for INIT;
•
’D’ for DATA;
•
’R’ for RBC;
•
’W’ for WBC;
•
’P’ for PLT.
the message consists of ASCII characters (between 32..128)
two hexadecimal digits of a one-byte checksum which contains
the lower byte of the sum of characters between the <SOH>
and <ETX> (incl. those, too).
9.2.3. Format of Acknowledge of the Receiver
The receiver must acknowledge transmission by the following message:
<ACK>CMD MID
CMD:
the type of the next package to send – this makes possible to a
request for histograms. If no more packages are required,
<SPACE> should be sent.
MID:
the identifier of the package that acknowledged by this
message.
If receiving of the message was not successful, <NAK> should be sent, and the analyzer will
repeat the last package.
The receiver has approx. 1 second to reply, otherwise the analyzer will repeat the last
transmission, twice automatically. But if still no response after 3 trials, the analyzer will not
start to communicate any more, even if there is data to send (see General Description).
9.2.4. Detailed Description of Packages
The packages sent by the analyzer are placed between a header and a tail. There are 3
main types of them: INIT, DATA and histogram packages. The histogram package can be:
RBC, WBC, and PLT. The format of histograms are the same, type descriptor differs only.
INIT package
Analyzer sends the general identifiers by this package during initiation of communication:
DEVICE<HT>VERSION<HT>DATE<HT>TIME
DEVICE:
VERSION:
DATE:
TIME:
device identifier
version of the software, e.g. „1.7”
date in YYYYMMDD format
time in HHMMSS format
Abacus junior /vet / B Service Manual
79
DATA package
This package contains sample and patient data, the measured parameters and the markers
of histograms. One data element consists of two items: name and value, which are
separated by a <HT> character, and closed by <LF>.
Important! SNO, DATE, TIME, SID and PID fields will always be present in this order, but other
fields may be omitted.
SNO<HT>152<LF>
DATE<HT>19980715<LF>
TIME<HT>114500<LF>
SID<HT>1AXX435<LF>
PID<HT>B72D44<LF>
NAME<HT>JOE SMITH<LF>
BIRTH<HT>19650208<LF>
SEX<HT>0<LF>
DOC<HT>Dr John Gold<LF>
OPID<HT>1172<LF>
MODE<HT>0<LF>
WRN<HT>0<LF>
PM1<HT>12<LF>
PM2<HT>204<LF>
RM1<HT>51<LF>
WM1<HT>23<LF>
WM2<HT>57<LF>
WM3<HT>92<LF>
PARN<HT>22<LF>
P01<HT> 6.6<HT>0<LF>
P02<HT>4.29<HT>0<LF>
...
P22<HT> 8.2<HT>0<LF>
internal identifier
date of measurement (YYYYMMDD)
time of measurement (HHMMSS)
sample identifier (alphanumeric)
patient identifier (alphanumeric)
patient name (alphanumeric)
birth date of patient (YYYYMMDD)
patient sex (0-male, 1-female)
doctor's name
operator identifier (alphanumeric)
patient type
warning bits1 (32-bit hexadecimal)
PLT lower marker2
PLT upper marker2
RBC lower marker2
WBC upper marker2
WBC LYM-MID marker2
WBC MID-GRA marker2
number of parameters to send
first parameter ID3, value and flag4
second parameter ID, value and flag
last parameter ID, value and flag
Remarks:
1
Position and meaning of the warning flags:
2
Bit
Mask
Letter
Meaning
0
0x00001
c
RBC/PLT clogging.
6
0x00040
b
RBC blank is high, or no RBC blank.
7
0x00080
p
PLT blank is high, or no PLT blank.
8
0x00100
C,Q
14
0x04000
B
WBC blank is high, or no WBC blank.
15
0x08000
H
HGB blank is high, or no HGB blank.
WBC clogging.
16 0x10000
E
No WBC three part.
The markers are given in histogram channel between 0 and 255, where 0 means
that the marker could not be found.
80
Diatron Ltd. 2004
3
The parameter IDs in the analyzer are: P01: WBC (109/l); P02: RBC (1012/l); P03:
HGB (g/l); P04: HCT (%); P05: MCV (fl); P06: MCH (pg); P07: MCHC (g/l); P08:
PLT (109/l); P09: PCT (%); P10: MPV (fl); P11: PDWsd (fl); P12: PDWcv (%); P13:
RDWsd (fl); P14: RDWcv (%); P15: LYM (109/l); P16: MID (109/l); P17: GRA (109/l);
P18: LYM% (%); P19: MID% (%); P20: GRA% (%); P21: RBCtime (sec); P22:
WBCtime (sec).
4
The parameter value is always 4 characters wide, spaces from left added if
necessary. It can be 9999, if the value could not be displayed in 4 digits, or ‘----‘ if
the value could not be calculated because of an error.
The meaning of the parameter flags:
Flag
Displayed
0
Meaning
Value correct.
1
+
Value high (more than upper limit)
2
−
Value low (less than lower limit)
3
*
Value is unreliable.
4
E
Value not given because of error. Value is ----.
5
Value cannot be calculated. There is no value!
RBC, WBC and PLT package
The format of the histogram packages are the same, they differ in type descriptor only. The
package contains the sample data (to identify the package) and the histogram.
SNO<HT>152<LF>
DATE<HT>19980715<LF>
TIME<HT>114500<LF>
SID<HT>1AXX435<LF>
PID<HT>B72D44<LF>
CHN<HT>256<LF>
9<HT>
...
1<HT>
0
internal identifier
date of measurement (YYYYMMDD)
time of measurement (HHMMSS)
sample identifier (alphanumeric)
patient identifier (alphanumeric)
number of histogram channels (256)
value of first histogram channel
value of 255th histogram channel
value of the last histogram channel
Example
Let us suppose that the receiver was not ready to receive when the analyzer was switched
on, therefore the instrument is not starting a communication.
Receiver sends that it is ready to receive now, the analyzer sends acknowledge.
<ENQ>
<ACK>
Analyzer sends INIT next time to initiate link (there is data to send):
<SOH>AI<STX>Abacus<HT>1.5<HT>20030405<HT>160734<ETX>E4<EOT>
Receiver sends acknowledge:
<ACK><SPACE>A
Abacus junior /vet / B Service Manual
81
The analyzer sends DATA package:
<SOH>BD<STX>SNO<HT>1<LF>DATE<HT>20010405<LF>TIME<HT>163800<LF>SID<HT>1<LF>PID
<HT><LF>NAME<HT><LF>BIRTH<HT>00000000<LF>SEX<HT>0<LF>DOC<HT><LF>OPID<HT>0<LF>
MODE<HT>0<LF>WRN<HT>0<LF>PM1<HT>10<LF>PM2<HT>135<LF>RM1<HT>34<LF>WM1<HT>21<LF>W
M2<HT>55<LF>WM3<HT>91<LF>PARN<HT>22<LF>P01<HT>6.4<HT>0<LF>P02<HT>4.36<HT>0<LF>
P03<HT>131<HT>0<LF>04<HT>39.0<HT>0<LF>P05<HT>90<HT>0<LF>P06<HT>30.0<HT>0<LF>P07<HT>33
5<HT>0<LF>P08<HT>262<HT>0<LF>P09<HT>0.24<HT>0<LF>P10<HT>9.2<HT>0<LF>P11<HT>12.0
<HT>0<LF>P12<HT>36.9<HT>0<LF>P13<HT>52.3<HT>1<LF>P14<HT>16.3<HT>0<LF>P15<HT>2.1<HT>0<L
F>P16<HT>0.5<HT>0<LF>P17<HT>3.7<HT>0<LF>P18<HT>33.4<HT>0<LF>P19<HT>7.8<HT>1<LF>P20<HT>
58.8<HT>0<LF>P21<HT>8.4<HT>0<LF>P22<HT> 5.0<HT>0<LF><ETX>89<EOT>
Receiver acknowledges DATA transmission, and requests for RBC package:
<ACK>RB
The analyzer sends RBC package:
<SOH>CR<STX>SNO<HT>1<LF>DATE<HT>20010405<LF>TIME<HT>163800<LF>SID<HT>1<LF>PID
<HT>57290<LF>CHN<HT>256<LF>4<HT>9<HT>17<HT>27<HT>37<HT>48<HT>58<HT>66<HT>70<HT>72
<HT>70<HT>66<HT>60<HT>54<HT>47<HT>39<HT>33<HT>28<HT>22<HT>18<HT>15<HT>11<HT>9<HT>8<
HT>7<HT>5<HT>4<HT>4<HT>3<HT>3<HT>2<HT>2<HT>1<HT>1<HT>0<HT>0<HT>0<HT>0<HT>0<HT>0<H
T>0<HT>0<HT>0<HT>0<HT>0<HT>0<HT>0<HT>0<HT>0<HT>0<HT>0<HT>0<HT>0<HT>0<HT>0<HT>0<HT>
1<HT>1<HT>1<HT>2<HT>2<HT>3<HT>4<HT>5<HT>6<HT>7<HT>8<HT>9<HT>10<HT>11<HT>12<HT>14<H
T>16<HT>18<HT>21<HT>24<HT>28<HT>31<HT>35<HT>38<HT>43<HT>47<HT>53<HT>58<HT>65<HT>71<
HT>78<HT>86<HT>94<HT>103<HT>113<HT>121<HT>130<HT>139<HT>149<HT>160<HT>171<HT>184<HT>
196<HT>207<HT>217<HT>225<HT>231<HT>237<HT>242<HT>245<HT>248<HT>251<HT>252<HT>253<HT>
253<HT>253<HT>253<HT>253<HT>254<HT>255<HT>254<HT>252<HT>248<HT>243<HT>236<HT>229<HT>
221<HT>214<HT>207<HT>199<HT>192<HT>185<HT>178<HT>170<HT>162<HT>154<HT>146<HT>137<HT>
129<HT>121<HT>113<HT>104<HT>96<HT>88<HT>82<HT>75<HT>71<HT>66<HT>62<HT>58<HT>55<HT>51
<HT>47<HT>43<HT>38<HT>35<HT>31<HT>28<HT>25<HT>22<HT>19<HT>18<HT>16<HT>14<HT>12<HT>1
1<HT>10<HT>9<HT>9<HT>9<HT>9<HT>8<HT>8<HT>7<HT>7<HT>6<HT>6<HT>5<HT>5<HT>5<HT>4<HT>4
<HT>3<HT>3<HT>3<HT>2<HT>2<HT>2<HT>1<HT>1<HT>1<HT>1<HT>1<HT>1<HT>1<HT>2<HT>2<HT>2<H
T>2<HT>2<HT>2<HT>2<HT>1<HT>1<HT>1<HT>1<HT>0<HT>0<HT>0<HT>0<HT>0<HT>0<HT>0<HT>0<HT>
0<HT>0<HT>0<HT>0<HT>0<HT>0<HT>0<HT>0<HT>0<HT>0<HT>0<HT>0<HT>0<HT>0<HT>0<HT>0<HT>0<
HT>0<HT>0<HT>0<HT>0<HT>0<HT>0<HT>0<HT>0<HT>0<HT>0<HT>0<HT>0<HT>0<HT>0<HT>0<HT>0<H
T>0<HT>0<HT>0<HT>0<HT>0<HT>0<HT>0<HT>0<HT>0<HT>0<HT>0<HT>0<HT>0<ETX>60<EOT>
Receiver acknowledges RBC transmission, and requests for WBC package:
<ACK>WC
The analyzer sends WBC package:
<SOH>DW<STX>SNO<HT>1<LF>DATE<HT>20010405<LF>TIME<HT>163800<LF>SID<HT>1<LF>PID
<HT>57290<LF>CHN<HT>256<LF>0<HT>0<HT>0<HT>0<HT>0<HT>0<HT>0<HT>0<HT>0<HT>0<HT>255<H
T>255<HT>255<HT>251<HT>209<HT>163<HT>118<HT>82<HT>56<HT>40<HT>32<HT>29<HT>29<HT>30<H
T>34<HT>40<HT>47<HT>55<HT>64<HT>76<HT>88<HT>103<HT>119<HT>136<HT>155<HT>174<HT>195<H
T>215<HT>233<HT>246<HT>254<HT>255<HT>249<HT>240<HT>227<HT>213<HT>200<HT>187<HT>176<H
T>164<HT>153<HT>141<HT>129<HT>118<HT>108<HT>99<HT>92<HT>86<HT>81<HT>76<HT>71<HT>67<H
T>64<HT>62<HT>61<HT>60<HT>60<HT>60<HT>57<HT>55<HT>51<HT>47<HT>44<HT>43<HT>42<HT>42<
HT>43<HT>44<HT>45<HT>47<HT>47<HT>46<HT>45<HT>43<HT>40<HT>37<HT>34<HT>32<HT>30<HT>30
<HT>30<HT>30<HT>29<HT>28<HT>26<HT>24<HT>21<HT>19<HT>17<HT>15<HT>14<HT>13<HT>12<HT>1
3<HT>13<HT>13<HT>13<HT>13<HT>12<HT>11<HT>11<HT>11<HT>12<HT>12<HT>14<HT>15<HT>16<HT>
17<HT>17<HT>17<HT>17<HT>17<HT>17<HT>17<HT>17<HT>17<HT>18<HT>19<HT>21<HT>22<HT>23<HT
>24<HT>25<HT>25<HT>25<HT>26<HT>29<HT>31<HT>34<HT>35<HT>36<HT>36<HT>35<HT>35<HT>35<H
T>37<HT>38<HT>41<HT>43<HT>46<HT>47<HT>48<HT>50<HT>52<HT>56<HT>60<HT>64<HT>70<HT>74<
HT>79<HT>82<HT>86<HT>89<HT>92<HT>95<HT>99<HT>102<HT>103<HT>104<HT>105<HT>105<HT>106<
HT>108<HT>110<HT>112<HT>115<HT>117<HT>119<HT>120<HT>121<HT>120<HT>120<HT>120<HT>121<
HT>122<HT>125<HT>129<HT>132<HT>136<HT>139<HT>141<HT>142<HT>142<HT>140<HT>138<HT>135<
HT>132<HT>129<HT>127<HT>125<HT>123<HT>122<HT>120<HT>117<HT>115<HT>112<HT>109<HT>108<
HT>108<HT>109<HT>110<HT>110<HT>108<HT>104<HT>99<HT>94<HT>89<HT>85<HT>82<HT>80<HT>79<
HT>78<HT>77<HT>75<HT>72<HT>68<HT>63<HT>58<HT>54<HT>50<HT>47<HT>44<HT>43<HT>41<HT>41
<HT>42<HT>42<HT>42<HT>42<HT>39<HT>37<HT>34<HT>30<HT>28<HT>25<HT>24<HT>23<HT>22<HT>2
2<HT>21<HT>21<HT>19<HT>17<HT>13<HT>9<HT>5<ETX>F7<EOT>
Receiver acknowledges WBC transmission, and closes the link. It is possible to request for PLT histogram if the
acknowledge contains a “P” instead of <SPACE>, but it is not shown in this example.
<ACK><SPACE>D
82
Diatron Ltd. 2004
9.3. UPLOADER: Software upgrading tool for Abacus Junior B
This tool allows you to update AJB’s software core, language module, settings and profiles.
In AJB there’s a controller card which has a microcontroller responsible for the instrument
operations. There’s a special part of the microcontroler firmware (a kind of software) which
provides the upgradeability of its core functions. This special part of the firmware is called
boot loader.
For the software update you need:
•
Abacus Junior B
•
Serial cable (9-pin)
•
A PC with Windows OS
•
…and the uploader software called ProjectCloud.
Installing Uploader:
1. Create somewhere on your PC’s harddrive a directory for example ABJB.
2. you have to copy thefollowing files into this directory:
ProjectCloud.exe
ProjectCloud.res
borIndmm.dll
CC3250mt.dll
CportLibCB5.bpl
vcl50.bpl
vcbde50.bpl
vcldb50.bpl
3. Create a directory for the source file of the firmware to be updated. The PC’s software
automatically will search for a \HEX directory, so it is not cumpolsory but advisable
name your directory HEX and place it into the installation directory.
Now, we have the following structure:
D:\ABJB:
2004.05.26.
11:59
<DIR>
.
2004.05.26.
11:59
<DIR>
..
2004.05.26.
11:55
<DIR>
HEX
2000.01.31.
05:00
25600 borlndmm.dll
2000.01.31.
05:00
1496064 cc3250mt.dll
2003.12.11.
16:17
142848 CportLibCB5.bpl
2004.05.26.
12:08
3534 dir.txt
2004.05.25.
14:36
89600 ProjectCloud.exe
2004.04.14.
13:33
876 ProjectCloud.res
2000.01.24.
05:01
2023424 vcl50.bpl
2000.01.24.
05:01
300032 vclbde50.bpl
2000.01.24.
05:01
558080 vcldb50.bpl
4. Place the file to be uploaded into HEX directory
Abacus junior /vet / B Service Manual
83
9.3.1. Process of SW download (AJB)
1. At AJB’s POWER OFF state connect the serial cable to the PC’s serial port.
IMPORTANT: Your PC has to be equipped with at least one serial port, which is
enabled by BIOS and Win OS, too. This port must not be used by any other device or
application during the upload process.
2. Switch on the PC (but don’t switch on the instrument!), login to windows and start
projectcloud.exe
3. Now you have to see this:
…the program started with a LOAD dialog. Select the hex file you want to upload and
press Open.
If you press Cancel, the program closes itself.
4. The file loads into the PC’s memory, and right after this it will be preprocessed
(converted into binary format).
5. You don’t need to open(it will be opened automatically) the serial port if all the default
settings of the port are correct.
84
Diatron Ltd. 2004
6. Choose the modules that you would like to upload into AJB.
This section is hierarchical up to down, so if you want to choose „Language” the
„Core” will be selected as well and if you want to select „Settings” the „Core” and the
„Language” modules will be selected as well, and of course if you want to select
„Profil” all the modules will be selected.
7. Click on SEND button.
This will automatically open the serial port and wait for an „Enquery packet” from the
Instrument. So NOW, please switch on the Instrument ! This action has 2 minutes
time out, that you can see under the Cancel button.
8. On the right hand side of the application’s window you will see the message of the
Enquiry packet’s arrival. After this, several seconds needs for the Instrument to free
the memory. Finally, a counter will count down with the addresses of the currently
written target memory.
Abacus junior /vet / B Service Manual
85
9. If everything went OK you get an „Done OK” message. The applicaton closes the
serial port automatically and the instrument starts the new firmware.
You get a popup error message if something’s wrong with the communication or the port’s
settings wrong.
You can change the settings of the serial port by clicking the „serial setting” button.
In this application there are only two valid settings:
•
baud rate: 115200,
parity: None, data: 8,
stop:1
•
baud rate: 9600,
parity: None, data: 8,
stop:1
For the ease of usage, this values are highlighted in the window.
If the port is open the changes of settings won’t take effect until you close the port.
86
Diatron Ltd. 2004
Important !
The instrument’s default communication settings are:
baud rate: 115200,
parity: None, data: 8,
stop:1.
To start the instrument with the slower settings hold down Start Button while you switch on
the instrument.
(baud rate: 9600,
parity: None, data: 8,
stop:1)
9.3.2. Troubleshooting of SW download (AJB)
If PC and AJB cannot communicate with each other, but everything (cables, program,
settings) seems to be all right…
1. Is COM port disabled by BIOS?
2. Is COM port disabled by the operating system (WIN)?
3. Does the PC’s mother board have IrDA port? On several motherboards if it’s enabled
COM1 turns into COM2 and COM1 will be used by IrDA.
4. Is it a shared IRQ problem in the operating system?
5. Is COM port used by another application/device? Several applications can change
the parameters of the COM port by the PC’s startup.
Fail-safe addresses and IRQ’s for COM ports:
•
COM1: 03F8h, 4
•
COM2: 02F8h, 3
•
COM3: 02E8h, 4
•
COM4: 03E8h, 3
If you think that your AJB’s COM port doesn’t function, you can check it with an oscilloscope,
because the instruments serial port sends 10 bytes out on it every time you power on the
system.
•
00: 05
•
01: 117
•
02: 112
•
03: version of the boot loader
•
04: version of the software High byte
•
05: version of the software Low byte
•
06: 00
•
07: 00
•
08: 00
•
09: Checksum
Checksum can be calculated by the following formula:
256- (Low byte of (SUM(00-08 bytes)))
Abacus junior /vet / B Service Manual
9.4. Abacus junior cabling diagram - AJ/AJvet
87
88
9.5. Abacus junior B cabling diagram - AJB
Diatron Ltd. 2004
Abacus junior /vet / B Service Manual
89
9.6. Abacus junior / Abacus Junior B tubing schematics - AJ/AJB
Abacus junior
&
Abacus junior
B
Tubing Schematics
version 6.1 2003.07.02.
csöv61.vsd
PUFFER
P
V10
V9
2
1
V8
3
2
1
V6
V7
3
2
1
3
V15
2
3
1
4A
M
4 A+ 1T
8
1
4
2
L
D
80u
1
1
2
2
V1
V2
2
V3
1
1 3
2
V4
3
1
2
3
V5
Pump
D
L
C
W
D
2
1
90
Diatron Ltd. 2004
9.7. Abacus junior Vet tubing schematics - AJvet
Abacus
junior vet
Tubing Schematics
version 6.1 2003.07.02.
csöv61.vsd
PUFFER
P
V10
V11
3
V9
2
2
1
1
V8
3
2
V7
3
1
2
1
V6
3
V15
2
3
1
4A
M
4 A+ 1T
1
8
4
80u
1
1
2
2
V1
V2
2
V3
1
1 3
2
V4
3
1
2
3
V5
Pump
D
L
C
W
R
2
L
R
D
D
2
1
Abacus junior /vet / B Service Manual
91
9.8. Recommended kit of tools
•
PC standard keyboard (PS/2)
•
Screwdrivers:
Cross Slot Screwdrivers (Philips)
Slot Screwdrivers
Hexagon Screwdrivers (3.5, 2.5, 2.0, 1.5 mm sizes)
•
Pocket digital multimeter
•
Diagonal Cutter (plier)
•
Nipper
9.9. Electronic schematics
Electronic schematics can be found in the following Appendices (in PDF).
Board name
File name
AJ/AJvet
AJB
COMB board
AJ-Comb_v3.14
x
PPB board
AJ-PPB_v3.14
x
IDEEPROM board
AJ-IDBoard_v3.0
x
Measuring board
AJ-Meas_v3.1
x
x
Dilutor Opto board
AJ-DilOpt2M_v3.1
x
x
Micro Dilutor board
AJ-MicroD_v3.0
x
x
Display board
AJ-DispIC_v3.1
x
Keypad
AJ-mckeyb_v2.1
x
Reagent Sensor board
AJ-ReagS_v3.0
x
x
START button and LED
AJ-StartGLED_v3.0
x
x
XYR Opto board
AJ-XYROpto_v3.1
x
x
Valve Module 1-5
AJ-valve_1-5v30
x
x
Valve Module 6-12
AJ-valve_6-12_v31
x
x
Main_v3.01
AJ-Main_v3.01
x
VREF
Shielded cable from the amplifier
+12V_A
+/- 12V
Coded: pin 3.
AD0-AD9
CSA1
+12V_HVB
+12V_A
-12V_A
GND_HVB
SPEED
AD9
CSA1
AD8
CSA0
VIN0_I
AD7
AD6
AD5
AS0
AD4
ADC
AD3
AD2
AD1
+12V_A
AD0
-12V_A
OE 19
DIO9_X
DIO8_X
DIO7_X
DIO6_X
9
7
5
3
Y1
Y2
Y3
Y4
A1
A2
A3
A4
11
13
15
17
DIO table:
DIO9
VREF
DIO8
DIO7
DIO6
DIO9_X
DIO8_X
DIO7_X
DIO6_X
DIO5_X
DIO4
DIO3
DIO1_X
18
16
14
12
Y1
Y2
Y3
Y4
A1
A2
A3
A4
DIO2
DIO1_X
OE 1
DIO5_X
DIO9_X --- HSW
DIO8_X --- CFSW
DIO7_X --- TEST
DIO6_X --- RSW
DIO5_X --- PLS
DIO4 --- DHM
DIO3 --- VMU
DIO2 --- VML
DIO1_X --- MVON
DIO0 --- DHON
VIN0_I
2
4
6
8
DIO0
DIO5
DIO1
Digital I/O
V_OUT
K_OUT
Coded: pin15 and pin16
K_OUT_X
BATT_SWITCH
V_OUT_X
Battery-saver
BAT_PC
11
RDY
10
9
8
IOCHRDY
BATT_PIC
fixing no battery displaying problem
Thru-Hole version
RSTDRV
3
4
5
6
13
12
RSTDRV
CLKGEN_O
3.13:
R67 added to the #CTS of the INTPRN(COM2)
Some documentational correction
R65 became a pull-down, BEFORE IC7
Coded: pin 2 and pin 3.
RST_V
MI Ltd.
Company:
Title:
Analog section and other circuits
Size:
Revision:
Number:
01-AJ-COMB v3.14
3.14
SPKR
CLKGEN_O
1
2
Approved by:
CLK20
Author:
Mendele Bálint
Katus Ferenc
Filename: AJ-COMB_v3.14.sch
Signature:
Last Modified:
Wed Aug 13, 2003
Sheet
1
of 4
LPT
Floppy Connector
SD0-SD15
SD0-SD15
IDE Connector
SD0-SD15
FDDSKCHG
RSTDRV
FDHDSEL
SD7
SD8
FDRDATA
SD6
SD9
FDWRPRT
SD5
SD10
SD4
SD11
FDWGATE
SD3
SD12
FDWDATA
SLIN
SD2
SD13
INIT
SD1
SD14
AFD
SD0
SD15
ERR
FDTRK0
FDSTEP
supports straight cable, too.
FDSDIR
STB
FDDS0
SLCT
PE
IOW
BUSY
FDMTR0
IOR
ACK
FDCIDX
IOCHRDY
BALE
PD7
PD6
IRQ14
PD5
IOCS16
SA1
PD4
SA0
PD3
IDECS0
PD2
DASP
PDIAG
SA2
IDECS1
PD1
PD0
Keyboard and Display
Start Button and LED
PP <> MPCPU connector
C_SCL
RST_V
Config I2C
C_SDA
V_OUT_X
V_IN_C
+5V
Replacements:
National: DS14C241
Texas: SN75LBC241
K_OUT_X
K_IN_C
CTS2
LED_GREEN
TXD2
internal printer
RXD2
LED_RED
START_GOMB
RTS2
RST_P
T1
2
DTR1
6
T2
3
TXD1
20
T3
1
21
T4
28
RXD1
8
R1
DCD1
5
R2
4
DSR1
26
R3
27
Coded: pin 9.
Pneumatic I2C+ control signals
P_SCL
IRQ_P
+12V
COM1
RI1_I
CTS1_I
RTS1_O
DSR1_I
GNDD
DTR1_O
TXD1_O
RXD1_O
DCD1_I
9
GND_HVB
7
RTS1
P_SDA
VCC 11
V+ 13
C1+
C1C2+
C2-
+12V_HVB
12
14
15
16
RST_P_F
HVB
P_SDA_F
CTS1
22
R4
23
RI1
19
R5
18
24
10 GND
+12V_HVB
P_SCL_F
IRQ_PF
+12V_HVB
GND_HVB
DIO8_X
DIO1_X
SHDN 25
V- 17
GND_HVB
Coded: pin 9 and pin 10.
EXT_TEMP
+12V_HVB
USB
PWM_HEAT
Keyboard
Reagent heater
KBDAT
USBUSB+
shielding
GND_HVB
KBCLK
MI Ltd.
Company:
Title:
Connectors
Size:
Approved by:
Author:
Revision:
Number:
01-AJ-Comb v3.14
Mendele Bálint
Katus Ferenc
Filename: AJ-COMB_v3.14.sch
3.14
Signature:
Last Modified:
Wed Aug 13, 2003
Sheet
2
of 4
SD0-SD15
+3.3V
18
37
54
73
90
108
128
144
SD0
SD1
SD2
SD3
SD4
7
6
5
4
3
2
SD5
SD6
SD7
RWE
DA11
DA8
DA10
DA9
I/O_TCK
I/O_TDI
I/O
I/O
I/O
I/O_GCK1
I/O
I/O
I/O
I/O
I/O
I/O_TMS
I/O
I/O
DD7
RD
16
15
14
13
12
11
10
9
DD6
DD5
RCS
DD4
DD3
DA4
DA3
DA2
26
25
24
23
22
21
20
19
DD0
DA1
DD1
DA0
33
32
31
30
29
28
M1 34
I/O
I/O
I/O
I/O
I/O
I/O
I/O
I/O
105 I/O_D0
106 I/O_GCK6_DOUT
107 CCLK
101 I/O_D1
102 I/O
103 I/O
104 I/O
I/O_D3
I/O
I/O
I/O
I/O
I/O
I/O
I/O
72
DONE
GND
GND
GND
GND
GND
GND
GND
GND
GND
GND
GND
GND
GND
GND
GND
GND
143
142
141
140
139
138
136
135
134
133
132
131
130
129
SD8
IRQ10
AEN
SMEMW
SA19
SMEMR
SA18
IOW
SA17
IOR
SA16
DACK0
SA15
DRQ0
126
125
124
123
122
121
120
119
SA14
SA13
SA12
SA10
SA9
SA8
SA7
117
116
115
114
113
112
111
109
137
127
118
110
100
91
81
71
64
55
45
35
27
17
8
1
MDA
SA11
SA6
SA5
SA4
SA3
SA2
SA1
SA0
IOCS16
!!!
DA0
DD0
DA1
DD1
DA2
DD2
DA3
DD3
DA4
DD4
DA5
DD5
DA6
DD6
DA7
DD7
DA8
DA9
pin 26 on 6264: CE
active high enable!
>>> pin 26 : VCC
RD
DA10
RWE
DA11
DA12
RCS
pin 1 on 6264: NC
for the smaller changes in the PCB
leave it on GND
AD0-AD9
3 In
CCLK
DIN
DIO9
DIO8
AS0
DIO7
DIO6
DIO5
RSTDRV
Out 2
+3.3V
gnd
C_SCL
DIO4
DIO3
C_SDA
1
DIO2
DONE
I/O
I/O
I/O
I/O
I/O
I/O_GCK4
92
93
94
95
96
97
98
99
CLK20
65
66
67
68
69
70
AD9
IRQ_PF
O_TDO
DIO0
RST_P_F
AD8
P_SCL_F
I/O
I/O
I/O
I/O
I/O
I/O
I/O
I/O
DIO1
56
57
58
59
60
61
62
63
AD0
CSPNEUM
P_SDA_F
AD7
K_IN_C
FPGA_ INIT
I/O
I/O
I/O_CS1
I/O
I/O
I/O_GCK7
I/O
I/O
I/O
I/O_D5
I/O
I/O
I/O
I/O_D4
I/O
K_OUT
AD6
V_OUT
V_IN_C
82
83
84
85
86
87
88
89
46
47
48
49
50
51
52
53
Display
I/O
I/O
I/O
I/O
I/O
I/O
I/O
I/O_INIT
AD5
RDY
START_GOMB
ADC
DA12
I/O
I/O
I/O
I/O
I/O
I/O
I/O
I/O
AD4
DA7
LED_RED
LED_GREEN
I/O_GCK3
I/O_HDC
I/O
I/O
I/O
I/O_LDC
AD3
MDA
+3.3V
39
40
41
42
43
44
AD2
DA6
PWRDWN
AD1
DA5
I/O
I/O
I/O
I/O
I/O
I/O
I/O
I/O
PROGRAM
I/O_D7
I/O_GCK5
I/O
I/O
I/O_D6
I/O
Start Gomb
& LED
SA0-SA19
I/O_GCK8
I/O
I/O
I/O
I/O
I/O
VCC
VCC
VCC
VCC
VCC
VCC
VCC
VCC
74
75
76
77
78
79
80
38
I/O_GCK2
I/O
I/O
I/O
I/O
I/O
M0 36
DD2
MDA
DIGITAL I/O
DIO9_X --- HSW
DIO8_X --- CFSW
DIO7_X --- TEST
DIO6_X --- RSW
DIO5_X --- PLS
DIO4 --- DHM
DIO3 --- VMU
DIO2 --- VML
DIO1_X --- MVON
DIO0 --- DHON
MI Ltd.
Company:
Title:
FPGA and MDA chip
Size:
Approved by:
Author:
Revision:
Number:
01-AJ-Comb v3.14
Mendele Bálint
Katus Ferenc
Filename: AJ-COMB_v3.14.sch
3.14
Signature:
Last Modified:
Wed Aug 13, 2003
Sheet
3
of 4
Dimm Socket
Config PIC and its other circuits
VPP
RSTDRV
DASP
PDIAG
IDECS1
IDECS0
CLK20
SD0-SD15
9
OSC1/CLKI
1 MCLR/VPP
RSTDRV
VDD 20
OSC2/CLKO 10
SD7
SD6
SD5
PWM_HEAT
SD4
C_SCL
SD3
TXD2
SD2
CTS2
RXD2
SD1
C_SDA
BATT_SWITCH
INT. PRN.
CCLK
DIN
RTS2
11
12
13
14
15
16
17
18
RC0/T1OSO/T1CKI
RC1/T1OSI/CCP2
RC2/CCP1
RC3/SCK/SCL
RC4/SDI/SDA
RC5/SDO
RC6/TX/CK
RC7RX/DT
RA0/AN0
RA1/AN1
RA2/AN2
RA3/AN3/VREF
RA4/T0CKI
RA5/ SS/AN4
2
3
4
5
6
7
RB0/INT
RB1
RB2
RB3
RB4
RB5
RB6
RB7
21
22
23
24
25
26
27
28
IOCS16
SD0
FDHDSEL
IOCHRDY
8 VSS
19 VSS
FDRDATA
IRQ10
FDWRPRT
AEN
SA0-SA19
FDTRK0
SMEMW
AN0
AN1
EXT_TEMP
AN3
BATT_PIC
FPGA_ INIT
DONE
FDWGATE
FDWDATA
SA19
FDSTEP
SMEMR
FDD
Config PIC
FDSDIR
FDDS0
FDCIDX
USB-
SA17
USB-
PGM RB3
FDDSKCHG
IOW
PGD RB7
SA18
PGC RB6
FDMTR0
IOR
IRQ14
SA16
DACK0
USB+
SA15
USB+
DRQ0
SA14
-12V_A
AN1
SA13
+12V_A
AN0
SA12
DCD1
SD8
DSR1
SA11
RXD1
RTS1
SD9
TXD1
SA10
CTS1
SD10
COM1
AN3
DTR1
SA9
RI1
STB
SD11
AFD
SA8
PD0
ERR
SD12
PD1
SA7
INIT
PD2
SLIN
PD3
PD4
SA6
LPT
VPP
PD5
SD13
PD6
PD7
SA5
ACK
SD14
SA4
RB6
PE
RB3
SLCT
SD15
KBDAT
BALE
SA3
RB7
BUSY
KBCLK
SPKR
SA2
SA1
BAT_PC
SA0
3.13:
ICSP connector and protecting (from VPP) circuit added
MI Ltd.
Company:
Title:
DimmPC and the Config PIC
Size:
Approved by:
Author:
Revision:
Number:
01-AJ-Comb v3.14
Mendele Bálint
Katus Ferenc
Filename: AJ-COMB_v3.14.sch
3.14
Signature:
Last Modified:
Wed Aug 13, 2003
Sheet
4
of 4
Company:
Title:
MI Ltd.
Abacus Jnr. - Control and Measurement Board v3.14
Drawing Number:
Revision:
03-AJ-COMB_v3.14
Approved by: Mendele Bálint
Signature:
Author:
3.14
Modified:
Katus Ferenc
Wed Aug 13, 2003
File name:AJ-COMB_v3.14.pcb Layer: Top Silk
IC13
1
2
LM350
12V input
Floppy/CD ROM
Diatron Ltd.
Company:
Title:
Power Supply
Size:
Approved by:
Author:
Revision:
Number:
03-AJ-PPB v3.14
Gyetvai Árpád
Nagy István
Filename: PPB v3.14.sch
3.14
Signature:
Date:
Tue Aug 26, 2003
Sheet
1
of 4
Integrated Pressure Sensor protecting and filter circuit added
IDC 2X5, klamnis
RC0/T1OSO/T1CKI
RC1/T1OSI/CCP2
RC2/CCP1
RC3/SCK/SCL
RC4/SDI/SDA
RC5/SDO
RC6/TX/CK
RC7/RX/DT
8 VSS
19 VSS
IDC 2X5, klamnis
RA0/AN0
RA1/AN1
RA2/AN2
RA3/AN3/VREF
RA4/T0CKI
RA5/ SS/AN4
2
3
4
5
6
7
RB0/INT0
RB1/INT1
RB2/INT2
RB3/CCP2
RB4
RB5/PGM
RB6/PGC
RB7/PGD
21
22
23
24
25
26
27
28
2
11
12
13
14
15
16
17
18
VDD 20
OSC2/CLKO/RA6 10
1
9 OSC1/CLKI
1 MCLR/VPP
For servicing purposes only !
SIP12
MIC5841
IDC 2X10, klamnis
MIC5841
Diatron Ltd.
Company:
Title:
Valves, Sensors and Connectors
Size:
Approved by:
Author:
Revision:
Number:
03-AJ-PPB v3.14
Gyetvai Árpád
Nagy István
Filename: PPB v3.14.sch
3.14
Signature:
Date:
Tue Aug 26, 2003
Sheet
2
of 4
RC0/T1OSO/T1CKI
RC1/T1OSI/CCP2
RC2/CCP1
RC3/SCK/SCL
RC4/SDI/SDA
RC5/SDO
RC6/TX/CK
RC7/RX/DT
8 VSS
19 VSS
RB0/INT0
RB1/INT1
RB2/INT2
RB3/CCP2
RB4
RB5/PGM
RB6/PGC
RB7/PGD
21
22
23
24
25
26
27
28
11
12
13
14
15
16
17
18
RC0/T1OSO/T1CKI
RC1/T1OSI/CCP2
RC2/CCP1
RC3/SCK/SCL
RC4/SDI/SDA
RC5/SDO
RC6/TX/CK
RC7/RX/DT
8 VSS
19 VSS
2
1
2
1
2
1
1
2
1
VS 4
2
1
9 OSC1/CLKI
1 MCLR/VPP
2
3
4
5
6
7
RB0/INT0
RB1/INT1
RB2/INT2
RB3/CCP2
RB4
RB5/PGM
RB6/PGC
RB7/PGD
21
22
23
24
25
26
27
28
11
12
13
14
15
16
17
18
RC0/T1OSO/T1CKI
RC1/T1OSI/CCP2
RC2/CCP1
RC3/SCK/SCL
RC4/SDI/SDA
RC5/SDO
RC6/TX/CK
RC7/RX/DT
8 VSS
19 VSS
RA0/AN0
RA1/AN1
RA2/AN2
RA3/AN3/VREF
RA4/T0CKI
RA5/ SS/AN4
2
3
4
5
6
7
RB0/INT0
RB1/INT1
RB2/INT2
RB3/CCP2
RB4
RB5/PGM
RB6/PGC
RB7/PGD
21
22
23
24
25
26
27
28
2
2
1
X, Y and Sample Rotator
Size:
Author:
Revision:
Number:
03-AJ-PPB v3.14
Approved by:
Gyetvai Árpád
Nagy István
Filename: PPB v3.14.sch
IDC 2X17 pin, klamnis
1
Diatron Ltd.
Company:
Title:
2
VDD 20
OSC2/CLKO/RA6 10
OSC2/CLKO/RA6 10
RA0/AN0
RA1/AN1
RA2/AN2
RA3/AN3/VREF
RA4/T0CKI
RA5/ SS/AN4
1
2
1
2
2
1
1
2
1
VDD 20
15 CSB
2
2
1
2
3
4
5
6
7
1
2
1
RA0/AN0
RA1/AN1
RA2/AN2
RA3/AN3/VREF
RA4/T0CKI
RA5/ SS/AN4
9 OSC1/CLKI
1 MCLR/VPP
OUT4 14
11 ENB
15 CSB
2
1
OSC2/CLKO/RA6 10
VSS 9
2
1
6 ENA
OUT4 14
1 CSA
2
VDD 20
GND 8
2
1
2
11
12
13
14
15
16
17
18
1
15 CSB
1 CSA
9 OSC1/CLKI
1 MCLR/VPP
OUT2 3
OUT3 13
12 IN4
6 ENA
11 ENB
OUT4 14
11 ENB
10 IN3
OUT2 3
OUT3 13
12 IN4
6 ENA
OUT1 2
7 IN2
10 IN3
OUT2 3
OUT3 13
12 IN4
5 IN1
OUT1 2
7 IN2
7 IN2
10 IN3
VS 4
GND 8
5 IN1
1 CSA
OUT1 2
VSS 9
2
1
2
1
2
1
2
1
VS 4
VSS 9
GND 8
5 IN1
3.14
Signature:
Date:
Tue Aug 26, 2003
Sheet
3
of 4
9 OSC1/CLKI
1 MCLR/VPP
11
12
13
14
15
16
17
18
RC0/T1OSO/T1CKI
RC1/T1OSI/CCP2
RC2/CCP1
RC3/SCK/SCL
RC4/SDI/SDA
RC5/SDO
RC6/TX/CK
RC7/RX/DT
8 VSS
19 VSS
RB0/INT0
RB1/INT1
RB2/INT2
RB3/CCP2
RB4
RB5/PGM
RB6/PGC
RB7/PGD
21
22
23
24
25
26
27
28
11
12
13
14
15
16
17
18
RC0/T1OSO/T1CKI
RC1/T1OSI/CCP2
RC2/CCP1
RC3/SCK/SCL
RC4/SDI/SDA
RC5/SDO
RC6/TX/CK
RC7/RX/DT
8 VSS
19 VSS
RB0/INT0
RB1/INT1
RB2/INT2
RB3/CCP2
RB4
RB5/PGM
RB6/PGC
RB7/PGD
21
22
23
24
25
26
27
28
2
2
1
1
GND 8
VSS 9
VS 4
9 OSC1/CLKI
1 MCLR/VPP
11
12
13
14
15
16
17
18
2
2
2
1
1
VDD 20
OSC2/CLKO/RA6 10
RC0/T1OSO/T1CKI
RC1/T1OSI/CCP2
RC2/CCP1
RC3/SCK/SCL
RC4/SDI/SDA
RC5/SDO
RC6/TX/CK
RC7/RX/DT
RA0/AN0
RA1/AN1
RA2/AN2
RA3/AN3/VREF
RA4/T0CKI
RA5/ SS/AN4
2
3
4
5
6
7
RB0/INT0
RB1/INT1
RB2/INT2
RB3/CCP2
RB4
RB5/PGM
RB6/PGC
RB7/PGD
21
22
23
24
25
26
27
28
8 VSS
19 VSS
Diatron Ltd.
Company:
Title:
1
2
2
1
2
3
4
5
6
7
1
2
1
RA0/AN0
RA1/AN1
RA2/AN2
RA3/AN3/VREF
RA4/T0CKI
RA5/ SS/AN4
15 CSB
2
1
VDD 20
OSC2/CLKO/RA6 10
OUT4 14
11 ENB
1 CSA
2
2
1
2
3
4
5
6
7
9 OSC1/CLKI
1 MCLR/VPP
1
2
1
RA0/AN0
RA1/AN1
RA2/AN2
RA3/AN3/VREF
RA4/T0CKI
RA5/ SS/AN4
15 CSB
2
1
VDD 20
OSC2/CLKO/RA6 10
6 ENA
OUT4 14
1 CSA
2
1
15 CSB
1 CSA
11 ENB
OUT2 3
OUT3 13
12 IN4
11 ENB
OUT4 14
1
2
1
10 IN3
6 ENA
6 ENA
OUT1 2
7 IN2
OUT2 3
OUT3 13
12 IN4
2
2
1
5 IN1
1
2
1
2
2
1
2
1
VS 4
2
1
10 IN3
OUT2 3
OUT3 13
12 IN4
OUT1 2
7 IN2
7 IN2
10 IN3
5 IN1
VSS 9
2
1
OUT1 2
GND 8
2
1
VS 4
VSS 9
GND 8
5 IN1
Dilutor, Micro Dilutor and Lyse Dilutor
Size:
Approved by:
Author:
Revision:
Number:
03-AJ-PPB v3.14
Gyetvai Árpád
Nagy István
Filename: PPB v3.14.sch
3.14
Signature:
Date:
Tue Aug 26, 2003
Sheet
4
of 4
AJ-Pneumatic and Power Board v3.14
03-AJ-PPB v3.14
Mendele Bálint
Nagy István
PPB_v3.14.pcb
3.14
Thu Aug 14, 2003
Top Silk
A
B
C
D
E
JP6
JP4
MVON
4
3
2
1
Q3
BC182
C31
10U-16V
+
DHON
2
+50V
HEADER 5X2
+8V
4
+8V
DGND
IC1
+150V
2
4
6
8
10
R13
150R 1%
R43
10K 1%
3
C40
1N
R45
1K 1%
R46
4K7 1%
1
R29
330R
HEADER 4
1
3
5
7
9
+50V
+5V
+50V
4
+150V
R3
10R
DHM
+5H
DLED
D1
+
1
R44
22K 1%
A
C
L M 3 34
1
R32
150R 1%
+
C12
10U-63V
2
R33
1 M - 2 0 0V
3
3
+
2
K
R21
100K
IC2
LF356
6
ELV
6
-
C37
1N
4
5
BAV99
+
IC3
LF356
3
-
2
1
7
3
C18
47U-16V
8
4
3
7
1
2
1
2
C20
33N
JP7
+12V
VREF
ELV
DGND
HSW
TEST
PLS
C21
33N
+
C19
47U-16V
R31
1K5 1%
-8V
-8V
C1
220N-63V
MVON
+5V
R12
150R 1%
D2
1
3
5
7
9
11
13
15
17
19
-12V
2
4
6
8
10
12
14
16
18
20
DGND
RSW
DHM
DHON
+5V
HEADER 10X2
C4
33U TA
C27
33N
3
+
3
R47
1 M - 2 0 0V
+150V
U1
4
R48
4
1
C8
3
3
2
330P
DGND
2
K
2
R26
10K 1%
3
C2
BAV99
R8
10K 1%
R9
150R 1%
1K 1%
C41
220N-250V
1
+8V
HSW
1
A
C
R37
150R 1%
R14
C24
33N
+8V
+8V
T L P 6 27
P1
10R
R36
10K 1%
A
4
3
2
-
22K
IC7
R27
1K 1%
BAS21
U3
6
LF356
C
C25
33U TA
C28
33N
+
3
3
+
2
-
IC8
JP5
IMP
6
1
2
3
LF356
HEADER 3
2
R49
5K1 1%
U2
1
2
3
4
-8V
Com NO
NC
VG N D IN
V+
VL
+8V
R5
4K7
C7
100P
R40
10K 1%
C23
33N
R50
1K
R42
22K
R1
150R 1%
T L P 6 27
+5V
R41
22K
7
1
7
1
+
R39
330R 1%
OP37
A
D4
BAV99
K
4
3
2
6
3
4
8
K
-
1
2
3
+
2
IC6
1
EL
3
C6
220N-63V
4
5
D3
R38
10K 1%
4
5
7
1
220N-63V
8
7
6
5
-8V
RSW
+5V
C5
33N
MAX319
1
R25
22K 1%
-8V
C9
200P
L4
1mH
IC4
L M 7 8 08
+12V
R23
10K 1%
Q2
BSS100
1
R24
10K 1%
+
C34
10U-16V
TEST
+
2
+8V
+
C36
33N
C32
10U-16V
Q1
BSS100
R34
150R 1%
C39
10U-16V
+
R35
100K
1
1
R22
10K 1%
+
L3
1mH
-12V
C35
10U-16V
3
C13
33N
GND
C38
10U-16V
1
VOUT
3
PLS
VIN
GND
R52
10K
1
2
3
1
2
2
Q4
BC182
VIN
+
C33
10U-16V
Title
VOUT
2
Abacus Junior Measuring Board v3.1
-8V
Size
B
IC5
L M 7 9 08
Date:
A
B
C
D
Document Number
Rev
2.20
01-AJ-MEAS_v3.1
Tuesday, August 26, 2003
Sheet
E
1
of
1
Company:
Title:
MI Ltd.
Abacus Junior Measuring Board v3.1
Drawing Number:
Revision:
01-AJ-MEAS_V3.1
Approved by: Gyetvai Árpád
Signature:
Author:
3.1
Modified:
Fábián György
Mon Aug 11, 2003
File name:AJ-MEAS_v3.1.pcb Layer: Top Silk
Motor A
Motor B
M11A
M21A
M22B
M12B
M12A
M22A
M21B
M11B
driving signals mirroring requested by Süleczky
ALLPWR
ALLPWR
ALLPWR
ALLPWR
PSB1
PSA1
ALLPWR
ALLPWR
ALLPWR
ALLPWR
PSB2
PSA2
ALLPWR
M22A
M21A
M12A
M11A
M22A
M21A
M12A
M11A
PSA2
PSA1
M22B
M21B
M12B
M11B
PSB2
M22B
M21B
M12B
M11B
PSB1
Motor + Pos.
Revision History (GyA)
V1.0 -> V3.1:
1. CONN1-25 was tied to GND, changed
now tied to VCC (because of PPB) !
2. LEDB_1 and LEDB_2 name exchange !
MI Ltd.
Company:
Title:
AJ Dilutor Opto Board for 2 motors
Size:
Approved by:
Author:
Revision:
Number:
01-AJ-DILOPT2M v3.1
Gyetvai Árpád
Katus Ferenc
Filename: AJ-Dilopt2M_v3.1.sch
3.1
Signature:
Last Modified:
Tue Jul 15, 2003
Sheet
1
of 1
Company:
Title:
MI Ltd.
AJ Dilutor Opto Board for 2 motors
Drawing Number:
Revision:
01-AJ-DILOPT2M v3.1
Approved by: Gyetvai Árpád
Signature:
Author:
3.1
Modified:
Katus Ferenc
Mon Aug 04, 2003
File name:AJ-Dilopt2M_v3.1.pcbLayer: Top Silk
Video and Keyboard Control
KEYBOARD
U2
79L15
2
C12
2.2u - 25V
C8
2.2u - 25V
GNDIN
+Vin
GNDD
KB1
KB3
KB5
KB7
KC0
KC2
KC1
KC3
GNDD
+5VIN
+5VIN
GNDIN
GNDIN
LCD
RST_V
V_IN
V_OUT
K_IN
K_OUT
2 x 5 pin, military, right angled
+5V
2x10 pin, military, right angled
+V2out
MCLR
+5VIN
GNDD
U1
P6CUI-057R518Z
6
-V2out
1
5
KB0
KB2
KB4
KB6
-15V
-15V
In
GNDD
20 pin, MALE
CONN2
Out 3
V0
RS
R/W
E
DB0
DB1
DB2
DB3
DB4
DB5
DB6
DB7
CS
1 gnd
4
2 -Vin -V1out
3
+V1out
+5V
U4
7805
1 In
GNDD
Out 3
gnd
2
100n
C1
100n
C2
C4
15..33p
GNDD
C6
GNDD
9 OSC1/CLKI
1 MCLR/VPP
VDD 20
OSC2/CLKO 10
VPP
C3
100n
+5VIN
K_IN
E
R/W
+5V
R2
1k
R4
1k
1N4148
V_IN
RX
SCK
4k7
SCK
D1
SDO
TX
RX
R11
R8
MCLR
10k
RC0/T1OSO/T1CKI
RC1/T1OSI/CCP2
RC2/CCP1
RC3/SCK/SCL
RC4/SDI/SDA
RC5/SDO
RC6/TX/CK
RC7RX/DT
RA0/AN0
RA1/AN1
RA2/AN2
RA3/AN3/VREF
RA4/T0CKI
RA5/ SS/AN4
2
3
4
5
6
7
RB0/INT
RB1
RB2
RB3
RB4
RB5
RB6
RB7
21
22
23
24
25
26
27
28
R18
1k
8 VSS
19 VSS
GNDD
R24
NTC 3k3
C9
100n
CS
DB0
DB1
DB2
DB3
DB4
RB5
RB6
RB7
R27
R20
100R
100R
R19
100R
DB5
DB6
DB7
KC0
KC1
KC2
KC3
1k
1k
R34
R35
GNDD
GNDD
GNDD
GNDD
1k
R32
KB7
KB6
KB5
KB4
GNDD
RST_V
KB3
KB0
D2
7v5
KB2
GNDD
MCLR
R36
560R
1k
1k
1k
1k
1k
C10
100n
10k
10k
10k
10k
GNDD
OPTO2
6N137
+5VIN
V0
+5VIN
Revision Note Table
+5V
R22
4k7
R9
R10
R12
R13
R14
R15
R16
R17
+5V
RS
R28
R29
R30
R33
R31
HCPL-2631 can be used
instead of 6N137
11
12
13
14
15
16
17
18
1n
1n 1n 1n
C14 C15 C16 C17
GNDD
KB1
OPTO1
HCPL-2631
100n
C13
10u - 63V
100k
100k
100k
100k
C5
15..33p
+5V
R3
100R
X1
10 MHz
R23
4k7
R21
2k2
OPTO3
HCPL-2631
GNDIN
R25
R26
K_OUT
V_OUT
+5VIN
C11
100n
GNDIN
470R
470R
TX
SDO
-15V
1. PIC16F876 --> PIC18F252 (PGM: RB3 --> RB5)
X1 20 MHz --> 10 MHz
2. undo 1.1
PIC18F252 --> PIC16F876 (PGM: RB5 --> RB3)
X1 10 MHz-->20 MHz
(pcb drill holes repair)
3. D[3...10] >>> R[28...35] (1k)
C14...C17 for filtering (1n)
R14...17 value change: (4k7 >>> 100k)
R9,10,12,13 value change (100R >>> 10k)
4. REDO 1.1
5. (v3.1) R36 added
CONN2 pin16, 18 shorted (avoid LCD startup blinking)
R18 value changed (4k7 >>> 1k) and R21 value changed (4k7 >>> 2k2) for the
better temperature compensation.
R24 Thermistor flipped on the pcb.(for the better temp. sensing)
Software Upgrade: v2.2
MI Ltd.
Company:
Title:
Abacus Junior Display Controller
Size:
Approved by:
Author:
Revision:
Number:
01-AJ-DisplC v3.1
Mendele Bálint
Katus Ferenc
Filename: AJ-DisplC_v3.1.sch
3.1
Signature:
Last Modified:
Thu Jul 03, 2003
Sheet
1
of 1
Company:
Title:
MI Ltd.
Abacus Junior Display Module
Drawing Number:
Revision:
AJ-DisplC v3.1
Approved by: Gyetvai Árpád
Signature:
Author:
3.1
Modified:
Katus Ferenc
Tue Aug 26, 2003
File name:AJ-DisplC_v3.1.pcb Layer: Top Silk
Motor
M11
M21
M12
M22
ALLPWR
M22
M21
M12
M11
PS2
VCC
M22
M21
M12
M11
PS1
ALLPWR
Motor + Pos.
ALLPWR
PS1
ALLPWR
MI Ltd.
Company:
ALLPWR
Title:
PS2
Abacus Junior Micro Dilutor v3.0
Size:
Approved by:
Author:
Revision:
Number:
01-AJ-MicroD v3.0
Mendele Bálint
Katus Ferenc
Filename: AJ-MicroD_v3.0.sch
3.0
Signature:
Last Modified:
Tue Jul 15, 2003
Sheet
1
of 1
Company:
Title:
MI Ltd.
Abacus Junior Micro Dilutor
Drawing Number:
Revision:
AJ-MicroD v3.0
Approved by: Mendele Bálint
Signature:
Author:
3.0
Modified:
Katus Ferenc
Mon Aug 25, 2003
File name:AJ-MicroD_v3.0.pcb Layer:Top Silk
PWM
GP1A52HR
SEL1
SENSE
PWM
for compesation...
GP1A52HR
SEL2
PWM
GP1A52HR
SEL0
PWM
GP1A52HR
PWM
SENSE
SEL0
SEL2
SEL4
SEL3
SEL1
SEL3
PWM
GP1A52HR
SEL4
Revision Note Table
1.1: SCH, PCB connection established,
Smaller PCB changes
3.0 MS-* v1.1 >>> AJ-* v3.0
MI Ltd.
Company:
Title:
Abacus Junior Reagent Sensors
Size:
Approved by:
Author:
Revision:
Number:
01-AJ-ReagS v3.0
Mendele Bálint
Katus Ferenc
Filename: AJ-ReagS_v3.0.sch
3.0
Signature:
Last Modified:
Wed May 21, 2003
Sheet
1
of 1
Company:
Title:
MI Ltd.
Abacus Junior Reagent sensors
Drawing Number:
Revision:
AJ-ReagS v3.0
Approved by: Mendele Bálint
Signature:
Author:
3.0
Modified:
Katus Ferenc
Wed May 21, 2003
File name:AJ-ReagS_v3.0.pcb Layer: Top Silk
Vertical Motor
Horizontal Motor
Rotor Motor
Rotor Switches
1x4 pin
MI Ltd.
Company:
Title:
Abacus Junior XYR OPTO Board
Size:
Approved by:
Author:
Revision:
Number:
01-AJ-XYROpto v3.1
Mendele Bálint
Katus Ferenc
Filename: XYROpto_v3.1.sch
3.1
Signature:
Last Modified:
Tue Jul 15, 2003
Sheet
1
of 1
Company:
Title:
MI Ltd.
Abacus Junior XYR OPTO Board
Drawing Number:
Revision:
AJ-XYROpto V3.1
Approved by: Katus Ferenc
Signature:
Author:
3.1
Modified:
Gyetvai Árpád
Thu Aug 07, 2003
File name:AJ-XYopto V3.1.pcb Layer:Top Silk
MI Ltd.
Company:
Title:
Abacus Junior Start Button and LED
Size:
Approved by:
Author:
Revision:
Number:
01-AJ-StartGLED v3.0
Mendele Bálint
Katus Ferenc
Filename: AJ-StartGLED_v3.0.sch
v3.0
Signature:
Date:
Tue Aug 26, 2003
Sheet
1
of 1
Company:
Title:
MI Ltd.
Abacus Junior Start Button and LED
Drawing Number:
Revision:
AJ-StartGLED v3.0
Approved by: Mendele Bálint
Signature:
Author:
3.0
Modified:
Katus Ferenc
Tue Mar 11, 2003
File name:AJ-StartGLED_v3.0.pcb
Layer:Top Silk
Company:
Title:
MI Ltd.
Abacus Junior Valve Module 1-5 v3.0
Drawing Number:
Revision:
01-AJ-Valve_1-5 v3.0
Approved by: Mendele Bálint
Signature:
Author:
3.0
Modified:
Gyetvai Árpád
Tue Aug 26, 2003
File name:Valve 1_5 V3.0.pcb Layer: Top Silk
Company:
Title:
MI Ltd.
Abacus Junior Valve Module 6-12
Drawing Number:
Revision:
01-AJ-Valve 6-12 v3.1
Approved by: Mendele Bálint
Signature:
Author:
3.1
Modified:
Gyetvai Árpád
Tue Aug 26, 2003
File name:Valve 6_12 V3.1.pcb Layer: Top Silk
Company:
Title:
MI Ltd.
Abacus Junior Valve Module 6-12
Drawing Number:
Revision:
01-AJ-Valve 6-12 v3.1
Approved by: Mendele Bálint
Signature:
Author:
3.1
Modified:
Gyetvai Árpád
Tue Aug 26, 2003
File name:Valve 6_12 V3.1.pcb Layer: Bot Silk
Company:
Title:
MI Ltd.
Abacus Junior ID Board v3.0
Drawing Number:
Revision:
03-AJ-IDBoard v3.0
Approved by: Mendele Bálint
Signature:
Author:
3.0
Modified:
Gyetvai Árpád
Tue Mar 25, 2003
File name:AJ-IDBoard_v3.0.pcb Layer: Top Silk
1
2
A
IC3
I/O/MC2-17
B
I/O/MC1-17
42
GND
4 GND
XC9536XL-15VQ44C
17 GND
25
20
AD_RDY
11
TCK 10
TMS 9
TDI 24
TDO
15
VCC_INT 35
VCC_INT 26
VCC_IO
SEL_MD
EN_YXRL
C
-ADIT_CPLD
HOME_YXRL
END_YXRL
CTL
CTU
TL0_CPLD
SLT_CPLD
SEL_MD
C
D
HOME_MD
E
-ADIT_P
END_MD
HOME_YXRL_P
END_YXRL_P
1Y 4
R46
R47
R48
SEL_YXRL_0
AD_RDY
EN_MD
SEL_YXRL_1
2Y 7
100R
R44
CTU_P
100R
100R
R45
CTL_P
100R
3Y 9
100R
R41
R42
4Y 12
100R
100R
SENSE_PIC
E
F
F
GNDD
SN74HCT244DW
18
16
14
12
OE 19
1A
1B
2A
2B
3A
3B
4A
4B
IC2
SN74HCT244DW
A1
Y1
A2 IC5:A Y2
A3
Y3
A4
Y4
1 OE
2
4
6
8
9
7
5
3
2
3
5
6
11
10
14
13
15 OE
1 A/B
Y1
A1 11
Y2 IC5:B A2 13
Y3
A3 15
Y4
A4 17
GNDD
SEL_MD
EN_YXRL
D
IC19
SN74HCT574DW
G
G
+5V
H
H
C_574
+5V
I
1 A
2 B
3 C
R80
R83
R84
R136
100R
100R
100R
100R
100R
100R
KB_SEL0
KB_SEL1
KB_SEL2
IC21
6 OE1
4 OE2A
5 OE2B
R40
Y0
Y1
Y2
Y3
Y4
Y5
Y6
Y7
15
14
13
12
11
10
9
7
Diatron MI Ltd.
TI Logic Decoder Library
R39
100R
100R
GNDD
R139
R38
Main
Number:
03-AJB-Main_v3.01
Sheet Name:
Size:
Gyetvai Árpád
Katus Ferenc
Approved by:
Author:
I
Filename: AJB-MAIN_v3.010.sch
Sheet
1
J
3.01
Revision:
J
of 8
Last Modified:
Tue May 04, 2004
Signature:
Title:
Abacus Junior Basic Main Board
Company:
SN74HCT138D
19
18
17
16
15
14
13
12
CTL_P
3
GNDD
B
SN74HCT157D
Q1
Q2
Q3
Q4
Q5
Q6
Q7
Q8
CTU_P
4
5
6
7
8
9
10
A
R28
D1
D2
D3
D4
D5
D6
D7
D8
100R
100R
100R
100R
100R
2
3
4
5
6
7
8
9
R60
R63
R61
R62
R14
R13
R12
R11
1 OE
11 CLK
100R
100R
R15
100R
100R
100R
100R
I/O/MC2-8
I/O/MC2-7
I/O/GSR/MC2-6
I/O/GTS2/MC2-5
I/O/MC2-4
I/O/GTS1/MC2-3
I/O/MC2-2
I/O/MC2-1
100R
32
38
33
34
37
36
39
19
R31
R30
R21
R20
R19
R18
R17
R16
100R
100R
100R
100R
100R
100R
100R
100R
100R
R73
R72
R71
R70
R69
R68
R67
R66
R65
R142
R77
I/O/MC1-8 6
I/O/GCK3/MC1-7 1
I/O/MC1-6 8
I/O/GCK2/MC1-5 44
I/O/MC1-4 5
I/O/GCK1/MC1-3 43
I/O/MC1-2 3
I/O/MC1-1 2
100R
100R
100R
100R
100R
R27
R26
R25
R24
R23
41
40
18
16
14
13
12
7
I/O/MC1-16
I/O/MC1-15
I/O/MC1-14
I/O/MC1-13
I/O/MC1-12
I/O/MC1-11
I/O/MC1-10
I/O/MC1-9
100R
100R
100R
100R
100R
100R
100R
100R
I/O/MC2-16
I/O/MC2-15
I/O/MC2-14
I/O/MC2-13
I/O/MC2-12
I/O/MC2-11
I/O/MC2-10
I/O/MC2-9
R29
21
22
23
27
28
29
30
31
100R
1
2
3
4
5
6
7
8
9
10
1
2
3
4
5
6
7
8
9
10
A
KB_IN0..2
A
B
KBD0..6
R100
IC31-7
D65
R104
100R
D66
R108
100R
D68
100R
R118
100R
R123
100R
R128
R132
D75
D77
100R
100R
1N4148
1N4148
1N4148
D72
1N4148
D70
1N4148
1N4148
1N4148
B
D64
D67
D69
D71
D73
D76
D78
C
1N4148
1N4148
1N4148
1N4148
1N4148
1N4148
1N4148
INTERNAL Printer
CS_PRINTER
pin 6: coded
2x5 pins, military
GNDD
C
D
D
KBD0
KBD2
KBD3
KBD5
KBD6
KBD4
KBD1
E
E
+5V
VLD
VLD
BG_LED_A
KB_IN1
F
2k2
R117
R109
680R
pin 29: coded
+5V
KBD1
KBD4
KBD6
CS_LED_RED
Serial Port
IC26
G
G
CTS_PC
RX_PC
RTS_PC
TX_PC
+5V
BG_LED_K
14
VCC 16
V+ 2
T1
C1+
C1C2+
C211
8
13
7
R1
T2
R2
V- 6
9
15 GND
12
10
1
3
4
5
IDC 2x17 pins, military, straight
CS_LED_GREEN
ST_BUTT
F
KB_IN0
KB_IN1
KB_IN2
R140
220R
220R
H
R138
DB9, Male
H
R93
47k
+5V
R85
47k
I
R79
47k
R81
R75
D57
2k2
ZPD5v1
R90
D60
2k2
ZPD5v1
2k2
D61
R96
R98
R101
R105
Diatron MI Ltd.
RB5
RB7
J
3.01
Revision:
33R
33R
33R
33R
Háttérfény: 1,25V@0,15A : R=8,25 Ohm, 0,2W
ZPD5v1
R137
2k2
+5V
Company:
Comm
Sheet
2
J
of 8
Last Modified:
Tue May 04, 2004
Signature:
Title:
Abacus Junior Basic Main Board
Number:
03-AJB-Main_v3.01
Sheet Name:
Size:
Gyetvai Árpád
Katus Ferenc
Approved by:
Author:
I
Filename: AJB-MAIN_v3.010.sch
1
2
3
4
5
6
7
8
9
10
1
2
3
A
B
C11
100n
C17
100n
+5V
+12V
VS
C
IC4
IC8
CSB
OUT4
OUT3
IN4
ENB
IN3
IN2
ENA
OUT2
OUT1
CSA
IN2
ENA
CSB
OUT4
OUT3
IN4
ENB
IN3
L298HN
GND
VSS
GNDD
+12V
VS
GND
D
D14
D18
D17
D20
D19
E
D12
D15
+12V
D13
D24
D25
D26
D27
D28
+12V
D22
D23
D31
D34
D33
D36
D35
+12V
D29
D32
GNDD
E
D30
GNDD
D21
GNDD
1N4001
1N4001
1N4001
VSS
1N4001
1N4001
1N4001
OUT2
OUT1
CSA
L298HN
1N4001
1N4001
1N4001
GNDD
+12V
IC11
CSB
OUT4
OUT3
IN4
ENB
IN3
IN2
ENA
1N4001
1N4001
1N4001
+5V
+5V
VS
GND
VSS
OUT2
OUT1
CSA
L298HN
D
1N4001
1N4001
1N4001
C20
100n
C23
100n
C30
100n
C32
100n
GNDD
C
1N4001
1N4001
1N4001
1N4001
1N4001
1N4001
4
B
1N4001
1N4001
1N4001
5
6
7
8
9
10
A
MA_YXRL
MB_YXRL
MC_YXRL
MD_YXRL
F
F
CS_XY
pin 24: coded
G
IDC_HEADER_2X17_MIL
GNDD
G
GNDD
H
R36
10R
+5V
H
Company:
I
Diatron MI Ltd.
MotorXYR
Sheet
3
J
3.01
Revision:
J
of 8
Last Modified:
Tue May 04, 2004
Signature:
Title:
Abacus Junior Basic Main Board
Number:
03-AJB-Main_v3.01
Sheet Name:
Size:
Gyetvai Árpád
Katus Ferenc
Approved by:
Author:
I
Filename: AJB-MAIN_v3.010.sch
1
2
3
4
5
6
7
8
9
10
1
2
3
4
A
C46
100n
C47
100n
+5V
GNDD
VSS
GND
VS
+12V
+12V
VS
IC16
IC14
B
CSB
OUT4
OUT3
IN4
ENB
IN3
IN2
ENA
OUT2
OUT1
CSA
C
D45
D48
D47
D50
D49
D52
D51
+12V
D46
D39
D42
D41
D44
D43
+12V
D37
D40
D8
D9
D10
D4
D5
D1
D2
GNDD
D7
+12V
GNDD
D38
GNDD
1N4001
1N4001
1N4001
CSB
OUT4
OUT3
IN4
ENB
IN3
1N4001
1N4001
1N4001
IN2
ENA
1N4001
1N4001
1N4001
GND
VSS
OUT2
OUT1
CSA
1N4001
1N4001
1N4001
+5V
+12V
1N4001
1N4001
1N4001
5
GNDD
+5V
IC1
C
1N4001
1N4001
1N4001
C41
100n
C43
100n
C3
100n
C5
100n
CSB
OUT4
OUT3
VS
IN4
ENB
IN3
GND
IN2
ENA
VSS
OUT2
OUT1
L298HN CSA
GNDD
B
1N4001
1N4001
1N4001
6
7
8
9
10
A
1N4001
1N4001
1N4001
D
D
+5V
R8
10R
+5V
R51
10R
E
CS_6TH:1
R50
10R
+5V
Pin 13,14: coded
E
CS_M
uncoded
2x13 klamnis
F
F
+5V
R49
10k
+5V
C10
47u-25V
R37
1k
G
G
+5V
R35
2k2
+5V
GNDD
H
MIC5841
MIC5841
H
IC9
IC12
+12V
Company:
I
V1
V2
V3
V4
V5
V6
V7
V8
V9
V10
V11
V12
Pin 2: coded
CS_VALVE
J
+12V
Header, IDC 2x10 military
Diatron MI Ltd.
Motor23M_V
Sheet
4
3.01
Revision:
J
of 8
Last Modified:
Tue May 04, 2004
Signature:
Title:
Abacus Junior Basic Main Board
Number:
03-AJB-Main_v3.01
Sheet Name:
Size:
Gyetvai Árpád
Katus Ferenc
Approved by:
Author:
I
Filename: AJB-MAIN_v3.010.sch
1
2
3
4
5
6
7
8
9
10
9
10
C72
R95
1n
330R
8
IC23:C
TL084ID
PADS3
B
C83
6
6
8
7
C
9
10
B
7
Pin 15,16: coded
CS_ANALOG
D59
ZPD5v1
IC23:B
TL084ID
Csúcsdetektor
11
5
16
15
+5V
VL 12
R135
100R
R122
47k
1n
C84
HEADER, IDC 2x10, Male, straight
+5V
D79
ZPD5V1
IMP_IN1
C74
1n
560R
R103
330R
IC24
DG411DY
+12V
R114
2k2
1N4148 R106
NOT PLACED
C
D63
100R
R127
47k
1n
+12V
GNDD
14
C
GND 5
4 VEE
A
IC23:A
TL084ID
A
R121
1
PADS2
NOT PLACED
GNDD
47k
Pulzus integrátor
R112
2
3
CS_IMP
Pin 3:coded
1x3 pins
GNDD
B
1
2
1
2
3
4
5
6
7
8
9
10
A
3
13 VDD
D
GNDD
AN_PEAK
D74
ZPD5V1
GNDD
D
GNDD
R86
10k
E
R88
10k
W:IC40:D:IN+
A:an_peak
B:gnd
SPI
GNDD
R97
3
2
+5V
+5V
1
1M
IC22:A
LM393D
IC20
MPC42010
2k2
10k
2k2
C75
47u-25V
F
R91
3k3
14
D
13
12
G
G
R134
2k2
+5V
IC23:D
TL084ID
C59
100n
2
+5V
R131
2k2
150k
150k
1
IC25:A
LM339AD
GNDD
4
5
R110
LM339AD
IC25:B
R126
3k3
6
7
R102
GNDD
F
2k2
GNDD
Alsó küszöbkomparátor
R120
R107
C78
47u-25V
R116
R99
IMP_IN1
Felso küszöbkomparátor
E
+5V
R125
3k3
CS_Reag
C80
10n
GNDD
H
H
R87
R119
2k2
10k
R94
10k
GNDD
C76
47u-25V
2k2
10k
GNDD
+5V
C77
47u-25V
R115
10k
D62
1N4148
R113
R111
Company:
I
14
1M
IC25:C
LM339AD
R124
9
8
Felso idokapu
GNDD
1M
7
R129
2k2
R92
2k2
+5V
+5V
IC22:B
+5V
Alsó idokapu
13
1M
R130
2k2
Zaj idokapu (4 usec)
R89
5
6
11
10
Diatron MI Ltd.
IC25:D
LM339AD
R133
Analog
Sheet
5
J
3.01
Revision:
J
of 8
Last Modified:
Tue May 04, 2004
Signature:
Title:
Abacus Junior Basic Main Board
Number:
03-AJB-Main_v3.01
Sheet Name:
Size:
Gyetvai Árpád
Katus Ferenc
Approved by:
Author:
I
Filename: AJB-MAIN_v3.010.sch
1
2
3
4
5
6
7
8
9
10
1
2
+5V
C38
47u-25V
+12V
A
C52
47u-25V
+8V
3 In
C44
100n
R56
1k8
Out 2
GNDD
1
gnd
IC15
L033V
R57
330R
C53
47u-25V
GNDD
C45
100n
IC17
LM350
+5V
PRINTER TÁP: 8V
IC lehet LM350 is
(PPB kompatibilis)
B
C6
100n
GNDD
+12V
R59
+12V
+12V
C51
47u-25V
GNDD
C
C82
100n
10K
GNDD
+5V
CS_HVB
D
Pin 9,10 :coded
C61
100n
+5V
2x5 pins, military
C81
47u-25V
+8V
R55
470R
D53
5v6
Unyitási(min): 6V
GNDD
TH1
TIC106D
+12V
C54
47u-25V
GNDD
+12V
C50
100n
GNDD
E
C66
+5V
C60
47u-25V
GNDD
C42
C73
100n
C7
+5V
100n
+5V
CS_CPLD
uncoded
2x5 tuske
GNDD
47u-25V
C63
GNDD
C89
+5V
100n
C21
100n
100n
E
GNDD
C13
100n
C15
100n
+5V
D54
R53
680R
D55
LED-Yellow
R58
1k
D56
LED-Red
R64
2k2
LED-Green
GNDD
D
F
C35
+5V
GNDD
100n
F
C8
C28
GNDD
47u-25V
47u-25V
G
+12V
G
+5V
C2
D11
1N4148
R22
33k
47u-25V
3
4
3 pins, SPOX
R52
330R, 1%
Ide 1% kell mert:
1%: 4,96V...5,12V
5%: 4,68V...5,44V
CS_PWR
L1
THR_Choke
+12V
GNDD
C
100n
C25
+5V
+5V
+12V
C57
C69
H
C56
C68
C62
C64
47u-25V
C67
100n 100n
C70
I
R76
GNDD
P6CU-1212Z
IC18
10k
just for the DCDC load
GNDD
J
GNDD
100n
C55
+12V
+5V
47u-25V
C49
+5V
47u-25V 100n
C16
100n
+5V
C14
C48
100n
C36
C19
C26
C9
GNDD
C40
C39
C18
100n
GNDD
C4
GNDD
100R
R43
100n 100n
Diatron MI Ltd.
GNDD
100n
+5V
47u-25V
47u-25V
100n
C1
100n
+5V
47u-25V
C37
100n
100n
C34
100n
C27
GNDD
C33
47u-25V
Power
Number:
03-AJB-Main_v3.01
Sheet Name:
Size:
Gyetvai Árpád
Katus Ferenc
Approved by:
Author:
I
Filename: AJB-MAIN_v3.010.sch
Sheet
6
3.01
Revision:
J
of 8
Last Modified:
Tue May 04, 2004
Signature:
Title:
Abacus Junior Basic Main Board
Company:
100n
CS_ICD
1x7 pins
If populated:
Pin 2: coded
GNDD
H
47u-25V
CS_+5V
R54
1k, 1%
12V input
4 pins, SPOX
L2
SMD_Choke: IXC-1270-01
B
47u-25V
5
6
7
8
9
10
A
47u-25V
47u-25V
1
2
3
4
5
6
7
8
9
10
1
2
3
4
5
6
7
8
9
10
GNDD
A
+5V
GNDD
+5V
GNDD
IC7
B
R3
R7
R9
R10
10k
10k
10k
10k
10k
GNDD
C22
100n
R1
+5V
T3
1N4148
B
GNDD
R32
1k
BC337
+5V
+5V
24FC256-I/SM
Address:(MSB,LSB):001
IC10
24FC256-I/SM
D16
100R
Address:(MSB,LSB):010
R82
R141
100R
BATTERY
CR2032-3V
A
+5V
CS_REAG_SEL1
CS_REAG_SEL3
C
Reagent Sensors
CS_REAG
Pin 5: Coded
CS_REAG_SEL0
CS_REAG_SEL2
CS_REAG_SEL4
+5V
2k2
R34
I2C EEPROMS
SDA
GNDD
2k2
R33
2x5 pins, military
GNDD
IC6
GNDD
C24
100n
SCK
SDA
SCK
R2025S
I2C Real Time Clock, Battery
FIX I2C Address: 064H
C
D
D
R2
10k
E
GNDD
E
R6
1k5
+5V
R74
T4
BC327
C29
22p
OSC1
F
D6
1N4148
R4
2k2
GNDD
1x4 pins
Pin 2,3: coded
CS_LS
GNDD
BC337
T2
+5V
R78
33R
D58
1N4148
24MHz
24 MHz only !
1k
F
G
IC5
PB1
PW1
PA1
G
H
H
R5
1k
Company:
C12
100n
GNDD
I
+12V
D3
1N4148
T1
GNDD
+12V
PMP_OUT
GNDD
+5V
CS_PRES
J
CS_PUMP
Pin 3: coded
1x4 pins
100n
C31
Pin 4: coded
R144
3k3
+5V
1x4 pins
R143
NTC 3k3
GNDD
Diatron MI Ltd.
TIP121
Misc.
Sheet
7
3.01
Revision:
J
of 8
Last Modified:
Tue May 04, 2004
Signature:
Title:
Abacus Junior Basic Main Board
Number:
03-AJB-Main_v3.01
Sheet Name:
Size:
Gyetvai Árpád
Katus Ferenc
Approved by:
Author:
I
Filename: AJB-MAIN_v3.010.sch
1
2
3
4
5
6
7
8
9
10
3
8
3
6
C
11
4
B
2
2
D
D
E
E
F
F
G
G
H
H
Company:
I
tables
Diatron MI Ltd.
Signature:
8
J
3.01
of 8
Revision:
J
Last Modified:
Tue May 04, 2004
Sheet
Title:
Abacus Junior Basic Main Board
Number:
03-AJB-Main_v3.01
Sheet Name:
Size:
Gyetvai Árpád
Katus Ferenc
Approved by:
Author:
I
Filename: AJB-MAIN_v3.010.sch
Net Index Table
Sheets
Analog[D8],Power[H2]
Main[D2],Analog[B1]
Main[I7],Comm[G4]
Main[H2],Misc.[A8]
Main[F10],Analog[D9]
Main[F10],Analog
Main[F10],Misc.[H4]
Main[A4][J7],Misc.[E5]
Main[F10],Analog[E5]
Main[H3],Power[G8]
Main[D7],Comm[F9]
Main[H10],Comm[D9]
Main[I6],Comm[G4]
Main[C4],Analog[D8]
Main[I8],Analog[D8]
Main[F10],Motor23M_V[G4]
Main[C3],Motor23M_V[E5]
Main[A9],Motor23M_V[E2]
Main[C3],Motor23M_V[F9]
Main[B9],MotorXYR[F3]
Main[B9],MotorXYR[F3]
Main[B9],MotorXYR[G3]
Main[A9],Motor23M_V[B6]
Main[A9],Motor23M_V[B3]
Main[A9],Motor23M_V[B9]
Main[B9],MotorXYR[C9]
Main[B9],MotorXYR[C6]
Main[B9],MotorXYR[C3]
Main[F9],Misc.[I7]
Main[C3],Motor23M_V[F5]
Main[A9],Motor23M_V[F2]
Main[C3],Motor23M_V[D9]
Main[B9],MotorXYR[G3]
Main[B9],MotorXYR[G3]
Main[B9],MotorXYR[F3]
Main[H1],Analog[B8]
Main[J4],Comm[A3]
Main[J4],Comm[A4]
Main[J5],Comm[A4]
Main[J5],Comm[A5]
Main[J5],Comm[A6]
Main[J5],Comm[A7]
Main[J5],Comm[A7]
Main[J5],Comm[D2]
Main[H2],Comm[I6]
Main[H2],Comm[I6]
Main[B2],Analog[G7]
Main[B2],Analog[J7]
Main[D6],Motor23M_V[B9]
Main[D7],MotorXYR[D9],Motor23M_V[B2]
Main[D7],Motor23M_V[B9],Analog[E7]
Main[D6],MotorXYR[D9],Motor23M_V[B1],Analog[H8]
Main[D7],Motor23M_V[C9],Analog[E9]
Main[F3],MotorXYR[D9],Motor23M_V[B1],Analog[H3]
Main[D6],Motor23M_V[C9]
Main[D7],MotorXYR[D9],Motor23M_V[B1]
Main[H1],Analog[B8],Power[D2]
Analog[G5],Misc.[F2]
Analog[G5],Misc.[F2]
Main[B9],Analog[B1]
Main[H2],Power[H6]
Main[H1],Analog[B8]
Main[A2],Analog[G2]
Main[F9],Misc.[H3]
Analog[G5],Misc.[F2]
Main[J8],Comm[G2]
Main[J7],Comm[J2],Power[G9]
Main[J7],Comm[J2],Power[G9]
Main[J7],Comm[J2],Power[G9]
Main[G3],Comm[E4]
Main[G3],Comm[G4]
Main[G3],Comm[E4]
Main[G4],Comm[G4]
Main[G4],Comm[E4]
Main[G4],Comm[G4]
Main[G4],Comm[E4]
Main[G4],Comm[G4]
Main[H1],Analog[D8]
Main[D7],Comm[F9]
Main[H10],Comm[D9]
Main[D6],Comm[F9]
Main[H10],Comm[B9]
Main[I7],Motor23M_V[G6],Analog[E5],Misc.[B6]
Main[J7],Misc.[B7]
Main[I7],Motor23M_V[G6],Analog[E5]
Main[E9],Misc.[B2]
Main[E9],Misc.[B2]
Main[E9],Misc.[B2]
Main[E8],Misc.[B3]
Main[E8],Misc.[B3]
Main[D3],Misc.[D2]
Main[D3],Analog[B1]
Main[D7],Misc.[E9]
Main[I8],Motor23M_V[G7]
Main[I7],Comm[I6]
Main[C6],Power[F10]
Main[C6],Power[F9]
Main[C6],Power[F9]
Main[H1],Analog[B8]
Main[D3],Analog[J5]
Main[C6],Power[F10]
Main[D6],Comm[F9]
Main[H10],Comm[B9]
Main[B2],Analog[G9]
Main[A2],Analog[J2]
Main[I6],Comm[E4]
A
35,26,15
Net Name
-12V_A
-ADIT_DG
A0
AN_BTY
AN_ELV
AN_PEAK
AN_PRS
CLK_MAIN
CS_DIGPOT
CS_ICD_ MCLR
CTS1
CTS2
DEN
DHM
DHON
DIL_CFG
END_D
END_L
END_M
END_R
END_X
END_Y
EN_D
EN_L
EN_M
EN_R
EN_X
EN_Y
FREE_TEMP
HOME_D
HOME_L
HOME_M
HOME_R
HOME_X
HOME_Y
HSW
KBD0_IC
KBD1_IC
KBD2_IC
KBD3_IC
KBD4_IC
KBD5_IC
KBD6_IC
KEYBOARD_INT
LED_GREEN_R
LED_RED_R
LTH
LTL
MA_MD
MA_YXRL
MB_MD
MB_YXRL
MC_MD
MC_YXRL
MD_MD
MD_YXRL
MVON
PA1
PB1
PDEN
PIC_AVDD
PLS
PULSE
PUMP
PW1
PWM_LCD
RB5
RB6
RB7
RD0
RD1
RD2
RD3
RD4
RD5
RD6
RD7
RSW
RTS1
RTS2
RX1
RX2
SCK
SDA
SDO
SEL0
SEL1
SEL2
SEL3
SEL4
SENSE
SLT
SPKR
STRB
ST_BUTT
TCK
TDI
TDO
TEST
TL0
TMS
TX1
TX2
UTH
UTL
WR
1
3V3
2
L298 FEKVO
SO-G16/D10_GLUED
QFP10X10-G44/XAE_ENLARGED
L298 FEKVO
SO-G20/G7.1
SO-G14_ENLARGED
5,6
SO-G8/Y1.7
L298 FEKVO
DIP18
SO-G8/Y1.7
L298 FEKVO
DIP18
TQFP80
L298 FEKVO
TO-220AB-STANDING
L298 FEKVO
TO220_FEKVO
SIP7#3#7
SO-G20/G7.1
SO-G14/G3_KF
SO-G16/D10
SO-G8
SO-G14/G3
SO-G16
SO-G14/G3
SO-G16
-12V_A MAX_V- +8V
3
C
+12V MAXV+
GNDD
4
8,15,1
15,8
4,25,17
9
4
8,15,1
20
1,19,10
11
1,8
3,4,2
9
4
8,15,1
5
10
9,1,4
2,8
1,3,4
9
4
8,15,1
5
10
9,1,4
48,71,12,32
51,31,26,11,70
9
4
8,15,1
3
1
4
9
1,15,8
3
1
2,4
20
1,10
11,14,12
10,4
6,16
5,4,8
2,4
4
10
13
12
7,5,15,10
12
2
16
15
4
Power Table
VDD_RTC
+5V
9
16
5
Package
6
B
Device(Type)
L298HN
SN74HCT157D
XC9536-15VQ44C_ENLAR
L298HN
SN74HCT244DW
R2025S
24FC256
L298HN
MIC5841
24FC256
L298HN
MIC5841
PIC18F8520
L298HN
L033V_STANDING
L298HN
LM1084
P6CU-XXXXZ
SN74HCT574DW
MCP42XXX
SN74HCT138D
LM393D
TL084ID
DG411DY
LM339AD
MAX232AESE
7
8
9
10
A
Ref Des
IC1
IC2
IC3
IC4
IC5
IC6
IC7
IC8
IC9
IC10
IC11
IC12
IC13
IC14
IC15
IC16
IC17
IC18
IC19
IC20
IC21
IC22
IC23
IC24
IC25
IC26
1
2
3
4
5
6
7
8
9
10
CD Spacer
AJMT-30
CD-ROM
Floppy Drive
M2x3 cross recessed
raised cheese head
screw
M3x6 hex hub
screw
M2x3 cross recessed
raised cheese head
screw
M3x6 hex hub
screw
ANYAGMEGNEVEZÉS
MEGJEGYZÉS
FELÜLETKIKÉSZÍTÉS
DARAB
MÉRETARÁNY
M 1:1
VÁLTOZÁS
RAJZ.
JELE
DÁTUM
MEGNEVEZÉS
DÁTUM
Floppy & CD-ROM assembly
RAJZSZÁM
AJASM-17
15
14
16
13
7
3
6
10
11
8
2
20
19
18
4
1
12
9
5
17
ANYAGMEGNEVEZÉS
In.
Q.
Name
1
2
Stepmotor
2
1
Front plate for frame
AJ30024
3
1
Joining bar lower for frame
AJ30008
4
1
Main moving block
AJ30001
5
1
Stepmotor holder for X
AJ30014
6
1
Roller axle for X
AJ30017
7
1
Belt roller for X
AJ30021
8
1
Axle for Y opto cog-wheel
AJ30016
9
2
Bearing
10
1
Opto board
11
1
Roller holder for X
12
2
Tube
13
1
Roller holder for Y
14
11
M3x3 hex set screw
15
1
Moving block for Y
AJ30003
16
1
Aspirator tip fastener
AJ30028
17
3
Washer D3
18
1
M3x8 hex hub screw
19
5
M3x10 hex hub screw
20
4
M4x10 hex hub screw
21*
1
Bush
22*
2
M2,5x10 hex hub screw
MEGJEGYZÉS
FELÜLETKIKÉSZÍTÉS
CODE
J307
AJ30019
AJ30020
AJ30013
DARAB
MÉRETARÁNY
M 1:1
VÁLTOZÁS
RAJZ.
JELE
DÁTUM
MEGNEVEZÉS
DÁTUM
H&V Moving Unit assmebly I.
RAJZSZÁM
RXY-00
25
32
49
26
In.
Q.
23
1
Timing belt MXL-105
24
1
Head washer
25
2
Head washer tube
26
1
Sealing for head washer
AJ31002
27
1
Stepmotor holder for Y
AJ30015
28
2
Axle for X
AJ30005
29
1
Joining bar upper for frame
AJ30007
30
1
Shaft coupling for Y
AJ30010
31
1
Drive stick for Y
AJ30009
32
2
Axle for Y
AJ30006
33
1
Opto flag
AJ30023
34
1
Belt roller for Y
AJ30022
35
2
Sliding tube for main
moving block
AJ30002
36
1
Timing belt fastener for X
AJ30011
37
1
Roller axle for Y
AJ30018
38
1
Timing pulley
AJ30501
39
2
Border ring for Y timing p.
AJ30502
40
1
Opto cog-wheel
AJ30600
41
1
Bed-plate for Y opto c-w.
AJ30025
42
1
Timing pulley for X
AJ30401
43
4
M3x6 countersunk screw
44
2
Washer D2
45
2
M2x6 hex hub screw
46
1
M3x6 hex hub screw
47
5
M2,5x8 hex hub screw
48
1
M3x6 slotted screw
CODE
49
1
Timing belt MXL-140
AJ30026
50
1
Timing belt fastener for Y
34
37
50
38
24
47
33
40
43
47
42
45
36
51
44
41
39
29
23
48
30
46
35
31
In.
Q.
51
1
Name
Head washer holder
ANYAGMEGNEVEZÉS
MEGJEGYZÉS
FELÜLETKIKÉSZÍTÉS
CODE
AJ31001
DARAB
RXY-11
MÉRETARÁNY
M 1:1
RAJZ.
VÁLTOZÁS
27
28
Name
JELE
DÁTUM
DÁTUM
MEGNEVEZÉS
H&V Moving Unit assembly II.
RAJZSZÁM
RXY-00.1
9
1
4
10
11
15
12
14
8
13
2
7
3
6
5
ANYAGMEGNEVEZÉS
In.
Q.
Name
1
2
Gear
2
6
Fixing nut
3
1
Dilutor panel
AJ2D10001
4
1
Lower syringe holder
AJ2D10002
5
1
Opto board
6
3
M3x10 hex hub screw
7
4
Actuator
AJ2D10204
8
4
Lyse glass cover
AJ2D10102
9
4
Lyse glass
10
1
Upper syringe holder
11
2
M3x25 double end bolt
12
1
Handle
AJ2D10013
13
4
Leadin rod
AJ2D10203
14
4
Piston washer D3
15
4
Lyse piston
MEGJEGYZÉS
FELÜLETKIKÉSZÍTÉS
CODE
AJ2D10016
J214
AJ2D10005
AJ2D10201
DARAB
MÉRETARÁNY
M 1:1
VÁLTOZÁS
RAJZ.
JELE
DÁTUM
DÁTUM
MEGNEVEZÉS
Main Dilutor assembly I.
RAJZSZÁM
2MD-00
18
22
24
17
26
28
27
25
20
23
29
19
21
16
33
ANYAGMEGNEVEZÉS
In.
Q.
Name
16
1
Motor holder
17
2
Stepmotor
18
4
Leading rod
AJ2D10012
19
1
Left sliding block
AJ2D10007
20
1
Right sliding block
AJ2D10008
21
4
Threaded pin
AJ2D10004
22
2
Gear stick
AJ2D10006
23
1
Adjuster
AJ2D10014
24
1
Spacer 26
AJ2D10011
25
2
Spacer 11
AJ2D10010
26
2
Opto flag
AJ2D10015
27
9
Washer D3
28
6
M3x6 hex hub screw
29
8
M3x3 hex set screw
30*
4
Bush
31*
4
M4x10 countersunk screw
32*
8
M3x12 hex hub screw
33
2
Leading bush
34*
4
Sealing ring
MEGJEGYZÉS
FELÜLETKIKÉSZÍTÉS
CODE
AJ2D10003
AJ2D10009
AJ2D10017
DARAB
MÉRETARÁNY
M 1:1
VÁLTOZÁS
RAJZ.
JELE
DÁTUM
DÁTUM
MEGNEVEZÉS
Main Dilutor assembly
RAJZSZÁM
2MD-00-1
M3x6 hex hub
screw with
cogged washer
Cover Ring
AJS40601
Amplifier Sheet
AJ40001
Counting Chamber
AJ43001
M3x6 hex hub
screw
Amplifier Board
J140
Measuring Tube
AJ42101
M3x6 hex hub
screw
M3x6 hex hub
screw with
cogged washer
M3x5 pin nut
Reference Electrode
assembly
AJ42202
HGB Head
A434
Bleeding
AJ40401
Chamber Holder Rod
AJ40002
Code for Chamber & Aperture without Amplifier Board: C400
ANYAGMEGNEVEZÉS
MEGJEGYZÉS
FELÜLETKIKÉSZÍTÉS
DARAB
MÉRETARÁNY
M 1:1
M3x5 pin nut
VÁLTOZÁS
RAJZ.
JELE
DÁTUM
DÁTUM
MEGNEVEZÉS
Chamber, Aperture and
Amplifier assembly
RAJZSZÁM
AJASM-16
14
22
15
31
16
27
13
21
A
4
12
11
8
24
18
7
10
9
6
3
2
5
1
19
A-A
A
28
20
17
26
29
30
23
Name
Q.
Name
CODE
1
1
Stepmotor
2
1
Motor holder
AJM10008
3
1
Gear 16.1
AJM10003
4
1
Gear axle
AJM10012
5
2
Seeger-ring
6
2
Sliding ring
AJM10011
7
1
Gear 30.1
AJM10006
8
1
Gear 16.2
AJM10004
9
1
Gear 30.2
AJM10005
10
1
Central panel
AJM10010
11
1
Spindle
AJM10009
12
1
Leading billet
AJM10014
13
2
Leading rod
AJM10013
14
1
Piston
AJM10101
15
1
Piston cover
AJM10201
16
1
Cover panel
AJM10203
17
1
Opto board
18
1
Opto flag
AJMVOL150
19
1
Fixing cover sheet
AJM10002
20
1
Cover sheet
AJM10001
21
1
M3x10 countersunk screw
22
1
Sealing ring
23
1
1,6/1,2 tube
24
2
Bearing
25
4
M3x8 hex hub screw
26
14
M3x6 countersunk screw
27
4
M3 PEM fastener
J224
In.
Q.
30
4
M2,5x10 hex hub screw
28
3
M25x8 countersunk screw
31
6
M3x3 hex set screw
29
4
Washer D2,5
ANYAGMEGNEVEZÉS
CODE
In.
MEGJEGYZÉS
FELÜLETKIKÉSZÍTÉS
DARAB
MÉRETARÁNY
M 1:1
25
VÁLTOZÁS
RAJZ.
JELE
DÁTUM
MEGNEVEZÉS
DÁTUM
Micro Dilutor assembly
RAJZSZÁM
M2.1-00
4
3
15
14
2
7
10
5
12
13
9
6
17
16
8
11
18
1
ANYAGMEGNEVEZÉS
VÁLTOZÁS
RAJZ.
JELE
In.
Q.
Name
1
1
Stepmotor
2
1
Rotor
3
1
Door sheet
4
1
Ball axle
MB-02
5
1
Crank
MB-03
6
1
Actuator
MB-04/1
7
1
Shaft
MB-04/2
8
1
Bob
MB-05
9
2
Abutment
MB-01
10
2
Spacer
MB-07
11
2
Microswitch
12
3
M3x3 hex set screw
13
4
M3x10 hex hub screw
14
2
M3x6 hex hub screw with
flat end
15
2
M2x8 countersunk screw
16
4
M2x8 hex hub screw
17
1
M4x5 hex set screw
18
4
M3x6 countersunk screw
MEGJEGYZÉS
FELÜLETKIKÉSZÍTÉS
DÁTUM
MEGNEVEZÉS
DÁTUM
Sample Rotor assembly
CODE
MB-06
VOL-160
AJMB10100
DARAB
MÉRETARÁNY
1 DB
M 1:1
RAJZSZÁM
MB-01
M3 PEM fastener
M3x8 PEM
fastener
M3 PEM fastener
M3 PEM fastener
Sheet I.
AJVOL-020
M3 PEM fastener
M3 PEM fastener
M3 PEM fastener
ANYAGMEGNEVEZÉS
MEGJEGYZÉS
FELÜLETKIKÉSZÍTÉS
DARAB
MÉRETARÁNY
M 1:2
VÁLTOZÁS
RAJZ.
JELE
DÁTUM
DÁTUM
MEGNEVEZÉS
Sheet I. assembly
RAJZSZÁM
AJASM-02
M3 PEM fastener
M3 PEM fastener
M3 PEM fastener
M3 PEM fastener
M4 PEM fastener
Sheet II.
AJVOL-030
M3 PEM fastener
M3 PEM fastener
ANYAGMEGNEVEZÉS
MEGJEGYZÉS
FELÜLETKIKÉSZÍTÉS
DARAB
MÉRETARÁNY
M 1:2
VÁLTOZÁS
RAJZ.
JELE
DÁTUM
DÁTUM
MEGNEVEZÉS
Sheet II. assembly
RAJZSZÁM
AJASM-03
M3x8 PEM
fastener
M3 PEM fastener
M3 PEM fastener
M3 PEM fastener
Sheet III.
AJVOL-040
M3x5 pin nut
M3 PEM fastener
ANYAGMEGNEVEZÉS
MEGJEGYZÉS
FELÜLETKIKÉSZÍTÉS
DARAB
MÉRETARÁNY
M 1:2
VÁLTOZÁS
RAJZ.
JELE
DÁTUM
DÁTUM
MEGNEVEZÉS
Sheet III. assembly
RAJZSZÁM
AJASM-04
Reagent Sensor Board
J240
Sheet I.
assembly
Sheet II.
assembly
M3x6 hex hub
screw
M3x6 hex hub
screw
Pressure Sensor
A531
M4x8 hex hub
screw
H&V Moving Unit
M3x6 slotted
screw
Sample Rotor
Sheet III.
assembly
M3x6 slotted
screw
Floppy & CD-ROM
assembly
Speaker Fastener
ANYAGMEGNEVEZÉS
MEGJEGYZÉS
FELÜLETKIKÉSZÍTÉS
DARAB
MÉRETARÁNY
M 1:2
RAJZ.
VÁLTOZÁS
Speaker
JELE
DÁTUM
MEGNEVEZÉS
DÁTUM
Structure 00.
RAJZSZÁM
AJASM-05
M3x10 hex hub
screw
Pneumatic & Power Board (PPB)
J100
M3x6 hex hub
screw
M3x16 hex hub
screw with
cogged washers
IDEPROM
J170
M3x6 hex hub
screw
Control & Measurement Board (COMB) J110
& DimmPC A192
Code for COMB with DimmPC: J111
ANYAGMEGNEVEZÉS
MEGJEGYZÉS
FELÜLETKIKÉSZÍTÉS
DARAB
MÉRETARÁNY
M 1:2
VÁLTOZÁS
RAJZ.
JELE
DÁTUM
DÁTUM
MEGNEVEZÉS
Structure 01.
RAJZSZÁM
AJASM-06
Frame
M3x8 hex hub
screw
Puffer
C510
M3x3 hex set
screw
ANYAGMEGNEVEZÉS
MEGJEGYZÉS
FELÜLETKIKÉSZÍTÉS
DARAB
MÉRETARÁNY
M 1:2
VÁLTOZÁS
RAJZ.
JELE
DÁTUM
MEGNEVEZÉS
DÁTUM
Structure 02.
RAJZSZÁM
AJASM-07
M3x16 hex hub
screw with
back nut
M3x6 hex hub
screw
Cover Sheet
AJVOL-141
M3x6 hex hub
screw
Amplifier Assembly
Micro Dilutor
M3x6 hex hub
screw
Reagent Connectors
Chamber and Aperture
C400
Valve Unit 1-5
J501
M3x6 hex hub
screw
ANYAGMEGNEVEZÉS
MEGJEGYZÉS
FELÜLETKIKÉSZÍTÉS
DARAB
MÉRETARÁNY
M 1:2
VÁLTOZÁS
RAJZ.
JELE
DÁTUM
MEGNEVEZÉS
DÁTUM
Structure 03.
RAJZSZÁM
AJASM-08
Valve Unit 11-16
J503
M3x10 hex hub
screw
M3x6 hex hub
screw
Main Dilutor
M3x6 hex hub
screw
Tube Fastener
AJKK-02
Power Switch
J157
12 V DC inlet
M3x6 hex hub
screw
M4x8 hex hub
screw
COMB Sheet
AJVOL-090
M3x6 hex hub
screw
M3x6 hex hub
screw
Peristaltic Pump
A560
Blanket Sheet
ANYAGMEGNEVEZÉS
MEGJEGYZÉS
FELÜLETKIKÉSZÍTÉS
DARAB
MÉRETARÁNY
M 1:2
RAJZ.
VÁLTOZÁS
M3x6 hex hub
screw
M4x8 hex hub
screw
JELE
DÁTUM
MEGNEVEZÉS
DÁTUM
Structure 04.
RAJZSZÁM
AJASM-09
M3x8 hex hub
screw
M3x6 hex hub
screw
M3x10 countersunk
screw
M3x10 hex hub
screw
M3x6 hex hub
screw
M3x10 hex hub
screw
M3x8 hex hub
screw
M3x6 hex hub
screw
M3x6 hex hub
screw
ANYAGMEGNEVEZÉS
MEGJEGYZÉS
FELÜLETKIKÉSZÍTÉS
DARAB
MÉRETARÁNY
M 1:2
RAJZ.
VÁLTOZÁS
M3x6 hex hub
screw
JELE
DÁTUM
DÁTUM
MEGNEVEZÉS
Structure 05.
RAJZSZÁM
AJASM-10
Foil Keypad
J132
LCD Assembly
Start Button
M3x10 hex hub
screw
Front Panel
AJVOABS-020
Stand
AJVST-010
ANYAGMEGNEVEZÉS
MEGJEGYZÉS
FELÜLETKIKÉSZÍTÉS
DARAB
MÉRETARÁNY
M 1:2
Fastener
AJVST-011
VÁLTOZÁS
RAJZ.
JELE
DÁTUM
DÁTUM
MEGNEVEZÉS
Front Panel assembly
RAJZSZÁM
AJASM-11
Upper Left Door Link
AJ60022/A
Left Door Sheet
AJVOL-190
M3X6 countersunk
screw
Link Holder
AJ60020
Door Lock
M3x10 hex hub
screw
MEGJEGYZÉS
FELÜLETKIKÉSZÍTÉS
DARAB
MÉRETARÁNY
M 1:2
RAJZ.
VÁLTOZÁS
M3X6 countersunk
screw
ANYAGMEGNEVEZÉS
Lower Left Door Link
AJ60022
JELE
DÁTUM
MEGNEVEZÉS
DÁTUM
Structure 07.
RAJZSZÁM
AJASM-12
Hinge
AJVOL-210
Door Fastener Sheet
AJVOL-130
M3x6 countersunk
screw
M3x6 countersunk
screw
Backdoor Sheet
AJVOL-200
Door Lock
M3x6 countersunk
screw
ANYAGMEGNEVEZÉS
MEGJEGYZÉS
FELÜLETKIKÉSZÍTÉS
DARAB
MÉRETARÁNY
M 1:2
Front Panel assembly
VÁLTOZÁS
RAJZ.
JELE
DÁTUM
MEGNEVEZÉS
DÁTUM
Structure 08.
RAJZSZÁM
AJASM-13