1
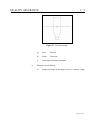
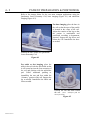
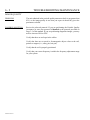
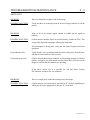
IGC-MEDICAL ADVANCES INC.
QUADRATURE LOWER
EXTREMITY COIL
473PH-64A
Compatible with Philips
Gyroscan NT and Intera
1.5T MRI Systems
05/25/04
Rev.1
Federal Law restricts this device to sale, distribution, and use by or on
the order of a physician.
Proper performance of this coil is guaranteed only while the coil is being
used on the MR system (hardware/software level) specified at the time
of purchase. Upgrades or other modifications to the system software
and/or hardware may affect compatibility. Prior to upgrading your MR
system, please contact IGC-Medical Advances Inc. Customer Service
Department to discuss coil compatibility issues. Failure to do so may
void your warranty.
©
US Headquarters:
IGC-Medical Advances Inc.
10437 Innovation Drive
Milwaukee, WI 53226-4815 USA
(414) 258-3808
800-657-0891
Fax: (414) 258-4931
E-mail: [email protected]
Web: www.medadv.com
A subsidiary of
Intermagnetics General Corporation
NOTICE:
Attention, Consult Accompanying Documents
Type BF Equipment
Class II Equipment
Conforms to European Medical Device Directive 93/42/EEC
TRANSPORT AND STORE THIS PRODUCT UNDER
THE FOLLOWING ENVIRONMENTAL CONDITIONS
ONLY, FOR A PERIOD NOT EXCEEDING 4 WEEKS:
AMBIENT TEMPERATURE OF -34°C TO + 60°C
RELATIVE HUMIDITY OF 15% TO 95%
(Non-Condensing)
ATMOSPHERIC PRESSURE OF 765hPa TO 1011hPa
M473PH-64A Rev.1
CONTENTS
i
Safety
Training........................................................................................ 1-1
Quality Assurance........................................................................ 1-1
Indications.................................................................................... 1-1
Contraindications ......................................................................... 1-1
Precautions................................................................................... 1-1
Cautions ....................................................................................... 1-2
Emergency Procedures................................................................. 1-3
Coil Instructions
Shipping List................................................................................ 2-1
Coil Description ........................................................................... 2-2
Pad Description............................................................................ 2-2
Coil Positioning ........................................................................... 2-3
System/Coil Connection .............................................................. 2-4
Coil Alignment............................................................................. 2-5
FOV Range .................................................................................. 2-5
Quality Assurance
Reconstitution Instructions for Phantom Bottle........................... 3-1
Image Quality Scan...................................................................... 3-1
Evaluation of the Scan ................................................................. 3-4
Original SNR Data Table............................................................. 3-5
Periodic Quality Assurance Check .............................................. 3-6
Periodic SNR Data Table............................................................. 3-6
Patient Preparation
& Positioning
Protocols
Troubleshooting/
Maintenance
Patient Preparation ....................................................................... 4-1
General Patient Positioning Guidelines ....................................... 4-1
Protocol ........................................................................................ 5-1
Troubleshooting ........................................................................... 6-1
Receiving No Signal .................................................................... 6-1
Image Quality............................................................................... 6-2
Artifacts........................................................................................ 6-3
Maintenance................................................................................. 6-4
Storage ......................................................................................... 6-4
Inspection..................................................................................... 6-4
Cleaning ....................................................................................... 6-4
M473PH-64A Rev.1
SAFETY
1-1
TRAINING
This manual contains detailed information on the set-up, positioning
and use of the IGC-Medical Advances Inc. (MAI) coil. The
instructions should be read carefully and thoroughly before
attempting to scan patients with the coil.
QUALITY ASSURANCE
The procedure described in the Quality Assurance Section of this
manual should be performed upon receipt of the coil to establish a
baseline for coil performance. The procedure should be repeated at
regular intervals.
INDICATIONS
IGC-Medical Advances Inc. magnetic resonance coils are indicated
for use as either receive-only or transmit and receive antennae of RF
energy at a specific frequency. The signal received by the coils is
dependent upon MRI parameters (T1 or Spin-lattice relaxation time,
T2 or spin-spin relaxation time, density of nuclei, flow velocity, and
chemical shift). The images produced by the imaging coil
correspond to the distribution of nuclei exhibiting nuclear magnetic
resonance.
The MR coil is tuned by MAI at the manufacturing site to the
approximate resonant frequency of the magnetic resonance system.
CONTRAINDICATIONS
PRECAUTIONS
The operator should be aware of the following contraindications for
use related to the strong magnetic field of the MR system:
•
Scanning is contraindicated for patients who have
electrically, magnetically or mechanically activated
implants (for example, cardiac pacemakers), because the
magnetic and electromagnetic fields produced by the MR
device may interfere with the operation of these devices.
•
Scanning patients with intracranial aneurysm clips is
contraindicated.
Precautions should be taken when scanning patients with the
following conditions:
•
A greater than normal potential for cardiac arrest.
•
An increased likelihood for developing seizures or
claustrophobia.
•
Unconscious, heavily sedated, confused patients or those
with whom no reliable communications can be maintained.
M473PH-64A Rev.1
1-2
CAUTIONS
M473PH-64A Rev.1
SAFETY
The following general warning statements apply to scanning with a
magnetic resonance system. For further details, review the warnings
included in your MR system operations manual.
•
Cables should not be looped or crossed. Arcing and patient
burns could result.
•
If a patient complains of burning, tingling, stinging, or other
“burn”-type sensations, promptly stop the scan procedure,
examine the patient, and contact the responsible physician
before continuing the procedure. Pay special attention to
very young, sedated, or other patients who may not be able
to communicate effectively.
•
Route all cables out of the magnet so that they do not contact
the patient.
•
Patients with ferromagnetic metal should not be scanned,
because the magnetic field may interact with implanted
surgical clips or other ferromagnetic materials.
•
Persons with cardiac pacemakers or other implanted
electronic devices should not enter the magnetic field zone
delineated by the system’s manufacturer.
•
There is a risk to scanning feverish or decompensated
cardiac patients.
•
Facial makeup should be removed before scanning because
many eye makeups contain metal flakes which can cause
skin and eye irritation. Permanent eye-liner tattoos may
cause eye irritation due to the presence of ferromagnetic
particles.
•
Patients who work in environments in which there is a risk
of having embedded metallic fragments in or near the eye
should be carefully screened before having an MR exam.
SAFETY
EMERGENCY
PROCEDURES
1-3
In the unlikely event that a coil creates smoke, sparks or makes an
unusually loud noise or if the patient requires emergency assistance:
1.
Stop the scan if one is in progress.
2.
Disconnect the coil.
3.
Remove the coil from the patient.
4.
Remove the patient from the scan room if medical treatment
is needed.
5.
Contact IGC-Medical Advances Inc. as soon as possible to
inform us about the details of the incident.
M473PH-64A Rev.1
COIL INSTRUCTIONS
2-1
SHIPPING LIST
Table 2-1 lists the Quadrature Lower Extremity Coil parts. Check that all
parts have been shipped.
TABLE 2-1
SHIPPING LIST FOR THE QUADRATURE
LOWER EXTREMITY COIL
QTY.
ITEM
PART NO.
1
Quadrature Lower Extremity Coil
1.5T
19700P1
1
Foot Support Pad
14626
1
Leg/Foot Support
14627
1
Toe Pad
14628
1
Knee Pad
14629
1
Phantom Bottle (contains NaCl &
CuSO4⋅5H2O)
19829
1
MSDS
10818
1
Tips Sheet
19706
1
Operator’s Manual
M473PH-64A
The use of the Quadrature Lower Extremity
Coil requires the Philips cable trap.
(Figure 2-1) For more information, please
contact your Philips representative.
Figure 2-1
M473PH-64A Rev.1
2-2
COIL INSTRUCTIONS
Quadrature Lower Extremity Coil
The Quadrature Lower Extremity Coil is
comprised of a coil, a positioning base, and a set
of positioning pads.
Figure 2-2
COIL DESCRIPTION
The Quadrature Lower Extremity Coil is a quadrature receive-only
imaging coil. The unique “chimney” design of the upper half of the coil
allows imaging of the foot and ankle in a comfortable, neutral position.
Several features make patient positioning particularly easy:
1.
The top half of the coil disconnects from the bottom half for ease of
patient entry and exit.
2.
The base allows you to move the coil left or right into alignment
with the anatomy to be scanned.
3.
A locking device on the support keeps the coil in place.
4.
A numbering scale allows you to estimate the lateral offset.
PAD DESCRIPTION
Four pads are supplied with the Quadrature Lower Extremity Coil. One pad
supports the knee during examinations of the knee, one pad supports the
foot/ankle during foot/ankle examinations, one pad stabilizes the forefoot,
and one pad supports the unaffected extremity. The pads are designed to
raise the knee or ankle to isocenter in the coronal plane. If more padding is
necessary to align the extremity with isocenter or to increase patient
comfort, use additional pads from the department.
M473PH-64A Rev.1
COIL INSTRUCTIONS
2-3
COIL POSITIONING
1.
Place the Quadrature Lower Extremity Coil on the patient table. The
coil cable should exit away from the magnet. The coil base should
be centered on the table right to left.
2.
Release the coil centering lever(s) and slide the coil laterally to its
desired position. Secure the coil in its desired position to ensure that
the coil will not move during imaging.
Always position the coil as close to magnet isocenter on the base as
possible. Image quality decreases the further off-center the coil is
positioned. This is especially important if fat saturation techniques
will be employed.
3.
Remove the top half of the coil. Apply downward pressure on the
latches located on either side of the coil to release the latches and
separate the two halves of the coil.
4.
Position the Quality Assurance Phantom or the patient within the
coil. Refer to either the QUALITY ASSURANCE or PATIENT
PREPARATION & POSITIONING Sections for more detailed
positioning information.
5.
Put the top half of the coil back in place. Be sure to align the coil
pins on the top half with the receiver holes on the coil bottom half
(note that there is only one way in which it can connect). Secure the
anterior portion of the coil.
NOTE:
6.
The anterior portion of the Quadrature Lower
Extremity Coil must be clamped completely to the
posterior portion. Failure to do so may cause severe
anterior signal drop-off or coil damage!
Raise the patient table to “full up” position. Ensure that the RF cable
does not get caught in the table or system while the table is being
raised.
M473PH-64A Rev.1
2-4
COIL INSTRUCTIONS
SYSTEM/COIL
CONNECTION
The use of the Quadrature Lower Extremity
Coil requires the Philips cable trap.
(Figure 2-3) For more information, please
contact your Philips representative.
Figure 2-3
M473PH-64A Rev.1
1.
Connect the Quadrature Lower Extremity Coil to the cable trap.
2.
Connect the cable trap to one of the receive coil ports. Be sure the
connector plug inserts completely.
3.
MC-MAI should appear as a coil selection. If it is not within your
system’s coil choices, please refer to the installation instructions
included in the Philips Service Manual. The procedure is as follows:
a)
Login
Gyrotool
b)
Enter Password when required
c)
Select
Modify system configuration
d)
Select
Coil administration
e)
Set
MAI coil version to NT
f)
Select
<Proceed> to activate the new selection
g)
Select
Exit to main menu
h)
Select
EXIT from Gyrotool
COIL INSTRUCTIONS
2-5
COIL ALIGNMENT
1.
Press the alignment light button. Lift the tumble switch
“Upward/In” and keep it lifted until the light cross hairs are fully
aligned with the mark on the anterior portion of the coil.
2.
If the coil is offset laterally, record the numerical amount from the
numbered scale on the coil base. Enter the offset distance in your
protocol.
FOV RANGE
The field of view coverage available from the coil in each scan plane is as
follows:
Axial Plane
18 cm
Axial through vertical extension:
Coronal Plane
22 cm
Sagittal Plane
22 cm
28 cm
M473PH-64A Rev.1
QUALITY ASSURANCE
3-1
RECONSTITUTION INSTRUCTIONS
FOR PHANTOM BOTTLE
1.
Unscrew the cap from the phantom bottle.
2.
Fill the phantom bottle approximately half full with distilled water.
The proper amount of sodium chloride (NaCl) and copper sulfate
(CuSO4⋅5H2O) has been added to the bottle.
3.
Securely screw the phantom bottle cap back on.
4.
Shake the bottle vigorously to dissolve the sodium chloride and
copper sulfate.
5.
Unscrew the cap from the phantom bottle.
6.
Fill the bottle completely with distilled water so that no air bubbles
are present (all the way to the rim).
7.
Securely screw the bottle cap back on.
1.
Position the extremity coil on the patient table.
2.
Position the coil in the middle of the base.
3.
Place the supplied phantom bottle inside the coil.
4.
Connect the coil to the cable trap and connect the cable trap to
Surface coil connector 1 (SC1).
5.
Align the lightvisor lights with the marker on the coil and move the
coil to the isocenter of the system by using the travel to scan plane
function.
IMAGE QUALITY
SCAN
M473PH-64A Rev.1
3-2
QUALITY ASSURANCE
6.
Create a new patient i.e., MAI-E
a)
Select
Scan control
b)
Select
Anatomy
c)
Select
Phantom studies
d)
Select
SC
e)
Use planscan for the scout scan and modify the next scan
parameters:
Coil selection
FOV
Connection
7.
f)
Press
Proceed
g)
Select
Start scan
h)
Press return for default scanname
After the scan is finished:
a)
Display the image on the image screen (i.e., using the + sign)
b)
Select
Scan control
c)
Select
Scan list
d)
Delete scout scan from scan list
e)
Select planscan on scan C11:T and check/modify the next
scan parameters:
Coil selection
FOV
Connection
f)
M473PH-64A Rev.1
MC-MAI
300 (mm)
SC1
MC-MAI
300 (mm)
SC1
Position the slice in the center of the bottle as indicated in
Figure 3-1.
QUALITY ASSURANCE
3-3
Figure 3-1 Slice Positioning.
8.
g)
Press
Proceed
h)
Select
Start scan
i)
Press return for default scanname
When the scan is finished:
a)
Display the image on the image screen (i.e., with the + sign)
M473PH-64A Rev.1
3-4
QUALITY ASSURANCE
EVALUATION
OF THE SCAN
Select a Rectangular ROI in the center of the bottle according to the next
procedure:
1.
Position the mouse pointer in the image area and press right mouse
button.
2.
Select ROI rectangular in the displayed menu.
NOTE:
The shape of the ROI can be set via this menu under
“More”, ROI settings.
Figure 3-2 Positioning of ROIs.
3.
Draw a square ROI in the image. The ROI will get a number
automatically.
4.
Position the mouse pointer on this number and press right mouse
button. A menu will appear.
a)
Select
b)
Modify the size of the ROI to 1200 mm2 +/- 100 mm2 but
keep it a square.
NOTE:
M473PH-64A Rev.1
Statistics,
Statistics
The size of the ROI can be changed by dragging the
marked points of the ROI individually.
QUALITY ASSURANCE
3-5
c)
Position the ROI in the center of the bottle (see ROI 1 in
Figure 3-2).
d)
Write down the Mean value in Table 3-1 below.
e)
Position the ROI in the image area below the bottle (ROI 2).
f)
Change the size of the ROI to approximately 7000 mm2 and
position the ROI as indicated in Figure 3-2 (ROI 2).
g)
Verify by using the window width and window level of the
image that the measured area is free of artifacts.
h)
Write down the Standard Deviation in Table 3-1.
i)
Calculate the SNR:
•
j)
MEAN
Standard Deviation
Log the SNR in Table 3-1.
Table 3-1
Original SNR Data Obtained at Initial Coil Installation
Date
Signal Mean Value
of Phantom
Standard Deviation
of Noise
SNR Value
Once the Original Image Quality Scan has been completed and the values
recorded in Table 3-1, the Quadrature Lower Extremity Coil is ready to be
used for clinical imaging.
M473PH-64A Rev.1
3-6
QUALITY ASSURANCE
PERIODIC QUALITY
ASSURANCE CHECK
On a periodic basis, such as during Preventative Maintenance, perform the
quality assurance check outlined previously to ensure that the Quadrature
Lower Extremity Coil is operating properly with no appreciable
degradation of image quality. It is also advisable to carry out this procedure
if any system software or hardware upgrades are installed to ensure
consistent performance. Record the results of the periodic quality assurance
check in Table 3-2.
TABLE 3-2
PERIODIC SNR DATA
1
DATE
2
SIGNAL MEAN
VALUE
3
NOISE
STANDARD
DEVIATION
VALUE
4
SNR VALUE
5
VALUE IN
COLUMN 4
DIVIDED BY
ORIGINAL
VALUE X 100
> 85%
> 85%
> 85%
> 85%
> 85%
> 85%
> 85%
> 85%
> 85%
> 85%
> 85%
> 85%
> 85%
> 85%
> 85%
M473PH-64A Rev.1
PATIENT PREPARATION & POSITIONING
4-1
PATIENT
PREPARATION
The following are some patient preparation considerations to be aware of
before positioning for the exam.
1.
Have the patient remove any jewelry or clothing that may interfere
with the study.
2.
Be aware of skin tattoos that may contraindicate scanning.
3.
Apply skin markers as requested by your Radiologist.
GENERAL PATIENT
POSITIONING GUIDELINES
Here are additional general positioning guidelines to consider:
1.
Position the coil at the end of the table closest to the magnet bore.
Place the table pad on the table superior to the coil to provide a more
even positioning surface.
2.
Position the base of the coil centered on the table. Offset the coil
within the base to adjust for patient size and comfort. Lock the coil
down when in position and record the offset distance for use during
the exam.
3.
Be sure not to pinch any gowns or bedding material between the coil
halves when attaching the top half of the coil. This would cause poor
image quality and possibly result in damage to the coil.
4.
Padding is provided that is designed for either knee imaging or for
specific ankle and foot imaging. Additional padding or towels from
the department may be required for patient comfort and
immobilization depending on the anatomy to be imaged and patient
size.
5.
Position the patient’s arms in a comfortable position either over the
chest or at the sides. Utilize additional pillows or sponges to support
the patient and make them comfortable.
M473PH-64A Rev.1
4-2
PATIENT PREPARATION & POSITIONING
Refer to the images below for the two most common applications using the
Quadrature Lower Extremity Coil, knee imaging (Figure 4-1) and ankle/foot
imaging (Figure 4-2).
For knee imaging, place the knee in
the coil so that the apex of the patella
is located in the center of the coil.
Adjust the rotation of the leg so that
the patient is comfortable and
positioned according to department
protocol. Support the leg above and
below the coil. Immobilize the knee
as needed.
Position the knee within the Quadrature
Lower Extremity Coil.
Figure 4-1
For ankle or foot imaging, place the
ankle in the coil with the foot flexed so that
it will extend up into the foot extension of
the coil and position with the ankle/foot
pad. Utilize additional padding to
immobilize the toes and foot within the
“chimney” portion of the coil. Support the
leg as needed. Immobilize the ankle and
foot as needed.
Position the foot and ankle within
the coil. (Note: Ankle/foot pads not
shown for detail.)
Figure 4-2
M473PH-64A Rev.1
PROTOCOLS
5-1
PROTOCOL
Make certain to use MC-MAI as the coil selection.
Always specify the coil connection port (either SC1 or SC2). Do not use the
“d” default option.
Proceed to scan using your designated protocol. If you need assistance with
protocol selection when using your Quadrature Lower Extremity Coil, call
our Applications Specialist at 1-800-657-0891.
M473PH-64A Rev.1
TROUBLESHOOTING/MAINTENANCE
6-1
TROUBLESHOOTING
The following is a list of common problems and solutions for those problems. If you cannot solve a
problem by following the procedures in the manual, contact IGC-Medical Advances Inc. Customer
Service at 1-800-657-0891 between the hours of 7:30 AM and 5:30 PM, (United States Central Standard
Time) Monday through Friday to arrange for service/repair or to speak with an Applications Specialist.
Further correspondence can be sent to the following address:
Customer Service
IGC-Medical Advances Inc.
10437 Innovation Drive
Milwaukee, WI 53226-4815 USA
Tel. 1 (414) 258-3808
Fax
1 (414) 258-4931
RECEIVING NO SIGNAL
PROBLEM:
You are unable to scan or are scanning and yet receiving no signal.
POSSIBLE SOLUTION:
Verify that the connector is plugged in fully and that the two halves of the
coils are secured together properly.
Verify that the system recognizes the coil identity.
Verify that the scan locations and any Shift Means entered are correct.
Verify MC-MAI is the selected coil.
Verify the coil connection is set to SC1 or SC2 (depending on which port
the coil is plugged into) and not set to “d.”
M473PH-64A Rev.1
6-2
TROUBLESHOOTING/MAINTENANCE
IMAGE QUALITY
PROBLEM:
The ratio obtained in the periodic quality assurance check is not greater than
85%, or the image quality is not what you expect it should be, given the
parameters selected.
POSSIBLE SOLUTION:
Review the selected protocol. If you are performing the Periodic Quality
Assurance, be sure your protocol is identical to the protocol provided on
Page 3-2 of this manual. If you are performing diagnostic images, you may
need to increase NSA or FOV.
Verify that there are no loops in the cables.
Verify that there are no metal or ferromagnetic objects close to the coil,
patient or magnet (i.e., safety pin, hair pin).
Verify that the coil is properly positioned.
Verify that your center frequency is within the frequency adjustment range
for your system.
M473PH-64A Rev.1
TROUBLESHOOTING/MAINTENANCE
6-3
ARTIFACTS
PROBLEM:
There is a black line or signal void on the image.
POSSIBLE SOLUTION:
Verify that there is no metal present in the area being scanned in or on the
patient.
PROBLEM:
Some or all of the images appear shaded or exhibit uneven signal or
banding.
POSSIBLE SOLUTION:
Confirm that no metallic objects are located nearby, outside the FOV. This
is especially important on images utilizing Fat Saturation.
If Fat Saturation is being used, verify that the center frequency has been
optimized.
For quadrature coils:
Verify that the coil is positioned with the cable exiting away from the bore
and that all connections are fully secured.
For phased array coils:
Confirm that all phased array channels are functioning properly. Perform a
Quality Assurance scan with another similar phased array coil. Review the
images to confirm that all channels are operating.
If the above checks out, it is possible the coil has failed. Contact
IGC-Medical Advances Inc. for assistance.
PROBLEM:
There is a single pixel width line running across the image.
POSSIBLE SOLUTION:
Confirm that the coil connection is specified as SC1 or SC2 (depending on
which port the coil is plugged into) and not “d” for default.
M473PH-64A Rev.1
6-4
TROUBLESHOOTING/MAINTENANCE
MAINTENANCE
STORAGE
Coils should be stored and used at the same room temperature as your MR
system.
INSPECTION
Inspect the coil weekly for mechanical breakage/damage. DO NOT USE A
COIL WHICH HAS SUSTAINED MECHANICAL DAMAGE. Return the
coil to IGC-Medical Advances Inc. for service/repair. This coil contains no
user serviceable parts. All repairs must be performed by factory trained
personnel.
CLEANING
The cleaning solutions listed below have been tested and are recommended
(with comments noted) for cleaning the coil(s) and strap(s). Spray or pour
the cleaning liquid onto a soft cotton cloth and proceed to clean.
Solution
1. Warm water
Comments
Safe for all areas
of the coil(s) or strap(s)
2.
Commercial dishwashing
liquid/water combination
(1 oz. per gallon
of water)
Safe for all areas
of the coil(s) or
strap(s)
3.
Alcohol mixture (70%
isopropyl alcohol/
30% water)
Do not apply to
adhesive backed materials
such as labels, decals or Velcro®
fasteners
4.
“Break Thru” all purpose
cleaner (25 oz. per gallon
of water)
Do not apply to
adhesive backed materials
such as labels, decals or Velcro®
fasteners
IMPORTANT:
M473PH-64A Rev.1
Do not spray or pour cleaning liquid directly onto
the coil or cables. Apply to a soft cotton cloth and
proceed to clean.