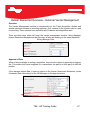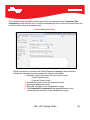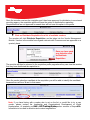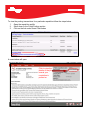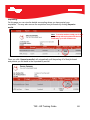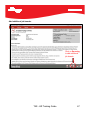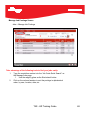
1
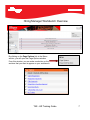
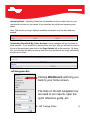
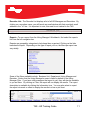
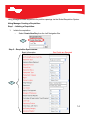
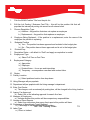
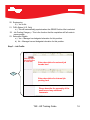
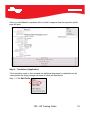
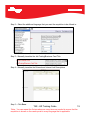
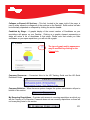
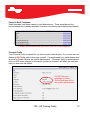
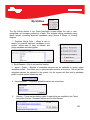
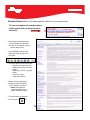
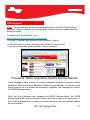
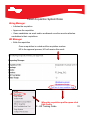
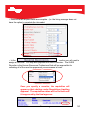
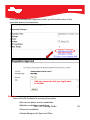
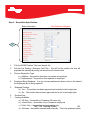
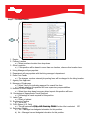
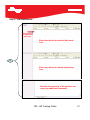
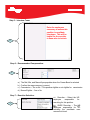
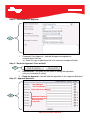
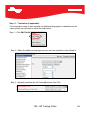
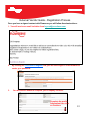
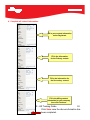
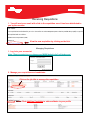
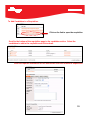
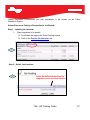
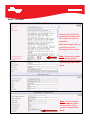
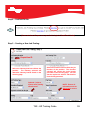
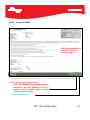
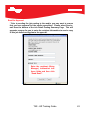
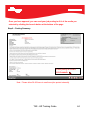
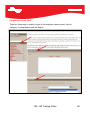
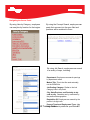
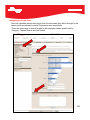
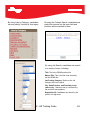
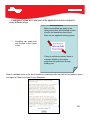
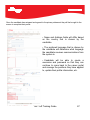
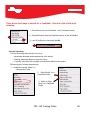
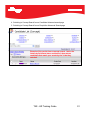
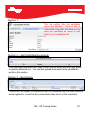
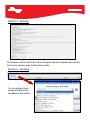
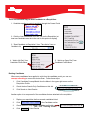
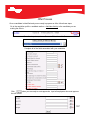
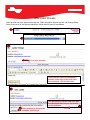
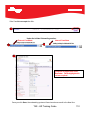
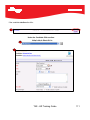
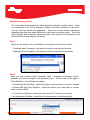
Introduction
TAS - HR Training Guide
1
Welcome to Flowserve’s Talent Acquisition System
Position Specifications
ti
si
ui
q
Re
Of
fe
r
on
Sourcing
C
Ap and
pl i da
ica te
tio
n
Hiring Manager
and Human
Resources
&
Hi
re
Candidate Selection
S
g
in
en
e
cr
Flowserve’s Talent Acquisition process is a series of collaborative activities
between Hiring Managers and Human Resources to identify talent for open
positions and future opportunities. The Talent Acquisition process serves to link
the business strategy in the identification of talent internally and externally to meet
the goals of the organization. This process includes the following steps:
•Requisition approval
•Position sourcing and job posting
•Candidate application
•Resume / CV review
•Candidate selection through interviews
•Offer letter and hire
The applicant tracking module supports the Talent Acquisition process by
assisting our Human Resources professionals in talent sourcing, identification,
and internal movement of talent. The global requisition system enables hiring
managers to submit and approve requisitions online, as well as review candidate
resume/CV information via email.
Implementation of the Talent Acquisition process allows Flowserve to have a
world-class recruiting process and pipeline for talent. This is accomplished
through process consistency, global compliance activities, development of talent
pools, and strong reporting and metrics.
TAS - HR Training Guide
2
Introduction
System Overview
Details
This product is 100% web-based software and requires an Internet connection and a Web
browser (such as Microsoft Internet Explorer). If you are using Microsoft Internet Explorer
version 7x, automatic cookie override should be accepted (advanced privacy). Below are a
few more details about the system.
Note: There are a few browser settings needed to insure the system is operating correctly:
In the Tools > Internet Options > General > Settings select “Every Visit to the Page”
Disable any pop-up blockers for the site.
Talent Acquisition System Basics
Save Your Work
Because the system is a web-based application, there are no automatic save functions. It is
very important for you to save any entries or edits before clicking a link or moving to another
page. There are save features on every editable page. There are multiple Save buttons
available when editing profiles. Any of these Save buttons can be used to save the entire
page.
Log Out
Always log out of the system; do not close the browser window to exit the Talent Acquisition
System. This ensures your session has ended.
Open New Window
Within the system you have the ability to open content in a separate window. Right-click on
any link in the application and select “Open in New Window” to open a secondary window
without losing your place in the system. Secondary windows, when opened this way, are
easy to identify because they do not have the left NavBar. We do not recommend using the
“Open New Window” option from the browser File menu since multiple main windows may
become confusing.
Browser Toolbar Options
The use of the Back and Forward buttons within the system is discouraged because the
results are not always what you might expect. You may be sent back to My Desktop or
Workbench with your work unsaved. Other buttons like Print and Favorites may be used.
Edit > Find on the menu bar is a useful feature in finding specific text (CTRL F on the
keyboard). In addition, the Cut, Copy, and Paste functions are always useful.
Refreshing
As you begin working in the Talent Acquisition System you may find it useful to Refresh
your screen after certain updates
have- been
made. Guide
TAS
HR Training
3
Note: We recommend right-clicking your mouse in the frame you want to refresh and
selecting Refresh from the right click menu.
Profiles
Details
A Profile contains information unique to a specific entity. In addition to your own information
located in your Human Resources Profile you will most often be working with the following
Profiles:
•Department Profile
•Hiring Manager Profile
•Requisition Profile
•Candidate Profile
These Profiles may be quickly accessed from the left NavBar.
System Terminology
Listed below are some terms and symbols used in the Talent Acquisition System along
with their definitions.
TAS - HR Training Guide
4
Field Types
The following Field Types are used in the Talent Acquisition
System:
TAS - HR Training Guide
5
Hiring Manager Workbench Overview
TAS - HR Training Guide
6
Hiring Manager Workbench Overview
By clicking on the Page Options link in the Menu
section, you will open the Page Options window.
From this window, you can make a selection on the
sections that you want to appear on your workbench.
TAS - HR Training Guide
7
Open Requisitions - Open Requisitions allows you to view and access all of your open
requisitions. To view a requisition profile, click on the title of the Requisition. You can also
Filter by other Hiring Managers that report to you. By doing this you will have the ability to
see all of their open requisitions on your workbench.
Requisition Approvals - Requisition approvals provides you access to requisitions that
require your approval. You can click on the Approve or Not Approve links under the Action
column to take appropriate action on the requisition. By clicking either link, you are brought to
a page where you can note the reason for approval or disapproval. Once you have taken
action on the requisition, it is removed from this area.
For your convenience, if you choose to email the recruiter on the requisition, you may click
the Question Mark (?). Note, this email is not recorded in the Talent Acquisition System.
Offer Approvals - Offer Approvals provides access to any offers that require your approval.
From this section you can view the requisition profile, candidate profile, and offer details. You
can also Approve or Not Approve the offer by clicking on the appropriate link in this section.
Requisitions Awaiting Approval - The Requisitions Awaiting Approval section displays
requisitions that are awaiting approval from someone else. These are not requisitions that
you need to approve.
TAS - HR Training Guide
8
Upcoming Starts - Upcoming Starts lists all candidates that have been hired for your
requisitions but have not yet started. It also identifies the job title and upcoming start
dates.
Note: This section no longer displays candidate information once the start date has
passed.
Onboarding Checklist & My Folder Sections - Hiring managers will not use either of
these sections. If you would like to remove them from your view you will need to scroll to
the top of the workbench and click on the Page Options link in the menu bar. By doing
this, you will have the ability to remove them from your workbench by simply unchecking
the box next to them.
Left Navigation Bar
Clicking Workbench will bring you
back to your home screen.
The links on the left navigation bar
are used to run reports, open the
quick reference guide, etc.
TAS - HR Training Guide
9
Preferences
Locale - Setting the time zone will impact the time stamp that is captured
when you save data (such as requisition approvals).
Interaction - The interaction options gives you more control on how you
interact with the system. Your options are:
Do not send emails: This stops the sending of system generated emails to your
email address. Unless you log into the Hiring Manager Workbench on a regular basis,
this is not recommended since this would eliminate one of the key functionalities of
communicating via the application.
Automatically Confirm all Scheduled Interviews & Notify Outlook on Interview
Confirmation: Both of these options need to remain unchecked because we do not use
the interview function or Microsoft Outlook.
Notify Delegates Only: This allows for communication directly to assigned delegates via
the application. This prohibits you from receiving emails from the system. The system
emails go only to your delegates. Note, you can still login and use the system, however,
only your delegate or delegates will receive system emails.
Change Password: You will not need to use this option because we use Single Sign On.
You are automatically logged into the system via Passport without having to enter in
a password.
Delegates - The Delegates section of the Preferences page allows you to assign
someone in the organization to act as your delegate in the hiring process. By default
there are up to 5 delegates that you can assign. You can assign the same or fewer user
permissions for your delegate.TAS
A delegate
can be another
- HR Training
GuideManager, a Recruiter or an 10
Employee. To enter a delegate you will need to click on the pick list and select their
name. Once the delegate is selected, you will then need to choose which permissions
this delegate will be able to take on your behalf.
Recruiter List - The Recruiter List displays a list of all HR Managers and Recruiters. By
clicking on a recruiters name, you will launch an email window with that recruiter's email
address in the "to" line. It is important to note, this email is not tracked in the TAS.
Reports - To run a report from the Hiring Manager's Workbench, first select the reports
link from the left navigation bar.
Reports are grouped by categories to help keep them organized. Clicking on the links
launches the report. Depending on the type of report you run, the filters per report can
vary widely.
Some of the filters available include: Business Unit, Department, Hiring Manager and
Recruiter. Notice, that the Hiring Manager's name is listed by default in the Hiring
Manager Filter. If you have other managers that report to you, they will also be available
to you as filters. By clicking on Filter, the report will run display the results. The report
description is available by clicking the Information Icon. You may also select to export
the report into excel or select to display the results in a bar or pie chart.
TAS - HR Training Guide
11
Help - The Help link gives Hiring Managers access to download documents for future
reference. In this section, hiring managers can download the Hiring Manager Quick
Reference Guide.
Quick Search - The Quick Search section allows you quick access to Requisition and
Offer information associated with your requisitions. You can select from the drop down
choices and type in full or partial information and select Go for the results to be
displayed. This is the most efficient way to locate requisitions that you have previous
saved as a draft.
TAS - HR Training Guide
12
Hiring Manager
Creating / Translating Requisitions
TAS - HR Training Guide
13
Hiring Managers create requisitions for position openings via the Global Requisition System.
Hiring Manager Creating a Requisition:
Step 1 – Initiating a Requisition:
1.
Initiate the requisition:
•
Select Create New Req from the Left Navigation Bar
1
Step 2 – Requisition Specification:
Basic Information
Red Fields are Required
2
TAS - HR Training Guide
14
1.
Pick the GEMS Position Title from the pick list.
2.
Edit the Job Posting / Business Card Title – this will be the position title that will
populate the internal job posting site as well as all external sites.
3.
Choose Requisition Type:
a.) Addition – Any position that does not replace an employee
b.) Replacement – Any position that replaces an employee.
Employee Being Replaced – If the position is a replacement, enter the name of the
employee the position is replacing.
4.
5.
6.
7.
8.
Budgeted Position
a.) Yes – The position has been approved and included in the budget plan.
b.) No – The position has not been approved and is not in the budget plan.
Division/Corp
Requisition Status – will default to “Draft” and apply as requisition is routed.
Employment Type
a.) Select Full-Time or Part-Time
9.
Employment Category
a.) Apprentice
b.) Employee
c.) Student/Intern – for co-ops and internships
d.) Temporary – encompasses consultant and contract labor
10. Region
11. Primary Location
a.) Select positions location from drop-down.
12. Hiring Manager will pre-populate
13. Department will pre-populate with the hiring manager’s department.
14. Enter Cost Center
a.) The charges, such as external job posting fees, will be charged to the hiring location.
15. Agency Fee Approved
a.) Select Yes or No indicating approval for search firm fees
16. Manager of Employees
a.) Indicate whether this position will have supervisory responsibilities.
17. Number of Direct Reports
a.) Select from drop-down how many direct reports this position will have.
18. Percentage of Approximate Travel Required
a.) Percentage of travelTAS
required
this position.
- HRforTraining
Guide
15
19. Labor Type
a.) Direct or Indirect
20. Engineering
a.) Yes or No
21. FLSA Status (U.S. Only)
a.) This will automatically populate when the GEMS Position title is selected.
22. Job Posting Category – This is the function that the requisition will fall under in
career portals.
23. Relocation Eligible
a.) Yes – Manager has budgeted relocation for this position.
b.) No – Manager has not budgeted relocation for this position.
Step 3 – Job Profile:
Click top left of
description box
to enter text.
Enter description for external job
boards here
3
Enter description for internal job
posting here
Please describe the necessity of the
position and any additional
comments.
TAS - HR Training Guide
16
Step 4 – Interview Team:
Enter the employees
necessary to assess this
position in candidate
interviews. This will be
helpful for the recruiter
to know who to include.
4
Step 5 – Route for Approval / Save as Draft:
5
1.
Save as Draft – this gives you the option of saving the requisition
until you come back to submit.
2. Routing for Approval – this will take the requisition to the “Approver
Selection.”
Step 6 – Approval Selection:
- Hiring Manager
- 2nd Level Manager
- Human Resources Manager
6
Additional Flowserve
hiring managers that
should approve
requisition
TAS - HR Training Guide
Click Save to route for approval
17
Once you click Save the requisition will be routed for approval and the requisition profile
page will open.
Step 6 – Translation (If applicable):
If the requisition needs to be translated into additional languages for candidates on the
career portals the hiring manager will need to follow the steps below:
Step 1 – Click Edit Profile
TAS - HR Training Guide
18
Step 2 – Select the additional language that you want the requisition to be offered in:
Step 3 – Manually translate the Job Posting/Business Card Title
Step 4 – Manually translate the External and Internal Job Descriptions
Step 5 – Click Save
TAS - HR Training Guide
19
*Note: You can repeat the 5 steps above as many times as needed to ensure that the
requisition is shown on the career portal in every language that is applicable.
HR Desktop Overview
TAS - HR Training Guide
20
HR Desktop Overview
Details
Logging In
Passport > Human Resources Tab > Talent Acquisition System > Human Resources > Log
In
Exploring the Talent Acquisition System Workspace
Four Frames
Although your screen may look like it is one page, the application is actually four individual
frames. In addition to the main workspace frame, currently displaying My Desktop, there
are also three additional frames, a Top Frame, left NavBar, and the Bottom NavBar. Each
of these frames has individual functions and all must be refreshed individually.
My Desktop
The pie chart will not appear
until you have candidates
attached to one of your open
requisitions.
This is the default main page when you first login to the system. My Desktop is where you,
as a Human Resource Employee, can get an overall picture of your activities. From the
links in the sections you can quickly access the details you need. (You can return to this
page at any time by clicking on My Desktop under the Tools section of the left NavBar).
Note: You may change your personal
Desktop
by clicking
you
TAS - HR
Training
Guidethe Edit Page link. Here 21
can add or remove sections you want displayed. You may also change the label of each
section by clicking on the text and replacing it. (Ex: You can change Candidates on My
Requisitions to say My Open Requisitions)
Collapse or Expand All Sections – This link, located in the upper right of the page, is
used to either expand or collapse all of the sections on the Desktop. Each section can also
be individually expanded or collapsed by clicking the section header.
Candidate by Stage – A graphic display of the current number of Candidates on your
requisitions will appear on your Desktop. Clicking on a graphic element representing a
stage will return a list of candidates in that stage. Please note that unless you have
candidates on your open requisitions, you will not see a graph.
The type of graph and its appearance
may be modified by clicking on the
Change link.
Company Resources – Convenient links to the HR Training Guide and the HR Quick
Reference Guide.
Company Bulletins – When there are system changes the system administrator will post a
bulletin in this section.
My Recurring Requisitions – Provides quick access to recurring requisitions on which you
are the Primary or Co-Recruiter. Flowserve does not use recurring requisitions so there will
not be anything listed in this section.
TAS - HR Training Guide
22
Candidate on My Requisitions – A listing of your open requisitions with all associated
candidates. Open requisitions are listed by default but a different status may be selected
from the dropdown. By using the drop down you can view positions that you have filled,
etc.
Requisitions Awaiting Approval – Shows a list of your requisitions that are waiting for
approval by someone else.
Requisition Expirations – Will list any requisitions from our internal and/or external job
posting sites that are due to expire. You should never have a requisition listed here
because we have our sites configured to post the requisition until it is filled or placed on
hold. Note: If one of your requisitions appears in this section you will need to modify the
posting dates by clicking on the edit portal dates link in the portal section on the requisition
profile page.
Auto Spot – A saved search that provides quick access to new candidates that meet your
pre-determined search criteria.
Quick Statistics – A listing of either new candidates or requisitions (by status) chosen from
the drop-down, grouped by Recruiter, during a selected/specific time range.
Job Launcher – This section will remain blank because we do not use the default job
launcher through the Talent Acquisition System.
TAS - HR Training Guide
23
Details
Req Interviews / My Interviews – A quick overview of how many interviews you are
participating in – regardless if you are the recruiter on the requisition or not. There is also a
link to your Interview Workbench which contains all of the details of your upcoming and
completed interviews. Note: You should not use this section because we do not
schedule candidate interviews through the TAS. Interviews within the system will not
populate Lotus Notes; you will still need to have a calendar invite in Lotus Notes.
Delegate Access – If you have been designated as a delegate for a Hiring Manager, you
will be able to log in to the Hiring Manager Workbench from this section. Note: this
section will not appear on your Desktop unless you have been assigned as
someones delegate.
Top Frame
The top frame consists of the Candidate Cart and the Log Out link, which is the preferred
way of exiting the system.
Candidate Cart – The cart is where you can store candidates on whom you plan to take
action. Since items in the cart are stored as cookies on the specific computer, you are
using this is only a temporary storage area. The Clear link will empty your cart. The
dropdown may display the total number of candidates in the cart or you may select to view
a list of all or individual candidates in the cart.
Log Out – Clicking Log Out ends your session.
TAS - HR Training Guide
24
Left NavBar
The left NavBar is divided into sections for quick navigation to the major profiles within the
system.
TAS - HR Training Guide
25
Bottom Frame
The bottom frame, also known as the Bottom NavBar, is a powerful navigation tool in the
TAS. Consisting of three sections, each with their own dropdown, the bottom NavBar
provides you with fast access to Profiles and Saved Searches.
Refresh – Because this NavBar is used to display data that is frequently updated,
remember to refresh this frame often. Whenever you can’t find a Profile that you have
recently visited or created be sure to click the Refresh link.
Last 10 Profiles – The last 10 candidates, managers, and requisitions you have visited will
be listed grouped by profile type. Selecting one and clicking Go will take you directly to the
profile.
Folders & Searches – Candidate folders can be created and accessed from the first
section of this drop-down. Saved searches, created from the Advanced Search page, can
be re-run with one click.
Open Requisitions – Requisitions are listed by title; if there are several openings for the
same positions, this would be less valuable.
My Setup
There will be two options available in the Human Resources Personal Setup: Personal
Email Templates and Personal Profile.
TAS - HR Training Guide
26
Personal Email Templates
Email templates have been created by your administrator. These templates are the
recommended way of adding templates to ensure consistency and branding requirements.
It is NOT recommended that you create your own email templates.
Personal Profile
Your Personal Profile is created for you by the system administrator. If you notice an error
please do NOT make edits to this page yourself. If changes need to be made please send
an email to Cyndie Oliveria, the system administrator. The reason that it is recommended
that you NOT make changes to this section yourself is because it will affect the new hires
that you enter into the system.
Do NOT edit your
language or country.
These have been set by
the system administrator.
TAS - HR Training Guide
27
My Utilities
The My Utilities section of the Talent Acquisition System allows the user to view,
manipulate, and increase productivity of data. This includes adding candidates using
Batch Upload, correcting duplicate candidates using Search & Merge, or Viewing
Reports.
1. Duplicate Merge Rule – allows a user to
search for potential duplicate candidates in the
system, review data to keep or discard, and
merge candidate records together.
123456-
2. Email Readers – We do not use this function
3. Import / Export – Batches of candidate resumes can be uploaded to quickly create
candidate profiles. This allows you to upload multiple resumes at one time. Not only will the
uploaded resumes be captured in the system, but the system will also build a candidate
profile for each resume loaded this way.
4. Knowledgebase – Frequently Asked Questions are stored here
5.
Reports – There are two distinct types of reports that are available in the Talent
Acquisition System: Standard Reports and Ad Hoc Reports.
TAS - HR Training Guide
28
Standard Reports allow you to select specific criteria to run your report with.
To view a complete list and description
of the reports that you have access to
click here:
• Each report has standard fields
a) Not all fields are mandatory
b) Click on the calendar icons to
choose dates to filter
• Click the Filter at the top righthand side of the tool bar to run
the report
• The other options on the tool bar are:
•Export your report into Excel
•Display your report in a chart
format
•Display your report in a graph
format
•Email your report
•View report details
• Results can be organized by
clicking the column heading
a) For example, clicking on
Status will organize a
requisition report by the
status’ alphabetical order
• To export reports in Microsoft
Excel, click the
icon
TAS - HR Training Guide
29
Ad Hoc Reports allow you to custom
build reports based on several elements
including:
• Candidate Data
• Requisition Data
• Hiring Manager Data
• Activity Data
• Hire Data
After you select data that you want captured on these report you can also select which
filters to run in your report.
6. Vendors – you may search for staffing vendors that are used within our system.
TAS - HR Training Guide
30
HRIS Support
Note: The quickest way to have your issue resolved is to call the
IT Service Desk
Details
to submit a ticket. However, if you would rather submit one online please follow the
directions below.
To submit an IT service ticket, go to
http://www.serviceonline.unisys.com/flowserve/
To log an IT service ticket, please visit the Passport > sign in
In the right hand corner you will click on the “Global IT Service Desk”
> key in your username (email address) > key in password.
Flowserve Talent Acquisition System Service Manual
Hiring Managers have access to training materials including Frequently Asked
Questions (FAQs), and Quick Reference Guides through Passport. In the event that
these materials do not answer the manager’s questions, the manager will contact
the GHRS Representative.
Once the Hiring Manager has contacted the GHRS Representative, the GHRS
Representative will have an estimated time of 48 hours to resolve an open issue. If
the GHRS Representative is unable to resolve the issue then the software vendor
will be contacted.
TAS - HR Training Guide
31
Human Resources
Creating / Translating Requisitions
TAS - HR Training Guide
32
Talent Acquisition System Roles
Hiring Manager
• Initiates the requisition
• Approves the requisition
• Views candidates via email and/or workbench once the recruiter attaches
candidates to their requisitions.
HR Manager
• Edits the requisition
Once a requisition is routed and the requisition reaches
HR in the approval process, HR will receive this email:
When the requisition profile opens click
Edit Profile
TAS - HR Training Guide
33
• Ensure that all required fields are complete. (i.e. the hiring manager does not
have the option to complete the job grade)
• In the
section you will need to
assign a Recruiter. You may also populate the GHRS Recruiter. The GHRS
Recruiter is the Human Resources Professional that will be responsible for
collecting all of the new-hire paperwork once someone is hired.
Once you specify a recruiter, the requisition will
appear on their desktop under Requisitions Awaiting
Approval. The requisition status will be On Hold until
it is approved by the final approver.
TAS - HR Training Guide
34
• If the Hiring Manager selected Yes in the Agency Fee Approved field, you will
need to fill out the Vendor Management information.
If they select Yes, complete the following steps. If they select No, skip this
step.
Choose the Submittal
Type
Complete all of the
appropriate fields.
• Click Save
TAS - HR Training Guide
35
Once you have edited the requisition profile, you will need to return to the
email and approve the requisition.
Add any comments that you might want
to include.
Recruiter
Acts as the HR Professional recruiting the position
•Sources and phone screens candidates
•Attaches candidates
requisitions
TASto- HR
Training Guide
•Closes out candidates
•Initiates Background Check and Offers
36
Creating Requisitions
Hiring Managers and Human Resources Professionals create requisitions for open positions
openings in the Global Requisition System. Hiring Managers and Human Resources
Professionals access the requisition system via a link on Passport.
Human Resources Creating a Requisition:
Step 1 – Initiating a Requisition:
1.
Initiate the requisition – These are the two most common ways to initiate a requisition:
•
Select New Requisition from the Left NavBar
1
•
Click the Add Requisition link on the requisition section of the Hiring Manager
Profile (Recommended)
1
TAS - HR Training Guide
37
Step 2 – Requisition Specification:
Basic Information
Red Fields are Required
2
1.
Pick the GEMS Position Title from the pick list.
2.
Edit the Job Posting / Business Card Title – this will be the position title that will
populate the internal job posting site as well as all external sites.
3.
Choose Requisition Type:
a.) Addition – Any position that does not replace an employee
b.) Replacement – Any position that replaces an employee.
Employee Being Replaced – if an you choose replacement above, enter in the nameof
the employee who is being replaced.
4.
5.
6.
7.
Budgeted Position
a.) Yes – The position has been approved and included in the budget plan.
b.) No – The position has not been approved and is not in the budget plan.
Division/Corp
Postings Available
a.) HR Only – Accessible to Flowserve HR users only
b.) Internal Only – Accessible only to Flowserve employees
c.) Public Only – Accessible to external parties only
TAS - HR Training Guide
38
d.) All Areas – Accessible internally and externally. This is the preferred option.
8.
9.
Job Posting Category – This is the function that the requisition will fall under in
career portals.
Requisition Status – will default to “Draft” and apply as requisition is routed.
10.
Employment Type
a.) Select Full-Time or Part-Time
11.
Employee Referral
a.) Eligible or Not Eligible
12.
Employment Category
a.) Apprentice
b.) Employee
c.) Student/Intern – for co-ops and internships
d.) Temporary – encompasses consultant and contract labor
13.
Career Band
a.) Select Career Band (based on Global Compensation Guide)
14.
Job Code will pre-populate
15.
EEO Code (U.S. Only) – choose from dropdown list
TAS - HR Training Guide
39
Step 3 – Position Details:
3
1. Region
2. Primary Location
a.) Select positions location from drop-down.
3. Other Locations
a.) If this position will be based in more than one location, choose other location here.
4. Hiring Manager will pre-populate
5. Department will pre-populate with the hiring manager’s department.
6. Enter Cost Center
a.) The charges, such as external job posting fees, will be charged to the hiring location.
7. Agency Fee Approved
8. Manager of Employees
a.) Select Yes or No indicating approval for search firm fees
a.) Indicate whether this position will have supervisory responsibilities.
9. Number of Direct Reports
a.) Select from drop-down how many direct reports this position will have.
10. Percentage of Approximate Travel Required
a.) Percentage of travel required for this position.
11. Labor Type
a.) Direct or Indirect
12. Engineering Position
a.) Yes or No
13. FLSA Status (U.S. Only)
a.) This will automatically
populate
when the GEMS
TAS
- HR Training
Guide Position title is selected. 40
14. Relocation Eligible
a.) Yes – Manager has budgeted relocation for this position.
b.) No – Manager has not budgeted relocation for this position.
Step 4 – Job Requirements:
Click top left of
description box
to enter text.
Enter description for external job boards
here
4
Enter description for internal job posting
here
Describe the necessity of the position and
insert any additional comments.
TAS - HR Training Guide
41
Step 5 – Interview Team:
Enter the employees
necessary to assess this
position in candidate
interviews. This will be
helpful for the recruiter
to know who to include.
5
Step 6 – Recommended Compensation:
6
a.) The Mid, Min, and Max will pre-populate when the Career Band is selected
b.) Confirm the wage currency is correct
c.) Commission – Yes or No – This position eligible or not eligible for commission.
d.) Bonus Eligible – Yes or No
Step 7 – Recruiter Selection:
7
a.) Recruiter – Select the HR
employee
responsible
for
recruiting for this position.
b.)
GHRS Recruiter – The HR
TAS - HR Training Guide
42
employee responsible for onboarding the candidate
someone is hired.
once
Step 8 – Placement Fees Approval:
8
1.
Placement Fees Approval – Indicate the approved expense for
external search firm fee.
a.) Select the type of placement fee to be used and complete all fields
Step 9 – Route for Approval / Save as Draft:
9
1.
Save as Draft – this gives you the option of saving the requisition
until you come back to submit.
2. Route for Approval – this will take the requisition to the “Approver Selection.”
Step 10 – Approval Selection:
- Hiring Manager
- 2nd Level Manager
- Human Resources Manager
10
Additional Flowserve
hiring managers that
should approve
requisition
TAS - HR Training Guide
Click Save to route for approval
43
Step 11 – Translation (If applicable):
If the requisition needs to be translated into additional languages for candidates on the
career portals you will need to follow the steps below:
Step 1 – Click Edit Profile
Step 2 – Select the additional language that you want the requisition to be offered in:
Step 3 – Manually translate the Job Posting/Business Card Title
TAS - HR Training Guide
44
Step 4 – Manually translate the External and Internal Job Descriptions
Step 5 – Click Save
*Note: You can repeat the 5 steps above as many times as needed to ensure that the
requisition is shown on the career portal in every language that is applicable.
TAS - HR Training Guide
45
Managing Requisitions Part 1
Distributing Requisitions to External Vendors
TAS - HR Training Guide
46
Human Resources Overview – External Vendor Management
Overview
Details
The Vendor Management module is incorporated into the Talent Acquisition System and
creates electronic access to recruiting agencies. Only vendors in the system may be used
for recruiting. These vendors have contracts with Flowserve and competitive rates.
There are three roles which will touch the vendor management module: Hiring Manager,
Human Resources Manager and the Recruiter, all who are working on the same requisition.
Hiring Manager Role
Approval of Fees
When a hiring manager is routing a requisition, they have the option of approving an agency
fee. This means they have budgeted for a commission fee paid to a third party to staff the
position.
If the manager selects Yes, it opens a section in the Human Resources Workbench (under
Contractor Rate Information) for the HR Manager on the approval matrix.
TAS - HR Training Guide
47
At the bottom of the requisition profile page there is an optional section, Contractor Rate
Information, which will allow you to view the estimated fees that you should expect should the
position be filled using an external vendor.
Human Resources Role
When a requisition is routed to the Human Resources Manager, they will have to
indicate the submittal type and populate the following information:
a) Select the type of placement fee used on this search
1. Direct Placement fee
2. Contract/Temp bill rate
b) Indicate the currency from the drop-down menu
c) Select percentage rate of pay
d) Enter the mid-point of the compensation range
e) The Estimated Fee Amount will pre-populate based on the
percentage and mid-point of the compensation range
TAS - HR Training Guide
48
Once the recruiter receives the requisition and it has been approved for distribution to an external
recruiting agency, the requisition profile will have the option to distribute the requisition.
Requisitions that are not approved for search fees will not have this option in the profile.
Click on Distribute Requisition for a list of available vendors
The recruiter will click Distribute Requisition, and be taken into the Vendor Management
Module. Vendors in the module have signed contracts with Flowserve and are approved on a
quarterly basis.
Once you have made
your selection click
on Distribute
Requisition
The recruiter will then be returned to the requisition profile page where they can view the vendors
that they have distributed the requisition to.
Once the vendor submits a candidate to the requisition you will be able to identify the candidate
because there will be a V next to their name.
Note: If you have history with a vendor who is not on the list, or would like to try a new
vendor, please contact the Leadership and Organizational Development at World
TAS L- HR
Training
Guide
Headquarters. At quarterly reviews,
& OD
will send
prospective vendors a Request49for
Information to be used in selection and contract negotiations.
External Vendor Guide
This guide should be sent to staffing vendors
who will be working in the system.
TAS - HR Training Guide
50
External Vendor Guide - Registration Process
Once you have a signed contract with Flowserve you will follow theseinstructions:
1. You will receive an email invitation from [email protected]
2.
3.
By clicking on Click Here to Register link you will be brought to a new window to
create your password:
You will then be asked to complete your Company’s Profile:
Complete the profile
information then click
Continue
TAS - HR Training on
Guide
51
Details
4. Complete all contact information:
Fill in your contact information
as the Registrant.
Fill in the information
for the Primary contact.
Fill in the information for
the Secondary contact.
Fill in the billing contact
information for your company
then click Continue.
TAS - HR Training Guide
52
Click Save once the above information has
been completed.
Details
5. You have completed your portion of the registration process:
6. The Flowserve System Administrator will review your registration information and
once it is complete they will officially approve your company to be added to our preferred
provider list. Once you are approved you will receive an email informing you:
TAS - HR Training Guide
53
Details
Receiving Requisitions
1. You will receive an email with a link to the requisition once it has been distributed to
you by the recruiter.
View the new requisition by clicking on the link.
Managing Requisitions
1. Log in to your account at
https://flowservestaging.recruitmax.com//MAIN/default.cfm?szCat=beyond
2. Manage your requisitions and candidates.
Click on the job title to manage the requisition
Click Add New Candidate to add candidates to your profile
TAS - HR Training Guide
54
Details
To Add Candidates to a Requisition:
Click on the link to open the requisition
Scroll to the bottom of the requisition page to the candidate section. Select the
candidates to add to the requisition and click submit.
Enter the required information on the next screen and then Submit to Requisition.
TAS - HR Training Guide
55
Managing Requisitions Part 2
Distributing Requisitions to External Job Posting Boards
TAS - HR Training Guide
56
Human Resources Professionals can post requisitions to job boards via the Talent
Acquisition System.
Human Resources Posting a Requisition to Job Boards:
Step 1 – Initiating job launcher:
1. Open requisition to be posted
A: Scroll down the page to the Portal Posting section
B: Click on the Post to Job Launcher link
1
Step 2 – Select Job Launcher:
2
Select SmartPost-Hodes from the
dropdown menu and click Submit.
TAS - HR Training Guide
57
Step 3 – Job Detail:
Items such as the job title
and the job description will
be brought over from the
requisition.
Make any changes that you
would like to the Job
Description in this section.
Note: Extending the dates
will NOT automatically
extend the life of the posting.
The posting will NOT auto
renew.
TAS - HR Training Guide
Note: You must check
Launch Now to launch
the requisition. Once 58
the box is checked click
Save.
Step 4 – Continue to site:
4
(A new window will open once you click to login to SmartPost-Hodes)
Step 5 – Creating a New Job Posting:
Requisition ID
Select the industry that best reflects the
position.
The Industry selected will
determine industry boards listed on the
sourcing page.
Select the function to best reflect the job
function of the position. The function
selected will impact the niche boards
provided on the sourcing page. You will
also be required to select a sub-function
from the list generated.
Optional: helps to
further refine posting
effectiveness
TAS - HR Training Guide
NOTE: Ensure all
information such as
Job Level is correct.
59
Link to the
requisition on the
corporate career site.
Can be used to
divide the cost
among more than
one cost center.
Click SAVE
TAS - HR Training Guide
60
Step 6 – Verify Job Detail:
Verify that everything is
correct on the job
summary page.
1. If changes need to be made, click edit.
2. If ready to post, click sourcing.
Note: By clicking the sourcing icon, the
SmartPost tool will generate a list of
relevant media sources based on the
criteria of each posting.
3. Email for Approval
TAS - HR Training Guide
61
Step 7 – Choose Electronic Sources:
Check Auto Total to total the cost of the job boards that you
choose. Primary Sources – number of boards that you have
chosen from the e-sourcing page directly. Affiliate Sources –
number of partner media of the primary source that your
requisition may be cross posted to.
Place a check in the box next to any of the job
boards where you want the position to be posted to.
As we add
corporate sites to
Smart Post they
will add to the “My
Corporate Sites
and Subscriptions”
section.
(as shown)
TAS - HR Training Guide
When you are
finished adding
sources - Click
Save
62
Email for Approval
* Prior to sending the job posting to the media, you may want to ensure
that you have approval for the media expenditure. Please select Send email from the bottom of the Job Detail Posting Summary Page. This will
generate a popup for you to enter the recipient information to send a copy
of this job and sourcing plan to for approval.
Enter the recipient (Hiring
Manager) information into
these fields and then click
“Send Email”.
TAS - HR Training Guide
63
Once you have approval, you can send your job posting to ALL of the media you
selected by clicking the Launch button at the bottom of the page.
Step 8 – Posting Summary:
If everything is correct
click Launch
Note: Please allow 24-48 hours to see these jobs posted externally
TAS - HR Training Guide
64
To view the posting transactions for a particular requisition follow the steps below.
1.
2.
3.
Open the requisition profile
Scroll down to the Portal Posting section
Click on the link under Smart Post-Hodes
A new window will open:
Click to view the
details of the job
boards your
requisition is
posted on.
TAS - HR Training Guide
65
Unposting:
On this page you can view the details surrounding where you have posted your
requisition. You may also remove the requisition from job boards by clicking Unpost emedia.
Note: To receive emails to notify you of when
you postings will expire please set the email
notification up in User Preferences.
Once you click Unpost e-media it will automatically pull the posting off of that job board
and provide you the detail in the Unposted By section.
TAS - HR Training Guide
66
Add additional job boards:
Click on Sourcing
to add additional
job boards.
TAS - HR Training Guide
67
Manage Job Postings Screen
Jobs > Manage Job Postings
1
Take advantage of the following tools to find your jobs easily:
1.
2.
Type the requisition number into the “Job Code Quick Search” on
the Manage Jobs page.
1. Use the magnify glass as the filter/submit button.
Click on the column headers to sort the postings in alphabetical
order, by user, location, date, etc.
TAS - HR Training Guide
68
Job Detail Summary Page Action Buttons:
TAS - HR Training Guide
69
How to access the Activity Report?
The ‘Activity Report’ is accessible through the ‘Manage Jobs’ and the ‘Job Detail’ pages.
•Manage Jobs Page: Click on the “Go” button under the ‘Analyze’ column
•Job Details Page: Click the Media Tracker link in the top right-hand corner
under Media Details.
Aggregate posting data
shows real time job
performance. The ability
to manage cost and
performance in one
simple report allowing
you to spend more time
recruiting!
The comparison gauges will
measure job performance
against your competitors or
jobs under similar
classifications.
Measured comparisons
by media shows how this
job stacks up against
similar jobs on a per
media level. Adding this
layer of source tracking
limits the dependency on
candidate selection and
bias results.
TAS - HR Training Guide
70
Measure the performance
of each media
individually to analyze
sourcing effectiveness
and applicant conversion.
This data will impact
sourcing decisions and
leverage media buying
power.
The Job History tells a
story about posting
performance over time.
The real time reporting
allows for optimization
and edits that affect your
results today!
TAS - HR Training Guide
71
1. If you posted your requisition to Monster, CareerBuilder, or Hotjobs and want to
further refine your search (i.e. update location) you will need to remember to click on
the green plus sign next to the site.
2. If you posted your requisition to a job board (i.e. Monster) and forgot to click on the
green plus sign to add locations, etc. and you would like to edit the posting you will
need to:
A: Click on the SmartPost link on the requisition profile page
B: On the Job Detail Posting Summary page you will need to
click on the Sourcing icon at the bottom of the screen. This
will give you the options again and allow you to change the
posting detail.
3. If you need a customer service representative to assist you please send an email to
[email protected] and a customer service representative will contact you.
TAS - HR Training Guide
72
Hiring Manager Profiles
TAS - HR Training Guide
73
Hiring Manager Profile Overview
There are several ways to locate a hiring manager in the Talent Acquisition System:
You can locate a hiring manager by using the drop down list on the bottom
navigation bar. This will list the last 10 managers that you have worked with in the
system.
You can also use the Advanced Search on the left navigation bar.
The fastest way to locate a hiring manager is to use the Quick Search field on the
left navigation bar. In this field you can type in the name of the hiring manager that
you want to locate.
By entering in the last name of the hiring manager, you will pull up a list showing
the hiring manager’s name. From this list you will simply click the Hiring
Manager’s name to open up their profile.
TAS - HR Training Guide
74
Hiring Manager Profile
You can review the details of the hiring manager’s profile and take action on the hiring
manager from this page. Lets review each section in detail:
Direct Reports – This section will list the manager’s direct reports who are also hiring
managers. It will list their name, department, title, and the number of employees that report to
them that are also hiring managers.
Delegates – This section will list the delegates that the hiring manager has setup to take
action in the system on their behalf.
TAS - HR Training Guide
75
Requisitions – This section will list all of the requisitions for this hiring manager. It will
show all of their requisitions regardless of their status (draft, open, pending, etc.) You can
also add a requisition for this hiring manager from this section by selecting the Add
Requisition link.
Activity History – You can track emails that you send to this hiring manager or voicemail
messages that you have left for this hiring manager.
Interviews – This section should always remain blank since we do not schedule interviews
via the Talent Acquisition System.
Recruiter Specification – This section will list the recruiter and co-recruiter assigned to
this hiring manager (if applicable).
TAS - HR Training Guide
76
Career Portal Overview
TAS - HR Training Guide
77
Internal Candidates (Employees)
Employees can search Flowserve’s open requisitions in Passport>HR>Talent
Acquisition.
Employees will be prompted to log in once they have selected the region for
their job search.
IMPORTANT NOTE
1. Your name was fed into the new system when it launched November 15, 2007:
To log in, use your existing Passport ID, and Flowserve1 as your password. Passwords are case-sensitive.
2. You were hired through the system after its launch:
Use the same username and password you had when applying.
3. You were hired after November 15, 2007, but did not apply to the position via Flowserve.com.
Contact your local HR representative to receive a username and password. They will flag your employee
profile, which has been loaded into the system with all other employees.
TAS - HR Training Guide
78
4. You do not have a Flowserve e-mail address:
Contact your local HR representative to receive a username and password. They will flag your employee
profile, which has been loaded into the system with all other employees.
Details
Navigating the Career Portal
Once employees have established a log-in, they will be able to access their workbench with
links to assist in navigating through the Career Portal. Jobs are accessible through the
Careers Home and Search Jobs links.
Careers Home: Includes an Introduction on Flowserve, Concept Search, and the
traditional Job Search .
My Workbench: Displays Job Submittal History, Tasks to Complete, and
Interviews that are scheduled.
My Resume: Employees can update all of their contact information, answers to
security questions, change their password, or update their resume.
My Searches: Displays saved searches and allows candidates or employees to
create new saved searches.
My Employee Referrals: Gives employees the ability to recommend and track
employee referrals.
My Job Cart: Candidates or employees can store jobs here temporarily and then
apply to them all at once.
Logout: Logs employees out of the portal.
TAS - HR Training Guide
79
Navigating the Career Portal
There are three ways to search for jobs in the employee careers portal: Jobs by
Category, Concept Search and Job Search.
TAS - HR Training Guide
80
Navigating the Career Portal
By using Jobs by Category, employees
can see jobs by function for that region.
By using the Concept Search, employees can
paste their resume into the open field and
positions will be matched to them.
Details
By using Job Search, employees can search
in a variety of ways, including:
Department: Employees can search openings
by department codes.
Market Title: This is the title used externally,
not the GEMS title.
Job Posting Category: Similar to the Job
Category links in the portal.
City, State/Province, and Proximity to zip
code or city: Searches can by conducted by
the positions demographics.
Requisition ID: Employees can search by the
position’s 4-digit code.
Percent Travel and Employment Type: Jobs
TAS - HR Training
Guide
81
can be
searched by additional specifications.
External Candidates
Candidates can search Flowserve’s open requisitions by visiting our website at
www.flowserve.com/careers.
TAS - HR Training Guide
82
Details
Navigating the Career Portal
Once the candidate selects their region from the drop down they will be brought to the
career portal and allowed to search Flowserves open requisitions.
There are three ways to search for jobs in the employee careers portal: Jobs by
Category, Concept Search and Job Search.
TAS - HR Training Guide
83
By using Jobs by Category, candidates
can see jobs by function for that region.
By using the Concept Search, candidates can
paste their resume into the open field and
positions will be matched to them.
Details
By using Job Search, candidates can search
in a variety of ways, including:
Title: This is the GEMS position title.
Market Title: This is the title used externally,
not the GEMS title.
Job Posting Category: Similar to the Job
Category links in the portal.
City, State/Province, and Proximity to zip
code or city: Searches can by conducted by
the positions demographics.
Requisition ID: Candidates can search by the
position’s 4-digit code.
TAS - HR Training Guide
84
Candidate
Creating Their Profile
TAS - HR Training Guide
85
• Candidate Profiles are a vital part of the application and Details
are created in
many different ways:
Before a candidate can apply for an
open position they will be asked to build
a profile for themselves that will put
them into our applicant tracking system.
1.
Candidate can create their
own Profiles on the Career
Portal
If they do not have a resume there is
a resume builder on the career
portal that will guide them through
building one.
When a candidate clicks on the link to build their candidate profile they will first be asked to review
and agree to Flowserve’s Data Privacy Statement.
TAS - HR Training Guide
86
Once the candidate has reviewed and agreed to the privacy statement they will be brought to the
screen to complete their profile.
• Name and Address fields will differ based
on the country that is chosen by the
candidate.
• The preferred language that is chosen by
the candidate will determine what language
the candidate receives communications from
the system in.
• Candidate will be able to create a
username and password so that they can
continue to come back to the career portal
and manage the positions they have applied
to, update their profile information, etc.
TAS - HR Training Guide
87
2.
Batch Upload link from the
“My Utilities” section
3.
New Profile link under the
Candidate section on the left
NavBar
4.
Auto Profile under the Candidate
section on the left NavBar
Note: Our goal is to encourage all Candidates and Employees to create Profiles through the
Career Portal. However, we do have options to create Candidate Profiles from the Human
Resources Workbench. If you have a resume in any electronic text format, Auto Profile is the
quickest and easiest way to add a Candidate to the system. This option will parse information
from the text of the resume into the most appropriate fields.
TAS - HR Training Guide
88
Searching for Candidates
TAS - HR Training Guide
89
There are several ways to search for a Candidate. Here are a few of the most
common:
1. Quick Search from the left NavBar in the Candidate Section
2. Advanced Search from the Candidate section on the left NavBar
2
1
3. Last 10 Profiles from the bottom NavBar
3
Concept Searching
Details
Concept Searching does the work for you by:
• Associating alternate words/expressions in the results
• Ranking candidates based on previous history
• “Learning” new skills and concepts as resumes are added to the system
Different types of concept searches are:
1. “Candidate Concept Match” on
a Requisition Profile
2. “Show Similar” on a
Candidate Profile
3. “Match to Open
Reqs” on a Candidate
Profile
TAS - HR Training Guide
90
4. Switching to Concept Search from a Candidate Advanced search page
5. Switching to Concept Search from a Requisition Advanced Search page
Example of the results from a concept search. Notice the
folders by field listed above and below it also returns
candidates that match your search by the % that they
matched.
TAS - HR Training Guide
91
Candidate Profile
TAS - HR Training Guide
92
Section 1:
The top section lists the candidate
name and address. There is also a
Take Action box that will allow you to
send the candidate an email or add
them to your candidate cart.
Section 2 – Add Candidate Documents:
If the candidate uploaded a soft copy of their resume when they built their profile,
it would be attached you. You can also upload documents to the candidate’s
profile in this section.
Section 3 – Req History:
This section will display all requisitions that this candidate has ever been added to
and/or applied to, as well as the current status they are in on the requisition.
TAS - HR Training Guide
93
Section 4: Resume
The Resume section will list all of the information that the candidate entered into
the resume text box when building their profile.
Section 5: Activities
You can add and track
certain activities to the
candidate in this section.
TAS - HR Training Guide
94
Section 6: Additional Information
List candidate information such as their email address.
Section 7: New Hire Paperwork
If this candidate has been hired on a requisition the new, hire paperwork that was
emailed to the candidate will be listed here. This is not currently available in all
locations.
Section 8: Education
List the education information that was filled in by the candidate.
Section 9: Languages
Lists the candidates preferred language that was chosen from Flowserve’s Core
Languages, as well as any other language the candidate is fluent in.
TAS - HR Training Guide
95
Section 10: Phones
Lists the candidate’s contact phone numbers.
Section 11: References
You may add the candidate’s references in this section as an easy way to keep
all of their information in one location.
Section 12: Candidate Expense
You may track all expenses
associated with this
candidate.
TAS - HR Training Guide
96
Section 13: Questionnaires
All of the questionnaires that are available will be listed in this section. To
review one of the questionnaires or to make edits to previously entered
information, simply click on the Edit link next to the questionnaire you would like
to view.
Section 14: Employee Referral Program
This section will look different for external and internal candidates.
External Candidate – you can add them to an employee’s profile as being
referred from this section.
Internal Candidate – you can add a candidate to the employee’s profile to show
that the candidate was referred by the employee.
TAS - HR Training Guide
97
Section 15: Merge History
If a candidate had duplicate profiles in the system that had been merged
together to create one profile, this would be detailed here.
Section 16: Candidate Forms
All available forms in the system such as the Employment Application will be
listed in this section. You will be able to easily identify in the Completed column
which forms the candidate has completed. You may view their response by
clicking the Edit link next to the form you want to view.
Section 17: Menu
1.
2.
3.
4.
5.
6.
7.
8.
Edit Profile – you may make changes to the
candidate’s profile (i.e. reset their username and
password)
Delete Profile – you may delete the candidate profile
Show Similar – if you would like to see similar
resumes to this candidate
Match to Open Reqs – this will match the information
in the candidate’s resume/cv to the information listed
in the open requisitions job descriptions and make
suggestions on positions they should be considered
for.
Add to My Req – will return a list of all requisitions that
you are listed as the recruiter on
Add to an Open Req – returns a list of all open
requisitions
Page Options – will allow you to change which
TAS - HR Training Guide
98
sections on the profile page that you view.
Expand All Sections – will open up all of the sections
on the candidates profile
Adding Candidates to Requisitions
TAS - HR Training Guide
99
There are numerous ways to Add Candidates to a Requisition:
Details
1. Candidate applies to posted requisition through the Career Portal
2. Click the “Add Candidates from Cart” link on the Requisition (at
least one Candidate must be in the cart for this option to display)
2
3. “Send Candidate to Requisition” from “Take Action” box on
Candidate list.
4. “Add to My Req” from
Candidate Profile Menu
5. “Add to an Open Req” from
Candidate Profile Menu
Ranking Candidates
When many candidates have applied to a job from the candidate portal, you can use
concept searching to narrow the choice down. Follow these steps:
1.
Click Candidate Concept Match from the Menu in the upper right corner on the
Requisition Profile
2.
Check the box Search Only Candidates on this Job
3.
Click Search to View Results
Another option is to compare all of the candidates that are attached to the requisition:
1.
Display your requisition that has several candidates listed
2.
Click
3.
Check the box to only search candidates on this job
4.
Click
in the Candidate section
TAS - HR Training Guide
to View Results
100
Workflow Overview
TAS - HR Training Guide
101
Workflows & Activities
Details
A Workflow is defined as the recruitment process of a candidate against a Specific Requisition.
Workflows consist of three specific items:
Stages
Stages are the “milestones” of a Workflow. Each Stage can have multiple steps (activities)
involved with it, and is a placeholder for candidates until all associated activities have been met.
Activities
Activities are categorized actions that need to take place within each stage. Every activity is
date/time stamped and indicates that a certain action has been completed in the recruiting
process. Activities that display in a red font are required before a Candidate can advance in the
Workflow.
Actions
Actions are what happens during an activity which can include sending an email, completing a
form, or generating an offer.
Moving Candidates through Stages
Activities are the driving force behind moving candidates
through a Workflow. Activities can be added through
either:
•The Candidate Section on a Requisition
Profile by clicking on Add New Activity for
the associated Candidate.
•The Requisition Section of a Candidate
Profile by clicking on Add New Activity for
the associated Requisition.
Note:
As you complete
different stages through the
process the completed stages
will drop off of the available
activities and the activity list will
only show those stages that
should still be completed.
TAS - HR Training Guide
102
Once you have added candidates to requisitions and are ready to begin them in the process
you will follow the steps listed below:
1.
Requisition Profile > Candidate section > Add New Activity – this will
allow you to begin walking the candidate through the recruitment
process (located to the far right of candidate’s name.)
2.
A drop-down box will pop up –
from the drop-down option
choose which activity you would
like to begin with
3.
Candidate Screening – from here you can save
your notes from the phone screen, track the call
log, and review the candidate’s profile.
3-
44.
Send the Hiring Manager an email with the
candidate’s resume.
5-
5.
Candidate Interview – track all interview info;
request Employment Application
6-
6.
Candidate Reference Check
7.
Candidate Offer
7-
• Generate Offer – when you are
prepared to make an offer you will
choose this option first. This will route
the offer for approval.
• Once the offer is approved you will
return to this dropdown to “Create Offer
Letter” (this is the letter that will be sent
to the candidate)
8.
Candidate Background Check/Drug Screen
9.
Initiate Onboarding – This will open the
placement page for you to hire the candidate
and feed them into GEMS
8-
910 -
11 -
10. Candidate Not Selected – This is used to notify
candidate’s that are not selected to be hired on
this requisition. Every candidate on a requisition
must have this action taken if they are not hired.
TAS - HR Training Guide
11. Any Time – these activities can be taken on the
candidate any time during the recruitment process.
i.e. reviewing the candidates profile.
103
Mass Activities
Details
Mass Activities allow you to select multiple candidates and assign specific activities to them.
Only certain activities will be available from this list as determined by your Talent Acquisition
System Administrator. Mass activities require a user to select all candidates to apply the
activity to and use the “Take Action” drop-down box to select the corresponding activity.
This function is most commonly used when identifying candidate’s that are not selected to
be hired on a requisition. We need to identify these candidate’s as not selected for a
couple reasons:
• You can keep track of who you are considering versus those that are no longer in
consideration.
• It “cleans up” a Candidate Profile allowing a user to quickly evaluate how many
positions a candidate is currently being considered for.
Follow these steps to disqualify candidates:
1. Display your requisition that has several candidates listed
2.
Click the checkbox next to one or several candidates name
listed on this requisition.
3.
Scroll down the values in the Take Action box to find the
section called Mass Activities. Study the activities that are
available for you and select the activity best suited.
4.
Click
TAS - HR Training Guide
104
There are two distinct types of mass disqualifying (Candidate’s Not Selected)
activities which we will
Details
explore in the table below. One illustrates “bulk” disqualification (same reason) and the other
illustrates “looping disqualification (various reasons):
TAS - HR Training Guide
105
Filtering
Details
To make the candidate section of a
Requisition Profile easier to manager, there is
a Filter link available in the Candidate
section.
Clicking the Filter button allows a user
to select which stages should be
visible in the view.
Once you have made your selections click
Filter to complete.
You can tell a filter is running because the
word “Filter” changes to “Filtered”.
Note: For this example, we chose not to show
candidates that were not selected. Notice that
Donna Johnson is no longer visible.
TAS - HR Training Guide
106
Offer Process
Once a candidate is identified and you are ready to prepare an offer, followDetails
these steps:
Go to the requisition profile > candidate section > Add New Activity to the candidate you are
making the offer to.
From the drop-down, choose Generate Offer, then click Go
Complete all of the fields associated with your candidate.
Click
the offer.
when you are ready to route approvals. Input all employees who must approve
TAS - HR Training Guide
107
Details
The approvers will receive an email requesting their approval of the offer.
Once the offer is approved, you will receive the following email:
TAS - HR Training Guide
Reminder:
The Job
Change Salary Action
Proposal has to be
completed
prior
to
creating the offer letter for
the candidate. The file
will be attached to108
the
email.
Offer Letter Process
Once the offer has been approved through the Talent Acquisition System and the Job Change Salary
Details
Action form has all of the required signatures, follow these 6 steps for candidates:
1
2
3
Pick a letter template
Ensure that all required information is
included in the body of the offer letter.
Once complete, click Create Letter.
4
You will need to view the letter and save
it in Microsoft Word so you can send it
to the candidate.
5
6
TAS - HR Training Guide
Click continue to return to the
candidate profile page.
109
If the Candidate accepts the offer:
Details
1
Under the Initiate Onboarding section:
External Candidate
Internal Candidate
2
2
3
Complete all applicable fields.
Reminder: Fields highlighted in
red are required.
Once you click Save, the onboarding system will send a welcome email to the New Hire.
TAS - HR Training Guide
110
If the candidate declines the offer:
Details
1
Under the Candidate Offer section:
2
3
TAS - HR Training Guide
111
Onboarding
TAS - HR Training Guide
112
About Onboarding (Aloha)
The Onboarding Section within the Talent Acquisition System is called “Aloha”. Aloha
is a component of the Talent Acquisition System that routes activities for new hires,
such as new hire emails and paperwork. Aloha also routes internal notifications
regarding tasks that have been distributed to new hires and require action. This guide
will go through what a new hire experiences when they receive their notifications, and
what a Flowserve task recipient will receive.
Step 1:
When you are ready to hire a candidate on a requisition you will choose either:
• Candidate Hired / Accepted – this option is used for new hires and re-hires
• Employee Hired / Accepted – this option is used for promotions and transfers
Step 2:
Once you have selected either Candidate Hired / Accepted or Employee Hired /
Accepted you will be brought to the placement page. The last field on this page is
Aloha Workflow. You will have four options:
• Canada New Hire Workflow – select this option for all new hires or re-hires in Canada
• Outside NAM New Hire Workflow – select this option for all new hires or re-hires
made outside of NAM
• U.S. New Hire Workflow – select this option for all U.S. new hires or re-hires
• No Onboarding Workflow – select this for all promotions or transfers globally
TAS - HR Training Guide
113
What the New Hire Sees:
1.
Once an employment offer is accepted, the new hire will receive an email
welcoming them to Flowserve and directs them to the New Employee
Resource Center at http://welcome.flowserve.com (for U.S) and
http://start.flowserve.com (for outside of the U.S.), where they are asked to
complete their paperwork.
TAS - HR Training Guide
114
2.
Once at the New Employee Resource Center, the new hire accesses the link
to complete their paperwork. (Note that paperwork is currently populated
for the U.S. and Canada only.)
Note: The circled link above directs them to
their career portal where they will log in
using the username and password they
created for their candidate profile.
TAS - HR Training Guide
115
3.
Once logged into their career profile,
the new hire is presented with a Read
Me First document as well as each
document they must complete.
3-
Note: Read Me First – explains how
each document is submitted and who
the documents must be faxed/returned
to.
4.
As the new hire accesses and
saves/submits each file or form, the
system will mark each item as
complete. For the U.S., it is important
to note, however, that files such as the
W-4, I-9, Direct Deposit, Code of
Business Acknowledgement, and the
EEO form are NOT complete until they
are received by the task recipient.
Note: This will be discussed
further in the Task Recipient
section.
TAS - HR Training Guide
116
Flowserve Task Recipient View
Receiving Email Notification:
A task recipient may be notified by email that a task has been issued to a new hire or is
approaching or past a deadline. When this occurs, the Aloha System will send an email to
the task recipient with information about the task and required action.
E
m
a
x
e
pl
Tracking New Hire Progress:
1.
Open the New Hire’s Profile (Candidate Profile)
TAS - HR Training Guide
117
2.
Click the + next to New Hire Documentation to view a list of documents the new hire needs
to complete.
TAS - HR Training Guide
118
New Hire Checklist for U.S. Only
Human Resources will need to track the new hire documents. For U.S. Hires, the New
Hire Checklist will need to be completed and faxed to GHRS with the required
documentation. Note: You will continue to use the GHRS checklist currently in place.
TAS - HR Training Guide
119
New Hire Process – U. S. OnlyDetails
All new hires will be processed online through the Talent Acquisition System by HR Operations
and Hiring Managers. For hires made through the Talent Acquisition System, HR Operations
is not required to submit the ‘Hire Employee’ transaction through the Global Employee
Management Solution system (GEMS). They should, however, validate the candidate data in
the Talent Acquisition System, as this will automatically feed GEMS, which will automatically
feed ADP (payroll).
Two fields that were not required in GEMS will be required in the Talent Acquisition System,
as they are required for ADP: AIP Incentive Group and Timekeeper. The Timekeeper is what
links the new hire to their correct timekeeper who will be responsible for submitting their hours.
Once the candidate has accepted the offer, HR Operations will change them to ‘Candidate
Hired/Accepted’ in the Talent Acquisition System. This triggers two actions:
1.
Aloha On-boarding Process: the new hire will either be emailed a link or mailed new
hire documentation to complete and return by fax or mail to HR Operations.
2.
Transition of the new hire’s data from the Talent Acquisition System to GEMS.
New hires will be instructed to fax or email all required paperwork to HR Operations prior to
their start date. HR Operations will review the paperwork and once all is completed correctly,
they will email to Global HR Solutions (GHRS) at [email protected] or fax
to (972) 443-6974 before the new hire’s start date.
Note: The candidate must be changed to ‘Candidate Hired/Accepted AND GHRS must
receive the new hire paperwork no later than the Wednesday one week prior to their first
paycheck. (see example below)
New hire
paperwork due
to GHRS
X
TAS - HR Training Guide
120
Details
The documents listed below are or may be required in order for the new hire to be set
up in ADP and paid correctly on their first payday:
• Federal W-4 (required)
• State Withholding Form for the following states (where applicable):
Alabama, Arizona, Arkansas, California, Connecticut, Georgia, Illinois, Indiana, Iowa,
Kentucky, Maryland, Michigan, Mississippi, New Mexico, North Carolina, Ohio,
Puerto Rico, and Virginia. (Links to State Tax Forms can be found on Passport)
• Local/County Tax Form (where applicable): for employees who are required to have
local taxes withheld
• Certificate of non-residence (where applicable): for employees who work in one
state and live in another. (see the Reciprocal Tax Agreements document on
Passport)
• Direct Deposit Form (required, include copy of a voided check)
• Sign-On Bonus Form (where applicable)
See the New Hire Checklist located on Passport for a list of additional required documents.
HR Operations will review and validate original documents as required by law, on the new
hire’s start date. These do not need to be faxed to GHRS unless there are changes to what
was submitted previously.
Validation of New Hire Data in GEMS
Upon receipt of the new hire paperwork, GHRS will validate the transfer of the new hire’s
data from the Talent Acquisition System to GEMS (This may not be applicable) will add
the I-9 information. If the new hire’s data is missing, incorrect or requires clarification,
GHRS will contact HR Operations and make any required corrections in GEMS.
Depending on the type of correction, HR Operations may be required to obtain additional
approvals before the correction can be made in GEMS.
TAS - HR Training Guide
121
Details
Completing the New Hire Record in GEMS
There are items HR Operations was previously able to enter in the GEMS Hire Employee
transaction that will now need to be entered by HR Operations after the new hire’s data
has been transferred from the Talent Acquisition System to GEMS:
• Visa Information: Use the GEMS HR Self-Service, Additional Personal Information
transaction to add information for new hires who are employed on a Visa: Visa Country,
Visa Type, Visa Number, Visa Issue Date and Visa Expiration Date.
• Assign New Direct Reports: For new manager hires, use the GEMS HR Self-Service,
Manager Change transaction to assign direct reports. Use the ‘Assign New Direct
Reports’ section of this transaction.
Setting up the New Hire in ADP
Our GEMS database is set up to automatically feed new hire data to ADP every evening.
The new hire will go into ADP as ‘Active’ but will be ‘Incomplete’ and unable to be paid until
their local, state (as applicable) and W-4 tax withholding information has been entered into
ADP by Payroll GHRS. As such, it is critical that HR Operations send the required new hire
paperwork to Payroll GHRS as soon as possible.
Upon receipt of the local, state (as applicable) and W-4 tax withholding forms and Direct
Deposit forms, Payroll GHRS will update the new hire’s record in ADP. Entry of the W-4
forms will enable the new hire to be paid.
Note: If the Federal W-4 is not received in time to process the new hire’s first paycheck,
Payroll GHRS will default their Federal W-4 into ADP as single with zero exemptions.
Change in Start Date
Should a new hire’s start date change, notify GHRS immediately by sending an email to
[email protected]. GHRS will update the date in GEMS, which will
automatically update the date in ADP.(Does Cyndie need to update TAS)
TAS - HR Training Guide
122
No-Show on First Day
Details
If the new hire does not show up for work on their start date, notify GHRS immediately by
sending an email to [email protected]. You will need to inform them if a
new start date has been determined, or if the new hire will not be joining Flowserve and
should be removed from GEMS and ADP.
If the new hire will not be joining Flowserve please disqualify the candidate in the Talent
Acquisition System after you have notified GHRS.
Processing a Sign-On Bonus for New Hire
Some new hires are offered a sign-on bonus during the offer process through the Talent
Acquisition System. Unfortunately, there is currently not a method to transfer this
information from the Talent Acquisition System to GEMS, then to ADP. HR Operations
must complete the Sign-On Bonus Form and return it to GHRS along with the new hire
paperwork.
Note: The Sign-On Bonus is different from a Relocation Bonus. Relocation Bonuses will
be processed by EHRO and the Relocation Administrator.
TAS - HR Training Guide
123