1
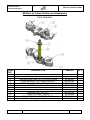
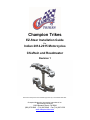
Champion Trikes EZ-Steer Installation Guide For Indian 2014-2015 Motorcycles Chieftain and Roadmaster Revision 1 Note: Above CAD picture is for illustrative purposes only to show detail of EZ Steer. Champion Motorcycle Accessories International, Inc. Dba Champion Sidecars 11841 Monarch Street, CA 92841 (800) 875-0949 (714) 847-0949 Fax (714) 847-1539 www.championtrikes.com Indian 2014-2015 Chieftain/Roadmaster EZ-Steer Installation Guide EZ-Steer for Indian Chieftain and Roadmaster Parts Illustration ITEM NO. DESCRIPTION ITEM NO. QTY. 1 2 3 4 5 6 7 8 9 10 11 12 TOP CLAMP, EZ STEER, INDIAN BOTTOM CLAMP, EZ STEER, INDIAN THREADED BAR, M8x1.25, EZ STEER, INDIAN SEAL, BEARING, TOP, SMALL, GL8/GL5 EXTENSION, FORK TUBE, EZ STEER, INDIAN O RING, 3mm, 38mm ID BEARING,SWING ARM, HON, TAPERED SEAL, BEARING, BOTTOM, EZ5 BEARING, BOTTOM, EZ5 STEM, EZ STEER, , INDIAN RING, RETAINING, EZ STEER, INDIAN Spacer, EZ Steer, Fairing, Indian Chieftain Roadmaster EZ-IN0-001 EZ-IN0-002 EZ-IN0-007 BE-E00-008 EZ-IN0-004 EZ-IN0-005 BE-E00-002 BE-E00-016 BE-E00-015 EZ-IN0-009 EZ-IN0-010 EZ-IN0-011 1 1 4 1 2 2 1 1 1 1 1 4 Installation Guide Page 2 of 4 Rev.1 Indian 2014-2015 Chieftain/Roadmaster EZ-Steer Installation Guide EZ Steer Instructions WARNING: The Champion EZ-Steer Kit is designed to be used only with a sidecar or trike application. Installation of the Champion EZ-Steer system is similar to the installation of the OEM triple clamp of your Indian motorcycle. We recommend that you use an OEM service manual and follow the prescribed disassembly, installation, and torque specifications unless otherwise stated below. Disassembly NOTE: The Champion EZ-Steer Kit is designed to reuse some OEM hardware. During disassembly it is a good idea to label and set aside all hardware so it can be easily put back together. NOTE: MARK ALL MATING PLUGS BEFORE DISCONNECTING THE WIRING. Male and Female connectors are the same in many instances, therefore it is possible to plug the wrong Male to the wrong Female. PLEASE mark all mating connectors before disconnecting. Mandatory Parts/Tools Needed: Steering Head Adjustment Socket (Polaris Part #PV-43508) EZ-Steer Installation Instructions 1. Use the Parts Checklist included with your kit to verify the contents of the box. 2. Remove the OEM Top Clamp and Bottom Clamp with steering stem as per the Indian Service Manual. 3. Remove steering lock from OE Top clamp and install to Champion Top Clamp and reuse the 8mm OEM bolts. Do not torque bolts it will be done later in the installation. 4. Replace both the top and bottom steering bearing races with the new supplied races. Remove both top and bottom race by utilizing a long flat head screw driver and hit the race out. 5. Completely pack the new top bearing with the supplied grease. Check the bottom bearing to ensure sufficient grease. It is the installer’s responsibility to ensure sufficient grease is installed in the bearings. Installation Guide Page 3 of 4 Rev.1 Indian 2014-2015 Chieftain/Roadmaster EZ-Steer Installation Guide 6. Install the Champion stem with bottom clamp into neck. 7. While holding the stem, install the supplied top bearing and dust seal. 8. Install the adjustment nut and torque to 30 ft-lbs using the Polaris steering stem socket tool. Loosen the adjustment nut and retighten to the same torque. Turn steering stem left and right, lock to lock a few times to fully seat the bearings. Retighten the adjustment nut to the same torque of 30 ft-lbs. 9. Install the Champion top clamp. Install stem nut finger tight (Note: to be tightened later in the installation). 10. Install the Champion fork extensions with o-rings onto both fork legs and torque to 40 ft-lbs. 11. Temporarily install the fork legs into the bottom and top clamp with the top surface of the fork extensions flush with top surface of the top fork clamp as per the illustration on the cover of this installation instruction set. Tighten the stem nut to 72 ft-lbs. 12. Make sure the steering stem moves smoothly, without play or binding, by turning right to left multiple times. 13. Install the fork legs properly and finish front end assembly according to the Indian Service Manual. Reuse the OEM pinch bolts. (Note: The top fork clamp pinch bolts should be torqued to 18 ft-lbs. The bottom fork clamp pinch bolts should be torqued to 18 ft-lbs.) EZ-Steer Maintenance The bearings in your EZ-Steer kit are normal wear items, not subject to replacement under Champion’s one year Limited Warranty for the product. Failure to follow your motorcycle manufacturer’s recommendations for periodic OEM triple-tree maintenance will accelerate the wear on these bearings. Installation Guide Page 4 of 4 Rev.1