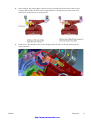
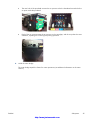
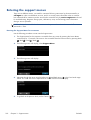
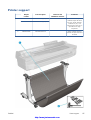
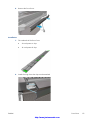
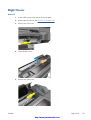
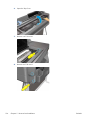
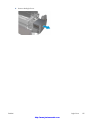
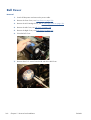
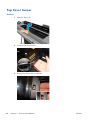
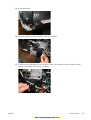
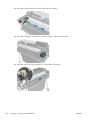
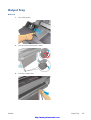
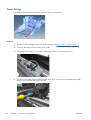
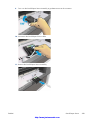
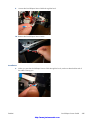
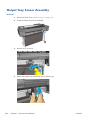
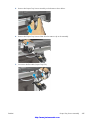
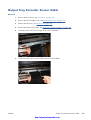
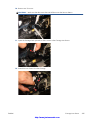
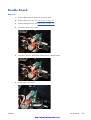
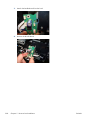
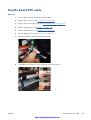
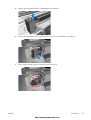
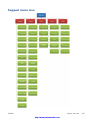
1
DESIGNJET T120/T520 ePrinter Series
Service Manual
iv
Notices
ENWW
Using this manual
This service manual contains information necessary to test, maintain, and service the following:
HP Designjet T120 Basic Printer 24 inch
CQ891A
HP Designjet T520 Pro Printer 24 inch
CQ890A
HP Designjet T520 Pro Printer 36 inch
CQ893A
For information about using these printers, see the user's guide.
Readership
The procedures described in this service manual are to be performed by HP Certified service personnel
only.
Part numbers
Part numbers for printer service parts are located in Parts and diagrams on page 126.
ENWW
v
http://www.justmanuals.com
vi
Using this manual
ENWW
Table of contents
1 Printer fundamentals ........................................................................................................ 1
Overview ................................................................................................................................ 1
Using the front panel ................................................................................................................ 2
Start-up sequence ..................................................................................................................... 3
Subsystems .............................................................................................................................. 5
2 Troubleshooting .............................................................................................................. 34
Printer troubleshooting flowchart .............................................................................................. 35
Basic printer troubleshooting ................................................................................................... 36
System error codes ................................................................................................................. 39
Paper troubleshooting ............................................................................................................. 61
Communication troubleshooting ............................................................................................... 66
Ink-supplies troubleshooting ..................................................................................................... 70
Print-quality troubleshooting ..................................................................................................... 83
Update the firmware ............................................................................................................... 97
3 Support menus ............................................................................................................. 101
Entering the support menus .................................................................................................... 102
Support menu ...................................................................................................................... 104
Extended Support menu ........................................................................................................ 124
4 Parts and diagrams ...................................................................................................... 126
Introduction ......................................................................................................................... 126
Printer support ..................................................................................................................... 127
Covers ................................................................................................................................ 128
Roll covers .......................................................................................................................... 129
Right-hand assemblies ........................................................................................................... 130
Left-hand assemblies ............................................................................................................. 132
Carriage assembly ............................................................................................................... 134
Paper path (front) ................................................................................................................. 136
Paper path (rear) ................................................................................................................. 137
Roll supports ........................................................................................................................ 138
Sensor Kit ........................................................................................................................... 139
Miscellaneous parts .............................................................................................................. 140
ENWW
vii
http://www.justmanuals.com
5 Removal and installation .............................................................................................. 141
Introduction ......................................................................................................................... 143
Customer Self Repair parts .................................................................................................... 145
Videos available .................................................................................................................. 146
Recommended checks after replacing parts ............................................................................. 146
Top Cover ........................................................................................................................... 147
Front Cover ......................................................................................................................... 150
Right Cover ......................................................................................................................... 153
Ink Cartridge Cover .............................................................................................................. 156
Left Cover ........................................................................................................................... 158
Roll Cover ........................................................................................................................... 160
Back Cover ......................................................................................................................... 163
Front Panel .......................................................................................................................... 165
Front Panel Cable ................................................................................................................ 171
Central Cover ...................................................................................................................... 172
Upper-Roll Paper Guide ........................................................................................................ 177
Left Roll Support ................................................................................................................... 180
Right Roll Support ................................................................................................................. 185
Top Cover Sensor ................................................................................................................ 188
Top Cover Sensor Cable ....................................................................................................... 191
Encoder Strip ....................................................................................................................... 193
Ink Cartridge Cover PCA Assembly ........................................................................................ 198
Power Supply ...................................................................................................................... 202
Main PCA ........................................................................................................................... 205
Paper Motor ........................................................................................................................ 211
Encoder PCA and Index ........................................................................................................ 213
Encoder Disk ....................................................................................................................... 217
Trailing Cable ..................................................................................................................... 220
Service Station ..................................................................................................................... 227
Prime Pump ......................................................................................................................... 233
Carriage and Belt ................................................................................................................ 236
Carriage Belt ....................................................................................................................... 243
Right Gear Train Module ...................................................................................................... 245
Starwheel Assembly ............................................................................................................. 247
Output Shaft ........................................................................................................................ 249
Output Tray ......................................................................................................................... 257
Multi-Sheet Tray Assembly ..................................................................................................... 260
Multi-Sheet Tray Assembly Extensions ..................................................................................... 261
Output Platen ...................................................................................................................... 263
Carriage Motor ................................................................................................................... 268
Cutter Assembly ................................................................................................................... 272
Cutter Guide ....................................................................................................................... 279
Out-Of-Paper Sensor ............................................................................................................. 281
Out-Of-Paper Sensor Cable ................................................................................................... 284
viii
ENWW
Output Tray Sensor Assembly ................................................................................................ 286
Output Tray Extender Sensor Cable ........................................................................................ 289
Carriage Line Sensor ............................................................................................................ 293
Bundle Board ...................................................................................................................... 297
Bundle Board FFC cable ....................................................................................................... 299
Pinchwheels ........................................................................................................................ 304
Left Spittoon ........................................................................................................................ 310
6 Preventive maintenance ............................................................................................... 313
Preventive maintenance ........................................................................................................ 314
Preventive maintenance kits ................................................................................................... 320
7 Appendices ................................................................................................................... 323
Important links ..................................................................................................................... 324
Front-panel home screen and menu map ................................................................................. 325
Support menu tree ................................................................................................................ 335
Extended Support menu tree .................................................................................................. 336
How to check whether your computer is connected to your network ............................................ 337
Wireless troubleshooting report error cases ............................................................................. 340
CSR fliers ............................................................................................................................ 351
ENWW
ix
http://www.justmanuals.com
x
ENWW
1
Printer fundamentals
●
Overview
●
Using the front panel
●
Start-up sequence
●
Subsystems
Overview
Feature
Paper source
Hardware differences
HP Designjet T120
HP Designjet T520
Roll and multi-sheet tray
Stand as an accessory, no
roll cover
More information
See the user's guide
Stand in box, roll cover
Connectivity
Wi-Fi, Fast Ethernet LAN, USB
Important! LAN and Wi-Fi are
not compatible
Web Services
Automatic firmware upgrade
The printer needs to be
Internet-connected: Web
Services do not work with a
USB connection. For some
configurations, the latest
firmware release is needed.
Manual firmware upgrade is
available in both printers via
HP Designjet Utility
(Windows) or HP Utility (Mac
OS). The same firmware file
is used for T120 and T520.
HP Designjet ePrint & Share
Printing by email
Speed
70 s per page on A1/D
35 s per page on A1/D
Resolution
Up to 1200 × 1200 dpi
Up to 1200 × 2400 dpi
Memory and languages
256 MB, HP-PCL3
(processing in printer)
1 GB, HP-GL/2 (processing
in computer)
Supplies
HP 711 29 ml Cyan, Magenta, Yellow
HP 711 38 ml and 80 ml Black
Ink cartridges and printhead
can be replaced by the
customer.
One on-axis printhead for all colors
Overview
ENWW
http://www.justmanuals.com
1
Using the front panel
The front panel is a touch-sensitive screen with a graphical user interface; it is located on the front left of
the printer. It gives you complete control of your printer: from the front panel, you can print, view
information about the printer, change printer settings, perform calibrations and tests, and so on. The
front panel also displays alerts (warning and error messages) when needed.
The front panel has a large central area to display dynamic information and icons. On the left and right
sides you can see up to six fixed icons at different times. Normally they are not all displayed at the
same time.
To the right of the front panel is the Power key, with which you can turn the printer on or off. The key is
illuminated when the printer is on. It flashes when the printer is in transition between on and off.
Left and right fixed icons
●
shows the status of the wireless connection: if the blue light is shining, the wireless connection is
active.
●
Press
●
Press
to view help about the current screen.
●
Press
to go to the previous item.
●
Press
to go to the next item.
●
Press
to go back to the previous screen.
●
Press
to cancel the current process.
to return to the home screen.
Home screen dynamic icons
The following items are displayed only on the home screen.
●
At the top left of the home screen is a message telling you which paper source is active.
●
Press
●
Press to view connectivity status information and to perform network configuration. If a network
cable is connected,
is displayed instead.
to view Web Services status and display your printer s email address.
NOTE: It is not possible to use wireless and wired network connections simultaneously.
●
2
Press
to view ink information.
Chapter 1 Printer fundamentals
ENWW
●
Press
●
Press
to load, unload, and change options for roll paper.
Press
to change options for the multi-sheet tray, or to activate it.
●
Press
to load, unload, and change options for single sheets.
●
Press
to access HP Designjet ePrint & Share.
●
to change printer settings.
NOTE: The active paper source is indicated by a slightly larger icon, with a white tick in a green
circle:
.
If the printer is left idle for some time, it goes into sleep mode and switches off the front-panel display.
To change the time that elapses before sleep mode, press , then Printer preferences > Sleep.
You can set a time between 5 and 240 minutes.
The printer wakes from sleep mode and switches on the front-panel display whenever there is some
external interaction with it.
The following table shows an overview of the two types of support menu available, for more details see
Entering the support menus on page 102.
NOTE: The icons mentioned in this table will not be visible in the front panel: you must press the front
panel in the places where they normally appear, as shown in the front panel illustration at the start of
this section.
Label
Description
Support menu: This can be used by customers under the
guidance of phone call agents assisting remotely. Using this
menu, customers can perform troubleshooting tasks and
access printer information.
From the Home screen, press the following icons one after the
,
, ,
.
other:
Extended Support menu: Service engineers only
If there is a system error, you may not be able to reach the
home screen. In this case, press the Power button and hold it
down for 15 seconds.
From the Home screen, press the following icons one after the
other:
,
,
,
.
Start-up sequence
There are three states between power-on and the Home screen:
1.
Electronics initialization
2.
Firmware initialization
3.
Mechanical initialization
Start-up sequence
ENWW
http://www.justmanuals.com
3
State 1: Electronics initialization
1.
The front panel moves from flashing white light to turning dark.
2.
The printer reads the firmware.
NOTE: At this stage, if something is broken, it will not be possible to enter the Support menu. To
diagnose what is happening, go to the front panel blank troubleshooting. (and add here the link).
Subsequently, you can enter the Support menu to troubleshoot if necessary.
State 2: Firmware initialization
1.
The HP logo appears with a static bar.
2.
Bundle board and ASICs are initialized.
3.
The HP logo changes.
State 3: Mechanical initialization
1.
A basic check of servos
2.
A check that the Scan Axis and Paper Axis are unobstructed by scraps of paper or other items
3.
Paper and print system initialization
Initialization flow summary
4
Time (sec)
Printer state
Visual and acoustic information
0
Power on
Using the Power button
10
Electronics initialization
Chapter 1 Printer fundamentals
ENWW
Time (sec)
Printer state
27
Mechanical initialization
45
Visual and acoustic information
1. Basic check of servos
Sound of the printer's motors
2. Scan Axis, Paper Axis check
Carriage movement
3. Paper and print system initialization
Paper movement
Ready state
NOTE: Initialization lasts around 45 s if there was a clean power-off (using the front panel Power
button). If there was a dirty power-off, the printer will require more time to inititialize (to ensure that the
printhead is in a good state).
Subsystems
Covers
Functionality
These parts cover the printing mechanism and act as protection from potential knocks or dust. They also
prevent the customer from coming into contact with unsafe parts during the operation of the printer.
Finally, the covers complement the style and aesthetics of the printer.
The T120 and T520 printers have covers of different colors, and a different configuration of the roll
cover, as seen in the following table:
HP Designjet T120
HP Designjet T520
Roll Cover
Not Present
Transparent
Top Cover
Opaque Black
Transparent
Output Platen
Black-Blackberry
Black-Olive
Output Tray
Black-Olive
Black-Olive
Subsystems
ENWW
http://www.justmanuals.com
5
Components
Other than the cosmetic aspects of the covers, there are several sensors related to the subsystem covers.
The sensors are designed to detect the status of the cover, open or closed.
●
The Ink Cartridge Cover Sensor senses whether the Ink Cartridge Cover is open or closed.
Opening the Ink Cartridge Cover starts ink cartridge replacement automatically. The sensor is
hosted in the printer chassis.
●
The Central Cover hosts the Top Cover Sensor to sense whether the Top Cover is open or closed.
IMPORTANT: Be careful to avoid damaging the sensor while removing the Central Cover. See
Central Cover on page 172.
●
The Output Tray Sensor senses whether the Output Tray is open or closed. To avoid paper jams
while printing on roll paper, the tray should be closed.
IMPORTANT: Damage to the covers can cause the sensors to malfunction.
Removal and installation
In order to proceed with the removal and installation of the covers its important to bear in mind their
cosmetic aspects, some surfaces of the covers have a glossy finish, which requires maximum attention
as they are very delicate and susceptible to scratches and finger marks. It is recommended that you use
gloves for any service operation involving the covers.
Due to the layout of the covers, it is important to bear in mind that some parts require removal before
you can remove a specific cover.
6
●
Right Cover requires Front Cover removal.
●
Left Cover requires Front and Ink Cartridge Cover removal.
●
Roll Cover requires Right and Left Cover removal.
Chapter 1 Printer fundamentals
ENWW
●
Top Cover requires Front Panel assembly removal.
●
Central Cover requires Right Cover and Left Cover removal.
Related tests
Sensor tests for the Top Cover, Ink Cartridge Cover, and Output Tray operation. See Diagnostics menu
on page 106.
Electronics
Other than the sensor boards, there are no electronics related to this subsystem.
Printhead health systems: Service Station, Primer system, and Left
Spittoon
Functionality
The service station is responsible for printhead maintenance. It takes action to clean ink residues and
service ink nozzles, and prevents ink from drying in critical zones by capping the printhead once
printing has finished.
The Primer system provides the necessary air pressure to the printhead to perform initialization. This
system also provides pressure to the necessary printhead service operations (by boosting air which
pushes ink out through the printhead nozzles, cleaning residues of dried ink and other particles).
The Left spittoon is a small container located to the left of the print-zone area, this is the area used by
the printhead to spit a small amount of ink at the end/beginning of the printing swath in order to
ensure correct nozzle heath for left-to-right printing.
Components
Subsystems
ENWW
http://www.justmanuals.com
7
Item
Function
Off-axis coupling assembly
This is a rubber spring link located on the side plate of the
scan axis (area where the Carriage moves). It links the primer
system with the Carriage when the Carriage is located in its
maximum left position. This system ensures the pressure from
the primer reaches the printhead for nozzle servicing.
Prime Pump
This is an air pump which provides the necessary pressure for
printhead servicing and nozzle repair. The Prime Pump is
suspended on a rubber holder to minimize the noise that the
Prime Pump makes while in operation.
Primer Tubes
The tubes take the air from the Prime Pump to the off-axis
coupling. There is a T link feature connected to a tube that
goes inside the service station; the purpose of this tube is to
release the air pressure from the system. The tube is pinched
by the shuttle of the service station when reaching a certain
position; this action closes the circuit and allows the system to
be pressurized. With the movement of the service station the
tube is released, allowing the pressure from the system to
escape.
Notes and considerations
Any leakage in the primer system will generate poor or no priming, this will affect nozzle heath (or
even cause the printhead startup to fail). Bear in mind that the system is not just for the Prime Pump and
tubes, the prime pressure is transmitted via the off-axis coupling to the Carriage and from there to the
printhead assembly and from there to the cartridges.
NOTE: There is no pressure sensor in the system. The Prime Pump operates at a certain time to reach
a specific pressure level, the system is depressurized by releasing the pinching of the release tube in the
Service Station (by moving the service station).
NOTE: It is important to ensure the Carriage reaches the maximum left position; if not, the off-axis
coupling will not connect the Prime Pump with the Carriage. Also, the coupling is made of a rubbery
material, degradation of the material will affect Primer performance due to air leaks.
Electronics
The control driver of the Prime Pump is located on the remote controller board located on the right-hand
side of the printer. There is no encoder for the Prime Pump. This pump is managed only by a DC motor
activated for a certain period of time to create the required priming pressure.
8
Chapter 1 Printer fundamentals
ENWW
Service Station system
Functionality
Item
Function
Printhead Wipers
These are rubber paddles that are passed through the nozzle
plate of the printhead with the Service Station movement. They
clean the excess ink from the nozzle plate with a rubbing
action.
Printhead Cap
This caps and protects the nozzles from drying when they are
not printing.
Service Station Motor system
This moves the shuttle with the wiper and the cap so that these
two items can perform their functions. The system is composed
of a DC motor and an encoder disk with an encoder sensor to
read the motor position.
Bottom Spittoon
This part acts as an ink reservoir when spitting and nozzle
health operations are performed. It contains diapers that
prevent the ink becoming liquid.
Top Spittoon
This seals the reservoir and completes the main body of the
service station.
Subsystems
ENWW
http://www.justmanuals.com
9
Item
Function
Absorber Base
This is made of foam and is located under the service station
on top of the printer structure. It works as an additional diaper
in case ink spills out of the Service Station.
Wiper Shuttle
This mobile part is propelled by the motor that contains the
Wiper and Cap. Depending on the position, spitting, wiping,
capping, or priming can take place:
Spitting: The printhead spits a little ink into the spittoon to
get the nozzles conditioned and ready for the next swath of
printing.
Wiping: A physical action to pass the rubber wipers through
the printhead nozzles.
Capping: Parking the printhead to maintain nozzle heath
during printer inactivity, with a surrounding seal.
Priming: Squirts ink through the nozzles to clean and
unblock them.
Notes and considerations
The service station is offered as a complete service part for full replacement. The failures from this
subsystem are usually related to the mobile parts: motor or encoder failures that prevent the shuttle from
reaching the positions for capping or uncapping.
With the life primer system, tube pinching can present an issue (although it is designed to function for
the life of the printer).
When the Service Station is replaced, it is mandatory to reset the Preventive Maintenance Kit for the
Service Station, this will trigger a simple calibration that is done with the Service Station on the next
printer startup. The calibration measures the length of the Service Station (shuttle front bump to shuttle
rear bump), which ensures a correct capping position.
Electronics
All the controlled movements for the Service Station are done from the remote-controlled board located
on the right-hand side of the printer. Issues with the Service Station can also be related to this control
board.
Paper path and Cutter
Functionality
The paper path
This comprises all the elements of the printer in contact with the paper, designed to hold, move, and
manage it in a controlled manner in order to print.
Paper can be loaded using a roll, which is mounted on the rear spindle, or single sheets loaded from
the Multi-Sheet Tray, or single sheets loaded singly.
The paper passes from its source (Roll, Single Tray, or Multi-Sheet Tray) until it touches the Out-Of-Paper
Sensor, when the printer detects the presence of the paper and proceeds to load it.
10
Chapter 1 Printer fundamentals
ENWW
To perform the paper feed, the printer catches the paper in between the Drive Roller and the Pinch
Rollers (Pinch Rollers are spring-loaded pushing the paper down on top of the Drive Roller), then the
paper is pushed forwards on top of the Print Platen in the print zone, which is where the printing
operation is performed. The paper advance is provided by a motor that moves the Drive Roller. The
exact position of the Drive Roller and hence the paper is controlled by an Encoder Disk located on the
roller axis.
The printed paper then passes between the Output Shaft and the Starwheels (which keep the paper
tension as flat as possible for printing) to exit on the Output Platen, where it is held in case of cut sheet
or is cut to fall on the output basket in the case of roll paper.
The Output Shaft is designed to over-advance the Drive Roller movement slightly, and hence create the
necessary paper tension to keep the paper as flat as possible. The Starwheels are spring-loaded and
are designed to create force on top of the paper, this is done so as to leave the paper unmarked and at
the same time allow the Output Shaft force to be appropriately transmitted.
In the Roll configuration, the rewinder module generates back force while printing to facilitate paper
control.
A key electrical element of the paper path is the Paper Sensor (also known as the Out-Of-Paper Sensor
or OOPS). This sensor is located at the beginning of the Print Platen; it detects paper insertion for roll
load and single-sheet load.
Electronics
In the paper-path driving system, the only electrically active element is the Drive Roller. The Drive Roller
is impelled by the drive roller motor and it contains an Encoder Disk on the axis to determine its
position. The Encoder Disk is read by two sensors. One, the encoder sensor , designed to read the
encoder, counts the Encoder Disk (the Encoder Disk outer marks) and another one, the encoder index
sensor , determines the start position (the 0 position) of the Drive Roller by reading the inner thicker
lines of the Encoder Disk.
NOTE: Every time the printer starts up, it searches for the 0 position of the Drive Roller. If this search
fails (which means that the index sensor is faulty), the printer will give a system error and will be unable
to initialize.
Subsystems
ENWW
http://www.justmanuals.com
11
The roll paper input system
Functionality
This system keeps the roll in place and ensures controlled rotation.
It contains the rewinder, which rewinds the paper for paper ejection, and provides an opposite tension
to the paper advance for better paper control.
●
The Left Support encloses the Rewinder Motor and Encoder, containing a set of gears that transmit
the Rewinder motion to the spindle. There is a V-shaped spring to load and fix the spindle in
position.
●
The Right Support holds the spindle in position to rotate over passive rollers.
In the T520, the right support also contains the dampers for the roll cover opening movement
control (the internal dampers perform a braking action preventing sudden movement during the
opening operation).
NOTE: The right support for the T120 models does not contain dampers. The T120 and T520
have two different assemblies from the factory, nevertheless both can be replaced by the damper
option of T520 (identical from the external point of view), and there is only one service part
available.
●
The spindle is designed to hold the paper rolls, and receive the motion from the rewinder gear in
the Left Support. It consists of a central bar and two hubs; the right hub is fixed to determine the
right-side loading position of the paper, and the moveable left hub adjusts to the width of the
paper.
●
The Roll Cover (T520 only) shields the roll from dust.
NOTE: The Roll Cover is a passive part, with no sensor: the printer does not know its status.
12
Chapter 1 Printer fundamentals
ENWW
Electronics
The Rewinder Motor and Encoder system are directly controlled by the Main PCA.
The paper output system
Functionality
The system ensures that the printed paper follows a controlled path and acquires a certain shape in
order to be delivered properly to the user. It also has a cosmetic function.
The system includes a set of three telescopic trays, which are extended to collect the cut-sheet paper
printed from the Multi-Sheet Tray.
There are two roll-paper control tabs that are deployed automatically when the telescopic trays of the
Output Tray are in the closed position. This is a purely mechanical action as the tabs are pushed up by
the output trays when closed. The purpose of those tabs is to control the shape of the roll paper when
coming out of the paper path.
The Front Cover is located underneath the Output Platen.
Electronics
The only electronic component related to the Output Platen is the Output Tray Sensor located
underneath the output trays. The sensor is activated when the three output trays are fully closed. The
sensor cable is routed via the front of the machine and is directly connected to the main PCA.
The Cutter system
The Cutter cuts the paper after the print has completed.
It comprises 1) a cutter module that cuts the paper with two rotary blades, 2) a Cutter Bridge attached
to the Carriage that catches and releases the Cutter to perform the cutting operation and then to leave it
in capping position, 3) a Cutter Guide that holds the movement of the Cutter along the printer width.
Subsystems
ENWW
http://www.justmanuals.com
13
In order to operate the Cutter, it needs to be in the parked position. If not, the Cutter will not be
engaged by the Cutter Bridge and the printer will not perform the cutting action.
Whenever the printer initializes, it performs a parking movement with the Carriage to ensure that the
Cutter is left in the appropriate position.
The printer does not have any feedback about the cutter engagement action. Hence, if for any reason
the engagement is not performed correctly, the printer will continue operating as if the engagement has
occurred.
How activation works
1.
14
Pre-activation phase: The Cutter Engagement Feature of the Bridge gets into the funnel of the
Cutter Module grooving the Cutter to ensure the correct position for activation.
Chapter 1 Printer fundamentals
ENWW
2.
Hook catching: The cutter bridge continues moving to the left pushing down the cutter hook (in
orange), after the left side of the cutter bridge passes the Carriage stops and the cutter hook
returns to its position due to its spring motion.
3.
Cutter action: The left feature of the cutter bridge pushes the cutter to the left, performing the
cutting operation.
Subsystems
ENWW
http://www.justmanuals.com
15
How deactivation works
1.
Disengagement: Hook Bridge changes direction moving now from right to the left, so that Cutter
Hook slides out of the Cutter Catch Feature.
2.
Move-away action: the Cutter Hook deactivates from the bridge by passing in front of it.
Accessory tray and right gear module
Functionality
The accessory tray holds and loads the cut-sheet paper for the printer. The accessory tray itself is a
completely mechanical system with no electronics or motors. All the motion drives for both picking and
paper drive are or created or transmitted by the Right Gear module located on the right-hand side of
the printer, behind the Service Station.
16
Chapter 1 Printer fundamentals
ENWW
The Right Gear module has two main functions. It contains the motor encoder and gear drive system for
the picking mechanism, and it contains the gear train system to transmit the movement from the drive
roller to the accessory tray.
Subsystems
ENWW
http://www.justmanuals.com
17
Right Gear module functionality
The Right Gear module has two different functions associated with the Multi-Sheet Tray.
1.
The paper drive from the Multi-Sheet Tray into the platen area (until the cut sheet reaches the drive
roller area).
The intermediate shaft in the Multi-Sheet Tray is driven by the drive roller through a gear train
inside the Right Gear module. The intermediate shaft meshes with the Multi-Sheet Tray gear
interface (red gear in the picture) at the end of the train. A swing arm engages the gear train
when the Drive Roller is driven backwards (as shown in the picture), driving the intermediate shaft
forwards. When the Drive Roller is driven forwards, the swing arm disengages from the gear train
and the intermediate shaft is not driven. This action is to prevent reverse paper movement to be
transmitted to the Multi-Sheet Tray.
18
Chapter 1 Printer fundamentals
ENWW
2.
Picking functionality drive system
The Multi-Sheet Tray pick drive assembly is mounted in the right side gear module. The assembly
contains a DC motor and pinion, belt, cluster pulley, and gear. An encoder (not shown, but it is
located in front of the white gear shown in the picture) is read by the encoder sensor (in red in the
picture) to servo-control the pick drive.
Right Gear and Multi-Sheet Tray interface
The two gears from the Right Gear module interface with the Multi-Sheet Tray by location once the
Multi-Sheet Tray is locked in position; both gears can be considered fully engaged.
Multi-Sheet Tray functionality
The function of the Multi-Sheet Tray is to pick and feed the cut-sheet paper until the paper is grabbed by
the drive roller (drive roller and pinch system).
The actions performed for those operations are (1) sheet pick and (2) sheet input.
1. Sheet pick
This movement is transmitted through a lateral gear chain in the Multi-Sheet Tray towards the swing
arm, which is pushed towards the paper, and the picking mechanism located at the bottom of the MultiSheet Tray, which separates the top sheet from the stack of pages.
Subsystems
ENWW
http://www.justmanuals.com
19
20
Chapter 1 Printer fundamentals
ENWW
Subsystems
ENWW
http://www.justmanuals.com
21
2. Sheet input
Once the paper is in the intermediate shaft area, the drive roller is rotated, impelling the intermediate
shaft through the right gear module, pushing the sheet towards the inside of the printer, so that it will be
grabbed by the drive roller and main printer pinch system, proceeding with the standard paper drive
motion (as with roll paper).
NOTE: The printer considers the load successful if, after the picking and sheet input procedures, the
sheet is detected by the printer's Paper Sensor. Hence, a correct function of the Paper Sensor is
required also for the accessory tray loading action.
NOTE: It is possible to reproduce the picking and loading motions by extracting the Multi-Sheet Tray
and rotating the gears with the hand, to validate module performance and troubleshoot any possible
mechanical issues.
NOTE: Different elements of the Multi-Sheet Tray are not serviceable, the whole module requires
replacement in case of failure.
Electronics
Both the encoder and motor-drive system are managed by the Bundle PCA located on the right-hand
side of the printer.
22
Chapter 1 Printer fundamentals
ENWW
Scan Axis system: Carriage and Carriage impelling
This system moves the Carriage from left to right and right to left of the printer on top of the paper in a
controlled manner to perform printing, cutting, paper detection, and any other Carriage movements for
servicing and final capping process.
The system comprises the Carriage sliding on the scan axis rod, on which rotates and whose position is
determined by a cam mounted on the Carriage, which slides touching the bottom surface of the antirotation rail.
There are two trailing cables mounted one on top of the other, which connect the Carriage with the
main electronics control board. A scan-axis encoder strip is needed for the Carriage to determine its
position, and a Carriage Motor which impels the Carriage via a belt.
The trailing cable is held in position by a plastic holder, which clips onto the scan axis structure. A
spring-loaded loop ensures follow-up action of the cables with the Carriage movement. Two plastic
cable sliders are also placed to ensure minimum contact of the trailing cables with the scan axis
structure. The plastic sliders are greased to prevent ink spray (aerosol) deposits from accumulating on
them, generating a sticky surface which could retain the cables and then be damaged by Carriage
movement.
The Encoder Strip Sensor is located inside the Carriage, once the Carriage is assembled the Encoder
Strip crosses the Carriage, passing by the detection area of the sensor inside the Carriage.
The main function of the Carriage is to hold the printhead in position, to enable cartridge insertion, and
to move the printhead in a controlled manner in order to print.
Subsystems
ENWW
http://www.justmanuals.com
23
The Carriage holds all the necessary interface electronics for the main board to interact with the
printhead via the trailing cables. A set of spring-loaded connectors are the main interface Carriageprinthead.
NOTE: It is very important that the contacts are clean, free of dust/ink to ensure a correct connection
between printhead and Carriage, as high-speed data are transmitted through this connection, and dust
could cause sporadic system errors. This is particularly important when replacing the printhead, as the
removal of the old printhead (extraction with a rotary movement) can cause the nozzle plate to touch
those contacts and create contamination that could cause problems with the new printhead. However,
manual cleaning of the contacts is not recommended.
The Carriage also has additional functionality:
1.
24
Transmits the pressure from the Prime Pump via off-axis coupling to each of the four cartridges
●
Off-axis coupling connects with the Carriage via the side connection bay:
●
An internal passage of the Carriage transmits the air pressure towards the printhead.
Chapter 1 Printer fundamentals
ENWW
2.
●
The rear hole of the printhead receives the air pressure which is distributed towards the four
air ports inside the printhead.
●
Each of the air ports transmits the air pressure to the cartridges, and the air pushes the inner
chambers, expelling the ink during the priming operation.
Holds the cutter bridge
The cutter bridge impels the Cutter for cutter operations (see additional information in the cutter
section).
Subsystems
ENWW
http://www.justmanuals.com
25
3.
Holds the Carriage Line Sensor
The Carriage Line Sensor (also known as the ZIM Sensor) is located on the right of the printer and
is used to detect the edges of the paper to determine the paper dimensions and start position. This
sensor is also the tool used to detect the position of printed lines to perform calibrations (Paper
Advance calibration and printhead alignment).
The Line Sensor is a reflective tool that generates a beam of LED light, whose reflection is detected
by a luminance sensor. The signal from this sensor is used to determine the position of lines or
paper edge according to the position of the Carriage.
NOTE: Both LED emitter and receiver sensor inside the line sensor are protected by a
transparent plastic cover. If this cover becomes dirty, the signal to detect edges or lines will be
affected, which could cause intermittent issues during the paper load.
It can also detect printed lines from short signals when the sensor crosses the lines:
26
Chapter 1 Printer fundamentals
ENWW
Carriage CAM and Auto PPS adjustment
At the back of the Carriage there is a sliding cam that determines the PRS (Print to platen Rib Space) of
the Carriage. In manufacturing, the anti-rotation rail (area in which the PRS cam slides) is adjusted to
calibrate the nozzle plate position of the printhead, at around 1.6 mm all along the scan axis width.
This calibration is not service-adjustable and should remain constant throughout the printer's life.
As there are different paper thicknesses, the printer is able to rotate this sliding cam automatically to
three different positions, changing the PRS distance to accommodate it to the appropriate printing
distance.
This rotation is performed by taking the Carriage to a feature on the left-hand side of the scan axis,
different side movements of the Carriage at different speeds allow this feature to grab and rotate the
cam accordingly. The Cam has three different areas for three different PRS adjustments.
Auto-PRS feature located on the left-hand side of the scan axis.
Back part of the Carriage with auto-PPS cam, after being activated in position 1.
Carriage impelling system
Subsystems
ENWW
http://www.justmanuals.com
27
Carriage encoder system
The encoder strip tension is also fixed by a tensioning spring. However, there is a mechanism to hold it
in position after the spring places the strip at one specific tension. This is to prevent the spring from
continually applying force over the encoder strip; which, over time and temperature changes, could
make it creep.
NOTE: When assembling the encoder strip, ensure that it is placed in the right orientation using the
smiling symbol located on the sides of the encoder strip.
NOTE: Due to the proximity of the encoder strip to the greased sliding rod, it is easy to dirty the strip
with grease when performing any repair operation in the area. Please clean any grease from the
encoder strip if necessary. A dry cloth can be used for this purpose, to prevent any deformation or
strain on the encoder strip while performing the cleaning.
28
Chapter 1 Printer fundamentals
ENWW
Printer electronics, power supply, and cables
The printer contains several electronics boards and electrical and electronic components in different
locations.
●
There are two main active boards (Main PCA and Bundle PCA).
●
One WiFi Module, which provides the WiFi functionality to the printer.
●
One interface board (Carriage PCA), which provides and converts the appropriate signals for the
Carriage (printhead interface and line sensor signaling) .
●
Three on/off sensor PCAs (Top Cover Sensor, Out Of Paper Sensor or OOPS, Output Tray
Sensor), which indicate the open/closed status of the different elements.
●
One active on/off sensor (the Ink Cartridge Cover sensor). Apart from indicating the open/closed
status of the ink cartridge cover, it includes the backup memory for all factory calibration values.
●
One encoder sensor and a feed index sensor (other than the encoder sensors located inside the
Rewinder, the Right Gear Module, and the Service Station).
●
One Power Button PCA. Located in the front panel, it is used to power the printer on and off.
●
One Power Supply (PSU), which converts the AC power line (110 240 V AC) into the DC power
needed by the printer (32 V and 12 V).
The standard wiring used in the printer is Flat Flexible Cables (FFCs), to interconnect all boards
(including sensors and encoders) and distributed cables for power signals to the motors.
NOTE: It is important to bear in mind that FFCs are relatively delicate, so please ensure cable
connectors are not touched or dirtied during manipulation for assembly and disassembly operations.
NOTE: Ensure that you are properly grounded for any electronics or wiring manipulation.
Subsystems
ENWW
http://www.justmanuals.com
29
The Main PCA
The Main PCA is located on the left-hand side of the printer. This board is the brain of the printer:
where all the processing and printer management occurs; control of the overall machine (digital and
mechatronics) with the battery for the Real-Time Clock.
There are two versions depending on memory size: Basic (256 MB) for the T120 and Pro (1 GB) for the
T520.
The Main PCA also contains other elements with the following functions:
●
Battery: To maintain the internal clock up and running. The internal clock is used to remember the
actual date, used for cartridge life counting and warranty accounting.
●
WiFi module: Attached to the top of the board with some plastic locators, provides WiFi
functionality to the printer.
●
USB dongle: Where the firmware of the printer is stored.
NOTE: This dongle does not operate as a standard USB drive. It is a customized device
designed to interact with the main electronics, and all the data are appropriately encrypted.
●
30
Buzzer: To provide acoustic signals to the user.
Chapter 1 Printer fundamentals
ENWW
The Bundle Board
The Bundle Board is located on the right-hand side of the printer, this board includes a driver ASIC to
control and manage the motor, encoder, and sensors located on the right-hand side of the printer.
IMPORTANT: The pick encoder and Service Station cables are not poka-yoke cables: it is possible
to connect them incorrectly, in which case a system error will result.
Electrical system
The following diagram describes the connections between components and electronic boards, the
voltage, and the type of data line.
Subsystems
ENWW
http://www.justmanuals.com
31
32
●
The printer contains a total of 11 printed circuit boards (PCA).
●
The OOP sensor, Top Cover, and Feed Index are exactly the same board.
●
The WiFi PCA, although included in the Main PCA Service Kit, is a different board used in other
products.
Part
Brief technical function
Main PCA (PRO/BASIC)
Has two versions depending on memory size: Basic (256 Mb)
and Pro (1Gb)
Bundle Board
Mechatronics driver for the right part of the machine motors
and encoder
Front panel and power button
Tactile color visual screen with buzzer for machine power up
and down, control, and user interface
Ink Cartridge cover Sensor
Ink Cartridge Cover opening state control
Carriage PCA => Part of Carriage assembly
Carriage control and feed for printhead spitting
OOPS
Paper presence detection
Output Tray sensor
Front tray state control (open or closed)
Top Cover sensor
Top Cover state control (open or closed)
Feed index
Encoder to detect the paper placement (absolute)
Feed encoder
Encoder to control the exact advance of the paper (relative)
Wifi PCA
Radio module (including antenna) to give wireless capabilities
(802.11 b/g)
Chapter 1 Printer fundamentals
ENWW
Locations of the PCAs
Subsystems
ENWW
http://www.justmanuals.com
33
2
34
Troubleshooting
●
Printer troubleshooting flowchart
●
Basic printer troubleshooting
●
System error codes
●
Paper troubleshooting
●
Communication troubleshooting
●
Ink-supplies troubleshooting
●
Print-quality troubleshooting
●
Update the firmware
Chapter 2 Troubleshooting
ENWW
Printer troubleshooting flowchart
Use the following as a guide to troubleshooting issues with the printer:
ENWW
Printer troubleshooting flowchart
http://www.justmanuals.com
35
Basic printer troubleshooting
The printer does not print
If all is in order (paper loaded, all ink components installed, and no file errors), there are still reasons
why a file you have sent from your computer may not start printing when expected:
1.
You may have an electrical power problem. If there is no activity at all from the printer, and the
front panel does not respond, check that the power cord is connected correctly and that there is
power available at the socket.
2.
You may be experiencing unusual electromagnetic phenomena, such as strong electromagnetic
fields or severe electrical disturbances, which can cause the printer to behave strangely or even
stop working. In this case, turn off the printer using the power key on the front panel and unplug
the power cord, wait until the electromagnetic environment has returned to normal, then turn it on
again. If you still experience problems, please contact your customer service representative.
3.
You may not have installed in your computer the correct driver for your printer.
4.
If you are printing on a sheet, you must specify Printer Autoselect or Single-Sheet or Multi-Sheet
Tray as the paper source in your printer driver.
The Front Panel is blank (the printer does not start)
If the printer does not start (the front panel is blank), try the following:
Remote troubleshooting
1.
Ask the customer to unplug and plug in the power cord. The customer should check when the
power cord is plugged in that the front panel is illuminated (white) for a few moments, after which
the printer should start the initialization process.
2.
If the front panel is still blank (does not show a flashing white screen), and the printer does not
start up, then ask the customer to hold down the Power key for a few seconds and ask to check
whether the Power LED button turns orange while the key is held down.
3.
If the customer does not see the orange light, no power is reaching the printer; ask to check that
the power cord is correctly plugged in. If the problem persists, there is a problem with the power
supply. Arrange a service engineer visit to replace the Power Supply, see Power Supply
on page 202.
●
CQ890-67025
4.
If the customer sees the orange light, ask to unplug and plug in the power cord and to listen and
wait for around 30 seconds for the printer to make a beeping sound.
5.
Three beeps mean that the Front Panel has failed or the Front Panel cable is disconnected or
damaged. Arrange a service engineer visit to check the cable and replace the Front Panel if
needed, see Front Panel on page 165.
●
6.
36
Main Power Supply
Front Panel
CQ890-67026
One long beep means an electronic problem. Arrange for a service engineer visit to replace the
Main PCA. To check that the Main PCA is broken you can ask the customer to open the Ink
Cartridge Cover and check whether there is a green light (heartbeat LED) flashing in the left
bottom part .
Chapter 2 Troubleshooting
ENWW
If there is no light or it is not flashing the Main PCA should be replaced.
7.
●
Main PCA Basic: CQ891-67003
●
Main PCA Pro: CQ890-67023
If the printer initializes and the Carriage moves but the front panel is still blank, the Front Panel
should be replaced, see Front Panel on page 165.
●
Front Panel
CQ890-67026
See also the troubleshooting flowchart for this issue on the next page.
Basic printer troubleshooting
ENWW
http://www.justmanuals.com
37
38
Chapter 2 Troubleshooting
ENWW
System error codes
Understanding system error codes
Error messages are generally used to report internal system errors. The following pages contain a list of
system error codes and their respective descriptions and recommended corrective actions. Try only one
recommended action at a time, in the order that they appear, and check whether the error code has
disappeared.
Advisory error messages
Advisory error messages communicate that some action must be performed, such as adding paper or
clearing a paper jam. Take the appropriate action to continue printing.
Problem type
Message (with customer
troubleshooting)
Details for call agent
Printhead missing/Not detected/
Incompatible
The printhead appears to be missing,
not detected, or incorrectly installed.
See Printhead troubleshooting
on page 80.
Ink Cartridge problem
The following cartridges appear to be
missing or damaged [list of affected
supplies]
Replace the listed supplies. See Replace
an ink cartridge on page 70.
Ink Sensor failure (sensor inside the
PHA)
Ink Sensor failure
This error is continuable (the customer
can press OK and keep working).
However if the message appears
continuously after restarting the printer
or while sending new jobs, it is very
likely that the Carriage PCA is not
working properly. Arrange a service
engineer visit to change the Carrriage.
Paper mismatch
Paper detected does not match paper
size or type selected.
If the paper size is correct, check that
the line sensor is OK by running the Line
Sensor diagnostic from the Support
Menu.
Paper jam
There is a paper jam (or misfeed). Clear
the jam and press Resume on the printer.
This occurs when trying to load the
paper. There is no need to turn off the
printer. Run the Carriage Servo and
Paper Servo diagnostics from the
Support Menu.
There is a paper jam (or misfeed) in the
scan path. Clear the jam or re-insert the
document and restart the task.
This occurs when the paper is already
loaded. There is no need to turn off the
printer. Run the Carriage Servo
diagnostic from the Support Menu.
The printer is out of paper
Load more paper and press Resume on
the front of the printer.
Run OOP sensor diagnostic from the
Support Menu.
Incompatible Cartridge(s)
The cartridge is not intended for use in
this printer.
Ask the customer to install the correct ink
cartridge.
Ink Cartridge Cover open
Replace ink cartridges and close the ink
cartridge cover.
Perform the ink cartridge cover sensor
diagnostic from the Support Menu.
Top Cover open
Please close Top Cover
Perform the Top Cover sensor diagnostic
from the Support Menu.
System error codes
ENWW
http://www.justmanuals.com
39
Problem type
Message (with customer
troubleshooting)
Details for call agent
Load paper
The printer is not able to complete the
load because it cannot detect the paper
Perform the OOP sensor diagnostic from
the Support Menu.
Out of memory
Out of memory
Job sent to the printer too complex, see
the user's guide for more details.
Improper shutdown
To avoid damage, use the On button to
shut down. Do not use a power strip or
wall switch to shut down.
Follow the front-panel message.
Printer or ink system error
There is a problem with the printer or ink
system. Turn printer off, then on. If the
problem persists, contact HP.
Ask the customer to retrieve the Error
History, see 1.5 Error history
on page 104. Ask the customer which
of these 2 errors are logged:
●
26:10
●
27:10
Follow the applicable error
troubleshooting.
40
Chapter 2 Troubleshooting
ENWW
Severe error codes
Severe error messages inform you of a device failure. Some of these messages can be cleared by
pressing the Power button to turn off the printer, and then pressing it again to turn the printer back on. If
a severe error persists, service is required.
System error
Component/System
01.1:10
Main PCA (MPCA) failure
01.1:19
Incorrect Main PCA installed
01.3:10
Bundle Board failure
02:10
Carriage Board Failure
03.1:10
Battery of Real-Time Clock ran down
08:10
Front Panel does not respond
21:10
Service Station (SS) failure
21.1:10
Pump motor failure
26:10
Ink system failure
27:10
Generic printhead error
41:10
Paper servo error
41.1:10
Right Rear Gear Train (picking motor) failure
41.2:10
Paper/Feed motor failure
42:10
Carriage servo error
42.1:10
Carriage motor failure
45:10
Rewinder motor failure
51:10
Top Cover sensor failure
51.1:10
Ink Cartridge Cover Sensor failure
53.1:10
OOP sensor failure
53.2:10
Output Tray sensor failure
55:10
Line Sensor failure
59.1:19
S/N Mismatch
59.2:19
An unsupported or reused NVM has been installed
79:03
Generic printer error (NVM reseated)
79:04
Generic printer error (FW assert)
85.1:10
Feed Index Sensor failure
85.2:10
Feed Encoder Sensor failure
87:10
Encoder Strip failure
System error codes
ENWW
http://www.justmanuals.com
41
How to interpret severe error codes
The severe error codes can be composed of five fields:
The two first fields before the (:) are the service part and the service index (if there is more than one, as
in PCAs or motors). For call agents and service engineers the most important parts to know are the
fields WHO DOES THE ACTION and ACTION TO PERFORM. These two fields can give guidance
as to the most appropriate course of action if this error code is displayed.
Who should perform action
Action to perform
0 User
0 Replace
1 Service engineer
1 Reseat/Reconnect/Clean/Adjust (manually)
2 Calibrate/Adjust (using Automatic Process)
3 Power Off and Restart the Printer
4 Upgrade System Firmware
5 Upgrade Driver or Computer Software
6 Add Accessory
7 Escalate
8 Send Print Again
9 Wrong Part Installed
System error code troubleshooting
This section describes each of the severe errors that may be encountered while using the printer, and
provides the diagnostic method and the actions required to solve the problem detected.
In general, each error is explained for two different situations:
1.
For a call agent to solve remotely with the customer
2.
If necessary, for an onsite service engineer to solve
NOTE: When more than one component could be affected by the system error, replace one
component at a time and check whether the error has gone before replacing another component. Do
not replace two electronic parts at same time! Using this procedure you will be able to
determine exactly which component failed.
42
Chapter 2 Troubleshooting
ENWW
System error:
01.1:10 (Equal to 1 long beep during startup sequence)
Problem description:
Communication with Main PCA (MPCA) failed
Other potential parts
associated:
WiFi module, Trailing Cable, Bundle PCA FFC cable, cables kit
How to solve. Follow
this procedure:
Remote troubleshooting (call agent)
1.
This error never appears in the Front Panel, it s only logged into the Error History and is
equivalent to 1 long beep during printer startup. It happens when the MPCA
communication fails.
2.
To troubleshoot this error, see The Front Panel is blank (the printer does not start)
on page 36.
3.
If a service engineer visit should be arranged to replace the Main PCA, take into account
the model of the printer (the Main PCA is different for Pro and Basic models).
Onsite troubleshooting and solution (service engineer)
1.
Remove covers and check that all the cables in the MPCA are correctly connected, and
that none of them are damaged. If any cable is disconnected then reconnect it, and
power on the printer again to check if the error message has disappeared. Important
note: If any cable is damaged replace the cable:
◦
2.
Cables Sk
CQ890-67021
Replace Main PCA (MPCA), see Main PCA on page 205).
◦
Main PCA Basic: CQ891-67003
◦
Main PCA Pro: CQ890-67023
NOTE: We recommend updating the printer s firmware after this procedure. See
Update the firmware on page 97.
NOTE: If printer was connected to the Internet before repair, we recommend
performing Web Services Setup. See the user's guide.
System error:
01.1:19
Problem description:
Incorrect Main PCA installed
Other potential parts
associated:
None
How to solve. Follow
this procedure:
Onsite troubleshooting and solution (service engineer)
1.
This system error happens if a Main PCA Basic is assembled in a Pro printer. To solve the
issue, install the correct Main PCA Pro in the printer.
◦
Main PCA Basic: CQ891-67003
◦
Main PCA Pro: CQ890-67023
See Main PCA on page 205 for the installation instructions.
System error:
01.3:10
Problem description:
Bundle board communication failure
System error codes
ENWW
http://www.justmanuals.com
43
Other potential parts
associated:
Bundle FFC, Main PCA
How to solve.
Remote troubleshooting (call agent)
1.
Switch the power off and disconnect the power cord. Reconnect the power cord and
power on the printer.
2.
The call agent should arrange a service engineer visit to change the Bundle PCA and
follow steps below on Onsite Troubleshooting:
◦
3.
Bundle Board
CQ890-67022
If a different system error is displayed then the call agent should perform the applicable
troubleshooting procedure.
Onsite troubleshooting and solution (service engineer)
1.
Remove covers and check that all the cables in the Bundle PCA and associated parts are
correctly connected, and that none of them is damaged. If any cable is disconnected then
reconnect it, and power on the printer again to check whether the system error has
disappeared. Important note: If any cable is damaged then order a Cable Service Kit:
◦
2.
CQ890-67021
Replace the Bundle PCA, see Bundle Board on page 297.
◦
44
Cables Sk
Bundle Board
CQ890-67022
3.
Replace the Bundle FFC cable, see Bundle Board FFC cable on page 299.
4.
Replace the Main PCA (MPCA See Main PCA on page 205)
◦
Main PCA Basic: CQ891-67003
◦
Main PCA Pro: CQ890-67023
System error:
02:10
Problem description:
Carriage PCA communication failure
Chapter 2 Troubleshooting
ENWW
Other potential parts
associated:
Trailing Cables, Printhead, Encoder Strip
How to solve.
Onsite troubleshooting and solution (service engineer)
1.
Remove covers and check that the Trailing cables are connected from the Main PCA or
from the Carriage PCA. If any cable is disconnected then reconnect it, and power on the
printer again to check whether the error message has disappeared.
2.
Go to Support Menu, see Entering the Extended Support Menu for service engineers
on page 103 and perform 2.1 Carriage Servo, see 2.1 Carriage servo on page 106 to
check that the error has disappeared.
3.
Replace the Encoder Strip, see Encoder Strip on page 193 and run the Carriage Servo
diagnostics to see if the error has disappeared.
4.
Replace the Carriage, see Carriage and Belt on page 236.
◦
Carriage assembly w/belt (24)
CQ890-67002
◦
Carriage assembly w/belt (36)
CQ893-67011
5.
No calibrations needed, but the PMK 1 should be reset, see 3.4 PMK1 on page 124.
6.
Replace the Main PCA, see Main PCA on page 205.
◦
Main PCA Basic: CQ891-67003
◦
Main PCA Pro: CQ890-67023
System error:
03.1:10
Problem description:
Real Time Clock (RTC) Battery ran down.
Other potential parts
associated:
None
How to solve.
Remote troubleshooting (call agent)
1.
The call agent asks the customer to go to the Support Menu by pressing the Power key
continuously for 15 seconds.
2.
Go to the Diagnostics Menu and select RTC Battery Status to check whether the RTC
Battery has actually expired, see 2.11 RTC battery status on page 117.
3.
If yes, the call agent should arrange a service engineer visit to replace the RTC battery by
replacing the Main PCA, see Main PCA on page 205.
◦
Main PCA Basic: CQ891-67003
◦
Main PCA Pro: CQ890-67023
Onsite troubleshooting and solution (service engineer)
System error:
1.
Replace the Main PCA, see Main PCA on page 205.
2.
Switch on the printer and go to Extended Support Menu. Select RTC Battery
Expired option from the Reset Menu in order to reset the RTC battery expired flag.
3.
Go back and select Set Date and Time from the Service Menu. Set the correct date
and time.
08:10 (Equals to 3 beeps during start up sequence)
System error codes
ENWW
http://www.justmanuals.com
45
Problem description:
Front Panel does not respond
Other potential parts
associated:
None
How to solve.
Remote troubleshooting (call agent)
1.
This error never appears in the Front Panel, it is only logged into the Error History, and is
equivalent to the 3 beeps during printer startup.
2.
It happens when there is no communication between the Front Panel and the Main PCA,
see The Front Panel is blank (the printer does not start) on page 36.
System error:
21:10
Problem description:
Service Station does not work properly or communication lost
Other potential parts
associated:
Bundle PCA
Corrective action:
Remote troubleshooting (call agent)
1.
Switch the power off and disconnect the power cord. Reconnect the power cord and
power on the printer.
2.
The call agent should arrange a service engineer visit to change the Service Station, and
follow the Onsite troubleshooting below:
◦
3.
Service station assy
CQ890-67045
If a different system error is displayed then the call agent should perform the applicable
troubleshooting procedure.
Onsite troubleshooting and solution (service engineer)
1.
Remove covers and check that the cables from the Service Station to the Bundle PCA are
correctly connected and not damaged. Important note: If any cable is disconnected then
reconnect it, and power on the printer again to check whether the system error has
disappeared. If any cable is damaged then order a Cable Service Kit.
◦
CQ890-67021
2.
Make sure that the Service Station path is clear. Remove any visible obstacles (screws,
plastic parts, etc.) restricting the movement of the Service Station.
3.
Go to Support Menu, see Entering the support menus on page 102 and run 2.12
Service Station, see 2.12 Service Station on page 117 to check whether the system error
has disappeared.
4.
Replace the Service Station, see Service Station on page 227.
◦
5.
Service station assy
Bundle board
CQ890-67022
System error:
21.1:10
Problem description:
Prime Pump does not work
Chapter 2 Troubleshooting
CQ890-67045
Replace the Bundle Board, see Bundle Board on page 297.
◦
46
Cables Sk
ENWW
Other potential parts
associated:
Bundle PCA
Corrective action:
Remote troubleshooting (call agent)
1.
Switch the power off and disconnect the power cord. Reconnect the power cord and
power on the printer.
2.
The call agent should ask the customer to go to the Support Menu, by pressing the power
key continuously for 15 seconds.
3.
Go to Diagnostics menu and perform the 2.8 Pump diagnostic procedure, see 2.8 Pump
on page 113.
4.
The call agent should arrange a service engineer visit to change the Pump, and to follow
the Onsite troubleshooting below.
◦
5.
Prime pump
CQ890-67030
If a different system error is displayed then the call agent should perform the applicable
troubleshooting procedure.
Onsite troubleshooting and solution (service engineer)
1.
Go to the Support Menu (see Entering the support menus on page 102) and perform the
diagnostic procedure 2.8 Pump, see 2.8 Pump on page 113.
2.
Remove the covers and check that the cable of the Prime Pump is connected to the Pump
and Bundle PCA and it is not damaged. Important note: If the cable is not connected
then reconnect it, and power on the printer again to check whether the error has
disappeared. Important note: If the cable is damaged then order a Cable Service Kit:
◦
CQ890-67021
3.
Check also that the tubes are well connected and not damaged. You can run the Pump
diagnostic again to check for damaged tubes.
4.
Replace the Pump motor, see Prime Pump on page 233.
◦
5.
Prime pump
CQ890-67030
Replace Bundle PCA, see Bundle Board on page 297.
◦
System error:
Cables Sk
CQ890-67022
26:10
System error codes
ENWW
http://www.justmanuals.com
47
Problem description:
Ink System Failure
Other potential parts
associated:
PHA, Service Station, Carriage PCA, Trailing Cables
Corrective action:
Remote troubleshooting (call agent)
1.
This error never appears in the Front Panel, it is only logged into the Error History and it
is equivalent to the message: There is a problem with the printer or ink system.
Turn printer off, then on. If the problem persists, contact HP.
2.
See Ink system hardware troubleshooting on page 79.
System error:
27:10
Problem description:
Generic Printer Error
Other potential parts
associated:
Carriage PCA, Trailing Cables
Corrective action:
Remote troubleshooting (call agent)
1.
This error occurs only when the printhead is detected as faulty during first printer
installation (Out Of the Box Experience). If it happens, follow printhead troubleshooting:
see Printhead troubleshooting on page 80.
System error:
41:10
Problem description:
Paper Servo error
Other potential parts
associated:
Feed Encoder Sensor PCA, Feed Index Sensor PCA, Feed Encoder Disk
Corrective action:
Remote troubleshooting (call agent)
1.
Switch the power off and disconnect the power cord. Reconnect the power cord and
power on the printer.
2.
The call agent asks the customer to go to Support Menu by pressing the Power key
continuously for 15 seconds.
3.
Go to 2 Diagnostics menu and run Paper Servo diagnostic, see 2.2 Paper servo
on page 107.
4.
After running the diagnostic the printer will show one of these system errors:
◦
41.2:10 arrange a service engineer to replace Paper/Feed motor and follow the
Onsite Troubleshooting explained below, see Paper Motor on page 211.
●
◦
5.
Paper Motor
CQ890-67036
85.2:10: need to replace Feed encoder sensor PCA and follow Onsite
Troubleshooting explained on the 85.2:10 error .
The call agent should arrange a service engineer visit to replace the right part depending
on the system error.
Onsite troubleshooting and solution (service engineer)
1.
48
Chapter 2 Troubleshooting
Go to the Support Menu (see Entering the support menus on page 102) and run
diagnostic 2.2 Paper Servo, see 2.2 Paper servo on page 107. If the system error
continues, remove covers and check that all the cables are well connected to the Main
PCA, specially the paper motor cable, and none of them are damaged. If any cable is
not connected then reconnect it, and power on the printer again to check whether the
ENWW
system error has disappeared. Important note: If any cable is damaged then order a
Cable Service Kit.
◦
2.
Cables Sk
If the 41.2:10 error continues then the Paper/Feed motor should be replaced. See Paper
Motor on page 211.
Paper Motor
3.
CQ890-67021
CQ890-67036
Replace the Main PCA, see Main PCA on page 205.
◦
Main PCA Basic
◦
Main PCA Pro
CQ891-67003
CQ890-67023
System error:
41.1:10
Problem description:
Right Rear gear train failure
Other potential parts
associated:
Bundle PCA, Multi-Sheet Tray
Corrective action:
Remote troubleshooting (call agent)
1.
Switch the power off and disconnect the power cord. Reconnect the power cord and
power on the printer.
2.
The call agent should arrange a service engineer visit to change the Right Rear Gear
Train, and follow the onsite troubleshooting below
◦
3.
Right rear gear train
CQ890-67041
If a different system error is displayed then the call agent should perform the applicable
troubleshooting procedure.
Onsite troubleshooting and solution (service engineer)
1.
Remove the Multi-Sheet Tray, see Multi-Sheet Tray Assembly on page 260 and check
that there is no paper jam or anything in the gear of the tray preventing the movement.
2.
Remove covers and check that the cables from the Right Rear gear train to the Bundle
PCA are correctly connected and not damaged. If any cable is disconnected then
reconnect it, and power on the printer again to check whether the system error has
disappeared. Important note: If any cable is damaged then order a Cable Service Kit.
◦
3.
Right Rear Gear Train
CQ890-67041
Replace the Bundle Board, see Bundle Board on page 297.
◦
5.
CQ890-67021
Replace the Right Rear Gear Train, see Right Gear Train Module on page 245.
◦
4.
Cables Sk
Bundle Board
CQ890-67022
Replace the Multi-Sheet Tray assembly, refer Multi-Sheet Tray Assembly on page 260
◦
Multi-Sheet Tray assembly
System error:
42:10
Problem description:
Carriage servo problem
CQ890-67007
System error codes
ENWW
http://www.justmanuals.com
49
Other potential parts
associated:
Trailing Cables, Carriage Board, Carriage Motor, Carriage Belt, Encoder Strip
Corrective action:
Remote troubleshooting (call agent)
1.
Switch the power off and disconnect the power cord. Reconnect the power cord and
power on the printer.
2.
The call agent asks the customer to go to Support Menu by pressing the Power key
continuously for 15 seconds.
3.
Go to 2 Diagnostics menu and run 2.1 Carriage Servo diagnostic, see 2.1
Carriage servo on page 106.
4.
After running this diagnostic the printer will show one of these system errors:
◦
42.1:10 Replace the Carriage motor and follow the Onsite Troubleshooting
described below, see Carriage Motor on page 268.
●
◦
5.
CQ890-67006
02:10: Replace the Carriage Assembly and follow the Onsite Troubleshooting
described below Carriage and Belt on page 236
●
Carriage assembly w/belt (24)
CQ890-67002
●
Carriage assembly w/belt (36)
CQ893-67011
The call agent should arrange a service engineer visit to replace the right part depending
on the system error.
System error:
42:1:10
Problem description:
Carriage motor failure
Other potential parts
associated:
Carriage Belt, Main PCA
Corrective action:
Onsite troubleshooting and solution (service engineer)
1.
Go to the Support Menu (see Entering the support menus on page 102) and run the
diagnostic 2.1 Carriage Servo, see 2.1 Carriage servo on page 106.
2.
Remove the covers and check that all the cables are well connected to the Main PCA,
especially the Carriage motor cable, and that none of them are damaged. If a cable is
not connected then reconnect it, and power on the printer again to check whether the
system error has disappeared. Important note: If any cable is damaged then order a
Cable Service Kit.
◦
3.
4.
Chapter 2 Troubleshooting
Cables Sk
CQ890-67021
Check that the Carriage Motor belt is not broken or out of place. If the belt is OK then the
Carriage Motor should be replaced, see Carriage Motor on page 268.
◦
50
Carriage Motor
Carriage Motor
CQ890-67006
If the belt was damaged, it should be changed. Order the belt service kit, see Carriage
Belt on page 243.
◦
Belt (24)
CQ890-67059
◦
Belt (36)
CQ893-67016
ENWW
System error:
45:10
Problem description:
Rewinder motor failure
Other potential parts
associated:
Main PCA
Corrective action:
Remote troubleshooting (call agent)
1.
Switch off the printer, and disconnect the power cord. Reconnect the power cord and
power on the printer.
2.
The call agent should arrange a service engineer visit to change the Rewinder module,
and follow the Onsite troubleshooting below.
3.
◦
Left Roll Support Pro
◦
Left Roll Support Basic
CQ890-67037
CQ890-67051
If a different system error is displayed then the call agent should perform the applicable
troubleshooting procedure.
Onsite troubleshooting and solution (service engineer)
1.
Remove the covers and check that the cables of the rewinder module are correctly
connected to the Main PCA, and that none of them is damaged. If any cable is
disconnected then reconnect it, and power on the printer again to check whether the
system error has disappeared. Important note: If any cable is damaged then order a
Cable Service Kit:
◦
2.
3.
Cables Sk
CQ890-67021
Replace the Left Roll Support, see Left Roll Support on page 180.
◦
Left Roll Support Pro
◦
Left Roll Support Basic
CQ890-67037
CQ890-67051
Replace the Main PCA, see Main PCA on page 205.
◦
Main PCA Pro
◦
Main PCA Basic
System error:
51:10
Problem description:
Top Cover sensor failure
CQ890-67023
CQ891-67003
System error codes
ENWW
http://www.justmanuals.com
51
Other potential parts
associated:
Main PCA
Corrective action:
Remote troubleshooting (call agent)
1.
Switch off the printer, and disconnect the power cord. Reconnect the power cord and
power on the printer.
2.
The call agent asks the customer to go to Support Menu by pressing the Power key
continuously for 15 seconds.
3.
Go to 2 Diagnostics menu and run 2.4 Top Cover Sensor diagnostic, see 2.4 Top
Cover Sensor on page 109.
4.
The call agent should arrange a service engineer visit to change the Ink Cartridge Cover
Sensor PCA; follow the onsite troubleshooting below.
◦
5.
Ink Cartridge Cover Sensor
CQ890-67028
If a different system error is displayed then the call agent should perform the applicable
troubleshooting procedure.
Onsite troubleshooting and solution (service engineer)
1.
Go to Support Menu (see Entering the support menus on page 102) and run 2.4 Top
Cover Sensor diagnostic, see 2.4 Top Cover Sensor on page 109.
2.
Replace the Top Cover Sensor PCA.
3.
Remove the covers and check that the cable of the Top Cover sensor is connected to the
Main PCA and is undamaged. If the cable is not connected then reconnect it, and power
on the printer again to check that the error has disappeared. Important note: If the
cable is damaged then order a Cable Service Kit.
◦
4.
52
Cables Sk
CQ890-67021
Replace the Main PCA, see Main PCA on page 205.
◦
Main PCA Pro
◦
Main PCA Basic
CQ890-67023
CQ891-67003
System error:
51.1:10
Problem description:
Ink Cartridge Cover sensor failure
Chapter 2 Troubleshooting
ENWW
Other potential parts
associated:
Main PCA
Corrective action:
Remote troubleshooting (call agent)
1.
Switch off the printer, and disconnect the power cord. Reconnect the power cord and
power on the printer.
2.
The call agent should arrange a service engineer visit to change the Ink Cartridge Cover
Sensor PCA, and follow the Onsite troubleshooting below.
◦
3.
Ink Cartridge Cover Sensor
CQ890-67028
If a different system error is displayed then the call agent should perform the applicable
troubleshooting procedure.
Onsite troubleshooting and solution (service engineer)
1.
Replace the Ink Cartridge Cover Sensor PCA, see Ink Cartridge Cover PCA Assembly
on page 198.
◦
2.
CQ890-67028
Check that the cable of the Ink Cartridge Cover sensor is connected to Main PCA and is
undamaged. If the cable is not connected then reconnect it, and power on the printer
again to check that the error has disappeared. Important note: If the cable is
damaged then order a Cable Service Kit.
◦
3.
Ink Cartridge Cover Sensor
Cables Sk
CQ890-67021
Replace the Main PCA, see Main PCA on page 205.
◦
Main PCA Pro
◦
Main PCA Basic
CQ890-67023
CQ891-67003
System error:
53.1:10
Problem description:
OOP (Out-Of-Paper) Sensor failure
Other potential parts
associated:
Bundle PCA, Bundle FFC, Main PCA
Corrective action:
Remote troubleshooting (call agent)
1.
Switch off the printer, and disconnect the power cord. Reconnect the power cord and
power on the printer.
2.
The call agent will ask the customer to go to Support Menu by pressing the Power
key continuously during 15 seconds
3.
Go to Diagnostics and run 2.5 OOP Sensor diagnostic, see 2.5 Out-Of-Paper
Sensor on page 110.
4.
The call agent should recommend the customer to power off the printer, remove the Multitray sheet module, and check that there is no paper behind it, then power on the printer
System error codes
ENWW
http://www.justmanuals.com
53
to see whether the error continues. If yes, send the customer an OOP Sensor module (CSR
B part).
◦
OOP Sensor flag
CQ890-67032
5.
If a different system error is displayed then the call agent should perform the applicable
troubleshooting procedure.
6.
If, after the customer replaces the OOP Sensor, the failure still continues, the failure may
be due to the OOP Sensor cable, so the call agent should order an onsite engineer with
the cables kit:
◦
Cables Sk
CQ890-67021
◦
OOP Sensor flag
CQ890-67032
Onsite troubleshooting and solution (service engineer)
1.
Go to the Support Menu (see Entering the support menus on page 102) and run 2.5
OOP Sensor diagnostic see 2.5 Out-Of-Paper Sensor on page 110.
2.
Remove the Multi-Sheet Tray at the back of the printer, see Multi-Sheet Tray Assembly
on page 260, and check that there is no paper jammed in the OOP sensor; check also
that the sensor is assembled correctly.
3.
Replace the OOP Sensor assembly, see Out-Of-Paper Sensor on page 281.
◦
4.
Cables Sk
CQ890-67021
Replace the Bundle PCA, see Bundle Board on page 297.
◦
54
Bundle Board
CQ890-67022
6.
Replace the Bundle FFC cable, see Bundle Board FFC cable on page 299.
7.
Replace the Main PCA, see Main PCA on page 205.
◦
Main PCA Pro
◦
Main PCA Basic
System error:
53.2:10
Problem description:
Output Tray sensor failure
Chapter 2 Troubleshooting
CQ890-67032
Remove the covers and check that the cable of the OOP sensor is connected to Bundle
PCA and is not damaged. If the cable is not connected then reconnect it, and power on
the printer again to check whether the system error has disappeared. Important note:
If the cable is damaged then order a Cable Service Kit.
◦
5.
OOP Sensor flag
CQ890-67023
CQ891-67003
ENWW
Other potential parts
associated:
Main PCA, Output tray
Corrective action:
Remote troubleshooting (call agent)
1.
Switch off the printer, and disconnect the power cord. Reconnect the power cord and
power on the printer.
2.
The call agent asks the customer to go to Support Menu by pressing the Power key
continuously for 15 seconds.
3.
Go to Diagnostics menu and run 2.6 Output Tray Sensor diagnostic, see 2.6
Output Tray Sensor on page 111.
4.
The call agent should send to the customer the Output Tray Sensor, which is a CSR part.
◦
Output Tray Sensor Assembly
CQ890-90015
NOTE: If, after the customer repair, the issue still continues, we recommend sending an
onsite engineer with Cables Kit and Output Tray Sensor PCA. Follow the steps below on
onsite troubleshooting.
5.
◦
Cables Sk
CQ890-67021
◦
Output Tray Sensor PCA
CQ890-90015.
If a different system error is displayed then the call agent should perform the applicable
troubleshooting procedure.
Onsite troubleshooting and solution (service engineer)
1.
Go to the Support Menu (see Entering the support menus on page 102) and run 2.6
Output Tray Sensor diagnostic, see 2.6 Output Tray Sensor on page 111. Check
that the Output Tray is not damaged.
2.
If the Output Tray is OK and the problem continues then replace the Output Tray Sensor
PCA.
◦
3.
CQ890-90015
Remove the covers and check that the cable of the Output Tray Sensor is connected to the
Main PCA and is not damaged. If the cable is not connected then reconnect it, and
power on the printer again to check whether the system error has disappeared.
Important note: If the cable is damaged then order a Cable Service Kit (add part
number and name of Cable Service Kit) and change the Output Tray sensor cable: see
Output Tray Extender Sensor Cable on page 289.
◦
4.
Output Tray Sensor PCA
Output Tray Sensor Assembly
CQ890-90015
Replace the Main PCA, see Main PCA on page 205.
◦
Main PCA Pro
◦
Main PCA Basic
System error:
55:10
Problem description:
Line sensor failure
CQ890-67023
CQ891-67003
System error codes
ENWW
http://www.justmanuals.com
55
Other potential parts
associated:
Carriage PCA, Trailing Cable, Main PCA
Corrective action:
Remote troubleshooting (call agent)
1.
Switch off the printer, and disconnect the power cord. Reconnect the power cord and
power on the printer.
2.
The call agent asks the customer to go to the Support Menu by pressing the Power
key continuously for 15 seconds.
3.
Go to the Diagnostics menu and run 2.7 Line Sensor diagnostic, see 2.7 Line
Sensor on page 112.
4.
The call agent should arrange a service engineer visit to change the Line Sensor
assembly; follow the onsite troubleshooting below.
◦
5.
Line Sensor
CQ890-67001
If a different system error is displayed then the call agent should perform the applicable
troubleshooting procedure.
Onsite troubleshooting and solution (service engineer)
1.
Go to the Support Menu (see Entering the support menus on page 102) and run 2.7
Line Sensor diagnostic, see 2.7 Line Sensor on page 112.
2.
Remove the covers and check that the cable of the line sensor is connected to the
Carriage PCA and it is not damaged. If the cable is not connected then reconnect it, and
power on the printer again to check whether the error has disappeared. Important
note: If the cable is damaged then replace the Line Sensor, see Carriage Line Sensor
on page 293.
◦
CQ890-67001
3.
Clean the Line Sensor and try again, see Clean the Carriage Line Sensor on page 314.
4.
Replace the Carriage Assembly, see Carriage and Belt on page 236.
5.
56
Line Sensor
◦
Carriage assembly w/belt (24)
CQ890-67002
◦
Carriage assembly w/belt (36)
CQ893-67011
Replace the Main PCA, see Main PCA on page 205
◦
Main PCA Pro
◦
Main PCA Basic
CQ890-67023
CQ891-67003
System error:
59.1:19
Problem description:
Main PCA and Ink Cartridge Sensor PCA replaced at the same time
Other potential parts
associated:
None
Corrective action:
Onsite troubleshooting and solution (service engineer)
Chapter 2 Troubleshooting
1.
The error appears if, during a service operation, the Main PCA and the Ink Cartridge
Cover Sensor PCA are replaced at the same time.
2.
To recover, do the repair by changing first one component (use the old component for
this printer); after powering the printer off and on, change the other.
ENWW
System error:
59.2:19
Problem description:
An unsupported or reused part has been installed
Other potential parts
associated:
None
Corrective action:
Onsite troubleshooting and solution (service engineer)
1.
The error appears if, during a service operation, the Main PCA or the Ink Cartridge
Cover Sensor PCA are replaced by a reused part (not a new spare part).
2.
To recover, do the repair using HP genuine new spare parts.
System error:
79:XX
Problem description:
Generic Printer Error
Other potential parts
associated:
None
Corrective action:
Turn the printer off and on again.
System error:
85.1:10
Problem description:
Feed index encoder sensor does not work properly
Other potential parts
associated:
Main PCA, Feed Encoder Disk
Corrective action:
Remote troubleshooting (call agent)
1.
Switch off the printer, and disconnect the power cord. Reconnect the power cord and
power on the printer.
2.
The call agent should arrange a service engineer visit to change the Feed Index PCA and
follow onsite troubleshooting below.
◦
3.
Feed Index encoder sensor PCA
CQ890-67020
If a different system error is displayed then the call agent should perform the applicable
troubleshooting procedure.
Onsite troubleshooting and solution (service engineer)
1.
Remove the covers and check that all the cables are well connected to the Main PCA,
and none of them are damaged. If any cable is not connected then reconnect it, and
power on the printer again to check whether the system error has disappeared.
Important note: If any cable is damaged then order a Cable Service Kit.
◦
2.
Feed Index encoder sensor PCA
CQ890-67020
Check that the Encoder Disk is not dirty or damaged. If the Encoder Disk is damaged, it
should be replaced, see Encoder Disk on page 217.
◦
System error:
CQ890-67021
Replace the Feed Index Encoder Sensor PCA, see Encoder PCA and Index on page 213
◦
3.
Cables Sk
Encoder Disk CQ890-67033
85.2:10
System error codes
ENWW
http://www.justmanuals.com
57
Problem description:
Feed encoder sensor does not work properly
Other potential parts
associated:
Main PCA, Feed encoder Disk
Corrective action:
Remote troubleshooting (call agent)
1.
Switch off the printer, and disconnect the power cord. Reconnect the power cord and
power on the printer.
2.
The call agent should arrange a service engineer visit to change the Feed encoder sensor
PCA.
◦
3.
Feed Encoder Sensor PCA
CQ890-67020
If a different system error is displayed then the call agent should perform the applicable
troubleshooting procedure.
Onsite troubleshooting and solution (service engineer)
1.
Remove the covers and check that all the cables are well connected to the Main PCA,
and none of them are damaged. If any cable is not connected then reconnect it, and
power on the printer again to check whether the system error has disappeared.
Important note: If any cable is damaged then order a Cable Service Kit.
◦
2.
Feed Encoder Sensor PCA
Encoder Disk
System error:
87:10
Problem description:
Encoder Strip failure
Chapter 2 Troubleshooting
CQ890-67020
Check that the Encoder Disk is not dirty or damaged. If the Encoder Disk is damaged it
should be replaced, see Encoder Disk on page 217.
◦
58
CQ890-67021
Replace the Feed Encoder Sensor PCA , see Encoder PCA and Index on page 213.
◦
3.
Cables Sk
CQ890-67033
ENWW
Other potential parts
associated:
None
Corrective action:
Remote troubleshooting (call agent)
1.
Switch off the printer, and disconnect the power cord. Reconnect the power cord and
power on the printer.
2.
The call agent should arrange a service engineer visit to change the Encoder Strip and
follow onsite troubleshooting below.
3.
◦
Encoder Strip (24)
CQ890-67003
◦
Encoder Strip (36)
CQ890-67004
If a different system error is displayed then the call agent should perform the applicable
troubleshooting procedure.
Onsite troubleshooting and solution (service engineer)
1.
Remove the covers and check that Encoder Strip is not broken or dirty.
◦
Cables Sk
CQ890-67021
2.
If the Encoder Strip is dirty, follow the procedure in this manual to clean it, see Clean the
Encoder Strip on page 315.
3.
If the Encoder Disk is damaged or does not work, it should be replaced, see Encoder
Disk on page 217.
◦
Encoder Disk
CQ890-67033
Other possible errors
Although infrequent, there are errors and asserts that can be displayed in the Front Panel in a different
format. Usually these errors are solved by turning the printer off and on. Examples of these errors are
shown here:
System error codes
ENWW
http://www.justmanuals.com
59
How to get the system error log
To see the last 10 system errors on the Front Panel, go to the Service Menu, enter the Information Menu,
and request the error history; see 1.5 Error history on page 104.
To print the error history, go to the Service Menu, enter the Reports Menu, and request the error history;
see 4.2 Error history on page 120.
60
Chapter 2 Troubleshooting
ENWW
Paper troubleshooting
Use the following section to troubleshoot paper-related issues when the problem has not been solved by
following the troubleshooting of paper issues in the user's guide.
For every paper issue, first make sure you have reviewed the paper supported by the product (type and
size). Also make sure the customer has followed the user's guide instructions to load the paper. In
summary, check that the customer is:
●
Using supported paper
●
Using appropriate paper path
●
Following the front-panel instructions
For further detailed information about HP Large-Format Printing Supplies, see http://www.hp.com/go/
designjet/supplies.
Paper cannot be loaded successfully
Remote troubleshooting (call agent)
●
Check that the customer has followed the paper troubleshooting included in the user's guide, if
not, help the customer to do it.
●
If the problem persists, ask the customer to restart the printer.
●
If the paper still cannot be loaded after restarting, follow the next recommendations depending on
the type of paper the user is trying to load (roll, single sheet, or from the Multi-Sheet Tray).
Unsuccessful roll load
1.
Ensure that the Output Tray is closed. If the Output Tray is open, ask the customer to close it and
try to load the roll again.
2.
Ask the customer to try to print from the Multi-Sheet Tray. If he can print from the Multi-Sheet Tray,
it means that the OOP sensor and the paper motor work correctly. Ask the customer to re-check
that there are no pieces of paper stuck in the paper path.
3.
If no anomalies are detected, ask the customer to cut 10 cm of the paper roll or use a new roll (if
possible) and try to load the roll again.
4.
If no anomalies are detected, ask the customer to run the OOP sensor diagnostics (see 2.5 Out-OfPaper Sensor on page 110). If they fail the OOP sensor should be replaced, arrange the
shipment of an OOP sensor (CSR A part) to the customer.
5.
If the OOP sensor diagnostics pass, arrange a service engineer visit to diagnose the issue.
Unsuccessful sheet load
1.
Ensure that the Output Tray is closed. If the Output Tray is open, ask the customer to close it and
try to load the sheet again.
2.
Ask the customer to try to print from the Multi-Sheet Tray. If he can print from the Multi-Sheet Tray,
it means that the OOP sensor and the paper motor work correctly. Ask the customer to re-check
that there are no pieces of paper stuck in the paper path.
Paper troubleshooting
ENWW
http://www.justmanuals.com
61
3.
If no anomalies are detected, ask the customer to try to load a different paper type (roll or single
sheet). If the load is successful, check with the customer that the type of paper failing to load is a
supported paper.
4.
If the paper is supported, ask the customer to run the OOP sensor diagnostics (see 2.5 Out-OfPaper Sensor on page 110). If the diagnostics fail, the OOP sensor should be replaced, arrange
the shipment of an OOP sensor (CSR A part) to the customer.
5.
If the OOP sensor diagnostics pass, arrange a service engineer visit to diagnose the issue.
Unsuccessful load from the Multi-Sheet Tray
1.
Ask the customer to remove all the sheets from the Multi-Sheet Tray, and load only one sheet (A4
or A3). Try to print. If the load is correct, ensure that the customer has not loaded too many sheets
into the tray, also that the paper is supported.
2.
Ask the customer to ensure that the Multi-Sheet Tray is well positioned.
3.
If one sheet works OK, but it fails with several, it could mean that there is a problem with the MultiSheet Tray. To check this, ask the customer if roll or single sheet can be loaded successfully. If yes,
the Multi-Sheet Tray should be replaced, arrange the shipment of a Multi-Sheet Tray (CSR A part)
to the customer.
4.
If it is impossible to load a sheet through the Multi-Sheet Tray, and neither roll nor single sheet can
be loaded, ask the customer to remove the Multi-Sheet Tray and re-check whether there is any
piece of paper stuck in the tray.
5.
If no anomalies are detected, ask the customer to run the OOP sensor diagnostics (see 2.5 Out-OfPaper Sensor on page 110). If they fail, the OOP sensor should be replaced, arrange the
shipment of an OOP sensor (CSR A part) to the customer.
6.
If the OOP sensor diagnostics pass, arrange a service engineer visit to diagnose the issue.
Onsite troubleshooting
The service engineer should first follow the paper troubleshooting procedure in the user's guide, and
also the instructions in this manual given to the customer by the call agent to double-check that the
troubleshooting has been done correctly. In most cases the problem can be solved by following these
instructions. If the problem persists, try the following:
1.
2.
62
Remove covers and check that there is no broken part in the following:
●
Starwheel rail
●
Pinchwheels
●
Strange noise in motor or Drive Roller
●
Upper paper guide is out of place or broken
●
Out-Of-Paper Sensor is badly positioned
If any defective or broken part is found, it should be replaced.
Chapter 2 Troubleshooting
ENWW
Printer displays out of paper when paper is available
Remote troubleshooting
●
Check if the customer has followed the paper troubleshooting included in the user's guide. If not,
help him or her to do it.
●
If the problem persists, ask the customer to unload paper, restart the printer and ask to load paper
again. If everything is OK, it is likely the printer has an old firmware version, ask the customer to
do an firmware upgrade.
●
If there is a problem with the printer is likely that the customer cannot load paper after restarting
the printer, in this case see Paper cannot be loaded successfully on page 61.
Onsite troubleshooting
The service engineer should first follow the paper troubleshooting in the user's guide, and also the
instructions in this manual given to the customer by the call agent to double-check that the
troubleshooting has been done correctly. In most cases the problem can be solved by following these
instructions. If the problem persists:
1.
Remove the covers and check that the OOP sensor is well placed and the flag is not broken.
2.
Check the cables to see whether any of them is broken or disconnected (especially the OOPS
cable and the cable in the Bundle Board).
3.
If everything is OK, replace the Bundle Board (see Bundle Board on page 297).
4.
If the problem persists, replace the Main PCA (see Main PCA on page 205).
Cutter does not cut, or does not cut well
Remote troubleshooting
●
Check that the customer has followed the paper troubleshooting included in the user's guide. If
not, help him or her to do it.
●
If the problem persists, ask the customer to check whether the cutter has been disabled in the front
panel and/or in the driver.
●
Ask to try a different paper, and try to cut it using Form Fit and Cut from the front panel menu.
Paper troubleshooting
ENWW
http://www.justmanuals.com
63
●
If is still not cutting, ask the customer to check that the cutter is engaged and that it moves together
with the Carriage. If the cutter is not activated, ask the customer to open the Ink Cartridge Cover
and check whether there is a strip of paper in the parking position causing the cutter not to
activate.
●
If this does not solve the issue, arrange a service engineer visit to replace the cutter assembly.
Onsite troubleshooting
The service engineer should first follow the paper troubleshooting in the user's guide, and also the
instructions in this manual given to the customer by the call agent, to double-check that the
troubleshooting has been done correctly. In most cases the problem can be solved by following these
instructions. However, if the problem persists, try the following steps:
64
1.
If the cutter is not engaged, check that the cutter bridge is well assembled.
2.
If the cutter bridge is well assembled and the cutter is not activated while cutting, the cutter
assembly should be changed..
3.
Check whether there is noise due to high friction during the cut. If this occurs, the cutter assembly
should be changed. The high friction could be due to one of the following circumstances:
a.
Worn-out blades as a consequence of many cuts.
b.
Dirty blades. Likely to hold some sticky glue after cutting vinyl.
Chapter 2 Troubleshooting
ENWW
c.
Hard points in blades. Whenever the cutter has suffered an impact, such as falling onto the
floor, the blades mark themselves creating a hard point.
d.
Excessive friction in the mechanism of the cutter.
Paper has jammed
Remote troubleshooting
●
Check that the customer has followed the paper troubleshooting procedures described in the user's
guide. If not, help him or her to do it.
●
If the jam occurs with roll or single sheet, check with the customer that the output tray is closed.
The printer does not allow printing or loading roll or single sheet with the Output Tray open (a
message appears on the Front Panel). However if this is the case it is likely that the Output Tray
Sensor is broken. Ask the customer to run the Output Tray Sensor diagnostics (see 2.6 Output Tray
Sensor on page 111). If the diagnostics fail, arrange a service engineer visit to replace the
Output Tray Sensor (see Output Tray Sensor Assembly on page 286).
●
If the jam occurs with roll, and the output tray is closed, check with the customer whether the jam
occurs at the beginning of the print, because due to the paper curling the paper is stopped into
the Output Tray (does not fall into the basket), provoking a paper jam. If this is the case, check
with the customer whether the ribs in the Output Tray have risen or not. If these ribs are not up
while printing from roll, it can cause paper jams at the beginning of the plot. If this is the case,
arrange a service engineer visit to replace the Output Tray.
●
If the problem persists it is probably a mechanical problem that should be diagnosed by a service
engineer. Arrange a service engineer visit to diagnose the issue.
Onsite troubleshooting
The service engineer should first follow the paper troubleshooting in the user's guide, and also the
instructions in this manual given to the customer by the call agent, to double-check that the
troubleshooting has been done correctly. In most cases the problem can be solved by following these
instructions. However, if the problem persists, remove the covers and try the following steps:
1.
Check that all the Pinchwheels are all present and well assembled; check also that all the
pinchwheel springs are in place.
2.
Check that the starwheel rail is correct.
3.
Check that the spindle is not broken or inserted incorrectly, and that the spindle gear is OK.
Paper troubleshooting
ENWW
http://www.justmanuals.com
65
Communication troubleshooting
Please follow these suggestions to diagnose remote communication issues.
General troubleshooting
1.
2.
Check the following symptoms:
●
The front-panel display does not show the Printing message when an image has been sent
to the printer.
●
The computer displays an error message instead of printing.
●
The computer or printer hangs (stays idle), while communication is taking place.
●
The printed output shows random or inexplicable errors (misplaced lines, partial graphics,
etc.).
To solve a communication problem:
●
Ensure that the correct printer has been selected in the application.
●
Ensure that the printer works correctly when printing from other applications.
●
Remember that very large prints may take some time to receive, process, and print.
●
If the printer is connected to a network, check the printer connectivity status: the printer
should have an IP address and it should match the IP address specified in the printing
computer. If the addresses do not match, then configure it correctly; if the issue persists, check
the network configuration or try connecting to the printer by USB cable.
●
Try another interface cable.
●
If the printer is connected by USB cable, try disconnecting and reconnecting the USB cable.
Also try using a different USB port on the computer.
●
If the printer is connected to a wireless network, try moving the printer closer to the wireless
router. Alternatively, try connecting the printer by network or USB cable.
●
If the printer is connected to a wireless network, you can request a diagnostic report from the
front panel: press , then Settings > Print Wireless Network Test. Alternatively, try
moving the printer closer to the wireless router, or try connecting the printer by wired network
or USB cable.
When a network device automatically configures itself by receiving an IP address from the DHCP
service, this IP address may change from the last time the device is powered off to the next time it
is powered on, which may lead to the device being shown as "offline" when driver port settings
are configured with the original IP address. There are at least three possible ways to avoid this:
66
●
Increase the lease time of the DHCP server device.
●
Set a fixed IP address for the printer so that it will not change by DHCP.
●
Configure the printer and driver to refer to the hostname instead of the numeric IP address.
Chapter 2 Troubleshooting
ENWW
Wired network issues
▲
If the HP software provided with the printer cannot be installed, check that:
●
All cable connections to the computer and the printer are secure.
●
The network is operational and the network hub is turned on.
●
All applications, including virus protection programs, spyware protection programs, and
firewalls, are closed or disabled for computers running Windows.
●
The printer is installed on the same subnet as the computers that use the printer.
If the installation program cannot discover the printer, print the Network Configuration Page, and
enter the IP address manually in the installation program.
Although assigning a static address to the printer is not recommended, some installation problems
(such as a conflict with a personal firewall) may be resolved by doing so.
Network port created does not match printer IP address (Windows)
If the computer is running Windows, make sure that the network ports created in the printer driver
match the printer's IP address.
1.
Print the printer s Network Configuration Page.
2.
From Start > Settings, and then click Printers or Printers and Faxes. - or - From Start >
Front Panel, and then double-click Printers.
3.
Right-click the printer icon, click Properties, and then click the Ports tab.
4.
Select the TCP/IP port for the printer, and then click Configure Port.
5.
Compare the IP address listed in the dialog box and make sure it matches the IP address listed on
the Network Configuration Page. If the IP addresses are different, change the IP address in the
dialog box to match the address on the Network Configuration Page..
6.
Click OK twice to save the settings and close the dialog boxes.
Wireless network issues
1.
Make sure the wireless (802.11) light at the top left of the front panel is turned on
.
If the blue light is not lit, the wireless capabilities may not have been turned on. To turn on
wireless, press , then Settings > Wireless > On.
2.
Make sure that an Ethernet cable has not been connected to the printer. Connecting an Ethernet
cable turns off the printer's wireless capabilities.
3.
Restart components of the wireless network.
Turn off the router and the printer, and then turn them back on in this order: the router first, and
then the printer. Then run the Wireless Setup wizard in the front panel and select your network. If
you still are unable to connect, turn off the router, printer, and computer. Sometimes, turning off
the power and then turning it back on recovers a network communication issue.
ENWW
Communication troubleshooting
http://www.justmanuals.com
67
4.
Run the Wireless Network Test.
For wireless networking issues, run the Wireless Network Test. To print a Wireless Network Test
page, press , then Settings > Print Wireless Network Test. If a problem is detected, the
printed test report includes recommendations that could help to solve the problem.
5.
If required, print the Network Configuration Page to check deep network status information.
Wireless Network Troubleshooting Report
1.
Print the Wireless Network Troubleshooting Report (WNTR). From the front panel: press
Settings > Print Wireless Network Test.
, then
This report consists of a top-level assessment of whether any wireless connection problems exist
between the printer (STA) and the home network s wireless router, followed by more detailed
sections showing the result of various diagnostic tests as well as a configuration summary.
For more information about the contents of the Wireless Network Troubleshooting Report, see
Wireless troubleshooting report error cases on page 340. There is only one situation that requires
on-site repair: when the Wireless PCA is defective. To replace the Wireless PCA, you must replace
the Main PCA; see Main PCA on page 205.
2.
68
If you are not using a unique network name (SSID), then it is possible that the computer could be
connected to the wrong network. See How to check whether your computer is connected to your
network on page 337.
Chapter 2 Troubleshooting
ENWW
Network Configuration Page
1.
Make sure that the computer's wireless networking has been turned on. For more information, see
the documentation that came with the computer.
2.
Print the Network Configuration Page. From the front panel: press
> User Information Prints > Network Configuration Page.
, then Internal Prints
This contains important wireless configuration information at a glance for the user and call agents.
Detailed configuration and status information is also included, such as MAC address, wireless
channel and signal strength, IP settings, Ports/Services status, and a list of wireless networks in
range of the printer. The Network Configuration Page contains important details for Wireless
Direct including SSID name, IP address and security pass code.
ENWW
Communication troubleshooting
http://www.justmanuals.com
69
Ink-supplies troubleshooting
Ink cartridges
Table 2-1 Available Ink Cartridges
Ink cartridge
Part number
HP 711 38 ml Black Ink Cartridge
CZ129A
HP 711 29 ml Cyan Ink Cartridge
CZ130A
HP 711 29 ml Magenta Ink Cartridge
CZ131A
HP 711 29 ml Yellow Ink Cartridge
CZ132A
HP 711 80 ml Black Ink Cartridge
CZ133A
All ink cartridges are compatible with the T120 and the T520.
Replace an ink cartridge
70
1.
Make sure the printer is turned on.
2.
If your printer is on a stand, make sure the printer wheels are locked (the brake lever is pressed
down) to prevent the printer from moving.
3.
Open the ink cartridge cover on the left-hand side of the printer, and wait until the Carriage stops
moving.
4.
Wait until the Carriage stops moving.
Chapter 2 Troubleshooting
ENWW
5.
Press the ink cartridge to unlock it.
6.
Remove the ink cartridge.
7.
Insert the new ink cartridge. Make sure that you insert the ink cartridge into the slot that has the
same colored letter as the cartridge you are installing.
Ink-supplies troubleshooting
ENWW
http://www.justmanuals.com
71
8.
Close the ink cartridge cover.
Ink cartridge status
To view the ink levels of your ink cartridges, press
on the front panel.
For more information, press More.
You can also get this information from the HP Utility.
●
In the HP Utility for Windows, go to the Supplies tab to see each cartridge's status.
●
In the HP Utility for Mac OS, select Supplies Status in the Information group.
Ink cartridge status messages
OK
The Ink Cartridge is operating correctly and no action is required.
Missing
There is no Ink Cartridge present, or it is not correctly connected to the printer
Low
The Low message is an early warning sign and it is advisable that new supplies should
be obtained of that particular color. The amount of ink remaining in the Ink Cartridge
depends on its capacity, but there is approximately 20% of ink available for the user.
Out of Ink
The printer will stop and will not be able to continue printing until a new Ink Cartridge has
been installed. If this occurs halfway through printing an image, you should check the
quality of this image, as stopping in mid-print can affect the print. It is recommended to
reprint the image once a new Ink Cartridge has been installed.
Not genuine HP
The cartridge is not a genuine HP cartridge.
Wrong slot
The cartridge has been inserted into the wrong slot.
Incompatible
The cartridge is incompatible with this printer.
Printhead
The printhead is extremely durable and does not need to be replaced every time an Ink Cartridge is
replaced. It is independent of the Ink Cartridges and will continue giving excellent results even if the Ink
Cartridges are low on ink.
Table 2-2 Available printheads
Part number
HP 711 Printhead Replacement Kit
72
Chapter 2 Troubleshooting
C1Q10A
ENWW
Replace the printhead
The printhead is a Customer Self Replaceable (CSR) part.
1.
Make sure the printer is turned on.
2.
If your printer is on a stand, make sure the printer wheels are locked (the brake lever is pressed
down) to prevent the printer from moving.
3.
From the front panel, press
4.
Open the Ink Cartridge Cover.
5.
Wait until the Carriage stops moving.
6.
Press each ink cartridge to unlock it.
7.
Remove each ink cartridge.
, then Image quality maintenance > Replace printhead.
Ink-supplies troubleshooting
ENWW
http://www.justmanuals.com
73
8.
Close the Ink Cartridge Cover.
9.
Press Next on the front panel.
10. Open the Top Cover.
11. Raise the Carriage Lever.
74
Chapter 2 Troubleshooting
ENWW
12. Remove the printhead, keeping it vertical to avoid spilling ink onto the connections.
13. Insert the new printhead.
14. Lower the Carriage Lever.
Ink-supplies troubleshooting
ENWW
http://www.justmanuals.com
75
15. Close the Top Cover.
16. Press Next on the front panel.
17. Open the Ink Cartridge Cover.
18. Insert the ink cartridges. Make sure that you insert each ink cartridge into the slot that has the
same colored letter as the cartridge you are installing.
CAUTION: If the printhead is new, install new ink cartridges. New ink cartridges are required
for successful printhead replacement.
76
Chapter 2 Troubleshooting
ENWW
19. Close the Ink Cartridge Cover.
20. Press Done on the front panel. The front panel recommends a printhead alignment..
Reseat the printhead
In some cases, printhead problems may be resolved by reseating the printhead without replacing it.
To do this, follow the printhead replacement procedure (see Replace the printhead on page 73), but
without using a new printhead or new ink cartridges: just reinsert the old ones.
Clean the printhead
If your print is streaked or has incorrect or missing colors, the printhead may need to be cleaned.
There are three stages of cleaning. Each stage lasts about two minutes, uses one sheet of paper, and
uses an increasing amount of ink. After each stage, review the quality of the printed page. You should
initiate the next phase of cleaning only if the print quality is poor.
If print quality still seems poor after you complete all stages of cleaning, try aligning the printhead.
NOTE: Cleaning uses ink, so clean the printhead only when necessary.
NOTE: Failing to turn off the printer correctly can cause print-quality problems.
Clean the printhead from the front panel
1.
Make sure there is paper in the Multi-Sheet Tray or a roll is loaded.
2.
Go to the front panel and press
, then Image Quality Maintenance > Clean printhead.
Clean the printhead from the Embedded Web Server
1.
Make sure there is paper in the Multi-Sheet Tray or a roll is loaded.
2.
In the Tools tab of the Embedded Web Server, select Print Quality Toolbox > Clean
Printhead, and follow the instructions on the screen.
Ink-supplies troubleshooting
ENWW
http://www.justmanuals.com
77
Clean the printhead from the HP Utility
1.
Make sure there is paper in the Multi-Sheet Tray or a roll is loaded.
2.
Windows: In the Support tab of the HP Utility, select Printhead Cleaning, and follow the
instructions on the screen.
3.
Mac OS: In the Information and Support tab of the HP Utility, select Clean Printhead,
and follow the instructions on the screen.
Align the printhead
Precise printhead alignment is essential for accurate colors, smooth color transitions, and sharp edges
in graphical elements. Your printer has an automatic printhead alignment process which runs whenever
a printhead has been accessed or replaced.
You may need to align the printhead after a paper jam or if you are experiencing problems with color
accuracy.
To align the printhead, ensure that paper is loaded, then press
Maintenance > Align printhead.
CAUTION:
, then Image Quality
Do not use transparent or semi-transparent paper to align the printhead.
Printhead status messages
OK
The printhead is operating correctly and no action is required.
Missing
There is no printhead present, or it is not properly connected to the printer.
Reseat
You are recommended to start the printhead removal process from the Front Panel, but
instead of removing the printhead, simply press the OK button on the Front Panel.
Replace
You are recommended to remove the printhead and then reinsert it; if that fails, clean the
electrical connections; if that fails, replace the printhead with a new printhead.
Replacement incomplete
A printhead replacement process has not completed successfully, relaunch the replacement
process and let it finish completely (it is not necessary to change the printhead).
Solving ink-supply problems
Most of the problems that you may encounter when working with the ink supplies are solved with
guidance from the Front Panel. A full list of Front Panel messages is supplied in the user's guide.
You cannot insert the Ink Cartridge
1.
Ensure that you have the correct HP no.711 Ink Cartridge.
2.
Check that the colored label on the cartridge is the same color as the label on the slot.
3.
Check that the cartridge is correctly oriented, with the letter or letters marking the cartridge label
right-side up and readable.
CAUTION:
78
Never clean inside the Ink Cartridge slots as this can cause damage to the printer.
Chapter 2 Troubleshooting
ENWW
You cannot insert the printhead
1.
Ensure that you have the correct HP no. 711 Printhead.
2.
Ensure that the printhead is in the correct orientation.
3.
Check that you have correctly latched the printhead.
The Front Panel says to reset or replace a printhead
1.
From the Front Panel, turn the power off then on.
2.
Check the Front Panel display message, if it shows the ready message, the printer is ready to print.
If the problem remains continue with the next step.
3.
Remove the printhead using the correct procedure. It is important that the ink cartridges are
removed before removing the printhead, this is in order to avoid damaging the printhead or
contaminating the Carriage contacts with ink.
4.
Clean the electrical connections on the backside of the printhead with a lint-free cloth. You can
carefully use a mild rubbing alcohol if moisture is needed to remove residue. Do not use water.
This is a delicate process and may damage the printhead. Do not touch the nozzles on the bottom
side of the printhead, especially not with alcohol.
5.
Reinsert the printhead.
6.
Check the Front Panel display message. If the problem remains, try a new printhead.
Ink system hardware troubleshooting
A potential ink system hardware failure can be reported to the user in the following way:
The printer is unable to determine whether the error is caused by a real hardware failure or which part
may be failing (possible candidates: ink cartridges, Prime Pump, Carriage Assembly, Trailing Cable).
Follow these steps to check which parts to repair to solve the problem:
1.
Perhaps the printer will recover automatically. Restart the printer and print a test page such as the
print-quality diagnostic report (see General print-quality troubleshooting on page 83). If the error
persists, proceed to the next step.
2.
Perform a diagnostic test of the pump subsystem (see 2.8 Pump on page 113). If it tests OK,
continue with the next step; otherwise, replace the Prime Pump (see Prime Pump on page 233).
Send an onsite engineer if necessary.
3.
Restart the printer. When the printer is ready, start a printhead replacement (see Replace the
printhead on page 73) and follow the first two steps shown on the Front Panel to remove the ink
cartridges and the printhead.
Ink-supplies troubleshooting
ENWW
http://www.justmanuals.com
79
4.
5.
Inspect both the ink cartridges and the Carriage, looking for evidence of ink leaks. If you find
none, move to step 5. If an ink cartridge is leaking, please order new ones for the customer and
do the following:
a.
Clean the electrical contacts in the Carriage slot inside the printer with a clean, dry, soft, lintfree cloth; slide the cloth up and down vertically.
b.
Put the printhead back into the Carriage (see Replace the printhead on page 73).
c.
Insert a set of non-leaky ink cartridges.
d.
Print a test page.
If there are no ink leaks, replace the Carriage Assembly, see Carriage and Belt on page 236.
Printhead troubleshooting
A printhead hardware failure can be reported to the user in the following ways:
A. The printhead appears to be missing, not detected, or incorrectly installed
▲
Press the Show me
process.
button appearing on the screen to launch the replacement/reseat wizard
B. System error 27:10 is displayed
1.
Turn the printer off.
2.
Open the Top Cover.
3.
Manually move the Carriage up to the ink replacement position.
4.
Open the Ink Cartridge Cover and remove the supplies (if present).
5.
Close the Ink Cartridge Cover.
6.
Move the Carriage so that you can access the printhead.
7.
Replace / Reseat the printhead (ensure that the Carriage lifter is lowered once the printhead
assembly has been reinserted)
8.
Close the Top Cover.
9.
Restart the printer.
10. Re-insert the supplies when prompted by the front panel.
11. If the error persists, the call agent should ship a new printhead assembly.
C. There is a problem with the printer or ink system. Turn printer off, then on. If the problem
persists, contact HP.
In addition to this a 27:10 error appears on the Error History (inside the Support Menu)
The printer is unable to determine whether the error is caused by a real hardware failure and which
might be the failing part. Possible candidates: Printhead, Carriage Board, Trailing Cable.
80
1.
Turn the printer off and on again.
2.
Wait until the Carriage stops moving, then open the ink cartridge cover.
Chapter 2 Troubleshooting
ENWW
3.
After hearing the audio alert, remove the ink cartridges, see Replace an ink cartridge on page 70.
4.
Clean the electrical contacts in the Carriage slot inside the printer with a clean, dry, soft, and lintfree cloth; ensure that this is done by sliding the cloth vertically.
5.
Reinsert the printhead assembly (ensure that the Carriage Lifter is properly lowered once the
assembly has been reinserted).
6.
Close the Top Cover.
7.
Move the Carriage to a position on the platen where you can access the printhead.
8.
Replace / Reseat the printhead (ensure that the Carriage Lifter is lowered once the printhead
assembly has been reinserted).
9.
Close the Top Cover.
10. Restart the printer.
11. Re-insert the supplies when prompted by the front panel.
12. The printer should show a missing cartridges message: open the Ink Cartridge Cover to reinsert
the supplies.
13. If the problem persists, the printhead must be replaced (a printhead replacement kit must be
provided to the user).
14. If the problem persists, the Carriage assembly must be replaced, see Carriage and Belt
on page 236.
Ink-supplies troubleshooting
ENWW
http://www.justmanuals.com
81
Printhead troubleshooting flowchart
82
Chapter 2 Troubleshooting
ENWW
Print-quality troubleshooting
General print-quality troubleshooting
These procedures should help with streaked or faded prints, prints without black or other colors, prints
with blurred or fuzzy text, prints with ink streaks or smears, and many other problems.
Try the following solutions in the order presented in order to resolve the common issues described
above. When one of the solutions resolves the issue, there is no need to continue troubleshooting.
Use genuine HP ink cartridges
▲
HP recommends that you use genuine HP ink cartridges. HP cannot guarantee the quality or
reliability of non-HP cartridges. If you are not using genuine HP ink cartridges, the following
solutions might not resolve your print-quality issue.
Check the paper
▲
Make sure that the paper is appropriate for the print job.
Check the print settings
▲
Windows: Open the Windows driver and go to the Paper/Quality tab. Adjust Print
Quality, Document Size, and Margins/Layout.
Mac OS: Open the Mac OS Print dialog and go to the Paper/Quality tab. Adjust Quality
Options, Paper Size, Format, and Margins/Layout.
Print and evaluate a print-quality diagnostic report and troubleshoot defects
Use the following procedure to print, and then evaluate a print-quality diagnostic report.
1.
Print a print-quality diagnostic page.
a.
Make sure there is plain white, letter-size paper loaded in the sheet feeder at the back of the
printer.
b.
Choose the Multi-Sheet Tray (multi-sheet or single-sheet) from the front panel.
c.
Press
on the printer front panel.
Print-quality troubleshooting
ENWW
http://www.justmanuals.com
83
d.
2.
3.
Select Image Quality Maintenance > Print diagnostic image. The print-quality
diagnostic page prints.
If the lines in Test Pattern 1 are not straight and connected, follow these steps to align the printer:
a.
Make sure there is plain white, letter-size paper loaded in the sheet feeder on the back of the
printer.
b.
Press
c.
Select Image Quality Maintenance > Align Printhead. The printhead alignment
procedure will begin.
d.
At the end of the process a page prints, which may be discarded.
on the printer front panel.
Examine the Test Pattern 2. Shown here is a good example of the test pattern.
If any of the colored blocks in Test Pattern 2 show white lines, or are faded or missing completely,
follow these steps to clean the printhead.
84
a.
Make sure there is plain white, letter-size paper loaded in the sheet feeder on the back of the
printer.
b.
Press
c.
Select Image Quality Maintenance > Clean Printhead. The printhead cleaning
process will begin.
d.
At the end of the process a page prints. Examine that page to see if more cleaning is
required.
on the printer front panel.
Chapter 2 Troubleshooting
ENWW
e.
If there are defects on the page that prints after cleaning, try cleaning the printhead by
pressing the Yes button on the Front Panel for second level cleaning. Repeat the cleaning for
the third level cleaning if it is still not resolved.
f.
If the problem is still not resolved after third-level cleaning, proceed to the next step (check
print quality), before replacing the printhead.
NOTE: To avoid problems that require printhead cleaning, always use the Power button to
turn the printer off. Always replace any missing cartridges as soon as possible to avoid printquality issues and possible extra ink usage or damage to the ink system. Never turn off the
printer when the ink cartridges are missing.
Check print quality
If you see no defects on the print-quality diagnostic report, you can double-check the print quality
with the Diagnostic Image.
a.
Make sure there is plain white, letter-size paper loaded in the sheet feeder on the back of the
printer.
Print-quality troubleshooting
ENWW
http://www.justmanuals.com
85
b.
Press four times on the Back Key. The Support Menu will appear. Go to 4. Reports > 4.4
Agents Assisted Image Test.
If the Agent Assisted Images both look OK, then the print mechanism and ink supplies are
working correctly.
Replace the problem ink cartridge
If none of the preceding steps resolved the issue, replace the cartridge that corresponds to the
defect on the Print Quality Diagnostic report. For example, if the magenta color block is streaked
and printhead cleaning does not help, replace the magenta cartridge, see Replace an ink
cartridge on page 70.
NOTE: Use the Print Quality Diagnostic Page (not the Agent Assisted Image Test) to confirm
failure before replacing ink cartridges or the printhead.
Replace the printhead
86
Chapter 2 Troubleshooting
ENWW
If you have completed all of the troubleshooting steps and are still experiencing a problem,
replace the printhead.
NOTE: Use the Print Quality Diagnostic Page (not the Agent Assisted Image Test) to confirm
failure before replacing ink cartridges or the printhead.
Service the printer
If the steps above have not solved the problem, service the printer.
NOTE: Keep a print sample that shows the problem. If the ink cartridges, printhead, or printer is
replaced under warranty, the support agent will request the print sample. If the printer is returned
to HP, the print sample must be returned with the printer. Place the sample in the output tray when
you package your printer for shipping.
Print-quality defects
●
Horizontal lines across the image (banding)
●
Lines are too thick, too thin or missing
●
Lines appear stepped or jagged
●
Lines print double or in the wrong colors
●
Lines are discontinuous
●
Lines are blurred
●
Line lengths are inaccurate
●
The whole image is blurry or grainy
●
The paper is not flat
●
The print is scuffed or scratched
●
Ink marks on the paper
●
Black ink comes off when you touch the print
●
Edges of objects are stepped or not sharp
●
Edges of objects are darker than expected
●
Vertical lines of different colors
●
White spots on the print
●
Colors are inaccurate
●
Colors are fading
●
The image is incomplete (clipped at the bottom)
●
The image is clipped
●
Some objects are missing from the printed image
●
A PDF file is clipped or objects are missing
Print-quality troubleshooting
ENWW
http://www.justmanuals.com
87
Horizontal lines across the image (banding)
If your printed image suffers from added horizontal lines as shown (the color may vary):
1.
Check that the paper type loaded corresponds to the paper type selected in the front panel and in
the software.
2.
Check that the customer is using appropriate print-quality settings for the purpose. In some cases,
you can overcome a print-quality problem merely by selecting a higher print-quality level. For
instance, if you have set the Print Quality slider to Speed, try setting it to Quality.
3.
Print the print-quality diagnostic report. See General print-quality troubleshooting on page 83.
4.
If the printhead is working correctly, perform paper advance calibration, see the user's guide.
If the problem persists despite all the above actions, contact your customer service representative for
further support.
Lines are too thick, too thin or missing
88
1.
Check that the paper type you have loaded corresponds to the paper type selected in the front
panel and in your software.
2.
Check that you are using appropriate print-quality settings for your purposes. Select the custom
print-quality options in the driver dialog, and try turning on the Maximum detail option (if
available).
3.
If the resolution of your image is greater than the printing resolution, you may notice a loss of line
quality. You can find the Max. Application Resolution option in the driver dialog's
Advanced tab, under Document Options > Printer Features.
4.
If lines are too thin or missing, print the print-quality diagnostic report. See General print-quality
troubleshooting on page 83.
Chapter 2 Troubleshooting
ENWW
5.
If the problem remains, align the printhead. See Align the printhead on page 78.
6.
If the problem remains, perform paper advance calibration, see the user's guide.
If the problem persists despite all the above actions, contact your customer service representative for
further support.
Lines appear stepped or jagged
If lines in your image appear stepped or jagged when printed:
1.
The problem may be inherent in the image. Try to improve the image with the application you are
using to edit it.
2.
Check that you are using appropriate print-quality settings, see the user's guide.
3.
Select the custom print-quality options in the driver dialog, and turn on the Maximum detail
option (if available).
Lines print double or in the wrong colors
This problem can have various visible symptoms:
●
Colored lines are printed double, in different colors.
●
The borders of colored blocks are wrongly colored.
Print-quality troubleshooting
ENWW
http://www.justmanuals.com
89
To correct this kind of problem, align the printhead. See Align the printhead on page 78.
Lines are discontinuous
If your lines are broken in the following way:
1.
Check that you are using appropriate print-quality settings, see the user's guide.
2.
Align the printhead. See Align the printhead on page 78.
Lines are blurred
Humidity can cause ink to soak into the paper, making the lines blurred and fuzzy. Try the following:
90
1.
Check that your environmental conditions (temperature, humidity) are suitable for high-quality
printing
2.
Check that the paper type selected in the front panel is the same as the paper type you are using.
3.
Try changing to a heavier paper type, such as HP Heavyweight Coated Paper.
4.
Select a paper type that is slightly thinner than the paper you have loaded; this will persuade the
printer to use less ink. Here are some example paper types in ascending order of thickness: Plain
Paper, Coated Paper, Heavyweight Coated Paper.
5.
If you are using glossy paper, try changing to a different type of glossy paper.
6.
Align the printhead. See Align the printhead on page 78.
Chapter 2 Troubleshooting
ENWW
Line lengths are inaccurate
If you have measured your printed lines and find that the lengths are not sufficiently accurate for your
purposes, you can try to improve line length accuracy in the following ways.
1.
Print on HP Matte Film, for which your printer's line length accuracy is specified.
Polyester film is about ten times more dimensionally stable than paper. However, using film that is
thinner or thicker than HP Matte Film will reduce line length accuracy.
2.
Set the Print Quality slider to Quality.
3.
Maintain the room at a steady temperature between 10 and 30°C (50 and 86°F).
4.
Load the roll of film and let it rest for five minutes before printing.
5.
If you are still not satisfied, try recalibrating the paper advance.
The whole image is blurry or grainy
1.
Check that the paper type you have loaded corresponds to the paper type selected in the front
panel and in your software.
2.
Check that you are printing on the correct side of the paper.
3.
Check that you are using appropriate print-quality settings. In some cases, you can overcome a
print-quality problem merely by selecting a higher print-quality level. For instance, if you have set
the Print Quality slider to Speed, try setting it to Quality.
4.
If the problem remains, align the printhead. See Align the printhead on page 78.
5.
If the problem remains, perform paper advance calibration.
If the problem persists despite all the above actions, contact your customer service representative for
further support.
The paper is not flat
If the paper does not lie flat when it comes out of the printer, but has shallow waves in it, you are likely
to see defects in the printed image, such as vertical stripes. This can happen when you use thin paper
that becomes saturated with ink.
Print-quality troubleshooting
ENWW
http://www.justmanuals.com
91
1.
Check that the paper type you have loaded corresponds to the paper type selected in the front
panel and in your software.
2.
Try changing to a thicker paper type, such as HP Heavyweight Coated Paper.
3.
Select a paper type that is slightly thinner than the paper you have loaded; this will persuade the
printer to use less ink. Here are some example paper types in ascending order of thickness: Plain
Paper, Coated Paper, Heavyweight Coated Paper.
The print is scuffed or scratched
The black ink pigment can be scuffed or scratched when touched by a finger, a pen or some other
object. This is particularly noticeable on coated paper.
Glossy paper may be extremely sensitive to the basket or to anything else that it contacts soon after
printing, depending on the amount of ink used and the environmental conditions at the time of printing.
To reduce the risk of scuffs and scratches:
●
Handle prints carefully.
●
Avoid stacking prints on top of each other.
●
Catch your prints as they are cut from the roll and do not let them fall into the basket. Alternatively,
leave a sheet of paper in the basket so that freshly printed sheets do not make direct contact with
the basket.
●
Increase the drying time. At the front panel, press
Retrieval > Select drying time > Extended.
, then Printer Preferences > Print
Ink marks on the paper
This problem can occur for several different reasons.
Horizontal smears on the front of coated paper
If a lot of ink is used on plain or coated paper, the paper absorbs the ink quickly and expands. As the
printhead moves over the paper, the printhead may come into contact with the paper and smear the
printed image. This problem is normally seen only on cut sheets of paper (not on roll paper).
92
Chapter 2 Troubleshooting
ENWW
Whenever you notice this problem, cancel the printing job immediately. Press
and also cancel the
job from your computer application. Soaked paper can damage the printhead.
Try the following suggestions to avoid this problem:
1.
Check that the paper type you have loaded corresponds to the paper type selected in the front
panel and in your software.
2.
If using sheet paper, try rotating the sheet 90 degrees. The orientation of the paper fibers may
affect performance.
3.
Try changing to a thicker paper type, such as HP Heavyweight Coated Paper.
4.
Select a paper type that is slightly thinner than the paper you have loaded; this will persuade the
printer to use less ink. Here are some example paper types in ascending order of thickness: Plain
Paper, Coated Paper, Heavyweight Coated Paper.
5.
Try to increase the margins by relocating the image to the center of the page using your software
application.
Ink marks on the back of the paper
Clean the platen with a soft cloth. Clean each rib separately.
Black ink comes off when you touch the print
This problem may be caused by printing with matte black ink on glossy paper. The printer will not use
matte black ink if it knows that the paper will not retain it. To be sure of avoiding matte black ink, you
can select Photo Glossy Paper as the paper type (in the Photo Paper category).
Edges of objects are stepped or not sharp
Print-quality troubleshooting
ENWW
http://www.justmanuals.com
93
If edges of objects or lines appear to be poorly defined or lighter in density, and you have already set
the print-quality slider to Quality in the driver dialog, select the custom print-quality options, and try
setting the quality level to Normal.
Edges of objects are darker than expected
If edges of objects seem darker than expected, and you have already set the print-quality slider to
Quality in the driver dialog, select the custom print-quality options, and try setting the quality level to
Speed.
Vertical lines of different colors
If your print has vertical bands of different colors along it:
1.
Try using thicker paper, choosing from the recommended paper types such as HP Heavyweight
Coated Paper.
2.
Try using higher print-quality settings. For instance, if you have set the Print Quality slider to
Speed, try setting it to Quality.
White spots on the print
You may notice white spots on the print. This is probably due to paper fibers, dust or loose coating
material. To avoid this problem:
94
1.
Try cleaning the paper manually with a brush before printing, to remove any loose fibers or
particles.
2.
Always keep the cover of your printer closed.
3.
Protect your paper rolls and sheets by storing them in bags or boxes.
Chapter 2 Troubleshooting
ENWW
Colors are inaccurate
If the colors of your print do not match your expectations, try the following:
1.
Check that the paper type you have loaded corresponds to the paper type selected.
2.
Check that you are printing on the correct side of the paper.
3.
Check that you are using appropriate print-quality settings. For the most accurate colors, select
Speed or Best quality.
4.
Print the print-quality diagnostic report. See General print-quality troubleshooting on page 83.
Colors are fading
If you print on instant-dry photo paper, your prints will fade rapidly. If you plan to display the prints for
more than two weeks, you should laminate them to achieve longer life.
Prints on swellable coated papers will fade much less rapidly. However, lamination will increase the life
of prints (depending on the type of lamination) with all paper types. For more information, consult your
laminate provider.
The image is incomplete (clipped at the bottom)
●
Did you press
before all the data were received by the printer? If so, you have ended the data
transmission and will have to print the page again.
●
The I/O timeout setting may be too short. This setting determines how long the printer waits for
the computer to send more data, before deciding that the job is finished. From the front panel,
increase the I/O timeout setting to a longer period and then send the print again. Press , then
Connectivity > Advanced setup > Select I/O timeout.
●
There may be a communications problem between your computer and the printer. Check your USB
or network cable, or your Wi-Fi connection.
●
Check to make sure that your software settings are correct for your current page size (for example,
long-axis prints).
●
If you are using network software, make sure it has not timed out.
Print-quality troubleshooting
ENWW
http://www.justmanuals.com
95
The image is clipped
Clipping normally indicates a discrepancy between the actual printable area on the loaded paper and
the printable area as understood by your software.
●
Check the actual printable area for the paper size you have loaded.
printable area = paper size
margins
●
Check what your software understands to be the printable area (which it may call "printing area"
or "imageable area"). For example, some software applications assume standard printable areas
that are larger than those used in this printer.
●
If you have defined a custom page size with very narrow margins, the printer may impose its own
minimal margins, clipping your image slightly. You may want to consider using a larger paper
size.
●
If your image contains its own margins, you may be able to print it successfully by using the Clip
Contents by Margins option.
●
If you are trying to print a very long image on a roll, check that your software is capable of
printing an image of that size.
●
You may have asked to rotate the page from portrait to landscape on a paper size that is not
wide enough.
●
If necessary, reduce the size of the image or document in your software application, so it fits
between the margins.
There is another possible explanation for a clipped image. Some applications, such as Adobe
Photoshop, Adobe Illustrator and CorelDRAW, use an internal 16-bit coordinate system which means
that they cannot handle an image of more than 32,768 pixels.
NOTE: An image 32,768 pixels long would print at a length of 1.39 m (54.61 in) if you select Best
or Quality in the driver, 2.78 m (109.23 in) if you select Fast, Normal or Speed in the driver.
If you try to print an image larger than this from these applications, the bottom of the image may be
clipped. To print the whole image, try these suggestions:
●
The driver dialog includes an option called Max. application resolution, which enables you
to print successfully in this situation. You will not normally need to change the default setting,
which is Auto. However, you can find the option in the Advanced tab, under Document
Options > Printer Features.
●
Save the file in another format, such as TIFF or EPS, and open it with another application.
●
Use a RIP to print the file.
Some objects are missing from the printed image
Large quantities of data may be necessary to print a high-quality large-format print job, and in some
specific workflows there may be issues that can lead to some objects missing from the output. Here are
some suggestions to help you to avoid this problem.
96
●
Tell the HP-GL/2 driver to send the image as a bitmap.
●
Select a smaller page size and scale to the desired final page size in the driver or in the front
panel.
Chapter 2 Troubleshooting
ENWW
●
Save the file in another format, such as TIFF or EPS, and open it with another application.
●
Use a RIP to print the file.
●
Reduce the resolution of bitmap images in your application software.
●
Select a lower print quality in order to reduce the resolution of the printed image.
NOTE: If you are working under Mac OS, not all of these options are available.
These options are suggested for troubleshooting purposes and may adversely affect the final output
quality or the time necessary to generate the print job. Therefore, they should be cancelled if they do
not help to solve the problem.
A PDF file is clipped or objects are missing
In older versions of Adobe Acrobat or Adobe Reader, large PDF files could be clipped or lose some
objects when printing with the HP-GL/2 and HP RTL driver at high resolution. In order to avoid such
problems, upgrade your Adobe Acrobat or Adobe Reader software to the latest version. From version 7
onwards, these problems should be solved.
Update the firmware
There are various ways of downloading and installing firmware updates, as described below; you can
choose whichever you find most convenient.
Update the firmware from the HP (Designjet) Utility
1.
Launch the HP Designjet Utility under Windows or the HP Utility under Mac OS.
2.
Go to the Admin tab.
Update the firmware
ENWW
http://www.justmanuals.com
97
98
3.
Select Update Firmware.
4.
Click Select File and a pop-up window to select the firmware upgrade file will appear.
Chapter 2 Troubleshooting
ENWW
5.
Select the file (*.ful) and click Open button. Then the Upload File button will be enabled. Click
it to start the firmware upgrade.
6.
Once the file has been sent, a new pop-up is displayed.
7.
Press OK. The printer restarts to finish the firmware upgrade, and the printer status report is
printed. Check that the firmware version is the latest.
Update the firmware
ENWW
http://www.justmanuals.com
99
Update the firmware from the Embedded Web Server
1.
Ensure that the printer is connected to the Internet.
2.
Go to Web Services.
3.
Select Printer Update.
Update the firmware automatically from the Front Panel
100
1.
Ensure that the printer is connected to the Internet.
2.
Go to Web Services.
3.
Select Automatic FW upgrade.
Chapter 2 Troubleshooting
ENWW
3
Support menus
In this chapter you will find an explanation in detail of each of the items included in the Support Menu
and the Extended Support Menu. All these service options and utilities are available to customers under
the assistance of an HP call agent.
●
Entering the support menus
●
Support menu
●
Extended Support menu
ENWW
101
http://www.justmanuals.com
Entering the support menus
There are two different menus, one used for customers following instructions by phone assisted by a
call agent in order to troubleshoot an issue, and/or to access printer information when a customer
has contacted HP for assistance; and a second menu accessible only by service engineers and used
for troubleshooting, diagnosis during repair, calibrations, reset, and accessing printer information
during a service operation.
NOTE: Some utilities included in these menus need a password in order to be executed. The
password is: 3746
Entering the Support Menu for customers
Use the following procedure to enter into the Support menu.
102
1.
The Support Menu for the customer is accessible from any screen by pressing the Power Button
continuously for 15 seconds. This menu is also accessible from the Home screen by pressing: Back
/ Back / Back / Back .
2.
The following screen will display, select Support Menu.
3.
The following screen will display:
4.
Navigate through the menu using the Left arrow ( ) and Right arrow ( ) in the Front Panel magic
frame. You could also use the Up and Down arrows of the Front Panel display.
5.
To go back to the previous level, use the Cancel (
Chapter 3 Support menus
) key.
ENWW
Entering the Extended Support Menu for service engineers
Use the following procedure to enter into the service engineer's Extended Support Menu.
1.
This menu is accessible only by the service engineer and is called the Extended Support Menu,
accessible from the Home screen by pressing: Home / Back / Home / Home .
NOTE: The Extended Support Menu is accessible only from the Home screen. If there is a system
error, you will not be able to access this menu. Therefore, to diagnose the issue, use the Support
Menu for customers (by pressing the Power button continuously for 15 seconds). Once the printer
is repaired, if you need access to this menu, do the resets or use the service utilities that are
accessible only from this menu.
2.
The following screen will display with the extended menu options:
NOTE: The Extended Self Test is only for manufacturing purposes, it should not be used in a
Service environment.
3.
Select the Extended Support Menu tab on Front Panel, the following menu will display:
4.
Navigate through the menu using the Left arrow ( ) and Right arrow ( ) in the Front Panel magic
frame. You could also use the Up and Down arrows of the Front Panel display.
5.
To go back to the previous level always use Cancel (
) key.
For information on the extra items in the Extended Support Menu, see Extended Support menu
on page 124.
Entering the support menus
ENWW
http://www.justmanuals.com
103
Support menu
In this section of the service manual you will find an explanation in detail of each of the menus included
on the Support Menu. All these service options and utilities are available to customers under the
assistance of an HP call agent. For a diagram of the menu tree, see Support menu tree on page 335.
Information menu
1.1 Model number
Select this to get the printer's Model Number
1.2 Serial number
Select this to get the printer's Serial Number
1.3 Firmware version
Select this to get the printer's Firmware Version. The firmware version have the following format:
AXP2CN1218MR
Where:
●
AXP2CN = Product Id
●
12= Year
●
18= Week
●
M= Minor weekly revision
1.4 Country/Language
Select this to get the printer's Country location and language setting.
1.5 Error history
Select this to get the printer's last 10 system errors or asserts.
Keep using Left arrow ( ) and Right arrow ( ) in the Front Panel magic frame to navigate thru the
errors list. The first error [1] is the most recently logged.
1.6 Printhead install date
Select this to get the PHA installation date, use this to find out the PHA warranty.
104
Chapter 3 Support menus
ENWW
1.7 Printhead drop count
Select this to display the amount of ink fired (ml) by the printhead for each color. Also shows printhead
warranty status.
*Warranty Info Status can be:
●
In Warranty
●
Out of Warranty
1.8 Wireless region
Select this to verify the wireless region. By default, it´s configured to WorldSafe. To change the wireless
region go to Service Menu, see 5.5 Wireless region on page 124.
Press OK:
1.9 to 1.13
Only for manufacturing purposes.
1.14 Counters
Select this to get information about the number of pages printed and Carriage cycles.
Support menu
ENWW
http://www.justmanuals.com
105
Press OK:
Diagnostics menu
2.1 Carriage servo
Description
This test verifies all the components associated with the Carriage servo subsystem: Carriage Motor,
Encoder Strip, and Encoder Strip sensor (located on the Carriage PCA). When the test is done the
Carriage is uncapped and moved outside the Service Station in order to check that all the components
work properly or if any seems damaged.
Associated errors
When any of the following errors occur in the printer, this diagnostics procedure must be performed:
●
System error 42:10
●
Printhead missing or damaged
●
Carriage jam error during printer startup
Procedure
1.
106
From the Diagnostics menu, select 2.1 Carriage Servo and then OK.
Chapter 3 Support menus
ENWW
2.
The Carriage will be uncapped and moved outside the Service Station. If everything is fine the
following screen will be displayed:
3.
If there is a failure you will see one of these system errors:
●
42.1:10
●
02:10
2.2 Paper servo
Description
This test verifies all the components associated with the Paper servo Subsystem: Paper Motor, Feed
Encoder Disk, Feed Encoder PCA, and Index Encoder PCA. When the test is done the feed roller is
moved a small distance in both directions in order to check that all the components work properly or if
any is damaged.
Associated errors
When any of the following errors occur in the printer, this diagnostics procedure must be performed:
●
System error 41:10
●
Paper jam error
Procedure
1.
From the Diagnostics menu, select 2.2 Paper Servo and then OK.
2.
Open the Top Cover and press OK again to verify if the feed roller is moving.
TIP: If there is no roll paper loaded and in order to check easily if the feed roller is moving or
not you can introduce a paper sheet into the top input slot (where single sheets are loaded see
below) if the feed roller moves correctly you will see the paper moving up and down.
Support menu
ENWW
http://www.justmanuals.com
107
3.
The feed roller will be moved a bit in both directions. If everything is fine the following screen will
be displayed:
4.
If there is a failure you will see one of these system errors:
●
41.2:10
●
85.2:10
2.3 Ink Cartridge Cover Sensor
Description
This test verifies the ink cartridge cover sensor. When this test is done you will be asked to open the Ink
Cartridge Cover Sensor to check that the sensor is not damaged.
Associated errors
When any of the following errors occur in the printer, this diagnostics procedure must be performed:
●
When opening the Ink Cartridge Cover, the Carriage does not move to the ink cartridges
replacement position.
●
The printer shows the animation Replace ink cartridges and close Ink Cartridge Cover
continuously although the door is closed.
Procedure
108
1.
From the Diagnostics menu, select 2.3 Ink Cartridge Cover Sensor and then OK.
2.
Press OK again to start the test, the following screen will display:
3.
Open the Ink Cartridge Cover and press OK. The screen message will change for this:
Chapter 3 Support menus
ENWW
4.
Close the Ink Cartridge Cover and press OK. If the sensor is not damaged then you will see:
5.
If the sensor does not work properly there will be the following error:
6.
If there is a failure, replace the Ink Cartridge Cover Sensor PCA, see Ink Cartridge Cover PCA
Assembly on page 198.
2.4 Top Cover Sensor
Description
This test verifies the Top Cover Sensor. When this test is done you will be asked to open and close the
Top Cover to check that the sensor is not damaged.
Associated errors
When any of the following errors occur in the printer, this diagnostics procedure must be performed:
●
The printer shows the animation Close Top Cover continuously although the cover is closed.
●
When you open the Top Cover, the printer does not beep and does not show the Close Top
Cover animation in the Front Panel.
Procedure
1.
From the Diagnostics menu, select 2.4 Top Cover Sensor and then OK.
2.
Press OK again to start the test, the following screen will display:
Support menu
ENWW
http://www.justmanuals.com
109
3.
Open the Top Cover and press OK. The screen message will change to:
4.
Close the Top Cover and press OK. If the sensor is not damaged then you will see:
5.
If the sensor does not work properly there will be the following error:
6.
If there is a failure, replace the Top Cover Sensor PCA.
2.5 Out-Of-Paper Sensor
Description
This test verifies the Out-Of-Paper Sensor. When this test is done you will be asked to introduce a single
sheet to check that the sensor is not damaged.
Associated errors
When any of the following errors occur in the printer, this diagnostics procedure must be performed:
●
The printer is not able to complete the load because it cannot detect the paper
●
The printer shows in the Front Panel that the paper is loaded although there is not any paper
loaded.
Procedure
1.
110
From the Diagnostics menu, select 2.5 OOP Sensor and then OK.
Chapter 3 Support menus
ENWW
2.
Press OK again to start the test, the following screen will display:
3.
Insert the paper sheet and press OK. The screen message will change for this:
4.
Remove the paper and press OK. If the sensor is not damaged then you will see:
5.
If the sensor does not work properly there will be the following error:
6.
Replace the OOP sensor, see Out-Of-Paper Sensor on page 281.
2.6 Output Tray Sensor
Description
This test verifies the Output Tray Sensor. When this test is done you will be asked to open and close the
Output Tray door to check that the sensor is not damaged.
Associated errors
When any of the following errors occur in the printer, this diagnostics procedure must be performed:
●
The printer shows the animation Close Output Tray Sensor when trying to load or print from roll
although the tray is closed.
Support menu
ENWW
http://www.justmanuals.com
111
Procedure
1.
From the Diagnostics menu, select 2.6 Output Tray Sensor and then OK.
2.
Press OK again to start the test, the following screen will display:
3.
Open the Output Tray and press OK. The screen message will change for this:
4.
Close the Output Tray and press OK. If the sensor is not damaged then you will see:
5.
If the sensor does not work properly there will be the following error:
6.
Replace the Output Tray Sensor, see Output Tray Sensor Assembly on page 286.
2.7 Line Sensor
Description
This test verifies the Line Sensor. When this test is done you will be asked to load paper into the MultiSheet Tray in order to check that the sensor is not damaged.
Associated errors
112
Chapter 3 Support menus
ENWW
When the following error occurs in the printer, this diagnostics procedure must be performed:
●
The printer is unable to complete the load because it cannot detect the paper.
Procedure
1.
From the Diagnostics menu, select 2.7 Line Sensor and then OK.
2.
Press OK again to start the test, the following screen will display:
3.
Check that there is paper in the Multi-Sheet Tray and the roll is unloaded and press OK. Then one
sheet will be loaded to perform the test. If the test is correctly done you will hear 3 beeps, and the
paper will be unloaded to finish the test, and the following will be displayed:
4.
If the sensor is not working properly the system error 55:10 will appear. The Line Sensor should
be replaced, see Carriage Line Sensor on page 293.
5.
If the Multi-Sheet Tray is empty or the paper cannot be loaded, you will see the following screen:
6.
If the test fails:
a.
Check that there is no paper jam preventing the sheet loading process. Remove the MultiSheet Tray if necessary.
b.
Perform the OOP sensor diagnostics to be sure that the Paper Sensor works correctly, see 2.5
Out-Of-Paper Sensor on page 110.
2.8 Pump
Description
Support menu
ENWW
http://www.justmanuals.com
113
This test verifies the Pump Motor. When the test is done the Carriage is uncapped and moved a bit
outside the Service Station, then the Pump Motor will start to pump and by opening the Top Cover you
will be able to hear if it is pumping.
Associated errors
When the following error occurs in the printer, this diagnostics procedure must be performed:
●
When there is an ink system failure during printhead priming even with new supplies and new
printhead.
Procedure
114
1.
From the Diagnostics menui, select 2.8 Pump and then OK.
2.
Press OK again to start the test, the following screen will display:
3.
Open the Top Cover, the Carriage will be uncapped and moved outside of the Service Station.
The Pump will start to pump for some seconds. If you can hear it, then the pump is OK.
4.
Once the Pump stops pumping, the Carriage returns to the cap position, and the message in the
screen changes automatically to:
5.
If you cannot hear the Pump then it should be replaced, see Prime Pump on page 233.
Chapter 3 Support menus
ENWW
6.
If the Pump works, check the pump tubes visually:
TIP: Only for service engineers: In order to check that the Prime Pump works properly, besides
hearing the noise during the diagnostic test by opening the Top Cover, put your hand close to the
Pump's air output (see picture below), and you can feel whether the Primer is pumping air or not.
2.9 Display frame keys
Description
This test verifies all the keys in the Front Panel frame: Home , Help , Left arrow , Right arrow ,
Back , Cancel , and the Power key located on the right of the Front Panel. When this test is done
you are asked to press these keys one by one to check whether any are damaged.
Associated errors
When the following error occurs in the printer, this diagnostics procedure must be performed:
●
One or more keys are unresponsive.
Procedure
1.
From the Diagnostics menu, select 2.9 Display Frame keys and then OK.
2.
The following screen will display:
3.
Check that the Cancel key is on and press it, then the screen will change automatically to the next
key (Home). Check again that the Home key is on (the icon should be illuminated), press this key
and then one by one through all the keys. The last one is the Power key.
Support menu
ENWW
http://www.justmanuals.com
115
4.
If you press all the keys and they work correctly you will see:
5.
If any key does not work, the diagnostic will not pass to the next key, and will stay always in the
screen of the failing key therefore the front panel should be changed, see Front Panel
on page 165. To recover the printer, if this occurs the printer should be restarted by switching it
off and on with the power key.
2.10 Display
Description
This test verifies that the Front Panel display works OK.
Associated errors
When any of the following errors occur in the printer, this diagnostics procedure must be performed:
●
There is no specific error associated with a failure of some pixels or the backlight of the Front
Panel. This diagnostic should be run when we want to check if the front panel display is OK, or if
the Front Panel does not respond.
Procedure
116
1.
From the Diagnostics menu, select 2.10 Display and then OK.
2.
The following screen will display:
3.
Press OK several times. Each time that OK is pressed the display color will change.
4.
Once the test is finished you will see:
Chapter 3 Support menus
ENWW
2.11 RTC battery status
Description
This test checks whether the Real-Time Clock s battery has expired.
Associated errors
There is no error. The symptom is that the date and time is lost when the power cord is disconnected.
To check that the battery is OK perform this diagnostic following the procedure below.
Procedure
1.
Switch off the printer and remove the power cable.
2.
Wait for 20 seconds.
3.
Reconnect the power cord and turn on the printer..
4.
From the Diagnostics menu, select 2.11 RTC Battery Status and then OK.
5.
The following screen is displayed:
6.
If the battery is exhausted the following message is displayed:
Problem found: Battery expired or RTC problem. Call HP support and provide the
following code: 03.1:10
2.12 Service Station
Description
This test verifies the mechanical components of the Service Station to check whether there is any
anomaly (such as a mechanical blockage, a broken gear, etc.).
Associated errors
This test is used for manufacturing purposes.
Procedure
1.
From the Diagnostics menu, select 2.12 Service Station and then OK.
Support menu
ENWW
http://www.justmanuals.com
117
2.
The following screen is displayed:
3.
Press OK to perform the test, if everything is OK the following screen is displayed.
4.
If there is a failure with the Service Station test the following screen is displayed:
Reset menus
3.1 Restart OOBE
Restores all the settings of the OOBE (Out Of the Box Experience). This is the first time the printer is
installed. This option will ask for language/country, PHA initialization (including printhead alignment) ,
and connectivity setup.
3.2 Soft reset
Erases all the custom user settings to their default values.
3.3 Hard reset
Erases all the settings and device self-calibrations including OOBE.
3.4 Web Server password
Erases the password set in the Web Server.
118
Chapter 3 Support menus
ENWW
Reports
After printing a report the printer will return to the normal printer menu. If you want to continue in the
support menu you will have to enter again.
In some cases there is a delay between the moment when you press OK in the support menu and when
the printer starts to print the report. Please be patient.
4.1 Counters
Support menu
ENWW
http://www.justmanuals.com
119
4.2 Error history
120
Chapter 3 Support menus
ENWW
4.3 PMK
Support menu
ENWW
http://www.justmanuals.com
121
4.4 Agent-assisted image test
4.5 Button tap
Used only for manufacturing purposes.
Service
5.4 Set mfg mode
Used only for manufacturing purposes.
122
Chapter 3 Support menus
ENWW
5.5 Set user mode
Used only for manufacturing purposes.
Support menu
ENWW
http://www.justmanuals.com
123
Extended Support menu
Here you will find an explanation in detail only of those items not included or different in the Support
Menu. These resets and utilities should be used only by HP service engineers. For a diagram of the
menu tree, see Extended Support menu tree on page 336.
3. Reset menu
3.2 Linefeed MFG cal
This deletes the advance calibration settings from the factory. Not used for service purposes.
3.3 RTC Battery expired
Use this option to reset the RTC battery flag after replacing the RTC battery.
3.4 PMK1
Use this option to reset the counters after installing the Print Maintenance Kit 1 or if replacing the
Carriage Assembly/Carriage Belt..
3.5 PMK2
Use this option to reset the counters after installing the Print Maintenance Kit 2 or if replacing the
Service Station.
5. Service menu
5.5 Wireless region
This can be used to change the Wireless region.
124
1.
From the Service menu, select 5.5 Wireless Region and then OK.
2.
The following screen is displayed:
Chapter 3 Support menus
ENWW
3.
Press OK.
4.
Use the left arrow ( ) and right arrow ( ) to change the wireless region.
CAUTION: Changing the wireless region has legal implications. If you change the region, be
sure you are using the correct wireless region for the country in which the printer is installed.
The options available are the following:
●
World Safe: It can be used worldwide, and is the default region in the printer. If you are not
sure which region to use, please configure the printer with the World Safe region.
◦
●
World: This region can be used worldwide except in the following countries: USA, Canada,
and Taiwan.
◦
●
Settings: 2.4 Ghz; Maximum Power EIRP = 20 dBm; Channels = 1 to 11
Settings: 2.4 Ghz; Maximum Power EIRP = 20 dBm; Channels = 1 to 13
US: This region can be used only in the USA, Canada, or Taiwan. Do not use this wireless
region in any other country.
◦
Settings: 2.4 Ghz; Maximum Power EIRP = 30 dBm; Channels = 1 to 11
Extended Support menu
ENWW
http://www.justmanuals.com
125
4
Parts and diagrams
●
Introduction
●
Printer support
●
Covers
●
Roll covers
●
Right-hand assemblies
●
Left-hand assemblies
●
Carriage assembly
●
Paper path (front)
●
Paper path (rear)
●
Roll supports
●
Sensor Kit
●
Miscellaneous parts
Introduction
126
●
The list of parts in this chapter include the notation CSR A or CSR B for parts that can be replaced
by the customer. All other parts must be replaced by an engineer. See Customer Self Repair parts
on page 145.
●
For information on the preventive maintenance kits, see Preventive maintenance kits
on page 320.
●
Unless otherwise indicated, service parts are compatible with all SKUs. If there is any limitation, it
is indicated in the tables below as follows:
◦
36: compatible with the 36-in T520.
◦
24: compatible with the 24-in T520 and the T120.
◦
Pro: compatible with the T520.
◦
Basic: compatible with the T120.
Chapter 4 Parts and diagrams
ENWW
Printer support
1
2
HP part
number
Part description
CQ890-67052
Stand Assembly (24)
CQ890-67053
Stand Assembly (36)
CQ890-67054
Stand Hardware Kit
Removal and
installation reference
Comments
CSR A. Includes all parts
needed to repair the stand:
bin, legs, wheels, brackets,
hardware kit, etc., and
instruction flier. There are no
separate kits for single
components.
CSR A. Includes all screws
and tools to repair and mount
the stand.
Printer support
ENWW
http://www.justmanuals.com
127
Covers
HP part
number
Part description
Removal and
installation reference
CQ890-67011
Right Cover
Right Cover on page 153
CQ890-67050
Front Cover (24)
CQ894-67001
Front Cover (36)
3
CQ890-67046
4
1
2
5
6
7
128
Comments
Front Cover on page 150
CSR A; see Front Cover flier
on page 353
Ink Cartridge Cover
Ink Cartridge Cover
on page 156
CSR A; see Ink Cartridge
Cover flier on page 354
CQ890-67012
Left Cover
Left Cover on page 158
CQ890-67010
Back Cover (24)
CQ893-67002
Back Cover (36)
CQ890-67014
Central Cover (Basic)
CQ891-67008
Central Cover (24-Pro)
CQ893-67004
Central Cover (36)
CQ891-67007
Top Cover (Basic)
CQ890-67009
Top Cover (24-Pro)
CQ890-67008
Top Cover (36)
Chapter 4 Parts and diagrams
Back Cover on page 163
Central Cover on page 172
Top Cover on page 147
also known as Central
Window
Includes Top Cover and Top
Cover Sensor
Opaque
Transparent
ENWW
Roll covers
1
2
HP part
number
Part description
CQ890-67013
Roll Cover (24-Pro)
CQ893-67003
Roll Cover (36)
CQ890-67051
Left Roll Support with
Rewinder and Cover (Basic)
CQ890-67037
CQ890-67038
3
CQ891-67009
Left Roll Support with
Rewinder and Cover (Pro)
Right Roll Support with Cover
and dampers (Pro)
Right Roll Support with Cover
(Basic)
Removal and
installation reference
Comments
Roll Cover on page 160
Left Roll Support
on page 180
Right Roll Support
on page 185
The Basic Right Roll Support
does not need dampers
because there is no Roll
Cover.
Roll covers
ENWW
http://www.justmanuals.com
129
Right-hand assemblies
130
HP part
number
Part description
Removal and
installation reference
1
CQ890-67030
Prime Pump
Prime Pump on page 233
2
CQ890-67022
Bundle Board
Bundle Board on page 297
Interconnect board
3
CQ890-67045
Service Station Assembly
Service Station on page 227
Includes the Service Station
motor, encoder, spittoons,
wipers, extra absorber pad
(in case of need), extra left
spittoon (in case of need),
and gloves. The Left Spittoon
is available also in a
separate kit (see Left-hand
assemblies on page 132).
Chapter 4 Parts and diagrams
Comments
ENWW
Service Station kit
Right-hand assemblies
ENWW
http://www.justmanuals.com
131
Left-hand assemblies
HP part
number
Part description
Removal and
installation reference
Comments
1
CQ890-67026
Front Panel
Front Panel on page 165
Includes Front Panel PCA,
Power button, cable, and
ribbon cable incorporated
and assembled. There is no
separate kit for the Power
button PCA, always order the
full Front Panel module.
2
CQ890-67028
Ink Cartridge Cover Sensor
Ink Cartridge Cover PCA
Assembly on page 198
3
CQ890-67044
Left Spittoon
Left Spittoon on page 310
4
CQ890-67025
Power Supply SV
Power Supply on page 202
CQ890-67023
Main PCA Pro
CQ891-67003
Main PCA Basic
CQ890-67033
Encoder Disk
5
6
132
Chapter 4 Parts and diagrams
Includes gloves
Main PCA on page 205
Includes the Wireless PCA
Encoder Disk on page 217
Includes instruction flier and
gloves
ENWW
Ink Cartridge Cover Sensor kit
Encoder Disk kit
Left-hand assemblies
ENWW
http://www.justmanuals.com
133
Carriage assembly
HP part
number
CQ890-67002
1
Carriage Assembly with Belt
(24)
CQ893-67011
Carriage Assembly with Belt
(36)
CQ890-67001
Carriage Line Sensor (ZIM
Sensor)
CQ890-67059
Belt (24)
CQ893-67016
Belt (36)
CQ890-67003
Encoder Strip (24)
CQ890-67004
Encoder Strip (36)
5
CQ890-67017
6
2
3
4
7
134
Part description
Removal and
installation reference
Carriage and Belt
on page 236
Carriage Line Sensor
on page 293
Comments
Includes carriage base,
carriage PCA and cover,
Carriage Line Sensor, extra
Encoder Strip, instruction
flier, and gloves
Includes T-6 screwdriver
Carriage Belt on page 243
Encoder Strip on page 193
Includes gloves
Cutter Assembly
Cutter Assembly
on page 272
Includes cutter body, cutter
extrusion lead (cover), cutter
bridge, and instruction flier
CQ890-67006
Carriage Motor
Carriage Motor
on page 268
Includes instruction flier and
gloves
CQ890-67005
Trailing Cable (24)
CQ893-67001
Trailing Cable (36)
Chapter 4 Parts and diagrams
Trailing Cable on page 220
ENWW
Carriage Line Sensor kit
Encoder Strip kit
Carriage assembly
ENWW
http://www.justmanuals.com
135
Paper path (front)
1
2
3
4
136
HP part
number
Part description
CQ890-67034
Starwheel Assembly (24)
CQ893-67007
Starwheel Assembly (36)
CQ890-67041
Right Gear Train Module
CQ890-67019
Output Tray (Pro)
CQ891-67010
Output Tray (Basic)
CQ891-67011
Output Platen (Basic)
CQ890-67018
Output Platen (24-Pro)
CQ893-67005
Output Platen (36)
CQ893-67018
Output Tray Sensor without
cable
Chapter 4 Parts and diagrams
Removal and
installation reference
Comments
Starwheel Assembly
on page 247
Includes the Output Shaft and
instruction flier
Right Gear Train Module
on page 245
Output Tray on page 257
Output Platen on page 263
The cutter rail is not a service
part
CSR B; see Output Tray
Sensor flier on page 363
ENWW
Paper path (rear)
HP part
number
Part description
Removal and
installation reference
Comments
1
CQ890-67032
Out-Of-Paper Sensor without
cable
Out-Of-Paper Sensor
on page 281
CSR B; see Out-Of-Paper
Sensor flier on page 358
2
CQ890-67036
Paper Motor
Paper Motor on page 211
3
CQ890-67060
Pinchwheels Assembly
Pinchwheels on page 304
Includes 3 pinchwheels, a
tool to remove and mount
them, and an instruction flier
4
CQ890-67007
Multi-Sheet Tray module
Multi-Sheet Tray Assembly
on page 260
CSR A
5
CQ890-67047
Extension in Multi-Sheet Tray
CSR A; see Multi-Sheet Tray
Extension flier on page 356
Paper path (rear)
ENWW
http://www.justmanuals.com
137
Roll supports
1
2
138
HP part
number
Part description
CQ890-67043
Spindle module (24)
CQ893-67008
Spindle module (36)
CQ893-67009
Spindle hubs
Chapter 4 Parts and diagrams
Removal and
installation reference
Comments
CSR A
CSR A
ENWW
Sensor Kit
1
HP part
number
Part description
Removal and
installation reference
Comments
CQ890-67020
Sensor Kit
Encoder PCA and Index
on page 213
Includes Encoder PCA +
Index + cable, Output Tray
Sensor + cable, and Top
Cover Sensor
Output Tray Sensor Assembly
on page 286
Top Cover Sensor
on page 188
Sensor Kit
ENWW
http://www.justmanuals.com
139
Miscellaneous parts
HP part number
Part description
Comments
CQ890-67021
Cables Service Kit
Includes FFC-Encoder-Rewind, FFC-Ink-Door,
Pick Motor Encoder FFC, FFC-Control-Panel,
FFC-Power Button, FFC - Paper-Feed-Sensors,
Assy-FFC-Bundle-24, Assy-FFC-Bundle-36,
Assy-FFC-OOPS, FFC-Top-Door, FFCOUTPUTTRAYSENSOR-LEFT-24, FFCOUTPUTTRAYSENSOR-LEFT-36
CQ890-67057
Labels Kit
CSR A. Includes ink supply label, serial label,
nameplates, and ink supply labels.
Lubrication Kit
CQ891-60021
Power Cord: EU SV KIT
CSR A
8120-6314 EU, Denmark, South Africa,
Switzerland
8120-8699 UK & Middle East
CQ891-60022
Power Cord: AMS SV KIT
CSR A
8120-6313 US, Canada & Mexico
8120-8367 Argentina
8121-1081 Brazil
8121-0514 Chile
CQ891-60023
Power Cord: APJ SV KIT
CSR A
8120-8699 Singapore, HK, MY
8121-1168 India
8121-0664 Thailand & Philippines
8120-6316 Japan
8120-8373 China
8121-0963 Taiwan
8120-8441 Korea
8120-6314 Indonesia & Vietnam
8121-0870 Australia
140
Chapter 4 Parts and diagrams
ENWW
5
Removal and installation
Parts in alphabetical order
Parts in removal order
Back Cover on page 163
Top Cover on page 147
Bundle Board on page 297
Front Cover on page 150
Bundle Board FFC cable on page 299
Right Cover on page 153
Carriage and Belt on page 236
Ink Cartridge Cover on page 156
Carriage Belt on page 243
Left Cover on page 158
Carriage Line Sensor on page 293
Roll Cover on page 160
Carriage Motor on page 268
Back Cover on page 163
Central Cover on page 172
Front Panel on page 165
Cutter Assembly on page 272
Front Panel Cable on page 171
Cutter Guide on page 279
Central Cover on page 172
Encoder Disk on page 217
Upper-Roll Paper Guide on page 177
Encoder PCA and Index on page 213
Left Roll Support on page 180
Encoder Strip on page 193
Right Roll Support on page 185
Front Cover on page 150
Top Cover Sensor on page 188
Front Panel on page 165
Top Cover Sensor Cable on page 191
Front Panel Cable on page 171
Encoder Strip on page 193
Ink Cartridge Cover on page 156
Ink Cartridge Cover PCA Assembly on page 198
Ink Cartridge Cover PCA Assembly on page 198
Power Supply on page 202
Left Cover on page 158
Main PCA on page 205
Left Roll Support on page 180
Paper Motor on page 211
Left Spittoon on page 310
Encoder PCA and Index on page 213
Main PCA on page 205
Encoder Disk on page 217
Multi-Sheet Tray Assembly on page 260
Trailing Cable on page 220
Multi-Sheet Tray Assembly Extensions on page 261
Service Station on page 227
Out-Of-Paper Sensor on page 281
Prime Pump on page 233
Out-Of-Paper Sensor Cable on page 284
Carriage and Belt on page 236
Output Platen on page 263
Carriage Belt on page 243
Output Shaft on page 249
Right Gear Train Module on page 245
ENWW
141
http://www.justmanuals.com
142
Parts in alphabetical order
Parts in removal order
Output Tray on page 257
Starwheel Assembly on page 247
Output Tray Extender Sensor Cable on page 289
Output Shaft on page 249
Output Tray Sensor Assembly on page 286
Output Tray on page 257
Paper Motor on page 211
Multi-Sheet Tray Assembly on page 260
Pinchwheels on page 304
Multi-Sheet Tray Assembly Extensions on page 261
Power Supply on page 202
Output Platen on page 263
Prime Pump on page 233
Carriage Motor on page 268
Right Cover on page 153
Cutter Assembly on page 272
Right Gear Train Module on page 245
Cutter Guide on page 279
Right Roll Support on page 185
Out-Of-Paper Sensor on page 281
Roll Cover on page 160
Out-Of-Paper Sensor Cable on page 284
Service Station on page 227
Output Tray Sensor Assembly on page 286
Starwheel Assembly on page 247
Output Tray Extender Sensor Cable on page 289
Top Cover on page 147
Carriage Line Sensor on page 293
Top Cover Sensor on page 188
Bundle Board on page 297
Top Cover Sensor Cable on page 191
Bundle Board FFC cable on page 299
Trailing Cable on page 220
Pinchwheels on page 304
Upper-Roll Paper Guide on page 177
Left Spittoon on page 310
Chapter 5 Removal and installation
ENWW
Introduction
This chapter is a step-by-step guide to the removal and installation of the key components of the printer.
Use the illustrations for each procedure to identify the parts referred to in the text.
NOTE: Before using this chapter to remove and install a new component, always make sure that you
have performed the relevant service test. If the test passes you will not need to replace the component.
NOTE: We recommend that, every time a part is removed, the Line Sensor and the Encoder Strip are
cleaned. See Clean the Carriage Line Sensor on page 314 and Clean the Encoder Strip
on page 315.
NOTE: There are no parts in this printer that require calibration after installation.
Safety precautions
Review the instructions identified by WARNING and CAUTION symbols before you service the printer.
Follow these warnings and cautions for your protection and to avoid damaging the printer.
Serious shock hazard leading to death or injury may result if you do not take the following precautions:
●
Switch the printer off and disconnect it from the power source prior to performing any
maintenance.
●
Prevent water or other liquids from running onto electrical components or circuits, or through
openings in the module.
IMPORTANT: You are recommended to wear gloves when removing or installing any part, even if it
is not mentioned in the removal or installation procedure.
Electrostatic Discharge (ESD) Precautions
To prevent damage to the printer's circuits from high-voltage electrostatic discharge (ESD):
1.
Do not wear clothing that is subject to static build-up.
2.
Do not handle integrated circuits (ICs) in carpeted areas.
3.
Do not remove an IC or a Printed-Circuit Assembly (PCA) from its conductive foam pad or
conductive packaging until you are ready to install it.
4.
Ground (earth) your body while disassembling and working on the printer.
5.
After removing a cover from the printer, attach an earthing (ground) lead between the PCA
common and earth (ground). Touch all tools to earth (ground) to remove static charges before
using them on the printer.
6.
After removing any PCA from the printer, place it on a conductive foam pad or into its conductive
packaging to prevent ESD damage to any ICs on the PCA.
Introduction
ENWW
http://www.justmanuals.com
143
Required tools
All the special tools and equipment required to disassemble, service, and repair the printer are
provided in the Toolkit P/N Q6683-67001. Some tools can be ordered separately from the toolkit.
The Toolkit contains the following tools:
Description/Comments
Alcohol
HP part number
Q6675-60091
Cleaning Cloth
9300-2531
Protective Plastic Gloves
Q6675-60035
Tweezers
Q6675-60037
Flat screwdriver
Torx screwdriver 6, 10
Pliers
You may also need the following standard hand tools:
Description/Comments
Long Torx Screwdriver
Torx bit (75 mm)
Size
1/4 inch drive
15
20
144
Chapter 5 Removal and installation
ENWW
Customer Self Repair parts
Some printer parts are designated Customer Self Repair (CSR) parts, which means that a faulty part can
be replaced by the customer. Non-CSR parts need to be replaced by an engineer. There are two
categories of CSR parts:
●
CSR A: Customer self-repair is mandatory, as mentioned in the printer's warranty statement. If HP
is asked to replace such parts, the customer will be charged for travel and labor costs. Parts
should be replaceable by end users (customers) from a mechanical perspective within 5 minutes,
with simple or no tools required. Examples include spindles and cartridges.
●
CSR B: Parts are easy to replace, but some knowledge of the printer and technical skills may be
required. The customer can decide whether to replace the part or to call for an engineer.
The CSR parts are listed below.
Part number
Description
CSR type
Flier
CQ890-67050
Front Cover (24)
CSR A
Yes
CQ894-67001
Front Cover (36)
CSR A
Yes
CQ890-67046
Ink Cartridge Cover
CSR A
Yes
CQ890-67057
Labels Kit
CSR A
No
CQ890-67007
Multi-Sheet Tray Assembly
CSR A
No
CQ890-67047
Multi-Sheet Tray Extensions
CSR A
Yes
CQ891-60021
Power Cords EU SV Kit
CSR A
No
CQ891-60022
Power Cords AMS SV Kit
CSR A
No
CQ891-60023
Power Cords APJ SV Kit
CSR A
No
C1Q10A
Printhead
CSR A
Yes
CQ890-67043
Spindle (24)
CSR A
No
CQ893-67008
Spindle (36)
CSR A
No
CQ893-67009
Spindle Hubs
CSR A
No
CQ890-67052
Stand Assembly (24)
CSR A
Yes
CQ890-67053
Stand Assembly (36)
CSR A
Yes
CQ890-67054
Stand Hardware Kit
CSR A
No
CQ891-67010
Output Tray (Basic)
CSR B
Yes
CQ890-67019
Output Tray (Pro)
CSR B
Yes
CQ890-67032
Out-of-Paper Sensor (OOPS)
CSR B
Yes
CQ893-67018
Output Tray Sensor
CSR B
Yes
Copies of most of the fliers can be found in the appendices to this manual: see CSR fliers
on page 351.
Customer Self Repair parts
ENWW
http://www.justmanuals.com
145
For further information
●
CSR Corporate Standards: http://standards.corp.hp.com/smc/hpstd/AHP0001501.htm
●
CSR Web site: http://www.hp.com/go/csrparts/
●
CSR Parts Availability (EasiTool): https://easitool.atlanta.hp.com/
●
HP Parts Page: http://partpage.corp.hp.com/default.asp
Videos available
The following videos are available in the HP Services Media Library:
●
Public, available to customers: Ink Cartridge Cover, Out-Of-Paper Sensor, Output Tray, Output
Tray Sensor.
●
For service technicians only: Carriage, Carriage Motor, Central Cover, Cutter, Front Panel, Main
PCA, Output Platen, Pinchwheels, Starwheels and Output Shaft, Trailing Cable.
HP Services Media Library
●
HP intranet access: http://thesml.hp.com/
●
HP external/Customer Self Repair: http://www.hp.com/go/sml
●
HP Partner via regional Partner portal: http://www.hp.com/go/psml
Recommended checks after replacing parts
After replacing a part, we recommending checking the status of the printer as follows:
1.
Turn on the printer and check that there is no system error.
2.
Print the print-quality diagnostic report on an A4 or US Letter sheet of paper and check that there
are no problems. See General print-quality troubleshooting on page 83.
3.
Load a roll of paper and perform some form feeds and cuts.
For some parts, further actions are required:
146
●
After replacing the Main PCA, check for firmware updates and set up Web Services.
●
After replacing the Service Station or Carriage Assembly, perform the appropriate preventive
maintenance reset. See Extended Support menu on page 124.
Chapter 5 Removal and installation
ENWW
Top Cover
NOTE: The Top Cover is also known as the Central Window.
1.
Open the Top Cover.
2.
Unclip the indicated clip of the Front Panel.
3.
Push up the clip as shown below.
Top Cover
ENWW
http://www.justmanuals.com
147
148
4.
Press down the flange of the Top Cover to slide it to the left.
5.
Make sure you have slid the Top Cover as far as possible to the left.
6.
Move the right side of the Top Cover upwards.
Chapter 5 Removal and installation
ENWW
7.
Remove the Top Cover.
8.
Remember to replace the Front Panel clip that you removed earlier.
Top Cover
ENWW
http://www.justmanuals.com
149
Front Cover
Removal
150
1.
Switch off the printer.
2.
Lock the four wheels.
3.
Unclip the lower part of the Front Cover (1) and unclip the upper part (2) from locations along the
length of the cover.
●
24 inch printer: 3 clips from the bottom and 3 from the top
●
36 inch printer: 4 clips from the bottom and 4 from the top
Chapter 5 Removal and installation
ENWW
4.
Remove the Front Cover.
Installation
1.
2.
The underside of the Front Cover
●
24 inch printer: 6 clips
●
36 inch printer: 8 clips
Detail showing where the clips must be attached
Front Cover
ENWW
http://www.justmanuals.com
151
3.
152
Snap the Front Cover into place, making sure that each of the clips is fully engaged.
Chapter 5 Removal and installation
ENWW
Right Cover
Removal
1.
Switch off the printer and remove the power cable.
2.
Remove the Front Cover, see Front Cover on page 150.
3.
Remove one T-20 screw.
4.
Open the Roll Cover.
5.
Remove one T-20 screw.
Right Cover
ENWW
http://www.justmanuals.com
153
154
6.
Open the Top Cover.
7.
Remove one T-20 screw.
8.
Remove two T-20 screw.
Chapter 5 Removal and installation
ENWW
9.
Remove the Right Cover.
Right Cover
ENWW
http://www.justmanuals.com
155
Ink Cartridge Cover
Removal
156
1.
Open the Ink Cartridge Cover 90º.
2.
Detach the Ink Cartridge Cover with care, because the clips are quite hard.
3.
Remove the Ink Cartridge Cover.
Chapter 5 Removal and installation
ENWW
Installation
▲
When installing the Ink Cartridge Cover, make sure that the hinges are correctly engaged.
Ink Cartridge Cover
ENWW
http://www.justmanuals.com
157
Left Cover
Removal
158
1.
Switch off the printer and remove the power cable.
2.
Remove the Front Cover, see Front Cover on page 150.
3.
Remove the Ink Cartridge Cover, see Ink Cartridge Cover on page 156.
4.
Remove one T-20 screw.
5.
Open the Roll Cover.
6.
Remove one T-20 screw.
Chapter 5 Removal and installation
ENWW
7.
Remove one T-20 screw.
8.
Remove two T-20 screws.
9.
Remove the Left Cover.
Installation
▲
When installing the Left Cover, take care not to disconnect or damage the Front Panel cables.
Left Cover
ENWW
http://www.justmanuals.com
159
Roll Cover
Removal
160
1.
Switch off the printer and remove the power cable.
2.
Remove the Front Cover, see Front Cover on page 150.
3.
Remove the Ink Cartridge Cover, see Ink Cartridge Cover on page 156.
4.
Remove the Left Cover, see Left Cover on page 158.
5.
Remove the Right Cover, see Right Cover on page 153.
6.
Close the Roll Cover.
7.
Remove three T-15 screws from the left side of the Roll Cover.
Chapter 5 Removal and installation
ENWW
8.
Remove three T-15 screws from the right side of the Roll Cover.
9.
Unclip and detach the left side of the Roll Cover, bending it carefully.
10. Unclip and detach the right side of the Roll Cover, bending it carefully.
CAUTION:
Take care not to damage the Rewinder cables.
Roll Cover
ENWW
http://www.justmanuals.com
161
11. Remove the Roll Cover.
Installation
▲
162
When installing the Roll Cover, ensure that the key is correctly installed when attaching the Roll
Cover to the Gear Damper.
Chapter 5 Removal and installation
ENWW
Back Cover
Removal
1.
Switch off the printer and remove the power cable.
2.
Remove the Multi-Sheet Tray, see Multi-Sheet Tray Assembly on page 260.
3.
Remove four T-10 screws.
4.
Unclip the four bottom clips.
5.
Unclip the left top clip.
Back Cover
ENWW
http://www.justmanuals.com
163
6.
Unclip the two top clips.
7.
Remove the Back Cover.
Installation
▲
164
When installing the Back Cover, take care not to disconnect or damage the cables at the rear.
Chapter 5 Removal and installation
ENWW
Front Panel
Removal
1.
Switch off the printer and remove the power cable.
2.
Remove the Front Cover, see Front Cover on page 150.
3.
Remove the Ink Cartridge Cover, see Ink Cartridge Cover on page 156.
4.
Remove the Left Cover, see Left Cover on page 158.
5.
Disconnect the Power Button FFC.
6.
Hold the connector latch in these two positions and push it up to remove the FFC cable.
Front Panel
ENWW
http://www.justmanuals.com
165
166
7.
Take care! Do not pull up so hard that it damages the connector latch as you remove the cable.
8.
Move up the Front Panel if it is in the flat position.
9.
Remove one T 20 screw.
Chapter 5 Removal and installation
ENWW
10. Open the Top Cover.
11. Unclip the clip.
12. Push up after unclipping.
Front Panel
ENWW
http://www.justmanuals.com
167
13. Unclip the clip indicated here.
14. Unclip the clip indicated here.
15. Push up after unclipping.
168
Chapter 5 Removal and installation
ENWW
16. Slide up the Front Panel carefully, taking care not to damage the flat cable attached to the ferrite.
17. Remove the flat cable from the ferrite.
18. Remove the Front Panel.
Front Panel
ENWW
http://www.justmanuals.com
169
Installation
170
1.
When you install the Front Panel, be careful to insert the indicated parts inside.
2.
If the Front Panel cable is not correctly connected, the printer can sometimes start up with colors
that are different from the normal colors (orange, blue), as shown below.
Chapter 5 Removal and installation
ENWW
Front Panel Cable
Removal
1.
Switch off the printer and remove the power cable.
2.
Remove the Front Panel, see Front Panel on page 165.
3.
Unhook the Front Panel FFC from the retaining clip.
4.
Push up the Front Panel FFC connector flap.
CAUTION:
5.
Be careful not to break this flap
Remove the Front Panel FFC from its assembly by pushing it up.
Front Panel Cable
ENWW
http://www.justmanuals.com
171
Central Cover
Removal
172
1.
Switch off the printer and remove the power cable.
2.
Remove the Front Cover, see Front Cover on page 150.
3.
Remove the Ink Cartridge Cover, see Ink Cartridge Cover on page 156.
4.
Remove the Left Cover, see Left Cover on page 158.
5.
Remove the Right Cover, see Right Cover on page 153.
6.
Remove the Front Panel, see Front Panel on page 165.
7.
Uncap the Carriage.
Chapter 5 Removal and installation
ENWW
8.
Move the Carriage to the left.
CAUTION: Make sure the Carriage is positioned at the far left, so that the Trailing Cable does
not become damaged.
9.
Close the Top Cover.
Central Cover
ENWW
http://www.justmanuals.com
173
10. Ensure that the flat cable shown here is disconnected.
11. Unroute the flat cable.
12. Remove two T-15 screws from the left side.
174
Chapter 5 Removal and installation
ENWW
13. Remove two T-15 screws from the right side.
14. Remove one T-15 screw from the left side.
15. Remove one T-15 screw from the right side.
Central Cover
ENWW
http://www.justmanuals.com
175
16. Unclip it from both sides.
17. Remove the Central Cover.
Installation
▲
176
VERY IMPORTANT: Before mounting the Central Cover, make sure that the Carriage is located
at the extreme left.
Chapter 5 Removal and installation
ENWW
Upper-Roll Paper Guide
Removal
1.
Switch off the printer and remove the power cable.
2.
Remove the Back Cover, see Back Cover on page 163.
3.
Remove the Roll Cover, see Roll Cover on page 160.
4.
Remove the Spindle.
5.
Remove two T-10 screws.
6.
Remove two T-10 screws.
Upper-Roll Paper Guide
ENWW
http://www.justmanuals.com
177
178
7.
Move up the Upper-Roll Paper Guide to detach the pin.
8.
Slide the Upper-Roll Paper Guide to the left to release both pins from the holes.
9.
Close the Roll Cover.
Chapter 5 Removal and installation
ENWW
10. Rotate up the Upper-Roll Paper Guide.
11. Rotate down the Upper-Roll Paper Guide.
12. Remove the Upper-Roll Paper Guide.
NOTE: There are two brackets for the Back Cover that are screwed onto the Multi-Sheet Tray,
which do not need to be removed.
Installation
▲
The first step is to insert the two pins at the left.
Upper-Roll Paper Guide
ENWW
http://www.justmanuals.com
179
Left Roll Support
Removal
1.
Switch off the printer and remove the power cable.
2.
Remove the Front Cover, see Front Cover on page 150.
3.
Remove the Ink Cartridge Cover, see Ink Cartridge Cover on page 156.
4.
Remove the Left Cover, see Left Cover on page 158.
5.
Remove the Right Cover, see Right Cover on page 153.
6.
Remove the Back Cover, see Back Cover on page 163.
7.
Remove the Spindle.
8.
Remove the Roll Cover, see Roll Cover on page 160.
9.
Remove the Upper-Roll Paper Guide, see Upper-Roll Paper Guide on page 177.
10. Disconnect the flat cable.
11. Detach the flat cable.
180
Chapter 5 Removal and installation
ENWW
12. Disconnect the cable.
CAUTION:
Take care, because the small connector is easy to break.
13. Detach the cable from the 3 clips of the LAN Panel USB.
14. Make sure both cables are free.
Left Roll Support
ENWW
http://www.justmanuals.com
181
15. Remove three T-10 screws.
16. Remove two T-10 screws.
17. Rotate the Cover Left Roll Support to the left a little to detach it from the bracket.
182
Chapter 5 Removal and installation
ENWW
18. Remove the Left Roll Support, taking care not to damage the cables.
19. Pass the cables through the arch.
Installation
1.
When mounting the Left Roll Support, make sure to pass both cables through the arch.
NOTE: Be careful with the routing, make sure it is the same as when the cables were removed.
Check that it does not obstruct any moving parts or prevent any covers from being installed
correctly.
Left Roll Support
ENWW
http://www.justmanuals.com
183
2.
Make sure the Left Roll Support is attached inside the two holes.
NOTE: When connecting the cables to the Main PCA, make sure that the blue side of the flat
cables is facing you; and, with the red/black cables, the red color should always be on
the left.
184
Chapter 5 Removal and installation
ENWW
Right Roll Support
NOTE: The right support for the T120 models does not contain dampers. The T120 and T520 have
two different assemblies from the factory, nevertheless both can be replaced by the damper option of
T520 (identical from the external point of view), and there is only one service part available.
Removal
1.
Switch off the printer and remove the power cable.
2.
Remove the Front Cover, see Front Cover on page 150.
3.
Remove the Ink Cartridge Cover, see Ink Cartridge Cover on page 156.
4.
Remove the Left Cover, see Left Cover on page 158.
5.
Remove the Right Cover, see Right Cover on page 153.
6.
Remove the Back Cover, see Back Cover on page 163.
7.
Remove the Spindle.
8.
Remove the Roll Cover, see Roll Cover on page 160.
9.
Remove the Upper-Roll Paper Guide, see Upper-Roll Paper Guide on page 177.
NOTE: There are two brackets for the back cover that are screwed onto the Multi-Sheet Tray,
these do not need to be removed.
10. Remove three T-15 screws.
Right Roll Support
ENWW
http://www.justmanuals.com
185
11. Remove two T-10 screws.
12. Remove three T-10 screws.
13. Remove the end of the Roll Support.
186
Chapter 5 Removal and installation
ENWW
14. Remove one T-10 screw.
15. Remove the Cover Right Roll Support.
Right Roll Support
ENWW
http://www.justmanuals.com
187
Top Cover Sensor
Removal
188
1.
Open the Top Cover.
2.
Locate the Top Cover Sensor.
3.
Slide the Top Cover Sensor to the left.
Chapter 5 Removal and installation
ENWW
4.
Take out the Top Cover Sensor, being careful not to damage the flat cable.
5.
Disconnect the flat cable from the Top Cover Sensor.
6.
Slide the flat cable from the two hooks of the Top Cover Sensor.
Top Cover Sensor
ENWW
http://www.justmanuals.com
189
7.
Remove the Top Cover Sensor.
Installation
190
1.
Be careful with the routing of the cable. If the cable hangs down, it could be broken by the
Carriage.
2.
Center the sensor in the hole to facilitate the assembly.
Chapter 5 Removal and installation
ENWW
Top Cover Sensor Cable
Removal
1.
Switch off the printer and remove the power cable.
2.
Remove the Front Cover, see Front Cover on page 150.
3.
Remove the Ink Cartridge Cover, see Ink Cartridge Cover on page 156.
4.
Remove the Left Cover, see Left Cover on page 158.
5.
Remove the Front Panel, see Front Panel on page 165.
6.
Remove the Top Cover Sensor, see Top Cover Sensor on page 188.
7.
Unroute the flat cable.
8.
Unclip the flat cable.
Top Cover Sensor Cable
ENWW
http://www.justmanuals.com
191
9.
Disconnect the flat cable (Top Door Sensor FFC).
10. Remove the flat cable
Installation
▲
192
When routing the flat cable, make sure that you pass it through the 3 hooks, and that the blue-end
cable is facing up.
Chapter 5 Removal and installation
ENWW
Encoder Strip
Removal
1.
Switch off the printer and remove the power cable.
2.
Remove the Front Cover, see Front Cover on page 150.
3.
Remove the Right Cover, see Right Cover on page 153.
4.
Insert some paper (of any type) to prevent grease or dirt from falling into the printer.
NOTE: When working in this area, in which dirt and grease can contaminate other parts of the
printer, we recommend wearing gloves.
5.
Uncap the Carriage and move it to the left.
Encoder Strip
ENWW
http://www.justmanuals.com
193
6.
Detach the spring.
CAUTION: The Encoder Strip must not come into contact with the slider rod grease! Handle
with care, and be careful with your hands and the Encoder Strip.
CAUTION:
194
The primer pipe at the end plate can become damaged.
7.
Open the Ink Cartridge Cover.
8.
Rotate the Encoder Strip a little to detach it from the hook.
Chapter 5 Removal and installation
ENWW
9.
Detach the Encoder Strip from the hook.
10. Slide the Encoder Strip carefully from the right side, and remove it.
Installation
1.
Move the Carriage to cap position.
2.
Pass the Encoder Strip through the hole of the bracket. Very important: The face is shown here:
NOTE: The Encoder Strip must be inserted from the right side of the Carriage into the left side.
Encoder Strip
ENWW
http://www.justmanuals.com
195
196
3.
Pass the Encoder Strip through the hole of the Carriage, taking care not to bend it.
4.
The Encoder Strip should go out through the other side of the Carriage as shown.
5.
The right end of the Encoder Strip must have the triangle in the position as shown below.
Chapter 5 Removal and installation
ENWW
6.
When you attach the left end of the Encoder Strip to the hook, make sure the position of the face is
as shown below.
7.
Attach the Encoder Strip at the left before attaching the spring at the right.
Encoder Strip
ENWW
http://www.justmanuals.com
197
Ink Cartridge Cover PCA Assembly
Removal of the Ink Cartridge Cover PCA and Sensor
198
1.
Switch off the printer and remove the power cable.
2.
Remove the Front Cover, see Front Cover on page 150.
3.
Remove the Front Panel, see Front Panel on page 165.
4.
Remove the Ink Cartridge Cover, see Ink Cartridge Cover on page 156.
5.
Remove the Left Cover, see Left Cover on page 158.
6.
Remove the Right Cover, see Right Cover on page 153.
7.
Remove the Central Cover, see Central Cover on page 172.
8.
Disconnect the flat cable.
9.
Remove one T-10 screw.
Chapter 5 Removal and installation
ENWW
10. Remove the Ink Cartridge Cover PCA and Sensor.
Removal of Ink Cartridge Cover PCA Cable
The cable needs to be replaced only if it is clearly damaged or if the replaced sensor fails to work.
ENWW
1.
Slide down the flat cable to detach it from the hook.
2.
Unroute the Ink Cartridge Cover PCA Cable.
Ink Cartridge Cover PCA Assembly
http://www.justmanuals.com
199
200
3.
Be sure the Ink Cartridge Cover PCA Cable is free as shown.
4.
Unclip the Ink Cartridge Cover PCA Cable from the clip.
5.
Slide out the Ink Cartridge Cover PCA Cable, taking care not to lose the ferrite.
Chapter 5 Removal and installation
ENWW
6.
Disconnect the Ink Cartridge Cover PCA Cable.
7.
Remove the Ink Cartridge Cover PCA Cable.
Installation of Ink Cartridge Cover PCA Cable
▲
ENWW
It is important to route the new cable in the same way as the old cable.
Ink Cartridge Cover PCA Assembly
http://www.justmanuals.com
201
Power Supply
Removal
202
1.
Switch off the printer and remove the power cable.
2.
Remove the Front Cover, see Front Cover on page 150.
3.
Remove the Ink Cartridge Cover, see Ink Cartridge Cover on page 156.
4.
Remove the Left Cover, see Left Cover on page 158.
5.
Disconnect the Power Supply cable from the Main PCA.
6.
Remove two T-10 screws.
Chapter 5 Removal and installation
ENWW
7.
Slide out with a flat screwdriver and push from the rear.
8.
Never take out the Power Supply by pulling the cable, because you will damage it.
9.
Slide out the Power Supply carefully.
CAUTION:
Take care not to disconnect or damage any cables or the Disk Encoder.
Power Supply
ENWW
http://www.justmanuals.com
203
10. Remove the Power Supply from the front.
204
Chapter 5 Removal and installation
ENWW
Main PCA
Removal
1.
Switch off the printer and remove the power cable.
2.
Remove the Front Cover, see Front Cover on page 150.
3.
Remove the Ink Cartridge Cover, see Ink Cartridge Cover on page 156.
4.
Remove the Left Cover, see Left Cover on page 158.
5.
Disconnect all cables (7 FFC cables on top and 3 FFC cables underneath, and 3 motor cables).
See The Main PCA on page 30.
CAUTION:
6.
Take care! Do not pull up so hard as to damage the connectors .
When you disconnect this flat cable, make sure to unlock it by pushing up the clip.
Main PCA
ENWW
http://www.justmanuals.com
205
206
7.
Disconnect the flat cable.
8.
Unclip and remove it.
9.
Unhook the two cables from the bottom hook.
Chapter 5 Removal and installation
ENWW
10. Unhook the two cables from the top hooks.
11. Make sure both cables are free.
12. Remove two T-10 screws.
Main PCA
ENWW
http://www.justmanuals.com
207
13. Remove two T-10 screws.
14. Slide out the Main PCA horizontally to disengage it from the hook.
15. Remove the Main PCA.
CAUTION:
208
The Main PCA will come out of the printer together with the attached metal bracket.
Chapter 5 Removal and installation
ENWW
Installation
1.
When mounting the Main PCA, remember to insert it in the hook.
2.
First place these two screws, because will be easier to screw in the next two screws.
3.
Push in the bracket of the Main PCA to align the two holes and screw the two screws without
damaging them.
Main PCA
ENWW
http://www.justmanuals.com
209
4.
210
When connecting the cables to the Main PCA, make sure that the blue side of the flat cables is
facing you; and, with the red/black cables, the red color should always be on the left.
Chapter 5 Removal and installation
ENWW
Paper Motor
Removal
1.
Switch off the printer and remove the power cable.
2.
Remove the Front Cover, Front Cover on page 150.
3.
Remove the Ink Cartridge Cover, see Ink Cartridge Cover on page 156.
4.
Remove the Left Cover, see Left Cover on page 158.
5.
Remove the Main PCA, see Main PCA on page 205.
6.
Remove two T-10 screws.
7.
Slide the Paper Motor inwards, and hold it with a finger to stop it falling down.
Paper Motor
ENWW
http://www.justmanuals.com
211
8.
Slide it out from this hole.
9.
Remove the Paper Motor.
Installation
▲
212
Make sure to reinstall the ferrite inside the wall of the LAN Panel USB.
Chapter 5 Removal and installation
ENWW
Encoder PCA and Index
Removal
1.
Switch off the printer and remove the power cable.
2.
Remove the Front Cover, see Front Cover on page 150.
3.
Remove the Ink Cartridge Cover, see Ink Cartridge Cover on page 156.
4.
Remove the Left Cover, see Left Cover on page 158.
5.
Remove the Main PCA, see Main PCA on page 205.
6.
Remove one T-10 screw.
CAUTION:
7.
Be careful not to damage the Encoder Disk.
Release the PCA from the pin or locator.
Encoder PCA and Index
ENWW
http://www.justmanuals.com
213
8.
Rotate the PCA to see the connector.
9.
Disconnect the flat cable.
10. Remove one T-10 screw.
CAUTION:
214
Be careful not to damage the Encoder Disk.
Chapter 5 Removal and installation
ENWW
11. Release the PCA from the pin or locator.
12. Rotate the PCA to see the connector.
13. Disconnect the flat cable.
Encoder PCA and Index
ENWW
http://www.justmanuals.com
215
Installation
216
1.
Be careful not to damage the Encoder Strip when you mount the two PCAs.
2.
When connecting the cables to the PCAs, make sure that the blue side of the flat cables is facing
up.
Chapter 5 Removal and installation
ENWW
Encoder Disk
1.
Switch off the printer and remove the power cable.
2.
Remove the Front Cover, see Front Cover on page 150.
3.
Remove the Ink Cartridge Cover, see Ink Cartridge Cover on page 156.
4.
Remove the Left Cover, see Left Cover on page 158.
5.
Remove the Main PCA, see Main PCA on page 205.
6.
Remove the Encoder PCA and Index, see Encoder PCA and Index on page 213.
7.
Remove one T-10 screw.
8.
Remove the Holder Brush Feed Shaft.
Encoder Disk
ENWW
http://www.justmanuals.com
217
9.
IMPORTANT: Do not remove the Encoder Disk without checking the position of the black
reference mark.
10. Rotate the Encoder Disk to a position where the black reference mark is entirely below the
midpoint of the disk (so that it looks like a smile).
11. Remove the Encoder Disk by pulling it off (without moving the Roller).
218
Chapter 5 Removal and installation
ENWW
Installation
1.
Remove the film from the new Encoder Disk. IMPORTANT: Wear gloves.
2.
Clean the new Encoder Disk with a lint-free cloth dampened with alcohol to remove any remaining
glue. Let it dry before proceeding.
3.
Attach the new Encoder Disk with the black reference mark in exactly the same position as it was
when you removed it (without moving the Roller).
4.
Make sure the Encoder Disk is firmly attached.
Encoder Disk
ENWW
http://www.justmanuals.com
219
Trailing Cable
Removal
1.
Switch off the printer and remove the power cable.
2.
Remove the Front Cover, see Front Cover on page 150.
3.
Remove the Ink Cartridge Cover, see Ink Cartridge Cover on page 156.
4.
Remove the Left Cover, see Left Cover on page 158.
5.
Remove the Right Cover, see Right Cover on page 153.
6.
Remove the Front Panel, see Front Panel on page 165.
TIP: If you want to power on the printer, the Front Panel can be placed on clips (without cover).
220
7.
Remove Central Cover, see Central Cover on page 172.
8.
Move the Carriage to the middle of the Platen.
9.
Remove the PCA Carriage Cover.
Chapter 5 Removal and installation
ENWW
10. Unclip and remove the strain relief.
11. Disconnect the Trailing Cable by pulling the blue plastic.
12. Put the Trailing Cable in a flat position, carefully avoiding making folds in the cable.
Trailing Cable
ENWW
http://www.justmanuals.com
221
13. Slide out the Trailing Cable carefully through the hole.
14. Disconnect the second Trailing Cable by pulling the blue plastic.
15. Put the Trailing Cable in a flat position, carefully avoiding making folds in the cable.
222
Chapter 5 Removal and installation
ENWW
16. Slide out the Trailing Cable carefully through the hole.
17. Leave the two parts of the Trailing Cable hanging on the right side.
18. Disconnect the two parts of the Trailing Cable.
Trailing Cable
ENWW
http://www.justmanuals.com
223
19. Remove one T-10 screw.
20. Unclip the flex retainer. You are recommended to wear gloves.
21. Slide the flex retainer to the right to unhook it.
224
Chapter 5 Removal and installation
ENWW
22. Slide the Trailing Cable to the right, passing the flat cables through the hole.
23. Remove the Trailing Cable.
Installation
You are recommended to wear gloves throughout the installation; and be careful not to touch the
Encoder Strip.
1.
Pass the Trailing Cable through the Main PCA Cover and through the ferrite.
Trailing Cable
ENWW
http://www.justmanuals.com
225
2.
When connecting the cables to the Main PCA, remember that the blue side of the Trailing Cable
must be facing up.
CAUTION:
straight.
3.
When connecting the two parts of the Trailing Cable, insert them into the connectors
Hook the Trailing Cable to the two hooks.
NOTE: Be careful not to damage the cables.
226
4.
Remember to put back the Trailing Cable retainer.
5.
When installing the PCA Carriage Cover, the letter A should be on the right side.
6.
When the installation is complete, clean the Encoder Strip. See Clean the Encoder Strip
on page 315.
Chapter 5 Removal and installation
ENWW
Service Station
Removal
1.
Switch off the printer and remove the power cable.
2.
Remove the Front Cover, see Front Cover on page 150.
3.
Remove the Right Cover, see Right Cover on page 153.
4.
Uncap the Carriage.
CAUTION:
5.
Avoid touching the Encoder Disk by mistake.
Move the Carriage to the left.
Service Station
ENWW
http://www.justmanuals.com
227
228
6.
Unclip the tube.
7.
Unclip the Tee Pump Prime.
8.
Remove the Tee Pump Prime.
Chapter 5 Removal and installation
ENWW
9.
Disconnect the tube.
10. Disconnect the tube.
11. Disconnect the flat cable.
Service Station
ENWW
http://www.justmanuals.com
229
12. Disconnect the cable.
13. Remove one T-15 screw.
14. Loosen only one T-15 screw.
230
Chapter 5 Removal and installation
ENWW
15. Rotate the Xlimiter.
16. Push down the metal sheet and slide out the Service Station.
17. If, while you are sliding out the Service Station, there is an interaction with the metallic bracket,
then you should push down the Service Station.
Service Station
ENWW
http://www.justmanuals.com
231
18. Remove the Service Station.
Installation
▲
Install the blue washers of the tube on the left side of the hook.
NOTE: After the successful installation of this part, perform the Preventive Maintenance Kit Reset
procedure, see 3.5 PMK2 on page 124.
232
Chapter 5 Removal and installation
ENWW
Prime Pump
Removal
1.
Switch off the printer and remove the power cable.
2.
Remove the Front Cover, see Front Cover on page 150.
3.
Remove the Right Cover, see Right Cover on page 153
4.
Disconnect the cable.
5.
Disconnect the tube.
6.
Unhook the cable.
Prime Pump
ENWW
http://www.justmanuals.com
233
234
7.
Unclip the Tee Pump Prime.
8.
Remove the Tee Pump Prime.
9.
Disconnect the tube.
Chapter 5 Removal and installation
ENWW
10. Remove one T-10 screw.
11. Remove the Prime Pump.
Installation
▲
Install the blue washers of the tube on the left side of the hook.
Prime Pump
ENWW
http://www.justmanuals.com
235
Carriage and Belt
Removal
1.
Switch off the printer and remove the power cable.
2.
Remove the Front cover, see Front Cover on page 150.
3.
Remove the Ink Cartridge Cover, see Ink Cartridge Cover on page 156.
4.
Remove the Left Cover, see Left Cover on page 158.
5.
Remove the Right cover, see Right Cover on page 153.
6.
Remove the Front Panel, see Front Panel on page 165
TIP: If you want to power on the printer, the Front Panel can be placed on clips (without cover).
7.
Remove the Central Cover, see Central Cover on page 172.
8.
Remove the Service Station, see Service Station on page 227.
NOTE: Do not touch the Service Station's Encoder Disk when handling the Service Station.
9.
Remove Encoder Strip, see Encoder Strip on page 193.
10. Remove the Ink Cartridges, see Replace an ink cartridge on page 70.
11. Make sure the Carriage is in this position.
236
Chapter 5 Removal and installation
ENWW
12. Disconnect the two flat cables from the PCA.
13. Remove one T-15 screw from the left side.
14. Unclip the trailing cable retainer clip shown here (1) and slide it to the right (2).
Carriage and Belt
ENWW
http://www.justmanuals.com
237
15. Slide the right backbone end plate to the right.
16. Leave the right backbone on the platen.
17. Remove two T-10 screws from the Right End Plate.
238
Chapter 5 Removal and installation
ENWW
18. Remove the Right End Plate.
19. Unhook the Carriage Belt with a finger and lift it away.
20. Remove the Carriage Belt from the end pulley.
Carriage and Belt
ENWW
http://www.justmanuals.com
239
21. Remove one T-15 screw .
22. Unclip the pulley latch shown here (1) and slide it to the right (2).
23. Remove the pulley latch..
240
Chapter 5 Removal and installation
ENWW
24. Pull the latch down.
25. Slide the Carriage, the Belt, and the Trailing Cable to the right.
26. Remove the Carriage Assembly.
Installation
1.
To reinstall the Belt, use a screwdriver to lever the Belt back on.
Carriage and Belt
ENWW
http://www.justmanuals.com
241
242
2.
When installing the Carriage Assembly, make sure you slide the part indicated here onto the
slider rod.
3.
When the installation is complete, clean the Encoder Strip (see Clean the Encoder Strip
on page 315) and the Line Sensor (see Clean the Carriage Line Sensor on page 314).
Chapter 5 Removal and installation
ENWW
Carriage Belt
Removal
1.
Switch off the printer and remove the power cable.
2.
Remove the Front Cover, see Front Cover on page 150.
3.
Remove the Ink Cartridge Cover, see Ink Cartridge Cover on page 156.
4.
Remove the Left Cover, see Left Cover on page 158.
5.
Remove the Right Cover, see Right Cover on page 153.
6.
Remove the Front Panel, see Front Panel on page 165.
7.
Remove the Central Cover, see Central Cover on page 172.
8.
Remove the Service Station, see Service Station on page 227.
9.
Remove the Ink Cartridges, see Replace an ink cartridge on page 70.
10. Remove the Encoder Strip, see Encoder Strip on page 193.
11. Remove the printhead, see Replace the printhead on page 73.
12. Remove the Carriage, see Carriage and Belt on page 236.
13. Rotate the Carriage to see the bottom side.
14. Slide the Carriage Belt.
Carriage Belt
ENWW
http://www.justmanuals.com
243
15. Remove the Carriage Belt.
NOTE: After the successful installation of this part, perform the Preventive Maintenance Kit Reset
procedure, see 3.4 PMK1 on page 124.
244
Chapter 5 Removal and installation
ENWW
Right Gear Train Module
Removal
1.
Switch off the printer and remove the power cable.
2.
Remove the Front Cover, see Front Cover on page 150.
3.
Remove the Right Cover, see Right Cover on page 153.
4.
Remove the Service Station, see Service Station on page 227.
5.
Remove the Prime Pump, see Prime Pump on page 233.
6.
Remove the Multi-Sheet Tray, see Multi-Sheet Tray Assembly on page 260.
7.
Disconnect the flat cable.
8.
Disconnect the motor cable.
Right Gear Train Module
ENWW
http://www.justmanuals.com
245
9.
Remove three T-10 screws.
10. Slide the Right Gear Train Module horizontally to detach the pins.
11. Remove the Right Gear Train Module.
246
Chapter 5 Removal and installation
ENWW
Starwheel Assembly
Removal
1.
Switch off the printer and remove the power cable.
2.
Remove the Front Cover, see Front Cover on page 150.
3.
Remove the Ink Cartridge Cover, see Ink Cartridge Cover on page 156.
4.
Remove the Left Cover, see Left Cover on page 158.
5.
Remove the Right Cover, see Right Cover on page 153.
6.
Remove the Front Panel, see Front Panel on page 165.
7.
Remove the Central Cover, see Central Cover on page 172.
8.
Remove one T-10 screw on the left side of the Starwheel Assembly.
9.
Remove one T-10 screw on the right side of the Starwheel Assembly.
Starwheel Assembly
ENWW
http://www.justmanuals.com
247
10. Detach the Starwheel Assembly from the two hooks by sliding it up.
11. Remove the Starwheel Assembly.
Installation
▲
248
When installing the Starwheel Assembly, make sure it is located correctly on the hooks.
Chapter 5 Removal and installation
ENWW
Output Shaft
Removal
1.
Switch off the printer and remove the power cable.
2.
Remove the Front Cover, see Front Cover on page 150.
3.
Remove the Ink Cartridge Cover, see Ink Cartridge Cover on page 156.
4.
Remove the Left Cover, see Left Cover on page 158.
5.
Remove the Right Cover, see Right Cover on page 153.
6.
Remove the Front Panel, see Front Panel on page 165.
7.
Remove the Central Cover, see Central Cover on page 172.
8.
Remove the Main PCA, see Main PCA on page 205.
9.
Remove the Starwheel, see Starwheel Assembly on page 247.
10. Uncap the Carriage and move it to the left of the printer.
11. Pull the Right Bearing to unclip it from the hole.
12. Rotate the Right Bearing.
Output Shaft
ENWW
http://www.justmanuals.com
249
13. Move the Carriage from the left to the right side of the printer.
14. Leave the Carriage as shown below, without touching it with the Output Shaft.
15. Move the cutter to the right and leave it in the middle of the Platen.
250
Chapter 5 Removal and installation
ENWW
16. Unroute the flat cable.
17. Remove one T-10 screw.
18. Remove one T-10 screw.
Output Shaft
ENWW
http://www.justmanuals.com
251
19. Rotate the Bridge FFC.
20. Slide the Bridge FFC (1) and remove it (2).
21. Detach the Main PCA Cover from the bracket.
252
Chapter 5 Removal and installation
ENWW
22. Remove the Main PCA Cover.
23. Pull the Left Bearing to unclip it from the hole (1), then rotate it (2).
24. Slide the Left Bearing to the right.
Output Shaft
ENWW
http://www.justmanuals.com
253
25. Move the Output Shaft up to detach the Middle Bearing.
26. Slide the Output Shaft to the left to release it from the hole.
27. Remove the Output Shaft .
254
Chapter 5 Removal and installation
ENWW
Installation
1.
If you find the Middle Bearing mounted from the factory in a different position (rotated by 180º),
this is also correct.
2.
Make sure the Middle Bearing is mounted correctly.
3.
Put the Left Bearing in this position to mount to the left bracket.
Output Shaft
ENWW
http://www.justmanuals.com
255
4.
256
Rotate the Left Bearing until it clips into the hole.
Chapter 5 Removal and installation
ENWW
Output Tray
Removal
1.
Turn off the printer.
2.
Lock the castors of the printer's stand.
3.
Pull out the Output Tray.
Output Tray
ENWW
http://www.justmanuals.com
257
258
4.
Pull out the Output Tray to the A4 position.
5.
Bend the Output Tray slightly as shown below.
6.
At the same time, pull out the Output Tray.
Chapter 5 Removal and installation
ENWW
7.
Remove the Output Tray.
Output Tray
ENWW
http://www.justmanuals.com
259
Multi-Sheet Tray Assembly
Removal
260
1.
Unlock the Multi-Sheet Tray Assembly .
2.
Pull out the Multi-Sheet Tray Assembly.
Chapter 5 Removal and installation
ENWW
Multi-Sheet Tray Assembly Extensions
Removal
ENWW
1.
Pull out the Multi-Sheet Tray Assembly Extensions to the A3 position.
2.
Unclip the Extensions from the assembly.
3.
Bend the Extensions slightly as shown below.
Multi-Sheet Tray Assembly Extensions
http://www.justmanuals.com
261
4.
262
Remove the Extensions.
Chapter 5 Removal and installation
ENWW
Output Platen
Removal
1.
Switch off the printer and remove the power cable.
2.
Remove the Front Cover, see Front Cover on page 150.
3.
Remove the Ink Cartridge Cover, see Ink Cartridge Cover on page 156.
4.
Remove the Left Cover, see Left Cover on page 158.
5.
Remove the Right Cover, see Right Cover on page 153.
6.
Remove the Front Panel, see Front Panel on page 165.
7.
Remove the Central Cover, see Central Cover on page 172.
8.
Remove the Output Tray, see Output Tray on page 257.
9.
Remove two T-10 screws.
10. Pull out the left side of the Cutter Extraction Lid.
Output Platen
ENWW
http://www.justmanuals.com
263
11. Slide the Cutter Extraction Lid to the left to detach it from the hole.
12. Remove the Cutter Extraction Lid.
13. Remove T-10 screws:
●
●
264
36 inch printer:
◦
3 vertical screws
◦
7 horizontal screws
24 inch printer:
◦
2 vertical screws
◦
5 horizontal screws
Chapter 5 Removal and installation
ENWW
14. Remove two T-10 screws.
15. Remove two T-10 screws.
Output Platen
ENWW
http://www.justmanuals.com
265
16. Remove two T-10 screws.
17. Remove one T-10 screw.
18. Remove the Output Platen.
266
Chapter 5 Removal and installation
ENWW
Installation
1.
There are 4 pins and locators when mounting the Output Platen.
2.
Introduce the Cutter Extraction Lid into the hole.
3.
Ensure that the part indicated below is located correctly as you install it.
Output Platen
ENWW
http://www.justmanuals.com
267
Carriage Motor
Removal
268
1.
Switch off the printer and remove the power cable.
2.
Remove the Front Cover, see Front Cover on page 150.
3.
Remove the Ink Cartridge Cover, see Ink Cartridge Cover on page 156.
4.
Remove the Left Cover, see Left Cover on page 158.
5.
Remove the Front Panel, see Front Panel on page 165.
6.
Remove the Power Supply, see Power Supply on page 202.
7.
Disconnect the Carriage Motor Cable.
8.
Unclip it from the holder in the chassis.
Chapter 5 Removal and installation
ENWW
9.
Remove the Carriage Motor Cable.
10. Keep the screwdriver inserted while levering and at the same time releasing the left end of the Belt
from the Carriage Pulley Motor.
11. Remove the Carriage Belt from the pulley.
Carriage Motor
ENWW
http://www.justmanuals.com
269
12. Remove two T-15 screws.
13. Rotate the Carriage Motor to have better access to it.
14. Remove the Carriage Motor.
270
Chapter 5 Removal and installation
ENWW
Installation
▲
When you attach the left end of the Encoder Strip to the hook, make sure the position of the face is
as shown below.
Carriage Motor
ENWW
http://www.justmanuals.com
271
Cutter Assembly
Cutter
Removal
272
1.
Switch off the printer and remove the power cable.
2.
Remove the Front Cover, see Front Cover on page 150.
3.
Remove the Ink Cartridge Cover, see Ink Cartridge Cover on page 156.
4.
Remove the Left Cover, see Left Cover on page 158.
5.
Move the Cutter to the right.
6.
Leave the Cutter in this position.
Chapter 5 Removal and installation
ENWW
7.
Remove two T-10 screws.
8.
Pull out the left side of the Cutter Extraction Lid.
9.
Slide the Cutter Extraction Lid to the left to detach it from the hole.
Cutter Assembly
ENWW
http://www.justmanuals.com
273
10. Remove the Cutter Extraction Lid.
11. Move the Cutter to the left.
12. Remove the Cutter.
274
Chapter 5 Removal and installation
ENWW
Installation
1.
Mount the Cutter.
2.
Move the Cutter to the right. Make sure that the cutter gears keep below the cutter guide rack and
engage perfectly with it.
3.
Introduce the Cutter Extraction Lid into the hole.
Cutter Assembly
ENWW
http://www.justmanuals.com
275
Cutter Bridge
The Cutter Bridge is attached to the front of the Carriage as shown below:
Removal
276
1.
Remove the Ink Cartridges and the Printhead Assembly, see Replace the printhead on page 73.
2.
Switch off the printer and remove the power cable.
3.
Ensure that the Carriage is in the center of the Platen, where you can easily access it.
4.
Use the tool provided with the Cutter Assembly Kit to lever up the two prongs attaching the Cutter
Bridge to the right-hand side of the Carriage.
Chapter 5 Removal and installation
ENWW
5.
Use the tool again to lever up the two prongs attaching the Cutter Bridge to the left-hand side of
the Carriage.
6.
Remove the Cutter Bridge.
Installation
1.
Position the new Cutter Bridge above the Carriage and press down.
Cutter Assembly
ENWW
http://www.justmanuals.com
277
278
2.
The Cutter Bridge is designed to fit over features of the Carriage.
3.
Use the tool provided with the Cutter Assembly Kit to press each of the four prongs attaching the
Cutter Bridge to the Carriage, and make sure that all of them are correctly engaged; otherwise the
Cutter may not work correctly.
Chapter 5 Removal and installation
ENWW
Cutter Guide
Removal
1.
Switch off the printer and remove the power cable.
2.
Remove the Front Cover, see Front Cover on page 150.
3.
Remove the Ink Cartridge Cover, see Ink Cartridge Cover on page 156.
4.
Remove the Left Cover, see Left Cover on page 158.
5.
Remove the Right Cover, see Right Cover on page 153.
6.
Remove the Front Panel, see Front Panel on page 165.
7.
Remove the Central Cover, see Central Cover on page 172.
8.
Remove the Output Tray, see Output Tray on page 257.
9.
Remove the Cutter Assembly, see Cutter Assembly on page 272.
10. Remove twelve T-10 screws for the 36 inch printer (nine screws for the 24 inch printer).
11. Rotate the Cutter Guide approximately 160°.
Cutter Guide
ENWW
http://www.justmanuals.com
279
12. Slide the Cutter Guide to the right and remove it.
280
Chapter 5 Removal and installation
ENWW
Out-Of-Paper Sensor
Removal
1.
Switch off the printer and remove the power cable.
2.
Remove the Multi-Sheet Tray, see Multi-Sheet Tray Assembly on page 260.
3.
Locate the Out-Of-Paper Sensor.
4.
Unclip the Out-Of-Paper Sensor FFC Cover.
5.
Slide the Out-Of-Paper Sensor FFC Cover.
Out-Of-Paper Sensor
ENWW
http://www.justmanuals.com
281
282
6.
Lift up (1) the Out-Of-Paper Sensor FFC Cover and slide it to the left (2).
7.
Press the retaining clips of the Out-Of-Paper Sensor Assembly.
8.
Slide out the Out-Of-Paper Sensor Assembly.
Chapter 5 Removal and installation
ENWW
9.
Turn over the Out-Of-Paper Sensor Assembly to get better access to the connector.
10. Disconnect the Out-Of-Paper Sensor cable.
11. Remove the Out-Of-Paper Sensor Assembly.
Out-Of-Paper Sensor
ENWW
http://www.justmanuals.com
283
Out-Of-Paper Sensor Cable
Removal
284
1.
Remove the Front Cover, see Front Cover on page 150.
2.
Remove the Ink Cartridge Cover, see Ink Cartridge Cover on page 156.
3.
Remove the Left Cover, see Left Cover on page 158.
4.
Remove the Right Cover, see Right Cover on page 153.
5.
Remove the Back Cover, see Back Cover on page 163.
6.
Remove the Out-Of-Paper Sensor, see Out-Of-Paper Sensor on page 281.
7.
Unclip the locator FFC.
8.
Disconnect the Out-Of-Paper Sensor Cable from the Bundle Board.
Chapter 5 Removal and installation
ENWW
9.
Unroute the Out-Of-Paper Sensor Cable through the hook.
10. Remove the Out-Of-Paper Sensor Cable.
Installation
▲
When you pass the Out-Of-Paper Sensor Cable through the hook, make sure that the blue end of
the cable is facing you.
Out-Of-Paper Sensor Cable
ENWW
http://www.justmanuals.com
285
Output Tray Sensor Assembly
Removal
286
1.
Remove the Front Cover, see Front Cover on page 150.
2.
Locate the Output Tray Sensor Assembly.
3.
Remove two T-10 screws.
4.
Detach the Output Tray Sensor from the two locator pins.
Chapter 5 Removal and installation
ENWW
5.
Remove the Output Tray Sensor Assembly in the direction shown below.
6.
Remove the Output Tray Sensor Cable from the retainer clip in the assembly.
7.
Disconnect the flat cable (Output Tray FFC).
Output Tray Sensor Assembly
ENWW
http://www.justmanuals.com
287
Installation
288
1.
When installing the Output Tray Sensor Cable, ensure the orientation of the cable is correct as you
install it.
2.
Attach the two pins of the Output Tray Sensor to the front of the printer.
3.
Make sure the Output Tray Sensor is mounted correctly.
Chapter 5 Removal and installation
ENWW
Output Tray Extender Sensor Cable
Removal
ENWW
1.
Remove the Front Cover, see Front Cover on page 150.
2.
Remove the Ink Cartridge Cover, see Ink Cartridge Cover on page 156.
3.
Remove the Left Cover, see Left Cover on page 158.
4.
Remove the Output Tray Sensor, see Output Tray Sensor Assembly on page 286.
5.
Unclip the locator FFC from the right of the Front Cross Beam.
6.
Unclip the locator FFC from the middle of the Front Cross Beam.
Output Tray Extender Sensor Cable
http://www.justmanuals.com
289
290
7.
Unclip the locator FFC from the left of the Front Cross Beam.
8.
Disconnect the Output Tray Extender Sensor Cable from the Main PCA.
9.
Unroute the flat cable carefully.
Chapter 5 Removal and installation
ENWW
10. Remove the Output Tray Extender Sensor Cable.
Installation
ENWW
1.
Pass the Output Tray Extender Sensor Cable through the hole of the Front Cross Beam.
2.
Pass the Output Tray Extender Sensor Cable through the hole of the left arch. Important: The
blue color should be facing you.
Output Tray Extender Sensor Cable
http://www.justmanuals.com
291
3.
292
Slide the Output Tray Extender Sensor Cable through the hole of the left arch.
Chapter 5 Removal and installation
ENWW
Carriage Line Sensor
Removal
1.
Switch off the printer and remove the power cable.
2.
Remove the Front Cover, see Front Cover on page 150.
3.
Remove the Right Cover, see Right Cover on page 153.
4.
Make sure the Service Station is located in the right position.
5.
Detach the right side of the Cover PCA Carriage.
6.
Remove the Cover PCA Carriage.
Carriage Line Sensor
ENWW
http://www.justmanuals.com
293
294
7.
Disconnect the flat cable.
8.
Important: If the Carriage is in the capped position, move the Service Station gear clockwise to
uncap it.
9.
Move the Carriage slightly to allow access to the Carriage Line Sensor, maintain a separation of 4
cm.
Chapter 5 Removal and installation
ENWW
10. Remove one T-6 screw.
CAUTION:
Make sure that the screw does not fall down into the Service Station.
11. Open the Carriage latch upwards to allow access to the Carriage Line Sensor.
12. Detach the Line Sensor from the Carriage.
Carriage Line Sensor
ENWW
http://www.justmanuals.com
295
13. Remove the Carriage Line Sensor.
Installation
296
1.
Make sure to introduce the end of the Carriage Line Sensor into the hole in the Carriage.
2.
Before putting the covers back on, clean the Carriage Line Sensor. See Clean the Carriage Line
Sensor on page 314.
Chapter 5 Removal and installation
ENWW
Bundle Board
Removal
1.
Switch off the printer and remove the power cable.
2.
Remove the Front cover, see Front Cover on page 150.
3.
Remove the Right Cover, see Right Cover on page 153.
4.
Disconnect three motor cables.
5.
Disconnect four FFC (flat flexible cables) from the Bundle Board.
6.
Remove two T-10 screws.
Bundle Board
ENWW
http://www.justmanuals.com
297
298
7.
Detach the Bundle Board from the hook.
8.
Remove the Bundle Board.
Chapter 5 Removal and installation
ENWW
Bundle Board FFC cable
Removal
1.
Switch off the printer and remove the power cable.
2.
Remove the Front Cover, see Front Cover on page 150.
3.
Remove the Ink Cartridge Cover, see Ink Cartridge Cover on page 156.
4.
Remove the Left Cover, see Left Cover on page 158.
5.
Remove the Right Cover, see Right Cover on page 153.
6.
Remove the Back Cover, see Back Cover on page 163.
7.
Disconnect the FFC cable from the Bundle Board.
8.
Unclip the two locators FFC, by first pushing up and pushing out.
Bundle Board FFC cable
ENWW
http://www.justmanuals.com
299
9.
Unroute the Bundle Board Cable FFC.
10. Unclip the locators FFC.
●
3 clips in the 24 inch printer
●
4 clips in the 36 inch printer
11. Carefully remove the FFC from the hook of the left arch.
300
Chapter 5 Removal and installation
ENWW
12. Carefully remove the FFC from the 2 hooks of the left arch.
13. Disconnect the Bundle Board cable FFC from the Main PCA and remove it.
Installation
1.
When re-installing the Bundle FFC into the hooks of the left arch, orient the FFC inclined as shown
below. Make sure to assemble the Bundle Ferrite in the same position close to the Bundle Board.
NOTE: When re-installing the Bundle FFC, hook each clamp first on the upper clip and then
push on the bottom area.
Bundle Board FFC cable
ENWW
http://www.justmanuals.com
301
302
2.
Unclip to remove the ferrite of the right arch.
3.
Remove the ferrite.
4.
Route the Bundle FFC.
Chapter 5 Removal and installation
ENWW
5.
Re-install the Bundle FFC in exactly the same place where the ferrite was.
6.
Pass the ferrite through the FFC.
7.
Attach the ferrite to the right arch.
Bundle Board FFC cable
ENWW
http://www.justmanuals.com
303
Pinchwheels
Removal
1.
Switch off the printer and remove the power cable.
2.
Remove the Front Cover, see Front Cover on page 150.
3.
Remove the Ink Cartridge Cover, see Ink Cartridge Cover on page 156.
4.
Remove the Left Cover, see Left Cover on page 158.
5.
Remove the Right Cover, see Right Cover on page 153.
6.
Remove the Front Panel, see Front Panel on page 165.
7.
Remove the Central Cover, see Central Cover on page 172.
8.
Remove the Back Cover, see Back Cover on page 163.
9.
Remove the Upper-Roll Paper Guide, see Upper-Roll Paper Guide on page 177.
10. If the damaged Pinchwheels are in the zone indicated in green below, remove the Aerosol Shields
and go to step 17.
If the damaged Pinchwheels are in the zone indicated in green below, continue with the next
steps.
304
Chapter 5 Removal and installation
ENWW
11. Uncap the Carriage, move it to the right, and leave it in the position indicated below.
12. Disconnect the two flat trailing cables from the Main PCA.
13. Remove one T-10 screw.
Pinchwheels
ENWW
http://www.justmanuals.com
305
14. Detach the flex retainer assembly from the backbone.
15. Slide the flex retainer with the trailing cable to the right. Be careful not to damage the trailing
cable.
16. Leave the flex retainer with the trailing cable in the position shown below.
306
Chapter 5 Removal and installation
ENWW
17. Loosen the screws that secure the Pinchwheels.
18. Locate the tool needed to detach the springs.
19. Detach the left end of the Pinchwheels.
Pinchwheels
ENWW
http://www.justmanuals.com
307
20. Detach the right end of the Pinchwheels.
21. Remove one T-10 screw.
22. Remove the Pinchwheels.
308
Chapter 5 Removal and installation
ENWW
Installation
1.
Make sure that the new Pinchwheels are properly aligned (1). Then tighten the screw (2).
2.
Attach the spring to the hook by pushing with the tool provided.
Pinchwheels
ENWW
http://www.justmanuals.com
309
Left Spittoon
Removal
310
1.
Switch off the printer and remove the power cable.
2.
Open the Ink Cartridge Cover.
3.
Slide the Cutter to the right.
4.
Unclip the flange of the Left Spittoon (1). Maintain it in the unclipped position and slide it up (2).
Chapter 5 Removal and installation
ENWW
5.
Slide up the Left Spittoon until it is detached from the bracket.
6.
Remove the Left Spittoon in the vertical position. You are recommended to wear gloves.
7.
Never incline the Left Spittoon, because the ink can fall out.
Left Spittoon
ENWW
http://www.justmanuals.com
311
Installation
312
1.
When sliding the Left Spittoon down, make sure to slide it by the path of the bracket.
2.
Press down the Left Spittoon until you hear a click; make sure the flange is clipped.
Chapter 5 Removal and installation
ENWW
6
Preventive maintenance
●
Preventive maintenance
●
Preventive maintenance kits
ENWW
313
http://www.justmanuals.com
Preventive maintenance
Clean the printer
To maintain the printer in good operating condition, keep it free of accumulated dust, ink, and other
contamination. Cleaning intervals are determined by the printer environment and by the types of printer
supplies used.
General cleaning
Proper general cleaning should include the following:
NOTE: To prevent an electric shock, make sure that the printer is switched off and unplugged before
any cleaning is performed. Do not let any water get inside the printer.
1.
Blow away dust accumulation with compressed air if available.
2.
Clean the outer surface of the printer with a damp sponge or cloth. Use a mild soap and water
solution if necessary. Do not use abrasive cleaners.
3.
Wipe the printer dry with a soft lint-free cloth.
Clean the Carriage Line Sensor
The Carriage Line Sensor should not normally require cleaning during the life of the printer. However, it
may require cleaning after a bad printhead crash while printing with high ink density. In practice, it is
recommended to clean the sensor if there are intermittent failures of paper edge detection, printhead
alignment, or paper advance calibration.
The cleaning actually involves cleaning the clear plastic lens cover, not the sensor itself.
314
1.
Use tap water. Do not use chemicals that could damage the clear plastic of the lens cover.
2.
Use a lint-free cloth.
3.
Wipe the lens with the damp cloth, then remove excess water or moisture with a dry area of the
same cloth.
Chapter 6 Preventive maintenance
ENWW
Clean the Encoder Strip
The Encoder Strip should not normally require cleaning during the life of the printer. However, it may
require cleaning in the following cases:
●
When droplets of ink get into the encoder. This may happen under certain environmental
conditions, with very heavy use of the printer, high ink concentrations, and system errors affecting
the scan axis.
●
When there is grease on the Encoder Strip. This may happen if the Encoder Strip is allowed to
touch the Carriage rail during repair operations or while clearing a paper jam.
Cleaning procedure
1.
Switch off the printer and remove the power cable.
2.
Move the Carriage Assembly to the capping position and uncap the printhead.
3.
Place some paper over the slider rod in order to protect the lubricant and avoid crosscontamination with grease and alcohol.
4.
Dampen a cloth with alcohol.
Preventive maintenance
ENWW
http://www.justmanuals.com
315
316
5.
Clean the encoder strip carefully, not moving the papers underneath and not stretching the strip.
6.
Move the Carriage towards the center of the printer and clean the remaining portion of the strip.
7.
Return the Carriage to the capping position and cap it manually.
8.
Remove the papers carefully in order not to remove grease from the slider rod.
Chapter 6 Preventive maintenance
ENWW
Lubricate the Carriage Assembly
The Carriage should not normally require lubrication during the life of the printer. However, lubrication
is recommended if there are intermittent Carriage jams.
1.
Lubricate the four areas indicated here.
2.
Lubricate the areas indicated here, A-D.
Preventive maintenance
ENWW
http://www.justmanuals.com
317
3.
Use a syringe to inject grease into the ports. Push the needle against the ports firmly to direct
grease into the channels.
NOTE: The Encoder Strip must stay free of grease. Wipe off with a dry lint-free cloth if
necessary.
4.
Move the Carriage 10 20 mm to check the grease on the rod.
Lubricate the Carriage Rod
1.
318
Apply a large drop of grease to a cotton swab.
Chapter 6 Preventive maintenance
ENWW
2.
Apply grease to the front of the rod and smear for a distance of about 50 mm.
3.
Apply grease to the rear of the rod and smear for a distance of about 50 mm.
Moisture on the printer
Customers should use the printer in an environment between 20% and 80% relative humidity. To
recover from moisture condensation, turn the printer off, and wait until the printer is completely dry
before using it again.
Level of printer usage
Normal printer use means 800,000 m Carriage traveled distance (which corresponds approximately to
more than 15,000 A1 prints on average). Under normal conditions, it will be approximately more than
5 years before the printer needs a maintenance. If the printer is used more than the normal usage
conditions, then it will need maintenance service more frequently.
Service Part
Scan Axis Distance Covered
Right Spittoon Volume
Left Spittoon Volume
LIFE_VALUE
Maintenance Advice
800,000 meters
PMKIT1
600 cc
PMKIT2
51 cc
PMKIT2
When these components of the printer exceed this amount, the Front Panel displays the following
message:
Preventive maintenance
ENWW
http://www.justmanuals.com
319
"Maintenance #1 required"
"Maintenance #2 required
Once one of the maintenance advised messages is displayed, the relevant preventive maintenance kit
must be used to replace the most worn parts of the printer. See Removal and installation on page 141
when replacing the necessary parts.
Preventive maintenance kits
Preventive maintenance kits are designed to replace high-usage parts before they fail, avoiding printer
downtime.
Warning message displayed on the front panel
The following is the process that the customer will see when a component has passed a maintenance
usage threshold and needs replacement.
1.
As the printer is turned on, if a component has passed its maximum-usage threshold a warning will
be displayed. If the customer presses OK, the message disappears and will not reappear until the
printer is turned on again.
2.
A warning icon will remain over the wrench until the part has been replaced. If the wrench icon is
touched, before going into the setup menu, the above warning message is shown again.
3.
When the warning threshold is surpassed by a significant amount, reaching a critical threshold,
the message becomes more assertive and the warnings appear more frequently.
PMK1 (Carriage)
800,000 meters
PMK2 (service station)
90% full of ink: 1 warning
95% full of ink:1 warning per print
100% full of ink: stops printing
320
Chapter 6 Preventive maintenance
ENWW
Printing and interpreting the Preventive Maintenance Kit status report
The Preventive Maintenance Kit status report shows the status of the high-usage parts and how far they
are from requiring replacement.
▲
To print the report, go to Diagnostics menu > Reports > PMK category.
Preventive Maintenance Kit #1 (Carriage)
PMK #1 for 24-in Carriage (CQ890-67063)
PMK #1 for 36-in Carriage (CQ893-67017)
Part number
Description
Part number
Description
CQ890-67002
AmpXL 24 Carriage Assembly with Belt
SV
CQ893-67011
AmpXL 36 Carriage Assembly with Belt
SV
CQ890-67006
AmpXL Carriage Motor SV
CQ890-67006
AmpXL Carriage Motor SV
CQ890-67017
AmpXL Cutter Assembly SV
CQ890-67017
AmpXL Cutter Assembly SV
CQ890-67063
AmpXL 24-in PM Kit SV
CQ893-67017
AmpXL 36-in PM Kit SV
Preventive maintenance kits
ENWW
http://www.justmanuals.com
321
Preventive Maintenance Kit #2 (Service Station)
322
Part number
Description
CQ890-67045
AmpXL Service Station Assembly SV
Chapter 6 Preventive maintenance
ENWW
7
Appendices
●
Important links
●
Front-panel home screen and menu map
●
Support menu tree
●
Extended Support menu tree
●
How to check whether your computer is connected to your network
●
Wireless troubleshooting report error cases
●
CSR fliers
ENWW
323
http://www.justmanuals.com
Important links
The following are links to useful sources of information.
●
●
●
324
Printer drivers:
◦
http://www.hp.com/go/T120/drivers
◦
http://www.hp.com/go/T520/drivers
Accessories:
◦
http://www.hp.com/go/T120/accessories
◦
http://www.hp.com/go/T520/accessories
Support:
◦
www.hp.com/go/T120/support
◦
www.hp.com/go/T520/support
Chapter 7 Appendices
ENWW
Front-panel home screen and menu map
IMPORTANT: This information is based on firmware release version AXP2CN1229AR. Features are
subject to change in later firmware releases.
ENWW
Number
Description
Number
Description
1
Home screen
8
Web Services menu
2
Multi-Sheet Tray menu
9
Previous item
3
Single-sheet menu
10
Back
4
Roll menu
11
Help
5
Bluetooth enables you to search for wireless
devices to connect to the network
12
Next item
6
View the status of the ink cartridges
13
Cancel
7
Set up features
Front-panel home screen and menu map
http://www.justmanuals.com
325
8. Web Services (from above, printer not connected to Internet)
▲
Connection Required. Printer must be connected to the network and Internet for this feature.
▲
OK
▲
Web Services Summary / Email: Not available / ePrint Status: Not connected / ePrint:
On / Apps: On
▲
326
Chapter 7 Appendices
Settings / Web Services Settings
●
Display Email Address
●
Print Info Page
●
Printer Update
●
Set Web Proxy
●
ePrint (on/off)
●
Apps (on/off)
●
Remove Web Services
▲
OK (goes to home screen)
ENWW
5. Bluetooth
▲
Settings
a.
Not Connected
i.
Wireless (on/off)
ii.
Wireless Setup Wizard
●
This wizard will help you set up a wireless connection for the printer.
●
Continue (button)
◦
Single sheet / Status: Not ready / The current ready paper source is MultiSheet Tray.
◦
Paper Type (button)
◦
Load single sheet (button showing help animations )
◦
Replay (button)
●
Wi-Fi Protected Setup
●
View Network Summary
◦
View Wired > IP not applicable / MAC: 101F74700458 / Hostname:
HP70036D
◦
Print Details (button to Printing report (animation of HP logo) Paper source:
Multi-Sheet Tray / Paper type: Plain paper
◦
OK
◦
View Wired (a drop-down menu takes you to the View Wired screen)
View Wireless (a drop-down menu takes you to the Wireless Summary screen)
●
Print Wireless Network Test
●
Print Network Configuration
●
Advanced Setup
◦
Select I/O timeout : 30 s; 1 min; 2 min; 4.5 min; 5 min; 10 min; 15 min; 20
min; 30 min
◦
Link Speed: Automatic; 10-Full; 10-Half; 100-Full; 100-Half
◦
IP Settings (changing the IP address will remove the printer from the network)
OK (button activated): Automatic (DHCP) (button activated); Manual (Static)
(button not activated)
◦
Hostname > Hostname: HP70036D
Change (button without option to select); OK (button with option to click that
takes you back to the Advanced Setup screen)
●
ENWW
Restore Network Defaults
Front-panel home screen and menu map
http://www.justmanuals.com
327
b.
●
Print Details (button not activated)
●
OK (goes to home screen)
Connected IP:xxx.xxx.x.xx. MAC:101G74700458 Hostname: HPxxxxxx
i.
Wireless (on/off)
ii.
Wireless Setup Wizard
●
Wireless connection has already been set up. Are you sure you want to set it up
again?
◦
Yes (button that allows you to select but nothing happens)
◦
No (button that allows you to select and then the options below appear)
●
Wi-Fi Protected Setup
●
View Network Summary
◦
View Wired (a drop-down menu takes you to the View Wired screen)
◦
View Wireless (a drop-down menu takes you to the Wireless Summary screen)
●
Print Wireless Network Test
●
Print Network Configuration
●
Advanced Setup
◦
Select I/O timeout : 30 s; 1 min; 2 min; 4.5 min; 5 min; 10 min; 15 min; 20
min; 30 min
◦
Link Speed: Automatic; 10-Full; 10-Half; 100-Full; 100-Half
◦
IP Settings (changing the IP address will remove the printer from the network)
OK (button activated): Automatic (DHCP) (button activated); Manual (Static)
(button not activated)
◦
Hostname > Hostname: HP70036D
Change (button without option to select); OK (button with option to click that
takes you back to the Advanced Setup screen)
●
Restore Network Defaults
●
Print Details (button not activated)
●
OK (goes to home screen)
6. Estimated ink levels
328
●
More (button that takes you to a drawing of the ink levels of all cartridges)
●
Print Report
◦
Printing Report (message of printing in progress with animation of HP logo)
◦
Paper source: Multi-Sheet Tray / Paper type: Plain Paper
Chapter 7 Appendices
ENWW
7. Setup (Wireless off)
1.
Last page
●
Last page is not available to reprint (there is a drop-down menu with numbers)
●
Reprint (button that takes you back to the Setup menu)
2.
Form feed
3.
Form feed and cut
4.
Connectivity
a.
Not Connected
b.
Wireless (on/off)
c.
Wireless Setup Wizard
This wizard will help you set up a wireless connection for the printer.
i.
Press Print Guide for easy wireless setup instruction
ii.
Print Guide
●
●
d.
Printing Report
◦
Paper source: Multi-Sheet Tray
◦
Paper type: Plain Paper
◦
Wi-Fi Protected Setup
◦
Setting up the network through Wi-Fi Protected Setup (WPS) has timed out
◦
For diagnostic information, press Print Report. For help, press ?
◦
Print Report
◦
OK
◦
Continue
Searching for wireless routers...
Wi-Fi Protected Setup
i.
Two ways to set up using Wi-Fi Protected Setup (WPS):
●
Use the WPS button, if available, on your router.
●
Enter the PIN generated by the printer in the router s configuration software.
For help, press ?
ii.
Continue
●
ENWW
Wi-Fi Protected Setup
◦
Push Button
◦
Wi-Fi Protected Setup
Front-panel home screen and menu map
http://www.justmanuals.com
329
On the router, press and hold the WPS button for 3 seconds to connect to the
network.
●
Show Me
◦
Starting animation...
Replay
Done
iii. PIN
e.
View Network Summary
●
View Wired
◦
Wired Summary
IP: Not applicable
MAC: 02BAD0AD5AB5
Hostname: HPxxxxxx
●
5.
330
◦
Print Details
◦
OK
View Wireless
f.
Print Wireless Network Test
g.
Print Network Configuration
h.
Advanced Setup
i.
Restore Network Defaults
Image quality maintenance
●
Printhead information
●
Align printhead
●
Clean printhead
●
Replace printhead
●
Print diagnostic image
●
Paper advance calibration
◦
Calibrate ready paper
◦
Reset ready paper calibration
Chapter 7 Appendices
ENWW
6.
Printer preferences
●
Screen Brightness (there is a picture of brightness regulation)
◦
●
Language
◦
●
OK
English, Français, Deutch, Português, Español, Italiano, Japanese, Korean, Chinese,
Taiwanese, etc.
Country/Region
◦
USA, Canada, Australia, India, UK, Singapore, New Zealand, South Africa, Hong
Kong, Israel, Thailand, Saudi Arabia, UAE, Malaysia, Philippines, Ireland, Indonesia,
Egypt, Kuwait, Jordan, Pakistan, Qatar, Lebanon, Vietnam, Argentina, Austria, Belarus,
Belgium, Brazil, Bulgaria, Chile, China, Columbia, Costa Rica, Croatia, Czech
Republic, Denmark, Ecuador, Estonia, Finland.
●
Keyboard: QWERTY (selected) /AZERTY/QWERTZ
●
Auto Off: Off (selected) / 2 Hours/ 4 Hours/ 8 Hours/ 12 Hours
●
Sleep: After 5 Minutes / After 15 Minutes / After 30 Minutes (selected) / After 60 Minutes /
After 120 Minutes / After 240 Minutes
●
Print retrieval : Select drying time / Enable cutter
7.
Anonymous usage information
8.
Internal prints
9.
●
Demo prints
●
User information prints
Service menu
●
Restore factory settings
●
Reset all paper calibration
7. Setup (Wireless on)
1.
ENWW
Last page
●
Last page is not available to reprint (there is a drop-down menu with numbers)
●
Reprint (button that takes you back to the Setup menu)
2.
Form feed
3.
Form feed and cut
4.
Connectivity
a.
Connected
b.
Wireless (on/off)
Front-panel home screen and menu map
http://www.justmanuals.com
331
c.
Wireless Setup Wizard
This wizard will help you set up a wireless connection for the printer.
i.
Press Print Guide for easy wireless setup instruction
ii.
Print Guide
●
●
d.
Printing Report
◦
Paper source: Multi-Sheet Tray
◦
Paper type: Plain Paper
◦
Wi-Fi Protected Setup
◦
Setting up the network through Wi-Fi Protected Setup (WPS) has timed out
◦
For diagnostic information, press Print Report. For help, press ?
◦
Print Report
◦
OK
◦
Continue
Searching for wireless routers...
Wi-Fi Protected Setup
i.
Two ways to set up using Wi-Fi Protected Setup (WPS):
●
Use the WPS button, if available, on your router.
●
Enter the PIN generated by the printer in the router s configuration software.
For help, press ?
ii.
Continue
●
Wi-Fi Protected Setup
◦
Push Button
◦
Wi-Fi Protected Setup
On the router, press and hold the WPS button for 3 seconds to connect to the
network.
●
Show Me
◦
Starting animation...
Replay
Done
iii. PIN
332
Chapter 7 Appendices
ENWW
e.
View Network Summary
●
View Wired
◦
Wired Summary
IP: Not applicable
MAC: 02BAD0AD5AB5
Hostname: HPxxxxxx
●
◦
Print Details
◦
OK
View Wireless
f.
Print Wireless Network Test
g.
Print Network Configuration
h.
Advanced Setup
●
Select I/O timeout: 30 s / 1 min / 2 min / 5 min / 10 min / 15 min / 20 min / 30
min
●
Link Speed: Automatic / 10-Full / 10-Half / 100-Full / 100-Half
●
IP Settings (changing the IP address will remove the printer from the network)
●
◦
Automatic (DHCP)
◦
Manual (static)
Hostname > Hostname: HP70036D
◦
Change
Changing the hostname affects the existing connection between your computer and
this printer. You would need to reestablish connection.
OK
◦
i.
5.
ENWW
OK
Restore Network Defaults
Image quality maintenance
●
Printhead information
●
Align printhead
●
Clean printhead
●
Replace printhead
Front-panel home screen and menu map
http://www.justmanuals.com
333
6.
●
Print diagnostic image
●
Paper advance calibration
◦
Calibrate ready paper
◦
Reset ready paper calibration
Printer preferences
●
Screen Brightness (there is a picture of brightness regulation)
◦
●
Language
◦
●
English, Français, Deutch, Português, Español, Italiano, Japanese, Korean, Chinese,
Taiwanese, etc.
Country/Region
◦
USA, Canada, Australia, India, UK, Singapore, New Zealand, South Africa, Hong
Kong, Israel, Thailand, Saudi Arabia, UAE, Malaysia, Philippines, Ireland, Indonesia,
Egypt, Kuwait, Jordan, Pakistan, Qatar, Lebanon, Vietnam, Argentina, Austria, Belarus,
Belgium, Brazil, Bulgaria, Chile, China, Columbia, Costa Rica, Croatia, Czech
Republic, Denmark, Ecuador, Estonia, Finland.
●
Keyboard: QWERTY (selected) /AZERTY/QWERTZ
●
Auto Off: Off (selected) / 2 Hours/ 4 Hours/ 8 Hours/ 12 Hours
●
Sleep: After 5 Minutes / After 15 Minutes / After 30 Minutes (selected) / After 60 Minutes /
After 120 Minutes / After 240 Minutes
●
Print retrieval : Select drying time / Enable cutter
7.
Anonymous usage information
8.
Internal prints
9.
334
OK
●
Demo prints
●
User information prints
Service menu
●
Restore factory settings
●
Reset all paper calibration
Chapter 7 Appendices
ENWW
Support menu tree
Support menu tree
ENWW
http://www.justmanuals.com
335
Extended Support menu tree
336
Chapter 7 Appendices
ENWW
How to check whether your computer is connected
to your network
1.
If you are not using a unique network name (SSID), then it is possible that the computer could be
connected to the wrong network. The following steps can help you to determine whether your
computer is connected to the correct network.
Windows
a.
Click Start, click Control Panel, point to Network Connections, and then click View
Network Status and Tasks or Click Start, select Settings, click Control Panel,
double-click Network Connections, click the View menu, and then select Details.
Leave the network dialog box open while you continue to the next step.
b.
Disconnect the power cord from the wireless router. The connection status of the computer
should change to Not Connected.
c.
Reconnect the power cord to the wireless router. The connection status should change to
Connected.
▲
Click the AirPort icon in the menu bar at the top of the screen. From the menu that appears,
you can determine if the AirPort is turned on and which wireless network the computer is
connected to.
Mac OS X
NOTE: For more detailed information about the AirPort connection, click System
Preferences in the Dock, and then click Network. If the wireless connection is working
correctly, a green dot appears next to AirPort in the list of connections. For more information,
click the Help button in the window.
If you are unable to get the computer connected to your network, contact the person who set up
your network or the router manufacturer as there may be a hardware issue with the router or
computer.
If you are able to access the Internet and are using a computer running Windows, you can also
access the HP Network Assistant at http://www.hp.com/sbso/wireless/tools-setup.html?
jumpid=reg_R1002_USEN for help in setting up a network (this website is available in English
only).
ENWW
2.
Print the printer's Wireless Configuration page. After the page has been printed, check the
Network Status and URL. The Network Status is Ready if the printer is actively connected to a
network, or Offline if it is not (in the latter case, run the Wireless Network Test). The URL is the
network address assigned to the printer by the router; you need it to connect to the printer's
Embedded Web Server.
3.
If you have established that the computer and the printer both have active connections to a
network, you can check whether they are on the same network by trying to access the printer's
Embedded Web Server.
4.
The printer may be too far away from the WiFi access point or there may be intervening objects
that are preventing connection. You can try moving the printer closer to the WiFi acess point.
5.
Check that the WEP key password entered is the correct one. The pass phrase capitalization,
punctuation, etc., must all match exactly.
How to check whether your computer is connected to your network
http://www.justmanuals.com
337
6.
If you cannot access the Embedded Web Server and are sure that both the computer and printer
have active connections to the same network, the firewall security software could be blocking
communication. Temporarily turn off any firewall security software running on the computer, and
try to access the Embedded Web Server again. If you can access it, try using the printer for
printing.
If you are able to access the Embedded Web Server and use the printer with the firewall turned
off, you need to reconfigure your firewall settings to allow the computer and printer to
communicate with each other over the network.
If you are able to access the Embedded Web Server, but are still unable to use the printer even
with the firewall turned off, try enabling the firewall software to recognize the printer.
7.
Make sure the printer is online and ready.
If you have the HP software installed, you can check the printer s status from your computer to see
if the printer is paused or offline, preventing you from using it. To check the printer s status,
complete the following steps:
Windows
a.
From Start > Settings, and then click Printers or Printers and Faxes. - or - From Start
> Control Panel, and then double-click Printers.
b.
If the printers on the computer are not being displayed in Details view, click the View menu,
and then click Details.
c.
Do one of the following, depending on the printer status:
●
If the printer is Offline, right-click the printer, and click Use Printer Online.
●
If the printer is Paused, right-click the printer, and click Resume Printing.
d.
Try using the printer over the network.
a.
Click System Preferences in the Dock, and then click Print & Fax.
b.
Select the printer, and the click Print Queue.
c.
If Jobs Stopped appears in the window that appears, click Start Jobs.
Mac OS X
8.
338
If you install the HP software a second time, the installer may create a second version of the printer
driver in the Printers or Printers and Faxes folder (Windows only). If you have difficulties printing
or connecting to the printer, make sure the correct version of the printer driver is set as the default.
a.
From Start > Settings, and then click Printers or Printers and Faxes. - or - From Start
> Control Panel, and then double-click Printers.
b.
Right-click the printer icon and then click Properties, Document Defaults, or Printing
Preferences.
Chapter 7 Appendices
ENWW
9.
c.
On the Ports tab, look for a port in the list with a checkmark. The version of the printer
driver that is connected wirelessly has Standard TCP/IP Port as the Port description, next
to the checkmark.
d.
Right-click the printer icon for the version of the printer driver that is connected wirelessly, and
select Set as Default Printer.
Try restarting the HP Network Device Support service (Windows only).
a.
Delete any print jobs currently in the print queue.
b.
On the desktop, right-click My Computer or Computer, then click Manage.
c.
Double-click Services and Applications, then click Services.
d.
Scroll down the list of services, right-click HP Network Devices Support, then click Restart.
e.
After the service restarts, try using the printer over the network again.
If you still cannot use the printer over the network, or if you have periodic problems in doing so,
the firewall may be interfering, or there may be a problem with the network configuration or
router. Contact the person who set up the network or the router manufacturer for help.
If you are able to use the printer over the network, the network setup was successful.
ENWW
How to check whether your computer is connected to your network
http://www.justmanuals.com
339
Wireless troubleshooting report error cases
In the first column of the table below, W indicates Warning and F indicates Failure.
W
/F
#
Description
Internal conditions
and parameters
Internal details
Troubleshooting
W
0
Ethernet cable
plugged in
Ethernet cable
plugged in &&
ncaPolicy != nHot &&
powerOnEnabled ==
true && no SSID
found
The Ethernet cable is plugged in. The
printing device cannot connect to a
wireless network while it is connected
via Ethernet. To connect wirelessly,
unplug the cable from the printing
device and run these tests again.
ATTENTION: Your printer is
unable to connect to your
wireless router.
Ethernet cable
plugged in &&
ncaPolicy != nHot &&
powerOnEnabled ==
true && SSID found
A wireless network was found that
matches what you have configured (%s).
However, the Ethernet cable is plugged
in, which will prevent you from
connecting to it. To connect wirelessly,
unplug the cable from the printer and
run these tests again. The %s parameter
will be the SSID name that is displayed
on the advanced wireless networking
webpage.
ATTENTION: Your printer is
unable to connect to your
wireless router.
powerOnEnabled ==
false
The wireless network interface in the
printing device (%s) is not enabled. You
cannot connect to a wireless network
until this is turned on. If you want to
connect to a wireless network, consult
the documentation that came with the
printer on how to enable the wireless
interface. The first %s parameter will be
the name of the interface, i.e.
Wifi0 .>>
ATTENTION: The wireless
radio on your printer is
currently turned off.
The wireless network interface (%s) is not
functioning properly. The printer cannot
connect to a wireless network. This may
be a problem with the printer hardware.
As a first step, disconnect the power
from the printer, wait a few seconds,
then plug the power back in and re-run
these tests. If this error message persists,
the printer will need to be serviced. The
%s parameter will be the name of the
interface, i.e. Wifi0 .
ATTENTION: The wireless
radio is not functioning.
Contact HP support. The
Wireless PCA needs to be
repaired.
W
W
F
340
1
2
4
Ethernet cable
plugged in and
SSID found
Wireless
adaptor
disabled
Radio
hardware not
functioning
properly
Chapter 7 Appendices
powerOnEnabled ==
ncaTrue &&
radioHardwareStatus
!= ncaRSInitialized
SOLUTION 1: To connect
wirelessly, disconnect the
Ethernet network cable from
your printer.
SOLUTION 1: To connect
wirelessly, disconnect the
Ethernet network cable from
your printer.
SOLUTION 1: To connect
wirelessly, disconnect the
Ethernet network cable from
your printer. Refer to the
assembly instructions that
came with your printer.
ENWW
W
/F
#
Description
Internal conditions
and parameters
Internal details
Troubleshooting
F
10
0
Possible MAC
filtering
Trying to associate
&& mode ==
infrastructure && SSID
matches &&
completion code !=
AkmFailedPmkInvalid
all parameters
consistent
The printer is configured to connect to a
wireless network (%s). An access point
(AP) with this SSID has been found and
its settings are consistent with those
configured in the printer, but you are
not connected. Some possible causes
and fixes are:
ATTENTION: Your printer is
unable to connect to your
wireless router. MAC
address filtering may be
enabled on your wireless
router, which can prevent
your printer from connecting
to your wireless network
during setup.
The printer may be temporarily
experiencing a problem. Turning the
printer off and then back on may correct
this problem.
The AP may be temporarily experiencing
a problem. Turning the AP off and then
back on may correct this problem. Note
that turning off the AP will cause other
connected devices (computers, printers,
etc.) to lose their network connection
until the AP is turned back on.
SOLUTION 1: If MAC
address filtering is enabled
and you would like to keep
it enabled, you must add
the MAC address of your
printer (available in this Test
Report) to the list of
permitted devices for your
wireless router before
continuing.
The AP firmware may be out of date.
Check the manufacturer s website to see
if an update is available.
MAC address filtering may be enabled
on the AP. This can prevent the printer
from connecting if its MAC address is
not in the AP's approved list of devices.
The person who initially set up your
network may have done this for added
security. If this is the case you can either
disable MAC filtering in the AP, or add
the printing device s MAC address
(%02x:%02x:%02x:%02x:%02x:%02x)
to the approved list in the AP. Refer to
the documentation that came with the AP
for more information about MAC
address filtering.
The first %s parameter will be the SSID
name that is displayed on the advanced
wireless networking webpage. The
second set of %s parameters will be the
MAC address of the printer.
ENWW
Wireless troubleshooting report error cases
http://www.justmanuals.com
341
W
/F
#
Description
Internal conditions
and parameters
Internal details
Troubleshooting
F
10
1
Consistency
check when
only one AP
found with
matching name
while trying to
associate
mode ==
infrastructure && SSID
matches exactly one
AP && not all
parameters consistent
The settings you entered in the printer do
not match those of the wireless network
you are trying to connect to (%s).
Connection was not made. Ensure that
all of the wireless settings in the printer
match those in the access point (AP) for
this network.
ATTENTION: Your printer
settings do not match your
wireless router settings.
SOLUTION 1: Run the
Wireless Setup Wizard to
configure your printer.
Assuming that the settings in the AP are
the correct ones, change the wireless
network settings in the printer. Consult
the documentation that came with the
printing device on how to do this. If you
do need to change the settings in the AP
then consult the documentation that
came with the AP on how to do this.
Note that this will require you to update
settings in all devices (computers,
printers, etc.) that connect wirelessly
through this AP.
The first %s parameter will be the SSID
name that is displayed on the advanced
wireless webpage.
342
W
10
3
AutoIP
configured
Adaptor assigned an
AutoIP
W
20
0
Check that
configuration
has
manufacturer
default SSID for
access point
currentState !=
ncaASOff && mode
== infrastructure &&
SSID matches entry in
manufacturer default
list
Chapter 7 Appendices
Your printer is configured to connect to
a wireless network with a manufacturer's
default SSID name (%s). You should
change the name to something unique to
you in order to avoid connecting to the
wrong network. You will most likely
experience network problems if you do
not correct this problem. Even if the
network appears to be functioning
correctly now, it may not in the future.
Refer to the documentation that came
with your access point to change the
SSID name. If you do change the SSID
name of the wireless network, note that
this will require you to update settings in
all devices (computers, printers, etc.) that
connect to this network. The %s
parameter will be the SSID name that is
displayed on the advanced wireless
networking webpage.
ATTENTION: Your wireless
network is currently using
the manufacturer s default
network name (SSID). It is
recommended that you
change your network name
(SSID) to be unique, to
avoid connecting to other
wireless networks that may
also be using the same
default network name. If you
change your network name,
you will need to configure
the SSID on all wireless
devices to match your new
network SSID.
ENWW
W
/F
#
Description
Internal conditions
and parameters
Internal details
Troubleshooting
F
20
1
SSID not found,
infrastructure
mode
Trying to associate
&& mode ==
infrastructure &&
configured SSID is not
found in directed scan
list
The SSID (%s) that you have entered in
the printer does not match any of the
available wireless network access points
(AP). Connection was not made.
ATTENTION: Your printer is
unable to connect to your
wireless router.
The undirected scan list above shows all
of the access points that were found
nearby that are broadcasting their SSID.
Your access point may not be in this list
if broadcasting has been disabled. Note
that if broadcasting is off it won t affect
your ability to connect, just the visibility
of the AP in the undirected scan list.
When the SSID is correct and the AP is
functioning properly, it will show up in
the directed scan list above.
SOLUTION 1: Check that
your wireless router is
powered on.
SOLUTION 2: Check that
your printer network name
(SSID) matches your wireless
router network name (SSID)
exactly. If they do not match
exactly, run the Wireless
Setup Wizard to configure
your printer.
Some possible causes and fixes for the
connection problem are:
You may have entered an incorrect SSID
in the printing device. Refer to the
documentation that came with the printer
for information on how to change the
SSID.
The AP may be powered off. Make sure
your AP is powered on and that the
SSID is correct. Refer to the
documentation that came with your AP
to verify its SSID.
The printer may be too far from your AP
or there may be intervening objects that
are preventing connection. You can try
moving the printer and the AP closer
together.
The %s parameter will be the SSID name
that is displayed on the advanced
wireless networking webpage.
ENWW
Wireless troubleshooting report error cases
http://www.justmanuals.com
343
W
/F
#
Description
Internal conditions
and parameters
Internal details
Troubleshooting
F
20
2
SSID not found,
ad hoc mode
Trying to associate
&& mode == ad hoc
&& configured SSID is
not found in directed
scan list
The printer has created an ad-hoc
wireless network with SSID %s.
However, no other wireless devices have
been found that are using this SSID.
Connection was not made. This is not a
problem if the other devices you want to
connect to are not powered on yet. If
they are powered on then some possible
causes and fixes are:
ATTENTION: Your printer is
unable to connect to your
wireless router.
You may have entered an incorrect SSID
in the printer. In order to form an ad-hoc
wireless network, all the devices must be
using the same SSID. Refer to the
documentation that came with the printer
for information on how to change the
SSID.
SOLUTION 1: Check that
your access point is
powered on.
SOLUTION 2: Check that
your printer network name
(SSID) matches your access
point network name (SSID)
exactly. If they do not match
exactly, run the Wireless
Setup Wizard to configure
your printer.
The printer may be too far from any
other devices in the wireless network or
there may be intervening objects that
are preventing connection. You can try
moving the printer closer to the other
devices. Note that you cannot connect to
an access point (AP) using the ad-hoc
method. Ad-hoc mode allows devices to
communicate directly without the use of
an AP. Infrastructure mode allows you to
connect to a wireless network using an
AP. Refer to the documentation that
came with the printer if you want to
connect to a wireless network with an
AP.
The %s parameter will be the SSID name
that is displayed on the advanced
wireless networking webpage.
F
20
3
SSID found if
doing caseinsensitive
search, ad hoc
and
infrastructure
Associated or trying
to associate && any
mode && non-exact
SSID match found in
undirected scan. Nonexact match means
case-insensitive
compare is true and
case-sensitive
compare is false.
A wireless network was found (%s)
whose name closely matches the name
you have entered (%s) in the printer s
wireless settings. You are not connected
to this network. If this is the network you
are trying to connect to, you will need to
change the SSID name you have entered
in the printer. Refer to the documentation
that came with the printer for information
on how to do this. Note that network
SSID names must be entered exactly as
they appear in the list above:
capitalization, punctuation, etc., must all
match.
ATTENTION: Your printer is
unable to connect to your
wireless router. A network
name (SSID) was found that
closely matches your
wireless network name
except for upper/lower
case.
SOLUTION 1: Run the
Wireless Setup Wizard to
re-enter the SSID correctly.
The first %s parameter will be the SSID
name found during the un-directed scan,
the second %s parameter will be the
SSID name that is displayed on the
advanced wireless networking
webpage.
344
Chapter 7 Appendices
ENWW
W
/F
#
Description
Internal conditions
and parameters
Internal details
Troubleshooting
W
40
0
Signal strength
when
associated
Associated &&
adaptor signal
strength < -85 dB
The signal strength of the wireless
network you are connected to (%s) is %d
dBm. This is below -85 dBm which may
result in poor performance or an
intermittent connection.
ATTENTION: The wireless
signal strength between
your printer and wireless
router is weak.
If you are using an access point (AP),
bring the printing device and AP closer
together to increase the signal strength.
If you are connecting to an ad-hoc
wireless network, bring the printer closer
to other devices in the wireless network.
In either case there may also be
intervening objects that are causing the
signal strength to weaken. Large metal
objects such as refrigerators, water
heaters, or office furniture can block
wireless signals. Try to ensure that such
objects are not directly between the
printer and the AP or other devices in
the wireless network.
ENWW
SOLUTION 1: Move your
printer closer to your
wireless router and avoid
obstructions such as walls
and large metal objects.
SOLUTION 2: After moving
your printer, run the wireless
network test to verify the
signal strength.
Wireless troubleshooting report error cases
http://www.justmanuals.com
345
W
/F
#
Description
Internal conditions
and parameters
Internal details
Troubleshooting
W
50
0
Check for
multiple access
points (or
wireless
repeaters) with
the target SSID
Associated or trying
to associate &&
infrastructure mode
&& number of
directed scans > 1
There were %d access points (APs) (or
wireless repeaters) with your configured
SSID (%s) found in the area. The printer
will connect to the one with the strongest
signal.
ATTENTION: More than
one wireless router has
been found that matches
your wireless network name
(SSID). If this is not
intended, your printer may
connect to the wrong
wireless network. To avoid
this, change your wireless
network name (SSID) to be
unique. If you change your
network name, you will
need to configure the SSID
on all wireless devices to
match your new network
SSID.
If you ve set up a network with multiple
APs, this is a normal condition. Note
that the APs must be connected to the
same LAN, usually via a wired
connection. A special case is a wireless
repeater, which is an AP but uses a
wireless connection to connect to a
master AP.
If you have not set up a network with
multiple APs, it means that someone else
has a network with the same SSID
nearby, in which case you could
connect to the other network instead of
your own. You will probably experience
network problems if you do not correct
this problem. Even if the network
appears to be functioning correctly now,
it may not in the future.
You can solve this problem by creating
a wireless network with a unique SSID.
Refer to the documentation that came
with your access point for information on
how to change its SSID. When you
change the SSID name of the wireless
network, note that this will require you to
update settings in all devices (computers,
printers, etc.) that connect to this
network.
The %d parameter is an integer value of
the number of networks found with the
name, the %s parameter will be the SSID
name found in the network scan.
346
Chapter 7 Appendices
ENWW
W
/F
#
Description
Internal conditions
and parameters
Internal details
Troubleshooting
F
60
0
Incorrect WEP
key
Connected &&
associated &&
encryption mode ==
WEP &&
wepDecryptStatus ==
ncaD11WDSFailed
The printer is connected to a wireless
network (%s) that requires a WEP key.
The key you have provided does not
match what is expected. Although it
looks as if a valid connection is made,
the printer will not receive any data. You
will need to enter a matching WEP key
in the printer. Refer to the documentation
that came with the printer for information
on how to change the WEP key.
ATTENTION: The WEP
security key configured on
your printer does not match
your wireless router setting.
The WEP key index setting
on your printer has been
changed from the default
setting of 1 . This may
cause problems when
connecting to your wireless
network if your wireless
router is not using the same
WEP key index value.
The person who initially set up your
network should be able to provide you
with the correct WEP key to use.
Alternately, if you are connecting to an
access point (AP), you may be able to
find the matching WEP key from the AP.
Consult the documentation that came
with the AP on how to do this.
SOLUTION 1: Run the
Wireless Setup Wizard to
re-enter your wireless
network WEP security key.
The %s parameter will be the SSID name
found in the network scan.
I
60
1
Unknown WEP
decrypt status
Connected &&
associated &&
encryption mode ==
WEP &&
wepDecryptStatus ==
ncaD11WDSUnknow
n
The printer is connected to a wireless
network (%s) that requires a WEP key.
However, no data have been sent to the
printer. Because of this, it is unknown
whether the WEP key entered in the
printer matches that of the wireless
network.
Usually this is a temporary condition.
Once some data are sent, the printer
will be able to determine whether the
WEP keys match. Try running this report
again in a few seconds.
The %s parameter will be the SSID name
found in the network scan.
ENWW
Wireless troubleshooting report error cases
http://www.justmanuals.com
347
W
/F
#
Description
Internal conditions
and parameters
Internal details
Troubleshooting
W
60
2
WEP key index
is different from
1
Connected &&
associated &&
encryption mode ==
WEP &&
wepDecryptStatus ==
ncaD11WDSUnknow
n
ncaD11WDSFailed
&& wepKeyIndex !=
1
The printer is connected to a wireless
network (%s) that requires a WEP key.
Data are not being received. You are
using a WEP key index of %d. A WEP
key index of 1 is typical.
ATTENTION: The WEP key
index setting on your printer
has been changed from the
default setting of 1 . This
may cause problems when
connecting to your wireless
network if your wireless
router is not using the same
WEP key index value.
If the index does not match what the
wireless network is expecting, it will
prevent the printer from being able to
receive data. The person who initially
set up your network should be able to
provide you with the correct WEP key
index to use. Alternately, if you are
connecting to an access point (AP), you
may be able to find the matching WEP
key index from the AP. Consult the
documentation that came with the AP on
how to do this.
SOLUTION 1: Run the
Wireless Setup Wizard to
re-enter your wireless
network WEP security key.
If you do need to change the WEP key
index of the printer, refer to the
documentation that came with the printer
for information on how to do this.
The %d parameter will be the index, the
%s parameter will be the SSID name
found in the network scan.
F
60
4
Non-default
WEP
Authentication
associationState !=
ncaD11ASAssociated
&&
communicationMode
== infrastructure &&
wirelessEncryptionMo
de == WEP &&
wirelessAuthMode !=
OpenThenShared
The printer is configured to connect to a
WEP wireless network (%s), and the
printer s configured authentication
method (\"%s\") has been changed
from its default setting (\"Automatic
(Open then Shared)\").
This could potentially cause the printer to
be unable to connect to the wireless
network. The printer s default setting
should always work and avoids any
potential future problems. Unless you
know that the printer s current setting is
correct for your wireless network, it is
recommended that this setting be
changed back to the default. Refer to the
documentation that came with the printer
for information on how to configure the
WEP authentication method.
ATTENTION: The WEP key
authentication setting on
your printer has been
configured to a non-default
setting. This may cause
problems when connecting
to your wireless network if
your wireless router is not
using the same WEP
authentication method.
SOLUTION 1: Refer to your
printer documentation for
information on configuring
WEP.
The first %s parameter will be the SSID
name found in the network scan , the
second %s parameter will be the actual
value of the setting.
348
Chapter 7 Appendices
ENWW
W
/F
#
Description
Internal conditions
and parameters
Internal details
Troubleshooting
F
60
5
Non-default
WPA
Encryption
Associated or trying
to associate &&
communicationMode
== infrastructure &&
wirelessAuthMode ==
ncaD11AMWPA_PSK
&&
wirelessEncrypMode !
=
ncaD11EMAESorTKIP
The printer is configured to connect to a
WPA-PSK wireless network, (%s) and the
printer s configured encryption method
(\"%s\") has been changed from its
default setting (\"Automatic (AES or
TKIP)\").
ATTENTION: The WPA
encryption method on your
printer has been configured
to a non-default setting. This
may cause problems when
connecting to your wireless
network if your wireless
router is not using the same
WPA encryption method.
This could potentially cause the printer to
be unable to connect to the wireless
network. The printer s default setting
should always work and avoids any
potential future problems. Unless you
know that the printer s current setting is
correct for your wireless network, it is
recommended that this setting be
changed back to the default. Refer to the
documentation that came with the printer
for information on how to configure the
WPA-PSK encryption method.
SOLUTION 1: Refer to your
printer documentation for
information on configuring
WPA.
The first %s parameter will be the SSID
name found in the network scan , the
second %s parameter will be the actual
value of the setting.
ENWW
Wireless troubleshooting report error cases
http://www.justmanuals.com
349
W
/F
#
Description
Internal conditions
and parameters
Internal details
Troubleshooting
F
60
6
Non-default
WPA
Authentication
associationState !=
ncaD11ASAssociated
&&
communicationMode
== infrastructure &&
wirelessAuthMode ==
ncaD11AMWPA_PSK
&& rsnAuthType !=
ncaD11ATAutoWPA
The printer is configured to connect to a
WPA-PSK wireless network, (%s) and the
printer s configured WPA version (\"%s
\") has been changed from its default
setting (\"Automatic (WPA2 or
WPA1)\").
ATTENTION: The WPA
authentication method on
your printer has been
configured to a non-default
setting. This may cause
problems when connecting
to your wireless network, if
your wireless router is not
using the same WPA
authentication method.
This could potentially cause the printer to
be unable to connect to the wireless
network. The printer s default setting
should always work and avoids any
potential future problems. Unless you
know that the printer s current setting is
correct for your wireless network, it is
recommended that this setting be
changed back to the default. Refer to the
documentation that came with the printer
for information on how to configure the
WPA-PSK WPA version.
SOLUTION 1: Refer to your
printer documentation for
information on configuring
WPA.
The first %s parameter will be the SSID
name found in the network scan , the
second %s parameter will be the actual
value of the setting.
F
60
9
Non-standard
WPA mode
Radio connected to
an 802.11n-only AP
which supports WPA
with TKIP.
ATTENTION: Your printer is
unable to connect to your
wireless router. This may be
caused by the following
settings on your wireless
router: 1) 802.11n devices
only and 2) WPA-TKIP only
encryption. WPA-TKIP is no
longer allowed for newer
certified wireless 802.11n
devices because WPA-AES
provides stronger security.
SOLUTION 1: Change your
wireless router encryption
setting to WPA-AES or
WPA-AES or TKIP (also
called mixmode ), then run
the printer s Wireless Setup
Wizard again.
350
Chapter 7 Appendices
ENWW
CSR fliers
●
Accessory Tray flier
●
Front Cover flier
●
Ink Cartridge Cover flier
●
Multi-Sheet Tray Extension flier
●
Out-Of-Paper Sensor flier
●
Output Tray flier
●
Output Tray Sensor flier
●
Printhead Replacement Kit flier
CSR fliers
ENWW
http://www.justmanuals.com
351
Accessory Tray flier
352
Chapter 7 Appendices
ENWW
Front Cover flier
CSR fliers
ENWW
http://www.justmanuals.com
353
Ink Cartridge Cover flier
354
Chapter 7 Appendices
ENWW
CSR fliers
ENWW
http://www.justmanuals.com
355
Multi-Sheet Tray Extension flier
356
Chapter 7 Appendices
ENWW
CSR fliers
ENWW
http://www.justmanuals.com
357
Out-Of-Paper Sensor flier
358
Chapter 7 Appendices
ENWW
CSR fliers
ENWW
http://www.justmanuals.com
359
360
Chapter 7 Appendices
ENWW
Output Tray flier
CSR fliers
ENWW
http://www.justmanuals.com
361
362
Chapter 7 Appendices
ENWW
Output Tray Sensor flier
CSR fliers
ENWW
http://www.justmanuals.com
363
364
Chapter 7 Appendices
ENWW
Printhead Replacement Kit flier
CSR fliers
ENWW
http://www.justmanuals.com
365