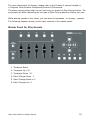
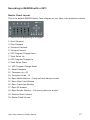
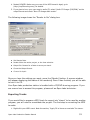
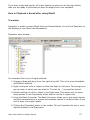
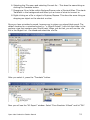
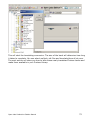
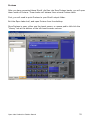
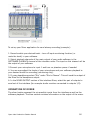
1
Open Labs Production Station Manual
© 2008 Open Labs Inc.
All Rights Reserved
Open Labs
4020 South Industrial Drive
Austin TX, 78744
USA
Open Labs Production Station Manual
1
Preface
This Product Manual gives information about the Open Labs production station, as per
Generation 4 specifications.
Manual Organization
The chapters in this User Manual are arranged as follows:
●
Introduction: information and overviews of an Open Labs production station.
●
Getting Started: information on preparing your Open Labs production station for use.
●
First time: instructions on what to expect from the software and hardware environment
of your Open Labs production station.
●
Playing Sounds: instructions on how to use Karsyn to play sounds with your Open Labs
production station.
●
Recording: instructions on how to record on your Open Labs production station using
REAPER.
●
MIDI Mapping: information about mFusion, and using mFusion to create MIDI controller
assignments.
●
MimiK Manual: instructions on how to mimik keyboards/modules and how to play back
said mimiked sounds.
●
Hardware Maintenance: information regarding the need to make hardware changes.
●
Appendix: information about preinstalled software, audio hardware, and sound banks.
As well as an appendix for learning the basics of professional audio.
Useful Suggestions
This manual has a fair amount of information, however, from time to time you may not find
what you need to know in this manual. Every application that comes with an Open Labs
production station has a manual. These are usually in either a .PDF format or HELP file format,
and can be located in their “c:\Program Files\Product Name” folder.
Also, Google or Wikipedia are both great resources for finding more detailed information on
the application you require assistance with.
Open Labs Production Station Manual
2
Table of Contents
Chapter 1 - Introduction .................................................................................6
Open Labs Production Station Components........................................................7
About the Touchscreen Monitor.....................................................................8
Chapter 2 - Getting Started.............................................................................9
Unpacking and Setting up your Open Labs Production Station..............................9
Connecting the Cables................................................................................9
Rear Panel Layout.................................................................................10
Audio & MIDI Connections.........................................................................10
Rear Panel I/O:.....................................................................................10
Front Panel Audio Interface.....................................................................11
Basic Connection Diagrams.....................................................................13
Turning on an Open Labs production station.....................................................14
About the BIOS...........................................................................................14
About the Open Labs GUI..............................................................................15
Chapter 3 – First Time ..................................................................................16
The Open Labs GUI In Detail.........................................................................16
About the MIDI Controllers............................................................................19
Master Control.........................................................................................19
DJ/VJ Controller.......................................................................................19
The Track Pad, Keyboard, and Special Keys......................................................20
Using USB Devices.......................................................................................21
Using DVD/CD-RW Drive...............................................................................21
Using the Internet.......................................................................................22
Adding Software to your Open Labs Production Station......................................22
New Software Installation Considerations.....................................................23
Chapter 4 - Quickstart...................................................................................24
Three Steps to Playing Sounds on an Open Labs Production Station....................24
Master Panel for Play Sounds.........................................................................25
Chapter 5 - Playing Sounds - Karsyn.............................................................26
Key Features...............................................................................................26
Karsyn’s Control Module................................................................................27
Output Busses.........................................................................................27
Adding and Deleting Output Busses.............................................................28
Instrument Modules..................................................................................28
Adding and Deleting Instrument Modules........................................................28
Instrument Console..................................................................................29
Docking and Floating the Instrument Console...............................................29
Adding and Removing Effects.....................................................................29
Advanced Performance Recovery....................................................................30
Preferences.................................................................................................30
MIDI Input Ports......................................................................................30
Remapping or Disabling MIDI Program Changes............................................30
Key Range and Transpose..........................................................................30
Open Labs Production Station Manual
3
Channel Map............................................................................................31
Continuous Controller Map.........................................................................31
Toggle Mode............................................................................................32
Saving and Loading MIDI Configurations......................................................32
Setting a Default MIDI Configuration...........................................................33
Insert Manager............................................................................................33
Showing Effects Consoles..............................................................................33
Using Effect Presets.....................................................................................33
Insert Effect Automation using MIDI Continuous Controllers...............................33
Working with Presets....................................................................................34
Creating Presets.......................................................................................34
Changing Presets from the Control Module...................................................35
Changing Presets from the QWERTY Keyboard..............................................35
Chapter 6 – Recording - REAPER...................................................................36
Recording with an Open Labs Production Station..............................................36
New to Recording? ......................................................................................36
Opening REAPER for the First Time.................................................................37
Inserting and Using a VSTi ...........................................................................38
Setting VSTi Preferences ...........................................................................38
VST Plug-in Settings ................................................................................38
Setting up a Virtual Instrument......................................................................41
Setting up Recording....................................................................................42
Setting up Track Input..................................................................................43
Recording in REAPER with a VSTi...................................................................47
Master Panel Layout..................................................................................47
Recording................................................................................................48
Enable Metronome....................................................................................49
Looping...................................................................................................50
Mixing ....................................................................................................52
Importing Existing Tracks...........................................................................52
Rendering ...............................................................................................52
Exporting Tracks.......................................................................................53
Chapter 7 – MIDI Mapping - mFusion™.........................................................57
Mapping MIDI Controllers..............................................................................57
About this Chapter....................................................................................57
Maps..........................................................................................................57
Presets.......................................................................................................57
Control Panel Overview.............................................................................58
Preset List...............................................................................................58
Preset menu...............................................................................................58
Options......................................................................................................59
MIDI In...................................................................................................59
MIDI Out.................................................................................................59
General ..................................................................................................59
Virtual Controls........................................................................................59
Panel View and Control Editor........................................................................59
Control Types..............................................................................................60
Button Control Settings.............................................................................60
Open Labs Production Station Manual
4
MIDI Control ...........................................................................................60
Keystroke ...............................................................................................60
App Launch ............................................................................................60
Map Change ...........................................................................................60
Transpose ...............................................................................................61
Program Change ......................................................................................61
MIDI Note ..............................................................................................61
Fader Control Settings...............................................................................61
Encoder Control Settings...........................................................................62
Control Panel Types......................................................................................63
Miko Master Control..................................................................................63
DJ/VJ Controller.......................................................................................63
Keyboard Range Map................................................................................63
Chapter 8 – MimiK Users Guide......................................................................65
What is MimiK?..............................................................................................65
MimiK Suggested Usage............................................................................65
What is a Preset and a Bank?.....................................................................65
SFZ Format.............................................................................................65
How to Physically Set Up MimiK.....................................................................66
Wiring Diagram........................................................................................66
Setting up MimiK.........................................................................................67
MimiK Features Guide...................................................................................69
Main Window...........................................................................................69
Options Window.......................................................................................69
MimiK Tutorial (Quick Start)..........................................................................72
How to Playback a Sound after using MimiK..................................................73
Translator.............................................................................................73
Proteus................................................................................................76
Chapter 9 – Hardware Maintenance...............................................................80
Please Read................................................................................................80
New Hardware Installation Considerations.......................................................80
Opening your Open Labs Production Station.....................................................80
Appendix A - Bundled Software.....................................................................82
Appendix B - Audio Interface Control Panel...................................................88
Appendix C - Sound Presets...........................................................................93
VST Instruments.........................................................................................93
VST Effects.................................................................................................95
General Sound Libraries................................................................................97
Appendix D – Pro Audio Basics....................................................................110
Appendix E – Making Adjustments ..............................................................122
Calibrating the Touchscreen.........................................................................122
Adding a Second Display.............................................................................124
Adding a New Program to Launch from the Open Labs Shell.............................126
Open Labs Production Station Manual
5
1
Chapter 1 - Introduction
Open Labs creates the ultimate performance and studio instruments. Based on the
OpenSynth™ platform, Open Labs production stations free you from frustrating
limitations imposed by closed, proprietary systems, while still maintaining the virtues
of an all in one keyboard instrument.
Open Sounds: Open Labs production stations can emulate almost any instrument
ever invented by hosting industry standard VSTi software synthesizers, samplers, and
audio processing plug-ins.
Open System: Open Labs production stations utilize industry standard motherboards
and processors that allow you to run standard operating systems (such as Microsoft
Windows), and use standard PC-compatible hardware.
All in One: Open Labs production stations all in one design eliminates the clutter and
confusion of traditional desktop computer systems, so you can focus on your music.
User Friendly: Open Labs production stations enable you to change settings and
access programs through an easy-to-use interface that shields you from the
complexities of the operating system.
Power to Rock: Open Labs production stations can accommodate the fastest
processors available, more RAM, and more storage than any other music workstation.
Low Latency: Open Labs production stations give you near-zero latency even under
high processor loads.
Versatility: Open Labs production stations are so versatile, that they can run virtually
any plug-in or application designed for the Windows XP operating system, including
products from Steinberg, Native Instruments, IK Multimedia and many others!
Bring It!: Equipped with PCI/PCI-E slots that can accept up to full size cards, Open
Labs production stations can accommodate your favorite Creamware. TC, and,
Universal Audio cards, providing unsurpassed power. Open Labs production stations
also features PCI-Express (PCIEX1) slots, offering even greater expansion potential.
Modern Art: With a sleek, modern design incorporating an aluminum chassis, Open
Labs production stations are as beautiful as they are powerful.
Surfboard: An ethernet port allows you to directly access the Internet, and to quickly
and easily download upgrades, sounds, and applications.
The versatility to grow and adapt to every musician’s needs is why Open Labs
production stations are unique. Extreme care should be taken when installing new
Open Labs Production Station Manual
6
hardware and software. Installing the wrong components could cause great instability
to your Open Labs production station. Read Chapter 4 before installing any new
devices or software.
Open Labs Production Station Components
DVD/CDRW Drive
Open Labs production stations come standard with a DVD/CD-writer, so that you may
use it as a backup device, or to create audio CDs of your music. The DVD/CDRW drive
can also be used to play CDs, DVDs, or install software.
Hard Drive
The hard drive is the main physical storage device for all your data and applications.
Because hard drives are delicate devices, always treat them with care.
Power Button/Reset Button
The power switch and reset button are located in the recessed area on the right side
of the keyboard.
Audio Interface
Open Labs production stations include a mutichannel audio interface. Please refer to
Chapter 2 for information about the specific audio input/output features of your Open
Labs production station.
USB Ports (2)
Two rear USB ports allow connections to USB devices.
Internal USB Port
All Open Labs production stations have at least one unused USB port located inside
the chassis. This is ideal for USB software protection devices.
Monitor Port
The monitor port allows you to connect any monitor with a standard VGA connector to
your Open Labs production station.
Ethernet 10/1000
The Ethernet port will accept a single high-speed cable connection. This will allow you
to share files, print, and access the Internet.
DIMM Expansion Slots
If your Open Labs production station is currently fitted with less than 4GB of RAM, you
can install additional memory. Open Labs production stations support 240-pin, DDR2
DIMMs. Call technical support for details about expanding an Open Labs production
station’s memory capacity.
PCI/PCI-E Expansion Slots
PCI and PCI-Express slots are for adding additional hardware boards such as I/O
Open Labs Production Station Manual
7
cards, DSP cards, or additional graphics boards. Add-in boards should all be Microsoft
Windows XP compatible. If you are unsure, please call Open Labs technical support.
Performance Controllers
An Open Labs production station’s top panel contains a variety of faders, knobs,
buttons, and a DJ A/B fader. All of these may be mapped to control the functions of
various applications, instruments, sequencing software, etc.
Touchscreen Monitor
Open Labs production stations comes with a touchscreen monitor. The touchscreen
can be accessed using your fingertips, or a plastic stylus. The touchscreen provides an
alternative method of inputting commands. It can be used by itself as the sole source
of command input, or it can be used in conjunction with the built-in keyboard and
track pad, or a standard keyboard and mouse.
About the Touchscreen Monitor
Here are a few techniques that will help you get the most out of the touchscreen:
Rather than using the flat portion of your finger, use your fingernail. By using your
nail, you make contact with a smaller portion of your finger and get greater accuracy.
To have a “right-click” effect with your finger, tap and hold down on the screen with
your finger. In a moment, the right-click options will pop up for you.
For fine details, use the supplied touchpad. Either use a finger on the touchpad with a
thumb on the left button for clicking, or use two hands.
Open Labs Production Station Manual
8
2
Chapter 2 - Getting Started
Unpacking and Setting up your Open Labs Production Station
The first time you open the box, you should ensure that all the parts are enclosed.
Because each Open Labs production station may be customized with different options,
you should validate its contents with your order. Ensure that all components are
included and that none of them were damaged during shipping.
Select a flat tabletop near a stable power source, preferably one that is surgeprotected, or an uninterrupted power supply (UPS) to unpack your Open Labs
production station. Network availability is also a plus, especially if you plan to transfer
work through a local area network (LAN).
Please note:
1) Open Labs production stations have cooling vents on the back panel and on the
underneath the chassis. Make sure that none of these vents are obstructed.
2) There should be ample room on the left side of your Open Labs production stations
to allow for the DVD/CD-ROM tray to eject without obstruction.
Connecting the Cables
Open Labs production stations contain all the common interfaces you would find on a
computer workstation. On the back panel you will find two USB ports, one VGAmonitor port, Ethernet port (10/1000), Firewire 400, PS/2 keyboard, the audio I/O
connectors, MIDI I/O and pedal inputs.
Before powering the Open Labs production station:
1) Connect your Open Labs production station’s audio outputs to your monitoring
system.
2) Connect to your Open Labs production station any external items you plan to use,
such as USB devices, an external video monitor, additional MIDI-equipped devices,
sustain pedal, etc.
Open Labs Production Station Manual
9
Rear Panel Layout
On an Open Labs production station’s back panel you will find:
1. VGA monitor out port
2. Switches for the power supply (some systems may have auto voltage switching)
3. Firewire 400 port
4. Ethernet (10/100/1000)
5. Two USB ports
6. PS/2 keyboard connector
7. Audio/MIDI I/O panel
Audio & MIDI Connections
Open Labs production station’s back panel provides six analog outputs, two analog
inputs, stereo S/PDIF digital I/O, and MIDI I/O. An additional coaxial digital output is
located to the left of the stereo S/PDIF I/O connectors. This output can be used to
send stereo or multi-channel (up to 7.1) audio to an external decoder, typically the
digital audio inputs of a home theater system.
Rear Panel I/O:
See the end of this chapter for examples of connections to the various inputs and
outputs.
Open Labs Production Station Manual
10
Front Panel Audio Interface
There is also an audio interface located on the front of Open Labs production station,
providing two more audio inputs and an output for headphones.
The two inputs on this panel serve as preamps for either microphones or instruments
(as opposed to the rear panel inputs, which are appropriate for line-level signals).
Phantom power may be turned on for use with condensor mics.
Both of the inputs utilize the Neutrik Combo connector, which lets you use either 1/4”
phone or XLR connectors.
The 1/4” connectors are for use with an instrument (guitar, bass, etc.). When an
instrument is plugged into the instrument input, the microphone preamplifier is
bypassed and the interface becomes an active instrument preamplifier.
Note: Active instruments are those that have an internal preamp or a line level output.
Active instruments should be plugged into a line input (located on the back) rather
than into an instrument input. In other words, don’t plug an active instrument into the
combo jacks on channels 1 or 2.
48-volt Phantom Power
Pressing this button will send phantom power to the mic inputs. When on, the button
will light up.
Input Gain Control
Each channel has an input gain control knob and associated clip light. The following
gain structure is provided for each channel:
Microphone Input XLR: 45dB of variable gain (+14dB to +55dB)
Instrument HiZ Input TS 1/4”: 45dB variable gain (+8dB to +50dB)
Clip Indicator: The clip indicator will light up if your input signal from the XLR (Mic)
or ¼” (line) reaches +18dBu (0dBfs). At this level, your mic preamp/line trim signal
may not exhibit signs of clipping such as distortion. However, this level will cause the
A/D (analog to digital) converters to clip. Therefore, it is highly recommended that you
do not allow your converters to clip (the clip indicators to light up) as the sound
quality will not be desirable.
Open Labs Production Station Manual
11
Main Level: This knob allows control over the output level. It has a range of -80db to
+10dB.
Headphone ¼” Jack: This is where you connect your headphones.
Phones Knob: The phones knob controls the amount of volume going to the
headphone output on the front of the unit. Notice the volume indicator goes to 11
(loud). Use this setting with caution.
Red-Blue Power/Sync Light: This light is a clock (sync) indicator. It lets you know if
your unit is receiving wordclock correctly. Wordclock is the manner by which digital
devices sync frame rates. Proper wordclock sync prevents digital devices from having
pops, clicks, or distortion in the audio signal (due to mismatched digital audio
transmission).
●
Blue – solid sync
●
Red – sync not present.
●
Flashing Red and Blue – external sync not present
Open Labs Production Station Manual
12
Basic Connection Diagrams
The following picture shows examples of the rear audio and MIDI connections.
The following picture shows examples of the front audio connections.
Open Labs Production Station Manual
13
Turning on an Open Labs production station
There are two power switches on an Open Labs production station. One is located on
back of the power supply and the main power switch is located on the right side of the
Open Labs production station within the end bezel.
Please note carefully:
Be sure your Open Labs production station power supply is configured for the proper
voltage. You can set the voltage via the switch on the power supply (rear panel). If
you are unsure what the setting should be, please contact technical support at Open
Labs before attempting to power up your Open Labs production station.
The power supply also has a switch labeled “H” for High, “L” for Low, and “A” for Auto.
This switch will adjust the fan speeds of the power supply. As a default it should be set
to Auto.
Upon powering up, the Open Labs production station will boot up in two phases: The
first phase is the BIOS phase, or the pre-Microsoft Windows phase. This is when the
hardware validates that all systems are functional within acceptable parameters. PCI
devices, onboard memory, and other system devices run through a short diagnostic
routine, and then the system will begin to load the operating system—Microsoft
Windows XP. It is normal for the BIOS screen to load upside down on your display.
Once Windows XP loads, the screen will rotate to the correct orientation.
Unless you plan to make immediate hardware changes, there is no need to access any
of the BIOS configuration menus. If you do plan to make some BIOS modifications,
you can access the BIOS by hitting the DELETE key when your Open Labs production
station first boots.
About the BIOS
System BIOS is a menu where you can configure your hardware settings. The settings
pertain to hardware only, and will sometimes affect your software programs if
configured incorrectly. If you plan to make modifications to the BIOS, it is
recommended that you read the motherboard manual which is provided with your
system. This manual contains all the configuration options supported by your Open
Labs production station.
The second phase loads Microsoft Windows XP. This is an optimized installation of
Windows XP, meaning that it contains all the tweaks that will enhance system
performance. Since this is the “Full Version” rather than the “Embedded” version of
the Windows package, your Open Labs production station has all the potential to be
your most powerful sound production appliance without any hindrance to any
computer-driven applications. Any software supported under the Microsoft Windows XP
Open Labs Production Station Manual
14
platform will be supported by your Open Labs production station. After the system is
fully booted, you should be in the Open Labs Graphical User Interface (GUI).
About the Open Labs GUI
The Open Labs GUI is not a standard part of Microsoft Windows XP. It is a
customizable overlay to the standard Microsoft XP work environment. You can toggle
between the two modes by clicking on the Open Labs icon (located in the lower lefthand corner of the screen), select Util, and then select Go To Windows. You can always
reinstate the Open Labs GUI by accessing the shortcut (named “Open Labs Shell”)
provided on the desktop.
For more information about the Open Labs GUI, see chapter 3.
Open Labs Production Station Manual
15
3
Chapter 3 – First Time
The first time you power up your Open Labs production station you may realize that
the screen looks nothing like Microsoft Windows XP. The new look is the Open Labs
Graphical User Interface that will enhance your productivity, especially in combination
with the touchscreen.
The Open Labs GUI In Detail
The GUI, or graphical user interface, is a customizable shell that allows the launching
of applications from a single location. This GUI is optimized for use with a touchscreen
and for musical performance. Traditionally, within the Microsoft Windows environment,
you would have to make shortcuts for applications you use most often, and arrange
them on your desktop or system tray for easy access. Because these items are often
masked by open applications and windows, you may have to reposition your windows
every time you wish to initiate a new application. Starting programs via the ‘Start’
button is also not ideal, because the program groups contain all installed programs,
rather than just those few applications you use the most.
The Open Labs GUI is designed to allow access to the programs and tasks that you will
use most frequently with your Open Labs production station. After powering up your
Open Labs production station, Windows XP will launch, followed by the Open Labs GUI.
You will notice right away how the GUI organizes and simplifies the tasks associated
with making music.
Currently active applications will appear on the taskbar. If there are more applications
open than will fit in the taskbar at once, you can scroll left and right using the arrows
in the lower right-hand corner of the screen.
Clicking on the Open Labs icon in the lower left-hand corner will reveal shortcuts to a
variety of applications and files.
The picture below shows the first level of buttons displayed when you click the Open
Labs icon. It also shows the icon for an open application (in this case, Windows
Explorer).
Open Labs Production Station Manual
16
Starting from the bottom, the icons will be explained.
QUIT
Clicking on this button will give you the following options:
Machine Shut Down: Use this to turn your Open Labs production station off
Restart: Use this to restart your Open Labs production station.
UTIL
The Util button provides access to utilities that you might need while working on your
Open Labs production station. When you click on the Util button, you will see the
following options:
File Nav: This is a touchscreen friendly file browser. To launch a file or program, or to navigate into a
directory, you will need to left click the icon to the left of the file/directory name. Double clicking is not
required.
Search: Click on the search icon to search for files on your hard disk(s).
On-Screen Keyboard (OSK): This button will display a graphical representation of a standard
computer keyboard for touchscreen entry of alphanumeric input.
SysRestore: This button will launch the Windows XP backup utility. Use this periodically to back up
your data.
Touchscreen Options: Use to calibrate your touchscreen and display settings.
About: Shows information about the Open Labs Graphical User Interface.
Files: The Files button is a user-defined menu button. It is a default shortcut to the data partition on
your hard drive.
Go To Windows: This button will close the Open Labs GUI and take you to the standard Windows XP
desktop.
Open Labs Production Station Manual
17
Help
The Help button gives you access to various forms of information regarding your Open Labs production
station. When you click the Help button you will see the following options:
Tutorial Videos: You will find video tutorials that will help you make recordings and play sounds.
Manuals: Will take you to a folder containing user guides and manuals.
Remote support (Requires an Internet connection): Clicking this will take you to a website where
an Open Labs technician can log into your production station and provide you with technical assistance,
and online tutorials. Please call Open Labs tech support to schedule a remote support session.
512.444.6222.
Open Labs Forum (Requires an Internet connection): To gain access to the Open Labs on line
community, and technical support forums use this link: (http://forum.openlabs.com).
Forum access requires registration.
Apps
The Apps button is a way to access various programs installed on your Open Labs
production station. When you click the Apps button you will see the following options:
Play Media: This button launches Windows Media Player, for the playback of media files.
Burn CD-DVD: Launches a CD/DVD burning program.
Internet: Launches the Firefox browser for gaining access to web pages.
Audio
The Audio button directs the controls for your sound card. When you click the Audio
button you will see the following options:
Control Panel: Launches the sound card control panel, from here you can adjust latency, sample rate,
and boost input volume.
Mixer: This button launches the sound card mixer panel.
MIDI
Launches the mFusion Control Panel. See Chapter 6 for information about using
mFusion.
MimiK Keyboard
Launches the MimiK Keyboard cloning software. For information on using MimiK, refer
to Chapter 8.
Record/Sequence
This button will launch the MIDI/audio sequencer bundled with your Open Labs
Open Labs Production Station Manual
18
production station, which REAPER. For information about using Reaper see Chapter 4.
Play Sounds
This button displays a list of sounds. Selecting one of the sounds launches either
Proteus X or Karsyn and loads the desired sound.
About the MIDI Controllers
Open Labs production stations offer the following control surfaces:
●
Master Control (faders and buttons)
●
DJ/VJ Controller (A/B crossfader, buttons)
Both of these are actually programmable MIDI control surfaces. Open Labs production
stations ship with MIDI control maps for use with the installed applications (Karsyn,
REAPER, and so on), but you can also create your own custom maps to use with any
MIDI application. See Chapter 4 for information about using mFusion to create and
edit MIDI control maps.
Master Control
The master control panel contains 18 buttons and five sliders. The buttons are all
freely assignable, but have been designed and labeled to support specific system
operations and software functions.
DJ/VJ Controller
Open Labs Production Station Manual
19
The DJ/VJ controller contains 12 buttons, one A-B crossfader, and 7 knobs. The
buttons are all freely assignable, but have been designed and labeled to support
specific system operations and software function.
The Track Pad, Keyboard, and Special Keys
The Open Labs production station keyboard is no different than the standard computer
QWERTY keyboard. Additionally, you can use an external keyboard. The Open Labs
production station keyboard has a “windows” key located between the Ctrl and Alt
button to the left of the spacebar. The Windows key allows immediate access to the
Microsoft Windows Start Menu. From the Start Menu, you can launch all your
applications, configure settings, and browse for data or shutdown your Open Labs
production station.
Your track pad has two main buttons: left and right. The left track pad button is
mostly used to select objects, or to launch programs. The right track pad button is
used to call up auxiliary menus and properties of objects.
In general, to access or launch an application, double-click the left track pad button
while the track pad pointer is hovering over the desired icon.
To move an object from one folder to another, or to reposition onscreen icons, you can
move these objects by dragging. To drag an object, position your track pad pointer
over the icon, press and hold down the left mouse button, then move the object to its
new location. When you release the left track pad button, your object or icon will be
placed in its new location. Dragging does not always work, and it may be disabled by
the program that you are using.
You can also select multiple items by grouping them using the left track pad button.
When you position the pointer over an empty area on your desktop, you can hold
down the left track pad button and proceed to drag a rectangle over several objects.
Releasing the left track pad button will highlight all objects or icons within the area of
the rectangle created by dragging the pointer. Selecting multiple objects allows you to
move and assign attributes to all the objects at once rather than doing each one
individually. For example, you may wish to delete four files in your music folder. You
can use this method to select the four items and then hit the DELETE key on your
keyboard to send these items to the recycle bin.
In Microsoft Windows XP, one of the most popular keystrokes is the Control-Alt-Delete
command. Press the Control, Alt, and Delete key simultaneously, and you will invoke
the Windows Task Manager. Windows Task Manager allows you to restart your
computer or quit applications that are either not running, or locked. Anytime your
system is experiencing problems, it is always a good idea to Control-Alt-Delete to see
whether the application in question is ‘not responding’. If it isn’t responding, you can
highlight the application, and press the ‘end task’ button. This will allow you to restart
the application from scratch.
Other important keystrokes recognized in the Windows XP environment are the
function keys, labeled F1 to F12. The function keys are used by your applications, and
may have different functions from one program to the next. The function keys serve
as shortcuts (sometimes called quick-keys) to open menus, execute commands, or
Open Labs Production Station Manual
20
toggle settings.
Using USB Devices
The Open Labs production station comes with two USB ports on the back panel. If you
require more USB ports, you can purchase a USB hub. Typically, USB devices also
require you to have Windows XP USB drivers in order for the device to work properly
in Microsoft Windows. The drivers are provided by your USB device manufacturer, and
can be downloaded from their support site on the Internet.
Using DVD/CD-RW Drive
The DVD/CD-RW drive can be opened by pressing the release button located below
the ejection tray. Because Microsoft Windows supports bootable CDs, it is important
that you do not leave any CDs that are bootable in the DVD/CD-RW drive so that you
will not boot the CD accidentally.
Adding CDs into the CD-RW Drive while the Open Labs production station is running
will sometimes initiate pop-up menus. This depends on how the CD was written. For
example, typical software installation CDs have pop-up menus to assist in installation
of its software when the CD is first inserted into the DVD/CD-RW drive. Alternatively,
inserting an audio CD into the DVD/CD-RW drive will initiate CD-Player to play.
The CD drive can be used to burn files onto blank recordable CDs. Recordable CDs are
sold at most computer stores and provide an inexpensive method of backing up your
critical files.
You may use any number of programs to burn CDs with your DVD/CD-RW drive.
Microsoft Windows XP will author CDs as well. To use the Microsoft tool, navigate to
the “Start” button, and then double-click on My Computer.
Double-clicking on My Computer will open a window showing all your storage devices.
Insert a black recordable CD (CD-R) into your DVD/CD-RW drive and your DVD/CDRW drive icon should change to indicate the presence of a CD-R disc.
Double-clicking on this icon will open an empty window that is empty except for a
legend to the left.
Using the drag-and-drop method, you can place multiple files into the empty area
within the right pane of this window. Files should start to populate this empty area.
Keep in mind that the maximum amount of data you can store on a single CD-R is
approximately 700 MB, or 80 minutes of audio wav files.
When you are done, select: “Write these files to CD”.
Another pop-up will appear and will provide a walk-through with step-by-step
instructions to complete your CD. These step-by-step pop-ups are called wizards.
Microsoft loves to use wizards, and you will encounter many wizards while using
Windows XP.
Simply follow the Wizard to the end and your CD will be finished.
Open Labs Production Station Manual
21
Using the Internet
The network adapter allows you to connect a high-speed network to your Open Labs
production station. Depending on your setup, the network could be local area only
(just connects to other computers around you) or to the Internet. Open Labs
production stations will support a 10 Mbits or 1000 Mbits network.
Anytime you connect to the Internet, it is vital that you use the same precautions as
you would use with a normal computer. It is recommended that you keep Internet
activities to a minimum to reduce risks of computer viruses, hackers, pop-ups, and
other vulnerabilities inherent on the Internet.
Internet use for the Open Labs production station should be restricted to the
following:
●
Connection to Microsoft to run updates of service packs. (Please check with Open Labs support
for compatibility of Microsoft updates).
●
Technical support with Open Labs.
●
Updating virus definitions for your anti-virus protection.
●
Collaboration with other musicians in sharing of music.
●
Network printing and local file sharing.
Adding Software to your Open Labs Production Station
Adding new software to your Open Labs production station is not unlike adding
software to your home computer. The process still requires that you have the
software, either on a CD ROM or resident on your hard drive from an Internet
download. System requirements of your Open Labs production station should meet
that of your software, or installation will fail. For example, you cannot install Macintosh
software in a Open Labs production station, or install Windows 98 compliant software.
Your Open Labs production station runs Microsoft Windows XP, and will only accept
software that works on this platform.
As a guideline, most current software sold at your music supplier will work on a Open
Labs production station. It is only with older software applications that you should
practice caution during installation. If you are uncertain whether software applications
will work in the Microsoft Windows XP environment, please contact your software
manufacturer.
Instructions for installing software are provided in the software package you wish to
install. Please read the software’s user guide for step-by-step instructions, or visit its
website for support.
Be aware that there may be compatibility issues with some third party software. Your
Open Labs production station is extremely stable with the software installed as
shipped. Open Labs does not recommend installing untested freeware, shareware or
firmware to your Open Labs production station. For questions about particular
software products, please contact Open Labs support, or the software manufacturer.
Open Labs Production Station Manual
22
New Software Installation Considerations
If you plan to add your own software, be sure you meet all the following criteria:
The software you wish to install is compatible with Microsoft Windows XP.
The software does not conflict with software that is already on your system. An
example of this is having two brands of anti-virus software running at the same time.
The software you are installing has support. Open Labs does not support software that
is not part of the factory installation.
Your Open Labs production station meets or exceeds the recommended system
requirements of the software you wish to install.
Also ensure that you have the necessary disk space needed to install the program.
System Recovery
Should you install an incompatible program that compromises the stability of your
Open Labs production station, a hidden recovery partition has been set up for a
complete system recovery. Call or email an Open Labs technician before attempting a
system recovery. An Open Labs technician can be reached by calling (512) 444-6222,
or by emailing [email protected].
Open Labs Production Station Manual
23
4
Chapter 4 - Quickstart
Three Steps to Playing Sounds on an Open Labs Production
Station.
1. Select the ‘Open Labs” icon in the lower left corner of the screen
2. Select the “Play Sounds” button.
3. Select a preset sound library.
This loads default instruments and banks from either the Proteus-X sample player, or
the live VSTi host, Karsyn.
For further info on using Karsyn, please consult Chapter 5.
Open Labs Production Station Manual
24
For more information on Proteus, please refer to the Proteus-X manual located in:
c:\Program Files\Creative Professional\Proteus X\Documents
The above screen shows what you will see once you press the Play Sounds button. The
sound sets will differ depending on the type of Open Labs production station you own.
While playing sounds in this mode, you may want to transpose - or change – presets.
The following diagram shows you the basic controls of the master panel.
Master Panel for Play Sounds
1. Transpose Reset
2. Transpose Up +12
3. Transpose Down -12
4. Patch Change Down -1
5. Patch Change Reset to 0
6. Patch Change Up +1
Open Labs Production Station Manual
25
5
Chapter 5 - Playing Sounds - Karsyn
Karsyn is a live performance work station software application for virtual instruments.
The software is based on the product Forte by Brainspawn, Inc. Open Labs has
modified the interface, and updated the design to support touchscreen users. Karsyn
is designed for musicians transitioning from hardware rack-mount rigs, and uses the
concept of stackable horizontal modules. The modules consist of a control module,
output busses for controlling access to audio device outputs, and instrument modules
for controlling sound sources.
This document contains basic information to get you started using Karsyn. For
additional information, you can view the complete documentation for Forte at:
www.brainspawn.com. You can find the complete Karsyn manual by navigating to: c:\
Program Files\OpenLabs\Karsyn\User Manual
Key Features
Low Latency Multiple Instrument Hosting – Play up to 32 virtual instruments live
with mixing and routing to multiple audio outputs.
Performance Automation – Reconfigure virtual instruments and MIDI routing
instantly with remote controlled presets.
Advanced MIDI Routing and Filtering – Independent routing and filtering per MIDI
input port; MIDI control of audio effect plug-ins and MIDI clock tempo
synchronization.
Audio Effects – Add audio effects to audio inputs, instruments, or audio buss
outputs.
Audio Thru – Process live audio input through audio effects with very low latency.
Virtual Set List – Presets View displays the set of upcoming configurations in full
screen view.
Performance Features – Auto - start on boot up, auto-recovery, remote control,
Presets View and other features eliminate keyboard and mouse use during a
performance.
Open Labs Production Station Manual
26
Karsyn’s Control Module
Though you can find Karsyn under the “Play Sounds” menu, you may want to open
Karsyn directly. To do so:
1. Select the “Open Labs” icon in the lower left corner of the screen
2. Select the “Util” button.
3. Select “Go to Windows”. The Open Labs shell will close.
4. You will find a Karsyn icon on the desktop. Double left-click to launch it.
1. Control Module
2. Output Bus
3. Instrument Module
The top rack space is the Control Module. On the Control Module you can:
●
Load and save racks
●
Add, remove, duplicate, and hide output busses
●
Create and manage presets
●
Configure program options
●
Rename plug-ins (open the Add Module menu and right-click to rename)
●
View CPU utilization
●
MIDI Panic
Output Busses
On each buss you can:
Open Labs Production Station Manual
27
●
View audio levels going into the audio output device (post buss effects) with the peak level LED
●
Change the volume of all audio routed to the buss with the buss volume fader (post buss effects)
●
Add, remove or reorder VST and DirectX audio effects
●
Display the console for each VST and DirectX audio effect
●
Select an audio output device
Adding and Deleting Output Busses
Adding an output buss can be accomplished in several ways:
●
Select File>New>Bus menu
●
Press [CTRL] + [INSERT] on your keyboard
●
Right-click on the Control Module or a Module and selecting [Add Audio Output Buss]
●
Press the Buss [Add] button on the Control Module
To delete the selected output buss, as indicated by the selection caret, press [DELETE]
on your keyboard, the buss [minus] button on the Control Module, or right-click on the
output buss and select [Remove].
Instrument Modules
Below the output busses are the instrument modules. Each contains one VSTi or DXi
instrument. On each module you can:
●
Adjust the volume of the instrument output (post effects)
●
View MIDI input activity
●
Display or hide the console for the instrument
●
Mute or Solo the module
●
Add, remove, or reorder audio effects
●
Display the console for audio effects
●
Select an output buss
Adding and Deleting Instrument Modules
Adding an Instrument Module can be accomplished in several ways:
●
Select the File>New>Module menu item
Open Labs Production Station Manual
28
●
Press the [INSERT] key on your keyboard
●
Right-click on the Control Module or a Module and select [Add Module…]
●
Press the Module [Add] button on the Control Module
To delete an Instrument Module, as indicated by the selection caret, press [DELETE]
on your keyboard, the module [minus] button on the Control Module, or right-click on
the instrument module and select [Remove].
Instrument Console
Each instrument has its own user interface called a “console”. Consoles can be either
displayed or hidden.
Docking and Floating the Instrument Console
The console may either be docked (embedded in the window below the instrument
module strip) or floating (shown in a separate window).
To float a docked console, double-click on the docking handle or single-click on the
float button at the top left of the console window.
To dock a floating window, double-click on the title bar of the console window.
More information on this subject can be found by viewing page 23 of the Karsyn users
manual.
Adding and Removing Effects
VST and DirectX audio effects may be inserted into either modules or output busses.
To insert an effect, right-click on an audio effects patch point and select the DirectX
effect from the pop-up menu.
To delete an effect, right-click on the effect you wish to remove and select ‘Remove
Audio Effect’ on the pop-up menu.
You can use the up/down arrows on the right to view different effects in the chain.
By right-clicking and opening the insert menu, you may right-click on an effect and
add it to your favorites, rename it, or hide it.
Working with Audio Inputs
Audio inputs allow you to run audio through modules and busses. They are available
on any instrument module in the Audio Input Configuration tab of the console.
You may select the stereo audio input source and monitor the input levels. Select “No
Audio Input” from the input selection box to turn off audio input.
Although some instruments will process audio input, most will not. For this reason,
there is a special module you can create from the Add Module menus called
Open Labs Production Station Manual
29
‘Brainspawn Audio Input’. This is a module without an instrument. In the Audio Input
module, the audio is sent directly from the input to the module’s insert effects.
Advanced Performance Recovery
Advanced Performance Recovery (APR) is a performance feature designed to provide
Karsyn some additional resilience in a live situation.
Preferences
You can change Karsyn’s preferences by selecting Options>Preferences from the menu
bar or by right-clicking on the Control Module and selecting “Preferences.”
MIDI Input Ports
Enable/Disable MIDI Input Ports – Use this list to enable or disable MIDI input
ports for use in Karsyn. If an input port is not checked in this list, it will not be opened
for input and it will not be included in the MIDI Configurations list.
Leave MIDI Ports Open – If checked, Karsyn will open MIDI input ports when
started but will not close them when the rack power is turned off. It will always close
ports when exiting. When un-checked, input ports will be closed when rack power is
turned off.
Remapping or Disabling MIDI Program Changes
Incoming MIDI Program Changes may be optionally remapped or disabled. If
remapping is on, the program change is remapped to a configurable list of presets. If
remapping is off, the program change is sent directly to the instrument which may or
may not respond by changing its internal preset. The list can be of any length, up to
128 entries.
Additionally, MIDI program changes can be ignored. When checked, program change
messages are not remapped or passed to the instrument.
Key Range and Transpose
Refer to page 29 of the Karsyn manual for much more detailed information on key
ranges and transposing.
You may configure an instrument to respond to only a subset of the entire 128-note
MIDI keyboard. To do this, click the mouse anywhere within the keyboard graphic. The
disabled upper and lower ranges will be displayed in gray. You may change the upper
and lower ranges a note at a time by clicking the up/down arrow buttons for each.
Training is a convenient way to automatically set the upper and lower ranges. Press
[Train] and a message will show “Training…”. Now simply press two notes
Open Labs Production Station Manual
30
(simultaneously or one after another) on your MIDI input device. The instrument
module must not be muted, and the rack power must be on for the training to
succeed.
The MIDI keys that lie within the enabled range are then transposed by the amount
shown in the transpose box.
Press [Reset] to enable the entire keyboard.
Key Range and Transpose are MIDI input port-specific. You will have as many ranges
and transpose settings as you have input ports. Highlight the input port at the left to
display and change the configuration on the right.
Channel Map
Incoming MIDI data, such as notes or controllers that are “per-channel,” may be
remapped to a different channel or disabled. Remapping can be useful if the
instrument supports only certain channels (e.g. only channel 1) or if you wish to do
complex routing of multiple MIDI input devices. Disabling can be useful if you have
one controller split between multiple instruments. The list contains each remap entry
up to 16 with a “from” and a “to” column. The list will only display entries that are
remapped to different channels. Any channel not listed in the “from” column is not
remapped.
To add a remap entry, press [New]. To delete a remap entry, highlight the entry in the
list and press [Delete].
Training is a convenient way to automatically set the “From” field without having to
consult your MIDI controller configuration. Select a “From” field, press “Train” and the
field will change to “Training…” Now simply press a note or change a controller on your
MIDI input device, and the field will automatically change to the channel of the MIDI
data you sent. You must manually select the “To” field. The Instrument Module must
not be muted, and the rack power must be on for training to succeed. If the “AutoTrain” button is on when “New” is pressed, training will be started automatically.
If you manually configure a remap entry so that “From” and “To” fields are identical,
the entry will not remain in the list if you close and re-show the console.
Channel remap is MIDI input port-specific. You will have as many channel maps as you
have input ports. Highlight the input port at the left to display and change the map on
the right.
Continuous Controller Map
Incoming MIDI continuous controller data may be remapped to a different controller
number or disabled. They can also be configured to toggle the instrument’s controller
value. This can be useful to remap. For example, your foot-pedal MIDI input to B4’s
Leslie speed so that one tap slows Leslie and a second tap speeds it up. The list
contains each remap entry up to 128 with a “From” and a “To” column, along with a
“Toggle” checkbox. The list will only display entries that are remapped to different
controllers or configured to toggle. Any controller not listed in the “From” column is
Open Labs Production Station Manual
31
not remapped and toggle is disabled. Any disabled controllers will not be passed to the
instrument.
To add a remap entry, press [New]. To delete a remap entry, highlight the entry in the
list and press [Delete].
Training is a convenient way to automatically set the “From” field without having to
consult your MIDI controller configuration. Select a “From” field, press “Train” and the
field will change to “Training…”. Now simply change a controller on your MIDI input
device and the field will automatically change to the controller number you sent. The
instrument module must not be muted and the rack power must be on for training to
succeed. If the [Auto-Train] button is on when [New] is pressed, training will be
started automatically.
You must manually select the “To” field. Some instruments provide a comprehensive
list of MIDI controllers which will be shown in the “To” field. Many do not, and you
must consult the instrument manual and select a numerical field.
If you manually configure a remap entry so that “From” and “To” fields are identical,
the entry will not remain in the list if you close and re-show the console.
Continuous controller remap is MIDI input port-specific. You will have as many
controller maps as you have input ports. Highlight the input port at the left to display
and change the configuration on the right.
Toggle Mode
Toggle Mode configures a controller mapping to toggle the “To” value between 0 and
127 each time the “from” value transmits a value of 127. This feature allows you to
assign MIDI foot switches to features on the instrument like an organ’s rotary speed:
Click once to slow the rotors down and click again to speed them up.
Saving and Loading MIDI Configurations
MIDI Configurations are assigned to an instrument module, but some settings can be
saved and reloaded from a file. Press [Save] to save a configuration. This includes the
following for each MIDI input:
●
Key Range
●
Transpose
●
Channel remap
●
Controller remap
This allows frequently used MIDI configuration parameters to be applied to other
instrument modules or stored for future use. When a MIDI Configuration is loaded,
you may optionally load or ignore specific portions of the configuration.
Open Labs Production Station Manual
32
Setting a Default MIDI Configuration
The last-used MIDI configuration is always saved with an instrument module. Usually,
this MIDI configuration will be reloaded automatically on any future instrument
module using the same instrument. However, if you select a MIDI configuration to be
the default, it will be used instead.
Insert Manager
Right-click and select Insert Manager to control the order of inserts.
Showing Effects Consoles
Double-click an effect to show its console. Working with audio effects consoles is very
similar to working with instrument consoles. The only difference is that the console
window is always floating (never docked) and there are no Program Map or MIDI
Configuration tabs. Close an effect console by clicking the upper right hand [Close]
button.
Using Effect Presets
Accessing an audio effect preset is identical to accessing instrument presets.
MIDI Routing to Effects
●
MIDI input is sent to insert effects. The filtering is different for effects than for the instrument
module.
●
Program changes from MIDI are never sent to insert effects
●
The Instrument Channel and Controller remap is not applied to MIDI before it goes to the effect.
Each effect has its own controller remap to apply automation.
●
Insert Effect Controller mapping is not MIDI input port specific (unlike an instrument’s controller
remap).
●
Instrument Transpose is applied so that plug-ins like harmonizers can build chords on incoming
audio data from MIDI notes.
Insert Effect Automation using MIDI Continuous Controllers
Incoming MIDI continuous controller data may be remapped to VST or DirectX 8.0
automation parameters. They can also be configured to toggle the effect’s parameter.
This can be useful to remap (For example, your foot-pedal MIDI input to Amplitube’s
stomp effects). The list contains each remap entry up to 128 with a “from” and a “to”
column, along with a “toggle” checkbox. The list will only display entries that are
remapped to automation parameters. Any controller not listed in the “from” column is
not remapped and toggle is disabled. Any disabled controllers will not be passed to the
instrument.
Open Labs Production Station Manual
33
To add a remap entry, press [New]. To delete a remap entry, highlight the entry in the
list and press [Delete].
Training is a convenient way to automatically set the “from” field without having to
consult your MIDI controller configuration. Select a “from” field, press [Train] and the
field will change to “Training…”. Now simply change a controller on your MIDI input
device and the field will automatically change to the controller number you sent. The
Instrument Module must not be muted, and the rack power must be on for training to
succeed. If the [Auto-Train] button is on when [New] is pressed, training will be
started automatically.
You must manually select the “to” field. Most effects provide a list of automatable
parameters which will be shown in the “to” field.
Working with Presets
Presets are one of the most powerful features of Karsyn. Presets enable you to use a
single rack for an entire performance and automate preset changes, output routings,
and mutes.
Each rack file can contain multiple presets visible in the Presets window.
Each preset contains a complete configuration including:
●
A preset for every instrument in the rack. This does not need to be a saved preset because the
actual settings of each instrument are saved instead of just a name.
●
An effect preset for every audio effect in the rack. Again, this does not need to be a saved
preset.
●
A MIDI input enable for each port on each Instrument Module.
●
A MIDI keyboard range, transpose, channel and controller remap for every MIDI input on every
Instrument Module.
●
An output buss selection for every Instrument Module
●
A tempo (which many VST and DirectX plug-ins will follow).
Note that the Program Change remap is not included in a Preset. Presets may be
optionally changed using incoming MIDI program changes. When this feature is
enabled, MIDI Program Remap does not work because the program change messages
are used to change presets instead of being remapped and sent to the instruments.
Creating Presets
Presets can be created by clicking the [Presets] button to the left of the presets list on
the Control Module. The new presets will be given a name that represents the time
and date the presets is created.
Open Labs Production Station Manual
34
Presets can also be created from within the Presets Manager (described below).
Changing Presets from the Control Module
You can change the current presets by clicking the up or down arrow to the right of
the presets list.
Changing Presets from the QWERTY Keyboard
You may also advance to the next presets by pressing the SPACE BAR, or by assigning
a shortcut key to each Preset.
Presets Tempo
Each preset can contain a tempo that instruments and effects can sync to. In addition,
you may optionally choose to have Karsyn adjust the tempo dynamically from
incoming MIDI Clock messages from a chosen MIDI input port.
To alter the preset’s tempo, click the [Tempo] button in the Control Module.
The tempo dialog will let you adjust tempo using the horizontal slider control- or by
typing the tempo into the edit box.
If you click [Follow MIDI Clock] on the input port, Karsyn will follow the tempo of
incoming MIDI Clock messages from the highlighted input port.
Open Labs Production Station Manual
35
6
Chapter 6 – Recording - REAPER
Recording with an Open Labs Production Station
Ready to jump right in and start making music? This section will get you going. One
great way to learn REAPER quickly is to read the Keyboard Control section of
Preferences (Ctrl-P). Reading this section will give you insight into just how flexible
and powerful REAPER is. Can’t find what you’re looking for in REAPER? Try rightclicking on everything, you’ll be surprised at the power hidden just below the surface.
The following pages will teach you how to record using your Open Labs production
station. This is not intended to replace the REAPER PDF manual. Topics covered in this
guide are:
●
Opening REAPER
●
Custom Color Themes
●
Inserting and Using a VSTi
●
Inserting an Audio Track
●
Setting up VSTi Preferences
●
Recording with a VSTi
●
Rendering a Mix to File for Burning to CD
●
Exporting Tracks for use in Other Programs
New to Recording?
If this is your first time using any type of recording system, you may want to research
the basics of Pro Audio, producing music, and MIDI recording. A good place to start is
KVR Audio. (http://www.kvraudio.com/wiki/)
Open Labs Production Station Manual
36
Also, be sure to register on the Open Labs user forum, (http://forum.openlabs.com),
where you can read and discuss music with artists like yourself.
Opening REAPER for the First Time
To open REAPER, click on the Open Labs icon. The icon is located at the bottom left of
the opening screen. If you have exited the Open Labs shell, simply double left-click
the REAPER Icon on the desktop. This will launch REAPER.
When you open REAPER, if it looks different than the pictures used in this guide, this is
because REAPER allows you to use a custom color theme. In the following example,
you will be shown where to switch color themes.
There are a couple of ways to select a color theme for REAPER. First, you can simply
go to Options>Color Themes, and select a new theme. Or you can use the keystroke
combination CTRL+ALT PGUP (to scroll theme up) or CTRL+ALT PGDN (to scroll theme
down).
Open Labs Production Station Manual
37
Additional custom color themes can be downloaded from the REAPER user forum,
(http://stash.REAPER.fm).
Inserting and Using a VSTi
Using VSTi’s is simple in REAPER. REAPER on your Open Labs keyboard has already
profiled your VSTi’s, and is ready to go. The following section tells you how to scan
directories of VSTi’s that you have added. If you have not installed additional VSTi’s,
then you can skip this next section.
Setting VSTi Preferences
There may be some options that pertain to you and your setup in the following
example. Usual options are the “get plug-in names” scanning options. If you have
problems scanning VSTi’s, disable the “Get VST plug-in names/type when scanning”
that REAPER does by default.
VST Plug-in Settings
Click the [Auto Detect] button to make REAPER scan your system and detect VST
plug-ins.
Open Labs Production Station Manual
38
VST plug-in paths: Enter a path here, or click the Add button to browse the directory
that contains your VST plug-ins. Multiple directories may be added to this list.
Separate each directory with a semicolon. Multiple directories are shown in the above
example. If you use the add button, the semicolon is added for you.
Rescan directory: Click this button to force REAPER to rescan your VST directory(s).
If you have installed a plug-in and it does not show in the list, use this option.
Clear cache and rescan directory: Click this button to clear the plug-in cache and
force REAPER to build a new list of VST plug-ins. If you have installed a plug-in and it
does not show in the list, and RESCAN DIRECTORY does not resolve, then use this
option.
Get VST plug-in names/types when scanning: By default, REAPER retrieves the
full plug-in name and type when scanning. Clear this checkbox to prevent this
behavior.
What does this mean? If you have this option enabled, it will take much longer to scan
your VST plug-ins, because as REAPER scans and initializes each one, it will increase
the likelihood of a “buggy” VST to crash REAPER. However, if you do not have it on, it
will not differentiate between VST effects and instruments and will put them all in the
same folder. You will be able to use them just the same, but, they will show up a bit
differently.
Save full VST plug-in state if supported (recommended): By default, REAPER
saves the full VST plug-in state if the plug-in supports this function. Clear this
checkbox to prevent this behavior.
Avoid restoring VST state on undo/redo if possible: Select this checkbox if you
are having issues with VST plug-ins reloading patches when using the Undo function in
REAPER.
Default VST configuration windows to generic UI (instead of plug-in UI): This
gives you the option to view by default the generic VST window in REAPER instead of
the plug-ins original GUI. Here is an example:
Open Labs Production Station Manual
39
Plug-in GUI: (EVM Bassline)
Generic UI of the same plug-in:
Better buggy processReplacing compatibility mode (slower): Selecting this
checkbox may provide compatibility with poorly coded or older VST plug-ins, but will
also increase the CPU overhead of REAPER.
Don’t flush synthesizer plug-ins on stop: In general, this should be unchecked,
unless you have plug-ins that don’t handle the mainschanging properly (some
SynthEdit-based ones reload all of their samples, for example).
Inform plug-ins of offline rendering state: This enables REAPER to “tell” plug-ins
that have the ability to “hear” that it is rendering, and if the VST(i) has the feature, it
will usually increase the quality for rendering (Voxengo plug-ins do this; so does
Image-Line’s Sytrus and Fxpansion’s BFD).
Don’t flush UAD-1 plug-ins on stop (helps avoid native CPU munch): This
option prevents the UAD-1 from taking too much native CPU.
Set your VST path here:
Scan for your VSTi’s using this button:
Open Labs Production Station Manual
40
Setting up a Virtual Instrument
Starting from a new project window, this how you prepare a plug-in (DXi, VSTi, or
other supported plug-in) for output:
Press Control+T to add a new track. Then click the FX button:
You will then see the FX chain view page. Press the Add button located to the bottom
left.
On the left side, select “VSTi”. This will show you all the VSTi’s included with your
Open Labs production station, as shown in the following illustration.
Select VSTi from the left side menu. For this example we’ll select MrRay22 in the VSTi
window, and either double left-click, then drag and drop it onto your track, or select it
and press “OK”. MrRay22 is included with your Opens Labs production station.
Open Labs Production Station Manual
41
Setting up Recording
The next thing to do is arm your track for MIDI recording. Press the ARM button so it
turns red. After arming the track, you will be able to hear this VSTi when you play
notes on the keys.
By default, REAPER on your Open Labs production station is set to record MIDI
whenever the ARM button is pressed. However, there is more than one recording mode
for MIDI. Right-click the Record icon (pictured above), and you will see these options:
●
Record Input: This is the default recording mode. It will record MIDI when a MIDI input is
selected. This mode will record new items over others if encountered.
●
Record Output: (MIDI) similar to the input mode, but instead it records the MIDI coming out of
the FX chain. For instance, it would record the effects of a MIDI VST on to the track. It also
renders the live output of a VSTi.
●
Record MIDI: This will enable overdubbing in selected items, and will add notes within items,
this is great for “loop” recording.
●
Record MIDI: Replace in selected items: this will replace notes within items instead of
overwriting the items themselves. The notes within will be entirely erased as you record over
them.
●
Track Recording Settings (Input Quantize: Format, Etc.): This allows you to setup input
quantizing. It also allows you to dial in groove and swing settings, as well as set the format
and .WAV bit depth of incoming audio tracks.
Open Labs Production Station Manual
42
Setting up Track Input
If you want to change the input source of a track, left-click the
located on the VU meter on the track:
button. This is
In the examples below you will see the input source sections. If you need to input a
drum machine, guitar, or microphone, follow these guidelines:
Open Labs Production Station Manual
43
The first is Mono Input. Here you can choose a mono audio in source from the sound
card.
Mono input allows a source to be assigned to an individual input of the sound card. For
instance, if you want to plug in a microphone, guitar, drum machine, and a keyboard
all at once and record them, just add a track for each source, and select an input for
that source. Plug the microphone into MIC input 1 and the guitar into Mic Input 2
(these are the front inputs of the production station). For the drum machine and
keyboard use LineIn 1 and LineIn 2 (these are located on the back of the production
station). Remember to arm your tracks!
Open Labs Production Station Manual
44
The second is Stereo Input. Here you can choose a stereo audio in source from the
Presonus Firebox.
Stereo input allows a source to be assigned to paired inputs of the Firebox. The
process is the same as for the mono inputs, except the stereo-ins are paired together
as Mic 1 and 2, and LineIn 1 and 2.
Open Labs Production Station Manual
45
The third is MIDI Input. Here you can choose a MIDI port and a MIDI channel for
that port. This will list all active MIDI ports.
The Open Labs MIDI Driver 2 is the port that all your production stations control and
keyboard keys are routed through. By default, all tracks are preset to this port. If you
need to route MIDI from an external sequencer or MIDI device, use the Presonus
FIREBOX MIDI-In. The firebox port is located on the back of your Open Labs
production station. Here you have options to only record certain MIDI channels, or all
MIDI channels. You can even select all channels from all MIDI inputs. Select the input
you want to use.
Open Labs Production Station Manual
46
Recording in REAPER with a VSTi
Master Panel Layout
This is the default REAPER Master Panel diagram of your Open Labs production station.
1. Return to the Beginning of a Project
2. Scroll Forward
3. Stop Playback
4. Transport Playback
5. Transport Record
6. VSTi Program Change Down
7. Track Select Up
8. VSTi Program Change Up
9. Track Select Down
10. VSTi Program Change Reset
11. Reset Transpose
12. Transpose Up +12
13. Transpose Down -12
14. Open Media Explorer – Drag and drop Karsyn sounds
15. Open Mixer View Window
16. Open Track View Window
17. Open FX Browser
18. Open Render Window – For mixing down the project
19. Selected Track Volume
20. Master Track Volume
Open Labs Production Station Manual
47
Recording
To record with the VSTi you have inserted, just press the Record button on the master
panel. You can also give the track a name.
You can then start playing the keys and the MIDI notes will be recorded.
Once you record a few bars, this is what you will see:
Hit the play button to play it back. You may need to hit rewind.
The metronome will help you to stay on time. Here is how you setup your metronome:
First, right-click the metronome icon.
You will then see the metronome settings window.
Open Labs Production Station Manual
48
The Metronome Settings window allows for various options for your metronome click
sound.
Enable Metronome
●
Enable during playback and/or count-in before playback.
●
Enable during recording and/or count-in before recording.
●
Count-in length: Allows you to pick how many counts you want it to click before recording or
playback starts. There will be four clicks per number. For instance, if you type in the number 1,
you will get four clicks before recording or playback starts. If you add the number 2, you will get
eight clicks before recording or playback starts.
●
Metronome volume: Allows the adjustment of the level of the first click.
●
Secondary beat gain: Adjusts the level of all clicks after the first click.
●
First beat sample: Allows you to choose a media file as the first sound of your click. If you have
a sound you would like to substitute as the click source insert it here. This sound will be the first
hit of the click. The volume of this one is controlled by the Metronome volume slider.
●
Subsequent beat: Allows you choose a media file to be the secondary click of your metronome.
The volume of this click will be controlled by the Secondary Beat.
●
Frequency of first beat/subsequent beats: This is for adjusting the pitch of the default
metronome click. This does not affect a custom click source.
●
Beat click length: This adjusts the length of the default metronome click in milliseconds. A lower
number makes the click sound shorter: A higher number makes the click sound longer. This does
not affect a custom click source.
Notes:
If you do choose a custom sound it will be used until you select the text in the custom
field and delete it.
If you want eighth note clicks instead of the default quarter note click, you will need to
press ALT+ENTER to open the Project Settings window>Project Settings tab.
Open Labs Production Station Manual
49
On the Time signature setting, change it from “4/4” to “4/8”. This will give you eighth
note clicks instead of default quarter note click. You can also adjust your project
tempo (BPM) here. Refer to the REAPER PDF manual for more info regarding the
Project Settings window.
Looping
If you would like to loop the event you just recorded, you can do so by selecting a
region to loop. Simply left-click and drag from the start of the project to the end of the
area you want to loop. In this example, 1.1.00 to 5.1.00 is highlighted.
To loop playback or recording, you need to turn cycle on. Do this either by pressing
the cycle button, or by using the “R” key on your QWERTY keyboard. Once playback or
record reaches the end of the selection, it will return to the beginning and playback.
Hence, looping.
Open Labs Production Station Manual
50
You can use the same steps to record a loop, except you will want to draw out the
region selection before you record. Left-click on the timeline and drag.
The selection is stretched from 1.1.00 to 5.1.00. This sets up the project as a four bar
loop and will cycle around once the transport reaches the end.
For recording MIDI drums, you might want to set the record mode to “overdub”. Every
time it cycles, it will allow you to add more notes.
When loop recording is in normal MIDI record mode, every time the transport cycles
around a new take will be created. Start recording and let it make four cycles. Vary
what you play each cycle. This allows you to choose the best one afterward.
As you can see, four takes were recorded in this recording. To monitor an individual
take, just left-click that part of the take, or press “T” to toggle to the active take and it
will solo itself from the others. This example has the second take selected. Right-click
the take you want, and select “glue”. This keeps the take you want, while deleting the
others.
Refer to the REAPER PDF manual for more information on recording with plug-ins.
Open Labs Production Station Manual
51
Mixing
REAPER offers Track Mixers and a Main Mixer. Use either - or both - to set volume and
pan. Select mute and solo, to add effects to your tracks. REAPER comes with a large
assortment of built-in, high-quality effects. Add them by clicking the FX button on the
track.
In REAPER, groups are called “folders”. Use folders to apply volume, pan, and effects
to a group of tracks. This is also known as linking tracks. To create a folder:
1. Place the tracks you want to link together in the Track Control Panel.
2. Add a blank track above them (CTRL + T). This will be the Folder track.
3. Click the folder icon on the folder track. The icon will change, and all tracks
below the folder track will become part of that folder.
4. Click the folder icon on the last track you want included in the folder. The icon
will change, and the folder is ready to go.
Importing Existing Tracks
You can add existing sound files to your REAPER project by:
1. Clicking and dragging them in. REAPER will automatically add tracks to
accommodate them.
2. Inserting them through the “Insert” menu item. Note the media item under the
Insert menu is for supported sound formats and for video media as well.
Rendering
When your mix is finished, it’s time to combine your individual tracks into a single,
stereo file. Rendering is done by clicking File>Render, or pressing the C5 button on
your Open Labs production station’s master panel. REAPER supports .WAV, .Ogg,
.AIFF, as well as many other audio formats.
You can also burn to MP3. Please use the following steps to set REAPER up for creating
MP3 audio:
1. You must download a MP3 codec and place it in the main REAPER directory.
2. Download the LAME encoder (http://www.free-codecs.com/Lame_Encoder_download.htm),
and unzip the downloaded file.
3. Then extract “lame_enc.dll” into the main REAPER directory (“C:\Program Files\REAPER”).
Open Labs Production Station Manual
52
4. Restart REAPER. Make sure your use of the MP3 format is legal; go to
(http://mp3licensing.com/) for details.
5. If you plan to burn your new song to audio CD, select “Audio CD Image (CUE/BIN)” as the
output format and check “Burn CD Image after render”.
The following image shows the “Render to file” dialog box:
●
Set Sample Rate.
●
Render either the entire project, or the time selection.
●
Output file: Browse for a folder to store your track.
●
Chose the Output format.
●
Choose bit depth.
Once you have the settings you want, press the [Render] button. A process window
will appear displaying the status of the rendering. Once it has finished, you will be able
to burn it to CD.
Your Open Labs production station is bundled with a CD/DVD burning program. If you
are unsure how to access this program, please call an Open Labs technician.
Exporting Tracks
If you would like to prepare a MIDI track for export into “stems” to be used by another
program, you will need to consolidate the project. The first step is converting the MIDI
to audio.
1. Right-click your MIDI event. Note the section, “Apply FX to items as new take” for stereo.
Open Labs Production Station Manual
53
2. For a mono take note the “Apply FX to items as new take (mono output) section”.
3. Once you make your selection, the “Applying FX” window appears and processes your MIDI
event to a chosen format.
The processed event will show your original MIDI event with the new AUDIO take
directly underneath. From here you need to decide whether the audio portion of the
event is what you want. Left-click to select the audio portion of the event.
If the audio is what you want, right-click the audio portion of the event and select
“glue selected items”.
This is the finished event. MIDI has been converted to a stereo audio track.
Open Labs Production Station Manual
54
You can export this as a track stem to be used in another program. To do so, go to
File>Consolidate/Export tracks.
The following is the Consolidate Tracks settings window.
Consolidation settings: This area allows you to determine which area of a track you
want to export.
●
Entire project: Will export every track of the project, as well as the full length of the project.
●
Time selection: If you have a loop range selected, it will only export content within the range.
●
Custom: Allows manual input of what is exported.
●
Tracks: All – Exports all tracks in the project.
●
Tracks: Selected – Exports only the selected tracks. This is good if you want to export Tracks 1,
5, 7, and 14, for instance. Hold down CTRL and left-click each track you want to export.
●
Consolidate to: Allows you to choose the format of the exported track.
●
.WAV bit depth: Make sure the program you are exporting to can handle the bit depth you
Open Labs Production Station Manual
55
choose. Some programs can only handle up to 32 bit.
Output settings: This area allows you to choose the directory or folder you want the
exported audio to go to.
For more information on consolidation, please refer to the REAPER PDF user guide.
To learn more about the power of REAPER, please read the REAPER PDF users guide.
Also, visit (http://www.REAPER.fm), and visit the REAPER online Wikipedia,
(http://www.cockos.com/wiki/index.php/Main_Page).
Open Labs Production Station Manual
56
7
Chapter 7 – MIDI Mapping - mFusion™
Mapping MIDI Controllers
Open Labs mFusion software unifies multiple MIDI interfaces, MIDI keyboards, and
MIDI controllers into a single MIDI control panel for assigning MIDI channels,
providing keyboard splits, assigning MIDI controllers, and setting other parameters for
incoming MIDI data. In mFusion this is all called mapping.
Keyboards and other controls may be mapped from one type of MIDI data to another,
or mapped to other functions, such as keystroke shortcuts, application launching, or
even changing the mapping of another MIDI controller. All of the MIDI data mapped by
mFusion is unified into a “virtual” MIDI port so that any music application may receive
data from all attached MIDI controllers through one single MIDI port. The individual
MIDI ports from each device remain available, however, for maximum flexibility.
About this Chapter
This chapter describes the mFusion control panel application, as well as the
procedures for creating presets, adding maps, adjusting MIDI settings, and changing
controller assignments.
Maps
Miko will typically have three control panels installed: the Master, DJ/VJ Controller, and
the QWERTY keyboard. Both the Master and the DJ/VJ controllers are complete,
independent USB MIDI controllers. In addition, the piano keyboard itself, including the
pitch and modulation wheels, and the hold and expression pedals are MIDI controllers.
Users may also use MIDI or USB to attach external MIDI controllers. Each of these
MIDI controllers or panels has its own settings within mFusion called a map. Each map
contains settings for the buttons, faders, knobs, or other control items that may be
mapped.
A key feature of mFusion is the ability to make partial maps. If a map only includes
settings for a few controls, all other controls retain previous settings. Maps may be
saved and recalled as needed to apply different controller assignments or MIDI
settings for entire panels or individual controls.
Presets
During a music performance, or when changing from one music application to another,
Open Labs Production Station Manual
57
it is often necessary to change several or all maps all at once. In mFusion, several
maps may be saved together as a group called a preset. Maps always live within
presets, so even if only one map is needed for one MIDI controller, at least one preset
must be created.
Control Panel Overview
The mFusion control panel is divided into four parts. On the left side is the Preset List.
Each preset in the Preset List may be expanded to show the maps within each preset,
and the controls within each map.
The Preset List also contains the “Live” view to show the actual current settings of
each connected MIDI controller. To the right of the Preset list are the Panel View on
top and the Control Editor below.
The panel view shows the controller panel for the selected map and preset, while the
Control Editor shows the settings for the particular control selected in the panel view.
Across the bottom of the mFusion control panel are the Global Keyboard Settings for
basic settings of the music keyboard.
Preset List
The preset list contains all saved presets, as well at the “Live” panel view. Each preset,
as well as the live view, may be expanded to show the maps contained within the
preset. Each map may then be expanded to show the individual controls within each
map. When a map or control is selected in the preset list, the control or control panel
for that map will appear in the control editor or panel view areas, respectively.
The Live view shows the current settings for all attached MIDI controllers, and allows
immediate real-time setting of the controls. Changes in live view are effective
immediately, and do not affect any settings in a stored preset. Presets, on the other
hand, are just settings stored for later use. Changing settings in a preset does not
immediately affect the actual MIDI controls. Pressing the [Make Active] button applies
the currently selected preset or map to the actual live control panel at that moment.
Preset menu
The [Preset Menu] button pops up all of the functions for working with presets. To
create a preset, select [New Preset] from within the preset menu. This creates a new
empty preset with the default name of “Preset” followed by a new preset number.
Select [Rename] to name or rename the new preset. To add control panel maps to the
preset, select [New Map] and then select an available control panel to add. The new
map will be selected and ready for editing.
To save changes to the selected preset, select “save preset” from the preset menu.
While editing a control in a particular map, that map and preset are already selected
for saving. Several different maps may be edited by just switching between different
maps and presets. To save all changes at one time, select “save all”. No changes are
lost until quitting the mFusion control panel. To delete a preset, a map, or an
Open Labs Production Station Manual
58
individual control from a map, select the item to be deleted from the preset list and
select “delete” in the preset menu.
Options
The [Options] button displays overall settings and options for mFusion.
MIDI In
Selects the MIDI input ports which mFusion will map and control. Any attached Open
Labs control panels are always selected and do not appear in the list. This list is for
additional input ports to be included in mFusion’s MIDI processing and mapping.
mFusion outputs all mapped data through a virtual port called “Open Labs MIDI
Driver”. Any MIDI applications will detect this as an input.
MIDI Out
Selects additional output ports for mapped data. The same MIDI data that goes to the
Open Labs MIDI Driver will be output to all selected ports. Selecting the MIDI out port,
for example, will send all data to the rear panel MIDI OUT jack. This would allow the
Miko to control external sound and MIDI devices.
General
Options panel selects system wide setting. The “default note panel device” determines
which MIDI data source is considered the main music keyboard input for the system.
In the Miko, this defaults to the “Master Control Panel” which serves as the input for
the MIDI keyboard, including the pitch and modulation wheels, and the foot pedal
inputs. The “preset directory” is the location on disk where the mFusion presets are
stored.
Virtual Controls
Launches an on-screen X-Y controller, allowing a mouse or the touch screen itself to be
used as a MIDI controller. Each axis may be assigned to a separate MIDI channel,
controller number, and value range. The velocity setting adds a control lag or delay to
make movement slower and smoother. A black circle indicator shows the current
mouse or finger position, while a red circle indicator shows the actual MIDI output
after velocity is applied.
Panel View and Control Editor
The panel view section of the mFusion control panel shows a graphical representation
of the map selected in the preset list. For example, if the MIDI keyboard map is
selected, an image of the keyboard will appear along with buttons for the wheels and
pedals. To view or change the settings of any button, knob, fader or other controller,
Open Labs Production Station Manual
59
just click on that item to select it. The selected control item will be highlighted in
white.
When an item is selected, all of the settings for that item will appear in the control
editor section just below. Any control item that had been mapped, but is not currently
selected will be highlighted in blue. Unmapped items will not be highlighted.
Control Types
Each different type of control item will have its own particular settings. Buttons will
have one set of options, for instance, while faders will have another. Buttons, faders,
and encoders are each common, general purpose control types described below.
Additional control types may be unique to a particular device or control panel, and will
be described under that specific panel.
Button Control Settings
Select a button to edit its settings. For example, click on the red [Record] button on
the master control panel to bring up setting for that button. A button type list will
appear below on the left. Each button type is used to send a different type of message
or command.
MIDI Control
Sends MIDI continuous controller messages. Continuous controllers, or CC’s are
numbered from 0 to 127, and will be sent on the selected MIDI channel from 1 to 16.
Many of the Controller numbers have specific defined uses such as 64 for sustain and
65 for portamento on/off, but it’s really up to the specific MIDI implementation of each
device, application, or plug-in. The MIDI cc# and MIDI ch values sets the continuous
controller number and the MIDI channel number for the button.
Keystroke
Emulates key presses and key commands on the PC keyboard. A button can send any
single keystroke, complete with shift, control, or alt key combinations. To set the
keystroke, press the [Learn] button. The next keystroke pressed will now be recorded.
App Launch
Sets the button to startup a particular Windows application. For Example, a button
may be setup to launch the Karsyn VST host application. If Karsyn is already running,
but is covered by another window or another application, this will bring Karsyn up as
the current application.
Map Change
Switches to another single control map, or another complete preset. This allows a
Open Labs Production Station Manual
60
button to act as a mode or bank change for group of controls, a whole panel, or for
the whole keyboard. For example, one button might load a preset for use with the
Karsyn VST host, while another button would load a preset for use with sequencer or
recording software. As a bank-switching example, a row of buttons might be set to
send MIDI CC numbers 1-8. Another button could be set to load a new map with those
same buttons re-mapped as MIDI CC number 9-16. This second map could also remap
the [Map Change] button to switch back to the first map with MIDI CC numbers 1-8.
Transpose
Allows immediate shifting of notes on the MIDI keyboard. Typically, one button might
shift the keyboard up an octave, while another would shift the keyboard down an
octave. A transpose button may be set to “Absolute Mode” to set the transposition to a
specific octave and semitone, or it may be set to relative to shift the transposition by a
specific amount each time the key is pressed. For example, to set the keyboard to the
key of B-flat, use “Absolute Mode”. To create octave shift keys, use “Relative Mode” to
move the transposition up or down an octave each time the key is pressed.
Program Change
Sends a MIDI program change command. This is typically used to change patches or
sounds in a particular instrument or plug-in. It is up to the specific MIDI
implementation of each instrument, application, plug-in, or other device as to how
program changes are handled. In Karsyn, for example, program changes can select
any of the first 128 presets by number.
The “prog chg” and “MIDI ch” values sets the program change number and the MIDI
channel number for the button.
MIDI Note
Sends MIDI “note-on” commands, emulating the keys on the MIDI keyboard. Usually
MIDI notes are used to play sounds, as on the MIDI keyboard, but some applications
can map specific software functions to notes on the MIDI keyboard. In other cases, a
note-on or note-off will start or stop a particular sample or drum loop. Pressing the
button sends the selected note-on message. Releasing the buttons sends a
corresponding note-off command. The note num and MIDI ch values sets the note
number and the MIDI channel number for the button.
Fader Control Settings
Faders send MIDI continuous controller messages. Continuous controllers, or CC’s, are
numbered from 0 to 127, and will be sent on the selected MIDI channel from 1 to 16.
Many of the Controller numbers have specific defined uses, such as 1 for modulation,
7 for volume, and 10 for pan position, but it’s really up to the specific MIDI
implementation of each device, application, or plug-in.
Open Labs Production Station Manual
61
The MIDI CC# and MIDI ch values sets the continuous controller number and the MIDI
channel number for the fader. The mute button is useful when using the Live view.
While mute is on, the fader may be moved without sending any MIDI commands. This
can help prevent sudden value jumps in cases where a recalled value in some music
application does not match the last known position of the fader. The Invert button
effectively reverses the direction of the fader, causing values to decrease when the
fader is moved up.
Encoder Control Settings
Encoders turn like a regular knob, except that they turn continuously in either
direction. By their nature, encoders send relative values, as in “one to the right” or
“one to the left”, making some assigned value go higher or lower.
Jog and scrub wheels often behave in this manner to sweep from the beginning to the
end of particular track by continually moving in one direction or the other. Encoders
may also be set to emulate a knob, where the assigned value goes between two fixed
limits, usually 0 and 127 in the MIDI and music software world. Encoders send MIDI
continuous controller messages.
Continuous controllers, or CC’s are numbered from 0 to 127, and will be sent on the
selected MIDI channel from 1 to 16.
Many of the Controller numbers have specific defined uses such as 1 for modulation
and 7 for volume, but it’s really up to the specific MIDI implementation of each device,
application, or plug-in. The “MIDI cc#” and “MIDI ch” values sets the continuous
controller number and the MIDI channel number for the encoder.
Behave like encoder sets the encoder to operate in its normal relative manner,
sending only change values on the selected MIDI CC number and channel.
The [Emulate] knob automatically tracks the encoder to adjust a value between the
chosen low value and high value. In most cases with MIDI, this will be between 0 and
127. Normally, when the encoder reaches the low or high value limits, further turning
of the knob past that limit will have no effect.
If the [Wrap] button is selected, turning the knob past a limit will cause its value to
wrap around to the opposite limit and continue changing. Because a knob has an
absolute position, but an encoder does not, knob emulation has “init value” to set the
initial value of the encoder when a map or preset is first loaded.
The mute button is useful when using the Live view. While mute is on, the knob may
be turned without sending any MIDI commands. This can help prevent sudden value
jumps in cases where a recalled value in some music application does not match the
last known position of a knob or emulated knob.
The “sensitivity” setting adjusts how much a value will change with each turn of the
knob. If the low and high values go from 1 to 10, for example, the sensitivity might be
set very low such that it takes a full turn of the know to get from 1 to 10.
Open Labs Production Station Manual
62
The [Invert] button effectively reverses the direction of the knob, causing values to
decrease when the knob is turned to the right.
Control Panel Types
Miko Master Control
The Open Labs Miko master control panel contains eighteen buttons and five sliders.
The buttons are all freely assignable, but have been designed and labeled to support
specific system operations and software functions.
DJ/VJ Controller
The Open Labs DJ/VJ controller contains twelve buttons, one A-B cross fader, and
seven knobs. The buttons are all freely assignable, but have been designed and
labeled to support specific system operations and software functions.
Keyboard Range Map
The Miko MIDI keyboard range map allows the keyboard to transmit on each of 16
MIDI channels, with each channel having its own range or split. In the Keyboard
Range Map panel, select one of the 16 MIDI channels to edit the range for that
channel. The low key and high key values set the range of keys that will play on the
selected channel. The octave and semitone values transpose the keys played within
the range to make the keys play the desired notes.
Keyboard Range Map
The Miko MIDI keyboard range map allows the keyboard to transmit on each of 16
MIDI channels, with each channel having its own range or split. In the Keyboard
Range Map panel, select one of the 16 MIDI channels to edit the range for that
channel. The “low key” and “high key” values set the range of keys that will play on
the selected channel. The “octave” and “semitone” values transpose the keys played
within the range to make the keys play the desired notes. The selected range of keys
on each channel is illustrated graphically in the panel view above.
Global Keyboard Settings
Global Keyboard settings are immediate system settings for the MIDI keyboard, and
are not stored as part of any presets or maps. The “octave” and “semitone” value shift
the keyboard up or down by the selected values. This transposition occurs before any
keyboard ranges are applied so that key ranges and splits are shifted up and down
with the global settings.
The “velocity” value adjusts the velocity response curve of the keyboard. At the lower
Open Labs Production Station Manual
63
values, the keyboard becomes less sensitive at medium velocities, while the higher
values make the keyboard more sensitive at medium velocities.
Selecting Presets in mFusion
You should select your desired preset in mFusion before you launch your application.
To do so simply click the preset listed in mFusion’s editor and press the “make active”
button.
Open Labs Production Station Manual
64
8
Chapter 8 – MimiK Users Guide
What is MimiK?
MimiK is a program designed to sample your MIDI-capable keyboards and hardware.
It can be set up to automatically record all the sounds on your favorite hardware for
use on your Open Labs production station. The basic algorithm behind MimiK is that it
will send MIDI messages for every note on the target keyboard you want to sample.
At the same time it will record each note played back by the keyboard. It has the
ability to capture different note lengths, velocities, note ranges, note off samples and
much more. After it has recorded/sampled all the notes of a preset, it will store a
special file that can be read by a SFZ sample player. Each sample is stored separately
as a WAV or OGG file on the MimiK machine.
MimiK Suggested Usage
Due to the amount of time it takes to correctly mimic one sound well, we recommend
sampling each preset one at a time. You can mimic batches of presets or entire banks,
but the time and disk space required can be inhibiting.
Straightforward sounds like pianos, drums, and basses have a pretty simple
architectural structure. This makes it very easy to mimic an entire bank at once.
Performance banks and custom patches may have nuances that really need to be
dialed in, therefore increasing the time and disc space required. There are a number
of ways to reproduce a custom or performance patch.
For instance, some performance patches are made up of multiple sounds. Instead of
MimiKing the performance patch, MimiKeach sound that is in that performance patch.
Then blend them all back together in your host. This will allow you to really dial a
sound in.
It is also a good thing to write down key settings of the original sound effects settings,
ADSHR and envelope settings.
What is a Preset and a Bank?
In this documentation the terms "preset" and "bank" will be used frequently. A preset
is one complete unique sound. A bank is a collection of presets.
SFZ Format
MimiK uses the open SFZ format for storing sample libraries. The SFZ format is very
simple. Every preset captured by MimiK will have a matching SFZ file (.sfz). This SFZ
Open Labs Production Station Manual
65
file is a human readable text file that can be opened and edited in Notepad or
Microsoft Word. The SFZ file is a list of all the samples that are in the library. Each
sample is either a WAV or OGG file. The SFZ file also contains information about each
sample, such as what note the sample is and things of that nature. SFZ files can be
opened up with the free SFZ sample player (Highlife by Disco DSP)
How to Physically Set Up MimiK
Wiring Diagram
The following image shows you a basic wiring diagram.
Turn on the keyboard you want to mimic. You will need a standard MIDI cable and one
or two ¼-inch audio cables (One audio cable if you want to record in mono, two for
stereo).
Now plug in one end of a standard MIDI cable from the "MIDI out" port of your Open
Labs production station. The port is clearly marked on the back of the unit. Plug the
other end of the MIDI cable into the "MIDI in" port of the keyboard or module you
want to mimic.
Next, obtain one or two ¼-inch audio patch cables. Plug one end into the audio
output(s) of the keyboard you want to mimic. Then plug in the other end to audio
input one (and two if you are recording a stereo keyboard) of the Open Labs
production station.
Now we need to test if cables have been correctly hooked up.
Make sure the Open Labs production station is hooked up to a set of speakers or that
Open Labs Production Station Manual
66
you have a pair of headphones plugged into the headphone jack. You will use these to
monitor the sounds coming from the keyboard you are cloning.
Setting up MimiK
If the Open Labs production station is not turned on, do so now. Shut down all other
programs that are running. Other programs may interfere with the recording process.
Launch MimiK. The main window should appear. Click on the Options button.
The options dialog will appear.
Open Labs Production Station Manual
67
Make sure that the correct Audio Input Device is chosen.
For most users it will be the PreSonus Asio Driver (Firebox). This is the default device
driver for your installed sound card, but it may be any other ASIO device you have
installed.
Make sure the correct MIDI Output Device is chosen.
Open Labs Production Station Manual
68
For most users it will be the PreSonus Firebox MIDI Out. This will be the default MIDI
device driver for your installed MIDI output device, but it can be any MIDI output
device you have installed.
MimiK Features Guide
Main Window
Options: Launches the Options dialog window.
Panic Button: Sometimes keyboards drop note off MIDI messages. You'll know when that happens
because you'll get a stuck note. The Panic button sends a "note all off" message to the keyboard. This
should get rid of any stuck notes.
Monitor Button: By default this is on. When highlighted, all audio input will be routed to the audio
outputs of the Open Labs production station. This is useful when you want to hear the progress of the
MimiK process.
MimiK Button: Starts the MimiK process. The MimiK process basically consists of sending MIDI notes
for each key on the keyboard for a specified period of time and recording the output. This process can
be paused or stopped at any time.
Options Window
Open Labs Production Station Manual
69
Defaults Button: Resets all the options to the original defaults.
Program Change Time: Time (in seconds) that a program change will take. If the current program is
being sampled then this is irrelevant. Some keyboards have notoriously long program/preset change
times.
ASIO Inputs Device: Exposes which ASIO audio input device is used.
ASIO Inputs: Exposes which inputs on the ASIO audio input device are used to record.
MIDI Output Device: Exposes which MIDI output device is used.
Output Directory: Defines the output directory that all the samples are stored in. To pick another
output directory, click on this text box to bring up a directory picker dialog.
Low Range and High Range: Defines what MIDI messages will be sent from MimiK to the keyboard.
These notes are inclusive. You may either drag up or down to raise or lower each range. Or you may
type in a valid note. Click on the play button beside each range to send a test MIDI message to the
keyboard.
Note Down Time: Defines the time in seconds that each velocity layer of each note is sampled. The
longer the note down time the better. The trade off is in how much disk space is used and how long it
takes to MimiK a preset. You will need to experiment with each preset to see what works best.
Release Time: Defines the time that MimiK will continue recording output from the keyboard after a
Note Off MIDI message is sent. This is useful for capturing the decay/release of a sound after a note
Open Labs Production Station Manual
70
has been released. Some sounds have long decays (sounds with lots of reverb) so you may want to
adjust depending upon the preset.
Velocity Layers: Choose how many velocity layers to MimiK. If "1" velocity layer is chosen, then each
note will be sampled once as if it was hit at full strength (a velocity of 127). If "2" velocity layers are
chosen then two velocities are recorded (63 and 127), and so on. Keep in mind that most keyboards
don't actually playback that many different sounds per velocity. Volume attenuation is used, but the
actual sound played back is usually the same. We recommend using 1, 2, or 4 velocity layers for most
keyboards.
Channels: You can decide whether you want to capture a mono or stereo sound. If you choose to
capture a mono sound, the left input will be used. This can cut the amount of disk space in half. This
option makes the most sense when cloning keyboards only capable of creating mono output.
Output Type: You can decide whether you want to capture a mono or stereo sound. If you choose to
capture a mono sound, the left input will be used. This can cut the amount of disk space in half. This
option makes the most sense when Cloning keyboards only capable of creating mono output.
WAV Bit Depth: Defines how many bits are used for each sample (CDs are 16-bit). The higher the
better. The higher the bitrate, the more disk space used.
Quality: When the OGG/Vorbis format is used, the quality of the output files can be edited. The higher
the quality, the better sounding the sample will sound. Keep in mind that higher quality settings will
also create larger files.
Quality 0 is roughly equivalent to 64kbps on average, 5 is roughly 160kbps, and 10 gives about
400kbps. Most people seeking very-near CD-quality audio encode at a quality of 5 or, for lossless stereo
coupling, 6. The default setting is quality 3, which at approximately 110kbps gives a smaller file size
and significantly better fidelity than .mp3 compression at 128kbps.
The default setting of 3 seems to work for many sounds.
As always, if you need CD-quality sound use the WAV output type.
Test Button: The Test button is extremely useful. It will behave exactly like the "MimiK" button on the
main window, except that nothing is recorded to disk. Therefore you can hear a preview of what MimiK
will actually do once you hit the "MimiK" button. The test can be canceled at any time.
Playback Transpose: This value is In octaves. It specifies the amount of transposing that happens
when the samples are played back. Really this just shifts what keys will trigger the samples. It will have
no effect on the actual sound. Take for example, you sample a few of the lower octaves from a
keyboard (C0 - C2). For some reason you want to play them back with your right hand. This option will
let you shift the keys that will play back the samples, up a few octaves if necessary (maybe C5-C7).
Experiment to see.
VU Meter: Audio input VU meter. It mirrors the VU on the main window.
Input Gain: Some keyboards can be a bit soft or loud. Adjusting this will allow for keyboards with
different levels of output.
Bank Select: When this is NOT selected, you can type in the name of the Bank you will be recording It
will be left up to you to manually (on the keyboard) pick the bank you want to sample from.
If Bank Select is selected, you will be allowed to select an inclusive range of banks that MimiK will
attempt to capture. Warning: many keyboards do not support the General MIDI Bank Select command,
so running this may or not work. It is recommended that you test if your Keyboard even has more than
one bank. If it does, then check if it even supports Bank Select via MIDI. Due to the amount of time it
takes to sample one preset we recommend not using the Bank Select option even if your keyboard
supports it. Sampling one bank at a time is what we recommend over attempting to sample multiple
banks. Regardless the option is there.
Program Change: When this is NOT selected you can type in the name of the preset you will be
recording. It will be left up to you to manually (on the keyboard) pick the preset you want to sample
from. If Program Change is selected then you will be allowed to select an inclusive range of programs
that MimiK will attempt to capture.
Open Labs Production Station Manual
71
Release Trig: ***This setting will record a separate sample!!!***
Short for Release Trigger.
Some keyboards trigger sound/samples upon the MIDI note off message. Enabling this option will
enable MimiK to capture just the sounds made after the MIDI note off is sent. Sounds captured this way
can then be played back whenever a note off is sent for a particular sample.
The Note Down Time parameter is the time that a note will be played. During this time period no sound
is actually recorded! The recording will begin once the note is let up (MIDI note off message is sent).
The Offset parameter is any additional time to NOT record after the MIDI note off message is sent. This
is useful for tweaking and isolating a specific part of the sound.
The Release parameter is how long to record after the note off is sent plus the Offset time. This is the
only time actual recording takes place within the Release Trig event.
Capture Aftertouch: If your keyboard supports it, aftertouch can be captured separately from regular
note down events. To keep things simple it sends an aftertouch message immediately after the note
down is sent. All the other parameters (note down time, release time) apply. Different aftertouch layers
can be captured. If “1” layer is selected, then an aftertouch value of 127 is sent and recorded. If “2”
layers are used, then an aftertouch value of 63 and 127 are sent and recorded, and so on.
Chop Leading Samples: Anything below the noise floor is chopped off at the beginning of the sample.
There is a slight delay in the time that the MIDI information is sent by the Open Labs production station
and when the keyboard output sound is recorded by MimiK. This delay can be noticeable, so this option
is useful in removing it.
Chop Trailing Samples: Anything below the noise floor is chopped off from the end of the sample.
This can be a disk space saver for sounds that end before the note down and release time expire.
Noise Floor: Floating point noise floor for Chop Leading Samples and Chop Trailing Samples. Anything
below this noise floor will be cut out of the samples.
MimiK Tutorial (Quick Start)
Click on the Play button under the Low Range label. This will cause MimiK to send a
MIDI note to the keyboard. This should in turn cause the keyboard play a note back to
the Open Labs production station. If you do NOT hear a note played back from the
Open Labs production station or see the VU meter light up in the options screen then:
1) Move the Low Range note around (up or down). Your keyboard may only play back
from a small note range. Dragging up or down on the control will move the note range
up and down. Do the same for the High Range.
2) Recheck all your cables. Check for possible bad cables.
3) Make sure the keyboard you are trying to mimic has its MIDI input enabled (read
the keyboard manual). If you plan on MimiKing multiple sounds from multple banks,
make sure your MIDI keyboard or module has MIDI bank select enabled, and MIDI
program change selected.
Open Labs Production Station Manual
72
If you hear a note and see the VU meter lighting up when you hit the play button,
then you are ready to pick what you want to sample from your keyboard.
How to Playback a Sound after using MimiK
Translator
Translator is used to convert MimiK files into Proteus Banks. You will find Translator on
the desktop of your Open Labs Workstation.
Translator main window:
You translate files by one of eight methods:
1. Dragging (drag-and-drop) from the right to the left. This is the most immediate
and efficient method.
2. Right-clicking on a file or object in either the Right or Left pane. This brings up a
pop-up menu in which you can select to “Convert As...” into another format.
3. Double-clicking on a file or object in the Right pane. This works only for items
being written to non-Proprietary drives and for one file or object only.
4. Using the Batch Converter. The Batch Converter allows you to pre-select objects
and then translate them in groups into separate objects or combine them in any
sort of ways into single objects.
5. Clicking the [Translate] button in the toolbar. This will translate the one or more
objects selected in the Right pane.
Open Labs Production Station Manual
73
6. Selecting the File menu and selecting Convert As... This does the same thing as
clicking the Translate button.
7. Dragging a file or folder within Explorer/Expose onto a Shortcut/Alias. This starts
Translator in the background and offers you a choice of what to convert to.
8. Right-clicking on a file or object in Explorer/Expose. This does the same thing as
dropping an object on the shortcut or alias.
Once you have mimicked a sound, browse over to where you stored that sound. The
default location for a mimicked sound is: “c:\MimiK Output”. Left-click the folder in the
explorer view that contains your MimiK bank. When you do that, you will see the .sfz
file in the Object List. Go ahead and select the .sfz file.
After you select it, press the “Translate” button.
Now you will see the “All Export” window. Select “Emu Emulator X Bank” and hit “Ok”.
Open Labs Production Station Manual
74
This will start the translating conversion. The size of the bank will determine how long
it takes to complete. You can select multiple .sfz files and translate them all at once.
The next section will show you how to take those newly translated Proteus banks and
make them available in your Proteus Library.
Open Labs Production Station Manual
75
Proteus
After you have converted those MimiK .sfz files into Emu/Proteus banks, you will open
them inside of Proteus. These banks will behave like a normal Proteus bank.
First, you will need to point Proteus to your MimiK output folder.
Exit the Open Labs shell, and open Proteus from the desktop.
Once Proteus is open, either use the touch screen, or mouse pad to left-click the
“Library” tab at the bottom of the left-hand browser column.
Open Labs Production Station Manual
76
Left-click “Banks”, and you will see the “Update Library...” option. Select this option.
This option will allow you to add a new folder to your Proteus instrument.
Once the option window is open, left-click the “Add Location...” button.
This will bring up the “Browse For Folder” dialog window. Browse over to the “MimiK
Output” folder or if you have your own folder, add it.
Open Labs Production Station Manual
77
Open Labs Production Station Manual
78
Place a check-mark on “MimiK Output”. Then left-click the “Update” option. This will
load up all the files in your MimiK sound folder.
Once the banks have been loaded, select “Banks” in the left-hand column. Your banks
will show up on the right-hand side. Just scroll down until you see them. Select one
and load it up.
Please refer to the Proteus manual for more information on using Proteus.
Open Labs Production Station Manual
79
9
Chapter 9 – Hardware Maintenance
Please Read
If you have never worked with the interior components of a computer, please read this
chapter carefully, and consult Open Labs for assistance. Most of the components are
delicate and are sensitive to rough handling, static electricity and magnetic fields.
Practice these precautions before proceeding with hardware work:
●
Do not work on hardware with the Open Labs Production Station plugged in.
●
Always work on your Open Labs Production Station on a flat table-top and not on the carpet or
floor.
●
Do not use excessive force on any components within the case.
●
Keep all hardware in anti-static bags until installed.
●
Avoid moisture and wet surfaces.
●
When in doubt, consult technical support.
New Hardware Installation Considerations
If you wish to add more onboard memory, hard disk storage, or additional PCI boards
you will need to upgrade your Open Labs Production Station. When adding new
hardware, the following considerations should be made:
●
All hardware should be in the Microsoft Hardware Compatibility List for Microsoft Windows
XP. If it is not, then you risk the chance of device or system malfunction, or system
corruption, which may require system recovery.
●
Your hardware should comply with the motherboard specifications. For example, use only
DDR2 memory when you wish to upgrade onboard memory. If you do not use the correct
memory for your system, you will experience instability and perhaps even data corruption.
Ideally all memory should be from the same manufacturer and of the same speed and type.
Motherboard specification for other onboard devices can be found in the motherboard
manuals provided or from download.
●
Additional hardware should not over cramp other components. It is not recommended that
you overload your Open Labs Production Station with too many internal devices. This can
cause too much heat output. For example, connecting 4 IDE hard drives, plus 4 SATA drives
would be a bad idea. Too much heat will cause hardware to fail.
●
Air flow should be optimized by securing all loose cables with recommended cable-ties, or
using rubber-insulated ribbons. Ensure that no cables are brushing up against moving fans.
Opening your Open Labs Production Station
Before opening your Open Labs Production station, please consult with an Open Labs
Open Labs Production Station Manual
80
Technician. Failing to to do so may void your warranty. To speak with a tech please
email [email protected] or call 512.444.6222.
Open Labs Production Station Manual
81
Appendix A - Bundled Software
Open Labs Production Station’s ship with a wide variety of software, including many
VST instruments, effects, utilities, and of course the Windows XP operating system:
Microsoft
Windows XP Home
Open Labs Inc
Open Labs GUI
Karsyn 1.5
MFusion 1.5
MimiK
Cockos
Reaper
CD Burner XP
CD Burner XP
Chicken Systems
Translator
Softthinks
PC Angel Lite
Mozilla
Firefox 2.0
Thunderbird 1.5
Adobe
Acrobat Reader 7.08
Apple
Quicktime
Open Labs Production Station Manual
82
Instruments:
4-Front Technologies
Truepiano
Wusik
WusikStation V3+DFD+GM
EMU
Proteus – X
Disco DSP
Highlife
Vertigo
Discovery
LennarDigital
Sylenth 1
Luxonix
Purity
Synth 1
Synth1
XLN Audio
Addictive Drums Demo
Music Lab
Real Guitar SE (Demo)
Audio Nerdz
Delay Lama
Open Labs Production Station Manual
83
Big Tick
Tiki Clav
Buzz Room
Lollapalooza lite
BB303i v2
Green Oak
Crystal
Elogoxa
Sun RA
Soundfonts
ORGANized Trio
Mr. Ray
Mr. Ray73
Mr. Tramp
Ugo
Motion
Rez
String Theory
Psychic Modulation
Optik
Minimal
Pandemonium
Insert Piz Here
Mr. Alias
Blood Bucket
Open Labs Production Station Manual
84
Chris Huelsbeck
Microsynth
Noslogan
Rogue
Safwan Matni
Accordion
Space Window
Artphase
Jorgen Aase
EnergyXT
Northern Beat Audio
Monolisa
Algo
String Synth
Concrete FX
Rock
EVM Synths
Bassline
Ultrasonique
Syncoder
Simple Media
Spookeys
Jack Resweber
Phone
Open Labs Production Station Manual
85
Plugsound
Plugsound Free
HG Fortune
X-Fortuna
Lazer Blade
protoplasm
Effects:
Kjaerhus Audio
Classic Chorus
Classic EQ
Master Limiter
Classic Verb
Classic Phaser
Classic Delay
Classic Auto-Filter
Classic Flanger
Simulanalog
Rednef Twin
JCM900
TubeScreamer
BossDS1
BossSD1
PS1
Univibe
Buzz Room
Filter One
BUZ
Octo Buzz
Bcheese
Open Labs Production Station Manual
86
Ohm Force
Fromage
Soundfonts
Mr Trump
4-Front Technologies
Mastering Bundle
Open Labs Production Station Manual
87
Appendix B -
Audio Interface Control Panel
The Control Panel will be available from your system tray (typically located at the
bottom right hand corner of your screen near your clock).
Double click on the icon to open the audio interface hardware settings.
Sample Rate: Drop down the menu to select the sample rate – 44.1, 48, 88.2, 96k.
This must be set to the same sample rate in your recording software.
Clock Source: Drop down the menu to select the digital sync source.
INTERNAL SPDIF: Must be selected to use the SPDIF input.
Note that Control Panel settings will be saved upon power down.
Latency: – Sets the amount of delay time (1.5ms – 24ms). Latency is the time it
takes for the computer to process audio. Lower latency settings demand more CPU
resources. In the case of inconsistent audio, (i.e. drop outs, pops and clicks, digital
distortion, etc) we recommend that you increase this setting.
Input Level Boost
Input Level Boost: clicking this button will boost the input level of each
corresponding analog input by +12dB. Use this feature for recording quiet instruments
Open Labs Production Station Manual
88
or devices with low output.
AUDIO INTERFACE CONTROL PANEL ADVANCED SETTINGS:
You can “right-click” on the control panel icon to select between three different
computer optimization settings. These settings optimize the buffers and audio
streaming settings based on the speed of your processor. If you are experiencing
audio drop-outs, it is recommended that you select a lower CPU setting.
●
High: 2GHz and higher
●
Medium: 1GHz to 2GHz
●
Low: 800MHz to 1GHz
Audio Interface Mixer Panel
The interface includes a software MIXER/ROUTER for flexible monitoring and routing of
the audio signal before it hits your software program. This is helpful to avoid the time
it takes to process the audio you are recording – called latency. Therefore, you can
mix the input signal going into the interface with the playback from your software for
zero latency recording and monitoring.
Note: The default settings (pictured above) for the interface mixer has all faders set
to 0dB and all pans set to center, with the Software Playback set to channels 1/2, the
Mixer Output set to Bypass, and the Playback to Phones set to channels 1/2.
Open Labs Production Station Manual
89
To set up your Mixer application for zero latency recording (example):
1. Record enable your desired track – turn off input monitoring function (or
mute the track) in your software.
2. Select playback channels of the main output of your audio software in the
SOFTWARE PLAYBACK channel of the interface mixer. The input on this channel will be
the output of your software.
3.Connect your microphone to input 1 and turn on phantom power if needed.
4. You can now adjust the levels of your microphone and your software playback to
your desired levels for recording (monitoring only).
5. If using headphones select “Mix” under “Mix to Phones”. This will send the output of
the Mixer to the headphone output.
6. In the MIXER OUTPUT section of the interface Mixer, select the pair of outputs to
send out of the interface (for example studio monitors connected to outputs 1/2).
OPERATION OF MIXER
The silver tracks represent the six possible inputs from the interface as well as the
software playback. The blue section contains information on the output of the mixer.
Open Labs Production Station Manual
90
Open Labs Production Station Manual
91
Open Labs Production Station Manual
92
Appendix C - Sound Presets
VST Instruments
Accordion: Accordion Emulator - Acoustic-Klezmer, Polka, Zydeco, Tejano, World- Beirut, Weird Al
Addictive Drums: Multi-Timbral Drum Sampler - Drums- Rock, Pop- Any
Artphase-VSTi: Phase Distortion Synth - Lead, Trance, Spacey, Tangerine Dream, Orbital
BB303i: Classic 303 - Bass, Synth- Lead, Bass- House, Techno, Acid- Old Skool Hip-Hop (West
Coast), Heaven 17
Blood Bucket: Synth- Lead, Ambient Sounds- IDM, Glitchcore, Illbient- Kid 606, Venetian Snares
Crystal: Subtractive/ FM Synth - Lead, Pads, Ambient Sounds- Trance, Ambient- Brian Eno, JeanMichaael Jarre
Cubix: Drum/Bassline Synth - Drums, Synth- Electro, House- Kraftwerk, Depeche Mode
DirectWave VSTi: Multi-Timbral Sampler - Samplers- Electronic, Hip-Hop- Any
Discovery_v2: Analog Subtractive Synth- Lead, Pads- Techno, Ambient- Erasure, Dust Bros.
EVM Bassline v1-3: Acoustic Bass Synthesizer - Acoustic- Rock, Pop
EVM Syncoder 32-2: Frequency Synthesizer/ Vocoder- Lead, Vocoders- Electronic, ExperimentalThomas Dolby, Daft Punk
EVM UltraSonique: Synthesizer/ Sample player- Lead, Pads, Samplers- Electronic, Pop- Air, Van
Halen's 1984
HighLife: Sampler- Samplers- Any- Everyone
Lallapallooza_lite: FM Synth- Lead, Pads- Experimental, Industrial- Front 242, Merzbow
MicroSynt: PWM Synth - Lead- Electronic, Any- Basic synth sounds
Mini_ErHu: String Synth- Acoustic, Lead- Scary Movie Music
Minimal: Drum/ Bassline Synth- Drums, Synth- Acid, House- Rebirth
Monolisa: Bass Synth- Lead, Bass- Electronic- generic
Motion2.8: Automated Modulation Synth- Lead, Pads, Ambient Sounds- Dust Bros,, soundtrack
music
Mr. Alias: Noise Synth- Ambient Sounds- IDM, Experimental- Alec Empire, Kid 606
MrRay22: Electric Piano Synth- Lead, Acoustic- Pop, R ; B, Any- everybody
MrRay73: Rhodes-Style Piano Synth- Lead, Acoustic- Pop, R ; B, Rock, any- Ray Charles,
everyone else
Open Labs Production Station Manual
93
MrTramp: Wurlitzer-style Piano Synth- Lead- Pop, R ; B, Rock- Supertramp, Three Dog Night, Fela
Kuit
Nanotron2: Novatron/Mellotron emulator- Lead- Rock, Pop- The Moody Blues, David Bowie
Optik: Drum Synth- Drums- Electronic, Techno- Kraftwerk, Nitzer Ebb
ORGANized_trio_v30: Hammond Organ emulator- Lead- Gospel, Rock, R ; B- Jimmy Smith, Al
Green, MMW
Pandemonium-2: FM Synth- Pads, Ambient Sounds- IDM, Experimental- unknown
ph0ne: PM Synth- Lead, Ambient Sounds- Electronic, Experimental- Various DHR Artists
Phadiz(P): PD Synth- Lead, Pads- Electronic, Ambient- Vangelis, The Orb
Plugsound Free: Multi-Instrument Sound Module- Lead, Misc- All Genres- Any Artist
ProteusX: Multi-Instrument Sample Player- Lead, Misc- All Genres- Any Artist
ProtoPlasm21free: Multi-timbral synth; Lead, Pads- Electronic, Experimental- Orbital, Little
Computer People
Purity: Mulit-Instrument Sample Player- Lead, Pad, Bass, Drums, Misc- All Genres, Any Artist
RealGuitar2SE (Demo): Acoustic Guitar Sample Player- Lead, Acoustic- Rock, Pop- Any
ReZ v.1.3: PM Synth- Lead, Bass- Techno, Industrial- Daft Punk, NIN
Rock: Multi Mode Synthesizer- Lead, Pads- Electronic, Techno- Depth Charge, Prodigy
Rogue: Synth- Lead- Electronic- Any
Spook Keys: Theremin- FM Synth- Lead, Ambient Sounds, Rock, Electronic, ExperimentalStereolab, Pink Floyd
StringSynth: ARP/Solina String Synth emulator- Lead, Acoustic, Ambient Sounds- Air, Pink Floyd
Super Spook Keys: Theremin Emulator- similar to Spook Keys with more options- Lead, Ambient
Sounds, Rock, Electronic, Experimental- Stereolab, Pink Floyd
TickyClav: Clavinet Emulator- Lead- Rock, Pop, Funk- Mates of State, Stevie Wonder, The
Commodores
TruePianos: Piano Module- Lead- Rock, Pop, Classical- Alicia Keys, Elton John
String Theory 1.5: String / Hybrid Synth- Lead, Ambient Sounds- Rock, Pop, Electronic, Ambient
STS-26: FM Synth- Lead, Pads, Ambient Sounds- Electronic, Ambient- The Orb, Black Dog
Productions
Suburban Guitarist: Guitar Simulation Synth- Lead, Acoustic- Rock, Pop- Any
Sun Ra: Hybrid Synth- Pads, Ambient Sounds- Electronic, Experimental-The Orb, The Moody Blues
Open Labs Production Station Manual
94
Sylenth1: VA Synth- Lead, Pads, Bass, Ambient Sounds- Electronic, Pop, Ambient- Yello, New
Order
Synth1 VST: VA Synth modeled after Nord Lead2- Lead, Bass- Electronic, Pop, Hip-hop- Autechre,
RZA, Peter Gabriel
VB3_OLse: Virtual Tonewheel Organ- Lead- Rock, Pop- Question Mark and The Mysterians, Elvis
Costello
Vertigo: Spectral Synthesizer- Lead, Pads, Ambient Sounds- Electronic, Experimental- Alec
Empire, Various 80's Video Games
Wusikstation: FM Synth- Lead, Bass, Pads- Electronic, Pop- New Order, J Saul kane
Wusikstation Multi-Out: FM Synth with Multiple Outputs- Lead, Bass, Pads- Electronic, Pop- New
Order, J Saul kane
XWOF-3: Multipart, Multiinstrument complete music System- Lead, Bass, Pads, Drums, MiscElectronic- Boards of Canada or any One AD artist.
VST Effects
4Front Auxiter: Mastering ; EQ; Exciter/Refresher- Enhancing Vocals, Track Restoration
4Front Contour Max: Mastering ; EQ; Frequency Shaper- Use For Final Mastering and Track
Restoration
4Front Sand Brush: Mastering ; EQ; High Frequency Booster- Track Restoration, Vintage Vinyltype Effects, Good for Vocals
4Front XLimiter: Mastering ; EQ; Soft Compressor- Use for Vocal or Master Track Compression
4Front YLimiter: Mastering and EQ; Hard Compressor- Use for Drum/Percussion Tracks and
Effects
BCheese: Filters; LFO Driven Filter Set- Good For Synths- Use to create sweeps and other effects
Boss DS-1: Distortion; Distortion Stomp Pedal Simulator- Useful for String Instruments
Boss SD-1: Distortion; Super Overdrive Stomp Pedal Emulator- Creates ;Over-driven Tube Amp;
effect. Useful for String Instruments
BUZ: Distortion; Distortion Stomp Box Emulator- Useful for String Instruments
Classic Auto-Filter: Filters; Four-pole LFO Modulated Filter- Use to Create Sweeps and Other
Strange Effects
Classic Chorus: Filters; Adds Depth To Almost Any Type of Track
Classic Compressor: Mastering; Analog-style compressor- adds warmth and punch to Vocal
Tracks
Classic Delay: Delays ; Reverbs; Full Featured, Multi-Purpose Delay
Open Labs Production Station Manual
95
Classic EQ: Mastering ; EQ; 7-Band Analog-style Multi-purpose equalizer
Classic Flanger: Filters; Adds ;Swirling;-type effect- Useful for Guitar Type Sounds
Classic Master Limiter: Mastering ; EQ; Extremely Simple Sonic Booster
Classic Phaser: Filters; Analog Phase Shift Emulator- Many Uses, Sounds Good on Vocals
Classic Reverb: Delays and amps; Reverbs; All-Purpose Reverb
EVM V90: Delays ; Reverbs; Digital Delay and Reverb Module
Frohmage_vst2win: Filters; Unique Resonance Filter- Produce EXTREME Effects
JCM900: Amps; Vintage Marshall Tube Amplifier Simulator- Adds Warmth to Guitars and strings
MrDonald: Amps; Panning; Rotary (Leslie) Speaker simulator- Multi-Purpose
OctBUZ: Distortion; Distortion/ Overdrive Module with Octave Adjustment
PS-1: Filters; Simulated Oberheim Phaser Stomp Box
Rednef Twin: Amps; Simulated 1969 Fender Twin Reverb Guitar Amp
Tube Screamer: Distortion; Simulated Overdrive Stompbox
Univibe: Filters; Simulated ;Modulation; Stompbox- Provides Reverb/ Phaser Type Effects
Open Labs Production Station Manual
96
General Sound Libraries
Open Labs Production Station Manual
97
Open Labs Production Station Manual
98
Open Labs Production Station Manual
99
Open Labs Production Station Manual
100
Open Labs Production Station Manual
101
Open Labs Production Station Manual
102
Open Labs Production Station Manual
103
Open Labs Production Station Manual
104
Open Labs Production Station Manual
105
Open Labs Production Station Manual
106
Open Labs Production Station Manual
107
Open Labs Production Station Manual
108
Open Labs Production Station Manual
109
Appendix D – Pro Audio Basics
The following glossary will help you to understand some of the more common terms
found in the digital audio workstation world. Also, be sure to check out some of the
following online resources:
●
Open Labs User Forums – http://forum.openlabs.com
●
Modern Recording Techniques – http://www.modrec.com
●
Wikipedia – http://en.wikipedia.org/wiki/Professional_audio
●
Wikiaudio – http://www.wikiaudio.org
●
Audio Engineering Society – http://www.aes.org
●
Recording.org – http://recording.org/index.php
Open Labs Pro Audio Primer
ASIO
(Audio Stream Input/Output), developed by Steinberg, is a cross-platform, multichannel audio transfer protocol that is being adopted by many of the manufacturers of
audio/MIDI sequencing applications. It allows software to have access to the multichannel capabilities of a wide range of powerful sound cards. ASIO expands on the
basic capabilities of a standard computer sound card, most of which can only provide
stereo (two-channel) audio input and output. The ASIO specification defines the
interface that manufacturers of professional audio sound cards must use to create an
ASIO driver for their hardware. This driver allows the host audio/MIDI application to
"see" all of the inputs and outputs available on the sound card. The user can then
assign these I/O ports as needed for recording or playback when using an ASIOcompatible software program. This allows the users to record more tracks
simultaneously than the previous limitation of two channels imposed by a standard
sound card.
ATTACK
The initial transient or first part of the envelope of a signal. The beginning of a note.
Also, see Release.
AUDIO
Of, pertaining to, or employed in the transmission, reception, or reproduction of
sound.
AUDIO EFFECT
A special type of plugin that accepts an audio stream and produces a new audio
stream. Examples include compressors, distortion and reverb.
Open Labs Production Station Manual
110
AUDIO EFFECT CHAIN
A collection of plugins that start with an audio input, then goes through a chain of
optional audio effects before going out to an audio bus.
BALANCED LINE
A cable having two conductors and a ground connection and often surrounded by a
shield. These lines are often used in professional settings to reduce or eliminate
induced noise and interference from external electromagnetic sources.
BANK
A collection of Presets that are loaded into memory for easy access and low load time.
BITRATE
In digital multimedia, bitrate represents the amount of information, or detail, that is
stored per unit of time of a recording. The bitrate depends on several factors:
1. The samples may use different numbers of bits.
2. The original material may be sampled at different frequencies.
3. The data may be encoded by different schemes.
4. The information may be digitally compressed by different algorithms or to different degrees.
Generally, choices are made about the above factors in order to achieve the desired
trade-off between minimizing the bitrate and maximizing the quality of the material
when it is played.
If lossy data compression is used on audio or visual data, differences from the original
signal will be introduced; if the compression is substantial, or lossy data is
decompressed and recompressed, this may become noticeable in the form of
compression artifacts. Whether these affect the perceived quality, and if so how much,
depends on the compression scheme, encoder power, the characteristics of the input
data, the listener's perceptions, the listener's familiarity with artifacts, and the
listening or viewing environment.
Experts and audiophiles may detect artifacts in many cases in which the average
listener would not. Some musicians enjoy the distinct artifacts of low bitrate (sub-FM
quality) encoding and there is a growing scene of net labels distributing stylized low
bit music.
The bitrates in this section are approximately the minimum that the average listener in
a typical listening or viewing environment, when using the best available compression,
would perceive as not significantly worse than the reference standard:
•
Audio (MP3)
•
•
•
•
4 - kbit/s - minimum necessary for recognizable speech (using special-purpose
speech codecs)
8 - kbit/s - telephone quality
32 - kbit/s - MW (AM) quality
96 - kbit/s - FM quality
Open Labs Production Station Manual
111
128 - kbit/s - Typical "acceptable" music quality
256 - 320 kbit/s - Near audio CD quality
Video (MPEG2)
• 16 kbit/s - videophone quality (minimum necessary for a consumer-acceptable
"talking head" picture)
• 128 - 384 kbit/s - business-oriented videoconferencing system quality
• 1 Mbit/s - VHS quality
• 5 Mbit/s - DVD quality
• 15 Mbit/s - HDTV quality
•
•
•
CARDIOID MICROPHONE
A common mic pickup pattern designed to attenuate signals arriving 180 degrees offaxis, while fully picking up those sounds that arrive at the front (on-axis).
COMPONENT
A collection of windows controls. An easy way to group controls that work together to
provide service to the user.
CONDENSOR MICROPHONE
A microphone that operates on an electrostatic principle rather than on the
electromagnetic principle used in dynamic and ribbon mics. These microphones
require phantom power, or a +48 volt charge.
CONTROL
A single GUI item that performs a task. Examples include list boxes, right-click menus
and “OK” buttons.
DC OFFSET
A DC Offset is an offset in the baseline, or zero mark of the waveform. A sample wave
not centered on the zero baseline in the Waveform Display is said to have a DC Offset.
This is usually caused by a calibration problem in the audio hardware. It is desirable to
remove this offset after recording because undesirable pops can occur when editing a
file with a large DC offset. To remove DC offset, a number of options are available
ranging from applying a Low-Pass Filter to the waveform to using correction features
built into most Audio Editors such as Wavelab or Audition. Dedicated DC Offset plugins
in several formats such as VST and Direct X are also available.
DECIBEL (dB)
A unit of audio measurement of sound-pressure level (SPL), signal level, and changes
or differences in signal level. The decibel is a logarithmic (log) mathematical function
that reduces large numeric values into smaller, more manageable numbers. Decibel is
calculated as being 10 times the log of the ratio of two powers and 20 times the log of
the ratio of two voltages.
DESTRUCTIVE EDITING
When the audio data recorded on a hard disk is altered and rewritten to disk in such a
way that it can't be recovered in its original form.
Open Labs Production Station Manual
112
DIALOG
A window that is not full screen. In this host all Dialog boxes will be modal (meaning
they will be the foremost window and nothing else can be done until they are closed).
DYNAMIC MICROPHONE
A microphone that operates by electromagnetic induction to generate an output signal.
When an electrically conductive coil of wire or ribbon is made to cut across the flux
lines of a magnetic field, a current of specific magnitude and direction is generated
within that coil or ribbon.
EFFECTS SEND
An auxiliary send feeding an effects device.
EQUALIZER
A frequency-dependent amplifier that enables a recording or mix engineer to control
the relative amplitude of various frequencies in the audible bandwidth. Put another
way, the equalizer lets you exercise tonal control over the harmonic content or timbre
of a recorded sound.
EXPANDER
A device that increases the dynamic range of a signal.
FADER
A linear attenuation device or linear volume control.
FILE TYPES
•
•
•
•
WAVE - WAV (or WAVE), short for Waveform audio format, is a Microsoft and IBM audio
file format standard for storing audio on PCs. It is a variant of the RIFF bit stream format
method for storing data in "chunks", and thus also close to the IFF and the AIFF format used
on Macintosh computers. Both WAVs and AIFFs are compatible with Windows and Macintosh
operating systems. It takes into account some differences of the Intel CPU such as littleendian byte order. The RIFF format acts as a "wrapper" for various audio compression
codecs. It is the main format used on Windows systems for raw audio.
MIDI - Musical Instrument Digital Interface, or MIDI, is an industry-standard
electronic communications protocol that defines each musical note in an electronic musical
instrument such as a synthesizer, precisely and concisely, allowing electronic musical
instruments and computers to exchange data, or "talk", with each other. MIDI does not
transmit audio - it simply transmits digital information about a music performance.
MP3 - MPEG-1 Audio Layer 3, more commonly referred to as MP3, is a popular digital
audio encoding and lossy compression format, designed to greatly reduce the amount of
data required to represent audio, yet still sound like a faithful reproduction of the original
uncompressed audio to most listeners. It was invented by a team of European engineers
who worked in the framework of the EUREKA 147 DAB digital radio research programme
and finally standardized by ISO/IEC in 1991
OGG - Ogg is a patent-free, fully open multimedia bit stream container format designed for
efficient streaming and file compression (storage).The name "Ogg" refers to the file format
which includes a number of separate independent open source codecs for audio, video and
text (e.g. subtitles). Files ending in the .ogg extension may be of any Ogg media file type,
and because the format is free, Ogg's various codecs have been incorporated into a number
of different free and commercial media players.
Open Labs Production Station Manual
113
FREQUENCY
The rate at which an acoustic generator, electrical signal, or vibrating mass repeats a
cycle of positive+ and negative- going amplitude. The number of cycles that occur
over the period of one second is measured in hertz (Hz). Often, the perceived range of
human hearing is from 20 Hz to 18,000 Hz.
GAIN
Amount of amplification in dB.
GROUND LOOP
The rate at which an acoustic generator, electrical signal, or vibrating mass repeats a
cycle of positive+ and negative- going amplitude. The number of cycles that occurs
over the period of one second is measured in hertz (Hz). Often, the perceived range of
human hearing is from 20 Hz to 18,000 Hz.
GUI
A graphical user interface (or GUI, often pronounced "gooey") is a method of
interacting with a computer through a metaphor of direct manipulation of graphical
images and widgets in addition to text. GUIs display visual elements such as icons,
windows and other gadgets.
The precursor to GUIs was invented by researchers at the Stanford Research Institute
(led by Doug Engelbart) with the development and use of text-based hyperlinks
manipulated with a mouse for the On-Line System. The concept of hyperlinks was
further refined and extended to graphics by researchers at Xerox PARC, who went
beyond text-based hyperlinks and used GUIs as the primary interface for the Xerox
Alto computer. Most modern general-purpose GUIs are derived from this system.
For this reason some people call this class of interface a PARC User Interface (PUI)
(note that PUI is also an acronym for perceptual user interface). The PUI consists of
graphical widgets (often provided by widget toolkit libraries) such as windows, menus,
radio buttons, checkboxes and icons, and employs a pointing device (such as a mouse,
trackball or touchscreen) in addition to a keyboard. Those aspects of PUIs can be
emphasized by using the alternative acronym WIMP, which stands for Windows, Icons,
Menus and Pointing device.
The GUI familiar to most of us today is either the Windows or the Macintosh operating
systems and their applications originated at the Xerox Palo Alto Research Laboratory in
the late 1970s. Apple used it in their first Macintosh computers. Later, Microsoft built
on many of Apple's ideas in their first version of the Windows operating system for
IBM-compatible PCs.
HARD DISK RECORDER
A system that uses a computer hard disk to record, edit, and reproduce digital data.
INSTRUMENT
Open Labs Production Station Manual
114
A collection of plugins that starts with a MIDI input, then goes through optional MIDI
effects, into a soft synth, and then into optional audio effects before going out to an
audio bus. An instrument is set up anytime a user wants to play a soft synth.
LATENCY
Latency is the amount of time an application allocates to prepare a buffer full of audio
data for playback. Lower latency settings add processing time because of the need to
refill the smaller data buffers more often. You may need to increase your applications
latency under the following conditions:
•
•
•
You use lots of real-time effects, and you hear dropouts. Check the CPU meter for high
readings; try increasing the latency.
Your sound card does not function well at lower latency. Some sound cards just do not
function well at lower latency settings.
Even if your application reports no problems, if you hear dropouts try increasing the mixing
latency.
LIMITER
A device used to keep signal peaks from exceeding a certain level in order to prevent
the clipping or distortion of amplifier signals, recorded signals on tape or disc,
broadcast transmission signals, and so on.
LINE LEVEL
A signal level that is referenced to either 4 dBm (pro) or -10 dBV (semipro/consumer). Devices other than mics, speakers, and power-amplifier outputs
operate at these levels.
MASTERING
The processing and transferring of a final, sequenced audio tape to a medium for
duplication.
MFUSION
Open Labs mFusion software unifies multiple MIDI interfaces, MIDI keyboards, and
MIDI controllers into a single MIDI control panel for assigning MIDI channels,
providing keyboard splits, assigning MIDI controllers, and setting other parameters for
incoming MIDI data. In mFusion this is all called mapping. Keyboards and other
controls may be mapped from one type of MIDI data to another, or mapped to other
functions such as keystroke shortcuts, application launching, or even changing the
mapping of another MIDI controller. All of the MIDI data mapped by mFusion is unified
into a "virtual" MIDI port so that any music application may receive data from all
attached MIDI controllers through one single MIDI port. The individual MIDI ports
from each device remain available, however, for maximum flexibility.
MIDI
Musical Instrument Digital Interface, or MIDI, is an industry-standard electronic
communications protocol that defines each musical note in an electronic musical
instrument such as a synthesizer, precisely and concisely, allowing electronic musical
instruments and computers to exchange data, or "talk", with each other. MIDI does
Open Labs Production Station Manual
115
not transmit audio - it simply transmits digital information about a music performance.
MIDI CC
Short for "MIDI Continuous Controller", a specific kind of MIDI message. The
modulation wheel of your synth, for example, sends out "MIDI Continuous Controller
1", or CC#1. Likewise, Volume is CC#7, GLIDE - Portamento Time is CC#5.
MIDI CHANNEL
A discrete portion of the complete MIDI signal that can include as many as 16
channels. Each channel carries independent messages; individual instruments tune in
to these, just as a television tunes in to one of many channels. Instruments that can
respond to multiple channels at once are called MULTITIMBRAL.
MIDI EFFECT
A special type of plugin that accepts a MIDI stream and produces a new MIDI stream.
Examples include arpeggiators, note repeat, chorders and MIDI echo.
MIDI HOST
A MIDI Host is an application that allows you to use virtual effects and instruments
(plug-ins). They can be basic programs used to audition plug-in effects and
instruments right up to a complex multitrack recording environment for audio and
MIDI.
MIDI SEQUENCING
In the field of electronic music, a sequencer was originally any device that recorded
and played back a sequence of control information for an electronic musical
instrument. Nowadays, the term almost always refers to the feature of recording
software which allows the user to record, play back and edit MIDI data. This is distinct
from the software features which record audio data. Early analog music sequencers
used control voltage/trigger interface, but were replaced by digital hardware- or
software-based MIDI sequencers, which play back MIDI events and MIDI control
information at a specified number of beats per minute.
MONOPHONIC
Of, or noting a system of, sound recording, reproduction, or musical instrument using
only a single channel.
MULTITIMBRAL
The capability of an electronic musical instrument to respond to and output multiple
voice patches at one time.
MULTITRACK RECORDING
Multitrack recording ('multitracking' or just 'tracking' for short) is a method of sound
recording that allows for the separate recording of multiple sound sources to create a
cohesive whole. This is the most common method of recording popular music.
Multitracking can be achieved with hard disk based systems like an Open Labs
production station, often employing a computer and multitrack audio recording
software.
Open Labs Production Station Manual
116
Multitrack recording devices vary in their specifications, such as the number of
simultaneous tracks available for recording at any one time; in the case of tape based
systems this is limited by, among other factors, the physical size of the tape
employed. For computer based systems the trend is towards unlimited numbers of
record/playback tracks, although issues such as memory and CPU available will in fact
limit this from machine to machine. It has to be noted that on computer based
systems, the number of simultaneously available recording tracks is limited by the
sound card discrete analogue or digital inputs.
When recording, audio engineers can select which track (or tracks) on the device will
be used for each instrument.
At any given point on the tape, any of the tracks on the recording device can be
record or playing back, so that an artist is able to record onto track 2 and,
simultaneously, listen to track 1, allowing him to sing or to play an accompaniment to
the performance already recorded on track 1. He might then record on track 3 while
listening to track 2. All three performances can then be played back in perfect
synchrony, as if they had originally been played and recorded together. This can be
repeated until all of the available tracks have been used, or in fact, reused.
When recording is completed, the many tracks are "mixed down" through a mixing
console to a two-track stereo recorder in a format which can then be duplicated and
distributed. Most of the records, CDs and cassettes commercially available in a music
store are recordings that were originally recorded on multiple tracks, and then mixed
down to stereo. These stereo mixes can in turn be recorded onto two tracks of a fourtrack recorder, allowing additional sound to be layered on the remaining tracks.
NOISE GATE
A device that acts as an infinite expander, allowing a signal above the selected
threshold to be passed through to the output at unity gain and without dynamic
processing. When the input signal falls below this threshold level, the device
effectively shuts down the signal by applying full attenuation to the output.
NON-DESTRUCTIVE EDITING
Editing a hard-disk sound file by moving pointers, without altering in any way the
digital audio data originally recorded to disk.
NORMALIZING
A specialized gain-related process that makes the best use of a digital system's
dynamic range by automatically determining the amount of gain required to increase
the level of the highest amplitude signal to its full-scale amplitude value, and then
increasing the level of the selected region or entire file by this gain ratio.
OCTAVE
The most basic musical interval, and the second harmonic of the natural scale, which
represents a doubling of frequency.
The diatonic scales in the western harmonic system have 8 notes to the octave, hence
the name. There are 12 semi-tones to an octave and in some middle-eastern scales,
Open Labs Production Station Manual
117
24 quarter-tones.
OMNI-DIRECTIONAL MICROPHONE
A mic that outputs signals received from all incident angles at the same (or nearly
equal) level.
OSCILLATOR
In modern musical terms, an oscillator is a component that originates a signal. The
period of an oscillator is the time it takes to oscillate, or repeat. The period is also
referred to as frequency or pitch. The classic analog synthesizers had regular periodic
oscillator shapes such as Sine, Triangle, Pulse, Ramp, and Saw. They also sometimes
had a special non-periodic oscillator called noise. Although not technically an oscillator
because it does not repeat a pattern, the noise oscillator generates semi-random
values within a certain frequency.
PHANTOM POWER
Power for a condenser mic that comes directly from the console through balanced mic
cables by supplying a positive DC supply voltage of 48V (usually) to both conductors
(pins 2 & 3) with respect to pin 1. This voltage is distributed through identical value
resistors so that no differential exists between the two leads; therefore, the voltage is
electrically invisible to the alternating audio signal. The DC circuit is completed by
connecting the negative side of the supply to the cable's grounding shield.
PLUG-IN
Plug-ins are audio processing modules. They are usually of the VST or DX format.
They are usually third party external DLLs that will usually take an input stream and
produce output streams. In the case of music software this generally takes the form of
an instrument, such as a synth or sampler, or an effect processor, such as a reverb or
compressor.
POLAR PATTERN
A polar graph of the sensitivity of a microphone at all angles of sound incidence
relative to the sensitivity on-axis.
POLYPHONIC
The capability of an electronic musical instrument to output multiple notes at one
time.
PRESET
A collection of Instruments and/or Audio Effect chains with unique settings for each
plugin in the preset.
PRESET GROUP
User defined group of Presets contained within a Bank.
PUNCH-IN PUNCH-OUT
The entering into and out of record mode on a track that contains existing program
material for the purpose of correcting or erasing an unwanted segment.
Open Labs Production Station Manual
118
QUANTIZATION
The amplitude component of the digital sampling process. In an A/D converter, the
process of generating a binary number (made of 1s and Os) that represents the
voltage of the analog waveform at the instant it is measured or sampled.
RELEASE
The final portion of a note's envelope, which falls from the sustain signal level to
silence.
SAMPLE RATE
Level of accuracy with which audio data is stored. The higher the rate, better the
sound quality but the more costly in computer time and memory.
In digital audio, common sampling rates are:
•
•
•
•
•
•
•
•
•
•
8,000 Hz - telephone, adequate for human speech
22,050 Hz - radio
32,000 Hz - miniDV digital video camcorder
44,100 Hz - audio CD, also most commonly used with MPEG-1 audio (VCD, SVCD, MP3)
47,250 Hz - world's first commercial PCM sound recorder by Nippon Columbia (Denon)
48,000 Hz - digital sound used for digital TV, DVD, DAT, films and professional audio
50,000 Hz - first commercial digital audio recorders from the late 70's from 3M and
Soundstream
50,400 Hz - sampling rate used by the Mitsubishi X-80 digital audio recorder
96,000 or 192,400 Hz - DVD-Audio, some LPCM DVD tracks, BD-ROM (Blu-ray Disc) audio
tracks, and HD-DVD (High-Definition DVD) audio tracks
2.8224 MHz - SACD, 1-bit sigma-delta modulation process known as Direct Stream Digital,
co-developed by Sony and Philips
SEQUENCING
MIDI Sequencer - In the field of electronic music, a sequencer was originally any
device that recorded and played back a sequence of control information for an
electronic musical instrument. Nowadays, the term almost always refers to the feature
of recording software which allows the user to record, play back and edit MIDI data.
This is distinct from the software features which record audio data. Early analog music
sequencers used control voltage/trigger interface, but were replaced by digital
hardware- or software-based MIDI sequencers, which play back MIDI events and MIDI
control information at a specified number of beats per minute.
SMPTE TIME CODE/MTC MIDI TIME CODE
Time codes contains binary coded decimal hour:minute:second:frame identification
and 32 bits for use by users. There are also drop-frame and color framing flags and
three extra 'binary group flag' bits used for defining the use of the user bits. The
formats of other forms SMPTE timecodes are derived from that of the longitudinal time
code.
Time code can have any of a number of frame rates: common ones are:
•
•
24 frame/s (film)
25 frame/s (PAL color television)
Open Labs Production Station Manual
119
•
•
29.97 (30/1.001) frame/s (NTSC color television)
30 frame/s (American black-and-white television) (almost obsolete)
In general, SMPTE timecode frame rate information is implicit, known from the rate of
arrival of the timecode from the medium, or other metadata encoded in the medium.
The interpretation of several bits, including the "color framing" and "drop frame" bits,
depends on the underlying data rate. In particular, the drop frame bit is only valid for
a nominal frame rate of 30 frame/s: see below for details. SMPTE/MTC is a position
and timing reference that indicates the current location in the project and how quickly
the project should be playing. Time code labels the position in a project in hours,
minutes, seconds, and frames. The speed of playback is indicated by a frame rate.
Time code is recorded onto tape using a device called a time code generator. The
process of recording a time code signal onto a track is called striping. Normally, the
start of a tape stripe has a particular time, expressed in hours, minutes, seconds, and
frames. For example, the tape stripe might start at 00:00:00:00, 01:00:00:00, or any
other time. The material recorded on the tape usually starts anywhere from 10
seconds to several minutes after the start of the time code. Sometimes, the tape
stripe starts at a time like 00:59:50:00, and the material starts 10 seconds later, at
01:00:00:00.
SOFT SYNTH
A soft synth, also known as a software synthesizer or virtual instrument, is a computer
program for digital audio generation. Computer software which can create sounds or
music can accomplish the same tasks as dedicated hardware. Soft synths can be
cheaper and more portable than dedicated hardware, and easier to interface with
other music software such as MIDI sequencers.
SOLO
A monitor function that lets the engineer hear a single instrument or group of
instruments without affecting the studio's headphone monitor mix, recorded tracks, or
mixdown signal.
STREAMING
A system for transmitting audio and/or data through a transmission media (such as
the web) in real-time.
SUSTAIN
In a traditional envelope, the level at which an enveloped setting remains after the
Attack and Decay stages until the key is released.
SYNC
The locking of relative transport or playback speeds of various devices to allow them
to work together as a single, integrated system.
TRANSPOSE
To write or perform (a composition) in a key other than the original or given key.
Open Labs Production Station Manual
120
UNBALANCED LINE
A cable having only one conductor plus a surrounding shield, in which the shield is at
ground potential. The conductor and the shield carry the signal.
VST/VSTi (Virtual Studio Technology):
Refers to an interface standard for connecting audio synthesizer and effect plugins to
audio editors and hard-disk recording systems. VST and similar technologies allow the
replacement of traditional recording studio hardware with software counterparts. A
VST instrument (or VSTi) is a type of VST plug-in that is generally used to synthesize
sound or play-back sampled audio. Types of VST instruments include (among others)
virtual synthesizer devices and sampler devices. VST instruments can be played in
real-time when used with an appropriate software and hardware configuration.
VSTi LINK
The connection between a plugin parameter and a physical hardware MIDI control (or
a virtual soft control). An example of a link would be when a user moves a hardware
MIDI knob and the volume output of a soft synth changes.
WAVEFORM
Usually a graphic representation of the shape of a wave that indicates its
characteristics (as frequency and amplitude). When talking about synthesizers, the
term generally refers to the most common types of waveforms, such as the sine,
triangle, sawtooth, and pulse waves. It can also refer to digital waveforms which are
rendered from pre-recorded samples.
WORD CLOCK
A word clock is a device used to create a regular pulse used to synchronize other
devices, such as digital audio tape machines and compact disc players, which
interconnect via digital audio. S/PDIF, AES/EBU, ADAT and other formats use a word
clock. A word clock neither produces nor uses timecode; it is used entirely to keep a
perfectly-timed and constant bitrate to avoid data errors.
Open Labs Production Station Manual
121
Appendix E – Making Adjustments
Calibrating the Touchscreen
There is a property in the “TouchKit” utility used to customize your touch screen to
your on touch style, that property is called Calibration.
Start by pressing the Open Labs icon in the bottom left corner. Press “Util”, then press
the Touch Screen Icon to launch it's interface.
Open Labs Production Station Manual
122
Press the “Cal 4 Point” button on the preferences page below.
Touch the blinking “X” symbol on the screen until it beeps or it stops blinking. There
will be four “X's” to push.
Open Labs Production Station Manual
123
Adding a Second Display
All Open Labs production stations come standard with an external VGA monitor
output. This is so you can run an additional display. For best results, use “extended
desktop” mode. The following instructions will explain to you how to achieve this.
While your machine is powered down, connect the second display. When you boot the
machine back up the second monitor probably will seem connected. However, once the
system loads up, the second display will be blank. From here, the second display
needs to be set to extended desktop.
1. Press the Open Labs icon in the lower left corner of the screen, press the UTIL button and
select “Exit to Windows”.
2. Right-click the desktop, and then click Properties on the shortcut menu.
3. In the Display Properties dialog box, on the Settings tab, click the blue rectangle with the
number 2 (which represents the external monitor), and then select the Extend my Windows
desktop onto this monitor checkbox.
4. Under Screen resolution, drag the slider to the right to change the screen resolution of
Monitor 2 to 1024 by 768 pixels, and then click OK.
5. When prompted, click Yes.
Open Labs Production Station Manual
124
You can change the screen resolution in the Display Properties dialog box.
Note: If your desktop background does not appear on the external monitor, click No,
and then repeat step 3 to decrease the screen resolution.
Adjust the position of the monitors
By default, Windows places the second screen to the right of the first (or primary)
one. You can change the position of the monitors to reflect their physical position.
1. Right-click the desktop, and then click Properties on the shortcut menu.
2. In the Display Properties dialog box, on the Settings tab, drag the graphical representation
of Monitor 2 (the blue box with the number 2 in it) to the left of Monitor 1, and then click
OK.
3. When prompted, click Yes.
Adjust your screen settings
When you first enable Extended Desktop mode, your taskbar and any icons on your
desktop appear on the Open Labs touch screen; desktop space without icons appears
on the external monitor. You may find it easier to show the taskbar on the external
monitor since it is usually the larger of the two screens.
1. On your touchscreen, right-click an empty area of the taskbar, and then click Lock the
Taskbar.
2. Drag the taskbar to the external desktop and drop it where you want it to appear.
Adding a New Program to Launch from the Open Labs Shell
If you would like to add for example, Cubase to the [Record] button of the Open Labs
shell, follow these steps.
1. Make sure there is a shortcut on your desktop of the item you want to create a shell link
with. Make sure the item is not named "shortcut to Cubase". Rename the item
appropriately.
2. While the shell is running, hit "windows key + E”. This launches Windows Explorer.
3. Browse over to your desktop.
4. Drag the shortcut from desktop to the Open Labs Shell Icon in the bottom left of the screen.
Once you get to the Open Labs icon, the other tabs will show themselves, keep dragging the
item until you get over the [Record] button.
5. Release the shortcut over the [Record] button, and it will be added to the shell.
6. Relaunch the shell.
Open Labs Production Station Manual
125
Open Labs Production Station Manual
126