1
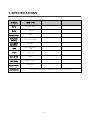
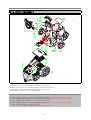
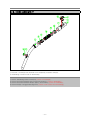
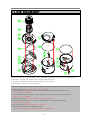
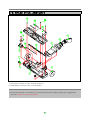
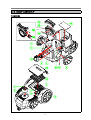
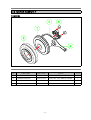
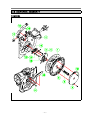
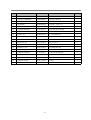
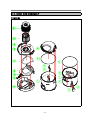
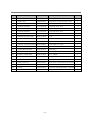
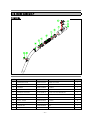
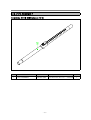
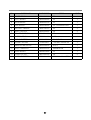
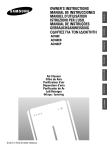
Service Manual
VACUUM CLEANER
MODEL : RCC-740
DAEWOO ELECTRONICS CO., LTD
June,2006
CONTENTS
Page
1.SPECIFICATIONS ----------------------------------- 2
2. EXTERNAL VIEWS
2-1. ASSEMBLY ------------------------------------------------
3
3. DIAGRAM
3-2. CIRCUIT DIAGRAM ------------------------------------------
4
5
4. TRBOUBLE SHOOTING GUIDE ------------------------
6
3-1. WIRING DIAGRAM ------------------------------------------
5. DISASSEMBLING AND TREATMENT
5-1. CLEANER ASSEMBLY ---------------------------------------5-2. BODY ASSEMBLY ------------------------------------------5-3. COVER ASSEMBLY -----------------------------------------5-4. CORDREEL ASSEMBLY -------------------------------------5-5. MOTOR ASSEMBLY ----------------------------------------5-6. HOSE ASSEMBLY ------------------------------------------5-7 DUST BOX ASSEMBLY --------------------------------------5-8. BRUSH PEDAL ASSEMBLY ------------------------------------
7
8
9
10
11
12
13
14
6. EXPLODED VIEW AND PARTS LIST
6-1. CLEANER ASSEMBLY ---------------------------------------6-2. BODY ASSEMBLY ------------------------------------------6-3. MOTOR ASSEMBLY ----------------------------------------6-4. CASE MOTOR ASSEMBLY ------------------------------------6-5. CORDREEL ASSEMBLY -------------------------------------6-6. COVER BODY ASSEMBLY ------------------------------------6-7. DUST BOX ASSEMBLY --------------------------------------6-8. HOSE ASSEMBLY ------------------------------------------6-9. PIPE ASSEMBLY -------------------------------------------6-10. BRUSH PEDAL ASSEMBLY -----------------------------------
15
17
19
20
21
23
24
26
27
28
1. SPECIFICATIONS
MODEL
RCC-740
Rating
AC 230V, 50Hz
Watts
1800W
Weight(body)
4.5Kg
Dimension
(WxDxH)
4413 x 228 x 295mm
Anti-biotic
NanoSilver
Dust Box
Hose
PVC transparency
1.6M
Pipe
One touch
Main Brush
Pedal
Sub Brush
Dusting / Crevice
Exhaust Filter
HEPA Filter
convenience
transparency dust box / 360 degree rotational hose /
stand keeping and body keeping temporary / convenient handle for moveing
-2-
2. EXTERNAL VIEW
2-1. ASSEMBLY
Part Name
A
- Dust Box
B
- Mood Lamp
C
- HEPA Filter
D
- General Filter
E
- Open Grip Hose
F
- Pipe (One touch aluminum)
G
- Main Brush (Pedal)
H
- Dusting, Crevice Nozzle
RCC-740
○
X
○
X
○
○
○
○
- 3 -
3. DIAGRAM
3-1. WIRING DIAGRAM
1) MODEL(Without LED PCB)
2) MODEL(With LED PCB)
-4-
3-2. CIRCUIT DIAGRAM
1) MAIN PCB(Without LED PCB)
2) MAIN PCB(With LED PCB)
-5-
4. Trouble Shooting Guide
☞ CAUTION ! Please surely unpluged power plug before repairing.
TROUBLE
Suction power
is weak
CAUSE
CHECKING
Dust box is full with dust
Dust Box (See 5-7)
Remove the dust
Dust box is installed incorrectly
Dust Box (See 5-7)
Reinstall dust box
Filter in dust box is clogged with dust
Dust Box (See 5-7)
Cleaning→drying→using
Exhaust filter is clogged with dust
Body (See 5-2)
Cleaning→drying→using
Defective motor
Motor (See 5-5)
Replace the motor
Filter in the body assembly is clogged with dust
Motor (See 5-5)
Clean the filter
Clogging or tear in hose
Hose (See 5-6 )
Remove obstacle or replace the hose
Telescopic pipe is clogged with large dust
Remove obstacle
Brush nozzle or hose is clogged with large dust
Dust full indicator is
on in the body
Dust full indicator will be executed when dust
box is filled up with dust or hose is clogged
with obstacle.
Brush (See 5-8)
Remove obstacle
Dust Box (See 5-7)
Remove dust
Hose (See 5-6 )
Remove obstacle
Pipe
Remove obstacle
Brush (See 5-8 )
Remove obstacle
Breaking in power cord
Replace power cord
Cord reel (See 5-4)
Bad contacts in cord reel assembly
Breaking of connections in cord reel assembly
Vacuum cleaner
does not work
Motor does not stop
even if switch off
Power cord is not
wound up
CAUTION
Power cord does
not stop at an
arbitraty position
Brush does not
rotate any direction
COUNTERMEASURE
Repair bad contact
Repair Disconnection
Defective terminal connection of PCB in body
PCB (See 5-1)
Check terminal connection state
Defective PCB
PCB (See 5-1)
Replace PCB
Defective contact between PCB and motor/cord reel
PCB (See 5-1)
Repair bad contact
Motor out
Motor (See 5-5)
Replace Motor
Fuse disconnection
Cord reel (See 5-4)
Replace fuse
Defective PCB
PCB (See 5-1)
Replace PCB
Broken reel sping of cord reel
Cord reel (See 5-4)
Replace Cord reel
Power cord is interwined
Cord reel (See 5-4)
Repair interwinement
Be careful when breaking up the cord reel, the reelspring may spring out of the spring cover.
Abrasion of the roller tire of cord reel
Cord reel (See 5-4)
Replace tire
Broken lever
Cord reel (See 5-4)
Replace lever
Lever spring broken away from cord reel bracket
Cord reel (See 5-4)
Repair lever spring
Bobbin is transformed
Cord reel (See 5-4)
Replace bobbin
Bracket is transformed
Cord reel (See 5-4)
Replace bracket
Lever is pushed by handle
Cover (See 5-3)
Repair handle
Clogged impurites in rotational part
Brush (See 5-8)
Remove impurites
-6-
5. DISASSEMBLING AND TERATMENT
5-1. CLEANER ASSEMBLY
1)
2)
4)
5)
Remove dust box assembly(1) from body assembly(5).
Lift handle(2) up cover assembly(4) then unscrew 6 screws(3).
Remove cover assembly(4) from body assembly(5).
Remove cord reel assembly(8), case motor assembly(6) and motor assembly(6) from body assembly(5).
1)
2)
3)
4)
5)
Check
Check
Check
Check
Check
dust leakage between dust box(1) and body assembly(2) (Cause of defective motor).
inlet(9) of body assembly(2) clogged with dust (Cause of low suction power).
connection between wire connector(6) of cord reel and PCB (Cause of malfunction).
connection between wire connector(5) of motor and PCB (Cause of malfunction).
PCB circuit, ON/OFF switch(8) and rotary volume(7) (Cause of of malfunction).
-7-
5-2. BODY ASSEMBLY
1)
2)
3)
4)
Unscrew 3 screw(11) and separate socket(10) from body(1).
Remove socket(10) then separate packing socket(9) from body(1).
Unscrew 1 screw(17) then separate guide(14) from body(1).
Assembling is reverse order of disassembly.
1)
2)
3)
4)
5)
Check leakage between socket(10) and packing socket(9) (Cause of low suction power).
Check leakage between guide(14) and packing dust box(12) (Cause of low suction power).
Check impurities in roller(2,4) (Cause of roller malfunction).
Check leakage between safety assembly(15) and body(1) (Cause of low suction power).
Check filter assembly(19) clogged with dust.
(Cause of low suction power and overheating of cleaner body)
-8-
5-3. COVER ASSEMBLY
1) Remove cover assembly from body assembly.
2) Remove handle(3) and cover top variable(4) from cover body(1).
3) Assembling is reverse order of disassembly.
1) Check handle(3) (Cause of defective cord rewinding).
2) Check button switch(5) (Cause of malfunction).
3) Check button variable(7) (Cause of malfunction).
-9-
5-4. CORDREEL ASSEMBLY
1) Separate cord reel assembly form body.
2) Separate plug of power cord(5) from bracket(11) and turn bobbin counterclockwise 4~5 times by holding
Unscrew 1 screw(19).
3) Separate bobbin(1) from bracket(11).
4) Unscrew 2 screws(15) then separate wires(13,14) from supporter terminal(12).
5) Unscrew 2 screws(10) then separate reel sping assembly(9).
CAUTION
Be careful when disassembling the cord reel, the reelspring may spring
out of the spring cover.
6) Unscrew 1 screw(6) then separate hole terminal(2~4) from bobbin(1).
7) Assembling is reverse order of disassembly. Make reserved winding 5 revolutions of bobbin clockwise
then assemble plug of power cord to bracket.
1) Check connection between power cord and plug(5) (Cause of malfunction)
2) Check breaking of connection in power cord(5) (Cause of malfunction)
3) Check contact and abrasion between Y terminal(13,14) and ring terminal(3,4)
(Cause of malfunction)
4) Check connection between Y terminal(13,14) and wires (Cause of malfunction)
5) Check connection between terminal ring(3,4) and power cord.
6) Check spring(18) of lever (Cause of automatic rewinding by itself).
7) Check lever(16) (Cause of automatic rewinding by itself).
8) Check abrasion in tire(17) of stopper (Cause of automatic rewinding by itself).
9) Check reel spring assembly(9) is damaged (Cause of unwinding power cord).
10) Check power cord(5) is entangled in bobbin(1) (Cause of unwinding power cord).
11) Check fuse(13) (Cause of malfunction).
12) Check bobbin(1) is transformed (Cause of unwinding bobbin or noise)
- 10 -
5-5. MOTOR ASSEMBLY
1) Separate motor assembly from body assembly.
2) Assembling is reverse order of disassembly. Put motor wire in a hole of body before assembling.
1) Check motor(1) brush is damaged (Cause of malfunction, noise or smell).
2) Check connection between motor(1) and wire(2) (Cause of malfunction).
3) Check leakage between packing motor(3) and motor(1) (Cause of low suction power).
- 11 -
5-6. HOSE ASSEMBLY
1) Unscrew 1 screws(5) then separate cover adapter(4). Separate clamp(2).
2) Assembling is reverse order of disassembly
1)
2)
3)
4)
Check
Check
Check
Check
assembling states of knob(10) (Cause of air leakage)
connection between pipe hose(9) and holder(7) (Cause of breakaway).
connection between adapter pipe(1) and holder(7) (Cause of breakaway).
hose(6) is clogged with large dust (Cause of low suction and overheating).
- 12 -
5-7. DUST BOX ASSEMBLY
1)
2)
3)
3)
Unscrew 4 screws(19) then separate cover middle(13), guide outlet(16) and filter assembly(20,21).
Unscrew 1 screw(6) then separate frame filter(5) from box dust(1).
Unscrew 2 screw(4) then separate guide inlet(3) from box dust(1).
Assembling is reverse order of disassembly
1) Check clamp(7) (Cause of breakaway of cover bottom)
2) Check inside between guide air inlet(3) and box dust(1) clogged with large object or not.
(Cause of low suction power)
3) Check assemble state (a air leak or not) of gasket(11) of cover bottom(10) and box dust(1)
(Cause of fine dust leakage)
4) Check frame filter(5) (Cause of malfuction of dust compression).
5) Check assemble state(a air leak or not) of cover middle(13) and guide air outlet(16).
(Cause of fine dust leakage)
6) Check clamp(14) (Cause of breakaway of dust box).
7) Check filter assembly(20,21) clogged with dust.
(Cause of low suction power and overheating of cleaner body).
- 13 -
5-8. BRUSH PEDAL ASSEMBLY
1) Unscrew 4 screws(15) then separate body(13).
2) Assembling is reverse order of disassembly.
1) Check the opening of the duct(2), the neck brush(3) and the pipe brush(4) are clogged with
the dust (Cause of low suction power).
- 14 -
6. EXPLODED VIEW AND PARTS LIST
6-1. CLEANER ASSEMBLY
1) MODEL
- 15 -
NO
PART NAME
PART CODE
SPECS.
Q'YT
1
BODY AS
3620433910
ASSY(RCC-740) BODY VARIABLE
1
2
MOTOR UNIVERSAL
396251180D
230V 1600W, V1J-PH27
1
3
HARNESS MOTOR
3622713150
TER+TER, 1015 AWG18, 290MM
1
4
PACKING MOTOR
3624012700
NR FOAM, 덕승 1600W
1
5
FRAME MOUNT MOTOR
3622207000
PP
1
6
ABSORBER FRAME DS
3620114400
NR
2
7
CASE MOTOR TOP AS
3621111300
ASSY(RCC-740)
1
8
PCB POWER CONTROL AS 3624318200
RCC-740 230V 50HZ
1
9
SCREW TAPPING
7121401412
T2S PAN 4X14 MFZN BK
1
10
CORD REEL AS
3629509110
ASSY,RCC-740 230V
1
11
COVER BODY AS
3621452920
ASSY(RCC-740) BODY VARIABLE
1
12
SCREW TAPPING
7121402011
T2S PAN 4X20 MFZN
6
13
BUTTON VARIABLE
3626610600
ABS
1
14
BOX DUST AS
3620511200
ASSY(RCC-740)
1
15
HOSE AS
3623210600
RC-400(WIRELESS, EVA)
1
16
PIPE AS
36244114BH
TELESCOPIC.SPC.T0.7 - PAINTING
1
17
BRUSH AS
362930910H
ASSY(STEEL,GY004A,CHINA HOWE
1
18
NOZZLE CREVICE
3628100600
PP
1
19
BRUSH DUSTING
3629305000
PP+NYLON
1
- 16 -
6-2. BODY ASSEMBLY
1) MODEL
- 17 -
NO
PART NAME
PART CODE
SPECS.
Q'YT
1
BODY
3620433800
PP
1
2
ROLLER AS
3624701300
BRACKET & ROLLER (P.P)
1
3
SCREW TAPPING
7128401212
T2S WAS 4X12 MFZN BK
1
4
ROLLER BACK ASSY
3624710500
ASSY(PP+PVC)
2
5
HOLDER BRUSH
3623005500
PP
1
6
SCREW TAPPING
7121401412
T2S PAN 4X14 MFZN BK
1
7
COVER SIDE DECO L
3621451100
ABS
1
8
COVER SIDE DECO R
3621451200
ABS
1
9
PACKING SOCKET
3624011300
NR
1
10
SOCKET
3629803400
PP
1
11
SCREW TAPPING
7121401412
T2S PAN 4X14 MFZN BK
3
12
PACKING DUST BOX
3624012400
PVC
1
13
FILTER INLET
3621915600
PU,BK,T=3.0,13X114 (BODY)
1
14
GUIDE DUCT
3622508000
PP
1
15
SAFETY AS
3625402000
ASSY
1
16
SCREW TAPPING
7121301011
T2S PAN 3X10 MFZN
2
17
SCREW TAPPING
7121401412
T2S PAN 4X14 MFZN BK
1
18
FILTER EXHUAST
3621915500
PE,BK,T=3.0,118.4X77.3 (BODY)
1
19
FILTER EXHAUST
3621915700
PE,WH,T=16.0,134X120.5(BODY)
1
20
GRILLE EXHAUST
3622402100
PP
1
21
BRUSH DUST BOX
3629313600
PP+식모
1
- 18 -
6-3. MOTOR ASSEMBLY
1) MODEL
NO
PART NAME
PART CODE
SPECS.
Q'YT
1
MOTOR UNIVERSAL
396251180D
230V 1600W, V1J-PH27
1
2
HARNESS MOTOR
3622713150
TER+TER, 1015 AWG18, 290MM
1
3
PACKING MOTOR
3624012700
NR FOAM, 덕승 1600W
1
4
FRAME MOUNT MOTOR
3622207000
PP
1
- 19 -
6-4. CASE MOTOR TOP ASSEMBLY
1) MODEL
NO
PART NAME
PART CODE
SPECS.
Q'YT
1
CASE MOTOR TOP
3621111100
PP
1
2
DUST METER AS
3629705000
ASSY, RCC-740
1
3
SCREW TAPPING
7121401412
T2S PAN 4X14 MFZN BK
1
- 20 -
6-5. CORDREEL ASSEMBLY
1) MODEL
- 21 -
NO
PART NAME
PART CODE
SPECS.
Q'YT
1
BOBBIN
3629200600
PP
1
2
HOLDER TERMINAL
4565A36020
PP(5101SW,V-0)
1
3
TERMINAL
4565A36024
C2600P-1/2H T0.3
1
4
TERMINAL
4565A36034
C2600P-1/2H T0.3
1
5
CORD POWER
362130255S
250V16A H05VVH2F 5.4M
1
6
SCREW TAPPING
7121401011
T2S PAN 4X10 MFZN
1
7
WAX VASELINE
2291140301
VASELINE
8
SHAFT CR
4569C35051
PC LEAXAN 500
1
9
SPRING AS
3625102000
SUS301-EH+COVER,3500MM
1
10
SCREW TAPPING
7121300811
T2S PAN 3X8 MFZN
2
11
BRACKET CR
3620602810
RECYCLE PP
1
12
SUPPORTER TERMINAL
3625300500
PP(5101SW)
1
13
HARNESS CR
3622718310
Y+WIRE(260) BK
1
14
HARNESS CR
3622718300
Y+WIRE(260) WH
1
15
SCREW TAPPING
7121400811
T2S PAN 4X8 MFZN
2
16
LEVER CR
3623703000
ABS
1
17
STOPPER ASSY
3625200200
ASSY
1
18
SPRING LEVER
3625104300
HSW3
1
19
SCREW TAPPING
7121401411
T2S PAN 4X14 MFZN
1
- 22 -
0.002
6-6. COVER BODY ASSEMBLY
1) MODEL
NO
PART NAME
PART CODE
SPECS.
Q'YT
1
COVER BODY
3621451300
ABS
1
2
COVER CR
3621451700
ABS
1
3
HANDLE
3622607200
ABS
1
4
COVER TOP VARIABLE
3621451400
ABS
1
5
BUTTON SWITCH
3626610500
ABS
1
6
SPRING BUTTON SWITCH
3625116300
HSW3,15MM
1
7
BUTTON VARIABLE
3626610600
ABS
1
- 23 -
6-7. DUST BOX ASSEMBLY
1) MODEL
- 24 -
NO
PART NAME
PART CODE
SPECS.
Q'YT
1
BOX DUST
3620511100
ABS(투명)
1
2
LABEL BOX
3623518200
ART+OPP, DUST BOX RCC-740
1
3
GUIDE AIR INLET
3622508200
ABS
1
4
SCREW TAPPING
7121301208
T2S PAN 3X12 SUS
2
5
FRAME BOX FILTER
3622207100
PP + 250目
1
6
SCREW TAPPING
7121301208
T2S PAN 3X12 SUS
1
7
BUTTON DOOR DUST
3626610100
ABS
1
8
SPRING BOX BOTTOM
3625113900
SUS
1
9
GASKET COVER BOX REA
3622309800
NR FOAM D3 L=460
1
10
COVER BOTTOM
3621451800
ABS
1
11
GASKET COVER BOX REA
3622309800
NR FOAM D3 L=460
1
12
COVER BOX TOP
3621452010
ABS + PAINT
1
13
COVER BOX MIDDLE
3621451900
ABS(투명)
1
14
CLAMP BOX DUST
3621204800
ABS
1
15
SPRING CLAMP BOX
3625116400
STS, 20MM
1
16
GUIDE AIR OUTLET
3622508300
ABS(투명)
1
17
GASKET OUTLET
3622310800
EVA FOAM 1T
1
18
LABEL BUTTON
3623518300
ART+OPP, GUIDE AIR OUTLET RCC
1
19
SCREW TAPPING
7121301208
T2S PAN 3X12 SUS
4
20
FILTER
3621915300
200G(VILENE,WASHABLE) URETHAN
1
21
FRAME FILTER
3622207200
ABS
1
- 25 -
6-8. HOSE ASSEMBLY
1) MODEL
NO
PART NAME
PART CODE
SPECS.
Q'YT
1
ADAPTER PIPE
3629101000
ABS KR-2870
1
2
CLAMP ADAPTER
3621200900
ABS
1
3
SPRING
3625102900
HSW3
1
4
COVER ADAPTER
3621412400
ABS KR-2870
1
5
SCREW TAPPING
7121300812
T2S PAN 3X8 MFZN BK
1
6
HOSE
3623207500
EVA, NON-CURRENT 1.6M STRING
7
HOLDER HOSE
4569A71021
PP
2
8
CUFF HOSE
3626800200
HDPE
2
9
PIPE HOSE
3624408200
PP
1
10
VALVE AIR
3625400400
PP
1
11
PACKING HOLE
3624005900
EVA FOAM
1
- 26 -
1.6
6-9. PIPE ASSEMBLY
1) MODEL 전기종 공통 (3624417310)
NO
1
PART NAME
PIPE ASSEMBLY
PART CODE
36244114BH
- 27 -
SPECS.
TELESCOPIC.SPC.T0.7 - PAINTIN
Q'YT
1
6-10. BRUSH ASSEMBLY
1) MODEL
- 28 -
NO
PART NAME
PART CODE
SPECS.
Q'YT
1
COVER BRUSH
3621420800
PP
1
2
DUCT BRUSH
3629306300
PP
1
3
NECK BRUSH
3628002100
PP
1
4
PIPE BRUSH
3624408300
PP, CLEAN BR PIPE
1
5
ROLLER-F BRUSH
3624704310
PP
2
6
SHAFT ROLLER
3624900900
PA
2
7
ROLLER-B BRUSH
3624704400
PP
2
8
BUTTON BRUSH
3626604400
ABS
1
9
SPRING BUTTON
3625107300
SK-5,T=0.3
1
10
SCREW TAPPING
7128400811
T2S WAS 4X8 MFZN
1
11
SWEEPER BRUSH AS
3629306400
ASS'Y
1
12
SHAFT SWEEPER
3624901400
SWRM MFZN
1
13
BODY BRUSH
3620407800
PP
1
14
PICKER LITTER
3627000700
PA
2
15
SCREW TAPPTITE
7171401412
TT2 PAN 4X14 MFZN BK
4
- 29 -