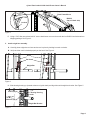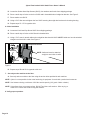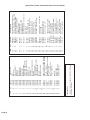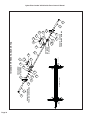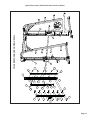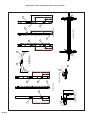
1
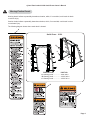
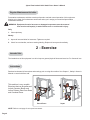
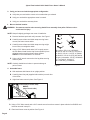
Cybex® Plate Loaded Smith Press
Owner’s and Service Manual
Strength Systems
Part Number 16120-999-4 D
www.cybexinternational.com
Cybex® Plate Loaded Smith Press
Owner’s and Service Manual
Strength Systems
Part Number 16120-999-4 D
Cybex® and the Cybex logo are registered trademarks of Cybex International, Inc.
DISCLAIMER: Cybex International, Inc., makes no representations or warranties regarding the contents of this manual. We reserve the right to
revise this document at any time or to make changes to the product described within it without notice or obligation to notify any person of such
revisions or changes.
© Copyright 2010, Cybex International, Inc. All rights reserved.
Printed in the United States of America.
10 Trotter Drive Medway, MA 02053 • 508-533-4300 • FAX 508-533-5183
www.cybexinternational.com • [email protected] • 16120-999-4 D • March 2010
Table of Contents
1 Safety
Safety. . . . . . . . . . . . . . . . . . . . . . . . . . . . 1
Safety Guidelines and Practices . . . . . . . 2
Warning/Caution Decals . . . . . . . . . . . . . 3
Regular Maintenance Activities . . . . . . . . 4
2 Exercise
Intended Use . . . . . . . . . . . . . . . . . . . . . . 4
Instructions. . . . . . . . . . . . . . . . . . . . . . . 4
3 Customer Service
Contacting Service. . . . . . . . . . . . . . . . . . 5
Ordering parts . . . . . . . . . . . . . . . . . . . . . 6
Return Material Authorization (RMA). . . . 6
Damaged Parts . . . . . . . . . . . . . . . . . . . . 7
4 Assembly
Tools Required. . . . . . . . . . . . . . . . . . . . . 7
5 Maintenance
Daily Procedures . . . . . . . . . . . . . . . . . . 11
Weekly Procedures . . . . . . . . . . . . . . . . 11
6 Service
Parts Lists . . . . . . . . . . . . . . . . . . . . . . . 14
Exploded-View Diagram . . . . . . . . . . . . 15
Page i
Cybex Plate Loaded 16120 Smith Press Owner’s Manual
1 - Safety
Safety
Read the Owner’s Manual carefully before assembling, servicing or using Cybex equipment.
WARNING: Serious injury could occur if these safety precautions are not observed:
User Safety Precautions
•
Obtain a medical exam before beginning any exercise program.
•
Stop exercising if feeling faint, dizzy or experiencing pain and consult your physician.
•
Obtain instructions before using. Lisez les instructions avant I’untilisation.
•
Read and understand the owner’s manual and all warnings posted on the machine before using.
•
Keep all children (12 and under) away. Teenagers (13 and over) and disabled must be supervised.
Garder tous les enfants (de 12 ans et moins) éloignés. Les adolescents (de 13 ans et plus) et les
handicapés doivent être surveillés.
•
Use a spotter.
•
Keep body and clothing free from and clear of all moving parts.
•
Use the machine only for the intended use. DO NOT modify the machine.
•
Inspect machine prior to use. DO NOT use if it appears damaged or inoperable.
•
DO NOT attempt to fix a broken or jammed machine.
•
Report any malfunctions, damage or repairs to the facility.
•
Replace any warning labels if damaged, worn or illegible.
Facility Safety Precautions
•
Read the Owner’s Manual carefully before assembling, servicing or using this
equipment.
•
Make sure that each machine is set up and operated on a solid level surface. Do not install
equipment on an uneven surface.
NOTE: Cybex is not responsible for the actual anchoring of equipment. Consult with a professional
contractor.
NOTE: Use fasteners having a minimum of 500 lbs. tensile capacity (3/8” grade 2 bolts or better).
NOTE: If legs/frame does not contact surface, DO NOT pull down with anchors. Shim any
leg or frame not in contact with surface using flat washers.
•
Make sure that all users are properly trained on how to use the this equipment.
•
Make sure there is enough room for safe access and operation of this equipment.
•
Perform regular maintenance checks on this equipment. Also pay close attention to all areas most
susceptible to wear.
Page 1
Cybex Plate Loaded 16120 Smith Press Owner’s Manual
•
Immediately replace worn or damaged components. If unable to immediately replace worn or
damaged components then remove from service until the repair is made.
NOTE: It is the sole responsibility of the user/owner or facility operator to ensure that regular maintenance is performed.
Safety Guidelines And Practices
Cybex recommends that all fitness equipment be used in a supervised area. It is recommended that the equipment be
located in an access controlled area. Control is the responsibility of the owner. The extent of control is at the discretion
of the owner.
It is the responsibility of the purchaser/user of Cybex products to read and understand the owner’s manual, and warning
labels; as well as instruct all individuals, whether end users or supervising personnel, on proper usage of the equipment.
PROPER USAGE:
Use machine only as described in the manual. Failing to follow proper instructions may result in injury.
Do Not Lean Against or Pull On the framework, weight stack, or any component, whether machine is at rest or in use.
Inappropriate or improper use may result in injury to users or third parties (bystanders).
Do not use machine if it is not located on a solid level surface or is improperly installed.
Provide an adequate safety perimeter between the machine, walls and other equipment to ensure that the facility has
the proper clearance for usage and training.
SECURING EQUIPMENT:
The machine has holes in the feet, which allow for ease in anchoring to the floor. Cybex strongly recommends that,
to eliminate rocking, tipping or falling over due to incorrect usage and misuse, equipment be secured to a solid, level
surface.
1. The solid, level surface should not deviate more than 1/8” over a 10’ distance or as defined and required by local
building and architectural codes.
2. Anchoring of equipment must be completed by a qualified licensed contractor.
3. Anchoring holes are provided on the feet of the frame. All anchoring locations must be used when anchoring the
equipment to the floor.
4. Due to the wide variation of flooring on which machines may be anchored or installed, verify anchoring method and
anchoring fasteners with a qualified and licensed contractor.
5. A minimum pull out force of 220 lbs/100 kgs is required for each anchor position..
6. Do not use machine until it is properly anchored.
MAINTENANCE:
Preventative maintenance allows proper equipment operation and reduces the risk of injury. Perform the maintenance
requirements as specified in the manual.
STANDARD COMPLIANCE:
Cybex products meet or exceed applicable ASTM and EN Standards.
Page 2
Cybex Plate Loaded 16120 Smith Press Owner’s Manual
Warning/Caution Decals
Warning decals indicate a potentially hazardous situation, which, if not avoided, could result in death
or serious injury.
Caution decals indicate a potentially hazardous situation, which, if not avoided, could result in minor
or moderate injury.
The following diagram shows where each decal is located.
A
Smith Press - 16120
B
A
C
B
B
B
C
C
C
DESCRIPTION
PART NO.
A. Warning Decal...................5220-364-4
B. Warning Decal...................16120-340-4
C. Warning Decal...................16120-341-4
B
C
A
Page 3
Cybex Plate Loaded 16120 Smith Press Owner’s Manual
Regular Maintenance Activities
Preventative maintenance activities must be performed to maintain normal operation of this equipment.
Keeping a log sheet of all maintenance actions will assist you in staying current with all preventative
maintenance activities.
WARNING: Equipment found to have worn or damaged components must be removed
from service until repair(s) is made. Failure to do so could result in injury.
Daily
1. Clean upholstery.
Weekly
1. Inspect all nuts and bolts for looseness. Tighten as required.
2. Check for worn handles, and worn warning labeling. Replace all worn parts immediately.
2 - Exercise
Intended Use
The intended use of this equipment is to aid or improve general physical fitness and exercise. For Comercial use.
Instructions
Read and understand all instructions and warnings prior to using this machine. See Chapter 1, Safety in Owner’s
Manual or consult with floor staff.
This machine is very versatile.
Exercises that can be performed
include: Squates, Bench and
Incline Presses, Bent-Over Rows
and Overhead Press.
Bench Press
NOTE: Refer to next page for set up and movement.
Page 4
Squat
Cybex Plate Loaded 16120 Smith Press Owner’s Manual
Set Up
1. Adjust bar to appropriate height for exercise. See Diagram A.
2. Adjust bar stops to appropriate height for exercise. See Diagram B.
NOTE: Ensure stops are set properly at equal height.
3. Load bar evenly with appropriate resistance.
NOTE: Unloaded bar weight = 15 pounds (7kg).
Diagram A
Diagram B
Movement
1. Position yoursalf for the exercise to be performed and grasp bar.
2. Lift bar rotate to release catch. See Diagram A.
3. Lift/lower bar with smooth, controlled movements.
4. Lock bar by rotating until catch is fully engaged. See Diagram A.
NOTE: Ensure bar catch is fully engaged over hook before releasing grip on bar.
3 - Customer Service
Contacting Service
Hours of phone service are Monday through Friday from 8:30 a.m. to 6:00 p.m Eastern Standard Time.
For Cybex customers living in the USA, contact Cybex Customer Service at 888-462-9239.
For Cybex customers living outside the USA, contact Cybex Customer Service at 508-533-4300 or fax 508-533-5183.
Find information on the web at www. cybexintl.com or e-mail at [email protected].
Page 5
Cybex Plate Loaded 16120 Smith Press Owner’s Manual
Ordering Parts
Fax orders to 508-533-5183. To speak with a customer service representative, call 888-462-9239 (for customers living
within the USA) or 508-533-4300 (for customers outside the USA). You may also contact us through e-mail at
[email protected].
Having the following information ready when calling, will assist our Cybex representatives in serving you.
•
Unit Serial Number
• Product Name
The unit serial number and product name can be found on the serial number decal. See Chapter 6 for exact location of
serial number decal.
•
Part Description
•
Part Number
Part descriptions and part numbers are located in Chapter 6 of this manual.
•
Shipping Address
•
Contact Name
In addition to your shipping address and contact name, your account number is helpful but not required.
Return Material Authorization (RMA)
The Return Material Authorization (RMA) system outlines the procedures to follow when returning
material for placement, repair or credit. The system assures that returned materials are properly handled and
analyzed. Follow the following procedures carefully.
Contact your authorized Cybex dealer on all warranty-related matters. Your local Cybex dealer will request a RMA
from Cybex, if applicable. Under no circumstances will defective parts or equipment be accepted by Cybex without
proper RMA and an Automated Return Service (ARS) label.
1. Call the Customer Service Hot Line listed above for the return of any item that is defective.
2. Provide the technician with a detailed description of the problem you are having or the defect in the
item you wish to return.
3. Provide the model and serial number of your Cybex equipment.
4. At Cybex’s discretion, the technician may request that you return the problem part(s) to Cybex for
evaluation and repair or replacement. The technician will assign you a RMA number and will send
you an ARS label. The ARS label and the RMA numbers must be clearly displayed on the outside of
the package that contains the item(s) to be returned. Include the description of the problem, the serial number of the equipment and the name and address of the owner in the package along with the
part(s).
Page 6
Cybex Plate Loaded 16120 Smith Press Owner’s Manual
5. Forward the package through UPS to Cybex.
Attn: Customer Service Department
Cybex International, Inc.
1975 24th Ave SW
Owatonna, MN 55060
NOTE: Merchandise returned without an RMA number on the outside of the package or shipments sent COD
will not be accepted by the Cybex receiving department.
Damaged Parts
Materials damaged in shipment should not be returned for credit. Shipping damages are the responsibility of the carrier
(UPS, Federal Express, trucking companies, etc.)
Apparent Damage - Upon receipt of your shipment, check all items carefully. Any damage seen with a visual check must
be noted on the freight bill and signed by the carrier’s agent. Failure to do so will result in the carriers refusal to honor your
damage claim. The carrier will provide you with the required forms for filing such claims.
Concealed Damage - Damage not seen with a visual check upon receipt of a shipment but notices later must be reported
to the carrier as soon as possible. Upon discovery of the damage, a written or phone request to the carrier asking them to
perform an inspection of the materials must be made within ten days of the delivery date. Keep all shipping containers and
packing materials as they will be needed in the inspection process. The carrier will provide you with an inspection report
and the necessary forms for filing a concealed damage claim. Concealed damage claim is the carrier’s responsibility.
4 - Assembly
Tools Required
•
•
•
•
•
9/16” Socket wrench
7/16” Wrench
7/32” Allen wrench
9/16” Wrench
5/16” Allen wrench
Smith Press - Product No.16120
Total Weight and Size
380 lbs. inches - 84 W x 54 L x 84 H
173 kg cm - 213 W x 137 L x 213 H
NOTE: Three people will be required for this procedure.
NOTE: It is the responsibility of the facility owner/owner of the equipment to ensure that
there is appropriate clearance around each machine to allow for safe use and passage.
NOTE: Refer to chapter 6 for reference diagrams.
1. Read and understand all instructions thoroughly before starting any of the procedures
listed on this instruction sheet.
Page 7
Cybex Plate Loaded 16120 Smith Press Owner’s Manual
2. Verify you have received the appropriate configuration.
A. Verify that you received the correct color machine that you ordered.
B. Verify you received the appropriate owner’s manual.
C. Verify you received the warranty sheet.
3. Move to desired location.
WARNING: Use extreme caution when removing Smith Press assembly from pallet. Failure to do so
could result in injury.
NOTE: Keep all shipping packages near area of installation.
A
A. Remove hardware pack and verify contents. See Figure 1.
B
B. Carefully remove foam and shrink wrap securing frame
mounts, set frame mounts aside.
F
C
C. Carefully remove foam and shrink wrap securing weight
bar to frame, set weight bar aside.
D. Using a 7/32” Allen wrench and a 9/16” wrench remove
the four Button Head Socket Cap Screws (BHSCS) from
shipping bracket securing frame halves together.
NOTE: Do not discard BHSCS or locknuts.
E. Using a 9/16” wrench remove the four lag bolts securing
frame to pallet
NOTE: Carefully handle frame halves to prevent damage to
paint or frame.
E
G
D
A. Locknut .375-16 (4), HN704901
B. HHCS .250-20 x 2.00 (2), HC621215
C. SHCS .375-16 X 1.25 (8), JC702820
D. BHSCS .375-16 X2.50 (4),HC700430
E. Split, Lockwasher .375 (8), HS348300
F. Foot Pad (6), 16010-311
G. Loctite 242 (1) YA000008
Figure 1
4. Assemble frame.
A. With assistants hold frames in an upright position.
B. Carefully place foot pad (supplied with machine) on each foot
of the frame.
C. Align front frame mount in place. See Figure 2.
Locknut (Qty of 2 each side)
BHSCS
(Qty of 2 each side)
Front Frame Mount
Figure 2
D. Using a 7/32” Allen wrench and a 9/16” wrench secure front frame mount in place with the four BHSCS and
locknuts removed in step 3C.
E. Place back frame mount in position. See Figure 3.
Page 8
Cybex Plate Loaded 16120 Smith Press Owner’s Manual
Locknut (Qty of 2 each side)
Back Frame Mount
BHSCS
(Qty of 2 both side)
Locknut
Figure 3
F. Using a 7/32” Allen wrench and a 9/16” secure back frame mount to frame with the four BHSCS and locknuts from
shipping package. See Figure 3.
5. Install weight bar assembly.
A. Carefully place weight bar on frame and secure in place by latching bar catch on hooks.
B. Verify each bar catch is hooked properly on the hook. See Figure 4.
Hook
Bar Catch
Weight Bar
Figure 4
C. Slide bearing housing up (located at bottom of guide shaft) and align holes with weight bar bracket. See Figure 5.
Guide Shaft
SHCS (Qty 4)
Bearing Housing
Loctite
Washers (Qty 4)
Weight Bar Bracket
Figure 5
Page 9
Cybex Plate Loaded 16120 Smith Press Owner’s Manual
D. Locate four Socket Head Cap Screws (SHCS), four washers and loctite from shipping package.
E. Place a small drop of loctite on the four SHCS and in threaded holes of weight bar bracket. See Figure 5.
F. Place washer over SHCS.
G. Using a 5/16” Allen wrench tighten the four SHCS securing the weight bar bracket to the bearing housing.
H. Repeat steps 5C - 5F for opposite side.
6. Cable installation
A. Locate two Hex Head Cap Screw HHCS from shipping package.
B. Place a small drop of loctite on HHCS and in threaded hole.
C. Using a 7/16” wrench, attach cable end to weight bar bracket with HHCS. NOTE: Cable end must be attached
straight to avoid a kink in cable. See Figure 6.
Weight Bar Bracket
Cable
Cable End
NOTE: Cable end must be attached
straight to avoid kink in cable.
HHCS
Figure 6
D. Repeat steps 6B and 6C for opposite cable end.
7. Securely anchor machine to the floor.
A. Securely anchor machine to the floor using the anchor holes provided in each machine.
NOTE: Cybex is not responsible for the actual anchoring of equipment. Consult with a professional contractor.
NOTE: Use fasteners having a minimum of 500 lbs. tensile capacity (3/8’’ grade 2 bolts or better).
NOTE: If legs/frame does not contact surface, DO NOT pull down with anchors. Shim any leg or
frame not in contact with surface using flat washers.
8. Verify proper operation.
Page 10
Cybex Plate Loaded 16120 Smith Press Owner’s Manual
5 - Maintenance
All preventive maintenance activities must be performed on a regular basis. Performing routine preventive
maintenance actions can aid in providing safe, trouble-free operation of all Cybex Strength Systems equipment.
NOTE: Cybex is not responsible for performing regular inspection and maintenance actions for your machines.
Instruct all personnel in equipment inspection and maintenance actions and also in accident
reporting/recording. Cybex phone representatives are available to answer any questions or concerns
that you may have.
Daily Procedures
1. Upholstery - Wipe down all upholstery.
2. Frames - Wipe down all frames using a mild solution of warm water and car wash soap. Be sure to dry thoroughly.
AVOID acid or chlorine based cleaners and also cleaners containing abrasives as these could scratch or
damage the equipment.
3. Chrome - Clean chrome tubes, first using chrome polish and then using a car wax seal. Neutral cleaners
with a pH between 5.5 and 8.5 are recommended. Be sure to dry thoroughly. AVOID acid or chlorine based
cleaners and also cleaners containing abrasives as these could scratch or damage the equipment.
Weekly Procedures
1. Inspect all nuts and bolts for looseness. Tighten as required
2. Inspect all labeling for readability. This includes instructional placards, warning and caution decals.
Replace all worn labeling immediately.
Page 11
Cybex Plate Loaded 16120 Smith Press Owner’s Manual
Page 12
Cybex Plate Loaded 16120 Smith Press Owner’s Manual
6 - Service
Please refer to the next pages for parts lists and exploded-view diagrams
NOTE: All inspections
and repairs must be
performed by trained
service personnel only.
Cybex will void warranty if
non-Cybex replacement parts
are used.
Plate Loaded Smith Press
PRODUCT NO. 16120
B
D
A
C
B
B
B
C
C
C
NOTE: See exploded view for location of E (serial number decal) and
F (Caution decal).
DESCRIPTION
PART NO.
A. Placard................................ 16120-598-X
B. Warning Decal..................... 16120-340-X
C. Warning Decal..................... 16120-341-X
DESCRIPTION
PART NO.
D. Warning Decal..................... 5220-364-X
E. Serial Number Decal
F. Caution Decal......................4000Y316-X
Page 13
Page 14
2
6
2
1
1
1
1
1
2
1
1
1
2
1
4
4
2
NA
4
2
2
NA
3
3
2
1
8
2
2
NA
2
2
4
2
QTY
GRIP
FOOT PAD
CABLE ASSEMBLY
FRAME LH
FRAME RH
FRAME MOUNT
FRAME MOUNT
WEIGHT BAR
BEARING HOUSING
WEIGHT BAR BRACKET LH
WEIGHT BAR BRACKET RH
CATCH LH
BACKING PLATE
CATCH RH
PLATE, MOUNTING HOOKS
BUSHING
COUNTERWEIGHT
CAPLUG (REMOVED 7/27/09)
CAPLUG, MODIFIED
SPACER
BEARING HOUSING
DECAL, CYBEX 1.00 HOR (BLACK)
DECAL, CYBEX 1.00 HOR (SILVER)
PULLEY, 3.50 INCH
WARRANTY BOOK (NOT SHOWN)
SPACER, PLASTIC
SHAFT 1.00 DIA X 79.88
WEIGHT TUBE 6.00
SPACER
WEIGHT TUBE
WEIGHT TUBE 10.00
WEIGHT TUBE 8.00
3900-443
3900-444
4400-354
51198
5220-367
5340M042
5340P003
5341-340
5341-365
5490P009
5490P010
DESCRIPTION
11090-385
16010-311
16120-002
16120-200
16120-201
16120-202
16120-203
16120-204
16120-205
16120-206
16120-207
16120-208
16120-209
16120-211
16120-308
16120-318
16120-351
16120-343
16120-344
16120-345
16120-346
PART NO.
1-German , 2-French, 3-Spanish, 4-English, 6-Japanese,
7- Swedish, 8- Russian
*Language Key
1
2
3
4
5
6
7
8
9
10
11
12
13
14
15
16
17
18
19
20
21
22
23
23
24
25
26
27
28
29
30
31
32
33
ITEM
4
2
2
4
4
4
4
4
2
8
2
28
2
24
4
28
4
12
2
8
NA
2
10
4
4
1
1
8
2
2
2
1
38
39
40
41
42
43
44
45
46
47
48
49
50
51
52
53
54
55
56
57
58
59
60
61
62
63
64
65
66
QTY
34
35
36
37
ITEM
PN HD PHIL SC # 8 X .625 BLK
SET SCREW
BHSCS .375-16 X 1.25
BHSCS .375-16 X 1.75
SHCS .375-16 X 1.25
INSERT, DOMED PLASTIC
INSERT, PLASTIC END
DECAL, WARNING
DECAL WARNING
PLACARD (SMITH PRESS)
DECAL, WARNING
LOCKWASHER SPLIT .375
BHSCS .250-20 X 2.00
LOCKNUT .250-20 NYLON
DECAL, CAUTION
DECAL, MADE IN USA
PP130003
PP130006
16120-340-X*
16120-341-X*
16120-598-X*
5220-364-X*
HS348300
HC620431
HN625200
4000Y316-X*
11040-790
RETAIN RING LINEAR BRG 1.00
INTERAL RETAINING RING, 52 MM
EXT RETAINING RING, 25 MM
DECAL, PATENT PENDING
(REMOVED 7/6/09)
BEARING, RADIAL
BEARING, RADIAL 10MM
EXTENDED RACE
BEARING,FLANGE 1.000 ID x 1.25
OD x 1.00 LG
BRG, RADIAL
SEAL, LINEAR BRG 1.00
HX HD CAP .250-20 X 7.50
BHSCS .375-16 X 2.50
BHSCS .375-16 X 2.75
GROMMET, NYLON
NUT, HEX JAM .375-16
LOCKNUT, .375-16 NYLON
DESCRIPTION
FB110201
FS110201
HC621215
HC700430
HC700432
HF540200
HN704400
HN704901
NA
HT542514
HY623410
JC700420
JC700424
JC702820
FB050226
FB030234
FB030257
BR030204
BR030222
BR030223
CM000211
PART NO.
Cybex Plate Loaded 16120 Smith Press Owner’s Manual
62
54
11
41
40
16
9
42
34
27
40
62
14
1
41
34
56
59
58
44
42
23
51
44
2
SERIAL DECAL
16
51
64
63
2
48
5
6
48
54
40
16
62
41
34
48
62
23
27
42
10
7
41
12
56
9
59
58
60
1
48
42
44
2
51
34
16
66
64
16120 SMITH PRESS MAIN ASSEMBLY DETAIL
23
26
51
4
26
63
44
2
26
33
57
32
32
57
57
57
(Items 26, 28, 32, 33, 57, Both Sides)
26
28
Cybex Plate Loaded 16120 Smith Press Owner’s Manual
Page 15
Page 16
31
CENTER ON HOUSING
65
H
11
38
WARNING DECAL DETAIL
REMOVE SCREWS
FROM INSIDE BEARING
57
38
30
35
48
SET SCREW
INCLUDED
36 W BEARING
65
39
CENTER ON HOUSING
45
20
21
8
45
38
30
39
38
48
21
10
20
35
39
36
REMOVE SCREWS
FROM INSIDE BEARING
SET SCREW
INCLUDED
W BEARING
39
16120 SMITH PRESS HANDLE DETAIL
31
57
Cybex Plate Loaded 16120 Smith Press Owner’s Manual
58
58
13
50
3
46
19
17
19
43
24
53
48
48
47
48
48
48
48
15
15
52
52
52
17
3
17
16120 SMITH CABLE ROUTING DETAIL
NOTE: Cable fitting end
must be straight so cable wil
not kink>
3
Cybex Plate Loaded 16120 Smith Press Owner’s Manual
Page 17
Page 18
2X CENTER
ON TUBE
2X 1.25±.12
CYBEX DECAL
PLACEMENT DETAIL I
23
17.22±.25
41.73±.25
58
5
59
17.22±.25
41.73±.25
.38±.13
1.00±.13
SERIAL DECAL DETAIL
DECAL DETAIL I
59
58
CENTER ON
TUBE
H
CENTER ON HOUSING
65
CYBEX DECAL
PLACEMENT DETAIL II
5
CENTER ON TUBE
37
24.10±.25
23
7
17.22±.25
41.73±.25
59
58
16120 SMITH PRESS DECAL PLACEMENT DETAIL
61
DECAL DETAIL II
WARNING DECAL DETAIL
4
51.50±.25
.25±.12
59
58
17.22±.25
65
CENTER O
51.50±.25
41.73±.25
60
Cybex Plate Loaded 16120 Smith Press Owner’s Manual
10 Trotter Drive Medway, MA 02053 • 508-533-4300 • FAX 508-533-5183
www.cybexinternational.com • [email protected]