1
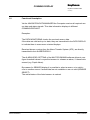
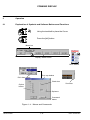
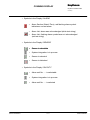
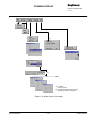
Raytheon Anschütz GmbH Postfach 1166 D -- 24100 Kiel Germany Tel +49--4 31--30 19--0 Fax +49--4 31--30 19--501 Email [email protected] www.raytheon--anschuetz.de CONNING DISPLAY (Box--Pc) Description 4094.DOC000002 Edition: 28.MAR.2011 Weitergabe sowie Vervielfältigung dieser Unterlage, Verwertung und Mitteilung ihres Inhaltes nicht gestattet, soweit nicht ausdrücklich zugestanden. Zuwiderhandlungen verpflichten zu Schadenersatz. Copying of this document, and giving it to others and the use or communication of the contents thereof, are forbidden without express authority. Offenders are liable to the payment of damages. Toute communication ou reproduction de ce document, toute exploitation ou communication de son contenu sont interdites, sauf autorisation expresse. Tout manquement à cette règle est illicite et expose son auteur au versement de dommages et intérêts. Sin nuestra expresa autorización, queda terminantemente prohibida la reproducción total o parcial de este documento, así como su uso indebido y/o su exhibición o comunicación a terceros. De los infractores se exigirá el correspondiente resarcimiento de daños y perjuicios. CONNING DISPLAY R Raytheon Anschütz GmbH Germany SAFETY NOTES: S Warning! Take care during maintenance and repair work: avoid touching live electrical connections. The applicable safety regulations such as VDE, VBG 4, OSHA 1919 and other appropriate safety standards must be followed. S The installation and first putting into operation may only be performed by trained and qualified personnel. S Maintenance and repair work may only be performed by trained and qualified personnel having knowledge of the national safety regulations for this type of equipment. S The equipment can be damaged! Parts may only be replaced when the supply voltage is switched off. Edition: 28.MAR.2011 A 4094DOC000002 CONNING DISPLAY 4094DOC000002 B Edition: 28.MAR.2011 CONNING DISPLAY R Raytheon Anschütz GmbH Germany Table of Contents 1 General . . . . . . . . . . . . . . . . . . . . . . . . . . . . . . . . . . . . . . . . . . . . . . . . . . . . . . . . . . . . . . . . . . 1--1 Construction . . . . . . . . . . . . . . . . . . . . . . . . . . . . . . . . . . . . . . . . . . . . . . . . . . . . . . . . . . . . . 1--2 1.1.1 TFT--Display --1-- . . . . . . . . . . . . . . . . . . . . . . . . . . . . . . . . . . . . . . . . . . . . . . . . . . . . . . . . 1--3 1.1.2 Trackball --2-- . . . . . . . . . . . . . . . . . . . . . . . . . . . . . . . . . . . . . . . . . . . . . . . . . . . . . . . . . . . 1--3 1.1.3 Computer . . . . . . . . . . . . . . . . . . . . . . . . . . . . . . . . . . . . . . . . . . . . . . . . . . . . . . . . . . . . . . 1--4 Functional Description . . . . . . . . . . . . . . . . . . . . . . . . . . . . . . . . . . . . . . . . . . . . . . . . . . . . 1--5 Operation . . . . . . . . . . . . . . . . . . . . . . . . . . . . . . . . . . . . . . . . . . . . . . . . . . . . . . . . . . . . . . . . 1--6 2.1 Explanation of Symbols and Software Buttons and Functions . . . . . . . . . . . . . . . . . . 1--6 2.2 Operator Involvement during Operation . . . . . . . . . . . . . . . . . . . . . . . . . . . . . . . . . . . . . 1--8 2.2.1 General . . . . . . . . . . . . . . . . . . . . . . . . . . . . . . . . . . . . . . . . . . . . . . . . . . . . . . . . . . . . . . . . 1--8 2.2.2 The Menu bar . . . . . . . . . . . . . . . . . . . . . . . . . . . . . . . . . . . . . . . . . . . . . . . . . . . . . . . . . . . 1--8 2.2.3 Working with the menu bar . . . . . . . . . . . . . . . . . . . . . . . . . . . . . . . . . . . . . . . . . . . . . . . 1--10 2.2.4 Settings in the Pop--up window (Example) . . . . . . . . . . . . . . . . . . . . . . . . . . . . . . . . . . 1--11 2.2.5 Selecting a Display . . . . . . . . . . . . . . . . . . . . . . . . . . . . . . . . . . . . . . . . . . . . . . . . . . . . . . 1--12 2.2.6 Indication of Alarms . . . . . . . . . . . . . . . . . . . . . . . . . . . . . . . . . . . . . . . . . . . . . . . . . . . . . . 1--13 2.2.7 Acknowledgement of Alarms . . . . . . . . . . . . . . . . . . . . . . . . . . . . . . . . . . . . . . . . . . . . . . 1--14 2.2.8 The MFC Switcher (Option) . . . . . . . . . . . . . . . . . . . . . . . . . . . . . . . . . . . . . . . . . . . . . . . 1--15 Installation and first Putting into Operation . . . . . . . . . . . . . . . . . . . . . . . . . . . . . . . . . 1--16 3.1 Installation . . . . . . . . . . . . . . . . . . . . . . . . . . . . . . . . . . . . . . . . . . . . . . . . . . . . . . . . . . . . . . . 1--16 3.2 First Putting into Operation . . . . . . . . . . . . . . . . . . . . . . . . . . . . . . . . . . . . . . . . . . . . . . . . 1--16 Servicing, maintenance and repair . . . . . . . . . . . . . . . . . . . . . . . . . . . . . . . . . . . . . . . . 1--17 4.1 Safety instructions . . . . . . . . . . . . . . . . . . . . . . . . . . . . . . . . . . . . . . . . . . . . . . . . . . . . . . . . 1--17 4.2 Servicing and maintenance . . . . . . . . . . . . . . . . . . . . . . . . . . . . . . . . . . . . . . . . . . . . . . . . 1--17 4.3 Repair . . . . . . . . . . . . . . . . . . . . . . . . . . . . . . . . . . . . . . . . . . . . . . . . . . . . . . . . . . . . . . . . . . 1--18 1.1 1.2 2 3 4 Edition: 28.MAR.2011 I 4094DOC000002 CONNING DISPLAY Table of Contents 4.3.1 Computer . . . . . . . . . . . . . . . . . . . . . . . . . . . . . . . . . . . . . . . . . . . . . . . . . . . . . . . . . . . . . . 4094DOC000002 II 1--18 Edition: 28.MAR.2011 CONNING DISPLAY R Raytheon Anschütz GmbH Germany 1 General The Conning Display is part of a NAUTOCONNING system. The Computer contains the Conning Display software, which offers the following functionality: Manoeuvre--oriented Data and Alarm displays (see example Figure: 1--1) Data monitoring Alarm level setting Sensor selecting The Computer receives the data, alarm and status information from connected devices/sensors via Ethernet. The Ehternet data distribution is managed by the Ethernet Switch. Figure: 1--1: Edition: 28.MAR.2011 Display „NAVIGATION“ 1--1 4094DOC000002 CONNING DISPLAY 1.1 Construction A Conning Display consists of the following hardware components (see Figure: 1--2). ¡ TFT Display © Trackball ¢ Computer with Conning Display Softare and a external Ethernet Switch 1 2 3 COMPUTER MFC NAUTOCONNING ECDIS Radar option or ETHERNET SWITCH option option NAVIGATION DATA MANAGER ALARM TRANSFER SYSTEM option RADAR ECDIS Figure: 1--2: CONNING DISPLAY Overview 4094DOC000002 1--2 Edition: 28.MAR.2011 CONNING DISPLAY R Raytheon Anschütz GmbH Germany 1.1.1 TFT--Display --1-The display is a high--resolution TFT (Thin Film Transistor) flat screen color monitor. It shows the data, status and alarm messages in appropriate CONNING DISPLAYS. 1.1.2 Trackball - 2-Operation is carried out via Trackball (see Figure: 1--3). Using the trackball, the cursor is moved by rolling the ball in the appropriate direction. Figure: 1--3 Trackball The trackball is equipped with three buttons. The middle and right button has no function for the NAUTOCONNING System. The [left] button is used as set button (or left mouse button) - Using the trackball, place the cursor over a softkey from the menu bar and press the button. The softkey function is activated. Edition: 28.MAR.2011 1--3 4094DOC000002 CONNING DISPLAY 1.1.3 Computer The Computer is a PC compatible computer system designed to be used in maritime environment. The computer is based on high processor technology and incorporates the GM45, ICH9M chipset. Detailed information see annex Service Manual no. 4090 (in NAUTOCONNIG manual 4093). 4094DOC000002 1--4 Edition: 28.MAR.2011 CONNING DISPLAY R Raytheon Anschütz GmbH Germany 1.2 Functional Description Via the NAVIGATION DATA MANAGER the Computer receives all required sensor data and status signals. This data information displays in different CONNING DISPLAYS. Examples: The DATA MONITORING checks the received sensor data. If the data are valid and up--to--date, they are transmitted to the DATA DISPLAY to indicate them in manoeuvre oriented displays. Received alarms, coming from the Alarm Transfer System (ATS), are directly transmitted to the ALARM DISPLAY . The ALARM LEVEL SETTING of the NAUTOCONNING software allows to configure threshold values for specified sensors to release an alarm, if these limits exceed (e.g. Depth Alarm). By means of a SENSOR display it is possible to select a sensor or to switch-over to another sensor if actual data are not available or are not valid (SENSOR SELECT). The actual status of the listed sensors is marked. Edition: 28.MAR.2011 1--5 4094DOC000002 CONNING DISPLAY 2 Operation 2.1 Explanation of Symbols and Software Buttons and Functions Using the trackball to place the Cursor Press the [left] button Menu bar Display--Select button MFC--Switch Pull--down menu Pop--up window Check box b Scroll bar Option button Spinners Command button Figure: 1--4 Menus and Commands 4094DOC000002 1--6 Edition: 28.MAR.2011 CONNING DISPLAY R Raytheon Anschütz GmbH Germany Symbols in the Display ’ALARM’ Alarm Section (Watch Time), red flashing alarm symbol indicates a current alarm Alarm List, alarm was acknowledged (white text string) Alarm List, flashing alarm symbol was not acknowledged (red text string) Symbols in the Display ’SENSOR’ Sensor is selectable System integration is in process Sensor is selected Sensor is disturbed Symbols in the Display ’ON DUTY’ Edition: 28.MAR.2011 Alarm unit No. .... is selectable System integration is in process Alarm unit No. .... is selected 1--7 4094DOC000002 CONNING DISPLAY 2.2 Operator Involvement during Operation 2.2.1 General The operating is exclusively carried out via the Trackball. The controlling of the NAUTOCONNING software is carried out via a menu bar, the selection of the different displays via corresponding select buttons. 2.2.2 The Menu bar Indications Comment/Notes *) For RAN service support *) *) The menu bar offers the following functions: File (used for RMG service support and settings only) Screen (Day/Night) Scaling of Sensor Data Debug (used for RMG service support and settings only) Info Figure: 1--5 gives an overview of all available menu functions. 4094DOC000002 1--8 Edition: 28.MAR.2011 R CONNING DISPLAY Raytheon Anschütz GmbH Germany *) *) **) *) For RAN service support **) Change to the RECORD menu for activating the pop--up windows Figure: 1--6: Menu options (Overview) Edition: 28.MAR.2011 1--9 4094DOC000002 CONNING DISPLAY 2.2.3 Working with the menu bar Indications Comment/Notes Menu bar is not active. [1] Selecting a menu function... Step 1 Menu bar is active. Select the desired menu function (e.g. Screen). Step 1 Step 2 Step 2 The pull--down menu appears. Select the desired Screen mode. 4094DOC000002 1--10 Edition: 28.MAR.2011 R CONNING DISPLAY Raytheon Anschütz GmbH Germany 2.2.4 Settings in the Pop-- up window (Example) Settings in the pop--up window will be done over the menu bar function SCALING. These settings will be transferred to the relevant conning display sections; ----- DEPTH HEADING (in the RECORD display) TURN RATE (in the RECORD display) RUDDER (in the RECORD display) In the following example the Record Time should be changed to 5 min. Indications Comment/Notes Menu bar is active. Select the scaling menu function Step 1 Step 2 Step 3 Step 1 The pull--down menu appears. Select the Record menu function Step 2 Select the next pull--down menu The pop--up window Heading appears. Step 3 Select the option button, change to 5 min. The Heading Scale changes to 5 min. Edition: 28.MAR.2011 1--11 4094DOC000002 CONNING DISPLAY 2.2.5 Selecting a Display Example: Docking Display Indications Comments/Notes [1] Select Display ... 4094DOC000002 1--12 Edition: 28.MAR.2011 CONNING DISPLAY R Raytheon Anschütz GmbH Germany 2.2.6 Indication of Alarms NAUTOCONNING includes a configurable watch alarm for W1--application. If a preset period of time is exceeded, preliminary warnings and alarms are given. The controlling timer is reset through pressing of keys or operations on the connected navigation equipment. Indications Comments/Notes [1] Watch Alarm Key symbol is visible; the watch alarm activator is switched to OFF. The preset watch time settings can be selected. key symbol Watch Alarm Activator [2] Watch Alarm settings (see chapter 2.2.4) [3] Activate the Watch Alarm Key symbol is not visible; the watch alarm activator is switched to ON. The preset watch time is running downwards. The watch time settings are blocked know. [4] Activate the Watch Alarm when AUTOPILOT is active Key symbol is not visible; the watch alarm activator is switched to AUTO. The AUTOPILOT is switched to TRACK or HEADING Control. The preset watch time is running downwards. The watch time settings are blocked know. Edition: 28.MAR.2011 1--13 4094DOC000002 CONNING DISPLAY 2.2.7 Acknowledgement of Alarms Indications Comments/Notes Acknowledging the current Alarm The alarm symbol is flashing red. The external buzzer sounds (e.g. external alarm unit). After pressing the key the buzzer sound and the flashing alarm symbol is stopped. The alarm message appears in the alarm list as acknowledged alarm (white text string), if the alarm can be acknowledged (Step 1). Otherwise only the buzzer sound stops and the alarm has to be acknowledge at the alarm generating system (e.g. Radar, Ecdis). Step 1 Indications Comments/Notes Indication and acknowledging of Alarms in the Display ’ALARMS’ (ALARM LIST) A still active alarm (not yet acknowledged) is indicated in red . An already acknowledged alarm is indicated in white and remains so long in the alarm list until the trouble source is fixed. Select an alarm message. and press the [left] button for acknowledging the selected alarm message. Otherwise the selection has to be done at the alarm generating system (e.g. Radar, Ecdis). 4094DOC000002 1--14 Edition: 28.MAR.2011 CONNING DISPLAY R Raytheon Anschütz GmbH Germany 2.2.8 The MFC Switcher (Option) Indications Comments/Notes Switching over to another application Select another application in the pull down menu. In this example the Multifunction Console switches over to the ECDIS application. Edition: 28.MAR.2011 1--15 4094DOC000002 CONNING DISPLAY 3 Installation and first Putting into Operation Warning! The installation and first commissioning may only be performed by trained and qualified personnel. 3.1 Installation The equipment is to be connected in accordance with the cable and connection plans shown in the appendix. 3.2 First Putting into Operation The NAUTOCONNING system is given a ship--specific configuration at the works, making the system operationally ready. 4094DOC000002 1--16 Edition: 28.MAR.2011 CONNING DISPLAY R Raytheon Anschütz GmbH Germany 4 Servicing, maintenance and repair 4.1 Safety instructions Warning! Take care during maintenance and repair work: avoid touching live electrical connections. The applicable safety regulations such as VDE, VBG 4, OSHA 1919 and other appropriate safety standards must be followed. Warning! Maintenance and repair work may only be performed by trained and qualified personnel having knowledge of the national safety regulations for this type of equipment. Warning! The equipment can be damaged! Parts may only be replaced when the supply voltage is switched off. 4.2 Edition: 28.MAR.2011 Servicing and maintenance Servicing and maintenance are not needed for the NAUTOCONNING system. 1--17 4094DOC000002 CONNING DISPLAY 4.3 Repair 4.3.1 Computer Detailed information see Service Manual Doc. No. 4090 in annex. 4094DOC000002 1--18 Edition: 28.MAR.2011