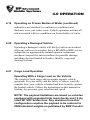
1
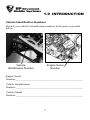
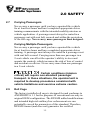
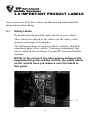
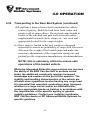
(RPAMS)
STRIKE-C/C4 LTV
STRIKE-M/M4 LTV
Supplemental Owner's Manual
for Maintenance and Safety
1
Contact Information:
RP Advanced Mobile Systems, LLC.
11160 SW Durham Lane, McMinnville, OR 97128 USA
Phone: 503-434-9446
FAX: 503-217-6080
Web: www.RPAMS.com
2
WELCOME
Welcome to the family of innovative RPAMS upfitted Can-Am based
SBS/ATV owners and operators! At RPAMS, we are committed to our
many sportsmen, warfighters, agents and allies around the world. Our
families of light tactical vehicles are combat proven, providing
mobility, sustainability, transportability and mission flexibility to our
mobilized warfighter.
RPAMS sets the standard of upfit excellence for all utility and
recreational vehicles manufactured by BRP Can-Am. Significant effort
and years of tactical experience are imbedded in the engineering and
development of your RPAMS upfitted vehicle, making it one of the
finest tactical platforms produced.
For safe and effective operation of your vehicle, be sure to follow the
instructions and recommendations in this owner’s manual and
supplemental appendices. This manual contains instructions for minor
maintenance. Major maintenance and repairs are outlined in the BRP
Can-Am Service Manual and should be performed only by a factorycertified technician.
For sales, parts, technical information and support, please contact a
RPAMS representative or Mike Jackson at the following web site,
respectively:
Web: www.RPAMS.com
Web: www.MilitaryATV.com
At RPAMS, we are passionate about producing an exciting line of utility and
tactical products for our customers. You can find out more about RPAMS by
visiting our web site: www.RPAMS.com
3
[INTENTIONALLY BLANK]
4
TABLE OF CONTENTS
1.0 Introduction . . . . . . . . . . . . . . . . . . . . . . . . . . . . . . . . . . . . . . . . 7
2.0 Safety . . . . . . . . . . . . . . . . . . . . . . . . . . . . . . . . . . . . . . . . . . . . . . 9
3.0 Important Product Labels . . . . . . . . . . . . . . . . . . . . . . . . . . . . 15
4.0 Operation . . . . . . . . . . . . . . . . . . . . . . . . . . . . . . . . . . . . . . . . . 19
5.0 RPAMS Tire Sizes and
4.0 Recommended Tire Pressures . . . . . . . . . . . . . . . . . . . . . . . . 33
6.0 Winch Guide . . . . . . . . . . . . . . . . . . . . . . . . . . . . . . . . . . . . . . . 35
7.0 Maintenance . . . . . . . . . . . . . . . . . . . . . . . . . . . . . . . . . . . . . . . 37
8.0 Warranty . . . . . . . . . . . . . . . . . . . . . . . . . . . . . . . . . . . . . . . . . 41
9.0 Index . . . . . . . . . . . . . . . . . . . . . . . . . . . . . . . . . . . . . . . . . . . . . 45
5
[INTENTIONALLY BLANK]
6
1.0 INTRODUCTION
Your RP Advanced Mobile Systems, LLC (RPAMS) upfitted vehicle
is a BRP Commander™ or Maverick™ LTV, upfitted by RPAMS with
accessories for military and industrial applications. The standard
RPAMS upfit kit comprises at a minimum a rear multi-modal bed, ride
mitigation seats, high load run-flat tires, MOLLE roof and front push
bumper system. The operator must follow the original equipment
manufacturers (OEM) manuals for proper operation and maintenance
of the base vehicles. The RPAMS manual is a supplement to, and not
meant to replace, the OEM manuals.
Failure to heed the warnings and safety
precautions contained in this manual can result in severe injury
or death. Your RPAMS vehicle can be hazardous to operate in
certain situations. This upfitted vehicle handles differently than
cars, trucks or other off-road vehicles. A collision or rollover can
occur, even when conducting routine maneuvers such as
turning, driving on hills or over obstacles and acceleration/
braking, if you fail to follow and implement proper operational
precautions.
All operators must read this manual and understand
all safety warnings, precautions and operating procedures
before operating the vehicle. This manual should always be
kept in the vehicle.
For additional safety information and training, visit the Recreational
Off-Highway Vehicle Association web site (rohva.org) and take the
free on-line training course.
7
1.0 INTRODUCTION
Vehicle Identification Numbers
Record your vehicle's identification numbers in the spaces provided
below.
Vehicle
Identification Number
Engine Serial
Number
Engine Serial
Number:_________________________________________________
Vehicle Identification
Number:_________________________________________________
Vehicle Model
Number:_________________________________________________
8
2.0 SAFETY
2.1
Signal Words/Symbols
Signal words/symbols appear throughout this guide. Your
safety is involved when these words/symbols are utilized.
Failure to operate this vehicle properly can result in a collision,
loss of control, accident or rollover, which may result in
serious injury or death. Heed all signal words/symbols and
safety warnings outlined in this section of the manual. Your
safety, and that of others, depends on it. Review the
descriptions below before proceeding further:
The safety alert symbol indicates a potential
personal injury hazard.
“DANGER” - A DANGER indicates a hazardous situation
that, if not avoided, will result in death or
serious injury.
“WARNING” - A WARNING indicates a hazardous situation
that, if not avoided, could result in death or
serious injury.
“CAUTION” - A CAUTION indicates a hazardous situation
that, if not avoided, could result in minor or
moderate injury.
“NOTICE” -
A NOTICE indicates a situation that could
result in property damage.
The Prohibition Safety Sign indicates an
action NOT to take in order to avoid a hazard.
The Mandatory Action Sign indicates an
action that NEEDS to be taken to avoid a
hazard.
9
2.0 SAFETY
2.2
Operator Restrictions/Age Restrictions
This vehicle is intended for ADULTS ONLY. At a minimum,
you MUST be at least age 18, properly trained by an accredited
operator course and have a valid driver’s license to operate this
vehicle. All operators must read and understand this manual
and all warning and instruction labels before operating the
vehicle. Never allow anyone to operate this vehicle until the
person has completed the same training. Make sure all
passengers are tall enough to sit comfortably and safely, reach
the provided hand holds and place both feet on the floor within
the cab.
2.3
Seat Belts
Always wear properly fitted seat belts when operating or riding
in this vehicle. Riding without seat belts increases the risk of
serious injury in the event of rollover, loss of control, other
accident or sudden stop. Seat belts can reduce the severity of
injury in these circumstances. All vehicle occupants must wear
seat belts at all times.
2.4
Using Alcohol or Drugs
Riding in this vehicle after
consuming alcohol or drugs
could adversely affect operator
judgment, reaction time, balance
and perception. Never consume
alcohol or drugs before or while
operating or riding in this
upfitted vehicle.
10
2.0 SAFETY
2.5
Operating Without Instruction
Operating this vehicle without proper instruction or training
increases the risk of an accident/incident. The operator must
understand how to operate the modified vehicle properly in
different situations and on different types of terrain. RPAMS
strongly recommends taking a training course and completing
the associated test to verify driver/operator proficiency.
2.6
Safe Riding Gear
Riding in this vehicle without wearing an approved helmet and
protective eyewear increases the risk of serious injuries in the
event of an accident/incident. Operators and all occupants must
wear a helmet, eye protection, gloves, protective apparel and
over-the-ankle boots.
Helmet
Wearing a helmet or appropriately certified head protective
gear can prevent a severe head injury. Whenever riding this
RPAMS upfitted vehicle, always wear a helmet that meets or
exceeds established safety standards.
Approved helmets in the USA and Canada bear a U.S.
Department of Transportation (DOT) label.
Approved helmets in Europe, Asia and Oceania bear the ECE
22.05 label. The ECE mark consists of a circle surrounding the
letter E, followed by the distinguishing number
of the country which has granted approval. The
approval number and serial number will also be
displayed on the label.
11
2.0 SAFETY
2.6
Safe Riding Gear (continued)
Eye Protection
Do not depend on eyeglasses or sunglasses for eye protection.
Whenever riding this RPAMS upfitted vehicle, always wear
shatter-proof goggles or use a shatter-proof helmet face shield.
RPAMS recommends wearing approved Personal Protective
Equipment (PPE) bearing markings such as VESC 8, V-8,
Z87.1, or CE. Make sure protective eye wear is kept clean.
Gloves
Wear gloves for comfort and for protection from sun, cold
weather and other elements.
Boots
Wear sturdy over-the-ankle boots for support and protection.
Never ride a RPAMS vehicle with bare feet or sandals.
Clothing
Wear long sleeves and long pants to protect arms and legs.
Rider Comfort
Under certain conditions, heat generated by the engine mid
chassis location and exhaust system can increase temperatures
in the cab area. The condition occurs most frequently when a
vehicle is being operated in high ambient temperatures at low
speeds and/or high load conditions for any period of time. The
use of certain cab enclosure systems may contribute to this
condition by restricting airflow. Any discomfort due to heat
accumulating in this area can be mitigated by wearing proper
riding apparel and by increasing airflow.
12
2.0 SAFETY
2.7
Carrying Passengers
Never carry a passenger until you have operated this vehicle
for at least two hours and have completed appropriate driver
training commensurate with the intended mobility mission or
vehicle application. A passenger must always be seated in a
passenger seat with seat belt secured and within the protection
of the roll cage. Never carry more passengers than designed.
Carrying Multiple Passengers
Never carry a passenger until you have operated this vehicle
for at least two hours and have completed appropriate driver
training. A passenger must always be seated in a passenger seat
with seat belt secured. Carrying more than one passenger in a
2-seat vehicle can affect the operator’s ability to steer and
operate the controls, which increases the risk of loss of control
and accident or rollover. Never carry more than one passenger
in a 2-seat vehicle.
Certain conditions (mission
critical) will require non-standard passenger
transport. In those situations, the operator/unit is
required to develop procedures consistent with
vehicle limitations and exercise extreme caution.
2.9
Roll Cage
The factory installed roll cage is designed for and conforms to
ANSI/ROHVA 1.1 for the purposes of recreational use only in
original OEM configuration. The RPAMS added modifications
and intended high risk military/law enforcement use can
potentially exceed the parameters of this standard. Therefore,
RPAMS cannot (and does not) guarantee the certified
13
2.0 SAFETY
2.9
Roll Cage (continued)
performance of the roll cage kit in event of a roll over.
Operators of modified vehicles need to exercise extreme
caution when operating the modified vehicle and properly use
installed occupant restraints.
14
3.0 IMPORTANT PRODUCT LABELS
Any person who rides this vehicle should read and understand this
information before riding.
3.1
Safety Labels
Read and understand all the safety labels on your vehicle.
These labels are affixed to the vehicle for the safety of the
operator, passenger or bystanders.
The following labels are on your vehicle, and they should be
considered parts of the vehicle. If missing or damaged, they
can be replaced free of charge. Contact RP Advanced Mobile
Systems.
NOTE: In the event of any discrepancy between this
supplemental guide and the vehicle, the safety labels
on the vehicle have precedence over the labels in
this guide.
1
TYPICAL
15
3.0 IMPORTANT PRODUCT LABELS
3.1
Safety Labels (continued)
2
TYPICAL
SUPPLEMENTAL LABEL 1
16
3.0 IMPORTANT PRODUCT LABELS
3.1
Safety Labels (continued)
SUPPLEMENTAL LABEL 2
17
[INTENTIONALLY BLANK]
18
4.0 OPERATION
4.1
Failure to Inspect Before Operating
Always perform a pre-ride inspection before each use of your
vehicle to make sure it's in safe operating condition. Failure to
inspect and verify that the upfitted vehicle is in safe operating
condition before operating increases the risk of an accident.
4.2
Operating on Pavement
Operating this upfitted vehicle on paved surfaces (including
streets, hardened paths, parking lots, and driveways) will
seriously affect handling and control of the vehicle, and may
cause the vehicle to lose control. This vehicle's tires are DOT
rated but designed for off-road use only, not for use on
pavement. Avoid operating the vehicle on pavement. If you
must operate on a paved surface, travel slowly, make turns
cautiously and do not make sudden maneuvers or stops.
4.3
Operating on Public Roads
Operating this vehicle on public streets, roads or highways
could result in a collision with another vehicle. Never operate
this vehicle on any public street, road or highway, including
dirt and gravel roads. Be aware that in many states, it's illegal
to operate off-road vehicles of this type on public streets, roads
and highways.
4.4
Operating at Excessive Speeds
Operating this vehicle at excessive speeds significantly
increases the operator's risk of losing control. Always operate
at a speed that is appropriate for the terrain, visibility,
conditions, your operator skills and your other occupant’s
skills.
19
4.0 OPERATION
4.5
Turning Improperly
Turning improperly could cause loss of traction, control, incur
an accident and/or rollover. Always follow proper procedures
for turning. Avoid sharp turns. Never turn while applying
heavy throttle or brake. Never make abrupt maneuvers. Always
consider the payload when turning. Practice turning at slow
speeds before attempting to turn at faster speeds. Always
follow operational training guidelines.
4.6
Physical Control of the Vehicle
Removing hands from the steering wheel, hand hold or
removing feet from the floor while riding increases the risk of
loss of control and can cause an accident or rollover. The
operator should always keep both hands on the steering wheel
during operation. Passengers should always be seated in a
passenger seat with seat belt secured, with both feet on the
floor and with both hands securely grasping the passenger hand
hold or grab bar. Keep hands and feet inside the vehicle at all
times.
4.7
Jumps, Stunts and Unauthorized Operations
Hazardous driving increases the risk of an accident or rollover.
DO NOT do power slides, “donuts”, jumps or other driving
stunts. Avoid exhibition style driving.
20
4.0 OPERATION
4.8
Descending Hills Improperly
Improperly descending a hill could cause loss of control or
incur a rollover. Always follow proper procedures for traveling
down hills as described in the owner's manual.
• Always descend a hill with the transmission in forward
gear. Never descend a hill with the transmission in neutral.
• Always investigate the terrain carefully before descending
a hill.
• Never travel down a hill at
excessive speed.
• Avoid traveling down a hill at
an angle, which could cause
the vehicle to lean sharply to
one side. Travel straight
downhill and carefully
traverse obstacles while
descending.
4.9
Improper Hill Climbing
Improper hill climbing could cause loss of control or rollover.
Use extreme caution when operating on hills. Always follow
proper procedures for hill climbing.
4.10
Crossing Hillsides
Driving on a side hill is not recommended under any
circumstance. Improper procedure could cause loss of control
or rollover. Avoid crossing the side of any hill unless
21
4.0 OPERATION
4.10
Crossing Hillsides (continued)
absolutely necessary. If crossing a hillside is unavoidable,
always follow proper procedures and always consider the
effects of onboard payload/cargo.
4.11
Stalling While Climbing a Hill
Stalling or rolling backwards while climbing a hill could cause
a rollover. Maintain steady speed when climbing a hill. If you
lose all forward speed:
•
Apply the brakes carefully until the vehicle is fully stopped.
•
Place the transmission in reverse and slowly allow the
vehicle to roll straight downhill while applying light
controlled brake pressure to control speed.
4.12
Operating in Unfamiliar Terrain
Failure to use extreme caution when operating on unfamiliar
terrain could result in an accident or rollover. Unfamiliar and
austere terrain may contain hidden rocks, foliage, obstacles
and/or holes that could cause loss of control or rollover. Travel
slowly and carefully. Use extreme caution when operating on
unfamiliar terrain. Always be alert to ever-changing terrain
conditions. Adhere to the specific operational training designed
for terrain navigation.
4.13
Operating Improperly in Reverse
Improperly operating in reverse could result in a collision with
an obstacle or person. Always follow proper operating
procedures as trained. Before shifting into reverse gear, always
check for obstacles or people within proximity of the vehicle.
When it's safe to proceed, back up very slowly.
22
4.0 OPERATION
4.14
Improper Tire Maintenance
Operating this vehicle with improper tires or with improper or
uneven tire pressure could cause loss of control, accident or
rollover. Always use the size and type of tires specified for
your vehicle and operation. Always maintain proper tire
pressure as described on the tire and on safety labels. See
Section 5.0, Tire Sizes and Recommended Tire Pressures for
specific tire pressures and recommendations. Always consider
proper tire selection and maintenance when planning to
conduct high payload transport.
4.15
Operating on Slippery Terrain
Operating on excessively austere, slippery or loose terrain
could cause loss of traction, loss of control, accident or
rollover. Do not operate on excessively rough, slippery or loose
terrain. Always use extreme caution on austere rough, slippery
or loose terrain.
4.16
Operating Over Obstacles
Improperly operating over
obstacles could cause loss of
control or rollover. Before
operating in a new area, check for
obstacles. Never attempt to
operate over large obstacles such
as rocks or fallen trees. Always
follow the proper procedures as
trained when operating over obstacles.
23
4.0 OPERATION
4.17
Skidding or Sliding
Skidding or sliding can cause loss of control or rollover (if tires
regain traction unexpectedly). Always follow proper
procedures for operating on slippery surfaces as trained. When
operating on slippery surfaces such as ice or loose gravel,
reduce speed and use extra caution to reduce the chance of
skidding or sliding. Do not operate on excessively slippery
surfaces.
4.18
Operating Through Water
Operating through deep or fast-flowing water can cause loss of
traction, loss of control, rollover or accident. Never operate in
fast-flowing water or in water that exceeds the recommended
maximum depth.
Always follow proper procedures as trained for operating in
water. Wet brakes will have reduced stopping ability. After
leaving water, test the brakes. Apply them lightly several times
while driving slowly. The friction will help dry out the pads.
Be cognoscente of water intrusion into engine intakes and
CVT. Follow OEM procedures to properly remove water
before further operations.
4.19
Operating on Frozen Bodies of Water
Severe injury or death can result if the vehicle and/or the
operator fall through the ice. Never operate the vehicle on a
frozen body of water unless you have first verified that the ice
is sufficiently thick to support the weight and moving force of
the vehicle, you and your occupants, and your cargo, together
with any other vehicles in your party. Always check with local
24
4.0 OPERATION
4.19
Operating on Frozen Bodies of Water (continued)
authorities and residents to confirm ice conditions and
thickness over your entire route. Vehicle operators assume all
risk associated with ice conditions on frozen bodies of water.
4.20
Operating a Damaged Vehicle
Operating a damaged vehicle will likely result in an accident.
After any rollover or accident, have a RPAMS or BRP service
technician (or appropriately trained operator technician/
mechanic) inspect the entire machine for possible damage,
including (but not limited to) brakes, throttle, cargo and
steering systems.
4.21
Cargo Load Operation
Operating With a Cargo Load on the Vehicle
The weight of both cargo and occupants impacts vehicle
operation. For your safety and the safety of others, carefully
consider how your vehicle is loaded and how to safely operate
the loaded vehicle. Follow the instructions in this manual for
loading, tire pressure, gear selection and speed.
NOTE: The payload limitations are based on vehicles
equipped with upgraded high load shocks and 12 ply
rated RP SOF Series tires. Any deviation from this
configuration requires the payload to be reduced to
OEM standard weights as published by BRP Can-Am.
25
4.0 OPERATION
4.21
Cargo Load Operation (continued)
Payload
Capacity
Rear
Bed
Capacity
Optional
Front Rack
Capacity
Strike-C
1,500 lb
1,000 lb
250 lb
Optional
4x6 TAG Axle
Extension
Capacity
1,500 lb
Strike-C4
2,000 lb
1,000 lb
250 lb
̶
RP C2 w/BRP Bed
1,500 lb
500 lb
250 lb
̶
Strike-M
Strike-M4
1,500 lb
2,000 lb
1,000 lb
1,000 lb
250 lb
250 lb
̶
Model
̶
•
Do not exceed vehicle weight capacities. The vehicle’s
maximum weight capacity is based on the configuration of
the upfitted vehicle (tires, suspension, and multi-modal
cargo structure). When more passenger weight is added,
cargo weight needs to be reduced accordingly. At all times,
both cargo and occupants MUST be properly restrained to
prevent unexpected weight shift and subsequent un-desired
vehicle movement due to CG movement.
•
The recommended tire pressures are critical to this
capability. Pressures must be checked prior to each vehicle
operation.
26
4.0 OPERATION
4.21
Cargo Load Operation (continued)
Always follow these guidelines:
Under ANY of these
conditions:
Do ALL of these steps:
Occupants and/or cargo
exceeds half the maximum
weight capacity
Operating in rough austere
terrain
Operating over obstacles
Climbing an incline or
descending on decline
Tow Operations
1. Slow down.
2. Verify tire type and pressure.
3. Use extreme caution when
operating.
4. Select lower CVT gear selection
Improper Cargo Loading
Overloading the vehicle or
carrying cargo not properly
restrained or exceeding
vehicle CG may cause
changes in stability and
handling, which could
potentially cause loss of
control or incur an accident.
When loading the vehicle, the operator must:
• Consider the vehicle configuration and establish
weight limits.
• Always follow proper instructions carrying cargo.
• Never exceed the bed or vehicle load capacity for this
upfitted vehicle.
27
4.0 OPERATION
4.21
Cargo Load Operation (continued)
•
•
4.22
Ensure that cargo is properly distributed and securely
attached with appropriately rated restraints.
Reduce speed when carrying cargo. Allow a greater
distance for braking and conduct careful maneuvers.
Transporting In the Rear Bed System
In addition to the requirements in this section, the operator
must adhere to established industry (or military) standards for
proper bed loading procedures. If transporting significant mass
loads in the bed, the operator should utilize equipment such as
ramps, lifts, shoring and similar equipage specifically designed
and load rated for that purpose. As a part of the loading
process, the operator should:
(1) Turn off the engine and set the transmission to park (utilize
chocks as conditions warrant).
(2) Ensure the cargo load will not exceed the Gross Vehicle
Weight Rating (GVWR) and tire load rating (passengers,
tactical/commercial gear, etc.).
(3) Inspect the tailgate, tailgate hinges, and tailgate latches for
signs of wear that would compromise the structural
integrity of the tailgate system. If any signs of wear are
identified, replace tailgate system components with
manufacturer rated components before beginning to load
the vehicle.
(4) Inspect the bed track rail system tie down points for signs
of wear and stress. Do not use the tie down points if there is
any indication that their structural integrity is impaired.
28
4.0 OPERATION
4.22
Transporting In the Rear Bed System (continued)
(5) Load heavy items of mass first to maintain the vehicle
center of gravity. Build the load from front center and
progress aft as cargo allows. Do not load cargo height in
excess of the side and rear gate wall structures unless
supplemental restraints (nets, straps, etc.) are used and
appropriately rated for the cargo weights.
(6) Once cargo is loaded in the bed, conduct a thorough
inspection to ensure no probability of cargo shift can occur.
Also note the weight of the loaded cargo and make any
necessary adjustments of the suspension spring rate and
preload per the suspension manufacturer recommendations.
NOTE: this is extremely critical to ensure safe
operations of the loaded vehicle.
While the integrated Strike-Kit cargo carriers can increase
the ability of the BRP Can-Am SxS to perform varied
tasks, the additional complexity requires increased
knowledge and caution on the part of the operator. The
stability and handling characteristics of the vehicle are
affected when operations involve hauling any cargo load.
It is essential that operators conducting cargo transport,
whether in a cargo carrier and/or an attached trailer,
receive appropriate hands-on training in accordance with
the requirements of the specific agency or general
mobility guidelines. Contact your mobility coordinator,
BRP Can-Am dealer or RP Advanced Mobile Systems for
specific guidance.
29
4.0 OPERATION
4.23
Strike-Kitted BRP Can-Am SxS Rear Cargo Bed
System and Optional Front Cargo Tray
The Strike-Kitted BRP Can-Am SxS comes equipped with a
rear cargo bed system and optional front cargo tray. They are
both designed to carry cargo in a specific manner that varies
depending on the cargo and the task. It is important to know
the design and load limits the manufacturer has placed on the
cargo systems. Operators must:
(1) Not exceed the design and load limits of the rear bed (1500
pounds static, low vertical profile, properly restrained cargo
or 500 pounds loose bulk)
(2) Securely fasten cargo to the cargo carriers (bed or front
tray) with an appropriate securement device(s) rated for the
total weight of the cargo that connects with the integrated
track rail system.
(3) Ensure that any cargo extending over the edge or side of
the vehicle perimeter will not strike the operator if it
becomes entangled with an obstruction.
Any supplemental cargo operation must remain within the
design limitations set by the manufacturer for any accessory
such as trailers or external load devices.
4.24
Blackout Operations
The RPAMS vehicle system has an option for “Blackout
Operations” if installed. When selected, this option eliminates
all displays and illumination generated by the driver MultiFunction Gauge, rear brake lights, rear tail-lights and frontal
headlights that could be potentially detrimental to night vision
(NVG) specialized vehicle operations. This mode of operation
30
4.0 OPERATION
4.24
Blackout Operations (continued)
is activated through switch selection on the center front switch
console.
CAUTION: selection of the “Blackout Mode” (see picture)
eliminates all vehicle external illumination
and can be hazardous when operating in
vicinity of other vehicles. Use appropriate
driving safety measures and exercise
constant vigilance to ensure proper margins
for vehicle proximity are maintained in
order to reduce risk of collision.
NOTE: When “Blackout Mode” is
selected, the digital power steering
is rendered inactive in order to
revert steering to manual mode and
provide direct terrain input to the driver (rocks,
debris, etc.). This is a unique safety feature to allow
the operator to have an accurate “terrain feel” during
hazardous navigation in low/no light environments.
Full steering authority is maintained but through
manual reversion.
4.25
Equipment Modifications
Your RPAMS upfitted vehicle is designed to provide safe
operation when used as directed. Modifications to your vehicle
may impact vehicle stability. Failure of critical machine
components may result from operation with any modifications,
especially those that increase payload, add tactical capability,
speed or power. This vehicle may become less stable at speeds
31
4.0 OPERATION
4.25
Equipment Modifications (continued)
higher than those for which it is designed. Loss of control may
occur at higher speeds and payload.
Do not install any equipment on a RPAMS upfitted vehicle that
may increase the payload, speed or power of the vehicle, or
make any other modifications to the vehicle for other purposes.
Any modification to the original and upfitted equipment of the
vehicle potentially creates a substantial safety hazard and may
increase the risk of bodily injury.
The warranty on your RPAMS upfitted vehicle is terminated if
any unauthorized equipment or modification has been
performed to the vehicle, or if any modifications have been
made to the vehicle, that increase its speed or power and/or
incur stresses to the vehicle chassis.
The addition of certain accessories, including (but not limited
to) weapons, mounts, sensors, seats, or large racks, may change
the handling characteristics of the vehicle. Use only RPAMS or
BRP Can-Am® approved accessories, and familiarize yourself
with their function and effect on the vehicle.
32
5.0 RPAMS TIRE SIZES AND
RECOMMENDED TIRE PRESSURES
5.1
All RPAMS RP SOF Series tires and tire types are certified to
DOT certified cold tire pressure of 20 psi and must be
maintained at that pressure for normal driving applications and
loads. RPAMS DELTA FX 4-PLY Dune/Desert tire is not
DOT certified.
5.2
Proper inflation is the key to tire life and performance. During
off road and lower speed applications for specific tactical
requirements, tire pressure reductions can facilitate more
effective terrain navigation. The following chart provides
minimum pressure applications for off road, lower speeds with
normal payloads:
RP SOF Series &
DELTA FX Tires
Number of Plies
Tire Pressure (in PSI) for Operating Conditions
Hard
Intermediate
Soft
Front
Rear
Front
Rear
Front
Rear
Series I, 8- PLY
Series I, 12-PLY
14 psi
12 psi
17 psi
15 psi
12 psi
10 psi
14 psi
12 psi
9 psi
5 psi
12 psi
10 psi
Series II, 6-PLY
15 psi
18 psi
13 psi
15 psi
8 psi
13 psi
Series II, 8- PLY
Series II, 12-PLY
Series III, 10-PLY
Series III, 12- PLY
Series IV, 10-PLY
Series IV, 12- PLY
DELTA FX, 4-PLY
14 psi
12 psi
13 psi
12 psi
13 psi
12 psi
̶
17 psi
15 psi
16 psi
15 psi
16 psi
15 psi
̶
12 psi
10 psi
11 psi
10 psi
11 psi
10 psi
̶
14 psi
12 psi
13 psi
12 psi
13 psi
12 psi
̶
9 psi
5 psi
6 psi
5 psi
6 psi
5 psi
10 psi
12 psi
10 psi
11 psi
10 psi
11 psi
10 psi
10 psi
33
5.0 RPAMS TIRE SIZES AND
RECOMMENDED TIRE PRESSURES
5.3
Do not reduce air below 5 psi on any tire that is not on a
beadlock wheel. Vehicles with beadlock wheels and good
treaded tires (tires with 50% or more tread remaining) can run
at 5 psi, with pressures down to zero psi for short periods of
time when utilizing the 12-PLY rated RP SOF Series tires.
5.4
The heavier the vehicle payload, the more care should be taken
not to decrease rated tire pressures and risk rolling a bead off
the wheel rim.
5.5
The RPAMS DELTA FX Desert/Dune 4-PLY tire is designed
for soft sand, off-road recreational applications only, on a
standard, non-modified vehicle. If the operator elects to reduce
tire pressure below 10 psi, this wheel must be a beadlock to
reduce tire to wheel separation.
34
6.0 WINCH GUIDE
Your RP Advanced Mobile Systems (RPAMS) Strike-C/C4/M/M4
LTV may come equipped with a 4000 lb. capacity winch
manufactured by WARN INDUSTRIES. This accessory adds a great
deal of flexibility and functionality to the RPAMS Strike-C/C4/M/M4
LTV. However, the improper use of such devices can be hazardous
and may result in property damage and/or injury and potentially loss of
life. Never use a winch before reading the winch operating manual and
understanding the winch basics and limitations.
The operator should familiarize himself with the general safety
precautions, basic operations of winching, rigging techniques and
winch maintenance. These are found in the WARN RX/XT Winch
Line Basic Guide to Winching Techniques manual that accompanies
the vehicle owner’s manual of your RPAMS Strike-C/C4/M/M4 LTV.
35
[INTENTIONALLY BLANK]
36
7.0 MAINTENANCE
7.1
CVT Care
To ensure optimal operation of newly installed belts, the CVT
sheaves must be cleaned of all old belt residue, glazing, and
oils. Cleaning can be accomplished by carefully scuffing belt
contaminates off the sheave/belt contact area with a mild
abrasive such as 220-400 grit sandpaper, Scotch-Brite Pad, or
Steel Wool. Follow up by cleaning the surfaces thoroughly
with soapy water and or brake cleaner until all impurities have
been removed. Cleaning the sheave surface until all
contaminates have been removed is vital to future belt and
CVT operation. If any particles remain, belt slip and a
noticeable drop in vehicle performance can occur. If a belt is to
be removed and reinstalled during future maintenance, it is
highly recommended that the belt is reinstalled in the same
direction as before to match belt wear profile to contact with
the corresponding sheave profile.
Sheave
Dirty
Cleaned
Sheave
37
7.0 MAINTENANCE
7.2
New Belt Break-In Process
New CVT drive belts require a break-in period of at minimum
30 miles to maximize belt life and performance. The goal of
the break-in period is to properly wear in the belt to match the
sheaves before applying maximum engine torque. By
conservatively running through the entire shift range, proper
belt contact over the entire sheave/belt contact path is
optimized to eliminate belt slippage and drastically increase the
belt’s lifespan.
Follow these guidelines to
accomplish proper belt break-in:
(1) Vary vehicle speed and engine RPM to shift belt through
normal operational range.
(2)
Do not exceed ¾ throttle within the first 30 miles of
installation.
(3)
Stop engine and allow belt to cool down every 15
minutes of use.
During break-in period, the following
activities SHOULD BE AVOIDED:
• Aggressive Acceleration or ‘Jerky’ throttle movements at
low speeds.
•
Holding engine/vehicle speed constant for extended time
periods.
•
Pulling Heavy Loads.
•
Long run times without complete CVT/belt cool down.
38
7.0 MAINTENANCE
7.2
New Belt Break-In Process (continued)
By following the break-in process carefully, the belt surface
will wear in to match the individual CVT sheaves to maximize
grip performance and dramatically reduce heat, glazing, and
future wear.
39
[INTENTIONALLY BLANK]
40
8.0 WARRANTY
8.1
RPAMS SxS upfitted vehicle limited warranty applies to new
UTV vehicles sold under the trade names Commander StrikeC™, Commander E Strike-R RAPTER™, Commander RP
C2™, Commander Max Strike-C4™, Maverick Strike-M™,
Maverick Max Strike-M4™ and the Outlander 6x6 StrikeAlpha™, hereinafter referred to as the “Products”, to
government military/police/SAR and industrial customers.
8.2
RPAMS provides a limited warranty on its Products upon
delivery to the customer and for a period of six (6) months
thereafter, where all Products shall be free from manufacturing
defects. This limited warranty excludes Products that have
been damaged as a result of misuse or improper or inadequate
handling, failure to follow the manufacturer’s vehicle
maintenance procedures, abuse, failure to use proper lubricant,
neglect, accident, fire, or any other cause other than a defect in
materials or workmanship. This limited warranty does not
cover any vehicle alterations made after delivery to the
customer or military/industry applications that expose it to
abuse beyond the recreational design applications and intended
structural limitations, nor does it cover claims of defective
design, unauthorized repairs or use of aftermarket or
unapproved components. Damage due to shipping and handling
does not constitute a defect under this warranty.
8.3
Set-up of the vehicle and proper vehicle preparation is a key
component to ensure proper operation. A part of set-up is the
customer completing and submitting the Warranty Registration
Form. All warranties are contingent upon RPAMS set-up and
the Warranty Registration Form with RPAMS at time of
purchase. RPAMS will record the registration and send a copy
to the vehicle manufacturer. All warranties are contingent upon
41
8.0 WARRANTY
8.3
(continued)
RPAMS vehicle set-up and the customer completing and
submitting the Warranty Registration Form.
8.4
It is understood that RPAMS shall only be responsible to repair
or replace RPAMS uplifted Products supplied to the customer
under this Agreement in accordance with its limited warranty
and when the Products have been maintained and operated
within the design limitations of the manufacturer. RPAMS
shall not be responsible to make any payment, repair, replace
or otherwise incur any liability for damages occurring to or
resulting from components that are not supplied by RPAMS or
its authorized suppliers at the time of sale.
8.6
The warranty for the engine, drive train and steering are as
provided by the manufacturer’s warranty. If, upon receipt of
the Products or any time within six (6) months thereafter, the
customer has a power train or steering warranty condition, the
customer shall contact the RPAMS warranty representative
within three (3) business days for warranty instructions.
RPAMS shall then contact the manufacturer for further
instructions.
Any modification or alteration of the horsepower, emissions
levels, transmission or the exhaust without the manufacturer’s
written permission will void any warranty. The Buyer shall
assume sole responsibility for the Goods and neither RPAMS
nor the manufacturer will in any way be responsible for any
failure or damage caused to the Goods or person as a direct or
indirect result of their acts or omissions.
42
8.0 WARRANTY
8.7
Warranty support for exported Products. Except where
specifically required by law, there is no warranty on this
Product when sold outside the United States.
8.8
RPAMS makes no representations or warranties, expressed or
implied, with respect to the Products either for itself, or where
applicable for the manufacturer, except as may be provided in
the written or printed limited warranty offered to the customer
with respect to one or more of the Products from time to time.
RPAMS reserves its right to amend or rescind the applicability
of such warranty at all times.
8.9
THE REMEDIES SET FORTH IN THIS LIMITED
WARRANTY ARE THE ONLY REMEDIES AVAIABLE
TO
ANY
PERSON
FOR
BREACH
OF
CONSEQUENTIAL OR SPECIAL DAMAGES OF ANY
DESCRIPTION, WHETHER ARISING OUT OF
EXPRESS OR IMPLIED WARRANTY OR ANY OTHER
CONTRACT, NEGLIGENCE OR OTHER TORT OTH
OTHERWISE. THE PRODUCTS SOLD BY RPAMS
SHALL CARRY NO WARRANTIES OTHER THAN AS
STATED HEREIN. IT IS UNDERSTOOD AND AGREED
THAT ALL WARRANTIES OF RPAMS, EITHER
EXPRESSED OR IMPLIED, INCLUDING ANY IMPLIED
WARRANTY OF MERCHANTABILITY AND ANY
IMPLIED WARRANTY OF FITNESS FOR A
PARTICULAR PURPOSE, ARE HEREBY EXCLUDED
AND DISCLAIMED. The exclusive remedy for breach of this
limited warranty shall be, at the sole option of RPAMS, the
repair or replacement of any defective materials, components
or Products.
43
[INTENTIONALLY BLANK]
44
9.0 INDEX
9.1
RP Advanced Mobile Systems (RPAMS) Strike-C/C4/M/M4
LTV come with a number of operator manuals for the vehicle
and various accessories. These manuals, listed below, detail the
safe operation and maintenance of the RPAMS Strike-C/C4/
M/M4 LTV accessorized vehicle. The owner and operators are
urged to read these manuals to ensure safe operation and are
provided for the owner’s is built around BRP’s Commander or
Maverick SxS include the:
•
Can-Am Commander™ 800R/1000 Operator’s Guide
•
Can-Am Maverick™ Max Operator’s Guide
•
Can-Am Side by Side Safety “Know Before You Go” DVD
•
WARN RX/XT Winch Line Basic Guide to Winching
Techniques™
45
NOTES
46
11160 SW Durham Lane, McMinnville, OR 97128 USA
Phone: 503-434-9446 | Fax: 503-217-6080
www.RPAMS.com
Part Number: 500-0003 REV6
47