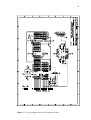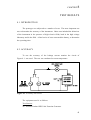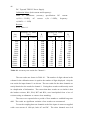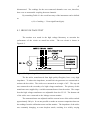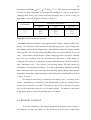
1
THE DESIGN OF A
LEAKAGE CURRENT MONITOR
FOR
LIVE LINE BARE HAND MAINTENANCE
A thesis submitted in fulfilment of the requirements for the Degree of
Master of Engineering in Electrical and Electronic Engineering
in the
University of Canterbury
by
A. J. H. de Beun, B.E. (Hons)
University of Canterbury
Department of Electrical and Electronic Engineering
1992
ABSTRACT
This thesis describes the design of an instrument for the protection of
personnel carrying out live line bare hand maintenance of power transmission circuits.
This instrument monitors the leakage current along equipment to ground and sounds
an alarm when preset thresholds are exceeded. The leakage current monitor is
microprocessor controlled, resulting in both flexible and user friendly operation. The
prototype constructed, has been tested and found to perform very well.
TABLE OF CONTENTS
1. INTRODUCTION . . . . . . . . . . . . . . . . . . . . . . . . . . . . . . . . . . . . . . 1
2. LIVE LINE TECHNIQUES . . . . . . . . . . . . . . . . . . . . . . . . . . . . . 3
3. CIRCUIT DESCRIPTION . . . . . . . . . . . . . . . . . . . . . . . . . . . . . . . 7
3.1. INTRODUCTION . . . . . . . . . . . . . . . . . . . . . . . . . . . . . . . . . . . 7
3.2. POWER SUPPLY . . . . . . . . . . . . . . . . . . . . . . . . . . . . . . . . . . . 8
3.3. ANALOGUE INPUT CIRCUITRY . . . . . . . . . . . . . . . . . . . . . . 15
3.4. DIGITAL PROCESSING CIRCUITRY . . . . . . . . . . . . . . . . . . . 17
3.5. THE DEVELOPMENT SYSTEM . . . . . . . . . . . . . . . . . . . . . . . 18
4. FIRMWARE DESCRIPTION . . . . . . . . . . . . . . . . . . . . . . . . . . . 21
4.1. INTRODUCTION . . . . . . . . . . . . . . . . . . . . . . . . . . . . . . . . . . 21
4.2. POWER ON PROCEDURE . . . . . . . . . . . . . . . . . . . . . . . . . . . 21
4.3. MONITORING MODE . . . . . . . . . . . . . . . . . . . . . . . . . . . . . . 24
5. ENCLOSURE DESIGN . . . . . . . . . . . . . . . . . . . . . . . . . . . . . . . . 31
6. OPERATING MANUAL . . . . . . . . . . . . . . . . . . . . . . . . . . . . . . . 35
6.1. INTRODUCTION . . . . . . . . . . . . . . . . . . . . . . . . . . . . . . . . . . 35
6.2. OPERATING MANUAL . . . . . . . . . . . . . . . . . . . . . . . . . . . . . 35
6.2.1. INTRODUCTION . . . . . . . . . . . . . . . . . . . . . . . . . . . 35
6.2.2. DESCRIPTION . . . . . . . . . . . . . . . . . . . . . . . . . . . . . 35
6.2.3. MONITORING MODE OPERATION STEPS . . . . . . . . 36
6.2.4. SET UP PROCEDURE . . . . . . . . . . . . . . . . . . . . . . . . 38
6.2.5. BATTERY CHARGING . . . . . . . . . . . . . . . . . . . . . . . 39
6.2.6. QUICK REFERENCE GUIDE . . . . . . . . . . . . . . . . . . . 40
7. CALIBRATION PROCEDURE . . . . . . . . . . . . . . . . . . . . . . . . . 41
7.1. INTRODUCTION . . . . . . . . . . . . . . . . . . . . . . . . . . . . . . . . . . 41
7.2. ADC GAIN CALIBRATION . . . . . . . . . . . . . . . . . . . . . . . . . . 41
7.3. RECTIFIER CALIBRATION . . . . . . . . . . . . . . . . . . . . . . . . . . 42
7.4. BATTERY CHARGER CALIBRATION . . . . . . . . . . . . . . . . . . 43
8. TEST RESULTS . . . . . . . . . . . . . . . . . . . . . . . . . . . . . . . . . . . . . . 45
8.1. INTRODUCTION . . . . . . . . . . . . . . . . . . . . . . . . . . . . . . . . . . 45
8.2. ACCURACY . . . . . . . . . . . . . . . . . . . . . . . . . . . . . . . . . . . . . 45
8.3. HIGH VOLTAGE TEST . . . . . . . . . . . . . . . . . . . . . . . . . . . . . 47
8.4. FIELD TEST . . . . . . . . . . . . . . . . . . . . . . . . . . . . . . . . . . . . . 48
8.5. BATTERY OPERATING TIME . . . . . . . . . . . . . . . . . . . . . . . . 48
8.6. MAGNET CONTACT . . . . . . . . . . . . . . . . . . . . . . . . . . . . . . . 49
9. WORK REMAINING . . . . . . . . . . . . . . . . . . . . . . . . . . . . . . . . . 51
10. CONCLUSIONS . . . . . . . . . . . . . . . . . . . . . . . . . . . . . . . . . . . . . 53
REFERENCES . . . . . . . . . . . . . . . . . . . . . . . . . . . . . . . . . . . . . . . . . . 55
APPENDIX A. COMPONENT LIST . . . . . . . . . . . . . . . . . . . . . . . . . . . 57
APPENDIX B. PROTOTYPE PHOTOGRAPHS . . . . . . . . . . . . . . . . . . . 59
LIST OF FIGURES
Figure 3.1. Block schematic diagram of the leakage current monitor . . . . . . .
7
Figure 3.2. Circuit diagram for the power supply and battery charger. . . . . . .
9
Figure 3.3. Circuit diagram for the analogue input section. . . . . . . . . . . . . . . 10
Figure 3.4. Circuit diagram for the digital processing section. . . . . . . . . . . . . 11
Figure 3.5. Charging voltage versus ambient temperature characteristic. . . . . . 13
Figure 3.6. Worst case normal mode error versus input frequency. . . . . . . . . . 16
Figure 3.7. Circuit diagram for the development system. . . . . . . . . . . . . . . . 19
Figure 3.8. Block diagram for the development system. . . . . . . . . . . . . . . . . 20
Figure 4.1. Simplified flow chart of power up procedure. . . . . . . . . . . . . . . . 22
Figure 4.2. Diagnostic data display on ASCII terminal. . . . . . . . . . . . . . . . . 22
Figure 4.3. Simplified flow chart of the timer 2 interrupt service routine. . . . . 25
Figure 4.4. Sample of diagnostic data out transmission. . . . . . . . . . . . . . . . . 28
Figure 5.1. Design for the leakage current monitor enclosure. . . . . . . . . . . . . 32
Figure 6.1. Location of controls. . . . . . . . . . . . . . . . . . . . . . . . . . . . . . . . . 36
Figure 8.1. Accuracy test circuit. . . . . . . . . . . . . . . . . . . . . . . . . . . . . . . . . 45
Figure 8.2. High voltage laboratory test circuit. . . . . . . . . . . . . . . . . . . . . . . 47
Figure 8.3. Mechanical drawing for the test magnetic contact. . . . . . . . . . . . . 50
Figure B.1. Individual printed circuit boards. . . . . . . . . . . . . . . . . . . . . . . . . 59
Figure B.2. Assembled circuit boards. . . . . . . . . . . . . . . . . . . . . . . . . . . . . 60
Figure B.3. Completed prototype. . . . . . . . . . . . . . . . . . . . . . . . . . . . . . . . 60
LIST OF TABLES
Table 4.1. Description of selftest error code. . . . . . . . . . . . . . . . . . . . . . . . . 23
Table 4.2. Default or initial set up parameters. . . . . . . . . . . . . . . . . . . . . . . 23
Table 4.3. Summary of the tasks performed during each normal frame. . . . . . 26
Table 7.1. Ambient temperature and charging voltage relationship. . . . . . . . . 44
Table 8.1. Accuracy test results for Channel 1. . . . . . . . . . . . . . . . . . . . . . . 46
Table 8.2. Results for battery life tests. . . . . . . . . . . . . . . . . . . . . . . . . . . . . 49
CHAPTER
1
INTRODUCTION
In order to obtain maximum efficiency from a power transmission system and
to ensure uninterrupted supply of electric power to consumers, it becomes necessary
for maintenance of transmission circuits to be carried out while the system is
energised. The safety of workers during such live line maintenance operations is the
primary consideration. The sole technical protection for personnel carrying out this
maintenance is an instrument to monitor the leakage current along equipment to
ground.
This instrument sounds an alarm when the maximum safe level of leakage
current is exceeded. The maximum safe current is generally lower that which can
be felt by a person and much lower than the point at which flashover occurs. The
alarm therefore provides the maintenance crew with an advance warning, long before
the leakage current reaches dangerous levels. The object of this project is to design
such an instrument.
Commercial leakage current monitors, purchased by Power Mark NZ Ltd to
be used with their live line maintenance activities, proved to be deficient in a number
of ways. The unit under consideration is the CHANCE SENTINEL, manufactured by
A. B. CHANCE COMPANY. Tests undertaken by P. S. Bodger at the Electrical and
Electronic Engineering Department of the University of Canterbury revealed that the
audible alarm sounds intermittently or not at all, depending on the rate of rise and the
magnitude of the current. A second problem was that the paint on the enclosure
caused the mounting brackets, used for the connection to earth, to be insulated. This
makes it impossible for the instrument to measure leakage current. Both a problem
and an inconvenience is the need for two different instruments, one for use with AC
and one for use with DC transmission lines. The problem arises when, by accident,
the wrong unit is used, in which case the instrument indicates zero current. As a
result of these problems, linemen have no confidence in the instrument that is to
protect their lives.
The motivation behind this project is to improve on commercially available
equipment. The initial design was guided by a set of generalised specifications and
1
2
requirements. These specifications formed a starting point only and were subject to
refinement as the design progressed. The initial design specifications are as follows:
1.
Easily understood, digital readout of leakage current, readable
from several metres and obtuse angles,
2.
Input range from 0 to 2000 µA with an accuracy of ±1 %,
3.
Measure leakage current generated by AC (50 Hz and 60 Hz),
positive DC and negative DC voltages without operator
interference,
4.
Audible alarm with variable threshold setting over full current
range,
5.
Audible early warning alarm at 90 % of threshold setting,
6.
Audible rate of rise alarm if rate of change exceeds
10 µA/minute,
7.
Visual display to show trend of leakage current,
8.
4 channel input for monitoring several pieces of apparatus at
once,
9.
10.
One side of the instrument to be attached to earth (pylon),
Rugged enclosure to deal with outdoor environment, up to 80%
air humidity, wind, dust, water and salt spray, varying
temperature, vibration, above ambient electric and magnetic
fields and able to withstand hauling by ropes and travelling in
the back of a truck.
The thesis is divided into chapters. Each chapter deals with an important
aspect of the overall project. Chapter 2 describes common live line practices and
discusses the application of this instrument. The hardware and software descriptions
of the design are in chapters 3 and 4 respectively. Chapter 5 describes the enclosure
designed for the instrument. The user instructions are in chapter 6. The calibration
procedure, to be included in a service manual, appears in chapter 7. The prototype
test procedure and results are listed in chapter 8. Chapter 9 discusses the unfinished
work and makes some suggestions for enhancements. The thesis report finishes with
the concluding remarks in chapter 10. For easy reference, appendix A lists the
components used for the final version of the prototype.
completed prototype can be found in appendix B.
Photographs of the
CHAPTER
2
LIVE LINE TECHNIQUES
Live line maintenance is defined as any maintenance activity performed on
energised electrical conductors or equipment with a phase to phase voltage rating
exceeding 33 kV. The maintenance techniques can be divided into two categories:
hot stick and bare hand.
The hot stick technique is a method of performing live line work using tools
which insulate workers from the live equipment being worked on. The hot stick is
an insulated pole. A variety of tools can be fitted to the end of the pole, such as a
prong for instance, to remove a cotter pin. The hot stick can sometimes be awkward
to use. Changing a pin with a pole of 4 or more meters in length in the top of a
tower can be frustrating. However, an experienced hot stick crew are very agile.
Live line maintenance using this technique has been performed in New
Zealand since the 1930’s, but the practice was discontinued in the 1950’s as a result
of increased transmission voltages, larger insulation distances and the lack of good
quality insulators.
In those days, the poles were made of wood with a varnish coating. The
varnish coating was kept immaculate to avoid the wood absorbing moisture. In
addition, the poles were kept in heated storage to ensure they were completely dry.
Nowadays, the poles are manufactured from fibreglass. Fibreglass is lighter and
stronger than wood and does not absorb moisture.
The bare hand technique is a method of performing work where the workers
are energised to the same potential as the equipment being worked on. The term bare
hand is actually a misnomer. During bare hand maintenance, the worker’s entire
body, including the hands, is covered with a conductive suit. Only the face remains
uncovered. The suit equalizes the potential across the workers body, avoiding an
uncomfortable tingling sensation as a result of induced current flow.
Bare hand work puts to practical use a phenomenon that protects any bird that
perches on a power line. When the person in contact with the live conductor is
isolated from ground or any other conductor at a different voltage, no fatal current
will flow. Workers reach the live conductors by a variety of means. Wearing a
3
4
lifting harness, the worker can be hoisted with an insulated rope attached to a pulley
mechanism controlled by an electric winch. The pulley mechanism is fixed to the
tower or suspended from a boom. The worker can either approach the conductor
from below (the ground) or from above (the crossarm). The worker can climb or
slide along an insulated ladder secured between the tower and the live conductor.
Another method is to lift the worker using an aerial bucket platform. Perhaps the
most spectacular method is where the worker sits on a platform clamped to a
helicopter’s struts. Irrespective of the method used to approach the line the worker
will bond to the line. Bonding is the process of making contact with a live line to
eliminate the potential difference between worker and line. A strong electrostatic
field, extending for several tens of meters, surrounds the conductor. The worker’s
presence in the field will cause the body to be energised to a level several kilovolts
less than the conductor potential. An arc will leap between the worker an the line
as the conductor is approached. The worker is holding a wand, extended toward the
line, to avoid the arc reaching the suit. After the worker is bonded, contact is
maintained through a short tie, called a bonding lead, from suit to conductor. The
suit, acting like a Faraday cage, equalises the charge across the surface. The suit not
only protects against current but against the corona effect as well. The corona effect
is caused by the ionization of the air around a person’s body and results in a prickly
sensation on such protruding body parts as the ears, as well as a distinct buzzing
sound.
Most maintenance is carried out near the tower, usually involving the
insulators. To allow inspection of the conductors between towers, a cart, hanging
from the line is used. The cart, with seating for the worker, is pulled along the line
from the ground or is motorised.
Live line maintenance cannot be carried out in all towers. Some towers do
not allow enough clearance between the worker and the conductors for safe working
conditions.
Live line maintenance was reintroduced into New Zealand by Power Mark NZ
Ltd in 1988 for the purpose of upgrading the HVDC transmission line between
Benmore and Haywards. Both techniques are used depending on which is most
appropriate. Live line maintenance is now carried out on a wider scale.
The safety of personnel is of the utmost concern. Codes of practice exist to
provide minimum requirements and workers are highly skilled, having received
special training.
Maintenance is only carried out during favourable weather
5
conditions. All equipment, in particularly the insulators, are kept in impeccable order
and free from contaminants.
While the equipment is in use, the insulating qualities may be reduced, mostly
caused by condensation, high air humidity, grease and filings from pulleys or salt
water spray. The decrease in insulation resistance results in an increase in leakage
current. The leakage current therefore, is a measure of the amount contamination.
The leakage current has to be kept within limits to ensure safe operating conditions.
The leakage current monitor, which is, in essence, an ammeter, bridges the
last section (25 to 50 mm) of the insulator to ground. The insulator may be any of
the devices mentioned above: ladders, ropes, hot sticks, aerial bucket booms, etc.
The insulating devices are fitted with connectors for the test leads to the leakage
current monitor.
The leakage current monitor sounds an alarm when the safe
threshold has been exceeded. The alarm prompts workers that something is amiss.
On hearing the alarm, workers quickly evacuate the energised conductor. Work is
suspended until the fault is found and rectified.
The leakage current monitor gives confidence that the other equipment is
functioning correctly. The monitor will warn maintenance personnel of equipment
that has developed a fault during use or of a fault that has escaped a previous
inspection.
The benefits from of bare hand work, saving in cost from doing the work
faster and without taking the line out of service, is a very attractive alternative to deenergised line maintenance.
6
CHAPTER
3
CIRCUIT DESCRIPTION
3.1. INTRODUCTION
The general design of the leakage current monitor is shown in Figure 3.1.
The microcontroller is at the heart of the circuit, controlling the analogue to digital
converter (ADC), doing the necessary computations and comparisons and performing
the task of user interface. The ADC, with integral multiplexer, samples the four
leakage current inputs, charging current from the battery charger and the signal from
the earth return detection circuitry. The precision rectifier can be included in the
Figure 3.1. Block schematic diagram of the leakage current monitor
signal path to enable the measurement of AC leakage currents. The entire circuit is
powered from a 4 V rechargeable battery, the symmetrical 5 V regulated power
supply being provided by two DC to DC converters. The final section, the user
interface, comprises a single push button for user input, an audible alarm and a 40
segment liquid crystal display to indicate leakage current, alarm thresholds, battery
charging progress or operating mode.
7
8
Most of the components used for the prototype have commercial grade
specifications with a typical operating temperature range from 0 °C to +70 °C. This
was convenient since these parts were readily available. In practical use however,
it is likely that ambient temperatures of less than 0 °C are encountered. For this
reason, extended grade versions are available for all the parts selected. The use of
extended grade parts would result in an increased operating temperature range, the
upper and lower limits being defined by the LCD and the battery respectively. With
the appropriate components installed, the operating temperature range is -25 °C to
+50 °C.
The schematic diagram for the leakage current monitor is divided into three
sheets. The detailed circuit description is conveniently divided into three sections
also, each referring to one sheet of the schematic. The power supply and battery
charger are shown in Figure 3.2. Figure 3.3. shows the leakage current inputs and
the analogue to digital converter, while the microcontroller and display appear in
Figure 3.4.
The final section of this chapter describes the development board that was
built to assist with the writing of the software. This board does not form part of the
leakage current monitor, but was found to be very helpful, particularly since an In
Circuit Emulator was not available.
3.2. POWER SUPPLY
Since the leakage current monitor is a portable instrument, it is required to be
battery powered. The digital logic requires a regulated +5 V supply. The analogue
circuits need a symmetrical supply. To avoid duplication of a positive supply, a -5 V
supply is added to provide these components with ±5 V.
The power source is a 4 V, 1 Ah, sealed, lead-acid rechargeable battery. A
rechargeable battery is used for convenience (no need to stock spares) and the
significantly lower overall cost.
The alternative to a lead-acid battery,
nickel-cadmium, was rejected because they have a lower energy density, are more
expensive and exhibit a memory effect when recharged after partial discharge. The
main advantage of nickel-cadmium is the longer expected lifespan.
The battery chosen, is manufactured by Sonnenshein. It is charged with a
constant voltage, the battery itself regulating the charging current. A fully discharged
9
Figure 3.2. Circuit diagram for the power supply and battery charger.
10
Figure 3.3. Circuit diagram for the analogue input section.
11
Figure 3.4. Circuit diagram for the digital processing section.
12
battery can be recharged to approximately 50 % of its capacity in only 1 hour and
to 90 % in 3.5 hours.
It is possible to use disposable batteries, in the form of three AA size alkaline
cells. This would reduce the size of the instrument since they occupy about half the
space needed for the lead-acid battery (for twice the capacity) and do not require a
charger.
The main disadvantages are the need for a user accessible battery
compartment in a splash proof enclosure and the quite frequent replacement operation
(approximately every 90 hours of use). The present design has the flexibility of
using alkaline batteries merely by omitting the charger and providing a suitable
enclosure.
Switching regulators are used for both the output voltages, a step-up converter
for the positive supply and an inverting converter for the negative supply. The
increased complexity and larger PCB area required for this type of regulator are
compensated by a number of advantages.
A linear power supply requires an input voltage greater than the output
voltage. This means two 6 V batteries, one for each supply rail, followed by low
dropout and low quiescent current regulators. The space advantage of a simpler
design with fewer components is eliminated by the larger, higher voltage, batteries.
Linear converters are less efficient, but have the advantage of less output noise and
better transient performance than their switching counterparts. Since the battery
output voltage drops during discharge not all of the battery capacity can be
withdrawn before the voltage drops below the minimum dropout voltage of the
regulator, unless this is compensated for by increasing the initial battery voltage.
The two batteries cause another problem. The batteries for the positive and
negative supply do not discharge at equal rates since the current drawn from the +5 V
supply does not equal the current in the -5 V supply. This problem can be eliminated
if the entire negative supply is replaced by an inverting switching regulator powered
from the positive supply. This topology is a compromise between a fully linear and
switching power supply.
The diagram of Figure 3.2. shows the completed power supply. The charger
is build around a L200 linear regulator. The leakage monitor is connected to an
external power source through two spring loaded contacts, K1 and K2, when it is
placed on the charger base. The external power source can be either a 12 V car
battery or a 9 to 12 VDC, 1 A, unregulated mains plug pack. The car battery
charging lead incorporates a filter to remove electrical noise caused by the engine
13
ignition system and alternator. K1 and K2 perform a second function as earth return
and earth detection, to be described later. Diode D3 protects the input against
accidental reverse voltages. D4 turns on the instrument when the charging source is
present.
progress.
This enables the microcontroller to monitor and display the charging
Diode D2 protects the regulator from the battery.
As previously
mentioned, this is a constant voltage charger, however, the optimum charging voltage
varies with battery temperature.
To ensure optimum performance, the battery temperature is measured and
used to adjust the output voltage. This is achieved by placing a temperature sensor,
R11, in the voltage regulation loop comprising P1, R8, R9, R11, R12 and T1. R11
is in thermal contact with the battery. The charging voltage characteristic is shown
in Figure 3.5. The broken curves represent the tolerance of the ideal charging voltage
and the solid curve the actual charger output. Transistor T1 together with the gate
Figure 3.5. Charging voltage versus ambient temperature characteristic.
drive circuitry R13, D5 and R14 ensure that the voltage regulation loop is
disconnected from the battery when it is not being charged. It would otherwise
discharge the battery even when the instrument is switched off. Resistor R10 limits
the maximum output current to about 900 mA, the maximum charging current,
14
regulated by the battery itself, is typically 500 mA. The final component associated
with the charger, R7, allows the microprocessor to measure the charging current and
from this compute the charged-in current in mAh.
The +5 V regulated power supply is provided by a MAX631 (IC1) step-up
switching regulator. The output is low pass filtered by L3 and C11. The -5 V
regulated power supply is provided by a MAX635 (IC2) inverting switching
regulator, with the output filtered by L4 and C12. Both converters operate on the
pulse-skipping method. The internal switches are driven by a constant frequency
oscillator that regulates VOUT by skipping pulses when the output is sufficiently high.
The comparator circuit in IC1 with components R1, R2 and R3 are used to signal the
microprocessor to switch on the low battery indicator (BAT). The comparator in IC2
with resistors R4, R5 and R6 detect when the battery is flat (approximately 3.5 V).
The microprocessor uses this signal to shut itself down, thereby preventing
unpredictable operation and limiting further discharge.
The only components not associated with the power supply are IC4, R15, R16,
R17, R18, R19, D6, D7 and D8. These components form a constant current source
(set to approximately -1 mA) and ADC input protection.
The leakage current
monitor is attached to the pylon with the aid of magnets. Contacts K1 and K2 must
touch the steel structure, since K2 is also used as the return for the leakage current.
It is important to know if this point is actually connected to the pylon and for this
reason a constant current source is connected to K1. When K1 is not connected to
K2 through a low impedance, the steel tower, a potential of about -4 V exists at this
point. This signal, limited by R15 and D6 to -0.7 V and attenuated by R18 and R19,
is applied to the ADC which will return a maximum negative value to the
microcontroller and so indicate an improper earth connection.
A correct earth
connection will return a value slightly less than zero, the magnitude of which is
directly proportional to the resistance between K1 and K2. The ADC will return a
maximum positive voltage when the charging source is present, indicating to the
microcontroller to enter the charge monitoring mode.
This current source has a second function as a simple input lead test. A
serviceable lead, plugged into the unit, will cause the display to indicate the source
current and sound the alarm (if it is set to less than 1 mA) when the free end is
touched to K1.
15
3.3. ANALOGUE INPUT CIRCUITRY
Sheet 2 of the schematic (Figure 3.3.) shows the leakage current inputs and
all the components associated with the analogue signal path including the analogue
to digital converter.
Each of the leakage current inputs is protected against small overloads by a
1 kΩ resistor and a pair of antiparallel diodes. The instrument is not protected
against flashover since it is very difficult to dissipate the energy involved in a
controlled manner. This situation however, should never arise if the insulators used,
are of good quality and properly maintained. The 100 kΩ resistors act as ADC input
protection for transients too fast to be clamped by the diodes.
The 100 Ω resistors form the burden. At the full scale input current of 2 mA,
the signal applied to the ADC is 200 mV. The ADC is of the integrating type. This
type of converter is eminently suitable for instrumentation applications.
They
combine high resolution, accuracy and normal mode rejection with low cost and
conversion speed.
The ADC used (MAX133) is actually a digital multimeter circuit with the
input attenuator inputs functioning as a multiplexer. The ADC chip requires only a
minimum of additional components to operate and is intended to work as an analogue
front end of a microprocessor. The additional parts required are: a capacitor and
resistor, C14 and R32, for the integrator, a crystal and capacitor, X1 and C13 for the
clock generator and an adjustable voltage reference. The voltage reference comprises
an ICL8069 1.2 V precision reference diode (IC6) in series with a current limiting
resistor (R33), a preset (P2) to calibrate the full scale range and several decoupling
capacitors. The voltage reference output is, ideally, set to a different value depending
on whether 50 Hz or 60 Hz mode is selected. In order to avoid selecting different
reference voltages, it is fixed at 655 mV (adjusted for 50 Hz mode) and the
conversion result is corrected digitally when the converter is used in 60 Hz mode.
The signals applied to the multiplexer are: the four leakage current inputs, the
charging current, the earth test signal and ground. The chip contains switches to
route the signal through an external precision rectifier, required for the measurement
of AC signals. The rectifier is build around two LM308 operational amplifiers, IC7
and IC8. The ADC is average responding and in order for the instrument to indicate
RMS current, a gain, equal to the form factor of a rectified sinewave (1.1107), is
included with the rectifier stage. Preset P3 is used to set the overall gain. The
16
rectifier is not connected to the ADC in the position intended by the manufacturer for
two reasons. The first reason is that when the rectifier is not part of the signal path,
the input floats near +5 V, causing an unacceptably long settling delay when it is
subsequently included. In the present position the rectifier input is always connected
and does not exceed ±400 mV during normal operation. The second reason is that
it frees up an additional input.
No smoothing is provided at the rectifier output. This is not required since
the ADC inherently performs the integration and is undesirable because it would
reduce the response time. This is made possible by a very important characteristic
of an integrating ADC: high normal mode rejection. The integrator will attenuate
high frequency noise from the switching PSU, the digital logic and from external
sources, producing smoothing and combined with the fixed averaging period, will null
out those frequencies that have integral numbers of cycles during the averaging
period. The fixed averaging period is chosen to be exactly 20 msec in 50 Hz mode
or 16.67 msec in 60 Hz mode. A deviation of the line frequency from nominal
causes the ADC output to vary up or down in an apparently random manner. The
worst case normal mode error is shown in Figure 3.6. for small variations of input
Figure 3.6. Worst case normal mode error versus input frequency.
17
frequency. In practice this error will be very small since the line frequency seldom
deviates from nominal by any significant amount.
One of the inputs of the ADC (pin 27) is connected to ground. This enables
the microcontroller to direct the ADC to perform a conversion with a zero input.
When this conversion includes the rectifier in the signal path the result obtained will
be equal to the sum of the offset errors introduced by the rectifier and the ADC. The
microcontroller will use this value to correct subsequent leakage current conversions.
This arrangement does away with the need for expensive, low drift op-amps and
offset null calibration.
The ADC receives its instructions and returns status and results through the
microprocessor interface with multiplexed 4 bit data and address bus and associated
control lines. The converter has 5 input (control) registers and 6 output (result and
status) registers.
3.4. DIGITAL PROCESSING CIRCUITRY
All the functions of the leakage current monitor are controlled by a single chip
microcontroller. The microcontroller is a PCB87C528, manufactured by Philips and
is a derivative of the popular Intel 8051 family. It has a number of additional
features compared with the standard 8051. The extra features made use of are the
watchdog timer, the additional ROM and RAM and the I2C bus.
The microcontroller directs the ADC and processes the results, tests the user
input, displays results to the user and sounds the alarm when required. All these
functions are performed by the control program contained within the processor.
Only a single push button (S2) is required for user input. Its function depends
on the current operating mode. On power up it is used to enter the set up mode, in
set up mode it changes the value of the digit being adjusted, in charging mode it
toggles the display between charging current and charged-in current and in
monitoring mode it selects the channel displayed. Full operating instructions are
described in the Operating Instructions section.
Two slave devices are connected to the I2C bus (pins 7 and 8 of IC9), an
EEPROM and a LCD driver. The EEPROM is used to store the alarm levels and
operating parameters. This permits the instrument to be turned off while retaining
the preset operating parameters. The operating mode is retrieved from the EEPROM
18
at power up, so setting up of the instrument needs to be done only once or until the
operating mode needs to be changed.
The second I2C slave device, a LCD driver, connected to two liquid crystal
displays provides visual output. The larger of the two displays, LCD2, is a 3½ digit,
7 segment display with additional indicators. The second display, LCD1, is a 2 digit
7 segment display. LCD2 is used to indicate measured leakage current, charging
current or to display the alarm thresholds.
The additional annunciators show
increasing current ( ), AC signal (~) and low battery (BAT).
LCD1 provides
additional information identifying the source of the information on LCD2, such as
leakage current channel number or alarm threshold. This display configuration has
a number of advantages and one disadvantage when compared with a dot matrix
alphanumeric display. The disadvantage is the limited alphabetic character abilities,
but this is minor compared with the advantages. Firstly the display is large, digit
height for the large display is 17.8 mm, making it readable from up to 5 meters.
Secondly it has high contrast and a wide viewing angle and last but not least, its
significantly lower cost.
Audible output is provided by a piezo buzzer (BZ1) switched by MOSFET
T2. Relay RE1, connected in parallel with BZ1, provides a pair of normally open
contacts with a maximum rating of 0.5 A, 50 V and 10 WDC for driving an external
alarm.
The serial port transmit line is connected to a terminal on the PCB. This line
can be connected to an ASCII terminal to display diagnostic information. This not
only proved to be useful during the development of the software but will be
worthwhile during future faultfinding as well. The information displayed includes:
self test progress and result, the conversion results from all sources including zero
offset, the computed rate of change of current and the status of the IC1 and IC2
comparators.
3.5. THE DEVELOPMENT SYSTEM
In order to keep the physical dimensions and parts count of the leakage
current monitor to a minimum the microcontroller is used in internal ROM mode.
This causes a problem during software development because an In Circuit Emulator
(ICE) was not readily available. To facilitate software development an add on circuit
19
Figure 3.7. Circuit diagram for the development system.
20
board was used. On this board the microcontroller is wired for external ROM mode.
This means that ports P0 and P2 are not available because their alternate function as
address and data bus is used. These pins are left disconnected on the PCB for the
leakage current monitor. The circuit diagram of the development system is shown
in Figure 3.7. The circuit shows the standard layout with a ROMless microcontroller
(IC1), an address latch (IC2) and an EPROM (IC3). In place of the EPROM an
EPROM emulator is used. This offers a significant time saving in the writing and
debugging of the software. When the software is completed, the board is removed
from
the
monitor
and
replaced
with
a
programmed
microcontroller.
Figure 3.6. shows a block diagrammatical representation of the interconnections
between the various components comprising the development system.
Figure 3.8. Block diagram for the development system.
As previously discussed the serial port transmit line is used for debugging
purposes. To ensure voltage level compatibility a RS232 driver chip (IC4) is added.
This chip is not provided on the PCB for the leakage current monitor since it is not
required for normal operation.
CHAPTER
4
FIRMWARE DESCRIPTION
4.1. INTRODUCTION
This chapter describes the software developed for the leakage current monitor.
The software is stored in the microcontroller and is not user accessible, hence the title
FIRMWARE. The word software will be used throughout since the firmware is
accessible from the designer point of view. The software is entirely written in 8051
assembly language and occupies approximately 7500 bytes of ROM space. It is the
software that, to a large extend, determines the features of the leakage current
monitor. It controls all the functions with the exception of battery charging, which
it monitors.
4.2. POWER ON PROCEDURE
Before entering the monitoring mode the instrument performs a series of
functions as depicted in Figure 4.1.
Immediately after power on the instrument executes a selftest. This selftest
comprises the following functions after sounding the buzzer for 0.5 seconds and
activating all the LCD segments:
1.
Comparison of computed ROM checksum with stored
checksum,
2.
Walking bit test of free internal RAM,
3.
Walking bit test of auxiliary RAM,
4.
Acknowledge test for LCD driver,
5.
Zero offset value, holding and not holding time and
always 1 bit of ADC,
6.
Acknowledge, signature and checksum of EEPROM.
If any of these tests fail, with exception of the EEPROM signature or checksum, the
instrument will display the error code and discontinue further operation. The error
21
22
Figure 4.1. Simplified flow chart of power up procedure.
LEAKAGE CURRENT MONITOR FOR LIVE LINE BARE HAND MAINTENANCE
VERSION 1.1
(C) COPYRIGHT 1991, 1992 BY A. DE BEUN
TESTING
TESTING
TESTING
TESTING
TESTING
TESTING
INTERNAL CODE MEMORY... CHECKSUM=C0ABH, PASS
FREE INTERNAL DATA MEMORY... PASS
AUXILIARY DATA MEMORY... PASS
LCD CONTROLLER... PASS
ANALOGUE TO DIGITAL CONVERTER... PASS
EEPROM... PASS
Figure 4.2. Diagnostic data display on ASCII terminal.
code is displayed on the LCD (provided it works) after the selftest is completed.
Testing progress and results can also be displayed on a serial ASCII terminal
connected to the diagnostic data out connector (K4). Figure 4.2. shows the ASCII
terminal display from power on until completion of the selftest. The error code
displayed on the LCD is a decimal representation of the binary error code. One bit
in the error code is set when the corresponding test fails. Multiple faults will be
displayed as the sum of the individual bit values. Table 4.1. lists the possible errors
with their corresponding codes.
If the EEPROM signature or checksum is incorrect then the software will
attempt, once, to re-initialize the EEPROM contents, restoring the operating
parameters to their default values. Again, if this is unsuccessful then the error code
23
will be displayed. The automatic initialisation serves a second purpose of initialising
the instrument after it is manufactured. This will put the monitor into a known state
without spending any time manually setting it up. The default values, which are also
the factory preset values are shown in Table 4.2.
Type of Error
ROM Checksum
Free Internal RAM
Auxiliary RAM
Liquid Crystal Display Driver
Analogue to Digital Converter
EEPROM
Bit Position
Bit Value
0
1
2
3
4
5
1
2
4
8
16
32
Table 4.1. Description of selftest error code.
User Set Up Condition
Alarm Threshold
Power Line Frequency
Early Warning Alarm Threshold
Rate of Rise Alarm Threshold
Default or Initial Value
100 µA
50 Hz
90 %
10 µA/minute
Table 4.2. Default or initial set up parameters.
The selftest is restricted to what the microcontroller can examine. It relies on
the user to check if the buzzer sounds and if the LCD segments function and to
periodically connect the instrument to a test source of known current to verify its
calibration. An additional problem is that it is hard to predict exactly how the
instrument will fail or whether the selftest will discover the failure or not. Despite
these limitations, successful completion of the selftest will give confidence in the
correct operation of the instrument.
The user has to press the FUNCTION switch at power on and for the
duration of the selftest (approximately 10 seconds) to enter the set up mode. This
relatively long time has been chosen, so that entering the set up mode must be a
conscious effort on part of the user, to protect the contents of the EEPROM from
inadvertent change. During set up mode each of the user adjustable digits will flash
in turn. The flashing digit can be incremented by briefly pressing the FUNCTION
switch. All that is required to proceed to the next digit is to release the FUNCTION
switch for three seconds once the current flashing digit is set to the desired value.
24
The set up procedure is completed by storing the new operating parameters in the
EEPROM.
The last operation before entering the monitoring mode is to display the
operating parameters. This allows the user to verify the previously set or newly
updated alarm thresholds and line frequency.
4.3. MONITORING MODE
The monitoring mode is an endless loop, performing 16 ADC conversions per
second. The 16 conversions (frames) are made up of 12 leakage current, one AC
zero, one DC zero, one charging current and one earth test conversion. Timer 2 on
the microcontroller is programmed to cause an interrupt every 62.5 msec.
The
interrupt service routine processes the result from the previous ADC conversion,
initiates a new one and performs some additional tasks. The actual additional task
performed depends on the frame currently being processed.
The functions of the interrupt service routine are illustrated in Figure 4.3.
Each time the service routine is executed the user input is tested. This allows the
user to select the display mode. The display mode cycles through the following
options: display channel with highest current, lock display into one channel (1, 2, 3
or 4) or display each channel in turn for 1 second. The next task for the service
routine is to test the battery level using the outputs from the comparators in IC1 and
IC2. When the battery has been fully discharged (i. e. flat) the message BAT E will
be displayed and the buzzer activated for 10 seconds. The controller then goes into
POWER DOWN mode.
Provided the battery is not exhausted, the routine proceeds to test the type of
alarm to determine if the buzzer should be on. The last operation, before executing
the actual task allocated to that frame, is to increment the counter that keeps track of
progress through the cycle. The charging mode frames are a subset of the normal
frames. When charging, all the conversions not required, are omitted.
Each of the 16 frames performs a different task, generally related to the ADC
conversion just completed. Table 4.3. gives a summary of these tasks. In frame
number 7 the controller makes a decision between AC and DC leakage currents. The
decision is based on the greater of the sum of the DC or the AC leakage currents.
When the AC currents are greater the ~ annunciator on the display is turned on to
25
Figure 4.3. Simplified flow chart of the timer 2 interrupt service routine.
reflect this. The outcome from this decision determines the type of conversion
initiated in frames 7 to 10 inclusive.
The AC and DC zero conversions allow the microcontroller to measure the
offset of the ADC and precision rectifier. All ADC results are corrected by the
appropriate offset, before being stored or displayed.
The rate of rise computation is performed in frame 14.
This algorithm
attempts to fit a straight line of the form y=ax+b through a set of 32 data points.
26
Frame No.
Task
0
Store DC channel 1 ADC result, start sum of DC leakage
currents, increment cyclic channel display counter, start DC
channel 2 conversion.
1
Store DC channel 2 ADC result, add to DC sum, start DC
channel 3 conversion.
2
Store DC channel 3 ADC result, add to DC sum, start DC
channel 4 conversion.
3
Store DC channel 4 ADC result, add to DC sum, start AC
channel 1 conversion.
4
Store AC channel 1 ADC result, start sum of AC leakage
currents, start AC channel 2 conversion.
5
Store AC channel 2 ADC result, add to AC sum, start AC
channel 3 conversion.
6
Store AC channel 3 ADC result, add to AC sum, start AC
channel 4 conversion.
7
Store AC channel 4 ADC result, add to AC sum, find greater of
DC sum or AC sum, start AC or DC channel 1 conversion, find
highest current channel, test alarm thresholds, update LCD.
8
Store AC or DC channel 1 ADC result, start AC or DC channel
2 conversion.
9
Store AC or DC channel 2 ADC result, start AC or DC channel
3 conversion.
10
Store AC or DC channel 3 ADC result, start AC or DC channel
4 conversion.
11
Store AC or DC channel 4 ADC result, start DC offset
conversion, find highest current channel.
12
Store ADC DC offset result, start AC offset conversion.
13
Store ADC AC offset result, start charging current conversion.
14
Store charging current ADC result, start earth test conversion,
compute rate of rise of leakage current.
15
Store earth test ADC result, start DC channel 1 conversion, test
earth, test alarm thresholds, update LCD
Table 4.3. Summary of the tasks performed during each normal frame.
Each data point is the average of two conversions so that 32 data points represent a
history of 32 seconds. Each leakage current channel has a first in first out (FIFO)
buffer, 64 bytes long, to store this data. The oldest data point, number 1, is lost
27
when the data in the buffer is shifted to make room for the most recent data point,
number 32.
The algorithm to compute the gradient is based on the step function or group
method. The grouping method is arithmetically much simpler than the least squares
formulae commonly used for line fitting. The significant saving of computation time
results in a small loss of accuracy. The 5 group method implemented, is given by
the equation
(4.1)
As all the t’s are fixed (t1=0, t2=1, etc.) the denominator of (4.1) can be simplified.
Since the slope is required in µA/min it is necessary to multiply (4.1) by 60. This
results in equation
(4.2)
To reduce the computational effort even further only the changes in the numerator
(N) of (4.2) need to be computed. If the most recent data point is i33 then the
calculation required, before shifting the data, is given by
(4.3)
Therefore, after all the variables have been initialised, the only computation required
is the calculation of (4.3) multiplied by -0.1488 (the reciprocal of the denominator
of (4.2)). The 62.5 msec available in one frame is ample time to perform the
computation four times, once for each channel.
The measurement of charging current gives the microprocessor the ability to
compute charged-in current.
The charging current display gives the user an
indication of how far the charging has progressed or if the unit is charging correctly.
Charging current reduces to near zero when charging is completed. The charged-in
28
current display allows the user to make an assessment of the amount of battery life
available after a partial charge. Since the battery is a 1 Ah type, a charged-in current
display of approximately 1000 indicates a fully charged battery. The software does
not take into account the charge remaining after a partial discharge or the efficiency
of the battery. This or an ’hours use’ indicator could easily be added if deemed
useful. There is however, the possibility that too many features may confuse the
user.
The final ADC result for each cycle is the earth test. When the resistance
between K1 and K2 is greater than approximately 50 Ω, the user is alerted that the
instrument is not properly attached by sounding the alarm and displaying noE (no
Earth). The earth test conversion serves a dual purpose to enable the processor to
sense the presence of the battery charging source.
In addition to the tasks listed in Table 4.3. each conversion result is also
available on the diagnostic data connector (K4) for display on an ASCII terminal.
The format of the data out is shown in Figure 4.4. The first line shows the
result from the first 4 DC leakage current conversions in 10-7 A (one more digit than
DC,
DC ZERO=99130: I1=00010, I2=00005, I3=00005, I4=00005
AC=50, AC ZERO=99173: I1=00009, I2=00006, I3=00006, I4=00004 >1
DC,
DC ZERO=99130: I1=00003, I2=00007, I3=00006, I4=00010 >4
SLOPE: I1=+00039, I2=+00031, I3=+00032, I4=+00029
Icharge=00000, EARTH=-36384, LOW BAT=1, FLAT BAT=1
Figure 4.4. Sample of diagnostic data out transmission.
shown on the LCD) and the actual result from the DC zero conversion in 9’s
complement BCD. The second line shows the same information for the first 4 AC
conversions. The ’AC=50’ indicates that the 50 Hz mode is selected. The ’>1’
indicates that channel 1 has measured the largest current, this would be the channel
displayed in highest current mode. The third line shows the result from the second
set of 4 leakage current conversions. The line starts with ’DC’, this indicates that the
controller decided that the input currents are DC. The fourth line shows the results
from the slope calculation in 10-7A/min. The last line shows that the battery charging
current is zero, that the earth test terminals are open and that the battery is in good
condition. The 1’s shown, refer to the actual logic level, the comparator output goes
low once the battery voltage has dropped sufficiently.
After exiting the service routine the microcontroller resets the watchdog timer,
enters IDLE mode to conserve battery power and waits for the next interrupt.
29
The on-chip watchdog timer acts as a safeguard to ensure that the controller
cannot crash. The purpose of the watchdog timer is to reset the microcontroller if
it enters erroneous processor states, possibly caused by electrical noise or RFI, after
a short period of time. The watchdog timer is set to time out after a minimum of
100 msec. In the event that the watchdog timer causes a reset, the microcontroller
will sense that this is a warm start and bypass the selftest. The buzzer will sound
briefly to warn that something has happened before resuming monitoring functions.
30
CHAPTER
5
ENCLOSURE DESIGN
The prototype for the leakage current monitor was housed inside a box, folded
from aluminium sheet, 1.6 mm thick. This was adequate for testing the prototype
circuitry but is not appropriate for practical use.
The ideal enclosure would be sealed against water, dust and contaminants,
shielded from EMI, is impact, oil and solvent resistant and easy to handle.
Figure 5.1. shows the enclosure designed for the leakage current monitor. The
enclosure has not been manufactured. No dimensions are shown because the actual
measurements will mainly depend on the size of the completed circuit boards. The
final dimensions are expected to be approximately 200 mm high, 100 mm wide and
50 mm deep.
The case is made from a suitable high impact, brightly coloured, synthetic
material with windows for the displays. The fragile LCDs are protected by a sheet
of transparent material. The inside is covered with a conductive layer or contains a
box from folded galvanised steel sheet to act as an EMI shield. The two case halves
and all holes for connectors, switches and screws are sealed against water and dust.
The sides of the enclosure are indented to allow the instrument to be grasped firmly
for removal.
The display, controls and connectors are located on the front panel. The
switches, connectors and buzzer are individual parts mounted on the enclosure.
These parts are all splash waterproof types. An alternative is that it may be possible
to incorporate switches and connectors as part of the case moulding. Sealing caps
protect the exposed contacts of unused connectors. The power switch is a rotary type
to avoid the need for an indicator. The indicator function is accomplished by the
rotary switch lever which turns through 90°. A rotary switch is less likely to be
inadvertently operated than a toggle switch.
On the back of the case are two magnets. The magnets are used for fixing
the instrument to a steel member of a pylon. This enables quick installation and
removal of the instrument without the need for any tools. The connection to earth
is made through two spring loaded contacts. One contact is the actual earth return.
31
32
Figure 5.1. Design for the leakage current monitor enclosure.
33
The second contact is required to permit testing for a proper earth connection. The
maximum spacing between the contacts is determined by the minimum width of the
angle iron used for construction of the tower. The minimum width is typically 50
mm, therefore, the contact spacing has to be no greater than 40 mm to avoid
troublesome alignment. The contacts have a sharp point to penetrate an oxide or
paint layer. The points are small enough not to damage the galvanised coating.
The two contacts also serve as battery charger inputs. The instrument would
be placed in a battery charging base when not in use. When placed into the base the
contacts make the connection to the charging source. Soft iron plates, fixed to the
base, directly opposite the magnets hold the monitor in place and act as keepers for
the magnets. The base has an input to allow the lead to a car battery or a mains
adaptor to be connected.
On top of the case is an indentation with a bar inserted across. A safety strap
fixed to this bar and secured to the pylon protects the instrument from falling in the
event it is accidentally dislodged. The safety strap serves a second purpose as a
means of fastening a rope for hoisting or for attaching to a tool belt.
34
CHAPTER
6
OPERATING MANUAL
6.1. INTRODUCTION
This chapter contains the operating instructions that would accompany each
instrument in booklet form. They are intended for the end user. The QUICK
REFERENCE GUIDE may be printed on plastic covered cardboard for durability and
stored with the instrument for handy reference. Alternatively, all or part may be
printed or engraved on the actual enclosure.
6.2. OPERATING MANUAL
6.2.1. INTRODUCTION
This manual provides operating instructions for the Leakage Current Monitor.
This specialised instrument is designed for use by personnel carrying out live line
maintenance on power transmission lines. This instrument monitors the leakage
current along insulators and sounds an alarm when safe levels are exceeded. It can
be used with a variety of live line techniques employing hot sticks, ropes, ladders or
aerial buckets.
6.2.2. DESCRIPTION
The leakage current monitor is a microprocessor controlled instrument to
monitor leakage currents along insulators. The monitor works like an ammeter.
When the current exceeds preset levels, an alarm will sound, warning maintenance
personnel of dangerously high leakage currents. The location of controls is shown
in Figure 6.1.
35
36
Figure 6.1. Location of controls.
6.2.3. MONITORING MODE OPERATION STEPS
1.
Visually inspect the instrument for damage, dust or water that might cause
malfunction.
2.
Turn the power switch to the on position:
-
The alarm will sound briefly and all the display segments are activated,
-
The monitor will perform a selftest,
-
If a fault is detected the message Er, accompanied by the fault code,
will be displayed.
3.
The display will show the preset operating parameters:
- XXXX AL -
Alarm threshold in microamps,
-
X0 EA -
Early warning alarm as % of alarm threshold,
-
X0 Fr -
Line frequency in Hz,
37
- XXXX rr -
4.
Rate of rise alarm threshold in microamps per minute.
Connect the external alarm, if used, to the terminal marked EXT ALARM.
Connect the input lead(s) to the input terminal labelled LEAKAGE
CURRENT INPUTS. Touch the free end of the lead(s) to the terminal
marked TEST on the back of the instrument. If the display does not indicate
a current of about 1000 microamps then the lead is faulty. The alarm should
sound if it is set to less than 1000 microamps.
5.
Attach the leakage current monitor to a grounded, steel structure with the aid
of the magnets. Ensure that both the lead test point and the earth return
contact are touching the support structure. Fasten the safety strap. The
monitor is now ready to display leakage current in microamps on the main
display and sound the alarm when the preset thresholds are exceeded.
Connect the insulating devices to be monitored to the input leads. The alarm
sounds different depending on which threshold is exceeded:
-
Double beeps
-
Rate of rise threshold exceeded,
-
Single beeps
-
Early warning, beep frequency increases with
rising current or,
-
when accompanied by the noE message:
improper earth connection,
-
6.
Continuous
-
Alarm threshold exceeded.
Three different display modes can be selected with the FUNCTION switch
indicated on the auxiliary display:
-
Hn -
Display highest current together with channel number,
-
Ln -
Lock into any one channel,
-
Cn -
Cycle through all channels automatically displaying each one
for one second.
NOTE:
The unit always monitors all channels independent of the channel
displayed.
7.
The
on the main display indicates that the current is rising.
38
8.
The ~ on the main display indicates that the instrument has selected AC
mode.
9.
The BAT indicator warns that the battery is low. Approximately 5 hours of
use remain when the indicator first appears. BAT E will appear when the
battery is completely flat, the alarm will sound for 10 seconds and the
monitor will shut down. Turn the monitor off and recharge the battery.
10.
Replace the connector sealing caps when the instrument is not in use. This
will protect the connectors from water and dust.
6.2.4. SET UP PROCEDURE
1.
Switch the monitor on while pressing the FUNCTION switch.
2.
Keep pressing the FUNCTION switch until the alarm threshold appears on
the main display, with the first digit flashing.
3.
Pressing the FUNCTION switch will increment the flashing digit.
4.
Once the first digit is set to the desired value do not press the FUNCTION
switch for 3 seconds after which the next digit will start flashing and may be
adjusted.
5.
Proceed to adjust the other preset values in a similar manner:
- XXXX AL -
Alarm threshold in microamps [range 0 to 1999 in steps
of 1],
-
X0 EA -
Early warning alarm as % of alarm threshold [range 10
to 100 in steps of 10],
-
X0 Fr -
- XXXX rr -
Line frequency in Hz [50 or 60] ,
Rate of rise alarm threshold in microamps per minute
[range 0 to 1999 in steps of 1].
39
6.
The monitor will automatically switch to monitoring mode after displaying the
new operating parameters.
6.2.5. BATTERY CHARGING
1.
Place the monitor onto the battery charging base and plug the base into a
source of 12 volts DC using the vehicle battery lead or into a wall socket
using the mains adaptor:
-
2.
the monitor will switch itself on.
The display will show the charging conditions using the FUNCTION switch:
-
CC -
Charging Current in milliamps,
-
Ah -
Charged-in Current in milliamp hours.
The charging current will reduce to less than 10 mA when charging is
complete.
3.
When new, charging from completely flat will take about 12 hours, a 1 hour
charge will give approximately 20 hours use. The charged-in current display
shows the capacity as a fraction of 1000.
4.
A full charge will give at least 40 hours use, when new.
5.
The battery will last at least 200 full depth cycles, the battery will last longer
if recharged after partial discharge.
6.
The monitor must be stored with the battery fully charged.
7.
The charging may continue indefinitely, trickle charging will start
automatically.
40
6.2.6. QUICK REFERENCE GUIDE
FUNCTION
Press to cycle through display options
SWITCH
Press at power-up to enter set up mode
Press to increment flashing digit while in set up mode
AL
Alarm threshold in microamps
Fr
Line frequency in Hz
EA
Early warning alarm as % of alarm threshold
rr
Rate of rise alarm threshold in microamps per minute
H
Highest current, together with corresponding channel number
L
Display locked into channel number shown
C
Cyclically display each input current for 1 second
noE
No Earth, the instrument is not properly attached to ground
Symbol displayed when current is rising
~
AC mode selected
BAT
Low battery, approximately 5 hours of battery life remains when
first displayed
BAT E
Battery is completely exhausted
OL
Over Load, 2000 microamp maximum input current exceeded
Er
Error detected during selftest
CC
Battery charging current in milliamps
Ah
Battery charged-in current in milliamp hours
CHAPTER
7
CALIBRATION PROCEDURE
7.1. INTRODUCTION
The number of calibrations to be carried out has been kept to a minimum.
The fewer calibrating points the less time is spend during manufacture and the less
opportunity exists for long term drift. There are only three calibrations to be carried
out. The first is to adjust the full scale range or gain of the ADC. The second is to
adjust the form factor of the precision rectifier. And the third is to adjust the output
voltage of the battery charger.
Start with all presets set to midrange. Switch the instrument on. Do not
proceed with the calibration if the instrument fails the selftest. Investigate the cause
of the failure and remedy the problem before continuing.
7.2. ADC GAIN CALIBRATION
The first calibration concerns preset P2. The objective is to adjust the gain
of the ADC. The calibration sequence is as follows:
1.
Connect a digital voltmeter between pin 26 of IC5 and
ground. Adjust P2 for a reading of 655 mV.
2.
Connect an accurate (±.1 µA) source of DC current to
leakage current input channel number 1. Set the source
to 1000 µA.
3.
Press the FUNCTION switch until the auxiliary
display shows L1. Make fine adjustments to P2 until
the main digital display reads 1000.
4.
Set the current source to 100 µA.
Check that the
display shows 100. Make fine adjustments to P2 if
necessary.
5.
Now connect the current source to the other inputs and
verify the correct reading for a range of input currents.
41
42
Use the FUNCTION switch to change the channel
being displayed. If the error is greater than 0.5 % and
the reading for channel 1 is correct check that R21,
R24, R27 and R30 are closely matched.
7.3. RECTIFIER CALIBRATION
The second calibration concerns preset P3. The objective is to adjust the gain
of the precision rectifier to 1.1107, being the form factor of a rectified sinewave.
Proceed as follows:
1.
Check that the instrument is in 50 Hz mode. Change
the set up if it is not.
2.
Connect an accurate (±.1 µA) source of AC (50 Hz)
current to leakage current input channel number 1. Set
the source to 1000 µA.
3.
Press the FUNCTION switch until the small display
shows L1. Adjust P3 until the digital display reads
1000. Check that the AC indicator ’~’ is activated.
4.
Set the current source to 100 µA.
Check that the
display shows 100. Make fine adjustments to P3 if
necessary.
5.
Now connect the current source to the other inputs and
verify the correct reading for a range of input currents.
Use the FUNCTION switch to change channels.
6.
Change the set up to 60 Hz mode. Set the AC current
source to 60 Hz.
Verify the correct reading on all
channels for a range of inputs.
43
7.4. BATTERY CHARGER CALIBRATION
The last calibration concerns preset P1. The objective is to adjust the battery
charging voltage until it follows the solid curve of Figure 3.5. The procedure is as
follows:
1.
Connect the instrument to the charger source.
The
leakage current monitor will switch itself on if it was
not on already.
2.
Measure the temperature at the battery BATT1 next to
R11.
3.
Connect a voltmeter across the battery terminals.
4.
Adjust P1 until the output voltage is equal to the value
shown on Figure 3.5. for the measured temperature. To
facilitate in making the adjustment, instead of reading
the graph, Table 7.1. may be used.
5.
Verify that the instrument indicates the correct charging
current by connecting an ammeter between the charger
source and K1. The meter should indicate a current
equal to the current displayed on the monitor plus
approximately 35 mA.
The 35 mA represents the
current drawn by the circuit itself.
44
T[°C]
VBATT[V]
T[°C]
VBATT[V]
T[°C]
VBATT[V]
-20
-19
-18
-17
-16
-15
-14
-13
-12
-11
-10
-9
-8
-7
-6
-5
-4
-3
-2
5.08
5.07
5.05
5.04
5.03
5.01
5.00
4.99
4.97
4.96
4.95
4.94
4.92
4.91
4.90
4.89
4.87
4.86
4.85
-1
0
1
2
3
4
5
6
7
8
9
10
11
12
13
14
15
16
17
4.84
4.82
4.81
4.80
4.79
4.78
4.77
4.76
4.74
4.73
4.72
4.71
4.70
4.69
4.68
4.67
4.65
4.64
4.63
18
19
20
21
22
23
24
25
26
27
28
29
30
31
32
33
34
35
36
4.62
4.61
4.60
4.59
4.58
4.57
4.56
4.55
4.54
4.53
4.52
4.51
4.50
4.49
4.48
4.47
4.46
4.45
4.44
Table 7.1. Ambient temperature and charging voltage relationship.
CHAPTER
8
TEST RESULTS
8.1. INTRODUCTION
The prototype was subjected to a number of tests. The most important test
was to determine the accuracy of the instrument. Other tests included the behaviour
of the instrument in the presence of high electric fields, both in the high voltage
laboratory and in the field. A final series of tests concerned the battery, to determine
the operating time.
8.2. ACCURACY
To test the accuracy of the leakage current monitor the circuit of
Figure 8.1. was used. The test was conducted at room temperature.
Figure 8.1. Accuracy test circuit.
The equipment used is as follows:
Test Sources:
AC: Hewlett Packard HP3310A Function Generator
45
46
DC: Topward TPS DC Power Supply
Calibration Meter (both current and frequency):
Fluke
87
Multimeter
±(0.2% + 2 LSD),
AC
(accuracy
current
specification:
±(1% + 2 LSD),
DC
current
frequency
±(0.005% + 1 LSD)
Resistor:
Refer Table 8.1.
ITEST
[µA]
0.00
1.00
2.00
5.00
10.00
20.00
50.00
100.00
200.0
500.0
1000.0
1500.0
1900.0
Readings AC Mode
[µA]
f=50Hz
f=60Hz
1
1
2
7
11
21
51
102
202
501
1002
1504
1906
1
1
1
7
12
21
51
101
201
500
1001
1503
1905
R
[Ω]
100k
100k
100k
100k
100k
100k
100k
100k
10k
10k
10k
1k
1k
Readings DC Mode
[µA]
+DC
-DC
0
0
1
6
9
19
50
99
200
502
1005
1510
1912
0
1
2
6
11
20
51
101
202
505
1008
1511
1913
R
[Ω]
1M
1M
1M
1M
1M
1M
100k
100k
100k
10k
10k
10k
10k
Table 8.1. Accuracy test results for Channel 1.
The test results are shown in Table 8.1. The number of digits shown in the
column for the calibration meter is equal to the number of digits displayed. Only the
test results for input channel 1 are shown. The test results for the other channels are
nearly identical to the results for channel 1. Listing these results would merely result
in a duplication of information. The reason that these results are so similar is that
the burden resistors, R21, R24, R27 and R30, were hand-picked from a box of
resistors using an ohmmeter to ensure close matching.
The tests were repeated after a period of four months to establish long term
drift. The result: no significant variation of test results was encountered.
To test the coupling between channels each of the inputs in turn was supplied
with a test current of 1900 µA, both AC and DC. The other channels were left
47
disconnected. The readings for the non connected channels were zero, therefore,
there was no measurable coupling between channels.
By examining Table 8.1. the overall accuracy of the instrument can be defined
as:
±(1% of reading + 2 least significant digits).
8.3. HIGH VOLTAGE TEST
The monitor was tested in the high voltage laboratory to ascertain the
performance of the circuit on actual hot sticks.
The test circuit is shown in
Figure 8.2.
Figure 8.2. High voltage laboratory test circuit.
The hot sticks, manufactured from high quality fibreglass, have a very high
impedance. To reduce the impedance, an artificial rain generator was constructed to
moisten the hot sticks. The sticks were mounted on an angle of 45°. The top end
was connected to the secondary of a high voltage transformer. The primary of this
transformer was supplied by a variable autotransformer from the mains. The output
from the high voltage transformer was adjustable from 0 to 25 kV. The bottom end
of the sticks were connected to the leakage current monitor.
The autotransformer was adjusted until the current in one of the sticks reached
approximately 200 µA. It was not possible to make an accurate comparison between
the readings from the calibration meter and the monitor. The impedance of the sticks
was constantly changing, as water droplets struck, resulting in a widely varying
48
current. The readings, however, were of a similar magnitude. The test current was
not increased beyond 200 µA because of the risk of flashover.
This test shows that the instrument works when used in its intended
application. It also shows that the instrument continues to function in the presence
of strong electric fields.
8.4. FIELD TEST
The prototype was tested, with the cooperation of a Power Mark
(Christchurch) live line maintenance crew, on a 66 kV transmission line.
The
weather conditions were fine: clear sky, windy and 20°C.
The leakage current monitor was attached to the pylon and the input
connected to a hot stick. The other end of the hot stick was clamped to the live
conductor. The instrument measured zero current.
Discussions with the maintenance crew revealed that the highest current they
had ever measured was 5 µA on a 220 kV line, under much poorer weather
conditions. The zero leakage current reading is probably correct, considering the
relatively low line voltage and fine weather conditions.
One point was proved: the instrument did not malfunction in the presence of
strong electromagnetic fields.
One other point raised during discussions with the maintenance crew was that
some expected to set the instrument to the line voltage, not the leakage current. A
maximum safe level of 1 µA of leakage current per kV of line voltage was suggested.
If this type of set up is preferred then it can easily be included by making changes
to the software. In this case the software would contain a look up table containing
line voltages and maximum safe levels of leakage current. The table need not be
fixed in ROM but can be stored in EEPROM.
8.5. BATTERY OPERATING TIME
The battery has been subjected to a series of tests in order to determine the
operating time.
The battery was charged and discharged at three different
49
temperature conditions: 19 °C, 5 °C and -15 °C. The battery was charged for
24 hours at room temperature prior to the first discharge at each test temperature.
Charging time before the second and third discharge was 12 hours at the test
temperature. The test results are shown in Table 8.2.
Discharge Time [hours]
Test number
1
2
3
T 19°C
T 5°C
T -15°C
44.1
42.7
41.7
43.3
38.8
37.6
38.9
36.1
35.0
Table 8.2. Results for battery life tests.
The BAT indicator first appears after approximately 30 hours, initially flashing only
briefly. The indicator on time increases as discharge progresses. The operating time
was slightly reduced at low temperatures. The difference however, is much smaller
than expected. The second and third discharge times are shorter than the first in all
cases. This probably means that the 12 hour charging period is too short, although
this value was predicted from the manufacturer’s data sheet.
If the battery is
recharged after each use, overnight for instance, than the battery will never reach the
fully discharged level.
This practice will prolong battery life and ensure the
availability of a functional instrument. The results show that a minimum operating
time of 40 hours can be expected from a new and fully charged battery under normal
temperature conditions. Under extremely cold conditions the operating life is reduced
to about 38 hours.
The ability to store energy is reduced as the battery ages. According to the
battery’s manufacturer a minimum of 200 full discharge cycles are available before
the battery’s end of life is reached. The battery’s end of life is defined as the point
were it fails to hold more then 60 % of its initial capacity. The battery is still usable
at this point, with an expected operating time of 24 hours.
8.6. MAGNET CONTACT
To test the feasibility of the magnet attachment and spring contact system, a
test magnetic contact was made by the Electrical and Electronic Engineering
50
Department workshop.
The drawing for the test magnetic contact is shown in
Figure 8.3.
The contact comprises a cylindrical magnet with a pointed steel pin inserted
through the centre. The contact is held in the forward position using a spring. The
pin is allowed to move backwards, against the spring force, when the magnet is
affixed. The spring force was 8 N.
The contact has been tested on a variety of surfaces. On both new and
weathered galvanised steel surfaces the contact resistance is less than 0.5 Ω. The
connection is made reliably. On painted surfaces the connection is less reliable. A
thin paint layer is easily penetrated, but a primed and painted surface is not.
Figure 8.3. Mechanical drawing for the test magnetic contact.
This test shows that this type of contact is feasible for use with galvanised
steel. Galvanised steel is the main construction material for pylons, which is the
intended application area for this instrument.
CHAPTER
9
WORK REMAINING
The prototype was not completed to the point where it is a commercially
sellable item. A number of tasks need to be completed.
The first task is to redesign the printed circuit boards to match the circuit
diagrams and to fit the enclosure design. The use of surface mount components will
greatly reduce the overall dimensions when compared to standard parts. This is
followed by finalising the actual enclosure design and dimensions. The battery
charging base needs to be designed and build.
The completed enclosure needs to be tested for water proofing and shock and
vibration resistance.
One important test remains: to determine the extend of the damage resulting
from flashover. Other tests could be conducted, like testing to comply to appropriate
standards and guidelines.
The instrument appearance and user friendliness would be enhanced with a
custom designed LCD. The LCD could spell out the operating and display modes
instead of using abbreviated messages.
51
52
CHAPTER
10
CONCLUSIONS
A prototype leakage current monitor was constructed to test the design and
housed in an aluminium enclosure. The design has achieved the primary objective
of improving on a commercial design.
The prototype meets or exceeds the
requirements listed in chapter 1. A practical enclosure has been designed but has not
been manufactured.
The electronics has been kept to a minimum, incorporating only those
components necessary for the power supply, measurement and user interface
functions. The use of a microcontroller reduces the overall parts count and results
in a user friendly operator interface. Many of the instrument’s features are defined
in software and can easily be changed at the manufacturing stage, perhaps to meet
individual customer requirements or to keep up with changing practices.
The next step is to construct a second, more complete, prototype to fit the
enclosure and turn the design into a finished product.
53
54
REFERENCES
Analog Devices Engineering Staff, Analog-Digital Conversion Handbook, Englewood
Cliffs, Prentice-Hall, 1986.
Bodger, P. S., Code of Practice for Bare-Handed Live-Line Maintenance,
Christchurch, Canterprise (University of Canterbury), December 1989.
Bodger, P. S., Correspondence to Electricorp Marketing, Christchurch, 25 August
1989.
Dekis, Jim, "Careful Power Supply Design Extends Portable System Battery Life Part
I: Battery and Regulator IC Fundamentals", Power Conversion and Intelligent
Motion, February 1991, pp. 15 to 22.
Dekis, Jim, "Careful Power Supply Design Extends Portable System Battery Life Part
II: Step-Down Switching Regulator With 9V Battery", Power Conversion and
Intelligent Motion, April 1991, pp. 58 to 64.
Dekis, Jim, "Careful Power Supply Design Extends Portable System Battery Life Part
III: Step-Up Switching Regulator By Two AA Cells", Power Conversion and
Intelligent Motion, May 1991, pp. 50 to 57.
Forgie, G. C. et al, "The Introduction of Bare Hand Live Line Techniques For
Reinsulating of The New Zealand HVDC Inter Island Link", Proc. 5th Int.
Conf. on Transmission and Distribution Construction and Live Line
Maintenance, June 19-21, 1990, Toronto, Canada, pp. 145 to 148.
Intersil Inc., Component Data Catalog 1987, Cupertino, 1987, pp 6-39 to 6-40.
Jung, Walter G., IC Op-Amp Cookbook, Indianapolis, Howard W. Sams & Company,
1988.
Lion, Arthur L., Dealing With Data, Oxford, Pergamon Press, 1970.
National Semiconductor Corporation, Linear Databook 1, Santa Clara, 1988, pp. 2308 to 2-313.
National Semiconductor Corporation, Linear Databook 2, Santa Clara, 1988, pp. 7-20
to 7-27.
Philips, I²C-bus compatible ICs Types PCF8582A to UMA1010T, Data Handbook
IC12b, 1989, pp. 707 to 715.
Philips, 8051-based 8-bit Microcontrollers, Data Handbook IC20, 1991.
Philips, Liquid Crystal Displays and Driver ICs for LCD, Data Handbook LCD01,
1991.
Sonnenschein, Sonnenschein Batteries dryfit maintenance-free, Büdingen.
55
56
Stix, Gary, "Working hot: life at 765 kV", IEEE Spectrum, September 1988, pp. 54
to 56.
APPENDIX
A
COMPONENT LIST
RESISTORS:
9
1
1
1
1
2
3
1
1
3
1
1
2
4
4
1
1
1
1
2
1
2
1
1
1
100k
220k
120k
560k
330k
0.5E, 0.5W
1k5
KTY81-221
1k8
10k
120E
1k2
180k
1k
100E, 0.5%
604k
15k
82k
68k
56k
12k
2k2
500E, multiturn preset
10k, multiturn preset
1k, multiturn preset
R1, R4, R14, R18, R22, R25, R28, R31, R40
R2
R3
R5
R6
R7, R10
R8, R9, R12
R11
R13
R15, R33, R34
R16
R17
R19, R41
R20, R23, R26, R29
R21, R24, R27, R30
R32
R35
R36
R37
R38, R44
R39
R42, R43
P1
P2
P3
CAPACITORS:
3
2
4
5
1
2
1
1
5
1
1
2
1
100p
220µ, 16V, low ESR
10µ, 16V
100n, ceramic
470µ, 25V
2µ2, 16V, tantalum
10p
4n7, polypropylene
100n, monolithic
1n
2µ2, 16V
22p
3n3
C1, C22, C23
C2, C4
C3, C16, C18, C20
C5, C6, C7, C8, C9
C10
C11, C12
C13
C14
C15, C17, C19, C25, C29
C21
C24
C26, C27
C28
57
58
INDUCTORS:
2
2
330µ
47µ
L1, L2
L3, L4
SEMICONDUCTORS:
2
11
SB130
1N4001
1
6
1
1
1
1
1
1
2
1
1
1
1
1
7V zener
1N4148
MAX631
MAX635
L200
LM334
MAX133
ICL8069
LM308
PCB87C528
PCF8576
PCF8582
BST70A
BST100
D1, D9
D2, D3, D4, D10, D11, D12, D13, D14, D15,
D16, D17
D5
D6, D7, D8, D18, D19, D20
IC1
IC2
IC3
IC4
IC5
IC6
IC7, IC8
IC9
IC10
IC11
T1
T2
MISCELLANEOUS:
1
1
1
1
1
1
1
1
1
1
1
Battery A204/1.0K
Buzzer RS 626-141
AMP P/N 206430-1
AMP P/N 206061-1
LCDisplay LTD202
LCDisplay LTD241
DIL relay RA30982051
rot. SW eao 52-271.025
PB SW eao 51-131.025
32768kHz crystal
11.0592 MHz crystal
BATT1
BZ1
K3
K5
LCD1
LCD2
RE1
S1
S2
X1
X2
APPENDIX
B
PROTOTYPE PHOTOGRAPHS
This appendix shows photographs of the prototype. Figure B.1. shows the
circuit boards produced for the initial design together with the modifications for
the present circuit. The circuits from left to right are the: back of the LCD,
precision rectifier (on prototype board), microcontroller and ADC, current source
(on prototype board) and power supply with battery charger. Shown at the top is
the buzzer, the power switch is on the far right and the user input is at the bottom
centre.
The circuit boards are stacked together as shown in Figure B.2.
The prototype enclosure is shown in Figure B.3. The four BNC sockets at
the top are the leakage current inputs.
Figure B.1. Individual printed circuit boards.
59
60
Figure B.2. Assembled circuit boards.
Figure B.3. Completed prototype.