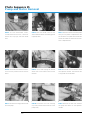
1
C H A P T E R
General ABS Service
9
Upon completion and review of this chapter, you should be able to:
❏ Inspect and test the brake system to
determine if a complaint is related to the
base brakes system or the antilock system.
❏ Use a computer pin voltage, or pin out,
chart to perform voltage and resistance
tests on computer control circuits.
❏ Relieve high pressure from an ABS
hydraulic accumulator.
❏ Perform resistance and voltage waveform
tests on a speed sensor and its circuit.
❏ Bleed an ABS.
❏ Remove and replace a wheel speed
sensor.
❏ Explain the purposes and major features
of diagnostic trouble codes.
❏ Explain the differences between hard and
soft trouble codes.
❏ Remove and replace an ABS computer
(control module).
Service Skills
The basic concept of ABSs dates back to the 1950s, but digital electronic control was not available until the 1980s. ABSs were installed on slightly more than 3 percent of domestic vehicles produced in 1987, on more than 50 percent by 1995, and almost all new vehicles built for the year
2000 had ABSs. As ABS use grows, the variations in designs will continue. For this reason, you
must have the manufacturer’s specifications, service instructions, and electrical circuit diagrams for
the system you are servicing.
ABSs are more likely to suffer from basic brake system problems than from problems in the
ABS control circuitry or components, which means you should be familiar with the normal braking system and how to diagnose its problems. Some ABS installations require special testers to
read trouble codes and perform some system tests. If the required tester is not available, you can
troubleshoot many of the circuits with ordinary test equipment, but your diagnosis will not be
as fast or as efficient. This chapter contains basic ABS troubleshooting information, as well as
general test and repair guidelines that apply to most systems. Chapter 10 in this Shop Manual
contains specific control system diagnostic information for antilock systems used by domestic
carmakers.
Basic Tools
Basic technician’s
tool set
Appropriate service
manual
DMM
Brake System Troubleshooting
An ABS is an electrically controlled hydraulic system. The ABS function will not work if the brakes
do not work properly in their non-antilock mode. Some ABS problems will be electrical, but many
will result from a hydraulic system malfunction. When such problems are detected by the ABS
control module, it will disable the antilock function and light the antilock indicator lamp on the
instrument panel. The cause can be as simple as a low hydraulic fluid level or a leaking hose, line,
or connection.
Brake System Check
Use the following quick and simple brake system check to help you determine if the base brake
system is working properly and whether the problem is electrical or hydraulic. You have already
learned several of these tests earlier in this manual as checks for the base brake system.
415
Special Tools
Coworker
To check the base brake system:
The ABS warning
light is amber.
1. Start the engine and note the brake and ABS indicator lamps. When you turn the ignition
switch on, the BRAKE lamp should light with the parking brake off. The ABS indicator lamp
should light for a few seconds, then go out (Figure 9-1).
2. Apply and release the parking brake. The BRAKE lamp should light when the parking brake
is applied and go out when it is released. The ABS indicator lamp should light while the
engine is cranking and go out when it starts. On some systems, it may remain on for a few
seconds after the engine starts, then go out.
3. Check the operation of the stoplamps by pressing the brake pedal while an assistant watches
both fender mounted lamps and the CHMSL to make sure they light when the pedal is applied
and go off when the pedal is released.
4. With the engine running, pump the brake pedal rapidly several times. The pedal height should
remain about the same. If it increases during pumping, or if you note a very spongy feeling
during pedal application, air may be trapped in the hydraulic lines. It is common for the brake
pedal on a car with antilock brakes to feel slightly softer than a car without them. On many
systems you can force the pedal to the floor with firm pressure. The important thing to check
for is the uniformity or repeatability of the brake pedal operation. Pedal height and feel should
remain constant as you apply and release the pedal. If they change with repeated pedal applications, air may be trapped in the brake lines.
5. If the car has vacuum-assisted power brakes, start the engine and run it at medium speed for a
short time, then shut it off. Wait about 90 seconds and then apply the brake pedal moderately
several times. The brake pedal should feel firmer. When the vacuum reserve is exhausted,
depress the brake pedal firmly and restart the engine. The pedal should drop slightly and then
hold as vacuum is applied to the booster.
6. Shut the engine off and check the master cylinder fluid level. On most late-model cars, this can
be done by cleaning the translucent reservoir, and visually noting the fluid level in relation to
the embossed line or mark on the reservoir (Figure 9-2). To evaluate fluid condition, remove
the reservoir cap or cover.
7. Check the condition of the vacuum hose between the power booster and intake manifold.
Start the engine and listen for a hissing noise from the hose or hose connection. Such a noise
indicates a vacuum leak. Replace the hose if it is deteriorated; replace the hose clamps if the
hose connections are not tight.
Figure 9-1 Both the BRAKE and the ABS indicator lamps should light when you turn on the
ignition.
416
Fluid reservoir
Figure 9-2 On many vehicles, you can check the brake fluid level through the translucent
master cylinder reservoir.
8. Inspect all brake hoses, lines, and fittings for damage, deterioration, leakage, or chassis
interference. This inspection requires that the vehicle be raised on a hoist. Fix any defects
found.
9. Finally, test drive the vehicle to evaluate brake system performance. Accelerate to about 20
mph and use normal braking to stop the car. If you can stop it smoothly within 25 feet without
swerving, the brakes are probably in good working order. Under hard braking, beginning from
25 mph or 30 mph, you may feel the brake pedal pulsate and the ABS light may come on for a
moment if you incur an ABS event.
Troubleshooting with the Brake Pedal
The brake pedal is a helpful diagnostic tool that is easily used by a trained technician. You can
determine the probable cause of a wide variety of brake system problems by identifying apparent symptoms as you apply the pedal. Figure 9-3 lists symptoms and probable causes that can be
determined in this way.
Troubleshooting at the Brake Pedal
SYMPTOM
Pedal surging, brake chatter, vehicle surge
during braking
PROBABLE CAUSE
Front discs out of round; excessive disc thickness
variation; bearings out of adjustment
Rear drums out of round; hard spots caused by
overheating
Brakes grab
Hard spots on front discs or rear drums; cracked
pads or shoe linings
Car pulls to one side
Misaligned front end; drum brake components
malfunctioning; frozen caliper pistons or contaminated
front brake pads; pinched lines or leaking seals
(continues)
Figure 9-3 An experienced technician can tell a great deal about the condition of a brake
system just by the pedal feel.
417
Troubleshooting at the Brake Pedal (cont.)
SYMPTOM
PROBABLE CAUSE
Excessive pedal effort
Insufficient engine vacuum; defective booster;
vacuum leak; frozen piston; contaminated or
glazed linings
Rear brakes drag
Misadjusted parking brake; rear brakes out of
adjustment; weak shoe return springs; frozen
wheel cylinder pistons
All brakes drag
Frozen brake pistons; misadjusted stoplamp
switch; restricted pedal return; defective master
cylinder; contaminated brake fluid
Low-speed disc brake squeak
Worn pad lining
Scraping noise when brakes are applied
Brake linings completely worn out
Intermittent chirp when drum brakes are applied
Insufficient backing plate pad lubricant
Intermittent clunk when drum brakes are applied
Threaded drums
Rear wheel lockup
Contaminated linings; front calipers frozen;
defective combination valve
Pedal low and spongy with excessive pedal travel
Insufficient fluid in system; air in hydraulic
system
Pedal low and firm with excessive pedal travel
Brakes out of adjustment
Brakes release slowly and pedal does not
fully return
Frozen caliper or wheel cylinder pistons;
defective drum brake return springs; binding
pedal linkage
Brakes drag and pedal does not fully return
Contaminated brake fluid; defective master
cylinder; defective vacuum booster or vacuum
check valve; binding pedal linkage or lack of
lubrication
Figure 9-3 Continued
●
CUSTOMER CARE: Advise your customers that pumping the brake pedal on a
vehicle with antilock brakes actually defeats the operation of the antilock system.
ABS Hydraulic System Service
When you service the non-antilock part of some ABS installations, you must take certain precautions. You must understand the system components and their operation before you try to bleed
the brakes or perform other service that requires opening the hydraulic system.
An integrated ABS installation using a pressurized accumulator is similar to the hydro-boost
power brake system that uses the power steering fluid to operate both the steering gear and the
418
brake booster. In both designs, the hydraulic fluid is under very high pressure. For example,
2,600 psi of hydraulic pressure exists in the DaimlerChrysler ABS-3 system whenever the ignition
switch is on. Opening a hydraulic line in this system without first discharging the pressure can
result in a messy and potentially dangerous situation.
▲
WARNING: Before opening the hydraulic system of an ABS installation, review the
manufacturer’s service instructions, with particular attention to safety precautions that
relate to hydraulic pressure. Do not loosen any fittings or otherwise open hydraulic lines
where pressure may be present. Failure to comply may result in vehicle damage or injury.
Depressurizing the System (Relieving Accumulator Pressure)
You must refer to the carmaker’s service procedures if you find it necessary to check brake fluid
level, bleed the brakes, or open a hydraulic line to replace a component. These service procedures
will tell you if it is necessary to depressurize the hydraulic accumulator first.
For example, the DaimlerChrysler ABS-3 system and the Teves ABS both use a pressurized
hydraulic accumulator. The DaimlerChrysler ABS-3 system must be depressurized to bleed the
brakes, but the Teves ABS requires that the accumulator be fully pressurized when bleeding the
rear brakes. The Teves front brakes can be bled with or without accumulator pressure.
When the automaker’s procedure requires that the system be depressurized, the ignition
switch should be off. Pump the brake pedal at least twenty-five times with about 50 pounds of
pedal force. As the accumulator pressure discharges, you will notice a change in pedal feel. When
you feel an increase in pedal effort, pump the pedal a few more times. This will remove all
hydraulic pressure from the system. Some systems may require up to fifty pedal applications to
relieve accumulator pressure completely. It is always better to proceed on the side of caution, so
apply the pedal a few more times after the pressure seems to have been relieved.
Special Tools
Service manual
Fluid Level Check and Refill
Some integrated antilock systems require different procedures to check and refill the fluid reservoir. The DaimlerChrysler-Bosch ABS-3 system must be depressurized before the reservoir cap
is removed. The fluid level should be at the top of the white screen in the filter-and-strainer
assembly.
To check fluid level in an early Teves Mark II system, turn the ignition on and pump the
brake pedal until the hydraulic pump motor starts. When the pump shuts off, you can visually
check the level through the translucent reservoir. Under certain conditions, the fluid level may be
above the MAX fill line on the reservoir. If this is the case, shut the ignition off and then turn it
back on. Pump the brake pedal again to start the hydraulic pump. When the pump stops, the fluid
level should be accurate. If the fluid is below the MAX fill line (Figure 9-4), remove the cap and
add enough fluid to bring it to the correct level.
To check the fluid level on later Teves systems, depressurize the system and look at the
fluid through the translucent reservoir. The level should be at the FULL mark. With the system
pressurized, the level will be somewhere below the FULL mark.
Do not overfill the reservoir in either system. This will cause the fluid to overflow when the
accumulator discharges during its normal operation.
Special Tools
Service manual
Special Tools
Service manual
Tubing with
transparent
container
Bleeding the System
Bleeding an ABS is fundamentally the same as bleeding a non-ABS hydraulic system. Some variety exists in extra steps that may be required for different systems, however. Some nonintegral
ABS installations can be bled in the same way as a non-ABS hydraulic system, with no extra steps.
419
Scan tool with ABS
cartridge
Coworker
Fill level with
charged accumulator
MAXIMUM
Maximum
fill line
Figure 9-4 The hydraulic reservoir used with the early Ford Teves Mark II ABS has two fill marks.
One indicates the normal level with a charged accumulator; the other is a MAX fill level mark.
On most ABSs a
coworker can speed
up the bleeding
process, especially if
the vehicle is raised.
On the other hand, on some integral systems, such as the Teves Mark II ABS, the rear brakes must
be bled with a fully pressurized accumulator. The ignition must be on, and the brake pedal
must be applied while the rear bleed screws are opened one at a time. Because of the procedure
variations that exist, you should check the manufacturer’s instructions before bleeding a system
that you have not worked on previously. The details of bleeding procedures can change from one
model year to the next, so reviewing the carmaker’s instructions is always a good idea.
▲
WARNING: If a system requires that a high-pressure accumulator be charged to
bleed the brakes, follow the manufacturer’s instructions and precautions exactly
when working with high-pressure hydraulic components.
Some manufacturers state that either pressure bleeding or manual bleeding is acceptable for
their various ABS installations. Others specify either one method or the other.
▲
WARNING: Do not use DOT 5 silicone brake fluid in an ABS. ABS operation will
be degraded.
Use the DOT 3 or DOT 4 brake fluid specified by the vehicle manufacturer. When bleeding
an ABS hydraulic system, it is good practice to flush the system completely to ensure that all old
fluid and possible contamination are removed.
SERVICE TIP: If a brake-pull problem develops after bleeding an ABS, completely
flush and bleed the system again. If sludge or dirt of any kind gets trapped in antilock
brake solenoids or valves, it can unbalance hydraulic pressure at the wheels—even for non-ABS
braking. Flushing the dirt out of the system often solves an antilock brake pulling problem.
The following paragraphs summarize the special instructions for bleeding some of the most
popular systems. These sections do not cover all possible ABS installations, however, and should
not be substituted for manufacturers’ specific procedures. They do provide general guidelines and
examples of ABS bleeding methods, however. Before bleeding any antilock system, repair any
conditions that would set diagnostic trouble codes and clear all codes from computer memory.
Bendix 9 ( Jeep). The Bendix 9 system can be bled with pressure equipment or manually. The
entire system, including the accumulator, pump, and master cylinder, must be bled if any hydraulic
connection is opened. To bleed these hydraulic control components, loosen the fittings on the side
of the hydraulic modulator one at a time while an assistant holds steady pressure on the brake
pedal. Bleed the accumulator, pump, and master cylinder before bleeding the wheel brakes.
420
To bleed the wheel brakes, turn the ignition off and pump the brake pedal thirty to forty
times to exhaust accumulator pressure. Leave the ignition off and the accumulator depressurized
while bleeding the brakes. The usual bleeding sequence for the Bendix 9 system is: modulator,
RR, LR, RF, LF.
Bendix 10. The Bendix 10 system can be bled with pressure equipment or manually. Before
bleeding the wheel brakes, turn the ignition off and pump the brake pedal thirty to forty times to
exhaust accumulator pressure. Leave the ignition off and the accumulator depressurized while
bleeding the brakes. The usual bleeding sequence for the Bendix 9 system is: LR, RR, LF, RF.
Bendix 6. If the hydraulic modulator is not removed or otherwise exposed to air, the bleeding
procedure for the Bendix 6 system is the same as for the Bendix 10 system. If air has entered the
modulator, special procedures beyond the scope of this manual are needed to purge the air from
the system. Refer to a Bendix-DaimlerChrysler shop manual or aftermarket service manual for the
specific year and model of vehicle being serviced.
Bendix LC4. The Bendix LC4 system can be bled only manually. Pressure-bleeding equipment
does not produce pressure high enough to remove all air from the system. The usual bleeding
sequence is: RR, LF, LR, RF.
Bleeding the LC4 system is a two-stage process that requires the use of a scan tool. Several
aftermarket scan tools provide the necessary capabilities. Follow the instructions for your particular service equipment.
Bendix ABX-4. Unless air has entered the modulator, you can bleed the Bendix ABX-4 system
as you would a non-antilock system. You can use either manual or pressure-bleeding methods,
but Bendix 4 and ABX- 4 systems are best bled manually. The usual bleeding sequence is: LR,
RF, RR, LF.
If air has entered the hydraulic modulator, bleed the wheel brakes first and then bleed the
modulator, using a scan tool to control system operation. Follow the instructions for your particular service equipment. After bleeding the modulator, repeat the bleeding operations at all four
wheels. To thoroughly purge these systems, however, you also must cycle certain solenoid valves
while holding down the brake pedal. Do this only when a Bendix 4 and ABX-4 brake bleeding
procedure in a DaimlerChrysler service manual instructs you to do so.
Bendix Mecatronic. You can bleed the Bendix Mecatronic system using either manual or
pressure-bleeding methods as you would a non-antilock system. The usual bleeding sequence
is: RR, LF LR, RF.
Bosch 3. Before bleeding the wheel brakes, turn the ignition off and pump the brake pedal
thirty to forty times to exhaust accumulator pressure. Leave the ignition off and the accumulator depressurized while bleeding the brakes. You can bleed the system using either manual or
pressure-bleeding methods as you would a non-antilock system. The usual bleeding sequence
is: LR, RR, LF, RF.
To bleed the master cylinder and hydraulic booster, relieve accumulator pressure and top off
the reservoir. Connect a transparent hose to the bleeder screw on the side of the hydraulic assembly and place the other end in a clear container filled with a few ounces of brake fluid. Open the
bleeder screw one-half to three-quarters turn and turn the ignition on. The pump will run and
force fluid from the hydraulic assembly into the bleeding container. Close the bleeder screw when
the fluid flowing into the container is free of air bubbles. Disconnect the bleeder hose, turn the
ignition off, and top off the fluid reservoir.
Bosch 2, 2E, 2S, 2U, Micro, and ABS-ASR. You can bleed the Bosch 2 system versions using
either manual or pressure-bleeding methods generally as you would a non-antilock system. All of
421
A scan tool is a
diagnostic tool that
allows the technician
to communicate with
the vehicle’s onboard
computers. It can
be used to command
some vehicle
actuators to perform
certain tasks.
these Bosch 2 ABS versions have been used by many carmakers for many years. Although the
basic bleeding procedures are similar, it is important to check manufacturers’ instructions for specific years and models. The bleeding sequence usually begins with the wheel farthest from the
master cylinder, but different sequences are specified by different manufacturers.
Delco Moraine III. Before bleeding the wheel brakes, turn the ignition off and pump the brake
pedal thirty to forty times to exhaust accumulator pressure. Leave the ignition off and the accumulator depressurized while manually bleeding the front brakes. Bleed the RF caliper first, then
the LF caliper.
To bleed the rear brakes, turn the ignition on to let the pump recharge the accumulator.
Have an assistant press the brake pedal slowly while you open the RR bleeder screw. Do not press
the brake pedal to the limit of its travel. Doing so discharges the accumulator too fast.
Hold the bleeder screw open for about 15 seconds while your assistant maintains pedal pressure. Then close the bleeder screw, release pedal pressure, refill the fluid reservoir, and repeat the
procedure at the LR wheel.
Delphi Chassis (Delco Moraine) ABS-VI. To bleed the ABS-VI system, the pistons in the front
and rear modulators must be in their upper positions to unseat the check balls in the hydraulic
circuits. GM recommends using a scan tool with bidirectional control to do this. Although a scan
tool makes the job faster and easier, the pistons can be positioned manually.
To manually position the modulator pistons, start the engine and run it for 10 seconds. Verify that the ABS lamp is off and listen for several sharp clicks that indicate the pistons being driven
to their upper positions. If you do not hear these distinct clicks, drive the car at 5 mph and again
listen for the clicking of the ABS control motors. When you hear the clicks, carefully drive the car
to the service bay without activating ABS operation.
Before bleeding the wheel brakes, attach a hose to the rear bleeder screw on the hydraulic
modulator (closest to the master cylinder) and manually bleed all air from the bleeder port (Figure 9-5). Then repeat this procedure at the forward bleeder screw. After bleeding the modulator,
loosen all of the brake line fittings on the outboard side of the modulator and manually bleed air
from the upper ends of the brake lines (Figure 9-6).
Bleed
first
Bleed
second
Figure 9-5 Bleed these two points on the ABS-VI modulator first. (Courtesy of General Motors
Corporation, Service Operations)
422
Brake line
fittings
Figure 9-6 Bleed air from the brake line fittings at the outboard side of the ABS-VI modulator.
(Courtesy of General Motors Corporation, Service Operations)
The last stage of bleeding an ABS-VI system is to bleed the wheel brakes, either manually
or with pressure equipment. Because of the variations in ABS-VI installations and because the
system has been split either diagonally or front to rear on different vehicles, consult the carmaker’s service instructions for the specific wheel bleeding sequence.
Kelsey–Hayes EBC2 (RABS and RWAL). The Kelsey–Hayes rear-wheel antilock systems, used
on light trucks and SUVs, can be bled manually or with pressure equipment in generally the same
way as a non-antilock system. On most systems, the combination valve must be held open for
pressure bleeding. The modulator must be bled separately if air has entered it. Some modulators
have bleeder screws; others require that a brake line fitting must be loosened for bleeding.
Because of the wide variety of trucks and SUVs on which this system has been used, refer
to the vehicle manufacturer’s instructions for the wheel bleeding sequence.
Kelsey–Hayes EBC4. Either manual or pressure-bleeding methods can be used for this system.
If no air has entered the hydraulic system, standard non-ABS methods can be used. The usual
bleeding sequence is: RR, LR, RF, LF. If air has entered the modulator, special bleeding procedures
must be used. Refer to the manufacturer’s service instructions for details on a specific year, make,
and model.
Kelsey–Hayes EBC410. Standard non-ABS manual or pressure-bleeding methods can be used
for this system if no air has entered the hydraulic lines. The usual bleeding sequence is: RR, LR,
423
RF, LF. If air has entered the ABS valve assembly, special bleeding procedures that require a scan
tool must be used. Refer to the manufacturer’s service instructions for details on a specific year,
make, and model.
Teves Mark II. You can bleed the Teves Mark II system manually or with pressure equipment.
You can bleed the front brakes with or without system accumulator pressure, but the accumulator must be fully charged to bleed the rear brakes manually. The ignition must be on, and the
brake pedal must be applied while the rear bleed screws are opened one at a time. Because of
the high pressure at the bleed screws, you must be very careful when opening a screw to bleed
the line. Within 10 seconds after opening the screw, the fluid flow should be free of air bubbles
and the screw can be closed. Refill the reservoir after bleeding each wheel. The pump will run
periodically during the bleeding procedure to maintain accumulator pressure.
Teves Mark IV. Standard non-ABS manual or pressure-bleeding methods can be used for this
system. Unlike the Teves Mark II system, the accumulator of the Mark IV system must be depressurized before bleeding the rear brakes. The bleeding sequence varies for different years, makes,
and models.
Proper bleeding for these systems consists of first manually bleeding the base brakes, then
bleeding the hydraulic control unit, and finally repeating a manual base brake bleeding sequence.
Refer to manufacturers’ recommended brake-bleeding procedures for these systems.
SERVICE TIP: Before forcing a caliper piston back into its bore to remove the caliper
or change the pad, attach a bleeder hose to the caliper bleeder screw, put the other end
in a container of clean brake fluid, and open the bleeder.
That is only half the preparation, however. Next you have to keep old fluid from flowing
back up the brake lines when you push the piston back in its bore. You can do this in one of
two ways. You can clamp the brake hose with smooth-jawed locking pliers or a similar clamp
to keep sediment from flowing back up the hose, or you can use the brake pedal depressor
from the wheel alignment equipment to apply the brake pedal about 1/2 inch. This will block
the ports in the master cylinder and hold moderate pressure in the lines.
Then, push the piston back in its bore. Any sediment in the caliper bore will be forced
out through the bleeder, not back into the brake system where it can damage expensive ABS
components.
General ABS Troubleshooting
The following sections outline the troubleshooting principles for ABS control systems and for individual components. These guidelines apply to all antilock systems. Chapter 10 of this Shop
Manual contains specific diagnostic information for specific systems. You will get the most benefit from any diagnostic guidelines if you use them as part of organized, systematic troubleshooting. The four major steps for accurate troubleshooting are:
1. Basic inspection and vehicle checkout
2. Control system diagnosis—trouble codes, self-tests, and data readings
3. Operating symptom diagnosis
4. Intermittent problem diagnosis
The details of these steps are nothing new or revolutionary. These steps are simply up-todate applications of proven test principles. The following sections explain how to use these principles effectively.
424
Basic Inspection and Vehicle Checkout
The system computer does not monitor or control all parts of the ABS. You must inspect mechanical components, vacuum and hydraulic lines, wiring, and mechanical parts. You also should
check for body damage, mechanical damage or tampering, and newly installed accessories. The
following steps will make your inspection and checkout easier.
Verify the Customer’s Complaint. Get the customer to describe the problem in as much detail
as possible. Ask these kinds of questions:
❏ Does the problem exist all the time or some of the time? Does it occur regularly or at
random?
❏ Does the problem occur at certain times or temperatures?
❏ What are all the symptoms: noises, vibrations, smells, vehicle performance, or any
combination?
❏ Has the problem occurred before and what was done to fix it?
❏ When was the vehicle last serviced and what was done to it?
Listen to the customer’s complaint carefully and get as much information as possible. Avoid
asking closed-end questions such as: “Does it happen when the engine is hot?” Ask open-ended
questions such as: “What temperature is the car when this happens?”
Finally, check the vehicle yourself to verify that the problem exists as described. Try to
recreate the conditions that the customer describes. You may not always be able to duplicate the
conditions exactly, but try to come as close as possible. You may have to road test the vehicle, or
you may have to leave it standing overnight to recreate a cold-operating problem. If the problem
caused a soft code, try to get the code to recur during testing.
Sometimes the
best source of
information about
a vehicle is ignored:
the owner/driver.
Inspect and Check Out the Vehicle. Look for obvious faults and try to eliminate simple problems first. Look for loose or broken wires, connectors, and hydraulic lines or hoses. Check for
leaks. Check for mechanical and electrical tampering and collision damage. After you have
completed the basic inspection and checkout of a system, you can move into control system
diagnosis.
Test the Control System
Test from the general to the specific. If you immediately look at the computer system for the cause
of a problem, you can overlook other possible causes. The basic inspections and tests described in
other sections of this Shop Manual begin with general checks or area tests. Testing the computer
control system also should begin with general area tests before moving on to pinpoint tests.
Check the System Warning Lamp. Vehicles with ABSs have an amber or yellow instrument
panel lamp that lights to indicate major system problems (Figure 9-7). Any such indicator lamp
should light when the ignition key is turned on without starting the engine. This is a basic bulb
check similar to the bulb check for alternator or other brake system warning lamps. The ABS lamp
may go out within 1 or 2 seconds of turning on the ignition, or it may stay lit for a longer time.
If the lamp does not light when the ignition is turned on, the computer probably will not go
into the diagnostic self-test mode. The problem may be as simple as a burned out bulb, or the
problem may be with the computer itself. Begin by checking the bulb. Then test the lamp circuit
for correct power and ground. Follow the specific carmaker’s instructions for checking the lamp
to verify that the system can perform its self-test functions.
If the warning lamp lights steadily with the engine running, it indicates that a system problem exists. The following section on trouble codes explains the differences between hard and soft
codes and permanent and intermittent faults. On many vehicles, some system problems will set a
trouble code in the computer memory but will not light the warning lamp.
425
Before getting all
wrapped up in all
the possibilities,
check the brake
fluid level. Some
ABSs will switch on
both warning lights
if the fluid is low.
ANTILOCK
ABS
Figure 9-7 The ABS warning lamp will light to indicate system problems.
Special Tools
Service manual
Scan tool with ABS
cartridge
diagnostic trouble
code (DTC)
a numerical code
generated by an
electronic control
system that has
self-diagnostic
capabilities as the
result of a system
self-test or
monitoring to
indicate a problem
in a circuit or
subsystem or to
indicate a general
condition that is
out of limits;
also called trouble
codes, service codes,
or fault codes by
various carmakers
If the warning lamp does not light with the key on or if the computer will not go into a
diagnostic mode, you may have to make some voltage tests at a diagnostic connector. Almost
all diagnostic connectors have a ground terminal that is used for one or more test modes. Use
a voltmeter to check the voltage drop between the diagnostic ground terminal and the battery
negative terminal. High ground resistance or an open circuit can keep the computer out of the
self-test mode and may be a clue to other system problems.
Various other terminals on the diagnostic connector may have other levels of voltage applied
to them at different times. Some may have battery (system) voltage present under certain conditions. Others may have 5 volts, 7 volts, or a variable voltage applied for specific test conditions.
Self-test programs and diagnostic modes operate differently on different vehicles, but all provide the same basic kind of information. Most ABS computers with any kind of self-test capability allow a scan tool or special tester to read system trouble codes. The following paragraphs
outline the common features and principles of trouble code diagnosis.
SERVICE TIP: Dirty or damaged wheel speed sensors and damaged sensor wiring
harnesses are a leading trigger to turn on ABS warning lamps. Do not rush to condemn the ABS computer or hydraulic module before checking the speed sensors and their
signals carefully.
SERVICE TIP: A poor ground connection for the ABS controller will generally lead
to the storage of multiple, nonrelated codes.
Troubleshooting Trouble Codes. Automotive computers can test their own operation and the
operation of input and output circuits. Most computers have one or more of the following self-test
capabilities:
1. They can recognize the absence of an input or output signal or a signal that is continuously
high or low when it should not be.
2. They can recognize a signal that is unusual or out of limits for a period of time or a signal
from one sensor that is abnormal when compared to the signal from another sensor.
3. They can send a test voltage signal to a sensor or actuator to check a circuit, or they can
operate an actuator and check the response of a sensor.
426
If the computer recognizes a condition that is not right, it records a diagnostic trouble code
(DTC). A DTC is a 2-, 3-, 4-, or 5-digit numeric or alphanumeric code that indicates a particular
system problem. Most systems will light the ABS warning lamp for many—but not all—codes. In
addition, most ABS computers will store the code in long-term memory.
A DTC can indicate a problem in a particular circuit or subsystem, but it does not always pinpoint the exact cause of the problem. Checking DTCs is an overall or area test of the system.
Carmakers have different names for codes and categorize them in different ways, for example:
❏ GM: trouble codes
❏ Ford: service codes
❏ DaimlerChrysler: fault codes
With the introduction of the second generation onboard diagnostic systems (OBD-II) for
engine control systems in the mid-1990s, the term diagnostic trouble code has been widely applied
to codes for all automotive control systems. Two general terms we can use for all codes are hard
codes and soft codes.
Hard Codes. A hard code indicates a failure that is present at the time of testing and permanent until you fix it. If you turn off the ignition and clear the codes, a hard code will reappear
immediately or within a few minutes because the problem still exists until you correct it. Hard
codes indicate full-time problems that are not too difficult to diagnose. Ford refers to hard codes
as on-demand codes because they are detected by the computer immediately on demand when
it runs a self-test.
A hard code enables you to go right to a certain area or areas and begin pinpoint testing.
Carmakers’ diagnostic charts or pinpoint test procedures are designed to troubleshoot hard codes.
The procedures assume that the problem is present at the time of testing.
Soft Codes. A soft code, or memory code, indicates an intermittent problem: one that comes and
goes. Soft codes are the computer’s way of remembering a problem that occurred sometime in the
past, before testing, but that is not present now. The problem may not reappear if you clear the
codes and retest the system. It may have happened at a certain speed or temperature or under
some other conditions that you cannot recreate in the shop.
Ford refers to soft codes as continuous memory codes because they are stored continuously
in the computer’s memory until cleared. Some GM divisions call soft codes on late-model vehicles
history codes and identify them as such on the computer’s data stream.
Because soft codes indicate intermittent problems, diagnostic charts and pinpoint tests usually do not isolate the problem immediately. The special intermittent test procedures later in this
section will help you troubleshoot soft codes accurately. To find the problems that cause soft
codes, you should not open or disconnect electrical connectors until you have checked them in
normal operation or by doing a wiggle test. Disconnecting and reconnecting a connector may temporarily solve a problem without revealing the basic cause.
Determine Whether Codes Are Hard or Soft. After checking trouble codes, write down any
codes that may be present. Remember that if you clear the codes, soft codes will not reappear
right away. Some antilock systems will display only one or up to three codes at a time, even when
more faults exist. For such systems, you must repair and clear each code in sequence and then
retest the system until no more codes appear.
If you determine that a code is a hard code, you can go to the manufacturer’s test or troubleshooting chart for that code number. If you determine that a code is a soft code, use the intermittent diagnostic procedures outlined later in this chapter to help pinpoint the problem.
All carmakers advise that trouble codes should be diagnosed and serviced in a basic order:
hard codes first, followed by soft codes.
427
hard code
a diagnostic trouble
code from a vehicle
computer that
indicates a problem
that is permanently
present at the time
of testing; may
or may not keep
the system from
operating
soft code
a diagnostic trouble
code from a vehicle
computer that
indicates a problem
not present at the
time of testing,
indicating an intermittent problem
that occurred sometime before testing;
stored in long-term
computer memory
and usually erased
after fifty to one
hundred ignition
cycles if the problem does not recur
The terms hard code
and soft code also
apply to DTCs that
are stored by the
vehicle’s PCM.
Special Tools
Service manual
Scan tool with ABS
cartridge
Digital multimeter
Operating Range Tests
Special Tools
Service manual
Scan tool with ABS
cartridge
Digital multimeter
The signal from an analog sensor can drift out of range as the sensor ages or wears. Some sensors
can develop an erratic signal, or dropout, at one point in the signal range. A loose or corroded
ground connection for a sensor also can force the signal out of limits.
These sensor problems and similar problems can cause definite malfunctions without setting
a code. You can check the operation of many sensors, however, by using the operating range
charts provided by the carmakers. These charts list signal-range specifications for voltage, resistance, frequency, or temperature that the sensor provides under varying conditions.
Use a DVOM, a frequency counter, or other appropriate instrument to test the sensor signal at the sensor connector and, if necessary, at the main connector to the computer. You can
back probe many sensor connectors or install jumper wires to provide connection points for
your meter. You may need a breakout box or harness to check sensor signals at the main computer connector. If possible, operate the sensor through its full range and check the signal at
several points.
Figure 9-8 Part of a pin out chart for testing circuit functions at an ABS control module. (Courtesy of Ford Motor Company)
428
Use Computer Pin Voltage Charts. A computer pin voltage or pin out chart identifies all the
connector terminals at the main computer connector by number, circuit name, and function. The
voltage or resistance levels that should be present under various conditions also are often listed.
Some circuits have different voltage specifications with the key on and the engine off, during
cranking, and when the engine is running. Use the pin voltage charts to check input and output
signals at the computer. Figure 9-8 is an example of part of a pin out chart for the main connector at an ABS control module. Checking signals at the computer is closely related to sensor operating range tests.
Check Ground Continuity. With the key on, circuit energized, and current flowing, use a digital voltmeter to check the voltage drop across the main computer ground connection and across
the ground connection of any sensor that you think may be causing a problem (Figure 9-9). Lowresistance ground connections are critical for electronic control circuits.
With the ignition on, voltage drop across the ground connection for any electronic circuit
should be 0.1 volt or less. The voltage drop across a high-resistance ground connection in series
with a sensor circuit reduces the signal voltage of the sensor. This ground resistance can offset
the signal voltage enough to cause serious problems. For example, a 0.5-volt drop across the
ground connection on a sensor that operates on a 5-volt reference equals a 10-percent measurement error.
0.100v
Back probe at
connector
*Redundant grounds
+
Figure 9-9 With any circuit closed and current flowing, voltage drop across any ground
connection and the battery negative (–) terminal must be no more than 0.100 volts
(100 millivolts).
429
Special Tools
Service manual
Wiring diagram
Electronic component
locator
Special Tools
Service manual
Wiring diagram
Electronic component
locator
Troubleshooting Intermittent Problems
Intermittent problems can be the hardest to diagnose and fix. If you are lucky, the intermittent
problem will set a soft code in the computer memory. This gives you a clue, at least, about the
general area in which to start testing. Remember, however, that if you clear the codes, the problem may not recur right away. You may have to simulate the conditions that caused the problem
or road test the vehicle to catch the intermittent fault. The following paragraphs outline some basic
points that can help you troubleshoot intermittent problems.
Use Wiggle Tests and Actuator or Sensor Special Tests. Most control systems have long-term
memory that will record soft codes for intermittent problems. Ford recommends wiggle tests in
which you put the car computer and a scan tool in communication so that the scan tool will indicate when a soft code is set. You can then tap or wiggle wiring and connectors to try to get the
problem to occur. If you do get the problem to occur, remember what you did when the code set.
Use the scan tool to read the codes from the car again to verify the fault.
Many vehicles have special tests that let you command the computer to switch actuators on
and off for testing. Some scan tools, for example, allow you to operate the pumps of the Delco
Moraine ABS-VI system for bleeding.
Check Connectors for Damage. Many intermittent problems are caused by damaged connectors and terminals. Unplug the connectors in the problem circuit and inspect them carefully for:
❏ Bent or broken terminals
❏ Corrosion
❏ Terminals that have been forced back in the connector shell, causing an intermittent
connection
❏ Loose, frayed, or broken wires in the connector shell
NOTE: Do not use spray electrical contact cleaner on a harness connector unless the wiring
harness has been disconnected from the ABS controller. Electrostatic discharge (EDS) may damage the ABS controller.
Road Test and Record Data. If the vehicle transmits computer data in a road test or normal
operating condition—and most ABS computers do—drive the vehicle and try to duplicate the
problem. Use the snapshot or data recording function of a scan tool to record the computer data
when the problem occurs. Then analyze the data in the shop to try to locate the cause.
Switch and Speed Sensor Testing
ABS control systems receive relatively simple input signals compared to power train control systems. Input signals for an ABS computer or control module come principally from switches and
speed sensors. The following sections outline common troubleshooting guidelines for these common devices.
Switch Testing
The brake switch, the cruise control switch, and the brake fluid warning switch are examples of
ABS input signals that come from simple switches. When used as a control system sensor, a switch
provides a digital, on-off, high-low voltage signal. Such a signal indicates either one or the other
of two operating conditions such as “brakes released” or “brakes applied.”
To provide this kind of input signal, the switch may be installed between the battery and the
computer or between the computer and ground. If the switch is installed between the computer
430
reference voltage
a fixed voltage
supplied to the
sensor by a voltage
regulator inside
the computer or
control module; as
the sensor changes,
the return voltage
is altered and
sent back to the
computer for use
Pull up resistor
B+
Signal
high
Controller
switch open = high voltage signal
Pull up resistor
pull up resistor
a fixed resistor in
a voltage divider
circuit for a sensor
input signal; a
variable-resistor
sensor changes
its voltage drop
proportionally to
the quantity being
measured, and
the pull up resistor
drops the rest of
the reference
voltage
B+
Controller
Signal
low
switch closed = low voltage signal
Figure 9-10 The basic switch circuit used to provide an on-off input signal to a computer.
and ground a reference voltage is applied to the switch circuit inside the computer, across a
fixed resistor (Figure 9-10). A pull up resistor creates the on-off condition that can be recognized
as a digital signal. The fixed resistor is often called a pull up resistor because it pulls the reference voltage up to the open-circuit level when the switch is open and drops the voltage when the
switch is closed. The computer takes its input signal internally at a point between the resistor and
the switch (Figure 9-10).
The reference voltage for the switch circuit is most often the 5-volt reference used for other
computer circuits. For some circuits, it may be full system voltage (approximately 12 volts) or
some other voltage level. The important thing to remember is that the voltage signal to the computer is either high or low, depending on the switch position, and indicates one of two operating states.
Testing a switch circuit is the basic process of placing the switch in a known operating position (open or closed) and using a voltmeter to check the voltage signal received by the computer.
One common way to do this is to back probe the switch circuit wire terminal at the computer harness connector with the positive (+) lead of your voltmeter. Figure 9-11 shows this test method
with the switch both open and closed.
With the switch open, no current flows in the circuit so no voltage can be dropped across
the fixed resistor. The input signal is open-circuit reference voltage, and that is what the test voltmeter should read. With the switch closed, current flows through the circuit, and the fixed resistor drops all of the reference voltage. The input signal is near zero volts, and that is what the test
voltmeter should read.
If the switch is easily accessible, you also can remove or disconnect it from the circuit and
check continuity with an ohmmeter or self-powered test lamp (Figure 9-12).
431
Different
manufacturers
may refer to
reference voltage
as VREF or REFV.
v
Back probe at
connector
Figure 9-11 Back probe the switch circuit at the computer harness connector and operate the
switch to test the input voltage signal.
OL v
Figure 9-12 Use an ohmmeter or self-powered test lamp to check continuity with the switch
disconnected from the circuit.
432
0v
Figure 9-13 Typical ac sine wave voltage signal produced by a pickup coil speed sensor.
Speed Sensor Testing
Speed sensors for antilock brake systems are voltage-generating sensors called pickup coil
sensors, reluctance sensors, and permanent magnet (PM) generators. All work as did
the earliest pickup coils in electronic distributors. As a toothed reluctor ring rotates past the stationary sensor, it produces a voltage frequency and intensity directly proportional to wheel
speed. As the teeth of a rotating trigger wheel pass by the magnet, the magnetic field expands
and collapses to generate an ac voltage in the coil (Figure 9-13). This signal is sent to the electronic module, which processes it to determine rotational speed.
Whether the speed sensor is mounted on a wheel or inside the transmission or differential,
it works on these same principles. Figure 9-14 and Figure 9-15 are photos of cutaway wheel
speed sensor installations for front and rear disc brakes.
ABS speed sensors produce an ac sine wave voltage signal, which is typical of any pickup
coil sensor. The computer converts the ac sine wave voltage to a digital square wave signal so that
it can read the sensor frequency or speed (Figure 9-16). The computer simply counts the trailing
or falling edge of the square wave signal to determine wheel speed.
The ac sine wave signal from the speed sensor must have a certain amplitude and a smooth
frequency within its specified operating range. The amplitude is the strength of the signal or the
positive and negative height of the voltage waveform. The amplitude of a signal being shown on
pickup coil sensor
a reluctance sensor
that generates
a voltage signal
by moving a
conductor through
a permanent
magnetic field
reluctance sensor
a magnetic pulse
generator or
pickup coil that
sends a voltage
signal in response
to varying
reluctance of a
magnetic field
permanent magnet
(PM) generator
a generator
that generates
a voltage signal
by moving a
conductor through
a permanent
magnetic field
Wheel speed
sensor
amplitude
signal strength
or the maximum
measured value
of a signal
Figure 9-14 Front wheel speed sensor installation.
433
Integral wheel
speed sensor
Figure 9-15 Rear wheel speed sensor installation (Integral type ABS).
0v
0v
ac voltage waveform converted
to a square wave signal
Figure 9-16 The computer converts the sine wave to a square wave to measure signal
frequency.
an oscilloscope (scope) is the height above and below the reference line usually labeled zero (0).
Although the signal frequency or speed varies with the wheel speed, it must be smooth and operate at a uniform amplitude. Figure 9-17 shows an example of a typical speed sensor voltage signal, along with examples of low-amplitude and low-frequency signals.
A variation in speed signal frequency or a speed difference between the wheels is the normal trigger for antilock operation. An uneven or erratic frequency signal also can trigger a system trouble code. A normal speed sensor signal should be a repeatable ac voltage as shown in
Figure 9-13, with the frequency varying smoothly with wheel speed. A missing signal, a lowamplitude signal, or an erratic frequency signal can cause a system trouble code.
Sensor Resistance Testing. All pickup coil sensors have resistance specifications. One basic test
for any speed sensor is to disconnect it from its circuit and measure its resistance by connecting
an ohmmeter across the two terminals of the sensor wiring harness (Figure 9-18). If resistance is
out of limits, either high or low, replace the sensor.
434
0v
Typical ac voltage waveform
from a pickup coil sensor
0v
Low-amplitude signal
0v
Low-frequency signal
Figure 9-17 Typical speed sensor voltage waveform (top) compared to a low-amplitude signal
(center) and a low-frequency signal (bottom).
0
Wheel speed
sensor
Figure 9-18 Use an ohmmeter to measure the resistance of the pickup coil winding.
435
Special Tools
Oscilloscope or
scan tool with
PC graphing
or graphing
multimeter
Service manual
Wiring diagram
Electronic component
locator
A waveform is
a graphic
representation
of a voltage signal
as displayed on an
oscilloscope. Almost
all scan tools, and
some graphing
meters can display
one or two waveforms or traces
or they have the
hardware to be
connected to a
personal computer
(PC).
A resistance test for a speed sensor is only a starting point, however. Sensor resistance often
can be within limits, but the sensor can produce a faulty signal. Damage to the sensor trigger
wheel (tone ring), for example, can produce an uneven signal even when the pickup coil is electrically in good condition.
Sensor Voltage Waveform Testing. The best way to test and evaluate the signal voltage from
an ABS speed sensor is to view the signal waveform with an oscilloscope (Figure 9-19). Disconnect the sensor harness from the vehicle wiring harness and connect the oscilloscope or graphing
meter leads across the two terminals of the sensor harness. Then rotate the wheel by hand or by
using the vehicle power train, as appropriate. A good sensor signal should be continuously similar to the waveform shown in Figure 9-13.
Observing the signal while the sensor is operating lets you look for intermittent problems,
such as erratic frequency changes or unstable waveforms. Damage to the trigger wheel can produce an uneven signal that you could not see without operating the sensor. A low-amplitude signal also will be very clear when viewed on an oscilloscope or a graphing multimeter.
Checking Speed Sensor Bias Voltage. A pickup coil speed sensor can generate a signal voltage
through the electromagnetic action of the rotating trigger wheel and the magnetic field surrounding the coil winding. It does not need a reference voltage provided by the computer, as a resistive sensor does.
However, most ABS speed sensors receive a bias voltage from the system computer for two
reasons:
❏ The bias voltage lets the system computer detect an open or a short circuit for the
sensor before the wheel turns.
❏ The bias voltage elevates the sensor signal off the common ground plane of the
vehicle electrical system to reduce signal interference.
Figure 9-20 shows a simple speed sensor bias voltage circuit that uses a pull up resistor
inside the computer. The bias voltage varies from manufacturer to manufacturer. It may be the
5 volts used for other computer circuits, or it may be a different value such as 1.5 volts or 1.8 volts.
Check the carmaker’s test procedures and system specifications to determine the required bias
voltage when troubleshooting a speed sensor circuit.
Analog-type scope
Digital-type scope
Figure 9-19 An oscilloscope is the best tool for analyzing a speed sensor signal.
436
Speed sensor
(magnetic pickup)
Pull up resistor
Sensor
bias
voltage
Signal monitor
Figure 9-20 Simplified speed sensor circuit showing bias voltage and the signal monitor point.
The computer monitors the sensor signal at a point between the fixed pull up resistor and
the pickup coil (Figure 9-20). When power is applied to the circuit, current flows through the pull
up resistor and through the pickup coil to ground. The voltage drop at the signal monitor point
is a predetermined portion of the reference voltage and a known value that is part of the computer program.
If an open circuit exists, no current flows through the circuit, and no voltage is dropped
across the pull up resistor. The signal monitor voltage will be high: equal to open-circuit bias voltage (Figure 9-21). In this case, the computer will immediately set a trouble code for an open circuit fault.
If a shorted or grounded circuit exists, all—or almost all—of the bias voltage is dropped
across the pull up resistor. The signal monitor voltage will be lower than the programmed signal
monitor voltage (Figure 9-22). In this case, the computer will immediately set a trouble code for
a grounded or shorted circuit.
The simple voltage divider circuit shown in Figure 9-21 and Figure 9-22 lets the computer
detect an electrical fault as soon as the ignition is turned on. The wheel does not need to turn even
Bias voltage +
Pull up
resistor
Signal
monitor
high
Open
circuit
Pickup coil
resistance
OPEN
circuit
Signal
monitor HIGH
Figure 9-21 If the sensor circuit is open, signal monitor voltage will be high.
437
Bias voltage +
Pull up
resistor
Signal
monitor
low
Grounded
or
shorted
circuit
Pickup coil
resistance
GROUNDED
or
SHORTED
circuit
Signal
monitor LOW
Figure 9-22 If the sensor circuit is grounded or shorted, signal monitor voltage will be low.
one revolution. You can verify an open- or short-circuit fault by connecting a voltmeter between
the high-voltage side of the pickup coil circuit and ground. Depending on the circuit fault, the
meter should read close to full bias voltage or close to zero volts with the ignition on.
Some speed sensors receive a bias voltage to raise the signal above the common ground
plane of the vehicle electrical system, as well as to detect open- and short-circuit problems. Ford
Motor Company particularly favors this type of signal biasing.
Figure 9-23 and Figure 9-24 are signal waveforms from a rear antilock brake system (RABS)
speed sensor. Note that the waveforms in both figures are evenly shaped sine waves. High resistance in the circuit of Figure 9-23 created a trouble code by offsetting the signal voltage too high
above the zero-voltage point (shown by the small rectangle at the right side of the waveform) and
reducing the signal amplitude.
The programs for many Ford control systems require that a biased ac signal voltage still must
cross a certain amount below the zero point of the voltage scale. The signal in Figure 9-23 barely
5V
Year:
Manufacturer:
0V
Model:
Engine:
Component:
Waveform:
–5 V
20ms
+ slope
Figure 9-23 Faulty RABS speed sensor signal.
438
00
Ford
Explorer
4000c
RABS sensor
Good
Bad
5V
Year:
Manufacturer:
0V
Model:
Engine:
Component:
Waveform:
–5 V
20ms
00
Ford
Explorer
4000c
RABS sensor
Good
Bad
+ slope
Figure 9-24 Good RABS speed sensor signal.
drops below zero volts. The signal in Figure 9-24, on the other hand, clearly drops below zero volts
to the negative side of the scale and has a greater amplitude than the signal in Figure 9-23.
The circuit conditions shown in these two illustrations can only be seen when bias voltage
is applied to the circuit and the sensor is operating. An oscilloscope or a graphing multimeter is
an important tool for troubleshooting these kinds of problems in any ABS speed sensor circuit.
ABS Component Replacement
Troubleshooting and diagnosis are larger factors in ABS service than is component replacement.
Preceding sections of this chapter provide general guidelines for the most common troubleshooting requirements. Vehicle manufacturers also provide specific test procedures for specific
components in their service manuals. Look for this information in carmakers’ service manuals or
aftermarket information sources.
When a component does require replacement, the methods are generally straightforward
mechanical procedures. Some special tools may be needed to service some ABS components. You
can find this information, along with replacement procedures, in manufacturers’ and after marketservice manuals.
▲
WARNING: ABS service may require opening the hydraulic system. ABS hydraulic
systems may operate with pressures of 2,000 psi or higher. The system must be completely depressurized before opening any hydraulic connection. In most cases, you can
depressurize the system by applying and releasing the brake pedal at least twenty-five times.
Follow the vehicle manufacturer’s instructions for complete information on hydraulic system
service and safety.
Photo Sequence 15 shows the key steps of a typical ABS pump and motor removal. This
sequence outlines basic pump service for a GM Teves system. These or similar steps are examples
of common component replacement methods.
SERVICE TIP: When doing any kind of service work on an ABS, let the system be
your guide. Many ABS components have decals (usually yellow) with important service
directions. For example, many ABS accumulators have decals with instructions on how to
depressurize the system before opening the hydraulic lines or checking fluid level. The decals are
there for your benefit. Pay attention to them.
439
Special Tools
Service manual
Wiring diagram
Electronic component
locator
Lift or jack with
stands
Photo Sequence 15
Pump and Motor Removal
P15-1 You will need fender covers,
a combination wrench set, a flare-nut
wrench set, a syringe, and fresh brake
fluid.
P15-2 Place the fender covers on the
vehicle and disconnect the battery ground
(negative) cable.
P15-3 Press and release the brake pedal
thirty to forty times to depressurize the
accumulator. The pedal should become
firmer and travel less when the accumulator is depressurized.
P15- 4 Disconnect the electrical connectors from the pressure switch and the
motor.
P15-5 Use a clean syringe to remove
about half of the brake fluid from the
reservoir.
P15-6 Unscrew the accumulator from
the hydraulic module. Then remove the
O-ring from the accumulator.
P15-7 Disconnect the high-pressure hose
from the pump.
P15- 8 Disconnect the wire retaining
clip. Then pull the return hose out of the
pump body.
P15-9 Remove the bolt that attaches
the pump and motor to the hydraulic
module.
440
Photo Sequence 15
Pump and Motor Removal (continued)
P15-10 Remove the pump and motor
assembly by sliding it off the locating pin.
Wheel Speed Sensor Replacement
A problem in a wheel speed sensor may require replacement of the sensor pickup coil and its harness or the tone ring or both. Some wheel sensors have an adjustable air gap between the sensor
head and the teeth on the tone ring. An equal number of sensors are nonadjustable. The sensors
shown in Figure 9-14 and Figure 9-15, for example, provide no access to either measure or adjust
the air gap.
If a sensor is adjustable, follow the carmaker’s adjustment procedure exactly. Some nonadjustable sensors use a lightweight plastic or paper spacer on the mounting surface (Figure 9-25
and Figure 9-26). The spacer sets the air gap correctly. A new spacer of the correct thickness
should be used whenever a sensor is reused.
Manufacturers differ in their requirements for servicing the wiring harnesses on speed sensors.
The short, two-wire harness that is part of the sensor assembly on GM vehicles is made with very
fine wire strands to provide maximum flexibility with minimum circuit resistance. GM specifies that
the sensor harness should not be repaired by any method. If it is damaged, the complete sensor
assembly must be replaced. DaimlerChrysler, on the other hand, says that the harnesses on most of
its wheel speed sensors can be repaired by soldering and reinsulating with heat-shrink tubing.
Wheel sensor
Polyethylene
strip
Figure 9-25 Some wheel speed sensors use a plastic spacer to set the air gap correctly.
441
Paper air gap
adjusting disc
Wheel
sensor
Figure 9-26 Other wheel speed sensors use a paper spacer. In either case, the spacer should
not be removed during sensor installation.
Because of the importance of signal accuracy from a wheel speed sensor, it is generally
preferable to replace a sensor assembly, including the harness, instead of trying to repair the harness. Consult the manufacturer’s specifications before deciding how to service these components.
Sensor tone rings that are pressed on the inside of the rotor or on the axle shaft often can
be replaced. If the sensor ring is an integral part of the wheel bearing assembly, hub assembly, or
the outer constant velocity joint on the axle, the entire component must be replaced if the sensor
ring is damaged.
Observe these additional guidelines when servicing ABS wheel speed sensors:
❏ Unplug sensor electrical leads when replacing suspension components.
❏ If a sensor tone ring (trigger wheel) is replaceable, fit the new one in place by hand.
Do not hammer or tap the sensor in place.
❏ If a wheel sensor ring or tone wheel is replaceable and is pressed into place, do not
remove the old ring or install a new one by hammering or prying. Use a hydraulic
press with the proper special tools.
❏ Remove the vehicle wheel when replacing a wheel sensor.
❏ Some wheel sensors require an anticorrosion coating before installation to prevent
galvanic corrosion. Never substitute grease unless the carmaker specifies its use.
Sensor assemblies that are a permanent part of the wheel bearing and hub assembly are
used on many late-model GM cars. They need no adjustment and plug directly into the vehicle
wiring harness.
Computer (Control Module) Replacement
Vehicle computers do fail but not with great frequency or regularity. Too many computers have
been replaced because someone “thought it might be the problem,” or “didn’t know what else to
do.” Too often, computer replacement does not cure the problem. The shop has spent several
hundred dollars and still has a car to fix. Before deciding to replace a computer, you should check
the manufacturer’s technical service bulletins (TSBs) for specific information on revised computer
part numbers and the problems they were designed to correct. Also check with dealership parts
departments for the latest part number information. Computers and other electronic parts usually
are special-order items. All electronic parts are absolutely, positively nonreturnable. Once purchased, they are yours. To avoid costly, unnecessary computer replacement, check these items:
1. Battery voltage supply to the computer and the main system ground. Be sure the battery is fully
charged and provides at least 9.6 volts to 10 volts during cranking. Be sure the charging system
442
is maintaining correct battery charge. Most computers receive battery voltage through a fuse or
fusible link. Be sure that battery voltage is available at the specified terminals of the computer’s
main connector. Most computers are grounded remotely through several wires in the harness.
Trace and check the ground connections to ensure good continuity.
2. Operation of a system power relay. Some computers receive power through a system power
relay. If the vehicle is so equipped, check the relay operation. This relay may be remote
mounted or underneath the electrohydraulic plastic cover.
3. Sensor reference voltage and ground circuits. Many sensors share a common reference voltage
supply from the computer and a common ground. Incorrect or erratic reference voltage or a
bad common ground can affect operation of several sensors simultaneously. The symptoms
may appear as if the computer has a major system problem. Repairing a wiring connection
may correct the problem.
4. Resistance and current flow through all computer-controlled solenoids and relays. Every output
device (solenoid or relay) controlled by a computer has a minimum resistance specification.
The actuator resistance limits the current through the computer output control circuit. If the
actuator is shorted, current can exceed the safe maximum and damage the computer. In most
cases, current through a computer-controlled output device should not exceed 0.75 ampere
(750 milliamperes). Before replacing a computer, check all output circuits for shorts or low
resistance that could damage the computer.
▲
WARNING: Be sure that the ignition is off when removing and installing a control
module or other electronic component.
As a general rule, the system computer should be at the bottom of the list of things to
replace. Again, computers can fail, but a sensor or actuator problem, bad wiring, or a mechanical
fault in the engine is a more likely cause of a problem.
SERVICE TIP: Beware of ESD when handling electronic components. ESD is static
electricity that can destroy the microscopic circuits of electronic integrated circuits. If you
take some simple precautions, however, you can avoid ESD problems.
ESD occurs when two dissimilar materials are rubbed together or quickly separated from
each other. Electrical charges build up on the surfaces and then discharge when a circuit path is
available. If you slide across the front seat of a car and then touch a metal surface, you can build
up and then discharge several thousands of volts of static electricity. ESD of 8,000 volts to 10,000
volts is very common and you will not even feel or see it. When ESD generates a small spark from
your fingertip to a metal surface and you can feel the snap, you are dealing with 40,000 volts to
50,000 volts of ESD.
High-voltage ESD does not hurt you because it is moving only a few microamperes of
current. That small amount of current, however, can destroy the microscopic interconnections of an integrated circuit. Those few microamps blow the circuit as does a low-current fuse.
You can avoid ESD problems by observing a few simple precautions when handling electronic
components:
❏ Do not remove an electronic part from its packing material until you are ready to
install it.
❏ Do not hold an electronic part by its connector pins.
❏ Before entering a vehicle to remove or replace an electronic part, touch an exposed
metal part of the vehicle to discharge any static charge from your body.
443
The best method
to prevent damage
to electronic
components from
static is to always
wear an antistatic
strap during the
repairs. The strap
can be worn on the
wrist or may be a
waist belt. Some
companies require
their technicians to
wear one as part
of the uniform.
❏ Avoid sliding across upholstery or carpeting when removing or installing an electronic
part. If this is not possible, touch an exposed metal part of the vehicle with your free
hand before installing a new component.
❏ When available, use an antistatic grounding strap attached to your wrist and clipped
to a metal part of the vehicle body to prevent static charges from accumulating.
C A S E
S T U D Y
The GMC Sonoma got a normal maintenance brake job, including thoroughly flushing and
bleeding the hydraulic system. After the brake job, the owner reported that the left rear
wheel locked under normal braking and the ABS activated with a lot of noise. “It made this
loud ‘knock, knock, tick, tock’ noise,” said the driver.
The tech who did the brake job retested the truck and, sure enough, found premature
ABS activation. Any noises seemed normal for an ABS installation, however. The tech
checked his service procedures again and found that the ABS computer had “adaptive memory” that needed to be reset. The best way to do this was with a scan tool, which the tech
did. After he reset the computer adaptive memory and drove the truck several miles to seat
the rear brake shoes to the refinished drums, the tech returned the truck to its owner. No further complaints were heard.
Terms to Know
Amplitude
Permanent magnet (PM) generator
Reference voltage
Diagnostic trouble code (DTC)
Pickup coil sensor
Reluctance sensor
Hard code
Pull up resistor
Soft code
444
ASE Style Review Questions
1. Technician A says that an ABS problem can cause
the electronic control module to shut off or inhibit
the system.
Technician B says that a loss of hydraulic fluid or
power booster pressure will disable the ABS.
Who is correct?
A. A only
C. Both A and B
B. B only
D. Neither A nor B
2. Which of the following is NOT true about servicing
ABS components or the entire system?
A. Before beginning service, depressurize the
accumulator by pumping the brake pedal with
the ignition off until the pedal becomes hard.
B. All base brake parts can be serviced in the
same way as they would be if they were part
of a non-ABS.
C. Air gaps between the speed sensors and toothed
ring must be adjusted after machining the brake
rotors.
D. Wheel bearings must be adjusted properly.
Technician B says that pressure bleeding is required
for bleeding ABSs.
Who is correct?
A. A only
C. Both A and B
B. B only
D. Neither A nor B
6. When removing a vehicle’s ABS electronic control
module:
Technician A relieves hydraulic pressure in the
system.
Technician B disconnects the battery ground cable.
Who is correct?
A. A only
C. Both A and B
B. B only
D. Neither A nor B
7. When first testing a car with ABS, it is important to:
A. disconnect the battery ground (negative) cable.
B. apply the parking brake.
C. note the status of the ABS warning lamp.
D. try to lock the brakes.
3. Technician A says that it is normal for the amber ABS
8. When inspecting wheel speed sensors, check for all
lamp to light when the ABS is activated during
braking.
Technician B says that it is normal for the red BRAKE
lamp to light when the ignition is first turned on and
the engine is off.
Who is correct?
A. A only
C. Both A and B
B. B only
D. Neither A nor B
of the following except:
A. correct bias voltage.
B. proper contact between the pole piece and tone
ring.
C. secure sensor mounting.
D. condition of the tone ring teeth.
4. When working on a vehicle with antilock brakes:
Technician A relieves system pressure by slightly
opening a bleeder screw and allowing fluid to spray
into a wide-mouth container.
Technician B turns off the ignition and pumps the
brake pedal thirty to forty times until she feels an
increase in pedal pressure.
Who is correct?
A. A only
C. Both A and B
B. B only
D. Neither A nor B
5. Bleeding an ABS is being discussed:
Technician A says that cracking open the brake line
connections at the hydraulic module and bleeding
the air into a shop rag is the recommended
procedure for some systems.
9. Technician A says that in some antilock systems, the
power brake assist is provided by pressurized brake
fluid supplied by the hydraulic accumulator.
Technician B says that the accumulator holds highly
pressurized nitrogen gas that is used for power brake
boost.
Who is correct?
A. A only
C. Both A and B
B. B only
D. Neither A nor B
10. Technician A says that wheel speed sensors generate
a square-wave frequency signal.
Technician B says that a wheel speed sensor has a
permanent magnet.
Who is correct?
A. A only
C. Both A and B
B. B only
D. Neither A nor B
445
ASE Challenge Questions
Use these ABS codes as directed in the following questions. The codes are not for any single vehicle.
CODE
DESCRIPTION
12
13
14
15
16
17
18
19
20
POWER INTERRUPT DURING LAST 40 STARTS
LEFT FRONT SPEED SENSOR VOLT LOW
LEFT FRONT SPEED SENSOR VOLT HIGH
REAR SPEED SENSOR CIRCUIT OPEN
REAR SPEED SENSOR CIRCUIT SHORTED
INSUFFICIENT PRESSURE IN THE ACCUMULATOR
BRAKE LIGHT SWITCH CIRCUIT OPEN
VEHICLE SPEED SENSOR CIRCUIT OPEN
LOW BRAKE FLUID
1. Antilock brake systems are being discussed:
Technician A says a code 12 (above chart) and a lit
warning light may cause problems with the regular
service brakes.
Technician B says code 20 (above chart) and a lit
warning light could cause service brake problems.
Who is correct?
A. A only
C. Both A and B
B. B only
D. Neither A nor B
2. Technician A says a vehicle that experiences
vibration in the pedal during panic braking indicates
the ABS is functioning properly.
Technician B says a hard pull to the right during
panic stopping with ABS may indicate a wheel
alignment problem.
Who is correct?
A. A only
C. Both A and B
B. B only
D. Neither A nor B
3. Technician A says code 12 (above chart) and no
warning light are probably just indications that the
ABS power has been disconnected recently.
Technician B says a code 16 (above chart) and a
warning light could indicate improper servicing of
the differential of a RWAL-equipped vehicle.
Who is correct?
A. A only
C. Both A and B
B. B only
D. Neither A nor B
446
4. RABS is being discussed:
Technician A says a code 13 (above chart) indicates
the front sensor probably has a short.
Technician B says a code 19 may also mean the
speedometer is not working.
Who is correct?
A. A only
C. Both A and B
B. B only
D. Neither A nor B
5. Three-channel, four-wheel ABSs are being discussed:
Technician A says code 18 (above chart) and a lit
warning light indicate the brake lights are not
working.
Technician B says code 16 (above chart) and a lit
warning light indicate that the rear ABS is disengaged
but the front circuit should still be working.
Who is correct?
A. A only
C. Both A and B
B. B only
D. Neither A nor B
Table 9-1 ASE TASK
Follow accepted service and safety precautions when inspecting, testing and servicing
of ABS hydraulic, electrical, and mechanical components.
Diagnose poor stopping, wheel lockup, pedal free and travel, pedal pulsation, and noise
problems caused by the ABS; determine needed repairs.
Problem Area
Symptoms
Possible Causes
Safety
Classroom
Manual
Shop
Manual
WHEELS LOCK,
POOR BRAKING
Wheels lock under
normal braking;
pedal feels
uneven.
1. Damaged/misadjusted
wheel speed sensor
2. Low brake fluid
3. Modulator inoperative
4. Service brake incorrect
Wear safety glasses
Lift and jack safety
procedures
Follow ABS and SIRs
safety procedures
65–66,
229–233
415–418,
424–430
Table 9-2 ASE TASK
Follow accepted service and safety precautions when inspecting, testing, and servicing
of ABS hydraulic, electrical, and mechanical components.
Observe ABS warning light(s) at startup and during road test; determine if further
diagnosis is needed.
Diagnose ABS electronic control(s), components, and circuits using self-diagnosis and/or
recommended test equipment; determine needed repairs.
Diagnose, service, and adjust ABS speed sensors and circuits following manufacturers’
recommended procedures (includes voltage output, resistance, shorts to voltage/ground,
and frequency data).
Repair wiring harness and connectors following manufacturers’ procedures.
Problem Area
Symptoms
Possible Causes
Safety
Classroom
Manual
Shop
Manual
ABS LIGHT
Light stays on;
no ABS.
1. Sensors damaged/
misadjusted
2. Service brakes incorrect
3. Low fluid
4. Bad switch(es) or circuit(s)
5. Corroded/damaged
connections
Wear safety glasses
Lift and jack safety
procedures
Follow ABS and SIRs
safety procedures
228–232
415,
424–443
447
Table 9-3 ASE TASK
Follow accepted service and safety precautions when inspecting, testing, and servicing
of ABS hydraulic, electrical, and mechanical components.
Depressurize integral (high-pressure) components of the ABS following manufacturers’
recommended safety procedures.
Fill the ABS master cylinder with recommended fluid to proper level following manufacturers’
procedures; inspect system for leaks.
Bleed the ABS hydraulic circuits following manufacturers’ procedures.
Perform a fluid pressure (hydraulic boost) diagnosis on integral (high-pressure) ABS; determine
needed repairs.
Remove and install ABS components following manufacturers’ procedures and specifications;
observe proper placement of components and routing of wiring harness.
Problem Area
Symptoms
Possible Causes
Safety
Classroom
Manual
Shop
Manual
ABS LIGHT
Light stays on;
no ABS.
1. Sensors damaged /
misadjusted
2. Service brakes incorrect
3. Low fluid
4. Bad switch(es) or circuit(s)
Wear safety glasses
Lift and jack safety
procedures
Follow ABS and SIRs
safety procedures
223–237
415,
418–424,
439–444
448
Job Sheet 25
25
Name: ____________________________________________ Date: __________________________
Measure ABS Component Values
Upon completion of this job sheet, you will have measured various ABS component electrical
values.
Tools and Materials
Scan tool
Digital Multimeter (DMM)
Oscilloscope
Describe the Vehicle Being Worked On
Year _________ Make _____________________ Model _______________________________
VIN __________________ Engine type and size______________________________________
Procedures
■
CAUTION: Follow the scan tool’s instructions for entering the vehicle’s ID.
Some scan tools may clear all DTCs if it is connected to the vehicle prior to entering
the vehicle ID.
Connect the scan tool to the vehicle data link.
Turn the ignition on.
Verify that there are no codes present. If there are, notify your instructor.
Referring to the service manual, identify the location of the RF wheel speed sensor
connector. Where is it located? ________________________________________________
5. Locate and disconnect the speed sensor two-way connector harness for the RF wheel.
6. Connect your DMM to the sensor side of the connector and set it to the kilohm scale.
1.
2.
3.
4.
NOTE: You must refer to the appropriate manual to perform the following procedures.
7. Measure the resistance across the two wires of the sensor connector. Is this resistance
value within the specification listed in the manual? ______________________
8. Set the DMM to read dc voltage.
9. Measure the voltage across the harness side of the connector.
Right front speed sensor voltage: ______________________
10. What is the purpose of this voltage? ______________________
11. Reconnect the speed sensor.
12. Back probe the (+) side of the connector.
Did the voltage drop? ______________________
Record your measurement: ______________________
The voltage you measure is what the ABS control module senses when it conducts a
test for sensor electrical continuity. The voltage is lower because most of it is being
dropped across the resistance of the sensor. If there is an open in the circuit, the
module measures the full bias voltage.
449
13. Lower the vehicle so that the tires are approximately 5 inches off the ground.
14. Using an oscilloscope back probe the (+) and (–) cavities of the ABS module harness
15.
16.
17.
18.
for the wheel speed sensor of the driven wheel.
Have an assistant start the vehicle and accelerate to 10 mph and maintain that speed.
Observe the amplitude and frequency of the generated signal while your assistant
accelerates and decelerates the wheel. Have your assistant release the accelerator
pedal, apply the brakes, and turn off the engine.
In the chart provided below, draw the sine wave you observed at 55 mph.
Lower the vehicle.
VOLTS
TIME
Instructor’s Check _____________________________________________________
450
Job Sheet 26
26
Name: ____________________________________________ Date: __________________________
Brake System Operation Check
Upon completion and review of this job sheet, you should be able to complete a thorough operational check of the brake system on a vehicle equipped with an ABS.
ASE Correlation
This job sheet is related to the ASE Brakes Test Content Area: Anti-Lock Brake System
(ABS) Diagnosis and Repair Task: Observe ABS warning light(s) at startup and during
road test; determine if further diagnosis is needed.
Tools and Materials
Operator’s manual or service manual
Describe the Vehicle Being Worked On
Year _________ Make _____________________ Model _______________________________
VIN __________________ Engine type and size______________________________________
Procedures
1. Ensure parking brake is set.
2. Turn ignition to KOEO. Observe and record brake warning light(s) that are lit.
Compare to specifications in manual.
Results ____________________________________________________________________
______________________________________________________________________________________
3. Start engine and allow to idle. Observe and record actions of brake warning light.
Compare to specifications from manual.
Results ____________________________________________________________________
______________________________________________________________________________________
4. Apply service brakes and release parking brakes. Observe and record brake warning
light(s).
Results ____________________________________________________________________
______________________________________________________________________________________
5. Set parking brakes and switch ignition to off.
6. Pump the service brake pedal until the power boost is exhausted. Hold the pedal
down.
7. Start engine. Observe and record action(s) of brake pedal and brake warning lights.
Results ____________________________________________________________________
______________________________________________________________________________________
8. Keep parking brakes applied. Apply service brakes. Engage either Reverse or Drive
and allow to idle.
NOTE: The next step is to test the holding ability of the parking brakes. If a slope is
not available, follow the procedures in step 10.
451
9. Use a clear, open sloping area. Apply the parking brakes and engage neutral with the
transmission.
Results ____________________________________________________________________
______________________________________________________________________________________
10. If slope is not reasonably available:
A. Stop the car, apply the service brakes, and set the parking brakes.
NOTE: If vehicle moves during the next step apply the service brakes immediately.
B. With engine idling and transmission in drive or reverse, release the service brakes.
Results ____________________________________________________________________
______________________________________________________________________________________
11. Return the vehicle to the bay or parking area.
12. Is system satisfactory at this point? Explain your findings and recommendations.
______________________________________________________________________________________
______________________________________________________________________________________
______________________________________________________________________________________
Instructor’s Check _____________________________________________________
452
Job Sheet 27
27
Name: ____________________________________________ Date: __________________________
Testing an ABS Wheel Speed Sensor
Upon completion and review of this job sheet, you should be able to inspect and test an ABS
wheel speed sensor with a graphing multimeter.
ASE Correlation
This job sheet is related to the ASE Brakes Test Content Area: Anti-Lock Brake System
(ABS) Diagnosis and Repair Task: Diagnose, service, and adjust ABS speed sensors and
circuits following manufacturers’ recommended procedures (includes voltage output,
resistance, shorts to voltage/ground, and frequency data).
Tools and Materials
Service manual
Wiring diagram
Component locator
Graphing multimeter or oscilloscope
Lift or jacks with stands
Describe the Vehicle Being Worked On
Year _________ Make _____________________ Model _______________________________
VIN __________________ Engine type and size______________________________________
Procedures
1.
2.
3.
4.
5.
6.
If vehicle is FWD, set transaxle to neutral and ignition to accessory position.
Lift the vehicle until one of the front wheel sensors is accessible.
Turn wheels to left or right for better access to the sensor.
Locate and disconnect the speed sensor.
Program the multimeter, if necessary, according to its operator’s manual.
Connect the multimeter leads to the terminals on the sensor.
SERVICE TIP: If the multimeter operator can stay clear and keep the leads clear of
the wheel, a coworker can rotate the wheel using the engine.
NOTE: If the multimeter has a printer or data storage capabilities, use either or
both to print or save the graphs.
7. Rotate the wheel at a constant speed while observing the graph.
General results______________________________________________________________
______________________________________________________________________________________
______________________________________________________________________________________
______________________________________________________________________________________
453
8. Speed the wheel faster while observing the graph.
General results______________________________________________________________
______________________________________________________________________________________
9. Stop the wheel(s).
10. After the wheel(s) have stopped, disconnect the multimeter and reconnect the harness
to the sensor.
11. Lower the vehicle.
12. Shift the transaxle to park, switch the ignition to off, and set the parking brakes.
13. Record the operational action of this speed sensor and make any recommendation.
______________________________________________________________________________________
______________________________________________________________________________________
______________________________________________________________________________________
______________________________________________________________________________________
Instructor’s Check _____________________________________________________
454
Job Sheet 28
28
Name: ____________________________________________ Date: __________________________
Replace an ABS Wheel Speed Sensor
Upon completion and review of this job sheet, you should be able to replace an ABS wheel speed
sensor.
ASE Correlation
This job sheet is related to the ASE Brakes Test Content Area: Anti-Lock Brake System
(ABS) Diagnosis and Repair Task: Diagnose, service, and adjust ABS speed sensors and
circuits following manufacturers’ recommended procedures (includes voltage output,
resistance, shorts to voltage/ground, and frequency data).
Tools and Materials
Service manual
Lift or jack with stands
Impact tools
Describe the Vehicle Being Worked On
Year _________ Make _____________________ Model _______________________________
VIN __________________ Engine type and size______________________________________
Procedures
1. Determine:
Wheel sensor fastener torque ______________________
Wheel lug nut torque ______________________
Special tools and procedures for setting air gap__________________________________
______________________________________________________________________________________
______________________________________________________________________________________
2.
3.
4.
5.
Lift vehicle to a good working height.
Remove the wheel assembly.
Inspect the area around the speed sensor.
Remove any component blocking access to the speed sensor and/or fasteners. Items
removed, if any. ____________________________________________________________
______________________________________________________________________________________
6. Remove the speed sensor.
7. Inspect the tone ring as much as possible.
Results ____________________________________________________________________
______________________________________________________________________________________
8. Remove the new speed sensor from its shipping carton.
9. Install the speed sensor into its mounting.
455
10.
11.
12.
13.
14.
15.
Secure the special tools and set the air gap to specifications.
Install and torque the speed sensor fastener.
Install the wheel assembly and torque the lug nuts to specifications.
Lower the vehicle.
Clear any ABS codes and road test.
When the repair is complete, clean the area, store the tools, and complete the repair
order.
Instructor’s Check _____________________________________________________
456