1
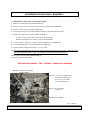
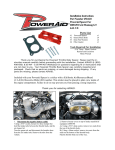
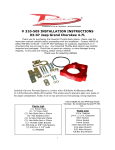
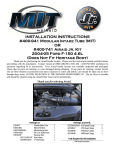
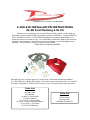
# 400-519 INSTALLATION INSTRUCTIONS
94-98 Ford Mustang 3.8L V6
Thank you for purchasing the PowerAid Throttle Body Spacer. Please read the
instruction manual carefully before proceeding with the installation. Contact AIRAID @
(800) 498-6951 8:00 AM - 5:00 PM MST Weekdays for questions regarding fit or instructions that are not clear to you. Your PowerAid Throttle Body Spacer was carefully
inspected and packaged. Check that no parts are missing, or were damaged during
shipping. If any parts are missing, please contact AIRAID.
Thank you for selecting AIRAID.
Included with your Poweraid Spacer is a sticker with a California Air Resources Board
(C.A.R.B.) Executive Order (EO) number. This sticker must be placed in plain view inside of
the engine compartment. Failure to do so may prevent you from passing a smog inspection.
Parts List
(1) Power Plate
(2) Gaskets
(4) 8mm x 50mm Bolts
(4) 8mm Washers
(2) 5/16-18” Linkage Plates
(2) 8mm x 16mm Flat Head Screws
(2) 5/16-18” x 5/8” Bolts
(2) 5/16” Flat Washers
Tools List
13mm Socket
5mm Hex Key
Standard Screwdriver
1
Installation Instructions. Read Me!
1.
DISCONNECT NEGATIVE (-) BATTERY CABLE.
2.
Remove air cleaner housing from the throttle body.
3.
Remove (3) bolts and (1) stud from the front side of the throttle body. (Ref. “D”)
4.
Remove (2) bolts from the throttle linkage bracket.
5.
Move throttle body away from intake manifold. Remove old gasket and clean surfaces.
6.
Install power plate using (2) gaskets. (Ref. “A” & “B”)
A. Place one gasket between the throttle body and power plate.
B. Place second gasket between the power plate and manifold.
7.
Install (4) 8mm x 50mm bolts, (4) 8mm washers and tighten evenly. (Ref. “D”)
8.
Locate (2) linkage plates using (2) flat head screws. (Ref. “C”)
9.
Relocate throttle linkage bracket using (2) 5/16-18” bolts.
10. Inspect & Test throttle linkage for full Open & Closed travel before driving. Some cruise or kick down cables
may require adjustment. Please refer to your vehicles service manual for proper adjustment.
11. Reinstall air cleaner housing (Refer to Step 1)
12. Reconnect battery cable. Enjoy!
The sound of power...The “whistle” means its working!
Ref. “D”- (4) 8mm x 50mm Bolts
(4) 8mm Washers
Ref. “C”- (2) 5/16-18” Linkage Plates
(2) 8mm Flat Head Screws
(2) 5/16-18” x 5/8” Bolts
(2) 5/16” Flat Washers
Ref. “A”- (1) Power Plate
(2) Gaskets
Ref. “B”- Throttle Body
Rev. 12/01/06
AIRAID Filter Co. 2688 E Rose Garden Ln. Phoenix AZ 85050 (800) 498-6951 [email protected] www.airaid.com
2